

Page 1
WinZo
Installation Instruction
For One Piece Toilet (Side Flush)
Thanks for your selecting our products. To ensure this product is installed properly, please read these instructions carefully before you begin.
IMPORTANT!
PRODUCT IS FRAGILE. TO AVOID BREAKAGE AND POSSIBLE INJURY HANDLE WITH CARE
The toilet must be installed by a fully insured and licenced plumber only.
Also be sure the installation conforms to local plumbing and building codes.
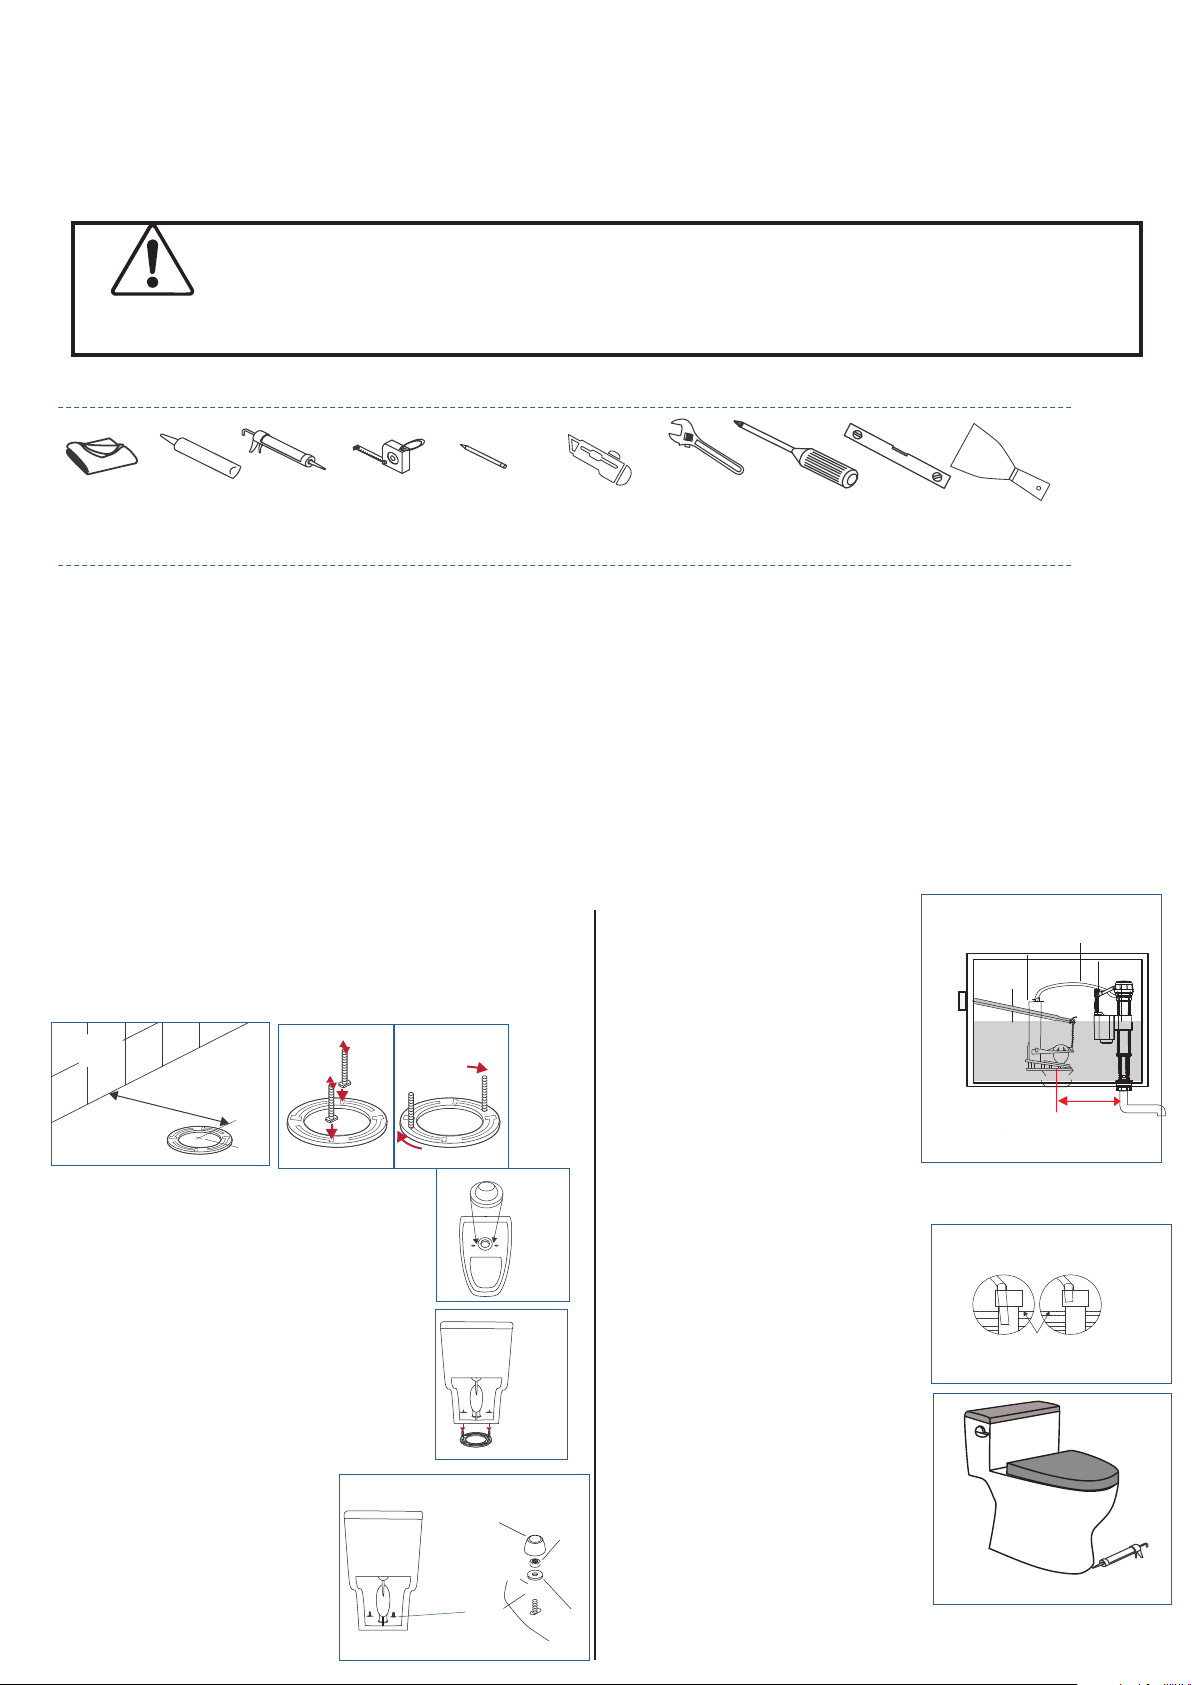
TOOLS REQUIRED FOR INSTALLATION
Soft Cloth
or Blanket
Silicone Silicone/
Caulk Gun
Tape
Measure
Pencil/Marker
Knife
Adjustable
Wrench
Screwdriver
REMOVE OLD TOILET Shut off main water supply prior to installation!
1. Shut off water supply line. If you do not have shut-off valve near the toilet shut off main water supply line.
2. Flush the old toilet and make sure that tank is empty.
3. Disconnect and remove water supply line connected to the toilet's tank.
4. Remove old toilet, bolts, nuts from the closet flange.
5. Clean closet flange area from old wax ring and putty sealant using putty knife from the base area.
6. Clean any remaining debris and wipe any water at the installation area
7. Temporarily plug flange on a floor with a flange plug or towel to prevent gasses from escaping
IMPORTANT! The mounting surface area must be clean, dry,
and leveled prior to installation of the new toilet!
NOTE! Inspect the existing closet flange for damages. If
damaged, replace it to new flange before proceeding to the
installation
INSTALL NEW TOILET
1. If it is a new bathroom, install water supply ,shut-off valve,
and toilet flange as necessary to conform to the roughing-in
dimensions.
2. Inser 2 floor bolts inside of the toilet flange and slide the bolts
through the holes and align bolts horizontaly. (see Figure 1)
Bathroom
Wall
Closet Flange
12"
Rough-in
Bathroom
Floor
Step 1 Step 2
Figure 1
90º
90º
3. Cover the floor with the soft-cloth blanket.
Carfeully turn the toilet on it’s side or
upside-down on the blanket. Install wax ring on
the toilet outlet.(see Figure 2)
4. Lift and carefully put the toilet over the
closet flange so the closet bolts can go through
the mounting holes in the toilet's base. Apply
full body weight to rim of bowl for proper
gasket seal.(see Figure 3)
5. Install bolt cap bases, washers,nut
and bolt cap .Do not tighten the nuts.
It may and will cause damage to the
Bolt cap
toilet's ceramic base. (see Figure 4)
Figure 2
Figure 3
Nut
6. Connect the water supply line,and
turn on the water. Flush several times,
check for leaks. (see Figure 5)
7. If necessary, adjust the water level
in the water tank. Turn the adjusting
screw clockwise to raise the water or
Turn the screw counter-clockwise to
reduce water. (see Figure 5)
8. Make sure the refill tube is
properly inserted into the
overflow pipe of the flush valve.
Refill tube should be positioned
higher than water level. (see
Figure 6)
9. Carefully put the tank lip on the
tank. Install the supplied toilet seat.
(see Figure 7)
(Toilet seat installation see Page 3)
10. Apply the silicone around the
base of the toilet. When the silicone
is dry, check for leaks for the next
several days (see Figure 7)
Level
Putty Knife
Overflow Pipe
Water Line
Refill Tube
Adjusting Screw
4.5”
RIGHTWRONG
Water
Level
Supply Line
Figure 5
Figure 6
Figure 4
Bolt Cap Base
Figure 7
Washer
1/3
Page 2
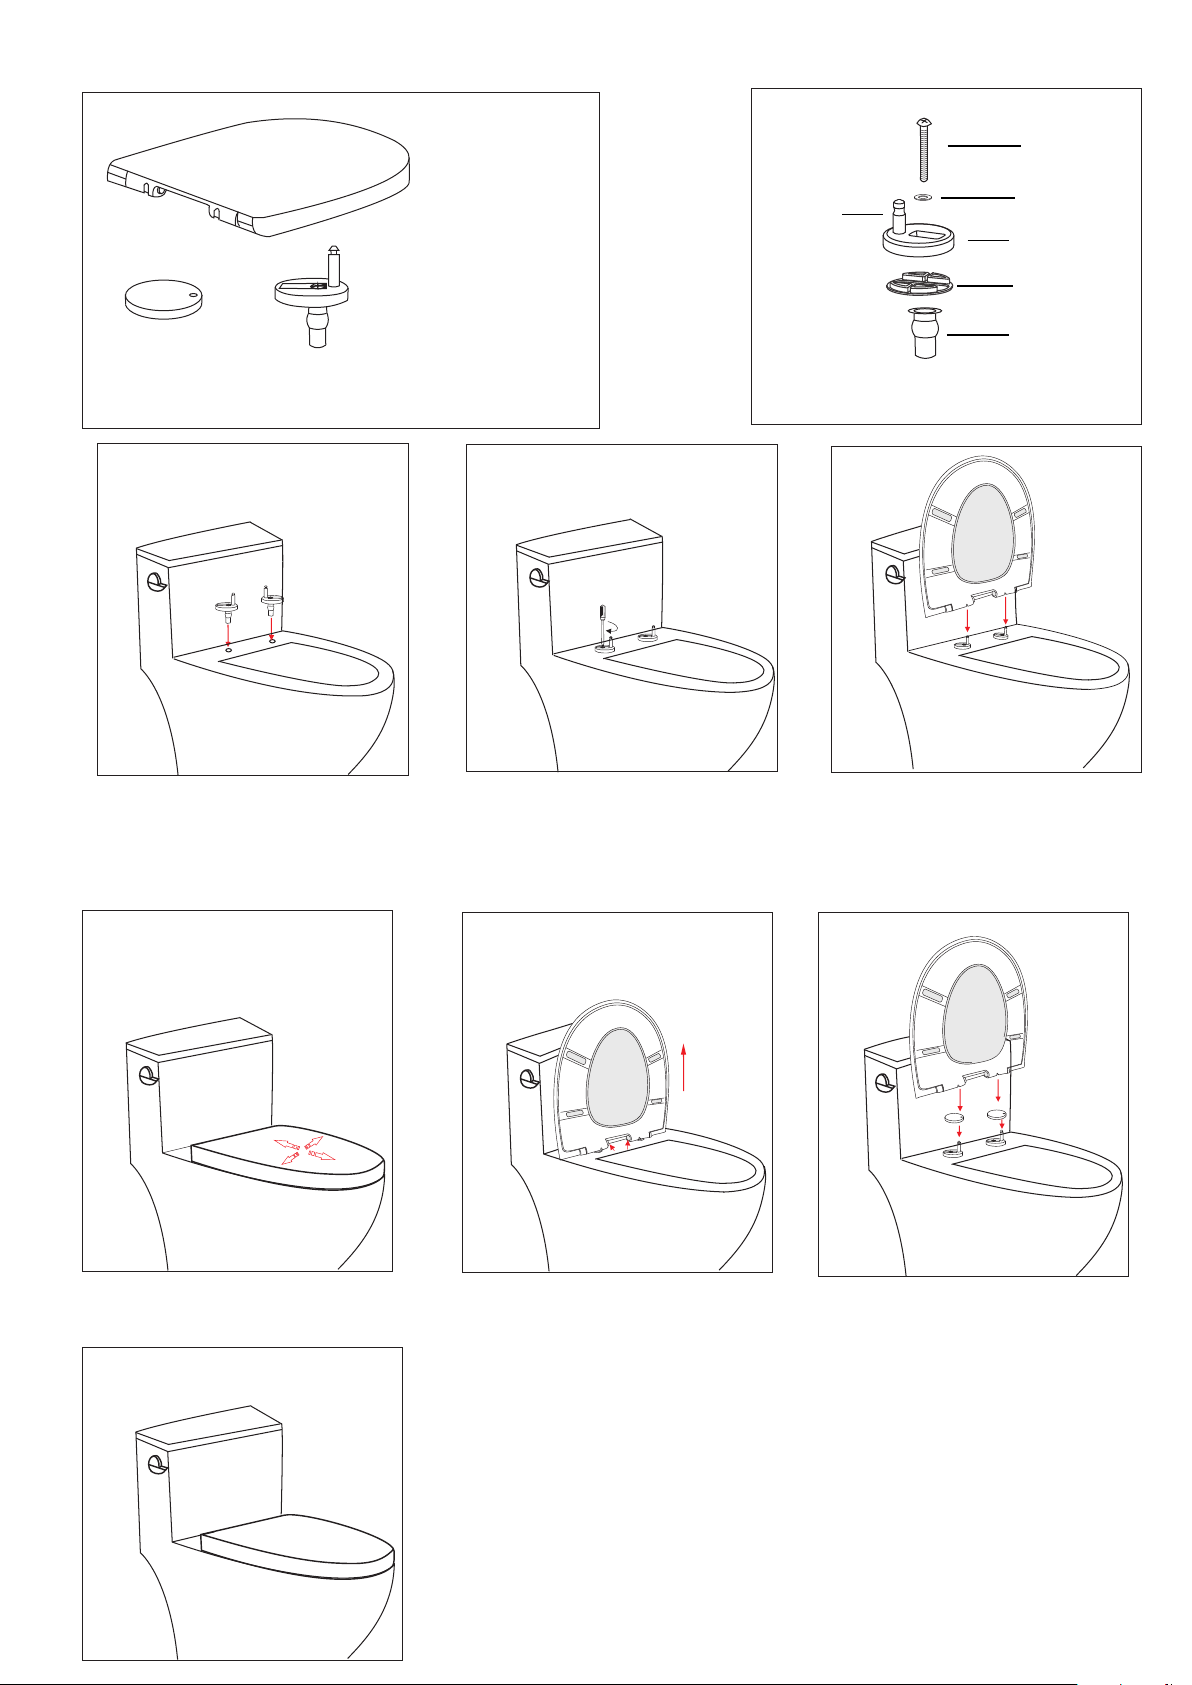
Toilet Seat Installation Instruction
Screw
Toilet seat x 1
Cover capx2 Fixing Bolt setsx2
1 2 3
Washer
Pin
Fixing base
Flex-washer
Expansion fitting
Fixing bolt sets assembly
(normally it has been assembed)
1.Insert the fixing bolt set into the
seat holes of pan.
4
4. Close the toilet seat onto pan,
adjust until the seat is located in a satisfactory
position.
2. Using a screwdriver to temporarily
tighten the bolts. (Do not full tighten).
Adjustability is required at this step
in order to position the seat in following
steps.
5 6
5.Push two release buttons to release the seat.
Carefully lift the seat so that the postion of the
seat will not shift,then firmly tighten the screws.
3.Place the seat vertically,align holes
to pins and press down insert.
6.Place the cover caps over the fixing base.
And put the toilet seat back on the pins.
CLEANING
The toilet seat may be removed for cleaning -depress two release buttons and lift
up. (see step 5)
Clean only with a soft cloth or sponge usingwarm water and mild soap or detergent.
Do not use any abrasive cleaning materials.
Do not use any solvents or corrosive liquids.
3/3
 Loading...