

Page 1
During recording, the product may be affected by wireless devices such as radio frequency,
DMB signal, remote start device, remote controller etc. Install as far away from the antenna
and antenna cable as possible; and when cabling or tidying up cables, please avoiding the cables to be duplicated.
BRAVO Quick Guide How to use
Package
1. Please check any defects on the product before installation. We are not responsible for any cost or expense
incurred, as a result of the failure to check before installation.
3. Please format a Micro SD card every other week, as it may cause recording error, storing video file error and
playback error.
2. If the constant power discharge protection function is set ‘ON’, motion detection will work as parking
REC mode. If the vehicle battery voltage becomes lower than setting value of cut off voltage, a recording
will stop even parking REC mode.
4.
Below table is Recordable Time by “SD card Folder Capacity Adjustment”and“Video Quality”based on the
default setting.
5. The Micro SD card is a consumable goods. Aged SD card may cause error. Please replace the periodically.
(In general, the warranty period for a Micro SD card for car recorder is 6 months.)
6.
When an accident occurred, please power off the product, remove the Micro SD card and save the accident file on
your PC. If long time passed after accident and the file will be deleted, we are not responsible for missing the file.
Please read below introduction carefully before using.
By time: When the memory is full, the oldest file will be automatically deleted.
By mode: Total record files are stored by your setting rate on “SD card Folder Capacity Adjustment”.
When memory is full on a particular recording mode, the oldest file will be automatically deleted on
particular recording mode. Stored file may also be deleted.
GPS module may be affected by main body or by other electronic devices if it is too close each other.
Keep a distance as much as possible.
The receiving signal may become poor depending on the climate, satellite status and geography in the neighborhood.
The receiving signal may become poor if the windshield is heavy sun-coated or fixed with metallic materials.
Rear Camera Rear Camera Video Cable
Null Cable
(Option)
Micro SD Card
AV – OUT Cable
(Option)
GPS Module
(Option)
Cigar Lighter Bracket
BRAVO
Option
Accessories
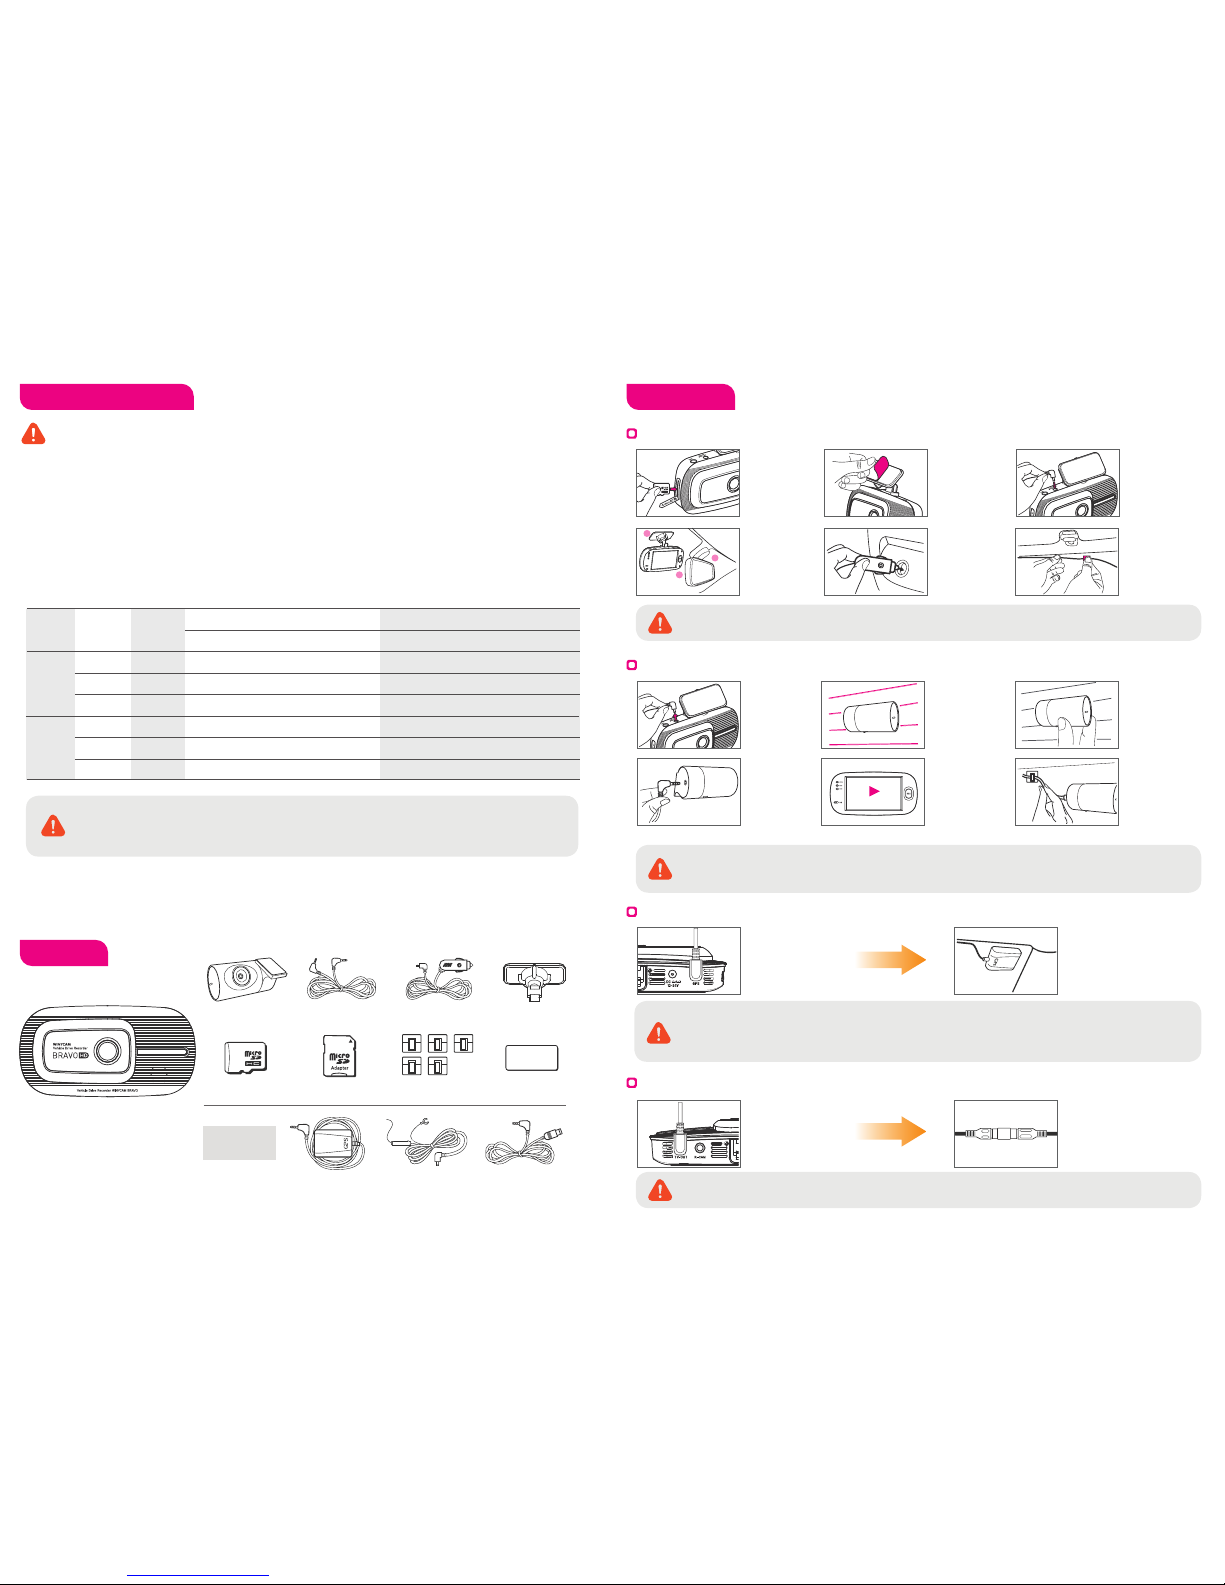
Front Camera Installation
External GPS Module Installation
TV-Out Cable Installation
Rear Camera Installation
1. Insert the Micro SD
Card to BRAVO
card slot.
(Check the direction)
2. Remove the protect
sticker.
3. Connect Cigar lighter
cable to Power
connection of product.
4. Attach the BRAVO
in place on the top
of front windshield
or middle o left and
right of the mirror.
5. Connect the Cigar
Lighter to Cigar
Socket
6. Arrange a power cable.
1. Shutdown a v ehicle
battery and power
off BRAVO first
before installing
a rear camera.
(Disconnect the
power connection)
2.
Remove a protect
sticker and attach a rear
camera in proper
location in windshield.
3.
After attached a rear
camera, adjust an
angle. Adjust angle is
e right angle to lens
face or little downward
facing.
4.
Connect a rear
camera jack(smaller
side) to a rear camera
and a another jack
(bigger side) to
R-CAM connection.
5. After connecting a
power/video cable,
Please check the
recorded image that
is stored in Micro SD
card if BRAVO can
record properly.
6.
After checking recording
operation, well arrange
a cable.
If you embed cable to
vehicle wall, please
check cable connection.
Also after embedded
double-check if BRAVO
can record properly
When use the Null cable, please check the fuse is normally. (Some Fuses are different depend of the type of vehicle.)
When connecting to your vehicle Navigation, you need an applied vehicle Navigation video cable. With a specific
Vehicle Navigation, installation may be restricted, and/or extra service charge may be incurred.
Connect External GPS
to GPS connection on
BRAVO body.
Attach GPS module
at well visual place
and tidy up a cable.
Connect a TV-Out
cable to the TV-Out
jack on a BRAVO body.
Connect a TV-Out cable
to AV-IN jack your vehicle
navigation.
PLAY
Cable Clip Extra 3M tapeSD card Adaptor
CH
1CH
2CH
Image
Quality
Camera
16GB 32GB
Super High Front
High Front
Normal Front
Super High Front/Rear
High Front/Rear
Normal Front/Rear
Normal(50%)
130
174
262
141
176
265
Event(30%)
78
105
157
83
104
161
Motion(20%) Normal(50%) Event(30%) Motion(20%)
51
69
104
55
69
107
266
353
531
285
356
535
158
212
318
168
211
325
105
141
212
111
140
216
(Unit : Minute)
Page 2
Format a Micro SD Card on a device. (Menu > Others > SD Card Format)
User manual and viewer program are stored on packaged Micro SD card, please note all data will be
deleted if you format a Micro SD card.
Please backup user manual and viewer program on your computer before you format a Micro SD Card.
Please set FAT32 for file system when you format a Micro SD Card.
If you format as NTFS or another format, Micro SD card will not be recognized and product can not work
correctly. We recommend allocated value 32KB when you format a Micro SD Card.
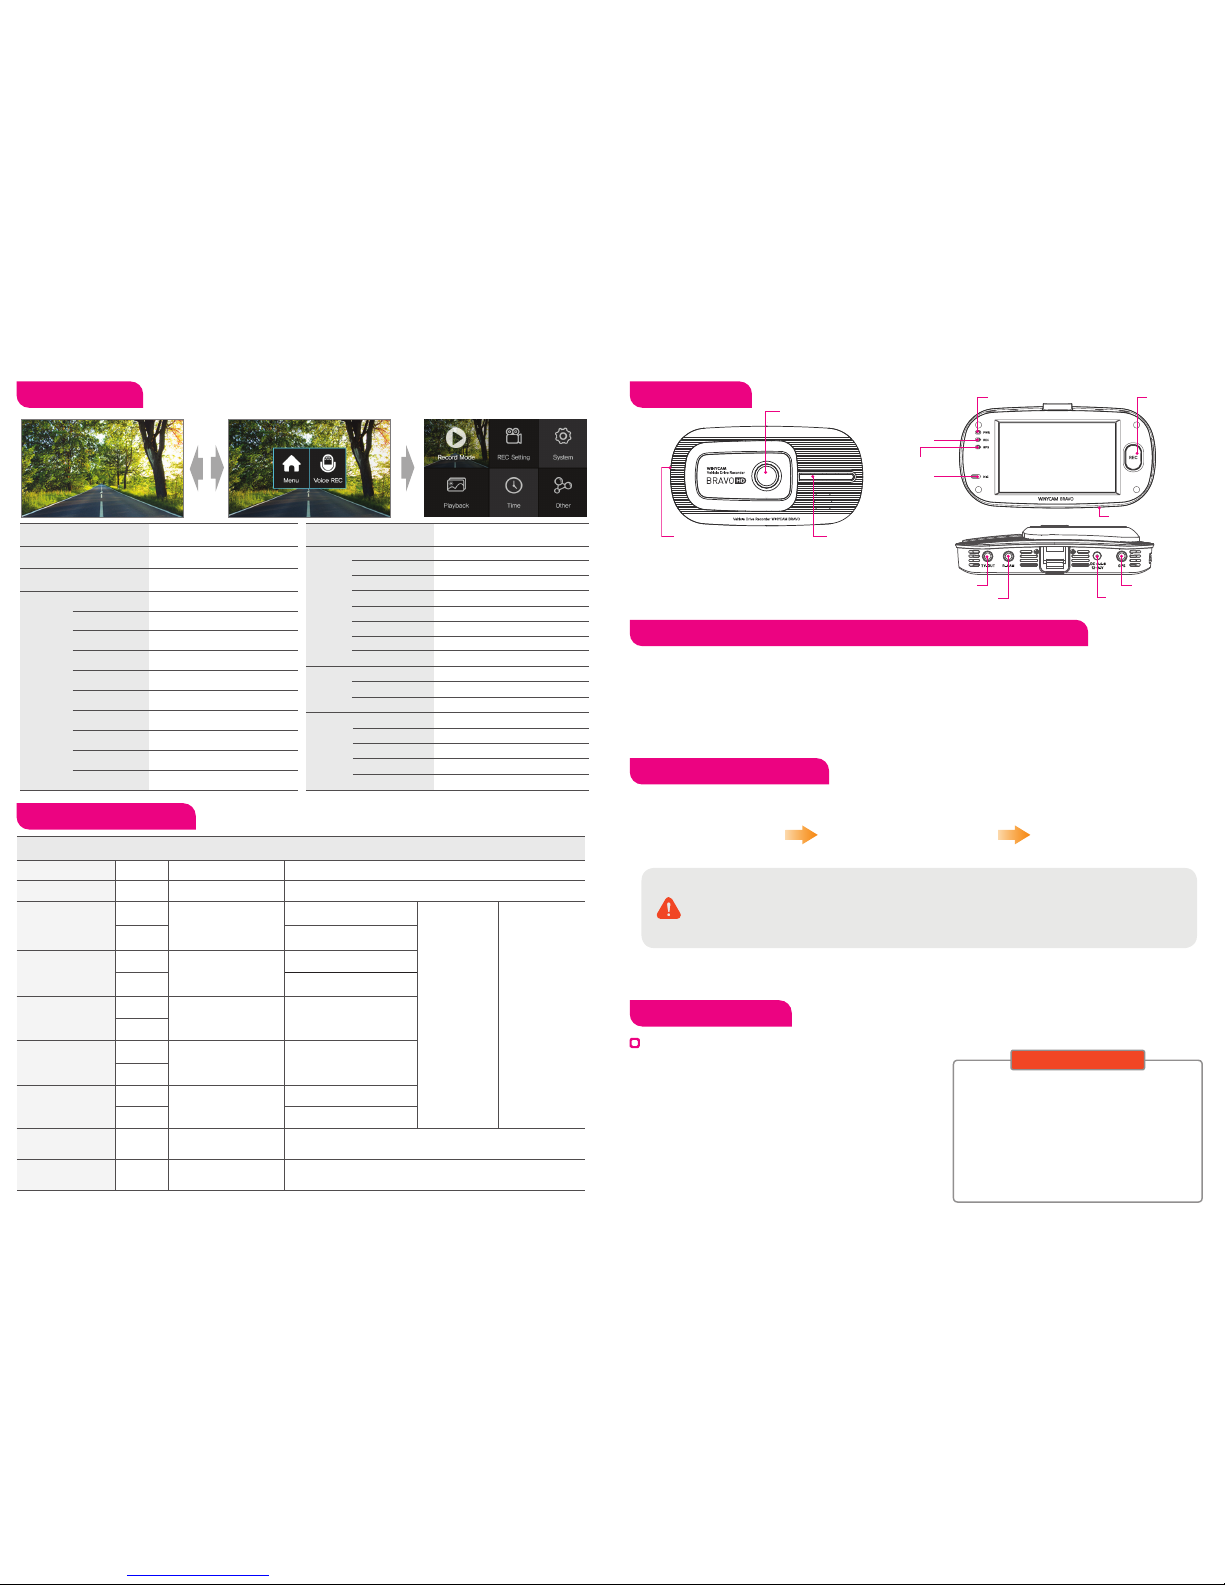
LED Operating Guide
Configuration Product Parts
Micro SD Card Format
To set vehicle constant power discharge protection function
Firmware Upgrade
1. On PC
Connect a SD card
to your PC, and click
on‘My Computer’
Right-click‘Removable
Disc’and select on
‘Format’from the menu.
Set Allocated value as 32KB
and press “Start” to format.
This device has the built-in vehicle constant power
discharge protection function, and therefore does
not require an extra device to cut off constant power.
With the configuration on LCD or PC Viewer program,
you can set the Cut Off Voltage for the
constant-power-off function.
1) Configuration
Menu > System > Cut off voltage
2) PC Viewer Program
Configuration > Breaking Voltage
There are some differences depend on a type of vehicle and
vehicle age.
(Breaking Voltage : 11.8V, 11.9V, 12.0V, 12.1V, 12.2V, OFF)
Customer Service
2. Format on BRAVO
Auto Firmware Upgrade
1) Remove a Micro SD card from the device while Power is off.
2) Connect it to PC to back up the stored REC files onto PC.
3) Format a Micro SD card.
4) Go to the web site (http://www.winycam-eng.com) and download
a new firmware onto the memory card.
5) Insert a Micro SD memory card into the device, turn on a power and
a automatic upgrade will begin.
6) During the upgrade, the upgrade status will be shown on a LCD and
voice guidance will be announced.
7) Once upgrade completed, the device will be initialized and voice
guidance will be announced.
Manufacture : 303-305, Bucheon Technopark,
#365, Samjeong-dong, Ojeong-gu, Bucheon-si,
Gyeonggi-do , Korea 421-741
Please download the user manual, program from
below website
http://www.winycam-eng.com
Winy Technology Co., Ltd
Front Camera
SD Card slot
Security LED
MIC
GPS LED
MIC LED
Reset
Power LEC REC Button
by manual
Rear Camera Connection
GPS Connection
Power Connection
TV-OUT
※ Even though GPS signal dose not connect depends on GPS situation and location, GPS LED turn on Red lighting.
Item CH Front LED PWR LED GPS LEDMIC LED
Booting - ON Red lighting ON
Orange lighting ON- OFF
1CH
1CH
1CH Red lighting ON
1CH
1CH
GPS
NOT Receiving OFF
Receiving ON
Red lighting
ON/OFF based on
audio REC setting
2CH
2CH
2CH
Green lighting ON / OFF
interval at 0.5 sec
Red lighting ON / OFF
interval at 1.5 sec
Green lighting ON / OFF
interval at 1.5 sec
Red lighting ON / OFF
interval at 0.5 sec
Green lighting ON
2CH
2CH
FW update
Lighting ON / OFF
interval at 1 sec
Normal, Event,
REC Stanby
Lighting ON / OFF
interval at 0.5 sec
Lighting ON / OFF
interval at 0.25 sec
In detect a shock
(Event REC)
Parking REC
Stanby
Red/Green flashing
interval at 1.5 sec
Cross flashing 3LEDs rightleft
interval at 0.5 sec
(1, 2, 3, 3, 2, 1, …)
Red/Green flashing
interval at 0.5 sec
Parking REC
(Motion, Event)
-
-
OFF
OFF
OFF
Red flashing interval at 0.5 sec
Red/Green flashing interval at 0.5 sec
Menu
No SD Card
(Including other error)
High temperature
Cut off
Menu MenuFunction Function
REC Mode Setting
LCD Screen Saver
Front Camera Setting
Breaking Voltage
Video Quality
TV-Out
REC Time
LCD Setting
REC CH
OSD Setting
Motion Sensitivity
Front LED Setting
Shutdown by Temp
G-Sensor Sensitivity
Time setting
Voice Guide Volume
Standard Time
REC Volume
Summer Time
SD Card Adjustment
FW Update
Parking Mode Change
SD Card format
Touch Calibration
Configuration Initialization
System Information
Start the recording on setting
Set Breaking Voltage
Display REC list
Set front camera sensor
Set REC Mode
Set LCD Screen Save Time
REC Video Quality
Set TV output
Set Normal REC Time
Set Video output on LCD
Set REC Channel
Set OSD output on LCD
Set Motion Sensitivity
Set Security LED
Set High Temperature Shutdown Function
Set 3D Sensor Sensitivity
Set Time
Set Voice Guide Volume Level
Set Standard Time
Set REC Volume
Set Summer Time
Set SD Car Capacity Rate by mode
FW Upgrade Function
Set Auto Change to Parking mode
SD Card Format Function
LCD Touch Screen Calibration
Initi
alize Configuration
Display System Information
Record Mode
Playback
REC
Setting
System
Time
Other
 Loading...