


P P
P P
P
en-Ten-T
en-Ten-T
en-T
abab
abab
ab
let User Manlet User Man
let User Manlet User Man
let User Man
ualual
ualual
ual
Model No. WP-906Model No. WP-906
Model No. WP-906Model No. WP-906
Model No. WP-906

Chapter 1Chapter 1
Chapter 1Chapter 1
Chapter 1
Introduction . .........................................Introduction . .........................................
Introduction . .........................................Introduction . .........................................
Introduction . .........................................
11
11
1
Suggested uses for Paint Pal Deluxe ....... 1
System Requirements ............................. 2
Package Contents .................................. 2
Chapter 2Chapter 2
Chapter 2Chapter 2
Chapter 2
Installing the HarInstalling the Har
Installing the HarInstalling the Har
Installing the Har
dd
dd
d
ware . ........................ware . ........................
ware . ........................ware . ........................
ware . ........................
33
33
3
Getting familiar with Paint Pal Deluxe ....... 3
Connecting to Desktop system ................ 5
Connecting to Notebook Computer ......... 7
Chapter 3Chapter 3
Chapter 3Chapter 3
Chapter 3
Installing the Software ..........................Installing the Software ..........................
Installing the Software ..........................Installing the Software ..........................
Installing the Software ..........................
88
88
8
Installing t he D river . ................................9
Chapter 4Chapter 4
Chapter 4Chapter 4
Chapter 4
Customizing the PCustomizing the P
Customizing the PCustomizing the P
Customizing the P
en en
en en
en
TT
TT
T
abab
abab
ab
let ..................let ..................
let ..................let ..................
let ..................
11
11
1
11
11
1
Finding the Pen Table icon .......................11
AppendixAppendix
AppendixAppendix
Appendix A. Taking care of your T ab let ...................1 4
B. Questions & Answ ers .........................15
C. S pecifications . ...................................16
D. FCC Compliance Statement ................ 1 7
E. W arr anty and Trademarks ..................18
TT
TT
T
abab
abab
ab
le of Contentsle of Contents
le of Contentsle of Contents
le of Contents

IntroductionIntroduction
IntroductionIntroduction
Introduction
Chapter 1Chapter 1
Chapter 1Chapter 1
Chapter 1
Congratulations on your purchase of
Paint Pal DeluxePaint Pal Deluxe
Paint Pal DeluxePaint Pal Deluxe
Paint Pal Deluxe!
Paint Pal DeluxePaint Pal Deluxe
Paint Pal DeluxePaint Pal Deluxe
Paint Pal Deluxe is the perfect tool for creating art on
your computer.
PP
PP
P
aint Paint P
aint Paint P
aint P
al Deluxal Delux
al Deluxal Delux
al Delux
ee
ee
e replaces a tr aditional
Mouse with a flexible pen tablet, giving you a more
natural way to dr aw , trace, write , and design.
PP
PP
P
aint Paint P
aint Paint P
aint P
alal
alal
al
DeluxeDeluxe
DeluxeDeluxe
Deluxe also comes bundled with advanced drawing softw are that will get you star ted r ight away.
Suggested uses for Paint Pal DeluxeSuggested uses for Paint Pal Deluxe
Suggested uses for Paint Pal DeluxeSuggested uses for Paint Pal Deluxe
Suggested uses for Paint Pal Deluxe
Paint Pal DeluxePaint Pal Deluxe
Paint Pal DeluxePaint Pal Deluxe
Paint Pal Deluxe is a powerful aid in creating computer graphics and for any application that requires
the accuracy of hand held writing tools. Possible uses
for
Paint Pal DeluxePaint Pal Deluxe
Paint Pal DeluxePaint Pal Deluxe
Paint Pal Deluxe include:
u
Drawing and graphic design
u
Handwriting
u
Signatures
u
Computer-aided design
u
Image Editing
u
CAI
u
Picking commands on a template
Welcome !Welcome !
Welcome !Welcome !
Welcome !
- 1 -

System requirementsSystem requirements
System requirementsSystem requirements
System requirements
Intel Pentium level computer or compatible.
Windows 95/98 operating system.
32MB RAM
80 MB hard disk space
256 color VGA display adapter(Hi-color or Truecolor preferred)
Serial port
CD-ROM drive
Package contentsPackage contents
Package contentsPackage contents
Package contents
After you open the box, please check the package
contents carefully. You should have the f ollowing
items:
1.
Tablet with Com/PS2 port cable
2. Cordless Stylus Pen
3.
Cordless Stylus Mouse
4. AT to PS/2 Adapter
5. Quick Installation Guide
6. Driver, Manual & Art Dabbler CD
Introduction
- 2 -

Installing the HardwareInstalling the Hardware
Installing the HardwareInstalling the Hardware
Installing the Hardware
Chapter 2Chapter 2
Chapter 2Chapter 2
Chapter 2
Getting familiar with Paint Pal DeluxeGetting familiar with Paint Pal Deluxe
Getting familiar with Paint Pal DeluxeGetting familiar with Paint Pal Deluxe
Getting familiar with Paint Pal Deluxe
Before you install
Paint Pal DeluxePaint Pal Deluxe
Paint Pal DeluxePaint Pal Deluxe
Paint Pal Deluxe, take a few minutes
to inspect the parts and get familiar with how
Paint PalPaint Pal
Paint PalPaint Pal
Paint Pal
DeluxeDeluxe
DeluxeDeluxe
Deluxe connects to your computer (see the diagrams
below).
ConntorsConntors
ConntorsConntors
Conntors
1. AT to PS/2 Adapter
2. AT Type Keyboard Connector
3. PS/2 Type Keyboard Connector
4. Serial Port (COM Port) Connector
- 3 -

Stylus Pen buttonsStylus Pen buttons
Stylus Pen buttonsStylus Pen buttons
Stylus Pen buttons
There are three buttons on the Stylus Pen :
Button 1Button 1
Button 1Button 1
Button 1 - Also called “
Tip ButtonTip Button
Tip ButtonTip Button
Tip Button”. This button
works like Mouse’s left button. It is not
programable.
Button 2Button 2
Button 2Button 2
Button 2 - This button works like Mouse’s right
button. User may set its function in
Control Panel (see description on
page 11).
Button 3Button 3
Button 3Button 3
Button 3 - This button works like Mouse’s middle
button. User may set its function in
Control Panel (see description on
page 11).
Installing the Hardware
- 4 -
Button 3
Button 2
Tip Button
(Button 1)

To Tabl et
To Keyboard
AT to PS/2
Adapter
Connecting to a desktop systemConnecting to a desktop system
Connecting to a desktop systemConnecting to a desktop system
Connecting to a desktop system
Follow these simple procedures to connect
Paint PalPaint Pal
Paint PalPaint Pal
Paint Pal
DeluxeDeluxe
DeluxeDeluxe
Deluxe to a desktop system:
1.Turn off your system and any other devices connected
with the system.
2.
Paint Pal Deluxe Paint Pal Deluxe
Paint Pal Deluxe Paint Pal Deluxe
Paint Pal Deluxe needs to connect keyboard and
gets pow er from keyboard connector. Please
identify your keyboard type before you first, there are
tw o type of k eyboards, AT and PS/2 type (see
diagram below).
3.If y our keyboard is AT type, you may connect
PP
PP
P
aintaint
aintaint
aint
Pal DeluxePal Deluxe
Pal DeluxePal Deluxe
Pal Deluxe t o your system and to an available serial
por t and AT keyboard connector according to
diagrams below :
- 5 -
PS/2 Connector
AT Connector
Installing the Hardware

To Tabl et
To Keyboard
AT to PS/2
Adapter
4. If your keyboard is PS/2 type, you mayconnect
PaintPaint
PaintPaint
Paint
Pal DeluxePal Deluxe
Pal DeluxePal Deluxe
Pal Deluxe t o your system and to an available serial
port and PS/2 keyboard connector according to dia
grams below :
- 6 -
Installing the Hardware
To Tabl et
To Other PS/2
Device
AT to PS/2
Adapter
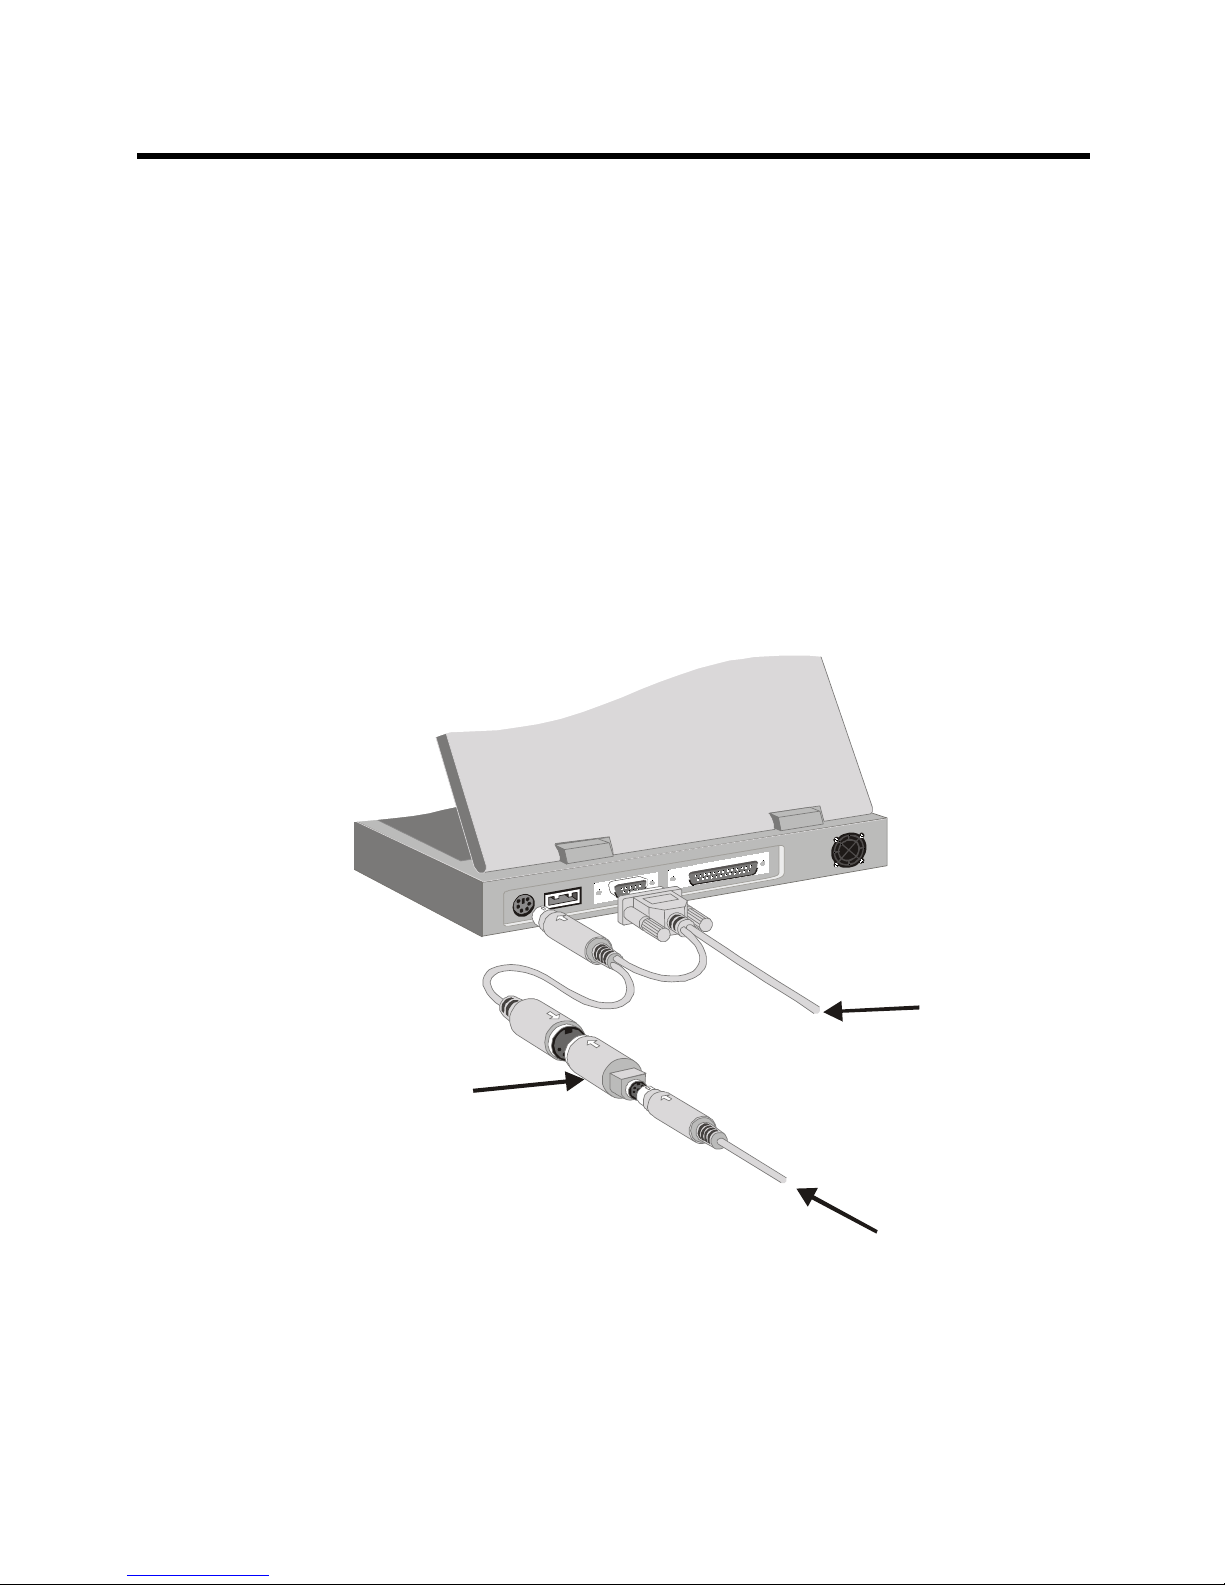
Connecting to a Notebook computerConnecting to a Notebook computer
Connecting to a Notebook computerConnecting to a Notebook computer
Connecting to a Notebook computer
Follow these simple procedures to connect
Paint PalPaint Pal
Paint PalPaint Pal
Paint Pal
DeluxeDeluxe
DeluxeDeluxe
Deluxe to a Notebook computer:
1.Tur n off y our Notebook and any other devices
connected with the Notebook.
2. Connect
Paint Pal DeluxePaint Pal Deluxe
Paint Pal DeluxePaint Pal Deluxe
Paint Pal Deluxe to a n available serial port
and PS/2 keyboard connector according to the
diagram below .
- 7 -
Installing the Hardware

Installing the SoftwareInstalling the Software
Installing the SoftwareInstalling the Software
Installing the Software
Chapter 3
Installing the driverInstalling the driver
Installing the driverInstalling the driver
Installing the driver
If you have previously installed a pen tablet, please first
remove the old driver from your system before installing the
PP
PP
P
aint Paint P
aint Paint P
aint P
al Deluxal Delux
al Deluxal Delux
al Delux
ee
ee
e driver.
Follow these procedures to install
Paint Pal DeluxePaint Pal Deluxe
Paint Pal DeluxePaint Pal Deluxe
Paint Pal Deluxe.
1. Make sure
Paint Pal DeluxePaint Pal Deluxe
Paint Pal DeluxePaint Pal Deluxe
Paint Pal Deluxe is properly connected
to your computer.
2. Star t your computer.
3. Insert the
Paint Pal DeluxePaint Pal Deluxe
Paint Pal DeluxePaint Pal Deluxe
Paint Pal Deluxe driver CD
4.4.
4.4.
4.
Paint Pal DeluxePaint Pal Deluxe
Paint Pal DeluxePaint Pal Deluxe
Paint Pal Deluxe is a Plug & Play (PnP) device,
your system will detect the hardware and activate the
new device installation procedures automatically.
- 8 -

5. Some systems do not support PnP, yo u ma y go to
StartStart
StartStart
Start , and click on
RunRun
RunRun
R u n. Then select CD-ROM drive
and run Setup.exe
6. You will then see a Window welcoming you to the
Tabl et driver. (see the diag rams below ). Click
NeNe
NeNe
Ne
xtxt
xtxt
xt
when you are ready to continue.
Installing the Software
- 9 -

7. System will ask where that you wish to place the
driver. You can select the defa ult folder b y just
clicking Next, or type in your own preference.
8. You can then select the folder f or the prog ram icons
that come with
Paint Pal DeluxePaint Pal Deluxe
Paint Pal DeluxePaint Pal Deluxe
Paint Pal Deluxe. Click
NextNext
NextNext
Next when
you are ready to continue . The Tablet driver will
then install.
9. After the installation ends, you will need to reboot
your system to start using your
Paint Pal DeluxePaint Pal Deluxe
Paint Pal DeluxePaint Pal Deluxe
Paint Pal Deluxe.
- 10 -
Installing the Software

Finding the PFinding the P
Finding the PFinding the P
Finding the P
en en
en en
en
TT
TT
T
abab
abab
ab
let iconlet icon
let iconlet icon
let icon
After you have installed your pen tablet, it is easy to
customize according to your own personal preferences.
1. The pen tablet icon can be found under the Windows
Control Panel. Clic k on this icon, and the “
WP WP
WP WP
WP
TT
TT
T
ab-ab-
ab-ab-
ab-
let Settingslet Settings
let Settingslet Settings
let Settings” parameter window will appear.
2. There are four pages in this window:
InfoInfo
InfoInfo
Info ,
ModeMode
ModeMode
Mode,
ButtonsButtons
ButtonsButtons
Buttons, and
Pressure Pressure
Pressure Pressure
Pressure. The details as :
InfoInfo
InfoInfo
Info
This page shows the basic information of the Device,
Firmware and Driver (see diagram above).
Customizing the PCustomizing the P
Customizing the PCustomizing the P
Customizing the P
en en
en en
en
TT
TT
T
abab
abab
ab
letlet
letlet
let
Chapter 4
- 11 -

ModeMode
ModeMode
Mode
There are two major settings in this page: Operation
Mode and Double Click. In “
Operation ModeOperation Mode
Operation ModeOperation Mode
Operation Mode” area,
you may select Absolute Mode or Relative Mode, you
may also define the sensitivity of the Relative Mode
here. In Double Click” area, you may define the
double-click speed and double-click area here. There
is a testing area for testing the double-click functions.
ButtonsButtons
ButtonsButtons
Buttons
In this page, you may define the action of Button 2
and Button 3 here. There are 25 options for Button 2
and 14 options for Button 3. If you press “
defaultdefault
defaultdefault
default”
button, the action of these buttons will back to
manufacturer default settings. Manufacturer default
setting are Button 1 as Mouse’s left button, Button 2
as Mouse’s right button and Button 3 as Mouse’s
middle button.
Customizing the Pen Tablet
- 12 -

PressurePressure
PressurePressure
Pressure
You m ay define the pressure sensitivity of Tip Button
in this page. There are two elements Force and
Response, are adjustable. There is a testing area
for testing the pressure sensitivity.
Customizing the Pen Tablet
- 13 -

TT
TT
T
aking Care of aking Care of
aking Care of aking Care of
aking Care of
YY
YY
Y
our our
our our
our
TT
TT
T
abab
abab
ab
letlet
letlet
let
Appendix A
WW
WW
W
orking enorking en
orking enorking en
orking en
virvir
virvir
vir
onmentonment
onmentonment
onment
Paint Pal Deluxe must be installed at temperatures
between 41o F to 104o F (5o C to 40o C), and humidity
of 10 to 80 percent.
Paint Pal Deluxe may not function properly if these
conditions are not met.
HoHo
HoHo
Ho
w to cw to c
w to cw to c
w to c
lean lean
lean lean
lean
TT
TT
T
abab
abab
ab
letlet
letlet
let
1. Be sure to use soft textures and natural cleaners to
clean the Tabl et.
2. Do not use chemicals or gasoline to clean the
surf ace of the Tab l et.
3. Please do not place anything that is very hot (like a
coffee cup) on the Tablet’s surf ace .
- 14 -

Questions and AnswersQuestions and Answers
Questions and AnswersQuestions and Answers
Questions and Answers
Appendix B
What do I need to use Paint Pal Deluxe?What do I need to use Paint Pal Deluxe?
What do I need to use Paint Pal Deluxe?What do I need to use Paint Pal Deluxe?
What do I need to use Paint Pal Deluxe?
The hardware requirements for Paint Pal Deluxe are:
n Intel Pentium level computer or compatible.
n Windows 95/98 operating system.
n 32MB RAM
n 80 MB hard disk space
n 256 color VGA display adapter(Hi-color or True-color
preferred)
n Serial port
n CD-ROM drive
What are the buttons on the stylus penWhat are the buttons on the stylus pen
What are the buttons on the stylus penWhat are the buttons on the stylus pen
What are the buttons on the stylus pen
for?for?
for?for?
for?
Buttons on the stylus pen are the same as buttons on
a mouse. The Tip-Button is just lik e the left button on
a mouse. The Button 2 (one near the tip) is corresponds to the button on the right side of a mouse. The
Button 3 (one near the base) is the same as the
button in the middle of a mouse.
Can a pen and mouse be used at theCan a pen and mouse be used at the
Can a pen and mouse be used at theCan a pen and mouse be used at the
Can a pen and mouse be used at the
same time?same time?
same time?same time?
same time?
As long as you have enough open ports, Paint Pal
Deluxe and a mouse can be used at the same time.
- 15 -

SpecificationsSpecifications
SpecificationsSpecifications
Specifications
Appendix C
Model : WP906
Active Area : 9 x 6 inches
Resolution : Default 1000, can be set up to
2048 lpi
Accuracy : +/- 0.5mm / 0.0125 inches
Proximity : 0.5 inch
Report Rate : Up to 120 per second
Pressure Level : 512 levels
Technology : Electromagnetic
Certifications : FCC Class B, CE, BCIQ, UL
Data Format : Packed binary
Interf ace Ty p e : RS-232C
Baud Rate : Default 9600
Frame : 1 start bit, 8 data bits, none parity
bit, 1 stop bit
Dimensions : 255.5 x 317.1 x 15.5 mm
(L x W x H)
Weight : 800 g
Operation Te m p.: 5o to 40oC (32o to 132 oF)
- 16 -

FCC Compliance StatementFCC Compliance Statement
FCC Compliance StatementFCC Compliance Statement
FCC Compliance Statement
Appendix DAppendix D
Appendix DAppendix D
Appendix D
This equipment has been tested and found to comply with the limits for
a Class B digital device, pursuant to Part 15 of FCC Rules. These limits
are designed to provide reasonable protection against harmful interference when the equipment is operated in a residential installation.
This equipment generates, uses, and can radiate radio frequency energy and if not installed and used in accordance with the instruction
manual may cause harmful interference to radio communications. Howev er, there is no guar antee that interference will not occur in a par ticular
installation.
If this equipment causes harmful interference to radio or television reception, which can be deter mined by tur ning the equipment off and on,
the user is encouraged to try to correct the interference by one or more
of the following measures:
l Reorient the receiving antenna.
l Increase the separation betw een the equipment and receive r.
l Connect the equipment into an outlet on a circuit different from that
to which the receiver is connected.
Changes or modifications not expressly approved by the party responsible for compliance can void the user's authority to operate the equipment. This product is equipped with a shielded cable. Extension cable,
if used, must be shielded in order to comply with the emission limits.
Operation of this device is subject to the following conditions: (1) This
device may not cause harmful interference, and (2) this device must
accept any interference received, including interference that may cause
undesired operation.
- 17 -

WW
WW
W
arranty and arranty and
arranty and arranty and
arranty and
TT
TT
T
rademarksrademarks
rademarksrademarks
rademarks
Appendix EAppendix E
Appendix EAppendix E
Appendix E
Limited Limited
Limited Limited
Limited
WW
WW
W
arrantyarranty
arrantyarranty
arranty
Wintime warrants that the enclosed Hardware Device
will be free from defects in materials and workmanship
under normal use and service for a period of one year
from the date of purchase. Any suppor t ser vices provided by Wintime shall be substantially as described in
applicable written materials provided to you by Wintime.
Some states and jurisdictions do no allow limitations on
duration of an implied w a rranty, so the above limitation
may not apply to y ou. To the extent allo w ed b y applicab le
law , implied w arranties on the Hardware Device , if any,
are limited to one years.
Should you have any questions concer ning this W arranty, please contact your dealer or you may visit the
Wintime web site at http://www.wintime.com.tw
TT
TT
T
rademarks Infrademarks Inf
rademarks Infrademarks Inf
rademarks Inf
ormationormation
ormationormation
ormation
Wintime and Paint Pal Deluxe are the trademarks of
Wintime Electronics Inc. IBM is a trademark of the International Business Machine Corporation. Microsoft and
the Windows Logo are registered trademarks and Windo ws is a t rademark of Microsoft Cor por ation. All brand
names and trademarks are properties of their respective
owners.
- 18 -
 Loading...