

Page 1
Installation and
operating instructions
This product is made for inner room air circulation in conformity to the
current CE rules:
- EN 60335-1:2002+A1+A11+A12+A2+A13+A14
- EN 60335-2-80:2003+A1+A2
- EN 61233:2008
- Additional examination GPSG
IMPORTANT:
Do not use this fan for other applications without our agreement.
Read and follow these instructions carefully to prevent personal injury and property damage. Keep always this instruction booklet
03.210
Manual-03210-Eng-R(15) - 2013/10
© Copyright All Rights Reserved
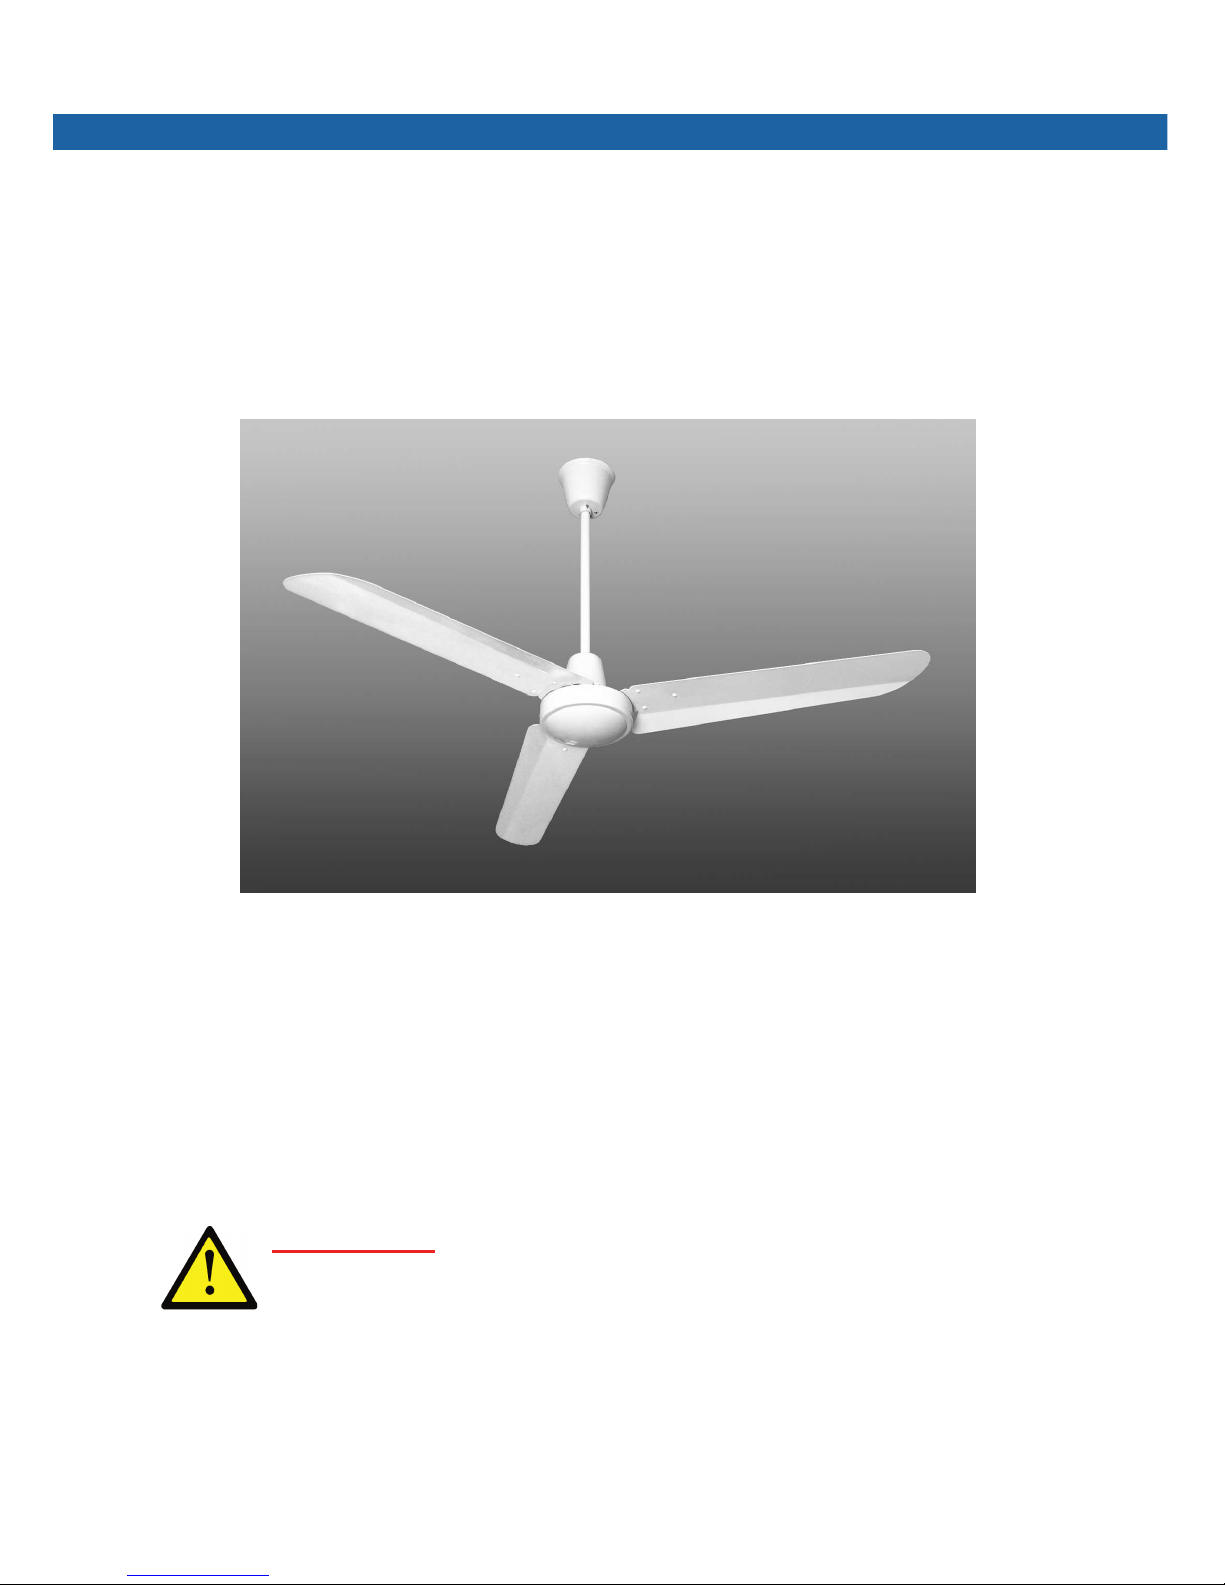
Industrial ceiling fan 03.210 - 03.215
Page 2
Index
Installation safety - must be followed................................... 1
Operational safety - must be followed..................................2
Contents of the package.......................................................2
Mount of the ceiling j-hook................................................... 2
Mount of the blades..............................................................3
Hang the fan and connect wiring..........................................3
Mount of the safety wire....................................................... 4
Fix the upper canopy............................................................ 4
Troubleshooting.................................................................... 5
Maintenance......................................................................... 6
Disposal and environmental protection................................ 6
Specifications........................................................................6
Industrial ceiling fan 03.210 - 03.215
Page 3
Installation safety - must be followed
1. Choise of placement:
• The ceiling structure must be able to support at least 50kg/m² moving
weight.
• Choose a place where there is no risk for people or objects to contact
with rotating blades.
• The fan must not be installed in a damp room.
• The fan must not be installed near flammable or explosive substances or
gas.
• Follow the requirements of automatic fire alarm systems.
• Follow the requirements of infrared heaters regarding the gas exhaust
system.
2. To prevent contact with running blades, the fan must be mounted with a
minimum distance of 2,50 m between blades and floor.
3. For the installation of the ceiling j-hook use only fastening parts authorized
for this kind of ceiling. The choise of the fastening parts and the correct
installation of the j-hook is on the responsibility of the installation expert.
Check all connections for perfect tight before first-time operation.
4. Be sure, that nobody can arrive the danger zone during the operation of
the fans. Follow the local accident prevention.
5. The electric installation and the repairs must be done by a professional
expert in accordance with all applicable codes and standards.
6. URGENT: Before hanging the fan and connecting the wiring make sure
power is off at the main service panel. Tag it to prevent unexpected power
on.
7. Verify that power supply is compatible with rating label markings.
8. The fan must be protected by a certificated switch, with double terminal
and contact opening not lower than 3 mm.
9. The wiring must be in accordance to the official norms. The fan must be
connected to “earth”: Make sure that the green/yellow wire of the fan is
tight connected with the green/yellow wire of the power supply.
10. Pay attention to the wires during the installation, in order to prevent any
damage.
11. While installation check all nuts, bolts and cotter pins if they are perfectly
tight, especially inside the two canopies.
- 1 -
Page 4

Operational safety - must be followed
1. Do not work near a running fan. Turn power off before.
2. Do not bend the blades and do not push any object between the running blades. Never stop the blades with hands.
3. Only one direction of rotating is allowed: Air movement downwards.
4. URGENT: If there is any change in the condition of the fan, such as noises,
wobbling, damaged or loose parts, the fan must be switched off immediately
and repaired by a professional.
5. In case of taking out of operation of the product, you have to make it unusable. For example by removing the power cord.
Contents of the package
1 motor, assembled with downrod, rubber grommet and canopies
3 baldes
1 ceiling j-hook with safety pin
2 jam screws to fix the upper canopy
Mount of the ceiling j-hook
- Mount the ceiling j-hook with fastening parts authorized for this kind of ceiling
safety to the ceiling. Make sure the screws are tightened well.
- The j-hook must be immovable, able to support at least 40 kg moving weight
and must not gradually loose because of the fan use.
- 2 -
65
26
26
Page 5

Mount of the blades
- Use a soft underlay to place the motor for assembling with blades.
- The blades are assorted by weight to prevent wobbling. Do not exchange blades
from one set to another.
- Mount the three fan blades (blade holder upside) to the motor using the blade
screws, spring rings, washers and blade holder underlay cards, same as the drawing.
- Make sure the blade screws are evenly and safely tightened (with care not to
damage the thread).
Hang the fan and connect wiring
- URGENT: Before doing anything with the power supply, make sure power is off
at the main service panel. Tag it to prevent unexpected power on.
- Carefully hang the fan assembly by place the rubber grommet in the ceiling jhook. Make sure not to wedge wires between rubber grommet and ceiling j-hook.
- URGENT: Place the safety pin in the hole at the end of the ceiling j-hook.
The fan must not used without the original j-hook safety pin. If the pin is lost,
order a new one.
- Connect the three wires from supply circuit to the fan terminal as follows:
• the green/yellow wire with the “grounding”
• the blue wire with the “neutral”
• the brown wire with the “line”
- Fix the power cord at the ceiling professionally.
- Afterwards, make sure that the power cord has is long enough for a little movement of the fan (do not strain).
- IMPORTANT: Make sure the wire connection is safe and tight.
Make sure the wire connection is according to the local electrical code. If any
wire will be damaged, this must be fixed by a professional expert, to prevent danger.
- NOTE: For wiring of a fan control, follow instructions packed with the speed controller.
- 3 -
Page 6

Mount of the safety wire
- Choose a screw or a screw eye, suitable for the safety wire and the kind of
ceiling.
- Fix the safety wire with the screw or the screw eye to the ceiling, 10cm besi-
de the upper canopy.
- After this the safety wire must not touch the
ceiling j-hook, the rubber grommet and the
terminal and should not be stretched.
- The screw or the screw eye must be immovable, able to support at least 40 kg moving
weight and hold the safety wire safe.
Picture: example - screw eye and carabiner not included
Fix the upper canopy
Raise the upper canopy to the ceiling. Make sure there is 1cm distance between the ceiling and the top of the upper canopy. Now fix the upper canopy
horizontally with the two jam screws (do not over-tighten).
- 4 -
wall plugs (example - not included)
ceiling j-hook
screws (example - not included)
safety pin for ceiling j-hook
safety wire
rubber grommet
terminal
upper canopy
jam screws
blade screw
spring ring
washer
blade underlay card
minimum distance to floor 2,5 m
Page 7

Troubleshooting
- URGENT: Before checking the fan, make sure power is off at the main service
panel. Tag it to prevent unexpected power on.
- The motor housing must not be opened.
Fan will not start.
Suggested remedy
- Check main and branch circuit fuses or circuit breakers.
- Check line wire connections to fan and switch wire connections in switch housing.
Fan makes noise.
- IMPORTANT: For the reason of safety the fan must not be used with unusually noi-
ses!
Suggested remedy
- Allow a “running-in” period of 24 hours. Most noises, associated with a new fan, will
disappear after this period.
- While testing the motor without blades, a resonance sound can happen, but makes
no problem. With blades this resonance sound is not present.
- Check the screws which attach the fan blade to the motor to make sure that they
are tight.
- Check all nuts and bolts behind the two canopies for perfect tight.
- Check the upper canopy is a short distance away from the ceiling. The upper canopy should not be allowed to touch the ceiling or cables.
- Check the lower canopy, cotter pin and wires under the lower canopy. These parts
should not be allowed to touch the motor.
- A slight humming sound if used at an infinitely speed control (especially on lower
speed) is normal for all ceiling fans. Use our original speed control not oversized to
avoid or minimize this sound.
Fan wobbles / fan is out of balance.
-
IMPORTANT: For the reason of safety and the risk of material damage the fan must
not be used when it is seriously wobbling!
Suggested remedy
- A little wobbling, especially after starting or after speed changes, is normal. If end
speed is reached, the fan will be stable.
- Main causes for wobbling are unequal blades. If one blade is damaged or bended
use a complete new set of three blades.
- The blades are assorted by weight to prevent wobbling. If you have to assemble a
range of fans, be sure not to exchange a blade from any set of three blades.
- Check to make sure the blade screws which attach the fan blade to the motor are
tight.
- Check all nuts and bolts behind the two canopies for perfect tight.
Fan runs too slow.
Suggested remedy
- The capacitor could be damaged, maybe because of overload or lightning. Arrange
to check the capacitor by a professional expert and order a new original capacitor.
- 5 -
Page 8

Model 03.210 03.211 03.214 03.215
Color white black white white
Voltage 230 V, 50 Hz
Power 75 W
Max. current 0,35 A
Speed 300 rpm
Air Volume 15.000 m3/h
Performace max. 10 m 10 m 10 m 6 m
Sound level at 1m 52 dB(A)
Weight 9,5 kg
Diameter 1420 mm
Height 690 mm 690 mm 440 mm 440 mm
Blade straight straight straight curved
Carton Size 690x255x235 mm
Test mark GS, CE
Specifications
Subject to alteration.
- 6 -
Maintenance
1.
ATTENTION:
The necessary maintenances are indispensable and must be done
by an expert.
2.
URGENT:
Before maintenance and cleaning the fan, make sure power is off at the
main service panel. Tag it to prevent unexpected power on.
3. On the basis of the typical fan use, gradually some connections may be loose.
Therefore all connections must be checked two times per year for perfect tight.
Especially the blade screws, all nuts, bolts and cotter pins inside the two canopies,
the pin and strength of the ceiling j-hook and the safety wire. In case of intensive
use the checks should be more frequent.
4. In case of need use a damp cloth for cleaning. Do not use liquid cleaners or aerosol cleaners. Never dip the fan into water or other liquid.
Disposal and environmental protection
1. This product and the packaging are made of valueable raw materials and should
not be disposed in the household waste.
2. By ensuring this product is disposed of correctly, you will help prevent potentially
negative consequences for the environment and human health
3. Sort the different kinds of waste of the packaging and the machine and follow the
newest disposal technology.
4. Take care to use authorised disposal and recycling specialists.
 Loading...