

Page 1
EME MANUAL
Page 2

Table OF Contents
1. Introduction.......................................................................3
2. Installation........................................................................4
3. Updating the Eloquencer...............................
4. Connecting the Eloquencer with the EME............................4
5. MIDI IN.......................................................
6. Key REC...........................................................................8
7. MIDI IN Route...................................................................9
8. Controller Rotary Type........................................
9. Incremental Rotary Sensitivity.........................
10. Controller Feedback..................................
11. MIDI OUT.................................................
12. Load/Save Conguration............................
...................
...............
..............
...................
.....................
....................
...................
.4
.....7
9
9
9
10
10
13. EME Buttons..............................................
14. Load/Save EME Button Assignment.............
15. Troubleshooting..............................
16. Appendix 1 - CC Tables.........................................
17. Appendix 2 - Button Assignment......................................25
...............................
....................
....................
.........
11
11
12
13
2
Page 3
Introduction
EME (Eloquencer MIDI Expansion) is the perfect companion for the Eloquencer,
adding capabilities to sync with MIDI devices, controlling most of the eloquencer
parameters with MIDI interfaces, generating MIDI voices from the eloquencer tracks,
and converting MIDI signals to the eurorack world.
It provides 6 main features:
• MIDI Synchronization: MIDI CLK IN and OUT.
• MIDI Control: This feature allows a MIDI controller with mapped CCs to modify
many of the Eloquencer parameters.
• MIDI controller keyboard: This feature allows a MIDI controller to introduce notes
in LIVE REC mode or FREE PLAY mode
• MIDI in route: MIDI to Gate and CV interface for any of the Eloquencer tracks.
• MIDI out: Internal Eloquencer sequences can be routed to the MIDI output as a
voice message (note on/off, velocity), CC or Program Change.
• Assignable buttons: These 4 buttons allow you to personalize the Eloquencer with
your favorite functions.
3
Page 4
Installation
Before you can start making music, you’ll need to do two important things:
1. Upgrade the Eloquencer (if you have 1.2.0 or below)
2. Physically link the Eloquencer and EME.
Updating the Eloquencer
To run the EME, the Eloquencer will need to be updated with 1.3.0 or higher
version. The downloader and instructions can be found on our github page:
https://github.com/enoughframes/ELOQUENCER___UPDATER
*** Note : Make sure you are using a USB Data Transfer cable as opposed to a USB charging
cable. Some people have encountered issues because of this. If the updater does not detect
the eloquencer close the updater, try another USB cable and run the application again.
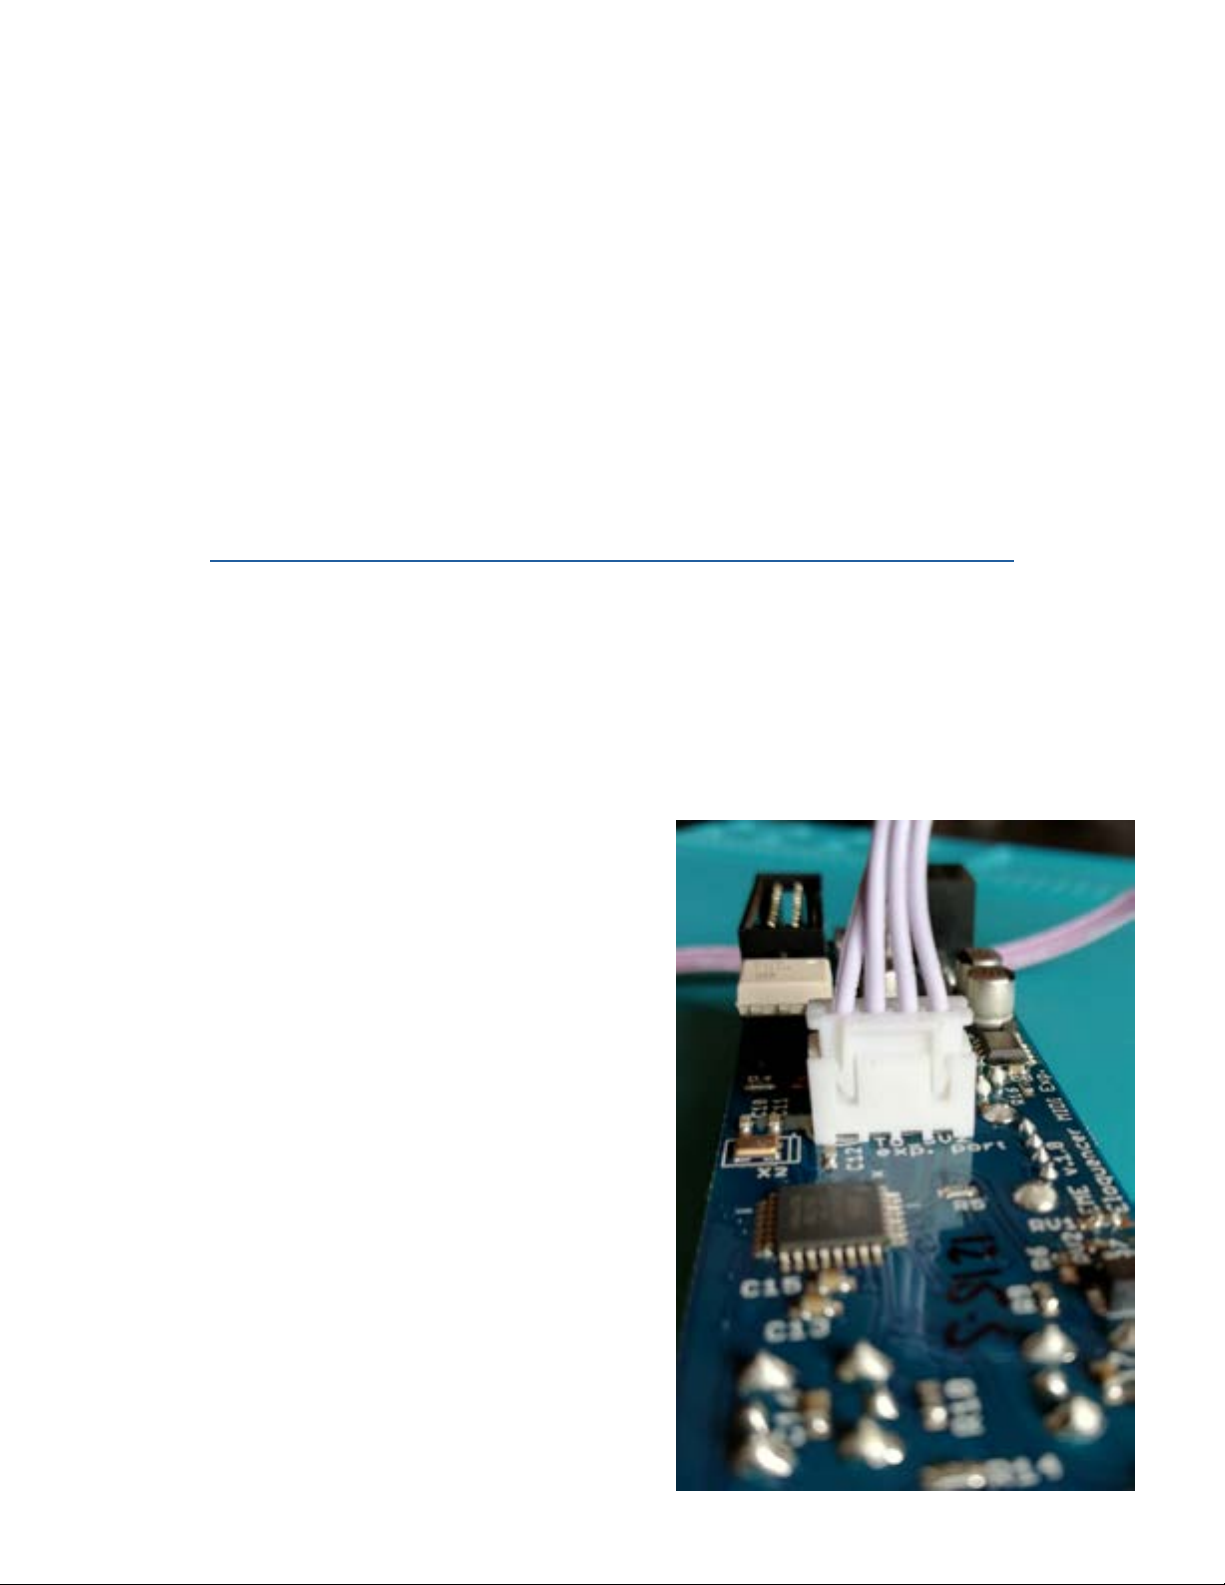
Connecting Eloquencer and EME
Connect the EME with the Eloquencer using
the 4 pin cable provided. On the EME
module, the cable connector has two plastic
arrows that match into the plastic socket rails
in the module. This feature makes it
convenient to connect cable to the EME since
it can only be connected in a single direction.
4
Page 5
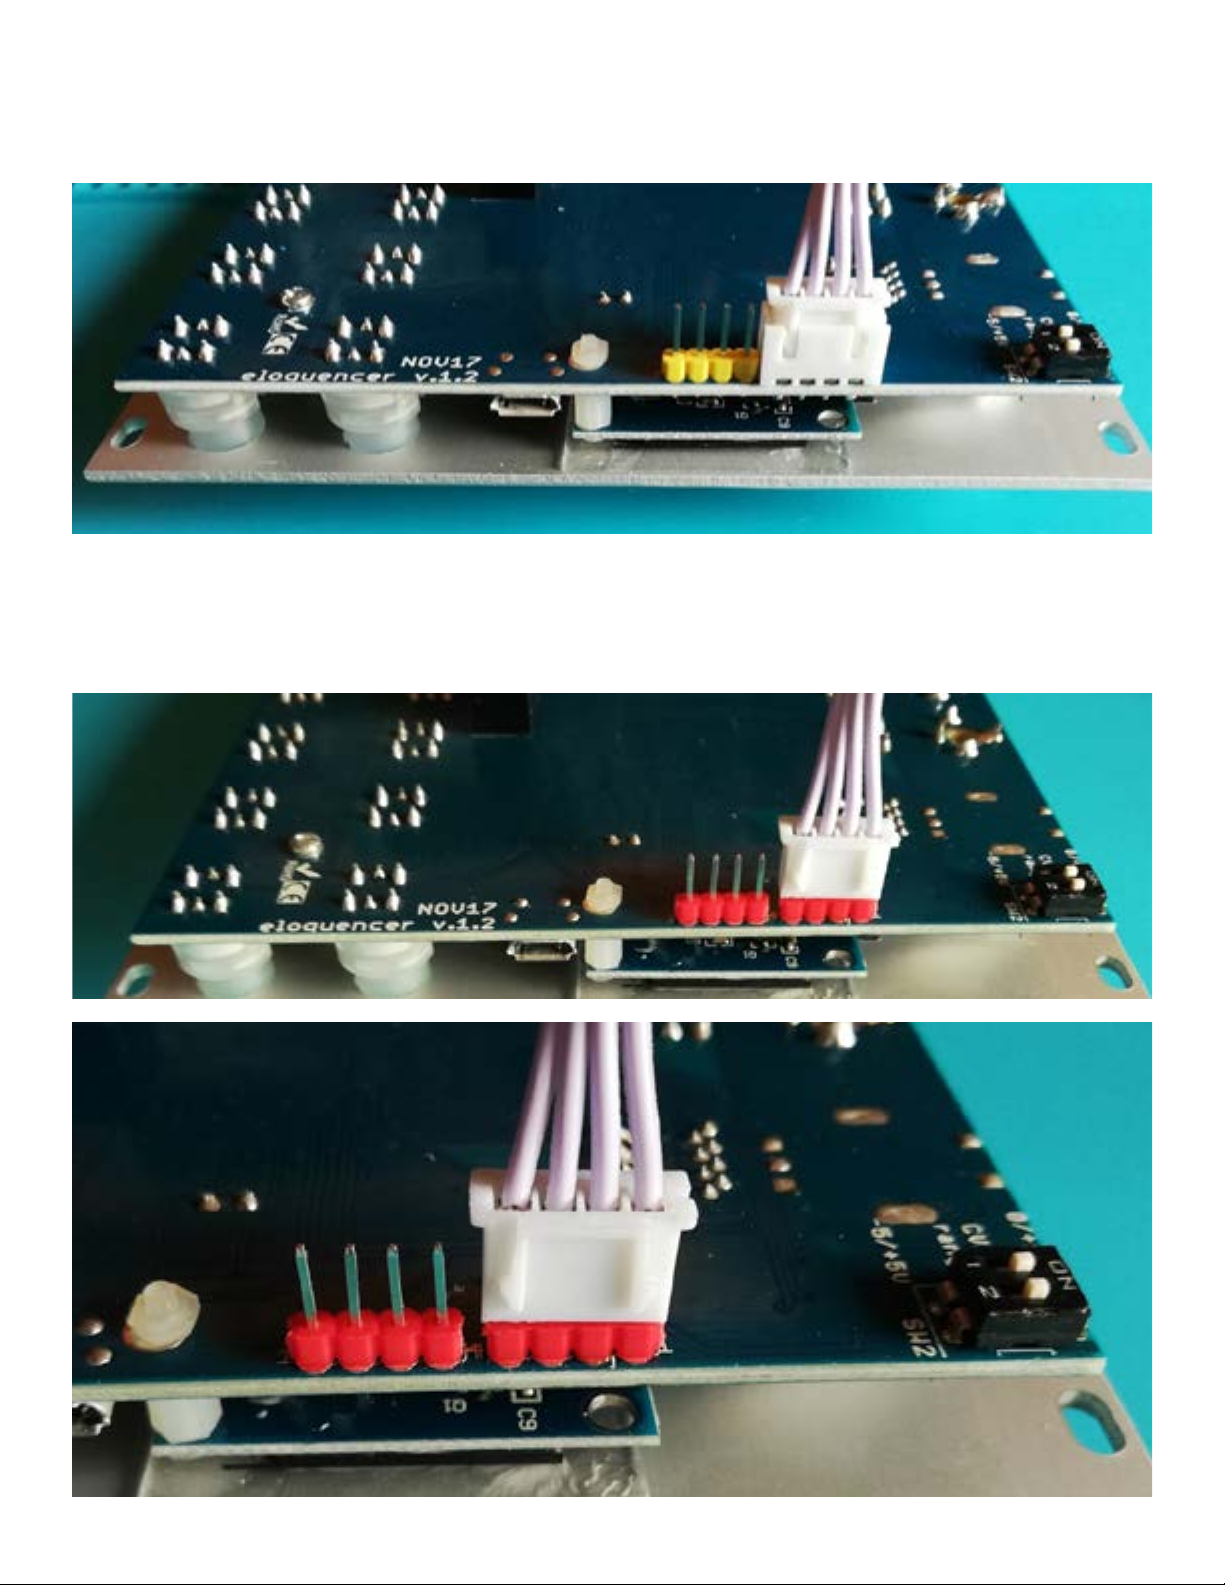
When connecting the Eloquencer module to the EME it is necessary to check the
unit’s serial number. Serial numbers above 4999 have the same mono-directional
cable connection as the EME. (see below)
If you have an Eloquencer with serial number below 5000, you will have to connect
the cable in the SV2 position, making sure the two small plastic arrows are facing
out. (see below)
5
Page 6
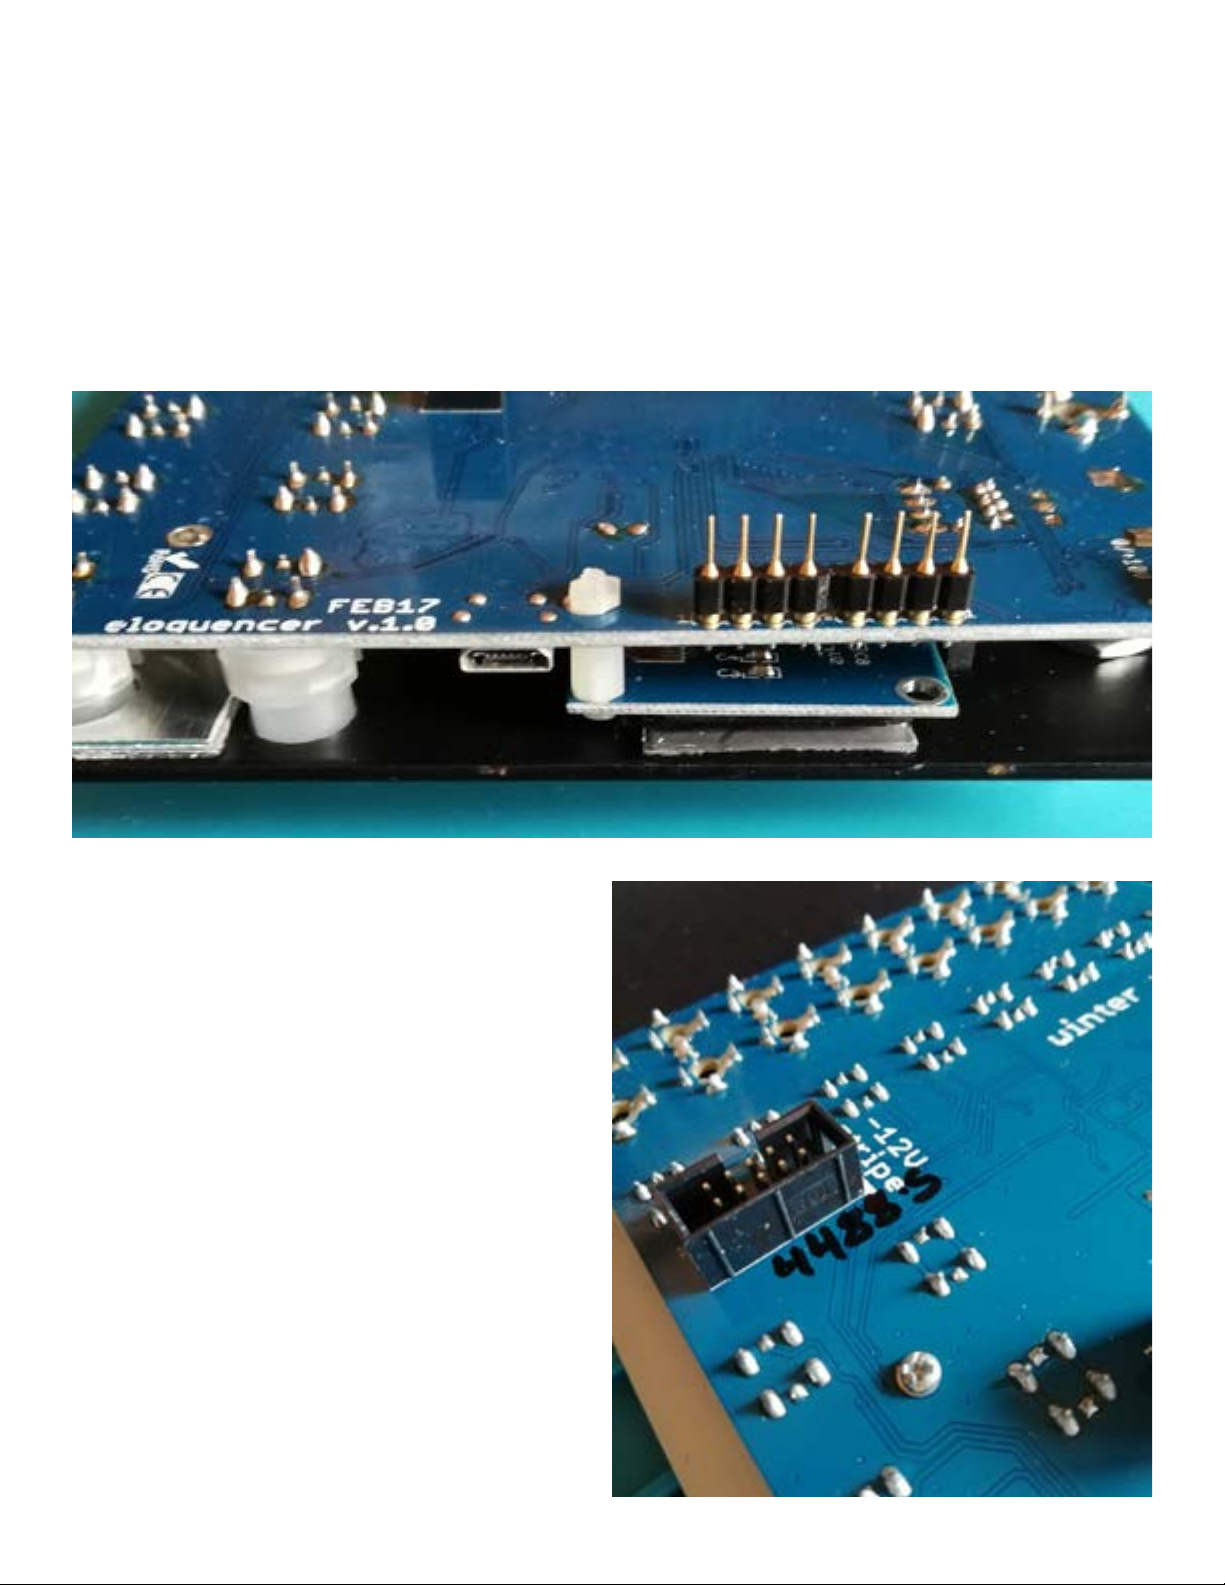
If you have one of the rst units (serial number starting with 1) you will notice that
the connector has rounded pins. While these work well, you may nd that it ts a bit
loose. Because of this, we recommend you pay attention when moving your case you
make sure this connector is still attached.
If you prefer a more permanent solution, there are more secure ways to attach this
connector. You can use a small drop of cyanocrilate to adhere cable to the
connector, or you can replace the 4 rounded pins attached to the eloquencer for 4
squared pins. (you will need a solder iron and minimum soldering skills)
Note: the serial number is on the rear
part, beside the power connector.
Once the Eloquencer and the EME are
connected, power up the system.
The eloquencer will take a few seconds
to identify the EME. If the update has
gone successfully and the physical
connection is ok, the message
‘Exp 2 : EME’ should appear in
the Power Up Status display.
6
Page 7

MIDI IN
The eloquencer can receive MIDI message for different purposes:
• MIDI IN clock and transport (DIN5) – The EME can receive standard MIDI clock
(24 ppqn) and Start / Stop messages.
• MIDI control (USB and DIN5)– Eloquencer can receive MIDI CC messages from
a MIDI controller to control the Eloquencer parameters. There is a list of CCs and
channels that can be used to control specic Eloquencer parameters (see
Appendix 1 - CC in tables).
There are three main types of control: global, focus and track.
• GLOBAL – All the CC messages received in MIDI Channel 1 are global messages,
those are related with generic Eloquencer parameters, or in some cases with
‘selected’ parameters. Examples of global parameter can be tempo, shufe,
scale, or going to an specic mode. Example of ‘selected’ can be STEP MODE
SELECTED, when we go to the step mode conguration you can select which
tracks you are modifying, so sending CH1 CC34 will be modifying the STEP
MODE in this selected group of tracks.
• FOCUS – All the CC messages received in CH2 are FOCUS channel, so we will
be modifying the focused track. For example if you press track A in the
Eloquencer, and you send a value in CH2 CC39 (TRACK SHIFT FOCUS) you will
be track shifting track A, then you press track H button and send again CC39 in
CH2 message and you will be track shifting track H.
• TRACK – All the CC MIDI messages received between CH9 and CH16 will be
understood to control an specic Eloquencer Tracks.
CH 9 > TRACK A
CH 10 > TRACK B
CH 11 > TRACK C
CH 12 > TRACK D
CH 13 > TRACK E
CH 14 > TRACK F
CH 15 > TRACK G
CH 16 > TRACK H
For example, sending CH9 CC71 value 127 will mute Track A, sending CH10 CC71
value 127 will mute Track B.
7
Page 8

MIDI Keyboard (USB and DIN5)
A Keyboard MIDI controller can be used to send ‘note on’ and ‘note off’
messages to:
• MIDI IN REC – To record notes to the sequence
• FREE PLAY – To send ‘note on’ and ‘note off’ MIDI messages to analog outputs
(Gate and CV) or to the assigned MIDI output for the focused track (in case the
focused track has a MIDI output congured)
MIDI IN route (USB and DIN5)
This functionality allows to use the Eloquencer as a MIDI to GATE and CV interface,
that means that all the ‘note on’ and ‘note off’ MIDI messages received in the
chosen MIDI channel will be transformed into GATE and CV value for the chosen
Track. In this case if we chose something different from ‘none’ in the MIDI IN route
conguration the information contained in the Eloquencer sequence won’t be listen
anymore, and the GATE and CV outputs of the track will only change if a ‘note on’
or ‘note off’ message is received in the chosen MIDI channel.
To access the MIDI IN conguration press and hold FUNC (in the Eloquencer) +
BTN4 (in the EME), and go to MIDI IN
Find below the list of parameters that can be modied in the MIDI IN conguration
section:
Key REC
Here we decide which channel are we going to listen/record while being in MIDI IN
REC or FREE PLAY (LIVE REC). There are two main possibilities:
CH1 to 8: All the ‘note on’ and ‘note off’ MIDI messages received in a specic MIDI
channel will be played or recorded in a specic track as shown below:
CH 1 > TRACK A
CH 2 > TRACK B
CH 3 > TRACK C
CH 4 > TRACK D
CH 5 > TRACK E
CH 6 > TRACK F
CH 7 > TRACK G
vCH 8 > TRACK H
FOCUS : All the ‘note on’ and ‘note off’ MIDI messages received in the chosen MIDI
channel will be played or recorded on the current focused track (from A to H)
8
Page 9

MIDI IN Route
Here YOU dene which Eloquencer tracks are working as a MIDI to Gate and CV
interface. Move the encoder to choose the track, push the encoder, choose the MIDI
channel, and press the encoder again to conrm.
Controller rotary type
Here you dene how the Eloquencer will understand the CCs coming from the MIDI
controller. In most cases we can decided if the rotary acts in Absolute or in
Incremental mode. There are some cases that only can be congured in Incremental
(see Appendix 1 - CC in tables).
Absolute – The Eloquencer expects a potentiometer/fader behavior, that means
if the MIDI controller is in its minimum position it will send a value of 0, as we turn
(Clockwise) the potentiometer the MIDI controller will send absolute values of its
position, at the end it will reach its maximum position, sending a value of 127.
Incremental – The Eloquencer expects differential values, anything above 64 will
be understood as a positive increment, so if the Eloquencer receives a value of 68,
will understand it as a +4 increment (68 -64 = 4). Any value below 64 will be understood as a negative increment, for example if the Eloquencer receives a value of 58
it will be understood as a -6 increment (58-64).
This behavior can be specied independently for most of the MIDI CC CONTROL
parameters.
All can be changed at the same time using ‘Change all to: Incr./Abs’
Incremental rotary sensitivity
This parameter is used to establish the amount of detents (clicks) on a rotary encoder
that have to turn before a value changes one unit. For example if we congure it at
1 that means that one detent in the encoder will increase one value, if we congure
it at 4 means that we need 4 detents in the encoder to increase one value.
Controller feedback
This parameter is used to determine if the EME will send feedback information to a
MIDI Controller, this parameter only needs to be active if we are using a USB MIDI
controller with LEDS for the push buttons and the rotaries.
9
Page 10

MIDI OUT
This functionality allows to route your Eloquencer sequence
information of a particular track to a specic MIDI channel and message type. So
every time that you have a GATE event in your sequence, this event will be transform
to a MIDI message using the step CV value.
There are 3 different types of messages that we can choose:
• VOICE: Messages related with a voice, ‘note’ will send ‘note on’ and ‘note off’ to
the MIDI output, velocity will add velocity information to a ‘note’ event. Velocity
will only work if we have another track with the same MIDI channel assigned with
‘type: VOICE / value: NOTE’.
• CC: In this case we transform the track sequence information into a CC value,
dening Channel and CC number.
• PGMCH: The information contained in the track sequence will be transform into a
PGMCH value, in this case we dene Channel and Bank.
In order to allow a correct sequence of events you must establish the order in which
the MIDI events are output. You must rst send the PGMCH messages (this way the
preset change will take place before the ‘note on’ message arrives), then the CC
message and nally the ‘note on’ message.
Load / Save EME conguration
Any of the parameters mentioned above need to be saved if we want them cong-
ured next time we power up the synth.
To LOAD a MIDI conguration choose the conguration (from 1 to 16) using the
steps buttons, choose LOAD using the rotary encoder, press the rotary encoder, and
conrm the security ques
To SAVE a MIDI conguration choose the conguration (from 1 to 16) using the
steps buttons, choose SAVE using the rotary encoder, press the rotary encoder, and
conrm the security question.
tion.
10
Page 11

EME buttons
The four EME buttons can be personalize with many functions.
(nd a complete list of assignable parameters in Appendix 2).
Conguration by default is:
BTN1 > previous pattern
BTN2 > next pattern
BTN3 > previous part
BTN4 > next part
To assign a function to a button press and hold FUNC (in eloquencer) + BTN3 (in the
EME). Press the button you want to personalize in the EME panel, press the encoder,
choose the desired functionality, and press the encoder again.
Load / Save EME buttons assignment
The buttons assignment needs to be saved if you want them congured next time we
power up the synth.
To LOAD a button assignment choose it (from 1 to 16) using the steps buttons,
choose LOAD using the rotary encoder, press the rotary encoder, and conrm the
security question.
To SAVE a button assignment choose it (from 1 to 16) using the steps buttons, choose
SAVE using the rotary encoder, press the rotary encoder, and conrm the security
question.
11
Page 12

TROUBLESHOOTING
I’m using a MIDI controller to control the Eloquencer parameters,
but the rotaries are not responding as expected.
Make sure your MIDI controller and the ‘rotary behavior conguration’ in the ‘EME
conguration’ have the same type of behavior, absolute or incremental.
EME doesn’t work at all
Make sure you have the Eloquencer rmware version 1.3.0 (or greater)
Check the physical connections between the Eloquencer and the EME (4-pin cable in
the correct position and polarity).
12
Page 13

6/4/2019 Winter Modular EME Manual - Google Docs
APPENDIX 1 - CC IN TABLES
CHANNEL (MIDI in from CH9 to CH16)
Relative to a particular channel, MIDI CH 1 modifies Track A, MIDI CH 2 modifies Track B
CC Rotary /
Button
12 CV ADD ROTARY only
13 CVP ADD ROTARY only
14 CVR ADD ROTARY only
15 GP ADD ROTARY only
Rotary /
Button
Behavior
incremental
incremental
incremental
incremental
Adds or subtracts the value to the global CV
values, it affects all the patterns and is not
destructive. It is link with CC 77, resetting the
value to 0
Adds or subtracts the value to the g
values, it affects all the patterns and is not
destructive. It is link with CC 78, resetting the
value to 0
Adds or subtracts the value to the global CVR
values, it affects all the patterns and is not
destructive. It is link with CC 79, resetting the
value to 0
Adds or subtracts the value to the global GP
values, it aff
destructive. It is link with CC 80, resetting the
value to 0
ects all the patterns and is not
lobal CVP
16 GL ADD ROTARY only
incremental
17 GLP ADD ROTARY only
incremental
18 GLR ADD ROTARY only
incremental
19 R ADD ROTARY only
incremental
Adds or subtracts the value to the global GL
values, it affects all the patterns and is not
destructive. It is link with CC 81, resetting the
value to 0
Adds or subtracts the value to the global GLP
values, it affects all the patterns an
destructive. It is link with CC 82, resetting the
value to 0
Adds or subtracts the value to the global GLR
values, it affects all the patterns and is not
destructive. It is link with CC 83, resetting the
value to 0
Adds or subtracts the value to the global R
values, it affects all the patterns and is not
d is not
13
Page 14

6/4/2019 Winter Modular EME Manual - Google Docs
destructive. It is link with CC 84, resetting the
value to 0
20 RP ADD ROTARY only
incremental
21 RVP ADD ROTARY only
incremental
22 TRACK SHIFT ROTARY ABS / INC
23 TRK LEN STRT ROTARY ABS / INC
24 TRK LEN END ROTARY ABS / INC
25 STEP MODE ROTARY ABS / INC
26 STEP MODE
ROTARY ABS / INC
DIV
27 STEP MODE
ROTARY ABS / INC
REP
Adds or subtracts the value to the global RP
values, it affects all the patterns and is not
destructive. It is link with CC 85, resetting the
value to 0
Adds or subtracts the value to the global RVP
values, it affects all the patterns and is not
destructive. It is link
with CC 86, resetting the
value to 0
28 LFO TYPE ROTARY ABS / INC
29 LFO PATTERN ROTARY ABS / INC
30 LFO STEPS ROTARY ABS / INC
31 LFO TIME ROTARY ABS / INC Jumps 4 steps for each rotary detent
32
LFO
ROTARY ABS / INC
AMPLITUDE
33 LFO OFFSET ROTARY ABS / INC
70 FILL BUTTON
71 MUTE BUTTON
72 RANDOM 1
BUTTON
PUSH
TOGGLE
PUSH randomizes the selected track (midi CH 1 to 8)
LAYER
73 RANDOM 3
BUTTON
PUSH
LAYERS
14
Page 15

6/4/2019 Winter Modular EME Manual - Google Docs
74 CV GATE LINK BUTTON TOGGLE
75 LFO RST BUTTON
76 LFO ON/OFF BUTTON
77 CV ADD reset BUTTON
78 CVP ADD reset BUTTON
79 CVR ADD reset BUTTON
80 GP ADD reset BUTTON
81 GL ADD reset BUTTON
82 GLP ADD reset BUTTON
83 GLR ADD reset BUTTON
84 R ADD reset BUTTON
85 RP ADD reset BUTTON
86 RVP ADD reset BUTTON
PUSH
TOGGLE
PUSH relative to track add parameters. Resets to 0
PUSH relative to track add parameters. Resets to 0
PUSH relative to track add parameters. Resets to 0
PUSH relative to track add parameters. Resets to 0
PUSH relative to track add parameters. Resets to 0
PUSH relative to track add parameters. Resets to 0
PUSH relative to track add parameters. Resets to 0
PUSH relative to track add parameters. Resets to 0
PUSH relative to track add parameters. Resets to 0
PUSH relative to track add parameters. Resets to 0
15
Page 16

6/4/2019 Winter Modular EME Manual - Google Docs
GLOBAL (MIDI CH1)
relative to global parameters, or a group of tracks)
CC Rotary /
Button
12 CV ADD ROTARY only
13 TEMPO ROTARY only
14 GROUP SCALE
ROOT 1
15
GROUP SCALE
ROOT 2
16 GROUP SCALE
ROOT 3
17 GROUP SCALE
ROOT 4
ROTARY ABS / INC
ROTARY ABS / INC
ROTARY ABS / INC
ROTARY ABS / INC
Rotary /
Button
Behavior
incremental
incremental
Adds or subtracts CV value to the tracks
assign in ‘OPTIONS > CV ASSIGN > CV
ADD’, it affects all the patterns and is not
destructive. It is link with CC 89, resetting
the value to 0
18 GROUP SCALE
ROOT 5
19 GROUP SCALE
ROOT 6
20 GROUP SCALE
ROOT 7
21 GROUP SCALE
ROOT 8
22 GROUP SCALE 1 ROTARY ABS / INC
23 GROUP SCALE 2 ROTARY ABS / INC
24 GROUP SCALE 3 ROTARY ABS / INC
25 GROUP SCALE 4 R
ROTARY ABS / INC
ROTARY ABS / INC
ROTARY ABS / INC
ROTARY ABS / INC
OTARY ABS / INC
16
Page 17

6/4/2019 Winter Modular EME Manual - Google Docs
26 GROUP SCALE 5 ROTARY ABS / INC
27 GROUP SCALE 6 ROTARY ABS / INC
28 GROUP SCALE 7 ROTARY ABS / INC
29 GROUP SCALE 8 ROTARY ABS / INC
30 TRACK SHIFT
ROTARY ABS / INC Shifts the tracks selected in ‘Track Shift
SELECTED
31 CLOCK OUT
ROTARY ABS / INC
MULT
32 RANDOM LOW
ROTARY ABS / INC
RANGE
33 RANDOM HIGH
ROTARY ABS / INC
RANGE
34 STEP MODE
ROTARY ABS / INC Changes the step m
SELECTED
35 STEP DIV
ROTARY ABS / INC Changes the step mode div in the tracks
SELECTED
36 STEP REP
ROTARY ABS / INC Changes the step mode rep in the tracks
SELECTED
37 SHUFFLE ROTARY ABS / INC
Mode’
ode in the tracks
selected in the ‘step mode section’
selected in the ‘step mode section’
selected in the ‘step mode section’
70 PLAY BUTTON
71 STOP BUTTON
72 RANDOM 1
BUTTON
LAYER
SELECTED
73 RANDOM 3
BUTTON
LAYERS
SELECTED
74 NEXT PATT BUTTON
75 PREV PATT BUTTON
76 NEXT PART BUTTON
77 PREV PART BUTTON
PUSH
PUSH
PUSH randomizes the selected tracks in ‘Random
Mode’
PUSH randomizes the selected tracks in ‘Random
Mode’
PUSH
PUSH
PUSH
PUSH
17
Page 18

6/4/2019 Winter Modular EME Manual - Google Docs
78 FREEZE BUTTON PUSH
79 REVERT BUTTON
80 PATTERN MODE BUTTON
81 PLAY PARTS
BUTTON PUSH
PUSH
PUSH
MODE
82 DUPLICATE BUTTON PUSH
83
84 PROJECT MODE BUTTON PUSH
85 GATE REC
BUTTON PUSH
MODE
86 CV KEY REC
BUTTON PUSH
MODE
87 MIDI KEY REC
BUTTON PUSH
MODE
88 FREE PLAY
BUTTON PUSH
MODE
89 RESET CV ADD BUTTON PÙSH
90 CLEAR
BUTTON PÙSH
CURRENT
TRACK
91 BUTTON PÙSH
92 eme btn 1 BUTTON PÙSH executes the action that is assigned to the
button
93 eme btn 2 BU
TTON PÙSH executes the action that is assigned to the
button
94 eme btn 3 BUTTON PÙSH executes the action that is assigned to the
button
95 eme btn 4 BUTTON PÙSH executes the action that is assigned to the
button
96 dj nudge bck
BUTTON PÙSH
coarse
97 dj nudge bck fine BUTTON PÙSH
18
Page 19

6/4/2019 Winter Modular EME Manual - Google Docs
98 dj nudge fwd fine BUTTON PÙSH
99 dj nudge fwd
BUTTON PÙSH
coarse
100 mute mode BUTTON PÙSH
101 Fill mode BUTTON PÙSH
102 copy BUTTON PÙSH
103 paste BUTTON PÙSH
104 clear BUTTON PÙSH
19
Page 20

6/4/2019 Winter Modular EME Manual - Google Docs
FOCUS (MIDI CH2)
Relative to a particular channel that is currently chosen in the elo interface (track keys) or the
step edition mode (cv,gl,r...)
CC Rotary /
Button
12 CV ADD ROTARY only
13 CVP
14 CVR ADD ROTARY only
15 GP ADD ROTARY only
16 GL ADD ROTARY only
17 GLP ADD ROTARY only
ADD ROTARY only
Rotary /
Button
Behavior
incremental
incremental
incremental
incremental
incremental
incremental
Adds or subtracts CV value to the current
track (chosen with track buttons), it affects
all the patterns and is not destructive. It is
link with CC 93, resetting the value to 0
18 GLR ADD ROTARY only
incremental
19 R ADD ROTARY only
incremental
20 RP ADD ROTARY only
incremental
21 RVP ADD ROTARY only
incremental
22 STEP 1 ROTARY ABS / INC changes the value of the parameter
depending on the choice o
step mode edition. If eloquencer is is CVP
mode and in track E, it will change the CVP
value of track E for step 1
f channel and
20
Page 21

6/4/2019 Winter Modular EME Manual - Google Docs
23 STEP 2 ROTARY ABS / INC
24 STEP 3 ROTARY ABS / INC
25 STEP 4 ROTARY ABS / INC
26 STEP 5 ROTARY ABS / INC
27 STEP 6 ROTARY ABS / INC
28 STEP 7 ROTARY ABS / INC
29 STEP 8 ROTARY ABS / INC
30 STEP 9 ROTARY ABS / INC
31 STEP 10 ROTARY ABS / INC
32 STEP 11 ROTARY ABS / INC
33 STEP 12 ROTARY ABS / INC
34 STEP 13 ROTARY ABS / INC
35 STEP 14 ROTARY ABS / INC
36 STEP 15 ROTARY ABS / INC
37
STEP 16 ROTARY ABS / INC
38 TRACK SHIFT ROTARY ABS / INC
39 TRK LEN STRT ROTARY ABS / INC
40 TRK LEN END ROTARY ABS / INC
41 STEP MODE ROTARY ABS / INC
42 STEP DIV ROTARY ABS / INC
43 STEP REP ROTARY ABS / INC
44 LFO TYPE ROTARY ABS / INC
45 LFO PATTERN ROTARY ABS / INC
46 LFO STEPS ROTARY ABS / INC
47 LFO TIME ROTARY ABS / INC
48 LFO
ROTARY ABS / INC
AMPLITUDE
49 LFO OFFSET ROTARY AB
S / INC
21
Page 22

6/4/2019 Winter Modular EME Manual - Google Docs
23 STEP 2 ROTARY ABS / INC
24 STEP 3 ROTARY ABS / INC
25 STEP 4 ROTARY ABS / INC
26 STEP 5 ROTARY ABS / INC
27 STEP 6 ROTARY ABS / INC
28 STEP 7 ROTARY ABS / INC
29 STEP 8 ROTARY ABS / INC
30 STEP 9 ROTARY ABS / INC
31 STEP 10 ROTARY ABS / INC
32 STEP 11 ROTARY ABS / INC
33 STEP 12 ROTARY ABS / INC
34 STEP 13 ROTARY ABS / INC
35 STEP 14 ROTARY ABS / INC
36 STEP 15 ROTARY ABS / INC
37
STEP 16 ROTARY ABS / INC
38 TRACK SHIFT ROTARY ABS / INC
39 TRK LEN STRT ROTARY ABS / INC
40 TRK LEN END ROTARY ABS / INC
41 STEP MODE ROTARY ABS / INC
42 STEP DIV ROTARY ABS / INC
43 STEP REP ROTARY ABS / INC
44 LFO TYPE ROTARY ABS / INC
45 LFO PATTERN ROTARY ABS / INC
46 LFO STEPS ROTARY ABS / INC
47 LFO TIME ROTARY ABS / INC
48 LFO
ROTARY ABS / INC
AMPLITUDE
49 LFO OFFSET ROTARY AB
S / INC
22
Page 23

6/4/2019 Winter Modular EME Manual - Google Docs
70 STEP 1 BUTTON PUSH Activates / deactivates the step 1 for the
chosen track
71 STEP 2 BUTTON PUSH
72 STEP 3 BUTTON PUSH
73 STEP 4 BUTTON PUSH
74 STEP 5 BUTTON PUSH
75 STEP 6 BUTTON PUSH
76 STEP 7 BUTTON PUSH
77 STEP 8 BUTTON PUSH
78 STEP 9 BUTTON PUSH
79 STEP 10 BUTTON PUSH
80 STEP 11 BUTTON PUSH
81 STEP 12 BUTTON PUSH
82 STEP 13 BUTTON PUSH
83 STEP 14 BUTTON PUSH
84 STEP 15 BU
TTON PUSH
85 STEP 16 BUTTON PUSH
86 FILL FOCUS BUTTON PUSH
87 MUTE FOCUS BUTTON TOGGLE
88 RANDOM 1
BUTTON PUSH randomized the current chosen track
LAYER
89 RANDOM 3
BUTTON PUSH randomized the current chosen track
LAYERS
90 LFO RST PUSH
91 LFO ON/OFF TOGGLE
92 CV GATE LINK TOGGLE
93 CV ADD reset PUSH
94 CVP ADD reset PUSH
23
Page 24

6/4/2019 Winter Modular EME Manual - Google Docs
95 CVR ADD reset PUSH
96 GP ADD reset PUSH
97 GL ADD reset PUSH
98 GLP ADD reset PUSH
99 GLR ADD reset PUSH
100 R ADD reset PUSH
101 RP ADD reset PUSH
102 RVP ADD reset PUSH
24
Page 25

6/4/2019 Winter Modular EME Manual - Google Docs
6/4/2019 Winter Modular EME Manual - Google Docs
APENDIX 2
Next Part push
Previous part push
Next Part push
Previous part push
Pattern Mode push
Play Parts Mode push
Duplicate push
Save Current Project push
Project Mode push
Gate Rec Mode push
CV Keyboard Rec Mode push
MIDI Keyboard Rec
Mode
Free Play Mode push
Fill 1 push
Fill 2 push
Fill 3 push
Fill 4 push
Fill 5 push
Fill 6 push
Fill 7 push
push
Mute 5 toggle
Mute 6 toggle
Mute 7 toggle
Mute 8 toggle
Random Selected 1
Layer
Random Selected 3
Layer
Random Focus 1 Layer push
Random Focus 3 Layer push
Focused LFO Reset push
Focused LFO On/Off toggle
Freeze push
Revert push
Nudge Back Coarse push
Nudge Back Fine push
Nudge Forward Fine push
Nudge Forward Coarse push
Mute Mode push
Fill Mode push
push
push
Fill 8 push
Mute 1 toggle
Mute 2 toggle
Mute 3 toggle
Mut
e 4 toggle
25
 Loading...