

Page 1
-0-
Page 2

-0-
WGT-168 GPS Speaker/Microphone
User’s Manual
Contents
Introduction ………………………………p.1
Controls/Functions ………………………..p.3
Assembly/ Battery Charging ……………p.5
Icons guide ………………………………p.6
Menu Chart ………………………………p.8
Function List ………………………………p.10
Finder ………………………………p.10
Track ………………………………p.15
Waypoint ………………………………p.17
Satellite ………………………………p.20
Compass ………………………………p.21
Status ………………………………p.22
Messages ………………………………p.23
Setting ………………………………p.25
Extras ………………………………p.30
Page 3

-1-
Introduction
The breaking innovative microphone speaker
integrates smart GPS features, transmits data
through two-way communication. Wintec
WGT-168 provides the best assistant in group
communication for climbing teams, hunting
activities, wildlife games, rescue teams, and
fleet management, . .etc
Features:
◎Support major brands of radio
(ex. Motorola, Wintec, Yaesu, Kenwood,
Icom, Hyt…)by optional types of cable.
◎LCD display:
120 x 160 4 level grayscale screen
◎Built in GPS ATMEL chipset receiving 16
parallel channels(WAAS/EGNOS-enabled).
◎Built in electronic compass.
◎Radio-transmitted coordinates, the instant
gourp position,distance, and dire ction
tracking, max. 10 persons.
◎Tr ack-log records up to 50,000 points.
Increasable max.100 waypoints provided,
◎Group ID communication.
◎Target Finding function.
Page 4

-2-
◎Powered by USB cable with or w/o battery
to be a G-mouse and PC-supported
navigation.
◎WGT-168 Workbench is a free PC software
available for uploading and managing the
tracks, waypoints, as well as upgrading
MCU firmware. The parameters setting is
provided on WGT-168 Wo rkbench, and the
uploaded tracks can be conve rtible into
different formats like Google Earth KMZ,
GPX, Virtual Earth.
Page 5
-3-
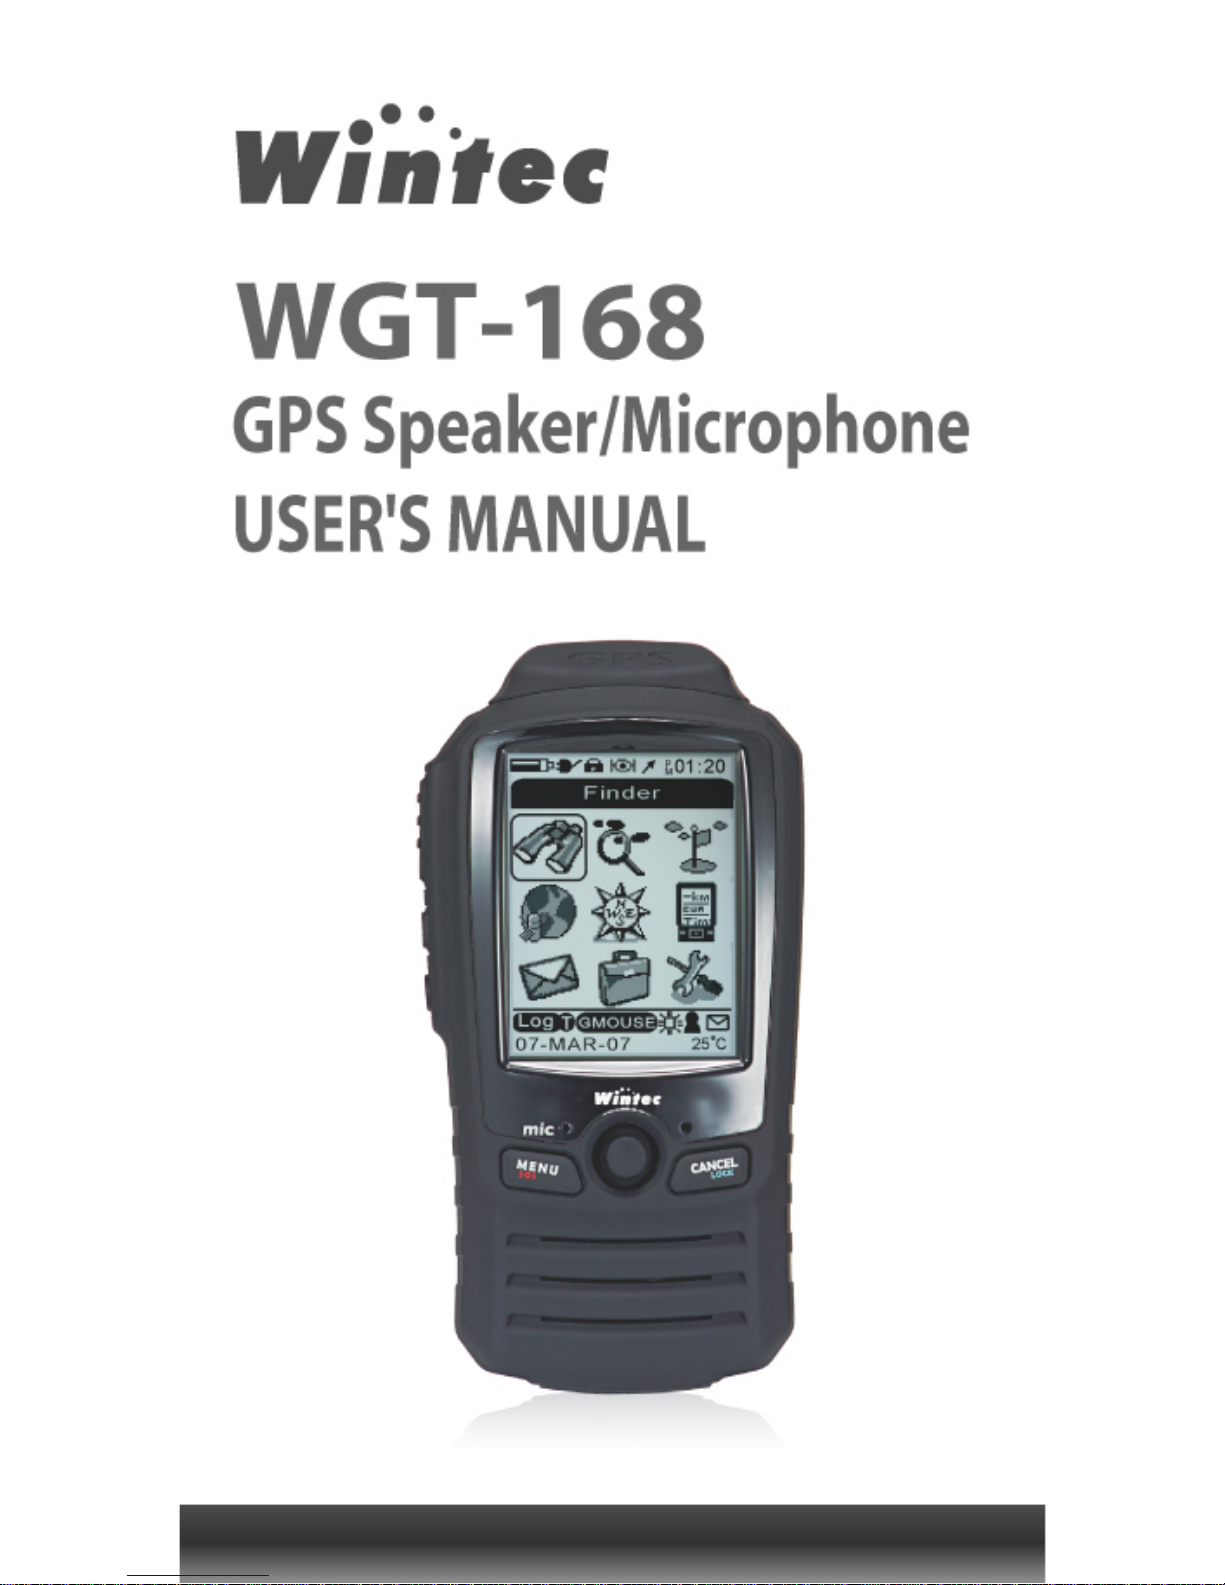
Controls/Functions
1 GPS Antenna
2 PTT; Push To Talk
3 Function Key
4
Power On/Off
button
5 Microphone
6 Return / SOS GID
7 Speaker
8
USB Port / Radio
interface
9
Five Position Switch
push to enter
10 Cancel / Lock
1 1 LCD Display
(3)
(4)
(2)
(5)
(6)
(7)
(9)
(10)
(8)
(11)
(1)
Page 6
-4-
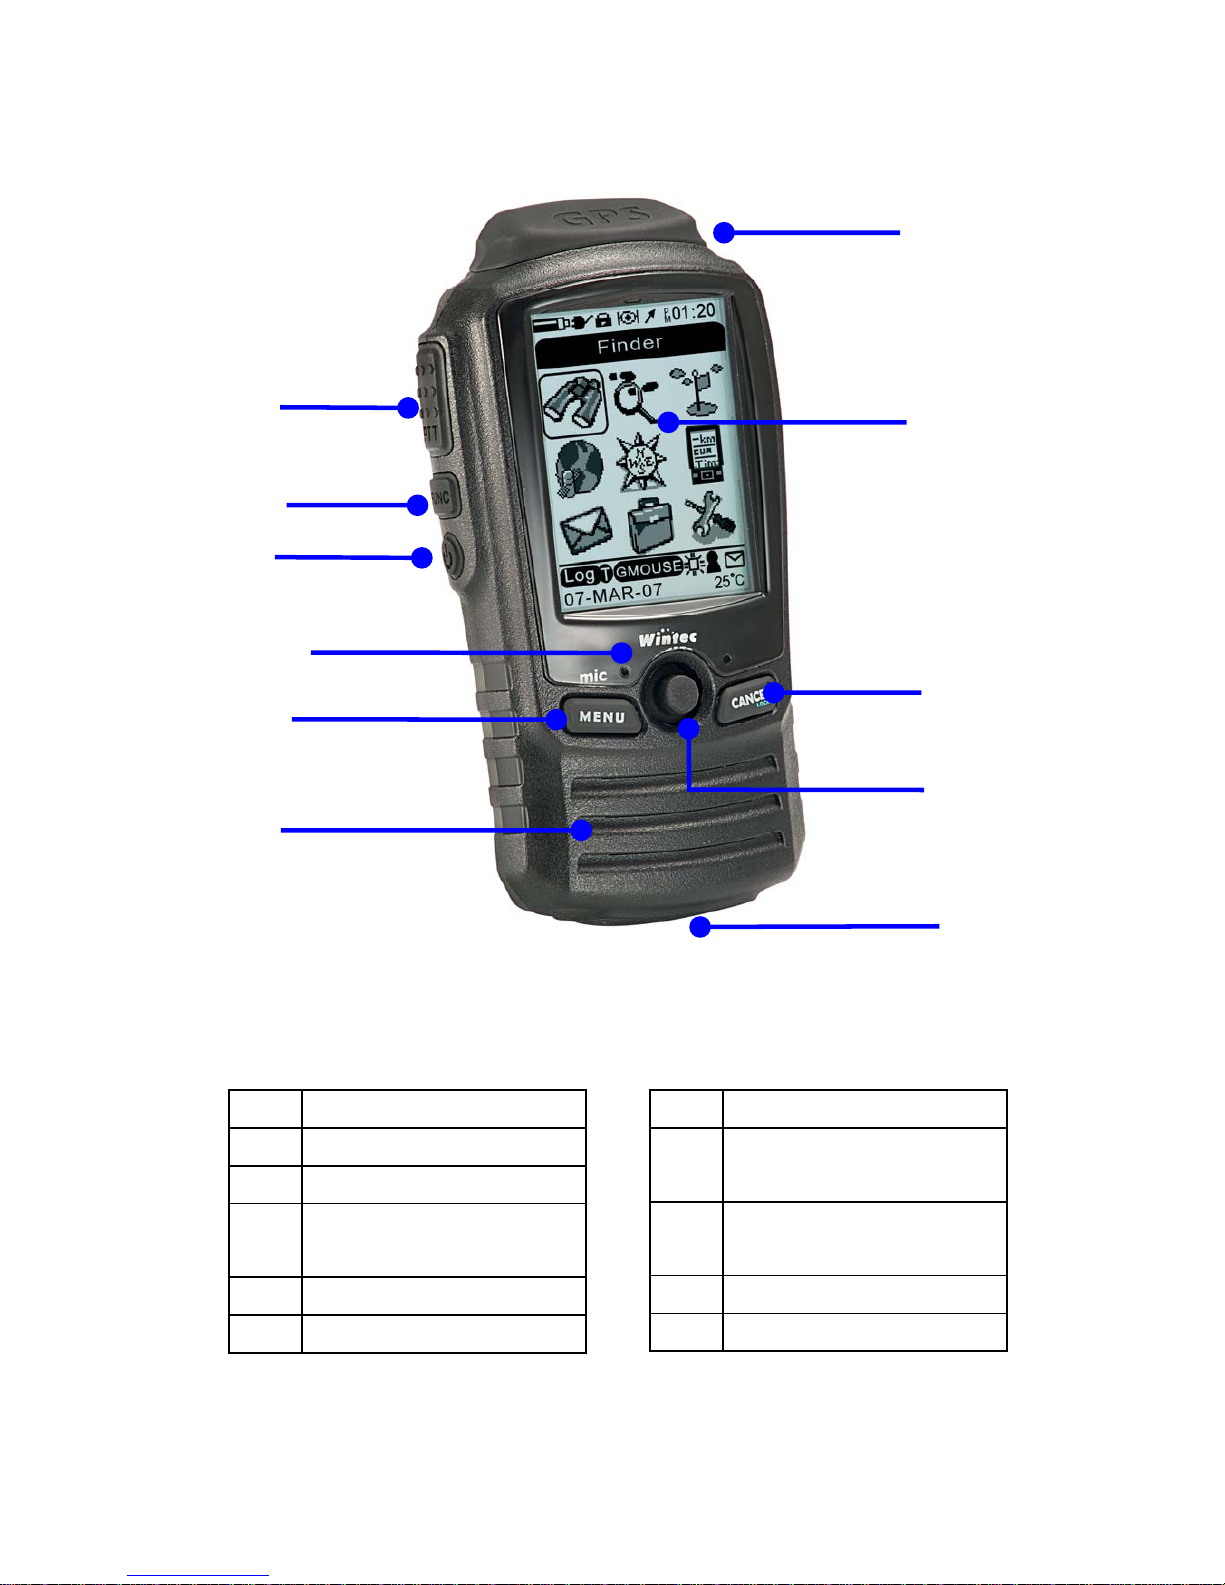
Button Function
z SOS GID function:
If SOS GID function is enabled it will
automatically send geographic dat a in every 30
sec for all group members.
PTT
Push to talk over 0.8sec, release PTT
will send geographic data
automatically , the PTT function is
always be used
FUNC
Press to cycle over function pages
Press to enable backlight On/Off
Press and hold to turn the unit On/Off
MENU
Press to return
Press and hold to open SOS GID
function
Press to select
Press and hold cycling the selection
ENTER
Press to enter
Press and hold for two seconds to
mark your current location on a track
*( Add the Mark need to open
Track Log function and GPS
must be Fixed)
CANCEL /
LOCK
Press to delete / information switch
Press and hold to lock/unlock unit,
without PTT &
& cancel
Page 7
-5-
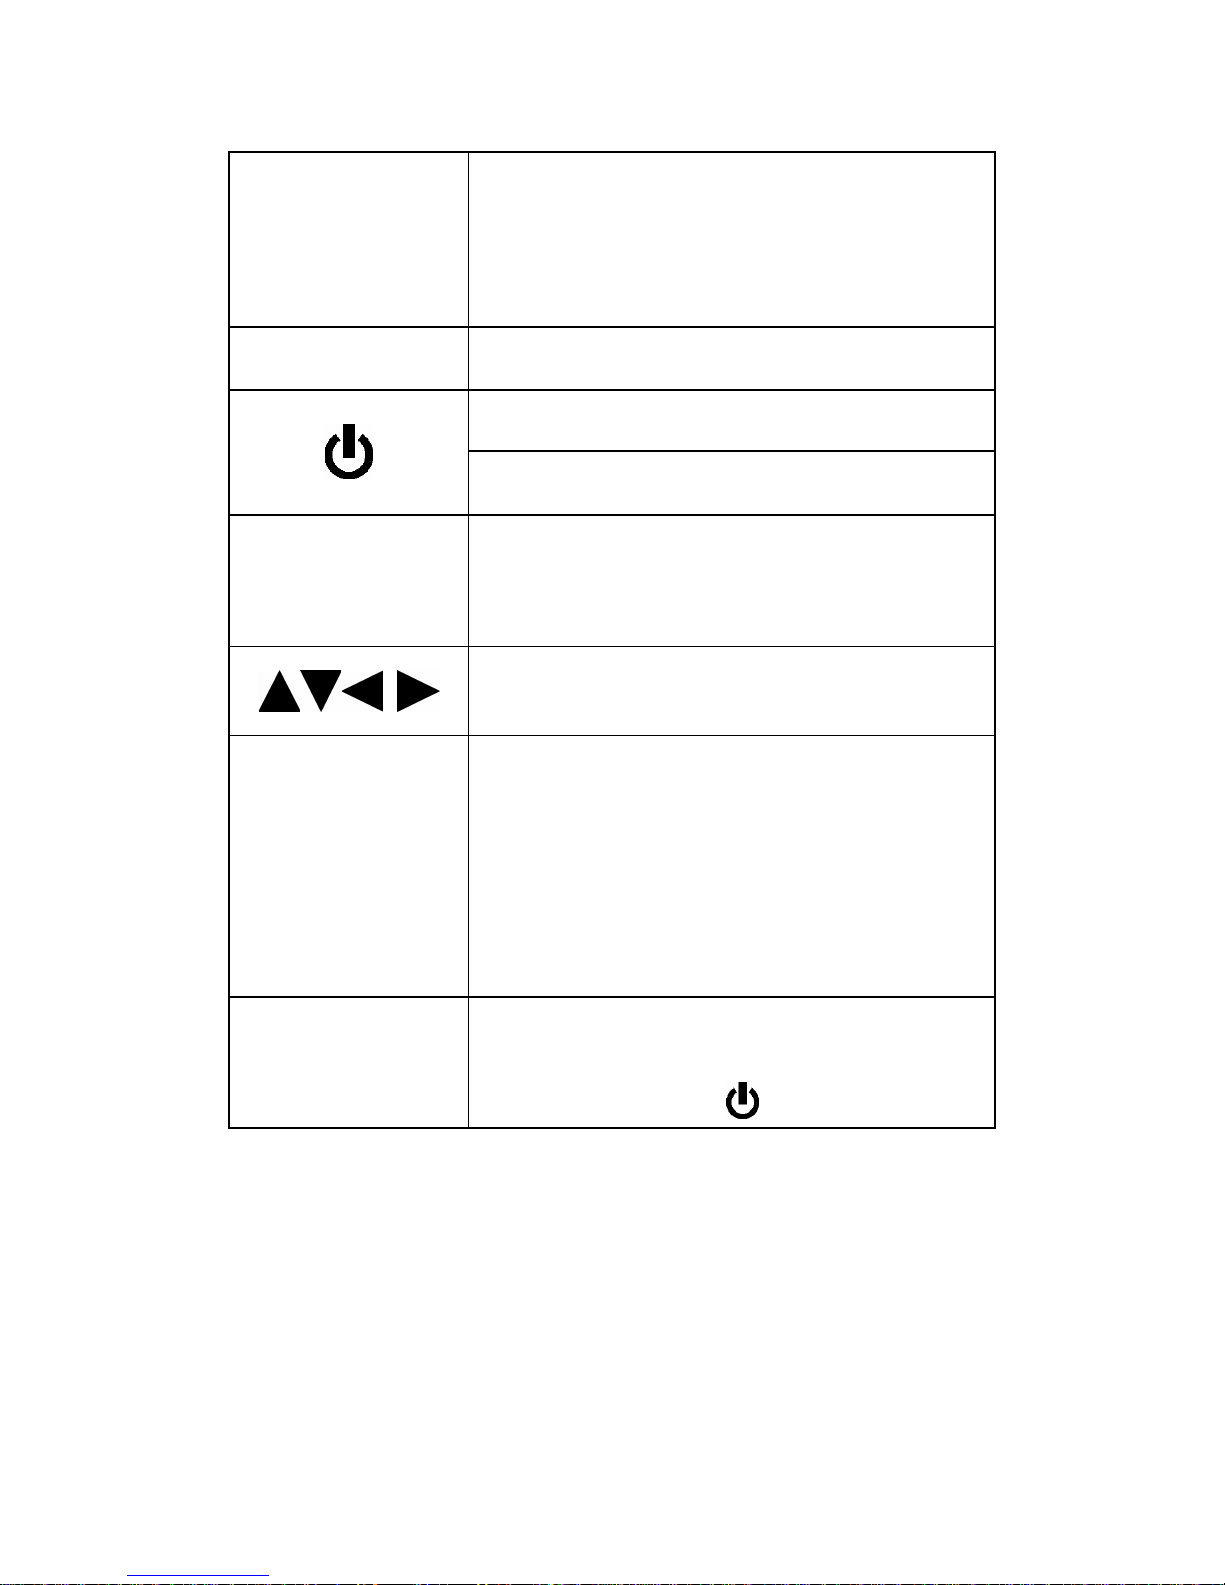
Assembly
Insert radio interface cable as in illus #1.
#1
Remove the battery case and place the
battery properly.
Then rotate the scre w of battery case tightly
as in illus #2..
#2
Charging
For battery charging, the internal battery of
WGT-168 can be powered by USB port,
just plug in the USB cable from WGT-168
connected to any USB port for charging.
Page 8
-6-
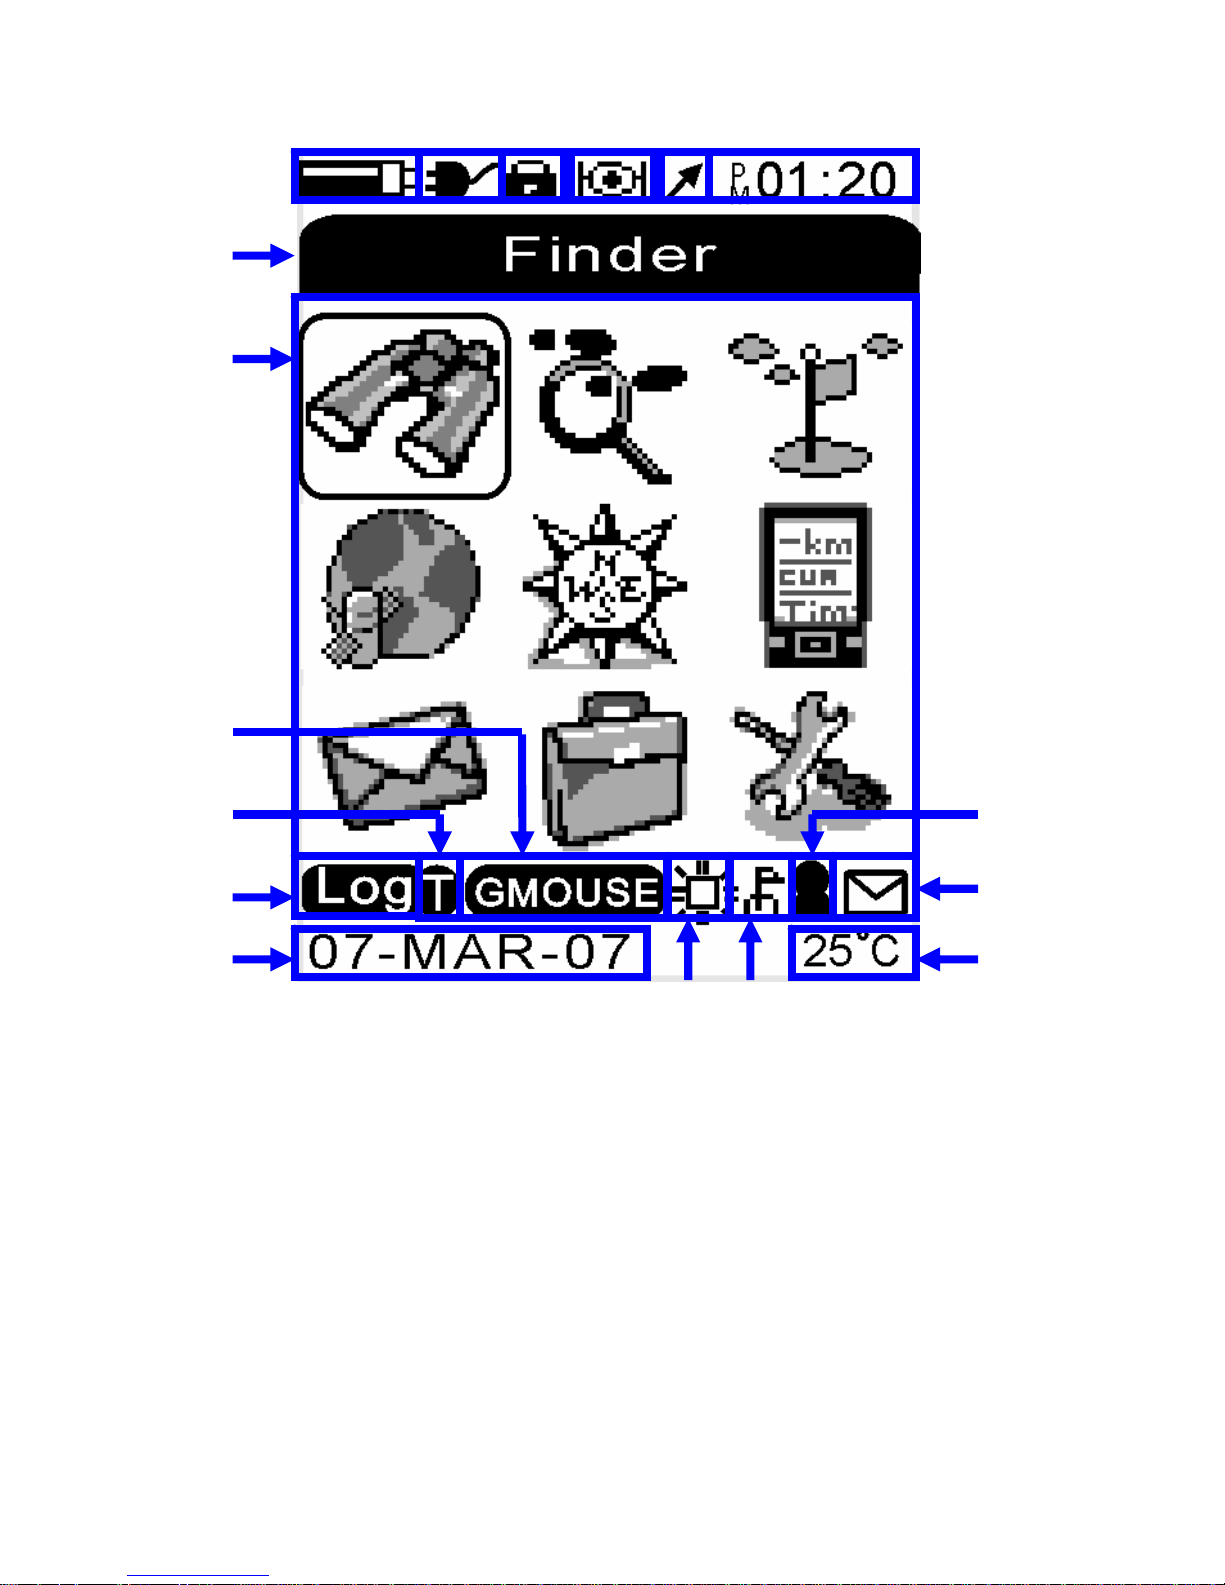
Icons guide
(1)
(2) (3) (4) (5) (6)
(8)
(9)
(16)
(10)
(11)
(15)
(14)
(13)
(7)
(17)
(12)
Page 9
-7-
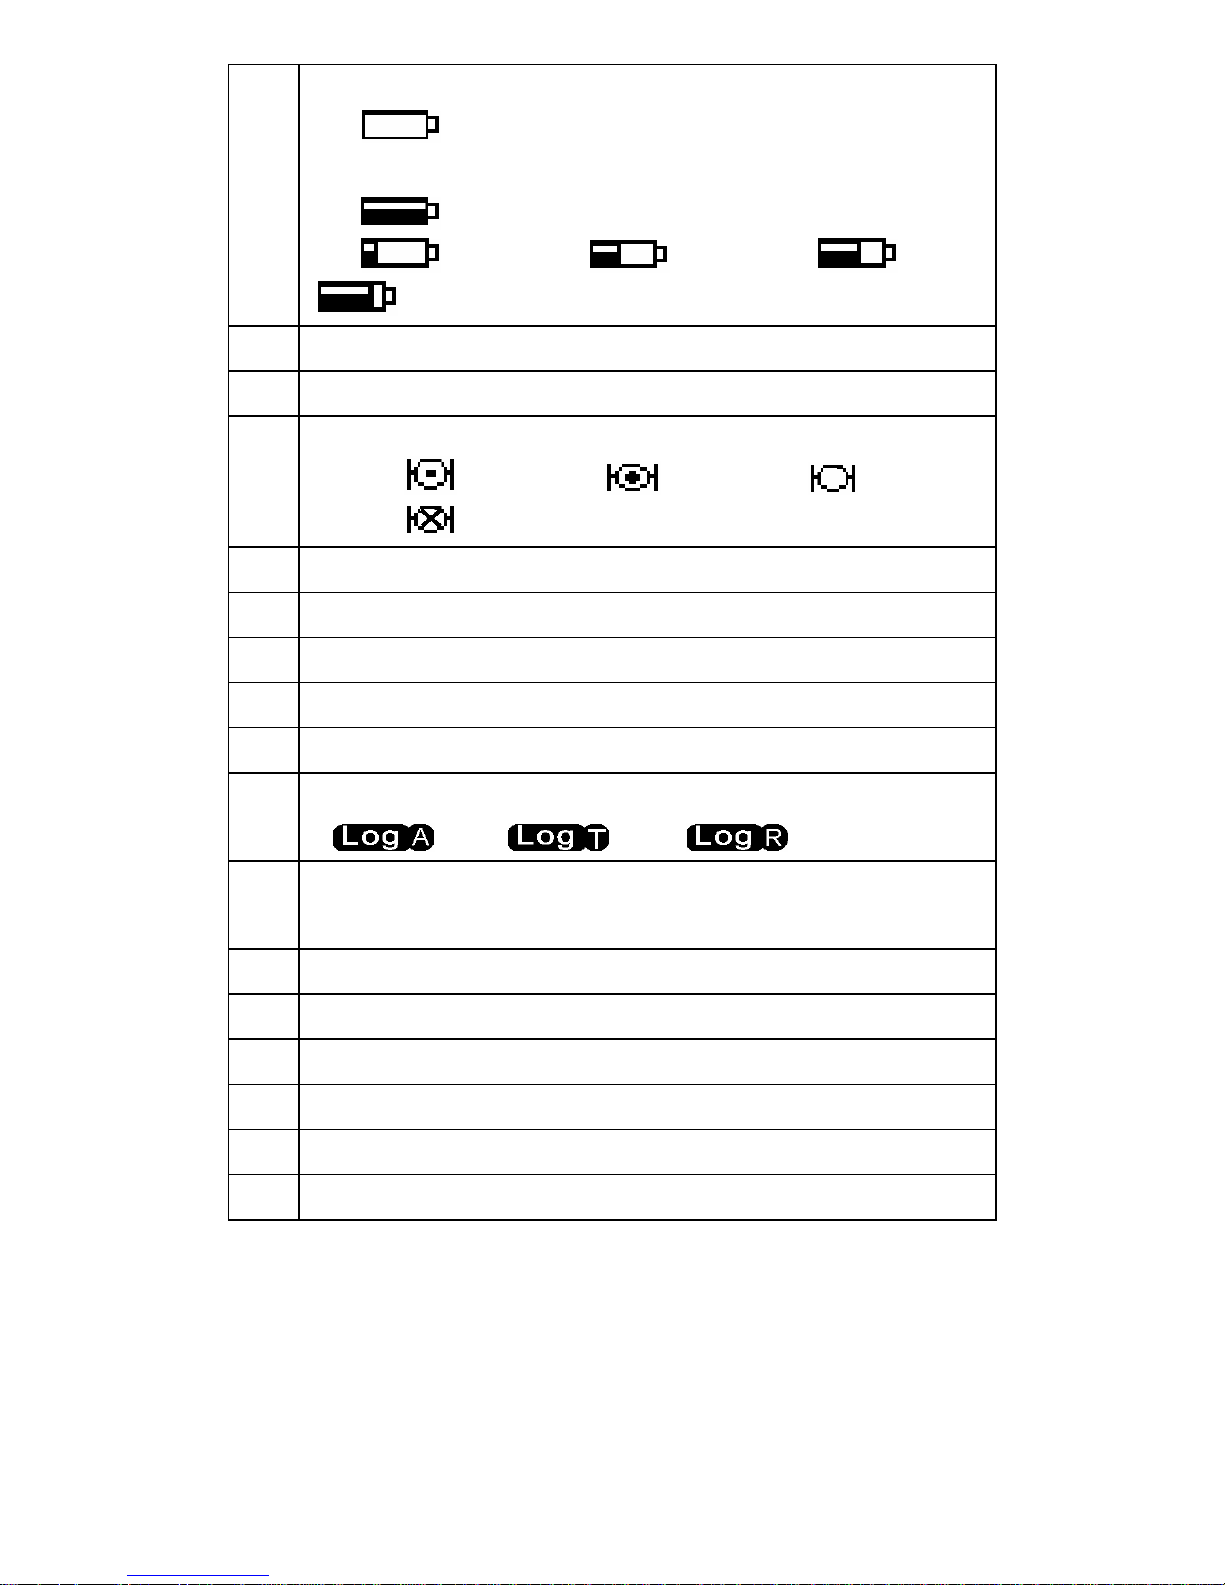
1
Battery power indication
Battery power run out and unit will be
automatically turn Off
Full Battery
20% 40% 60%
80%
2 Powered from USB
3 Keypad lock
4
GPS status
2D Fix 3D Fix No Fix
GPS disables
5 Data TX/RX
6 Local time
7 Function headline
8 Function icon
9 Log enable
10
Track log mode
Auto Time Range
11
G-mouse mode Enable and NEMA data out from
USB port
12 Backlight ON
13 Received waypoint data.
14 Received messages
15 Local date
16 Temperature
17 Temperature
Page 10
-8-
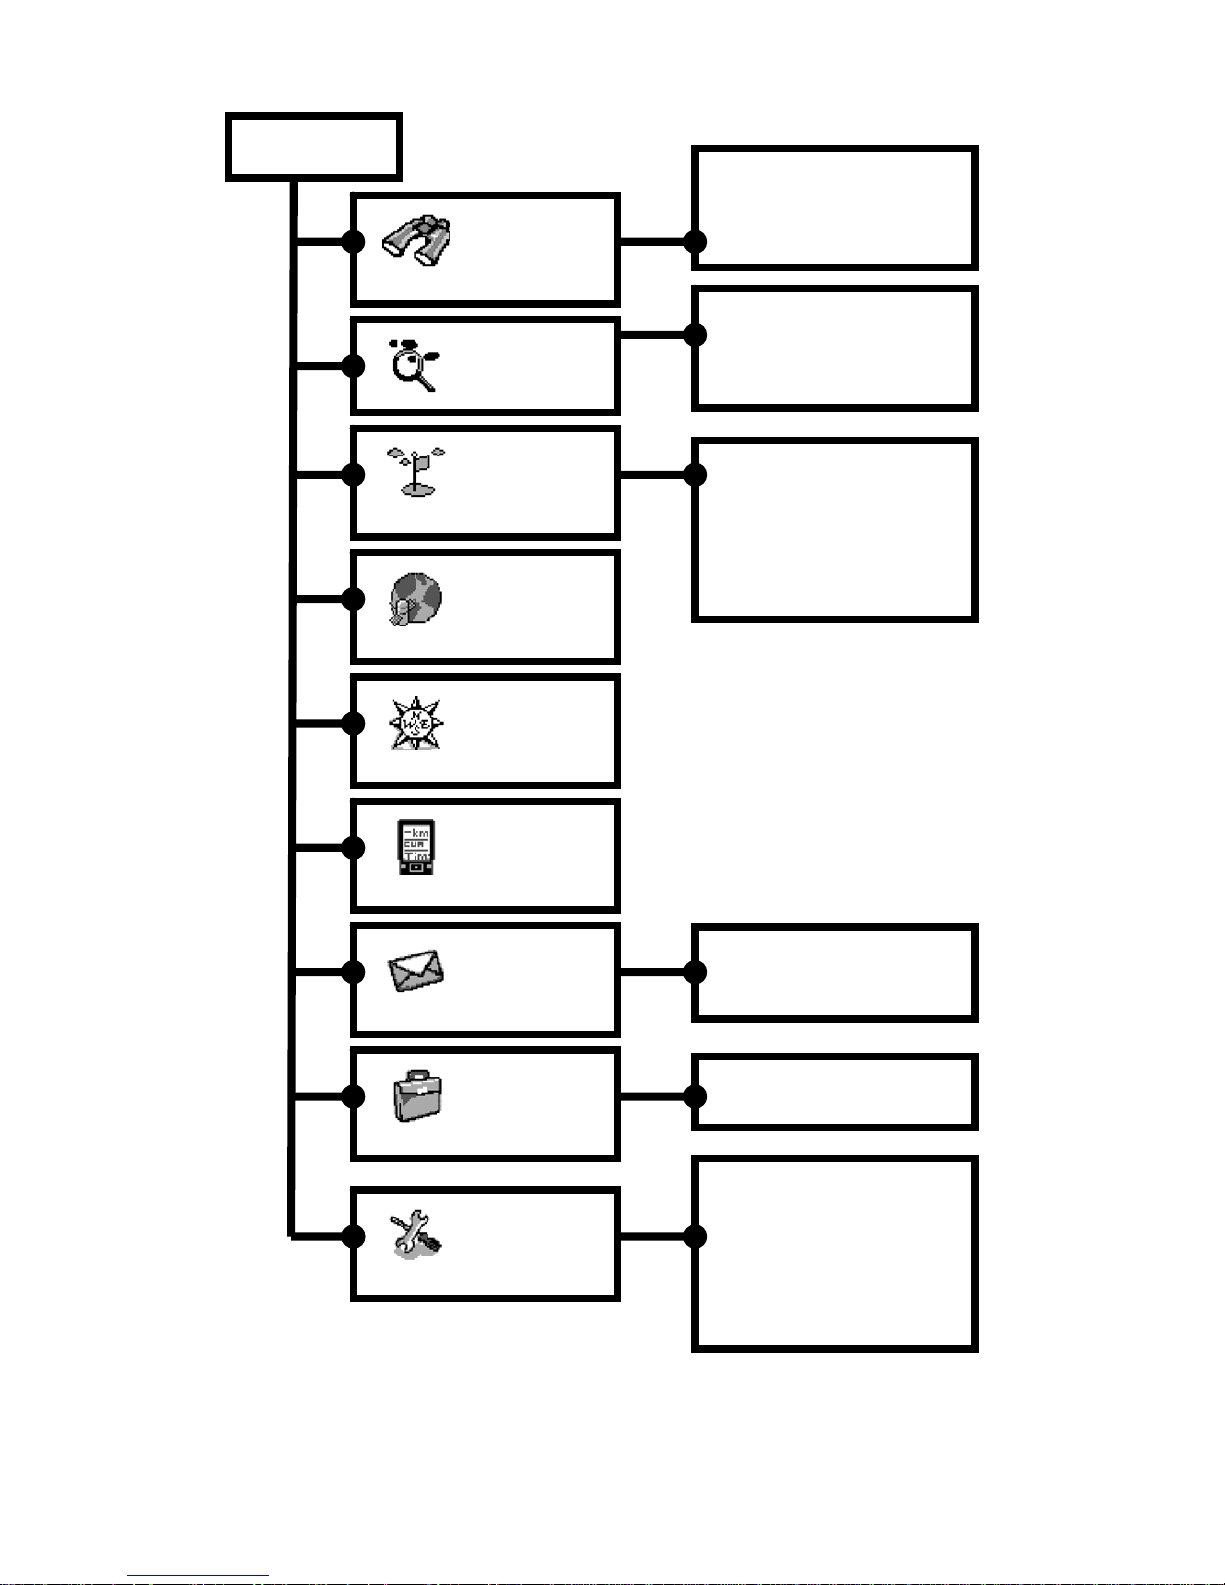
Menu Chart
MENU
Compass
Finder
Extras
Status
Setting
INBOX
WRITE NEW
WATCH GROUP
GROUP LIST
GROUP ID
Satellite
Waypoint
Tracks
Messages
A
DD TRACK
TRACK LIST
DELETE ALL
USER NAME
TIME/DATE
CONTRAST
UNITS
SYSTEM
CALENDAR
A
DD WAYPOINT
W AYPOINT LIST
DEL TET ALL
WAYPOINT
INBOX
Page 11
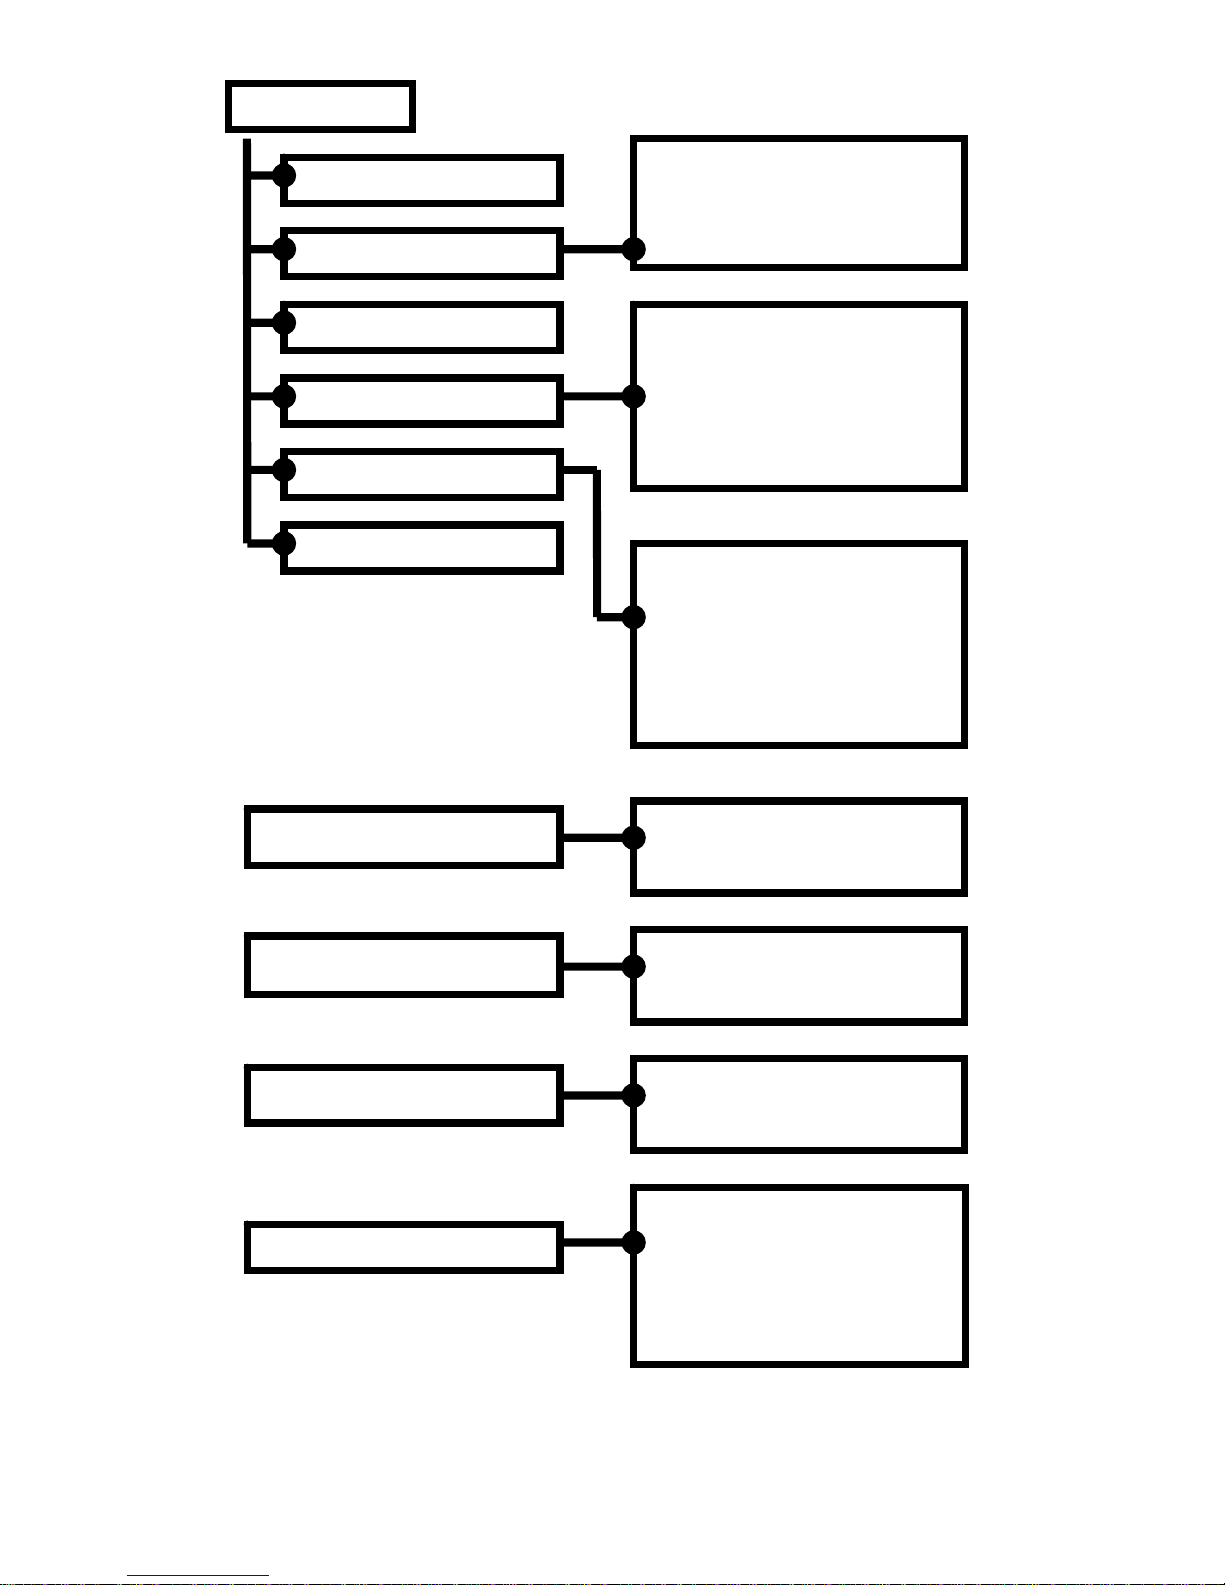
-9-
GPS SET
POWER MANAGER
LANGUAGE
OTHER
SYSTEM INFO
Setting
TIME/DATE
UNITS
POSITION FORMAT
Dist/SPEED
EVLEATION
EVLEVATION
TEMPERATURE
TIME ZONE
TIME FORMAT
DATE F
O
RMAT
USER NAME
CONTRAST
SYSTEM
EXIT
POWER MANAGER
BACKLIGTH
POWER SAVING
OTHER
POWERUP LOG
G-MOUSE
RX MUTE
SOS TX TIME
BAUD RATE
GPS SET
GPS POWER
GPS STARTUP
LANGUAGE
ENGLISH
CHINESE
Page 12

-10-
Function Lists
1. Finder
Function List
1-1.WATCH GROUP
Select function
ENTER
Enter the select function
page
MENU Return to main page
(1)
(7)
(5)
(6) (8)
(4)
(3)
(2)
Page 13

-11-
1 Grid north
2 My location
3
Display selected group members direction、
distance and geographic information
4 Non-selected group member
5 Waypoint
6 Selected group member
7
Real time tracking
z Every 30m one point
8
proportional scale
z proportional scale range 20m ~ 200km
proportional scale select
Zoom in. Zoom out.
Selection group member
ENTER
Enter GOTO selection group member
function
CANCEL Switch group member information
MENU Return to Finder page
Page 14

-12-
1-1-1. GOTO GROUP MEMBER PAGE.
1 E.T.A. (Estimated time of arrival)
2 Line distance
3 Member location
CANCEL selection information .
MENU Return Finder page
(1)
(3)
(2)
Page 15

-13-
1-2. Group Lists
View communication record, and display
member’s name、direction、distance and
geographic information, The latest rece ived
member will be on top of the first number.
1 received number list
2 Group member SOS GID enable
3 Group member name
4 Group member direction
5 Group member distance
Selection Group member
N/A
ENTER View Group member information
CANCEL Delete Group member
MENU Return to Finder page
(1)
(2)
(3)
(5)
(4)
Page 16

-14-
1-2-1. View Group member information
1-3.Group ID
Next / previous Group
member information
ENTER
Up data the select
member location
MENU Return to Fi nder page
Group ID 01 ~ 99。
ENTER confirm
MENU Return to Finder page
Page 17

-15-
2. Tracks
2-1.ADD TRACKS / STOP TRACK
z Log By Auto : Log automatically
z Log By Time : Log by time step settin g (rang e 1~60 sec)
z Log By Range : Log by move distance setting (range
50m~500m)
Selected function
ENTER
Enter the select
function page
MENU Return
Select tracks LOG mode
ENTER confirm
MENU Return
Page 18

-16-
2-2. TRACKS LIST
2-2-1. TRACKS INFO
2-3. DELETE ALL
Delete all tracks record。
1 In user tracks Log
2 log date for a track
Move select ion ba r
ENTER View tracks information
CANCEL
Delete tracks
MENU Re turn to tracks page
select
ENTER confirm
MENU Return to tracks List
(2)
(1)
Page 19

-17-
3. Waypoint
3-1.ADD WAYPOINT
Creating a waypoint from now location。
z Your could mark new waypoint and select the icon types and
also can use WGT-168 Workbench to edit waypoint and
download / upload waypoint to WGT-168 by USB cable.
Select function
ENTER
Enter the select
function page
MENU Return
1 Waypoint icon
2 Waypoint name
3 Coordinate Location
4 Elevation
5 Waypoint number
6 Confirm
7 View the waypoint position
Select function
ENTER Enter the select function page
MENU Return
(1)
(3)
(5)
(2)
(6)
(7)
(4)
Page 20

-18-
3-2.Waypoint List
View the waypoint list。
3-2-1.Waypoint information
1 Go to waypoint
2 View waypoint
3
Send waypoint to group or personal
z View waypoint information including waypoint name,
icon, distance, location, elevation。
Select waypoint
CANCEL Delete waypoint
ENTER view waypoint information
MENU Return to Waypoint page
Select
ENTER Enter the selected function
MENU Return to last page
(1)
(2)
(3)
Page 21

-19-
3-2-1-1. GO TO Function
1 Estimated time of arrival
2 Distance
3 Current position coordinate
CANCEL
Press cancel button to switch over the
information bar below
ENTER Press and hold into compass ca lib ra t ion mo de
MENU Return to last page
Look and follow flag on top side to find Waypoint
3-3.DELETE ALL
Delete all waypoint.
Flag
2
3
1
Page 22

-20-
4. Satellite
4-1. Satellite infomation
Sky plot Æ Location Info Æ signal strength
FUNC Press FUNC to switch function page
ENTER Press ENTER to switch between page
MENU Return to last page
Page 23

-21-
5. Compass
Enabler compass mode 。
FUNC Press FUNC to switch function page
ENTER
Press enter button switch two different type c ompass.
Press and hold in to the calibrating mode.
MENU Return to main list
z Calibrati ng COMPASS :
Making sure that the unit is level, press and hold ENTER
in to the calibrating mode, rotate the WGT-168 slowly two
rounds in the same direction. And press ENTER again to
check the calibrating is done, if not Please try again.
z Note:
please keep the unit out of any magnetic, speaker, or
metal shelter when operating compass calibration.
Page 24

-22-
6. Status
Real time SPEED、COURSE、TIME and Coordinate. Press
ENTER to switch between pages
PAGE(1) PAGE(2) PAGE(3)
FUNC Press FUNC to switch function page
ENTER Press ENTER to switch between page
CANCEL
In the page 2, reset all the data about
speed, moved distance, time.
Page 25

-23-
7. Message
7-1.Messages - In Box
View the received messages。
Select function
ENTER Confirm.
MENU Return the main page
Select messages.
ENTER Enter to the messages.
CANCEL Delete messages
MENU
Return to last page
Roll up and down
messages.
MENU
Return to last page
Page 26

-24-
7-2. Messages - Write New
Edit and send text messages。
Move bar in alphabet press FUNC change into Capital mode.
Move bar in symbol area press FUNC to change to other symbols.
FUNC Change capital or other symbol.
select text
CANCEL Backspace
ENTER Enter text
MENU Return to Setting page
Page 27

-25-
8. Setting mode
8-1.Setting – User Name
Setting your name, this can be viewed in the group member
Move bar in alphabet press FUNC change into Capital mode.
Move bar in symbol area press FUNC to change to other symbols.
Select function
ENTER
In to the selection function
MENU
Return to Setting page
FUNC Change capita l or other symbol.
select text
CANCEL Backspace
ENTER Enter
MENU Return to Setting page
Page 28

-26-
8-2.Setting – Time/Date
Setting Time zone, Time format, Date format.
z Time Zone Setting Time zone.
z Time Format Setting Time format ext.12hrs or 24hrs mode.
z Date Format Setting Date format ext. dd/mm/yy mm/dd/yy
yy/mm/dd
8-3.Setting – Contrast
Select function
ENTER
Enter the selection
function / confirm.
MENU Return to Setting page
Selection c ontrast from
00 to 21
ENTER confirm.
MENU Return to Setting page
Page 29

-27-
8-4.SETTING - Unit
z POSITION Setting position unit ext. ddd.dddd d
z MAP DATUM setting MAP datum
(default value is WGS-84)
z ELEVATION setting elevation unit ext. metric / feet
z TMEPERATURE setting temperature unit ext.
Degree C / Degree F
8-5. SETTING - System
z GPS SET GPS enable/disables.
z POWER MANAGER Select backlight timeout and
auto poweroff timeout setting
z LANGUAGE Select language (English、Chinese)
z OTHER Other function setting
Select function
ENTER
Enter the selection
function / confirm.
MENU Return to Setting page
Select function
ENTER
Enter the selection
function / confirm .
MENU Return Setting page
Page 30

-28-
8-6-4. System-Other
z POWER-UP LOG Enable automatically Log since
power On.
z G-MOUSE GPS MOUSE mode enable/disables.
z RX MUTE close speaker if received geographic data
function On/Off.
z SOS TX TIME Setting SOS transmitter time
steps(2sec~99min)
z BAUD RATE Setting NMEA out put baud rate
(4800 / 9600 / 19200 / 38400)
Select function
ENTER confirm.
MENU Return to Setting page
Page 31

-29-
8-6-5.System Info
Display system information
Page (1) SYSTEM INFOMATION:
z Power UP Times of power-on
z Temperatures Show the Temperatures information
z Battery Battery voltage
z Waypoint Waypoint used number
z Tracks Show the T rack used numbers
z Log Used Memory cap a c it y for tracks
Page (2) SYSTEM INFOMATION:
z FW Firmware version
z HW Hardware version
z BaudRate NMEA Baud Rate
z MapDatum Map Datum in use
MENU Return to System p a ge
Change page
(1) (2)
Page 32

-30-
9. Extras
9-1.Extras-Calendar
z Display date and check date on the calendar, from 2000
year to 2099 year
Select months
MENU Return to main page
Page 33

-31-
Specification
Dimension 59(W) x 114(H) x 30(D)mm
Weight Approx 108g
(without battery and cable)
LCD 120 x 160 4 level gray LCD
Microphone Capacitance microphone
Speaker 1W / 8ohm
Power DC 3.7V/1200mAH Li-Ion battery
Battery operation time
18Hrs (backlight off)
Temperature range -20 ~ +70℃℃
Compass Accuracy : ±5degrees
(This need to be calibrated by
user manually) 。
Resolution : 1 degrees
Thermometer -20 ~ +50 Accuracy +/- 2
degrees.
Page 34

-32-
 Loading...