

Page 1
1
WBT-202 English User’s Manual
Page 2

2
SAFETY NOTES
GPS (Global Positioning System) is provided by the United States
government. Its accuracy may varies depending on special conditions
(area at war or if it is blocked). Any control by USA will affect this system
and its accuracy.
If installed on the transportation device, driver must not operate this while
driving.
GPS performance is affected when satellite coverage is degraded as near
a high-rise building, in the tunnel or under a cover.
Personal replacement of components and re-structuring of WBT-202 is
prohibited and may result in loss of warranty.
Operation of this device is strictly prohibited in highly explosive
environment such mining, in-fl ight or other unauthorized area against use
of this.
Avoid exposing this at places of high temperature and humidity.
Return to original dealer immediately if it emits strange smell or fume.
Set the WBT-202 on the place where can receive GPS signal easily
for 10 to 15 minutes if it is the fi rst time to be used. This procedure
enables the device to gather some Almanac Data and ensures the
quicker position fi xed and better GPS performance.
Page 3

WBT-202
Bluetooth GPS Receiver with
Micro-SD interface
CONTENTS
FEATURES
PRODUCT OVERVIEW
LED INDICATOR
CONTENTS
BATTERY INSTALLATION
BATTERY CHARGING
MICRO-SD CARD INSTALLATION
USING THE UNIT
BLUETOOTH CONNECTION
SHOWING TRACK
ENTER THE MSD (MASS STORAGE DEVICE) MODE
GOOGLE MAPS OVERVIEW
USING WBT_Tool UTILITY
TRACK EDITING VIA TIMEMACHINEX
INSTALLING THE USB DRIVER
CONNECT TO POCKET PC
FIRMWARE UPGRADE
TROUBLE SHOOTING
1
3
4
5
6
7
8
9
10
11
11
16
17
41
51
57
59
63
Page 4
1
FEATURES
Wintec WBT-202, a Bluetooth GPS Receiver with micro SD card interface, built-in u-blox 5
GPS chipset, not only provides extreme high sensitivity to recode GPS data but supplies
huge memory to log travel records. Besides, its low power consumption can sustain long time
operation more than 28 hours.
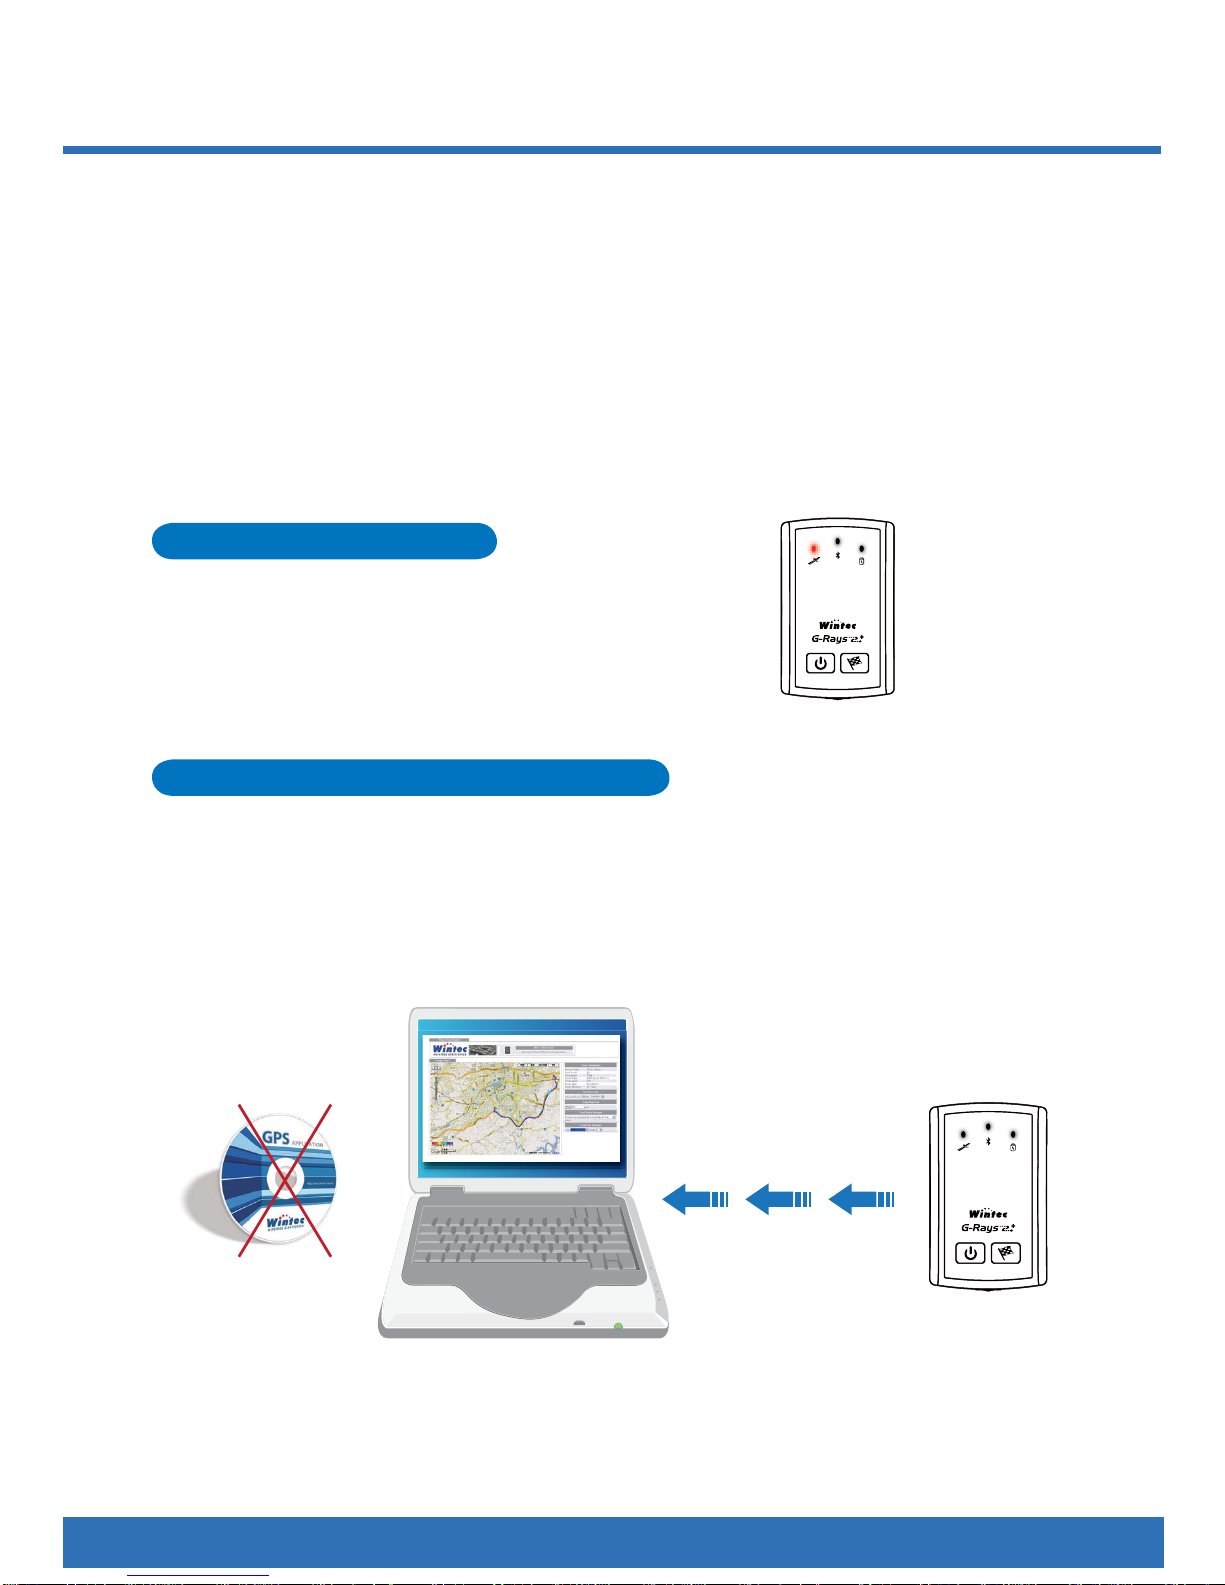
WBT-202 supports MSD mode (Mass Storage Device), the USB driver and its inbuilt software
(WBT_Tool) are inside the Micro-SD card. All tracking records can be downloaded, transferred,
saved easily without any software installation, and also displayed directly on Google Maps with
photos by integrated Geotagging function. That is to say, WBT-202 is a plug and play device,
and you can use it and enjoy your track anywhere.
Start to record GPS log
Turn on WBT-202 before you start your trip,
make sure it gets acquisition, and take pictures
with your digital camera. The device records
the GPS log after the power is turned on until
turned off.
Plug & play, auto-show track on Google Maps
No need to install any driver or software.
Ð
Just connect WBT-202 to computer via USB or Bluetooth interface, and the tracking
Ð
records will show on Google Maps automatically.
Even connect to computer for navigation or TimeMachineX via USB, you can install driver
Ð
through the one inside the Micro-SD card, and no need to set it by Tool CD.
GPS LED Blink (Red)
Page 5

2
Useful & user-friendly inbuilt software
No need to install any extra software, the inbuilt one will pop up after connect WBT-202 to
Ð
computer.
No matter GPS parameter setting, format converting Geo-tagging…etc. can be done via
Ð
the inbuilt software.
Page 6
3
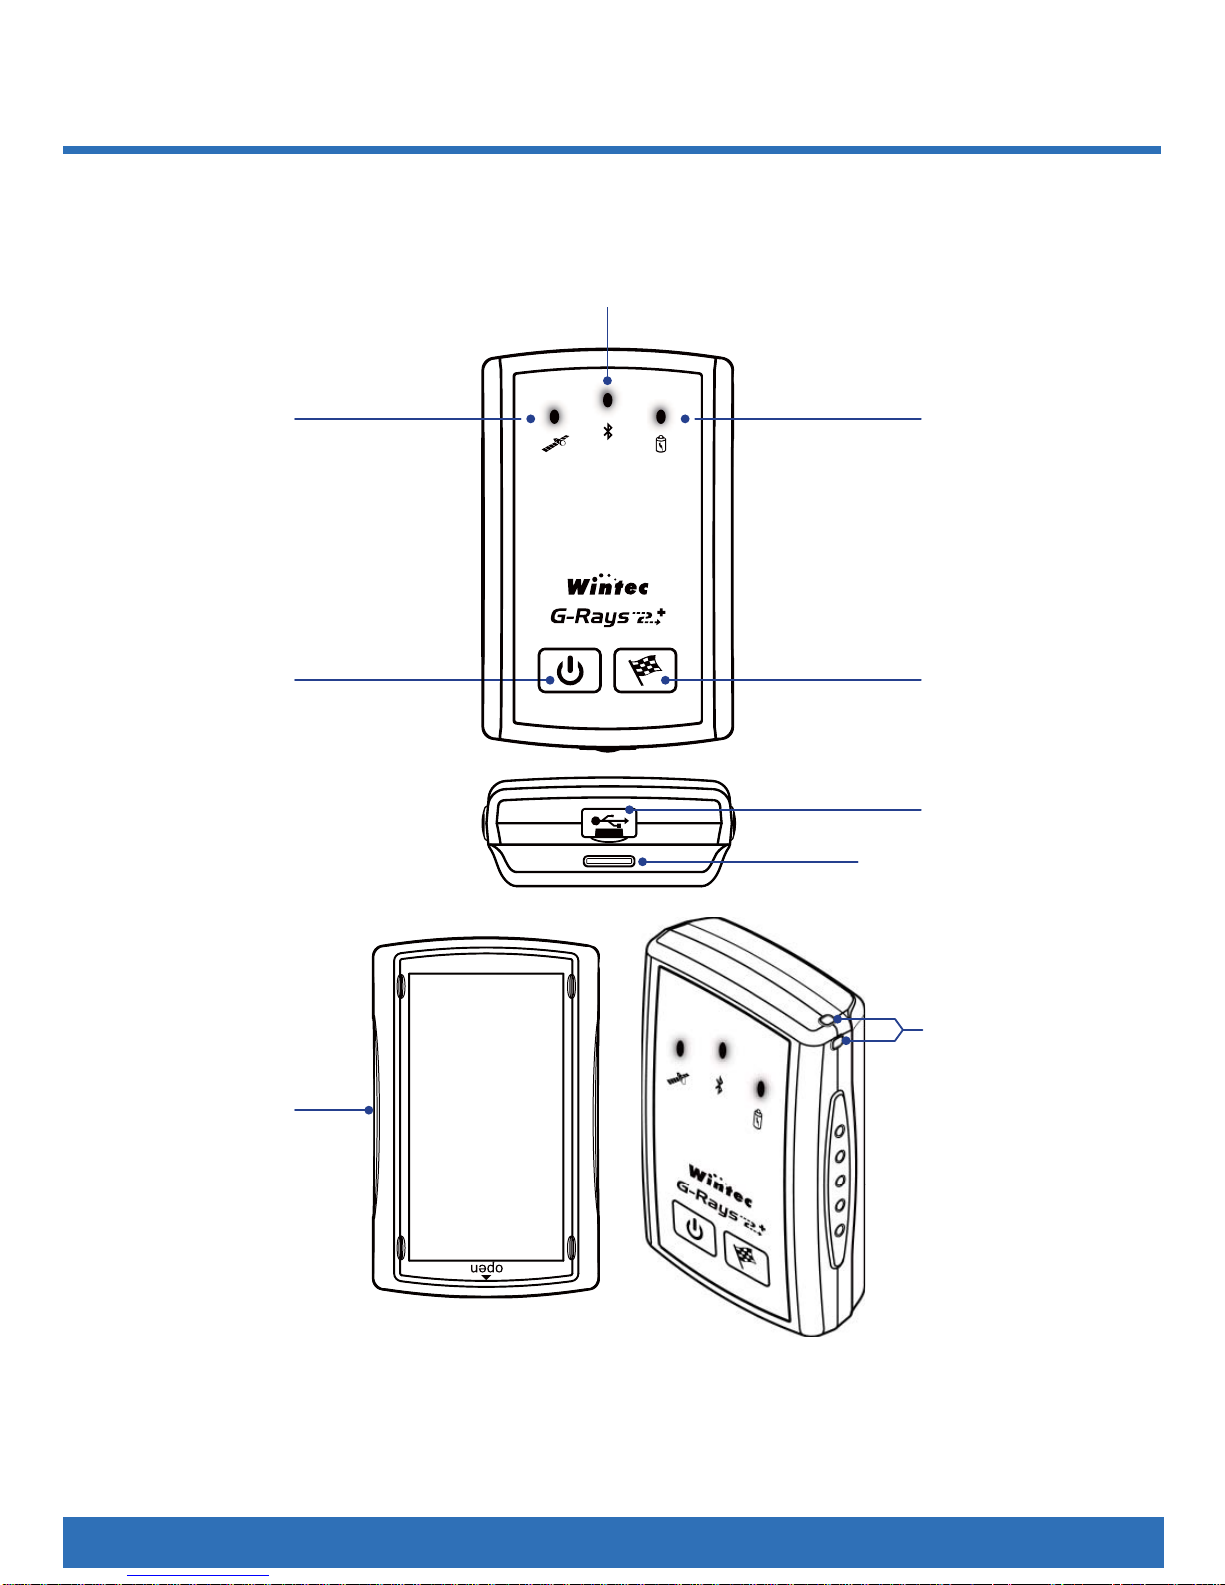
PRODUCT OVERVIEW
Power Button Flag Button
Bluetooth LED
Micro-SD card LED
GPS LED Power LED
USB Jack
Battery Case
Carrying Strap
Hole
The mechanism for
opening battery case.
Page 7
4
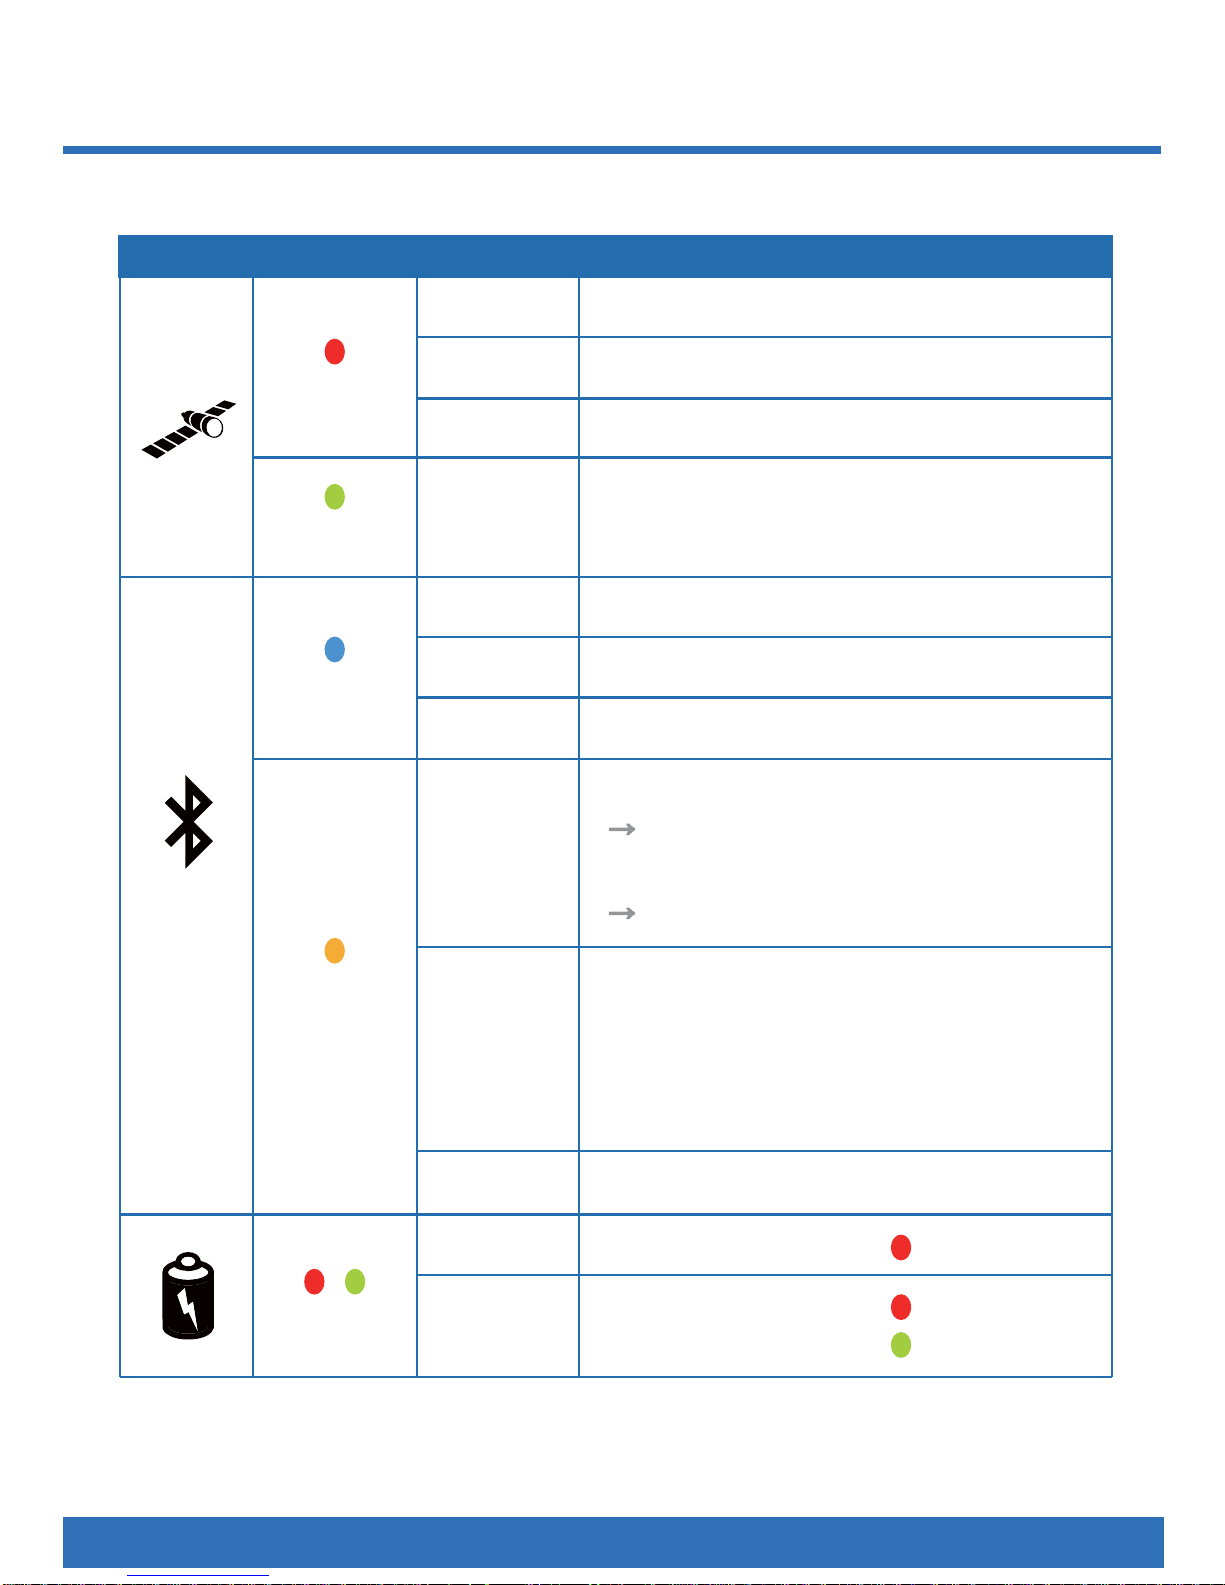
LED INDICATOR
LED Status Light Description
Blink GPS get acquisition
Searching satellites & Not get acquisition
Record a Push To Log point or
Create a new track
Rapidly flash with Micro-SD card
log a point on Micro-SD card.
Rapidly flash w/o Micro-SD card
log a point on inbuilt memory.
No Micro-SD card.
Micro-SD card full.
Micro-SD card error.
( Track points will be recorded to the
inbuilt memory.)
Log to Micro-SD card
Device off
Bluetooth connected
Bluetooth off
Bluetooth on & searching
On
Off
Blink
On
Off
Blink
On
Blink
On
Off
On
GPS
GPS
Bluetooth
Micro-SD
Low power (Red)
Charging (Red)
Fully Charged (Green)
Power
Page 8
5
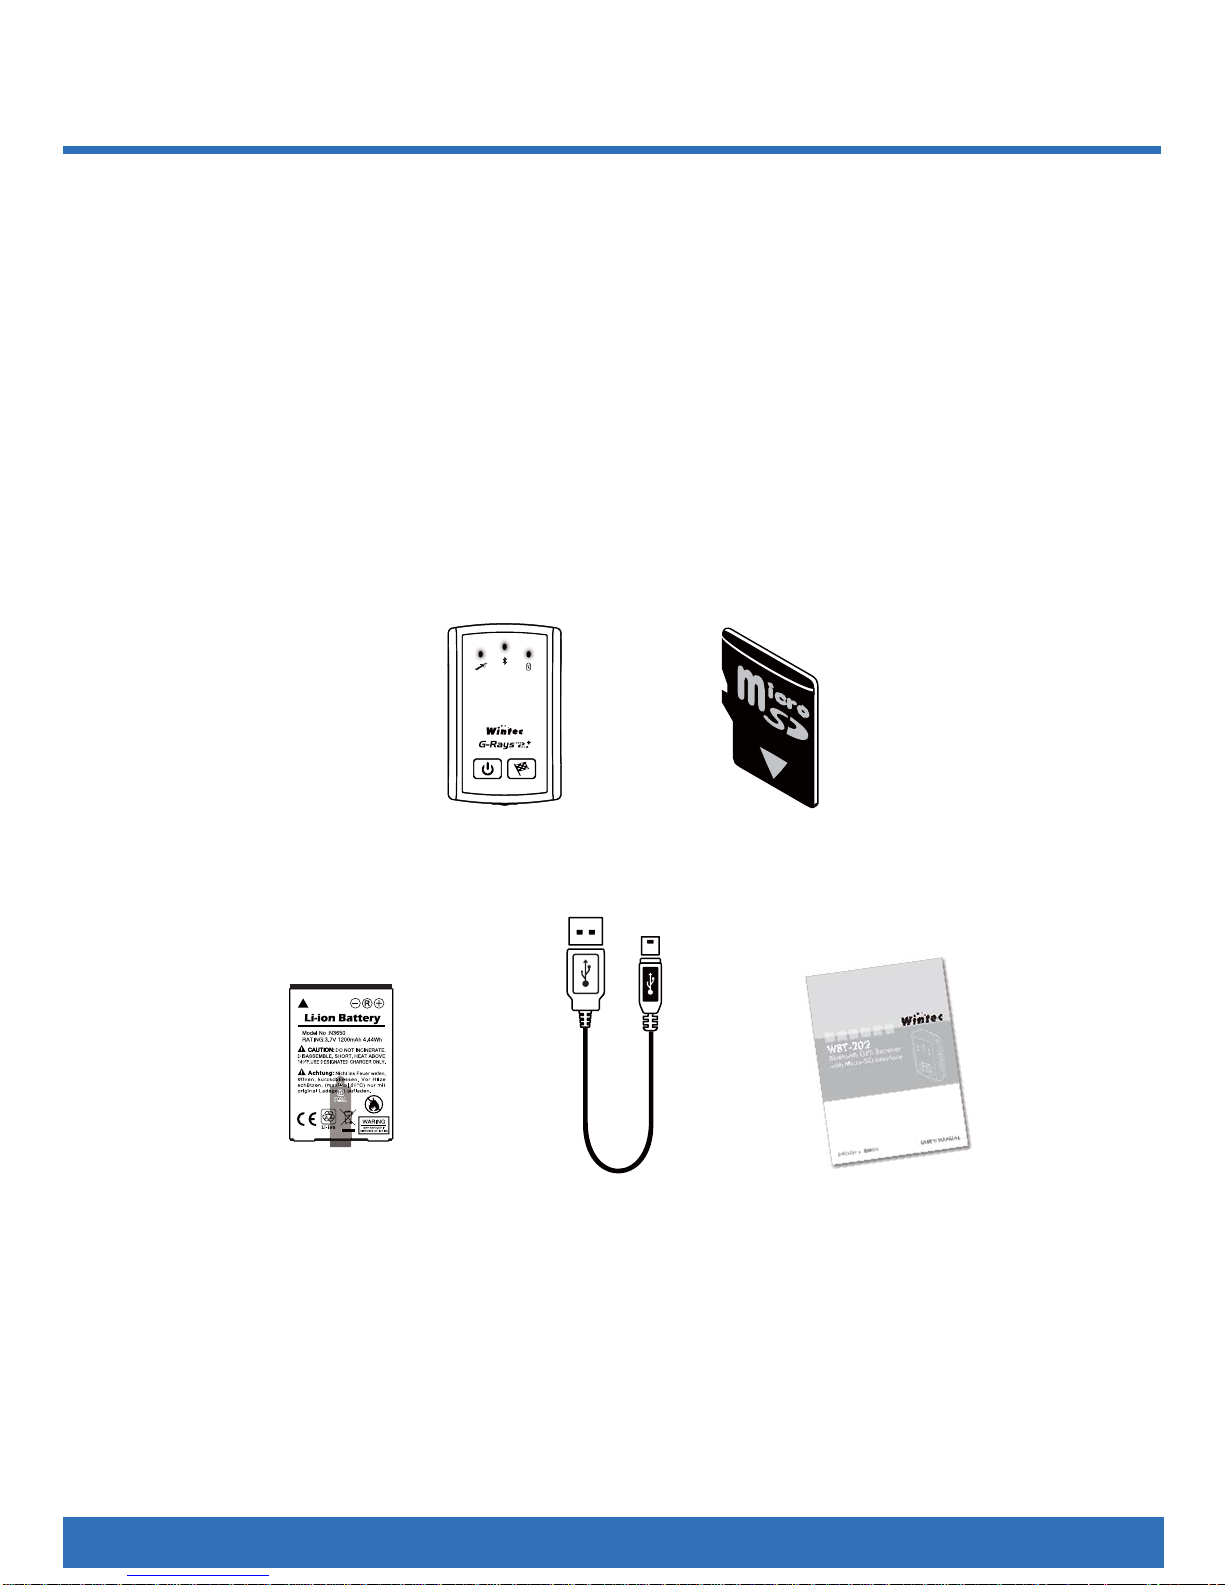
CONTENTS
Before using the device, please make sure that all accessories are included in the package.
In case any one is missing or damaged, please contact your dealer immediately.
1 x WBT-202 / BT GPS Receiver with micro SD card
Ð
1 x Micro SD card
Ð
1 x Lithium-ION rechargeable battery
Ð
1 x Mini USB cable
Ð
1 x Quick installation guide
Ð
1 x Power adapter
Ð
1 x Car charger
Ð
Optional accessories
WBT-202 / BT GPS Receiver
with micro SD card
Quick installation guide
Lithium-ION
rechargeable battery
Micro SD card
Mini USB cable
Page 9
6
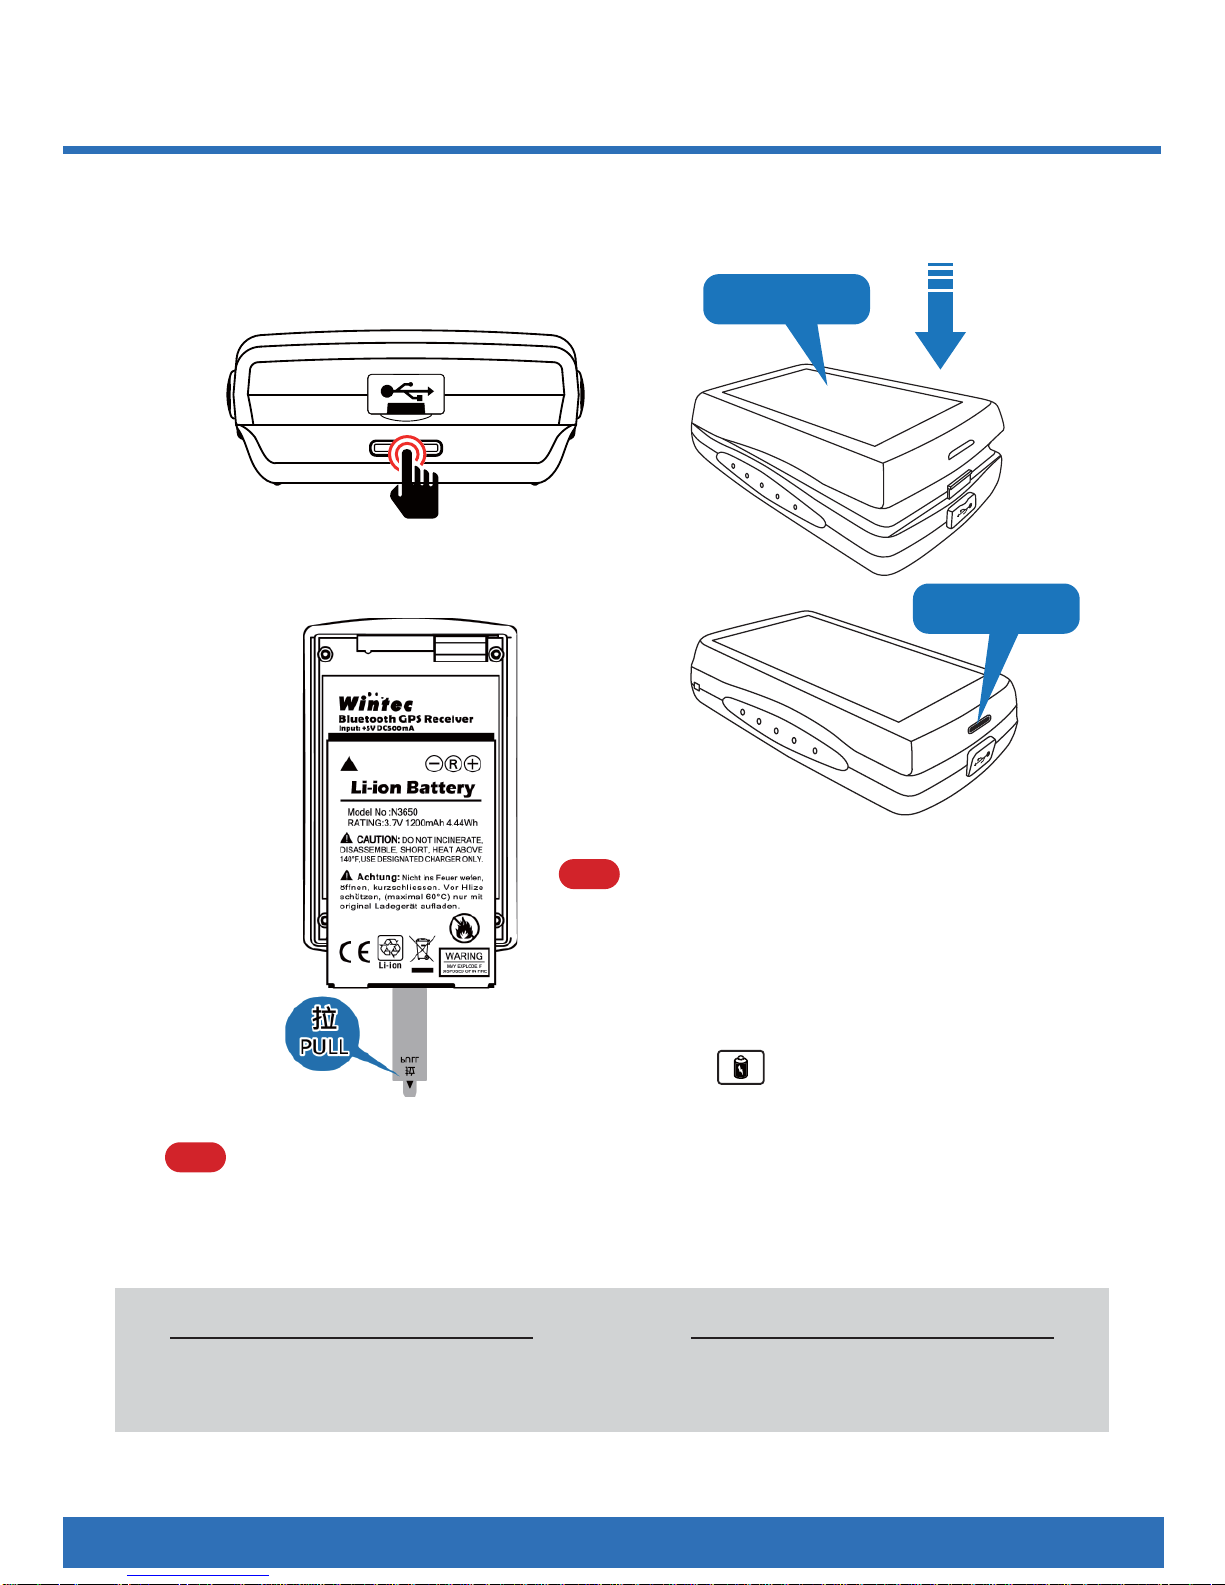
BATTERY INSTALLATION
1.
Push the mechanism at the bottom
of the unit and take off the battery
case
2.
Place the battery properly
NOTE
Please be aware that the tab
on battery is for easily pulling,
don't remove.it.
3.
Close the battery case.
Down
Lock
NOTE
Please take off the battery if the device will 1.
not be operated more than 30 days.
Be sure WBT-202 has been turned the 2.
power off before removing the battery. The
abnormal process may cause damage of
log data.
Charge the battery immediately when the 3.
red (Power) LED blinks. Doing so can
avoid worse GPS performance and incom-
plete log data.
Do not disassemble, puncture, or damage 4.
the battery.
Contact your local waste dispose depart-5.
ment to properly recycle of the battery.
CAUTION
RISK OF EXPLOSION IF BATTERY IS REPLACEDBY AN INCORRECT TYPE. DISPOSE
OF USED BATTERIES ACCORDING TO THE INSTRUCTIONS.
Page 10
7
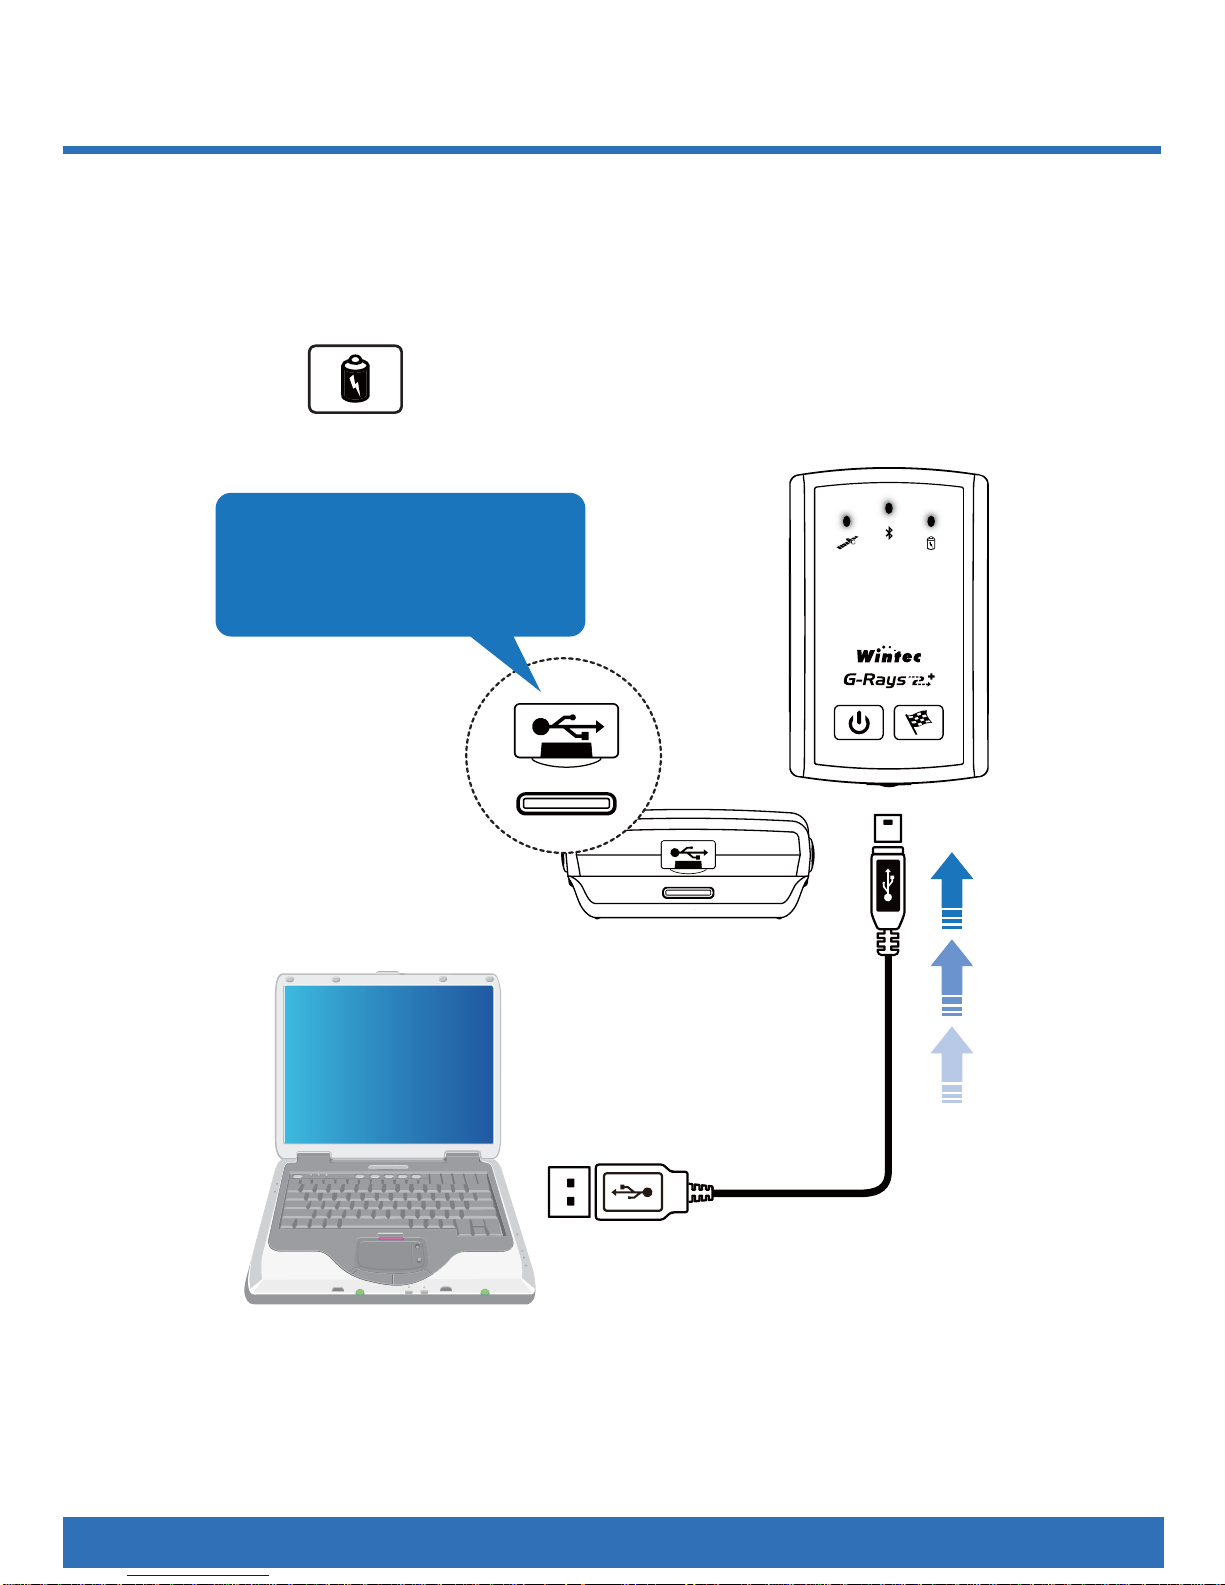
BATTERY CHARGING
Mini USB Jack
The rubber covering the USB
port is for waterproof purpose,
please make sure it is placed
well after charging.
Plug in the USB cable from WBT-202 connected to any USB port of computer for charging.
Ð
For the fi
rst time using WBT-202, please charge battery until it is fully charged.
Ð
The unit can be charged no matter power on or off.
Ð
Battery charging can via USB cable to computer directly or power adapter or car charger
Ð
(optional accessories).
When the (Power) LED is red and blinking, it is battery low, please recharge.
Ð
When the (Power) LED is red and on, the battery is under charging.
Ð
When the (Power) LED is green and on, the battery is fully charged.
Ð
Page 11
8
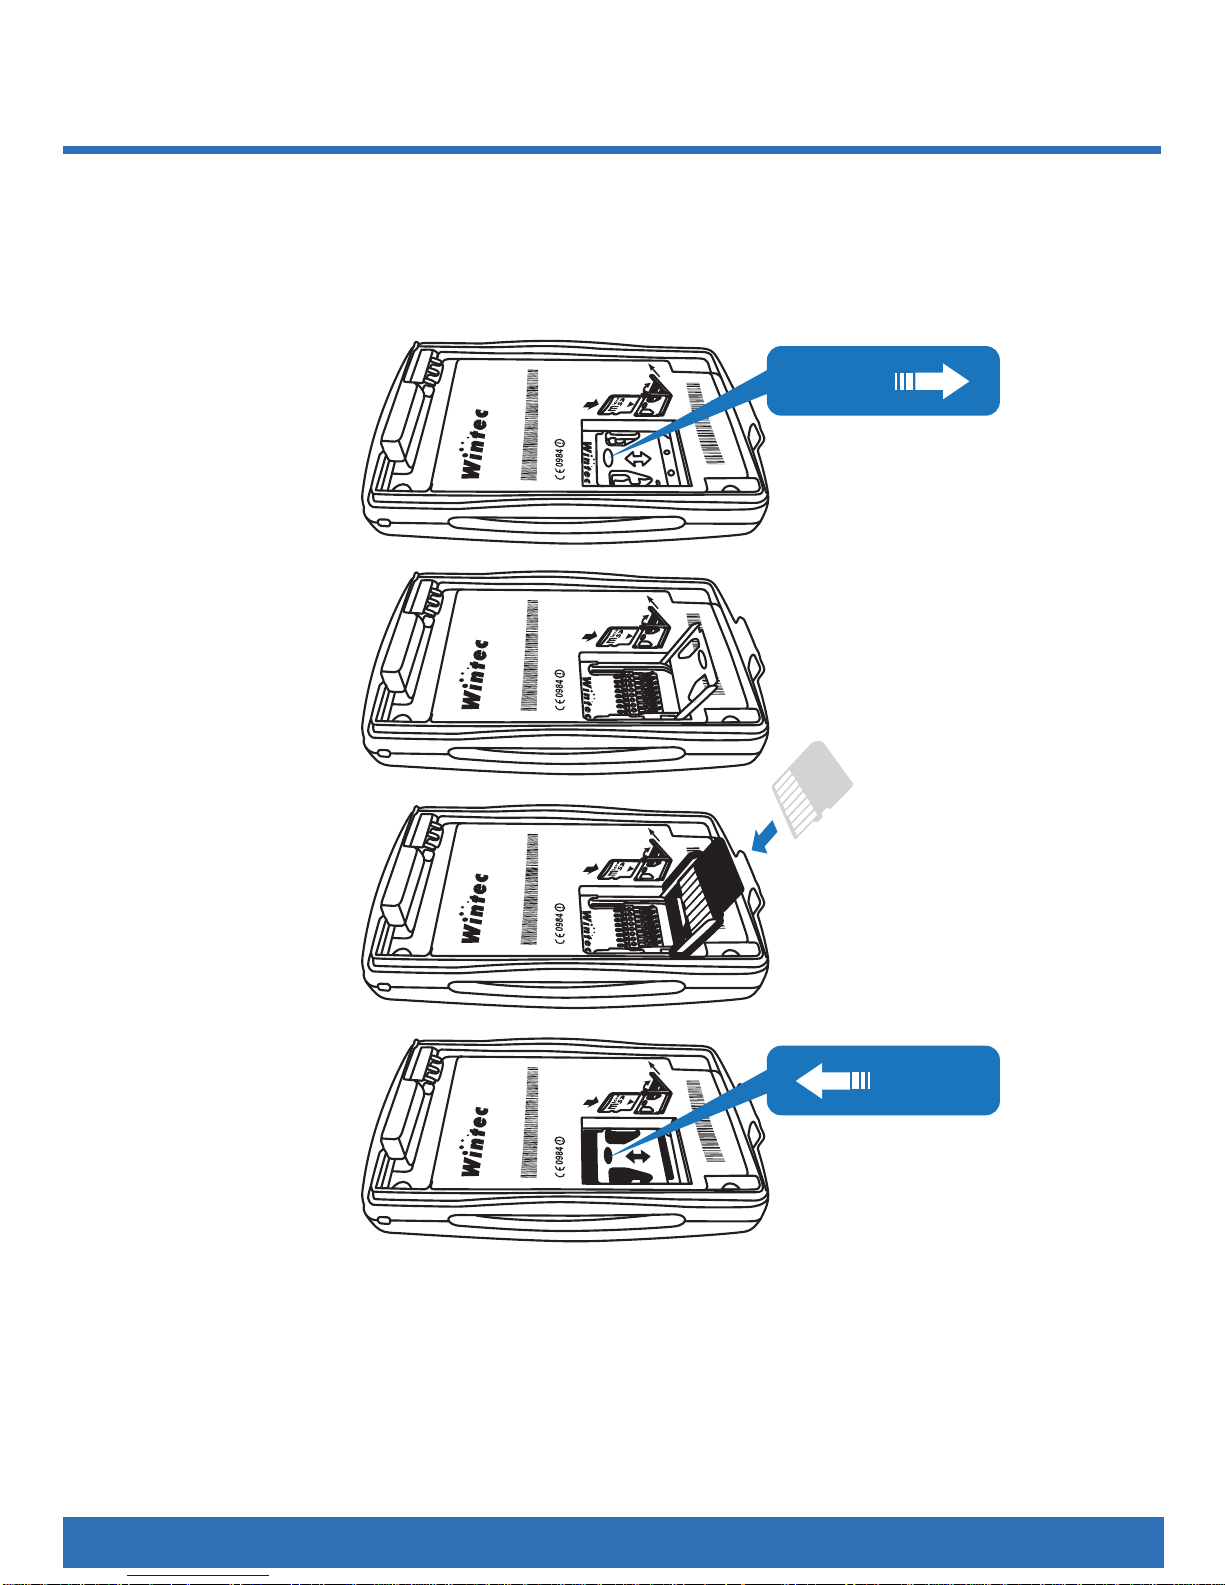
MICRO-SD CARD INSTALLATION
B
l
u
e
t
o
o
t
h
G
P
S
R
e
c
e
i
v
d
e
r
I
n
p
u
t
:
+
5
V
D
C
5
0
0
m
A
M
o
d
e
l
N
o
:
W
B
T
-
2
0
2
M
a
d
e
In
T
a
iw
a
n
S
/
N
:
W
7
0
2
0
0
0
0
9
7
L
O
O
K
OP
EN
B
l
u
e
t
o
o
t
h
G
P
S
R
e
c
e
i
v
d
e
r
I
n
p
u
t
:
+
5
V
D
C
5
0
0
m
A
M
o
d
e
l
N
o
:
W
B
T
-
2
0
2
M
a
d
e
In
T
a
iw
a
n
S
/
N
:
W
7
0
2
0
0
0
0
9
7
B
l
u
e
t
o
o
t
h
G
P
S
R
e
c
e
i
v
d
e
r
I
n
p
u
t
:
+
5
V
D
C
5
0
0
m
A
M
o
d
e
l
N
o
:
W
B
T
-
2
0
2
M
a
d
e
In
T
a
iw
a
n
S
/
N
:
W
7
0
2
0
0
0
0
9
7
B
l
u
e
t
o
o
t
h
G
P
S
R
e
c
e
i
v
d
e
r
I
n
p
u
t
:
+
5
V
D
C
5
0
0
m
A
M
o
d
e
l
N
o
:
W
B
T
-
2
0
2
M
a
d
e
In
T
a
iw
a
n
S
/
N
:
W
7
0
2
0
0
0
0
9
7
L
O
O
K
OPE
N
OPEN
LOCK
Before installing the Micro-SD card, please turn off the WBT-202, remove the battery and
Ð
take off the USB cable if any.
Install the Micro-SD card properly. Please refer to below illustration.
Ð
Relocate the battery and start to use WBT-202.
Ð
Page 12
9
USING THE UNIT
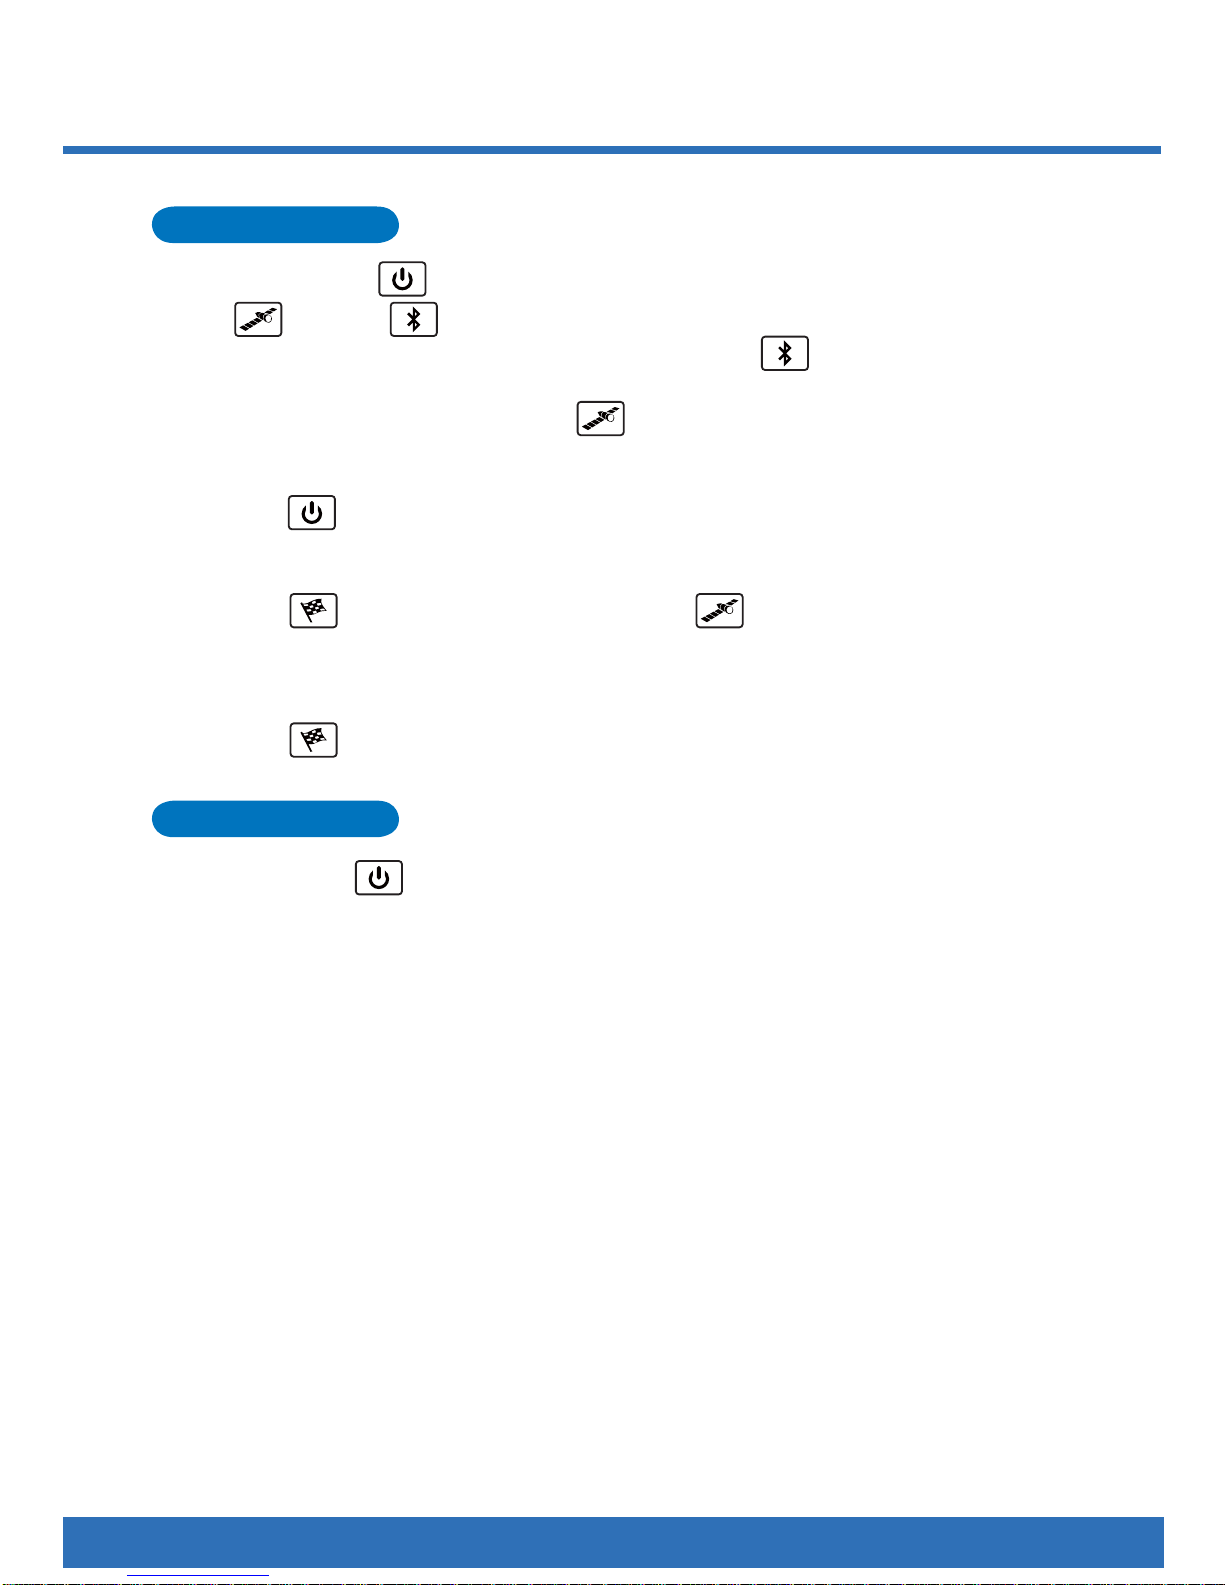
Power On
Press and hold the (Power) button for 3 seconds to turn on the WBT-202.
Ð
The (GPS) & (Bluetooth ) LED will light up and start to search satellites signals.
Ð
If there is no Micro-SD card inside the device, the orange (Micor-SD) LED will light up.
Ð
At this moment, ensure the unit facing to the sky in open sky environments for about a minute
Ð
unit the WBT-202 gets acquisition (Red LED blinks).
Bluetooth On/Off
Press the (Power) button to enable or disable the Bluetooth connection.
Create a new track
Press the (Flag) button longer until the green (GPS) LED goes out, and the WBT202 will re-start a new fi le for logging.
Add a Push-To-Log point
Press the (Flag) button to log a Push-To-Log point.
Power Off
Press and hold the (Power) button for 3 seconds to turn off the WBT-202. All LED will
go out.
Page 13

10
BLUETOOTH CONNECTION
Before using Bluetooth interface, please ensure that the device you will connect with
Ð
supporting Bluetooth SPP Master Service.
The baud rate is 4800~115200 bps, you can set it by yourself according to the demand.
Ð
Turn on the WBT-202 fi rst, and use the other device to search it.
Ð
Connecting WBT-202, and place it to a proper location to receive better satellites signal.
Ð
After getting acquisition, WBT-202 starts providing GPS data via Bluetooth. Enjoy your
Ð
application.
NOTE
The logging function would be proceeded no matter Bluetooth on or off.1.
When the logging function is disabled with unworked Bluetooth and USB in-2.
terface, the WBT-202 will auto turn off after 10 minutes (the interval time can
be set via WBT_Tool).
Page 14
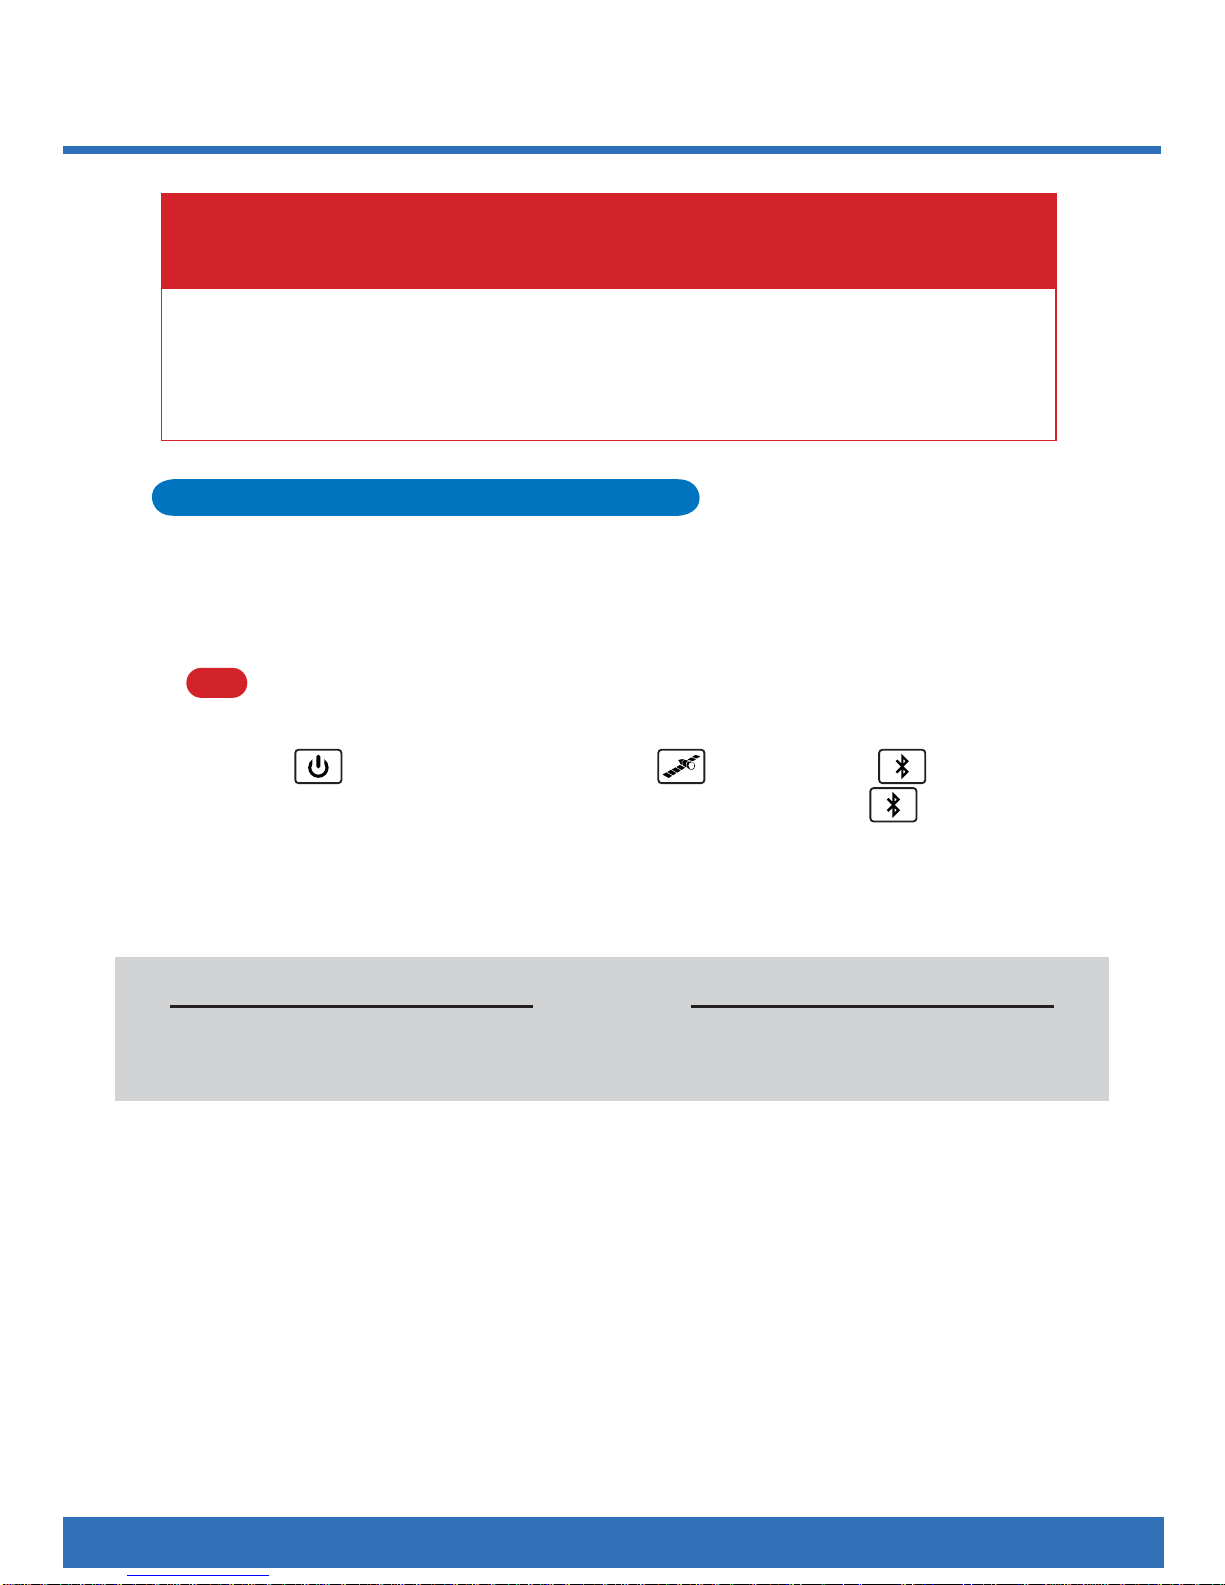
11
SHOWING TRACK
Turn on the WBT-202.1.
Connect the unit to any USB port of computer via USB cable.2.
NOTE
If the USB driver hasn’t been installed yet, the “Find New Hardware Wizard” will pop
up, please cancel it fi rst.
Press the (Power) button longer until the (GPS) LED and (Bluetooth ) LED 3.
go out. It switched to MSD mode now. At this moment, the orange (Micro-SD ) LED
will light on.
Under MSD mode, take off the USB cable or press the fl
ag button, WBT-202 will exit MSD 4.
mode and turn the power off.
CAUTION
Don’t delete, rename or re-organize the exist fi les inside the WBT-202; otherwise the log
data may not be properly recorded.
How to switch to MSD mode?
Ð
Enter the MSD (Mass Storage Device) mode
Please ensure that your computer is on-line status
before you execute following steps.
Please be aware that following instruction is applied to the log data stored in
the Micro-SD card, but inbuilt backup memory.
For record stored in the inbuilt backup memory should be shown up via
TimeMachineX.
Page 15
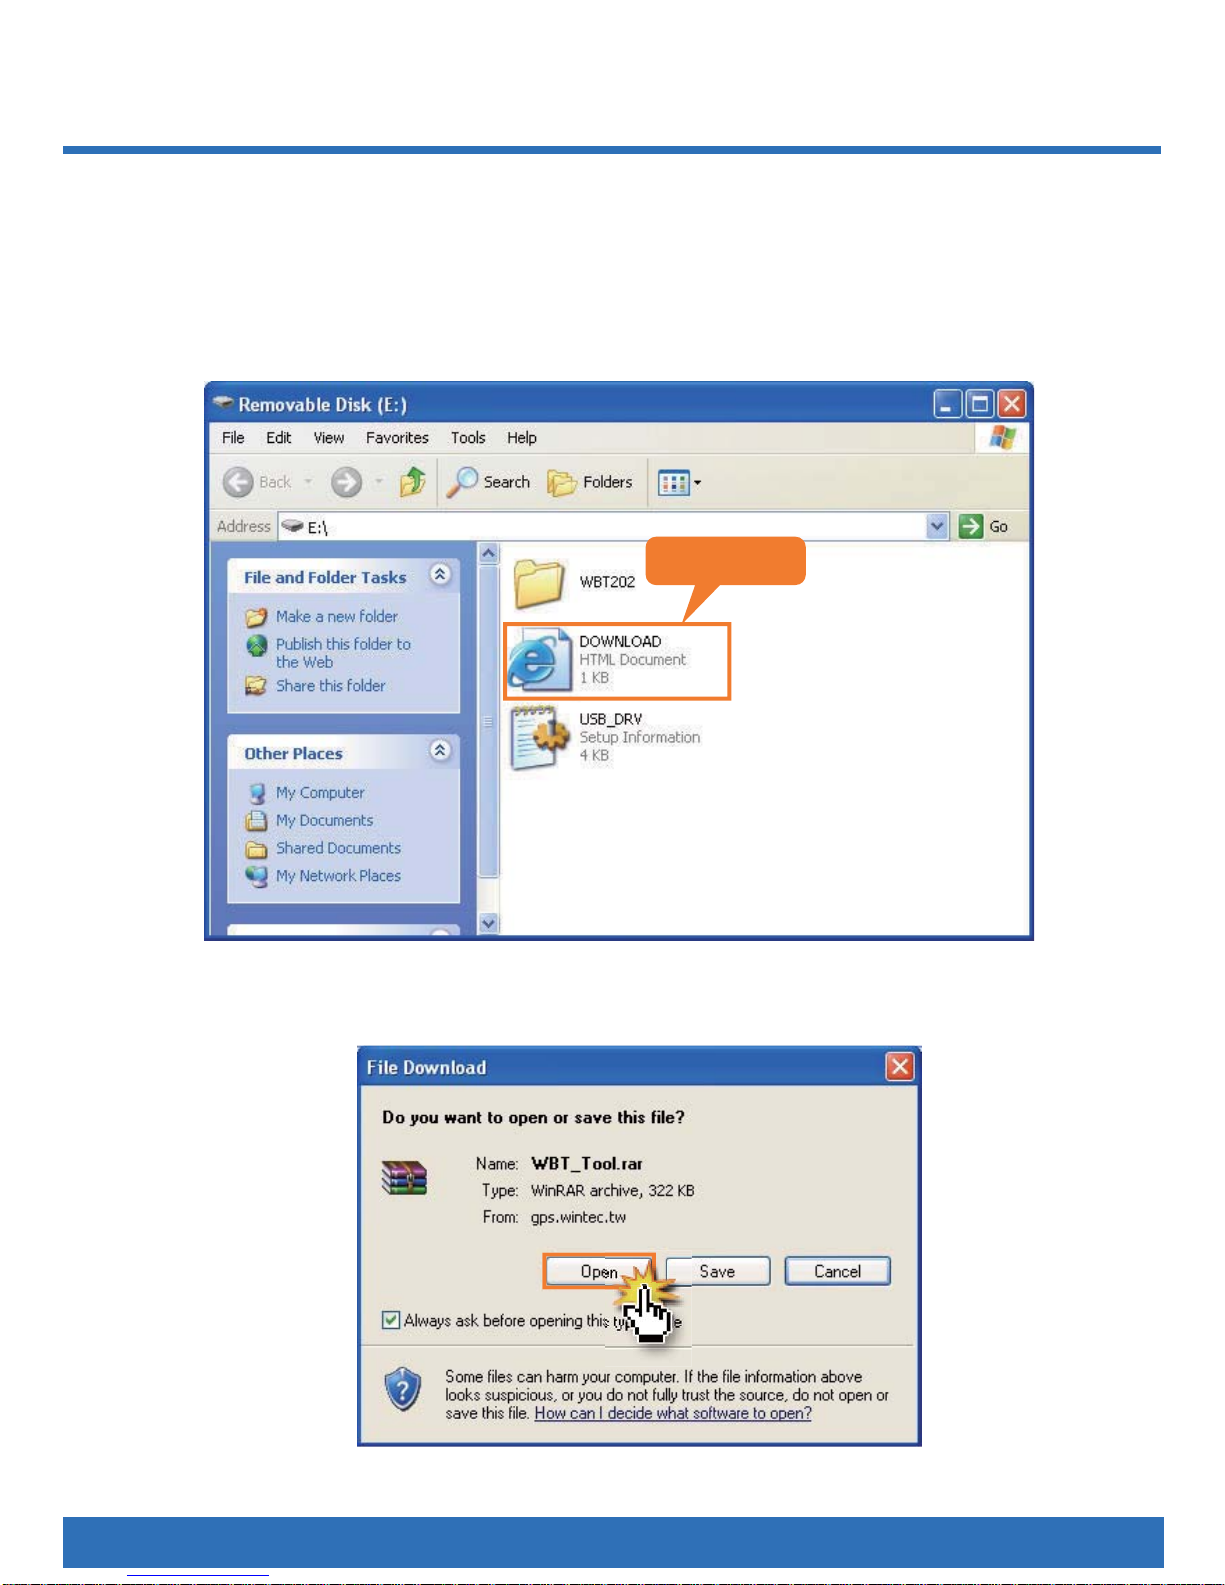
12
Can I use my own Micro-SD card?
Ð
Following screen will pop up.1.
Double click the fi
le of "DOWNLOAD.HTM", and enter the link of WBT_T
ool.2.
If you enter MSD mode with your own Micro-SD card, please follow below steps.
Double Click
Decompress the rar fi le.3.
Page 16
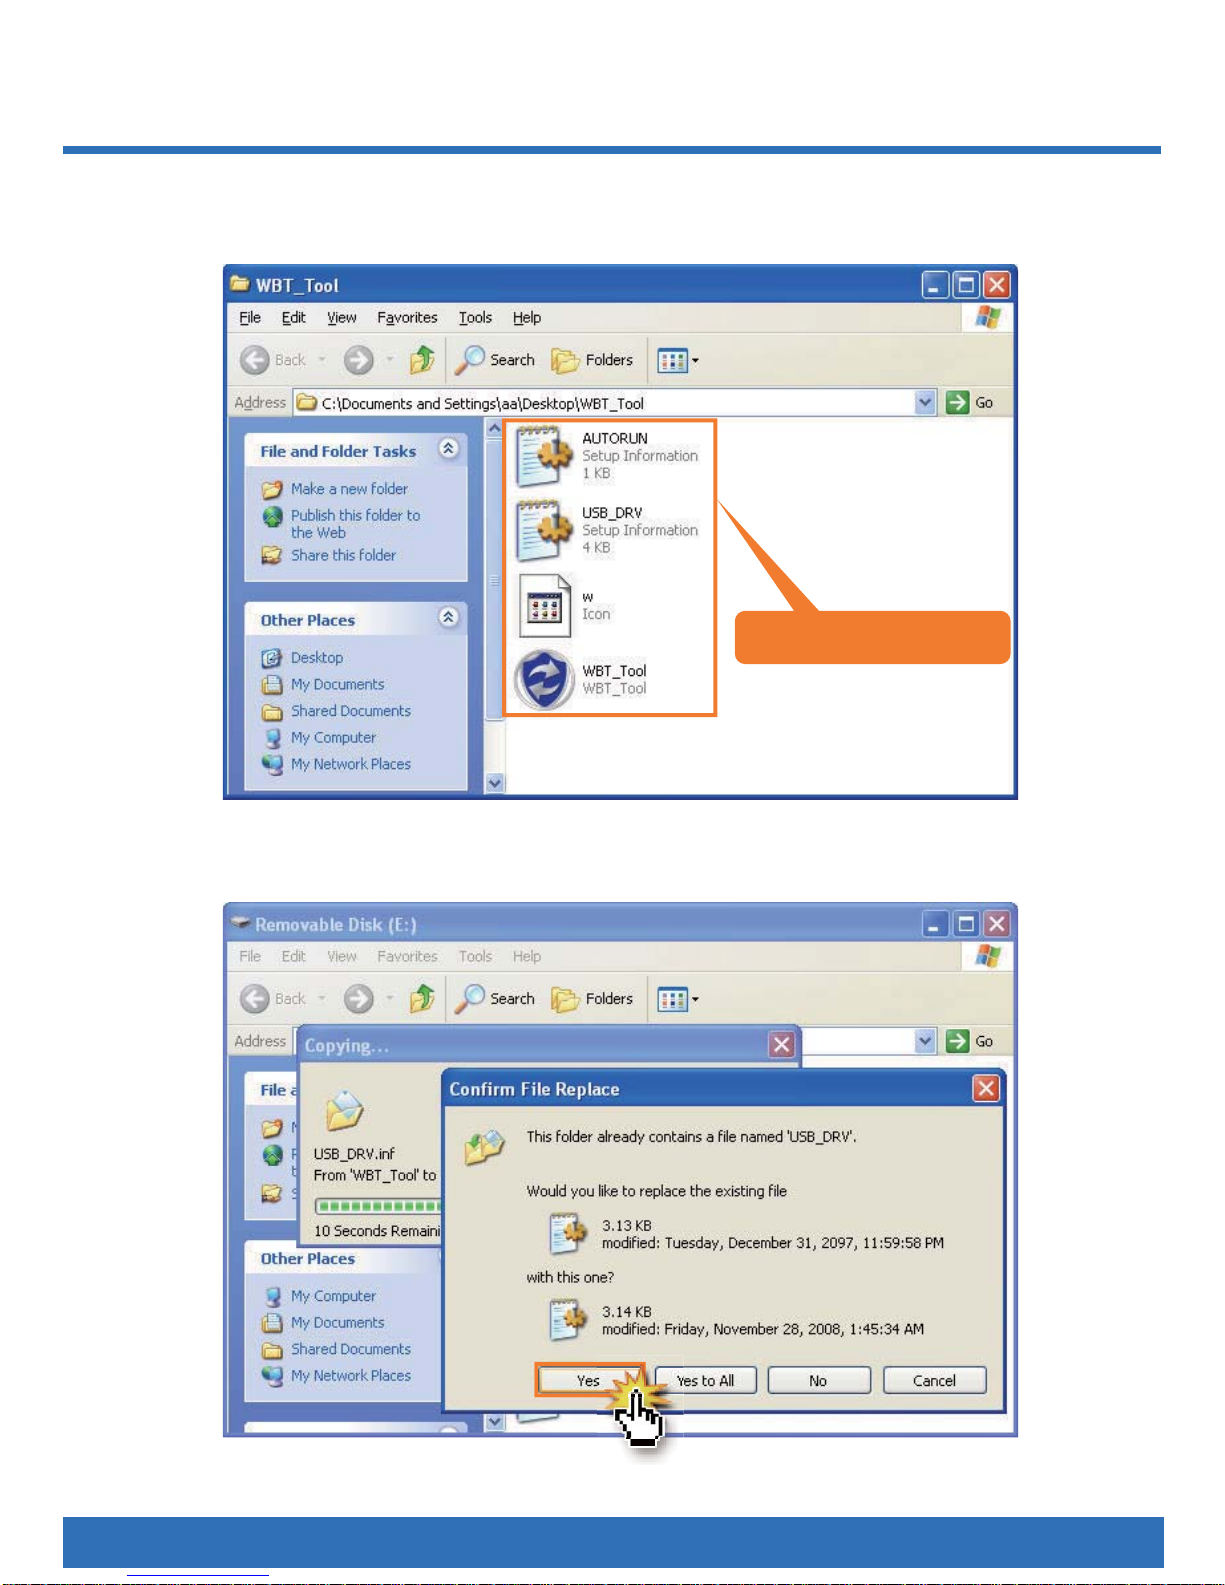
13
Copy those four fi les inside the compressed fi le to your Micro-SD card.4.
Copy to Micro-SD card.
Use new one Instead of old one if any.5.
Page 17

14
At the fi rst time, you have to enter WBT_Tool by double clicking its icon; however, when you 6.
enter MSD mode next time, the WBT_Tool will auto run and pop up.
The inbuilt access tool (WBT_Tool) will be executed automatically and pop up following •
dialogue, please choose WBT_Tool and press “OK”.
Page 18
15
You probably can not see the above dialogue if the antivirus program in your computer •
does not accept the “Auto Run” function. Please change the setting to accept it.
You also can execute the WBT_Tool manually. Please refer to below process.•
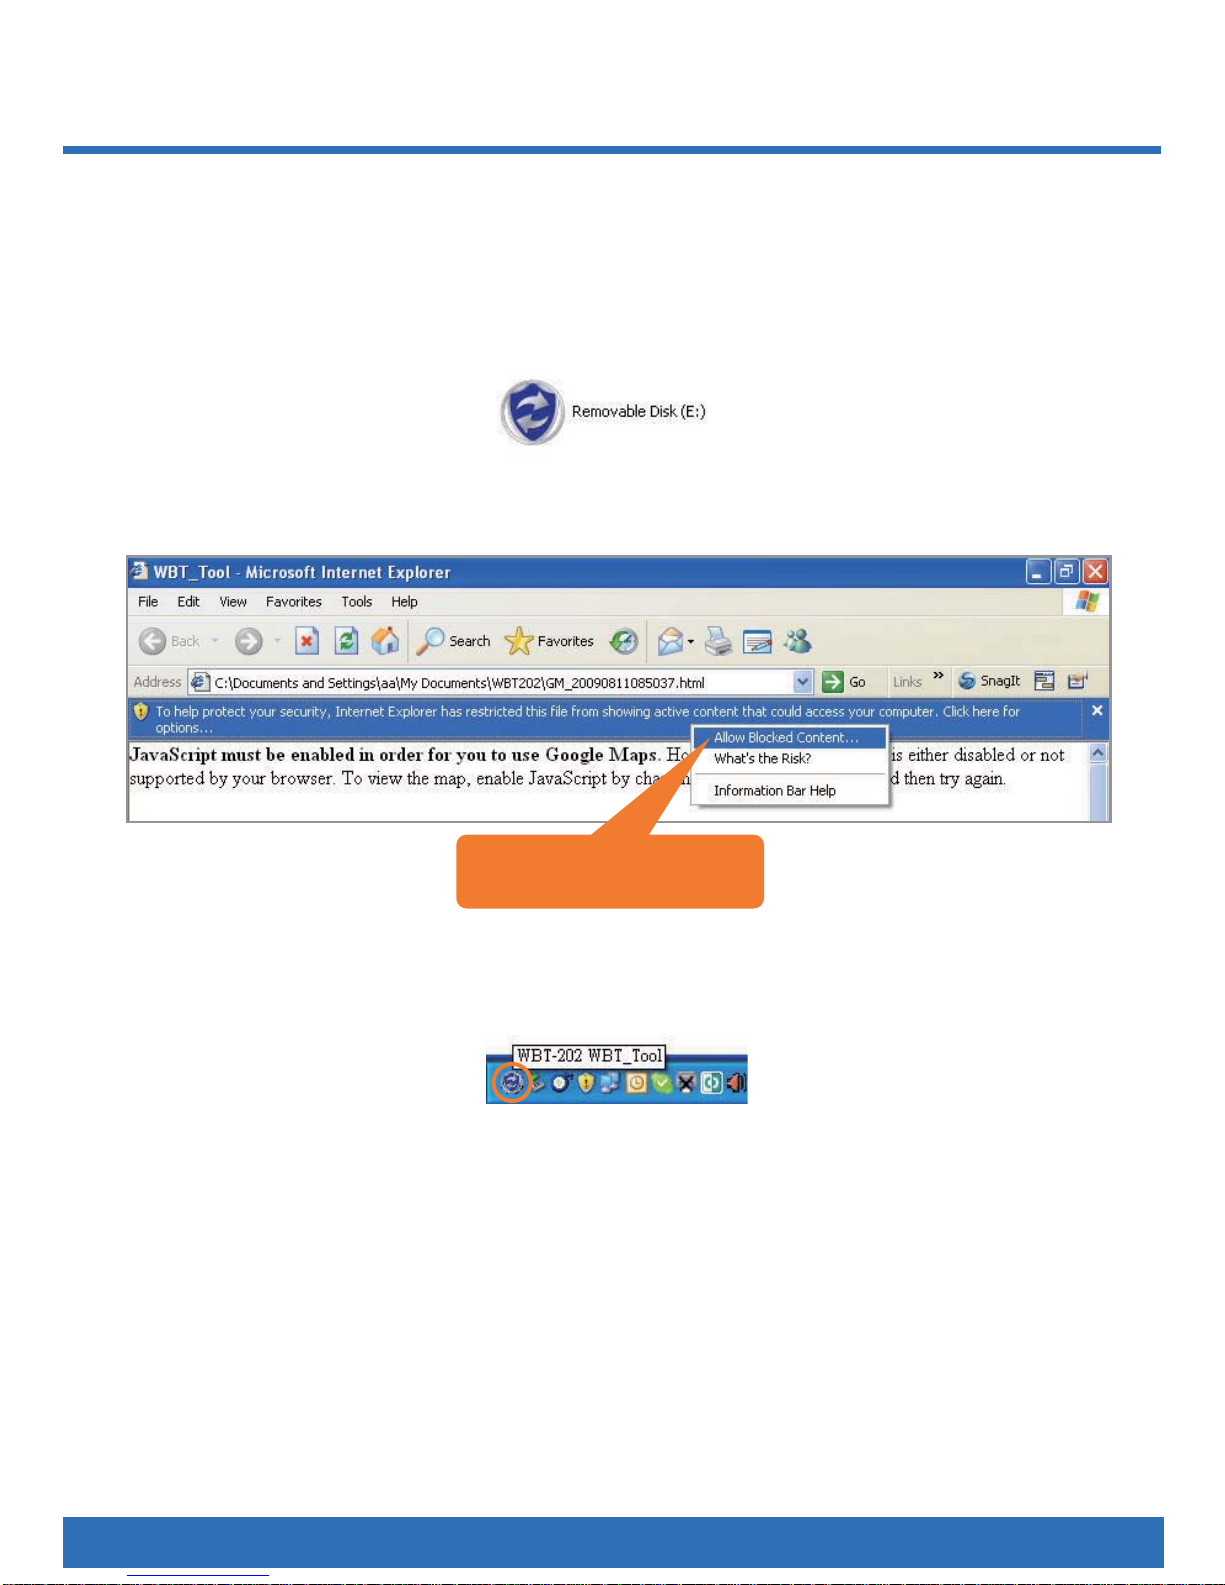
a) Open “My Computer”.
b) Double click the icon of WBT_Tool as following.
The WBT-202 will auto-connect to Google Maps. And the safety mechanism from IE as •
following will be shown up, please allow blocked content.
Allow this page to access
my computer
Now, the recorded track will be shown on Google Maps automatically.•
At this moment, the inbuilt WBT_Tool will be minimized and hidden in the system tray
. •
Click its icon as below anytime when you want to use the WBT_Tool.
Page 19

16
Google Maps OVERVIEW
1.
2.
5.
6.
7.
8.
3.
4.
Track Information: Basic information of the device and selected track.1.
Selected Track: Only show the last track inside the WBT-202.2.
Track Point Tour: Key in the digit which exact point you want to see and press “Go to” 3.
button. It will be pointed out on map, and the detail will be shown by left click.
Track Points Manager: It can be shown by different combination of track points. 4.
Track Line Manager: Select the color of track.5.
Speed Bar: Defi ne colors for speed. The track point shown on Google Maps with color and 6.
direction, and different color stands for different speed.
Start Point.7.
End Point.8.
Page 20
17
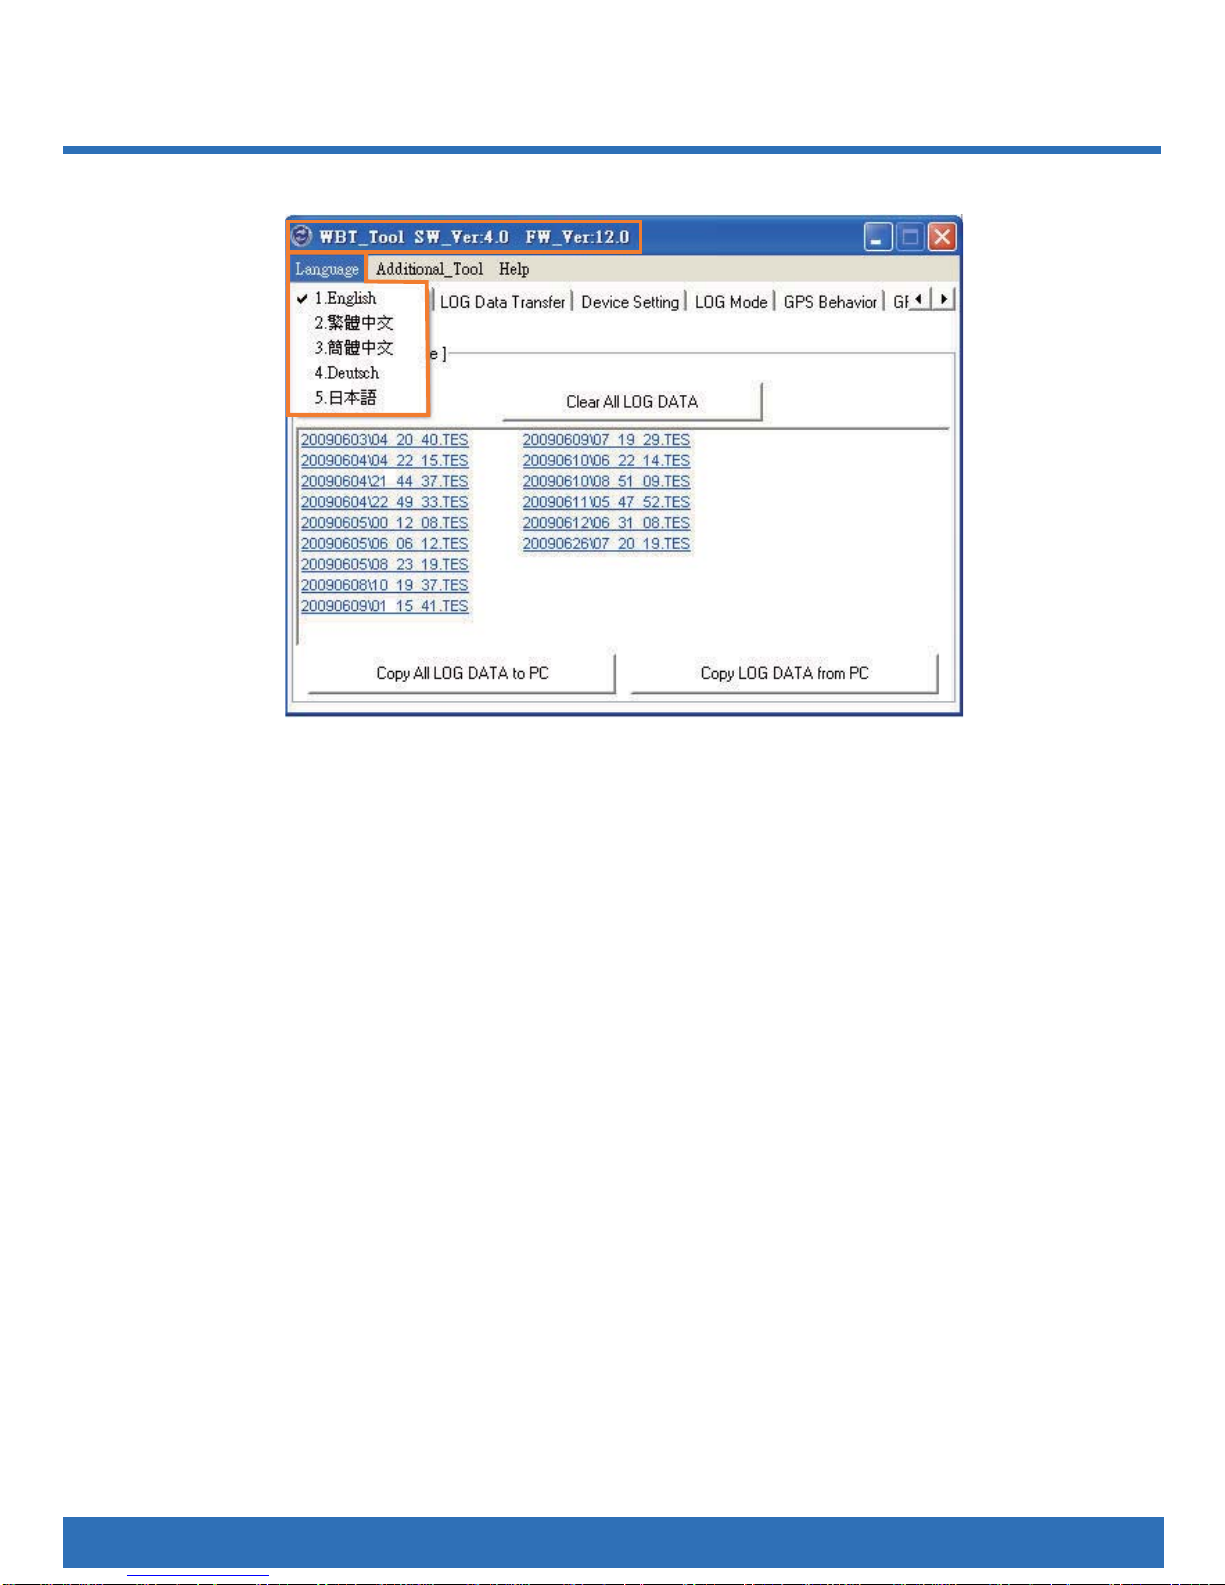
USING WBT_Tool UTILITY
Version & Language
Ð
WBT_Tool Version & WBT-202 Firmware Version.1.
Language Page: Select a language here.2.
Page 21

18
1.
2.
3.
5.4.
LOG Data Manage
Ð
Tab: LOG Data Manage Tab.1.
LOG Data List: 2.
NOTE
The fi le name of each track is the UTC time of its start point.
Double click any track fi le to review track information.•
All original log data saved in the Micro-SD card inside WBT-202 will be shown here.•
Page 22

19
NOTE
If you want to clear log stored in the WBT-202 inbuilt memory not Micro-SD card,
please do it via TimeMachineX.
Use right key function to copy or delete one or more log fi les.•
Clear All LOG Data:3.
Press this button to clear all log data stored in the Micro-SD card.
Copy All LOG Data to PC: 4.
Press this button to copy all log data stored in the Micro-SD card to PC.
Copy LOG Data from PC:5.
Press this button to copy log data (*.TES) backup in PC or the one (*.TK2) from
TimeMachineX to the Micro-SD card of WBT
-202.
Page 23

20
LOG Data Transfer
Ð
Tab: LOG Data Transfer Tab.1.
Reference Unit: Select Metric or Imperial measure shown on track records.2.
Reference Zone: Adjust the time zone for the process of transferring log data format. 3.
NOTE
A Geo-tagging process is based on the time zone here.
1.
2.
5.
8.
3.
4.
6. 7.
LOG Data Source: Select a LOG data from the Micro-SD card to transfer the format.4.
LOG Data Format: Select a format that you want to transfer to.5.
China Map: When the track is logged in Mainland China, please tick “China Map” and 6.
transfer to Google Maps again.
Transfer: After
confi rming above items, press this button to convert to the format assigned.7.
Track List:8.
All transferred track fi le will be shown here.•
Use right key function to copy
, delete or e-mail those fi les.•
NOTE
For Google Maps & Virtual Earth, the maximum of one track is 10,000 points.
If a track includes more than 10,000 points, it will be separated into two tracks
automatically.
Page 24

21
Device Setting
Ð
Tab: Device Setting Tab.1.
Password: Key in the password and press “Enable Password” button to authorize the pass-2.
word mechanism.
1.
2.
5.
3. 4.
6.
NOTE
The password should be 4 digits.1.
When you want to disable the password protection, just key in nothing in the 2.
blanks of both “New” and “Confi rm” and then click “Change Password” button.
Device Name: Add a device name and press the “Change” button to confi rm it.3.
Device Info: Key in the device info if any and press “Change” button to confi rm it.4.
Bluetooth Setting: 5.
When the logging function is DISABLE with unworked Bluetooth and USB interface, the •
WBT-202 will auto turn of
f after 10 minutes (depend on the time you set).
When the logging function is ENABLED with unworked Bluetooth and USB interface, the •
Bluetooth function will be switched off automatically.
NOTE
The valid setting is 60~3600 seconds. Please remember pressing the “Set” button 1.
after setting.
The Bluetooth auto turn off function will be shut down when the setting is “0” second.2.
Shake Mode: Enable or Disable the shake mode function.6.
When the shake mode on with no movement for 5 minutes (default, depend on the •
duration time you set), WBT-202 will auto turn of
f and turn on again when it feels vibration.
NOTE
If the WBT-202 is switched off manually under shake mode on, it won’t turn on
again automatically even with movement.
Page 25

22
LOG Mode
Ð
Tab: LOG Mode Tab.1.
LOG Mode: Select a log mode and press “Set Log Mode” button to confi
rm the setting.2.
User De
fi ne: the detail can be set according to point 3.•
Walk: Log a track point per 10 sec. or 20 m when the velocity is between 1~2000 km/h.•
Bicycle: Log a track point per 20 sec. or 100 m when the velocity is between 3~2000 km/h.•
Car: Log a track point when a heading change is bigger than10 degrees when the •
velocity is between 5~2000 km/h
User Defi ne LOG Mode: The detail of “User Defi ne” can be set here.3.
NOTE
Select “Disable LOG function” will stop the logging process.1.
Please be aware that the moving speed should lie in between the valid 2.
speed for record; otherwise, the point won’t be saved.
You also can set the valid speed to fi lter some shift points.3.
Factory Setting: Press this button to return LOG Mode setting to default.4.
Mix Mode: Combine following conditions by your preference and log a point only one of 5.
them is conformed.
Time Interval (T)•
Distance Interval (D)•
Heading Change (H) •
Speed Change (S)•
1.
2.
3.
4.
5.
Page 26

23
GPS Behavior
Ð
Tab: GPS Behavior Tab.1.
NMEA Output: Select NMEA output items by your requirement, and press SET button 2.
to confirm it. GPRMC, GPGGA, GPGSA & GPGSV are fixed because they are basic
necessaries of navigation and data logging; GPVTG, GPZDA
and GPGLL
are option.
GPS LED Setting: Defi ne the behavior of LED getting acquisition.3.
GPS LED Blink Cycle: Time includes one LED light on and one LED light off, a complete •
cycle.
GPS LED Off Cycle: Time for LED light off during a complete cycle.•
For instance by above picture, a LED cycle is 1 second. Light on for 0.1 second and light •
off for 0.9 seconds.
GPS Re-Start: Include Cold Start, Warm Start and Hot Start.4.
Cold Start is suggested for quicker acquisition if one of below mentioned is confi rmed.•
a)
The WBT
-202 didn’t be operated for more than 3 months.
b) The distance between your current location and the last time device turn off location
is more than 800 km.
Warm Start is suggested if the device was used over 15 minutes in a week, but you just •
can not get acquisition when you use it again.
Hot Start is suggested when you often use the device, the GPS signal is okay and sev-•
eral satellites are received; however the device still can not get acquisition.
SBAS: Enable (ON) or disable (OFF) the SBAS function, and press the SET button to 5.
confi rm
it.
1.
2.
3.
4.
5.
Page 27

24
GPS Parameters
Ð
Tab: GPS Parameters Tab.1.
GPS Mode: Select a GPS mode and press “Set GPS Parameter” button to confi rm
it.2.
1.
2.
3.
GPS Parameters: In GPS mode, if the “User defi ne” is selected, and the detail can be set 3.
here.
NOTE
Please be aware that the higher accuracy is selected, the longer acquisition time is
needed, that is to say, the faster acquisition time is chosen, the lower accuracy is
provided.
Page 28

25
Additional Tool
Ð
Geotagging/Report: Press this button to enter Geotagging screen for further application.1.
GIS Shapefi
le
Tool: Press this button to enter GIS Shapefi le screen for further operation.2.
1.
2.
Page 29

26
Gotagging/Report
Ð
Page: Photo Page.1.
Selected LOG Section: Choose a track that you want to combine photos or create a report.2.
Selected Track Information: Indicate how many points included in the selected track and the 3.
time of the fi
rst and last point.
Load JPEG Photos: Press this button to select photos for Geotagging.4.
Show
Thumbnail: Tick this item to show minimized photos you chose. Please be aware •
this item would slow down the photo selecting process.
Ignore already Geotagging Photo: When selected photos have had geographic data in-•
side will not be Geotagged again.
Generate Original backup photo after Geotagging:
T
ick this item to backup all selected •
photos after Geotagging.
JPEG Photos Area: All selected photos including geographic data will be shown here.5.
Before Geotagging process, please make sure that the time zone of device and digital camera
should be the same as each other, otherwise photos won’t be correctly Geotagged.
Combine photos with track
1.
5.
4.
3.
6.
2.
Page 30

27
NOTE
Right key functions are available, including Cancel Photo, Preview Photo Position,
Add Photo Description, Manual Geotagging and Make Shapefi le.
When the auto-Geotagging is not working or you want to modify the geographic coordinates, 6.
please use the function of manual Geotagging.
By Map:•
Drag the “red sign” on the map to the correct position, and press the “Manual Geotagging” button (right key function) to complete Geotagging process.
By Coordinates:•
Key in the exact Latitude (format: dd.ddddddd degree), Longitude (format: ddd.ddddddd
degree) and
Altitude in blanks, and press the “Manual Geotagging” button (right key func-
tion) to complete Geotagging process.
Right Click
Page 31

28
Combine URL (web picture or video link) with track
1.
5.
4.
3.
6.
2.
Page: URL page.1.
Selected LOG Section: Choose a track that you want to combine URL link.2.
Selected Track Information: Indicate how many points included in the selected track and the 3.
time of the fi
rst and last point.
Add URL: Press this button to add URL
item to the [URL Link] area for Geotagging.4.
URL Type: Select a URL type for photo or video.•
URL Link: Key in a link of web photo or video.•
[URL Link] area: All added URL link will be shown here.5.
NOTE
Right key functions are available, including Cancel URL, Preview RUL Position,
Add URL Description, Manual Geotagging(URL) and Make Shapefi le.
Page 32

29
The Geotagging for URL link can be done by Map or Coordinates.6.
By Map:•
Drag the “red sign” on the map to the correct position, and press the “Manual Geotagging” button (right key function) to complete Geotagging process.
By Coordinates:•
Key in the exact Latitude (format: dd.ddddddd degree), Longitude (format: ddd.ddddddd
degree) and
Altitude in blanks, and press the “Manual Geotagging” button (right key func-
tion) to complete Geotagging process.
Right Click
Manual Geotaging (URL)
Page 33

30
Create a track fi le including photos and URL link
7.
1. 2.
6.
3.
4.
5.
Max. Photo Show Size: Select a size of photo shown on your track.1.
Map Type: Google Earth or Google Maps.2.
NOTE
When you choose Google Maps, the extra function of Google Maps API key as
below will show up.
Please key in your exclusive “Google Maps API Key” if you want to share your track
in your Blog.
Track Line Option: Set the color, transparency and width of the track line, also tick the item of 3.
“3D Track” if you need the track on Google Earth with height.
NOTE
When you choose Google Maps, the item of “Hybrid Map” will show up instead of “3D
Track”. Tick it if you prefer the map consisted of road and satellite image.
Page 34

31
Photo Map: Create a fi le only showing Geotagged photos on map (The initial fi le’s name will 4.
be “PGM”)
Photo-Track Map: Create a fi le showing Geotagged photos and track on map (The initial fi le’s 5.
name will be “PTGM”)
File Area: All fi les from point 4 & 5 will be shown here.6.
NOTE
Right key function is available for copying and deleting those fi les.
Make Report: Enter “Report Page” for further setting and create a report.7.
Page 35

32
Create a report
Page: Report page.1.
Tab: Each tab stands for one analytic chart.2.
Tick charts you want to include in your report.3.
Description: Key in some detail you want to show in report.4.
Create Report: Press this button to create a report with html format and open it by browser 5.
automatically.
1.
3.
2.
4.
5.
Page 36

33
A Complete Report File
5.
6.
4.
3.
7.
2.
1.
Page 37

34
Track Map: A map with track.1.
NOTE
If you have created a Photo-Track Map (PTGM) file during previous process, the
track presented on report will include photos.
Instantaneous Basic Information: The basic information will be changed along with the 2.
dynamic track.
Track Point Bar: Indicates the total track points and a moving one along with the dynamic
3.
track.
Stop : Stop the dynamic track i.e. the moving icon.•
Pause : Pause the dynamic track.•
Play : Re-start the dynamic track.•
Fast : Speed up the dynamic track.•
Slow : Slow down the dynamic track.•
Previous : Back to last diagram and stop auto-switching behavior.•
Pause : Stop in current diagram.•
Play : Re-start the Auto-switching behavior.•
Stop : Stop in current diagram.•
Next : Skip to next diagram and stop auto-switching behavior.•
Moving Icon: Stand for the dynamic track.4.
Track Information: Present detailed data about this track.5.
Analytic Diagrams: There are eight kinds of diagrams.6.
Operation Bar for Diagram: The default of diagrams will auto-switching around, you can stop 7.
this action via operation bar.
Page 38

35
Save a report
Press the “Save Report” button to save it in the specifi c area you assigned.1.
The complete report can be demonstrated anytime by double clicking the report fi le.2.
Page 39

36
NOTE
Please be aware that all fi les including jpeg, html and xml fi les should exist in the
same folder; otherwise the report fi le can not be shown normally.
Page 40

37
If there is any demand for GIS (Geographic Information System) application, please into GIS
Shapefi le Tool to transfer the format.
Selected LOG Section: Choose a track that you want to transfer to shapefi le format.1.
Selected Track Information: Include the Time for the fi rst and last point, and the amount for 2.
Total points, Push points and Shake on points.
Shapefi le Type: Select PolyLine or Point, and press “Transfer” button to confi rm it.3.
NOTE
For PolyLine, a track should include 2 points at least; otherwise, the format 1.
transfer process is not acceptable.
For Point, as following, it provides 3 kinds of log points for transfer.2.
Shapefi le Area: All transferred Shapfi le will be shown here.4.
NOTE
The shapfi le will be presented by zip fi le, and each zip fi le is composed of 1.
*.shp, *.shx and *.dbf.
Right key function is available for copying and deleting.2.
4.
3.
2.
1.
GIS Shapefi le Tool
Ð
Page 41

38
5.
4.
3.
2.
1.
Help
Ð
Page: Help page.1.
WBT_Tool User Manual: Link to a complete WBT-202 user manual.2.
Download TimeMachineX: Link to Wintec’s website to download TimeMachineX software.3.
MSCHART Register: Execute the MSCHART Register when the report function is not 4.
working.
NOTE
The computer which is login should be administrator or the one has the same
authorities.
Download latest WBT_Tool: Download the latest update fi le.5.
Page 42

39
WBT_Tool Update Process
Decompress the update fi le downloaded from WBT_T
ool.1.
Switch the WBT-202 to MSD mode (please do not execute the WBT_Tool).2.
In ”My Computer”, open WBT-202 via Explore.3.
Right Click
Page 43

40
Copy ”WBT_Tool.exe”from decompressed update file and paste to the mass storage of 4.
WBT-202 instead of the existing one.
Right Click
Page 44

41
TRACK EDITING VIA TimeMachineX
Track editing process, such as deleting some incorrect point or resetting some shift point to
Ð
its proper position, can be done via TimeMachineX.
Also, the log data stored in the WBT-202’s inbuilt backup memory can be downloaded and
Ð
edited through TimeMachineX.
Track editing process, such as deleting some incorrect point or resetting some shift point to
Ð
its proper position, can be done via TimeMachineX.
Also, the log data stored in the WBT-202’s inbuilt backup memory can be downloaded and
Ð
edited through TimeMachineX.
Install TimeMachineX
Ð
Please visit our website www.wintec.com.tw, and download the latest version of 1.
TimeMachineX by following path.
Support/GPS Application/WBT
-202.
After downloading, double click the program and follow the InstallShield Wizard to complete 2.
the installation process.
Convert the track fi le to TimeMachineX’s format
Ð
Please reconfi rm that the USB driver is existed. 1.
For log data stored in inbuilt backup memory
NOTE
Please refer to “USB Driver Installation” on page 51.
Turn on the WBT-202, connect it to computer by USB cable and execute the TimeMachineX.2.
Select a correct COM Port and baud rate of 57600 bps.3.
Page 45

42
NOTE
The correct COM Port can be confi rmed with Device Manager.
Page 46

43
Enter “Device Setting” Page of TimeMachineX, and see if the NMEA string running at 4.
the bottom of the page or not. If yes, that means the connection between WBT-202 and
TimeMachineX is working well.
Page 47

44
Read Log5.
Enter “Read Log” tab and press “Read Log” button to download recorded data.•
The “Read Log Succeed” dialogue shows up.•
Page 48

45
At this moment, all log data is to combine to form a TK1 fi le and show on track list.•
A TK1 file includes a lot of tracks, that is to say, all tracks inside the inbuilt backup •
memory would combine to only one TK1 fi le. Please use the right key function to convert
TK1 format to TK2. A TK2 fi le stands for one track, so you can choose a TK2 fi le for track
editing.
Right Click
NOTE
For deleting record, please press “Delete record” button to erase all data inside the
inbuilt memory of WBT-202.
When the deleting process is completed, the dialogue of “Log deleted” shows up.
Page 49

46
Connect the WBT-202 to PC, and enter MSD mode to execute the WBT_Tool.1.
Select a track, and use WBT_Tool to convert it to TK2 format i.e. the format for 2.
TimeMachineX.
For log data stored in Micro-SD card
Execute TimeMachineX and go to “Track Convert” page, the TK2 fi le transferred via WBT-3.
202 in last step should be show up in TK2 list as below.
Page 50

47
NOTE
The step2 should be done before executing TimeMachineX; otherwise, the 1.
TK2 fi le won’t auto-show up in the TK2 list.
You also can copy the TK2 fi le by hand if it doesn’t show up automatically.2.
In WBT_Tool, use the right key function to copy the TK2 fi le to desk, and
paste it in Track Convert page of TimeMachineX.
Right Click
Page 51

48
Track Editing
Ð
Enter “Track Editor” page, “Edit Track” tab, select a TK2 fi le, and double click it for editing.1.
Page 52

49
Start the track editing process.2.
If there are some fl ying points, you can move them to correct positions by dragging the red
points shown on Google Maps. Also you can delete points by right key function on point
list.
Right Click
Click and Drag
Please save the fi le after editing.3.
Save as a new TK2 fi le. Save the TK2 fi le.
NOTE
If you want to combine photos or make report with edited track, please save the
TK2 fi le editing by TimeMachineX back to the Micro-SD card inside the WBT-202,
and then complete the after process via WBT_Tool.
Page 53

50
Regarding the further instruction of TimeMachineX, please refer to the user manual
of TimeMachineX.
NOTE
If you have completed the installation process of TimeMachineX, the user manual
is existed in the system, you can fi nd it according to the following picture.
Page 54

51
INSTALLING THE USB DRIVER
Before connecting WBT-202 to computer (for navigation software or TimeMachineX…etc.) via
USB interface, please install the USB driver according to following processes.
Switch the WBT-202 to MSD mode and execute the WBT_Tool.1.
The USB driver (USB_DRV.inf) will be auto-copied to the path at “… \ my document \ 2.
WBT202”.
Press the (Flag) button to leave MSD mode.3.
Turn on the WBT-202 again and connect to computer via USB cable. At this moment, the 4.
computer will auto-detect the new USB device and ask for the software installation. The
Found New Hardware Wizard will pop up as below, please select item of “No, not this time”
and press “Next button for further operation.
Page 55

52
Select “Install from a list or specifi c location (Advanced)” and press “next” button.5.
Tick items as below picture and press “Browse” button.6.
Page 56

53
Choose the location of “… \ my document \ WBT202”, and press “OK” button.7.
When back the Found New Hardware Wizard, please press “Next” button to confi rm the 8.
location.
Page 57

54
The searching of the USB driver is in progress.9.
Click “Continue anyway”.10.
Page 58

55
Click “Finish” to complete it.11.
Page 59

56
Enter “Device Manager” to reconfi rm if the USB driver is installed successfully and which 12.
COM Port is the assigned one (The device should under connection).
In the future, when you connect the WBT-202 to the same computer with the same USB
Port, the assigned COM Port can be used directly.
Page 60

57
CONNECT TO POCKET PC
Switch WBT-202 on.1.
Click the Bluetooth icon shown on the 2.
lower right corner.
Select “Bluetooth Manager” and press 3.
“New” to search the Bluetooth device
you used.
The WBT-202 can connect to Pocket PC via Bluetooth on condition that the Bluetooth on
Ð
your pocket PC supports SPP(Serial Port Profi le) service.
Connect WBT-202 to Pocket PC according to below steps.
Ð
NOTE
The exact connection process should refer to the user manual of your Pocket PC.
Different Pocket PC has different screen shots and procedure.
Select “Explore a Bluetooth 4.
device” and “Next” to create
connection shortcuts for
WBT-202.
Click the icon of WBT-202 to 5.
check the Bluetooth device
service.
Page 61

58
Press “Bluetooth Serial Port” 6.
(SPP slave) and “Next” to
create a shortcut.
Shortcuts created. Press 7.
“Finish” to close the
connection wizard.
Press the icon of “WBT-8.
202: Bluetooth Serial Port”
and select “Connect” item to
connect WBT-202 to Pocket
PC.
Connection is success.
9.
The icon will become green
one as above picture.
Page 62

59
FIRMWARE UPGRADE
WBT-202 is firmware upgradeable. Please update the firmware inside the WBT-202 to the
latest version according to below steps.
NOTE
The latest fi rmware will be released on Wintec’s website.
Please reconfi rm the USB driver is existed.1.
T
urn off the WBT-202, take off the battery and disconnect the USB cable if any.2.
Press and hold the (Flag) button with providing the power to WBT-202 by USB cable 3.
simultaneously, and release the button when all LED lights are blinking. Now, it is under
fi rmware upgrade mode.
Press and hold the fl ag button
with plugging in the WBT-202
by USB cable simultaneously.
The WBT-202 is under fi rmware
upgrade mode when you see
all LED lights are blinking.
Now, you can release the flag
button.
Page 63

60
Decompress the fi rmware fi le and open the update tool “WBT-202_Firmware_Update_Tool.4.
exe”.
Click “Browser” button to select the fi rmware (*.wfw) for WBT-202.5.
Page 64

61
Select a COM Port.6.
The Firmware Update Tool will assign the correct COM Port (COM**(USBSER***)]
automatically, please press the “Connect” button to communicate with WBT-202.
NOTE
If the assigned COM Port is not correct, please go to “Device Manage” to reconfi rm
the correct one.
Page 65

62
Click the “Update Firmware” button when it becomes visible. And the fi rmware update 7.
process is in progress.
Click the “OK” button to complete the update process.8.
NOTE
If there is any error occurred during update process, please shut the Firm-1.
ware Update Tool and rerun the update process again.
If you want to leave the Firmware Update Mode before updating, please 2.
take off the USB cable directly or press and hole the (Power) button to
back regular mode.
Page 66

63
TROUBLE SHOOTING
If you run into any problem using WBT-202, use the following table to troubleshoot the
problem. If the problem persists, contact your dealer for further service.
The WBT-202 can not get acquisition.
Ð
You may be in a location where the radio signals from GPS satellites can not be reached.
Ð
Avoid using the unit in the locations such as tunnels, underground locations or among
Ð
obstructions such as tall buildings or thick forest.
The sun shade in the vehicle may ef
fect the reception.
Ð
Avoid placing 2 GPS devices too close during positioning.
Ð
Ð
It takes much time to get acquisition.
Ð
It may take a long time to track the location under following two situations:
Ð
The WBT-202 didn’t be operated more than 3 months.•
The distance between your current location and the last time device turn off location •
is more than 800 km.
At this moment, cold star is suggested. For details, refer to “Cold Start” on page 23.
Ð
There are some shifted points with incorrect velocity and
Ð
position in your track.
When you stay somewhere without movement or the moving speed is less then 10km/hr
Ð
or under the environment with tall buildings, the satellite signal is too weak to calculate
the accurate data. It’s a GPS character, just move to open sky area and keep moving to
get better GPS signal.
Ð
The PIN CODE for Bluetooth connection.
Ð
Please key in “0000”.
Ð
I lost my battery. Where can I fi nd the replacement?
Ð
The battery model for WBT-202 is BL-5C, compatible with Nokia phone series.
Ð
How may waypoints can WBT-202 log?
Ð
Regarding WBT-202, you can log data in Micro-SD card or its inbuilt backup memory.
Ð
For Micro-SD card, it depends on the capacity for memory card. With 1GB is around 67
million points and 2GB is 134 million points.
For inbuilt backup memory
, it can accept 260,000 points.
Ð
Page 67

64
I can not use my own Micro-SD card.
Ð
Please make sure that the Micro-SD card is placed properly.
Ð
WBT-202 doesn’t support the Micro-SD card with SDHC format.
Ð
Please be aware that the capacity of Micro-SD card must no exceed a maximum of
Ð
2GB. And the brand of SanDisk, Transcend, FILEMATE, KINGMAX and Kingston are
suggested.
For the further operation at the fi
rst time using, please refer to the detail of page 12.
Ð
Ð
Page 68

65
Wintec Co., Ltd.
www.wintec.com.tw
 Loading...