

Page 1
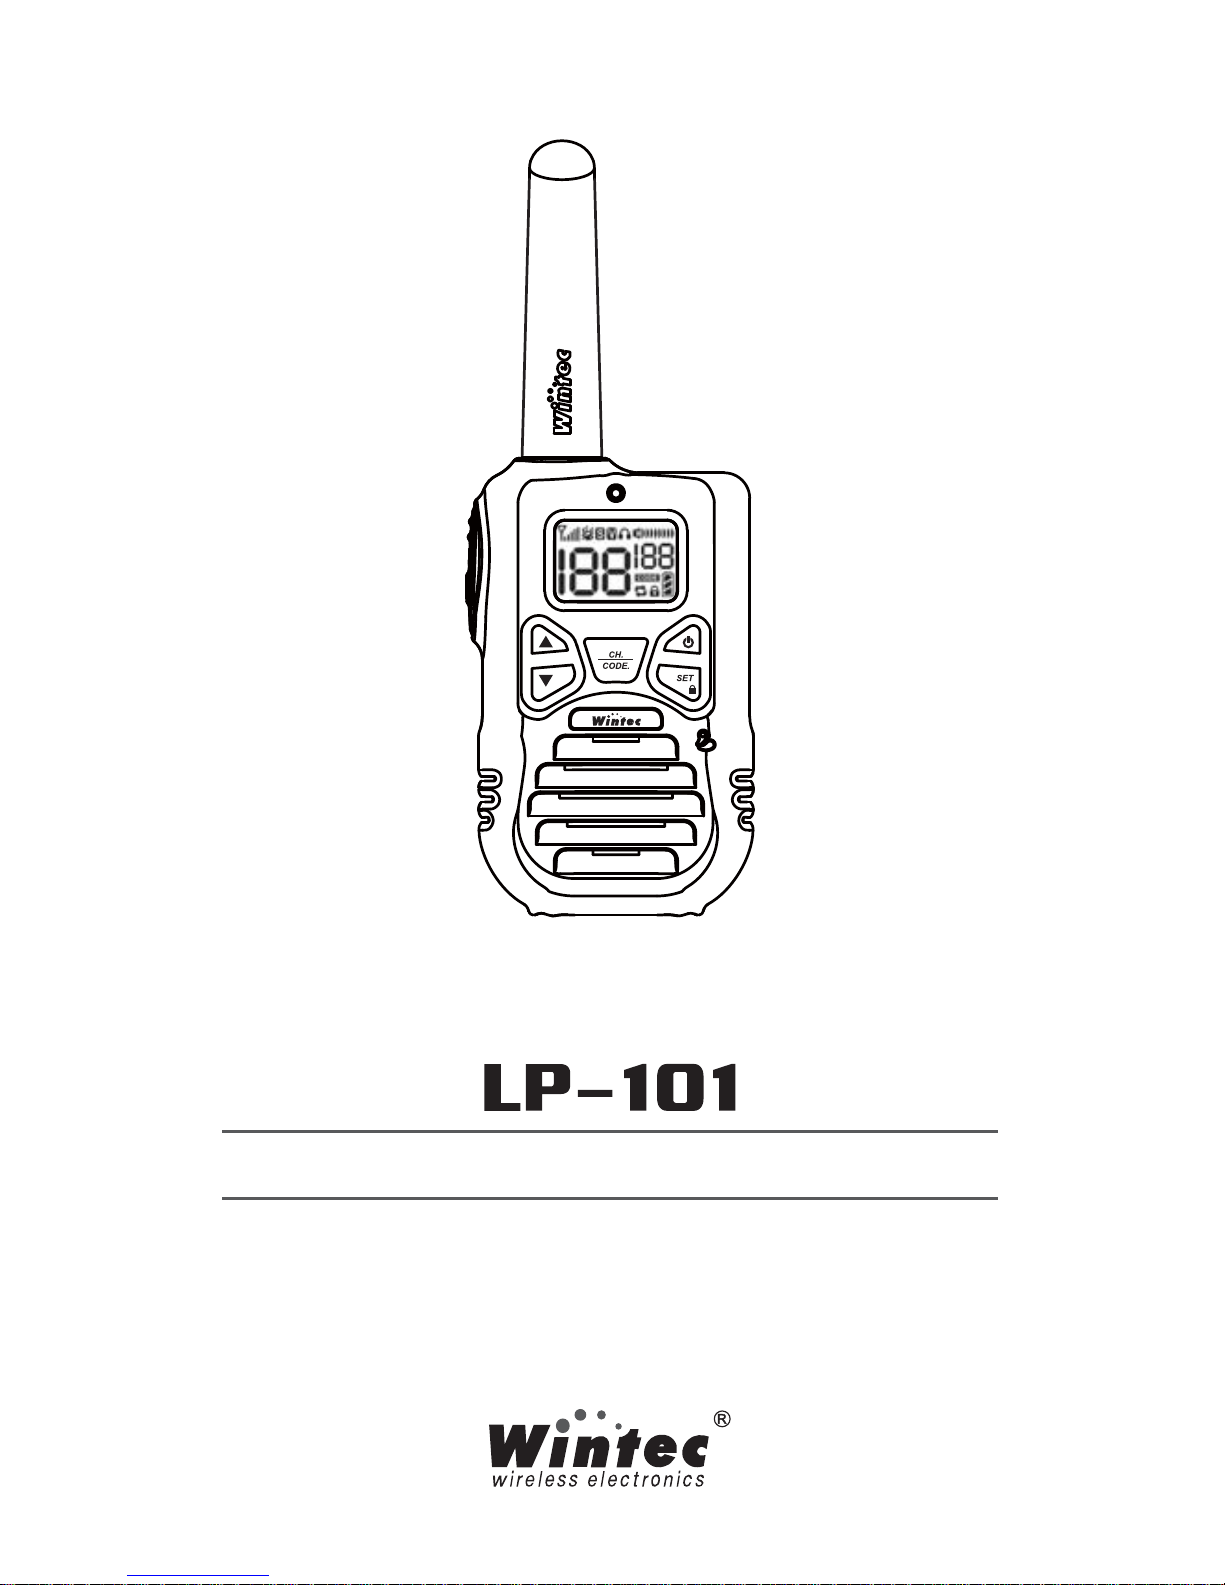
USER MANUAL
Page 2
Thank you for purchasing Wintec products. Based on the innovative
technology in this ever-changing environment, we have been
developed many wireless products that have attract more consumers’
attentions. We sincerely appreciate your interest for our products, and
we suggest you read the instruction carefully. Your comment will be
highly valued. Please read through the manual in order to get familiar
with the device and learn the features of this model.
The following safety precautions shall always be observed during
operation.
Do not modify the radio for any reason.
Use only Wintec supplied or approved batteries and chargers.
To avoid electromagnetic interference and/or compatibility
conflicts, turn off your radio in any area where posted notices
instruct you to do so. Turn off your radio before boarding an aircraft.
Any use of a radio must be in accordance with airline regulations or
crew instructions.
Turn off your radio prior to entering any area with explosive and
flammable materials.
Do not use any portable radio that has a damaged antenna. If a
damaged antenna comes into contact with your skin, a minor burn
can result.
Do not expose the radio to direct sunlight over a long time, nor
place it close to heating source.
When transmitting with a portable radio, hold the radio in a vertical
position with the microphone 3 to 4 centimeters away from your
lips. Keep antenna at least 2.5 centimeters away from your body
when transmitting.
Certificate Approval
Safety Warning
.
.
.
.
.
.
.
Page 3

Contents
Radio Overview.....................
LCD Icons........................
Installation of Accessories.................
Operation Guide.....................
Function Menu.....................
Optional Accessories...................
1
2
4
5
8
10
When you receive your radio package, inspect the shipping carton for
any signs of damage. Next, remove and check the contents of the
packing case to be sure that all items ordered have been included.
Contents of the packing case may be different from those listed if
optional accessories were ordered.
Packaged Model Contents
1. Radio Unit
2. Battery
3. Belt Clip
4. Rapid Charger and Transformer
5. User’s manual
Page 4
1
2
6
7
8
9
11
12
10
3
4
5
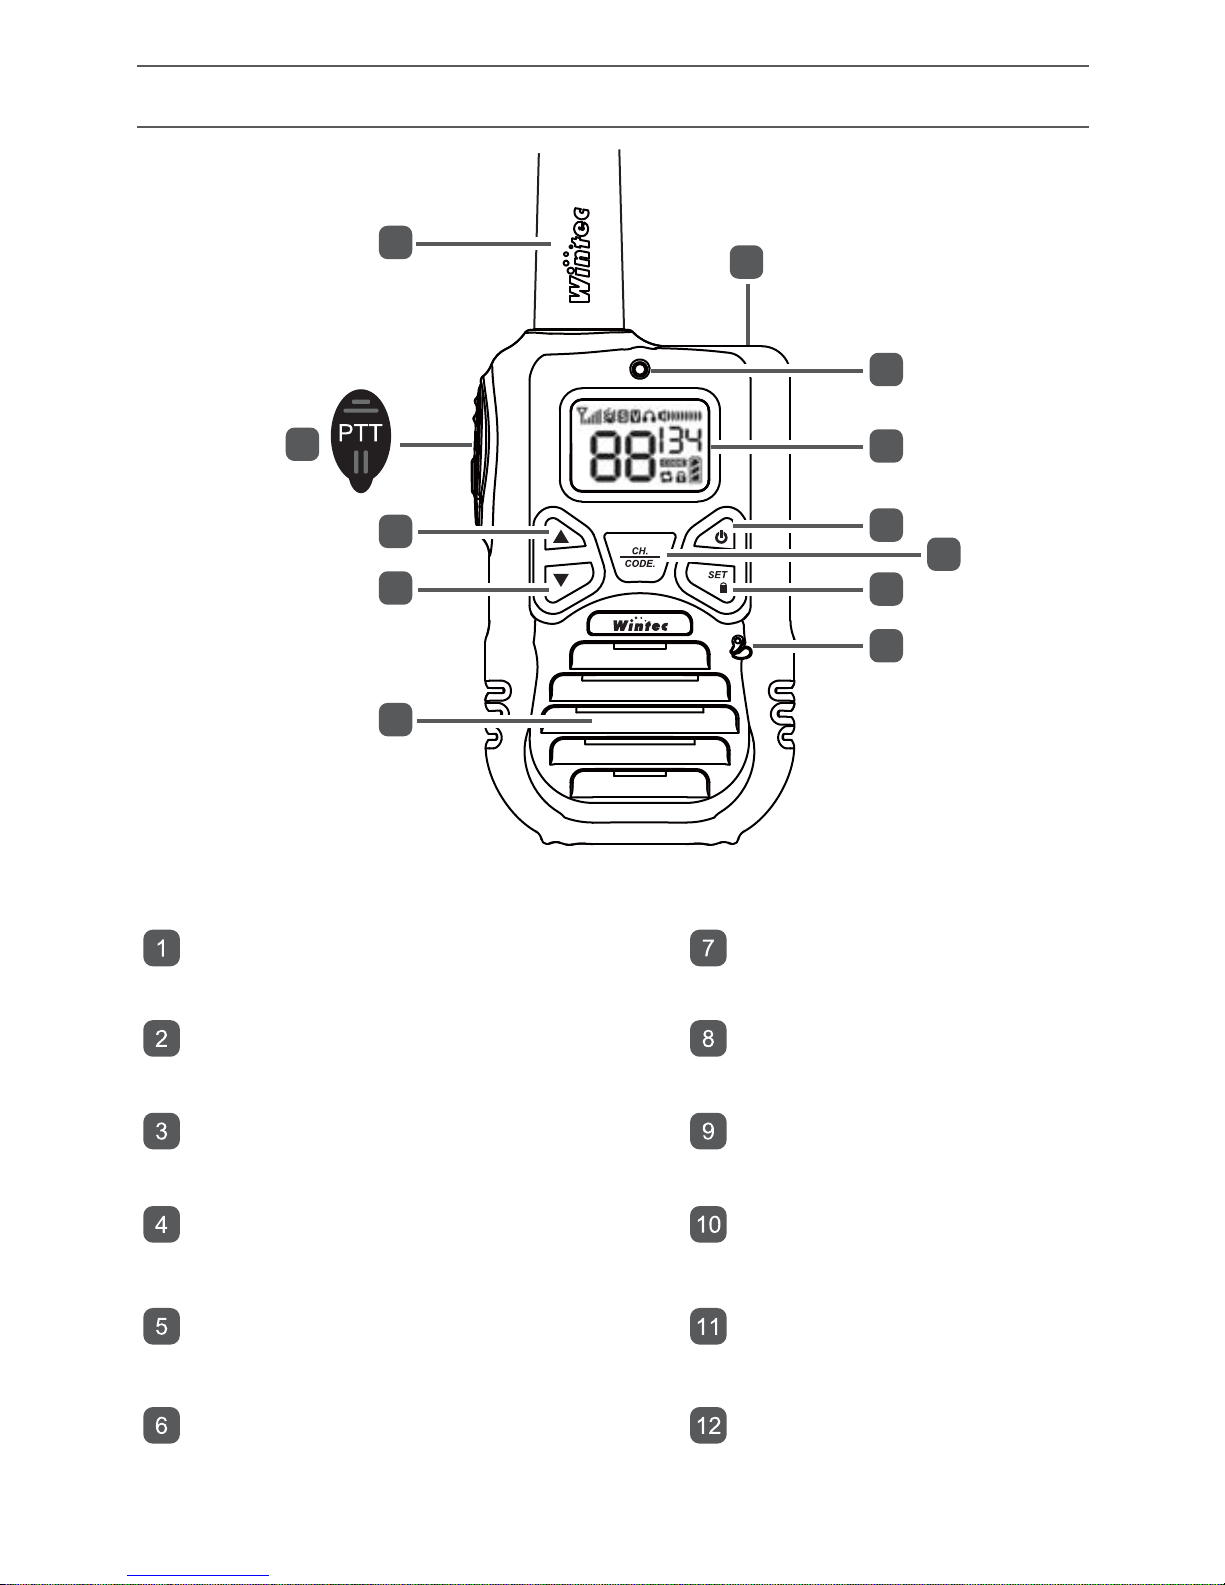
Radio Overview
1
Antenna
PTT Button(Push-to-talk)
Up Key
Down Key
Speaker Area
External Microphone Jack
LED Indicator
LCD Screen
Power Button
Channel / Code Adjustment
Function Key / Keypad Lock
Microphone
Page 5
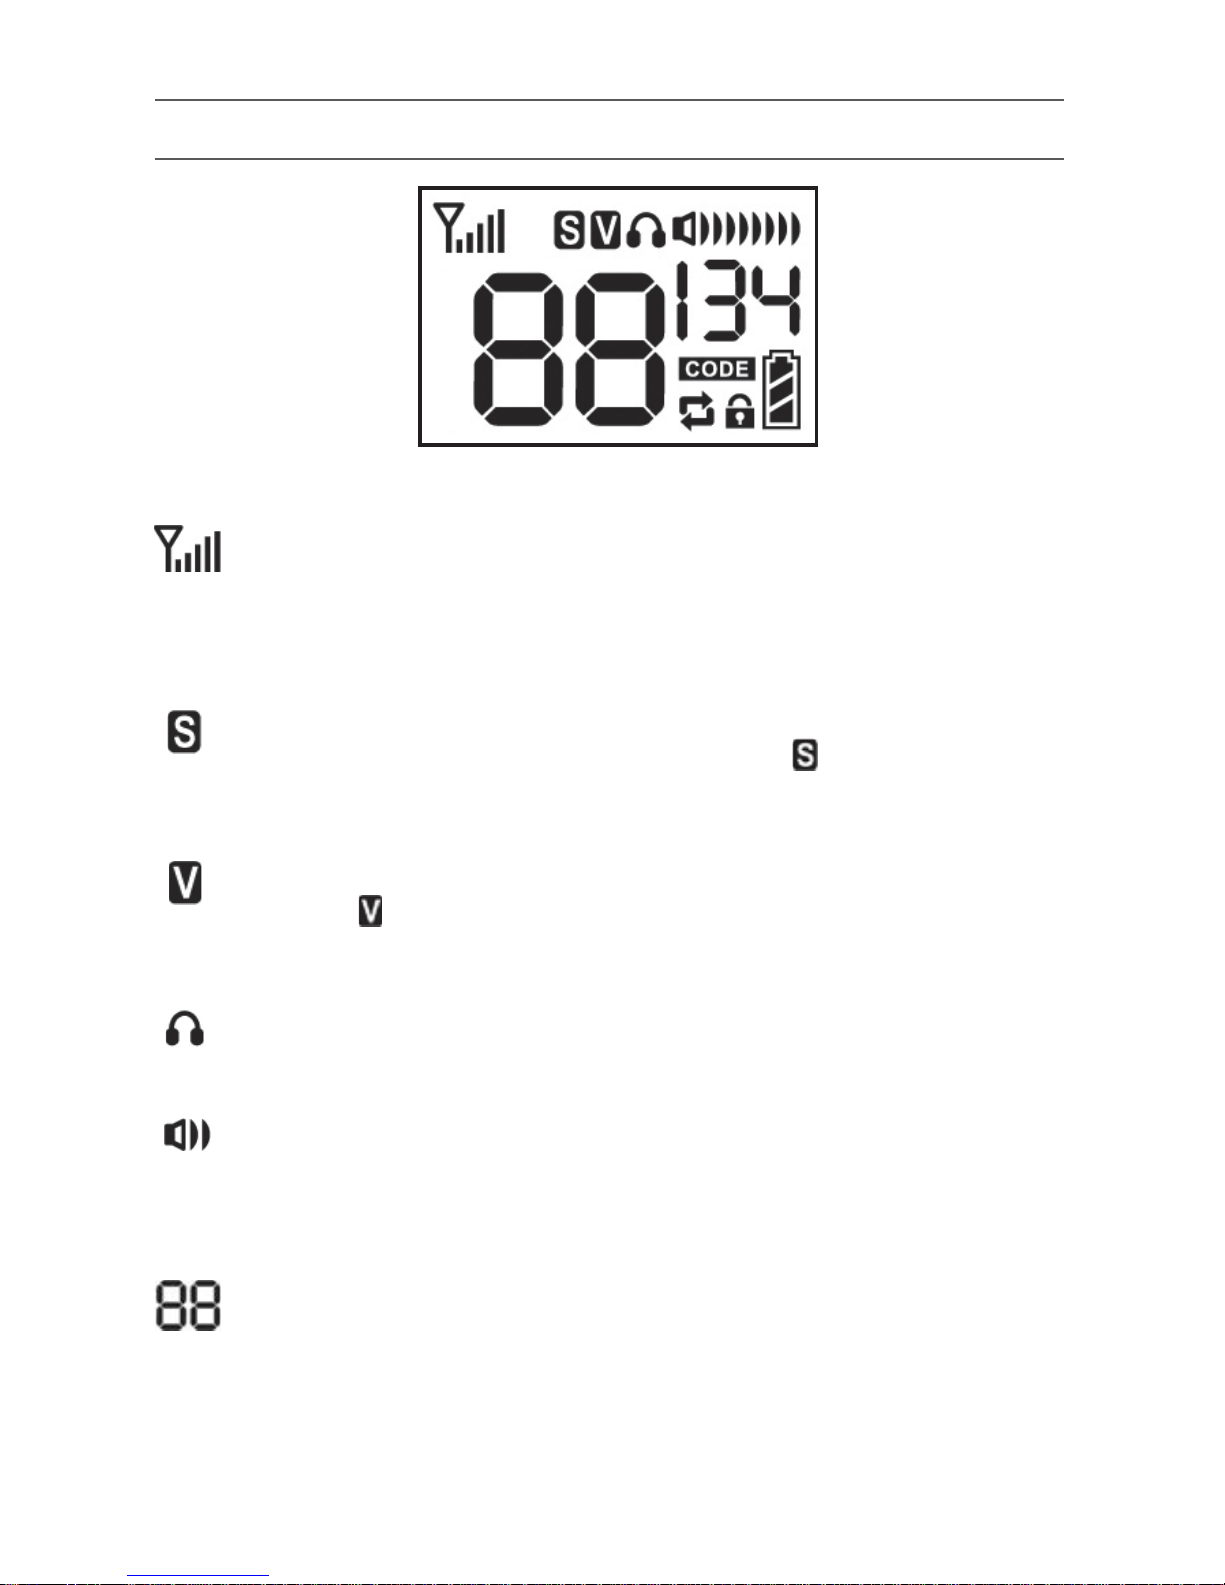
2
When the scan function enabled, the icon will appear on the
screen and ash once the signal is receiving.
Signal Strength
Shows the signal strength. Five bars indicate the strongest signal.
The more bars of signals on the screen, the stronger the signal
received.
Scanning On
LCD Icons
The icon will appear on the screen when the VOX function is
enabled.
Vox On
The icon is lit up when the headset is connected.
Headset
There are a total of eight levels display, and 16 levels of volume
adjustment / control.
Volume
Indicates the current channel.
Channel Number
Page 6

3
Please refer to the table listed as below.
Code Activated indication
4 level indication. Shows the remaining charge of the battery
capacity.
Battery Level
Indicates that all operations on the keypad are disabled besides
PTT, unlock, volume adjustment and power button.
Keypad Lock
The icon is lit up when the radio is under programming mode.
Programming Mode
51 groups in CTCSS.
CTCSS
Page 7

4
Battery Installation
# 1
# 2
Press and hold the battery latch locked on the bottom and remove
the case upward as in Fig # 1.
Place or take out AA or LI-ION battery pack into battery compartment
as in illus # 1.
(Please note that to install the lithium battery into its compartment, it
needs to be put at with front-side upward.)
Place the battery case from top to the button and press the case until
a click sound is heard x as in Fig # 2.
It will lock into compartment.
BT FRS10LI The Front
1.
2.
3.
Page 8

5
Operation Guide
Before operating the radio, make sure the attached battery is fully
charged. When the battery level is very low, you need to recharge it
before you can continue to use your radio (The radio has a battery
voltage icon to show the battery status on LCD screen).
Press and hold the power button around 1sec to power on the radio.
Press and hold the power button around 1sec to turn radio o.
Power On / O
Note: When turned o successfully, the monitor will shut down and
you'll hear the turn-o sound.
.
.
Before press and hold the PTT button, please check if the LED
indicator turns on green or not (Green stands for channel busy).
Press PTT button and speak clearly with your mouth about 5cm away
from the microphone. The LED indicator turns on red during
transmission.
Release PTT button when you nish speaking and receive signals.
During receiving, LED indicator turns on green.
Receiving / Transmitting
.
.
.
Press repeatedly on Up button to adjust the volume louder; Press
repeatedly on Down button to decrease the volume.
Press and hold UP or Down button can quick adjust the volume louder
or lower.
There is a total of 16 levels display, and each adjustment increase or
decrease by 2 levels.
Adjust the volume slowly to avoid outburst of sound harmful to ears.
Adjusting Volume
.
.
.
.
Press CH button. While channel icon blinks, the radio is in the channel
selection mode.
Press [▲] [▼] to select the assigned channel.
Channel Adjustment
.
.
Page 9

6
Press CH button or PTT again to set the channel and exit the channel
selection.
.
Press twice CH button, the icon will ash and enter the CTCSS
adjustment mode.
The Screen indicate〝OF〞when the code turns o above the icon .
Press [▲] [▼] to enable and select the assigned tone on channel.
When the code is set, press〝PTT〞, 〝CH〞or 〝SET〞button to
jump o and return to the main page.
There are 51 standard codes of CTCSS as below table. (Factory default
is OFF)
CTCSS Tone Adjustment
.
.
.
.
Hold on〝SET〞button for about 1 sec till shows on the screen to
conrm keypad lock is enabled.
Hold on〝SET〞button again, the disappear on the screen to
disable the keypad lock function.
Keypad Lock / Unlock
.
.
Press any button to initiate the backlight and press PTT button to turn
o the backlight.
The backlight will automatically turn o after 7 sec.
LCD Backlight On / O
.
.
1 67.0 11 97.4 21 136.5 31 192.8 41 159.8
2 71.9 12 100.0 22 141.3 32 203.5 42 165.5
3 74.4 13 103.5 23 146.2 33 210.7 43 171.3
4 77.0 14 107.2 24 151.4 34 218.1 44 177.3
5 79.7 15 110.9 25 156.7 35 225.7 45 183.5
6 82.5 16 114.8 26 162.2 36 233.6 46 189.9
7 85.4 17 118.8 27 167.9 37 241.8 47 196.6
8 88.5 18 123.0 28 173.8 38 250.3 48 199.5
9 91.5 19 127.3 29 179.9 39 69.3 49 206.5
10 94.8 20 131.8 30 186.2 40 62.5 50 229.1
51 254.1
CTCSS
Note: When keypad is locked, all buttons are locked expect PTT, unlock,
volume adjustment and power button.
Page 10

7
Hold PTT button and simultaneously press [▲] to expand to high power
or press [▼] to switch to low power .
Power Adjustment
Hold〝PTT〞and press〝SET〞button once together to sent out the
tone call to other units.
Tone Call Selection
Press 〝CH〞 button, when channel icon blinks, hold [▲] or [▼]
around 2 secs to perform the channel scanning.
When performing the auto scanning, jumping of channel numbers
increasingly or decreasingly indicates scan in progress.
Scan stops when it detects a busy channel. Temporarily press any
〝
PTT〞,〝CH〞or〝Set〞button will disable scan and select the nal
busy cannel.
The radio will only scan the channels in the list.
Scan Channel
.
.
.
.
Note: To perform the scan function, please turn o the CTCSS code in
advance.
Page 11

8
Function Menu
Press and hold P2 button to enter the function menu. Press [▲] [▼] to
select the function settings.
Adjust radio’s squelch level between Level 0 ~ Level 7.
The smaller grade to be set, the weaker signals can be detected by the
speaker but the radio is susceptible to interferences.
Level 0 means the SQL is turned o.
SQL Adjustment
.
.
.
VOX’s sensitivity adjustment can be selected in OFF / 1~9 levels.
1 stands for the highest sensitivity; 9 stands for the lowest. That
means, the smaller of the no. means the better ability to transmit the
signals.
VOX Adjustment
.
.
Menu Items Symbol Factory Default Option
SQL Level 3 Level 0~ Level 7
VOX OFF
OFF
Level1~ Level 9
Tone Call OFF b01 ~ b10
Keypad Tone ON ON / OFF
Power Save 1-2
OFF / 1-1 / 1-2 /
1-3 / 1-4
Page 12

9
There are totally 11 kinds of tone call for selection. The range is from
b0~b10.
Tone Call Selection
Press [▲] [▼] to enable(ON) or disable(OFF) this function.
Keypad Tone
Press [▲] [▼] to enable(ON) or disable(OFF) this function. Enable
power saving mode could extend radio operation time.
There are 4 levels for options. Choose 1-4 if talk time is short for best
power saving and in general 1-2 is for the proper use.
When in the power saving mode, the icon will be ashing on the
main screen.
Power Saving Mode
.
.
.
Page 13

10
Optional Accessories
LP-10M
Swivel Belt Clip for best placement
and take-out the radio
LP-CHG 10B
Desktop Rapid Charger
charging time 2hrs
BT FR 10LI
3.7V/1250mAh
Li-ion batteryin the transceiver
LP- 10A
Earbud Headsets
LP-10B
Earhook Headsets
LP-10C
Air-tube Headsets
PB 101
Leather Case
WI AL10
Programmable Cables
Note: Pictures are for reference only and may vary from actual product. Product
function shall remain the same. The above listed items are the common optional
accessories for your radio. To order other accessories, please contact your local
dealer.
Wintec endeavors to achieve the accuracy and completeness of this manual,
but no warranty of accuracy or reliability is given. All the above specifications
and design are subject to change without notice due to continuous
development. No part of this manual may be copied, reproduced, translated,
stored in a retrievable system, distributed, or transmitted in any form or by
any means, electronic or mechanical, for any purpose without the express
written permission of Wintec.
Page 14

PK EZ01-S-2 VER.1
www.wintec.com.tw
 Loading...