

Page 1

wintecind.com/FileMateIdentity
Page 2
2 시작하기 전에
Page 3

CONTENTS
4 Before Getting Started
5 Safety Precautions
7 Using IDENTITY tab Safely
7 Symbols in the Manual
8 Features of IDENTITY tab
10 Product, Accessories & Optional
Components
10 Product and accessories
11 Optional components
12 IDENTITY tab Exterior
12 Frontal view of IDENTITY tab
12 Rear view of IDENTITY tab
13 Top and bottom view of IDENTITY tab
13 Holding IDENTITY tab Correctly
14 Charging the Battery
16 Basic Functions
17 Turning On/ Turning Off/ Resetting
17 Turning on
17 Turning off
18 Resetting
18 Button Functions
19 Home Screen
22 Using the Touchscreen
22 Precautions before use
22 Tapping
23 Tapping and holding down
24 Dragging
25 Enlargement
25 Reduction
26 Entering Text − Keyboard
26 Editing text
27 Executing Functions
27 Execution functions on the Home screen
28 Usage by screen display
31 Adjusting the Volume
32 Connecting the Accessories
32 Connecting the earphones
33 Inserting / removing the SD card
34 Connecting the External Devices
34 Connecting to a computer
35 Connecting to an external USB storage
device
36 Connecting to an HDMI device
40 Other Features
41 Talk
42 Talk settings
43 Maps
44 Market
45 Address Book
46 Managing the address book
47 Sending an email
48 Gallery
49 Managing pictures and video files
50 Video
50 Caption settings
51 Music
52 Playing music
52 Deleting music
53 Photo
53 Editing pictures
54 My Album settings
54 Slideshow
55 Task Manager
55 Ending applications
56 Clock
2 Before Getting Started
Page 4

56 Set Alarm
57 ThinkFree Oce
58 File Manager
59 Twitter
60 ConvergenceOne™
60 Installing ConvergenceOne™ on a PC
62 Playing multimedia contents using a PC
63 Program screen
64 Playing multimedia contents using
IDENTITY tab
66 Email
66 Setting up an email account
68 Adding an email account
68 Setting up your work email
69 Deleting an email account
70 Browser
71 Camera
72 Settings
73 Wireless & networks
74 Sound
75 Display
76 Location & security
77 Applications
78 Account & Sync
79 Privacy
80 SD card & device storage
81 Search
82 Select language
83 Android keyboard
84 Date & Time
85 About system
86 Index
87 Managing Data on IDENTITY tab
88 Specications and Features
90 Copyright / Authentication, Trademark /
Exemption Clause
90 Copyright
90 Trademark
90 Exemption clause
90 Internet Service Types
91 Troubleshooting
94 Warranty Statement and After-Sales Service
96 Index
Before Getting Started 3
Page 5

Before Getting Started
Product, Accessories & Optional Components
Safety Precautions
Using IDENTITY tab Safely
Symbols in the Manual
Features of IDENTITY tab
IDENTITY tab Exterior
Holding IDENTITY tab Correctly
Charging the Battery
4 Before Getting Started
Page 6
Safety Precautions
Class B Device (Residential Broadcasting and Communications Device): IDENTITY tab is for
residential environments (Class B) and is certied for EMC (Electromagnetic Compatibility).
This device is used mainly in residential environments, and can be used in all regions.
Warning
Breaching this safety instruction may result in death or major injury to the user.
Caution
Breaching this safety instruction may result in minor injury to the use and product damage.
For safe and proper use of the product, avoid the following places.
Places close to home appliances, such as a TV, audio equipment, or a refrigerator.
Places affected by heat or direct sunlight.
Steel structures or places enclosed with thick walls.
Dusty places.
Wet or damp places.
Turn o IDENTITY tab in places where use of radio devices is prohibited.
A problem or danger may occur with relation to radio waves.
Turn off IDENTITY tab when boarding an airplane. The radio waves emitting from
IDENTITY tab may affect the electronic aviation systems and endanger the airplane.
Turn off IDENTITY tab in a hospital. The radio waves emitting from IDENTITY tab
may affect medical equipment.
Precaution when using the power
Do not pull out the adapter cord or touch the power plug with wet hands.
Do not connect many power plugs into the same extension cord.
Do not use a damaged power cord, a damaged plug or a loose power outlet.
Do not use IDENTITY tab in areas with a high temperature or humidity.
IDENTITY tab can be broken when you drop or impact it strongly.
Do not disassemble, repair, or modify your IDENTITY tab arbitrarily.
Do not paint or put a sticker on your IDENTITY tab.
Before Getting Started 5
Page 7
Safety Precautions
Precautions for battery use
Do not disassemble the battery, put it in the mouth, or eat it (also keep away from
pets).
Ensure that no leaked battery fluid comes into contact with the eyes, skin, or cloth.
Do not impact the battery or make a hole in it with a sharp object.
Do not peel the surface of the battery or modify it.
Ensure that the battery is charged with a standard charger that is certified by
government-designated authorities.
Do not impact the battery or disassemble arbitrarily.
If an uncertified battery is used, it may explode.
Do not place the battery in the vicinity of heat sources (heater, microwave, etc.).
Do not leave the battery in a sauna where the temperature is very high or heat the
battery up.
Ensure that the battery charging terminals do not make contact with metal
substances.
Precautions when using the product
Do not drop or impact IDENTITY tab.
Ensure that IDENTITY tab is always used or kept in a clean area.
Do not leave IDENTITY tab in a humid, dusty, or sooty area.
Use a smooth cloth soaked with a neutral detergent when you clean your IDENTITY
tab and the charger.
The IDENTITY tab battery may have discharged spontaneously during distribution.
If this happened, charge the battery for more than 5 hours before use.
Other precautions
Please learn how to use the antenna properly. Do not touch the antenna or the area
where the antenna is embedded, otherwise battery consumption may increase.
If the same screen is displayed continuously, an afterimage may appear.
If a protective film or a sticker is stuck on the screen, the touchscreen may
malfunction.
6 Before Getting Started
Page 8
Using IDENTITY tab Safely
Do not download suspicious applications.
Do not visit unreliable websites.
Delete suspicious messages and mails sent by unidentified senders.
Use the password-setting function and change your password regularly.
Only turn on wireless interfaces, such as Bluetooth when necessary.
If an abnormal symptom continues, check if your IDENTITY tab is affected by malicious
codes.
Execute a virus check before using a downloaded file.
Install an anti-virus application and execute a virus check regularly on the external
devices connected to your IDENTITY tab.
Do not modify the structure of the platform.
Update the OS and anti-virus appplication to the latest version at all times.
Symbols in the Manual
Note
Additional description of the corresponding function or cautions when you use the function
To Execute
Description of the order of execution
Descripton of the connecting menu for the corresponding function or relevant functions.
Before Getting Started 7
Page 9
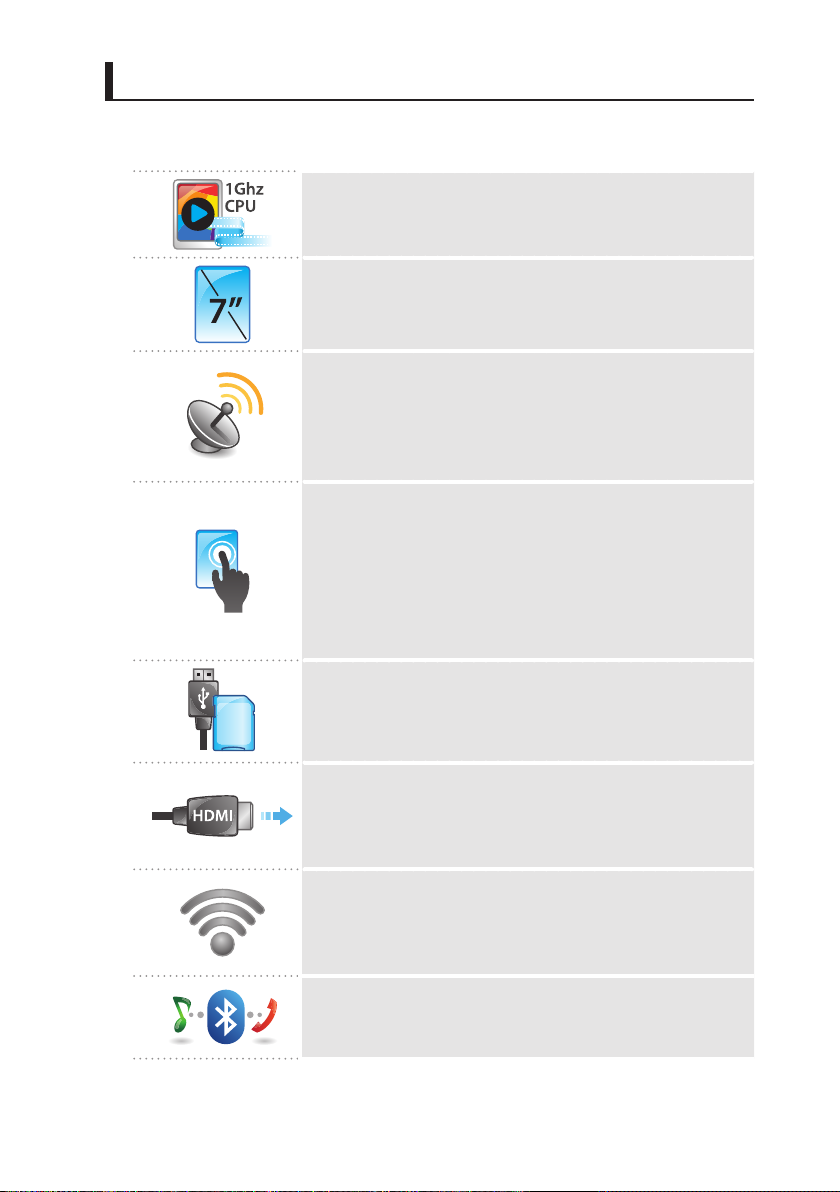
Features of IDENTITY tab
IDENTITY tab is an HMHD (Home Media Hub Device) for future media convergence.
The market's best specication of 1 GHz CPU
A new 1 GHz ARM Coretex-A8-based multimedia processor
processes 3D graphics and HD videos quickly.
7” WVGA TFT LCD Screen
Provides a natural and clear resolution for magazines,
animations, and HD videos, Internet web pages, etc.
GPS, a G sensor, a light sensor, and various other sensors are
incorporated.
Convenient functions are provided, using the GPS, G sensor and
light sensor. You can use services, such as maps and augmented
reality, by tracking your location.
Multi Touch / Full Capacitive Touch Screen
A touch method that utilizes the static electricity of the human
body is used. Various operations are available with multiple
touch points.
The response of the device to touch can be set in accordance
with the number of touch points. Operations are available by
adjusting the touch point gaps.
8 Before Getting Started
SD
SD Card Slot / USB Host / Slave Mini Slot
You can save and manage your data easily in the SD card. You
can also send and manage your data using the USB cable.
Micro-HDMI
You can connect digital devices to your IDENTITY tab more
easily and quickly using the HDMI cable for high quality images
and sound.
Wi-Fi
You can use an ultra high speed Internet or communications
service within a certain distance from where an AP (Access
Point) is installed.
Bluetooth
Convenient functions are provided, using Bluetooth. Enjoy
videos and musics with a Bluetooth headset.
Page 10
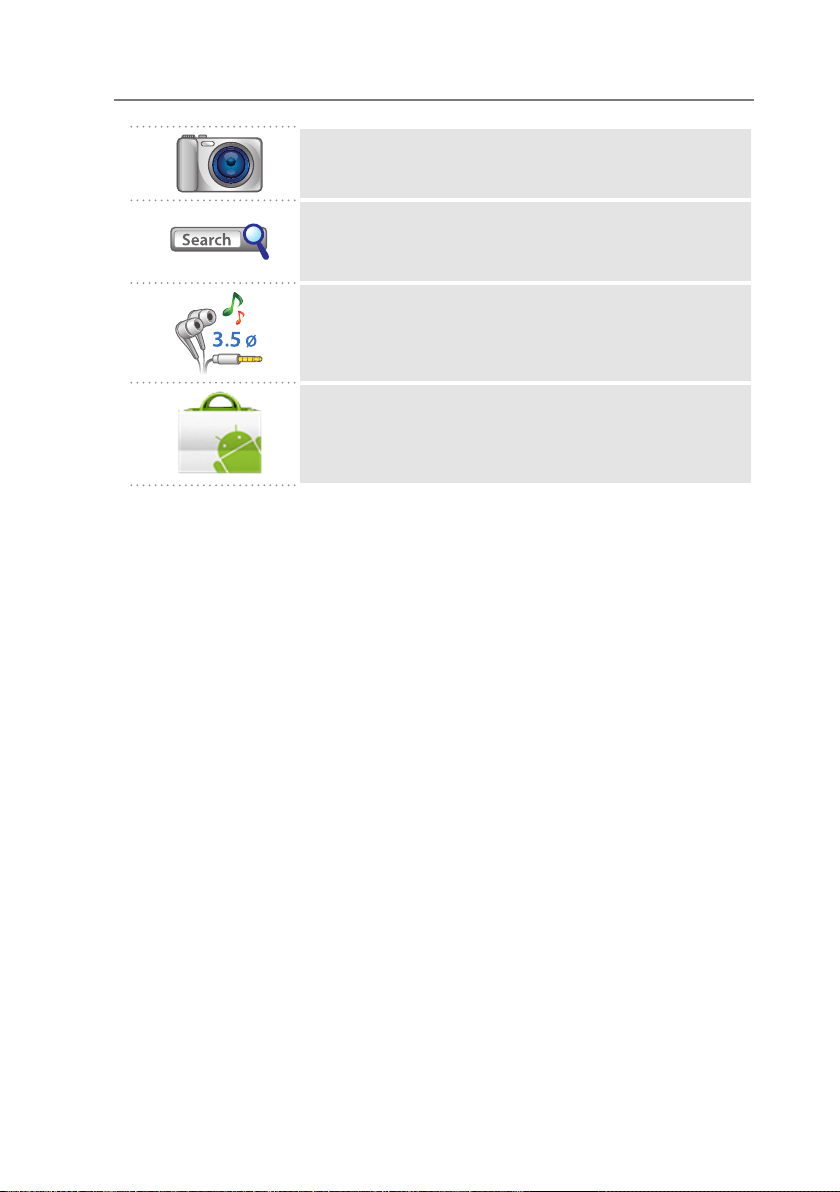
Features of IDENTITY tab
Camera
You can take pictures with a 3M pixel camera.
Smart Search
You can use various search engines. You can easily and quickly
check various and accurate search results.
3.5 Ø Earphones
You can enjoy high-quality live sound eects with the 3.5 Ø
earphones without using a jack converter.
Google Market
You can download and use various applications by Google
market.
Before Getting Started 9
Page 11

Product, Accessories & Optional Components
Product and accessories
USB cable for charging
Simple IDENTITY tab
Portable pouch for
protecting IDENTITY tab
from scratches or external
impacts
5-pin power adapter
The above items comprise the product and the accessories inside the package
when you purchase the product.
The images of the product and the accessories may dier from the actual product
and its accessories. Some accessories are subject to change.
the IDENTITY tab battery
and connecting external
devices to IDENTITY tab
IDENTITY tab earphones
that provide superior
sound quality
Cleaning cloth for cleaning
IDENTITY tab
CD-ROM
(User Manual, Installation
Program)
Quick Start Guide for
users to quickly use the
functions of IDENTITY tab
10 Before Getting Started
Page 12

Product, Accessories & Optional Components
Optional components
A protective lm, a premium pouch and mount, a small mount, a silicon urethane case, a car
mount, etc.
The earphones that come with your IDENTITY tab are only for use with IDENTITY
tab, so they may not be compatible with cellular phones or MP3 players.
Using the accessories that come with your IDENTITY tab will deliver you the best
performance.
When purchasing optional components, rst check if they are compatible with
your IDENTITY tab and use only registered parts.
Some optional components are subject to change, depending on the
circumstances.
Please be aware that Enspert shall not assume responsibility for the decreased
lifespan or failure of your IDENTITY tab resulting from using non-authorized
optional components.
For improving its performance, the exterior and specications of IDENTITY tab are
subject to change without prior notice. The sale of optional components is subject
to change depending on circumstance. For further information on the optional
components, please visit the Enspert website (http://www.identitytab.com).
Before Getting Started 11
Page 13
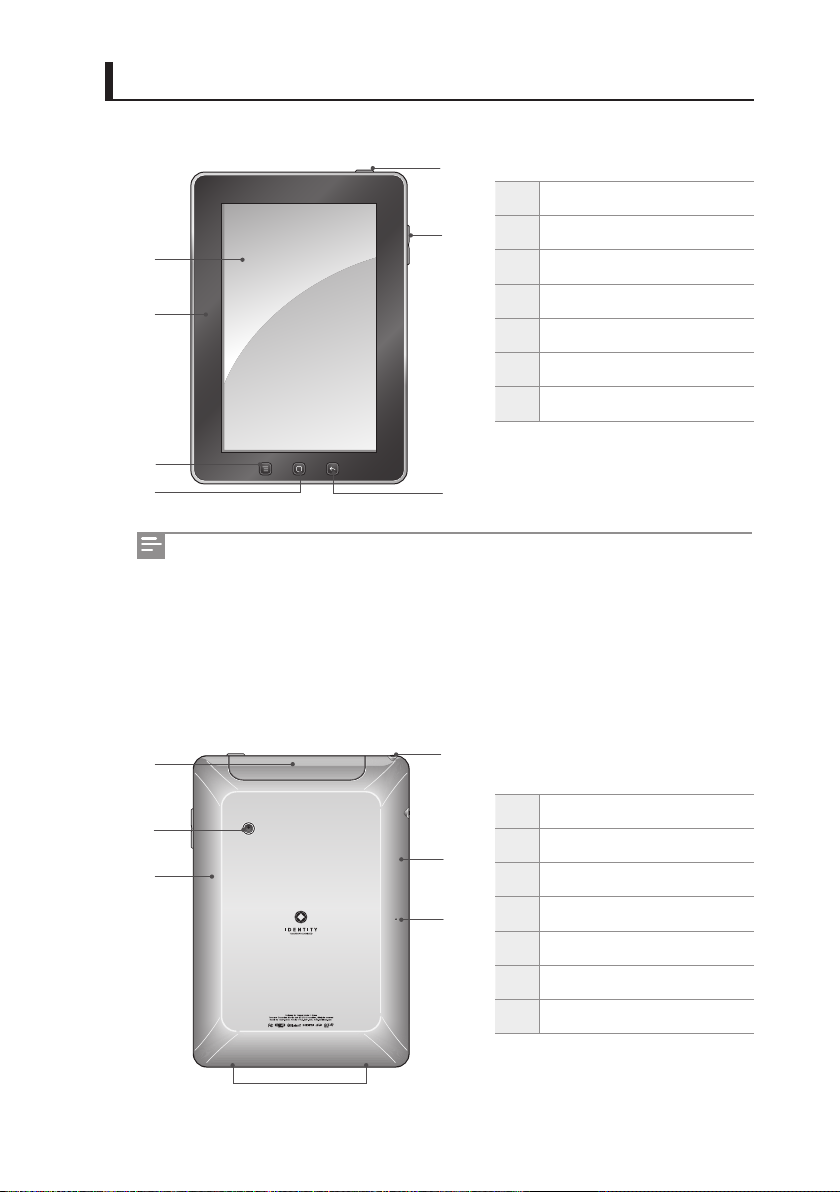
IDENTITY tab Exterior
Frontal view of IDENTITY tab
2
3
4
5
You can connect the power adapter and the USB cable, which is included in the
package, to IDENTITY tab.
Touching the Wi-Fi antenna area while using Wi-Fi and Bluetooth may reduce the
quality of communication or increase the consumption of the battery.
The IDENTITY tab touchscreen is coated with an anti-ngerprint lm to prevent
ngerprints.
1
7
6
1
2
3
4
5
6
7
Power Button
Touchscreen
Light Sensor
Menu Button
Home Button
Previous Button
Volume Button
Rear view of IDENTITY tab
1
2
3
12 Before Getting Started
4
7
6
5
1
2
3
4
5
6
7
Port Cover
Camera
GPS Antenna
Speakers
Microphone
Wi-Fi Antenna
Earphones Jack
Page 14

IDENTITY tab Exterior
Top and bottom view of IDENTITY tab
Earphones Jack
1
Reset Button
2
micro-HDMI Port
1 3 42
5
3
SD Card Slot
4
Mini USB Port (Charging)
5
Speakers
6
6
Holding IDENTITY tab Correctly
When using your IDENTITY tab, hold it correctly as shown in the gure below.
Touching the area where the Wi-Fi antenna is embedded during data
communication may reduce the quality of communication or increase the
consumption of the battery.
Using accessories such as metallic stickers around the area where the Wi-Fi
antenna is embedded may reduce the quality of communication or increase the
consumption of the battery.
Before Getting Started 13
Page 15
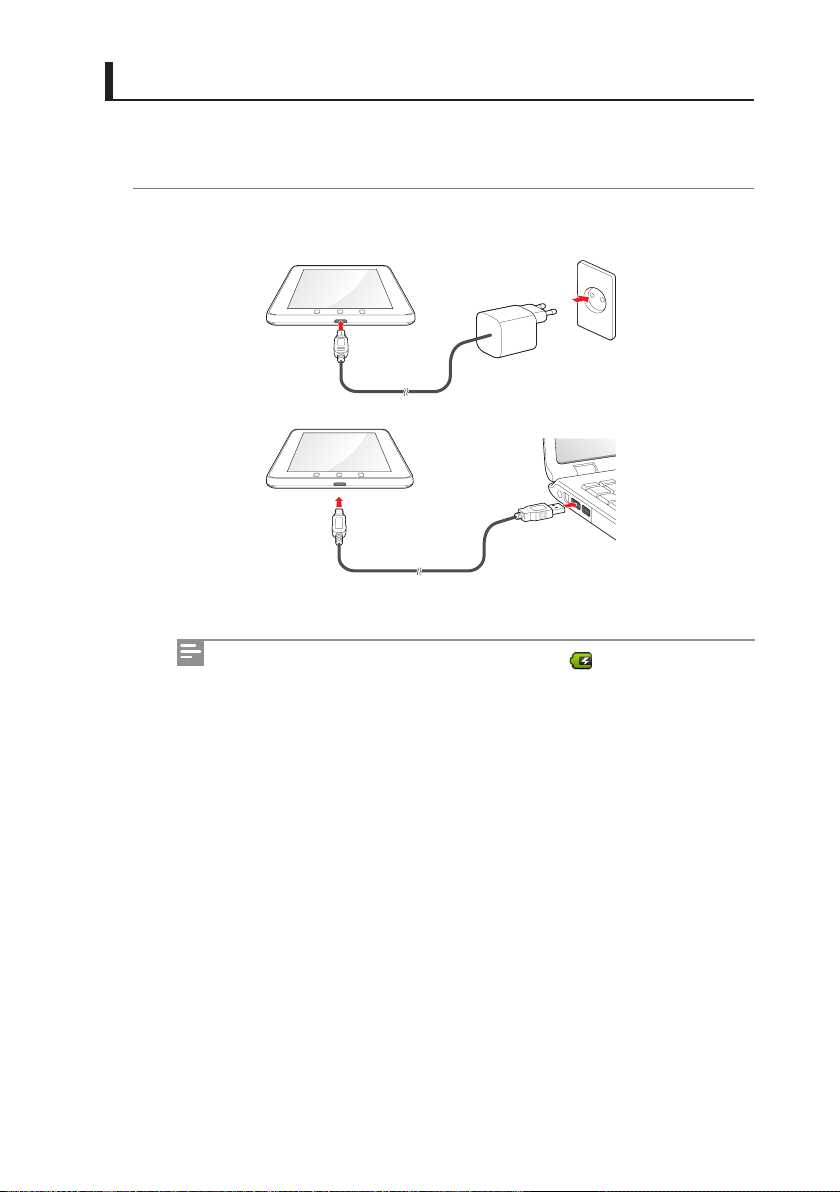
Charging the Battery
The IDENTITY tab battery can be charged by connecting it to the USB power adapter or the
USB cable.
1 To charge the IDENTITY tab battery, open the USB port cover and connect the USB
power adapter or the USB cable to IDENTITY tab in the correct direction.
[Connect the 5-pin power adapter or the USB cable to charge the battery]
When you start charging the battery, the battery icon is displayed at the top
of the screen.
14 Before Getting Started
Page 16
Charging the Battery
2 When the IDENTITY tab battery is charged, disconnect the power adapter or the USB
cable from IDENTITY tab.
When the battery is charged using the 5-pin power adapter, disconnect the
adapter from IDENTITY tab or disconnect the power cable.
You can also charge the IDENTITY tab battery using the USB cable that came
with IDENTITY tab when you purchased it. Connect the USB cable to your
IDENTITY tab USB port and to the USB port on your PC or laptop computer.
However, the IDENTITY tab battery may not be charged when the USB cable is
connected to the USB port on certain devices, such as the audio sets of some
automobiles and TV set-top boxes.
The IDENTITY tab battery may be charged slowly when using the USB cable.
(The battery may drain when enjoy multimedia, such as watching a video, due
to the slowly charging speed.)
you use your IDENTITY tab again after not using it for an extended length of
time.
If you charge the fully discharged IDENTITY tab battery, the IDENTITY tab
power will not turn on immediately.
IDENTITY tab has an internal 4100mAh rechargeable Li-polymer battery. Do
not disassemble your IDENTITY tab and touch the battery.
The IDENTITY tab battery is a consumable part, so its lifespan decreases
Before Getting Started 15
Page 17

Basic Functions
Turning On/ Turning O/ Resetting
Button Functions
Home Screen
Using the Touchscreen
Entering Text − Keyboard
Executing Functions
Adjusting the Volume
Connecting the Accessories
Connecting to External Devices
16 Basic Functions
Page 18
Turning On/ Turning O/ Resetting
Turning on
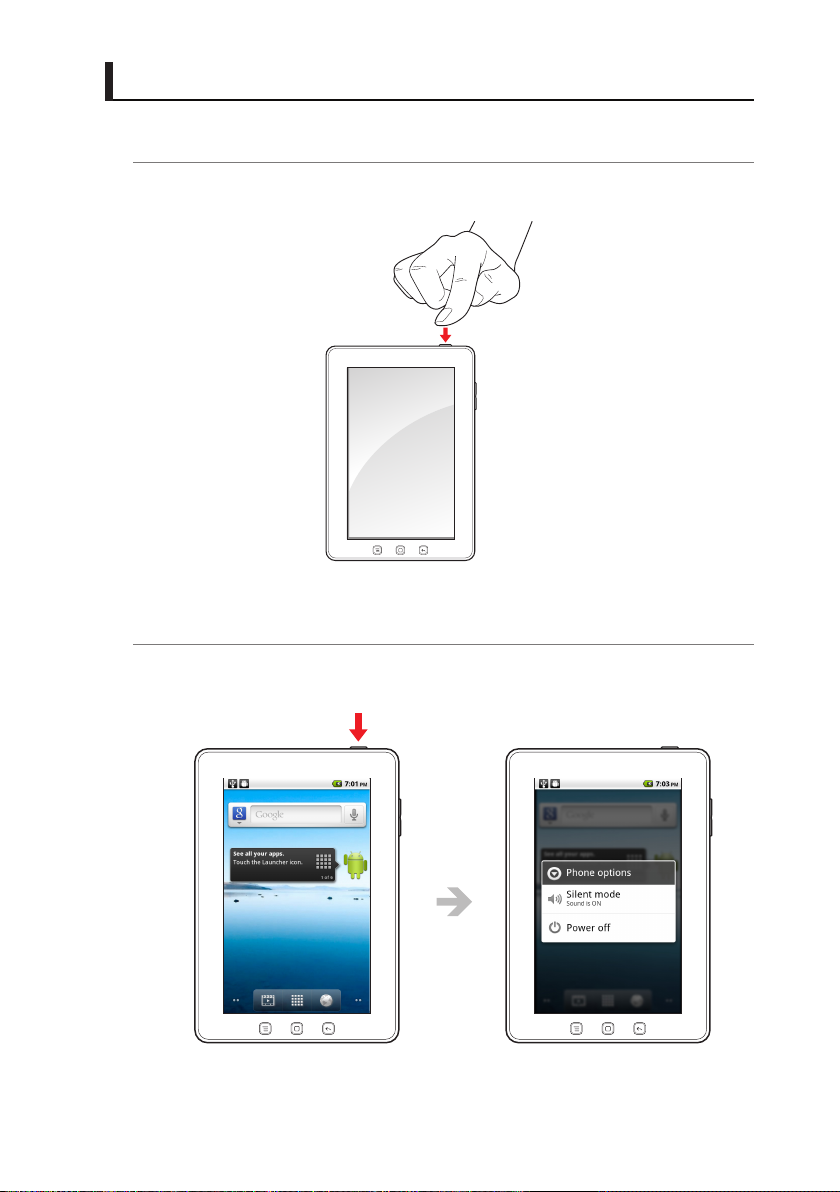
1 Press and hold down the Power button to turn on IDENTITY tab.
Turning o
1 Press and hold down the Power button to turn o IDENTITY tab.
Basic Functions 17
Page 19
Turning On/ Turning O/ Resetting
Resetting
If errors occur while using IDENTITY tab and IDENTITY tab does not work properly, refer to
the image below and reset the system by pressing the Reset button with a thin, long metal
object, such as a ballpoint pen. You can reset IDENTITY tab without any loss of the application
or the data saved in the SD card memory.
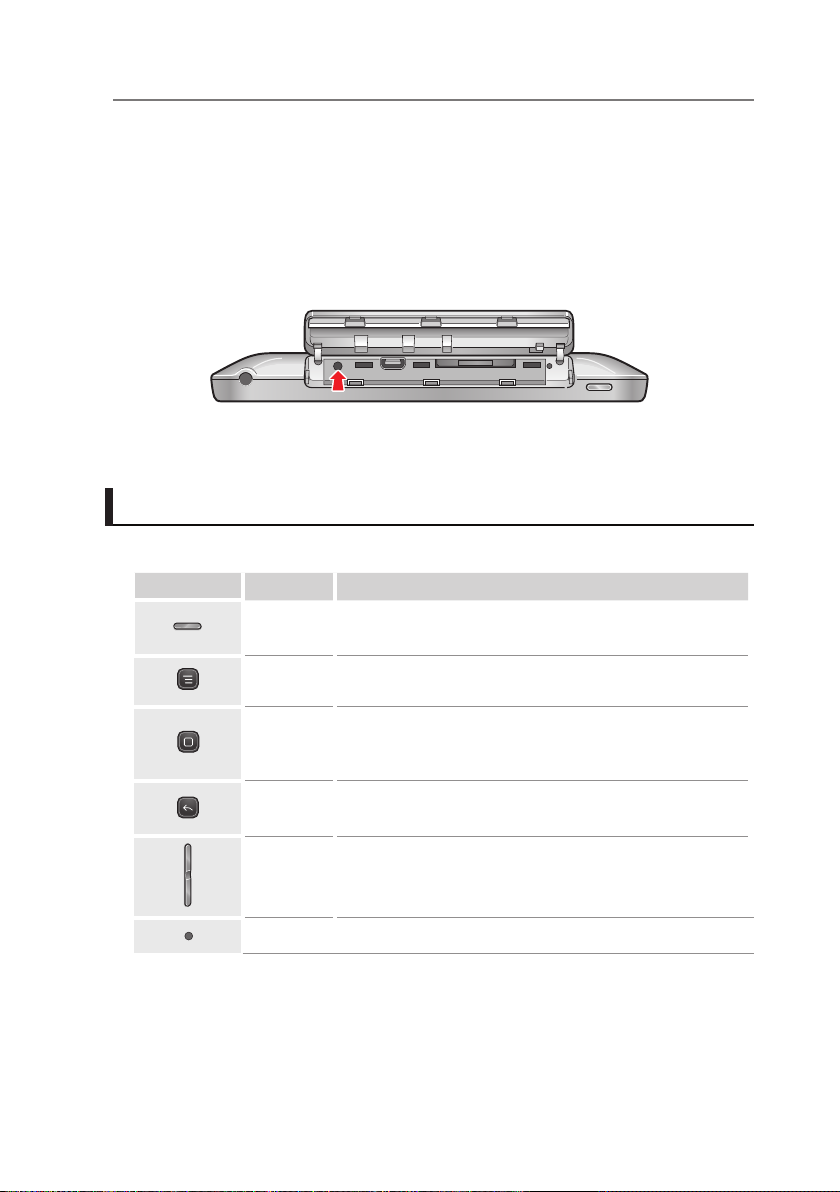
Button Functions
Button
18 Basic Functions
Name Function
Power Turns on or o the screen.
Menu Opens the corresponding, linked munu
Returns to the Home screen
Home
Previous Returns to the previous menu.
Volume
Reset Resets IDENTITY tab.
Executes the last menu when this button is pressed and
held down.
Adjust the volume.
Sets to the Silent mode when this button is pressed and
held down.
Page 20
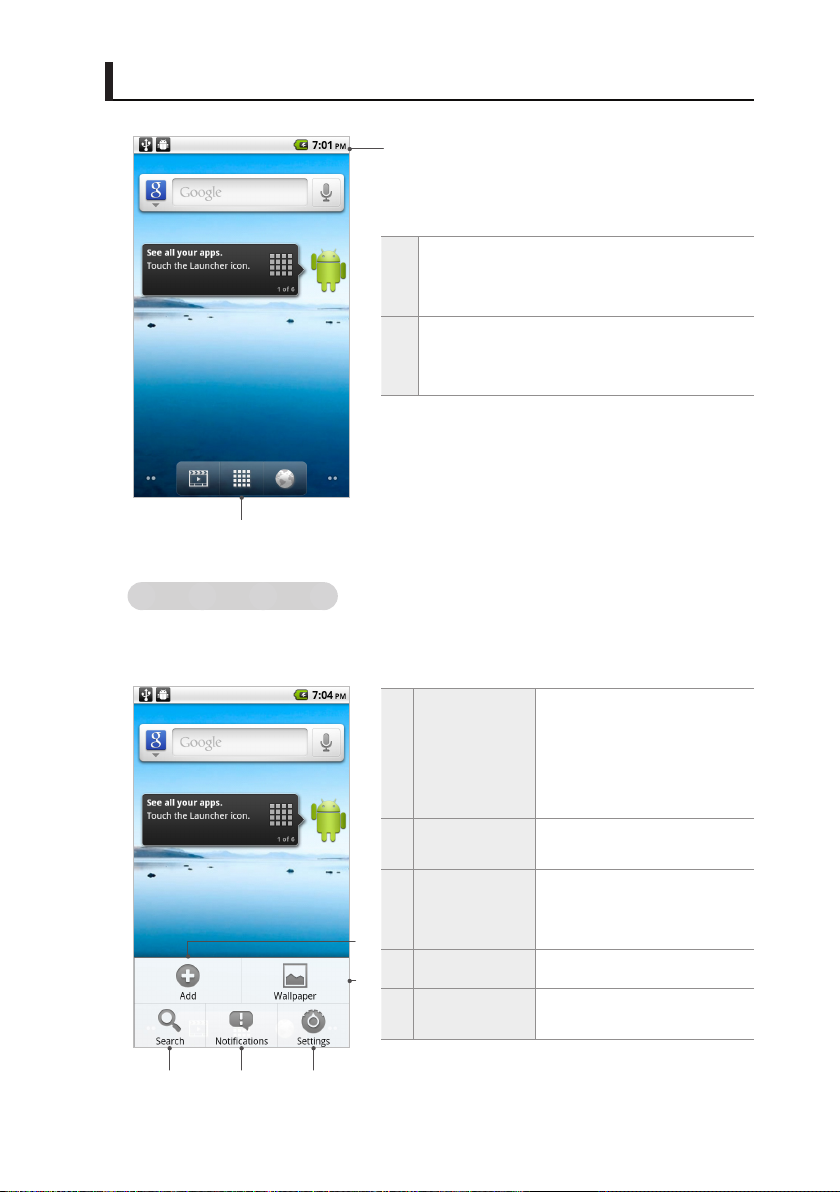
Home Screen
1
Status bar
The status icon, the notication icon, and the
1
current time are displayed on the status bar.
Application
You can view the list of application on the main
2
menu screen and use them.
2
Menus on the Home screen
Tap the Menu button on the Home screen or an application screen to use various menu
functions.
3 4 5
1
2
Shortcuts, widgets and fold-
ers can be added. The back-
Add
1
Wallpaper
2
Search
3
Notications Notications can be viewed.
4
Settings
5
ground of the Home screen
can be changed to wallpapers
you want.
The wallpaper for the Home
screen can be changed.
You can search for les saved
in the menu or IDENTITY tab,
or by linking to Google.
The setting functions can be
used.
Basic Functions 19
Page 21
Home Screen
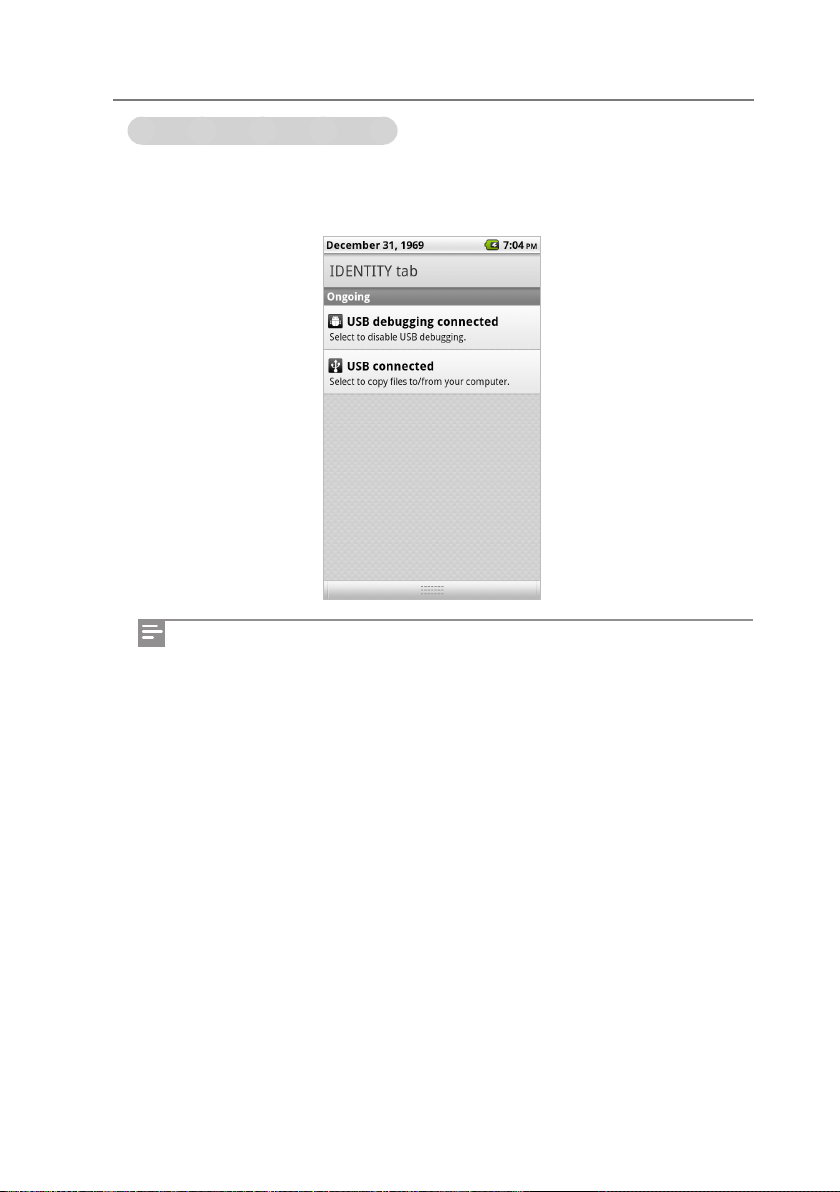
Checking the notication indication
Information on the communication services and notications on the functions you are using
can be checked. If you drag the status bar downwards on the Home screen or while using the
menu, the notication screen appears.
You can delete all the notications by tapping Delete.
20 Basic Functions
Page 22
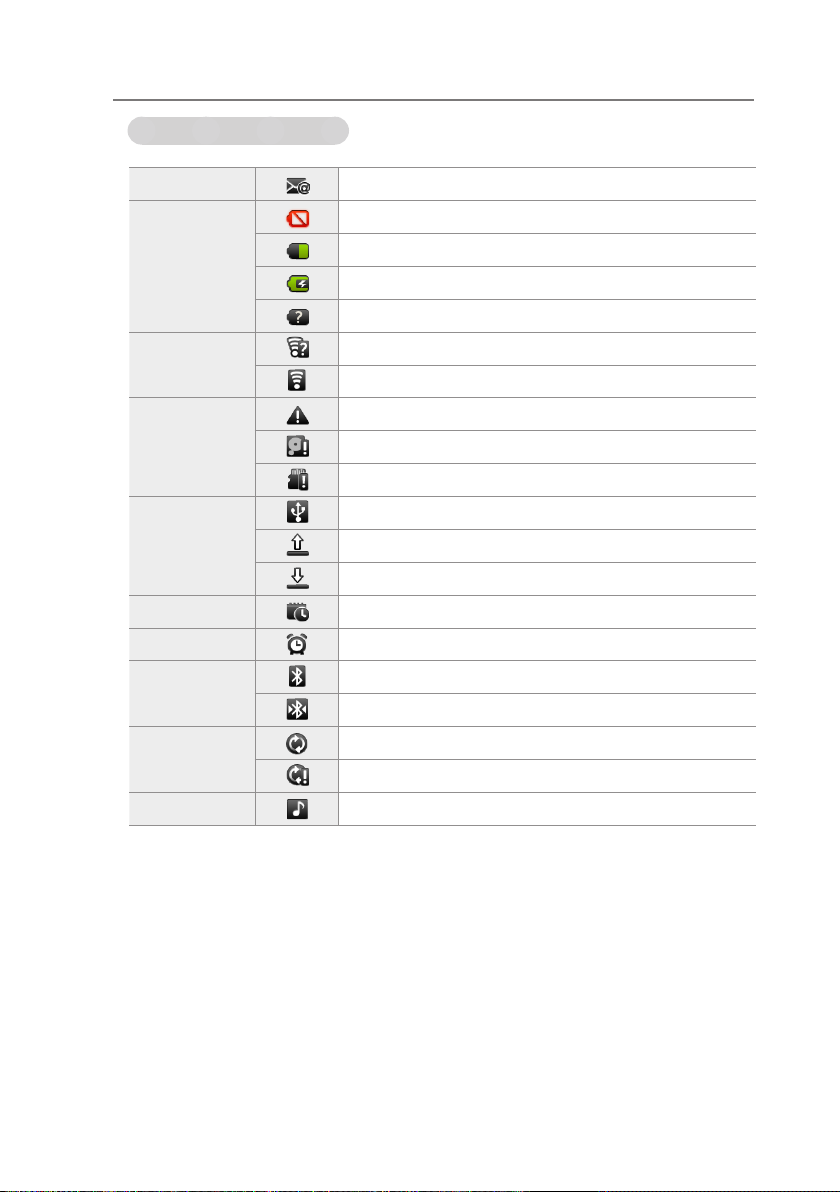
Icons at the top of the screen
Email A new email is received.
The battery needs to be charged.
Battery
Wi-Fi
Warning
Status
Schedule Schedule registration status
Alarm Alarm setting status
Bluetooth
Synchronizing
Playback Playing music
Remaining battery level
The battery is being charged.
The battery is not recognized.
An open Wi-Fi network can be used.
Wi-Fi connection status
System warning
The internal memory capacity is low.
SD card warning
USB connection status
Uploading to the Market
Downloading from the Market
Bluetooth connection setting
Connecting Bluetooth.
Synchronizing
Synchronizing warning
Home Screen
Basic Functions 21
Page 23
Using the Touchscreen
Precautions before use
IDENTITY tab has a capacitive touchscreen that is operated by detecting a very small
amount of current in the human body.
- Do not press the screen hard with a plastic pen.
Do not press the touchscreen hard.
- The sensors may be damaged when they are pressed too hard or excessive pressure is
applied to them.
Ensure that no substances with electric current make contact with the touchscreen.
- The touchscreen may not work properly due to electrical stimulation, such as static
electricity.
Do not use the touchscreen in a humid place. If there is water on the touchscreen, remove
it before use.
- The touch sensors may not work properly.
The touch sensors may not work properly when LCD protective lms or accessories, which
are available on the market, are attached to the touchscreen.
Tapping
You can select or execute a function by tapping a desired menu or item.
22 Basic Functions
Page 24
Using the Touchscreen
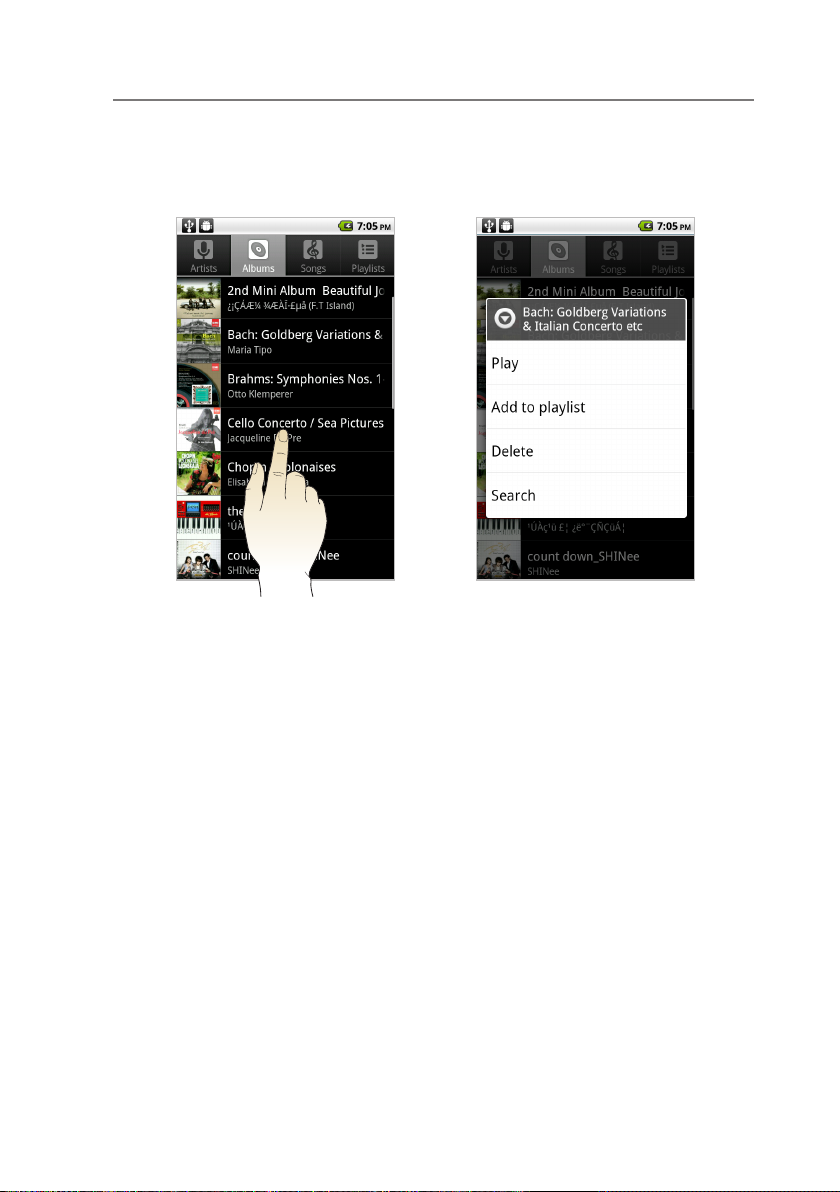
Tapping and holding down
You can check additional options by tapping and holding down a desired menu or item.
Basic Functions 23
Page 25
Using the Touchscreen
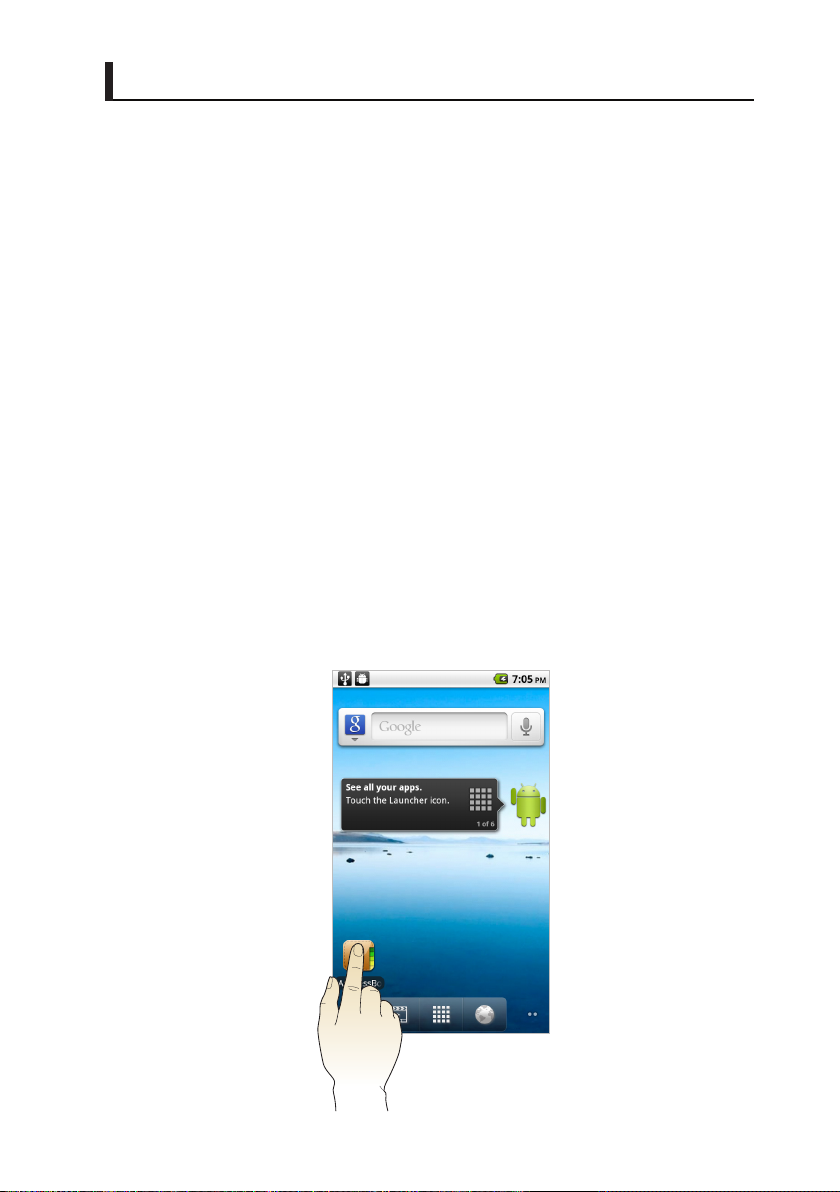
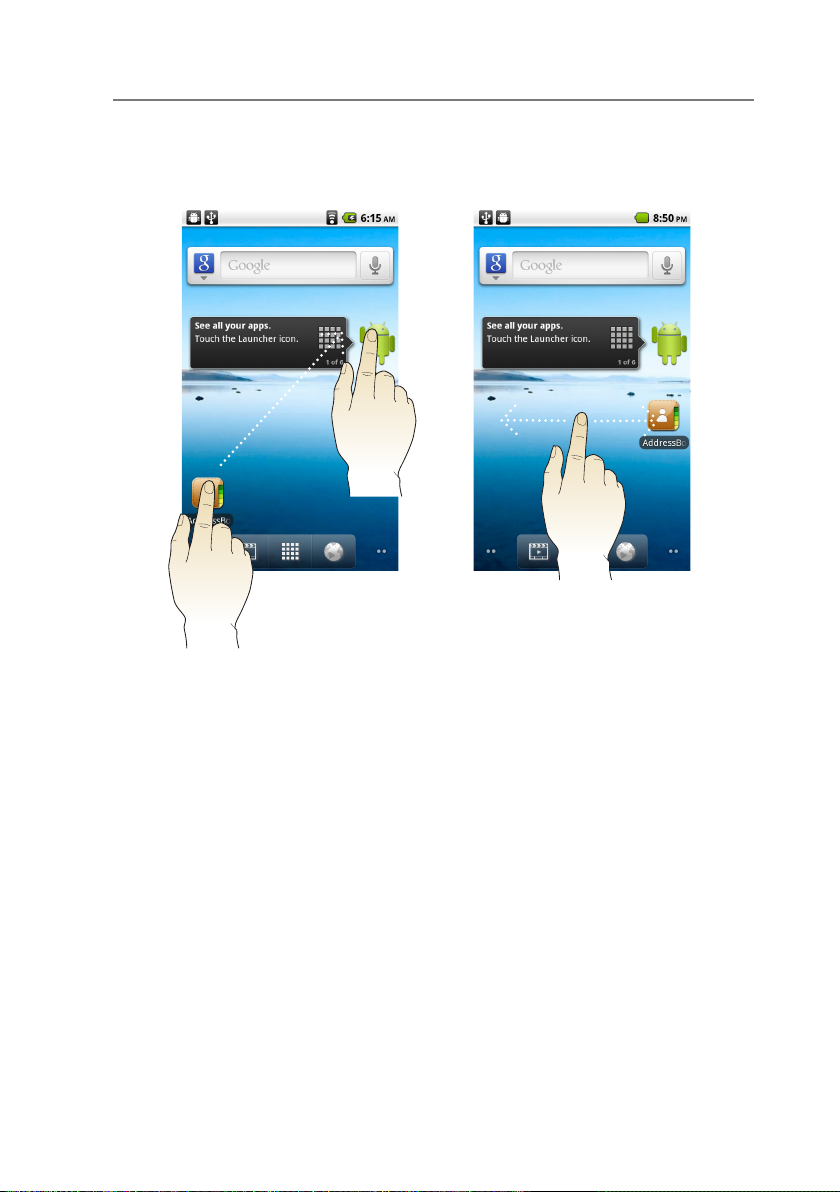
Dragging
Drag the item you want to move to a desired location on the screen.
24 Basic Functions
[Moving and deleting an icon] [Switching between the screens]
Page 26
Using the Touchscreen
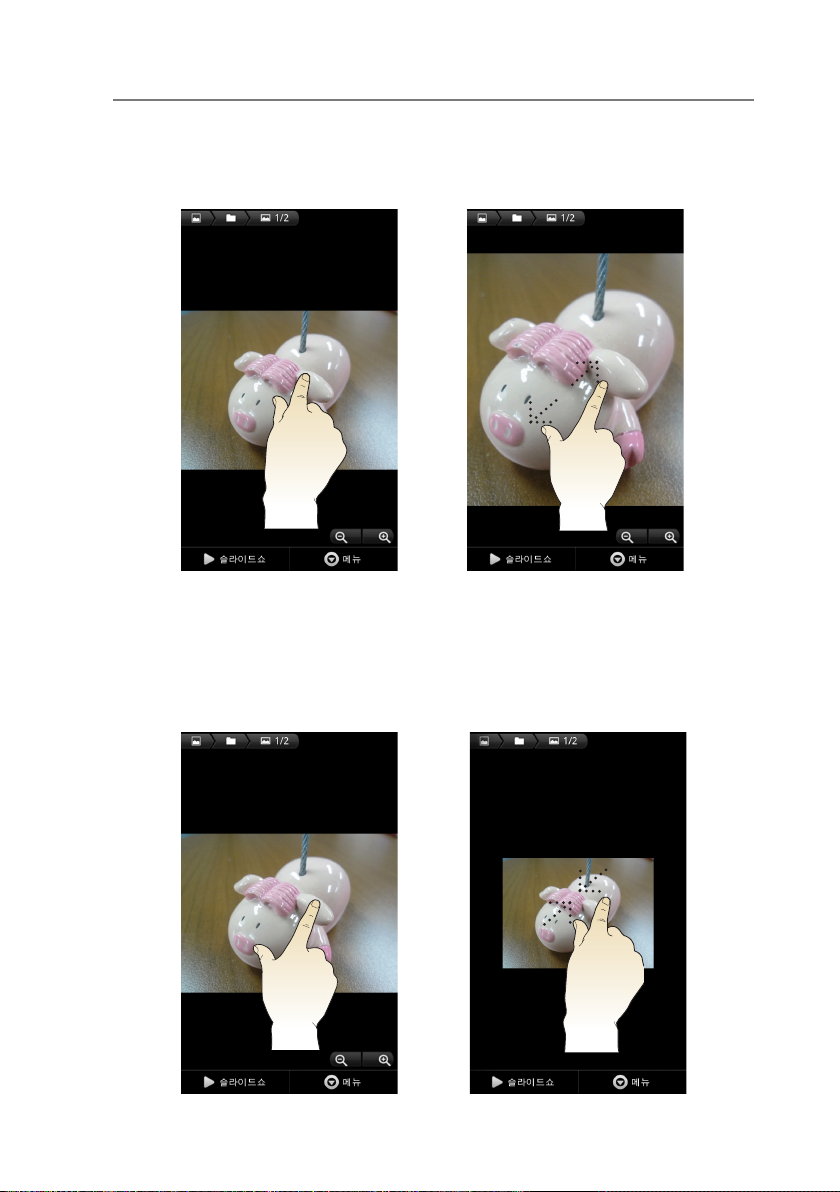
Enlargement
Tap the screen with two ngers and drag them outwards to enlarge the screen.
Reduction
Tap the screen with two ngers and drag them inwards to reduce the screen.
Basic Functions 25
Page 27
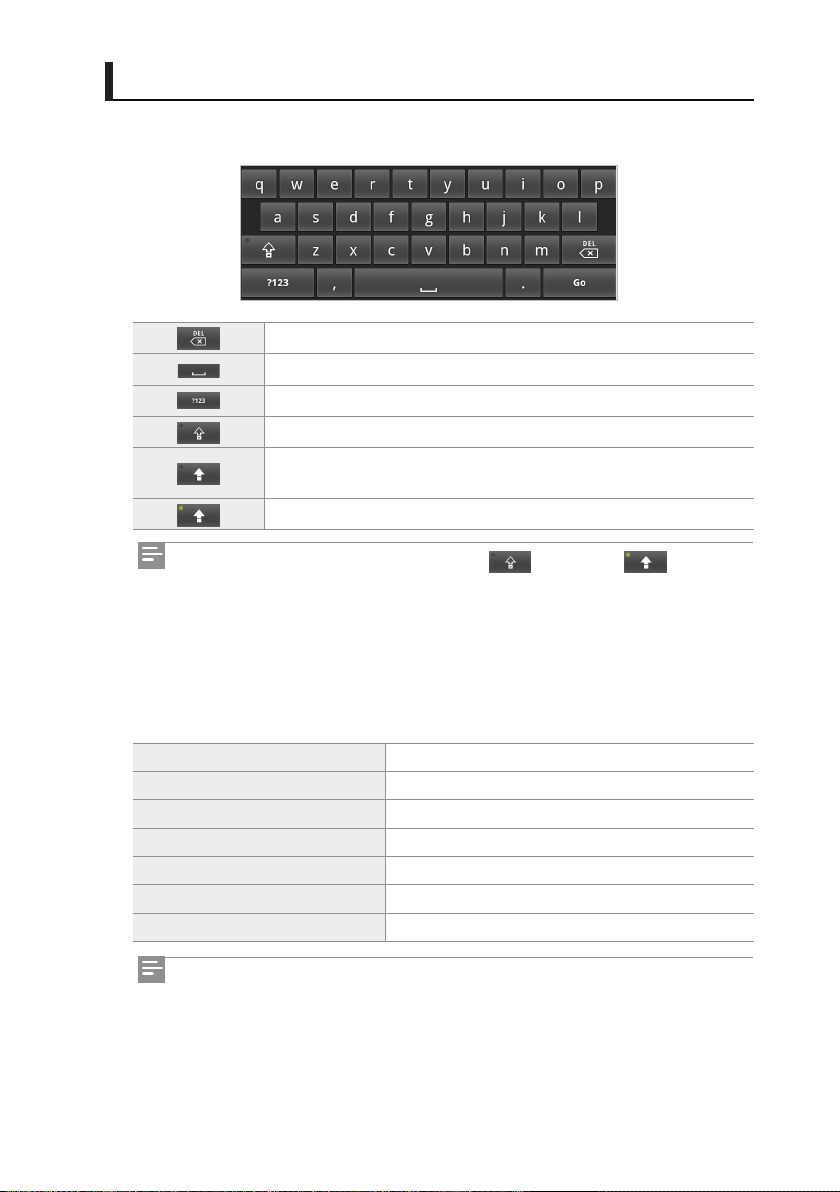
Entering Text − Keyboard
You can enter English letters, numbers, and symbols using the QWERTY keyboard.
Deletes a character right before the cursor.
Leaves a space.
Tapping and holding down or double-tapping will switch to .
Number/ symbol entry mode
English lower case entry mode
English upper case entry mode (only the rst entered character is ap-
plicable)
English upper case entry mode (continuously applicable)
Editing text
When tapping and holding down a character you entered, a menu for editing appears. You
can cut, copy, or paste it.
Select all Selects all the characters you entered.
Select text
Cut all
Copy all
Paste Pastes copied characters.
Input method Change the Entering text method. (Keyboard)
Add "**" to dictionary Add selected characters to dictionary database.
You can set the keyboard in Settings. For further information, see "Android keyboard" on
page 83.
26 Basic Functions
Selects some characters you entered.
Cuts selected characters or all the characters you entered.
Copy selected characters or all the characters you entered.
Page 28
Executing Functions
Execution functions on the Home screen
Adding icons
You can add frequently-used functions as icons.
1 Tap and hold down a blank space on the screen or tap the Menu button and select
'Add'.
2 Tap the shortcut and then select a function to add.
Adding Widgets
You can add widgets.
1 Tap and hold down a blank space on the screen or tap the Menu button and select
'Add'.
2 Tap Widget and select a widget to add.
Deleting icons and widgets
1 Tap and hold down an icon or a widget to delete.
2 Drag the icon or the widget for deletion onto the recycle bin, and then retract your
nger.
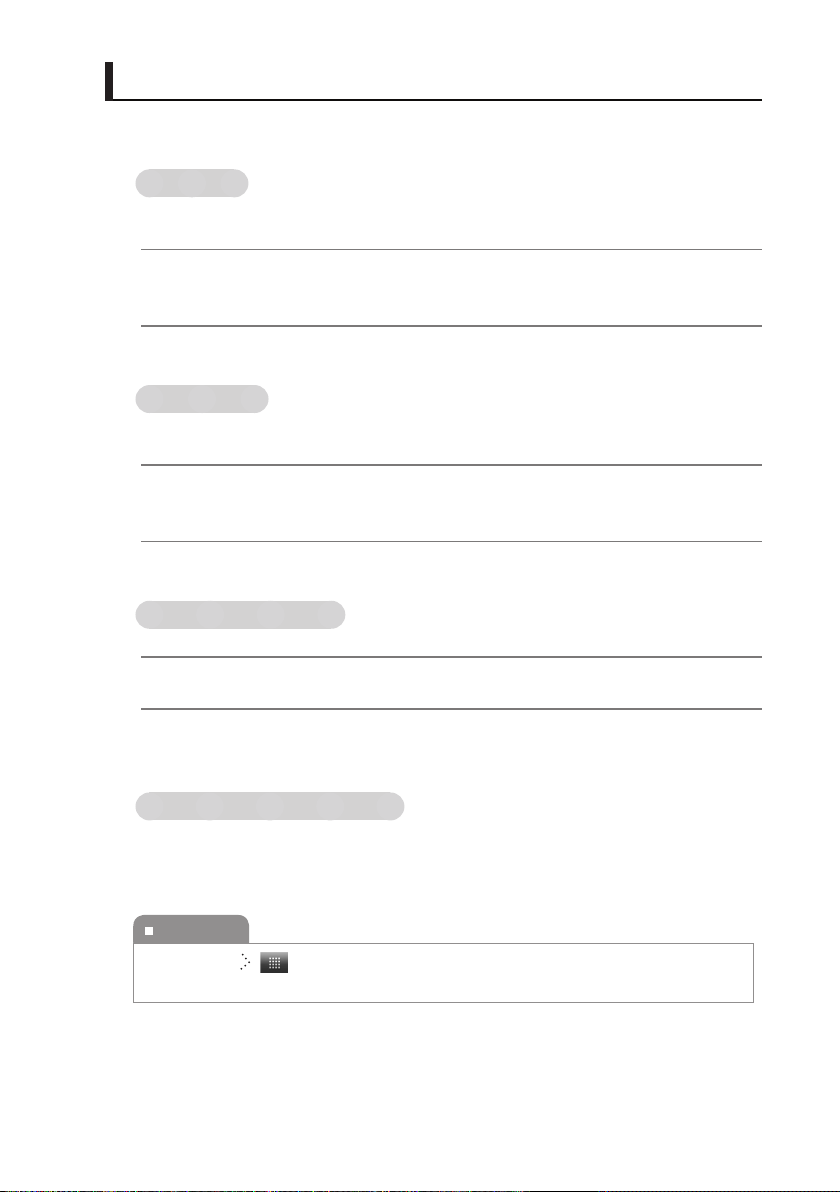
Executing on the main menu screen
You can execute a function that you want quickly.
When an application is installed, it is added to the main menu screen.
To execute
Home Screen
Basic Functions 27
Page 29

Executing Functions
Usage by screen display
When a scroll bar is displayed
When a scroll bar is displayed due to many items, you can scroll up and down the screen to
check all the items.
When tabs are displayed
When tabs are displayed, you can select a desired tab.
28 Basic Functions
Page 30
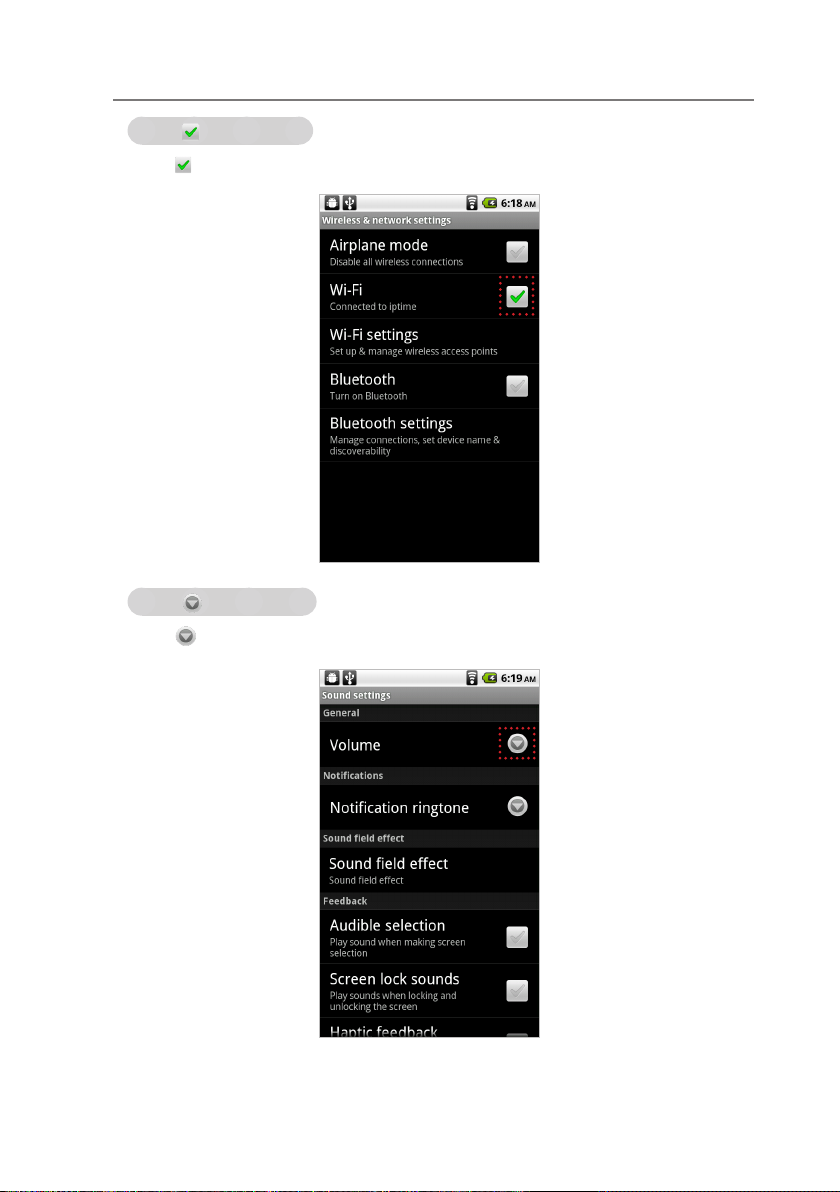
When s are displayed
When s are displayed, you can set or unset the function.
When s are displayed
When s are displayed, you can set the detail options.
Executing Functions
Basic Functions 29
Page 31

Executing Functions
is displayed
When you select an item from among multiple items, is displayed. When the item is
selected, is displayed.
When a control bar is displayed
When ne-tuning is necessary, tap and hold down the control bar and drag it to the left or
right for adjustment.
30 Basic Functions
Page 32

Adjusting the Volume
Use the volume buttons at the right top of IDENTITY tab to adjust the volume.
Press the volume buttons quickly to adjust the volume. In Settings > Sounds, you can set
Sounds
on page 74.
Note
SRS WOW HD
were in a movie theater or a concert hall. You can use this function when listening to music
or watching a movie.
SRS WOW HDTM is a package with many technologies and is custom designed to reproduce
natural audio, thereby producing close-to-original sounds.
SRS WOW HD
bandwidth for rich base and clear details. When audio is played, the sound quality improves
TM
(Sound Retrieval System): You can enjoy live stereophonic sound as if you
TM
Basic Functions 31
Page 33

Connecting the Accessories
Connecting the earphones
Connect the earphones into the earphones jack on your IDENTITY tab.
When you use the earphones, you may not hear external sounds. For your safety,
do not use the earphones where there is potential danger. If you use the earphones
at a high volume while you are walking or driving, it may distract you and cause an
accident.
If you use the earphones at a high volume for an extended length of time, they
32 Basic Functions
The earphones that came with your IDENTITY tab are only for IDENTITY tab (4 pins),
so they may not be compatible with other products.
If you need to use extra earphones, purchase 4-pin earphones. IDENTITY tab is
optimized for 4-pin earphones.
Page 34

Connecting the Accessories
Inserting / removing the SD card
1 Open the plug cover.
2
makes a clicking sound.
3 If you push the inserted SD card once again, the SD card is detached.
Do not apply excessive force when inserting the SD card.
Do not remove the SD card while the SD card is in use.
Doing so may delete the data or cause malfunctioning of IDENTITY tab.
If the SD card is inserted in the opposite direction, IDENTITY tab may fail or
the SD card may not be removed.
If the SD card is not recognized or causes malfunctioning, format the SD card
before use.
It is recommended that you format the SD card using the FAT system.
The SD card is not included in the accessories. You need to buy an SD card
separately.
The data storage path of the SD card is "/sdcard/sd".
Wintec Industries recommends SD cards that are class 4 or lower with
the Identity Tab.
Basic Functions 33
Page 35

Connecting the External Devices
Connecting to a computer
1 Connect the one end of the USB cable to the USB Host/Slave Mini port on IDENTITY tab
and the other end to a computer.
You can copy, delete, or manage les on your IDENTITY tab and PC.
IDENTITY tab has similar functions to a PC, but it may have functional
dierences and some functions may not be supported.
Before disconnecting the USB cable, execute "Safe Hardware Removal" on
your PC.
When you connect the USB cable into a PC USB port, the IDENTITY tab battery
starts charging automatically. However, when there is no power at the USB
port, the IDENTITY tab battery is not charged.
When the USB cable is connected, the icon appears at the top of the
screen.
34 Basic Functions
Page 36

Connecting to External Devices
Connecting to an external USB storage device
1 Connect the one end of the USB cable to the USB Host/Slave Mini port on IDENTITY tab
and the other end to an external device.
Some products (digital cameras and external HDDs) that require separate
installation of a driver or some products (multi card readers) or require
creation of multiple drivers may not be supported.
Some products requiring separate power may not be supported.
Only FAT formatting is available for an external HDD.
When the USB cable is connected, the icon appears at the top of the
screen.
Basic Functions 35
Page 37

Connecting to External Devices
Connecting to an HDMI device
Use the micro-HDMI port on IDENTITY tab to display images on your external digital devices,
such as a TV, cellular phone or monitor.
1 Connect the micro-HDMI port on the right side of your IDENTITY tab to an external
digital device (TV, cellular phone, monitor).
2 When the connection is complete, turn on your IDENTITY tab and the external digital
device (TV, cellular phone, monitor).
When you connect to an external digital device using the micro-HDMI port,
you can enjoy superior resolution and sound quality.
The micro-HDMI port supports digital image and audio signals, so an extra
audio signal cable is not necessary.
If an external digital device does not support HDMI input, you cannot use the
micro-HDMI port.
In Settings, you can set the HDMI output. For further information, see Display
on page 75.
36 Basic Functions
Page 38

Memo
Basic Functions 37
Page 39

Other Features
Talk
Maps
Market
Address Book
Gallery
Video
Music
Photo
Task Manager
Clock
ThinkFree Oce
File Manager
Twitter
ConvergenceOne™
Email
Browser
Camera
40 Other Features
Page 40

Talk
You can chat freely with your friends by using a Google account, and you don't need to install
an additional program or sign up for membership. Register your Google account prior to use.
To execute
Home Screen
Talk
Select the desired ID.
All friends Shows all your friends registered in Talk.
Add friend Allows you to add a friend via an email invitation.
Search Allows you to search for a friend.
Sign out Allows you to log out of the account in use and end Talk.
Settings Allows you to set the Away status and the notication sound.
More > Close all chats Allows you to close the chat window in use.
More > Invites
More > Blocked Shows a list of friends who have been blocked from chatting.
Shows a list of friends who have been invited and are pend-
ing conrmation.
Other Features 41
Page 41

Talk
Talk settings
To execute
Home Screen
Talk
Select the desired email address.
General
settings
Notications
settings
About Term & privacy Shows Google's legal disclaimer.
42 Other Features
Automatically
sign in
Mobile indicator Shows your log-in status to registered friends.
Automatic
away-status
Clear search history
IM notications
Select ringtone Allow you to specify the notication ringtone.
Vibrate Allows you to specify vibration for notication.
Allows you to set the automatic log-in for the
specied account.
Allows you to set the status to Away when the
screen is changed to Protected mode and is
turned o.
Allows you to clear previous chat search words in
the search box so as not to show them.
Displays a notication in the status bar when a
message arrives from a registered friend.
Page 42

Maps
You can search for a desired location based on GPS or you can view various location informa-
tion. You can view the driving route from your current location to your destination, nd
public transportation routes and view an outline map for walking. You can also view the map
through a web search for the location and through satellite images.
To execute
Home Screen
Maps
Select a desired location.
- Drag the screen to the top/ bottom/ left/ right with your nger to move the map.
- Tap the screen twice to enlarge the map.
- Press and hold down the desired location on the map to view its address.
Search
Directions
Starred Places
Clear Map Allows you to clear all location information on the map.
Join Latitude Shows your current location.
More Shows information such as labs, Help and Terms, Privacy & notices.
Allows you to search for a desired location and shows it on the
map.
Allows you to select from the car, public transportation or pedes-
trian navigation functions.
Shows the map with map layers such as trac information, and
satellite images and geographical features.
Other Features 43
Page 43

Market
Market is an application market dedicated to Google. You can download various applications
onto your device, including games.
To execute
Home Screen
Market Select a desired application.
Search Allows you to search for a desired application.
My apps
Settings
44 Other Features
Help
Shows a list of applications which have been downloaded and
installed on your device.
Allows you to set a notication if there is an update on installed ap-
plications or games.
Allows you to search for and view Help about Market by connecting
to the Internet.
Page 44

Address Book
Address Book
You can save and search for various information, such as telephone numbers and email
You can save and search for various information, such as telephone numbers and email
addresses. You can also select an email address and send an email.
addresses. You can also select an email address and send an email.
To execute
Home Screen Address Book
Other Features 45
Page 45

Address Book
Managing the address book
Adding a new contact
To execute
Address list Enter contact details to add Save
Editing a contact
To execute
Address list Select a contact to edit Edit Enter contents to edit Save
Deleting a contact
To execute
Address list Menu Button Delete Select a contact to delete (or Select all) Delete
46 Other Features
Page 46

Sending an email
To execute
Address list Select an email address to send an email to.
or
Address list Select the email address you want Send the email
You need to set up an email account to send an email. For further information on
how to set up an email account, see "Email" on page 66~69.
To send an email, your Wi-Fi should be connected. For further information on how
to connect Wi-Fi, see "Wireless & networks" on page 73.
Address Book
Other Features 47
Page 47

Gallery
You can view and manage the pictures and videos saved in the memory. You can view the
pictures in a slideshow or edit them.
To execute
Home Screen Gallery
48 Other Features
When selecting at the top right of the screen, you can change the sorting
method to 'By date' or 'Preview'.
Dragging the screen to the left or right, you can check the le collection that is
sorted by folder.
Tap to use the camera function.
Page 48

Managing pictures and video les
1 Select the folder you want on the Gallery screen.
If you press the Menu button twice, you can either select all the les, or select
les individually for sharing, deleting, or to perform other tasks.
You can check all the folders by dragging the screen to the left or right.
2 Select the picture or video you want.
When you select a video le, the screen returns to the previous screen after
the video le is played.
When you select a picture le, a menu appears that allows you to play a
slideshow or to share, delete, or perform other tasks.
You can view the les saved in the selected folder by dragging the screen to
the left or right.
Gallery
Select All
Deselect All You can cancel the Select All task.
Share You can share the selected le via Bluetooth.
Delete You can delete the selected le.
Other Tasks
You can share, delete, or perform other tasks by selecting all the les
saved in a folder.
Details: You can check the information on the selected le.
Set As: You can set the selected picture as a wallpaper or an icon
for contacts.
Crop: You can cut the selected picture to the size you want.
Rotate to the left: You can rotate the selected picture to the left.
Rotate to the right: You can rotate the selected picture to the right.
Only Details for video les can be checked.
Other Features 49
Page 49

Video
You can watch videos using the ash player. You can search for the video les saved in the
memory.
To execute
Home Screen Video
Supported le formats
File formats: mp4, avi, wmv, 3gp, k3g, ak3g
Resolution: 1024 x 720
Caption settings
To execute
While a video is playing Menu button Settings Select the item you want.
50 Other Features
You can add widgets on the Home screen. For further information on how to add
widgets, see "Executing Functions" on page 27
Page 50

Music
You can enjoy your music with the Player.
To execute
Home Screen
Music
Album You can sort your music by album title.
Song You can view the entire list of saved music.
Artist You can sort your music by artist name.
Play List
You can add widgets on the Home screen. For further information on how to add
widgets, see "Executing Functions" on page 27
A list of the music that was recently added is displayed, and you can
check it in the widget.
Other Features 51
Page 51

Music
Playing music
Press and hold down the Menu button to set the functions.
Mini Explorer You can search the memory.
Audio Enhancement Eect You can set the sound eects.
File Information You can check the le information.
Deleting music
To execute
Music List Menu button Delete Select a song to delete Delete
or
Music Playback Screen Menu button Delete Select a song to delete Delete
52 Other Features
Only MP3 les are supported.
For further information on the equalizer, see "Sound" on page 74.
Even if you switch to the Home screen while playing music, the music continues to
play in background mode. To pause the music, tap the Pause button on the screen.
When playing music, appears at the top of the screen.
Page 52

Photo
You can enjoy your pictures in a slideshow or manage the pictures you want by album.
To execute
Home Screen Photo
All Photos You can view all the saved pictures.
view Folder You can view the pictures by folder.
my Album You can manage the pictures you want by adding albums.
slideshow You can enjoy a slideshow.
Editing pictures
You can rotate a picture and apply lter eects using many functions. You can also cut the
area you want.
To execute
All Pictures Select the pictures you want Menu button More Edit
Edited pictures are saved in new les.
You can add widgets on the Home screen. For further information on how to add
widgets, see "Executing Functions" on the page 27
Other Features 53
Page 53

Photo
My Album settings
Adding albums
To execute
Album List Screen Enter the album name Ok Select a picture Complete
Deleting albums
To execute
Album List Screen Menu button Delete Individually (or Delete All) Select an
album to delete Complete Ok
Slideshow
You can set a function by pressing the Menu button during a slideshow.
show setup
File Information You can check the information on the pictures.
54 Other Features
You can set the screen switch speed of a slideshow, the slide eects
and the background music.
Delete You can delete the pictures displayed on the screen.
Wallpaper You can set wallpaper to the picture.
Page 54

Task Manager
You can view a list of the currently used applications and the memory capacity, as well as the
installed applications.
To execute
Home Screen
or
Press and hold down the Home button
Ending applications
You can increase the available memory capacity by closing any applications that are running.
To execute
List of the applications that are running
or
List of the applications that are running
Task Manager
Task Manager
End all
End
Android, the OS, uses the memory, so the total memory is not displayed as 512MB.
This is not a hardware fault.
Other Features 55
Page 55

Clock
You can set the alarm according to your desired setting time.
To execute
Home Screen
Alarm Clock
Set Alarm
You can set alarm with time, Ringtone, Vibrate, Repeat, and Label. You can also change the
alarm setting value you want.
Turn alarm on You can set alarm.
Repeat You can set repeat function by day of the week. (Monday ~ Sunday)
Ringtone
Vibrate You can choose vibrate function except ringtone.
56 Other Features
When the Alarm Clock is set, appears at the top of the screen.
Time You can set desire time to alarm.
You can set desire ringtone. (Silent, BeeBeep Alarm, Beep-Beep-Beep
Alarm, Buzzer Alarm, Piezo Alarm, Ringing Alarm, and Rooster Alarm)
Label You can write label.
Page 56

ThinkFree Oce
ThinkFree Oce is an oce package that is compatible with Microsoft Oce and allows you
to manage your documents online and oine. You can view or edit various Oce les (PDF,
Text, Word, Excel, Power Point) saved in the SD card (external memory card). If you have an
account on the ThinkFree website, you can also manage your documents online.
To execute
Home Screen
ThinkFree Oce
If you want to manage your documents online on the ThinkFree website, your Wi-Fi
should be connected. For further information on how to set up the Wi-Fi for IDENTITY
tab, see "Wireless & networks" on page 69.
Other Features 57
Page 57

File Manager
You can manage the les and folders saved on the memory card.
To execute
Home Screen File Manager
Press and hold down the Menu button to set the functions.
Sort by You can sort the les and folders by name, size, and date.
Service Info. You can view the application information.
58 Other Features
Copy You can copy the les and folders you want.
Move You can move the les and folders you want.
Delete You can delete the les and folders you want.
Page 58

You can enjoy Twitter, a representative social networking service. You can communicate with
many people through real-time messaging.
To execute
Home Screen Twitter
You need to set up a Twitter account.
You can add widgets on the Home screen. For further information regarding how
to add widgets, see "Executing Functions" on page 27.
Other Features 59
Page 59

ConvergenceOne™
Using ConvergenceOne™, you can share multimedia contents on various digital devices via
a wireless network. You can make your IDENTITY tab interoperate with your PC and TV that
support the DLNA function, and share and enjoy the contents. You need to connect to Wi-Fi
to use ConvergenceOne™.
Devices that will share Wi-Fi need to use the same AP (Access Point). If the devices
To make your IDENTITY tab interoperate with your TV, ensure that the TV supports
the DLNA (Digital Living Network Alliance) function. See the User Manual on how
to set TV networks.
If many devices are connected to the same router or other devices use a lot of
network bandwidths, HD videos may not be reproduced smoothly.
to may not be found.
For further information on how to set up the Wi-Fi for IDENTITY tab, see "Wireless &
networks" on the page 73.
Installing ConvergenceOne™ on a PC
System requirements
OS: Microsoft Windows XP, Windows Vista, Windows 7
Hard drive disk space needed to install the application: 15 MB
If you use the UAC (User Account Control) on Windows Vista, you will need to allow access
when executing the application.
60 Other Features
You can use the PC installation program on the CD that came with your IDENTITY tab,
or download it from the IDENTITY tab website
(http://www.wintecind.com/support_center/Downloads/index.html).
Page 60

ConvergenceOne™
1 Double-click the installation le (ConvergenceOne_Setup) on the CD.
2 Complete the installation by following the installation precedures.
Other Features 61
Page 61

ConvergenceOne™
Playing multimedia contents using a PC
1 Execute ConvergenceOne™ on your PC.
2 Set a folder with the multimedia content you want to share.
3 Select a device (PC) that contains multimedia contents (pictures, music, videos) to play.
4 Select some multimedia content to enjoy.
Only shared les are displayed.
5 Click the Play button on the right side of the screen.
6 Select a device to play the multimedia content.
7 The selected multimedia content plays.
62 Other Features
Page 62

Program screen
ConvergenceOne™
5
4
1
2 3
You can select the device where the multimedia contents (pictures, music, videos)
1
to share are saved.
A list of the pictures, music, and videos on the storage device are displayed.
2
You can select a device to play multimedia contents.
3
You can set the le view mode or change a folder to share.
4
You can search for the saved multimedia contents, and set the le view mode.
5
Other Features 63
Page 63

ConvergenceOne™
Playing multimedia contents using IDENTITY tab
1 Execute ConvergenceOne™.
A device that can be connected is searched automatically. If there is no device
that you want, tap the Search Again button to try again.
2 Select a device (IDENTITY tab) that contains multimedia contents (pictures, music,
videos) to play.
3 Select some multimedia content to enjoy, and tap the View (or Listen) button.
64 Other Features
Page 64

4 Select a device to play the multimedia content.
5 The multimedia content is played on the selected device.
ConvergenceOne™
Other Features 65
Page 65

You can send or receive emails by synchronizing email accounts you are using on the Inter-
net. Register your email accounts before use.
To execute
Home Screen
To use the email, your Wi-Fi should be connected. For further information on how to
connect the Wi-Fi, see "Wireless & networks" on page 73
Setting up an email account
set up some widely used email accounts (hotmail, gmail, etc).
List of the email providers
Email
Gmail (Gmail.com, googlemail.com, google.com, android.com)
AOL (aol.com)
Hotmail (hotmail.com, live.com, msn.com)
Yahoo (yahoo.com, ymail.com, yahoo.co.kr)
66 Other Features
Page 66

1 Enter an email address by tapping the email address box.
2 Enter the password in the password box, and then tap Next.
If you fail to connect to the server through the automatic registration, go back
to the email setup screen and tap Manual Setting.
If you fail to connect to the server due to entering an incorrect user name or
password, tap Edit Details and try again by re-entering your user name and
password correctly.
When the automatic registration is complete, the account type selection
screen does not appear. You can set the name for your account and sent
messages directly.
Email
3 When the screen for selecting an account type appears, select POP3 or IMAP.
4 Enter the receiving and sending server setting information, and then tap Next.
5 Set the name for your account and sent messages, and then tap Complete.
Other Features 67
Page 67

Email
Adding an email account
You can register more than one email account.
To execute
Inbox Menu button Account Menu button Add an Account
For information on how to set up an email account, see "Setting up an email account"
on page 66-67.
Setting up your work email
You can receive information such as emails, your address book, and your schedule through
the exchange server that is used at your work.
1 Enter an email address by tapping the email address box.
2 Enter the password in the password box, and then tap Next.
3 When the account type selection screen appears, choose Exchange.
4 Enter the detailed information of the exchange server.
5 Set the frequency of email checking and the number of emails to be synchronized, and
6 Set the name for your account and sent messages, and then tap Next.
68 Other Features
To set up a POP3 or IMAP account, see "Setting up an email account" on page
66-67.
For further information on the server, contact the person who is in charge of the
server.
then tap Next.
Page 68

Deleting an email account
To execute
Inbox Menu Button Account Touch and hold on the name of the account to
delete Delete the account
Email
Other Features 69
Page 69

Browser
You can access websites to search for information.
To execute
Home Screen Browser
Press and hold down the Menu button to set the functions.
New Window You can open a new web page.
Bookmark
Windows You can check all the open web pages.
Refresh You can update the current page to the last status.
Previous You can go to the previous screen of the currently used web page.
Add a bookmark You can add bookmarks to web pages.
Find on page You can search for the texts you want within an open web page.
Select text You can select, copy, and paste texts from an open web page.
Page info You can view the information on an open web page.
Share page You can share the page by Bluetooth or Gmail.
Download You can view a list of the les that you downloaded from the Internet.
Settings You can change the settings about the Internet.
70 Other Features
You can check your bookmarks, frequently visited pages, and the
browsing history.
Page 70

The les downloaded from the Internet are saved in the "sdcard/download" folder.
The Flash Player is installed, so you can easily view the ash screens on the web
pages.
To use the Internet, your Wi-Fi should be connected. For further information on
how to connect Wi-Fi, see "Wireless & networks" on page 73.
When you receive a new email, appears at the top of the screen.
Camera
You can take pictures with the camera.
To execute
Home Screen Camera
You can set the shooting options while pressing the Menu button to take pictures.
Browser
Other Features 71
Page 71

Settings
Wireless & networks
Sound
Display
Location & security
Applications
Account & sync
Privacy
SD card & device storage
Search
Select language
Android keyboard
Date & time
About system
72 Settings
Page 72

Wireless & networks
You can change the wireless & network settings.
To execute
Home Screen Settings Wireless & networks Select the item you want, and
then change the setting.
Airplane mode You can disable all wireless connections.
Wi-Fi You can turn on or o Wi-Fi.
You can set the network notication function. You can also
Wi-Fi settings
Bluetooth You can turn on or o Bluetooth.
Bluetooth settings
When an open Wi-Fi network is available, appears at the top of the screen.
When the Wi-Fi network is connected, appears at the top of the screen.
While Bluetooth is being connected, appears at the top of the screen.
select a Wi-Fi network from the Wi-Fi list or add a new one to
the Wi-Fi list.
You can set various functions, such as transferring data, to
use Bluetooth. When Bluetooth is turned on, you can change
the device names, set the search availability, and search for a
device to connect.
Settings 73
Page 73

Sound
You can change the settings of the sounds.
To execute
Home Screen Settings Sound Select the item you want, and then change
the setting.
74 Settings
Volume
Notication ringtone You can set notication sounds.
Audible selection
Screen lock sounds
Haptic feedback
You can set the sound volume of Media, Alarm and
Notication.
When selecting a screen, you can set the touch pad sounds
to turn on or o.
When locking or unlocking a screen, you can set the touch pad
sounds to turn on or o.
You can set the vibrate when pressing soft keys and on certain
UI interactions
Page 74

Display
You can change the settings of the display.
To execute
Home Screen
the setting.
Settings Display Select the item you want, and then change
Brightness You can set the brightness of the screen.
Auto-rotate screen
Animation You can set the display of animations.
Screen timeout
TV Mode You can choose TV out mode.
TV Resolution You can choose TV Resolution.
You can change the orientation of the screen by rotating your
IDENTITY tab horizontally or vertically.
You can adjust the interval of the Auto Screen O time.
Settings 75
Page 75

Location & security
You can set the settings of the location, date and time.
To execute
Home Screen
then change the setting.
Settings Location & security Select the item you want, and
76 Settings
My location
Screen unlock
Passwords
Credential
storage
Use GPS
satellites
Set up screen
lock
Visible
passwords
Use secure
credentials
Install from SD
card
Set password
Clear storage
You can set whether to use the satellite global positioning system.
You can set whether to lock screen with a pattern or
password.
You can set whether to show password as you type.
You can set whether to use a security certication encrypted with your personal information to use electronic
information systems, such as Internet banking.
You can install an encrypted certication that is
necessary for using electronic information systems on
your external memory card.
You can set or change your PIN, which is necessary for
using the security certication.
You can delete all saved documents and the PIN.
Page 76

Applications
You can manage the applications that are installed or are in use.
To execute
Home Screen
change the setting.
Settings Applications Select the item you want, and then
Unknown sources
Manage applications
Running services You can view the list of the running applications.
Memory Cache Delete You can delete memory caches.
Development
personal information may be divulged or abnormal symptoms may occur in your
telecommunications services or basic operations. Wintec Industries shall not assume any
responsibility for any loss or damage incurred from the aforementioned. If, therefore,
abnormal symptoms occur, uninstall the applications immediately.
You can set whether to install the applications that are not
You can view the information on the installed application, and
control the functions.
USB debugging: When the USB cable is connected, you can set
or cancel the function for executing the debugging mode.
Stay awake: You can set or cancel the function for the screen to
stay on while the battery is being charged.
Allow mock locations: You can set or cancel the function for
allowing a temporary location.
Settings 77
Page 77

Account & Sync
You can change the detailed settings of the registered account, and add a new account.
To execute
Home Screen
change the setting.
Settings Account & Sync Select the item you want, and then
78 Settings
Background data
Auto-sync You can automatically set the synchronization of the set accounts.
Manage accounts You can add, delete, change, or manage many email accounts.
Add account You can add Exchange account and Goolgle account.
When you are not using the functions that need to be synchronized
directly, you can allow a background data transmission.
Page 78

Privacy
To execute
Home Screen
the setting.
Back up my data You can whether to back up my settings and other application data.
Automatic restore
Settings Privacy Select the item you want, and then change
When you reinstall an application, restore backed up settings or
other data.
Factory data reset
Terminal
initialization
All the data, such as the google account, system data, applications
data, settings, and downloaded applications data are deleted. The
les in the SD card are not deleted.
You can whether to initialize the terminal.
Settings 79
Page 79

SD card & device storage
To execute
Home Screen
and then change the setting.
SD Card
Internal
memory
Internal SD
Memory
Settings SD card & device storage Select the item you want,
Total space You can check the total space of the SD card.
Available space
Unmount SD card
Format SD card You can initialize the SD card.
Available space
Available space
You can check the available space of the SD
card.
When removing the SD card, you can prevent
errors, such as data loss.
You can check the available space of the
internal memory.
You can check the available memory of the
internal SD memory.
80 Settings
Page 80

Search
You can set the search function while using Google.
To execute
Home Screen
Settings Search
Web Google search
Searchable items
Phone
Clear shortcuts
You can set the function that suggests words at the
bottom of the screen before you complete entering
a full word.
You can set available search items using the quick
search box.
You can delete the shortcuts of the latest search
results.
Settings 8181 Settings
Page 81

Select language
You can set the text entry settings on the screen.
To execute
Home Screen
Settings Language & Keyboard Select language
82 Settings
You can choose from among 8 languages the one that will be used on the device.
Page 82

Android keyboard
You can set the text entry settings on the screen.
To execute
Home Screen
Settings Language & Keyboard Android keyboard
Android
keyboard
settings
Word
suggestion
settings
Vibrate on keypress
Sound on keypress
Auto-capitalization
Voice input
Input languages
Quick xes Corrects commonly typed mistakes.
Show suggestions Display suggested words while typing.
Auto-complete
Vibrates when the key on the keyboard is touched.
Emits sound when the key on the keyboard is
touched.
Capitalizes the rst word of a sentence automatically.
You can select Mic on main keyboard.
You can whether to slide nger on spacebar to
change language.
Spacebar and punctuation automatically insert
highlighted word.
Settings 83
Page 83

Date & Time
You can set the date and time automatically or manually.
To execute
Home Screen
change the setting.
Settings Date & Time Select the item you want, and then
84 Settings
Automatic You can set the time use network-provided values.
Set date You can set the date manually.
Select time zone You can select time zone manually.
Set time You can set the time manually.
Use 24-hour format You can set the display type of time.
Select date format You can select the date format.
Page 84

About system
You can check the system information, such as Network, Battery, and the legal information.
To execute
Home Screen
Settings About system
Settings 85
Page 85

Index
Managing Data on IDENTITY tab
Copyright / Authentication / Trademark/ Exemption Clause
Internet Service Types
Troubleshooting
Warranty Statement and After-Sales Service
Index
86 Index
Page 86

Managing Data on IDENTITY tab
ConvergenceOne™ will help you manage your personal information easily. While using
IDENTITY tab, the saved data may be lost due to malfunctions or failures of your IDENTITY
tab. In order to prevent or to minimize any inconvenience incurred from such a loss, it is
recommended that you back up your personal data on another device. Wintec Industries
shall not assume any responsibility for the loss of your data.
Please visit the Enspert website for further information on the latest software information, the
software upgrade method, and the management of personal information.
Index 87
Page 87

Specications and Features
Color Metal Silver
Dimension
Operating
Temperature
Operating
Relative
Humidity
CPU ARM Cortex-A8 1GHz
OS Android Froyo
H/W
Display
Memory 8GB NAND Flash Memory/512MB System Memory
Network
GPS
Interface
Sensor G sensor, Light sensor, Digital Compass
Camera 3M Pixels
Battery
Size 191.2 (W) * 130.5 (L) * 14.6 (H)
Weight 425 g
IDENTITY tab: 0°C ~40°C Charger: 0°C ~40°C
5% ~95%
7.0” 260K Color TFT LCD
Resolution WVGA (800X480)
Contrast level
Capacitive multi
touch
Wi-Fi IEEE 802.11 b/g/n
Bluetooth Bluetooth 2.1 + EDR
Stand Alone GPS
micro-HDMI, USB mini B type, Ear/ Mic Jack(diameter 3.5 Ø), SD
Card Slot
4100 mAh Li-polymer Battery
Charge with the Mini USB
Level 3
Browser/ Map/ eBook Viewer/ Image
88 Index
Page 88

Specications and Features
Speaker
Audio
E-Book ePub
Image JPG, BMP, PNG, GIF
S/W
Document TXT, PDF, DOC, PPT, XLS
Codec
Basic
applications
ACC Adapter Rechargeable with a USB adapter
Microphone Built-in microphone
Sound eects SRS WOW HD
Video H.264, H.263, Xvid, WMV9, MPEG4, AVI, ASP
Audio AAC, MP3, WMA3, AMR-NB/WB, AC3
Image JPG, BMP, PNG
Internet Browser, Widget, Memo, Address Book
Built-in Stereo Speaker (above 1W x 2CH)
Index 89
Page 89

Copyright / Authentication, Trademark / Exemption Clause
Copyright
Copyright© 2011 Wintec Industries. All rights reserved.
This User Manual is the property of Wintec Industries and is protected by copyright law.
This User Manual shall not be partially or wholly reproduced, distributed, translated or altered
in an electronic or printed form without the written permission of Wintec Industries.
The companies, institutions, and products that were used as examples are not actual data.
It is not intended for these companies, institutions, products, persons, or incidents to be
associated with Wintec Industries. Therefore, such an assumption should not be made.
It is the user's responsibility to follow the corresponding copyright laws.
Trademark
FileMate, FileMate logo, Wintec Industries, and the Wintec Industries logo are the trademarks
of Wintec Industries.
The Android logo, Google Search, Voice Search, Map, Gmail, YouTube, Market, and Talk are the
trademarks of Google Inc. Other company names and product names may be the trademarks
of the corresponding companies.
90 Index
WOW HD, SRS and the
symbol are the trademarks of SRS Labs, Inc.
Exemption clause
Wintec Industries. shall not assume responsibility for accidental damage or damage incurred
from the incorrect use and operation of IDENTITY tab. The information in the User Manual was
Wintec Industries has been adding
to change without prior notice.
Internet Service Types
In general, you need an Internet line to use the Internet. You can use all Internet lines, such
as Internet line, dedicated lines, cable modems, and other Internet lines. Also, you can access
Wi-Fi wireless Internet using Wi-Fi Multi.
Page 90

Troubleshooting
No screen
appears at all.
When the Internet is not
connected or connected
incorrectly, the screen may not
display.
When IDENTITY tab is selected
in External Output Mode, the
screen may not display.
Check the Internet
connection.
Switch the External
Output mode.
LCD
Afterimages
appear.
Border lines
appear.
The screen
does not look
clear.
No input
power
When you watch the same
screen for an extended length
of time, afterimages appear.
Have you played games for an
extended length of time?
Have you used the 4:3 screen for
an extended length of time?
The border lines on the left and
right and at the top and bottom
of the screen are xed, or the
penetration of light diers
from each other. Therefore, if
you watch the screen for an
extended length of time, border
lines appear.
The screen does not look clear
under direct sunlight.
You did not turn on the power
switch.
The battery is discharged
completely.
The screen may cause
permanent damage to
the touchscreen.
If a paused screen
continues to be displayed
when you are playing a
game, afterimages may
appear.
The same screen may
cause permanent
damage to the pad
screen. Failures incurred
from the aforementioned
are not covered in the
warranty statement.
Use your IDENTITY tab in
a shaded area or in a level
of brightness where you
can read a book.
Press the power switch to
turn on.
Charge the battery.
Installation
and
Connection
The battery is
not charged.
IDENTITY tab
generates
heat.
The charger is not connected
to IDENTITY tab.
When using IDENTITY tab, a
lot of current is required. As
a result, if you talk on your
IDENTITY tab, play games,
or use the Internet for an
extended length of time, it
may generate heat.
Check if the USB charger
is properly connected to
IDENTITY tab.
This is neither a product
failure, nor does it
aect the lifetime or
performance of your
IDENTITY tab.
Index 91
Page 91

Troubleshooting
Installation
and
Connection
Menu
Other
The screen is
not displayed
after an external
device was
connected.
The menu is not
selected
Knocking
sound from the
product
IDENTITY tab is
dirty.
Data saved
on IDENTITY
tab has been
deleted.
When IDENTITY tab is not
connected to an external
device or connected
incorrectly, the screen may
not display.
The menu is gray
(deactivated).
This can happen due to the
mechanical contraction or
expansion of the exterior.
Foreign objects adhere to
IDENTITY tab.
If the data was damaged
due to the initialization or
failures of IDENTITY tab, it
cannot be recovered unless
you have backup data.
Check if the external
device is connected
properly.
The menus that are
supported vary depending
on the model. Check the
model when checking the
functions.
The knocking sound
occurs when the product
contracts or expands due
to heat. Therefore, it is not
a failure of the product
and you can use the
product safely.
IDENTITY tab can be
damaged if you wipe it
with alcohol, benzene, or a
synthetic detergent. Wipe
your IDENTITY tab with a
pencil eraser or a soft cloth.
Ensure that you back up
the data on a safe external
device at all times.
92 Index
The battery
usage time
(standby time)
diers from the
User Manual.
When you leave the
charged battery at a low
or high temperature, its
usage time decreases.
When using additional
functions, such as entering
text, playing games, or
using the Internet, the
battery consumption
increases.
The battery is a consumable
part, so its lifespan
decreases slowly.
Use IDENTITY tab at room
temperature.
End the applications
when you are not using
IDENTITY tab.
When you are not using
Bluetooth, Wi-Fi, or the
GPS, turn them o.
Page 92

Wi-Fi
Camera
The Internet
is often
disconnected.
The quality of an
image is not as
good as the one
on the preview
screen.
The Internet connection
may be delayed or
may not be connected
properly, depending
on the wireless AP
condition.
If you use IDENTITY
tab while you are
moving, the wireless
Internet service can
become disconnected,
depending on the
wireless AP condition.
The quality of an
image is sensitive
to the surrounding
environments and can
vary depending on the
shooting technique.
Lighting is insucient
in a dark place, at night,
or indoors. As a result,
noise may occur or you
cannot focus the camera
properly.
Troubleshooting
Move to another area and
try again.
Take pictures in a bright
area or where sucient
lighting is present.
You cannot nd
GPS
Earphones
Due to the technical limitations of the manufacturing process, it can look brighter or
darker by 1 PPM (1/1,000,000) on the LCD panel of IDENTITY tab. This does not aect the
performance of IDENTITY tab at all. (The number of LCD panel pixels: 480,000 pixels).
your location
indoors.
Only one side of
the earphones
works.
You cannot properly
receive GPS signals
indoors.
IDENTITY tab is
optimized for 4-pin
earphones.
Use a wireless network or
use it outdoors.
Use the earphones that
came with your IDENTITY
tab. You can also buy 4-pin
earphones if you want
extra ones.
Index 93
Page 93

Warranty Statement and After-Sales Service
A. EXTENT OF LIMITED WARRANTY
1. Enspert warrants hardware products against defects in materials and workmanship
for a period of one year from date of purchase ("Warranty Period"). The customer is
responsible for keeping all original proof of purchase documents during this time.
Enspert will only accept purchase receipts from authorized resellers as proof of
purchase. Receipts coming from credit card processing companies, including but not
limited to PayPal, Authorizenet.com, Visa, Mastercard, Amex and Discovery, will not be
accepted as proof of purchase.
2. Concerning software products, Enspert Limited Warranty applies only to a failure to
execute programming instructions. Enspert does not guarantee the operation of any
product will be uninterrupted or error free.
3. Enspert Limited Warranty covers only those defects which arise as a result of normal
use of the product, and does not apply to:
• Improper or inadequate maintenance or modication;
• Software, interfacing, media, parts and supplies not provided or supported by
Enspert; or
• Operation outside the product's specications.
4. If Enspert receives, during the applicable Warranty Period, notice of a defect in any
hardware product, which is covered by Enspert's warranty, Enspert will either repair
the product using new or refurbished replacement parts or replace the defective
product with new or like-new product of the same model with the same functionality
as the original unit. If Enspert is unable to repair or replace the defective product,
the customer will either be oered a comparable model* (if available) or will be
refunded the purchase price of the defective product. When a product is exchanged,
any replacement item becomes the property of the customer and the replaced item
becomes Enspert's property. (* whose functionality is at least equal to that of the
product being replaced.)
5. Enspert shall have no obligation to replace or refund a defective product until the
customer returns the defective product to Enspert.
6. Enspert is not responsible (i) for any data stored on returned products. Customers
should backup his/her data prior to shipping the unit back to Enspert. Hard drives and
devices which include a hard disk or other memory storage system will be reformatted
during the repair process (even if the repair is not related to the hard drive itself )
and will not include the customer's data when it is returned. (ii) for protecting the
condentiality of any data on a product sent in for repair.
7. Enspert ' limited warranty is only valid in the country of purchase.
8. The Enspert limited warranty is non-transferable. Enspert will not validate purchases
made via trade, barter or auctions. This pertains to trade, barter or auction between
individuals or between resellers and individuals on sites including but not limited to
E-Bay and Ubid where trade, barter or auction transactions are facilitated.
9. Enspert does not warrant against damages incurred to the LCD screen. Devices
94 Index
Page 94

Warranty Statement and After-Sales Service
returned with broken LCD screens will be evaluated by an Enspert technician who
will determine if such damage falls within the scope of product neglect or misuse
and hence whether or not it is guaranteed.
10. The batteries in IDENTITY TAB products have a nite number of charge cycles and
thus over its life span, the autonomy will slowly decrease. Enspert does not guaranty
a specic battery charge retention time scale as degradation of battery autonomy
includes variables beyond the control of Enspert, such as, but not limited to, how
often you deplete and charge it, the temperature the device is used and/or charged
at, and the amount of time that the device is used or not used between charges.
11. The LCD screens on IDENTITY TAB products may display pixel failures immediately or
over time. Please refer the full PDF user manual of your product for information on
your rights for replacement of a screen with multiple defective pixels.
B. LIMITATIONS OF WARRANTY
To the extent allowed by local law, neither Enspert nor its third party suppliers make any
other warranty or condition of any kind, whether expressed or implied, with respect to
the Enspert products, and specically disclaim the implied warranties of conditions of
merchantability, satisfactory quality, and tness for a particular purpose.
C. LIMITATIONS OF LIABILITY
To the extent allowed by local law, the remedies provided in this Warranty Statement are
the customer's sole and exclusive remedies. To the extent allowed by local law, except for
the obligations specically set forth in this warranty statement, in no event shall Enspert
or its third party suppliers be liable for direct, indirect, special, incidental, or consequential
damages, whether based on contract, tort, or any other legal theory and whether advised of
the possibility of such damages.
D. LOCAL LAW
This Warranty Statement gives the customer specic legal rights. The customer may
also have other rights that vary from state to state in the United States, from province to
province in Canada. To the extent that this Warranty Statement is inconsistent with local
law, this Warranty Statement shall be deemed modied to be consistent with such local
law. Under such local law, certain disclaimers and limitations of this Warranty Statement
may not apply to the customer. For example, some states in the United States as well as
Canada may: preclude the disclaimers and limitations in this Warranty Statement from
limiting the statutory rights of a consumer; restrict the ability of a manufacturer to enforce
such disclaimers or limitations; or grant the customer additional warranty rights, specify
the duration of implied warranties which the manufacturer cannot disclaim, or not allow
limitations on the duration of implied warranties.
Index 95
Page 95

Index
A
About system 85
Accessories 32
Account 78
Address Book 45
Android keyboard 83
Application 19
Applications 77
Auto-sync 78
B
Battery 14
Bluetooth 73
Bookmark 70
Browser 70
C
Camera 71
Clock 56
ConvergenceOne™ 60
Copy 58
Credential storage 76
D
Date 84
Delete 58
Development 77
E
Email 66
Ending Applications 55
External Devices 34
F
Factory data reset 79
File Manager 58
Firmware 87
G
Gallery 44, 48
Google search 81, 83
H
Home 18
Home Button 12
I
Icons 21
Internal memory 80
Internet 70
K
Keyboard 26
M
Memory 80
Menu 18
Menu Button 12
Move 58
mp3 52
Music 51
My Album 53
My location 76
96 Index
Page 96

Index
O
Optional components 11
P
passwords 76
Photo 53
Power Button 18
Previous 18
Previous Button 12
Privacy 79
Q
Quick fixes 83
QWERTY keypad 26
R
Reset Button 18
Resetting 18
S
Scroll bar 28
SD card 33
SD Card 80
Search 81
Select Language 82
Service info. 58
Settings 72
Slideshow 54
Speakers 12
SRS WOW HD 31
Status bar 19
Stay awake 77
Sync 78
T
Task Manager 55
ThinkFree Office 57
Time 84
Touchscreen 12, 22, 23, 24, 25
Twitter 59
V
Video 50
Volume 18, 31
W
Wallpaper 19
Wi-Fi 73
Index 97
Page 97

Page 98

99 시작하기 전에
 Loading...