

Page 1
DVD/DVB-T COMBO PLAYER
PDVDX100S/PDVDX100B
INSTRUCTION BOOK
Please read this IB carefully to get the best performance from this player.
PDVDX100S-100B-im.p65 06-5-16, 11:301
Page 2

TABLE OF CONTENT
Safety information ......................................... 3
Precautions ..................................................... 4
Fe a tures .......................................................... 5
Accessories ................................................... 6
Front Panel Reference ................................. 6
Rear Panel Reference ................................... 7
Remote Control Reference ......................... 8
VFD Reference ............................................... 9
Basic connection ................................... 10-12
Remote Control Preparation ..................... 13
Operation ....................................................... 14
DVD Player Playback Part:
Preparation ................................................... 14
STANDBY .....................................................14
PLAY ............................................................. 14
STOP .............................................................14
SKIP-/SKIP+ ................................................... 14
F. FWD/F. RWD ............................................. 14
SLOW ........................................................... 14
PAUSE/STEP .................................................14
Number(0-9/10+ button) ...............................14
MUTE ............................................................. 14
VOL-/VOL+ ................................................... 15
DISPLAY ....................................................... 15
ZOOM ........................................................... 15
A-B REPEAT.................................................. 15
MODE ............................................................ 15
ANGLE .......................................................... 15
AUDIO ...........................................................15
PROGRAM ....................................................15
MARK ............................................................15
VIDEO-OUT ...................................................15
SEARCH ........................................................ 15
TITLE(For DVD Disc) ....................................16
MENU ............................................................ 16
SUBTITLE ...................................................... 16
CLR ............................................................... 16
DVD/DVB ......................................................16
SETUP ...........................................................16
PLAYBACK MP3/JPEG .................................16
1. PLAYBACK MENU ....................................... 16
2. PLAYBACK MP3 .......................................... 16
3. PLAYBACK JPEG FILE ................................16
DVD PLAYER Setup Interface ...................... 17
DVB OPERATION Part:
Fast installation Operation ............................ 18
MAIN operation ...................................... 18-21
DVB-T Receiver Setup Interface ................. 22
For your reference ...................................... 23
Unit Maintenance .......................................... 23
Definition Of Terms ....................................... 23
Specification ................................................. 24
Troubleshooting ............................................25
PDVDX100S-100B-im.p65 06-5-16, 11:302
-2-
Page 3
SAFETY INFORMATION
Dear customer:
We take this opportunity to thank you for purchasing this DVD/CD/DivX player with built-in Digital
Terrestrial Receiver. We strongly recommend that you study carefully the operation instruction before
attempting to operate the unit and that you have noted the list precautions.
Note:
This unit can be used only where the power supply is 240V,50Hz, it can’t be used elsewhere.
Caution
DVD/DVB IS A CLASS 1 LASER PRODUCT. HOWEVER THIS DVD/CD PLAYER USES A VISIBLE
LASER BEAM WHICH COULD CAUSE HAZARDOUS RADIATION EXPOSURE IF DIRECTED. BE
SURE TO OPERATE THE DVD/CD PLAYER CORRECTLY AS INSTRUCTED WITHOUT OPENING
CABINET AND LOADER COVER.
WHEN THIS PLAYER IS PLUGGED INTO THE WALL OUTLET, DO NOT PLACE YOUR EYES CLOSE
TO THE OPENING OF THE DISC TRAY AND OTHER OPENINGS TO LOOK INTO THE INSIDE OF THE
PLAYER.
WHEN THIS PLAYER IS PLUGGED INTO THE WALL OUTLET, DO NOT REMOVE THE PROTECTIVE
CAP ON THE OPTICAL OUTPUT SCART. RED BEAM SENDS OUT TO HARM YOUR EYES ESPECIALLY FOR CHILDREN WHEN YOU LOOK AT OPTICAL OUTPUT TEMINAL. PUT ON THE PROTECTIVE CAP WHEN THE SCART IS IDLE.
RADIOACTIVE DANGER MAY BE CAUSED IF YOU DO NOT FOLLOW THE METHOD STIPULATED
HERE FOR THE OPERATION, ADJUSTMENT OR CONTROL.
PLEASE CONSIGN THE MAINTENANCE TO THE PROFESSIONAL TECHNICIAN.
Warning:
To reduce the risk of fire or electric shock, do not expose this equipment to rain or moisture.
To reduce the risk of fire or electric shock, and annoying interference, use the recommended
accessories.
Copy Protection
This DVD player supports Macrovision copy protection. On DVD disc that include a copy protection
code, if the contents of the DVD disc are copied using a VCR, the copy protection code prevents the
videotape copy from playing normally.
This product incorporates copyright protection technology that is protected by U.S. patents and
other intellectual property rights. Use of this copyright protection technology must be authorized by
Macrovision, and is intended for home and other limited viewing uses only unless otherwise authorized by Macrovision. Reverse engineering or disassembly is prohibited.
Official DivX CertifiedTM product.
Plays DivX®5, DivX®4, DivX®3, and DivX®VOD video content (in compliance with DivX Certified
TM
Technical requirements)
U.S Patent Nos. 4,631,603; 4,577,216; 4,819,098; 4,907,093; and 6,516,132.
PDVDX100S-100B-im.p65 06-5-16, 11:303
-3-
Page 4

Precautions Features
Power cord protection
To avoid any malfunctions of the unit, and to protect against electric shock, fire or personal injury,
please observe the following.
Hold the plug firmly when connecting or dis-
connecting the AC power cord to this unit.
Do not connect or disconnect the AC power
when your hands are wet.
Keep the AC power cord away from heating
appliances.
Never put any heavy object on the AC power
cord
Do not attempt to repair or reconstruct the AC
power cord in any way.
Remove dust, dirt, etc. on the plug at regular
intervals.
If the unit has been dropped or otherwise
damaged, turn off the power and disconnect
the AC power cord.
If you find smoke, bad smells or noises are
emitted from the unit, turn off the power and
disconnect the AC power cord.
Placement
Avoid placing the unit in areas of:
Direct sunlight or heating radiators, or closed
automobiles.
High temperature (over 35°C) or high humidity
(over 90%)
Excessive dust
Strong magnetic or static electricity place.
Vibration, impact or where the surface is titled.
Otherwise the internal parts may be damaged.
Non-use Periods
Switch the unit to standby status or turn off
the power when the unit is not being used.
It should be unplugged from the household AC
outlet when the unit is idle for a long period of
time.
No fingers or other objects inside
Touching internal parts of this unit is dangerous,
and may cause serious damage to the unit.
Do not attempt to disassemble this unit.
Keep away from water and magnets
Keep the unit away from flower vases, tubs,
sinks, etc. If liquids are spilled into the unit,
serious damage could occur.
Never bring magnetic objects such as speak-
ers near the unit.
Stacking
Place the unit in a horizontal position, and do
not place anything heavy on it.
Do not place the unit on amplifiers or other
equipment, which may become hot.
Minimum distances around the apparatus for
sufficient ventilation.
The ventilation should not be impeded by cov-
ering the ventilation openings with items, such
as newspaper, table-cloths, curtains, etc.
No naked flame sources, such as lighted
candles, should be placed on the apparatus.
This apparatus shall not be exposed to drip-
ping and splashing.
Socket outlet for connecting the mains plug
should be easily accessible and remain readily
operable.
Features
DVD section
DVD a completely new dimension in video
entertainment
Subtitles may be displayed in one of a maxi-
mum of 32 languages available (multi-subtitles
DVD only)
Audio soundtrack can be heard in up to 8 lan-
guages (multi-languages DVD only).
Multi-angle function allows you to choose the
viewing angles of scene (for DVD with multiple camera angles only).
High quality digital audio
The AC-3/MPEG2 audio/Linear PCM decoder
is built into the player which makes it possible
to have Multi-Channel Surround sound.
Other convenient features
Parental lock settings to prevent playing un-
suitable discs for some audiences (DVD only).
A full function remote control provides quick
access to DVD functions.
5.1CH or 2CH output.
Video output modes: CVBS, YUV and YPbPr,
Supports 16:9 wide screen mode.
Compatible with both PAL and NTSC systems.
Supports DTS decoding.
Digital audio output: COAXIAL and OPTICAL
output. Supports RAW (digital audio) and PCM.
Input and Output for stereo (analogue).
Programmed playback, bookmark, zoom in/out
and rotation of JPEG pictures. Status memory
for discs.
Operate pictures interface
Disc rating lock function
PDVDX100S-100B-im.p65 06-5-16, 11:304
-4-
Page 5

Features
Full function remote control.
Intelligent software update.
Compatible with PAL DVD and NTSC DVD
This player can play discs recorded in either
PAL or NTSC system. However, the player
must be connected to a multi-system TV to
play both PAL DVD and NTSC DVD. The use of
a multi-system TV is recommended and set
the video output of this player as AUTO in the
video setup.
Compatible with CD and DVD
This player could play various discs such as
DVD, CD (8cm/12cm discs).
This player can play DIVX format movies such
as DivX3.11, DivX4+, DivX5+
Note: DIVX discs with bit rate above 1Mbps
may not be played normally.
DVB section
MPEG-2 / DVB-T compatible
Bandwidth 7MHz or 8MHz optional
Electricity broken memory, resume
automatically.
Multi-subtitle
Manual/Auto scan
Support OSD & VBI teletext
SCPC/MCP C compatible
Electron Program Guide (EPG)
User-friend interface
PDVDX100S-100B-im.p65 06-5-16, 11:305
-5-
Page 6
ACCESSORIES
Remote control one piece
Instruction Book one piece
Batteries two pieces
Customer Care Centre Sheet one piece
3 Pin AV Cable one piece
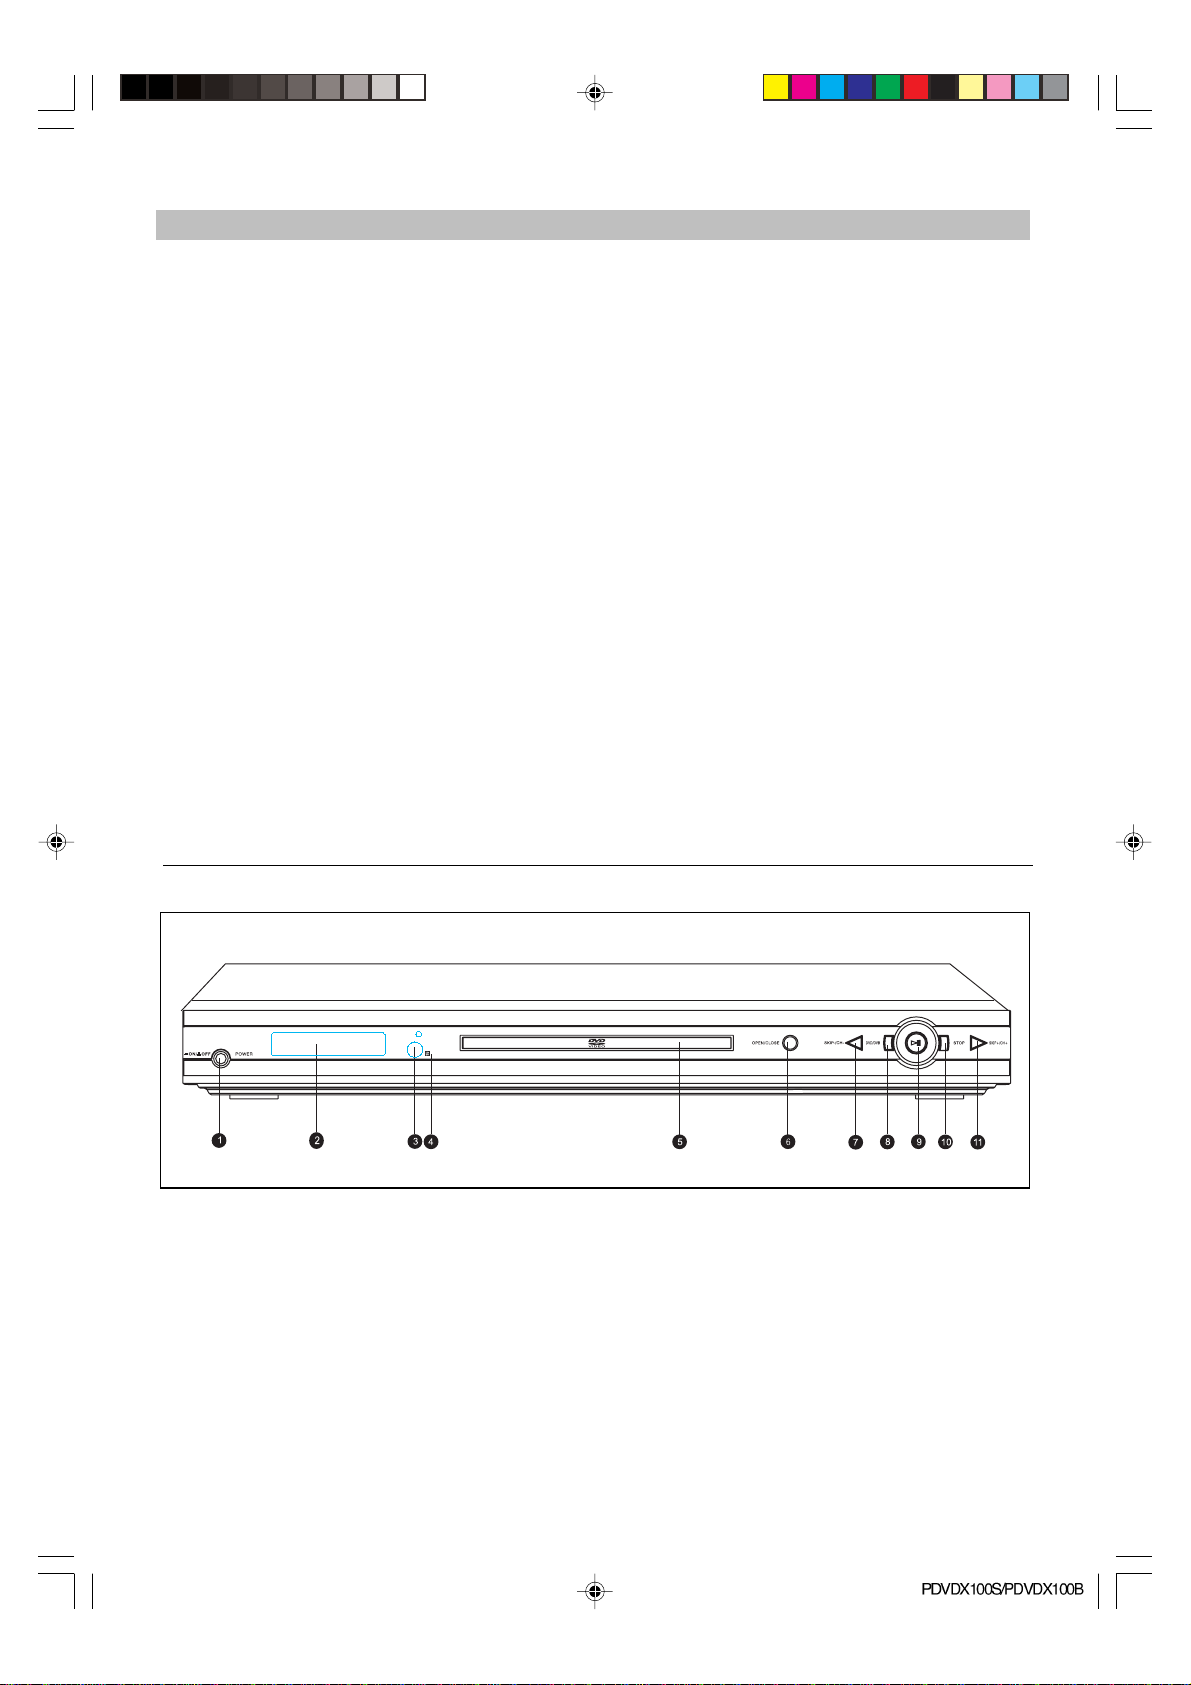
Front panel reference
1. Power button
2. VFD display
3. STANDBY LED
4. Remote control sensor
5. Disc tray
6. OPEN/CLOSE button
7. SKIP-/CH- button
8. DVD/DVB switch button
9. PLAY/PAUSE button
10. STOP button
11. SKIP+/CH+ button
PDVDX100S-100B-im.p65 06-5-16, 11:306
-6-
Page 7
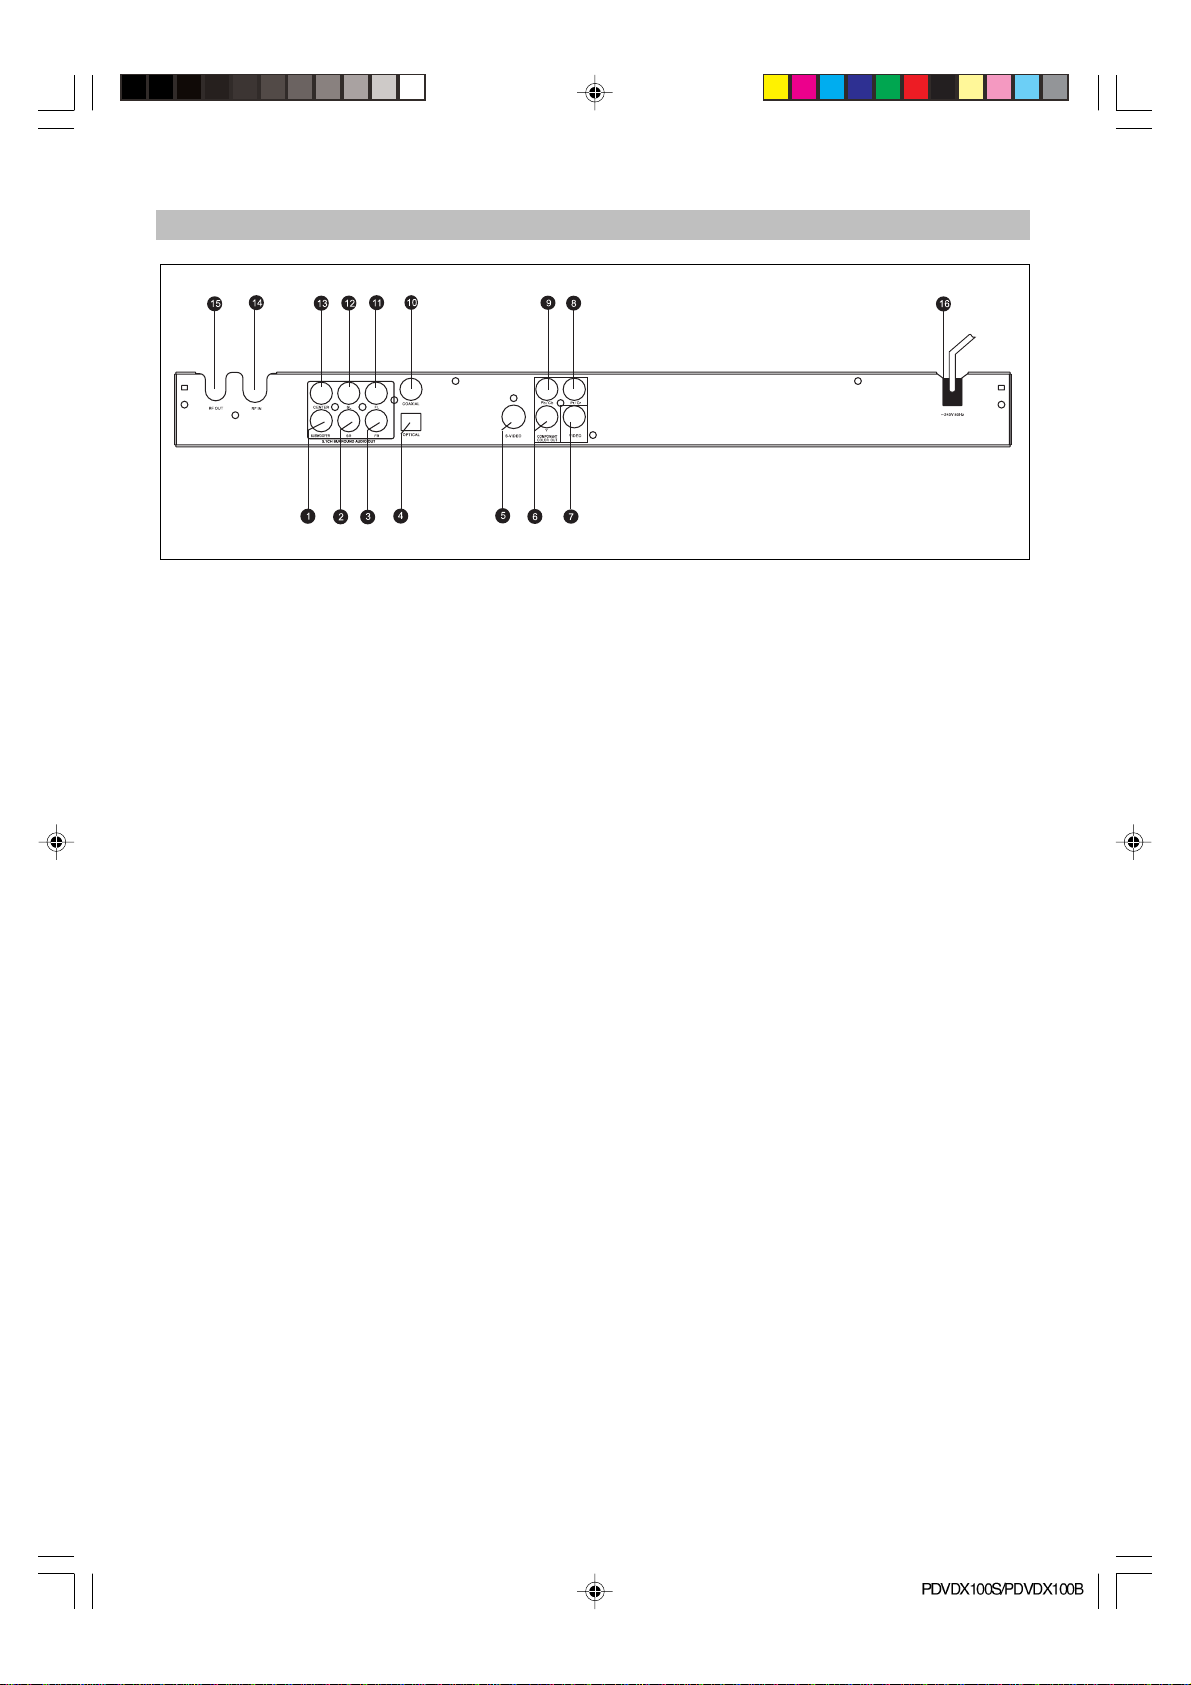
Rear panel reference
1. 5.1 CH SUBWOOFER output jack
2. 5.1 CH SR output jack
3. 5.1 CH FR output jack
4. Optical output jack
5. S-video output jack only for DVD player
6. Chromatic aberration signal Y-axis output jack only for DVD player
7. Video output
8. Chromatic aberration signal Cr/Proutput jack only for DVD player
9. Chromatic aberration signal Cb/Pb output jack only for DVD player
10. Coaxial output jack
11. 5.1CH FL output jack
12. 5.1CH SL output jack
13. 5.1CH CENTER output jack
14. RF IN
15. RF OUT
16. AC power cord
Remarks: For STB video output, only use video out put (yellow connector).
NOTE:
Please unplug and keep the power cord orderly when the unit is idle for a long time in order to avoid
electricity leak and shock resulted from scratched power cord.
-7-
PDVDX100S-100B-im.p65 06-5-16, 11:307
Page 8
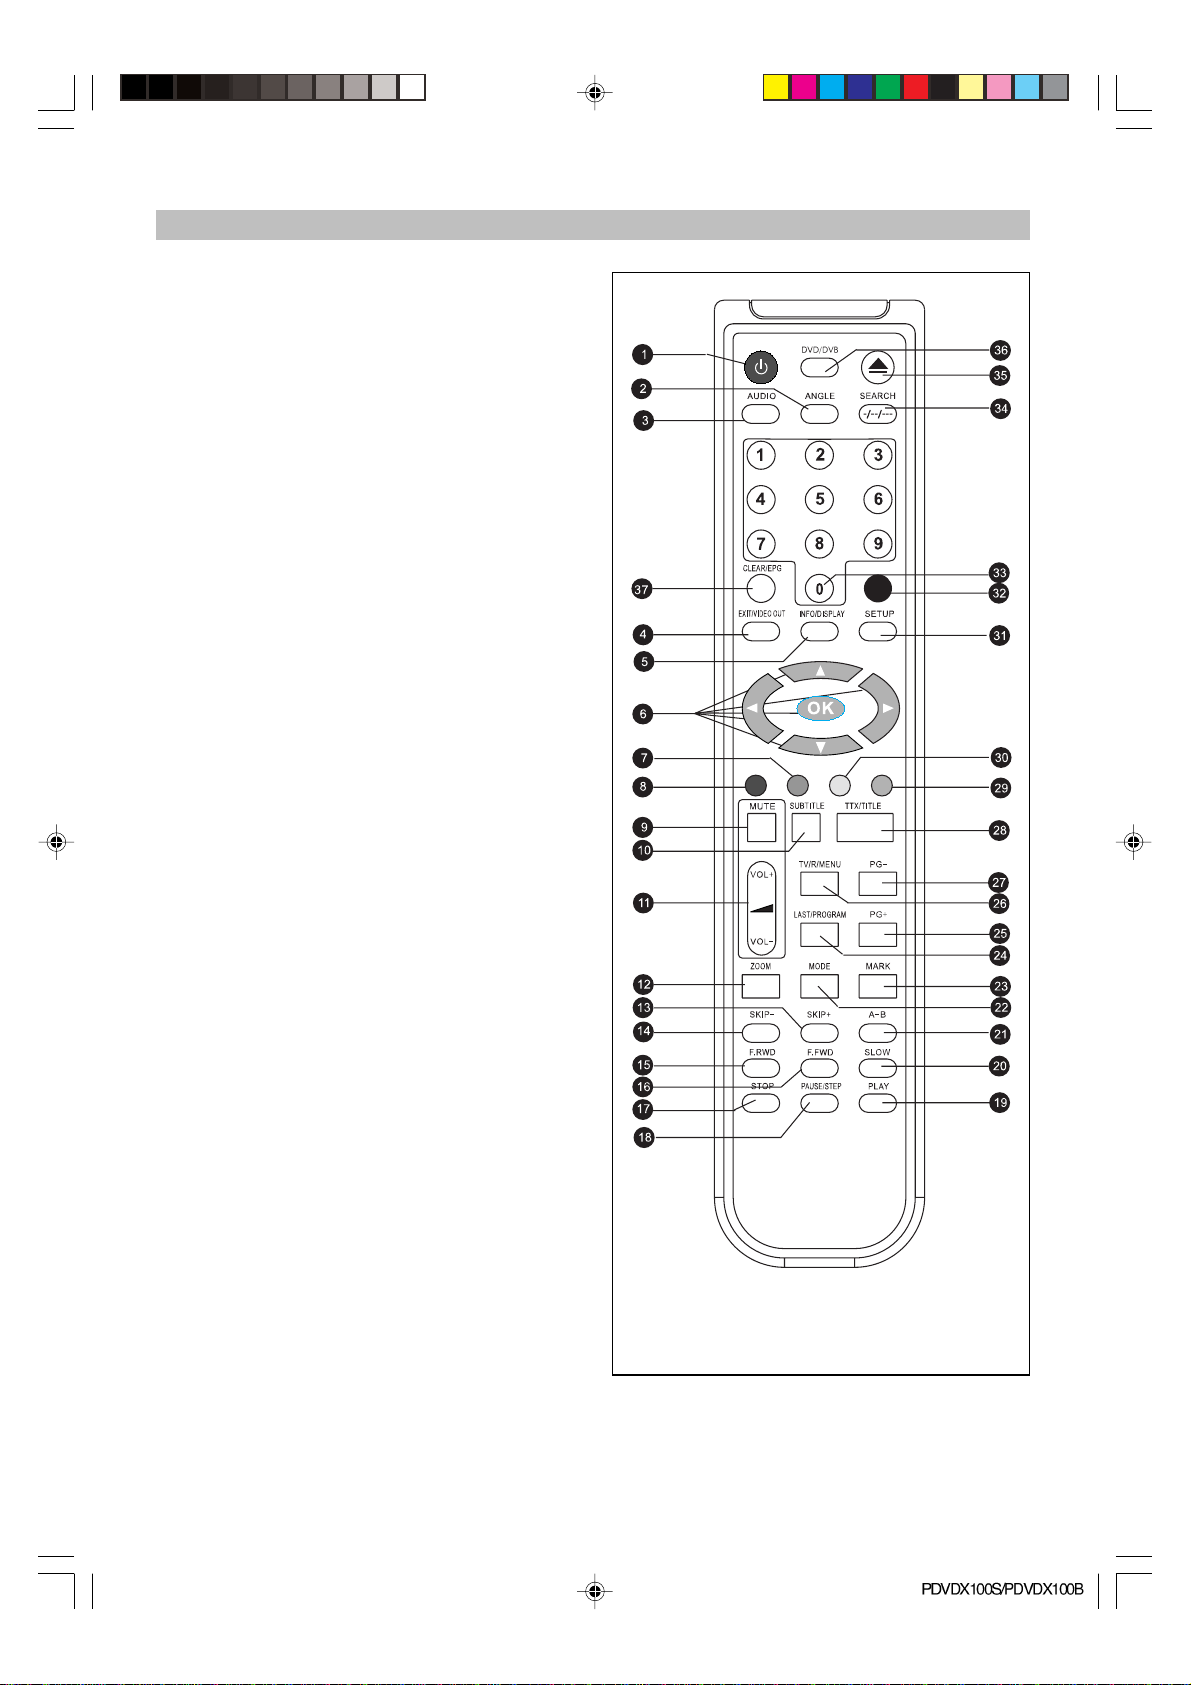
Remote Control Reference
1. STANDBY button
2. ANGLE button
3. AUDIO button
4. E XIT/VIDEO OUT
5. INFO/DISPLAY button
6. , , , , OK buttons
7. GREEN button
8. RED button
9. MUTE button
10. SUBTITLE button
11. VOL+ / - button
12. ZOOM button
13. SKIP+ button
14. SKIP- button
15. F.RWD button
16. F.FWD button
17. STOP button
18. PAUSE/STEP button
19. PLAY button
20. SLOW button
21. A-B button
22. MODE button
23. MARK button
24. LAST/PROGRAM button
25. PG+ button
26. TV/R/MENU button
27. PG- button
28. TTX/TITLE button
29. Favorite Function button (BLUE)
30. Favorite Function button (YELLOW)
31. SETUP button
32. Favorite Function button (WHITE)
33. NUMBER (1-9, 0) button
34. SEARCH -/—/— button
35. OPEN/CLOSE button
36. DVD/DVB button
37. CLEAR/EPG button
NOTE:
1. The same buttons on remote control and front
panel have the same function.
2. Favorite Function button , Please refer to the
indication exact operation abut the button.
PDVDX100S-100B-im.p65 06-5-16, 11:308
-8-
Page 9

VFD reference
1. Shows when playing DVD discs
2. Shows DVB when the unit is at the DVB mode
3. Shows DVB-T
4. Shows MP3 when playing MP3
5. Shows second
6. Shows minute
7. Shows hour
8. Shows chapter/track number
9. Shows pause symbol when pausing the playback
10. Shows playback symbol
11. Shows rotating playback
12. Shows timer when timer is setup
13. Shows CD when playing CD discs
PDVDX100S-100B-im.p65 06-5-16, 11:309
-9-
Page 10

BASIC CONNECTION
Ensure that the power switch of this unit and
other equipment to be connected is turned off
before commencing connection
Read through the instructions before connect-
ing other equipment
Ensure that you observe the color-coding
when connecting audio and video cords
Please use only one kind of connection with
TV set for the unit and choose correct video
output setting, otherwise there may be image
distortion.
DVD player part Connection
A: Connecting to TV set w/AV input jack
1. TV set (optional)
2. DVD/DVB-T Combo player
3.4. S-Video cord (optional), to S-Video input
connector
5.6.7. Video/Audio cord (optional), to TV video/
audio input connector
8. Power cord
B: Connecting to a stereo TV set
1. TV set (optional)
2. DVD/DVB-T Combo player
3.4. Audio cord, to TV audio input connector
5. 6.7. To the corresponding Y Pb/Cb Pr/Cr VIDEO
IN jack on the TV. (green, blue, red).
8. Video cord, To TV video input connector
ture output.
3. Consumers should note that not all high definition television sets are fully compatible with
this product and may cause artefacts to be
displayed in the picture. In case of 525 or 625
progressive scan picture problems, it is recommended that the user switch the connection to the ‘standard definition’ output.
Relative Setup
When using 2ch output to connect TV or audio
equipment, please set submenu of Analog Out
under the menu of Audio Setup as 2 channels.
To get better viewing quality, you are advised
using S-video cord to connect the TV set with
CVBS input meanwhile changing the TV set to Svideo input format. The TV set with Y, Cb, Cr input
can get more clear picture and realistic image
when it connects to Y, Cb, Cr output jacks of this
player. The Video out setting must be set as YUV
if you use Y, Cb, Cr output.
If your TV has “Y Pb Pr” function (progressive
scan function), you can use this unit’s progressive scan output by using Y Pb Pr output jacks &
setting the player’s VIDEO OUT as Y Pb Pr.
Note:
1. Choose below speaker size setting in the setting “Audio” menu if you use the TV speakers:
Front: Large, Center/Rear/Subwoofer: Off. At
this setting situation which is Stereo effect,
the signal from Audio output L, R is the same
as the FL & FR output, also same as the audio
signal from Scart jack.
2. Only one kind of connection to TV set can be
made. If your TV set doesn’t support “Y Pb Pr”
function, don’t switch the VIDEO OUT to Y Pb
Pr of the unit, otherwise there will be no pic-
-10-
PDVDX100S-100B-im.p65 06-5-16, 11:3010
Page 11

BASIC CONNECTION
C: Connection to audio system
1. DVD/DVB Combo Player
2. Audio system (optional)
3. Audio cords
4. Coaxial cable, to the audio system coaxial
input connector
5. Optical cable, to the audio system optical
input connector
6. To center audio input connector
7. To audio input connector (subwoofer, sur-
round left, surround right, front left, front
right).
Regarding the audio system connection to
other unit, please kindly refer to the audio
system instruction manual.
Relative setup
According to your audio system, it is ok that
you connect any of point 3/4/5.
When using 5.1ch analog to connect the audio
system, please set the submenu of analog out
under the menu of audio setup as 5.1 channel
Coaxial Digital Output Notice
Do not connect this unit’s coaxial digital output
to the amplifier which does not have AC-3 or
MPEG2. Otherwise it will cause extreme high
level noise and damage to your listening.
Optical Digital Output Notice
Take out the optical digital output protective
cap, and insert the optical cable into the unit’s
optical output hole and amplifier’s optical input
connector. Keep the protective cap well when
non-use. Put the protective cap onto optical
output in avoid of any damage to the eyes.
PDVDX100S-100B-im.p65 06-5-16, 11:3011
-11-
Page 12

DVB-T Connection Part
A: Connection to TV and antenna
1. TV Set (optional)
2. Power cord
3. Video cable (optional)
4.5. Audio cords, to TV FL, FR audio input Con-
nectors (optional)
6. Antenna (optional)
Note:
YPrPb and S-video output only for DVD player.
B: Connection to TV and another DVB-T
Receiver
1. TV set (Optional)
2. Antenna (Optional)
3. Video cable (optional)
4.5. Audio cords, to TV FL, FR audio input
6. DVD/DVB Combo Player (optional)
7. Power cord
PDVDX100S-100B-im.p65 06-5-16, 11:3012
-12-
Page 13

REMOTE CONTROL PREPARATION
Battery Installation
Insert the batteries while observing the positive
(+) and negative (-) polarities as Figure A
Service life of batteries
The batteries normally last for a year although
this depends on the operation and on how
often the remote control is used.
If the remote control unit fails to work even
when it is operated near the player, replace
the batteries with new ones.
Use size AAA UM-4 batteries (2 pieces)
Notes:
Do not use rechargeable (Ni-Cd) batteries
Do not attempt to recharge, short circuit,
disassemble, heat or throw the batteries into
fire
Do not drop, step on the remote control, other-
wise it may damage the parts or lead to malfunctioning
Do not mix old and new batteries
If the remote control is not going to be used for
a long time, remove the batteries. Otherwise,
electrolyte may leak and lead to malfunctioning
or even burns by electrolyte
Wipe away any electrolyte leaking inside the
remote control, and install new batteries
If the leaking electrolyte has contact with some
parts of your body, wash it off thoroughly with
water.
Remote control operation range
The operation range of the remote control is
no more than 5m from and within about 60
degree of the front of the unit.(Figure B)
The operating distance may vary according to
the brightness of the room
Note:
Do not point bright lights to the remote control
sensor
Do not place objects between the remote con-
trol and the remote control sensor
Do not use this remote control together with
the remote control of any other equipment.
-13-
PDVDX100S-100B-im.p65 06-5-16, 11:3113
Page 14

OPERATION
DVD PLAYER OPERATION PART
The option of display language catalog is pre-
set to English. Please refer to Setup operation
Most of functions are operated by remote
control. Either operation of remote control and
front panel is effected when their buttons indicate the same function
Preparation
Turn the TV on and select AV as the TV input
Switch on the stereo system power if the
player has been connected to stereo system.
Note: some of buttons will have double
function. Please refer to DVB PART for those
buttons with DVB operation function.
STANDBY
When you press the buttons, the player will switch
to Standby status. When pressed again, the player
is returned to normal working status.
Note: should you not wish to use the player,
please switch off the power by pressing the
power button
DVD player playback operation
This unit default status is DVB status. Please kindly
push DVD/DVB button to switch into the DVD
status.
PLAY
1. Push power button on the unit, and it displays
LOAD on the VFD which indicates normal
power supply.
(Note: The disc information appears after several seconds if there is a disc after LOAD displayed otherwise appears NO DISC)
2. Press OPEN/CLOSE button to open disc tray.
OPEN will be indicated on the left upper of TV
screen.
3. Place a disc (8cm or 12cm) into the tray. (For
one- sided disc, position it with printed title
side facing up. For two-sided disc, position
side to be playback facing down)
4. Press OPEN/CLOSE again to close disc tray
CLOSE will display on the left upper of TV
screen, then shows “Reading” and “Loading”
will display on the VFD screen.
5. Press PLAY to playback disc. You may oper-
ate according to MENU indication after MENU
shows on the screen then press OK button to
playback. Some discs can play automatically
after loaded.
STOP
Press STOP button to stop playing. When playback is stopped, the unit records the point where
STOP was pressed (RESUME function). Press
PLAY again, and play will resume from this point.
Press STOP button twice, RESUME function will
be cancelled. RESUME function is suitable for discs
showing playing time during playback.
DivX discs have no such function.
SKIP-/SKIP+
Press SKIP-/SKIP+ button on remote control during playback. A chapter (DVD) or a track (CD) is
skipped back or ahead correspondingly each time
the button is pressed.
Note: SKIP-/+ buttons works as Page down/up in
MP3/DivX/JPEG CD playing menus.
F.FWD/F.RWD
Press F.FWD/F.RWD button on the remote control
during playback and the unit will enter fast
forward/reverse status. There are 4 speeds of
fast forward (reverse) available: x2, x4, x8, x20.
To return to normal play, press PLAY button on
player or remote control again.
Note:
1. Some discs have no such function.
2. For DIVX discs, if the played file is too small,
the speed levels of fast forward (reverse)
will only have x2 or x4.
SLOW
Press SLOW button on the remote control during
playback and the unit will enter slow forward/
reverse status. There are 4 speeds available: 1/
2, 1/4, 1/6, 1/7. To return to normal play, press
PLAY button on player or remote control again.
Note: Some discs have no such function
PAUSE/STEP
Press PAUSE/STEP button during playback, the
player will enter pause mode. If the button is
pressed again, the disc is advanced by one frame
(step). When the button is kept pressed, consecutive frame advance works. To return to normal play, press PLAY button.
Note: Some discs have no such function.
NOTE: During the playing of the introduction of a
movie, PAUSE/STEP, F.FWD, F.RWD, SLOW, SKIP/ SKIP+ may be ineffective.
NUMBER (0-9, 0/10 button)
Press Number (0-9, 0/10) button and press OK
button allows you to directly access any desired
track while a disc is playing.
Note: Some discs have no such function.
MUTE
Press MUTE button during playback, the player
shows mute picture and there is no audio output
-14-
PDVDX100S-100B-im.p65 06-5-16, 11:3114
Page 15

OPERATION
(silence), press again to cancel MUTE. And pressing VOL+ or VOL can cancel MUTE also.
VOL+/VOL-
Press VOL+/VOL- button during playback may
change volume for audio output
Note:
1. The volume is set as largest initially.
2. VOL+/VOL- button will lose function when
using this digital output.
DISPLAY
Press DISPLAY button during play to show the
disc’s relevant information on TV screen.
ZOOM
Press ZOOM button during playback or pause to
zoom up the current picture. There are 3 levels of
zoom available (x1, x2, x3). Press continuously
to Q off to resume normal playing.
Note: Some discs have no such function or have
only x1 or x2.
A-B REPEAT
Press A-B button during playback at the point
where repeat play is to commence (a) then press
again at the point where repeat play is to be concluded (B). Repeat playback between point (A)
and point (B) starts.
Press A-B button once more where TV screen
appears “REP OFF”
Note: Some DVD discs and all MP3, DIVX discs
have no such function.
MODE
Press MODE button during the playing to choose
different REPEAT modes.
Under DVD discs playback status, there are three
options available: Chapter/Title/Off.
Under CD discs playback status, there are three
options available: Single/All/Off.
Note: Some discs and cards have no such
function.
ANGLE
Press ANGLE continuously during playback of
DVD disc to toggle the disc between available
angles recorded on the disc if the disc has multiangle function.
AUDIO
Press AUDIO button during playback to toggle
between available audio languages recorded on
the disc if the disc has this multi-language function.
Note: Press AUDIO button could toggle available
audio language soundtracks.
PROGRAM
Press STOP button first then press PRG button,
the program playback screen appears on the TV
set. 12 tracks (CD) or chapters (DVD) can be
programmed. Use NUMBER button to input your
preferred track (CD) or chapter (DVD) when the
blue cursor flashes on the position1. Note: When
programming a DVD disc, you must input title number ahead of “:”and chapter number after it. It is
invalid to input the number larger than available.
Then press direction button (UP, DOWN, LEFT,
RIGHT) down to remove blue cursor to position 2.
Use the same procedure to program your preferred track or chapter. Use CLR button and enter
a new number to amend false or unsatisfied program through direction button. After you have selected all your preferred title/chapter(s) or track
(s), press OK button or just press PLAY button to
start program play.
Note:
1. Some discs have no program function.
2. No Search function during programming
playing.
MARK
Press MARK button on remote control while the
disc is playing and the menu of mark setting with
bookmarks will appear on the screen. Press “OK”
button to set the playing times where you would
like to view as mark. Once mark were set, press
OK button to play from the mark. Press “CLR”
button to clear a particular mark .A maximum of
three marks can be stored.
Note:
1. All the marks are cleared when the power is
off or the disc is removed.
2. Some discs including MP3, JPEG, DivX have
no such function.
VIDEO-OUT
This button provides you easy access to this unit’s
video output without need to enter SETUP menu.
Press continuously, it changes to following output signals in turn: CVBS, YUV, YPbPr.
SEARCH
When you play a DVD disc, press the “SEARCH”
button and “Time/Title / Chapter” will appear on
the screen. Use the number buttons/direction button to set chapter or title. Press the OK button to
start playing from the selected point. Press
SEARCH button once again, it will cancel SEARCH
playback.
Note: Some discs have no search function.
PDVDX100S-100B-im.p65 06-5-16, 11:3115
-15-
Page 16

OPERATION
TITLE (DVD only)
For DVD discs, press TTX/TITLE button on remote
control during playback, a list of titles of the disc
(depends on discs) will be displayed on TV set.
Use direction button or number button to select
your preferred title then press “OK” button to confirm and start playing from the selected point.
MENU
Press TV/R/MENU button on remote control during playback discs, a list of menus on the disc
(depends on discs) will be displayed on TV set.
Use direction or number button to select your preferred items then press OK button to confirm and
start playing from the selected point. (DVD discs
only)
SUBTITLE
Press SUBTITLE button on remote control during
playback. “Subtitle: [1]” will be displayed on TV
set that means a kind of language. Press once
more, “Subtitle: [2]” appeared on TV set means
another kind of language and accordingly subtitles appear that represents how many kinds of
language being selected. “Subtitle: [OFF]” appears
that toggle subtitle.
Note: This function is valid for DVD discs with
multi-subtitle only.
CLEAR
When setting a program or searching, you need
to input a number. Press CLR button to clear the
number when the input number is incorrect.
DVD/DVB
Press DVD/DVB button to switch the working status between DVB and DVD.
Note: this unit’s default working status is DVB.
SETUP
Press SETUP button on the remote control and
access to setup interface. Then you can setup
the menu of Language Setup, Screen Setup, Audio Setup and Custom Setup. Use direction cursor to highlight the option, press the OK button ton
enter the next level setup interface.
Playback MP3/JPEG /DivX/JPEG
MENU
Main window
Mode
Folder / file list window
Folder normal
1. Playback Menu
Main root: Use direction button to select the
submenu, and press OK button to enter the file
you prefer.
In the submenu press Left button to return to
previous menu; You must press STOP button
to return to menu interface when playback the
current tracks or pictures.
2. Playback Mode
Press STOP button and use direction button
“” to select play mode When MP3, JPEG,
WMA, DIVX discs are playing status. Then
press SELECT button to shift 9 modes: NORMAL FILE MODE, RE PEAT FILE, BROWSE DI SC,
NORMAL DISC MODE , REPEAT DISC, SH UFFLE
MODE, START PROGRAM, PLAYBACK SINGLE
SONG, REPEAT SINGLE SONG. After selected
play mode, then pressing to select tracks, it
will be play when pressing PLAY or SELECT
button again
Note: Press F.FWD/F.RWD is invalid When
select file or playing tracks, pictures, pressing
SKIP+./- can up or down to play the tracks, but
it is invalid for the main menu.
3. Playing MP3, DIVX,
No search, F.FWD/F.RWD, bookmark function
when playing MP3, DivX discs; Use the number button directly select the tracks to playback.
4. Playing JPEG disc
After enter to JPEG pictures mode from play
menu, there are some operations as below:
Press TITLE button to browse with 9 pictures.
Press SKIP+ button to play the next picture
Press SKIP- button to play the previous picture
Press PAUSE/STEP button to pause playing,
and pressing the PLAY button to continue
playing.
Pressing ZOOM button enter to zoom pictures,
its have 6-levels available: 4/3, 3/2, x2, 1/2, 3/
4, OFF.
Press ANGLE/Direction button (up, left, right)
can rotate the pictures, its there are 4-levels
are available: NORMAL/90/180/270.
Press Direction button to rotate the picture 180
degree with clockwise.
Note: The reading time of JPEG picture CD
formatted discs may vary due to the level of
content. Please allow more time for highly formatted discs.
Note: some characters of folder/file names may
not be displayed normally.
PDVDX100S-100B-im.p65 06-5-16, 11:3116
-16-
Page 17

DVD PLAYER Setup Interface
Menu, Submenu and Options SHEET
Menu Submenu Options Description
English English On Screen Display
OSD Menu
Subtitle
Language
Audio
DVD Menu
Screen Format
TV System
Video
Video output
Front Speakers Large/Small
Center Speaker Large/Small/Off
Surround Speakers Large/Small/Off
Audio
Subwoofer On/Off
Pro Logic
Digital Out
Pink noise
More Aud
CNTR CTRL 0,1,2,3,4,5 ms Adjust the center control within in 0-5ms
REAR CTRL 0,3,6,9,12,15 ms Adjust the rear control within 0-15ms
Password Input number by users and confirmed by OK button
Rating
Parental
French French On Screen Display
Spanish Spanish On Screen Display
English English subtitle
French French subtitle
Spanish Spanish subtitle
Auto Automatically Display Subtitle
Off Turn off the subtitle
English English audio language
French French audio language
Spanish Spanish audio language
English English DVD menu
French French DVD menu
Spanish Spanish DVD menu
4:3 Letter Box Set TV screen at 4:3 Letter Box
4:3 Pan Scan Set TV at screen 4:3 Pan Scan
16:9 Set TV at screen16:9
NTSC Set TV system as NTSC
PAL Set TV system as PAL
Auto Let TV choose system automatically
CVBS Set video output as CVBS
YUV Set video output as YUV
Y Pb Pr Set video output as Y Pb Pr
Large means full frequency speaker; SMALL means
medium high frequency speaker which can not perform
ultra low frequency. Please choose the right setting as per
your speaker characteristic & your preference. When you
connect this player to your TV set, which is so-called
DOWNMIX stereo effect, please set Front as LARGE and
Center, Surround, subwoofer as OFF; otherwise it will not
be audible or only very quiet.
On Turn on the Pro logic function
Off Turn off the Pro logic function
PCM Output digital signal in PCM
Raw Output Raw digital signal
Off Turn off AC-3 5.1 output
OFF/Left/Center/Right/
Left Surr/Right
Surr/Subwoofer
G General Audiences (All Ages Admitted)
PG-13
Adult For adult only
Test respective speaker output
Parents Strongly Cautioned, Some material may be
inappropriate for children under 13
PDVDX100S-100B-im.p65 06-5-16, 11:3117
-17-
Page 18

OPERATION
DVB Operation Part:
Fast installation operation:
Connect this unit and other equipments according to “BASIC CONNECTION”
1. Power on the POWER switch on front panel.
2. Press SETUP button, then enter into the SETUP menu, restore the factory setup.(You should operate
this item if this unit is used for the first time or the software has been upgraded.)
3. Enter into the SCAN menu, Scan Type and choose AUTO SCAN, press OK button to start automatically scan.
4. After scanning, usebutton to choose a program channel.
See the following instructions for the details.
Main operation:
Remote control operating instruction:
EPG: Press CLEAR/EPG button to show the EPG information of the current service (if the current
service support).
TTX: Press TTX/TITLE button to show the teletext information of the current service (if the current
service support).
SUB:Press this button to change different languages on the screen (if the current service support).
If you want to turn off the subtitle, please press this button again.
INFO: Press INFO/DISPLAY button to show the information of the current service
TV/R: Press TV/R/MENU button to turn or off TV/R channels.
RED, GREEN, YELLOW, BLUE, WHITE: these buttons are used for the function operation.
LAST: Press LAST/PROGRAM button to return to the last service
AUDIO: Press this button to change different languages and shift the audio channel between
Stereo/Left channel/Right channel
MUTE: Press this button turn on or off mute.
STANDBY: Press this button to enter to STANDBY status, press again to return to working status.
—/—: Press “SEARCH/—/—“ button can select the channels in the service list. If press this button
and will appear “—-“, then press the number button to input “365” and enter to the 365th program, if
appear “—“ on the screen and use number button input “65”, then enter to the 65
PG-./+: Press this button can PG-/PG+ in the service list to select the preferred program.
Menu operation Note: Asicon appear on the menu item, you can pressbutton on the remote to
pop option box and pressbutton to highlight the option item, then press OK button to confirm.
Press button to exit option box without changing option item.
th
program.
1. Main Menu
Press Setup key to show the Main Menu on the screen. There are 4 menu items:
Service
Scan
Setup
EPG
Press Left/Right button to select a menu item, press OK button to confirm it and enter into this Submenu. Press EXIT/VIDEO OUT button to return to the Main Menu.
Note: Press EXIT/VIDEO OUT button can return to the previous menu from the current menu, press this
button repeatedly, you can exit from the Main Menu.
2. Service
Service window shows the service list. Press
TV/R/menu button to shift service list between
TV and radio. Press Pg+ / Pg- button to page the
channel pages up/down. There are maximum 600
channels can be stored.
Press / button to choose the service, then
press OK button to play the service and the service information is displayed in the service information box.
-18-
PDVDX100S-100B-im.p65 06-5-16, 11:3118
Page 19

OPERATION
2.1 Service add to favor
Four color button on bottom of service window are defined as favor list button: News (red) Movie
(green) Sports (yellow) Music (blue).
Pressbutton to choose the service, press color button to add the service to favor list accordingly
and the color favor icon is showed on the right. Press the color button to remove the service from the
favor list and the color favor icon disappear.
When no menu displayed on the screen, press color button to show the service favor list accordingly.
Press the red button to move the chose favor service: pressbutton to choose the service, press
red color button to focus and usebutton to move the service up/down, press OK button to confirm.
2.2 Service Edit
When no menu displayed on the screen, press
OK button to show the service list. Three color
button on the bottom of window is defined as
service edit button: move (white) lock(green) delete (yellow).
Press white color button to move the service: press button to choose the service, press red color
button to focus and use button to move the service up/down, press OK button to confirm.
Press green color button to lock the service: press button to choose the service, press green
color button and input the correct PIN CODE using the digit button, press OK button to confirm. The icon
is appeared on the corresponding channel, if you want to cancel the Lock, press green button again
and input the correct PIN CODE, the service is unlocked and icon will disappear. The default password is “0000”.
Press yellow color button to delete the service: press button to choose the service, press yellow
color button to pop the message box of delete?, press OK button to confirm it, or press EXIT/VIDEO OUT
button to cancel it and exit.
3. SCAN
You can scan the channel in the SCAN submenu.
SCAN type: Manual Scan, Auto Scan, NIT Scan
Channel: use the digital button on the remote control to input the channel number.
Update mode: Append, Replace If you select
Append, the new channel will be appended to the
last of the channel list. Note: The new channel is
that not in the channel list before.
If you select Replace, all of channels will be replaced by new channels.
3.1 Manual Scan
Select Manual Scan, input the proper channel
number, and choose a proper Update mode, press
OK button, the screen shows Message Box of
please wait… and begin to scan. You can press
EXIT button to exit.
The screen shows N service found when the
scan has been finished (N means the number of
the scanned channels). Press EXIT/VIDEO OUT
button to exit.
PDVDX100S-100B-im.p65 06-5-16, 11:3119
-19-
Page 20

OPERATION
3.2 Auto Scan
Select Auto Scan, choose an Update mode, press
OK button, the screen shows Message Box of
Scan Process and begin to scan. You can press
EXIT/VIDEO OUT button to exit.
Note: When select Auto scan, service number
can not setup, and the system will automatically
scan.
The Message Box of Scan Process shows the
percentage of the scan process, TV channels
and radio channels have been displayed in two
columns.
The screen shows N service found when the
scan has been finished, press EXIT/VIDEO OUT
button to exit.
3.3 NIT Scan
Select NIT Scan, input the proper channel number, and choose a proper Update mode, press Ok button,
show the Message Box of Please wait… and begin to scan. You can press EXIT/VIDEO OUT button
to exit.
The Message Box of Scan Process shows the percentage of the scan process, TV channels and
radio channels have been displayed in two columns.
The screen shows N service found when the scan has been finished, press EXIT/VIDEO OUT button
to exit.
Note: Please don’t power off immediately after SCAN.
4. Setup
There are 8 submenus:
AV S e t up
Language Setup
Time Setup
Password Setup
LCN Setup
Factory Restore
Booking List
Version
4.1 AV Setup
There are following submenus under the AV setup:
TV Shape: 4:3 Letter Box/ 4:3 Pan& Scan/4:3 FullFrame /16:9
Audio Track: Stereo/ Left/ Right
4.2 Language Setup
Language setup menu:
Menu: English/Français/Español
Subtitle: English
Audio: English
Tel e Te x t: English
4.3 Time Setup
Time Zone: GMT - 11 ~ GMT + 1
Sleep Time: No Sleep/ 5 Mins/ 10 Mins/ 20 Mins/
30 Mins/ 60 Mins
Choose a Sleep Time, press OK button, the unit
start to count, when count to the Sleep Time, the
unit will enter sleep status.
-20-
PDVDX100S-100B-im.p65 06-5-16, 11:3120
Page 21

OPERATION
Note: When turn 0off the unit and press STANDBY button enter to standby status, set up to sleep time
is invalid.
4.4 Password Setup
Use the digital buttons to input the old password,
then input a new password, retype the new
password, press OK button, then the new password has been enable.
4.5 LCN Setup
Choose this item to setup the On / Off status of
LCN.
If choose On, the system shall automatically list
the channels in a natural order according to the
signal flow; and If choose Off, the system shall automatically list the channels in their usual order.
Push OK button to confirm and Exit button to cancel the operation.
4.6 Factory Restore
Choose Factory Restore, press OK button, the screen shows Message Box of factory restore,press
OK button to confirm it, press EXIT/VIDEO OUT button to exit.
You must restore the factory setup if this unit is used for the first time or the software has been
upgraded.
4.7 Booking List
Choose Booking List and press OK button to enter the Booking List, the screen shows Program
information:
Channel number, Channel list, Play time, Event
time.
Press
number button can remove the selected booking program.
4.8 Version
Choose version, press OK button and show the software version, press OK to exit.
5. Electronic Program Guide (EPG) At present not available in Australia
Select EPG under the Main Menu to enter into EPG menu,
Use
button to show the detail information. Press EXIT/VIDEO OUT button to exit.
The booked program list will be displayed on the Booking list in the Setup menu.
button to select event, use button to browse, use button to book a program. Press OK
-21-
PDVDX100S-100B-im.p65 06-5-16, 11:3121
Page 22

SETUP
Main Menu Sub-Menu Option
Service
Scan
Main Menu
Setup
EPG
TV Service/Radio
Service
Scan Type
Channel Channel
Update Mode
AV Setup
Language Setup Menu
Time Setup
Password Setup Password Setup
LCN Setup
Factory Restore Factory Restore
Booking List Booking List
Versi on Versi on
Events Events
Browse Browse
Booking Booking
Detail Detail
Exit Exit
Description
TV/Radio
Lock Lock the service
Move Move the service
News (red) Favor : News
Movie (green) Favor : Movie
Sports (yellow) Favor : Sports
Music (blue) Favor : Music
Manual Scan Manual Scan
Auto Scan Auto Scan
Nit Scan
Append Append
Replace Replace
4:3 Letter Box 4:3 Letter Box
TV Shape
Audio Track
Time Zone GMT-11~GMT+11 Time Zone
Sleep Time
Summer Time
LCN Off Set LCN as LCN Off
LCN On Set LCN as LCN on
16:9 Pan & Scan 16:9 Pan & Scan
4:3 FullFrame 4:3 FullFrame
16:9 16:9 Full Frame
Stereo Stereo
Left Left track
Right Right track
English English
Français French
Español Spanish
No Sleep No Sleep
5 Minutes 5 Minutes
10 Minutes 10 Minutes
20 Minutes 20 Minutes
30 Minutes 30 Minutes
60 Minutes 60 Minutes
Off Set Summer Time as Off
On Set Summer Time as On
TV/Radio
Nit(Net Information table)
Scan
PDVDX100S-100B-im.p65 06-5-16, 11:3122
-22-
Page 23

FOR REFERENCE ONLY
Maintenance
Be sure to turn the unit off and disconnect the AC
power cord before maintaining the unit.
Keep the unit clean. If the surfaces are extremely
dirty, wipe the unit with a dry soft cloth. Never
use alcohol, benzene or other chemicals. Do not
use compressed air to remove dust. Ask the technician to maintain the unit when problems appear.
DEFINITION OF TERMS
DVB MPEG-2
DVB is the abbreviation of Digital Video
Broadcasting, which is a standardization group.
DVB-T corresponds to the type of transmission
(T=Terrestrial). MPEG is the abbreviation of Moving Picture Experts Group, a working group which
defines international standards for audio and video
digital compression. The MPEG 2 standard applies to the compression of digital TV signals.
Subtitles
There are the printed lines appearing at the bottom of the screen which translate or transcribe
the dialogue. They are recorded on DVD discs
and up to 32 languages.
FEC
FEC stands for Forward Error Correction, used to
correct signal transmission faults between antennas and your receiver.
PID
The PID code (Packed Identification) is the identification number of audio and video signals in the
digital data flow of DVB MPEG-2 signals. With this
code, the receiver transmits audio and video signals to a specific address. The PCR PID code is
the identification code of the synchronization
symbol. It is usually the same as the Video PID.
CHAPTER NUMBER
These numbers are recorded on DVD discs. A
title is subdivided into many sections. Each of them
is numbered, and specific parts of video presentations can be searched quickly using these
numbers.
DVD disc
This refers to a high-density optical disc on which
high-quality pictures and sound have been recorded by means of digital signals. Incorporating
a new video compression technology (MPEG2)
and high-density recording technology, DVD enables esthetically pleasing full-motion video to be
recorded over long periods of time (for instance,
a whole movie can be recorded).
Subtitles
These are the printed lines appearing at the bottom of the screen, which translate or transcribe
the dialogue. They are recorded on DVD discs
and up to 32 languages.
Audio
Language recorded on discs and the maximum
languages are up to 8.
Time
This indicates the play time elapsed from the start
of a disc or a title. It can be used to find a specific
scene quickly (it may not work with some discs).
Title Number These numbers are recorded on DVD
discs. When a disc contains two or more movies,
these movies are numbered as title 1,title 2, etc.
Track Number
These numbers are assigned to the tracks, which
are recorded on audio CDs. They enable specific
tracks to be located quickly.
ANGLE
Recorded onto some DVD discs are scenes,
which have been simultaneously shot from a number of different angles (i.e. the same scene is
shot from the front, left side and right side, etc.).
With such discs, the ANGLE button can be used
to view the scene from different angles.
PDVDX100S-100B-im.p65 06-5-16, 11:3123
RAW
The original DTS, AC-3 5.1 signals non-decoded.
If users choose “RAW” as audio setting, they must
connect a decoder to decode those original audio
signals.
-23-
Page 24

FOR YOUR REFERENCE
Specification
Power requirement : ~240V,50Hz
Power consumption :
Operating temperature range : 0~+40°C
Operating humidity range : 5~90% (no
condensation)
DVD PART:
Disc played:
1. DVD-video disc
12cm single-sided, single-layer
12cm single-sided, double-layer
12cm double-sided, double-layer (single sided)
8cm single-sided, single-layer
8cm single-sided, double-layer
8cm double-sided, double-layer (single sided)
2. CD-AUDIO, DVD-VIDEO, CD, HDCD, DTS-CD,
MP3, DIVX, JPEG disc
12cm disc
8cm disc
Video output:
Output level : 1
Horizontal resolution :
Video, Audio code
Video decode : ISO/IEC13818-2 MPEG2
MP@ML Compatible
Video resolution : 720
Video code rate : 15Mbit/s Max.
S/N ratio :
56dB
28W
0.2Vp-p (75S)
500 lines
576
Audio output (Impedance: 10k ohm):
Output level : 1.8+0.2/-0.8Vrms (1KHz 0dB)
Harmonic distortion :
typical)
Dynamic range :
S/N ratio :
Digital audio output:
Coaxial output
Optical output
DVB-T PART:
High Frequency
Input Frequency Range :
174 ~ 230MHz; 470 ~ 862MHz VHF&UHF
IF Bandwidth : 7 or 8MHz
Input Signal Level : -72 ~ - 20dBm
RF Input Connector : IEC169 - 2 type, Female
RF Output Connector : IEC Type, male
Input impedance : 75S
De-module Mode
Waveform :
COFDM (Code Orthogonal Frequency Division
Multiplexing)
Demodulation : QPSK, QAM16, QAM64
Mode : 2K, 8K
Guard interval : 1/4,1/8,1/16,1/32
Code rate : 1/2,2/3,3/4,5/6,7/8
Teletext : support DVB-TXTETSI/EN300472
Audio decode : ISO/IEC13818 - 3
Audio Track : Stereo, Left ch, Right ch.
Audio Sample rate : 32, 44.1, 48KHz
90dB (JIS-A 1KHz, typical)
-65dB (JIS-A 1KHz,
80dB (JIS-A 1KHz, typical)
Weight and dimensions are approximate
Specifications are subject to change with or without notice.
-24-
PDVDX100S-100B-im.p65 06-5-16, 11:3124
Page 25

FOR YOUR REFERENCE
Troubleshooting
Check the chart below for a possible cause of the problem you are experiencing before requesting
service for this unit. Some simple checks or a minor adjustment on your part may eliminate the problem
and restore proper operation. Let the technician maintain the unit.
Keep away from static electricity properly before maintenance as loader, key IC are easy to be
damaged by it.
Trouble Possible Cause Suggested Solution
No power
Can not scan program
No picture
No color
Image distortion from a
channel to the another or
during fast forward or
reverse
The RCU is not working
Audio sound and subtitle
language is not the
chosen items
No sound
No sound suddenly
Serious distortion and
can not receive smoothly Serious interferential signal Adjust the antenna.
The power cord has not been
connected or the pin does not
plugged well
The antenna is not adjusted well Adjust the antenna or use an outdoor antenna
Use antenna incorrectly Use an antenna with 75 Ω impedance input
Parameter input incorrectly Input Frequency, Bandwidth parameter correctly
Output cord connect incorrectly Connect the output cord correctly
The video output mode of the unit
is different from the mode of
monitor
Output cord connect incorrectly Connect the output cord correctly
The video output system of the unit
is different from the mode of
monitor
normal
Insert battery incorrectly Insert the battery correctly
Battery exhausted Change the battery
The operating distance is too far or
the operating angle is too large.
The remote control sensor is
pointed by bright lights
Has not choose the sound channel
correctly
Is in a mute status Cancel the mute
Volume is set in a low level Augment the volume
Connect cable incorrectly Connect the cable correctly
There will be a short Circuit Connect output cable correctly, and reopen the unit
In a mute status Cancel the mute
Enter sleeping status Reopen the unit
Plug the power cord into the power outlet tight and
turn on the power, if no power either, turn off the
power again, and turn on the power in 5-10
minutes.
Reset the working mode
Reset the working system
Operate within a permit range
Place the unit in another place
Press the Audio button to shift the channel
Cannot read disc
No 4:3 or 16:9
picture
Can not change
angle
Forget password While the unit is in the stop mode, enter the setup mode and 8888 for the password to
1.Disc access time within 10-20
seconds
2.The disc is scratched or defiled
3.The code of disc is different from
the code of unit
4.PAL to NTSA error
Wrong TV sharp setting. Choose the correct setup at TV SHAPE item that
This function depends on software availability. Even if a disc has a number of
angles recorded, these angles may be recorded for specific scenes only.
unlock parental setting.
1. normal
2. change disc
3.change the disc
4.Set video output as AUTO
matches the TV set.
-25-
PDVDX100S-100B-im.p65 06-5-16, 11:3125
 Loading...