

Page 1
Page 2

Page 3

Table of Contents
1.Precautions
2.Accessories
3.Appearance
4.Remote Control Application
5.Basic Operation Methods
6.DVB-T Menu Operation
6.1.Auto installation
6.2.Installation setup
6.3.Program receive and shift
6.4.Program search function
6.5.Main menu option
6.6.Parental control
6.7.System setup option
Accessory Setting
6.8.
6.9.Game menu option
1
3
4
5
8
10
10
13
16
18
20
22
24
27
29
6.10.DIY menu setting
6.11.Error message
6.12.Menu Analog quantity
6.13.Off-time setting
7.ATV Menu Operation
8.In Order to Receive clearer picture
9.Before you request for repair
10.Technical parameters
30
32
33
34
35
40
41
42
Page 4

1. Precautions
Storage and Keeping
Keep this machine
away from too hot
or too cold places
The storage
temperature of this
machine is -20~
60→, the
application
temperature of this
machine is 5~35→
Never make the
TV set under
effect of moisture,
dust or oil smoke
etc environment
Never put this
machine within
certain box at
your will or place
it at toooscillating place
and under further
severe collision
Never use this
machine near
bathtub,
washbasin, and
kitchen, etc places
with water or at
damp basement,
swimming pool or
similar places
Avoid this
machine from
dropping or
impacting
Never extrude
or chafe this
machine with
sharp objects
Maintenance
Please plug off all connection wires before you start cleaning this machine.
Please wipe the
machine cover,
display screen
and buttons with
soft cloth
dipped with
little soft
abluent
Alcohol
Never wipe this
machine with
abrasion cloth,
abstergent
powder, alcohol
and benzene etc
various
propellants or
chemical
cleaning media
-1-
Page 5
Operation Precautions
1.Only the attached AC adapter and the automobile adapter (9V) are suitable.
2.For the sake of safety, when you do not intend to use the display, please
unplug the AC adapter or automobile adapter.
Earphone Operation Precautions
1.Please don't tune your headphone / earphone at too high volume, otherwise,
it may lead inconvenience and danger to yourself and other people.
2.For open-designed earphone, to avoid influencing your periphery, please
tune down the volume.
3.In case of any tinnitus, please tune down the volume or stop using this
machine.
4.It is recommended by the aurists that the earphone should not be
continuously used for a prolong period.
Warning!
!
1.
For the sake of safety for yourself and others, please do not watch
or turn on the TV set while driving.
2. It is very dangerous to watch or operate TV while driving.
!
Special Notice
A few highlights or dark spots may occur on the LCD screen. It is a very
common phenomenon of the active matrix display technology, and does
not mean any defects or faults. Never try to repair this machine by yourself.
In case of any fault or failure, please turn off the display at once, and notify
our Company or the corresponding dealer. The display is made up of many
precision electronic components. Any disassembly or modification may lead
to further damage.
-2-
Page 6
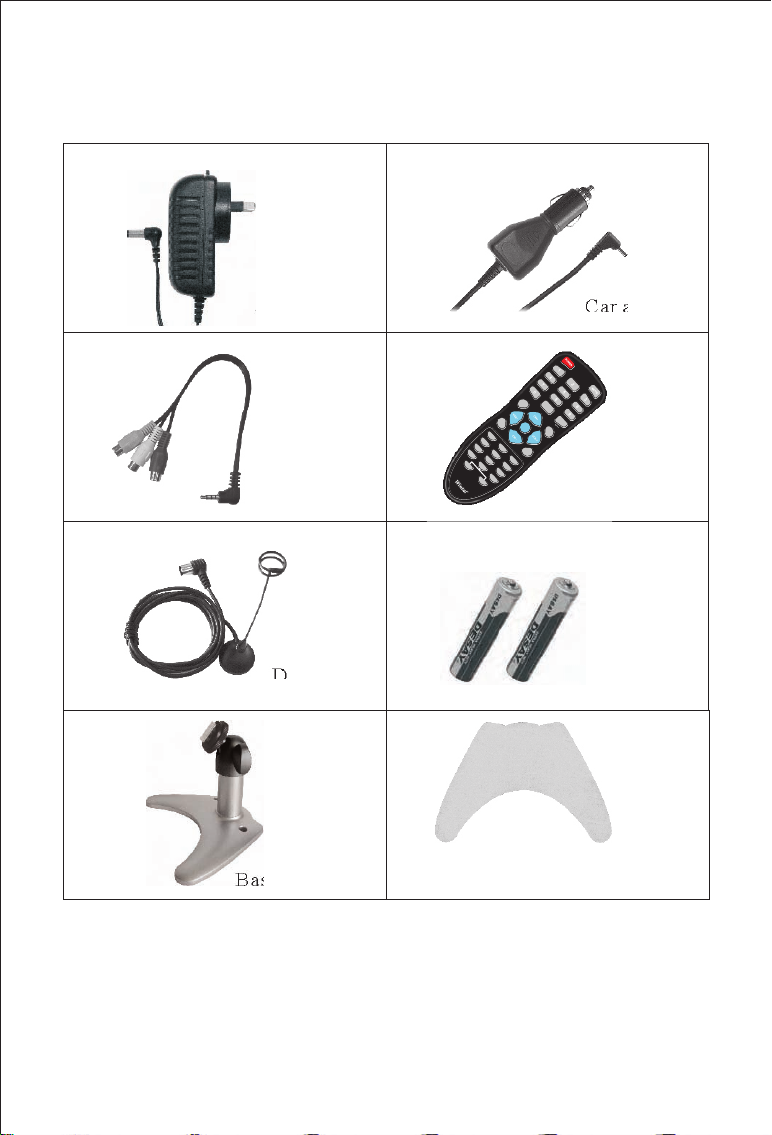
2. Accessories
AC adapter
AV in/out
cord
Digital
TV antenna
se support
adapter
C
E
G
G
-
G
O
E
Remote
control
AAA type
batteries
Double-side adhesive
tape for base support
-3-
Page 7
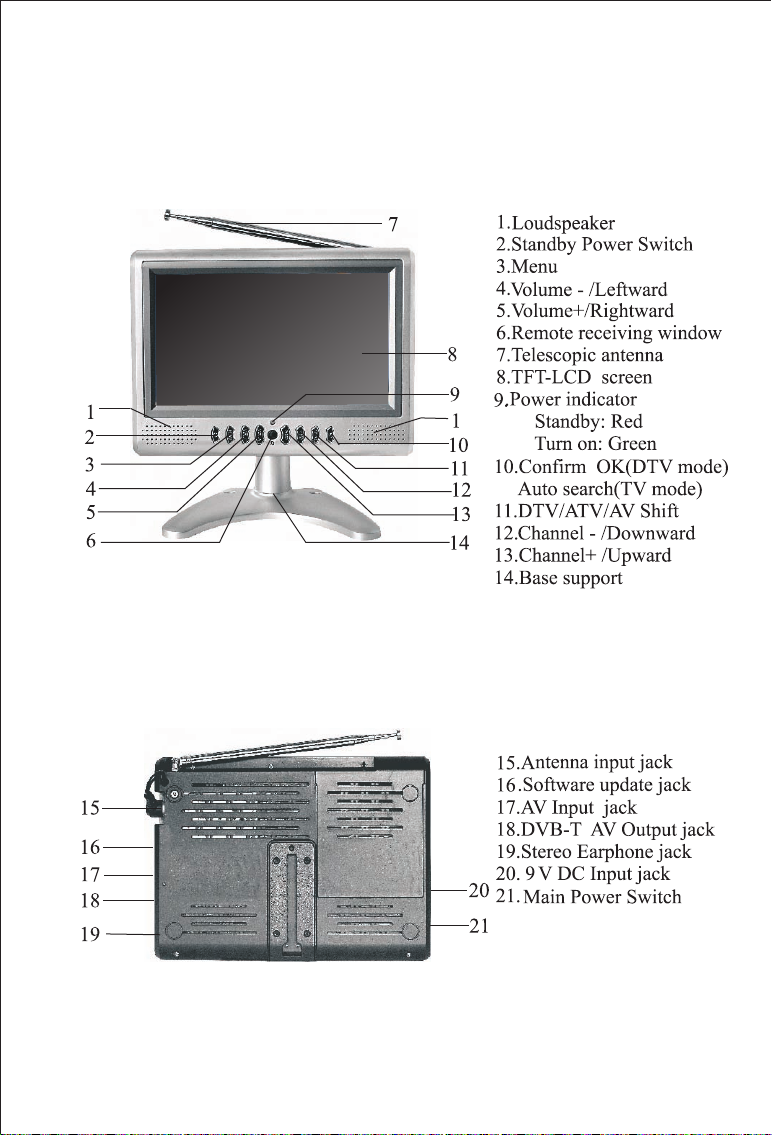
3. Appearance
-4-
Page 8
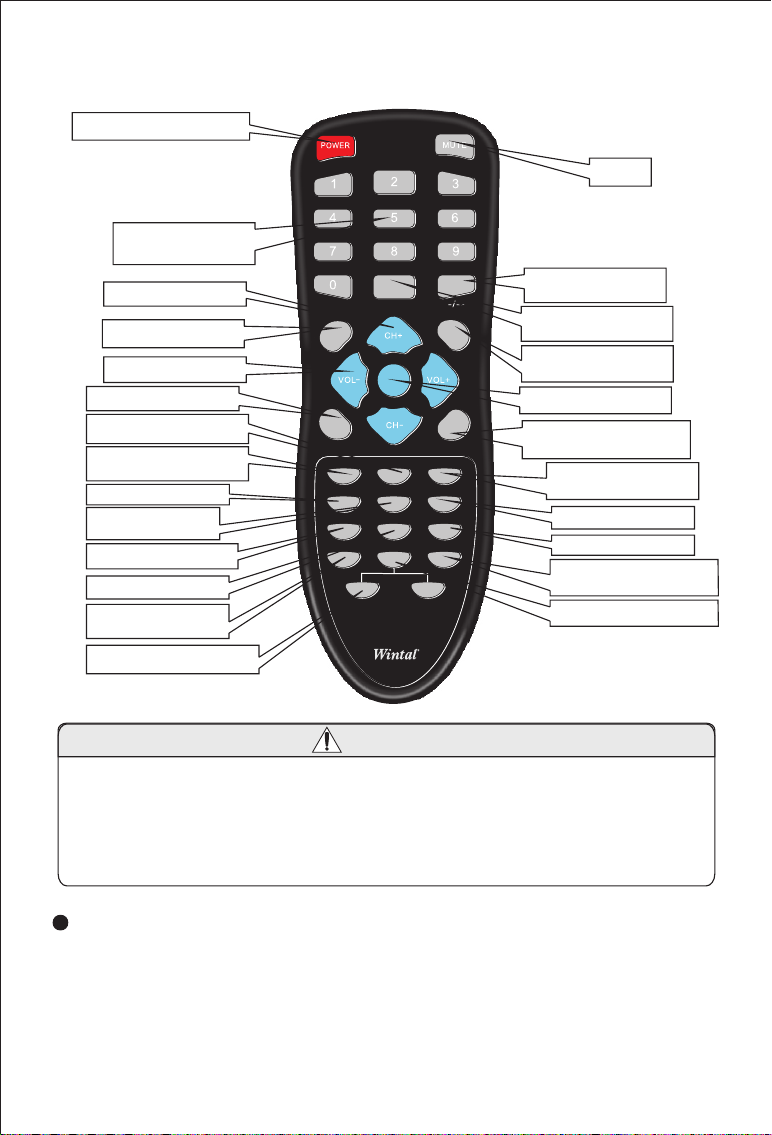
4. Remote Control Operation
StandbyPower on/off /
Input numbers/
Channel keys
Channel Adjust
Main Menu
Volume Adjust
DVB Music Shift
OSD Language
Select
Return to the
previous program
Turn on Teletext
My Favourite
Channel on/off
Nine Picture Guide
Enter Game menu
DVB/ATV/AV
Shift
Analog quantity adjust
Menu
TV/
Radio
Info
CALL
OK
Lang
Return
Teletext
Guide Game Pause
TV/AV
-
Search/Auto
FAV Prlist
Mode
+
Sleep
EPG
Exit
Audio
Mute
Display Electronic
Program Guide
Information
Display
Return to Last
Program/Menu(Exit)
DVB Confirm
L/R Sound Output
Shift
Auto Search/
Auto adjust
Program Edit Table
Pause
Sleep time/
Clock setup
Picture Mode
Caution
1.Please align the remote control with the infrared-receiving window on TV set in
operation.
2.Never oppress, drop, wet or disassemble the remote control.
3.Never press any button continuously and swiftly. Operation interval is at least 2 seconds.
4.Press Power to turn on the TV before pressing CH+, CH- for channel selection.
5.If the remote control were not to be used for a long time, please remove batteries.
Channel keys (digit keys (0-9) and - / - - ): There are 0 ~ 255 in total of 256
channels available on the remote control for your option by the 11 buttons
of 0-9 and - / - - on the remote control. When the channel is a one-digit
figure, just press the corresponding digit key. If the channel is a two-digit
figure, you should press - / - - first to show - - on the display screen before
further pressing the corresponding digit keys. (ATV mode only)
-5-
Page 9

POWER (Power On / Off):
Press this button to turn off the TV , press it again to turn on the TV.
LANG:
Press this button to realize the switch of German, French, Dutch, English,
Spanish, Portuguese and Italian OSD menu language.
SEARCH: (Auto adjust)
Start Auto search in DVB mode.
Press and hold for 5 seconds to realize auto search in ATV mode.
FAVORITE PR: My Favourite Channel option on/off (DVB mode only).
GAME: Press this button to enter the game menu(DVB mode only).
TELETEXT: Turn on the teletext option to watch teletext information
(DVB mode only).
GUIDE: Enter nine picture guide function (DVB mode only).
PRLIST: Enter the Program Edit List function (DVB mode only).
EPG: Press this button to display (DVB mode only)
INFO: Press this button to display the information of current
program(DVB mode only).
MENU: Press this button to display the main menu.
EXIT: Return to last program or menu.
CH+ / CH- (Channel select):
Press CH + ,the number of TV channel increases.
Press CH - , the number of TV channel decreases.
VOL-/+ (Volume adjust):
Press VOL-, the volume of TV set decreases.
Press VOL+, the volume of TV set increases.
OK: Confirm key (DVB mode only).
MUTE (Mute):Press this button, the sound will disappear. Press it again or
pressVOL+/VOL- to resume the normal sound.
AUDIO: Press this button to realize the switch of L/R sound output .
0,1,2,3,...,9: Channel keys: Press to chose the corresponding channel.
Press 0-9 digital keys to chose a two-digit or three-digit channel.
Pause (DVB mode only): Press it to pause the picture or sound.
TV/RADIO: Shift between TV and Radio (DVB mode only)
Sleep: Off-time setup.You can set Sleep Time to automatically turn off
the TV set within 120 minutes.
Return: Press this button to return to the previous channel.Press it again
to return to the current channel.
DVB/ATV/AV shift: Press this button to shift between Digital TV,
Analogue TV and Vedio/Audio(AV)
Electronic Program Guide .
-6-
Page 10

+/-: Bright, contrast. Color, and TINT analog quantity adjust.(Only DVB mode)
Press Mode, then press +/- to adjust the analog quantity of bright, contrast ,
color or TINT.
Mode:(Picture mode)
a. In DVB mode, press this button to select the items between bright, contrast,
color and TINT. Then press +/- to adjust the analog quantity of the chosen
item .
b. In ATV mode, press this button to realize the five picture modes: Standard,
Soft, Vivid, Light and Personal.
-7-
Page 11

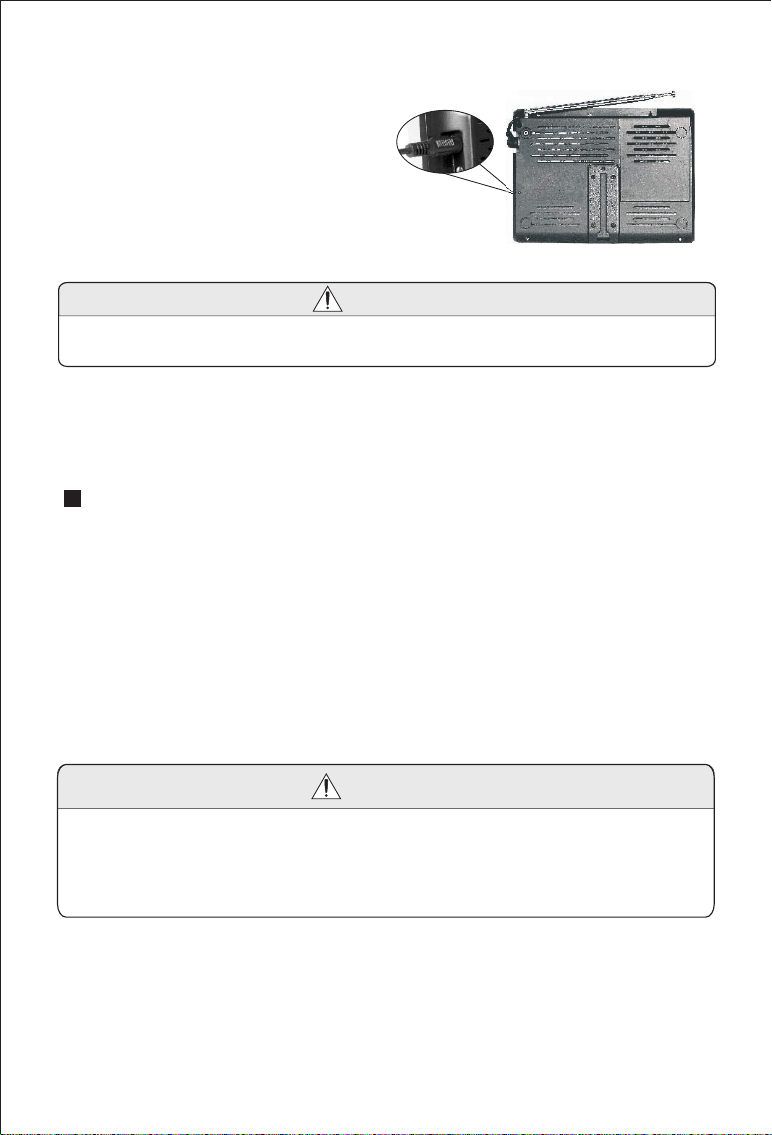
5. Basic Operation Methods
Basic interface connection
5.1.Connection of Power Supply:
Align the power supply plug on AC
adapter with the jack on the machine
cover marked with DC9V.
5.2.Connection of Stereo Earphone:
Align the earphone plug with the
earphone jack on the TV set, and
just plug in .
Notice
If the earphone is applied, the sound only transmits through the earphone,
and no sound is available from the loudspeaker of the TV set.
5.3.Connection of AV Input
Just insert the plug of the external
video cord into the yellow port of the
AV exchange head and the audio left
track plug into the white port and
audio right track plug into the red port.
Then insert the AV head into AV IN
jack of the TV set.
-8-
Page 12
5.4.Connection of AV Output
Connect the yellow port of the AV
output head to video jack, the white
port to the audio left track plug, the
red port to the audio right track plug.
Then insert the AV head into the
AV OUT jack.
Notice
The AV output function is available when using DVB function only.
Basic operation methods of TV set
1. Connect with power supply and press the power key. In normal status,
the power light is green. If the light is red, press the Power key to turn
on the TV set.
2. Pull out the telescopic antenna.
3. Press CH-/CH+ to choose the desired channel.
4. Adjust the sound volume of the TV set.
Notice
The OK key on panel is available as confirm OK only when DVB function is
operating. In ATV mode, press and hold for 5 seconds to realize auto search; In
AV mode, this key does not work.
-9-
Page 13
6. Menu Operation
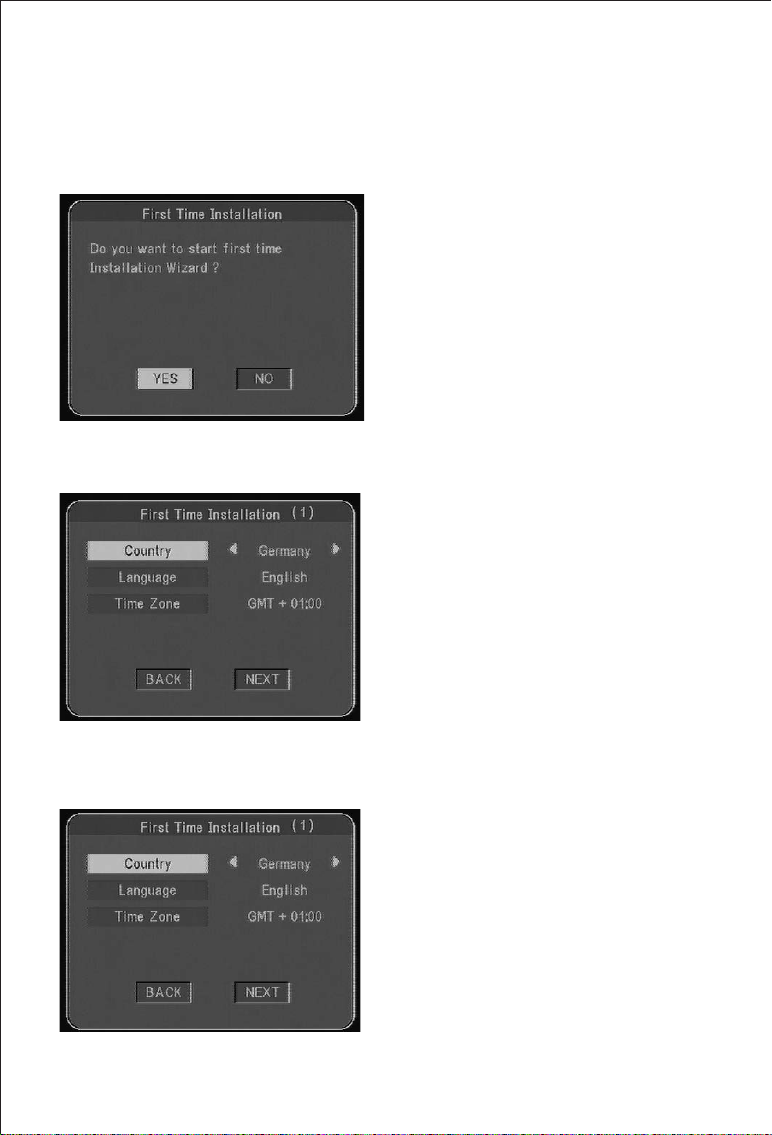
6.1. DVB-T TV receiver automatic installation
First Time Installation.
(The Program table does not exist.)
Cancel first time installation
The system will automatically start
the First Time Installation when the
TV is turned on . Please set up the
installation as illustrated. The system
may not start the First Time
Installation at status as below:
1.The First Time installation has been
set before.
2.The Program table is not empty.
If you want to start the First Time
Installation again, please do as below:
1.Delete all channels in the program list.
2.Set Factory Default at additional option
setting.
Press VOL+/VOL- to move the cursor
to YES or No . Press OK key to confirm.
YES: Start First Time Installation.
NO: Cancel First Time Installation.
Select country
(Receiving the local system)
Press VOL+ or VOL- o
remote control to select Country at
the standard of local TV system.
Press CH+ or CH- key on the remote
control to move the cursor to made
other selection.
key n the
-10-
Page 14
Select language menu
Skip to the next menu page
Press VOL+/VOL- to select language
menu.
Press CH+ or CH- to move the cursor
to other items.
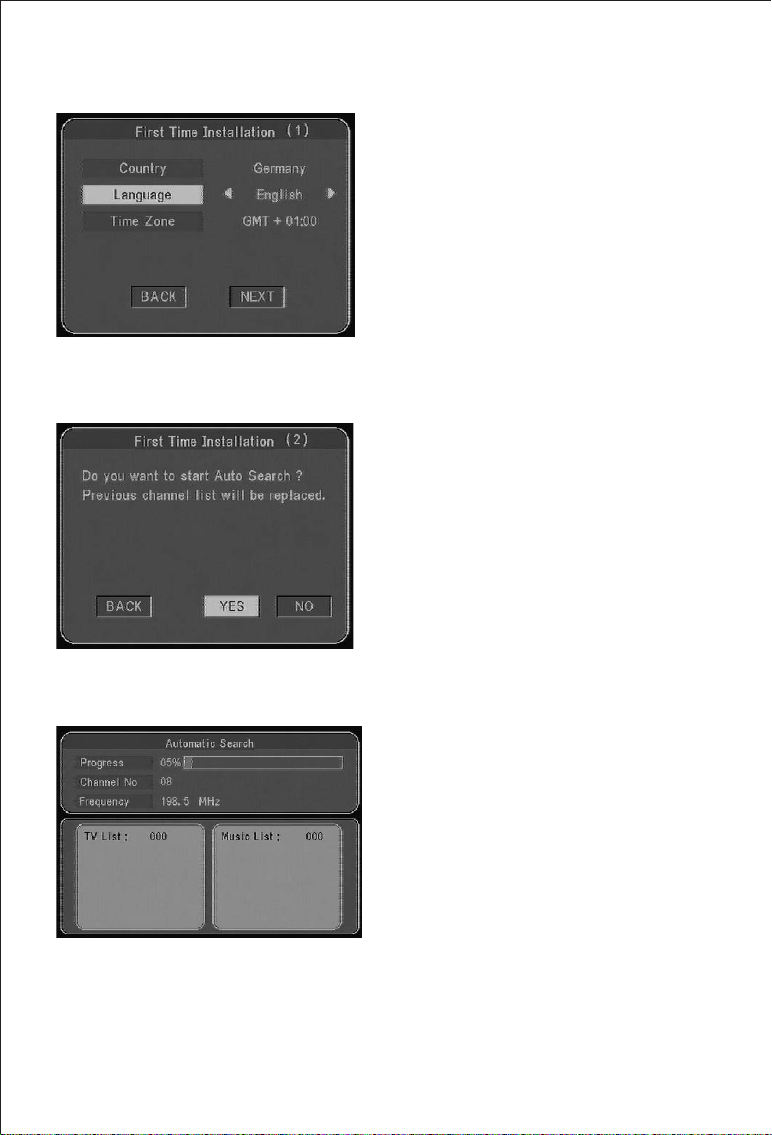
Press VOL+/VOL- to move the cursor
to BACK or NEXT item. Press OK
key to confirm.
Press VOL+/VOL- key to move the
cursor to BACK , YES or NO item,
Press OK key to confirm.
BACK: Skip to the last menu page.
YES: Delete program list and start
Auto Search.
NO: Cancel Auto Search .
Start program auto search Step 1
Auto searching......
Notice:
During auto searching, do not press any
key on the remote control or panel.
Otherwise it may interrupt the search
progress.
-11-
Page 15
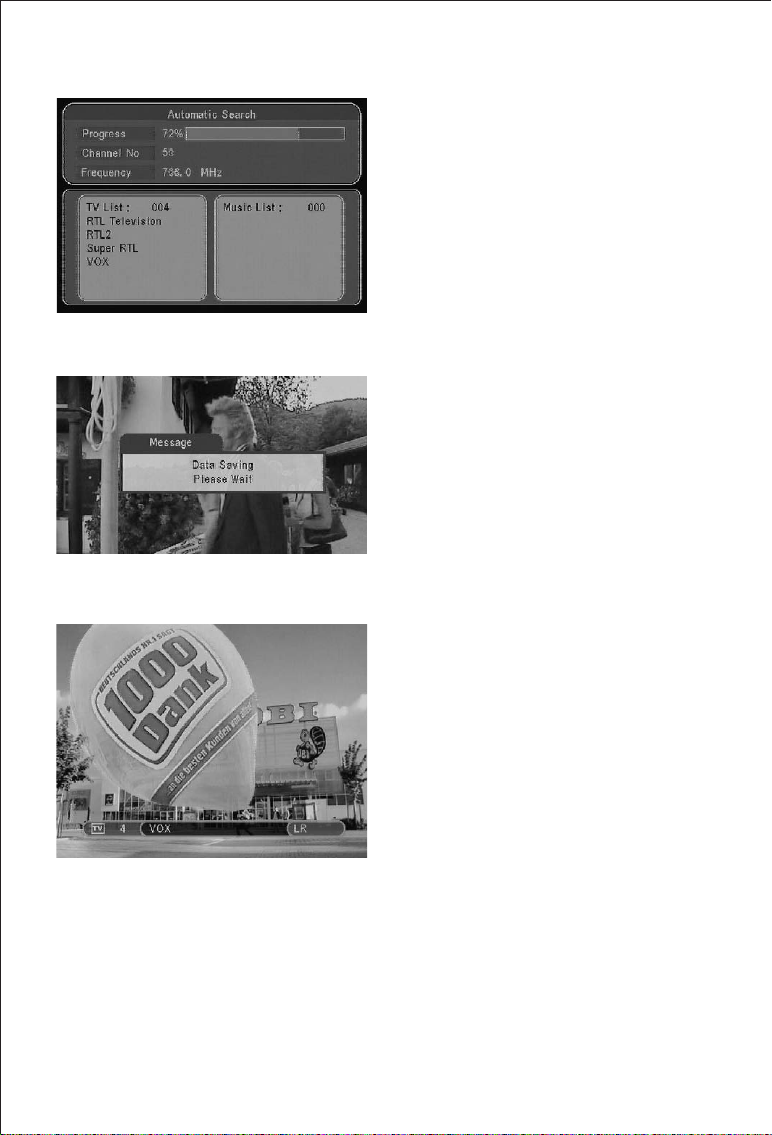
Step 2
Step 3
Step 4
Auto searching......
The program list display.
Auto Search has been finished.
Data saving...
Auto Search has been finished.
Press CH+/CH- to watch the program.
-12-
Page 16

6.2.Installation Setup
Please follow the steps below to
set up:
Step 1
Step 2
1.Press MENU key to display Main Menu.
2.Press CH+ or CH- key to move the
cursor to select System Setting sub-menu.
3.Press OK key to enter System Setting
menu.
Press CH+ or CH- key to move the
4.
cursor to select Regional Setting menu.
5.Press OK button to confirm.
Step 3
6.Press CH+ or CH- key to move the
cursor to select Country item.
7.Press VOL+ or VOL- key to set the
located Country.
8.After setting, press EXIT key twice to
return to Main Menu.
-13-
Page 17

Step 4
Step 5
Step 6
9.Press CH+ or CH- key to move the
cursor to select Program Search item.
10.Press VOL+ key to enter the program
search menu.
12.Press CH+ or CH- key to move the
cursor to select Automatic Search item.
Press OK key to continue the next step.
Manual search can be used to search
the certain frequency which is existent.
It is suitable for professionals to operate.
13.Press VOL+/VOL- key to move the
cursor to select OK item, then press
OK key to continue next step.
Step 7
14.Press VOL+/VOL- key to move the
cursor to select YES or NO item. Press
OK key to start Auto Search.
YES: Delete channel list and start auto
search.
NO: Keep channel list and start auto
search.
-14-
Page 18

Step 8
Step 9
Step 10
15.Auto searching......
16.Auto searching......
The channel list display.
17.Auto Search has been finished.
Data saving......
Step 11
18.Auto Search has been finished.
Press CH+/CH- to watch the TV
program.
-15-
Page 19

6.3.Program receive and shift
Program preview
Input the channel number on the remote
control
After finishing auto search, you can
enjoy watching high quality TV programs.
Press OK key , and program preview
picture will be displayed as illustrated.
Press CH+ or CH- key to move the cursor
to select channels in the Program list.
Press OK button to confirm.
You can input the channel number on
the remote control to select your desired
programs.
Press OK to confirm.
Nine Pictures Guide
This DVB-T TV set provides Nine
Picture Guide function. Press GUIDE
key to start the function and press
CH+/CH- or VOL+/VOL- key to move
the cursor to select program image.
Press OK button to confirm.
-16-
Page 20

Electronic Program Guide
EPG Time Table
Program details
This digital TV set supports Electronic
Program Guide (EPG) function. Press
EPG key to start the function.
To run EPG, the program signal must
contain EPG data.
Press VOL+ key to enter EPG Time Table.
You can browse the program guide of that
day. Press VOL+ key to move the cursor
to choose the program items.
Press EXIT button to return to the
previous page.
While program items list is displayed ,
press OK key to browse the program
details.
Press EXIT key to return to the previous
page.
Press EXIT key several times to return to
normal playback.
Teletext Display
Step1
This DVB-T TV set supports Teletext
Display. Press Teletext key to start the
function.
Press VOL+ or VOL- to select Teletext or
Teletext Subtitle
To display Teletext, the program signal
must contain teletext data.
-17-
Page 21

Step 2
Step 3
6.4.Program Search Function
Program Search Menu
CH+/CH- key or input the page
Press
number on the remote control to change
display pages.
Press EXIT key to return to normal
playback.
To display Teletext, the program signal
must contain teletext data.
To Teletext Subtitle,the program
signal must contain the data
For the first installation of the TV set,
it is recommended to perform program
search function. So you can renew the
channel list and receive program picture
normally.
Manual Search
If program parameters have been
renewed, you must run program search
function again and renew the channel
list of the TV set.
Under the Installation Menu, press
CH+ or CH- key to move the cursor
to select Manual Search item. Press
OK key to continue the next step.
Manual search can be used to search
the certain frequency which is existent.
It is suitable for the professional to
operate.
-18-
Page 22

Manual Search Setup
Manual Searching
Finish Manual Search
Under the main menu,
CH- key to move the cursor to select
the Channel Number.
Press VOL+ or VOL- to change to the
desired channel number.
Press CH+ or CH- key to move the
cursor to select OK item.
Press OK key to start Manual Search.
Manual Searching ......
(Press any key on the remote control
to exit manual search.)
Manual Search is finished.
press CH+ or
System Saving
Press MENU key to save the setting
and return to normal playback.
-19-
Page 23

6.5.Main Menu Operation
Program Edit Table
Press MENU key to display Main Menu,
then press CH+ or CH- key to move the
cursor to select Program Editing item.
Press VOL+ to enter Program Editing
function.
There are three options in it :TV program
list, Radio program list and the sort of
order for programs.
There are three options in Program List
There are three options in
TV Program
List or Radio Program List
Edit My Favorite Program
Press CH+ or CH- key to move the
cursor to select TV Program List
or Radio Program List. Press OK to
enter.
(The setting for Radio program list is the
same as for TV program list. Below is an
examples for TV program list setting)
For the three options, press CH+/CH- key
to move the cursor to select the item you
like. Press OK to confirm and press OK
again to cancel..
This digital TV set supports My Favorite
Program function. You can mark programs
you like to be My Favorite Program. Press
OK key to confirm and press again to
cancel. After marking, press MENU key
several times until the system saves setting
and return to normal playback.
Press Favorite PR key to start My Favorite
Program, then press CH+ or CH- to
choose programs among all My Favorite
Programs. Press Favorite PR key again to
exit. When My Favorite Program is
started, press PR List key to display My
Favorite Progran List.
-20-
Page 24

Move Program
Delete Program
Sort for Programs
Select methods for sort
Under Program Edit Table menu, press
VOL+ or VOL- key to move the cursor
to the Move row of program table,
Press CH+ or CH- to move the cursor
to the desired position.
Press OK key to confirm. And press OK
key again to cancel. After setting, press
MENU key then the system will save
the setting automatically and return
to normal playback.
Under Program Edit Table menu, press
VOL+ or VOL- key to move the cursor
to the Del row of program table, Press
CH+ or CH- to move the cursor to the
program you want to delete. Press OK
key to confirm. And press OK key
again to cancel. (More than one can be
selected.)After setting, press MENU key
then the system may save the setting
automatically and return to normal
playback.
The deleted program can not be resumed
unless the Program Search function is
restarted.
Notice:
You need to enter PIN number to delete
all programs to enter search or start the
first time installation while parental
control lock is in ON status. But in
OFF status, no PIN is required. After
returning to the factory default, the
parental lock is set in OFF status.
After Sorted
Under Program Edit Table menu, press
CH+ or CH- key to move the cursor to
Sort item. Press OK to enter Sort menu.
Press CH+ or CH- to move the cursor
to the desired position.
Press OK key to confirm.
Display as left after sorted. Press Exit to
return to last page. Press MENU key
several times to save the setting and return
to normal playback.
-21-
Page 25

6.6.Parental Control Setup
Parental Control
Set PIN
Some program is not suitable for kids
or youth. Parents can start Parental
Control function to lock and restrict
some program to be displayed.
Press MENU key to display Main menu,
then press CH+ or CH- key to move the
cursor to select Parental Control item.
Press OK key to continue the next step.
Channel Lock
Start Channel Lock
Parental Setting
Input a four- PIN, then press OK
key to confirm. If the PIN is correct,
Parental Control function starts.
The default PIN of this DVB-T TV set
is preset as 8888.
Under Parental Control menu, press
CH+ or Ch- key to move the cursor to
Channel Lock item. Press OK key to
continue the next step.
Press CH+ or CH- key to
cursor to YES or NO item.
Press OK key to confirm. The system
will return to Parental Control menu.
YES: Start Channel Lock.
NO : Cancel Channel Lock.
Lock up the programs on Parental
Setting list.
digit
move the
Press CH+ or CH- key to move the
cursor to Parental Setting item.
Press OK key to confirm and then
continue the next step.
-22-
Page 26

Select Programs To Be Locked
Protected Program
Change PIN
Press CH+ or CH- key to move the
cursor to select the program to be locked.
(More than one can be selected.)
Press OK key to confirm or press OK
key again to cancel.
Press MENU key several times till the
system saves the setting and returns to
normal playback.
To protect programs, you must start
Channel Lock function,
To display protected programs, you
must input the correct PIN.
Please input four digit number and
press OK key to confirm.
System PIN can be set under this
menu.
Press CH+ or CH- key to move the
cursor to select Change PIN.
Press OK key to confirm and get into
the next step.
Confirm Renew
PIN Code Change
Input old PIN and new PIN in order.
(Press OK key to confirm) Then press
OK key to realize OK item.
Press OK key to confirm.
Press MENU key several times till the
system saves the setting and returns to
normal playback.
Notice: Please remember the new PIN
after the change.
-23-
Page 27

6.7.System Setting
TV System Setting
TV Output System Setting
Press MENU key to display Main Menu,
then press CH+ or CH- key to move the
cursor to select System Setting item.
Press OK key to access System Setting
sub-menu.
Under the Main Menu, press CH+ or
CH- key to move the cursor to select
TV Standard. Press OK key to enter
TV Standard menu.
Under the TV Standard Menu, press
CH+ or CH- key to move the cursor
to select correct color system item.
Press OK key to confirm, then the
system may returns to normal playback.
Display Type
PAL: Europe TV System
NTSC: America TV System
AUTO: Auto choose correct System
Under the System Setting Menu, press
CH+ or CH- key to move the cursor
to select Display Type item. Press OK
key to enter Display Type menu.
-24-
Page 28

Display Type Setting
Regional Setting
Country Setting
OSD Language
Under the Display Type Menu, press
CH+ or CH- key to move the cursor
to select desired display type. Press OK
key to confirm and the system returns
to System Setting menu.
If the picture gets into distortion after
the setting, it means that new Display
Type setting is not suitable for the TV
or the monitor.
Under the System Setting Menu, press
CH+ or CH- key to move the cursor
to select Regional Setting item. Press
OK key to enter.
Under the Regional Setting Menu,
press CH+ or CH- key to move the
cursor to select Country item. Press
VOL+ or VOL- key to select country.
Press CH+ or CH- key to move the
cursor to select other items or
press OK key to confirm. Then the
system will return to System Setting
menu.
Under the Regional Setting Menu,
press CH+ or CH- key to move the
cursor to select OSD Language item.
Press VOL+ or VOL- key to move the
cursor to select language.
Press CH+ or CH- key to move the
cursor to select other items or press
OK key to confirm. Then the system
will return to System Setting menu.
-25-
Page 29

Language
OSD Language
Under the System Setting Menu, press
CH+ or CH- key to move the cursor
to select Language item. Press OK key
to confirm.
Under the Language Menu, press CH+ or
CH- key to move the cursor to select OSD
language item. Press VOL+ or VOL- key
to select OSD language. Press CH+ or
CH- key to move the cursor to select
other items or press OK key to confirm.
Then the system will return to System
Setting menu.
The first Audio language setting
The second Audio language setting
Under the Language Menu, press CH+ or
CH- key to move the cursor to select 1st
Audio Language item. Press VOL+ or
VOL- key to select language. Press CH+
or CH- key to move the cursor to select
other items or press OK key to confirm.
Then the system will return to System
Setting menu.
The audio language depended on the
sender of program. If the program does
not support multi-language, the TV set
can select language automatically.
Under the Language Menu, press CH+ or
CH- key to move the cursor to select 2nd
Audio Language item. Press VOL+ or
VOL- key to select language. Press CH+
or CH- key to move the cursor to select
other items or press OK key to confirm.
Then the system will return to System
Setting menu.
-26-
Page 30

The Subtitle language setting
6.8.Accessory Setting
Under the Language Menu, press CH+ or
CH- key to move the cursor to select
Subtitle Language item. Press VOL+ or
VOL- key to select language. Press CH+
or CH- key to move the cursor to select
other items or press OK key to confirm.
Then the system will return to System
Setting menu.
The subtitle language depended on the
sender of program. If the program does
not support selected language, the TV set
should display no subtitle language.
Under the System Setting Menu,
press CH+ or CH- key to move the
cursor to select Accessory item. Press
VOL+ to enter Accessory menu.
Under the Accessory Menu, press CH+
or CH- key to move the cursor to select
System Information item. Press OK key
to enter next step.
System Version
Display the Version of TV set.
Press EXIT key then the system return
to Accessory menu. Press MENU key
several times return to normal playback.
-27-
Page 31

Set Factory Default
Enter PIN
Under the Accessory Menu, press CH+
or CH- key to move the cursor to select
Factory Default item. Press OK key
to enter next step.
Input a four-digit PIN number. If the PIN
is correct, you can enter the Set Factory
Default menu.
The default PIN is preset as 8888.
Set Factory Default
Step 2
Step 1
Select OK item under Warning menu
and press OK key to confirm to enter
factory default.
Notice: The PIN is preset as 8888.
If you has changed the PIN , then
when you want to set factor default,
the PIN will not be 8888 ,but the
PIN changed by the user.
Please do fix the PIN.
Data Saving, please wait......
-28-
Page 32

System update
6.9.Game Menu
Game Menu
Game Item
Keep down the function
(For the professional to reference)
Under Main Menu, press CH+ or CHkey to move the cursor to select Game
item.
Press OK key to enter Game menu.
Press CH+ or CH- key to move the
cursor to select Game item. Press OK
key to start game.
Mine.
Tetris.
Gomoku.
Calender
In Game Status
Press EXIT key to return to Game
menu.
Press EXIT several times till the system
saves data and returns to normal playback.
Enter game status.
-29-
Page 33

In Calender Status
6.10.DIY Menu Setting
Menu Color Setting
Enter Calender status
You can set up a personal menu in
this function.
Under Main Menu, Press CH+ or CHkey to move the cursor to select Personal
Style item. Press OK key to confirm.
Press CH+ or CH- key to move the
cursor to select Menu Color.
Press VOL+ or VOL- to select color.
Press CH+ or CH- key to move
the cursor to set other items.
Then press EXIT key to save setting
and return to Main Menu. Press EXIT
key several times till the system saves
the setting and returns to normal playback.
Transparent Level
Press CH+ or CH- key to move the
cursor to select Transparent Level item.
Press VOL+ or VOL- to select level
data. Press CH+ or CH- key to move
the cursor to set other items. Then
press EXIT key to save setting and
return to Main Menu. Press EXIT key
several times till the system saves the
setting and returns to normal playback.
-30-
Page 34

Border Pattern
Press CH+ or CH- key to move the
cursor to select Border Pattern..
Press VOL+ or VOL- to select Round
or right-angle item.
Press CH+ or CH- key to move the cursor
to set other items.
Then press EXIT key to save the setting
and return to Main Menu. Press EXIT
key several times till the system saves
the setting and returns to normal playback.
Cover Style
Press CH+ or CH- key to move the
cursor to select Cover Style item.
Press VOL+ or VOL- to select cover style.
Press CH+ or CH- key to move
the cursor to set other items.
Then press EXIT key to save the setting
and return to Main Menu. Press EXIT
key several times till the system saves
the setting and returns to normal playback.
Wa i grn n
It is necessary to enter PIN number to delete all programs to enter search or start the
first time installation while parental control lock is in ON status. But in OFF status,
no PIN is required.
-31-
Page 35

6.11.Error message
Input a wrong PIN
In some option setting, it is necessary
to enter PIN number. If the image is
displayed, it means your PIN is wrong.
Please check you PIN and set the option
again.
The default PIN is preset as 8888.
No Signal
My Favorite List is not exist.
The channel is locked.
Mosaic in picture continually
This image displayed means no signal
can be received..
Please check if the antenna is connected
correctly. Or adjust the direction and
angle of antenna may be help.
If My Favorite List is not exist, while
press Favorite PR key to start My
Favorite List function, system will
display this image.
The channel is locked
This image displayed means the signal
received is too weak. The TV set can not
output a clear TV picture. Please check
if the antenna is connected correctly. Or
adjust the direction and angle of antenna
may be help.
-32-
Page 36

6.12.Analog Quantity Setting in DVB mode
Brightness
Press MODE key to enter Analog
Quantity Setting.
Brightness: Press + or - key to adjust.
Contrast
Press MODE key repeatedly to enter
Contrast menu. Press + or - key to
adjust contrast.
Color
Press MODE key repeatedly to enter
Color menu. Press + or - key to
adjust color.
TINT (Only in NTSC system)
VOLUME
UP/DOWN
MIRROR
Press MODE key repeatedly to enter
TINT menu. Press + or - key to
adjust TINT.
Press MODE key repeatedly to enter
VOLUME menu. Press + or - key to
adjust volume.
Press MODE key repeatedly to enter
UP/DOWM menu. Press + or - key to
adjust UP/DOWN.
Press MODE key repeatedly to enter
MIRROR menu. Press + or - key to
adjust MIRROR.
-33-
Page 37

RESET
6.13.Off-time Setting
Off-time setting
Press MODE key repeatedly to enter
Reset menu. Press + or - key to
reset the Brightness, contrast, color, TINT
and Volume to 50.
Press Sleep key to enter the
Off-time screen. Press the Sleep
key repeatedly to set the time. The
maximum is 120 minutes.
Notice
In case the signal intensity is too weak, the image will appear mosaic
like diamonds and sound halts, which is not TV fault. If the image
remains mosaic when using telescopic antenna, please try to use the
external antenna or CATV.
-34-
Page 38

7. ATV Menu Operation
Press MENU to display options as follows:
PICTURE
PRESET
SYSTEM
MAIN MENU
PICTURE
SYSTEM
PRESET
7.1. Picture
Press CH+ or CH- to select Picture item. Press VOL+, Bright,
Contrast, Color and Reset will displays on the screen as illustrated below:
PICTURE
BRIGHT 50
CONTRAST 50
COLOR 50
RESET
Press CH+ or CH- to select the item Bright. Press VOL+ to adjust the analog
quantity of Bright. Press CH+ or CH- in turn to select Contrast, Color ,to
adjust the analog quantity of Contrast and Color. Press CH+ or CH- to select
the item Reset. Press VOL+ to reset the quantity of Bright,Contrast, Color
to 50.
-35-
Page 39

7.2. System
Press CH+ or CH- to select System item, press VOL+ then
(language), Time, (picture mode), (overturn) and Blue back will
display on the screen as illustrated below:
Press CH+ or CH- to select item
Press VOL + to realize the selection of German, French, Dutch,
English, Spanish, Portuguese, Italian OSD menu language.
Press CH+ or CH- to select Time item.
Press VOL + to realize Off-time within 120 minutes..
-36-
Page 40

Press CH+ or CH- to select item.
Press VOL + to shift the screen mode betweem 16:9 and 4:3.
Press CH+ or CH- to select item.
Press VOL + to make the screen overturn.
Press CH+ or CH- to select Blue back item.
Press VOL + to realize the ON/OFF of Blue Back under no signal.
-37-
Page 41

7.3.Preset
Press CH+ or CH- to select Preset item, and Position, Remember, Auto
search, Swap, Fine, Manul search, Sound system and Color System will
display as illustrated below:
Press CH+ or CH- to select Remember item
Press VOL- or VOL+ to choose ON under the item Remember, and then it
will display this channel upon changing program. In Off status, it will not
display the Channel Number.
Notice
1.Auto Search ∪ Start from Program No. 0.
2.When the signal is received under Manul Search, the indication frequency will
stop, which means the optimum position for signal storage. If the signal is too
weak , the system will automatically identify it as no signal.
-38-
Page 42

Press CH+ or CH- to select Auto search item
Press VOL- or VOL+ to start Auto Search, and it will put into automatic memory
and storage upon completion of A uto Search. And then return to Program No. 0
upon completion
Press CH+ or CH- to select Sound system item
Then press VOL+, the Sound System will display in the order of I, DK
BG , L and M.(Only when displaying the preset of NTSC system, it will
show the character of TINT in the Preset menu.)
Notice
1. Notes on Sound System: 6.0M means I, 6.5M stands for DK(L) ,
5.5M is BG and 4.5M is M, please set the Sound System at local one.
2. Color system (all color system are auto setup)
A. While sound system is I, color system is PAL-I
B. While sound system is DK, color system is PAL-DK or SECAM-DK
C. While sound system is BG, color system is PAL-BG or SECAM-BG
D. While sound system is L, color system is SECAM-L.
E. While sound system is M,color system is NTSC.
3. In case with picture while without sound or with noise, please check
the Sound System for correct setup first.
-39-
Page 43

Notice
While the input signal is not enough strong,Please adjust "FINE" item,It can
make the picture and sound better.
8. In order to receive a clearer picture
Adjust the length, angle and direction of the telescopic antenna to obtain
optimum image. Draw back the antenna from the butt end after using it .
Notice
The ATV Menu Operation Part only for Analogue TV
Caution
!
In case the signal intensity is too weak, the image will remain inferior
whatever you adjust the antenna, and cause loud noise wave, shaking
image and inferior sound, etc., which is not TV fault. If the image remains
inferior when using telescopic antenna, please try to use the external
antenna or CATV.
-40-
Page 44

10. Before you request for repair
Phenomena below does not necessarily mean the failure with the TV set.
Please check the following before you request for repair.
Phenomena
No picture, no sound
No image
No sound
Diamonds in picture
No signal
Dark picture
Diamonds in picture or
inferior sound during
driving.
Possible Causes
Improper connection with AC adapter or
Car adapter. Use of unauthorized power
supply. Power Switch is on OFF position.
The antenna is not adjusted correctly;
The Channel or Country is not selected.
If so, reset it.
The sound is turned to minimum . The
earphone is not plugged in. ERASE functions
are under too weak signal. Sound system is
not correctly set in ATV mode.
The antenna is not adjusted correctly;
The signal at the receiving place is too
weak
The correct Country is not selected;
Maybe the signal is too weak.
Adjust Brightness, Contrast correctly
The signal is too weak at that place
-41-
Page 45

11. Technical Parameters
Tune:
Input code rate: 4.98 31.67Mbit/s
Demodulation: COFDM
Modulate: QPSK. 16-QAM, 64-QAM
FFT Mode: 2K/8K
ATV Receiving Channel: DK/I 49.75MHz~847.25MHz
BG 48.25MHz~847.25MHz
Sound System: DK I BG L M
Input:
Input Frequency: VHF 177.5MHz~226.5MHz UHF 474MHz~858MHz
Video Output:
Output Resistance : 75 ohm, Need AV conversion cord.
Output Voltage: 1 .020mVp-p
Audio Output:
Output Resistance: 680 ohm
General Techn ical Parameters
Display Device: Color TFT-LCD
Screen Size: 7 inches
Power Supply: DC9V 18W
Connecting Terminal:
External antenna input jack, stereo earphone jack,
Audio / Video (AV) input jack, DVB-T AV output jack,
External power supply input jack
Applicable Power Supply: Two options:
1.AC Power supply-AC adapter
2.Automobile storage battery(9V) Car adapter
Application Temperature: 5~35¡
Storage Temperature: -40~60¡
Outer Dimension: 191¡143¡27.5MM
Weight: about 575g
~
-42-
Page 46

a
W rning
This operation instruction is only intended for reference. No further notice
is available to any modification of all information contained therein. Due
to continuing improvements, the features and design are subject to change
without notice.
War ingn
No repairable components exist in the machine. Do not try to dismantle and
improve the TV set, and the high voltage in the machine may cause danger.
Maintenance and adjustment of the TV set is subject to professionals.
¡ after some items in this manual means it is available with this function. ¡
-43-
Page 47

Page 48

 Loading...