

Page 1
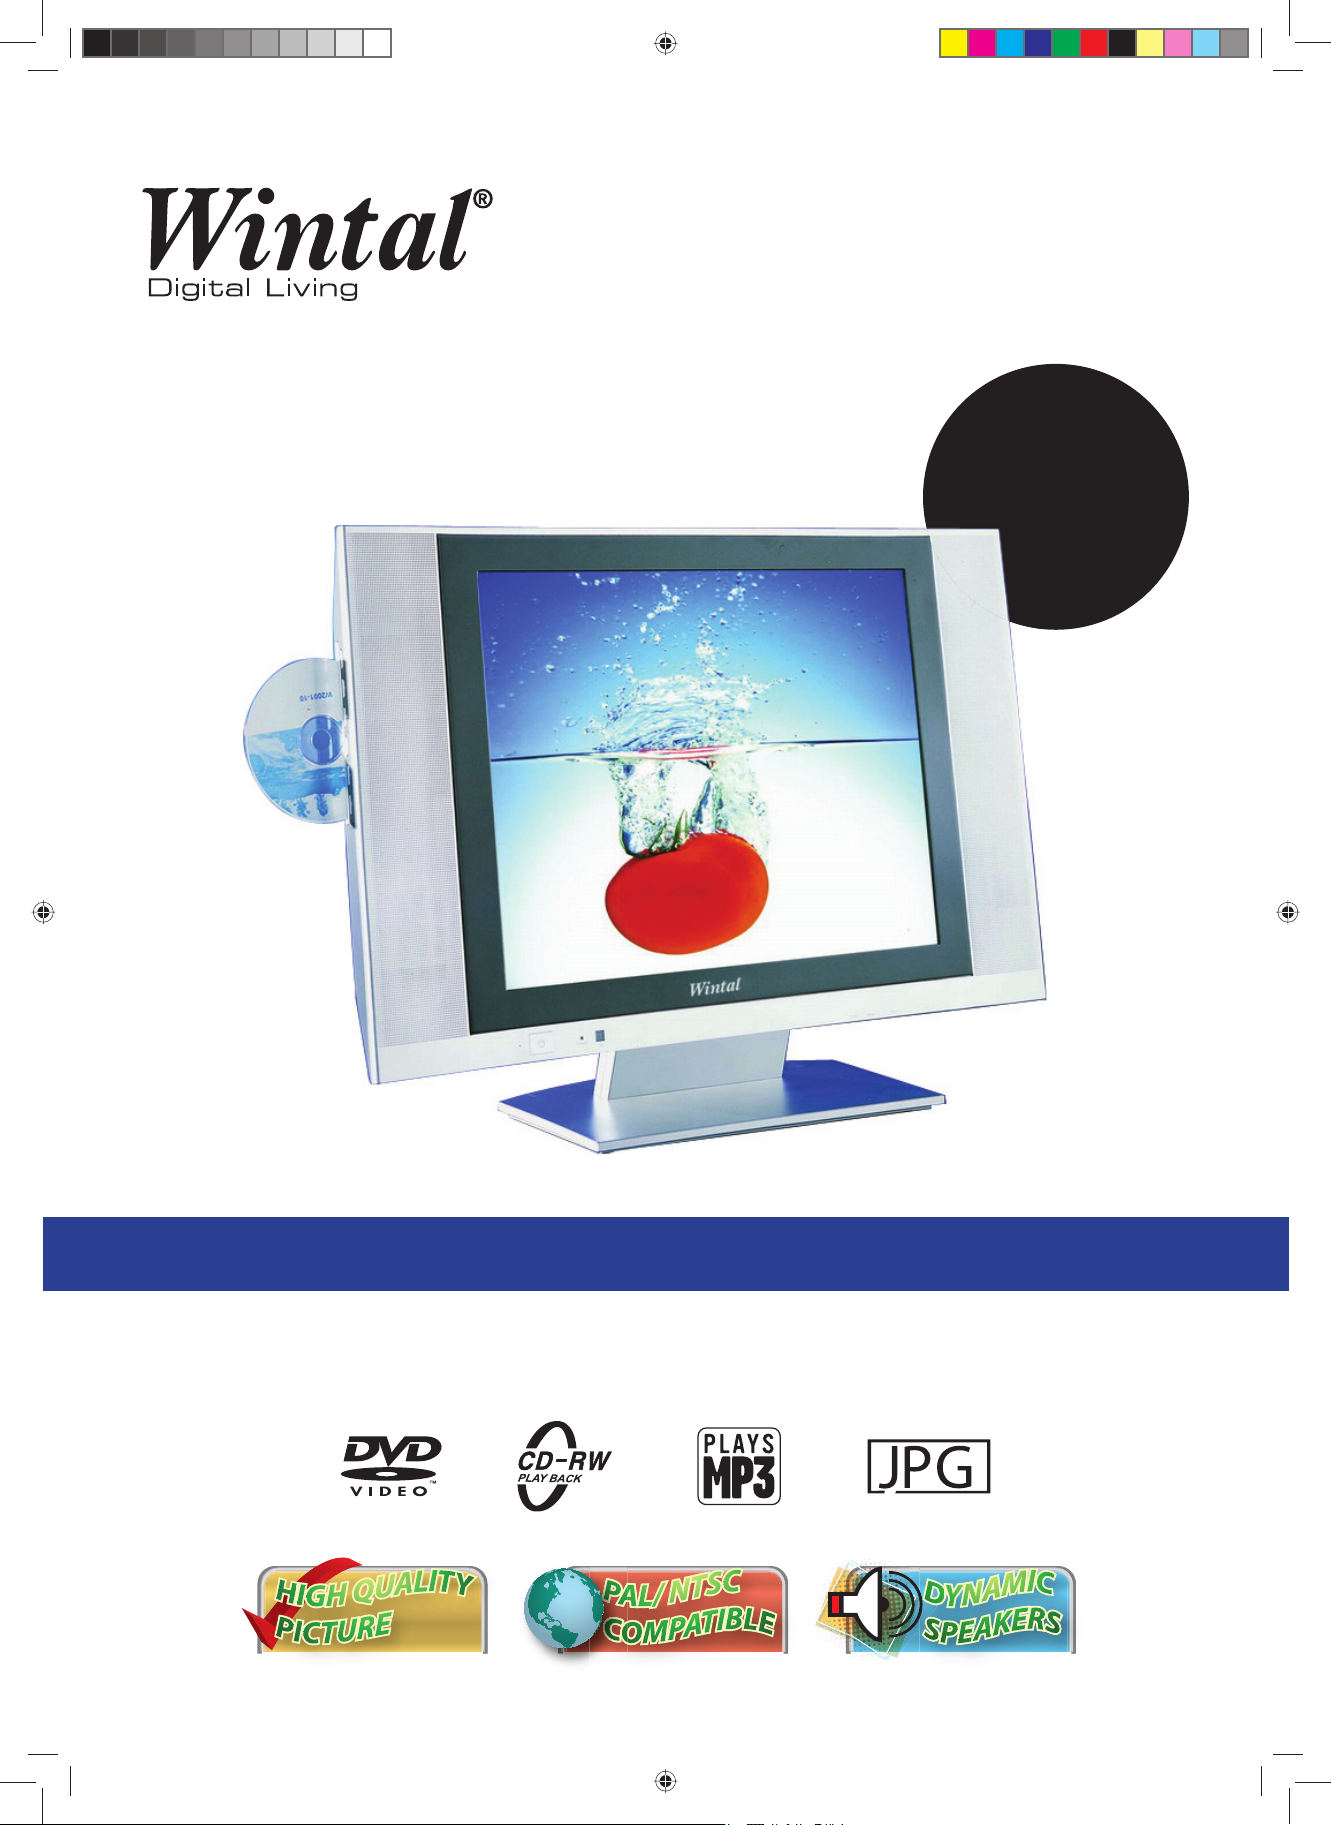
Model: 20LDVD05
20”
4:3 Digital LCD Television with DVD Player
Operating Manual
http://wintal.com.au
Manual 20LDVD05.indd aManual 20LDVD05.indd a 12/07/2005 11:43:03 AM12/07/2005 11:43:03 AM
Page 2
Manual 20LDVD05.indd bManual 20LDVD05.indd b 12/07/2005 11:43:13 AM12/07/2005 11:43:13 AM
Page 3

TABLE OF CONTENTS
1. PreFace 1
2. Safety Precautions 1
3. Front, Back Connections 2
4. TV Installation 4
4.1 Connecting Antennas 4
4.2 AV Video Input 4
4.3 S-Video Input 4
4.4 YCbCr Input 5
4.5 PC (VGA) Connection 5
5. Setting Up Your LCD 6
5.1 Auto Search 6
5.2 Manual Search 6
5.3 Fine Tune 6
5.4 Save Settings 6
5.5 Skip 6
6. Picture Setting 7
7. Audio Setting 7
8. Source Setting 7
9. Language Select 8
10. Lock 8
11. Reset 8
12. Blue Background 8
13. Channel Swap 8
14. PC Setting 9
15. TV / DVD Combo Remote Control 10
15.1 Remote control instructions in TV mode 10
15.2 Remote Control Instructions in DVD Mode 11
16. Remote Control Setup 11
16.1 Battery Usage Caution 11
17. Accessories 12
18. DVD Operation Instructions 12
18.1 DVD Console Operation 12
18.2 DVD System Setup Menu 13
18.3 DVD Language Setup 13
18.4 DVD Display Setup 13
18.5 DVD Audio Setup 14
18.6 DVD Lock Setup 15
18.7 “Others” Settings 17
19. Troubleshooting 18
20. Specifi cations 19
Manual 20LDVD05.indd cManual 20LDVD05.indd c 12/07/2005 11:43:13 AM12/07/2005 11:43:13 AM
Page 4
1. PREFACE
Congratulations on your purchase of a Wintal LCD! Please read this manual
thoroughly before operating the monitor. Make sure the monitor was not damaged
in transit. Should the monitor be damaged, do not install it and contact your dealer.
Check that you have all the accessories according to the model.
2. SAFETY PRECAUTIONS
Place the Monitor on a stable surface.
Do not use the monitor with other fi xations than those provided or suggested by the
manufacturer.
Do not place any material on the monitor.
Do not block or cover the ventilation openings on the monitor.
If you have a wall mount, check that it is steady.
Power source
e monitor must be plugged with a voltage source of 220/240 volts and 50 Hz.
Connection cable
Power cord and cables must be properly routed and protected to prevent people from
stepping on them and causing the monitor to fall.
Heating sources and humidity
Keep the monitor dry and away from humidity.
Keep the monitor away from heat sources
Cleaning and maintenance
Unplug the monitor before cleaning it. Do not use solvents or liquids to clean the
monitor.
Only clean the monitor with a soft and dry cloth.
In case of troubleshooting, do not use spare parts other than those suggested by the
manufacturer. Using incorrect spare parts can lead to electric shocks, short-circuits
fi re or other incidents.
Lightning/ Holidays
Unplug the LCD during lightning storms or when not used for long periods of time.
1 | Wintal LCD
Manual 20LDVD05.indd Sec1:1Manual 20LDVD05.indd Sec1:1 12/07/2005 11:43:13 AM12/07/2005 11:43:13 AM
Page 5
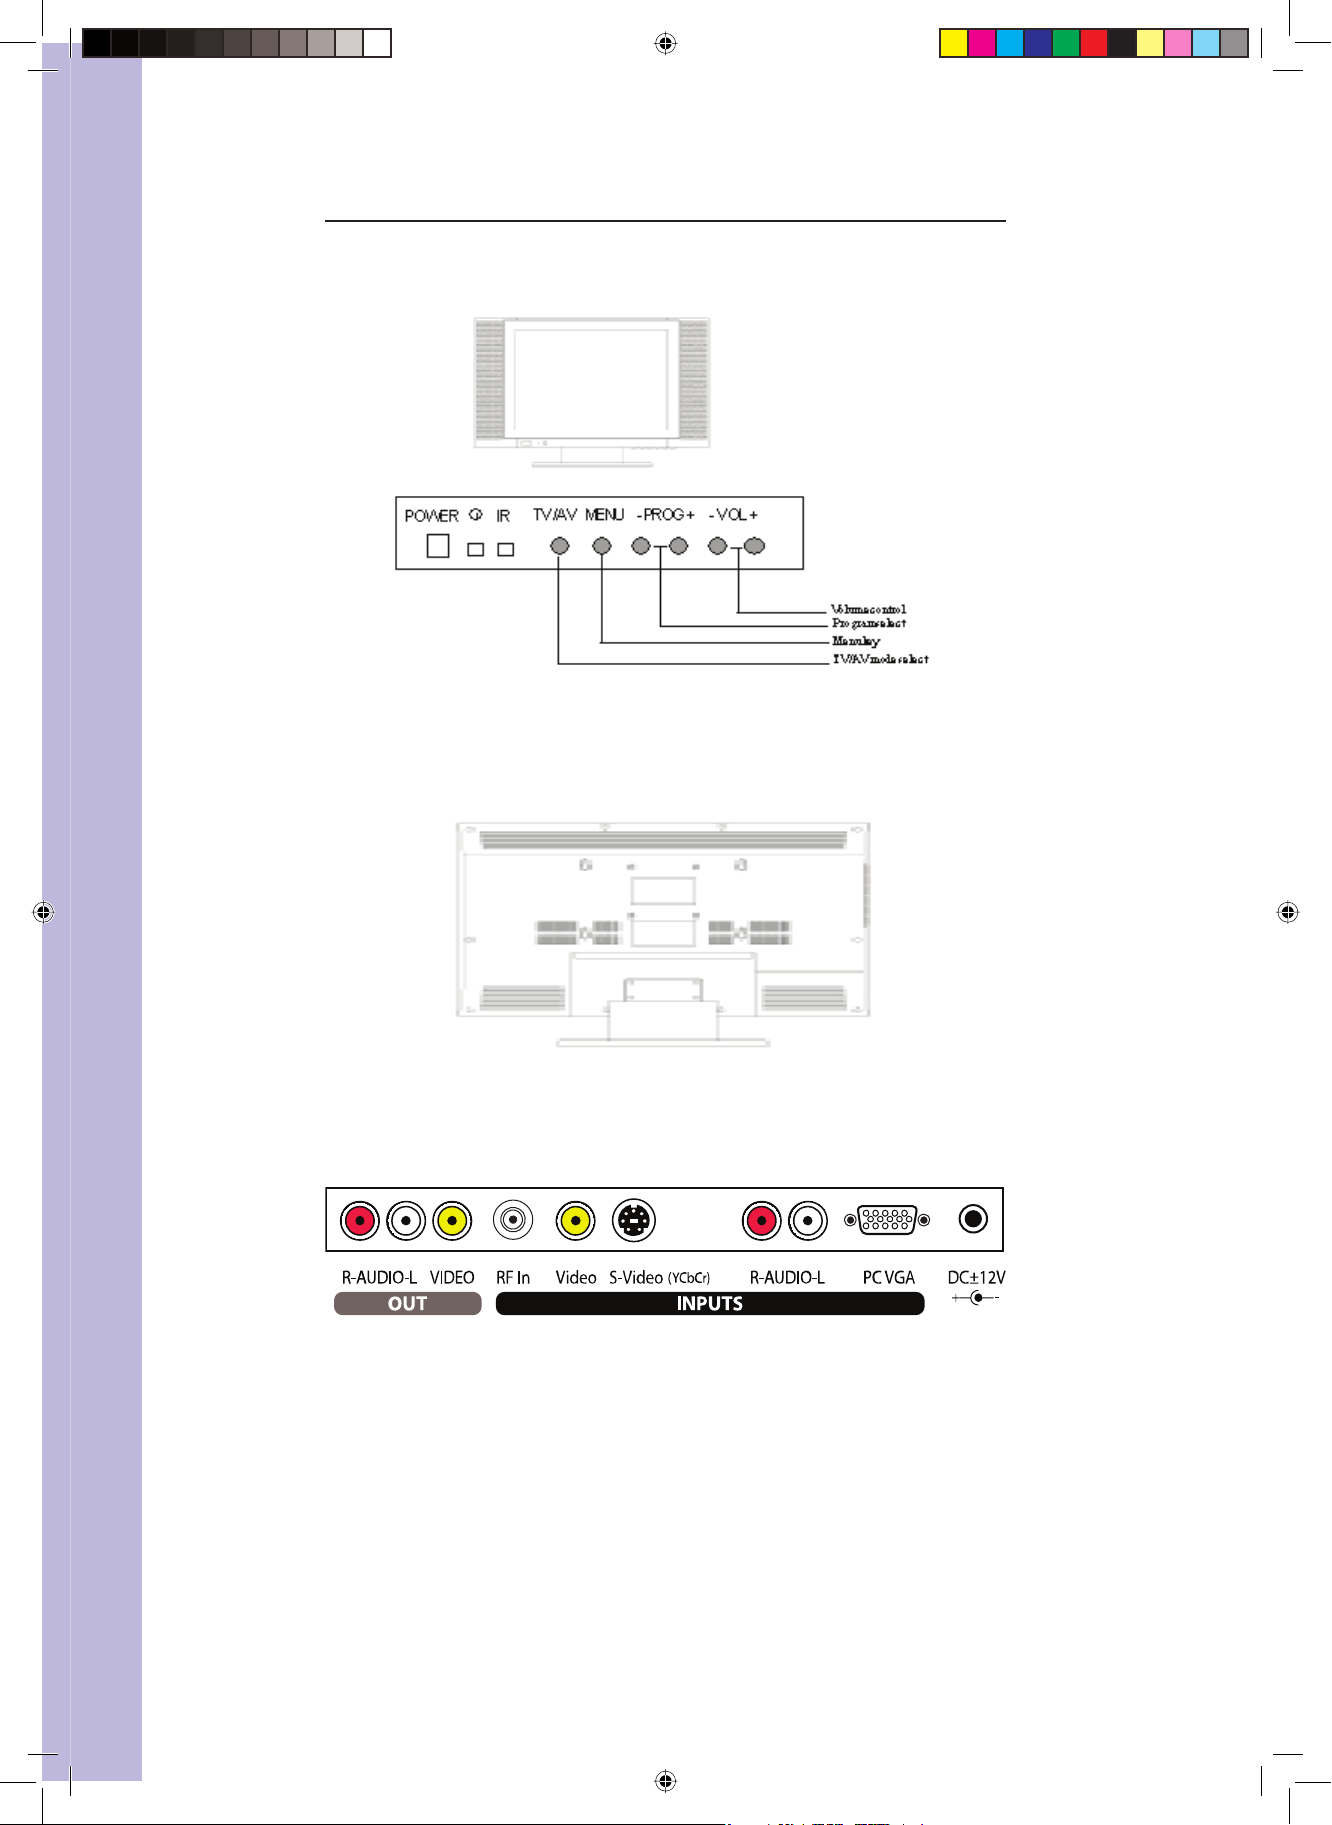
3. FRONT, BACK CONNECTIONS
Front View and Controls
Back View
Back Connections
Wintal LCD | 2
Manual 20LDVD05.indd Sec1:2Manual 20LDVD05.indd Sec1:2 12/07/2005 11:43:14 AM12/07/2005 11:43:14 AM
Page 6
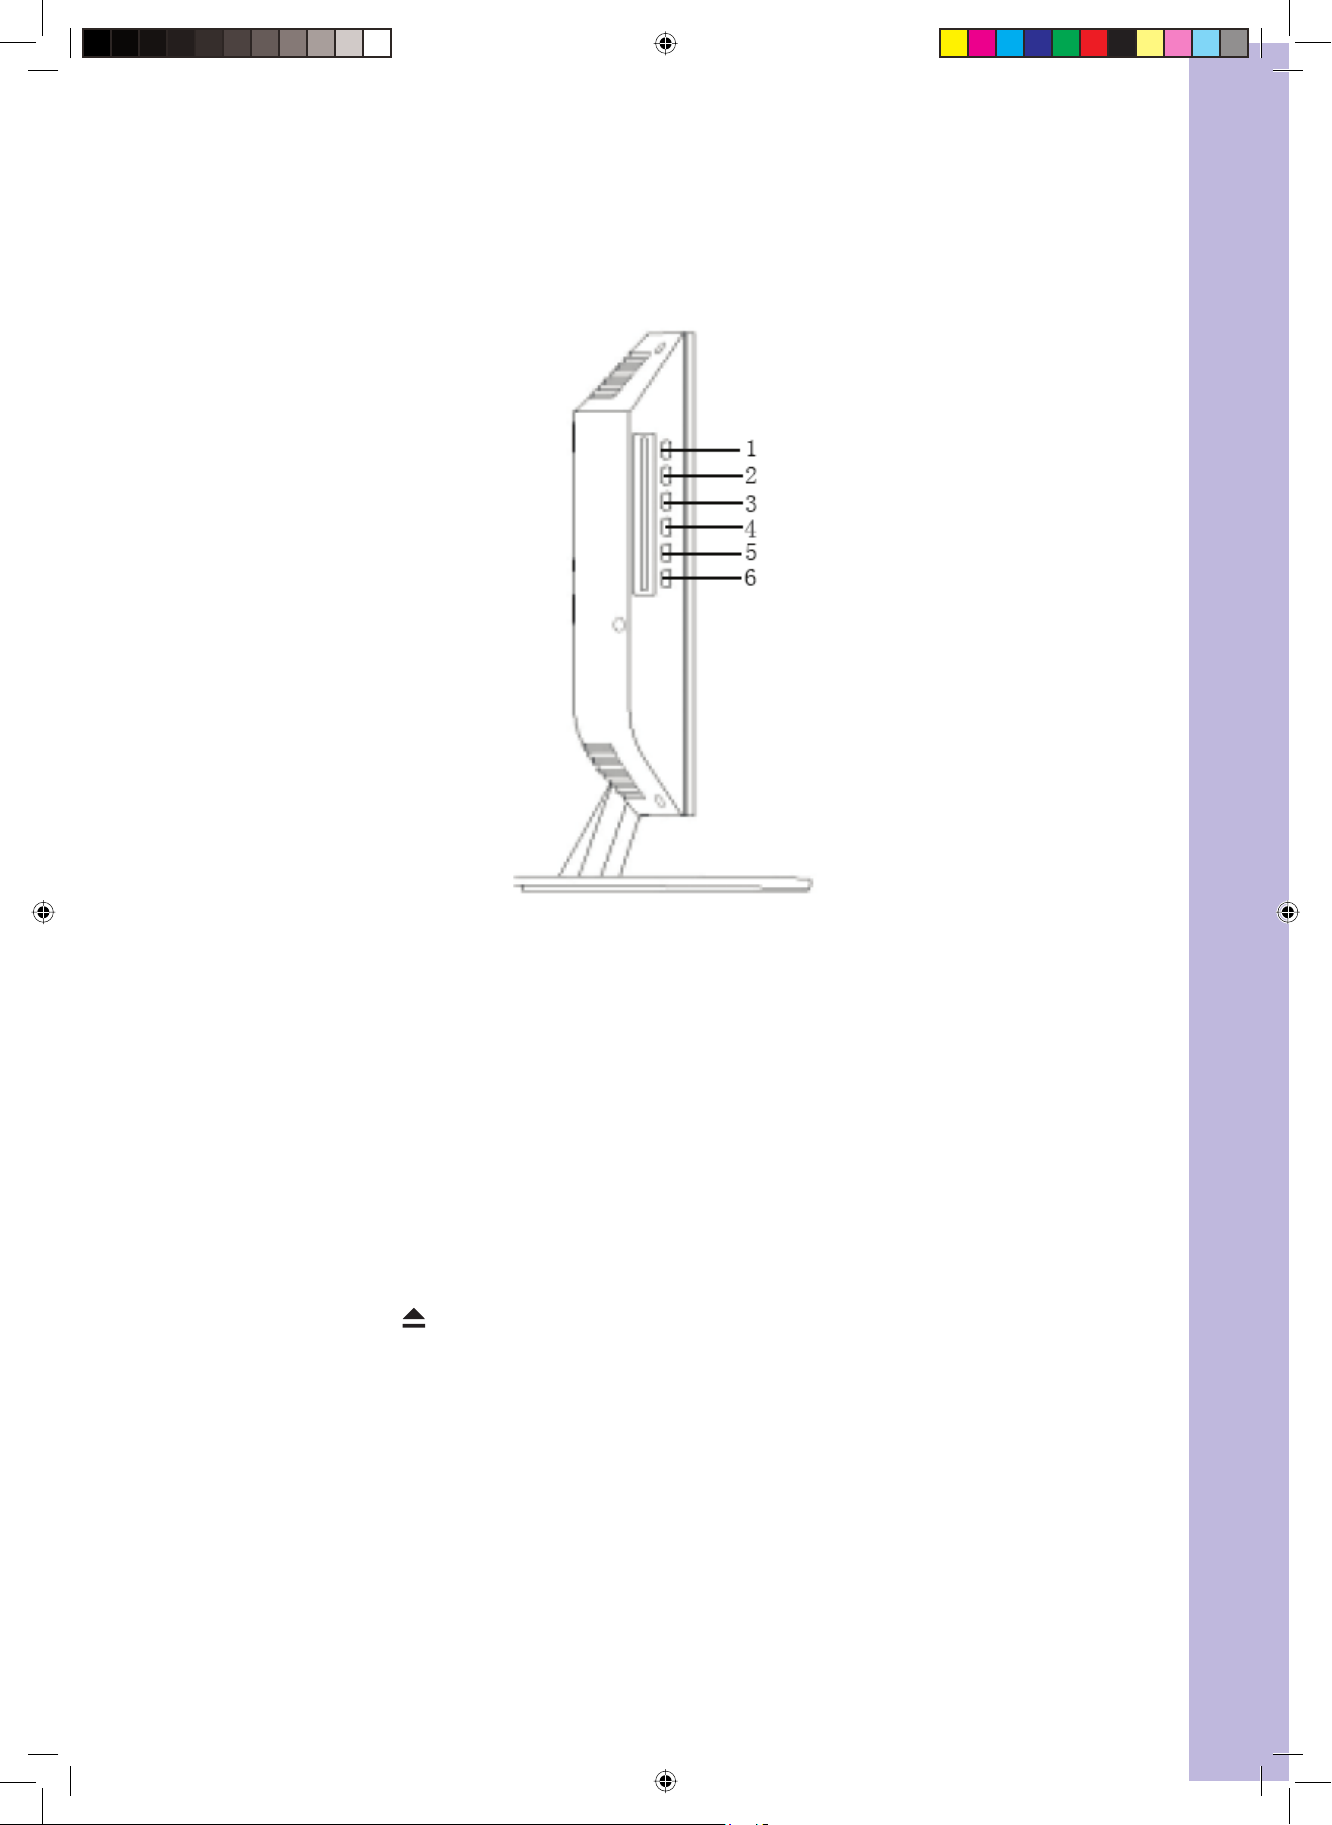
Side View
DVD Player Controls
1. : PLAY
2. : PAUSE
3. : STOP
4. : NEXT TRACK
5.
6. : EJECT
: PREVIOUS TRACK
3 | Wintal LCD
Manual 20LDVD05.indd Sec1:3Manual 20LDVD05.indd Sec1:3 12/07/2005 11:43:14 AM12/07/2005 11:43:14 AM
Page 7
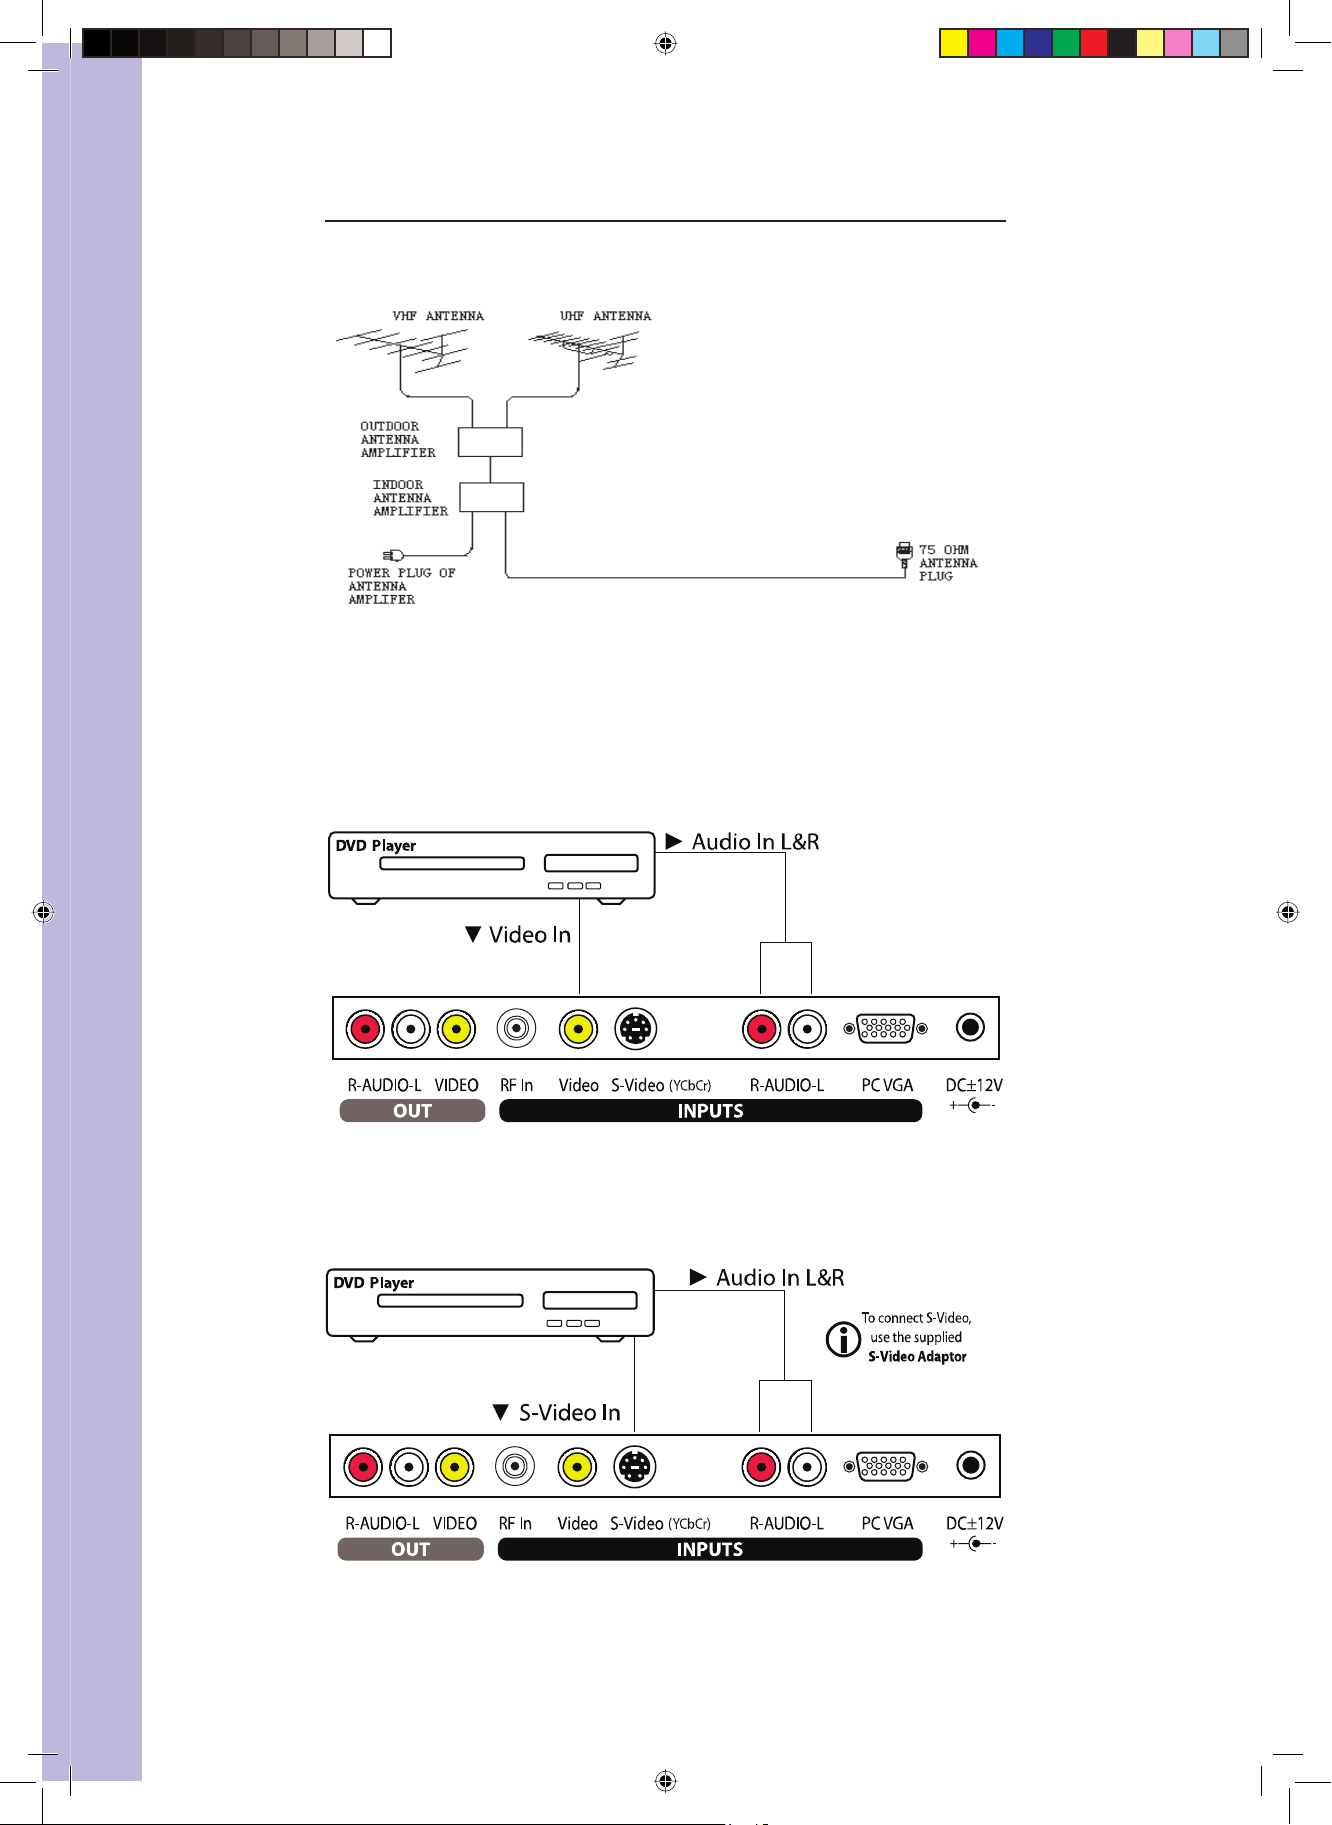
4. TV INSTALLATION
4.1 Connecting Antennas
To ensure good picture and sound, TV antenna system needs to be installed. e
antenna system as shown can be sourced from TV equipment shops, which will
provide service for correct installation and connection. After installation, insertv the
75Ω antenna plug into the antenna jack as shown.
4.2 AV Video Input
4.3 S-Video Input
Wintal LCD | 4
Manual 20LDVD05.indd Sec1:4Manual 20LDVD05.indd Sec1:4 12/07/2005 11:43:14 AM12/07/2005 11:43:14 AM
Page 8

4.4 YCbCr Input
*To connect to your source component terminal, use the supplied “S-Video to 3x
RCA” adaptor.
4.5 PC (VGA) Connection
5 | Wintal LCD
Manual 20LDVD05.indd Sec1:5Manual 20LDVD05.indd Sec1:5 12/07/2005 11:43:14 AM12/07/2005 11:43:14 AM
Page 9

5. SETTING UP YOUR LCD
5.1 Auto Search
Press «MENU» key on the front control panel or «SYS MENU» key on the
•
remote control to go into the menu
en press ◄ or ► to access the menu below
•
Before selecting «Auto search», choose the «Colour system» and the «Sound
•
system» with ▲ or ▼
Select « Auto search » with ▲ or ▼
•
Press ◄ or ► to confi rm
•
5.2 Manual Search
•
Press «MENU» key on the front control panel or «SYS MENU» key on the
remote control to go into the menu
•
en press ◄ or ► to access the menu above
•
Press ▲ or ▼ to select «Manual search»
•
Confi rm with ◄ or ►
5.3 Fine Tune
If the reception signal is poor :
Press «MENU» key on the front control panel or «SYS MENU» key on the
•
remote control to go into the menu
•
en press ◄ or ► to access the menu above
•
Press ▲ or ▼ to select «
•
Press ◄ or ► to adjust
Fine tune»
5.4 Save Settings
Press «MENU» key on the front control panel or «SYS MENU» key on the
•
remote control to go into the menu
en press ◄ or ► to access the menu above
•
Press ▲ or ▼ to select «Save»
•
Press ◄ or ► to save the channel you want when you use for example manual
•
search or sort channel option.
5.5 Skip
Skip function can jump the TV program you dislike. For example, to skip the
program:
Change the channel on the LCD to channel 2
•
Press «MENU» key on the front panel or «SYS MENU» on the remote control
•
to go into the menu
Press ◄ or ► to access the menu above
•
Wintal LCD | 6
Manual 20LDVD05.indd Sec1:6Manual 20LDVD05.indd Sec1:6 12/07/2005 11:43:14 AM12/07/2005 11:43:14 AM
Page 10

Press ▲ or ▼ to select «SKIP»
•
Press ◄ o ► to activate «ON» and to delete the program 2
•
6. PICTURE SETTING
•
Press «MENU» key on the front panel or «SYS MENU» on the remote control
to go into the menu
•
Press ◄ or ► to access the menu below
•
Press ▲ or ▼ to select the setting you wish to adjust
•
Press ◄ or ► to adjust the setting selected
7. AUDIO SETTING
Press «MENU» key on the front panel or «SYS MENU» on the remote control
•
to go into the menu
Press ◄ or ► to access the menu below
•
Press ▲ or ▼ to select the setting you wish to adjust
•
Press ◄ or ► to adjust the setting selected
•
8. SOURCE SETTING
Press «MENU» key on the front panel or «SYS MENU» on the remote control
•
to go into the menu
Press ◄ or ► to access the menu below
•
Press ▲ or ▼ to access SOURCE
•
Press ◄ or ► to select TV, AV, S-Video, YcrCb, or PC source
•
7 | Wintal LCD
Manual 20LDVD05.indd Sec1:7Manual 20LDVD05.indd Sec1:7 12/07/2005 11:43:15 AM12/07/2005 11:43:15 AM
Page 11

9. LANGUAGE SELECT
Press «MENU» key on the front panel or «SYS MENU» on the remote control
•
to go into the menu
Press ◄ or ► to access the menu above
•
Press ▲ or ▼ to access LANGUAGE SELECT
•
Press ◄ or ► to choose the language
•
10. LOCK
Press «MENU» key on the front panel or «SYS MENU» on the remote control
•
to go into the menu
Press ◄ or ► to access the menu above
•
Press ▲ or ▼ to access LOCK setting
•
Press ◄ or ► to lock the front control panel keys of the LCD
•
NB : to unlock the front control panel keys, press any key on the remote control
11. RESET
Press «MENU» key on the front panel or «SYS MENU» on the remote control
•
to go into the menu
Press ◄ or ► to access the menu above
•
Press ▲ or ▼ to access RESET setting
•
Confi rm with ◄ o ► to reset the LCD to default factory settings
•
12. BLUE BACKGROUND
Press «MENU» key on the front panel or «SYS MENU» on the remote control
•
to go into the menu
Press ◄ or ► to access the menu above
•
Press ▲ or ▼ to access BLUE BACKGROUND setting
•
Press ◄ or ► to activate the function
•
NB : is function can be activated for example when scanning program or when
reception signal is poor, if you wish to have a blue background instead of a screen
with snow and noise.
13. CHANNEL SWAP
is function is used to sort channels.
Press «MENU» key on the front panel or «SYS MENU» on the remote control
•
to go into the menu
Press ◄ or ► to access the menu below
•
Press ▲ or ▼ to select the 2 channels you wish to swap
•
Press ◄ or ► to insert the 2 numbers of channels to be swapped
•
Swap by selecting «EXCHANGE» with ◄ or ►
•
Wintal LCD | 8
Manual 20LDVD05.indd Sec1:8Manual 20LDVD05.indd Sec1:8 12/07/2005 11:43:15 AM12/07/2005 11:43:15 AM
Page 12

14. PC SETTING
Set up the LCD to PC mode by changing the «MODE» key on remote control
•
Switch on PC with a contrast ratio 800*600 /60Hz
•
Connect the LCD to the PC with the VGA cable
•
Press «MENU» key on the front panel or «SYS MENU» on the remote control
•
to go into the menu
Press ◄ or ► to access the menu above
•
Press ▲ or ▼ to select the setting you wish to adjust
•
Adjust with ◄ or ►
•
9 | Wintal LCD
Manual 20LDVD05.indd Sec1:9Manual 20LDVD05.indd Sec1:9 12/07/2005 11:43:15 AM12/07/2005 11:43:15 AM
Page 13

15. TV / DVD COMBO REMOTE CONTROL
e
m
q
3
1
5
7
9
11
4
W
E
SLEEP MUTE MODE
R
O
P
2
EJECT
a
b
c
6
8
-/--
PICTURE
2 31
PAUS E
5 64
STOP
8
97
BACK
SYS MENU
0
CH+
AUDIO
10
ENTER
VOL - VOL +
12
13
CH-
SETUPRESUME MENU DISPLAY
d
SUBTITLESEARCH TITLE ZOOM
h
PBCCLEAN BOOKMARK
LANGUAGE
l
REPANGLE SLOW
A-B
p
g
f
k
ji
o
n
s
r
t
v
wu
20LDVD05
15.1 Remote control instructions in TV mode
1 Power ON/OFF
2 TV/AV/DVD/PC mode
3 Sleep timer 30-60-90-120 off
4 Mute
5 Number keys
6 System setting menu key
7 Access to several numbers program
8 Back to the previous screen
9 Picture mode
10 Audio mode
11 Decrease volume control key
12 Channel control and menu item execute key
13 Increase volume control key
Wintal LCD | 10
Manual 20LDVD05.indd Sec1:10Manual 20LDVD05.indd Sec1:10 12/07/2005 11:43:15 AM12/07/2005 11:43:15 AM
Page 14

15.2 Remote Control Instructions in DVD Mode
a To eject the disc
b Pause
c To stop disc
e Access to menu in DVD mode
f Access to settings in DVD mode
d Resume playback
g Display control menu
i Locating a title
j Access to subtitles
h Search disc chapter and time
k Zoom of the picture
m Set bookmark
n Right/left sound track selection while playing VCD
l Clear all bookmarks
o Selecting language
q Slow key
r Repeat to the previous chapter
p Select movie vision angle
s Replaying point A to point B when selected
u Fast forward key
t Fast backward key
v Jump to next track
w Jump to previous track
16. REMOTE CONTROL SETUP
Open the cover
a.
Insert the supplied “AA” size batteries
b.
When inserting the batteries, make sure correct polarities as per the “+” and “-”
marks on the batteries are correct
Replace the battery cover
c.
16.1 Battery Usage Caution
To prevent battery leakage which may result in injury or damage to the remote:
Install all batteries correctly, and as marked on the remote control
1.
Do not mix batteries: (OLD and NEW or CARBON and ALKALINE, etc.)
2.
Remove batteries when the remote is not used for a long time
3.
11 | Wintal LCD
Manual 20LDVD05.indd Sec1:11Manual 20LDVD05.indd Sec1:11 12/07/2005 11:43:16 AM12/07/2005 11:43:16 AM
Page 15

17. ACCESSORIES
Included with your Wintal LCD are the following accessories:
AC/DC Power Adapter
1.
One Remote Control
2.
2x 1.5V “AA” batteries
3.
One User Manual
4.
AV Cable
5.
18. DVD OPERATION INSTRUCTIONS
18.1 DVD Console Operation
Press DISPLAY to bring up the Console Menu.
1.
e Console function is only available in DVD/DVD Audio/ DVD-VR/ VCD
2.
discs, and the display result may diff er among these disc types.
DVD-VR Console
Wintal LCD | 12
Manual 20LDVD05.indd Sec1:12Manual 20LDVD05.indd Sec1:12 12/07/2005 11:43:16 AM12/07/2005 11:43:16 AM
Page 16

18.2 DVD System Setup Menu
Press < SETUP > key until the screen displays as photo 1.
1.
Press ◄ key or ► key to select LANGUAGE -- DISPLAY - AUDIO -
2.
LOCK - OTHERS menu setting.
18.3 DVD Language Setup
Press < SETUP > key until the screen displays as photo 2
1.
Press ▼ key to selecting Menu Language –Disc Audio –Disc Subtitle- Disc
2.
Menu setting.
Press ► key to adjust.
3.
Press < Enter > to confi rm the selection.
4.
Photo 2
18.4 DVD Display Setup
Press < SETUP > key until the screen displays as photo 3
1.
Press ▼ key to selecting TV Aspect –Display mode -TV Output Menu setting.
2.
Press ► key to adjust.
3.
Press < Enter > to confi rm the selection.
4.
13 | Wintal LCD
Manual 20LDVD05.indd Sec1:13Manual 20LDVD05.indd Sec1:13 12/07/2005 11:43:16 AM12/07/2005 11:43:16 AM
Page 17

Photo 3
TV Aspect: Depending on the type of television you have, the image adjustment
off ers 2 options for your setting: 4:3 and 16:9. is item is used to display image
data in the wide-screen fi lm on the normal TV set. e option 16:9 is used when
the DVD player is connected to wide screen TV in Full Mode, and the screen will
display pictures in full size.
Display Mode item can only be modifi ed when the TV Display mode is set to 4:3.
Two options are provided: Letterbox and Panscan.
* Letterbox: is image option will display the panoramic frame movie in the smaller
portion of the screen. And the movie might appear with black bars at the top and
bottom of the screen.
* Panscan: is image option refers to pictures where the left and right edges of the
picture are cut off so it fi lls the whole screen. It is selected for the normal TV set
display. is mode is selected when the picture is displayed in panoramic view and
complete scan format.
TV Output : Auto-PAL-NTSC
18.5 DVD Audio Setup
Press < SETUP > key until the screen displays as photo 4
1.
Press ▼ key to selecting Dolby Digital – DTS-Sample Freq.-Digital Output
2.
– DRC Menu setting.
Press ► key to adjust.
3.
Press < Enter > to confi rm the selection.
4.
Photo 4
Wintal LCD | 14
Manual 20LDVD05.indd Sec1:14Manual 20LDVD05.indd Sec1:14 12/07/2005 11:43:16 AM12/07/2005 11:43:16 AM
Page 18

1. Dolby Digital indicates the output mode of the Dolby Digital.
Two options are provided: Bitstream and PCM
2. DTS indicates the output mode of the Digital Cinema.
Two options are provided: Bitstream and PCM.
a.
BITSTREAM: Select this option when the unit is connected to an amplifi er
with a built–in DTS decoder, Dolby Digital decoder and MPEG decoder, or
other audio equipment with digital audio output terminals.
b.
PCM: Select this option when the unit is connected to the dual stereo digital
audio equipment. When the DVD disc being played is recorded with the Dolby
Digital, MPEG1/ MPEG2 recording systems, the DVD player selects PCM as
the audio output.
I.
Sample Freq. item off ers 2 options. If the connected receiver or amplifi er is
incapable of processing digital input with sampling frequency of 96KHz, it will
select 48KHz as the sampling frequency to compress the signal to a standard
signal. After the 48KHz frequency is selected, the unit will automatically
convert the 96KHz signal into the 48KHz signal, and then your system will be
able to execute the decoding on the signals. On the other hand, if the receiver is
capable of outputting digital signals with a sampling frequency of 96KHz, it will
select 96KHz for the signal to be output as it is.
After 96KHz frequency is selected, the unit will be able to process all signals
without any further operations required.
II.
Dynamic Range Compression (DRC) Provides 2 options: ON and OFF. When
the option is set as ON, the dynamic range is compressed by reducing loud
sounds and increasing soft sounds, making it easier to listen at low volume but
still enjoy clear dialogues.
Note:
Audio-digital out function is only fi t for machines that have the digital out option.
18.6 DVD Lock Setup
Press < SETUP > key until the screen displays as photo 4
a.
Press ▼ key to selecting Rating—Password—Country Code Menu setting.
b.
Press ► key to adjust.
c.
Press < Enter > to confi rm the selection.
d.
15 | Wintal LCD
Manual 20LDVD05.indd Sec1:15Manual 20LDVD05.indd Sec1:15 12/07/2005 11:43:16 AM12/07/2005 11:43:16 AM
Page 19

Rating item is used to set the rating level.
Before you enter into the item, the system will request you to input the password
fi rst. After the password is entered correctly, the parental control rating level can be
changed.
If you didn’t set any password of Parental Control, the system will request you to
input a new password.
If you make a mistake before pressing ENTER, press CLEAR and enter your
4-digit password again.
After the new password is entered successfully, press ▲/▼ to change the parental
control rating level. Including the Unlock level, there are a total of 9 levels in the
parental control rating levels. See the Parental Control section for details.
e parental control function is only valid after the disc eject operation is performed
following the parental lock setting.
Password item is used to set the new password or change the old password. Before
you enter into the item, the system will request you to input the old pass word fi rst.
e new password will be accepted only when the old password is input correctly.
e Country code item is used to set the national code. It is a prerequisite that the
setting of the parental control level is only valid when the country code of the unit
is matched with that of the disc. e country code item provides two alphabetical
letters for changes.
Before user can enter into the country code item, the system will request you to
input the password fi rst. e country code can be changed only after the password is
input successfully.
Wintal LCD | 16
Manual 20LDVD05.indd Sec1:16Manual 20LDVD05.indd Sec1:16 12/07/2005 11:43:17 AM12/07/2005 11:43:17 AM
Page 20

18.7 “Others” Settings
Press < SETUP > key until the screen displays as photo 5.
a.
Press ▼ key to selecting PBC - Auto Play – B.L.E. –Load Default – Screen
b.
Saver – Last player Menu setting.
Press ► key to adjust.
c.
Press < Enter > to confi rm the selection.
d.
PHOTO 5
PBC item provides 2 options: ON and OFF. Please refer to the section VCD
1.
/ SVCD PBC Menu for the respective descriptions of ON and OFF option of
the PBC function.
Auto Play item provides 2 options: ON and OFF. When the option is set as
2.
ON, the auto play function will be activated.
e DVD player will search for the DVD disc track that has the longest playback
time, and proceed to play the track.
For the VCD and CD discs, the unit will automatically play the VCD/CD disc
from the beginning after the disc is recognized.
17 | Wintal LCD
Manual 20LDVD05.indd Sec1:17Manual 20LDVD05.indd Sec1:17 12/07/2005 11:43:17 AM12/07/2005 11:43:17 AM
Page 21

19. TROUBLESHOOTING
Before calling our Service Centre, please check if you can troubleshoot the problem
by yourself.
Troubleshooting
No signal
No colour shades Adjust the contrast, the colour and the brightness
Double or multiple
display image
Snow on the screen
e remote control does
not work
No sound
No DVD
DVD player not working
properly
Control
Please check that all cables and connectors are
correctly plugged in.
May be the result of an electrical wave disturbance
from another TV, Computer and Game machine or
Radio
e cables of the antenna are not correctly plugged
in.
Please check the batteries are inserted correctly.
Check that the IR of the remote control is not
hidden by something.
Make sure that you have not press the MUTE button
of the panel or of the remote control.
Make sure if the TV Set have been switched to
DVD mode
Ensure disc is correctly inserted into the player.
Ensure the disc is not damaged and is of correct
format. Please wait as some discs require longer time
to read.
Manual 20LDVD05.indd Sec1:18Manual 20LDVD05.indd Sec1:18 12/07/2005 11:43:17 AM12/07/2005 11:43:17 AM
Page 22

20. SPECIFICATIONS
Screen Size 20.1 Inch
Display Type LCD TFT
Resolution (Pixel) 800 x 600
Brightness 500 cd / m²
Colour 24 bit ( 16,777,216)
Contrast Ratio 500 : 1
View Angle (H/V ) Horizontal 160, Vertical 140, CR10
Aspect Ratio 4:3
Power 100-240 VAC, 12V 50/60HZ.
Power consumption 80W
TV System PAL / NTSC
Video Input Format PAL / NTSC
Antenna Input Standard antenna socket 75Ω
Audio Output L / R 3W + 3W
VGA Input 800 x 600 60HZ
RGB 0.7 VP- P 75Ω
Input
VIDEO CVBS: 1.0 Vp – p, 75Ω; RCA
AV Video 1.0 VP – 75 Ω; Audio 20 KΩ ; RCA
VIDEO 1 CVBS:1.0 VP- P 75 Ω; RCA
Output
AUDIO L/R 200 m Vrms , 20 kΩ ( max.3.0 VP – P ) ; RCA
VIDEO 2 1.0 VP – P , 75 Ω ; RCA
Slot – in DVD
DVD/VCD/CD/CD-R DISC
Compatible
Eff ective Range IR < 6 m
Weight 9.4 Kg
e manual is only for your reference, any change to the design and specifi cation will
not be advise.
19 | Wintal LCD
Manual 20LDVD05.indd Sec1:19Manual 20LDVD05.indd Sec1:19 12/07/2005 11:43:17 AM12/07/2005 11:43:17 AM
Page 23

Manual 20LDVD05.indd Sec1:20Manual 20LDVD05.indd Sec1:20 12/07/2005 11:43:17 AM12/07/2005 11:43:17 AM
 Loading...