


ALL WEATHER WICKER PATIO TRIPLE-SEATING SOFA
ASSEMBLY INSTRUCTION
WARNING : This sofa is not a to y. The proper use o f the sofa
!
is for thre e-p erson seat ing m ax. Furthe r, the sofa is not to b e
used for st and ing purpos es an d it will not fu nction as a stool o r
step- lad der . Besides, p lea se use this so fa on even surfac es only.
The singl e sea ting teste d for use at a max weig ht of 350 lb.
Imprope r use o f this produ ct or failure to us e as directed may
result in i nju ry. This sof a is not intended f or commercial u se.
IMPORTANT:
Please re ad al l the instru cti ons and warn ing s before ass embling. In ord er to make the
whole pro duc t adjust to th e bes t, please in stall all the scr ews on the produc t and
tighten a ll th e screws aft er adjusting th e product which c an stand on the flo or even.
WARNING:
·Please k eep all childre n and pets away fro m th e assembly ar ea. In addition , children an d
pets sho uld be supervis ed when they are in t he a rea of produc t co nstructio n.
·Please m ake sure to keep the as sembly area at le ast 6 feet from any obs truction su ch as
a fence, gar age, house, o verhangin g br anches, lau ndry line or elec trical wire s.
·Some par ts may contain sh arp edges. Therefor e, when assem bling and using t his
produc t, basic safe ty p recaution s should alwa ys be followed to red uce the risk of per sonal
injury a nd damage to the prod uct. Please r ead all instruc tions befor e as sembly and us e.
·Please c heck all bolts fo r ti ghtness bef ore use. IMPORTANT-check an d ti ghten bolts
often to kee p them secure !
·The sofa is no t to b e used for standi ng purposes a nd w ill not funct io n as a stool or
stepla dder.
Again, t his sofa is used on eve n su rfaces only.
·The sing le seating test ed for use at a max weigh t of 3 50 lb Imprope r us e of this product o r
failur e to use as
direct ed may result in in jury. Not i ntended for com mercial use .
CARE & MAINTENANCE
SPIL LS
Plea se imme diate ly wipe u p the spi ll usin g a white d amp clo th. Rep eat pro cess if n ecess ary
unti l stain i s gone.
FABRI C CARE
Plea se use co ld wate r and han d wash, u se non- chlor ine ble ach whe n neede d, lay fl at to dry.
Cool i ron if ne cessa ry. Do not dry c lean.
RESI N WICKE R PRODU CT CARE
Befo re usin g, plea se clea n the pro duct co mplet ely wit h a soft dr y towel . Moreo ver, whe n the
chai r not in us e, you sh ould wi pe off any di rt or los e objec ts, was h with a mi ld solu tion of
soap a nd wate r, rinse t horou ghly an d dry com plete ly. Please d o not use s trong d eterg ent or
abra sive cl eaner s. Sinc e nuts an d bolts c an loos en over t ime, so p lease c heck nu ts and
bolt s on all ch airs an d table s, re-t ighte n if nece ssary.
1
Parts List:
NO.
1
3
7 8
20 33
A
L
Part
Left ar m
Chair b ack
Chair b ack
(With Foot )
Seat
Cushi on
Screw
(6x40 mm)
Allen w rench
Qty
1
1
2
4
1
Image
NO.
2
4
21
C
Part
Right a rm
Seat Pa nel
Seat Pa nel
(With Foot )
Back
Cushi on
Screw
(6x20 mm)
Qty
1
1
2
18
Image
2

3
L
L
C
C
L
L
C
C
C
L
3
7
4
8
7
4
L
C
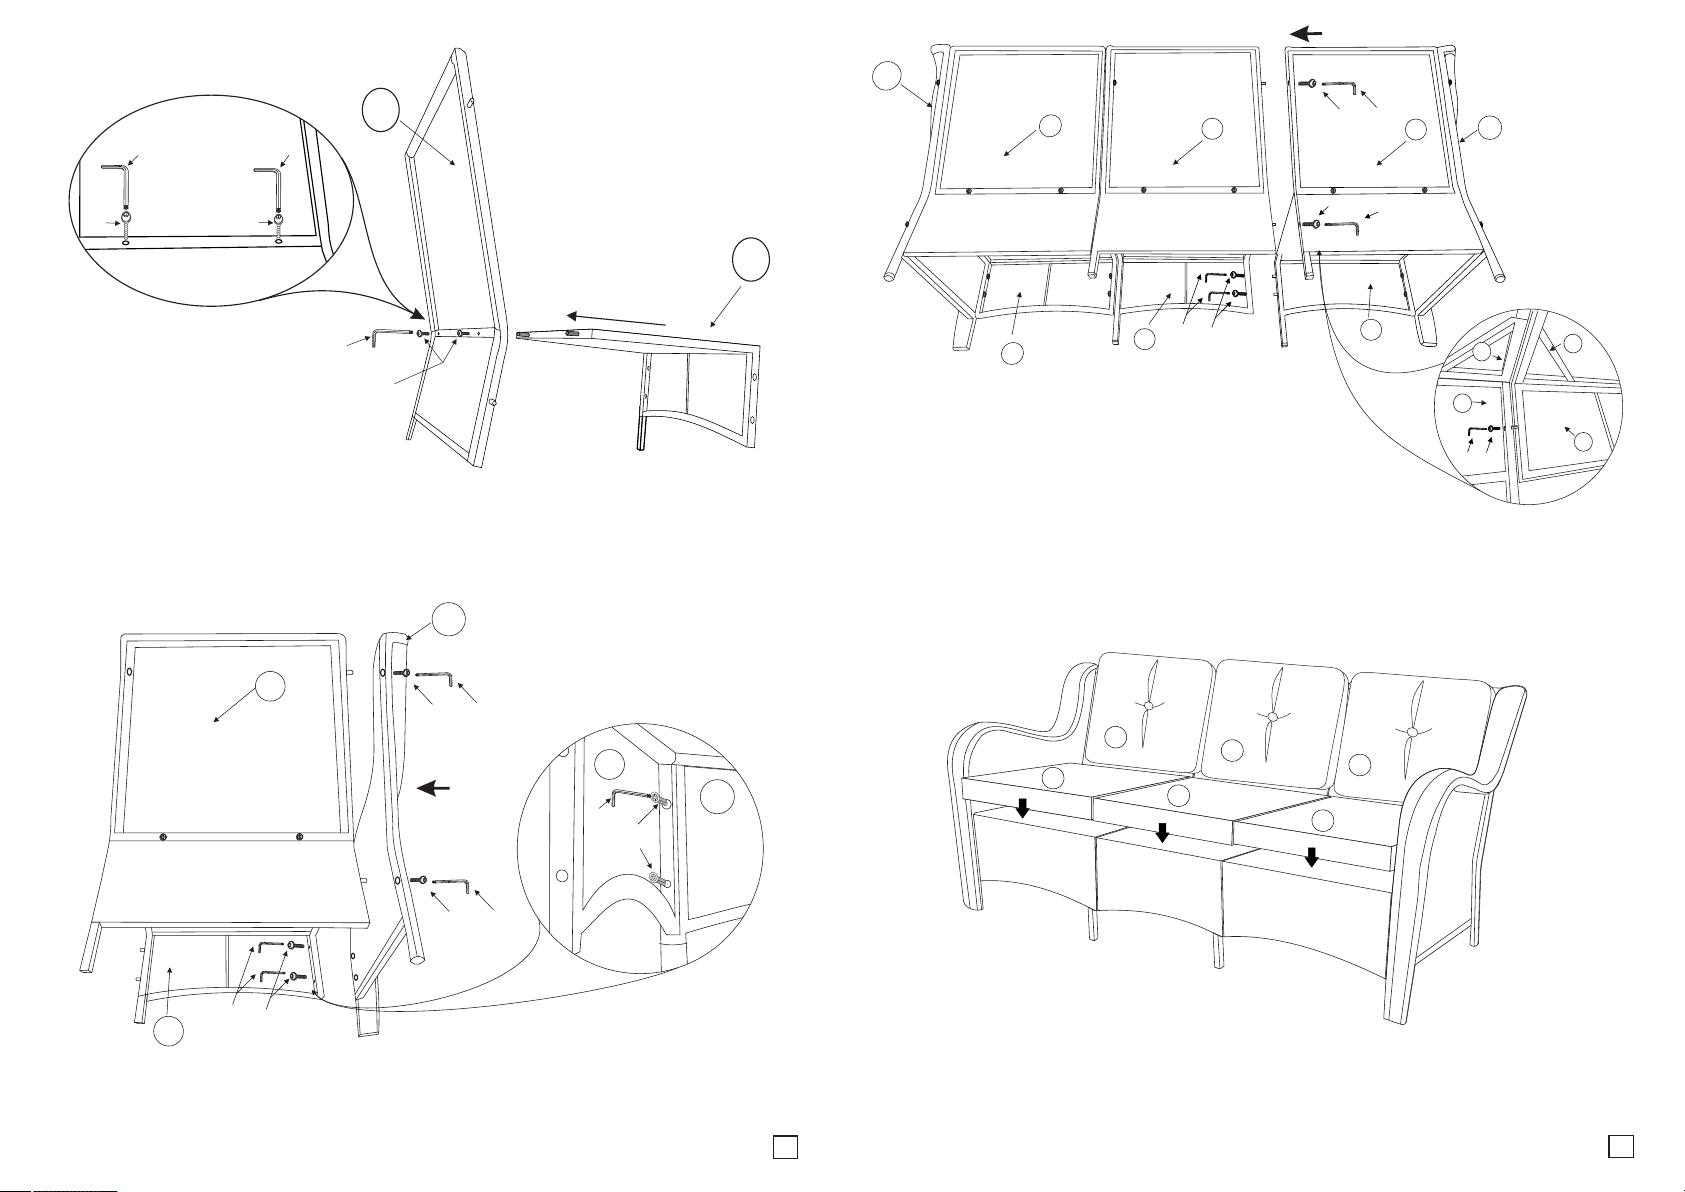
Step 1: I nsert seat panel (4) into t he two holes on chair back (3 ), then secure
them wi th 2 screws (C) by using alle n wrench (L). Do not tighte n all screws
now.
1
L
C
3
4
1
L
A
8
L
C
Step 3: I nsert seat panel (8) into t he two holes on chair back (7 ), then secure
them wi th 2 screws (C) by using alle n wrench (L). Do not tighte n all screws
now.
1
C
L
3
7
Insid e of chair back
L
C
4
A
L
Step 2: S ecure left arm (1) to assem bled chair back (3) with 2 sc rews (C) by
using a llen wrench(L). Do not ti ghten all screws now. Then, secure s eat
panel ( 4) to assembled left arms ( 1) with 2 screws (A) by using a llen wrench
(L). Do n ot fully tighten now.
C
L
L
4
Step 4: C onnect and secure left an d middle part of the sofa tog ether with 4
screw s (C) by using allen wrench ( L), two at the chair back and t wo at the front
seat pa nel.
3
C
8
4
L
C
L
7
7
8
8
L
L
C
C
7
C
8
1
C
3
4
8
7
L
C
L
7
C
L
8
2
Insid e of chair back
Step 5: R epeat the same step as step 3 . Do not tighten all screws n ow.
2
7
C
L
8
2
L
A
C
L
L
Step 6: S ecure right arm (2) to asse mbled chair back (7) with 2 s crews (C) by
using a llen wrench (L). Then, secure sea t panel (8) to assembled ri ght arm
(2) wit h 2 screws (A) by using allen w rench (L). Do not fully tig hten now.
8
A
Step 7: C onnect and secure right a nd middle part of the sofa to gether with 4
screw s (C) by using allen wrench ( L), two at the chair back and t wo at the front
seat pa nel.
21
20
STEP 8: Please ve rify the alignment and ad just, fully tighten all t he screws
now. Then put seat c ushion (20) and back cush ion (21) on the sofa, your ch air
is asse mbled.
5
21
20
21
20
6
 Loading...