

Series Includes:
CAC503
CAC507
CAC509
CAC SERIES
1
CVap® Cook & Hold Oven Owner’s Manual
CAC522
4275V275 R40
wp 06-07-18
2
COOK & HOLD OVEN
WELCOME
If you have questions about your CVap equipment,
please contact your corporate office, local distributor, or
Winston’s Customer Care Center at 1.800.234.5286 or
1.502.495.5400, or e-mail us at
winstonind.com
.
customercare@
CONTACT INFORMATION:
Internet: www.winstonfoodservice.com
E-mail: customercare@winstonind.com
Phone: 1.800.234.5286 | 1.502.495.5400
Fax: 1.502.495.5458
Mail: 2345 Carton Drive | Louisville, KY 40299 USA
CONTENTS
Important Safety Information 2-3
General Installation 3-5
How Your CVap Works 6-11
Daily Cleaning Procedure 12-13
Warranty & Terms and Conditions 14
WARNINGS AND INSTALLATION
INSTRUCTIONS
As is the case with most cooking equipment, your
CVap oven should be used with caution. Please read
the following warnings to avoid potential injuries.
!
WARNING: Burn Hazard
Can cause serious injury >> Avoid heated vapor when opening
or closing cabinet door.
This equipment utilizes heated water vapor, which
transfers heat much more quickly and efficiently than dry
air of the same temperature. Use caution when opening
doors or reaching into the equipment, as heated vapor
can quickly cause burns.
!
WARNING: Contamination
Hazard
Can cause serious illness or damage to equipment >>
Clean equipment daily to avoid potential contamination hazard.
Clean equipment daily to prevent buildup of food
residue or chlorides, which can also damage stainless
steel and contaminate food. Failure to follow proper
cleaning procedures can void your warranty.
Prior to using equipment for the first time, perform the
daily cleaning procedure listed on page 12-13.
!
DANGER: Electrical Hazard
Can cause serious injury or death >> Do not attempt to
service this equipment unless you are a licensed electrician or trained
servicer.
Because this equipment utilizes high voltage, it should
only be installed and serviced by a licensed electrician or
trained servicer. Attempting to install or service the
equipment yourself could result in serious, potentially
fatal injuries.
If an electrical shock is felt when touching equipment,
shut off power immediately (pull cord or turn off circuit
breaker) and call a trained servicer for repair. Failure to
do so could result in serious, potentially fatal injuries.
Always turn power switch off any time equipment is not
in use.
!
CAUTION: Electrical Hazard
Can cause injury >> Do not connect equipment to an
external switching device.
In order to avoid a hazard due to inadvertent resetting of
the thermal cutout, this appliance must not be supplied
through an external switching device, such as a timer, or
connected to a circuit that is regularly switched on and
off by the utility.
!
CAUTION: Burn Hazard
Can cause injury >> Allow 30 minutes for equipment to cool
before attempting to clean.
Always allow equipment to cool before cleaning to avoid
potential burns.
Copyright© 2018 Winston Foodservice. All rights reserved. CVap is a registered trademark of Winston Industries LLC. The CVap logo is a trademark of Winston Industries LLC. All other company and product names may be trademarks of their respective
companies.
winstonfoodservice.com | 1.800.234.5286
Questions? Concerns? E-mail us at customercare@winstonind.com
| +1.502.495.5400
Revised 06.07.18

!
WARNING: Safety Hazard,
Intended Use
Can cause serious injury or damage to equipment >>
Supervise untrained, young, or handicapped persons.
1. This equipment is not intended for use by persons
(including children) with reduced physical, sensory,
or mental capabilities, or lack of experience and
knowledge, unless they have been given supervision or
instruction concerning use of the equipment by a person
responsible for their safety.
2. Children should be supervised to ensure that they do
not play with the equipment.
3. This equipment is intended to be used for commercial
applications, for example in kitchens of restaurants,
canteens, hospitals and in commercial enterprises such
as bakeries, butcheries, etc., but not for continuous mass
production of food.
COOK & HOLD OVEN
Equipment with automatic water fill systems are to
be installed with adequate backflow protection to
comply with federal, state, and local codes.
As water evaporates, any minerals in the water will
deposit on the surface of the evaporator. These mineral
deposits will inhibit the transfer of heat. Deposits can
also degrade and damage stainless steel. The best way
to avoid mineral deposits is to clean the equipment
daily. It is also advisable to contact your water utility for
advice on minimizing deposit buildup.
For locations with hard water, add one tablespoon
(15ml) of white vinegar or lemon juice to water to help
minimize scale buildup. Please consider contacting your
local water authority to obtain advice on possible water
treatment to protect the appliance. Some water supplies
are high enough in chemical content to be capable of
damaging stainless steel (if used untreated). The
evaporation process can concentrate the chemicals in
the water to a level which could cause a damaging
reaction with the stainless steel.
3
!
CAUTION: High Temperature &
Grease Hazard Can cause damage to equipment
>> Avoid placing equipment near high heat or in grease-laden
atmosphere.
Do not place equipment in areas where air temperature
exceeds 100˚F (38˚C). A heat shield may be required to
prevent heat exposure and grease-laden vapors from
affecting the equipment if near heat, vapor, or grease
generating devices (such as grills, steamers, ovens, etc.).
Excess heat and grease inside the equipment cavities
may cause electrical components to fail.
WATER FILL PROCEDURE
Water Supply
In order to operate properly, the evaporator in this oven
must be filled with clean, potable water. Hardware is
included to connect the oven to a copper line in your
facility’s water system. If your facility has plastic or
galvanized pipes, contact a licensed plumber to connect
the water supply. Equipment should be installed to
comply with applicable federal, state, or local plumbing
codes.
INSTALLING AUTO WATER FILL
Insert tubing and push fully into the connector.
(Reference drawing on this page.) Once seated, try to pull
the tubing out of the connector so that the capture ring
comes out (about 1/16” (1.6mm)) and the tubing cannot
be removed.
Prior to connecting a newly installed water line to the
auto water fill connection, it is extremely important
to flush the water line of any debris. Debris in the
water line will cause damage to the water solenoid
and would not be covered under warranty.
PUSH
HERE
The maximum incoming water temperature may not
exceed 140˚F (60˚C) and the incoming water pressure
must be between 20 and 150 psi (1.4 Kgf/cm2 to 10.5
Kgf/cm2 (kilogram-force per sq. centimeter)).
APPLIANCE WALL
TUBING
CAPTURE RING
Revised 06.07.18
winstonfoodservice.com | 1.800.234.5286
Questions? Concerns? E-mail us at customercare@winstonind.com
| +1.502.495.5400

4
COOK & HOLD OVEN
!
CAUTION: High Temperature
Hazard
evaporator with water prior to turning power on, and do not allow
evaporator to run dry.
CAUTION: Equipment with auto water fill systems
MUST NOT BE ALLOWED TO RUN DRY. Heat damage to
the water valve may result.
Can cause damage to equipment >> Fill
It is the responsibility of the owner and installer to
make sure that installation complies with all
applicable local and state plumbing codes.
!
CAUTION: High Temperature &
Grease Hazard
Avoid placing equipment near high heat or in grease-laden atmosphere.
Can cause damage to equipment >>
Do not place equipment in an area where air
temperatures around the equipment exceed 100°F
(38˚C). A heat shield may be required to prevent
excessive heat exposure and grease laden vapors
from affecting the equipment if adjacent to heat,
vapor, or grease generating devices (such as grills,
steamers, ovens, etc.). Excess heat and grease inside
the equipment cavities may cause electrical
components to fail.
Vent hood - Generally this equipment does not
need to be installed under a mechanical ventilation
system (vent hood). Check local health and fire
codes for specific requirements.
ELECTRICAL
The equipment is shipped from the factory with a 84"
(2134mm) (minimum) power cord and plug. Refer to the
table below to determine the correct electrical outlet. It
may be necessary to hire a licensed electrician to install
the correct outlet or wiring. Winston does not
recommend wiring the unit direct.
VENTILATION REQUIREMENTS
Ventilation clearances - To operate properly, the Cook &
Hold oven will need sufficient space for air circulation.
Allow at least 2" (51mm) clearance on all sides of the
oven, particularly around ventilation holes. Care should
be taken to prevent placing the oven close to anything
combustible. It must be installed with its supplied legs,
feet, or casters. Half size equipment may be stacked
upon each other using only a Winston supplied stacking
kit and following the instructions enclosed with the kit.
Your warranty may be void if you do not adhere to these
ventilation requirements.
winstonfoodservice.com | 1.800.234.5286
Questions? Concerns? E-mail us at customercare@winstonind.com
| +1.502.495.5400
Revised 06.07.18
COOK & HOLD OVEN
5
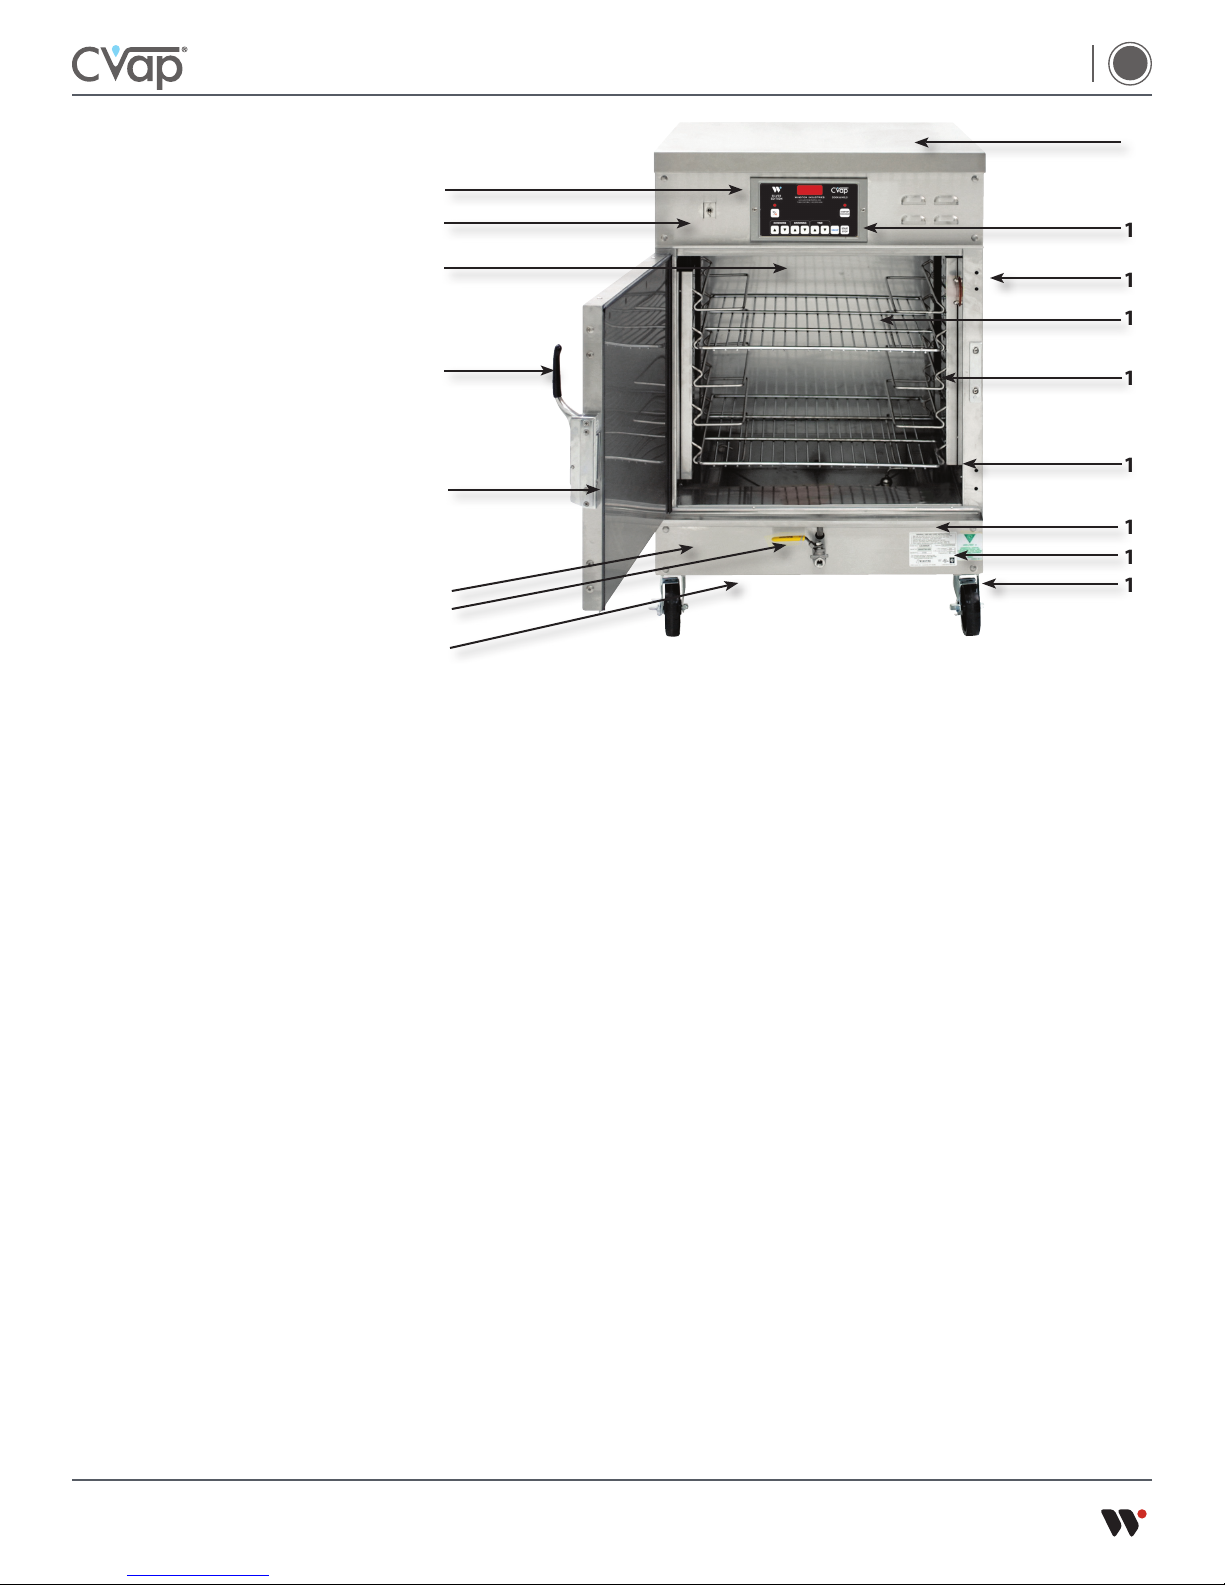
COMPONENT IDENTIFICATION
1
2
3
4
5
6
7
8
9
10
11
12
13
14
15
16
17
1. Microprocessor Controller allows operator to
program doneness, browning, and cook time.
2. Power Switch allows operator to turn electrical
power on and off.
3. Food Chamber cooking cavity where the dual heat
system combines to create the perfect cooking
environment.
4. Door & Latch can be reversed on site.
5. Door Gasket seals food chamber against heat or
vapor loss.
6. Evaporator and Heater (not visible) supply vapor
atmosphere to the food chamber by heating water
within the evaporator.
7. Drain Valve enables operator to drain evaporator, to
perform daily cleaning.
8. Bottom Cover (not visible) provides service access.
9. Top Cover provides service access.
10. Control Escutcheon is removable for servicing or
replacing microprocessor.
11. Side Panels support insulation and form outside of
oven.
12. Adjustable Rack Support supports racks onto which
food is placed.
13. Rack Support Bracket receives rack support.
14. Air Heaters (not visible) supply air heat for food
texture control.
15. Drain Trough carries water that has condensed onto
door back to evaporator.
16. Name Plate identifies model and serial numberimportant for servicing and parts orders. Plate also
displays electrical data.
17. Casters are non-locking in the back; front are
locking.
Revised 06.07.18
winstonfoodservice.com | 1.800.234.5286
Questions? Concerns? E-mail us at customercare@winstonind.com
| +1.502.495.5400

6
COOK & HOLD OVEN
CONTROLS SILVER EDITION
3
1.800.234.5286 | 1.502.495.5400
1
2
9 8 7 6
1. Power Switch controls electrical power to the oven.
2. F˚/C˚ Button is used to switch oven display between
Fahrenheit and Centigrade temperature scales.
3. Digital LED Readout displays chosen setpoints for
doneness, browning, and cook time as the oven is
programmed. After pressing Start/Stop button, the
display indicates the remaining time in each portion
of the cooking process.
4. Constant Cook & Hold Button allows operator to
manually override High Yield Cooking for
personalized cooking or holding.
5. Start/Stop Button is used to start or stop the timed
cooking process.
6. HACCP Button enables user to check current
HACCP-relevant conditions inside the oven. Press
once to read water (evaporator) temperature. Press
again within five seconds to read differential air
www.winstonindustries.com
COOK & HOLD
CONSTANT
COOK/HOLD
START
HACCP
STOP
4
5
temperature (the difference between the air
temperature and the water temperature). Press again
within five seconds to read the actual air (oven)
temperature. The LED readout will revert back to
default display after five seconds of inactivity.
7. Time Up () and Down () Buttons are utilized to
set the cooking time (up to 24 hours).
8. Browning Up () and Down () Buttons allow
selection of the degree of browning (using a 0 to 10
scale).
9. Doneness Up () and Down () Buttons allow
selection of the final food temperature (from 90 to
200˚F (32 to 93˚C)).
winstonfoodservice.com | 1.800.234.5286
Questions? Concerns? E-mail us at customercare@winstonind.com
| +1.502.495.5400
Revised 06.07.18

CONTROLS GOLD EDITION
COOK & HOLD OVEN
3 4
7
1
2
10 9 8 7
1. Power Switch controls electrical power to the oven.
2. F˚/C˚ Button is used to switch oven display between
Fahrenheit and Centigrade temperature scales.
3. Digital LED Readout displays chosen setpoints for
doneness, browning, and cook time as the oven is
programmed. After pressing Start/Stop button, the
display indicates the remaining time in each portion
of the cooking process.
4. Programmable Channels allow user to program
and save specific setpoints for future use.
5. Constant Cook & Hold Button allows user to
manually override High Yield Cooking for
personalized cooking or holding.
www.winstonindustries.com
1.800.234.5286 | 1.502.495.5400
COOK & HOLD
CONSTANT
COOK/HOLD
START
HACCP
STOP
5
6
water temperatures). Press again within five seconds
to read the actual air (oven) temperature. The LED
readout reverts back to default display after five
seconds of inactivity.
8. Time Up () and Down () Buttons are utilized to
set the cooking time (up to 24 hours).
9. Browning Up () and Down () Buttons allow
selection of the degree of browning (using a 0 to 10
scale).
10. Doneness Up () and Down () Buttons allow
selection of the final food temperature (from 90˚ to
200˚F (32 to 93˚C)).
6. Start/Stop Button is used to start or stop the timed
cooking process.
7. HACCP Button enables user to check current
HACCP-relevant conditions inside the oven. Press
once to read water (evaporator) temperature. Press
again within five seconds to read differential air
temperature (the difference between the air and
Revised 06.07.18
winstonfoodservice.com | 1.800.234.5286
Questions? Concerns? E-mail us at customercare@winstonind.com
| +1.502.495.5400

8
COOK & HOLD OVEN
HOW IS THE CVAP COOK & HOLD
OVEN DIFFERENT?
The Winston CVap® Cook & Hold oven gives you more
control over food quality than other ovens or combis. It
allows you to determine whether cooking time or final
yield is more important, and doesn’t force you to sacrifice
quality for either. The following is a brief description of
this unit’s unique features.
High Yield Cycle
The High Yield Cycle gives you the maximum possible
yield from your foods. Once you have programmed the
desired final temperature and degree of browning, the
microprocessor automatically determines the best heat
curve to achieve the highest yield possible.
Constant Cook & Hold Cycle
The Constant Cook & Hold Cycle allows you to manually
override the High Yield cook cycle while automatically
predetermining optimal holding temperatures.
MICROPROCESSOR CONTROLLED
PROCESSES
Cook Cycle
The CVap Cook & Hold oven utilizes a dual heat system to
cook foods to precise doneness, while maintaining high
yield. After doneness temperature, degree of browning,
and cook time are chosen and START/STOP is pressed,
the microprocessor takes over control of the two heat
input systems until the end of the serving period.
!
WARNING: Contamination Hazard
Can cause serious illness >> Clean equipment prior to rst use to
remove traces of industrial chemicals and oils.
Prior to using equipment for the first time, perform the
daily cleaning procedure listed on pages 12 and 13.
COOKING INSTRUCTIONS - HIGH YIELD
Preliminary Set-up
1. Adjust shelving appropriate for product being
cooked. Make sure you have at least 2" (51mm) space
between top of food product and shelf above.
2. Fill unit evaporator with 2.5 to 3 gallons (9.5 to 11.8L)
of water. Note: the oven will preheat faster if hot
water is used. Don't use water that is hotter than the
desired doneness temperature.
3. Flip Power Switch to ON position. The display flashes
Prht (preheat), indicating that the unit is warming
up to current temperature setting.
4. To program DONENESS temperature, press
DONENESS buttons to set desired
temperature. Temperature range is
90˚ to 200˚F (32˚ to 93˚C).
Hold Cycle
The cooking process is followed by a timed cycle to meet
the requirements of FDA regulations pertaining to food
safety in the 120˚ to 157˚F (49˚ to 69˚C) range. If
doneness temperature is set at 130˚F (54˚C), the
minimum hold time is 121 minutes; 135˚F (57˚C), 37
minutes; 140˚F (60˚C), 12 minutes; 150˚F (66˚C), two
minutes; 151˚ to 157˚F (66˚ to 69˚C), one minute. If
doneness temperature is set at 158˚F (70˚C) or higher,
there is no FDA requirement for holding time. This data is
programmed in the microprocessor and requires no
action by the operator.
Sell Cycle
The microprocessor automatically chooses the right dual
heat combination to hold foods without quality loss for
hours while serving. The automatic hold feature requires
no action from the operator, freeing up labor.
winstonfoodservice.com | 1.800.234.5286
Questions? Concerns? E-mail us at customercare@winstonind.com
| +1.502.495.5400
5. To program degree of browning, press BROWNING
buttons. Browning levels range from
0 to 10.
Time 0 1 2 3 4 5 6 7 8 9 10
0˚F 5˚F 10˚F 20˚F 30˚F 40˚F 50˚F 75˚F 100˚F 125˚F 350˚F
Doneness
Temp
Brown scale temperature equivalents are as follows:
0=0, 1=5, 2=10, 3=20, 4=30, 5=40, 6=50, 7=75,
8=100, 9=125, 10= makes oven equal to 350˚F
(177˚C) temperature.
Example: 130˚+10 (220) =350˚, 150˚+10 (200) =350˚,
200˚+10 (150) =350˚, 180˚+10 (170) =350˚.
Browning Scale
Revised 06.07.18

COOK & HOLD OVEN
9
6. To program COOK TIME, press TIME buttons to
customize cook cycle. Refer to
guidelines found on page 14 for
details.
7. After programming DONENESS, BROWNING, and
TIME, unit will heat to new setpoint. When setpoint
has been reached, LoAd will appear on LED. This
indicates that the unit is pre-heated and ready to be
loaded with product.
8. Place food product on pan(s) (bun pans or steam
table/hotel pans), making sure that spacing between
product (vertically and horizontally) is at least 2"
(51mm). Place pan(s) on the rack supports at about
the middle of the oven.
9. Close door. Press START/STOP button to begin cook
cycle.
10. The CVap
®
Cook & Hold Oven begins its timed
countdown. The display shows the remaining cook
time.
8. As timer counts down to zero, if the doneness
temperature is less than 158˚F, (70˚C) timer will
display alternately Hold and the remaining FDArecommended hold time (see the HOLD Cycle section
on page 8).
4. To program DONENESS temperature, press
DONENESS buttons to set desired
endpoint temperature. Temperature
range is 90˚ to 200˚F (32˚ to 93˚C).
5. To program BROWNING, press BROWNING buttons.
Browning levels range from 0 to 10.
See page 11 for detailed description
of Browning levels.
6. To program COOK TIME, press TIME buttons to
customize cook cycle.
7. After programming DONENESS, BROWNING, and
TIME, unit will heat to new setpoint. When setpoint
has been reached, LoAd will appear on LED. This
indicates that the unit is pre-heated and ready to be
loaded with product.
8. Place food product on pan(s) (bun pans or steam
table/hotel pans), making sure that spacing between
product (vertically and horizontally) is at least 2"
(51mm). Place pan(s) on the rack supports at about
the middle of the oven.
9. Close door. Press START/STOP button to begin cook
cycle.
9. Sell display indicates that any FDA-recommended
holding period has been completed, and that the
food may be served. Timer indicates how long
product has been in Sell Cycle.
COOKING INSTRUCTIONS
CONSTANT COOK
1. Fill unit evaporator with 2.5 to 3 gallons (9.5 to 11.8L)
of water. Note: the oven will preheat faster if hot
water is used. Don't use water that is hotter than the
desired doneness temperature. Adjust shelves if
needed.
2. Flip Power Switch to the ON position.
3. Press CONSTANT Cook & Hold button.
®
10. The CVap
Cook & Hold Oven unit begins its timed
countdown. The display shows the remaining cook
time.
11. As timer counts down to zero, if the doneness
temperature is less than 158˚F (79˚C), timer will
display alternately SELL and the remaining FDA
hold time.
12. Sell display indicates that any FDA-recommended
holding period has been completed, and that the
food may be served. Timer indicates how long
product has been in Sell Cycle.
NOTE: When power switch is turned off, the controller
remembers the last temperature and time values set.
Revised 06.07.18
winstonfoodservice.com | 1.800.234.5286
Questions? Concerns? E-mail us at customercare@winstonind.com
| +1.502.495.5400

10
COOK & HOLD OVEN
HIDDEN KEYS
www.winstonindustries.com
1.800.234.5286 | 1.502.495.5400
The “hidden” key (shown above) on the control panel
allows additional programming functions. The keys are
intended for management use only.
#7 KEY - Adjust Sell/Hold temperature - 150˚F (66˚C),
155˚F (68˚C), 160˚F (71˚C), 165˚F (74˚C), 170˚F (77˚C),
175˚F (79˚C), 180˚F (82˚C):
This key allows adjustment of the sell (long term holding)
temperature. To operate this function, press and hold the
#7 key for two seconds. The current sell temperature will
be displayed. Adjust the temperature setting by tapping
the #7 key. The value will be stored after two seconds of
inactivity. Hold range will increase by five-degree
increments.
COOK & HOLD
#7
PROGRAMMING FILL ALERT IN THE COOK & HOLD
CONTROLLER
With power switch in the OFF position, press and hold
both DONENESS arrow keys while switching power on.
Release the arrow keys after the current
setting is displayed (FILL or noFL). Use
the arrow keys to change the setting.
This enables / disables the visual and
audible alert for low water. The system will control water
level regardless of the alert setting.
FILL on LED
www.winstonindustries.com
1.800.234.5286 | 1.502.495.5400
COOK & HOLD
noFL on LED
ELEc on LED
www.winstonindustries.com
1.800.234.5286 | 1.502.495.5400
COOK & HOLD
If the LED displays ELEc, it indicates that the unit has
experienced an interruption in the power supply at some
point during the cook cycle. This can be caused by a
power failure, an electrical surge, by the power switch
being turned off during a cook or hold cycle, or by the
unit being unplugged. The LED will flash between ELEc
and an advancing timer. Timer indicates how long it has
been since power was restored to the unit.
To cancel this mode, push and hold the Start/Stop button
for two seconds. This clears the memory so that a
new cook cycle may be programmed.
www.winstonindustries.com
1.800.234.5286 | 1.502.495.5400
COOK & HOLD
winstonfoodservice.com | 1.800.234.5286
Questions? Concerns? E-mail us at customercare@winstonind.com
| +1.502.495.5400
Revised 06.07.18

COOK & HOLD OVEN
11
COOK & HOLD COOKING GUIDELINES
When roasting meats or other large proteins, begin with
a browning level of 5. This will produce moderate
browning or texture. If less browning or texture is
desired, select a browning level of 2-4. If more browning
or texture is desired, select a browning level of 6-10.
High Yield Cook: Gives you the maximum possible yield
for your foods. Once you have programmed the desired
doneness temperature and browning level, the
microprocessor automatically determines the best heat
curve to give the highest yield possible.
Constant Cook: Allows the manual override of High Yield
Cook Cycle, while automatically determining optimal
holding temperatures for personalized cooking and
holding.
ON: High Yield Cook Cycle is not functional. Constant
cook light will illuminate to indicate that the Constant
Cook Cycle has been activated.
OFF: High Yield Cook Cycle is functional.
Slow Roasting/Roasting: Cooking food in an uncovered
pan, a method that will produce a browned or textured
exterior while maintaining a moist, juicy interior. This
roasting process can be utilized for either tender or
tough pieces of meat. The moist environment within the
®
Cook & Hold Oven will tenderize cuts that are
CVap
usually associated with braising.
Braise: Cooking in a small amount of liquid. The amount
of liquid involved can vary. Some recipes call for foods to
be half-immersed in liquid. Other recipes call for very
little liquid. Braising can be a rapid process by which
foods are gently simmered (short braising), just until
they're cooked through. Braising can also involve long,
slow cooking (long braising). Foods may be browned
before adding the liquid.
When braising, bring liquid to a simmer on stove top
before placing into Cook & Hold Oven. This will help
expedite the cooking cycle by one to two hours. Pans do
not need to be foil-covered when cooking. Four-inch
(102mm) braising pans are recommended. Once braising
cycle is complete, product will be held at 150˚F (66˚C)
during recommended hold cycle.
Confit: Food product is salted and slowly cooked in its
own fat or any other type of fat, such as oil. Bring fat or
oil to a simmer on stove top before placing into oven.
Four-inch (102mm) braising pans are recommended.
Once confit cycle is complete, product will be held at
150˚F (66˚C) during recommended hold cycle.
Poach: Food is gently cooked, completely submerged, in
slightly simmering liquid just below boiling point.
Steam: Food is cooked gently in moist CVap
environment, with temperature range of 200˚ - 230˚F (93˚
- 110˚C).
Thermalizing: Rapidly elevating food product
temperature from thawed or frozen state to minimum
temperature of 165˚F (74˚C).
Baking: When utilizing a CVap Cook & Hold Oven to bake
items that normally require water during baking process,
water baths are not needed. Place pans or ramekins
directly on sheet pans or oven racks.
Revised 06.07.18
winstonfoodservice.com | 1.800.234.5286
Questions? Concerns? E-mail us at customercare@winstonind.com
| +1.502.495.5400

12
COOK & HOLD OVEN
DAILY CLEANING
Required Cleaning Accessories and Supplies
• Pan for draining evaporator
(unless utilizing floor drain)
• Food grade germicidal detergent
• Descaling agent
!
CAUTION: Burn Hazard
Can cause injury >> Allow 30 minutes for equipment to cool before
attempting to clean.
Before each cleaning procedure, disconnect equipment
from its electrical power source and allow to cool for at
least 30 minutes.
!
DANGER: Electrical Hazard
Can cause serious injury or death >> If an electrical shock is felt
during operation or cleaning, unplug equipment and have it serviced by a
licensed electrician or trained servicer before placing back into service.
!
WARNING: Contamination Hazard
Can cause serious illness or damage to equipment >>
Clean equipment daily to avoid potential contamination hazard.
Ensure safe operation by cleaning oven daily. Failure
to do so can allow harmful deposits to develop,
increasing the potential for food contamination, and
endangering your customers.
!
CAUTION: Corrosion Hazard Can
cause damage to equipment >>
potential corrosion damage.
Clean equipment daily to avoid
1. Place empty pan under drain valve, open valve, and
allow evaporator to drain.
2. Remove and clean rack supports using a food grade
germicidal agent.
3. Spray food chamber and evaporator with a food
grade germicidal detergent.
4. Wipe inside surfaces to remove all food deposits.
5. Inspect for scale build-up on tank surface, float, and
probe. (see photo below). If present, apply descaling
agent. Read ALL warnings and follow directions listed
on descaling agent package.
Clean evaporator daily to prevent chlorides (salts) from
accumulating. Chlorides can cause the evaporator tank to
corrode, to the extent that leaks can occur. Leaks caused
by corrosion, which is caused by a failure to clean daily, are
not covered under the manufacturer's warranty.
!
WARNING: Contamination Hazard
Can cause serious illness >> Clean equipment prior to rst use to
remove traces of industrial chemicals and oils.
Prior to using equipment for the first time, perform the
daily cleaning procedure listed at right.
winstonfoodservice.com | 1.800.234.5286
Questions? Concerns? E-mail us at customercare@winstonind.com
| +1.502.495.5400
6. Inspect heating elements (if exposed). The heating
elements are stainless steel. If cleaning is needed,
scrub with a Teflon
heavy food particles. Further cleaning may be done
with a plastic scouring pad and alkaline based
cleansers. DO NOT use wire brushes, scrapers, steel
wool pads or chloride based cleansers. Follow
cleanser manufacturer's instructions for use on
stainless steel. Rinse well several times with clean
water
and wipe immediately.
™
or nylon bristle brush to remove
Revised 06.07.18

7. Rinse all inside surfaces, including evaporator, and
dry with clean towel.
Do not spray outside of equipment or controls
with water.
!
WARNING: Electrical Hazard
Can cause serious personal injury or damage to
equipment >> Avoid spraying equipment exterior or controls with
water.
9. Verify that valve is closed, and refill evaporator.
10. Reconnect equipment to electrical power and make
ready for use.
COOK & HOLD OVEN
13
Revised 06.07.18
winstonfoodservice.com | 1.800.234.5286
Questions? Concerns? E-mail us at customercare@winstonind.com
| +1.502.495.5400

14
COOK & HOLD OVEN
WARRANTY AND TERMS & CONDITIONS
Limited 1 year Warranty (excluding gaskets, lamps, hoses, power cords, glass panels, fryer baskets, batteries, and
evaporators). Warranty disclaimer for failure to clean.
WINSTON EXPRESSLY DISCLAIMS ALL OTHER WARRANTIES, EITHER EXPRESS OR IMPLIED, INCLUDING ANY IMPLIED
WARRANTY OF FITNESS FOR A PARTICULAR PURPOSE AND ANY IMPLIED WARRANTY OF MERCHANTABILITY.
Ask us for a complete warranty disclosure or go to:
www.winstonind.com/Documents/4272V089_zap_warranty_agreement.pdf.
Terms and Conditions of Sale for Winston Foodservice’ products are available here:
www.winstonind.com/Documents/4272X833_terms_and_conditions_of_sale.pdf.
Both the Warranty and Terms and Conditions of Sale are integral to this document.
Buy Winston Parts Online!
Parts and accessories for our products are available to purchase through our online, secure site – it’s your one-stop
shop for genuine Winston replacement parts. These parts are designed specically for our products and can help you
save on costly repairs while maintaining valuable warranty coverage.
www.winstonind.com/buyparts/.
800.234.5286 | +1.502.495.5400 | Fax +1.502.495.5458 | www.winstonfoodser vice.com
Winston Foodservice is a Division of Winston Industries LLC
2345 Carton Drive | Louisville, KY 40299
Revised 06.07.18
 Loading...