

Page 1
Instruction, Use & Care Manual
Product Name:
SKU #:
Thank you for purchasing this Winsome House product. This product has been manufactured with the highest standards
of safety and quality.
LED Solar Motion Sensor Wall Light
WHSL449
Operating Instructions
BEFORE USING THIS PRODUCT: READ, UNDERSTAND AND FOLLOW THESE INSTRUCTIONS.
How Your Solar Motion Sensor Light Works:
During the day, the solar charge panel included with this LED Solar Motion Sensor Wall Light converts sunlight into
electricity recharging the batteries. Using this stored energy, the LED light turns on automatically at night when motion is
detected.
The light works with a built-in PIR (Passive InfraRed) sensing device which is continuously scanning for heat-source moving
in its detection scope. Once a heat source (such as a human or a car) is detected in that area, the light switches on
immediately and automatically to illuminate your pathways, steps, patios, porches, or anywhere you select for safety,
convenience, and security. The light remains on while the moving heat source stays in the detecting scope.
Motion-activated light
Choosing a Location for Your Solar Motion Light:
Please save this manual for future reference.
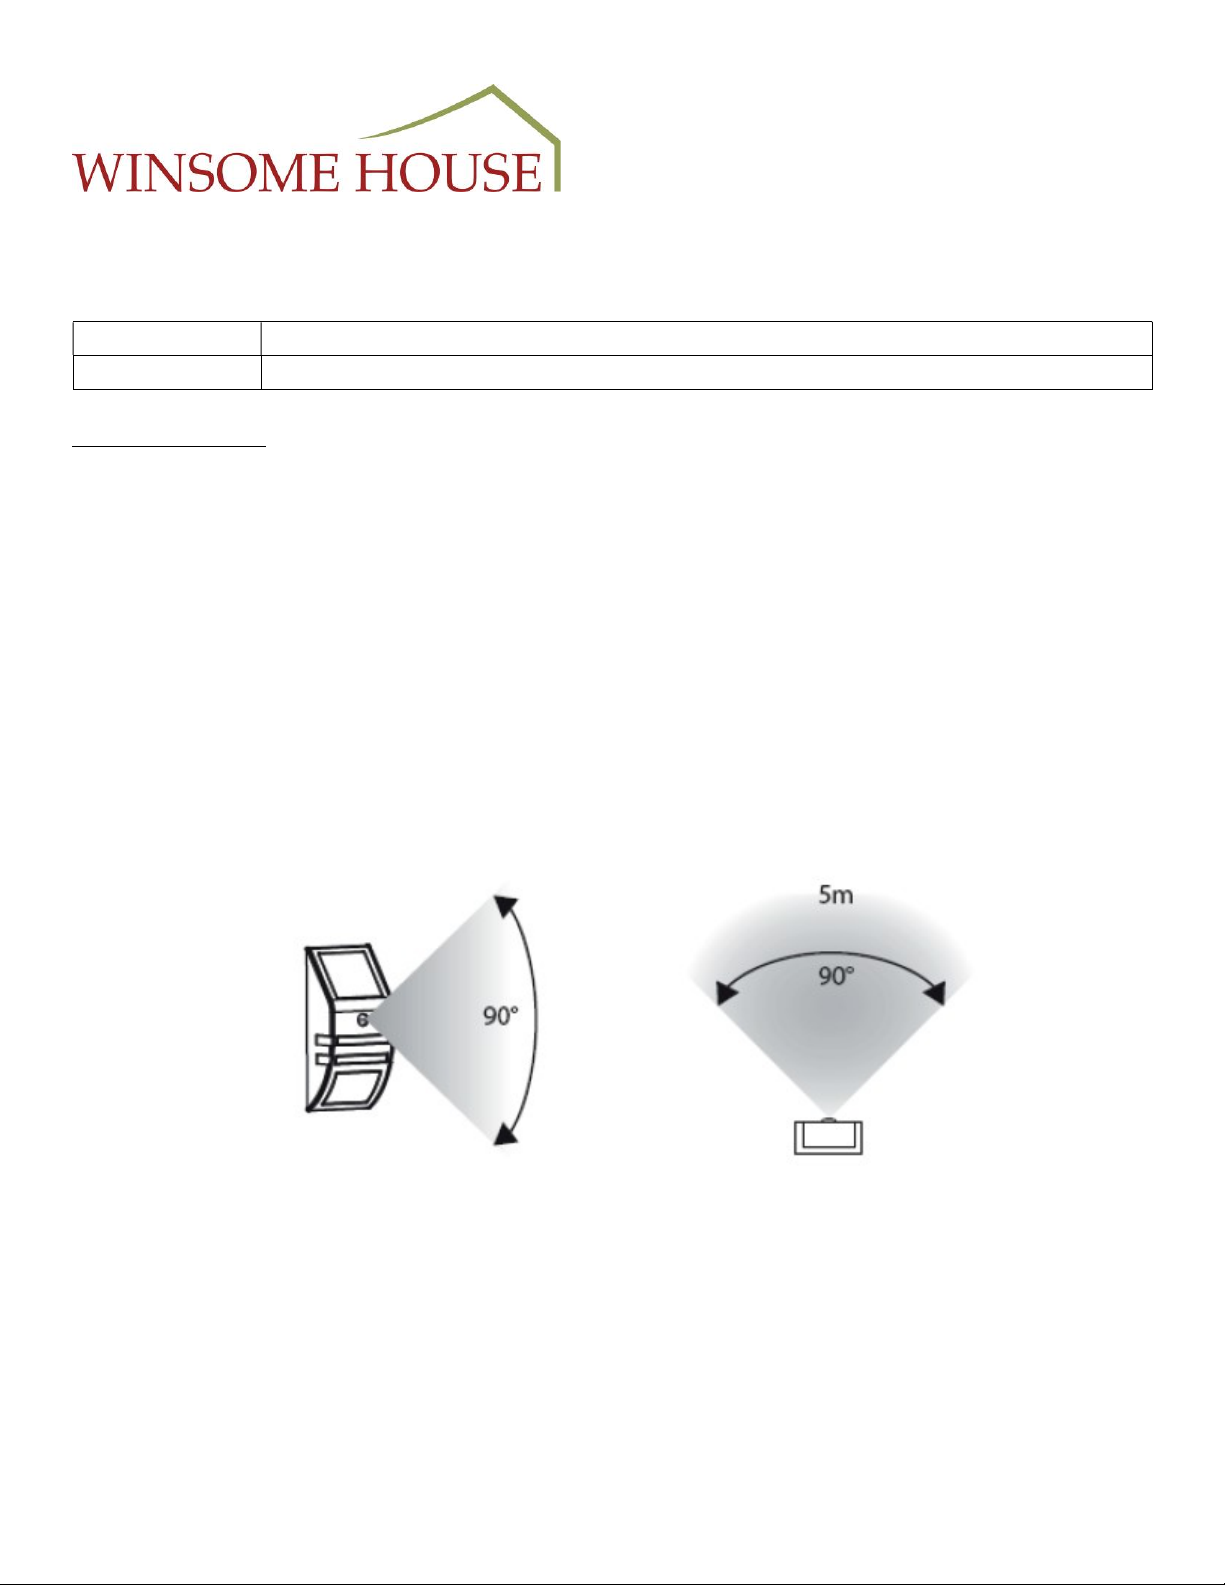
The solar light must be located in a position where it can get direct sunlight on the solar panel, and generally free
from cover and shade. When locating a suitable position for the unit, remember that it detects an area of about 90
degrees vertically and about 90 degrees horizontally, with a range of over 5 meters (16.4 ft). See figure above.
Make sure that the photo sensor on the lamp body is not going to be affected by another light source, otherwise the
light will not illuminate at dusk.
The solar light must be left to charge for two sunny days before first time use so that the best results are achieved.
Page: 1
Page 2
Instruction, Use & Care Manual
Product Name:
SKU #:
LED Solar Motion Sensor Wall Light
WHSL449
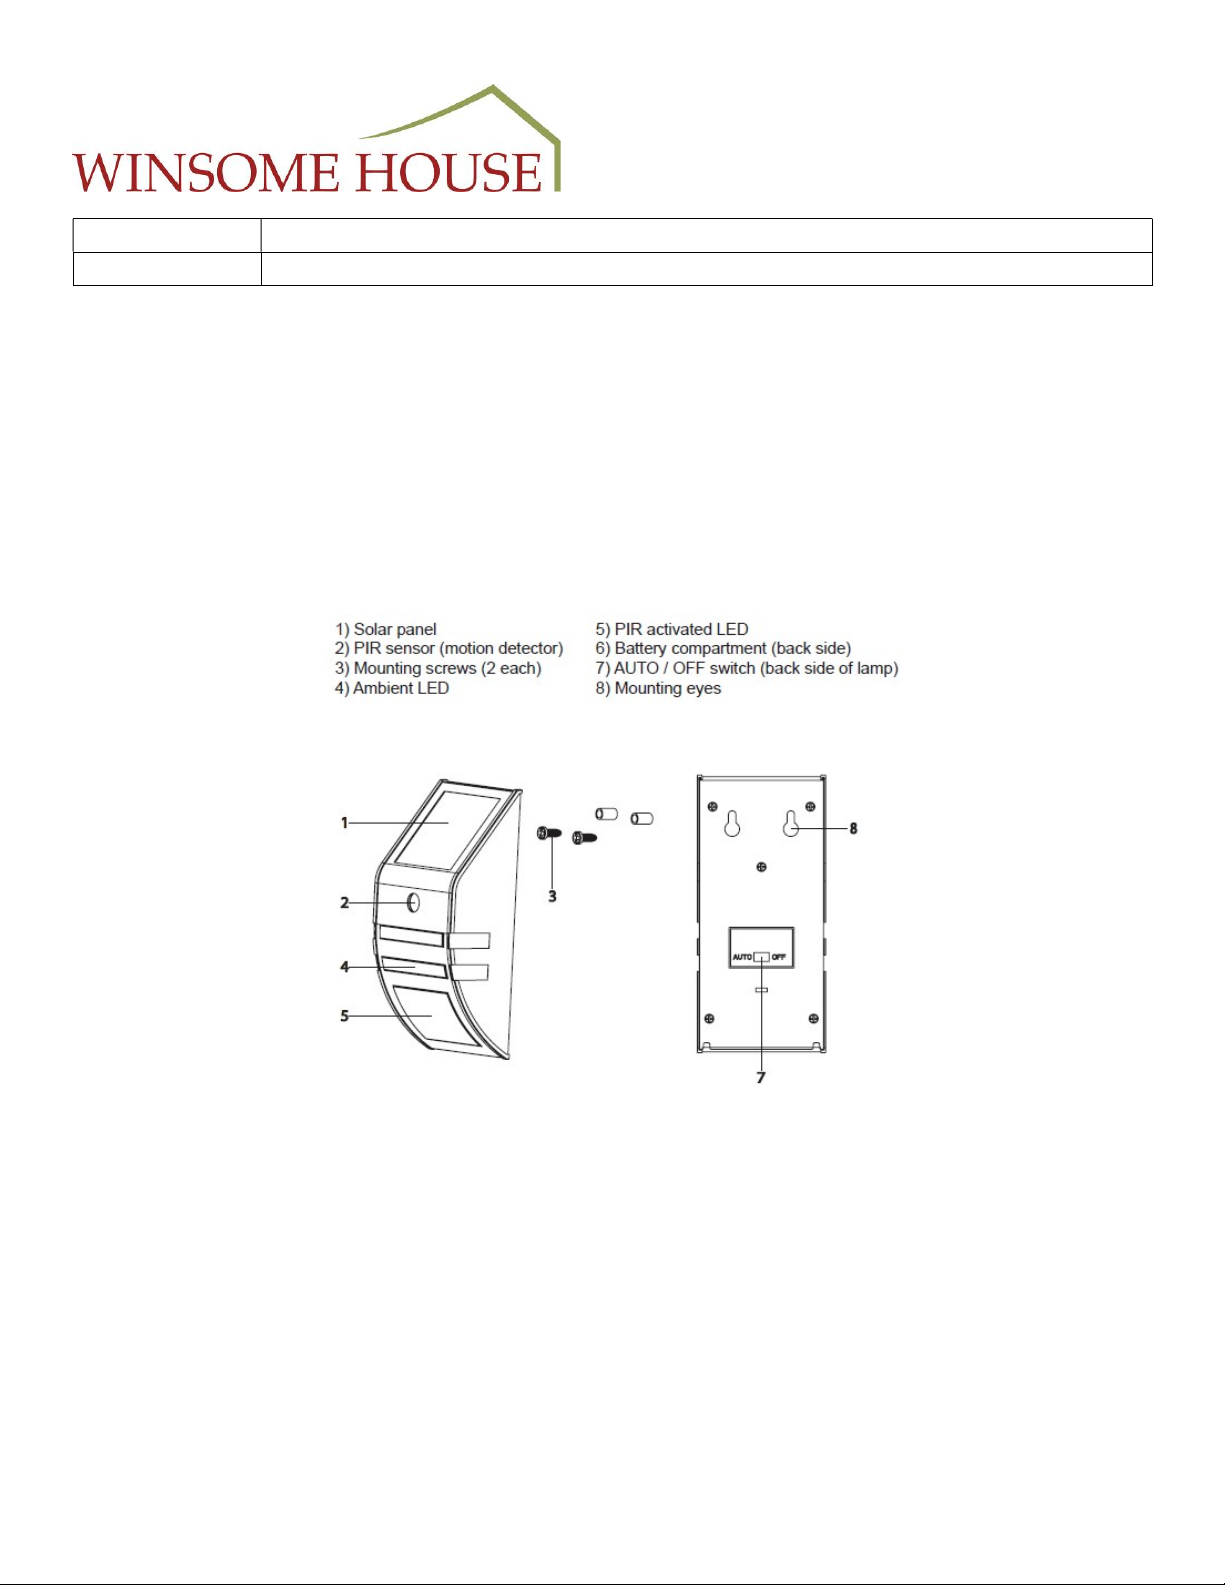
Operation:
The AUTO / OFF switch is located on the back of the solar wall light. The lamp will light up continuously after dark if
the switch is set to AUTO.
The light features 1 LED for standby lighting, and additional LED is switched on if the motion detector is triggered.
When the switch is in the OFF position, the lamp does not light up. The battery will charge in the OFF position.
The output of the solar wall light will vary depending on the season. The light will stay on longer after a sunny day
rather than after an overcast day.
Installation Tips
Carefully remove the Solar Wall Light and all the fittings out of the box.
Please save this manual for future reference.
Find a suitable location for your solar wall light. It can be mounted on an EXTERIOR WALL, STAIR TREAD,
MASONRY, OR WOOD POST.
Note: For installation on masonry, start by drilling holes for the plugs and the attachment screws. Insert
the plug (included), and make sure it is flush with the surface. The screws must protrude from the surface
by at least 5mm (0.2in.) in order to attach the light.
Hook the lamp’s mounting eyes over the screw heads. Check that the solar light is firmly attached. There
should be no movement.
Page: 2
Page 3

Instruction, Use & Care Manual
Product Name:
SKU #:
LED Solar Motion Sensor Wall Light
WHSL449
Replacing the Batteries
For best results, batteries should be replaced every 12 months.
Detach the housing from the lamp body by pushing it upward.
Remove the screws on the back of the solar wall light.
Remove the old battery. Make sure the new battery is a LiFePO4 3.2V / 500mAh rechargeable battery.
Install the new battery in the battery compartment, ensuring the correct polarity is observed.
Reassemble the unit by reversing the above procedure.
Maintenance
To keep your solar motion sensor light looking new, keep the lens free of dust and deposits by wiping occasionally with a
dry or damp cloth.
Most important, ensure that the solar panel is kept free of dirt and debris at all times. A dirty solar panel will not allow the
batteries to fully charge, and this will shorten the life of the batteries and may cause the light to not function properly.
Technical Specifications
LED Light Setting: 40 Lumen (2 LEDs)
1 Lumen (1 LED)
Rechargeable Battery Type: LiFePO4 3.2V / 500mAh
Solar Panel: Amorphous silicon
High Light activation (range): 10-40 seconds
Charge Time (minimum): 6 Hours
Motion Sensor Range: 5 meters (16.4 feet); 90 degrees
Please save this manual for future reference.
Page: 3
Page 4

Product Name:
SKU #:
Troubleshooting:
Light will not switch
on when there is
movement in the
detection area
Light switches on
during the day
Light switches on for
no apparent reason
Instruction, Use & Care Manual
LED Solar Motion Sensor Wall Light
WHSL449
Ensure that the power switch on the main body has been turned to the AUTO or ON position.
Ensure that the motion sensor has been positioned to face oncoming movement.
Ensure that the battery has been fully charged in direct sunlight for one sunny day.
Check to see that the solar cell charge panel is facing south so that it receives direct sunlight for
most of the day, enabling the battery to fully charge.
Check to see that the solar panel is not near the night time light sources, such as street lights.
Ensure the wall light is not placed in shady area.
Ensure the solar panel is facing towards direct sunlight.
Moving trees, traffic, pet, or birds may be getting in the area of detection. This may be unavoidable;
however, the sensor could be redirected to a height where this less likely to occur.
If there are reflective objects in the detection area, such as windows, water, or white walls, you may
need to redirect or possibly reposition the motion sensor.
Test the motion sensor by covering it completely with cardboard, and waiting several minutes to
make sure it does not detect motion.
Please save this manual for future reference.
Light quickly flashes
on and off
Light is not as bright as
normal
Battery charge may be low. Turn the power switch to the OFF position and charge the battery for
two (2) sunny days, ensuring the solar cell charge panel has been placed in direct sunlight.
Battery charge may be low. Turn the power switch to the OFF position and charge the battery for two (2)
sunny days, ensuring the solar cell charge panel has been placed in direct sunlight.
Page: 4
 Loading...