

Winradio G305 User Manual

WiNRADiO®
G305 VHF/UHF Receiver
User’s Guide

WiNRADiO G305 VHF/UHF Receiver
2
Published by
WiNRADiO Communications
PO Box 6118, St Kilda Road, Melbourne 3004, Australia
© 2006 WiNRADiO Communications, Melbourne
All rights reserved. No part of this book may be reproduced or transmitted in any form or by any
means without the written permission of the publisher.
Trademarks
WiNRADiO, G3 and G305 are trademarks of WiNRADiO Communications.
All other brand and product names are trademarks of their respective owners.
Patents
WiNRADiO technology is protected by US Pat. No. 6,289,207 and other pending US and
international patent applications.
Printed in Australia

WiNRADiO G305 User’s Manual
3
FCC Notice
This equipment has been tested and found to comply with the limits for a Class B digital device,
pursuant to Part 15 of the FCC Rules. These limits are designed to provide reasonable protection
against harmful interference in a residential installation. This equipment generates, uses and can
radiate radio frequency energy and, if not installed and used in accordance with the instructions,
may cause harmful interference to radio communications. However, there is no guarantee that
interference will not occur in a particular installation. If this equipment does cause harmful
interference to radio or television reception, which can be determined by turning the equipment off
and on, the user is encouraged to try to correct the interference by one or more of the following
measures:
• Reorient or relocate the receiving antenna
• Increase the separation between the equipment and the receiver
• Connect the computer into an outlet on a circuit different from that to which the receiver is
connected
• Consult an authorised dealer or an experienced radio/TV technician for help
Caution
To comply with the limits for the Class B digital device, pursuant to Part 15 of the FCC rules, the
WiNRADiO receiver must be installed in computer equipment certified to comply with the Class B
limits. Only peripherals certified to comply with the Class B limits may be attached to the
computer containing the WiNRADiO receiver. Only original cables and power adapters must be
used. Operation with non-certified cables, power adapters and peripherals may result in
interference to radio and TV reception.
Modifications
Any changes or modifications to the WiNRADiO receiver could void the user's authority to operate
this equipment, as well as void the manufacturer’s warranty.
Limitation of Liability and Remedies
The information published in this book has been compiled from several sources. While every
effort has been made to ensure its accuracy, neither the authors nor the publisher can guarantee
that all information is entirely correct or up-to-date. Furthermore, neither the authors nor the
publisher can take any responsibility for the use of this information or any consequences arising
therefrom. WiNRADiO Communications shall have no liability for any damages due to lost profits,
loss of use or anticipated benefits, or other incidental, special or punitive damages arising from the
use of, or the inability to use, the WiNRADiO receiver, whether arising out of contract, negligence,
tort or under any warranty, even if WiNRADiO Communications has been advised of the possibility
of such damages. In no event shall WiNRADiO Communications ' liability for damages exceed the
amount paid for this product. WiNRADiO Communications neither assumes nor authorises anyone
to assume for it any other liabilities.
Warning
In certain countries or states it may be illegal to monitor certain frequencies. We cannot accept
any responsibility for the consequences of your non-compliance with government regulations. If
you are in doubt about the regulations in your country or state, please contact your nearest radio
communications regulatory authority.

WiNRADiO G305 VHF/UHF Receiver
4
Table of Contents
Table of Contents .................................................................................... 4
Introduction.............................................................................................. 5
G305 Receiver Models ............................................................................ 6
Installation................................................................................................ 9
System Requirements.......................................................................... 9
Hardware Installation ......................................................................... 10
G305e Interface Status Indication...................................................... 13
Connecting the Antenna .................................................................... 14
Software Installation........................................................................... 15
Setting up the Sound Card................................................................. 15
Getting Started....................................................................................... 20
Using WiNRADiO G305 ......................................................................... 22
Tuning to a Frequency ....................................................................... 22
Fine Tuning........................................................................................ 23
Fast Tuning Pad................................................................................. 24
Setting the Modulation Mode ............................................................. 24
Volume Control .................................................................................. 26
Mute Control ...................................................................................... 26
Audio Filter......................................................................................... 26
AGC ................................................................................................... 27
IF Gain ............................................................................................... 28
Software AGC .................................................................................... 28
AFC.................................................................................................... 29
RF Gain.............................................................................................. 29
Squelch Control ................................................................................. 30
Frequency Stepping........................................................................... 32
Frequency Memory ............................................................................ 33
Scanning............................................................................................ 40
S-meter .............................................................................................. 45
Power Switch ..................................................................................... 46
Date and Time Displays..................................................................... 46
Spectrum Scope ................................................................................ 47
Appendix A - Troubleshooting ............................................................. 50
Appendix B - Sound Card Controls ..................................................... 55
Appendix C - Dealing with Interference............................................... 57
Appendix D - Inside WR-G305 .............................................................. 59
Appendix E - Professional Demodulator Option................................. 61
Appendix F - Wide-band FM Option..................................................... 69
Appendix G - Developer Support ......................................................... 70
Appendix H - Frequency Calibration.................................................... 71

WiNRADiO G305 User’s Manual
5
Introduction
Welcome to the WiNRADiO G305 scanning receiver. Your new receiver is a
world-first in more than one respect. Most importantly, it is the first
commercially available Software Defined Receiver (SDR) for the VHF/UHF
bands, where the entire demodulator and the last intermediate frequency
stage are performed by software running on a personal computer rather than
using conventional hardware circuits or a dedicated Digital Signal Processor
(DSP). Your PC probably has more power than even the fastest DSP had only
a few years ago. Your new WiNRADiO G305 receiver is now ready to take
advantage of that power.
This advanced receiver is the result of our ongoing quest to combine many
years of accumulated know-how in computer-based radio receivers with the
latest advances in components and digital signal processing techniques, to
push the radio technology forward and make it available at an affordable price.
In designing the WiNRADiO G305 receiver, we strived to provide the optimum
balance of sensitivity, selectivity and dynamic range, yet maintaining low cost
and implementing a number of significant features previously available only on
receivers significantly more expensive, bulky and far less friendly to the user.
While we have implemented many more features and functions than normally
would be found on a typical communications receiver, we also strived to keep
its operation logical, intuitive and easy to use.
The WiNRADiO G305 receiver transforms any modern personal computer into
a sophisticated VHF/UHF monitoring station offering surprising power and
flexibility.
We wish you many hours of enjoyment with your new G305 receiver.
WiNRADiO provides regular upgrades to our application software. Don’t forget to
register as a WiNRADiO user to receive news about new products, accessories and
software upgrades for your WiNRADiO G305 receiver. Use our on-line registration form
on www.winradio.com/register to take advantage of this free service.
WiNRADiO G305 VHF/UHF Receiver
6
G305 Receiver Models
There are two basic models of the WiNRADiO G305 receiver:
• G305i (PCI card based “internal” model)
• G305e (USB based “external” model)
Both receivers have similar parameters and identical software user interface.
This manual covers the installation and operational aspects for both types.
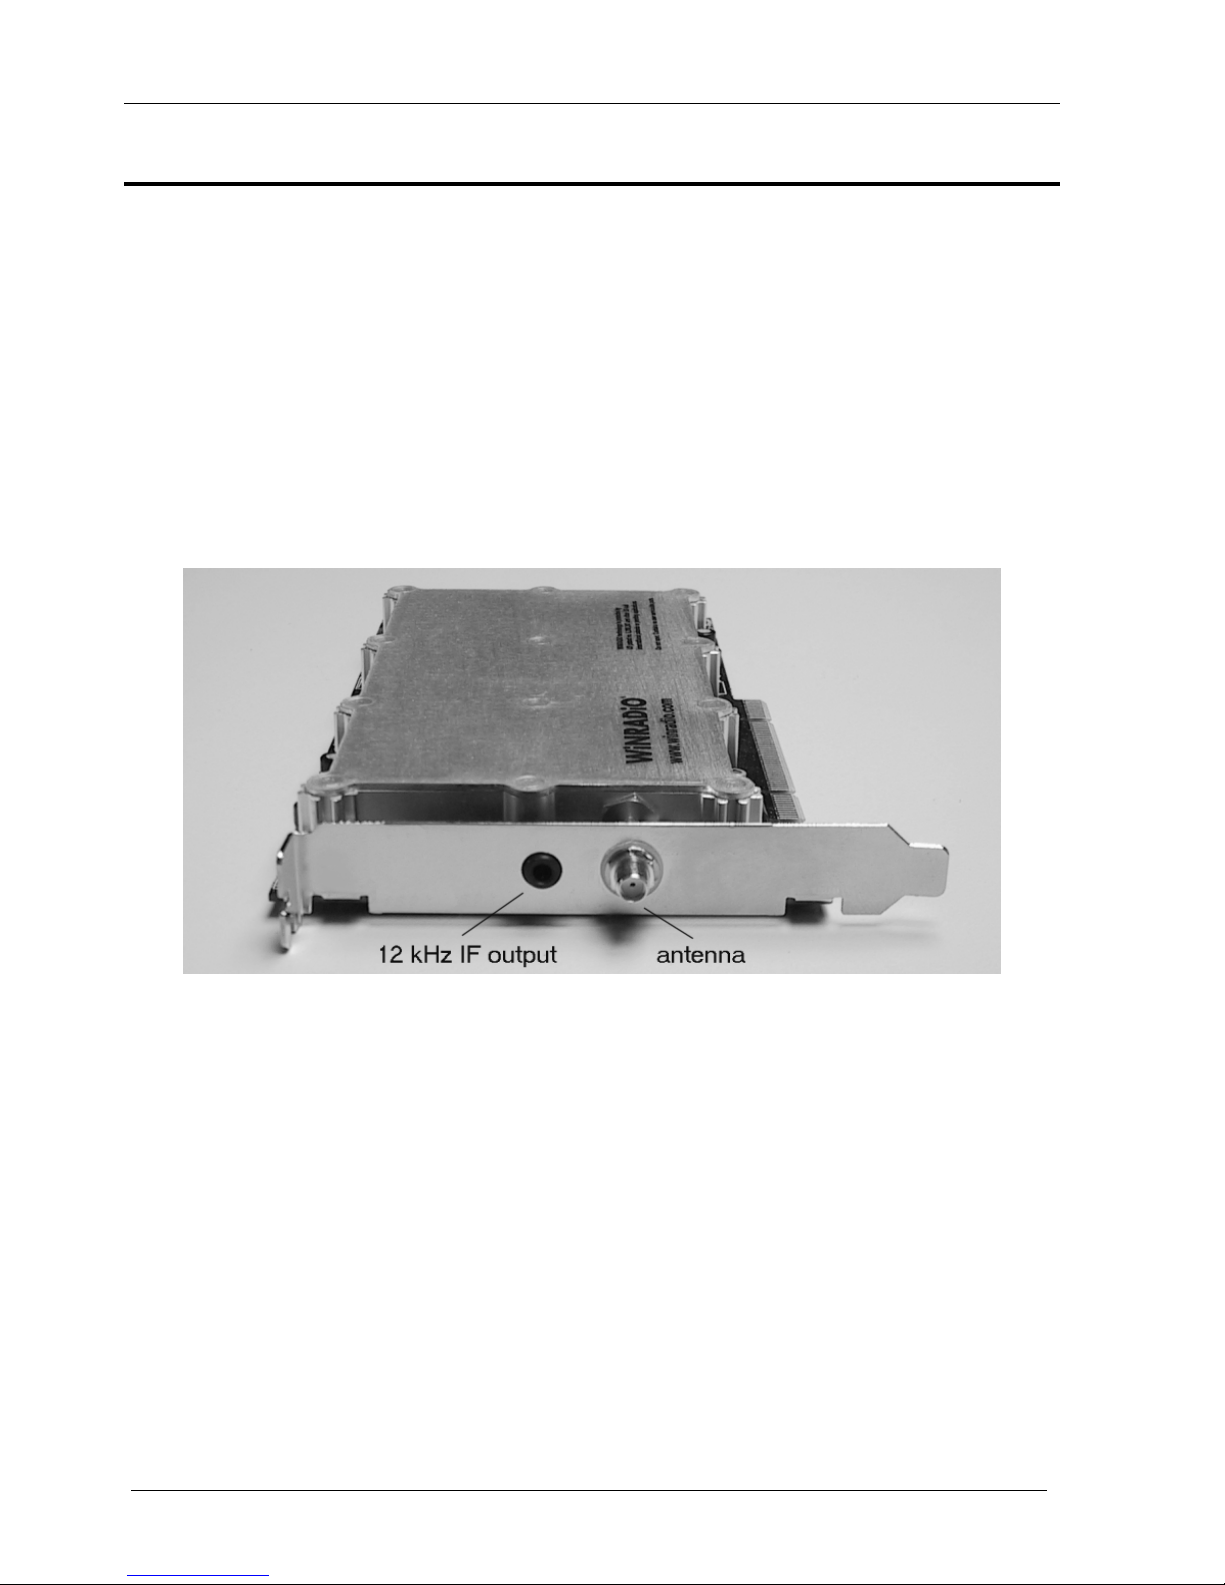
The G305i model has two connectors: the antenna connector (SMA type,
50 ohm) and 12 kHz IF (intermediate frequency) output:
The signal from the 12 kHz IF output is normally connected to the PC sound
card, where it is digitized, to be then processed by the PC.
The advantage of this model is that it does not require any external power
supply, and does not occupy any additional desk space. The receiver is very
well shielded to prevent any interference generated by the PC from entering
the receiver. The receiver comes with a suitable audio lead to connect the 12
kHz IF output to the sound card input.
WiNRADiO G305 User’s Manual
7
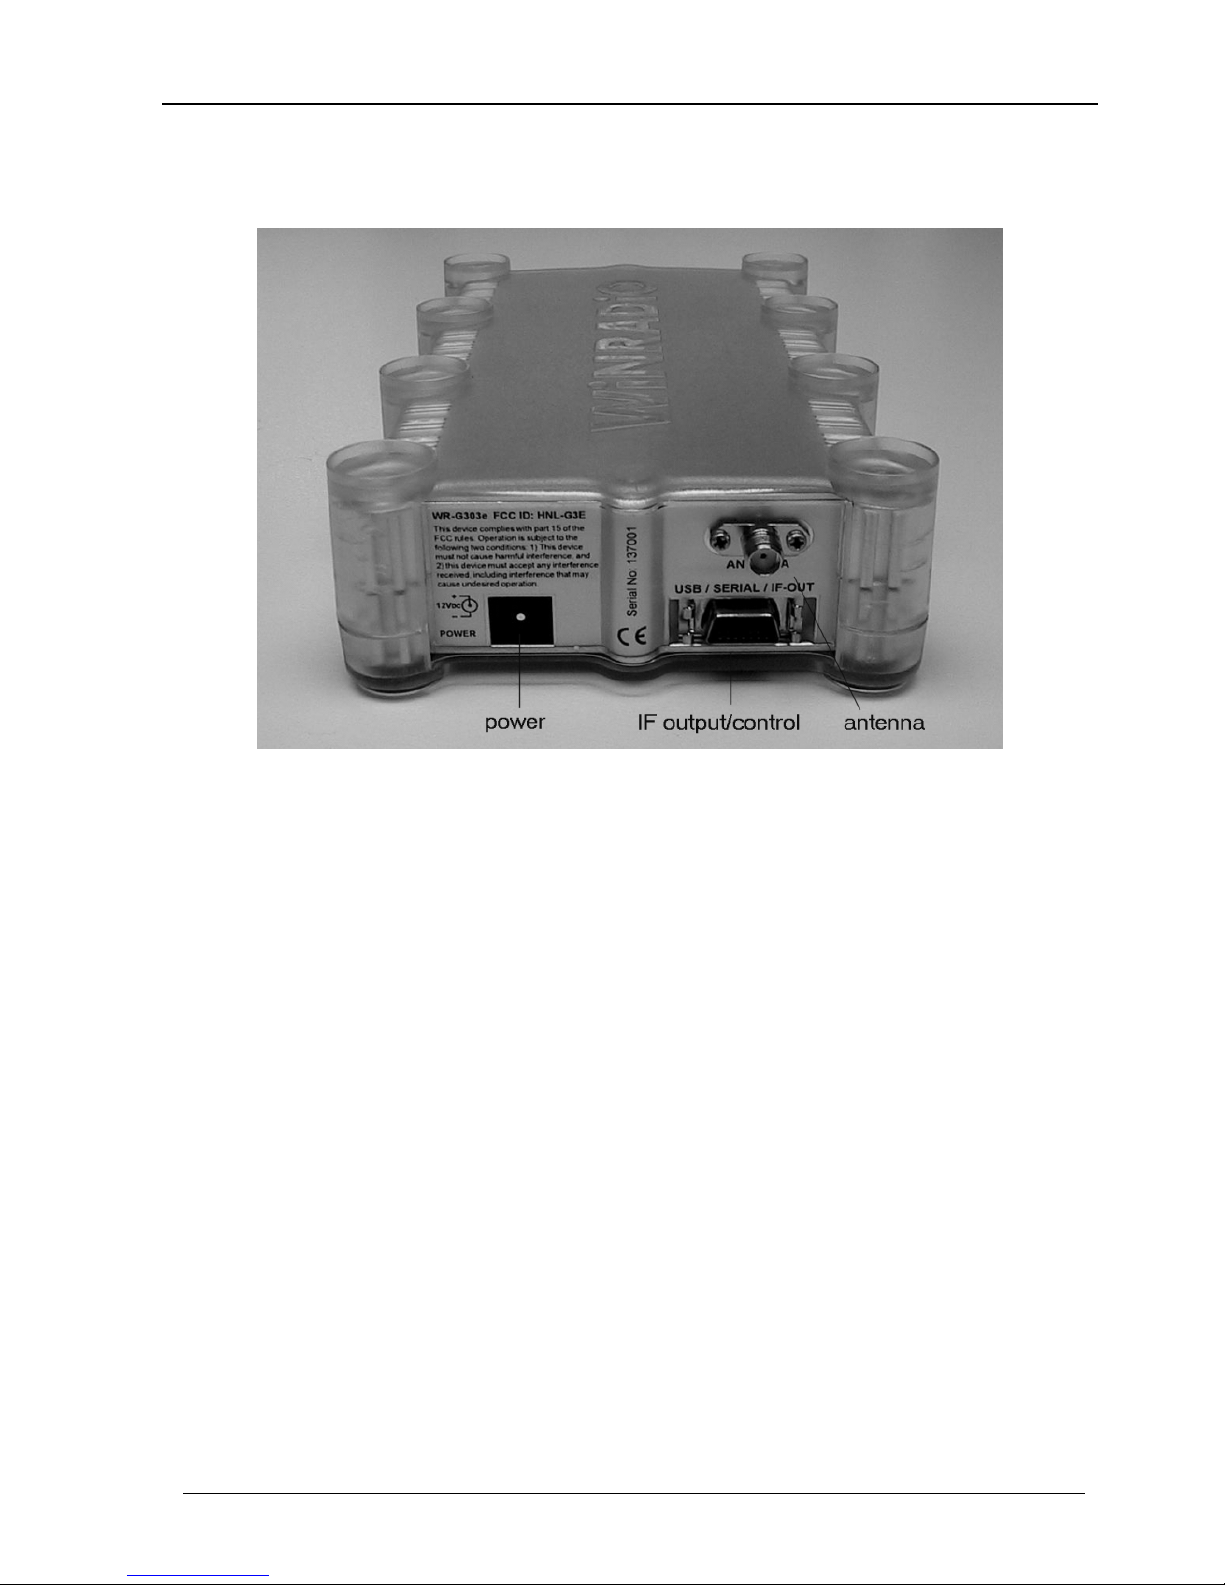
The external G305e model has three connectors:
The power jack accepts 12 V DC (the power adapter must be rated for
minimum 500 mA). To minimize interference, a linear-mode power adapter is
recommended (as supplied by WiNRADiO).
The antenna input is an SMA-type connector with 50 ohm impedance.
The IF output/control connector combines the 12 kHz IF (intermediate
frequency output), USB interface and serial interface. Normally, only the USB
interface cable is supplied, and the IF signal arrives from the receiver to the
PC already digitized, via the USB cable. This method is preferable, because it
relies on a high-quality analog-to-digital converter inside the receiver, and
guarantees optimum and consistent performance. The installation is also
simpler as it does not require adjustment of the 12 kHz IF signal input level
(this is already set to an optimum level inside the receiver).
WiNRADiO G305 VHF/UHF Receiver
8
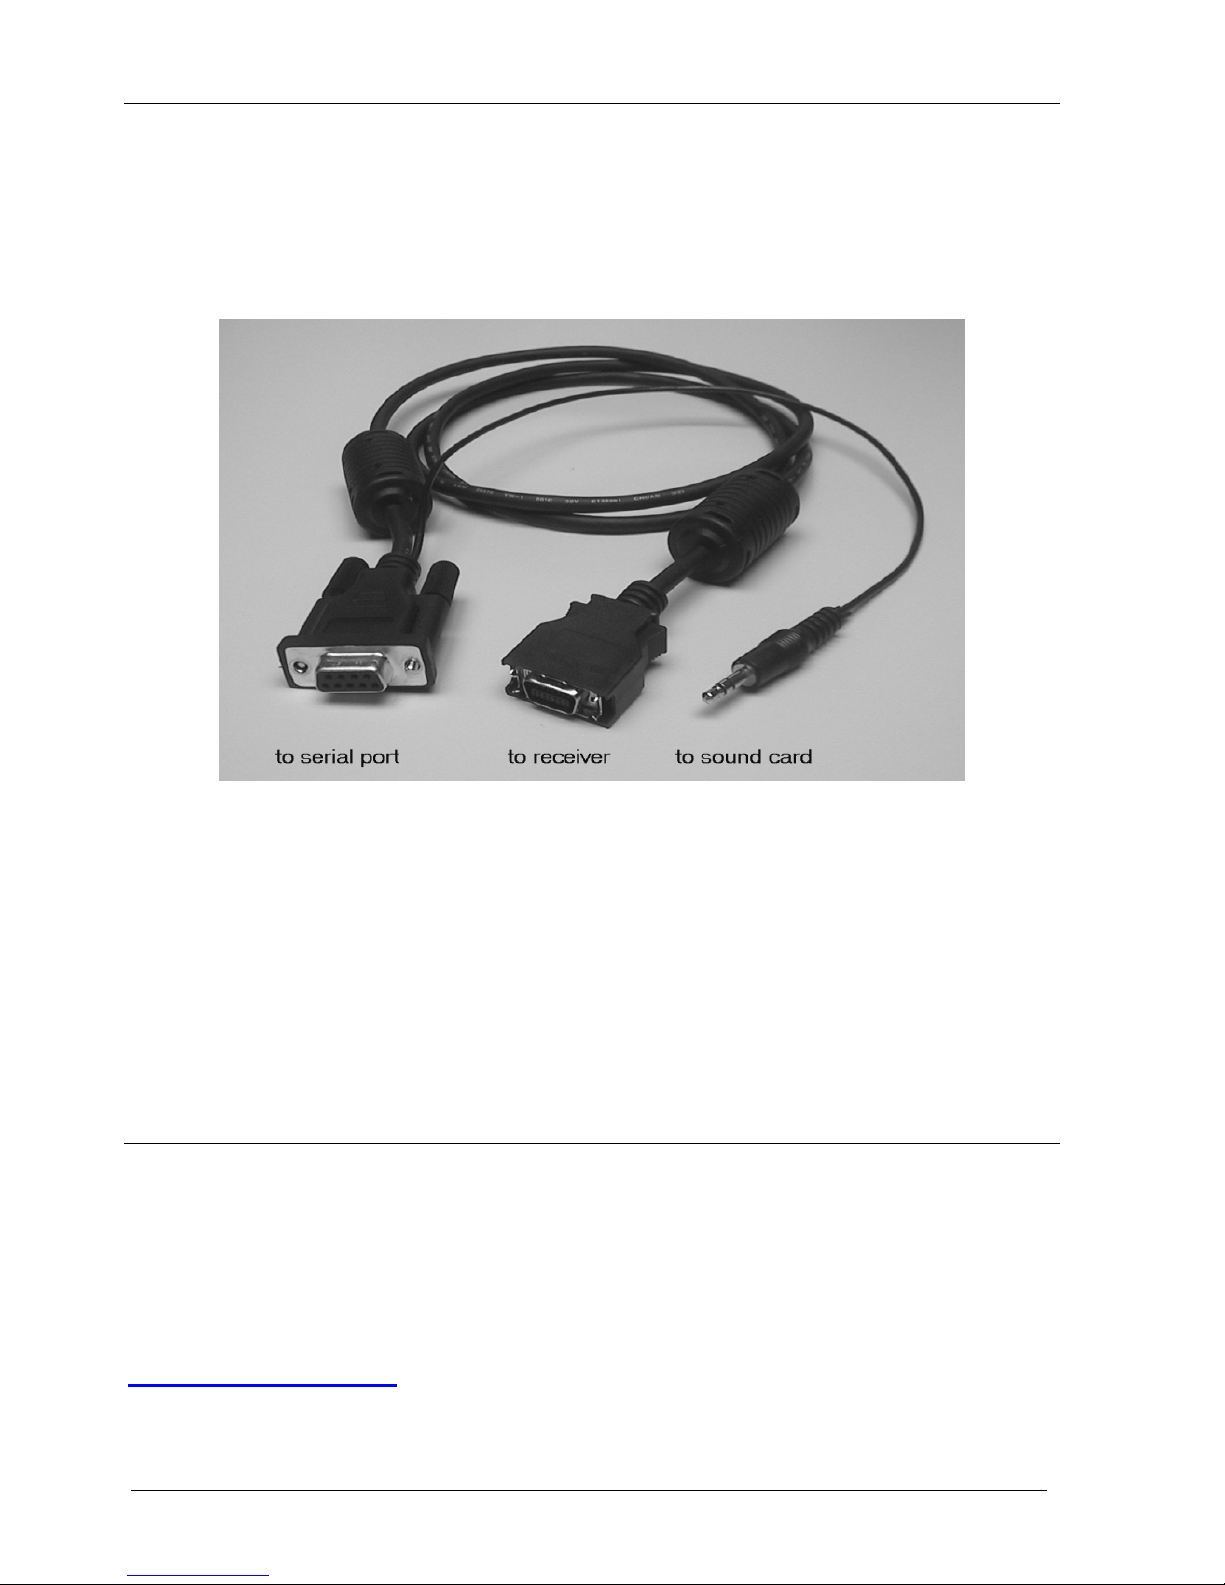
It is also possible to control the receiver via the serial (RS-232) interface,
which necessitates using the PC sound card for digitization of the IF signal.
WiNRADiO provides a special serial interface option cable which takes care of
all the appropriate connections, both to the serial port and the sound card
input.
G305e serial interface option
As this interfacing method relies on the sound card to provide the digitization
of the 12 kHz IF signal, it requires careful adjustment of the input signal level.
The performance will depend on the sound card quality, similarly to the internal
G305i model. It is a suitable method in situations where the receiver needs to
be controlled by computer systems without the USB interface.
Did you know?
DRM (Digital Radio Mondiale) is a new digital broadcasting system for medium and
short waves. By introducing sophisticated signal coding and compression, this system
offers a dramatic improvement in broadcast quality. WiNRADiO has a DRM
demodulator available for your G305 receiver. For more details please refer to
www.winradio.com/drm.

WiNRADiO G305 User’s Manual
9
Installation
The WiNRADiO package contains the following items:
• WiNRADiO G305i or G305e receiver
• WiNRADiO software on a CD ROM
• Start-up indoor antenna
• Audio cable (G305i model only)
• Power adapter (G305e only)
• Interface cable (G305e only)
• This User’s Guide
• Warranty information
In order for the WiNRADiO receiver to function, your IBM PC compatible
computer must meet the minimum system requirements specified below.
System Requirements
Minimum Recommended
CPU 500 MHz,
Pentium III
1GHz or higher,
Pentium IV or Athlon
RAM 64 MB 256 MB or more
Display SVGA SVGA (16 mil. colors)
HD free space 20 MB 40 MB
Sound card SoundBlaster
compatible, 16 bit,
full duplex
Creative Sound Blaster,
16 or 32 bit
OS Windows
98/ME/2000/XP
Windows XP
Note: LCD TFT panel displays are preferable to older CRT monitor types, as
modern LCD panels typically exhibit far less electromagnetic interference.
WiNRADiO G305 VHF/UHF Receiver
10
Hardware Installation
G305i model (PCI card-based)
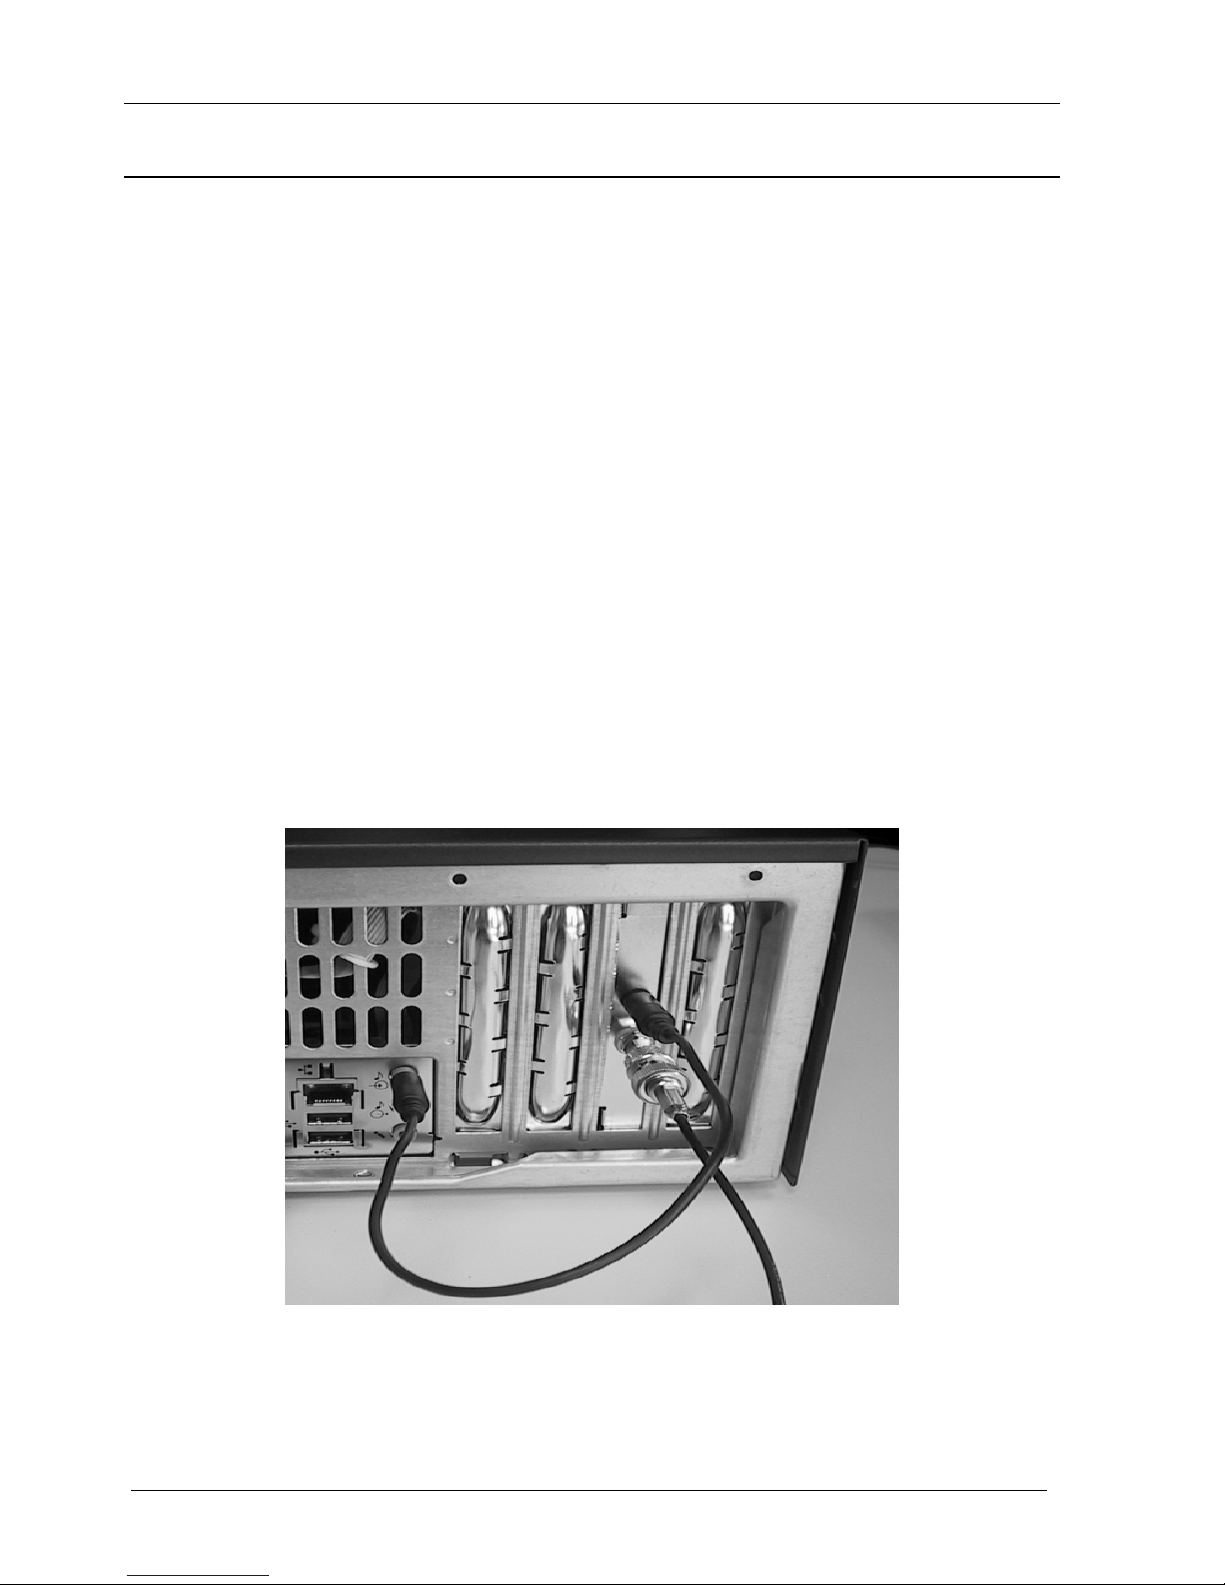
1. Turn off the computer and disconnect the power cord.
2. Remove the computer case. Choose an empty PCI slot, as far as possible
from the power supply and from other cards.
3. First touch the computer metalwork with your hand to drain any static
charge, then carefully insert the card into the vacant slot and push down
until it is firmly seated. Screw the metal bracket at the end of the card to
the computer case. (This must be done to provide proper grounding for the
card).
4. Replace the computer case and reconnect the power cord.
5. Connect the supplied audio lead between the receiver output (a standard
audio jack) and the sound card Line Input. (If there is no Line input on your
PC, as is the case with some laptops, you may use alternative inputs, such
as the Microphone input. This may be also necessary with certain types of
sound cards, such as Creative Audigy 2.)
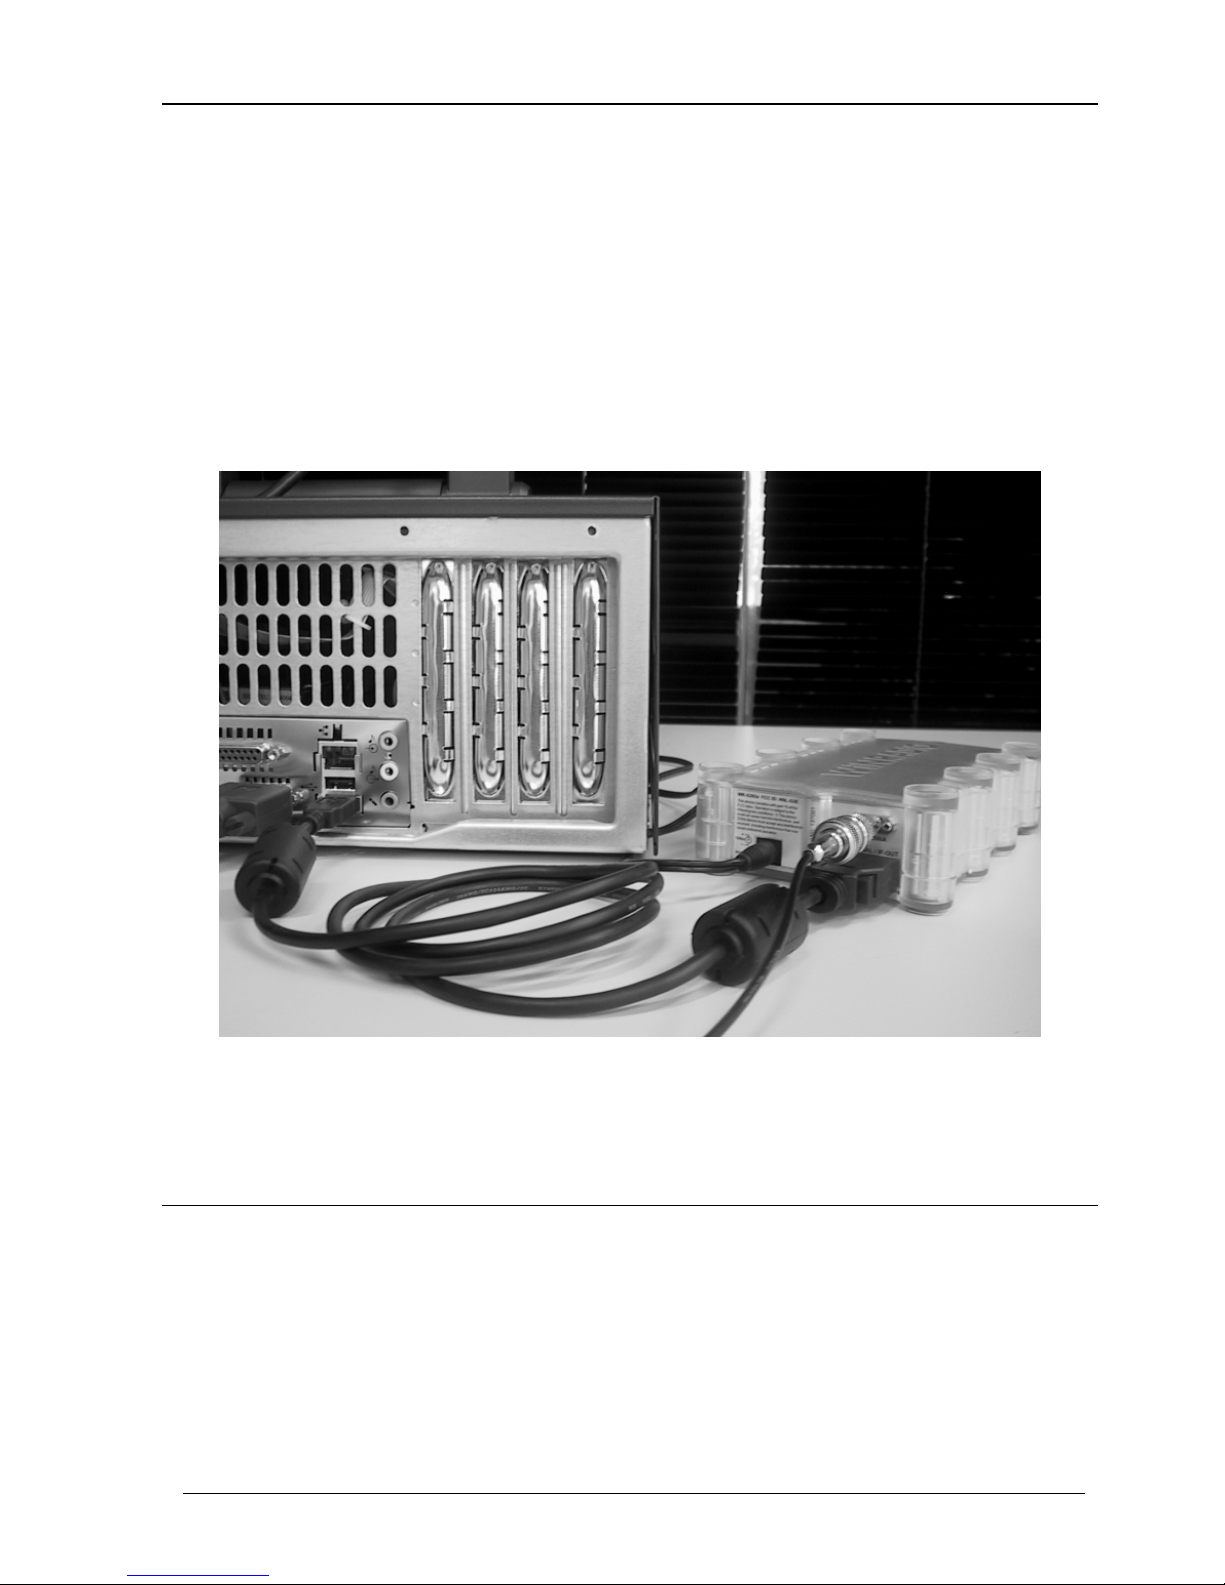
G305i receiver installed in a desktop PC
WiNRADiO G305 User’s Manual
11
G305e (external) model with standard USB interface
1. Connect the receiver to the USB port using the supplied cable.
2. Plug the supplied power adapter to the power outlet and connect its
output to the receiver.
3. Turn the receiver on using the power switch at front of the receiver.
The blue LED will blink to indicate that the receiver is powered up.
G305e receiver with USB interface
Did you know?
USB (Universal Serial Bus) is a modern interface standard designed to replace the slow
RS-232 serial standard. USB version 1.0 makes it possible to transfer data at 12
megabits per second. The newer USB version 2.0 is 40 times faster. The G305e
receiver is compatible with both USB interface standards.
WiNRADiO G305 VHF/UHF Receiver
12
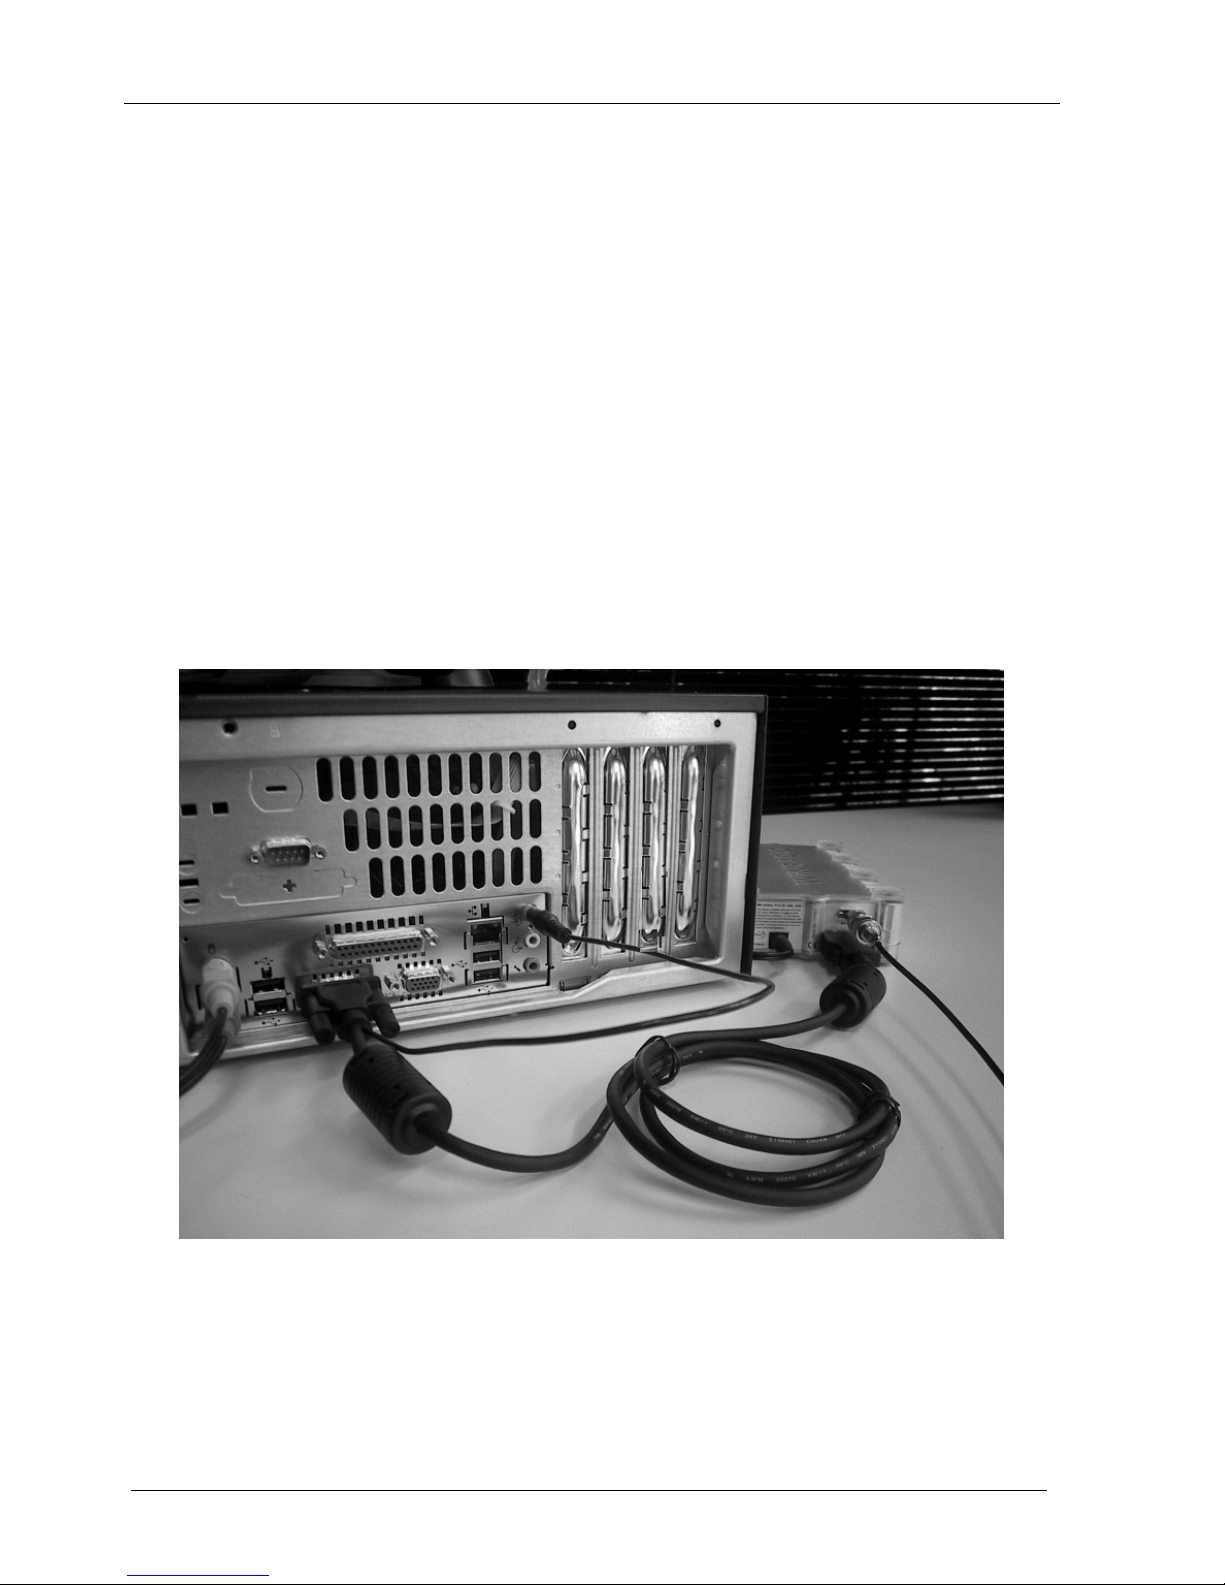
G305e (external) model with serial (RS-232) interface
1. Connect the receiver to the serial port using the supplied adapter,
which combines both the serial interface and the audio lead in one
cable.
2. Connect the audio lead on the PC side to the sound card Line input.
(If there is no Line input on your PC, as is the case with some laptops,
you may use alternative inputs, such as the Microphone input. This
may be also necessary with certain types of sound cards, such as
Creative Audigy 2.)
3. Plug the supplied power adapter to the power outlet and connect its
output to the receiver.
4. Turn the receiver on using the power switch at front of the receiver.
The blue LED will blink to indicate that the receiver is powered up.
G305e receiver with serial (RS-232) interface
WiNRADiO G305 User’s Manual
13
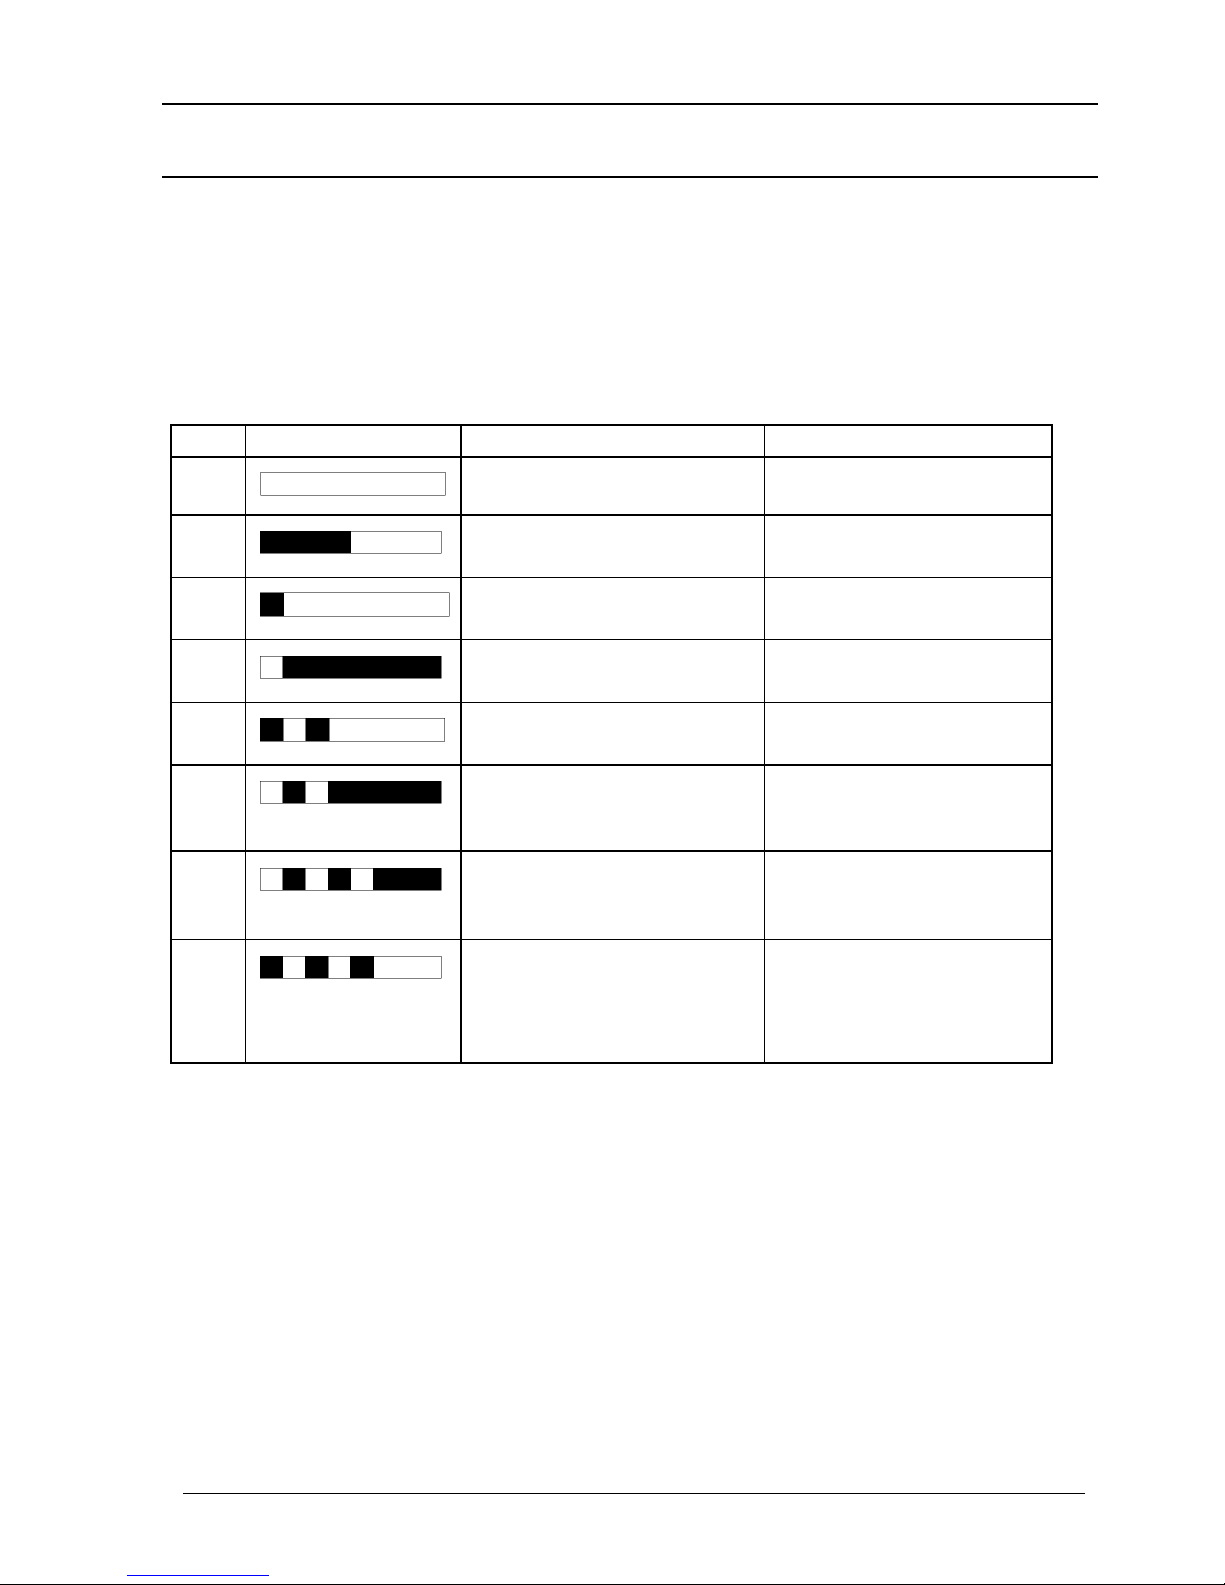
G305e Interface Status Indication
The single blue LED on the front of the WiNRADiO G305e (external) receiver
can display a number of different states using various specific flash patterns.
Each pattern is repeated once per second.
In the following table, “black” in the pattern indicates that the LED is on in that
time interval.
No. Pattern Description Mode
1
Off No power
2
Long flash, equal gap No connection to
computer
3
Single short flash Serial connection,
radio off
4
Single long flash
Serial connection,
radio on, ready
5
Two short flashes
USB connection,
radio off
6
One short flash
followed by a long one
USB connection,
radio on, ready
7
Two short flashes
followed by a long one
USB connected, but
driver not installed
8
Three short flashes USB connected,
driver installed, but
application not
running yet
For the normal Ready states as indicated by patterns 6 (for USB) or 4 (if the
optional RS-232 serial interface is used), the front panel LED can be controlled
by the user, under the Options top bar menu. The user has a choice for the
LED to either indicate the diagnostic patterns, or be continuously on or off.
This is useful in situations when a blinking LED might appear disturbing and a
steady state is preferable when the receiver is ready.
WiNRADiO G305 VHF/UHF Receiver
14
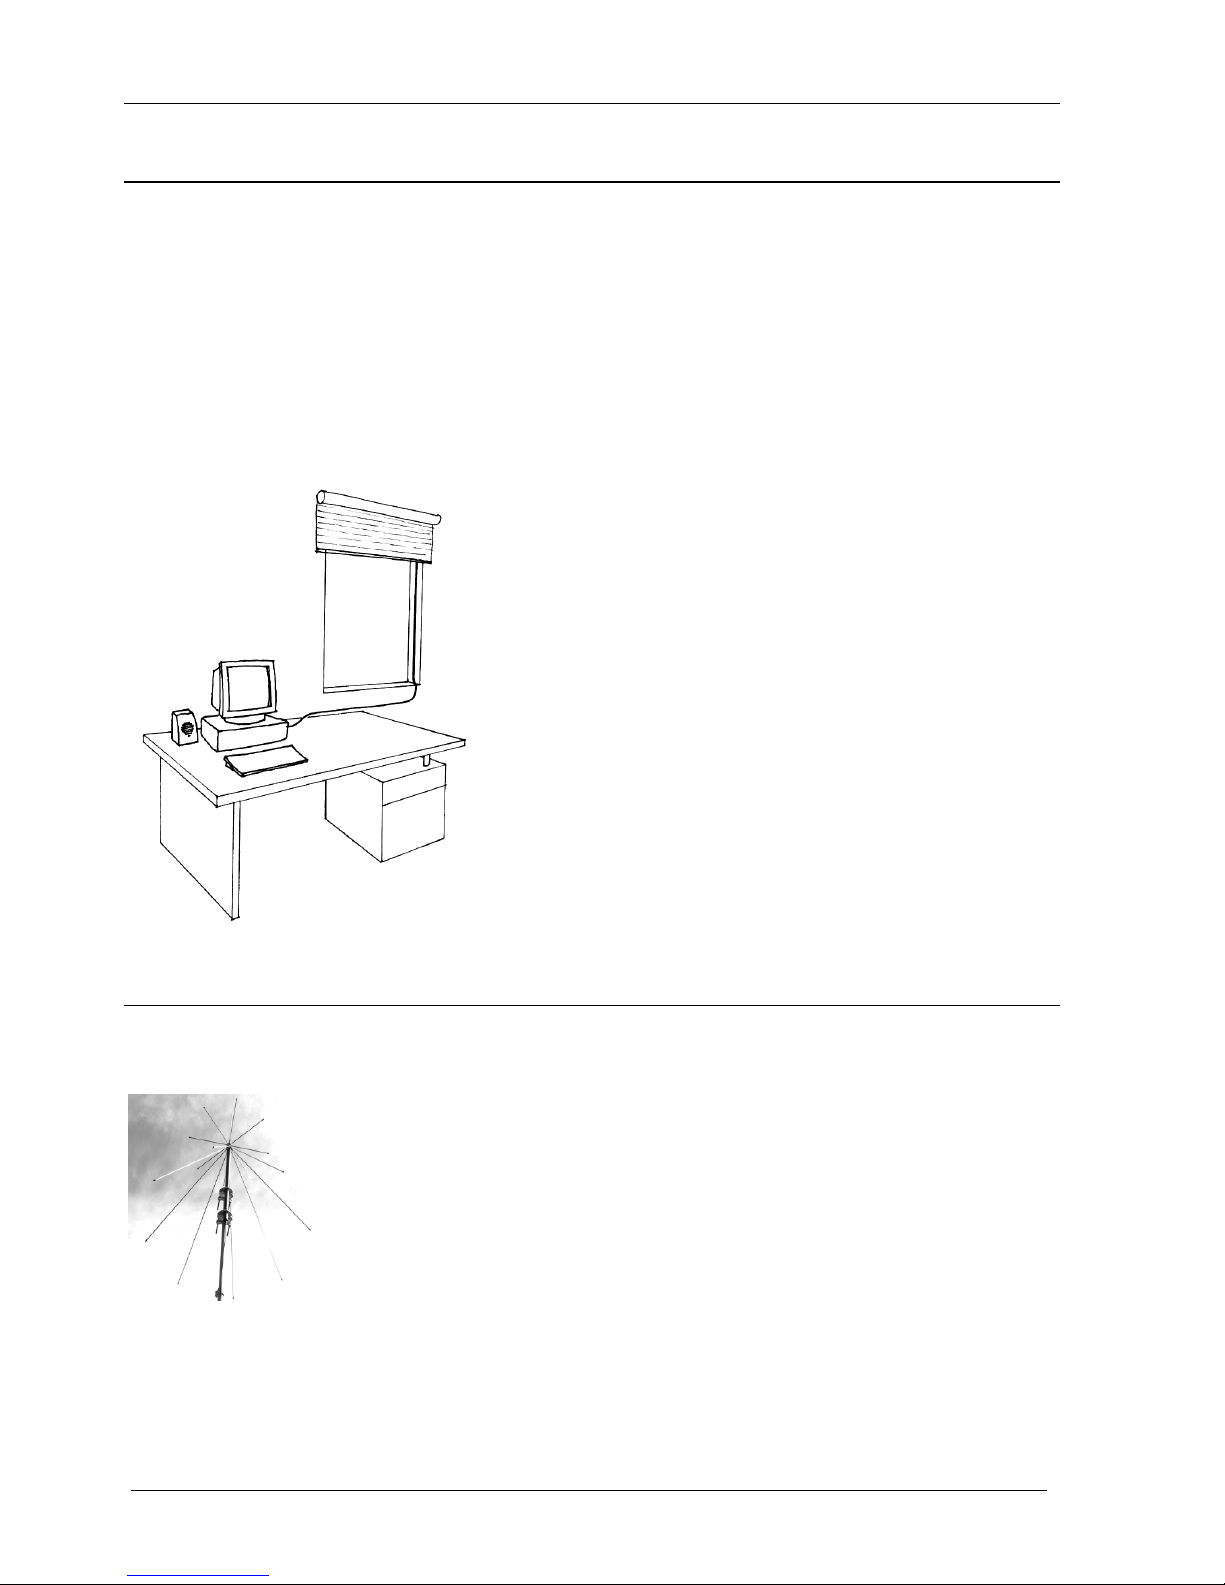
Connecting the Antenna
Your WiNRADiO G305 receiver comes with a start-up antenna consisting of a
3-meter length of coaxial lead-in cable, with an additional 3 meters of insulated
wire. The thinner, insulated wire at the end is the actual antenna. The long
lead-in cable is necessary for the antenna to be located as far away from the
PC as possible, to reduce interference from the PC. Please note that this startup antenna is supplied for immediate gratification only and is not intended to
replace a proper VHF/UHF antenna.
The best placement of the start-up antenna
depends on your actual situation, and will often
involve some experimentation. However, the
basic rule is simple: Place the antenna as close
to the window as you can, and keep the active
part of the antenna as far away from the PC
and other electrical devices, and metal objects,
as possible.
No matter how good a radio receiver is, the
performance of the entire receiving system will
depend on the quality of the antenna. The
same applies to a WiNRADiO receiver. To
make the most of your WiNRADiO receiver,
you should install a proper VHF/UHF antenna.
Something to consider?
WiNRADiO also manufactures many antennas and antenna
accessories, suitable for your WR-G305. Whether you need an
indoor or outdoor antenna, WiNRADiO probably has an antenna to
suit. One of our most popular antennas, and very suitable for the
G305 receiver, is our AX-71C discone antenna. For more
information on this product as well as the entire WiNRADiO range
of antennas and antenna accessories, see the WiNRADiO website
www.winradio.com.

WiNRADiO G305 User’s Manual
15
Software Installation
1. If the PC is off, turn it on. Windows will find the receiver and automatically
start the usual New hardware found driver installation routine. Insert the
installation CD ROM into the drive, and follow on-screen instructions.
2. After installing the drivers, choose the Run command from the Start menu
in Windows and type D:\INSTALL (if the CD ROM is the D: drive on your
PC).
3. This will run the application installer, which will guide you in the installation
process.
4. After all the files have been installed to your hard disk, run the WiNRADiO
G305 application.
Note: If the receiver is not detected by Windows, you can simply skip the driver
installation procedure, insert the CD ROM, and run the installation program,
which will also install the drivers.
Setting up the Sound Card
This section refers to the G305i model, or the G305e model with serial
interface, only. The G305e model with the standard USB interface does
not require this set up and this entire section may be skipped.
After installing the hardware and software, you will need to set-up the sound
card parameters. This is done both in the WiNRADiO application and in the
Windows sound card control panel – this provides the actual connection
between the receiver front-end and the PC back-end of your radio system.
In computer terminology a sound card is a wave device. A computer may
have several such wave devices installed (for example a modem with voice
capabilities). That’s why you need to select the sound card as the desired
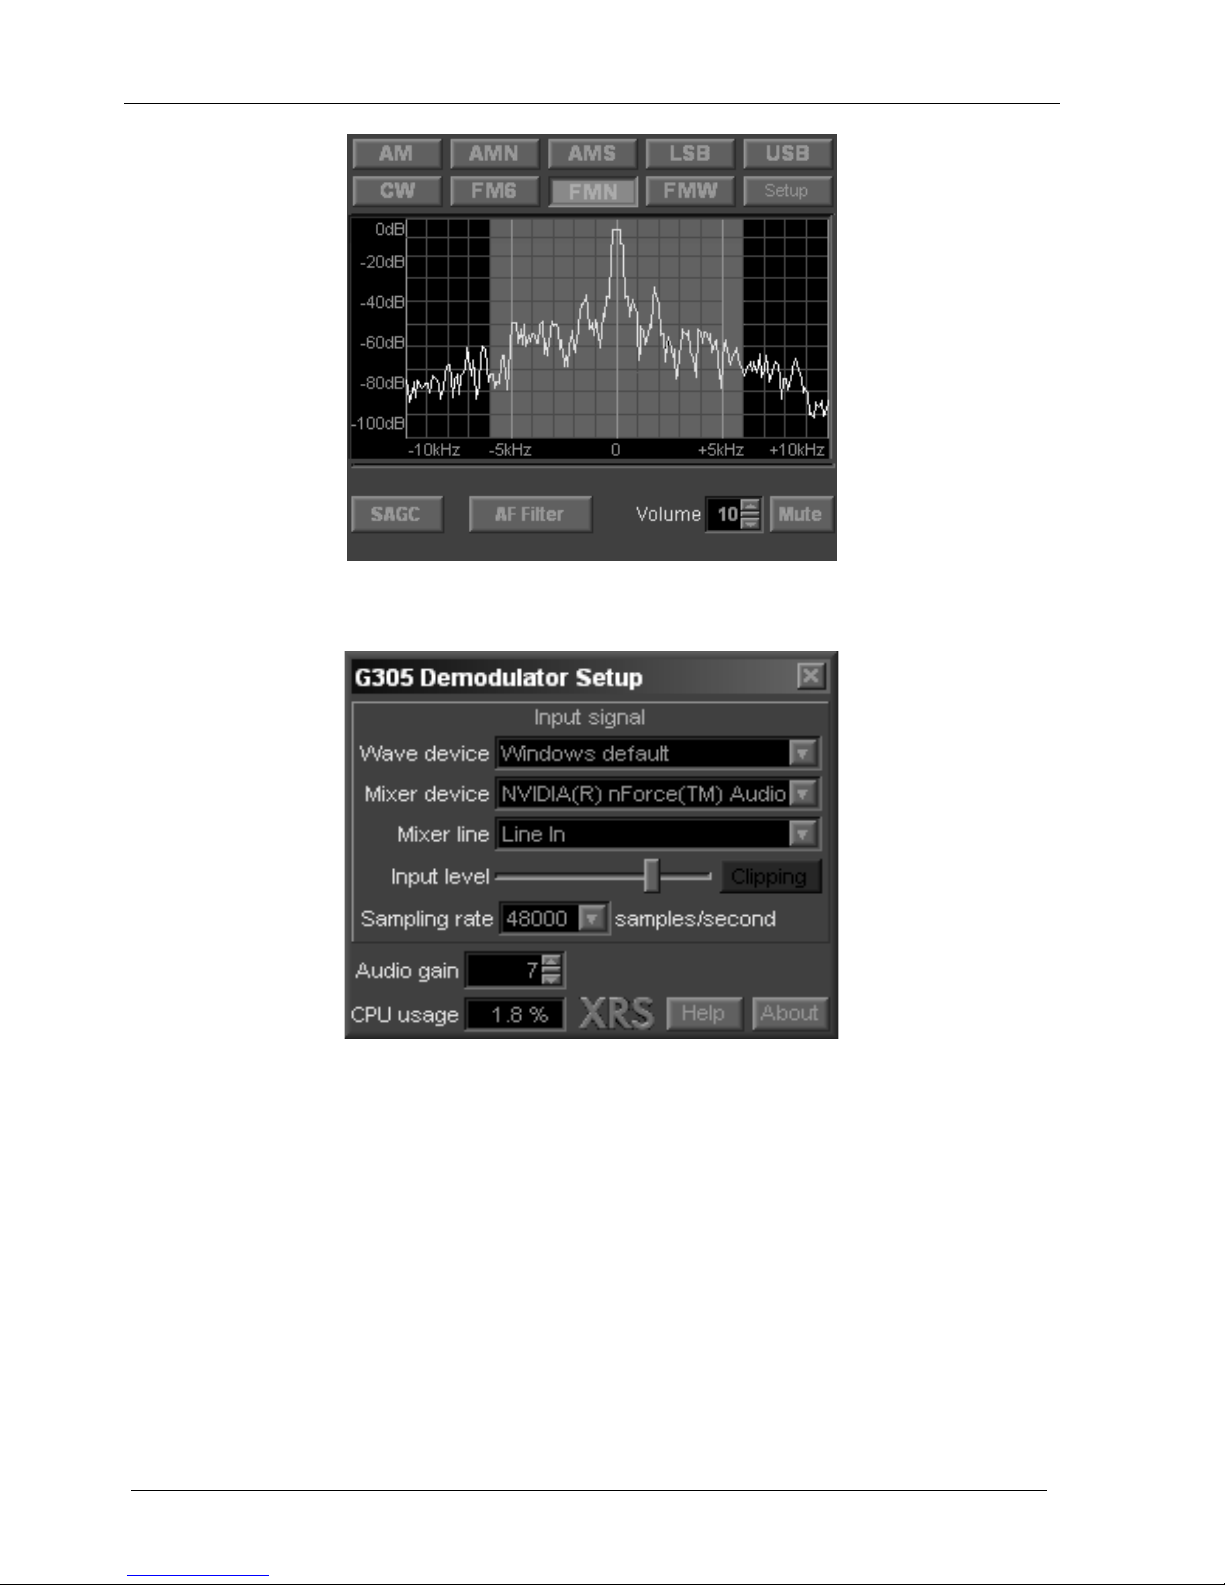
wave device first. Start the WiNRADiO G305 application and click on the
Setup button (located below the USB button) in the demodulator panel:
WiNRADiO G305 VHF/UHF Receiver
16
The demodulator set-up window opens, as shown:
The Wave device drop-down list shows all the installed wave devices:
Windows default is the Control Panel setting specified under Start | Settings |
Control Panel | Multimedia Properties | Audio. If a sound card is specified
in this Control Panel setting for both playback and recording (this is very likely,
but not always necessarily so), then you can simply select Windows Default
as the wave device for the demodulator. Otherwise, the specific name of the
sound card should be selected.

WiNRADiO G305 User’s Manual
17
The selected sound card must support duplex operation and the standard
44100 or 48000 samples/second sampling rates, 16 bits per sample, stereo.
Most modern sound cards do satisfy all these conditions, but some cards may
have a high level of distortion at 48000 samples per second; for such cases,
the 44100 samples/second sampling rate is provided.
The next parameter to select is the mixer device associated with the already
selected sound card, using the Mixer device drop-down list, and the Mixer
line (the sound card input line). If the signal is arriving at the sound card via an
external cable, the cable should be physically connected to the Line input of
the sound card. If the receiver is connected internally, most probably the input
would be called Aux or CD Line.
In the drop-down list of sound card inputs, each line is available either as
normal, or Reversed. If the reversed line is selected, this means that the left
and right channels (of the sound card stereo input) are to be reversed.
Normally, you should not need to select any of these reverse inputs. However,
there is a very small number of sound cards where the left and right inputs are
swapped. Normally, the G305 Demodulator expects the receiver output to be
connected to the right sound card input. If it is to be connected to the left input
instead, the reverse input line needs to be selected from the drop-down list.
With some laptops, only the Microphone input may be available and you will
need to connect the receiver to the Microphone input instead, and also select
this input in the demodulator Setup panel. Certain sound cards, in particular
Creative Audigy 2, have a design problem which prevents them from using
the Line input in a full duplex mode. In such case, you will also need to use
the Microphone input.
If you are using the Microphone input instead of Line input, please check if
there is an Advanced button under the Microphone volume control in the
sound card control panel. If so, then click on it and uncheck the +20dB gain
check box if it exists. The extra large gain would result in overloading the
sound card, and cause distortion.
The last parameter to set is the Input level. Set it to half the maximum level
initially. When you then tune the receiver to your first station, you should return
to this, and adjust the Input level below the point when the Clipping indicator
turns red. If the signal still sounds distorted, reduce the level further down until
the distortion disappears.
WiNRADiO G305 VHF/UHF Receiver
18
While adjusting the Input level, you will also see the noise floor of the signal
spectrum shown in the main demodulator window rising proportionally.
This completes the software installation process. The G305 software then
automatically configures the sound card control panel. It may be interesting to
describe what it actually does and why:
Firstly, in the sound card Playback volume control panel, the software mutes
the sound card input line the receiver is actually connected to. This is the
same line as selected in the WiNRADiO G305 demodulator Setup, i.e. usually,
this will be Line or Microphone input.
This may seem a bit unexpected: Why are we muting the input line? This is
because the signal coming from the receiver is not an audio signal, but rather
the intermediate frequency signal. It needs to be processed (demodulated) by
the PC first, before it is output back to the sound card. That’s also why the
sound card needs to be full duplex, to allow for such simultaneous
input/output processing.
Failure to mute this line would cause a high-pitched intermediate frequency
sound to be combined with the demodulated signal.
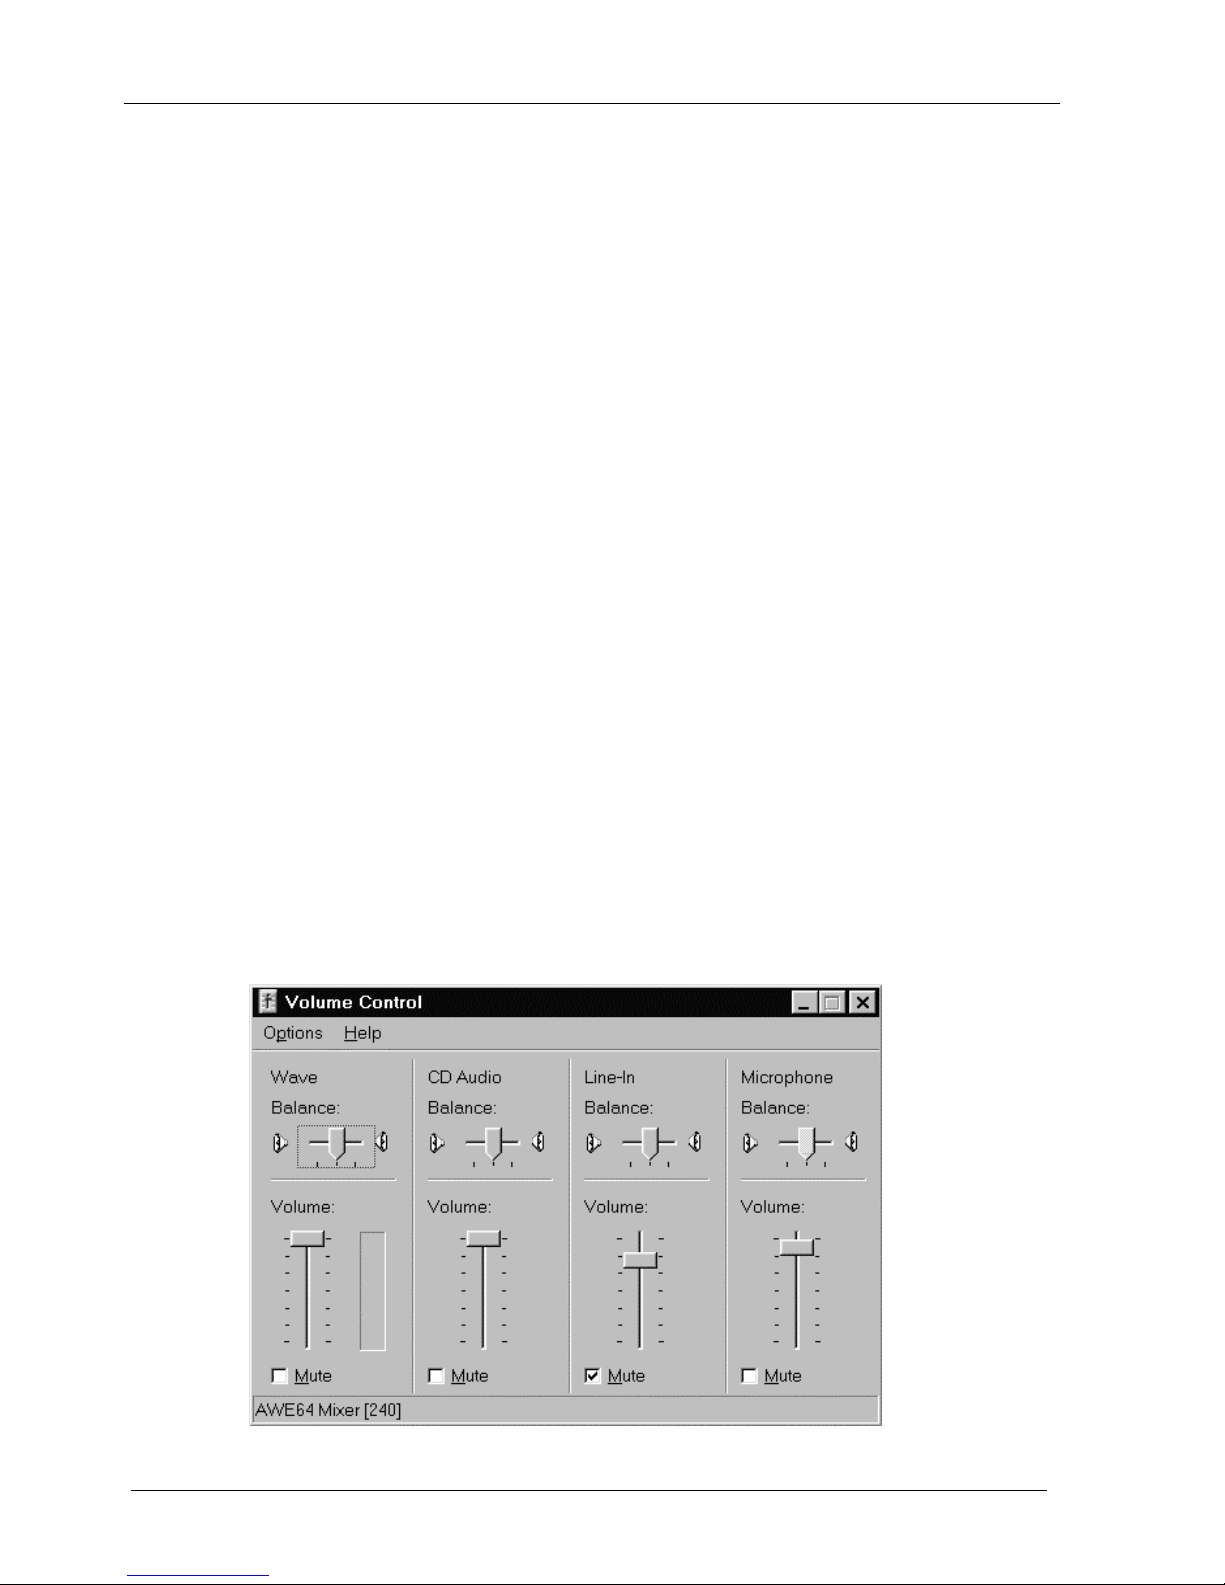
To see how the line is muted, click on the speaker icon in the task bar in the
bottom, to bring up the sound card Volume Control panel (consult Appendix
B – Sound Card Controls if you have difficulties locating the sound card
settings):
WiNRADiO G305 User’s Manual
19
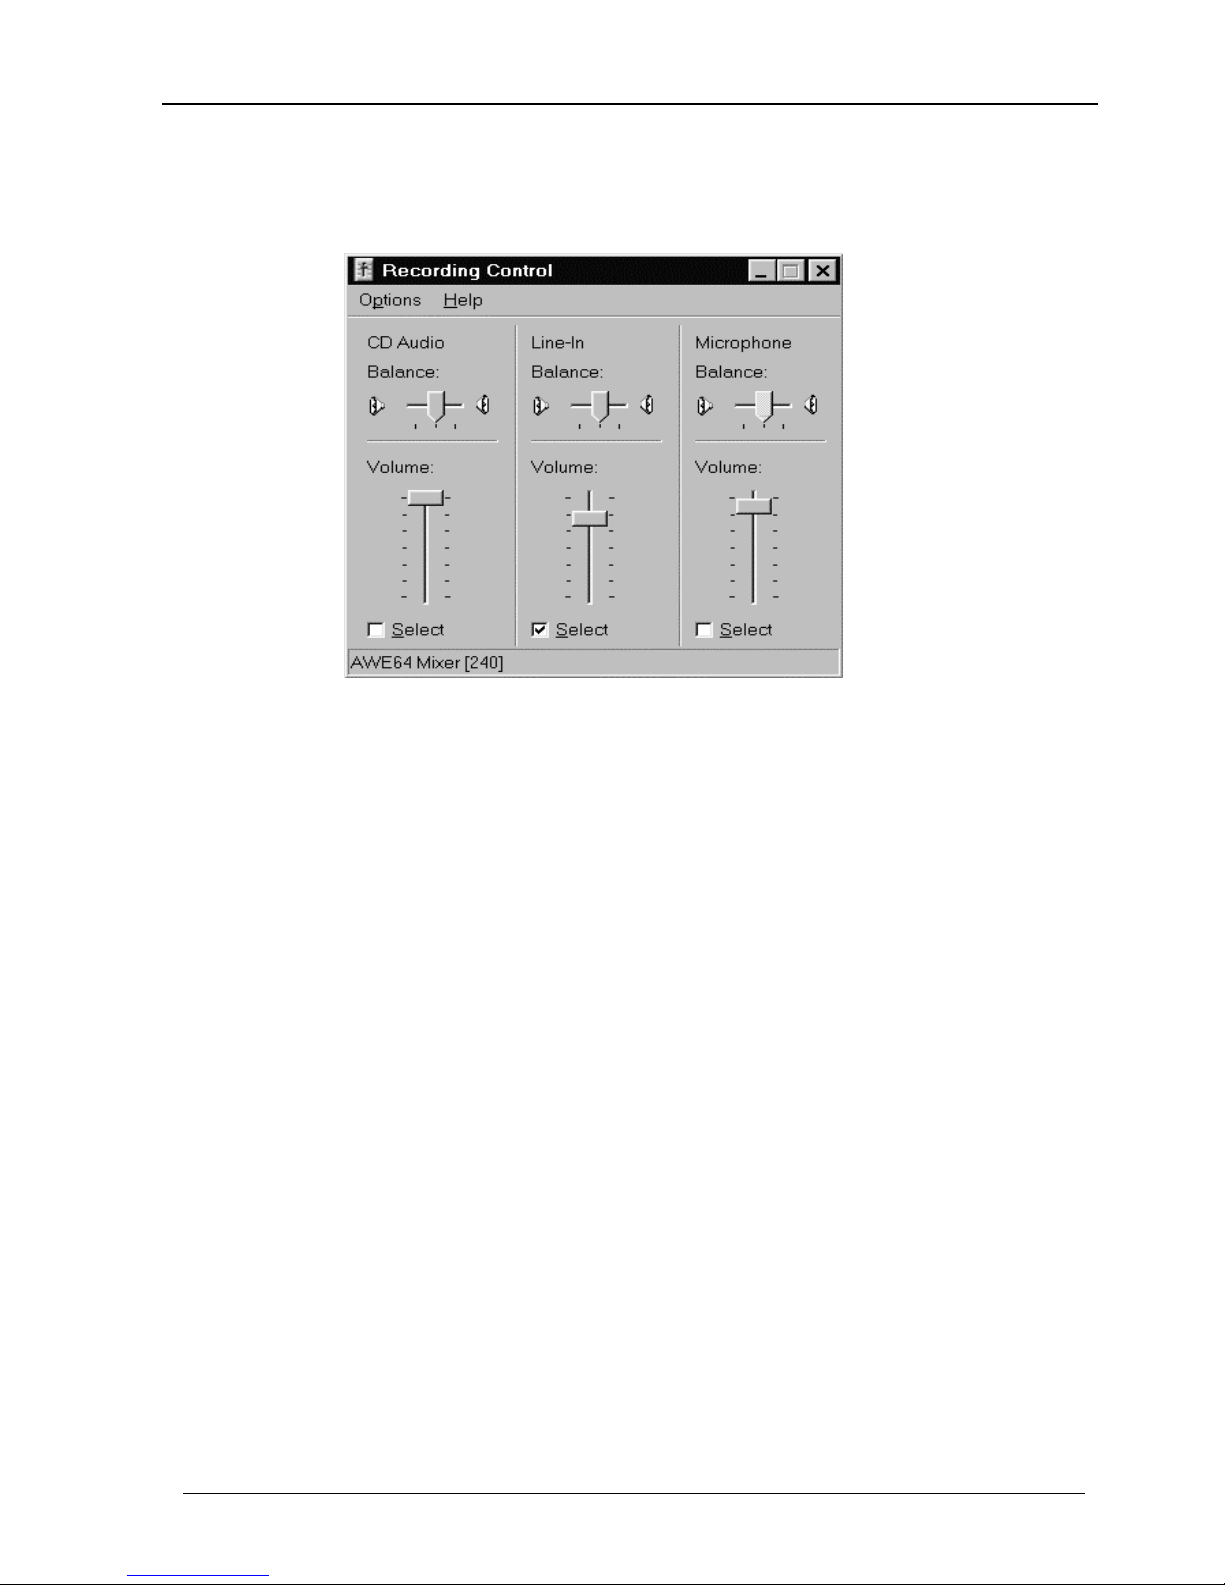
The same line will be selected in the Recording Control of the sound card
control panel. To get there, you need to select Options | Properties |
Recording in the top bar menu of the Volume Control panel.
The Volume slider of the Recording Control is duplicated in the demodulator
Setup panel (where it is labeled Input level).
Please pay great attention to the sound card set-up, as most initial problems
associated with using this type of receiver can be attributed to an incorrect
sound card setting. Typical problems include:
• Not selecting the Mixer device or Mixer line correctly (which will manifest
itself by the absence of any signal appearing in the spectrum scope);
• Failing to adjust the Input level properly, which may result either in low (or
no) audio output, or, on the other hand, distortion if the signal level is too
high.
Note: Some sound cards may become overloaded and start distorting even
before the Clipping detector in the demodulator Setup window is able to
detect such condition. If the audio sounds distorted, try to reduce the Input
level in the demodulator Setup window as the first measure.

WiNRADiO G305 VHF/UHF Receiver
20
Getting Started
There is often a degree of understandable impatience when exciting new
equipment such as a new WiNRADiO receiver is acquired. The following fastforward introduction makes it possible for you to start using your new
acquisition as quickly as possible. Detailed operation is described in the
subsequent chapter Using WiNRADiO G305 Receiver. We hope you will
return to that chapter, as the WiNRADiO G305 receiver has many fine features
which it would be a shame to miss.
Start the WiNRADiO G305 receiver application (double clicking on the
WiNRADiO icon). The WiNRADiO G305 receiver control panel will appear as
shown below.
WiNRADiO G305 Receiver Control Panel
The WiNRADiO G305 receiver control panel has some elements similar to
conventional receivers, and many additional features as well.
The quickest way to get started with this receiver is to check its operation on
local AM stations.

WiNRADiO G305 User’s Manual
21
Using the keyboard, type in the frequency of one your local AM stations: For
example, for 774 kHz, type in 7 7 4 , then k for kHz, then press Enter. The
typed-in frequency will appear on the digital frequency display. Then select
the AM mode by clicking on the AM button. At this point, you should hear the
station. You can adjust the volume using the two buttons next to the small
Volume display. (Note also the little slider between these two buttons: you can
drag it up and down to change the volume faster.)
Manual tuning can be done in several ways. Let’s start with the tuning knob:
Place the mouse cursor to the upper half of the tuning knob, at which point you
will see the cursor change to a curved double ended arrow. Hold down the
right or left mouse buttons to increase or decrease the frequency, and the
knob will rotate clockwise or anti-clockwise, respectively. If you place your
cursor in the bottom half of the tuning knob, the direction of the rotation will
reverse.
The rotation increment of the tuning knob is 0.5 kHz. This can be changed
easily using the Shift, Ctrl or Alt keys: If you press the Shift key while tuning,
the increment will increase ten times (to 5 kHz). Pressing Ctrl will increase the
increment a hundred times (50 kHz). On the other hand, if you use the Alt key,
the increment becomes ten times finer: 50 Hz.
If you are still unable to tune to any stations at this point, please refer to
Appendix A - Troubleshooting.
There are also several other ways to tune the WiNRADiO receiver other than
typing the frequency or using the tuning knob. These will be explained in
detail in the following chapter.
Did you know?
Hertz, as a unit of frequency, used to be called “cycles per second” (cps), along with
related multiples kilocycles (kc) and megacycles (Mc) – now kilohertz and megahertz. It
is named after the German physicist Heinrich Rudolf Hertz, who made important
scientific contributions to electromagnetism.
WiNRADiO G305 VHF/UHF Receiver
22
Using WiNRADiO G305
Tuning to a Frequency
To change frequency, simply type the new frequency into the keyboard. As
soon as you press a digit or decimal point, the frequency display will activate,
waiting for a frequency to be typed. You can also click on the display to type
in a new frequency. After typing the new frequency, press Enter and the
receiver will instantly retune. To abort, press Esc.
To enter units, such as kHz or MHz, simply press H for Hz, K for kHz or M
for MHz after entering the digits. Any invalid keystrokes are ignored.
Frequencies outside the receiver limit (9 kHz to 1800 MHz) will not be
accepted and the display will revert to the previous frequency.
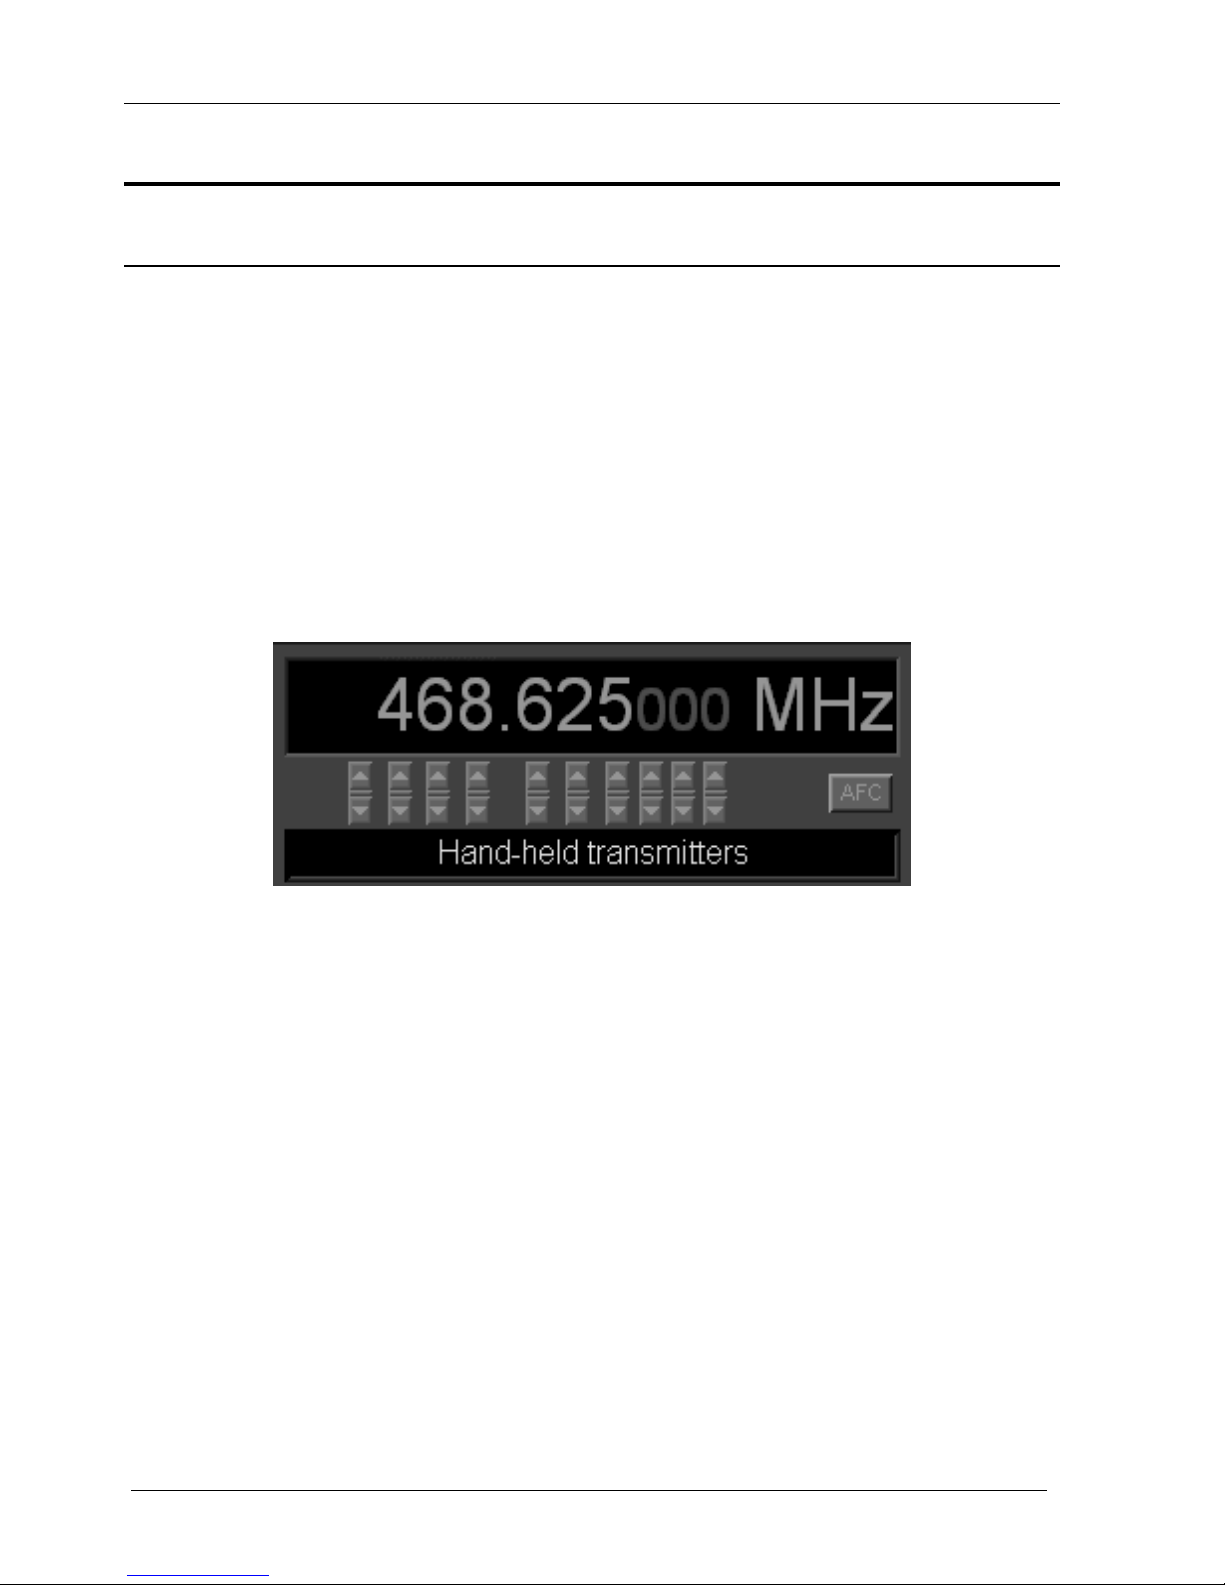
WiNRADiO G305 Receiver Frequency Display
The up and down buttons under the individual digits make it possible to quickly
step up or down the frequency in the corresponding positions. (The little slider
buttons between the buttons can be used for faster adjustment.)
Under these buttons there is a band description window. This shows the
band allocation of the currently tuned frequency. These band descriptions are
based on those applicable to North America. However, these allocations are
based on international treaties and therefore are generally applicable
worldwide.
Note that the default band allocation can be overridden with a call sign or a
user-defined description of a frequency stored in memory. The default band
description is also user modifiable: it resides in the file bands.csv in the
WiNRADiO installation folder. This file can be edited using a spreadsheet
application, such as Microsoft Excel.
 Loading...