

Page 1

Safety
Please read following concise rules. Without regard to it, danger or law-viloation may be resulted in.
1. Boot the PC Safely
Don’t boot PC in prohibition of using wireless device or meeting interference or danger from device use.
2. Be careful of the traffic firstly
Please observe local laws & rules, try to drive car with both hands by considering traffic safety firstly.
3. Interference
All wireless devices may be interferred, then affecting PC capability.
4. Use qualified maintenance
Only qualified maintainers can install or repair the device.
5. Accessories and battery
Use authorized accessories and batteries. Do not connect incompatible products.
6. Water resistance
Please keep the device dry as the device doesn’t have waterproofing quality.
Page 2

Appearance
Front view
Page 3
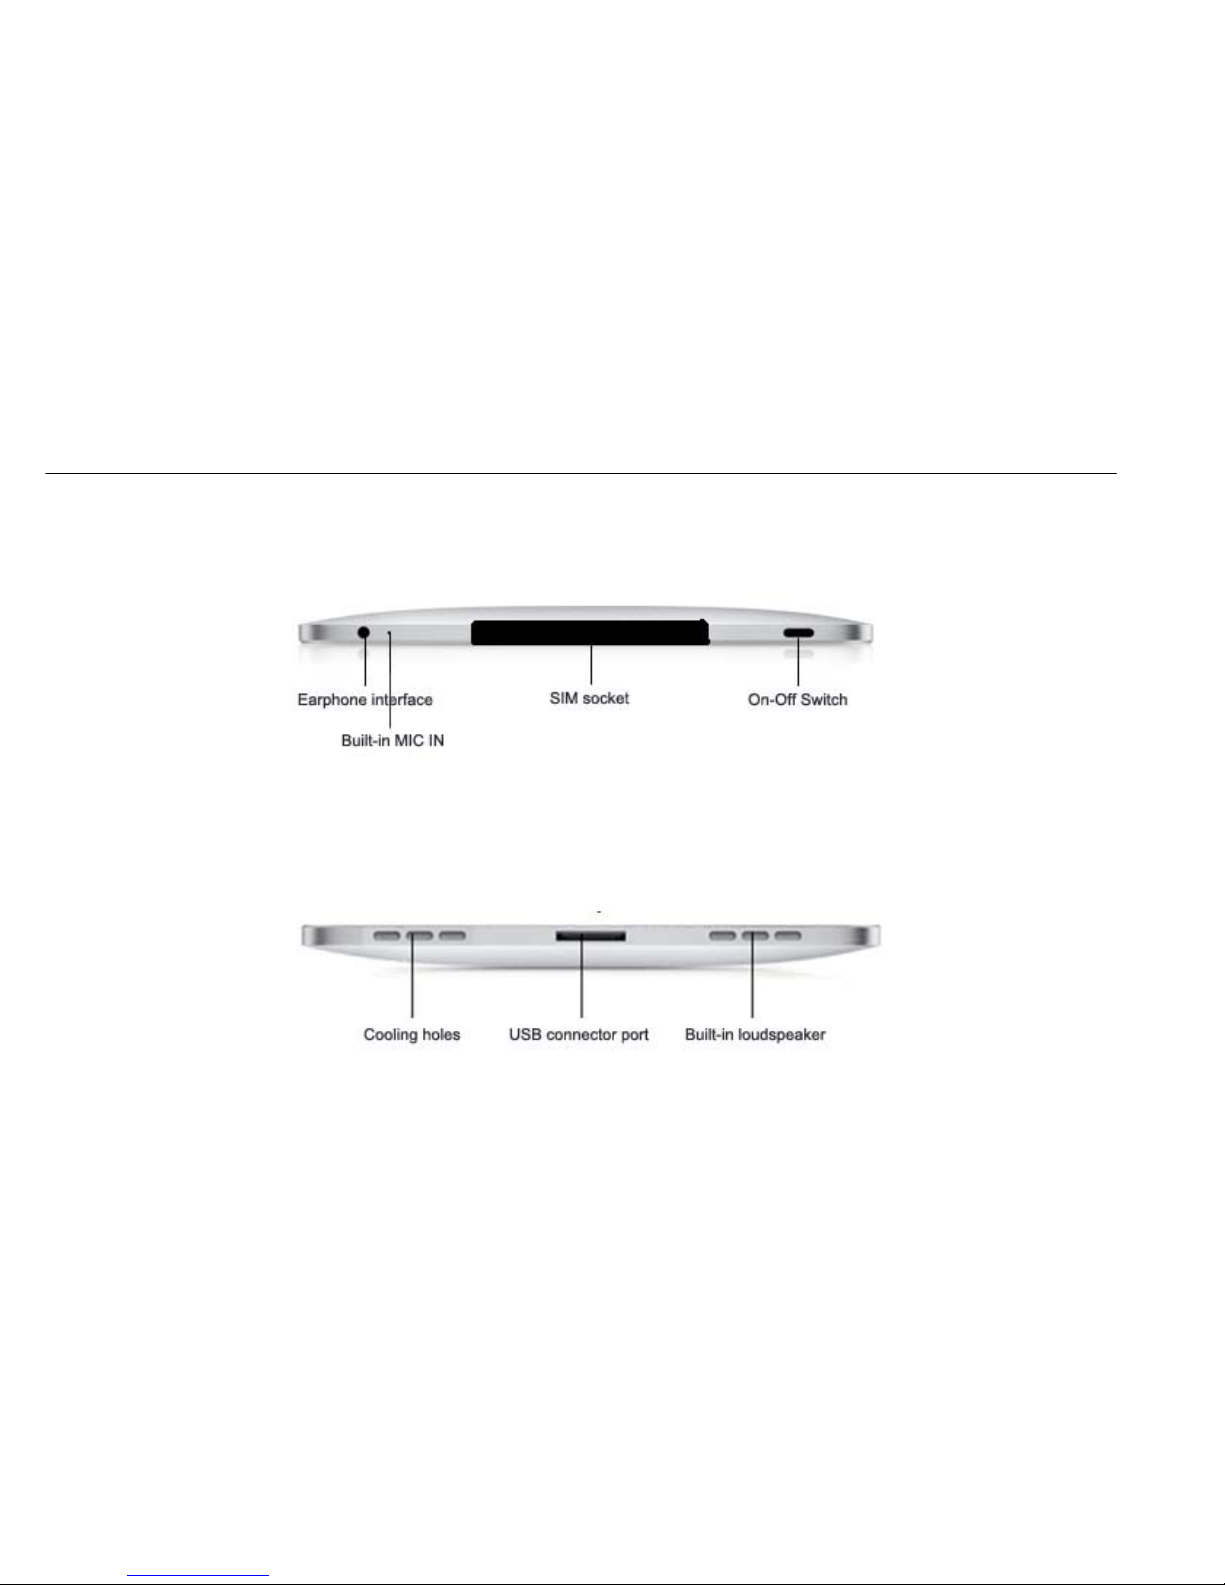
Appearance
Top view
Bottom view
Page 4
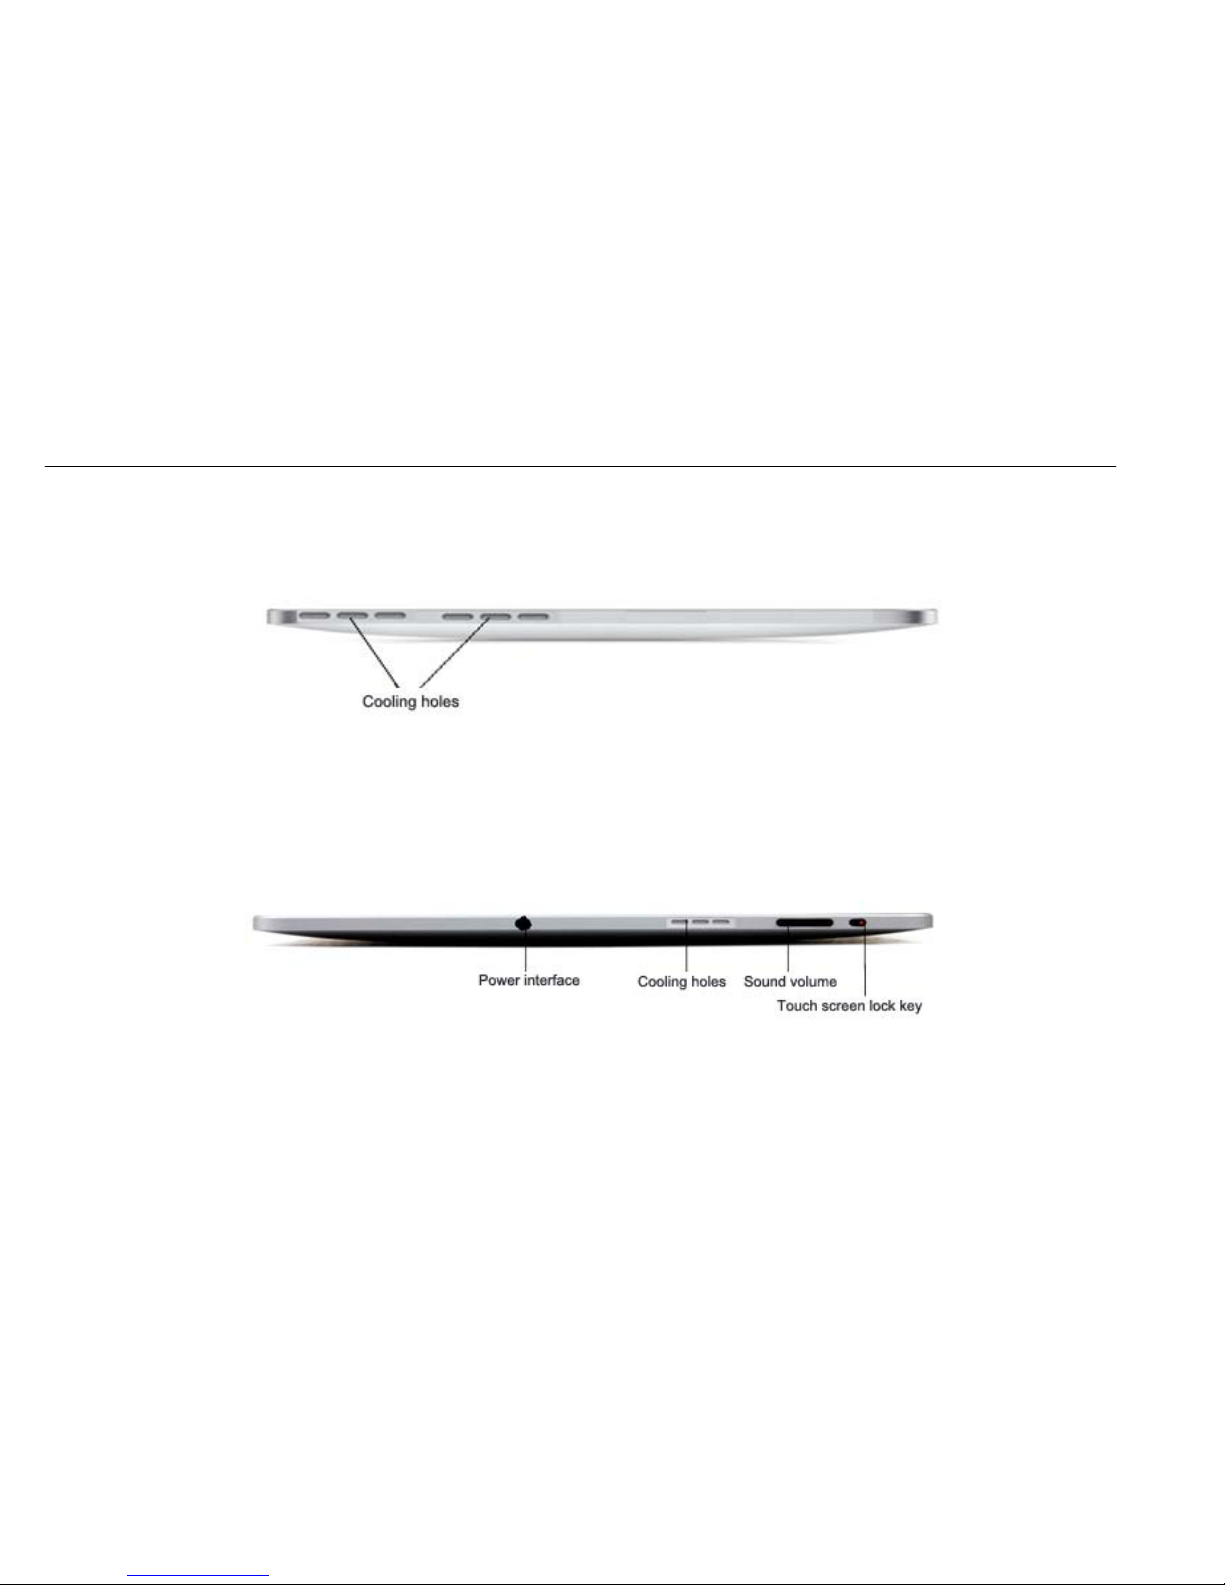
Appearance
Left view
Right view
Page 5
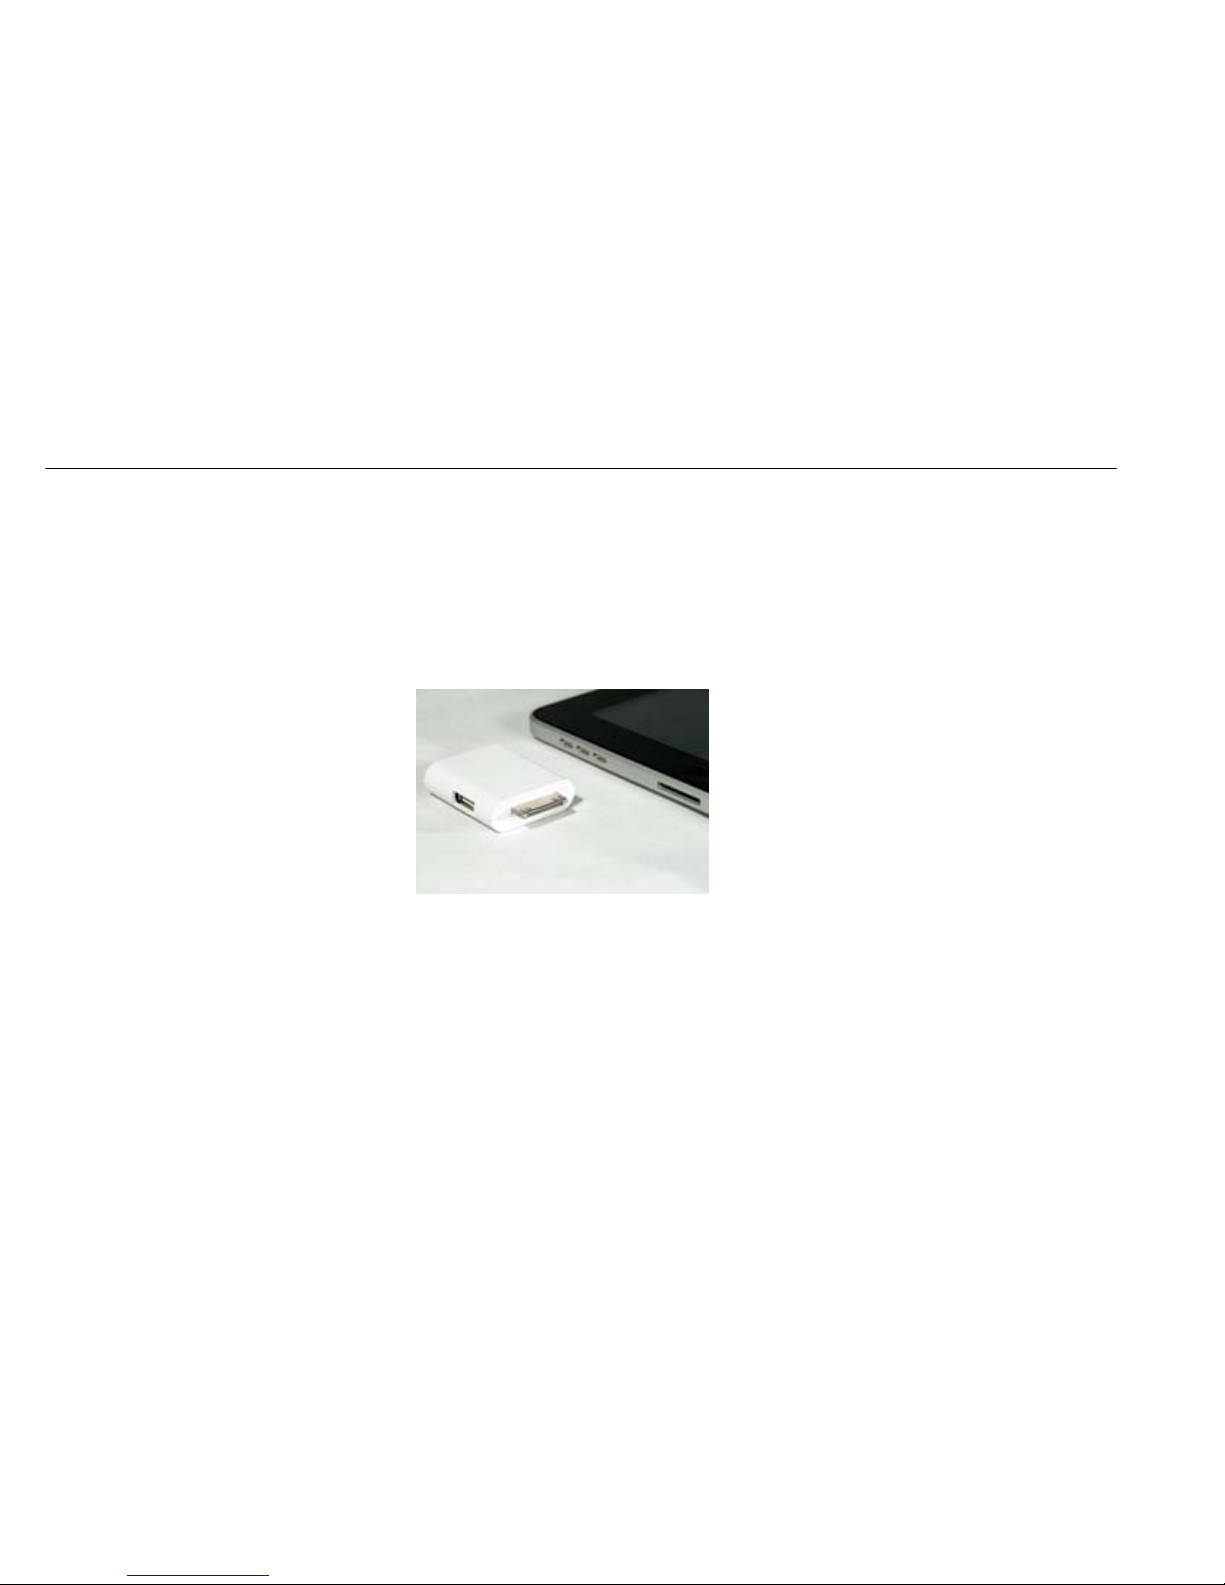
Accessories
USB expansion
can expand to 3 standard
USB interfaces
Page 6

Basic Operation
1. Inset/pop SIM card
Inset SIM card (metal face towards top) into 3G SIM slot, just like the sense of spring being locked. Pressing SIM card to inserted direction firstly and then
pull out SIM.
Notice: Please close PC power during insert/pop SIM card; otherwise, the machine wil be damaged.
2. Connect power(charge adapter)
Connect charge adapter to power adapter. After coonecting the adapters properly, press power switch key for 3-5 seconds until machine boot.
Do not connect the built-in battery into adapter under the condition of high battery. Boot the PC directly via switch key. Connecting power adapter to
charge battery while the battery is low.
Page 7
Basic Operation
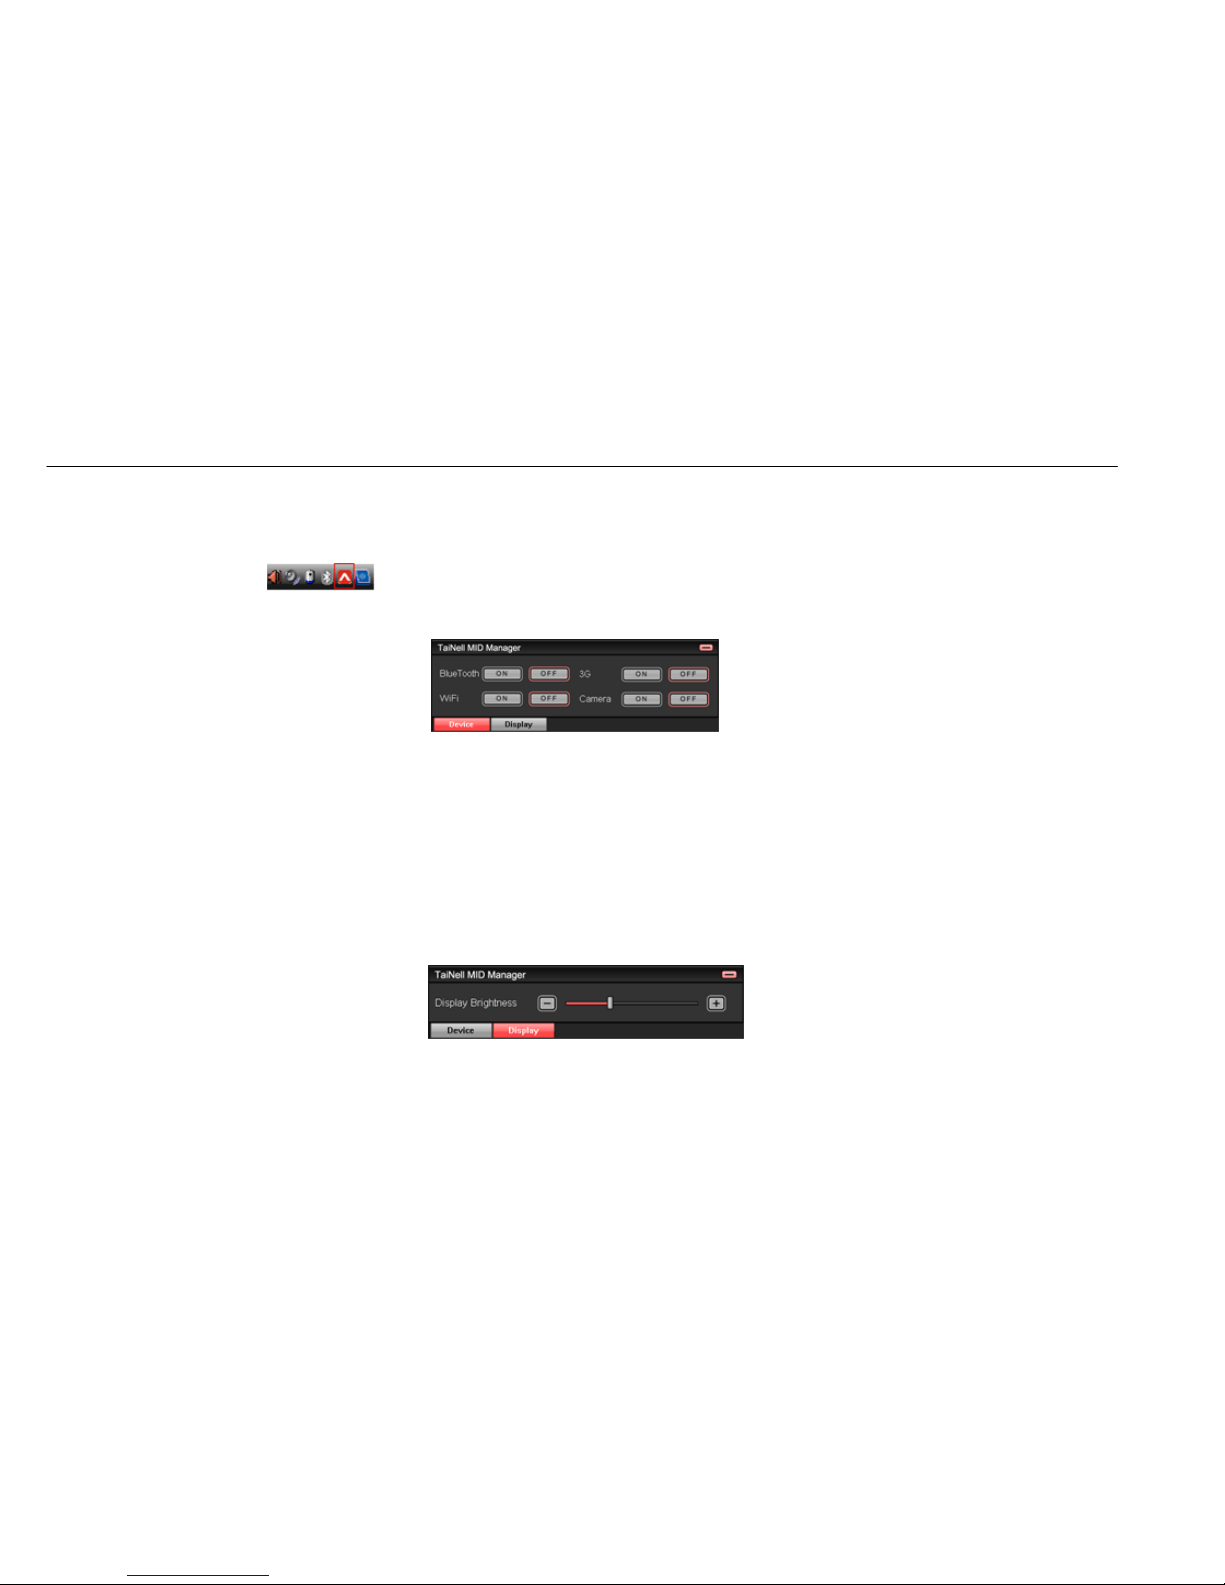
3. MID Manager Setup
(1)Default setting of MID manager--automatic startup during boot. Click MID manager ico under the bottom-right of windows, you will see the following
image (device options):
Notice: MID manager display equipments will be different to various types of device configurations.
(2)Click corresponding “On/Off” to start or close corresponding equipments. Default is On for g-sensor and Off for other devices.
(3)Double-click “MID Manager”to switch Chinese-English interface.
(4)Click “Display”to pop-up display options.
The screen brightness can be controlled via drawing sliders or clicking +/- buttons of both sides.
Page 8
Basic Operation
Notice: The device will consume electric power without use after boot. Suggest to close unused devices by clicking “close”, adjust backlight to proper
lighteness so as to increase battery endurance time greatly.
4. Volume control
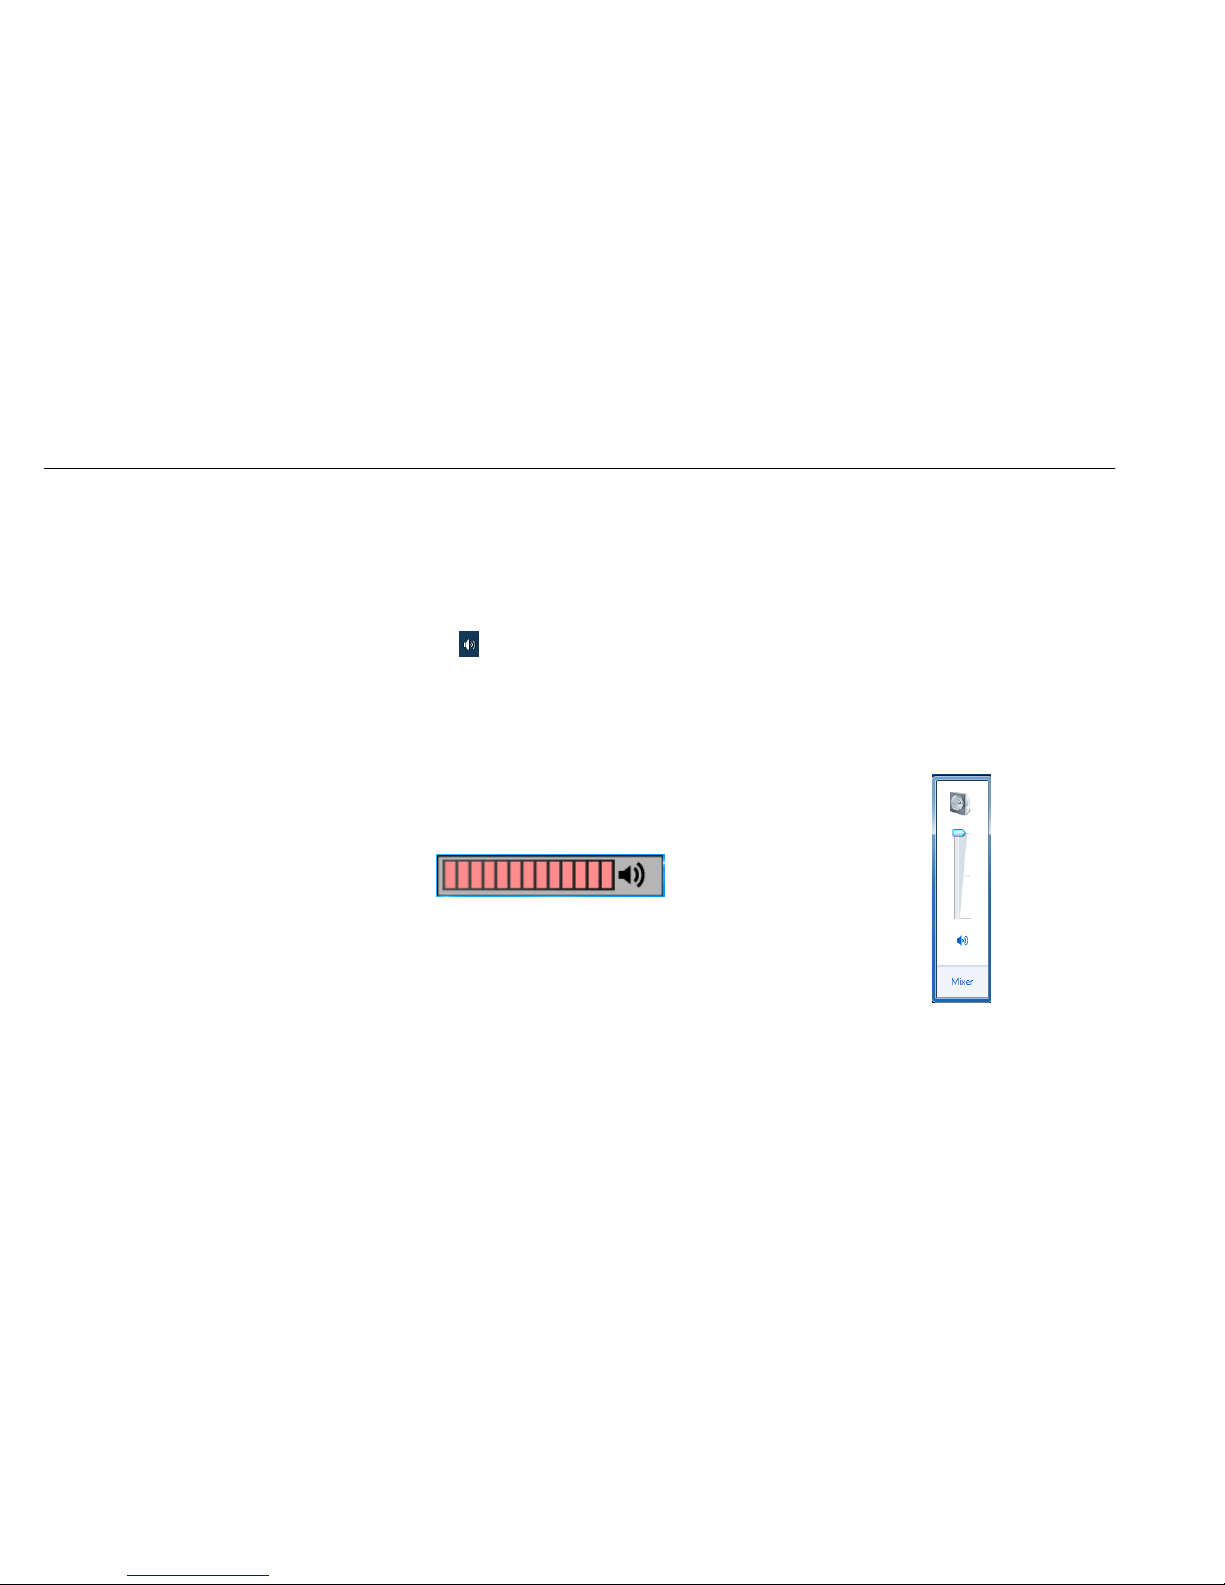
(1) Click the colume ico in the status column of desktoptop , drag arrowhead green ico up and down to realize the volume up/down.
(2)Adjust volume up/down via volume control key. Following slider will appear after pressing volume up/down key. The sliding red progress bar will be
increased if press volume up key and be lessened if press volume down key.
Page 9
Basic Operation
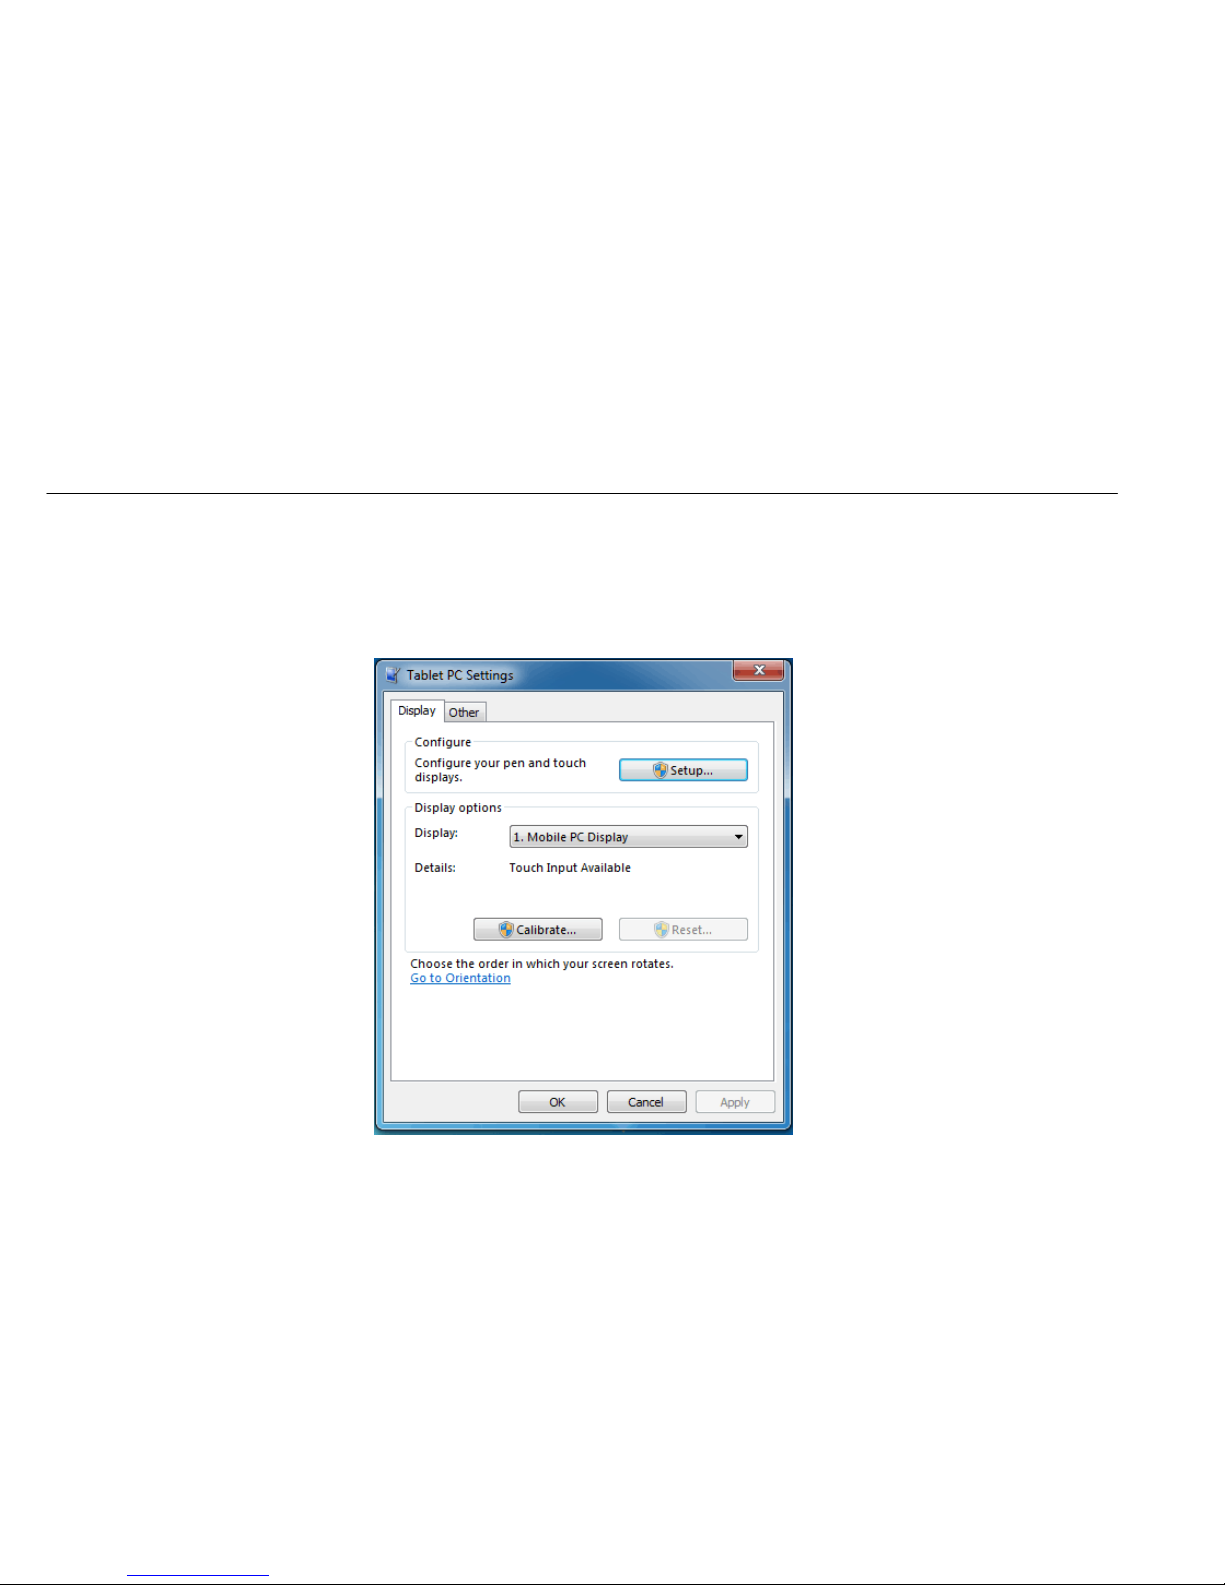
5. Touch screen adjustment
(1)Open control panel to change view modes—from the default classified view mode to big ico instead. Select Tablet PC setup, then following interface
will appear. Touch screen will be adjusted via clicking “adjustment”.
Page 10
Basic Operation
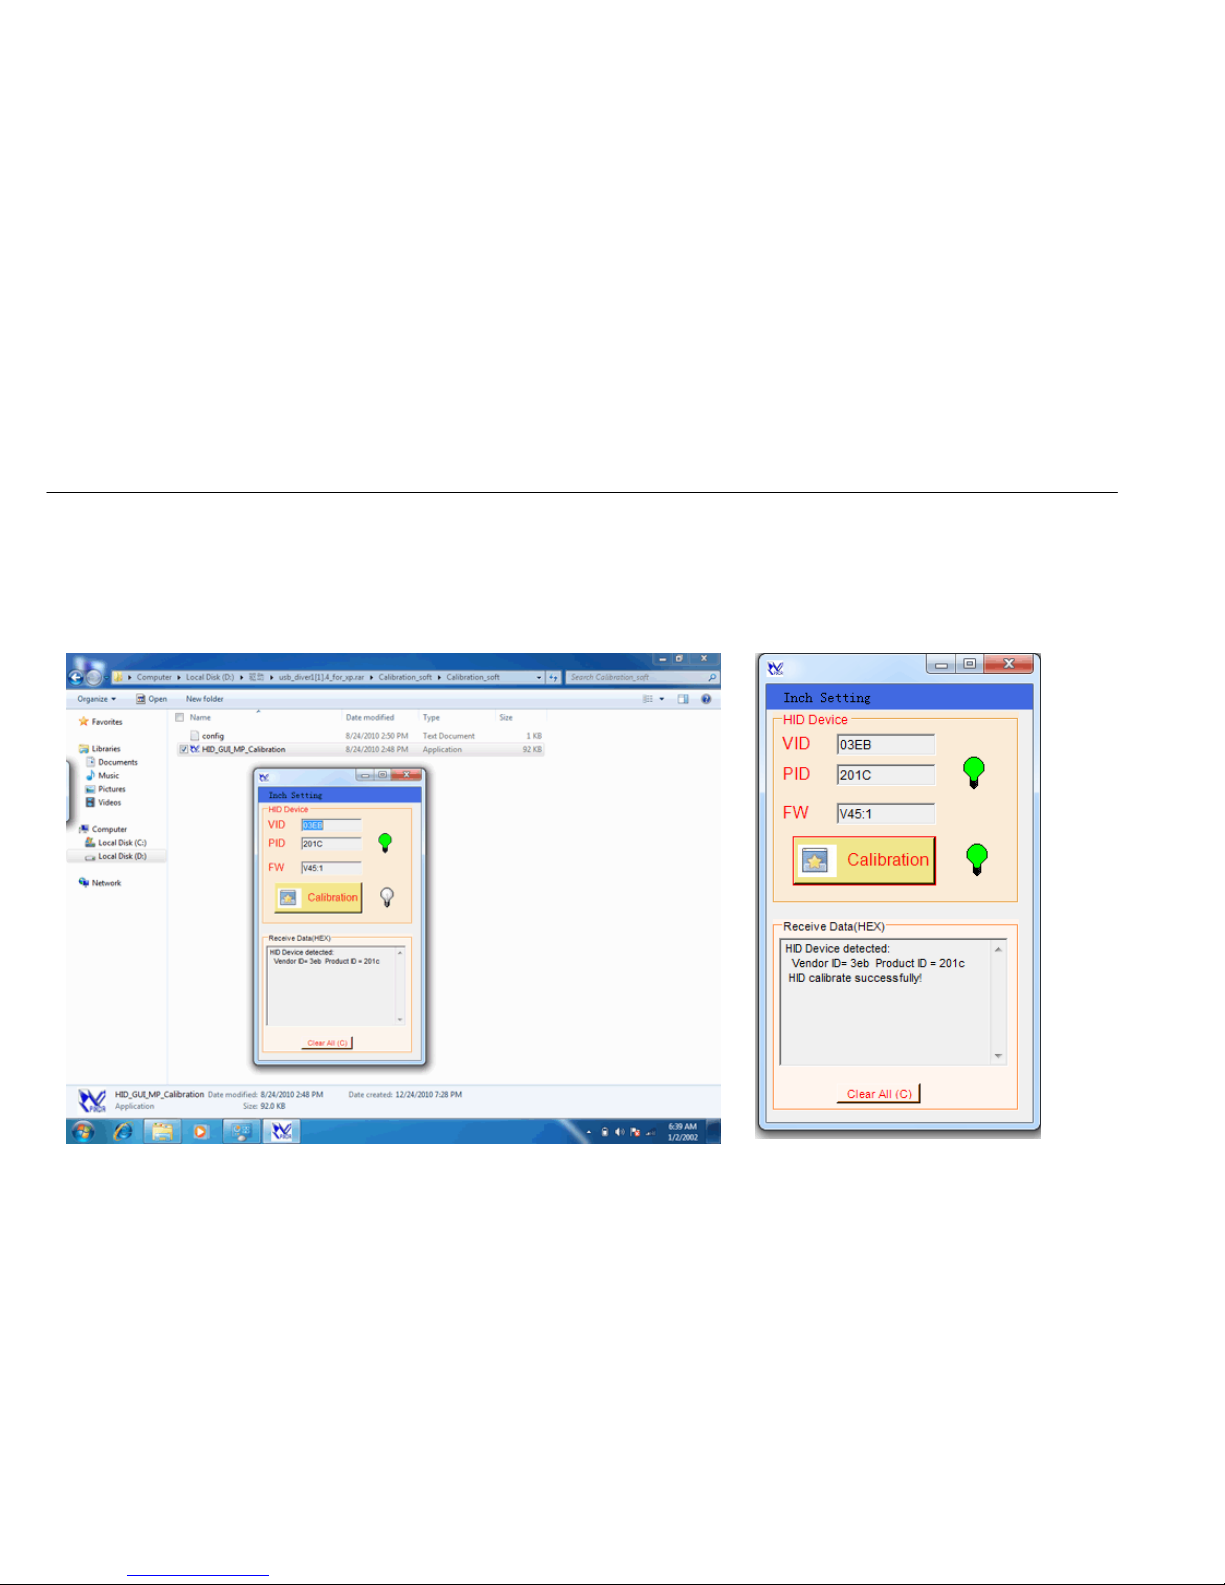
(2)Adjust touch screen via the attached calibration software.
Open the calibration software to display left-below emendation interface. Adjustment will be finished if appearing right-below interface after clicking
calibration—Calibration indicator being green and prompt HID calibrate successfully!
Page 11

Basic Operation
6. Multi-point touch
experience of capacitive screen
Our capacitive screen supports multi-point touch, easy to realize image zoom out and rotation via two-finger shift while viewing pictures.
Page 12
Basic Operation
7. Virtual keyboard operation
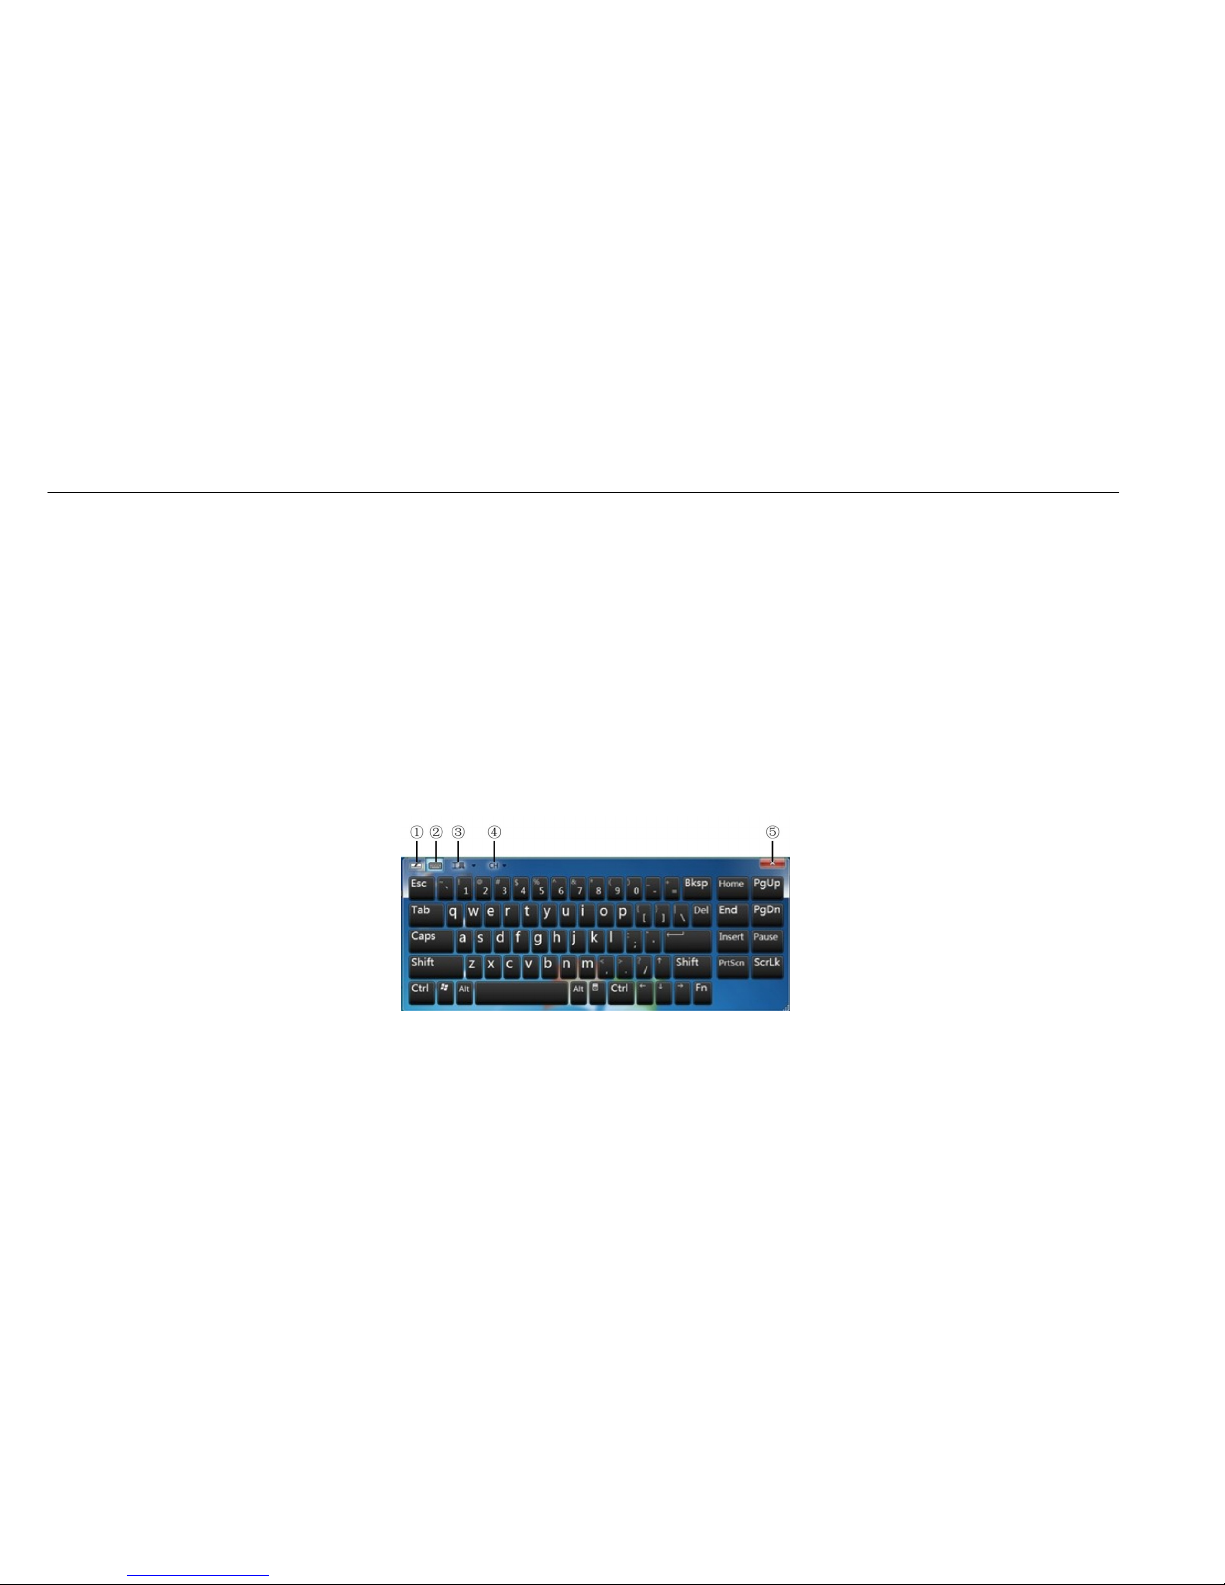
(1) Touch the screen blank via fingers, a rectangle ico will appear at the upper right of screen; click this ico and virtual keyboard will appear. While editing
characters, click editing area to pop-up cutdown virtual keyboard ico, then click the ico to callout virtual keyboard. This keyboard supports multi-point
operation—“!”character will appear if press the shift+1 concurrently, being to be shifted, enlarged and lessened if control the keyboard edge via mouse or
finger. Its functions are nearly identical to that of ordinary keyboard. Input operation can be realized via clicking the keystroke of touch screen (soft
keyboard is reflected from below chart).
Page 13
Basic Operation
(2) Special functions of soft keyboard
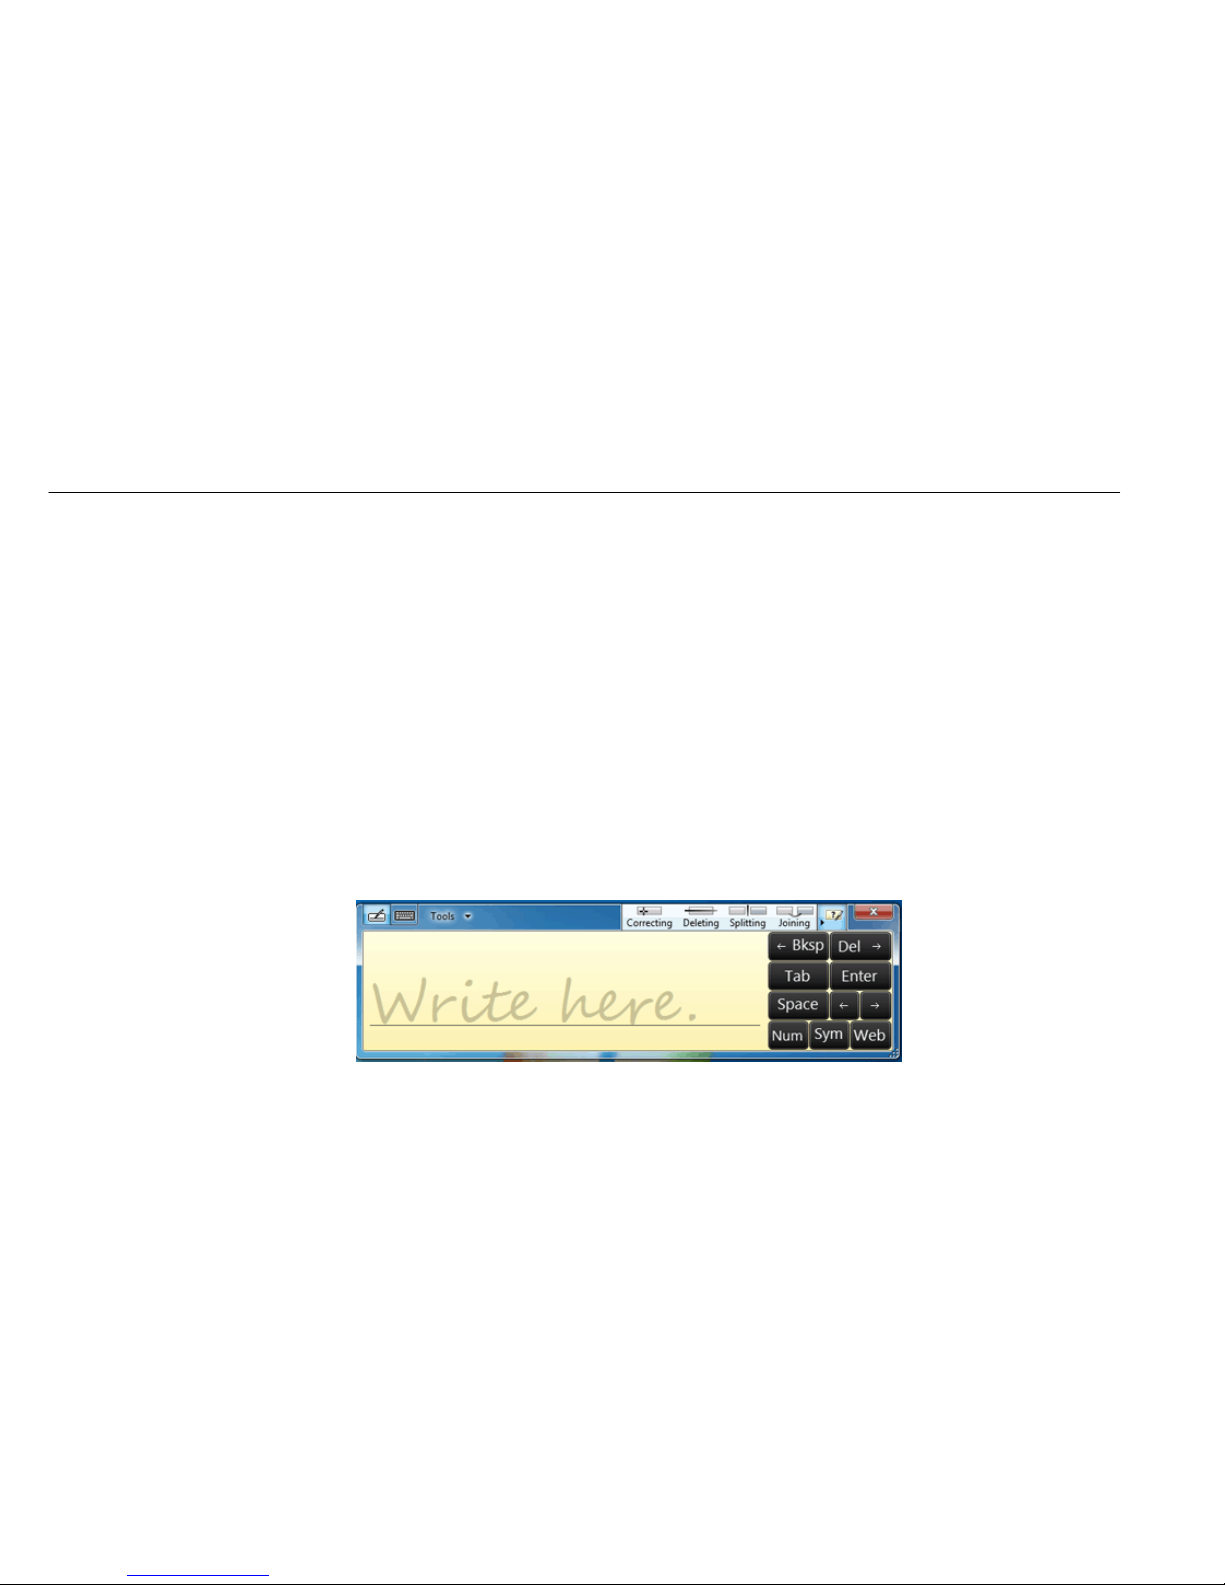
I. Handwirting
II. Button selection
III. Setup soft keyboard
IV. Shift input method
V. Close soft keyboard
Handwriting can be achived if pop-up following interface after click the “Handwirting” software ico of soft keyboard.
Page 14
Basic Operation
8. Keystroke introduction
The device has 4 shortcut keys with different functions as follows:
(1)Menu key-To realize ENTER key function under DOS system
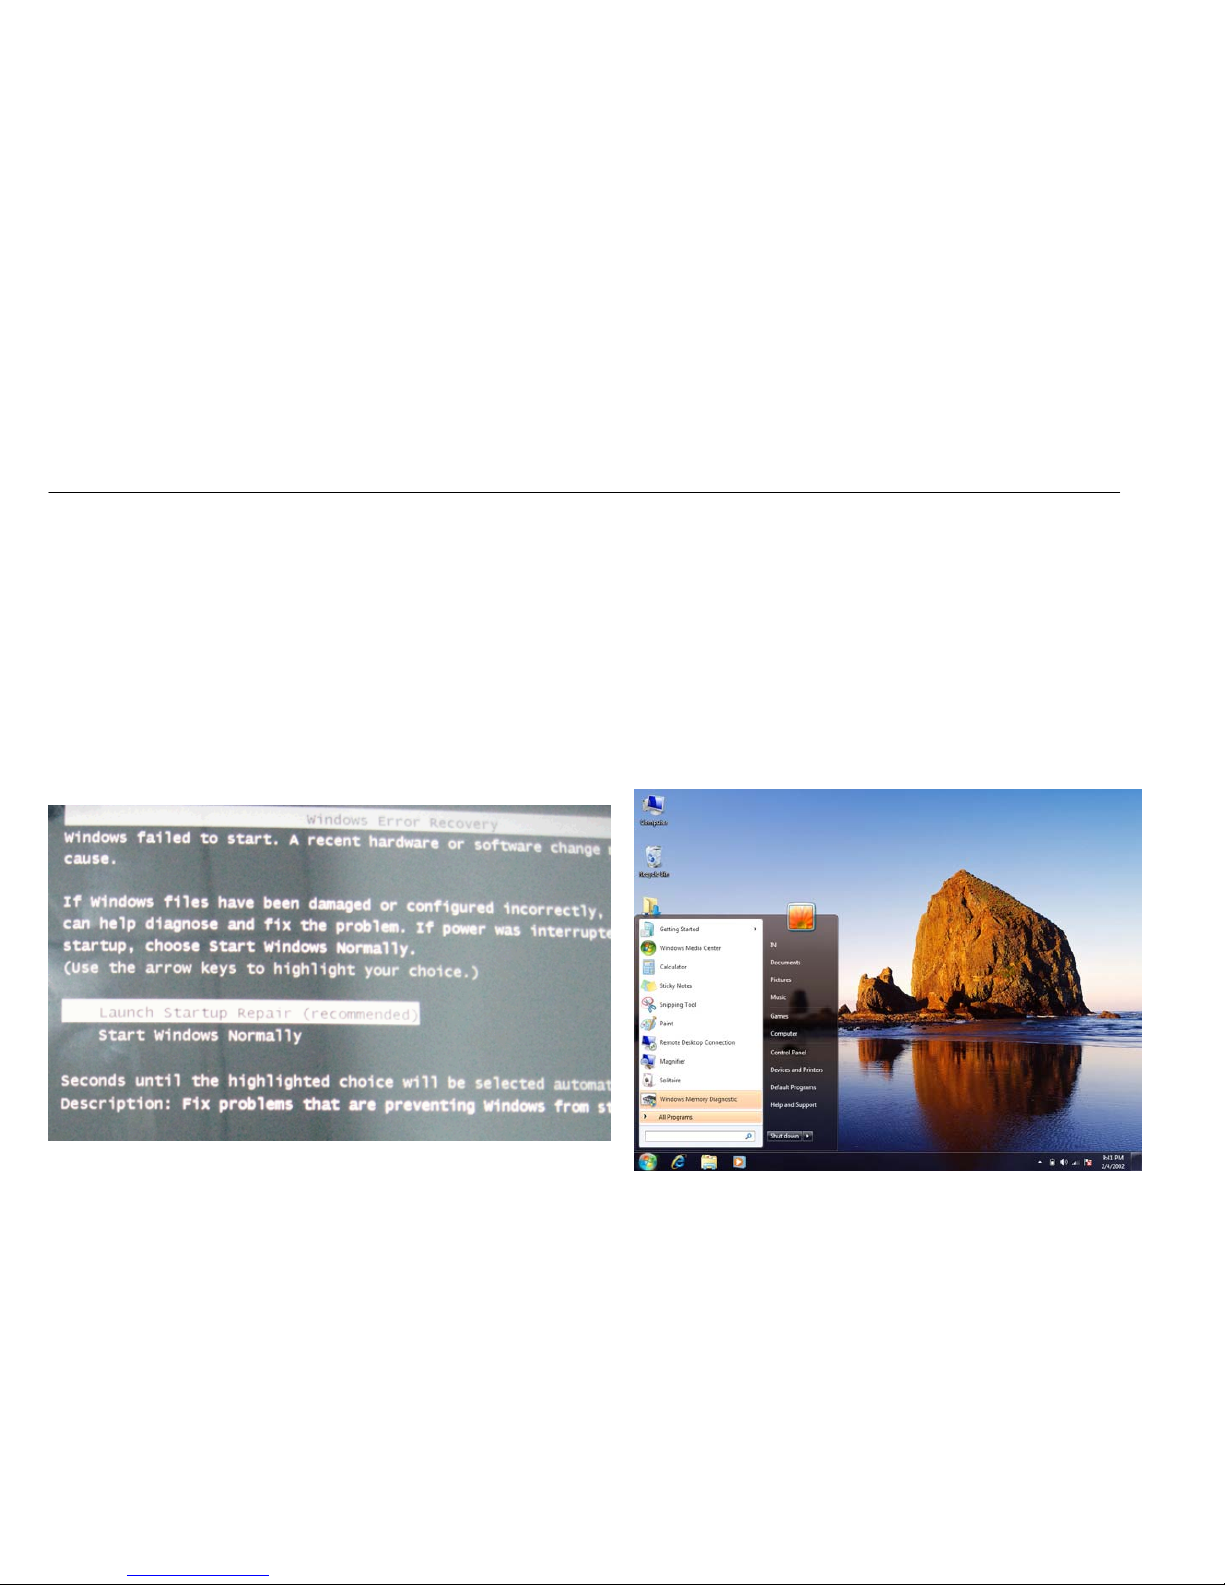
As below chart, the PC will enter following DOS interface during the next boot if shut the device abnormally, letting users to select between restore and
normal startup. Press Menu key to enter restore or normal startup status after selecting it.
Under normal win7 system, the Menu key is functioned to callout start menu, as reflected from below chart.
Page 15
Basic Operation
(2) Volume Up/Down Key—To realize the function of up-down selection key under DOS.
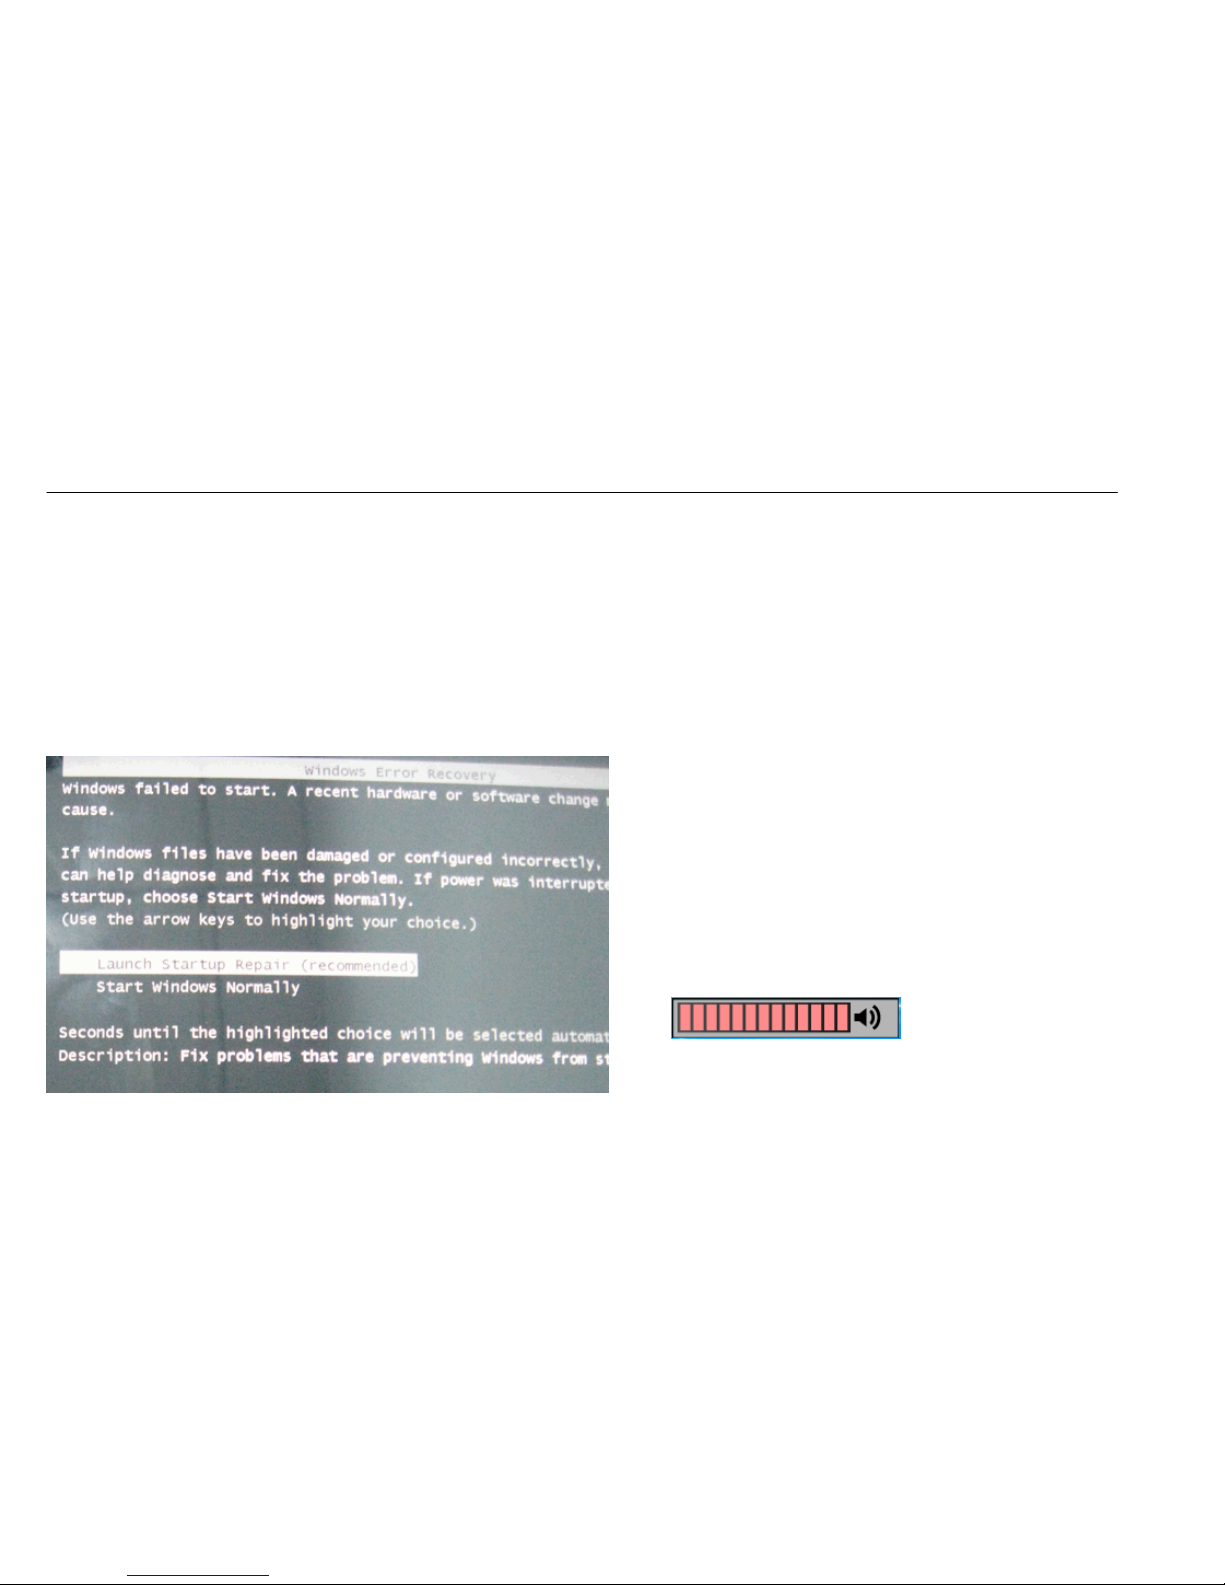
As below chart, the PC will enter following DOS interface during the next boot if shut the device abnormally, letting users to select between restore and
normal startup. Press Volume Up/Down Key to enter restore or normal startup status after selecting it.
Under normal win7 system, the Volume Up/Down Key is used to control volume up/down; press the key will appear bottom-right volume progress bar.
PS: The PC may support dual systems, being able to select system from boot menu via volume key and enter seleted system via Menu key
Page 16

Basic Operation
3. TP Lock Key-A slide switch.
The touch screen function will be effective if dial the switch to right. User can dial it to left to close touch screen function if using external mouse.
4. Reset Key
With built-in battery , it’ s inconvenient to take down it. While m eeting shut down or needing to power failure af ter update BIOS, the PC can be shut down by
pressing a needle object on the reset key, then boot can go on normally after shut down.
9. Open Camera
Win7 system doesn’t bear the instrument of opening camera. The camera can be opened via other software(QQ video) or third-party software, such as
amcap (as reflected from below chart).
Page 17
Basic Operation
10. Connect WIFI
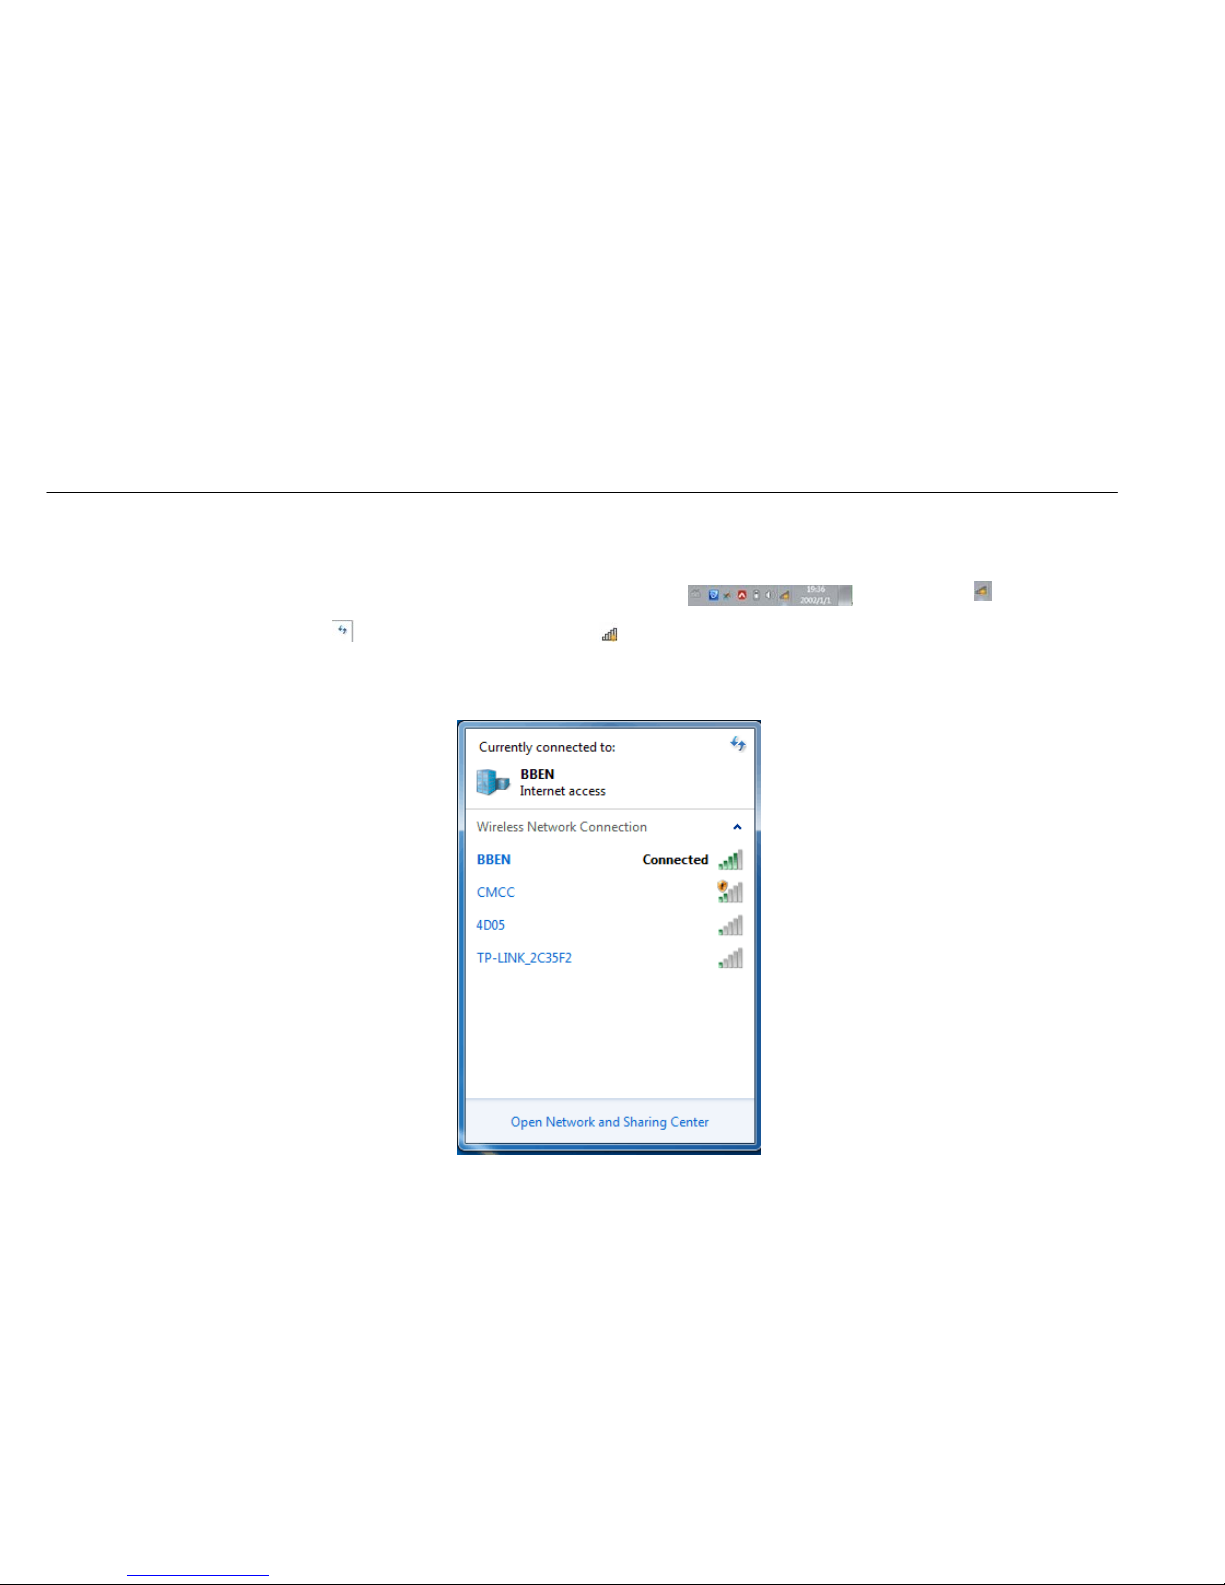
Setup “WIFI Wireless”of MID Manager to be “Open” condition, click the ico of desktop status column
, then searchable
wireless network will be pop up. Click to
refresh current wireless network. Represents current network can be connected for use, double-click one
of the available network (as liming TPlink A8 of below chart) , and wireless network can be effective after click “connect”.
Page 18
Basic Operation
11. Connect Bluetooth
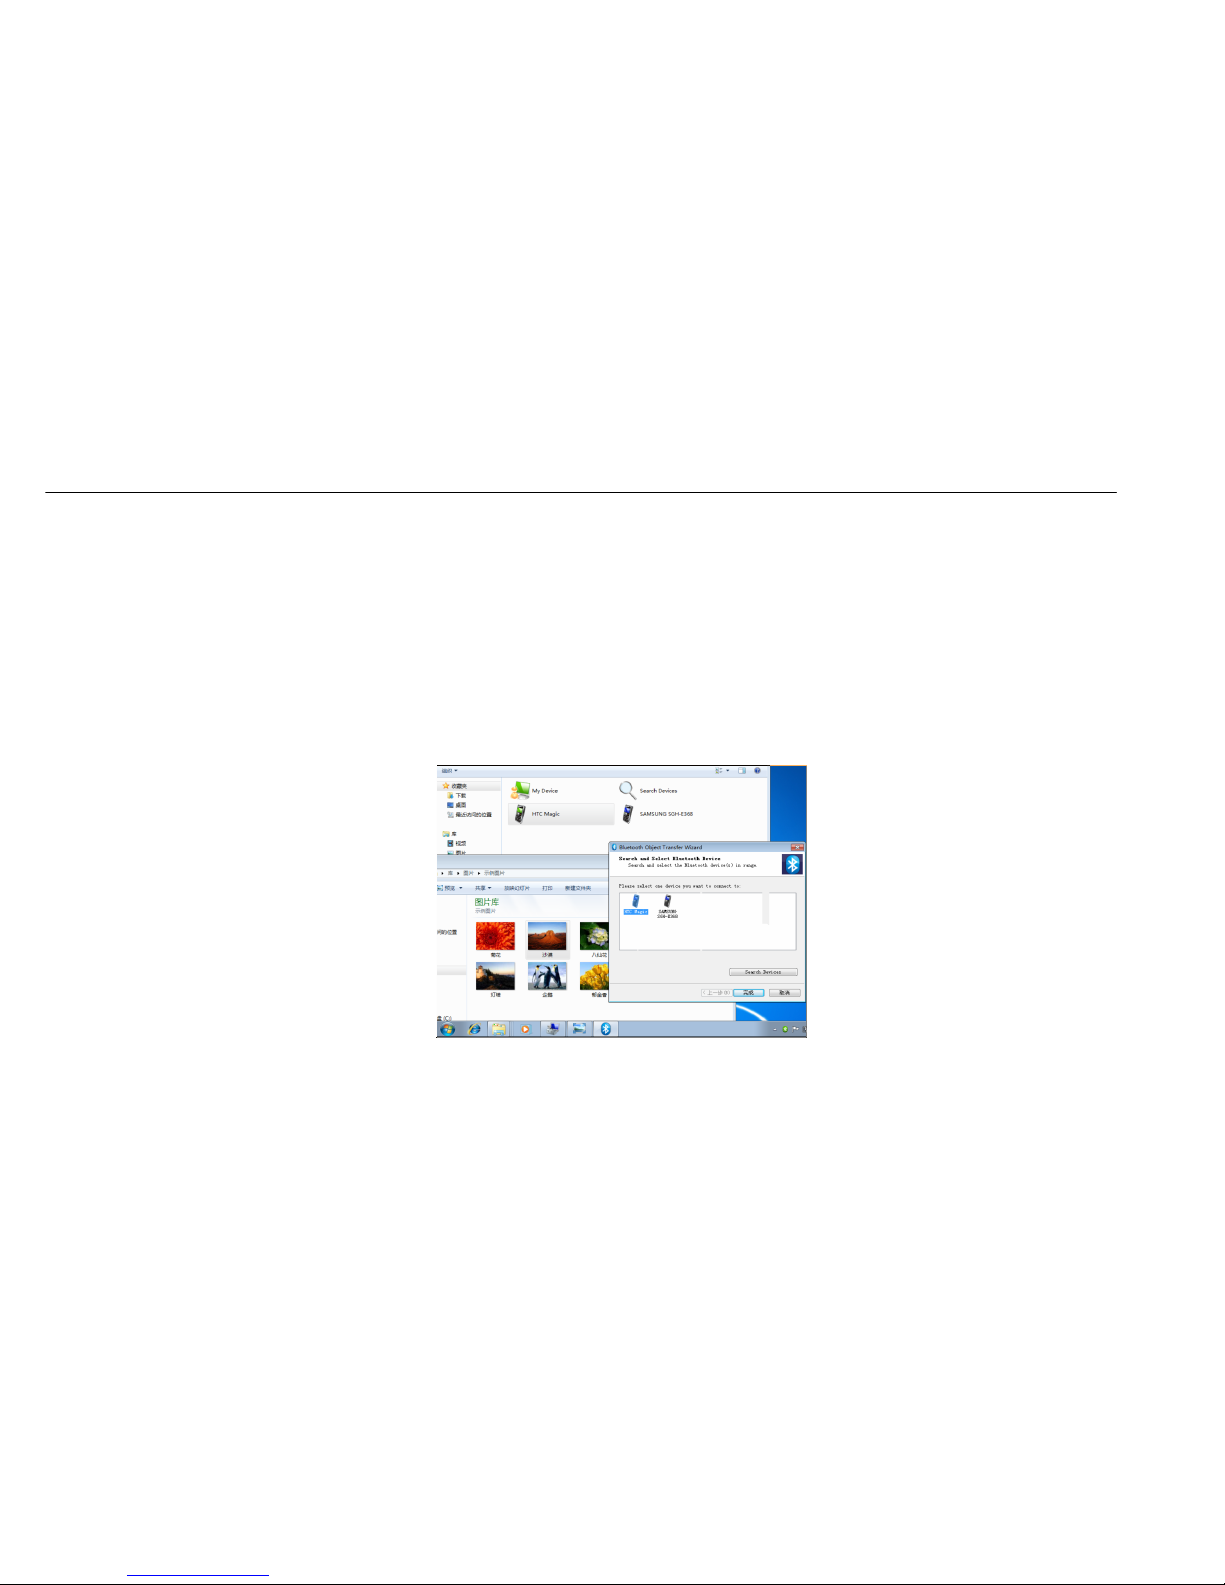
Setup “Bluetooth”of MID Manager to be “Open” condition, click the shortcut way of bluetooth ico on the desktop,then corresponding bluetooth terminal
will be opened. Following is cut example of HIC mobile phone. HIC Magic can be found via bluetooth search. The bluetooth ico on the bottom right corner
will be changed into green from blue after matching. Select one file(one picture) from the device, use right key to select and send via bluetooth. A dialog
box will appear to let you select and send to specific bluetooth terminal. Click and press completion to realize the documents sent mutually between two
bluetooth terminals.
Page 19
Basic Operation
12. 3G Connection
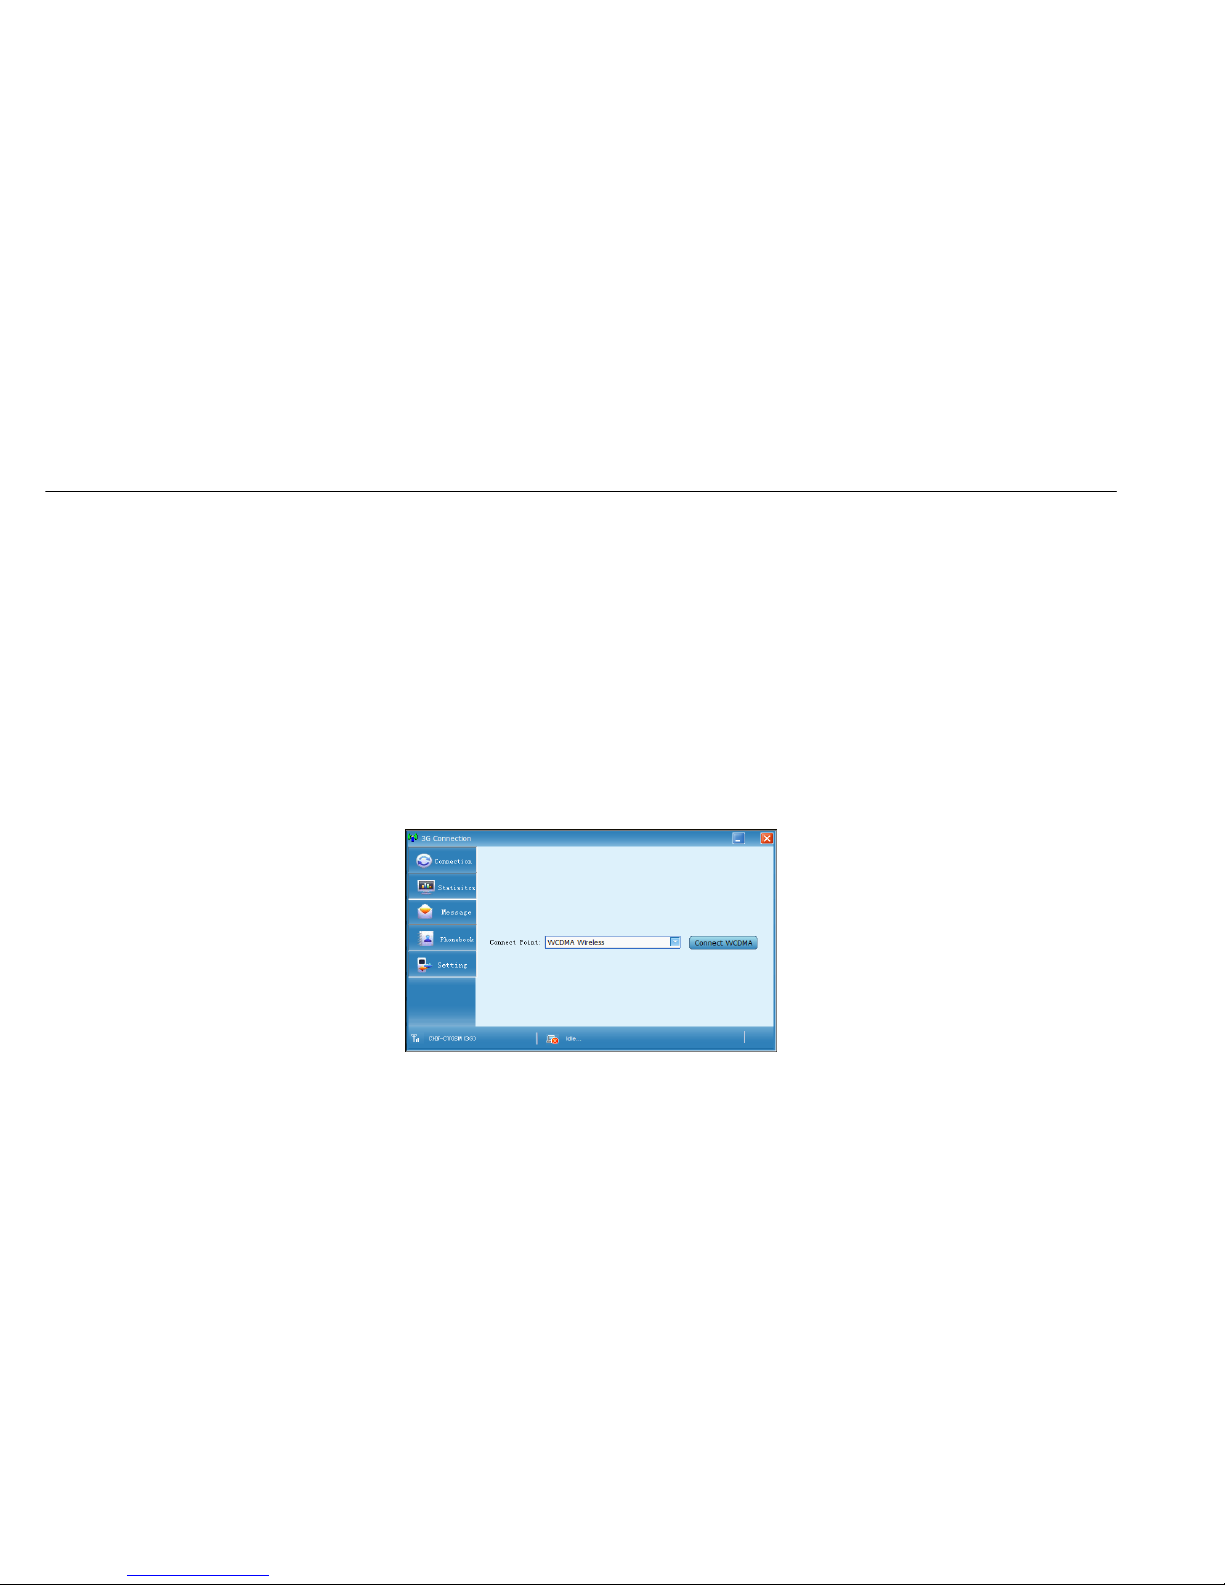
The device’s 3G is B2B connecting way, currently supporting EVDO/WCDMA system modules. Specific setting is as follows:
(1) Setup “3G Wireless”of MID Manager to be “Open” condition
(2) A client terminal program will be set up on the desktop after installing 3G module drive.
(3) Double-click the client program to appear the interface of below chart.
(4) Click connect wcdma if SIM is open for 3G business, then Internet can get on via 3G card after connecting successfully/
Page 20
Basic Operation
13. System Optimization
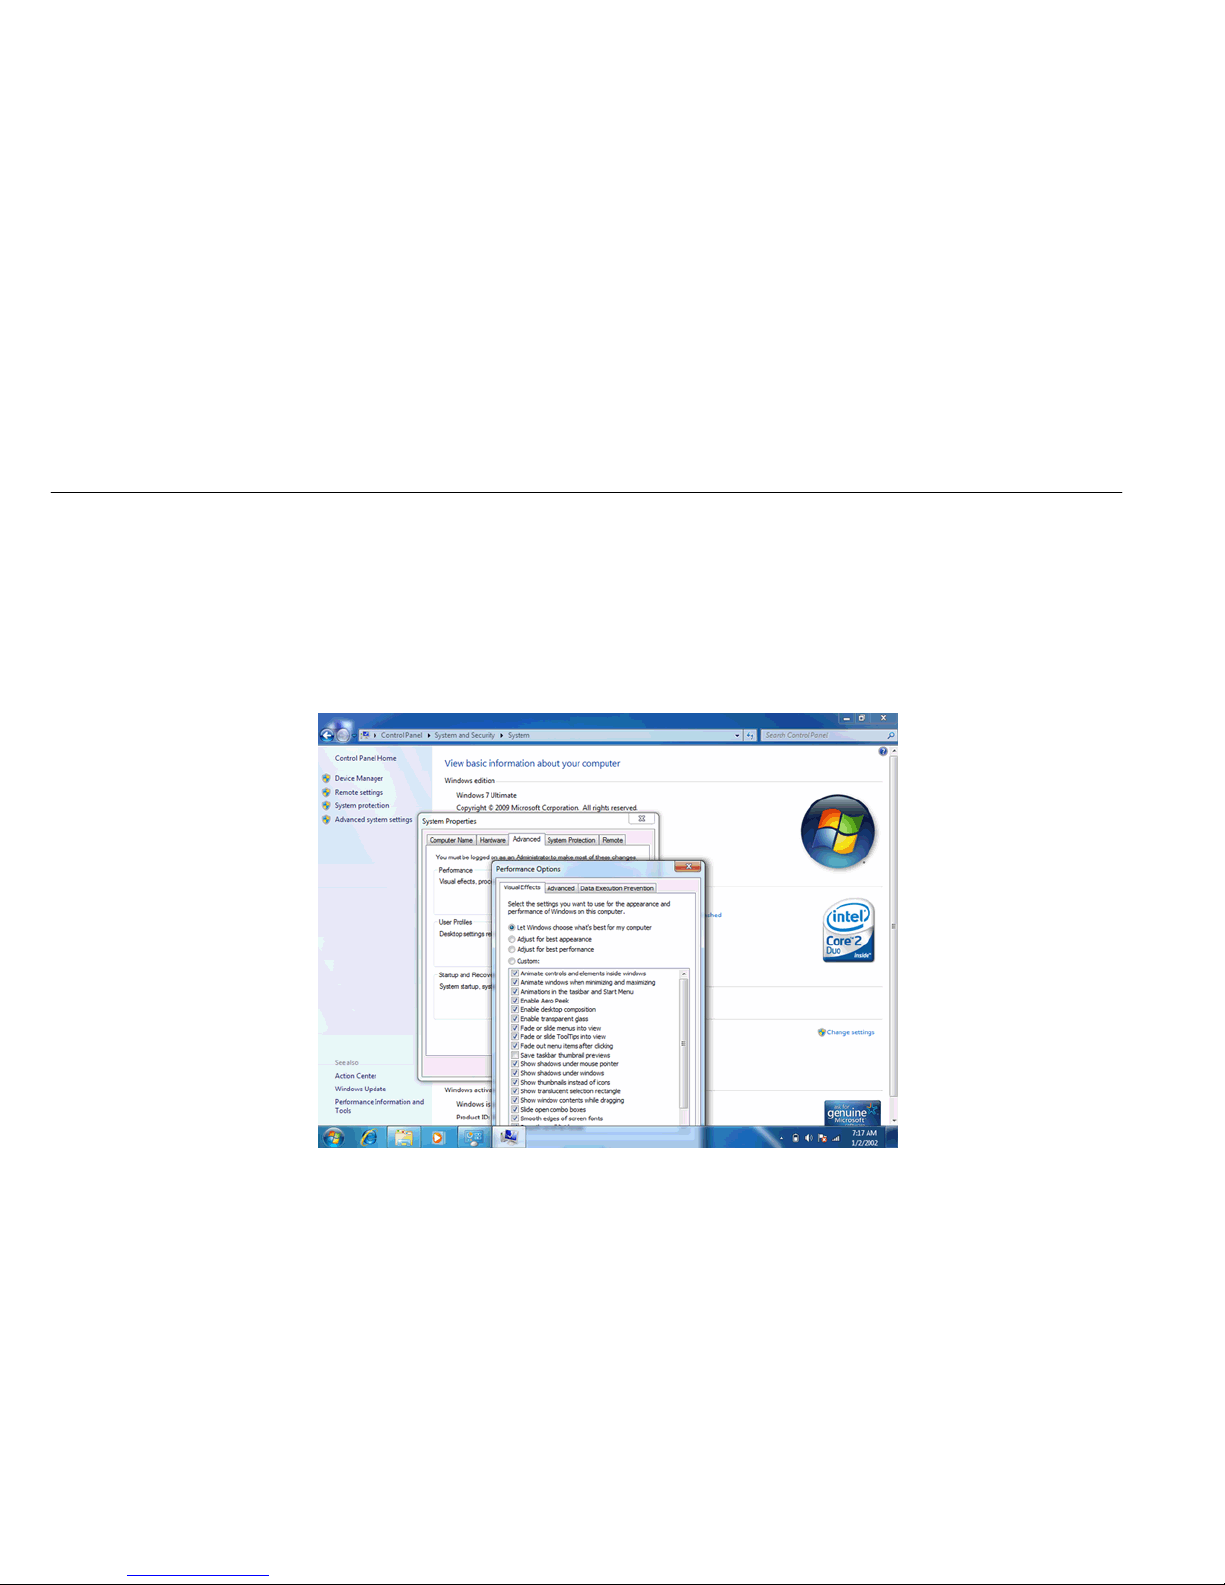
With many cartoons and lucent display effect, win7 system occupies great resource. Suitable styles can be adjusted between system appearance and
performance via following setup:
(1) Right-click My Computer-Select Properties-Advanced-Setup
(2) Select to adjust to best appearance, best performance and define own appearance and performance under the interface of performance option.
Page 21
Basic Operation
14. System Installation
The PC doesn’t have CD-Driver. If wanting to install operating system, user can use USB driver or install via U disk after writing the system into U disk.
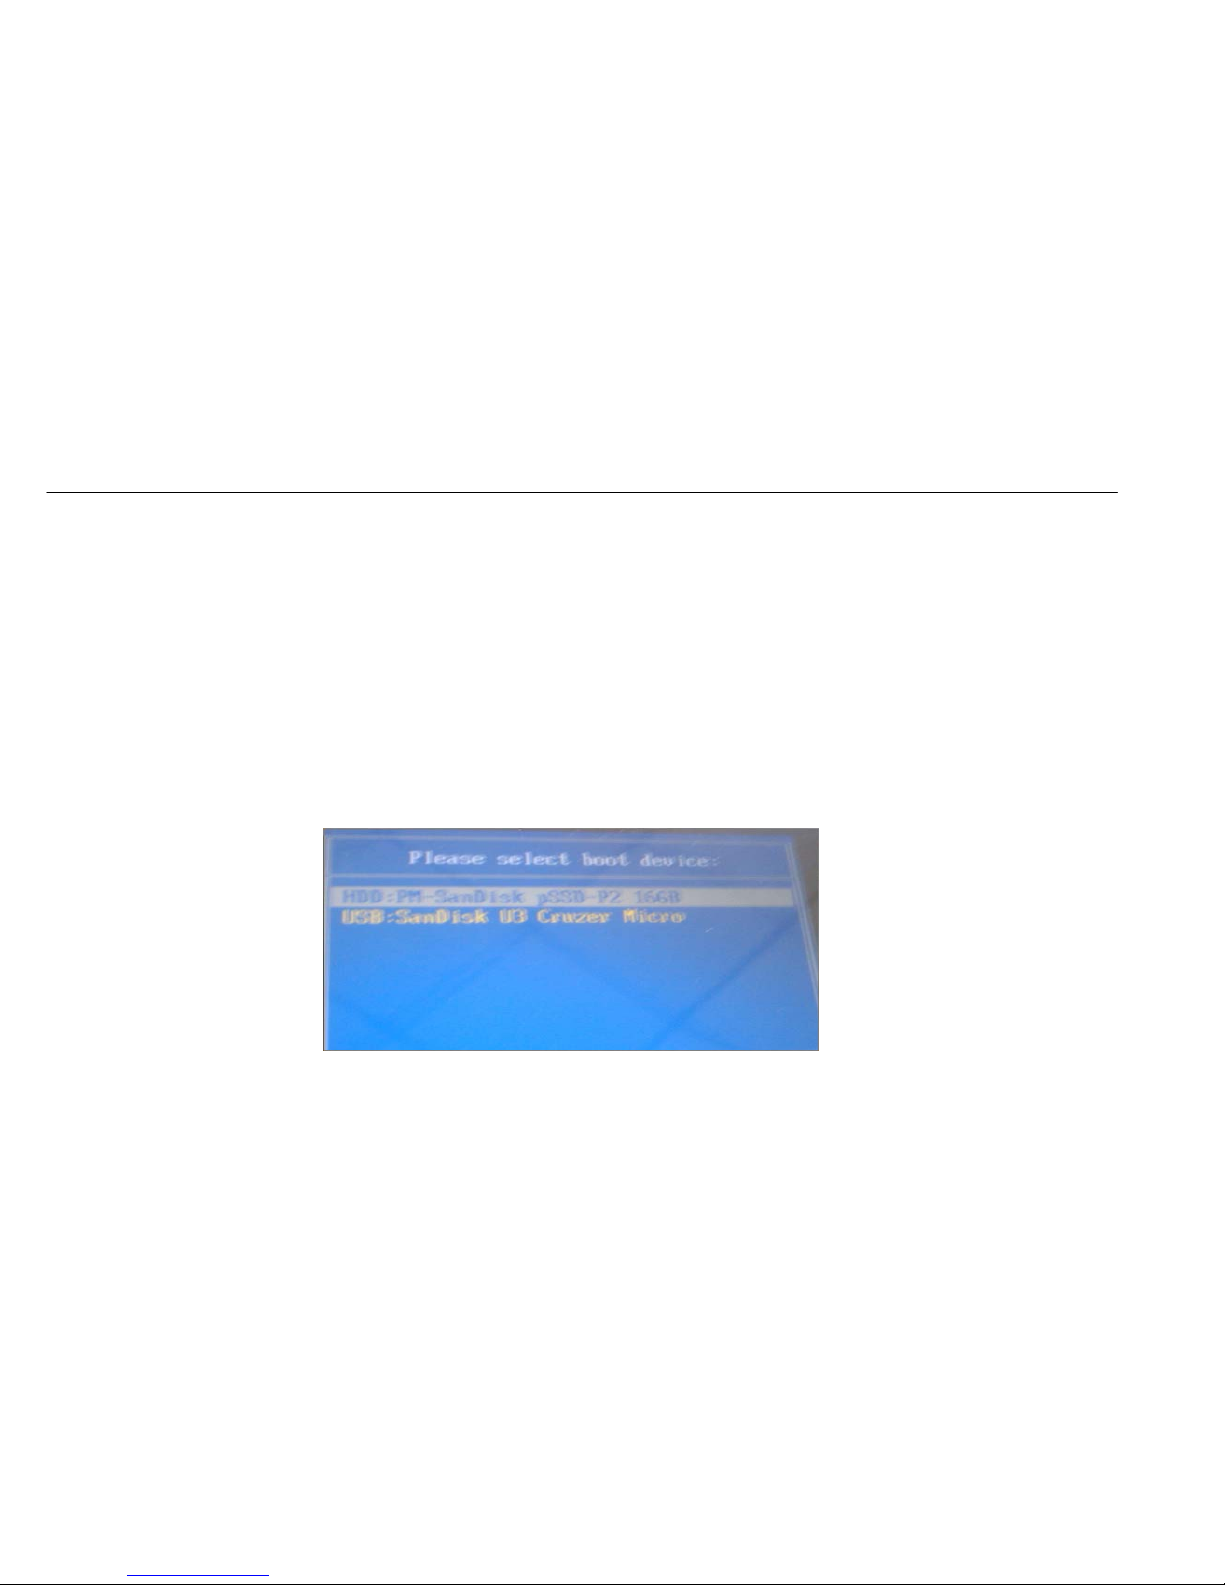
Connect external keyboard, press Esc key after shifting boot key, then select BOOT device after appearing below image:
HDD shows that start-up from hardware normally, being able to boot to operating system.
USB shows that start-up from USB device. If the USB device has system installation document, operating system can be installed after entering USB
device.
Page 22

Specofications
Operating Systems Support Windows XP® / Windows 7®
CPU Intel® Atom™ Z510 1.1GHz~Z530 1.6GHz
Chipset Poulsbo US15W
RAM On board DDR2 533/667 MHz 1G
Display 9.7-inch 1024x768 resolution With Touch Panel
Memory device 16~32GB SSD
High-definition audio compliant
Audio
Integrated Speaker & Integrated Microphone
Wi-Fi 802.11b/g
3G Support (WCDMA / EVDO)
Communication
Bluetooth
Size 242mm x189mm x 14.8mm
Weight 660g
Input/Output Touch Panel
Battery 4 cell 7.4 V 3800mAh
Interface 1xdocking, Microphone&Earphone Jack, DC-IN Jack
Camera 1.3 Mega Pixels Camera
 Loading...