

Page 1
WinPAC-5000 Series User Manual, Version 1.0.2 Page: 1
Copyright © 2010 ICP DAS Co., Ltd. All Rights Reserved. E-mail: service@icpdas.com
WinPAC-5000 User Manual
(WinCE Based, eVC & .net)
Version 1.0.2, December 2010
Service and usage information for
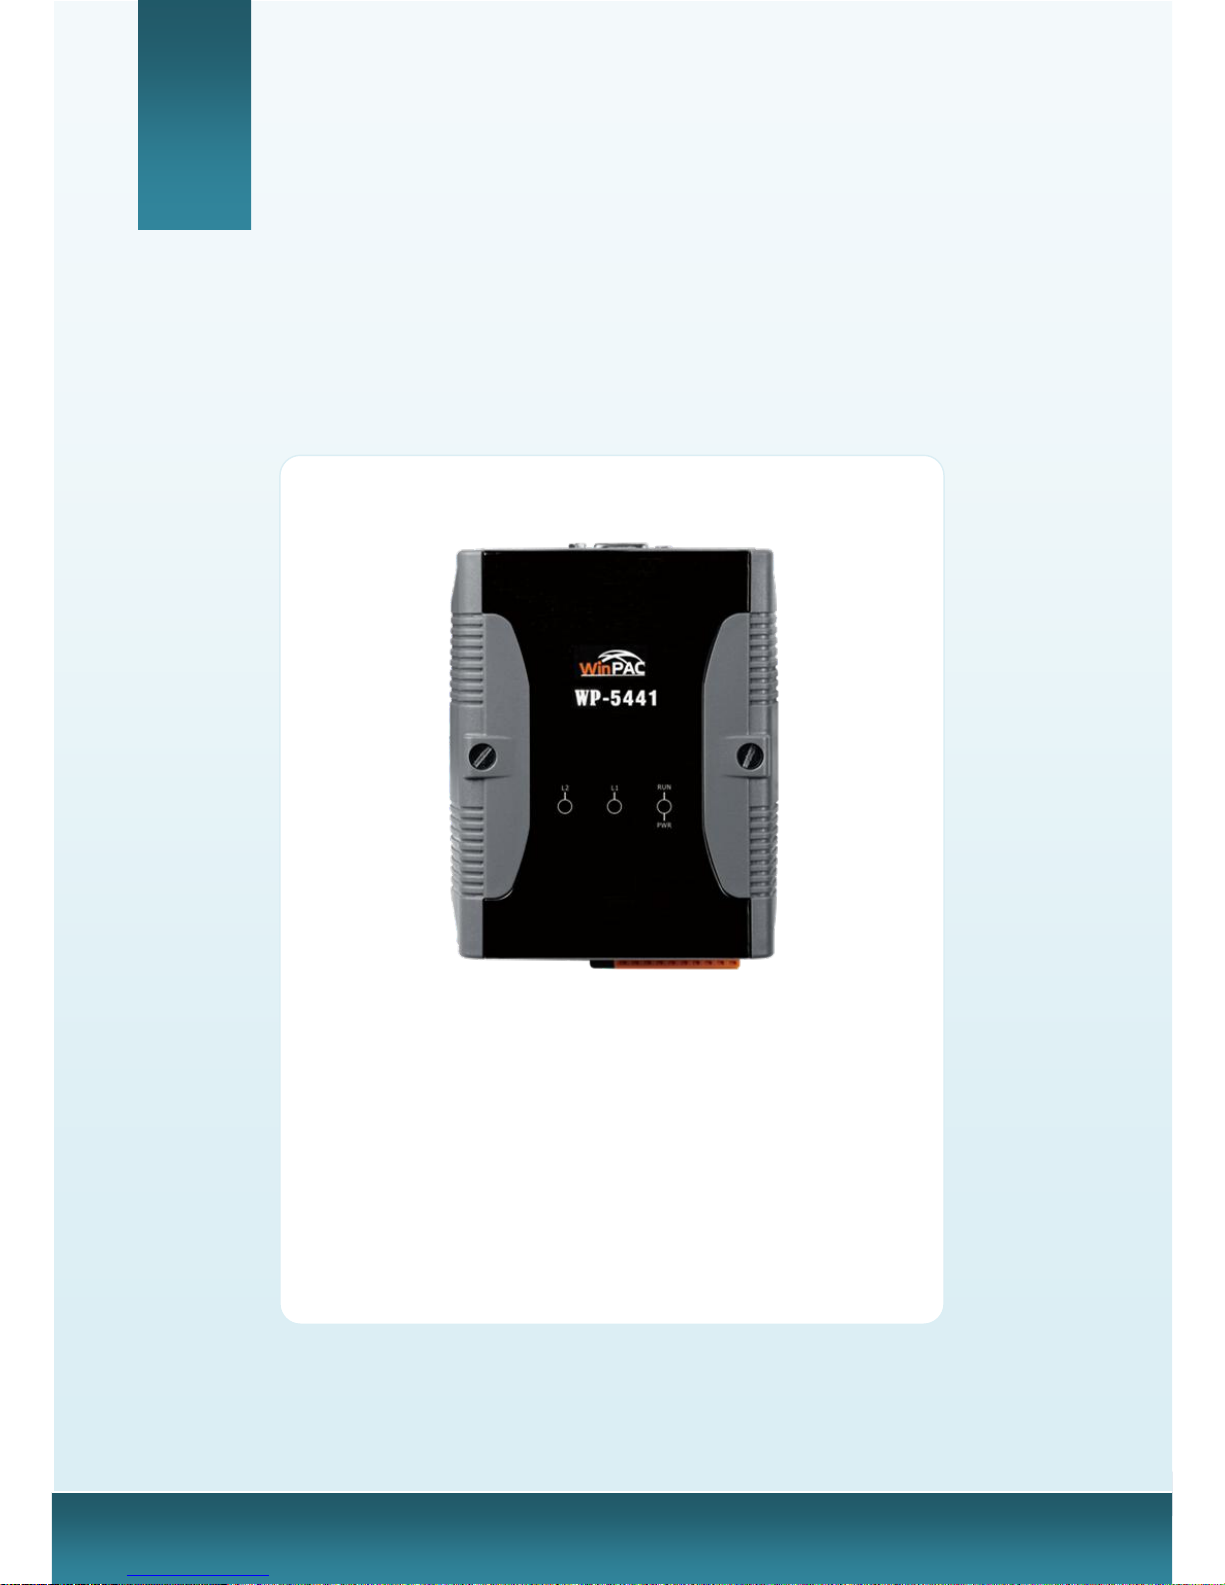
WinPAC-5141
WinPAC-5441
Page 2

WinPAC-5000 Series User Manual, Version 1.0.2 Page: 2
Copyright © 2010 ICP DAS Co., Ltd. All Rights Reserved. E-mail: [email protected]
Warranty
All products manufactured by ICP DAS are under warranty regarding
defective materials for a period of one year, beginning from the date
of delivery to the original purchaser.
Warning
ICP DAS assumes no liability for any damage resulting from the use of
this product.ICP DAS reserves the right to change this manual at any
time without notice. The information furnished by ICP DAS is believed
to be accurate and reliable. However, no responsibility is assumed by
ICP DAS for its use, not for any infringements of patents or other
rights of third parties resulting from its use.
Copyright
Copyright @ 2010 by ICP DAS Co., Ltd. All rights are reserved.
Trademark
The names used for identification only may be registered trademarks
of their respective companies.
Contact US
If you have any problem, please feel free to contact us.
You can count on us for quick response.
Email: [email protected]
Page 3

WinPAC-5000 Series User Manual, Version 1.0.2 Page: 3
Copyright © 2010 ICP DAS Co., Ltd. All Rights Reserved. E-mail: [email protected]
Table of Contents
1. Introduction ............................................................................................................ 6
1.1. WinPAC-5000 Family ................................................................................... 7
1.1.1. WinPAC-5000 Naming Convention .................................................... 7
1.1.2. WinPAC-5000 Comparison ................................................................ 8
1.2. Features ....................................................................................................... 9
1.3. Specifications ............................................................................................. 12
1.4. Overview .................................................................................................... 14
1.5. Dimension .................................................................................................. 19
1.6. Companion CD ........................................................................................... 20
2. Getting Started ..................................................................................................... 21
2.1. Mounting the Hardware .............................................................................. 21
2.2. Configuring the Boot Mode......................................................................... 24
2.3. Changing the Language of the User Interface............................................ 26
2.4. Using WinPAC Utility to Configure WinPAC-5000 Basic Functionality ....... 28
3. Tools and Tasks .................................................................................................... 32
3.1. Backup Utility ............................................................................................. 35
3.2. Dconmcnfg ................................................................................................. 37
3.3. Napopc_ce5 ............................................................................................... 38
3.4. SendToCOM ............................................................................................... 39
3.5. VCEP ......................................................................................................... 40
3.6. WinPAC_Utility ........................................................................................... 41
3.6.1. Menu Bar ......................................................................................... 42
3.6.2. Property Tabs ................................................................................... 47
4. Your First Program ............................................................................................... 56
4.1. Preparing the Development Tools .............................................................. 57
4.2. Installing WinPAC-5000 SDK ..................................................................... 58
4.3. Your First Program in C# ............................................................................ 59
4.3.1. Creating a New Project .................................................................... 59
Page 4

WinPAC-5000 Series User Manual, Version 1.0.2 Page: 4
Copyright © 2010 ICP DAS Co., Ltd. All Rights Reserved. E-mail: [email protected]
4.3.2. Adding the WinPAC-5000 Reference ................................ ............... 61
4.3.3. Adding the Control to the Form ........................................................ 62
4.3.4. Adding the Event Handling to the Control ........................................ 64
4.3.5. Upload the Application to WinPAC-5000 .......................................... 66
4.3.6. Executing the Application on WinPAC-5000 ..................................... 68
4.4. Your First Program in VB.net ...................................................................... 69
4.4.1. Creating a New Project .................................................................... 69
4.4.2. Adding the WinPAC-5000 Reference ................................ ............... 71
4.4.3. Adding the Control to the Form ........................................................ 72
4.4.4. Adding the Event Handling to the Control ........................................ 74
4.4.5. Upload the Application to WinPAC-5000 .......................................... 75
4.4.6. Executing the Application on WinPAC-5000 ..................................... 77
4.5. Your First Program in eMbedded Visual C++ ............................................. 78
4.5.1. Creating a Forms-Based Project ...................................................... 78
4.5.2. Configuring the Platform .................................................................. 83
4.5.3. Specifying the Path of the WinPAC-5000 Reference ....................... 84
4.5.4. Adding the Control to the Form ........................................................ 88
4.5.5. Adding the Event Handling to the Control ........................................ 90
4.5.6. Upload the Application to WinPAC-5000 .......................................... 92
4.5.7. Executing the Application on WinPAC-5000 ..................................... 94
5. APIs and Demo Programs .................................................................................... 95
5.1. Demo Programs with C# ............................................................................ 96
5.1.1. C# Demo Programs for WinPAC Standard API ................................ 96
5.1.2. C# Demo Programs for PAC I/O API ................................................ 98
5.2. Demo Programs with eVC++.................................................................... 100
5.2.1. eVC++ Demo Programs for WinPAC Standard API ....................... 100
5.2.2. eVC++ Demo Programs for PAC I/O API ....................................... 102
6. WinPAC-5000 Updates ...................................................................................... 104
6.1. OS Updates .............................................................................................. 105
6.1.1. OS Updates Using Installation Package File .................................. 107
6.1.2. OS Updates Using Eshell via Ethernet............................................ 111
Page 5

WinPAC-5000 Series User Manual, Version 1.0.2 Page: 5
Copyright © 2010 ICP DAS Co., Ltd. All Rights Reserved. E-mail: [email protected]
6.2. SDKs Updates .......................................................................................... 116
6.2.1. WinPAC SDK updates for C# or VB.net ......................................... 117
6.2.2. WinPAC SDK updates for eVC++ .................................................. 118
Appendix A. Tips-How to ........................................................................................ 119
A.1. How to add a User Account ..................................................................... 120
A.1.1. How to Use telnet to remote login the WinPAC from PC ....................... 122
A.1.2. How to remove the user from the login list ............................................ 124
A.2. How to online debug WinPAC .................................................................. 125
A.2.1. Debug WinPAC programs in EVC++ ............................................. 125
A.2.2. Debug WinPAC programs in Visual Studio 2005/2008 .................. 134
A.3. How to use the printer .............................................................................. 143
A.3.1. How to use network printer ............................................................ 144
A.3.2. How to use printer via USB ............................................................ 146
A.4. How to use services tool .......................................................................... 147
A.5. How to use ActiveSync through USB port ................................................ 150
A.6. How to automatically synchronize the WinPAC clock with an Internet Time
Server ............................................................................................................. 157
Appendix B. XW-board Modules ............................................................................ 159
Appendix C. Revision History ................................................................................. 160
Page 6

WinPAC-5000 Series User Manual, Version 1.0.2 Page: 6
Copyright © 2010 ICP DAS Co., Ltd. All Rights Reserved. E-mail: [email protected]
1. Introduction
WinPAC-5000 Series is the new generation PAC (Programmable Automation
Controller). It is equipped a PXA270 CPU (520 MHz) running a Windows CE.NET
5.0 operating system, various connectivity (VGA, USB, Ethernet, RS-232/485) and
I/O expansion bus.
The WinPAC-5000 series has many advantages, including hard real-time capability,
small core size, fast boot speed, interrupt handling at a deeper level, achievable
deterministic control and low cost. Using Windows CE.NET 5.0 gives it the ability to
run PC-based control software such as Visual Basic.NET, Visual C#, Embedded
Visual C++, SCADA software, SoftPLC …etc. It give users all of the best features of
both traditional PLCs and Windows capable PCs.
For hardware expansion, it also supports an I/O expansion bus. The I/O expansion
bus can be used to implement various I/O functions such as D/I, D/O,A/ D, D/A,
Timer/Counter, UART, and other I/O functions. Nearly all kinds of I/O functions can
be implemented by this bus. But the bus can support only one board. There are
more than 10 boards available for WinPAC-5000 series, users can choose one of
them to expand hardware features.
Page 7
WinPAC-5000 Series User Manual, Version 1.0.2 Page: 7
Copyright © 2010 ICP DAS Co., Ltd. All Rights Reserved. E-mail: [email protected]
1.1. WinPAC-5000 Family
The WinPAC-5000 family is divided into two main types according to Audio port.
▪ WP-5141 (without Audio port)
▪ WP-5441 (with Audio port)
For more detailed comparison information, please refer to “1.1.2. WinPAC-5000
Comparison”
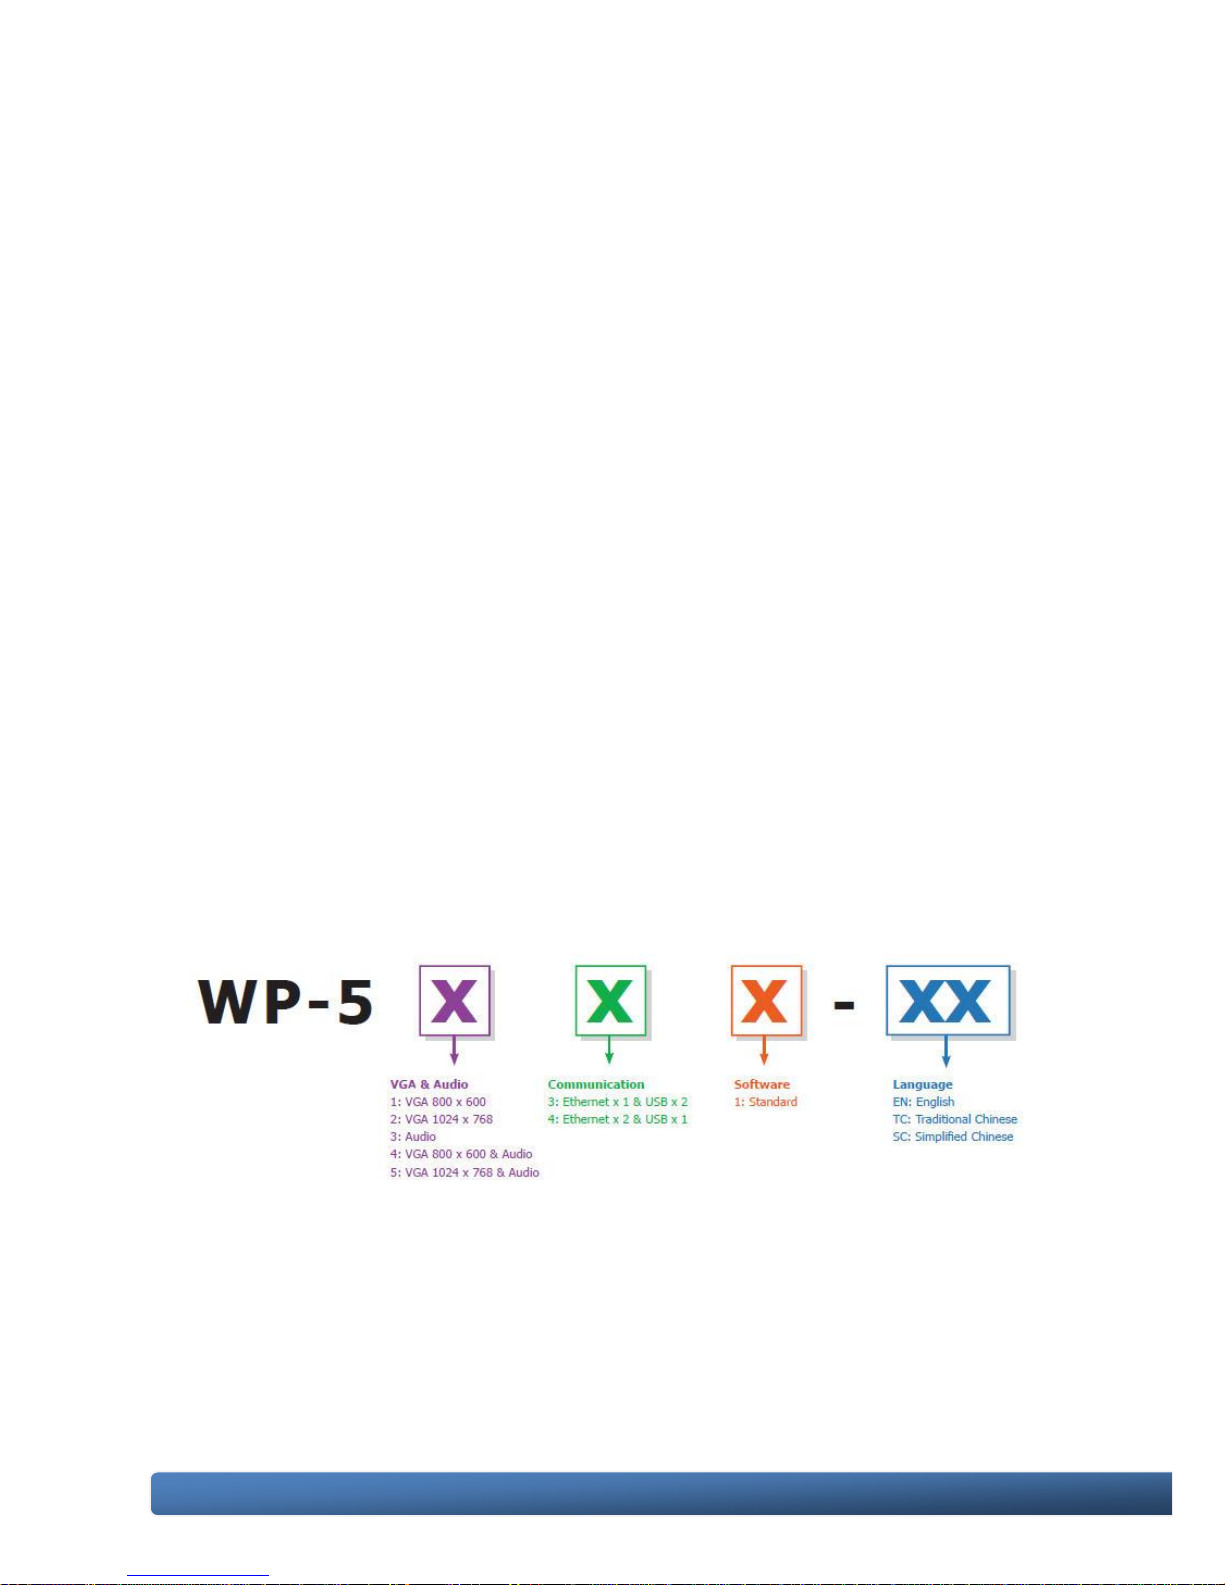
1.1.1. WinPAC-5000 Naming Convention
As you examine this manual, you„ll notice there are many different models available.
Sometimes it is difficult to remember the specifications for any given model.
However, if you take a few minutes to understand the module naming conventions, it
may save you some time and confusion. The figure below shows how the module
naming conventions work for each WinPAC-5000 model.
Page 8

WinPAC-5000 Series User Manual, Version 1.0.2 Page: 8
Copyright © 2010 ICP DAS Co., Ltd. All Rights Reserved. E-mail: [email protected]
1.1.2. WinPAC-5000 Comparison
The following table shows the comparison in all the features of WinPAC-5000 family.
Model
OS
CPU
Flash
SDRAM
Ethernet
VGA
Resolution
RS-232/
RS-485
I/O Expansion Bus
Audio Port
WP-5141
CE5.0
PXA270
520 MHz
64 MB
128 MB
2
800 x 600
2
Yes
(for XW-board only)
No
WP-5441
Yes
Page 9
WinPAC-5000 Series User Manual, Version 1.0.2 Page: 9
Copyright © 2010 ICP DAS Co., Ltd. All Rights Reserved. E-mail: [email protected]
1.2. Features
The key features of WinPAC-5000 include:
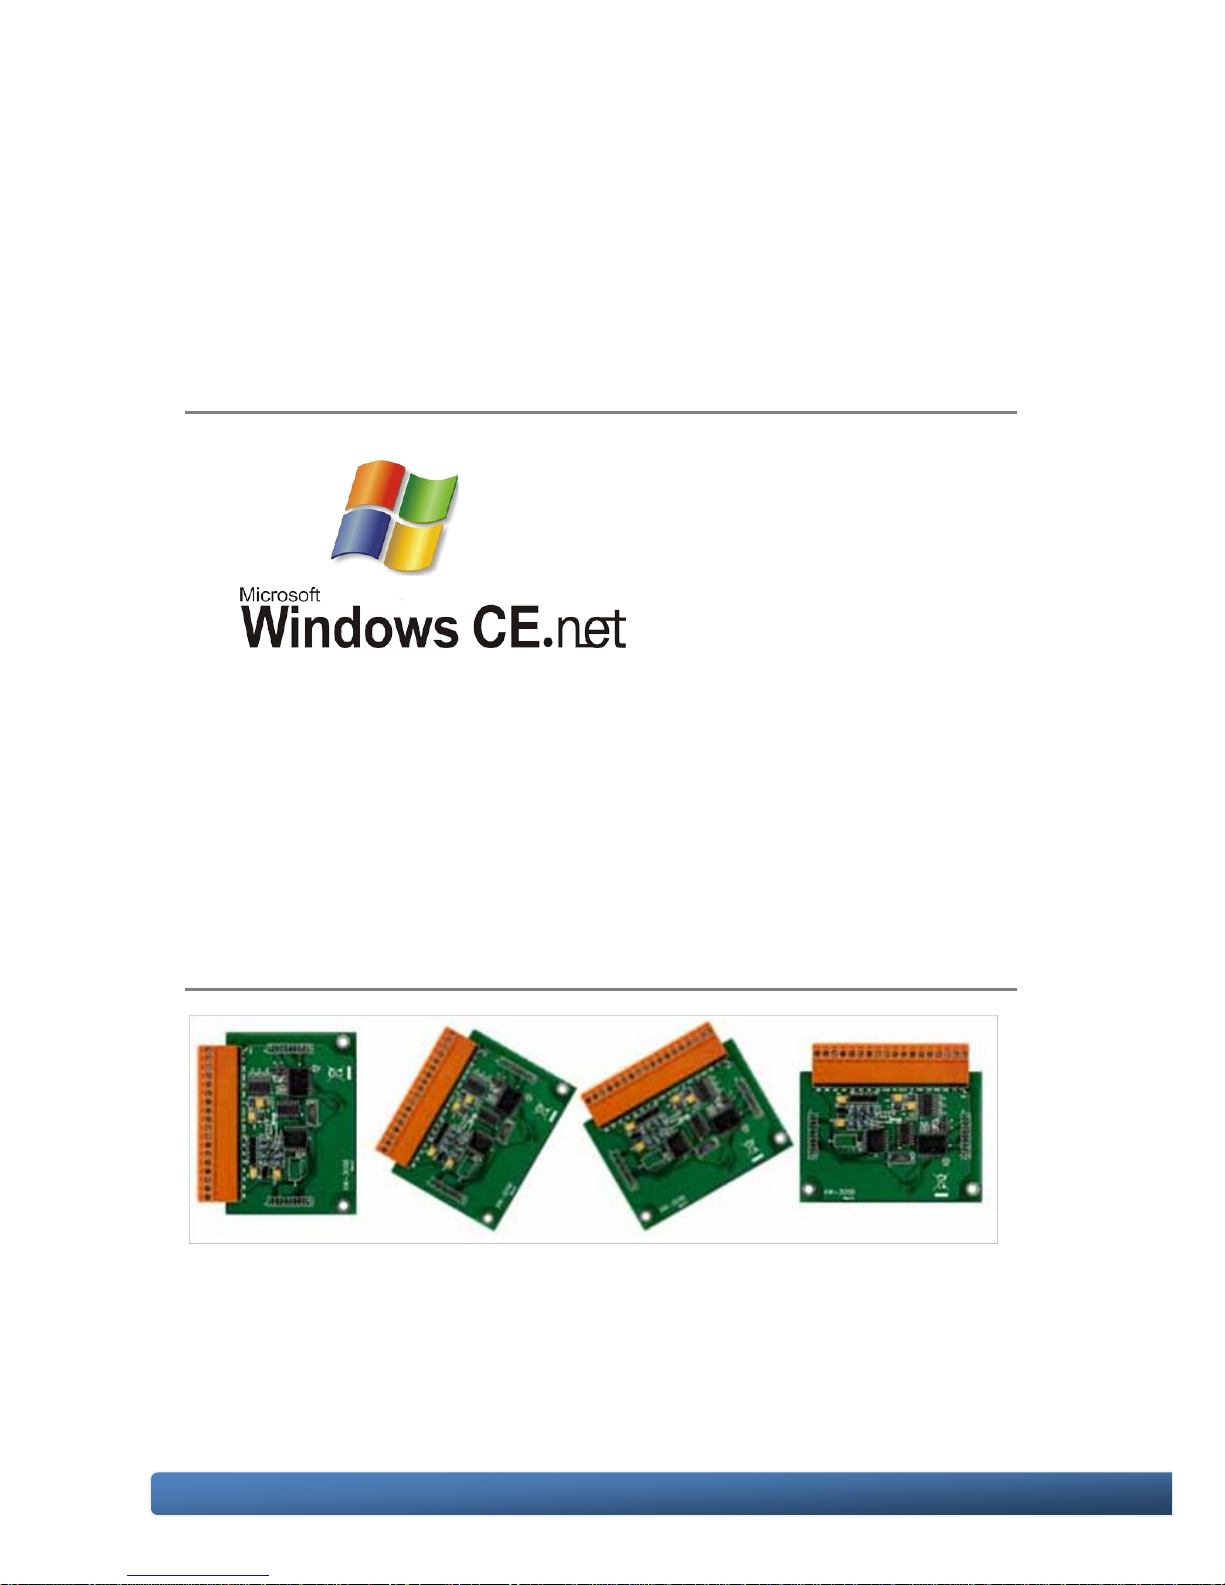
Windows CE.Net 5.0
● Supports PC based software: eVC and VS.NET
● Web server, FTP server, Telnet server
● ISaGRAF version for IEC 61131-3 programming
● InduSoft version for SCADA solution
Local I/O and Communication Expansion Board
WinPAC-5000 series equip an I/O expansion bus to support one optional expansion
board, called XW-board. It can be used to implement various I/O functions such as
DI, DO, A/D, D/A, Timer/Counter and various communication interface, such as
RS-232/422/485, CAN, FRnet, etc.
Page 10
WinPAC-5000 Series User Manual, Version 1.0.2 Page: 10
Copyright © 2010 ICP DAS Co., Ltd. All Rights Reserved. E-mail: [email protected]
Various Memory Expansions
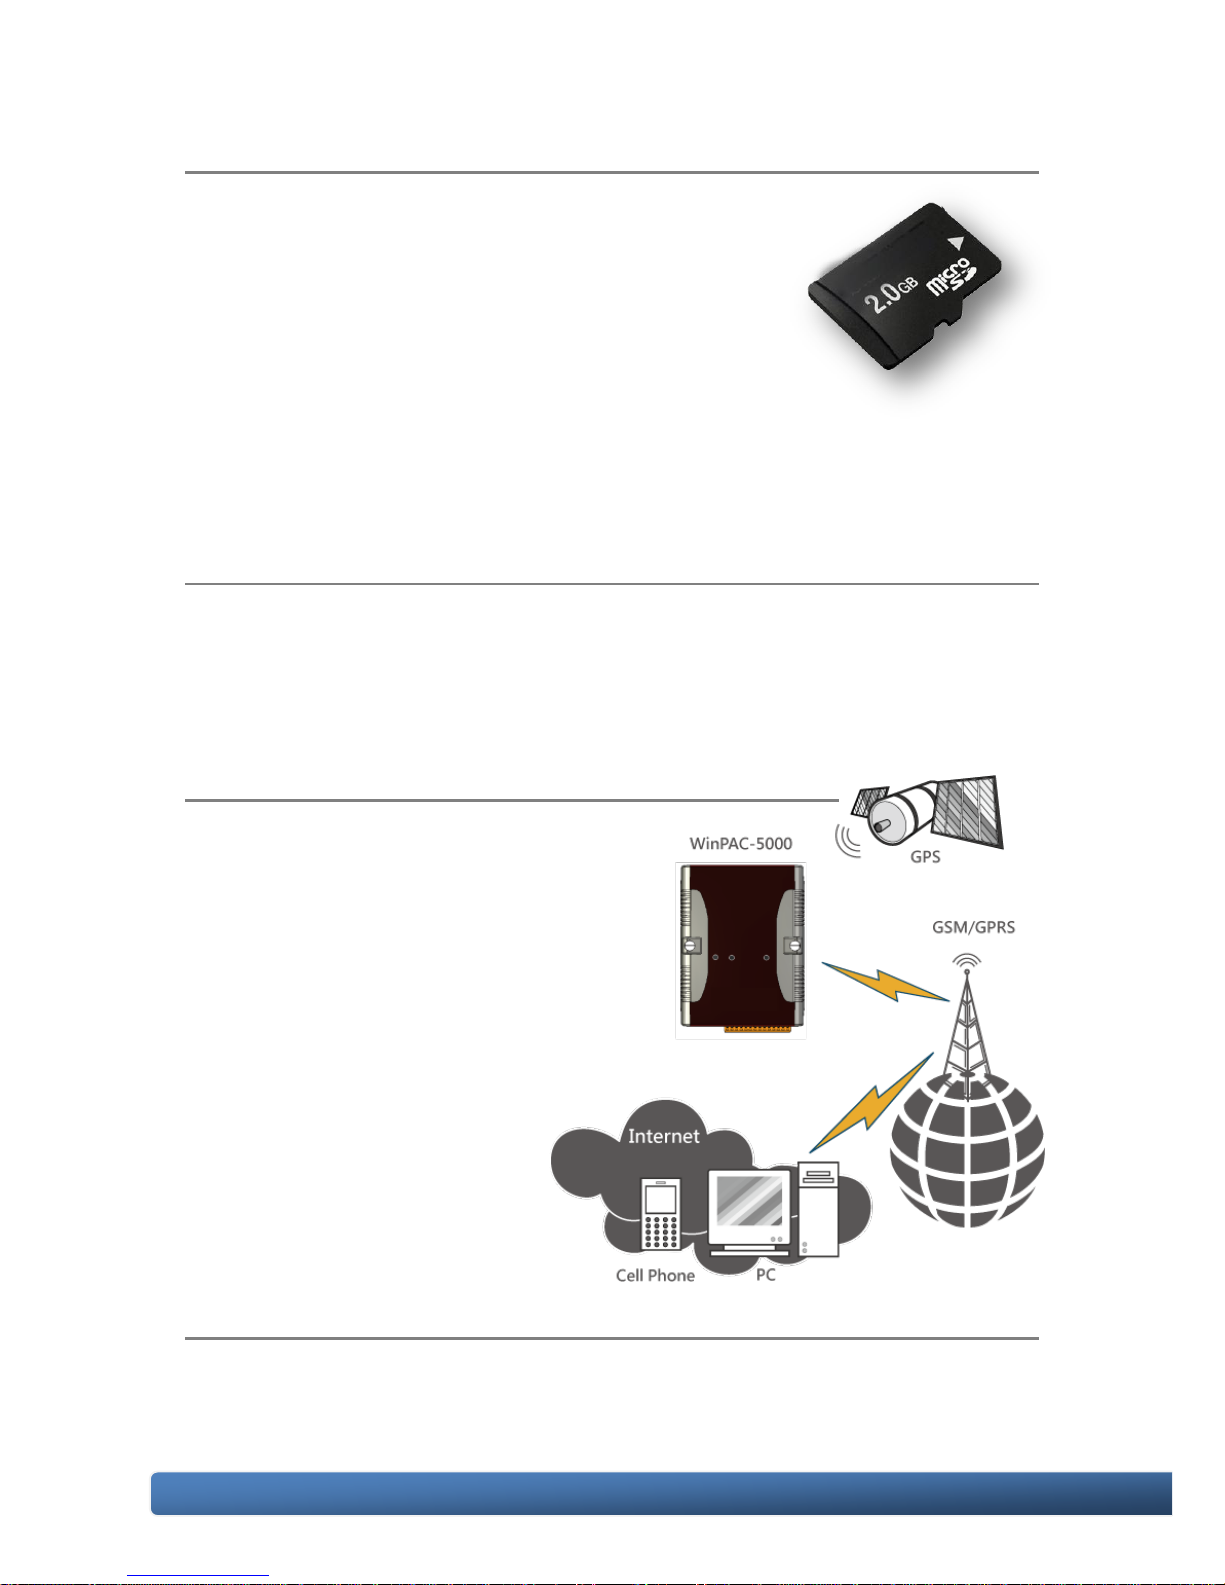
WinPAC-5000 provides various memory storage options, such as
EEPROM and microSD. Customers can choose the
memory based on their characteristics.
● 16 KB EEPROM: to store not frequently changed
parameters.
● microSD/microSDHC: to implement portable data logging applications.
Unique 64-bit Hardware Serial Number to Protect Your Program
A unique 64-bit serial number is assigned to each hardware device to protect your
software against piracy.
Remote I/O Module and Expansion Unit
With the built-in RS-485 and Ethernet port, the 5000
series can connect RS-485/Ethernet remote
I/O units (RU-87Pn/ET-87Pn) or modules
(I-7000/M-7000/ET-7000). With an XW-board,
the 5000 series can have more communication
ports or different interface to connect to other
type of devices, for example: CANOpen
devices, DeviceNet devices, or
FRnet I/O modules.
Plastic and Metal Casing
The default case is plastic material, customers can choose metal case if they want.
Page 11
WinPAC-5000 Series User Manual, Version 1.0.2 Page: 11
Copyright © 2010 ICP DAS Co., Ltd. All Rights Reserved. E-mail: [email protected]
Multi-Communication Interface
There are several of communication interfaces to expand I/O and connect to
external devices:
Small and Easy Installation
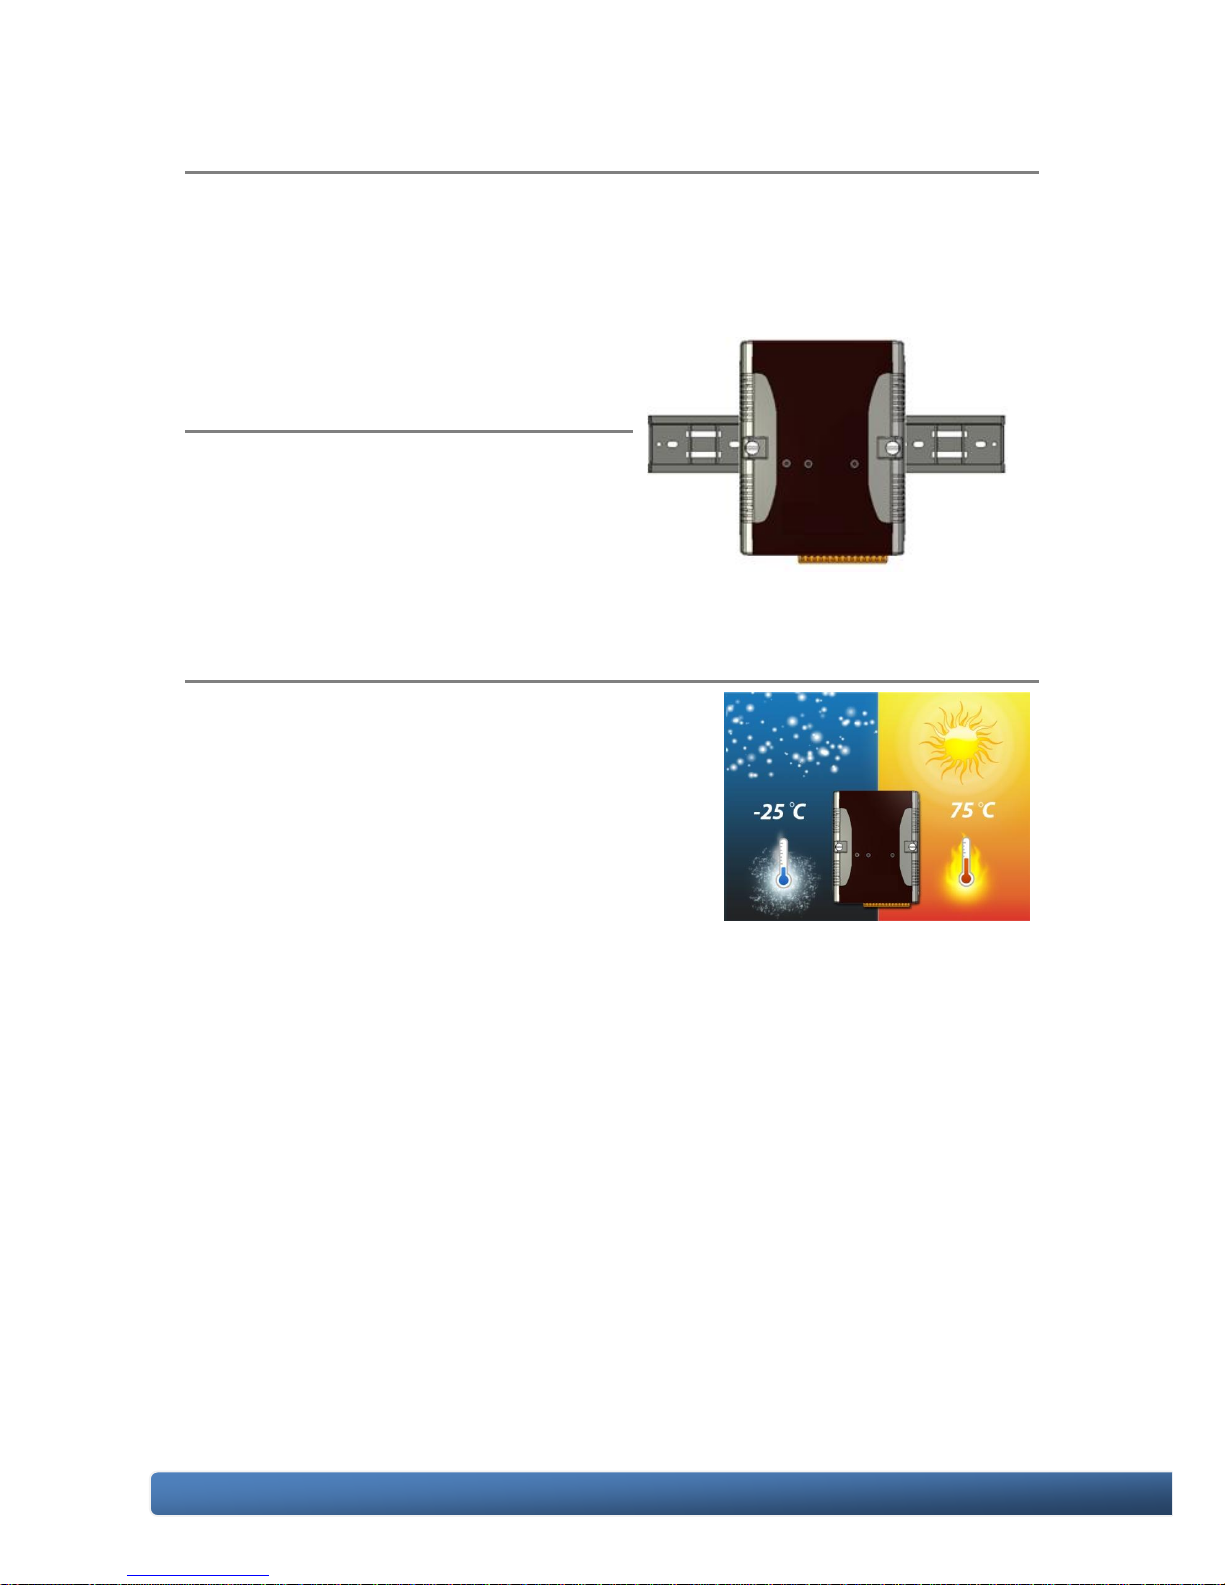
WinPAC-5000 Series have a palm-size
shape (91 mm x 132 mm x 52 mm) to be
installed in a narrow space with DIN-Rail.
Highly Reliable Under Harsh Environment
Our WinPACs operate in a wide range of
temperature and humidity.
● Operating Temperature: -25 ~ +75 °C
● Storage Temperature: -40 ~ +80 °C
● Humidity: 5% ~ 95% RH, non-condensing
Page 12

WinPAC-5000 Series User Manual, Version 1.0.2 Page: 12
Copyright © 2010 ICP DAS Co., Ltd. All Rights Reserved. E-mail: [email protected]
1.3. Specifications
Models
WP-5141
WP-5441
System Software
OS
Windows CE 5.0
.Net Compact Framework
2.0
Embedded Service
FTP server, Web server (supports VB script, JAVA script),
Embedded SQL server
SDK provided
Dll for eVC, Dll for Visual Studio.Net 2003/2005/2008
CPU Module
CPU
PXA270 or compatible (32-bit and 520 MHz)
SDRAM
128 MB
Flash
64 MB (32 MB for OS, 32 MB for System_Disk and System
Registry)
EEPROM
16 KB Data Retention: 40 Years; 1,000,000 erase/write cycles
Expansion Flash Memory
microSD socket with one 2 GB microSD card (support up to 16
GB microSDHC card)
RTC (Real Time Clock)
Provide second, minute, hour, date, day of week, month, year
64-bit Hardware Serial Number
Yes
Dual Watchdog Timers
Yes
LED Indicator
3 LEDs (RUN/PWR, L1 ~ L2; RUN/PWR for status indications,
L1 ~ L2 for user programmable)
Rotary Switch
Yes (0 ~ 9)
VGA & Communication Ports
VGA
640 x 480 or 800 x 600
Ethernet
RJ-45 x 2, 10/100 Base-TX (Auto-negotiating, Auto MDI/MDI-X,
LED indicators)
USB 1.1 (client)
1
USB 1.1 (host)
1
Audio Port (Microphone-In and
Earphone-Out)
-
Yes
Page 13

WinPAC-5000 Series User Manual, Version 1.0.2 Page: 13
Copyright © 2010 ICP DAS Co., Ltd. All Rights Reserved. E-mail: [email protected]
COM1
RS-232 (RxD, TxD and GND); Non-isolated
COM2
RS-485 (D2+, D2-); 2500 VDC; isolated
COM3
RS-232 (RxD, TxD and GND); Non-isolated
I/O Expansion
I/O Expansion Bus
Yes, to mount one optional XW-board
Mechanical
Dimensions (W x L x H)
91 mm x 132 mm x 52 mm
Installation
DIN-Rail Mounting
Environmental
Operating Temperature
-25 ~ +75 °C
Storage Temperature
-30 ~ +80 °C
Ambient Relative Humidity
10 ~ 90% RH (non-condensing)
Power
Input Range
+10 ~ +30 VDC
Isolation
1 kV
Consumption
4.8 W (0.2 A @ 24 VDC)
6 W (0.25 A @ 24 VDC)
Page 14
WinPAC-5000 Series User Manual, Version 1.0.2 Page: 14
Copyright © 2010 ICP DAS Co., Ltd. All Rights Reserved. E-mail: [email protected]
1.4. Overview
Here is a brief overview of the components and its descriptions for module status.
Front Panel
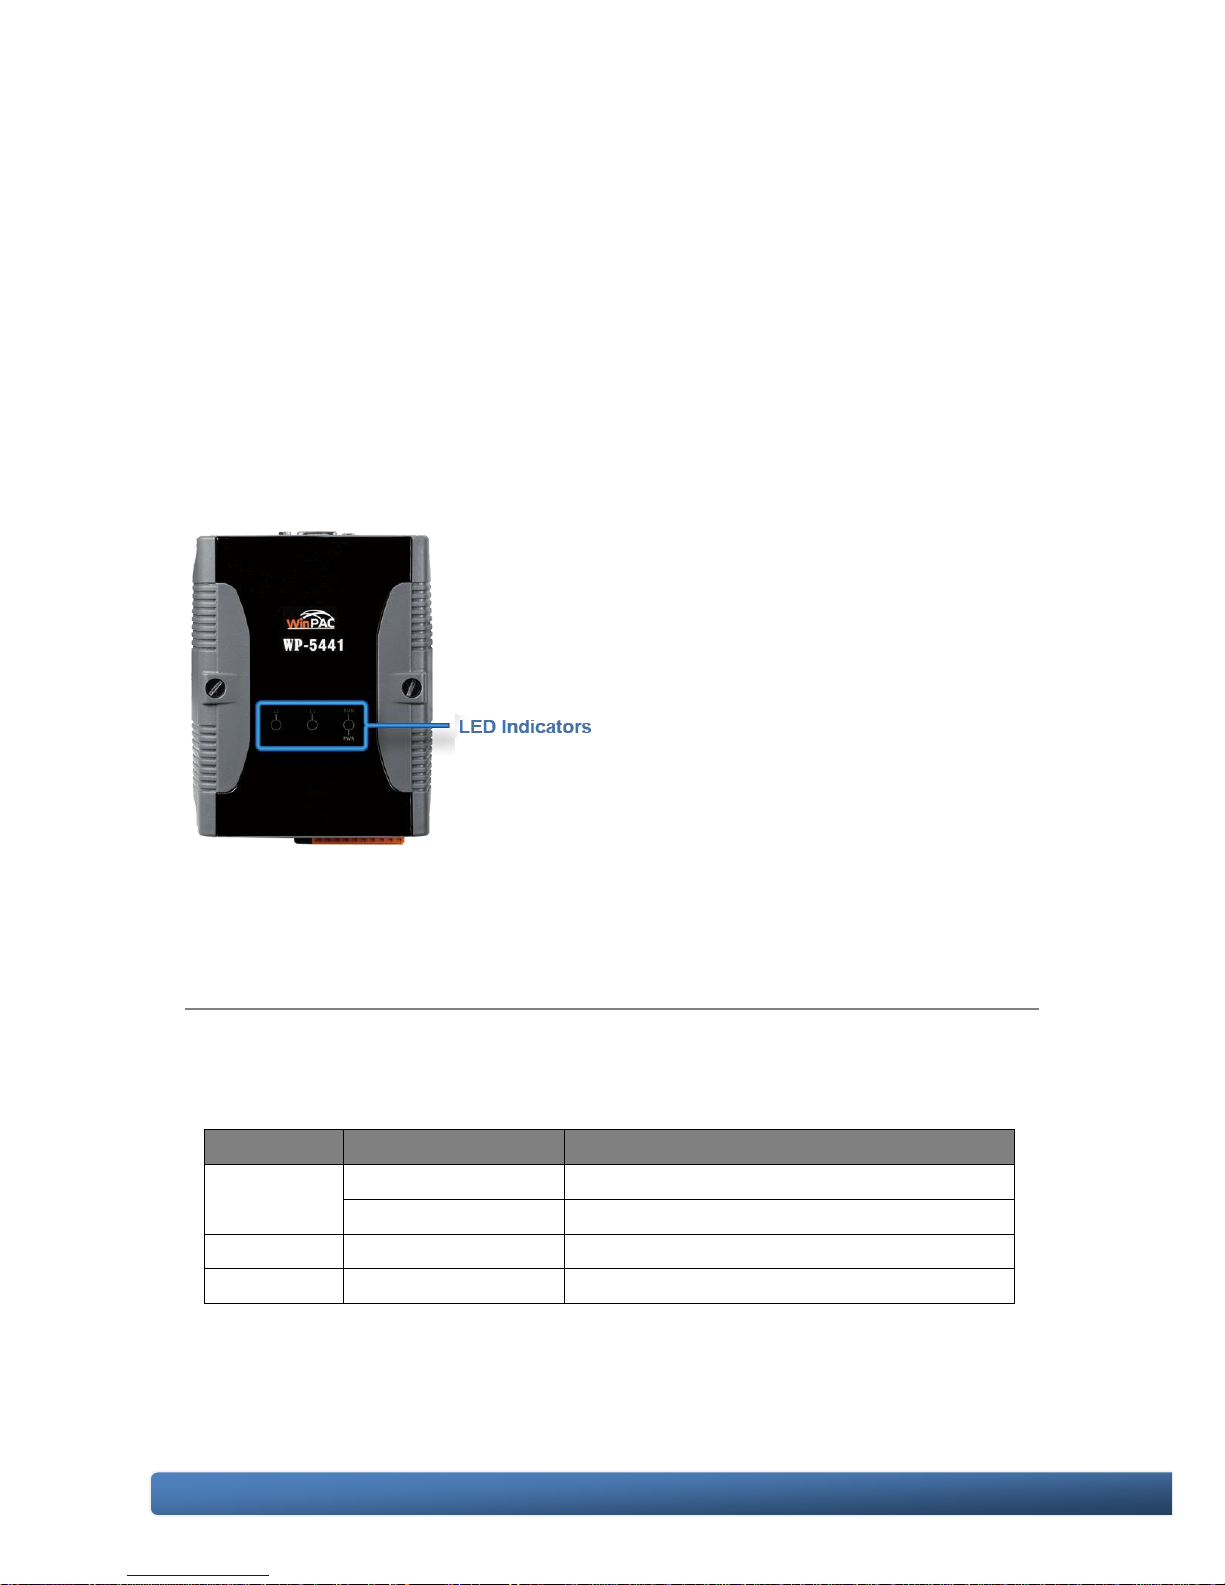
The front panel includes programmable LED indicators.
LED Indicators
LED indicators provide a very convenient way of status indications for faster, easier
diagnostics.
LED Name
Color (ON State)
Meaning
RUN/PWR
Green
Power is on
Orange
Power on and OS is running
L1
Green
User programmable control LED
L2
Green
User programmable control LED
Page 15
WinPAC-5000 Series User Manual, Version 1.0.2 Page: 15
Copyright © 2010 ICP DAS Co., Ltd. All Rights Reserved. E-mail: [email protected]
Tips & Warnings
The LED indicators can be programmed with WinPAC API. If do
not necessary, do not use RUN that is assigned to the OS-status
indicators.
Top Panel
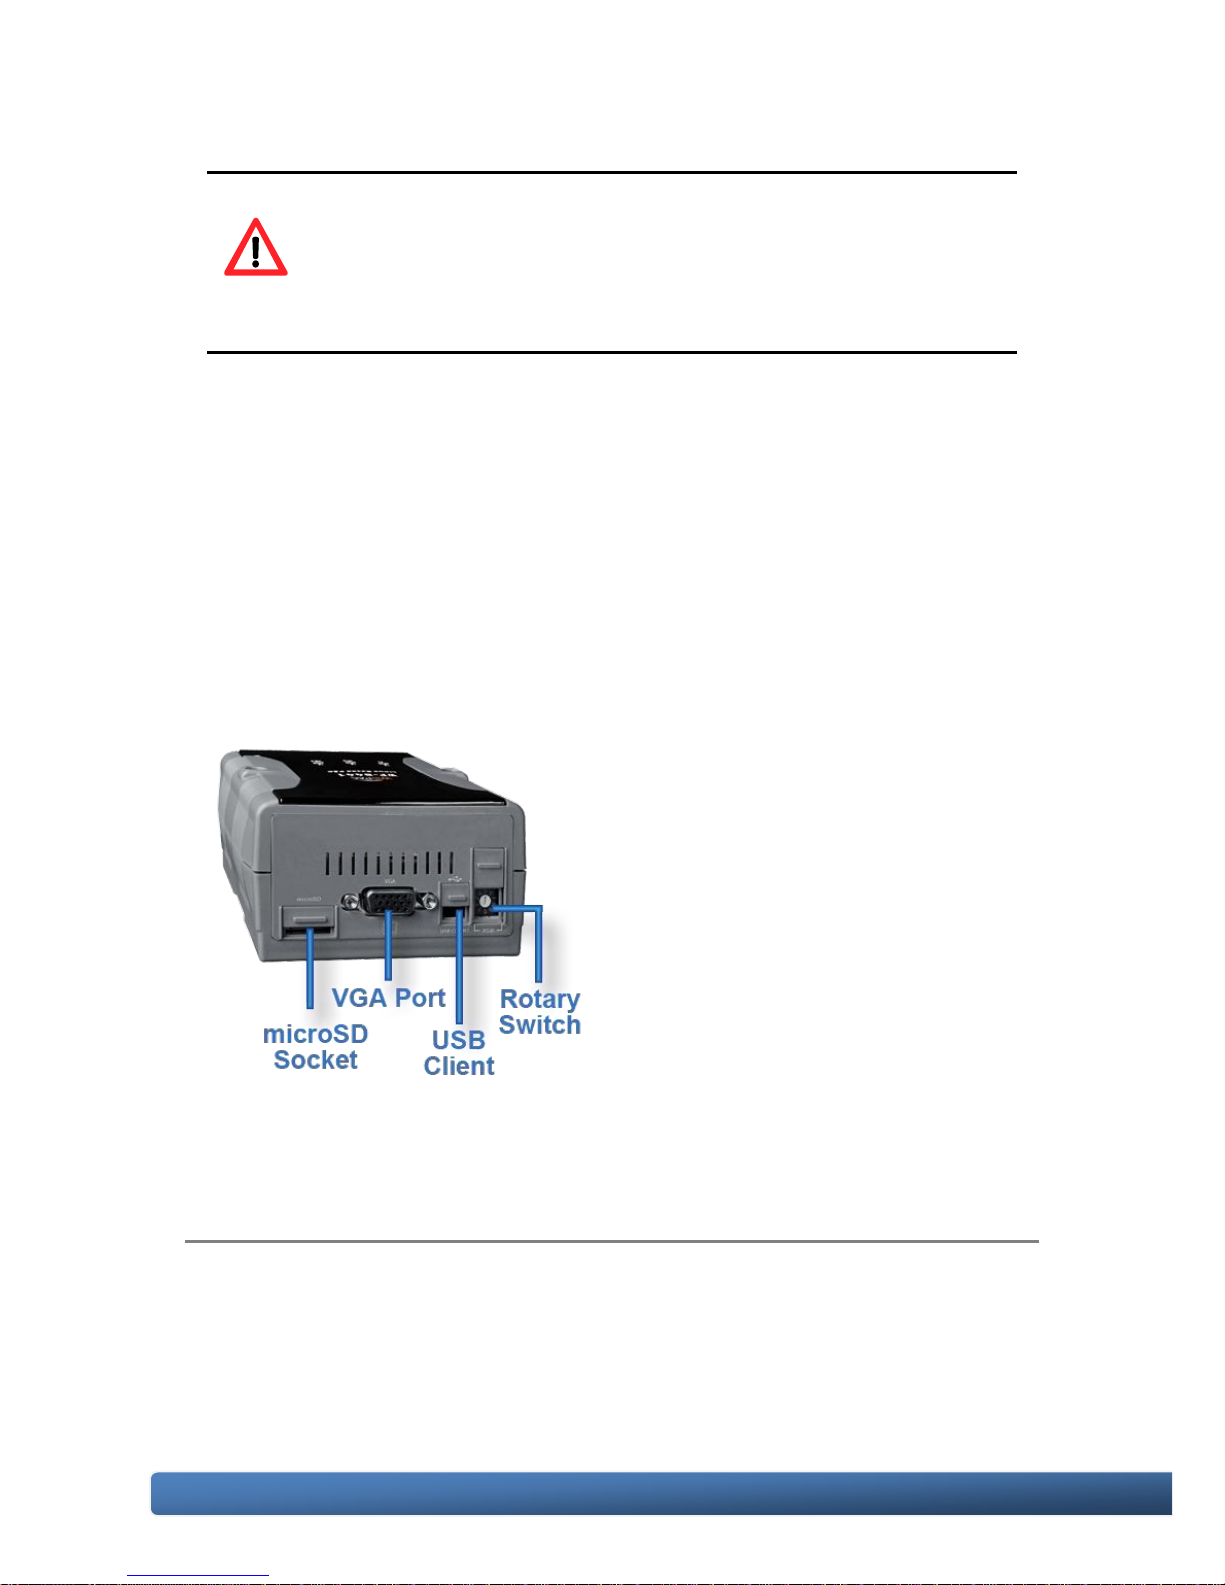
The top panel includes a microSD socket, VGA port, USB client and rotary switch.
microSD socket
The microSD socket provides an easy way to expand the available storage with a
microSD card up to 16 GB maximum.
Page 16

WinPAC-5000 Series User Manual, Version 1.0.2 Page: 16
Copyright © 2010 ICP DAS Co., Ltd. All Rights Reserved. E-mail: [email protected]
VGA port
External VGA port provides an easy connection to a monitor or touch panel.
USB Client
USB Client is used to for ActiveSync application. An accessory
USB cable is available to connect the client port with USB mini-B
type to USB. Type a plug on a PC for ActiveSync application.
Rotary Switch
The rotary switch is used to select the operating mode. For more information about
the operating mode, please refer to section 2.3. Configuring the Boot Mode.
Page 17
WinPAC-5000 Series User Manual, Version 1.0.2 Page: 17
Copyright © 2010 ICP DAS Co., Ltd. All Rights Reserved. E-mail: [email protected]
Bottom Panel
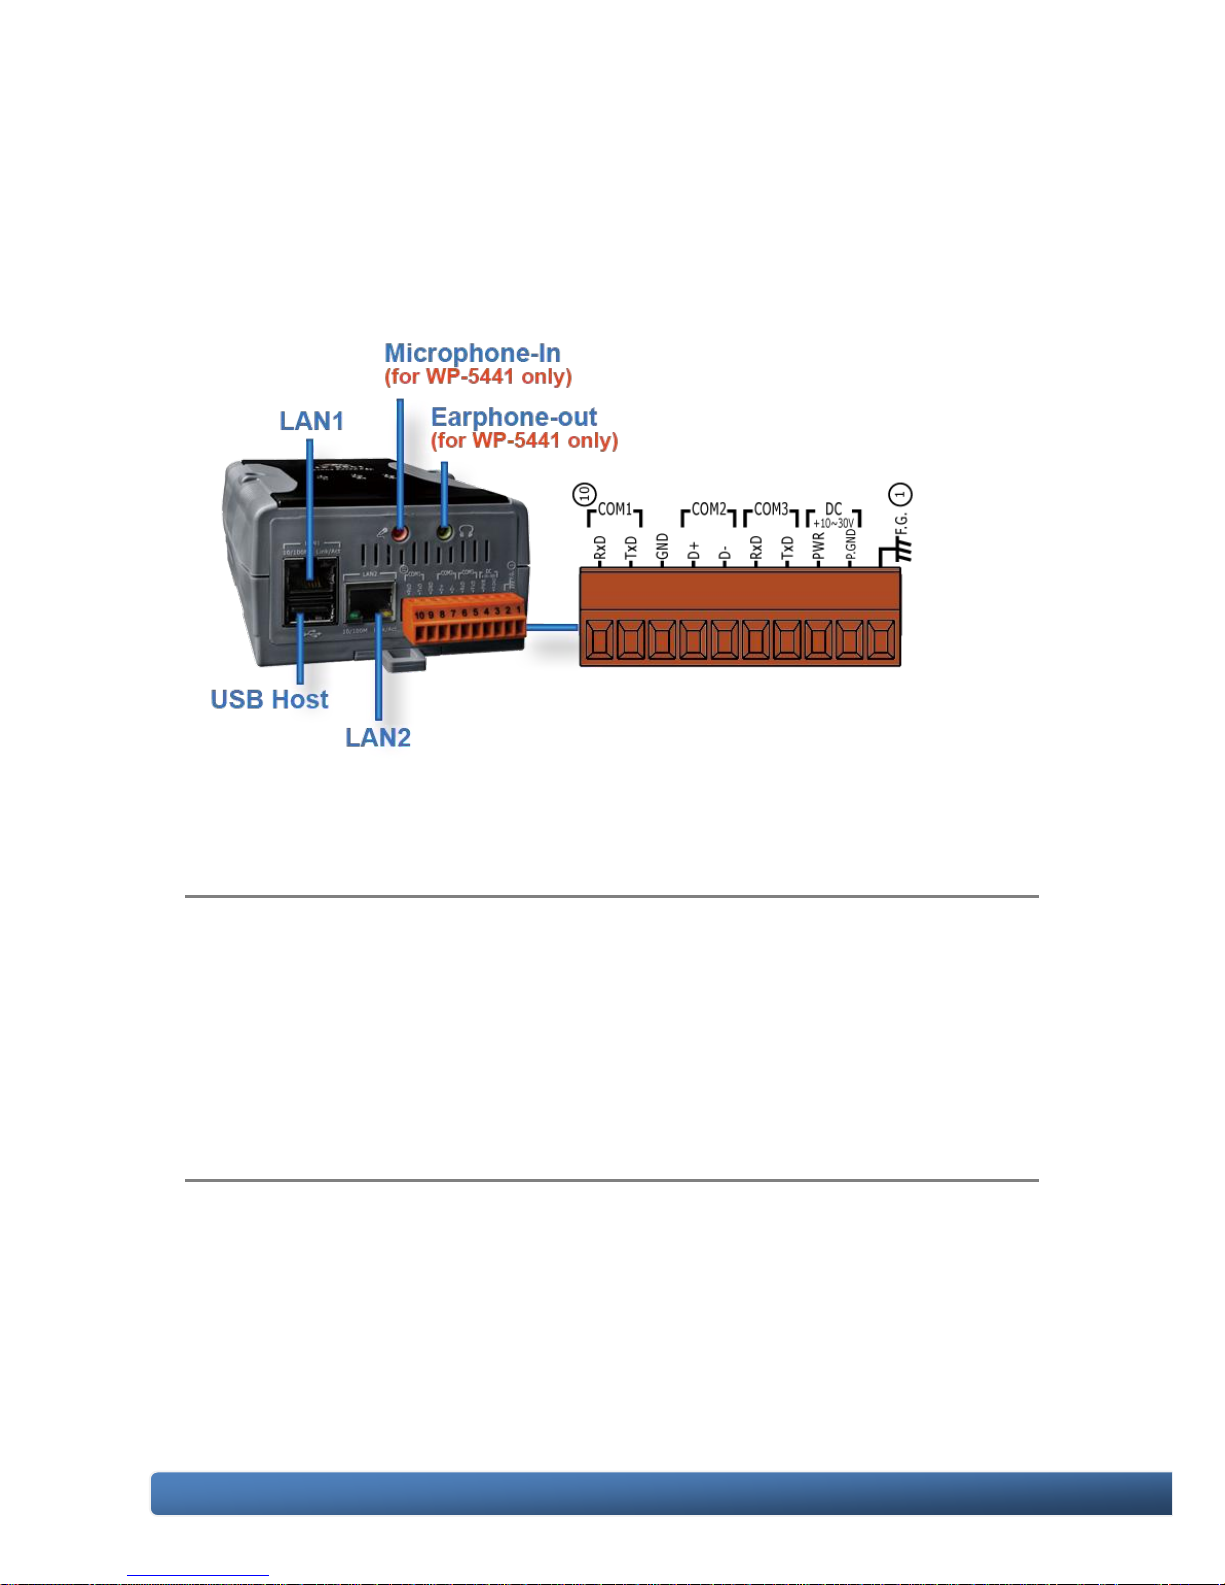
The bottom panel includes a microphone, an earphone, a USB host, a connector
and two Ethernet ports
Microphone-in and Earphone-out (for WP-5441 only)
USB Client provides a fast, flexible networking connection with unmatched ease of
installation and use
Ethernet Port (LAN1 and LAN2)
The Ethernet ports are the opening on WinPAC-5000 network equipments that
Ethernet cables plug into. Ethernet ports accept cables with RJ-45 connectors.
Page 18

WinPAC-5000 Series User Manual, Version 1.0.2 Page: 18
Copyright © 2010 ICP DAS Co., Ltd. All Rights Reserved. E-mail: [email protected]
USB Host
A USB host controller is a machine with a root hub which allows several input
devices to be connected to it, such as mice and keyboards.
Connector
The pin assignments of the connector are as follows:
Pin
Signal
Description
1 F.G
Frame Ground
2 GND
Power Input
3 PWR
4 TxD
COM3: RS-232
5 RxD
6 D-
COM2: RS-485
7 D+ 8
GND
COM1: RS-232
9 TxD
10
RxD
Page 19
WinPAC-5000 Series User Manual, Version 1.0.2 Page: 19
Copyright © 2010 ICP DAS Co., Ltd. All Rights Reserved. E-mail: [email protected]
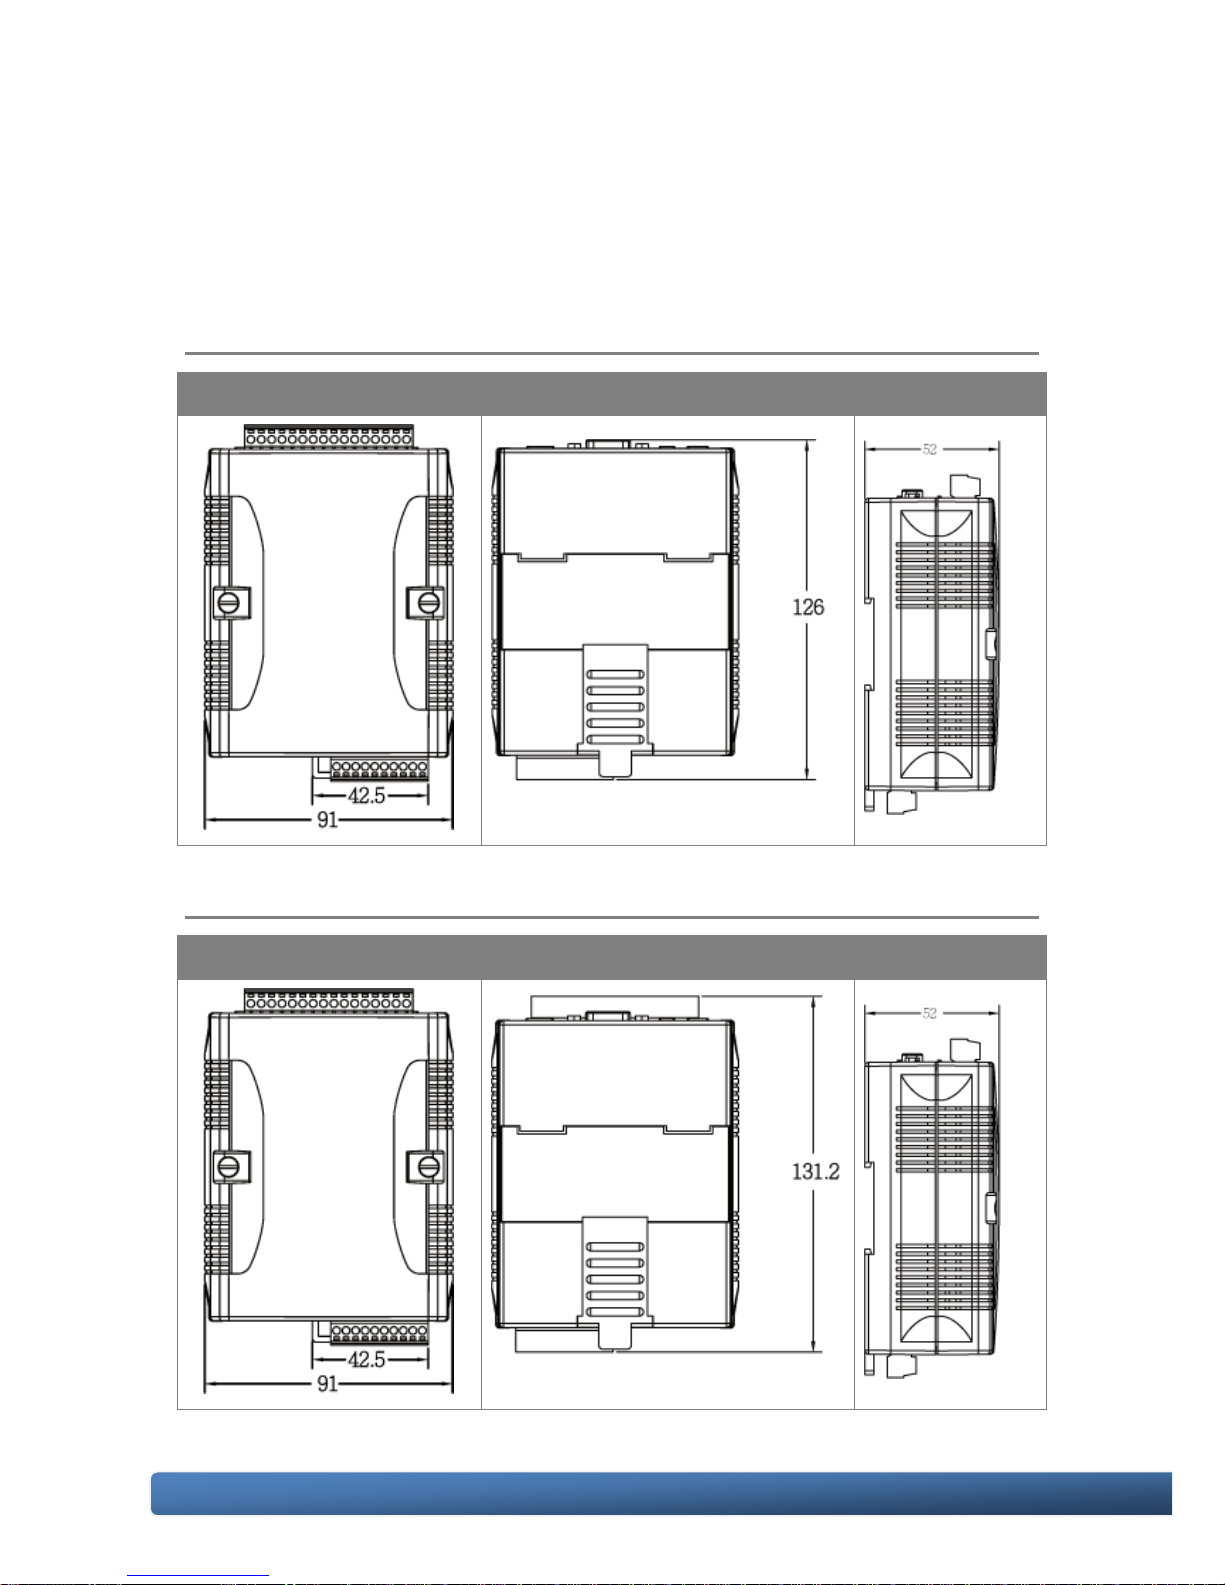
1.5. Dimension
All dimensions are in millimeters.
WP-5000
Front View
Back View
Side View
WP-5000 with the XW-board
Front View
Back View
Side View
Page 20
WinPAC-5000 Series User Manual, Version 1.0.2 Page: 20
Copyright © 2010 ICP DAS Co., Ltd. All Rights Reserved. E-mail: [email protected]
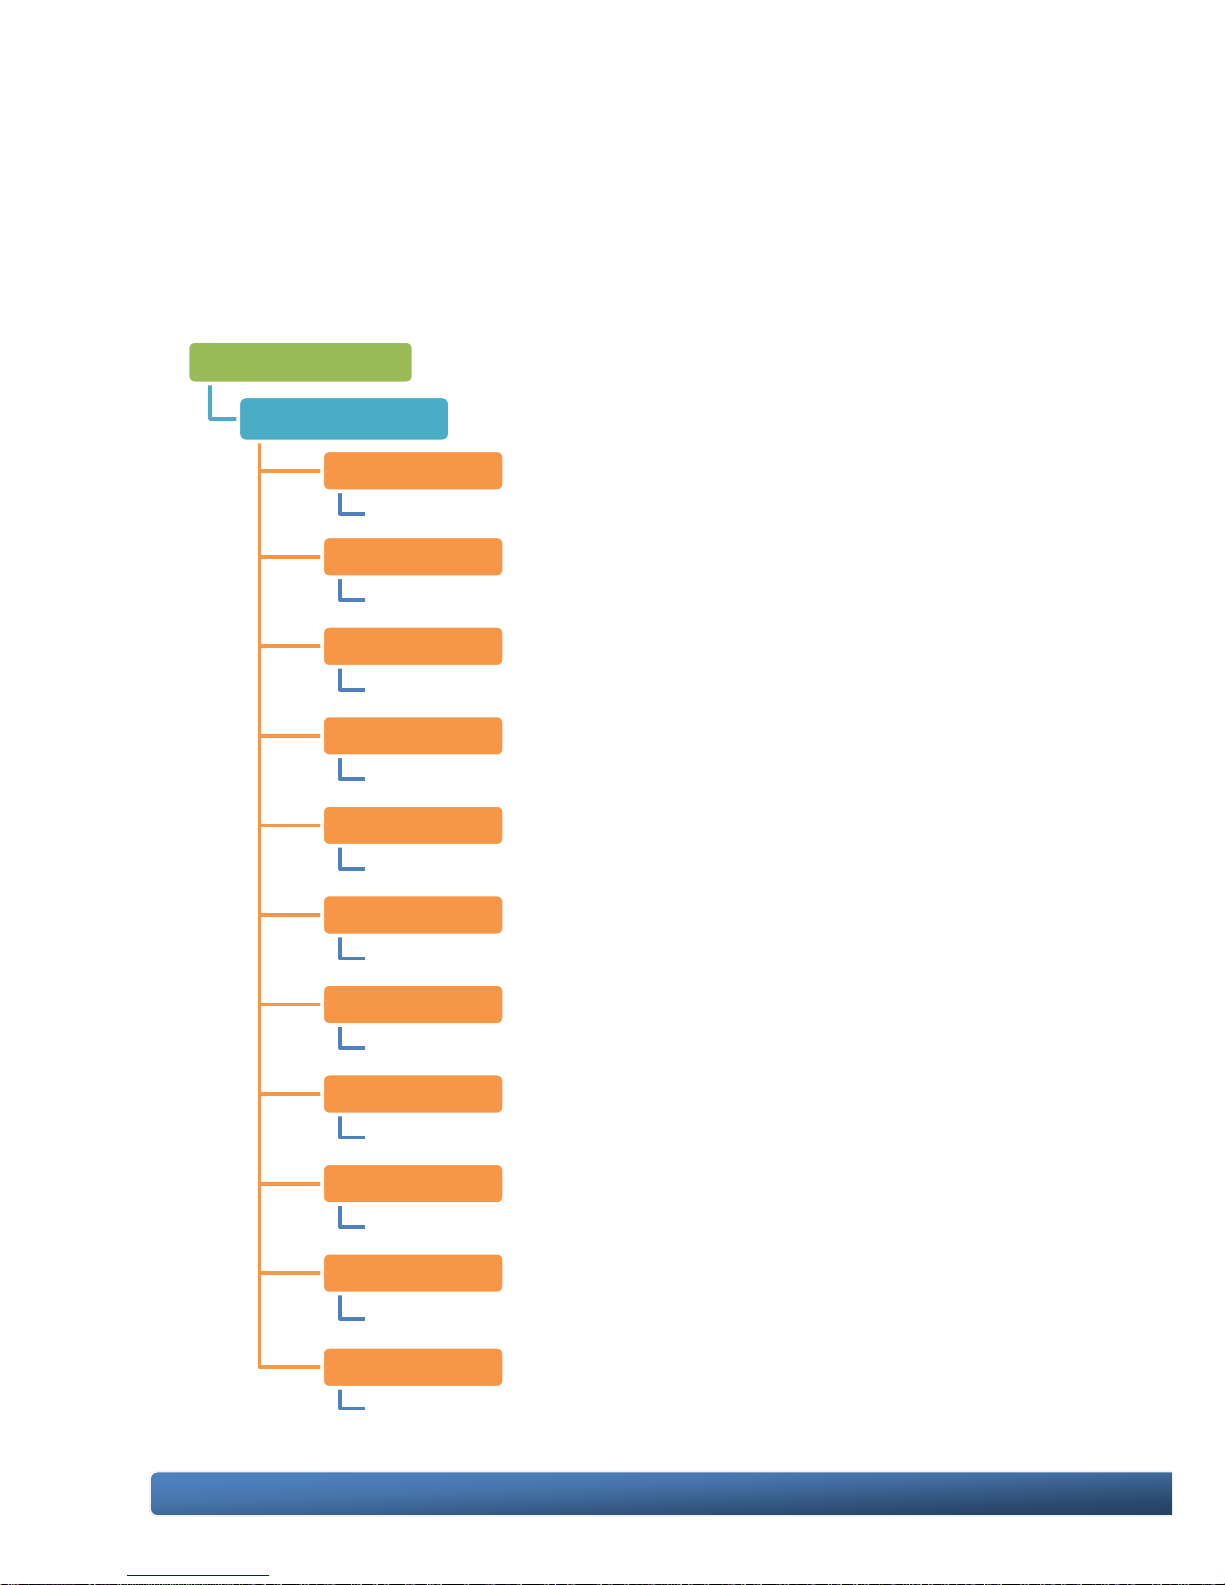
1.6. Companion CD
This package comes with a CD that provides drivers, software utility, all of the
required documentations…, etc. All of them are listed below.
CD:\napdos
wp-5000_ce50
Backup
Backup files related to the documents, OS images, SDKs...., etc.
Demo
Demos related to WinPAC
Document
Document related to WinPAC
eLogger
Demos and drivers related to eLogger
Micro_SD
Tools and drivers related to manage the microSD
misc
Files related to miscellaneous
OS_Image
OS_Image related to WinPAC
PC_Tools
Tools related to management WinPAC that install on PC
SDK
SDKs related to WinPAC
System_Disk
Tools and drivers related to System_Disk that install on WinPAC
Update
Installation packages related to WinPAC updates
Page 21
WinPAC-5000 Series User Manual, Version 1.0.2 Page: 21
Copyright © 2010 ICP DAS Co., Ltd. All Rights Reserved. E-mail: [email protected]
2. Getting Started
If you are a new user, begin with this chapter, it includes a guided tour that provides
a basic overview of installation and configuration.
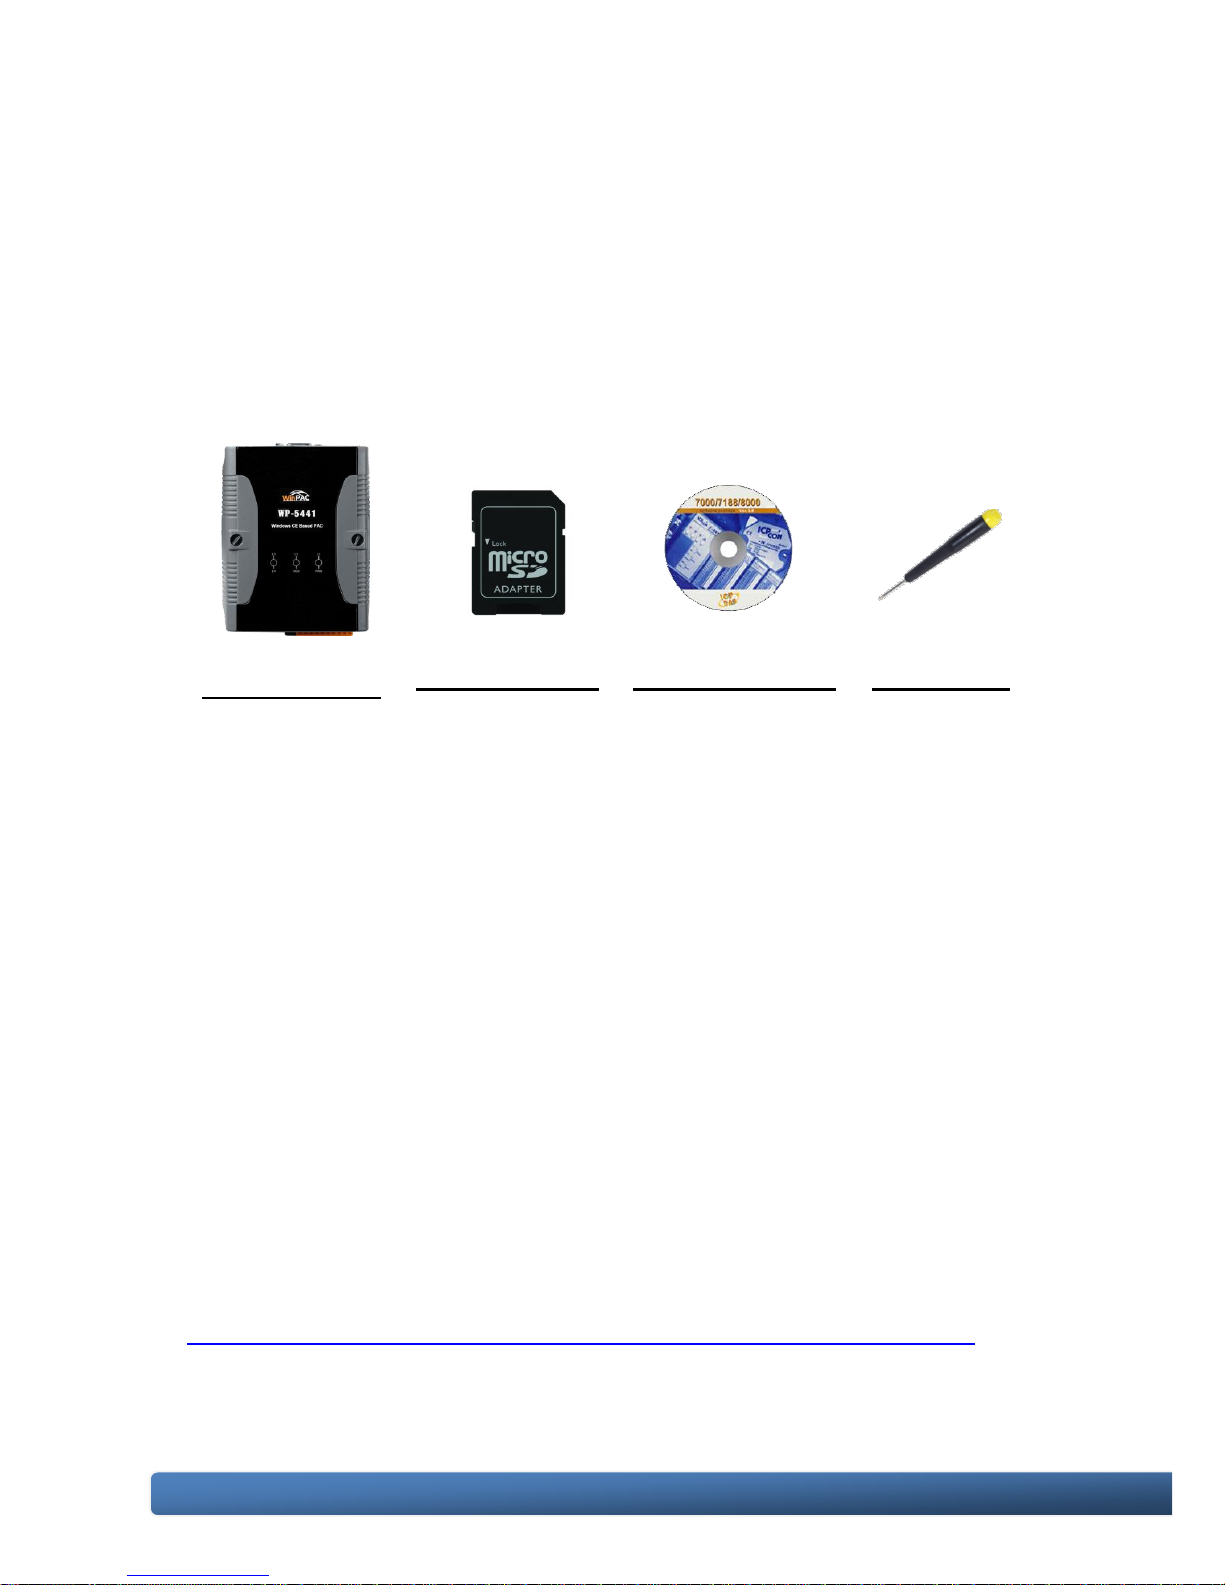
In addition to Quick Start Guide, the package includes the following items, if any
items are damaged or missing, please contact us.
Win PAC Module
microSD Adapter
Software Utility CD
Screw Driver
WP-5141
WP-5441
(1C016)
2.4 mm
2.1. Mounting the Hardware
Before installing the hardware, you should have a basic understanding of hardware
specification, such as the size of hard drive, the usable input-voltage range of the
power supply, and the type of communication interfaces.
For complete hardware details, please refer to section “1.2. Specifications” You also
need to know the expansion capacities in order to choose the best expansion
module for achieving maximal efficiency.
For more information about expansion module that are compatible with the unit,
please refer to
http://www.icpdas.com/products/PAC/up-5000/XW-board_Selection_Guide.htm
Page 22
WinPAC-5000 Series User Manual, Version 1.0.2 Page: 22
Copyright © 2010 ICP DAS Co., Ltd. All Rights Reserved. E-mail: [email protected]
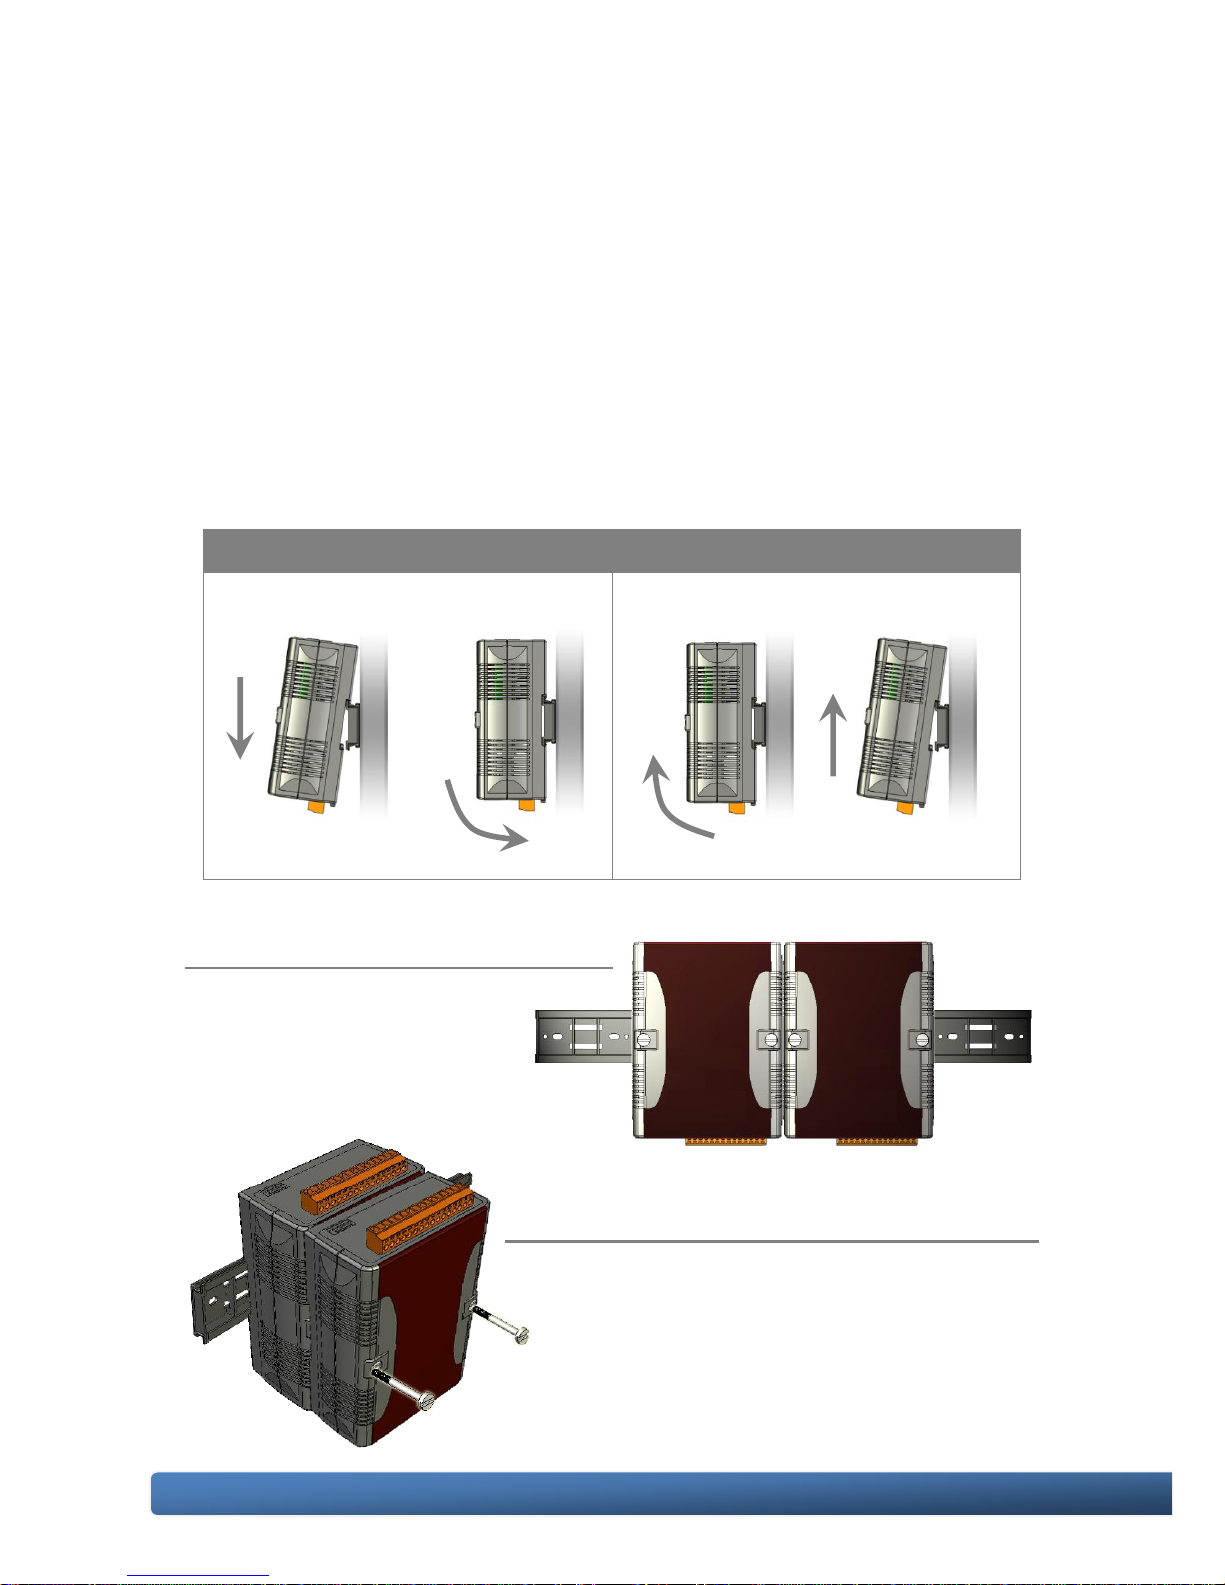
Step 1: Mounting WinPAC-5000
● The WinPAC-5000 can be mounted with the bottom of the chassis on the DIN rail,
the wall or piggyback.
● To clean the unit, wipe it with a clean, dry cloth.
● Maintain the following conditions:
▪ Operating Temperature: -25 °C to +75 °C
▪ Storage Temperature: -30 °C to +80 °C
▪ Relative Humidity: 10 to 90 non-condensing
Mounting on DIN rail
Removing from DIN rail
DIN rail mounting
The WinPAC-5000 has simple
rail clips for mounting reliably on
a standard 35 mm DIN rail.
Piggyback mounting
The WinPAC-5000 has two holes on both sides
for piggyback mounting.
Page 23
WinPAC-5000 Series User Manual, Version 1.0.2 Page: 23
Copyright © 2010 ICP DAS Co., Ltd. All Rights Reserved. E-mail: [email protected]
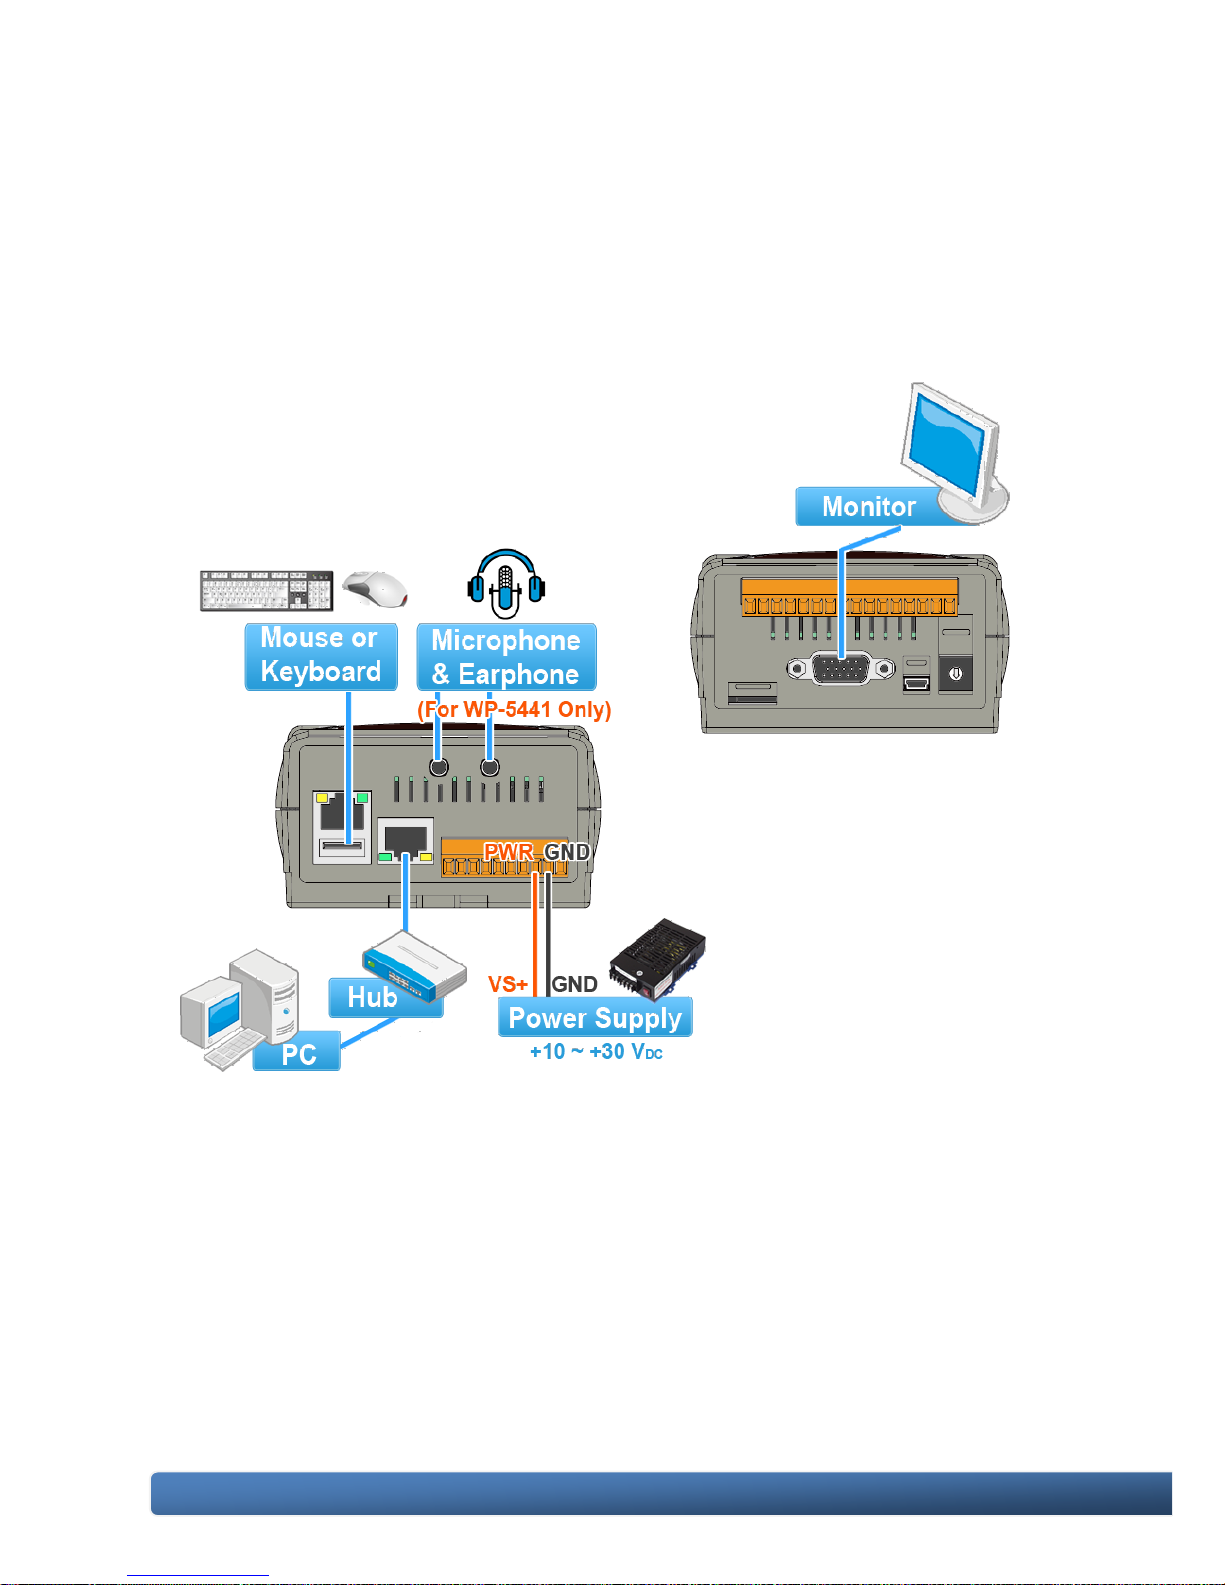
Step 2: Connecting to a microphone, an audio, a PC, the USB
device, and the power supply
i. Connect the mouse or keyboard to the USB port.
ii. Connect the microphone and earphone to the microphone-in and earphone-out
(for WP-5441 only)
iii. Connect PC to the Ethernet port through a hub.
iv. Connect the power supply (10 ~ 30 V) to PWR and GND terminals.
v. Connect the monitor to the VGA port.
Page 24
WinPAC-5000 Series User Manual, Version 1.0.2 Page: 24
Copyright © 2010 ICP DAS Co., Ltd. All Rights Reserved. E-mail: [email protected]
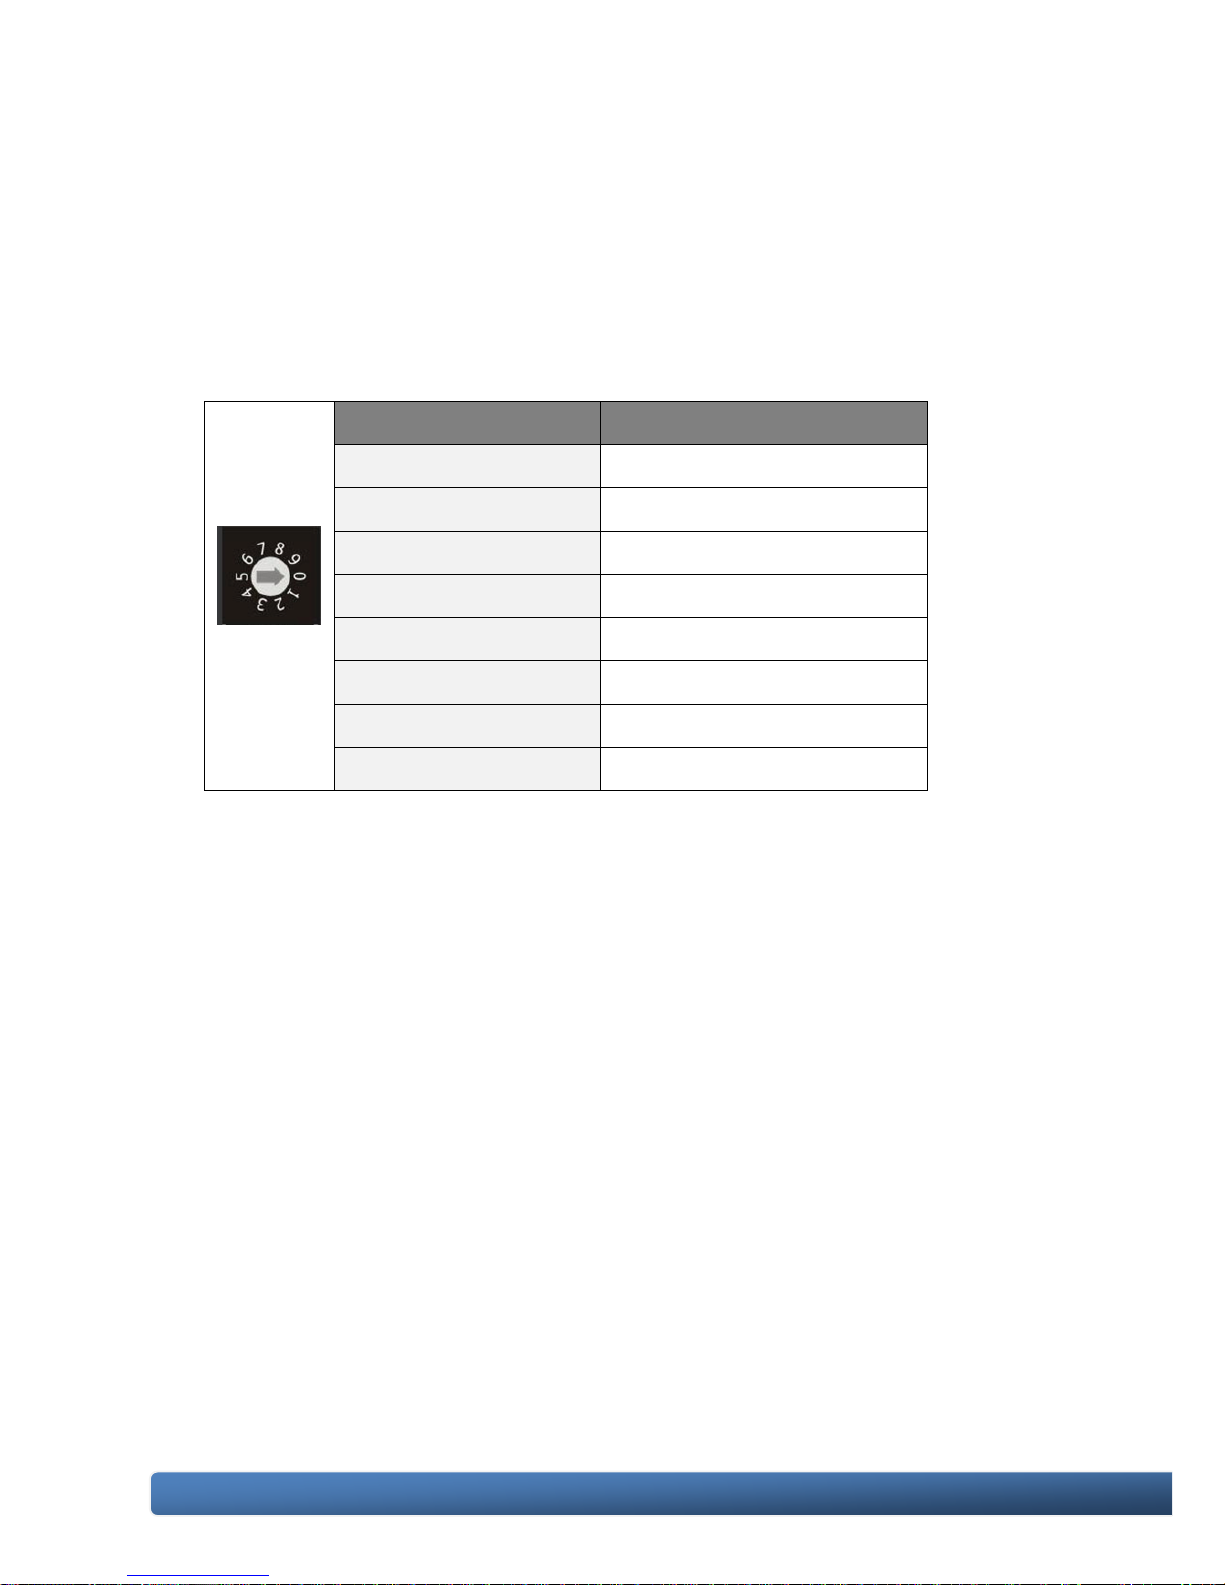
2.2. Configuring the Boot Mode
The WinPAC-5000 has the following six main operating modes, which can be
selected by a rotary switch.
Rotary switch position
Modes of operation
0
Normal mode (Default)
1
Safe mode
2
Debug mode
3
OS update mode
4
Development mode
5
DCON_CE
6
VCEP
7 ~ 9
(For user)
The following is an overview of the six modes.
Normal Mode (Default mode)
Normal mode is the default mode of operation and the one you will use most of the
time. Use this mode for more tasks and configurations. Programs also are executed
in this mode.
Safe Mode
Safe mode is a trouble shooting. The mode loads the minimum required device
drivers and system services to boot the WinPAC-5000.
If you have malicious software or a program caused the WinPAC-5000 cannot be
boot or run the normal mode, you can boot in safe mode to solve the problem.
Page 25

WinPAC-5000 Series User Manual, Version 1.0.2 Page: 25
Copyright © 2010 ICP DAS Co., Ltd. All Rights Reserved. E-mail: [email protected]
Debug Mode
Debug mode is a special environment in which program debug functions can be
used in addition to normal system functions.
Debug mode is unsupported.
OS Update Mode
OS update mode is a way used to update OS. For more information on updating the
WinPAC-5000 OS image, please refer to section 6.1. OS updates
Development Mode
DCON_CE
In this mode, the VCEP will be run automatically, and other settings are same as the
normal mode.
For more information about the VCEP, please refer to section 3.3. DCON_CE.
VCEP
In this mode, the VCEP will be run automatically, and other settings are same as the
normal mode.
For more information about the VCEP, please refer to section 3.12 VCEP.
User Mode
The positions 7, 8, 9 of rotary switch are reserved for user‟s applications.
When WinPAC-5000 is boot with one of these positions, it is boot at normal mode.
User‟s application can check the rotary switch position to run at different mode.
Page 26
WinPAC-5000 Series User Manual, Version 1.0.2 Page: 26
Copyright © 2010 ICP DAS Co., Ltd. All Rights Reserved. E-mail: [email protected]
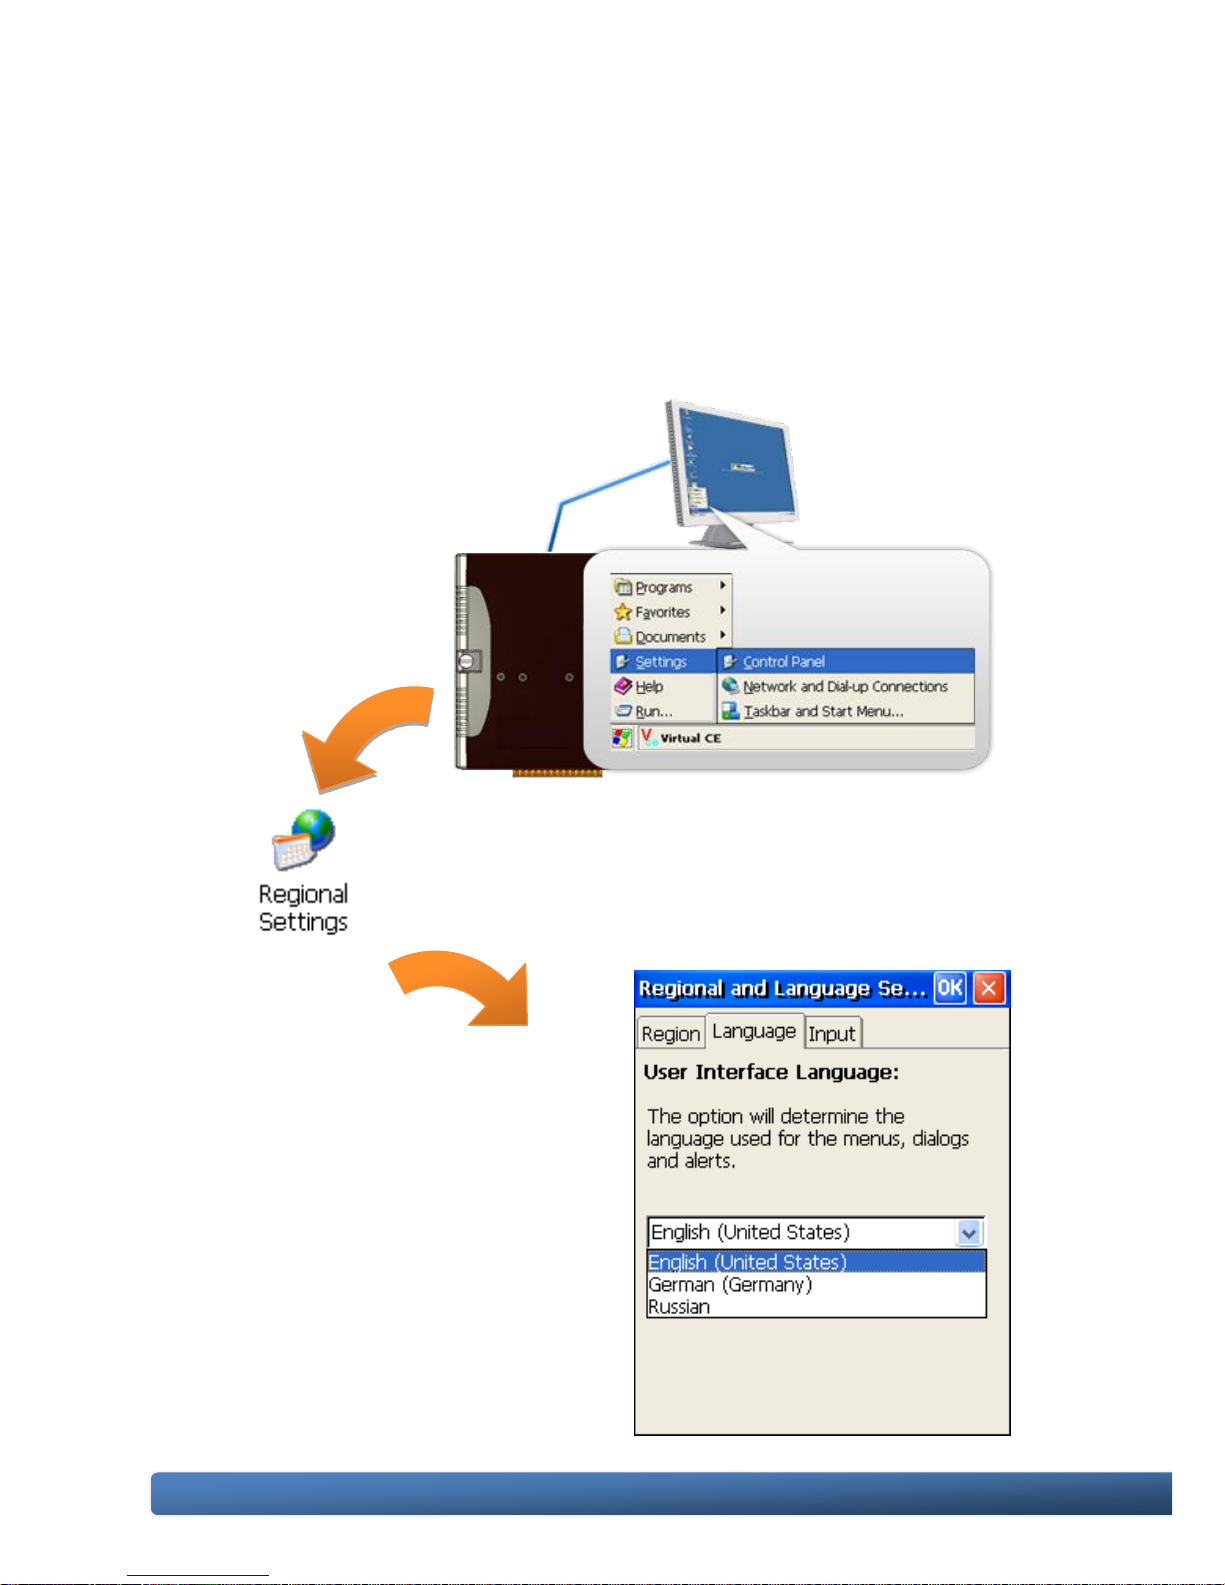
2.3. Changing the Language of the User Interface
The WinPAC-5000 is a Windows CE-based operating system which provides
multilingual user interface and the user interface can be set to one of multi
languages.
Step 1: Open the Control Panel
Step 2: Run the Regional Settings
Step 3: Choose the display
language, and then
click OK
Page 27
WinPAC-5000 Series User Manual, Version 1.0.2 Page: 27
Copyright © 2010 ICP DAS Co., Ltd. All Rights Reserved. E-mail: [email protected]
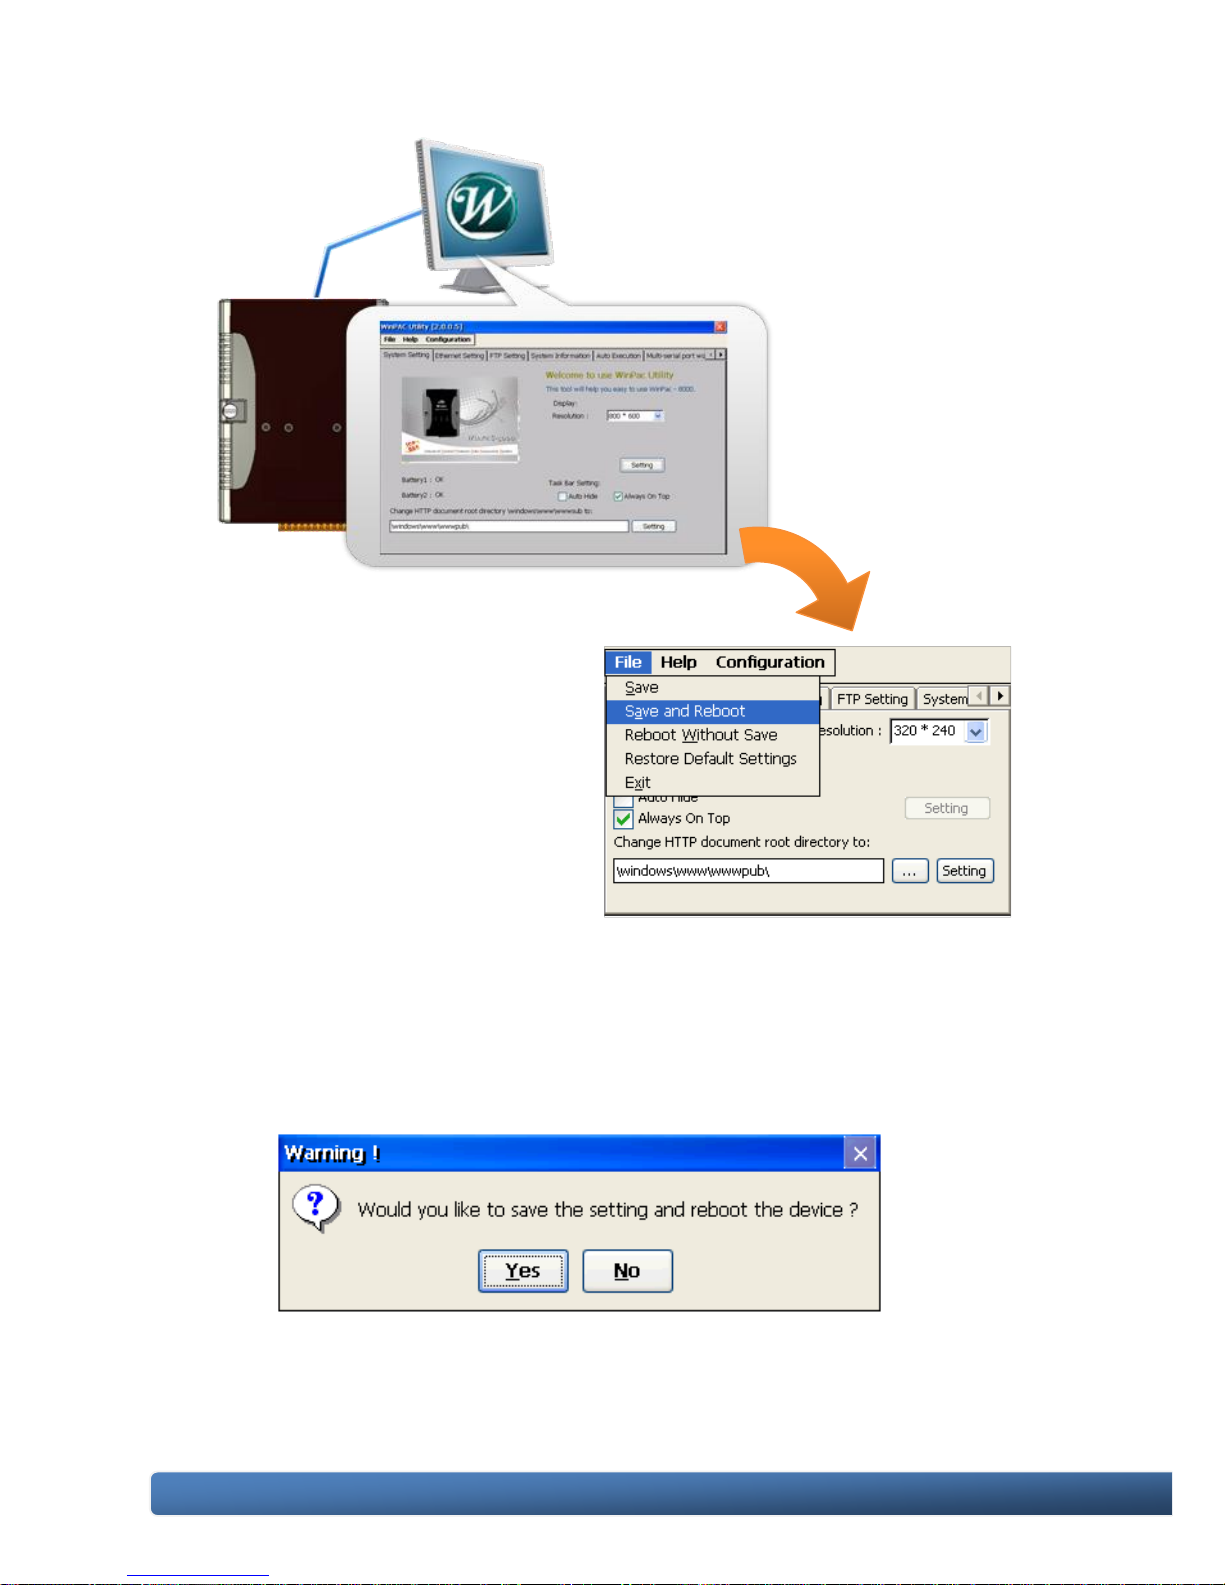
Step 4: Run the WinPAC Utility
Step 5: On the File menu,
click Save and
Reboot
Step 6: Click Yes to reboot the WinPAC-5000
Page 28
WinPAC-5000 Series User Manual, Version 1.0.2 Page: 28
Copyright © 2010 ICP DAS Co., Ltd. All Rights Reserved. E-mail: [email protected]
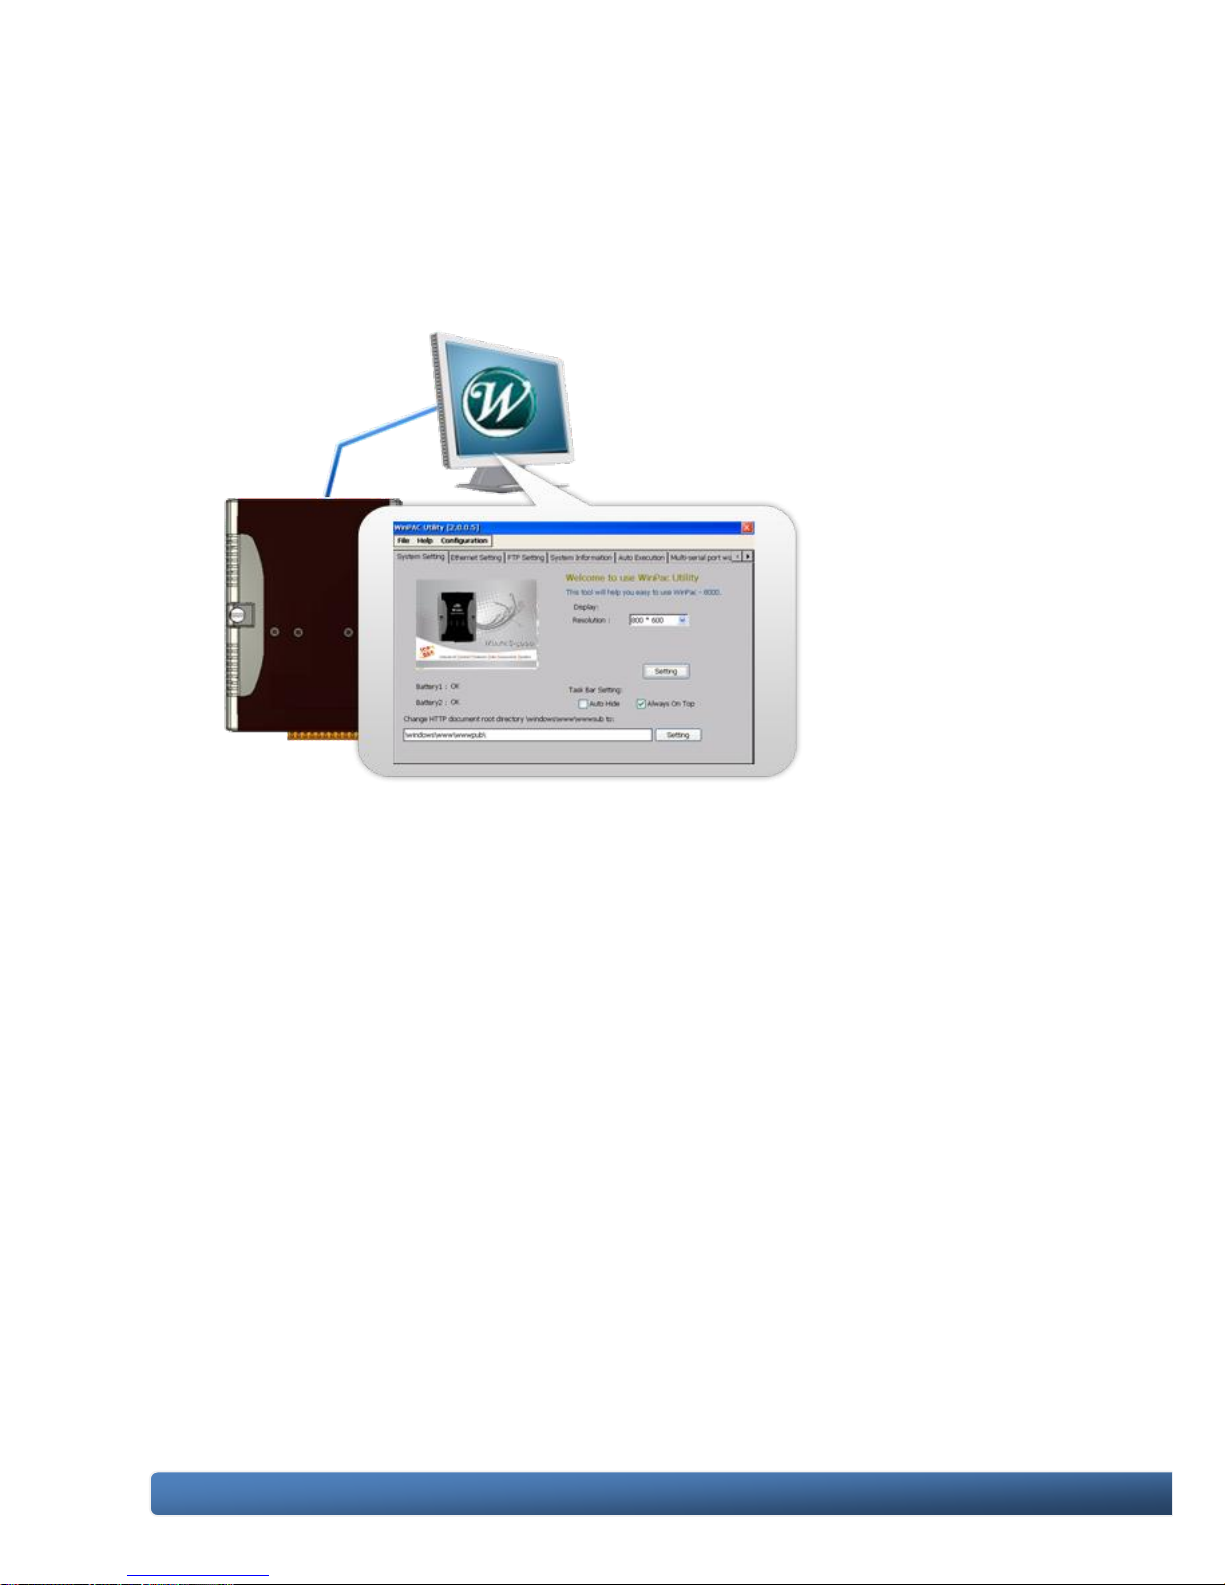
2.4. Using WinPAC Utility to Configure WinPAC-5000 Basic Functionality
WinPAC Utility is a tool that provides ability to configure the WinPAC-5000 services.
For more information on how to use the WinPAC Utility, please refer to section 3.13.
WinPAC Utility.
Page 29
WinPAC-5000 Series User Manual, Version 1.0.2 Page: 29
Copyright © 2010 ICP DAS Co., Ltd. All Rights Reserved. E-mail: [email protected]
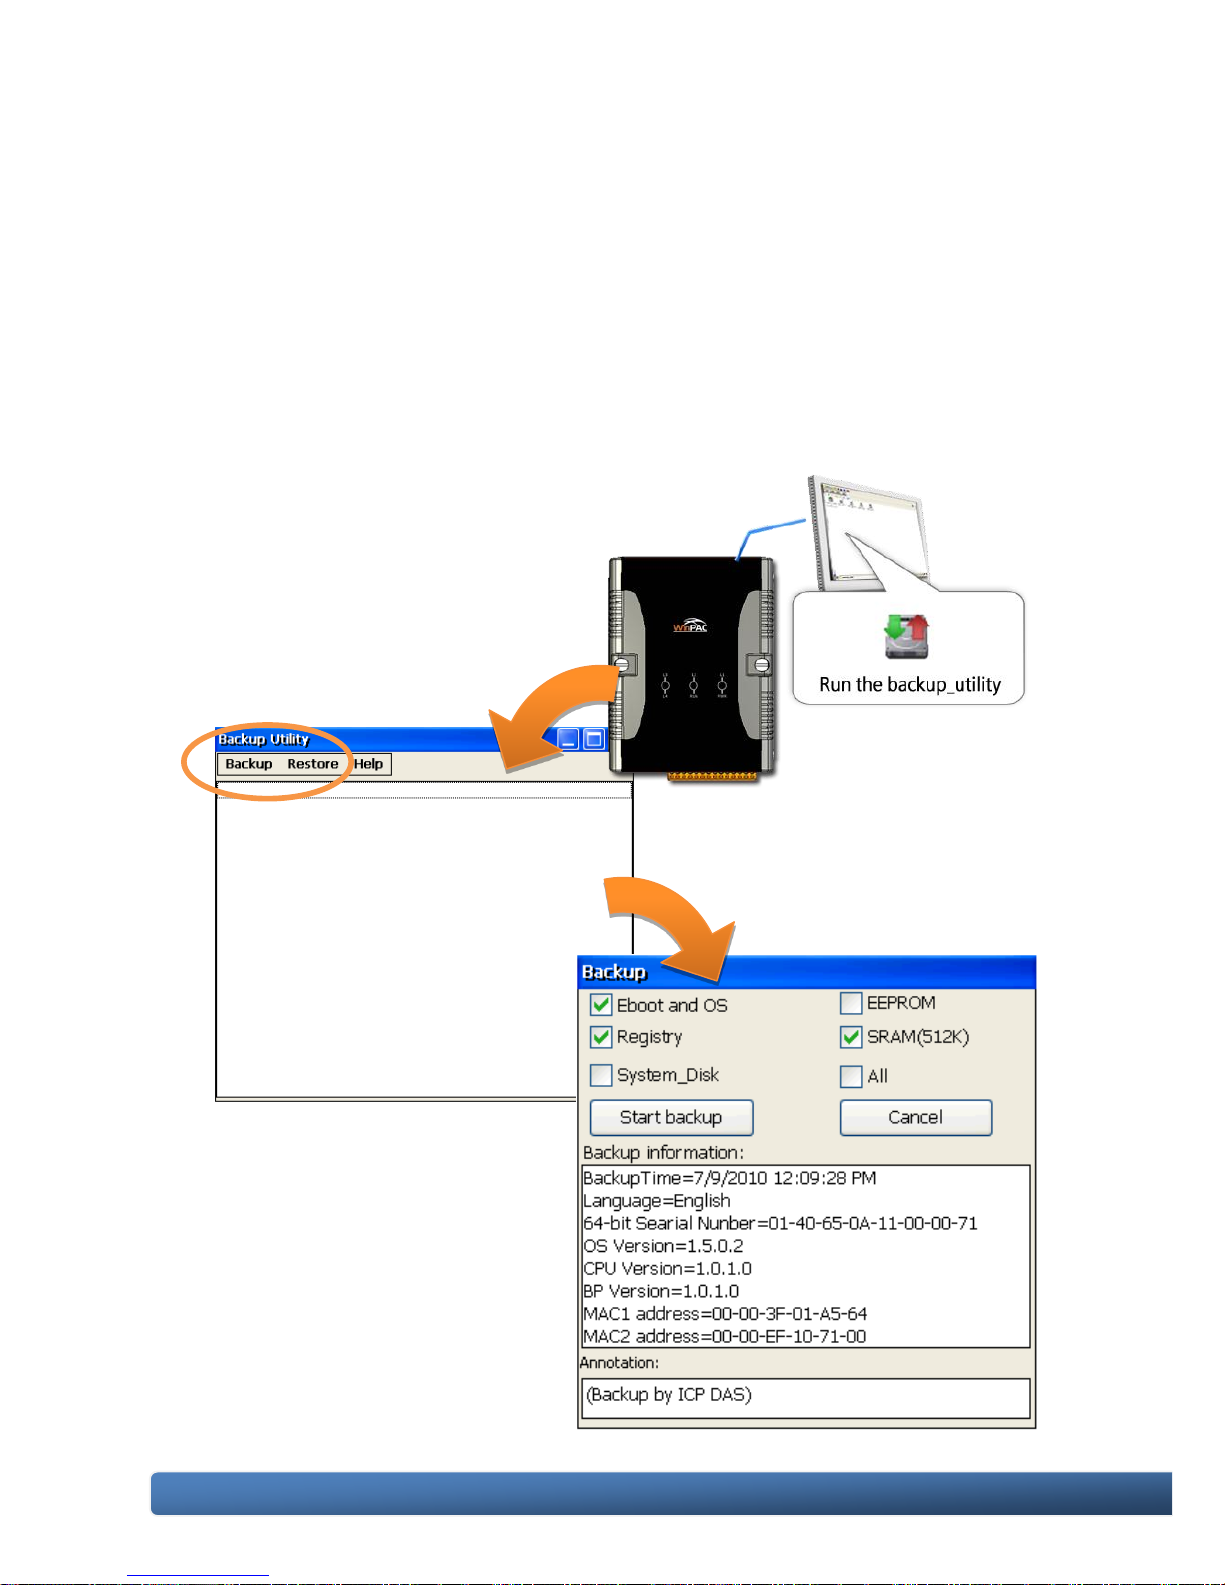
2.5. Using Backup Utility to back up the settings and files
After saving the configuration settings for a WinPAC device following the first use, it
is recommended to use the Backup utility to back up all the data (settings and files).
Step 1: Run the Backup Utility on the WinPAC
The DCON firmware is located at:
\System_Disk\tools\Backup_utilityE\
Step 2: Click the Backup
menu
Step 3: Select the options
that you want to
backup, enter text
annotations and
then click the Start
backup button
Page 30
WinPAC-5000 Series User Manual, Version 1.0.2 Page: 30
Copyright © 2010 ICP DAS Co., Ltd. All Rights Reserved. E-mail: [email protected]
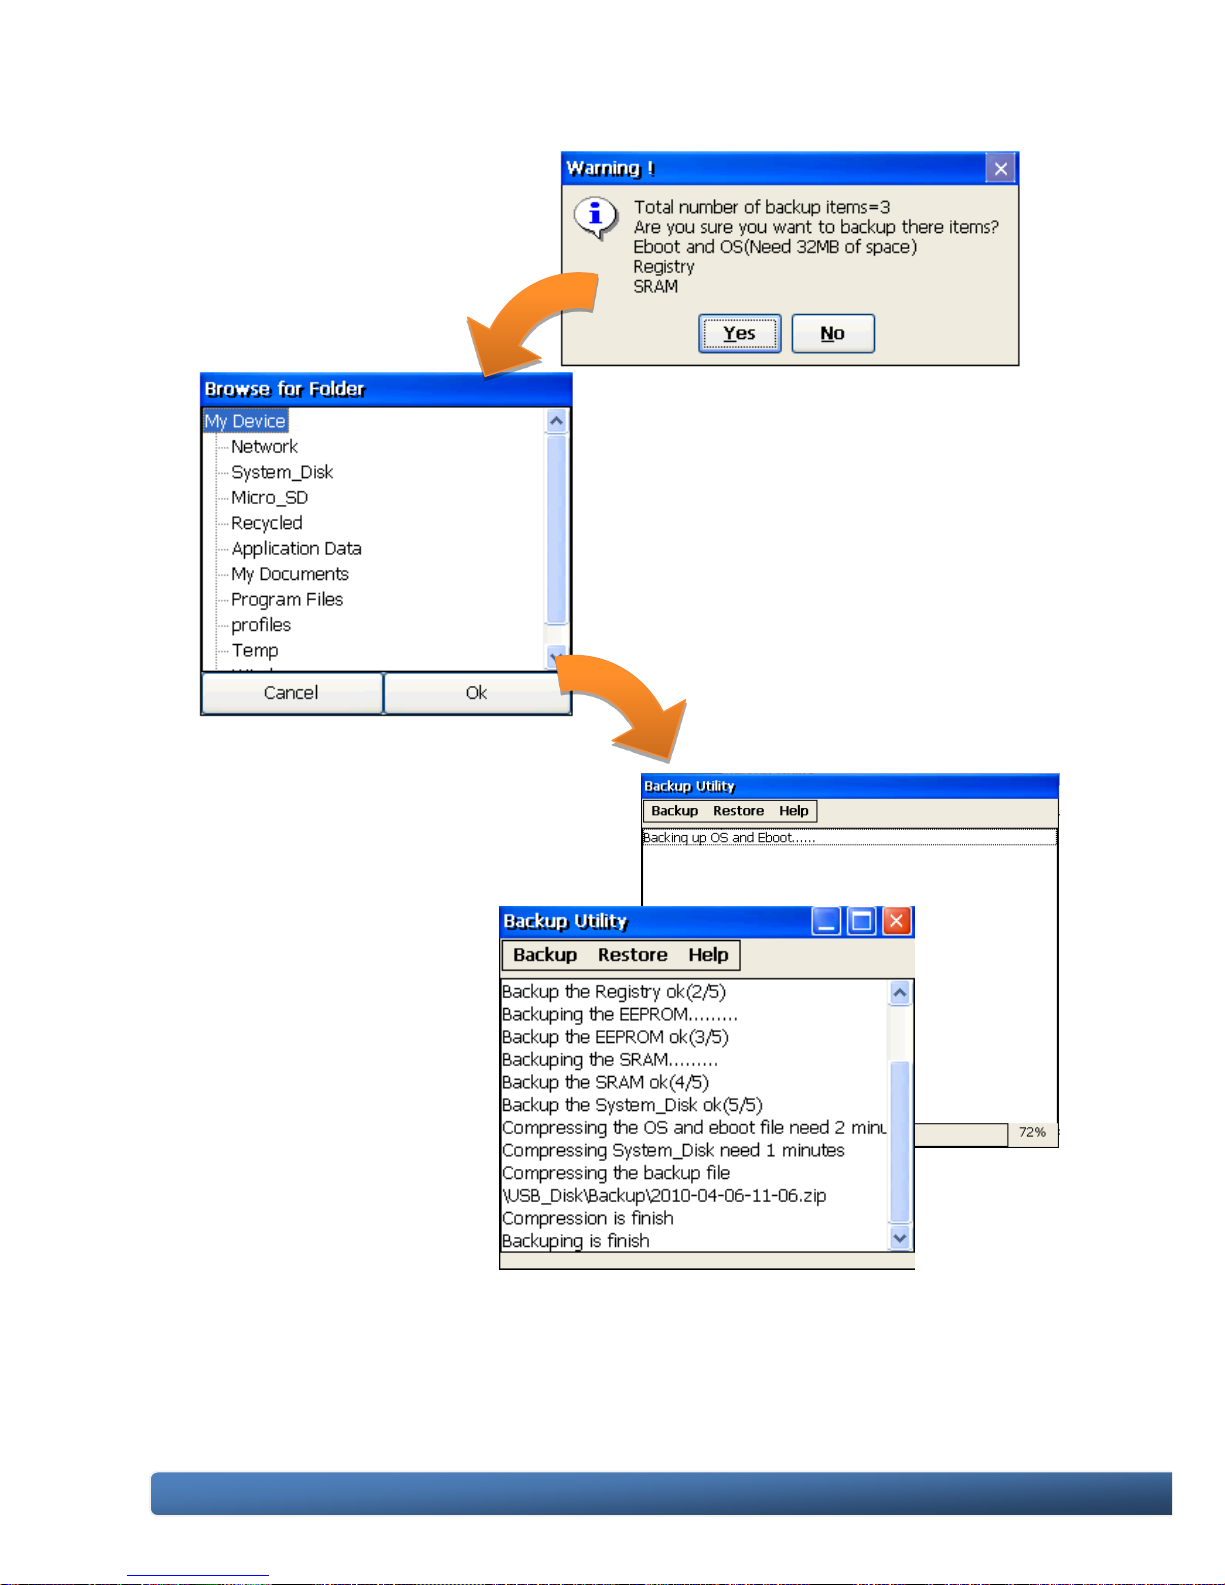
Step 4: Confirm the
backup options
and then click Yes
button
Step 5: Choose the folder that
you want to save
backup file and click
the Ok button
Step 6: Wait for process to finish
Page 31
WinPAC-5000 Series User Manual, Version 1.0.2 Page: 31
Copyright © 2010 ICP DAS Co., Ltd. All Rights Reserved. E-mail: [email protected]
2.6. A caution about using System_Disk
The System_disk is an authoritative storage device, but is not suitable for frequent
copying and deleting of files and is only suitable for storing important files that are
not changed frequently.
If files are copied and deleted frequently, the system will automatically perform a
System_Disk defragment action, which will consume the total resources of the CPU
and cause the OS not to function correctly.
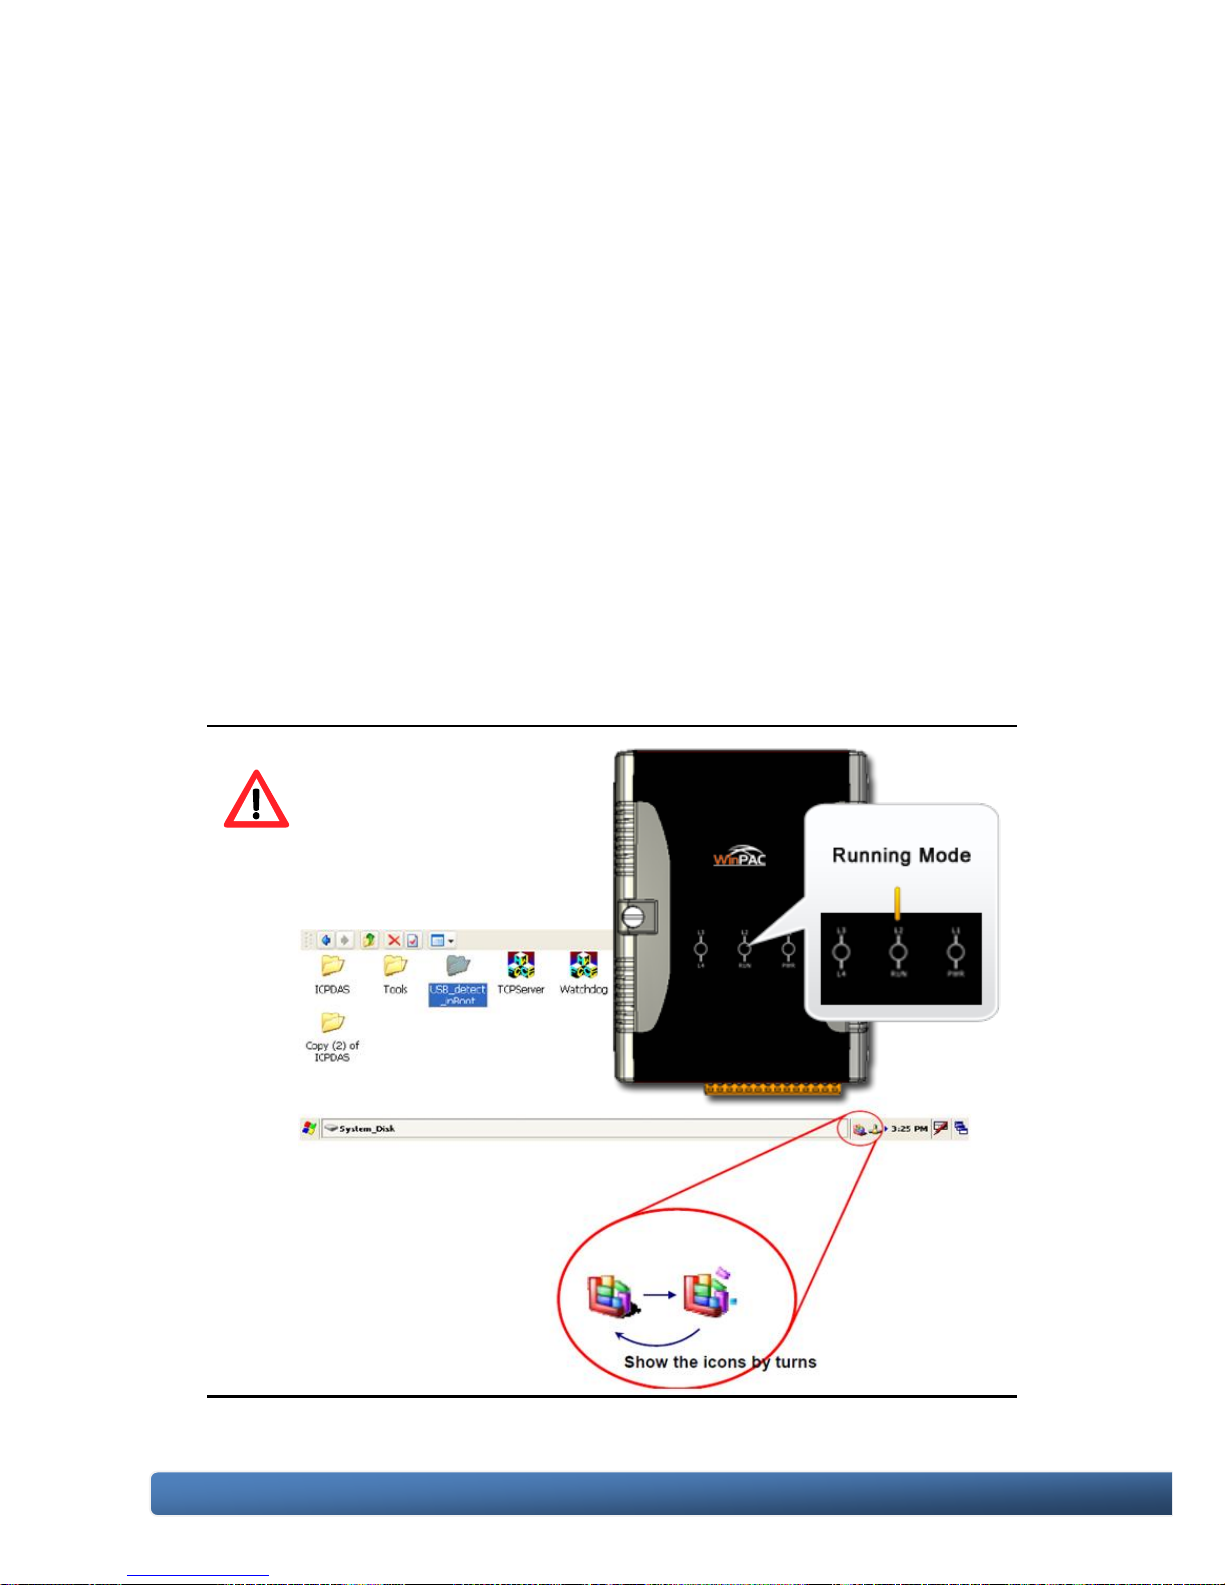
When the OS System_Disk defragment action is being performed, the run LED will
blink and the defragment action icon will show in the system tray in the bottom
right-hand of the pc screen.
Note: Do not power off the WinPAC while the defragment is being performed.
Tips & Warnings
Don not power off the
WinPAC while the
defragment is being
performed..
Page 32

WinPAC-5000 Series User Manual, Version 1.0.2 Page: 32
Copyright © 2010 ICP DAS Co., Ltd. All Rights Reserved. E-mail: [email protected]
3. Tools and Tasks
Following tools has been installed on WinPAC-5000.
CD:\Napdos
wp-5000_ce50
System_Disk
Tools
Backup_Utility
Dcomcnfg
DCON_CE
ISQLW35
Modbus
napopc_ce5
Quicker
RegistryEditor
RegistryViewer
Remote_display_application
SendToCOM
TaskMgr
VCEP
WinPAC_Utility
Page 33

WinPAC-5000 Series User Manual, Version 1.0.2 Page: 33
Copyright © 2010 ICP DAS Co., Ltd. All Rights Reserved. E-mail: [email protected]
Backup_Utility
The Backup_Utility is a system backup/restore tool used to backup/restore all the
data (OS, settings and files) from/to the WinPAC/ViewPAC device.
Dcomcnfg
dcomcnfg.exe for Windows CE to configure your DCOM settings.
NTLMUser.exe for Windows CE to create local NTLM accounts on the Windows CE
Device.
DCON_CE
With Host PC running the DCON Utility, on the WinPAC, the DCON_CE program
allows user to view and monitor the status of the DCON Utility.
ISQLW35
The ISQLW35 implements SQL server compact 3.5 Query Analyzer.
Modbus
The Modbus provides various applications of Modbus protocol for configuring the
WinPAC.
NAPOPC_CE5
NAPOPC_CE5 is an integrated omnibus software package, it allows user to quickly
establish a DCS control system.
RegistryEditor
The RegistryEditor allows user to editor the registry value of Windows CE Operating
System.
Page 34

WinPAC-5000 Series User Manual, Version 1.0.2 Page: 34
Copyright © 2010 ICP DAS Co., Ltd. All Rights Reserved. E-mail: [email protected]
Remote display application
The remote display application allows user to view the display remotely of the
WinPAC on a Host PC.
SendToCOM
The SendToCOM allows user to send/receive data to/from the expansion module via
serial port.
TaskMgr
The TaskMgr provides details about programs and processes running on the
WinPAC.
VCEP
The VCEP allows user to manage the WinPAC remotely on a Host PC.
WinPAC Utility
The WinPAC Utility provides various useful functions such as configuring Ethernet
settings, monitoring system settings and FTP services .etc for easy and quick
management.
Page 35
WinPAC-5000 Series User Manual, Version 1.0.2 Page: 35
Copyright © 2010 ICP DAS Co., Ltd. All Rights Reserved. E-mail: [email protected]
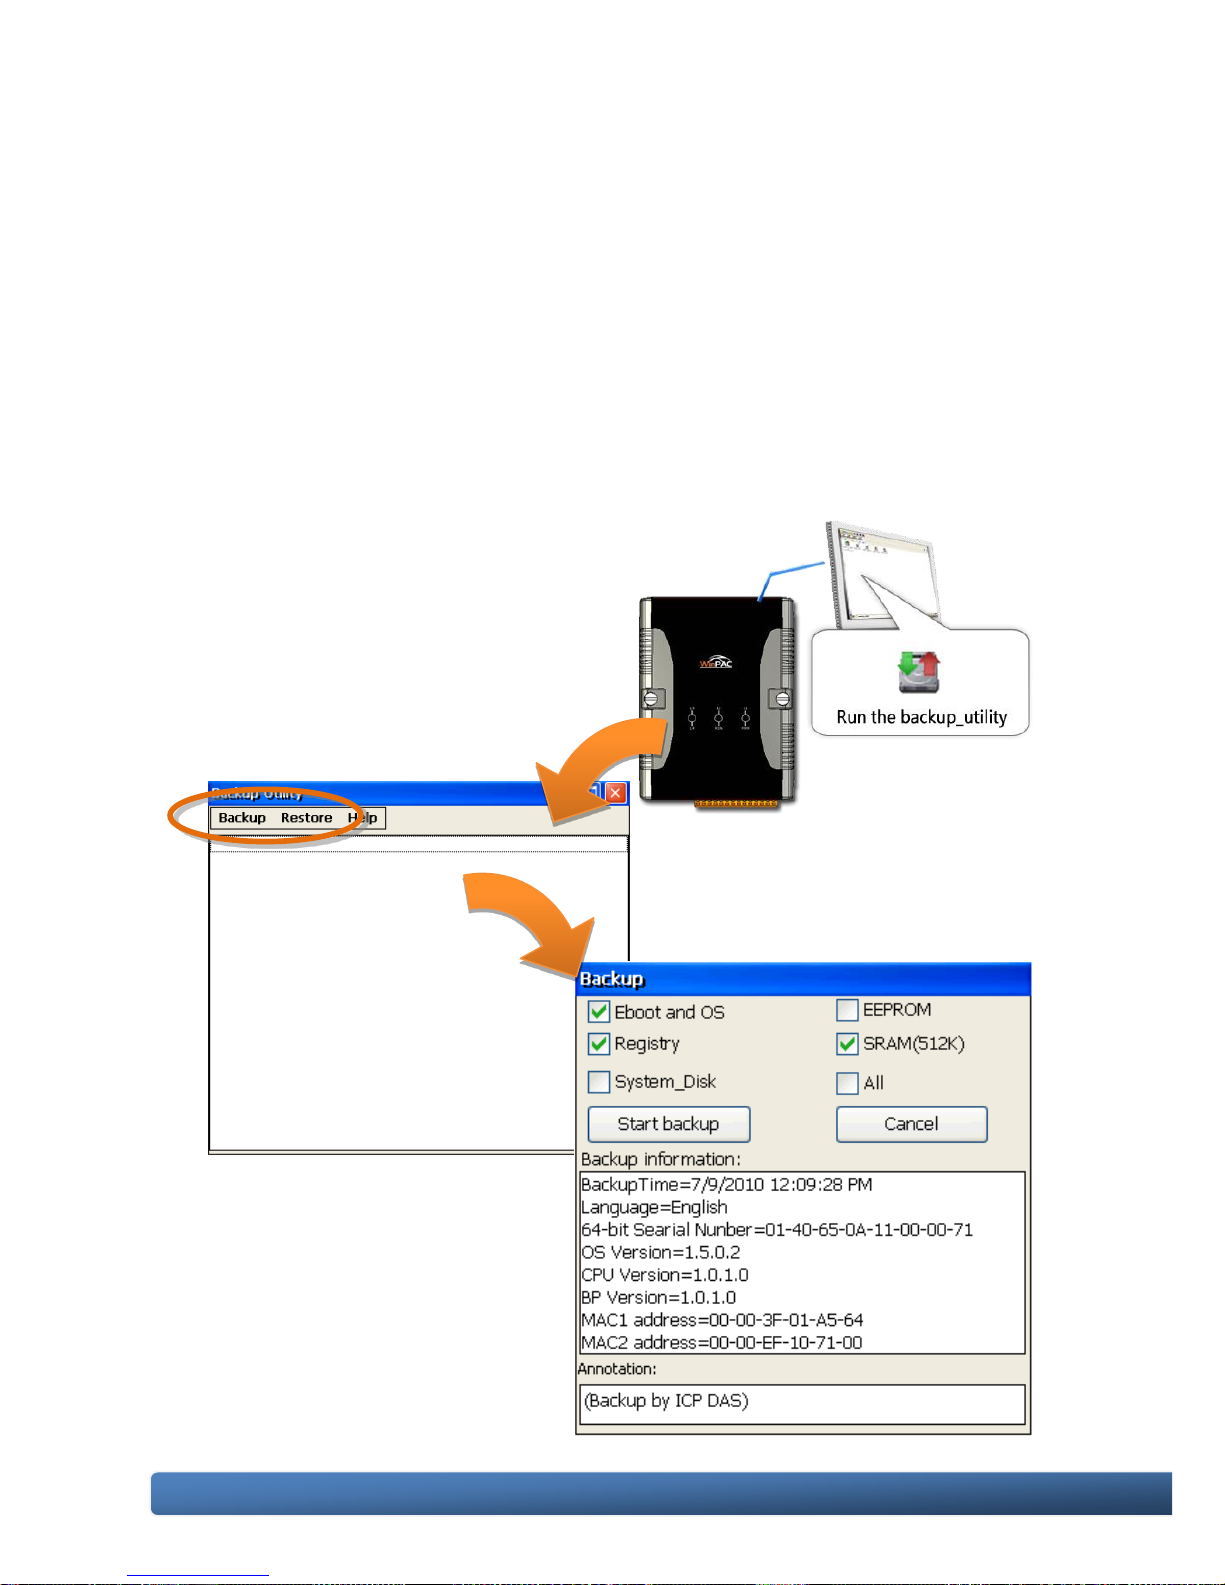
3.1. Backup Utility
Backup Utility is an application program for backing up data.
With this utility, you can easily back up not only the files and folders you have
created on your WinPAC-5000 but also the entire partition(s) including your
WinPAC-5000 operating environment and its settings and dictionaries.
Below are the step-by-step procedures to use the Backup utility to back up data.
Step 1: Run the Backup Utility on
WinPAC-5000
The DCON firmware is located at:
\System_Disk\tools\Backup_utilityE\
Step 2: Click Backup menu
Step 3: Select the options
that you want to
backup, enter text
annotations and
then click the Start
backup
Page 36
WinPAC-5000 Series User Manual, Version 1.0.2 Page: 36
Copyright © 2010 ICP DAS Co., Ltd. All Rights Reserved. E-mail: [email protected]
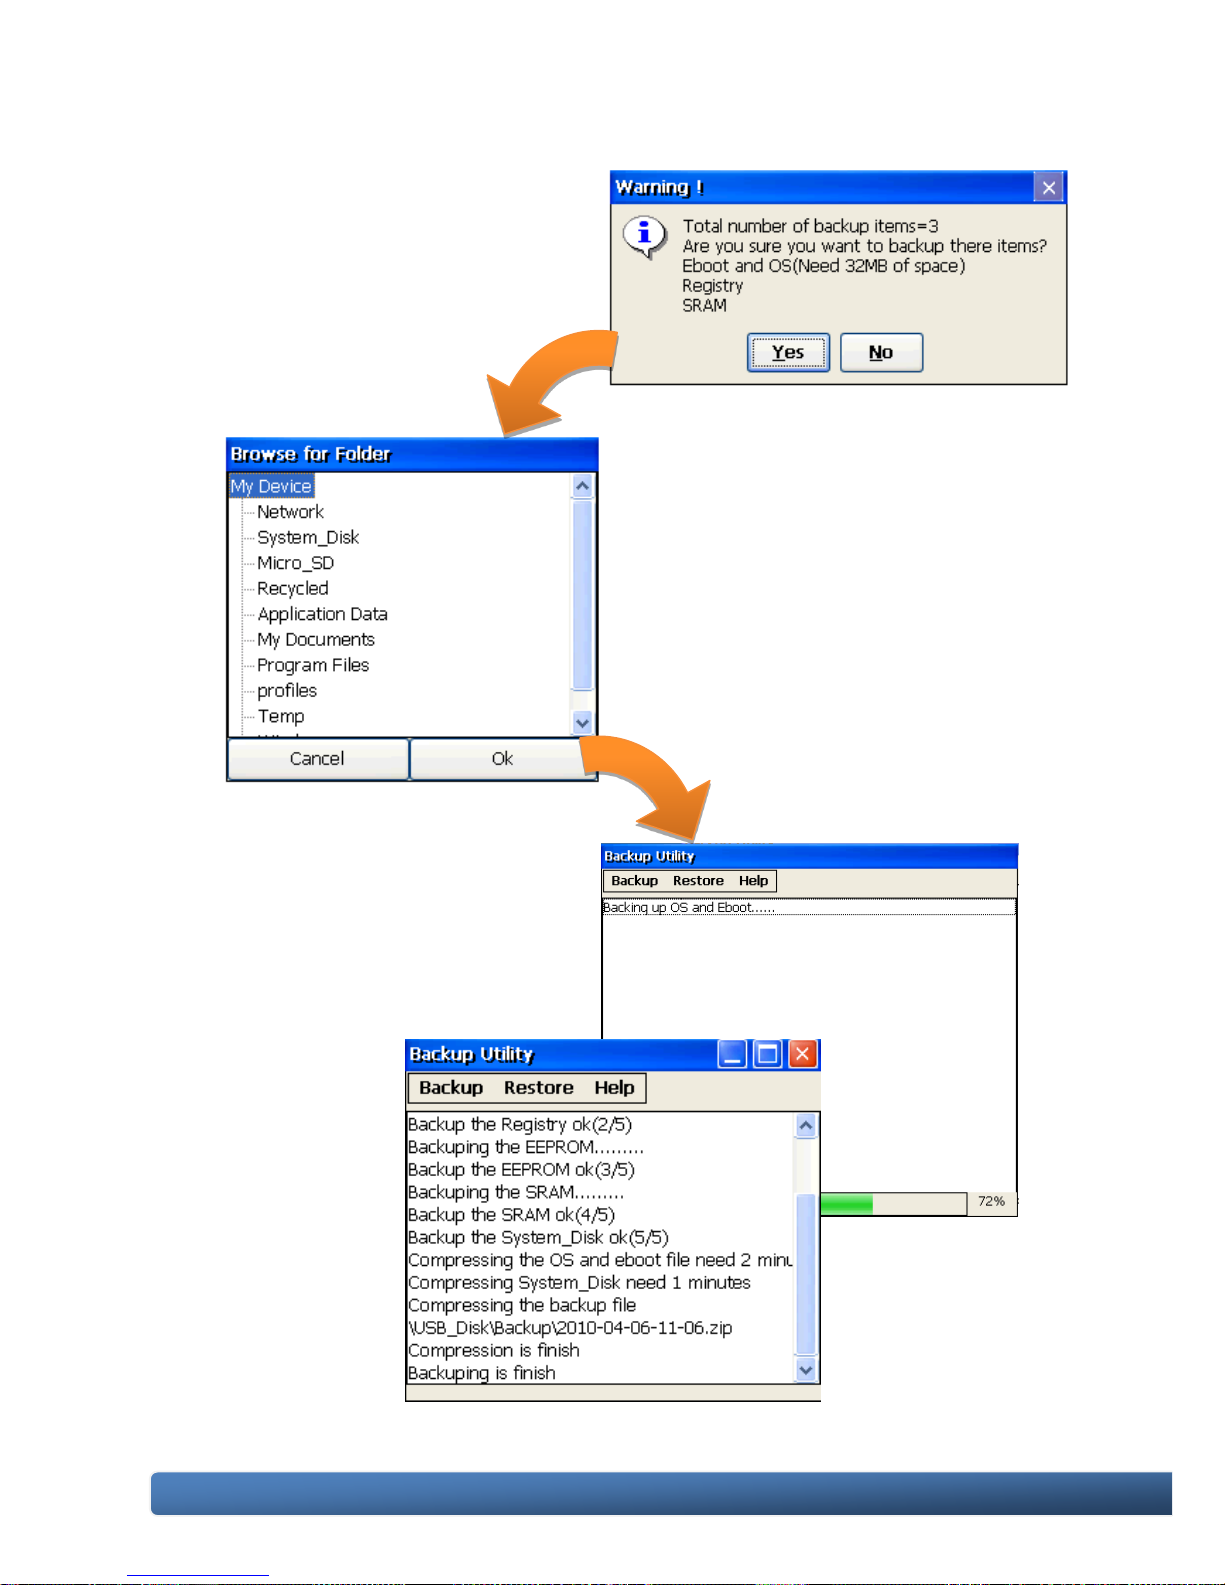
Step 4: Click Yes to confirm
the backup options
Step 5: Choose the folder that
you want to save
backup file and click
the Ok
Step 6: Wait for process to
finish
Page 37

WinPAC-5000 Series User Manual, Version 1.0.2 Page: 37
Copyright © 2010 ICP DAS Co., Ltd. All Rights Reserved. E-mail: [email protected]
3.2. Dconmcnfg
DCOMCNFG is a utility included with Microsoft Windows CE operating system and
is used to configure various DCOM-specific settings in the registry. You can use the
registry to specify default permissions for objects on the system, such as Access,
Launch, and Configuration.
Page 38

WinPAC-5000 Series User Manual, Version 1.0.2 Page: 38
Copyright © 2010 ICP DAS Co., Ltd. All Rights Reserved. E-mail: [email protected]
3.3. Napopc_ce5
NAPOPC_CE5 DA Server is a free OPC DA Server (The "OPC"
stands for "OLE for Process Control" and the "DA" stands for "
Data Access") working on WinPAC, ViewPAC & WinCon
controllers provided by ICP DAS Ltd. The first standard (originally
called simply the OPC Specification and now called the Data
Access Specification) resulted from the collaboration of a number of leading
worldwide automation suppliers working in cooperation with Microsoft. Originally
based on Microsoft's OLE COM (component object model) and DCOM (distributed
component object model) technologies, the specification defined a standard set of
objects, interfaces and methods for use in process control and manufacturing
automation applications to facilitate interoperability. NAPOPC_CE5 DA Server
integrates OPC, Modbus TCP Slave and Modbus RTU Slave three kind Slave
services, as well as integrates Modbus TCP Master, Modbus RTU Master and
DCON three kind Master communication protocols. It also provides one advanced
function “Rule Script” for use in the I/O integration and transformation, and some
conditional Logic operation.
Any version before 2.1.0 of the NAPOPC_CE5 was named “Quicker”
Page 39
WinPAC-5000 Series User Manual, Version 1.0.2 Page: 39
Copyright © 2010 ICP DAS Co., Ltd. All Rights Reserved. E-mail: [email protected]
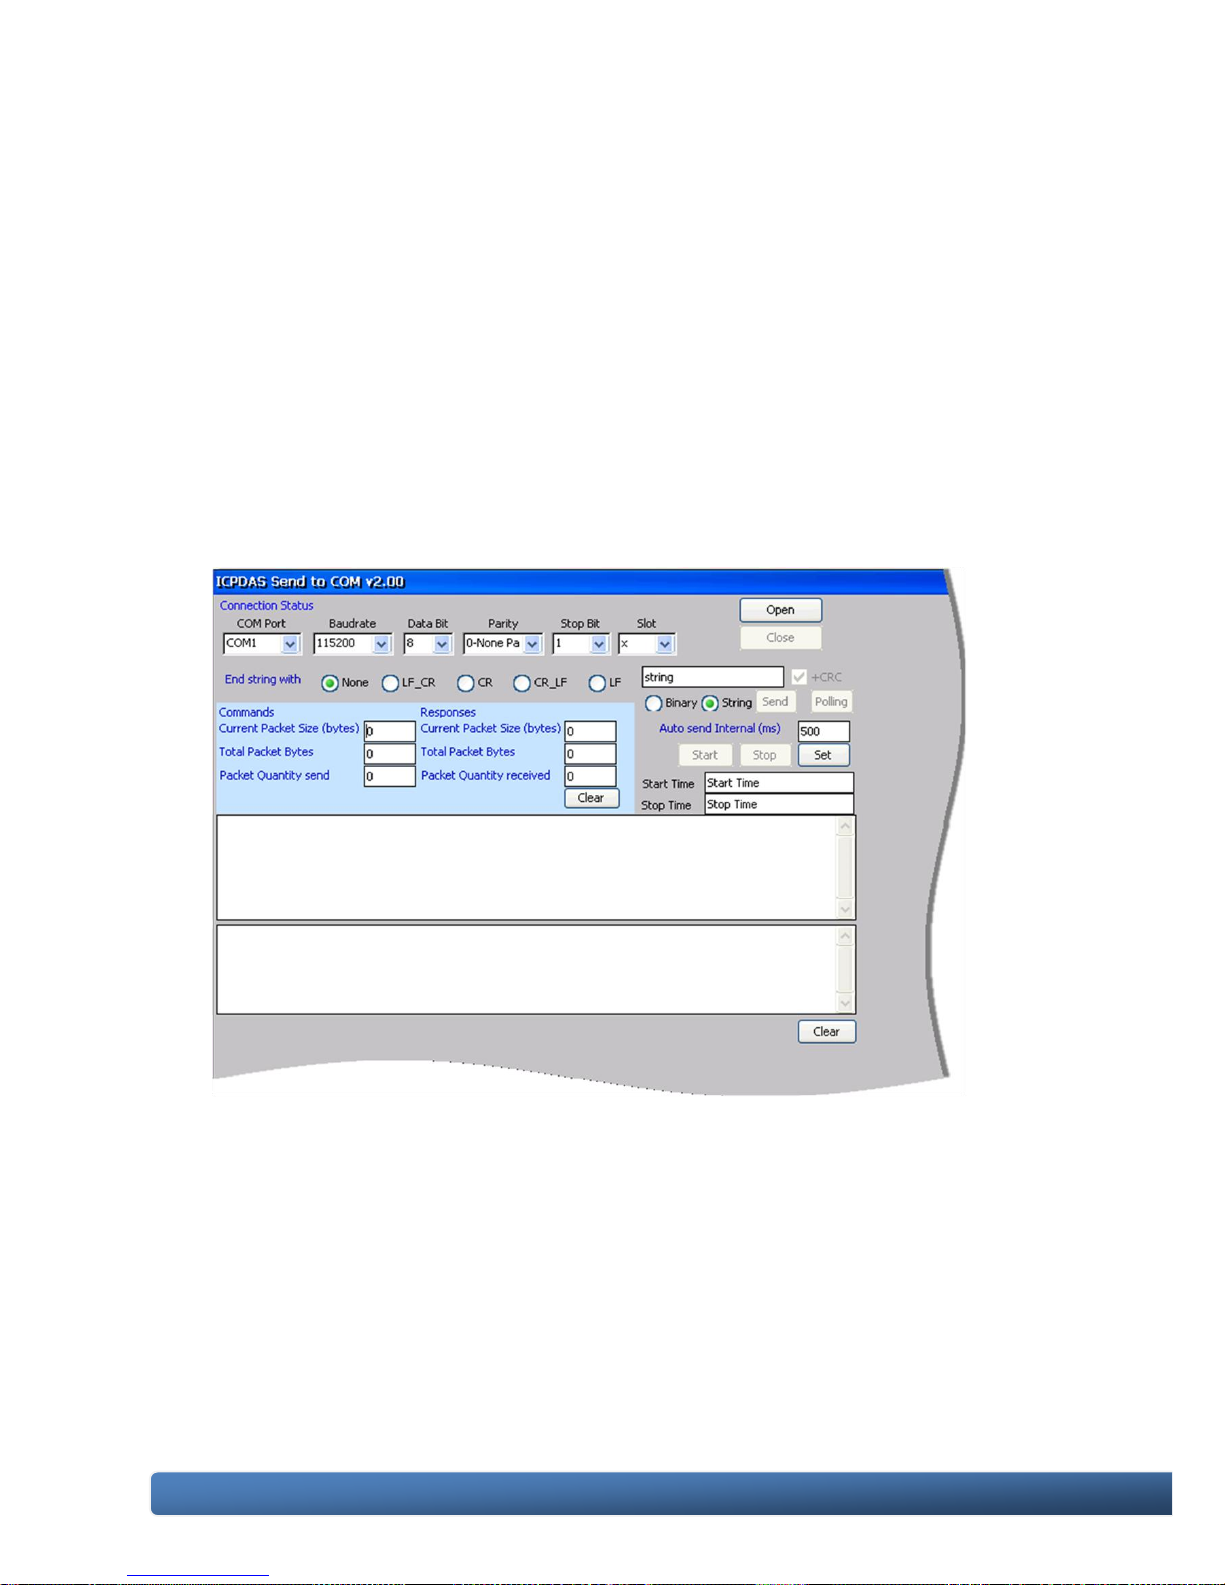
3.4. SendToCOM
The SendToCOM uses the serial port to communicate with expansion module. To
use the SendToCOM, you can send data to expansion module through the serial
port, and receive data from other device through the serial port.
For more information about these commands for communicating with expansion
module, please refer to:
CD:\Napdos\io_module\87k_high_profile_modules.htm
Page 40
WinPAC-5000 Series User Manual, Version 1.0.2 Page: 40
Copyright © 2010 ICP DAS Co., Ltd. All Rights Reserved. E-mail: [email protected]
3.5. VCEP
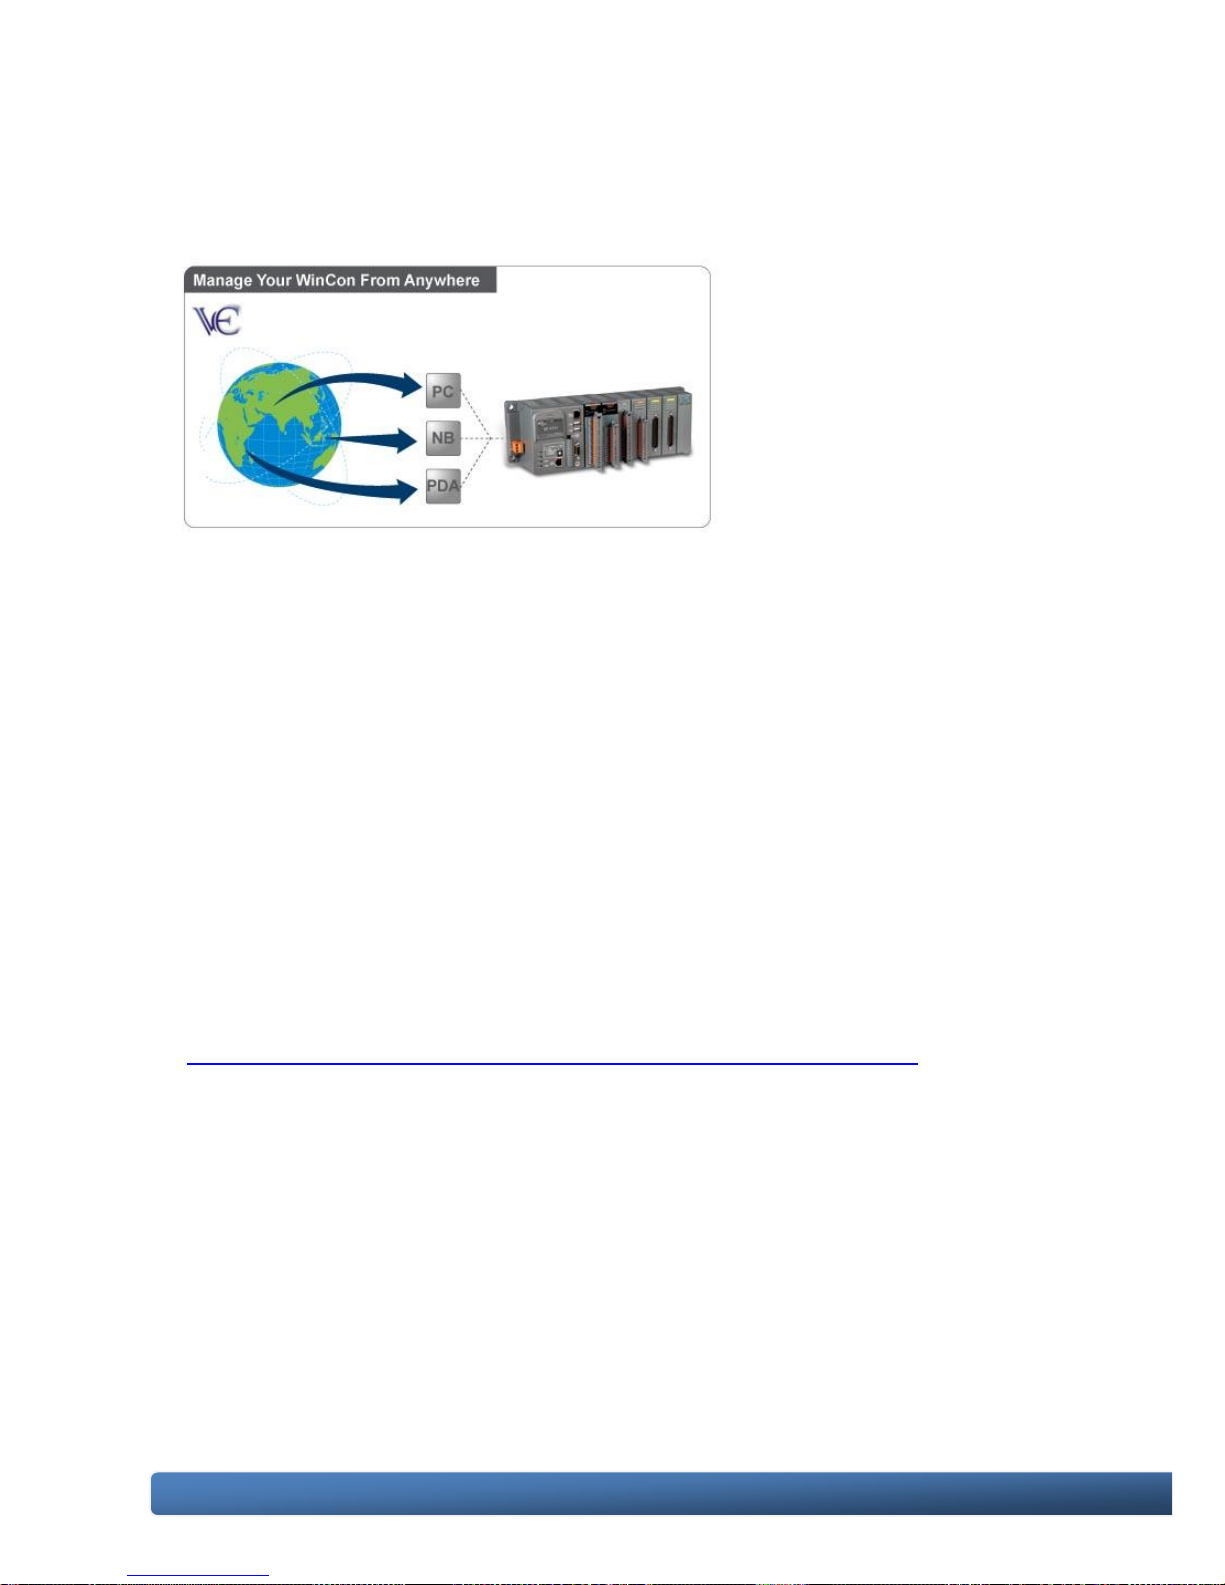
ICPDAS VCEP is designed
for managing your WinPAC
anywhere. No matter where
you are, ICPDAS VCEP
provides a convenient
environment on the Desktop
PC and allows you control
your WinPAC remotely.
ICPDAS VCEP is composed of two main components:
The “Server” which runs on WinPAC.
The “Client" which runs on a Desktop PC.
Once a connection is established between the client and server (initiated by the
client), the client will periodically send requests for screen updates and send
mouse/key click information to the server to simulate. Each video frame is
inter-compressed against the previous frame and then intra-compressed with a
modified LZW scheme to minimize the amount of data transmitted from server to
client.
For more detailed information on VCEP application, please refer to
http://www.icpdas.com/products/PAC/wincon-8000/wincon_VirtualCE.htm
Page 41
WinPAC-5000 Series User Manual, Version 1.0.2 Page: 41
Copyright © 2010 ICP DAS Co., Ltd. All Rights Reserved. E-mail: [email protected]
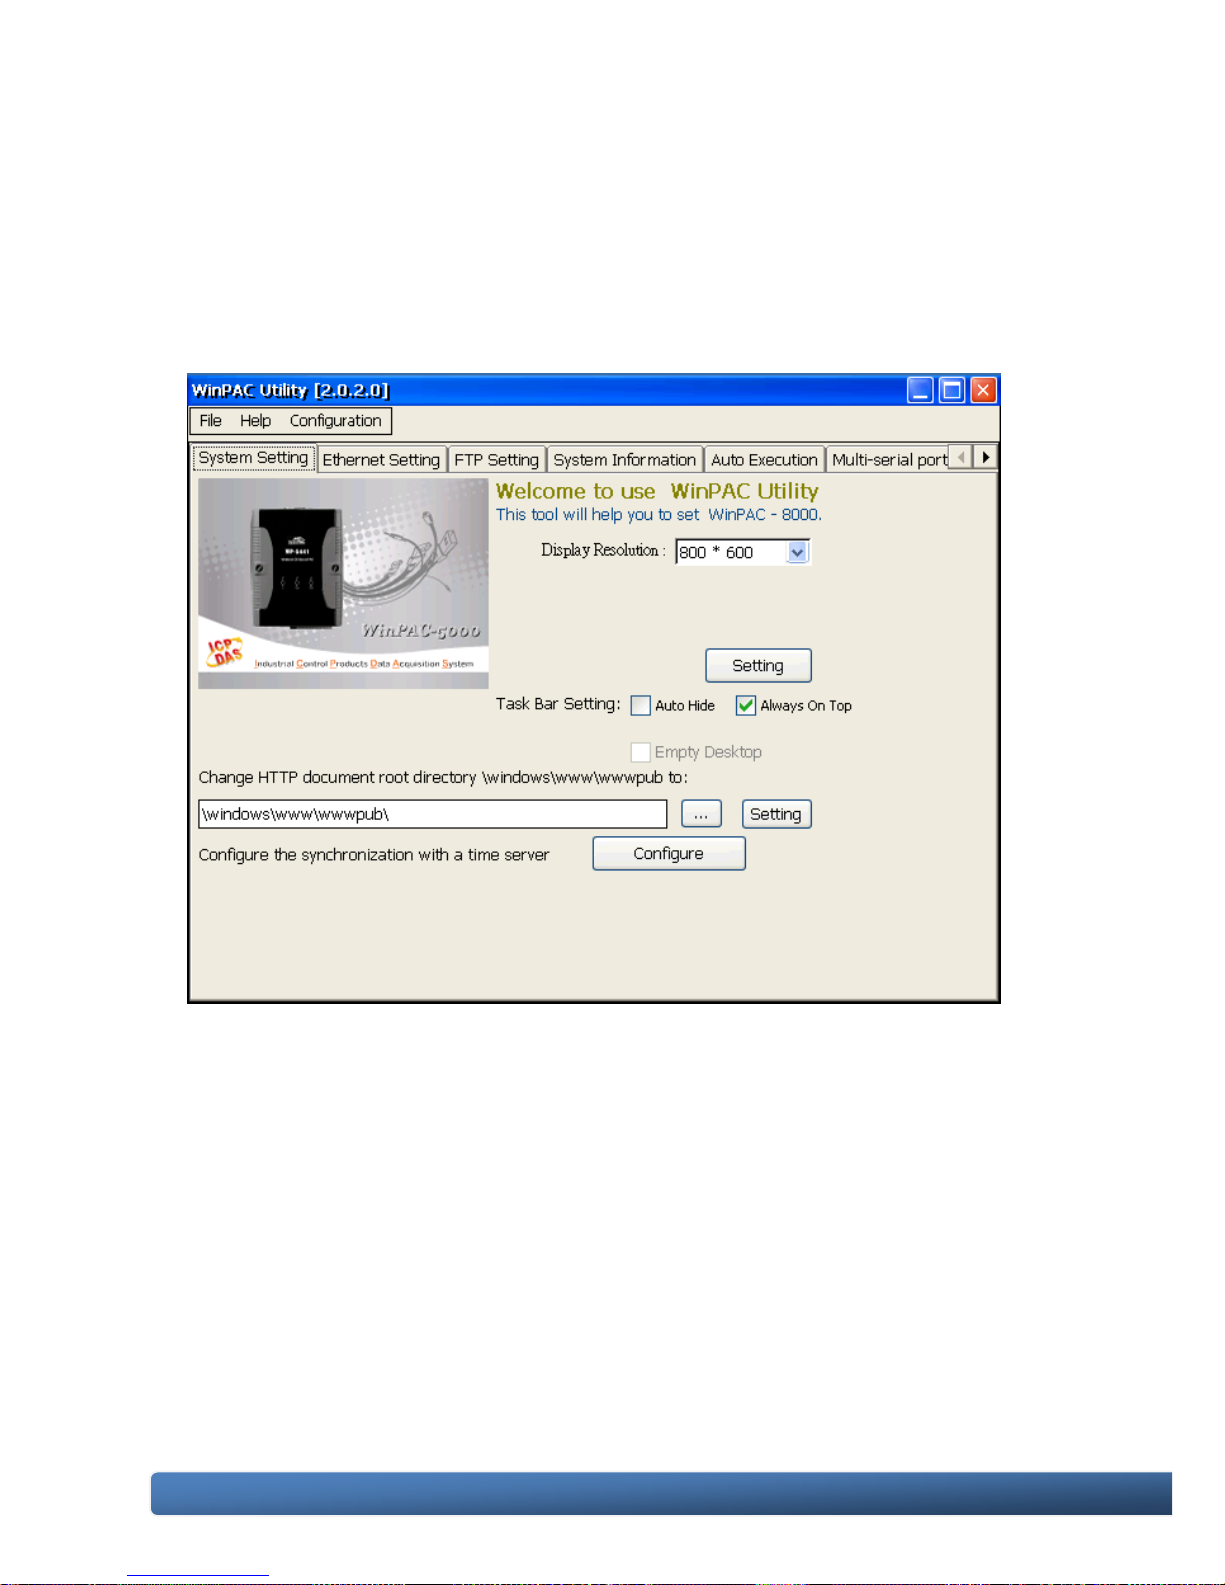
3.6. WinPAC_Utility
The WinPAC Utility is a tool which is designed to quickly control and manage the
WinPAC.
Page 42
WinPAC-5000 Series User Manual, Version 1.0.2 Page: 42
Copyright © 2010 ICP DAS Co., Ltd. All Rights Reserved. E-mail: [email protected]
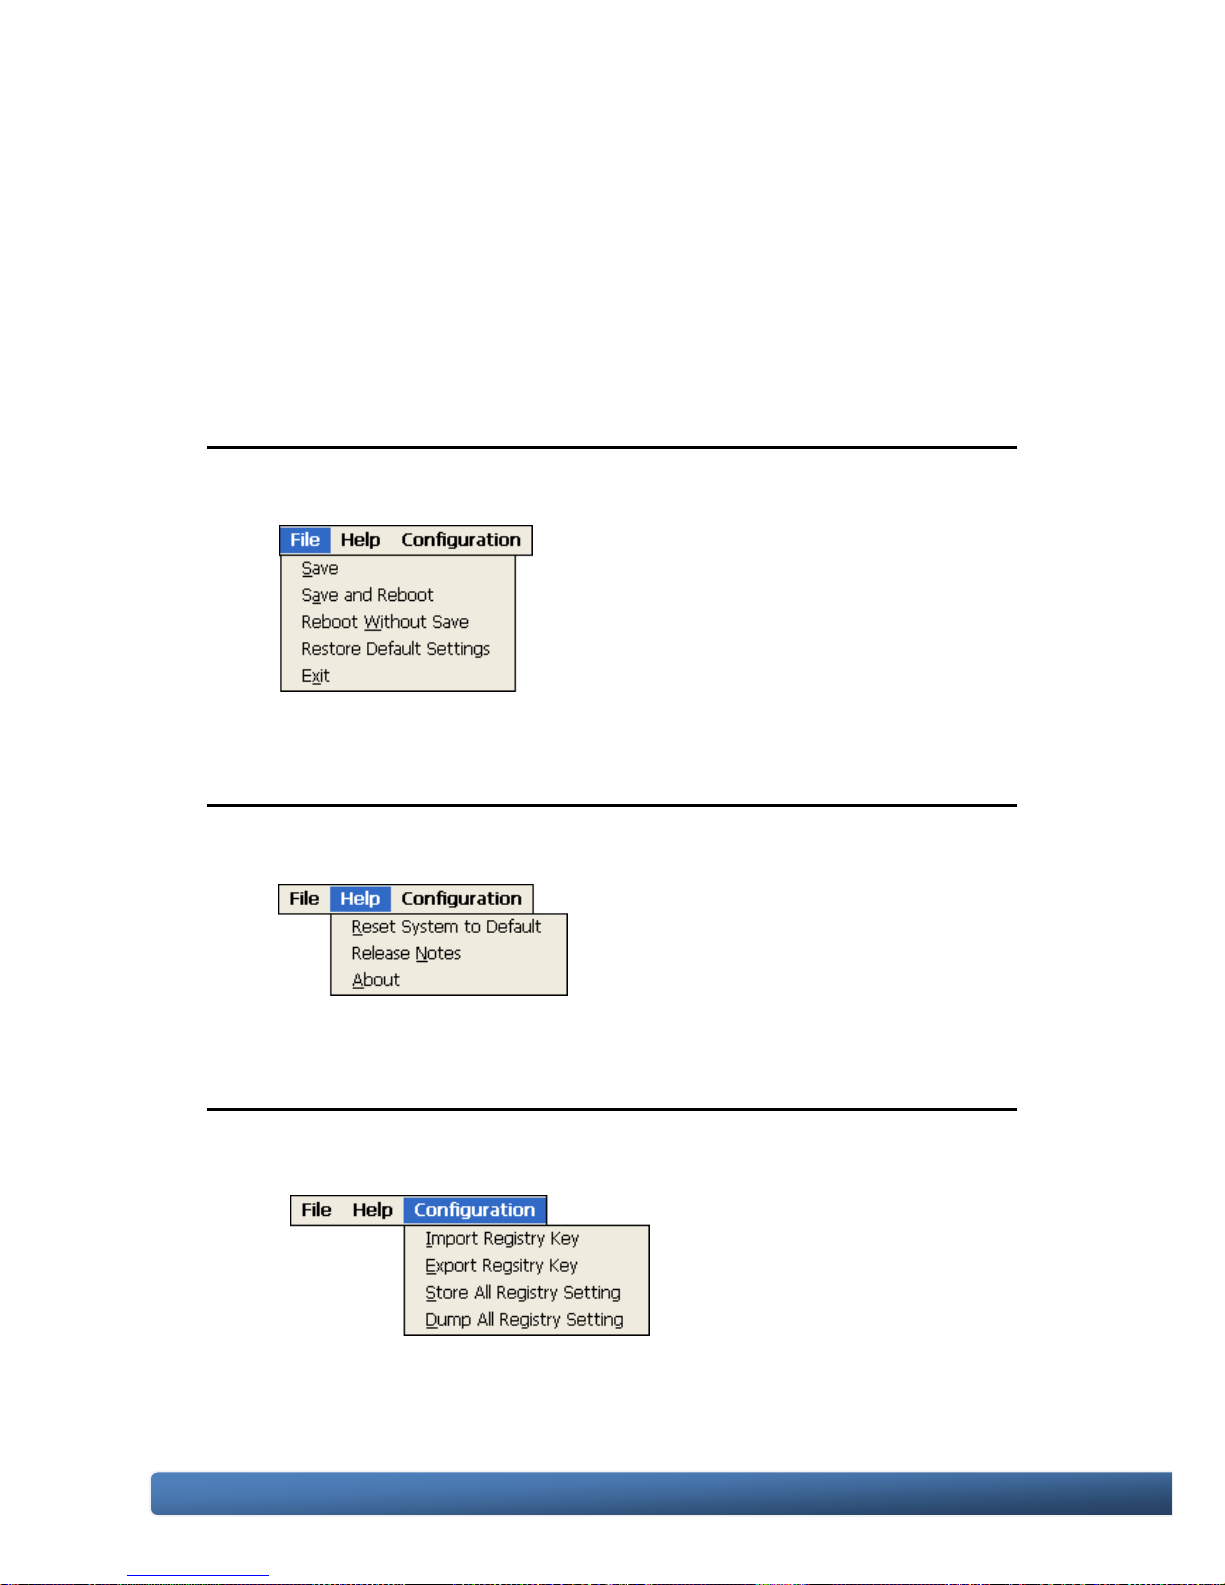
3.6.1. Menu Bar
The WinPAC Utility includes the following function menu. All function menu will be
explained later.
File Menu
Help Menu
Configuration Menu
Page 43
WinPAC-5000 Series User Manual, Version 1.0.2 Page: 43
Copyright © 2010 ICP DAS Co., Ltd. All Rights Reserved. E-mail: [email protected]
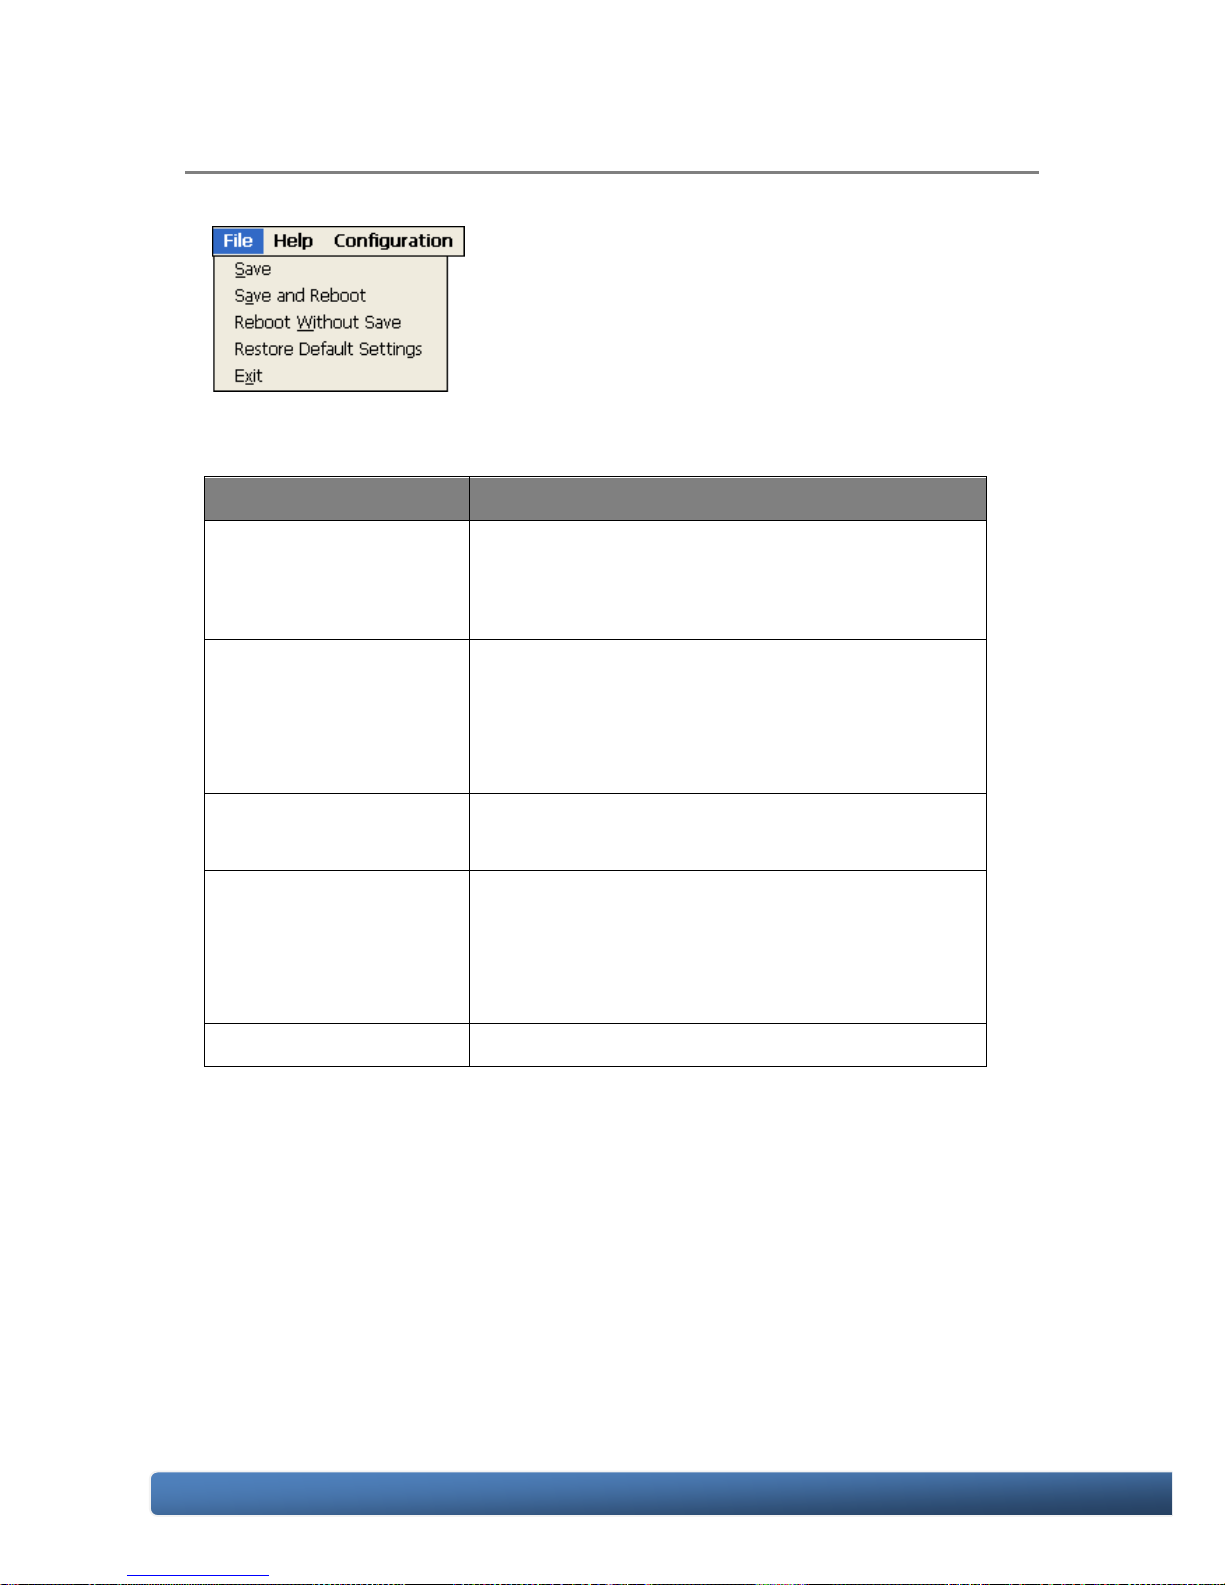
File Menu
The menu commands
Use to
Save
Saves the settings into Flash.
The new settings don‟t take effect until the
WinPAC restart.
Save and Reboot
Saves the settings into Flash and restart the
WinPAC.
The new settings will take effect after the
WinPAC restart.
Reboot Without Save
Restarts the WinPAC without save the settings
into Flash.
Restore Default
Settings
Restarts the settings of WinPAC to its factory
default values.
The settings include configuration setting,
network setting, auto execution, etc.
Exit
Exits the WinPAC Utility.
Page 44
WinPAC-5000 Series User Manual, Version 1.0.2 Page: 44
Copyright © 2010 ICP DAS Co., Ltd. All Rights Reserved. E-mail: [email protected]
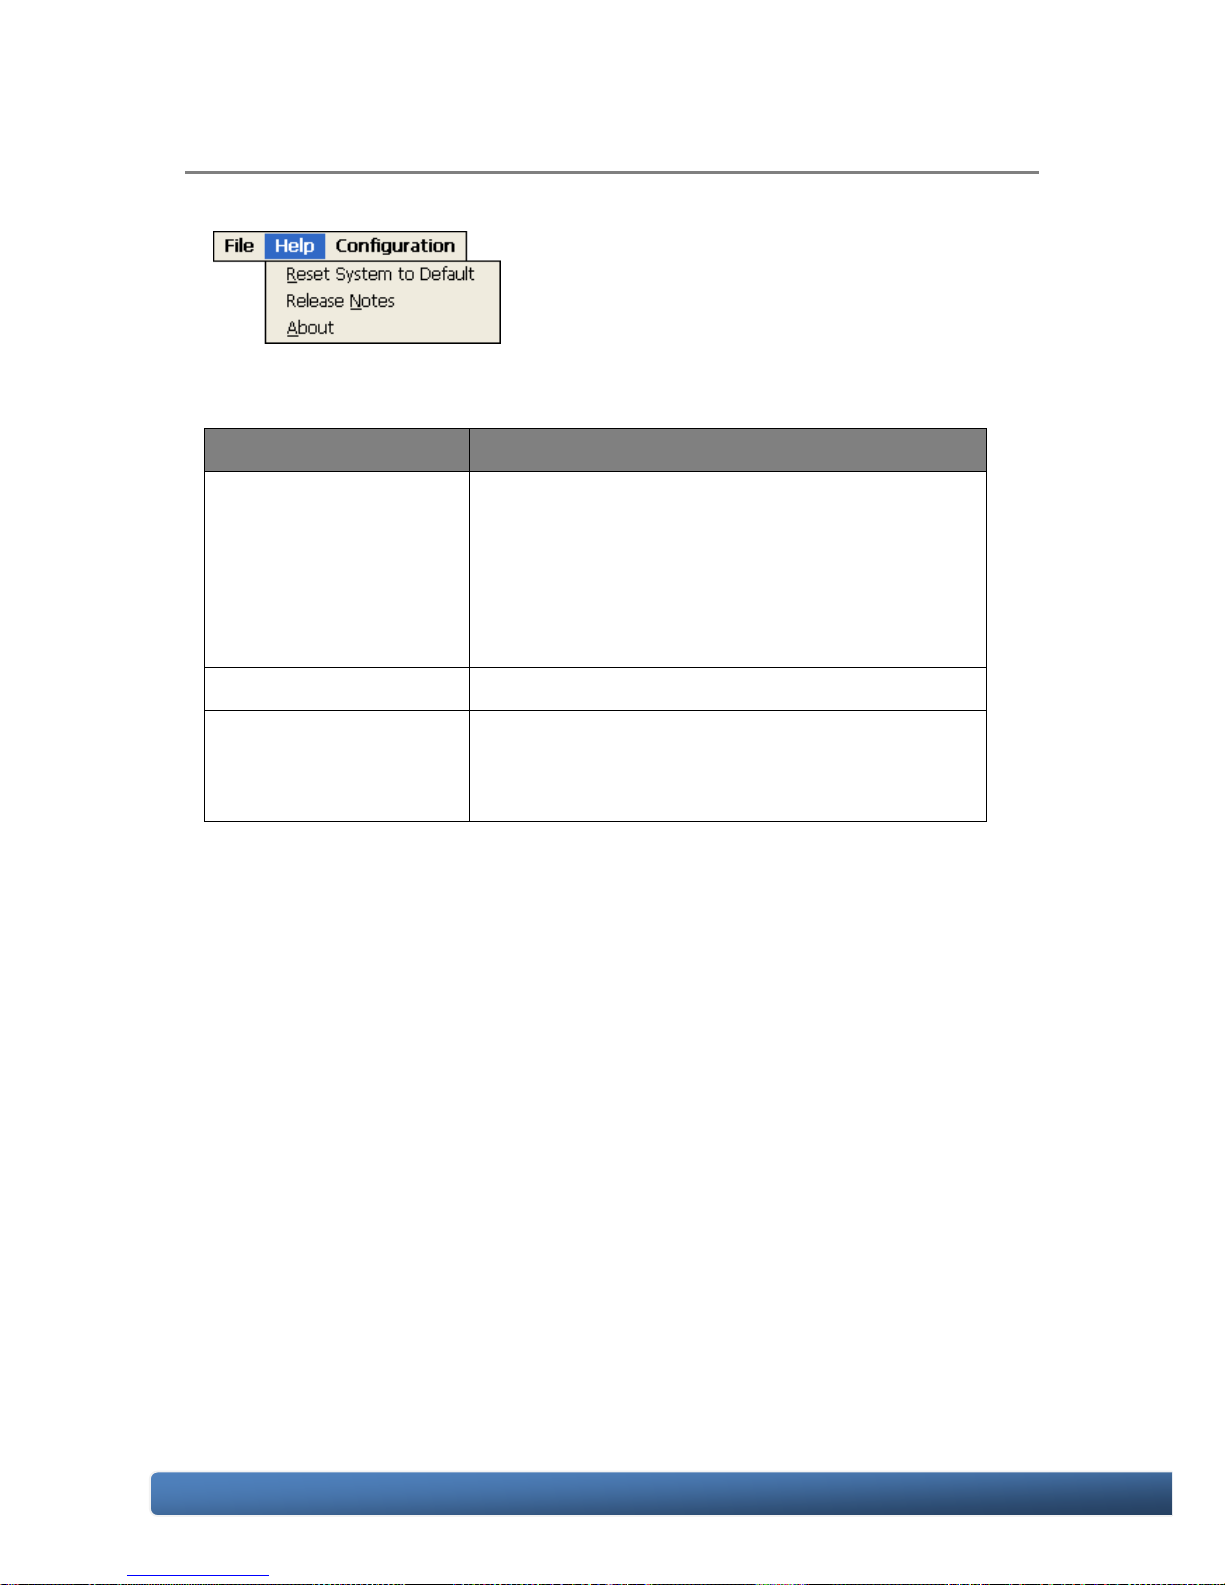
Help Menu
The menu commands
Use to
Reset System to
Default
Resets the system interrupt status to default.
The operation used in the situation when the
interrupt crash.
You can select this operation to reset the
interrupt status without rebooting the device.
Release Notes
Checks out what‟s new and the know issues.
About
Displays a dialog box with information about
WinPAC Utility, including the current version and
copyright information.
Page 45

WinPAC-5000 Series User Manual, Version 1.0.2 Page: 45
Copyright © 2010 ICP DAS Co., Ltd. All Rights Reserved. E-mail: [email protected]
Configuration Menu
The menu
commands
Use to
Import Registry Key
Backs up a sub-key of registry by using a
registration entry (.reg) file.
How to use:
Step 1: Select the “Import Registry Key”, then the
“Open” dialog box will appear
Step 2: On the “Open” dialog box, select a
specific .reg file to import
Warning:
1. The .reg file which should be saved by “Export
Registry Key”.
2. It will not save automatically after import a .reg
file.
Export Registry Key
Makes a back up of a registry sub-key
How to use:
Step 1: Select the “Export Registry Key”, then the
“Export Registry” box will appear
Step 2: Select a specific root key
Step 3: Input a specific path of sub-key
Step 4: Push the “OK” button, then the “Save As”
Page 46

WinPAC-5000 Series User Manual, Version 1.0.2 Page: 46
Copyright © 2010 ICP DAS Co., Ltd. All Rights Reserved. E-mail: [email protected]
The menu
commands
Use to
dialog box will appear prompting you to select a
location where you want to save this exported file
Warning:
The export operation will export all the sub-keys
of the specific key which you input.
Store All Registry
Setting
Stores all registry setting to flash from .das file
which is saved by “Dump All Registry Setting”.
How to use:
Step 1: Select the “Store All Registry Setting” ,
then the “Open” dialog box will appear
Step 2: On the “Open” dialog box, select a
specific .das file to store
Warning:
1. The .das file which should be saved by “Dump
All Registry Setting”.
2. It will save automatically after store .das file.
Dump All Registry
Settings
Dump all registries setting to .das file.
How to use:
Select the “Dump All Registry Setting”, then the
“Save As” dialog box will appear prompting you
to select a location where you want to save this
exported file.
Page 47
WinPAC-5000 Series User Manual, Version 1.0.2 Page: 47
Copyright © 2010 ICP DAS Co., Ltd. All Rights Reserved. E-mail: [email protected]
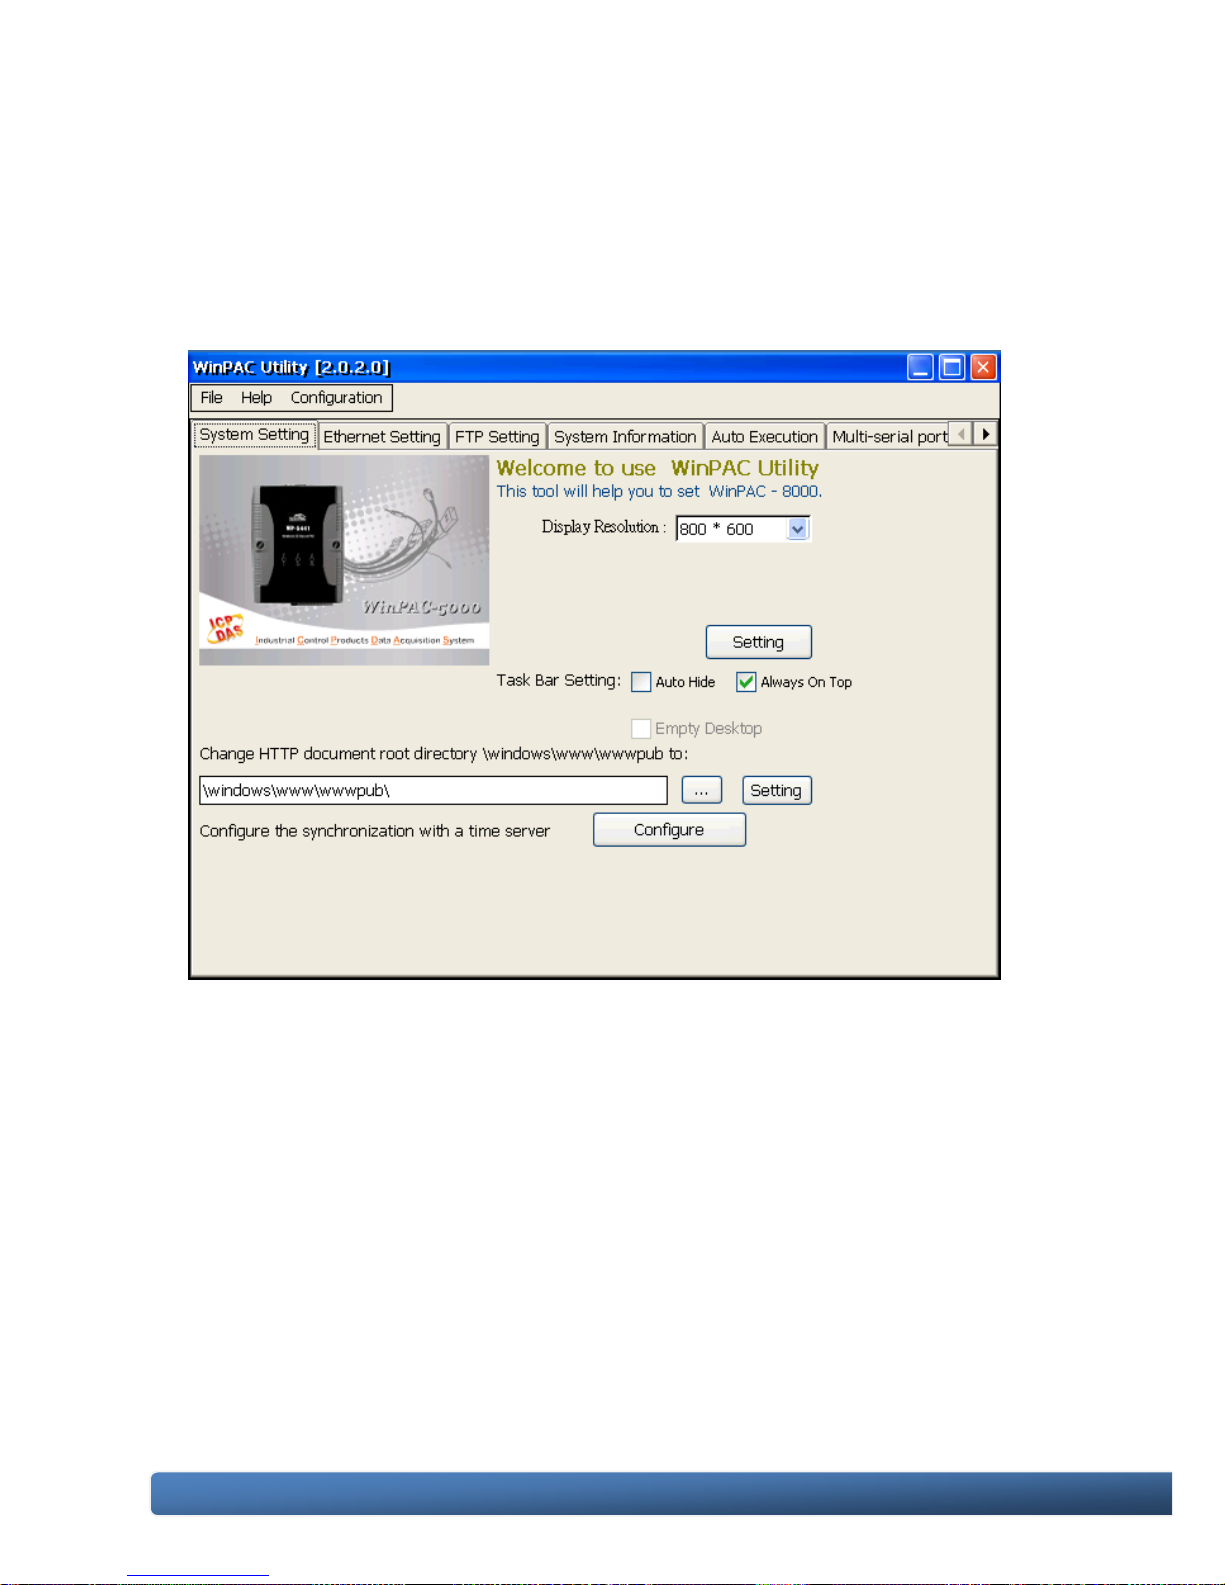
3.6.2. Property Tabs
The WinPAC Utility includes the following property tabs, all property tabs will be
explained later.
System Setting
Ethernet Setting
FTP Setting
System Information
Auto Execution
Multi-serial port wizard
System Memory Setting
Page 48
WinPAC-5000 Series User Manual, Version 1.0.2 Page: 48
Copyright © 2010 ICP DAS Co., Ltd. All Rights Reserved. E-mail: [email protected]
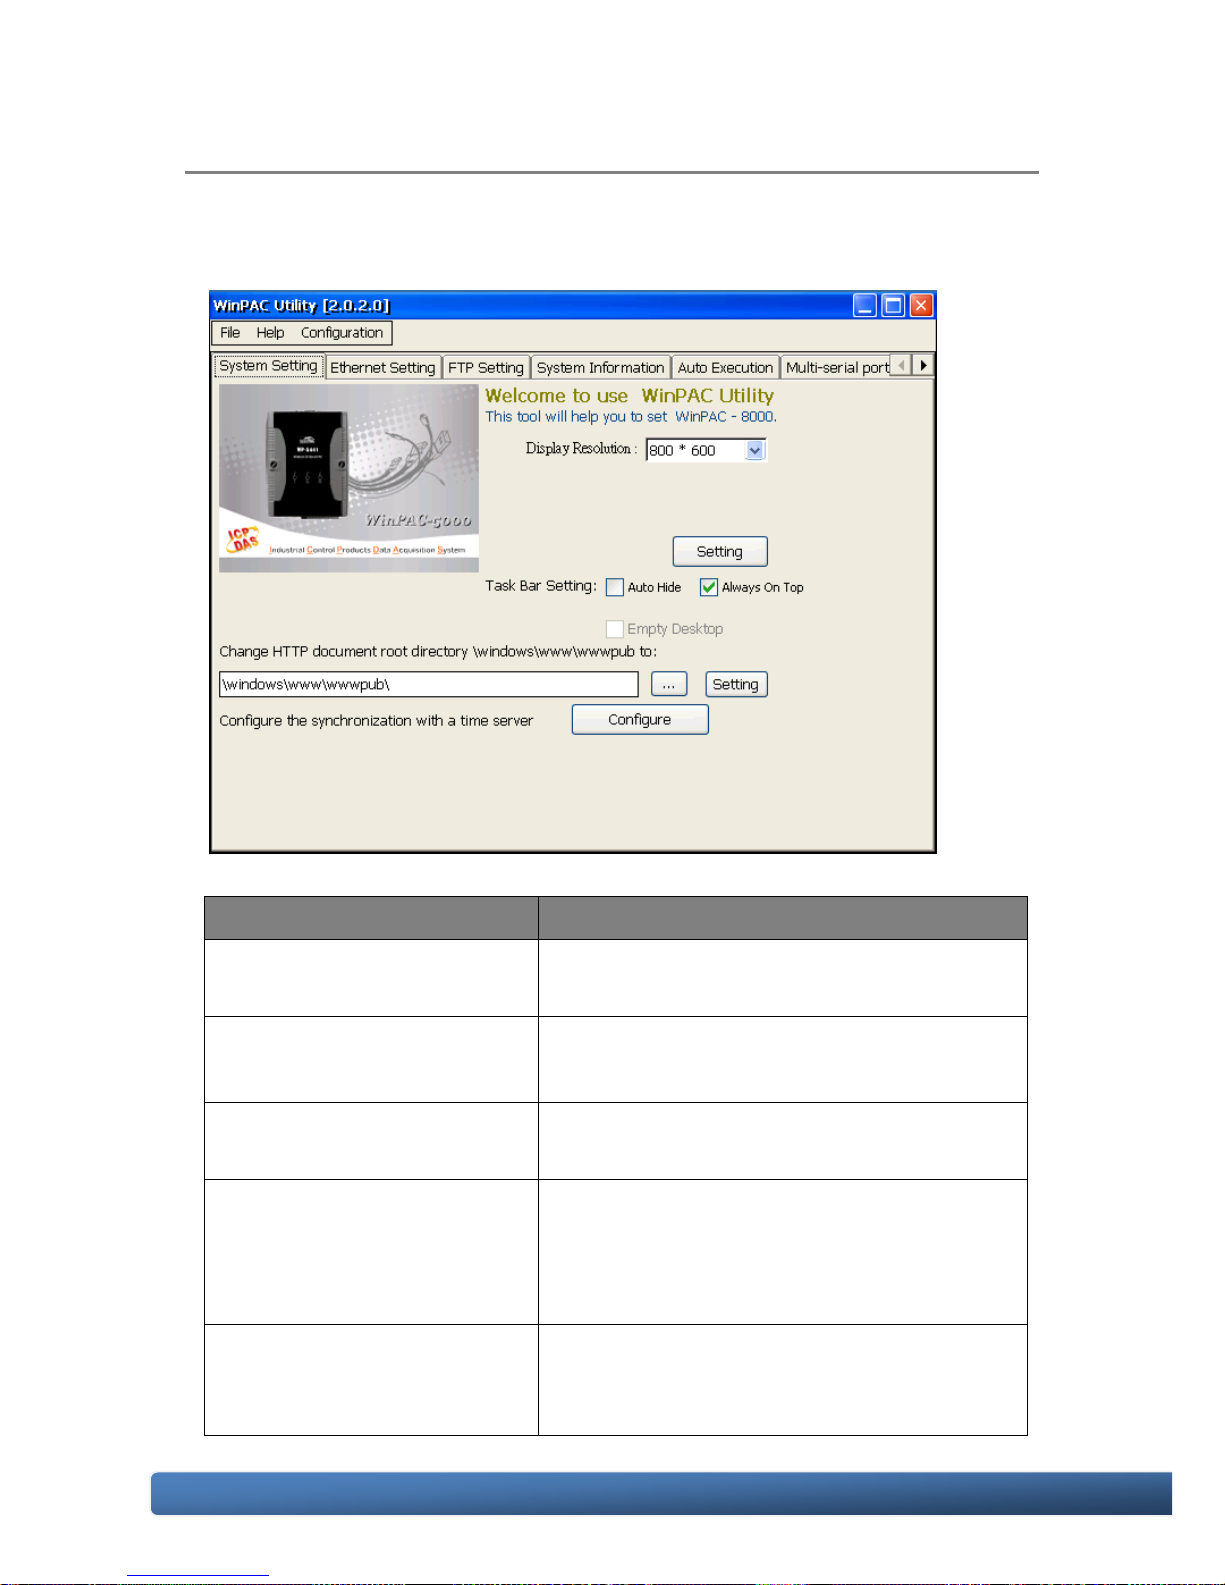
System Setting Tab
The System Setting tab provides functions to configure the task bar HTTP directory
path.
The tab use to
How to use
Adjust the size of the desktop
Select a display resolution from the
Resolution list.
Lock or Auto-Hide the taskbar
Auto-Hide: Select the Auto Hide check box
Lock: Select the Always On Top check box.
Check the status of the
battery
See the Battery1 and Battery2 field that
displays the battery status.
Change the HTTP directory
path
Enter a new path in the Change HTTP
document root directory
\windows\www\wwwpub to field, and then
press the Setting button.
Automatic synchronization of
system time
Refer to the Appendix A.6 How to configure
the service for automatically synchronizing
with the internet time server
Page 49
WinPAC-5000 Series User Manual, Version 1.0.2 Page: 49
Copyright © 2010 ICP DAS Co., Ltd. All Rights Reserved. E-mail: [email protected]
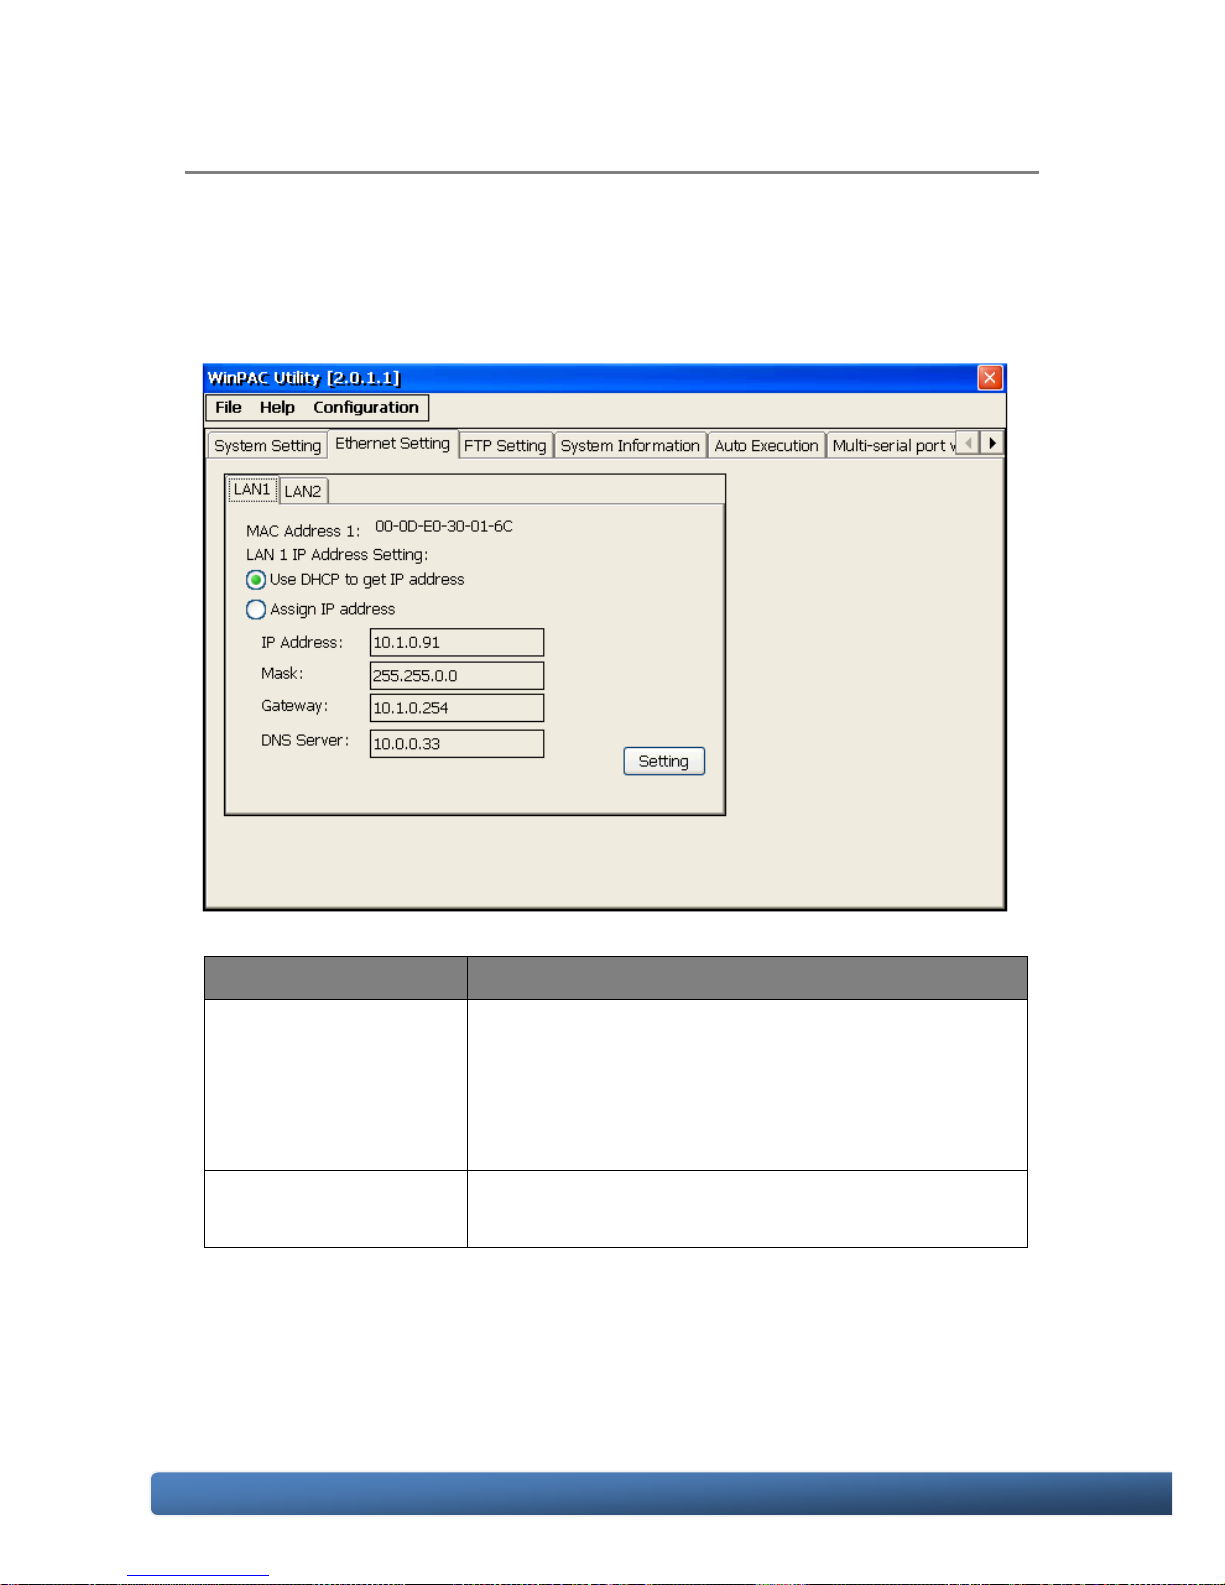
Ethernet Setting Tab
The Ethernet Setting tab provides functions to configure either DHCP (Roaming) or
manually configured (Static) network settings and to monitor the MAC address.
Generally, DHCP is the default settings, but if you don‟t have a DHCP server, you
must configure the network settings by using manual configuration.
The tab use to
How to use
Configure the network
settings
Obtaining an IP address automatically from DHCP:
Select the Use DHCP to get IP address option.
Manually assign an IP address:
Select the Assign IP address option.
Monitor the MAC
address
See the MAC Address 1 and MAC Address 2 fields
that display the physical address of LAN1 and LAN2.
Page 50
WinPAC-5000 Series User Manual, Version 1.0.2 Page: 50
Copyright © 2010 ICP DAS Co., Ltd. All Rights Reserved. E-mail: [email protected]
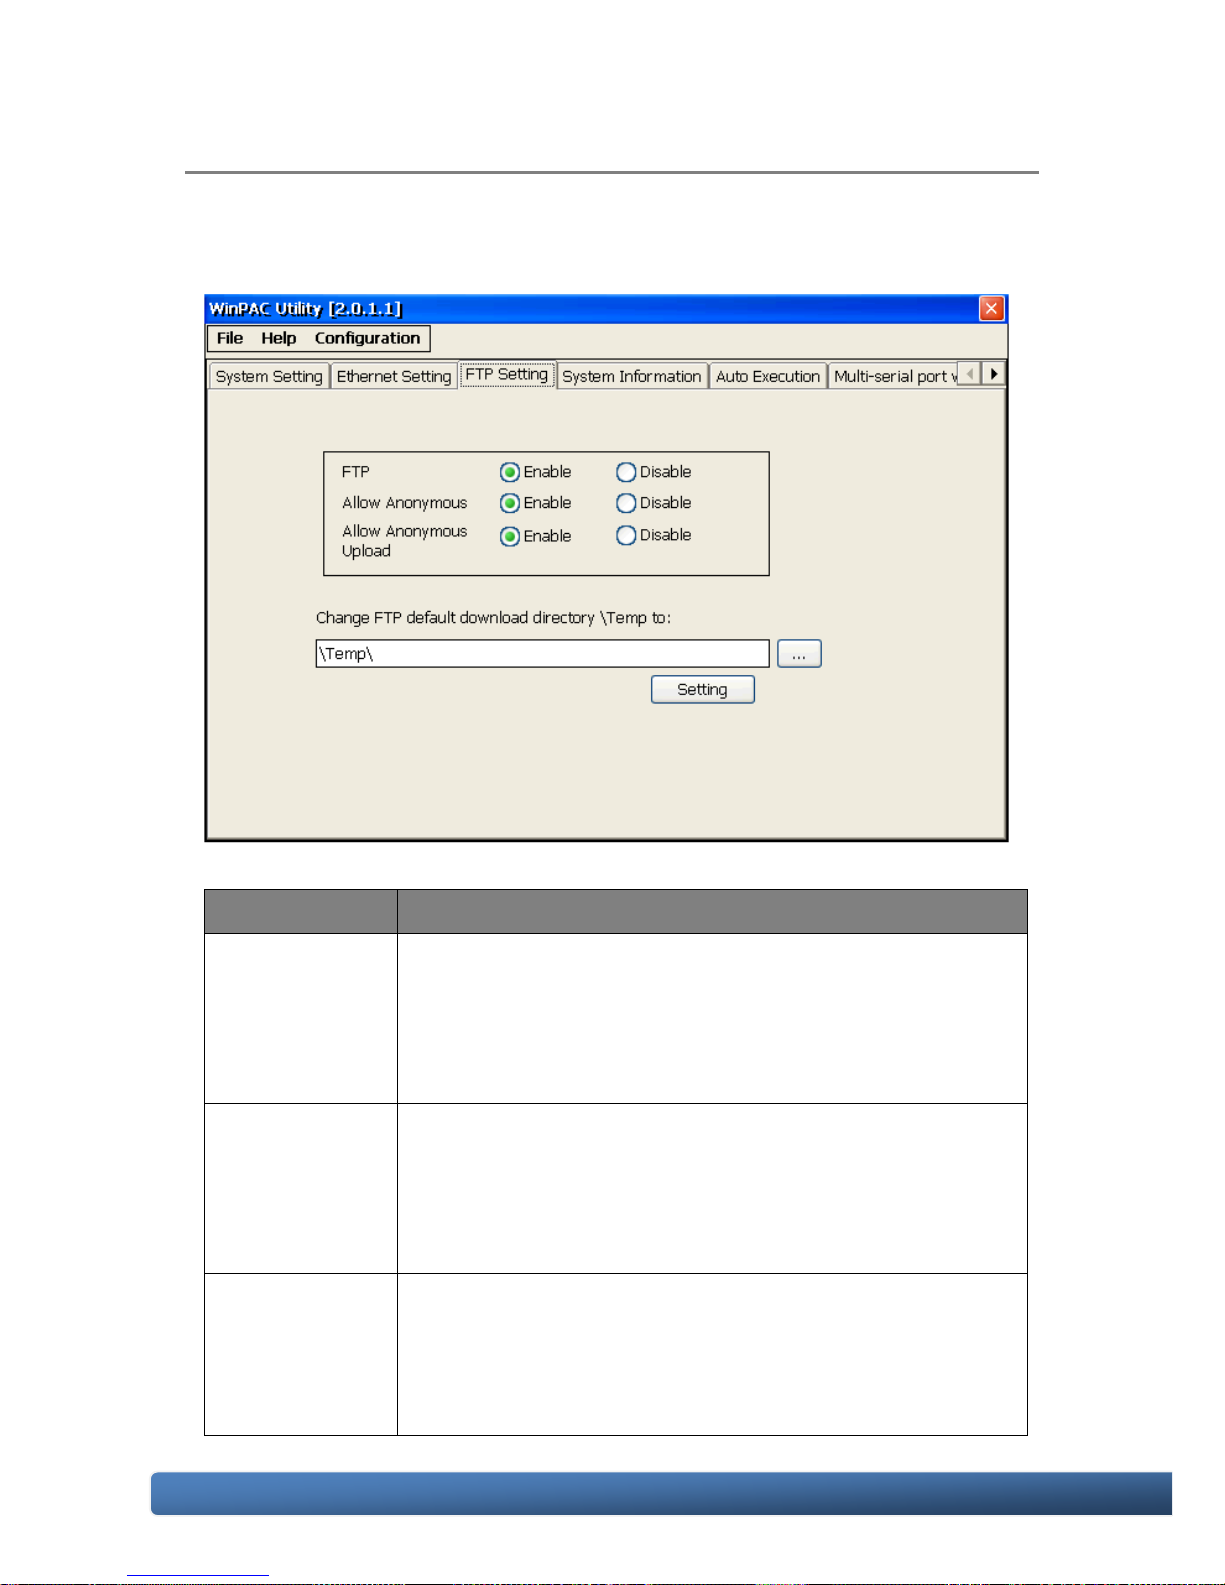
FTP Setting Tab
The FTP Setting tab provides functions to enable/disable the FTP access,
enable/disable anonymous FTP access, and configure the FTP directory path.
The tab use to
How to use
Enable or
disable the FTP
access
Enable:
Select the Enable check box in the FTP field.
Disable:
Select the Disable check box in the FTP field.
Enable or
disable
anonymous
FTP access
Enable:
Select the Enable check box in the Allow Anonymous field.
Disable:
Select the Disable check box in the Allow Anonymous field.
Enable or
disable
anonymous
FTP upload
Enable:
Select the Enable check box in the Allow Anonymous
Upload field.
Disable:
Page 51

WinPAC-5000 Series User Manual, Version 1.0.2 Page: 51
Copyright © 2010 ICP DAS Co., Ltd. All Rights Reserved. E-mail: [email protected]
The tab use to
How to use
Select the Disable check box in the Allow Anonymous
Upload field.
Change the
FTP directory
path
Enter a new path in the Change FTP default download
directory field, and then press the Setting button.
FTP/Telnet
authentication
Refer to the Appendix A.1
Page 52
WinPAC-5000 Series User Manual, Version 1.0.2 Page: 52
Copyright © 2010 ICP DAS Co., Ltd. All Rights Reserved. E-mail: [email protected]
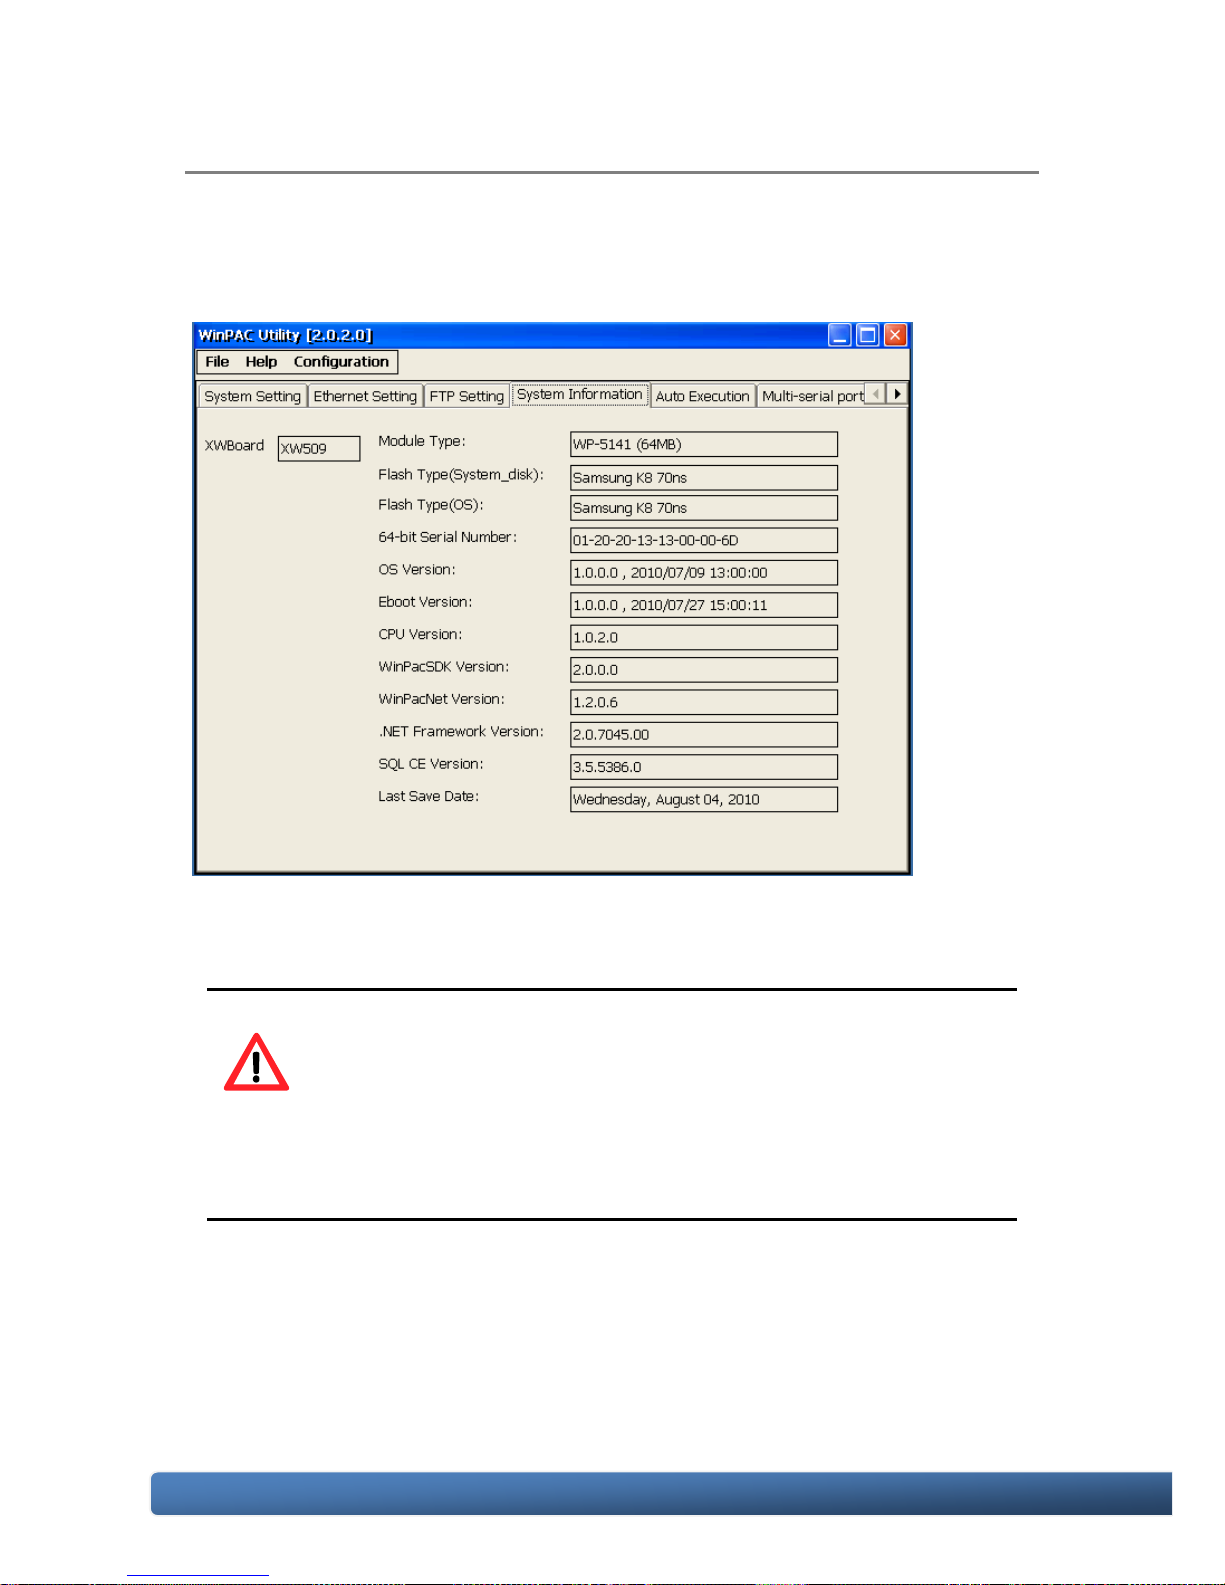
System Information Tab
The System Information tab provides functions to monitor necessary system
information of the WinPAC. The system information is the most important note of
version control for upgrading system.
Tips & Warnings
The XW-board series are for uPAC-5000, LP-5000, and
WP-5000 series.
One PAC can only plug only one XW-board. The System
Information tab show the module name for XW-board.
Page 53
WinPAC-5000 Series User Manual, Version 1.0.2 Page: 53
Copyright © 2010 ICP DAS Co., Ltd. All Rights Reserved. E-mail: [email protected]
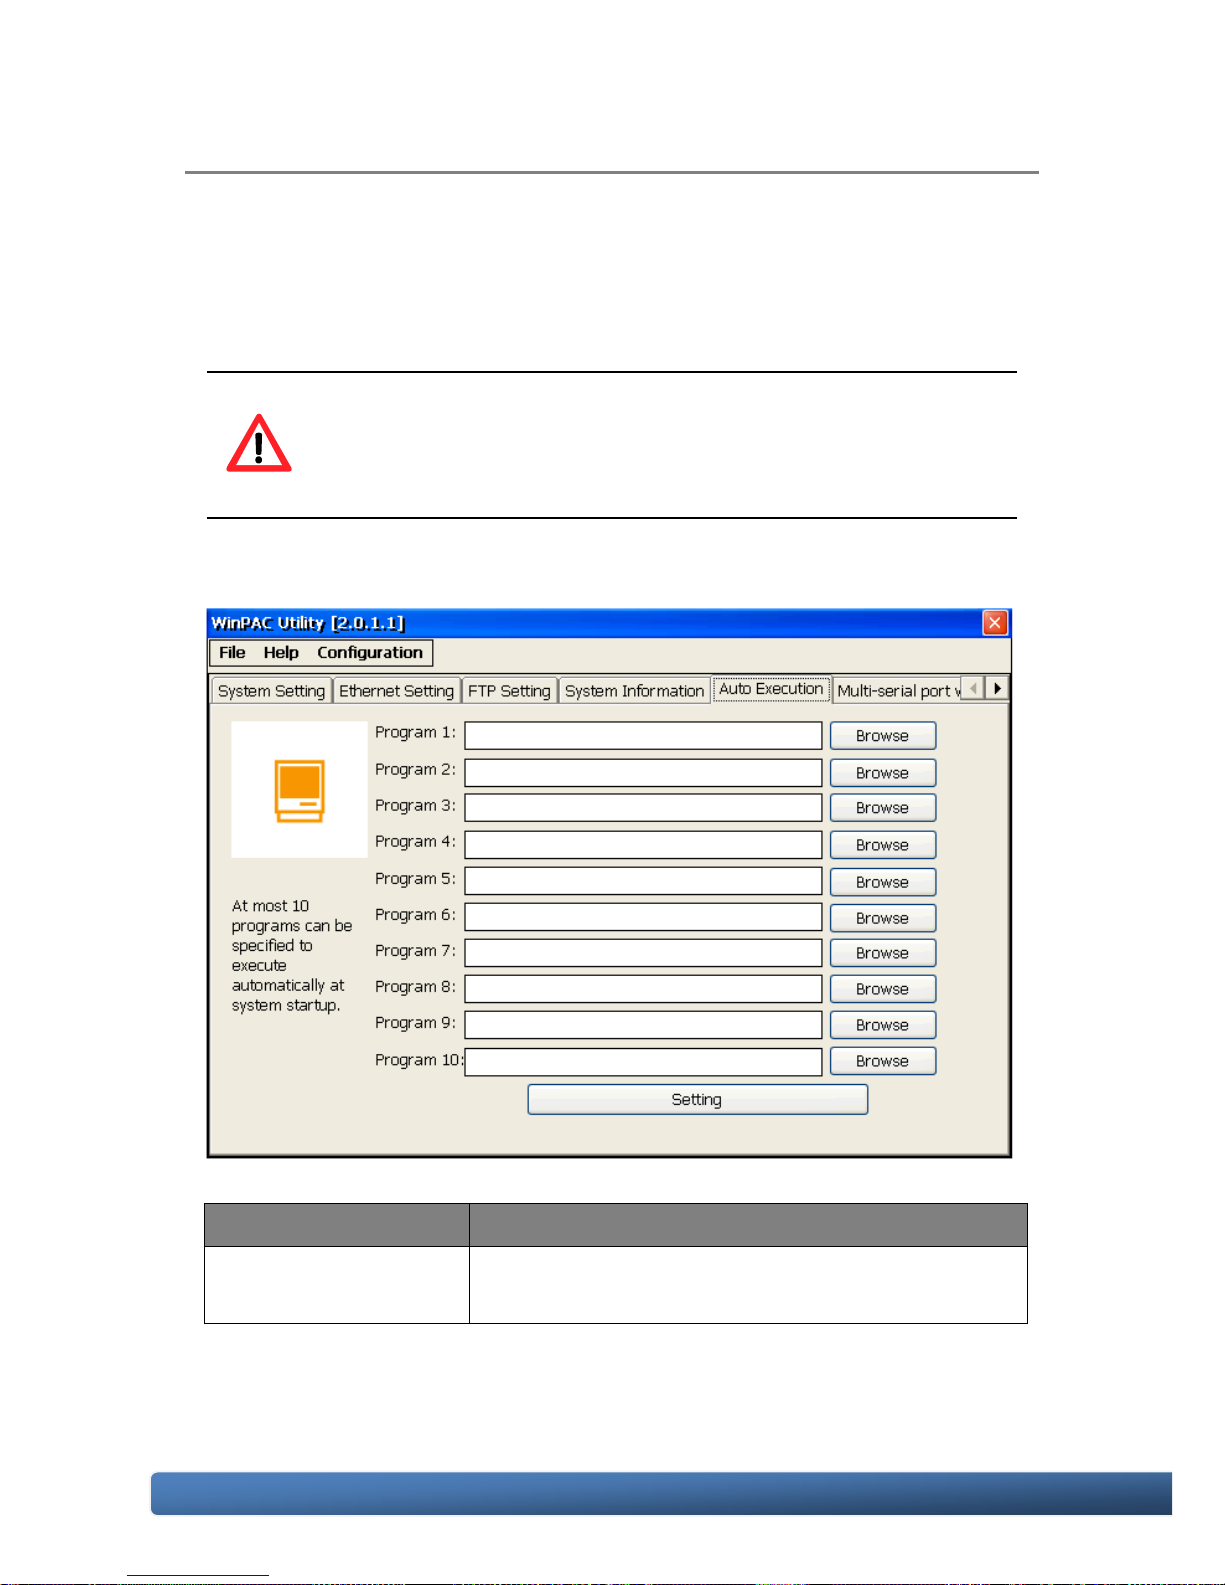
Auto Execution Tab
The Auto Execute tab provides functions to configure programs running at WinPAC
startup, it allows users to configure ten execute files at most.
Tips & Warnings
The allowed file types are .exe and .bat, and they are executed in
order of program 1, program 2, etc.
The tab use to
How to use
Configure programs
running at startup
Press the Browse button to select the execute file
which you want, and then press the Setting button.
Page 54
WinPAC-5000 Series User Manual, Version 1.0.2 Page: 54
Copyright © 2010 ICP DAS Co., Ltd. All Rights Reserved. E-mail: [email protected]
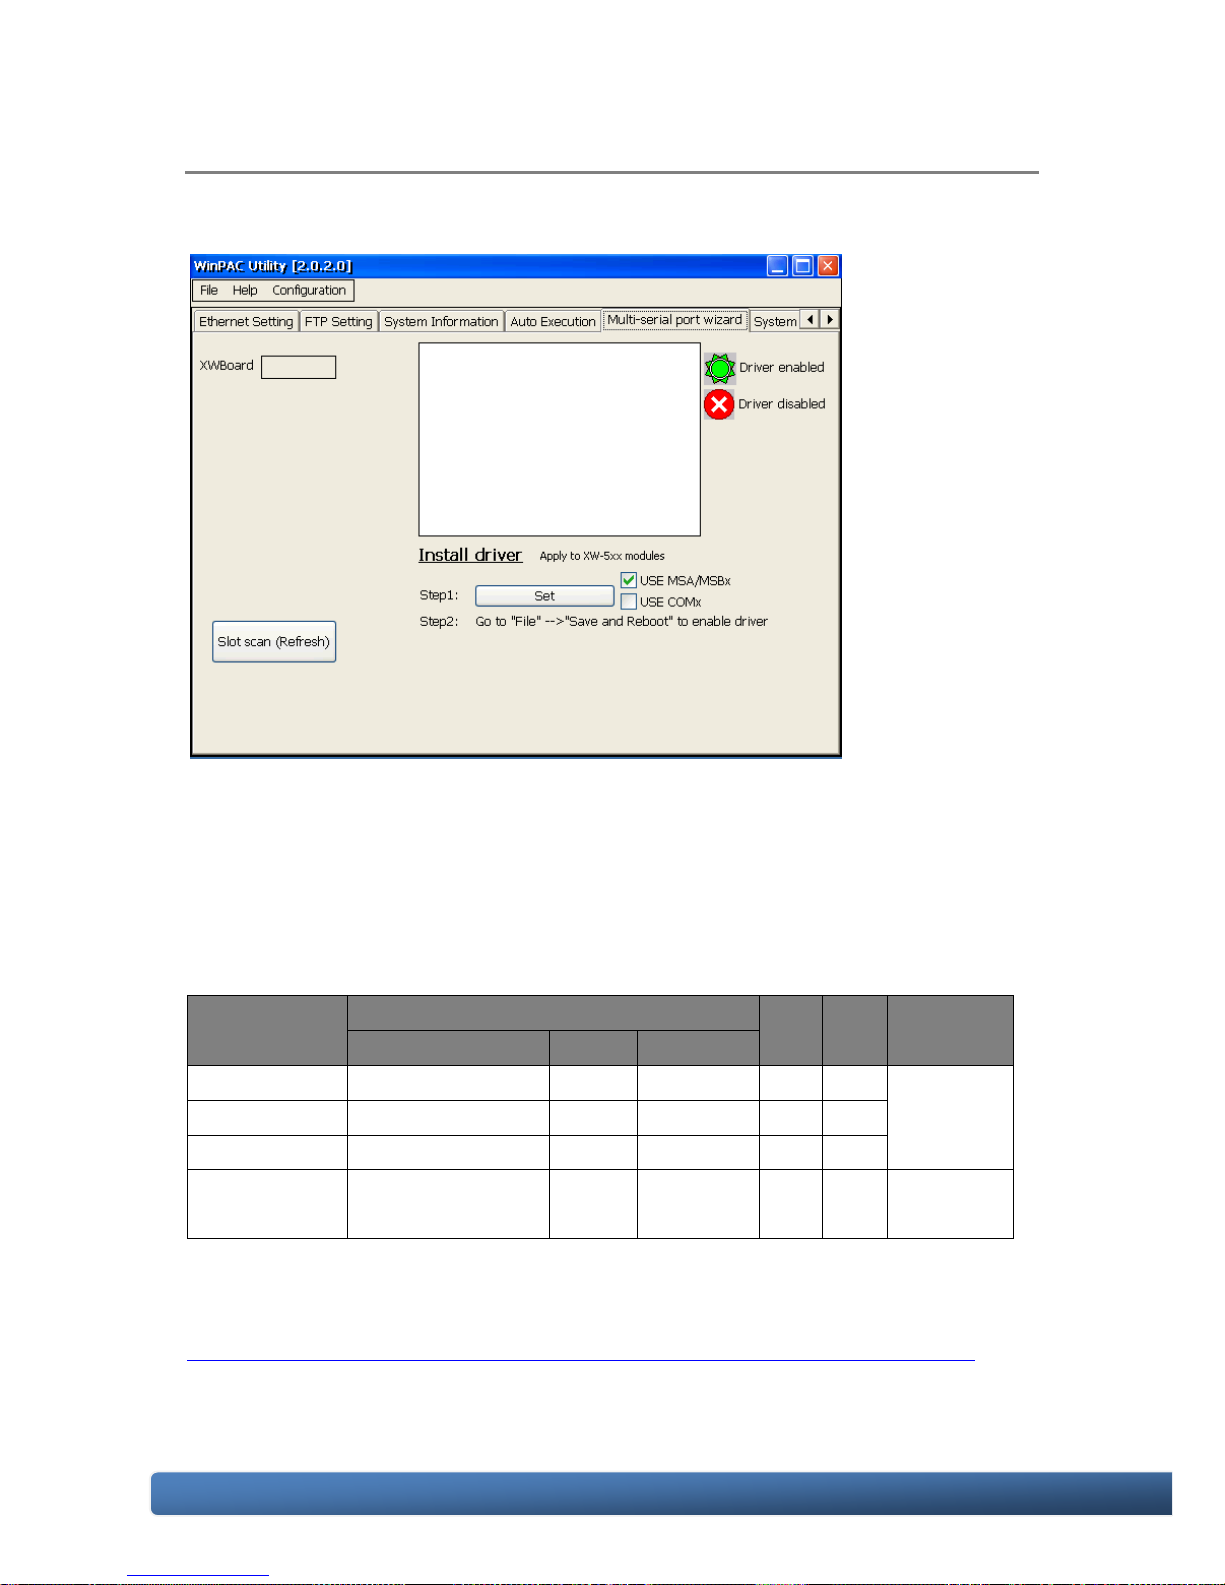
Multi-Serial Port Wizard Tab
The Multi-serial port provides functions for installation of the XW-board driver.
The table below shows the expansion communication modules that are compatible
with the WinPAC-5000.
RS-232/422/485, DI, DO Boards
Model
Serial Port
DI
DO
Isolation
Type
Ch
Wire
XW506
RS-232
6
3-wire
-
- - XW507
RS-422/RS-485
1
4/2-wire
6 4 XW509
RS-232
2
5-wire
6
4
XW511i
RS-422/RS-485
3
4/2-wire
- - 2500
Vrms
For more detailed information about these support modules, please refer to
http://www.icpdas.com/products/PAC/up-5000/XW-board_Selection_Guide.htm
Page 55
WinPAC-5000 Series User Manual, Version 1.0.2 Page: 55
Copyright © 2010 ICP DAS Co., Ltd. All Rights Reserved. E-mail: [email protected]
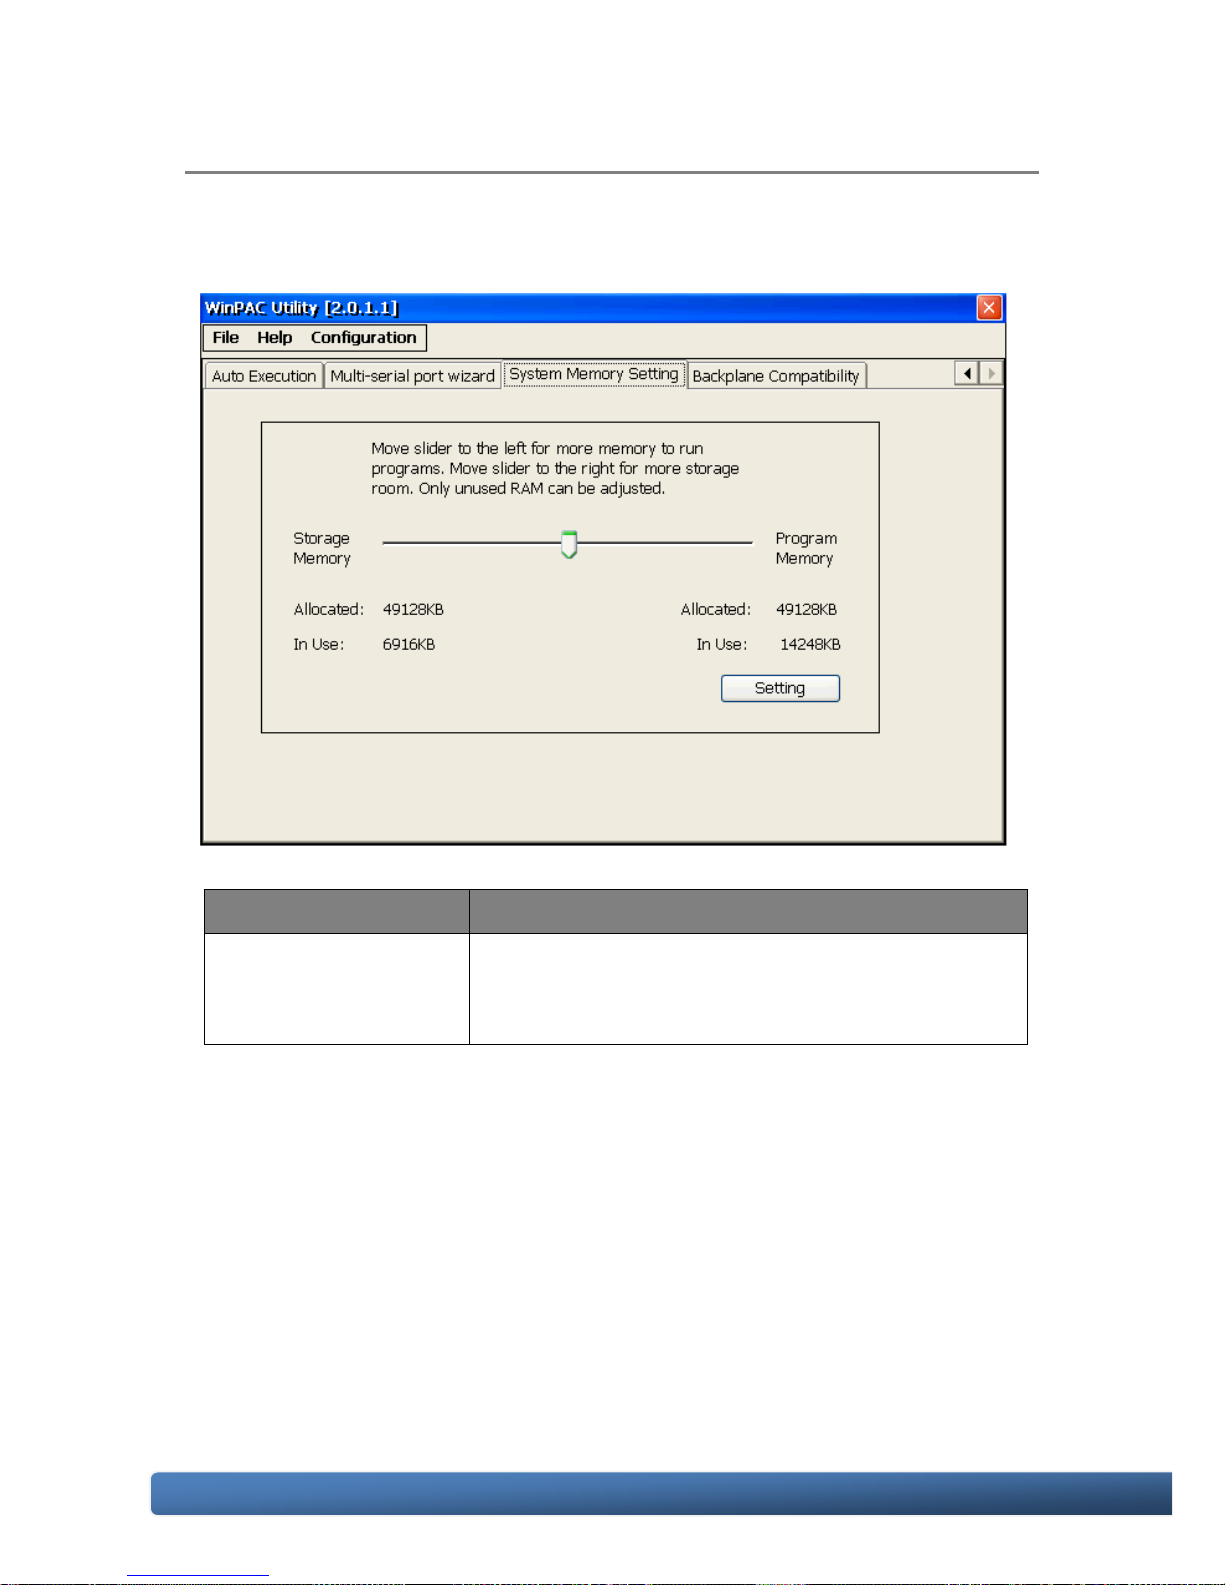
System Memory Setting Tab
The System Memory Setting tab provides functions to adjust and monitor the
unused RAM.
The tab use to
How to use
Adjust display
Move the slider left to release more memory running
programs or move the slider right to release more
storage room, and then press the Setting button
Page 56

WinPAC-5000 Series User Manual, Version 1.0.2 Page: 56
Copyright © 2010 ICP DAS Co., Ltd. All Rights Reserved. E-mail: [email protected]
4. Your First Program
When you learn every computer programming language you may realize that the
first program to demonstrate is "Hello World", it provides a cursory introduction to the
language's syntax and output.
Before writing your first program, ensure that you have the necessary development
tools and the corresponding WinPAC-5000 SDKs are installed on your system.
Page 57

WinPAC-5000 Series User Manual, Version 1.0.2 Page: 57
Copyright © 2010 ICP DAS Co., Ltd. All Rights Reserved. E-mail: [email protected]
4.1. Preparing the Development Tools
WinPAC-5000 is a Windows CE-based unit. Windows CE is a mature embedded
operating system which supports rapid development. Two standard development
tools are list as follows which are highly integrated, with comprehensive support for
developing applications of Windows CE-based WinPAC-5000.
Visual Studio
Visual Studio
WinPAC-5000 has .NET Compact Framework 2.0 installed. Visual Studio takes full
advantage of the .NET Compact Framework, which uses public Internet standards to
enable integration with new and existing applications running on any platform.
Supported languages include Visual C#, and Visual Basic .NET.
Microsoft Embedded Visual C++
eMbedded Visual C++
eMbedded Visual C++ is a standalone integrated development environment (IDE)
that brings a new level of productivity to Windows CE development without
compromising flexibility, performance, or control.
Page 58

WinPAC-5000 Series User Manual, Version 1.0.2 Page: 58
Copyright © 2010 ICP DAS Co., Ltd. All Rights Reserved. E-mail: [email protected]
4.2. Installing WinPAC-5000 SDK
The WinPAC SDK is a Software Development Kit (SDK) that contains C header files,
C libraries and documents.
Step 1: Insert the CD into your CD-ROM drive
Step 2: Execute the “PAC270_SDK_YYYYMMDD.msi”
The PAC270_SDK_YYMMDD.msi can be obtained from:
CD:\Napdos\wp-5000_ce50\SDK\
ftp://ftp.icpdas.com/pub/cd/winpac/napdos/wp-5000_ce50/sdk/
Step 3: Follow the prompts until the installation is complete
Page 59

WinPAC-5000 Series User Manual, Version 1.0.2 Page: 59
Copyright © 2010 ICP DAS Co., Ltd. All Rights Reserved. E-mail: [email protected]
4.3. Your First Program in C#
Here we will demonstrate how to create a C# program running on WinPAC-5000
with the C# development tool, which including the following topics:
1. Create a new project
2. Add WinPAC-5000 reference
3. Add the control to the form
4. Add the event handling for the control
5. Upload the application to WinPAC-5000
6. Execute the application on WinPAC-5000
In this tutorial, we will assume that you have installed WinPAC-5000 SDK on PC and
used the Visual Studio 2005 for application development.
4.3.1. Creating a New Project
The Visual C# project template is a composite control that you use in this example
creates a new project with this user control.
Step 1: Start Visual Studio 2005
Visual Studio 2005
Page 60
WinPAC-5000 Series User Manual, Version 1.0.2 Page: 60
Copyright © 2010 ICP DAS Co., Ltd. All Rights Reserved. E-mail: [email protected]
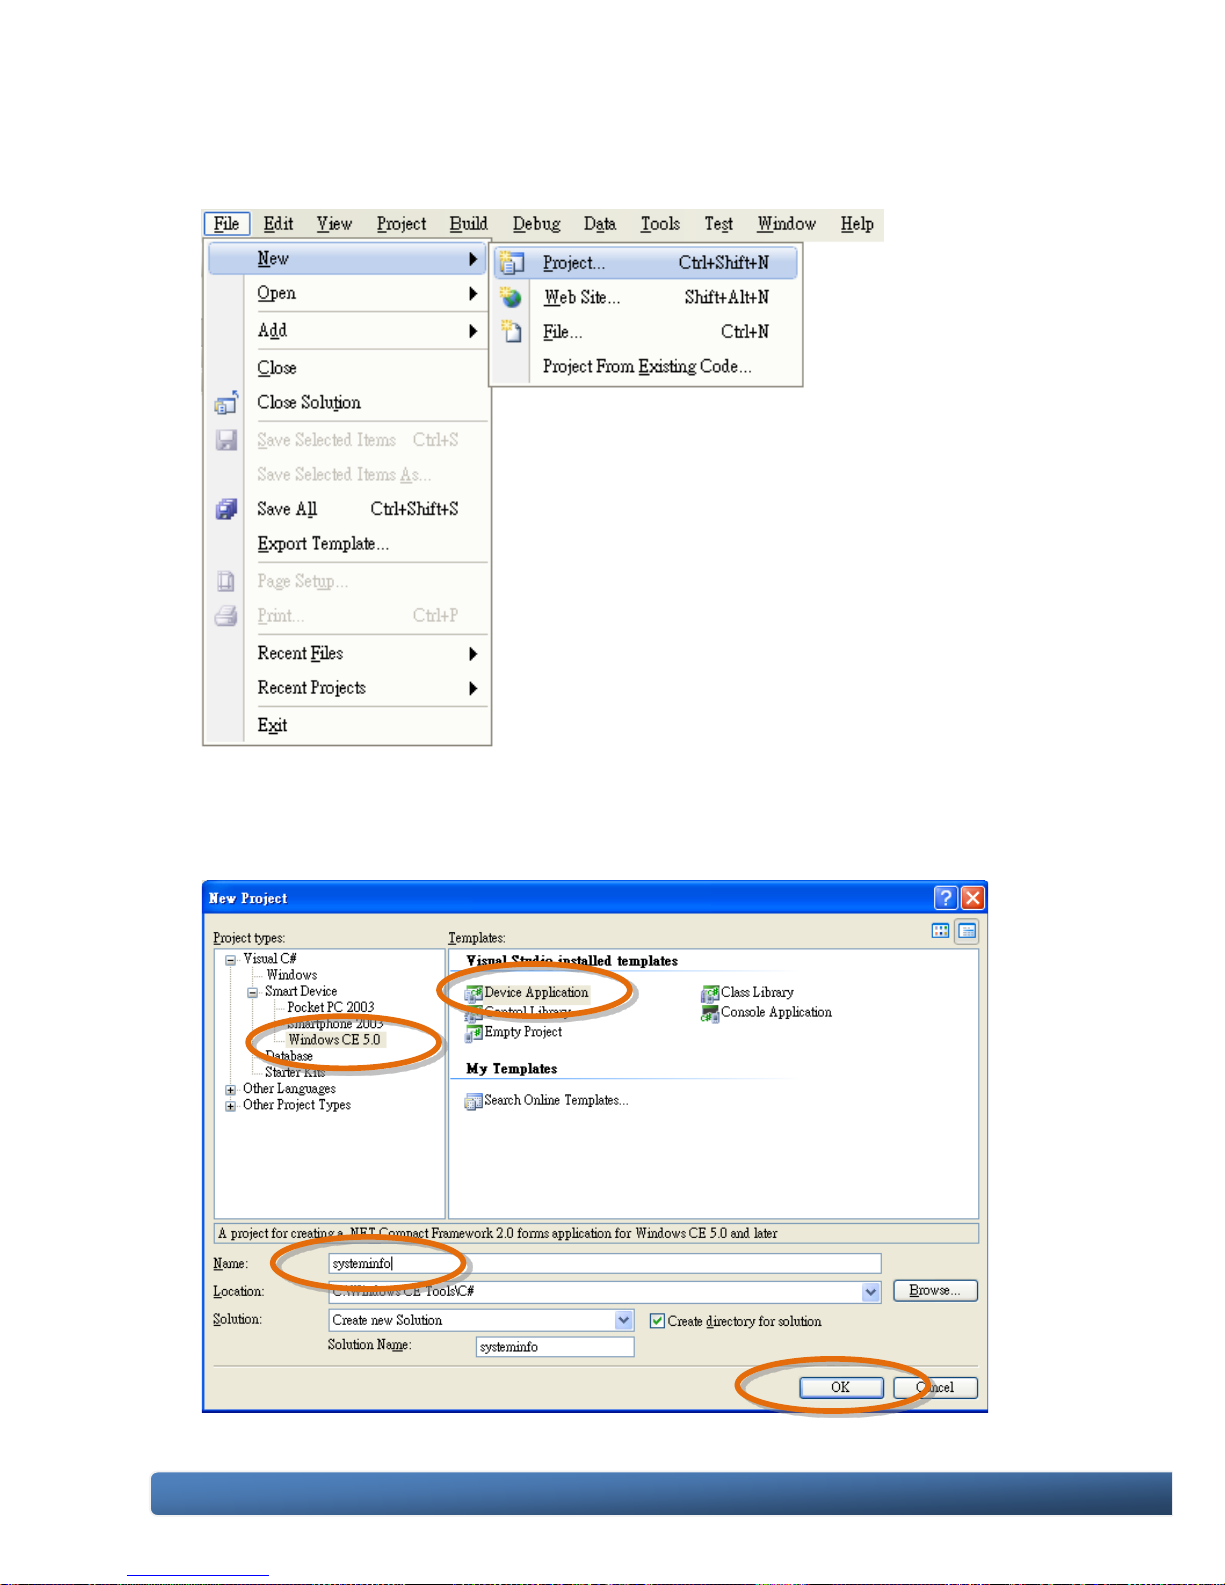
Step 2: On the File menu, point to New, and then click Project…
Step 3: In the Project types pane, expand
Visual C#, and then click Window
CE5.0
Step 4: In the Templates pane, click Device
Applications
Step 5: Type a name in the Name field, and
then click OK
Here we will enter the name “systeminfo” and a different location for the project if
you wish
Page 61
WinPAC-5000 Series User Manual, Version 1.0.2 Page: 61
Copyright © 2010 ICP DAS Co., Ltd. All Rights Reserved. E-mail: [email protected]
4.3.2. Adding the WinPAC-5000 Reference
The WinPAC-5000 SDKs provides a complete solution to integrate with
WinPAC-5000. Compatible with Visual C#,
Visual Basic .net and C++. In order to use a
component in your application, you must first
add a reference to it.
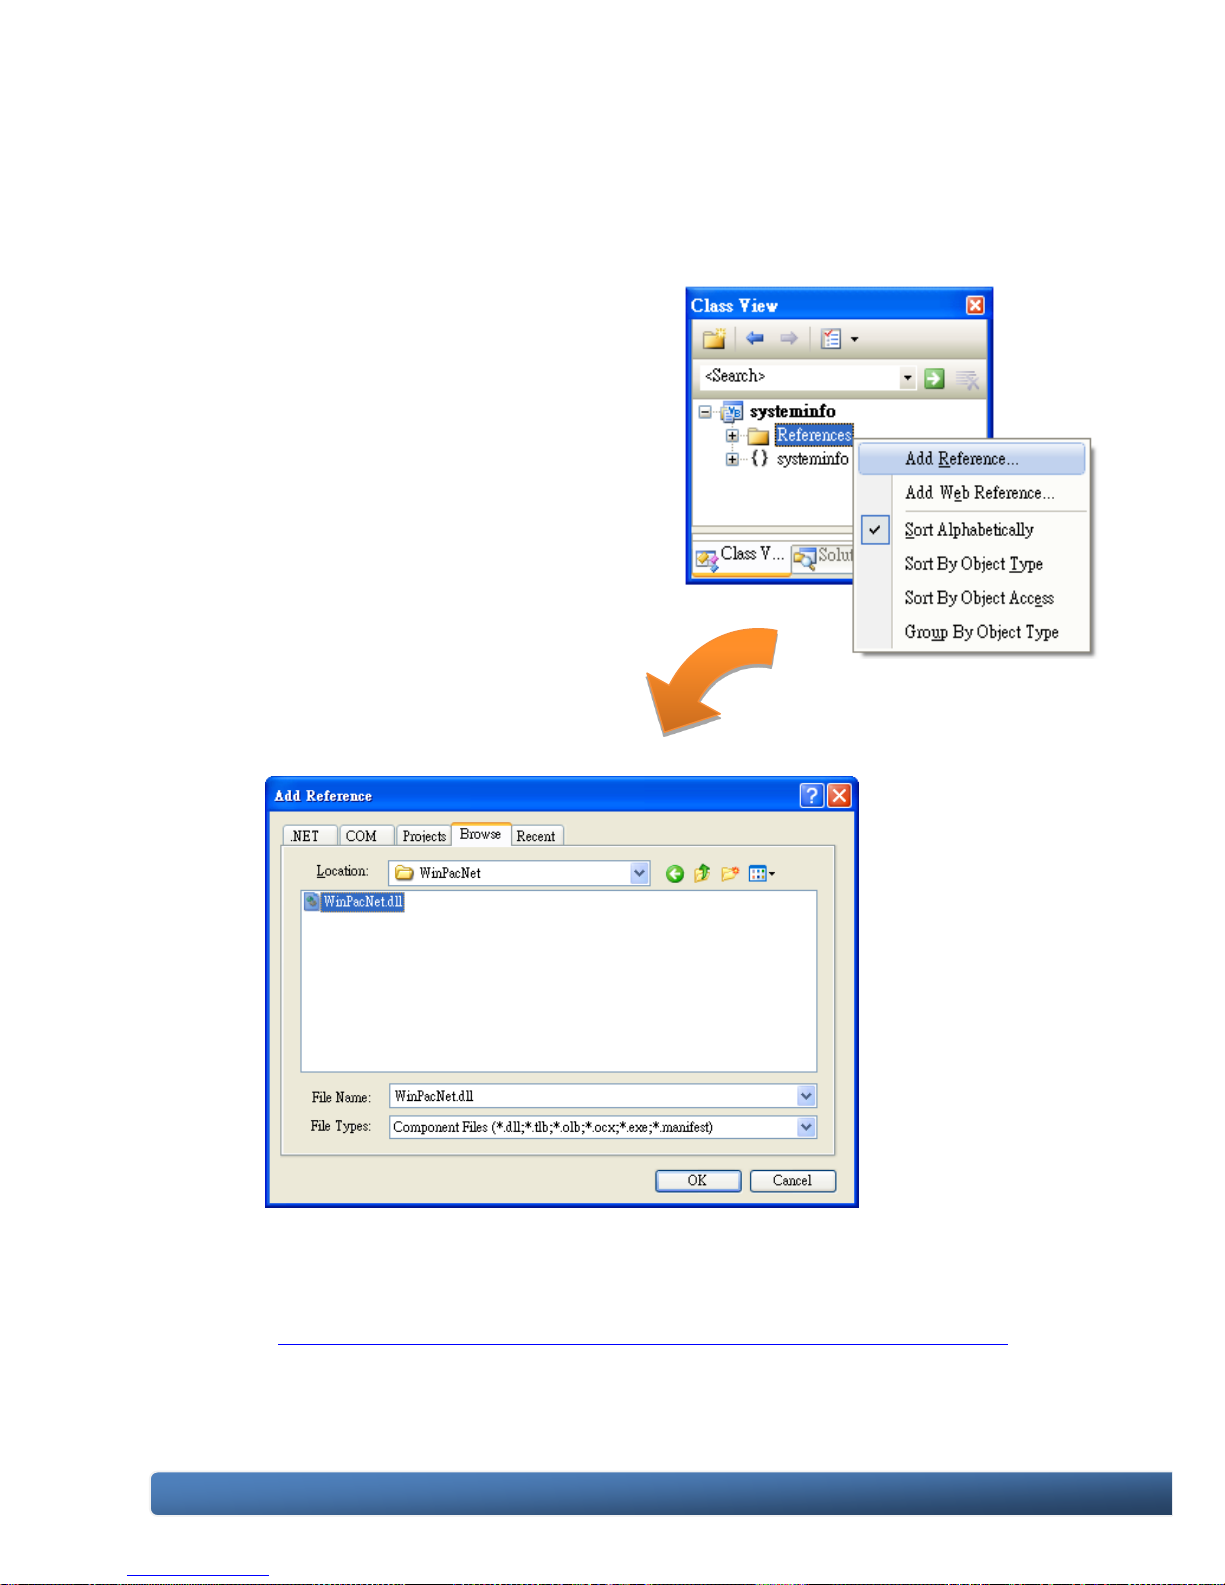
Step 1: In Solution Explorer, right-click the
References node and click Add
Reference on the shortcut menu
The Add Reference dialog box
appears.
Step 2: Click the Browe tab, and then
select WinPacNet.dll
The “WinPacNet.dll” file can be obtained from:
CD:\Napdos\wp-5000_ce50\SDK\WinPacNet\
ftp://ftp.icpdas.com/pub/cd/winpac/napdos/wp-5000_ce50/sdk/winpacnet/
Step 3: Click OK to close the Add Reference dialog box
Page 62
WinPAC-5000 Series User Manual, Version 1.0.2 Page: 62
Copyright © 2010 ICP DAS Co., Ltd. All Rights Reserved. E-mail: [email protected]
4.3.3. Adding the Control to the Form
You can drag various controls from the Toolbox onto the form. These controls are not
really "live"; they are just images that are convenient to move around on the form
into a precise location.
After you add a control to your form, you can use the Properties window to set its
properties, such as background color and default text. The values that you specify in
the Properties window are the initial values that will be assigned to that property
when the control is created at run time.
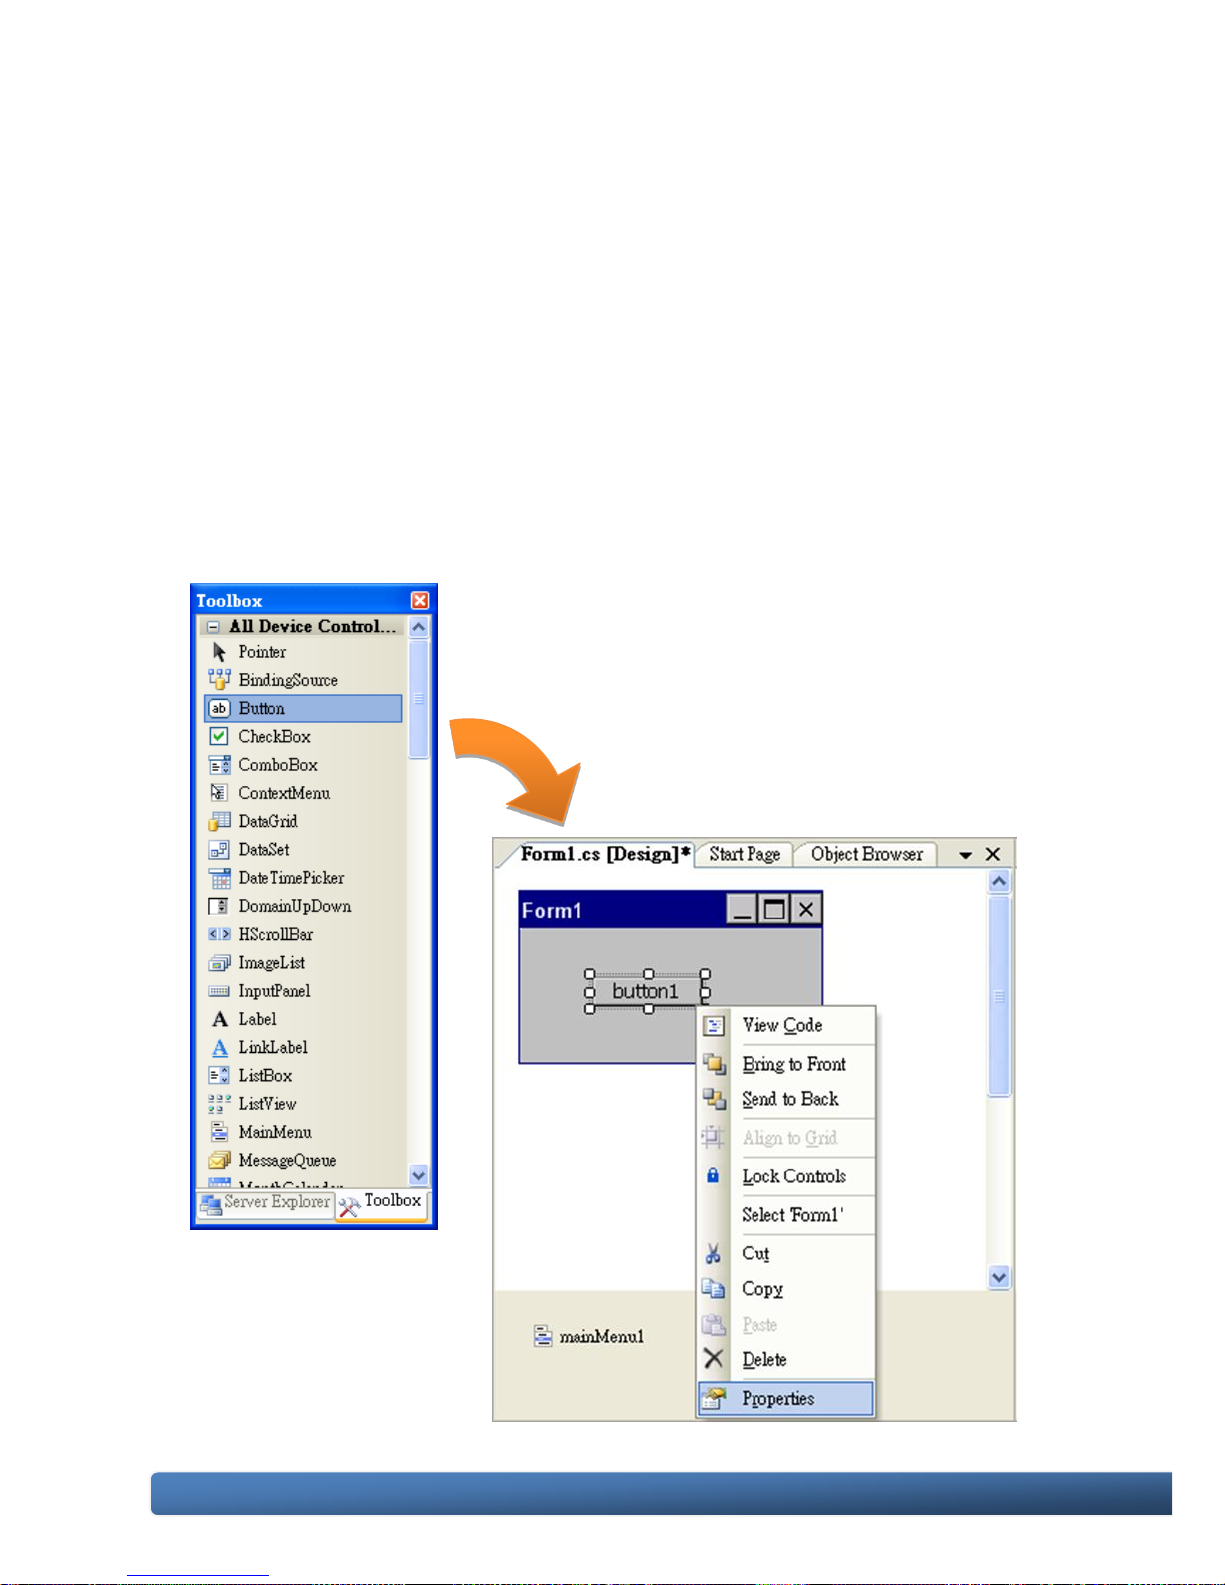
Step 1: From the Toolbox, drag a Button control onto the form
Step 2: Right-click the Button control, and then click
Properties
Page 63
WinPAC-5000 Series User Manual, Version 1.0.2 Page: 63
Copyright © 2010 ICP DAS Co., Ltd. All Rights Reserved. E-mail: [email protected]
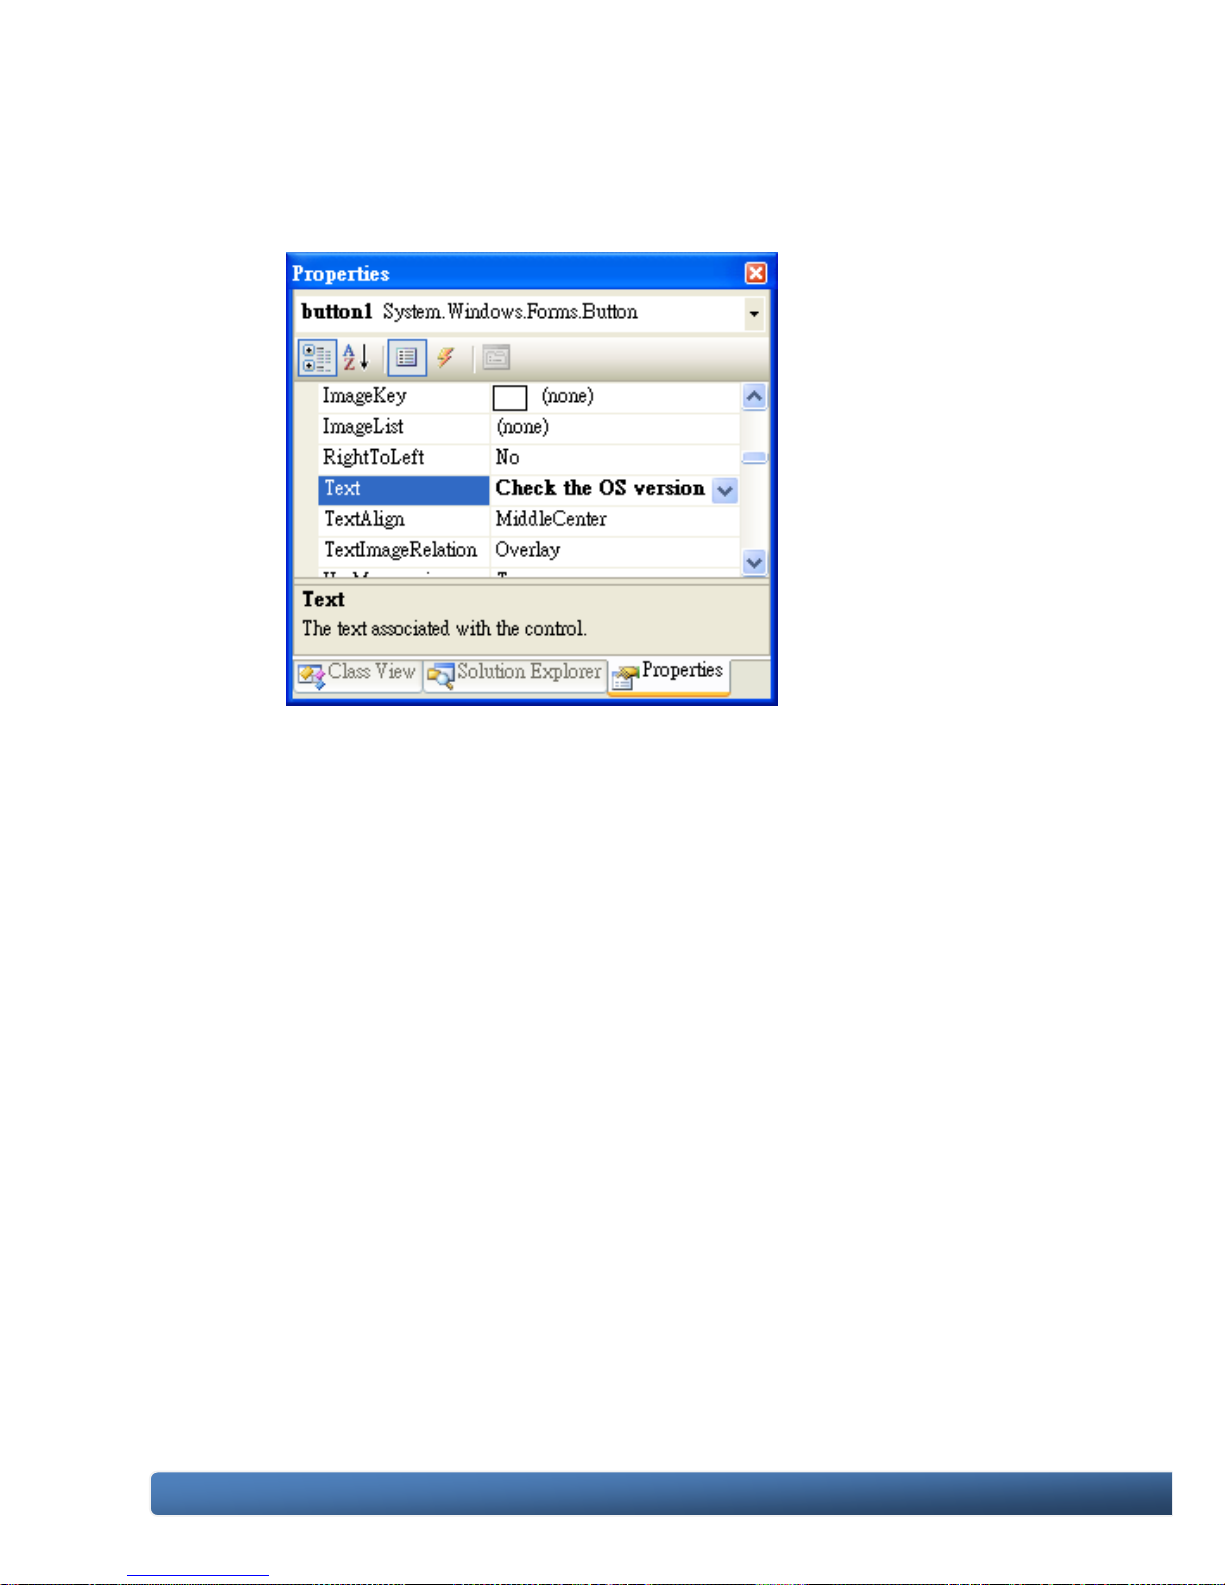
Step 3: In the Properties window, type Check the OS version, and press
ENTER to set the Text property
Page 64
WinPAC-5000 Series User Manual, Version 1.0.2 Page: 64
Copyright © 2010 ICP DAS Co., Ltd. All Rights Reserved. E-mail: [email protected]
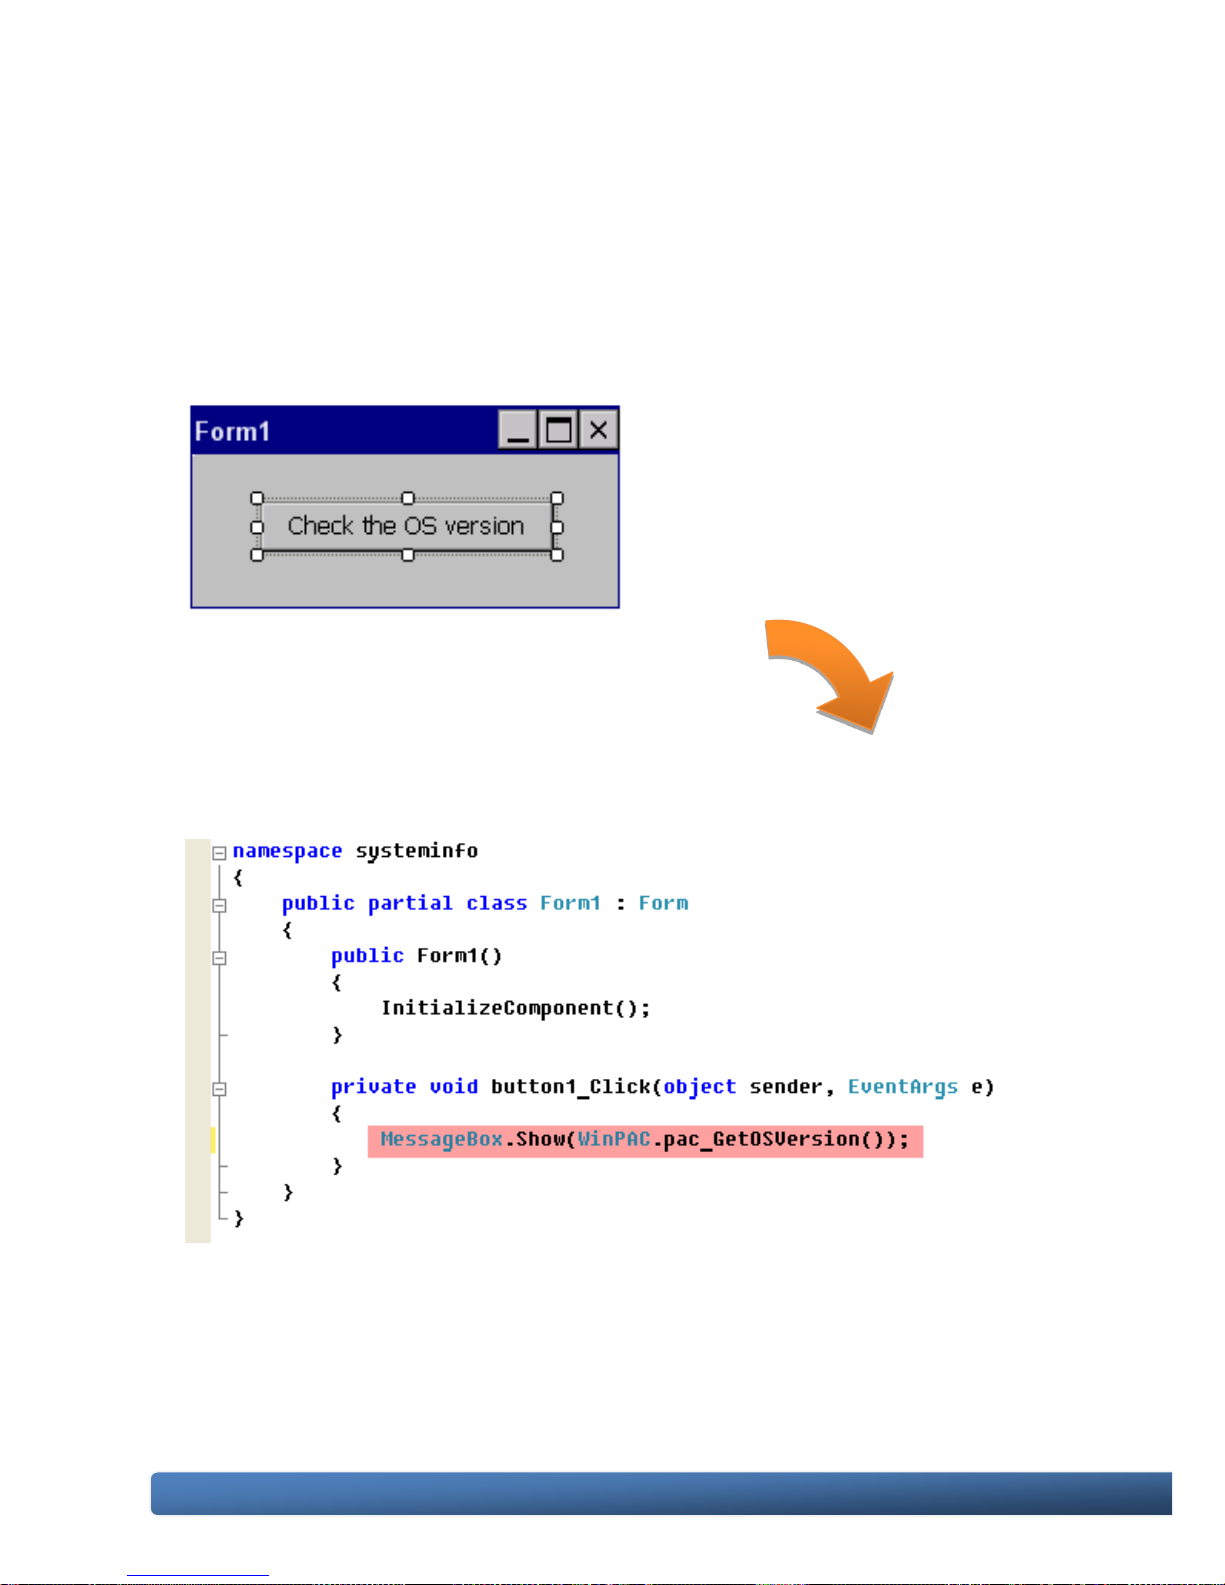
4.3.4. Adding the Event Handling to the Control
You have finished the design stage of your application and are at the point when you
can start adding some code to provide the program's functionality.
Step 1: Double-click the button on the form
The Code Editor opens with the cursor
positioned in the event handler.
Step 2: Inserting the following code
MessageBox.Show(WinPAC-5000.pac_GetOSVersion());
Page 65
WinPAC-5000 Series User Manual, Version 1.0.2 Page: 65
Copyright © 2010 ICP DAS Co., Ltd. All Rights Reserved. E-mail: [email protected]
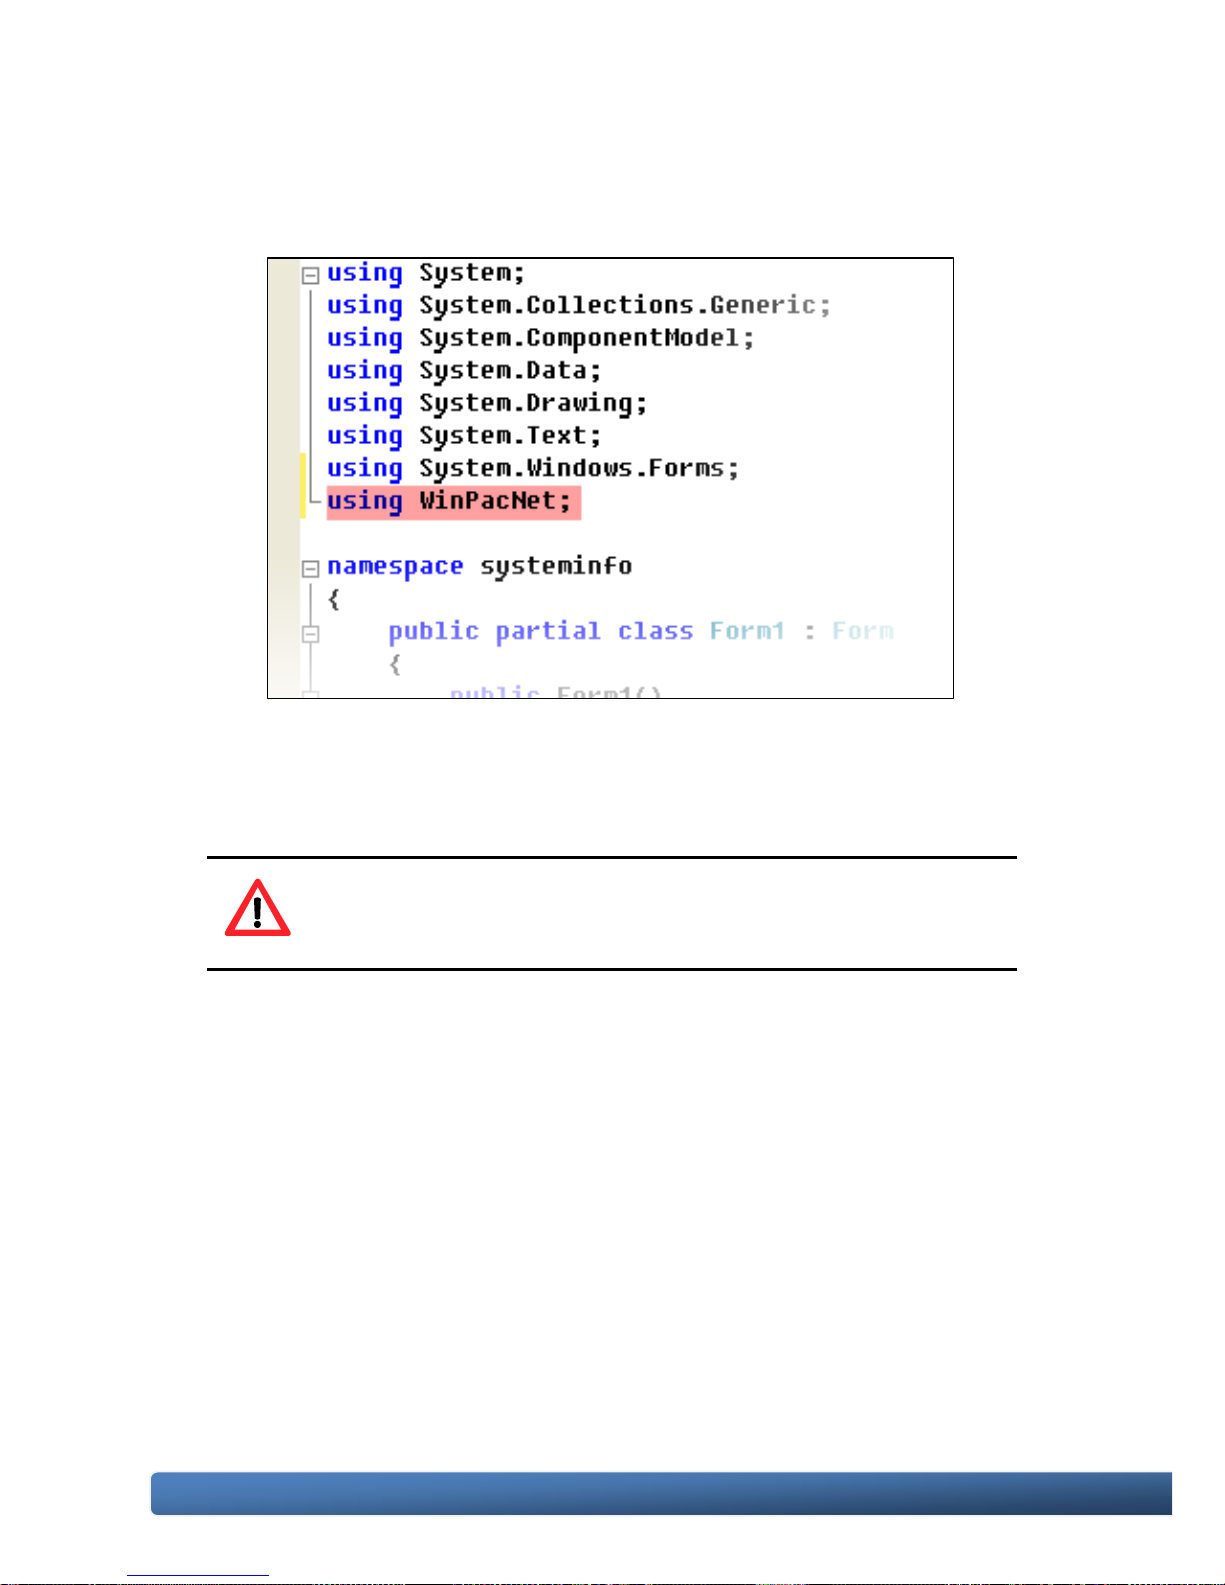
Step 3: Inserting the following code into the header area
vusing WinPacNet;
Tips & Warnings
The “WinPacNet” of “unsing WinPacNet” is case- sensitive..
Page 66
WinPAC-5000 Series User Manual, Version 1.0.2 Page: 66
Copyright © 2010 ICP DAS Co., Ltd. All Rights Reserved. E-mail: [email protected]
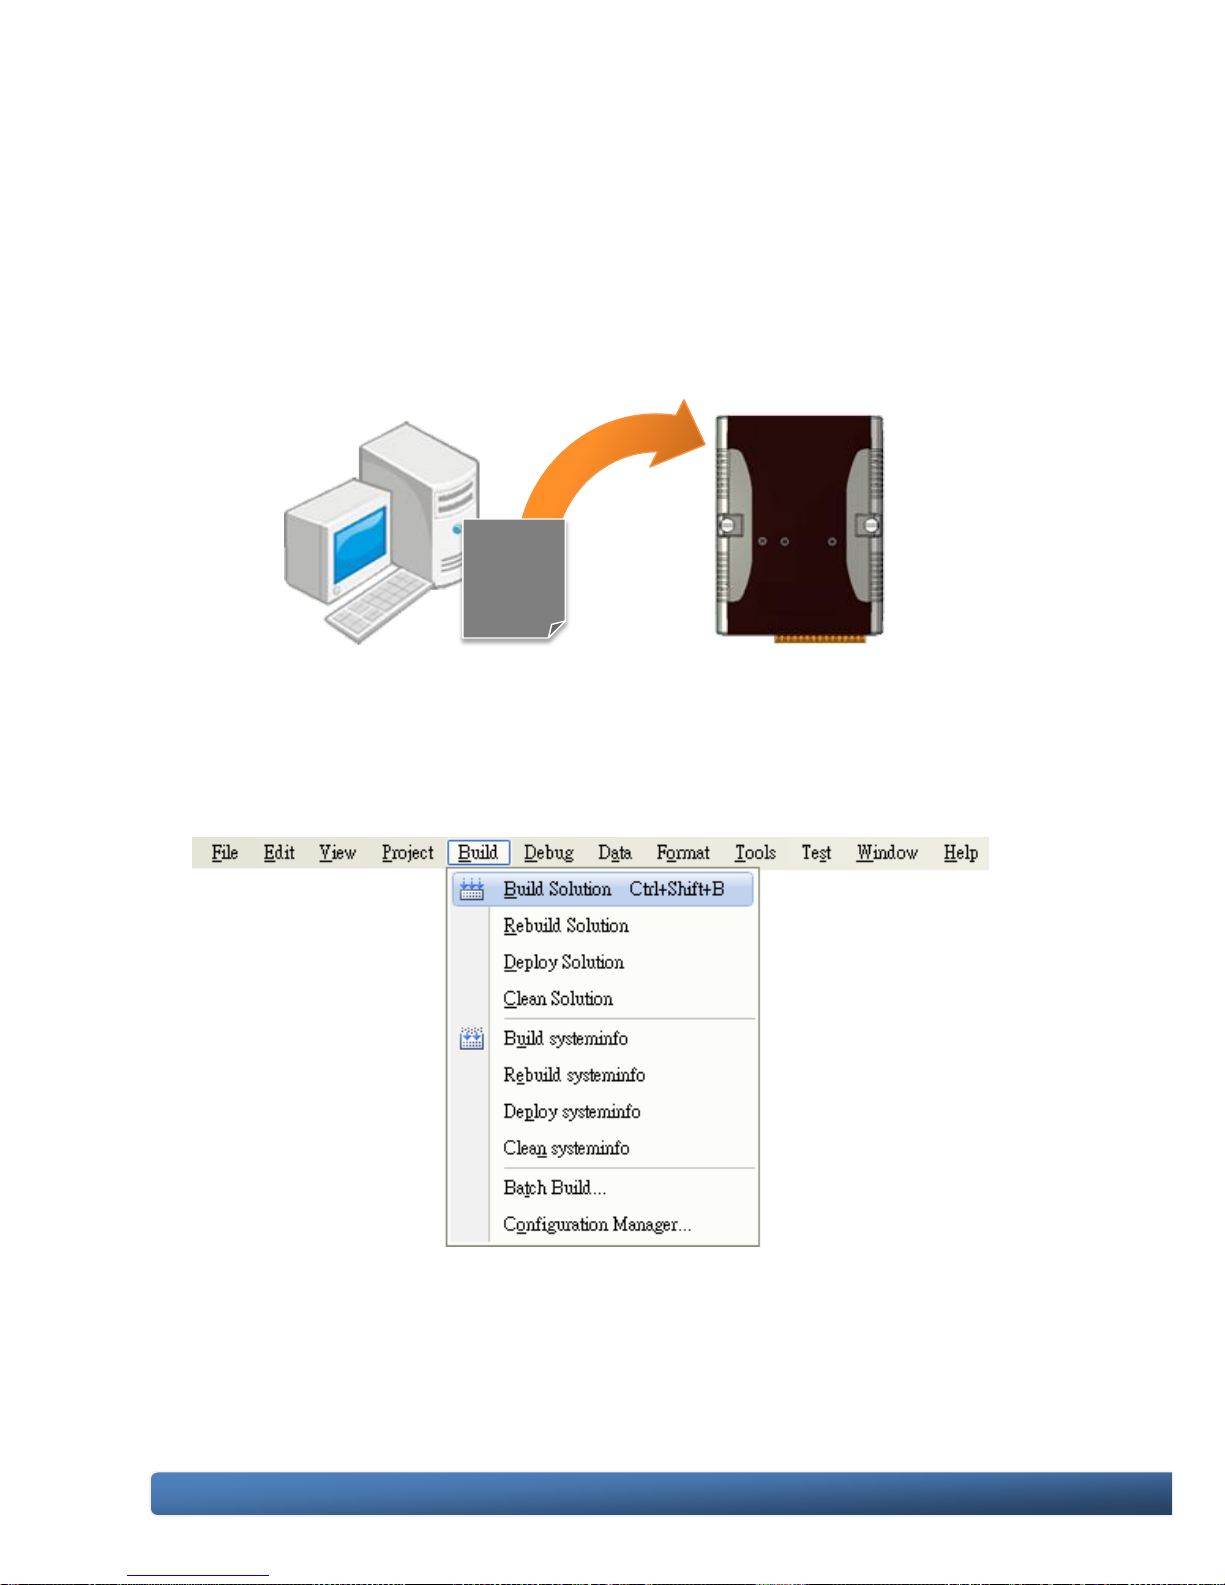
4.3.5. Upload the Application to WinPAC-5000
WinPAC-5000 provide FTP server service, you can upload files to WinPAC-5000 or
download files from a public FTP server.
Step 1: On the Build menu, click Build Solution
Step 2: Open the browser and type the IP address of WinPAC-5000
………
………
………
………
Page 67
WinPAC-5000 Series User Manual, Version 1.0.2 Page: 67
Copyright © 2010 ICP DAS Co., Ltd. All Rights Reserved. E-mail: [email protected]
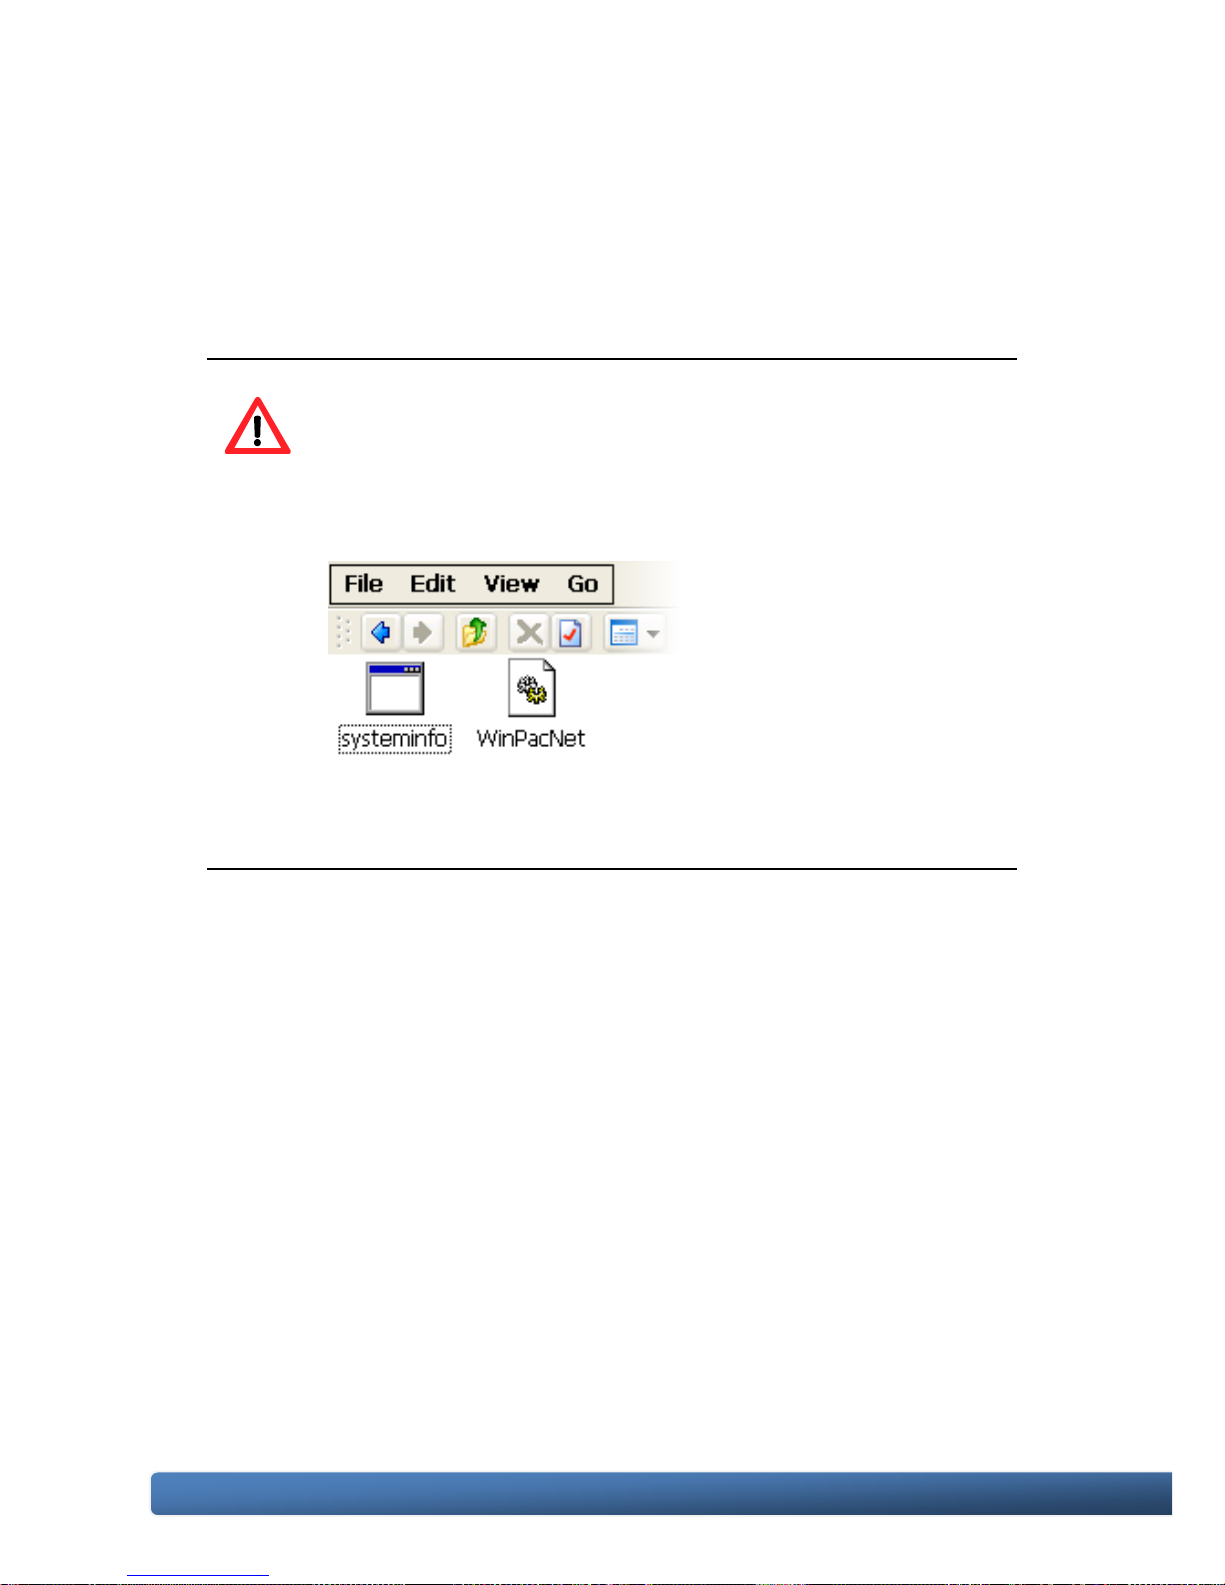
Step 3: Upload the systeminfo.exe application and the corresponding
Winpacnet.dll file to the WinPAC-5000
Tips & Warnings
For applications programming in C# and VB.net with .net
framework, when executing these application on the
WinPAC-5000 controller, the corresponding “Winpacnet.dll” file
must be in the same directory as the .exe file.
Page 68
WinPAC-5000 Series User Manual, Version 1.0.2 Page: 68
Copyright © 2010 ICP DAS Co., Ltd. All Rights Reserved. E-mail: [email protected]
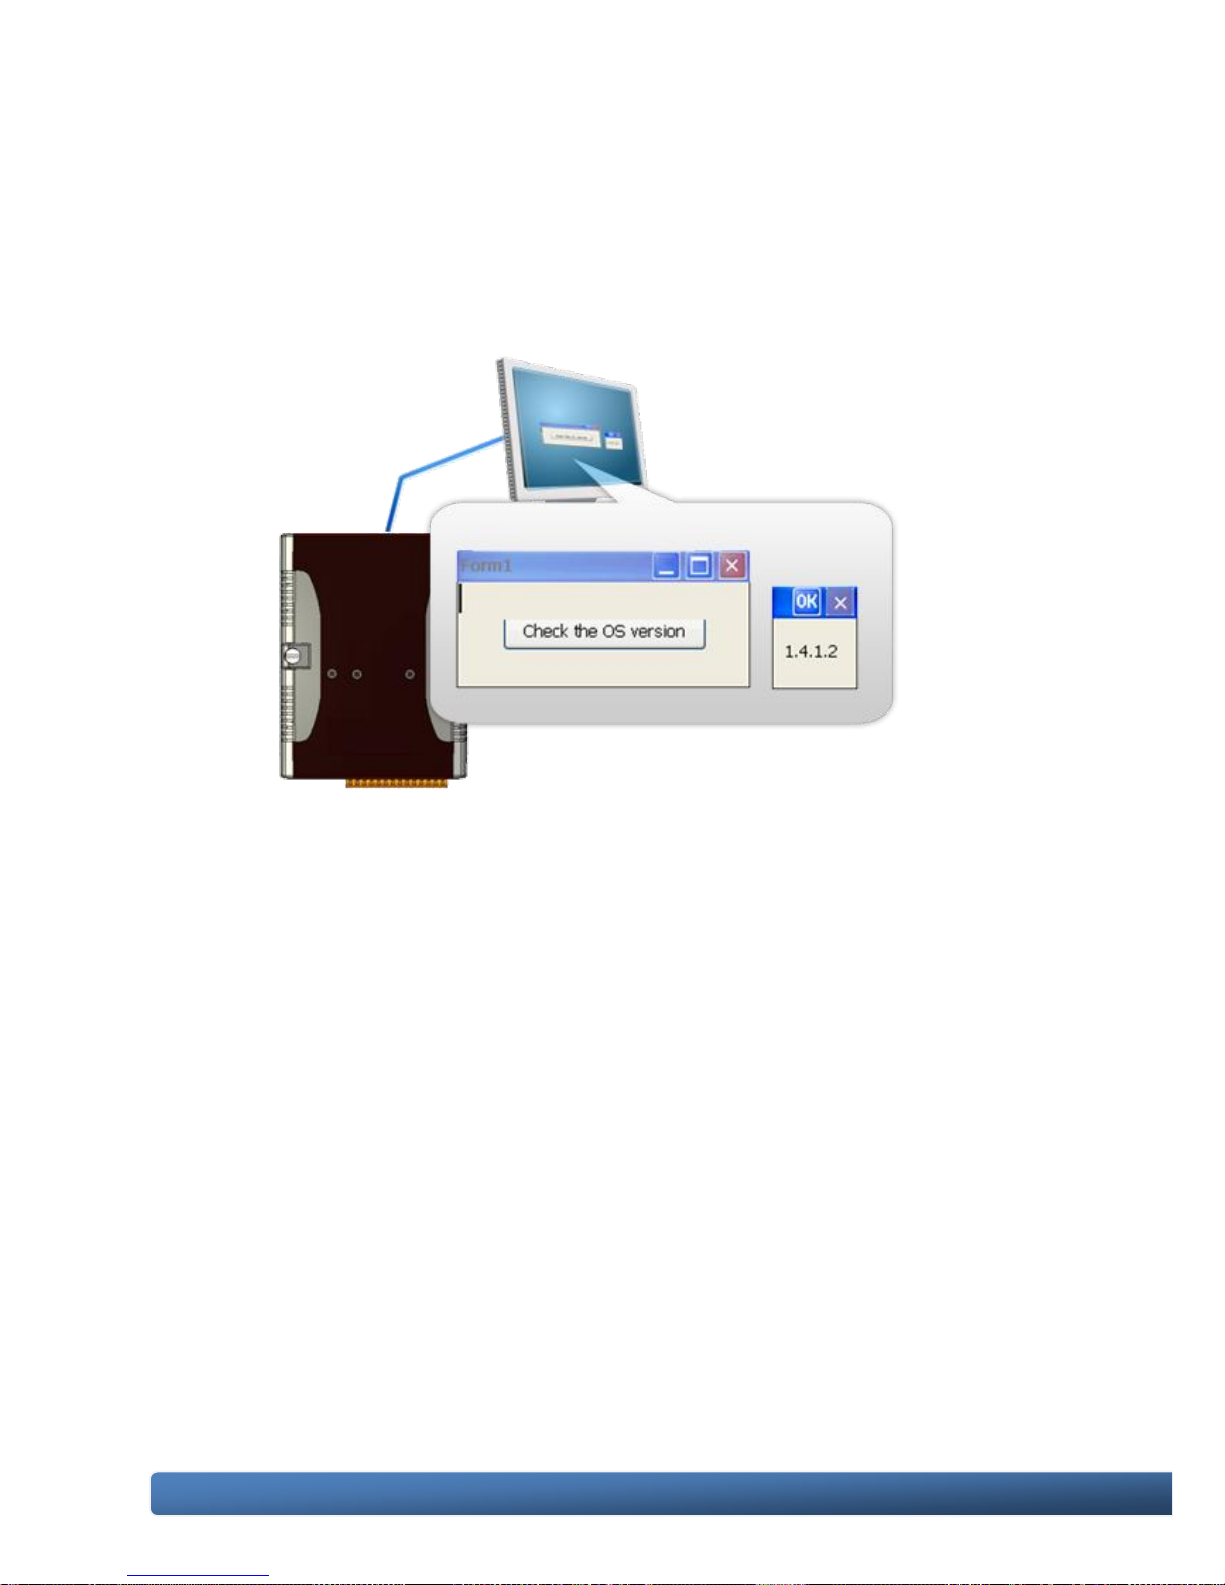
4.3.6. Executing the Application on WinPAC-5000
After uploading the application to WinPAC-5000, you can just double-click it on
WinPAC-5000 to execute it.
Page 69

WinPAC-5000 Series User Manual, Version 1.0.2 Page: 69
Copyright © 2010 ICP DAS Co., Ltd. All Rights Reserved. E-mail: [email protected]
4.4. Your First Program in VB.net
Here we will demonstrate how to create a VB.net program running on WinPAC-5000
with the VB.net development tool, which including the following topics:
1. Create a new project
2. Add WinPAC-5000 reference
3. Add the control to the form
4. Add the event handling for the control
5. Upload the application to WinPAC-5000
6. Execute the application on WinPAC-5000
In this tutorial, we will assume that you have installed WinPAC-5000 SDK on PC and
used the Visual Studio 2005 for application development.
4.4.1. Creating a New Project
The VB.net project template is a composite control that you use in this example
creates a new project with this user control.
Step 1: Start Visual Studio 2005
Visual Studio 2005
Page 70
WinPAC-5000 Series User Manual, Version 1.0.2 Page: 70
Copyright © 2010 ICP DAS Co., Ltd. All Rights Reserved. E-mail: [email protected]
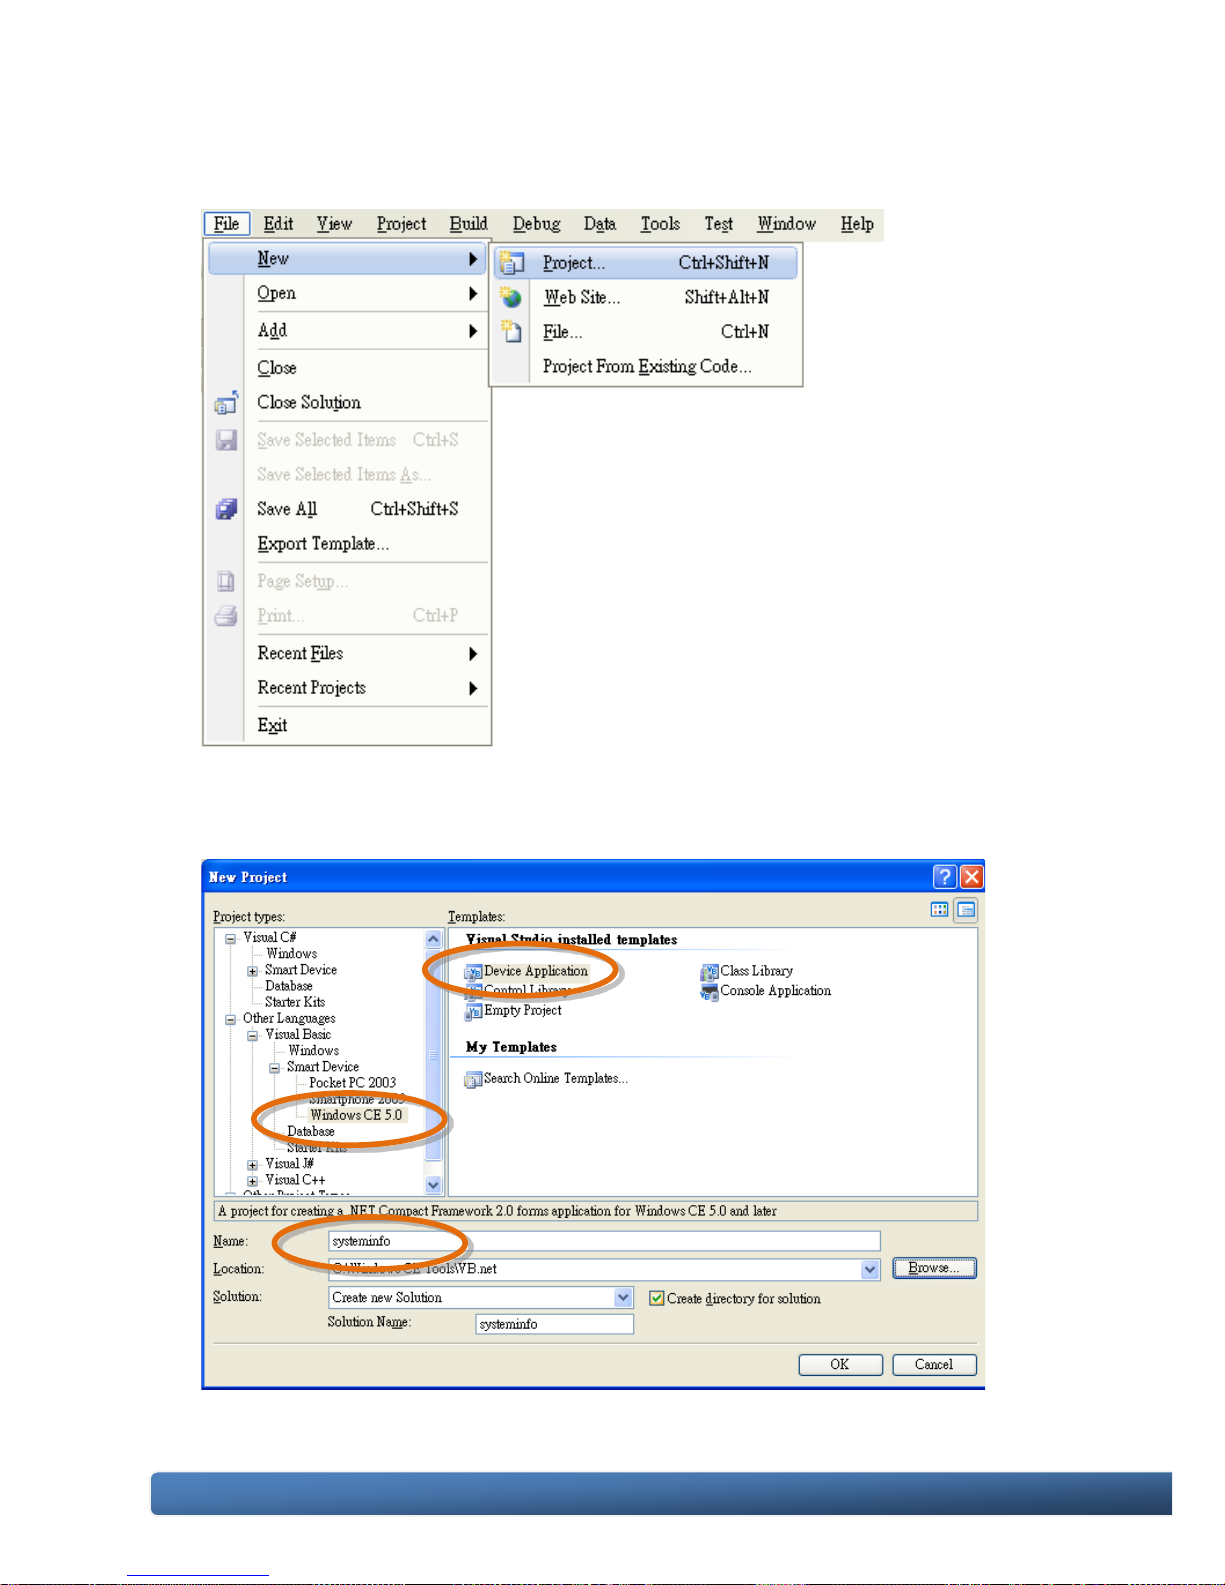
Step 2: On the File menu, point to New, and then click Project…
Step 3: In the Project types pane, expand
Visual Basic, and then click Window CE5.0
Step 4: In the Templates pane, click Device
Applications
Step 5: Type a name in the Name field, and
then click OK
Here we will enter the name “systeminfo” and a different location for the project if
you wish
Page 71
WinPAC-5000 Series User Manual, Version 1.0.2 Page: 71
Copyright © 2010 ICP DAS Co., Ltd. All Rights Reserved. E-mail: [email protected]
4.4.2. Adding the WinPAC-5000 Reference
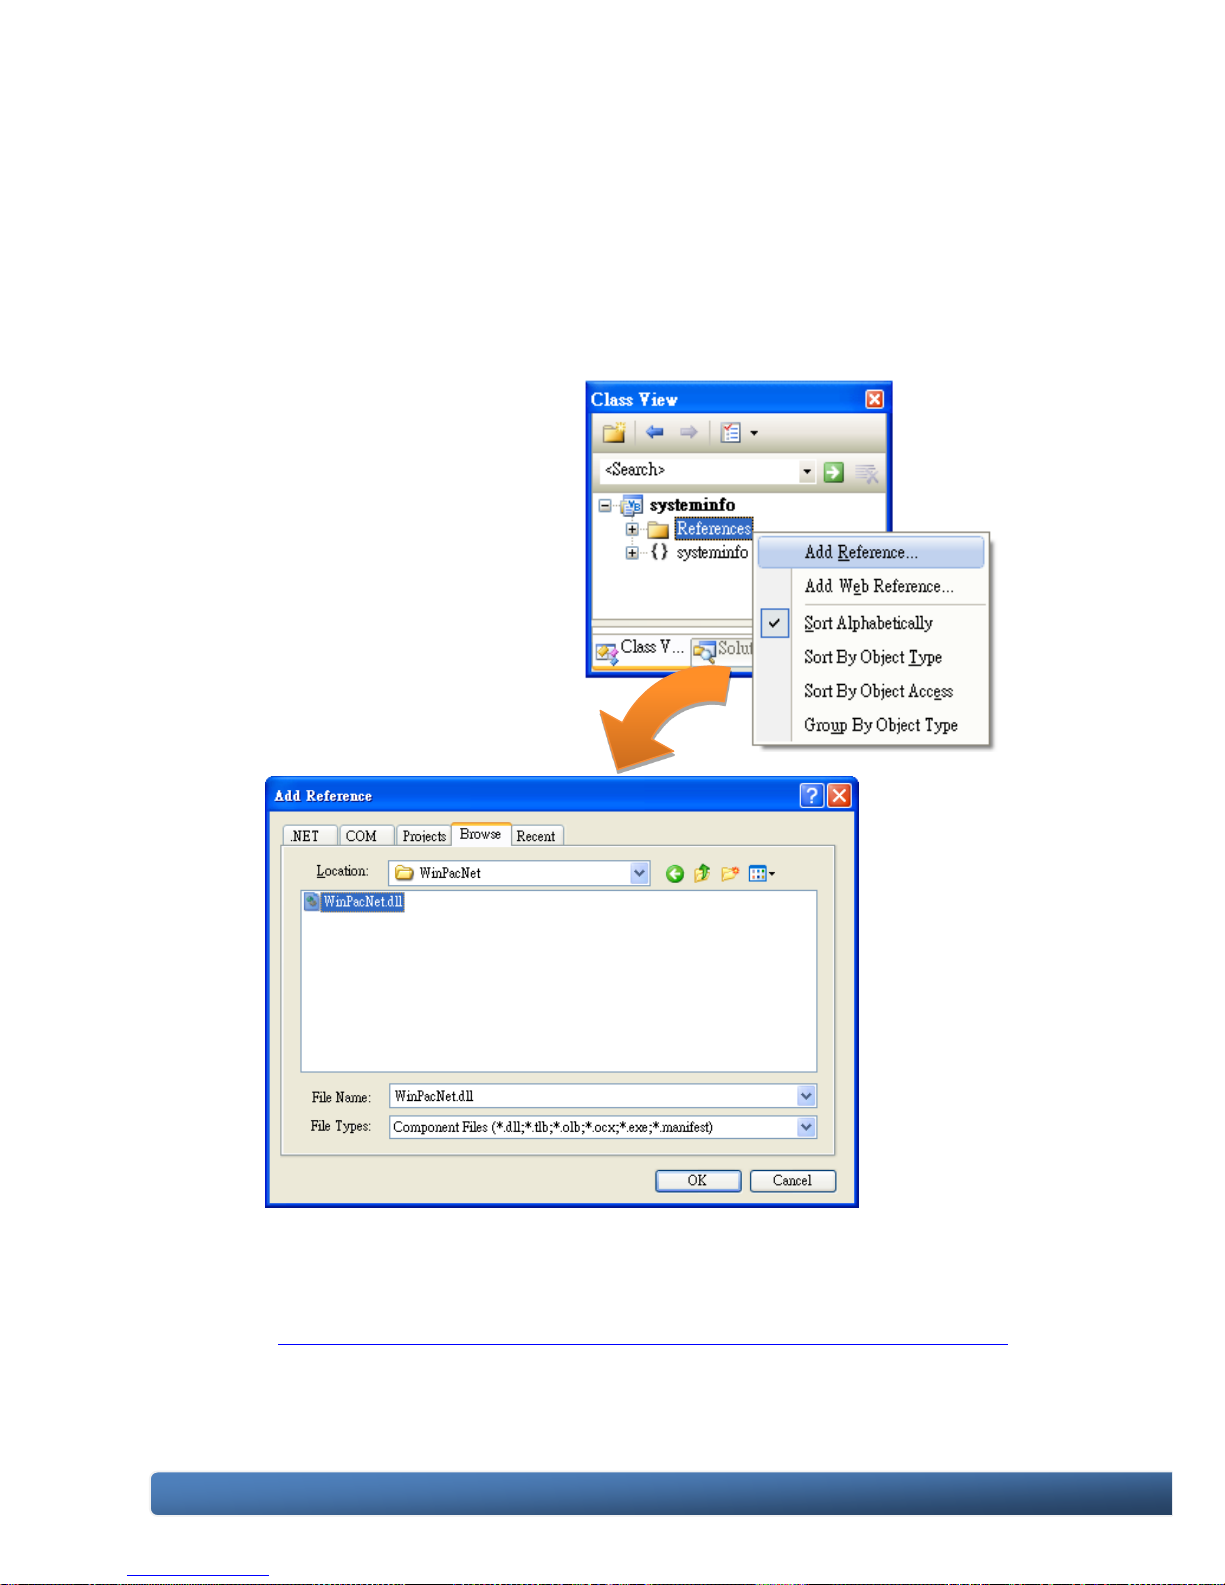
The WinPAC-5000 SDKs provides a complete solution to integrate with
WinPAC-5000. Compatible with Visual C#, Visual Basic .net and C++. In order to
use a component in your application, you must first add a reference to it.
Step 1: In Solution Explorer,
right-click the References
node and click Add
Reference on the shortcut
menu.
The Add Reference dialog
box appears.
Step 2: Click the Browe tab, and
then select WinPacNet.dll
The “WinPacNet.dll” file can be obtained from:
CD:\Napdos\wp-5000_ce50\SDK\WinPacNet\
ftp://ftp.icpdas.com/pub/cd/winpac/napdos/wp-5000_ce50/sdk/winpacnet/
Step 3: Click OK to close the Add Reference dialog box
Page 72
WinPAC-5000 Series User Manual, Version 1.0.2 Page: 72
Copyright © 2010 ICP DAS Co., Ltd. All Rights Reserved. E-mail: [email protected]
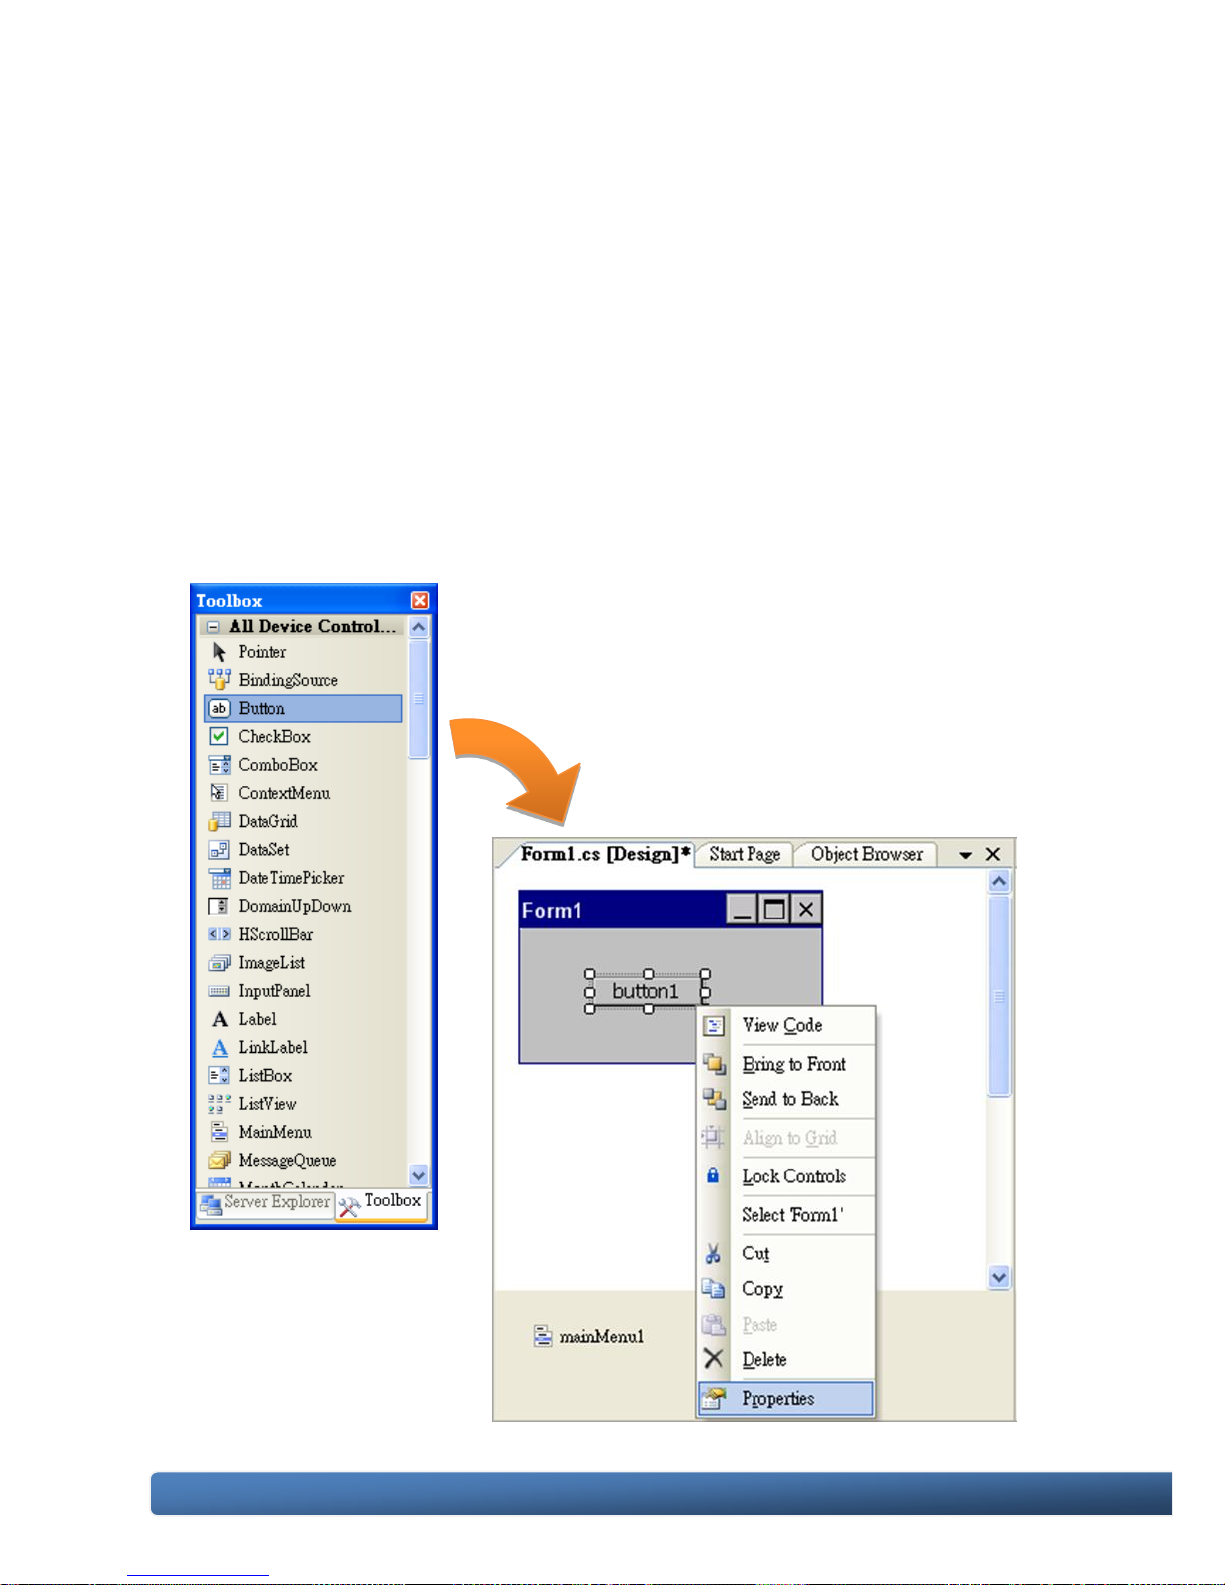
4.4.3. Adding the Control to the Form
You can drag various controls from the Toolbox onto the form. These controls are not
really "live"; they are just images that are convenient to move around on the form
into a precise location.
After you add a control to your form, you can use the Properties window to set its
properties, such as background color and default text. The values that you specify in
the Properties window are the initial values that will be assigned to that property
when the control is created at run time.
Step 1: From the Toolbox, drag a Button control onto the form
Step 2: Right-click the Button control, and then click
Properties
Page 73
WinPAC-5000 Series User Manual, Version 1.0.2 Page: 73
Copyright © 2010 ICP DAS Co., Ltd. All Rights Reserved. E-mail: [email protected]
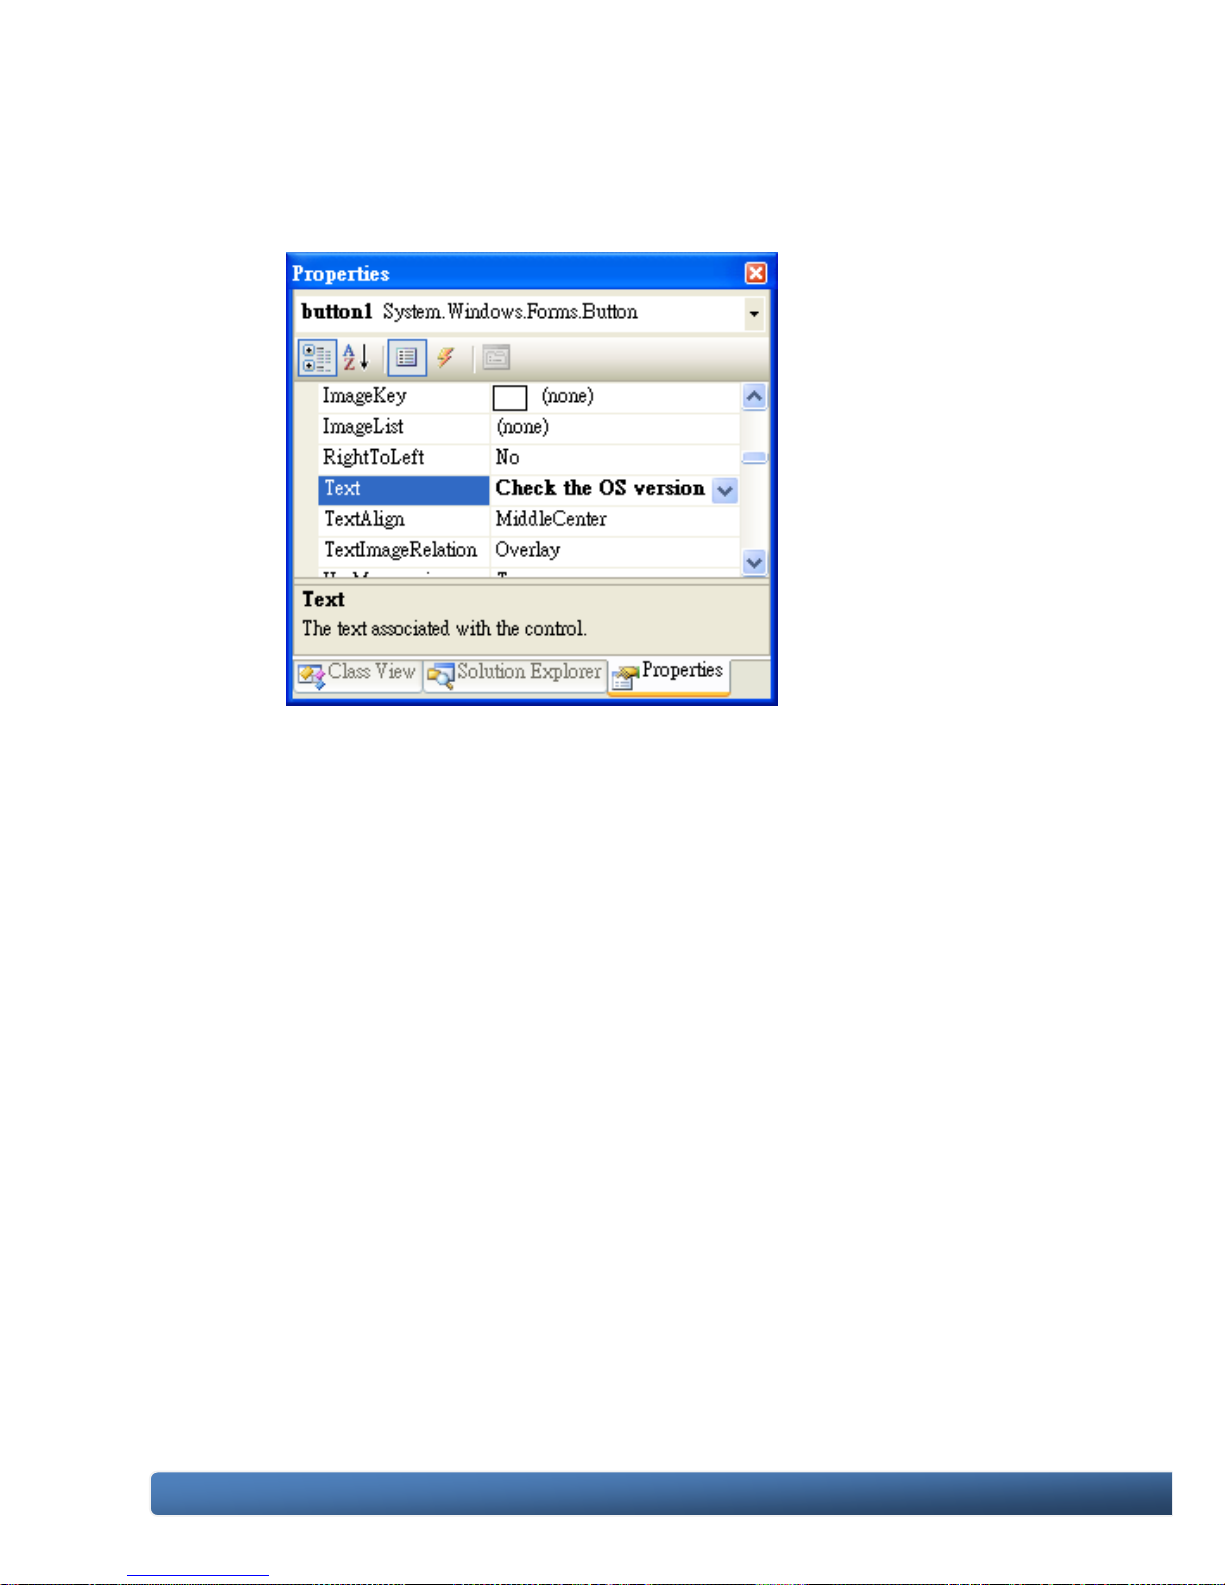
Step 3: In the Properties window, type Check the OS version, and press
ENTER to set the Text property
Page 74
WinPAC-5000 Series User Manual, Version 1.0.2 Page: 74
Copyright © 2010 ICP DAS Co., Ltd. All Rights Reserved. E-mail: [email protected]
4.4.4. Adding the Event Handling to the Control
You have finished the design stage of your application and are at the point when you
can start adding some code to provide the program's functionality.
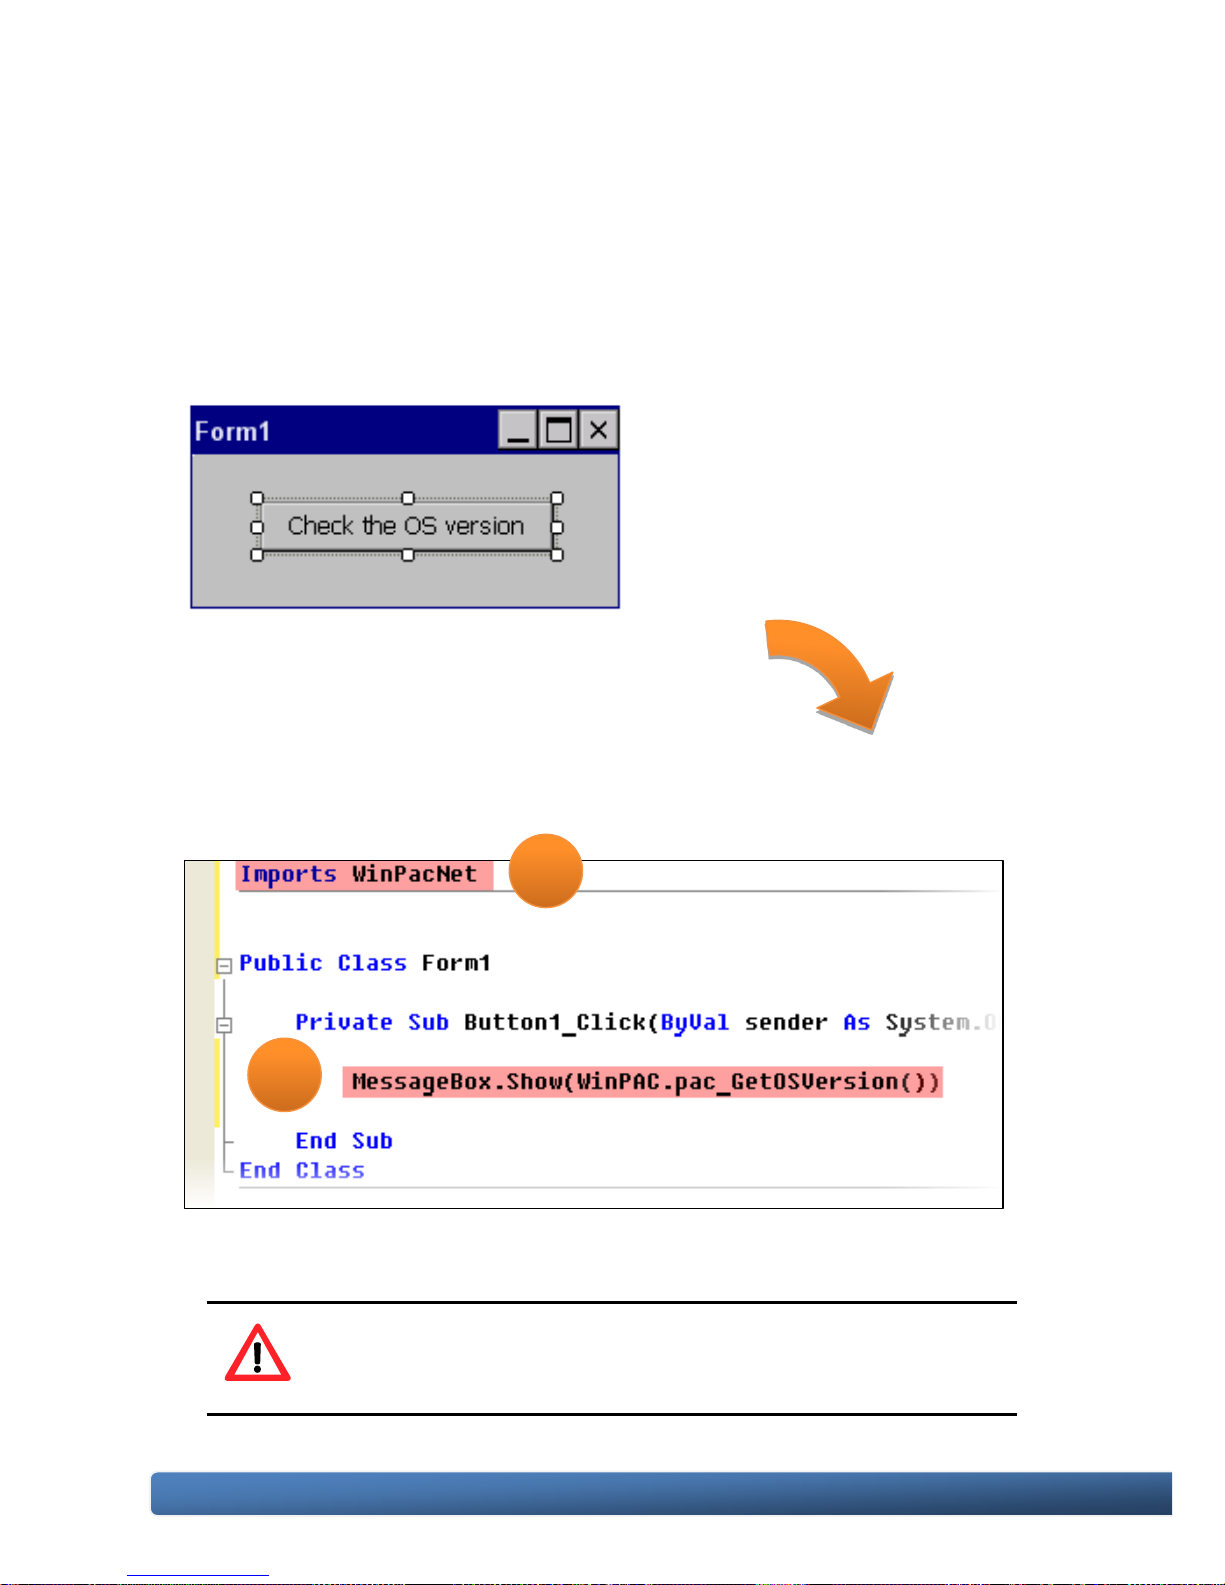
Step 1: Double-click the button on the form
The Code Editor opens with the cursor
positioned in the event handler.
Step 2: Inserting the following code
1. Imports WinPacNet
2. MessageBox(WinPAC-5000.pac_GetOSVersion())
Tips & Warnings
The “WinPacNet” of “unsing WinPacNet” is case- sensitive..
1
2
Page 75
WinPAC-5000 Series User Manual, Version 1.0.2 Page: 75
Copyright © 2010 ICP DAS Co., Ltd. All Rights Reserved. E-mail: [email protected]
4.4.5. Upload the Application to WinPAC-5000
WinPAC-5000 provide FTP server service, you can upload files to WinPAC-5000 or
download files from a public FTP server.
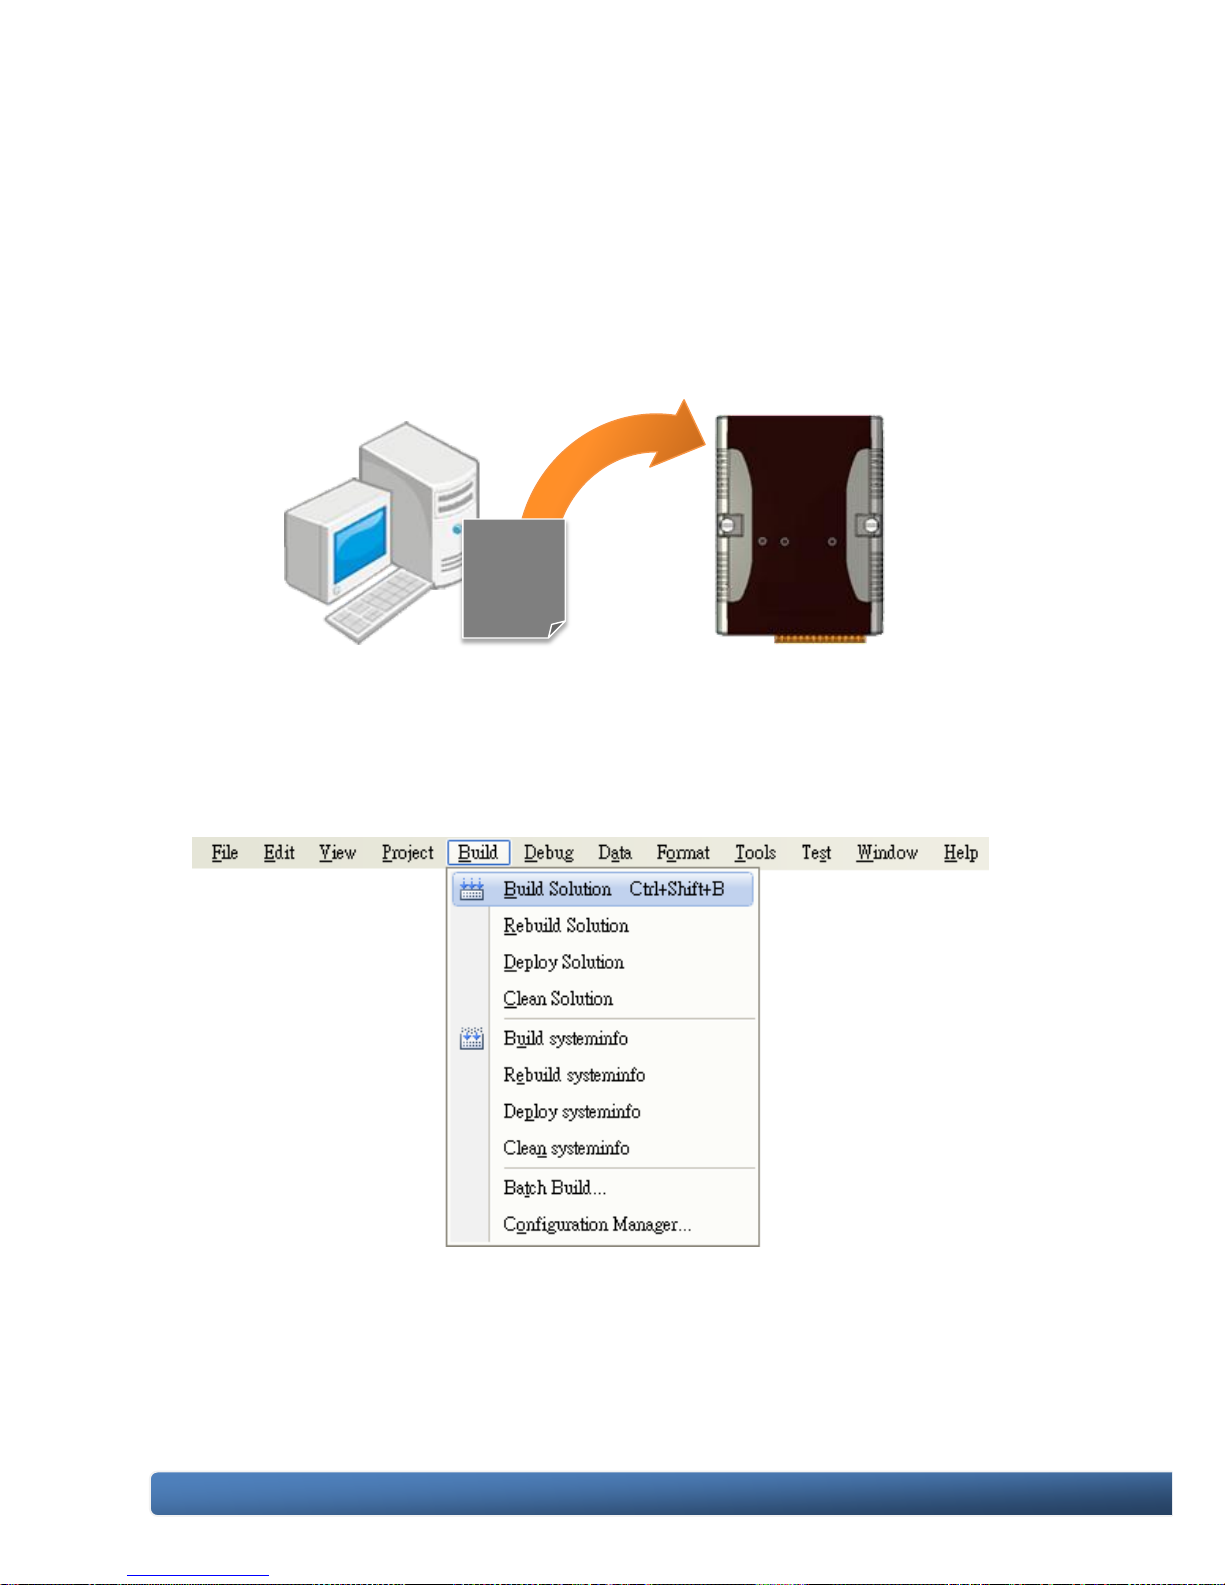
Step 1: On the Build menu, click Build Solution
Step 2: Open the browser and type the IP address of WinPAC-5000
………
………
………
………
Page 76
WinPAC-5000 Series User Manual, Version 1.0.2 Page: 76
Copyright © 2010 ICP DAS Co., Ltd. All Rights Reserved. E-mail: [email protected]
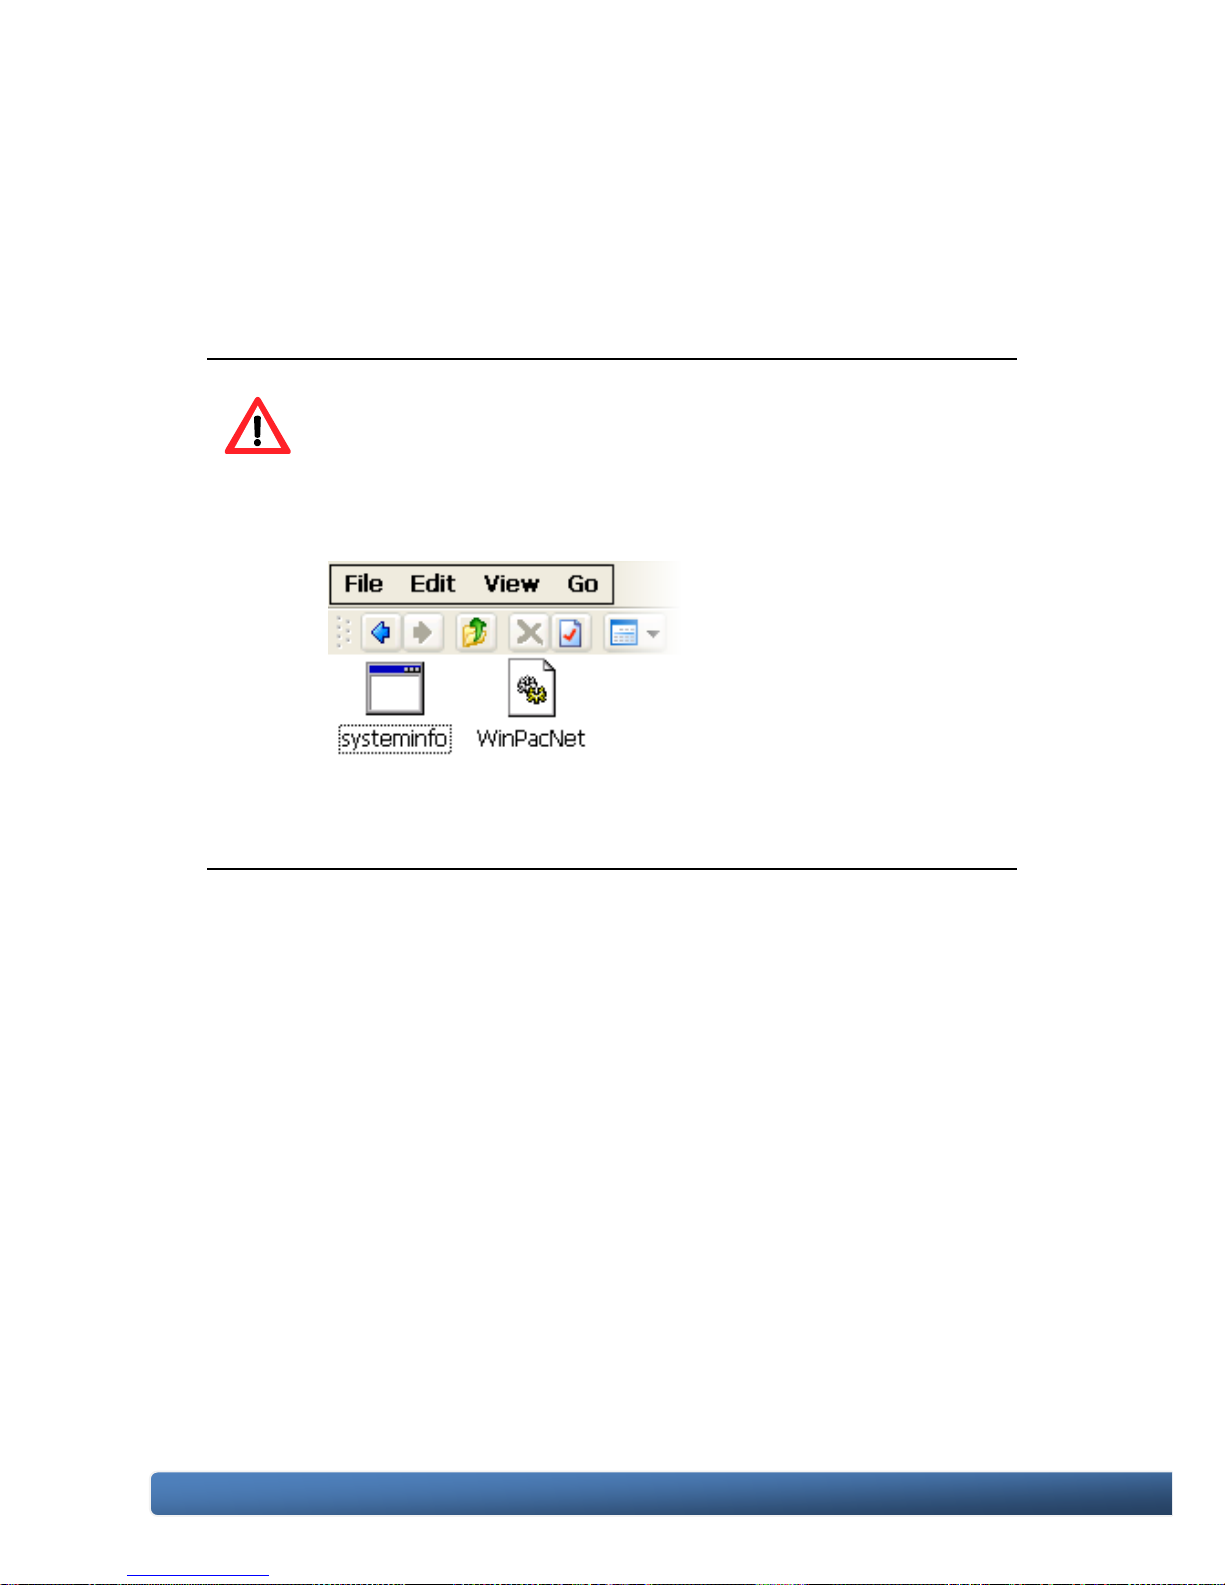
Step 3: Upload the systeminfo.exe application and the corresponding
Winpacnet.dll file to the WinPAC-5000
Tips & Warnings
For applications programming in C# and VB.net with .net
framework, when executing these application on the
WinPAC-5000 controller, the corresponding “Winpacnet.dll” file
must be in the same directory as the .exe file.
Page 77
WinPAC-5000 Series User Manual, Version 1.0.2 Page: 77
Copyright © 2010 ICP DAS Co., Ltd. All Rights Reserved. E-mail: [email protected]
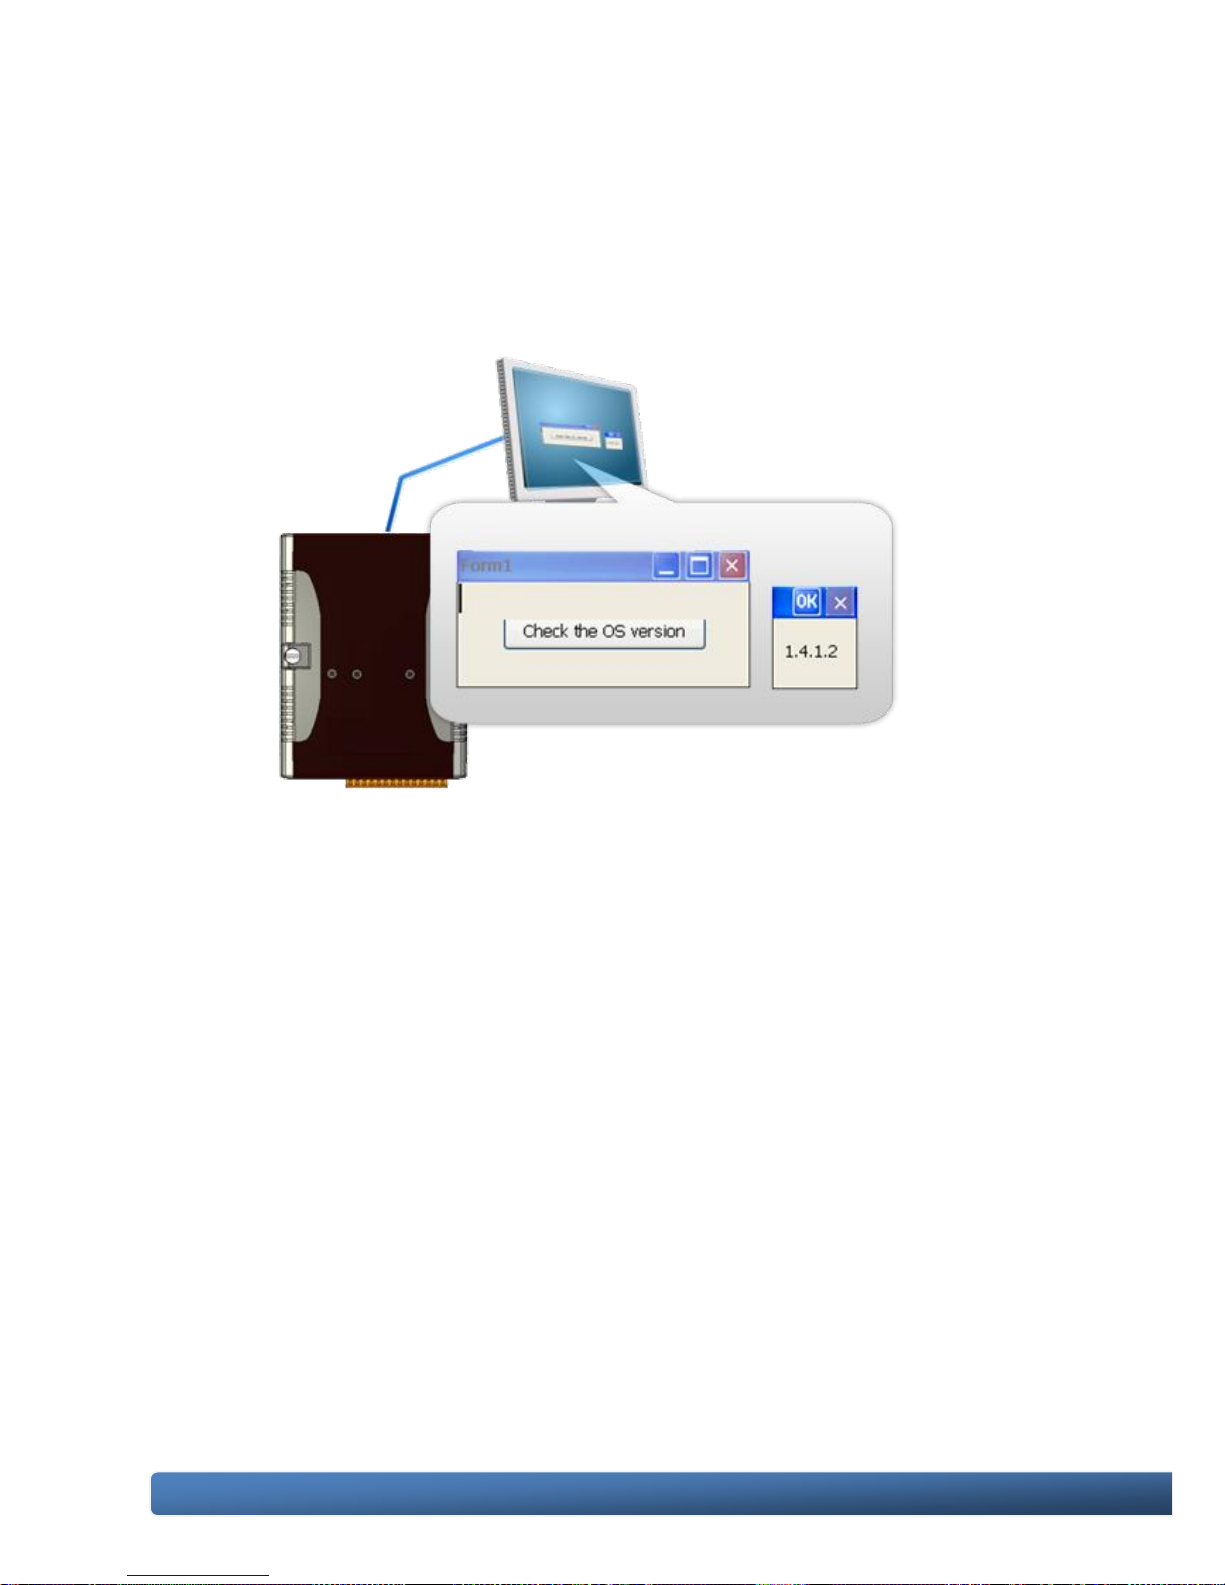
4.4.6. Executing the Application on WinPAC-5000
After uploading the application to WinPAC-5000, then you can just double-click it on
WinPAC-5000 to execute it.
Page 78

WinPAC-5000 Series User Manual, Version 1.0.2 Page: 78
Copyright © 2010 ICP DAS Co., Ltd. All Rights Reserved. E-mail: [email protected]
4.5. Your First Program in eMbedded Visual C++
Here we will demonstrate how to create a eVC++ program running on WinPAC-5000
with the eVC++ development tool, which including the following topics:
1. Create a new Forms-Based project
2. Configure the platform
3. Specify the path of the WinPAC-5000 reference
4. Add the control to the form
5. Add the event handling for the control
6. Upload the application to WinPAC-5000
7. Execute the application on WinPAC-5000
In this tutorial, we will assume that you have installed WinPAC-5000 SDK on PC and
used the eMbedded Visual C++ 4.0 for application development.
4.5.1. Creating a Forms-Based Project
The eVC++ project template is a composite control that you use in this example
creates a new project with this user control.
Step 1: Start eMbedded Visual C++
eMbedded Visual C++
Page 79
WinPAC-5000 Series User Manual, Version 1.0.2 Page: 79
Copyright © 2010 ICP DAS Co., Ltd. All Rights Reserved. E-mail: [email protected]
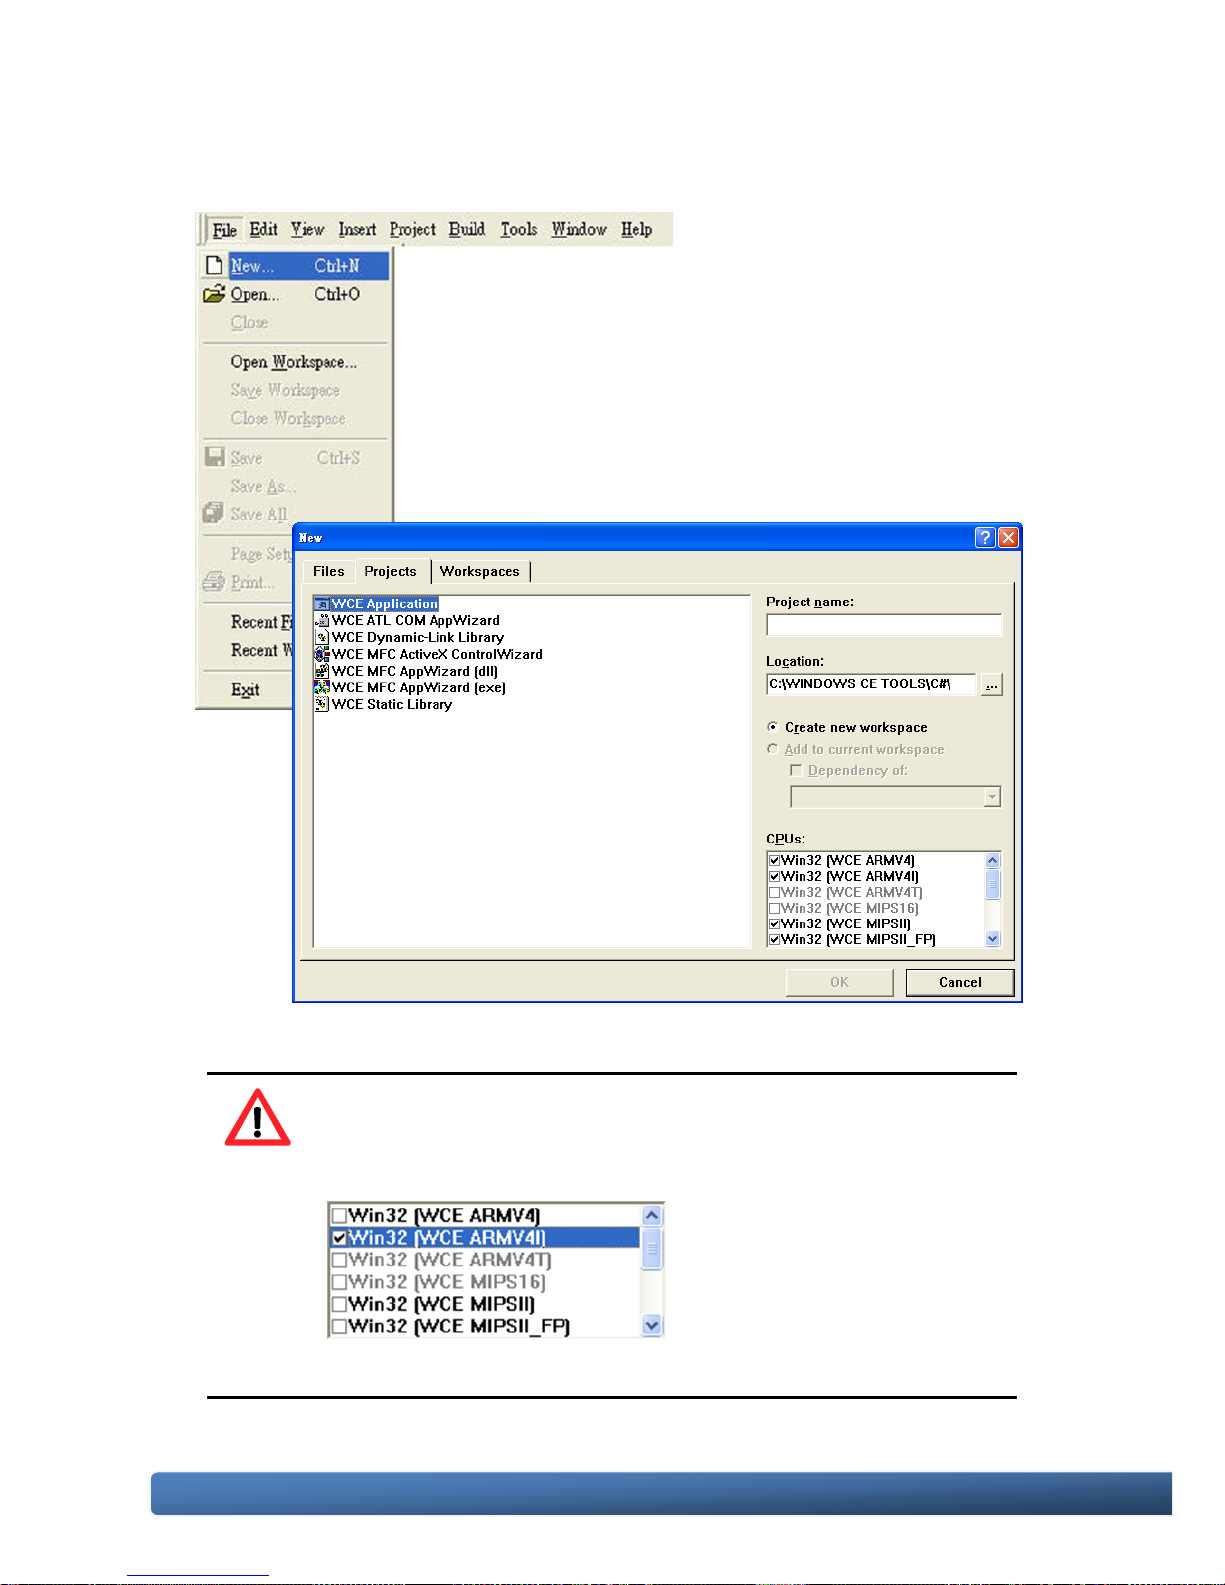
Step 2: On the File menu, and then click New
Step 3: Click the Projects tab, and then select WCE
Application
Step 4: Select the CPUs that WinPAC-5000 is
supported on from the CPUs list box
Tips & Warnings
Ensure that Win32 (WCE ARMV4I) is selected in the CPUs list
box and click OK.
Page 80
WinPAC-5000 Series User Manual, Version 1.0.2 Page: 80
Copyright © 2010 ICP DAS Co., Ltd. All Rights Reserved. E-mail: [email protected]
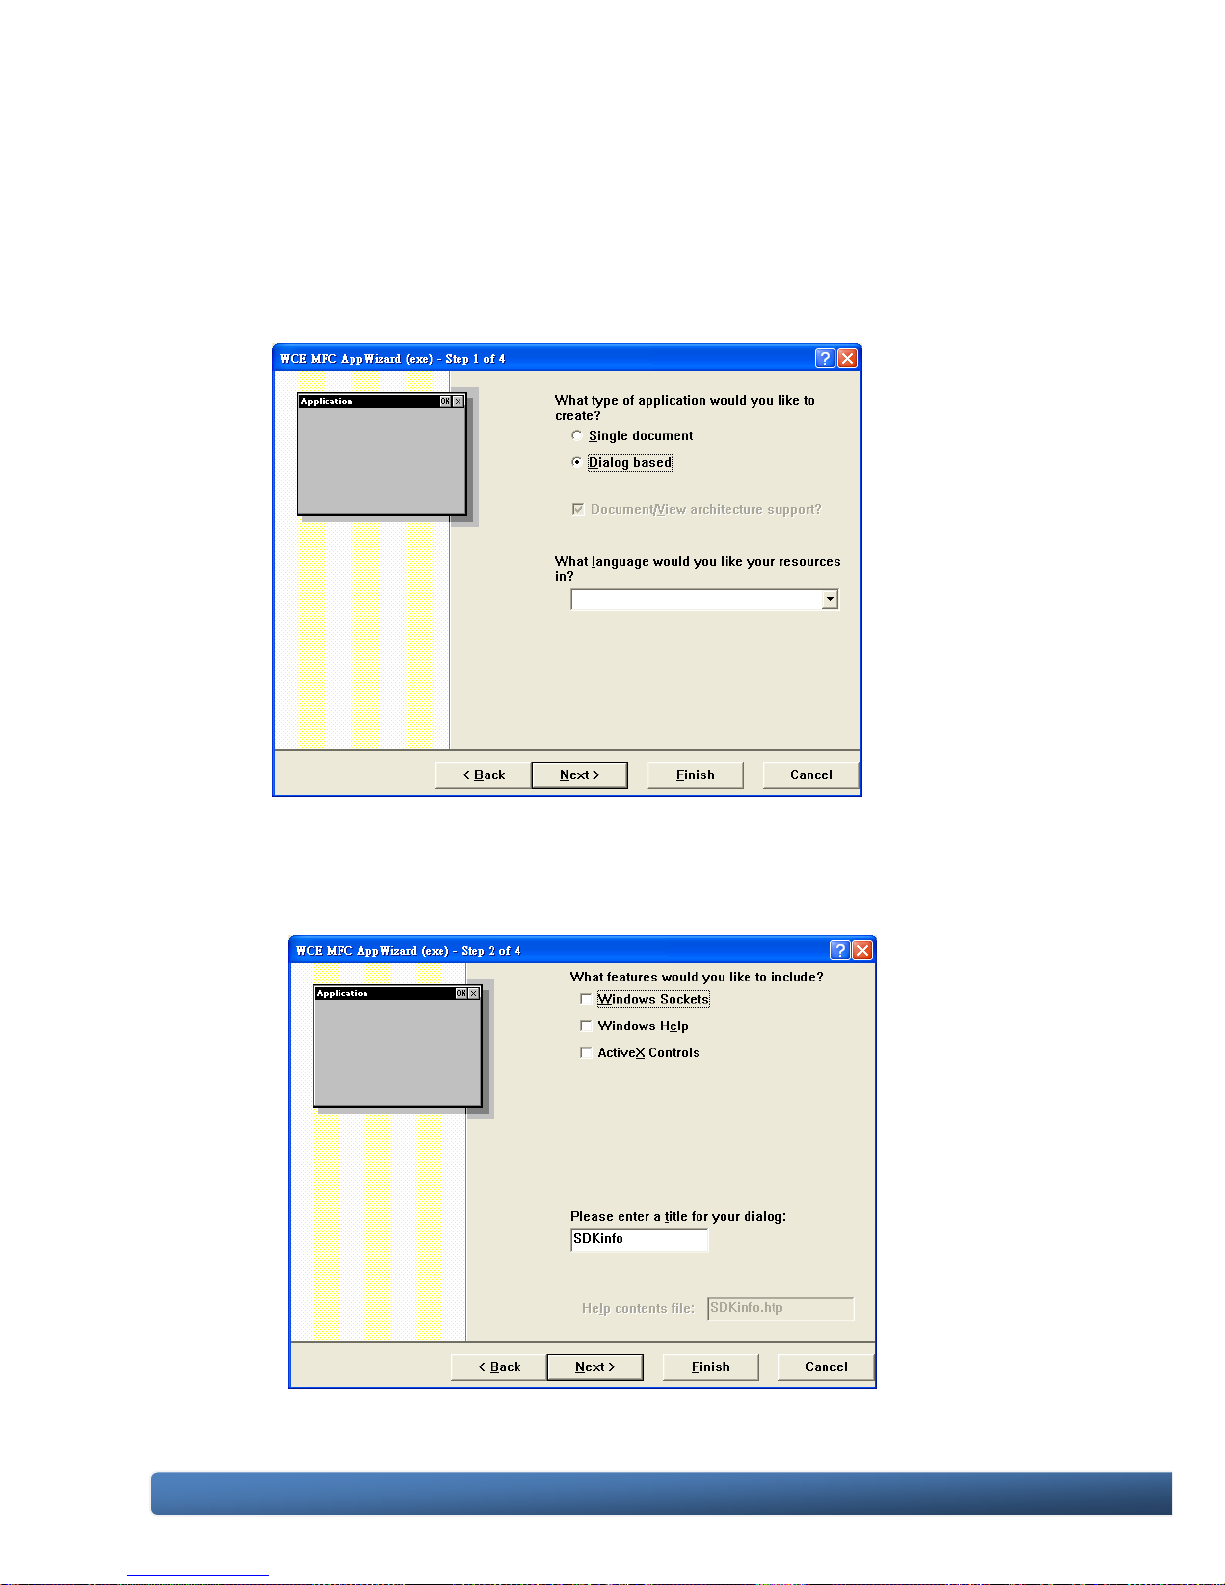
Step 5: Click OK to start the wizard
Step 6: On the first page of the wizard, click Dialog based and then click
Next, as shown in the following illustration
Step 7: On the next page of the wizard, leave all the options as they are, and
then click Next, as shown in the following illustration
Page 81
WinPAC-5000 Series User Manual, Version 1.0.2 Page: 81
Copyright © 2010 ICP DAS Co., Ltd. All Rights Reserved. E-mail: [email protected]
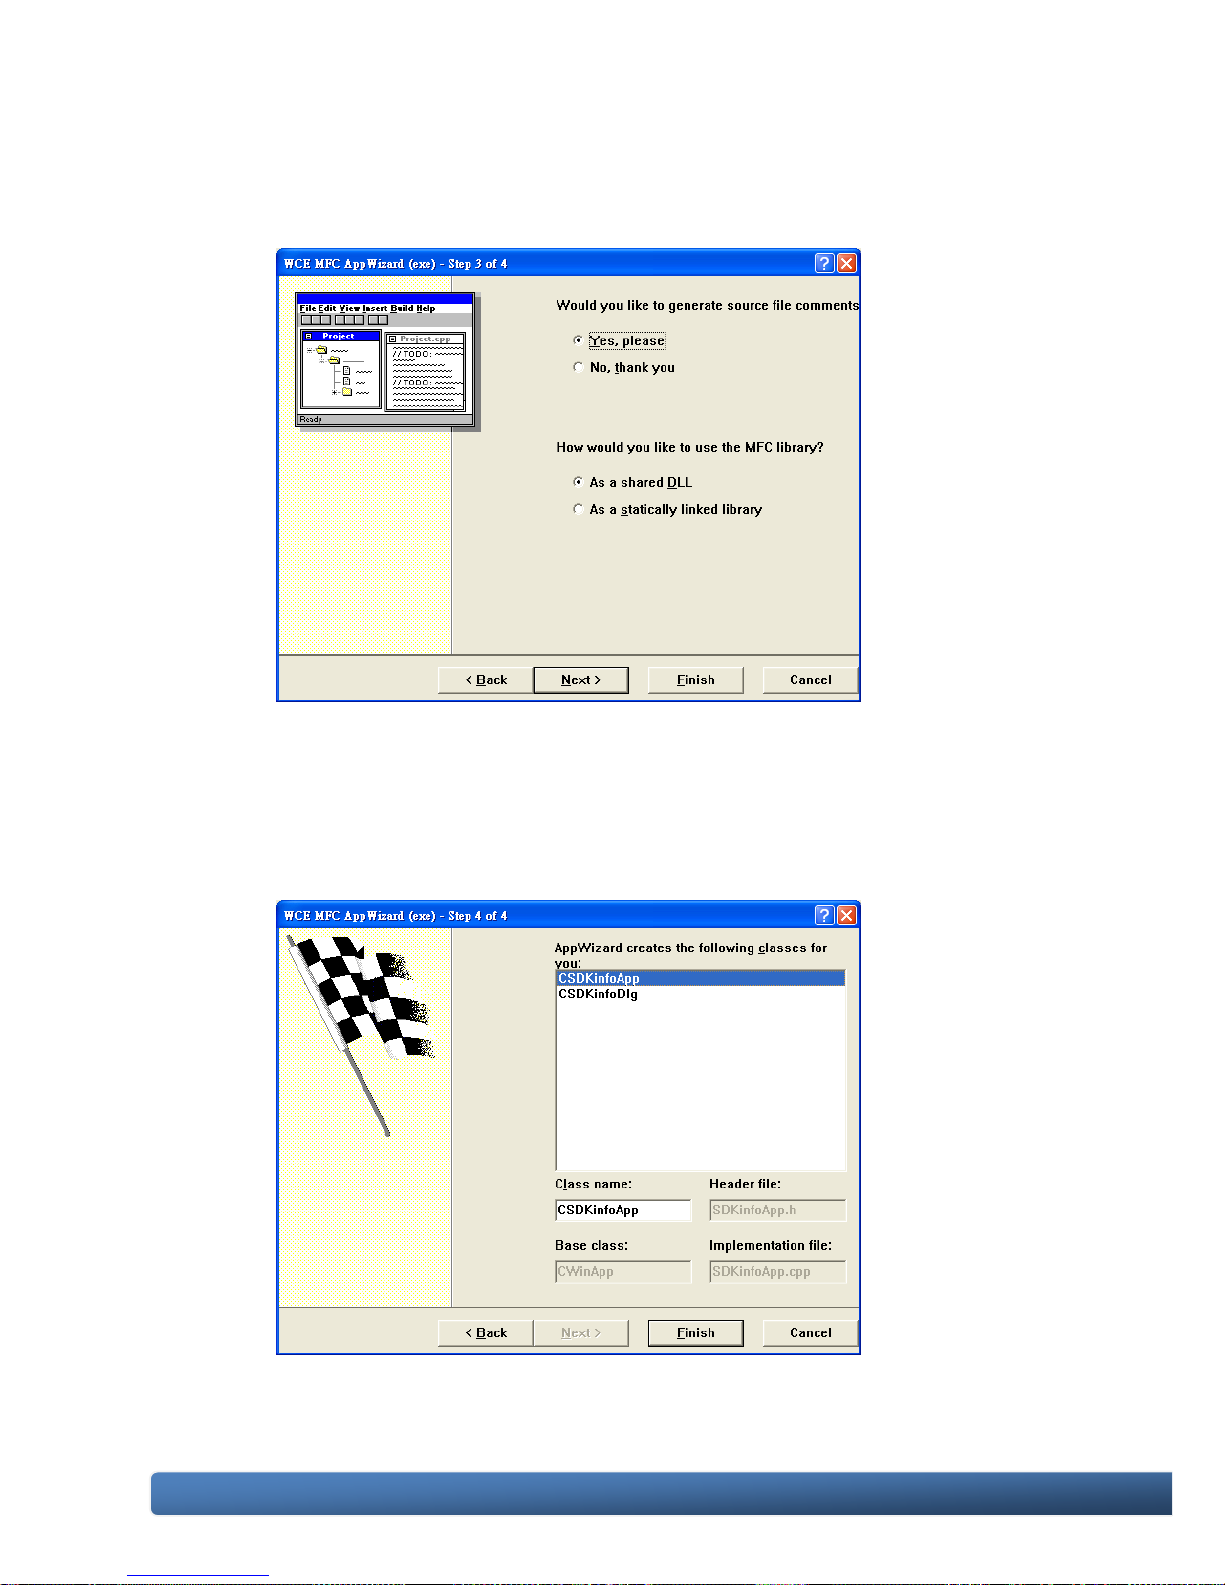
Step 8: On the next page of the wizard, click Next, as shown in the following
illustration
Step 9: On the next page of the wizard, Click Finish, as shown in the
following illustration
Page 82
WinPAC-5000 Series User Manual, Version 1.0.2 Page: 82
Copyright © 2010 ICP DAS Co., Ltd. All Rights Reserved. E-mail: [email protected]
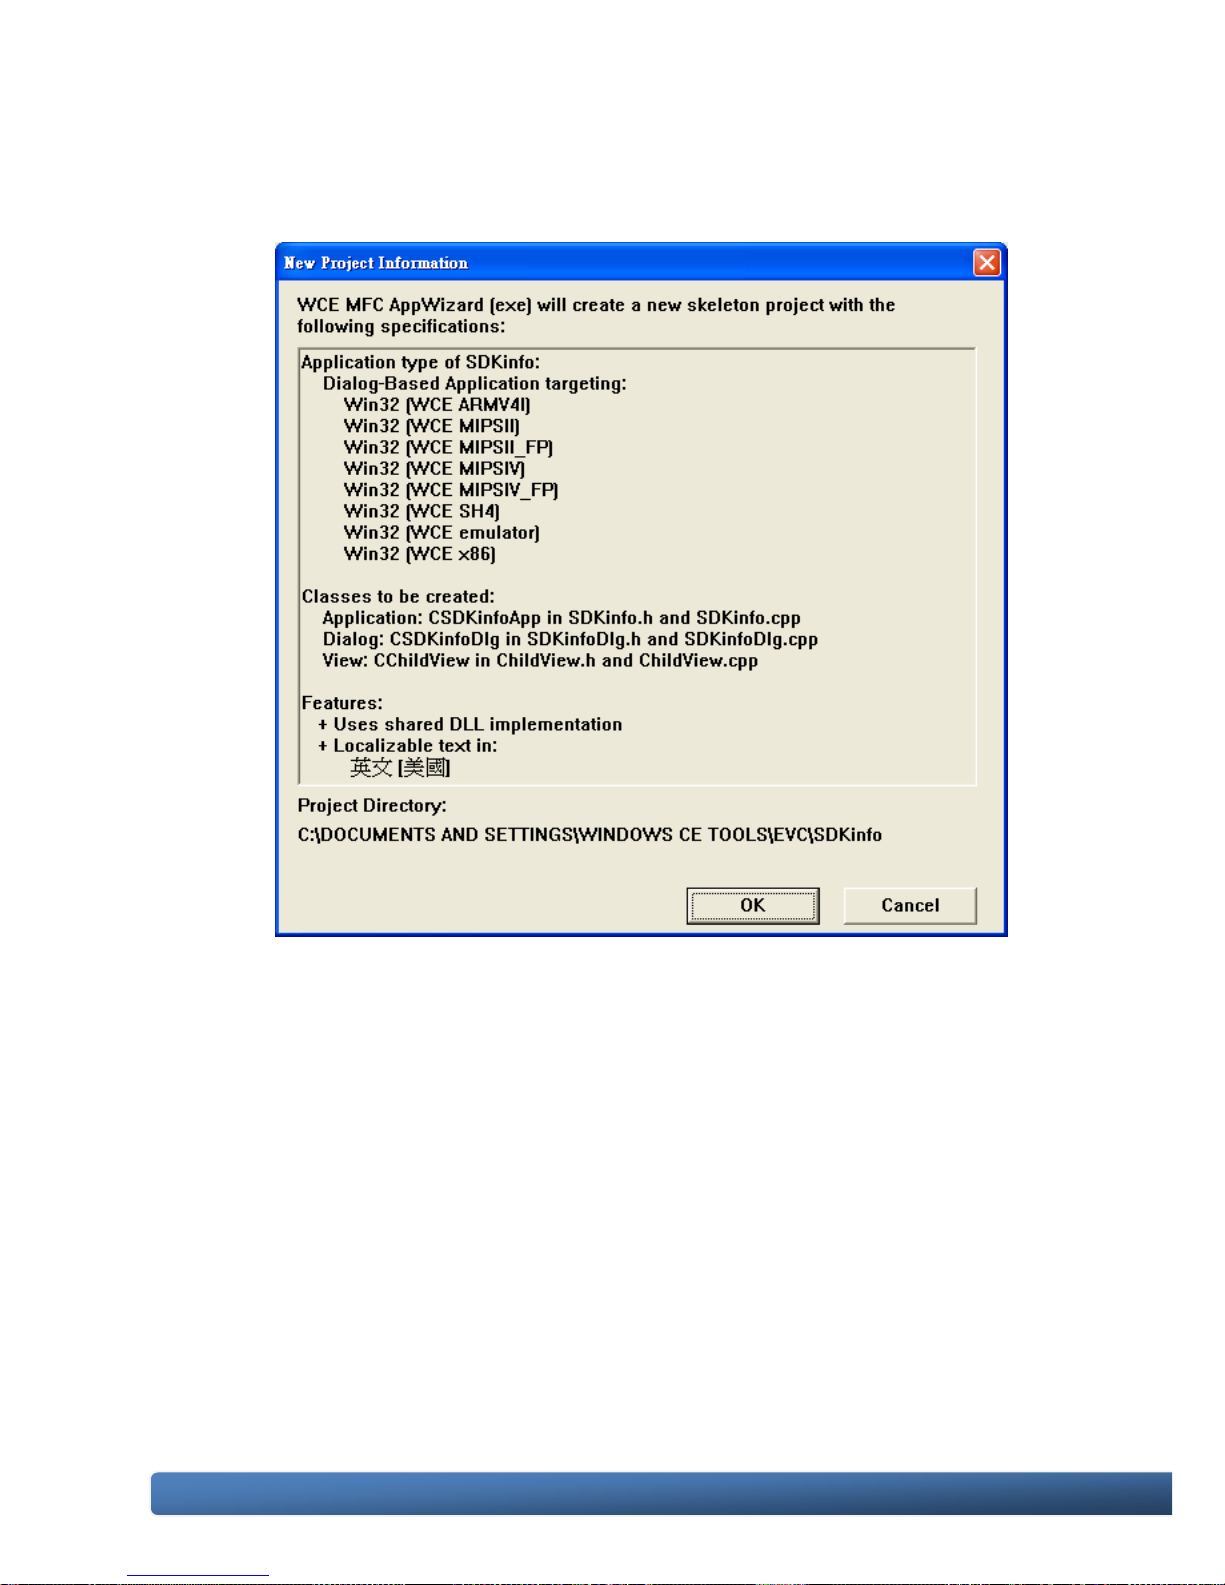
Step10: When the summary appears, click OK to complete the wizard, as
shown in the following illustration
Page 83
WinPAC-5000 Series User Manual, Version 1.0.2 Page: 83
Copyright © 2010 ICP DAS Co., Ltd. All Rights Reserved. E-mail: [email protected]
4.5.2. Configuring the Platform
When developing applications by using eMbedded Visual C++, you must configure
the Platform to indicate what platform and device you intend to download the
application to. Before you deploy your project, check the platform.
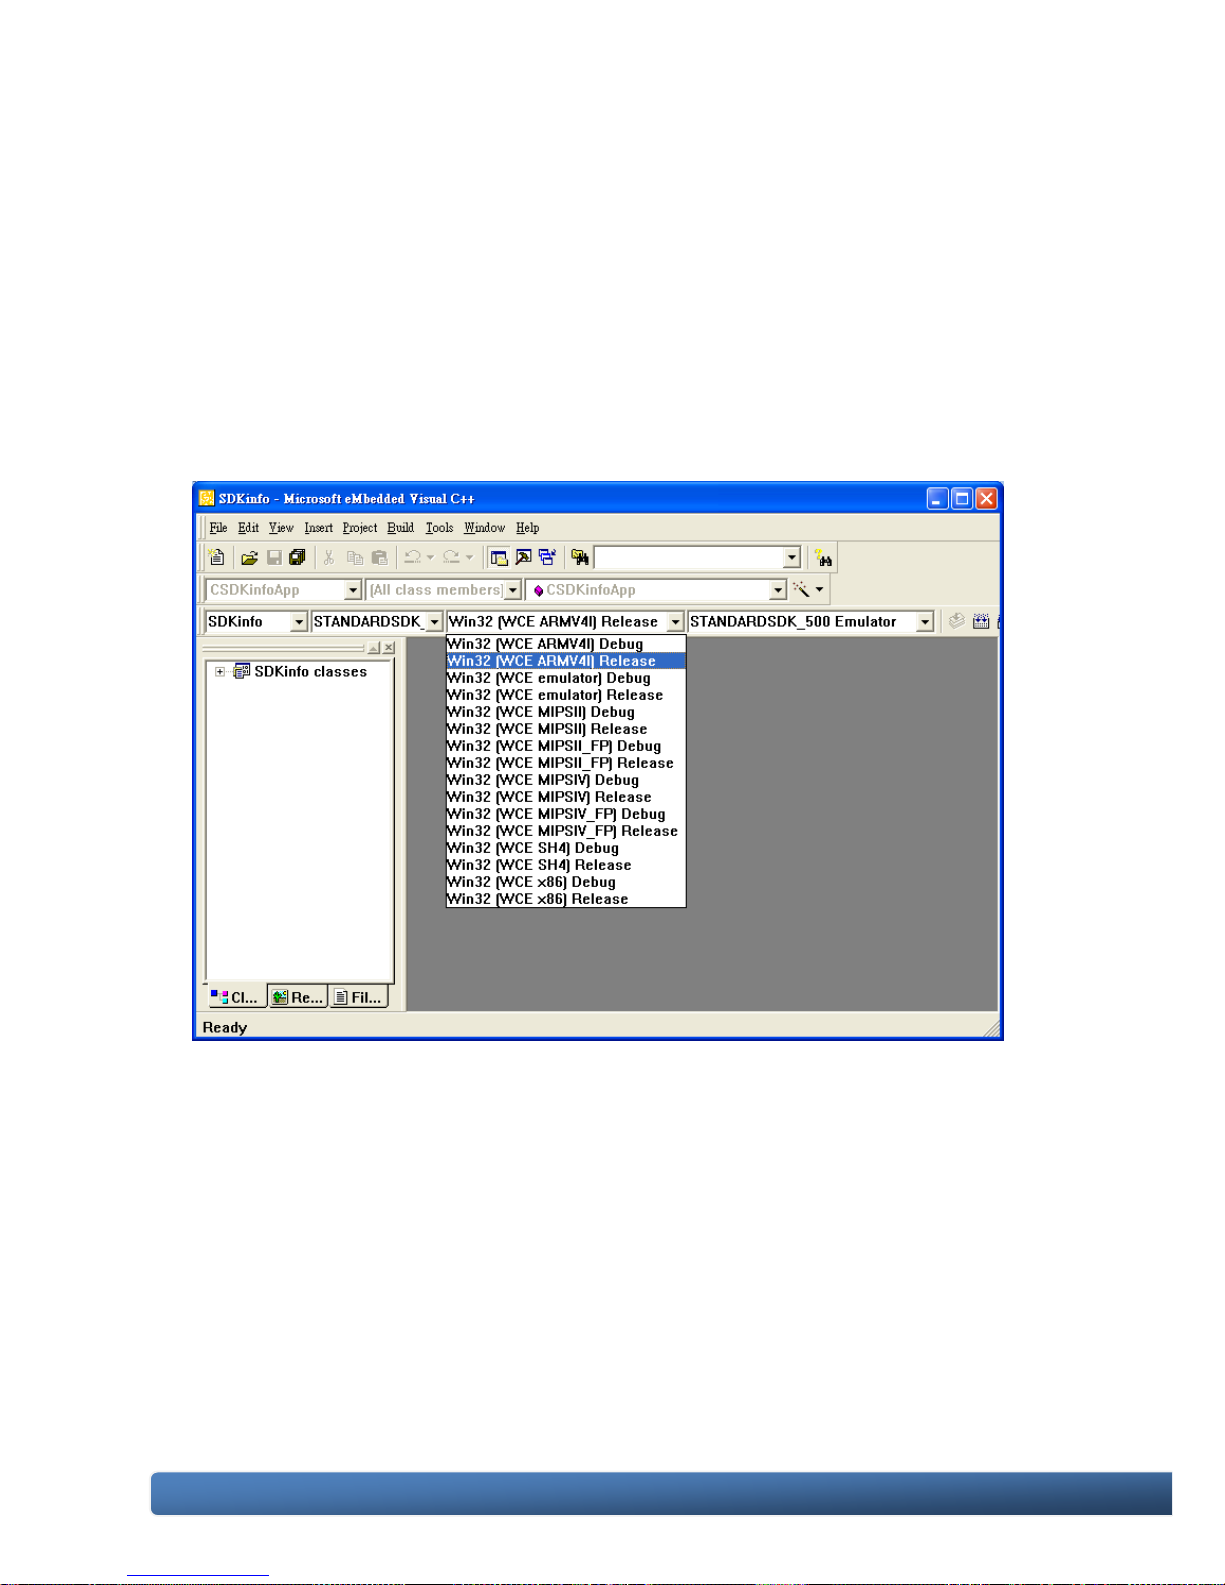
On the Win32 [WCE ARMV4I] Debug configuration toolbar, select Win32 [WCE
ARMV4I] Release, as shown in the following illustration.
Page 84
WinPAC-5000 Series User Manual, Version 1.0.2 Page: 84
Copyright © 2010 ICP DAS Co., Ltd. All Rights Reserved. E-mail: [email protected]
4.5.3. Specifying the Path of the WinPAC-5000 Reference
The WinPAC-5000 SDKs provides a complete solution to integrate with
WinPAC-5000. Compatible with Visual C#, Visual Basic .net and C++. In order to
use a component in your application, you must first add a reference to it.
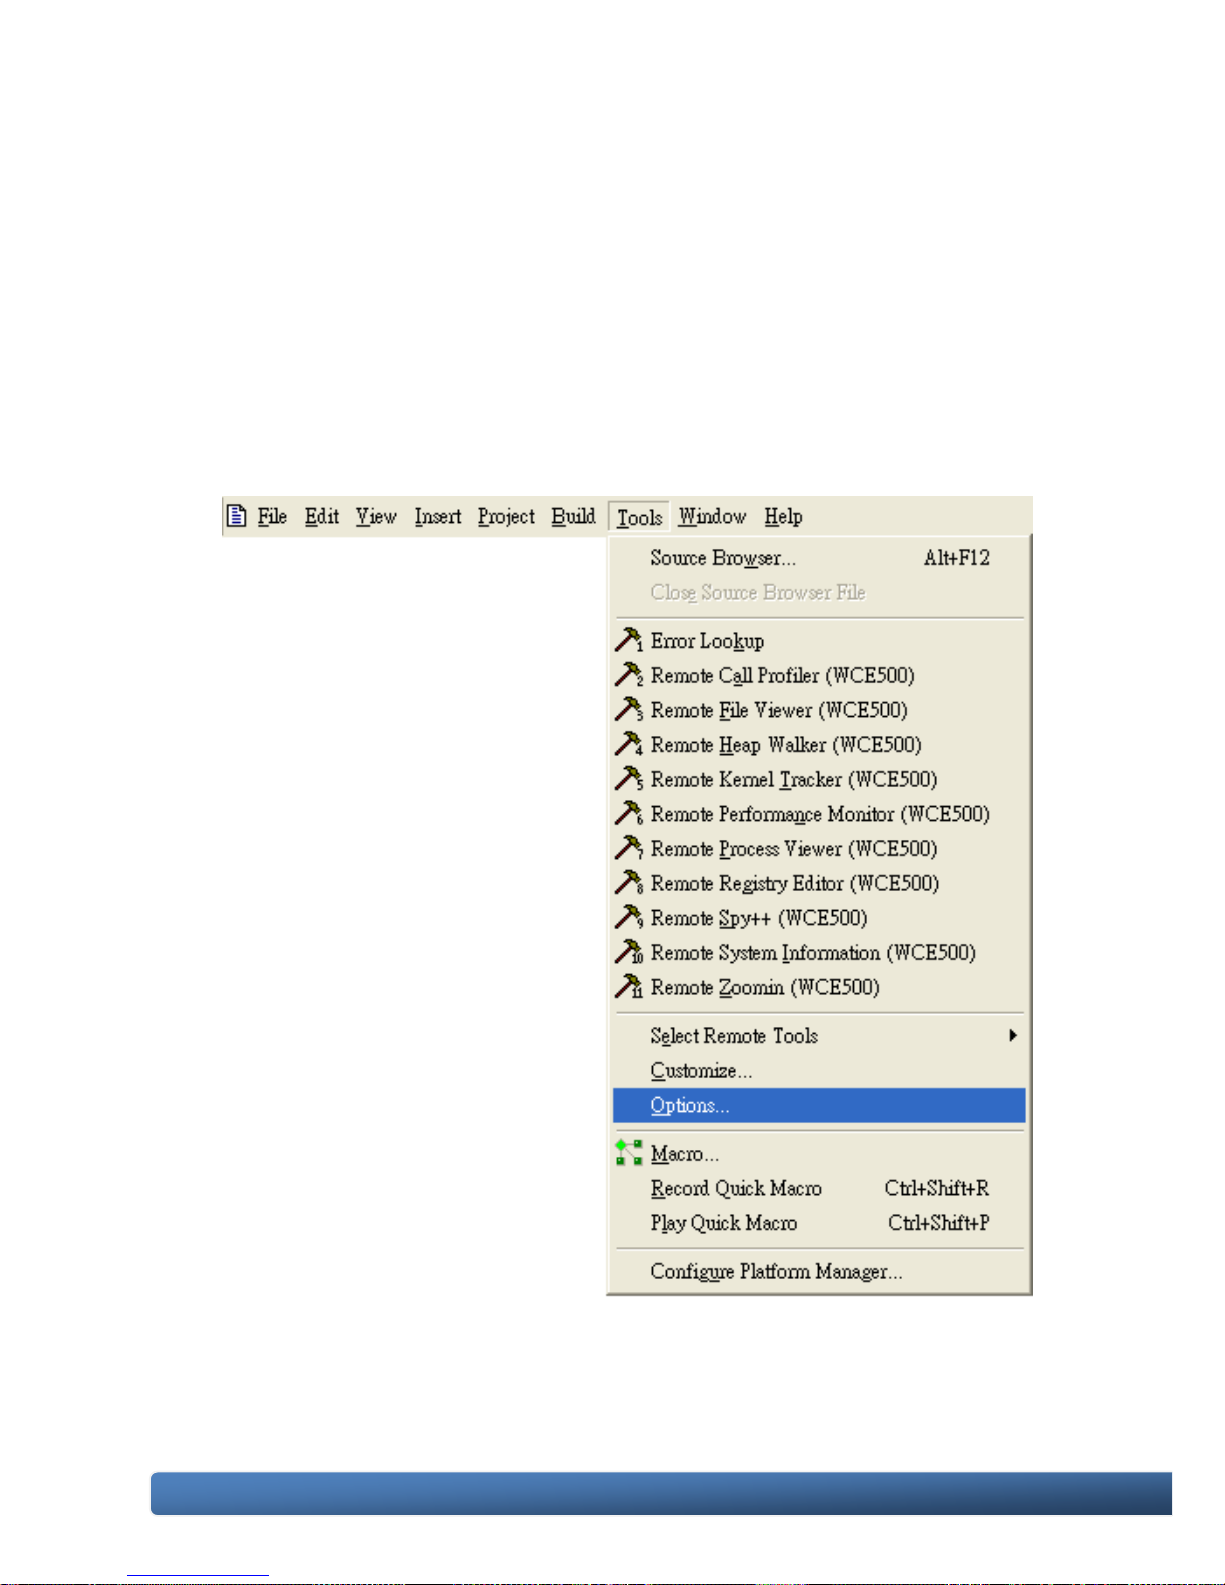
Step 1: On the Tools menu, and then click Options
The Options dialog box appears.
Page 85
WinPAC-5000 Series User Manual, Version 1.0.2 Page: 85
Copyright © 2010 ICP DAS Co., Ltd. All Rights Reserved. E-mail: [email protected]
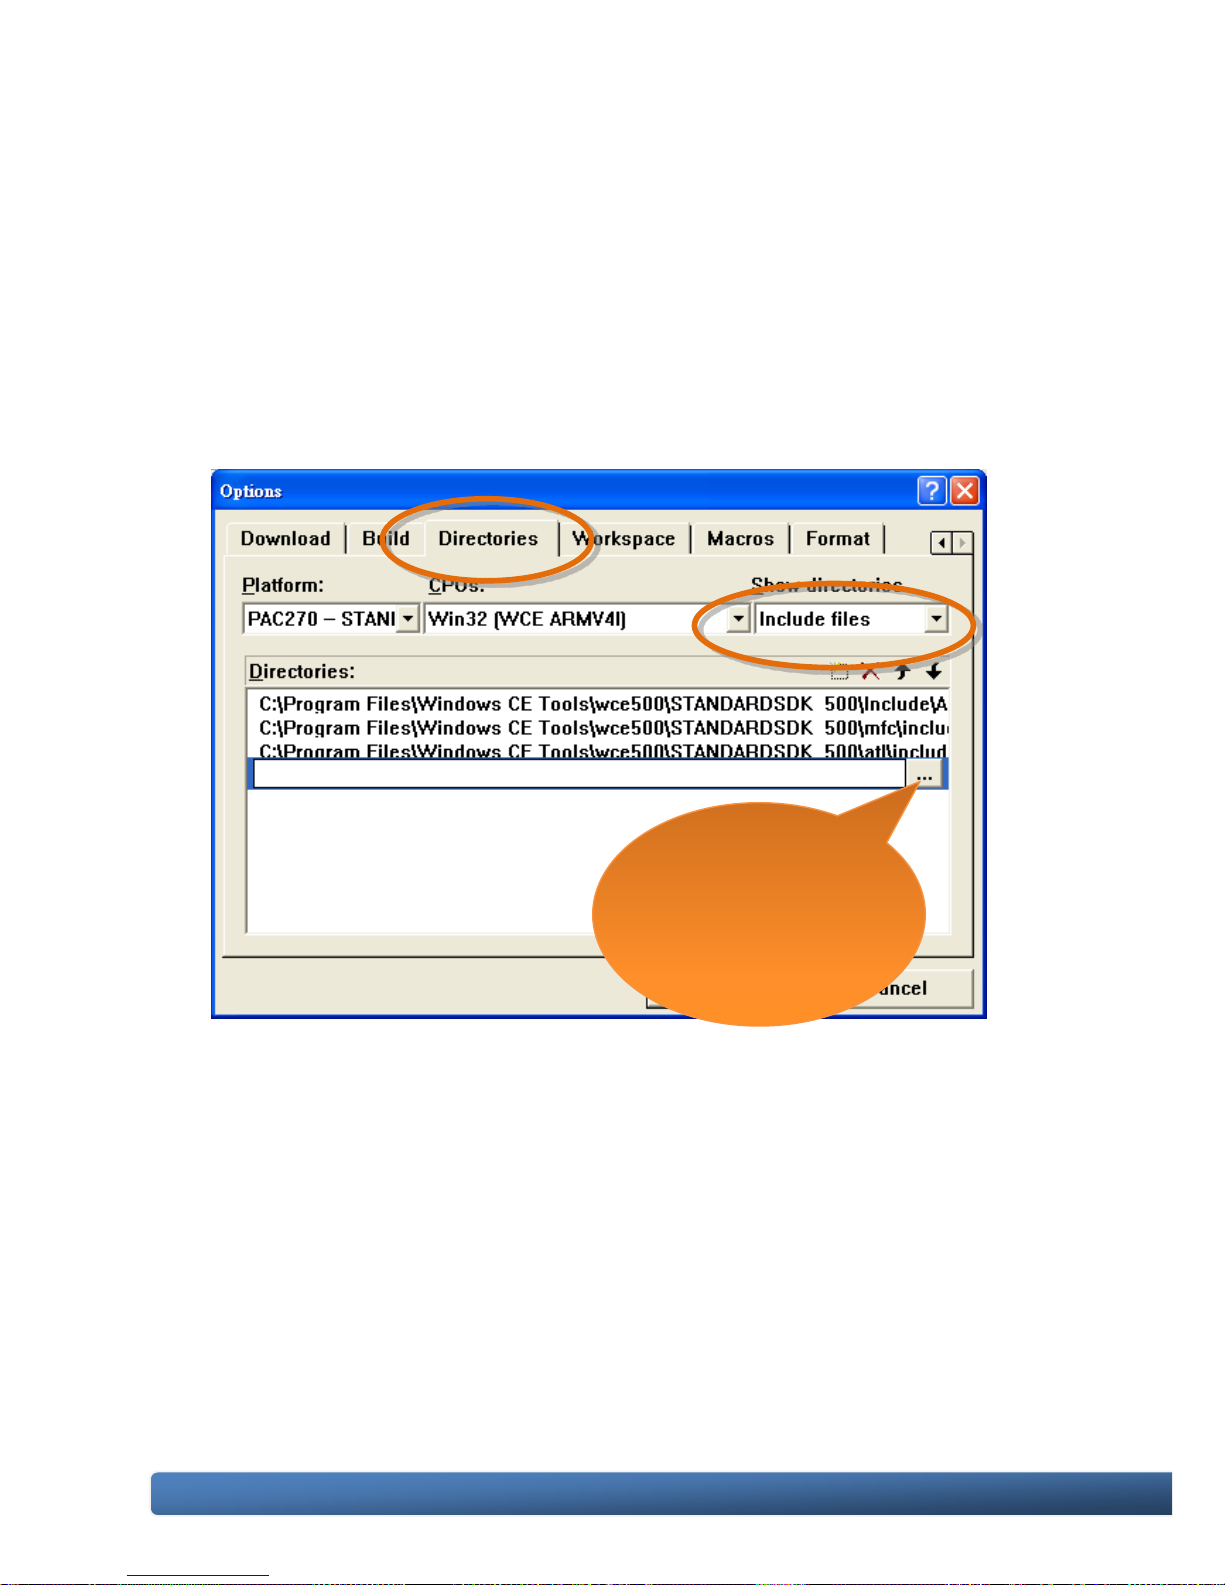
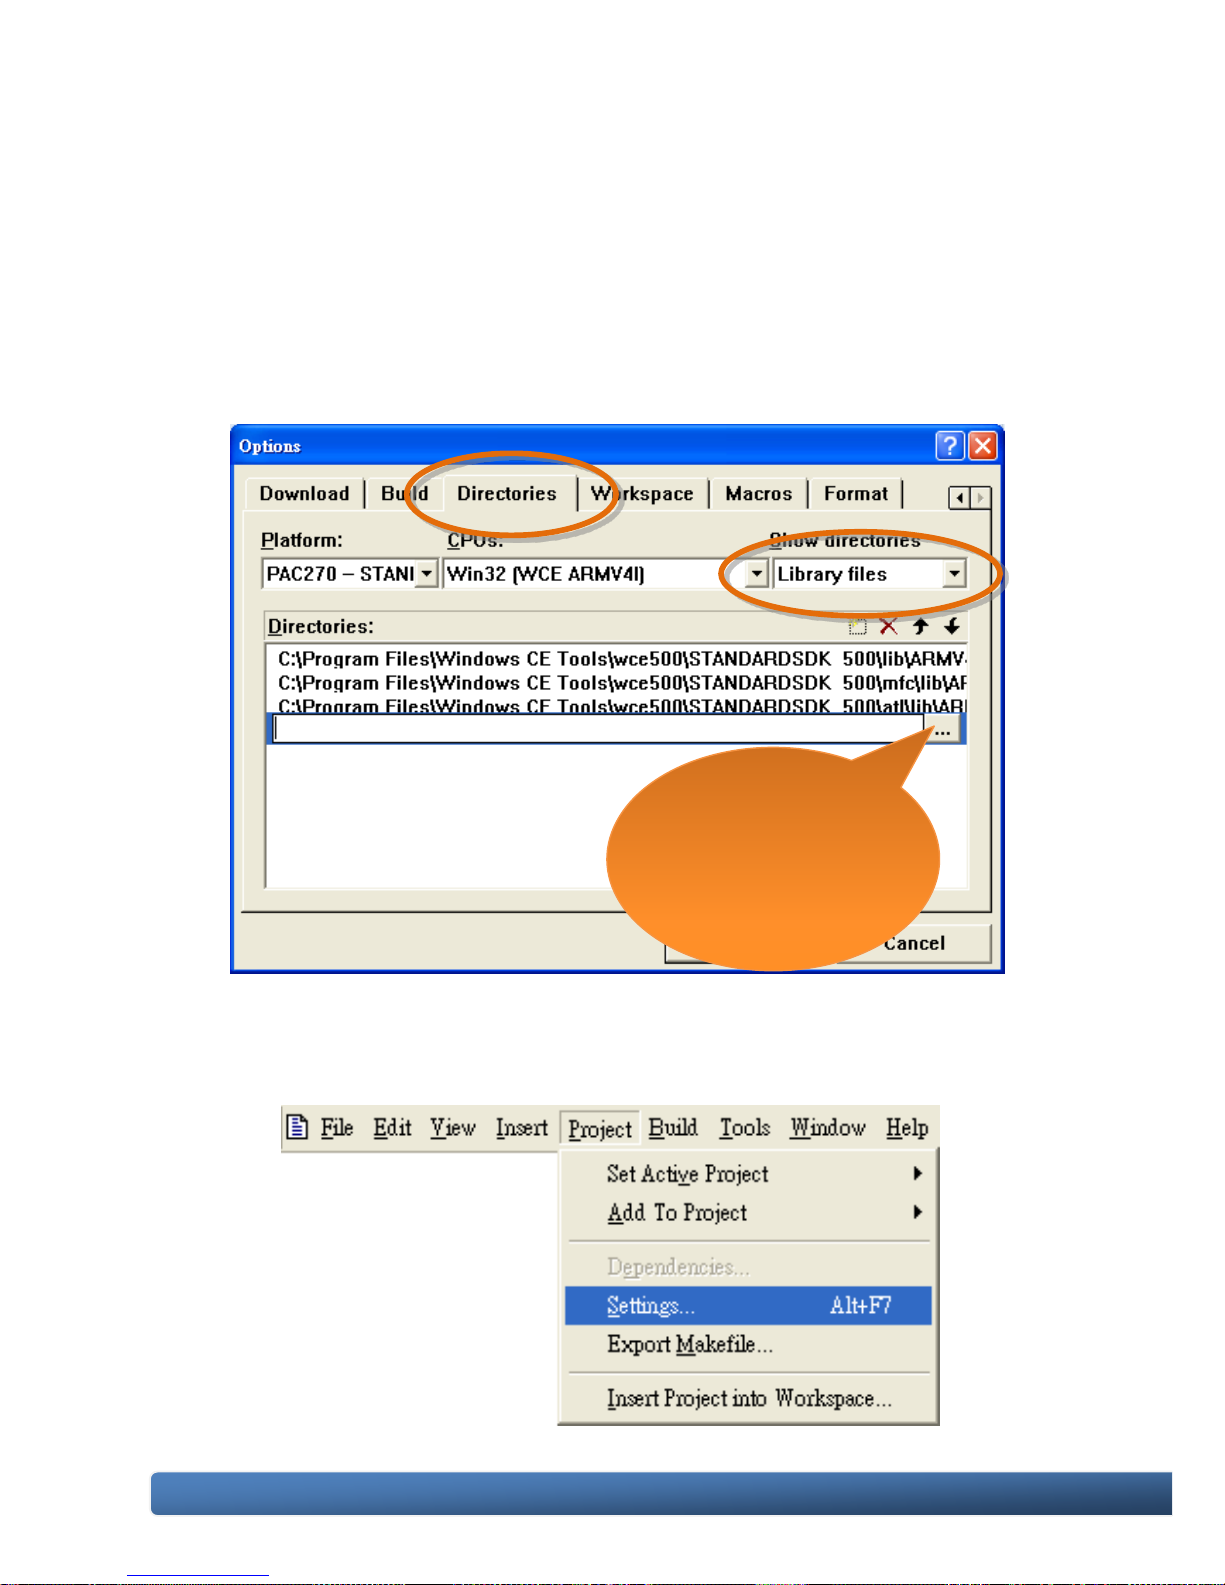
Step 2: On the Directories tab, in the Show directories for list, select Include
files
Step 3: Under Directories, type the path of the heard file
The specified include path of the header file is default located at:
C:\Program Files\Windows CE
Tools\wce500\PAC270\Icpdas\Include\ARMV4I\inPacNet.dll
Click this button
to specify the
path of the
header file
Page 86
WinPAC-5000 Series User Manual, Version 1.0.2 Page: 86
Copyright © 2010 ICP DAS Co., Ltd. All Rights Reserved. E-mail: [email protected]
Step 4: In the Show directories for list, select Library files
Step 5: Under Directories, type the path of the heard file
The specified include path of the header file is default located at:
C:\Program Files\Windows CE
Tools\wce500\PAC270\Icpdas\Include\ARMV4I\inPacNet.dll
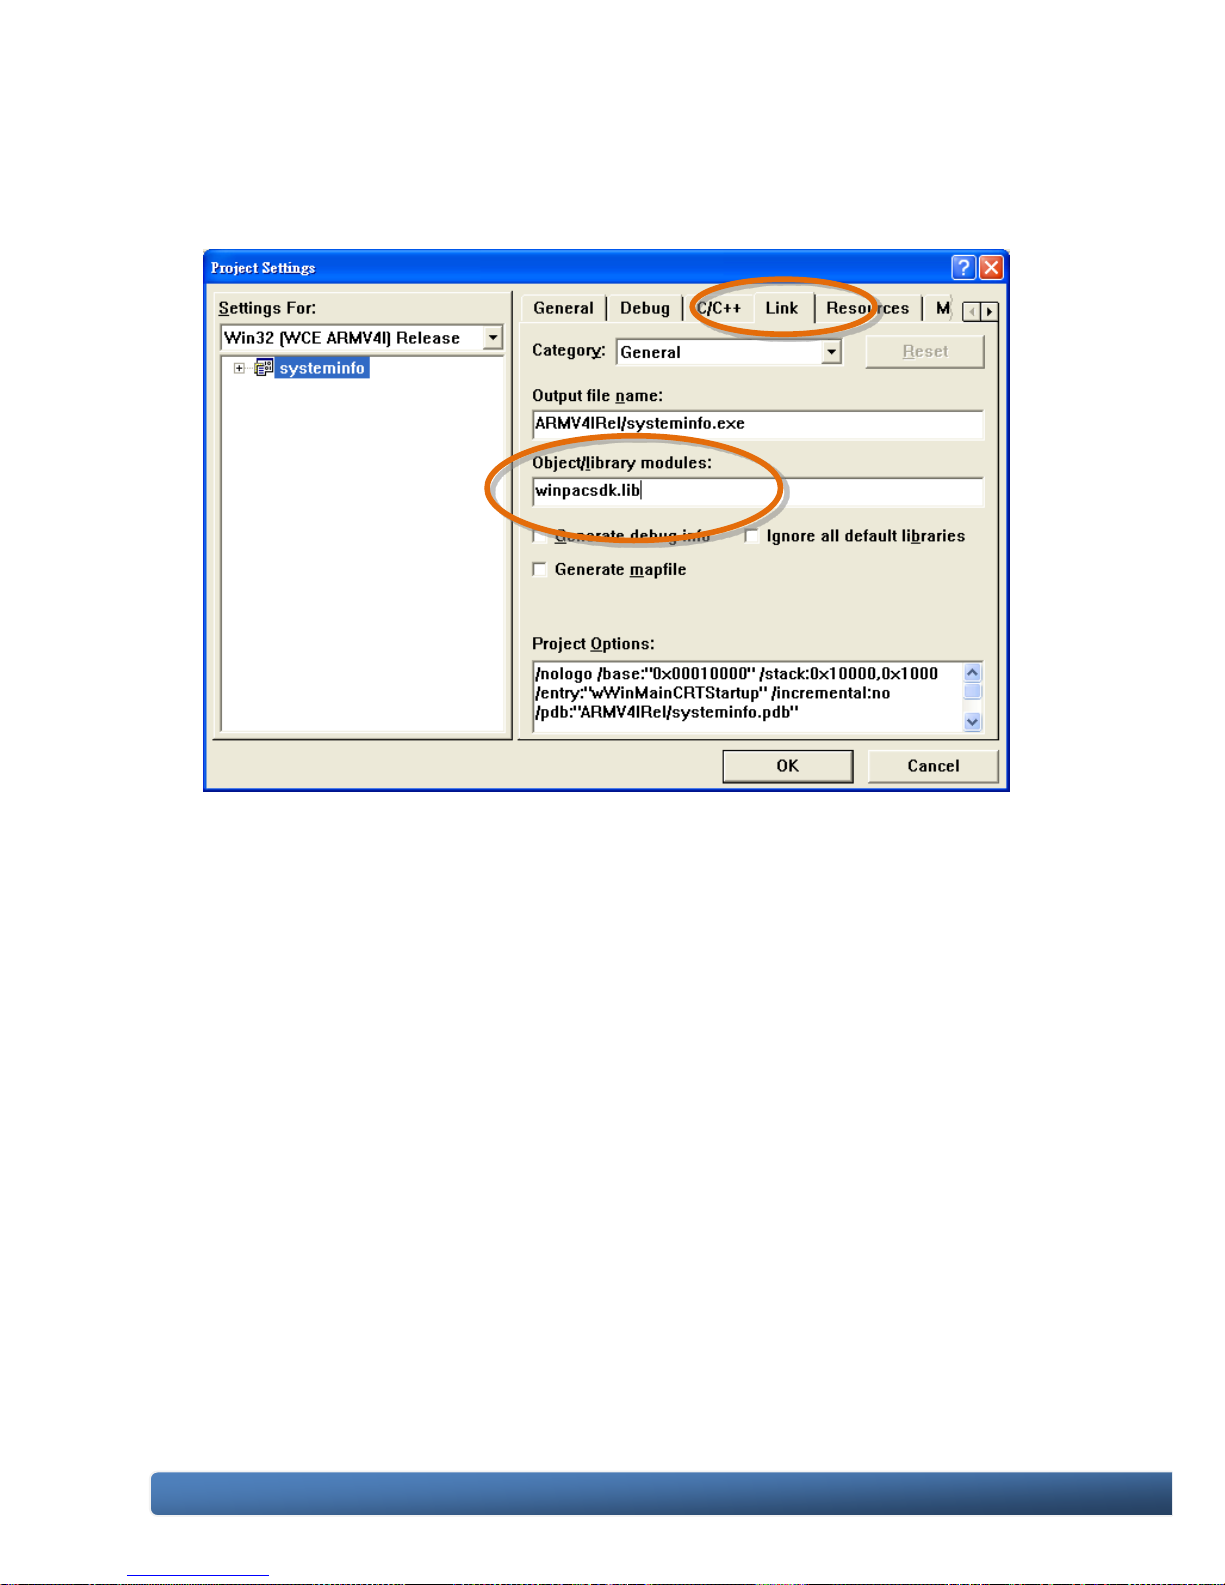
Step 6: On the Project menu, and then click Settings
The Project Settings dialog box appears.
Click this button
to specify the
path of the
Library files
Page 87
WinPAC-5000 Series User Manual, Version 1.0.2 Page: 87
Copyright © 2010 ICP DAS Co., Ltd. All Rights Reserved. E-mail: [email protected]
Step 7: On the Link tab, type the winpacsdk.lib in the Object/library
module field, and then click OK
Page 88
WinPAC-5000 Series User Manual, Version 1.0.2 Page: 88
Copyright © 2010 ICP DAS Co., Ltd. All Rights Reserved. E-mail: [email protected]
4.5.4. Adding the Control to the Form
You can drag various controls from the Toolbox onto the form. These controls are not
really "live"; they are just images that are convenient to move around on the form
into a precise location.
After you add a control to your form, you can use the Properties function to set its
properties, such as background color and default text.
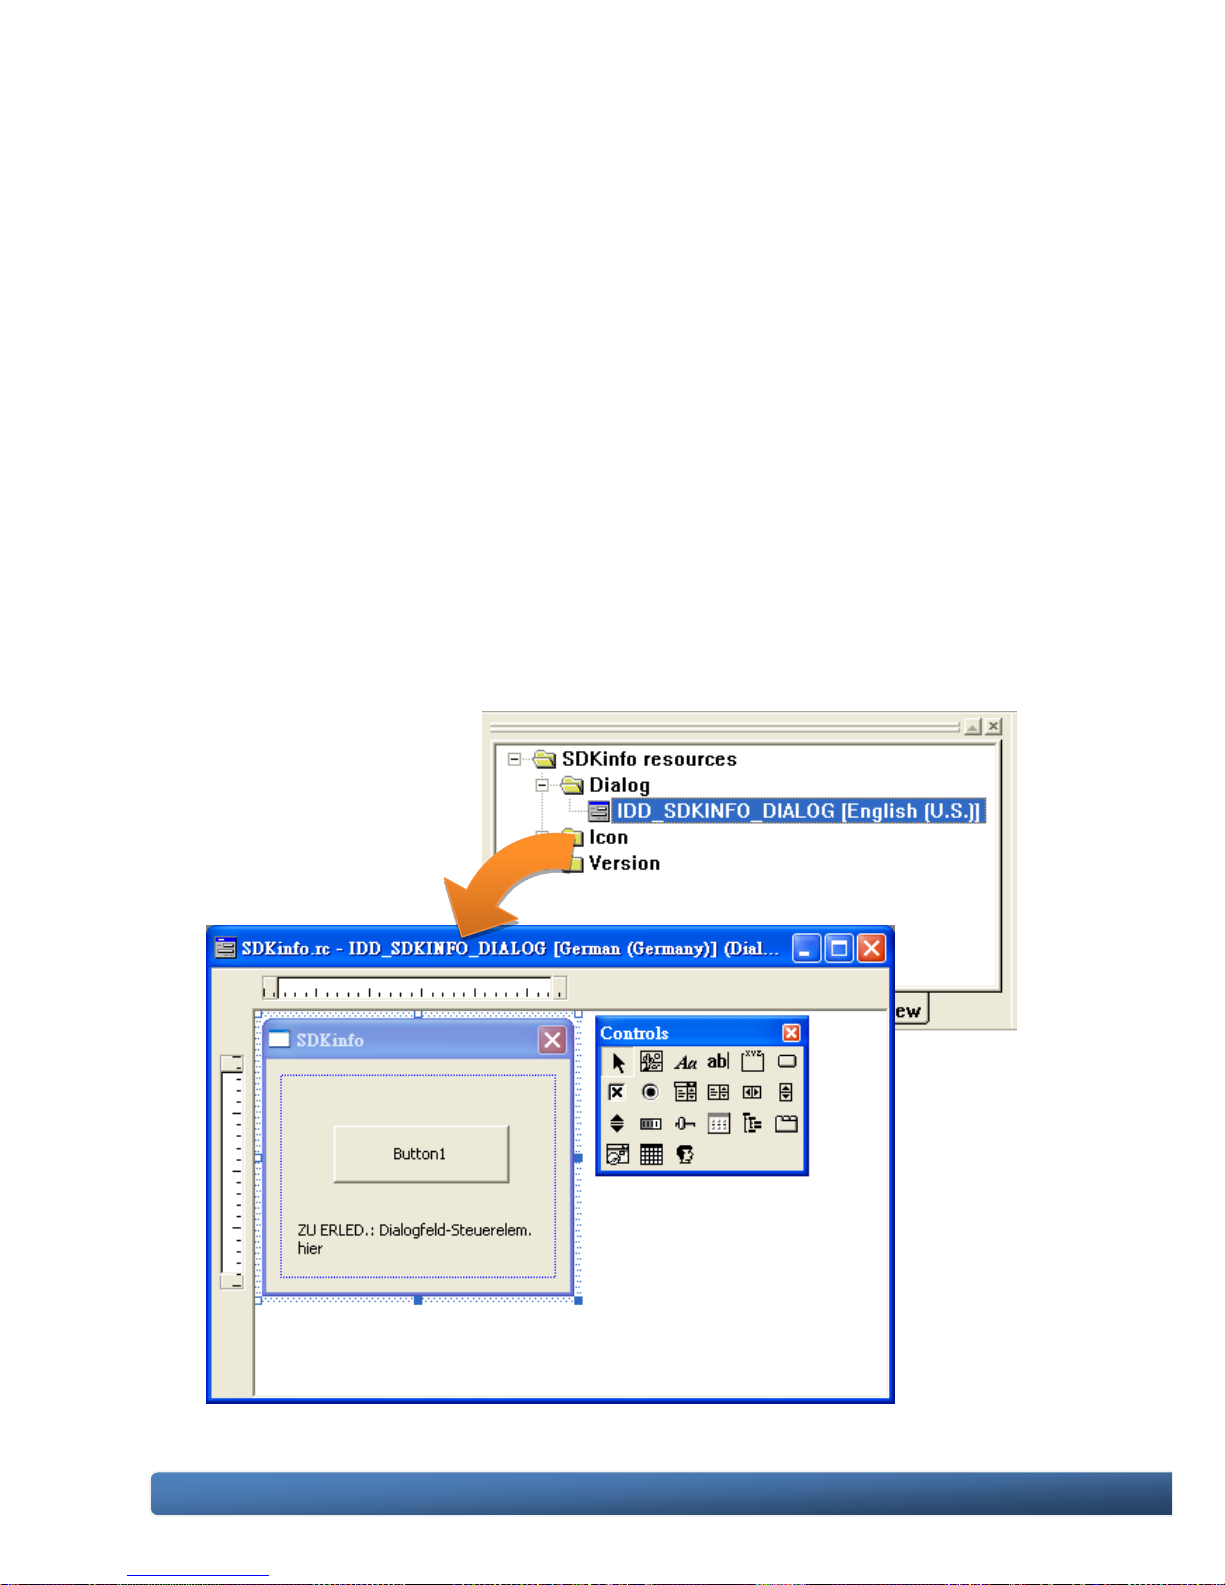
Step 1: Click ResourceView in the Project Workspace pane and expand the
resources tree by opening the top level folder
Step 2: Open the Dialog folder and then double-click the dialog resource
name IDD_SDKINFO_DIALOG
The resource editor appears in the right pane.
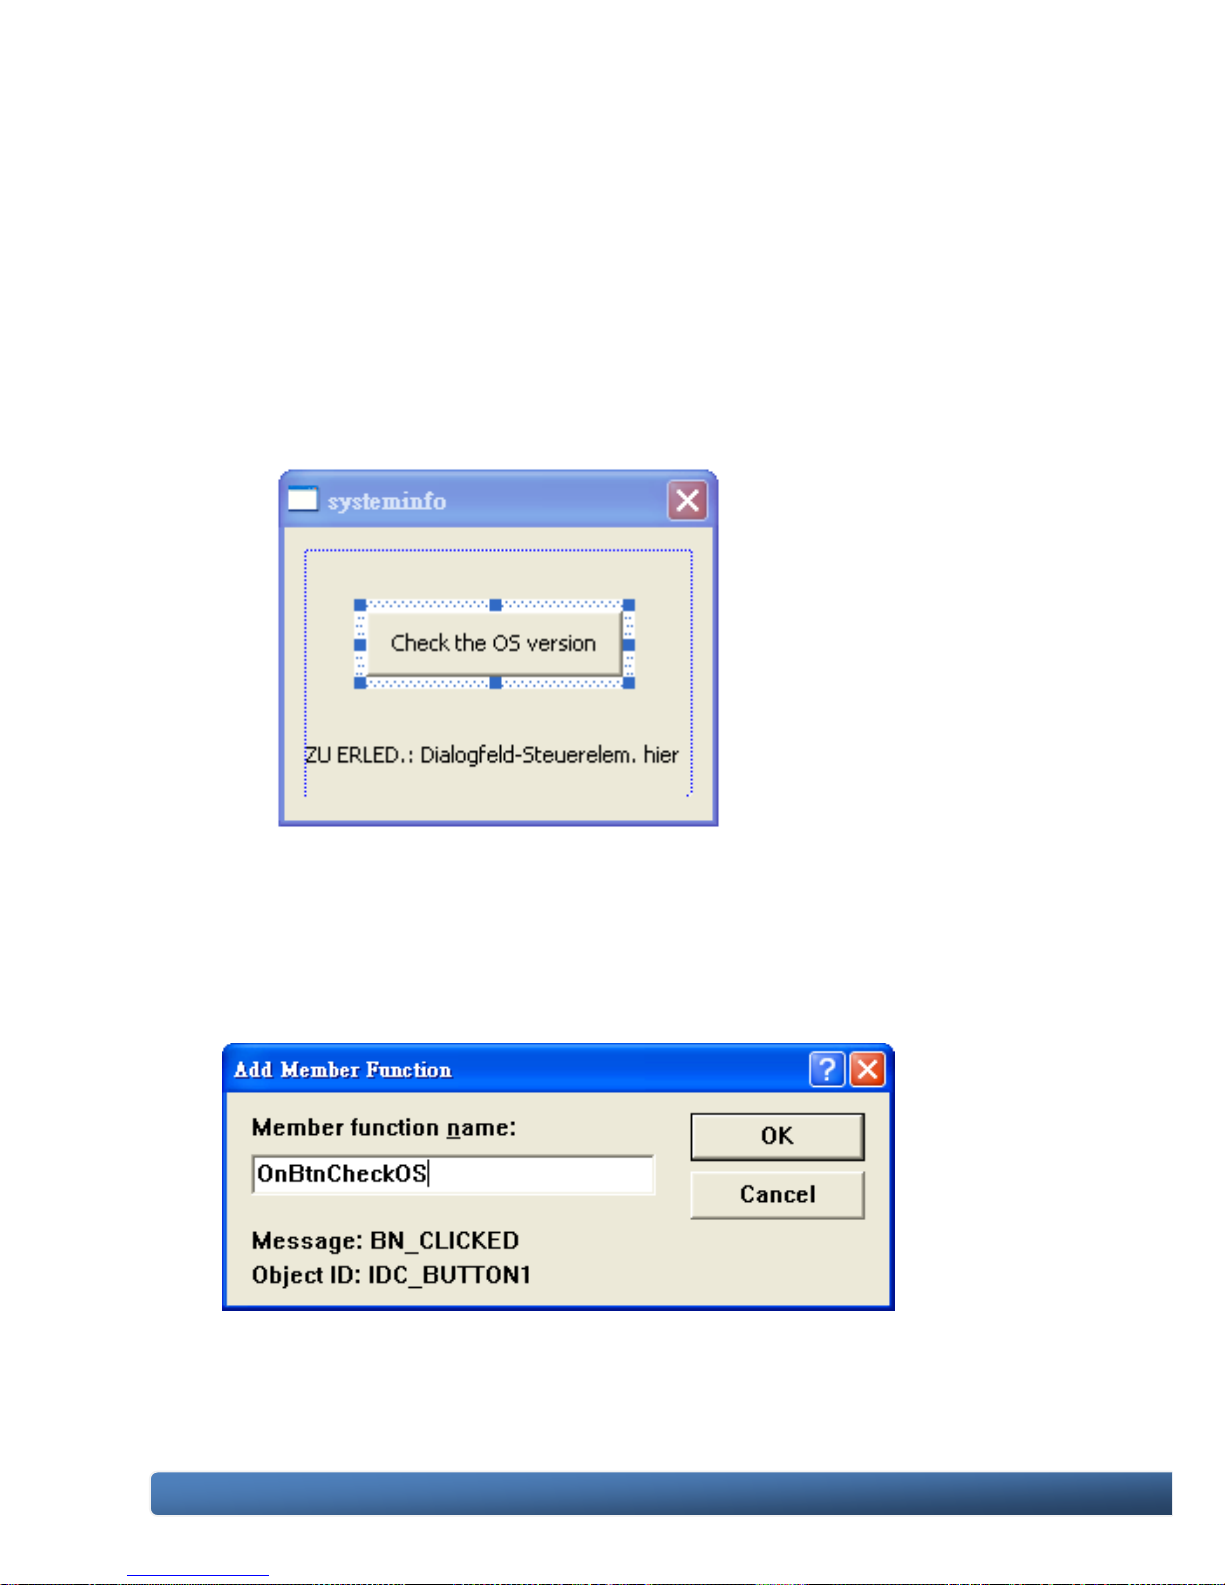
Step 3: From the
Toolbox, drag a
Button control
onto the form
Page 89
WinPAC-5000 Series User Manual, Version 1.0.2 Page: 89
Copyright © 2010 ICP DAS Co., Ltd. All Rights Reserved. E-mail: [email protected]
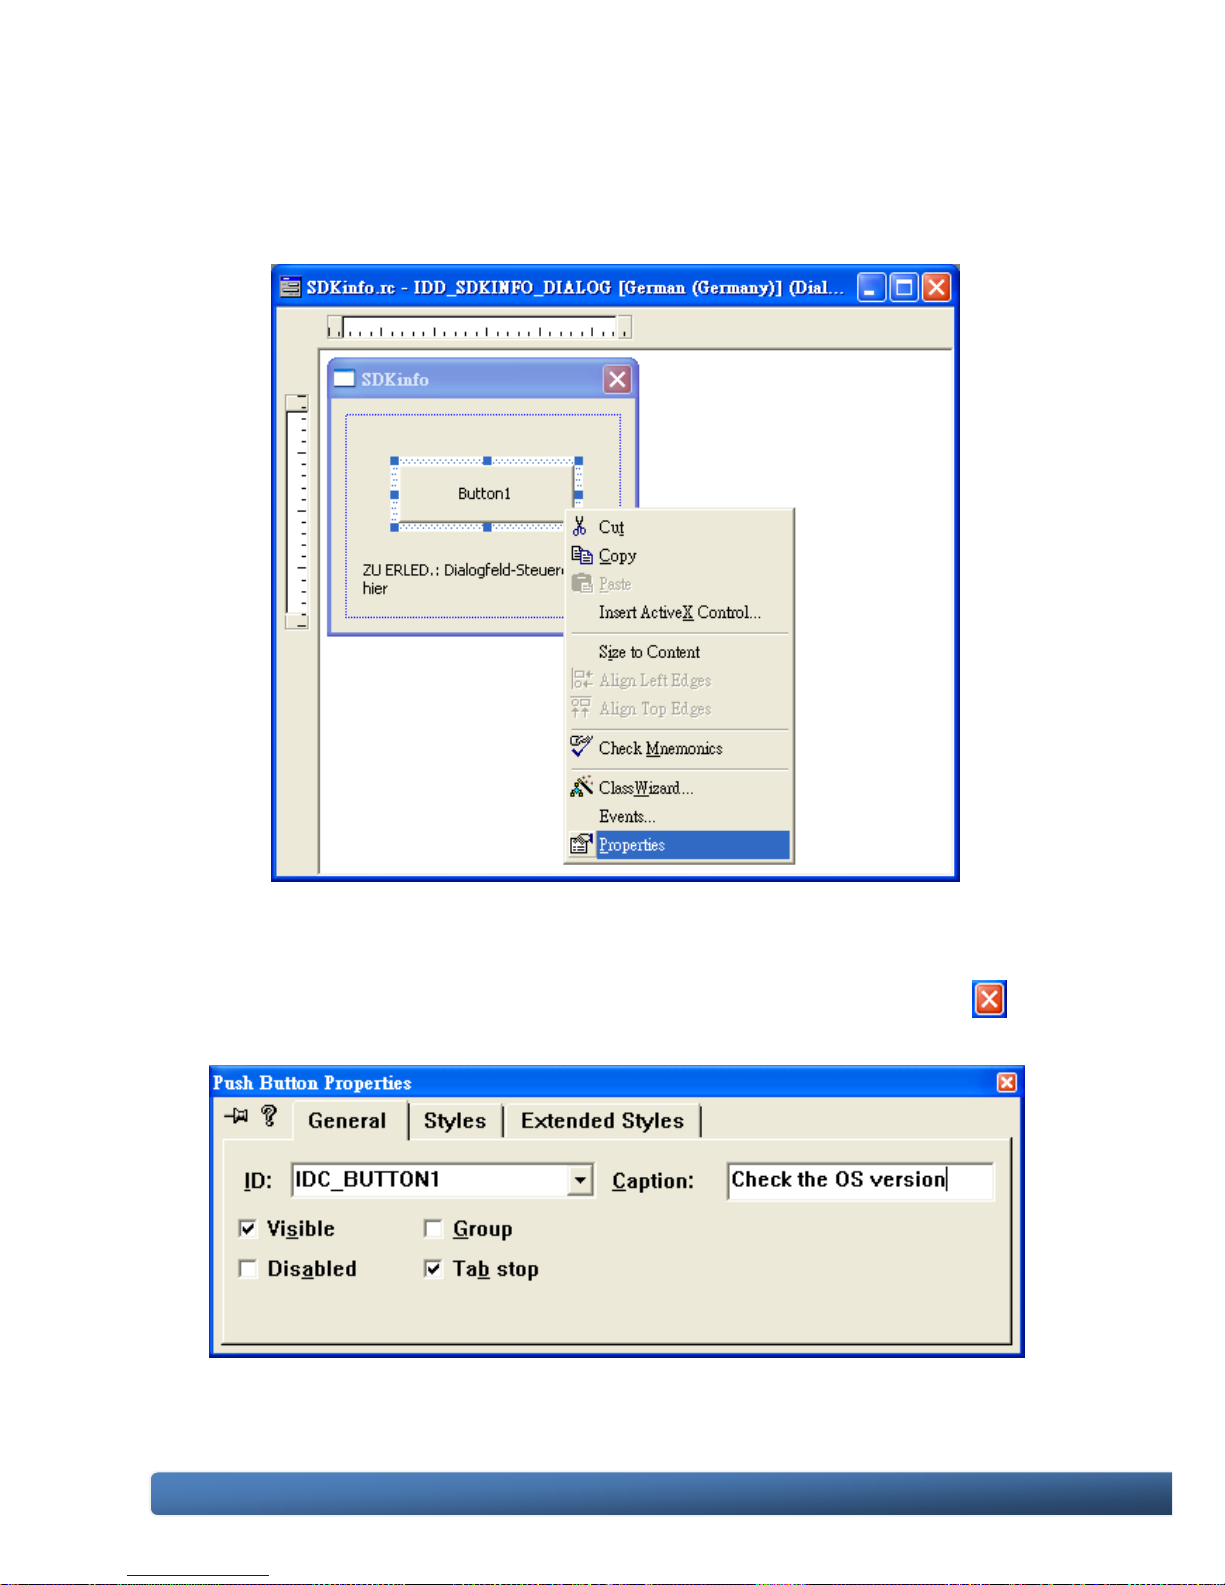
Step 4: Right-click the Button control, and then click Properties
The Push Button Properties dialog box appears.
Step 5: Type Check the OS version in the Captions field, and then click
Page 90
WinPAC-5000 Series User Manual, Version 1.0.2 Page: 90
Copyright © 2010 ICP DAS Co., Ltd. All Rights Reserved. E-mail: [email protected]
4.5.5. Adding the Event Handling to the Control
You have finished the design stage of your application and are at the point when you
can start adding some code to provide the program's functionality.
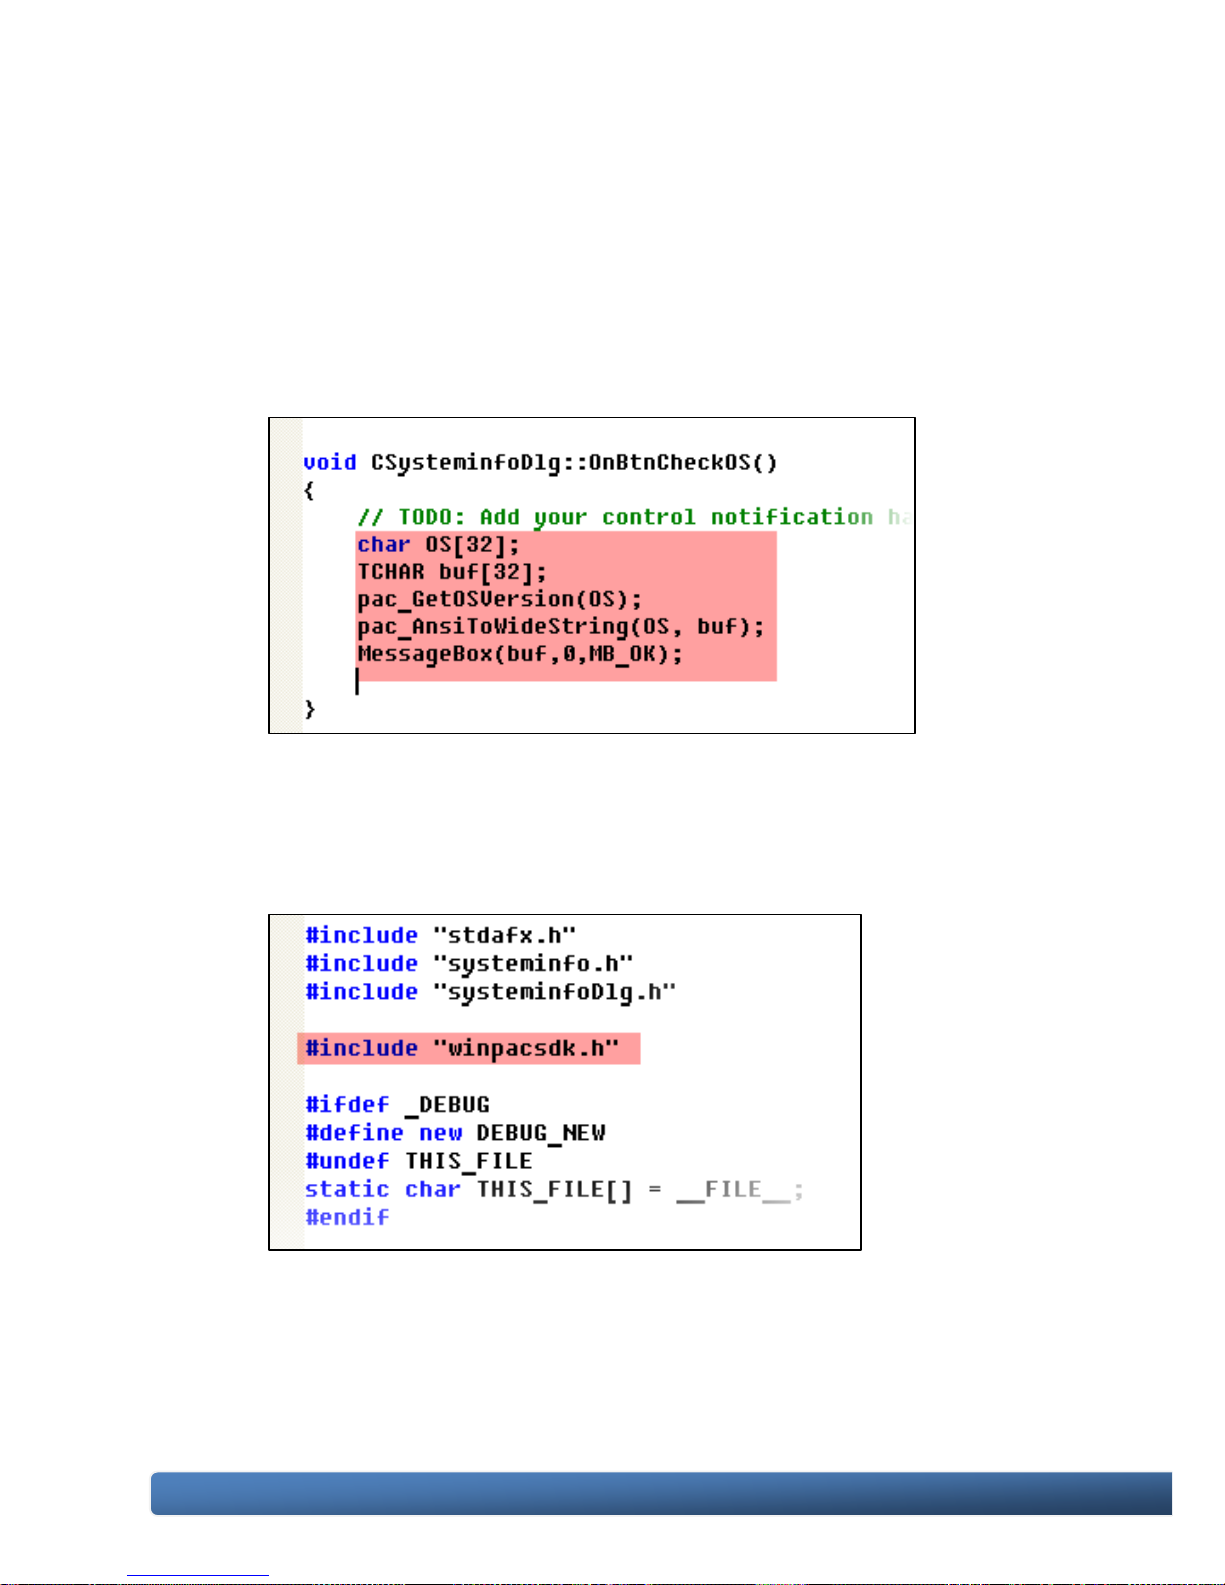
Step 1: Double-click the button on the form
The Add Member Function dialog box appears.
Step 2: Type the onBtnCheckOS in the Member function name field, and
then click OK
The Code Editor opens with the cursor positioned in the event handler.
Page 91
WinPAC-5000 Series User Manual, Version 1.0.2 Page: 91
Copyright © 2010 ICP DAS Co., Ltd. All Rights Reserved. E-mail: [email protected]
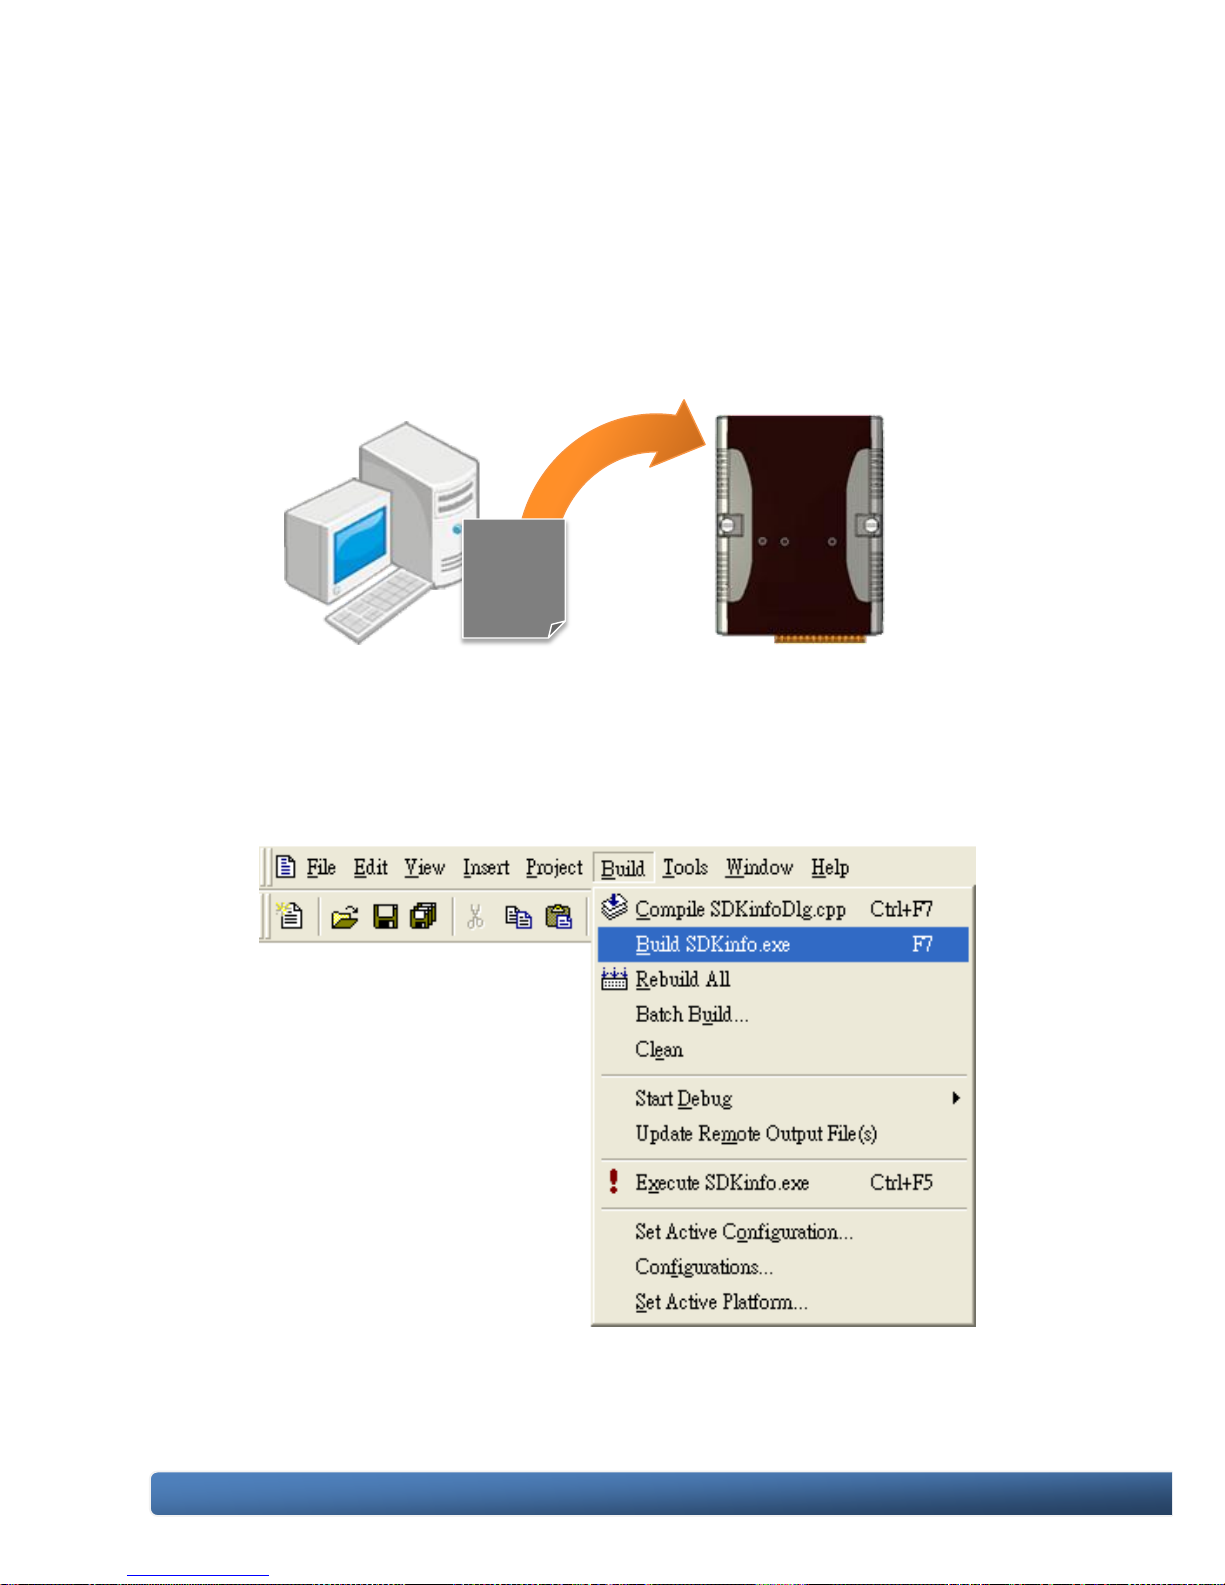
Step 3: Inserting the following code
char OS[32];
TCHAR buf[32];
pac_GetOSVersion(OS);
pac_AnsiToWideString(OS, buf);
MessageBox(buf,0,MB_OK);
Step 4: Inserting the following code into the header area
#include “winpacsdk.h”
Page 92
WinPAC-5000 Series User Manual, Version 1.0.2 Page: 92
Copyright © 2010 ICP DAS Co., Ltd. All Rights Reserved. E-mail: [email protected]
4.5.6. Upload the Application to WinPAC-5000
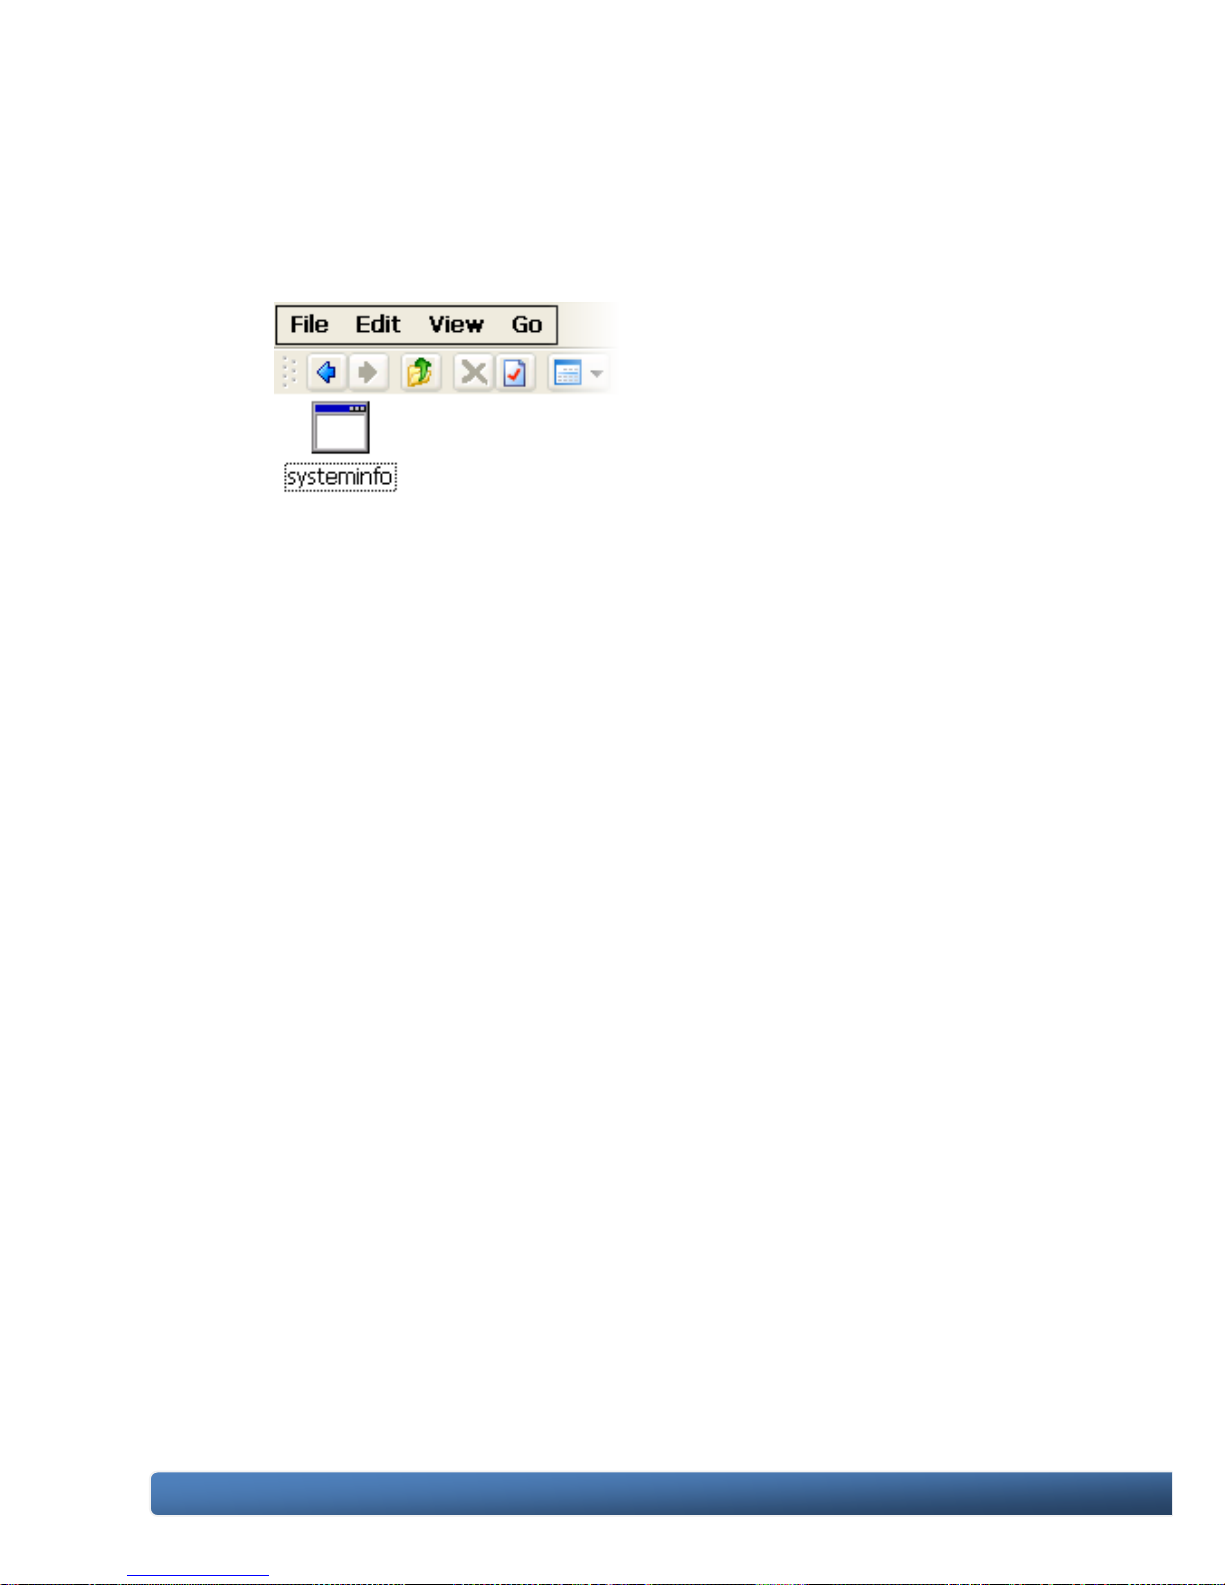
WinPAC-5000 provide FTP server service, you can upload files to WinPAC-5000 or
download files from a public FTP server.
Step 1: On the Build menu, click Build SDKinfo.exe
………
………
………
………
Page 93
WinPAC-5000 Series User Manual, Version 1.0.2 Page: 93
Copyright © 2010 ICP DAS Co., Ltd. All Rights Reserved. E-mail: [email protected]
Step 2: Open the browser and type the IP address of WinPAC-5000
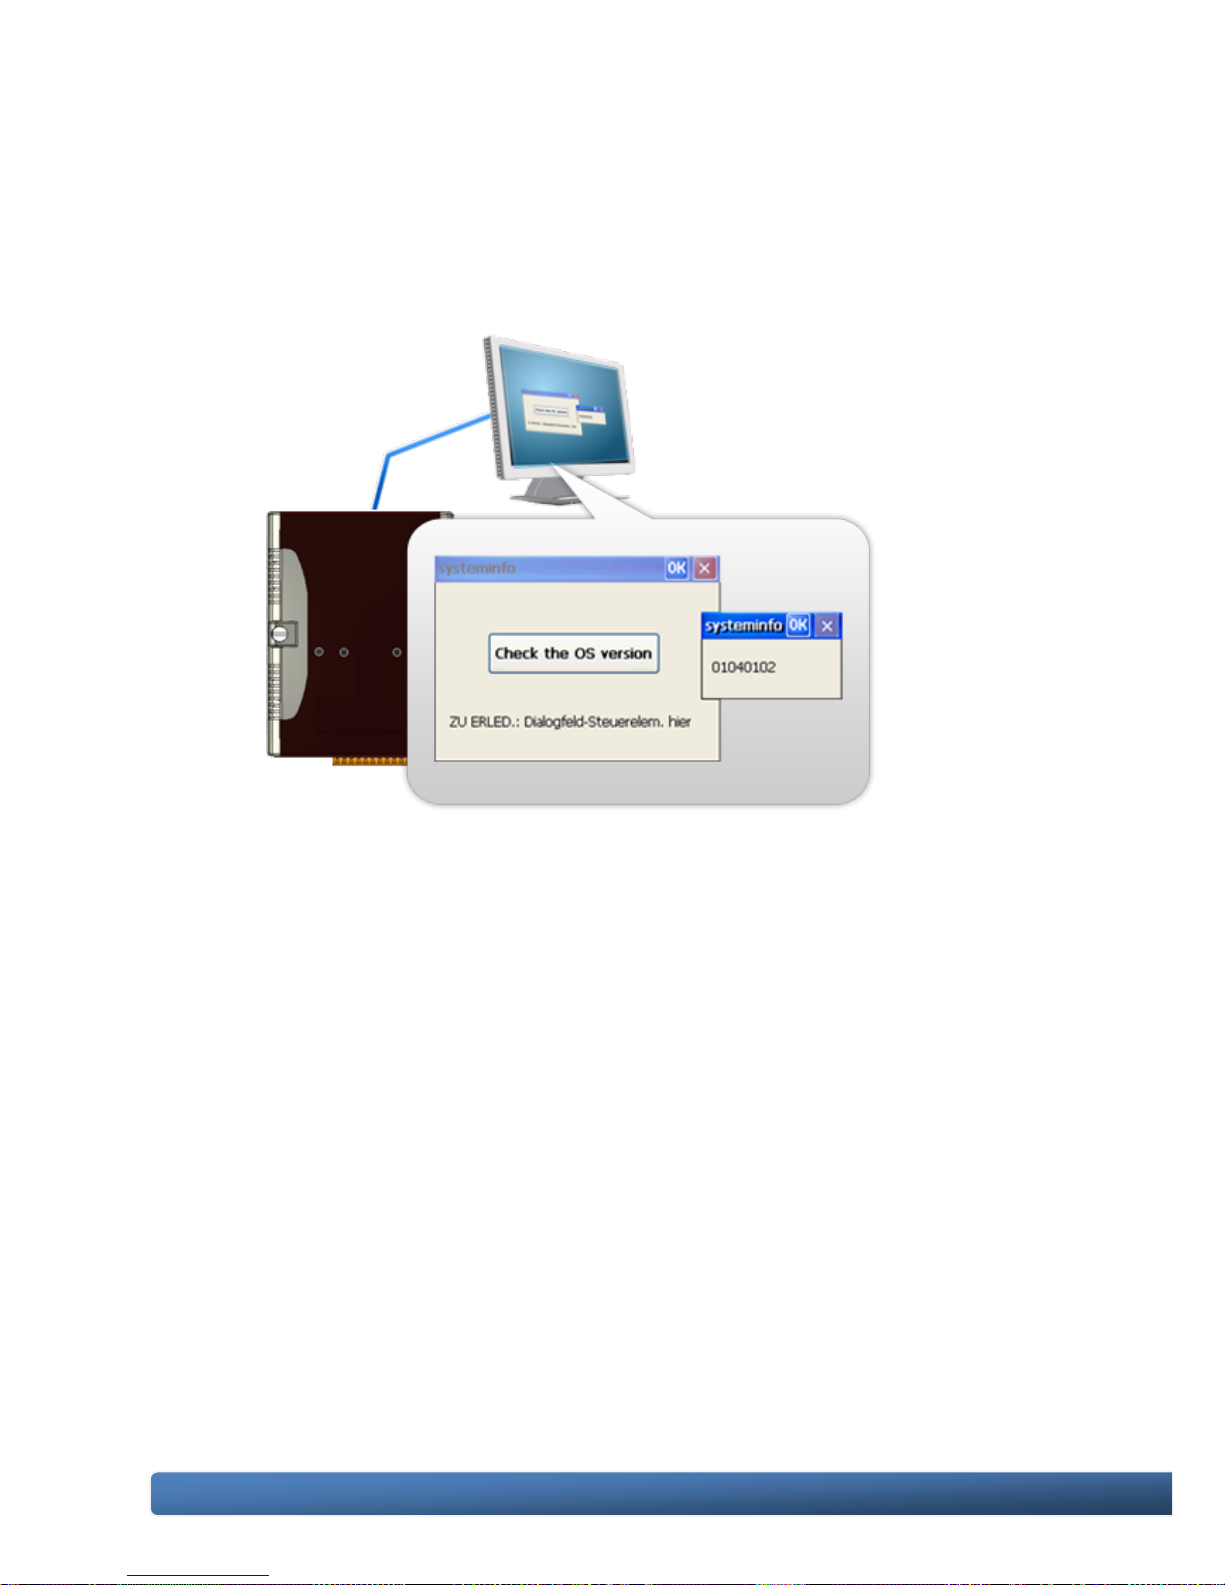
Step 3: Upload the systeminfo.exe application
Page 94
WinPAC-5000 Series User Manual, Version 1.0.2 Page: 94
Copyright © 2010 ICP DAS Co., Ltd. All Rights Reserved. E-mail: [email protected]
4.5.7. Executing the Application on WinPAC-5000
After uploading the application to WinPAC-5000,en you can just double-click it on
WinPAC-5000 to execute it.
Page 95

WinPAC-5000 Series User Manual, Version 1.0.2 Page: 95
Copyright © 2010 ICP DAS Co., Ltd. All Rights Reserved. E-mail: [email protected]
5. APIs and Demo Programs
There are several APIs and demo programs that have been designed for
WinPAC-5000. You can examine the APIs and demo source code, which includes
numerous functions and comments, to familiarize yourself with WinPAC-5000 APIs
and quickly develop your own applications quickly by modifying these demo
programs.
Page 96
WinPAC-5000 Series User Manual, Version 1.0.2 Page: 96
Copyright © 2010 ICP DAS Co., Ltd. All Rights Reserved. E-mail: [email protected]
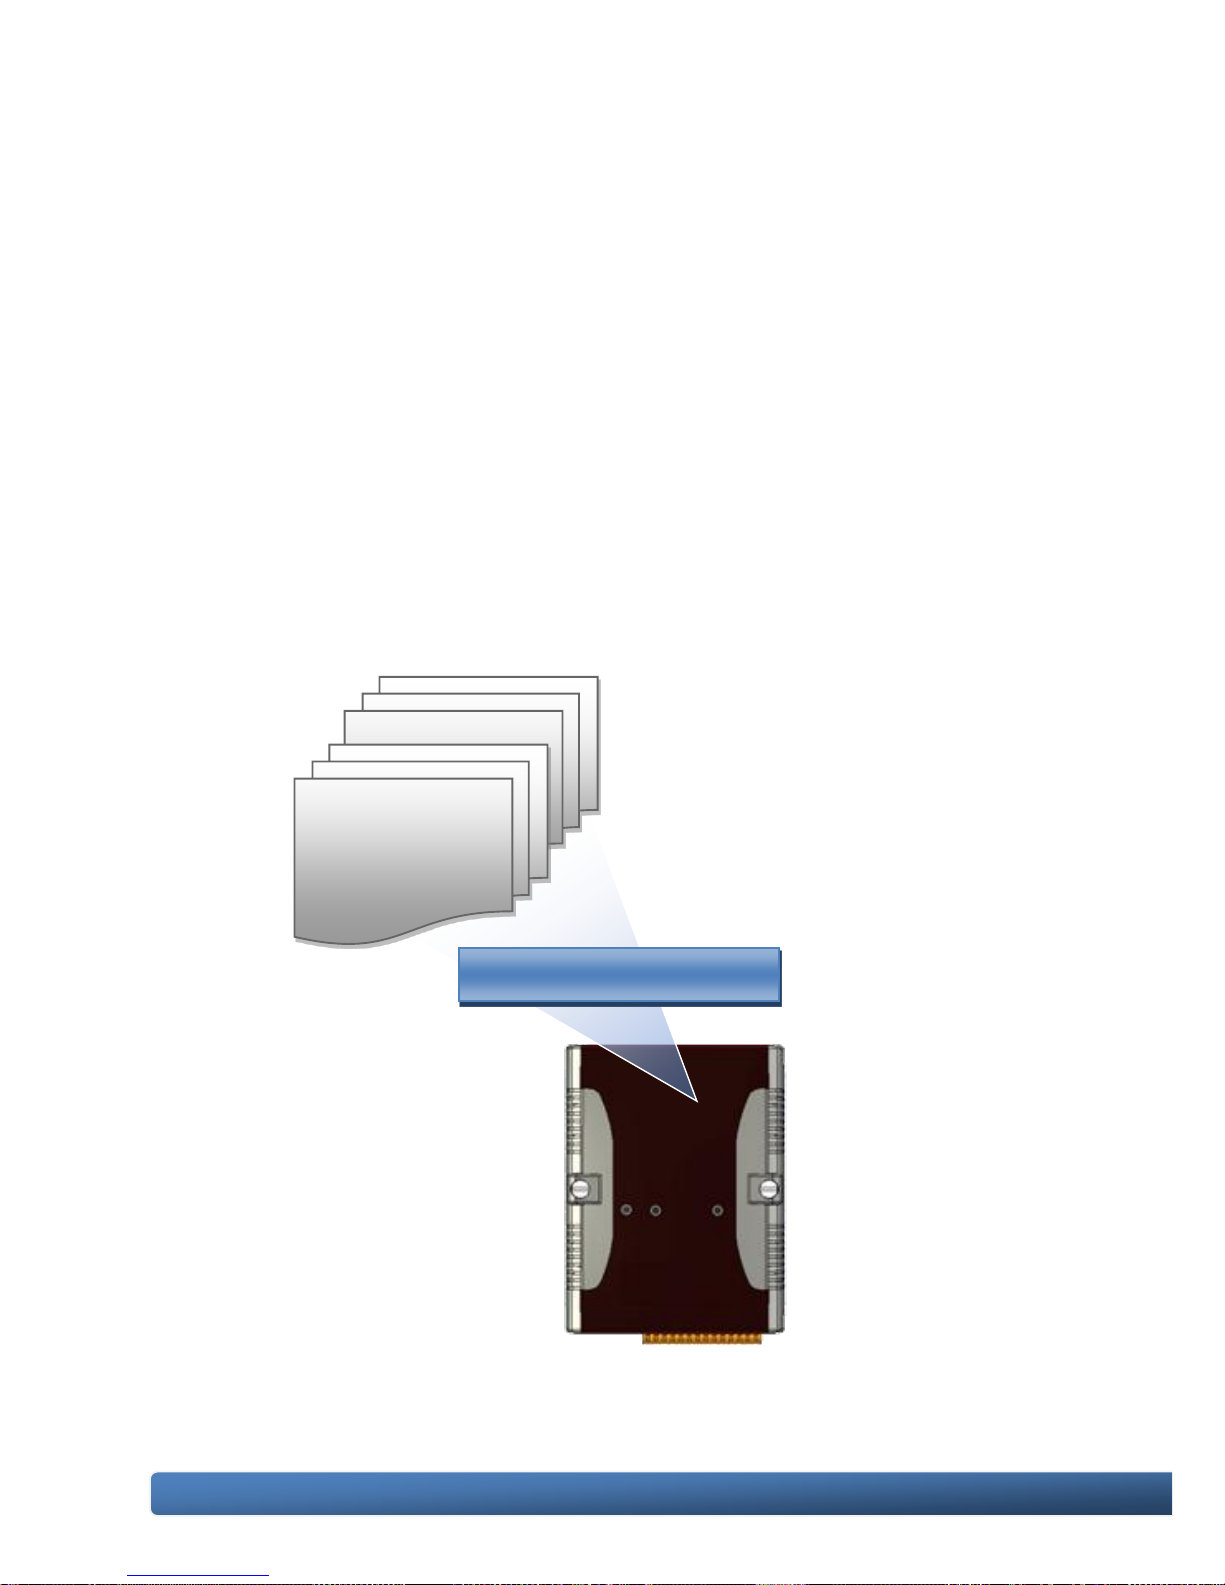
5.1. Demo Programs with C#
The following C# demos have been designed to demonstrate the various features of
the WinPAC.
5.1.1. C# Demo Programs for WinPAC Standard API
The table below describes the WinPAC-5000 demos that have been designed to
demonstrate the standard operation features of the WinPAC-5000.
System Operation
System Information
Interrupt
Memory Access
Watchdog
UART
Registry
Micro SD
Page 97

WinPAC-5000 Series User Manual, Version 1.0.2 Page: 97
Copyright © 2010 ICP DAS Co., Ltd. All Rights Reserved. E-mail: [email protected]
Folder
Demo
Explanation
system
systeminfo
Retrieves information about the OS
version, CPU version, SDK version,
etc.
memoryaccess
memory
Shows how to read/write date
values from/to EEPROM
battery_backup_sram
Shows how to read or write to the
battery backup
watchdog
watchdog
Displays how the watchdog operate
microsd
microsd_management
Shows how to enables/disables
Micro SD
registry
registry
Shows how to read/write date
values from/to registry
uart
diag
Shows how to read the name of
local I/O modules via UART
For C# application, these demo programs can be obtained from:
CD:\Napdos\wp-5000_ce50\Demo\WinPAC\DotNET\C#.NET\Standard\
ftp://ftp.icpdas.com/pub/cd/winpac/napdos/wp-5000_ce50/demo/winpac/dotnet/c%2
3.net/standard/
Page 98
WinPAC-5000 Series User Manual, Version 1.0.2 Page: 98
Copyright © 2010 ICP DAS Co., Ltd. All Rights Reserved. E-mail: [email protected]
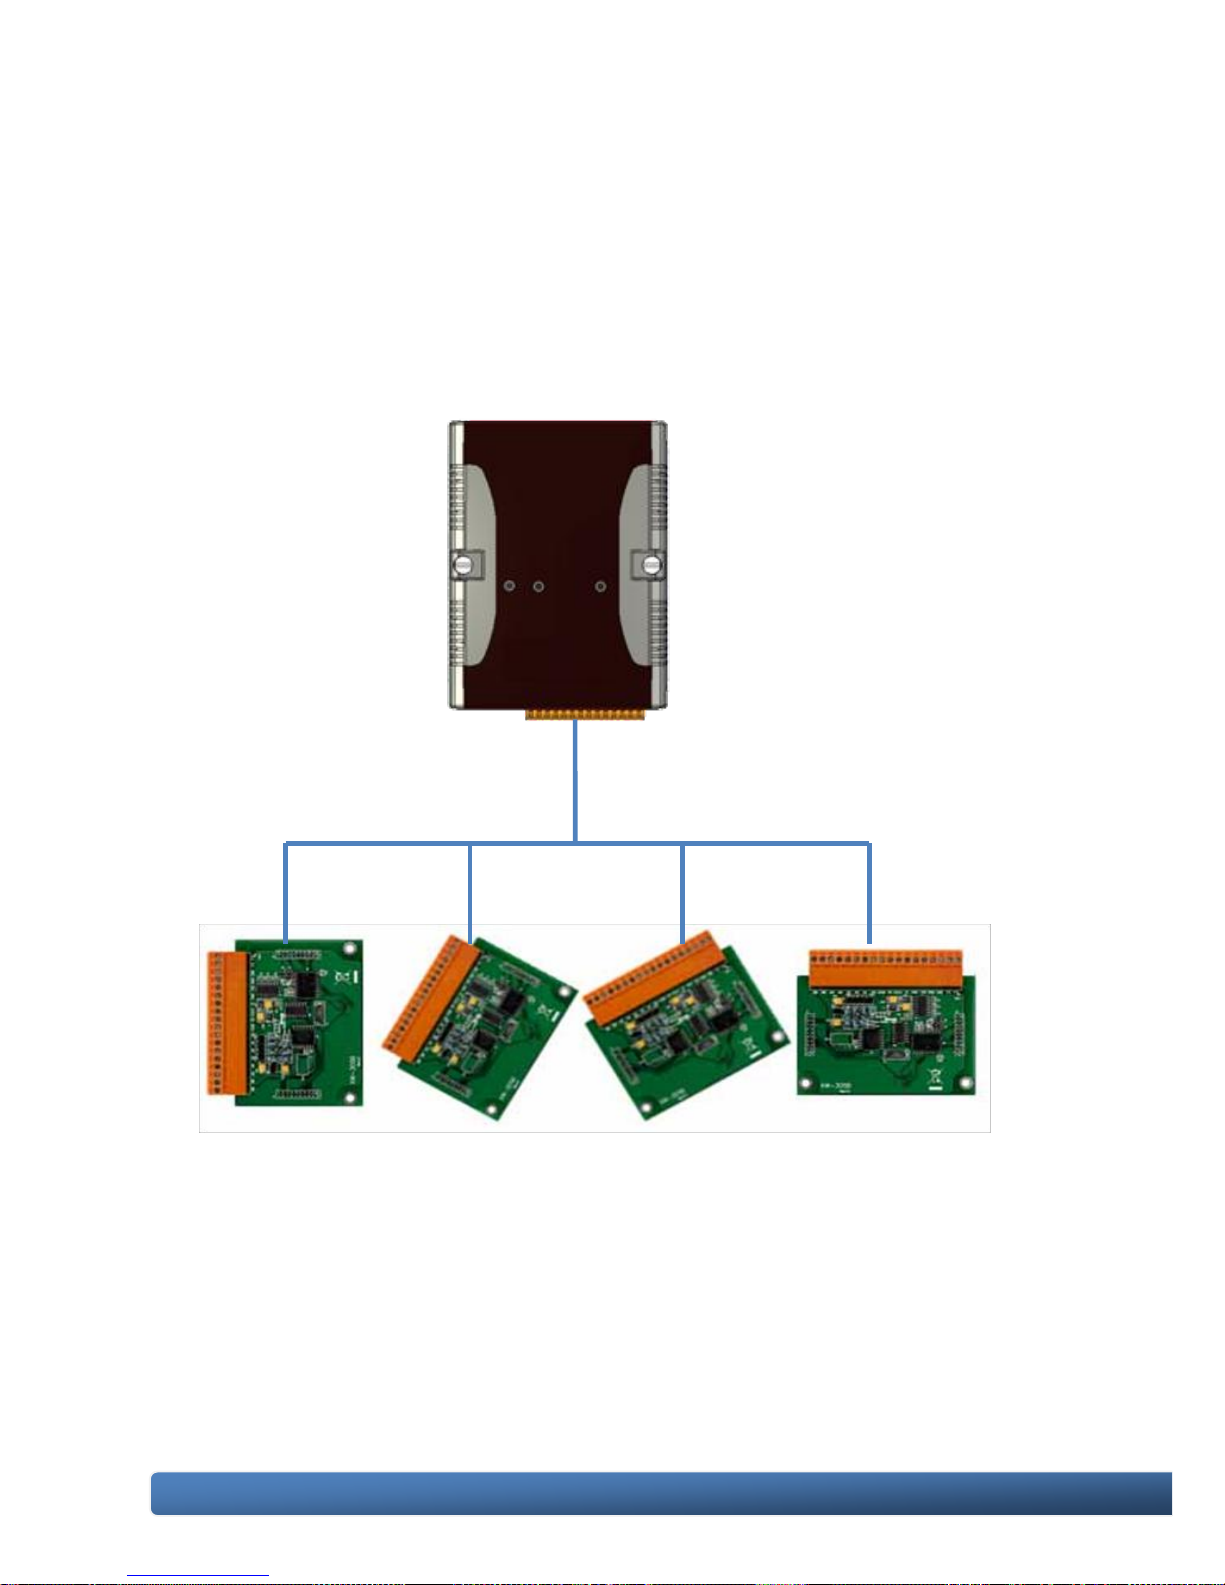
5.1.2. C# Demo Programs for PAC I/O API
The table below describes the WinPAC-5000 demos that have been designed to
demonstrate the expansion I/O module features of the WinPAC-5000.
Page 99

WinPAC-5000 Series User Manual, Version 1.0.2 Page: 99
Copyright © 2010 ICP DAS Co., Ltd. All Rights Reserved. E-mail: [email protected]
Folder
Demo
Explanation
GPIO
GPIO
Shows how to connect and control
the XW-board series modules.
XW107
XW107_demo
XW506
XW506_demo
XW507
XW507_demo
XW509
XW509_demo
XW511i
XW511i_demo
For C# application, these demo programs can be obtained from:
CD:\Napdos\wp-5000_ce50\Demo\WinPAC\DotNET\C#.NET\PAC_IO\XWBoard\
ftp://ftp.icpdas.com/pub/cd/winpac/napdos/wp-5000_ce50/demo/winpac/dotnet/c%2
3.net/pac_io/xwboard/
Page 100
WinPAC-5000 Series User Manual, Version 1.0.2 Page: 100
Copyright © 2010 ICP DAS Co., Ltd. All Rights Reserved. E-mail: [email protected]
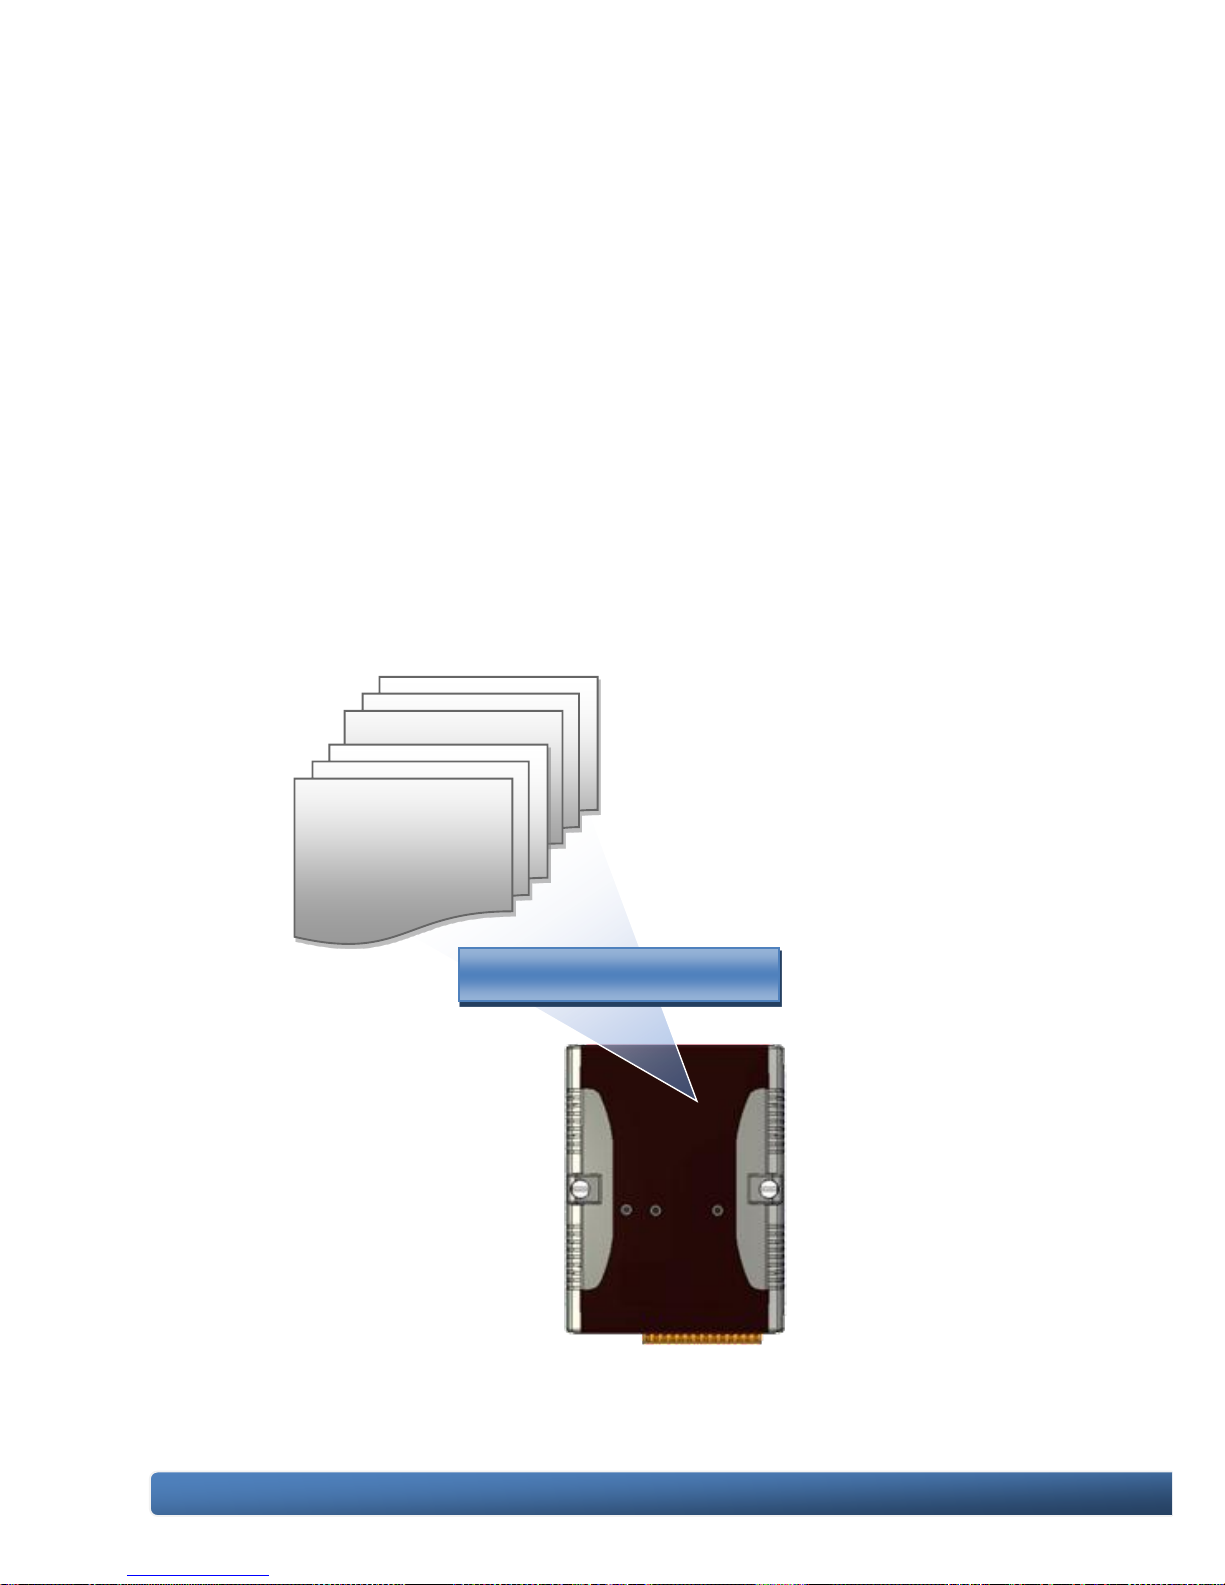
5.2. Demo Programs with eVC++
The following eVC++ demos have been designed to demonstrate the various
features of the WinPAC.
5.2.1. eVC++ Demo Programs for WinPAC Standard API
The table below describes the WinPAC-5000 demos that have been designed to
demonstrate the standard operation features of the WinPAC-5000.
System Operation
System Information
Interrupt
Memory Access
Watchdog
UART
Registry
Micro SD
 Loading...