

Page 1

1
Videum
Software
and
Hardware
Users Guide
Page 2

2
Table of contents
Videum 3
System Requirements 4
Hardware Installation 5
Software Installation 12
Multi Board 15
Videum Capture 16
Capturing an Audio, Video Clip, or Still Image 24
Adding Clips to Documents 26
Video Mail 28
Video Telephony 36
Time Lapse Video 30
Stop Motion for Animations 31
WebCam 32
Remote Video Control 34
Insignia 35
Videum Configure 36
Multimedia (capture panoramic images) 38
Security (face recognition and motion detection) 39
ActiveX Controls 40
Troubleshooting 41
Technical Specifications 45
© 1999 Winnov. All rights reserved.
Videum is a registered trademark of Winnov. VideumCam, Videum AV, Videum VO,
VideumCam Traveler, VideumCam Desktop, Videum Conference Pro, and Videum USB PC
Video Camera are trademarks of Winnov. Windows and Video for Windows are trademarks of
Microsoft Corporation. Pentium is a trademark of Intel Corporation. Other trademarks
mentioned in this document are owned by their respective companies.
No part of this document may be photocopied, stored in a retrieval system, transcribed, or
reproduced by any method, either mechanical, electronic, photographic, or otherwise
without prior written permission from Winnov.
Winnov continuously improves and updates the products described in this document to
suit the needs of our customers. The contents of this document and the specifications of
the hardware devices and software described in this document are subject to change at
any time without notice.
Winnov makes no warranty of any kind with regard to this material, including, but not
limited to, implied warranties of merchantability and fitness for a particular purpose.
Page 3

3
Videum
The ideal solution for visual communications
and multimedia
The Winnov Videum solutions are combinations of hardware
and software that easily enable you to utilize and maximize
the power of video communications. Use our cost-effective
and high-quality solutions for these application areas:
Communications:
•
Internet video telephony
•
Intranet and Internet video conferencing
•
VideoMail
•
WebCam
Video streaming:
•
Video on Demand
•
Live Video Broadcasting
Security:
•
Motion detection
•
Face recognition
•
Biometric identification
Multimedia:
•
Still image, audio and video capture
•
Animations
•
Panoramic images (360 degree images)
•
Video screensaver
Videum Product Family
This users guide covers all of the following products:
Videum VO (ISA or PCI) – video capture card
Videum AV (ISA or PCI) – audio and video capture card
Videum Conference (Pro) – Videum card and camera
VideumCam Desktop (ISA and PCI) – interface card and
digital camera
VideumCam Traveler - PC Card and digital camera
Page 4

4
Features
•
very easy to install, no interrupt, no DMA (except on PCI) ,
•
still images up to 704x576 (4CIF) and 16.8 million colors
•
video up to 640x480 (25 fps on PAL or 30 fps on NTSC)
•
integrated audio in and out (only on AV products) –
full-duplex audio and synchronous audio and video
•
full screen video with direct draw graphic adapters
•
drag-and-drop videos and stills into any application
•
remote control of cameras via IP
•
Multi Videum AV/VO PCI board support on Windows NT 4.0
and Windows 2000.
Packing list
Videum hardware (please check the label on the box, to see
what products are included)
The CD containing :
•
Drivers for Windows 3.11, 95/98/2000, and NT 4.0
•
Videum Capture application to record audio and video clips,
still images, animations or to set up a webcam
•
Third-Party Application Software, in full or trial version
including Microsoft NetMeeting, RealNetworks G2.
System Requirements
•
120 MHz Pentium® or faster
•
one free ISA, PCI or PC Card slot
•
minimum 16MB RAM (better 32 or 64MB)
•
Windows® 3.11, 95, 98, 2000 or NT 4.0
•
headset for audio communications without echo
•
VGA display with 256 colors (or more)
•
Internet access for communications and driver updates
Page 5
5
Installing the Videum AV, VO, or VideumCam
Desktop Board
Tools required: you will need a screwdriver to complete the
installation. You should also wear an antistatic strap when
installing any expansion board in your computer
Caution: Electrostatic discharge can cause damage to your computer circuitry, which can be followed by complete or intermittent
failures. At a minimum, touch a piece of grounded metal (like your
computer chassis) to discharge any static electricity before starting
the installation
Hardware Installation
To install these boards into your computer, follow these steps:
1. Turn off the computer and all peripheral devices.
Unplug the computer and peripherals from the wall outlet.
2. Remove the cover of the computer so you have access
to the open slots.
Use the instructions that came with your computer system.
3. Find an available ISA or PCI slot inside your computer.
4. Remove the protective slot cover from the back of the
computer using a screwdriver.
Save the screw, you will use later it to secure the Videum
board. Save the slot cover you removed for later use.
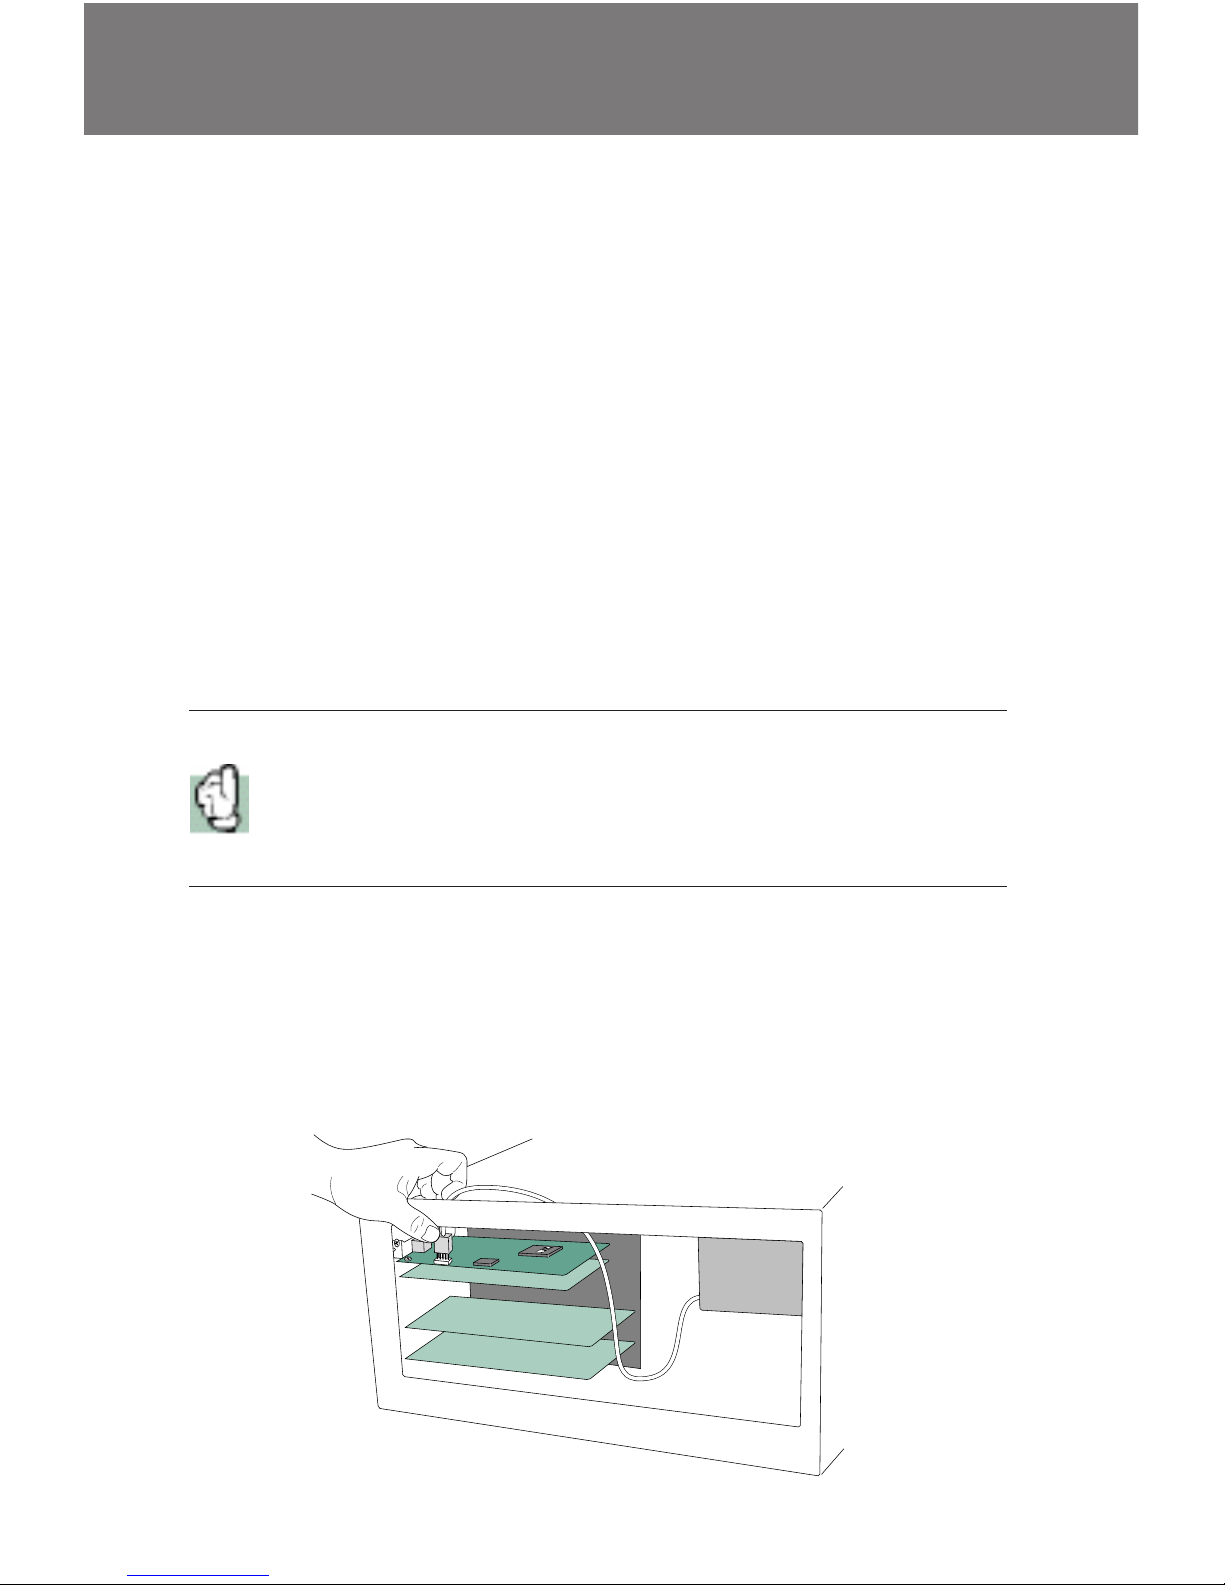
5. Install the Videum board into the available slot.
Hold the Videum board at the edges and align the pins on
the board with the pins in the connector. Firmly press the
pins into the connector until the board is seated evenly.
6. Secure the board with the screw that was holding the
protective slot cover.
Tighten the screw until the board is secure. If you want to
connect your internal CD-ROM drive directly to the Videum
AV board, refer to Connecting an Internal CD-ROM Drive to
Videum on page 8 before proceeding to step 7.
Page 6
6
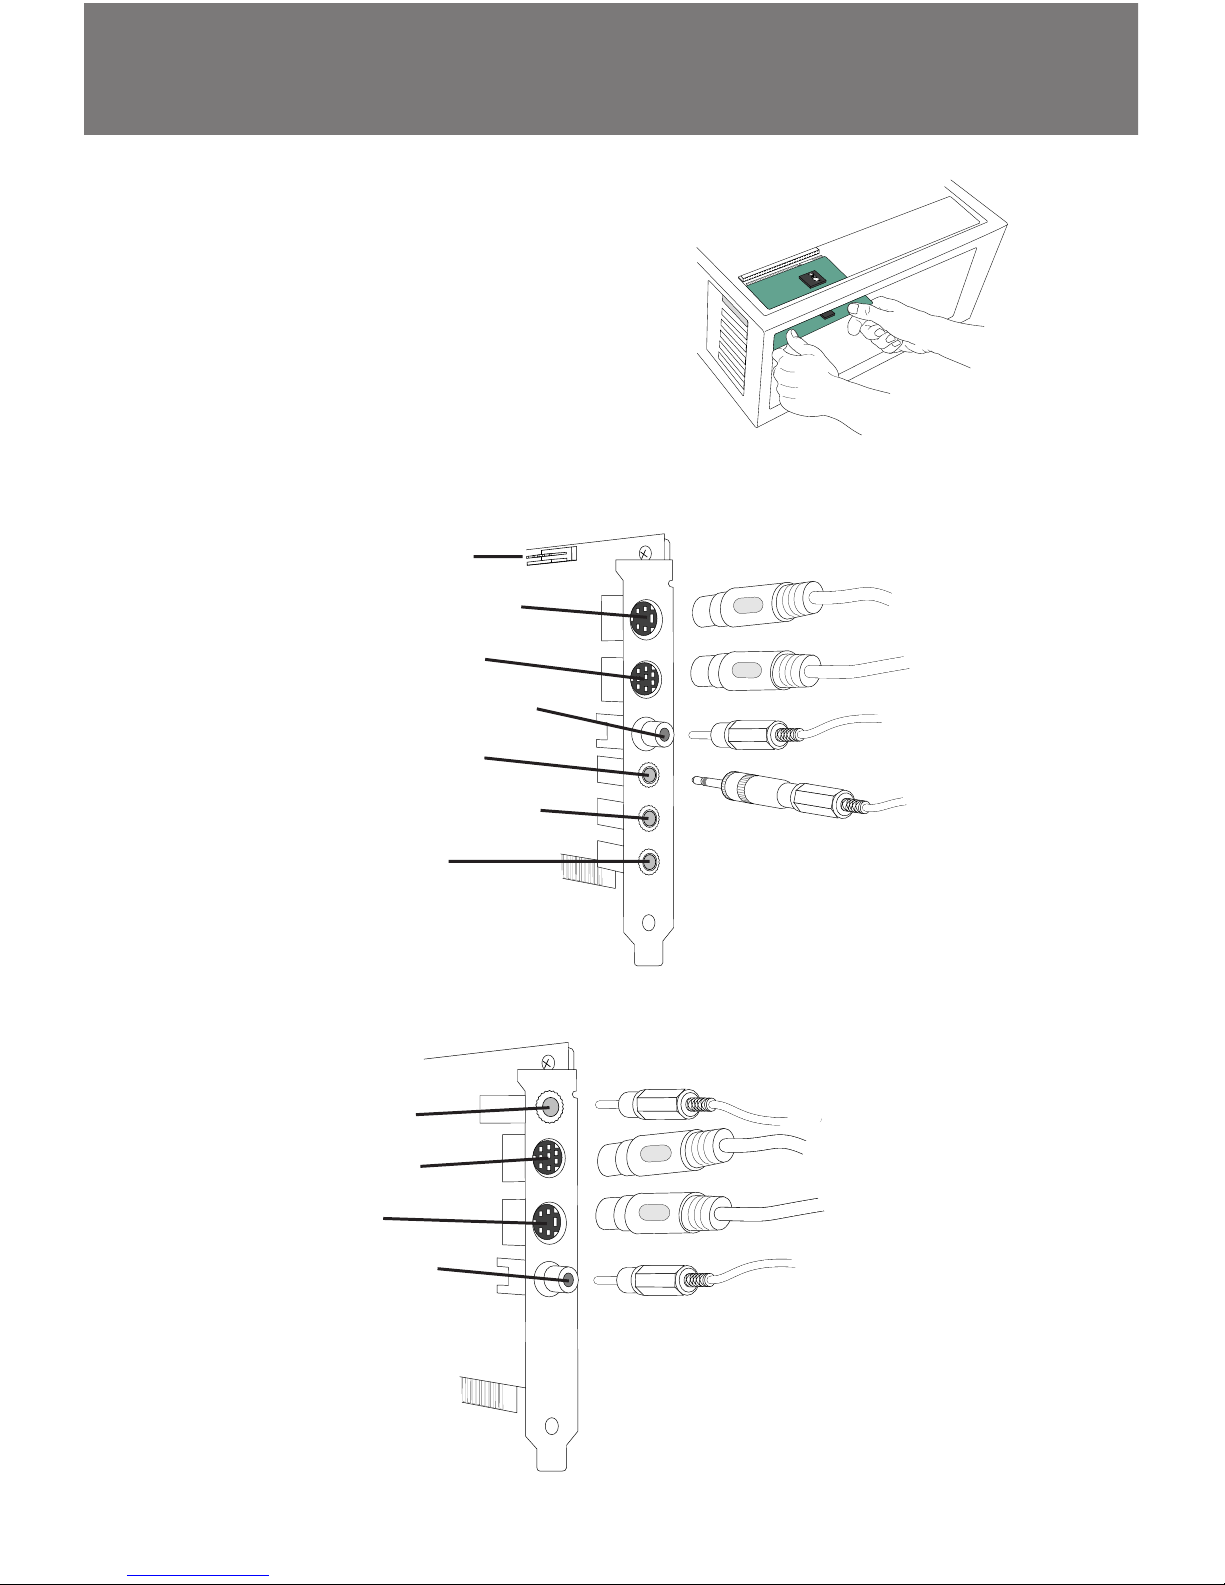
7. Reinstall the cover of the
computer.
8. Now you can see the Videum AV
or VO board connectors on the
back of the computer.
Videum AV or VO
Videum AV
Videum VO
CD Audio In
S-Video Camera
MXC Camera
Composite Video
Aux Audio In
Line/Mic Audio In
Audio Out
MXC Audio Out
S-Video Camera
MXC Camera
Composite Video
Page 7
7
Connecting the Video Camera
Only analog color video cameras (PAL or NTSC) may be
connected to the Videum AV and VO.
•
composite video input: connects to normal cameras and
camcorders. Audio connects to the Line/Mic input.
•
S-Video input: connects to S-VHS or Hi-8 camcorders.
Please connect audio to the Line/Mic input.
•
MXC input: connects to the Winnov Video Camera or other
cameras via special interface cable. This input combines
audio, video and power for the camera.
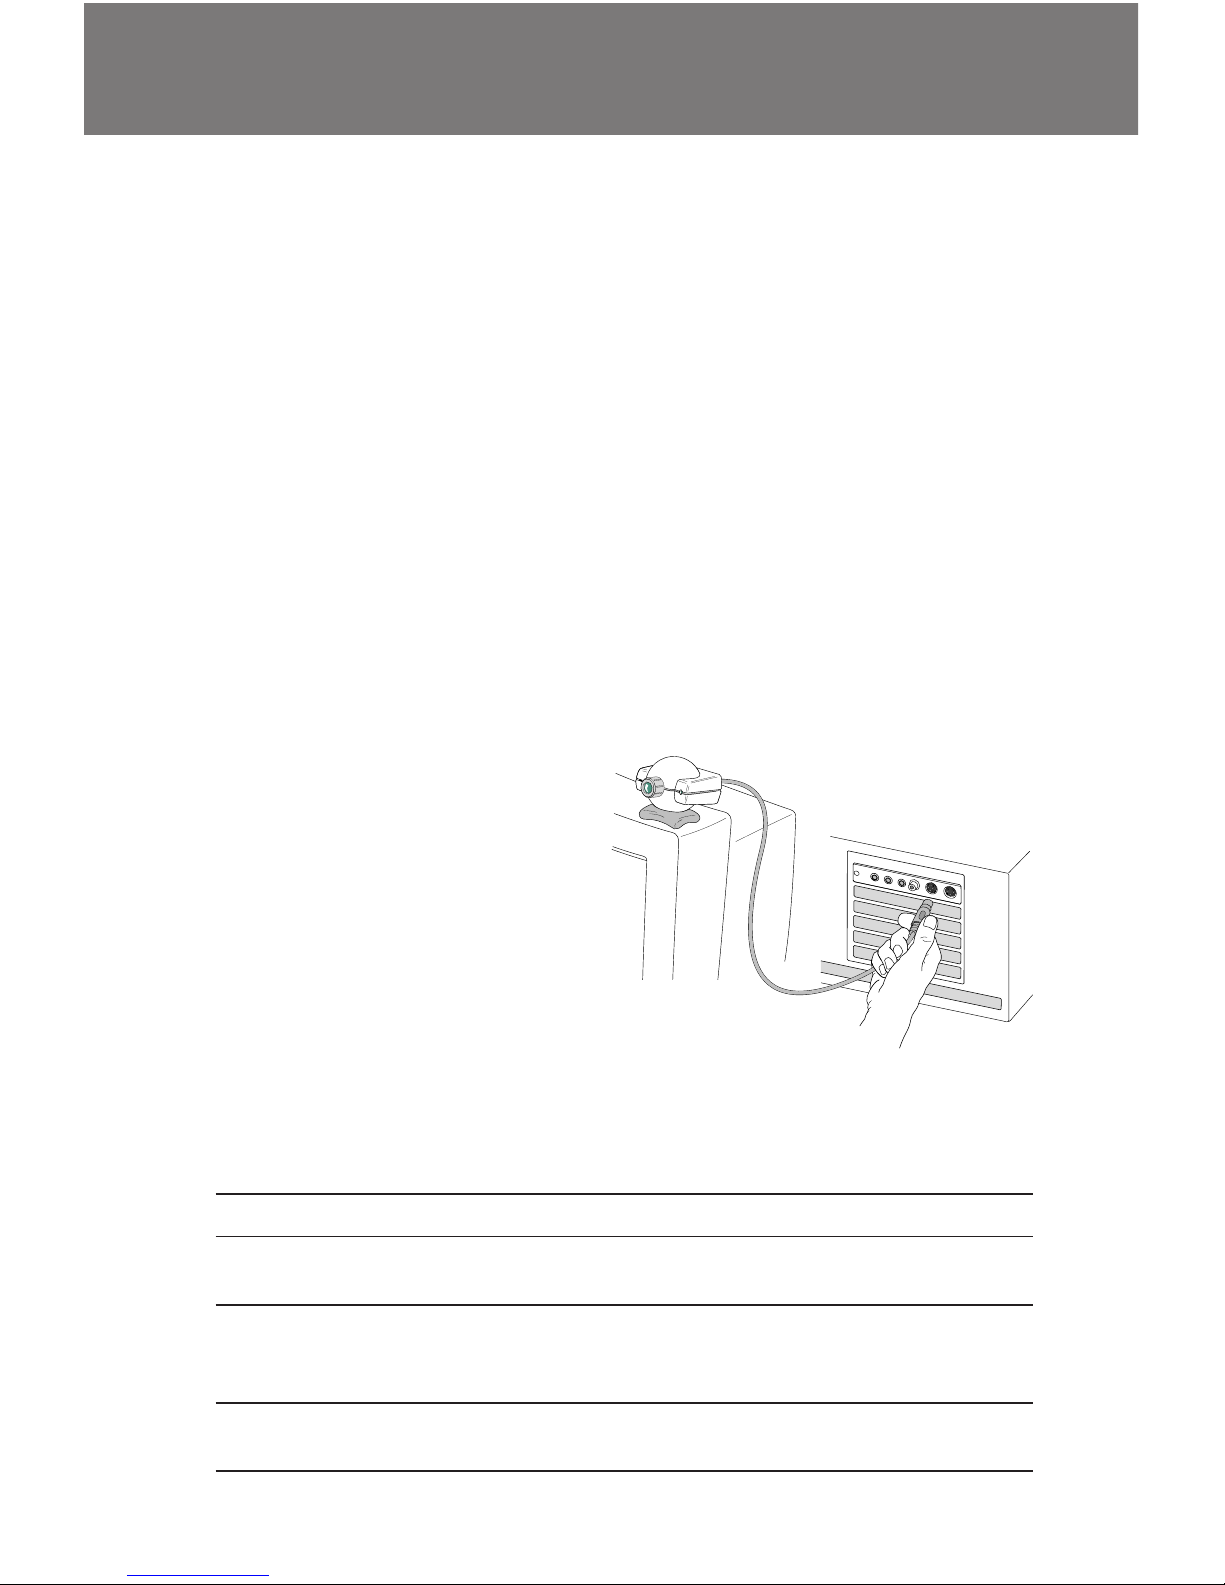
To connect the Winnov Video Camera, follow these steps:
1. Set the camera base on top of the monitor.
Place the camera so that
the power light is on the
right and the microphone
is on the left.
2. Connect the camera
cable to the Multimedia
Extension Connector
(MXC).
3. Turn the camera on, if necessary, using the Power
switch on the back of the camera.
Switch Default Setting Description
BLC On Sets backlight compensation to prevent under
exposed or overexposed images
WB Fixed (Freeze Mode) Sets the white balance for color reproduction.
Should be in Fixed mode when you have a
colored scene and stable lighting conditions
Image Positive/Negative Positive shows the image normally, negative
shows the photographic negative of the image
Video Camera
Page 8
8
Connecting an Internal CD-ROM Drive to Videum
You can connect Videum AV to the audio out port of an
internal CD-ROM drive, allowing you to use the Videum board
as a sound card.
Connect your CD-ROM drive in one of the following ways:
1. If your CD-ROM drive is already connected to a sound card,
connect the audio out of the sound card to the AUX or
audio in connector of the Videum AV board.
2. To connect an internal CD-ROM drive to Videum AV once
your computer is open, follow these steps:
•
Inside your computer, locate the 4- or 5-pin connector and
cable attached to the audio out port of the CD-ROM drive.
Refer to the documentation that came with your CD-ROM drive or
computer. Most manufacturers provide a cable that is already
attached to this connector and stored within the computer. If the
cable is not there, you can purchase it from your local electronics
store.
•
Connect the cable to the CD audio connector on the
Videum board.
•
You can use either a 3-, 4-, or 5-pin connector because pins
1, 3, and 5 are connected to ground.
Page 9

9
Connecting Other Audio or Video Devices
Once the Videum AV or VO board is installed, you can connect
other audio and video sources to the board such as VCRs,
camcorders, laser disc players, and external CD-ROM players.
The table below shows the types of devices that can be
connected to each connector on the Videum board. The table
also shows the connector type because you may need to
provide your own cables, which you can purchase at your local
electronics or radio/TV store.
Connector Connector Type Connect To ... Device
S-Video 4-pin mini-DIN Only S-Video devices including
VCRs, camcorders, Winnov S-Video
camera, and other S-Video
cameras
MXC 8-pin mini-DIN Winnov composite video camera
Composite Video In RCA jack VCRs, camcorders, and other
composite video cameras
Aux Audio In 3.5mm stereo mini-jack Audio output from VCR, audio
output from another sound card
Line/Mic In 3.5mm stereo mini-jack Microphone, or audio from an
S-Video camera
Stereo Audio Out 3.5mm stereo mini-jack Sound card Line In input; takes
audio from video camera to
sound card audio input. Can also
be used for external speakers or
headphones
All Videum audio connections are stereo. However, you can
connect a mono input if you connect to the left channel,
mono inputs are only played out of the left channel. Special
cables and connectors may be needed to connect the devices
you want. These are all available at your local electronics or
radio/TV store.
Page 10

10
To install the VideumCam Traveler hardware on your laptop
computer, follow these steps:
1. Turn on your laptop computer and close any open
applications.
2. Insert the Videum CD into the CD-ROM drive.
3. Attach the camera to the laptop clip-on base.
4. Place the camera assembly on
top of the laptop flat panel
5. Connect one end of the cable
to the camera, if the cable is
not permanently attached.
The green light on the front of
the camera indicates that the camera is on and initialized.
The light is only on when the Videum software is running.
6. Open the PC Card slot cover on the side of your computer and insert the PC Card into the PC Card slot as
shown. Then connect the cable to the PC Card.
Hold the PC Card at the edges and align the card with the
connector slot. Firmly press the card into the connector
until the release pin is pushed out.
Windows detects the new hardware and asks if you want to
install the appropriate drivers. Proceed with the driver
installation. You should hear a two-tone beep indicating that
the card is properly installed in the slot.
VideumCam Traveler
Page 11
11
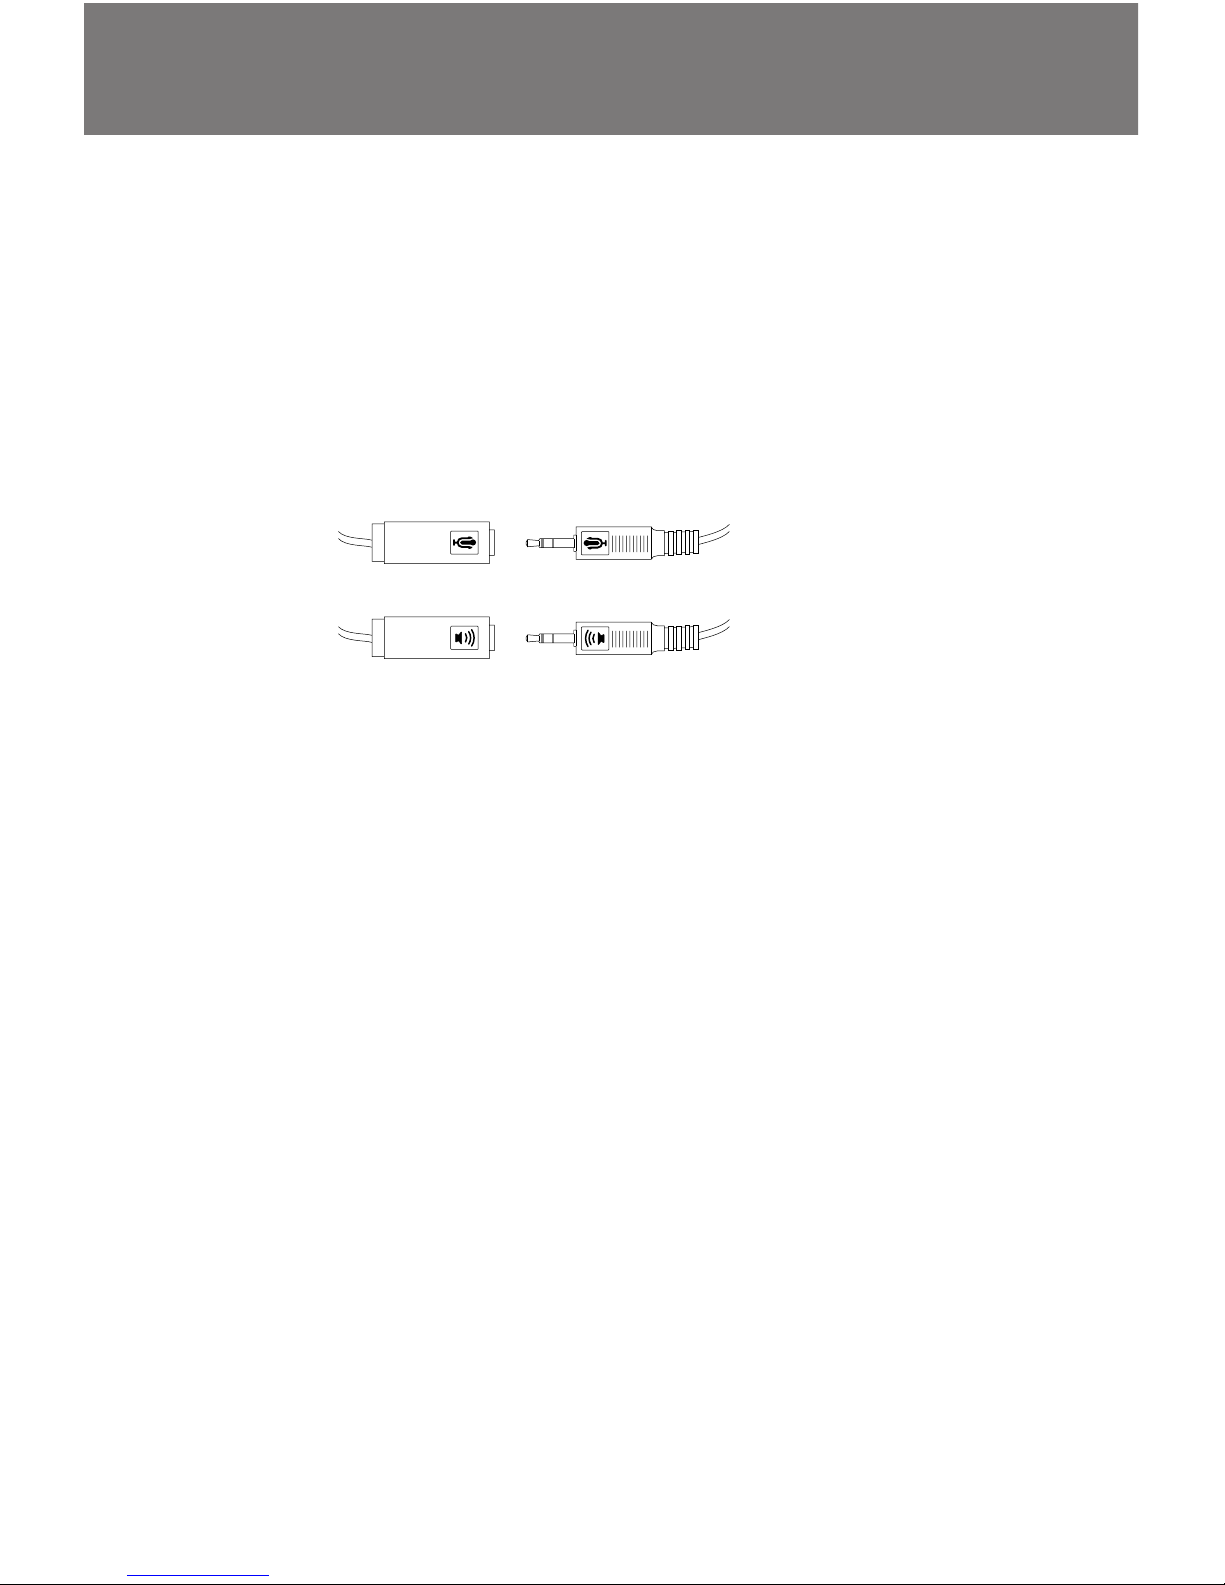
Connecting Headphones or Speakers and a
Microphone
Once the VideumCam interface is installed, you can connect
headphones or speakers, and a microphone. The VideumCam
camera integrates an audio in and out device, so you get a
second sound card. Below you see how to connect headphones and speakers, and a microphone to your VideumCam
system.
Using Videum With a Sound Card
Videum can work with an internal sound card. If a sound card
is already installed, the installation program installs the Videum
audio driver as the secondary driver. Use the MultimediaAudio Control Panel or select Audio Preferences from the
Videum menu to select which card you want to use for audio
capture and playback. Audio inputs that need to be synchronized with video capture should be connected to the Videum
board for best automatic audio/video synchronization.
Microphone
Speakers/Headset
Page 12

12
Software Installation
Plug-and-Play boards:
These products are automatically detected by Windows 95, 98
and 2000. With Windows NT 4.0 Plug-and-Play boards need to
be installed manually, since NT 4.0 does not support Plug-andPlay.
•
all VideumCam products (ISA, PCI and PC Card)
•
all Videum VO and AV PCI boards
•
Videum AV ISA PnP board
Non Plug-and-Play boards:
These boards are not detected by Windows 95 and 98.
•
Videum VO (ISA)
•
Videum AV (ISA)
Windows 95/98 Software Installation for Plugand-Play boards (from CD-ROM)
1. ISA and PCI cards: install the card and start the computer
PC Card: start the computer and plug in the PC Card.
Windows automatically detects the hardware.
2. Click Next
3. Click Search for best driver for your device and click Next
4. Mark CD-ROM drive and click Next
Windows now locates the new driver on CD-ROM. PC Card:
MediaPlug PCMCIA Adapter. Click Next.
5. Windows may ask you to insert Winnov Video Drivers.
Click Browse and select the Win95 directory on CD-ROM.
Windows now copies the files and builds the driver information database.
6. Click Finish. Question: Install video capture drivers
now? Click Ye s . InstallShield® now installs the Videum
software. Click Next. Software License Agreement. Click
Page 13

13
Ye s . Click Next to use the default folder.
7. Click Next to use the typical setup. Mark custom, if you like
to install other options. Click next and the software is
installed.
8. Click Ye s to view the ReadMe file. Register the software, to
receive update information. Restart the computer.
Windows 95/98 Software Installation (Upgrade)
Please register your product and download new software
from our website at any time. Installation procedure:
1. Double click on the file which you have downloaded.
2. Proceed through the procedure (similar to the previous
section)
Windows 95/98 Software Installation (non PnP)
1. Install the hardware. Start the computer.
2. Run Setup95.exe in the Win95/Disk1 directory on CD-ROM
3. Restart the computer and run Videum Configure.
Windows NT 4.0 Software Installation
Windows NT 4.0 does not support Plug-and-Play. So the
installation procedure is the same for PnP and non PnP
devices.
1. Install the hardware. Start the computer.
2. Run SetupNT.exe in the WinNT/Disk1 directory on CD-ROM.
3. Restart the computer and run Videum Configure.
Page 14

14
Windows 2000 Plug N Play Software Installation :
NOTE: When a Windows system is upgraded from NT4 to Windows 2000,
the Videum drivers will no longer function. You must install PlugAndPlay
drivers for Windows 2000. It is recommended that you uninstall the NT4
Videum drivers before installing the PlugAndPlay drivers.
If the card has not yet been inserted, then insert the card,
and point to the Windows 2000 directory of the Videum CD
when asked for drivers.
If the Videum card appears in the Device Manager under
“Sound, video, and game controllers”, then you can “Update
driver” from the Device Manager and point to the Videum
CD when it asks for drivers. If Videum appears under
“Unknown devices”, then delete it, click Refresh, and point to
the Videum CD when it asks for drivers. For a PCMCIA card,
point to the INF file in the Windows 2000 directory on the CD.
After the PlugAndPlay install has been completed (and the
device appears as operational in the Device Manager), you can
install the Winnov Videum applications, if you want. To do this,
just run the Setup.exe program.
In all cases, we recommend that you reboot after the drivers
are installed to hook in the audio drivers. The PlugAndPlay
install only needs to be done once. Future driver updates can
be accomplished by running the Setup.exe program.
Page 15

15
Winnov 2.7 Software enables you to plug into your Windows
NT 4.0 or Windows 2000 system several Videum AV/VO PCI
cards and control them .
Useful tips :
1. Installation
On Windows 2000, PnP drivers must be installed separately for
each card.
2. Choice of the board
Each card will get a number so that you know which one you
are using.
Videum Capture allows you to select a card in the Video
Properties dialog box in the Device list box.
While using the Videum Status application, you can select
directly the card
3. Configure your cards
Default settings configured using Videum Configure are
applied to all boards in the system.
The Information tab of the Videum Configure application
allows you to select the card.
You can use the Videum Mixer application on the board #0, for
the other ones, use Windows mixer. The Videum Board
number can be selected from the Windows mixer using the
Options menu, select Properties, then select the board with
Mixer Device list.
4. Use your boards
Most video applcations, such as NetShow and NetMeeting
allow the audio and video device to be selected, refer to your
application’s user guide.
Some applications such as Adobe Premier 5.0, do not
support multiple boards in the same system. Contact your
application vendor for updates.
Multi Board
Page 16
16
Videum Capture is a multimedia capture application. You can use
Videum Capture to record audio and video, and capture still
images for inclusion in other documents. Export them easily by
drag-and-drop.
For example, you might want to have your child send a personal
message to a friend or relative. You could use your video camera
to record a video message and then include it in an e-mail to
Grandma. Videum allows you to add multimedia to Web pages,
word processing documents, presentations, and so on. Sometimes it is much more effective to communicate your ideas by
seeing them than by writing an e-mail.
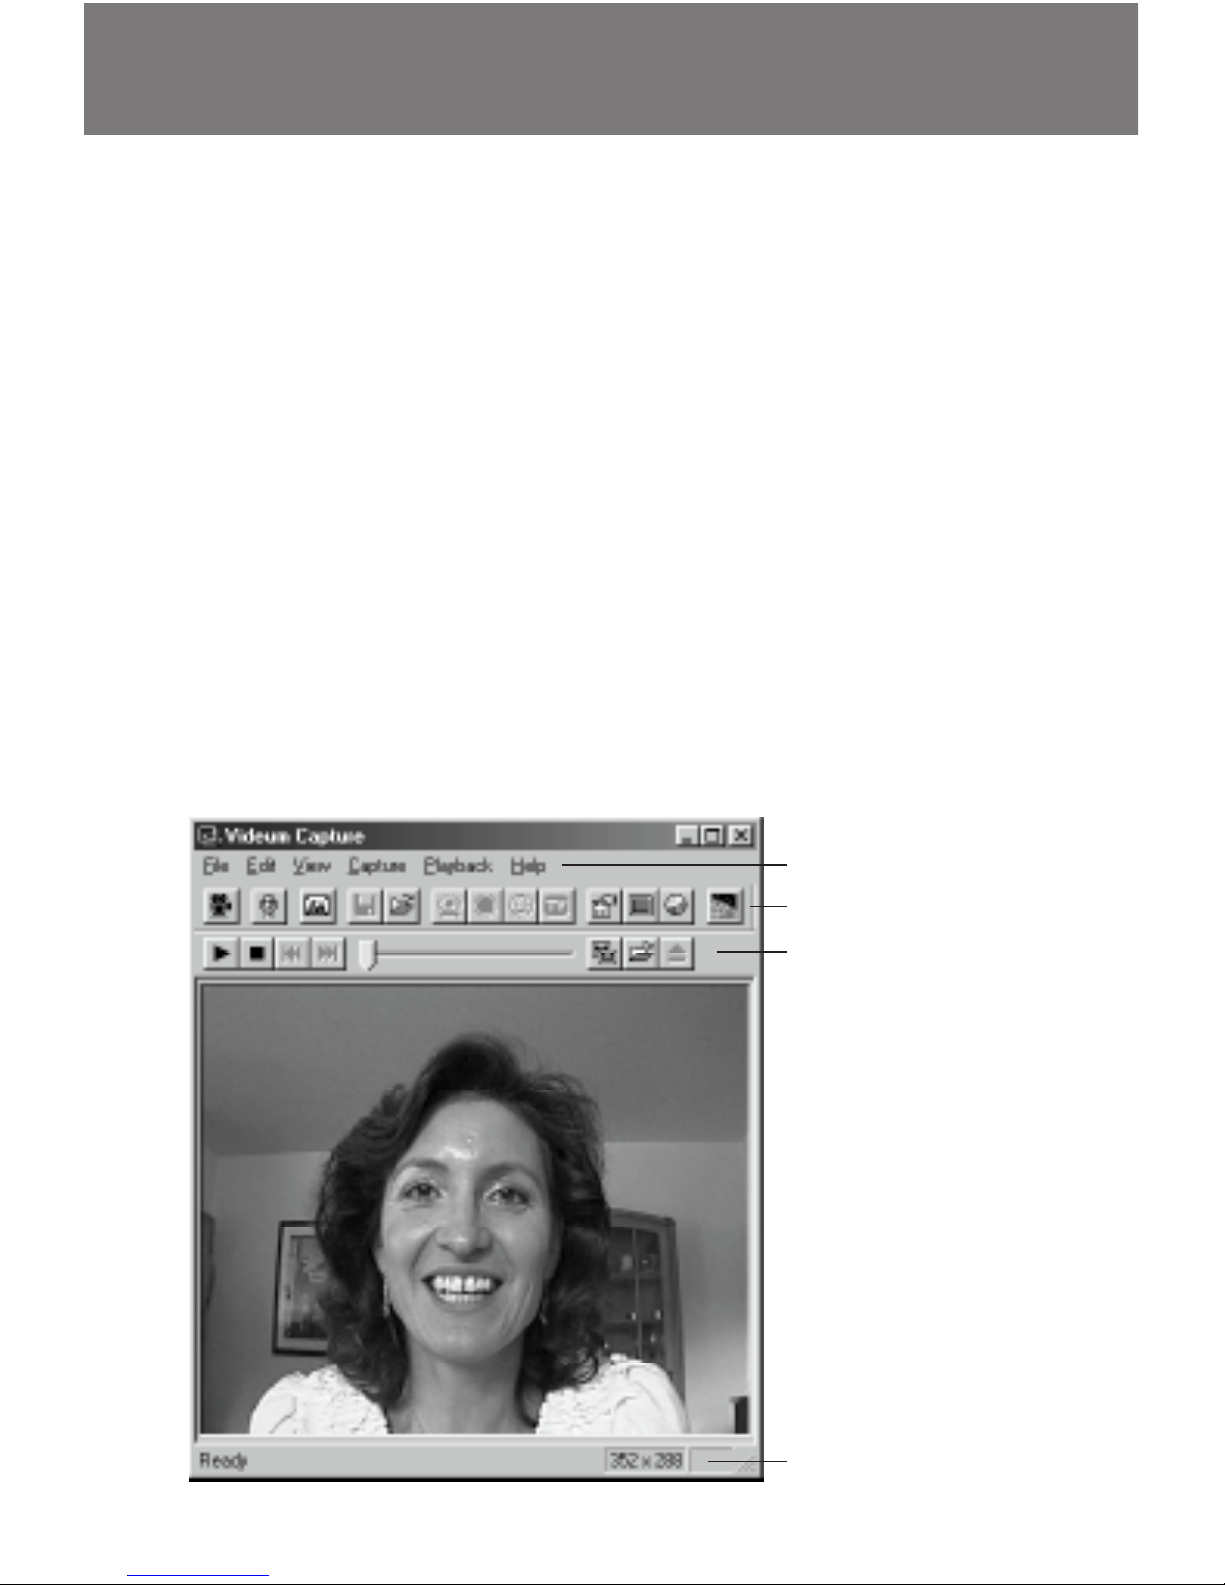
Using the Videum Capture Window
To view and record audio, video, and still images: first open the
Videum Capture application located in the Videum folder. All
commands available are listed in the table on the next two
pages:
Videum Capture
Menus
Capture toolbar
Playback toolbar
Status bar
Page 17
17
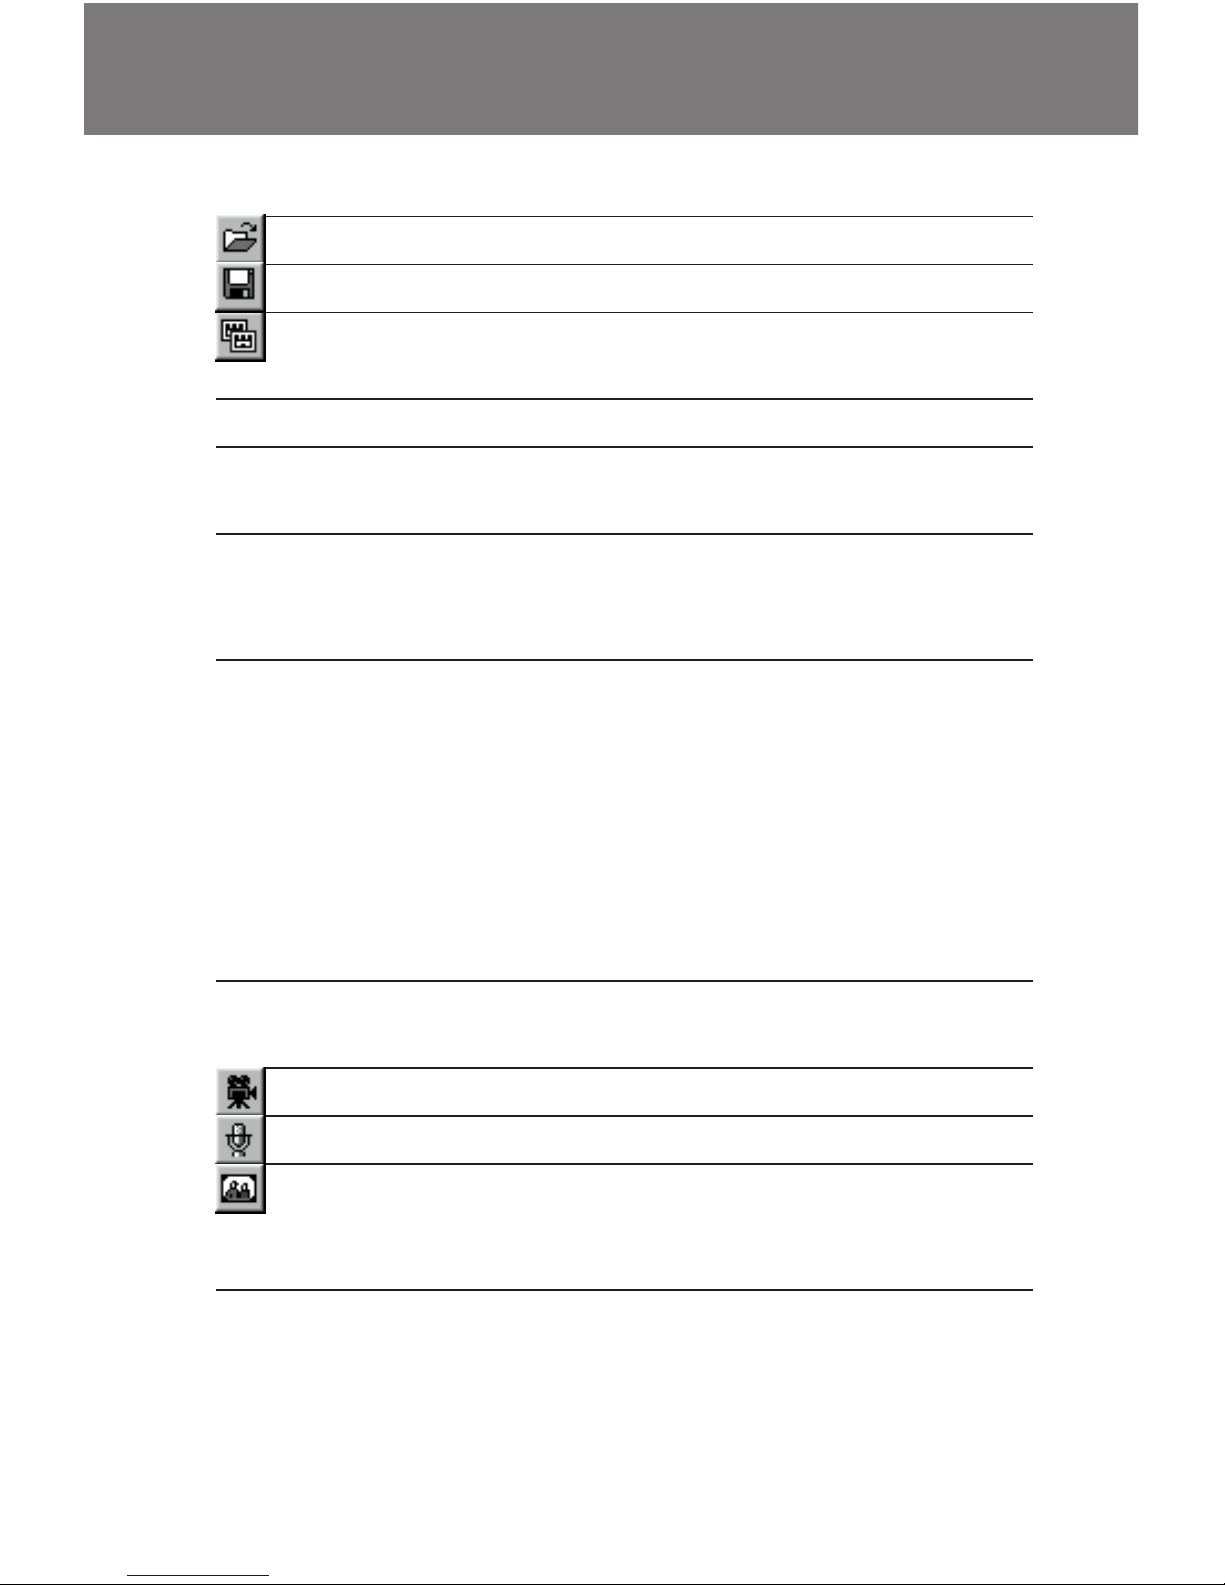
Button Menu SubMenu Description
File Open Opens a capture file
Save As Saves a captured clip to a file
Recent File Lists the most recent files
displayed
Exit Exits the Capture program
Edit Copy Copies the current frame to the
clipboard
View Customizes your display to
include some or all of the menus,
toolbars, and status bar
Preview Selects the mode in which to
preview a video clip. You can
select Freeze, Slow Speed,
Normal Speed, High Performance, or High Performance+
Stretch
(please choose the option which
you think works best for you)
Always on Top Keeps the Capture window as
the top window on your screen
Capture Record Video Records an video clip with audio
Record Audio Records an audio clip
Still Image Captures the image displayed
when the button or menu item is
selected
Page 18
18
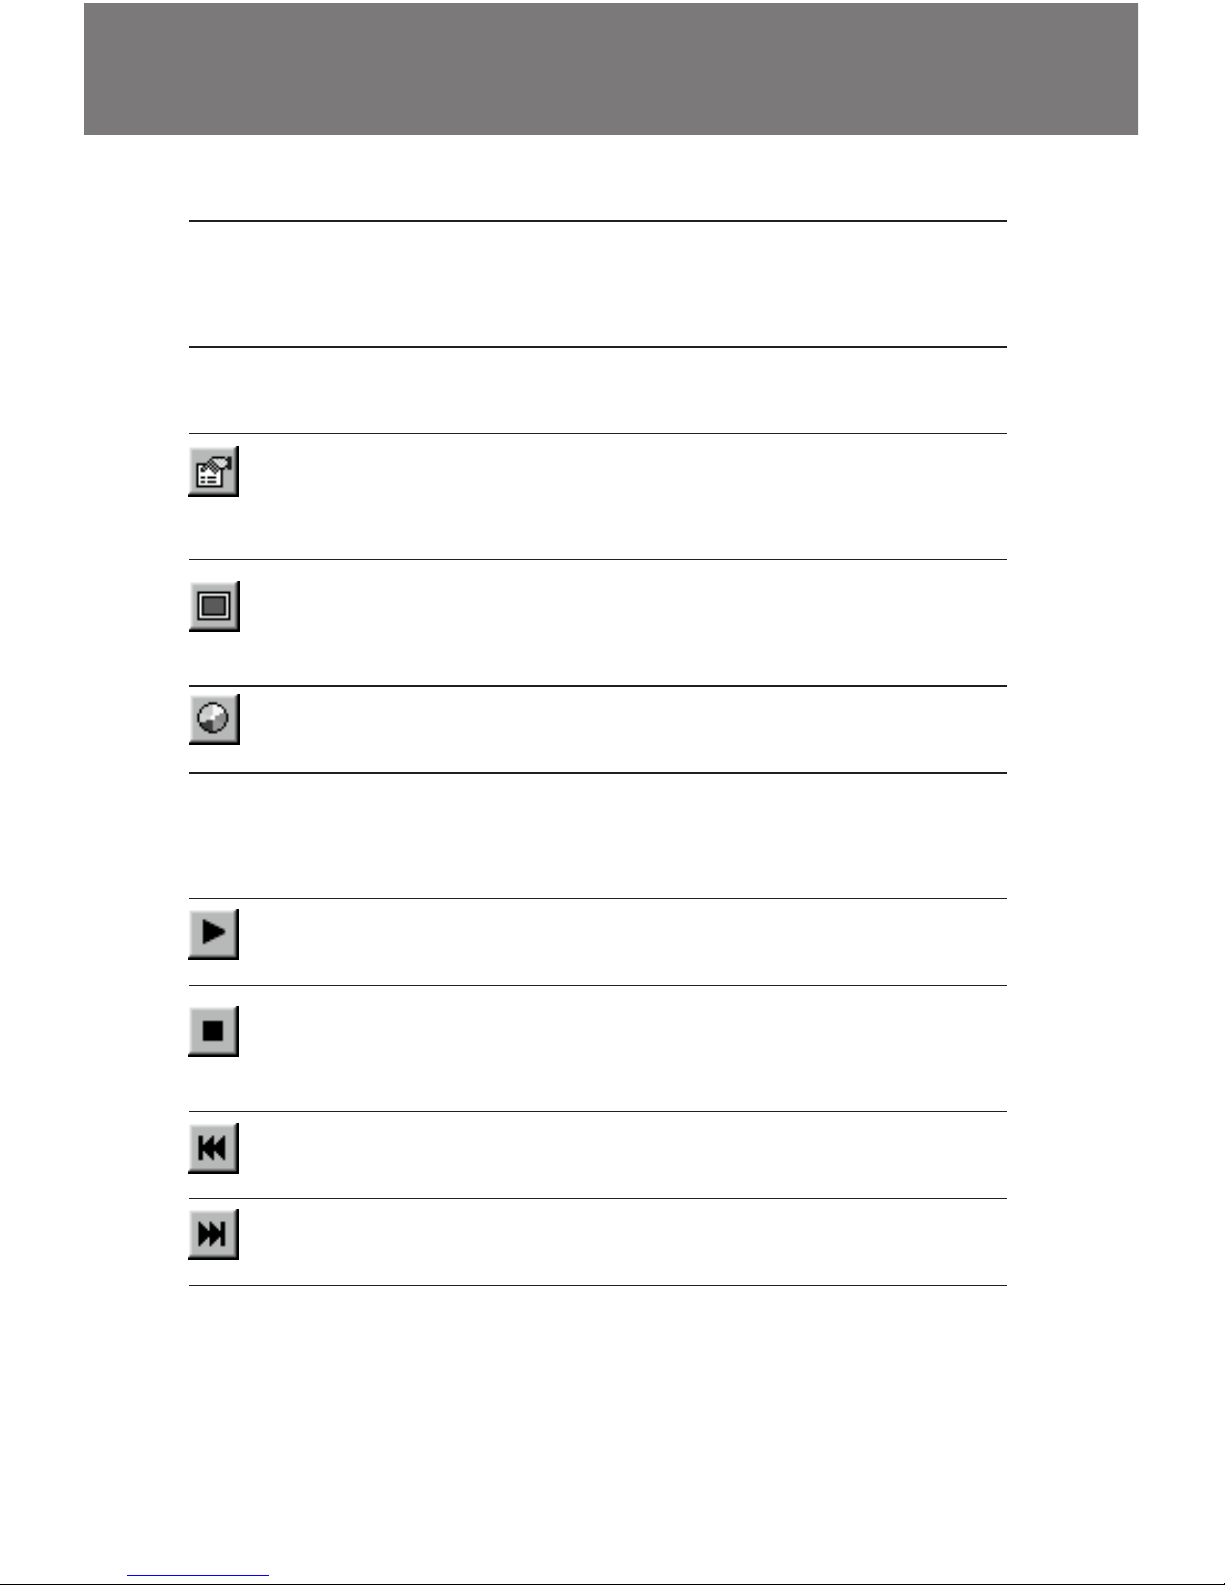
Button Menu SubMenu Description
Capture Time Lapse Video capture over a period of
time with programmable interval
and duration
Stop Motion Video capture one frame at a
time to create animations easily
Properties Sets video, audio, and still image
properties and selects the active
board
Video Format Sets image characteristics such
as image size and compression
ratio
Video Source Sets a variety of image options
such as brightness and contrast
Video Size Selects a video size without
having to access another dialog
box
Playback Play Plays the recorded audio or
video clip
Stop/Freeze Stops recording the audio or
video clip and stops the playback
once it is started
Rewind Rewinds the current audio or
video clip to the beginning
End Goes directly to the end of the
audio or video clip
Videum Capture
Page 19

19
The Video Control Panel allows you to set the video input
source, image size, and compression. To use the Video Control
Panel, choose Video Format from the Capture menu or the
toolbar.
1. In the input section please select the video source.
Please have a look at the picture below. It shows just one
item, the Winnov Camera, since one of VideumCam products is installed. If you install the Videum VO or AV, you see
three choices: Composite, S-Video and MXC.
VideumCam: set the gain and white balance to maximize
image quality. Set the white balance by pointing the
camera at a true white source such as a white paper.
Videum: select the video standard, either PAL or NTSC.
2. Set the image size.
It can be as small as 80x60 or as large as 704x576 (4CIF).
Video Control Panel
Page 20

20
3. Select the type of compression.
For best results when recording video, use the WNV1
compression, since it compresses video in hardware.
Compression Type Description
RGB8 256 colors, in Windows format. A Videum card and
Codec are not needed to playback video in this
format. These video files can be very large.
RGBH 64k colors, in Windows format. A Videum card and
Codec are not needed to playback video in this
format. These video files can be very large.
RGBT 16.7M colors, in Windows format. A Videum card
and Codec are not needed to playback video in
this format. These video files can be very large.
WINX Provides the highest compression (up to 1:48) but
this Videum Codec is also required for playback.
Only for playback on your own system.
WPY2 Provides compression but this Videum Codec is
also required for playback.
Only for playback on your own system.
WNV1 Provides good hardware compression (mostly
used under 4:1) but this Videum Codec is also
required for playback.
Only for playback on your own system.
YUY2 Uncompressed YUV 16-bits per pixel
YV12 Uncompressed YUV 12-bits per pixel
YVU9 Uncompressed YUV. Same as Intel Indeo® raw.
For sending highly compressed video files over the Internet,
use the Save as feature and choose the .ASF format.
6. Use the compression slider to balance between the size
of your video file and the quality of the image.
Page 21
21
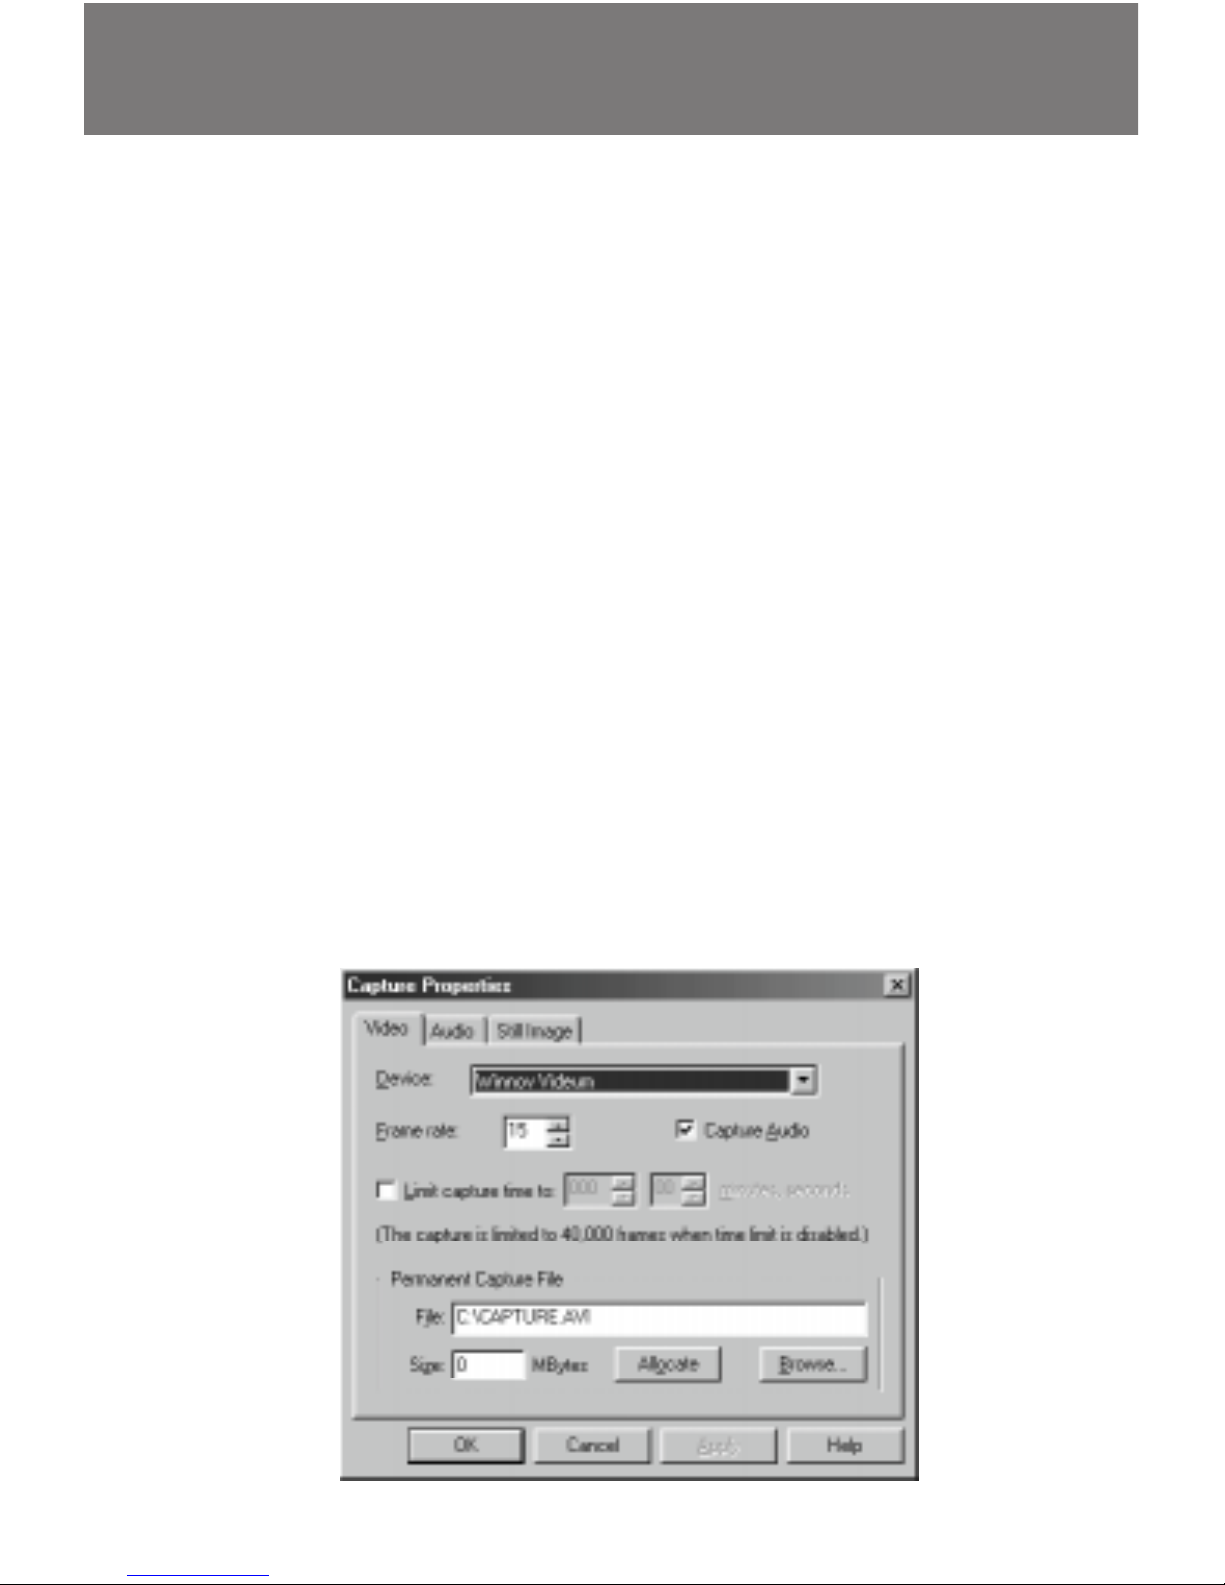
Setting Capture Properties
To set video, audio, and still image capture properties, choose
Properties from the Videum Capture menu. The Capture
Properties dialog has three tabs: Video, Audio, and Still Image.
The Video tab allows you to control properties associated with
video capture. Most important of these are the frame rate, and
whether or not you want to capture audio along with your
video. You can also set a capture time limit, so that your movie
files do not become too large. Finally, you can specify the
default file name for video captures, and give it an initial size in
megabytes. Pressing the Allocate button allocates space for
this file, which lets the Capture application capture more
efficiently.
Device lets you select between various installed Videum Cards,
if there is more than one.
Video Capture Properties
Page 22
22
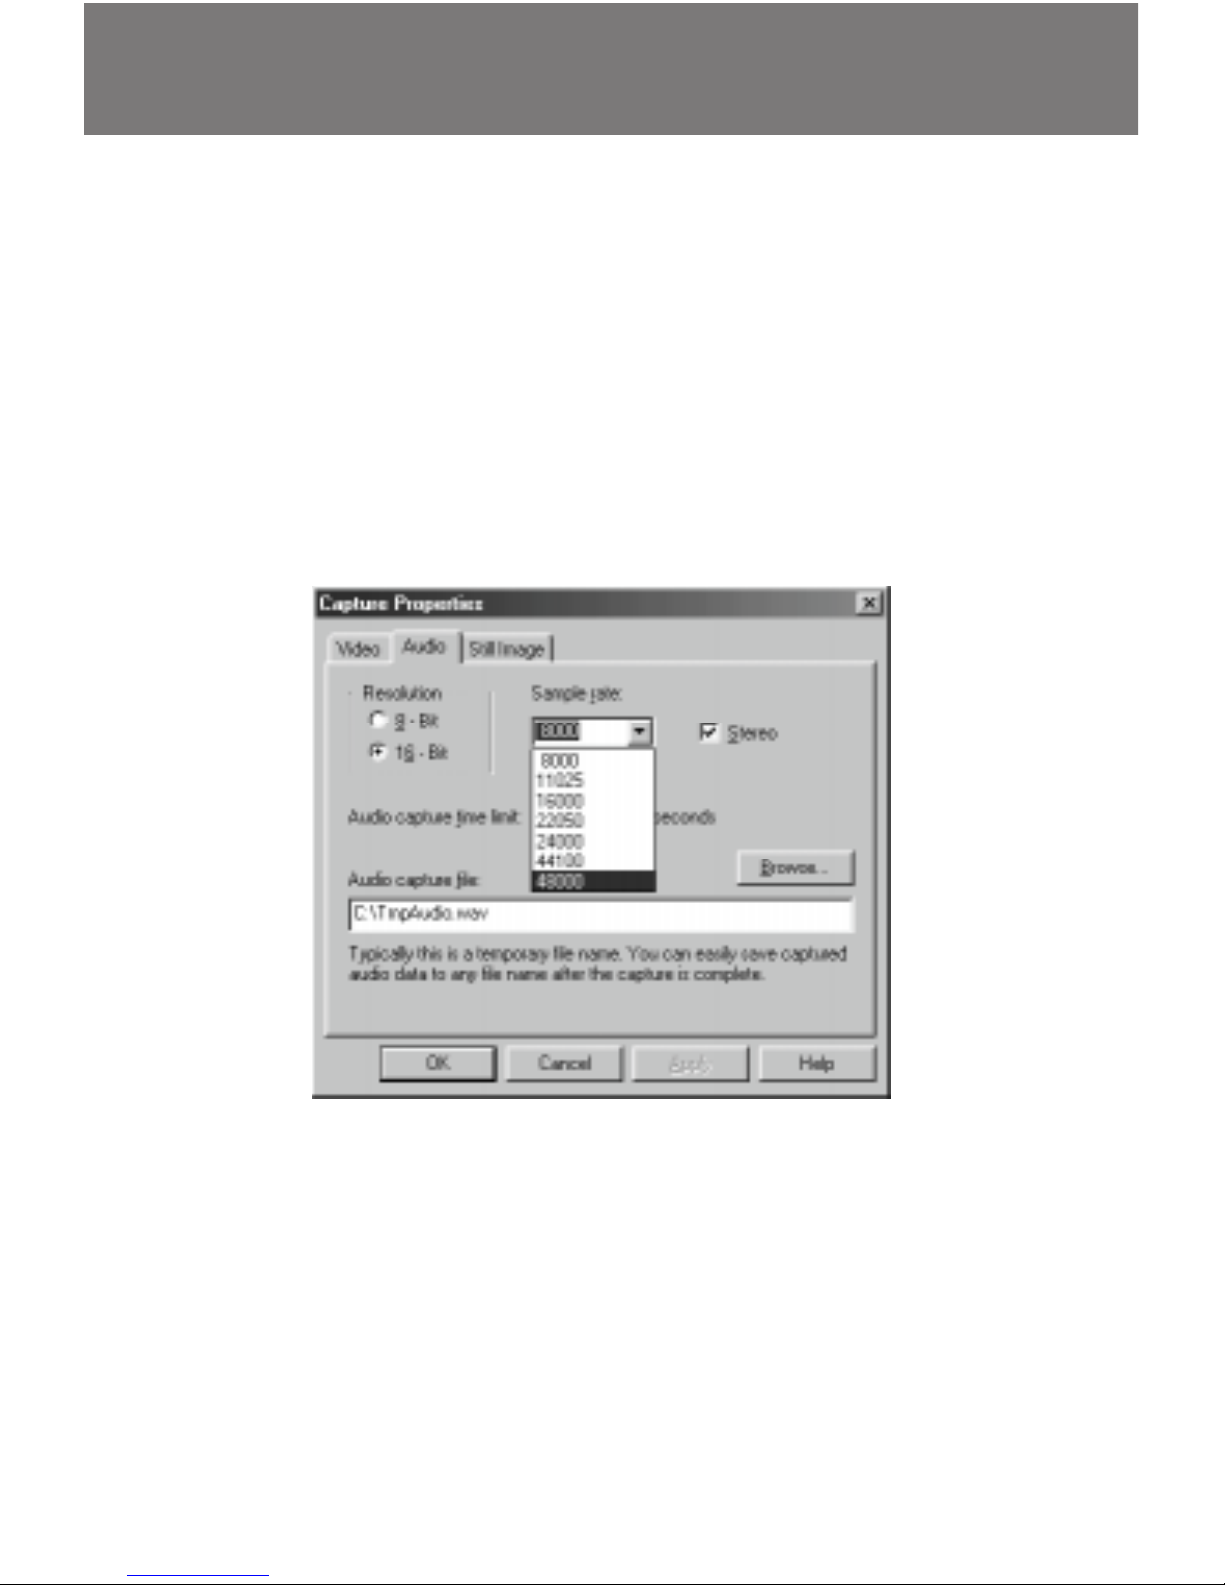
The Audio tab allows you to set properties relating to audio
capture.
You can set a time limit and a default file name for audio-only
captures.
Note that with Videum, the audio capture frequency can be
set from 8 to 48 kHz, 8 or 16-bit, mono or stereo. Four audio
inputs are supported.
Audio Capture Properties
Page 23

23
The Still Image tab allows you to set still image characteristics.
Still images can have two orientations: Landscape, which
gives you the standard image, which is wider than it is tall, and
Portrait, which is taller than it is wide. Portrait images will be
rotated 90 degrees, so you may want to re-orient your camera
before taking a Portrait still. The Still Image tab also allows you
to set a delay before the shot is taken, and the length in
seconds of the delay.
Slow Scan Capture (for still objects):
With standard analog video cameras a frame consists of two
halves, the even and the odd field. These two fields are to be
interleaved. To get the maximum vertical resolution, Videum
needs to digitize both fields. Click this option to enable this
feature.
The fields are then interleaved and an average is made
between multiple frames. This is why it is reserved for still
objects. Objects in motion would show jagged vertical edges.
When disabled, Videum only digitizes one field. This gives the
best results for moving objects.
Still Image Capture Properties
Page 24
24
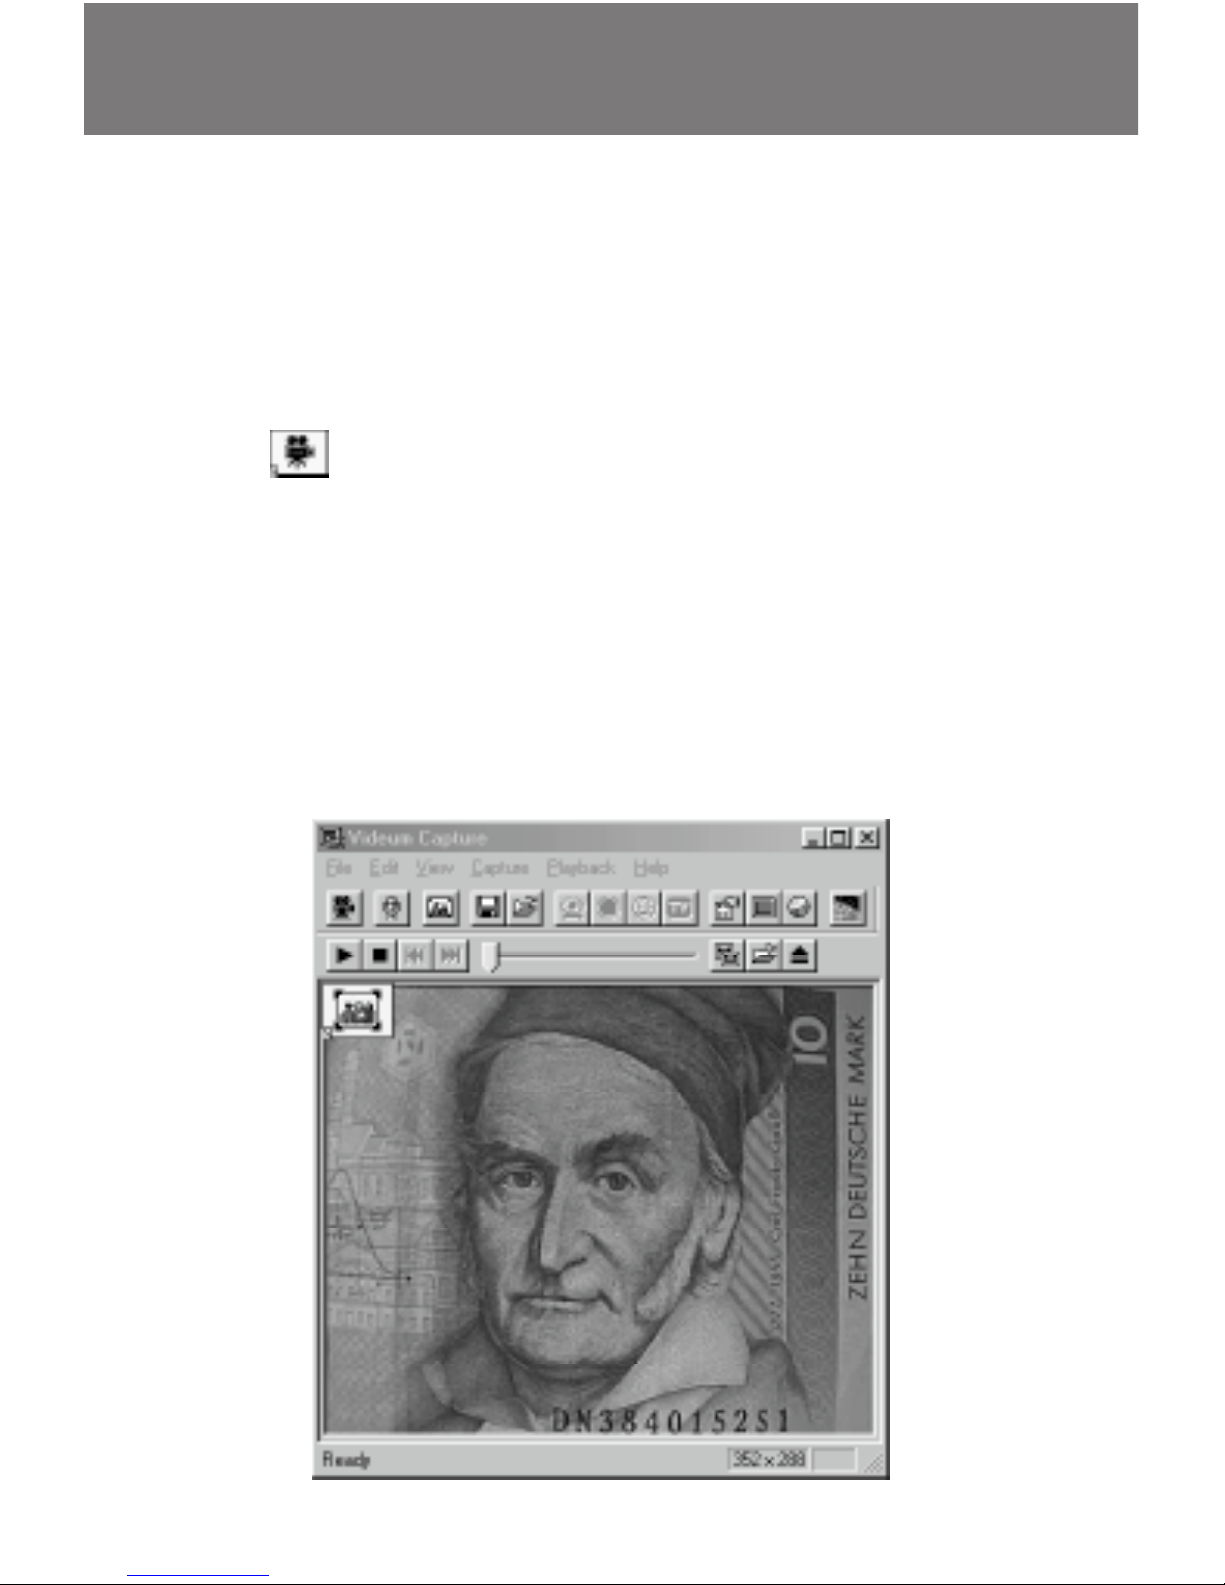
To record an audio, video, or still image clip, follow these steps:
1. To record a video clip, click the Record Video button.
Alternatively, you could choose Record Video from the
Capture menu. During the capture the elapsed time is
displayed below the image in the Videum Capture window.
2. To stop recording, click the Record Video button again.
3. An icon is displayed on the upper left side of the
Videum Capture image, indicating that a clip is ready.
Before you can capture another clip, you must either save it,
send it (via email), place the existing clip into a document,
or choose Delete to delete this clip.
You have the option of placing the clip into a document,
pressing the [Delete] key to delete the clip, or clicking the
Save As button to save the clip or select the Send command
from the File Menu to send the clip by email.
Capturing an Audio, Video Clip,
Page 25

25
To save or send a file choose Save As or Send from the File
menu. To Save, you can also click the Save As button to
display the Save As dialog box.
Name the captured file, specify the location where you
want to store the file, and then click the OK button (for Send,
the name corresponds to the name of the email
attachment). The Save As dialog box also allows you to save
the file in any AVI format available on your computer.
All video files are named with the .AVI extension (except for
.ASF files). You can save recorded files to any location but
the desktop is the default location.
4. To record an audio clip, click the Record Audio button
on the Videum Capture window.
A clip icon is displayed on the left side of the Videum
Capture image, indicating that a clip is available for placement. You must add it to a document, save it, or delete it
before you can do another capture.
5. To capture a still image clip, click the Still Image Capture
button on the Videum Capture window.
A clip icon is displayed on the left side of the Videum
Capture image, indicating that a clip is available for placement. You must add it to a document, save it, or delete it
before you can do another capture. Still images are normally saved as .BMP files. You can also use the Save As
button or menu item to save a still image as a .JPG (JPEG)
file.
or Still Image. Send it, Save it.
Page 26

26
Once you have recorded an audio, video, or still image, you can
paste it into a clipboard-compliant file such as your e-mail,
word processor, spreadsheet, web page, or presentation tools.
You can drag-and-drop the clip icon to any application that
supports drag-and-drop.
To add clips to documents, follow these steps:
1. Capture the clip according to the instructions in the
previous section.
Once the clip is captured, you can see the appropriate clip
icon on the Videum Capture window.
2. Open any other application that can accept audio,
video, or still images.
If the drag-and-drop feature is not supported by your
application, use the Paste feature in the Edit menu to insert
the clip.
Adding Clips to Documents
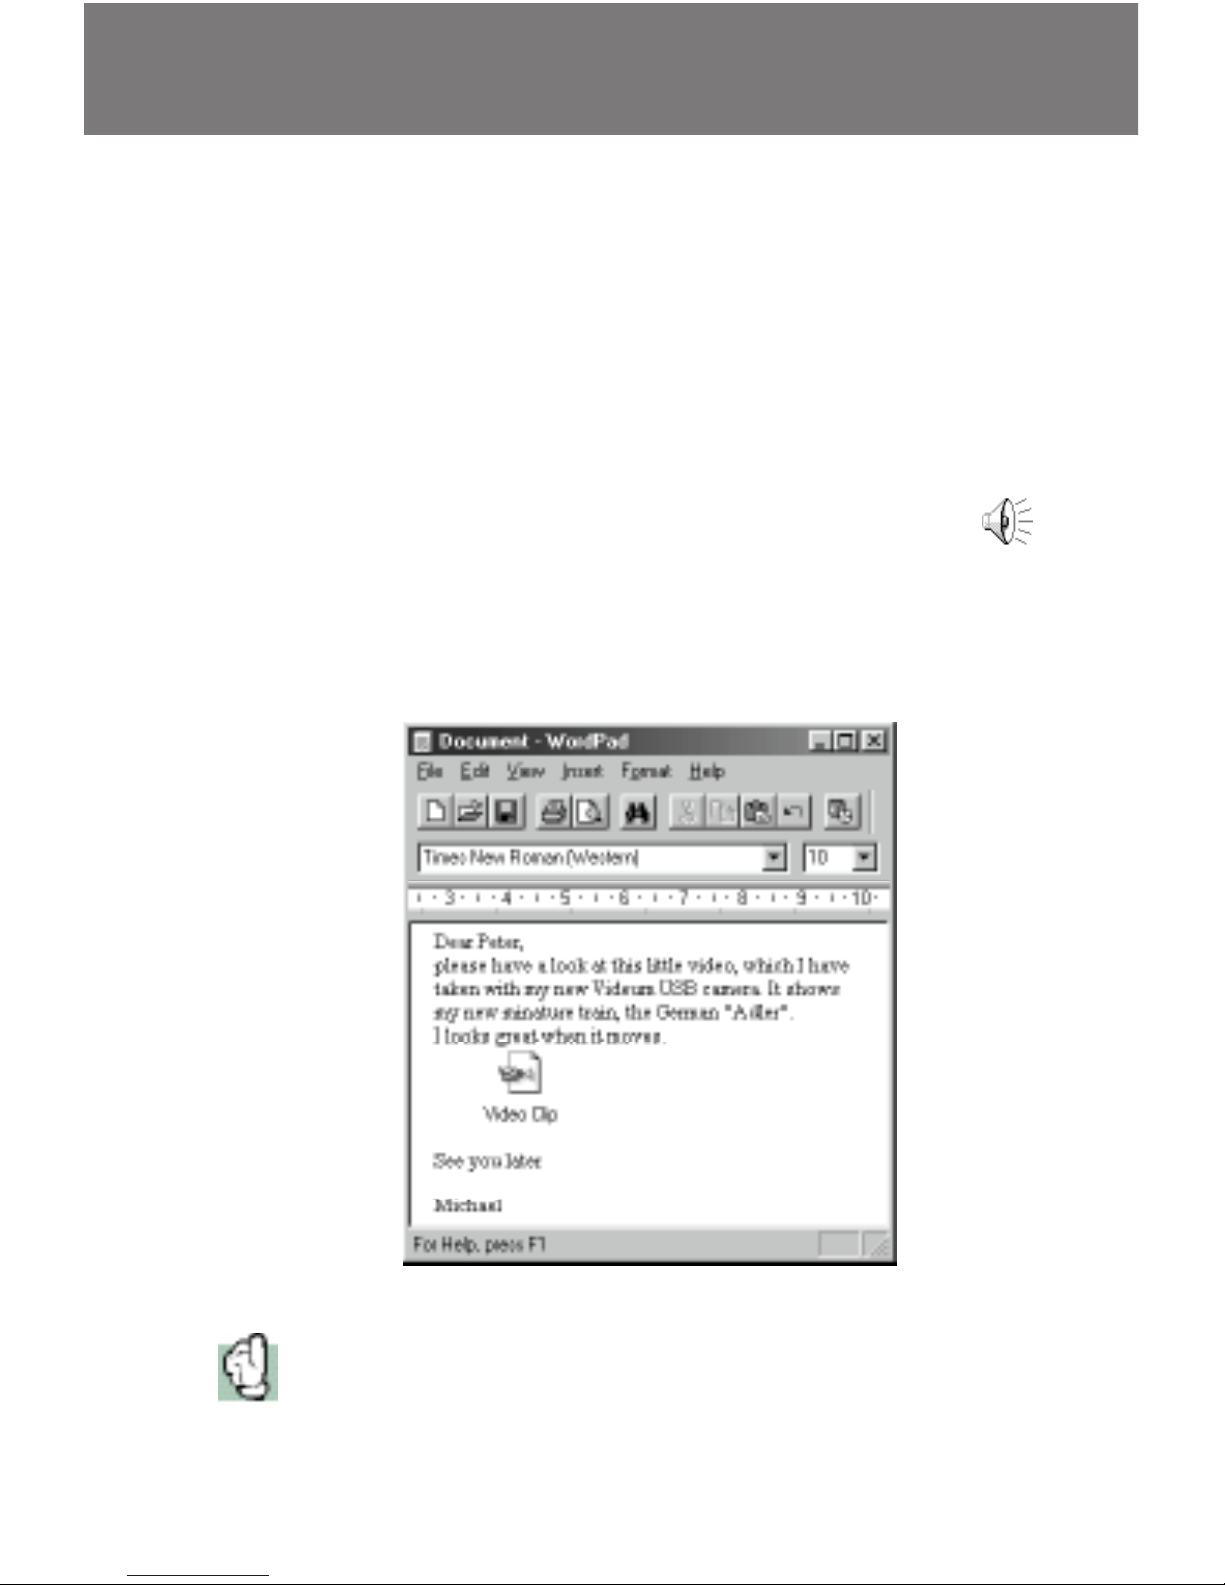
This video clip was
captured with the
Videum camera at
352x288 pixels.
Page 27
27
3. Drag the yellow clip icon from the Videum Capture
window and drop it on the document in which you
want it placed.
If you have transferred a video clip, a still image of the
beginning of the video is displayed in the document. You
can play the clip by double-clicking on the clip; use the
playback toolbar to control the clip.
When you drag-and-drop an audio clip, an audio clip
icon shown at the left is displayed. When still images
are inserted, they appear just as they were snapped.
For example, you can use audio and video clips to enhance
e-mail documents. Just open any clipboard-compliant application and drop the clip. Here is an example of what you can
do:
Starting with Version 2.7, you can directly capture still images from MS
Word, MS NetMeeting (including the WhiteBoard), MS Powerpoint, MS
FrontPage Editor, MS FrontPage Express using the Winnov Menu.
Page 28

28
Video Mail
By using the Send feature, you can now directly send your
video from the Videum Capture applet (See page 24).
Just capture your video in an appropriate format (you do not
want the file to be too big)
If you use .ASF for email format, we recommend the following
properties for your video :
- 6 to 10 fps, 8 fps would be the best,
- 8000 Hz Mono sound.
Select the Send feature in the File Menu. The video will be
compressed in the selected format. .ASF format for email is the
default format.
As soon as the compressed file is ready, a New Email window
will appear from your email application with the compressed
Video attached. Just enter your recipient’s address, the text
you want to add and click Send.
This feature is possible if your email application is Winodws
messaging compatible. If not, you just save your video and
send it as an attachment to your email as any other file.
Page 29

29
Video Telephony
Use the Internet to see your friends or relatives worldwide. Just
install Microsoft NetMeeting from the CD-ROM or any other
video conferencing application of your choice.
•
Connect to the Internet via a fast modem or ISDN.
•
Select an Internet Service Provider, who offers a good
quality of service (stable bandwidth) for audio without
dropouts
•
Use a headset to eliminate echo
•
Use a full duplex sound card (such as Videum AV), so that
you can speak and listen at the same time
•
Set the Video Quality control in Tools | Options.. | Video to
find the best compromise in frame rate and sharpness
Page 30
30
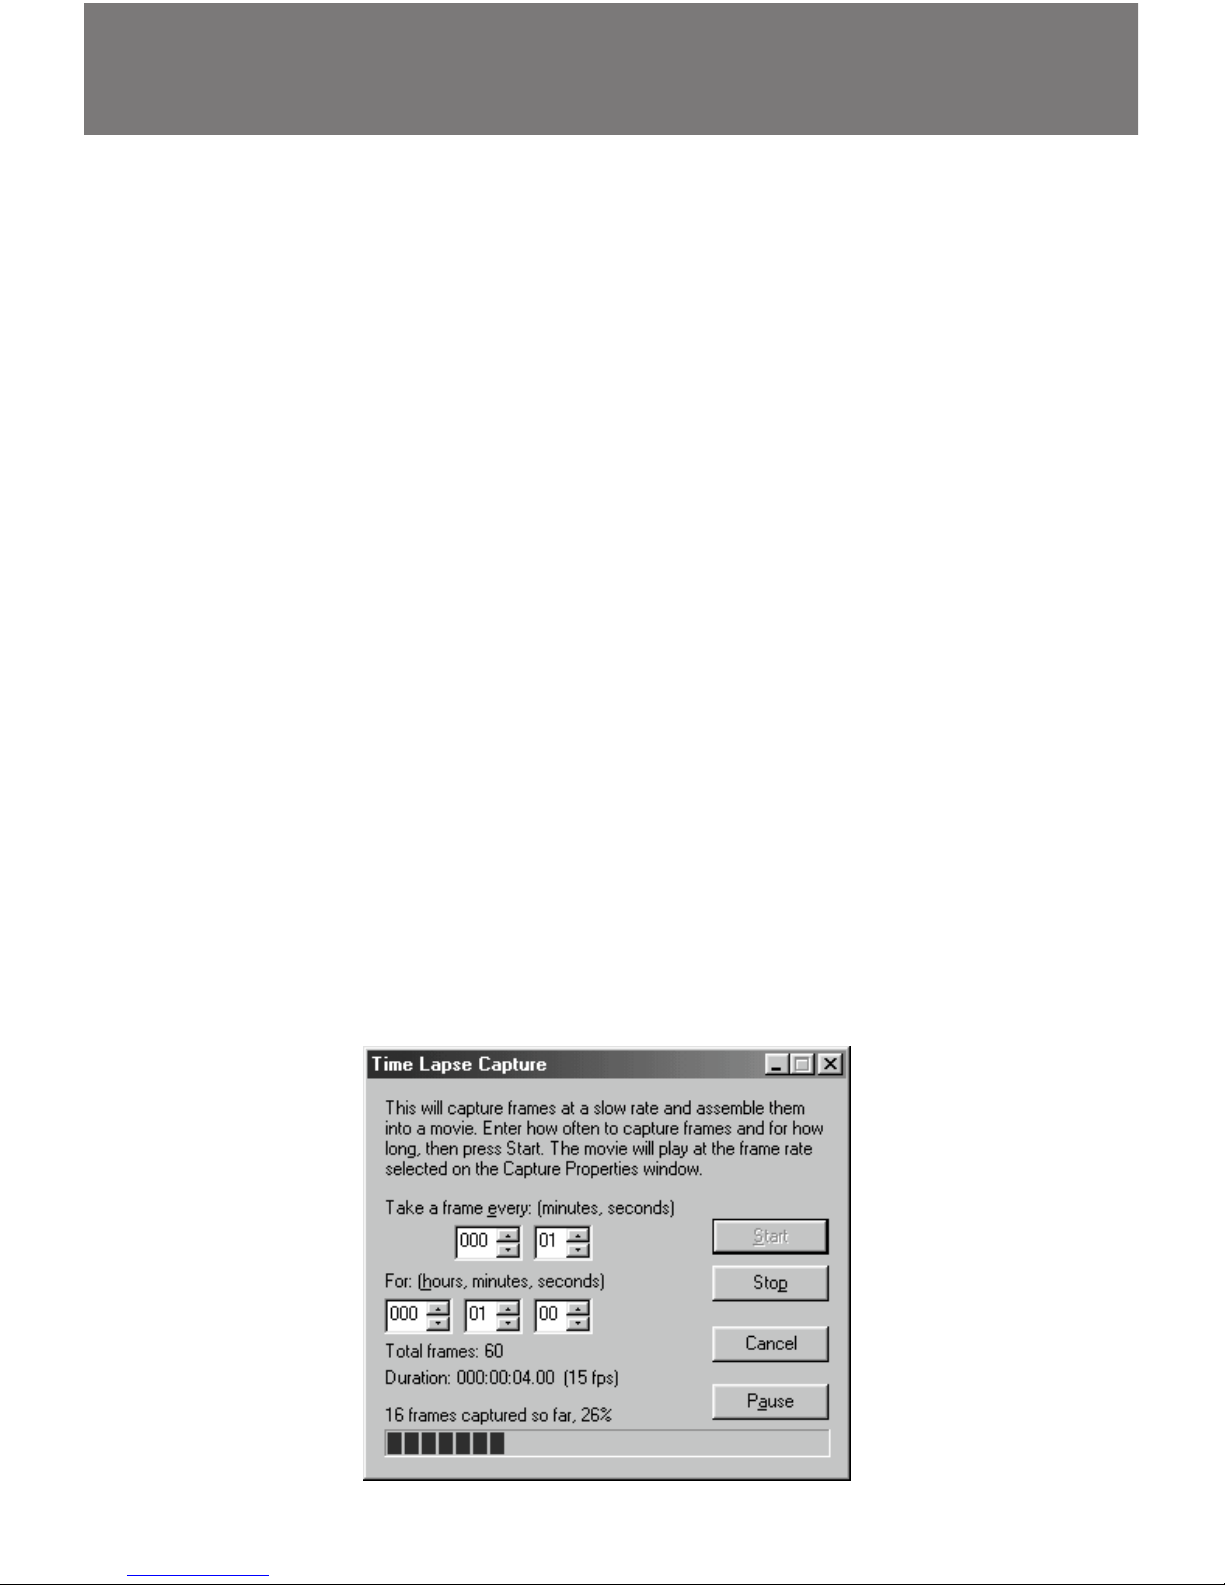
Use the Time Lapse feature to take snapshots at regular
intervals and assemble them into a movie.
To use the Time Lapse feature, follow these steps:
1. Choose Time Lapse from the Capture menu.
The Time Lapse dialog box is displayed.
2. Select how often you want to take snapshots and how
long you want this movie to record. Then click the Start
button to start recording a time lapse movie.
Once the movie is completed, a clip icon is available for
inserting into other documents.
Example
Take one frame every minute. If you have set the capture rate
to 15 fps, the final video will play at 15 fps. So, one hour (60
minutes = 60 frames) will play in 4 seconds. 10 hours will play
in 40 seconds.
With this technique you can capture very slow movements. At
replay time the sun will rise quickly or the flower will grow
visibly.
Time Lapse Video
Page 31

31
The Stop Motion feature allows you to take clips one frame at
a time and assemble them into a movie. This is useful for
claymation productions.
To use the Stop Motion feature, follow these steps:
1. Choose Stop Motion from the Capture menu.
The Stop Motion dialog box is displayed.
2. Click the Frame button each time you want to record a
frame.
3. Click the Done button when you are finished recording
frames for the stop motion movie.
Once the movie is completed, a clip icon is available for
inserting into other documents.
Example
Create your own animations easily. Position an object in front
of the camera. Click the frame button once, to take one image.
Move the object slightly, and take the second image. If the
capture rate (= replay rate) is set to 15 fps, 30 frames captured
create a 2 second video clip. Please have a look at the sample
file on the CD-ROM (3rdparty/winnov/sample).
Stop Motion for Animations
Page 32
32
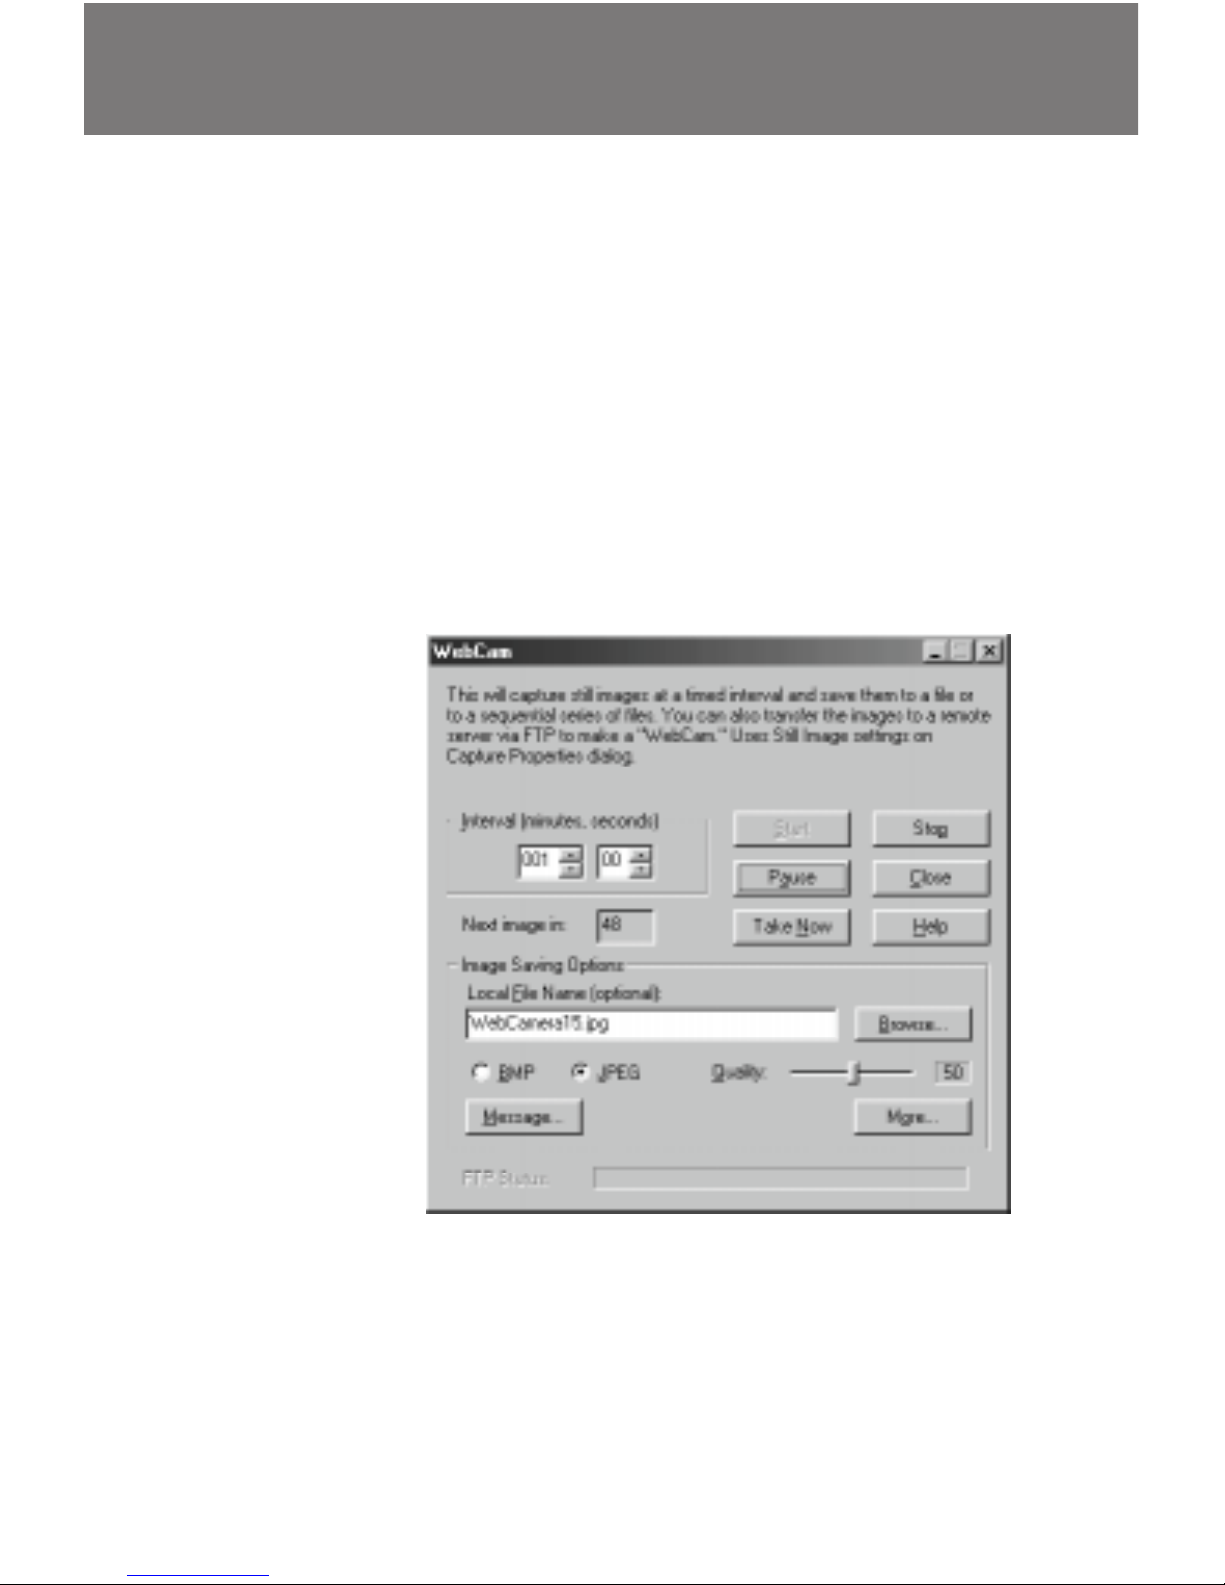
The WebCam feature allows you to capture video images at
regular intervals and save them to one or more files or transfer
them directly to your website using the Internet File Transfer
Protocol, FTP. You can set the capture interval and transfer
location according to your needs.
To capture images for Web pages, follow these steps:
1. Select WebCam from the Capture menu.
The WebCam dialog box is displayed.
2. Use the Interval to set the time between captures.
Click the up and down arrows to set the minutes and
seconds.
3. Use the
Browse
button or
type the
name of the
file to which
the captures
are to be
saved.
4. Select the
image type
and quality.
5. For more
image
saving
options, click on the More button. The Image Saving
Options dialog box is displayed. You can save each image to
a new file and set the characters you want appended to
each file name specified in the previous dialog. You can
also automatically FTP each image to a server you specify.
WebCam
Page 33
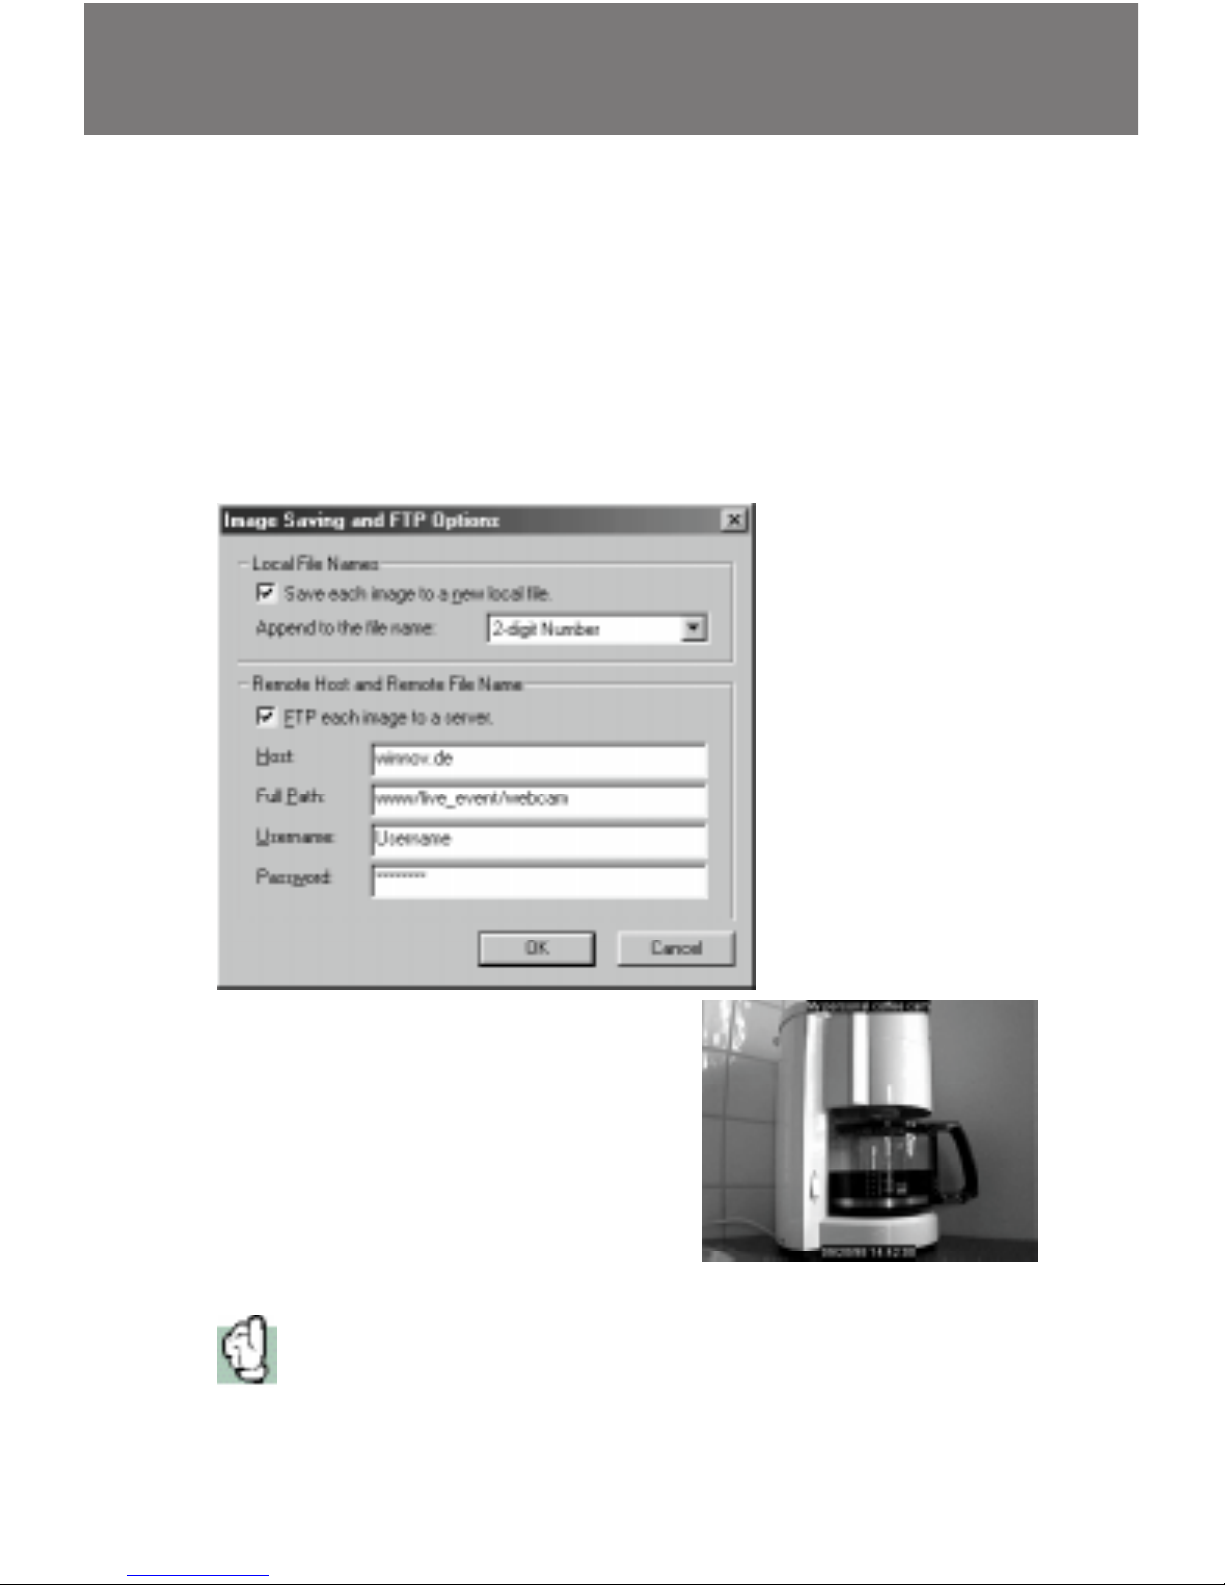
33
The classic webcam: students pointed
a camera at the coffee machine, to
save trips to the kitchen, if there is no
coffee left.
To use FTP, you must specify the host name, the path from
your login directory to the directory where you want the
image to be stored, the FTP user name and password.
6. Once all of the image saving options are specified, click
the OK button. Press the Start button to start capturing
images at the intervals specified or press the Take Now
button to perform an image capture immediately.
You can also start the webcam directly by running “wnvtool /wcam”.
A shortcut doing this action is available in the Winnov start menu.
Page 34
34
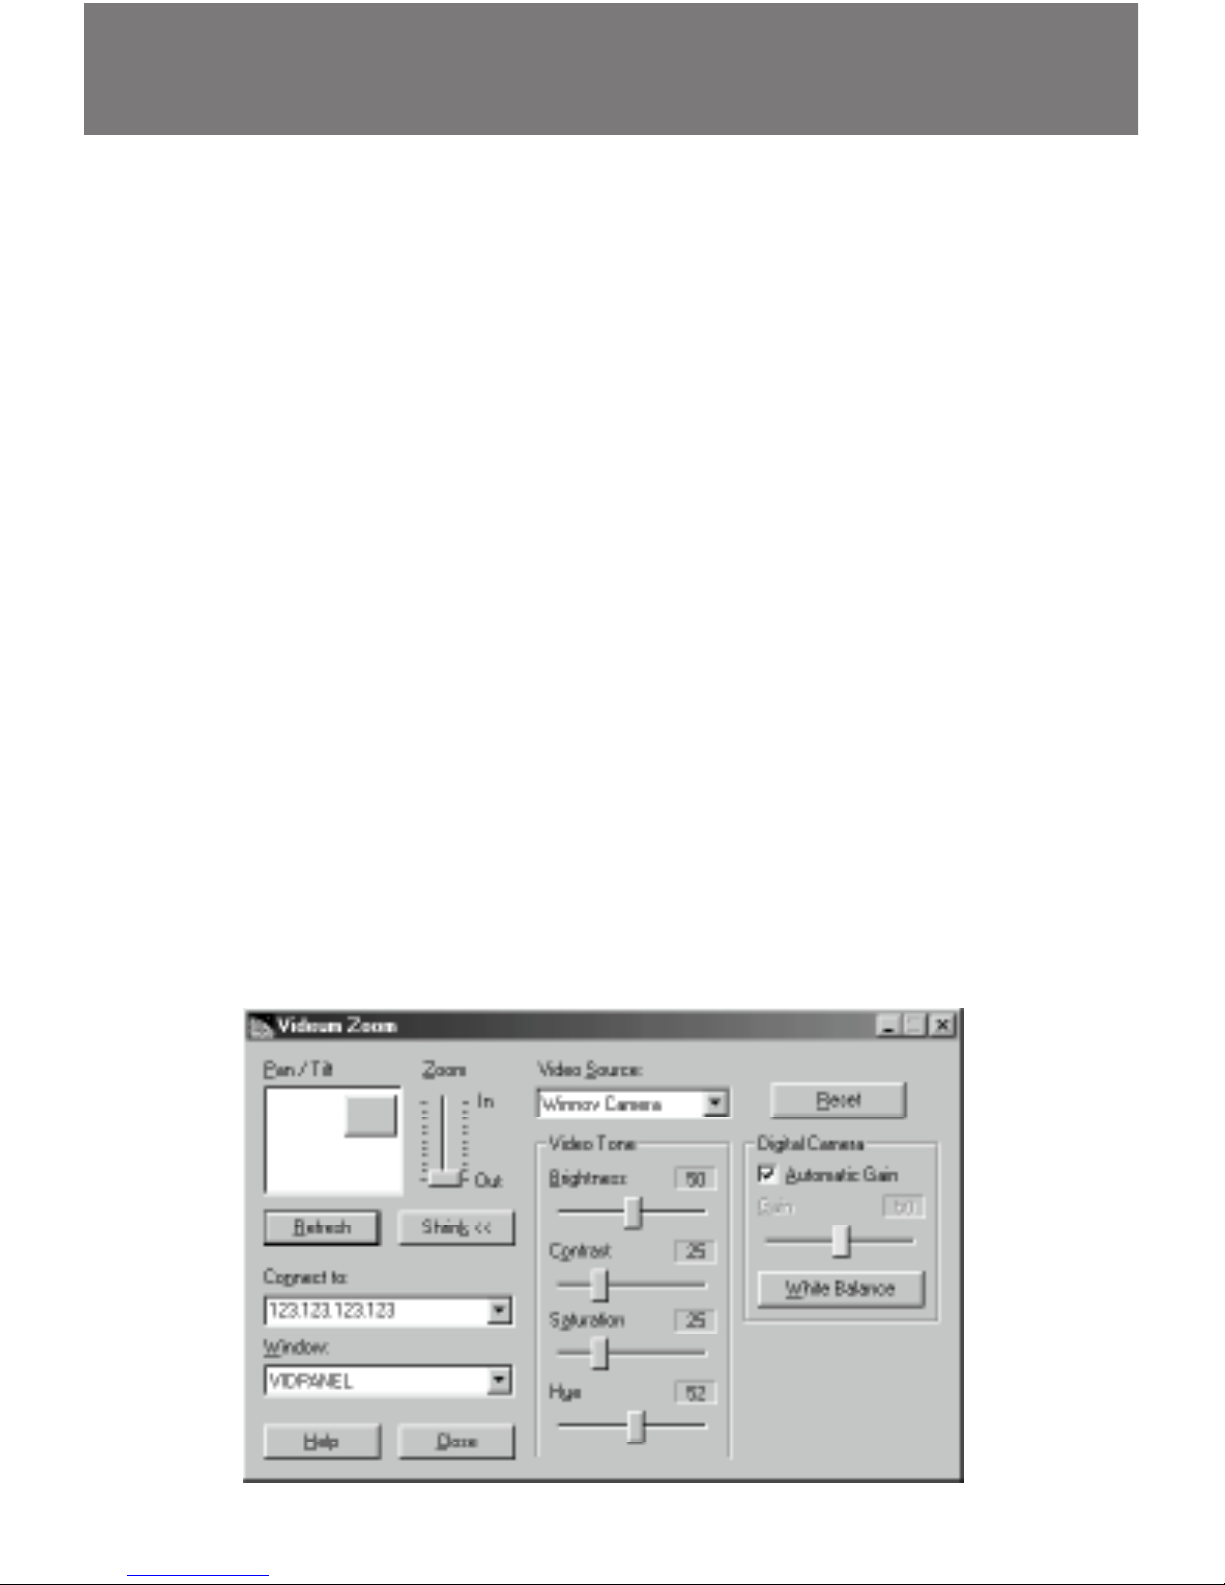
Remote Video Control
Videum Link allows you to pan and zoom both the local and
the remote camera, which is especially useful during video
conferencing.
Local Video Control
1. Set the image size of your local application to a size
smaller than 320x240.
2. Select the local application under Window.
Remote Video Control
1. Start Videum Link on the remote system.
2. Enter the IP address of the remote system and hit enter.
Both Videum Link applications now connect via IP. To determine your IP address, run winipcfg from the Start | Run
menu (Windows 95) or run ipcfg (Windows NT).
Below the IP address 123.123.123.123 was entered.
3. Now you can control all video windows of the remote
system. You need a communication program such as
NetMeeting to see the remote video window.
Page 35

35
Insignia
The Insignia application allows you to add an existing insignia
to your video window or to create a new insignia for display
on your video window. You can create an insignia of your
company logo and display it in black and white in any corner
of the video window.
The insignia is pasted into any local video window at the fixed
size specified.
1. Close all your Video applications,
2. Start Videum Insignia
3. Select an existing insignia from the list or
4. Click the Create New button or
5. Select an existing insignia and click the Edit button
Create a new insignia or edit an existing insignia
1. Select a name and dimensions for the insignia
2. Use the drawing tools to create or edit the insignia
3. Click Save to save it
Page 36

36
Videum Configure
The Videum Configure application allows you to set video,
audio, and power characteristics. After installation, you can run
the configure program or you can launch this program at any
time from the Videum menu to change your configuration.
VideumCam: only one video input, so only one preview
window.
Videum VO/AV: one video window for each of the three
video inputs.
1. Select the default input.
This input is selected when an application is started for the
first time.
2. Select the default audio source to associate with that
input
This feature is convenient for communication applications:
audio inputs switch automatically, when another video
input is selected.
Page 37
37
Settings selected in Step #1 and 2 are applied to all the boards on your
system.
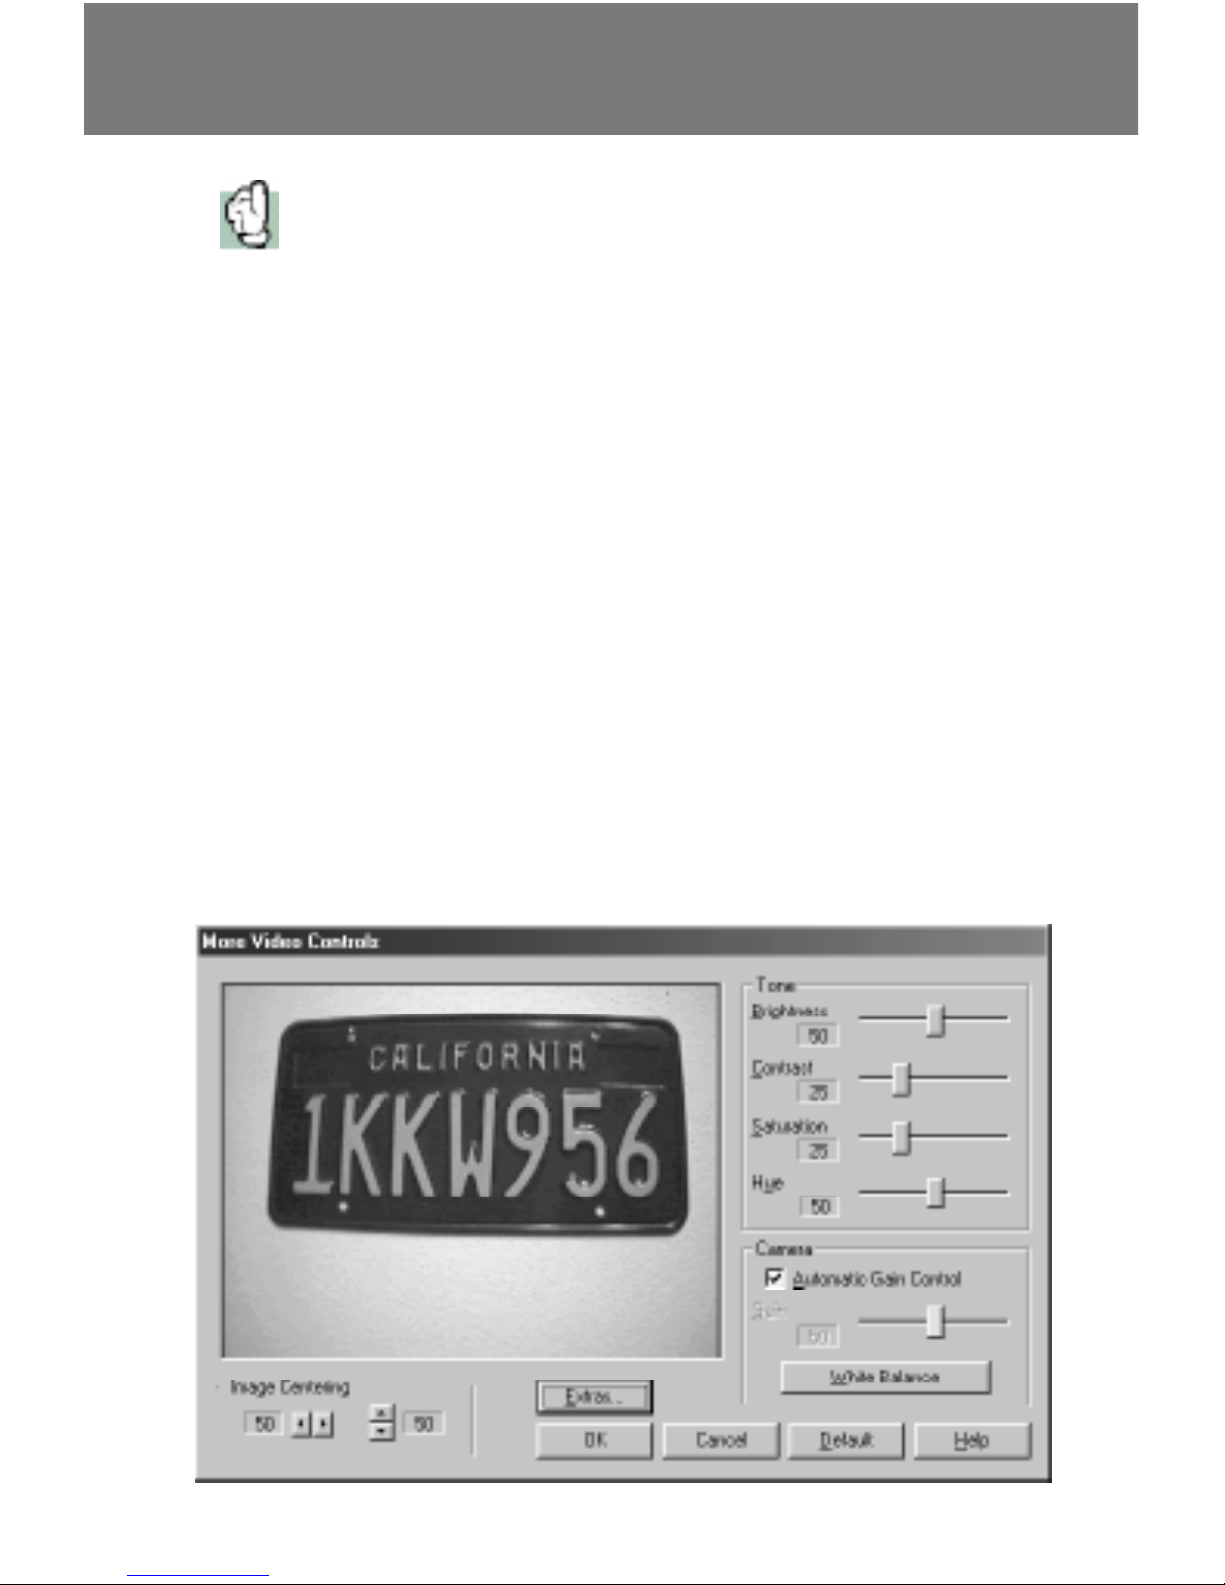
3. Click More to set the video parameters
4. Hue: this control is only used for NTSC cameras. For PAL it
should stay at the default setting of 50. Press the Default
button, to reset the value to 50.
NTSC cameras and VideumCam: set Hue to get the most
realistic color representation
5. Automatic Gain Control: the light sensitivity of the
VideumCam camera can be automatically controlled by
software. Gain of the Winnov Video Camera is controlled by
switches on the back of the camera.
6. Extras: experimental video settings. Smooth video setting
only available on VideumCam products.
7. Power Management: use this dialog box to set the time
intervals for powering down the audio, video and interface
hardware (VideumCam Traveler only).
Page 38

38
Multimedia
The Videum products are fully compatible to all Video for
Windows applications. You find more applications on the CDROM or visit our 3rdparty application page at our website.
WebCam on your website
Easily set up a web camera. Just enter a few parameters in the
Videum Capture application, set up the Internet connection,
and you see live images of the camera on the web.
Video on demand
For real Streaming Video on your website, use the RealEncoder
to compress the video in real time (fast Pentium or Pentium II
required). Upgrade to the RealPublisher, to create HTML pages
with video automatically. FTP the HTML page and the compressed video to your website, and any standard HTML server
will stream your video into the Internet.
Create animations
Use the Stop Motion feature of Videum Capture to create
animations easily. Please have a look at the sample animation
dolls.avi on the CD-ROM at 3rdparty/winnov/sample.
Create panoramic images
Capture an AVI file to disk while you are rotating the camera.
Use VideoBrush Panorama (demo version on CD-ROM), to
automatically create a 360 degree panoramic image. Great for
indoor and outdoor use. Check www.videobrush.com.
Page 39

39
Security
Face recognition
Let the computer recognize your face, to gain access to your
PC, and restrict the access of other users. Please find sample
applications on the CD-ROM or check www.visionics.com and
www.miros.com.
Motion detection
Set up the camera and a motion detection application such as
Gotcha (www.prescientsys.com), to protect your office, or your
home. Specify hot areas. Gotcha activates capturing as soon as
motion is detected in those areas defined. Video clips are
stored on hard disk, which document any intrusion.
The future in personal security
Watch for future integration of video communications and
home security, so that you can see from distance, if an intruder
enters your property. Silent alarms can be broadcasted over
the Internet.
Page 40

40
ActiveX Controls
Winnov´s ActiveX Software Development Kit (SDK) is now part
of the Videum 2.x software. A complete set of 32-bit ActiveX
controls (formerly OCXs) is now included. Just install the
software, but make sure that you use the Custom install to get
the SDK help files.
Support for ActiveX Controls and any programmatic features
or issues will be provided ONLY through the Winnov
Newsgroups. Please visit our website for more information.
Now you can easily access our capture functions to use them
in your application. You can use virtually any programming
environment: Visual Basic, Visual C++, Delphi and many more.
Also Microsoft Office97 includes Visual Basic for Applications
(VBA).
You will find Visual Basic samples on the CD-ROM at
Samples.vb.
Page 41

41
Troubleshooting
No video image
If you have no video display (a black video window):
•
Make sure that the camera is connected and turned on.
•
Select the right video input. Use Configure to see all three
video inputs.
•
No video in NetMeeting: you installed NetMeeting before
installing the Videum software. Deinstall NetMeeting, delete
the NetMeeting directory, reboot, and reinstall NetMeeting.
Scrambled video
If your video display is scrambled or the Video Control Panel
shows video but not your application:
•
Verify the NTSC/PAL setting (in Europe: select PAL)
•
Verify that the video format is compatible with your application.
•
Try uncompressed capture (YUY2 or RGBT).
Speckled or grainy video
Your display is set to 256 colors or less. Set it to 16-bit or 24-bit
color.
Video capture does not work
For best performance set the compression to WNV1. Capture is
slow at the first time, because the buffers and DLLs need to be
loaded. Poor capture performance: defragment your hard disk
or select a smaller image size. You should pre-allocate a bigger
capture file using the Video-property dialog in Videum Capture.
No audio
Multiple sound cards are supported in parallel. The Videum AV
and the VideumCam AV integrate an audio in and out device,
a second sound card in addition to the sound card, which may
already be installed.
Page 42

42
Troubleshooting
•
Use the Multimedia control panel to select the sound
device for recording and playback.
•
Open Audio Panel from the Videum menu to select the
audio input and output of the Videum board. Make sure the
audio output is not muted.
•
Play a .WAV file by double clicking it to verify the sound
output works.
Audio recording issues
•
Verify that the audio input cable is connected securely to
the Videum board. A mono audio source is only heard from
the left speaker.
•
If you have another sound card please use the Multimedia
control to select the recording device.
No full-duplex sound
Many standard sound cards do not support full-duplex
operation (especially under Windows NT). Videum supports
full-duplex audio under all conditions.
•
Select Videum as audio recording device.
•
Select either Videum or your existing sound card as audio
playback device.
Error message: Capture card not present
If you get this error message or if the device driver shows a
conflict, you have most likely an address conflict.
•
PnP cards: the I/O (Videum VO/AV) or memory
(VideumCam) address is set automatically. Try changing the
address, see the ReadMe file for more information. The ISA
cards and the PC Card do not use any interrupt or DMA. So
Page 43

43
there cannot be an interrupt or DMA conflict. The PCI cards
use just one shared interrupt (none on NT 4.0 or Windows
2000).
•
Non PnP cards: the Videum VO or AV ISA cards can be set
to one of 6 addresses (140, 150, 160, 8140, 8150, or 8160
Hex). Try one of the other addresses. With some SCSI
adapter cards and SCSI integrated on the motherboard, the
I/O conflict cannot be resolved. Use a PnP card instead. The
non PnP cards do not use any interrupt or DMA.
Echo during video conferencing
You hear yourself talking with a delay of about a second. The
person you are calling uses a loudspeaker. Your voice is then
picked up by the microphone and transmitted back to you.
Please ask the person you are calling to use a headset or a
loudspeaker/microphone combination with echo cancellation.
Please use a headset yourself, too.
You need help ?
If you have not found any help on the previous pages, please
have a look at the ReadMe file on the floppy disk or CD-ROM.
Also, please have a look at our support pages on the Internet.
Or visit our news groups. You can reach our technical support
at:
E-mail: support@winnov.com
Tel: (408) 744 9777
Fax: (408) 744 0174
Page 44

44
Windows 95/98 Device Manager
Windows installs one device driver for the Videum products:
Product Device Manager
Videum VO and AV (non PnP) Winnov Videum
Videum AV PnP Winnov PnP Videum
Videum VO and AV (PCI) Winnov PCI Videum
VideumCam Desktop ISA MediaPlug ISA Adapter
VideumCam Desktop PCI Winnov PCI Videum
VideumCam Traveler (PC Card) MediaPlug PCMCIA Adapter
Only one driver should be installed at a time. If you upgrade
from a non PnP to a PnP card, manually delete the old device
driver, before you install the new PnP card.
Page 45

45
Technical Specifications
Winnov Video Camera (analog)
Part Number NTSC 65-0006-00
PAL 65-0007-00
Active Pixels: 512 (H) x 582 (V), 1/4“ CCD, 300000 pixels
White balance: automatic and manual
Microphone: integrated
Lens: 3.8mm, f2.0 (< 10 lux)
Distance: 2mm to infinite
Dimensions: 77x84x62 mm (wxlxh)
Weight: 234 gr. incl. 2 m cable
Power consumption: 5 V, < 2.5 Watts␣ ␣ ␣
␣
VideumCam Camera (digital)
Active Pixels: 250,000 pixels
White balance: automatic and manual
Microphone: integrated
Lens: 3.6mm, f1.5 (< 10 lux)
Distance: 2mm to infinite
Dimensions: 60x96x28 mm (wxlxh)
Weight: 133 gr. incl. 0.7 m cable
Power consumption: 5 V, < 1.5 Watts␣ ␣ ␣
Video
Video formats: RGB8 8-bit RGB (256 colors)
RGBH 16-bit RGB (32,000 colors)
RGBT 24-bit RGB (16.8 million colors)
WINX Interframe Compression, 16:1 to 48:1
WNV1 Hardware Compression, 1:1 to 12:1
WPY2 Software Compression, 8:1 to 14:1
YUY2 YUV, 4:2:2, 16-bits/pixel
YV12 YUV, 4:2:0, 12-bits/pixel
YVU9 YUV, 4:2:0, Intel Indeo® Raw
Page 46

46
Capturing: ISA: 352x288 pixel (CIF), 25 fps (PAL), 30 fps (NTSC)
PCI: 640x480 pixel, 25 fps (PAL), 30 fps (NTSC)
Full screen preview with Direct-Draw graphic card
Remote control: Control via IP: brightness, hue, saturation, pan, tilt,
zoom, video input, etc.
File format: .AVI
Still images
Capturing: 704x576, 16.8 million colors (Videum VO and AV)
640x480, 16.8 million colors (VideumCam)
File format: .BMP and .JPG
Audio
Audio: 8 or 16 bit, mono or stereo
Frequences: 8 kHz (ideal for communications)
16, 24 and 48 kHz
11.025, 22.050 and 44.100 kHz (for multimedia)
Synchronisation: Audio and video hardware synchronized
File format: .WAV
4 audio inputs: CD, Line, Aux, and MXC
1 audio output: 4 Watts
Audio Connector Specifications
Connector Characteristics
Line/Mic In 3.5 mm stereo mini-jack for dynamic or electret bias
microphone
Aux In 3.5 mm stereo mini-jack with 1 V
p-p
and 10 kΩ input
impedance
CD Audio In 5-pin connector with stereo line level inputs
Pin 1,3,5 Ground
Pin 2 Left audio
Pin 4 Right audio
Audio Out 3.5 mm stereo mini-jack, 4 Watt RMS per channel to
4 Watt speakers (8 or 16 Ω only)
␣
Page 47

47
Video Connector Specifications
Connector Characteristics
Composite RCA jack with 1 V
p-p
and 75 Ω input impedance
MXC 8-pin Mini-DIN (audio, video and power)
pinout in the table below
S-Video 4-pin mini-DIN with 75 Ω input impedance
2 video signals: luminance and chrominance
no audio (connect audio to Line/Mic or Aux In)
MXC Connector Pinout
Pin Assignment
1 I
2
C SCL (control/data bus)
2 I
2
C SDA (control/data bus)
3 Ground
4 +5V DC at 500mA (unregulated from PC motherboard)
5 Ground
6 Line level audio (from camera microphone)
7 +5V DC at 500mA (regulated from Videum card)
8 Composite video (from camera)
 Loading...