

Page 1
User Guide
Version 3.3.030
Updated 04/17/2008
Page 2

Cbox 3 User guide V. 3.3.030
This guide contains the following main topics:
1. About this User Guide___________________________________________________________________ 4
1.1. Copyright __________________________________________________________________________ 4
1.2. Disclaimer _________________________________________________________________________ 4
1.3. Trademarks ________________________________________________________________________ 4
2. Product Description ____________________________________________________________________ 5
3. Scope of Delivery _______________________________________________________________________ 6
4. Specifications __________________________________________________________________________ 7
5. Safety Instructions______________________________________________________________________ 8
5.1. System Power ______________________________________________________________________ 8
5.2. Electrostatic Discharge (ESD) and ESD Protection ____________________________________ 8
6. Installation Notices _____________________________________________________________________ 8
7. Getting Setup __________________________________________________________________________ 9
7.1. Rear view _________________________________________________________________________ 10
7.2. Audio/Video Inputs and Outputs ____________________________________________________ 10
7.2.1. VGA (RGB) Input _____________________________________________________________ 11
7.2.2. Dual Head VGA Output _______________________________________________________ 11
7.2.3. Audio Monitor Output ________________________________________________________ 12
7.2.4. Audio Out for Room Sound System ___________________________________________ 12
7.3. Connecting Accessories ___________________________________________________________ 13
7.3.1. Mouse and Keyboard ________________________________________________________ 13
7.3.2. Phantom Power Microphone _________________________________________________ 13
7.3.3. Camera _____________________________________________________________________ 13
7.3.3.1. Using Video Cameras ________________________________________________________ 13
7.3.3.2. Using a Sony PTZ Camera____________________________________________________ 14
8. First Time Start of your Cbox 3 _________________________________________________________ 15
8.1.
Automatic Creating Backup Image__________________________________________________ 15
8.2. Microsoft Windows Mini-Setup _____________________________________________________ 15
8.3. First Windows Start ________________________________________________________________ 15
9. Application Software Overview _________________________________________________________ 16
10. Using CBOX Application _______________________________________________________________ 17
10.1. Getting Started ____________________________________________________________________ 17
10.1.1. Logging In __________________________________________________________________ 17
10.1.2. How to Begin a New Session _________________________________________________ 18
10.1.3. Audio and Video Settings_____________________________________________________ 19
10.1.4. Operator / Manager Information ______________________________________________ 21
10.1.5. SMTP Server Configuration___________________________________________________ 23
10.1.6. My Information ______________________________________________________________ 25
10.1.7. Use Imports/Exports_________________________________________________________ 26
10.1.8. Session Preferences _________________________________________________________ 27
10.1.8.1. Media Stream Preferences __________________________________________________ 27
10.1.8.2. Still Image Preferences _____________________________________________________ 28
10.1.8.3. Custom Properties _________________________________________________________ 29
-2-
Page 3

Cbox 3 User guide V. 3.3.030
10.1.8.4. Players ___________________________________________________________________ 30
10.1.8.5. Web API Acess ____________________________________________________________ 31
10.2. Capturing your Experience _________________________________________________________ 32
10.2.1. Starting Capture and Preview ________________________________________________ 32
10.2.2. Cbox 3 Operator Interface____________________________________________________ 33
10.2.3. Recording Your Capture _____________________________________________________ 34
10.2.4. Checking the Audio Levels ___________________________________________________ 34
10.2.5. Adjusting the Video Levels ___________________________________________________ 35
10.2.5.1. How to Set up your Broadcast and Archive Monitoring? ________________________ 35
10.2.5.2. Video Control / PTZ Control _________________________________________________ 37
10.3. Watching your Experience__________________________________________________________ 40
10.4. Editing your Session _______________________________________________________________ 42
10.4.1. Add an Event ________________________________________________________________ 42
10.4.2. Trim ________________________________________________________________________ 43
10.5. Broadcast your Recording _________________________________________________________ 44
10.5.1. Make a Reservation__________________________________________________________ 44
10.5.2. Live Broadcasting Configuration______________________________________________ 46
10.6. Publishing Your Recording _________________________________________________________ 49
10.6.1. Web Publishing ______________________________________________________________ 49
10.6.2. Publishing Recordings to CD/DVD ____________________________________________ 51
10.6.3. Custom Publishing Manager__________________________________________________ 51
11. Trouble Shooting ______________________________________________________________________ 52
12. System Updates _______________________________________________________________________ 53
13. How to Live Broadcast and Publish Online ______________________________________________ 54
Configuration 1 ____________________________________________________________________ 54
Configuration 2 ____________________________________________________________________ 54
Configuration 3 ____________________________________________________________________ 54
Configuration 4 ____________________________________________________________________ 55
13.1. Creating a New User (Web Server and Streaming Server) _____________________________ 55
13.2. Creating a Shared Directory (Web Server and Streaming Server) ______________________ 57
13.3. Web Site Setup (Web Server) _______________________________________________________ 63
13.4. Windows Media Services Configuration (Streaming Server) ___________________________ 67
13.5. Creating an On-Demand Publishing Point (Streaming Server) _________________________ 73
13.6. Live Broadcasting Configuration (Cbox 3) ___________________________________________ 79
13.7. Web Publishing Configuration (Cbox 3)______________________________________________ 87
14. Glossary ______________________________________________________________________________ 91
15. Contact Technical Support _____________________________________________________________ 95
16. Index Figures__________________________________________________________________________ 96
-3-
Page 4

Cbox 3 User guide V. 3.3.030
1. About this User Guide
This manual will guide you through the basic hardware setup of the Cbox 3 appliance. It
contains safety and hardware installation instructions.
Further information regarding the Cbox 3 application can be found in the help menu and the
online help system.
1.1. Copyright
No part of this document may be photocopied, stored in a retrieval system, transcribed, or
reproduced by any method, be it mechanical, electronic, photographic, or otherwise, without
prior written permission from Winnov.
This appliance is protected by copyright law and international treaties. Unauthorized
reproduction or distribution of this program, or any portion of it, may result in severe civil and
criminal penalties, and will be prosecuted to the maximum extent possible under the law.
©
Copyright
2008 by Winnov LP. All rights reserved.
1.2. Disclaimer
Winnov shall not be liable for any incidental or consequential damages resulting from the
performance or use of this product.
Winnov makes no warranty of any kind with regard to this material, including, but not limited to,
implied warranties of merchantability and fitness for a particular purpose.
Winnov continuously improves and updates the products described in this document to suit the
needs of our customers. The contents of this document and the specifications of the hardware
devices and software are subject to change at any time without notice.
1.3. Trademarks
Videum is a registered trademark of Winnov.
Cbox 3 and Cbox are trademarks of Winnov.
Intel and Pentium are registered trademarks of Intel Corporation.
Microsoft and Windows are registered trademarks of Microsoft Corporation.
Other trademarks mentioned in this document are owned by their respective companies.
-4-
Page 5
Cbox 3 User guide V. 3.3.030
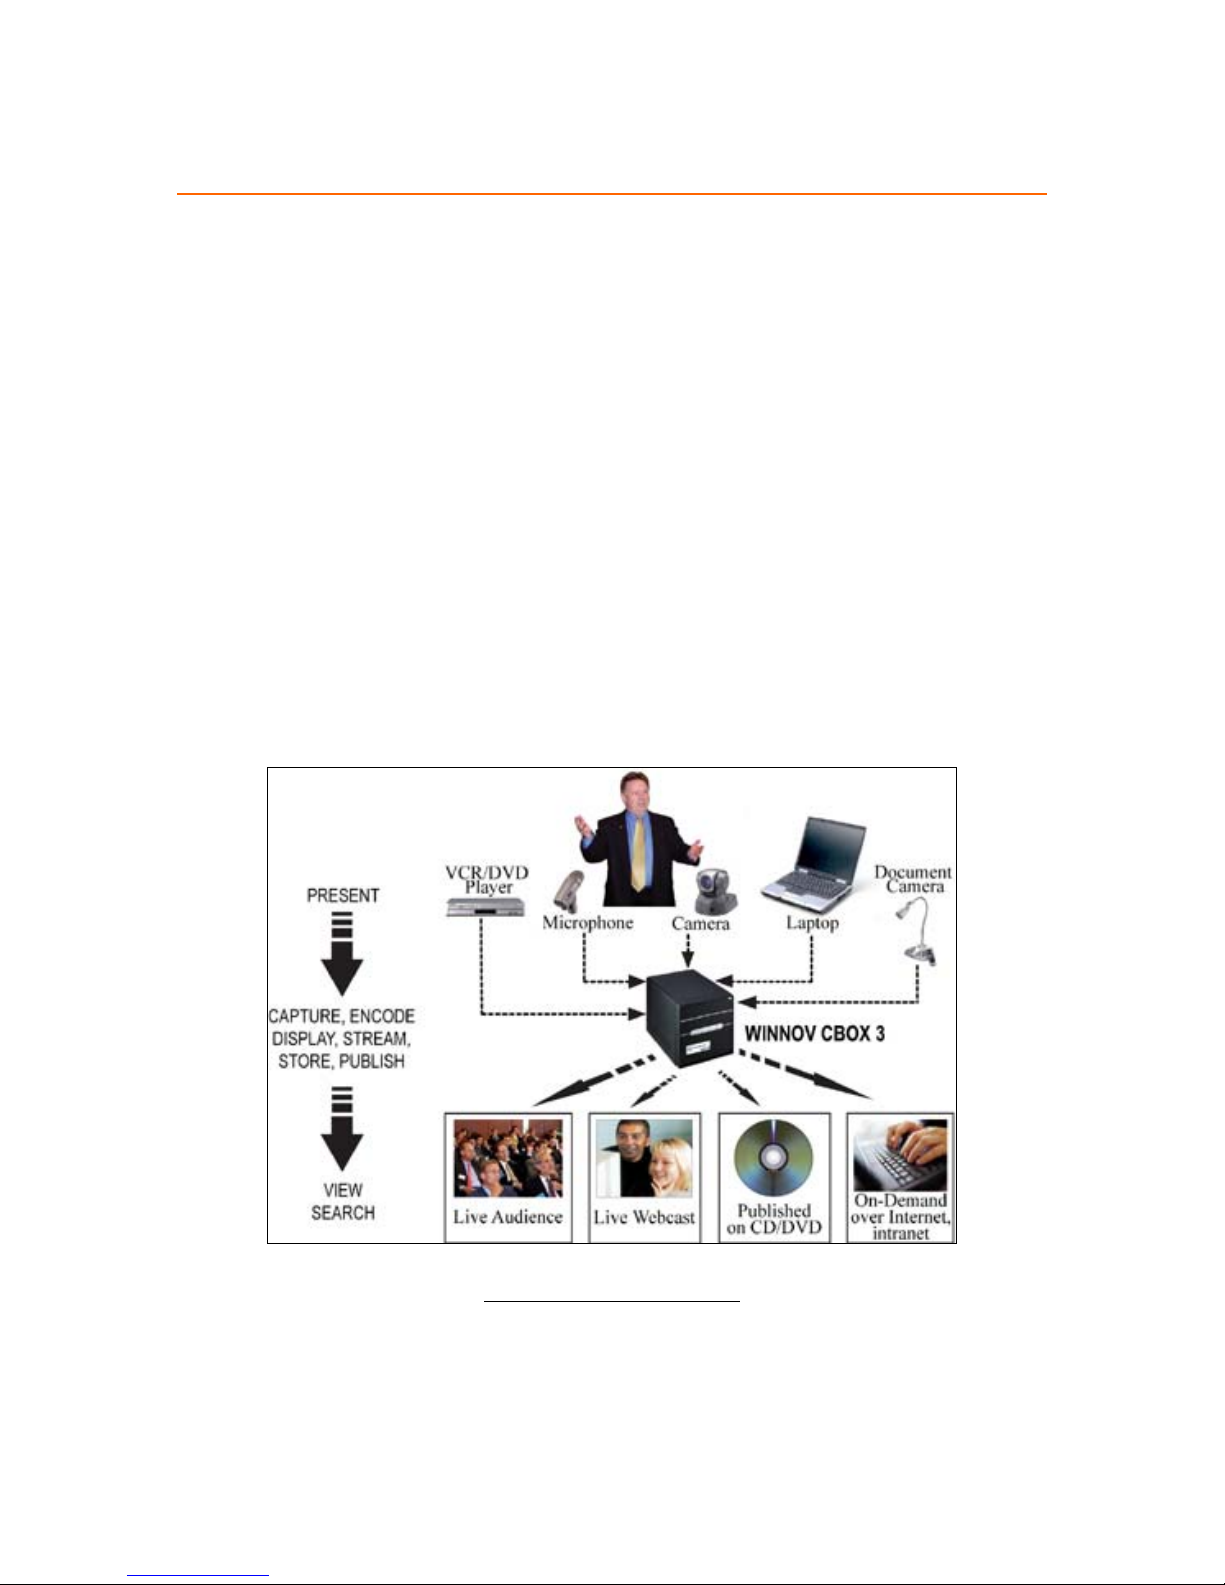
2. Product Description
Cbox 3 is a powerful presentation recording integrated hardware and software appliance that
will dramatically enhance the effectiveness and reach of any educational, corporate, or public
event communication or knowledge exchange by capturing and streaming real time rich media
presentations with DVD quality video and high fidelity sound.
Cbox 3 is ideal for use by educational institutions, training organizations, seminar and event
organizers, as well as by enterprises.
Companies can deploy Cbox 3 in meeting and conference rooms or bring it to off-site events, to
record and stream live and on demand executive briefings, sales training sessions, product
demonstrations, global announcements, web and marketing communications, employee.
Cbox 3 accepts and synchronizes feeds from any A/V equipment already available: microphone,
camera, VCR/DVD, document camera, video conferencing equipment.
Cbox 3 is able to capture a dynamic computer screen output as a video stream, allowing the
presenter to use any live computer application. Unique to Cbox 3 is its ability to perform text
recognition on the RGB source for automatic text extraction and slide detection.
-5-
Figure 1 - What to do with a Cbox 3
Page 6
Cbox 3 User guide V. 3.3.030
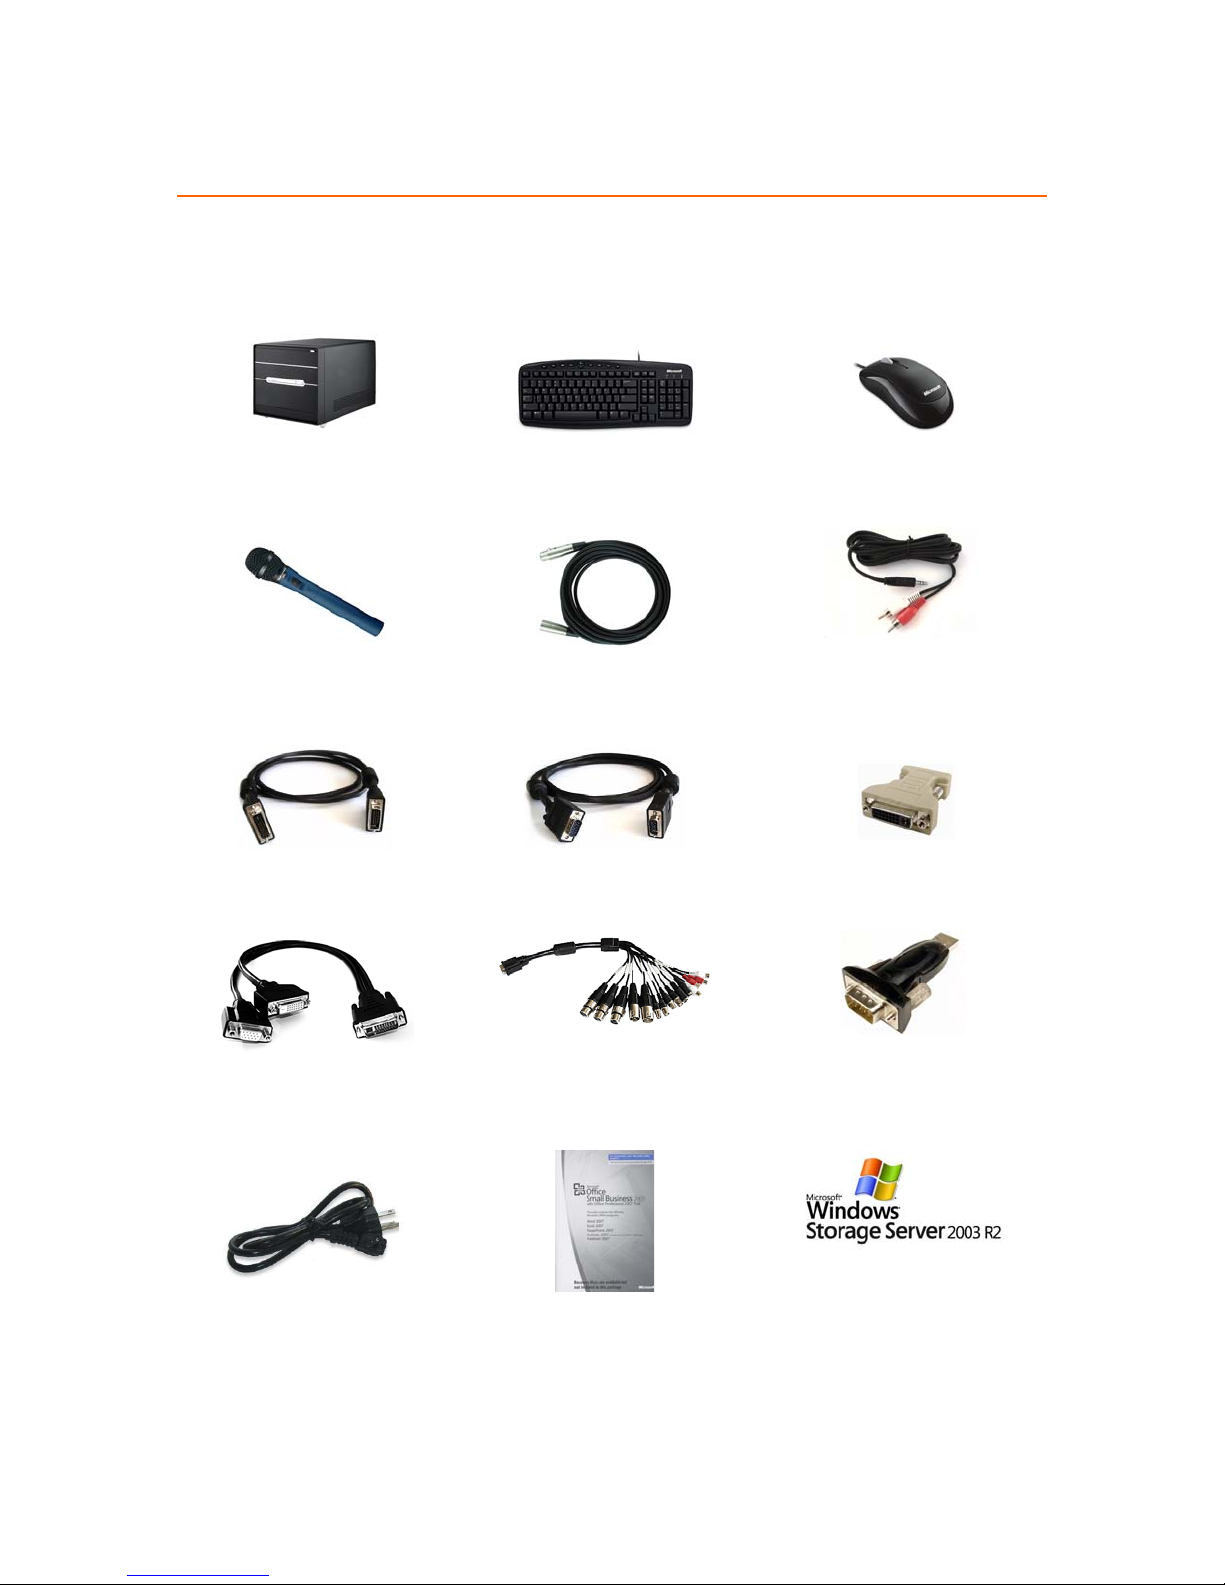
3. Scope of Delivery
Please make sure, that your Cbox 3 shipment contains the following devices, cables and
software licenses:
CBOX3 Platform USB Keyboard USB Optical Mouse
Microphone XLR Cable Male/Female Audio Adapter cable
VGA cable (DVI-D) VGA cable (HD15 M/M) DVI-I to HD15 Adapter
VGA Splitter cable AV Adapter cable USB to Serial Adapter
AC Power cord
-6-
(see bottom of CBOX3)
MS Office Small Business 2007
Software Key
Figure 2 - Cbox3 Shipment Content
MS Windows Server 2003 Software
Key
Page 7

Cbox 3 User guide V. 3.3.030
4. Specifications
VGA Input
Analog RGB & DVI up to 1600x1200 @60Hz
Video In
2 S-Video
Composite video
Video Out
Dual DVI (VGA with adapter)
Audio In
1 Microphone XLR balanced
2 RCA Stereo unbalanced
1 XLR Stereo balanced
Audio Out
1 Stereo XLR balanced
Front Panel I/O
2 USB 2.0 ports
1 Headphone-In
1 Microphone-In
Firewire/IEEE 1394 port
Back Panel I/O
Analog RGB & DVI up to 1600x1200 @60Hz
Processor
Intel Core 2 Quad Q6600
Memory
2GB total (1GB per DIMM)
Storage
500 GB 3.0GB/s.
Optical Drive
16X DVD/CD R/RW
Dimensions
WxLxH 7.9 in. x 12.2 in x 7.3 in
200mm x 310mm x 185mm
Weight
12lbs; 5.5kg
Power 250W
Input: 100-240V AC
Figure 3 - Specifications
-7-
Page 8

Cbox 3 User guide V. 3.3.030
5. Safety Instructions
5.1. System Power
When the computer is turned off by using the power switch, there still might be power supplied
to the motherboard. To ensure that your computer is completely shut down, unplug the
computer's power cord from its power source.
The Cbox 3 appliance is a completely preinstalled system and there is no need for opening the
chassis for adding and removing components. Please contact Winnov regarding any malfunction
and failure of Cbox 3.
Of course, we cannot inhibit opening the chassis. Therefore please make sure the AC
power cord is unplugged before you open the chassis!
5.2. Electrostatic Discharge (ESD) and ESD Protection
Static electricity can damage disk drives, boards, and other parts. Before connecting or
disconnecting any device to the Cbox 3 appliance, we recommend that discharge static by
touching a metal part of a grounded PC.
6. Installation Notices
• Do not place the Cbox 3 appliance underneath heavy loads or in an unstable position.
• Do not expose the Cbox 3 appliance to high levels of direct sunlight, high humidity and
wet conditions.
• Do not use or expose the Cbox 3 appliance around magnetic fields as magnetic
interference may affect the performance of the device.
• Do not block the air vents to this device or impede the airflow in any way.
-8-
Page 9
Cbox 3 User guide V. 3.3.030
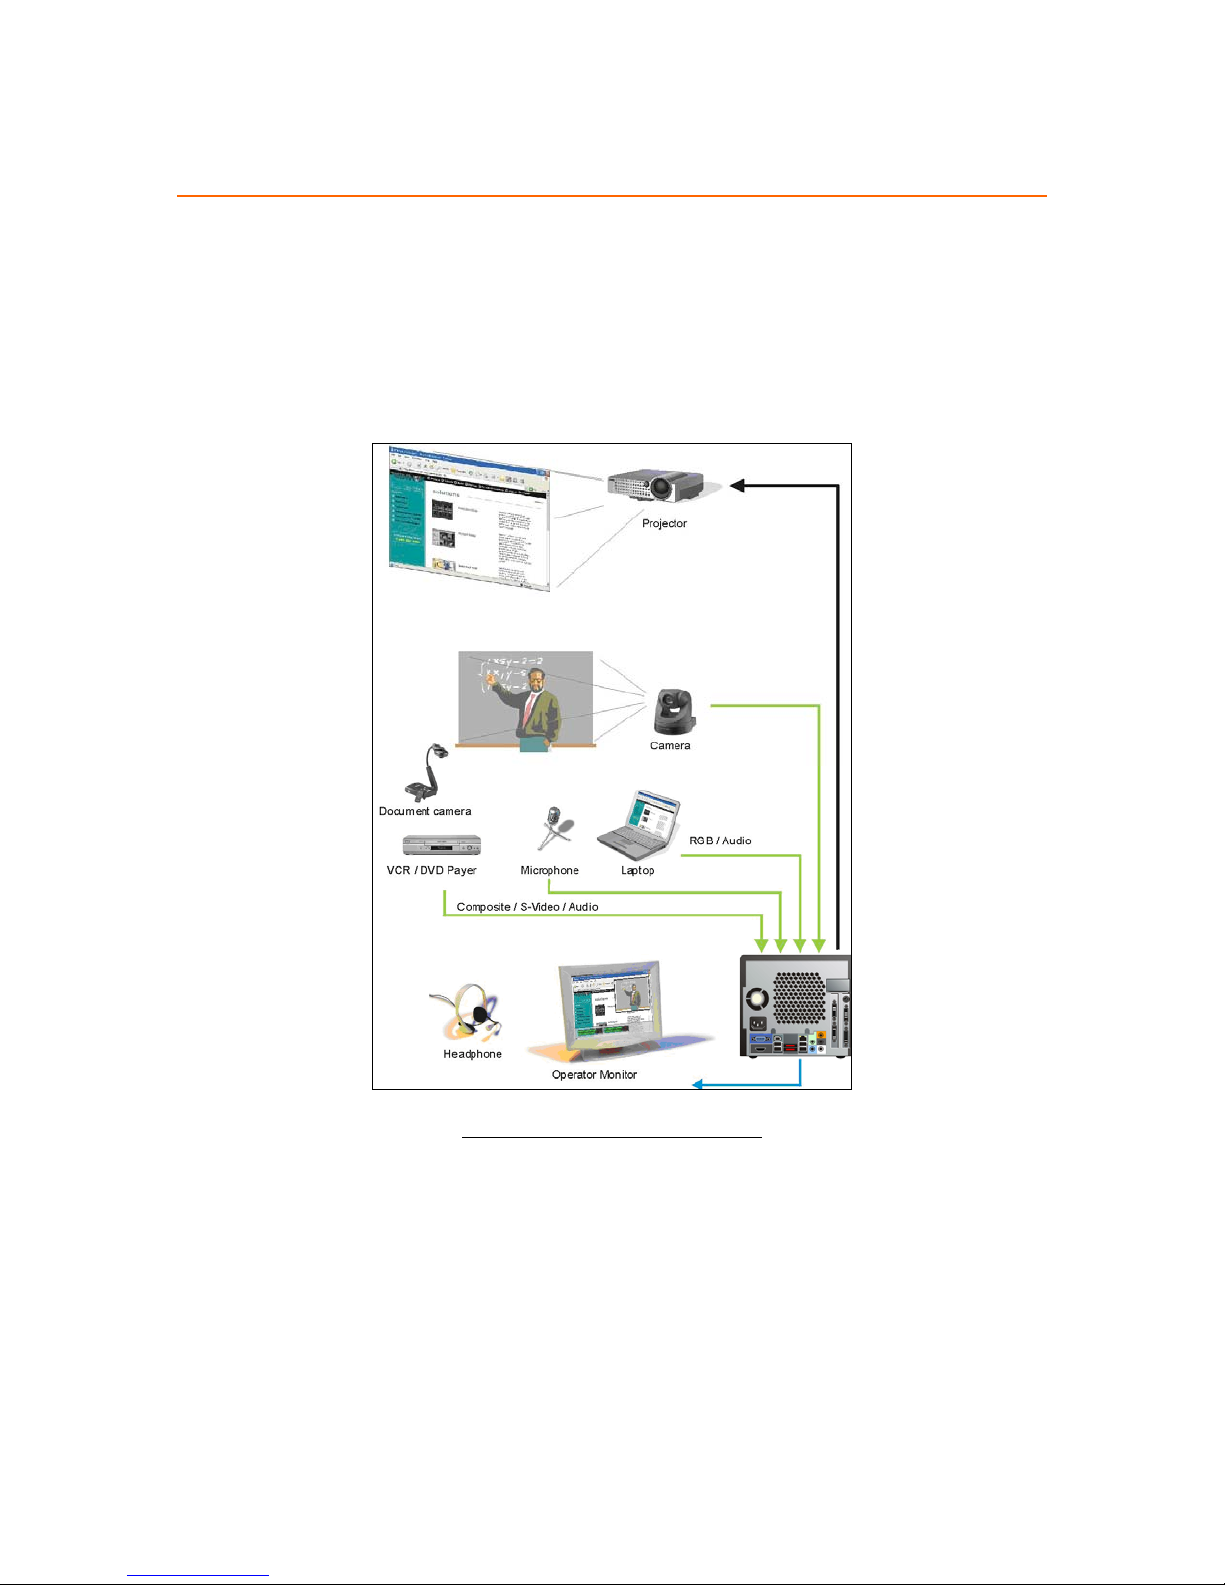
7. Getting Setup
Cbox 3 is a compact ready to use appliance that quickly converts any room into a quality A/V
studio. Cbox 3 is ready to capture and broadcast any multimedia presentation within minutes of
being carried in. The recording starts at the click of a mouse.
Cbox 3 is a completely preinstalled appliance. It doesn’t require any software installation from
the customer. All necessary system applications have been preinstalled.
The following pages will help you to integrate Cbox 3 within your multimedia environment and
describe how to connect your audio, video and VGA (RGB) sources.
-9-
Figure 4 - Typical Configuration of Cbox 3
Page 10
Cbox 3 User guide V. 3.3.030
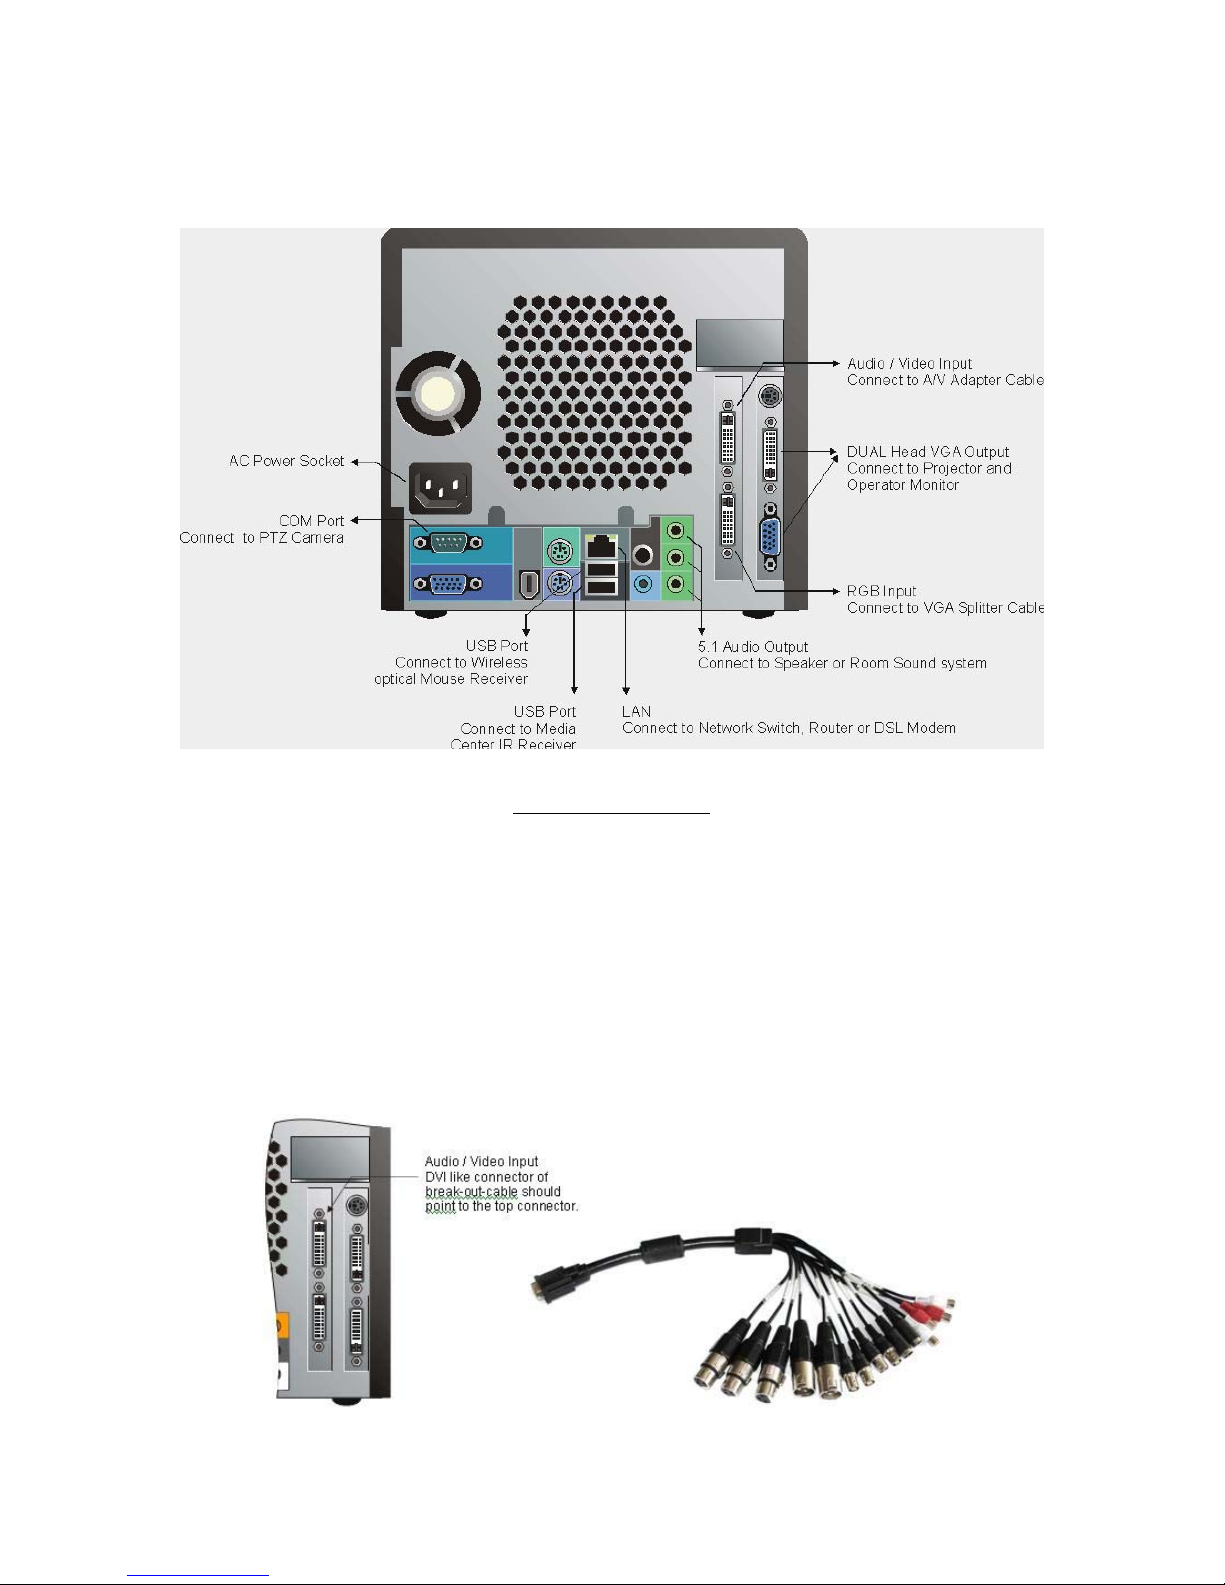
7.1. Rear view
Figure 5 - Cbox3 Rear View
7.2. Audio/Video Inputs and Outputs
The A/V Adapter cable is used to connect audio and video input sources to Cbox 3 and audio
output from Cbox 3. Each cable of the A/V Adapter has a unique description. This description
will help you to identify the video and audio sources during setup of Cbox 3.
Please connect the A/V Adapter cable to the upper slot bracket connector as shown in the
following drawing.
-10-
Page 11
Cbox 3 User guide V. 3.3.030
Figure 6 - A/V Slotbracket connector with A/V Adapter Cable
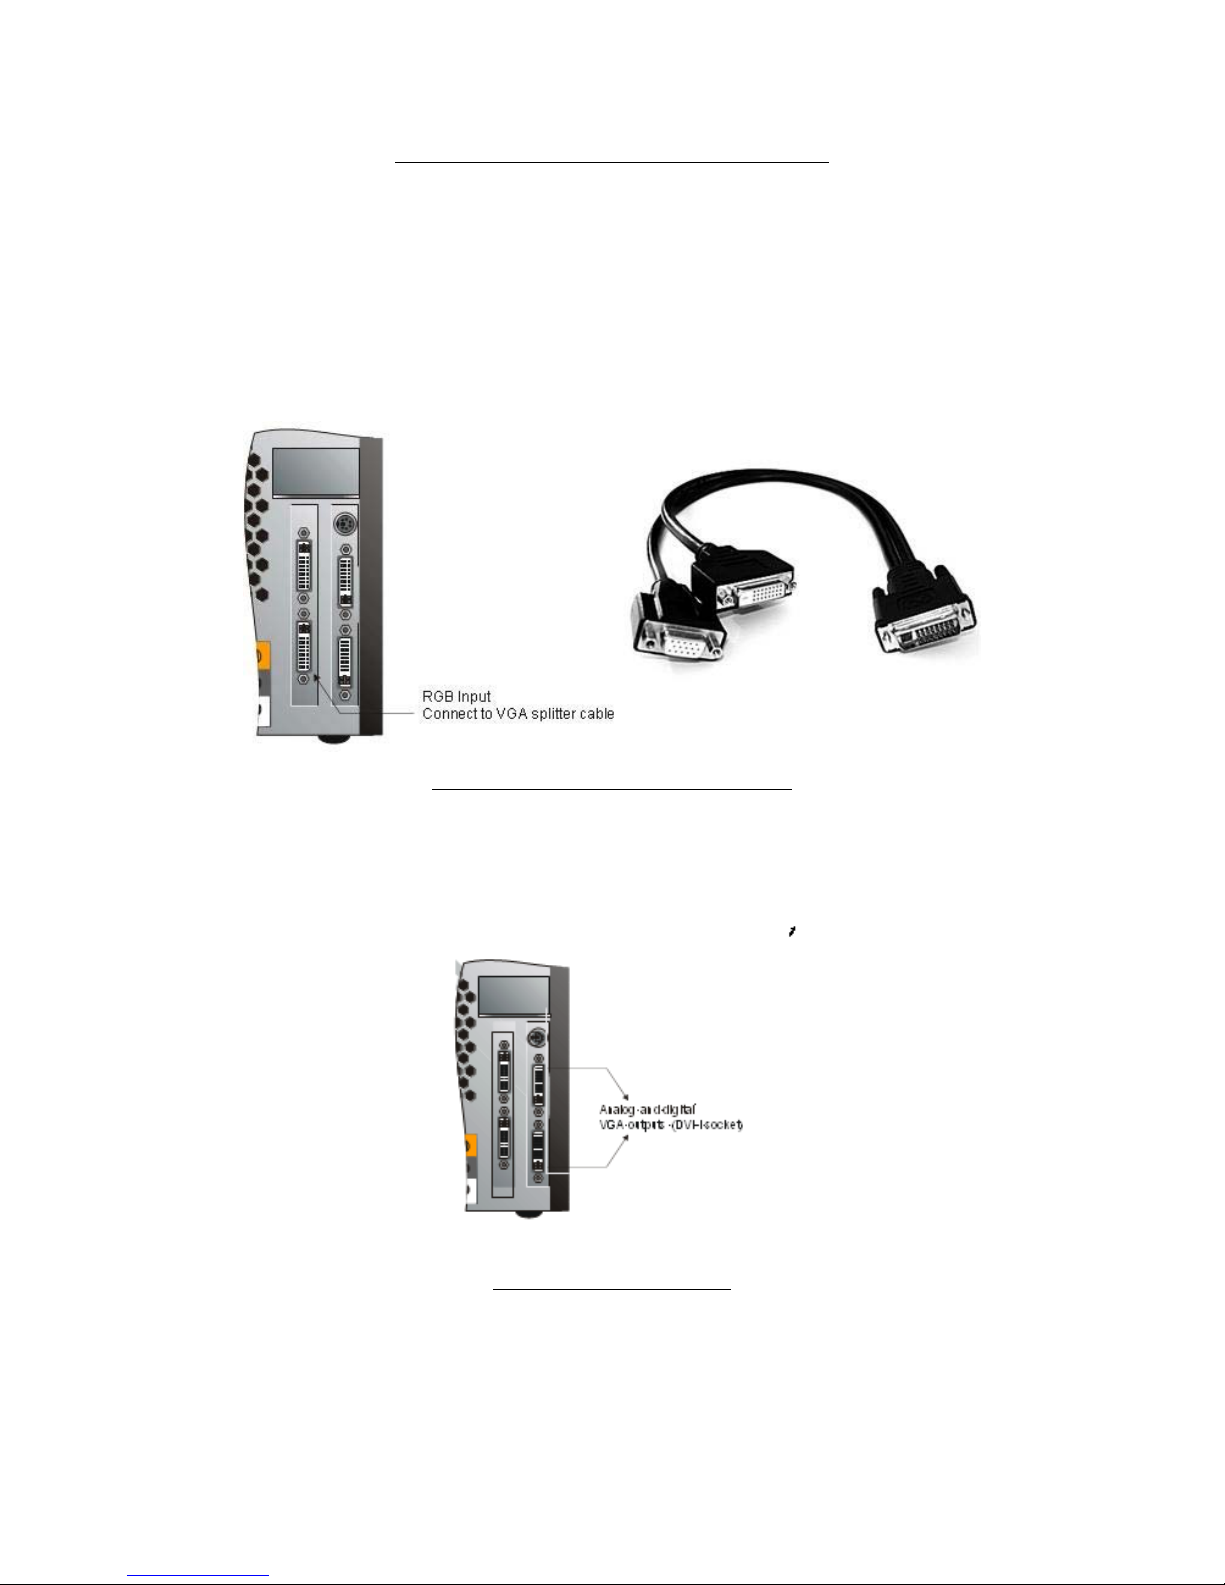
7.2.1. VGA (RGB) Input
A splitter cable is used to connect to the VGA output of another (Presenter) computer. The
splitter cable separates the analog RGB and digital DVI interface signals. This separation helps
to improve the monitor detection and forces the VGA graphics card of the (Presenter) computer
to enable the digital interface already at boot time.
Figure 7 - VGA (RGB) Input with and Splitter Cable
7.2.2. Dual Head VGA Output
Figure 8 - Dual Head VGA Output
The Dual Head VGA output can be used with either one or two VGA output devices (monitors,
projectors, etc.). One device is always used to display the operator interface of the Cbox 3
application. If a second device is used, it displays the audience view, which is controlled via the
operator interface.
-11-
Page 12

Cbox 3 User guide V. 3.3.030
Both outputs support the analog VGA interface and also provide a DVI interface, which
guarantees a better display quality. Therefore, the DVI interface should be used whenever
possible. If no Monitor or Projector with DVI Interface is available, then a DVI-I to HD15 adapter
is required for connecting to the DVI-I socket.
When two devices are in use, in order to display the audience view, the nVIDIA
graphics card has to be set to DualView. If it was set to Span, Clone or Single display,
audience view will not be displayed in the second VGA output device.
The Cbox 3 application has a mechanism for swapping the assignment of the devices. This
mechanism can be triggered by using the top menu strip item "View- Swap Screens". This
feature should be used when your operator VGA output device is displaying the audience view
and your audience VGA output device is displaying the operator interface.
The frame rate of the audience view is limited due to the fact that this is the output
of the RGB source that has been processed. A VGA splitter can be used to connect
the VGA source to the RGB capture card and to the projector to provide the full
frame to the audience view.
7.2.3. Audio Monitor Output
The Audio monitor output is very useful for the operator to get a preview of the audio sources or
to verify the audio quality of the current Live Stream (recording or broadcasting).
Audio Preview
Connect to Headphone
Figure 9 – Cbox 3 Front View with Audio Monitor Output
7.2.4. Audio Out for Room Sound System
The Audio output of the Cbox 3 appliance can be used to connect to the room sound system or
to a PC Speaker set. The A/V Adapter cable provides a balanced line-level stereo audio out
signal (Audio R Out, Audio L Out) via XLR connectors. Standard adapter/cables can be used to
interface to unbalanced line-level Audio input of the room sound system or to a PC speaker set.
-12-
Figure 10 - Balanced Audio OUT XLR (male) connectors
Page 13

Cbox 3 User guide V. 3.3.030
7.3. Connecting Accessories
The Cbox 3 appliance comes with
• USB Optical Mouse
• USB Keyboard
• Audio-technical professional Phantom Power Microphone
All these additional devices are shipped with their original packaging, manual and installation
instructions. For further information and more detailed installation instructions please follow the
original manufacturer documentation.
7.3.1. Mouse and Keyboard
The Cbox 3 appliance includes all the necessary applications preinstalled for normal operation.
Use the USB ports when connecting the mouse and the keyboard to the Cbox 3 appliance.
7.3.2. Phantom Power Microphone
Use a professional balanced Audio cable (XLR male and XLR female) to connect the microphone
to the “Audio 1 IN (MIC)” input of the A/V adapter cable. It is not necessary to use the
microphone with a battery; the Cbox 3 appliance will by default apply a 48V Phantom Power
Supply to the microphone.
Figure 11 - Balanced Microphone XLR (female) Connector
7.3.3. Camera
7.3.3.1. Using Video Cameras
Cbox 3 easily connects to a wide variety of videos cameras an S-Video or composite Video
output.
We recommend using the S-Video output because it guarantees the best video quality.
-13-
Page 14
Cbox 3 User guide V. 3.3.030
When using the S-Video output, connect the camera to the “S-Video 1 IN” or “S-Video 2 IN”
input. When using the composite output, connect the camera to one of the four video inputs
“Video 3 IN” to “Video 6 IN” of the A/V adapter cable.
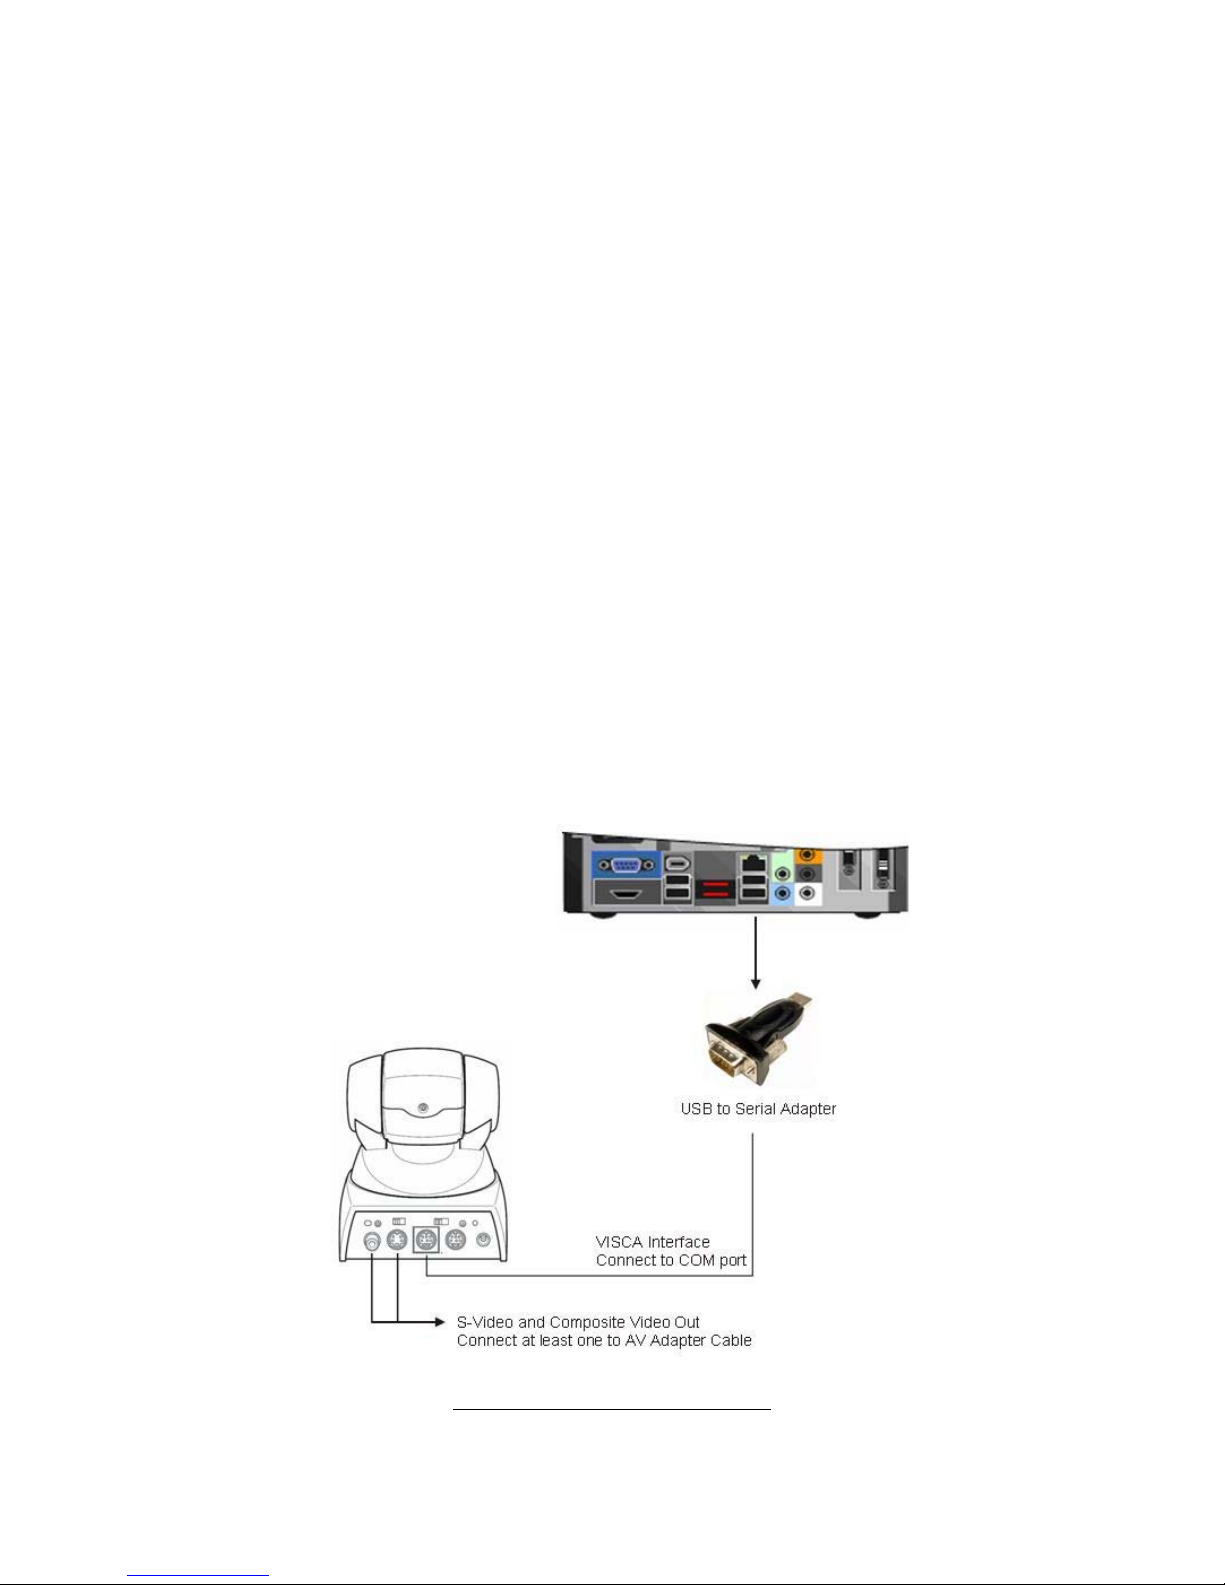
7.3.3.2. Using a Sony PTZ Camera
The Sony PTZ (Pan-Tilt-Zoom) camera is an optional accessory for Cbox 3. It provides an SVideo and composite video output. We recommend using the S-Video output because it
guarantees the best video quality.
When using the S-Video output, connect the camera to the “S-Video 1 IN” or “S-Video 2 IN”
input. When using the composite output, connect the camera to one of the video inputs “Video 3
IN” to “Video 6 IN” of the A/V adapter cable.
The PTZ control feature requires an additional cable connection from the camera (VISCA IN) to
the serial port (COM1) provided by the USB to serial adapter when connected to Cbox 3 (the
drivers for the USB to serial adapter are already preinstalled). Many PTZ cameras can be
controlled over one single COM port when using a VISCA daisy chain.
The address of each camera is assigned during the VISCA initialization process. The camera
addresses are 1, 2, 3… in order, starting from the one nearest the Cbox 3 Com port. The VISCA
address is used during the Cbox 3 installation setup to identify and address each PTZ camera.
Further information reading the VISCA protocol and the camera installation can be found in the
camera manual.
-14-
Figure 12 - PTZ Camera connection diagram
Page 15

Cbox 3 User guide V. 3.3.030
8. First Time Start of your Cbox 3
8.1. Automatic Creating Backup Image
The first time you start your Cbox 3 appliance, you will see a message that says "Acronis True
Image1 Loading...". This message indicates that a backup image is going to be created for your
appliance. It will take a few minutes for this process to complete. Completion is marked by an
automatic reboot.
8.2. Microsoft Windows Mini-Setup
After the reboot following the backup process, Windows mini-setup will run. The mini-setup will
prompt you to
• Read and accept the EULA (End User License Agreement)
• Enter a Windows product key
(The Windows registration key is found on the bottom of the Cbox 3. All product keys
are shipped with the Cbox 3 Appliance)
The Mini-Setup procedure will ask you to enter the administrator user account and the
computers name. If you are not going to be the administrator for this system, it would be wise to
consult the administrator before completing the mini-setup. Once the mini-setup is completed,
the appliance will automatically reboot.
8.3. First Windows Start
Once Windows starts, your appliance is ready to be used, but we highly recommend that you do
the following:
• Install all available Microsoft updates through Windows Updates
• Install all available Cbox 3 updates
• Activate Windows
• Start a Microsoft Office application (i.e. PowerPoint) and accept the EULA (End User
License Agreement).
1
Arconis True Image is a complete disk imaging, system disk backup and restore solution.
-15-
Page 16

Cbox 3 User guide V. 3.3.030
9. Application Software Overview
The feature rich Cbox 3 empowers presenters with the tools to record every aspect of a
presentation and transforms it into a high impact rich media experience that can be broadcasted
live, archived for on demand viewing, burned to DVD, or loaded onto a digital media storage
device. But feature rich doesn’t have to mean difficult to use. Cbox actually helps reduce set up
time and eliminate the need for audio/video mixing & editing know-how.
Record, publish and serve is now as easy as 1, 2, 3.
Record presentations with the click of a button, Cbox does the rest. While you present as you
normally would, Cbox captures every slide, every video, every animation, every website
referenced and turns it into a rich media presentation.
Publish lectures, dynamic presentations, training videos or corporate messages without any
post-production work. Audio and video mixing is handled by Cbox, plus your presentation is
indexed and all content is made searchable. Stream live presentations and lectures or make
them available to viewers as video on demand.
Serve streaming presentation videos to your audience on any standard web/media server.
Cbox’s open API allows you to choose the server hardware and content management software
that you want.
-16-
Page 17
Cbox 3 User guide V. 3.3.030
10. Using CBOX Application
10.1. Getting Started
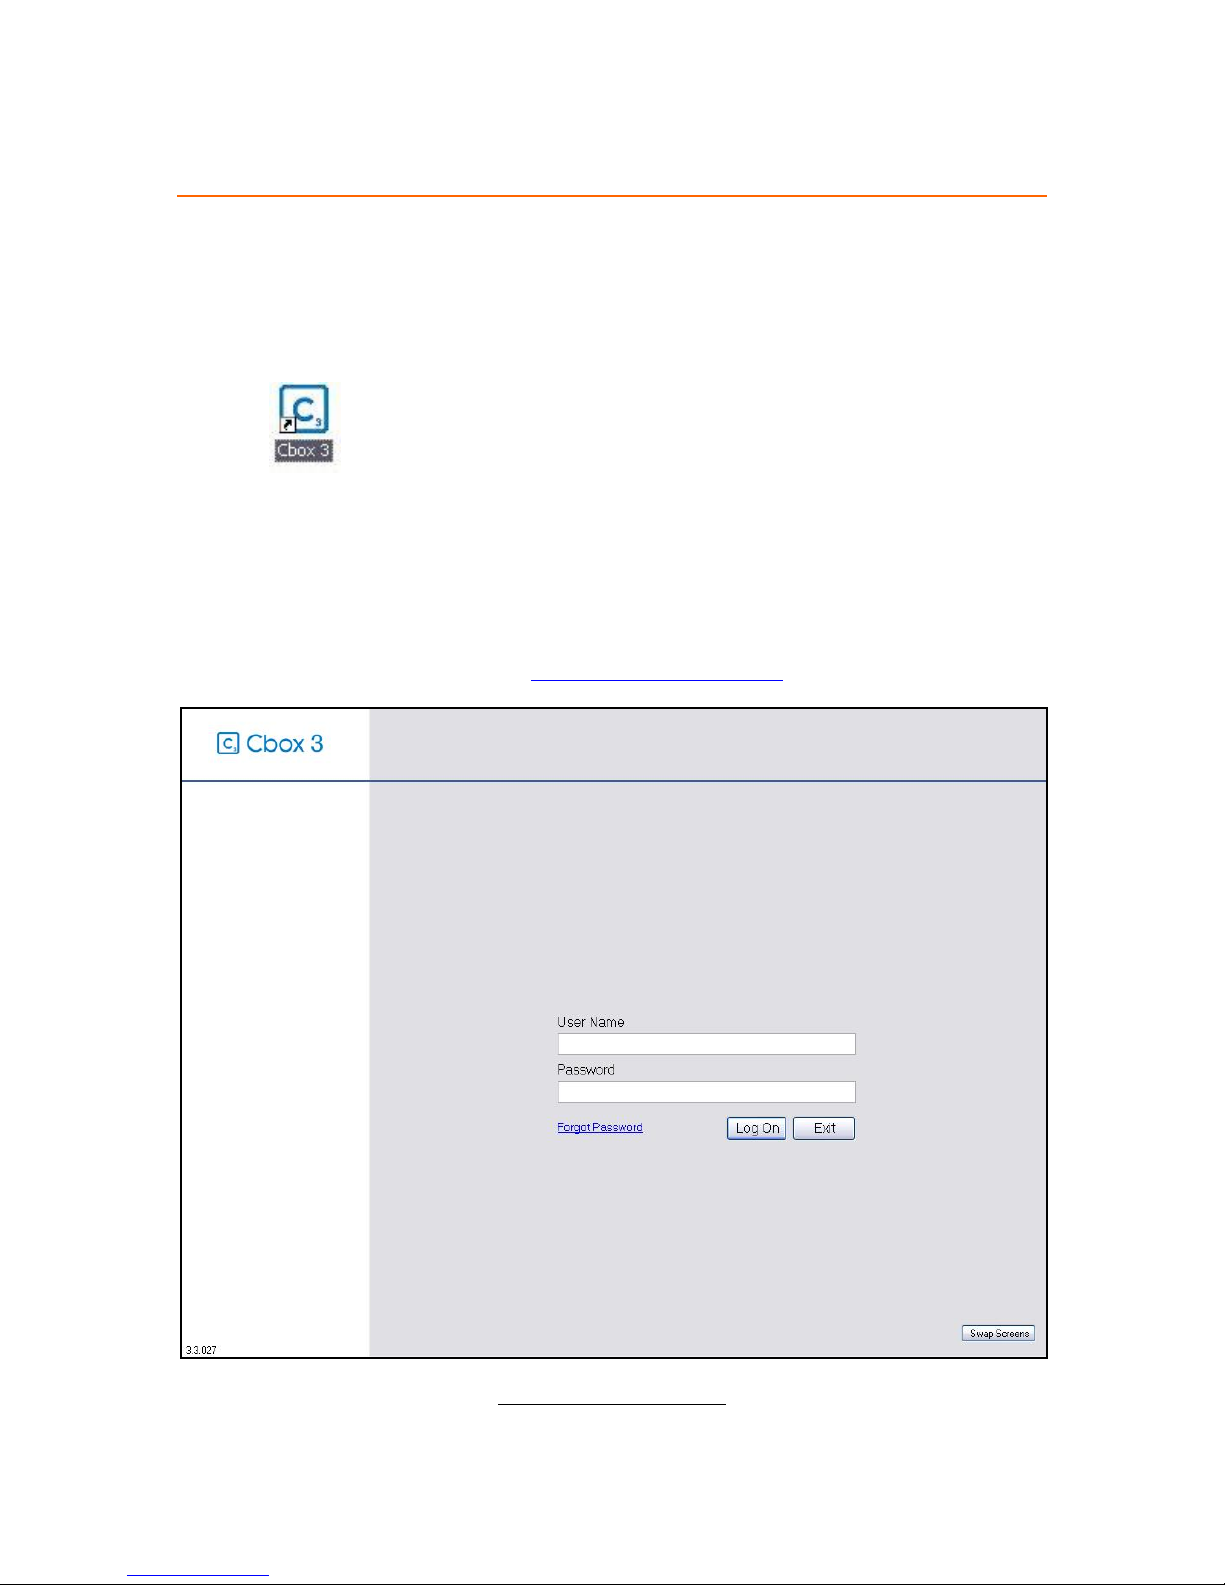
10.1.1. Logging In
Launch
The Cbox 3 application requires an authentication. The default login for the administrator is as
follows:
Username: administrator
Password: password
Next, follow the procedures outlined in How to begin a new session
to get started.
-17-
Figure 13 – User Login Interface
Page 18
Cbox 3 User guide V. 3.3.030
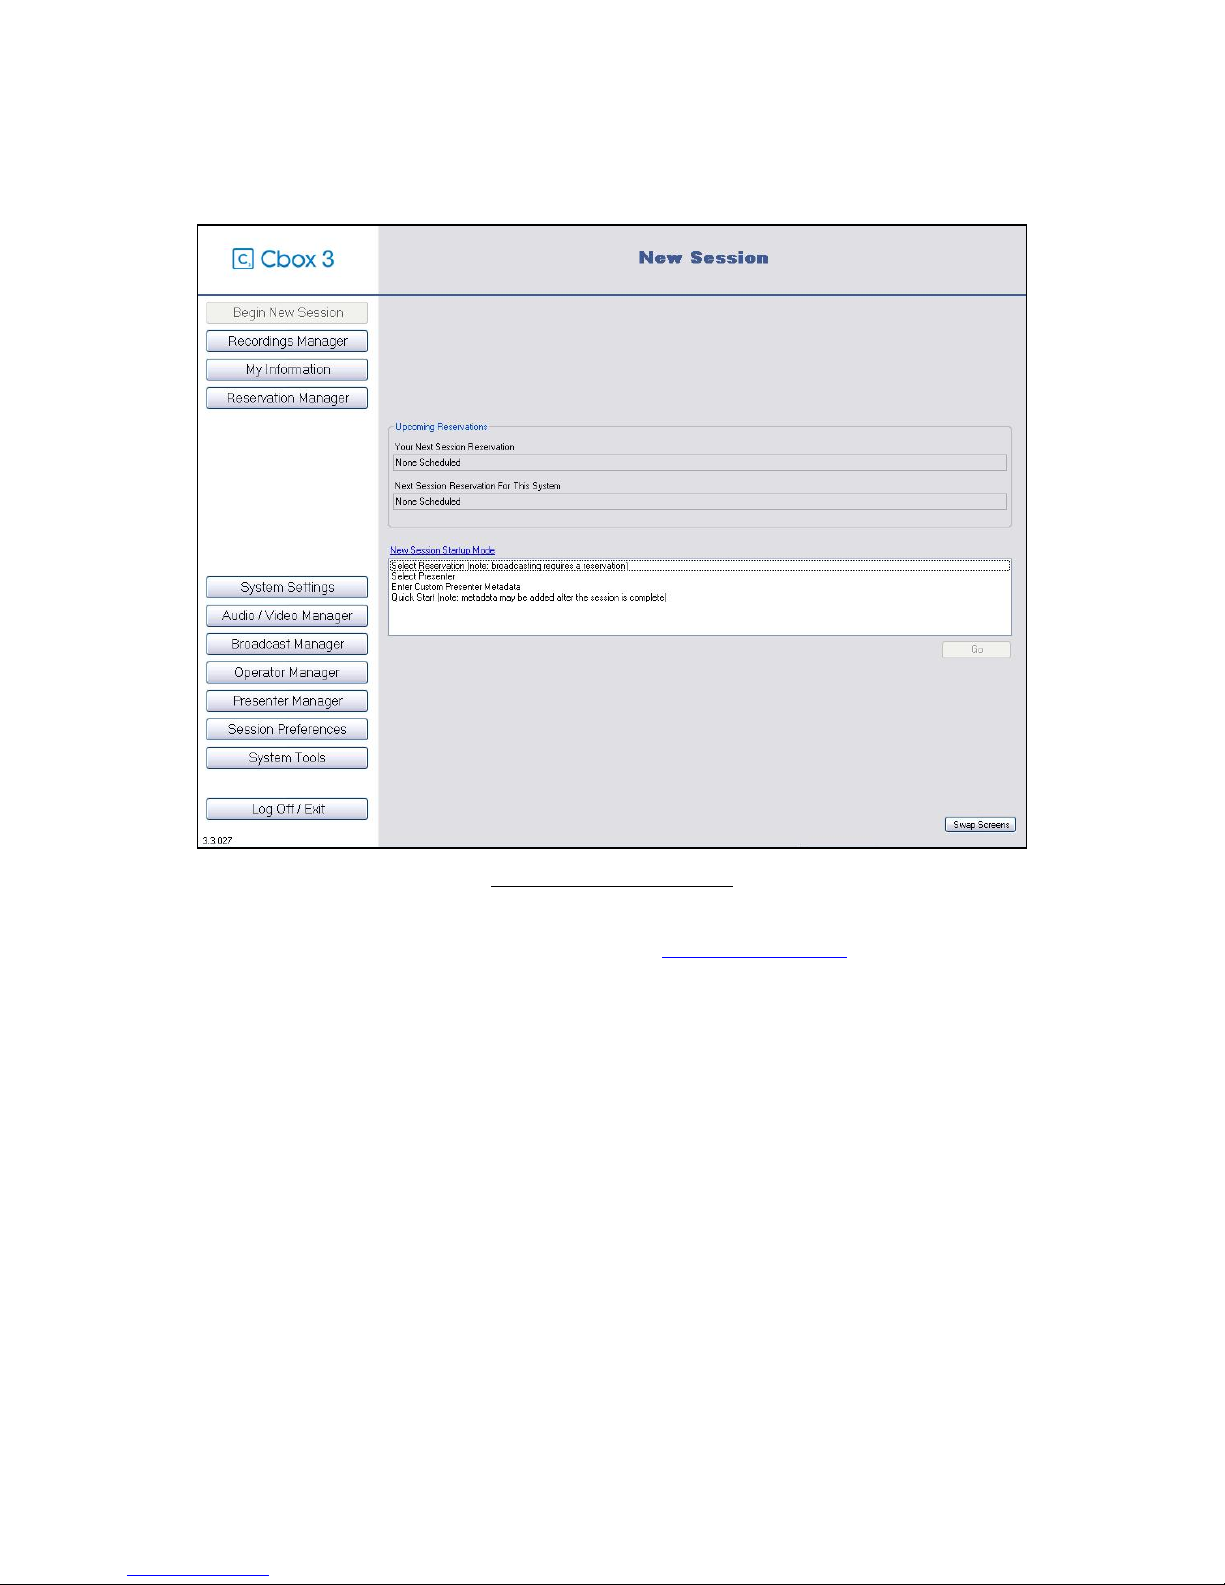
10.1.2. How to Begin a New Session
Figure 14 - New Session Interface
Before you begin a new session, you may consult the Audio/Video settings chapter.
In fact, setting up your audio and video devices will customize your Cbox 3 sequences.
For a quick start of the Cbox application, click on BEGIN NEW SESSION in the main menu and
choose
after the session is completed in the Recordings Manager.
There also are different session mode options:
QUICK START. It begins the session with no data. Meta data for this session can be added
SELECT RESERVATION Begins a new session using a session reservation that was
•
previously configured. If the session is going to be broadcasted, starting a session
reservation is required.
SELECT PRESENTER Allows the operator to select the presenter who will be in the session
•
from a list set up by the Administrator.
ENTER CUSTOM PRESENTER METADATA Allows the operator to manually enter the
•
Presenter's data for the session. One application of this is if the presenter is a guest
speaker, who will not often be presenting. Metadata may be added after the session is
complete.
-18-
Page 19
Cbox 3 User guide V. 3.3.030
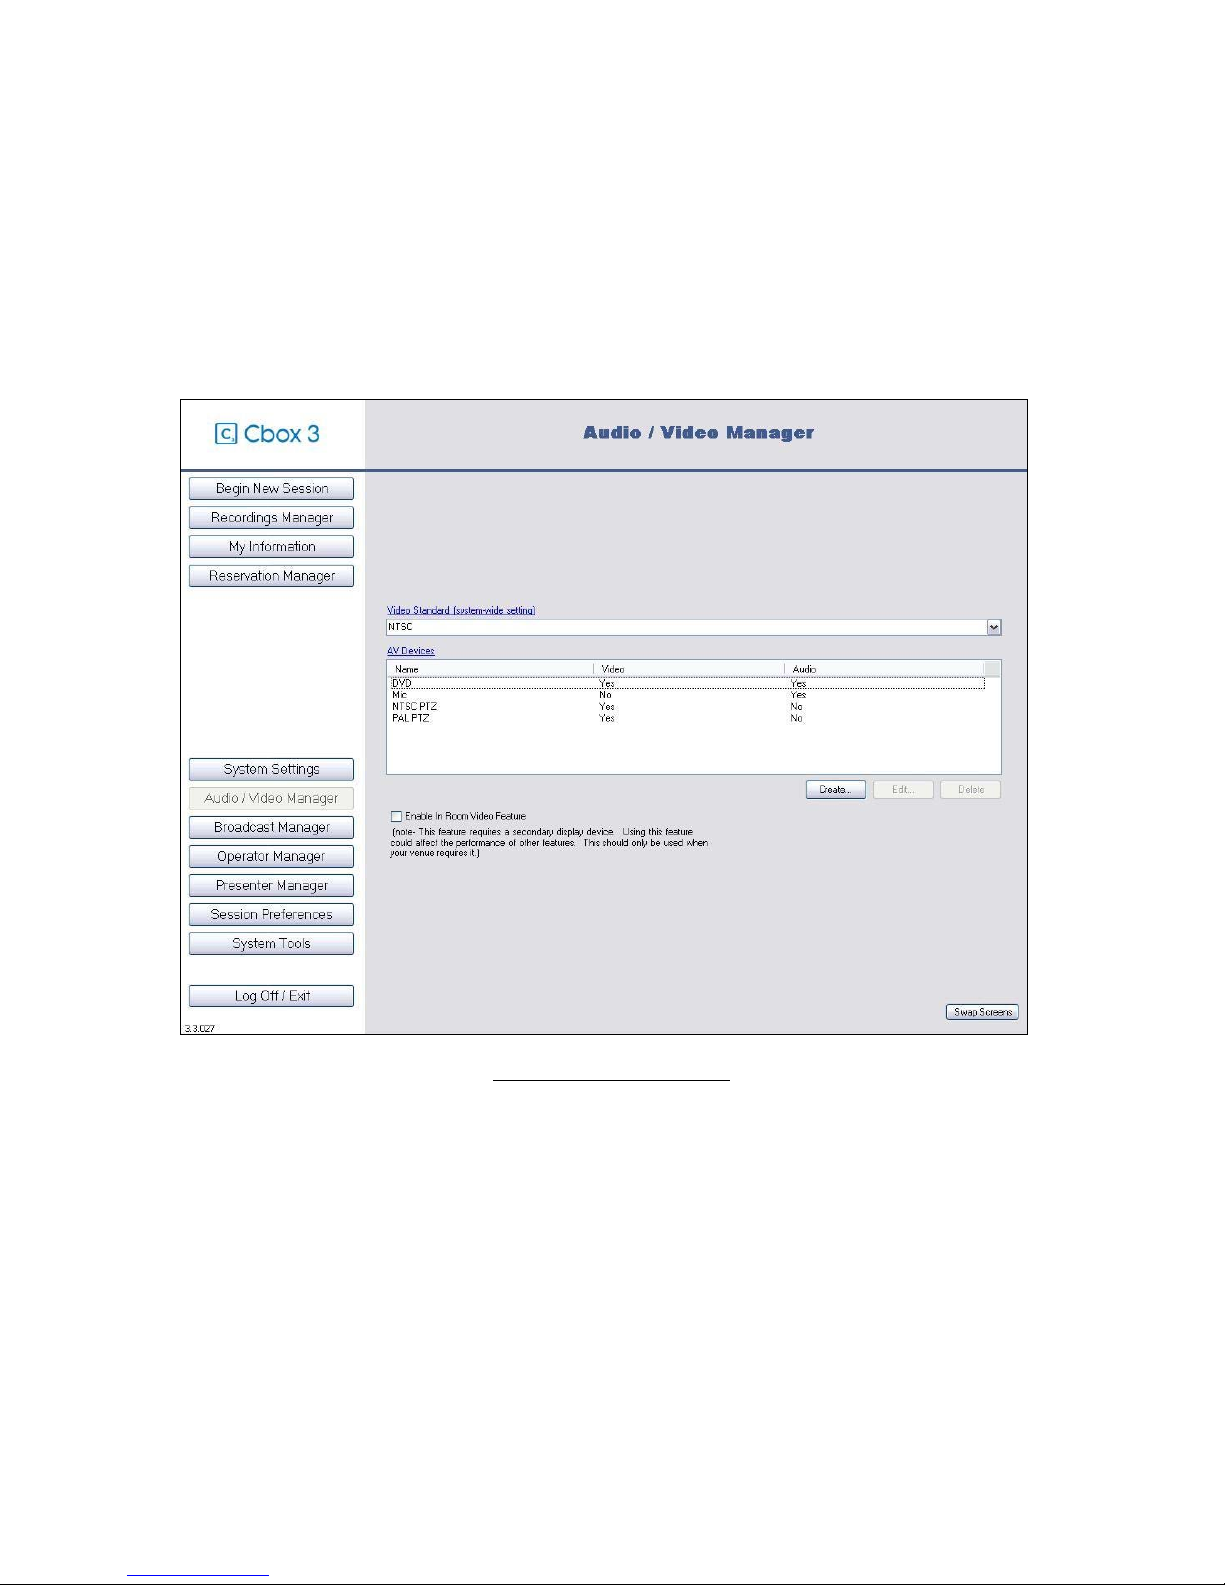
10.1.3. Audio and Video Settings
To configure your Audio and Video Settings you may go on AUDIO/VIDEO MANAGER.
Preset the audio / video manager is important in order to create a list of the devices you will use
(micro, DVD player, cameras) and boost the Cbox performance at its best.
Click on and set up first the
VIDEO STANDARD.
The VIDEO STANDARD should be chosen based on your analog video equipment. NTSC and PAL
video standards are supported. The video standard setting is applied system-wide, so use
equipment that supports the same video standard. If your video standard setting and your
equipment are mismatched, you may see no video or unstable, clipped video.
-19-
Figure 15 - Audio/Video Manager
Page 20
Cbox 3 User guide V. 3.3.030
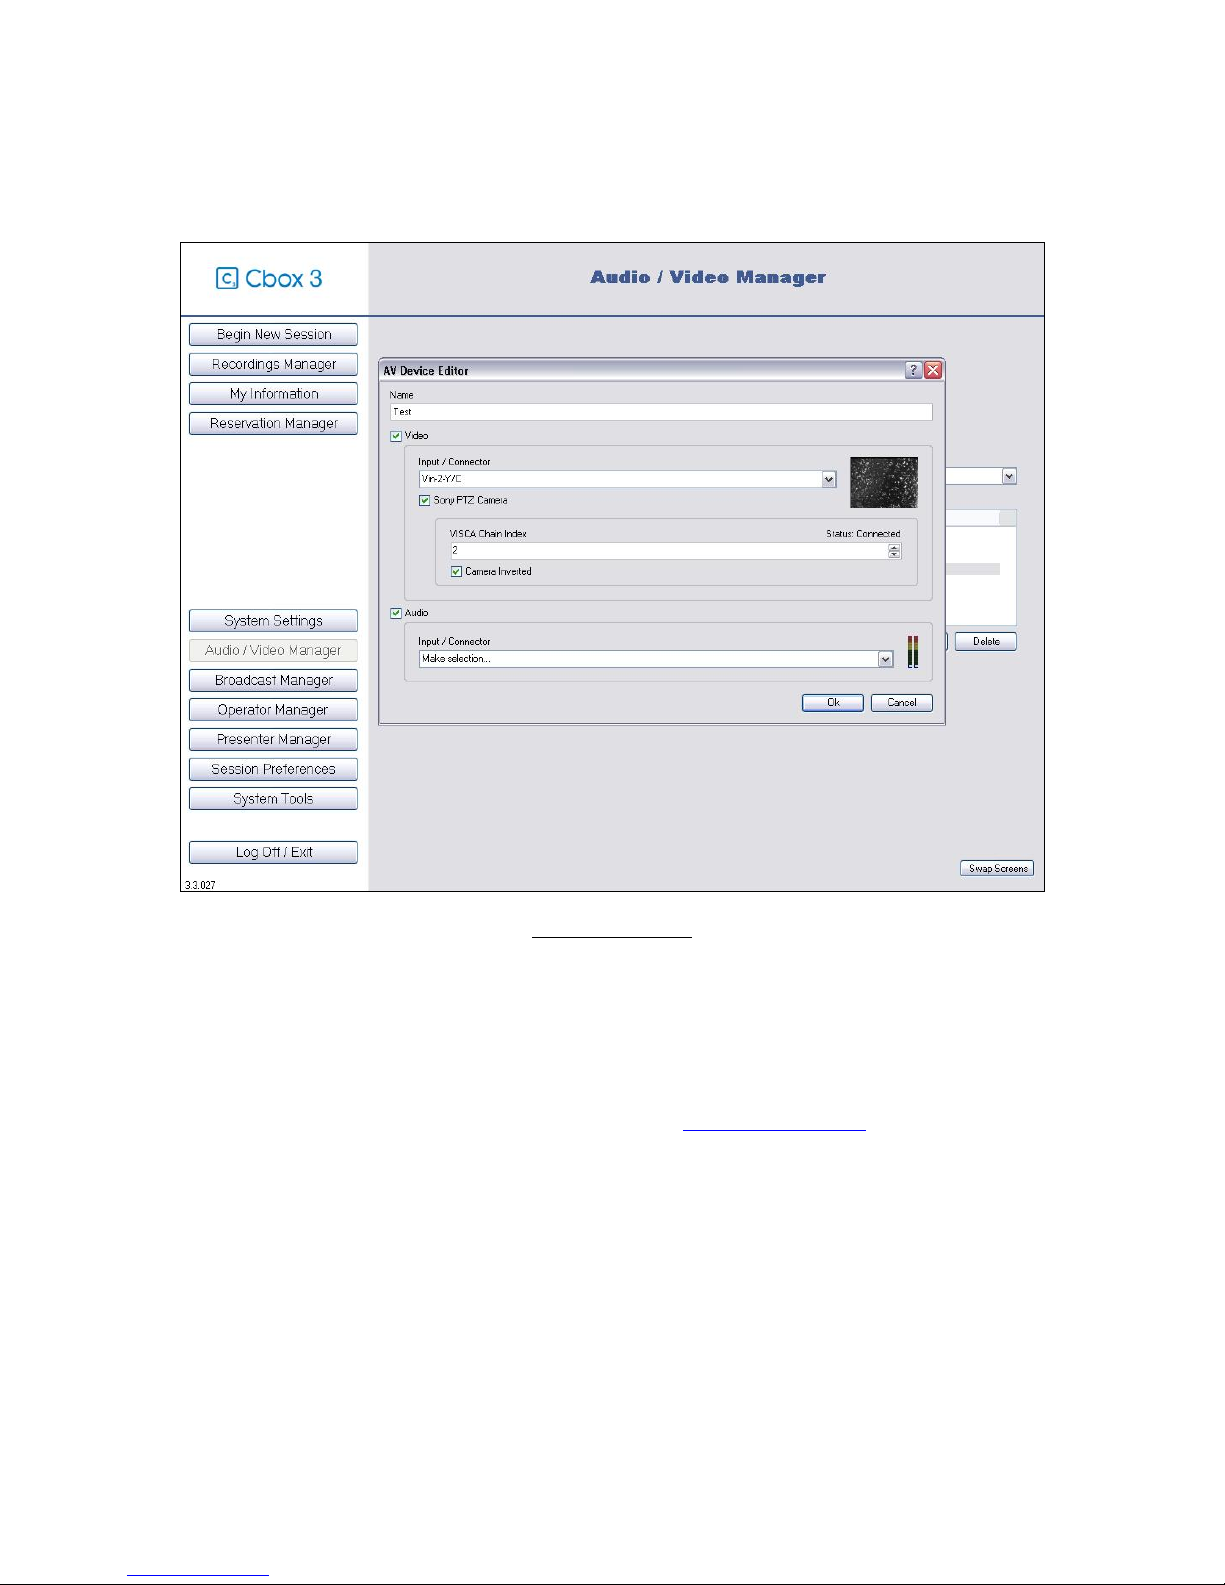
Creating a new A/V device
Click on
CREATE and the AV DEVICE EDITOR will appear as follows:
Figure 16 - A/V Device
AV DEVICES
create devices, all available inputs will be considered enabled and they will all use their default
names. By adding specific devices to the Devices list, you are able to provide custom names
and eliminate unused inputs such as micro, DVD player or cameras.
If you are using Sony Camera PTZ, you may consult the PTZ camera chapter
You can plug at maximum 3 cameras.
are analog audio and/or video sources. Creating devices is optional. If you do not
.
-20-
Page 21
Cbox 3 User guide V. 3.3.030
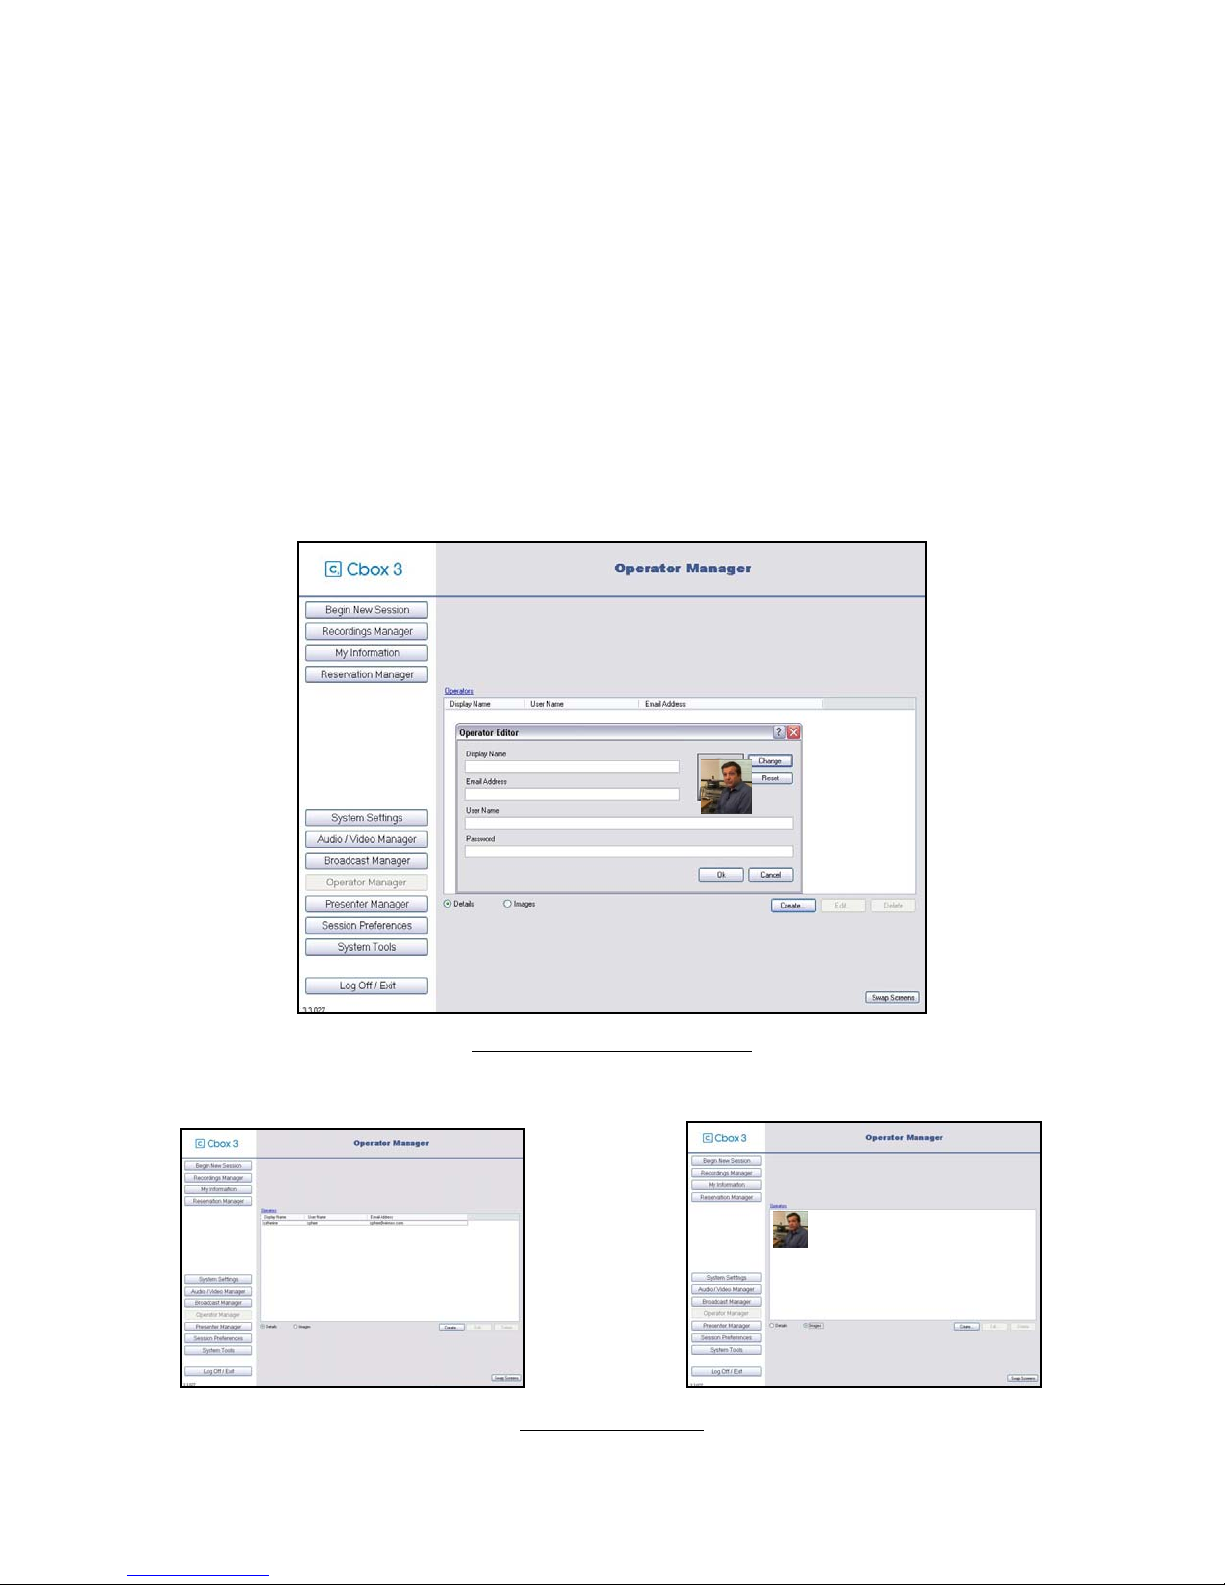
10.1.4. Operator / Manager Information
10.1.4.1. Who is the Operator Manager?
Operators logon through the Cbox 3 logon page. Operators are responsible for controlling and
monitoring Cbox 3 sessions.
10.1.4.2. Creating a New Operator
Click on OPERATOR MANAGER in the Main menu to access its information and click
OPERATOR EDITOR will appear as follows. You may be able to complete the information and
The
CREATE.
put a profile picture to identify your manager.
The Operator Manager allows you to
EDIT or DELETE an operator manager afterwards.
The operators list can be viewed by DETAILS or by IMAGES.
-21-
Figure 17 - Operator Manager Interface
Figure 18 - Operators List
Page 22
Cbox 3 User guide V. 3.3.030
10.1.4.3. Who is the Presenter Manager?
You may have many presenters depending on your venue type and how it is managed. Each
session has a single presenter associated with it. From the presenter, the session gets useful
metadata. By creating presenters, you reduce repeat entry of information.
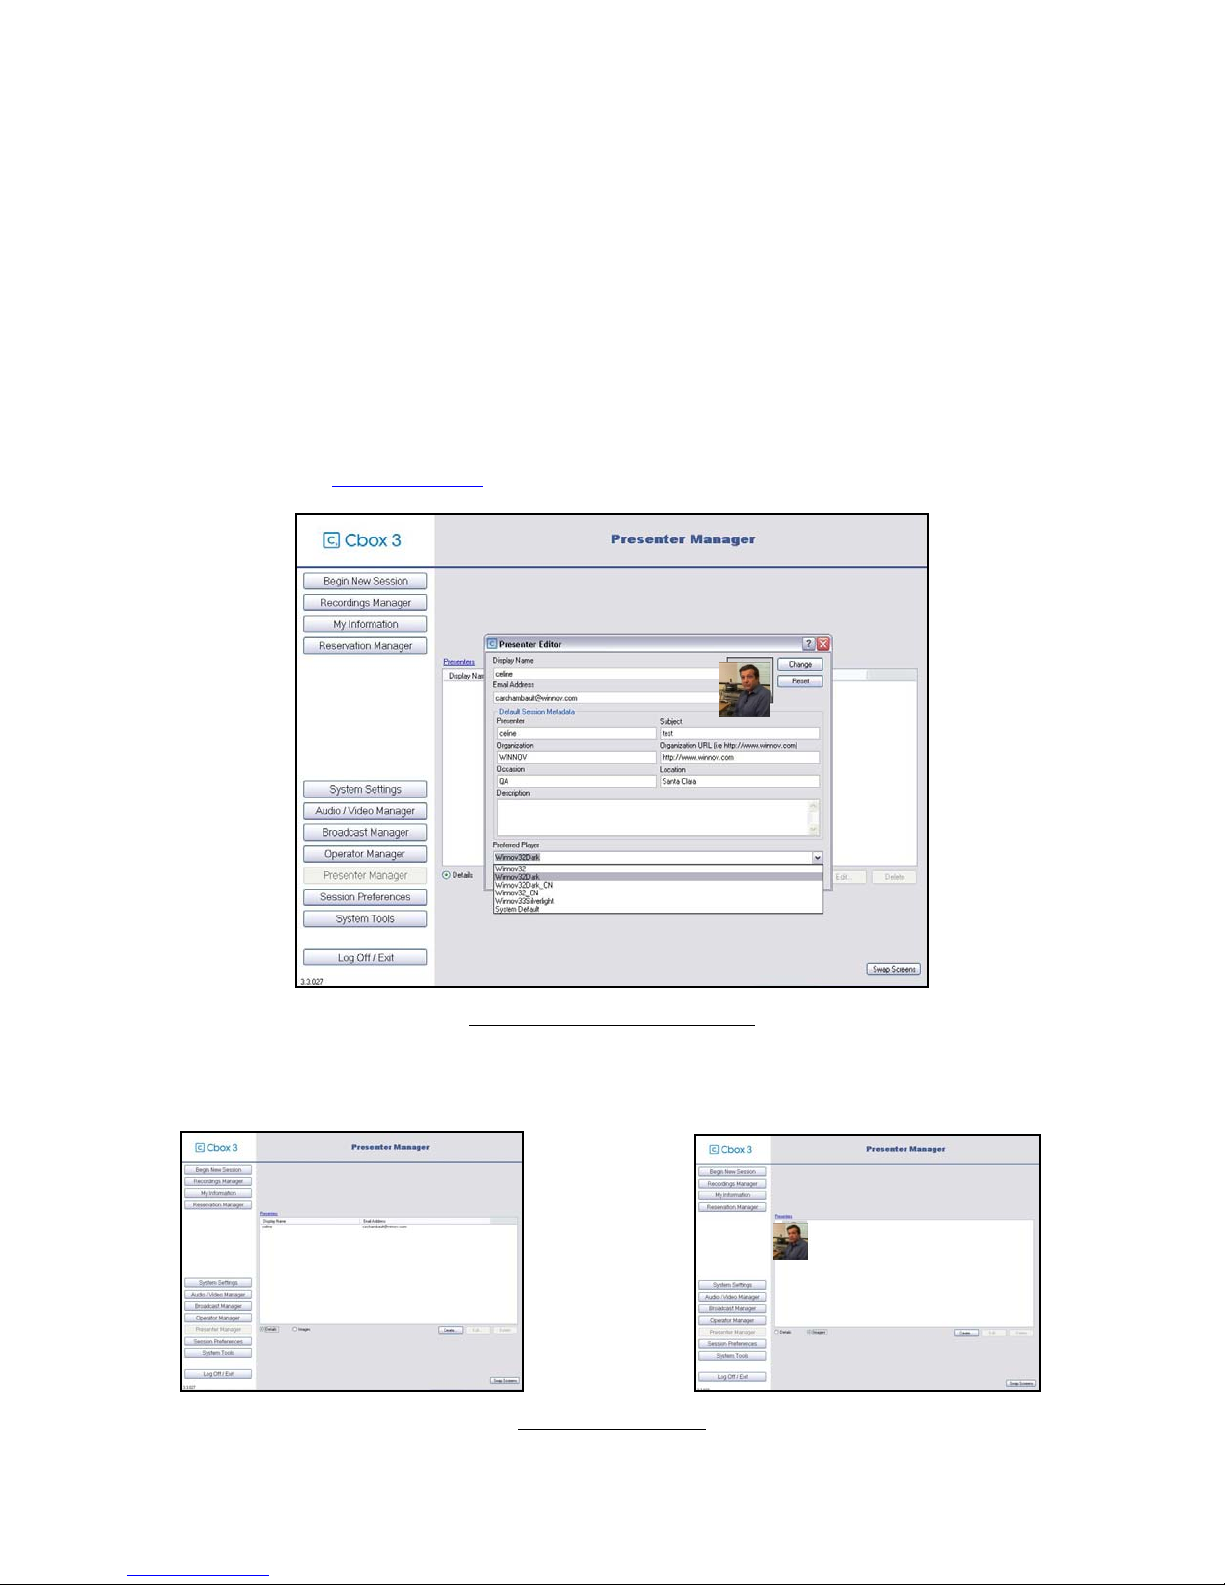
10.1.4.4. Creating a New Presenter
Click on PRESENTER MANAGER in the Main menu to access its information and click
The
PRESENTER EDITOR will appear. You may be able to complete the information and put a
profile picture to identify your manager. The Presenter Manager allows you to
CREATE.
EDIT or DELETE
presenters.
You can also choose your preferred player as follows. To have a preview of the different players
you may consult Watching Videos
chapter.
Figure 19 - Presenter Manager Interface
The Presenters list can be viewed by DETAILS or by IMAGES.
Figure 20 - Presenters List
-22-
Page 23
Cbox 3 User guide V. 3.3.030
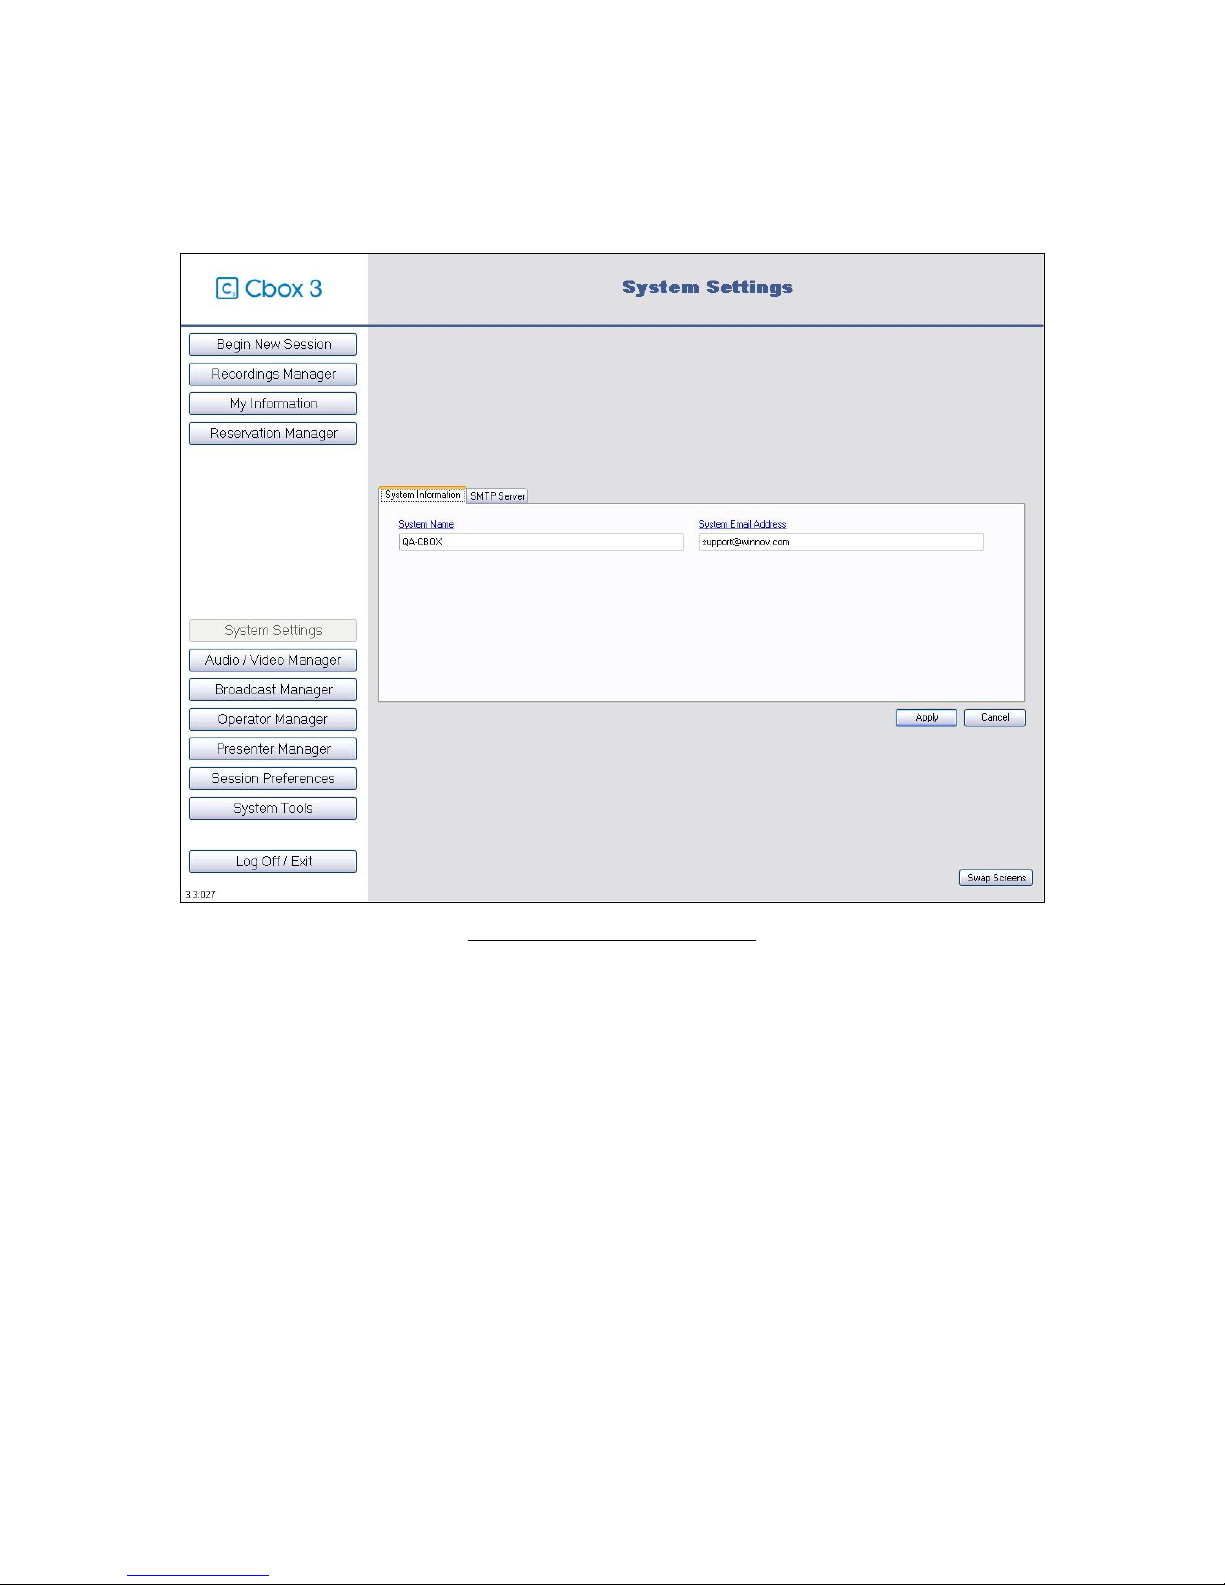
10.1.5. SMTP Server Configuration
Figure 21 - System Information Interface
To configure your SMTP Server you may go on SYSTEM SETTINGS. The
SYSTEM EMAIL ADDRESS are used when Cbox 3 sends out email notifications. These do not need
SYSTEM NAME and
to be unique per Cbox 3, but it would be a good idea so those who receive the email know
which Cbox 3 has sent it.
-23-
Page 24
Cbox 3 User guide V. 3.3.030
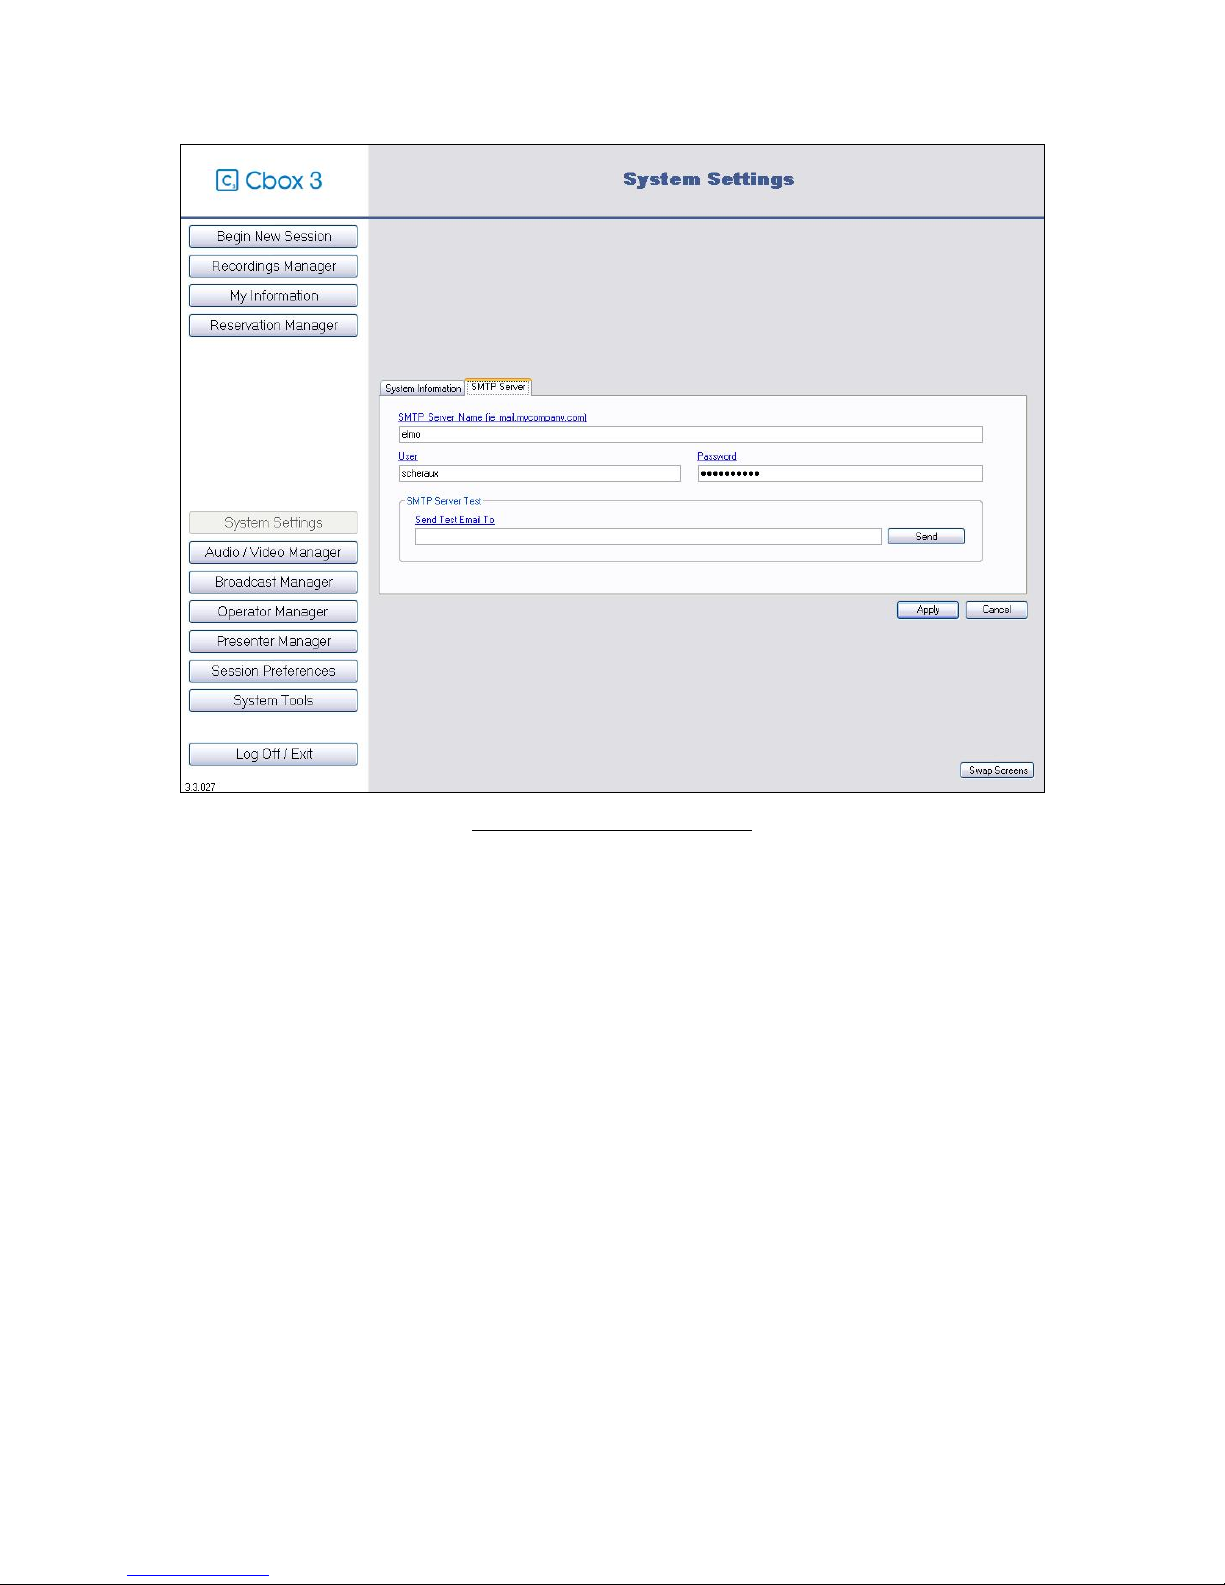
Figure 22 – SMTP Server Configuration
For the Cbox 3 system to send out email notifications an SMTP SERVER is required. The Cbox 3
will send out notifications to the administrator when new updates are available, hard drive
storage is low, and when sessions reservations have been set up to broadcast. The assigned
operator and presenter will also receive an email notification for session reservations.
The server name is the address of the
SMTP SERVER. If required enter the User Name and
password the Cbox 3 will log onto the SMTP server.
Contact your IT department if you are not sure what to put.
When the server is configured, enter any valid email address in the "Test" group box to verify the
settings are correct.
Click send and Cbox3 will attempt to send an email to the specified email address.
-24-
Page 25
Cbox 3 User guide V. 3.3.030
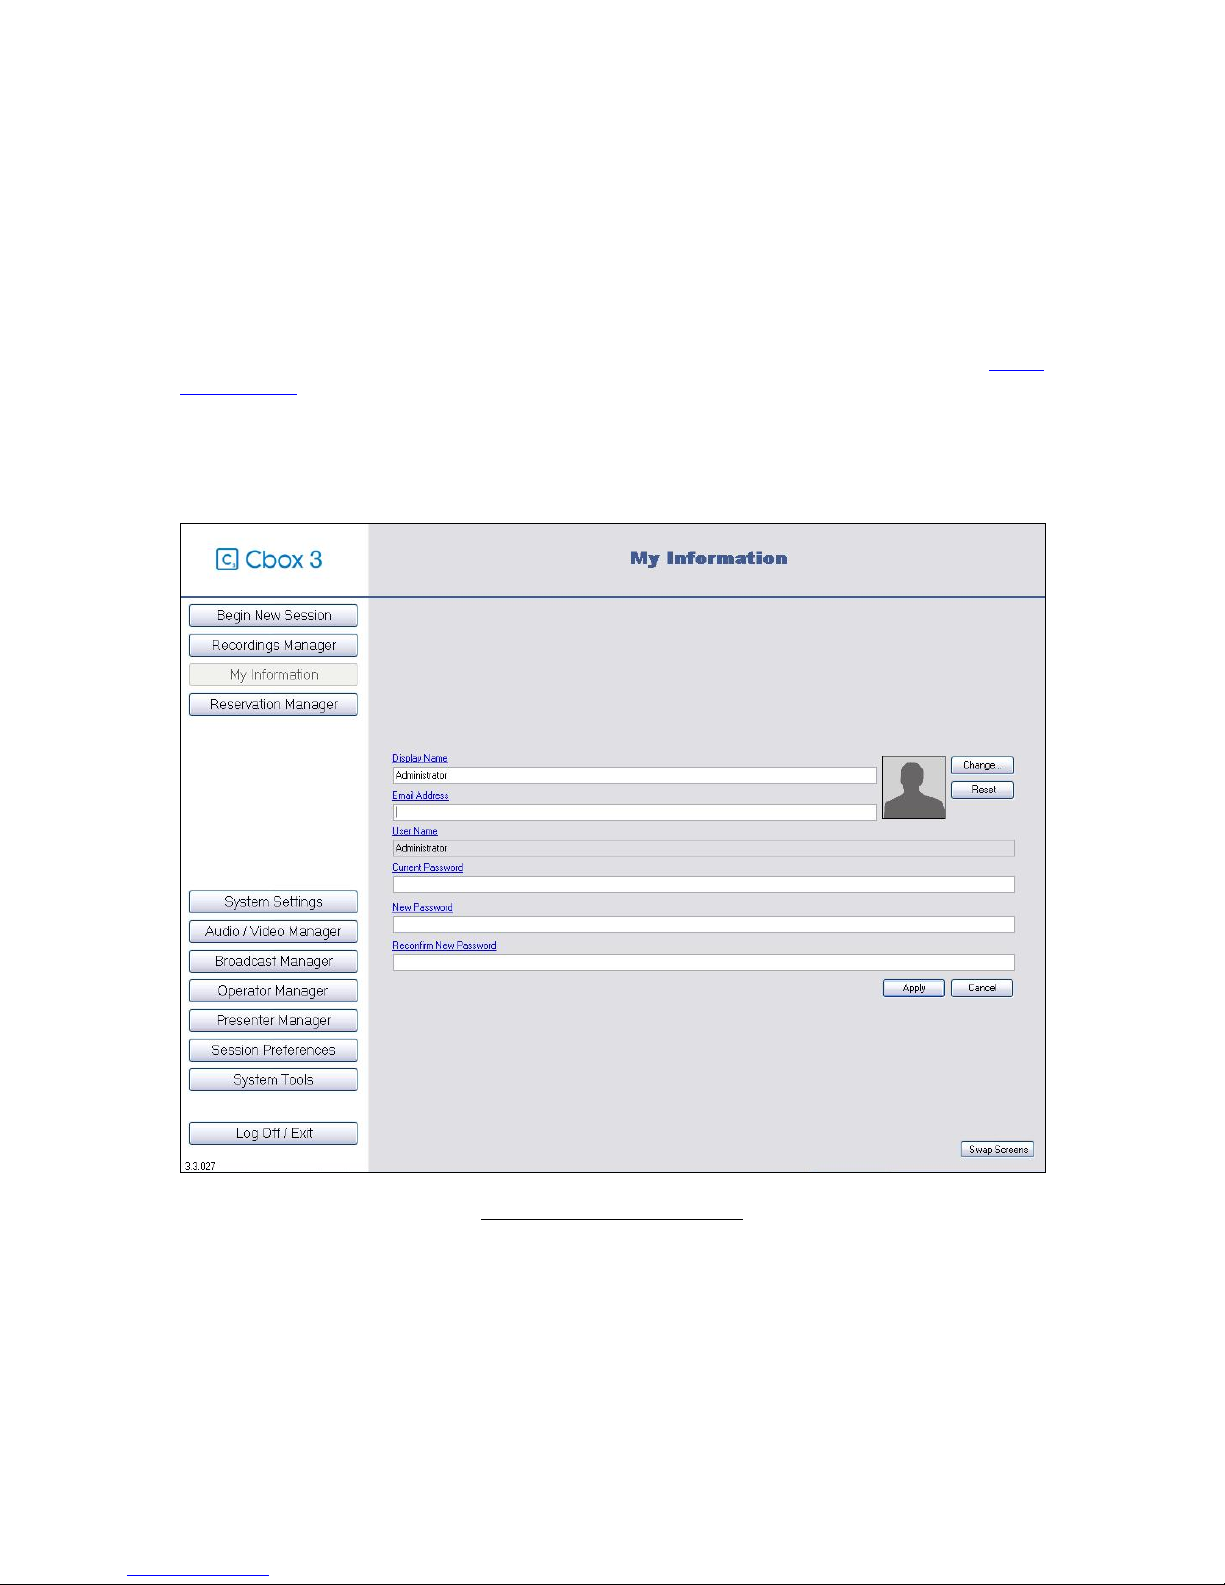
10.1.6. My Information
The MY INFORMATION panel is where users of all types can customize their specific
information. This includes setting the user email address, user password, and the user image.
It is important to ensure that the user email address is correct. In some cases, Cbox 3 will send
email to users. An example of such a case is when a user starts a broadcast session. The
address to play back the broadcast is sent to the user via email (if you had set up your SMTP
configuration)
The user image is completely optional. These images are not distributed in recording or
broadcast sessions. These images are purely for management purposes.
-25-
Figure 23 - My Information Summary
Page 26
Cbox 3 User guide V. 3.3.030
10.1.7. Use Imports/Exports
Also you can check the available settings for export in
EXPORT SETTINGS. It allows the
Administrator to export any and all Cbox 3 settings into a single file. The exported file can be
used as a backup for the Cbox 3 settings, or to load onto other Cbox 3 systems that will have
the same configuration. All settings are itemized, so it is up to the Administrator to choose what
settings are to be saved. If there are no settings to save under a category, that category is
grayed out and has a line through it.
You must set up your audio and video devices but you can easily use imports/exports existing
presets which allows you a one time set up production. Click on SYSTEM TOOLS. Then you
can browse and import a setting path in
IMPORTS SETTINGS.
The Administrator can import previously saved settings to the system. This is not system
specific. That means that the exported file can come from another Cbox 3 system. Just locate
the configuration file and click Import System Settings. When importing, all categories that are
affected by the import, and changed to the imported settings. Settings are not added, but
replace the current configurations.
-26-
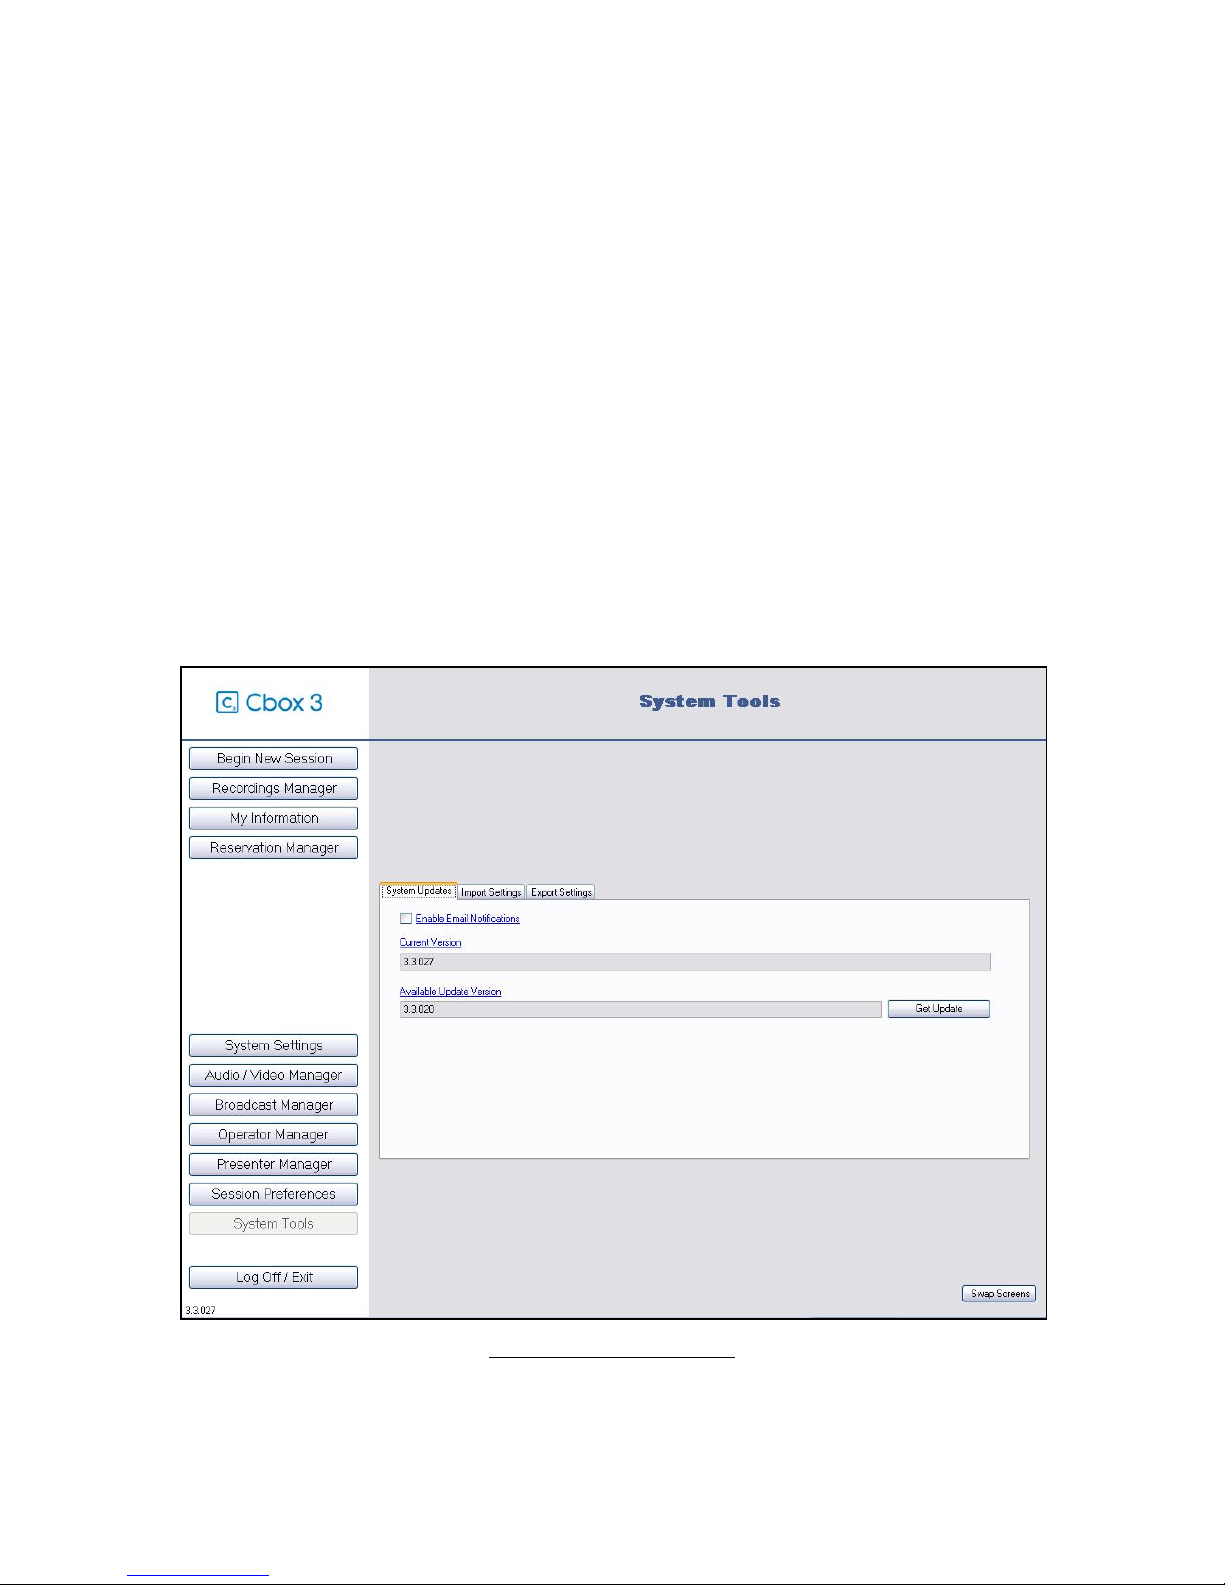
Figure 24 - System Tools Interface
Page 27
Cbox 3 User guide V. 3.3.030
10.1.8. Session Preferences
Click on SESSION PREFERENCES in order to set up the following:
- Media Stream Preferences
- Still Image Preferences
- Custom Properties
- Players
- Web API Access
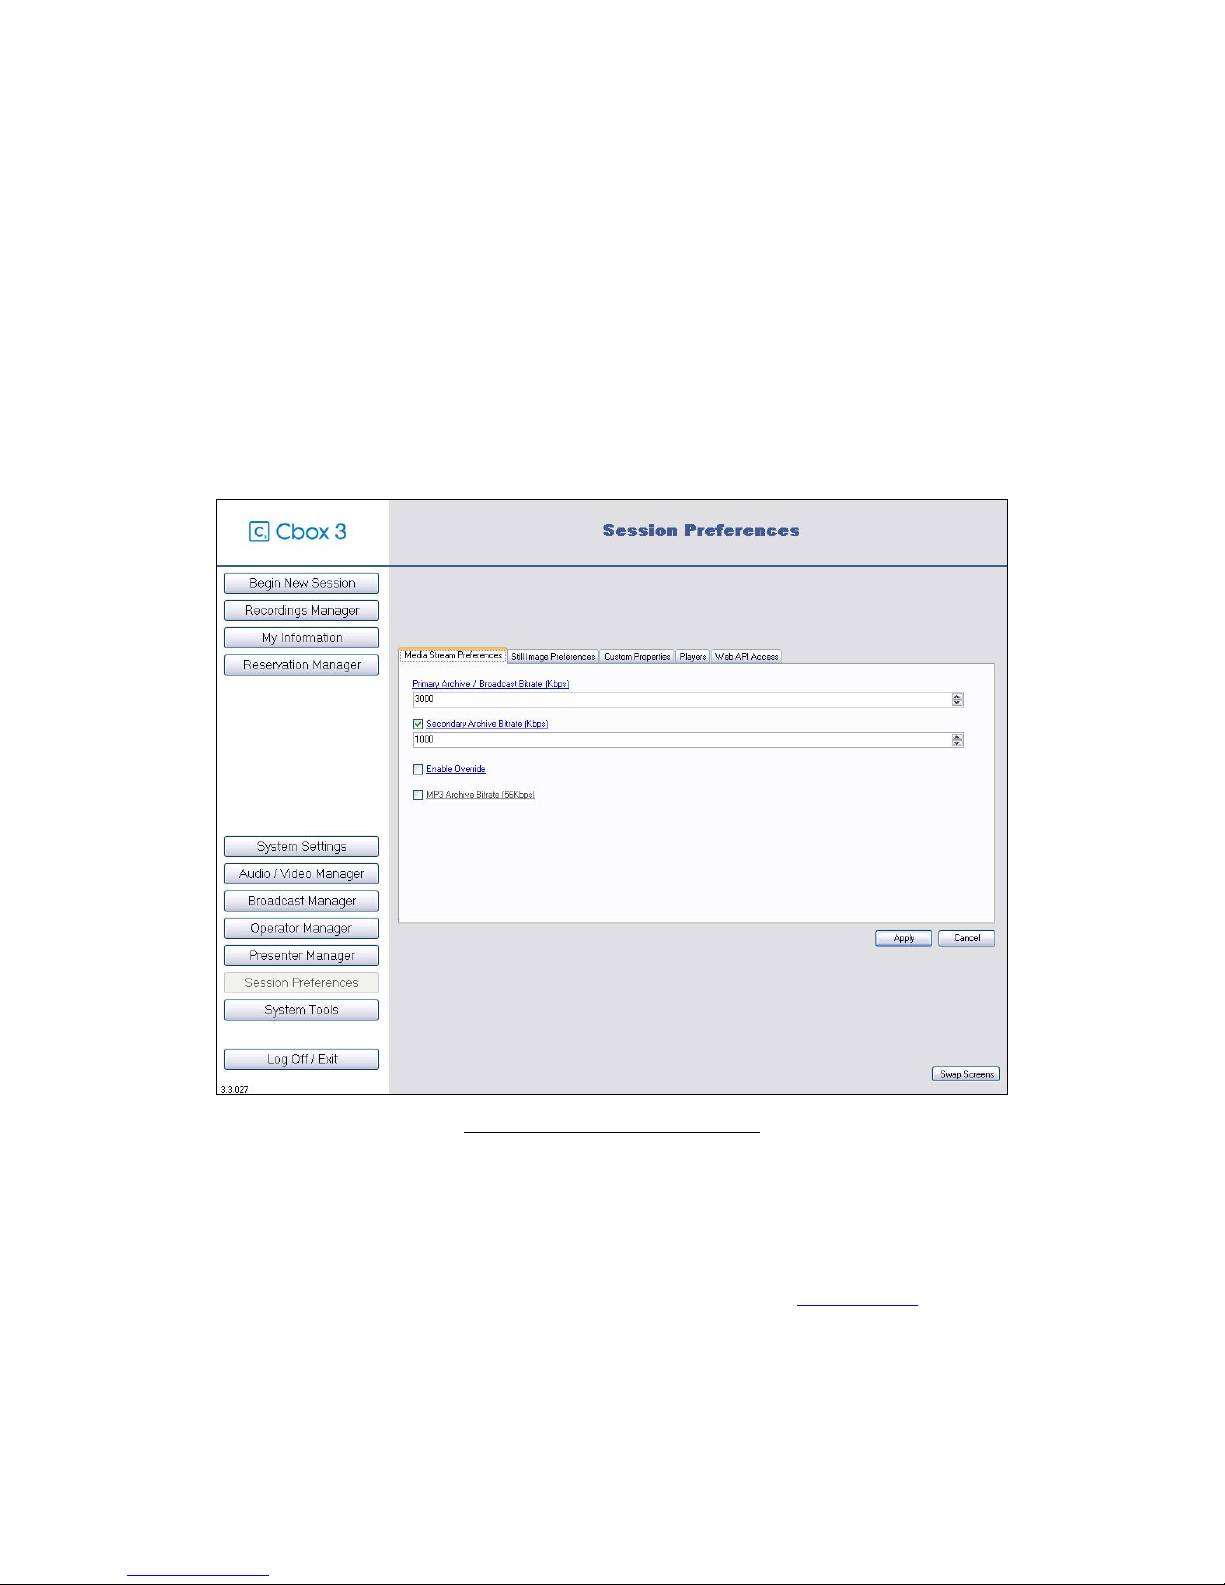
10.1.8.1. Media Stream Preferences
Cbox 3 is capable of producing multiple media streams. Bit rates should be chosen based on
your audience and delivery method. The first media stream, called the
BROADCAST
ARCHIVE / BROADCAST
The analog video input is basically an overlay on top of the RGB input. During a session, the
operator can control the size, location, and opacity of the overlay (RGB settings
media stream, called the
SECONDARY ARCHIVE can be switched between available analog video inputs.
For the
derived from the bit rate. This behavior can be overridden by checking
-27-
, is broadcast (if enabled) as well as written to file. The video source for the PRIMARY
is a mixture of both the switched analog video inputs and the RGB input.
PRIMARY ARCHIVE / BROADCAST and SECONDARY ARCHIVE, the resolution and frame rate are
Figure 25 - Session Preferences Interface
PRIMARY ARCHIVE /
). The second
SECONDARY ARCHIVE written to file only. The video source for the
ENABLE OVERRIDE and
Page 28

Cbox 3 User guide V. 3.3.030
supplying Windows Media Profile Files (.PRX). Once this has been done, Cbox 3 will check for
overriding PRX files at c:\primary.PRX and c:\secondary.PRX. If a profile is found to be
incompatible in any way, it will be ignored and the default behavior will be used without warning.
There is also an option to write an MP3 file.
10.1.8.2. Still Image Preferences
Cbox 3 captures still images of the RGB input. Captures can be initiated manually by the
operator or automatically by scene change detection. In on-demand and broadcast playback,
the Cbox 3 Player displays the captured images synchronized with the rest of the captured
media.
The still image compression quality influences the size (in bits) and clarity of the images
captured. If you find that the images captured are taking up too much space or you are having
trouble delivering them for playback due to bandwidth issues, you may want to reduce the
compression quality. If you find that the images aren't crisp enough, you may want to increase
the compression quality.
Three sizes of images are captured: thumbnail, normal, and large. The size (in pixels) of the large
image can be specified. The large size can be bound to the size of the RGB input for
convenience. Only the desired width needs to be specified. The height is automatically derived
from the width.
-28-
Figure 26 – Still Image Preferences Configuration
Page 29
Cbox 3 User guide V. 3.3.030
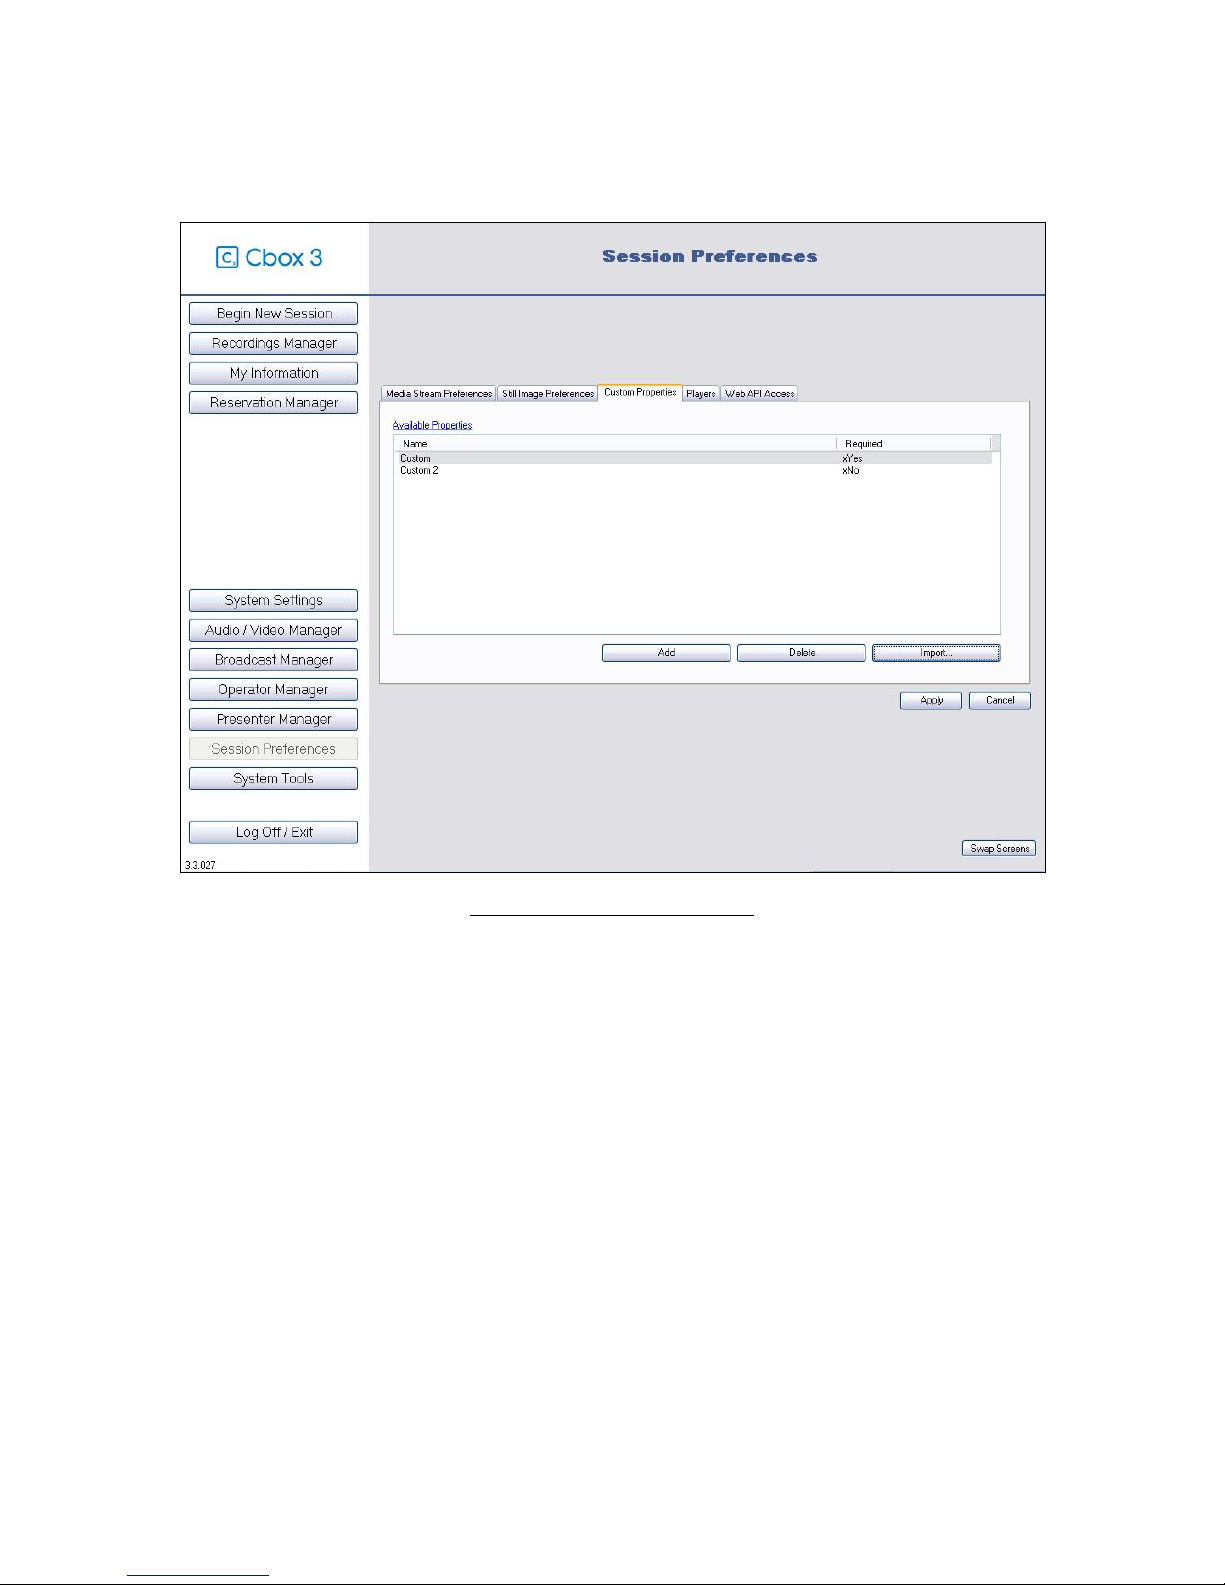
10.1.8.3. Custom Properties
Figure 27 – Custom Properties Interface
It is possible to add CUSTOM PROPERTIES to a session. CUSTOM PROPERTIES are defined here. The
operator is prompted to enter custom property values prior to starting a session.
PROPERTIES
can be used to store an application specific value, extend the Cbox 3 Player to have
additional functionality, and/or enable a content management system.
CUSTOM
-29-
Page 30

Cbox 3 User guide V. 3.3.030
10.1.8.4. Players
Cbox 3 can have an unlimited amount of player skin templates. The format of a Cbox 3
recording is open, so a custom player can be created from scratch. Maybe more useful, the
default Cbox 3 player can be used as a starting point to create a player with your branding.
To create a new player, you must create a new folder under the file folder c:\Program
Files\Winnov\CBOX\CBOX3Pro\Skins\. The name of the folder is the name of the player. In this
folder, all files that comprise your player should be included. To start from an existing player,
copy over all the files from the existing player's folder. Customization can be as simple as
editing the images and style sheet.
Figure 28 - Preview of Existing Players
Classic Player Dark Player
Silverlight Player
-30-
Page 31

Cbox 3 User guide V. 3.3.030
10.1.8.5. Web API Acess
Figure 29 – Web API Access Configuration
The purpose of the Cbox 3 WEB API is to allow remote control of Cbox 3 recording sessions.
This API will be supported, and possibly extended, in future Cbox 3 software versions (3.X.XXX).
For further information you may log into Winnov’s Collaborative Portal in order to read document
about the Cbox 3 WEB API.
-31-
Page 32

Cbox 3 User guide V. 3.3.030
10.2. Capturing your Experience
10.2.1. Starting Capture and Preview
Figure 30 - Capture Screen
Screens A and B up show what you will record.
Screen C is the RGB preview. It appears on the primary archive / broadcast video screen.
Screen D is the Video preview. If you want to record another video entry, you may choose the
one you want and click on
archive screen and if you choose so, on the primary archive / broadcast video screen too.
Screen E is for the audio controls.
Screen F manages the presets
Button G starts a recording.
-32-
TO BROADCAST / ARCHIVE button. It will appear in the secondary
Page 33

Cbox 3 User guide V. 3.3.030
10.2.2. Cbox 3 Operator Interface
1. FILE
1.1. New Session / Main Menu
1.2. Recordings Manager
1.2.1. File
1.2.1.1. View
1.2.1.2. Copy
1.2.1.3. Delete
1.2.1.4. Modify ID
1.2.1.5. Exit
1.2.2. Edit
1.2.2.1. Session Data
1.2.2.2. Select Player
1.2.2.3. Events
1.2.2.4. Trim
1.2.2.5. Extract text
1.2.3. Publish to
1.2.3.1. CD / DVD
1.2.3.2. Removable Storage
1.2.3.3. Web
1.2.3.4. Custom
1.3. Log Off
1.4. Exit
2. CONTROL
2.1. Record
3. SETTINGS
3.1. View
3.1.1. Swap screens
3.1.2. Dark Environment
3.2. Session Details
3.3. Audio
3.4. Video
3.5. RGB
3.5.1. RGB Settings
3.5.2. Snapshots
3.5.2.1. Auto Snapshot
3.5.2.2. Take Snapshot
3.5.3. Text Extraction
3.5.3.1. Auto Text Extraction
3.5.3.2. Extract text
4. PRESETS
4.1. Create
4.2. Manage Available
4.3. Reset Action
5. HELP
5.1. About
-33-
Page 34

Cbox 3 User guide V. 3.3.030
10.2.3. Recording Your Capture
After adjusting audio and video levels, you are now ready to record your event.
Llook at the
BROADCAST AND ARCHIVE MONITORING to have a preview the video
capture and when ready, just click on the record button.
Clicking on the record button will start and pause
the recording
A pop up alert will appear where you can either
RESUME or STOP
recording
Cbox 3 records presentations and lectures with minimal set up but you want to know the basic
steps to properly capture video from different outputs such as a laptop, desktop, a PTZ camera
or a DVD player.
The following sections cover various aspects of video capture such as trimming, de-interlacing,
inverse, filtering and intermediary recompression, transparency. This chapter will teach you how
to record and clean up your video and set you up for final destination as live broadcasting,
publishing your session into a portable media format or burning it into a CD/DVD.
10.2.4. Checking the Audio Levels
Proper audio level calibration is crucial for ensuring good audio quality.
Figure 31 – Audio Levels Configuration
Control the audio levels settings by clicking on SETTINGS then
Archive.
You can choose to accentuate the right or the left sound, mute or isolate a single audio source
for capture.
You may also control the headphone volume.
On room, you can check how the room will hear the sound if you had speakers
On preview, you can check your modifications.
AUDIO CONTROLS – Broadcast /
-34-
Page 35

Cbox 3 User guide V. 3.3.030
10.2.5. Adjusting the Video Levels
10.2.5.1. How to Set up your Broadcast and Archive Monitoring?
On this monitoring, you may adjust:
• The
INSET ALPHA BLEND: the combining of the alpha channel with other layers in an image
or video in order to show translucency.
• The
INSET SIZE: modify the size of the video output.
• The position of the video: click on the right/left or up/down corners to place your video.
Figure 32 - Using the Inset Alpha Blend
Figure 33 - Advance RGB Settings Toolbox
You may also correct the RGB settings by clicking on
SETTINGS then
Set the:
RGB SOURCE SETTINGS
• SOURCE: chooses the input control for an image
capture
ALIGNMENT: controls the orientation of your
•
camera.
PROPERTIES: shows the individual color gain
•
and brightness settings.
RGB.
-35-
Page 36

Cbox 3 User guide V. 3.3.030
SNAPSHOTS
Figure 34 - Snapshot Capturing
TAKE SNAPSHOT: The image capture is controlled by the BROADCAST AND ARCHIVE MONITORING.
AUTO SNAPSHOT SENSITIVITY: controls the timing of the capture. When the TAKE SNAPSHOT button
is pressed, Cbox 3 will capture the event following the snapshot sensitivity setup.
-36-
Figure 35 - Advance RGB Settings 1
Page 37

Cbox 3 User guide V. 3.3.030
TEXT EXTRACTION
AUTO TEXT EXTRACTION enables you to extract the words from the presentation and will
automatically set up a table of contents and an index. This option is very useful while you are
watching your experience and you are looking for something specific, just do a search.
Figure 36 - Advance RGB Settings 2
10.2.5.2. Video Control / PTZ Control
If you have multiple video sources, each of them is accessible via their tab on the video control
user interface and can control or adjust the settings of your different devices.
To control a camera, move your mouse over the video control as follows or through the menu.
Go to SETTINGS then
on
PAN/TILT CAMERA CONTROL. You will be able to control the camera left and right then up and
VIDE. The advanced video settings toolbox will appear (cf. Figure 38), click
down.
Figure 37: Video Control Window: Camera is Showing the PTZ1 Camera.
-37-
Page 38

Cbox 3 User guide V. 3.3.030
Figure 38 - Advanced Video Settings Toolbox
Video source exposure is controlled by allowing manual or automatic FOCUS and WHITE BALANCE
settings.
PAN/TILT CAMERA CONTROL
• FOCUS: The auto focus mode on a video source will use a sensor to determine how far
away the subject is from the video sources lens. The auto focus will compensate for the
difference and allow your image to be in clear and focus.
EXPOSURE: Creates a set point that the auto focus and/or auto white balance controls
•
use to establish an output video level. When the exposure control is in Automatic, the
exposure level is determined by the camera analyzing the video level to determine an
ideal set point.
WHITE BALANCE: The camera automatically sets white balance to match the true color of
•
the subject.
BACKLIGHT: Lighting a subject from behind to separate the subject from the background.
•
Correct the video settings by
Set the:
clicking on SETTINGS then VIDEO.
-38-
Figure 39 - Advanced Video Settings Toolbox
Page 39

Cbox 3 User guide V. 3.3.030
VIDEO CONTROL
• VERTICAL/HORIZONTAL FLIP: Flip vertically of horizontally the view of the video.
BRIGHTNESS: Adjusts the "black level" of the display system.
•
•
CONTRAST: Adjusts how bright the white is.
HUE: Adjusts the predominant color.
•
SATURATION: Corrects the color intensity.
•
SHARPNESS: Control systems for image and video acquisition in order to obtain an
•
improved picture quality.
Color information is transmitted as
LUMA GAIN is a weighted sum of the RGB colors.
•
CHROMA GAIN: Short for "chrominance." The attributes of a color, which include its hue
•
LUMA (brightness) and CHROMA (color).
and saturation.
-39-
Page 40

Cbox 3 User guide V. 3.3.030
10.3. Watching your Experience
After recording, you will be able to watch your event. Click on RECORDING MANAGER.
The Cbox 3 Recordings Manager pop up window shows a list of your different records.
Double click on the
ID RECORD you would
like to watch.
Figure 40 - Recording Manager
Your video will appear in a new window.
Figure 41 - Watch a Recording
All capture content is searchable from the Cbox 3 keyword search tab. Click
the word or phrase in the search field.
SEARCH and enter
-40-
Figure 42 – Search
Page 41

Cbox 3 User guide V. 3.3.030
The results will appear in a separate window.
Clicking n a search result link will take you to that specific point in the recording.
Figure 43 - Search Results
-41-
Page 42

Cbox 3 User guide V. 3.3.030
10.4. Editing your Session
With RECORDING MANAGER it is also possible to edit a recording.
Figure 44 - Edit a Session
10.4.1. Add an Event
To add an event, use the menu and go to
EDIT and click EVENTS. The EVENTS EDITOR window will appear as follows. From the events
go to
editory window, you can
EDIT or DELETE any events
EDIT > EVENTS or you can right click on your recording,
-42-
Figure 45 - Events
Page 43

Cbox 3 User guide V. 3.3.030
Two types of events can be added: an
IMAGE or a CHAPTER.
Select the type of event and select the
TITLE of the event you would like to add.
and
ADD
Click
Figure 46 - Type of Event
10.4.2. Trim
The TRIM option enables you to cut the beginning and the end of a recording. Set the BEGIN and
END TIME of your content and TRIM.
To trim a recording, set a new begin time and/or a new end time. If you are only trimming the
beginning of a recording, there is no need to set the end time.
TIME
Once a recording has been trimmed, neither the removed section, nor the previous
video can be recovered.
-43-
Figure 47 - Trim
Page 44

Cbox 3 User guide V. 3.3.030
10.5. Broadcast your Recording
10.5.1. Make a Reservation
Reservations can be created to organize times when the Cbox 3 is to be used, and are required
when a session is going to be broadcasted.
To make a reservation, click on RESERVATION MANAGER.
The reservation stores all information for the planned session; start and stop times, operator,
presenter, and broadcast information. (The start and stop times of the reservation are for
reference only. They do not automatically start and stop the reservation.)
Click on
CREATE and follow the steps
Step 1 – Start and Stop Time Step 2 – Assign Operator
Step 3 – Set Presenter Step 4 – Edit Presenter
-44-
Page 45

Cbox 3 User guide V. 3.3.030
Step 5 – Set Custom Properties Step 6 – Select Broadcast Configuration
Step 7 – Summary
-45-
Page 46

Cbox 3 User guide V. 3.3.030
10.5.2. Live Broadcasting Configuration
Broadcast configurations are groups of settings which describe how broadcasts are distributed.
To do a live broadcast, a broadcast configuration must exist. Broadcast configurations should
be reusable once they have been created.
To setup a new configuration or chose one that already exists, go on BROADCAST MANAGER,
then click on the button
CREATE.
1. Name your configuration
2. Fill out the
You have two
SERVER PUSH: In some live encoding situations, the streaming server may not be able to
•
coordinate the content feed between the encoder and the server. With Server Push you
can use the encoder to control the server to send the encoded content to a broadcast
publishing point. Using server push, you will have to log in to the server to distribute
your streaming media. This is a very handy tool if your encoding computer is set up
behind a router and you do not know how to configure your router to port forward,
however it can also cause problems. A disadvantage of using push is if your connection
drops, you will lose your connection to the server. Manual re-connect to the server is
required to continue streaming. You will also need to re-start your encoder.
MEDIA STREAMS information.
DISTRIBUTION MODES:
-46-
Page 47

Cbox 3 User guide V. 3.3.030
• ENCODER PULL: When Windows Media Services "pulls" the content from the encoder, the
server connects to an encoder stream that is already in progress. With encoder pull, the
server connects to your encoder, as apposed to 'push' where you log into the server to
stream your content. This is very useful because if you lose the connection to the server,
the server will reconnect to the encoder automatically, once an Internet connection
resumes. In an encoder pull configuration, the encoder must be started and encoding
content before the Windows Media server can connect to it.
In order to stream using 'pull', you must have an external static IP address. If your
encoding computer is behind a router, the server would not be able to communicate
with the encoder, unless you have your router configured to port forward to your
encoding machine.
• Ports:
Ports allow multiple applications to reside on a single computer - all talking TCP/IP.
The 80 is the default port number for the HTTP protocol so typing it is not necessary.
The most commonly used streaming ports are: 554, 1554, 4040 and 8080.
-47-
Page 48

Cbox 3 User guide V. 3.3.030
3. Fill out the Web Files information
You have two
DISTRIBUTION MODES:
•
FTP: Network protocol used to transfer data from one computer to another through a
network, such as over the Internet.
UNC: uses a network share to copy files.
•
4. Click on the button Ok to save the broadcast configuration.
-48-
Page 49

Cbox 3 User guide V. 3.3.030
10.6. Publishing Your Recording
10.6.1. Web Publishing
Before publishing streaming videos on a web server, you may consult the chapter about how to
configure your own server
. Then after setting up your Cbox 3 for Web publishing, launch
RECORDING MANAGER and select WEB > WEB PUBLISHING MANAGER.
The online publishing configuration manager will appear as follows:
1. Click on
ADD and fill out the form under the WEB SERVER tab.
-49-
Page 50

Cbox 3 User guide V. 3.3.030
2. Fill out the form under the MEDIA SERVER tab.
3. Right click on the recording you wish to publish.
4. Select
PUBLISH TO >WEB > CONFIGURATION NAME.
-50-
Page 51

Cbox 3 User guide V. 3.3.030
10.6.2. Publishing Recordings to CD/DVD
You can publish your recordings on a CD or DVD. Click on RECORDING MANAGER and select
PUBLISH TO > CD/DVD.
10.6.3. Custom Publishing Manager
-51-
Figure 48 - Custom Publishing Manager
Page 52

Cbox 3 User guide V. 3.3.030
11. Trouble Shooting
Image is Dark or Saturated on the RGB
Is the light level too low or too high in your
BROADCAST AND ARCHIVE MONITORING preview?
In fact the light background depends on the signal and the cables you are using.
You can fix this with the manual adjustment mode.
1. Click on
2. Set up the
RGB SOURCE SETTINGS.
GAIN in order to light up your BROADCAST AND ARCHIVE MONITORING background.
Audio/video manager error
If you get this warning, take the following steps:
1. Windows system >
2. and check your USB PORT. If your USB PORT uses COM3, change it to COM1.
The Cbox 3 is slow after setting up the Recording manager
After playing with events or trimming your stream, the computer may sometimes slow down.
When it happens, just close and restart the Cbox 3 application.
-52-
Page 53

Cbox 3 User guide V. 3.3.030
12. System Updates
You can check the CBOX version that is currently installed on the system by opening SYSTEM
TOOLS, as well as the CBOX version currently available for download. If a new version is
available clicking "Get Update", will download and begin the installation of the latest software
version.
Enable Email Notifications will send an email to the administrator when a new update is available.
-53-
Page 54

Cbox 3 User guide V. 3.3.030
13. How to Live Broadcast and Publish Online
Cbox 3 has capabilities for creating and distributing rich media content. One or more servers
or services are required for distribution. Here we will provide steps for configuring your own
server for online publishing and live broadcasting. This is only a sample of what can be done
using a specific set of resources. The following examples use Cbox 3 as the streaming and
web server (see configuration 1 below). You can substitute any Windows Server 2003 based
OS given that it supports IIS and/or Windows Media Services.
Basically, there are four possible configurations when dealing with online publishing and live
broadcasting:
• Configuration 1
Cbox 3
Encoder
Web Server
• Configuration 2
Cbox 3
Web Server
• Configuration 3
Streaming
Server
Encoder
Streaming
Server
Cbox 3
Encoder
Web Server
-54-
Streaming
Server
Page 55

Cbox 3 User guide V. 3.3.030
• Configuration 4
Encoder
Cbox 3
Web Server
Note: If problems arise, you may refer to your IT department to make sure your network and
firewall are properly configured.
13.1. Creating a New User (Web Server and Streaming Server)
A new user account will be created for live broadcasting and online publishing on the
streaming and web server (Cbox 3 in our case).
1. Go to My Computer > Manage > Local Users and Groups > Users.
Streaming
Server
2. Select Users > New User.
3. Add username and password.
-55-
Page 56

Cbox 3 User guide V. 3.3.030
4. Select “Password never expires”.
5. Review the new account, click on “Create” and then “Close”.
-56-
Page 57

Cbox 3 User guide V. 3.3.030
13.2. Creating a Shared Directory (Web Server and Streaming Server)
The web and media content for live broadcasting and online publishing needs to be
transferred to a shared place on a web server and streaming server (Cbox 3 in our case).
1. Launch Windows Explorer and create, for example, the following structure for the
folders.
2. Right click on “cboxplace” and select “Sharing and Security”.
-57-
Page 58

Cbox 3 User guide V. 3.3.030
3. Select the “Sharing” tab and then “Share this folder”.
-58-
Page 59

Cbox 3 User guide V. 3.3.030
4. Click on “Permissions” to bring up “Share Permissions”.
-59-
Page 60

Cbox 3 User guide V. 3.3.030
5. Click on “Add” to bring up “Select Users or Groups”.
6. Type the username which was created earlier (“cbox”) in “Enter the object names” and
click on “Check Names”.
7. Click on “OK”.
8. The user “cbox” is added to the list of “Group or user names”.
-60-
Page 61

Cbox 3 User guide V. 3.3.030
9. Select the user “cbox” in the list and check the permissions Allow > Full Control.
10. Click on “OK”.
11. Select the “Security” tab.
-61-
Page 62

Cbox 3 User guide V. 3.3.030
12. Click on “Add” to bring up “Select Users or Groups”.
13. Type the username which was created earlier (“cbox”) in “Enter the object names” and
click on “Check Names”.
14. Click on “OK”.
-62-
Page 63

Cbox 3 User guide V. 3.3.030
15. The user “cbox” is added to the list of “Group or user names”.
16. Select the user “cbox” in the list and check the permissions Allow > Full Control.
17. Click on “OK”.
13.3. Web Site Setup (Web Server)
A web site needs to be set up in order to serve the web content for live broadcasting and
online publishing on the web server (Cbox 3 in our case).
1. Go to “My Computer > Manage > Services and Applications > Internet Information
Services (IIS) Manager > Web Sites”.
-63-
Page 64

Cbox 3 User guide V. 3.3.030
2. Right click on “Default Web Sites”.
3. Select “New > Virtual Directory…” to bring up the creation wizard.
-64-
Page 65

Cbox 3 User guide V. 3.3.030
4. Click on “Next”.
5. Type an alias and click on “Next”.
-65-
Page 66

Cbox 3 User guide V. 3.3.030
6. Browse to select the shared directory you created earlier and click on “Next”.
7. Check all the permissions except “Write” and click on “Next”.
-66-
Page 67

Cbox 3 User guide V. 3.3.030
8. Click on “Finish”.
13.4. Windows Media Services Configuration (Streaming Server)
Your Windows Media Services need to be properly configured in order to live broadcast and
publish online.
1. Go to “My Computer->Manage->Services and Applications->Windows Media
Services”.
2. Select your server under “Windows Media Services”.
-67-
Page 68

Cbox 3 User guide V. 3.3.030
3. Select the “Properties” tab.
4. Select “Authorization” and enable all the services (right click and select Enable).
-68-
Page 69

Cbox 3 User guide V. 3.3.030
5. Right click on “WMS Publishing Points ACL Authorization” and select “Properties”.
6. Click on “Add” to bring up “Select Users or Groups”.
7. Type the username you created earlier (“cbox”) and click on “Check Names”.
8. Click on “OK”.
9. Select the user “cbox” in the “Name” list.
10. Check the permissions “Allow > Read”, “Allow Write” and “Allow Create”.
-69-
Page 70

Cbox 3 User guide V. 3.3.030
11. Click on “OK”.
12. Select “Authentication” and enable all the services (right click and select Enable).
-70-
Page 71

Cbox 3 User guide V. 3.3.030
13. Select “Control Protocol” and enable all the services (right click and select Enable).
Note: “WMS HTTP Server Control Protocol” might not get enabled because of a port
conflict. Follow the steps below to solve the conflict.
14. Right Click on “WMS HTTP Server Control Protocol” and select “Properties”.
15. Select “Use other port” and type a new port number (8089 for example).
-71-
Page 72

Cbox 3 User guide V. 3.3.030
16. Click on “OK”.
17. Right click on “WMS HTTP Server Control Protocol” and select “Enable”.
-72-
Page 73

Cbox 3 User guide V. 3.3.030
13.5. Creating an On-Demand Publishing Point (Streaming Server)
You can create an on-demand publishing point on your streaming server (Cbox3 in our case)
in order to serve the media content for online publishing. This step does not need to be taken
if you are doing live broadcast.
1. Go to “My Computer > Manage > Services and Applications > Windows Media
Services > Publishing Points”.
2. Right click on “Publishing Points” and select “Add Publishing Point (Wizard” to bring
up the wizard.
-73-
Page 74

Cbox 3 User guide V. 3.3.030
3. Click on “Next”.
4. Type the name of the publishing point (“cboxondemand” for example) and click on
next.
-74-
Page 75

Cbox 3 User guide V. 3.3.030
5. Select “Files” and click on “Next”.
6. Select “On-demand publishing point” and click on “Next”.
-75-
Page 76

Cbox 3 User guide V. 3.3.030
7. Set the path to the directory you created earlier where you want your on-demand
media content and click on “Next”.
8. Click on “Next”.
-76-
Page 77

Cbox 3 User guide V. 3.3.030
9. Click on “Next”.
10. Click on “Next”.
-77-
Page 78

Cbox 3 User guide V. 3.3.030
11. Uncheck “After the wizard finishes” and click on “Finish”.
12. A new publishing point has been created to server your media content on-demand.
-78-
Page 79

Cbox 3 User guide V. 3.3.030
13.6. Live Broadcasting Configuration (Cbox 3)
Following the completion of the steps above, the live broadcasting configuration needs to be
created in the Cbox 3 application (Broadcast Manager).
1. Launch Cbox 3 application.
2. Enter login information and click on “Logon”.
3. Click on “Broadcast Manager” and click on “Create”.
-79-
Page 80

Cbox 3 User guide V. 3.3.030
4. Type the name of your configuration in the “Name” field.
5. Select “Server Push” for the distribution mode.
6. Type the “Push Address” with the IP address of the streaming server (Cbox 3 in our
case), the push port (see “WMS HTTP Server Control Protocol” in 13.4) and a name for
the publishing point.
7. Enter the user and password you created earlier on the streaming server.
8. Type the playback URL to be used with the IP address of the streaming server (Cbox 3
in our case) and the name of the publishing point.
-80-
Page 81

Cbox 3 User guide V. 3.3.030
9. Select the “Web Files” tab.
10. Select “Network Share Copy (UNC)” for the distribution mode.
11. Type the UNC address with the IP address of your web server (Cbox 3 in our case)
and the place in the shared directory where to transfer the web files (see 13.2).
12. Enter the user and password you created earlier on the web server.
13. Type the playback URL with the IP address of your web server (Cbox 3 in our case)
and the place in the shared directory where the web files are being transferred.
14. Click on “OK”.
-81-
Page 82

Cbox 3 User guide V. 3.3.030
15. The broadcast configuration has been created.
-82-
Page 83

Cbox 3 User guide V. 3.3.030
16. Click on “Reservation Manager”.
17. Click on “Create”.
18. Follow the steps to create a reservation enabling broadcasting and selecting your
broadcast configuration.
19. Click on “Add”.
-83-
Page 84

Cbox 3 User guide V. 3.3.030
20. The reservation has been created.
21. Click on “Begin New Session”.
22. Select “Select Reservation”.
23. Click on “Go”.
24. Select your reservation and click on “Begin”.
-84-
Page 85

Cbox 3 User guide V. 3.3.030
25. Click on “Record” to start the live broadcast.
26. Click on “Broadcast Information”.
-85-
Page 86

Cbox 3 User guide V. 3.3.030
27. Click on the “Web Based Player URL” to test your live broadcast. This information
shall be provided to your audience to access the live broadcast.
Note: Any live broadcast will be assigned a unique ID so the web based player URL will
change from one live broadcast to another.
-86-
Page 87

Cbox 3 User guide V. 3.3.030
13.7. Web Publishing Configuration (Cbox 3)
Following the completion of the steps above, the web publishing configuration needs to be
created in the Cbox 3 application for on-demand (Web Publishing Manager).
1. Launch Cbox 3 Publisher.
2. Select “Publish To > Web > Web Publishing Manager…”.
3. Click on “Add”.
-87-
Page 88

Cbox 3 User guide V. 3.3.030
4. Type the configuration name.
5. Enter the “Web Destination Base URL” with the IP address of the web server (Cbox 3
in our case) and the place in the shared directory you created earlier where the web
files need to be transferred to.
6. Select “Network Share Copy (UNC)” for the distribution mode.
7. Type the “UNC Address” with the IP address of the web server (Cbox 3 in our case)
and the place in the shared directory.
8. Enter the username and password you created earlier on the web server.
9. Select the “Media Server” tab.
10. Check “Enable Media Server”.
11. Type the “On Demand Publishing Point Base URL” with the IP address of the
streaming server (Cbox 3 in our case) and the on-demand publishing point which has
been created earlier.
12. Select “Network Share Copy (UNC)” for the distribution mode.
13. Type the “UNC Address” with the IP address of the streaming server (Cbox 3 in our
case) and the place in the shared directory you created earlier where the media files
need to be transferred to.
14. Enter the username and password you created earlier on the streaming server.
-88-
Page 89

Cbox 3 User guide V. 3.3.030
15. Click on “OK”.
16. The web publishing configuration has been created.
17. Click on “Close”.
18. Click right on a recording you wish to publish online.
-89-
Page 90

Cbox 3 User guide V. 3.3.030
19. Select “Publish To > Web > [configuration name]”.
20. “Publishing to Web” shall complete successfully.
21. Click on “View” to test your online publishing.
22. The web browser starts with the URL to be provided to your audience.
-90-
Page 91

Cbox 3 User guide V. 3.3.030
14. Glossary
A
AV Devices: Analog audio and/or video sources. Creating devices is optional. If you do not
create devices, all available inputs will be considered enabled and they will all use their default
names. By adding specific devices to the Devices list, you are able to provide custom names
and eliminate unused inputs.
B
Broadcast Configurations: Groups of settings which describe how broadcasts will be
distributed. To do a live broadcast, a broadcast configuration must exist. Broadcast
configurations should be reusable once they have been created. This interface allows you to
create, edit, and delete broadcast configurations.
C
Custom Properties: It is possible to add custom properties to a session. Custom properties are
defined here. The operator is prompted to enter custom property values prior to starting a
session. Custom properties can be used to store an application specific value, extend the Cbox
3 Player to have additional functionality, and/or enable a content management system.
F
FTP = File Transfer Protocol
Network protocol used to transfer data from one computer to another through a network, such
as over the Internet.
I
Import Settings: Allows the Administrator it import previously saved settings to the system. This
is not system specific. That means that the exported file can come from another Cbox 3 system.
Just locate the configuration file and click Import System Settings. When importing, all
categories that are affected by the import, and changed to the imported settings. Meaning the
settings are not added, but replace the current configurations.
-91-
Page 92

Cbox 3 User guide V. 3.3.030
M
Media Stream Preferences: Cbox 3 is capable of producing multiple media streams. Bit rates
should be chosen based on your audience and delivery method.
The first media stream, called the Primary Archive / Broadcast, is broadcasted (if enabled) as
well as written to file. The video source for the Primary Archive / Broadcast is a mixture of both
the switched analog video inputs and the RGB input. The analog video input is basically an
overlay on top of the RGB input. During a session, the operator can control the size, location,
and opacity of the overlay.
The second media stream, called the Secondary Archive written to file only. The video source for
the Secondary Archive can be switched between available analog video inputs.
For the Primary Archive / Broadcast and Secondary Archive, the resolution and frame rate are
derived from the bitrate. This behavior can be overridden by checking Enable Override and
supplying Windows Media Profile Files(.PRX). Once this has been done, Cbox 3 will check for
overriding PRX files at c:\primary.PRX and c:\secondary.PRX. If a profile is found to be
incompatible in any way, it will be ignored and the default behavior will be used without warning.
There is also an option to write an MP3 file.
N
NTCS = National Television System Committee
Analog television system in use in the United States
O
Operators: Operators logon through the Cbox 3 logon page. Operators are responsible for
controlling and monitoring Cbox 3 sessions. The Operator Manager allows you to create, edit,
and delete operators. The operators list can be viewed by details or by images.
P
PAL = Phase Alternating Line
Color encoding system used in broadcast television systems in the United States
Players: Cbox 3 can have an unlimited amount of players. The format of a Cbox 3 recording is
open, so a custom player can be created from scratch. Maybe more useful, the default Cbox 3
player can be used as a starting point to create a player with your branding. To create a new
player, you must create a new folder under c:\Program Files\Winnov\CBOX\CBOX3Pro\Player\.
The name of the folder is the name of the player. In this folder, all files that comprise your player
should be included. To start from an existing player, copy over all the files from the existing
player's folder. Customization can be as simple as editing the images and style sheet.
-92-
Page 93

Cbox 3 User guide V. 3.3.030
Presenters: You may have many presenters depending on your venue type and how it is
managed. Each session has a single presenter associated with it. From the presenter, the
session gets useful metadata. By creating presenters, you reduce repeat entry of information.
The Presenter Manager allows you to create, edit, and delete presenters. The Presenters list can
be viewed by details or by images.
PTZ: Pan Tilt Zoom
Pan= Rotating the camera around Z-axis.
Tilt= Rotating the camera around the X-axis
Zoom = Bringing (a subject, scene, etc.) into closeup by using a zoom lens
R
Reservations: Reservation can be created to organize times when the Cbox 3 is to be used,
and are required when a session is going to be broadcasted. The reservation stores all
information for the planned session; start and stop times, operator, presenter, and Broadcast
information. The start and stop times of the reservation are for reference only. They do not
automatically start and stop the reservation.
S
SMTP = Simple Mail Transfer Protocol
SMTP is a relatively simple, text-based protocol, in which one or more recipients of a message
are specified (and in most cases verified to exist) along with the message text and possibly other
encoded objects.
SMTP Server = For the Cbox 3 system to send out email notifications an SMTP server is
required. The Cbox 3 will send out notifications to the administrator when new updates are
available, hardrive storage is low, and when sessions reservations have been set up to
broadcast. The assigned operator and presenter will also receive an email notification for
session reservations.
The server name is the address of the SMTP server. If required enter the User Name and
password the Cbox 3 will log onto the SMTP server. Contact your IT department if you are not
sure what to put. When the server is configured, you can enter any valid email address in the
"Test" groupbox to verify the settings are correct. When you click send, Cbox 3 will attempt to
send an email to the specified email address.
Still Image Preferences: Cbox 3 captures still images of the RGB input. Captures can be
initiated manually by the operator or automatically by scene change detection. In on-demand
and broadcast playback, the Cbox 3 Player displays the captured images synchronized with the
rest of the captured media.
The still image compression quality influences the size (in bits) and clarity of the images
captured. If you find that the images captured are taking up to much space or you are having
trouble delivering them for playback due to bandwidth issues, you may want to reduce the
compression quality. If you find that the images aren't crisp enough, you may want to increase
the compression quality.
-93-
Page 94

Cbox 3 User guide V. 3.3.030
Three sizes of images are captured: thumbnail, normal, and large. The size (in pixels) of the large
image can be specified. The large size can be bound to the size of the RGB input for
convenience. Only the desired width needs to be specified. The height is automatically derived
from the width.
System = The system name and system email address are used when Cbox 3 sends out email
notifications. These do not need to be unique per Cbox 3, but it would be a good idea so those
who receive the email know which Cbox 3 has sent it.
System Updates Displays: the Cbox 3 version that is currently installed on the system, as well
as the Cbox 3 version currently available for download. If a new version is available clicking "Get
Update", will download and begin the installation of the new version.
Enable Email Notifications will send an email to the administrator when a new update is available.
U
UNC = Universal Naming Convention or Uniform Naming Convention
Common syntax to describe the location of a network resource, such as a shared file, directory
or printer. The UNC syntax for Windows systems is as follows:
//ComputerName/SharedFolder/Resource
V
Video Standard: the video standard should be chosen based on your analog video equipment.
NTSC and PAL video standards are supported. The video standard setting is applied systemwide, so use equipment that supports the same video standard. If your video standard setting
and your equipment are mismatched, you may see no video or unstable, clipped video.
-94-
Page 95

Cbox 3 User guide V. 3.3.030
15. Contact Technical Support
The Cbox 3 appliance checks after start-up and periodically for updates when it is connected to
the internet. The administrator then needs to manually start the update process.
To obtain help or information associated with your Cbox 3 appliance, use the help menus,
supplied documentation, or contact Winnov support via e-mail at support@winnov.com
.
©
Copyright
2008 by Winnov LP. All rights reserved.
-95-
Page 96

Cbox 3 User guide V. 3.3.030
16. Index Figures
Figure 1 - What to do with a Cbox 3......................................................................................................... 5
Figure 2 - Cbox3 Shipment Content......................................................................................................... 6
Figure 3 - Specifications............................................................................................................................. 7
Figure 4 - Typical Configuration of Cbox 3.............................................................................................. 9
Figure 5 - Cbox3 Rear View ..................................................................................................................... 10
Figure 6 - A/V Slotbracket connector with A/V Adapter Cable .......................................................... 11
Figure 7 - VGA (RGB) Input with and Splitter Cable............................................................................. 11
Figure 8 - Dual Head VGA Output........................................................................................................... 11
Figure 9 – Cbox 3 Front View with Audio Monitor Output ......................................................................... 12
Figure 10 - Balanced Audio OUT XLR (male) connectors........................................................................... 12
Figure 11 - Balanced Microphone XLR (female) Connector ............................................................... 13
Figure 12 - PTZ Camera connection diagram....................................................................................... 14
Figure 13 – User Login Interface ............................................................................................................. 17
Figure 14 - New Session Interface.......................................................................................................... 18
Figure 15 - Audio/Video Manager ........................................................................................................... 19
Figure 16 - A/V Device.............................................................................................................................. 20
Figure 17 - Operator Manager Interface................................................................................................. 21
Figure 18 - Operators List ........................................................................................................................ 21
Figure 19 - Presenter Manager Interface ............................................................................................... 22
Figure 20 - Presenters List ....................................................................................................................... 22
Figure 21 - System Information Interface............................................................................................... 23
Figure 22 – SMTP Server Configuration................................................................................................. 24
Figure 23 - My Information Summary..................................................................................................... 25
Figure 24 - System Tools Interface......................................................................................................... 26
Figure 25 - Session Preferences Interface............................................................................................. 27
Figure 26 – Still Image Preferences Configuration ............................................................................... 28
Figure 27 – Custom Properties Interface ............................................................................................... 29
Figure 28 - Preview of Existing Players .................................................................................................. 30
Figure 29 – Web API Access Configuration........................................................................................... 31
Figure 30 - Capture Screen...................................................................................................................... 32
Figure 31 – Audio Levels Configuration ................................................................................................. 34
Figure 32 - Using the Inset Alpha Blend ................................................................................................ 35
Figure 33 - Advance RGB Settings Toolbox.......................................................................................... 35
Figure 34 - Snapshot Capturing.............................................................................................................. 36
Figure 35 - Advance RGB Settings 1...................................................................................................... 36
Figure 36 - Advance RGB Settings 2...................................................................................................... 37
Figure 37: Video Control Window: Camera is Showing the PTZ1 Camera. ..................................... 37
Figure 38 - Advanced Video Settings Toolbox...................................................................................... 38
Figure 39 - Advanced Video Settings Toolbox...................................................................................... 38
Figure 40 - Recording Manager............................................................................................................... 40
Figure 41 - Watch a Recording................................................................................................................ 40
Figure 42 – Search..................................................................................................................................... 40
Figure 43 - Search Results....................................................................................................................... 41
Figure 44 - Edit a Session ........................................................................................................................ 42
Figure 45 - Events...................................................................................................................................... 42
Figure 46 - Type of Event ......................................................................................................................... 43
Figure 47 - Trim.......................................................................................................................................... 43
Figure 48 - Custom Publishing Manager ...............................................................................................51
-96-
 Loading...