

Page 1
RK-1
7-Port Gigabit Router with BakPak
BakPak
Enabled
QUICK START GUIDE
Page 2

Introduction
The Pakedge RK-1 7-Port Gigabit Router with BakPak gives you incredibly fast speeds
and unmatched ease of use, including support of the Pakedge Zones VLAN solution.
The router has advanced features like port forwarding, 1:1 NAT, and static routes, while
also supporting UPnP for simple compatibility with common consumer devices. The
RK-1 also integrates BakPak, which means that you can access the power of BakPak to
monitor every device within the network.
Key features
• BakPak built in: Fully manage any network with an RK-1
• 900+Mbps WAN-to-LAN firewall throughput
• Secure VPN: Support for PPTP and OpenVPN
• Pakedge Zones: 6 VLAN configurations allowing inter-VLAN and multicast routing
for AV / home automation networks
• BakPakDDNS: Free Dynamic DNS service built in
• Simple-to-use web GUI
Package contents
• (1) RK-1 7-Port Gigabit Router with BakPak
• (1) Power cord
• (2) Rack-mount brackets and screws
• (1) Quick Start Guide
• (1) Ethernet cable
22
Page 3
Installing the RK-1
Tools required:
• Phillips screwdriver (if using rack-mount brackets)
• Computer with Ethernet interface and a web browser
• Ethernet cable
Installation
1 Open the box and remove the RK-1.
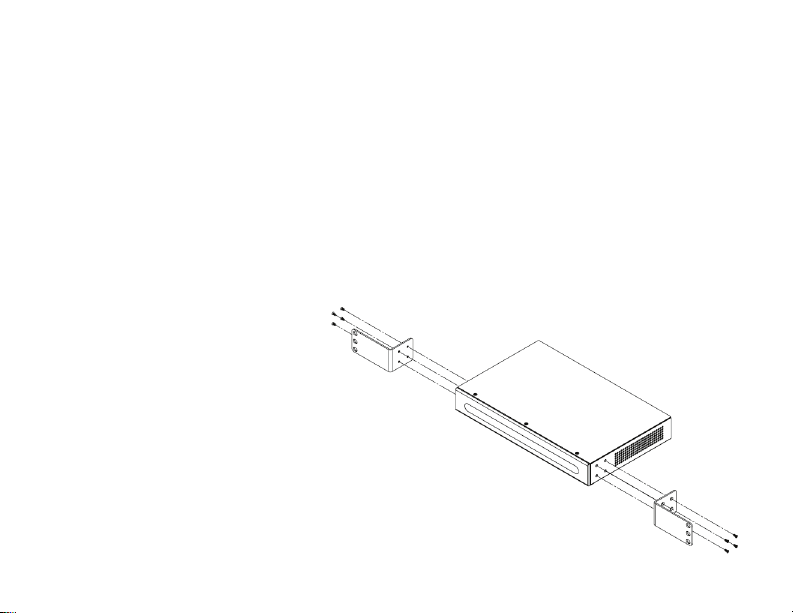
2 If mounting the RK-1 in a standard 19” AV rack, attach the included rack-mount
brackets to the sides of the
RK-1. If not mounting to a
rack, ensure that the RK-1
is physically mounted near
power and the ISP modem.
3 Connect power to the device.
4 Connect an Ethernet cable from
your ISP modem to the WAN port on
the RK-1.
You are now ready to configure the RK-1 to
allow Internet access and register with BakPak.
Access Point’s
33
Page 4

Logging in
1 Connect the RK-1 to power and toggle the power switch on the rear panel to the
On position. The PWR LED will light up.
2 Connect a computer to the RK-1 LAN port through an Ethernet cable. Enter
192.168.1.99 into the address bar of your web browser. A login page opens.
3 In the username box, type
pakedge. In the password box, type
pakedger, then click Log in. the
Quick Setup page opens.
4 The Quick Setup page lets you
configure the most common router
settings, all in one screen. The same
settings appear elsewhere in the
interface, but you can always relaunch Quick Setup by clicking the
Quick Setup tile in the Dashboard.
44
Page 5

After you click Apply, the Dashboard appears. The Dashboard lets you navigate
to all of the configuration sections of the router. To return to the dashboard at any
time, click the RK-1 circle in the upper-left corner.
5 To configure the network, go to Network > Network Zones. From here, you can
configure your WAN or change LAN settings, as desired.
6 To register the RK-1 with BakPak, click the BakPak icon in the top menu bar.
55
Page 6

Registering your RK-1 with BakPak
The BakPak Registration page allows you to connect this RK-1 to your existing BakPak
account or create a new account to manage all of your BakPak Management Agents.
Note: For more detailed instructions for this device and for the BakPak Management
Agent, refer to the RK-1 User Guide (
ctrl4.co/rk1-ug
66
).
Page 7

Creating a new Bakpak Cloud account
1 Click the HERE link on the BakPak Registration page or open a web browser and
enter the URL
2 Click [Create a] Dealer Admin Account. The Register for mybakpak page opens.
3 Follow the on-screen instructions to get your Dealer Code.
4 Enter your email address, new password, time zone, and Dealer Code, then click
Register.
5 Access your RK-1 again to register it with your new BakPak account.
https://mybakpak.com
77
Page 8

Technical Support
For technical help:
www.pakedge.com/portal
support@pakedge.com
(650) 385-8703
For non-technical inquires:
customerservice@pakedge.com
(650) 385-8701
For regulatory information:
www.pakedge.com/regulatory
11734 Election Road, Draper, UT 84020
Main: (650) 385-8700 Fax: (650) 685-5520
www.pakedge.com
sales@pakedge.com
©2018 Control4. All rights reserved.
200-00584-D, DOC-00268-D 2018-09-05 MS
 Loading...