

Page 1

WA-2200, WA-2200-1
802.11ac 2x2 Wave 2 Access Point
BakPak
Lite
QUICK START GUIDE
Page 2

WA-2200 features
• 802.11ac dual-band 2×2 wireless technology
• Advanced Wave 2 wireless technology with MU-MIMO and beamforming
• Powered by PoE (or optional 12VDC 1A power adapter, sold separately)
• Single- to multi-AP cloud configuration with built-in BakPak Lite
• 1 Gigabit Ethernet port
• For information on using the AP, go to pkdge.co/wa2200-ug.
System requirements
• Windows or Mac PC with an Ethernet port and Google Chrome or Mozilla Firefox
Specifications and credentials
• Operation mode: Access Point
• IP address: If no DHCP server is detected, the default IP address is automatically
set to 192.168.1.21.
• Username/Password (default): admin/password
• SSIDs (default): Pakedge_Main (5 GHz), Pakedge_Alt (2.4 GHz),
security/password: WPA2-PSK/pakedgewireless
• Guest SSIDs (default): PakedgeGuest_Main and PakedgeGuest_Alt,
security/password: WPA2/pakedgeguest
• Factory default transmit power: 13dBm for 2.4GHz and 18 dBm for 5 GHz.
• PoE power draw: 12W
22
Page 3
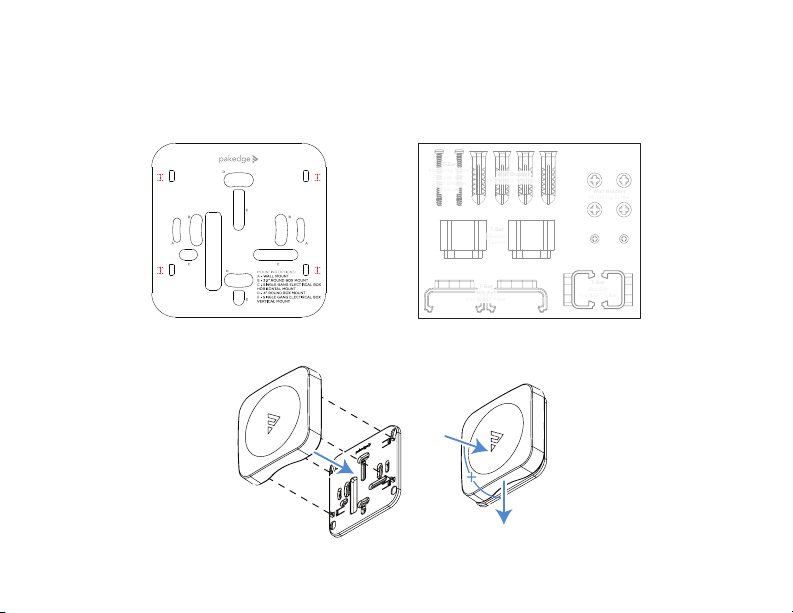
Mounting on a ceiling
1 Tape the included template against the desired mounting location, then mark the
places to drill mounting holes and install the appropriate mounting hardware.
T-Bar
T-Bar
Mounting Screw
Mounting Screw
For use with
For use with
T-Bar Bracket
T-Bar Bracket
2 Slide the tabs in the AP into the slots on the bracket, then slide until it’s locked.
1
33
Spacer
Spacer
Mounting Anchors
Mounting Anchors
T-Bar
T-Bar
Bracket
Bracket
Spacer
Spacer
T-Bar
T-Bar
Bracket
Bracket
For 15/16” T-Bar
For 15/16” T-Bar
Wall Bracket
Wall Bracket
2
Wall Bracket
Wall Bracket
Mounting Screw
Mounting Screw
T-Bar
Mounting Screw
T-Bar
T-Bar
Bracket
Bracket
For 9/16” T-Bar
For 9/16” T-Bar
Page 4
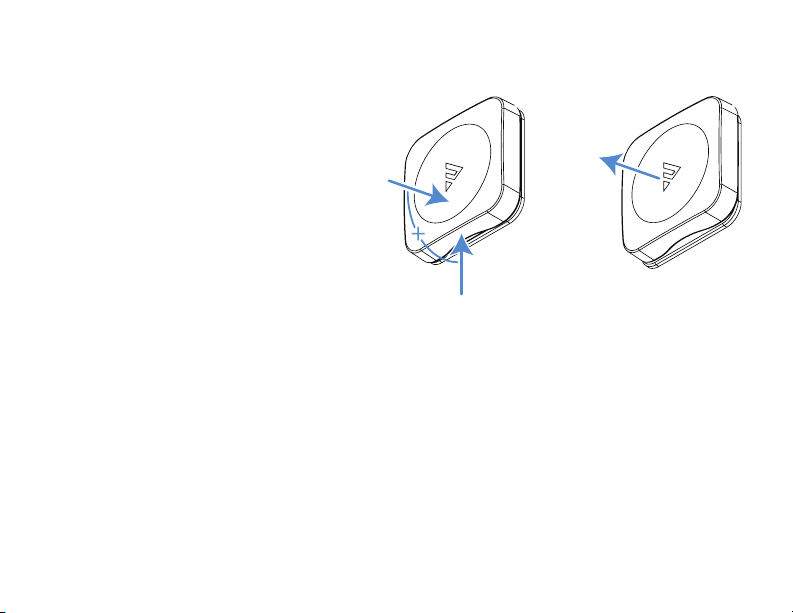
Removing the AP from the bracket
To remove the AP from the bracket:
1 While pressing the AP against
the bracket, slide the AP up
slightly, then pull it away from the
bracket.
1
2
Powering up
The AP can be powered by either PoE or the optional AC power adapter (sold
separately).
To power up the access point:
1 Connect power using a POE injector or POE switch, or with the optional AC
power adapter (sold separately).
The access point should now be up and running with its default settings. It does
not need to be configured to be functional. To make changes to the SSID and
security settings, you need to access the AP using a web browser.
44
Page 5

Logging in to the access point
To log in to the access point:
1 Connect the access point to your PoE switch with an Ethernet cable.
2 Log in to your Pakedge router to find the IP address assigned to the access point
under the DHCP Client Table.
Tip: If you do not have a router in your network that distributes IP addresses, you
can try to access the access point through its default IP address of 192.168.1.21.
3 Enter that IP address into a web browser to open the access point interface. The
Sign In page opens.
Note: Because the AP uses self-signed certificates for secure connection to the
web browser, a security message will appear. There is no risk in proceeding to the
AP’s web interface, and communications will remain secure.
4 In the username box, type admin. In the password box, type password, then click
Sign In. The first time you log in, the Configure page opens.
55
Page 6

5 Enter and verify a new username and password (required) before continuing, then
click Apply to complete the setup.
Caution: For international models, you must change the Country Code (a drop-down
list defaulting to GB - United Kingdom), to the specific country of operation.
66
Page 7

Registering your device with BakPak Lite
You can connect your access point to your existing BakPak account or create a new
account to manage all of your BakPak network management agents.
To register your device to your BakPak account:
1 In the device’s Connections tab, to the right of the “This product is not managed
by BakPak” message, click Click here to enroll.
2 Follow the on-screen instructions to complete your device registration.
77
Page 8

Creating a BakPak site for WA Series APs
To begin managing and configuring the AP, you need to create a BakPak site for it.
To create a BakPak site:
1 Log in to your BakPak account, then click Add Site to create a site.
2 In the Management Agent list, select the first WA-2200, complete the site
information, then click OK.
88
Page 9

Adding WA Series APs to the site
After the BakPak site is created, the WA-2200 will act as the “master AP” for adding
more WA Series APs to the site.
To add APs and provision them with the existing configuration:
1 Make sure that the master AP is already configured (through the local UI or
BakPak), and that the additional APs are turned on for at least five minutes and
connected to your network.
2 In BakPak, select the new WA-2200 site, then click Device Discovery.
Any additional WA Series APs are discovered and appear as tiles that can be
selected (already selected by default).
3 Click OK. The APs are added to the site.
99
Page 10

4 To apply the master AP’s settings to the new APs, in the BakPak site select the
master AP, then complete the site information and click Save & Apply Multiple at
the bottom. The settings are copied to the new APs.
1010
Page 11

1111
Page 12

Technical Support
For technical help:
www.pakedge.com/portal
support@pakedge.com
(650) 385-8703
For regulatory information:
www.pakedge.com/regulatory
11734 S. Election Road
Draper, UT 84020
Main: (650) 385-8700 Fax: (650) 685-5520
www.pakedge.com
sales@pakedge.com
©2019 Control4. All rights reserved.
Latest version at
pkdge.co/wa2200-qsg
200-00575-D 2019-04-30 MS
 Loading...