

Page 1
TRIAD DISTRIBUTED AUDIO SERIES IN-CEILING SPEAKERS - QUICK START GUIDE
MESSAGE FROM TRIAD
Thank you for purchasing a Triad Distributed Audio Series (DA Series) loudspeaker.
We designed and engineered each loudspeaker with pride in the United States of
America with the utmost attention to quality, décor-friendly design, and
high-performance sound—eliminating costly frills and features that add nothing to
sound quality.
We trust that you will hear the benefits of this engineering each time you play
them.
Thanks again and happy listening.
Triad Audio
INSTALLATION NOTES / CAUTIONS
Important! The Distributed Audio Series speakers are designed to be mounted
into drywall/plasterboard or suspended ceilings/walls with a surface thickness
between:
In-ceiling models
In-ceiling shallow-depth models
For all non-sealed ("open back") speakers:
Caution! Operating a speaker beyond its maximum power rating may result in the
speaker overheating and/or failure, In addition, always maintain the following
minimum clearances:
3/8" - 1 1/8" (10 - 28 mm)
1/8" - 3/4" (3 - 19 mm)
NEW CONSTRUCTION INSTALLATION
If these speakers are being installed during new home construction, using Triad's New
Construction Brackets (NCB) can simplify the process. These brackets make finish
installation easier by reserving the exact space and size needed for the speaker during
the framing stage of home construction. During the drywall process, the cutout can
be precisely made around the bracket flange.
To use the new construction bracket:
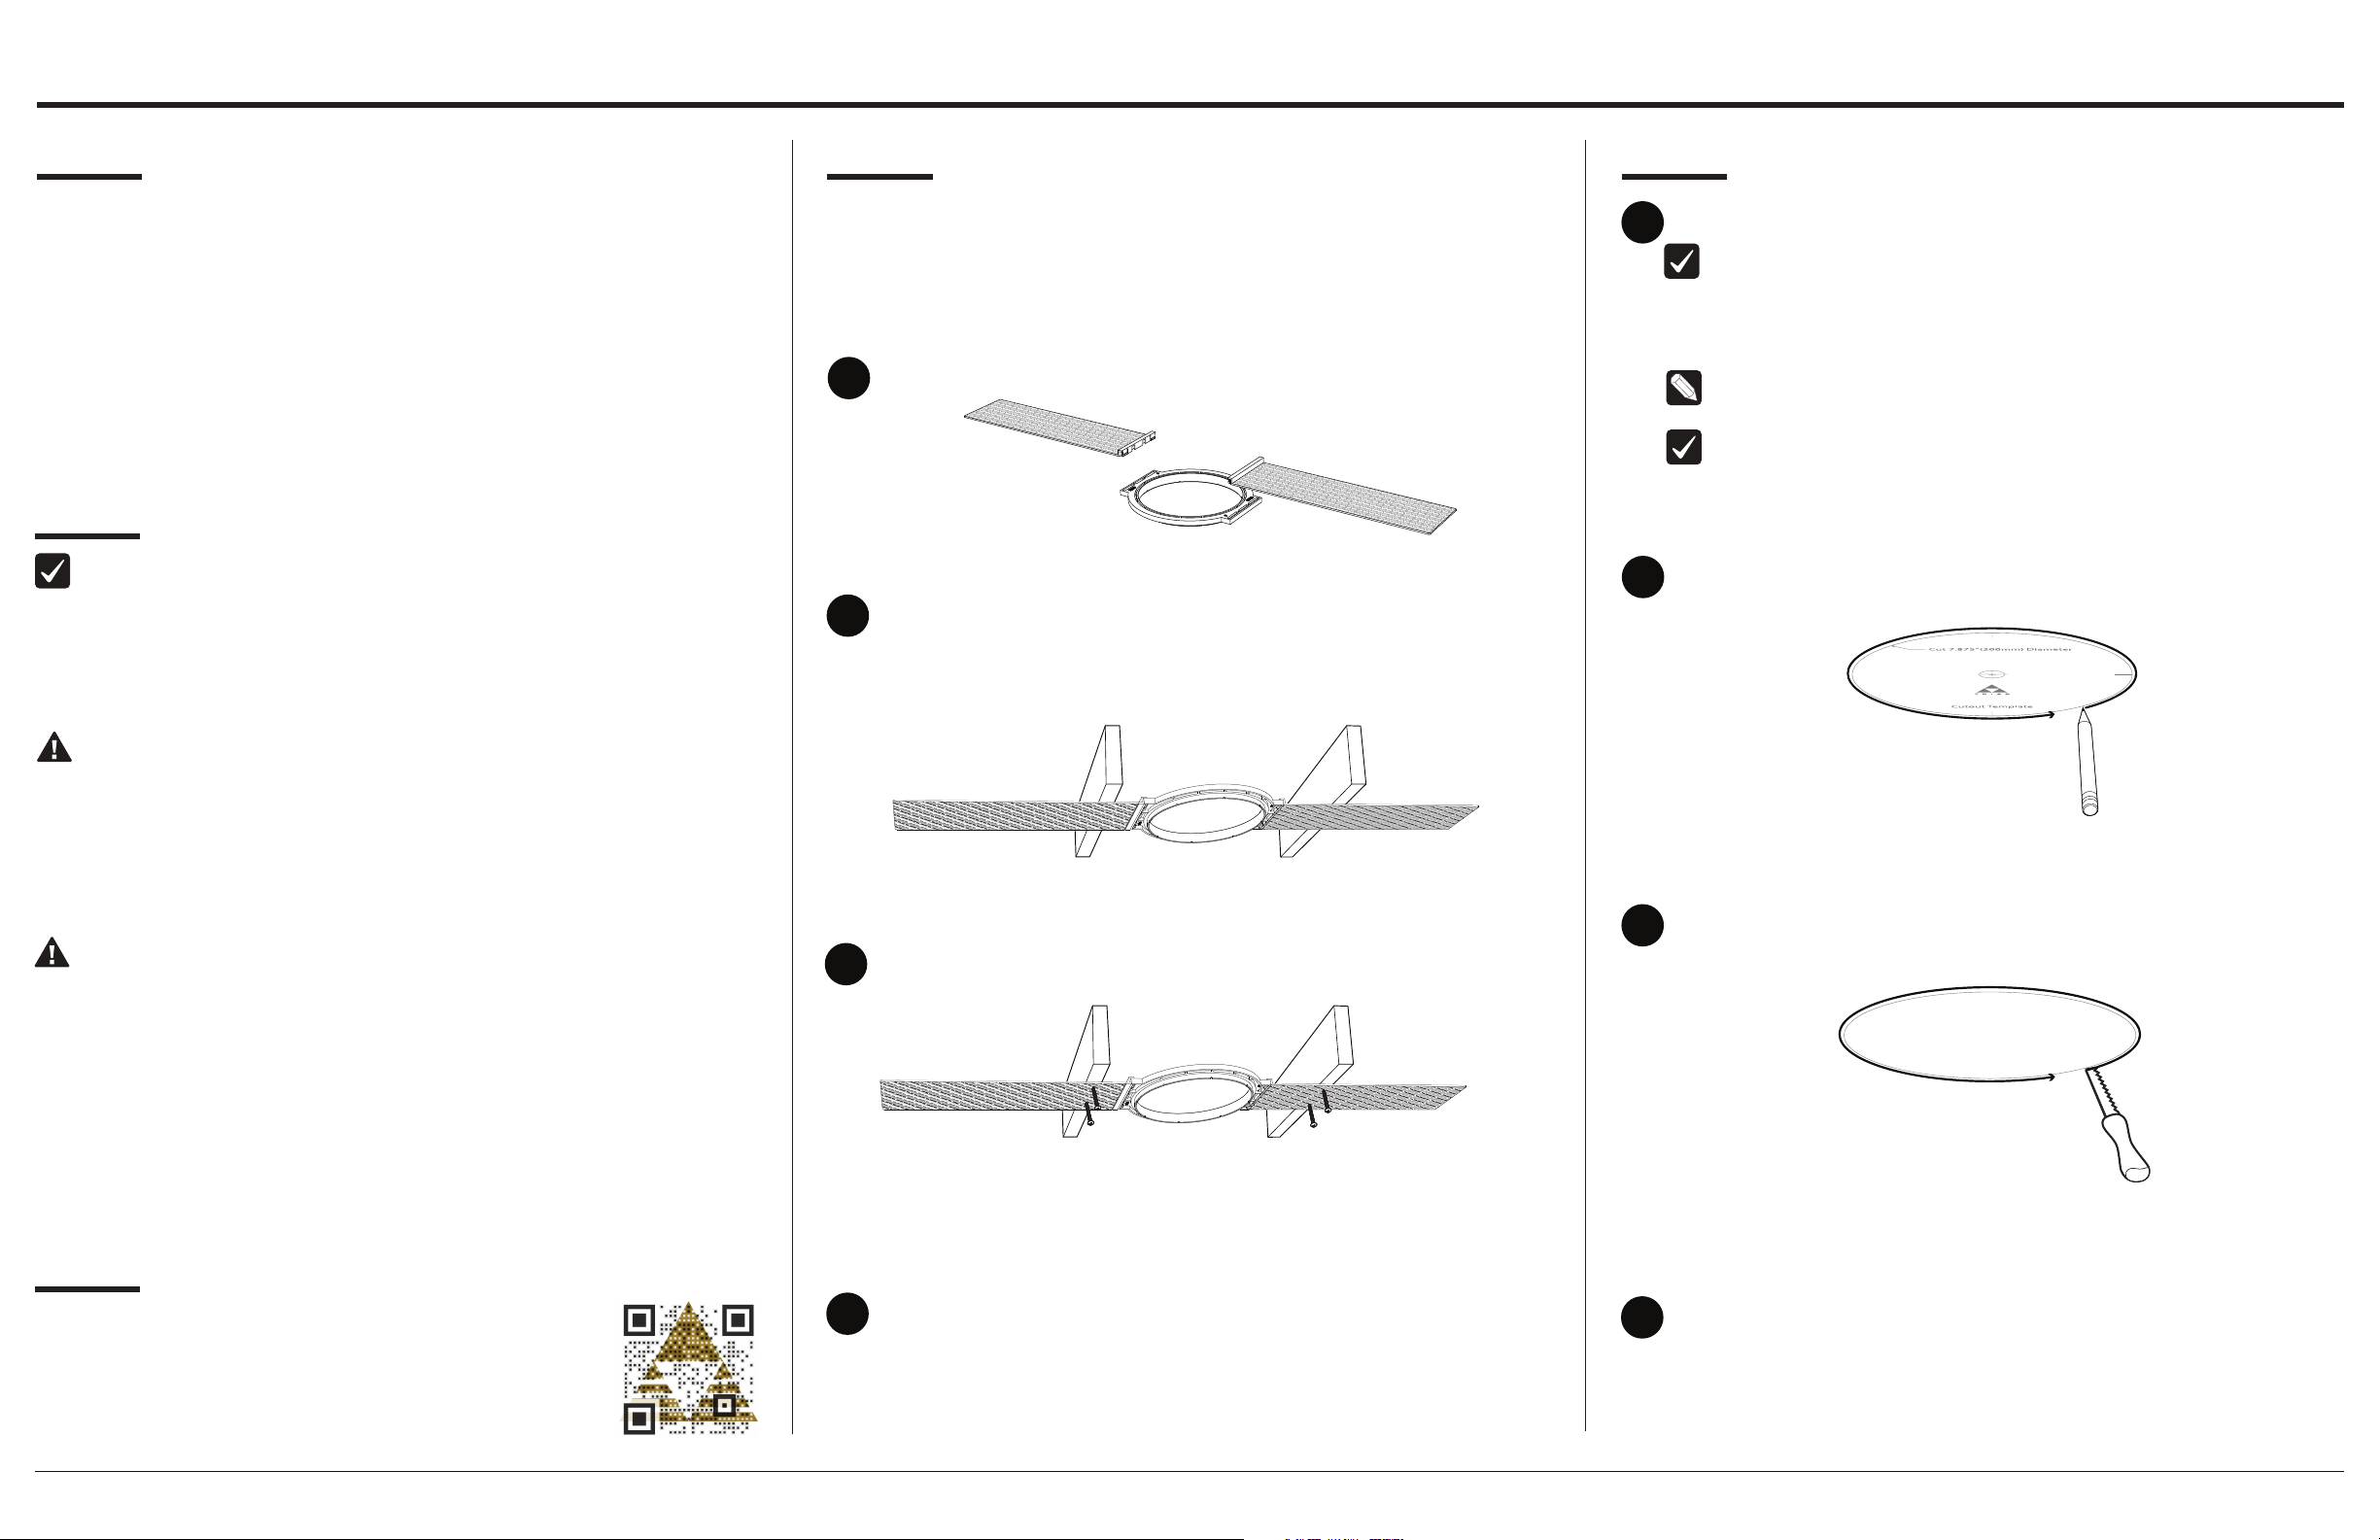
Attach New Construction Bracket (NCB) wings before use.
1
NCB: IC5, IC6, IW8
Locate the area where the speaker will be placed in the wall or ceiling, keeping in
2
mind that when the speaker is installed, it may take up the full wall cavity within
the NCB location (keep free from electrical wires, HVAC, and plumbing). Position
the bracket between the two joists or studs so the flange protrudes out for
drywallers to sheetrock around.
RETROFIT INSTALLATION
Determine the location that you would like to mount the speaker.
1
Important! Verify that there are no other obstructions (such as conduit,
pipes, HVAC ducts, or pocket doors) behind the area where you would
like to install the speaker. You may need to drill a small hole in the
center of your selected area and insert a wire hangar into the hole to
"feel" around for any possible obstructions.
Tip: Use a stud finder to locate the two studs or joists flanking the
location where you want to install the speaker.
Important! Avoid putting a speaker right up against a stud/joist, as the
mounting legs need a little space to engage. Keep the hole cutout a
minimum of 1" (25 mm) from the edge of the nearest stud.
Once you have confirmed the location, proceed with the following steps:
Using the enclosed hole cutout template as a guide, mark the outline on the
2
wall or ceiling with pencil.
Non-flammable materials
Flammable materials
Caution! Do not over-tighten the mounting dogleg clamps.
Over-tightening the mounting dogleg clamps on any Triad speaker may result in
damage to the speaker mounting hardware, damage to the ceiling/wall, and/or
deflection of the speaker frame during installation.
Should you notice any of the above during installation, loosen the mounting dog
leg clamps so the speaker frame is flat with the mounting surface. This will help
ensure that the grill contacts the mounting surface all the way around the
speaker for a proper fit.
If using a power screwdriver or drill to install this product, ensure that the clutch
is set to its lowest setting to avoid over-tightening.
1" (26 mm)
3" (78 mm)
MORE INFORMATION
For complete specs on Triad Distributed Audio Series speakers,
visit the Triad Portal, view the Products sections at
www.triadspeakers.com, or scan the QR code shown here:
Fasten each NCB wing to the stud/joist with two screws, nails, or staples
3
through each wing.
Pull speaker cable from the NCB to the amplifier location.
4
Consult local building codes before running speaker wires inside walls
for a full understanding of any special regulations/requirements.
Slowly cut along the outlined mark with a drywall knife/saw, trying not to
3
chip out the drywall excessively.
Pull pre-wired speaker cable through the cutout or run the speaker
4
wire from the cutout to the amplifier location.
Consult local building codes before running speaker wires inside walls
for a full understanding of any special regulations/requirements.
Page 2
TRIAD DISTRIBUTED AUDIO SERIES IN-CEILING SPEAKERS - QUICK START GUIDE
WIRING AND CONNECTIONS
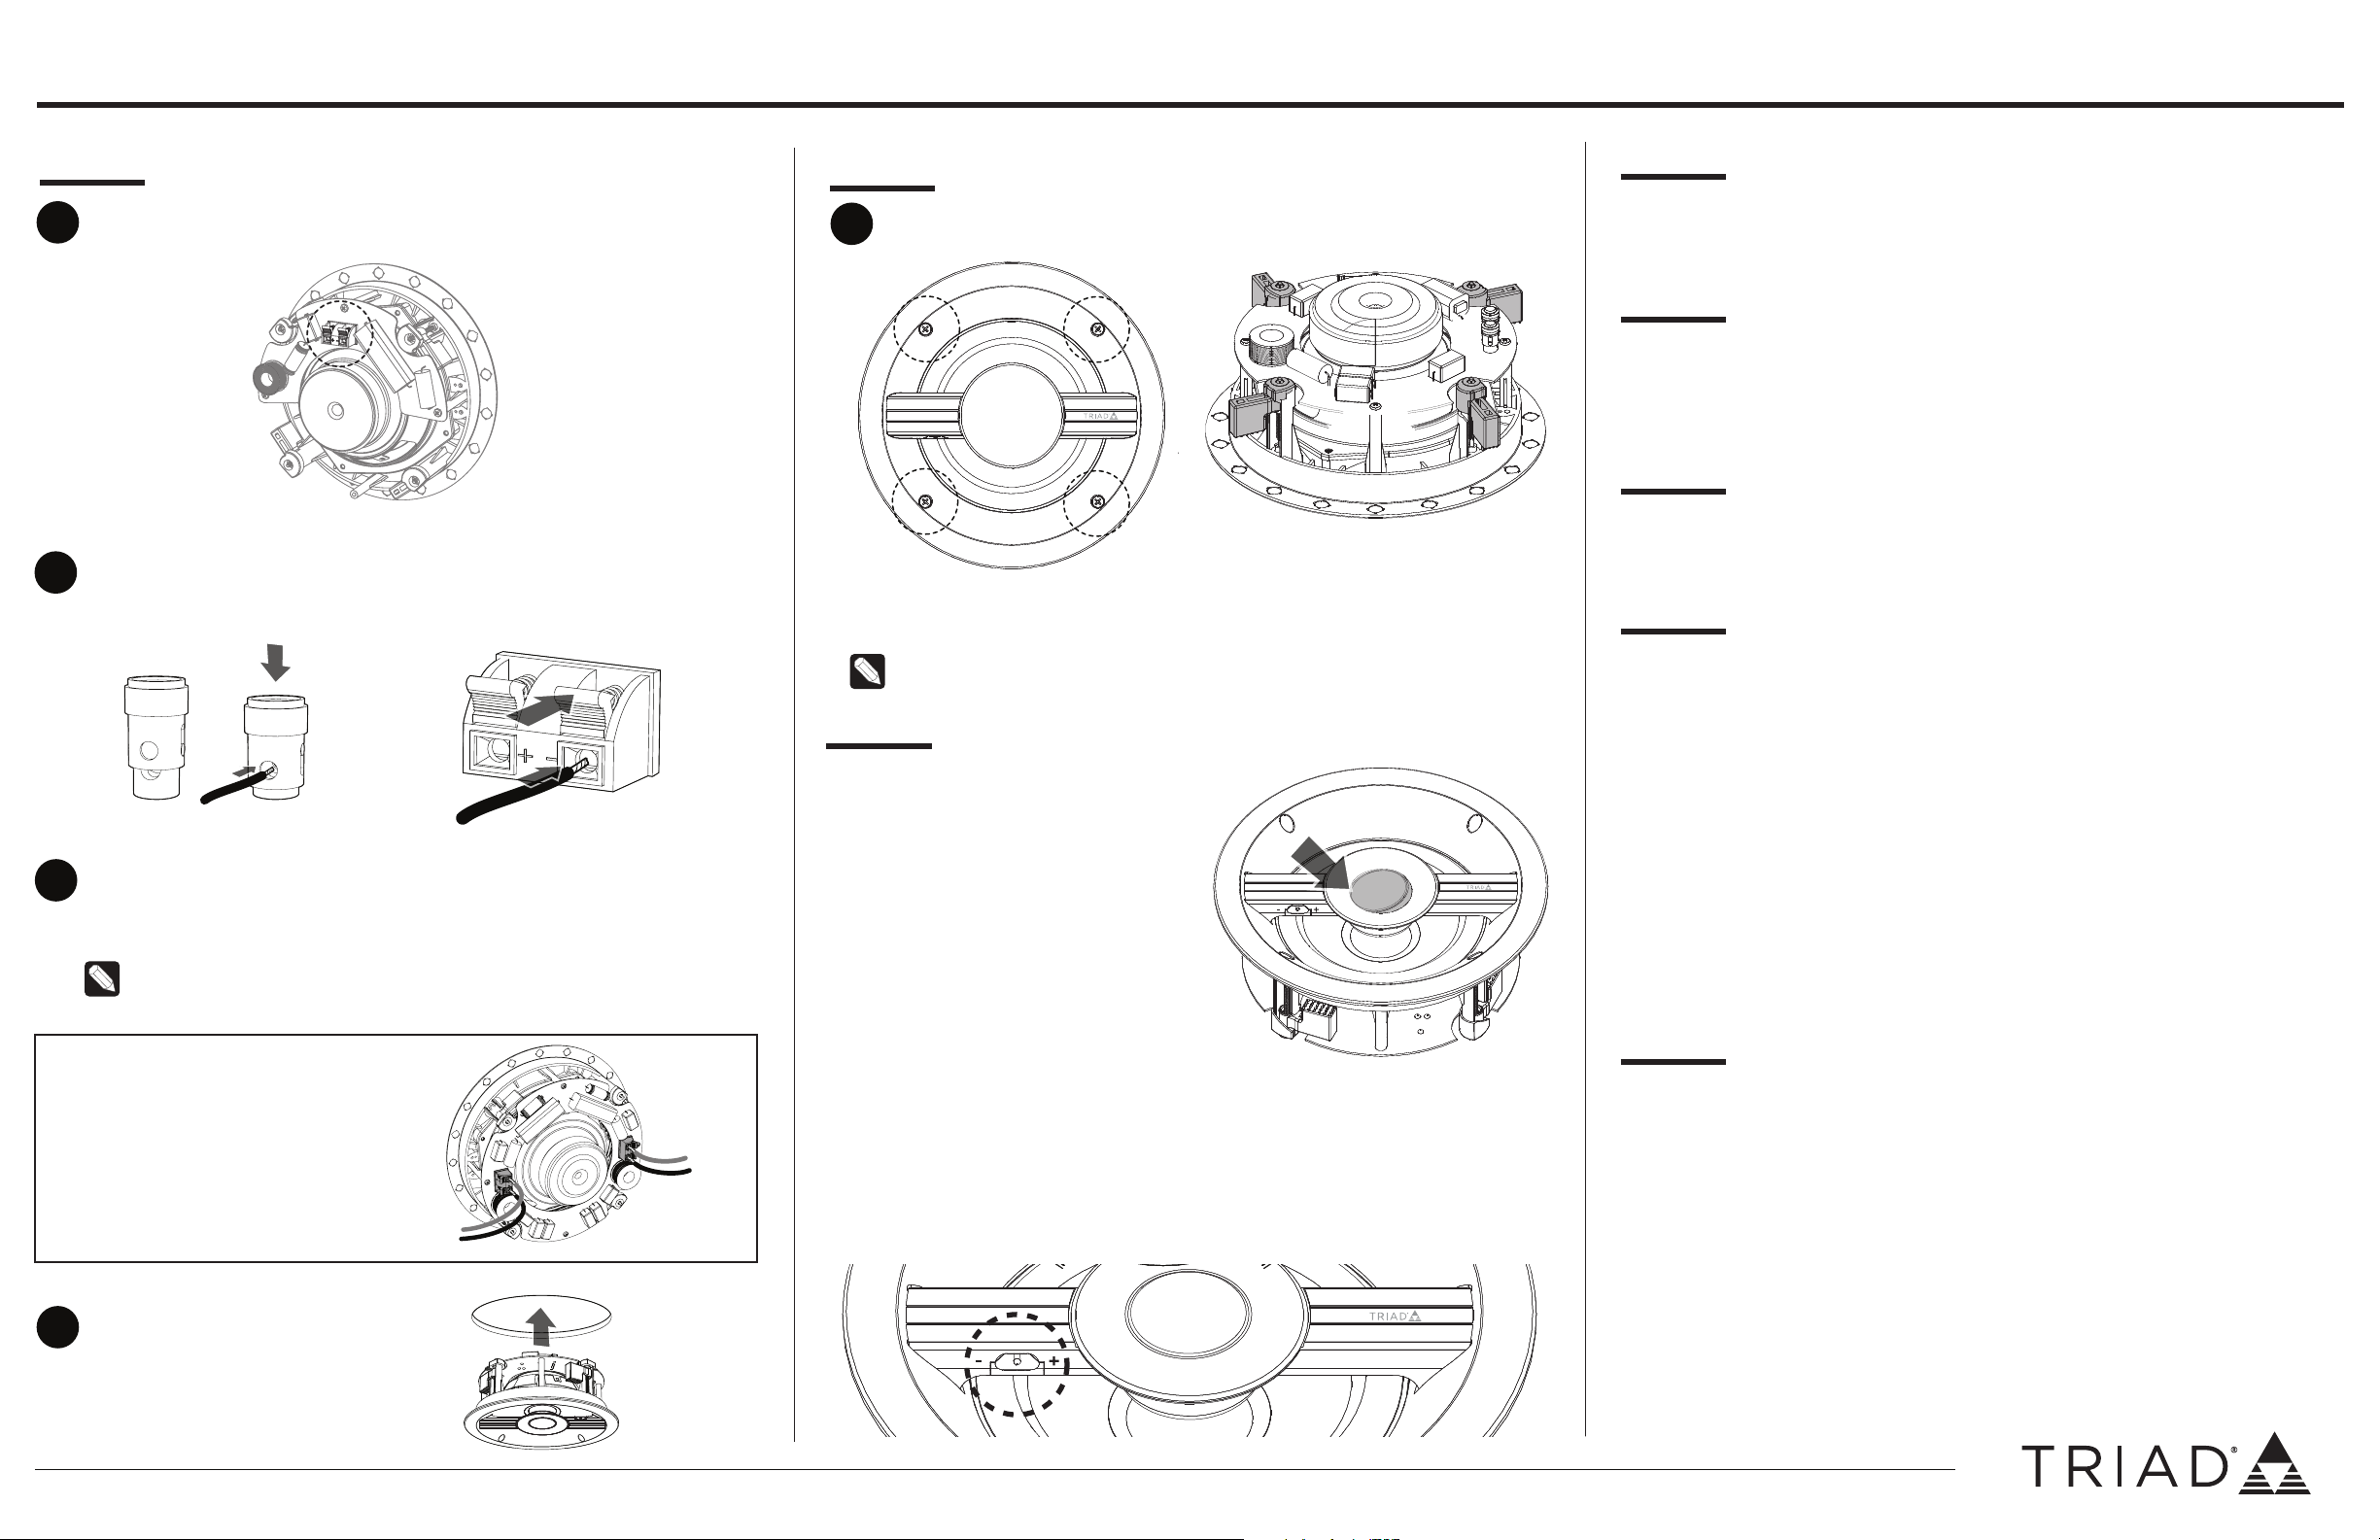
On the back of the speaker, locate the pair of push-type speaker wire
5
connectors.
Strip the protective jacket back 1/2" on each speaker wire lead. Press the
6
connector head down or push tab in, exposing a hole, and insert speaker wire
into the hole. Release the head/tab to lock onto the wire.
SPEAKER INSTALLATION
Tighten the Phillips screws located on the front bae (see drawing below) to
9
rotate and tighten the mounting doglegs to the drywall.
Mounting doglegs will move outward and tighten to secure the speaker to
the drywall.
Note: If using a power screwdriver or drill gun, always use the lowest
torque setting. Never over-tighten.
SOUND TUNING
SPEAKER GRILL INSTALLATION AND REMOVAL
Attach the metal grill to the frame by placing the grill over the edge of the
frame. Grill will self-center onto the magnet attachment system. To remove the grill,
grab the edge of the grill and gently pull it away from the speaker.
GRILL SCRIM
DA Series round grills come with white scrim (acoustically transparent cloth installed
on the inward-facing side of the grill). Square grills (sold separately) come with black
scrim to minimize the contrast of the black speaker bae over a light-colored
surface. Either scrim can be removed and carefully reinstalled when repainting the
grill.
FINISH MAINTENANCE AND CARE
The paint finish on all Triad speakers is designed to last a lifetime with minimal care. If
cleaning the surface becomes necessary, gently wipe the speaker grill with a soft cloth
lightly dampened with water.
CUSTOM PAINTING
Custom painting is an option available from Triad at the time your speaker is ordered.
If you supply us with an actual paint sample or your paint’s make and model number,
we can paint your new speaker grill any color you wish. The results will be superior,
and you will also be supplied with a small bottle of touch-up paint.
To keep polarity correct, connect the amplifier’s + (positive) channel to
7
speaker’s + (positive) channel and the amplifier’s - (negative) channel to the
speaker’s - (negative) channel. To avoid shorts, keep stray strands clear of
adjoining connectors.
Tip: Run a test signal to the speaker to verify the connection.
For DT models only
DT models have two terminals for their
dual-voice-coil woofer and two tweeters.
Connect the two left channel wires to one
terminal and the two right channel wires
to the other terminal.
Right
channel
Insert the speaker into the hole.
8
Left channel
Pivoting tweeter (on select models)
Tweeters on DA Series models can be
pivoted up to 10 degrees in any direction
around their axis to vary the sound distribution pattern as desired.
Press on the outside edge of the tweeter’s
metal grill portion to adjust.
Tweeter level switch (on select models)
In-Ceiling DA Series speakers have a 3-position tweeter level switch on their front bae.
To increase the output of the tweeter, slide the switch towards the "+" mark. This will
increase the tweeter output by @ +3 dB.
To decrease the output from the tweeter, slide the switch towards the "-" mark. This will
decrease the tweeter output by @ -3 dB. For a neutral/flat response, leave the switch in
the middle position.
Should you elect to paint these yourself, we recommend the following:
Remove the grill from the speaker. DO NOT paint grill while it’s attached to speaker.
1
Carefully remove the cloth scrim from the inside of the grill (it will be re-used).
2
Paint all grills of like color using the same batch of paint.
3
Spray application is recommended. Use light, multiple coats to avoid blocking any
4
of the holes in the grill. (Tips: Use a spray can of compressed air to clear any
blocked holes during the painting process. Allow each coat to dry fully before
applying additional coats.)
When painting is completed and dry, re-attach the cloth scrim with light adhesive
5
to the inside of the grill.
Fit the grill to the speaker.
6
WARRANTY AND SUPPORT
Warranty
Visit triadspkrs.co/warranty for details.
Return Merchandise Authorization (RMA) information
For Sales RMAs, contact your Inside Sales Associate. Your ISA information can be
found in the My Account section of the Triad Portal under Control4 Contacts.
Technical support information
Phone: (888) 550-4221
Hours: 7:00 a.m. – 6:00 p.m. MT (Monday–Friday)
Email: service@triadspeakers.com
Copyright ©2019, Control4 Corporation. All rights reserved. Control4, the Control4 logo, the 4-ball logo,
4Store, 4Sight, Control4 My Home, Triad, and the Triad logo are registered trademarks or trademarks of
Control4 Corporation or its subsidiaries in the United States and/or other countries. All other names and
brands may be claimed as the property of their respective owners. All specifications subject to change
without notice.
www.control4.com | 1-888-400-4072 | 200-04764-A 2019-03-13
 Loading...