

Page 1
D/N HD AF DOME IR IP
CAMERA
Instruction Manual
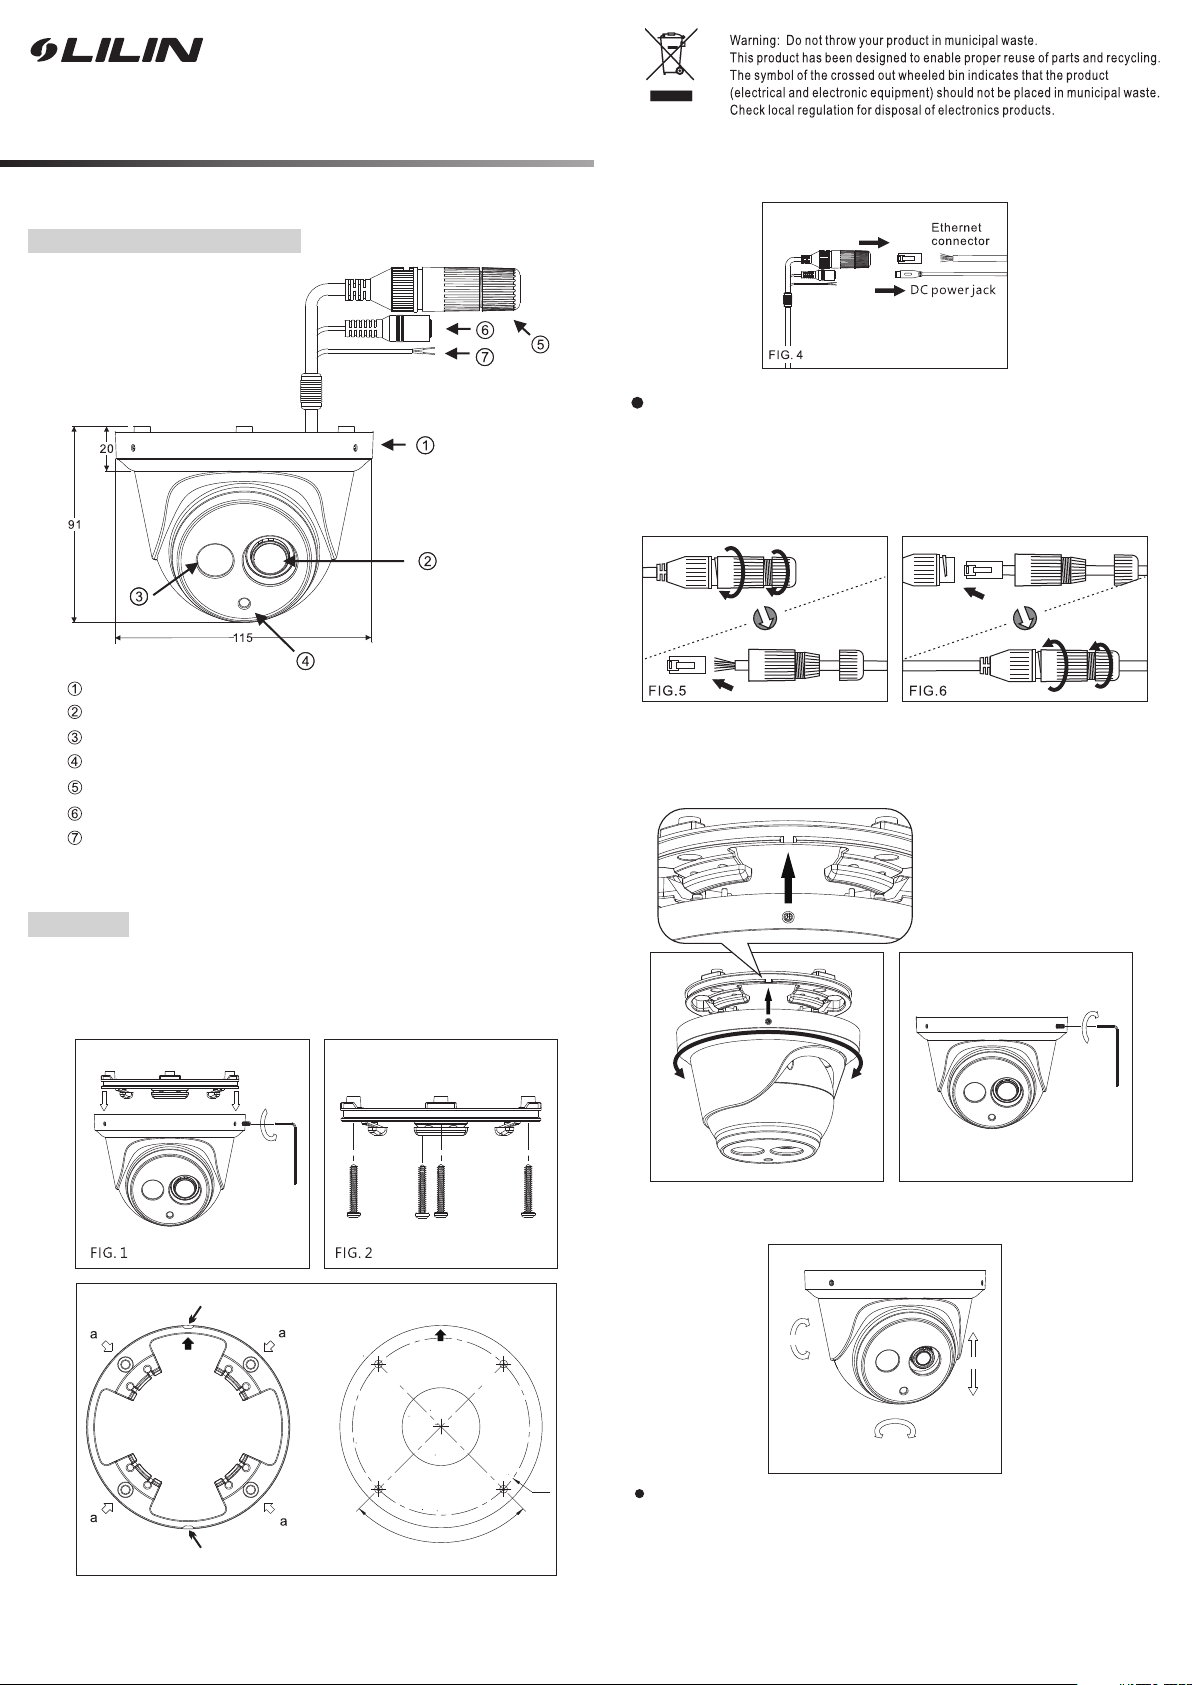
Part Description & Dimensions
Upper cover
Lens
Infrared LED (IR LED)
Light sensor
RJ-45 Ethernet connector (supports PoE)
Power jack (DC12V ±10%)
Reset Wire (strip off the wire insulation if needed; after the
camera is reset, cut off the bare wire)
66- 6522C SE-1B
2. Attach the pow er cabl e and video cable to t he vide o outpu t jack and DC power
input jack, re spect ively (FIG.4).
Connect the RJ-45 Ethernet cable with a waterproof connector
First, remove the waterproof connector and unscrew the
waterproof nut. Insert the Ethernet cable and connect to the
RJ-45 connector with proper tools (FIG.5). Then, tighten the
waterproof connector and nut before the RJ-45 connector is
connected to the camera (FIG.6).
Unit: m m
3. Align the hol e on the le ft side of the upper cover wi th the no tch on the bottom
bracket, pre ss in and r otate to the desir ed loca tion (F IG. 7). Secure the u pper
cover to the bot tom bra cket with a hex key (F IG.8) .
Installation
1.
Retrieve the c amera a nd remove the bott om brac ket fro m the upper cover wi th
a hex key (FIG.1 ).
Use the includ ed scre ws (M4.0x25) thr ough th e holes m arked as “a”, and fi x
the camera in th e desir ed location (FIG .2 & 3).
Screw s: 4
No tc he d fo rw ar d
Front
Front
PLEASE APPLY
DRILL BIT DIMENSION 6.3mm (1/4")
∅91
FI G. 7 FI G. 8
4. Adjust the pa n, tilt , and azimuth of the c amera t o the des ired location (F IG.9) .
AZI MUTH
TILT
PAN
FI G. 9
Make sure the li ght sen sor is at the lowest s ide of th e camera (FIG. 1).
FI G. 3
90°
No tc he d fo rw ar d
Page 2
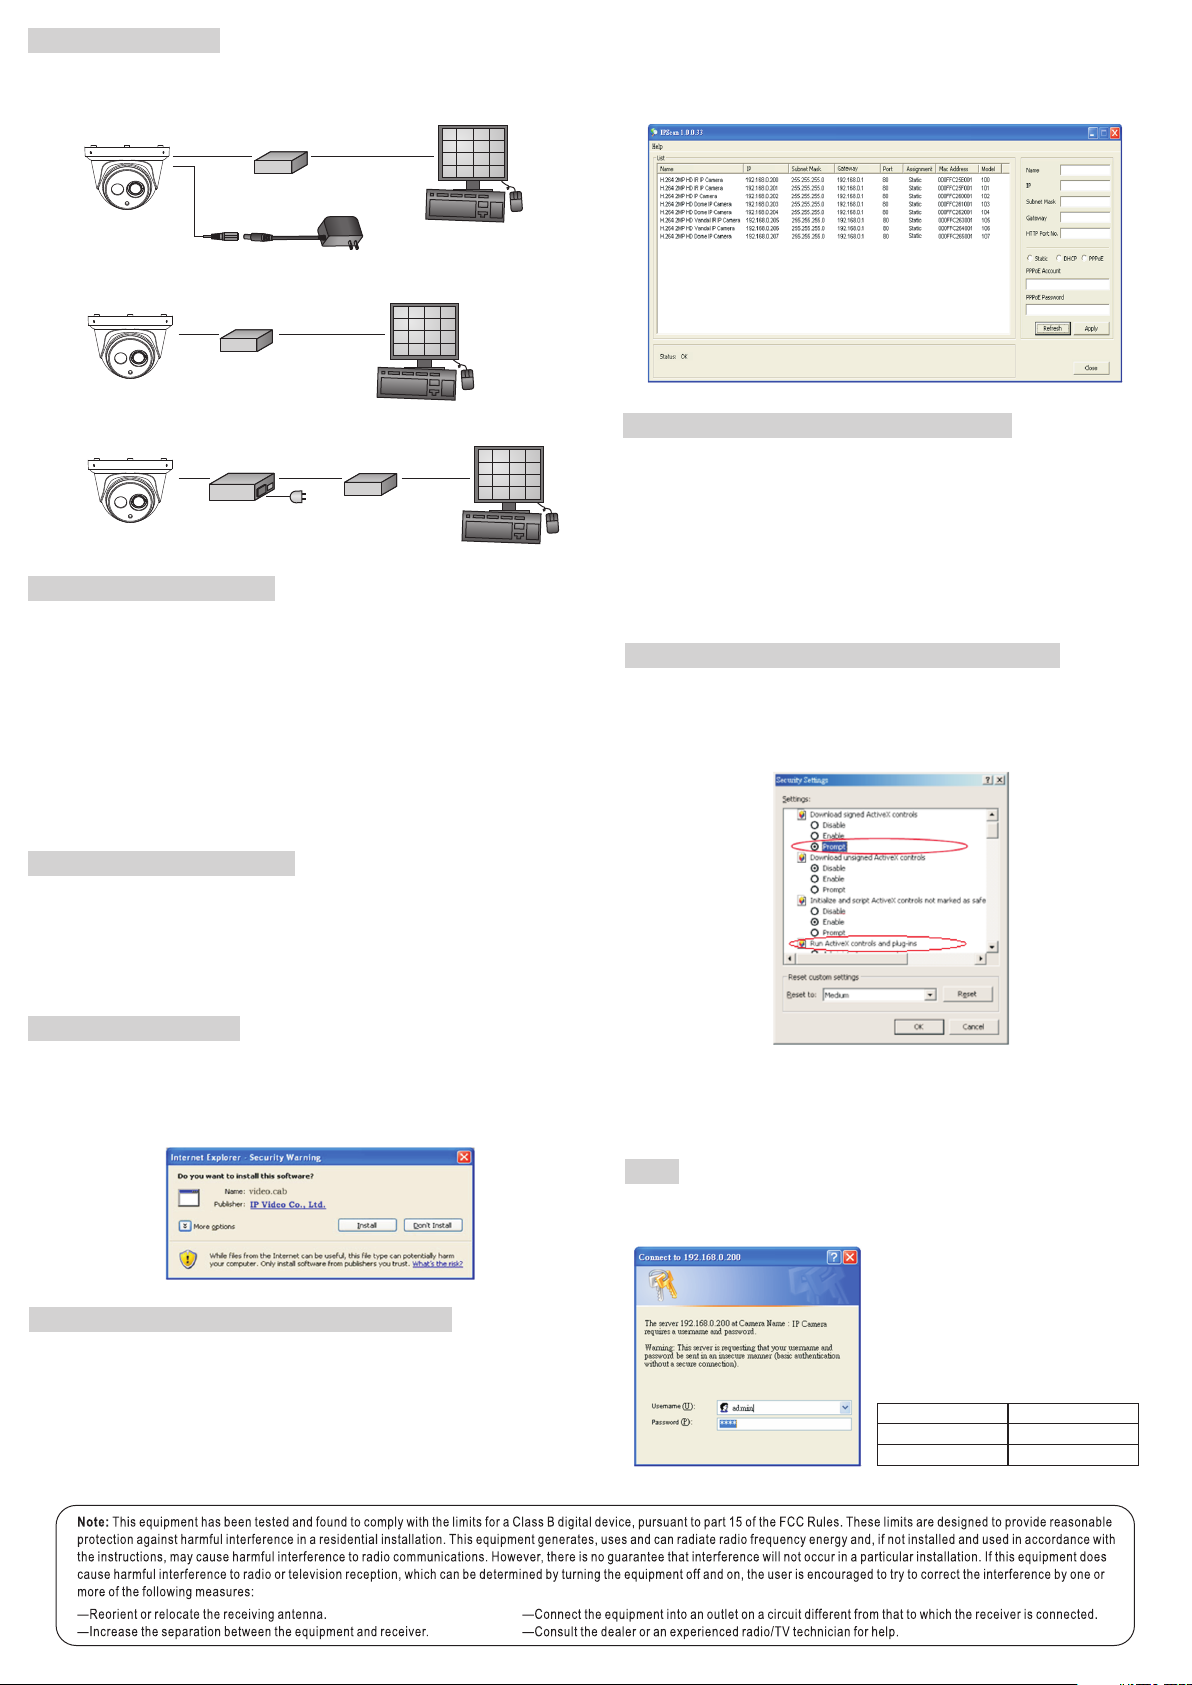
System Architectures
For c onnec ting D/ N HD IP Cam era s eri es to the n etwor k, plea se foll ow one of t he syst em
arc hitec tures :
(1) . Use DC1 2V powe r adapt or and ne twork s witch c onnec ted to a ne twork .
LAN LAN / I ntern et
Non -PoE Sw itch
HD IP C AMERA
DC1 2V Adapt or
(2) . Use wit h PoE of th e netwo rk swit ch conn ected t o the net work.
LAN LAN / I ntern et
PoE S witch
HD IP C AMERA
(3) . Use PoE p ower in jecto r and the n etwor k switc h conne cted to t he netw ork.
LAN LAN / I ntern et
PoE P ower In jecto r
HD IP C AMERA
LAN
AC
Non -PoE Sw itch
PC
PC
PC
Emergency Factory Default
To restore the har dware t o factory defaul t setti ngs, pl ease follow thes e steps :
1.Short the “RE SET wire” for 10 second s befor e releasing.
2.The camera wi ll be res tored to factory d efaul t setti ngs after approx imate ly 90
seconds and wi ll rebo ot automatical ly.
3.Search for th e IP device usin g the IPS can sof tware.
4.Start the IP device via an Inte rnet br owser.
5.Enter the def ault us ername “admin” and pass word “p ass” to operate.
3. Select your d evice f rom the list provi ded.
4. Change the IP address, subn et mask , gatew ay, or HTT P port for the IP camer a.
5. Click Apply t o submi t the settings.
6. Click Refre sh to ver ify the settings .
Configuring IP Addresses via Web Interface
To change an IP ad dress via web inte rface , type the default IP add ress
(192.168.0 .200) i n the Internet browser an d follo w the steps below:
1. Login to the Fu ll HD IP camera by t he defa ult use rname “admin” an d defau lt
password “pa ss”.
2. Click Basic M ode con figuration hyp erlin k.
3. Click Netwo rk->G eneral hyperli nk.
4. Change the IP address, subn et mask , gatew ay, or HTT P port for the IP camer a.
5. Click Submi t to veri fy the settings.
Internet Browser Settings & Application Required
Make sure your I ntern et browser allow s the sig ned Acti veX plug-in to wor k on your
computer. Set “ Downl oad Signed Active X plug- in cont rols” to “Prompt ” and “Ru n
ActiveX cont rol and p lug-in” to “Enable”. You ca n set this option via Inter net Exp lorer
-> Tool s-> Opt ions-> Securit y Setti ngs.
the IP addre ss will revert to th e defau lt setting of 192.168.0 .200.NOTE:
Before Accessing IP Cameras
Before acces sing th e IP came ra, mak e sure that the camera's RJ -45 net work, audio,
and power cabl es are pr operly connect ed. To set the IP ad dress , consult your network
administra tor for a n available IP address. The de fault I P address for ea ch IP camera is
192.168.0. 200. Us ers can use the default IP address for veri fying t he camera's network
connection .
Software Requirements
Universal Act iveX so ftware compone nts are r equir ed for web interfa ce disp lay of JPEG
or Full HD video . When yo u login to the IP ca mera by I nternet Explor er, the se curity
warning dial og box wi ll prompt the inst allat ion of th e Universal Activ eX.
Click Instal l to down load it.
Configuring IP Addresses with IPScan Software
To configure an IP address using t he IP scan tool, you can co py the IP Scan software
from the insta llati on CD, and paste to yo ur comp uter. Alternatively, you can execute
the IPScan sof tware f rom the installa tion CD . To change the sett ings of t he IP
address, sub net mas k, gateway, or HT TP port, you can f ollow t he steps below:
1. Run the IPSca n softw are.
2. Click Refre sh. All av ailable device s shoul d be listed in the device lis t.
Once complet e, you ca n access the IP ca mera's live video by ente ring th e default
IP ad dress v ia your Internet b rowse r. As the security warning di alog bo x appears,
click O K to down load th e ActiveX directl y from th e IP camera.
Login
To logon the HD IP camera, please ty pe user name and password in logo n HTML
page and click o n Submi t button to enter th e syste m.
The default us ernam es and passwords a re
as follows:
Adm inist rator
Use rname adm in
Pas sword pas s
 Loading...