

Page 1
InstallatIon notes
Touch Screen Keypad
Compatible with
Alarm Control Panels
Page 2
TAMP
+12V
+12V
0V
Z8
C
Z7
Z6
C
Z5
Z4
C
Z2
Z3
C
Z1
0V
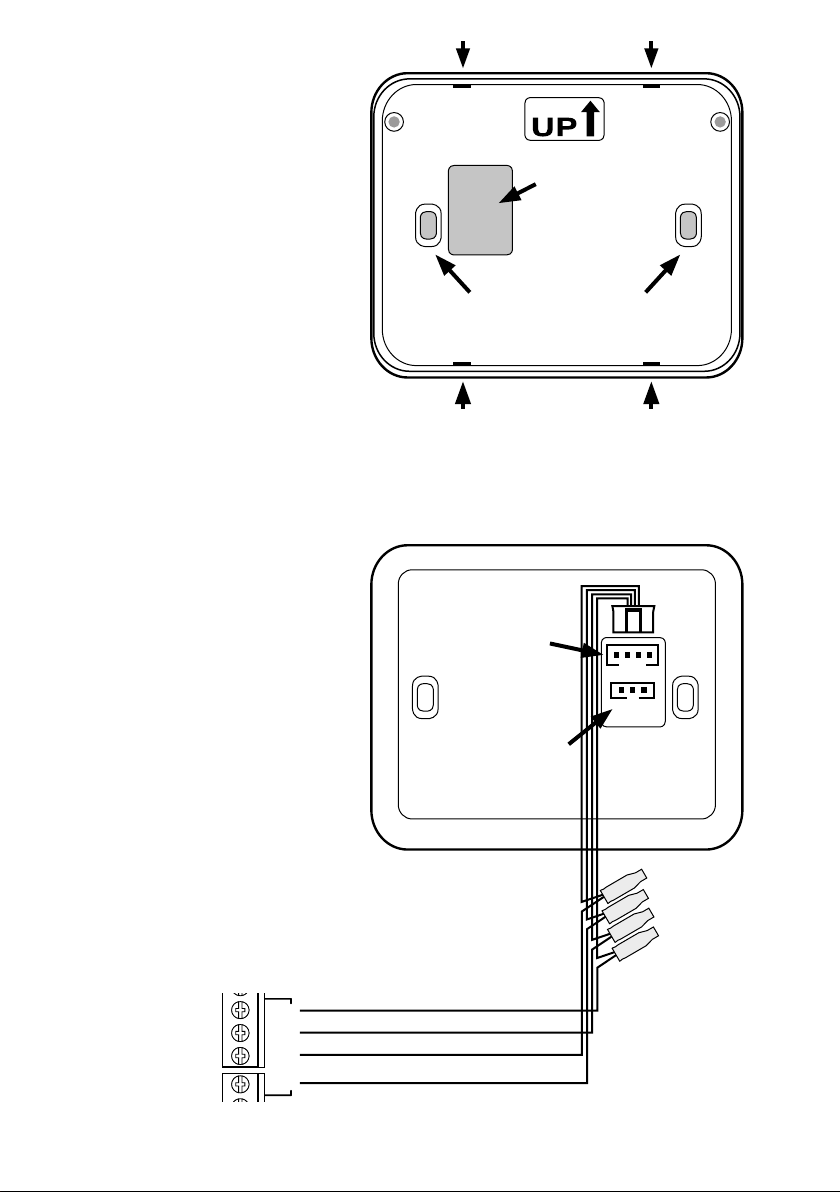
Installation
To open the Navigator Touch
Screen keypad, release the
four locking slots with a small
screwdriver.
Install the back housing on a
flat surface using the two slotted
mounting holes provided.
This way
Cable entry
The alignment arrow indicates
Mounting holes x 2
the correct way up.
Navigator Keypad back housing.
Locking slots x 4
Wiring
Navigator Touch Screen Keypad should be wired to the control panel using
minimum 7/020 security cable.
Up to four Navigator keypads
can be connected per control
panel as long as the maximum
current draw for all detectors
and keypads is below 500mA.
Maximum allowable cable
distance is 100m including
cable to all keypads.
Wire additional keypads in
“star” configuration to the
control panel.
D8x / D16x V7
Main Board
DAT
CLK
COM
KEYPAD
+12V
DAT
CLK
COM
+12V
FACTORY USE ONLY
Navigator Keypad REAR
Blue
White
Black
Red
4 pin header.
NAVIGATOR WIRE
LOOM
3 pin header.
Crimp connectors
(Supplied)
2
Page 3

Applying the Protective Film
Navigator Touch Screen Keypad is supplied with a self-adhesive screen
protector to help protect the sensitive touch surface from marks and
scratches which may appear under normal use. We highly recommend
you apply the film to keep your touch screen looking brand new for years
to come.
STEP 1.
Use the Number tab to peel off the
self-adhesive backing.
Please peel off this
mask BEFORE application
STEP 3.
Holding the protective film by
the No. 2 tab, carefully apply
the film to the Navigator’s
screen. Start applying at one
end and smooth the film as
you go to remove any air
bubbles
STEP 4.
Use the No. 2 tab to peel off
and discard the topmost layer
of the film.
Your Navigator is now ready
for use.
Please peel off this mask
AFTER application completed
STEP 2.
Flip the film over to position the No. 2
tab at the top left.
Please peel off this mask
AFTER application completed
3
Page 4

Compatibility
Navigator Touch Screen keypad
is compatible with Ness D8x and
D16x Version 7 and later control
panels.
The keypad will display a
warning if connected to
earlier panel versions.
Specifications
DIMENSIONS 108w x 86h x 15d mm.
DISPLAY TYPE 3.5" Colour LCD
DISPLAY RESOLUTION 320 x 240
TOUCH SCREEN Touch sensitive surface
COMPATIBILITY D8x & D16x control panels version 7 and later
MAX. KEYPADS 4 x Navigator Touch Keypads per panel
OPERATING VOLTAGE 12VDC supplied by the control panel
CURRENT DRAW 25mA with 50% backlighting
DATA 2 wire proprietary Ness data bus
www.nesscorporation.com
National Customer Service Centre
Ph: 1300 551 991
customerservice@ness.com.au
Maximum current draw for all detectors and keypads should
not exceed 500mA.
50mA with 100% backlighting
NAVIGATOR TOUCH SCREEN KEYPAD
INSTALLATION NOTES
Rev 2, Apr13
Document Part Number: 890-411
4
 Loading...