

Winnebago Towables User Manual

Rev. Part No. 203564-05-000
Copyright 2014 Winnebago Industries, Inc. All rights reserved.
5 - DASH / AUTO


TABLE OF CONTENTS
1 – INTRODUCTION
Initial Dealer Responsibility ............................................................................................................. 1-1
General Information .......................................................................................................................... 1-2
2 – SAFETY AND PRECAUTIONS
3 – RECOMMENDATIONS
Manufacturer Specifications .............................................................................................................3-1
Vehicle Tune-Up ............................................................................................................................... 3-1
Battery and Alternator ...................................................................................................................... 3-1
Hitches .............................................................................................................................................. 3-1
Electronic Brake Controllers ............................................................................................................ 3-1
Rearview Side-Mounted Mirrors ...................................................................................................... 3-1
Weight Distribution .......................................................................................................................... 3-1
Travel Trailer Equalizer Hitches .......................................................................................................3-2
Rear Bumper Limitations .................................................................................................................. 3-2
Weight Ratings ................................................................................................................................. 3-2
Determining Trailer Weight .............................................................................................................. 3-2
Secure For Travel .............................................................................................................................. 3-4
Safety Chains .................................................................................................................................... 3-4
Vehicle & Trailer Hookup ................................................................................................................ 3-4
Breakaway Device ............................................................................................................................ 3-5
Axles & Leaf Springs ....................................................................................................................... 3-5
Tires .................................................................................................................................................. 3-6
Brake System Components .............................................................................................................3-12
Brake Inspection & Adjustment ..................................................................................................... 3-13
Braking Tips ................................................................................................................................... 3-14
Parking & Leveling ......................................................................................................................... 3-14
4 – APPLIANCES AND SYSTEMS
Self-Contained vs. Utility Hookup ................................................................................................... 4-1
Air Conditioner (Optional) ............................................................................................................... 4-2
Awning, Patio ................................................................................................................................... 4-2
Carbon Monoxide (Co) Detector ...................................................................................................... 4-2
Furnace ............................................................................................................................................. 4-3
Thermostat - Wall Mounted .............................................................................................................. 4-4
Microwave/Convection Oven (Optional) ......................................................................................... 4-4
Oven Or Cooktop (Range) ................................................................................................................ 4-4
Range Hood ...................................................................................................................................... 4-4
Refrigerator ....................................................................................................................................... 4-4
Roof Vents (Power/Manual) ............................................................................................................. 4-4
5 - DASH / AUTO

Table Of Contents
5 – PROPANE GAS
Propane Gas Safety Precautions ....................................................................................................... 5-1
Filling Propane Gas Tanks ................................................................................................................ 5-2
QCC1 Coupler .................................................................................................................................. 5-2
Propane Gas Regulator ..................................................................................................................... 5-3
Lighting Propane Gas Appliances .................................................................................................... 5-3
Safety Regulations Regarding Propane Gas Systems & Propane Gas Appliances .......................... 5-3
6 – ELECTRICAL
12-Volt Chassis Electrical System .................................................................................................... 6-1
12-Volt Fuse Block Panel ................................................................................................................. 6-1
120-Volt Ac System .......................................................................................................................... 6-1
The Power Converter ........................................................................................................................ 6-2
Ground Fault Interrupter ................................................................................................................... 6-2
7 – PLUMBING
Freshwater Storage Tank .................................................................................................................. 7-1
City Water ......................................................................................................................................... 7-1
Freshwater System Sanitizing ........................................................................................................... 7-2
Draining the Water System ............................................................................................................... 7-2
Freshwater System Winterizing ........................................................................................................ 7-3
Holding Tanks & Drainage System .................................................................................................. 7-4
Toilet & Toilet Holding Tank ........................................................................................................... 7-4
Graywater Holding Tank .................................................................................................................. 7-4
Holding Tank Dos & Don’ts ............................................................................................................. 7-5
8 – ENTERTAINMENT
Antenna (TV) .................................................................................................................................... 8-1
Satellite ............................................................................................................................................. 8-1
Televisions ........................................................................................................................................ 8-1
9 – FURNITURE AND SOFTGOODS
Blinds and Pleated Shades ................................................................................................................ 9-1
Draperies/Bedspreads ....................................................................................................................... 9-1
Fabric and Upholstery ....................................................................................................................... 9-1
Carpeting ........................................................................................................................................... 9-1
Fabric Color Fading .......................................................................................................................... 9-1
10 – SLIDEOUT ROOMS AND LEVELING
Slideout Room ................................................................................................................................ 10-1
Opening the Slideout ...................................................................................................................... 10-1
Closing Slideouts ............................................................................................................................ 10-1
Slideout Room Maintenance ........................................................................................................... 10-1
Manual Opening/Closing Slideouts ................................................................................................ 10-1
Traveling ......................................................................................................................................... 10-2
Leveling Procedures ....................................................................................................................... 10-2
Stabilizing Jacks ............................................................................................................................. 10-3

Table Of Contents
11 – MAINTENANCE AND STORAGE
Interior Care .................................................................................................................................... 11-1
Exterior Care ................................................................................................................................... 11-1
Rubber Roof .................................................................................................................................... 11-2
Windows, Doors, Vents And Locks ............................................................................................... 11-2
Door & Window Resealing ............................................................................................................. 11-2
Maintenance Chart .......................................................................................................................... 11-4
General Cleaning Instructions ........................................................................................................ 11-5
Storage ............................................................................................................................................ 11-6
12 – MISCELLANEOUS
Effects Of Prolonged Occupancy ................................................................................................... 12-1


SECTION 1 – INTRODUCTION
Winnebago Towables employees welcome
you to our growing family of travel trailer and
fifth wheel owners. Since Winnebago Towables
inception, our goal has been to provide towable
recreational vehicles designed and engineered to
give many years of enjoyment to our customers
who love the great outdoors. This manual has
been compiled to assist campers, both novice and
experienced in set-up, use, and preventative
maintenance for continued enjoyment from their
travel trailer or fifth wheel. Like finely crafted
furniture or highly engineered automobiles,
Winnebago Towable travel trailers and fifth
wheels require care and regular maintenance to
retain maximum performance characteristics. If,
after taking delivery of your new trailer it
requires additional adjustment, please return the
trailer to your dealer as soon as possible. This
Owner’s Manual, along with information
provided in your Owner’s Information Package,
outlines important areas of operation and
provides maintenance schedules to ensure safe,
trouble-free service. Knowledge of trailer usage,
components and maintenance will help you enjoy
many miles and years of recreational living.
Note: This manual is of a general nature only.
Some equipment and features described
or shown in this manual may not be
available in your model. Because of the
Winnebago Towables continuous
program of product improvement, it is
possible that recent pr oduct changes and
information may not be included.
INITIAL DEALER
RESPONSIBILITY
Winnebago Towables employees assemble
travel trailers and fifth wheels to standards which
meet or exceed local, state and national codes.
Each trailer has been thoroughly inspected at our
facilities prior to shipment. Every Winnebago
Towable dealer has the responsibility to reinspect
and to prepare every travel trailer and fifth wheel
during the pre-delivery phase of the sale.
Dealership personnel will provide instruction in
basic trailer use and features plus complete a predelivery inspection with you. Dealership predelivery instruction and inspections should be
supplemented by a thorough review of all
material furnished with the trailer by Winnebago
Towables and component and appliance
manufacturers. The dealer/customer pre-delivery
instruction and inspection should review:
• TOW VEHICLE/TRAILER
CONNECTIONS
• TRAILER CONNECTION
MAINTENANCE
• COUPLING & UNCOUPLING
• BREAKAWAY SWITCH
•TRAILER LOADING
• EXTERIOR INSPECTION
• INTERIOR DÉCOR INSPECTION
• EMERGENCY EXITS
• FIRE EXTINGUISHER
• FRESHWATER SYSTEM OPERATION
• WATER PUMP OPERATION
• WASTEW ATER SYSTEM OPERATION
• WATER HEATER OPERATION
• LAVATORY AND TUB/SHOWER CARE
• CONVER TER FUNCTION & OPERATION
• GROUND FAULT INTERRUPTER (GFI)
• CIRCUIT BREAKERS
• INTERIOR LIGHTS, SWITCHES &
RECEPTACLES
• REFRIGERATOR OPERATION
• RANGE OR RANGE/OVEN OPERATION
• FURNACE OPERATION
• OPERATION OF OTHER APPLIANCES
• MONITORING PANEL FUNCTIONS
• PROPANE GAS SYSTEM & PROPANE
• LEAK DETECTOR
5 - DASH / AUTO
1-1

SECTION 1 –
INTRODUCTION
• TV ANTENNA & RELATED
COMPONENTS
• AWNINGS
• BED CONVERSIONS
• CURTAINS, CARPET & COUNTERTOPS
• TABLE SETUP & STORAGE
• SPARE TIRE CARRIER
• EXPLANATION OF WINNEBAGO
TOWABLE WARRANTY
• EXPLANATION OF COMPONENT &
APPLIANCE WARRANTIES
• ACCEPTANCE OF TRAILER
CLEANLINESS
• WEIGHT DISTRIBUTION
GENERAL INFORMATION
The Owner’s Manual will provide general
information and instruction. Product information
or instruction may not apply, may be excluded or
may be generalized because:
• Equipment and features described or shown
may be optional or unavailable on some
models.
• Ongoing design changes may not be included
because of continuous product improvement.
• Specifications may change without notice.
occupancy is not considered normal, and
constitutes misuse or abuse under the warranty
terms, therefore voiding your warranty
protection.
Obtaining Service
Make an Appointment
Always make an appointment in advance with
the service center. Schedule as far in advance as
possible, always confirm the appointment as the
date approaches. Do not show up without an
appointment for service and expect that the
service center will be able to “fit you in.”
Arriving without an appointment may cause
additional aggravation when your request is met
with “I’m sorry but our schedule is full for the
next several weeks.”
Preparation for an Appointment
If you have made an appointment to have
warranty service, be sure to have the correct
papers with you. Take your Warranty
Registration paperwork and owner’s packet with
you to your appointment. Not all work to be
performed may be covered by the warranty. Keep
a maintenance log of your trailer’s service
history. This can often provide a clue to the
current problem.
Descriptions or photographs in this manual
are representative of function and may not
specifically depict actual equipment, fabrics,
interior or exterior décor or design options as
installed with your trailer.
THIS PRODUCT IS DESIGNED FOR
RECREATIONAL USE AND SHORTTERM OCCUPANCY ONLY.
Winnebago Towable travel trailers and fifth
wheels are not designed or intended to be used as
permanent housing. Using this product for long
term or permanent occupancy may lead to
premature deterioration of appliances, plumbing,
interior finishes, fabrics, carpeting and drapes.
Damage or deterioration due to long term
1-2
Prepare A List...
Make a written list of your trailer’s problems
or the specific work you would like completed. If
you’ve had an accident or work done that is not
on your maintenance log, let the service advisor
know. Please don’t keep secrets.
Be Reasonable With Requests...
If you list a number of items and you must
have your trailer by the end of the day, discuss the
situation with the service advisor and list the
items in order of priority. Please do not expect to
add to the list for service beyond what you have
previously scheduled when you arrive for your
appointment. Even though the service center may
be able to complete the additional requests, their
schedule has been determined based on your
original request.

Inspecting Repairs
Winnebago Towable and your servicing
dealer want you to be satisfied with any repair.
After a repair is performed, inspect the
workmanship carefully. Check your service list
and go over the repairs with the service center
representative. Once satisfied, sign the
Winnebago Towable claim form. In the event a
problem should reoccur after you have left the
dealership, contact the repair center or
Winnebago Towables as soon as possible so that
the situation can be resolved in a timely manner.
If You Need Assistance...
Winnebago Towables and our dealers are
vitally interested in your satisfaction. We want
you to be happy with our products and services.
Your selling dealer is best equipped and most
anxious to provide prompt resolution for any
warranty issue or related matter that you may
experience. Winnebago Towable dealers have
the facilities, trained technicians, special tools
and the latest information to assure your trailer is
fixed correctly and in a timely manner. If special
circumstances arise, talk to your dealer’s service
manager. Most matters can be resolved with this
process. If for some reason you are still not
satisfied, talk to the general manager or owner of
the dealership. They want to know if you need
assistance. If your dealership is unable to resolve
the concern, you may contact Winnebago
Towable Customer Service.
SECTION 1 –
INTRODUCTION
Winnebago Towables
201 14th Street · Middlebury, IN 46540
Telephone: (574) 825-5250
FAX: (574) 825-5433
E-mail: warrantywoi@winnebagoind.com
Any communication to Winnebago Towable
Customer Service should include the following
information:
• Owner’s Name and Address
• Owner’s Telephone Number
• Dealership Name
• Trailer Identification Number
• Trailer delivery date
1-3

SECTION 2 – SAFETY AND PRECAUTIONS
CAUTION
CAUTION
WARNING
DANGER
WARNING
We have provided many important safety
messages in this manual. Read and follow them
carefully.
IF YOU SMELL GAS:
1. Extinguish all open flames, pilot
lights, lanterns and smoking
Always check to be certain that the hitch
is locked properly before towing. Be sure
hitch bars are adjusted for proper load
equalization.
It’s also important to load personal cargo
so that Gross Axle Weight Rating is never
exceeded. For safety’s sake, you should
weigh your family campi ng vehicle
frequently as loaded for travel. We cannot
emphasize too strongly that the Gross
Vehicle Weight and Axle Rating must not
be exceeded. Overloading is a safety
hazard.
IT IS NOT SAFE TO USE COOKING
APPLIANCES FOR COMFORT
HEATING.
materials.
2. DO NOT touch electrical switches.
3. Shut off the gas supply at the tank
valve(s) or gas supply connection.
4. Open the windows and exit the unit
leaving the door open.
5. Stay out of the unit until the odor
clears.
6. Have the propane system checked
immediately and the cause of the leak
corrected before using the system
again.
INSIST that propane bottle(s) are not
filled beyond 80% liquid level. Overfilling
bottle(s) will eliminate the “safety
cushion” provided by the 20% expansion
area, which in turn can result in the
discharge of gas through the pressure
relief valve when higher outside
temperatures are encountered.
5 - DASH / AUTO
2-1
SECTION 2 –
WARNING
WARNING
WARNING
WARNING
WARNING
WARNING
WARNING
SAFETY AND PRECAUTIONS
The water heater and furnace combustion
air exhaust ports may be extremely HOT
during water heater and furnace
operation. DO NOT touch these outlets or
allow any material to come in contact with
or cover either the air intake or exhaust
ports while operating the water heater
and/or furnace.
DO NOT use the breakaway switch as a
parking brake. The current needed to
operate the brakes will drain the battery in
a short time and the brakes will release
when the voltage fails.
DO NOT replace a blown fuse with one
that has a higher amperage rating. If a
fuse continues to blow (or circuit breaker
to pop) DO NOT attempt to bypass it with
a piece of wire. Determine the reason for
the overload and have it repaired before
using the circuit again. DO NOT attempt
wiring repairs on a “live” circuit. Turn off all
appliances and disconnect the trailer from
all sources of 120-volt and 12-volt
electricity.
DO NOT use a cheater plug (one with the
ground wire pin removed) to hook up your
trailer to a 120-volt plug-in. DO NOT use
an extension cord with a lower circuit
rating to plug into an electrical hookup
that is beyond the reach of your trailer’s
power cable.
DO NOT mix different types of tires on the
same vehicle such as radial, bias and
bias-belted tires except in emergencies
because vehicle handling and tire life may
be seriously affected and may result in
loss of control or tire failure.
DO NOT operate the 120-volt electrical
system without a proper ground.
Test the smoke detector’s operation after
your camping vehicle has been in
storage, before each trip and at least
once per week during use.
2-2
WARNING
Use only antifreeze made especially for
WARNING
potable water systems. Automotive
antifreeze, if ingested, can cause
blindness, deafness or death.
Sta tement of Formaldehyde from
Building Materials
Certain building products such as
particleboard, fiberboard, and hardwood
plywood are manufactured with an adhesive
containing urea-formaldehyde. The products
emit a small quantity of formaldehyde into the
air.
Other products contain formaldehyde or ureaformaldehyde resins such as some carpets,
draperies, upholstery, fabrics deodorizers,
cosmetics and permanent press fabrics.
Formaldehyde is also a by-product of
combustion and is produced by cigarettes and gas
appliances.
The concentration of formaldehyde in the
indoor air depends on the quantity and emission
rates of all emission rates of all emitting products
in the structure compared to the volume of indoor
air and the fresh air ventilation rate. As with other
indoor pollutants, ventilation should reduce
formaldehyde levels.
SECTION 2 –
SAFETY AND PRECAUTIONS
injury or death, immediately inform the National
Highway Traffic Safety Administration
(NHTSA) in addition to notifying Winnebago
Towables.
If NHTSA receives similar complaints, it may
open an investigation and, if it finds that a safety
defect exists in a group of vehicles, it may order
a recall and remedy campaign. However,
NHTSA cannot become involved in individual
problems between you, your dealer, or
Winnebago Towables.
To contact NHTSA, either call the Vehicle
Safety Hotline toll-free at 1-888-327-4236 (TTY:
1-800-424-9153); or write to: NHTSA, 1200
New Jersey Ave., Washington, D.C. 20590 or go
to http://www.savercar.gov. Information may be
obtained about motor vehicle safety from the
hotline.
FORMALDEHYDE LEVELS IN THE
INDOOR AIR CAN CAUSE
TEMPORARY EYE AND
RESPIRATORY IRRITATION AND MAY
AGGRAVATE RESPIRATORY
CONDITIONS OR ALLERGIES.
Additional Precautions
If you believe that your Winnebago
Towables travel trailer or fifth wheel has a
defect, which could cause a crash or could cause
2-3


SECTION 3 – RECOMMENDATIONS
Tow Vehicle Recommendations
MANUFACTURER
SPECIFICATIONS
Winnebago Towables travel trailers and fifth
wheels can be towed by many types of vehicles.
When selecting a tow vehicle for travel trailers
and fifth wheels, complying with vehicle
manufacturer specific recommendations
concerning towing capabilities and restrictions is
critical. Many vehicle manufacturers and dealers
can provide special towing packages based on
specific requirements, such as trailer size,
maximum trailer load and tow vehicle demands
during travel (i.e. terrain, trip lengths, etc.).
VEHICLE TUNE-UP
Proper vehicle maintenance is necessary
including engine tune-ups and lubrication. An
engine may overheat on long upgrades, which
may be prevented with a larger, heavy-duty
radiator and proper care.
BATTERY AND ALTERNATOR
During travel, the tow vehicle battery and
alternator must support some of the trailer’s
electrical equipment including taillights, turn
signals, brake lights, clearance lights and electric
brakes. The battery and alternator must be in
good condition and able to handle this load.
HITCHES
Many types and ratings of trailer hitches are
available. Important factors when selecting the
proper hitch are:
• Follow the tow vehicle manufacturer’s and
the hitch manufacturer’s recommendations to
ensure proper installation and size
requirements.
• Keep the tow vehicle and the trailer level to
maintain equal weight distribution and ensure
maximum steering control.
ELECTRONIC BRAKE
CONTROLLERS
Many types of electronic brake controllers are
available. Consult your dealer to determine
specific needs. Insist that any electronic brake
controller be installed per the manufacturer’s
instructions. It may be necessary to install a
resistor in the trailer’s braking system. If the
trailer skids or the brakes grab, a resistor in the
circuit may remedy the problem. Follow the
individual resistor manufacturer’s instructions.
Do not use more than one resistor in the circuit.
REARVIEW SIDE-MOUNTED
MIRRORS
Rearview, side-mounted mirrors on both
driver and passenger sides of the tow vehicle are
a necessity. Side-mounted mirrors provide a clear
view of following traffic and an unobstructed
view of the trailer action. They should be
properly extended offering an unobstructed view
of the rear of the trailer and possible traffic
hazards. A travel trailer chassis (springs, wheels,
tires axles, frame and tongue) is engineered to
carry certain maximum load.
WEIGHT DISTRIBUTION
Proper weight distribution between axles and
tongue is also critical to safe towing. Factors to
consider when evaluating proper weight
distribution are:
• On travel trailers, tongue proportion of the
GROSS VEHICLE WEIGHT should be
approximately 10 to 15% for tandem axle
trailers. Depending on the tow vehicle, 11 to
12% tongue weight is ideal. Hitch weight
5 - DASH / AUTO
3-1

SECTION 3 –
WARNING
RECOMMENDATIONS
proportion on fifth wheels is a larger
percentage of the GROSS VEHICLE
WEIGHT.
• Proper distribution required for towing
stability , assures the trailer is not rear, front, or
side heavy.
• A light tongue weight or heavy weight placed
at the rear end of the trailer may cause trailer
sway.
Too much weight on the tongue can overload
the tow vehicle, and cause poor tow vehicle
stability and handling, poor braking, poor
cornering and may damage the trailer frame.
TRAVEL TRAILER EQUALIZER
HITCHES
Travel trailer load equalizer hitches can add
33% plus or minus of hitch weight to trailer axles
when the trailer and tow vehicle are level. If the
tow vehicle tilts front or rear, the tension on the
equalizer bars will affect the amount of weight
distributed to the axles.
REAR BUMPER LIMITATIONS
The rear bumper of a travel trailer or fifth
wheel is not intended to be a weight bearing
structure. The bumper is not capable of
supporting any additional weight beyond that of
the tire carrier and spare tire. Besides being
unable to support added weight, adding weight to
the rear of the travel trailer will affect the hitch
weight and the stability of the trailer while
towing.
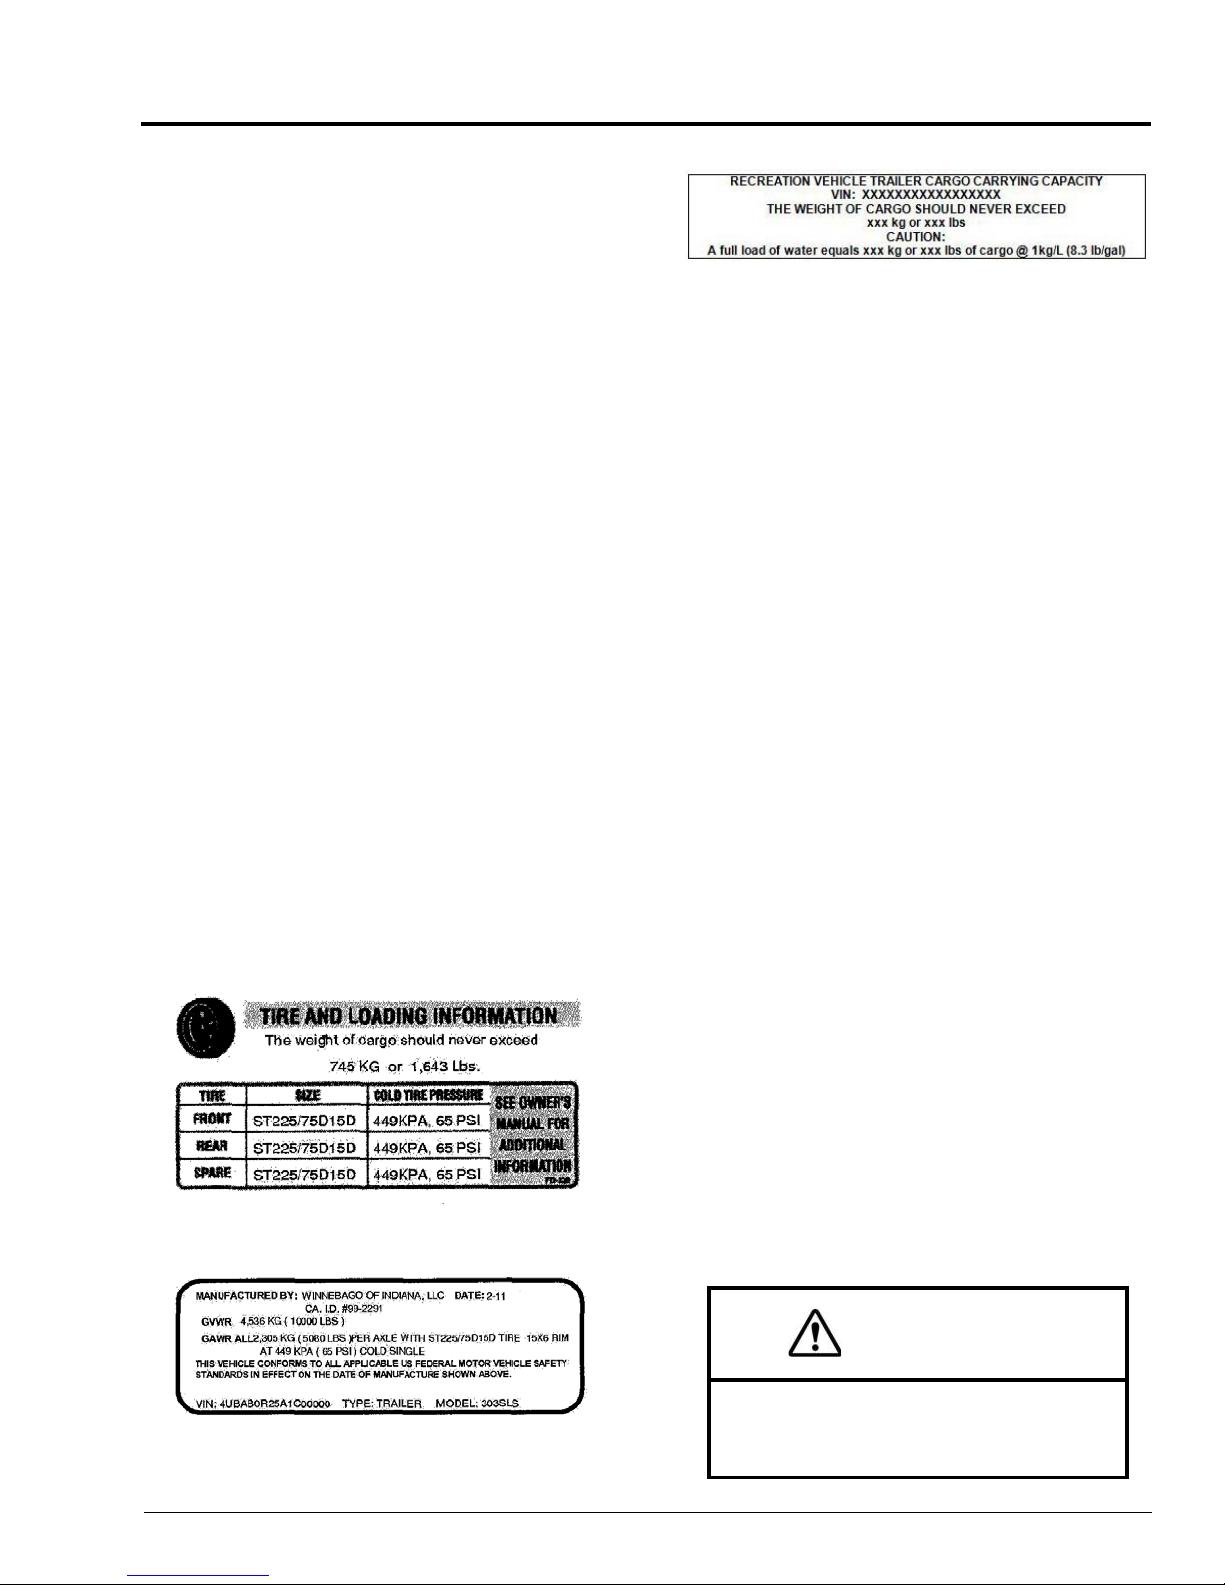
WEIGHT RATINGS
The Trailer Weight Information label (located
inside the inside lower bar on the screen door on
almost all trailers and fifth wheels) provides
weight data critical to understanding the
maximum load of a travel trailer or fifth wheel.
GROSS VEHICLE WEIGHT RATING
(GVWR) is the maximum permissible weight of
the trailer. The weight of the empty trailer, plus
weight added in the form of water, food, clothing,
and anything else in or attached to the trailer must
not exceed the GVWR. In other words, the
GVWR is equal to or greater than Unloaded
Vehicle Weight plus the Cargo Carrying
Capacity.
The UNLOADED VEHICLE WEIGHT
(UVW) is the weight of the travel trailer or fifth
wheel as manufactured. This is the weight on the
trailer axles and tongue or pin.
CARGO CARRYING CAPACITY is the
maximum weight of personal belongings, food,
fresh water, PROPANE gas tools, accessories,
etc. that can be loaded.
The GROSS AXLE WEIGHT RATING
(GAWR) represents the allowable empty
vehicle’s axle weight plus Cargo Carrying
Capacity excluding the hitch weight. The weight
is divided between each axle and each has its own
GAWR. The total of axle load plus the tongue
weight must not exceed the trailer GVWR. The
GAWR is located on the manufacturer’s Federal
ID label on the left side front corner outside the
trailer.
The rear bumper of travel trailers and fifth
wheels are not intended to be used as
steps and are not designed to support
more than 70 pounds.
3-2
DETERMINING TRAILER
WEIGHT
To determine the weight of a loaded trailer:
1. Locate public weight scale.
2. Park your trailer and disconnect it on the scale.
Both wheels and jacks should be on the scale.
3. The reading will be the Gross V ehicle W eight
of the trailer and should not exceed the
GVWR as indicated on the manufacturer
Federal ID tag.
To determine Gross Axle Weight - Both
CAUTION
Axles:
1. Leave trailer connected to the tow vehicle.
2. Be certain the trailer is level.
3. Leave the tow vehicle off the scale.
4. Roll forward far enough so both trailer axles
are on the scale.
5. The reading will be the Gross Axle W eight for
both axles.
To determine Gross Axle Weight - Each Axle:
1. Leave trailer connected to the tow vehicle.
2. Be certain the trailer is level.
3. Leave the tow vehicle off the scale.
4. Roll forward far enough so only rear trailer
axle (two tires) is on the scale.
5. The reading will be the Gross Axle W eight for
the rear axle.
6. Subtract the total Gross Axle W eight from the
rear axle weight to calculate the front axle
weight.
SECTION 3 –
RECOMMENDATIONS
Sample Trailer Weight Information
Labels
These labels should be affixed on the front
roadside of most travel trailers & fifth wheels.
IMPORTANT:
• Determine hitch and axle weights with both
vehicles level.
• Tilting the trailer forward will add front axle
weight.
• Hitch weight and tension of the equalizer bars
will be affected by leveling the trailer and tow
vehicle.
• Have the tow vehicle level if equalizers are
used. Have tire pressure up to specifications
as indicated on the tire sidewall.
To determine hitch weight:.
1. Subtract the total Gross Axle W eight reading
from the Gross Vehicle Weight reading. This
figure is the loaded hitch weight.
2. If equalizer equipment is installed, this will
affect both hitch and axle weight.
Consider load weights when determining
weight distribution. Proper trailer positioning
and loading are important not only for ease of
hauling, but for safety. Remember: 10 to 15%
of a travel trailer’s weight should be on the
hitch. A fifth wheel will be slightly more as a
percentage.
Heavier items should be placed over the axles.
Avoid placing too much weight at the front or
rear of the trailer.
Excess weight in/on the rear of the trailer can
have a negative effect on the stability of both
vehicles. Stability and weight can be affected if
waste is in the holding tanks or water in the
freshwater holding tank.
DO NOT attach such items as
motorcycles, fuel or water containers, etc.
on the rear of your trailer.
3-3

SECTION 3 –
RECOMMENDATIONS
SECURE FOR TRAVEL
Before starting out, make certain everything is
secure in the trailer.
• Check cabinets and drawers; make sure
nothing can spill in cabinets or refrigerator.
• Ensure that the refrigerator latch is engaged.
• Lock windows and rock guards.
• Close roof vents.
• Secure loose chairs and other items.
• Disconnect all hoses and close all valves.
• Make sure electrical cords and adapters have
been disconnected and put away.
Hitch Connection
Using the proper hitch on the tow vehicle is
critical for maximum safety when towing a travel
trailer. Load leveling or load-equalizing hitches
with anti-sway bars are recommended for added
stability and maneuvering.
Several factors need to be considered when
selecting the proper hitch including:
• Gross weight of the trailer
• Tongue weight
• A welded or bolted weight-carrying hitch on
the frame or body of the tow vehicle
• A 2 5/16 inches hitch ball (lubricate the hitch
ball periodically)
Consult your dealer and/or a representative of
your tow vehicle manufacturer in selecting a
hitch and accessories for your trailer.
SAFETY CHAINS
The Department of Transportation federally
mandates use of safety chains on travel trailers.
Safe towing recommendations include:
• Attach safety chains to the tow vehicle
separate from the hitch.
• Leave only enough slack in each length of
chain to permit the vehicle to turn during
normal driving.
• The chains should not contact the ground or
road surface.
• Cross the chains from the trailer hitch to the
tow vehicle.
• When all connections are secure, be certain
the 7-pin electrical connector cord and the
breakaway switch lanyard cable are longer
than the extended safety chains.
• Should the hitch ball become disengaged from
the coupler, the safety chains will extend, the
7-pin connector should remain connected to
the tow vehicle for braking and the breakaway
switch should not engage.
VEHICLE & TRAILER HOOKUP
Connecting the tow vehicle hitch to the
coupler on the travel trailer or fifth wheel is a
simple procedure described by the following:
T ravel Trailers
1. Before dropping the coupler over the hitch
ball, the coupler-locking arm must be in an
unlocked position.
2. The coupler should be slightly behind the ball
(away from the tow vehicle) permitting the
coupler to slide down over the ball positively .
3. After locking the coupler over the ball, be
certain the ball is fully engaged with the
coupler.
4. Attach the safety chains to the tow vehicle. Be
sure to cross the chains from the trailer hitch
to the tow vehicle. Be careful to leave slack in
each length of chain to permit the vehicle to
turn during normal driving.
5. Check the vehicle’s turning capabilities.
6. Attach the connector plug on the trailer to the
electrical connection on the tow vehicle. Be
sure there is slack in the cord to make sharp
turns.
7. The breakaway device is located on the trailer
tongue. It has a steel cable fastened to it,
which will reach to the frame of the tow
vehicle. The steel cable (lanyard) should be
attached to a secure part of the tow vehicle,
separate from the hitch, such as the frame.
3-4
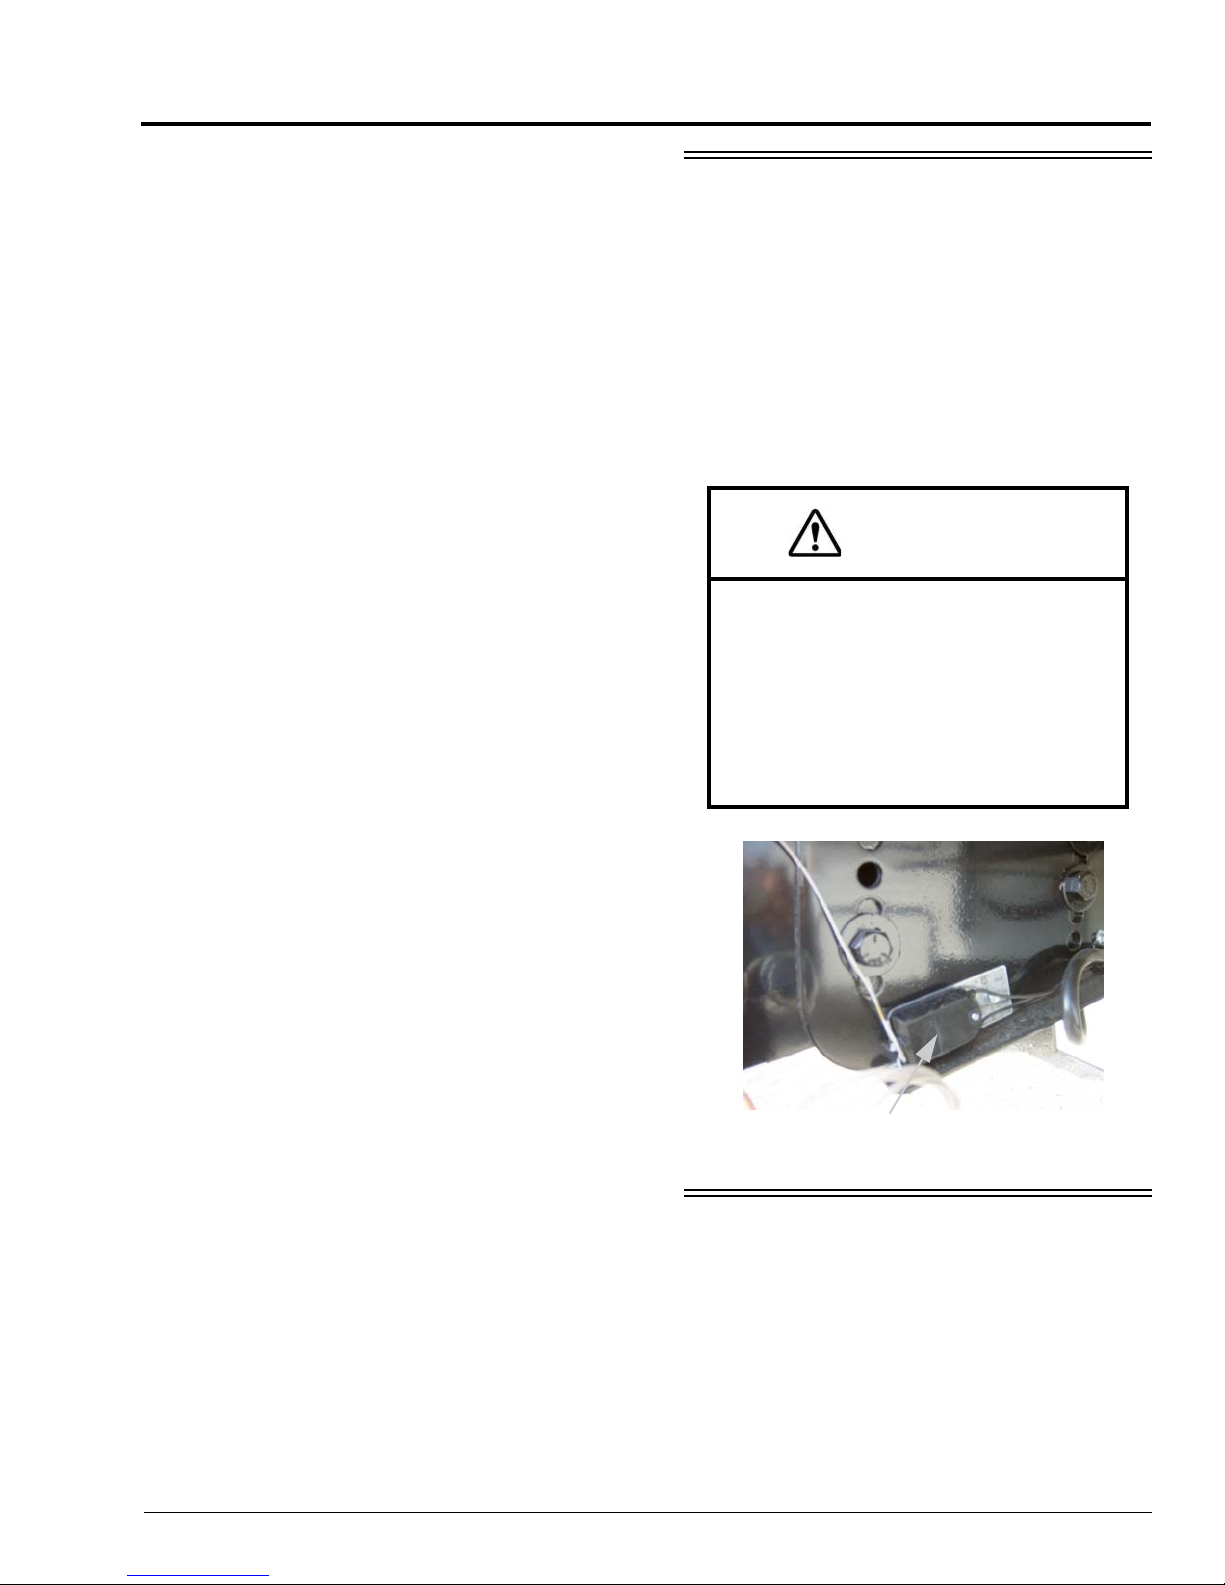
8. The breakaway device is connected to the
CAUTION
Break Away Device
trailer battery and will operate independently
to apply the trailer brakes should the trailer
become disconnected from the tow vehicle.
9. Apply trailer brakes only and proceed very
slowly to confirm proper engagement of the
hitch and brake operation.
10. Test all exterior lights on the trailer.
Fifth Wheels
1. Open the hitch locking device in the truck.
2. Lower the tailgate of the truck.
NOTE: If not required, the rear tailgate can be
removed to simplify coupling and
uncoupling.
3. Back the truck to engage the kingpin in the
hitch latch plate. It is important the pin box
and hitch latch plate are as level as possible.
4. Latch plates will engage the kingpin
automatically on some hitches, but the handle
grip must be pushed to the locked position
(see manufacturer’s instructions for full
details). On other hitches, the lever will be
used to engage the kingpin (manually) and to
lock it in position.
5. Visually check that the hitch is locked to the
small diameter portion of the kingpin.
6. Raise the tailgate of the truck.
7. Raise the front jacks of the fifth wheel trailer.
8. Plug the electrical connector cord into the
receptacle on the truck.
9. Attach the safety cable for the breakaway
device to part of the truck hitch. Keep the
cable in a straight line with the switch on the
trailer as much as possible and allow enough
slack for turns.
10. Apply trailer brakes only and proceed very
slowly to confirm proper engagement of the
hitch.
11. Test operation of all exterior lights on the
trailer.
SECTION 3 –
RECOMMENDATIONS
BREAKAWAY DEVICE
Should your trailer become completely
disconnected while being towed, the breakaway
device is designed to actuate the trailer brakes
and bring it to a stop, preventing a runaway
trailer. The switch has a pull pin linked to the tow
vehicle with a steel cable; the cable pulls the pin
free. This causes two contacts in the device to go
together, immediately closing the circuit between
the trailer battery and the trailer brakes.
Never tow a trailer without the trailer
battery being hooked up and fully
charged. Attach the breakaway
lanyard cable so it is longer than the
safety chain. When connected to the
vehicle, the pull on the pin is in a
straight line with the cable. Do not
hook the cable over the trailer ball.
AXLES & LEAF SPRINGS
Our travel trailers and fifth wheels axles are
suspended on heavy-duty, double-eye leaf
springs designed to absorb sharp jolts from the
road, reduce jolts from being transmitted to the
trailer and maintain tire contact with the road.
Spring shackle mounts are welded to the frame of
the trailers. Check the shackle bolts periodically
3-5

SECTION 3 –
WARNING
WARNING
CAUTION
RECOMMENDATIONS
for tightness. Do not reuse shackle bolts/nuts, if
an axle must be removed. Self-locking nuts must
be replaced if removed.
TIRES
All tires meet or exceed load and wear
specifications for trailers. Proper inflation
pressure must be maintained for safe trailer
stability and maximum tire life. Load range and
maximum cold inflation pressure are stamped on
the sidewall. Always inflate the tires to this
maximum pressure.
A tire gauge should always be part of your tool
kit. Check tire pressures before starting out, when
the tire is cold. Do not bleed air out of warm tires.
Inflation specifications are for cold tires. Inflate
the tires of the tow vehicle to the maximum cold
inflation pressure stamped on the tire sidewalls.
Higher rear tire pressure improves tow vehicle
stability.
Spare Tire & Cover
Note that a spare tire and/or spare tire cover
are not standard on all models. To help extend the
life and look of your spare tire cover, cover the
spare tire with a heavy-duty garbage bag before
putting on the spare tire cover. This will help
keep the spare tire from bleeding through the
spare tire cover.
Changing Tires
1. Turn on the tow vehicle’s hazard warning
flashers.
2. Set up flares or warning lights.
3. Chock the opposite tire and unhitch the trailer
from the tow vehicle, or eliminate tension on
equalizer bars, if applicable.
4. Place scissors-type or hydraulic jack on a
block of wood directly under the frame, close
to the tire you intend to change.
CHECK TIRE PRESSURES OFTEN.
ALWAYS CHECK PRESSURE WHEN
TIRES ARE COLD. DO NOT EXCEED
MAXIMUM RECOMMENDED
PRESSURE.
KEEP TIRES PROPERLY INFLATED.
TIRES MAY LOSE AIR SUDDENLY
AND/OR CATCH FIRE, IF DRIVEN FOR
LONG DISTANCES OR AT HIGH
SPEEDS WHILE SERIOUSLY
UNDERINFLATED. TIRES COULD
OVERHEAT WHERE DAMAGE TO THE
VEHICLE, CONTENTS AND/OR
PERSONAL INJURY MAY OCCUR.
When using bottle-type jacks, a metal
plate or block of wood to relieve stress
against the steel frame should be
inserted between jack and frame. DO
NOT use a bumper jack. It may damage
the sidewalls or floorboard of the
trailer.
5. Raise the jack to take weight off the tire.
6. Loosen the lug nuts.
7. Raise the jack until the tire clears the ground.
8. Remove the lug nuts and old tire and put the
spare on the hub.
9. Replace and tighten the nuts.
10. Lower the jack until the tire touches the
ground.
11. Tighten the lug nuts to a torque of 90 to 95 ft.
lbs.
12. Lower and remove the jack.
13. Hook up equalizer bars, if applicable.
14. CHECK THE TORQUE IMMEDIATEL Y.
3-6
 Loading...