

Page 1

Please read this instructions before operating the device and retain them for future reference.
Ultra-Rugged Tablet
R08IH8M-RTU1GP
R10IH8M-RTT2GP
Intel ® Core™ i5-5250U Broadwell
User Guide
Version 1.1
Page 2

2
Ultra-Rugged Tablet User Guide
Contents
Chapter 1: Read Me First ........................................................................................................................................... 3
1.1 Advisory Conventions ........................................................................................................................................ 3
1.2 Safety Information .............................................................................................................................................. 4
1.3 Handling and Maintenance ................................................................................................................................ 6
1.4 Declaration of Conformity (DoC) ........................................................................................................................ 7
Chapter 2: Getting Started ......................................................................................................................................... 8
2.1 Overview ............................................................................................................................................................ 8
2.2 Introduction......................................................................................................................................................... 8
2.3 Product Features ................................................................................................................................................ 8
2.4 Unpacking .......................................................................................................................................................... 9
2.5 Description of Parts .......................................................................................................................................... 10
2.6 HotKey for Specific Functions .......................................................................................................................... 14
2.7 First-time Operation ......................................................................................................................................... 15
2.8 Connecting to Power Supply ............................................................................................................................ 16
2.9 Powering On and Off ........................................................................................................................................ 17
Chapter 3: First Time Operation ............................................................................................................................. 18
3.1 Setting Up Windows Embedded Standard 7 (WS7P) ...................................................................................... 18
3.1.1 Creating a User Name and Password .......................................................................................................... 18
3.1.2 License Agreement ....................................................................................................................................... 18
3.1.3 Protecting Your Computer ............................................................................................................................. 18
3.1.4 Choosing Your Computer's Network ............................................................................................................. 19
3.1.5 Completing Windows 7 Setup ....................................................................................................................... 20
3.2 Setting Up Windows 7 Ultimate/Professional ................................................................................................... 21
3.3 Setting Up Windows Embedded 8.1 Industry Pro ............................................................................................ 25
3.4 Setting Up Windows 10 IoT Enterprise ............................................................................................................ 30
Chapter 4: Quick Access with Hottab .................................................................................................................... 32
4.1 Hottab Introduction ........................................................................................................................................... 32
4.2 Shortcuts .......................................................................................................................................................... 33
4.3 Camera ............................................................................................................................................................. 33
4.3.1 Using Camera Features ................................................................................................................................ 33
4.3.2 Description of Camera User Interface Buttons: ............................................................................................ 34
4.4 Device On / Off ................................................................................................................................................. 35
4.5 Using the Wireless LAN (Wi-Fi) ....................................................................................................................... 35
4.6 Using the Wireless WAN (3G/LTE) .................................................................................................................. 36
4.6.1 Insert SIM card (For 3G/LTE Equipped Devices) ......................................................................................... 36
4.6.2 Use Wireless WAN Feature .......................................................................................................................... 36
4.7 Using the GPS.................................................................................................................................................. 37
4.8 Using the Bluetooth .......................................................................................................................................... 37
4.9 Settings ............................................................................................................................................................ 38
4.9.1 PC Information .............................................................................................................................................. 38
4.9.2 Battery Information ........................................................................................................................................ 38
4.9.3 Using the Physical Function Keys (Hotkeys) ................................................................................................ 38
Chapter 5: Frequently Used Settings ..................................................................................................................... 40
5.1 Screen Resolution Scaling and Setting ............................................................................................................ 40
5.2 Changing Display Scaling Setting (Recommended) ........................................................................................ 40
5.3 Using Recovery Wizard to Restore Computer ................................................................................................. 41
Chapter 6: Troubleshooting .................................................................................................................................... 43
6.1 Basic Troubleshooting ...................................................................................................................................... 43
Appendix A: Technical Specifications ................................................................................................................... 45
Appendix B: Dimensions and Schematics ............................................................................................................ 46
Page 3

Please read this instructions before operating the device and retain them for future reference.
3
Chapter 1: Read Me First
Chapter 1: Read Me First
1.1 Advisory Conventions
Four types of advisories are used throughout the user manual to provide helpful information or to alert you
to the potential for hardware damage or personal injury. These are Notes, Important, Cautions, and
Warnings. The following is an example of each type of advisory.
Note:
A note is used to emphasize helpful information
Important:
An important note indicates information that is important for you to know.
Caution/ Attention
A Caution alert indicates potential damage to hardware and explains how to avoid the
potential problem.
Unealerted’attentionindique un dommage possible à l’équipement et explique comment
éviter le problèmepotentiel.
Warning! Avertissement!
An Electrical Shock Warning indicates the potential harm from electrical hazards and how
to avoid the potential problem.
Un Avertissement de Choc Électriqueindique le potentiel de chocssur des emplacements
électriques et comment évitercesproblèmes.
Page 4

4
Ultra-Rugged Tablet User Guide
1.2 Safety Information
Precaution on Battery Pack
Précaution avec le bloc-pile
Do Not Disassemble, Modify, or Insert Sharp
Objects Into the Battery Pack. Electrolyte
leakage, generation of heat, ignition or rupture
may result.
[FR] Ne pas démonter, modifier, ou insérer
des objets pointus à l'intérieur du bloc-pile.
Une fuite d'électrolyte, la génération de
chaleur, l'amorçage ou la rupture peuvent être
occasionnés.
Do Not Short the Positive (+) and Negative (-)
Terminals of the Battery. Generation of heat,
ignition or rupture may result. When carrying
or storing the device, do not place the battery
pack together with articles that may contact
electricity.
[FR] Ne pas court-circuiter les bornes Positive
(+) et Négative (-) de la pile, la génération de
chaleur, l'amorçage ou la rupture peuvent être
occasionnés. Lors du transport et du
rangement de l'appareil, ne pas placer le blocpile en même temps que des articles pouvant
créer un contact électrique.
Do Not Apply Shocks to the Battery by
Dropping It or Applying Strong Pressure to It.
Electrolyte leakage, generation of heat, ignition
or rupture of battery may occurs.
[FR] Ne pas faire subir de choc à la pile en la
laissant tomber ou en appliquant une forte
pression dessus. Une fuite d'électrolyte, la
génération de chaleur, l'amorçage ou la
rupture peuvent être occasionnés.
Do Not Charge the Battery Other Than
Methods Those Specified In This Manual. If
the battery is not charged using one of the
specified methods, electrolyte leakage,
generation of heat, ignition or rupture may
result.
[FR] Ne pas charger la pile par d'autres
méthodes que celles spécifiées dans ce
manuel. Si la pile n'est pas chargée en utilisant
l'une des méthodes spécifiées, une fuite
d'électrolyte, la génération de chaleur,
l'amorçage ou la rupture peuvent être
occasionnés.
When the Battery Pack Has Deteriorated,
Replace It with a New Battery. Continued use
of a damaged battery pack may result in heat
generation, ignition or battery rupture.
[FR] Lorsque la pile est détériorée, la
remplacer par une nouvelle pile. L'utilisation
continue d'une pile endommagée peut
occasionner une génération de chaleur,
l'amorçage ou la rupture de la pile.
Do Not Expose the Battery Pack to Excessive
Heat, or Extreme Heat (Near Fire, in Direct
Sunlight for example) Generation of heat,
ignition or rupture may result
[FR] Ne pas exposer le bloc-pile à une Chaleur
Excessive, ou une Chaleur Extrême (Près d'un
feu, sous la lumière du soleil par exemple)Une
production de chaleur, l'amorçage ou la
rupture peuvent être occasionnés
Do Not Use the Battery Pack With Any Other
Products. The battery pack is rechargeable
and is only designed for this specific product. If
it is used with a product other than the
specified product, electrolyte leakage,
generation of heat, ignition or rupture may
result.
[FR] Ne pas utiliser avec un autre produit La
batterie est rechargeable et a été conçue pour
un produit spécifique. Si elle est utilisée sur un
produit différent
de celui pour lequel elle a été conçue, des
pertes d’électrolytes et une production de
chaleur sont possibles, elle risque également
de prendre feu ou de casser.
Do Not Use This Product With Battery Other
Than the One Specified.
[FR] Ne pas utiliser ce produit avec une
batterie autre que celle spécifiée
Discontinue using device immediately if you
notice the battery is swelling, or looks puffy or
misshapen. Do not attempt to charge or use
the device. Do not handle a damaged or
leaking battery. Do not let leaking battery fluid
come into contact with your eyes, skin or
clothing.
[FR] Si vous remarquez une pile gonflée,
élargie ou anormale, cesser l’utilisation de
l’appareil immédiatement. N’essayez pas de
recharger l’appareil ou de l’utiliser. Ne pas
manipuler une pile qui fuit ou qui est
endommagée. Ne laissez pas de liquide qui
fuit entrer en contact avec vos yeux, votre
peau ou vos vêtements.
Page 5
5
Chapter 1: Read Me First
General Product Safety
Sécurité générale des
produits
Do not block any ventilation openings. Do not
place the product against a wall or in an
enclosed space as doing so might impede the
flow of cooling air.
[FR] Ne pas bloquer les ouvertures de
ventilation. Ne pas placer le produit contre un
mur ou dans un espace clos de façon à
entraver la circulation de l'air de
refroidissement.
Do not place the product near any heat
sources such as radiators, warm air intakes,
stoves or other heat-generating devices
(including amplifiers or other heat producing
equipment).
[FR] Ne pas placer le produit près d'une
source de chaleur comme des radiateurs, les
arrivées d'air chaud, poêles ou autres
produits générant de la chaleur (y compris les
amplificateurs ou autre équipement
produisant de la chaleur.)
Protect the power cord from being crushed or
pinched, particularly in the area of the plugs,
any receptacles used, and the point of exit
from the apparatus. Do not break off the
ground pin of the power cord.
[FR] Empêcher le cordon d'alimentation d'être
écrasé ou pincé, en particulier dans les zones
de prises, des containers utilisés, et du point
de sortie de l'appareil. Ne pas casser la
broche de terre du cordon d'alimentation.
Do not disregard the safety that a polarized or
grounded connection can provide. A
polarized connection consists of two plugs,
one of which is larger than the other. A
grounded connection has two blades and a
third one that is grounded. If the main plug
provided cannot be inserted into your outlet,
consult an electrician to replace your obsolete
outlet.
[FR] Ne pas ignorer la sécurité qu'une prise
polarisée ou une prise de terre peut prévoir.
Une prise polarisée se compose de deux
fiches, dont l'une est plus large que l'autre.
Une prise de terre possède deux lames et
une troisième qui est la terre. Si la fiche
principale fournie ne peut être insérée dans
votre prise, consultez un électricien pour
remplacer votre prise obsolète.
Use only accessories specified by the
manufacturer.
[FR] Utiliser uniquement les accessoires
spécifiés par le fabricant.
This product should not be used near water
such as bathtubs, sinks, swimming pools, wet
basement, etc.
[FR] Ce produit ne dois pas être utilisé près
de l'eau comme les baignoires, les éviers, les
piscines, les sous-sols humides, etc.
Use only with its transport carriage, stand,
tripod, console or table specified by the
manufacturer or sold with the product. When
using a carriage, move the carriage assembly
with the product carefully to avoid damage
from falling over.
[FR] Utiliser uniquement avec son chariot de
transport, support, trépied, console ou table
spécifiés par le fabricant ou vendu avec le
produit. Lors de l'utilisation d'un charriot,
déplacez l'ensemble chariot avec le produit
avec soin pour éviter tout dommage de chute.
Unplug this apparatus during lightning storms
or when it is not being used for long periods.
[FR] Débrancher cet appareil durant les
orages ou lorsqu'il n'est pas utilisé pendant
de longues périodes.
Refer all servicing to qualified service
personnel. A technical intervention is required
when the apparatus has been damaged in
any way, for example if the power cord or
plug is damaged, liquid has been spilled or
objects have fallen inside the unit, if the
product has been exposed to rain or
moisture, if it does not operate normally or if it
has been dropped.
[FR] Confier toute réparation à du personnel
qualifié. Une intervention technique est
nécessaire lorsque l'appareil a été
endommagé de quelque façon, par exemple
si le cordon d'alimentation ou la fiche est
endommagé, du liquide a été renversé ou
des objets sont tombés à l'intérieur de l'unité,
si le produit a été exposé à la pluie ou à
l'humidité, s'il ne fonctionne pas normalement
ou s'il a été jeté.
Page 6
6
Ultra-Rugged Tablet User Guide
1.3 Handling and Maintenance
General Guideline
Guide Général
Keep the product at least 13 cm (5 inches)
away from electrical appliances that can
generate a strong magnetic field such as TV,
refrigerator, motor, or a large audio speaker.
[FR] Garder le produit au moins à 13 cm (5
pouces) de distance des appareils électriques
qui peuvent générer un fort champ magnétique
comme une télévision, un réfrigérateur, un
moteur, ou un important haut-parleur.
Do not place heavy objects on top of the tablet
computer as this may damage the display.
[FR] Ne pas placer d'objets lourds sur le
dessus de l'ordinateur tablette cela peut
endommager l'écran.
The screen surface can be easily scratched.
Use with care. Do not use paper towels to
clean the display but use the included cleaning
cloth. Avoid touching it with a pen or pencil.
[FR] La surface de l'écran peut être facilement
rayée. Utiliser avec précaution. Ne pas utiliser
de serviette en papier pour nettoyer l'écran
mais utiliser le chiffon de nettoyage inclus.
Éviter de toucher avec un stylo ou un crayon.
To maximize the life of the backlight in the
display, allow backlight to automatically turn off
as a result of power management. Avoid using
a screen saver or other software that prevents
the power management from working.
[FR] Pour maximiser la durée de vie du
rétroéclairage de l'écran, autoriser le
rétroéclairage résultant de la gestion de
l'alimentation. Éviter d'utiliser un économiseur
d'écran ou un autre logiciel empêchant la
gestion de l'alimentation de fonctionner.
Cleaning Guideline
Guide de nettoyage
Use a soft cloth moistened with water or a nonalkaline detergent to wipe the exterior of the
product.
[FR] Utiliser un chiffon doux humidifié avec de
l’eau ou un détergeant non alcalin pour
essuyer l'extérieur du produit.
Gently wipe the display with a soft, lint-free
cloth. Do not use alcohol or detergent on the
product.
[FR] Essuyer délicatement l'écran avec un
chiffon doux non pelucheux. Ne pas utiliser
d'alcool ou un détergent sur le produit.
Touchscreen Guideline
Guide de l'écran tactile
Use your finger or the stylus on the display.
Using sharp or metallic object may cause
scratches and damage the display, thereby
causing errors.
[FR]Utiliser votre doigt ou le stylet sur l'écran.
L'utilisation d'un objet pointu ou métallique
peut provoquer des rayures.
Use a soft cloth to remove dirt on the display.
The touchscreen surface has a special
protective coating that prevents dirt from
sticking to it. Not using a soft cloth may cause
damage to the special protective coating on
the touchscreen surface. To clean off hard to
remove dirt, blow some steam on the particular
area and gently wipe away using a soft cloth.
[FR]Utiliser un chiffon doux pour enlever la
poussière sur l'écran. La surface de l'écran
tactile a un revêtement protecteur spécial
empêchant la saleté de se coller à lui. Ne pas
utiliser un chiffon doux peut endommager le
revêtement spécial sur la surface de l'écran
tactile. Pour nettoyer les saletés plus difficiles
à enlever, souffler de la buée sur la zone
particulière et essuyer doucement avec un
chiffon doux.
Do not use excessive force on the display.
Avoid placing objects on top of the display as
this may cause the glass to break.
[FR]Ne pas utiliser une force excessive sur
l'écran. Éviter de placer des objets au dessus
de l’écran cela pourrait provoquer une cassure
du verre.
When there is a noticeable discrepancy in the
operation of the touchscreen function (your
touch does not correlate to the proper location
on the screen), recalibrate the touchscreen
display.
[FR]Lorsqu'il y a un écart sensible dans le
fonctionnement de l'écran tactile (votre contact
ne correspond pas à la bonne position sur
l'écran), recalibrer l'écran tactile.
Page 7

7
Chapter 1: Read Me First
1.4 Declaration of Conformity (DoC)
FCC Statement
This device complies with part 15 FCC rules.
Operation is subject to the following two conditions:
This device may not cause harmful interference.
This device must accept any interference received including
interference that may cause undesired operation
This equipment has been tested and found to comply with the limits for a class "B" digital device, pursuant
to part 15 of the FCC rules. These limits are designed to provide reasonable protection against harmful
interference when the equipment is operated in a commercial environment. This equipment generates,
uses, and can radiate radio frequency energy and, if not installed and used in accordance with the
instruction manual, may cause harmful interference to radio communications. Operation of this equipment
in a residential area is likely to cause harmful interference in which case the user will be required to
correct the interference at him own expense.
CE Notice (European Union)
Electromagnetic Compatibility Directive (2014/30/EU)
EN55024: 2010/ A1: 2015
o IEC61000-4-2: 2009
o IEC61000-4-3: 2006+A1: 2007+A2: 2010
o IEC61000-4-4: 2012
o IEC61000-4-5: 2014
o IEC61000-4-6: 2014
o IEC61000-4-8: 2010
o IEC61000-4-11: 2004
EN55032: 2015/AC:2016
EN61000-3-2:2014
EN61000-3-3:2013
Low Voltage Directive (2014/35/EU)
• EN 60950-1:2006/A11:2009/A1:2010/A12:2011/ A2:2013
This equipment is in conformity with the requirement of the following EU legislations and harmonized
standards. Product also complies with the Council directions.
Page 8

8
Ultra-Rugged Tablet User Guide
Chapter 2: Getting Started
2.1 Overview
This chapter tells you information about Winmate® Ultra-Rugged Tablet Computer, its
highlighted features, and provides basic instructions for using the Ultra-Rugged Tablet
Computer.
Introduction
Product Features
Unpacking
Accessories
Description of Parts
Hot Key for Specific Functions
First Time Operations
Powering On and Off
2.2 Introduction
Thank you for purchasing Winmate® Ultra-Rugged Tablet. The Ultra-Rugged Tablet is
powered by Intel Core i5-5250U processor that was designed for high performance
computing and uses the Intel HD 6000 Graphics chipset and features a 4-wire resistive
touch screen may be operated with ease by either a plastic stylus of fingertip.
The Ultra-Rigged Tablet Computer packs WLAN, Bluetooth, GPS, and WWAN function - all
into a single device. Besides the ultra-rugged tablet offers the highly reliable mobility and
embedded hardware for data collection. Broad range of configuration options makes ultrarugged tablet highly customizable and most versatile mobile solution for mission- critical
mobile professionals.
2.3 Product Features
Winmate® Ultra-Rugged Tablet Computer features:
• 8.4/ 10.4" with resistive touch screen
• Intel Core i5-5250UHaswell 1.6 GHz (turbo max 2.6 GHz)
• Intel HD Graphics 6000
• 2 x SODIMM, Max 16GB DDR3L-1600 (default 4GB)
• Visible light transfection touch enhanced visibility
• Optional front (2MP) and rear (5MP) camera
• Alum-Mg alloy housing for MIL-810G, vibration, salt fog test
• Built in wireless/Bluetooth/GPS
• Support 3G Module (Optional)
Page 9

9
Chapter 2: Getting Started
2.4 Unpacking
If any of the following items are missing or damaged, contact us. Standard packing list includes:
Tablet Computer
Standard Battery
Power Adapter
Power Cord and Plugs
Driver CD
User Manual
Stylus Pen (located on the rear side)
Page 10

10
Ultra-Rugged Tablet User Guide
2.5 Description of Parts
8.4”, R08IH8M-RTU1GP
Front: Right: Left:
No
Item
Description
Power Mode
Battery Status
Storage Status
Wi-Fi Status
Light Sensor
7 Power
Power On/Off the unit
8
2 x USB 3.0
High speed USB port
connects to USB
devices, such as USB
flash drive, mouse,
keyboard, printer, etc
9
SD Card slot
Slot to insert SD Card
10
SIM Card slot
Slot to insert SIM Card
11
RS232/422/
485
RS232 COM Port
interface for serial
communication
12
Reset button
Hardware reset Button
13
Power Jack
DC-in power input jack
14 LAN port
Gigabit Ethernet RJ45
Connector for LAN
connection
No
Item
Description
Resistive
Touch Screen
Display acts as one of
the inputs for the Tablet
Computer
2
Menu
Menu function to show
brightness, volume,
battery status and
Wi-Fi/ Bluetooth on/off
3
Speaker
2 x 1 Watt Speaker
Up
Down
Push up key to increase
brightness or volume
under Menu Function
Push down key to
decrease brightness or
volume under Menu
Function
Hot Key
6 programmable hot-
key (short and long
press) for user to define
by application. Default
(F1 short press) will
turn on HotTab AP
utility
LED indicator
Show the current status
of the Tablet Computer
Page 11

11
Chapter 2: Getting Started
No
Item
Description
15
Stylus
Stylus pen to optimize
the touch performance
16
Adjustable
Kickstand
This adjustable
kickstand allows user
to adjust their viewing
angle.
17
Battery
11.1V, 5200 mAh
Lithium-Ion Battery
(6cells)
No
Item
Description
18
Docking
Connector
Port to docking
solutions such as
vehicle docking to
provide power and
external antenna.
Rear:
Bottom:
Top:
Page 12

12
Ultra-Rugged Tablet User Guide
10.4”, R10IH8M-RTT2GP
Front: Right:
Left:
No
Item
Description
Power Mode
Battery Status
Storage Status
Wi-Fi Status
Light Sensor
8 Power
Power On/Off the unit
9
2 x USB 3.0
High speed USB port
connects to USB
devices, such as USB
flash drive, mouse,
keyboard, printer, etc
10
SD Card slot
Slot to insert SD Card
11
SIM Card slot
Slot to insert SIM Card
12
RS232/422/
485
RS232 COM Port
interface for serial
communication
13
Reset button
Hardware reset Button
14
Power Jack
DC-in power input jack
15 LAN port
Gigabit Ethernet RJ45
Connector for LAN
connection
No
Item
Description
Resistive
Touch Screen
Display acts as one of
the inputs for the Tablet
Computer
Speaker
2 x 1 Watt Speaker
Menu
Menu function to show
brightness, volume,
battery status and
Wi-Fi/ Bluetooth on/off
Up
Down
Push up key to increase
brightness or volume
under Menu Function
Push down key to
decrease brightness or
volume under Menu
Function
Hot Key
6 programmable hot-
key (short and long
press) for user to define
by application. Default
(F1 short press) will
turn on HotTab AP
utility
Optional Front
Camera
5MP Autofocus
Camera. Captures
photos and videos.
LED indicator
Show the current status
of the Tablet Computer
Page 13

13
Chapter 2: Getting Started
No
Item
Description
16
Stylus
Stylus pen to optimize
the touch performance
17
Adjustable
Kickstand
This adjustable
kickstand allows user
to adjust their viewing
angle.
18
Battery
11.1V, 5200 mAh
Lithium-Ion Battery
(6cells)
No
Item
Description
19
Docking
Connector
Port to docking
solutions such as
vehicle docking to
provide power and
external antenna.
Rear: Bottom:
Top:
Page 14
14
Ultra-Rugged Tablet User Guide
2.6 HotKey for Specific Functions
For the physical buttons on the Ultra-Rugged Tablet Computer, in addition to their dedicated
functions detailed in the previous section, they can also be used to emulate commonly used
keyboard key strokes. Under different scenario, a single physical button or a combination of
physical buttons provide different keyboard key strokes, which are specified below:
POST (before windows boot up):
Buttons
Keystroke
F1
Recovery Menu
LED Indicators:
Windows:
Buttons
Keystroke
Menu
Menu function to show
brightness, volume, battery
status and WiFi / Bluetooth
on/off
F1
Open the HotTab
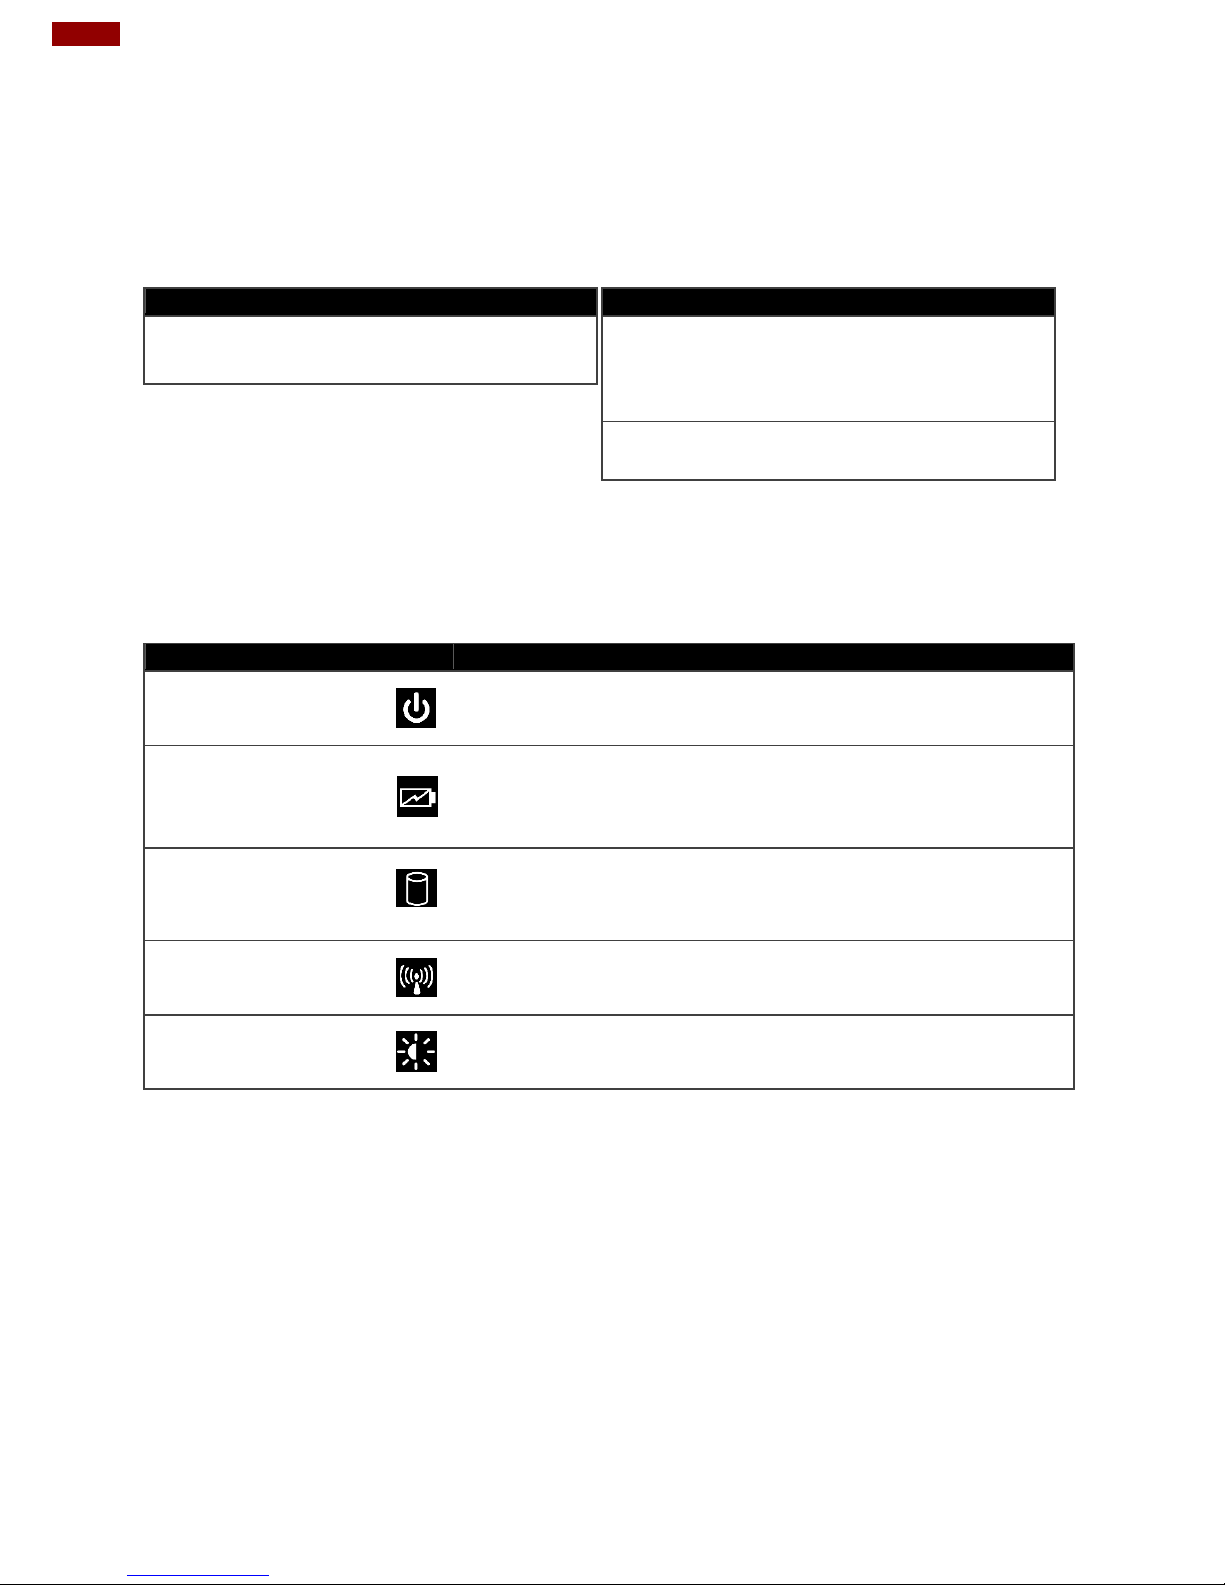
Item
Description
Power Indicator
Green – Tablet is ON
No light – Tablet is OFF
Battery Status
Orange – AC adapter is plugged in and charging
Blinking Red – Battery is Low and need to be charge
Disk
Activity
Indicator
Green - Disk Activity
No light - Disk Idling
RF Communication
Green – Wi-Fi/BT/WWAN/GPS ON
No light – Wi-Fi/BT/WWAN/GPS are all OFF
Light Sensor
Auto adjust screen backlight
Page 15

15
Chapter 2: Getting Started
2.7 First-time Operation
To start using the tablet computer for the first time:
Install the battery pack.
Install battery.
Charge the tablet computer.
Power on the tablet computer.
Configure the settings of the tablet computer
Inserting Battery Pack
To insert the standard battery pack into the tablet computer:
1.
Disconnect AC adapter and power cord from the Tablet Computer.
2.
Turn the Tablet Computer over, back facing up.
3.
Insert the battery on the connector-pins side first, and then lower the battery
into the battery compartment. Screw tightly on the battery to make it fully
inserted.
4.
Make sure the battery is completely inserted, battery will be flat against the housing
once fully inserted.
Place the tablet (back facing up) and insert the Battery into the battery slot.
Removing the Battery Pack
1.
Power off the tablet computer (or turn on sleep mode). Disconnect any cords
connected to the computer.
2.
Turn the tablet computer over, back facing up.
3.
Locate the Battery and unscrew it to the “Unlocked” position.
4.
Lift the battery out.
Page 16

16
Ultra-Rugged Tablet User Guide
2.8 Connecting to Power Supply
The Tablet Computer operates either on external AC power or internal battery power.
It is recommended to use AC power when you start up the Tablet Computer for the
first time.
Caution
Use only the AC adapter included with your Tablet Computer. Using other AC adapters
may damage the Tablet Computer and the Battery.
Important:
For users starting up the Tablet Computer for the first time with internal battery power,
please make sure the battery is full charged before using.
Perform the following to connect the Tablet computer to AC Power:
1.
On the side of the Tablet computer, lift the I/O protective cover by pulling on the latch.
2.
Plug the DC cord of the AC adapter into the Power Jack of the tablet computer.
3.
Plug the AC power cord into the AC adapter.
4.
Finally, Plug the AC power cord into the electrical outlet.
When the AC Adapter is connected, the battery pack starts charging. The battery LED
indicator on the tablet computer would show different states. Please refer to description of
LED indicator on Description of Parts.
Item
Hours
Battery Life
8 Hours
Battery charging time
2.5 Hours
Page 17

17
Chapter 2: Getting Started
2.9 Powering On and Off
Powering On
Press and hold the power button for 3 seconds until the blue LED power indicator light up.
Note:
• Do not press the power button repeatedly.
• Do not perform the following operations until the Disk Activity Indicator off
• Connecting or disconnecting the AC adapter
• Pressing the power button
• Touching the tablet buttons, screen, or external keyboard/mouse
Powering Off
Perform the following procedure to power off the Tablet Computer:
1.
Make sure you have closed any programs that are open on the Desktop. Start
Screen apps don’t need to be closed.
2.
Under Windows 8.1 OS, open the Charms Bar by swiping your finger from the far
right of the screen towards the middle of the screen.
3.
Tap on the Settings charm.
4.
Tap on Power.
5.
Tap on Shut Down.
6.
Wait for Tablet Computer to power off.
Note:
The computer will forcibly be powered off if the power button is pressed and held
for 6 seconds or longer.
Page 18

18
Ultra-Rugged Tablet User Guide
Chapter 3: First Time Operation
This section details how to setup different version of the Windows that may be installed on
the tablet for the first time.
Note:
Please notice that BIOS varies by different Windows OS; for users going to change OS,
please contact our sales contact window for details.
Important:
For users starting up the Tablet Computer for the first time with internal battery power,
please make sure the battery is full charged before using.
3.1 Setting Up Windows Embedded Standard 7 (WS7P)
During the setup process, you create a user name and password, verify the correct time and date,
and then choose your Internet network.
3.1.1 Creating a User Name and Password
1. Create a User name. (This user name is for the administrator of the computer.)
2. Type the selected user name in the text box, and then click Next.
3. On the next screen, type the password in the text box, retype the password in the next box,
and then click Next.
3.1.2 License Agreement
The next screen requests confirmation that you accept the Software License Terms and the End
User License Agreement.
Click both check boxes and then click Next.
3.1.3 Protecting Your Computer
The next screen displays options for protecting the security of your computer and for receiving
Windows updates.
Page 19

19
Chapter 3: First Time Operation
You have three choices:
1. Use recommended settings (automatically downloads and installs all updates provided by
Microsoft)
2. Install important updates only (only downloads and installs critical updates)
3. Ask me later.
Click the option you wish to use.
Reviewing your time and date settings
The next screen contains options for changing the date and time settings.
Verify your time zone, time, and date. Make any necessary changes. Then click Next to continue.
3.1.4 Choosing Your Computer's Network
If you have a home network, connect with an Ethernet cable or activate the Wireless feature
before continuing.
Use the following steps to setup your computer network:
1. Choose a wireless network from the list.
2. If you do not see your network, click Connect to a hidden wireless network, enter the
network name, and select the security type and encryption type. Or, click Skip to continue
without a wireless connection and set it up later.
3. From the next screen, select one of the following locations for your computer:
Home network: Select this location if all the computers on this network are at your home
and you recognize them. This is a trusted home network.
Work network: Select this location if all the computers on this network are at your
workplace and you recognize them. This is a trusted work network.
Page 20

20
Ultra-Rugged Tablet User Guide
Public network: Select this location if you do not recognize all the computers on the
network. (For example, you are in a coffee shop or airport, or you have mobile broadband.)
This is a public network and is not trusted.
4. Click the location where you will most often use the computer.
3.1.5 Completing Windows 7 Setup
After completing Windows 7 setup, a Preparing your desktop screen displays. Please allow
several minutes for Windows to save your settings.
Page 21

21
Chapter 3: First Time Operation
3.2 Setting Up Windows 7 Ultimate/Professional
Follow the steps below to complete the setup process.
1. Press the power button to power on the computer.
2. First select your region and language information, and then tap Next
3. Type in a user name for your account to be used on this PC and tap Next
Page 22

22
Ultra-Rugged Tablet User Guide
4. Type in a password for your account and tap Next
5. Now enter the product key that came with the computer and tap Next. For this version of
the Windows, a product key entry is required when setting up the computer for the first time.
Page 23

23
Chapter 3: First Time Operation
6. On the license terms screen, click on the I accept the license terms and tap Next
7. For the update option, choose Use recommended settings for Windows to install updates. If
you do not wish Windows to do so, choose the other options accordingly.
Page 24

24
Ultra-Rugged Tablet User Guide
8. Next, review the date and time settings on the computer
9. Select the computer current location for network privacy setting. Choose the location below
to your actual usage accordingly.
10. Allow time for windows to setup your desktop for the first time.
11. Now the computer is ready to be used.
Page 25

25
Chapter 3: First Time Operation
3.3 Setting Up Windows Embedded 8.1 Industry Pro
Follow the steps below to complete the setup process.
1.
Press the power button to power on the computer.
2.
Check I accept the license terms for using Windows to accept the terms, and then
click or tap "I Accept."
Page 26

26
Ultra-Rugged Tablet User Guide
3.
On the Personalize screen, choose a color you like – you can always change this
later from the Start screen.
4.
In the PC name field, type a name for your computer, and then click or tap Next.
Page 27

27
Chapter 3: First Time Operation
5.
On the Settings page screen, choose Use express settings for the fastest setup.
6.
Windows will then try to connect to network. Ignore attempt to connect to internet as
you do not need internet connection to finish setup your pc.
Page 28

28
Ultra-Rugged Tablet User Guide
7.
On Your account screen, type your username and password to create a local
account, and then click or tap Finish.
8.
Windows may take some time to finalize your settings.
Page 29

29
Chapter 3: First Time Operation
9.
On the Windows Sign-in screen, enter the user name and password that you
set up earlier, and then press Enter.
10.
Once Windows finishes login, you are now ready to use the PC
Page 30

30
Ultra-Rugged Tablet User Guide
3.4 Setting Up Windows 10 IoT Enterprise
This section details how to setup different version of the Windows that may be installed on
the tablet for the first time. 3.1 Setting up Windows 10 IoT Enterprise Follow the steps below
to complete the setup process.
1.
Press the power button to turn on the computer.
2.
First, select your country/region, your preferred app language, your preferred keyboard
layout, and your time zone, then tap Next.
3.
On the Here’s the legal stuff screen, read through the disclosures, then tap Accept.
Page 31

31
Chapter 3: First Time Operation
4.
Windows will then try to connect to network. Tap Skip this step to continue
without a wireless connection as you can then set up the network later.
5.
On the Get going fast screen, click Use Express settings for the fastest setup. If you
would like more information, tap Learn more, or if you would like to select your own
options, click Customize settings.
6.
To create a local account, type your User name, password, and Password hint in the
fields provided, then tap Next.
7.
The initial setup screens are complete, and the desktop is displayed.
8.
Read any introductory screens describing features of your computer, and tap Next
upon completing each. You are now done with the initial setup process.
Page 32

32
Ultra-Rugged Tablet User Guide
Chapter 4: Quick Access with Hottab
4.1 Hottab Introduction
Hottab provides quick access to the Tablet’s functions and features, such as setting up
shortcuts, using camera, powering on/off built-in devices, programming function key, and
changing power management.
As Windows starts up, Hottab opens and runs in the background. To display the Hottab
control utility, press the (F1) Button located on the front panel, OR launching the Hottab
Utility application.
Menu Button on the Front Panel:
Hottab Utility Icon:
The main user interface is located on the right side of the screen. There are 4 main menu
options: Shortcuts, Camera, Device ON/OFF, and Settings. Operations and functions on each
menu options are explained in detail in the coming section.
Device button enables/disables tablet computer’s hardware functions. The configurable
functions are Wi-Fi, WWAN (3G/4G/LTE), GPS, Bluetooth, Camera, LED indicators, Barcode
Reader, RFID Reader, Expansion Port, and GPS Antenna routing options.
Setting button provides users information such as PC Information, Battery status,
and also device settings such as power management setting, and function key
mappings.
Page 33

33
Chapter 4: Quick Access with Hottab
4.2 Shortcuts
Set up On-screen Software Shortcuts
Hottab Shortcuts Menu provides user-friendly interface to configure on-screen software
short cuts and allow users to quickly access programs with a few tabs. The Shortcuts
menu offers 8 empty slots to store user’s desired quick access. Shortcuts can be mapped
to any of the executable files (.exe) installed on the tablet.
Short Cut Menu:
To store a new shortcut:
1.
Launch the Hottab Utility application.
2.
Tap on the Shortcuts button.
3.
Tap on button of any empty slot.
4.
An on screen file browser will appear.
5.
Browse to find the desired application to have shortcut.
6.
Click “Open” to save the shortcut.
To remove an saved shortcut:
7.
Launch the Hottab Utility application.
8.
Tap on the Shortcuts button.
9.
Tap on the button of any saved slot to remove
10.
Shortcut will be removed, and once again show “Empty” to
indicate slot is empty.
Tap on the button will hide the Hottab Utility Menu.
Using the Hottab shortcuts:
1.
Launch the Hottab Utility application.
2.
Tap on the Shortcuts button.
3.
Tap on the saved shortcut items to access the saved programs.
4.3 Camera
4.3.1 Using Camera Features
This Hottab menu option allows users take a picture or record a video. Before use, make
sure the Camera is powered on under Devices ON/OFF menu with the following
scenarios:
1.
Launch the Hottab Utility application.
2.
Tap on "Device ON/OFF" button to check the built-in devices status.
3.
Check the status color of the Camera icon:
Item
Status Color
Description
Orange
Camera is enabled.
White
Camera is disabled.
4.
If the Camera feature is disabled (white), tap on the Camera icon to enable it (orange).
5.
Tap on the HotTabCamera shortcut to go into the Camera menu. The Camera
user interface will take up the entire screen as shown below:
Page 34

34
Ultra-Rugged Tablet User Guide
4.3.2 Description of Camera User Interface Buttons:
No Item Description
1 Camera Switch
Switch between front camera or rear camera.
2 Settings
Brings up Camera settings
page. Available Settings:
Picture Save: modify/inspect saved location
for pictures.
Video Save Folder: modify/inspect saved location
for video recordings.
Picture Quality: Picture compression quality.
3 Flash Control
Disables LED Flash when taking picture.
LED flash fires regardless of condition when taking
pictures.
LED Flash fires automatically in low light condition when
taking pictures.
4 Resolution
Pictures will be saved at resolution of 640 x 480.
Pictures will be saved at resolution of 1024 x 768.
Pictures will be saved at resolution of 1600 x 1200.
Pictures will be saved at resolution of 2592 x 1944.
5 Exit
Exits the Camera and hide HotTab Utility.
6
Picture/Vide
o Mode
Switch
Switches between picture taking or video recording.
7 Shutter/Record
Camera Shutter Button. Tap to take picture.
(automatically
switch base
on mode)
Video Record Button. Tap to Start, and press again to
stop recording.
8
Open
Saved
Location
Opens the location where pictures and videos are saved in
a window.
Page 35

35
Chapter 4: Quick Access with Hottab
4.4 Device On / Off
This section provides a quick access to set-up built-in devices, including turning
on/off RF modules, setting up barcode reader, RFID reader, and expansion modules.
4.5 Using the Wireless LAN (Wi-Fi)
To use the wireless LAN (Wi-Fi) feature to connect to the network, perform the
following procedure:
1.
Open the Hottab utility by press the (Menu) Button located on the front panel,
OR launching the Hottab Utility application.
2.
Tap on the Device ON/OFF button.
3.
Check the status color of the Wi-Fi icon:
Item
Status Color
Description
Orange
Wi-Fi is enabled.
White
Wi-Fi is disabled.
4.
If the Wi-Fi feature is disabled (white), tap on the Wi-Fi icon to enable it (orange).
5.
Click the wireless network connection status icon in the Windows notification area.
A list of available wireless networks is displayed.
6.
Double-click a network to connect to it. Provide required authentication
information if needed.
7.
To check the connection status, observe wireless network connection status icon
in the Windows notification area. The more bars the icon shows, the better the
wireless LAN connection strength is.
8.
Now wireless LAN connection is setup, try connection to the network with a
internet browser such as Internet Explorer.
Page 36

36
Ultra-Rugged Tablet User Guide
4.6 Using the Wireless WAN (3G/LTE)
4.6.1 Insert SIM card (For 3G/LTE Equipped Devices)
Notice that 3G/LTE feature is optional.
The Tablet Computer supports data connection with 3G/LTE Modules and fits Micro-SIM card.
Caution
Power off the tablet before installing the 3G/LTE module and micro SIM card, or the
Tablet Computer might be damaged by the incorrect installation behaviors
Before using the data connection program, please perform the following procedures to insert
the SIM Card into your Tablet
1.
Power off the Tablet Computer.
2.
Open the I/O Cover
3.
Insert the SIM card in to the SIM Card slot located under SD Card Slot.
4.6.2 Use Wireless WAN Feature
For tablets equipped with wireless WAN (3G or 4G/LTE) card, to use the wireless WAN
feature to connect to the network, perform the following procedure:
1.
Open the Hottab utility by press the (Menu) Button located on the front panel,
OR launching the Hottab Utility application.
2.
Tap on the Device ON/OFF button.
3.
Check the status color of the WWAN icon:
Item
Status Color
Description
Orange
WWAN (3G/4G) is enabled.
White
WWAN (3G/4G) is disabled.
Page 37

37
Chapter 4: Quick Access with Hottab
4.
If the WWAN feature is disabled (white), tap on the WWAN icon to enable it (orange).
5.
You can check the wireless WAN connection status through the wireless network
connection status icon in the Windows notification area. The more bars
encompassed, the better the signal is.
Note:
For the Windows 7 operating system, you also can check the Access Connections
gauge, the Access Connections status icon, or the Access Connections wireless status
icon in the Windows notification area.
4.7 Using the GPS
To enable the wireless GPS feature, perform the following procedure:
1.
Open the Hottab utility by press the (Menu) Button located on the front panel,
OR launching the Hottab Utility application.
2.
Tap on the Device ON/OFF button.
3.
Check the status color of the GPS icon:
Item
Status Color
Description
Orange
GPS is enabled.
White
GPS is disabled.
4.
If the GPS feature is disabled (white), tap on the GPS icon to enable it (orange).
5.
Now the GPS feature is ready to be used with an application utilizing the GPS.
4.8 Using the Bluetooth
To enable the wireless Bluetooth feature, perform the following procedure:
1.
Open the Hottab utility by press the (Menu) Button located on the front panel,
OR launching the Hottab Utility application.
2.
Tap on the Device ON/OFF button.
3.
Check the status color of the Bluetooth icon:
Item
Status Color
Description
Orange
Bluetooth is enabled.
White
Bluetooth is disabled.
4.
If the Bluetooth feature is disabled (white), tap on the Bluetooth icon to enable it
(orange).
5.
Click the Bluetooth icon in the Windows notification area. A contextual menu for
Bluetooth is displayed.
Page 38

38
Ultra-Rugged Tablet User Guide
6.
To add a device, tap on Add a Bluetooth Device. Windows will search any
Bluetooth device automatically
7.
Choose the Bluetooth device that user wants to connect and follow onscreen
prompt to continue the pair procedure and use the Bluetooth device.
4.9 Settings
This Hottab menu option provides users information such as PC Information, Battery status,
and also device settings such as power management setting, and function key mappings.
Perform the following procedure to access the Hottab Setting menu:
1.
Launching the Hottab Utility application.
2.
Tap on the Settings button.
3.
Below show the items listed in Settings Menu.
4.9.1 PC Information
This section provides user device information in regards
to BIOS Version, EC Versions, Hottab Versions, OS
Versions, as well as Unit Serial Number, shown in the
picture sample.
4.9.2 Battery Information
This section provides user battery Information.
Main Battery:
The main battery Icon displays the battery level in
percentages (0 to 100%).
Battery Charge Time:
The Battery Information also displays estimated time
needed to fully charge the main battery when AC
adapter is plugged in.
4.9.3 Using the Physical Function Keys (Hotkeys)
The function key mapping menu option allows user to
change the physical function buttons, F1 and F2. Users
can change what application will be launched with short
press or
long press of keys.
Page 39

39
Chapter 4: Quick Access with Hottab
To configure function key mapping, perform the
following:
1.
Launching the Hottab Utility application.
2.
Tap on the Setting button.
3.
Tap on function key icon for the corresponding key
that you want to change.
4.
At top of utility, it will say “Short Press” or “Long
Press” to indicate what type of press is being
configured
5.
You can switch what type of press you want to
configure by tapping on the “Short Press” or “Long
Press” icon at the bottom of the utility window.
6.
Pick from list of preset applications by tapping on the
application icons OR customize which application to
execute using the picker.
Using the Custom picker:
1.
Tap the icon to reveal browser window
2.
Navigate to the desired executable to map to function
key
3.
Tap on “Done” to save selection.
To map the function key to another application:
1. Tap on the icon to remove connection to the
original application, and pick again tapping on
icon.
Using the physical function keys:
1. While operating the tablet, click on the physical
function keys to activate functions mapped via the
setup in this section.
Page 40

40
Ultra-Rugged Tablet User Guide
Chapter 5: Frequently Used Settings
5.1 Screen Resolution Scaling and Setting
The high resolution display is perfect for viewing image, video, or other applications,
however, Windows user interface (icons, buttons, and other user interface elements) may be
too small to read and operate at the default Windows settings. By changing the display
scaling or the display resolution setting of the device, you can adjust the size of the text and
other items on the desktop for optimal viewing. Display scaling is the recommended method
because it has the effect of adjusting user interface element without having to move away
from the optimal resolution setting..
Note:
Winmate recommends the users set the scaling to this setting for optimal text and image
viewing. Before proceeding to change the scaling option, make sure any opened
document is saved and close, and all running applications are closed before proceeding
to change the display scaling, because this procedure requires users to log out of their
account to apply display scaling change.
5.2 Changing Display Scaling Setting (Recommended)
Perform the following to change display scaling setting:
1.
Tap and hold anywhere on the desktop and right-click your mouse and go to”
Display Settings” option as shown below:
Page 41

41
Chapter 5: Frequently Used Settings
2.
The following panel will open. Here you can adjust the size of text, apps, and other
items and also change the orientation. To change the resolution settings, scroll
down this window and click on Advanced Display Settings
5.3 Using Recovery Wizard to Restore Computer
The tablet computer has a dedicate recovery partition stored on the hard drive of the tablet
to enable quick one-key recovery process. This partition occupies about 11GB of the storage
space, and comes built-in to each tablet computer.
Important:
Before starting the recovery process, be sure to backup all user data, as all data
will be lost after the recovery process.
Follow the procedure below to enable quick one-key recovery procedure:
1.
Plug-in the AC adapter to the tablet computer. Make sure the tablet computer stays
plugged in to power source during the recovery process.
2.
Power on the tablet computer, and when the boot screen shows up, press the
Fn1 button (Recovery Key) on the front bezel OR press F6 when using an
external USB keyboard to initiate the Recovery Wizard.
3.
The following screen shows the Recovery Wizard. Click on “Recovery”
button to continue.
Page 42

42
Ultra-Rugged Tablet User Guide
4.
A warning message about data loss will show up. Make sure data is backed up
before recovery, and click on “Yes” to continue.
5.
Wait till the recovery process to complete. During the recovery process, a
command prompt will show up to indicate the percent of recovery process. After
recovery is completed, and the tablet computer will restart automatically.
Page 43

43
Chapter 6: Troubleshooting
Chapter 6: Troubleshooting
6.1 Basic Troubleshooting
Problem
Solution
The removable battery is not charging.
Make sure the AC adapter is properly
connected, and that the removable battery
is properly inserted.
Nothing appears on the screen.
The tablet computer may be in sleep
mode. Press the power button to wake up
the display.
The brightness level may be too low.
Increase brightness.
The screen suddenly turns blank and
the power indicator goes off.
Make sure that LED indicator is not
powered off in Hottab.
Make sure the AC adapter is properly
connected.
If running on battery power, the battery
may be depleted, charge the battery.
Wireless LAN signal quality is poor.
The tablet computer may be out of range.
Move the tablet computer closer to the
access point or another wireless LAN
device associated with it.
Check if your surroundings have
interferences, such as microwave ovens,
cordless phones. Move the tablet computer
away from objects causing interference.
I cannot connect to another wireless
LAN device.
Make sure that wireless LAN feature is
powered on.
Make sure that the SSID setting is the
same for every wireless LAN device in the
network.
Restart the tablet computer
Make sure the IP address or subnet mask
setting is correct.
I cannot connect to another device
with Bluetooth.
Make sure that both devices have
Bluetooth powered on (For the Tablet
Computer, check Hottab to see if Bluetooth
is powered on).
Make sure that the distance between the
two devices is within 10 meters and there
are no walls or large obstructions between
the devices.
Make sure the both devices are powered
on and configured to be discoverable.
Make sure that both devices are
compatible.
Page 44

Problem
Solution
The GPS application cannot find my
location.
Make sure that GPS is powered on in
Hottab.
Make sure that GPS receiver and the
location sensor are enabled in Control
Panel.
The tablet computer may be out of
coverage area. Move your tablet computer
outdoors or closer to a window.
Check if your surroundings have
interferences, such as microwave ovens,
cordless phones. Move the tablet computer
away from objects causing interference.
No sound is produced.
Adjust volume of the tablet computer by
pressing on the volume rocker.
If using an external audio device, make
sure that the cable is properly connected.
I cannot project the tablet computer
display to another monitor.
Make sure the VGA driver is installed.
Make sure the output setting selected is
correct.
Barcode scanner does not emit laser
beam and does not seem to work.
Make sure the Barcode scanner device is
enabled in Hottab utility.
Make sure under Windows, the Barcode
Reader is set to COM 15 port, so that
Hottab can trigger the Barcode Reader
hardware.
Barcode Scanner emits laser beam but
does not read barcode presented to it.
Adjust the distance between barcode
scanner of the device and the barcode
being scanned.
Make sure the barcode code type is
enabled in the tablet. To enable/disable a
specific barcode code type, go through the
“Barcode Scanner Configuration” section.
I am having GPS accuracy issue
When utilizing the GPS function, we
recommend disabling the Barcode Reader
in Hottab to reduce interference.
Page 45

Appendix A: Technical Specifications
Model Name
R08IH8M-RTU1GP
R10IH8M-RTT2GP
Display
Size
8.4"
10.4"
Resolution
800 x 600
1024 x 768
Brightness
800 nits
700 nits
Touch
Resistive
Resistive
Mechanical
Dimensions
266 x 220 x 50.5 mm
266 x 220 x 50.5 mm
Weight
2.39 kg
2.39 kg
Wireless Communications
WLAN
802.11 a/b/g/n
802.11 a/b/g/n
Bluetooth
Bluetooth 4.0 + Class I
Bluetooth 4.0 + Class I
GPS
u-Blox Neo-6Q
u-Blox Neo-6Q
WWAN
3G - Sierra MC8090 (Optional), 4G/LTE-
Sierra MC7355/ Gobi5000 (Optional),
Sierra MC7305 / Gobi5000 (Optional)
3G - Sierra MC8090 (Optional), 4G/LTE-
Sierra MC7355/ Gobi5000 (Optional), Sierra
MC7305 / Gobi5000 (Optional)
Interfaces
Audio
Built-in 1W Speaker
Built-in 1W Speaker
External I/O
2 x USB 3.0, 1 x Audio Combo Conn. (Mic
in or Line Out), 1 x SD card Slot,
1 x SIM card Slot, 1 x Power Jack, 1 x
RS232/422/485(set by jumper), 1 x RJ-45
2 x USB 3.0, 1 x Audio Combo Conn. (Mic in
or Line Out), 1 x SD card Slot,
1 x SIM card Slot, 1 x Power Jack, 1 x
RS232/422/485(set by jumper), 1 x RJ-45
Buttons
1 x Power, 1 x Menu, 3 x Function Key, 2 x
Brightness control key
1 x Power, 1 x Menu, 3 x Function Key, 2 x
Brightness control key
LED Indicators
Power, Battery, HDD, RF
Power, Battery, HDD, RF
Sensors
N/A
Light sensor
Data Capture
Camera
N/A
5MP auto-focus rear, 2MP front (Optional)
Barcode
N/A
1D/2D Barcode Reader (Optional)
Power Requirements
Power Input
19V DC
19V DC
Battery
11.1V, 5200 mAh Lithium-Ion (6cells)
11.1V, 5200 mAh Lithium-Ion (6cells)
Operating Time
Up to 5 hours (Battery Mark V.4.0.1)
Up to 8 hours (Battery Mark V.4.0.1)
AC Adapter
100-240V, 50-60Hz / 19V DC
100-240V, 50-60Hz / 19V DC
System Specifications
Processor
5 Gen. Intel® Core™ i5-5250U Broadwell, 1.60 GHz (turbo up to 2.70 GHz)
System Memory
4GB SODIMM DDR3L-1600, (Max 16GB)
Storage
64GB mSATA MLC SSD, (Max 512GB)
Graphic
Intel® HD Graphics 6000
OS
Windows 7 Pro Embedded (64 bit), Windows Embedded - 8.1 Industry,
Windows 10 loT Enterprise
Environment Considerations
Operating Temp.
-20°C to 60°C (AC Mode), -10°C to 50°C ( Battery Mode )
Operating Humidity
10 % ~ 90% (non-condensing)
IP Proof
IP54
Shock
MIL-STD-810G Method 516.6 Procedure I
Vibration
MIL-STD-810G Method 514.6 Procedure I
Drop
MIL-STD-810G Method 516.6, 4 ft to concrete
Certification
Safety
CE, FCC
Page 46

Appendix B: Dimensions and Schematics
8.4”, R08IH8M-RTU1GP Default Configuration
Page 47

10.4”, R10IH8M-RTT2GP Default Configuration
Page 48

Winmate Inc.
9F, No.111-6, Shing-De Rd., San-Chung District,
New Taipei City 24158, Taiwan, R.O.C
www.winmate.com
Copyright © 2018 Winmate Inc. All rights reserved.
 Loading...