

Page 1
Rugged Tablet Computer
User's Manual
M9020
Esc
Tab
Ctrl
Q
A
ZXCVBNM
0
123
456
789
Alt
Shift
SDFGHJKL
Enter
Space
Del Fn
,
.
WERTYUI
OP
!
@
-
=
#
$%^& *(
?>][}{
)
|
;\:
“‘
~
`
F1
F2
F4
F3
F5
Caps
/
-
+
USA
3348 Peachtree RD suite 700
Atlanta, GA 30326
TEL: 1-678-954-4889
FAX: 1-404-233-1800
Website: www.winmate-rugged.com
Email: [email protected]
www.winmate.com
Canada
2820 Argentia Road, Unit 4,
Mississauga, Ontario, Canada L5N 8G4
TEL: 905-814-5004 Ext. 22
FAX: 905-286-0553
Website: www.ttx.ca
Email: [email protected]
Taiwan Headquarter
9F, No.111-6, Shing-De Rd.,
San-Chung District,
New Taipei City 241, Taiwan, R.O.C
TEL: 886-2-8511-0288, 6635-5758
FAX: 886-2-8511-0211
Website: www.winmate.com.tw
Email: [email protected]
Shanghai
Room 1102, Building A, No. 900,
Yishan Rd., Xuhui District,
200235 Shanghai, P.R.China
TEL: 021-54278690, 54278691,
54278692 Ext. 188
FAX: Ext. 190
Website: www.winmate.com.cn
Email: [email protected]
Page 2

Copyright © 2014 Winmate Technologies. All rights reserved.
No part of this manual may be reproduced, copied, translated, or transmitted in any form or by
any means, electronic or mechanical, for any purpose, without the written permission of Winmate
Technologies.
TRADEMARKS
All product names, trademarks or logos mentioned herein are the properties of their respective
owners.
Microsoft, Windows, and the Windows logo are either registered trademarks or trademarks of
Microsoft Corporation in the United States and/or other countries. Microsoft products are licensed to
OEMs by Microsoft Licensing, Inc., a wholly owned subsidiary of Microsoft Corporation.
The Bluetooth
®
word mark and logos are registered trademarks owned by Bluetooth SIG, Inc.
All other brand and product names are trademarks or registered trademarks of their respective
owners.
NOTE:
Display images shown may vary slightly from actual display. Information in this manual is subject to
change without notice.
DISCLAIMER
Winmate Technologies reserves the right to make any product changes without notice, including
circuits and/or software described or contained in this manual in order to improve design and/or
performance. Winmate Technologies assumes no responsibility or liability for the use of the described
product(s), conveys no license or title under any patent, copyright, or masks work rights to these
products, and makes no representations or warranties that these products are free from patent,
copyright, or mask work right infringement, unless otherwise specied. Applications that are described
in this guide are for illustration purposes only. Winmate Technologies makes no representation
or warranty that such application will be suitable for the specied use without further testing or
modication.
WARRANTY
Winmate Technologies warrants that each of its products is free from material and workmanship defect
for a period of one year starting from the invoice date. If the customer discovers a defect, Winmate
Technologies will, at its option, repair or replace the defective product at no charge to the customer,
provided it is returned during the warranty period, with transportation charges prepaid. The returned
product must be properly packaged in its original packaging to obtain warranty service.
Page 3

Winmate Technologies i
Contents
Preface...................................................................................................v
Notational Conventions ....................................................................vi
Getting Started ....................................................................................1-1
Unpacking ........................................................................................1-2
Optional Items ...........................................................................1-3
Device Overview ..............................................................................1-4
Front View .................................................................................1-4
Rear View (With Compartment Cover and Battery Packs) .......1-6
Rear View (Without Compartment Cover and Battery Packs) ..1-7
Top and Bottom View ................................................................1-9
Installing the Hand Strap and Stylus .........................................1-10
Removing the Stylus .................................................................1-11
Releasing the Compartment Cover ..................................................1-12
Tightening the Compartment Cover ..........................................1-13
Installing the Memory Card ..............................................................1-13
Removing the Memory Card .....................................................1-14
Installing the SIM Card .....................................................................1-15
Installing the Battery Pack ................................................................1-17
Removing the Battery Pack ......................................................1-18
Connecting to AC Power ..................................................................1-19
Turning the M9020 On and Off .........................................................1-20
Turning On ................................................................................1-20
Turning Off ................................................................................1-21
Page 4

ii Winmate Technologies
Operating Your Tablet
Computer .............................................................................................2-1
Using the Touch Screen ...................................................................2-2
Calibrating the Screen ..............................................................2-3
Using the Integrated Keyboard .........................................................2-5
Keyboard Overview ................................................................2-5
Special Function Keys ..............................................................2-5
Navigation Keys ........................................................................2-6
Using the Panel Keys .......................................................................2-6
Using Wireless LAN .........................................................................2-7
Turning the Wireless Radio On and Off ....................................2-7
Connecting to a Wireless Network ............................................2-9
Using Bluetooth ................................................................................2-10
Turning the Bluetooth On and Off .............................................2-10
Turning the Bluetooth Adapter On and Off ................................2-11
Pairing with Bluetooth Devices .................................................2-12
Conguring Bluetooth Settings .................................................2-15
Using the WWAN Network ...............................................................2-17
Connecting to a WWAN Network ..............................................2-17
Using AirCard
®
Watcher ............................................................2-18
Conguring AirCard
®
Watcher Settings .....................................2-20
Using GPS ........................................................................................2-22
Turning the GPS On and Off .....................................................2-22
Enabling the Location Sensors .................................................2-23
Using u-center ..........................................................................2-24
Using the Camera ............................................................................2-26
Opening the Camera ................................................................2-26
The Camera Screen .................................................................2-27
Shooting Photos .......................................................................2-28
Camera Settings .......................................................................2-29
Using the Winmate Control Center ...................................................2-32
Opening the Winmate Control Center .......................................2-32
Viewing System Information .....................................................2-33
Dening Hotkeys .......................................................................2-34
Page 5

Winmate Technologies iii
Using the Barcode Reader ...............................................................2-36
Using ScannerManager ............................................................2-37
Working With Bluetooth Scanners ............................................2-40
Connecting Your M9020 .....................................................................3-1
Connecting USB Devices .................................................................3-2
USB Port Connection ................................................................3-2
Connecting VGA Devices .................................................................3-3
Connecting Audio Devices ...............................................................3-4
Connecting Serial Devices ...............................................................3-5
Managing Power .................................................................................4-1
Battery Pack .....................................................................................4-2
Charging the Battery Pack ........................................................4-2
Checking the Battery Level .......................................................4-4
Replacing the Battery Pack ......................................................4-5
Power Management .........................................................................4-6
Power Saving Tips ............................................................................4-6
Expanding Your M9020 ......................................................................5-1
Connecting the Docking Station .......................................................5-2
Overview of the Vehicle Docking Station ..................................5-2
Docking the M9020 ...................................................................5-4
Connecting the Docking Station ...............................................5-6
Maintenance, Troubleshooting and Specications .........................A-1
Taking Care of Your M9020 ..............................................................A-2
Location Guidelines ..................................................................A-2
General Guidelines ...................................................................A-2
Cleaning Guidelines ..................................................................A-2
Touchscreen Guidelines ...........................................................A-2
Troubleshooting ................................................................................A-3
M9020 Specications .......................................................................A-5
Page 6

iv Winmate Technologies
Regulatory Information ......................................................................B-1
Important Information .......................................................................B-2
Safety Information (EN) ............................................................B-3
Informations de sécurité (FR) ...................................................B-4
Installation and Operating Instructions (EN) .............................B-5
Installation et d’utilisation (FR) ..................................................B-5
About the Batteries ...................................................................B-6
About the Adapter ....................................................................B-6
FCC Regulations ..............................................................................B-7
ANSI/ISA 12.12.01-2013 ..................................................................B-8
CAN/CSA C22.2 No. 213-M1987 .....................................................B-8
CE Notice (European Union) ............................................................B-8
RF Exposure Information (SAR) ......................................................B-9
IC Regulations ..................................................................................B-9
Important Note ..........................................................................B-10
Page 7

Winmate Technologies v
Preface
This manual contains information that will help you operate this rugged
computer. It is divided into ve chapters and two appendices.
• Chapter 1: Getting Started, takes you through the process of setting up
your M9020 and identifying its external components.
• Chapter 2: Operating Your M9020, tells you how to use M9020’s
components and features.
• Chapter 3: Connecting Your M9020, provides information on installing
and using peripheral devices.
• Chapter 4: Managing Power, provides information on power
management.
• Chapter 5: Expanding Your M9020, provides information on installing
and using optional accessories, such as docking stations, expansion
modules, etc.
• Appendix A, provides technical specications and information on caring
for your M9020, and gives solutions to common problems you may
encounter when using the device.
• Appendix B, provides regulatory information and safety notices on your
M9020.
Page 8

vi Winmate Technologies
Notational Conventions
Throughout this manual, the following conventions are used to distinguish
elements of text.
NOTE: Identies additional information that requires special attention.
CAUTION: Identies important information that, if not followed, may result in loss of data or
damage to the device.
Hardware and keyboard keys are shown in a bold typeset. For example:
Press the F1 key to complete.
A title, command, setup item, value, option, or button that you can see on the
screen is shown in bold typeface. For example:
Select When I press the power button, set it to Shut down, and then tap
the Save changes button.
Page 9

Winmate Technologies 1-1
Getting Started
CHAPTER
1
Congratulations on purchasing the Winmate M9020. Its rugged design allows
you to use it in harsh outdoor environments. You can use it under blazing heat,
subzero cold, driving rain or dusty surroundings – places you could not take a
consumer-grade tablet computer.
This chapter tells you, step by step, how to get the M9020 up and running. You
will nd instructions for the following procedures:
• Unpacking
• Device Overview (an explanation of the external components and their
functions)
• Installing the Hand Strap
• Installing the SIM Card
• Installing Battery Packs and Connecting to AC Power
• Turning the M9020 On and Off
Getting Started
Page 10
1-2 Winmate Technologies
Getting Started
Unpacking
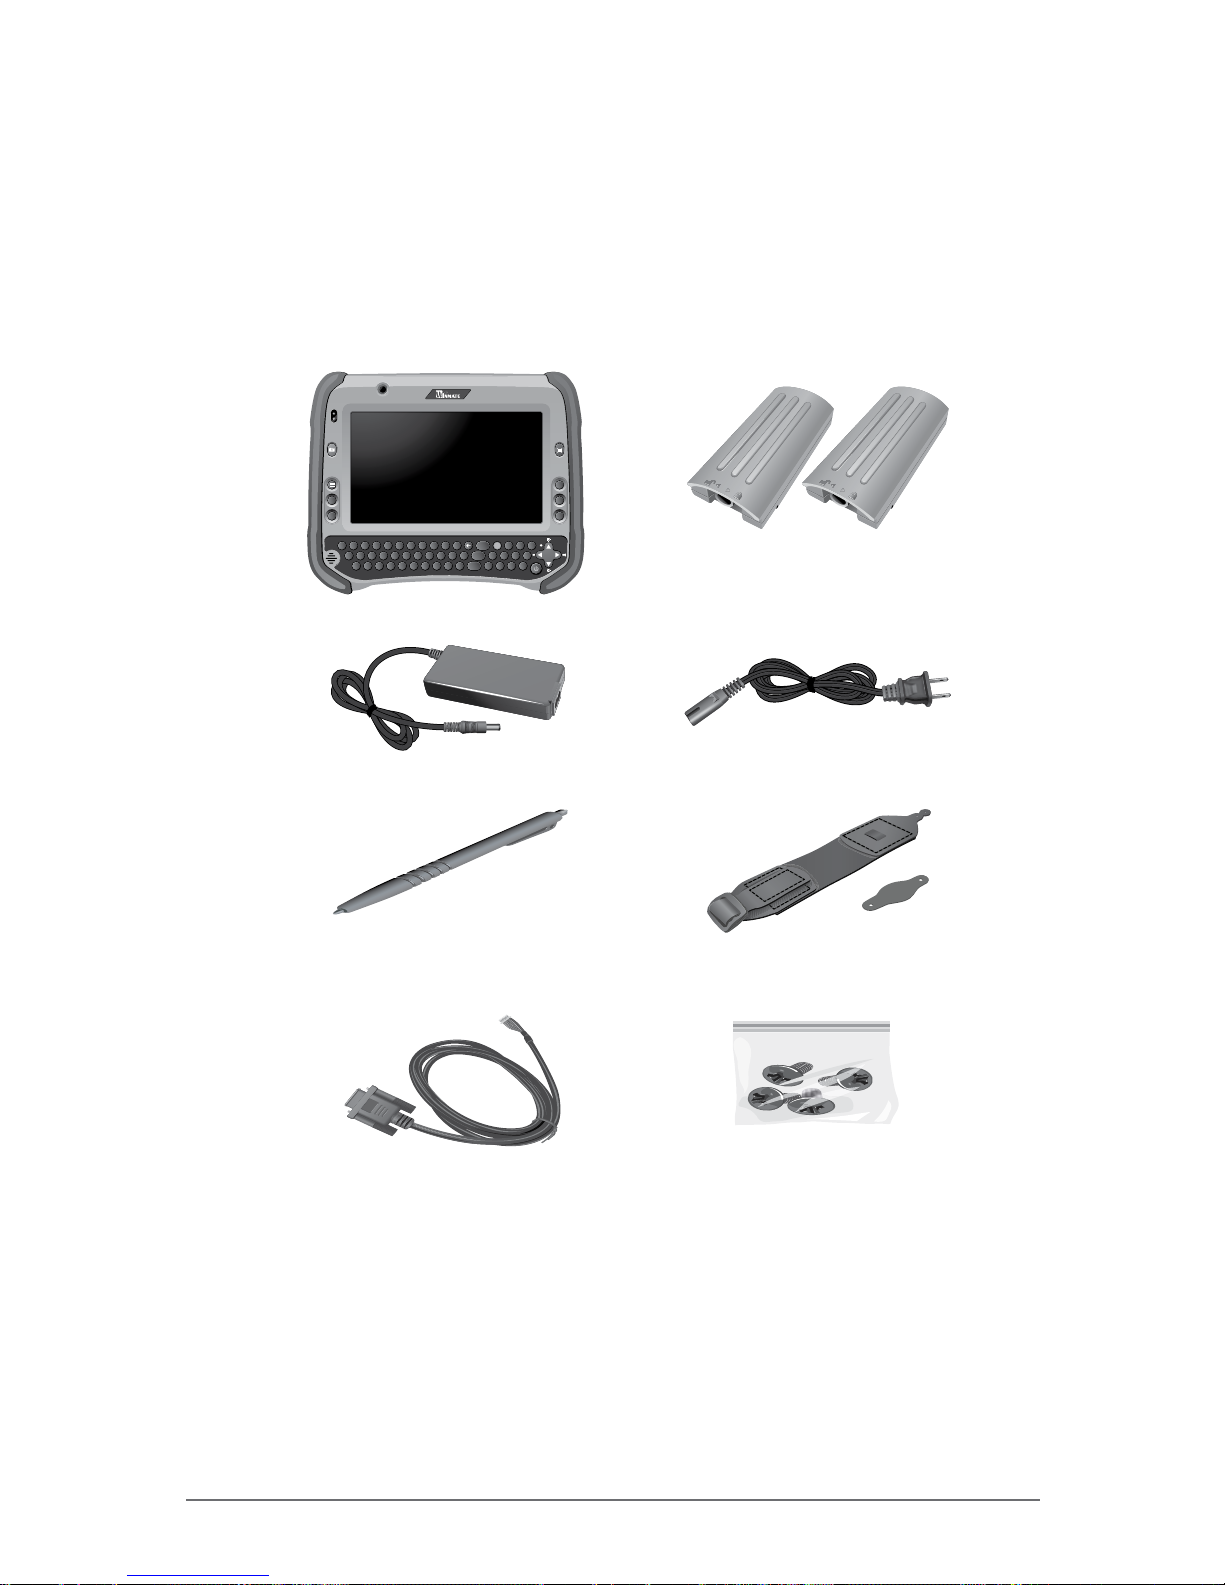
After unpacking the shipping carton, you should nd these standard items.
Inspect all items. If any item is damaged or missing, notify your dealer
immediately.
√ M9020 √ Battery Packs
Esc
Tab
Ctrl
Q
A
ZXCVBNM
0
123
456
789
Alt
Shift
SDFGHJKL
Enter
Space
Del Fn
,
.
WERT YUI
OP
!
@
-
=
Caps
#
$%^& *(
?/
-
>][}{
)+
|
;\:
“‘
~
`
F1
F2
F4
F3
F5
√ Power Adapter √ AC Power Cord
√ Stylus √ Hand Strap
√ VGA Cable √ Screws
√ Windows 7 Certicate of Authenticity Label (COA)
√ Quick Start Guide
Page 11
Winmate Technologies 1-3
Getting Started
Keep the shipping carton and packaging materials in case you need to ship or
store the M9020 in the future.
NOTE: Actual items may slightly differ depending on the purchased conguration.
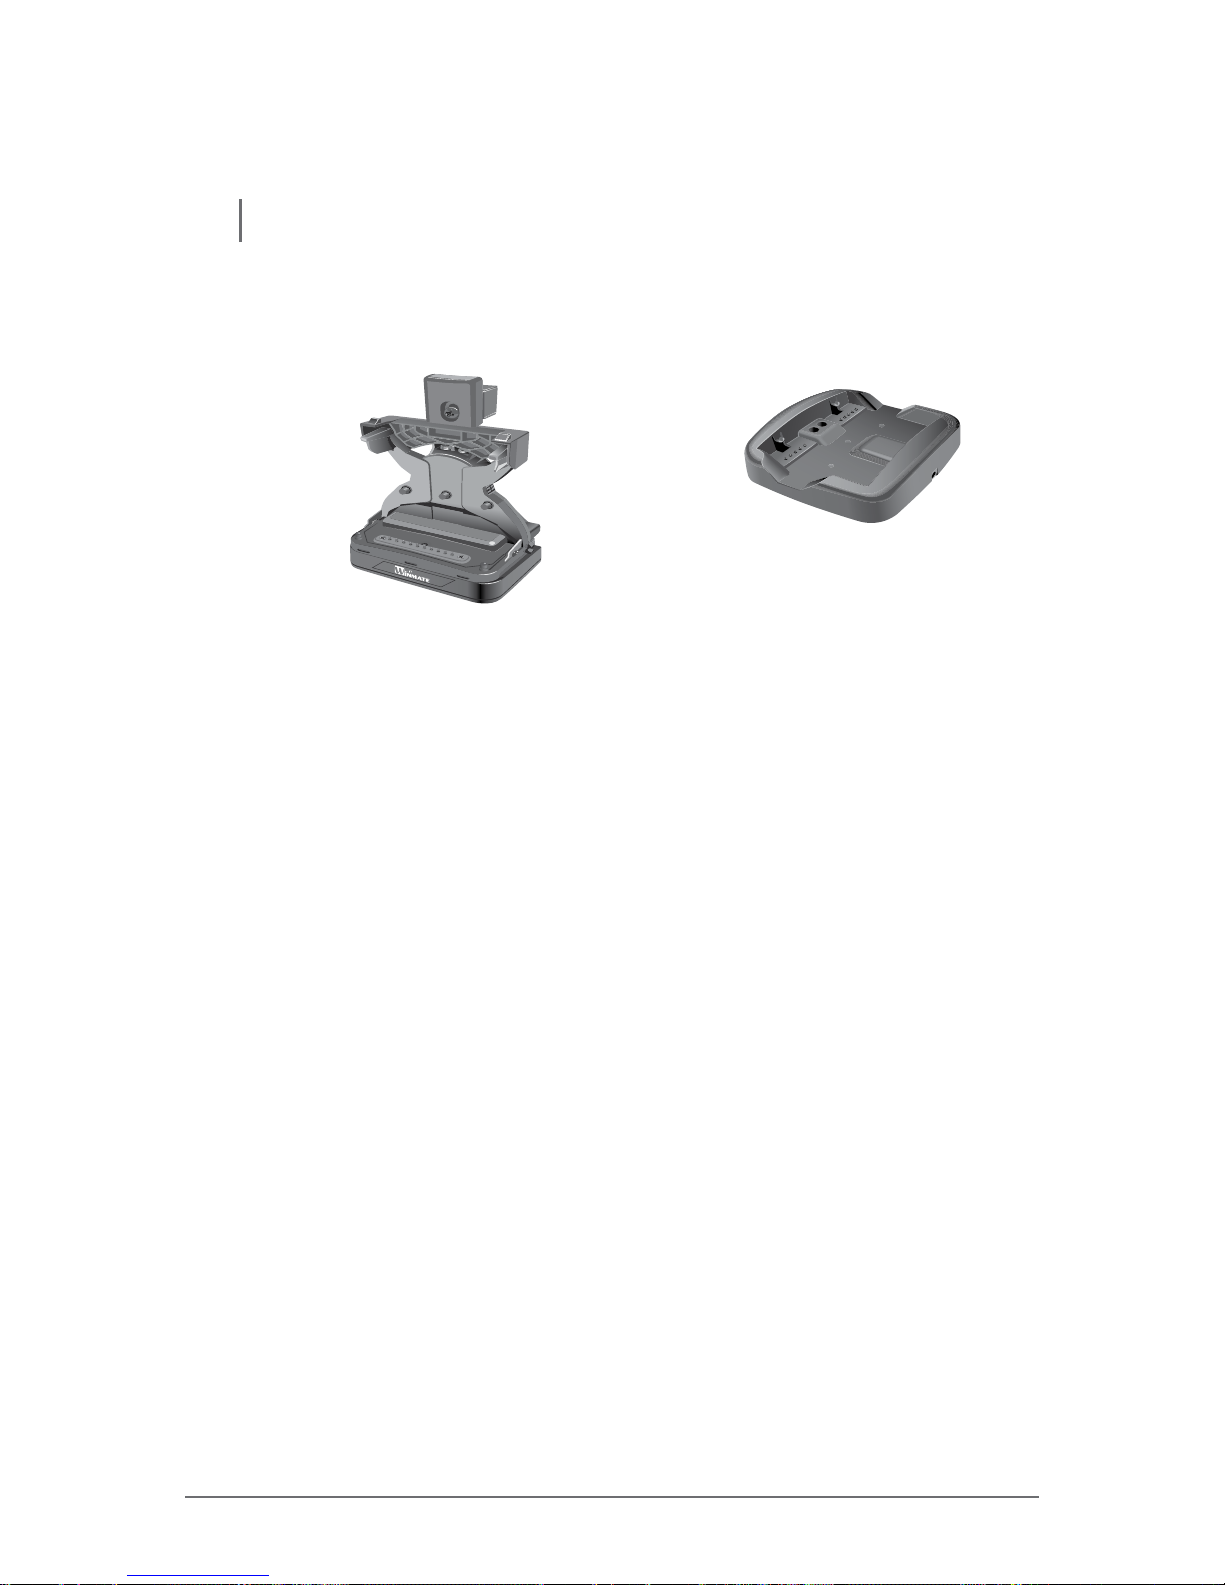
Optional Items
√ Vehicle Dock √ Battery Charger
Page 12
1-4 Winmate Technologies
Getting Started
Device Overview
Front View
Esc
Tab
Ctrl
Q
A
ZXCVBNM
0
123
456
789
Alt
Shift
SDFGHJKL
Enter
Space
Del Fn
,
.
WERTYUI
OP
!
@
-
=
Caps
#
$%^& *(
?/
-
>][}{
)+
|
;\:
“‘
~
`
F1
F2
F4
F3
F5
10
1
3
8
7
9
5
6
4
2
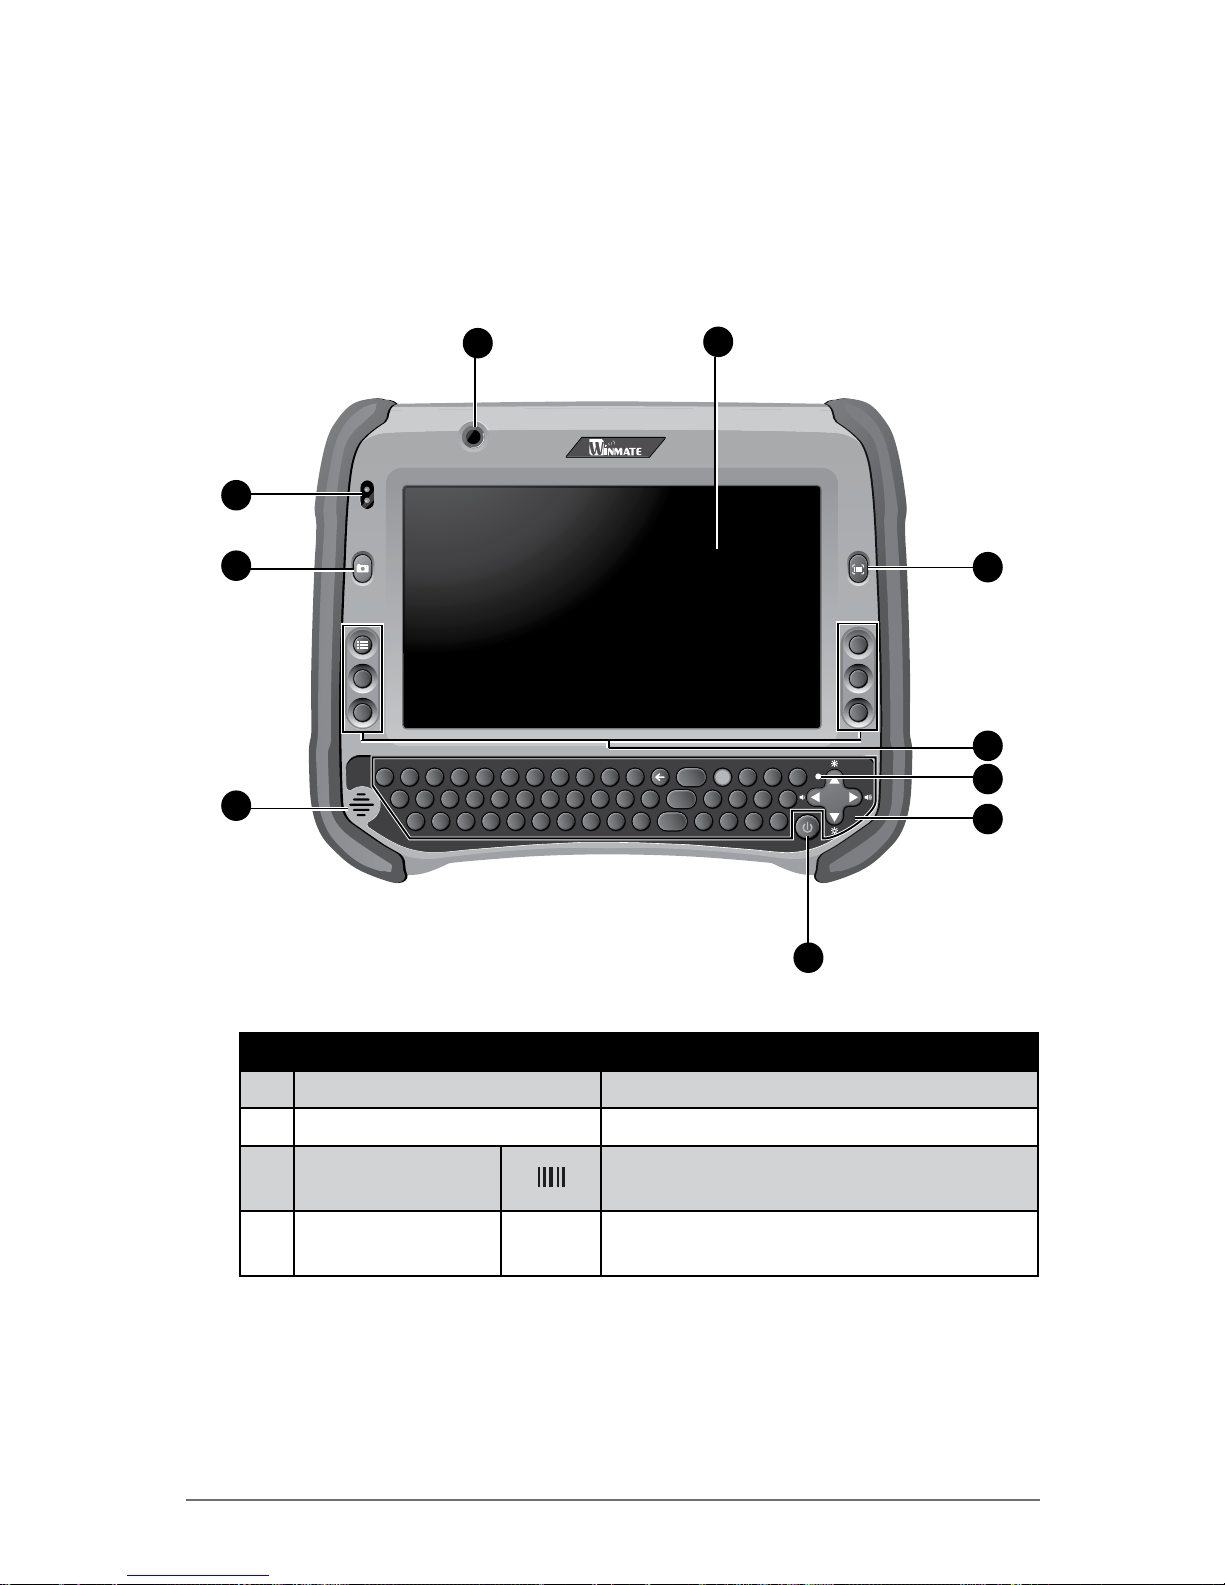
No. Item Description
1 2.0 MP Front Camera Allows you to take photos.
2 Touchscreen Glass-on-glass resistive touchscreen
3
Barcode Scanner
Button
Press to activate the barcode scanner
located on the top left corner of M9020.
4
Menu and
Function Keys
Common Windows function keys
(F1 ~ F5, Menu).
Page 13

Winmate Technologies 1-5
Getting Started
No. Item Description
5 LED
Battery Mode (On Battery Power):
• Solid Green: Power on.
• Blinking Greeen: Suspend: Every 3
seconds.
• Blinking Red (The average of two
batteries):
- <= 20%, blinking interval 5s.
- <= 15%, blinking interval 3s.
- <= 10%, blinking interval 1s.
- <= 5%, Hibernate.
(Depends on OS setting).
• Solid Red: Either Battery #1 or Battery
#2 is missing.
AC Mode (On External Power):
• Solid Green: Fully charged: Both
batteries are fully charged.
• Blinking Greeen: Suspend: Every 3
seconds.
• Solid Blue: Either battery is being
charged.
• Solid Red:
- Faulty: Cannot charge.
- Either Battery #1 or Battery #2 is
missing.
6 Keyboard Integrated keyboard.
7 Power Switch Press to turn on the M9020.
8 Speaker Integrated speaker.
9 Camera Button
Press to access the front / rear camera
feature.
10 Light Sensor
Provides automatic display brightness
functionality.
Page 14
1-6 Winmate Technologies
Getting Started
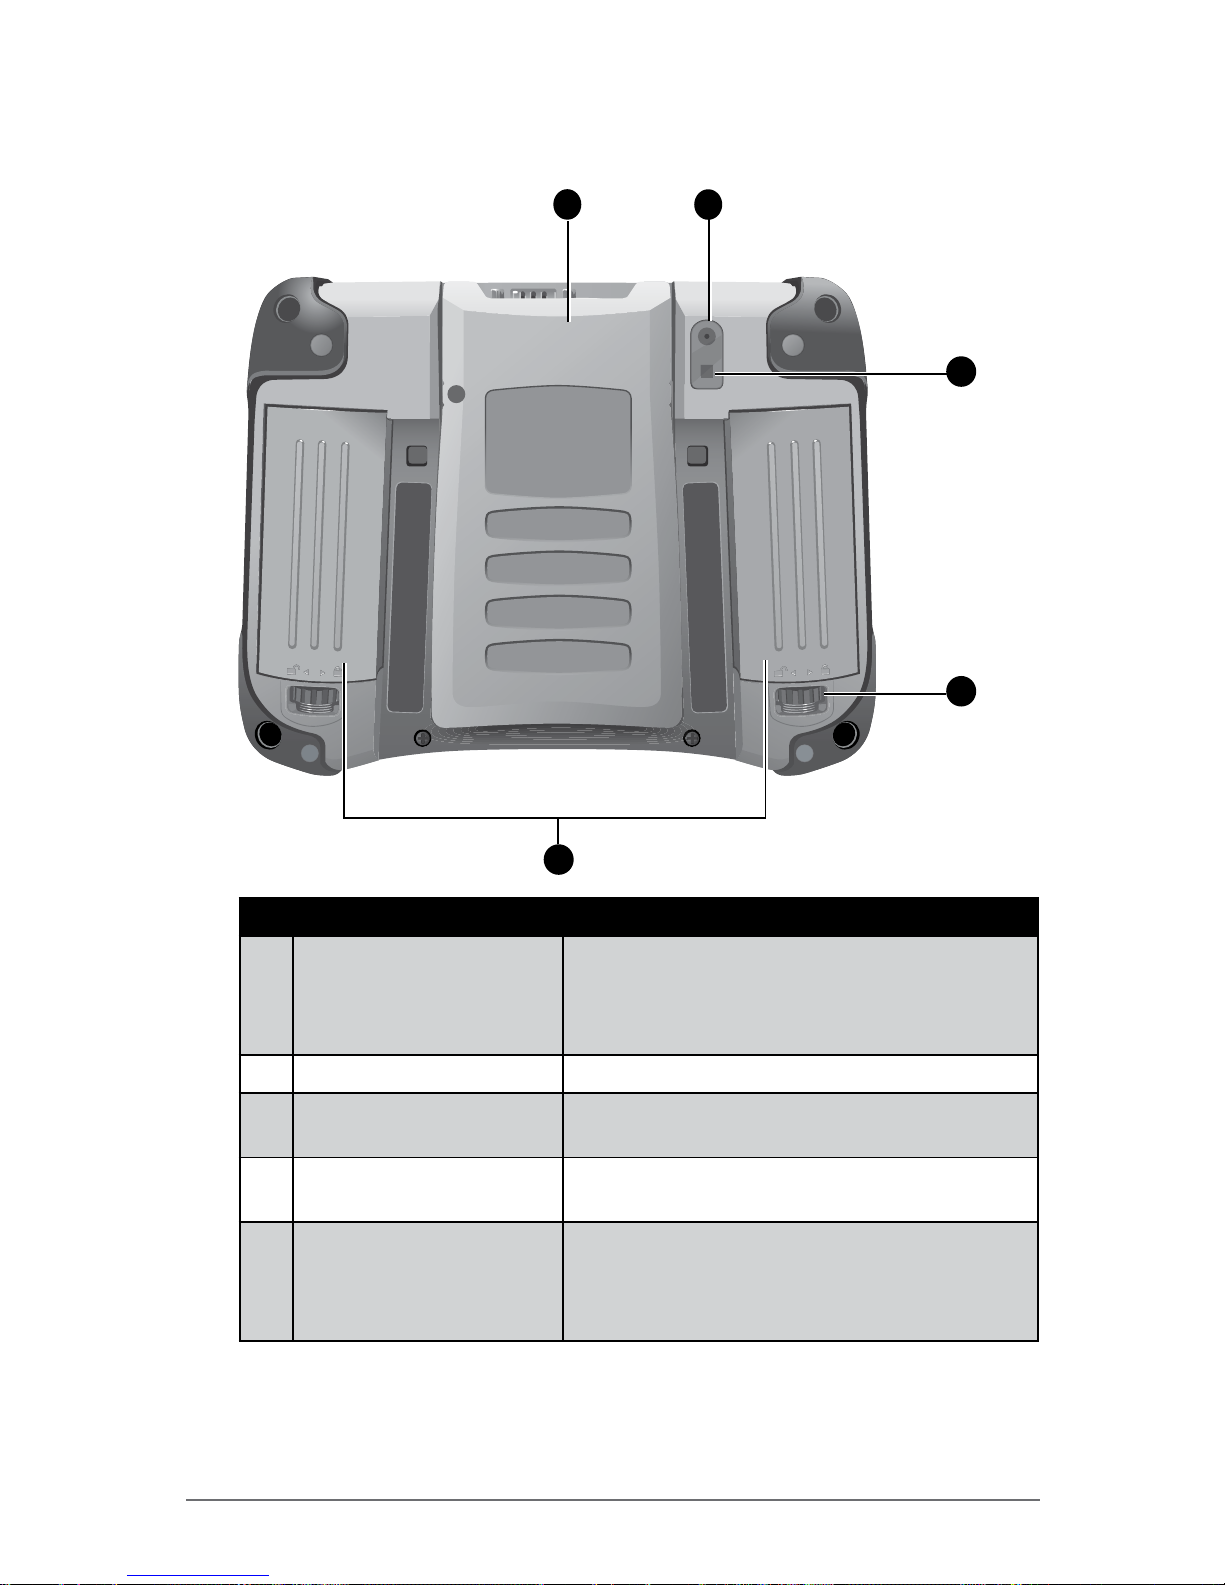
Rear View (With Compartment Cover and Battery Packs)
5
3
1
2
4
No. Item Description
1 Compartment Cover
Covers the internal connectors. See
the connectors in “Rear View (Without
Compartment Cover and Battery Packs)” on
page 1-7.
2 5.0 MP Rear Camera Allows you to take photos.
3 Camera Flash
Provides ash lighting for use with the camera
or just as an assisting light.
4 Battery Lock Latch
Rotate the latch to lock or unlock the
battery pack.
5 Battery Packs
Supplies power to your M9020 when external
power is not connected.
NOTE: At least one battery pack is required
to power up the M9020.
Page 15
Winmate Technologies 1-7
Getting Started
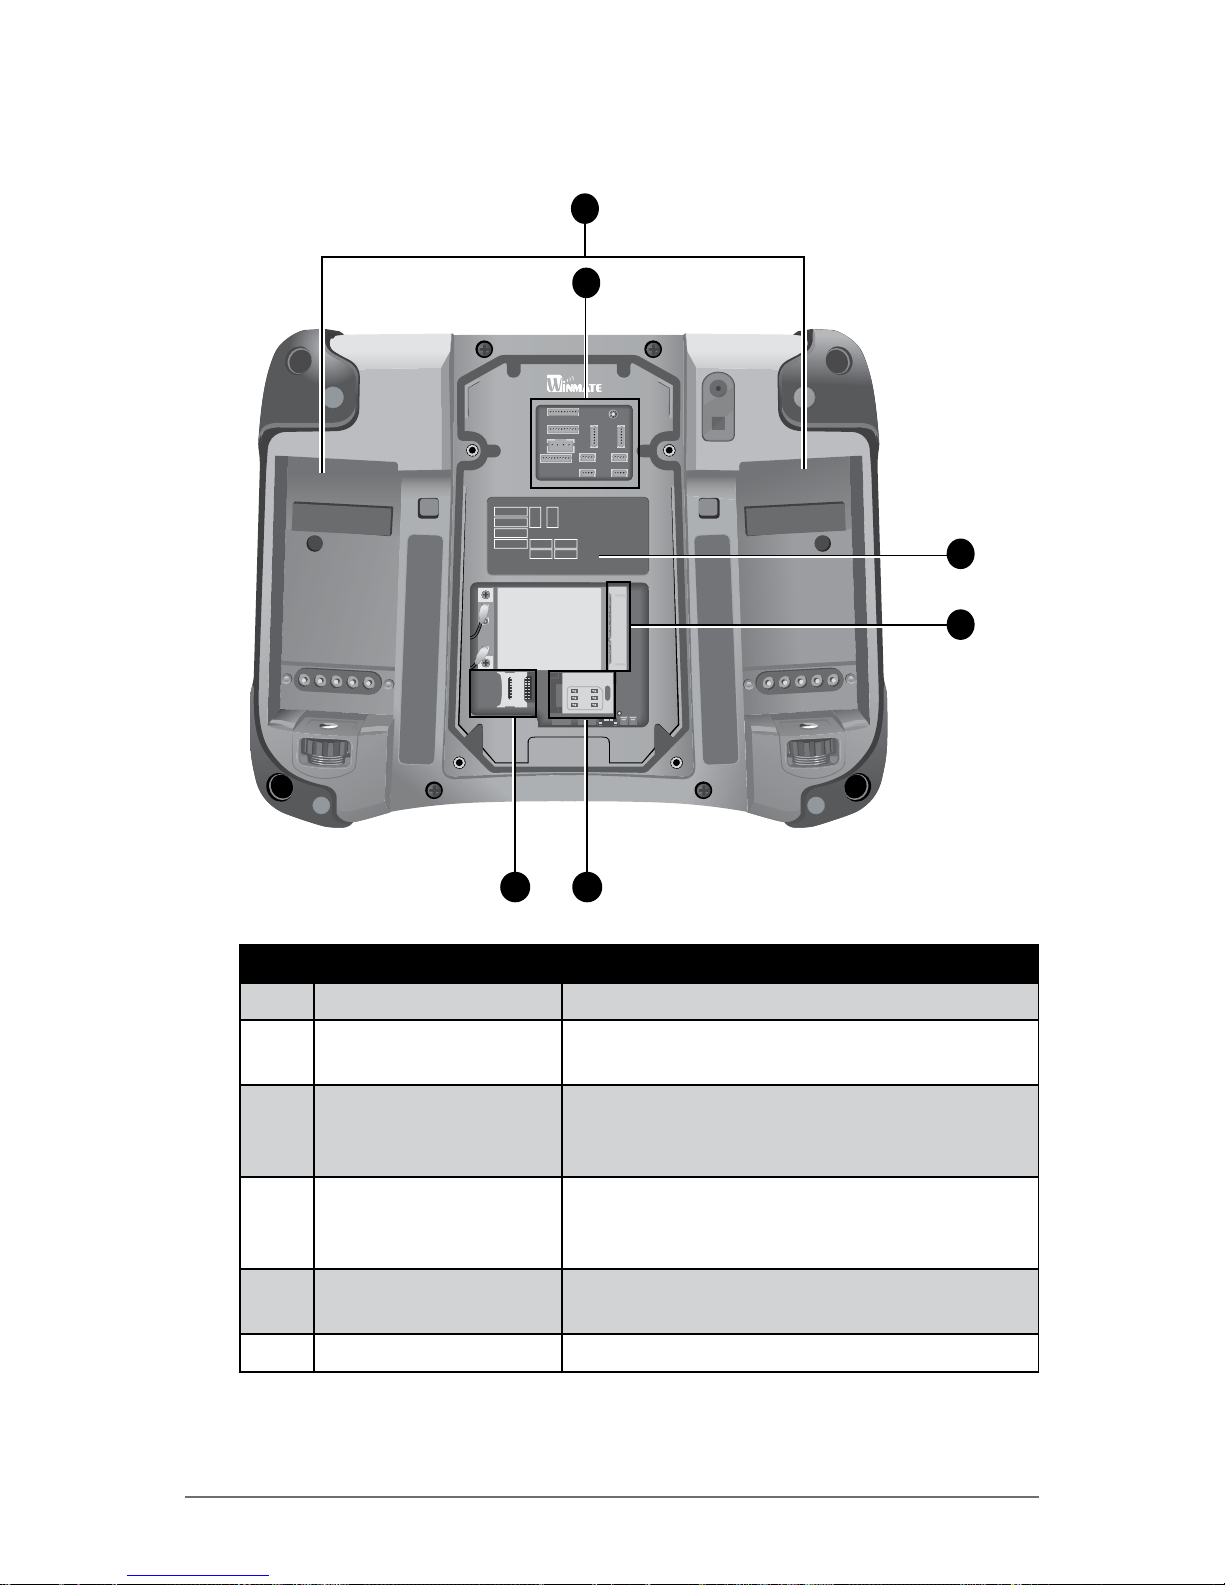
Rear View (Without Compartment Cover and Battery Packs)
Full COM
Full COM
PWR
VGA USB
TxRx
TxRx
USB
USB USB
WARNING: Prior to using the
connection points, contact
Winmate Technologies at: +1
(855) Winmate-TECH. Failure to
follow this instruction could
void product warranty.
2
5
1
4
3
6
No. Item Description
1 Battery Bays Bays for battery pack installation.
2 Cable Connectors See more “Cable Connectors Placement” on
page 1-8.
3 Cable Connectors
Location Label
This label includes information about the
connector placement under the compartment
cover.
4 WWAN Card
Connector
Connection for the WWAN card.
NOTE: On the illustration the WWAN card is
already connected.
5 SIM Card Slot For installation of a SIM card for WWAN data
network connectivity.
6 MicroSD card slot For installation of a Micro SD memory card.
Page 16
1-8 Winmate Technologies
Getting Started
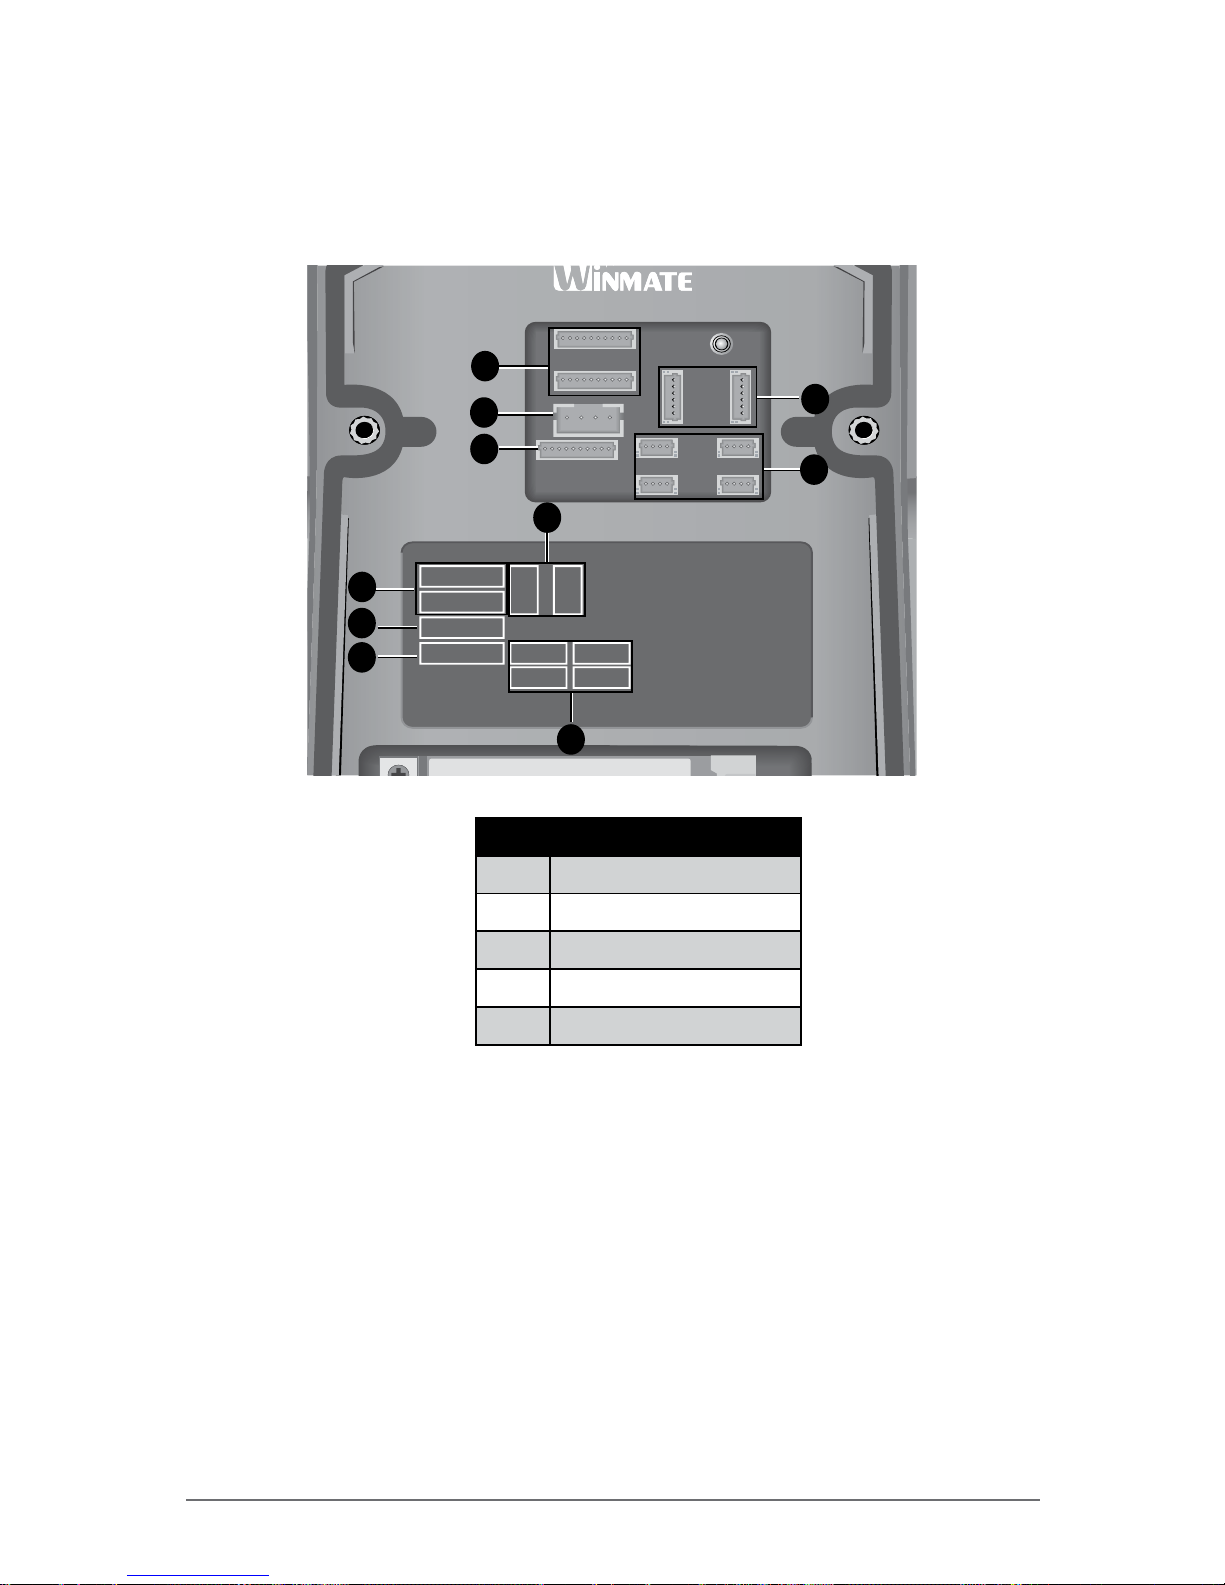
Cable Connectors Placement
The cable connectors are located under the compartment cover on the rear
panel. The following image illustrates the connector locations.
Full COM
Full COM
PWR
VGA USB
TxRx
TxRx
USB
USB USB
WARNING: Prior to using the
connection points, contact
Winmate Technologies at: +1
(855) Winmate-TECH. Failure to
follow this instruction could
void product warranty.
1
2
3
4
5
4
5
3
2
1
No. Item
1 VGA
2 PWR
3 2x Full COM
4 2x TxRx
5 4x USB
Page 17
Winmate Technologies 1-9
Getting Started
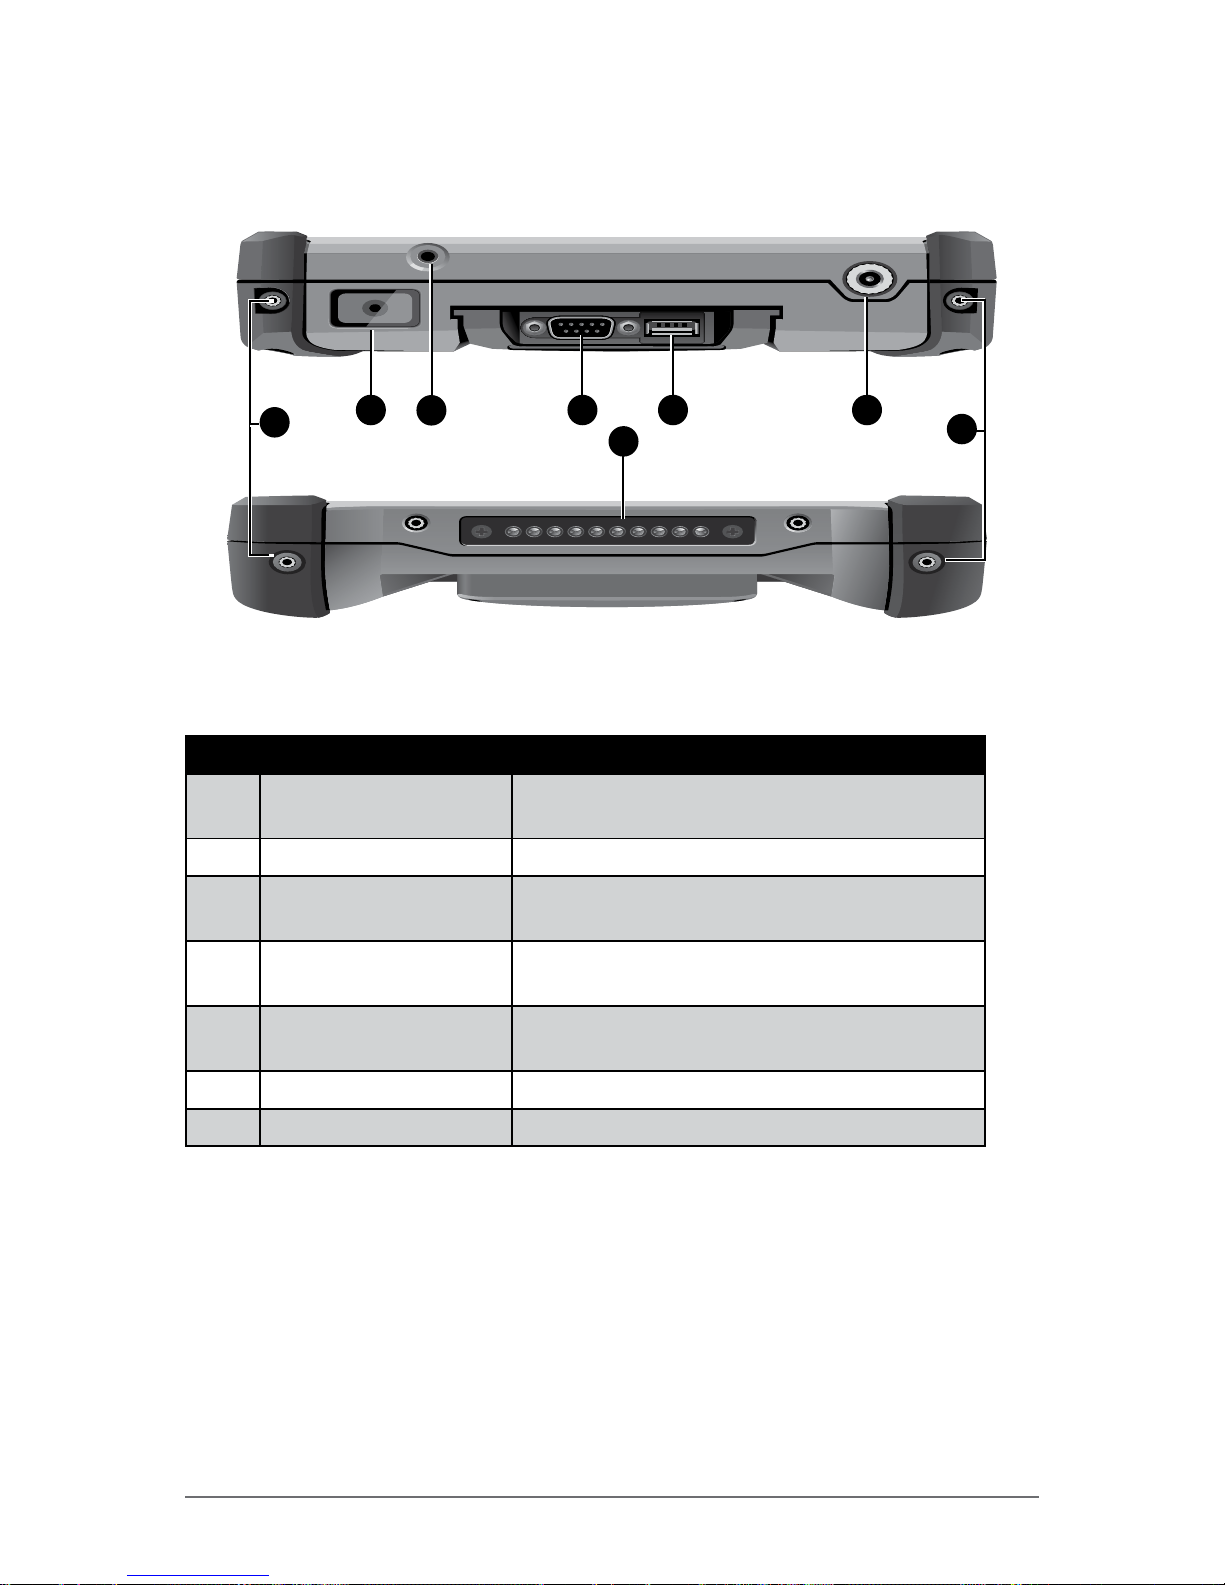
Top and Bottom View
2 5
Bottom View
Top View
64
7
1
1
3
No. Item Description
1 Screw Holes for Hand
Strap
To attach the hand strap to the side of the
M9020.
2 Barcode Reader For reading 1D/2D barcodes.
3 Audio Connector Connects to a stereo headset, external
speakers, or an audio recording device.
4 RS-232 Connector Connection for serial devices, such as a
scanner, printer, etc.
5 USB Port Connection for USB 2.0 compatible devices
such as a USB storage.
6 Power Connector Connects to the AC adapter.
7 Docking Connector Connects to a docking station (optional).
Page 18
1-10 Winmate Technologies
Getting Started
Installing the Hand Strap and Stylus
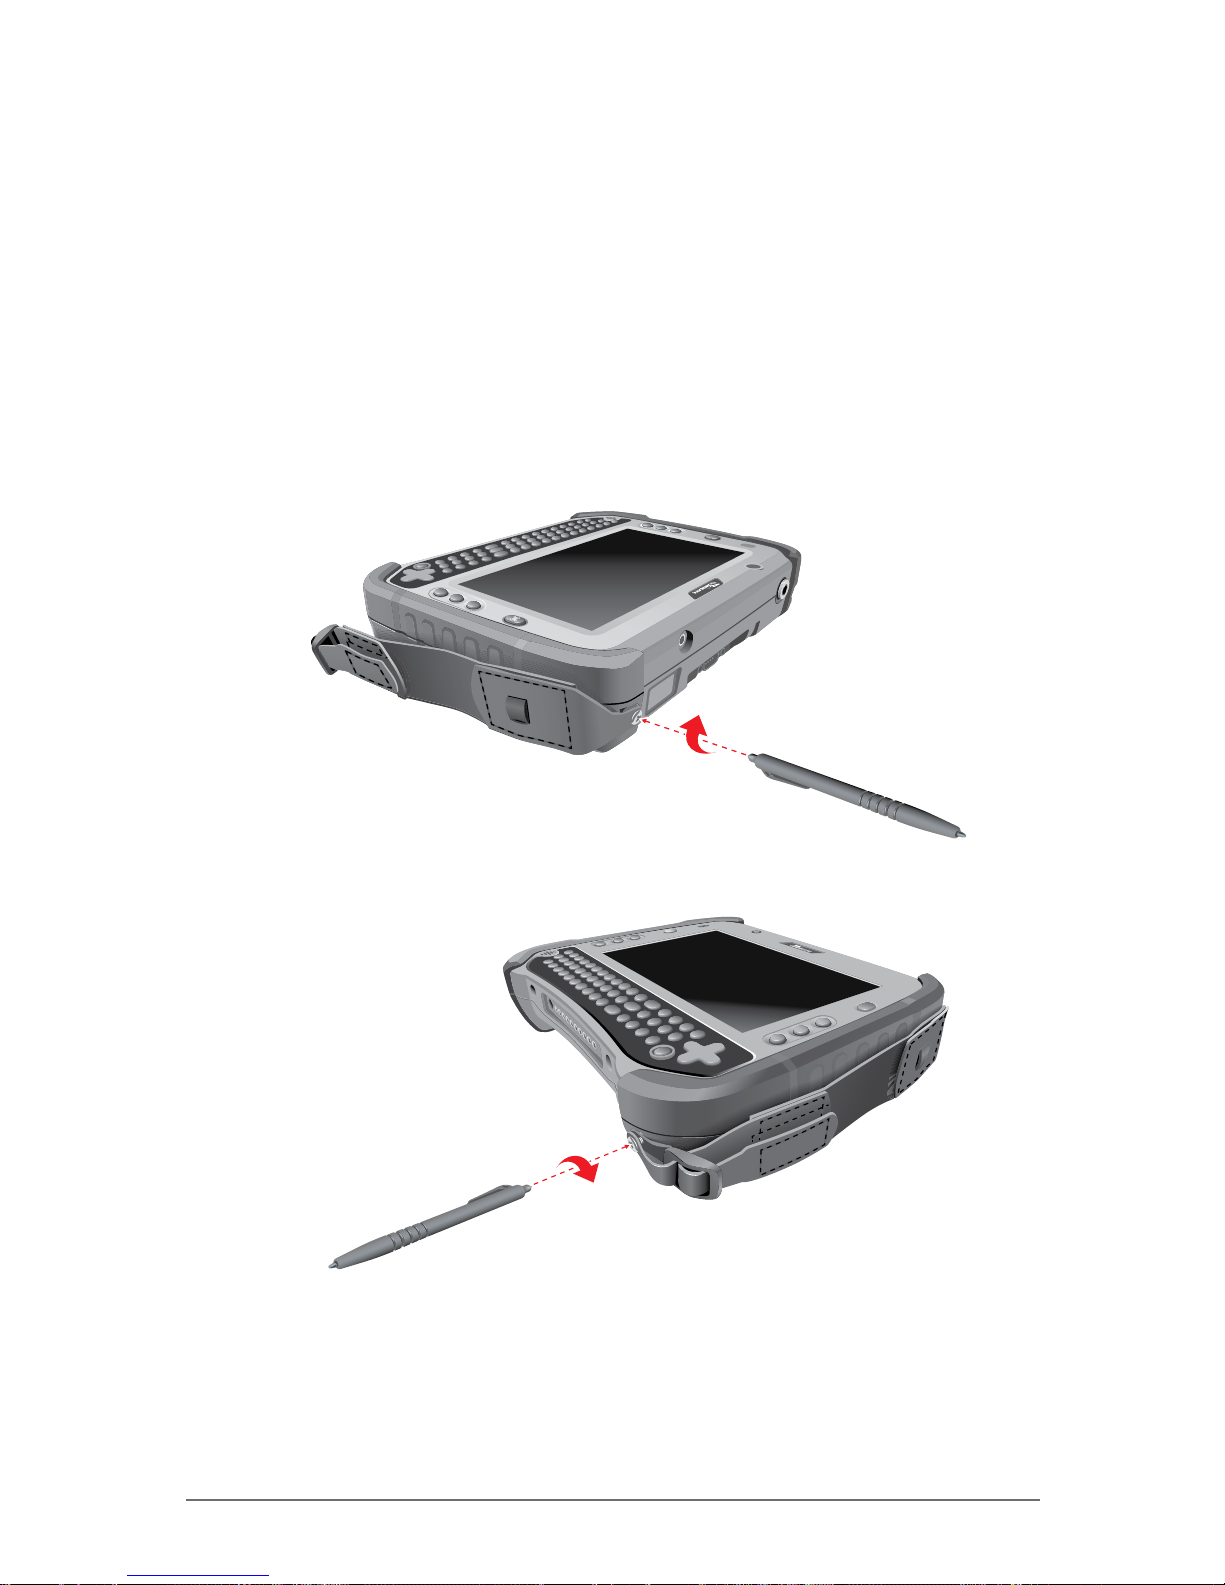
Your M9020 comes with a stylus for use with the touch screen.
For storing the stylus, you need to attach the supplied hand strap to your
M9020.
Perform the following to prepare and install the hand strap and stylus to your
M9020:
1. Align the screws on the hand strap with the screw holes on the top and
bottom of M9020.
2. Use the tip of the stylus to attach the screw on the hand strap to the screw
hole on top of M9020.
3. Repeat step 2 for the bottom side of M9020.
Page 19
Winmate Technologies 1-11
Getting Started
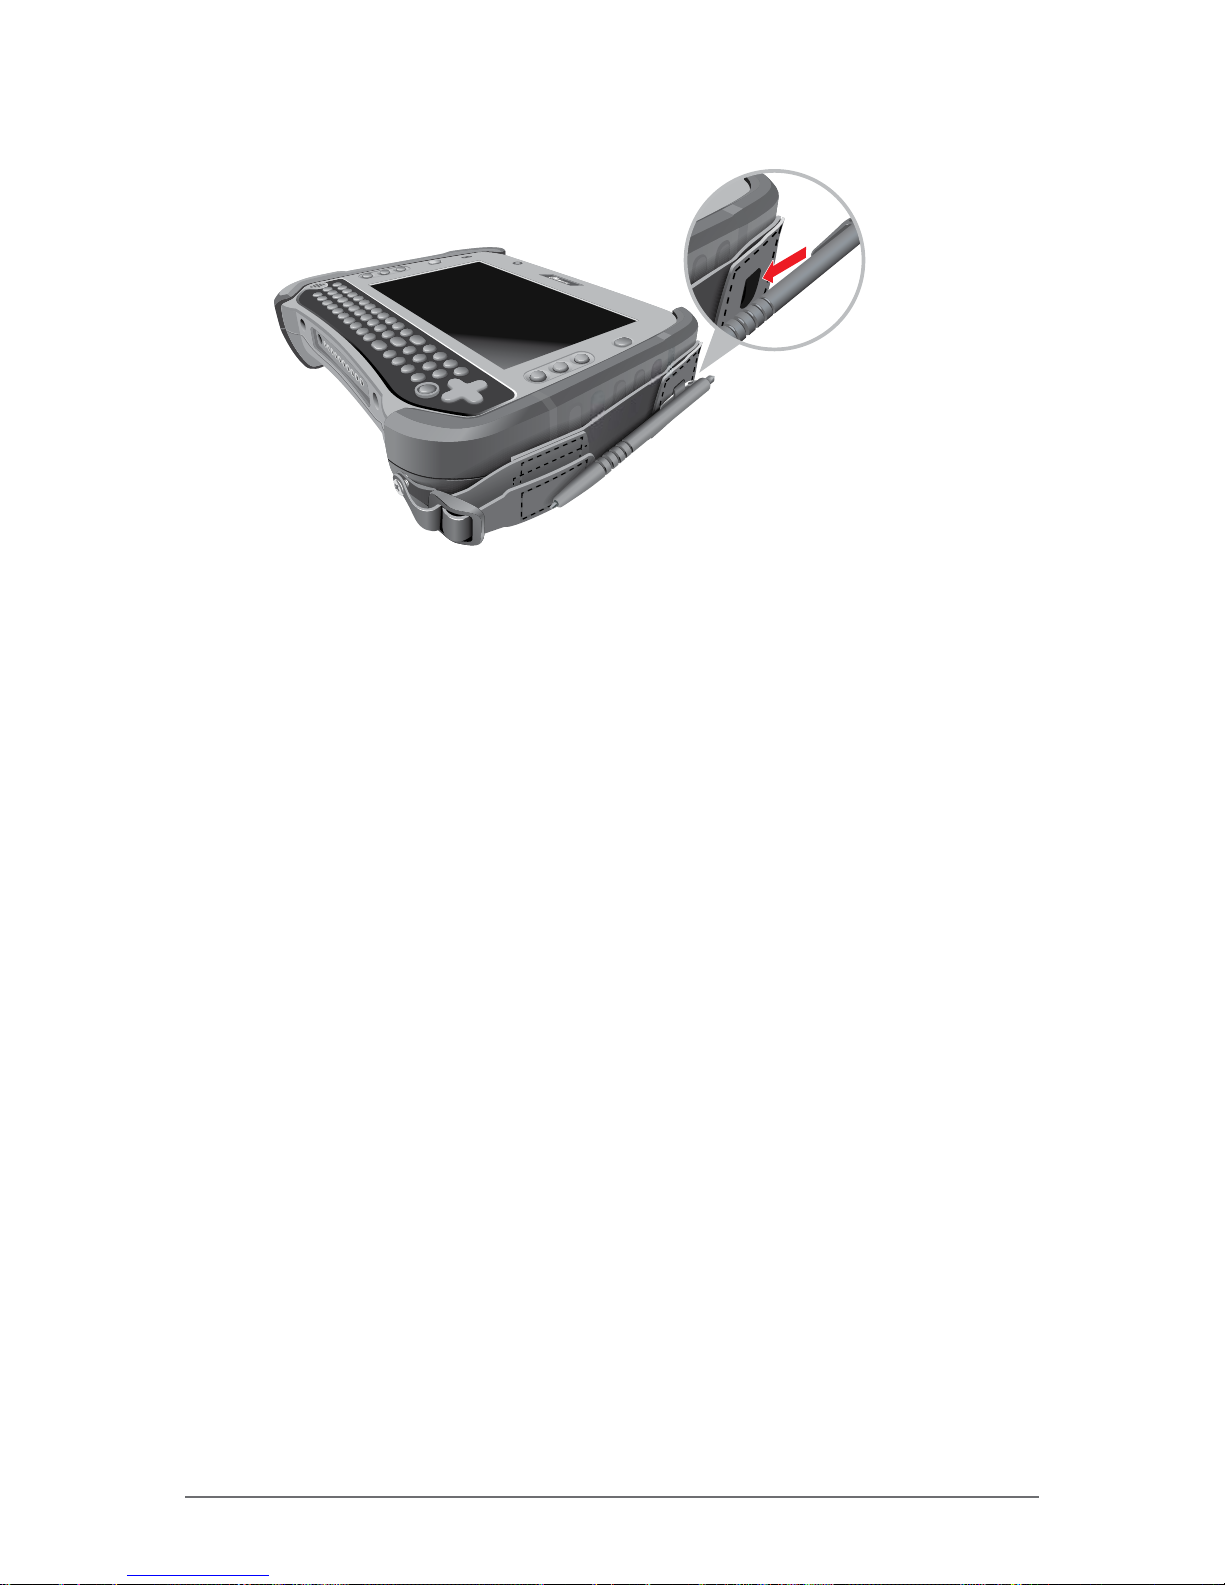
4. Insert the stylus into the stylus loop on the hand strap.
Removing the Stylus
Pull the stylus by its tab to remove it from the hand strap.
Page 20
1-12 Winmate Technologies
Getting Started
Releasing the Compartment Cover
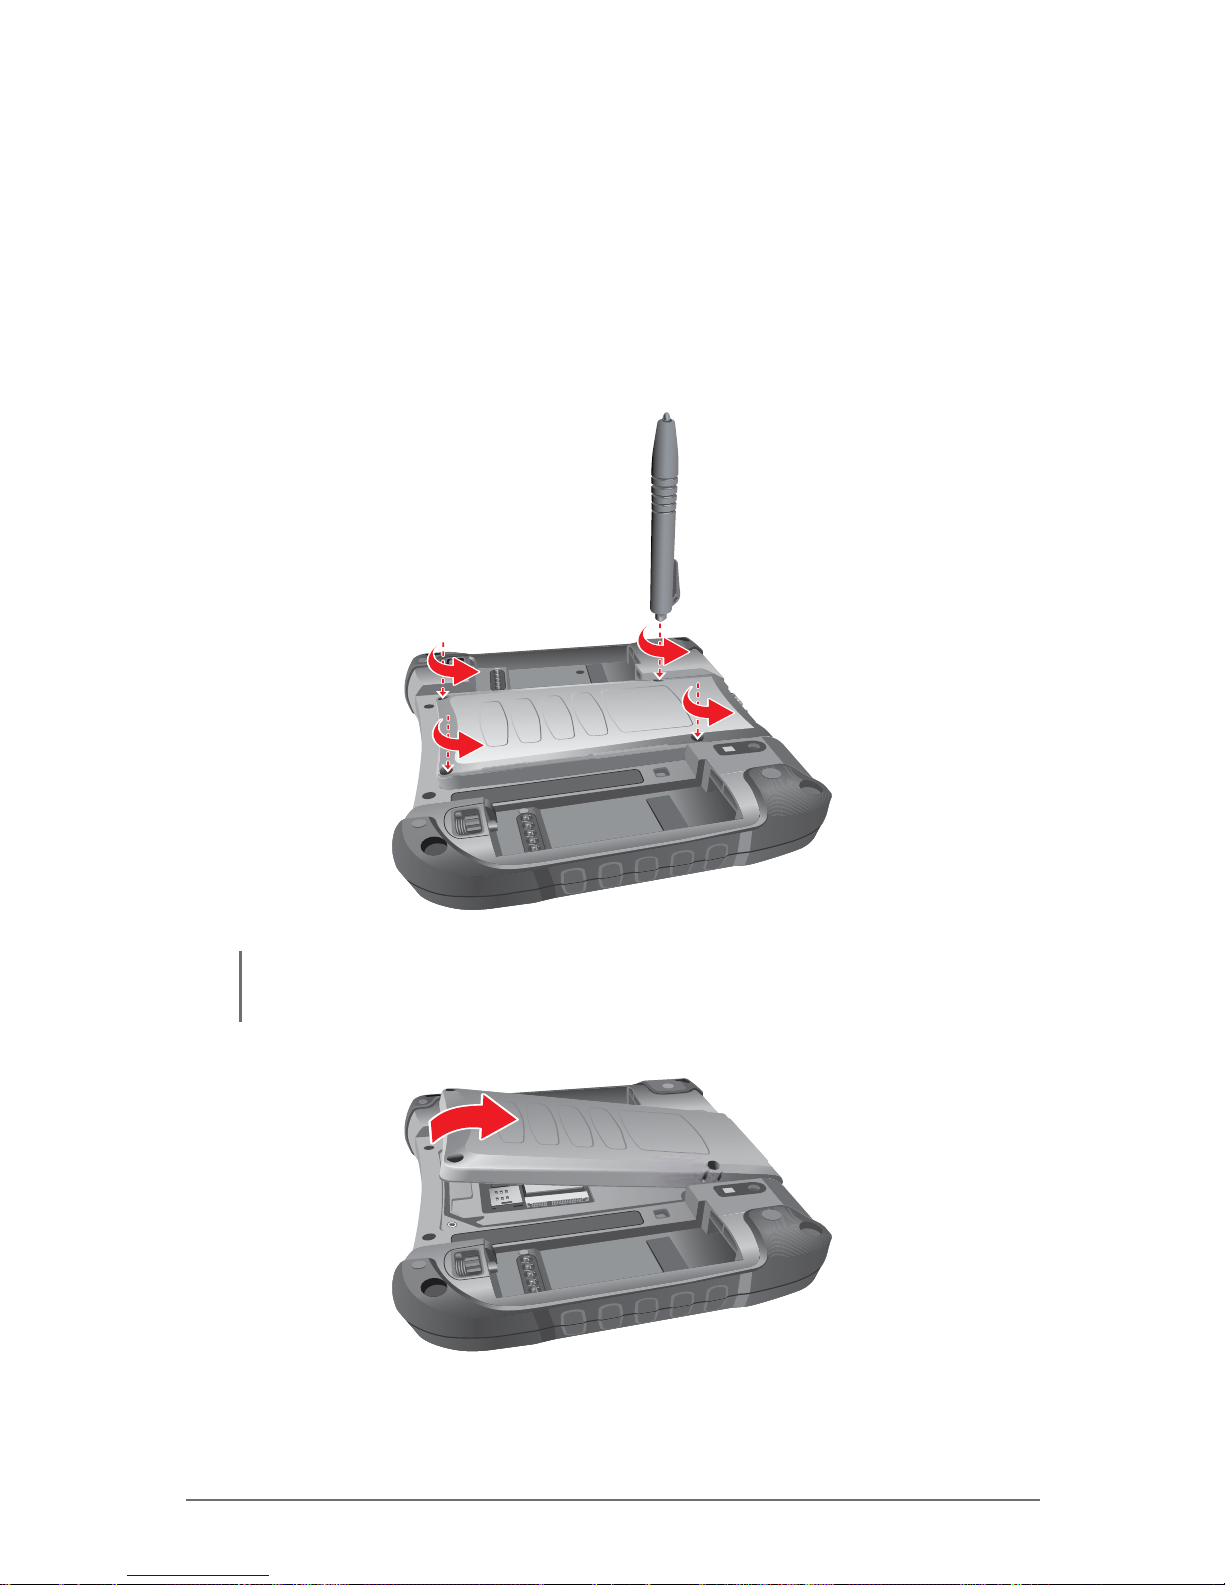
To access the connectors under the compartment cover, you need to release
the cover rst.
Perform the following to release the compartment cover:
1. Use the tip of the stylus to release the four (4) screws on the compartment
cover.
CAUTION: Avoid damaging the internal cable connectors. RS-232 and USB cables are con-
nected to the motherboard under the compartment cover.
2. Lift the cover in an angle as shown.
Page 21
Winmate Technologies 1-13
Getting Started
Tightening the Compartment Cover
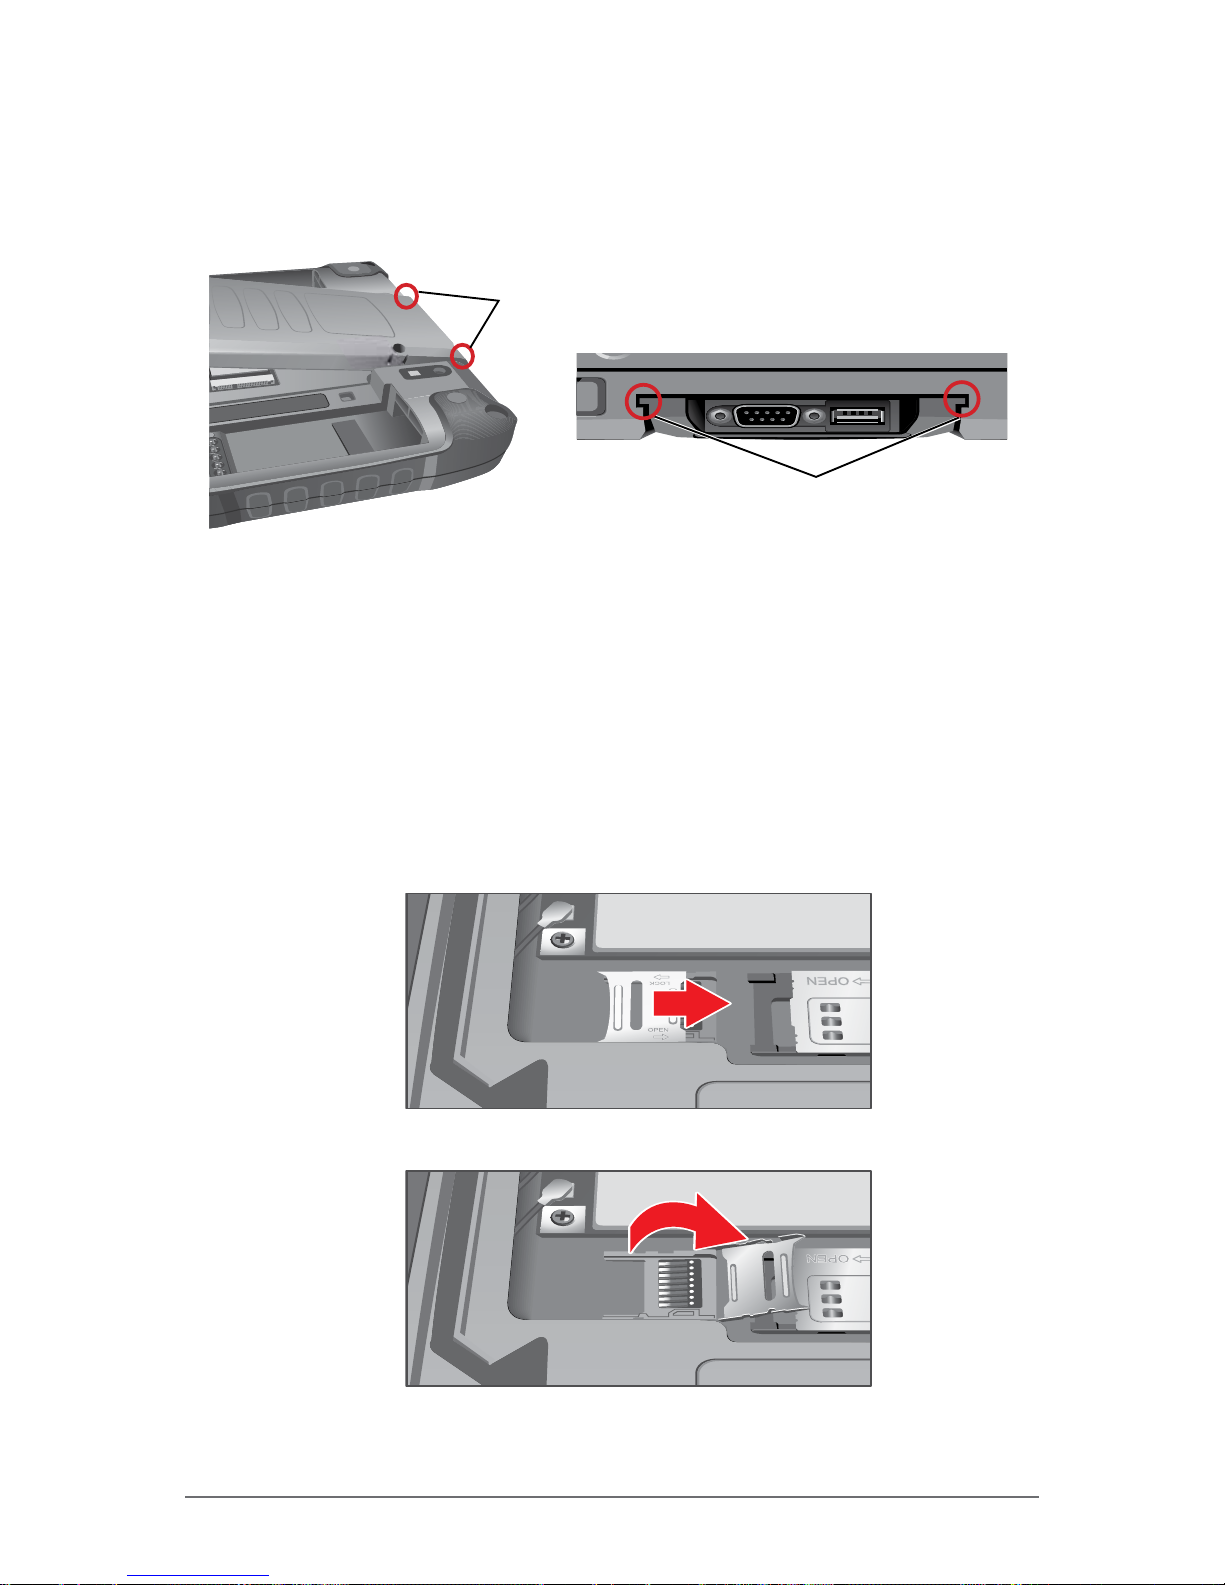
After the connections are complete, slide the tabs on the compartment cover
into the slots on the top of the M9020.
Rear view
Tab
Top view
Tab
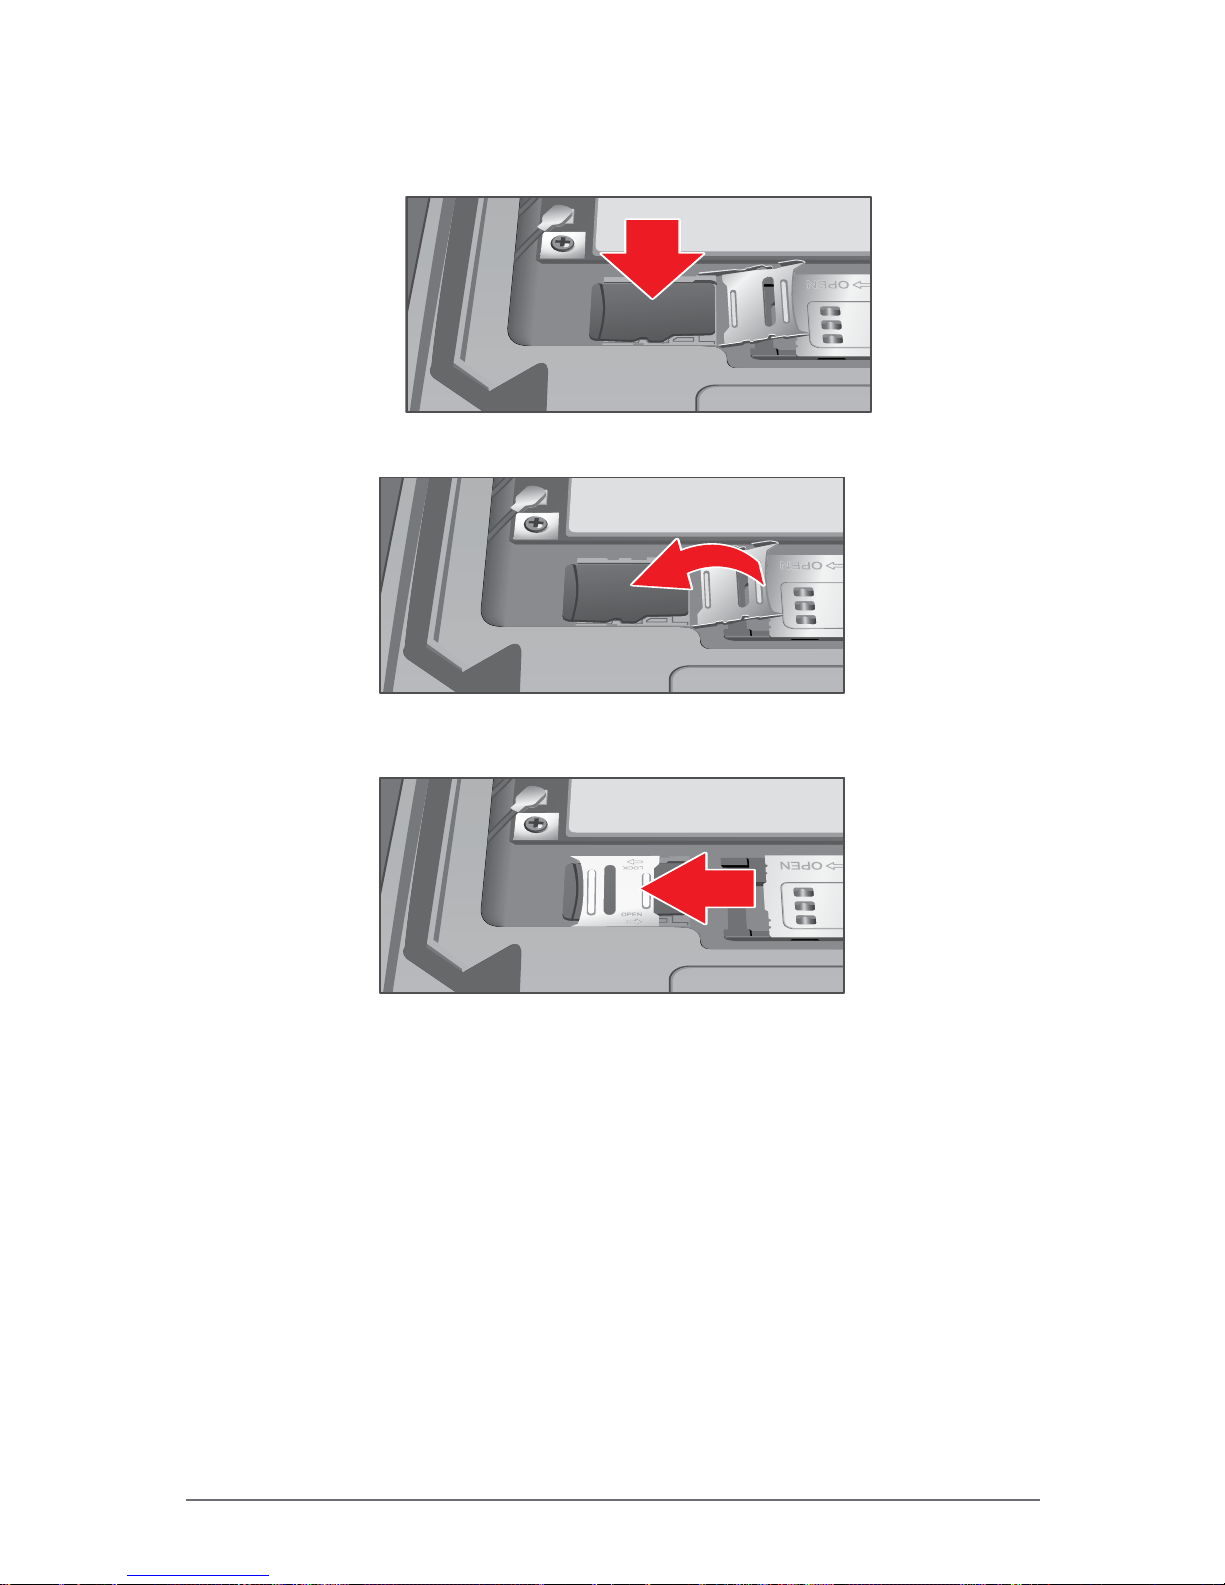
Installing the Memory Card
The M9020 has a memory card slot for additional storage space.
Perform the following to install a microSD card in your M9020:
1. Release the compartment cover. See “Releasing the Compartment Cover”
on page 1-12.
2. Slide the microSD socket cover to the “OPEN” direction.
3. Open the socket cover.
Page 22
1-14 Winmate Technologies
Getting Started
4. Place the microSD card into the socket, connectors facing the golden
socket connectors.
5. Close the microSD socket cover.
6. Slide the microSD socket cover to the “LOCK” direction.
7.
Tighten the compartment cover. See “Tightening the Compartment Cover”
on page 1-13.
Removing the Memory Card
Follow the microSD card installation steps in reverse order, to remove the
microSD card.
Page 23
Winmate Technologies 1-15
Getting Started
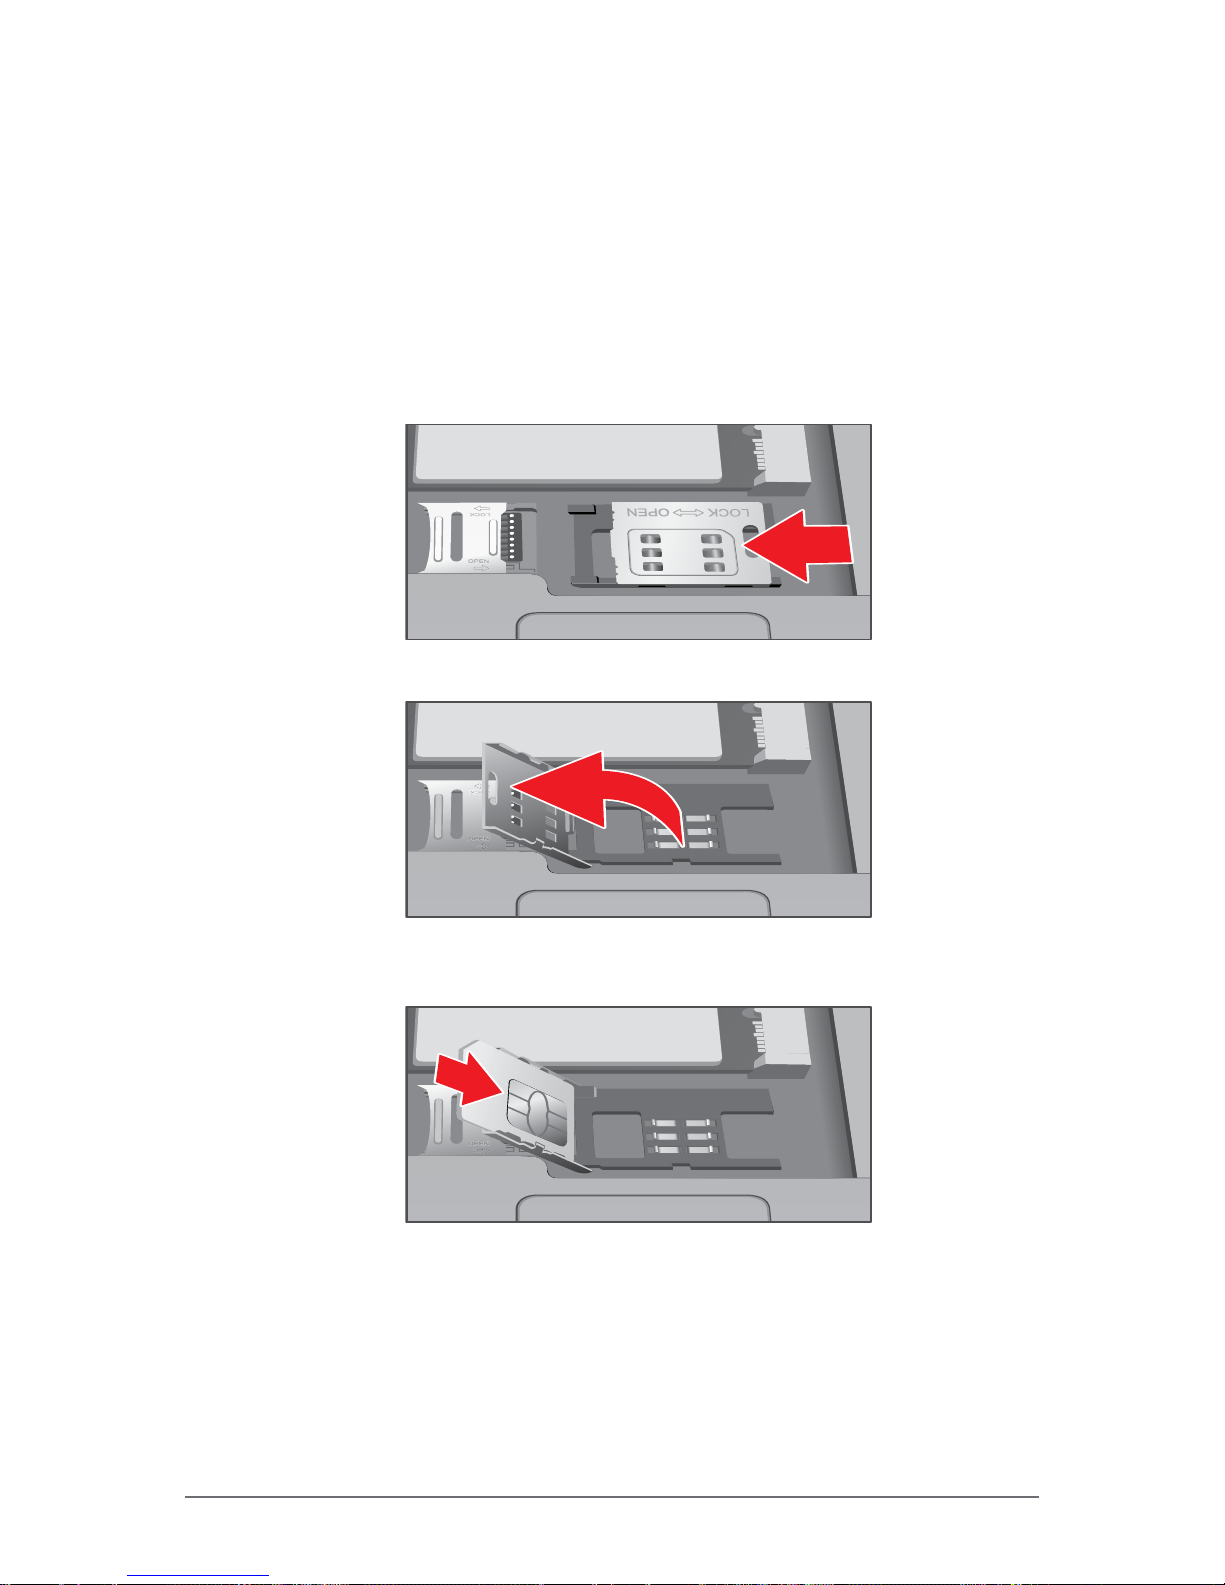
Installing the SIM Card
The M9020 supports data connection using WWAN SIM cards.
Perform the following to install the SIM card in your M9020:
1. Release the compartment cover. See “Releasing the Compartment Cover”
on page 1-12.
2. Slide the SIM card holder to the “OPEN” direction.
3. Open the SIM card holder as shown.
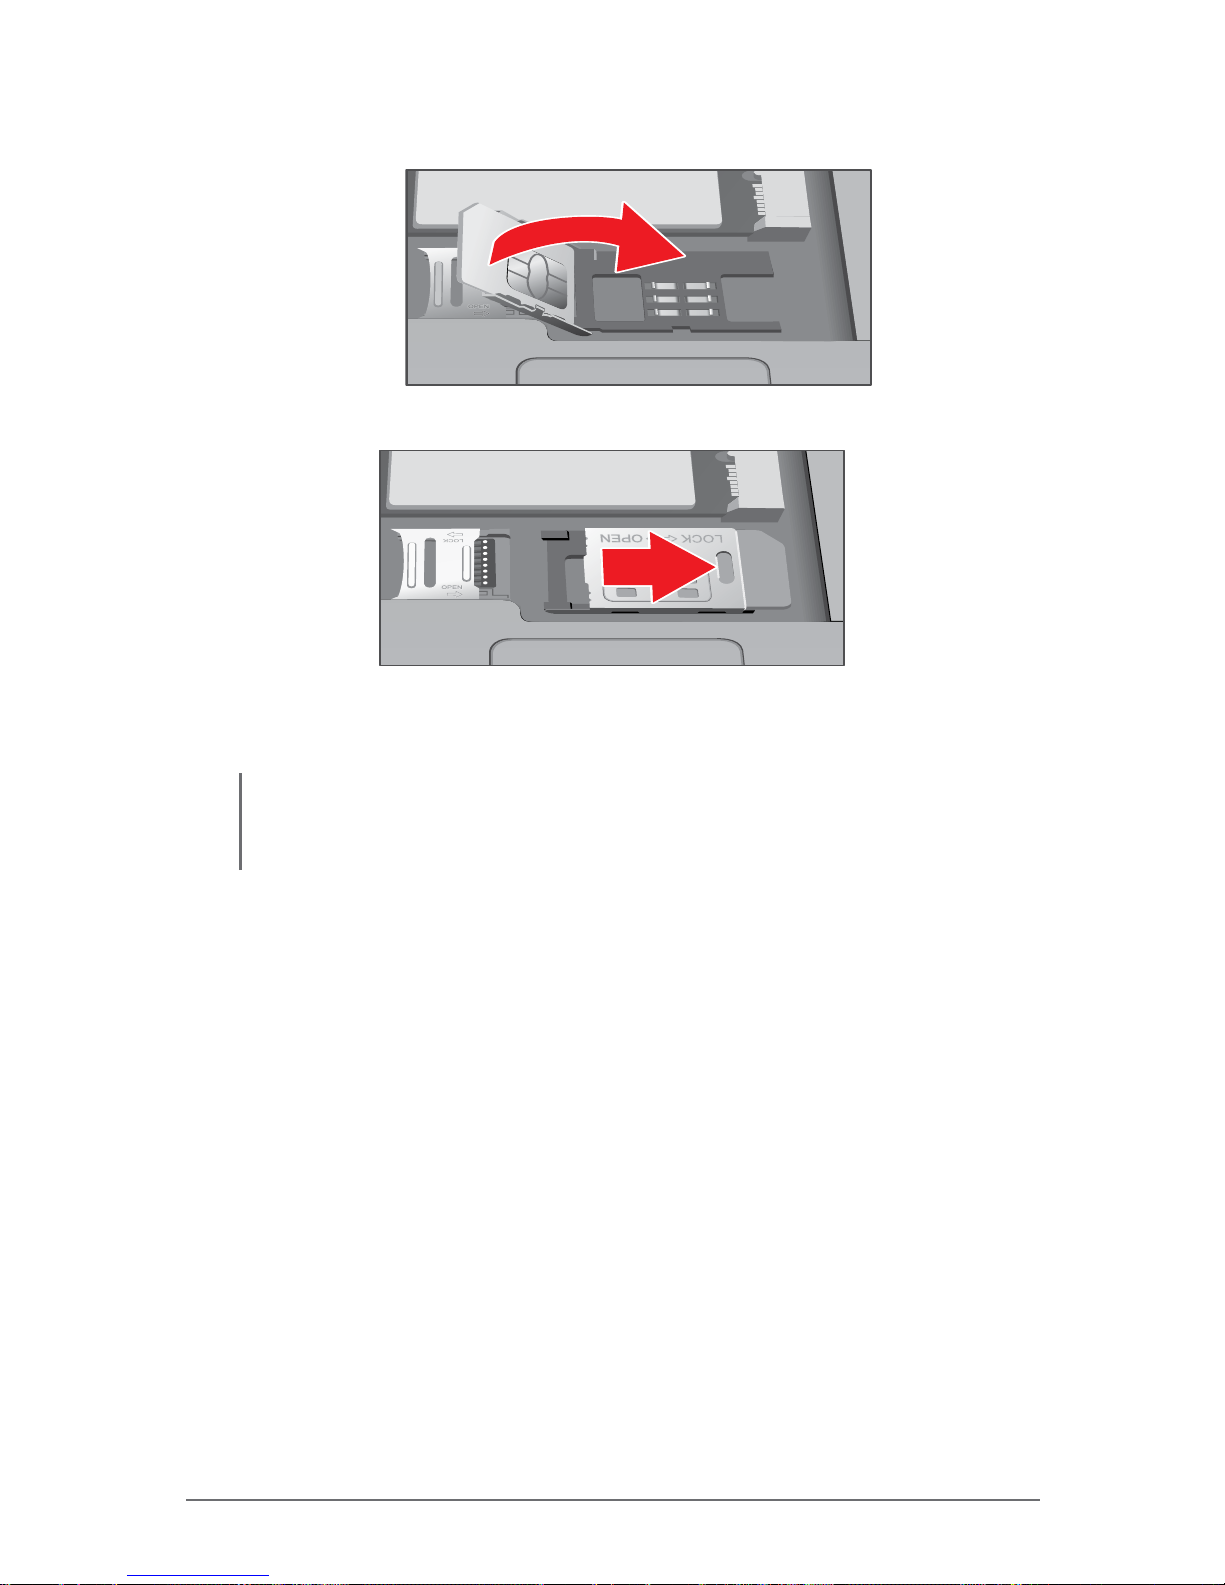
4. Insert the SIM card into the holder. Make sure the golden contacts face the
socket.
Page 24
1-16 Winmate Technologies
Getting Started
5. Close the SIM card holder.
6. Slide the SIM card holder to the “LOCK” direction.
7.
Tighten the compartment cover. See “Tightening the Compartment Cover”
on page 1-13.
NOTE:
• For more information on connecting to a WWAN network, see “Connecting to a WWAN
Network” on page 2-17.
Removing the SIM Card
1. Turn off the M9020 (see “Turning On” on page 1-20).
2. Follow the SIM card installation steps in reverse order, to remove the SIM
card. See “Installing the SIM Card” on page 1-15.
Page 25
Winmate Technologies 1-17
Getting Started
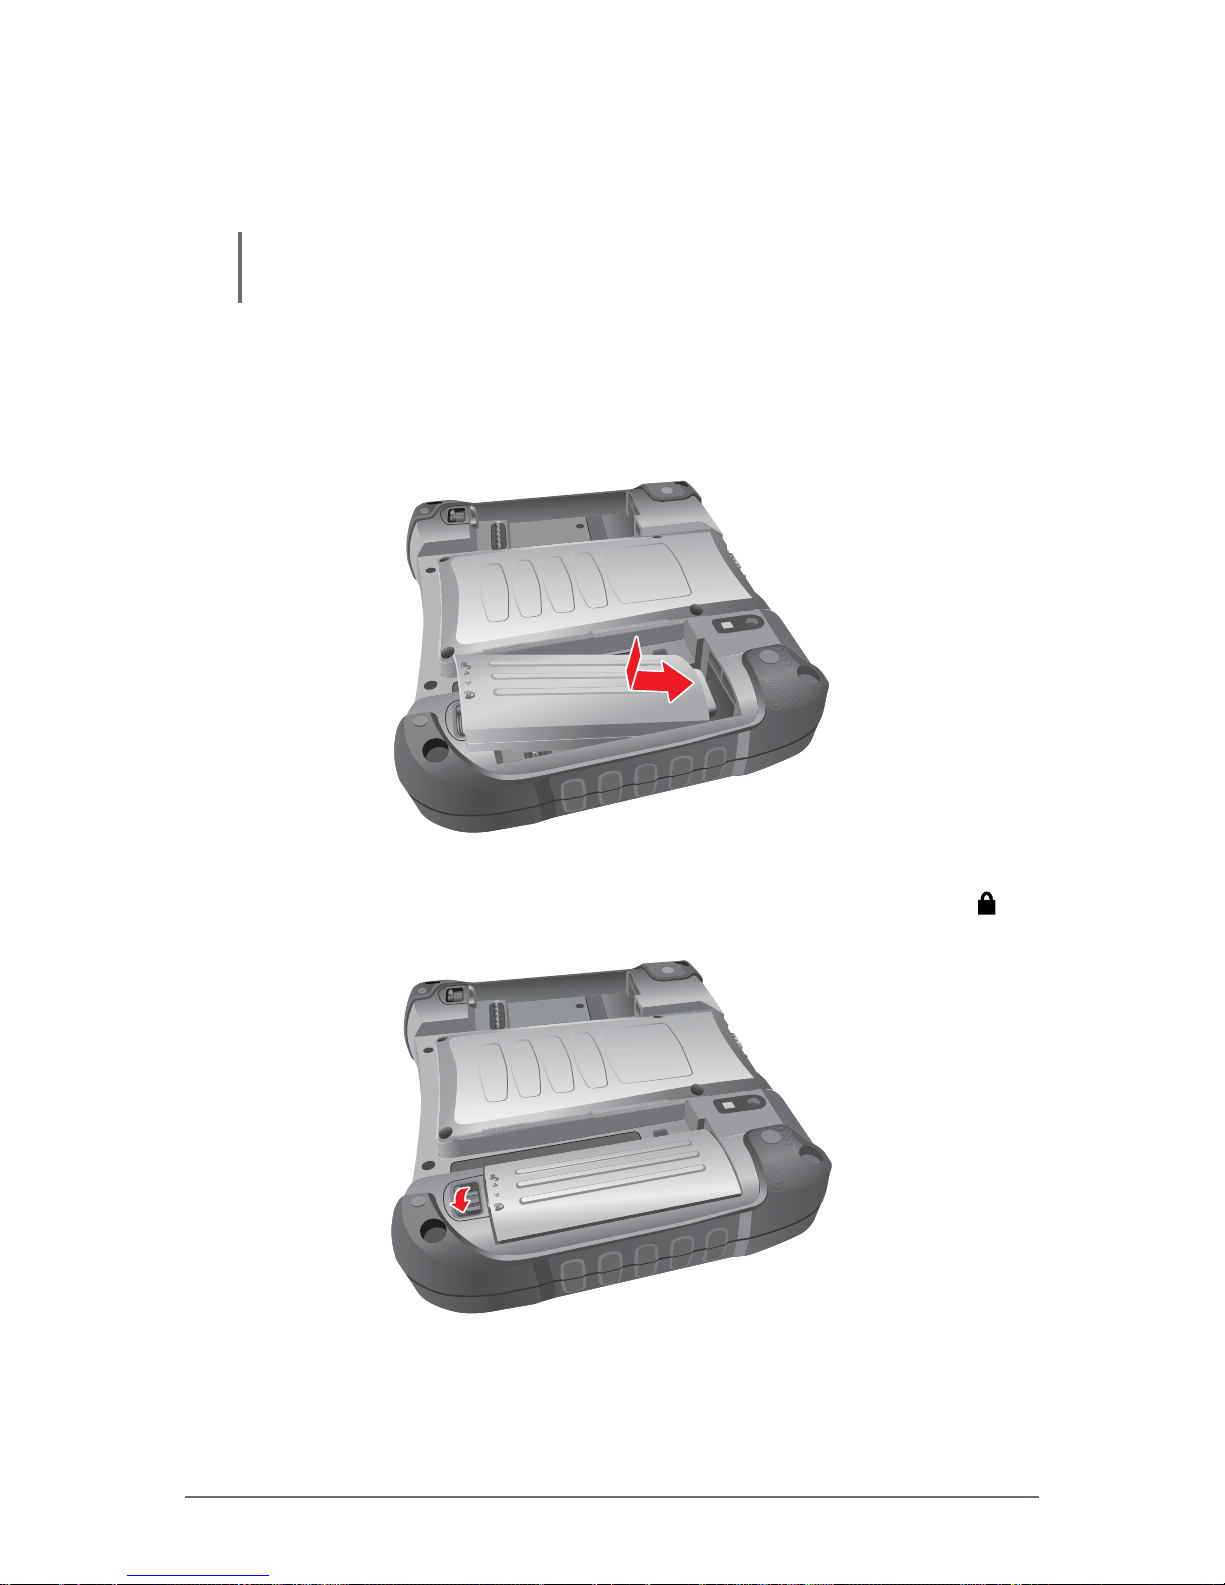
Installing the Battery Pack
NOTE:
• The battery pack(s) are hot-swappable.
Perform the following to install the battery pack to M9020:
1. From the top side of the battery pack, align and place the battery on its
bay.
2. Press down on the battery pack.
3. Press down on the battery pack and rotate the lock latch to the lock ( )
direction, until the battery pack is xed.
Page 26
1-18 Winmate Technologies
Getting Started
Removing the Battery Pack
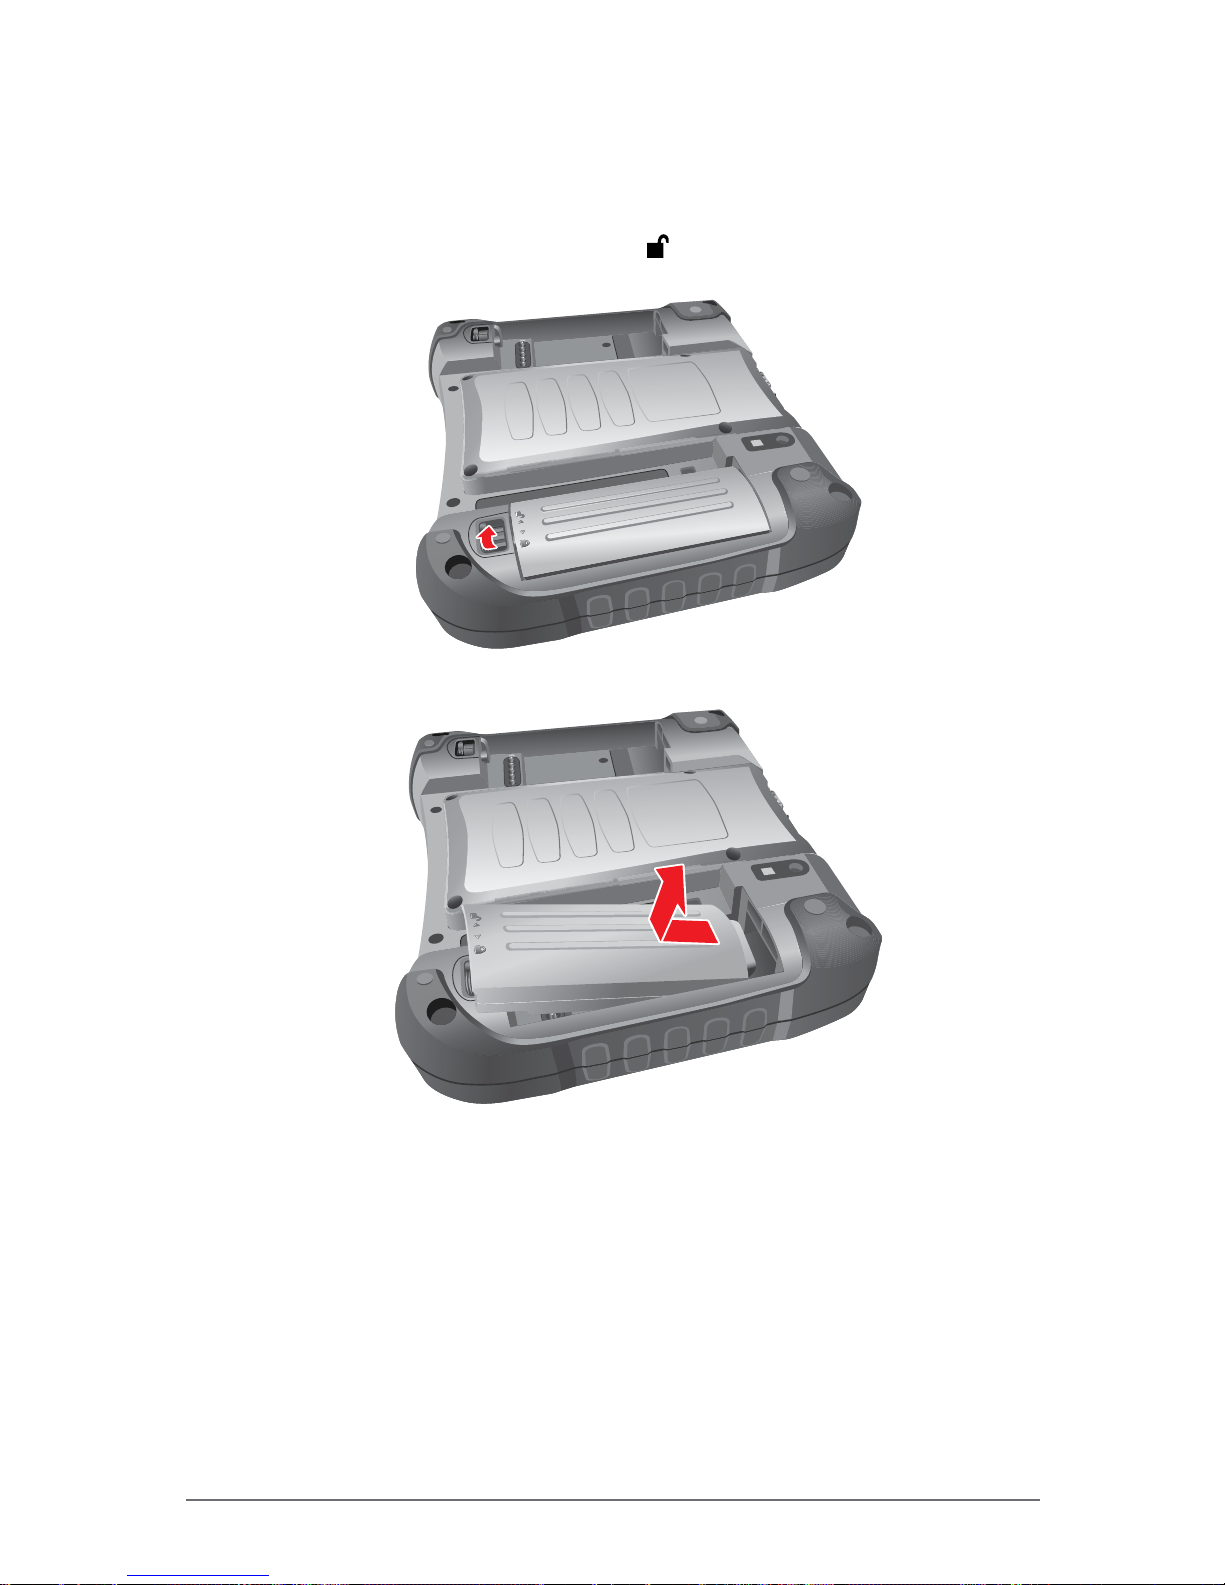
Perform the following to remove the battery pack from M9020:
1. Rotate the lock latch to the unlock (
) direction, until the battery pack is
released from the socket.
2. Release the battery pack from the bay, and remove.
Page 27
Winmate Technologies 1-19
Getting Started
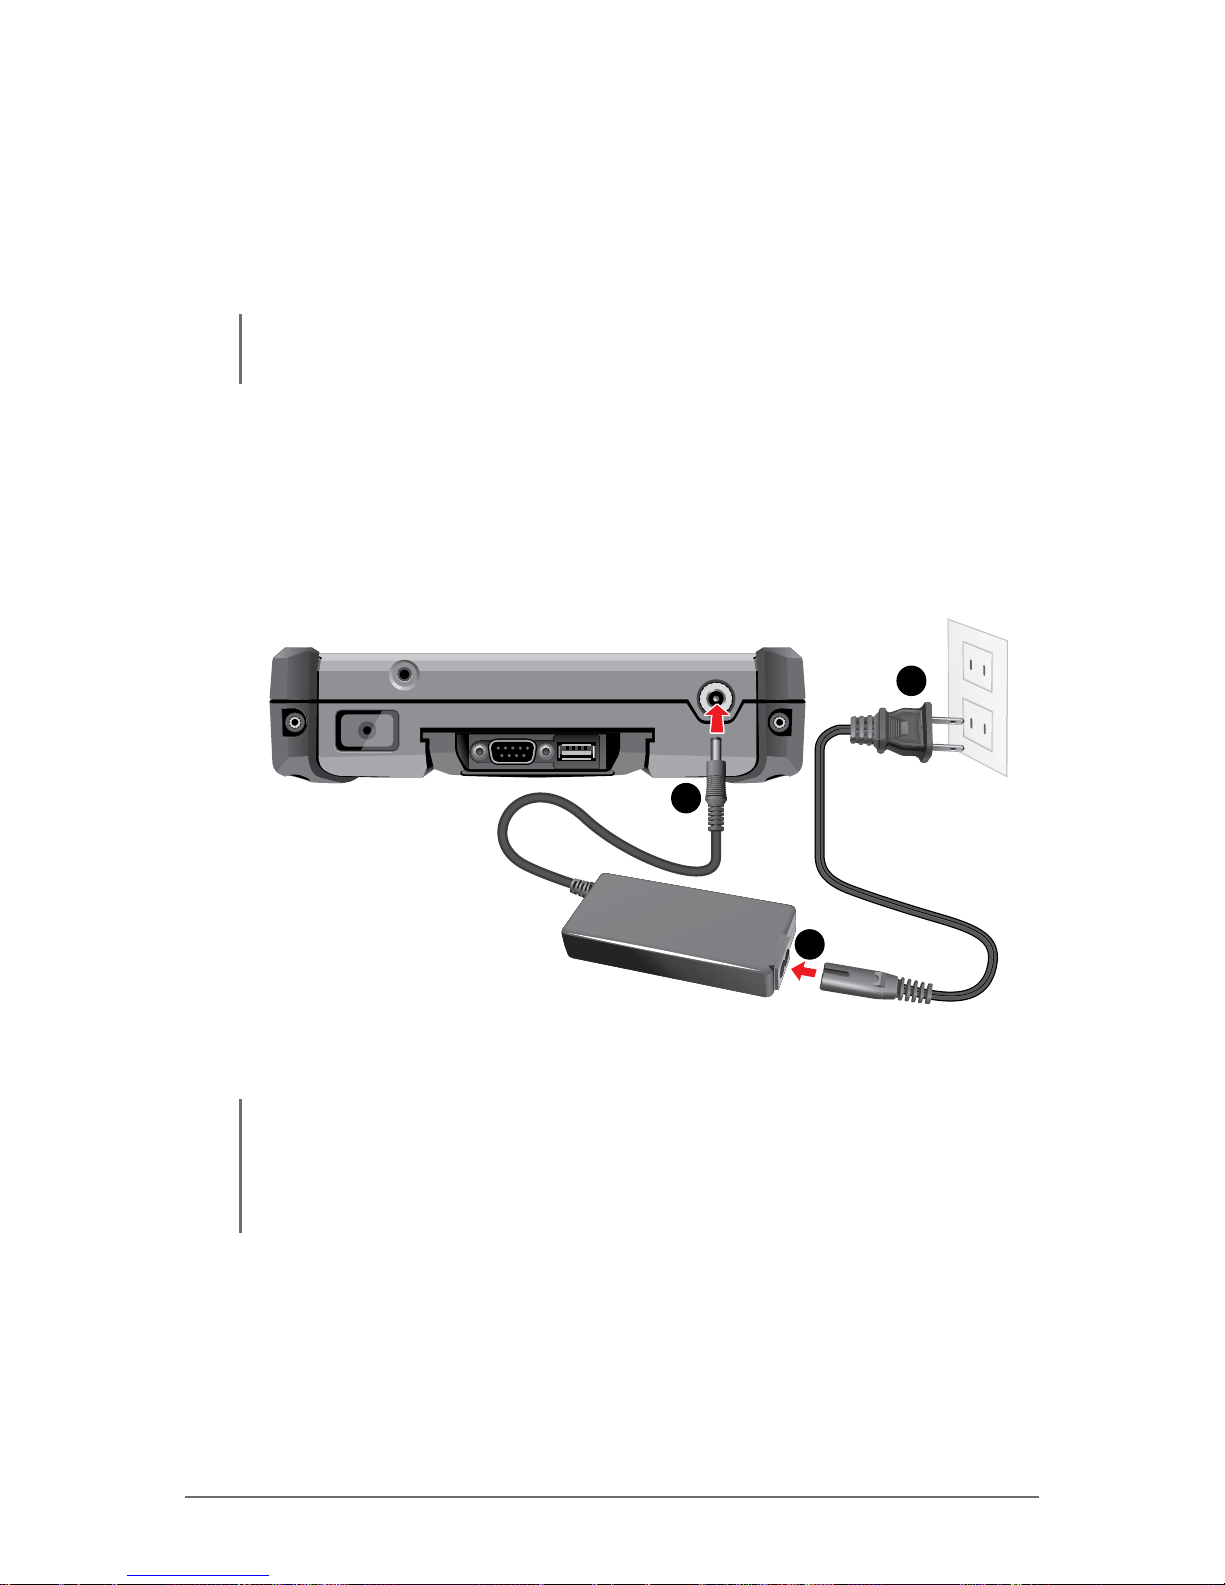
Connecting to AC Power
The M9020 operates either on external AC power or internal battery power. It is
recommended to use AC power when you start up the device for the rst time.
CAUTION: Use only the AC adapter included with your M9020. Using other AC adapters may
damage M9020.
Perform the following to connect the M9020 to AC power:
1. Plug the DC cord of the AC adapter into the power connector of the
M9020.
2. Plug the female end of the AC power cord into the AC adapter.
3. Then plug the male end of the AC power cord into an electrical outlet.
1
2
3
When the AC adapter is connected, the battery pack is charging.
CAUTION:
• When you disconnect the AC adapter, disconnect from the electrical outlet rst and
then from M9020. A reverse procedure may damage the AC adapter or M9020.
• When unplugging the connector, always hold the plug head. Never pull on the cord.
Page 28
1-20 Winmate Technologies
Getting Started
Turning the M9020 On and Off
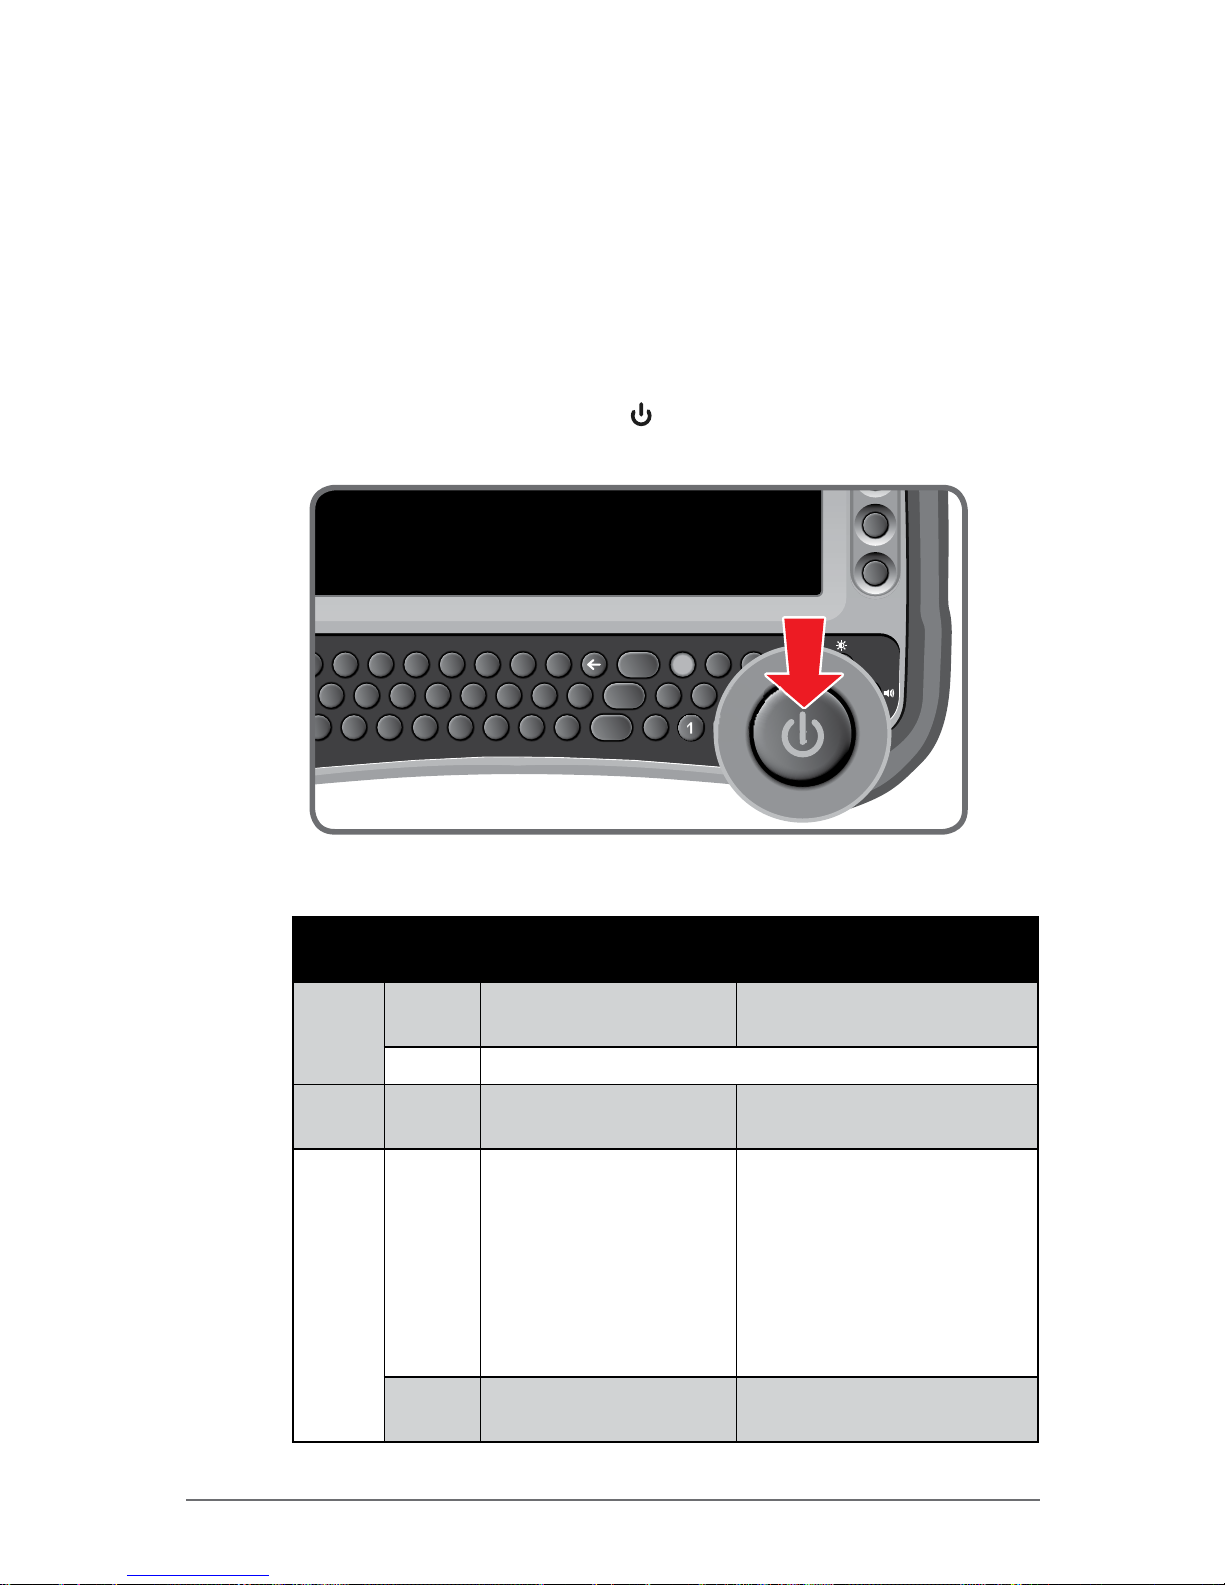
Turning On
1. Make sure that the M9020 is either connected to AC power or that the
battery pack is charged.
2. Press and hold the power button (
) for about 5 seconds, until the power
LED lights up.
0
12
45
789
Alt
Shift
F
GHJKL
Enter
Space
Del Fn
,
.
O
P
#
$%^& *(
?>][}{
)
|
;
:
“‘
~
`
F4
F3
F5
/
-
+
See the following table for the power LED indicator states:
LED
Color
Status
Battery Mode
(On Battery Power)
AC Mode
(On External Power)
Green
Solid
Power on. Fully charged: Both
batteries are fully charged.
Blinking Suspend: Every 3 seconds.
Blue Solid N/A
Either battery is being
charged.
Red
Blinking
(The average of two
batteries)
• <= 20%: every 5s.
• <= 15%: every 3s.
• <= 10%: every 1s.
• 5%: Hibernate.
(Depends on OS
setting).
N/A
Solid Either Battery #1 or
Battery #2 is missing.
N/A
Page 29

Winmate Technologies 1-21
Getting Started
Turning Off
To turn off the M9020, use the “Shut Down” command of your operating
system.
CAUTION: Wait for at least ve seconds after turning off the M9020 before turning it back on.
When you nish a working session, you can stop the device by shutting it down
or by leaving it in Sleep or Hibernation mode:
To stop in
this mode...
Do this...
Off Use the Windows Start Menu and follow the shut down
procedure.
You can force M9020 to turn off by pressing and holding the
power button (
) for more than 6 seconds. This is not the
recommended method, but may be necessary if the system is
locked up.
Hybrid Sleep
Short press the power button (
) or use the Windows Start
Menu to put M9020 in Hybrid Sleep mode.
Hibernation Use the Windows Start Menu to put M9020 in hibernation
mode.
Press the power button (
) to resume or turn on the M9020 from any of these
modes. See “Power Management” on page 4-6 for more information.
Page 30

Winmate Technologies 2-1
Operating Your Tablet Computer
CHAPTER
2
This chapter provides information about the use of the M9020 and
describes the operating basics of the following components and
features:
• Touch Screen
• Keyboard
• Panel Keys
• Wireless LAN Features
• Bluetooth Features
• Wireless WAN Features
• GPS Features
• Camera
• Winmate Control Center
• Barcode Reader
Operating Y our T ablet
Computer
Page 31
2-2 Winmate Technologies
Operating Your Tablet Computer
Using the Touch Screen
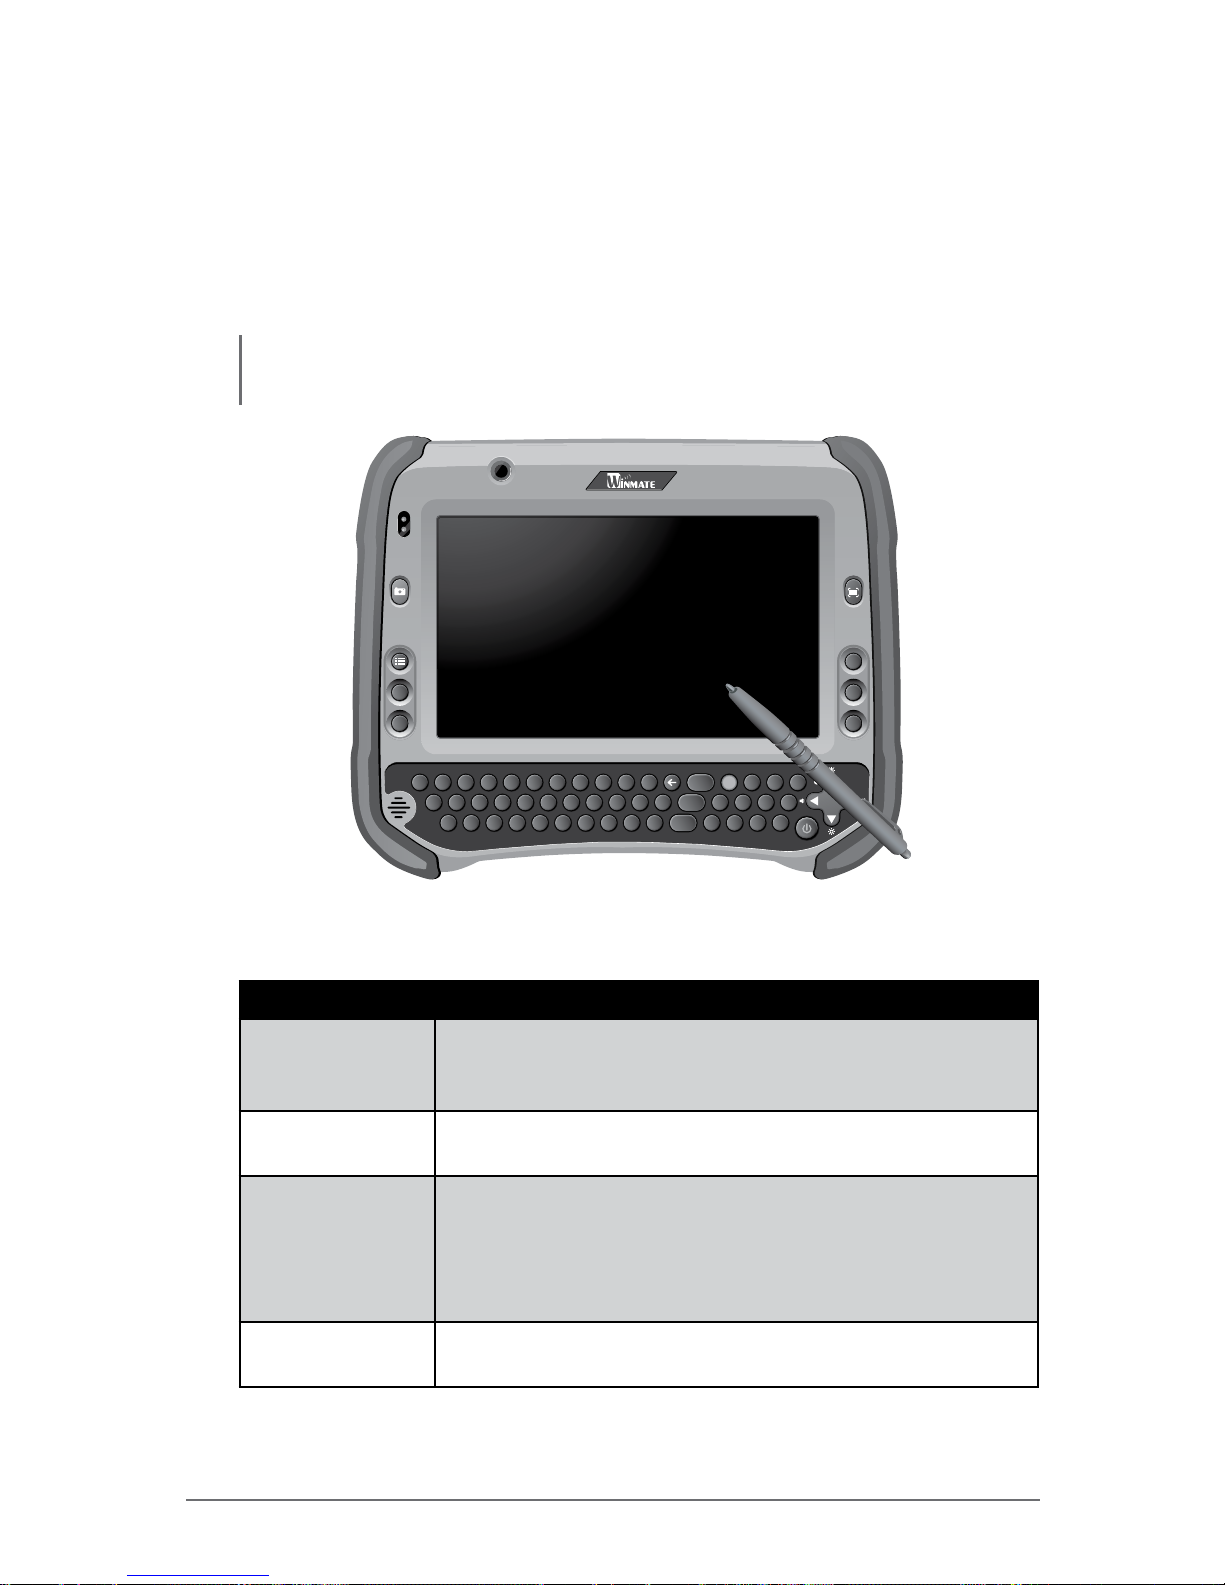
The touch screen is a touch-sensitive device that allows you to control and
make selections on the device by controlling the location of the pointer on the
screen.
CAUTION: Do not use sharp or pointed objects on the touch screen. These objects may
scratch the screen. Use only the stylus pen or the tip of your nger.
Esc
Tab
Ctrl
Q
A
ZXCVBNM
0
123
456
789
Alt
Shift
SDFGHJKL
Enter
Space
Del Fn
,
.
WERTYU I
OP
!
@
-
=
Caps
#
$%^& *(
?/
-
>][}{
)+
|
;\:
“‘
~
`
F1
F2
F4
F3
F5
Here are some common terms that you should know when using the touch
screen.
Term Action
Tap Tap gently on the touch screen to select or open an item.
Tapping is the same as clicking the left mouse button of a
PC.
Double-tap Rapidly tap twice on the touch screen. This action is
similar to double-clicking the left mouse button of a PC.
Tap and hold Tap and hold the stylus lightly on the display. A big circle
appears to indicate that a pop-up menu will soon appear.
Lift up the stylus and a pop-up menu appears. Select the
desired function. This action is similar to a right mouse
click on a PC.
Drag Hold the stylus on the screen and drag across the screen
to select text and images or move icons to a new location.
For more customized stylus settings, use the HIDeGalaxTouch available on the
desktop of the device.
Page 32
Winmate Technologies 2-3
Operating Your Tablet Computer
Calibrating the Screen
When there is a noticeable discrepancy in the placement of the stylus on
the screen and the indicated position of the onscreen pointer, recalibrate the
screen.
For calibration you can use the HIDeGalax Touch tool.
HIDeGalax Touch Calibration Tool
Perform the following to calibrate the screen:
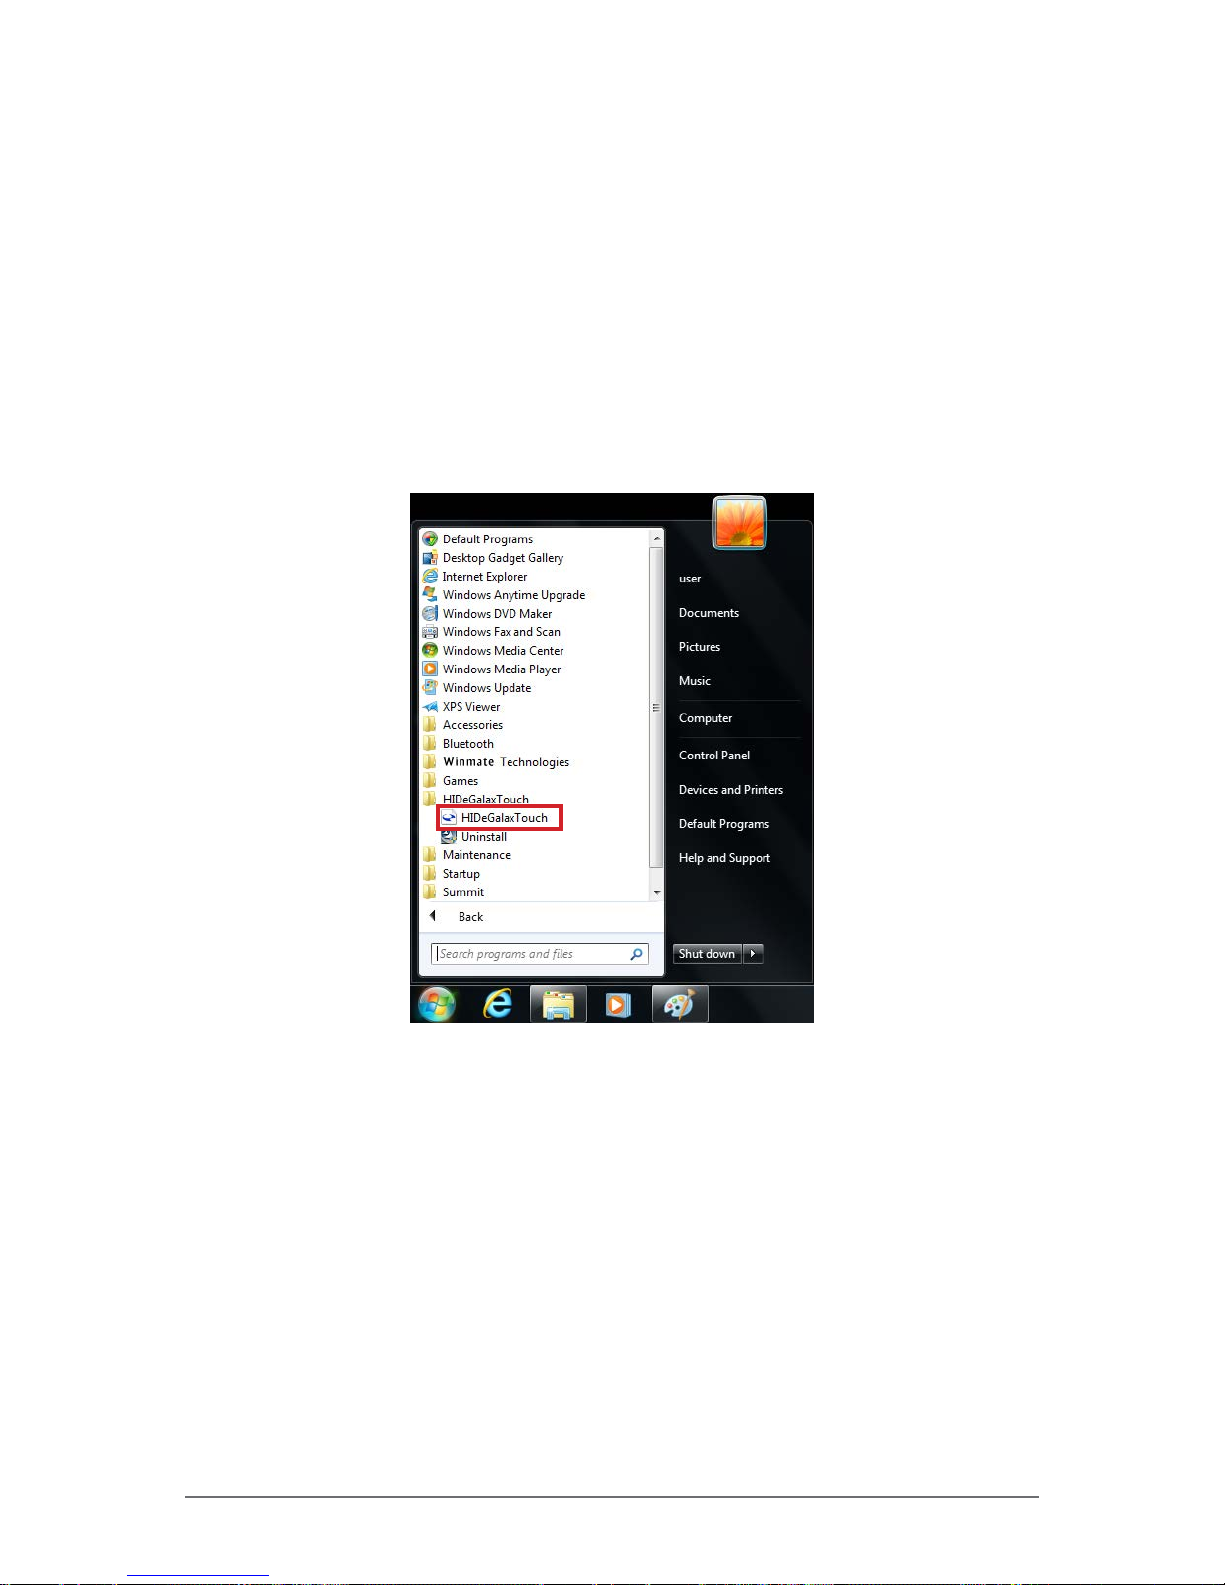
1. Tap Start > All Programs > HIDeGalaxTouch > HIDeGalaxTouch. The
following screen opens.
Page 33
2-4 Winmate Technologies
Operating Your Tablet Computer
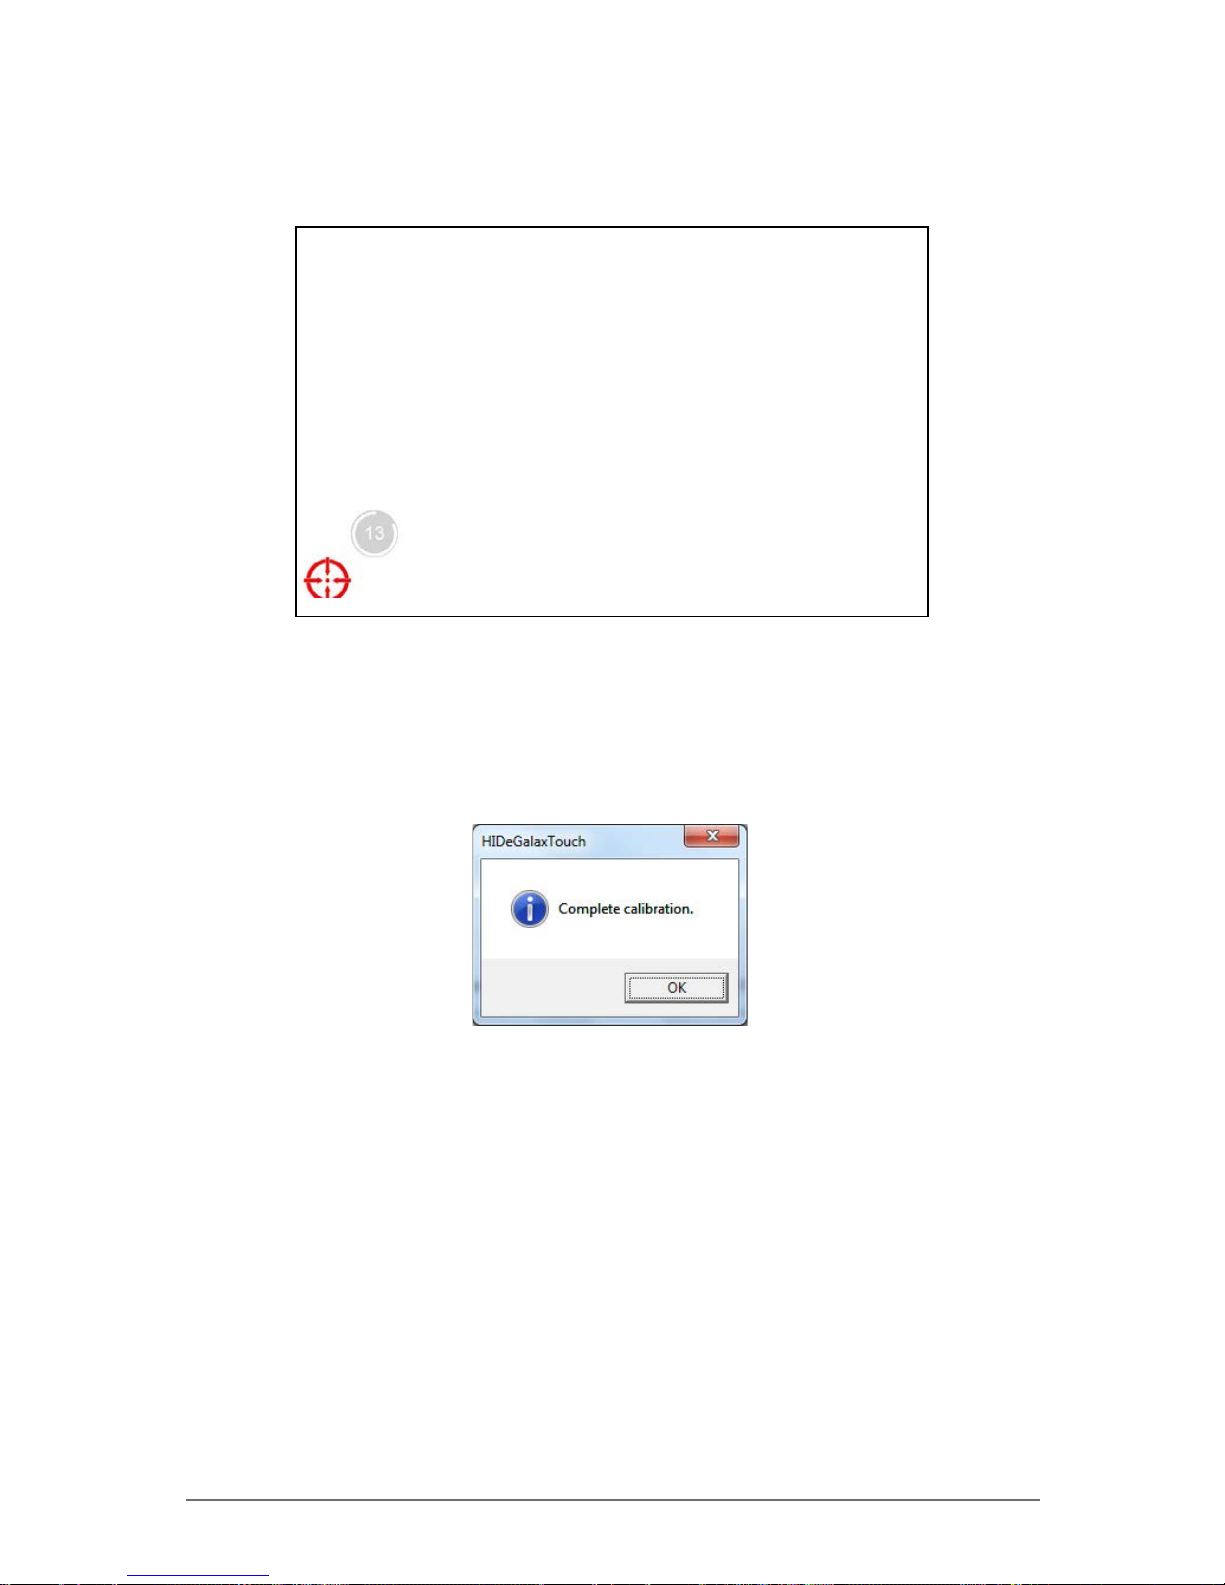
2. For a basic test, tap 4 Points Calibration, for more detailed one, tap 9
Points Linearization or 25 Points Linearization. The following example
shows 4 Points Calibration.
3. Use the supplied stylus to tap and hold the dot inside the red circle, until it
turns into a blue circle. Repeat this process as the dot moves around the
screen.
4. When calibration is complete, tap OK button and close the calibration
utility screen.
Page 34
Winmate Technologies 2-5
Operating Your Tablet Computer
Using the Integrated Keyboard
Your M9020 includes an integrated keyboard that allows you to enter text and
perform various keyboard functions.
Keyboard Overview
Esc
Tab
Ctrl
Q
A
ZXCVBNM
0
123
456
789
Alt
Shift
SDFGHJKL
Enter
Space
Del Fn
,
.
WERTYU I
O
P
!
@
-
=
Caps
#
$%^& *(
?/
-
>][}{
)+
|
;\:
“‘
~
`
F1
F2
F4
F3
F5
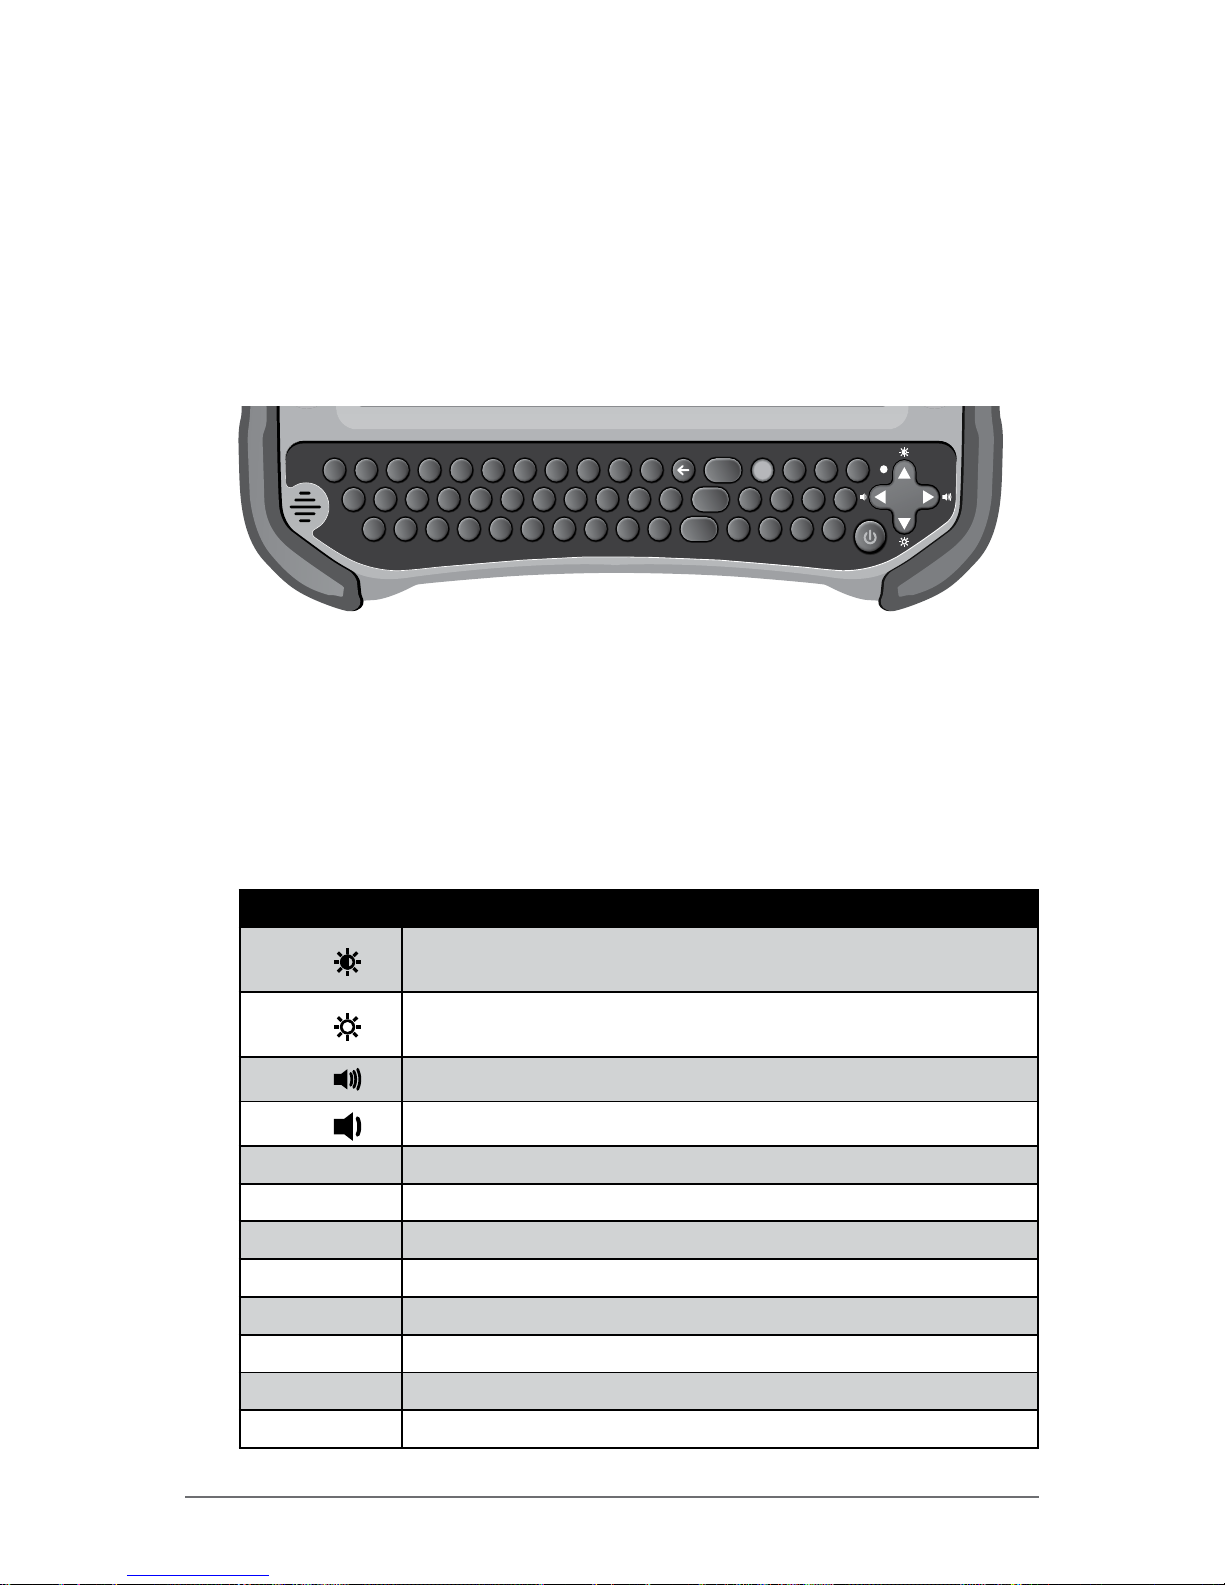
Use the keyboard to type in text and numbers. If you need to use special
symbols and functions, marked in yellow on the keyboard, press and hold the
Fn key, and then press the corresponding symbol or function key. For example,
to enter “%”, press and hold Fn key and then press the corresponding letter “T”.
Special Function Keys
The following is a list of special functions, accessible via keyboard.
Function Description
Fn +
Hold down Fn and press ▲ repeatedly to increase screen
brightness.
Fn +
Hold down Fn and press ▼ repeatedly to decrease screen
brightness.
Fn +
Hold down Fn and press ► repeatedly to increases volume.
Fn +
Hold down Fn and press ◄ repeatedly to decreases volume.
Fn + 1 Function key F11.
Fn + 2 Function key F12.
Fn + 3 Function key F13.
Fn + 4 Function key F14.
Fn + 5 Function key F15.
Fn + 6 Function key F6.
Fn + 7 Function key F7.
Fn + 8 Function key F8.
Page 35
2-6 Winmate Technologies
Operating Your Tablet Computer
Function Description
Fn + 9 Function key F9.
Fn + 0 Function key F10.
NOTE: To access the function keys F1 ~ F5, see “Using the Panel Keys” on
page 2-6.
Navigation Keys
Use the navigations keys (◄ / ► / ▲ / ▼) to move the cursor or selection one
space or line in the direction of the arrow, or scroll a webpage in the direction of
the arrow.
Using the Panel Keys
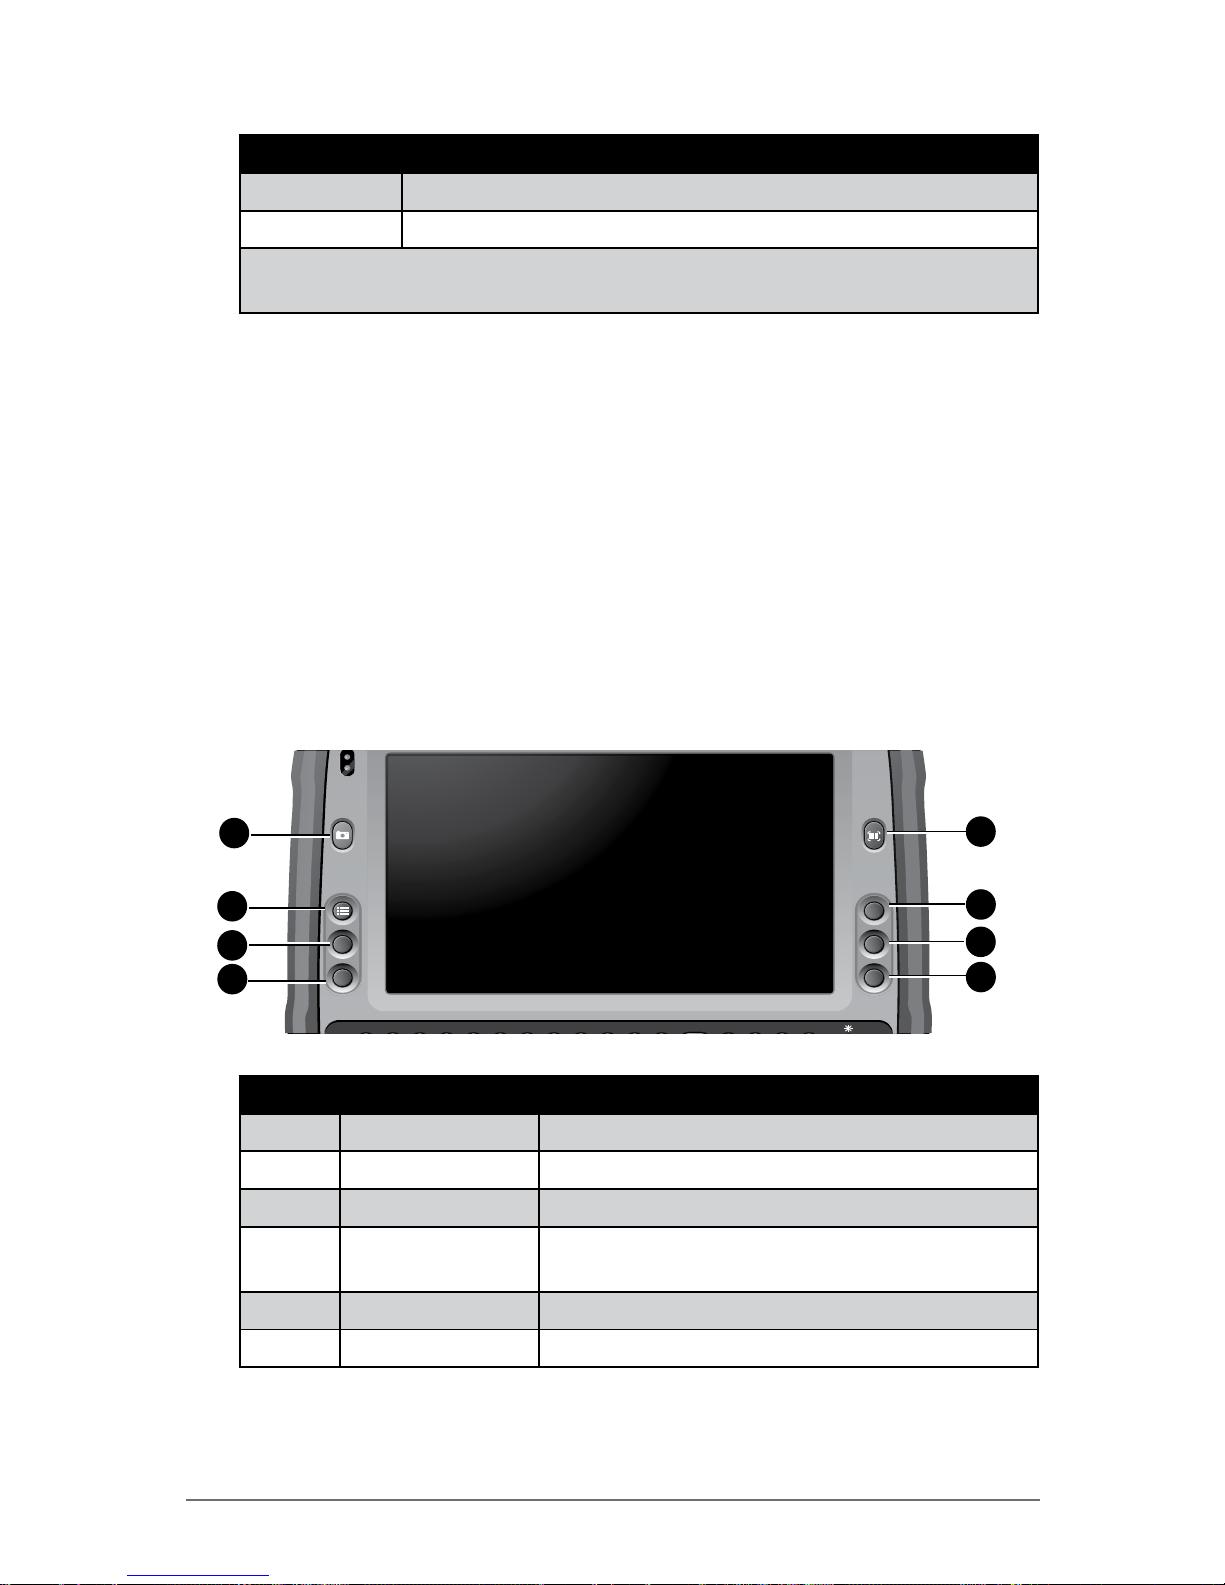
The Panel Keys provide shortcuts for you to utilize the common functions of
your M9020, such as opening the camera, activating the bar code reader, and
more.
@
F1
F2
F4
F3
F5
2
6
7
8
1
5
3
4
No. Button Description
1 Barcode Scanner Press and hold, to scan the barcode.
2 F3 Programmable funciton key.
3 F4 Programmable funciton key.
4
F5
Tap to refresh the active window in Internet
Explorer.
5 F2 Programmable funciton key.
6 F1 Programmable funciton key.
Page 36
Winmate Technologies 2-7
Operating Your Tablet Computer
No. Button Description
7 Menu Tap to open the Start menu.
8
Camera
Press to open the camera application. How to
use the camera, see “Using the Camera” on
page 2-26.
Using Wireless LAN
Your M9020 has a built-in wireless radio which automatically detects wireless
networks that are within range.
Turning the Wireless Radio On and Off
By default, the Wi-Fi is turned on. In case you need to turn it on or off, perform
the following:
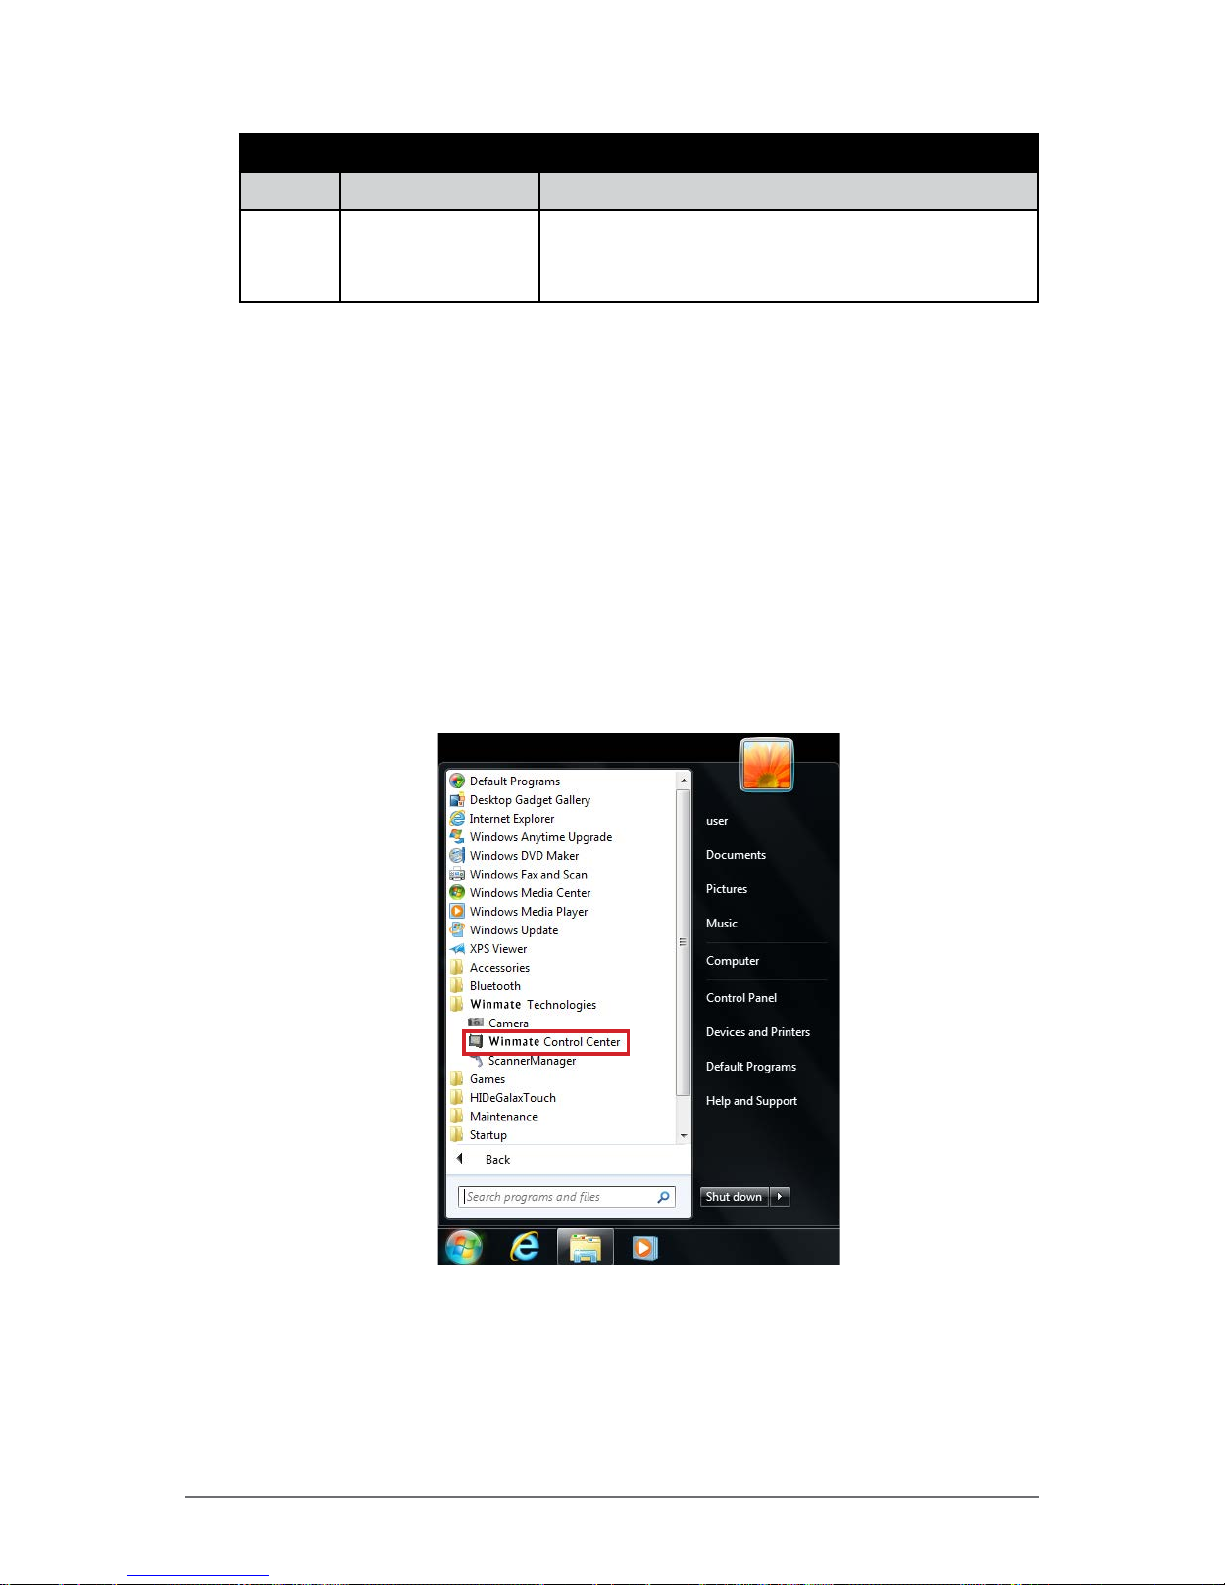
1. Tap Start > All Programs > Winmate Technologies > Winmate Control
Center.
Page 37
2-8 Winmate Technologies
Operating Your Tablet Computer
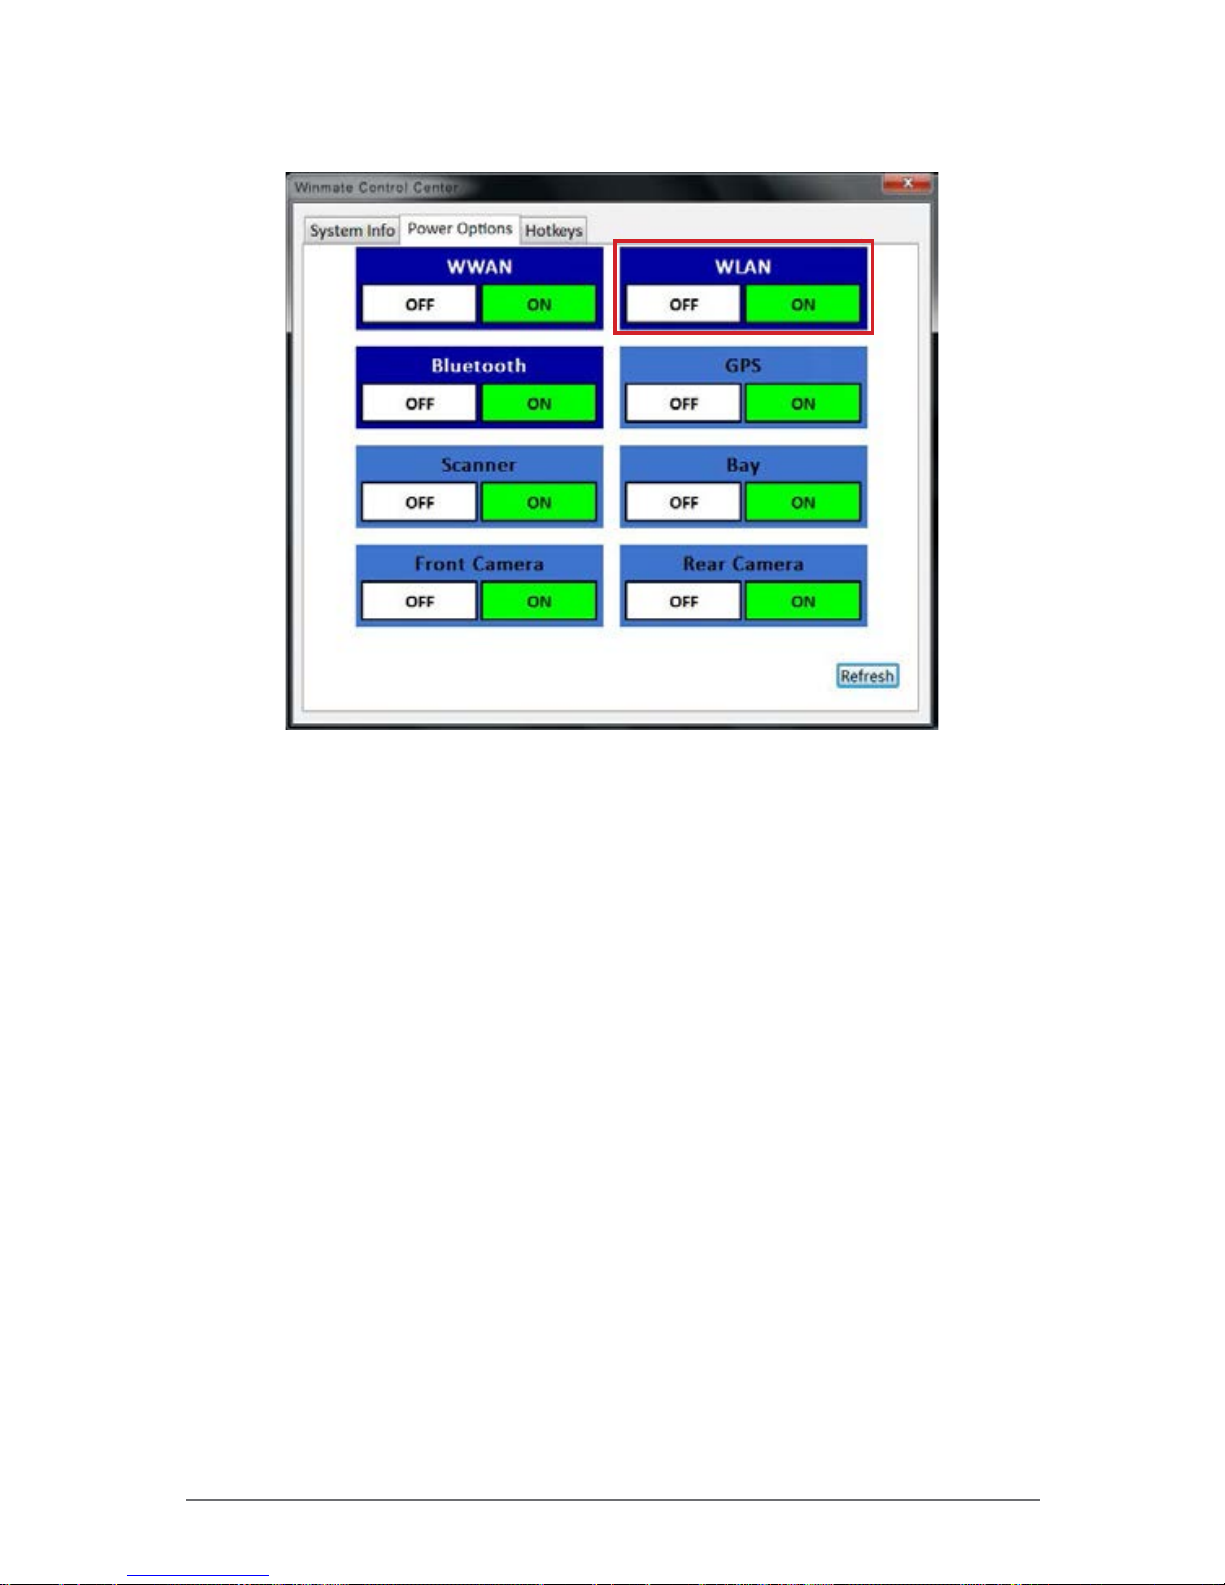
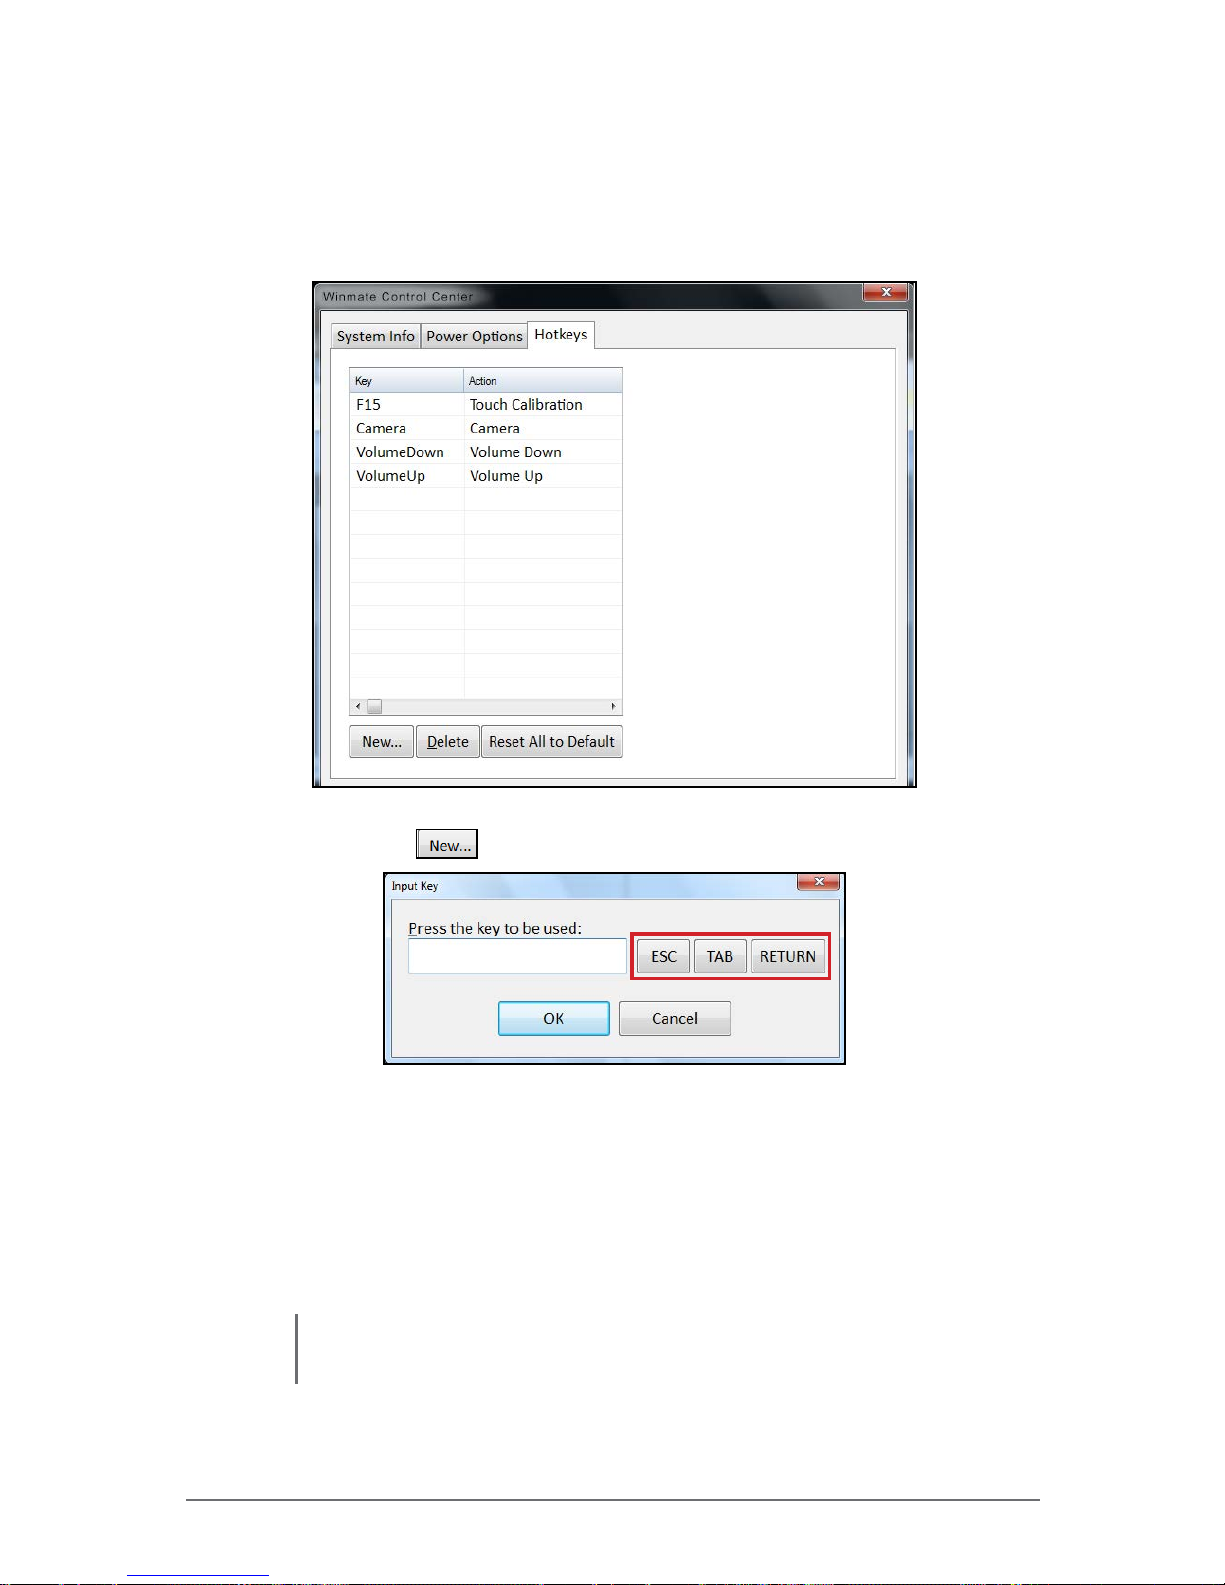
2. Select the Power Options tab.
3. To turn the Wi-Fi on or off, tap ON or OFF in the corresponding box.
Page 38
Winmate Technologies 2-9
Operating Your Tablet Computer
Connecting to a Wireless Network
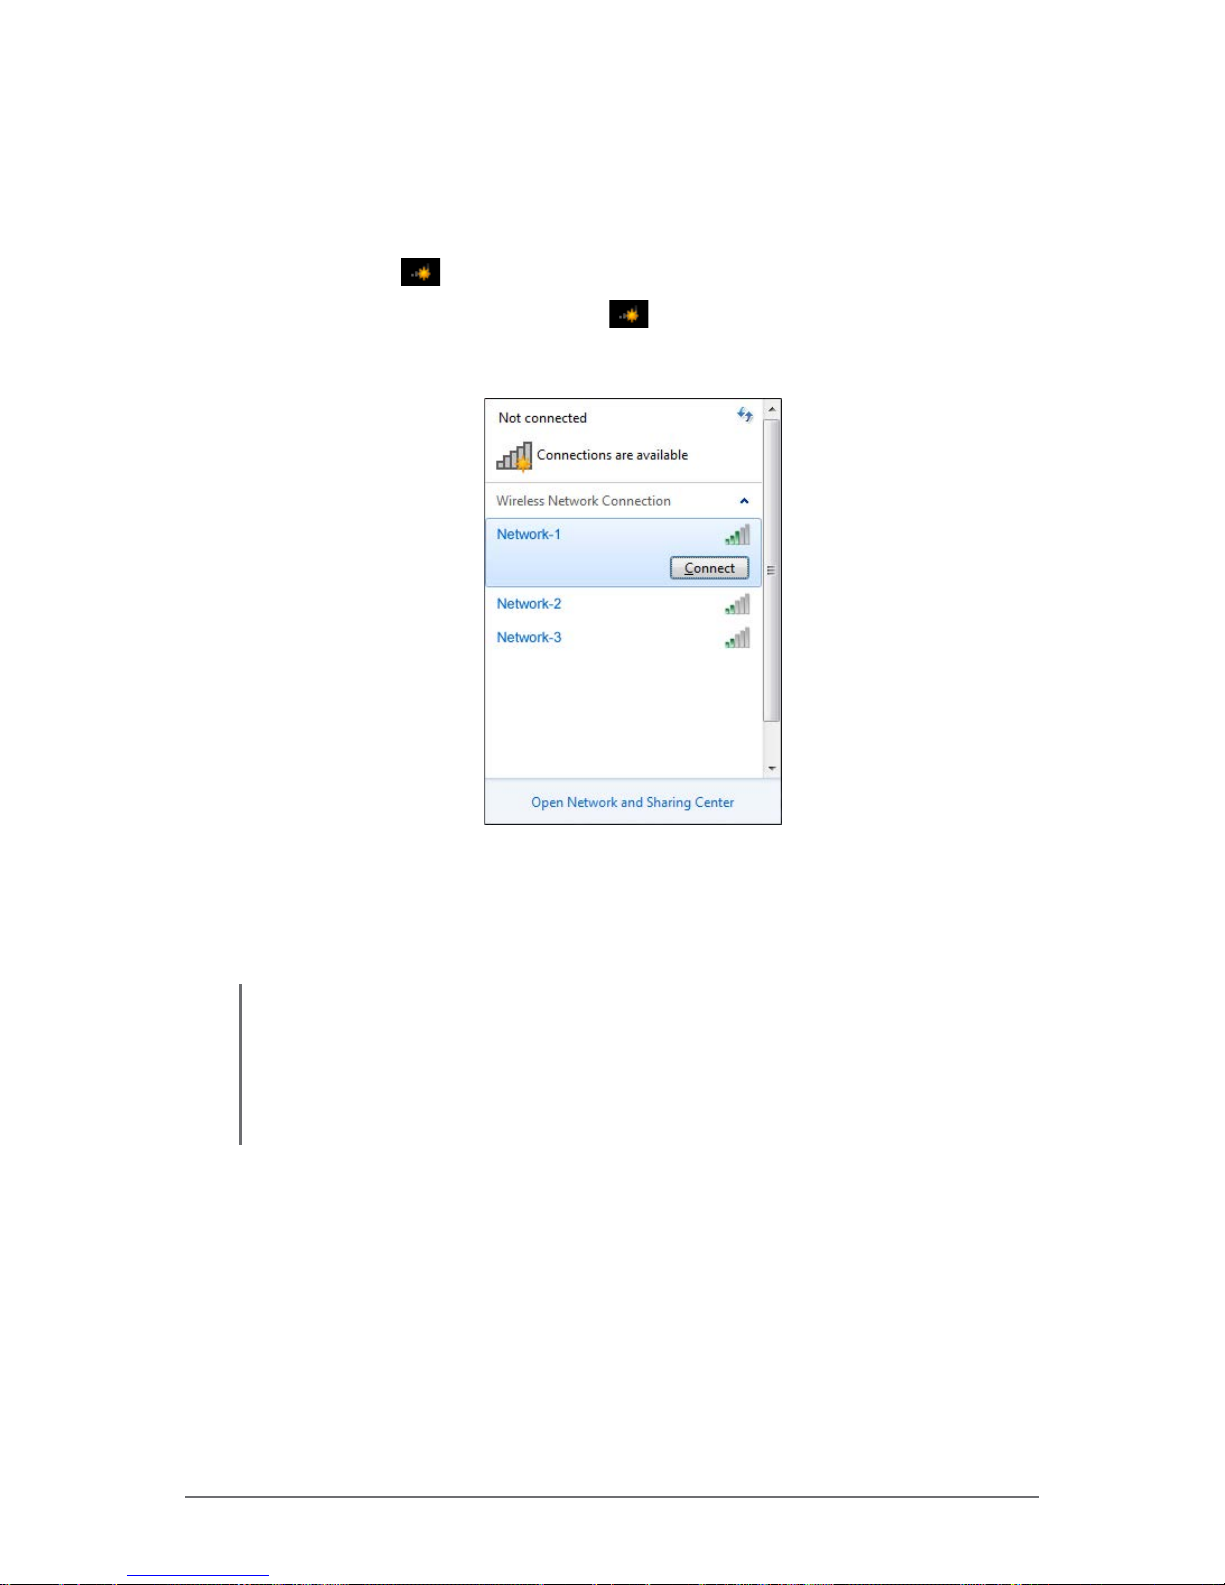
Perform the following to connect to a wireless network:
1. Make sure that the WLAN is ON (The Wireless network icon on the task
bar shows
).
2. Tap the Wireless Network icon (
) on the taskbar.
3. From the list of available networks, select a network.
4. Tap Connect.
5. If the network requires authentication, enter the security key or
passphrase.
NOTE:
• Once you are connected to a wireless network, Windows saves the network prole and
will automatically connect to that network when it is in range.
• For more information on connecting to your wireless network, contact your network
administrator.
Page 39
2-10 Winmate Technologies
Operating Your Tablet Computer
Using Bluetooth
Your M9020 has integrated Bluetooth capability for short-range wireless
communication between Bluetooth-enabled devices.
By default, the Bluetooth feature is enabled as indicated by the Bluetooth
icon (
) on the taskbar; but your M9020 is not visible to other devices. To
make your M9020 visible, check the Discovery box in Bluetooth settings (see
“Conguring Bluetooth Settings” on page 2-15).
Turning the Bluetooth On and Off
In case you need to turn the Bluetooth on or off, perform the following:
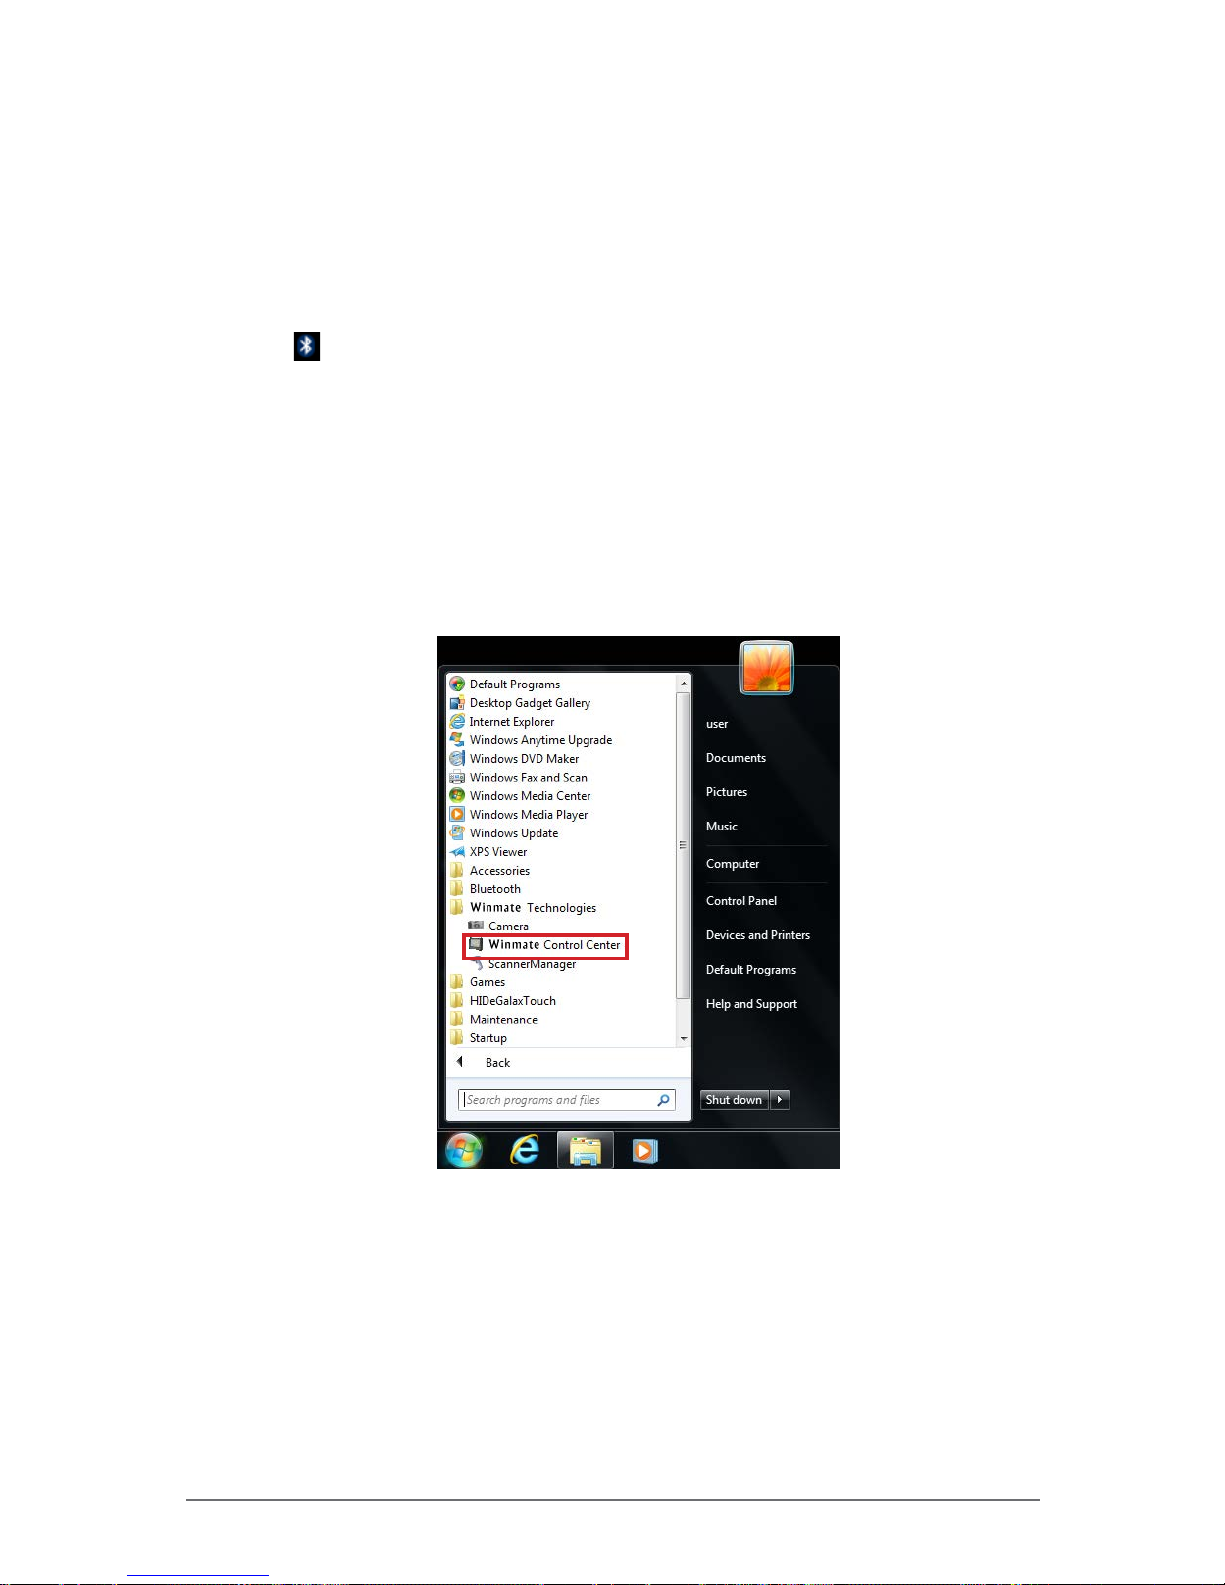
1. Tap Start > All Programs > Winmate Technlogies > Winmate Control
Center.
Page 40
Winmate Technologies 2-11
Operating Your Tablet Computer
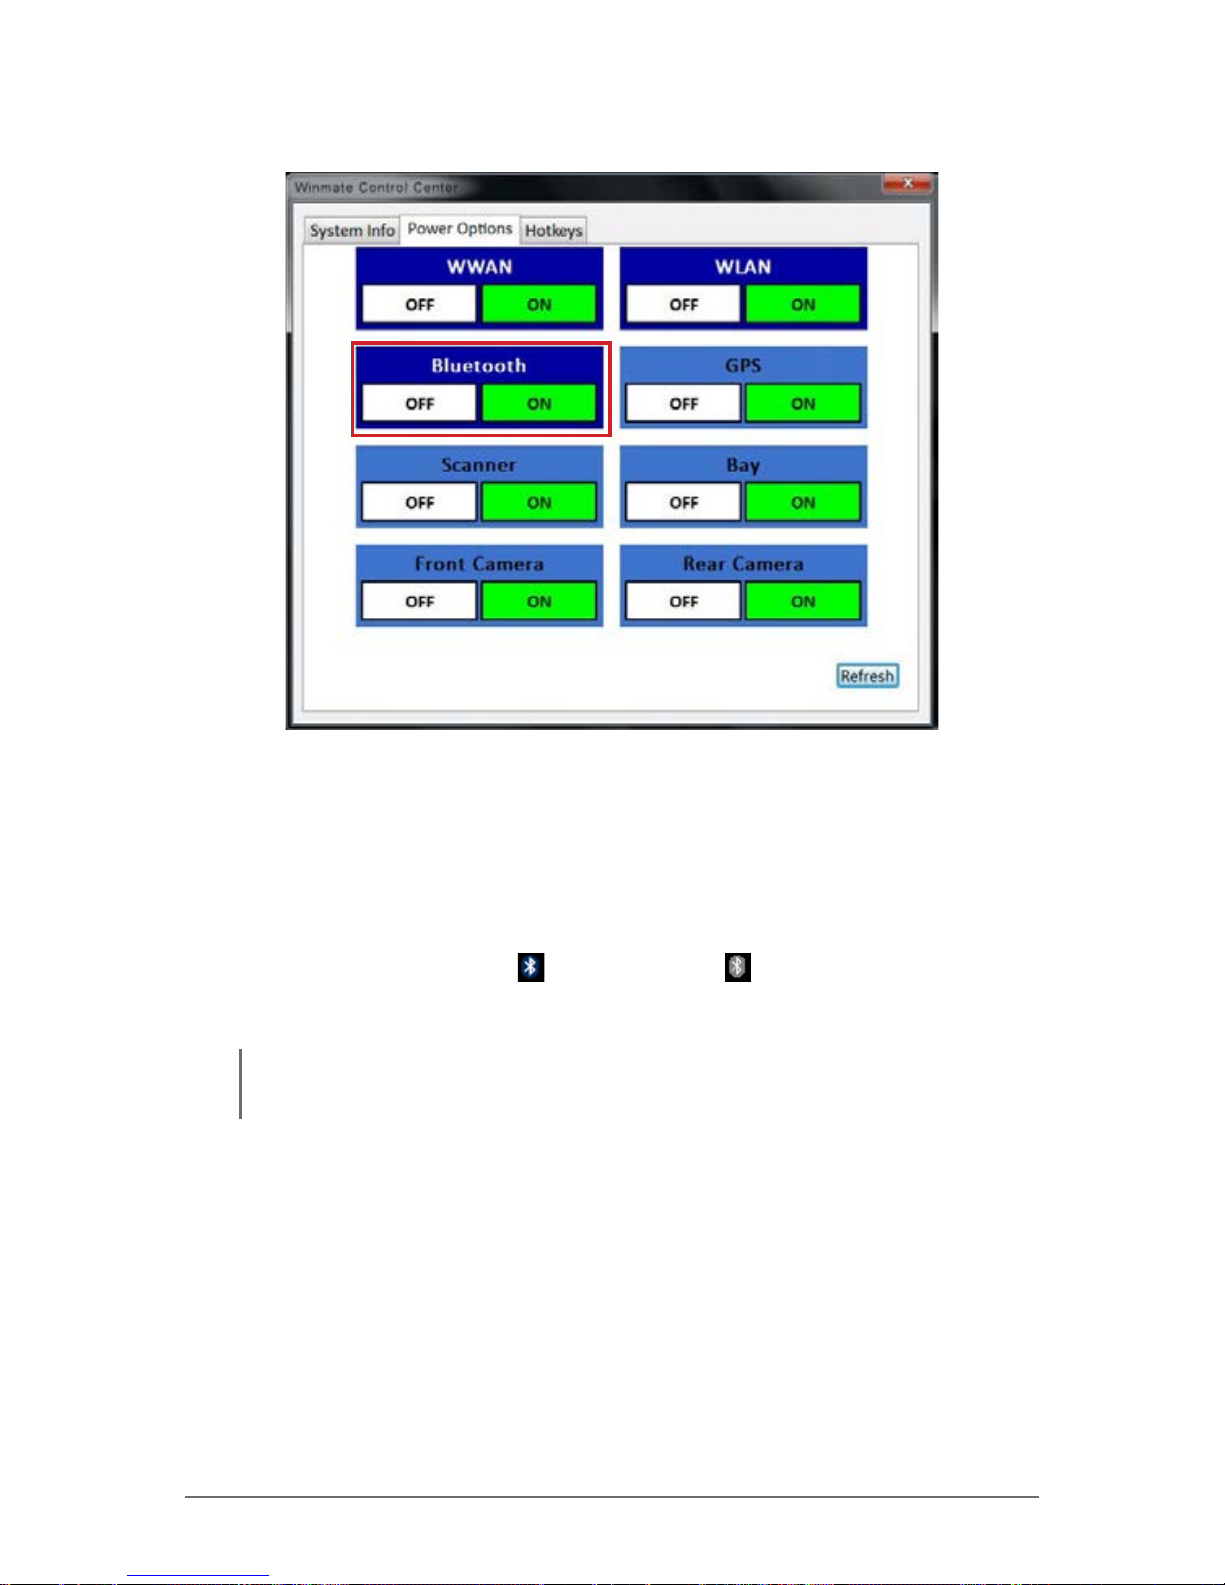
2. Select the Power Options tab.
3. To turn the Bluetooth on or off, tap ON or OFF in the corresponding box.
Turning the Bluetooth Adapter On and Off
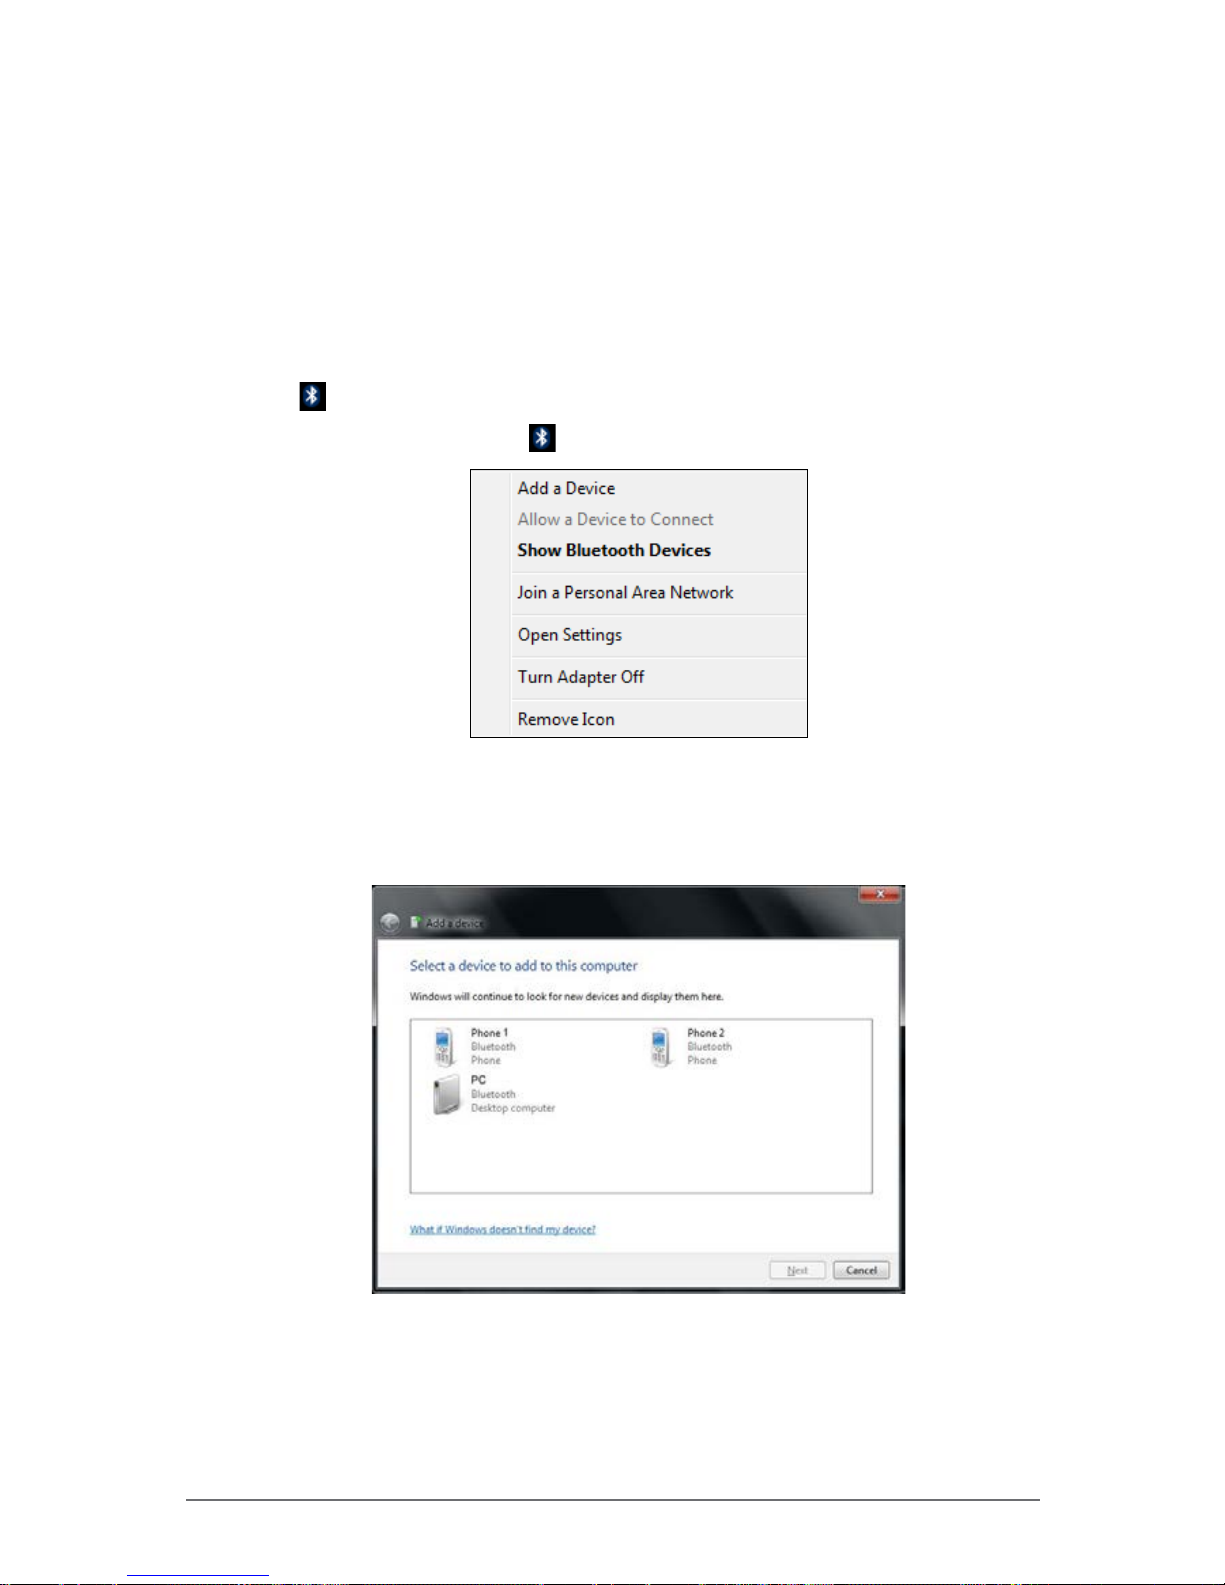
In case you need to turn the Bluetooth adapter on or off, perform the following:
1. Tap the Bluetooth On (
) or Bluetooth off ( ) icon on the taskbar.
2. A pop up menu appears. Tap Turn adapter on or Turn adapter off.
NOTE: If the Bluetooth icon is not shown on the task bar, check that the Bluetooth is activated on Winmate Control Center.
Page 41
2-12 Winmate Technologies
Operating Your Tablet Computer
Pairing with Bluetooth Devices
Before you can pair with Bluetooth devices for the rst time, you need to add
and save the device prole to your M9020.
To add and pair a Bluetooth device
Perform the following to pair your M9020 with Bluetooth devices:
1. Make sure the Bluetooth adapter is on as indicated by the Bluetooth icon
(
) on the taskbar.
2. Tap the Bluetooth icon (
) to display a pop up menu.
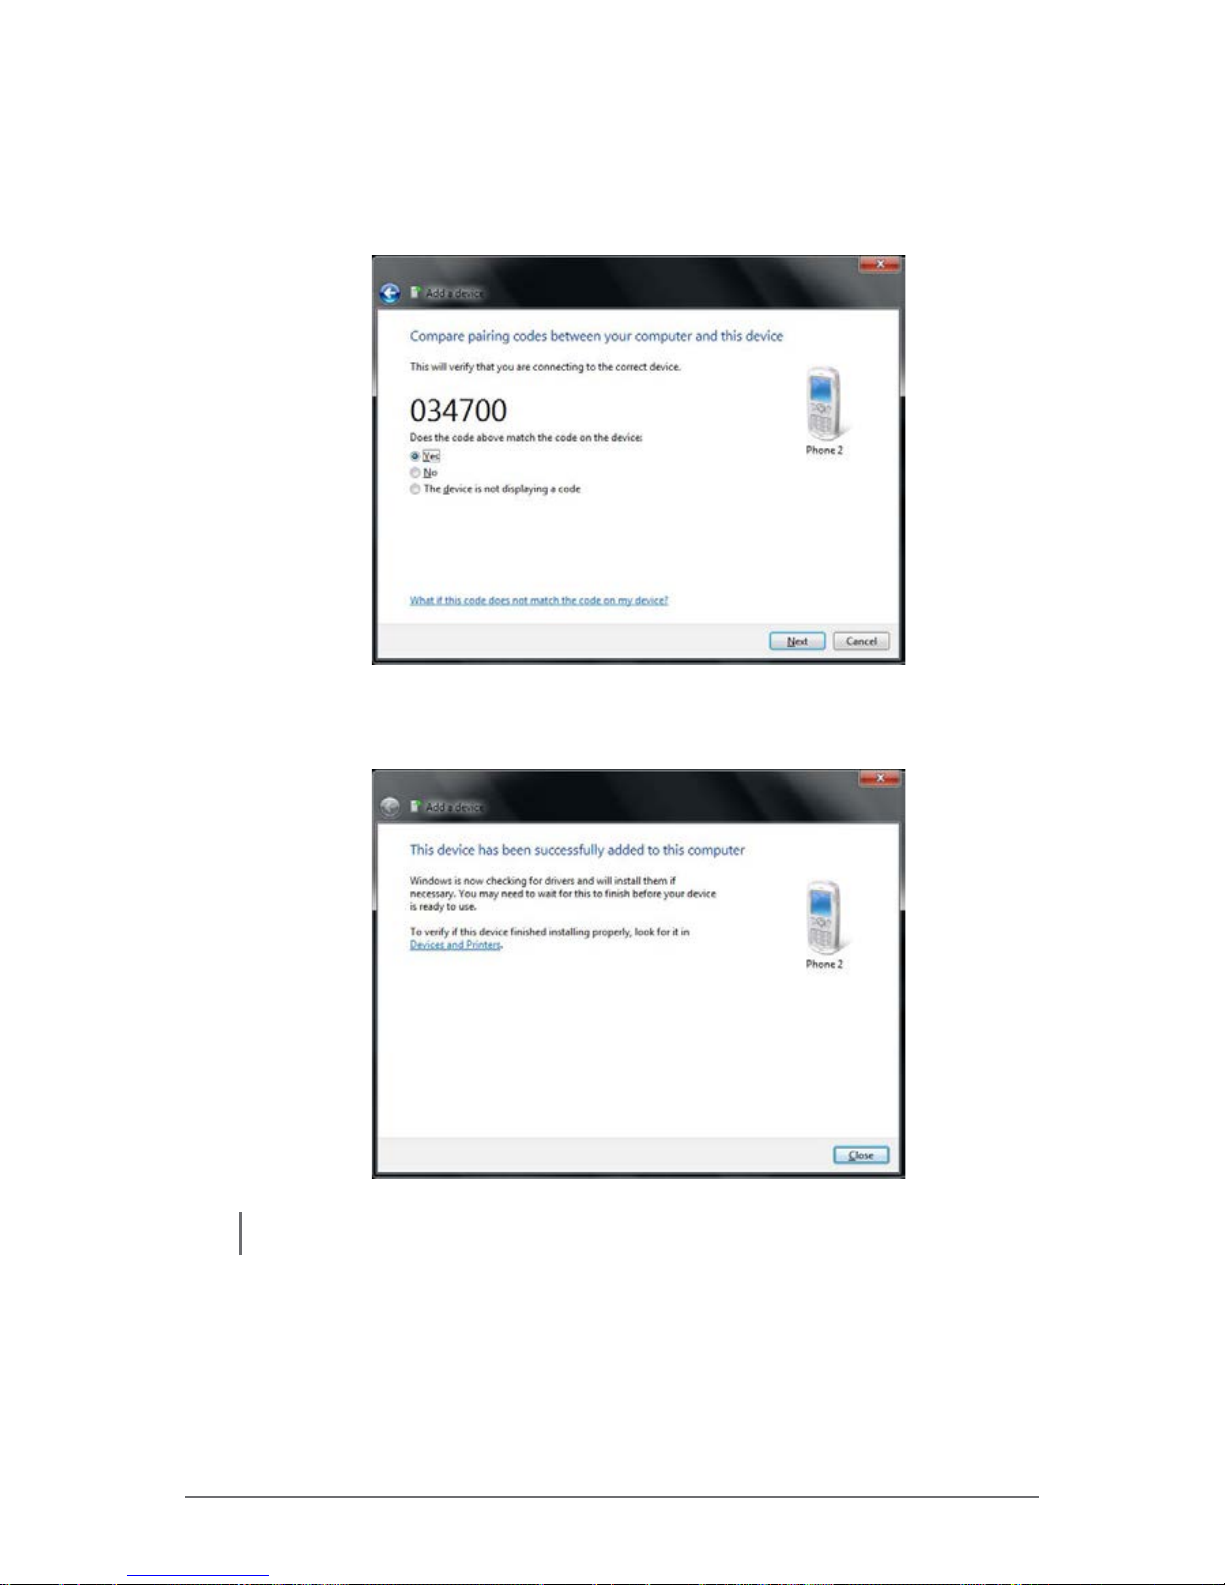
3. Tap Add a Device. The M9020 will scan for Bluetooth devices within
range.
4. Select the device you want to pair with, then tap Next.
Page 42
Winmate Technologies 2-13
Operating Your Tablet Computer
5. Depending on the device you are pairing with, you may be prompted to
enter or verify a pairing code. The pairing code entered or shown on your
M9020 must be the same as the one on the Bluetooth device. Click Next
to continue.
6. Windows will check for the device driver and install it, if necessary. Tap
Close to close the screen.
NOTE: For more information on using Bluetooth features, see Windows online help.
Page 43
2-14 Winmate Technologies
Operating Your Tablet Computer
To reconnect to a Bluetooth device
Once a Bluetooth device has been paired with your M9020, you do not need to
enter or verify the pairing code as you did the rst time.
To reconnect to a Bluetooth device, perform the following:
1. Make sure the Bluetooth adapter is on as indicated by the Bluetooth icon
(
) on the taskbar.
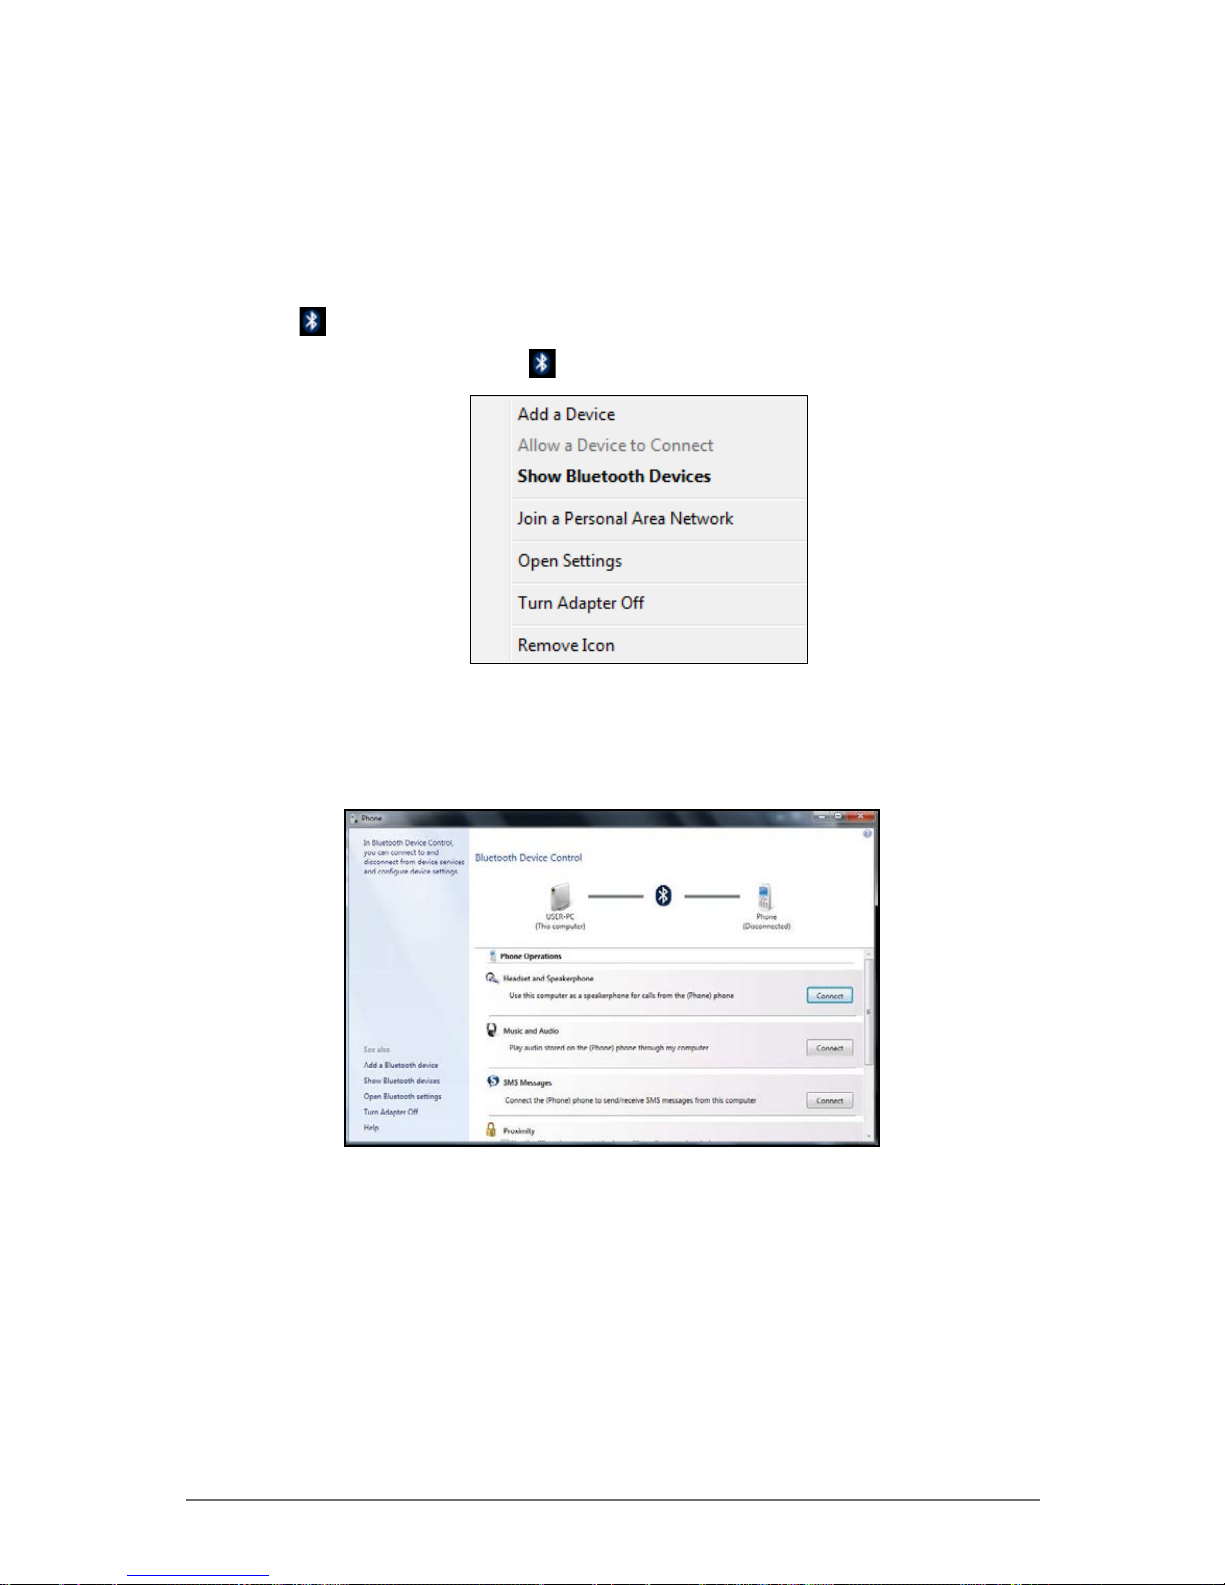
2. Tap the Bluetooth icon (
) to display a pop up menu.
3. Tap Show Bluetooth Devices.
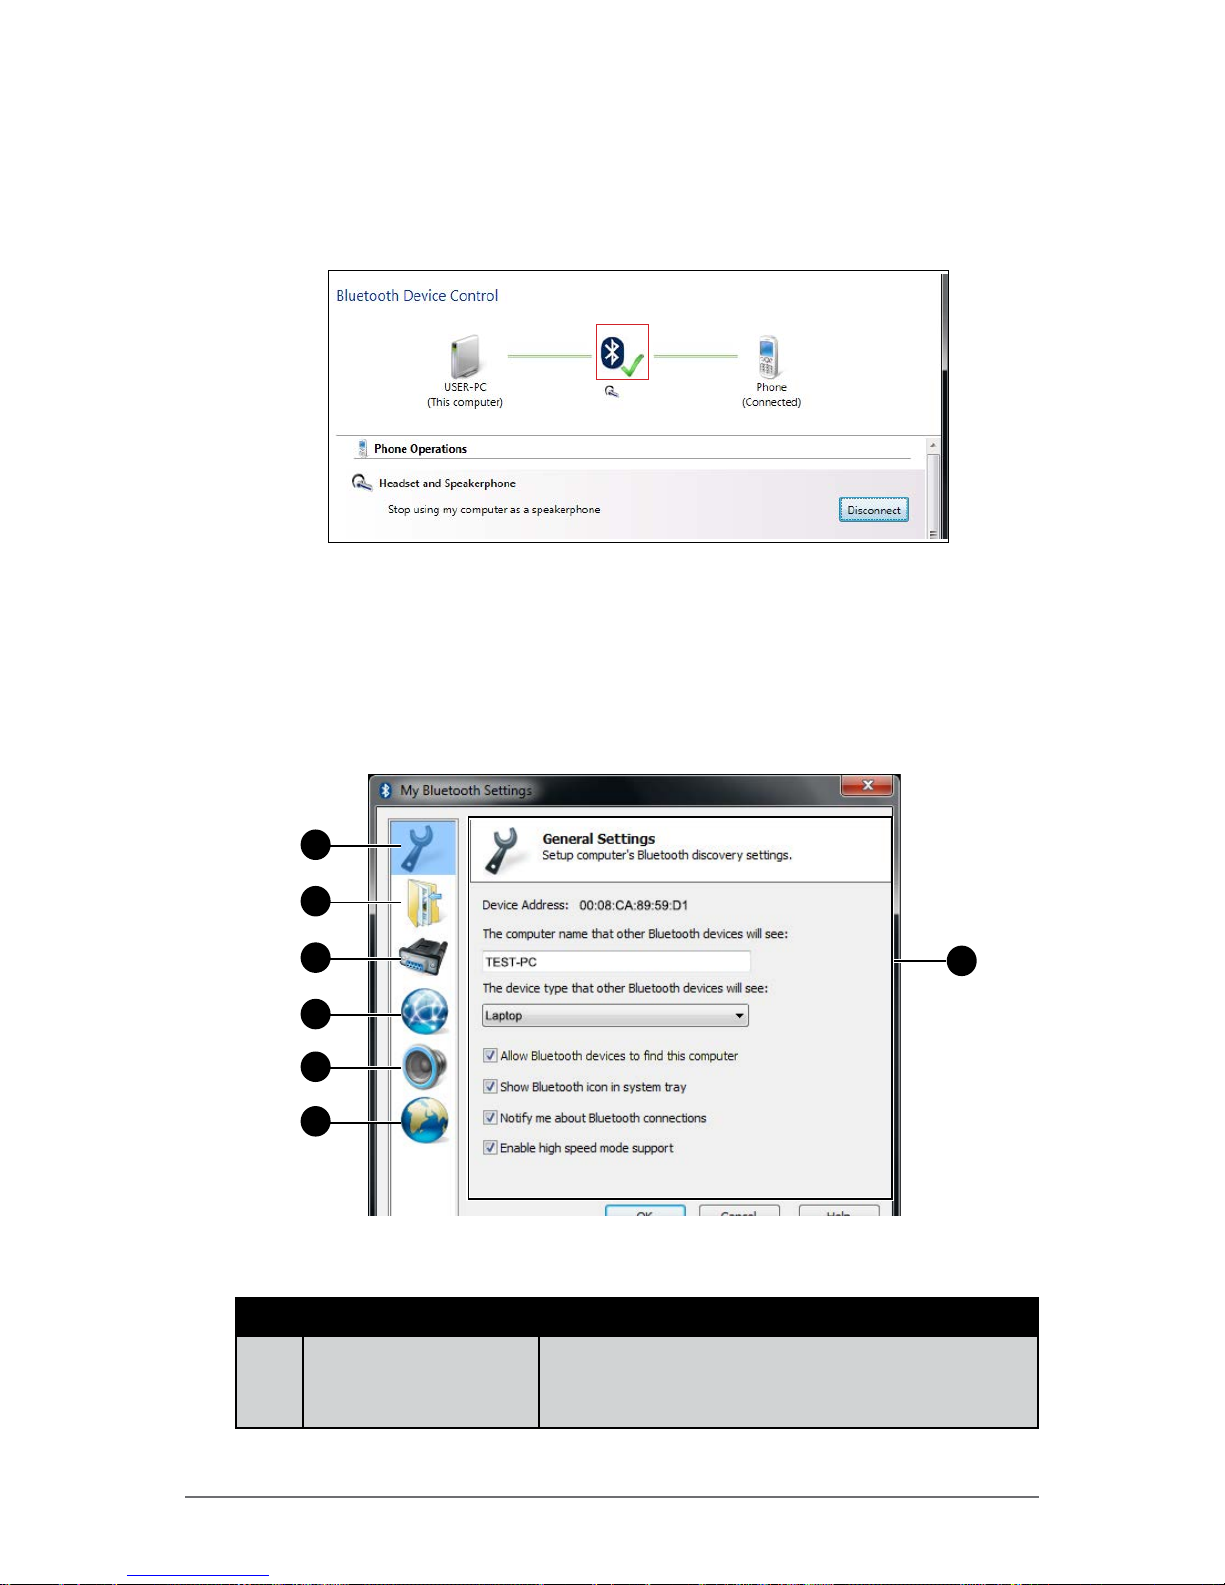
4. Double-tap the icon of the desired Bluetooth device. The Bluetooth Device
Control screen opens.
Page 44
Winmate Technologies 2-15
Operating Your Tablet Computer
5. Tap the applicable connection operation (for example, Headset and
Speakerphone).
When the connection is established, a “green” check mark appears next to
the Bluetooth logo.
Conguring Bluetooth Settings
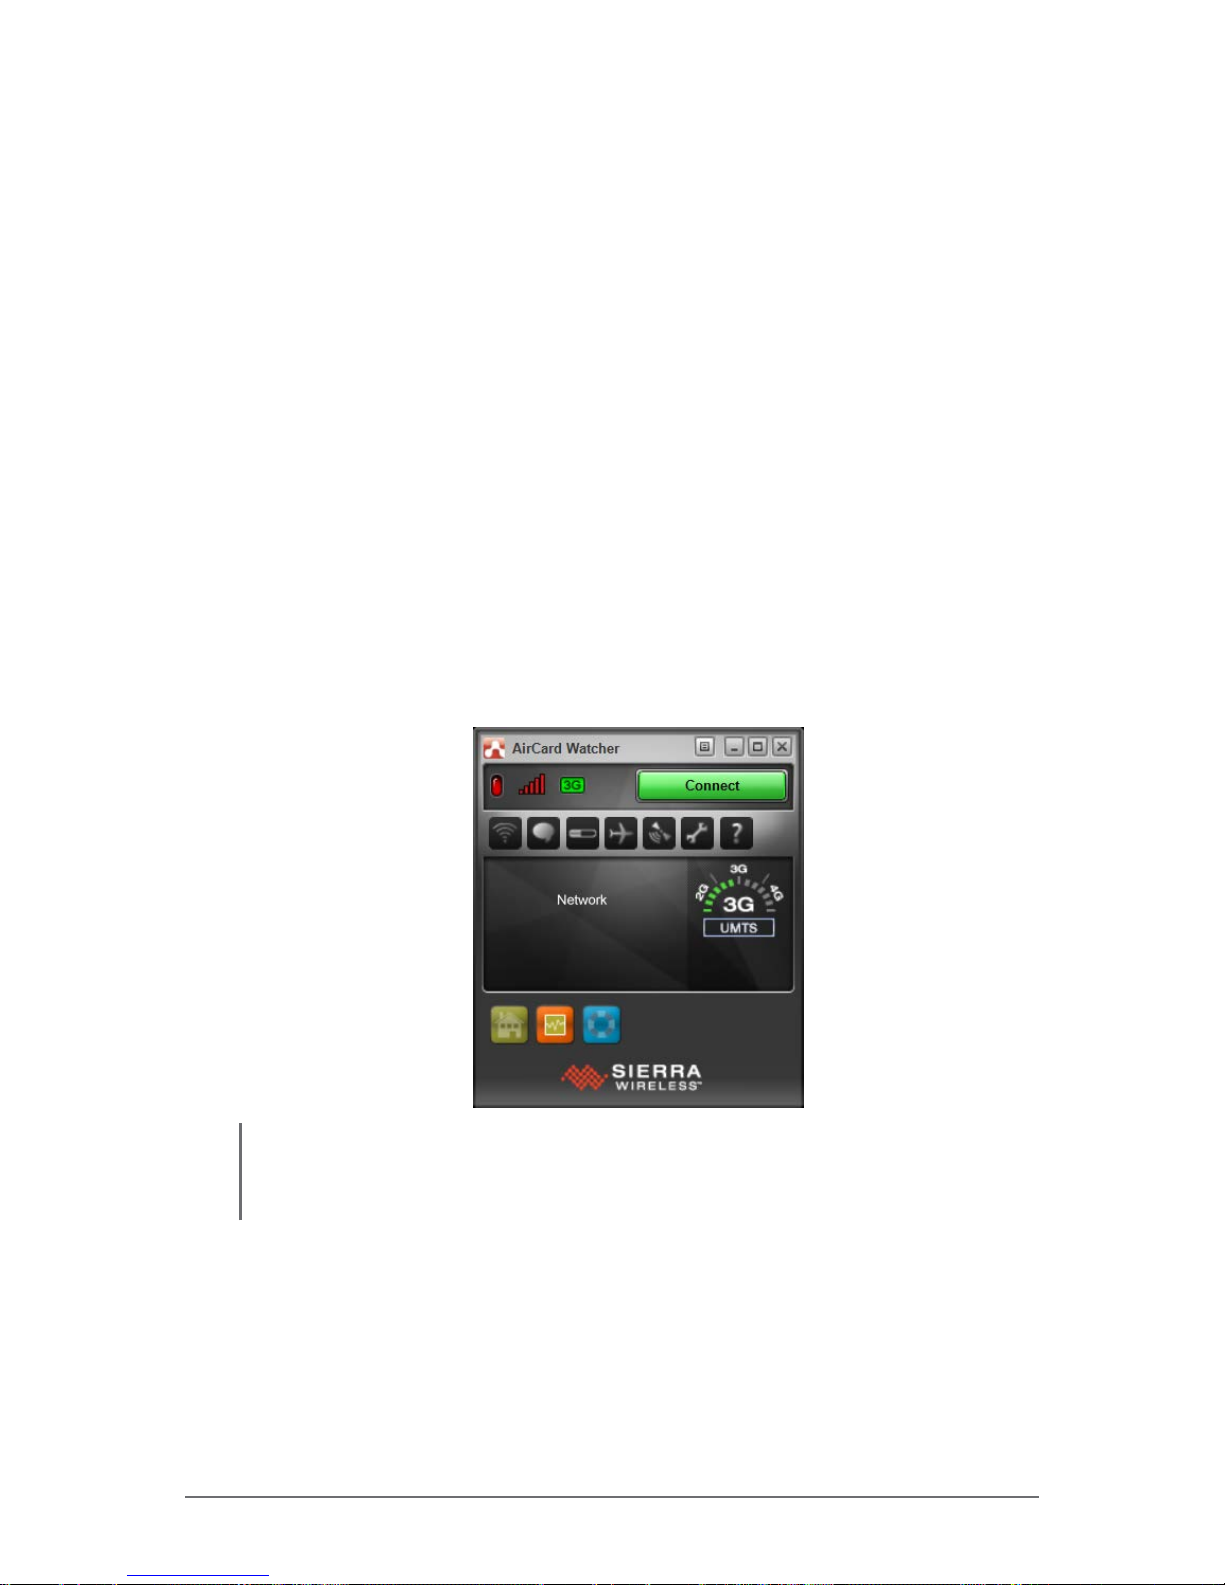
The Bluetooth Settings allows you to congure how you want to connect to
Bluetooth devices, sync data, and other options. To access the settings, open
My Bluetooth, and then tap My Bluetooth Settings.
1
2
3
4
5
6
7
Tap a menu from the left panel to display the relevant settings on the right.
Menu Description
1 General Settings Congures M9020 name and type, enable
visibility, notication options, and enable high
speed mode support.
Page 45

2-16 Winmate Technologies
Operating Your Tablet Computer
Menu Description
2 File Transfer Settings Congures the folder location of incoming les
and enable sharing of les with connected
Bluetooth devices.
3 Serial Port Settings Congures virtual serial ports to be used by
M9020.
4 Network Settings Enables networking via Bluetooth connection.
5 Audio Settings Selects how you want to play audio les through
M9020 and enable Skype switching.
6 Language Settings Selects the Bluetooth interface language.
7 Settings page Displays the relevant settings to congure. Tap
OK to apply changes and close the screen.
Page 46
Winmate Technologies 2-17
Operating Your Tablet Computer
Using the WWAN Network
The M9020 has optional WWAN network capabilities that provide wireless
connection to the Internet using a SIM card with data subscription.
Connecting to a WWAN Network
Your M9020 comes with Sierra Wireless AirCard® Watcher, an application
that allows you to connect to the Internet using your SIM card and keeps you
informed of your wireless connection status. Perform the following to connect to
your WWAN network:
1. Install a SIM card on your M9020 (see “Installing the SIM Card” on page
1-15).
2. Open the AirCard
®
Watcher application (tap Start > All Programs > Sierra
Wireless > AirCard Watcher).
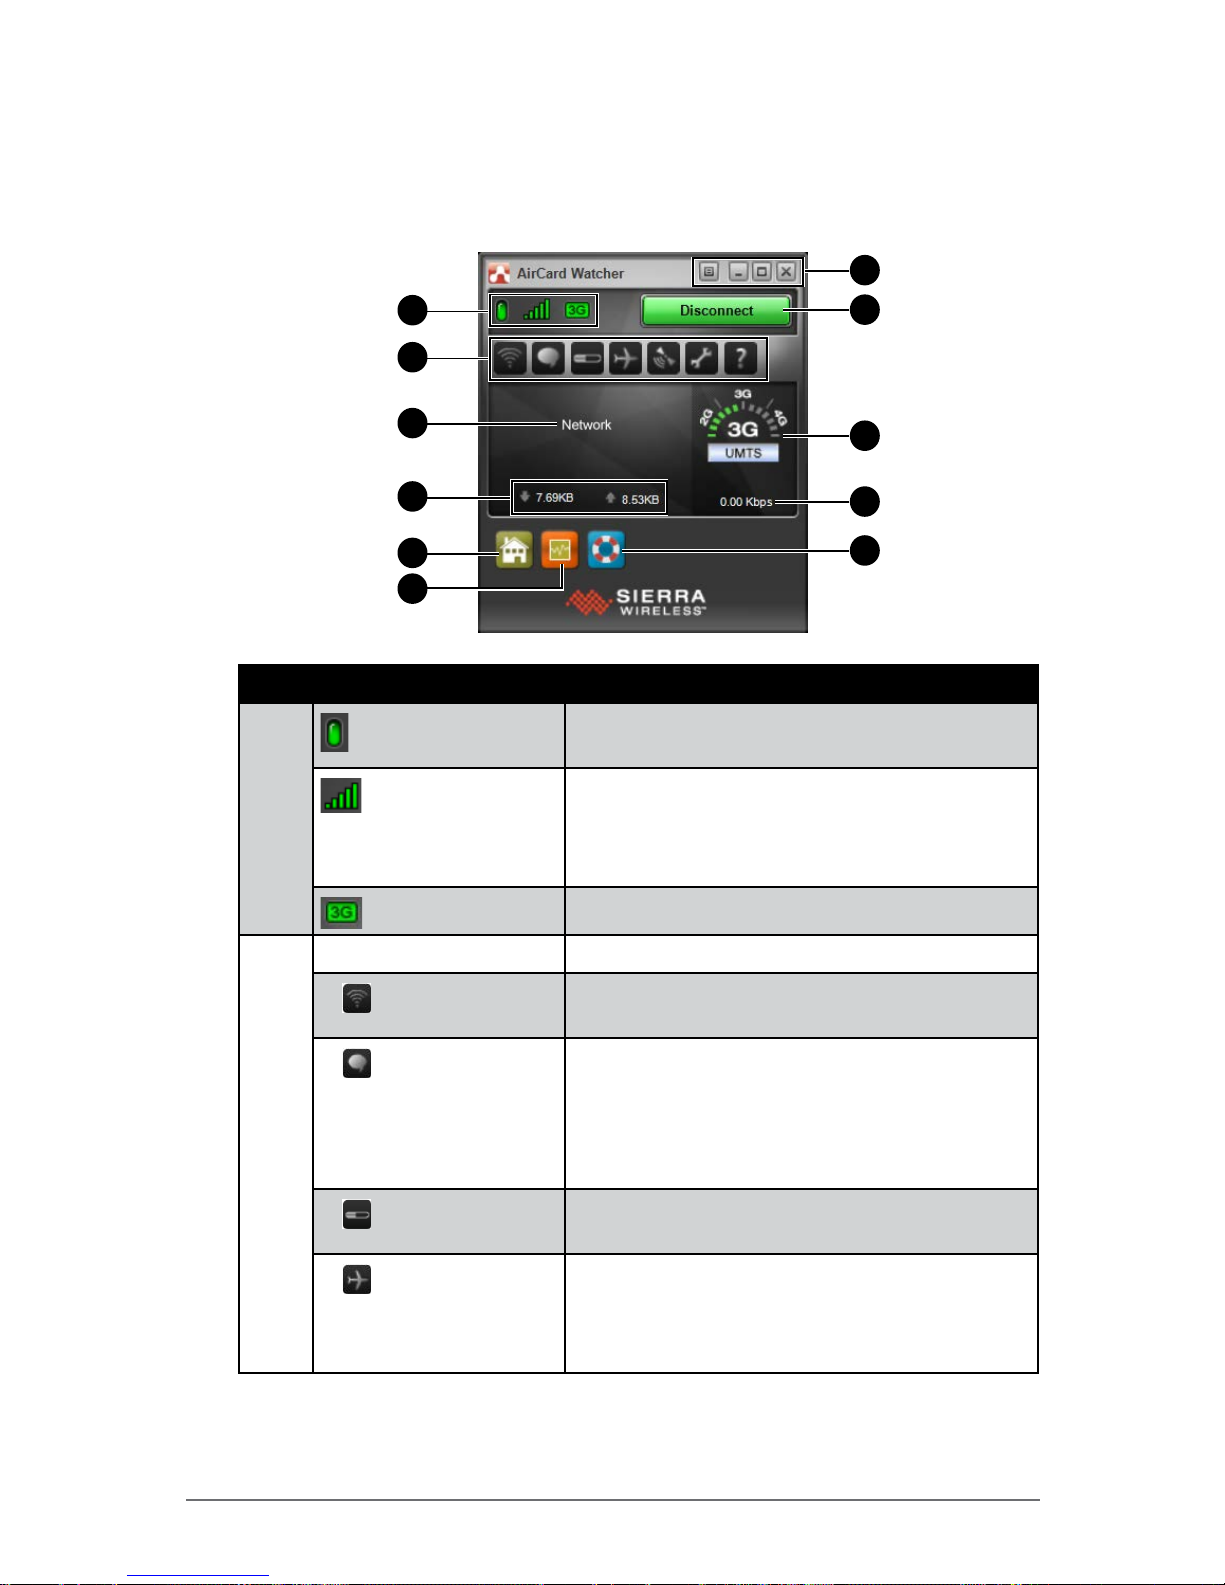
The application detects the SIM card and displays network information on
the AirCard
®
Watcher main screen.
TIP: T o open AirCard® Watcher faster, create a desktop shortcut icon. Alternatively, you can
set AirCard® Watcher to open and connect automatically with your WWAN network (see
“To congure WWAN network proles” on page 2-21).
3. Tap Connect to connect to the WWAN network.
Once connected, the AirCard
®
Watcher main screen displays the network
connection information, such as signal strength, connection speed, and
bitrate transfer. For more information on using the application, see “Using
AirCard® Watcher” on page 2-18.
Page 47
2-18 Winmate Technologies
Operating Your Tablet Computer
Using AirCard® Watcher
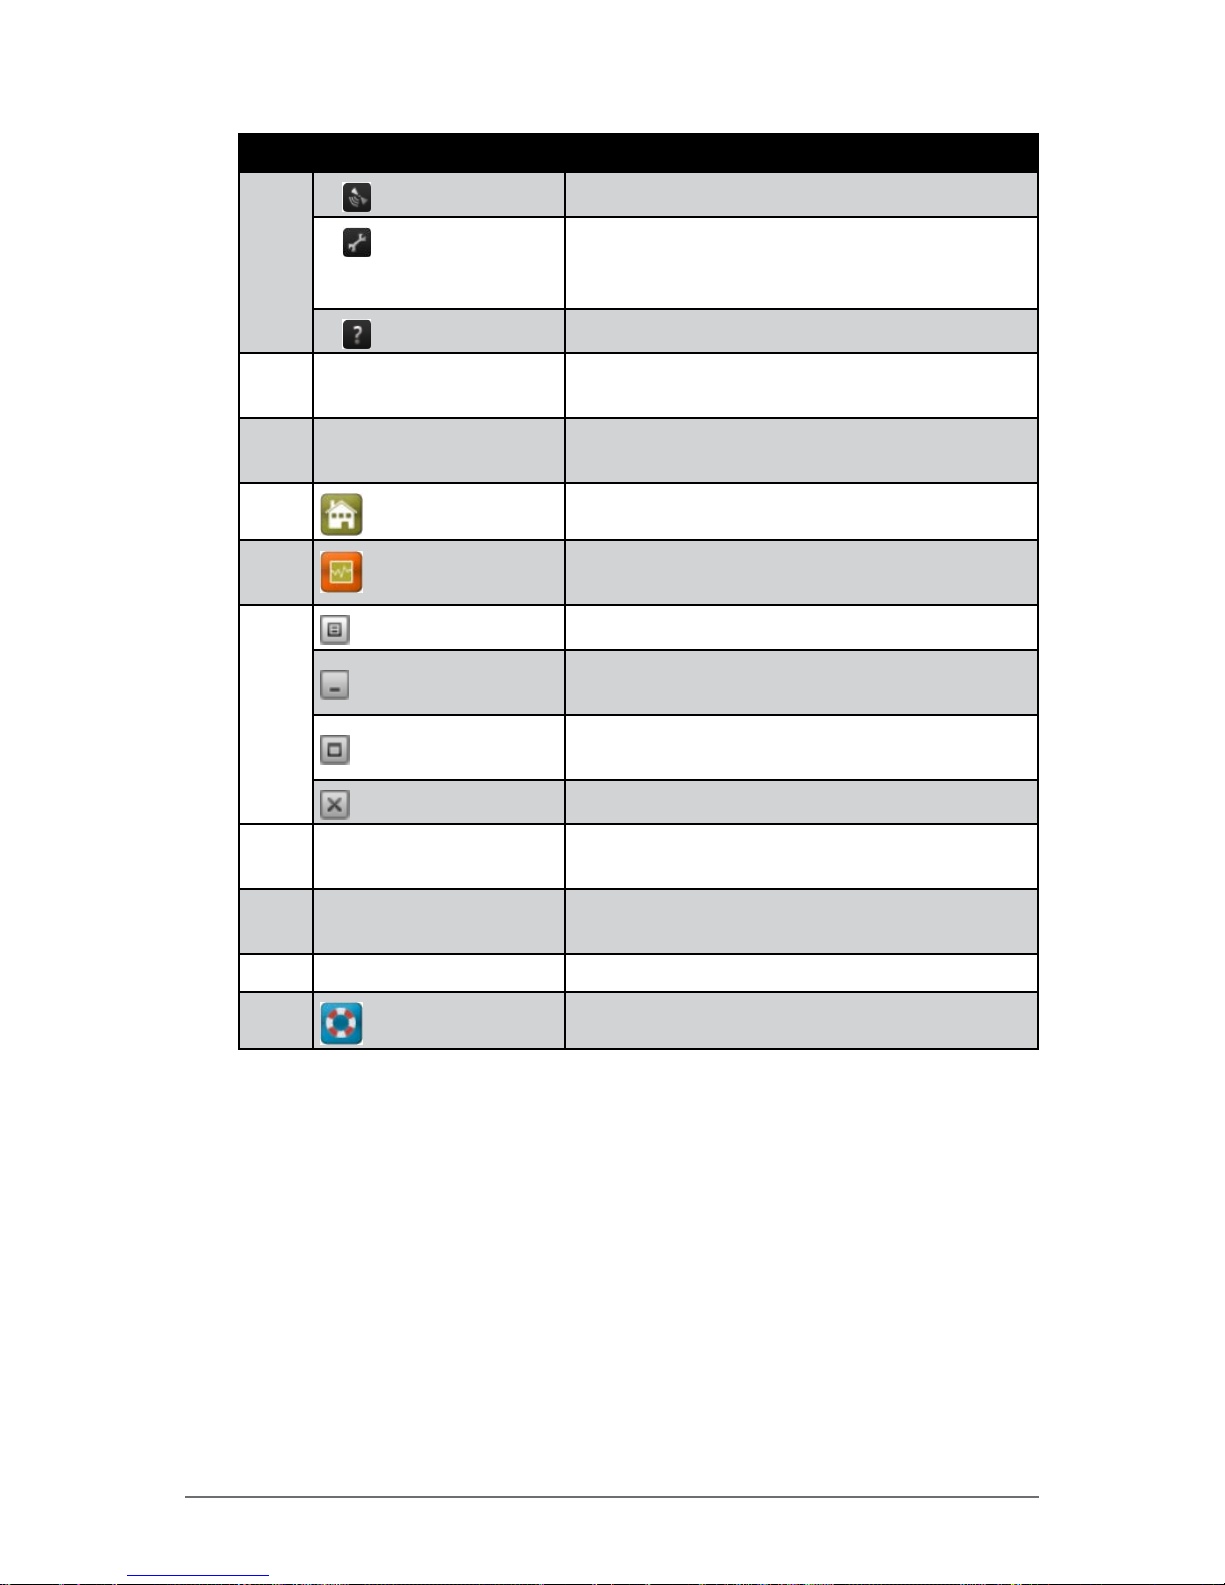
The AirCard® Watcher main screen
1
2
8
9
3
4
10
5
6
11
7
No. Item Description
1
WWAN Connection
• Green: WWAN network is connected.
• Red: WWAN network is disconnected.
Signal Strength
• Green: Indicate the network signal
strength. More lit bars indicate stronger
signal.
• Red: No signal.
Network Type
Indicates the network connection type.
2 Toolbar Tap an icon to access the function.
Wireless Prole
Tap to view and modify wireless network
prole.
SMS
Tap to open SMS Express to send and
receive SMS messages on your M9020.
NOTE: Your data plan subscription must support this
feature to be able to send and receive SMS messages
on your M9020.
History
Tap to view the usage history and clear the
bitrate counters.
Airplane Mode
Tap to enable airplane mode. When this
feature is enabled, the icon turns red. Tap the
icon again or tap Turn Radio On to disable
airplane mode.
Page 48
Winmate Technologies 2-19
Operating Your Tablet Computer
No. Item Description
2
AirCard GPS
Tap to open AirCard GPS Monitor.
Settings
Tap to access the AirCard
®
Watcher settings.
See “Conguring AirCard
®
Watcher Settings”
on page 2-20.
Help
Tap to view the help le.
3 Network Name Displays the name of the SIM card network
provider.
4 Data Transfer Rate Displays the upstream and downstream
transfer information.
5
Home
Tap to open the Sierra Wireless website.
6
Speed Graph
Tap to show a graphical display of the data
transfer speed.
7
Menu
Tap to access the application menu.
Minimize
Tap to minimize the application to the system
tray.
Restore
Tap to toggle the display between full view
and compact view.
Close
Shuts down the application.
8 Connect / Disconnect
Button
Tap to connect or disconnect from the
WWAN.
9
Network Info
A graphical display of the network connection
type.
10 Speed Indicates the network connection speed.
11
Customer Support
Tap to open Sierra Wireless support website.
Page 49
2-20 Winmate Technologies
Operating Your Tablet Computer
Conguring AirCard
®
Watcher Settings
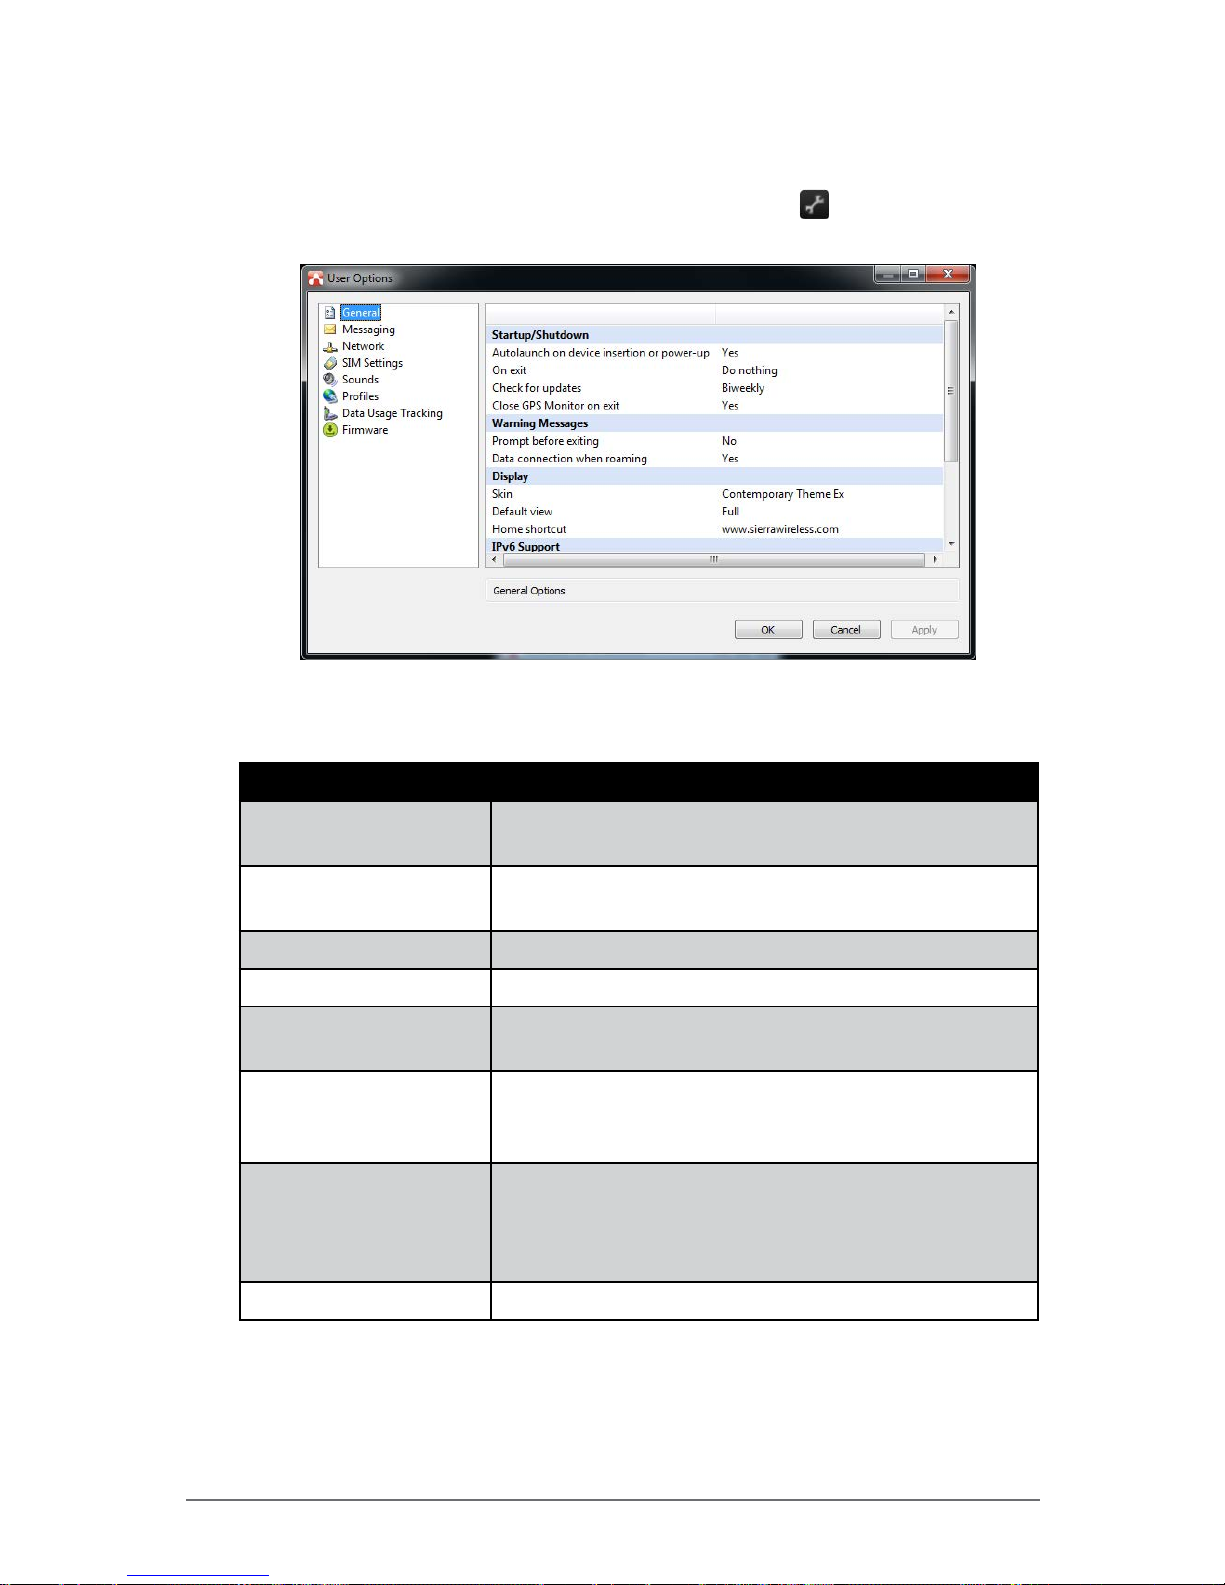
On the AirCard® Watcher main screen, tap the Settings ( ) icon to display the
screen below.
Tap a menu item on the left panel to display the corresponding settings on the
right. The following menus are available:
Menu Description
General Congures startup/shutdown settings, warning
messages, display properties, and others.
Messaging Congures message settings such as service center
number, default storage, and message notication.
Network Congures network mode and radio technology.
SIM Settings Enables SIM security settings.
Sounds Enables sound alert when network is connected,
disconnected or when a new message is received.
Proles Congures network proles and auto-connect
functions. See “To congure WWAN network proles”
on page 2-21.
Data Usage Tracking Enables data usage tracking and congures data
subscription rate plan settings. This feature helps
manage and control internet usage when you have a
subscription plan with a limited data rate
Firmware Displays rmware information.
Page 50
Winmate Technologies 2-21
Operating Your Tablet Computer
To congure WWAN network proles
Once a SIM card is used in your M9020, its network prole is created. You can
view network information, such as prole name, access point name (APN),
TCP/IP settings, and more. You can also set AirCard
®
Watcher to automatically
connect to the WWAN at startup.
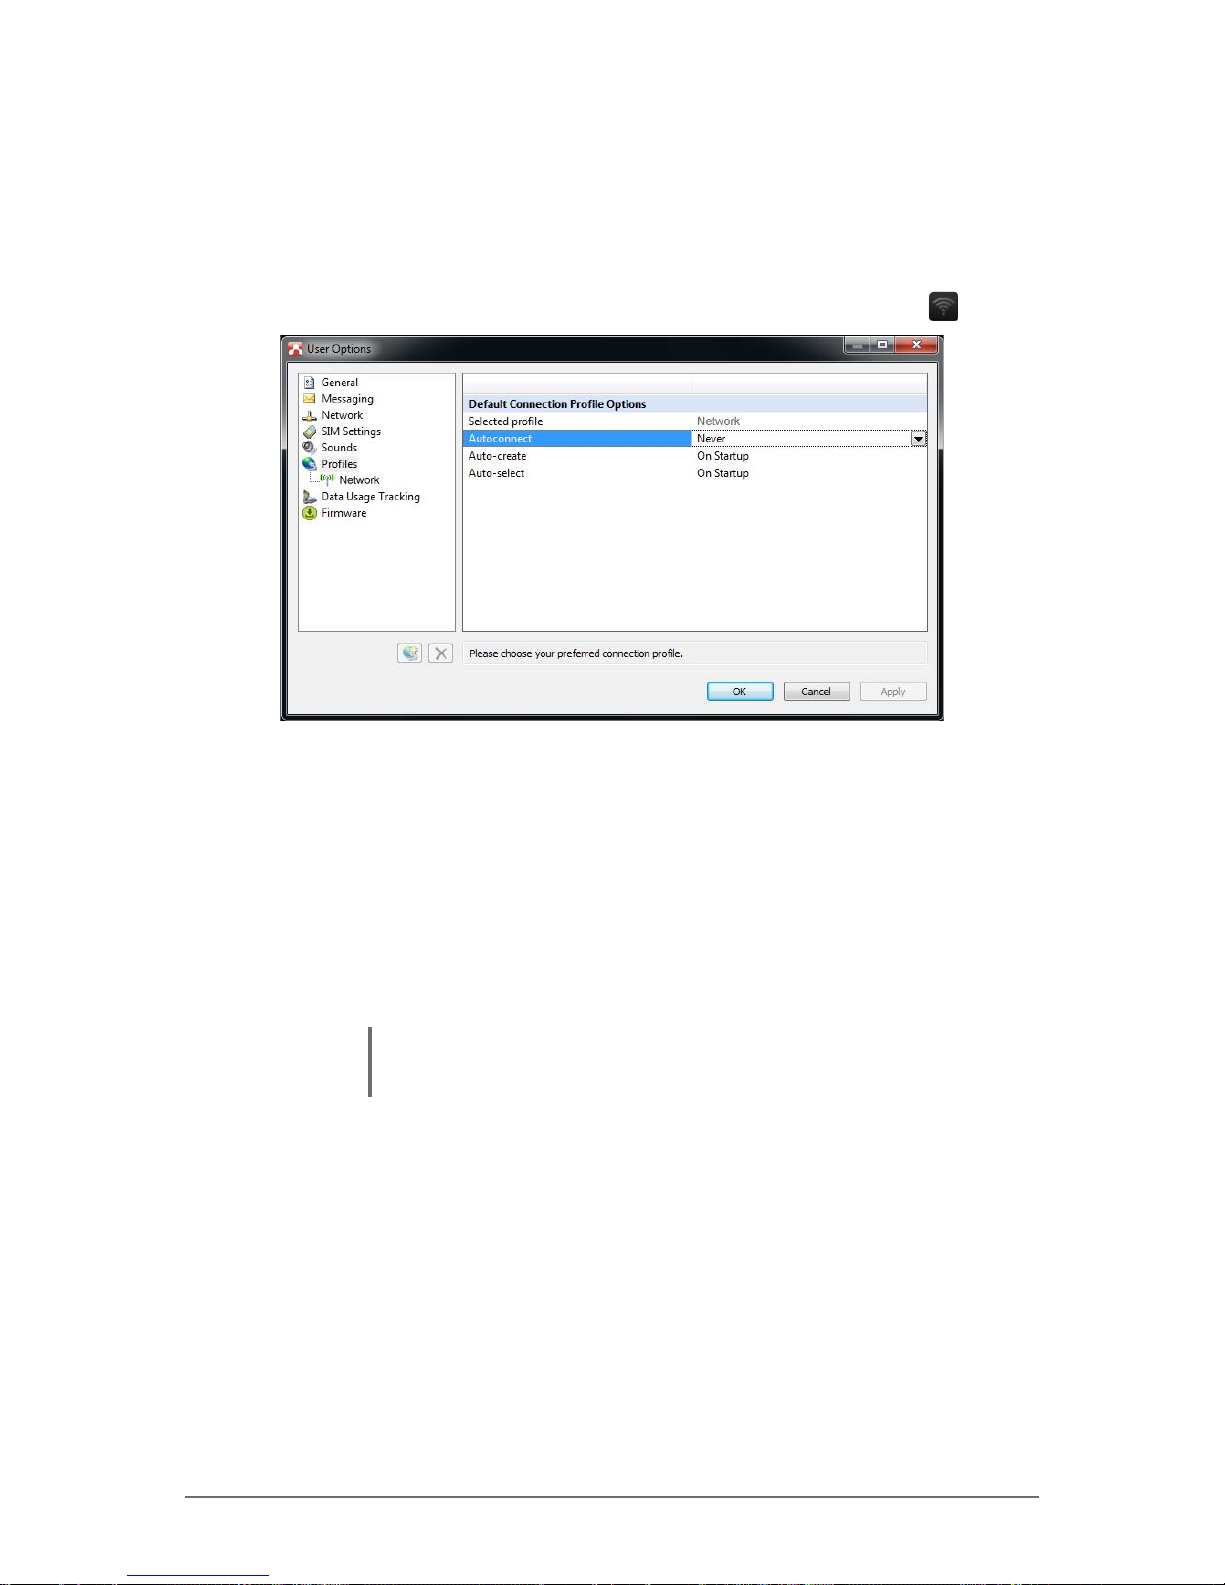
1. On the AirCard
®
Watcher main screen, tap the Wireless Prole ( ) icon.
2. On the Proles menu, the following items are displayed:
• Selected prole: Displays the name of your WWAN network.
• Autoconnect: Tap the eld and then select one of the following:
• Never: Do not auto-connect to network.
• While not roaming: Automatically connects to network while within
the local network coverage.
• Always (even when roaming): Automatically connects to network
even when roaming outside the local network coverage.
NOTE: Connecting to your network while roaming may incur additional
charges. Check with your service provider for details.
• Auto-create: Tap to automatically create a connection prole when
using a new SIM card.
• Auto-select: Tap to automatically select the best connection prole for
the current SIM.
3. Tap Apply to save the settings.
4. To congure specic parameters related to your connection, tap the
network name on the left panel.
5. Tap OK to close the screen.
Page 51
2-22 Winmate Technologies
Operating Your Tablet Computer
Using GPS
Your M9020 is equipped with GPS (Global Positioning System) capabilities
to determine your location and aid in the presentation and analysis of GPS
information.
Before using the GPS, make sure the GPS radio is enabled on ‘Winmate
Control Center’ and on ‘Location and Other Sensors’. See more information
below.
Turning the GPS On and Off
In case you need to turn the GPS on or off, perform the following:
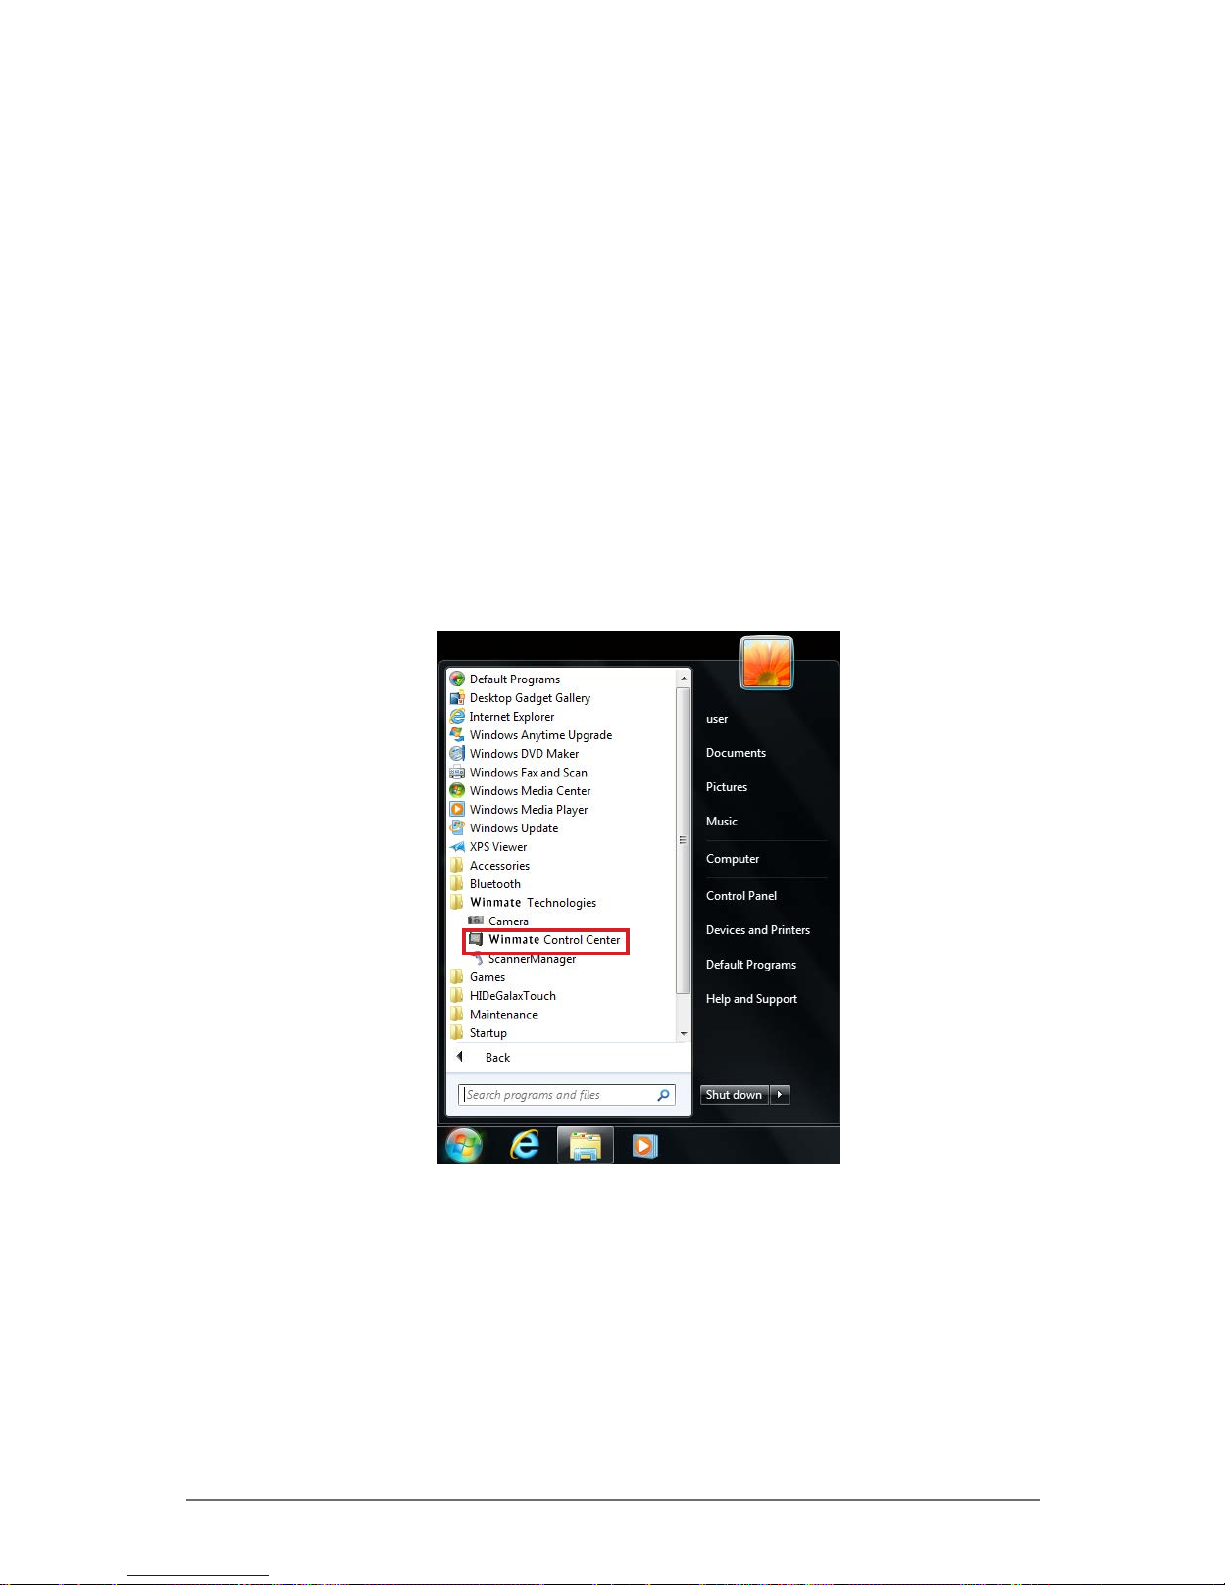
1. Tap Start > All Programs >Winmate Technologies > Winmate Control
Center.
Page 52
Winmate Technologies 2-23
Operating Your Tablet Computer
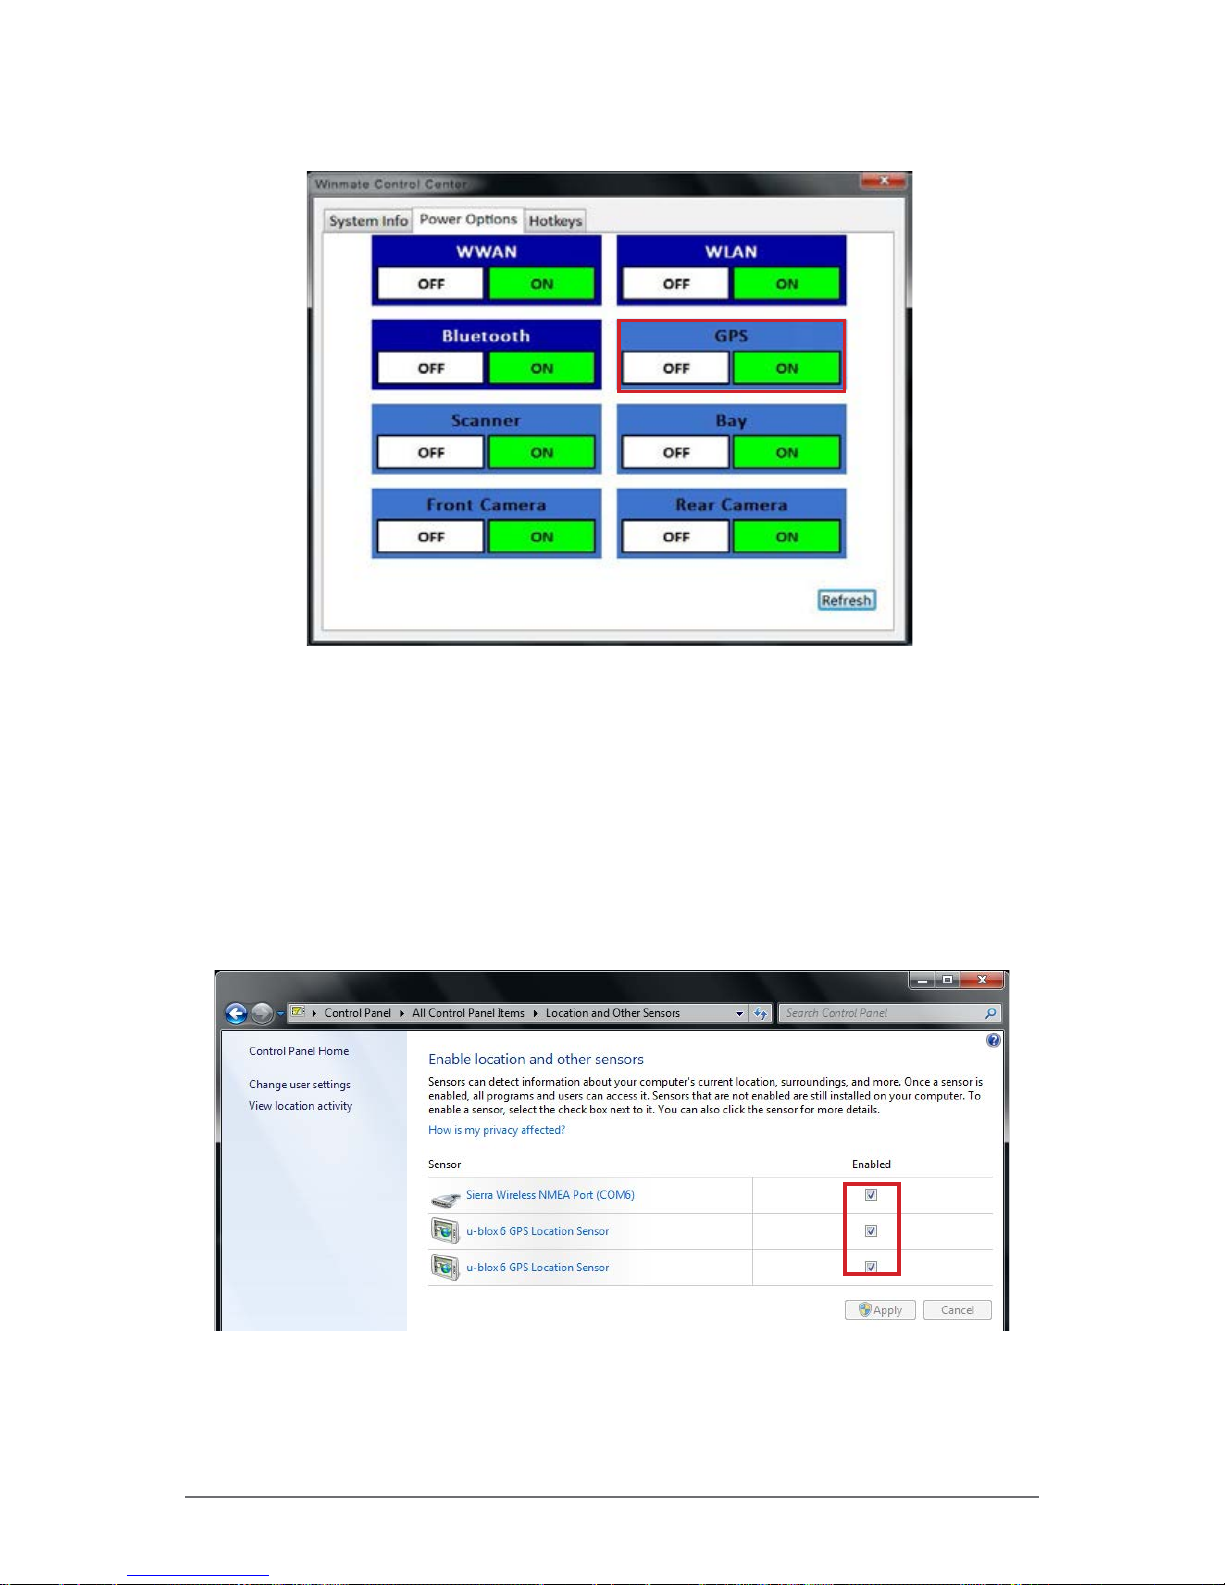
2. Tap Power Options tab.
3. To turn the GPS on or off, tap ON or OFF.
Enabling the Location Sensors
The M9020 is equipped with the u-blox 6 GPS Location Sensor. By default,
this location sensor is enabled.
Perform the following to enable the location sensors:
1. On Windows desktop, tap Start > Control Panel > Hardware and
Sound > Location and Other Sensors.
2. To enable/disable the sensors, use the check boxes.
3. Tap Apply to save and apply the changes.
Page 53
2-24 Winmate Technologies
Operating Your Tablet Computer
Using u-center
u-center is an application that displays position accuracy, road test position and
trajectory, satellite tracking, time to rst x, etc. All processed data can be saved
in ASCII format and opened using popular spreadsheet applications.
To open u-center, perform one of the following:
• Double-tap the u-center desktop shortcut icon.
• Tap Start > All Programs > u-blox > u-center > u-center.
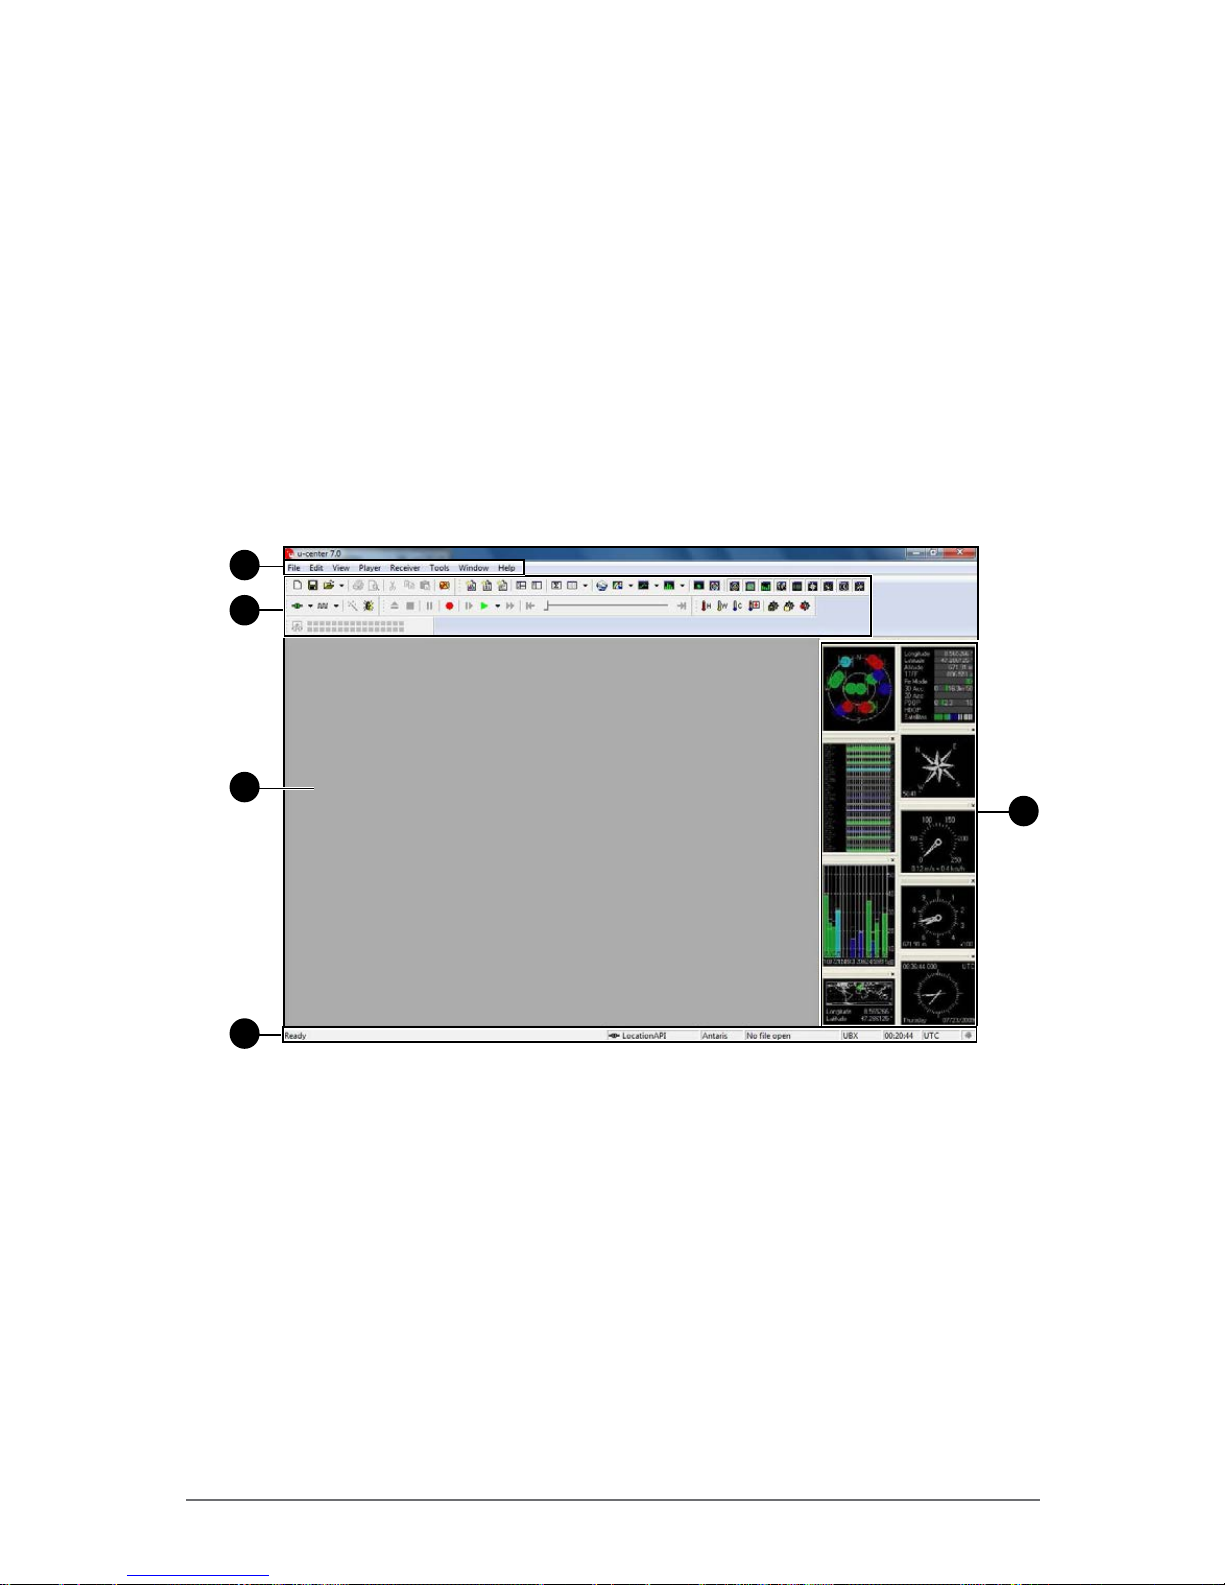
The u-center Main Screen
If the GPS receiver is working correctly, the main screen displays the satellite
position and level, data, altitude, compass, speed meter, etc.
1
2
3
4
5
Page 54

Winmate Technologies 2-25
Operating Your Tablet Computer
No. Item Description
1 Menu Bar Consists of eight menu items:
• File: Allows you to create, save, open,
close a log le or clear a database.
• Edit: Allows you to copy, paste, delete or
select text or set of information.
• View: Allows you to open console
windows, view maps, charts, camera,
and select toolbars to display on the main
screen.
• Player: Allows you to record and play a log
le.
• Receiver: Allows you to congure the
receiver settings, such as port, baudrate,
sensor, network connection settings, etc.
• Tools: Allows you to update the rmware
and set application preferences.
• Window: Allows you to select the layout of
your workspace.
• Help: Allows you to view help les.
2 Toolbars Provides shortcuts to common tasks by
tapping on the icon.
TIP: If using a USB mouse, hold the mouse cursor over
the button for a few seconds to view the button name. A
brief description is also displayed on the status display
area.
3 Window Area Displays maps, console windows, charts and
the camera view.
4 Status Display Area Displays a brief description of the button
function, communication information, GPS
mode, le in use, operating and UTC time,
protocol information, and GPS status.
5 Docking Window Displays graphical GPS information, such as
the satellite position, satellite level, satellite
level history, world position, data, altitude
meter, compass, speed meter, and watch.
NOTE: For more information on using u-center, see the u-center User Guide in Start > All
Programs > u-blox > u-center > u-center User Guide.
Page 55
2-26 Winmate Technologies
Operating Your Tablet Computer
Using the Camera
Your M9020 has integrated front and rear cameras for taking photos.
Opening the Camera
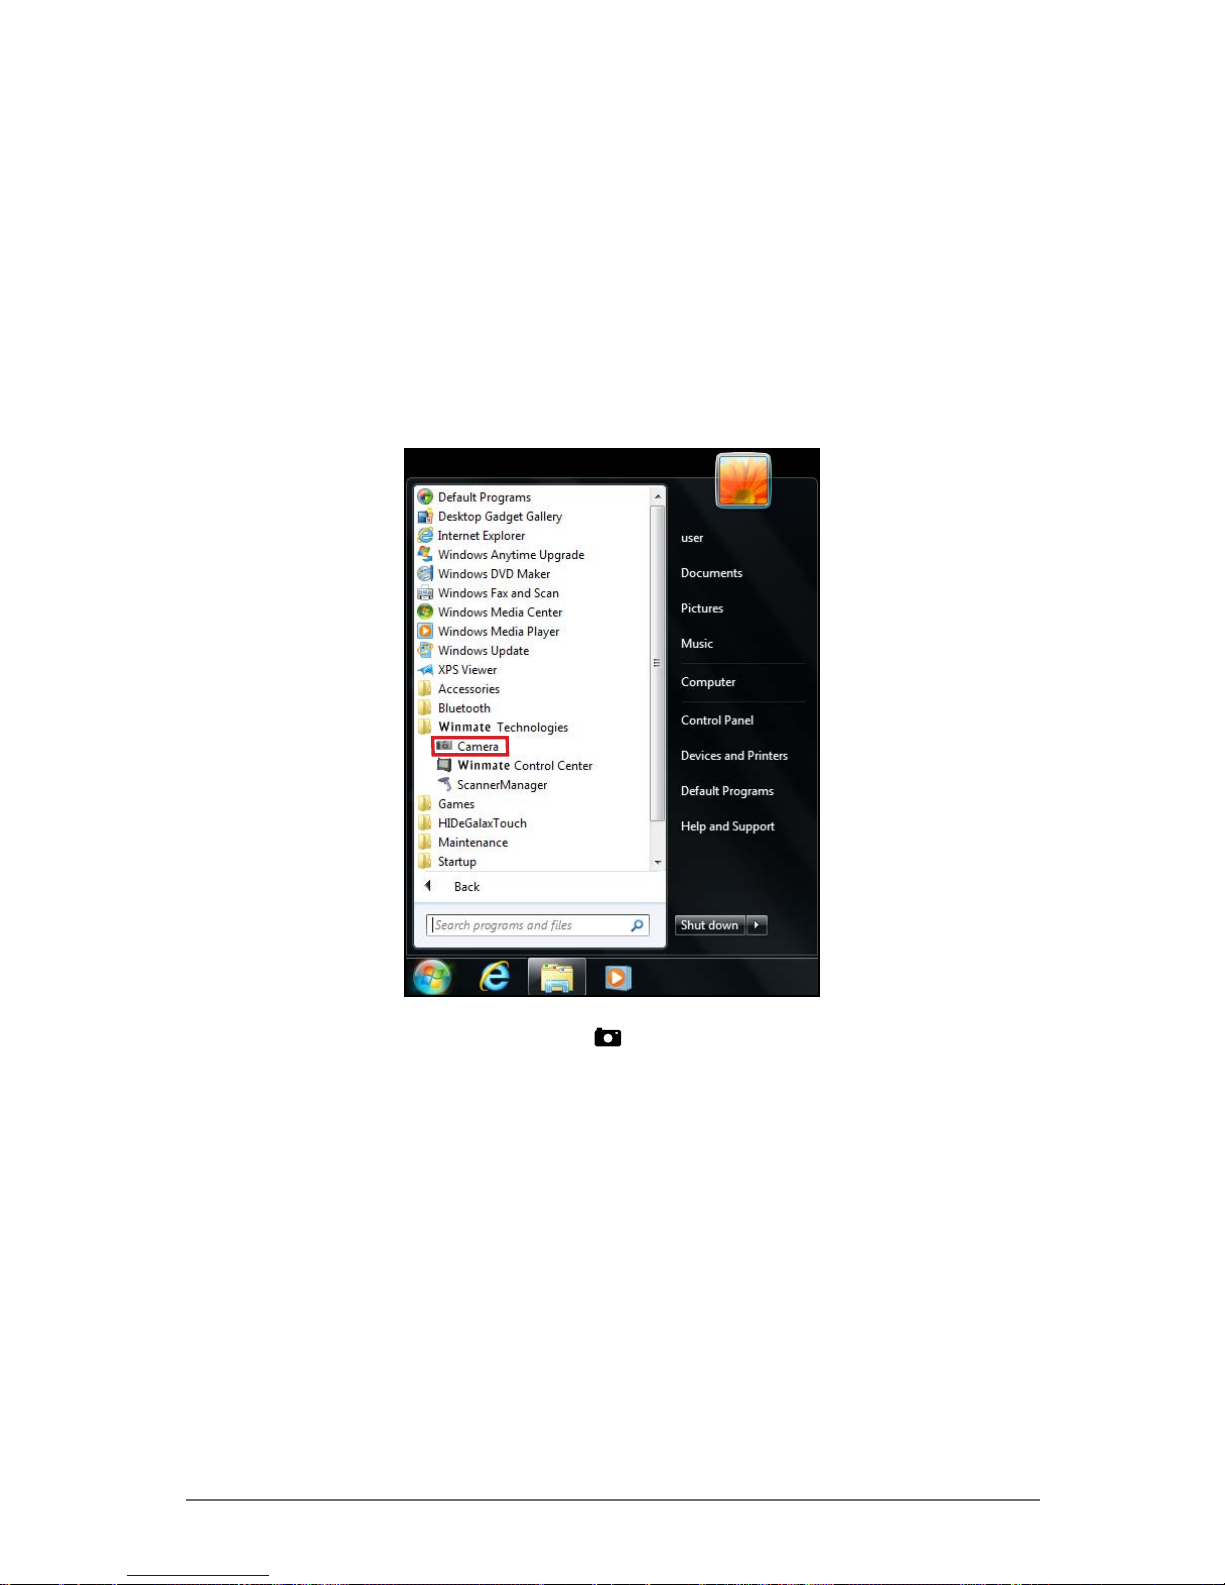
Perform one of the following to open the camera:
• Tap Start > All Programs > Winmate Technologies > Camera.
•
Press the camera shortcut key ( ).
Page 56
Winmate Technologies 2-27
Operating Your Tablet Computer
The Camera Screen
3
7
8
9
10
4
5
6
2
1
11
No. Item Description
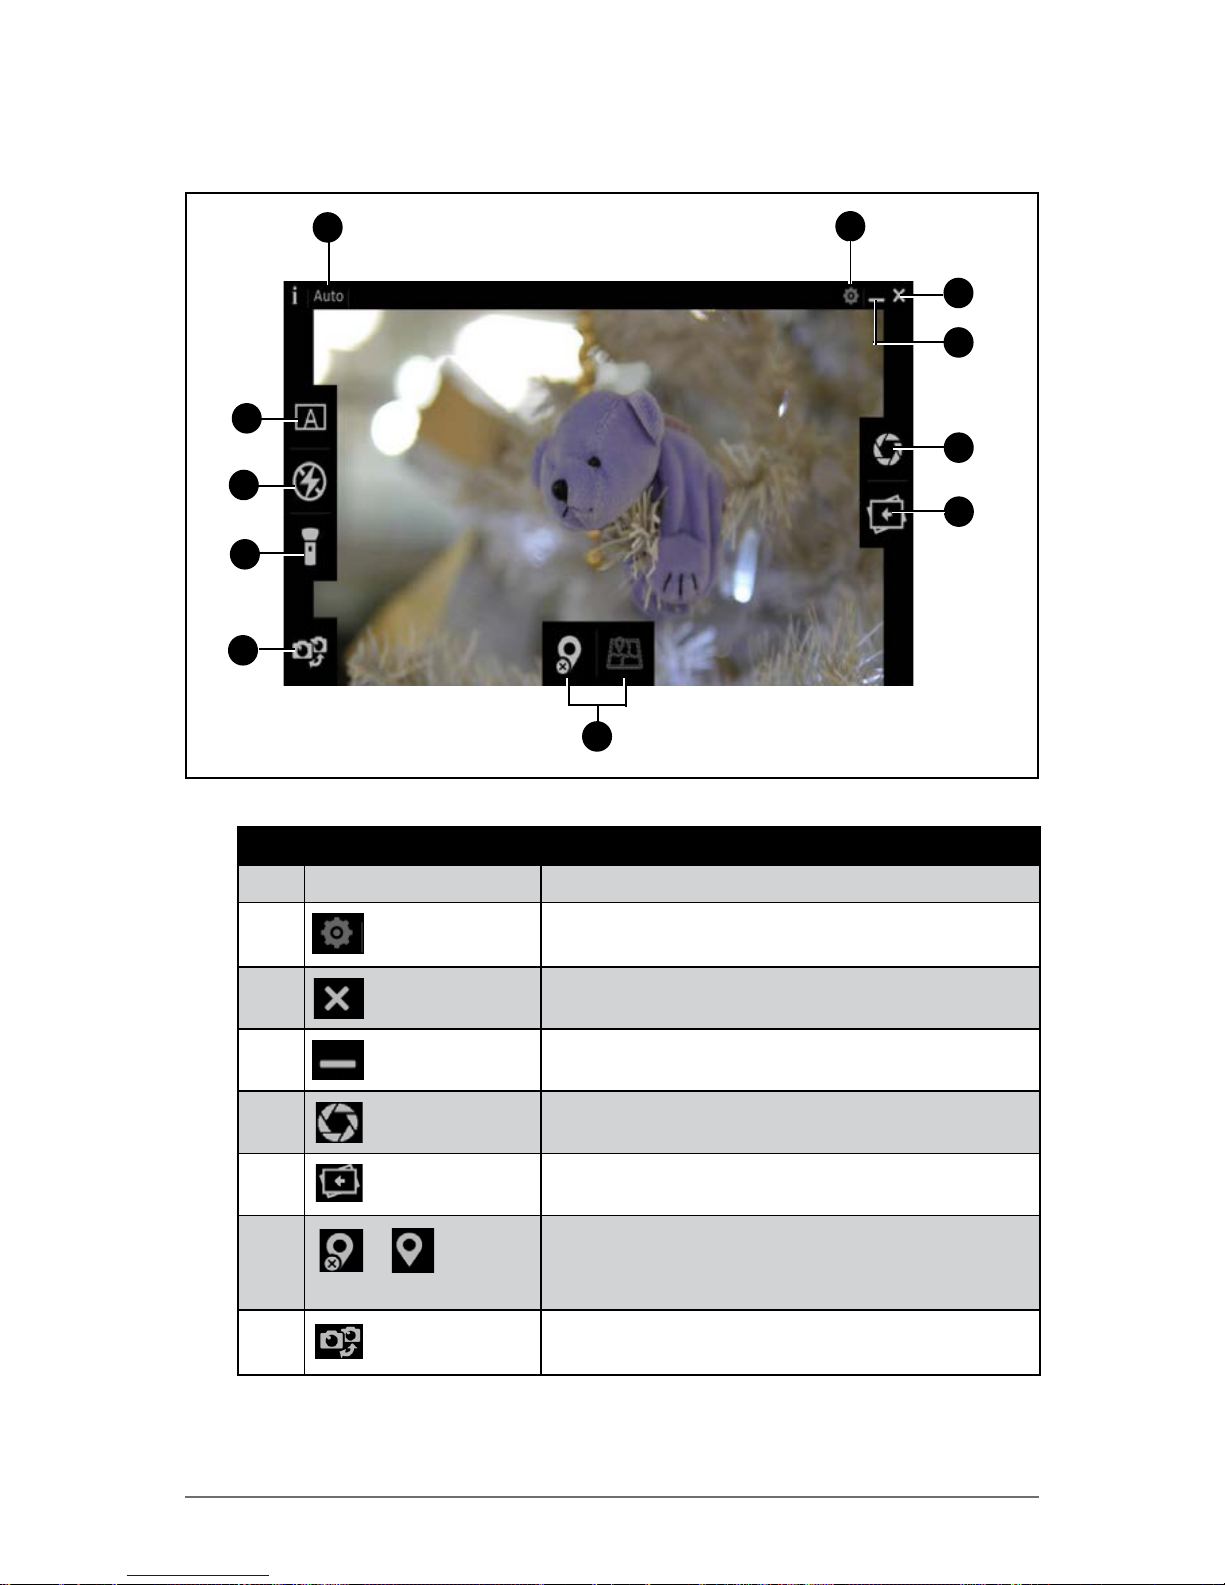
1 Shooting Mode Shows the shooting mode (by default it is Auto).
2
Settings
Tap to view the camera settings. See “Camera
Settings” on page 2-29.
3
Exit
Tap to close the camera screen.
4
Minimize
Tap to minimize the camera screen.
5
Shutter
Tap to capture a photo.
6
Open the Photo
Tap to open the captured photo.
7
/
Positioning
Tap to add/remove the GPS-based location
information on the photo (disabled by default).
8
Switch
Tap to switch between front camera and rear
camera.
Page 57
2-28 Winmate Technologies
Operating Your Tablet Computer
No. Item Description
9
/ Flashlight
Tap to activate/deactivate the ashlight function
(deactivated by default).
10
/ Flash
Tap to enable/disable ash (disabled by default).
11
Shooting Mode
The only shooting mode available on the M9020
is automatic.
Shooting Photos
1. Open the camera (see “Opening the Camera” on page 2-26).
2. Focus on your subject.
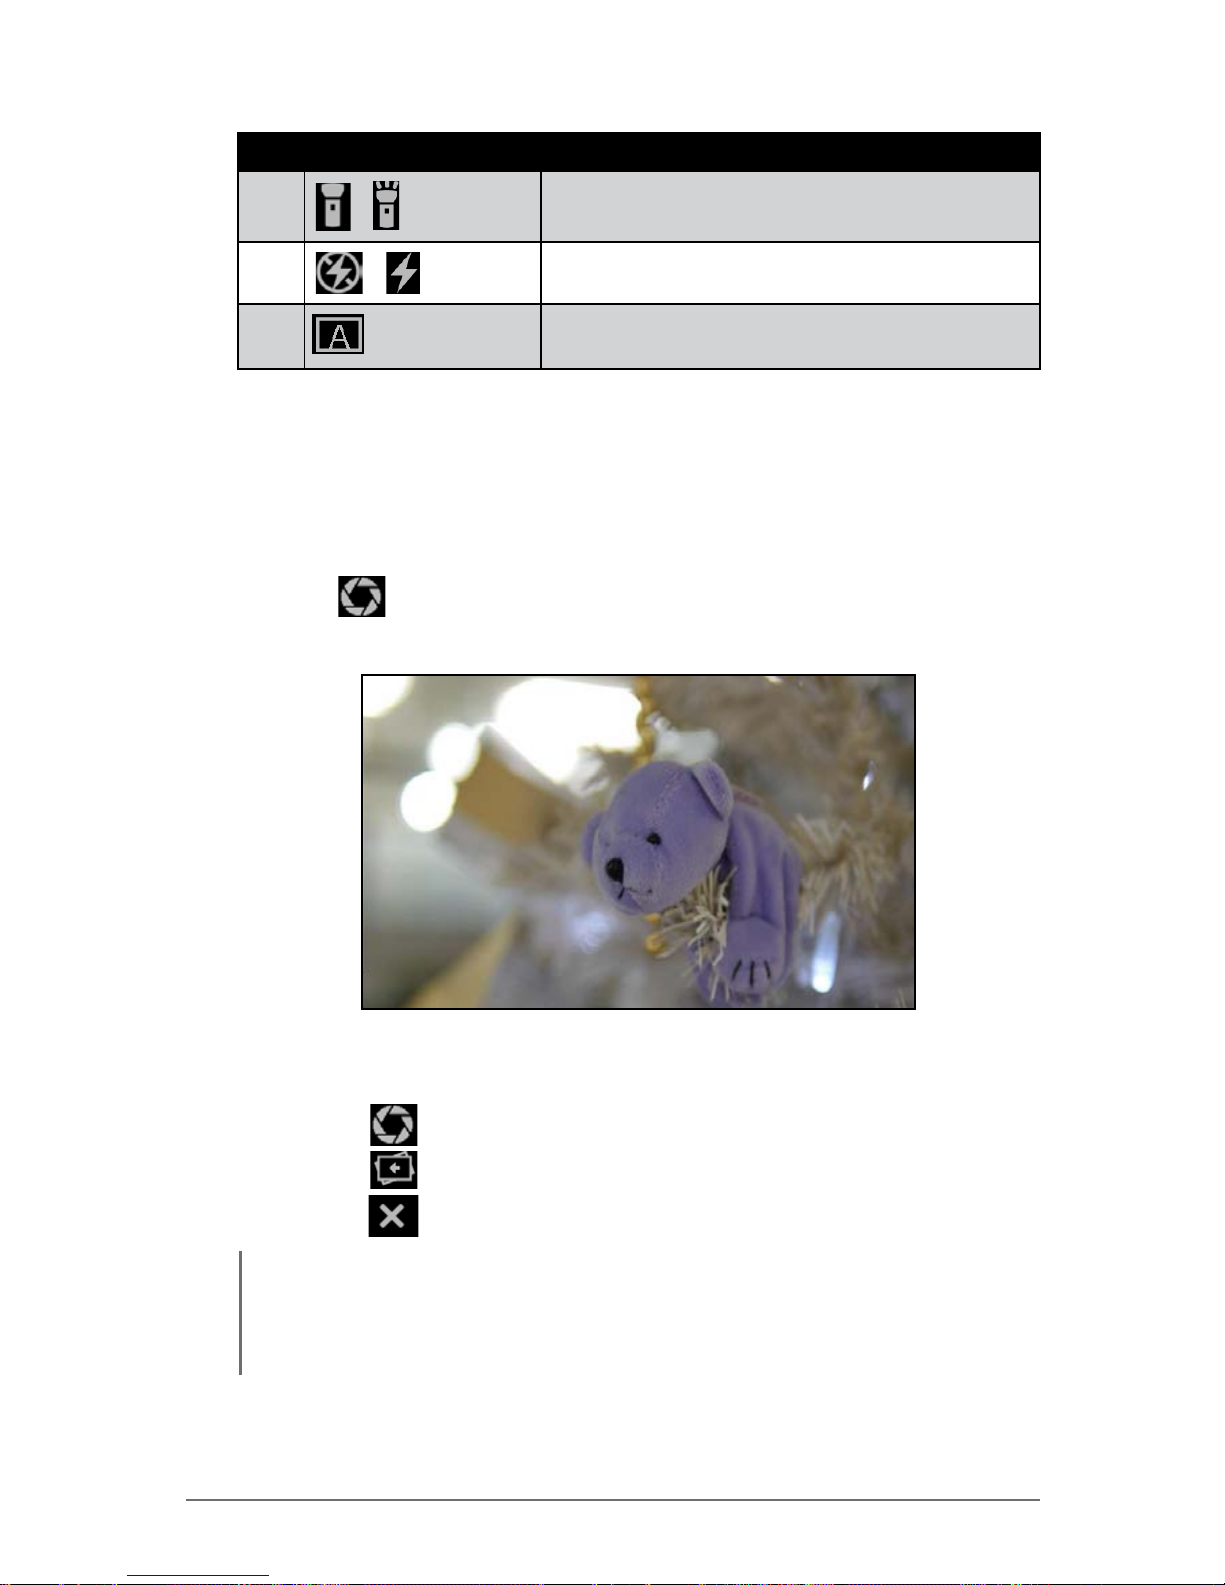
3. Tap
to capture the photo.
4. By default, the photo preview is briey shown on the screen.
The preview screen automatically closes after 3 seconds. Do one of the
following:
• Tap
to capture the next image.
• Tap
to see the image in Windows Photo Viewer.
• Tap
to close the camera screen.
NOTE:
By default the system automatically creates a folder with the current date to the logged in
user’s Pictures folder, and saves the images into that folder. For example, C:\Users\My
Name-PC\Pictures\2013-12-16.
Page 58
Winmate Technologies 2-29
Operating Your Tablet Computer
Camera Settings
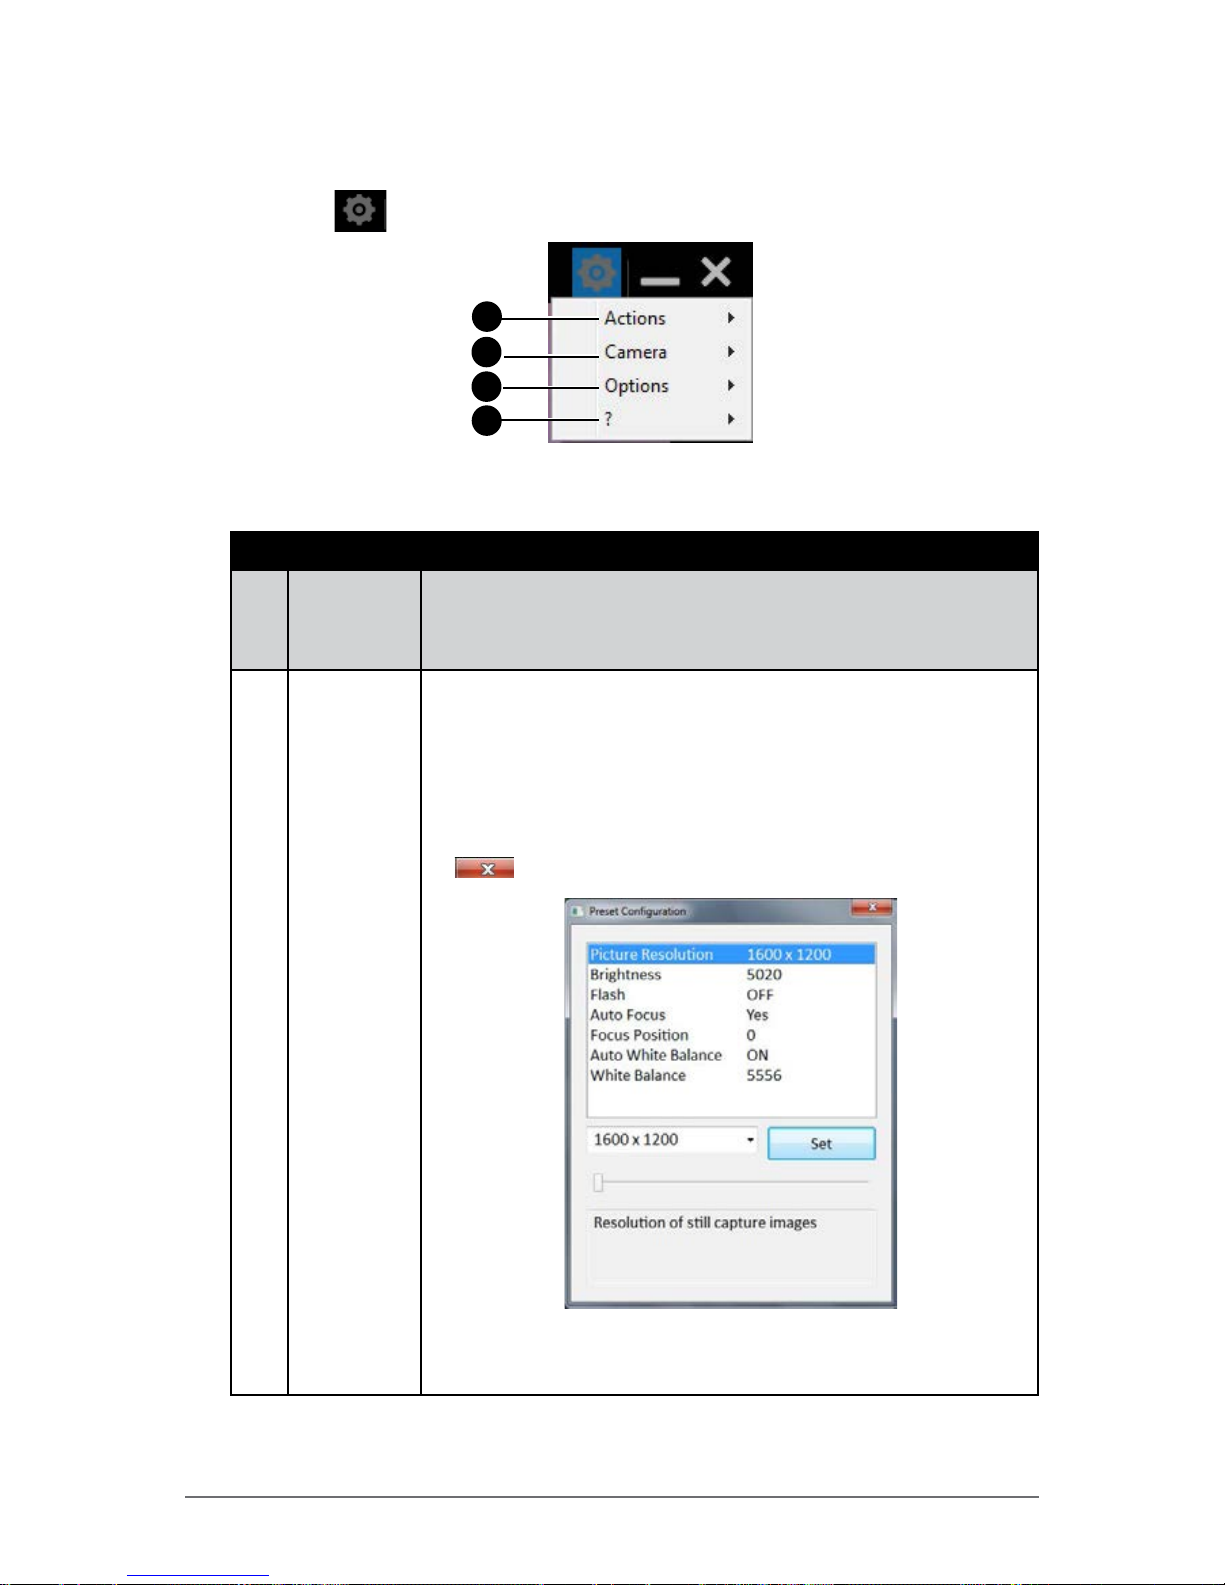
1. Tap to open the settings pop-up menu.
1
2
3
4
2. Modify the necessary settings.
No. Item Description
1 Actions
• Capture: Tap to capture an image.
• Show Image Folder: Tap to open the image folder.
2 Camera
• Advanced Settings...: Tap to open the Preset
Conguration page. On this page you can modify
parameters such as the default picture resolution,
brightness, ash and white balance of the camera. Tap
on the parameter and select the desired value. After all
modications are done, tap Set to save changes. Tap
to close the page.
Page 59
2-30 Winmate Technologies
Operating Your Tablet Computer
No. Item Description
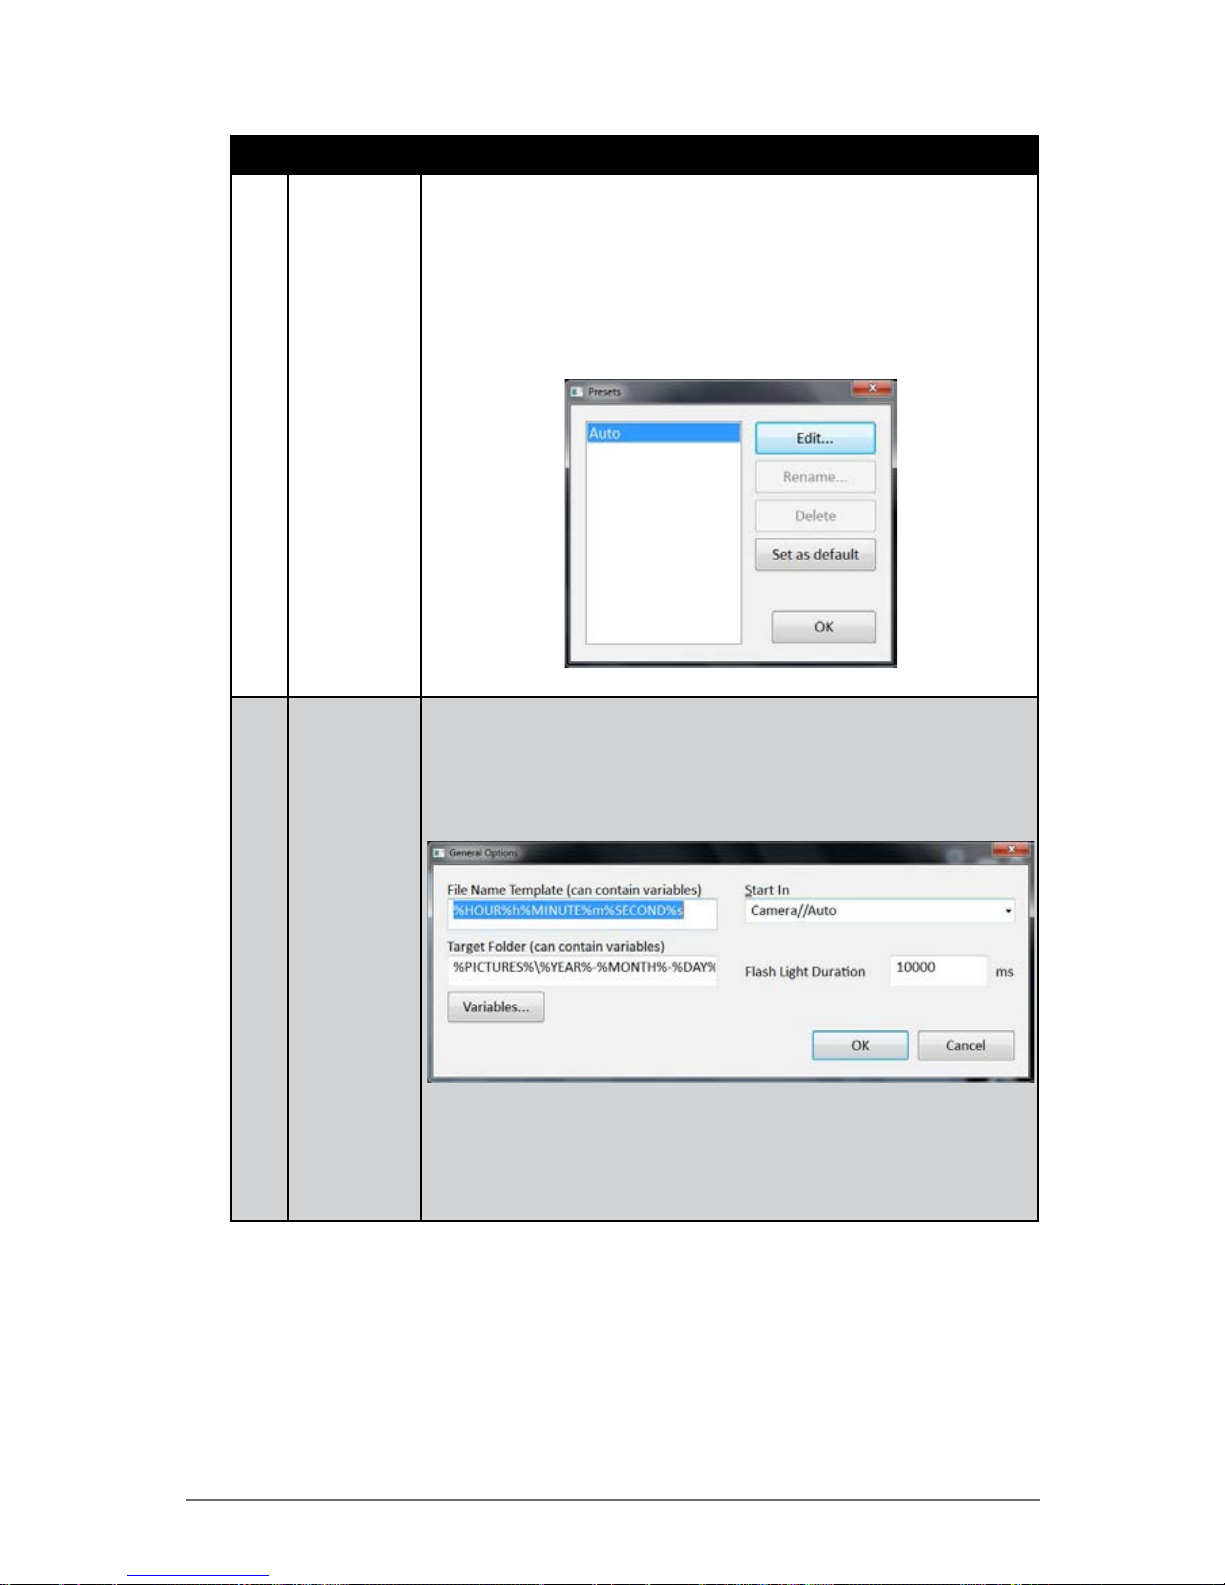
2 Camera
• Edit Presets...: Tap to open the Presets page. On
this page you can congure the default parameters of
Auto shooting mode. Tap on the mode and then tap
Edit.... You can also set the mode as a default mode, by
selecting a mode and clicking on Set as Default. Tap OK
to save changes and exit the page.
3 Options
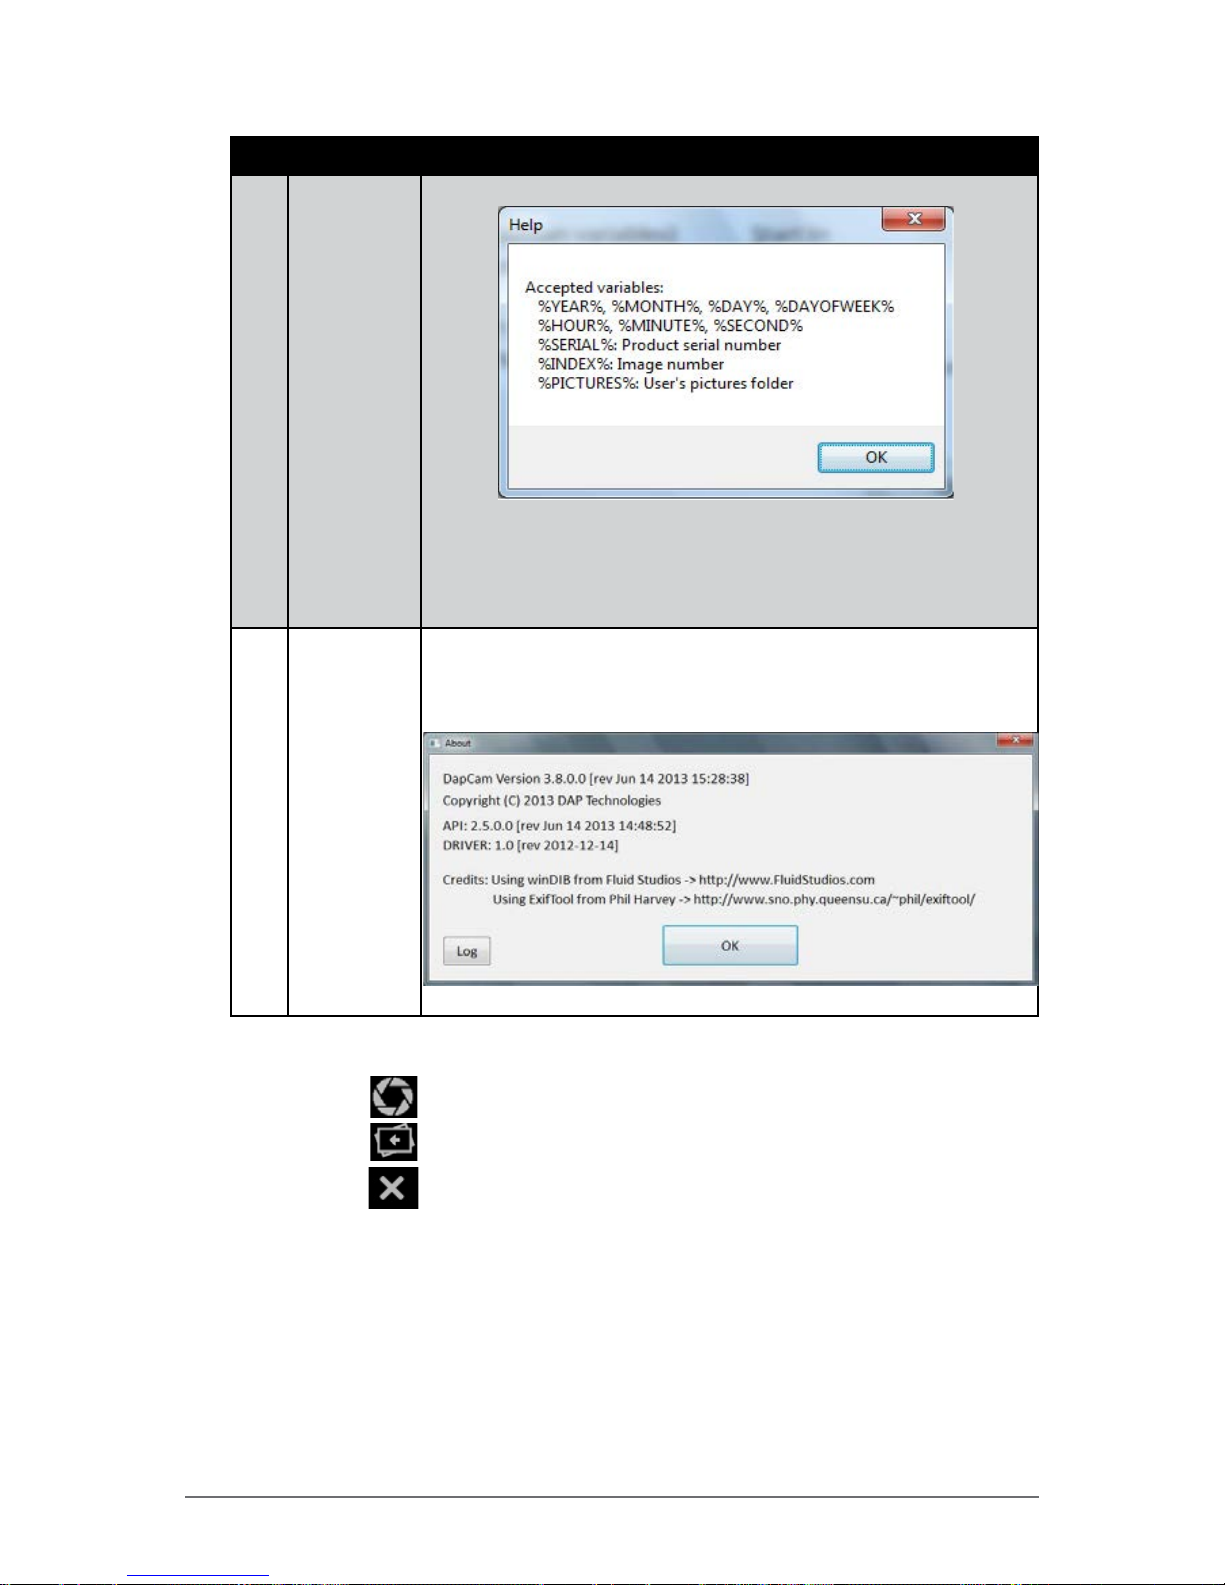
• General...: Tap to open the General Options page. On
this page you can dene the le name template, target
image folder location, start in mode and ash light
duration. When all modications are done, tap OK.
Please note that you can use variables, to automate
the image naming and image folder location and naming.
Click the Variables... button for more details on variable
names.
Page 60
Winmate Technologies 2-31
Operating Your Tablet Computer
No. Item Description
3 Options
Tap OK to return General Options page.
• Export Conguration...: Tap to select the location
where you want to save the conguration parameters.
The parameters are saved in XML format.
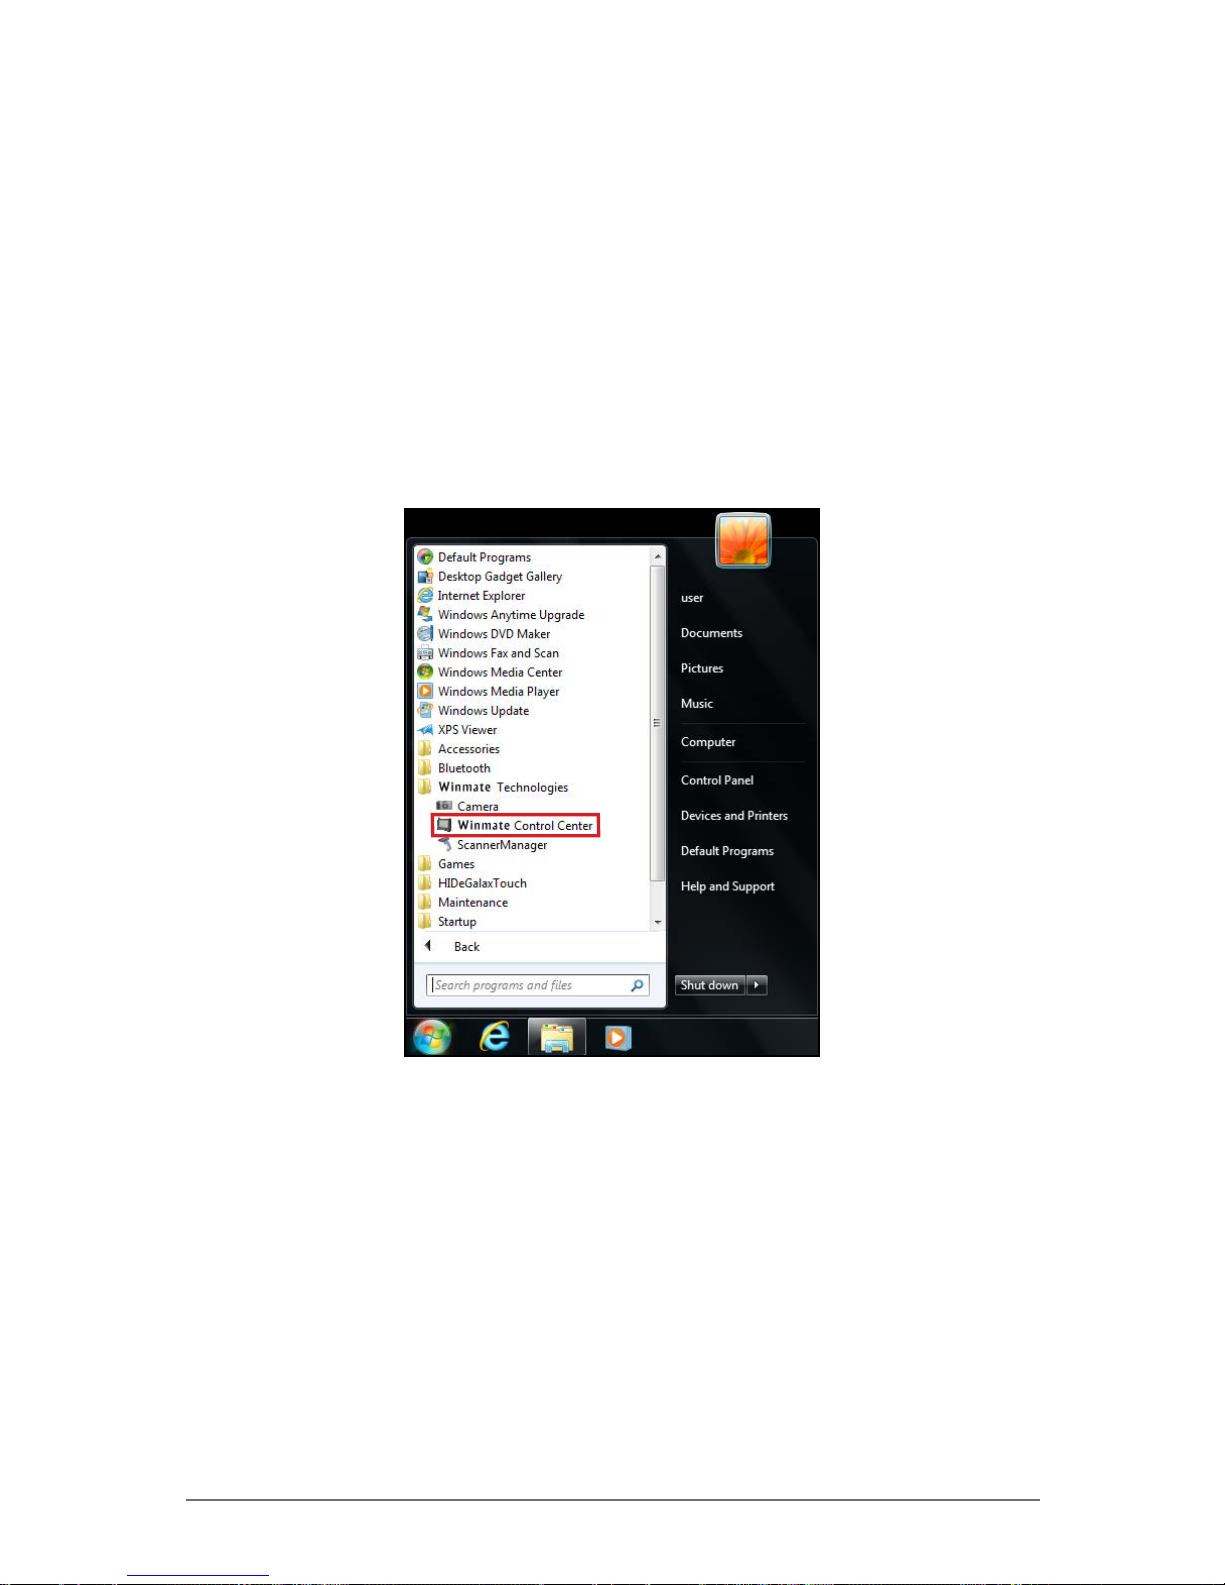
4 ?
• About: Tap to see the camera application information
page. Tap OK, to return to the
• camera screen.
3. When settings are complete, do one of the following:
• Tap
to capture an image.
• Tap
to see the image in Windows Photo Viewer.
• Tap
to close the camera screen.
Page 61
2-32 Winmate Technologies
Operating Your Tablet Computer
Using the Winmate Control Center
Your M9020 has a control center for viewing system information, setting power
options and dening hotkeys.
Opening the Winmate Control Center
Perform the following to open the Winmate Control Center:
• Tap Start > All Programs > Winmate Technologies > Winmate Control
Center.
Page 62
Winmate Technologies 2-33
Operating Your Tablet Computer
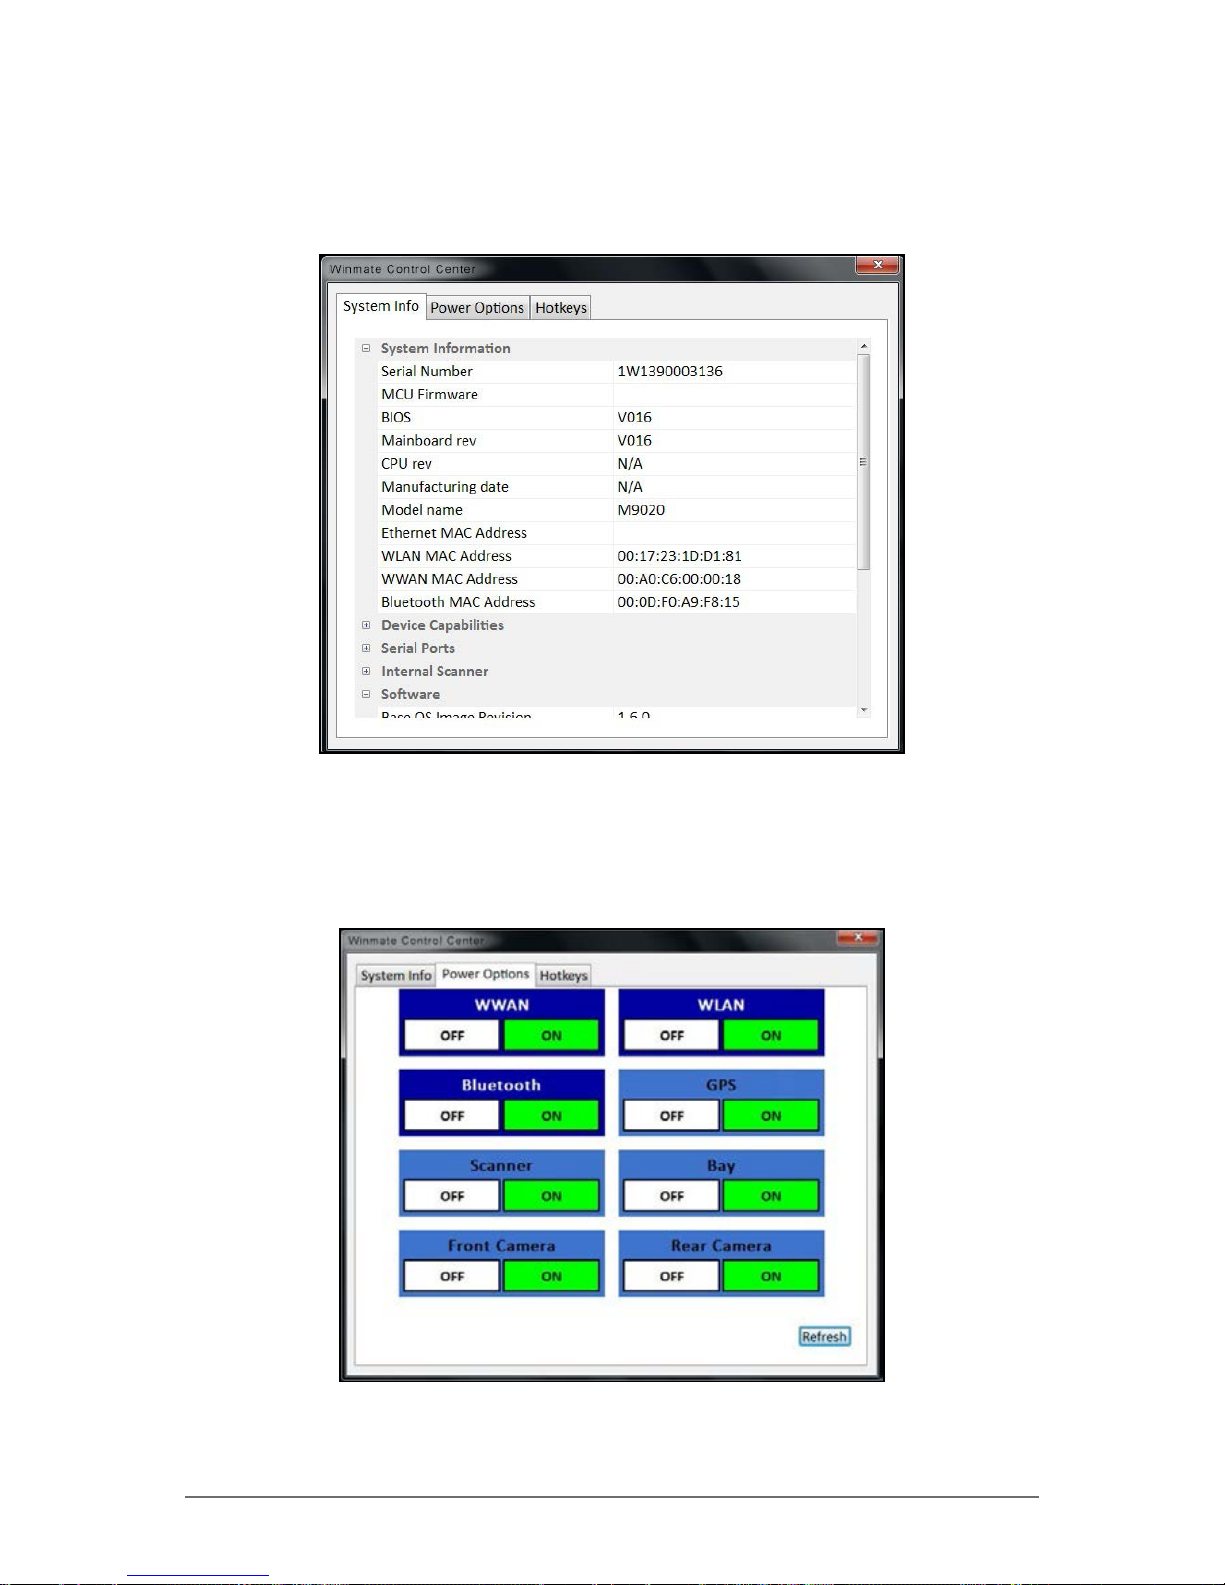
Viewing System Information
General system information is displayed in the System Info tab on Winmate
Control Center.
Setting Power Options
Tap the Power Options tab to control the power state of features such as the
WWAN, WLAN, Bluetooth, GPS, Scanner and Cameras.
Page 63
2-34 Winmate Technologies
Operating Your Tablet Computer
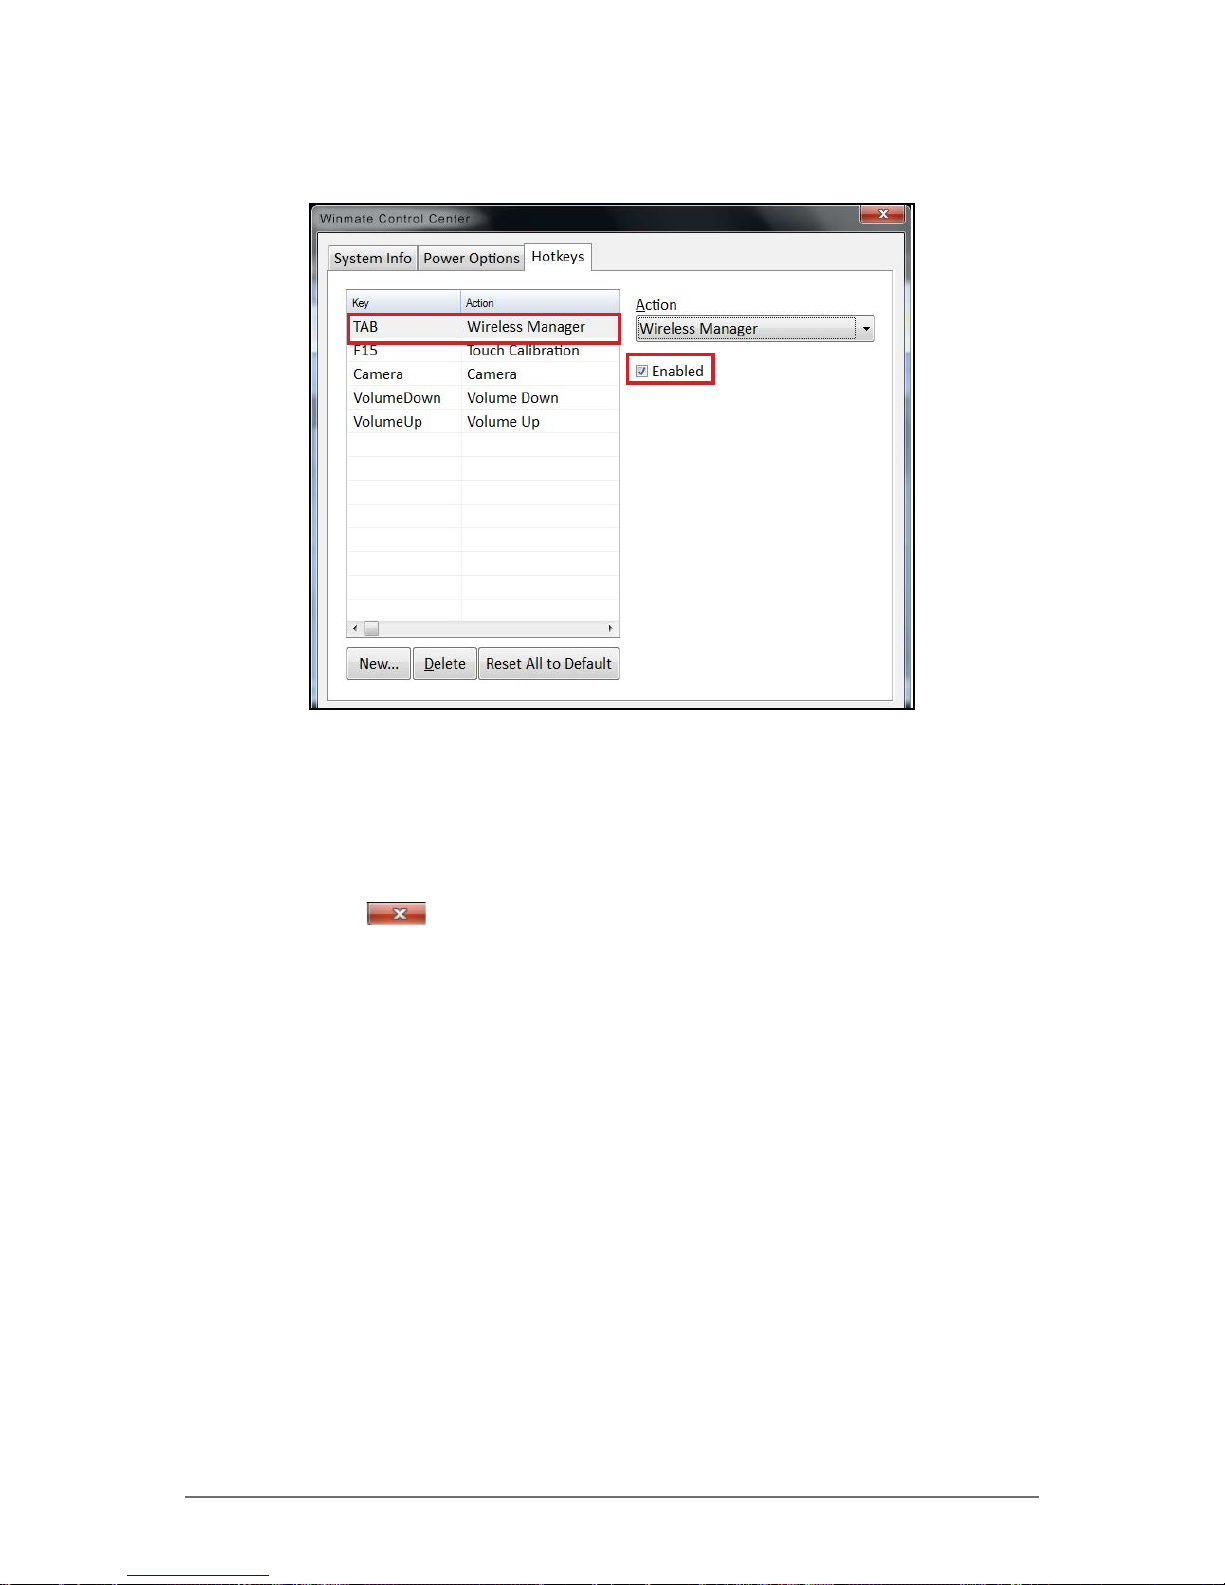
Dening Hotkeys
To dene hotkeys, do the following:
1. Tap on Hotkeys tab. The Hotkeys page opens.
2. Tap New... ( ). The Input Key window opens.
3. Type the key or key combination that will be dened as a hotkey. To assign
a hotkey to the ESC (Escape), TAB (Tabular) or RETURN (Enter) keys,
use the corresponding buttons. Tap OK to conrm.
The selected hotkey appears in the table on the Hotkeys page.
4. To assign an action to a hot key, select it on the list and then tap the Action
eld. A list of actions is displayed on the screen. Select the desired action
from the list.
NOTE:
To activate the hotkey, make sure the Enabled checkbox is checked.
Page 64
Winmate Technologies 2-35
Operating Your Tablet Computer
In the following illustration, the TAB key is assigned to open the Wireless
Manager.
5. After the hotkey is assigned, do one of the following:
• Tap New, to assign the next hotkey. Repeat steps from 1 to 4.
• Select the key and tap Delete, to delete the hotkey assignment.
• Tap Reset All to Default, to restore the default conguration.
• Tap
to close the Hotkeys page.
Page 65
2-36 Winmate Technologies
Operating Your Tablet Computer
Using the Barcode Reader
Your M9020 has a built-in barcode reader which is a 2D imager that you can
use to scan barcodes.
NOTE:
• The built-in barcode reader is an optional accessory.
• Alternatively, you can also use a Bluetooth scanner or connect an external barcode
scanner to the USB or RS-232 ports.
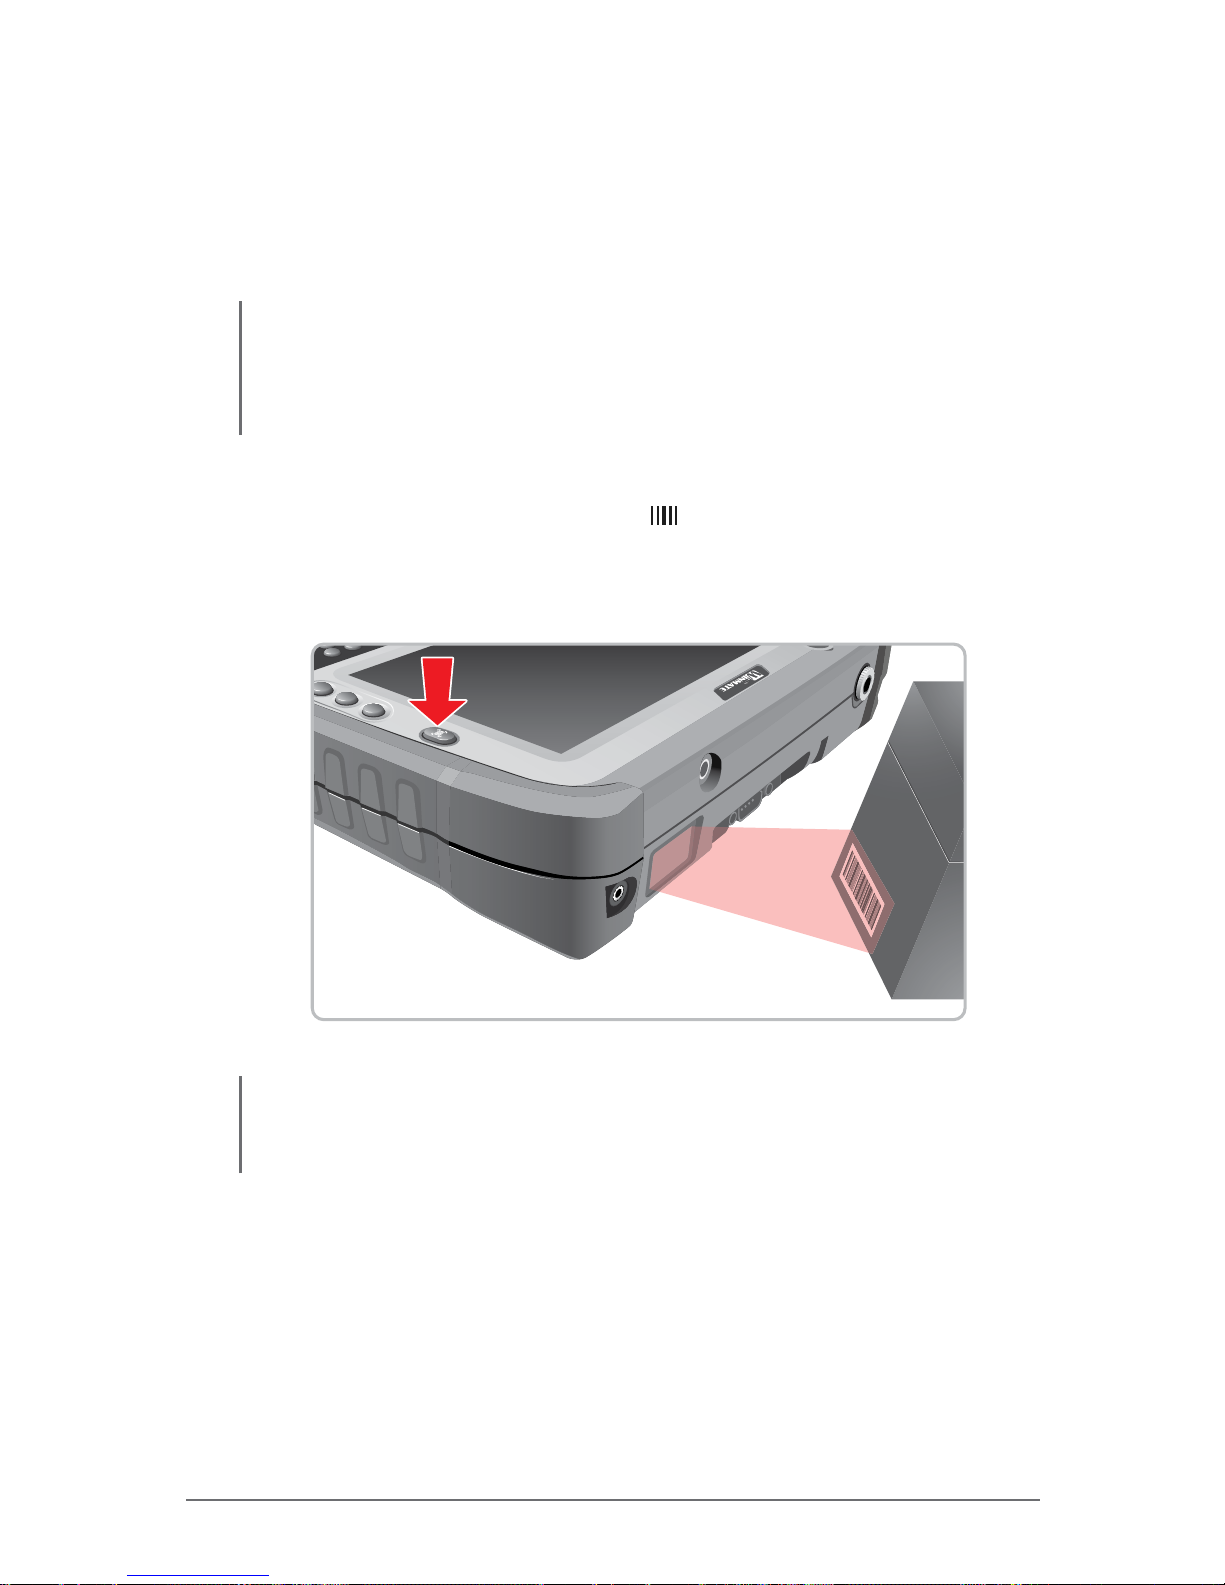
Perform the following to scan barcodes using the built-in barcode reader:
1. Press and hold the barcode button (
) to active the barcode reader. The
barcode reader lights red.
2. Point the beam to the barcode label. The device emits a beep sound when
the barcode is read properly.
CAUTION:
• DO NOT aim the barcode scanner into the eyes. It may severely damage the eyes or
may cause blindness if pointed directly into eyes.
Page 66
Winmate Technologies 2-37
Operating Your Tablet Computer
Using ScannerManager
The ScannerManager allows you to see the status and congure the settings of
the Internal Scanner, Tethered Scanner, and Bluetooth Scanner.
Opening the ScannerManager
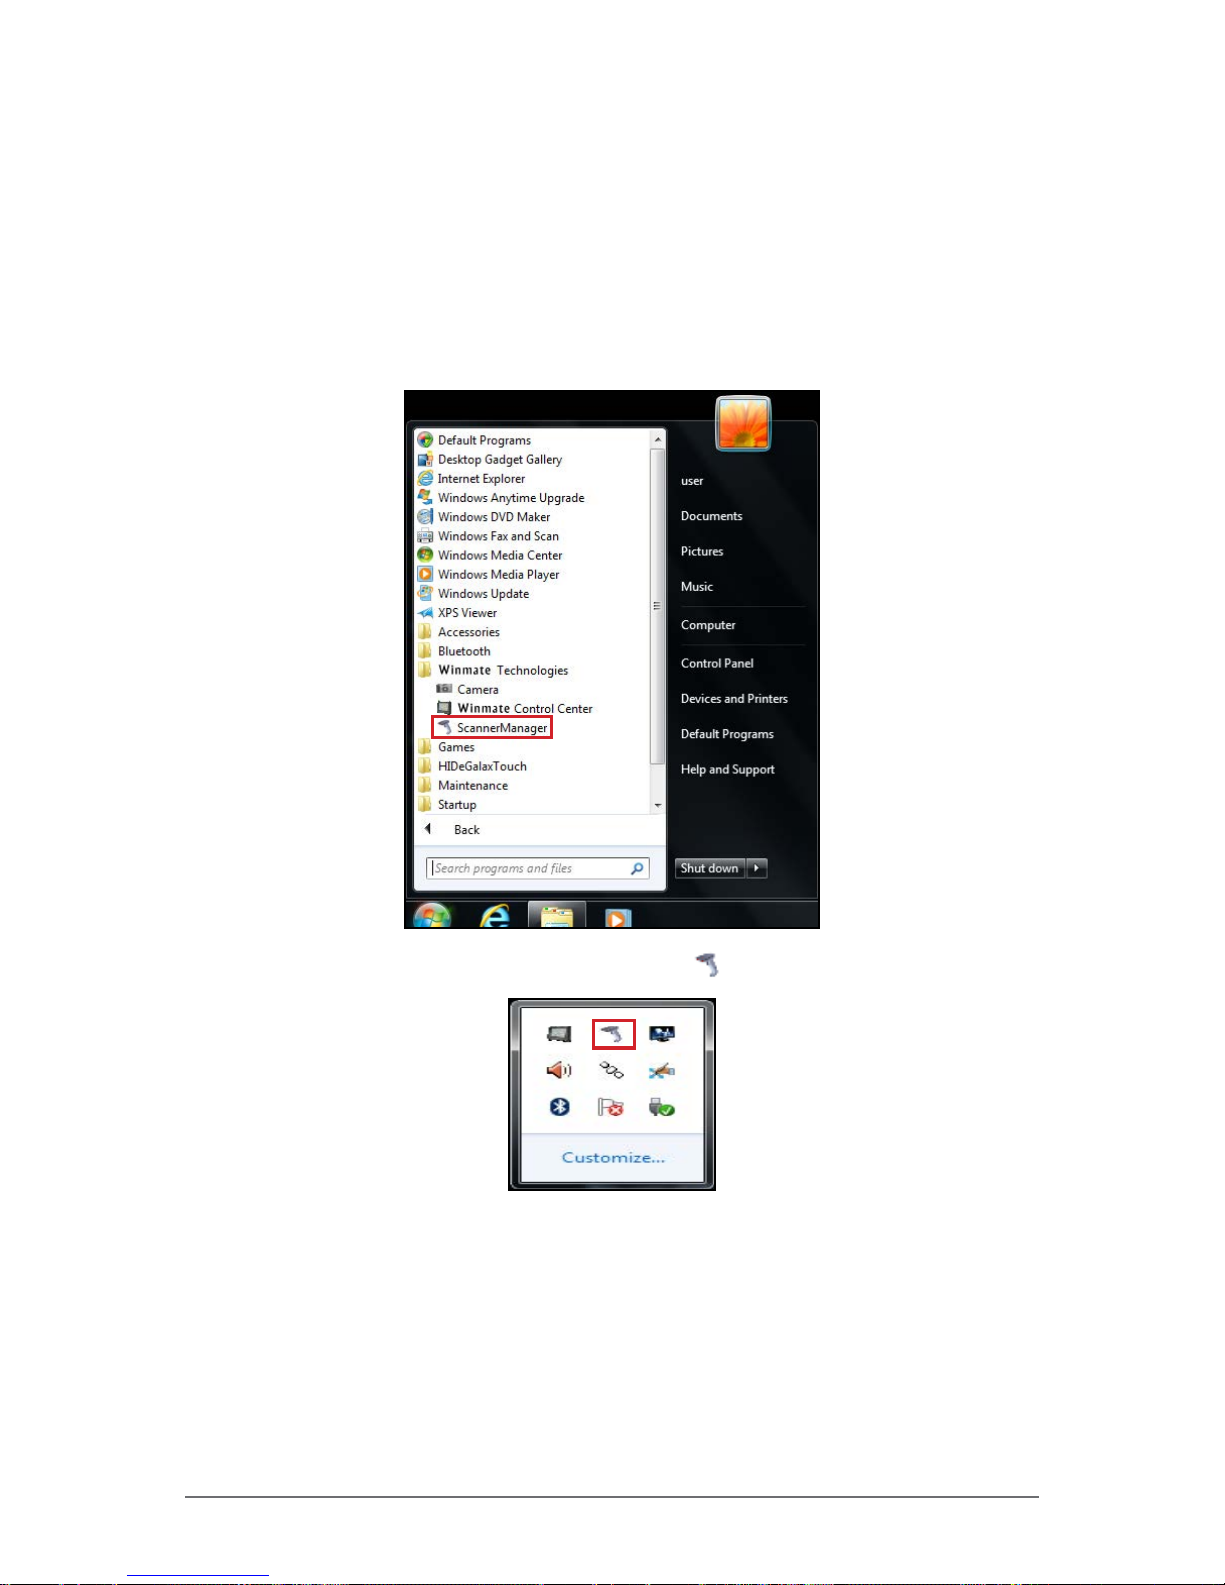
Perform one of the following to open the ScannerManager application::
• Tap Start > All Programs > Winmate Technologies > ScannerManager.
•
Press the ScannerManager shortcut key ( ) icon on the taskbar.
Page 67
2-38 Winmate Technologies
Operating Your Tablet Computer
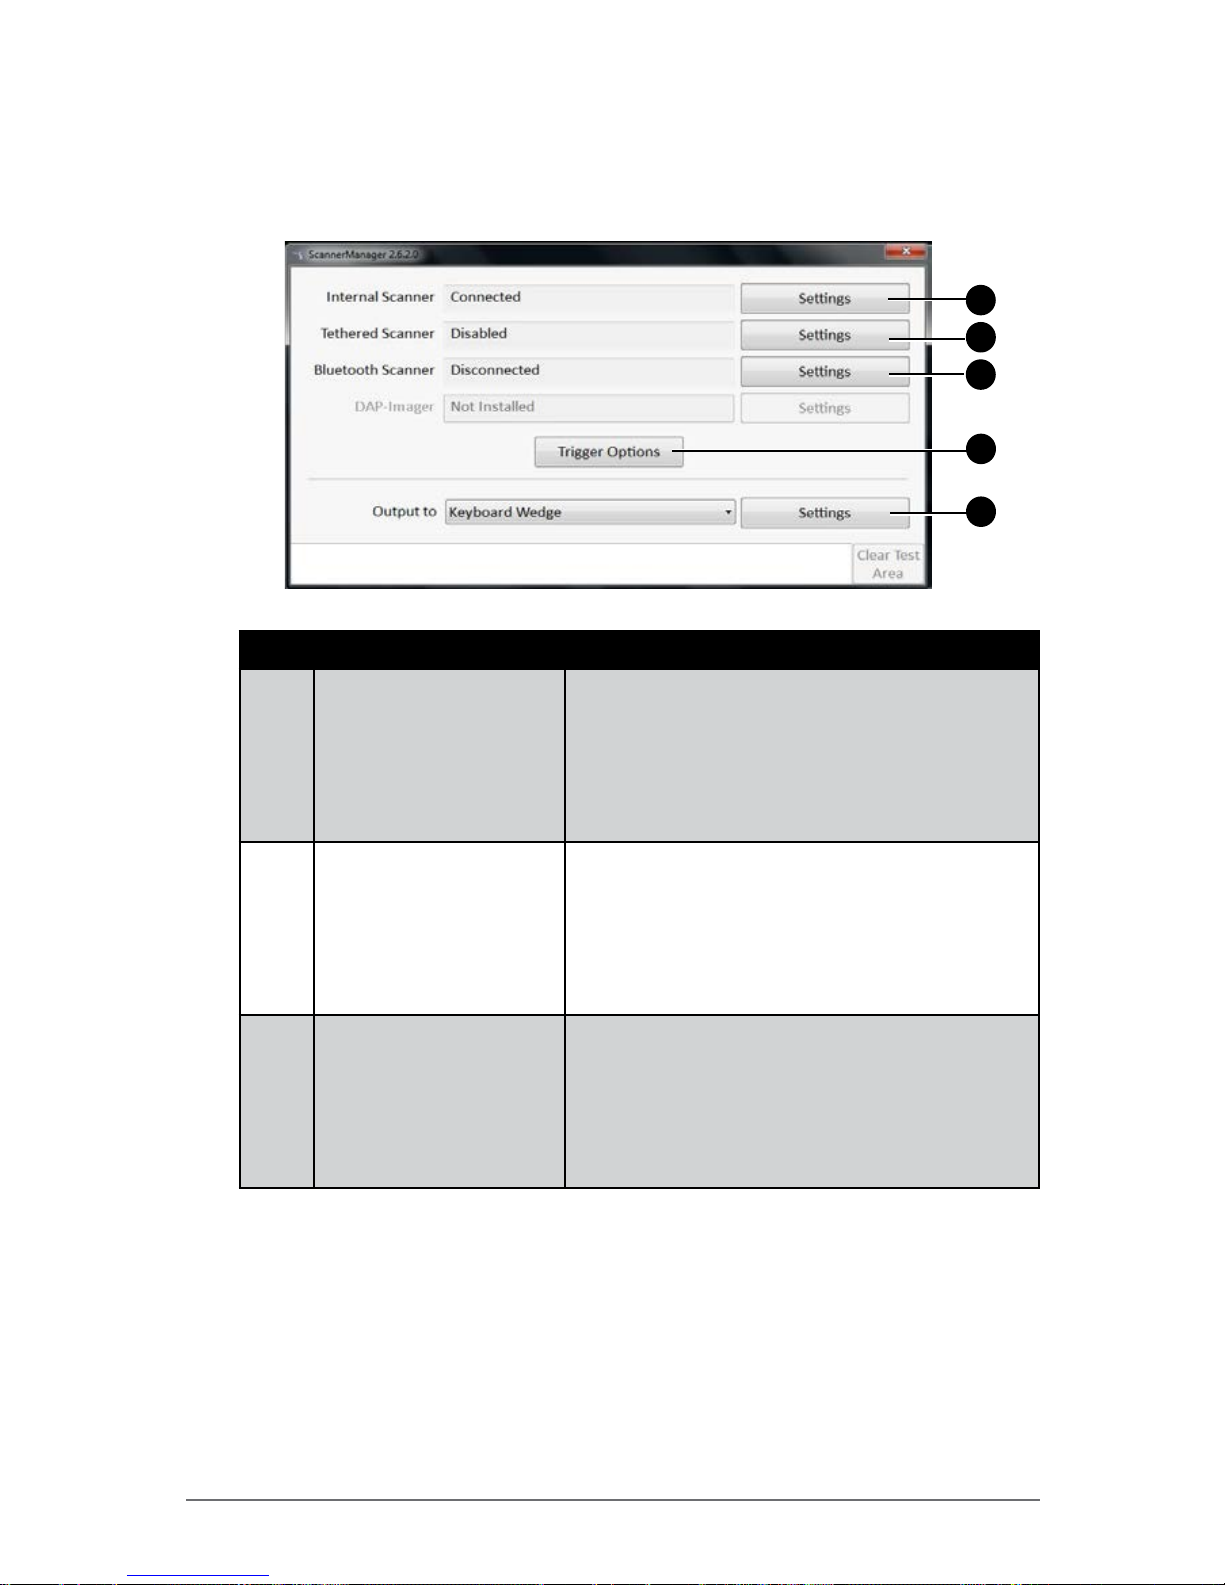
Using the ScannerManager
1. Open the ScannerManager, see “Opening the ScannerManager” on page
2-37. The settings main page opens on the screen.
2
1
3
4
5
No. Item Description
1 Internal Scanner By default the inner scanner is enabled and
connected. Tap Settings, to modify the de-
coder properties, import/export parameters,
or disable the internal scanner.
Tap OK to return to the ScannerManager
main page.
2 Tethered Scanner By default the tethered scanner is disabled.
Tap Settings to enable this scanner and do
modications to the serial link connection
parameters.
Tap OK to return to the ScannerManager
main page.
3 Bluetooth Scanner Tap Settings to congure the Bluetooth
scanner connection parameters. See
“Working With Bluetooth Scanners” on page
2-40.
Tap OK to return to the ScannerManager
main page.
Page 68
Winmate Technologies 2-39
Operating Your Tablet Computer
No. Item Description
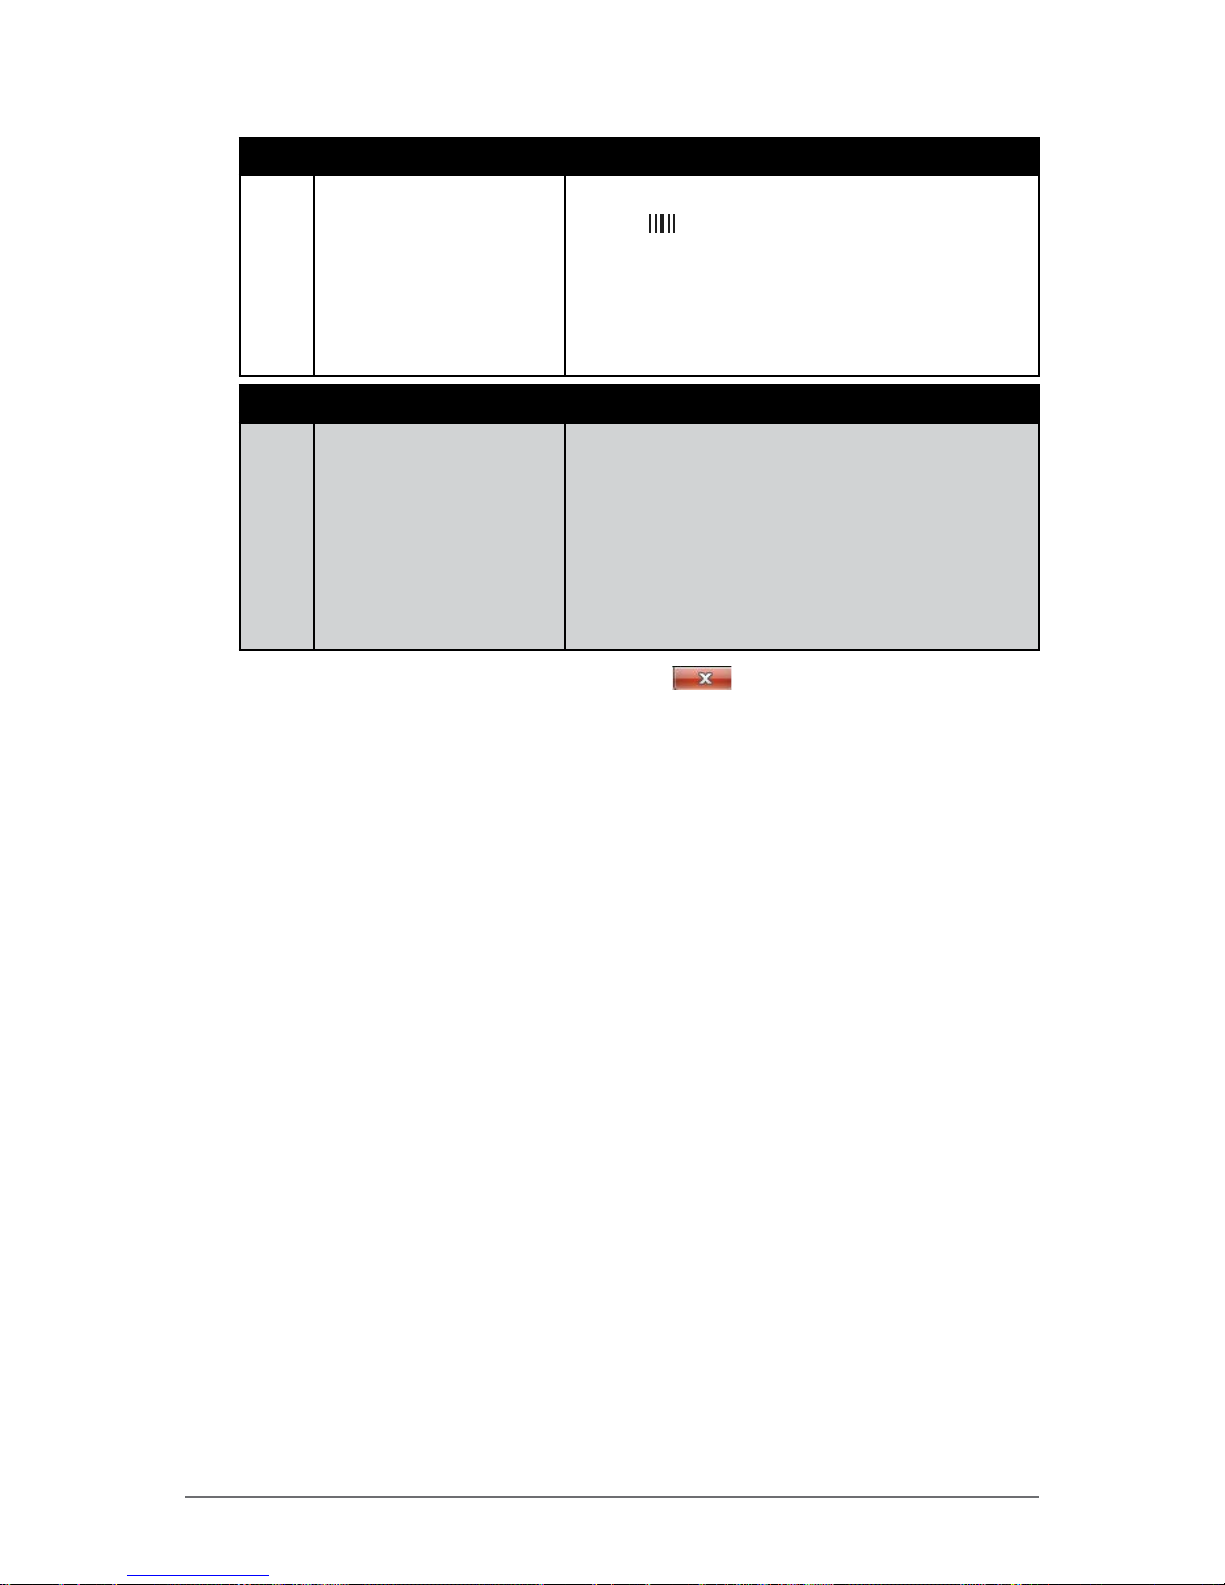
4 Trigger Options By default, when you press the barcode
button (
), the barcode scanner activates.
Tap Trigger Options if you want to remove
or assign the barcode scanner a different
shortcut key.
Tap OK to return to the ScannerManager
main page.
No. Item Description
5 Output to a) Select where to direct the barcode
scanning output. The available options are
as follows:
- Keyboard Wedge
- Link*One
- SDK.
b) Tap Settings to modify the selected output
conguration.
2. When the modications are done, tap
to close the ScannerManager
page.
Page 69
2-40 Winmate Technologies
Operating Your Tablet Computer
Working With Bluetooth Scanners
Scanner Manager recognizes Bluetooth scanners that are in master mode. This
means that the scanner initiates the connection. In order to do that, it must have
a way to know which unit to connect to.
Scanner manufacturers explain how to proceed to congure and pair their
devices in their documentation. Usually, the user must create a special barcode
based on the Bluetooth MAC address of the computer. Once that barcode has
been generated, it does not change. It can be placed on the M9020, and the
next time any scanner has to be associated with the unit, an operator simply
needs to scan the code and wait the connection to be established automatically.
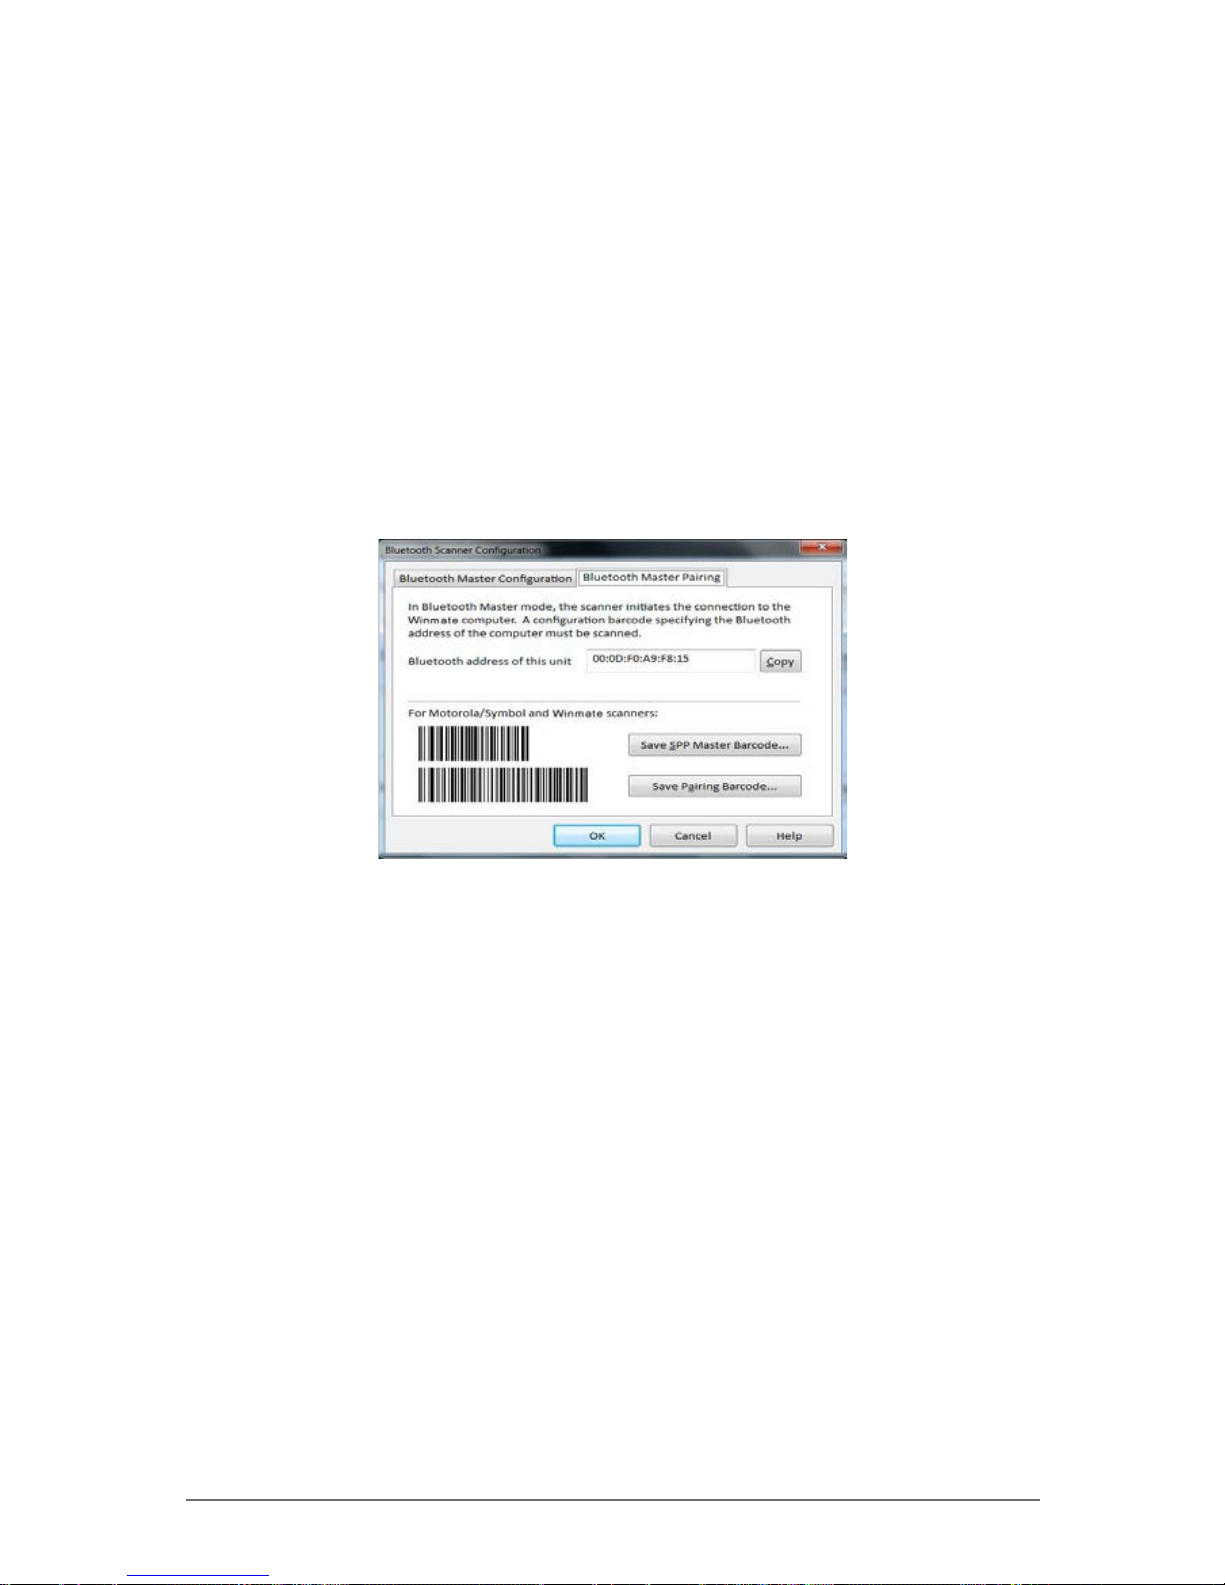
For Winmate and Symbol/Motorola scanners, you can use the Bluetooth Master
Pairing tab in the ScannerManager Bluetooth settings as follows:
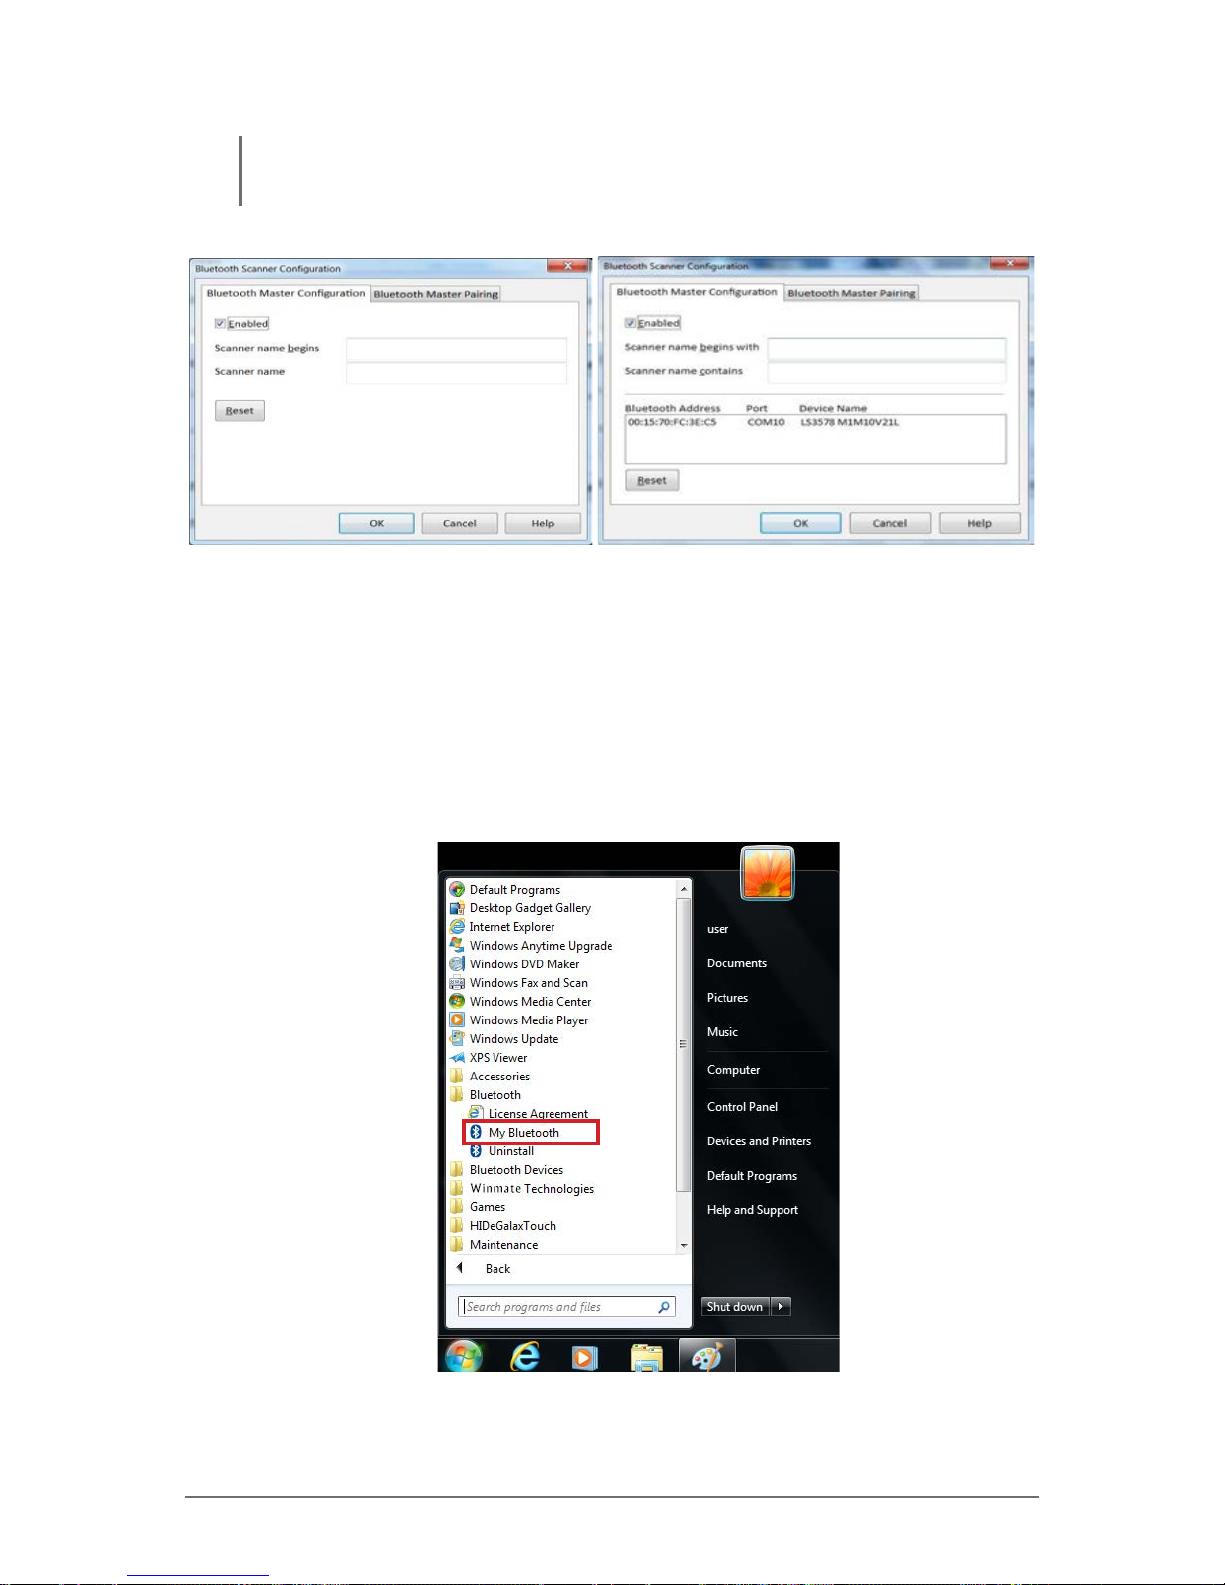
Bluetooth Master Conguration When Using BlueSoleil or the Microsoft BT Stack
The Bluetooth Master Conguration dialog box allows the ltering of which
Bluetooth scanner to accept a connection from. With the default values (empty),
the rst detected device using the Serial Port Prole (SPP) will be selected. In
most cases, this is correct. If you are using more than one SPP devices, change
the values to select, for example, only scanners from a given model.
Page 70
Winmate Technologies 2-41
Operating Your Tablet Computer
NOTE: The bottom list on “BlueSoleil Installed” illustration presents all the devices using the
Serial Port Prole, that are currently connected.
BlueSoleil Installed
Microsoft Bluetooth Stack
Bluetooth Master Conguration When Using an Incompatible Bluetooth Stack
In this situation, the Bluetooth Master Conguration page allows selecting the
COM port to use to connect to the scanner. A virtual COM port must be created.
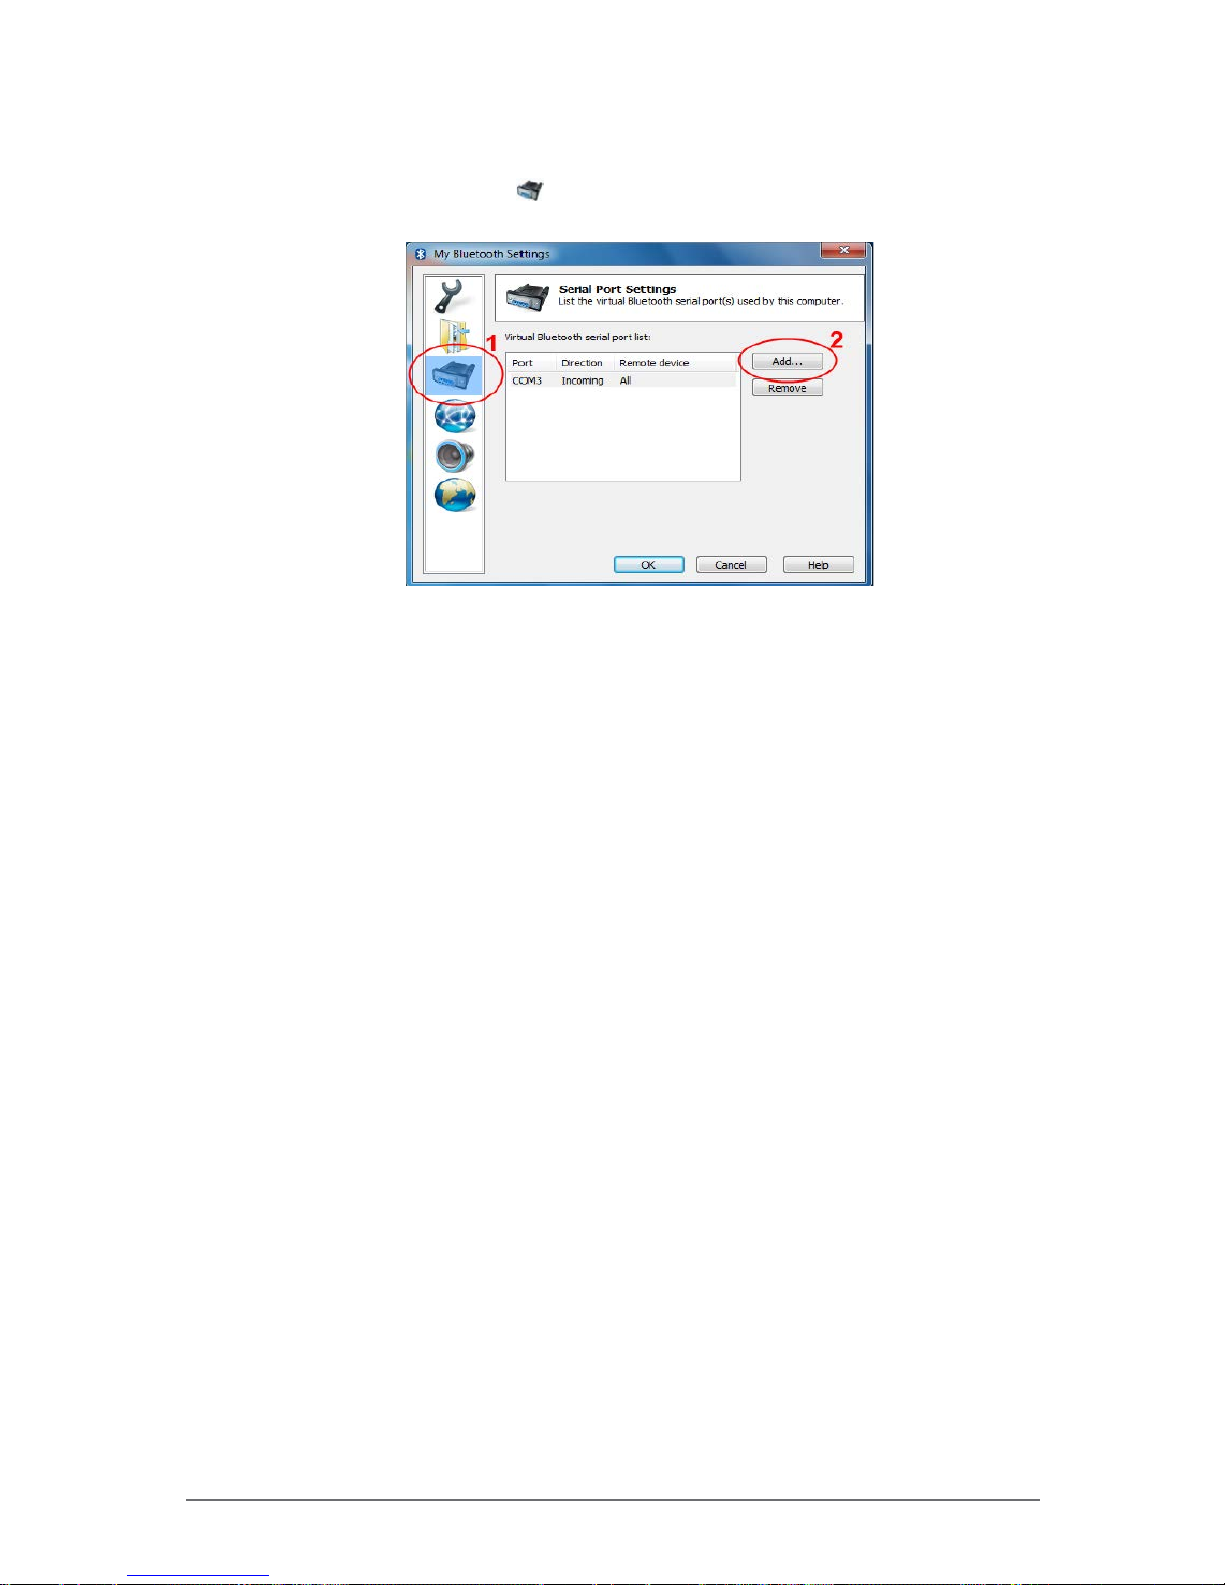
When using Motorola Bluetooth, perform the following, to create a Bluetooth
virtual COM port:
1. Tap Start > All Programs > Bluetooth > My Bluetooth. My Bluetooth
page opens.
Page 71
2-42 Winmate Technologies
Operating Your Tablet Computer
2. Tap My Bluetooth. My Bluetooth settings page opens.
3. Tap on the connector (
) icon (1). If no virtual COM port is shown, tap
Add button and create a virtual port (2).
Creating a virtual COM port is complete.
4. Return to the ScannerManager Bluetooth Master Conguration to
complete the scanner connection. See “Using ScannerManager” on page
2-37.
Page 72

Winmate Technologies 3-1
Connecting Your M9020
CHAPTER
3
You can extend the capabilities of your M9020 by connecting other peripheral
devices. When using a device, be sure to read the instructions accompanying
the device together with the relevant section in this chapter.
This chapter gives guidelines on installing and using the following devices:
• USB
• VGA
• Audio
• Serial
Connecting Y our M9020
Page 73
3-2 Winmate Technologies
Connecting Your M9020
Connecting USB Devices
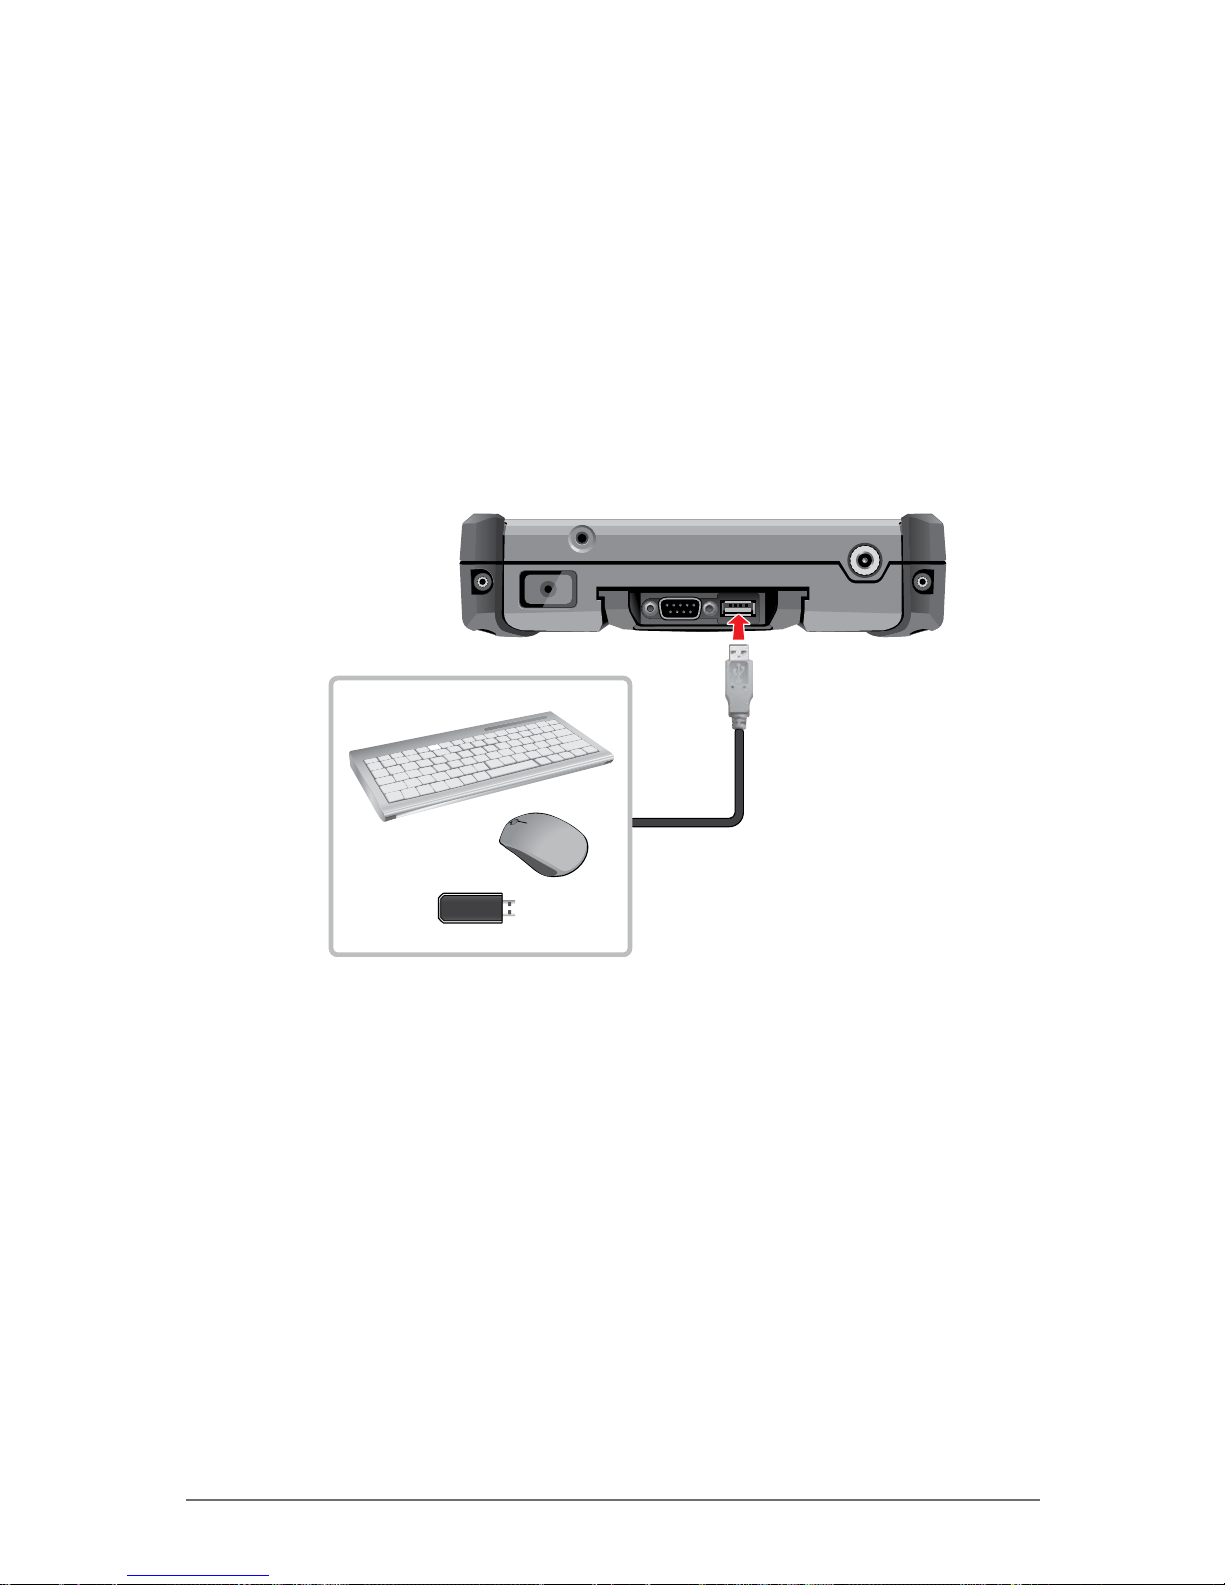
Your M9020 has one USB port available on the top of the compartment cover.
USB Port Connection
Use the USB port to connect USB devices, such as a ash disk drive, scanner,
printer, keyboard, and mouse.
To connect a USB device, simply plug the device cable into the USB port of
your M9020.
Page 74
Winmate Technologies 3-3
Connecting Your M9020
Connecting VGA Devices
Your M9020 has one VGA port for connecting VGA devices, such as an external
monitor.
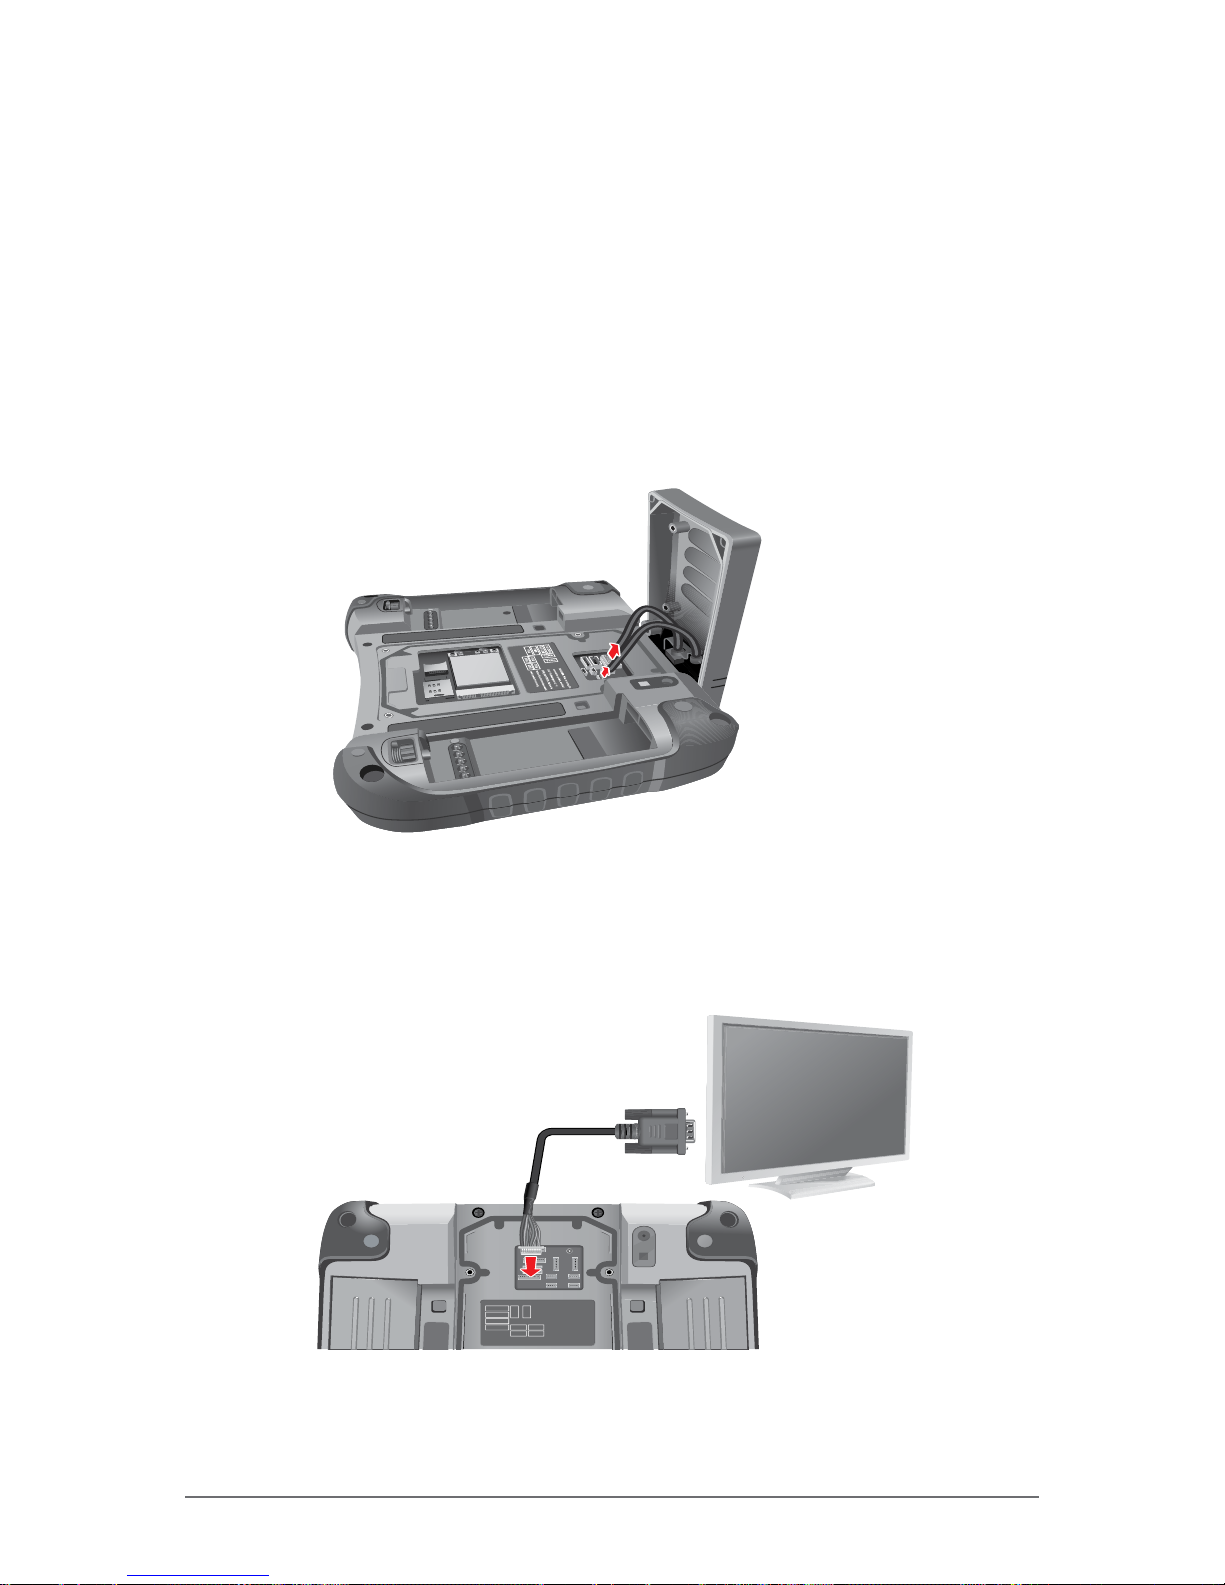
Perform the following, to connect a VGA device:
1. Release the compartment cover. See “Releasing the Compartment Cover”
on page 1-12.
2. Gently disconnect the RS-232 and USB cables from the connectors on
motherboard.
3.
Remove the compartment cover.
4. Connect the VGA cable to the VGA connector of the M9020.
5. Connect the VGA cable to the VGA device.
Full COM
Full COM
PWR
VGA USB
TxRx
TxRx
USB
USB USB
WARNING: Prior to using the
connection points, contact
Winmate Technologies at: +1
(855) Winmate-TECH. Failure to
follow this instruction could
void product warranty.
Page 75
3-4 Winmate Technologies
Connecting Your M9020
Connecting Audio Devices
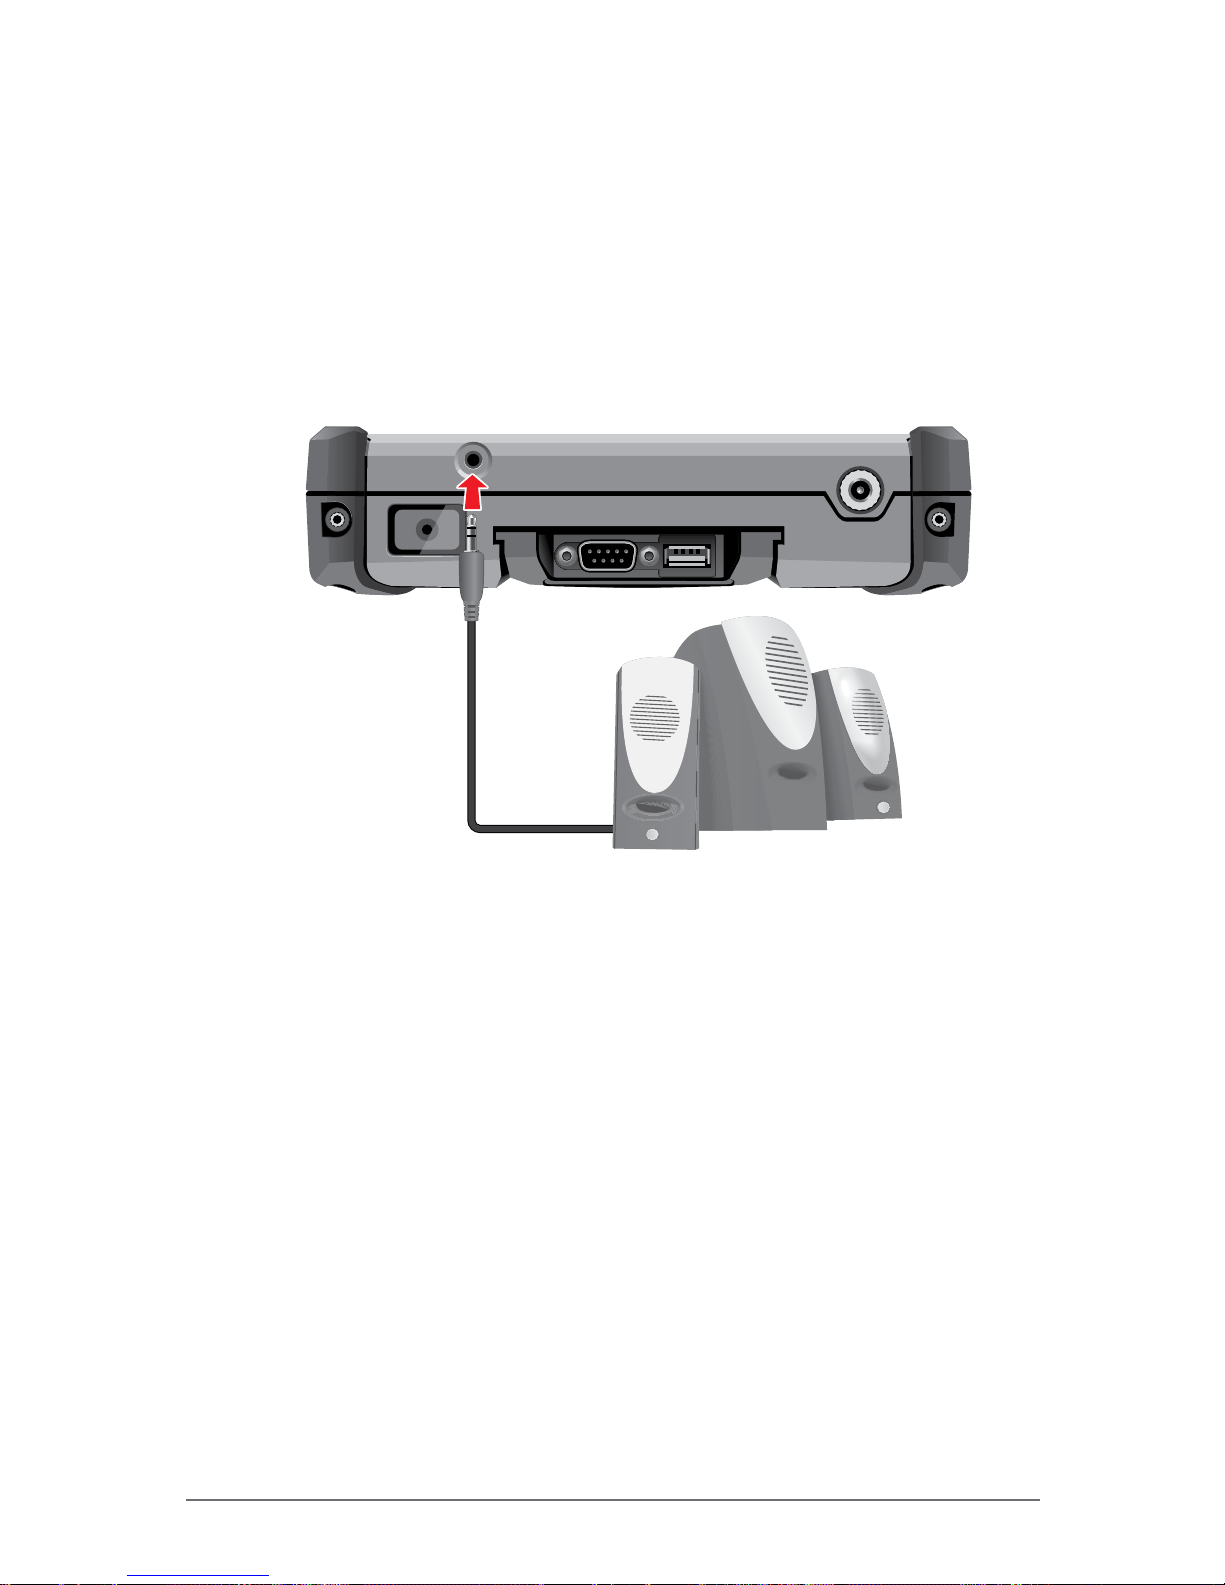
Your M9020 has one combo audio connector that supports both audio in
and audio out devices. You can connect speakers, headphones, or a stereo
headset.
To connect an audio device, simply plug the device cable into the audio
connector of your M9020.
Page 76
Winmate Technologies 3-5
Connecting Your M9020
Connecting Serial Devices
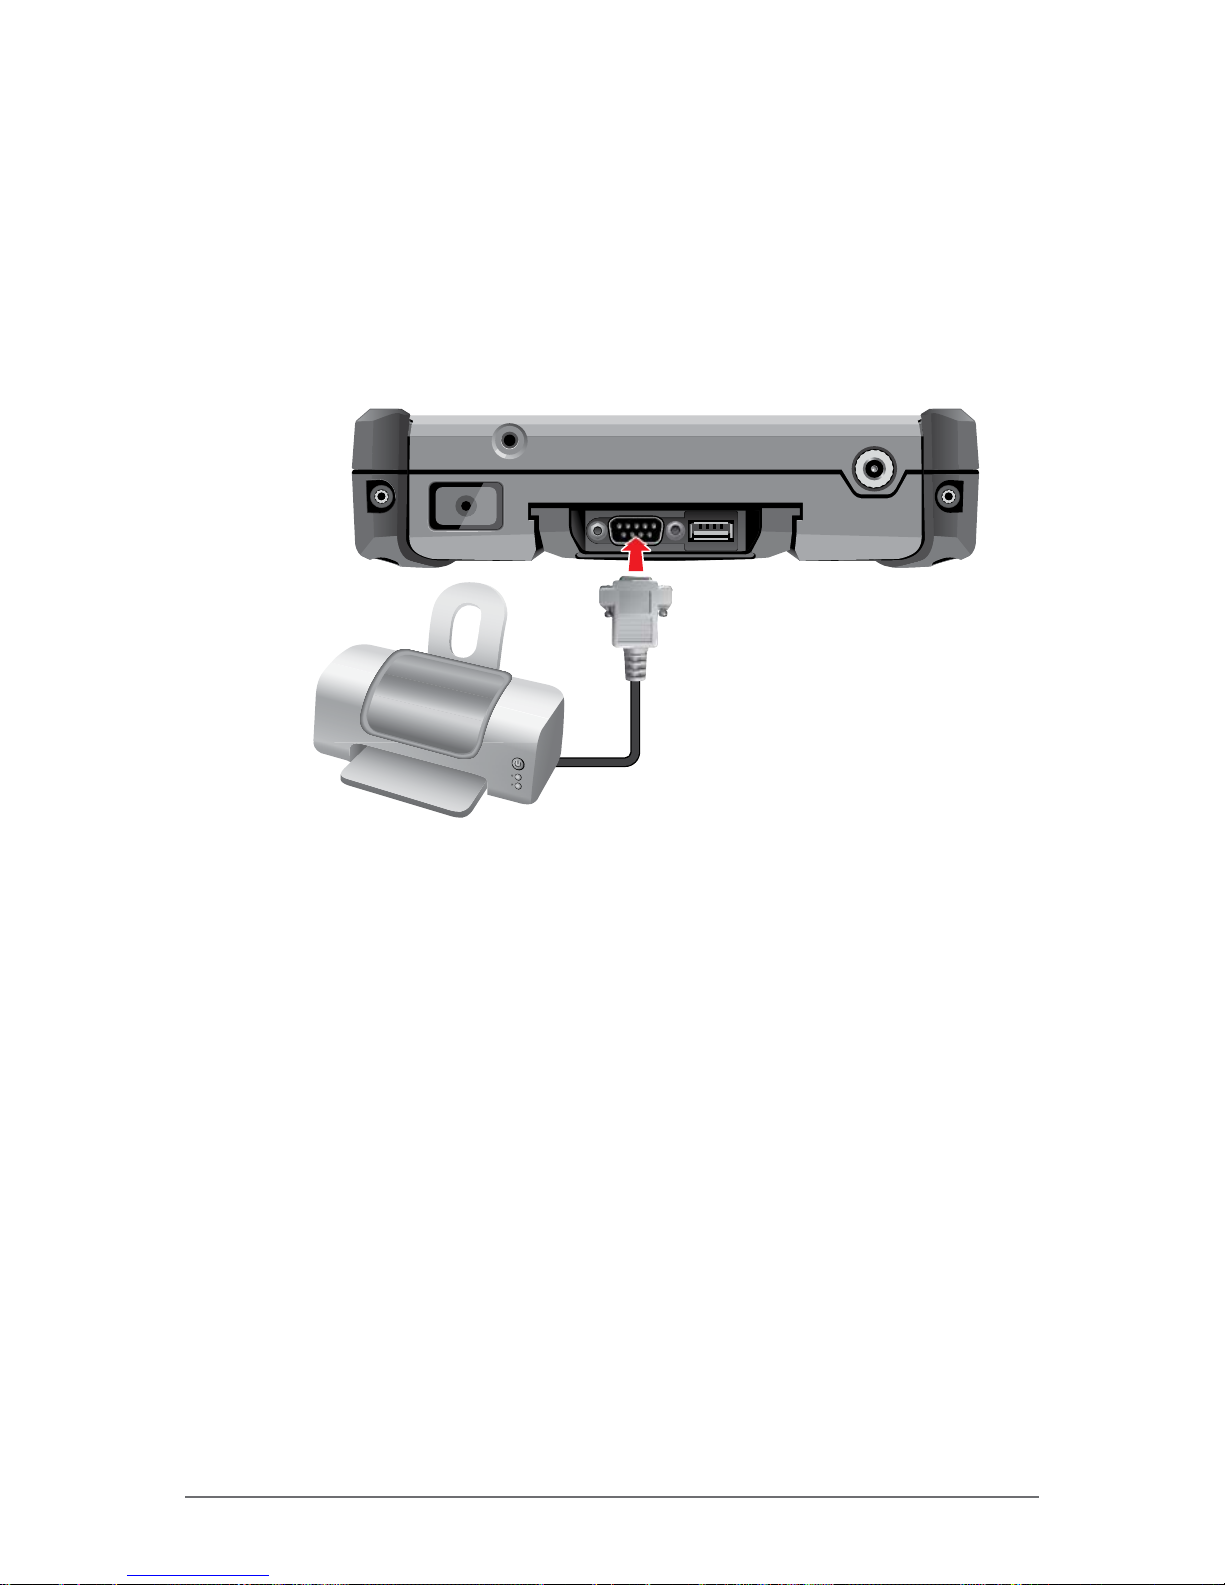
Your M9020 has one RS-232 port for connecting serial devices, such as
barcode scanners, printers, among others.
To connect a serial device, simply plug the device cable into the RS-232 port of
your M9020. Attach the screws to secure the connection.
Page 77

Winmate Technologies 4-1
Managing Power
CHAPTER
4
Your M9020 operates either on external AC power or on battery power.
This chapter tells you how you can effectively manage power. To maintain
optimal battery performance, it is important that you use the battery in the
proper way.
The topics in this chapter include:
• How to charge the battery pack
• How to check the battery level
• What happens when the battery is low and what actions to take
• What is Power Management
• How to save power
Managing Power
Page 78
4-2 Winmate Technologies
Managing Power
Battery Pack
The operating time of a fully charged battery pack depends on how you use the
device.
When you use applications that often access peripherals, or when you stay
connected to a wireless network, the operating time of the battery may be
shortened.
WARNING:
• Do not disassemble the battery pack. There are no user-serviceable parts inside. Doing so
may present risk of exposure to harmful chemicals, explosion or re.
• Contact your local waste disposal service provider regarding the disposal or recycling of used
battery packs.
Charging the Battery Pack
Perform one of the following, to charge the battery pack(s):
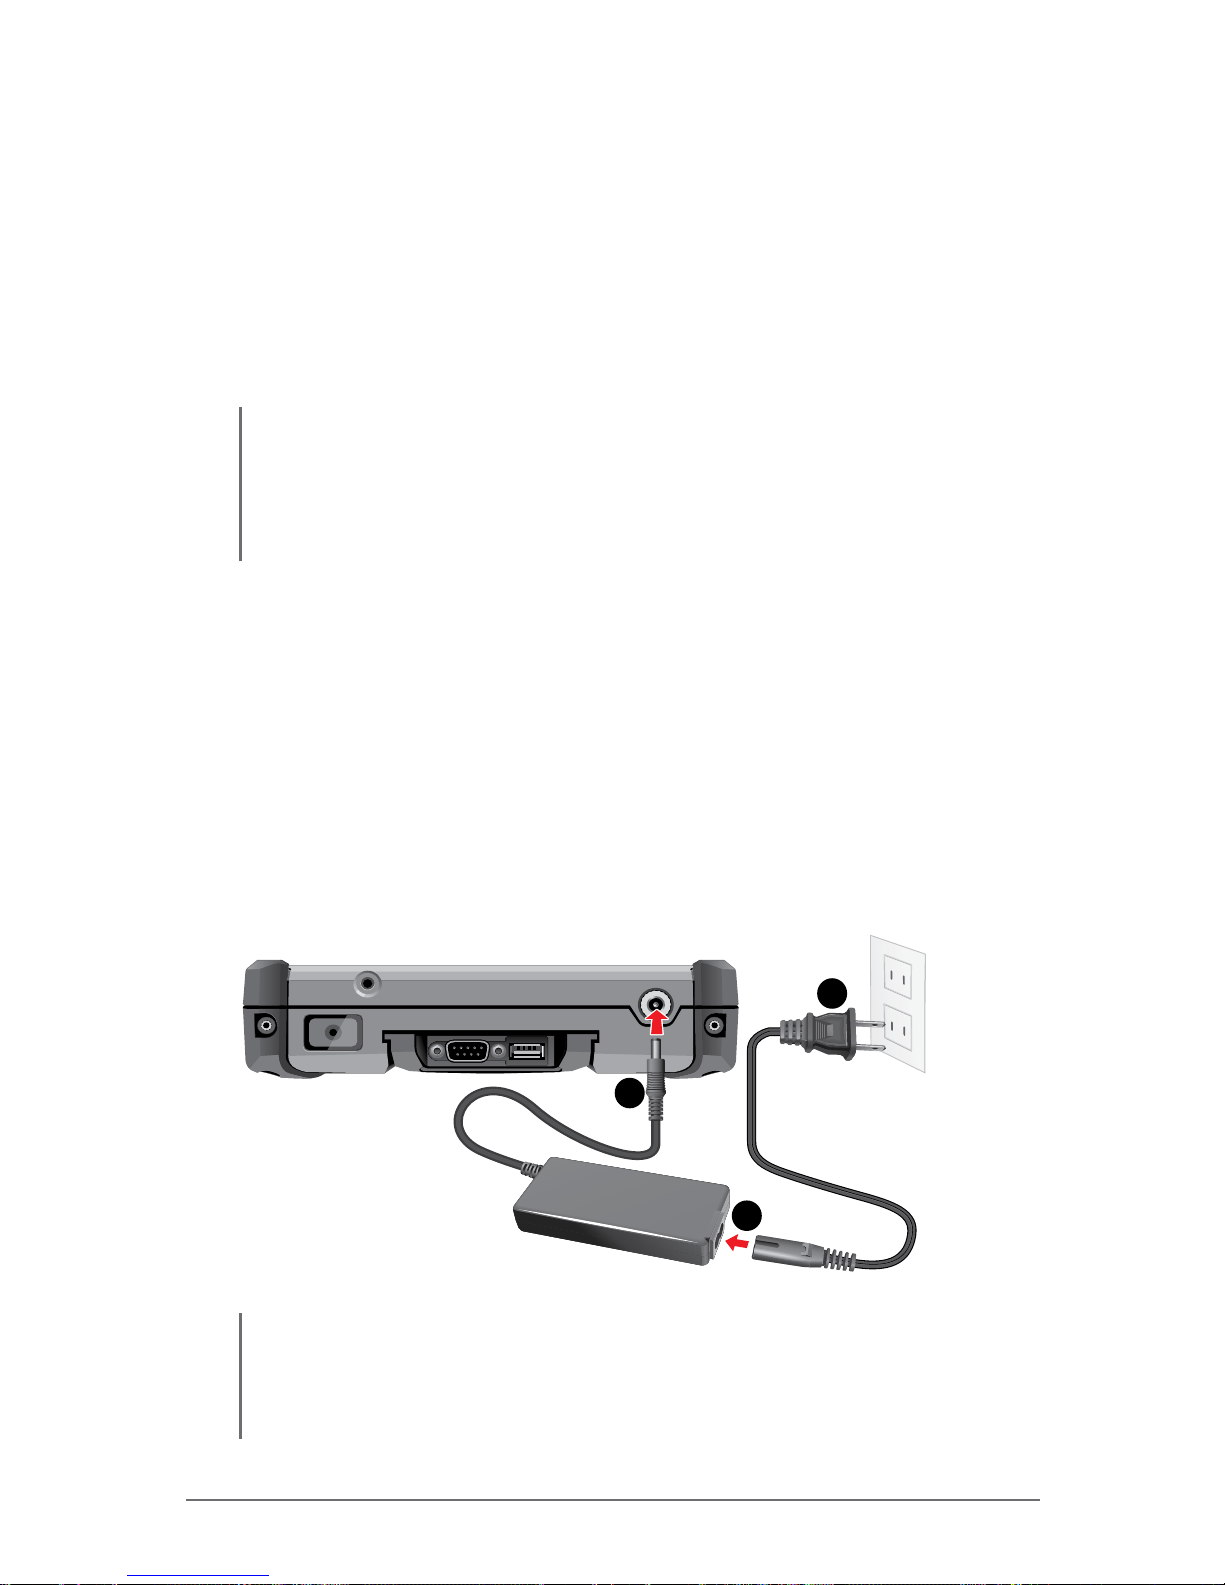
Via M9020
1. With the battery pack(s) installed, plug the DC cord of the AC adapter into
the power connector of M9020.
2. Plug the female end of the AC power cord into the AC adapter.
3. Then plug the male end of the AC power cord into an electrical outlet.
1
2
3
CAUTION:
• When you disconnect the AC adapter, disconnect from the electrical outlet rst and then from
M9020. A reverse procedure may damage the AC adapter or M9020.
• When unplugging the connector, always hold the plug head. Never pull on the cord.
Page 79
Winmate Technologies 4-3
Managing Power
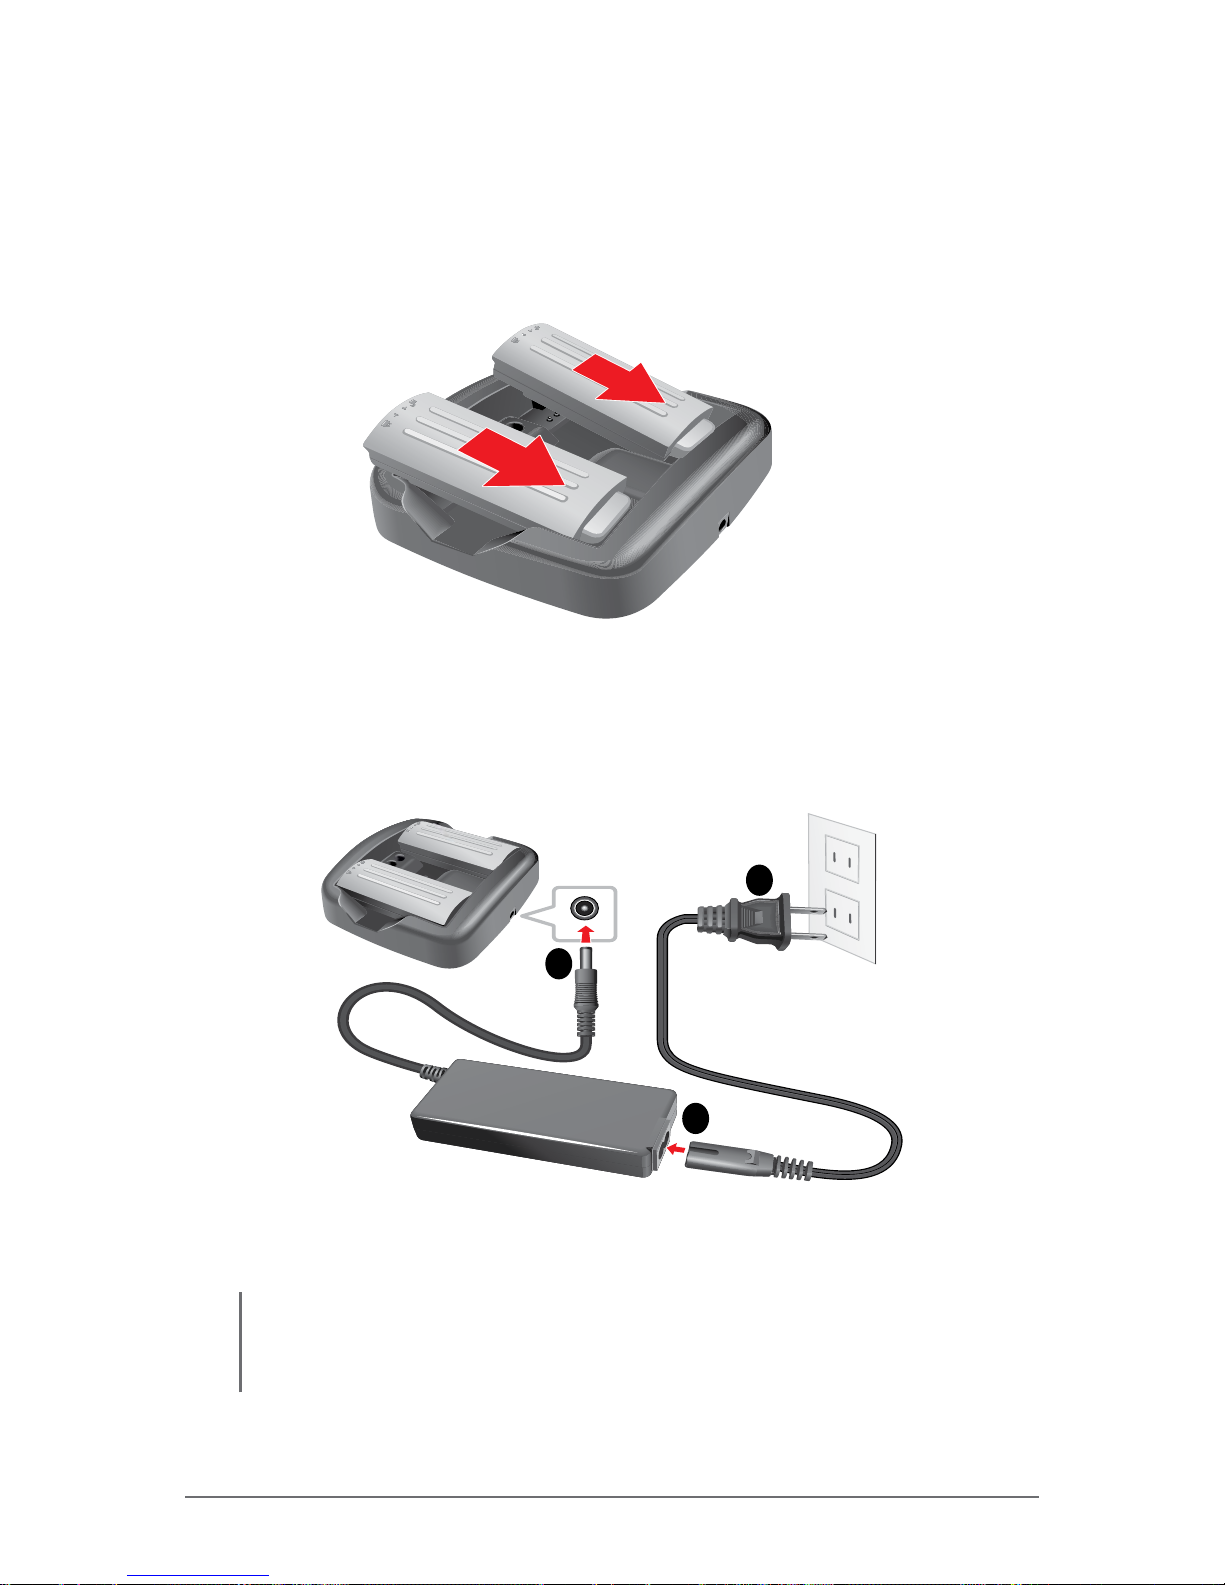
Via Charger (Optional)
1. From the top side of the battery pack, align and place the battery into the
battery charger.
2. Press down on the battery pack.
3. Repeat the above steps to install the second battery pack if necessary.
4. Plug the DC cord of the AC adapter into the power connector of the battery
charger.
5. Plug the female end of the AC power cord into the AC adapter.
6. Then plug the male end of the AC power cord into an electrical outlet.
6
5
4
7. Wait until the LED indicator on the battery charger lights from “red” to
“green”, indicating charging is nished.
NOTE:
• The additional battery pack is optional.
• The battery pack(s) are hot-swappable.
Page 80
4-4 Winmate Technologies
Managing Power
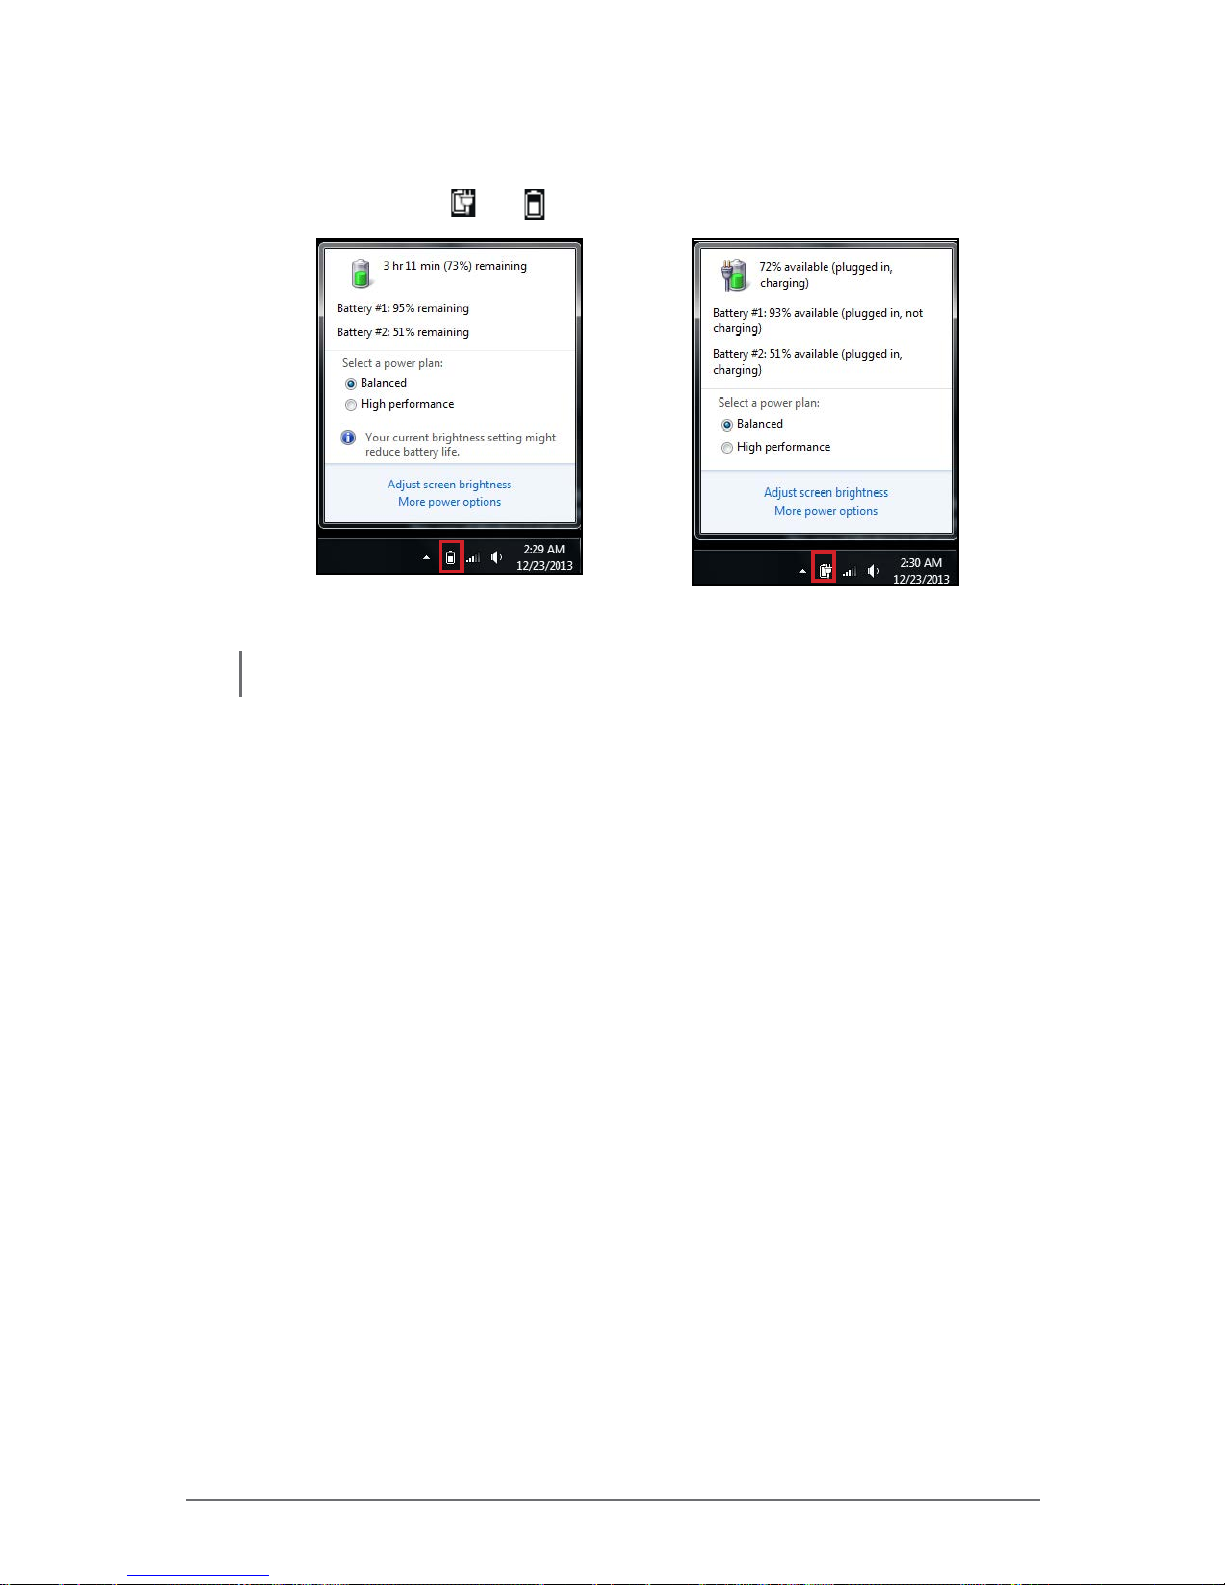
Checking the Battery Level
Tap the battery icon ( ) or ( ) on the taskbar. The window below appears.
On battery power
While charging the battery
Or
NOTE: The battery capacity indicator shows only an approximate battery level status.
Page 81
Winmate Technologies 4-5
Managing Power
Replacing the Battery Pack
If you rely on battery power for a long period of time, consider purchasing
additional batteries to allow a continuous use of the device.
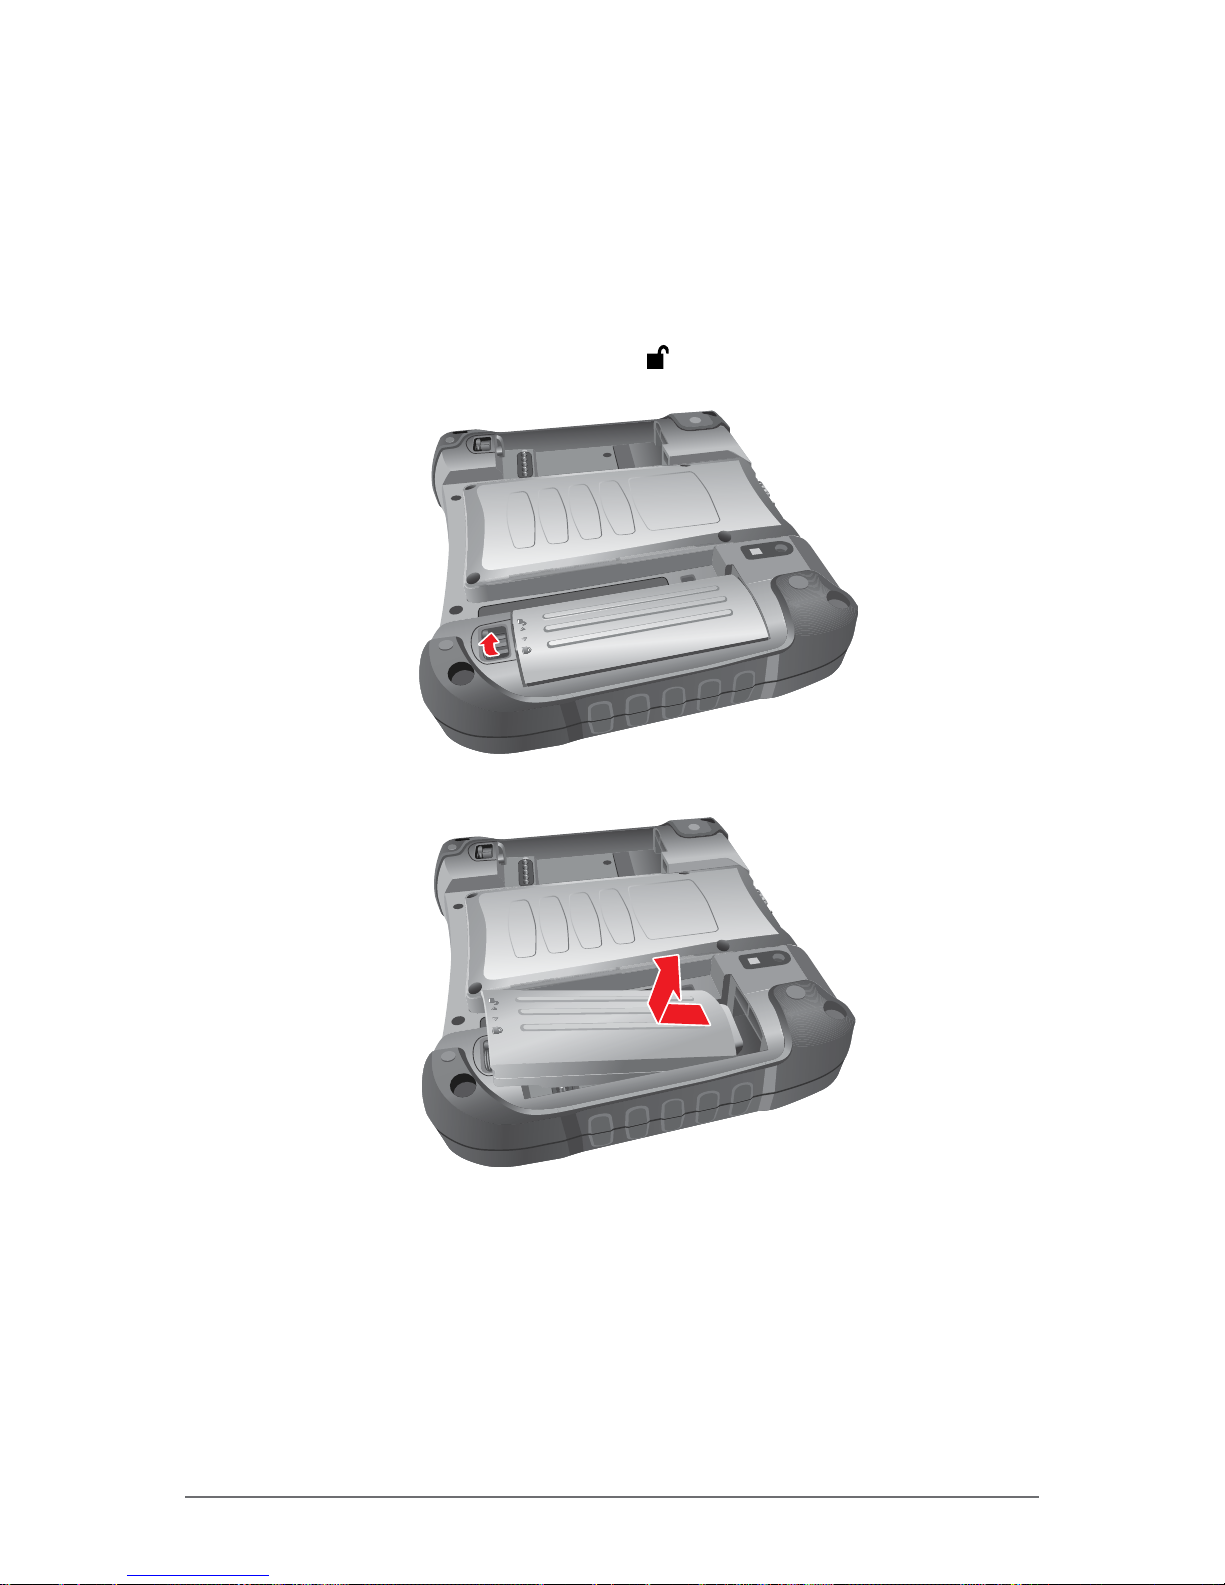
To replace the battery pack, perform the following:
1. Place M9020 face down on a at even surface.
2. Rotate the lock latch to the unlock (
) direction, until the battery pack is
released from the socket.
3. Release the battery pack from the bay and remove.
4. Install the replacement battery pack (see “Installing the Battery Pack” on
page 1-17).
Page 82

4-6 Winmate Technologies
Managing Power
Power Management
The power management feature helps reduce power consumption which
extends battery life.
Your M9020 supports ACPI (Advanced Conguration and Power Interface) for
power management. Power supply to different components is controlled on an
as-needed basis. This allows maximum power conservation and performance at
the same time.
Windows comes with pre-dened Power Options (Balanced, Power Saver,
and High Performance) for you to select. You can access Power Options by
tapping Start > Control Panel > Power Options. By default, your M9020 is in
Balanced Mode.
For detailed information on power management, see Windows Help.
Power Saving Tips
Here are some practical suggestions that you can do to maximize the operating
time of the battery:
• Enable Power Management. Choose a power plan that saves power. A
power plan is a collection of hardware and system settings that control how
your M9020 manages power.
• Decrease the LCD brightness to the lowest comfortable level.
• Shorten the length of time before Windows turns off the display.
• Many USB devices use power just by being connected. If you use a USB
ash drive, unplug it when you are not using it.
• Deactivate the Wireless LAN function if you are not using it.
• Deactivate Bluetooth wireless feature if you are not using it.
• Turn off M9020 when you are not using it.
Page 83

Winmate Technologies 5-1
Expanding Your M9020
CHAPTER
5
You can optimize the capabilities of your M9020 by using a docking station.
This chapter gives guidelines on installing and using the Vehicle Dock.
Expanding Y our M9020
Page 84
5-2 Winmate Technologies
Expanding Your M9020
Connecting the Docking Station
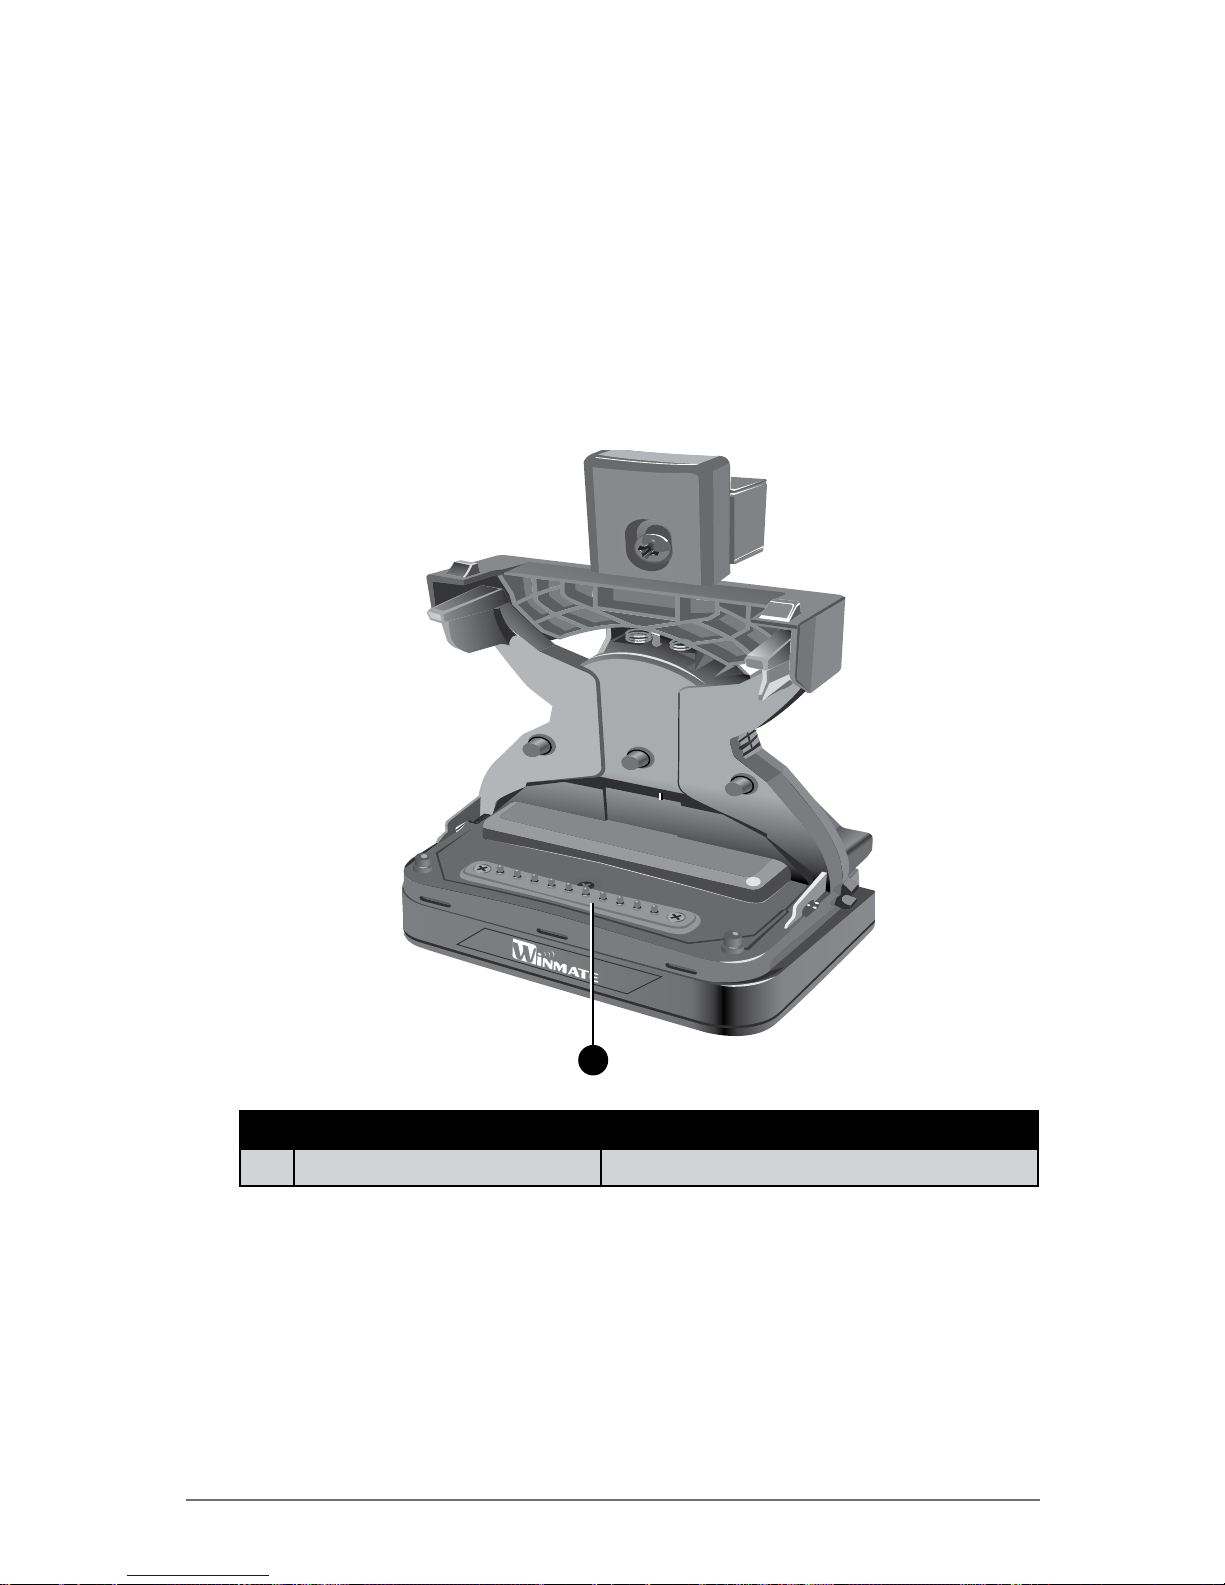
The Vehicle Dock, a docking station designed for use with your M9020, is
available as an optional accessory.
Overview of the Vehicle Docking Station
Front View
1
No. Item Description
1 Docking Station Connector For connection with the M9020.
Page 85
Winmate Technologies 5-3
Expanding Your M9020
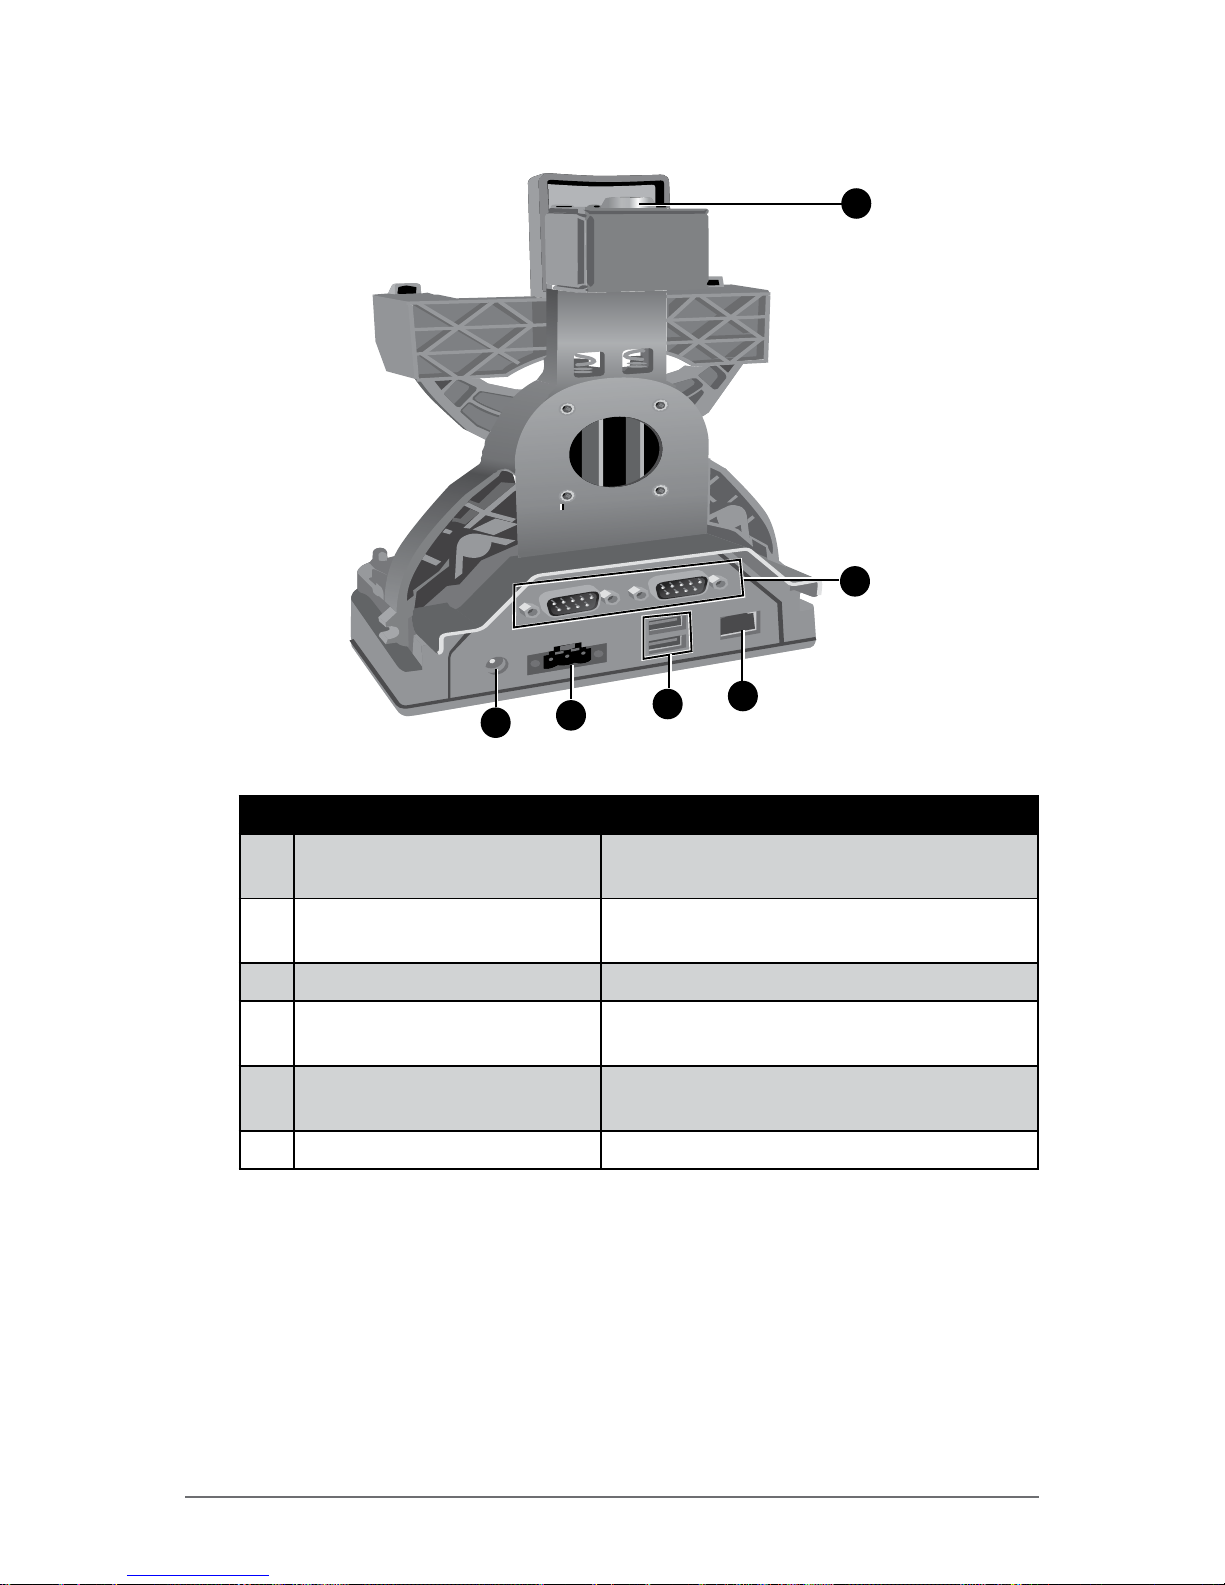
Rear View
2
6
5
4
3
1
No. Item Description
1 Lock
Locking system to avoid the device being
taken from the dock.
2 RS-232 Connectors
Connection for serial devices, for
example, a scanner or a printer.
3 RJ-45 Connector Provides connection to a LAN.
4
USB Ports Connection for 2 x USB 2.0 compatible
devices, for example, USB ash drives.
5 Bare leads DC connector
Connection for DC power supply with
bare leads.
6 Power Connector Connects to the AC adapter.
Page 86
5-4 Winmate Technologies
Expanding Your M9020
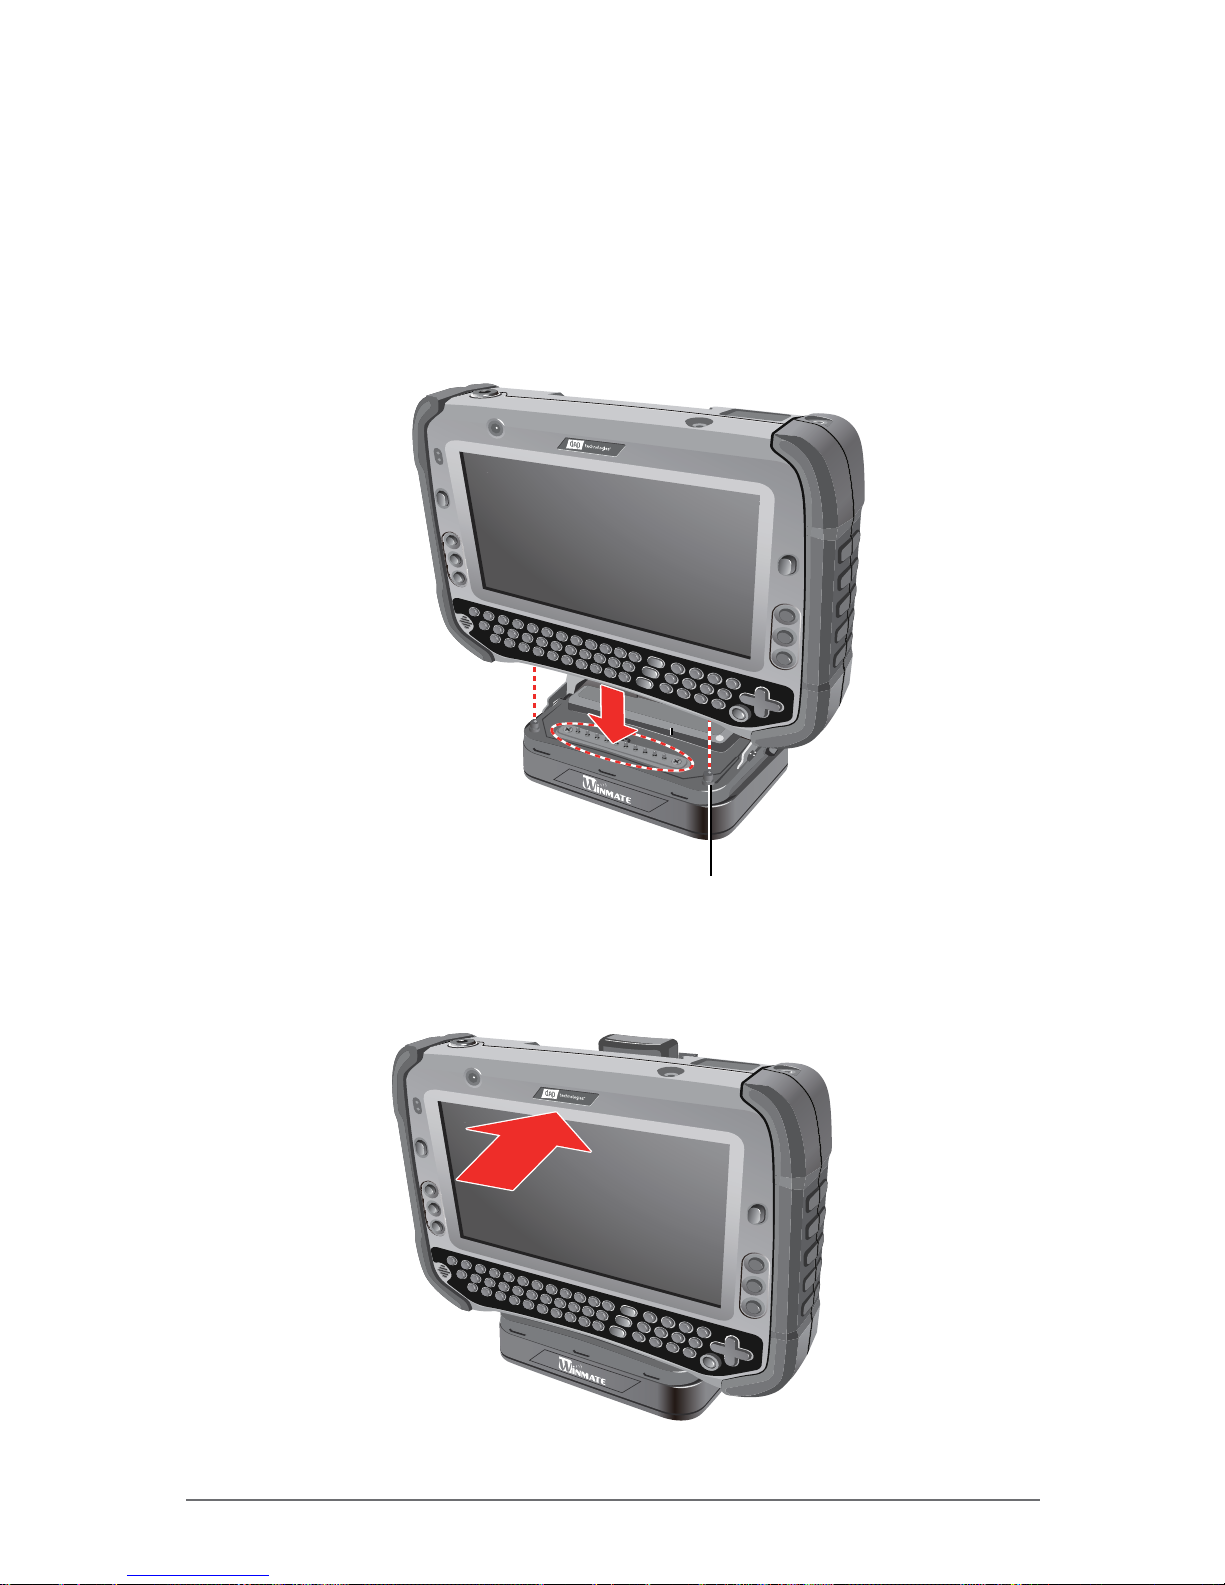
Docking the M9020
Perform the following to dock the M9020:
1. Align the golden connector and guide pin holes on your M9020 with the
golden connector and guide pins on the docking station.
2. Insert M9020 into the guide pin holes on the docking station.
Guide pin
3. Slightly push the upper part of M9020 towards the docking station, until
you hear the “click” sound, indicating that the device is xed to the docking
station.
Page 87
Winmate Technologies 5-5
Expanding Your M9020
Un-docking the M9020
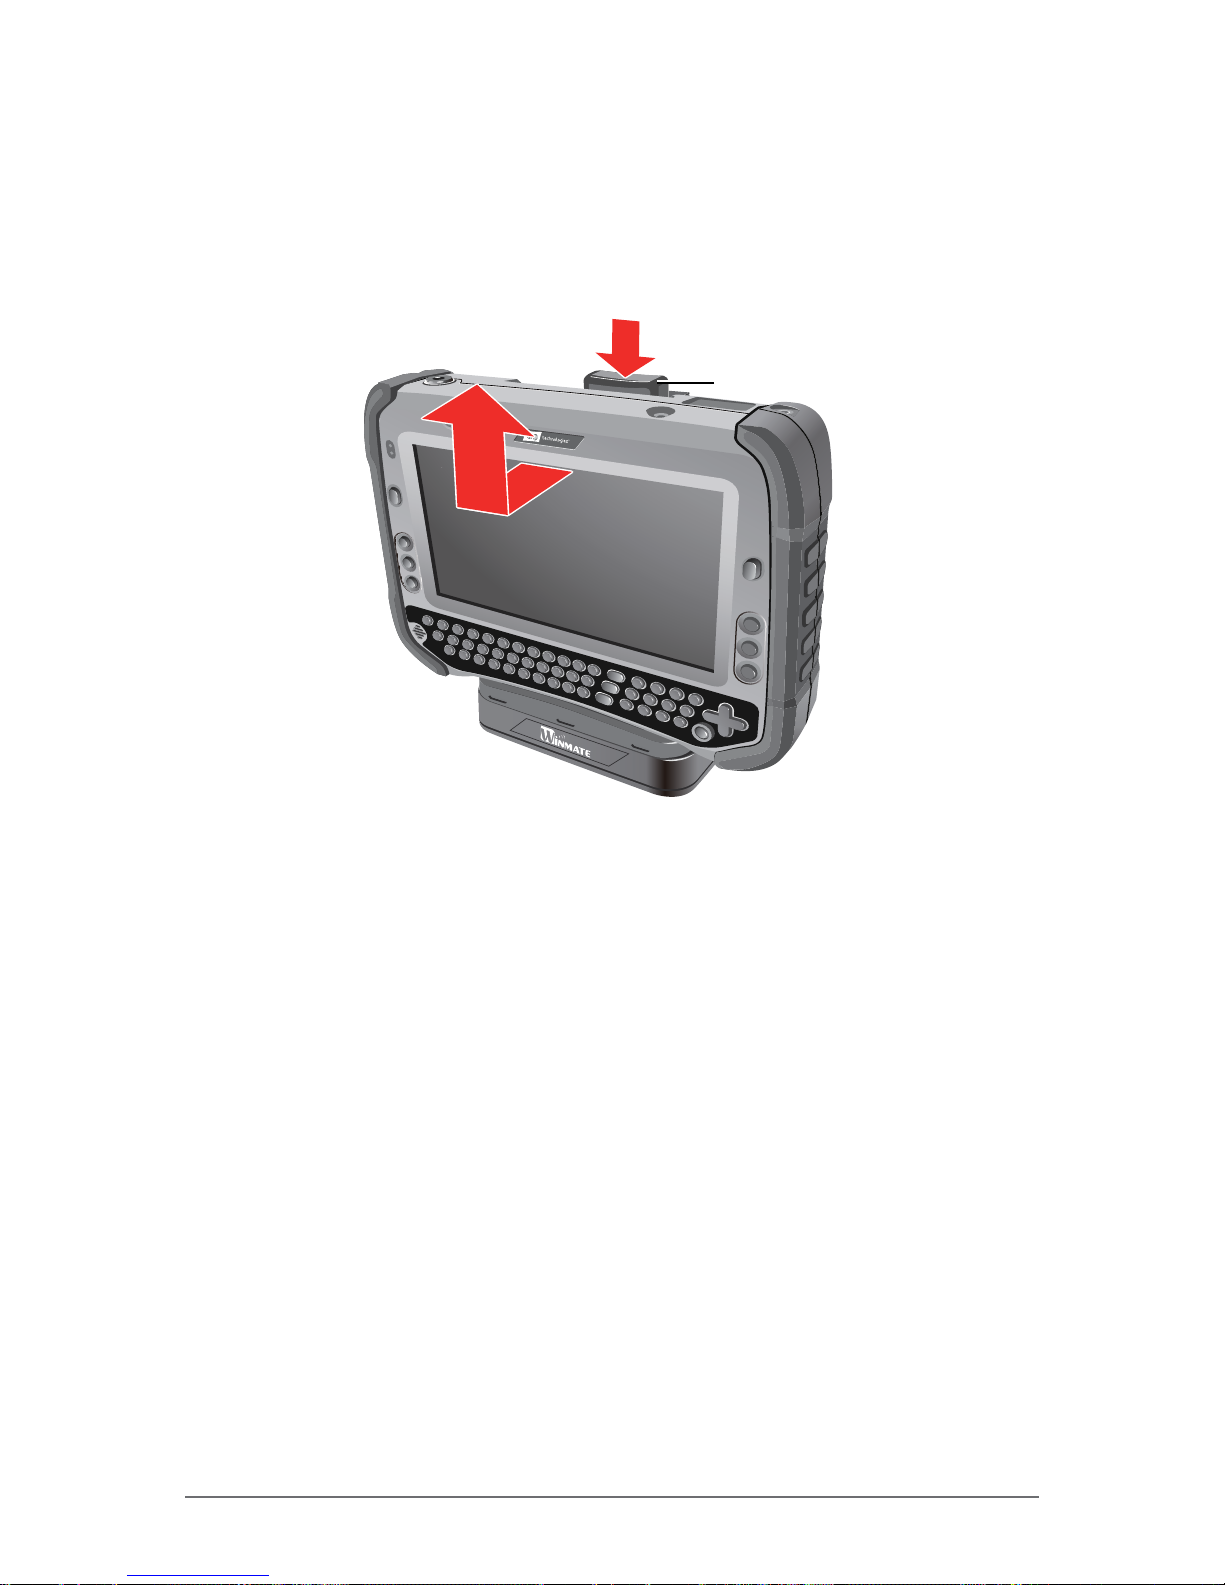
Perform the following to un-dock the M9020:
While holding the M9020, press the release latch on the docking station and
then lift the device to un-dock it.
Release latch
Page 88
5-6 Winmate Technologies
Expanding Your M9020
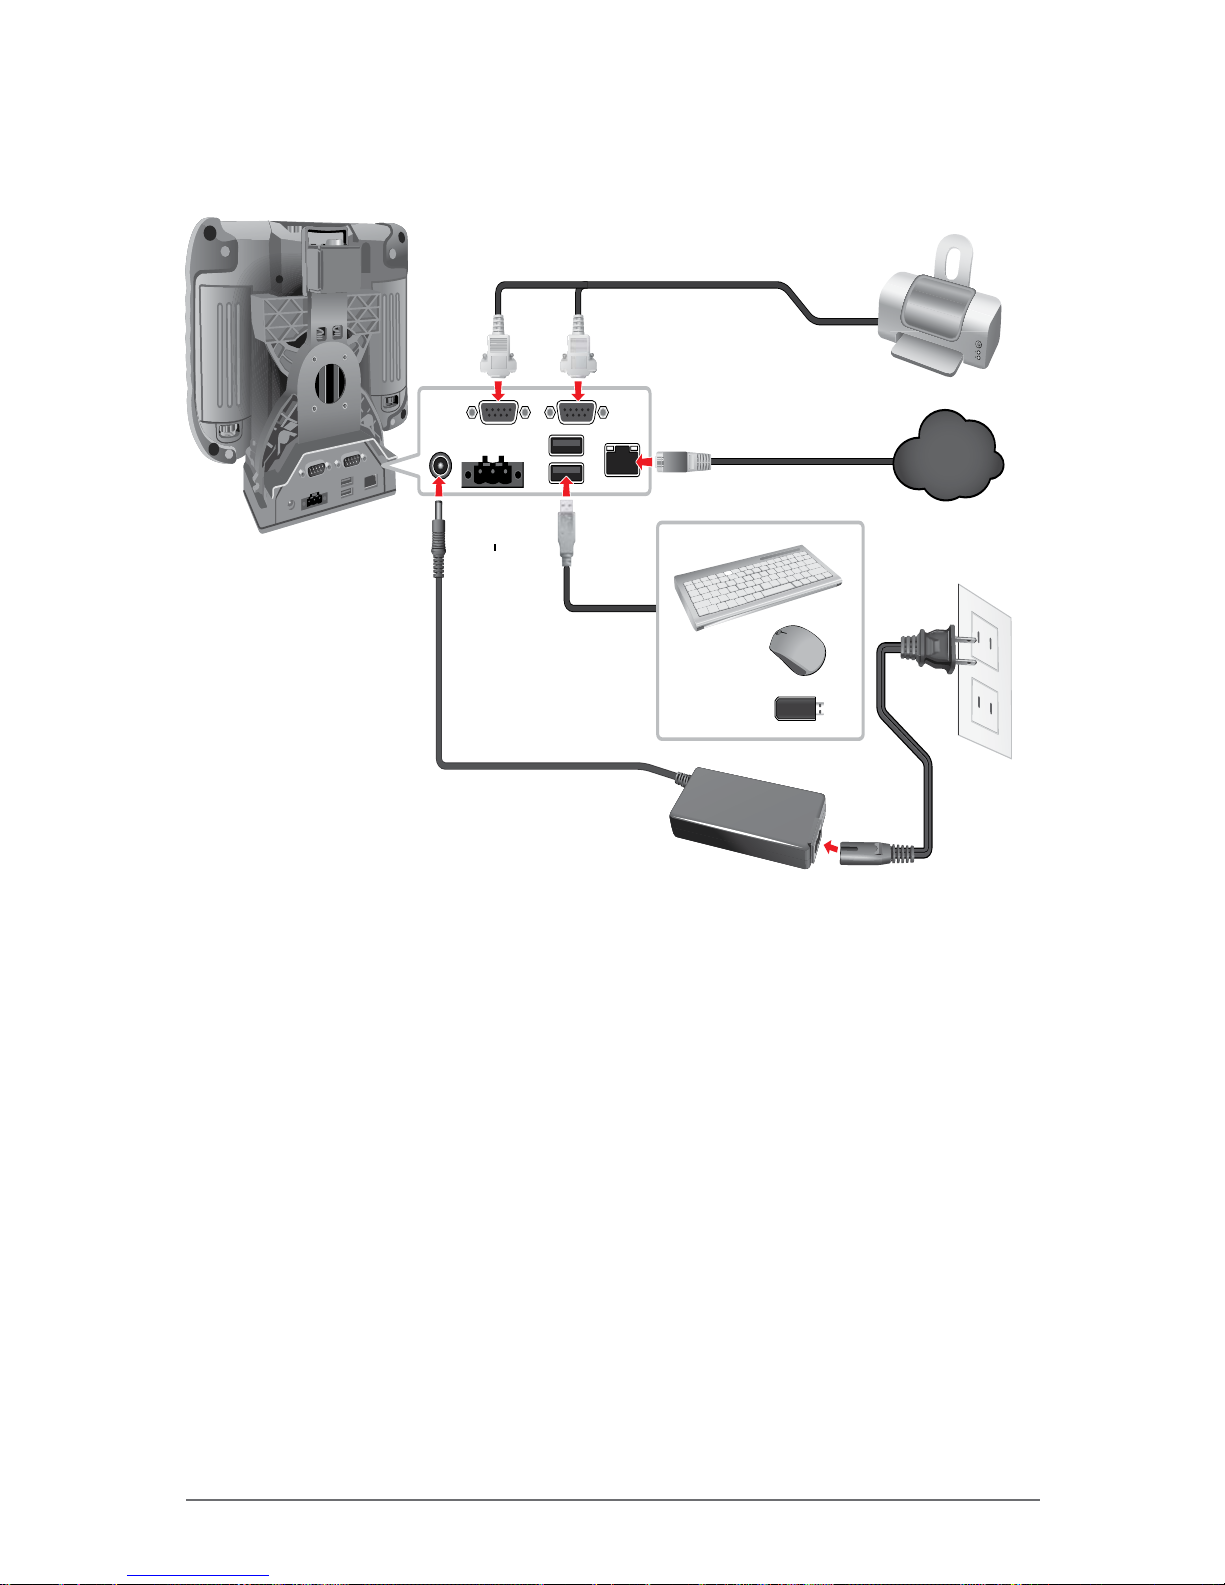
Connecting the Docking Station
Network
Connecting to the
power source.
Connecting
USB devices.
Connecting to the
network.
Connecting serial
devices.
Page 89

Winmate Technologies 6-1
Using BIOS Setup and System Recovery
CHAPTER
6
BIOS Setup Utility is a program for conguring the BIOS (Basic Input/ Output
System) settings of M9020. The BIOS is a layer of software, called rmware,
that translates instructions from other layers of software into instructions that
M9020 hardware can understand. The BIOS settings are needed by your
M9020 to identify the types of installed devices and establish special features.
System Recovery reinstalls Windows to your system and congures it to s
factory default settings.
The chapter describes how to use the BIOS Setup and System Recovery.
Using BIOS Setup and
System Recovery
Page 90

6-2 Winmate Technologies
Using BIOS Setup and System Recovery
BIOS Setup
When to Use
You need to run BIOS Setup utility when:
• You see an error message on the screen requesting that you run BIOS
Setup utility.
• You want to restore the factory default BIOS settings.
• You want to modify some specic hardware settings.
• You want to modify some specic settings to optimize the system
performance.
Starting BIOS Setup Utility
Use the embedded keyboard to move around, and make selections in the BIOS
Setup Utility.
1. Power on M9020.
2. When the system starts up and the post screen logo appears, quickly
press F2 or the Delete key to enter the BIOS Setup Utility.
Page 91

Winmate Technologies 6-3
Using BIOS Setup and System Recovery
How to Use
NOTE:
• The BIOS Setup Utility screens shown in this chapter are for reference only. The actual items
or settings on your M9020 may differ.
• The settings you select in your operating system might override similar settings in BIOS Setup
Utility.
Key Function
→ ←
Selects a menu title.
↑ ↓
Selects an item or option.
Enter
• Brings up the submenu, if available
• When an item is selected, opens or closes the options
window
• Goes to the next eld when an item has multiple elds, such
as System Date.
+ / -
Changes the option or adjusts the value.
F1
Displays help.
F2 Loads previous values.
F3 Loads optimized defaults.
F4 Save and exit BIOS.
Esc
Returns to the previous menu if in a submenu or Exit BIOS.
Page 92

6-4 Winmate Technologies
Using BIOS Setup and System Recovery
BIOS Menu
Main Menu
The Main menu contains the system date and time settings and shows the
basic system information.
Main AdvancedChipset Boot SecuritySave & Exit
Aptio Setup Utility - Copyright (C) 2011 American Megatrends, Inc.
Version 2.14.1219. Copyright (C) 2011 American Megatrends, Inc.
BIOS Information
BIOS Vendor American Megatrends
Core Version 4.6.5.1
Compliancy UEFI 2.3; PI 1.2
Project Version 7V016 E000
EC Version 7D016E000
VBIOS Type 1024x600 24bit SC
Serial Number 1W1390003136
Build Date and Time 09/11/2013 16:44:58
Intel RC Version
System Language [English]
System Date [Fri 12/20/2013]
System Time [19:12:12]
Access Level Administrator
Intel Reference Code version
: Select Screen
: Select Item
Enter: Select
+/_:Change Opt.
F1: General Help
F2: Previous Values
F3: Optimized Defaults
F4: Save & Exit
ESC: Exit
• System Date: Sets the system date.
• System Time: Sets the system time.
Page 93

Winmate Technologies 6-5
Using BIOS Setup and System Recovery
Advanced Menu
The Advanced menu contains the advanced settings, such as Watch Dog
Timer, PCI Subsystem, ACPI, Trusted Computing, CPU conguration, IDE
conguration, Intel Fast Flash Standby. USB conguration, F81216 Super IO
conguration, and PPM conguration.
Main Advanced ChipsetBootSecurity Save & Exit
Aptio Setup Utility - Copyright (C) 2011 American Megatrends, Inc.
Version 2.14.1219. Copyright (C) 2011 American Megatrends, Inc.
Legacy OpROM Support
Watch Dog Timer Select [Disabled]
PCI Subsystem Settings
ACPI Settings
Trusted Computing
CPU Configuration
IDE Configuration
Intel Fast Flash Standy
USB Configuration
F81216 Supper IO Congiguration
PPM Configuration
Enable or Disable BIOS
Support for security device.
O.S. will not show Security
Device. TCG EFI protocol and
INT1A interface will not be
available.
: Select Screen
: Select Item
Enter: Select
+/_:Change Opt.
F1: General Help
F2: Previous Values
F3: Optimized Defaults
F4: Save & Exit
ESC: Exit
• Watch Dog Timer Select: Enables or disables watchdog timer.
• PCI Subsystem Settings: Congures PCI, PCI-X and PCI Express
settings.
• ACPI Settings: Congures system ACPI parameters.
• Trusted Computing: Enable or disable BIOS support for security device.
• CPU Conguration: Congures CPU parameters.
• IDE Conguration: Congures IDE parameters.
• Intel Fast Flash Standby: Enables Intel Fast Flash Standby technology.
• USB Conguration: Congures USB parameters.
• FB1215 Super IO Conguration: System Super IO Chip parameters
conguration.
• PPM Conguration: Congures PPM parameters.
Page 94

6-6 Winmate Technologies
Using BIOS Setup and System Recovery
Trusted Computing
•
Advanced
Aptio Setup Utility - Copyright (C) 2011 American Megatrends, Inc.
Version 2.14.1219. Copyright (C) 2011 American Megatrends, Inc.
Configuration
Security Device Support [Disabled]
Current Status Information
SUPPORT TURNED OFF
Enable or Disable BIOS
Support for security device.
O.S. will not show Security
Device. TCG EFI protocol and
INT1A interface will not be
available.
: Select Screen
: Select Item
Enter: Select
+/_:Change Opt.
F1: General Help
F2: Previous Values
F3: Optimized Defaults
F4: Save & Exit
ESC: Exit
Security Device Support: Enable or disable BIOS support for security
device. If disabled, the operating system will not display the Security Device.
In this case, the TCG EFI protocol and INT1A interface will not be available.
Chipset Menu
The Chipset menu contains the host and south bridge settings.
Main Advanced Chipset Boot Security Save & Exit
Aptio Setup Utility - Copyright (C) 2011 American Megatrends, Inc.
Version 2.14.1219. Copyright (C) 2011 American Megatrends, Inc.
Host Bridge
South Bridge
Host Bridge Parameters
: Select Screen
: Select Item
Enter: Select
+/_:Change Opt.
F1: General Help
F2: Previous Values
F3: Optimized Defaults
F4: Save & Exit
ESC: Exit
• Host Bridge: Congures the host bridge parameters, such as Memory
Frequency and Timing and Intel IGD conguration.
• South Bridge: Congures the south bridge parameters, such as TPT
devices, PCI express root ports and power management.
Page 95

Winmate Technologies 6-7
Using BIOS Setup and System Recovery
South Bridge
•
Chipset
Aptio Setup Utility - Copyright (C) 2011 American Megatrends, Inc.
Version 2.14.1219. Copyright (C) 2011 American Megatrends, Inc.
TPT Devices
PCI Express Root Port 0
PCI Express Root Port 3
DMI Link ASPM Control [Enabled]
PCI-Exp. High Priority Port [Disabled]
High Precision Event Timer Configuration
High Precision Timer [Enabled]
SLP_S4 Assertion Width [1-2 Seconds]
Restore AC Power Loss [Power On]
Enable/Disable Inter(R) IO
Controller Hub (TPT) devices
: Select Screen
: Select Item
Enter: Select
+/_:Change Opt.
F1: General Help
F2: Previous Values
F3: Optimized Defaults
F4: Save & Exit
ESC: Exit
TPT Devices: Congures the parameters of the TPT devices.
• PCI Express Root Port: Congures the PCI Express root port 0 and PCI
Express root port 3 parameters.
• DMI Link ASPM Control: Enable or disable the ASPM (active state power
management) on both NB (north bridge) side and SB (south bridge) side of
the DMI link.
• PCI-Exp. High Priority Port: Enable or disable a PCI Express high priority
port.
• High Precision Event Timer: Enable or disable the high precision event
timer.
• SLP_S4 Assertion Width: Congures a minimum assertion width of the
SLP_S4# signal.
• Restore AC Power Loss: Congures AC power state when power is re-
applied after a power failure.
Page 96

6-8 Winmate Technologies
Using BIOS Setup and System Recovery
Boot Menu
The Boot menu sets the boot order of devices.
Main Advanced Chipset Boot Security Save & Exit
Aptio Setup Utility - Copyright (C) 2011 American Megatrends, Inc.
Version 2.14.1219. Copyright (C) 2011 American Megatrends, Inc.
Boot Configuration
Setup Prompt Timeout 1
Bootup NumLock State [On]
Quiet Boot [Enabled]
CSM16 Module Version 07.65
GateA20 Active [Upon Request]
Option ROM Messages [Force BIOS]
Interrupt 19 Capture [Disabled]
Boot Option Priorities
Boot Option #1 [Generic STORAGE DE...]
Boot Option #2 [UEFI: Built-in EFI...]
Hard Drive BBS Priorities
Number of seconds to wait for
setup activation key.
65535(0xFFFF) means indefinite
waiting.
: Select Screen
: Select Item
Enter: Select
+/_:Change Opt.
F1: General Help
F2: Previous Values
F3: Optimized Defaults
F4: Save & Exit
ESC: Exit
• Setup Prompt Timeout: Enter the number in seconds for setup, to wait for
the activation key.
NOTE: 65535(0xFFFF) indicates the indenite waiting.
• Bootup NumLock State: Selects the keyboard NumLock state.
• Quiet Boot: Enable or disable quiet boot option.
• GateA20 Active: Allows users to disable GA20.
• Option ROM Messages: Sets display mode for option ROM.
• Interrupt 19 Capture: Enable or disable trap Interrupt 19.
• Boot Option Priorities: Sets the system boot order of Boot Option #1 and
Boot Option #2.
• Hard Drive BBS Priorities: Sets the order of the legacy devices.
Page 97

Winmate Technologies 6-9
Using BIOS Setup and System Recovery
Security Menu
The Security menu contains the security settings, such as conguring the
Administrator and User Passwords.
Main Advanced Chipset Boot Security Save & Exit
Aptio Setup Utility - Copyright (C) 2011 American Megatrends, Inc.
Version 2.14.1219. Copyright (C) 2011 American Megatrends, Inc.
Password Description
If ONLY the Administrator’s password is set,
then this only limits access to Setup and is
only asked for when entering Setup.
If ONLY the User’s password is set, then this
is a power on password and must be entered to
boot or enter Setup. In Setup the User will
have Administrator rights.
The password length must be
in the following range:
Minimum length 3
Maximum length 20
Administrator Password
User Password
HDD Security Configuration:
HDD 0:SSE064GPTC0-
Set Administrator Password
: Select Screen
: Select Item
Enter: Select
+/_:Change Opt.
F1: General Help
F2: Previous Values
F3: Optimized Defaults
F4: Save & Exit
ESC: Exit
• Administrator Password: Congures the administrator password which will
be required before entering the BIOS Setup Utility.
• User Password: Congures the user password.
If both the administrator and user passwords are set, password entry is required
when accessing the BIOS Setup Utility. The entered password determines the
type of access. If you enter the user password, the type of access is limited to
viewing the settings and basic setup conguration only.
If only the user password is set, password entry is required before booting into
Windows.
• HDD Security Conguration: Displays the HDD security status.
Page 98

6-10 Winmate Technologies
Using BIOS Setup and System Recovery
Save & Exit Menu
The Save & Exit menu displays ways of exiting BIOS Setup Utility. After
modifying the settings, you must save and exit for the changes to take effect.
Main Advanced Chipset Boot Security Save & Exit
Aptio Setup Utility - Copyright (C) 2011 American Megatrends, Inc.
Version 2.14.1219. Copyright (C) 2011 American Megatrends, Inc.
Save Changes and Exit
Discard Changes and Exit
Save Changes and Reset
Discard Changes and Reset
Save Options
Save Changes
Discard Changes
Restore Defaults
Save as User Defaults
Restore User Defaults
Boot Override
UEFI: Built-in EFI Shell
Generic STORAGE DEVICE 0208
SATA PM: SSE064GPTC0-S81
Exit system setup after saving
the changes.
: Select Screen
: Select Item
Enter: Select
+/_:Change Opt.
F1: General Help
F2: Previous Values
F3: Optimized Defaults
F4: Save & Exit
ESC: Exit
• Save Changes and Exit: Saves the changes you have made and exits
BIOS Setup Utility to boot into Windows directly.
• Discard Changes and Exit: Exits BIOS Setup Utility without saving the
changes you have made.
• Save Changes and Reset: Saves the changes then restarts the system.
• Discard Changes and Reset: Restarts the system without saving the
changes you have made.
• Save Changes: Saves changes.
• Discard Changes: Discards all changes that you have made.
• Restore Defaults: Restores the default factory values of all settings.
• Save as User Defaults: Saves the changes that you have made as user
defaults.
• Restore User Defaults: Restores the user default values of all settings.
• Boot Override: Sets the boot override option.
Page 99

Winmate Technologies 6-11
Using BIOS Setup and System Recovery
System Recovery
Your M9020 comes with a Windows 7 Recovery Disc in case you need to
recover and restore the factory default settings.
To run system recovery, you need the following peripherials:
• External DVD-ROM drive
• Windows 7 Recovery DVD
• USB keyboard
• Desktop Dock or USB hub (to connect the DVD-ROM drive and USB
keyboard at the same time)
Perform the following to start system recovery:
1. Make sure the M9020 is turned off.
2. Place M9020 to the Desktop Dock or connect a USB hub to the USB port
of M9020.
3. Connect the DVD-ROM and the keyboard.
4. Connect M9020 to an electrical outlet and insert Windows 7 Recovery
DVD to the DVD-ROM drive.
5. Restart M9020.
6. On the startup screen, press the DEL key on the keyboard to enter BIOS
Setup Utility.
7. Go to Boot menu (see “Boot Menu” on page 6-8).
8. On Boot Option Priorities, set Boot Option # 1 to DVD-ROM drive.
9. Go to Save & Exit menu, and select Save Changes and Exit.
10. The system restarts and boots from the recovery disc.
11. Follow the onscreen instructions to complete system recovery.
Page 100

Winmate Technologies A-1
Maintenance, Troubleshooting and Specications
APPENDIX
A
This chapter covers the following topics:
• How to care for your M9020
• Troubleshoot your M9020
• M9020 Specications
Maintenance, Troubleshooting
and Specications
 Loading...