

Page 1

Please read this instructions carefully before using this product, and save this manual for future use.
8” Rugged Tablet Computer
Intel ® Celeron ® N3160 Braswell 1.6 GHz,
up to 2.24 GHz
M800BW
M800BW-M12
User Guide
Version 1.1
Page 2

- 1 -
Contents
PREFACE ............................................................................................................................................................................... - 3 -
ABOUT THIS USER GUIDE ..................................................................................................................................................... - 6 -
DOCUMENTATION SET ................................................................................................................................................................... - 6 -
CHAPTER DESCRIPTIONS ................................................................................................................................................................. - 6 -
CHAPTER 1: READ ME FIRST ................................................................................................................................................. - 7 -
1.1 SAFETY INFORMATION ............................................................................................................................................................. - 7 -
1.2 HANDLING AND MAINTENANCE ............................................................................................................................................... - 10 -
CHAPTER 2: GETTING STARTED .......................................................................................................................................... - 12 -
2.1 INTRODUCTION ..................................................................................................................................................................... - 12 -
2.2 PRODUCT FEATURES .............................................................................................................................................................. - 12 -
2.3 UNPACKING ......................................................................................................................................................................... - 13 -
2.4 DESCRIPTION OF PARTS .......................................................................................................................................................... - 14 -
2.5 HOTKEY FOR SPECIFIC FUNCTIONS............................................................................................................................................ - 16 -
2.6 FIRST-TIME OPERATION ......................................................................................................................................................... - 17 -
2.6.1 Inserting Battery Pack .............................................................................................................................................. - 17 -
2.6.2 Connecting to Power Supply .................................................................................................................................... - 18 -
2.7 POWERING ON AND OFF ........................................................................................................................................................ - 19 -
2.7.1 Powering On ............................................................................................................................................................. - 19 -
2.7.2 Powering Off ............................................................................................................................................................ - 19 -
CHAPTER 3: FIRST TIME OPERATION .................................................................................................................................. - 20 -
3.1 SETTING UP WINDOWS EMBEDDED 8.1 INDUSTRY PRO ................................................................................................................ - 20 -
3.2 SETTING UP WINDOWS 10 IOT ENTERPRISE ............................................................................................................................... - 25 -
CHAPTER 4: QUICK ACCESS WITH HOTTAB ......................................................................................................................... - 27 -
4.1 HOTTAB INTRODUCTION ......................................................................................................................................................... - 27 -
4.2 SHORTCUTS ......................................................................................................................................................................... - 28 -
4.3 CAMERA ............................................................................................................................................................................. - 29 -
4.4 DEVICE ON/OFF .................................................................................................................................................................. - 31 -
4.5 USING THE WIRELESS LAN (WI-FI) .......................................................................................................................................... - 32 -
4.6 USING THE WIRELESS WAN (3G/LTE) ..................................................................................................................................... - 33 -
4.6.1 Insert SIM card (For optional 3G/LTE equipped device) ........................................................................................... - 33 -
4.6.2 Use Wireless WAN Feature ...................................................................................................................................... - 35 -
4.7 USING THE GPS.................................................................................................................................................................... - 35 -
4.8 USING THE BLUETOOTH.......................................................................................................................................................... - 36 -
4.9 USING THE BARCODE READER ................................................................................................................................................. - 37 -
4.9.1 Setting the 1D/2D Barcode Scanner Symbologies .................................................................................................... - 41 -
4.9.2 Using the MotoSetting Application to Set the Symbologies..................................................................................... - 42 -
4.10 USING FINGERPRINT READER ................................................................................................................................................ - 48 -
4.11 USING THE HF RFID READER ................................................................................................................................................ - 51 -
4.12 SWITCHING TOUCH MODES .................................................................................................................................................. - 57 -
4.12.1 Switch via Built-in HotTab Utility ........................................................................................................................... - 58 -
4.12.2 Switch via Programmable Function Buttons .......................................................................................................... - 59 -
4.13 SETTINGS .......................................................................................................................................................................... - 60 -
4.13.1 PC Information ....................................................................................................................................................... - 60 -
4.12.2 Battery Information ............................................................................................................................................... - 60 -
4.13.3 Using the Physical Function Keys (Hotkeys) ........................................................................................................... - 60 -
CHAPTER 5: FREQUENTLY USED SETTINGS ......................................................................................................................... - 62 -
Page 3

- 2 -
5.1 SCREEN RESOLUTION SCALING AND SETTING .............................................................................................................................. - 62 -
5.1.1 Changing Display Scaling Setting (Recommended) .................................................................................................. - 62 -
5.1.2 USING RECOVERY WIZARD TO RESTORE COMPUTER ................................................................................................................. - 64 -
CHAPTER 6: TROUBLESHOOTING........................................................................................................................................ - 65 -
6.1 BASIC TROUBLESHOOTING ...................................................................................................................................................... - 65 -
APPENDIX A: PRODUCT SPECIFICATIONS............................................................................................................................ - 67 -
APPENDIX B: DIMENSIONS AND SCHEMATICS.................................................................................................................... - 69 -
APPENDIX C: ORDERING INFORMATION ............................................................................................................................ - 70 -
APPENDIX D: OPTIONAL ACCESSORIES ............................................................................................................................... - 71 -
APPENDIX E: SOFTWARE DEVELOPMENT KIT (SDK) ............................................................................................................ - 74 -
Page 4

M800BW User Guide Preface
- 3 -
Preface
Copyright Notice
No part of this document may be reproduced, copied, translated, or transmitted in any form or
by any means, electronic or mechanical, for any purpose, without the prior written permission
of the original manufacturer.
Trademark Acknowledgement
Brand and product names are trademarks or registered trademarks of their respective
owners.
Disclaimer
We reserve the right to make changes, without notice, to any product, including circuits
and/or software described or contained in this manual in order to improve design and/or
performance. We assume no responsibility or liability for the use of the described product(s)
conveys no license or title under any patent, copyright, or masks work rights to these
products, and make no representations or warranties that these products are free from patent,
copyright, or mask work right infringement, unless otherwise specified. Applications that are
described in this manual are for illustration purposes only. We make no representation or
guarantee that such application will be suitable for the specified use without further testing or
modification.
Warranty
Our warranty guarantees that each of its products will be free from material and workmanship
defects for a period of one year from the invoice date. If the customer discovers a defect, we
will, at his/her option, repair or replace the defective product at no charge to the customer,
provide it is returned during the warranty period of one year, with transportation charges
prepaid. The returned product must be properly packaged in its original packaging to obtain
warranty service. If the serial number and the product shipping data differ by over 30 days,
the in-warranty service will be made according to the shipping date. In the serial numbers the
third and fourth two digits give the year of manufacture, and the fifth digit means the month (e.
g., with A for October, B for November and C for December).
For example, the serial number 1W16Axxxxxxxx means October of year 2016.
Page 5
M800BW User Guide Preface
- 4 -
Customer Service
We provide a service guide for any problem by the following steps: First, visit the website of
our distributor to find the update information about the product. Second, contact with your
distributor, sales representative, or our customer service center for technical support if you
need additional assistance.
You may need the following information ready before you call:
Product serial number
Software (OS, version, application software, etc.)
Description of complete problem
The exact wording of any error messages
In addition, free technical support is available from our engineers every business day. We are
always ready to give advice on application requirements or specific information on the
installation and operation of any of our products.
Advisory Conventions
Four types of advisories are used throughout the user manual to provide helpful information or to
alert you to the potential for hardware damage or personal injury. These are Notes, Important,
Cautions, and Warnings. The following is an example of each type of advisory.
NOTE
A note is used to emphasize helpful information.
IMPORTANT
An important note indicates information that is important for you to know.
CAUTION
A Caution alert indicates potential damage to hardware and explains how to
avoid the potential problem.
WARNING!
An Electrical Shock Warning indicates the potential harm from electrical
hazards and how to avoid the potential problem.
Page 6

M800BW User Guide Preface
- 5 -
Important Information
Countries/
Area
Symbol
This equipment complies with essential
requirements of:
European Union
Electromagnetic Compatibility Directive(2014/30/EU)
Low Voltage Directive (2014/35/EU)
Restrictions of the use of certain hazardous substances
(RoHS) Directive (2011/65/EU)
USA
FCC Part 15 Subpart B Regulations Class B
Federal Communications Commission Radio Frequency Interface Statement
This device complies with part 15 FCC rules.
Operation is subject to the following two conditions:
This device may not cause harmful interference.
This device must accept any interference received including
interference that may cause undesired operation.
This equipment has been tested and found to comply with the limits for a class "B" digital
device, pursuant to part 15 of the FCC rules. These limits are designed to provide reasonable
protection against harmful interference when the equipment is operated in a commercial
environment. This equipment generates, uses, and can radiate radio frequency energy and, if
not installed and used in accordance with the instruction manual, may cause harmful
interference to radio communications. Operation of this equipment in a residential area is
likely to cause harmful interference in which case the user will be required to correct the
interference at him own expense.
Page 7

M800BW User Guide About This User Guide
- 6 -
About This User Guide
This User Guide provides information about using the Winmate® M800BW and accessories.
NOTE
Some pictures in this guide are samples and can differ from actual product.
Documentation Set
The documentation set for the M800BW series provides information for specific user needs,
and includes:
M800BW Series Quick Start Guide - describes how to get the M800BW up and
running.
M800BW Series User Guide – contains detailed description on how to use the
M800BW, its components and features.
Chapter Descriptions
Chapter 1, Read Me First provides important safety information for you to know prior using
M800BW
Chapter 2, Getting Started provides basic instructions on how to use M800BW, including main
SIM card, SD card and battery installation, powering on and resetting M800BW.
Chapter 3, First Time Operation provides instructions on how to set up Windows OS for the
first time.
Chapter 4, Quick Access by HotTab provides basic instructions on using the M800BW.
Chapter 5, Frequently Used Settings explains how to change M800BW display resolution,
replace hot-swap battery and restore the computer.
Chapter 6, Troubleshooting provides basic troubleshooting information on M800BW.
Page 8

M800BW User Guide Chapter 1 Read Me First
- 7 -
Chapter 1: Read Me
First
1.1 Safety Information
Follow and adhere to all warnings and
instructions in this manual. For your safety,
please read all safety and operating
instructions before using the product. Keep
this manual for future reference.
Precaution on
Battery Pack
Précaution avec le
bloc-pile
Do Not Expose the Battery Pack to
Excessive Heat, or Extreme Heat (Near
Fire, in Direct Sunlight for example).
Generation of heat, ignition or rupture
may result
Ne pas exposer le bloc-pile à une
Chaleur Excessive, ou une Chaleur
Extrême (Près d'un feu, sous la lumière
du soleil par exemple) Une production de
chaleur, l'amorçage ou la rupture peuvent
être occasionnés
Do Not Disassemble, Modify, or Insert
Sharp Objects Into the Battery Pack.
Electrolyte leakage, generation of heat,
ignition or rupture may result.
Ne pas démonter, modifier, ou insérer
des objets pointus à l'intérieur du blocpile. Une fuite d'électrolyte, la génération
de chaleur, l'amorçage ou la rupture
peuvent être occasionnés.
Do Not Short the Positive (+) and
Negative (-) Terminals of the Battery.
Generation of heat, ignition or rupture
may result. When carrying or storing the
device, do not place the battery pack
together with articles that may contact
electricity.
Ne pas court-circuiter les bornes Positive
(+) et Négative (-) de la pile, la génération
de chaleur, l'amorçage ou la rupture
peuvent être occasionnés. Lors du
transport et du rangement de l'appareil,
ne pas placer le bloc-pile en même temps
que des articles pouvant créer un contact
électrique.
Do Not Apply Shocks to the Battery by
Dropping It or Applying Strong Pressure
to It. Electrolyte leakage, generation of
heat, ignition or rupture of battery may
occur.
Ne pas faire subir de choc à la pile en la
laissant tomber ou en appliquant une
forte pression dessus. Une fuite
d'électrolyte, la génération de chaleur,
l'amorçage ou la rupture peuvent être
occasionnés.
Do Not Charge the Battery Other Than
Methods Those Specified In This Manual.
If the battery is not charged using one of
the specified methods, electrolyte
leakage, generation of heat, ignition or
rupture may result.
Ne pas charger la pile par d'autres
méthodes que celles spécifiées dans ce
manuel. Si la pile n'est pas chargée en
utilisant l'une des méthodes spécifiées,
une fuite d'électrolyte, la génération de
chaleur, l'amorçage ou la rupture peuvent
être occasionnés.
Page 9

M800BW User Guide About This User Guide
- 8 -
When the Battery Pack Has Deteriorated,
Replace It with a New Battery. Continued
use of a damaged battery pack may
result in heat generation, ignition or
battery rupture.
Lorsque la pile est détériorée, la
remplacer par une nouvelle pile.
L'utilisation continue d'une pile
endommagée peut occasionner une
génération de chaleur, l'amorçage ou la
rupture de la pile.
Do Not Use the Battery Pack With Any
Other Products. The battery pack is
rechargeable and is only designed for this
specific product. If it is used with a
product other than the specified product,
electrolyte leakage, generation of heat,
ignition or rupture may result.
Ne pas utiliser avec un autre produit La
batterie est rechargeable et a été
conçue pour un produit spécifique. Si
elle est utilisée sur un produit différent
de celui pour lequel elle a été conçue,
des pertes d’électrolytes et une
production
de chaleur sont possibles, elle
risque également de prendre feu ou de
casser.
Do Not Use This Product With Battery
Other Than the One Specified.
Ne pas utiliser ce produit avec une
batterie autre que celle spécifiée
General Product
Safety
Sécurité générale
des produits
This product should not be used near
water such as bathtubs, sinks,
swimming pools, wet basement, etc.
Ce produit ne dois pas être utilisé près
de l'eau comme les baignoires, les
éviers, les piscines, les sous-sols
humides, etc.
Do not block any ventilation openings.
Do not place the product against a wall
or in an enclosed space as doing so
might impede the flow of cooling air.
Ne pas bloquer les ouvertures de
ventilation. Ne pas placer le produit
contre un mur ou dans un espace clos
de façon à entraver la circulation de l'air
de refroidissement.
Do not place the product near any heat
sources such as radiators, warm air
intakes, stoves or other heat-generating
devices (including amplifiers or other
heat producing equipment).
Ne pas placer le produit près d'une
source de chaleur comme des
radiateurs, les arrivées d'air chaud,
poêles ou autres produits générant de
la chaleur (y compris les amplificateurs
ou autre équipement produisant de la
chaleur.)
Page 10

M800BW User Guide Chapter 1 Read Me First
- 9 -
Do not disregard the safety that a
polarized or grounded connection can
provide. A polarized connection consists
of two plugs, one of which is larger than
the other. A grounded connection has
two blades and a third one that is
grounded. If the main plug provided
cannot be inserted into your outlet,
consult an electrician to replace your
obsolete outlet.
Ne pas ignorer la sécurité qu'une prise
polarisée ou une prise de terre peut
prévoir. Une prise polarisée se
compose de deux fiches, dont l'une est
plus large que l'autre. Une prise de terre
possède deux lames et une troisième
qui est la terre. Si la fiche principale
fournie ne peut être insérée dans votre
prise, consultez un électricien pour
remplacer votre prise obsolète.
Protect the power cord from being
crushed or pinched, particularly in the
area of the plugs, any receptacles used,
and the point of exit from the apparatus.
Do not break off the ground pin of the
power cord.
Empêcher le cordon d'alimentation
d'être écrasé ou pincé, en particulier
dans les zones de prises, des
containers utilisés, et du point de sortie
de l'appareil. Ne pas casser la broche
de terre du cordon d'alimentation.
Use only accessories specified by the
manufacturer.
Utiliser uniquement les accessoires
spécifiés par le fabricant.
Use only with its transport carriage,
stand, tripod, console or table specified
by the manufacturer or sold with the
product. When using a carriage, move
the carriage assembly with the product
carefully to avoid damage from falling
over.
Utiliser uniquement avec son chariot de
transport, support, trépied, console ou
table spécifiés par le fabricant ou vendu
avec le produit. Lors de l'utilisation d'un
charriot, déplacez l'ensemble chariot
avec le produit avec soin pour éviter
tout dommage de chute.
Unplug this apparatus during lightning
storms or when it is not being used for
long periods.
Débrancher cet appareil durant les
orages ou lorsqu'il n'est pas utilisé
pendant de longues périodes.
Refer all servicing to qualified service
personnel. A technical intervention is
required when the apparatus has been
damaged in any way, for example if the
power cord or plug is damaged, liquid
has been spilled or objects have fallen
inside the unit, if the product has been
exposed to rain or moisture, if it does
not operate normally or if it has been
dropped.
Confier toute réparation à du personnel
qualifié. Une intervention technique est
nécessaire lorsque l'appareil a été
endommagé de quelque façon, par
exemple si le cordon d'alimentation ou
la fiche est endommagé, du liquide a
été renversé ou des objets sont tombés
à l'intérieur de l'unité, si le produit a été
exposé à la pluie ou à l'humidité, s'il ne
fonctionne pas normalement ou s'il a
été jeté.
Page 11
M800BW User Guide About This User Guide
- 10 -
1.2 Handling and
Maintenance
Follow and adhere to all warnings and
instructions in this manual. For the longevity
of the product usage, please read all
operating instructions before using the
product. Keep this manual for future
reference.
General Guideline
Guide Général
Keep the product at least 13 cm (5
inches) away from electrical appliances
that can generate a strong magnetic field
such as TV, refrigerator, motor, or a large
audio speaker.
Garder le produit au moins à 13 cm (5
pouces) de distance des appareils
électriques qui peuvent générer un fort
champ magnétique comme une
télévision, un réfrigérateur, un moteur, ou
un important haut-parleur.
Do not place heavy objects on top of the
tablet computer as this may damage the
display.
Ne pas placer d'objets lourds sur le
dessus de l'ordinateur tablette cela peut
endommager l'écran.
The screen surface can be easily
scratched. Use with care. Do not use
paper towels to clean the display but use
the included cleaning cloth. Avoid
touching it with a pen or pencil.
La surface de l'écran peut être facilement
rayée. Utiliser avec précaution. Ne pas
utiliser de serviette en papier pour
nettoyer l'écran mais utiliser le chiffon de
nettoyage inclus. Éviter de toucher avec
un stylo ou un crayon.
To maximize the life of the backlight in
the display, allow backlight to
automatically turn off as a result of power
management. Avoid using a screen saver
or other software that prevents the power
management from working.
Pour maximiser la durée de vie du
rétroéclairage de l'écran, autoriser le
rétroéclairage résultant de la gestion de
l'alimentation. Éviter d'utiliser un
économiseur d'écran ou un autre logiciel
empêchant la gestion de l'alimentation de
fonctionner.
Cleaning Guideline
Guide de
nettoyage
Use a soft cloth moistened with water or a
non-alkaline detergent to wipe the
exterior of the product.
Utiliser un chiffon doux humidifié avec de
l’eau ou un détergeant non alcalin pour
essuyer l'extérieur du produit.
Gently wipe the display with a soft, lintfree cloth. Do not use alcohol or
detergent on the product.
Essuyer délicatement l'écran avec un
chiffon doux non pelucheux. Ne pas
utiliser d'alcool ou un détergent sur le
produit.
Page 12

M800BW User Guide Chapter 1 Read Me First
- 11 -
Touchscreen
Guideline
Guide de l'écran
tactile
Use your finger or the stylus on the display.
Using sharp or metallic object may cause
scratches and damage the display, thereby
causing errors.
Utiliser votre doigt ou le stylet sur l'écran.
L'utilisation d'un objet pointu ou métallique
peut provoquer des rayures.
Use a soft cloth to remove dirt on the
display. The touchscreen surface has a
special protective coating that prevents dirt
from sticking to it. Not using a soft cloth
may cause damage to the special
protective coating on the touchscreen
surface. To clean off hard to remove dirt,
blow some steam on the particular area
and gently wipe away using a soft cloth.
Utiliser un chiffon doux pour enlever la
poussière sur l'écran. La surface de l'écran
tactile a un revêtement protecteur spécial
empêchant la saleté de se coller à lui. Ne
pas utiliser un chiffon doux peut
endommager le revêtement spécial sur la
surface de l'écran tactile. Pour nettoyer les
saletés plus difficiles à enlever, souffler de
la buée sur la zone particulière et essuyer
doucement avec un chiffon doux.
Do not use excessive force on the display.
Avoid placing objects on top of the display
as this may cause the glass to break.
Ne pas utiliser une force excessive sur
l'écran. Éviter de placer des objets au
dessus de l’écran cela pourrait provoquer
une cassure du verre.
When there is a noticeable discrepancy in
the operation of the touchscreen function
(your touch does not correlate to the
proper location on the screen), recalibrate
the touchscreen display.
Lorsqu'il y a un écart sensible dans le
fonctionnement de l'écran tactile (votre
contact ne correspond pas à la bonne
position sur l'écran), recalibrer l'écran
tactile.
Page 13

M800BW User Guide Chapter 2 Getting Started
- 12 -
Chapter 2: Getting Started
This chapter tells you information about Winmate® M800BW Series Rugged Tablet Computer,
its highlighted features, and provides basic instructions for using the M800BW, including
powering on and resetting the M800BW.
2.1 Introduction
Thank you for purchasing Winmate® M800BW Rugged Tablet Computer. Winmate® M800BW
Rugged Tablet PC is an enterprise-class tablet computer powered by an Intel® Celeron®
N3160 Braswell 1.6 GHz processor. The M800BW brings a new level of flexibility, functionality
and rugged design to pocket-sized mobile devices, providing task workers and managers with
the power to streamline business processes, increasing productivity and improving public
safety service.
The M800BW packs WLAN, Bluetooth, GPS, and WWAN function─all into a single device.
Besides Winmate® M800BW offers the highly reliable mobility and embedded hardware for
data collection. Broad range of configuration options- Fingerprint scanner, Barcode, RFID and
Smart Card Reader, makes M800BW highly customizable and most versatile mobile solution
for mission-critical mobile professionals.
2.2 Product Features
Winmate® M800BW Rugged Tablet PC features:
High performance
Multi-Touch Projective Capacitive, with optical bonding (Increased brightness)
Fanless & Robust Design
Designed with protection cover for better protection in rugged environments
Default with 4G RAM/ 64G SSD / GPS, WLAN, Bluetooth
Options:
o M12 Connector
o External antenna for better signal
o LTE module
o VESA Plate
o 1D/ 2D Barcode Reader, Fingerprint Scanner, RFID Reader, Smart Card Reader
Intel ® Celeron ® N3160 Braswell 1.6 GHz,
2M Cache, up to 2.24 GHz
Page 14

M800BW User Guide Chapter 2 Getting Started
- 13 -
2.3 Unpacking
If any of the following items are missing or damaged, contact us.
Standard packing list includes:
Tablet Computer
Standard Battery
Power Adapter
Power Cord and Plugs
Driver CD
Page 15

M800BW User Guide Chapter 2 Getting Started
- 14 -
2.4 Description of Parts
Front:
Left:
Right:
No
Item
Description
1
Front Camera
2 Megapixel Webcam
2
Touch Screen
Display acts as one of
the inputs for the Tablet
Computer
3
LED
Indicators:
Show the current status
of the Tablet Computer
Front LED Indicators Detail:
4
Power Button
Power on/off tablet
5
F1 Button
Programmable function
key configured by
Hottab Utility
6
F2 Button
Programmable function
key configured by
Hottab Utility
7
Optional
Fingerprint
Scanner
Scans fingerprints
8
Speaker
0.7W Speaker
9
Digital
Microphone
Digital Microphone
No
Item
Description
10, 11
USB 3.0
High speed USB port
connects to USB
devices, such as USB
flash drive, mouse,
keyboard, printer, etc.
12
Micro HDMI
Micro HDMI port
connects to HDMIcompatible
audiovisual devices,
such as computer
monitors, digital
televisions and video
projectors.
13
Optional
Barcode
Barcode Scanner for
reading of 1D/2D
barcode.
14
Capacitive
Stylus
Acts as one of the
inputs for the Tablet
Computer.
Page 16

M800BW User Guide Chapter 2 Getting Started
- 15 -
Rear:
Bottom:
M800BW
M800BW-M12
No
Item
Description
15
Battery Pack
7.6V typ. 5200mAh Liion Battery (2S2P)
16
Rear Camera
8MP Autofocus
Camera. Captures
photos and videos.
17
WWAN
Module
Service window to
insert WWAN Module
18,
19
Battery Lock
Latch
Latch to lock the
battery in place once
battery is inserted. Not
spring-loaded.
No Item Description
20 Power Input
with IP65
12 or19V DC
21 Smart Card
Reader
(M800BW)
Use to read smart
cards
M12 Connector
(M800BW-M12)
Use with External
Cable or Expansion
Box CPM800
Page 17
M800BW User Guide Chapter 2 Getting Started
- 16 -
2.5 HotKey for Specific Functions
For the physical buttons on the M800BW Tablet Computer, in addition to their dedicated
functions detailed in the previous section, they can also be used to emulate commonly used
keyboard key strokes. Under different scenario, a single physical button or a combination of
physical buttons provide different keyboard key strokes, which are specified below:
Under POST (before Windows boots up):
Buttons Keystroke
F1 Recovery Menu
F2 ESC
Under Windows:
Buttons Keystroke
F1 Default: Web Browser
F2 Default: Camera
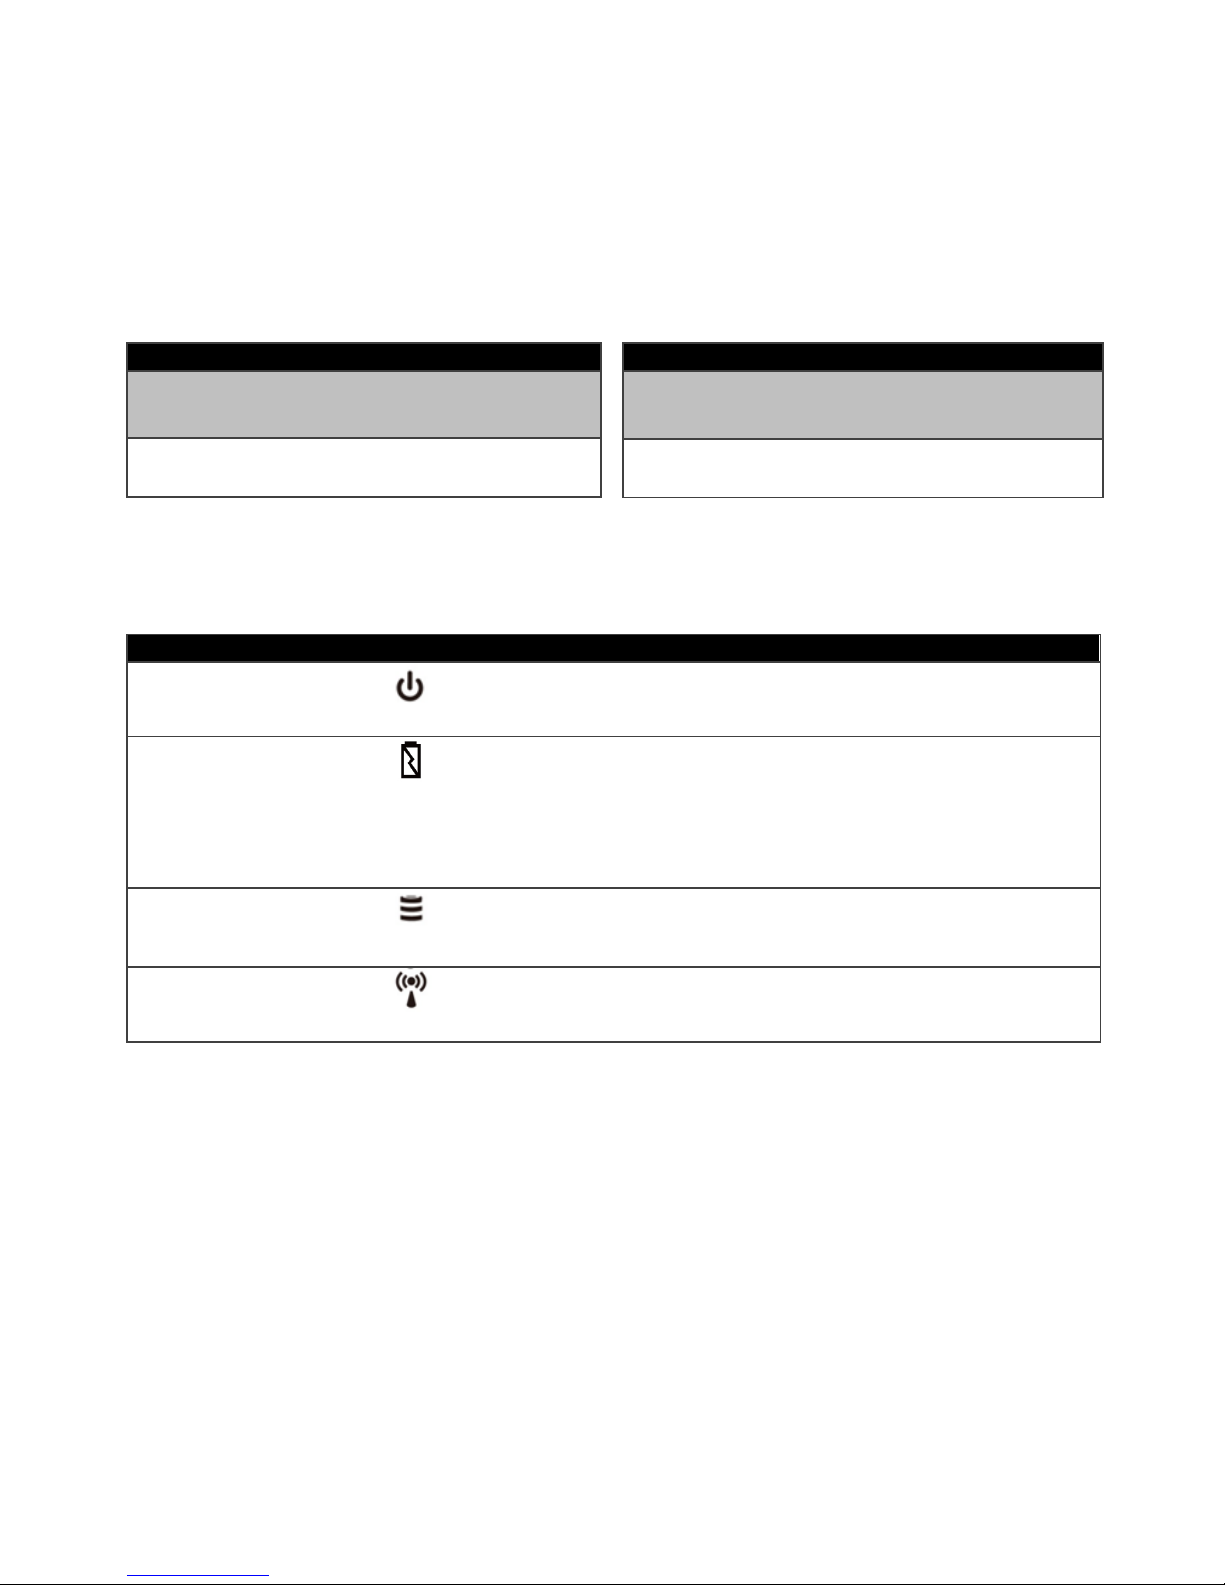
LED Indicators:
Item Description
Power Indicator
Blue – Tablet is ON
No light – Tablet is OFF
Battery Status
Orange – AC adapter is plugged in and charging
Green – AC adapter is plugged in and battery is full charged
Solid Red - Low battery (<10%)
Blinking Red – Battery is being hot swapped
No light – Battery is in use and more than 10%
Disk Activity
Indicator
Green - Disk Activity
No light - Disk Idling
RF Communication
Green – Wi-Fi/BT/WWAN/GPS ON
No light – Wi-Fi/BT/WWAN/GPS are all OFF
Page 18

M800BW User Guide Chapter 2 Getting Started
- 17 -
2.6 First-time Operation
To start using the M800BW for the first time:
Install the Battery Pack
Charge the M800BW
Power on the M800BW
Configure the M800BW
2.6.1 Inserting Battery Pack
To insert the standard battery pack into the Tablet Computer:
1. Disconnect AC adapter and power cord from the Tablet Computer.
2. Turn the Tablet Computer over, back facing up.
3. Insert the battery on the connector-pins side first, and then lower the battery into the
battery compartment. Continue to hold the Battery Release Slider before battery is fully
inserted.
4. Make sure the battery is completely lowered into the compartment before letting go the
Battery Release Slider. Battery will be flat against the housing once fully inserted.
Locate the Battery into the battery slot.
Insert the Battery.
Removing the Battery Pack
1. Power off the Tablet Computer (or turn on sleep mode). Disconnect any cords connected
to the computer.
2. Turn the Tablet Computer over, back facing up.
3. Locate the Battery Lock Latch and push it to the “Unlocked” position.
4. Lift the battery out using the opening on side of battery compartment.
Page 19

M800BW User Guide Chapter 2 Getting Started
- 18 -
2.6.2 Connecting to Power Supply
The Tablet Computer operates either on external AC power or internal battery power. It is
recommended to use AC power when you start up the Tablet Computer for the first time.
CAUTION
Use only the AC adapter included with your Tablet Computer. Using other AC
adapters may damage the Tablet Computer and the Battery.
IMPORTANT
For users starting up the Tablet Computer for the first time with internal
battery power, please make sure the battery is full charged before using.
Perform the following to connect the Tablet computer to AC Power:
1. On the side of the Tablet computer, lift the I/O protective cover by pulling on the latch.
2. Plug the DC cord of the AC adapter into the Power Jack of the tablet computer.
3. Plug the AC power cord into the AC adapter.
4. Finally, Plug the AC power cord into the electrical outlet.
M800BW
M800BW-M12
Page 20

M800BW User Guide Chapter 2 Getting Started
- 19 -
When the AC Adapter is connected, the battery pack starts charging. The battery LED indicator
on the tablet computer would show different states. Please refer to description of LED indicator
on Description of Parts.
Item
Hours
Battery Life
7 Hours
Battery Charging Time
2.5 Hours
2.7 Powering On and Off
2.7.1 Powering On
Press and hold the power button for 3 seconds until the blue LED power indicator light up.
NOTE
Do not press the power button repeatedly.
Do not perform the following operations until the Disk Activity Indicator off
o Connecting or disconnecting the AC adapter
o Pressing the power button
o Touching the tablet buttons, screen, or external keyboard/mouse
2.7.2 Powering Off
Perform the following procedure to power off the Tablet Computer:
1. Make sure you have closed any programs that are open on the Desktop. Start Screen
apps don’t need to be closed.
2. Under Windows 8.1 OS, open the Charms Bar by swiping your finger from the far right of
the screen towards the middle of the screen.
3. Tap on the Settings charm.
4. Tap on Power.
5. Tap on Shut Down.
6. Wait for Tablet Computer to power off.
NOTE
The computer will forcibly be powered off if the power button is pressed and
held for 6 seconds or longer.
Page 21

M800BW User Guide Chapter 3 First Time Operation
- 20 -
Chapter 3: First Time Operation
IMPORTANT
For users starting up the Tablet Computer for the first time with internal
battery power, please make sure the battery is full charged before using.
This section details how to setup different version of the Windows that may be installed on the
tablet for the first time.
NOTE
Please notice that BIOS varies by different Windows OS; for users going to
change OS, please contact our sales contact window for details.
3.1 Setting up Windows Embedded 8.1 Industry Pro
Follow the steps below to complete the setup process.
1. Press the power button to power on the computer.
2. Check I accept the license terms for using Windows to accept the terms, and then click
or tap "I Accept."
Page 22

M800BW User Guide Chapter 3 First Time Operation
- 21 -
3. On the Personalize screen, choose a color you like – you can always change this later
from the Start screen.
4. In the PC name field, type a name for your computer, and then click or tap Next.
Page 23
M800BW User Guide Chapter 3 First Time Operation
- 22 -
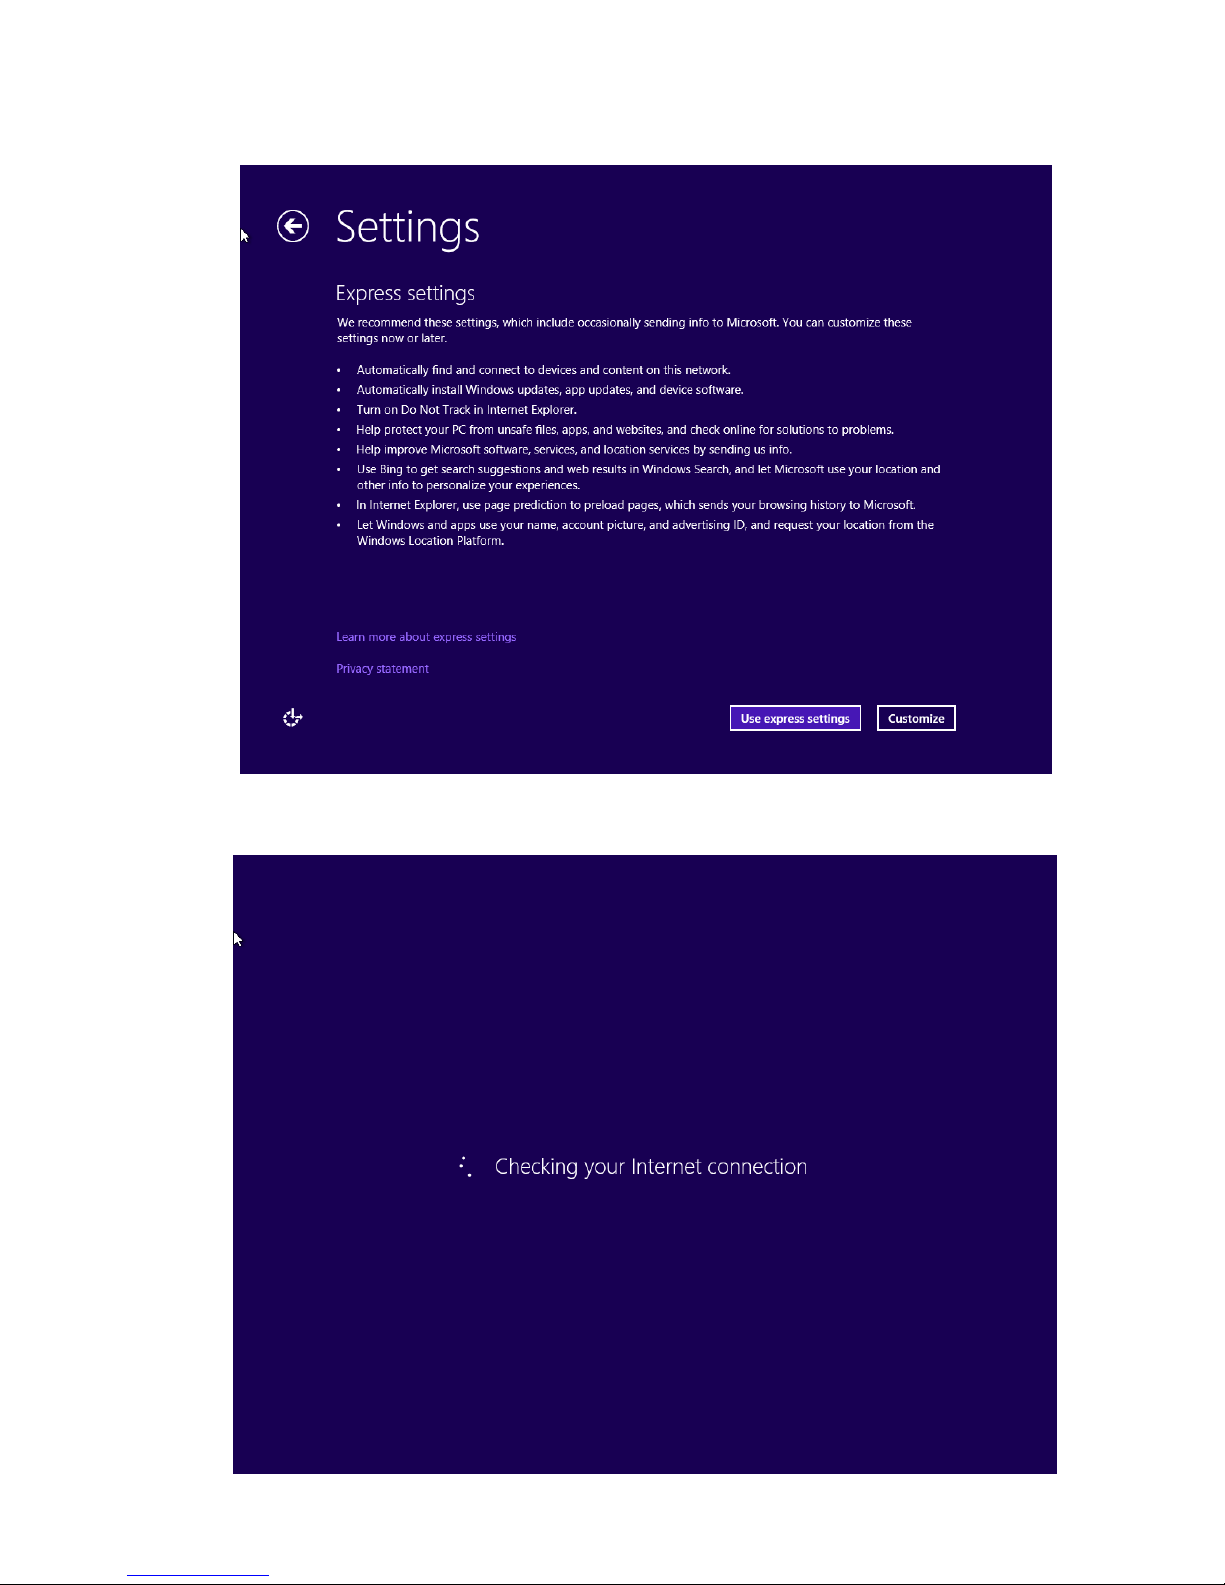
5. On the Settings page screen, choose Use express settings for the fastest setup.
6. Windows will then try to connect to network. Ignore attempt to connect to internet as you
do not need internet connection to finish setup your pc.
Page 24

M800BW User Guide Chapter 3 First Time Operation
- 23 -
7. On Your account screen, type your username and password to create a local account,
and then click or tap Finish.
8. Windows may take some time to finalize your settings.
Page 25

M800BW User Guide Chapter 3 First Time Operation
- 24 -
9. On the Windows Sign-in screen, enter the user name and password that you set up
earlier, and then press Enter.
10. Once Windows finishes login, you are now ready to use the PC
Page 26

M800BW User Guide Chapter 3 First Time Operation
- 25 -
3.2 Setting up Windows 10 IoT Enterprise
This section details how to setup different version of the Windows that may be installed on the
tablet for the first time. 3.1 Setting up Windows 10 IoT Enterprise Follow the steps below to
complete the setup process.
1. Press the power button to turn on the computer.
2. First, select your country/region, your preferred app language, your preferred keyboard layout,
and your time zone, then tap Next.
3. On the Here’s the legal stuff screen, read through the disclosures, then tap Accept.
4. Windows will then try to connect to network. Tap Skip this step to continue without a
wireless connection as you can then set up the network later.
Page 27

M800BW User Guide Chapter 3 First Time Operation
- 26 -
5. On the Get going fast screen, click Use Express settings for the fastest setup. If you would
like more information, tap Learn more, or if you would like to select your own options, click
Customize settings.
6. To create a local account, type your User name, password, and Password hint in the fields
provided, then tap Next.
7. The initial setup screens are complete, and the desktop is displayed.
8. Read any introductory screens describing features of your computer, and tap Next upon
completing each. You are now done with the initial setup process.
Page 28

M800BW User Guide Chapter 4 Quick Access with Hottab
- 27 -
Chapter 4: Quick Access with Hottab
4.1 Hottab Introduction
Hottab provides quick access to the Tablet’s functions and features, such as setting up shortcuts,
using camera, powering on/off built-in devices, programming function key, and changing power
management.
As Windows starts up, Hottab opens and runs in the background. To display the Hottab control
utility, press the (Menu) Button located on the front panel, OR launching the Hottab Utility
application.
(Menu) Button on the Front Panel:
Hottab Utility Icon:
The main user interface is located on the right side of the screen. There are 4 main menu options:
Shortcuts, Camera, Device ON/OFF, and Settings. Operations and functions on each menu
options are explained in detail in the coming section.
Page 29

M800BW User Guide Chapter 4 Quick Access with Hottab
- 28 -
Device button enables/disables tablet computer’s hardware functions. The
configurable functions are Wi-Fi, WWAN (3G/4G/LTE), GPS, Bluetooth, Camera,
LED indicators, Barcode Reader, RFID Reader, Expansion Port, and GPS
Antenna routing options.
Setting button provides users information such as PC Information, Battery status,
and also device settings such as power management setting, and function key
mappings.
Changing the Touchscreen modes.
4.2 Shortcuts
Set up On-screen Software Shortcuts
Hottab Shortcuts Menu provides user-friendly interface to configure on-screen software short
cuts and allow users to quickly access programs with a few tabs. The Shortcuts menu offers 8
empty slots to store user’s desired quick access. Shortcuts can be mapped to any of the
executable files (.exe) installed on the tablet.
Short Cut Menu:
To store a new shortcut:
1. Launch the Hottab Utility application.
2. Tap on the Shortcuts button.
3. Tap on button of any empty slot.
4. An on screen file browser will appear.
5. Browse to find the desired application to have shortcut.
6. Click “Open” to save the shortcut.
To remove an saved shortcut:
7. Launch the Hottab Utility application.
8. Tap on the Shortcuts button.
9. Tap on the button of any saved slot to remove
10. Shortcut will be removed, and once again show “Empty” to
indicate slot is empty.
Tap on the button will hide the Hottab Utility Menu.
Using the Hottab shortcuts:
1. Launch the Hottab Utility application.
2. Tap on the Shortcuts button.
3. Tap on the saved shortcut items to access the saved
programs.
Page 30

M800BW User Guide Chapter 4 Quick Access with Hottab
- 29 -
4.3 Camera
This Hottab menu option allows users take a picture or record a video. Before use, make sure
the Camera is powered on under Devices ON/OFF menu with the following scenarios:
1. Launch the Hottab Utility application.
2. Tap on "Device ON/OFF" button to check the built-in devices status.
3. Check the status color of the Camera icon:
Item
Status Color
Description
Orange
Camera is enabled.
White
Camera is disabled.
4. If the Camera feature is disabled (white), tap on the Camera icon to enable it (orange).
5. Tap on the HotTabCamera shortcut to go into the Camera menu. The Camera user
interface will take up the entire screen as shown below:
Page 31

M800BW User Guide Chapter 4 Quick Access with Hottab
- 30 -
Description of Camera User Interface Buttons:
No
Item
Description
1
Review
Preview the take picture.
2
Settings
Brings up Camera settings page.
Available Settings:
Photo format: modify/inspect saved location for
pictures.
Rear Video Resolution: Picture compression
quality.
File Location: Opens the location where pictures
and videos are saved in a window.
3 Switch Camera
Switches the front or rear camera device.
4
Flash Control
Enable/Disables LED Flash when taking picture.
5
Video Record
Video Record Button. Tap to Start, and press again to stop
recording.
6
Shutter
Camera Shutter Button. Tap to take picture.
7
Exit
Exits the Camera and hide Hottab Utility.
Page 32
M800BW User Guide Chapter 4 Quick Access with Hottab
- 31 -
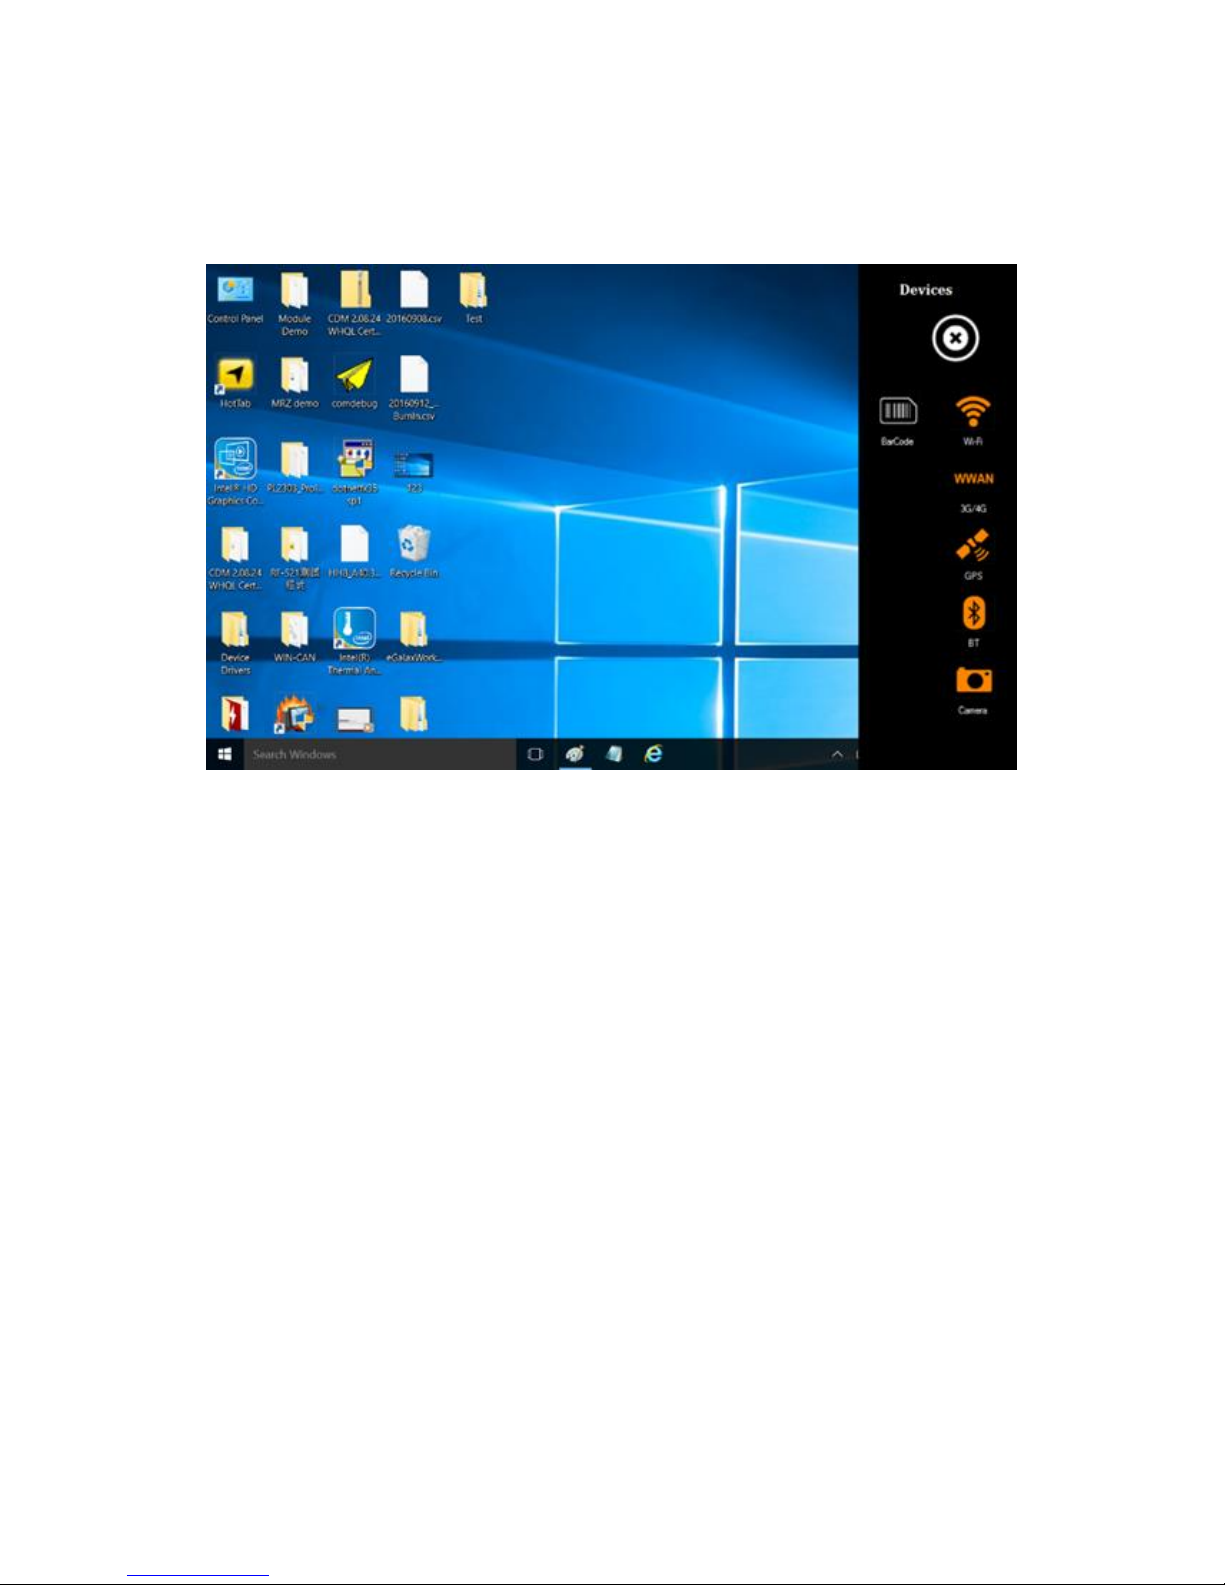
4.4 Device ON/OFF
This section provides a quick access to set-up built-in devices, including turning on/off RF
modules, setting up barcode reader, RFID reader, and expansion modules.
Page 33
M800BW User Guide Chapter 4 Quick Access with Hottab
- 32 -
4.5 Using the Wireless LAN (Wi-Fi)
To use the wireless LAN (Wi-Fi) feature to connect to the network, perform the following
procedure:
1. Open the Hottab utility by press the (Menu) Button located on the front panel, OR
launching the Hottab Utility application.
2. Tap on the Device ON/OFF button.
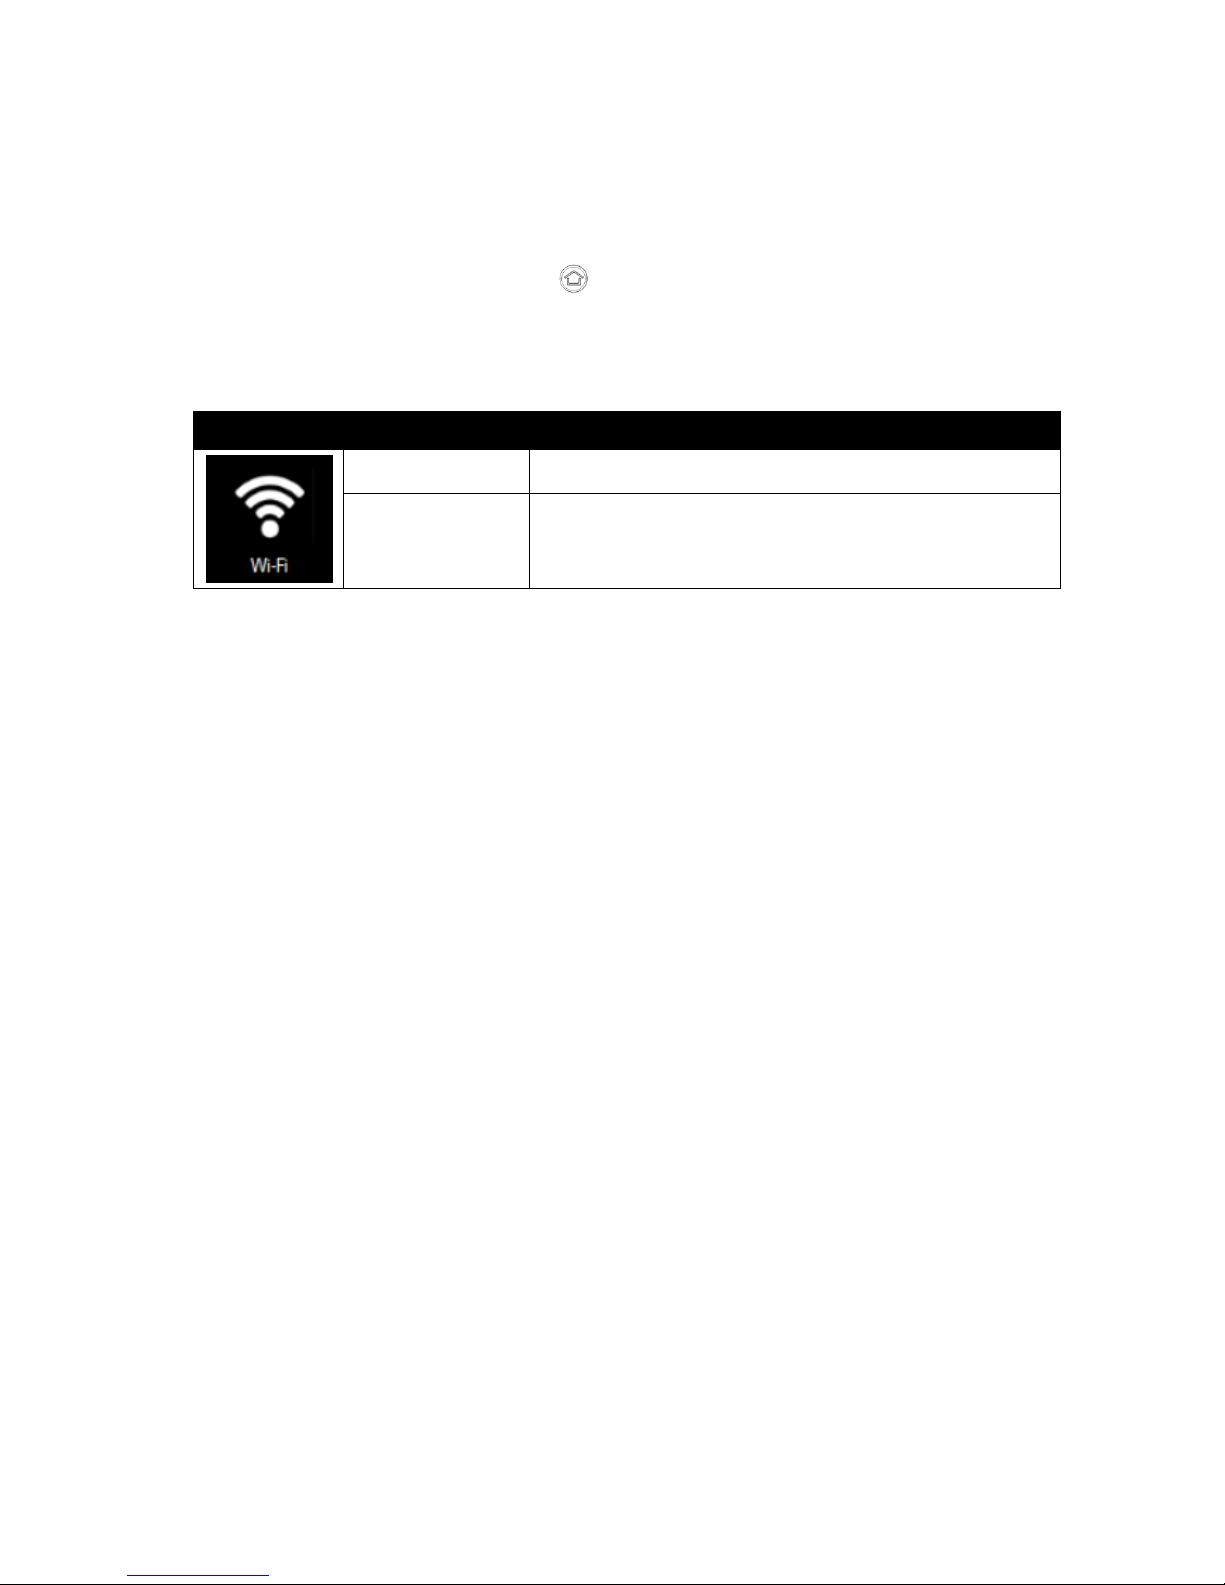
3. Check the status color of the Wi-Fi icon:
Item
Status Color
Description
Orange
Wi-Fi is enabled.
White
Wi-Fi is disabled.
4. If the Wi-Fi feature is disabled (white), tap on the Wi-Fi icon to enable it (orange).
5. Click the wireless network connection status icon in the Windows notification area. A list
of available wireless networks is displayed.
6. Double-click a network to connect to it. Provide required authentication information if
needed.
7. To check the connection status, observe wireless network connection status icon in the
Windows notification area. The more bars the icon shows, the better the wireless LAN
connection strength is.
8. Now wireless LAN connection is setup, try connection to the network with a internet
browser such as Internet Explorer.
Page 34

M800BW User Guide Chapter 4 Quick Access with Hottab
- 33 -
4.6 Using the Wireless WAN (3G/LTE)
4.6.1 Insert SIM card (For optional 3G/LTE equipped device)
CAUTION
Power off the tablet before installing the 3G/LTE module and micro SIM card,
or the Tablet Computer might be damaged by the incorrect installation
behaviors.
The Tablet Computer supports data connection with 3G/LTE Modules and fits Micro-SIM card.
NOTE
3G/LTE feature is optional.
Before using the data connection program, please perform the following procedures to insert the
3G/ LTE Module Card to your Tablet Computer:
1. Power off the Tablet Computer.
2. Remove the service window on the rear by unscrewing two Philips M2x4 flat head screws.
3. Remove the screws that secure the 3G/LTE module cover.
4. Carefully lift the cover up.
5. Insert 3G wireless module, and be cautious not to damage the connected cable.
6. Insert the cover and secure it with two Philips M2x4 flat head screws using screwdriver.
Page 35

M800BW User Guide Chapter 4 Quick Access with Hottab
- 34 -
Before using the data connection program, please perform the following procedures to insert the
Micro-SIM card to your Tablet Computer:
1. Power off the Tablet Computer.
2. Turn the Tablet Computer over, back facing up.
3. Locate the Battery Lock Latch and push it to the “Unlocked” position.
4. Remove the Battery.
5. Insert the SIM card in to the SIM Card slot located under SD Card Slot.
6. Insert the Battery back into the compartment.
7. Make sure the battery is completely lowered into the compartment before letting go the
Battery Release Slider. Battery will be flat against the housing once fully inserted.
Push the Battery Latches to unlock
position
Remove the Battery
Insert SIM Card to SIM Card Slot
Insert the Battery back into the
compartment.
Page 36

M800BW User Guide Chapter 4 Quick Access with Hottab
- 35 -
4.6.2 Use Wireless WAN Feature
For tablets equipped with wireless WAN (3G or 4G/LTE) card, to use the wireless WAN feature
to connect to the network, perform the following procedure:
1. Open the Hottab utility by press the (Menu) Button located on the front panel, OR
launching the Hottab Utility application.
2. Tap on the Device ON/OFF button.
3. Check the status color of the WWAN icon:
Item
Status Color
Description
Orange
WWAN (3G/4G) is enabled.
White
WWAN (3G/4G) is disabled.
4. If the WWAN feature is disabled (white), tap on the WWAN icon to enable it (orange).
5. You can check the wireless WAN connection status through the wireless network
connection status icon in the Windows notification area. The more bars encompassed, the
better the signal is.
NOTE
For the Windows 7 operating system, you also can check the Access
Connections gauge, the Access Connections status icon, or the Access
Connections wireless status icon in the Windows notification area.
4.7 Using the GPS
To enable the wireless GPS feature, perform the following procedure:
1. Open the Hottab utility by press the (Menu) Button located on the front panel, OR
launching the Hottab Utility application.
2. Tap on the Device ON/OFF button.
3. Check the status color of the GPS icon:
Item
Status Color
Description
Orange
GPS is enabled.
White
GPS is disabled.
4. If the GPS feature is disabled (white), tap on the GPS icon to enable it (orange).
5. Now the GPS feature is ready to be used with an application utilizing the GPS.
Page 37

M800BW User Guide Chapter 4 Quick Access with Hottab
- 36 -
4.8 Using the Bluetooth
To enable the wireless Bluetooth feature, perform the following procedure:
1. Open the Hottab utility by press the (Menu) Button located on the front panel, OR
launching the Hottab Utility application.
2. Tap on the Device ON/OFF button.
3. Check the status color of the Bluetooth icon:
Item
Status Color
Description
Orange
Bluetooth is enabled.
White
Bluetooth is disabled.
4. If the Bluetooth feature is disabled (white), tap on the Bluetooth icon to enable it (orange).
5. Click the Bluetooth icon in the Windows notification area. A contextual menu for Bluetooth
is displayed.
6. To add a device, tap on Add a Bluetooth Device. Windows will search any Bluetooth
device automatically
7. Choose the Bluetooth device that user wants to connect and follow onscreen prompt to
continue the pair procedure and use the Bluetooth device.
Page 38
M800BW User Guide Chapter 4 Quick Access with Hottab
- 37 -
4.9 Using the Barcode Reader
CAUTION
The 2D/1D Barcode Reader is optional for M800BW Tablet PC and is not
re-workable by the end user. To use this feature, please make sure the tablet
PC is built-in barcode reader before use, or contact our sales contact window
for more details.
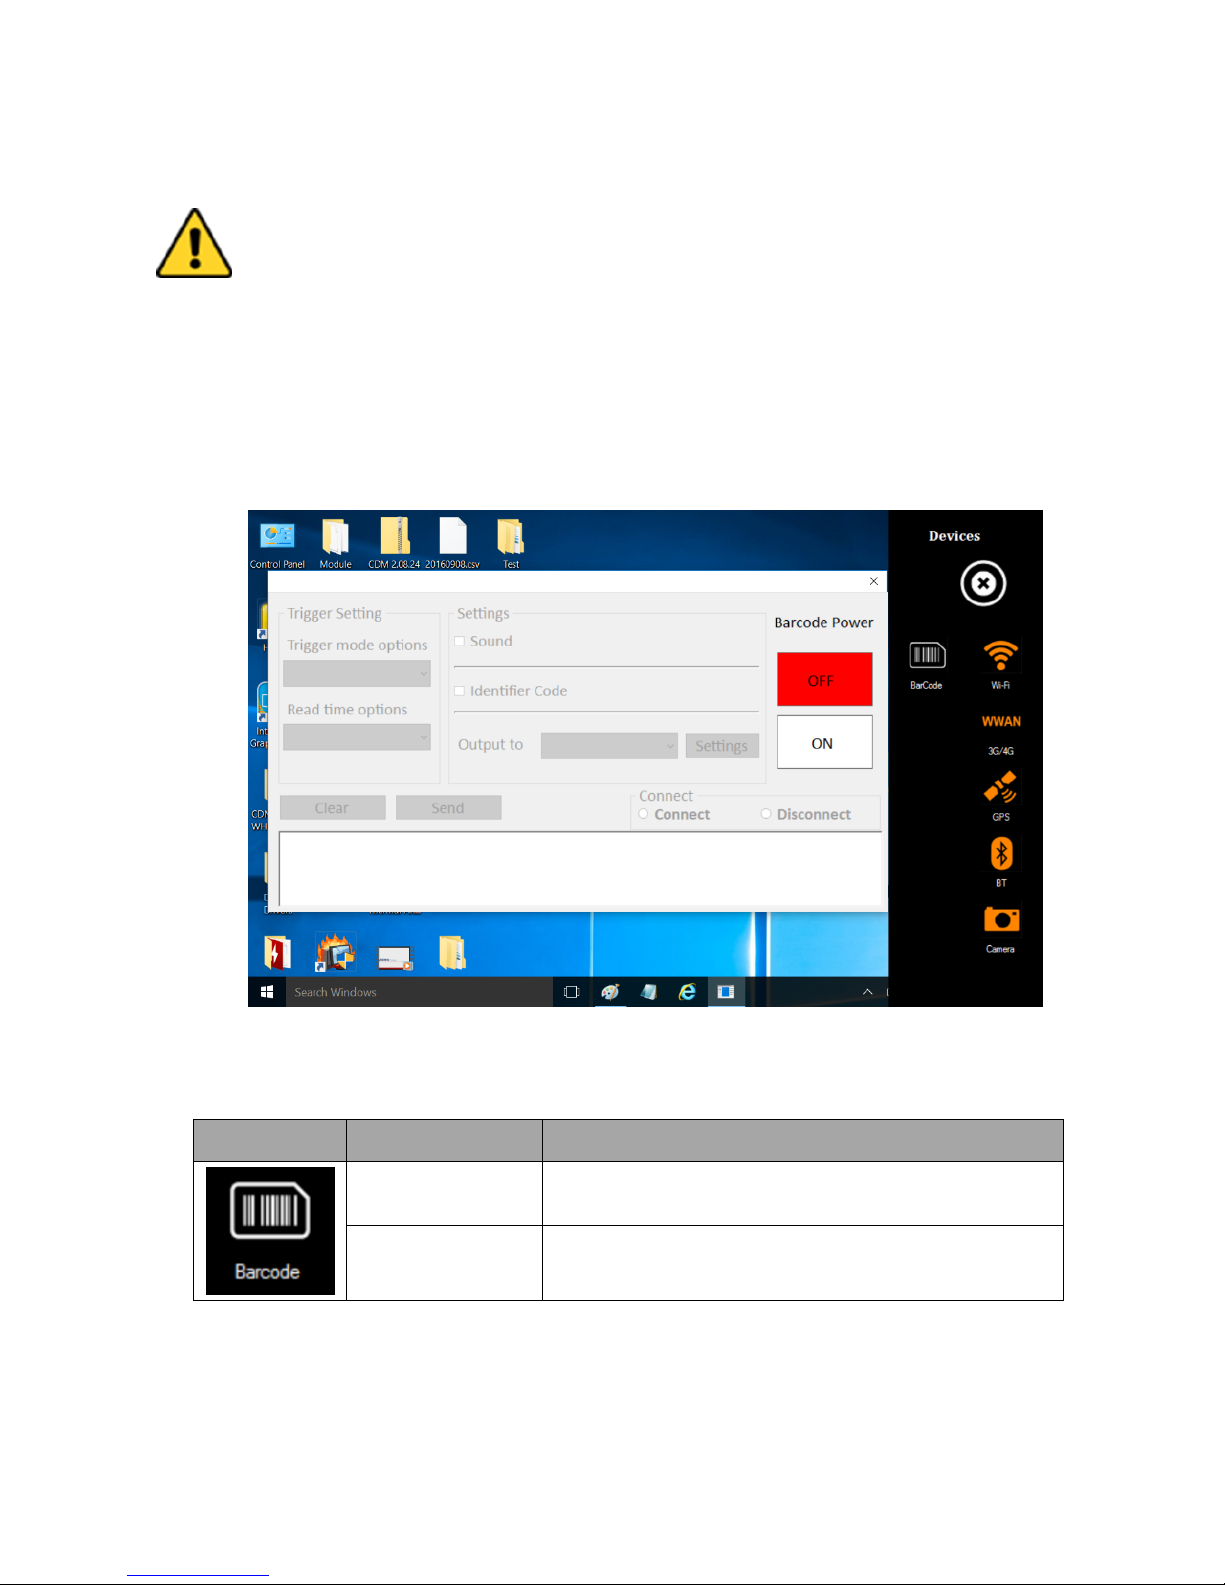
To enable the Barcode Reader feature, perform the following procedure:
1. Launching Hottab Utility application.
2. Choose “Device ON/OFF” and click on “Barcode”, and the setting utility will show up as
below:
3. Tap on the ON button.
4. Check the status color of the ON button is green, and the status color of the Barcode
icon on the Hottab menu is orange at the same time.
Item
Status Color
Description
Orange
Barcode Reader is enabled. Reading will need to
be triggered manually thru Fn button.
White
Barcode Reader is disabled.
5. Open the application where barcode reader will be displaying the scanned barcode.
6. Trigger the barcode reader by pressing F2 function key.
Page 39

M800BW User Guide Chapter 4 Quick Access with Hottab
- 38 -
Trigger Setting
Item
Description
Trigger
mode
options
User can define the barcode scanner trigger mode from Trigger mode options
drop-down menu shown as below.
Continuous
Under Continuous mode, the barcode scanner processes auto-scan
continuously. The scanning light and pattern will be always on.
Level
Under Level mode, the barcode scanner follows trigger button behavior. The
scanning light will be on when the Fn2 button is triggered, and off when the
barcode is successfully read or the Fn2 button is released.
Pulse
Under Pulse mode, user can define the scanning time after each trigger. The
scanning light will be on when the F2 button is triggered, and off when the
barcode is successfully read or the defined read time ends. To set up the
scanning time, tap on the Read time options drop-down menu and choose a
preferred time frame (options from 1 second to 9 seconds).
Flashing
Under Flashing mode, the scanning light is flashing, and the barcode scanner
processes auto-scan with the same frequency.
Page 40

M800BW User Guide Chapter 4 Quick Access with Hottab
- 39 -
Settings
Item
Description
Sound
The Sound check box defines whether a beep sound will come with the data
scanning.
Identifier
Code
The Identifier Code check box defines whether to filter Application Identifiers
from the scanned data. Some barcode types, such as EAN-128, use Application
Identifiers to include additional data. User can disable Identifier Code check
box to ignore specific characters.
Output to
This setting defines the output type of the scanned data. Here are the options
available:
Keyboard Wedge
Under this setting, the data scanned is sent like keyboard data. The scanned
data can be output directly to the demo area below this window, or user can also
open other utility, such as Office Word or Notepad files, for data input.
Please notice that the input method should support the scanned character.
power.
User can also tap on the Settings button for further details settings.
Demo Area
Page 41
M800BW User Guide Chapter 4 Quick Access with Hottab
- 40 -
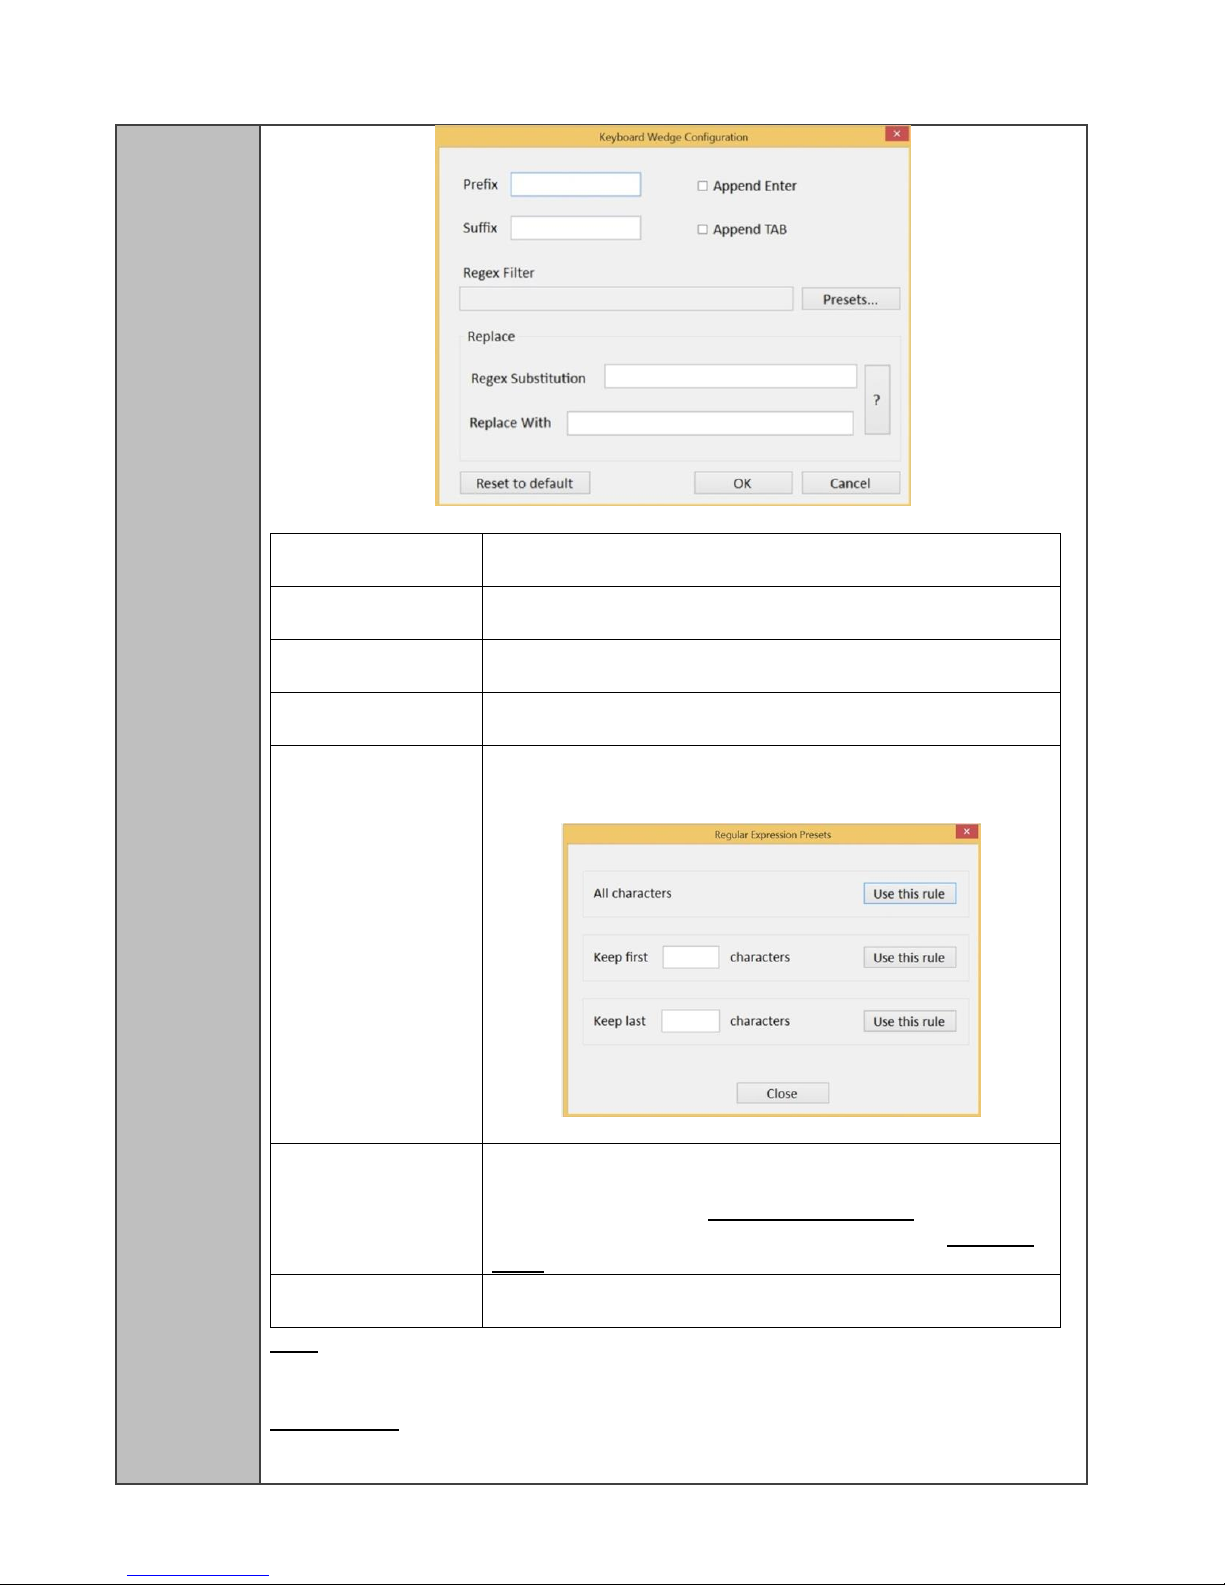
Prefix User can type in this field to define the characters
BEFORE the data scanned.
Suffix User can type in this field to define the characters
AFTER the data scanned.
Append Enter The check box user can defines to append an “Enter”
which is followed by the characters.
Append TAB The check box user can defines to append an “TAB”
which is followed by the characters.
Regex Filter Press on “Presets…” button, user can define how many
characters to show after the data scanned.
Replace User can define specific characters to be replaced with
preferred characters automatically. When the
characters defined in Regex Substitution is scanned,
the data will be replaced with the one filled in Replace
with.
Reset to default User can remove all the set up and back to default
mode.
SDK
For users following SDK for software porting, the scanned data can also be
output with the format needed.
Virtual COM
User can also choose Virtual COM to transfer scanned data to the defined COM
port.
Page 42

M800BW User Guide Chapter 4 Quick Access with Hottab
- 41 -
Disconnect
User can tap on the Disconnect button to stop the connection with Barcode
Reader.
*To recover the connection, please tap on the button again to re-connect with
Barcode Reader.
4.9.1 Setting the 1D/2D Barcode Scanner Symbologies
The Barcode Scanner is shipped with default settings shown below. If the default setting suits the
usage requirement, setting symbologies is not necessary.
Symbologies
Default Setting
1D
UPC-A
Enable
UPC-E
Enable
EAN-8
Enable
EAN-13
Enable
UPC-E1
Disable
GS1 DataBar Omni-Directinal
Disable
GS1 DataBar Limited
Disable
GS1 DataBar Expanded
Disable
Code 39
Enable
Code 128
Enable
ISBT 128
Disable
GS1-128
Enable
Interleaved 2 of 5
Disable
Matrix 2 of 5
Disable
Standard 2 of 5
Disable
Codabar
Disable
Code 93
Disable
Code 11
Disable
MSI
Disable
Plessey
Disable
Telepen
Disable
Australian Post
Disable
BPO
Disable
Canada Post
Disable
Dutch Post
Disable
Japan Post
Disable
PostNet
Disable
Sweden Post
Disable
2D
Data Matrix
Enable
PDF 417
Enable
Micro PDF 417
Disable
Codablock A
Disable
Codablock F
Disable
Maxicode
Disable
QR Code
Enable
Aztec
Disable
GS1 Composite A/B
Disable
GS1 Composite C
Disable
Page 43

M800BW User Guide Chapter 4 Quick Access with Hottab
- 42 -
4.9.2 Using the MotoSetting Application to Set the Symbologies
To set the Symbologies settings, the user can utilize the MotoSetting application that is
installed on the tablet. Please follow the instructions below:
CAUTION
To utilize the MotoSetting application, the user has to first turn on the Barcode
Scanner, and then disconnect the Barcode Scanner from HotTab utility. This
then allows the MotoSetting application to gain control for user to set the
Symbologies as required. Once the desired settings are set, the user has to
power cycle the Barcode Utility in HotTab, before continuing the Barcode
Scanner.
1. Launch the HotTab Utility application.
2. Choose “Device ON/OFF” and then click on “Barcode”
3. Barcode utility will show up as below:
4. Tap on the ON button to turn on the Barcode Scanner.
5. Once the Barcode Scanner is ON, as shown below, tap on the “Disconnect” button.
6. Once the HotTab utility disconnects from the Barcode Scanner successfully, it will be as
shown below:
Page 44

M800BW User Guide Chapter 4 Quick Access with Hottab
- 43 -
7. Open the MotoSetting application .
Page 45

M800BW User Guide Chapter 4 Quick Access with Hottab
- 44 -
8. MotoSetting application will be shown as below. The left panel shows the symbologies
settings, with check marks indicating the symbologies that are enabled. On the right side,
is the console information indicating any status for the application.
Table below shows the function of each button:
Button Name
Function
PULL
Turns on the Barcode Scanner, and stays on
RELEASE
Turns off the Barcode Scanner
Clear
Clears the right console panel of all status
R
Resets the Barcode Scanner if there are any malfunctions
9. Using the left panel, the user is free to check/uncheck the symbologies setting as
required.
Page 46

M800BW User Guide Chapter 4 Quick Access with Hottab
- 45 -
10. The right panel shows any status change in the symbologies settings, as shown below:
11. On the left panel, scroll to the top, scroll to the top, the user can also change the
symbologies settings to default setting.
12. Once the user is done setting the symbologies, close the MotoSetting by clicking on the
X on the top right, and then go back to the HotTab utility.
13. Launching HotTab Utility application.
Page 47

M800BW User Guide Chapter 4 Quick Access with Hottab
- 46 -
14. Choose “Device ON/OFF” and then click on “Barcode”
15. Barcode utility will show up as below:
16. Turn off the Barcode Scanner by tapping on the OFF button.
Page 48

M800BW User Guide Chapter 4 Quick Access with Hottab
- 47 -
17. And then tap on the ON button again.
18. The user can now continue to use the Barcode Scanner with the new Symbologies
settings.
Page 49
M800BW User Guide Chapter 4 Quick Access with Hottab
- 48 -
4.10 Using Fingerprint Reader
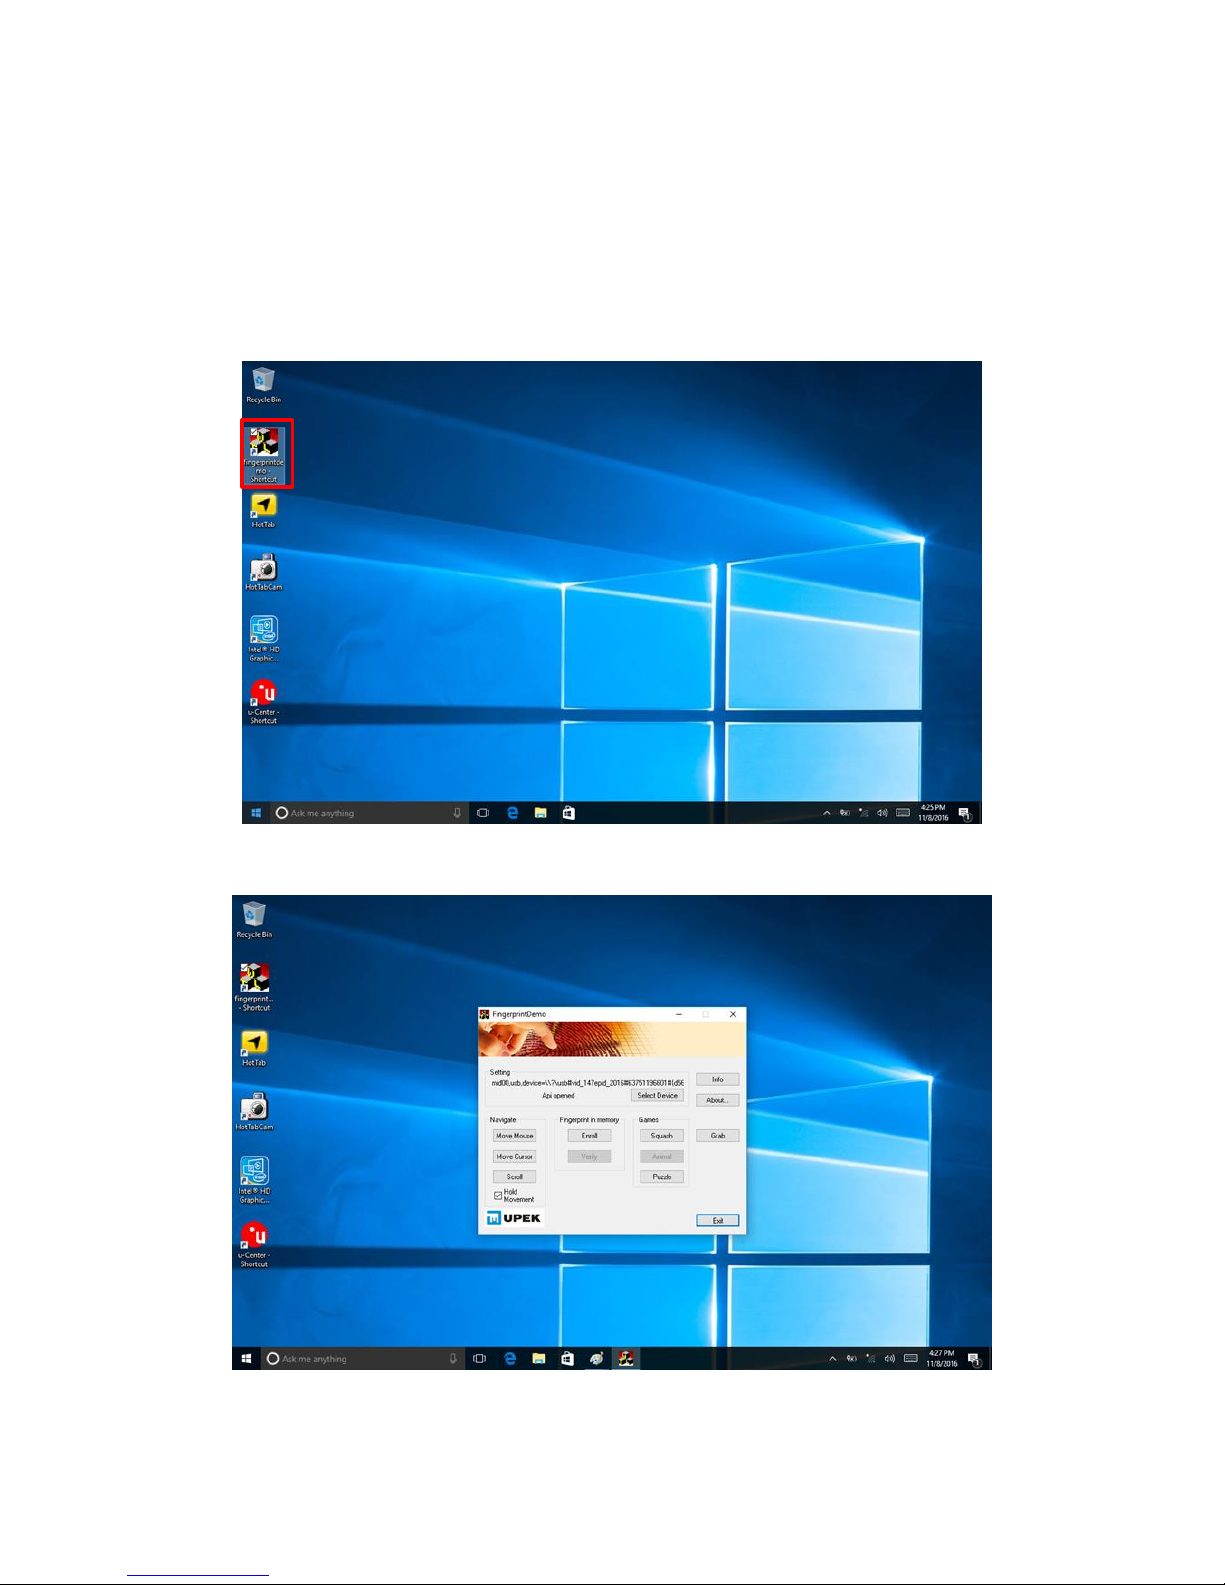
The tablet is pre-installed with a sample program for demonstration.
To enable the Fingerprint Reader feature, perform the following procedure to execute the
Demonstration Application:
1. Tap the “Fingerprintdemo” shortcut on the desktop and then click on it.
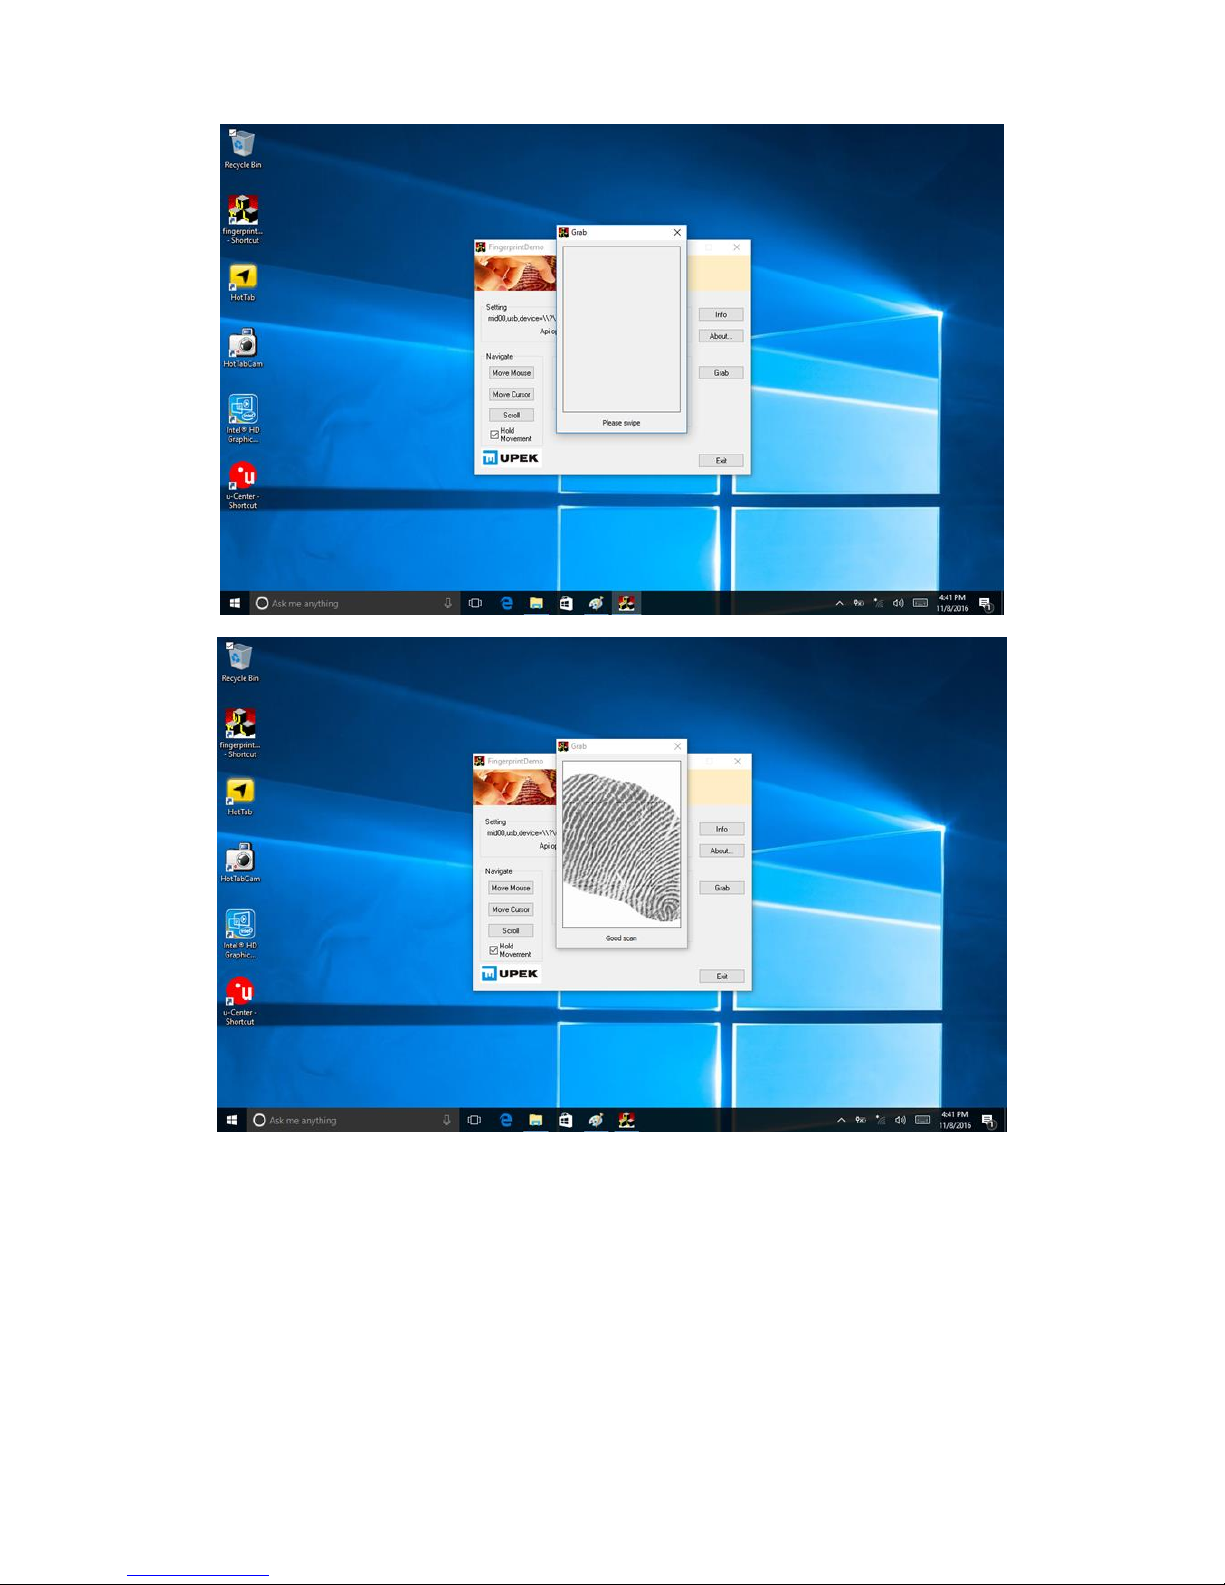
8. Choose “Grab” and then click on it. Fingerprint utility will show up as below:
3. You can press your finger onto the reader to capture a fingerprint and display it on the
screen as function.
Page 50
M800BW User Guide Chapter 4 Quick Access with Hottab
- 49 -
4. To exit the sample application, press the x icon in the top right corner.
Page 51

M800BW User Guide Chapter 4 Quick Access with Hottab
- 50 -
5. The SDK will put on the c:\ Program Files(x86) folder, you can use the SDK to develop
your own AP.
Page 52

M800BW User Guide Chapter 4 Quick Access with Hottab
- 51 -
4.11 Using the HF RFID Reader
CAUTION
The HF RFID Reader is optional for M800BW Tablet PC and is not reworkable by the end user. To use this feature, please make sure the tablet PC
is built-in HF RFID reader before use, or contact our sales contact window for
more details.
To enable the HF RFID Reader feature, perform the following procedure:
1.
Launching the Hottab Utility application.
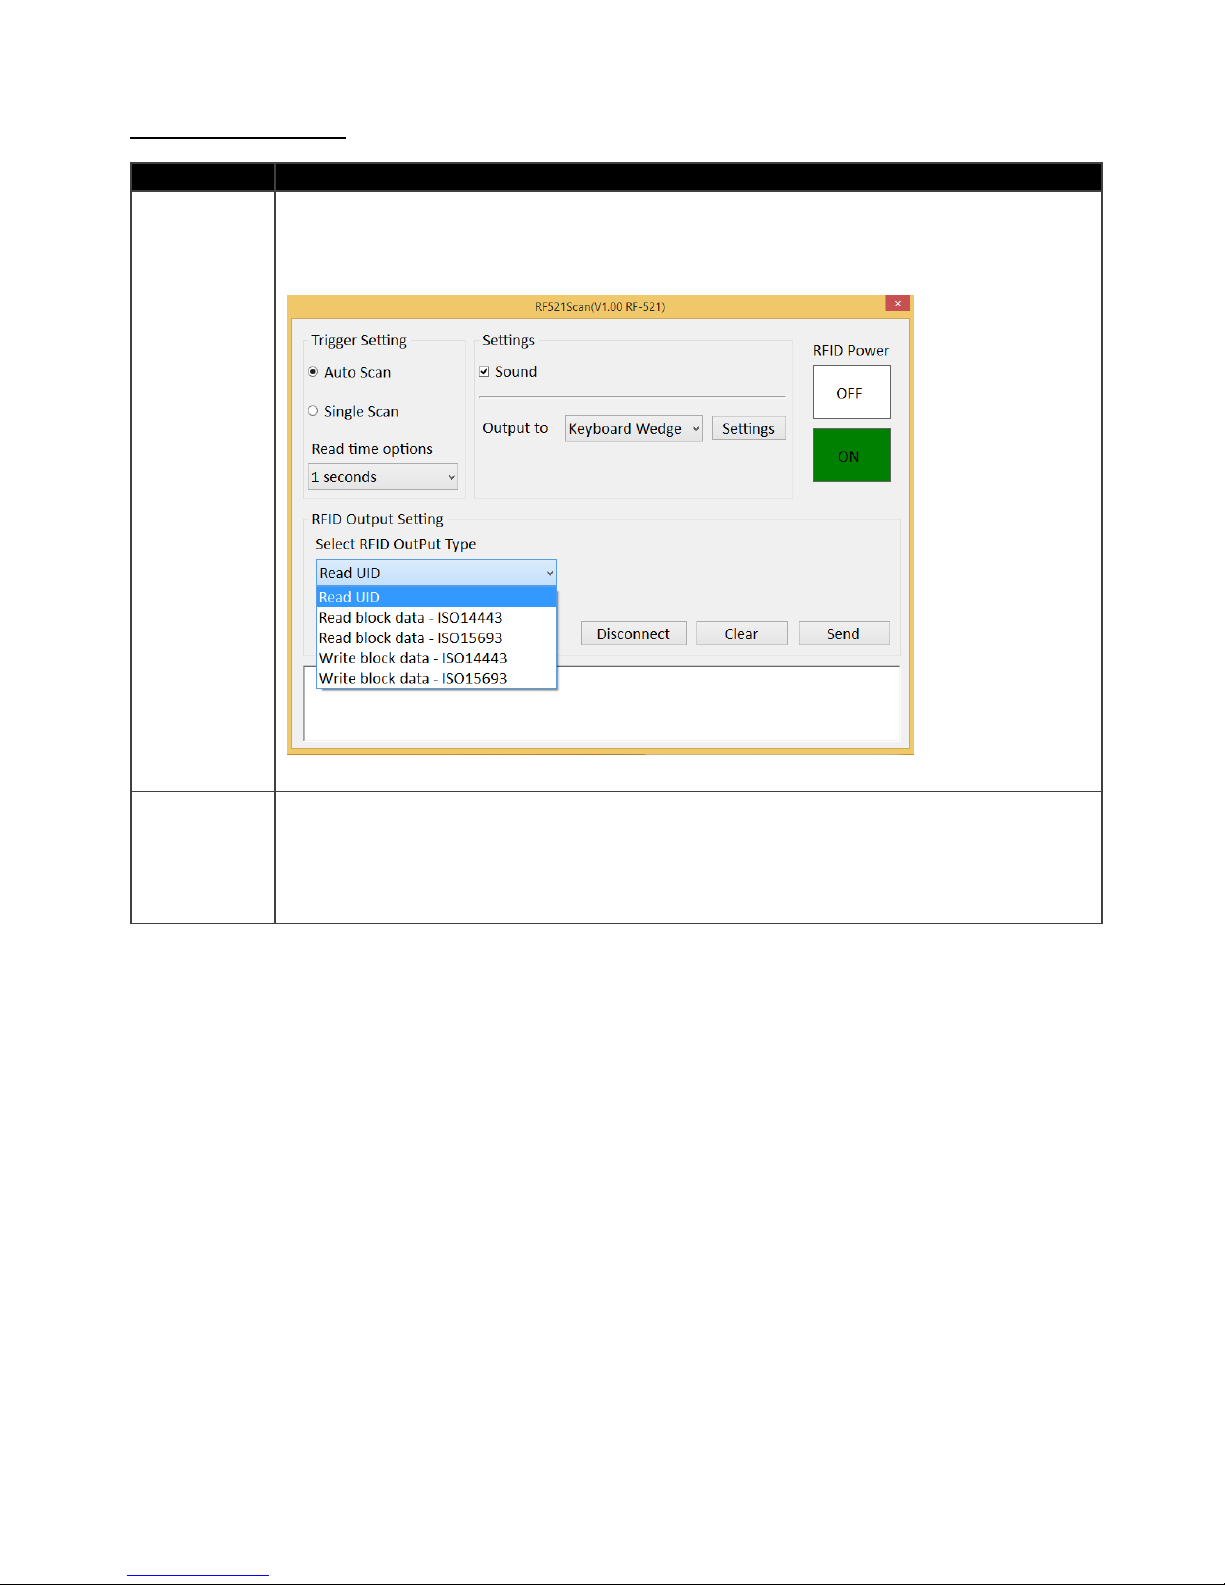
2. Choose “Device ON/OFF” and click on “Ext. Module”, and the setting utility will show up
as below:
3. Tap on the ON button.
4. Check the status color of the ON icon is green.
The RFID icon will show on the hottab after you connect the device well.
Page 53

M800BW User Guide Chapter 4 Quick Access with Hottab
- 52 -
Trigger Setting
Item
Description
Auto
Scan
The default setting for RFID trigger is Auto Scan. Under this setting, the RFID
Reader will always be ready to scan tags.
1. When the RFID tag is detected from RFID antenna, the data will be read
automatically.
2. User can define the RFID scanning frequency from the drop-down menu
shown as below. The frequency can be from 1 second to 9 seconds.
Single
Scan
User can also define the RFID Reader scanning as Single Scan. Under this
setting, the RFID Reader will be triggered only when user click on “Send”.
Page 54

M800BW User Guide Chapter 4 Quick Access with Hottab
- 53 -
Settings
Item
Description
Sound
The Sound check box defines whether a beep sound will come with the data
scanning.
This setting defines the output type of the scanned data. Two options are
available:
Output to
Keyboard Wedge
Under this setting, the data scanned is sent like keyboard data. The scanned
data
open other utility, such as Office Word or Notepad files, for data input.
IMPORTANT: Please notice that the input method should support the
scanned character.
Demo Area
Page 55

M800BW User Guide Chapter 4 Quick Access with Hottab
- 54 -
User can also tap on the Settings button for further details settings.
Prefix User can type in this field to define the characters
BEFORE the data scanned.
Suffix
User can type in this field to define the characters AFTER
the data scanned.
Append Enter
The check box user can defines to append an “Enter”
which is followed by the characters.
Append TAB
The check box user can defines to append an “TAB” which
is followed by the characters.
Regex Filter
Press on “Presets…” button, user can define how many
characters to show after the data scanned.
Replace
User can define specific characters to be replaced with
preferred characters automatically. When the characters
defined in Regex Substitution is scanned, the data will be
replaced with the one filled in Replace with.
Reset to
default
User can remove all the set up and back to default mode.
SDK
For users following SDK for software porting, the scanned data can also be
output with the format needed.
Page 56
M800BW User Guide Chapter 4 Quick Access with Hottab
- 55 -
RFID Output Setting
Item
Description
Select RFID
Output
Type
The default setting for built-in HF RFID Reader is to Read UID. For some
applications, user might need to read or write further block data; the drop-down
menu under this section can do this change.
Disconnect
User can tap on the Disconnect button to stop the connection with built-in HF
RFID reader.
*To recover the connection, please turn off the module from setting UI and then
turn on the module again.
Page 57
M800BW User Guide Chapter 4 Quick Access with Hottab
- 57 -
4.12 Switching Touch Modes
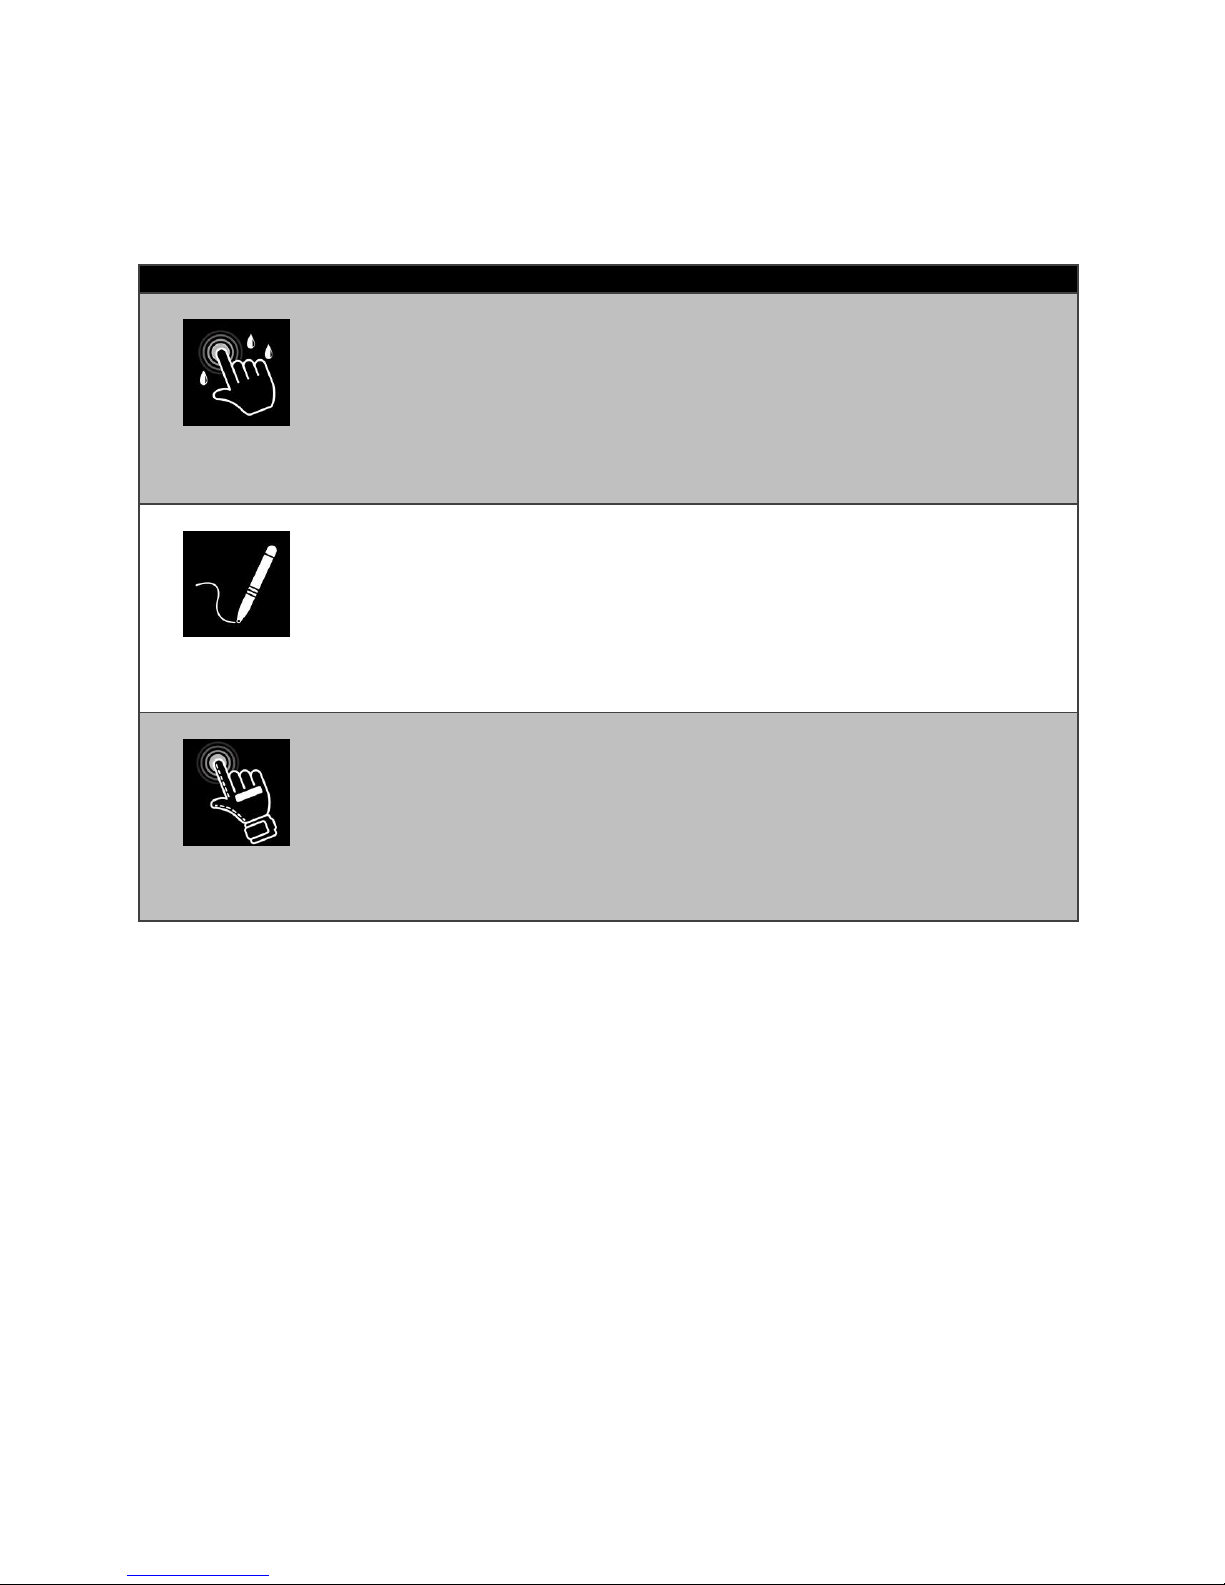
The tablet’s advanced capacitive touchscreen has 3 built-in operating modes, for users to
choose under different usage scenarios:
Mode
Usage Scenario
Hand/Rain
Mode
The Hand/Rain mode is the default operating mode of the touchscreen.
Under this mode, the touchscreen is set to have the ability to reject false
touch inputs while liquid is present on the touchscreen. Once the liquid
is removed from the touchscreen, touch inputs from bare fingertips will
continue to operate.
Stylus Mode
Under the Stylus mode, the touchscreen is set to have the ability to pick
up touch inputs from the fine-tip passive capacitive stylus that is shipped
with the tablet. Touch inputs from bare fingertips will also continue to
operate.
Glove Mode
Under the Glove mode, the touchscreen is set to have the ability to pick
up touch inputs while the user is operating the touchscreen with gloves
on. Touch inputs from bare fingertips will also continue to operate.
There are 2 ways to switch between the different touchscreen operating modes:
1. Via the built-in HotTab utility.
2. Via the programmable function buttons.
Page 58

M800BW User Guide Chapter 4 Quick Access with Hottab
- 58 -
4.12.1 Switch via Built-in HotTab Utility
To switch between the different touchscreen modes via the HotTab utility, perform the following
procedure:
1. Launching HotTab Utility application.
2. Choose “Device” and then click on “Touch Set” icon.
3. The Touch Mode Select utility appears.
4. Under the “Touch Mode”, select the desired touch modes by tapping on the radio button.
5. Now the touchscreen mode would behave as configured.
Page 59

M800BW User Guide Chapter 4 Quick Access with Hottab
- 59 -
4.12.2 Switch via Programmable Function Buttons
To switch between the different touchscreen modes via the programmable function buttons,
make sure the touchscreen mode switching is set to the programmable function buttons first.
1. Launching HotTab Utility application.
2. Tap on the Setting button.
3. Tap on F1 icon.
4. Tap on the Long Press icon.
5. Change the Long Press function to “Touch Mode” as
shown at the picture
Once the touchscreen mode switching is set to the programmable function button, Long Press
on “F1” function button to cycle through the different touchscreen modes. When touchscreen
mode is switched, an icon will temporarily overlay on the lower center of the screen to indicate
current touchscreen mode:
Page 60

M800BW User Guide Chapter 4 Quick Access with Hottab
- 60 -
4.13 Settings
This Hottab menu option provides users information such as PC Information, Battery status, and
also device settings such as power management setting, and function key mappings. Perform
the following procedure to access the Hottab Setting menu:
1. Launching the Hottab Utility application.
2. Tap on the Settings button.
3. Below shows the items listed in Settings Menu.
4.13.1 PC Information
This section provides user device information in regards to
BIOS Version, EC Versions, Hottab Versions, OS Versions, as
well as Unit Serial Number, shown in the picture sample.
4.12.2 Battery Information
This section provides user battery Information.
Main Battery:
The main battery Icon displays the battery level in
percentages (0 to 100%).
Battery Charge Time:
The Battery Information also displays estimated time needed
to fully charge the main battery when AC adapter is plugged
in.
4.13.3 Using the Physical Function Keys (Hotkeys)
The function key mapping menu option allows user to
change the physical function buttons, F1 and F2. Users can
change what application will be launched with short press or
long press of keys.
Page 61

M800BW User Guide Chapter 4 Quick Access with Hottab
- 61 -
To configure function key mapping, perform the
following:
1. Launching the Hottab Utility application.
2. Tap on the Setting button.
3. Tap on function key icon for the corresponding key
that you want to change.
4. At top of utility, it will say “Short Press” or “Long
Press” to indicate what type of press is being
configured
5. You can switch what type of press you want to
configure by tapping on the “Short Press” or “Long
Press” icon at the bottom of the utility window.
6. Pick from list of preset applications by tapping on the
application icons OR customize which application to
execute using the picker.
Using the Custom picker:
1. Tap the icon to reveal browser window
2. Navigate to the desired executable to map to function
key
3. Tap on “Done” to save selection.
To map the function key to another application:
1. Tap on the icon to remove connection to the
original application, and pick again tapping on
icon.
Using the physical function keys:
1. While operating the tablet, click on the physical
function keys to activate functions mapped via the
setup in this section.
Page 62

M800BW User Guide Chapter 5 Frequently Used Settings
- 62 -
Chapter 5: Frequently Used Settings
5.1 Screen Resolution Scaling and Setting
The M800BW’s 1280 x 800 high resolution display is perfect for viewing image, video, or other
applications, however, Windows user interface (icons, buttons, and other user interface
elements) may be too small to read and operate at the default Windows settings. By changing
the display scaling or the display resolution setting of the device, you can adjust the size of the
text and other items on the desktop for optimal viewing. Display scaling is the recommended
method because it has the effect of adjusting user interface element without having to move
away from the optimal resolution setting at 1280 x 800. This section will explain how you can
adjust the built-in windows display scaling setting and resolution setting.
NOTE
Winmate recommends the users set the scaling to this setting for optimal
text and image viewing.
Before proceeding to change the scaling option, make sure any opened
document is saved and close, and all running applications are closed
before proceeding to change the display scaling, because this procedure
requires users to log out of their account to apply display scaling change.
5.1.1 Changing Display Scaling Setting (Recommended)
Perform the following to change display scaling setting:
1. Tap and hold anywhere on the desktop and right-click your mouse and go to” Display
Settings” option as shown below:
2. The following panel will open. Here you can adjust the size of text, apps, and other items
and also change the orientation. To change the resolution settings, scroll down this
window and click on Advanced Display Settings
Page 63

M800BW User Guide Chapter 5 Frequently Used Settings
- 63 -
3. 1280 x 800 is the recommended screen resolution for M800BW.
Page 64

M800BW User Guide Chapter 5 Frequently Used Settings
- 64 -
5.1.2 Using Recovery Wizard to Restore Computer
M800BW tablet computer has a dedicate recovery partition stored on the hard drive of the tablet
to enable quick one-key recovery process. This partition occupies about 11GB of the storage
space, and comes built-in to each M800BW tablet computer.
IMPORTANT
Before starting the recovery process, be sure to backup all user data, as all
data will be lost after the recovery process.
Follow the procedure below to enable quick one-key recovery procedure:
1. Plug-in the AC adapter to M800BW tablet computer. Make sure the tablet computer
stays plugged in to power source during the recovery process.
2. Power on the tablet computer, and when the boot screen shows up, press the Fn1
button (Recovery Key) on the front bezel OR press F6when using an external USB
keyboard to initiate the Recovery Wizard.
3. The following screen shows the Recovery Wizard. Click on “Recovery” button to
continue.
4. A warning message about data loss will show up. Make sure data is backed up before
recovery, and click on “Yes” to continue.
5. Wait till the recovery process to complete. During the recovery process, a command
prompt will show up to indicate the percent of recovery process. After recovery is
completed, and the tablet computer will restart automatically.
Page 65

M800BW User Guide Chapter 6 Troubleshooting
- 65 -
Chapter 6: Troubleshooting
6.1 Basic Troubleshooting
Problem
Solution
The removable battery is not
charging.
Make sure the AC adapter is properly connected, and
that the removable battery is properly inserted.
Nothing appears on the
screen.
The tablet computer may be in sleep mode. Press the
power button to wake up the display.
The brightness level may be too low. Increase
brightness.
The screen suddenly turns
blank and the power indicator
goes off.
Make sure that LED indicator is not powered off in
Hottab.
Make sure the AC adapter is properly connected.
If running on battery power, the battery may be
depleted, charge the battery.
Wireless LAN signal quality is
poor.
The tablet computer may be out of range. Move the
tablet computer closer to the access point or another
wireless LAN device associated with it.
Check if your surroundings have interferences, such
as microwave ovens, cordless phones. Move the
tablet computer away from objects causing
interference.
I cannot connect to another
wireless LAN device.
Make sure that wireless LAN feature is powered on.
Make sure that the SSID setting is the same for every
wireless LAN device in the network.
Restart the tablet computer
Make sure the IP address or subnet mask setting is
correct.
I cannot connect to another
device with Bluetooth.
Make sure that both devices have Bluetooth powered
on (For the Tablet Computer, check Hottab to see if
Bluetooth is powered on).
Make sure that the distance between the two devices
is within 10 meters and there are no walls or large
obstructions between the devices.
Make sure the both devices are powered on and
configured to be discoverable.
Make sure that both devices are compatible.
The GPS application cannot
find my location.
Make sure that GPS is powered on in Hottab.
Make sure that GPS receiver and the location sensor
are enabled in Control Panel.
Page 66

M800BW User Guide Chapter 6 Troubleshooting
- 66 -
The tablet computer may be out of coverage area.
Move your tablet computer outdoors or closer to a
window.
Check if your surroundings have interferences, such
as microwave ovens, cordless phones. Move the
tablet computer away from objects causing
interference.
No sound is produced.
Adjust volume of the tablet computer by pressing on
the volume rocker.
If using an external audio device, make sure that the
cable is properly connected.
I cannot project the tablet
computer display to another
monitor.
Make sure the Graphic driver
is installed.
Make sure the output setting selected is correct.
Barcode scanner does not
emit laser beam and does not
seem to work.
Make sure the Barcode scanner device is enabled in
Hottab utility.
Make sure under Windows, the Barcode Reader is
set to COM 15 port, so that Hottab can trigger the
Barcode Reader hardware.
Barcode Scanner emits laser
beam but does not read
barcode presented to it.
Adjust the distance between barcode scanner of the
device and the barcode being scanned.
Make sure the barcode code type is enabled in the
tablet. To enable/disable a specific barcode code
type, go through the “Barcode Scanner Configuration”
section.
I am having GPS accuracy
issue
When utilizing the GPS function, we recommend
disabling the Barcode Reader in Hottab to reduce
interference.
RFID scanner does not seem
to work.
Make sure under Windows, the RFID hardware is set
to COM 3 port.
Page 67

M800BW User Guide Appendix A Product Specifications
- 67 -
Appendix A: Product Specifications
Hardware Specifications
Model Name
M800BW
Display
Specification
Size
8.0-inch
Resolution
1280 x 800
Brightness
550 nits with optical bonding
Touch
Multi-touch Projected Capacitive with Glove / Rain/
Stylus Modes. Supports Active Stylus.
Contrast Ratio
800:1
Viewing Angle
88/88/88/88
System
Specification
Processor
Intel ® Celeron ® N3160 Braswell 1.6 GHz,
up to 2.24 GHz
System Memory
Default 4GB SODIMM DDR3L-1600 (up to 8GB)
Storage
Default 64GB M.2 MLC SSD (up to 512GB)
Operating
System
Windows 10 IoT Enterprise
Wireless
Communications
WLAN +
Bluetooth
Intel® 802.11 a/b/g/n/ac + Bluetooth 4.0 ( Low Energy)
Combo module
GPS
u-Blox NEO-M8N (Optional for Glonass)
System I/O
Buttons
Indicators
Sensors Security
Audio
2 x Built-in Digital Mic
1 x Speaker
Default I/O
2 x USB 3.0
1 x Micro HDMI
Optional I/O
1 x M12 Connectors - USB signal & Power
Service Window
For WWAN Module:
Micro SD, Micro SIM: Located in battery
compartment
Buttons
1 x Power
2 x Programmable function keys
LED Indicators
4 x LED (Power, Battery, SSD, RF)
Sensors
Light sensor/ G sensor / Gyro / E-compass
Data Capture
Camera
Rear: 8 MP
Front: 2 MP
Page 68

M800BW User Guide Appendix A Specifications
- 68 -
Power
Management
Power input with
IP65
12 or 19V DC
Battery
7.6V typ. 5200mAh Li-ion Battery (2S2P)
Battery Operating
Time
7 hours
Battery Charging
Time
2.5 hours
Mechanical
Specifications
Dimensions
(W x L x H)
228.8 x 165.8 x 34 mm
Weight
1.1 kg
Housing
Plastic housing with fanless design
Environmental
Considerations
Operating Temp.
-20°C ~ +60°C (AC Mode)
-10°C ~ +50°C (Battery Mode)
Storage Temp.
-30°C ~ +60°C
Humidity
5% to 95% RH, non-condensing
IP Proof
IP65
Shock
MIL-STD-810G Method 516.6 Procedure I
Vibration
MIL-STD-810G Method 514.6 Procedure I
Drop
MIL-STD-810G Method 516.6, 4 ft to concrete
ESD
(Contact/Air)
6kV/8kV
Optional Module
WWAN
Data Capture
Fingerprint Scanner (Optional)
RFID Reader (Optional)
1D/ 2D Barcode Reader (Optional)
Smart Card Reader(Optional)
Standards and
Certifications
CE, FCC
*Note: Measured at dimming LCD brightness. Varies depending on the usage conditions, or
when an external device is attached.
***Note: All specifications are subject to change without prior notice.
LTE: BI/B2/B3/B4/B5/B7/B8/B13/B17/B20
WCDMA/HSDPA/HSUPA/HSPA+: 850 MHz/900 MHz/
1700 MH/1900 MHz/2100 MHz GPRS/EDGE
Page 69
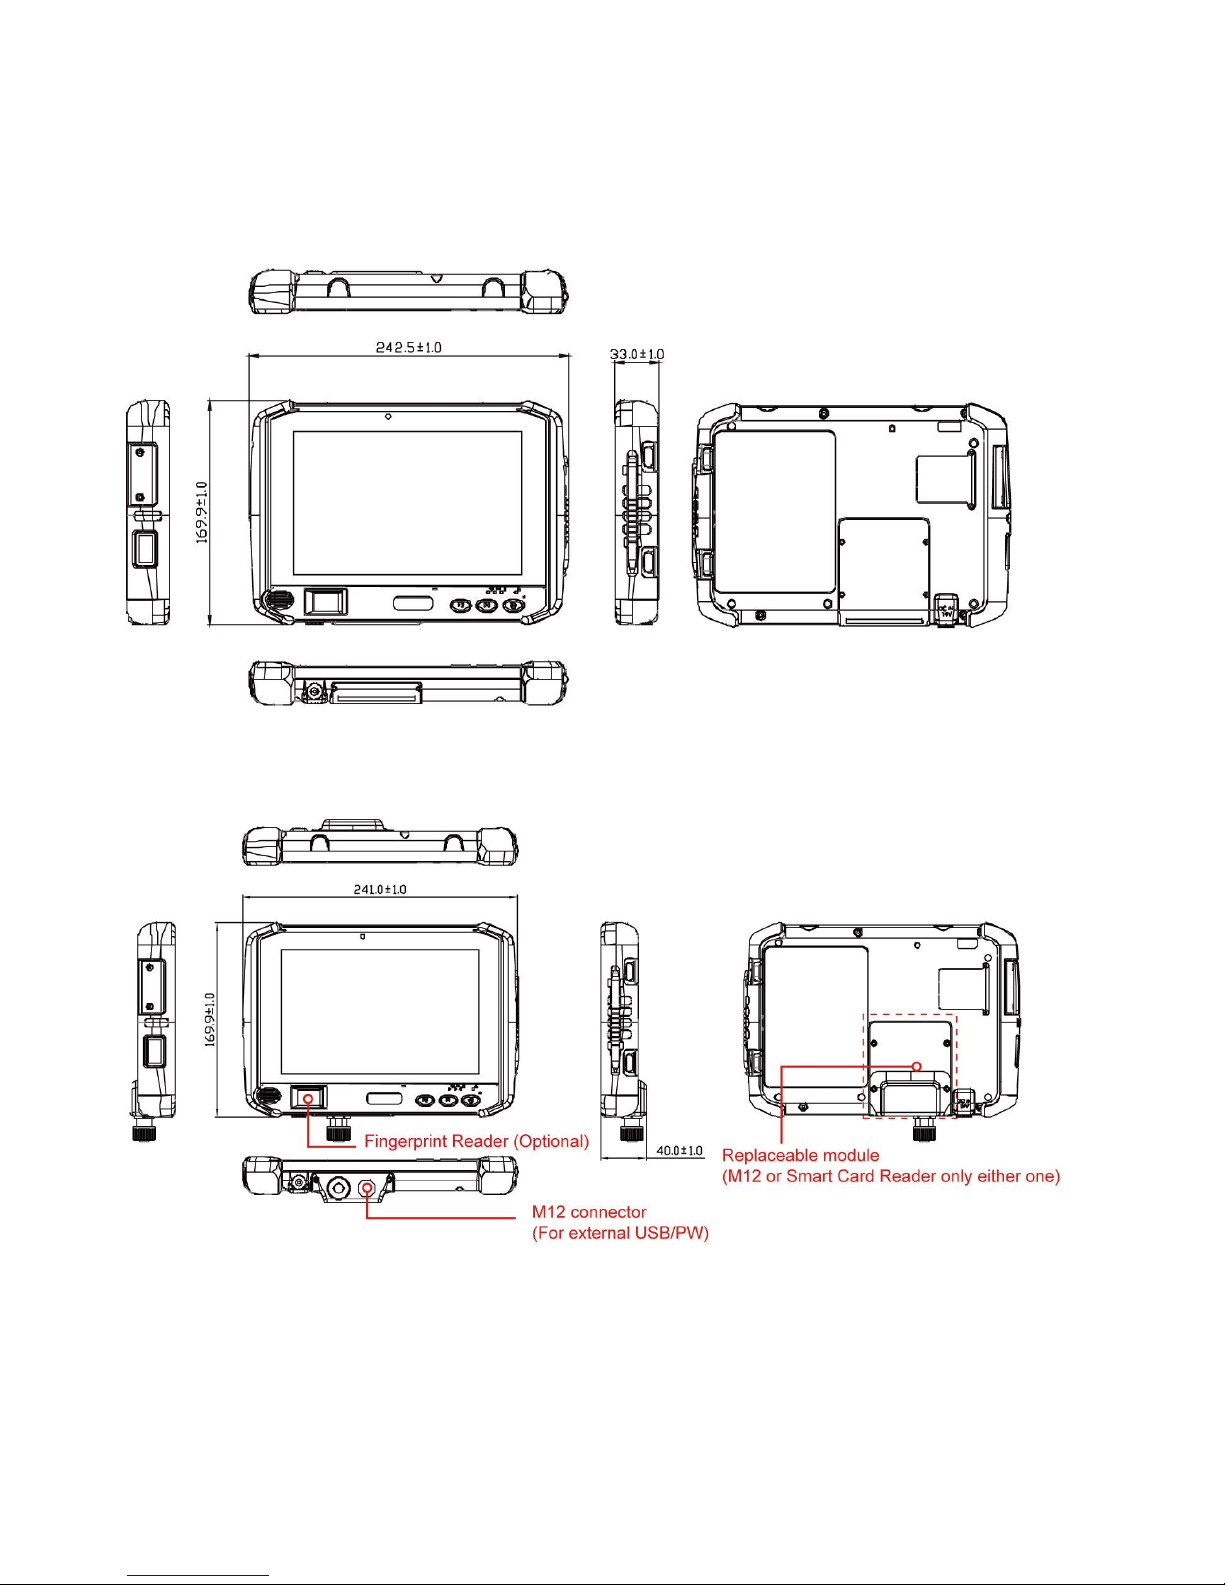
Appendix B Dimensions and Schematics
- 69 -
Appendix B: Dimensions and Schematics
Default Configuration
Optional Configuration
*M12 Connector is a default feature for M800BW-M12.
**M12 Connector and Smart Card Reader only either one.
***Fingerprint Scanner is an optional feature for both M800BW and M800BW-M12.
Page 70

M800BW User Guide Appendix D Accessories
- 70 -
Appendix C: Ordering Information
M800BW Series available in the following configurations:
Model Number
Specifications
M800BW
Standard
M800BW-M12
With M12 Connector
Page 71

M800BW User Guide Appendix D Accessories
- 71 -
Appendix D: Optional Accessories
M800BW Optional Accessory List:
Expansion Box for M800BW-M12
Perfectly connected to Tablet Computer
with M12/ D-sub connector
Extended I/O for M800BW-M12
Wide power voltage input
(9~36V DC) with terminal block
Compatible for vehicle mounting
Compact and slim design
Cable Type I: M12 to D-Sub Male Cable
Length 2m
Connects to M800BW Tablet Computer
Part Number: 98DT00A0000B
Part Number: 94E0121150K0
Part Number: 98DT00A0000B
Part Number: 94E0121150K0
External WiFi Antenna`
Part Number: `39700000000G
Handstrap
Part Number:
External WWAN Antenna`
Part Number: `39700000000H
98K000A0008C
Carry Bag
Part Number:
9B000000010V
(For unique model used)
(For unique model used)
Page 72

M800BW User Guide Appendix D Accessories
- 72 -
Expansion Box for M800BW-12
Model Name: CMP800
Refer to CPM800 User Guide for more details on hardware and installation procedures.
Cable Type I: M12 to D-Sub Male Cable
Length: 2 m
Pin No.
Symbol
Pin No.
Symbol
CN1-3
DET1
CN2-1
DET1
CN1-7
USB_D+
CN2-2
USB_D+
CN1-12
USB_D-
CN2-3
USB_D-
CN1-15
DET2
CN2-6
DET2
CN1-13
USB_GND
CN2-11
USB_GND
CN1-10
+5V
CN2-12
USB_VCC
CN1-5
GND (short)
CN2-4
GND (short)
CN1-8
CN2-5
CN1-11
CN2-10
CN1-1
VCC (short)
CN2-7
VCC (short)
CN1-2
CN2-8
CN1-6
CN2-9
Page 73

M800BW User Guide Appendix D Software Development Kit (SDK)
- 74 -
Appendix E: Software Development Kit (SDK)
Download SDK from Winmate Download Center.
1. Winmate Download Center:
http://www.winmate.com / > Support > Download Center > Rugged Tablet PC > M800BW >
Drivers / Development Kit
Or follow the link:
http://www.winmate.com/DownCenter/DownLoadCenter.asp?DownType=2215
Page 74

Winmate Inc.
9F, No.111-6, Shing-De Rd., San-Chung District,
New Taipei City 24158, Taiwan, R.O.C
Tel: 886-2-8511-0288
Fax: 886-2-8511-0211
Email: [email protected]
Official website: www.winmate.com
 Loading...