

Page 1
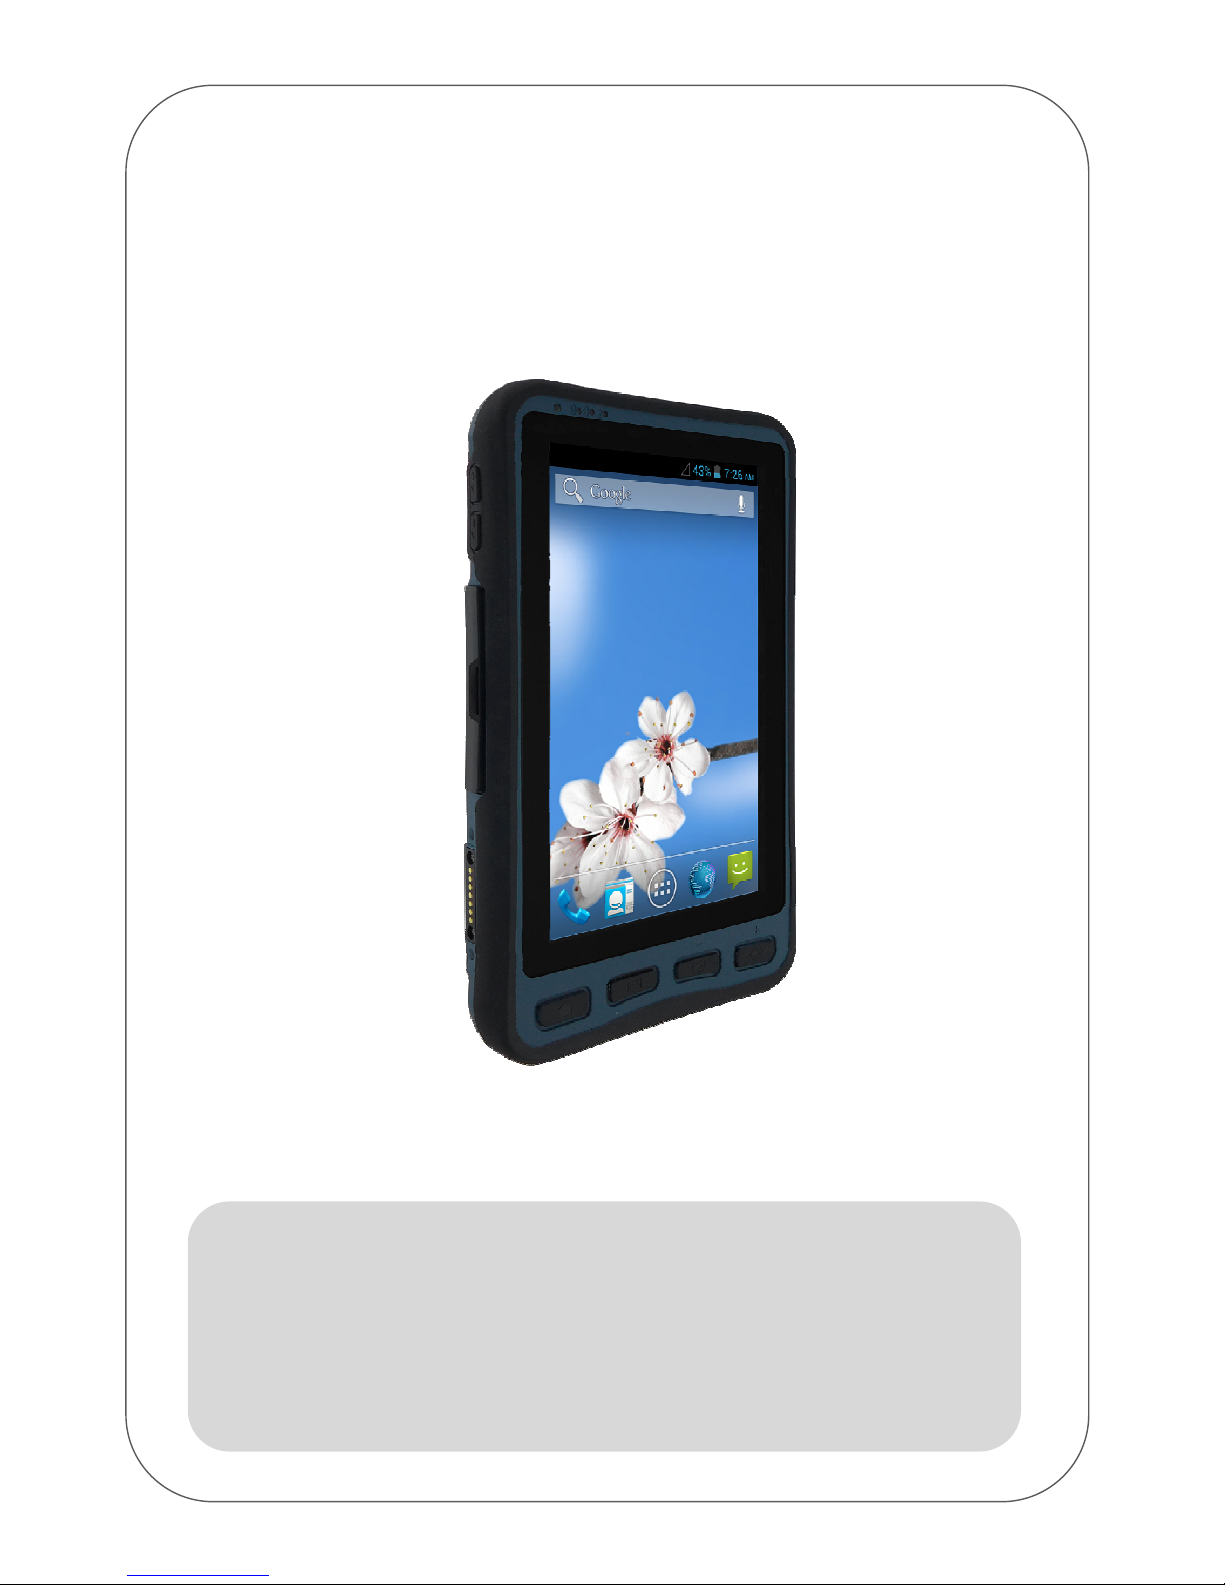
7” Rugged Android Tablet PC
Class 1 Division 2 Edition
User’s Manual
Version 1.0
Nov 2014
Page 2

I 7-inch Rugged Android Tablet PC C1D2 Edition User Guide
Revision History
Version Date Note
1.0 2014.11.25 Initial Release
Page 3

II 7-inch Rugged Android Tablet PC C1D2 Edition User Guide
Table of Content
CHAPTER 1: READ ME FIRST..............................................................................1
S
AFETY INFORMATION
................................................................................................................... 1
H
ANDLING AND MAINTENANCE
.......................................................................................................2
CHAPTER 2: GETTING STARTED........................................................................4
U
NPACKING
..................................................................................................................................4
D
ESCRIPTION OF PARTS
...............................................................................................................5
F
IRST-TIME OPERATION
................................................................................................................. 7
T
URNING ON / OFF
.....................................................................................................................11
CHAPTER 3: USING ANDROID 4.2 OPERATING SYSTEM ...............................12
W
AKE UP THE TABLET
................................................................................................................ 12
U
SING THE TOUCH SCREEN
.........................................................................................................12
U
SING THE HOME SCREEN
..........................................................................................................13
S
TATUS AND NOTIFICATION ICONS
................................................................................................15
U
SING THE ON-SCREEN KEYBOARD
.............................................................................................16
D
ISPLAY SETTING
.......................................................................................................................19
A
UDIO PROFILE SETTING
.............................................................................................................19
L
ANGUAGE & KEYBOARD SETTING
...............................................................................................20
USB D
EBUGGING SETTING
..........................................................................................................22
A
BOUT PHONE
............................................................................................................................22
CHAPTER 4: CONNECTING TO NETWORK AND DEVICES .............................24
C
ONNECTING TO MOBILE NETWORKS
...........................................................................................24
C
ONNECTING TO WI-FI NETWORKS
..............................................................................................24
C
ONNECTING TO BLUETOOTH DEVICES
.........................................................................................25
C
ONNECTING TO COMPUTER VIA
USB..........................................................................................26
CHAPTER 5: USING THE CAMERA....................................................................28
O
PEN CAMERA
...........................................................................................................................28
T
AKE A PICTURE
.........................................................................................................................28
V
IEWING PICTURES
.....................................................................................................................29
S
HOOT A VIDEO
..........................................................................................................................29
O
PENING THE GALLERY
...............................................................................................................30
CHAPTER 6: ACCESSORIES..............................................................................31
Page 4
7-inch Rugged Android Tablet PC C1D2 Edition User Guide 1
Chapter 1: Read Me First
Safety Information
Follow and adhere to all warnings and
instructions in this manual. For your safety,
please read all safety and operating
instructions before using the product. Keep
this manual for future reference.
Precaution on
Battery Pack
Do Not Expose the Battery Pack to
Excessive Heat, or Extreme Heat (Near
Fire, in Direct Sunlight for example)
Generation of heat, ignition or rupture may
result
Do Not Disassemble, Modify, or Insert
Sharp Objects Into the Battery Pack.
Electrolyte leakage, generation of heat,
ignition or rupture may result.
Do Not Short the Positive (+) and Negative
(-) Terminals of the Battery. Generation of
heat, ignition or rupture may result. When
carrying or storing the device, do not place
the battery pack together with articles that
may contact electricity.
Do Not Apply Shocks to the Battery by
Dropping It or Applying Strong Pressure to
It. Electrolyte leakage, generation of heat,
ignition or rupture of battery may occur.
Do Not Charge the Battery Other Than
Methods Those Specified In This Manual.
If the battery is not charged using one of
the specified methods, electrolyte leakage,
generation of heat, ignition or rupture may
result.
When the Battery Pack Has Deteriorated,
Replace It with a New Battery. Continued
use of a damaged battery pack may result
in heat generation, ignition or battery
rupture.
Do Not Use the Battery Pack With Any
Other Products. The battery pack is
rechargeable and is only designed for this
specific product. If it is used with a product
other than the specified product, electrolyte
leakage, generation of heat, ignition or
rupture may result.
Do Not Use This Product With Battery
Other Than the One Specified.
GPS Safety
Operation
Global positioning system (GPS) hardware,
GPS operating software, or other GPSrelated aspects of equipment covered
under this category have not been tested
for performance or reliability. This
equipment has only been tested for the
explosion, fire, shock and casualty hazards
required by the applicable hazardous
locations standards. Certification does not
cover the performance or reliability of any
GPS hardware, GPS operating software, or
other GPS-related aspects of equipment
covered under this category. UL makes no
representations, warranties or certifications
whatsoever regarding the performance or
reliability of any GPS-related functions of
equipment covered under this category.
General Product
Safety
This product should not be used near
water such as bathtubs, sinks, swimming
pools, wet basement, etc.
Do not block any ventilation openings. Do
not place the product against a wall or in
an enclosed space as doing so might
impede the flow of cooling air.
Page 5
2 7-inch Rugged Android Tablet PC C1D2 Edition User Guide
Do not place the product near any heat
sources such as radiators, warm air
intakes, stoves or other heat-generating
devices (including amplifiers or other heat
producing equipment).
Do not disregard the safety that a polarized
or grounded connection can provide. A
polarized connection consists of two plugs,
one of which is larger than the other. A
grounded connection has two blades and a
third one that is grounded. If the main plug
provided cannot be inserted into your
outlet, consult an electrician to replace
your obsolete outlet.
Protect the power cord from being crushed
or pinched, particularly in the area of the
plugs, any receptacles used, and the point
of exit from the apparatus. Do not break off
the ground pin of the power cord.
Use only accessories specified by the
manufacturer.
Use only with its transport carriage, stand,
tripod, console or table specified by the
manufacturer or sold with the product.
When using a carriage, move the carriage
assembly with the product carefully to
avoid damage from falling over.
Unplug this apparatus during lightning
storms or when it is not being used for long
periods.
Refer all servicing to qualified service
personnel. A technical intervention is
required when the apparatus has been
damaged in any way, for example if the
power cord or plug is damaged, liquid has
been spilled or objects have fallen inside
the unit, if the product has been exposed to
rain or moisture, if it does not operate
normally or if it has been dropped.
Handling and Maintenance
Follow and adhere to all warnings and
instructions in this manual. For you’re the
longevity of the product usage, please read
all operating instructions before using the
product. Keep this manual for future
reference.
General Guideline
Keep the product at least 13 cm (5 inches)
away from electrical appliances that can
generate a strong magnetic field such as
TV, refrigerator, motor, or a large audio
speaker.
Do not place heavy objects on top of the
tablet computer as this may damage the
display.
The screen surface can be easily
scratched. Use with care. Do not use paper
towels to clean the display but use the
included cleaning cloth. Avoid touching it
with a pen or pencil.
To maximize the life of the backlight in the
display, allow backlight to automatically
turn off as a result of power management.
Avoid using a screen saver or other
software that prevents the power
management from working.
Cleaning Guideline
Use a soft cloth moistened with water or a
non-alkaline detergent to wipe the exterior
of the product.
Gently wipe the display with a soft, lint-free
cloth. Do not use alcohol or detergent on
the product.
Touchscreen
Guideline
Use your finger or the stylus on the display.
Using sharp or metallic object may cause
scratches and damage the display, thereby
causing errors.
Page 6
7-inch Rugged Android Tablet PC C1D2 Edition User Guide 3
Use a soft cloth to remove dirt on the
display. The touchscreen surface has a
special protective coating that prevents dirt
from sticking to it. Not using a soft cloth
may cause damage to the special
protective coating on the touchscreen
surface. To clean off hard to remove dirt,
blow some steam on the particular area
and gently wipe away using a soft cloth.
Do not use excessive force on the display.
Avoid placing objects on top of the display
as this may cause the glass to break.
When there is a noticeable discrepancy in
the operation of the touchscreen function
(your touch does not correlate to the
proper location on the screen), recalibrate
the touchscreen display.
Page 7
4 7-inch Rugged Android Tablet PC C1D2 Edition User Guide
Chapter 2: Getting Started
Congratulations on purchasing this Android rugged Tablet Computer. The rugged design allows
you to use it in harsh outdoor environments.
This chapter tells you step by step how to get the Tablet Computer up and running. You will find
instructions for the following procedures:
• Unpacking
• Description of Parts
• First Time Operations
• Turning On/Off
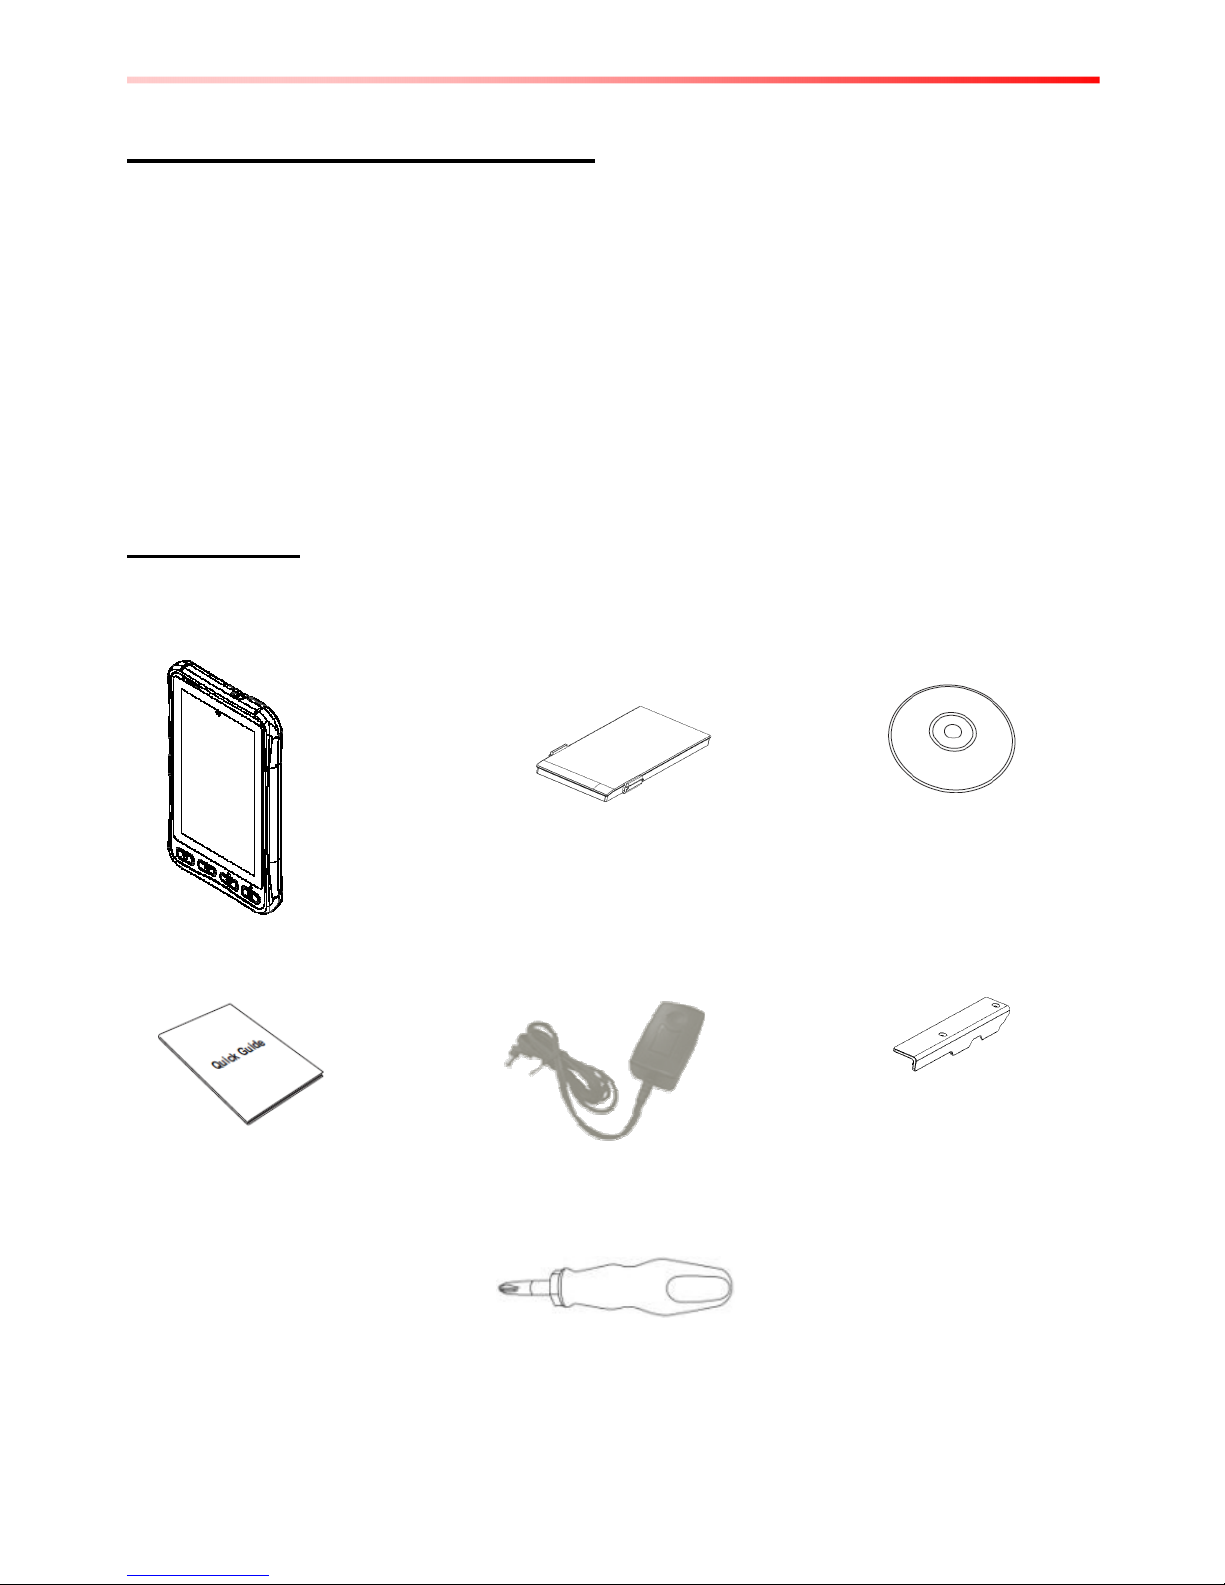
Unpacking
Check and identify the supplied accessories:
• Tablet Computer
• Standard Battery
• Driver CD
• Quick Start Guide
• Universal Adapter
• I/O Protection Cover
• Screw driver tool
Page 8
7-inch Rugged Android Tablet PC C1D2 Edition User Guide 5
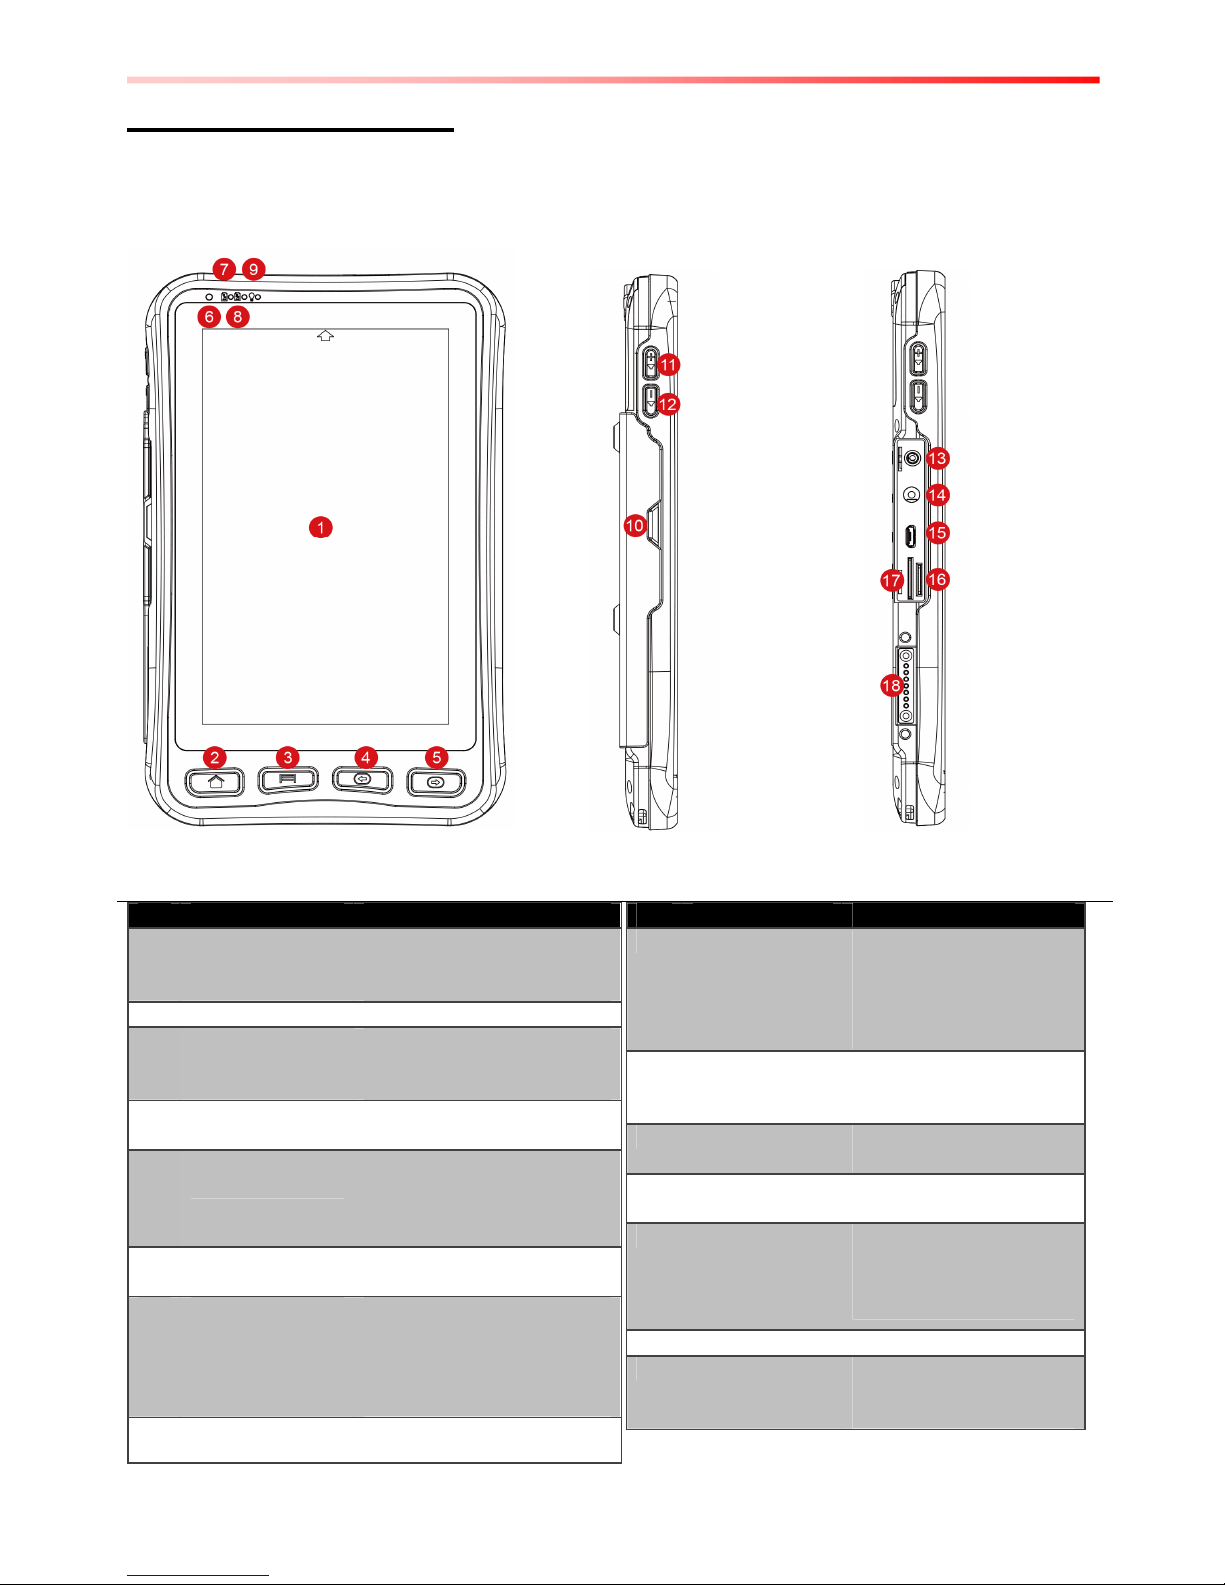
Description Of Parts
Front :
Left :
(with I/O protection
cover)
(without I/O protection
cover
No Item Description
1
7” Touch Screen Displays and act as one of
the inputs for the Tablet
Computer
2
Home Button Return to home screen
3
Menu Button
Open a list of actions that
user can do on the current
screen
4
Return Button Return to the previous
screen
5
Trigger Button If the device was equipped
with scanners, this button
can be function as a
trigger button
6
Light sensor To control screen
brightness
7 /
8
Battery Status Green light : Indicates the
device is charging
Red light : Indicates low
battery
No Item Description
9
Power Mode
Status
Blue light : indicates the
Power On
No light : indicates no
Power
10
I/O Protection
Cover
Use to prevent I/O
access by user in
Hazardous Location
11
Volume Up Increase the volume of
music or radio
12
Volume Down Decrease the volume of
music or radio
13
Audio Jack To connect a set of
headphones, external
speakers, or an audio
device
14
Power Jack DC-IN power input jack
15
USB ports To connect USB flash
drive 2.0 / mouse /
printer / keyboard, etc
Page 9
6 7-inch Rugged Android Tablet PC C1D2 Edition User Guide
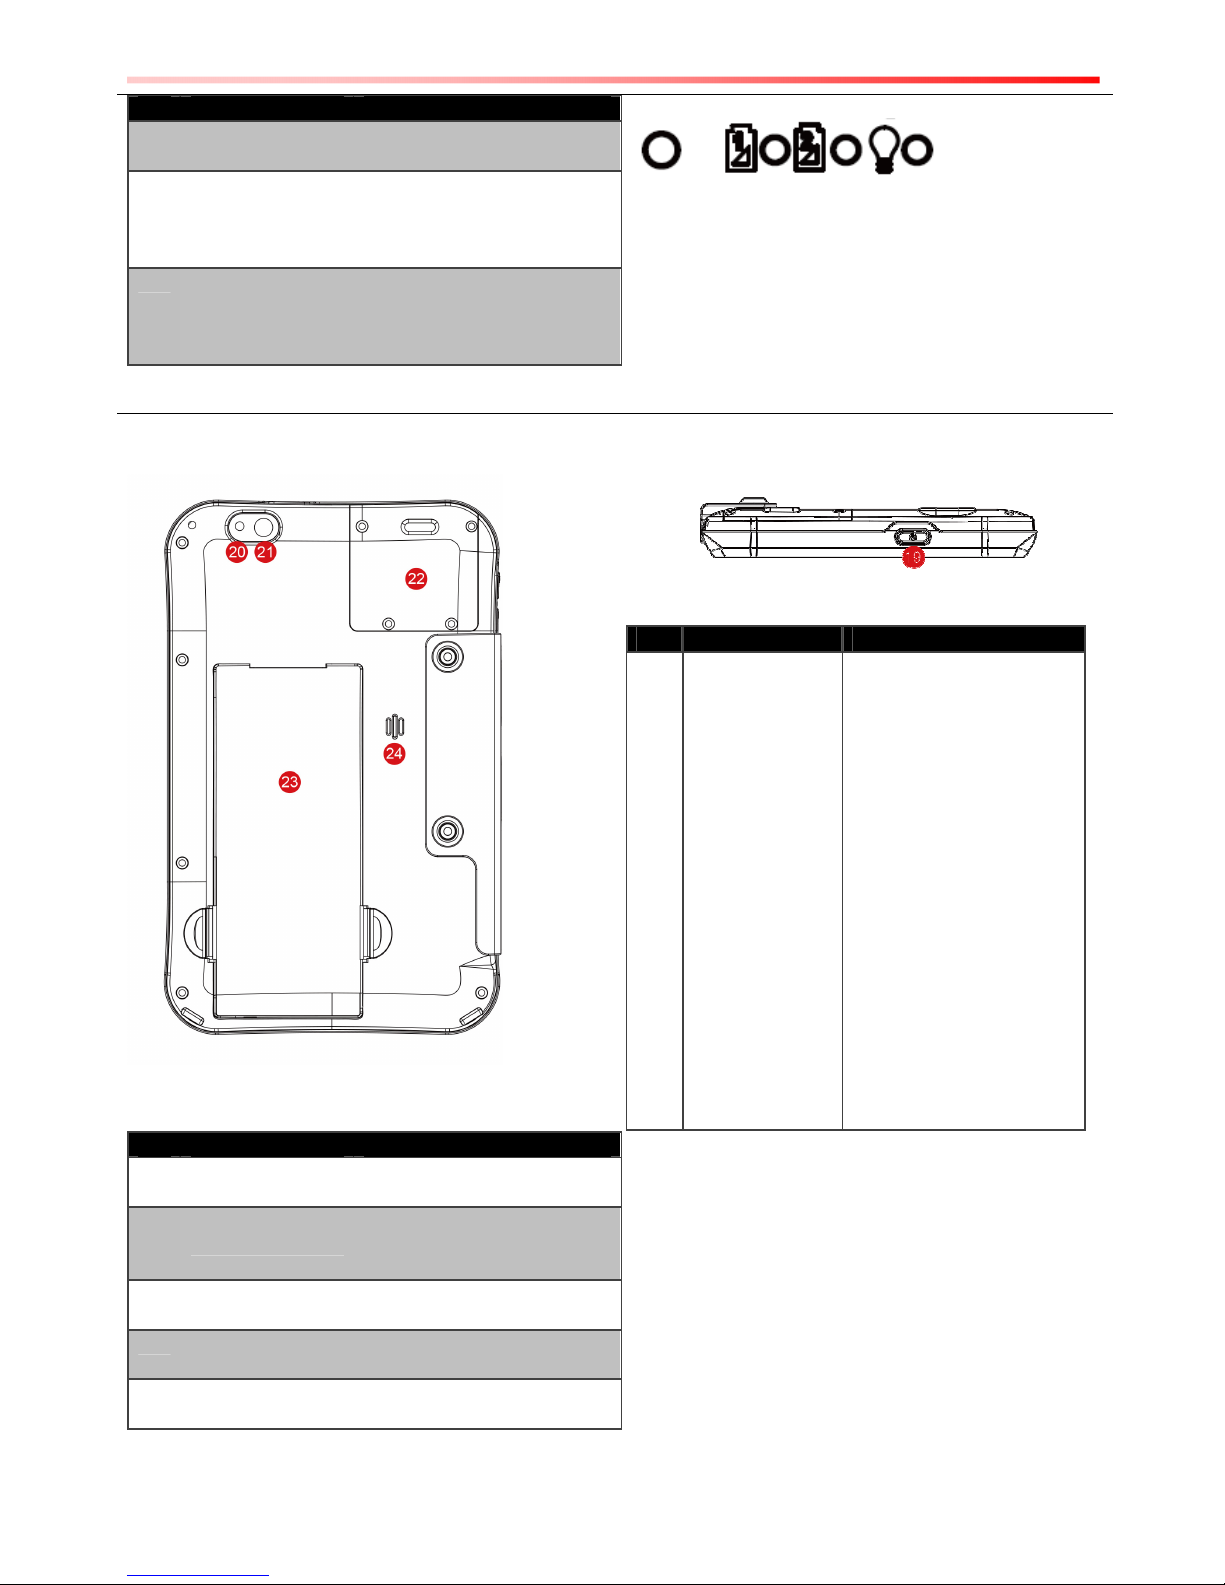
No Item Description
16
MicroSD Card
Reader
Memory card reader port
for MicroSD Card
17
3G Module/SIM
card slot
Service window to insert
Micro SIM card. Also
provide access to 3G
Module.
18
Docking
connector
Port to docking solutions
such as vehicle docking to
provide power and
external antenna
Front LED Indicators Detail :
Rear :
Top :
No Item Description
19
Power Button
Press and hold the button
for 3 seconds to turn on
M700DM4
Press to turn on/off the
screen
Press and hold the button
for 3 seconds to select:
• Power Off -- to turn off
the M700DM4
press button for 8 Sec to
force system power off
• Airplane mode – to
disable all wireless
connection
• Restart – to restart the
device
No Item Description
20
LED auxiliary
light
To provide lighting while
using camera
21
Rear Camera
5MP Autofocus Camera.
Captures photos and
videos.
22
Optional
Barcode
Barcode Scanner for
reading of 1D/2D barcode.
23
Battery
Replaceable batter
3.7V 5300mAh battery
24
Speaker Provide audio output for
music and video
Page 10
7-inch Rugged Android Tablet PC C1D2 Edition User Guide 7
First-time Operation
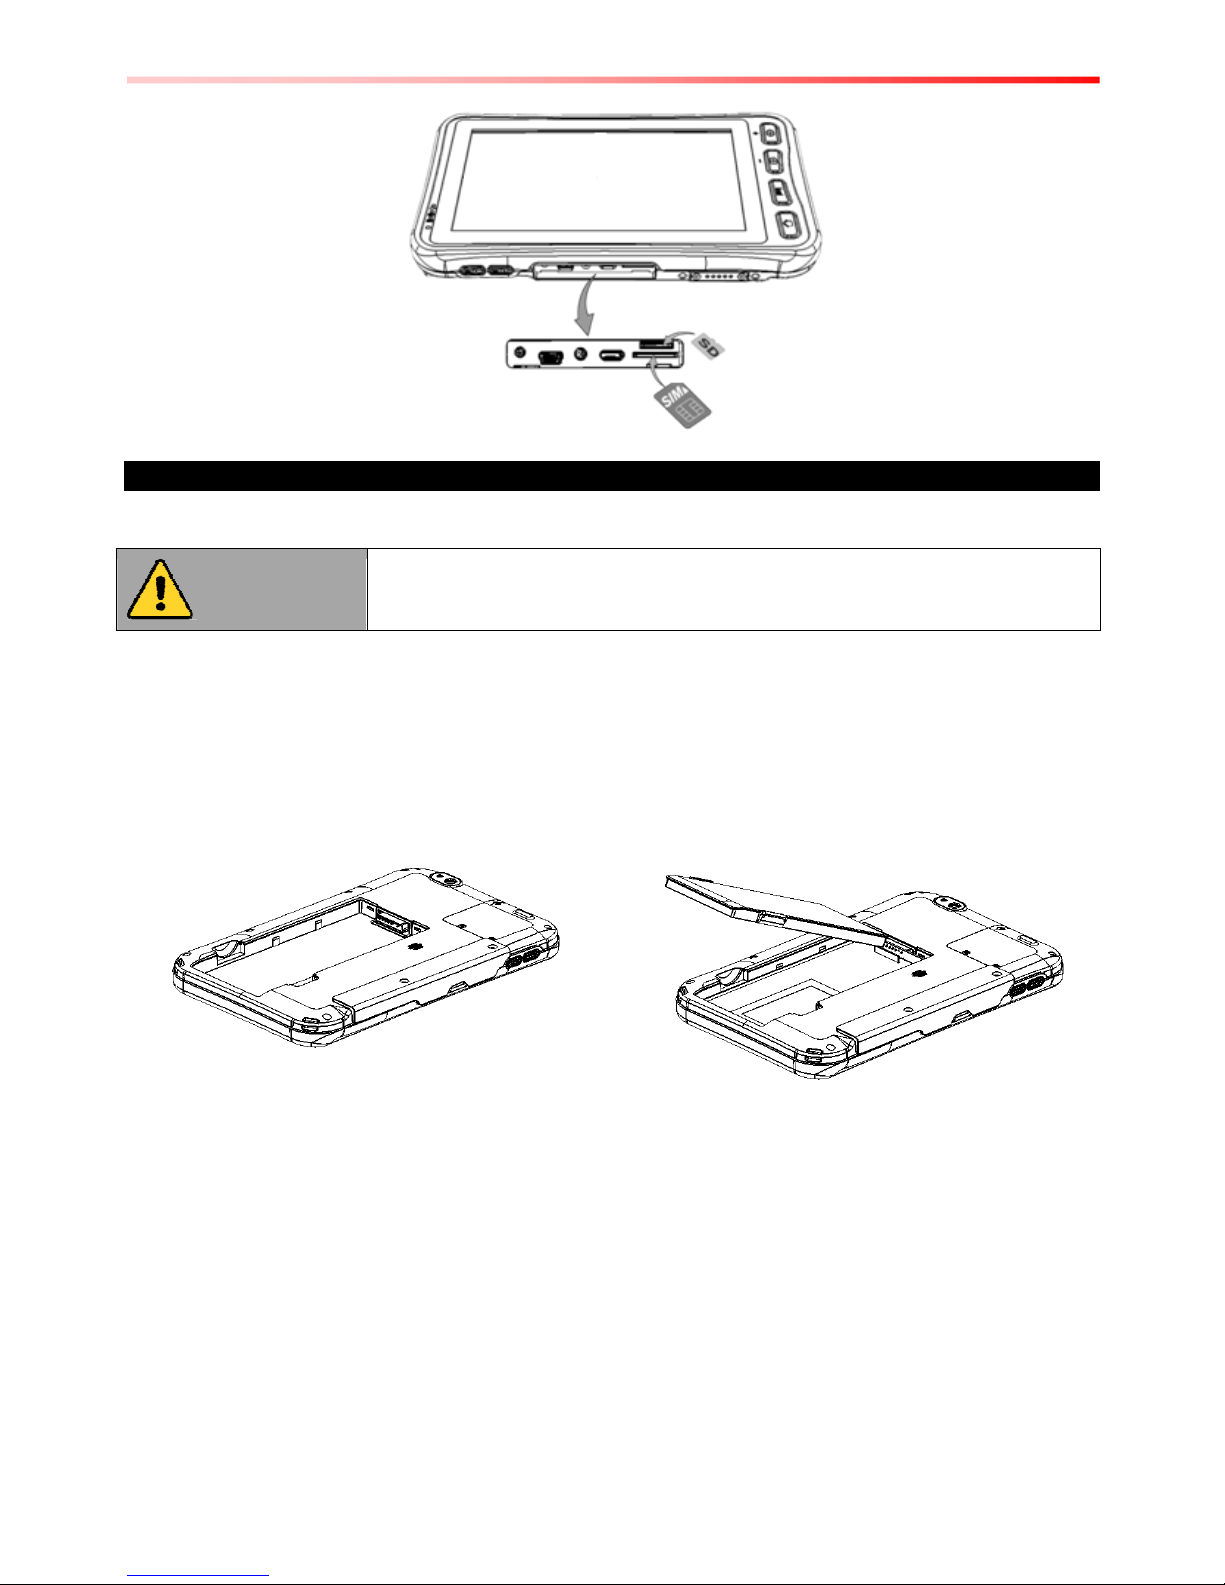
Insert SIM card (For Optional 3G/4G LTE equipped device)
The Tablet Computer supports data connection using 3G/4G LTE SIM cards and fits Micro-SIM
card. (Note: 3G/4G LTE feature is optional). Perform the following to install the SIM card to your
Tablet Computer:
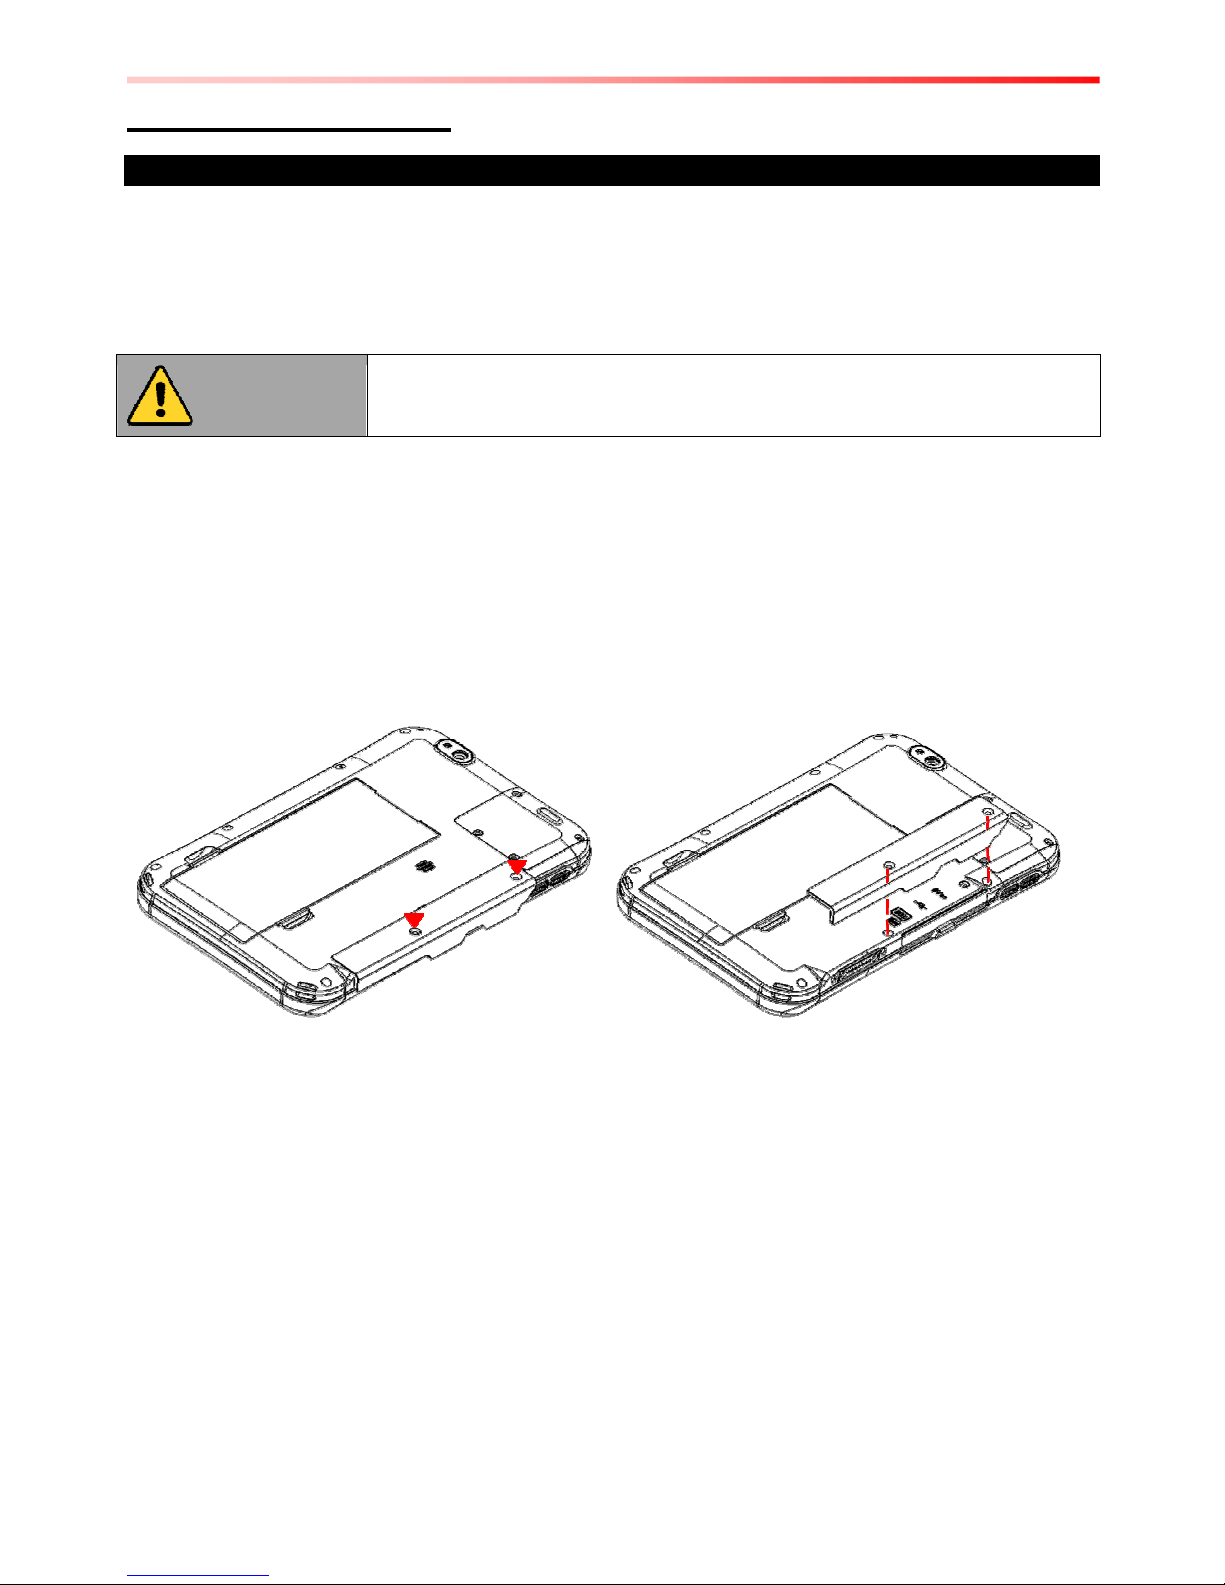
I. Removing protective I/O Cover
Caution
•
Please perform this action in the safe zone
Perform the following to remove the protective I/O Cover:
1. Turn the tablet computer over, back facing up
2. Remove the protective I/O Cover on the side by unscrewing the two screws
3. Remove the screw that is securing the protective I/O Cover
4. Carefully lift the protective I/O Cover
II. Inserting SIM card
1. Place the M700DM4 facing up and then locate the protective rubber bumper
2. Open the protective rubbed bumper
3. Locate the SD and SIM Card as follows
4. Insert the SIM card (with the gold parts facing up and cut-off corner facing out) and push it
in the direction of the arrow as shown in the figure
5. Push the SD card holder in the direction of the arrow to insert it.
Page 11
8 7-inch Rugged Android Tablet PC C1D2 Edition User Guide
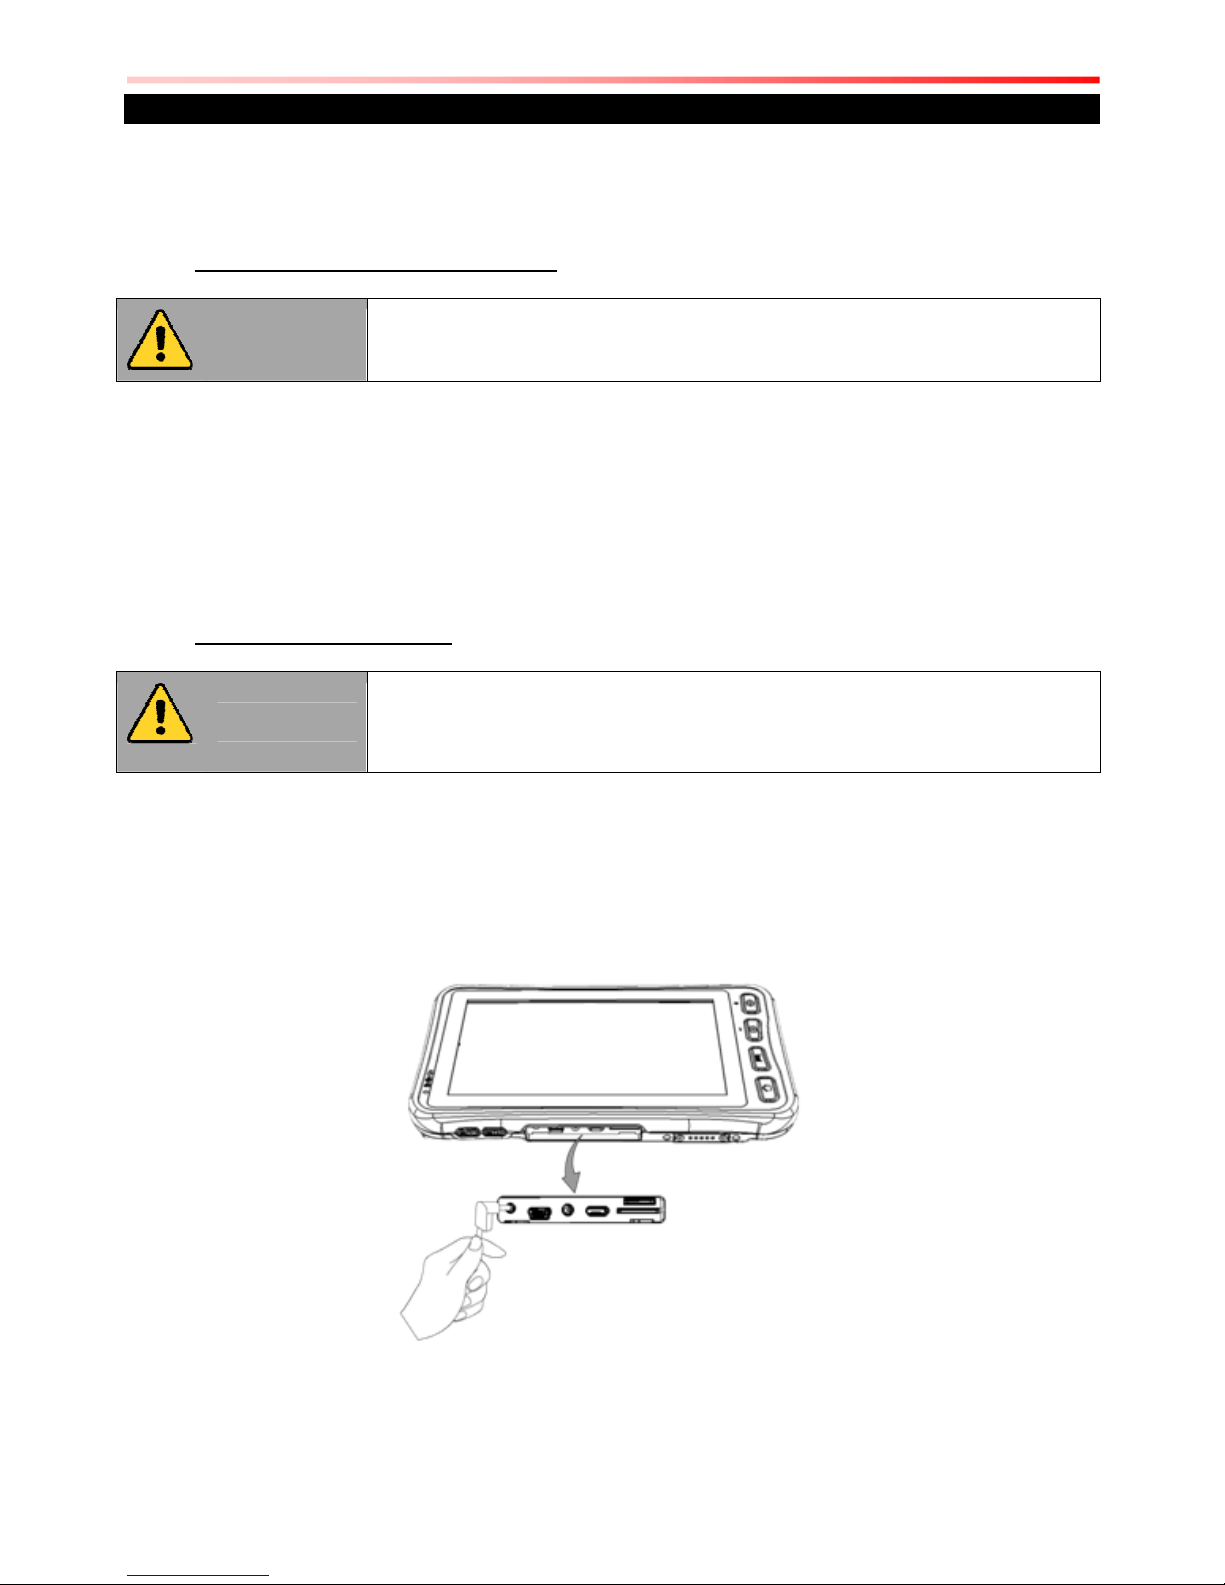
Inserting Battery Pack
To insert the included standard battery pack into the Tablet Computer:
Caution
•
Please perform this action in the safe zone
1. Disconnect any cords connected to the tablet computer.
2. Turn the tablet computer over, back facing up.
3. Insert the battery on the connector-pins side first, and then lower the battery into the
battery compartment. Continue to hold the Battery Locker before battery is fully inserted.
4. Make sure the battery is completely lowered into the compartment before letting go the
Battery Locker. Battery will be flat against the housing once fully inserted
Removing the Battery Pack
1. Shut down the tablet computer (or put it to sleep). Disconnect any cords connected to the
computer.
2. Turn the tablet computer over, back facing up.
3. Locate the Battery Lock and push it to the “Unlocked” position.
4. Pull back and hold.
5. Lift the battery out using the opening on side of battery compartment.
Page 12
7-inch Rugged Android Tablet PC C1D2 Edition User Guide 9
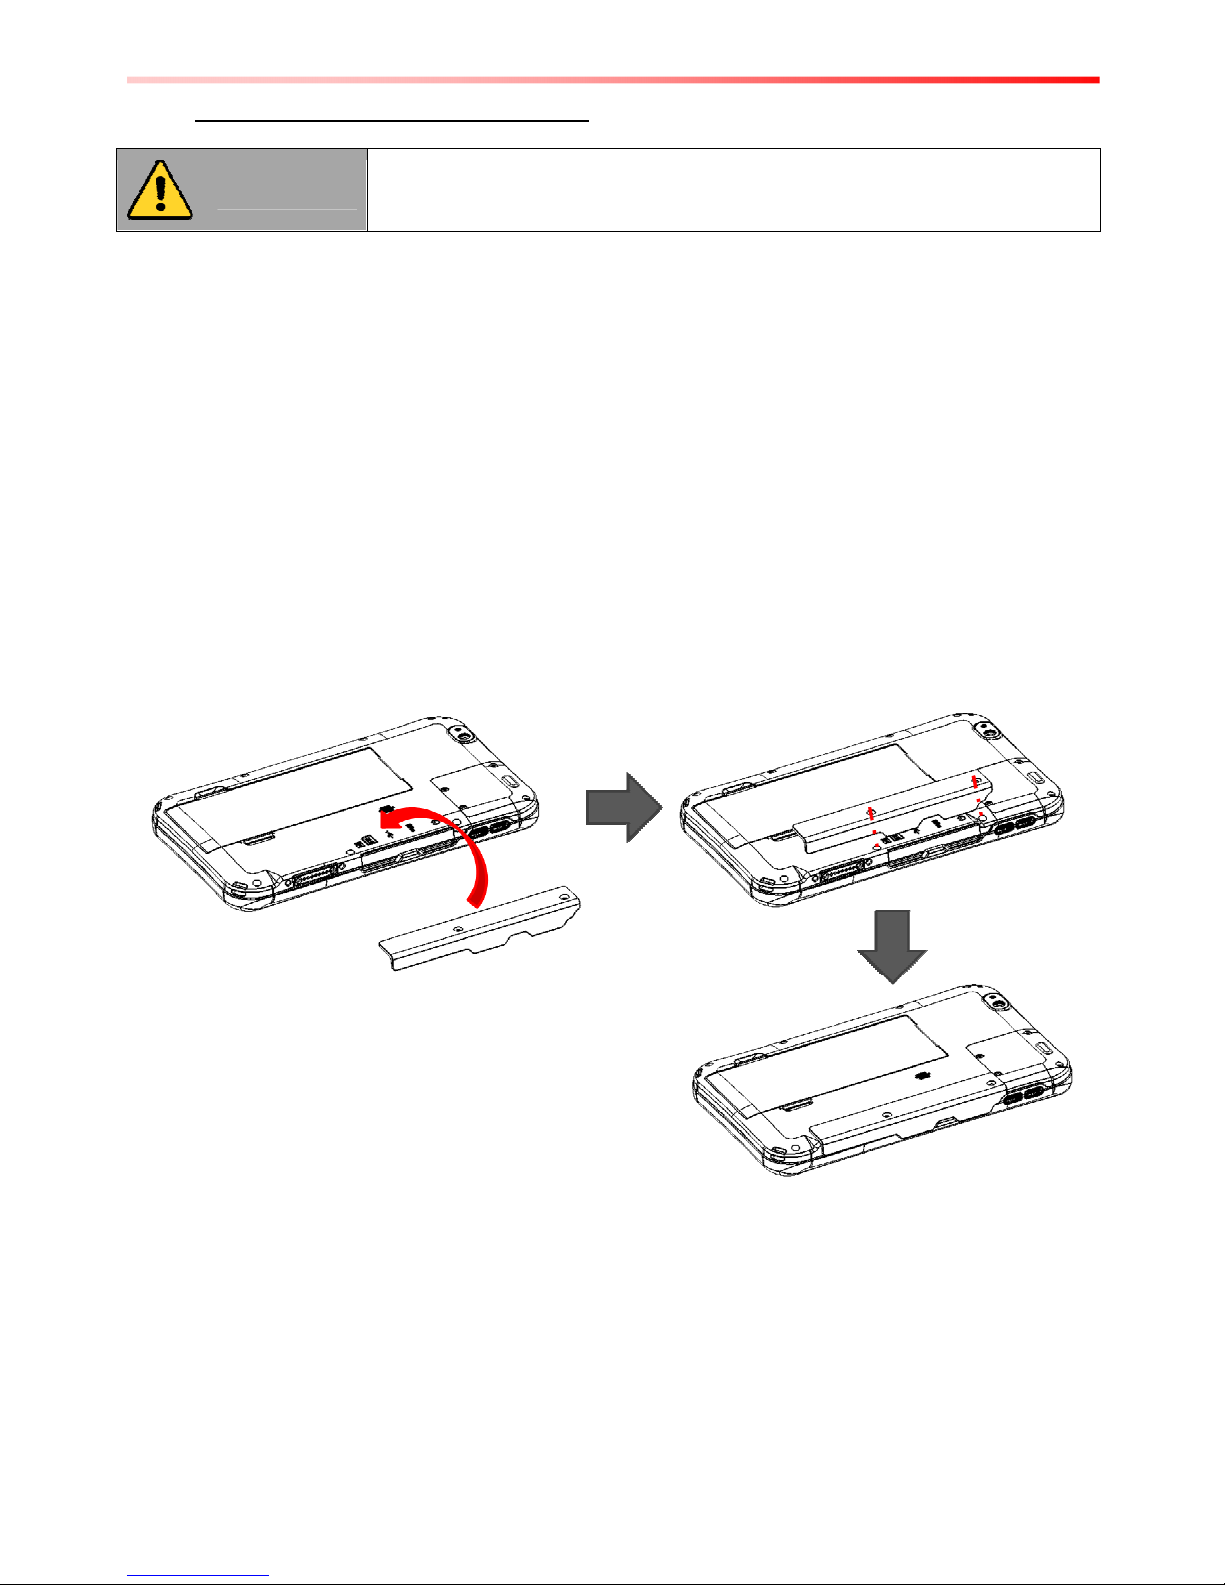
Connecting to Power Supply
The Tablet Computer operates either on external adapter or internal battery power. In this C1D2
version, the I/O connector is only accessible by tooling (screwdriver). To connect the tablet
computer to AC Power, user needs to remove the I/O Cover.
I. Removing protective I/O Cover
Caution
•
Please remove the I/O cover in the safe zone
Perform the following to remove the protective I/O Cover:
1. Turn the tablet computer over, back facing up
2. Remove the protective I/O Cover on the side by unscrewing the two screws
3. Remove the screw that is securing the protective I/O Cover
4. Carefully lift the protective I/O Cover
II. Connecting AC Power:
Caution
•
Use only the AC adapter included with your Tablet Computer. Using
other AC adapters may damage the Tablet Computer and the Battery.
•
Please perform this action in safe zone
Perform the following to connect the Tablet computer to AC Power:
1. On the side of the Tablet computer, lift the I/O protective cover by pulling on the latch
2. Plug the AC adapter into the Power Jack of the tablet computer.
3. Finally, Plug the AC adapter power cord into the electrical outlet.
When the AC Adapter is connected, the battery pack starts charging. The battery LED indicator
on the tablet computer would show different states. Please refer to description of LED indicator
on Description of Parts.
Page 13
10 7-inch Rugged Android Tablet PC C1D2 Edition User Guide
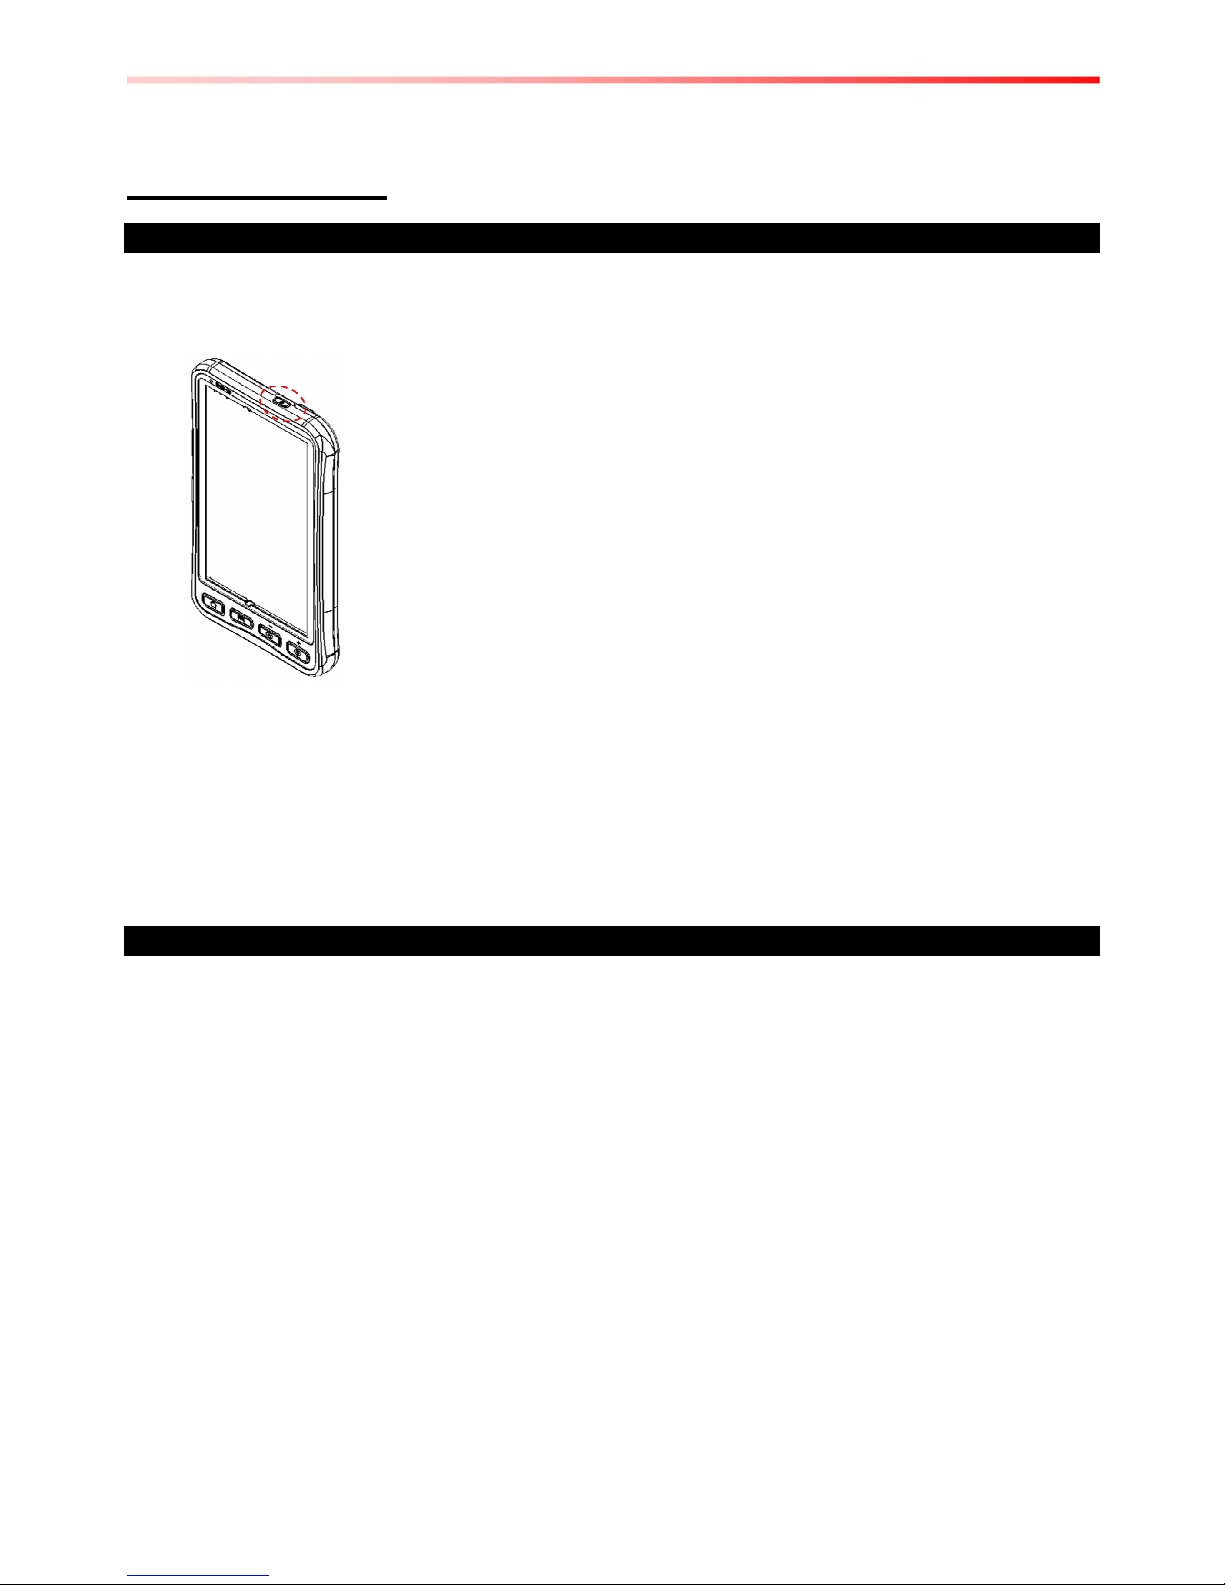
III. Reinstalling protective I/O Cover:
Caution
•
Please perform this action in the safe zone
When the LED indicator turns green, this indicates the device is fully charged and User needs to
perform the following to reinstall the I/O Cover:
1. Turn the tablet computer over, back facing up
2. Reposition the protective rubber bumper on the side
3. Prepare the protective I/O cover
Note: User can also use protective I/O Covers for device deployment in the safe zone; perform
the following to install the protective I/O Covers:
1. Place the protective mounting plate into the inset of the protective I/O seal
2. Insert the two screws into the plate, making sure not to over tighten them
3. Make sure the I/O seal is properly aligned and the port is correctly sealed
Page 14
7-inch Rugged Android Tablet PC C1D2 Edition User Guide 11
Turning On / Off
Turning On
1. Place the device on a flat and stable surface or hold it
2. Make sure the device is either connected to AC power or to the battery pack with power
3. Press and hold the power button for 3 seconds, located on the top part of the unit
Note:
• Do not press the power switch repeatedly.
• Do not perform the following operations until the hard drive indicator turns off
o Connecting or disconnecting the AC adapter
o Pressing the power switch
o Touching the tablet buttons, screen, or external keyboard/mouse
Turning Off
Perform the following procedure to shutdown the Tablet Computer:
1. Make sure you have closed any programs that are open on the Desktop.
2. To turn off the device, press and hold the power button until the phone options menu
appears, tap the Power off.
3. User can also use the Phone options menu to put the device into silent or airplane mode,
see features table.
4. Wait for Tablet Computer to power off.
Note:
• The computer will forcefully be turned off if the power switch is pressed and held for six
seconds or longer.
Page 15
12 7-inch Rugged Android Tablet PC C1D2 Edition User Guide
Chapter 3: Using Android 4.2 Operating System
This section details how to use Android 4.2 operating system on the tablet for the first time.
Wake Up the Tablet
If you do not use the tablet for a while, the screen dims and then darkens to conserve the battery.
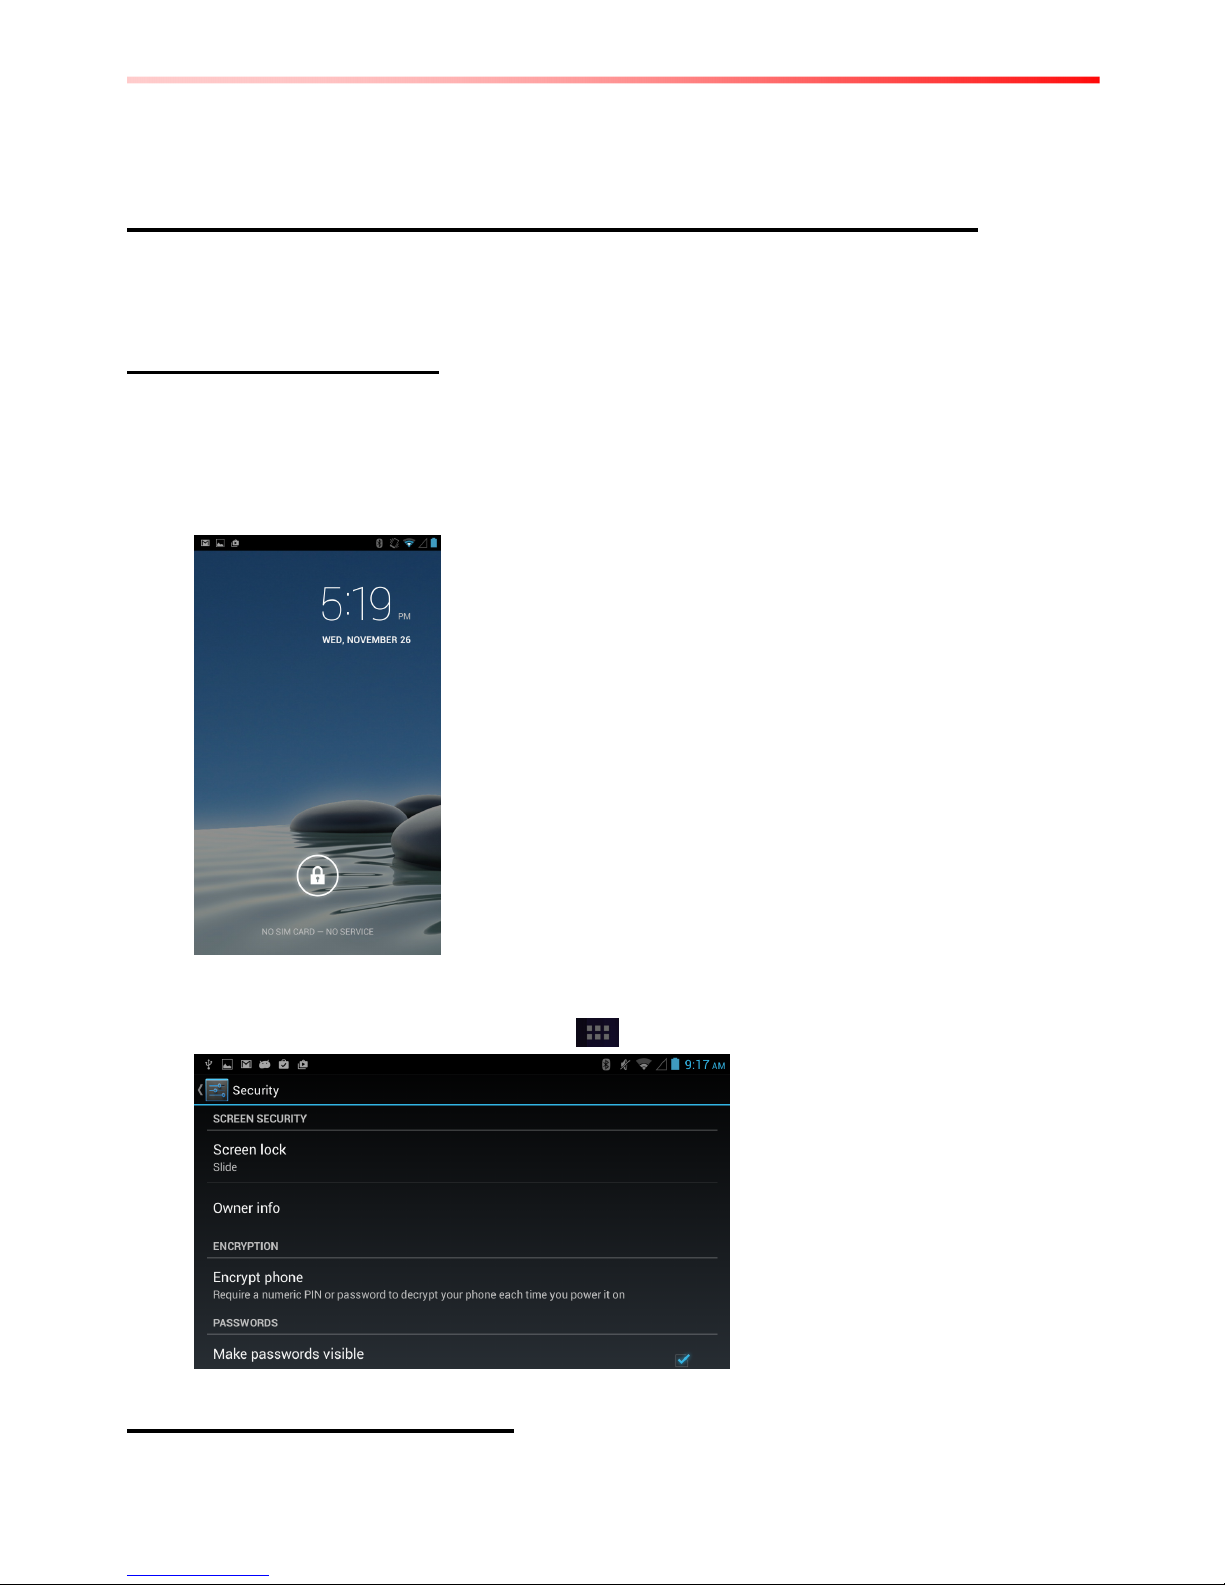
To wake up the tablet:
1. Press the Power button on the top of the Tablet PC
2. Drag the lock icon to the right
3. There are several options to choose the screen lock method such as Slide, Voice Lock,
Pattern, PIN or Password
4. To select the screen lock method, tap select Settings and then select Security
Using the Touch Screen
Page 16
7-inch Rugged Android Tablet PC C1D2 Edition User Guide 13
To gain full access of the Android interface is by using your finger to manipulate icons, on screen
keyboard, menu items, and other items on the touch screen.
• Tap – Simply touch the icon, symbol, or onscreen button using your finger
• Tap and hold – Touching an item using your finger and not lifting it until an action occurs
• Drag – Touch and hold an item for some amount of time and then, without lifting your
finger, move your finger along the screen until you reach target position
• Swipe or slide – Quickly move your finger across the surface of the screen, without
pausing it when you first touch it. (e.g. scroll a page or a list up or down)
• Double tap – Tap quickly twice on a webpage, map, or other screen to zoom. Double
tapping after pinching the zoom in some application to fit the width of the screen
• Pinch – Place two fingers on the screen at once and pinching them together (to zoom out)
and spreading them apart (to zoom in).
• Rotate the screen – Orientation of the screens rotates with the phone as user turn it from
upright to its side and back again.
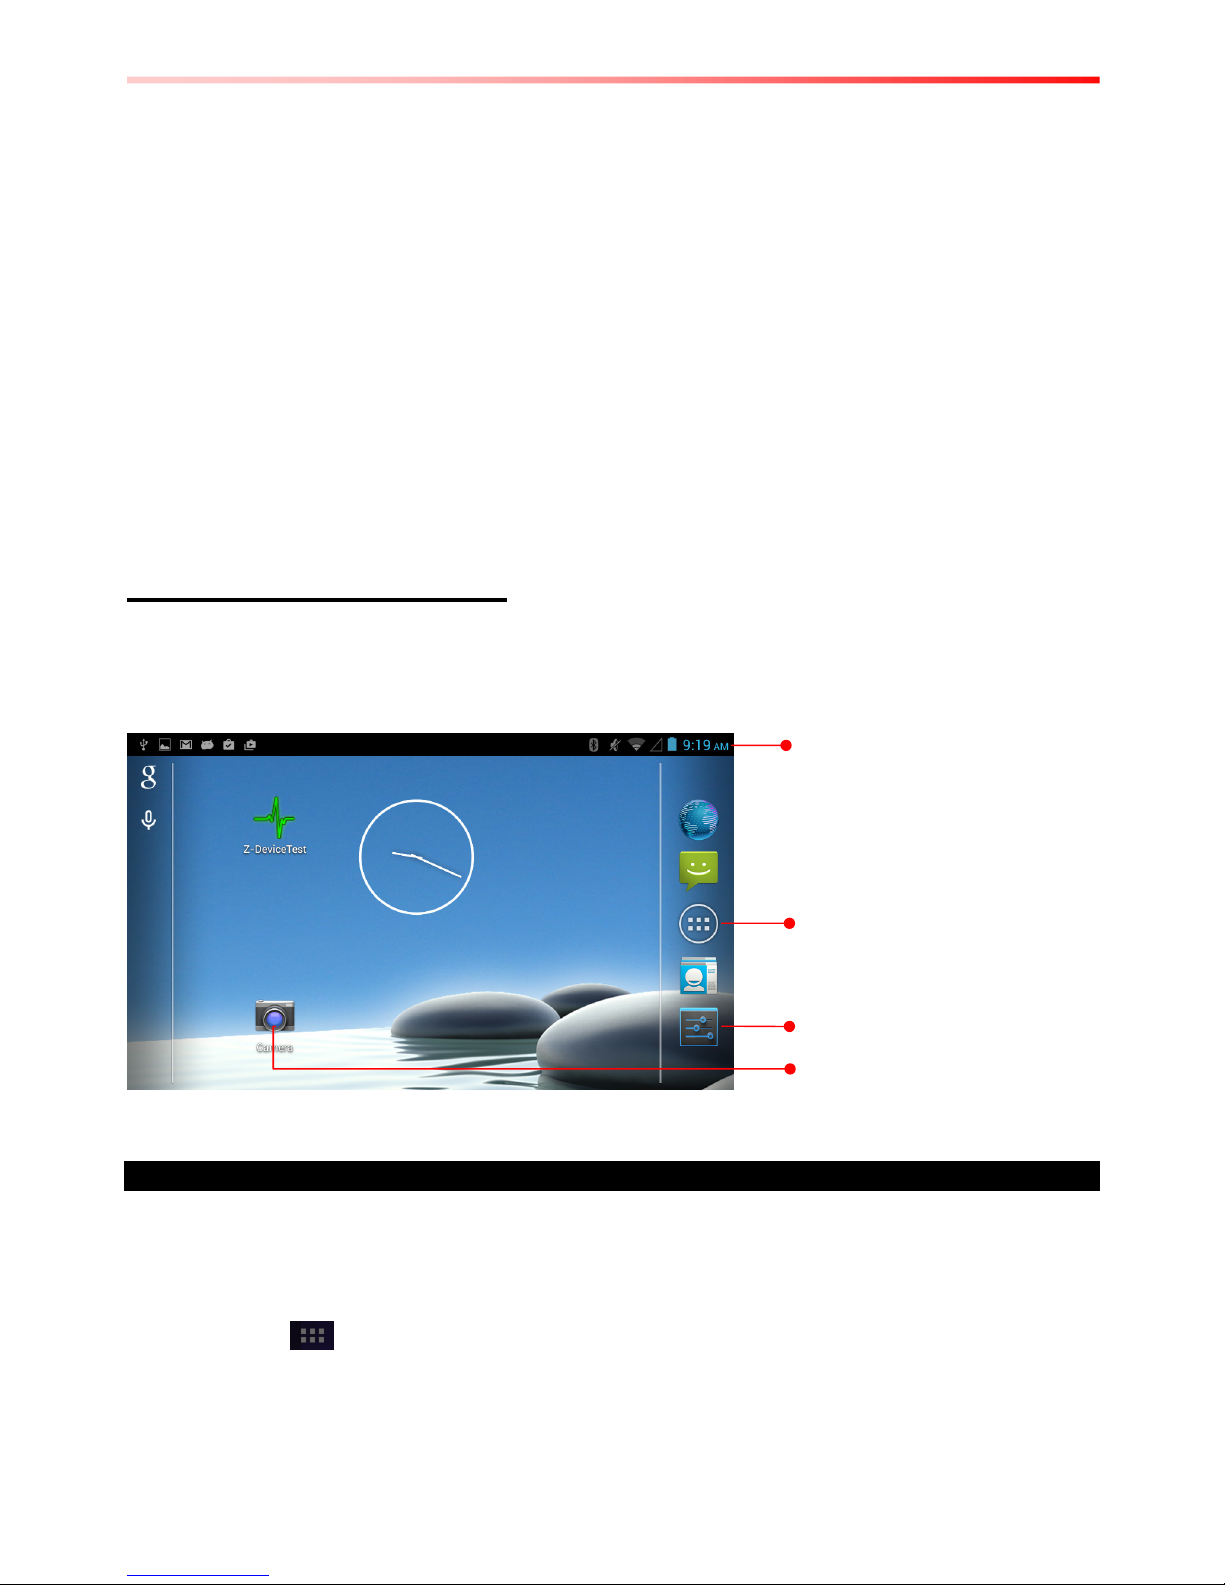
Using the Home Screen
Home screen is the starting point to access all the features on your PDA Device. It displays
application icons, widgets, shortcuts, and other features. User can personalize the home screen.
See “Personalizing home screen”
Personalizing Home Screen
User can add application icons, shortcuts, widgets, and other items to any part of any
Home screen where there is free space. User can also switch the wallpaper.
To change wallpaper on the Home screen:
1. Tap and select Setting, select Display and then tap Wallpaper
2. On the menu that opens tap the type of item you want to add.
Status Bar shows the time,
signal strength, battery status,
and other information. It also
display notification icons
Launcher icon to open the
launcher and view all
APPS which is applications that user
can use directly on the Home screen
Settings
Page 17
14 7-inch Rugged Android Tablet PC C1D2 Edition User Guide
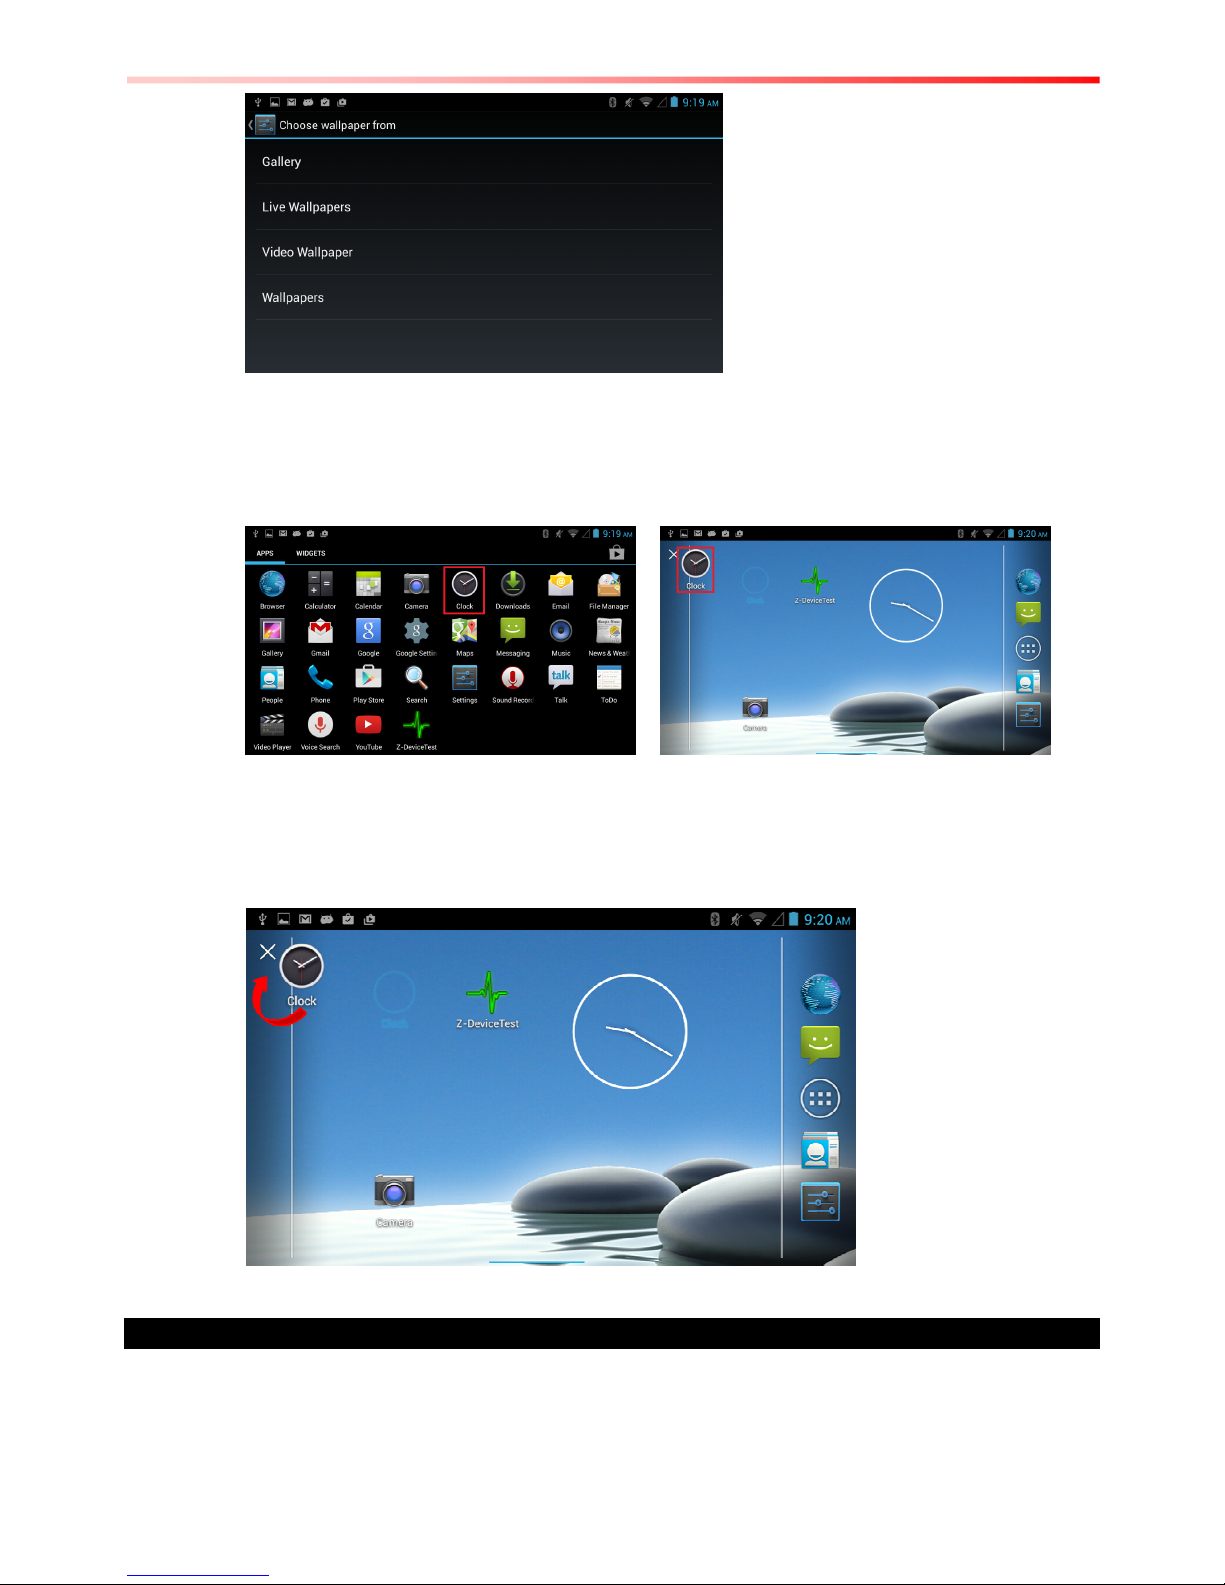
To move an item on the Home screen:
1. Tap and hold the item you want to move, until it can be moved.
2. Drag it to a new location on the screen
3. Place the item where you want to put it and lift your finger
To move an item on the Home screen:
1. Tap and hold the item you want to remove. The launcher icon will change into a
Remove icon
2. Drag the item you want to remove to the Remove icon on the top of the screen
3. When the icon turns red, release your finger
View other parts of the Home Screen
1. Slide your finger left or right across the Home screen
Extensions to the Home screen provide extra space for APPS, shortcuts, and other
items.
Page 18
7-inch Rugged Android Tablet PC C1D2 Edition User Guide 15
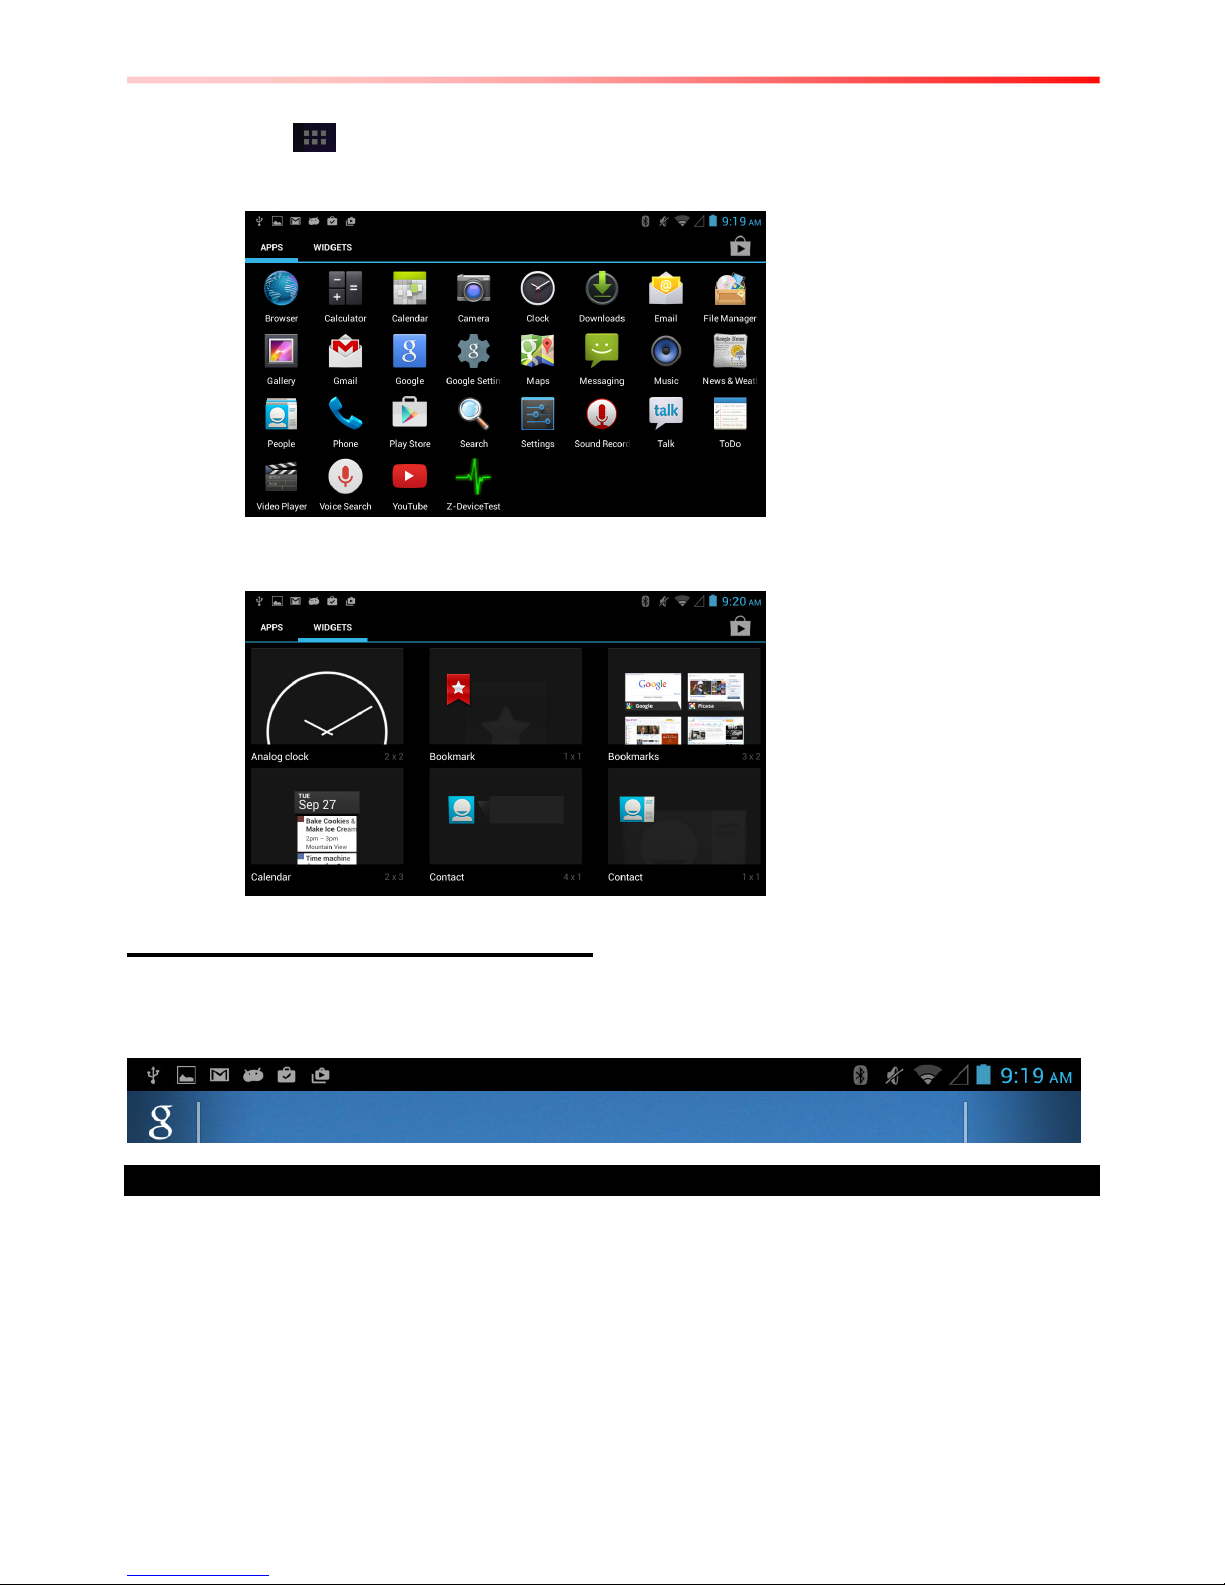
2. ........................................................................................................... Tap the launcher
icon (on the upper right part) to view the entire APPS and Widgets of the device
APPS
WIDGETS
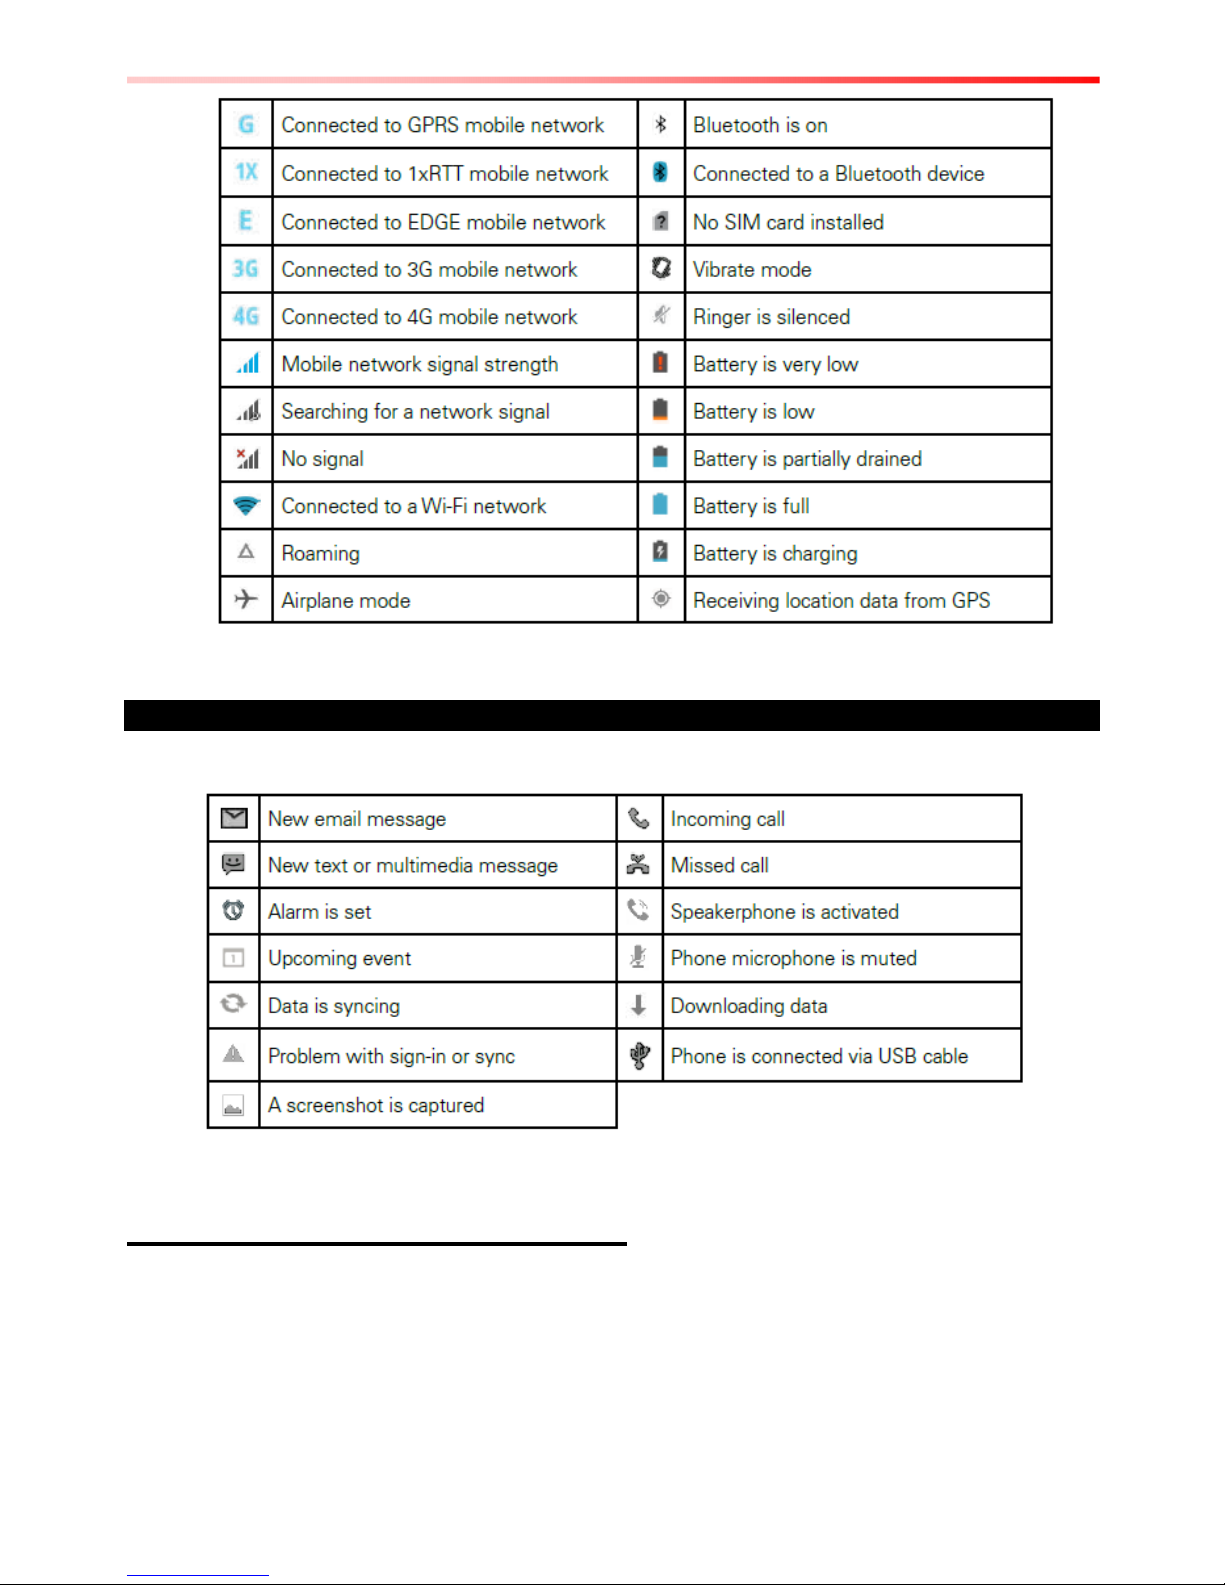
Status and Notification Icons
The status bar appears at the top right of every screen, along with the current time and on the
bottom left are navigation icons.
Status Icons
The following icons indicate the status of your PDA, for example if users are connected to a Wi-Fi
network that is not connected to the internet, the network icons are appears in white color. User
can view the details by touching the clock at the bottom right of the screen. Status icons that
appear in the status bar are as follows:
Page 19
16 7-inch Rugged Android Tablet PC C1D2 Edition User Guide
Notification Icons
The following icons indicate that you have received notification
Using the On-Screen Keyboard
User will be able to enter text using the On-Screen Keyboard. Some applications will launch the
keyboard automatically. In others, user needs to touch a text field where user wants to enter text
to launch the keyboard.
Page 20
7-inch Rugged Android Tablet PC C1D2 Edition User Guide 17
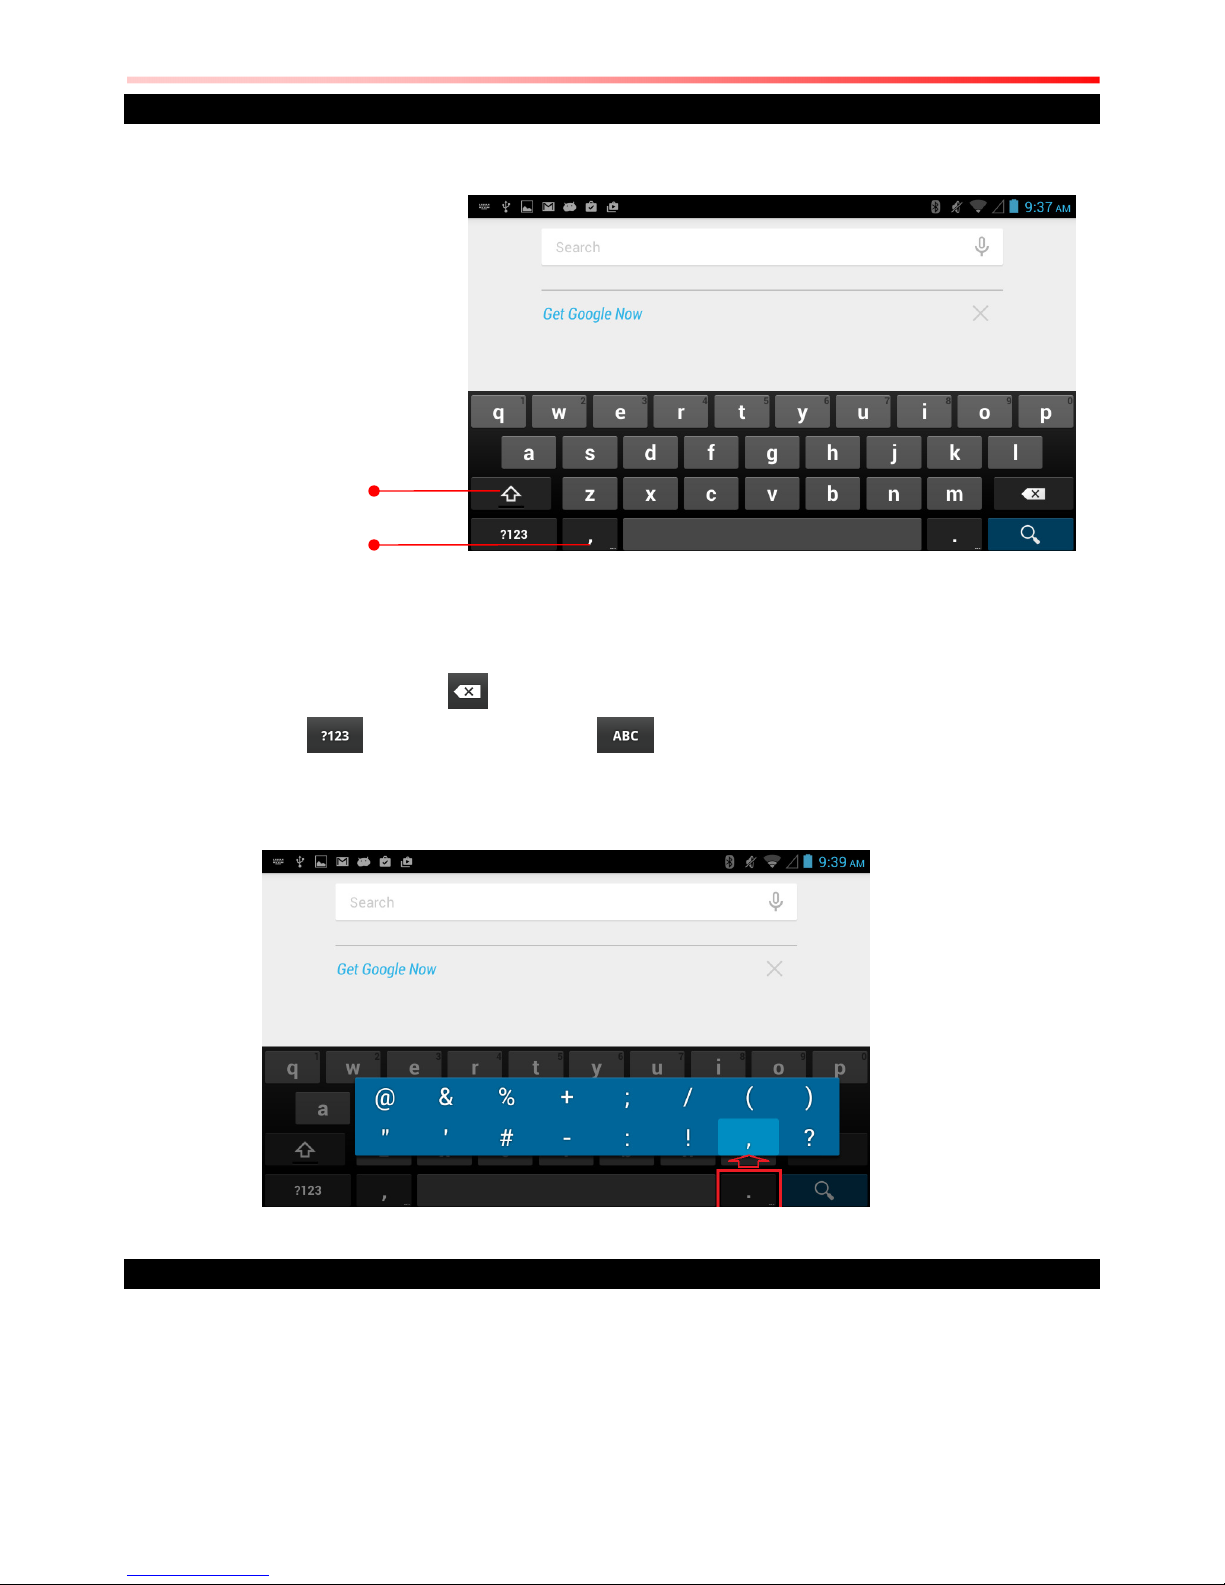
Enter text by Typing
1. Open a text field, in this example we used Chrome to create a text, The On-Screen
Keyboard opens.
If user taps in a text field which already contains text, the insertion point is set
where user tap and the cursor appears. User can drag the cursor to pick exactly
where you want to add more text. User can also select a word to copy, cut and
paste it. See “Editing Text”
2. Tap the delete key to erase characters to the left of the cursor
3. Tap to enter numbers. Tap to return to letters
4. To enter symbols and other characters, tap and hold one of the top-row keys and
slide your finger up to the list of the options. Lift your finger when you find your
selection.
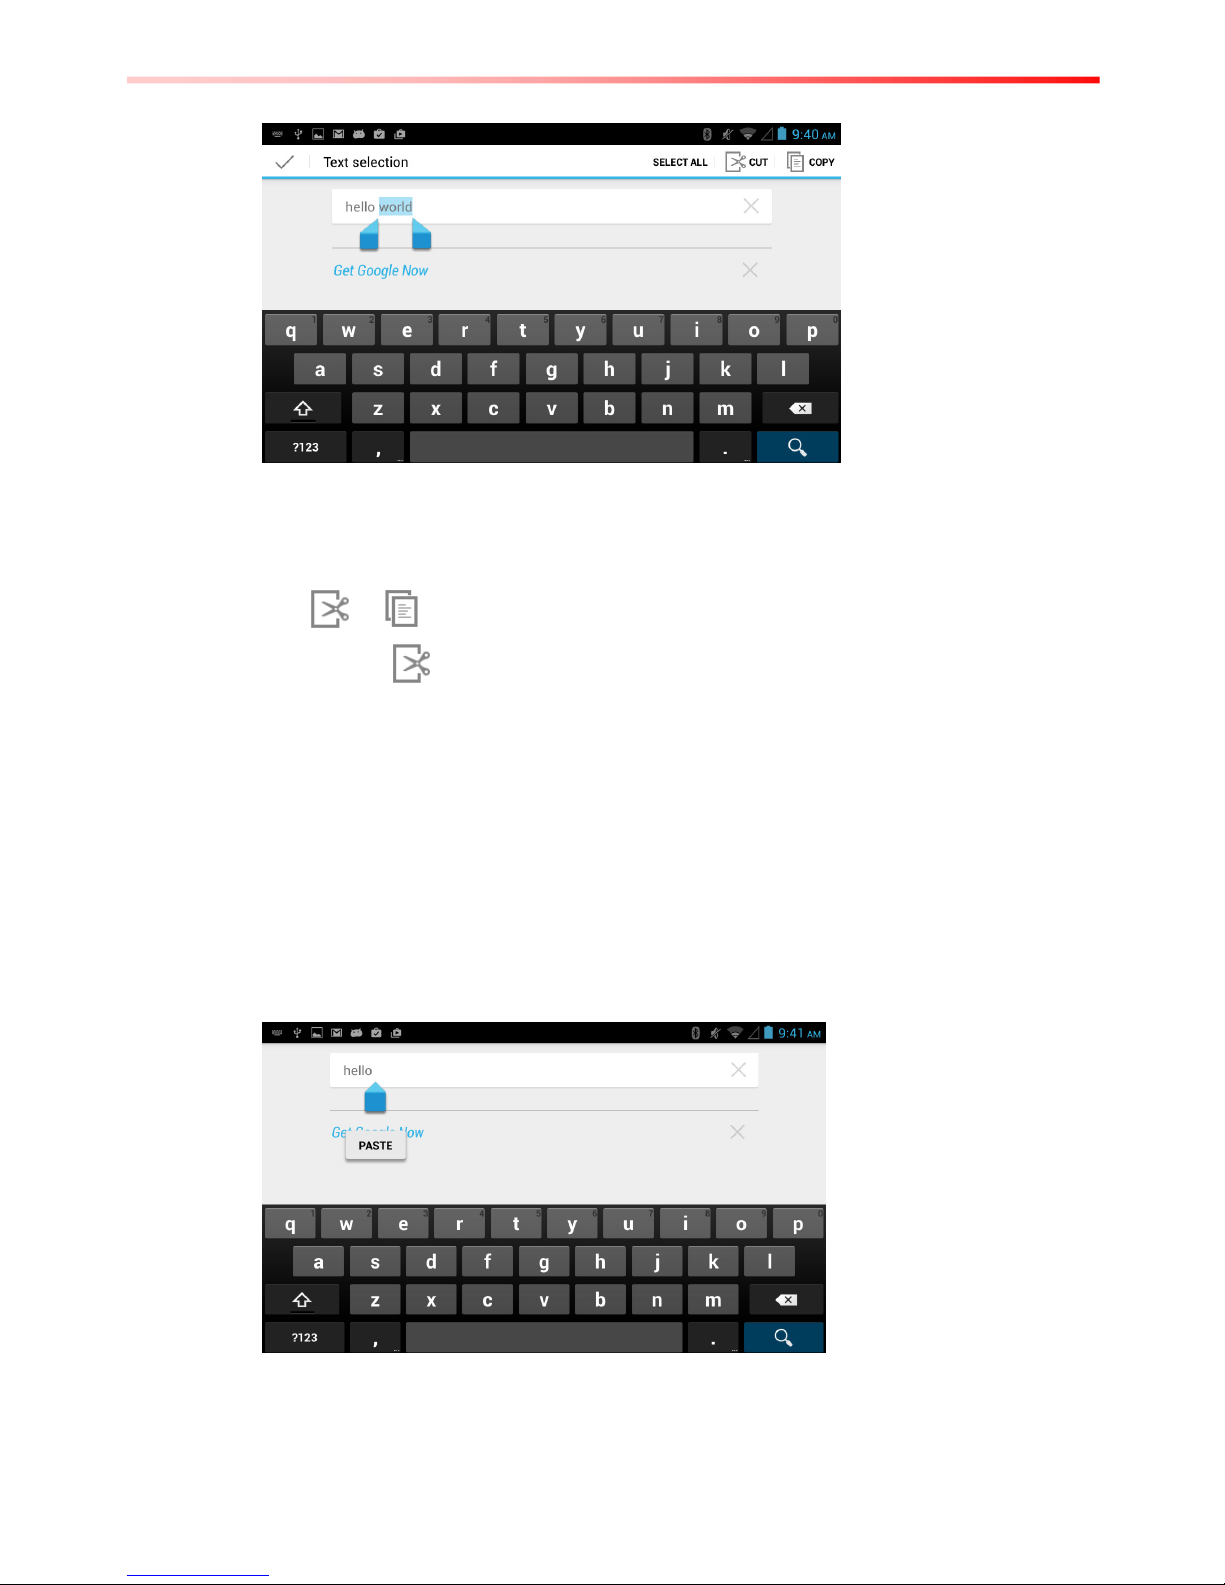
Editing text
To select text
1. Double tap the text you want to select
2. Tap Select All to select all the sentences in the menu that appears, the selected
text is highlighted in blue, with a tab at each end of the selected word
Tap once to
capitalize
Tap and hold for
input options
Page 21
18 7-inch Rugged Android Tablet PC C1D2 Edition User Guide
3. Drag selection tab to expand or reduce the range of the selected text
To Cut or Copy Text
1. Select the text to cut or copy, see “to select text”
2. Tap or in the Edit text menu
3. If you select , the selected text is removed from the text field; it is stored in
temporary area so that you can paste it into different text field.
To Paste Text
1. After Cut or Copy the text, see “To Cut or Copy Text”
2. Place the cursor in the text field where you want to paste the text, user can paste
text that you copied from one application into a text field in any application
3. Tap and hold into the location that you want to paste, Tap Paste in the menu that
opens to replace the existing text with copied text
Page 22
7-inch Rugged Android Tablet PC C1D2 Edition User Guide 19
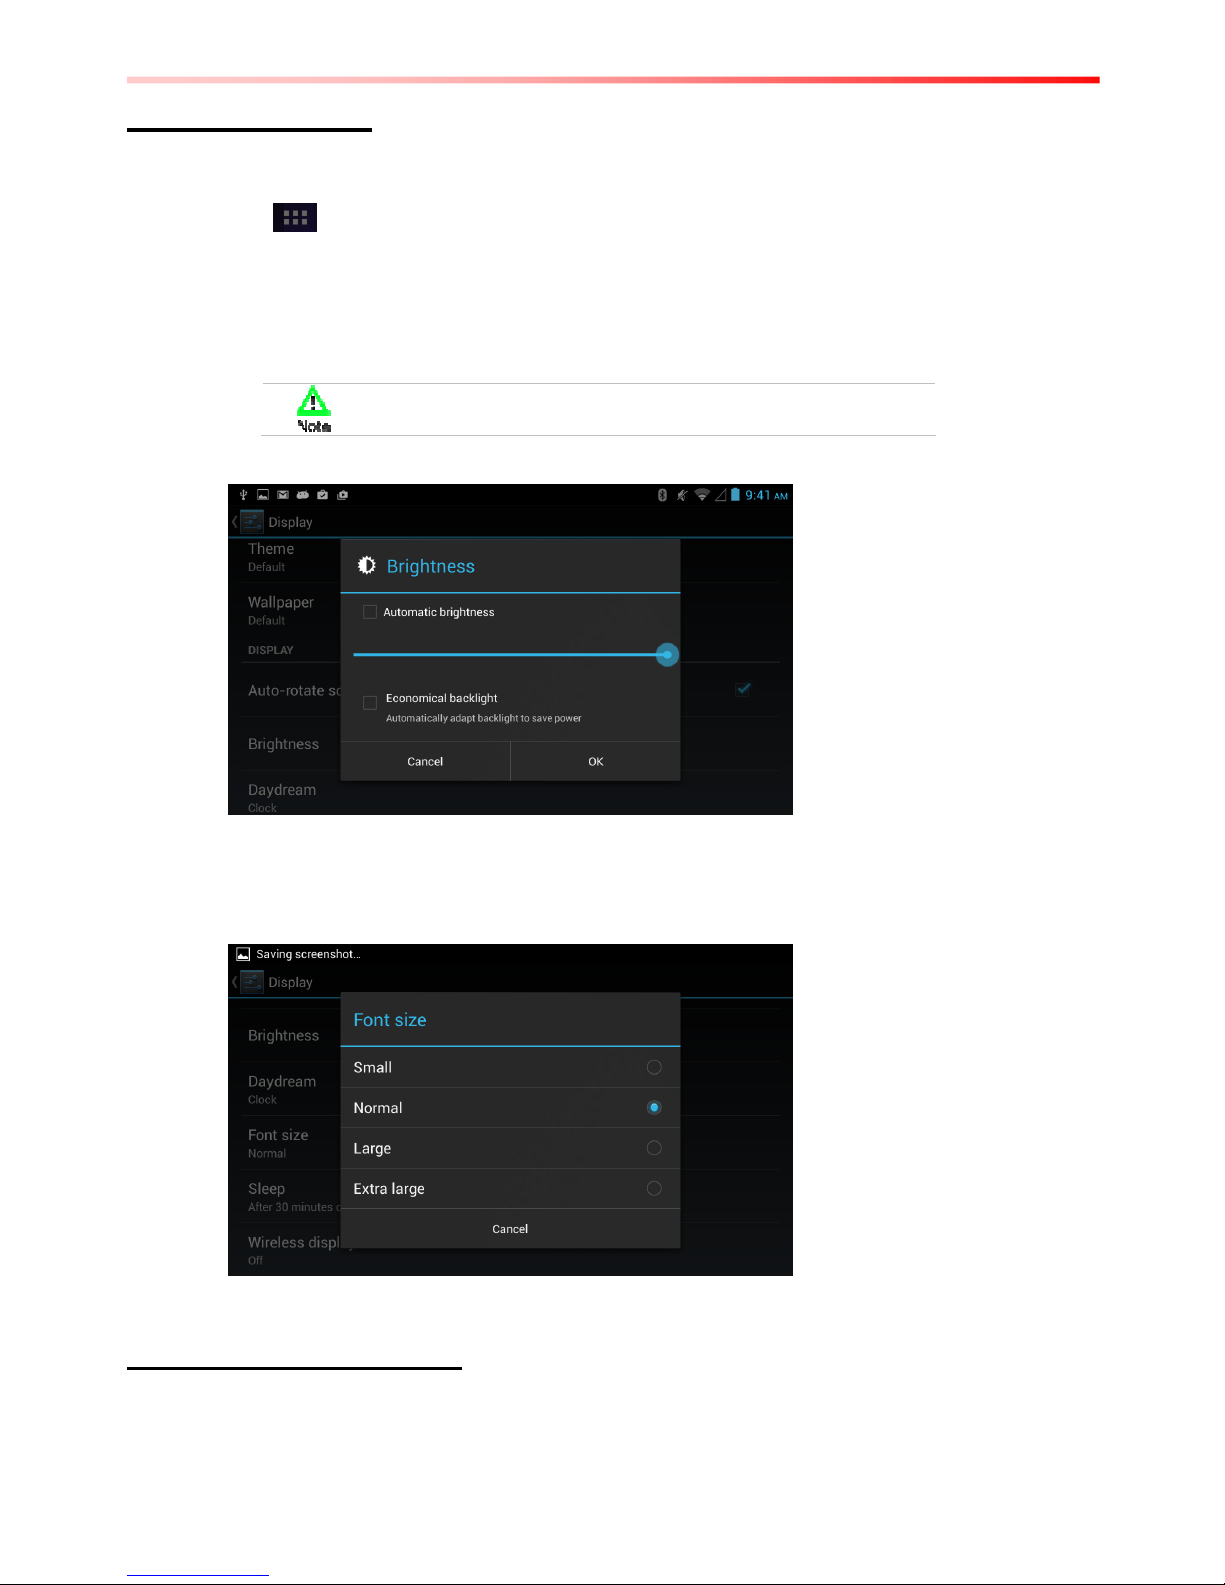
Display Setting
Use the display settings to configure brightness.
1. Tap and select Settings and then tap Display
2. Tap Brightness:
• Tap Automatic Brightness – for adjusting the brightness automatically.
• Tap Economical Backlight to save power
• Slide the bar to adjust the brightness manually
For the longest battery life between charges, use the lowest
brightness level
Use the display settings to configure Font size.
1. Tap Font Size to adjust the size, there are several options such as: Small, Normal ,
Large, or Huge
Audio Profile Setting
Use the sound settings to configure how and at what volume the phone rings, vibrates or alerts
user in other ways when user receive a call, receive a notification or an alarm sounds.
Page 23
20 7-inch Rugged Android Tablet PC C1D2 Edition User Guide
Sound Settings
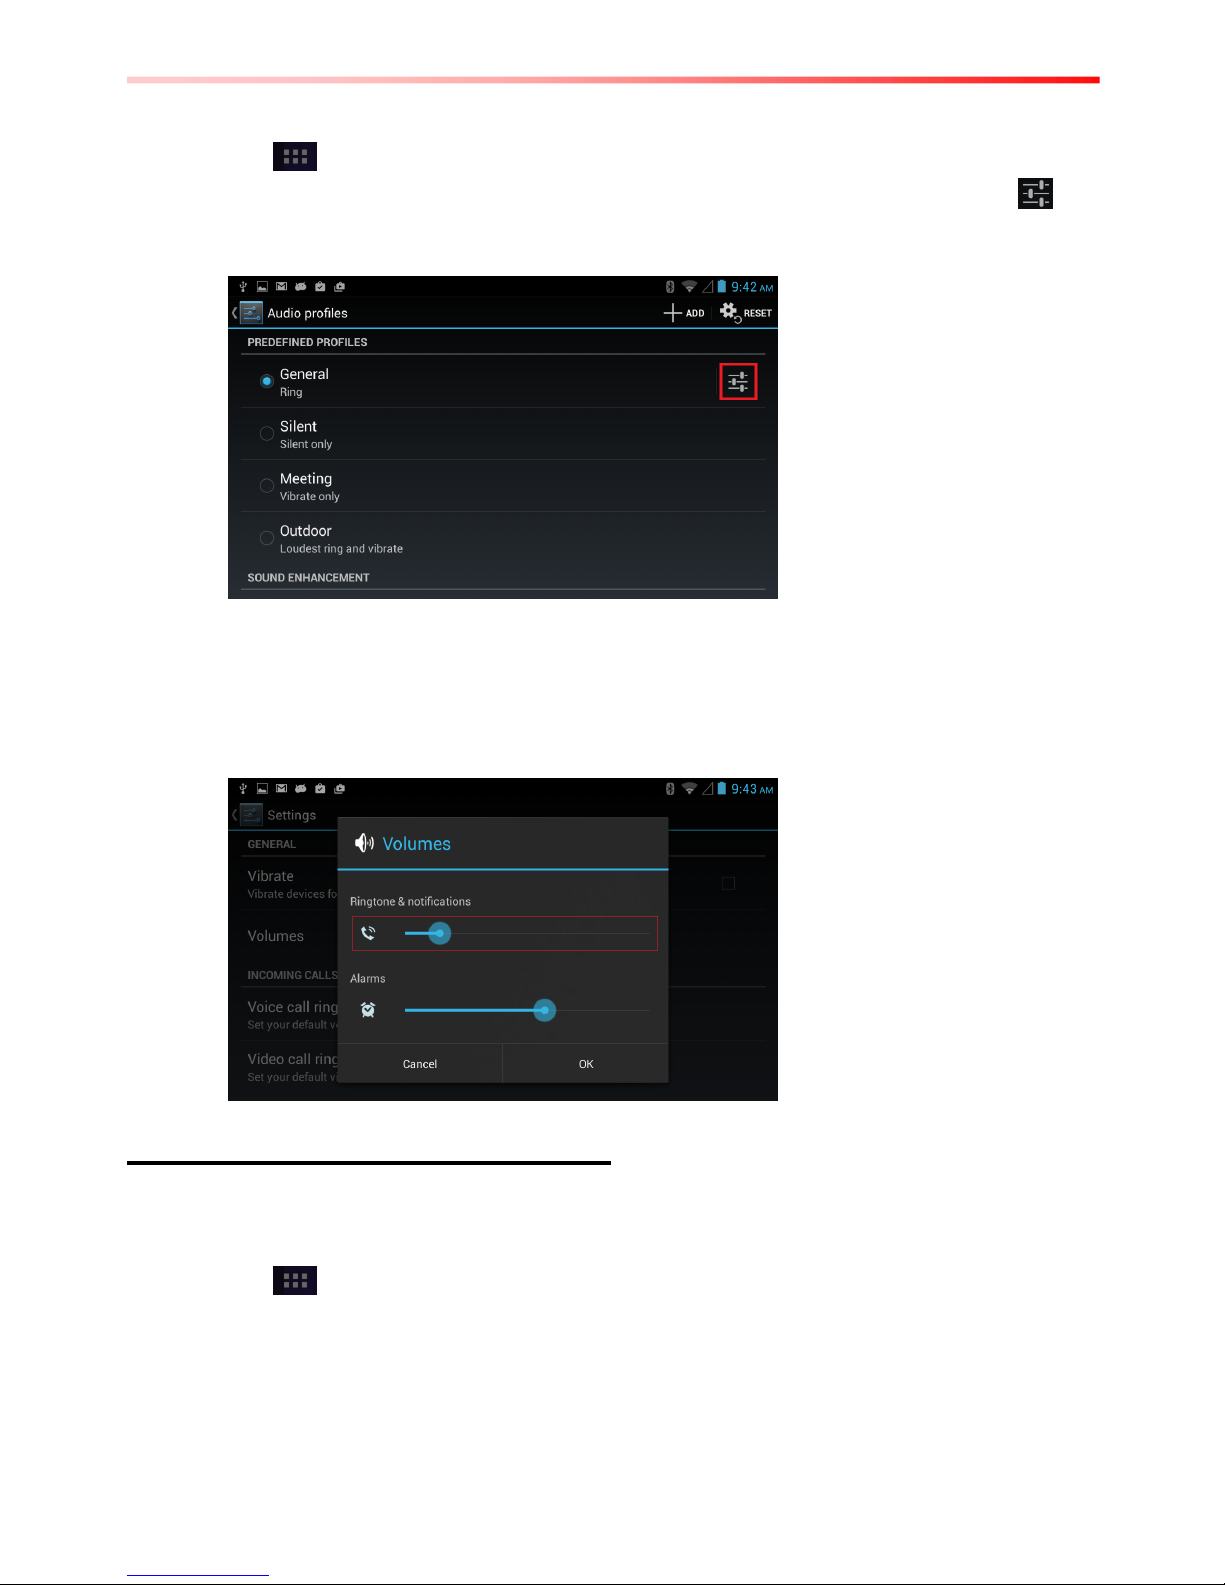
1. Tap and select Settings and then tap Audio profiles
2. Tap General and then tap the Settings (located on the right side of the screen )
user can select to disable or adjust the Music, video games & other media as well as
notifications and Alarms
Adjust Volume
1. Press the volume keys to change the ring volume
(On Home screen) or earpiece volume (during a call)
Language & Keyboard Setting
Use the Language & keyboard settings to select the language for the text on your phone and for
configuring On-Screen Keyboard, including words that you have added to its dictionary
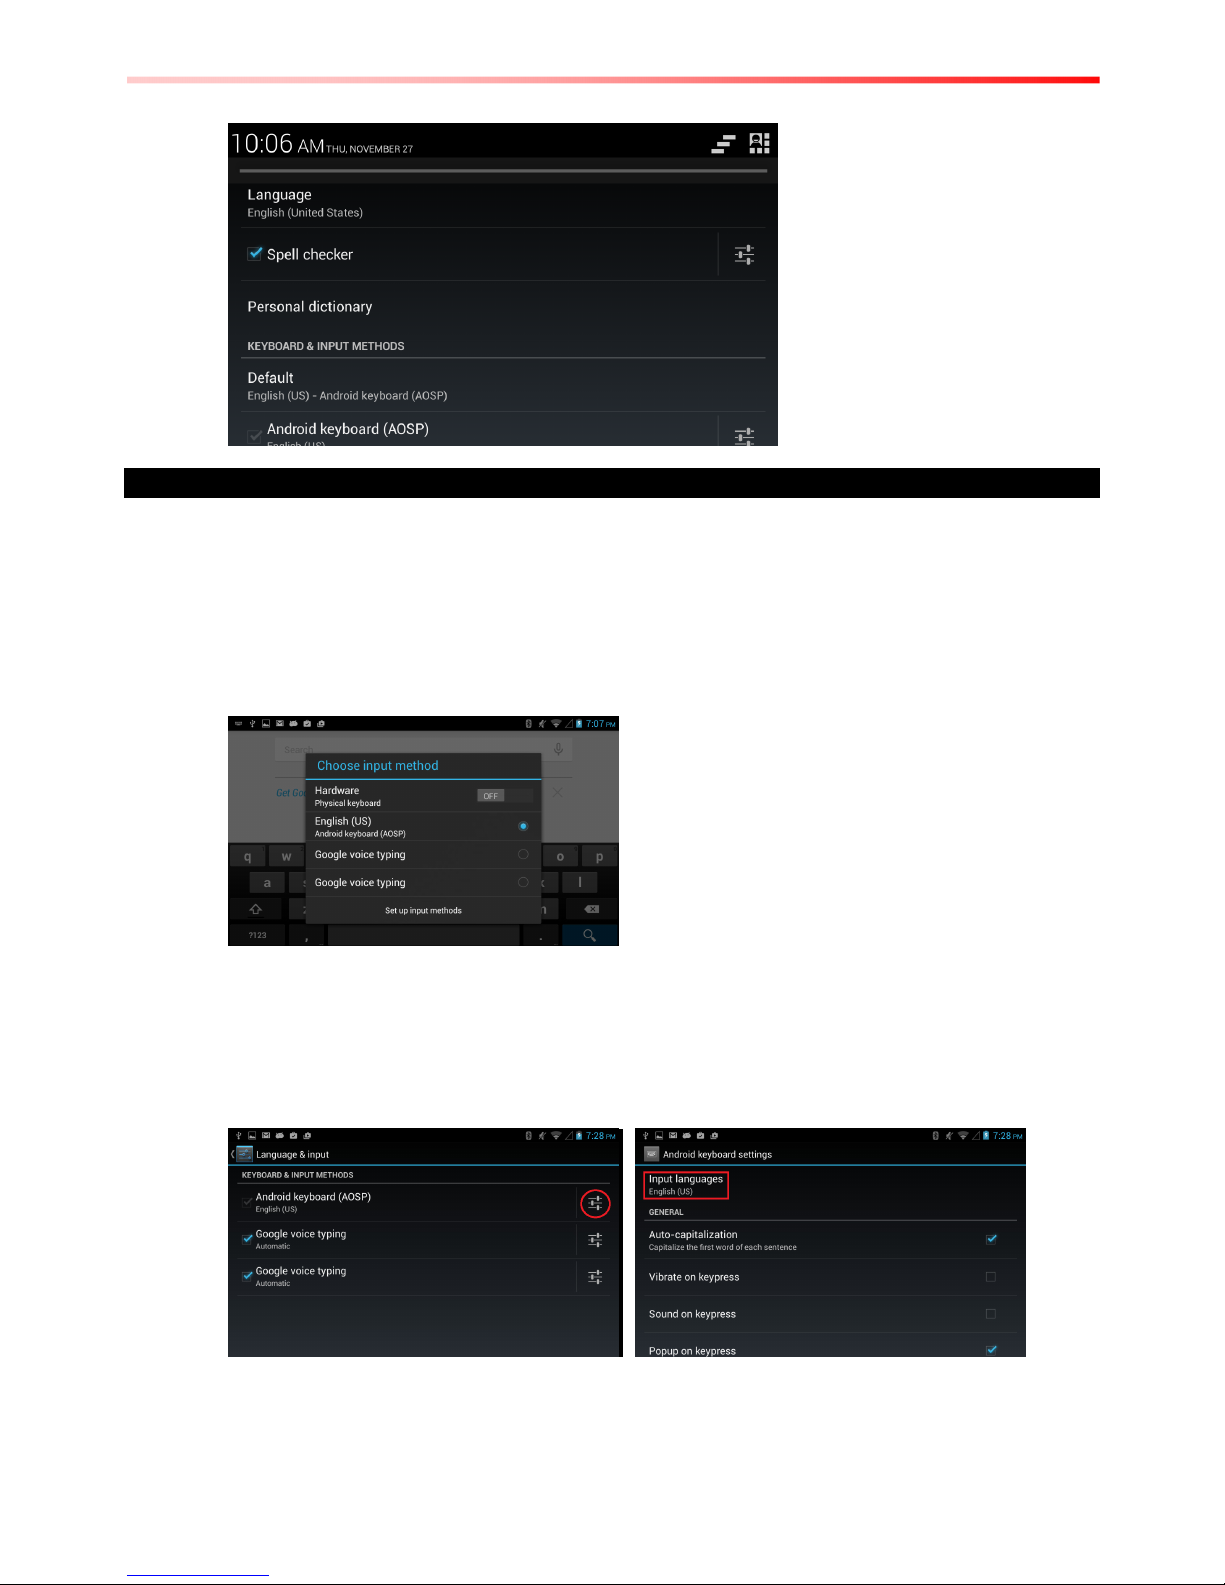
1. Tap and select Settings and then tap Language & input
2. Tap Language & Input
language – to open the language screen, where user can select the language to use
for the text on the device.
Spell checker – to improve the text-input experience on Android by helping the user
quickly identify and correct spelling errors
Personal dictionary – to add custom words to a personal dictionary for faster typing
Page 24
7-inch Rugged Android Tablet PC C1D2 Edition User Guide 21
Change the Keyboard Language
The current keyboard language is displayed on the Settings icon and user can switch
languages.
1. .............................................................................................................. Tap the keyboard
icon located on the top right, there are four input options Hardware-physical
keyboard, English (US)- Android Keyboard, and Google voice typing
2. .............................................................................................................. If you want to use
Android Keyboard, make sure to disable the Hardware-physical keyboard
3. .............................................................................................................. Tap English
(US)- Android Keyboard and in the Set up input methods, user can select the
languages by tapping (insert icon) and then select the Input languages >> ACTIVE
INPUT METHODS
Page 25

22 7-inch Rugged Android Tablet PC C1D2 Edition User Guide
4. .............................................................................................................. Tap android
keyboard settings to adjust the settings such as Auto capitalization, auto correction or
other options
USB Debugging Setting
To permit debugging tools on a computer to communicate with User’s Tablet via USB
Connection.
1. .............................................................................................................. Tap and
select Settings and then Tap { } Developer options and then tap USB debugging
2. .............................................................................................................. If the USB is
connected, there will be a symbol in the notification icons on the bottom right
About Phone
System Update — provides information regarding the local or online update of your devices
Status — opens the status screen with a list of information about battery, network, signal
strength and other details
Legal Information — lists details about the model number, Android Version, Baseband version
etc. this information is useful if user need to work with support team
Page 26

7-inch Rugged Android Tablet PC C1D2 Edition User Guide 23
Page 27
24 7-inch Rugged Android Tablet PC C1D2 Edition User Guide
Chapter 4: Connecting to Network and Devices
Connecting to Mobile Networks
When users assemble their PDA with a SIM card from service provider, their phone is configured
to use their provider networks for voice calls and for transmitting data.
Different locations may have different mobile networks available; user may need to configure
their phone to use certain networks. To obtain fastest networks user can configure their phone to
4G and to extend the life of battery user can use 2G network.
Checking the Network (3G / 4G LTE) Connection
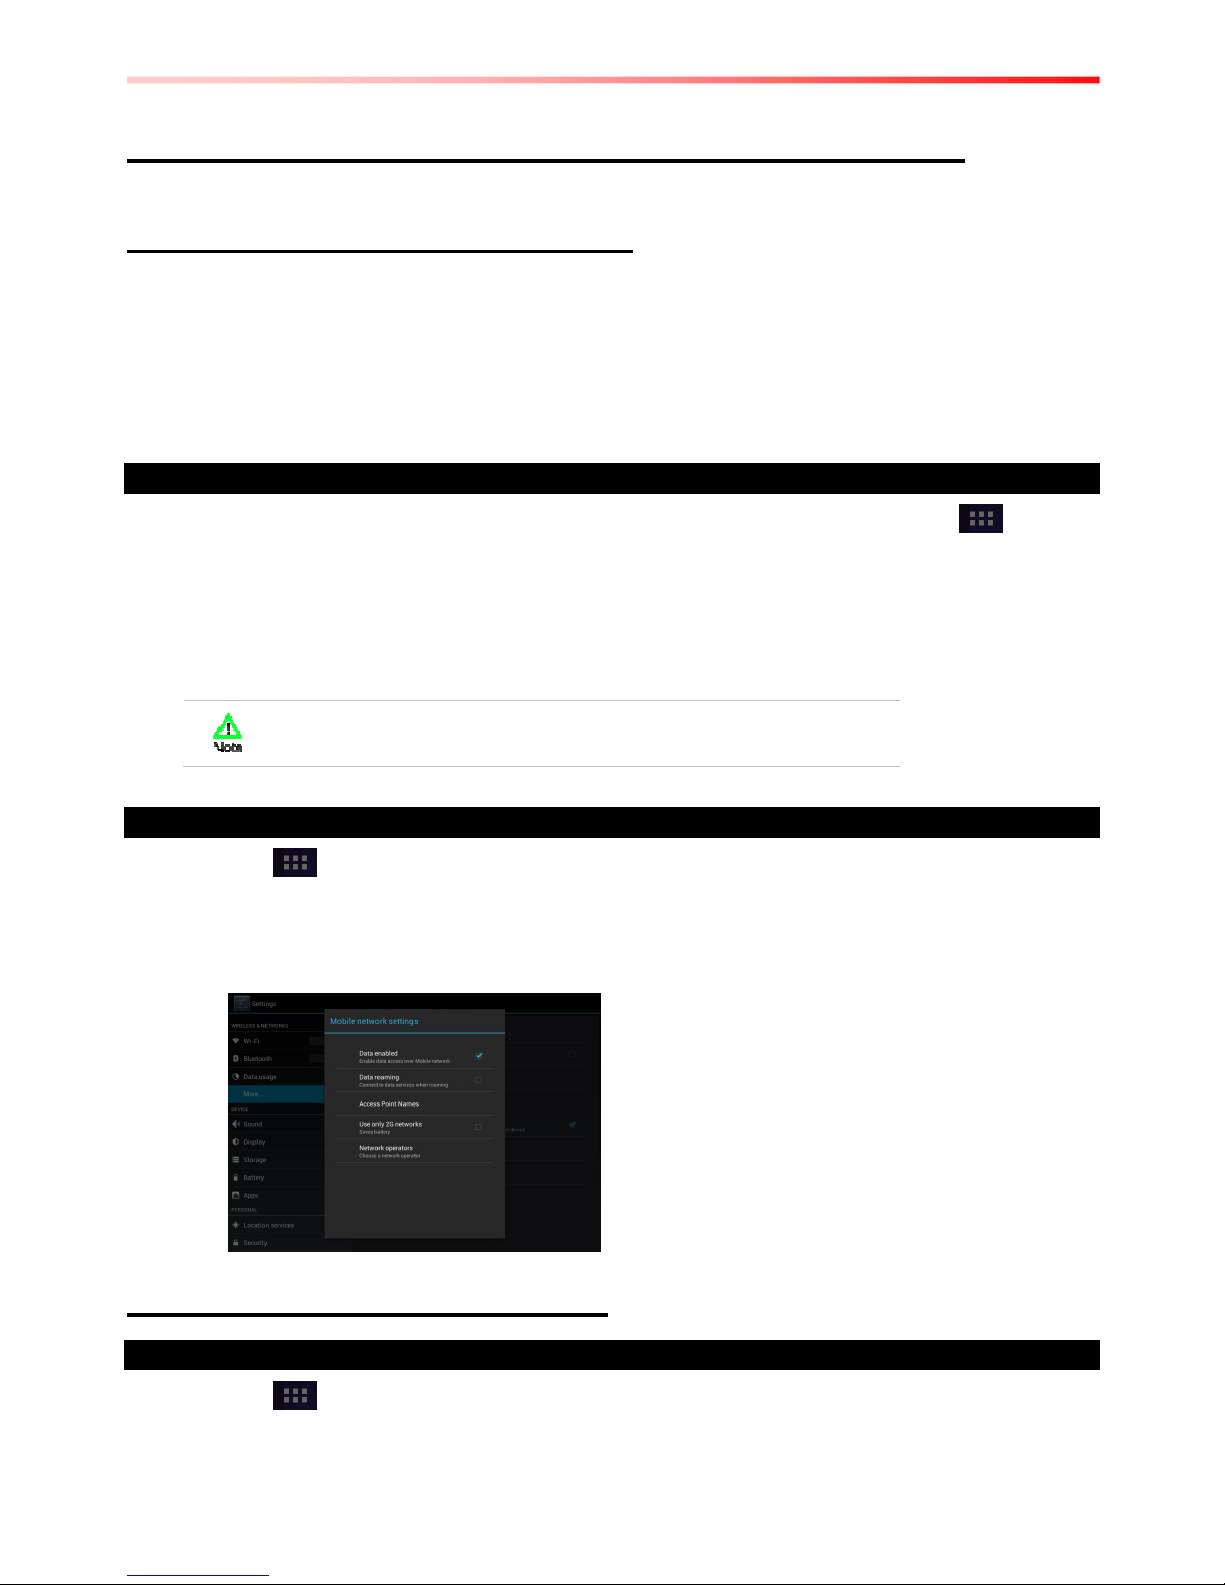
1. .............................................................................................................. Tap and then
tap Settings
2. .............................................................................................................. Tap More … in
the Wireless & networks, and then tap Mobile networks
3. .............................................................................................................. Tap Network
operators to choose a network operator
Do not change the parameters of the access point to prevent user may
not be able to access network sources
Turning on data service
1. Tap and then tap Settings
2. Tap More… in the Wireless & networks, and then tap Mobile networks
3. Tap Data enabled to enable data access over mobile network
4. Select the desired network operator to enable the data connection
Connecting to Wi-Fi Networks
Turn On the Wi-Fi and Connect to a Wi-Fi network
1. Tap and then tap Settings
2. Tap Wireless & networks and then select Wi-Fi to turn it on
3. Tap Wi-Fi
Page 28
7-inch Rugged Android Tablet PC C1D2 Edition User Guide 25
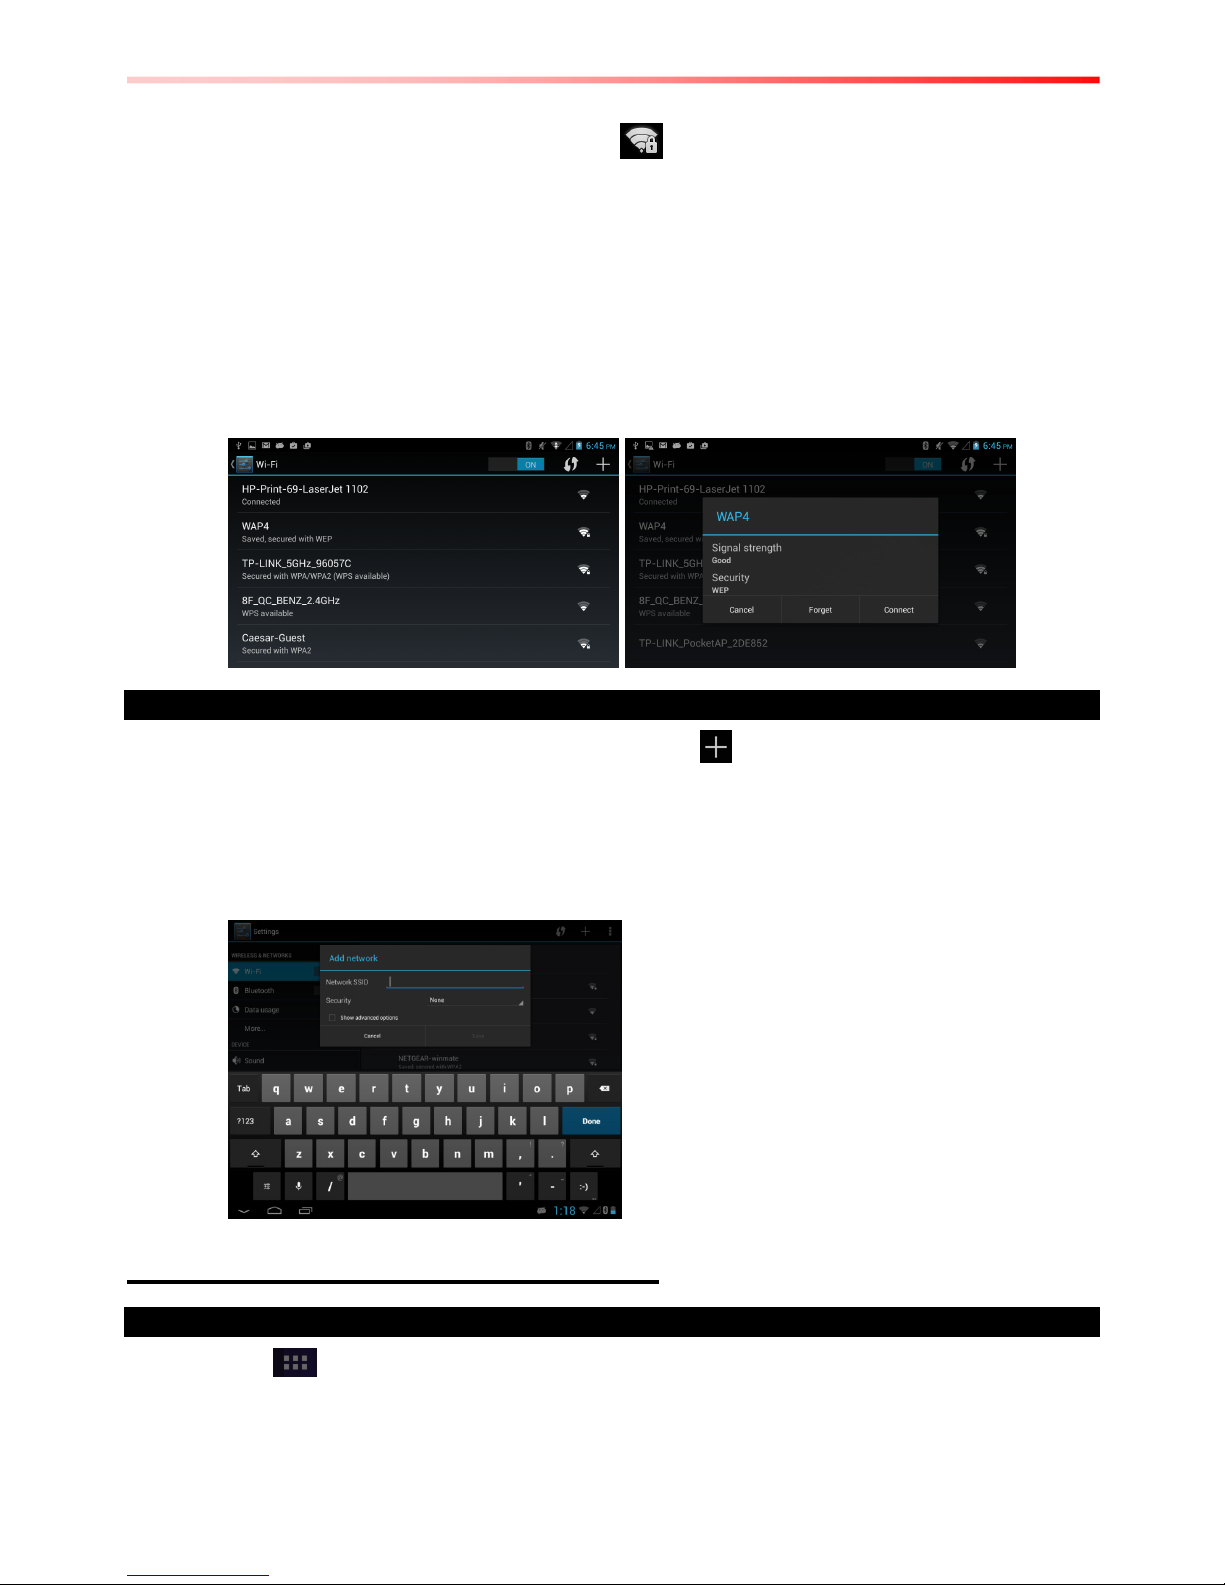
The device scans for available Wi-Fi networks and displays the list of it. Secured
networks are indicated with a lock icon
If the phone finds a network that you have connected previously, it connects to it
automatically.
4. Tap a network to connect to it;
• If the network is open, you are prompted to confirm that you want to connect it by
tapping Connect
• If the network is secured, users are prompted to enter a password or other
credentials
5. To check the details about the speed, security, address and related settings, tap its
name in the Wi-Fi settings screen
Add a Wi-Fi Network
1. Turn on Wi-Fi, in the Wi-Fi settings screen, tap icon (at the top right of the list of
discovered networks)
2. Input the SSID (name) of the network, if the network is secured, tap the security menu
and then tap the type of security deployed on the network.
3. Enter any required security credentials
4. Tap Save
Connecting to Bluetooth Devices
Turn Bluetooth On or Off
1. Tap and then tap Settings
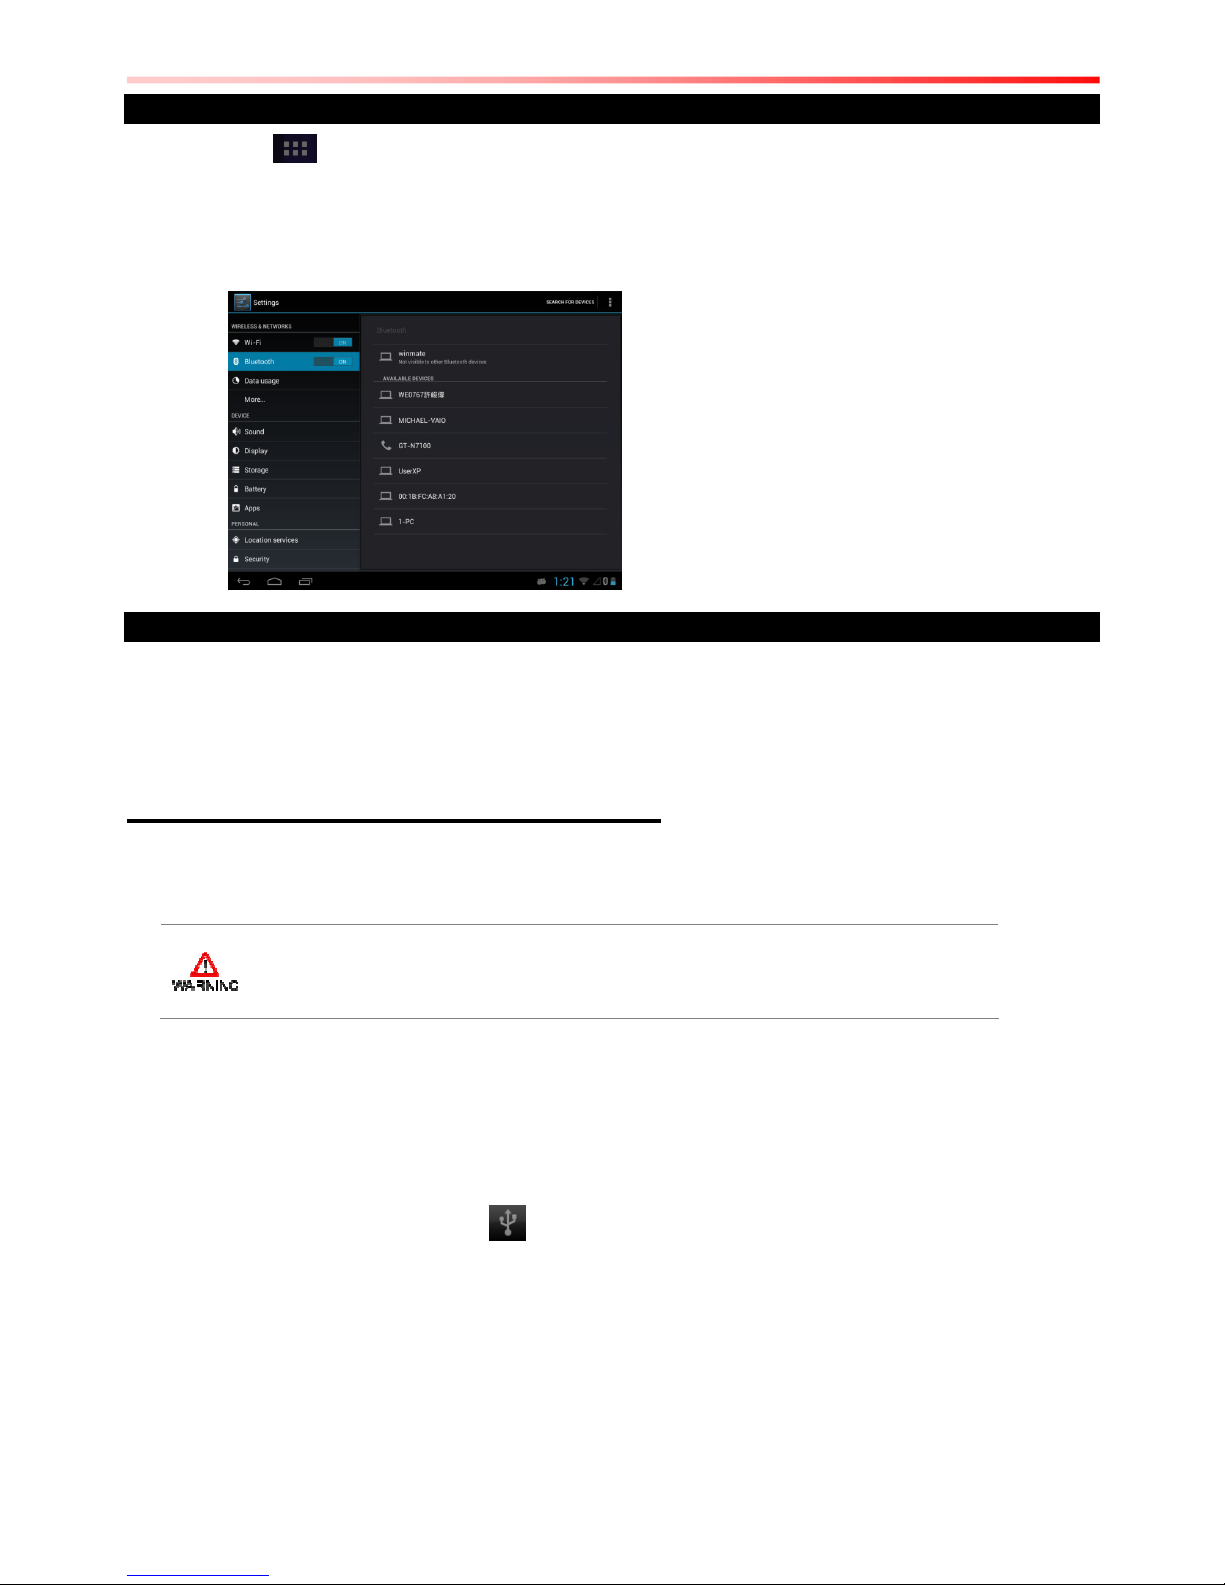
2. Tap Wireless & networks and then select Bluetooth to turn it on
Page 29
26 7-inch Rugged Android Tablet PC C1D2 Edition User Guide
Connect to a Bluetooth device
1. Tap and then tap Settings
2. Tap Wireless & networks, and then tap Bluetooth
3. It will automatically scans and displays the IDs of all available Bluetooth devices in
range. Tap SEARCH FOR DEVICES to search other Bluetooth devices
4. Tap the ID of the other device in the list in Settings to pair them
Disconnect from a Bluetooth Device
1. Tap the device in the Bluetooth settings screen
2. Tap OK to confirm that you want to disconnect
Connecting to Computer via USB
User can connect their Tablet PC to a computer with USB cable to transfer files between Tablet
PC and computer
When connecting your Tablet PC to a computer and mounting its USB storage or SD
card, user must follow the computer’s instructions for connecting and disconnecting
USB device, to avoid damaging or corrupting files.
To connect your Tablet PC to a computer via USB:
1. Use the USB cable that came with your Tablet PC to connect the device to a USB port
on your computer
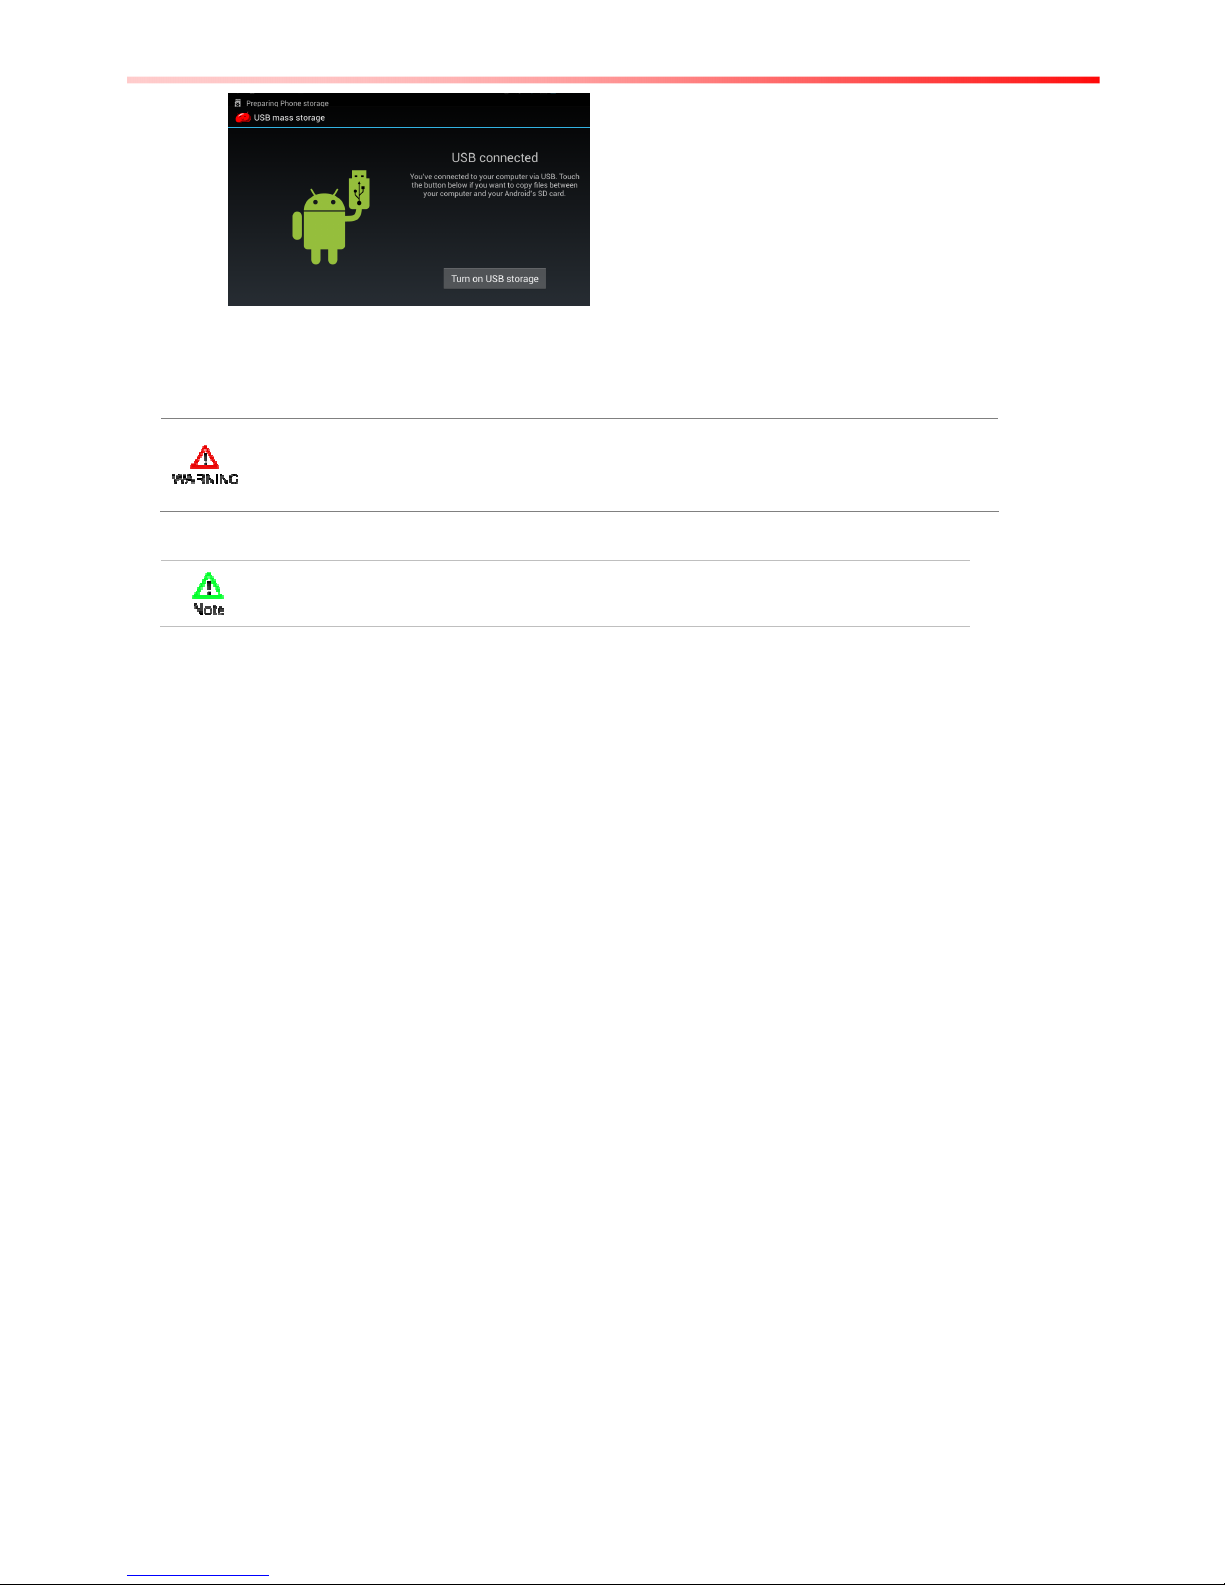
2. After received a notification that the USB is connected, tap the notification icon and
then tap USB connected
3. Select Turn on USB Storage to let user transfer media files on windows, or using
Android File Transfer
Page 30
7-inch Rugged Android Tablet PC C1D2 Edition User Guide 27
4. When the device is connected as USB storage, the screen indicates that USB storage
is in use and user will receive a notification
Carefully follow your computer’s instructions to un-mount the USB storage or SD card.
Disconnect USB device not properly can cause a loss of important data or information.
When user finished, simply disconnect the tablet by unplugging the USB cable.
Page 31
28 7-inch Rugged Android Tablet PC C1D2 Edition User Guide
Chapter 5: Using the Camera
Winmate M700DM4 equipped with 5 MP on the rear side, which user can use to capture photos
or video
Open Camera
1. .............................................................................................................. Tap the launcher
and then tap Camera
Camera opens in Portrait mode, ready to take a picture or shoot a video
Make sure the protective lens cover is clean before taking pictures. A lens cover
with smudges from fingers can cause blurry picture
Take a Picture
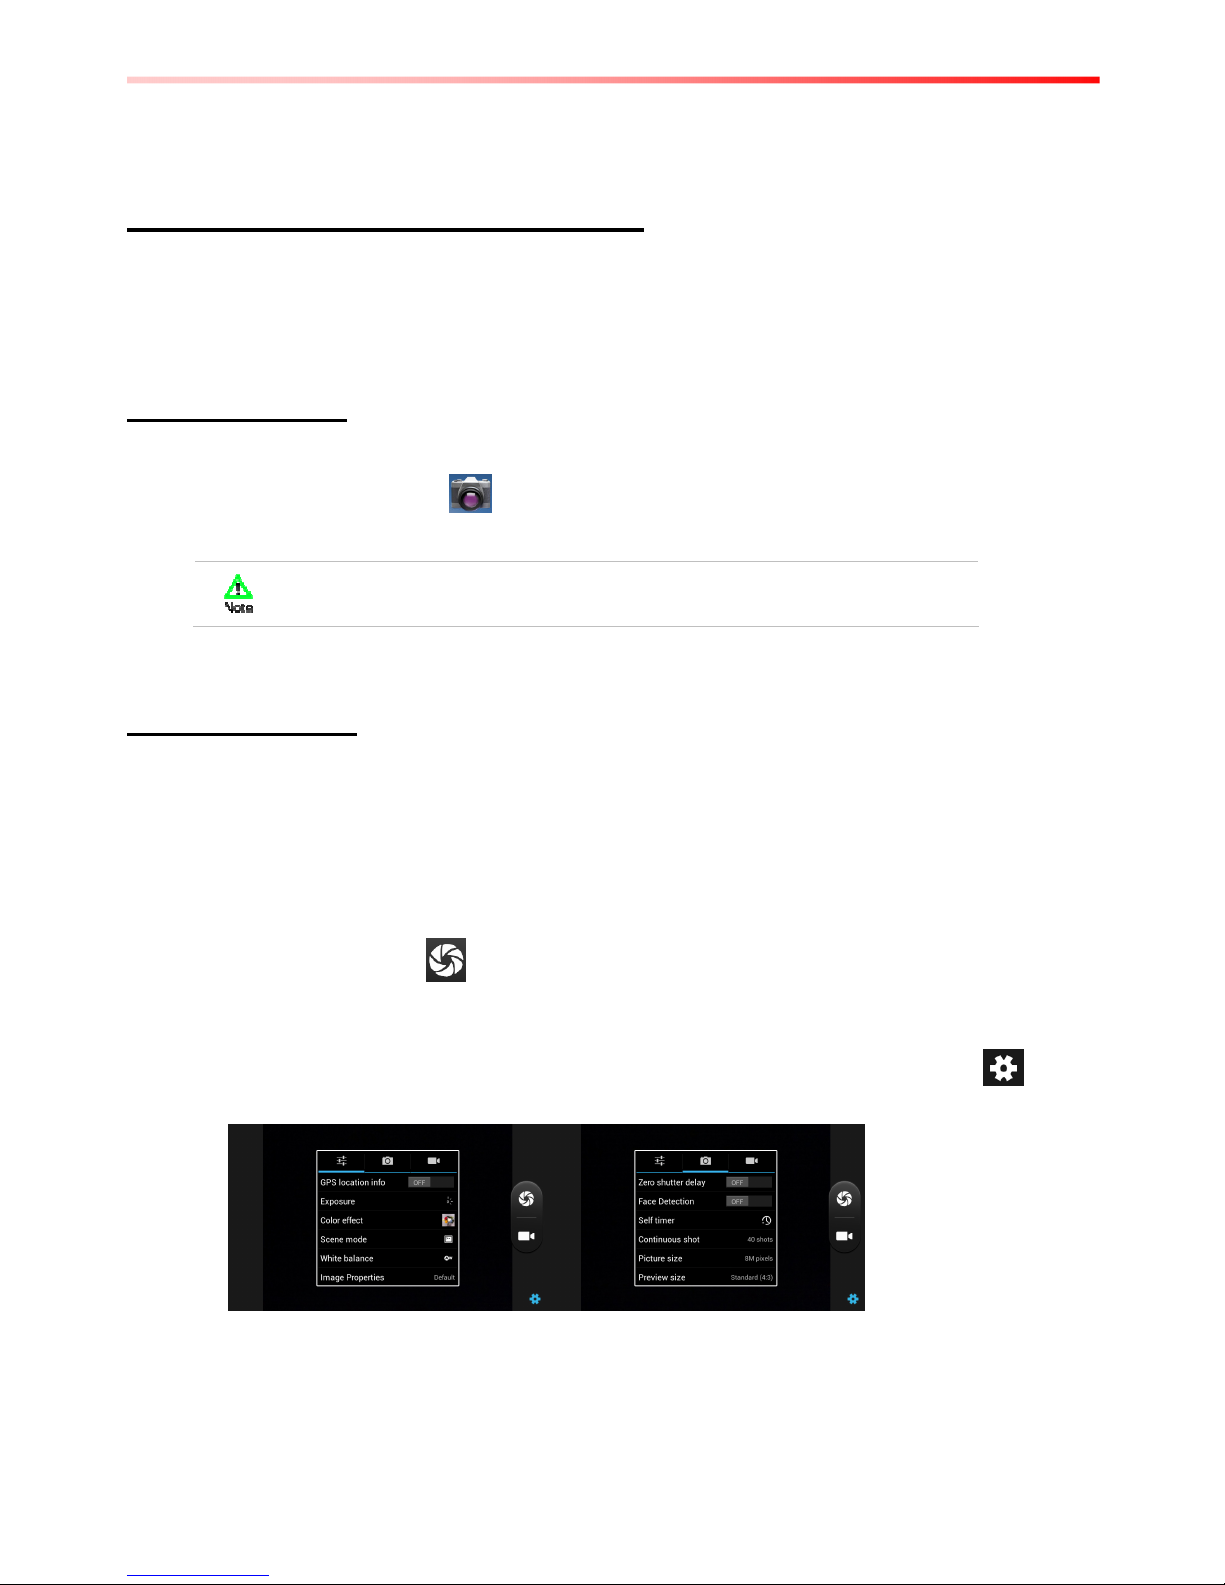
1. .............................................................................................................. Adjust the
exposure, flash, and other necessary settings. Or leave it automatic.
2. .............................................................................................................. Frame your
subject / object on screen
Pinch to zoom in or out.
3. .............................................................................................................. Tap the On
Screen Shutter icon
The camera brings the image into focus, when the image is in focus, the focus
indicators in each corner will turn green and ready to capture
4. .............................................................................................................. Touch to
change camera settings
Page 32
7-inch Rugged Android Tablet PC C1D2 Edition User Guide 29
Viewing Pictures
1. .............................................................................................................. After taking a
photo, a thumbnail of the picture is shown on the corner of the capture screen. Tap the
thumbnail to view it
2. .............................................................................................................. Tap the onscreen
button
to share photo
to delete photo
to view other photo or video in the galleries Swipe right or left to view more
Shoot a Video
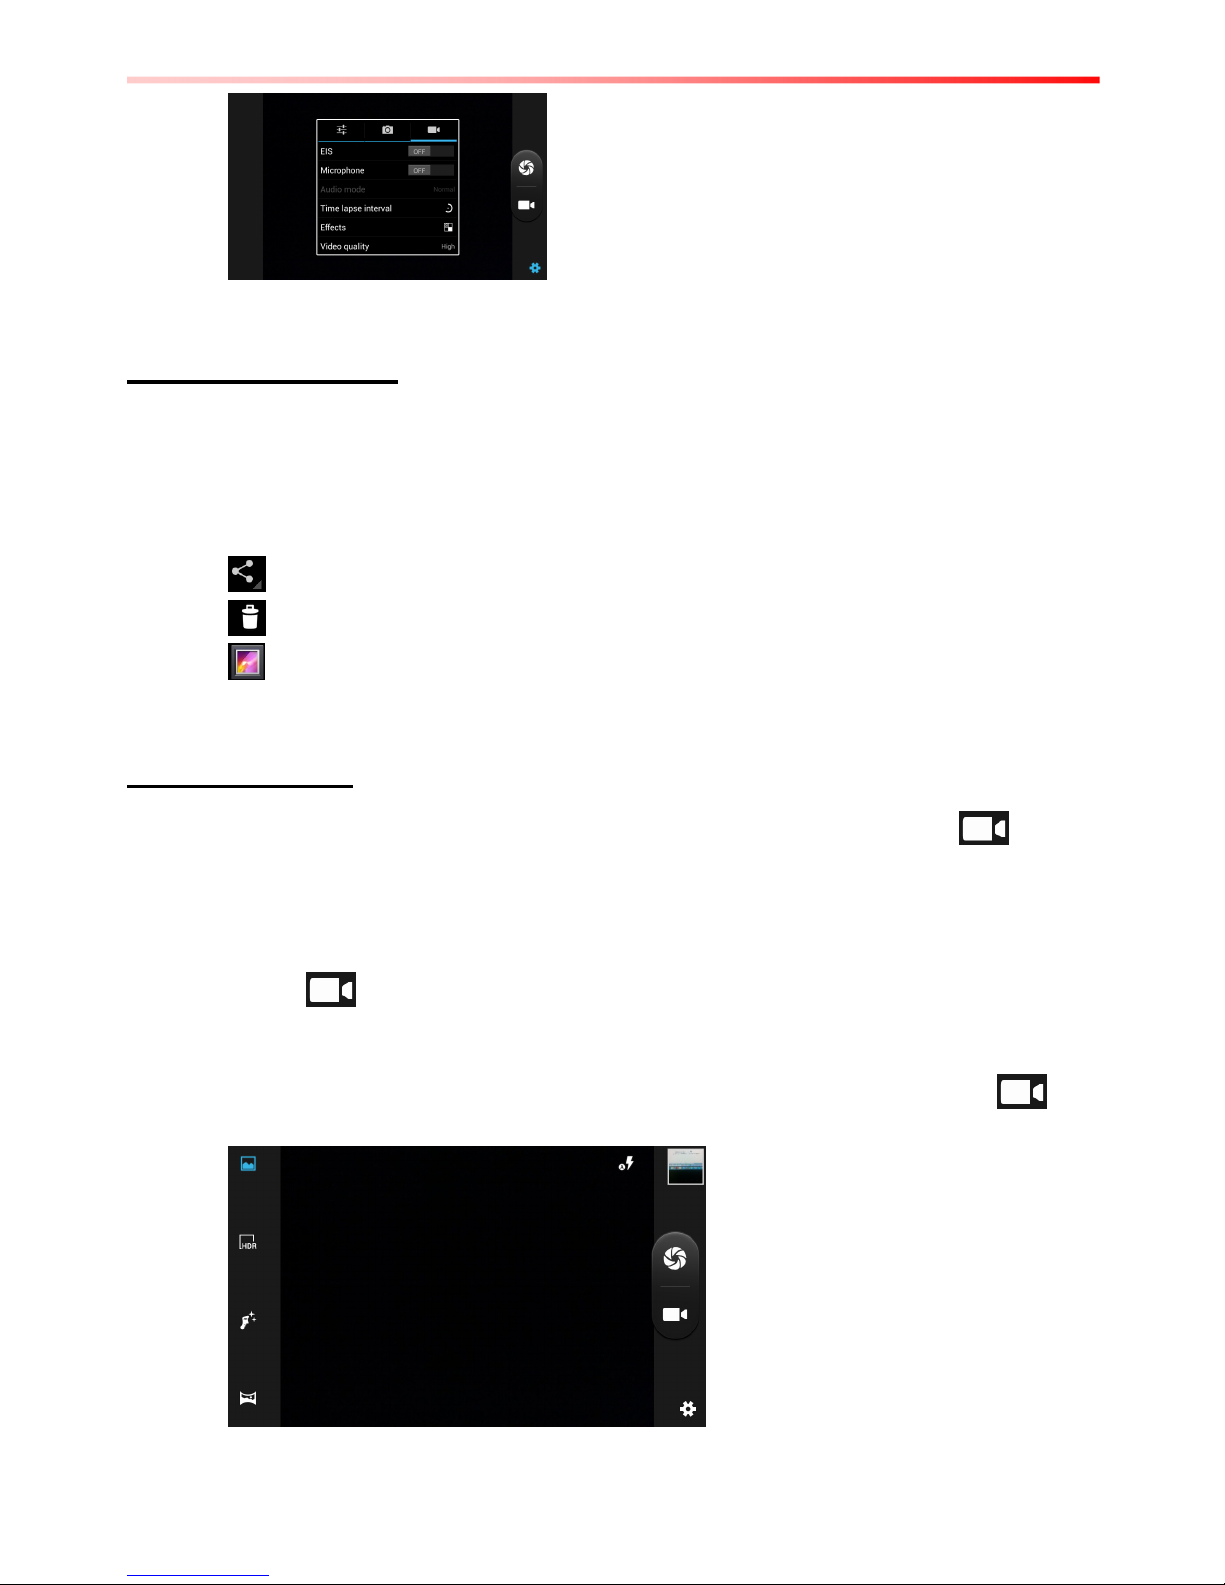
1. .............................................................................................................. Tap to
switch from camera to video mode
2. .............................................................................................................. Point the lens to
record the scene where you want to start
3. .............................................................................................................. Tap the On
Screen icon to start recording
The time remaining to shoot counts down at the left; when less than a minute is left,
the countdown turns red
4. .............................................................................................................. Tap the
icon again to stop shooting
Page 33

30 7-inch Rugged Android Tablet PC C1D2 Edition User Guide
Opening the Gallery
1. .............................................................................................................. Tap the launcher
and then tap Gallery
2. .............................................................................................................. Tap a folder to
view the pictures or video inside in full screen mode
3. .............................................................................................................. Flick the pictures
left or right to view the previous or next picture
Page 34
7-inch Rugged Android Tablet PC C1D2 Edition User Guide 31
Chapter 6: Accessories
The tablet computer offers the following optional accessories that can be purchased:
Vehicle Dock
• VESA Mounting support
• USB 2.0 x 2
• LAN (10/100)
• COM (RS232)
• 9-36V DC IN with 3-pin terminal block
• Easy insert and release with key-lock
Desk Dock
• USB 2.0 x 4 (Rear x 2, Side x 2)
• LAN (10/100)
• COM (RS232)
• 12V DC IN
Carry Bag
• Allow users to carry the device easily
Hand Strap
• Ergonomic hand-strap can help you handle
the Rugged Tablet PC much more easily and
comfortably.
Capacitive Touch Stylus
• For Capacitive Touch
Micro SD Card
• 4GB Micro SD Card
Page 35
 Loading...