

Page 1

Winmate M133W
Ultra Rugged Tablet PC
Microsoft
®
Windows
®
10 IoT Enterprise.
Microsoft® Windows® Embedded 8.1 Industry Pro.
Microsoft® Windows® Embedded Standard 7.
Microsoft® Windows® 7 Ultimate/Professional for Embedded Systems.
Product Reference Guide
Page 2

M133W User Guide
ii
Revision
Arthor
Date
Description
1.0
Henry Lee
Sept. 11, 2015
Initial Release
1.1
Henry Lee
Sept. 25, 2015
Update First Time Setup Section
1.2
Henry Lee
Oct. 13, 2015
Add MotoSettings Instruction
1.3
Henry Lee
Oct. 20, 2015
Update First Time Setup Section
1.4
Henry Lee
Jan. 19, 2016
Add Changing the Touchscreen modes
1.5
Henry Lee
Apr. 14, 2016
Add Setting up Windows 10 IoT Enterprise
Add instruction for LED/HF RFID/GPS/Light Sensor
Revision History
Page 3

M133W User Guide
iii
Note
• Display images shown may vary slightly from actual display. Information in this manual is subject to change without
notice.
Copyright © 2015 Winmate Communication Inc. All rights reserved.
No part of this manual may be reproduce, copied, translated, or transmitted in any form or any means, electronic or
mechanical, for any purpose, without the written permission of Winmate Communication Inc.
Trademarks
All product names, trademarks or logos mentioned herein are the properties of their respective owners.
Microsoft, Windows, and the Windows logo are either registered trademarks or trademarks of Microsoft Corporation
in the United States and/or other countries. Microsoft products are licensed to OEMs by Microsoft Licensing, Inc., a
wholly owned subsidiary of Microsoft Corporation.
The Bluetooth® word mark and logos are registered trademarks owned by Bluetooth SIG, Inc.
All other brand and product names are trademarks or registered trademarks of their respective owners.
Disclaimer
Winmate Communication Inc. reserves the right to make any product changes without notice, including circuits
and/or software described or contained in this manual in order to improve design and/or performance. Winmate
Communication Inc. assumes no responsibility or liability for the use of the described product(s), conveys no
license or title under any patent, copyright, or masks work rights to these products, and makes no representations
or warranties that these products are free from patent, copyright, or mask work right infringement, unless otherwise
specified. Applications that are described in this guide are for illustration purposes only. Winmate Communication
Inc. makes no representation or warranty that such application will be suitable for the specified use without further
testing or modification.
Warranty
Winmate Communication Inc. warrants that each of its products is free from material and workmanship defect for a
period of one year starting from the invoice date. If the customer discovers a defect, Winmate Communication Inc.
will, at its option, repair or replace the defective product at no charge to the customer, provided it is returned during
the warranty period, with transportation charges prepaid. The returned product must be properly packaged in its
original packaging to obtain warranty service.
Page 4

M133W User Guide
iv
CONTENTS
Chapter 1: Read Me First ................................................................................. 1-1
1.1 Safety Information ...................................................................................................... 1-1
1.1.1 Precaution on Battery Pack ........................................................................................................... 1-1
1.1.2 General Product Safety ................................................................................................................. 1-1
1.2 Handling and Maintenance ......................................................................................... 1-2
1.2.1 General Guideline ......................................................................................................................... 1-2
1.2.2 Cleaning Guideline ........................................................................................................................ 1-2
1.2.3 Touchscreen Guideline .................................................................................................................. 1-2
Chapter 2: Getting Started ............................................................................... 2-1
2.1 Unpacking .................................................................................................................. 2-1
2.1.1 Check and identify the supplied accessories: ............................................................................... 2-1
2.2 Description of Parts .................................................................................................... 2-2
2.2.1 Front LED Indicators Detail: .......................................................................................................... 2-3
2.2.2 Front Button Details: ...................................................................................................................... 2-3
2.3 Combination Keys (Keyboard Key Emulation) ............................................................ 2-4
2.4 First-time Operation .................................................................................................... 2-5
2.4.1 Insert SIM Card (for optional 3G/LTE equipped device) ............................................................... 2-5
2.4.2 Insert Battery Pack ........................................................................................................................ 2-6
2.4.3 Remove Battery Pack .................................................................................................................... 2-6
2.5 Using Hot Swappable Battery Feature ....................................................................... 2-6
2.5.1 Perform the following to hot swap the batteries: ........................................................................... 2-6
2.6 Connecting to Power Supply ...................................................................................... 2-7
2.6.1 Perform the following to connect the Tablet computer to AC Power: ............................................ 2-7
2.7 Kickstand Installation .................................................................................................. 2-7
2.8 Turning On / Off .......................................................................................................... 2-8
2.8.1 Turning On ..................................................................................................................................... 2-8
2.8.2 Turning Off (By Windows) ............................................................................................................. 2-8
Chapter 3: Setting up Windows for the First Time ........................................ 3-1
3.1 Setting up Windows 10 IoT Enterprise ....................................................................... 3-1
3.2 Setting up Windows Embedded 8.1 Industry Pro ....................................................... 3-3
3.3 Setting up Windows 7 Ultimate/Professional .............................................................. 3-8
Page 5

M133W User Guide
v
Chapter 4: Using the Tablet .................................................................................. 4-1
4.1 HotTab Introduction .................................................................................................... 4-1
4.2 Using the physical function keys (Hotkeys) ................................................................ 4-2
4.3 Changing the Touchscreen modes ............................................................................. 4-3
4.4 Using the Wireless LAN (Wi-Fi) feature ..................................................................... 4-7
4.5 Using the Wireless WAN feature ................................................................................ 4-7
4.6 Using the GPS feature ............................................................................................... 4-8
4.7 Using the Bluetooth feature ....................................................................................... 4-8
4.8 Turn on/off the LED Indicators ................................................................................... 4-9
4.9 Using the Front and Rear Camera feature ............................................................... 4-10
4.9.1 Description of Camera User Interface Buttons: ........................................................................... 4-11
4.10 Using the Barcode Reader Feature ....................................................................... 4-12
4.10.1 Trigger Setting ........................................................................................................................... 4-13
4.10.2 Settings ...................................................................................................................................... 4-14
4.11 Using the HF RFID Reader feature ........................................................................ 4-17
4.11.1 Trigger Setting............................................................................................................................ 4-18
4.11.2 Settings ...................................................................................................................................... 4-19
4.11.3 RFID Output Setting ................................................................................................................... 4-21
4.12 Turn on/off the GPS Ext. Antenna .......................................................................... 4-22
4.13 Turn on/off Light Sensor ......................................................................................... 4-23
4.14 Setting the 2D Barcode Scanner Symbologies ...................................................... 4-24
4.14.1 Symbologies Default Settings: ................................................................................................... 4-24
4.15 Using the MotoSetting Application to set the Symbologies .................................... 4-28
4.16 Configuring High Resolution Screen Scaling and Setting ...................................... 4-33
4.17 Changing display scaling setting (Recommended) ................................................ 4-34
4.18 Changing screen resolution setting ........................................................................ 4-36
4.19 Using the HotTab Shortcuts (On-screen Software Shortcut) .................................. 4-37
4.20 Accessing the Device Information (HotTab Setting) ............................................... 4-38
4.21 Using Recovery Wizard to Restore Computer ....................................................... 4-39
Chapter 5: Troubleshooting ............................................................................ 5-1
5.1 Troubleshooting (Basic) ................................ ................................ ............................. 5-1
Page 6

1
1-1
Read Me First
1.1 Safety Information
Follow and adhere to all warnings and instructions in this manual. For your safety, please read all safety and
operating instructions before using the product. Keep this manual for future reference.
1.1.1 Precaution on Battery Pack
1. Do Not Expose the Battery Pack to Excessive Heat, or Extreme Heat (Near Fire, in Direct Sunlight for example)
Generation of heat, ignition or rupture may result
2. Do Not Disassemble, Modify, or Insert Sharp Objects Into the Battery Pack.
Electrolyte leakage, generation of heat, ignition or rupture may result.
3. Do Not Short the Positive (+) and Negative (-) Terminals of the Battery. Generation of heat, ignition or rupture
may result. When carrying or storing the device, do not place the battery pack together with articles that may
contact electricity.
4. Do Not Apply Shocks to the Battery by Dropping It or Applying Strong Pressure to It. Electrolyte leakage,
generation of heat, ignition or rupture of battery may occur.
5. Do Not Charge the Battery Other Than Methods Those Specified In This Manual. If the battery is not charged
using one of the specified methods, electrolyte leakage, generation of heat, ignition or rupture may result.
6. When the Battery Pack Has Deteriorated, Replace It with a New Battery. Continued use of a damaged battery
pack may result in heat generation, ignition or battery rupture.
7. Do Not Use the Battery Pack With Any Other Products. The battery pack is rechargeable and is only designed
for this specific product. If it is used with a product other than the specified product, electrolyte leakage,
generation of heat, ignition or rupture may result.
8. Do Not Use This Product with Battery Other Than the One Specified.
9. Risk of Explosion if Battery is replaced by an Incorrect Type. Dispose of Used Batteries According to the
Instructions.
1.1.2 General Product Safety
1. This product should not be used near water such as bathtubs, sinks, swimming pools, wet basement, etc.
2. Do not block any ventilation openings. Do not place the product against a wall or in an enclosed space as doing
so might impede the flow of cooling air.
3. Do not place the product near any heat sources such as radiators, warm air intakes, stoves or other heatgenerating devices (including amplifiers or other heat producing equipment).
4. Do not disregard the safety that a polarized or grounded connection can provide. A polarized connection consists
of two plugs, one of which is larger than the other. A grounded connection has two blades and a third one that
is grounded. If the main plug provided cannot be inserted into your outlet, consult an electrician to replace your
obsolete outlet.
5. Protect the power cord from being crushed or pinched, particularly in the area of the plugs, any receptacles
used, and the point of exit from the apparatus. Do not break off the ground pin of the power cord.
6. Use only accessories specified by the manufacturer.
7. Use only with its transport carriage, stand, tripod, console or table specified by the manufacturer or sold with the
product. When using a carriage, move the carriage assembly with the product carefully to avoid damage from
falling over.
8. Unplug this apparatus during lightning storms or when it is not being used for long periods.
9. Refer all servicing to qualified service personnel. A technical intervention is required when the apparatus has
been damaged in any way, for example if the power cord or plug is damaged, liquid has been spilled or objects
have fallen inside the unit, if the product has been exposed to rain or moisture, if it does not operate normally or
if it has been dropped.
Page 7

M133W User Guide
1-2
1.2 Handling and Maintenance
Follow and adhere to all warnings and instructions in this manual. For you’re the longevity of the product usage,
please read all operating instructions before using the product. Keep this manual for future reference.
1.2.1 General Guideline
1. Keep the product at least 13 cm (5 inches) away from electrical appliances that can generate a strong magnetic
field such as TV, refrigerator, motor, or a large audio speaker.
2. Do not place heavy objects on top of the tablet computer as this may damage the display.
3. The screen surface can be easily scratched. Use with care. Do not use paper towels to clean the display but use
the included cleaning cloth. Avoid touching it with a pen or pencil.
4. To maximize the life of the backlight in the display, allow backlight to automatically turn off as a result of power
management. Avoid using a screen saver or other software that prevents the power management from working.
1.2.2 Cleaning Guideline
1. Use a soft cloth moistened with water or a non-alkaline detergent to wipe the exterior of the product.
2. Gently wipe the display with a soft, lint-free cloth. Do not use alcohol or detergent on the product.
1.2.3 Touchscreen Guideline
1. Use your finger or the stylus on the display. Using sharp or metallic object may cause scratches and damage the
display, thereby causing errors.
2. Use a soft cloth to remove dirt on the display. The touchscreen surface has a special protective coating that
prevents dirt from sticking to it. Not using a soft cloth may cause damage to the special protective coating on the
touchscreen surface. To clean off hard to remove dirt, blow some steam on the particular area and gently wipe
away using a soft cloth.
3. Do not use excessive force on the display. Avoid placing objects on top of the display as this may cause the
glass to break.
4. When there is a noticeable discrepancy in the operation of the touchscreen function (your touch does not
correlate to the proper location on the screen), recalibrate the touchscreen display.
1.2.4 General Guideline
1. It is recommended to reboot the device when some functions are defect or inactive. If it still can't solve the
problems please contact your dealer or agent.
Page 8
2
2-1
Getting Started
When there is a noticeable discrepancy in the operation of the touchscreen function (your touch does not correlate to
the proper location on the screen), recalibrate the touchscreen display.
Congratulations on purchasing this rugged Tablet Computer. The rugged design allows you to use it in harsh outdoor
environments.
This chapter tells you step by step how to get the Tablet Computer up and running. You will find instructions for the
following procedures:
• Unpacking
• Description of Parts
• First Time Operations
• Turning On/Off
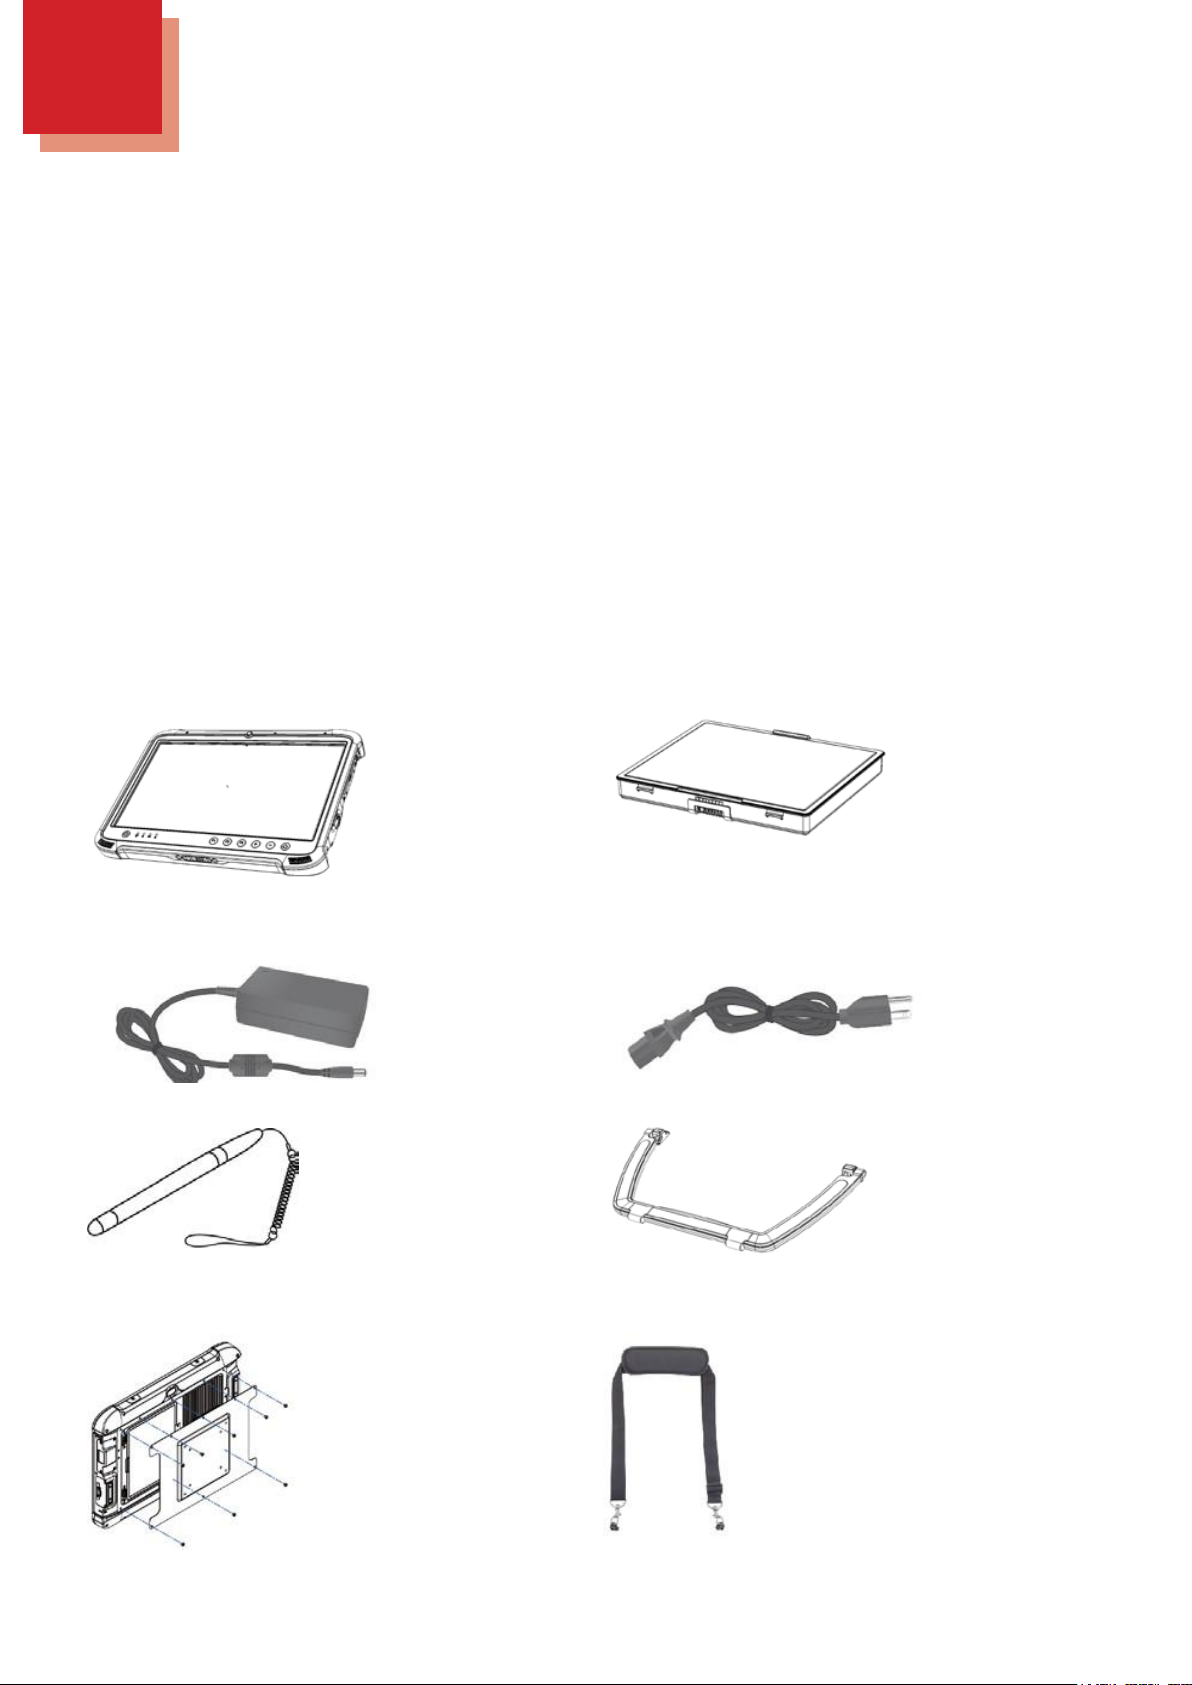
2.1 Unpacking
2.1.1 Check and identify the supplied accessories:
Tablet Computer Standard Battery
Power Adapter Power Cord and Plugs
Stylus Kickstand (optional)
VESA Mounting Kit (optional) Shoulder Strap (Optional)
Page 9
M133W User Guide
2-2
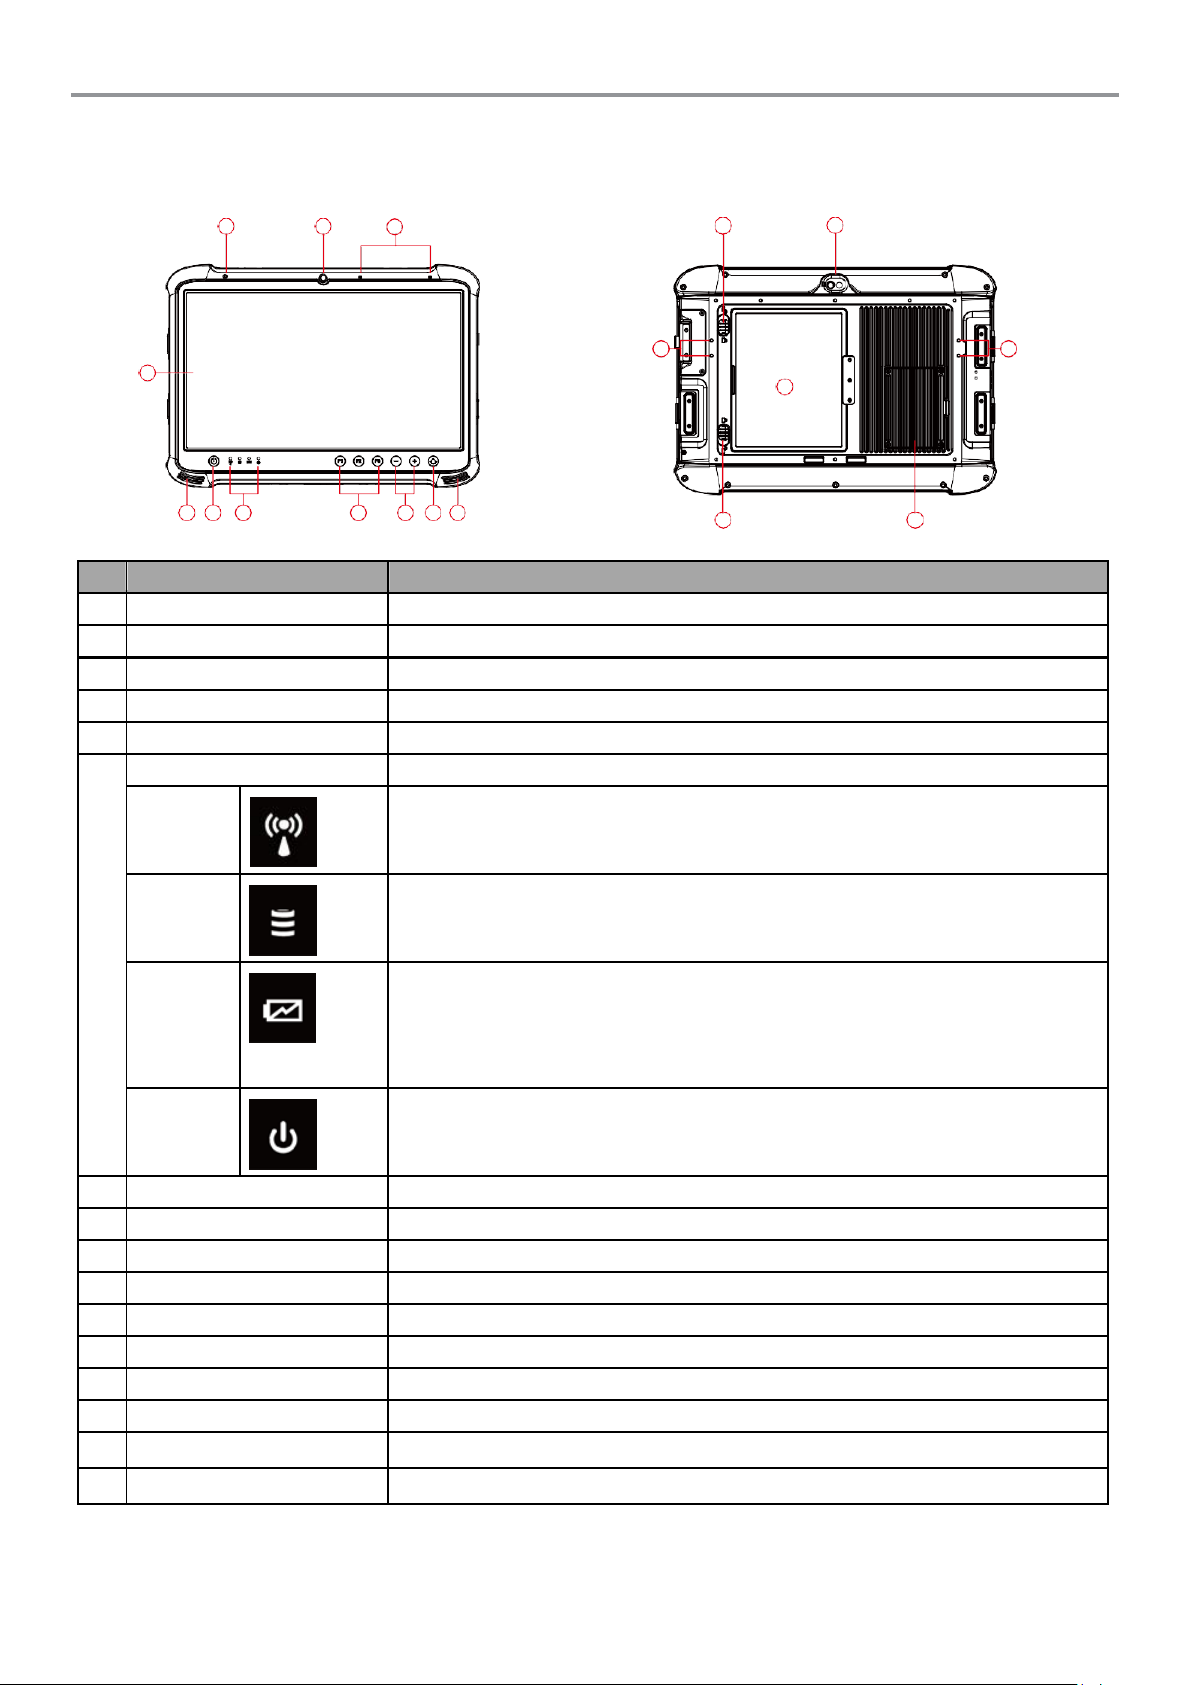
No
Item
Description
1
Front Camera
2 Megapixel Webcam
2
Microphone
Digital Microphones
3
Menu Button
HotTab Quick Access
4
+/- Buttons
Change be used to control volume
5
Fn Buttons
Programmable Function Buttons
6
LED Indicators:
Show the current status of the Tablet Computer
RF
Green - WiFi/BT/3G/GPS ON
No light - None of WiFi/BT/3G/GPS is ON
HDD
Green - Harddrive Activity
No light - Harddrive Idling
Battery
Orange – AC adapter is plugged in and charging
Green – AC adapter is plugged in and battery is completely charged
Solid Red - Low battery (<10%)
Blinking Red – Battery is being hot swapped.
Not lit – Battery is in use and more than 10%
Power
Blue – Tablet is ON
No light – Tablet is OFF
7
Power Button
Turns on/off tablet
8
Speakers
Emit sounds
9
Light Sensor
Controls screen brightness
10
Touchscreen
Display and input for tablet
11
Rear Camera
5 Megapixel Camera with Flash
12
Service Window
Access to 2 SSD M.2 slots,1 WWAN mPCIe slot, and Micro Sim Slot.
13
Battery
User-replaceable battery
14
Battery Lock Latch
Latch to lock the battery once battery is inserted. Not spring-loaded.
15
Battery Release Slider
Spring-loaded slider that latches the battery in.
16
Kickstand Screw Holes
Screw holes to mount the kickstand onto the tablet
13
2.2 Description of Parts
Front
10
9 1 2 14 11
8 7 6 5 4 3 8
Rear
16 16
15 12
Page 10

Page 11
M133W User Guide
2-3
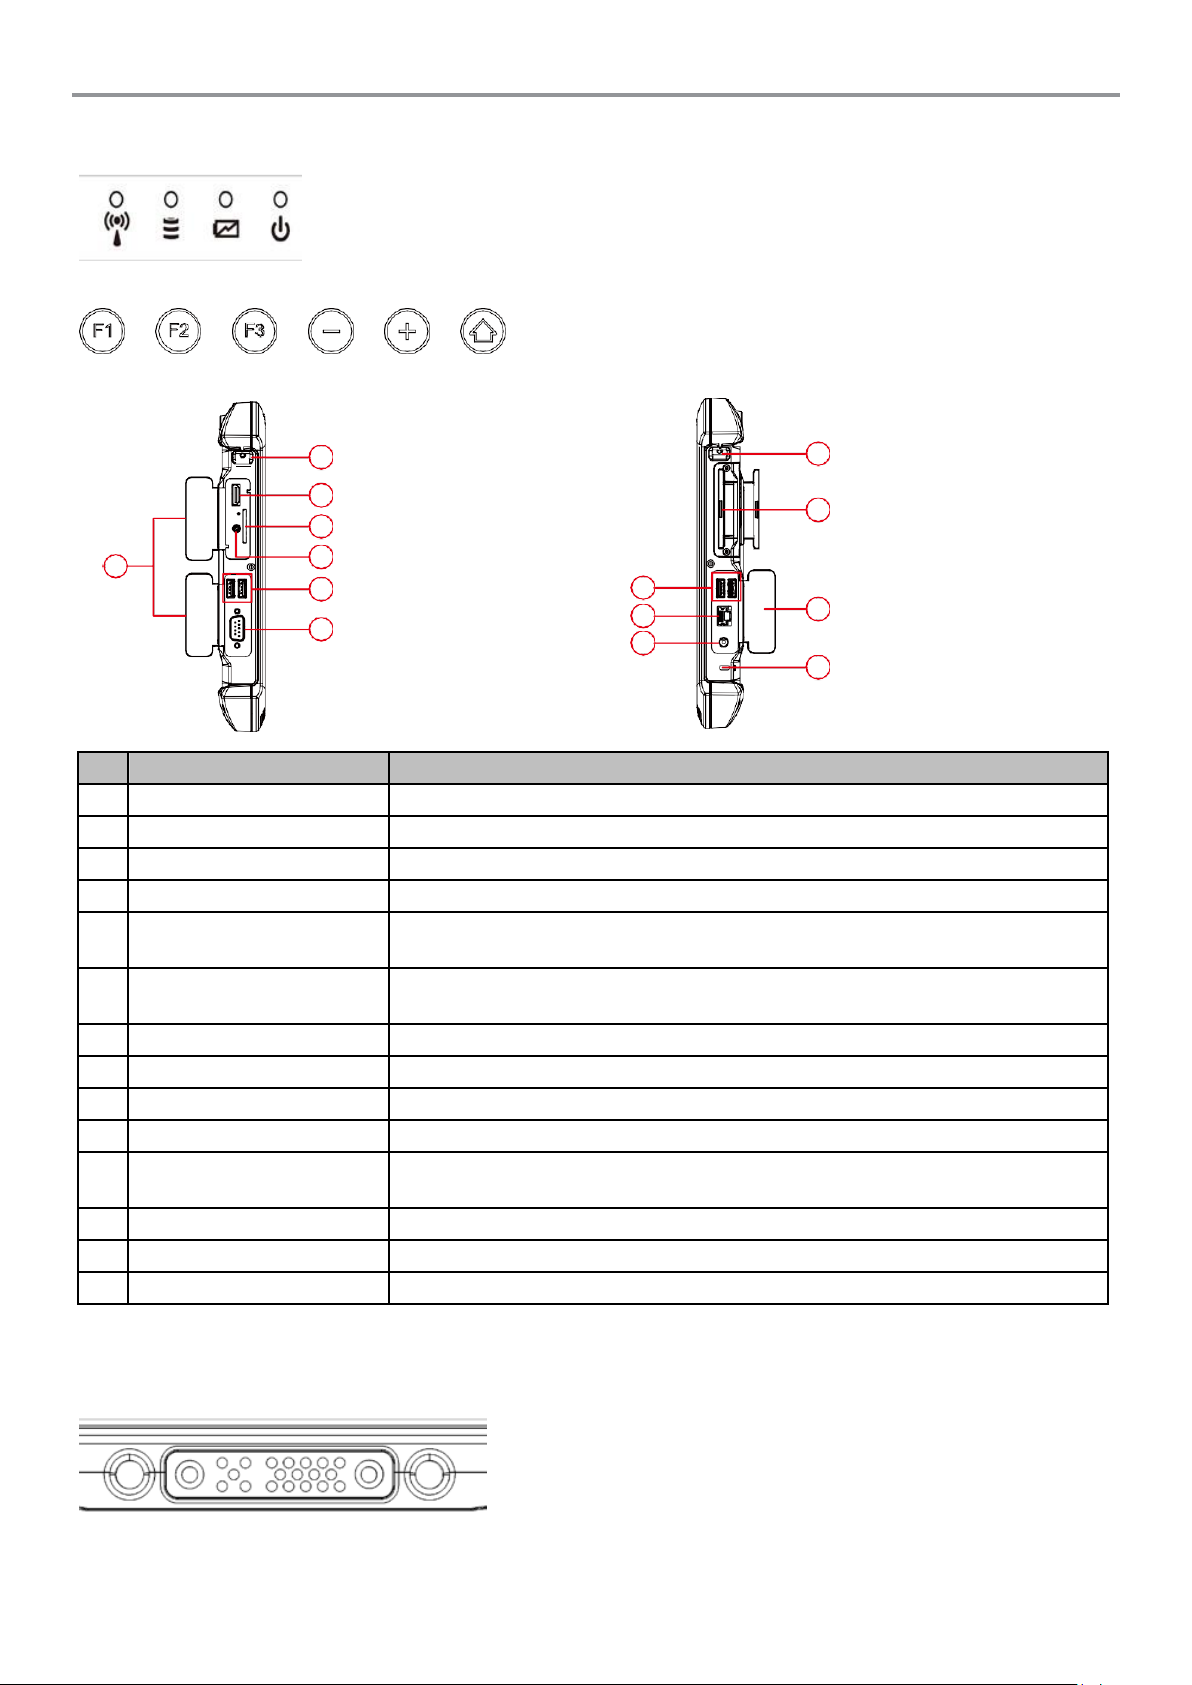
No
Item
Description
17
Shoulder Strap D-Ring
Provides loop to mount shoulder strap
18
I/O Cover
Protects I/O Ports
19
HDMI
HDMI output to external display
20
SD Card
Memory card reader port for SD Card
21
Audio Jack
(Mic In/Line Out)
Headset or headphone can be connected
(Mic is only supported with 3.5mm 4-pin headset)
22
USB 3.0 x 2
2 Ports High Speed USB ports, connects to USB devices such as USB flash
drive, mouse, keyboard, printer, etc.
23
RS232 Serial Port
RS232 COM Port interface for serial communication
24
Shoulder Strap D-Ring
Provides loop to mount shoulder strap
25
I/O Cover
Protects I/O Ports
26
Optional I/O Slot
Option of Smart Card Reader or 1D/2D Barcode Scanner
27
USB 2.0 x 2
2 Ports High Speed USB ports, connects to USB devices such as USB flash
drive, mouse, keyboard, printer, etc.
28
LAN Port
Gigabit Ethernet RJ45 Connector for LAN connection
29
Power Jack
DC-IN Power input jack
30
Kensington Lock Port
Provides lock access for Kensington Lock.
2.2.1 Front LED Indicators Detail:
Front Button Details:
Left Right
18
17
19
20
21
22
23
24
27
28
29
26
25
30
2.2.2 Docking Connector Detail:
Page 12

M133W User Guide
2-4
Buttons
Keystroke
F1
Recovery Menu- See
section 4-3 for more
detail.
Buttons
Keystroke
“+” button & “-” button
Ctrl + Alt + Del
2.3 Combination Keys (Keyboard Key Emulation)
For the physical buttons on the tablet computer, in addition to their dedicated functions detailed in the previous
section, they can also be used to emulate commonly used keyboard key strokes. Under different scenario, a single
physical button or a combination of physical buttons provide different keyboard key strokes, which are specified
below:
Under POST (before Windows boots up): Under Windows:
Page 13
M133W User Guide
2-5
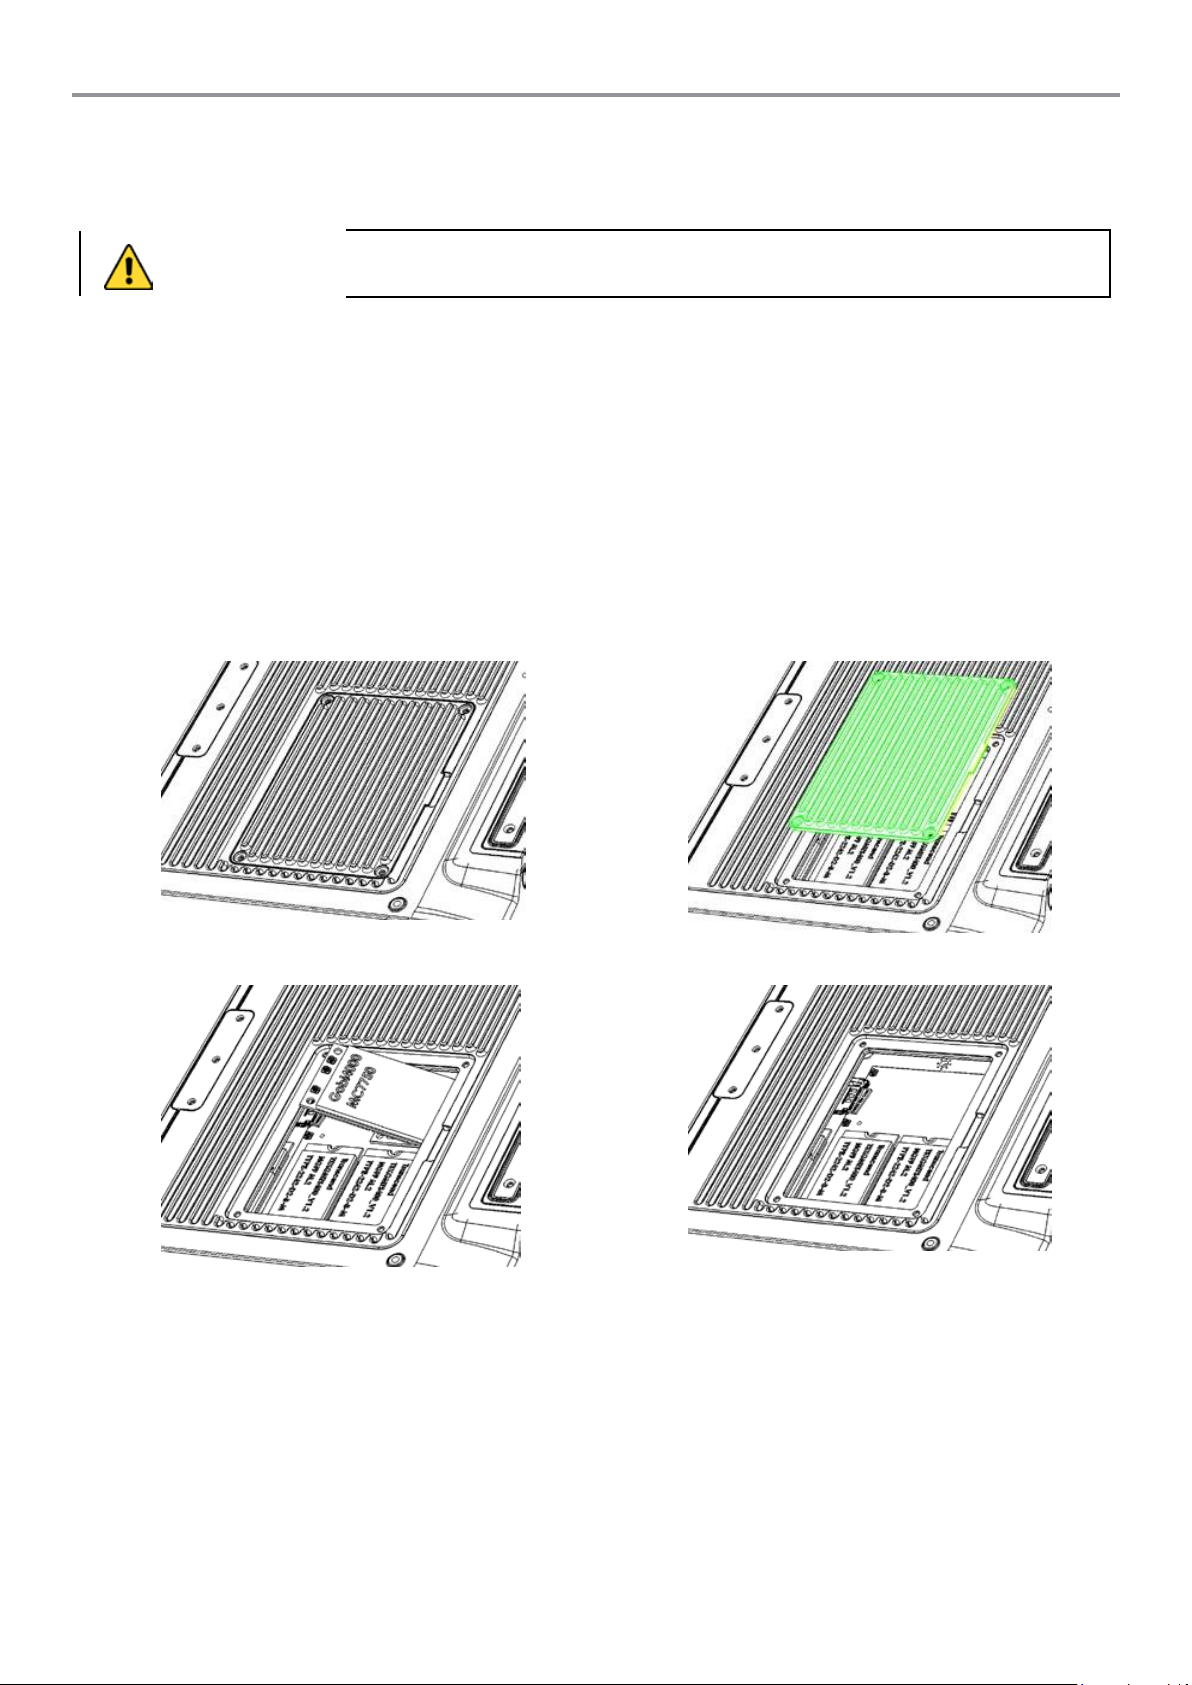
Caution
Please make sure the tablet is powered off, before opening up the service window to
insert the SIM card.
2.4 First-time Operation
2.4.1 Insert SIM Card (for optional 3G/LTE equipped device)
The Tablet Computer supports data connection using 3G/LTE SIM cards and fits Micro-SIM card. (Note: 3G/LTE
feature is optional). Perform the following to install the SIM card to your Tablet Computer:
1. Disconnect any cords connected to the tablet computer.
2. Remove the service window in the rear by unscrewing four screws.
3. Remove the screw that is securing the 3G/LTE module.
4. Carefully lift the 3G wireless module up, and be cautious not to damage the connected cable.
5. Make sure the SIM card IC contact patch is faced down, notch is in the direction of insertion (towards right).
6. Insert the 3G SIM card into the slot located near the right side of the service window.
7. Reposition the removed 3G/LTE module screw to secure the 3G/LTE module.
8. Reposition the removed service window screw to secure the service window.
Page 14

M133W User Guide
2-6
2.4.2 Insert Battery Pack
To insert the included standard battery pack into the Tablet Computer:
1. Disconect any cords connected to the tablet computer
2. Turn the tablet computer over, back facing up.
3. Locate the Battery Lock Latch and push it to the “Unlocked” position.
4. Locate the Battery Release Slider that is spring-loaded. Pull back and hold.
5. Insert the battery on the connector-pins side first, and then lower the battery into the battery compartment.
Continue to hold the Battery Release Slider before battery is fully inserted.
6. Make sure the battery is completely lowered into the compartment before letting go the Battery Release Slider.
Battery will be flat against the housing once fully inserted
2.4.3 Remove Battery Pack
1. Shut down the tablet computer (or put it to sleep). Discconect any cords connected to the computer.
2. Turn the tablet computer over, back facing up.
3. Locate the Battery Lock Latch and push it to the “Unlocked” position.
4. Locate the Battery Release Slider that is spring-loaded. Pull back and hold.
5. Lift the battery out using the opening on side of battery compartment.
2.5 Using Hot Swappable Battery Feature
The tablet computer supports hot-swapping of batteries, meaning the tablet does not need to be powered off in order
to replace the mainbattery. To support such mechanism, there is a backup battery inside the tablet that is charged up
with the main battery. This backup battery cannot be removed, and needs to have adequate power for hot swapping
of main battery to be done without issue. When the backup battery is fully charged, it can sustain up to 5 minutes of
runtime to allow for battery hot-swapping.
2.5.1 Perform the following to hot swap the batteries:
1. While the tablet is powered on, go to HotTab utility to check on the power level of the Backup battery.
2. If the Backup battery level is at “Low”, please charge the tablet with AC Power until the Backup battery level is at
“Medium” or “High”, and do not remove the main battery.
3. If the Backup battery level is at “Medium” or “High”, remove the main battery.
4. Insert a new charged battery into the battery compartment.
Page 15

M133W User Guide
2-7
Caution
Use only the AC adapter included with your Tablet Computer. Using other AC
adapters may damage the Tablet Computer and the Battery.
2.6 Connecting to Power Supply
The Tablet Computer operates either on external AC power or internal battery power. It is recommended to use AC
power when you start up the Tablet Computer for the first time.
2.6.1 Perform the following to connect the Tablet computer to AC Power:
1. On the side of the Tablet computer, lift the I/O protective cover by pulling on the latch
2. Plug the DC cord of the AC adapter into the Power Jack of the tablet computer.
3. Plug the AC power cord into the AC adapter.
4. Finally, Plug the AC power cord into the electrical outlet.
When the AC Adapter is connected, the battery pack starts charging. The battery LED indicator on the tablet
computer would show different states. Please refer to description of LED indicator on Description of Parts.1.
2.7 Kickstand Installation
1. Turn the tablet computer over, so the back of the device is facing up.
2. Place the kickstand bracket with the screw holes in a line. (as the picture above)
3. Put the bracket cover on top of the kickstand screw holes.
4. Fasten all four screws on the bracket cover.
Page 16

M133W User Guide
2-8
• Do not press the power switch repeatedly.
Note
Note
• Forced Power Off:
• In case OS is irresponsible, it may need to be forcibly turned off by holding the power switch.
• The computer will forcibly be turned off if the power switch is pressed and held for six seconds or longer.
2.8 Turning On / Off
2.8.1 Turning On
Press and hold the power switch for 3 seconds until the blue LED power indicator light lid up.
2.8.2 Turning Off (By Windows)
Perform the following procedure to shutdown the Tablet Computer:
1. Make sure you have closed any programs that are open on the Desktop. Start Screen apps don’t need to be
closed.
2. Open the Charms Bar by swiping your finger from the far right of the screen towards the middle of the screen.
3. Tab on the Settings charm.
4. Tab on Power.
5. Tab on Shut Down.
6. Wait for Tablet Computer to power off.
Page 17
3-1
3
Setting up Windows for the First Time
This section details how to setup different version of the Windows that may be installed on the tablet for the first time.
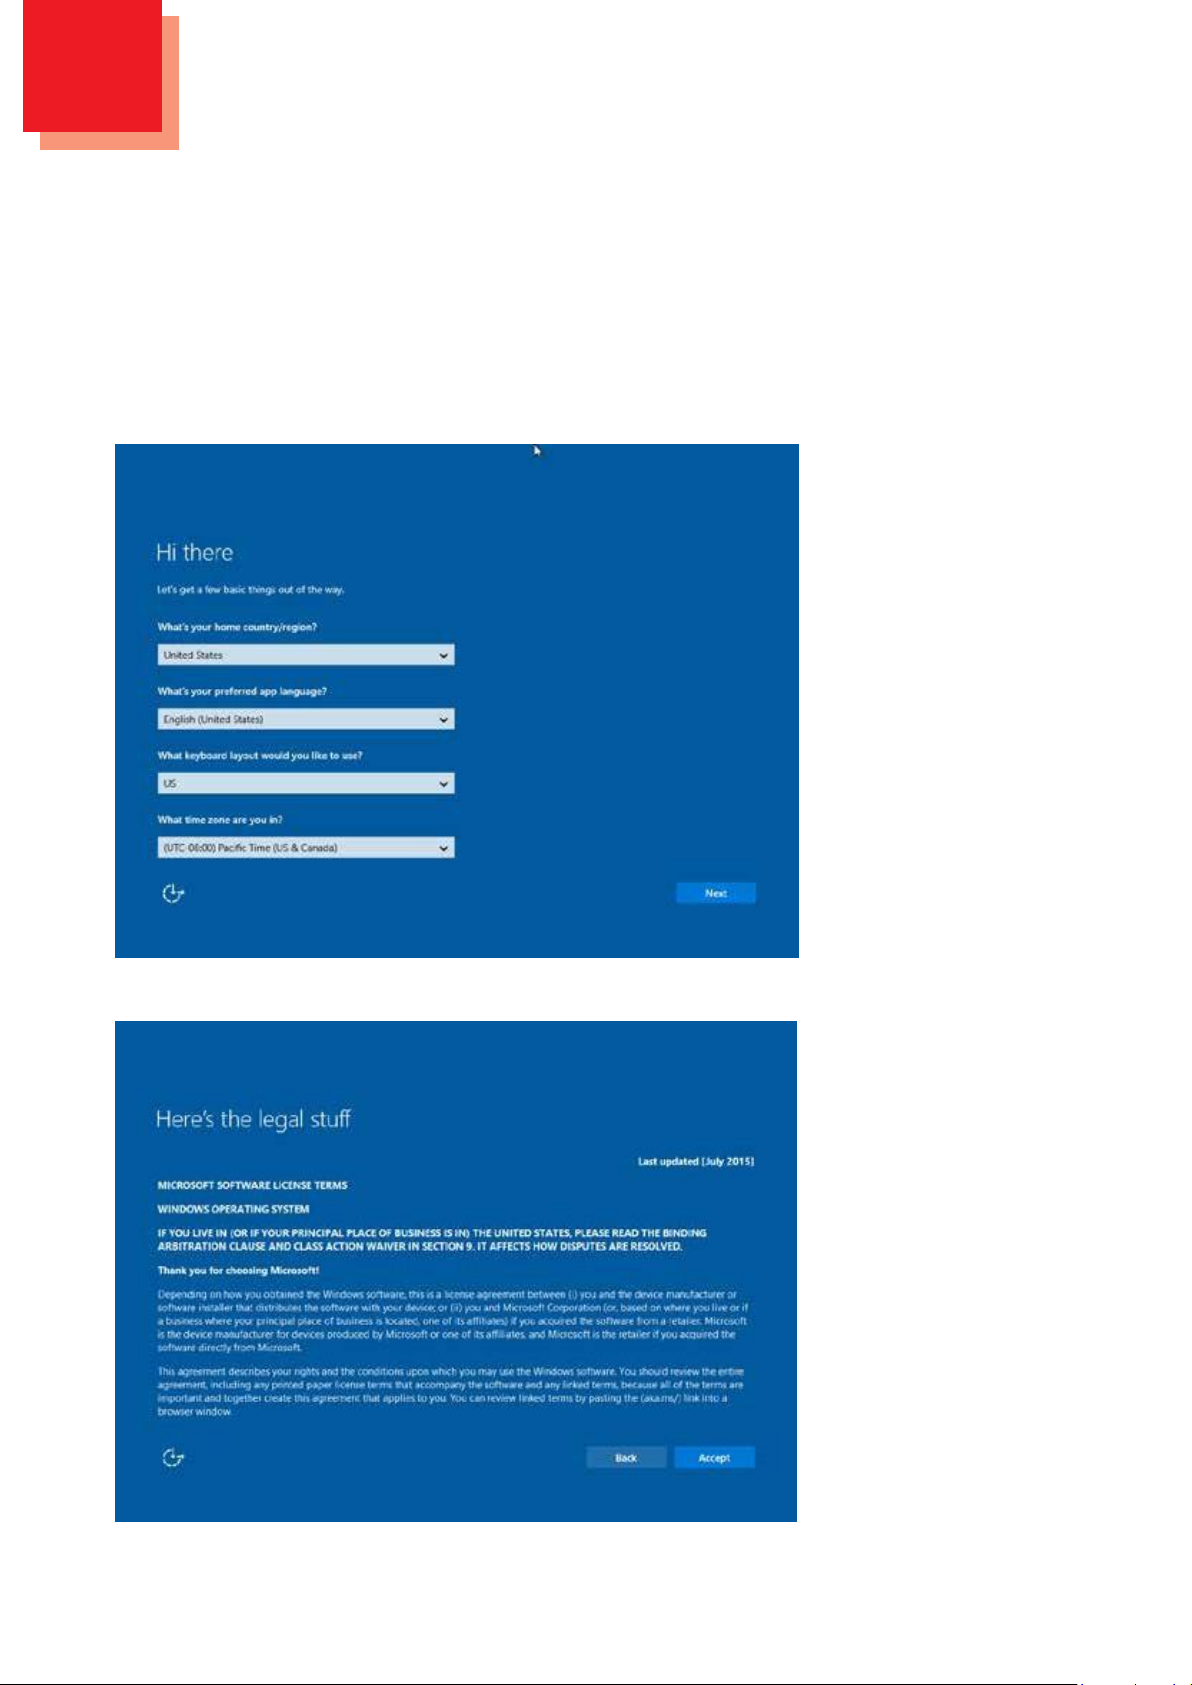
3.1 Setting up Windows 10 IoT Enterprise
Follow the steps below to complete the setup process.
1. Press the power button to turn on the computer.
2. First, select your country/region, your preferred app language, your preferred keyboard layout, and your time
zone, then tap Next.
3. On the Here’s the legal stuff screen, read through the disclosures, then tap Accept.
Page 18
3-2
M133W User Guidee
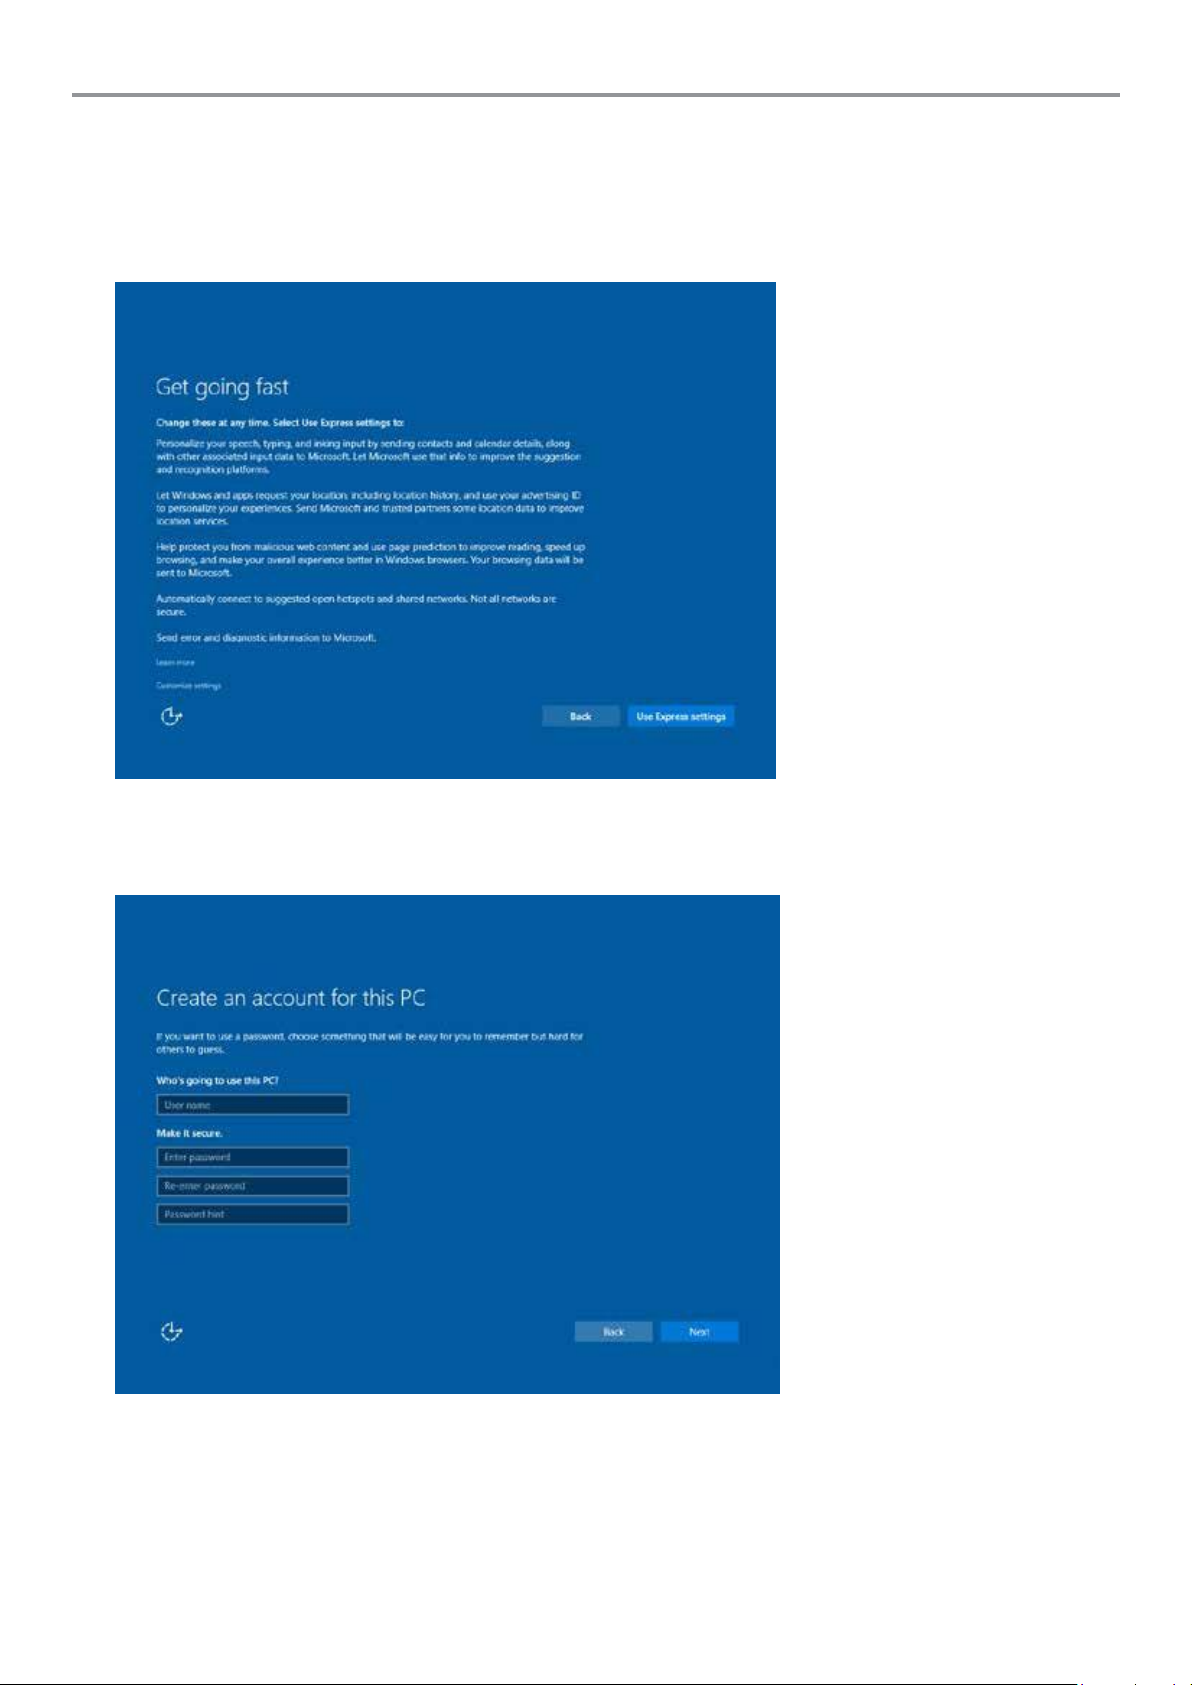
4. Windows will then try to connect to network. Tap Skip this step to continue without a wireless connection as you
can then set up the network later.
5. On the Get going fast screen, click Use Express settings for the fastest setup. If you would like more
information, tap Learn more, or if you would like to select your own options, click Customize settings.
6. To create a local account, type your User name, password, and Password hint in the fields provided, then tap
Next.
7. The initial setup screens are complete, and the desktop is displayed.
8. Read any introductory screens describing features of your computer, and tap Next upon completing each. You
are now done with the initial setup process.
Page 19
3-3
M133W User Guide
Note
• The Windows Product Key for this version of Windows has been pre-installed with the system, so the
user will not need to enter the Product Key when using the tablet for the first time.
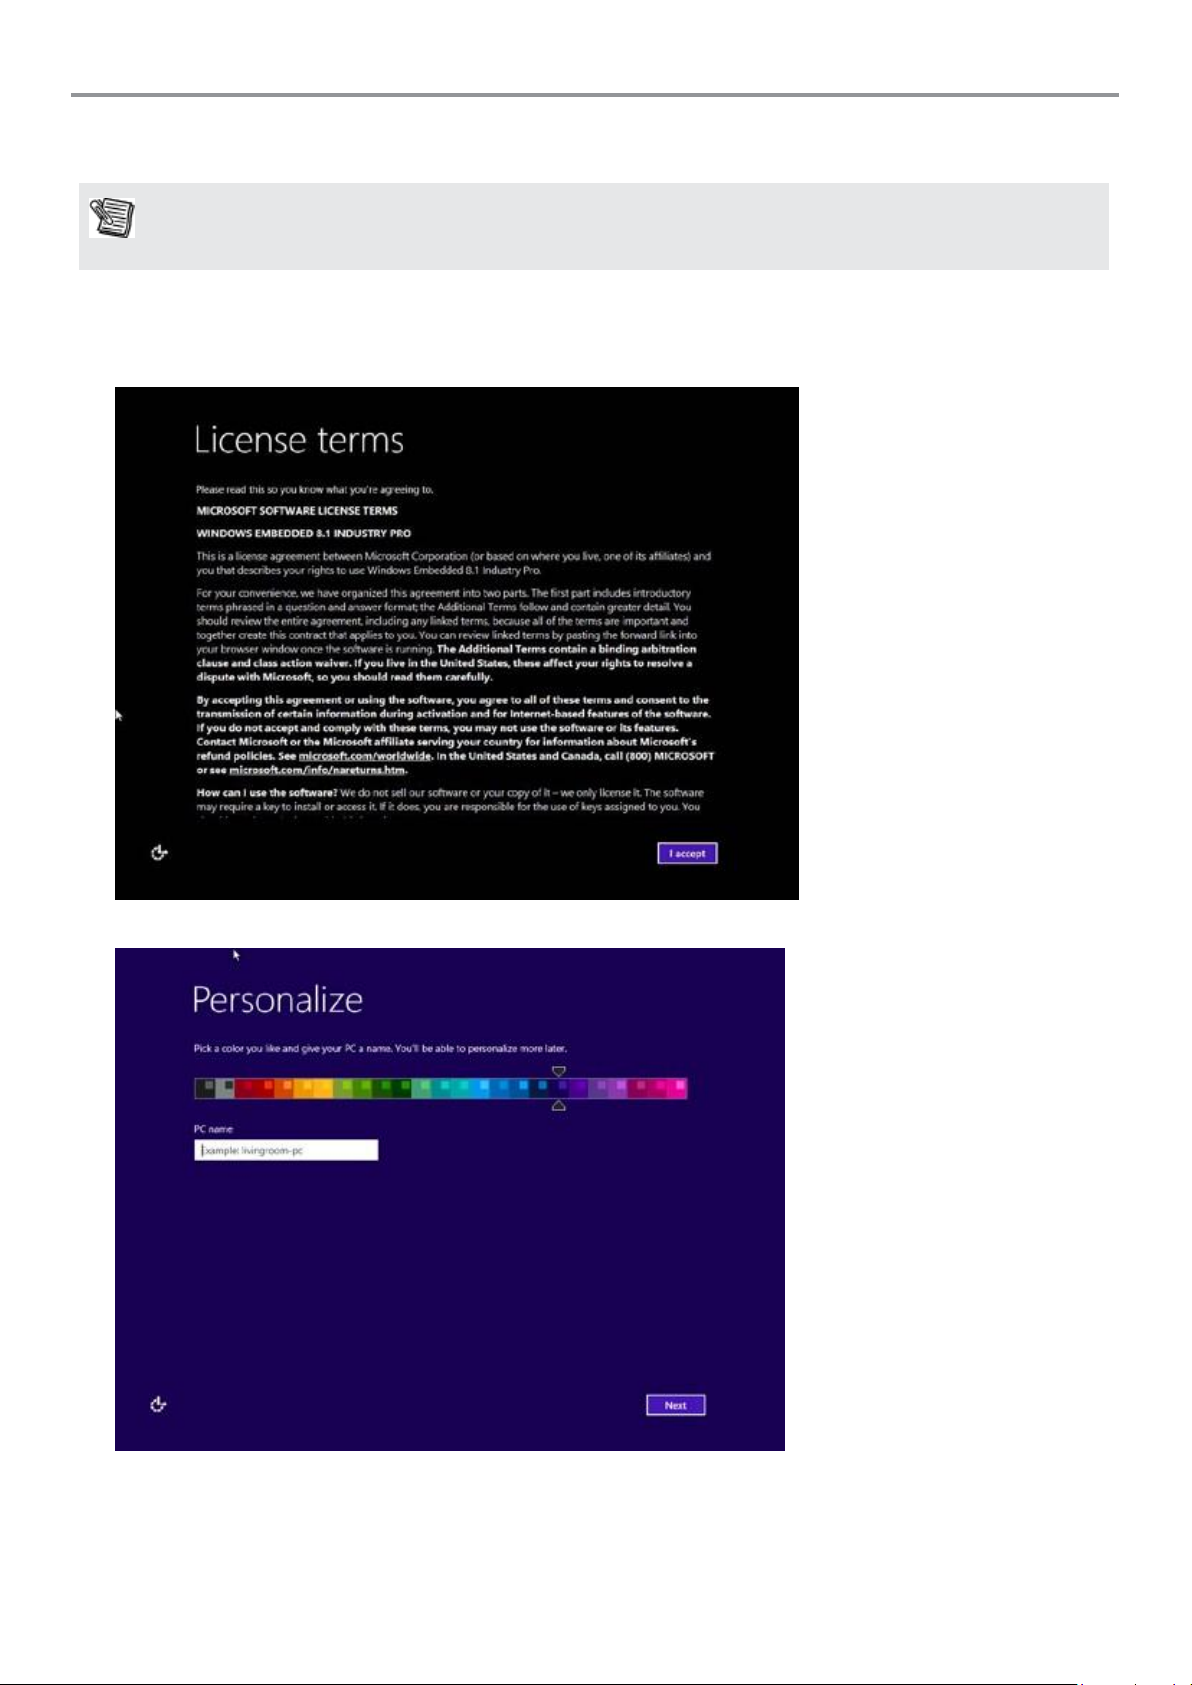
3.2 Setting up Windows Embedded 8.1 Industry Pro
Follow the steps below to complete the setup process.
1. Press the power button to turn on the computer.
2. CheckI accept the license terms for using Windowsto accept the terms, and then click or tapAccept.
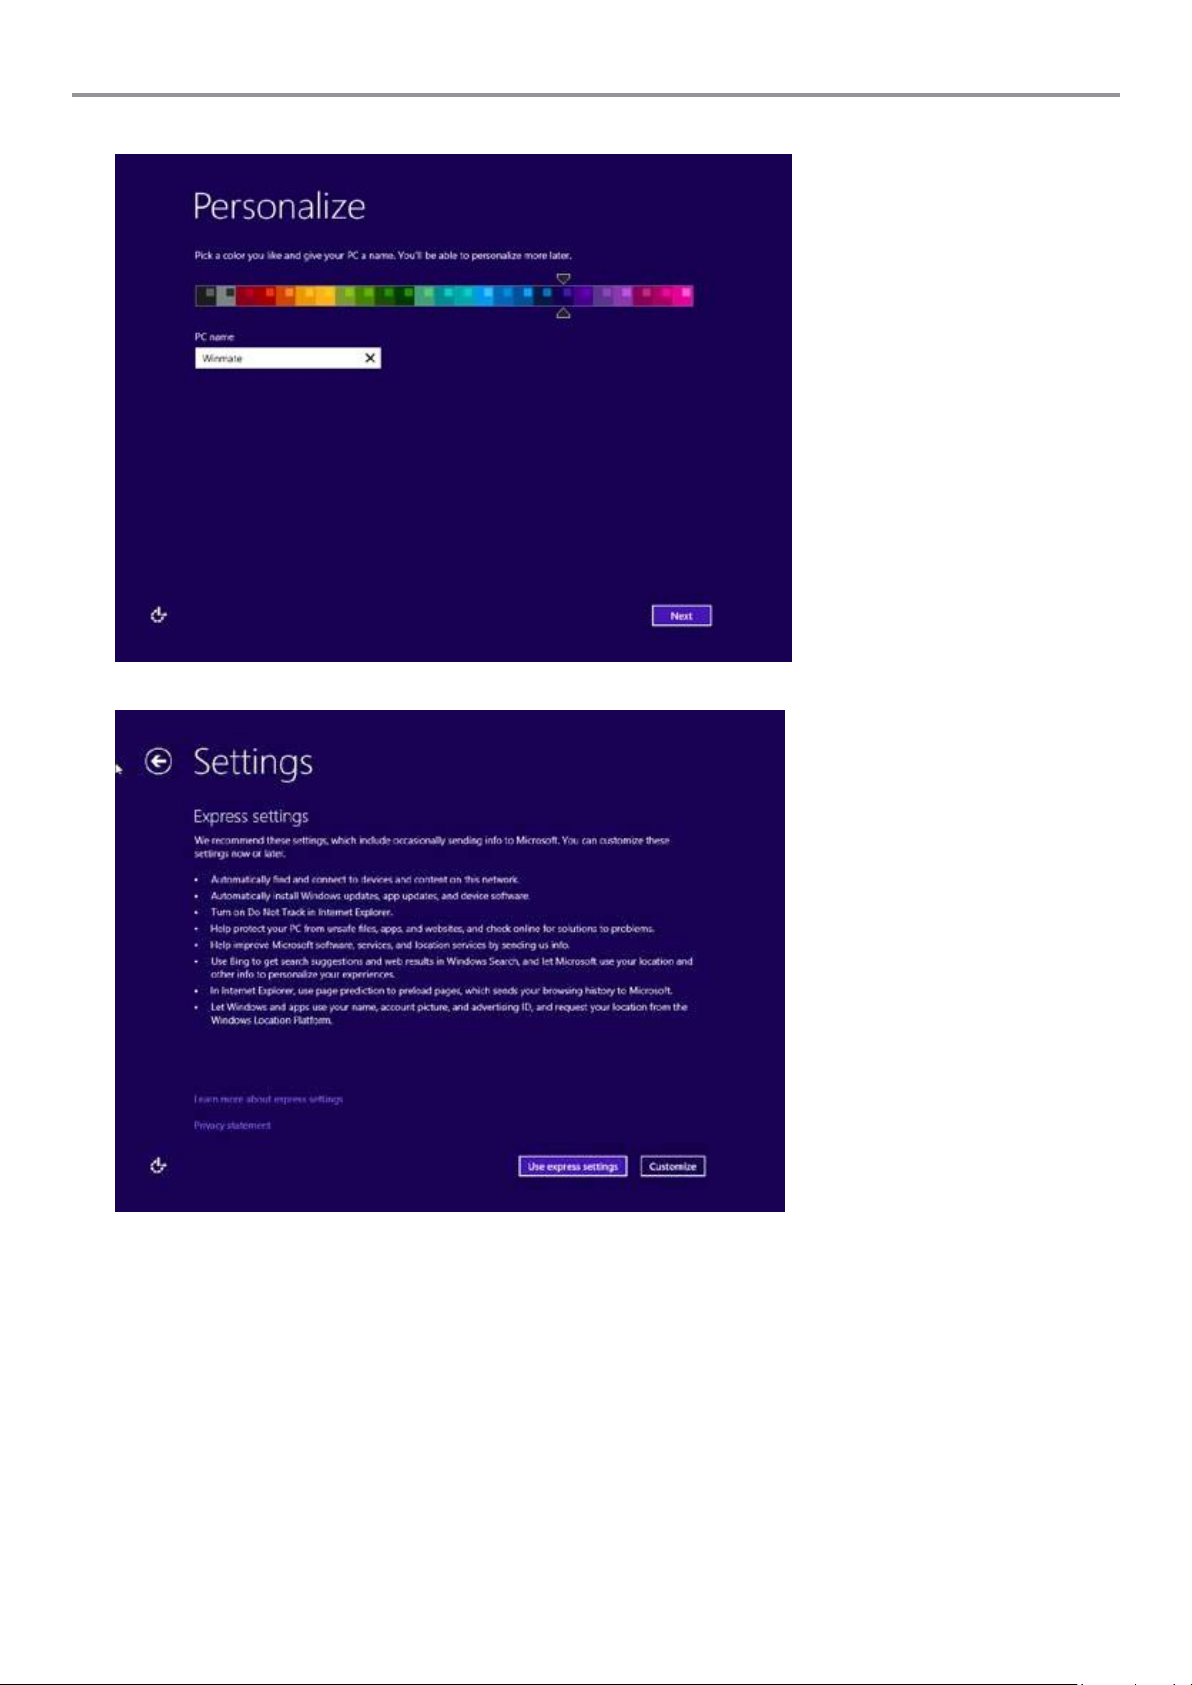
3. On the Personalize screen, choose a color you like – you can always change this later from the Start screen.
Page 20
3-4
M133W User Guidee
4. In thePC namefield, type a name for your computer, and then click or tapNext.
5. On theSettings pagescreen, choose Use express settings for the fastest setup.
Page 21

3-5
M133W User Guide
6. Windows will then try to connect to network. Ignore attempt to connect to internet as you do not need internet
connection to finish setup your pc.
7. On Your account screen, type your username and password to create a local account,
and then click or tapFinish.
Page 22

3-6
M133W User Guidee
8. Windows may take some time to finalize your settings.
9. On theWindows Sign-inscreen, enter the user name and password that you set up earlier, and then pressEnter.
Page 23

3-7
M133W User Guide
10. Once Windows finishes login, you are now ready to use the PC
Page 24

3-8
M133W User Guidee
3.3 Setting up Windows 7 Ultimate/Professional
Follow the steps below to complete the setup process.
1. Press the power button to turn on the computer.
2. First select your region and language information, and then tap Next
3. Type in a user name for your account to be used on this PC and tap Next
Page 25

3-9
M133W User Guide
4. Type in a password for your account and tap Next
5. Now enter the product key that came with the computer and tap Next. For this version of the Windows, a product
key entry is required when setting up the computer for the first time.
Page 26

M133W User Guidee
3-11
6. On the license terms screen, click on the I accept the license terms and tap Next
7. For the update option, choose Use recommended settings for Windows to install updates. If you do not wish
Windows to do so, choose the other options accordingly.
Page 27

M133W User Guide
3-10
8. Next, review the date and time settings on the computer
9. Select the computer current location for network privacy setting. Choose the location below to your actual usage
accordingly.
Page 28

M133W User Guidee
4-1
10. Allow time for windows to setup your desktop for the first time.
11. Now the computer is ready to be used.
Page 29

M133W User Guide
3-12
4
Using the Tablet
4.1 HotTab Introduction
HotTab provides quick access to the tablet’s functions and features, such as turning on/off Wifi, Bluetooth, GPS,
programming function key, and changing power management.
As Windows starts up, HotTab starts and runs in the background. To display the HotTab control utility, press the
(Menu) Button located on the front panel, OR lau nching the HotTab Utility application.
(Menu) Button on the Front Panel: HotTab Utility Icon:
HotTab is designed to be a quick access uility, therefore the main user interface will be on the right side of the screen
without blocking the content on screen. There are 4 main menu options: Short cut, Camera, Device and Settings.
Operations and functions on each menu options is explained in detail in the coming section.
Shortcuts button allows users to configure short cut to quickly access programs with a few tabs.
Camera button allows users take a picture or record a video. User can also adjust setting related to
camera in this menu option.
Device button enables/disables tablet computer’s hardware functions. The configurable functions are
Wi-Fi, WWAN(3G/4G/LTE), GPS, Bluetooth, Camera, LED indicators, Barcode Reader, RFID Reader,
Expansion Port, and GPS Antenna routing options.
Setting button provides users information such as PC Information, Battery status, and also device
settings such as power management setting, and function key mappings.
Page 30

M133W User Guide
4-2
4.2 Using the physical function keys (Hotkeys)
The function key mapping menu option allows user to change the physical
function buttons, F1, F2 and F3. Users can change what application will be
launched with short press or long press of keys.
To configure function key mapping, perform the following:
1. Open the HotTab utility by press the (Menu) Button located on the front
panel, OR launching the HotTab Utility application.
2. Tap on the Setting button.
3. Tap on function key icon for the corresponding key that you want to change.
4. At top of utility, it will say “Short Press” or “Long Press” to indicate what type
of press is being configured
5. You can switch what type of press you want to configure by tapping on the
“Short Press” or “Long Press” icon at the bottom of the utility window.
6. Pick from list of preset applications by tapping on the application icons OR
customize which application to execute using the picker.
Using the Custom picker:
1. Tap the icon to reveal browser window
2. Navigate to the desired executable to map to function key
3. Tap on “Done” to save selection.
To map the function key to another application:
1. Tap on the icon to remove connection to the original application, and
pick again tapping on icon.
Using the physical function keys:
1. While operating the tablet, click on the physical function keys to activate
functions mapped via the setup in this section.
Page 31

M133W User Guide
4-3
Mode
Usage Scenario
Hand/Rain Mode
The Hand/Rain mode is the default operating mode of the touchscreen. Under this mode,
the touchscreen is set to have the ability to reject false touch inputs while liquid is present on
the touchscreen. Once the liquid is removed from the touchscreen, touch inputs from bare
fingertips will continue to operate.
Stylus Mode
Under the Stylus mode, the touchscreen is set to have the ability to pick up touch inputs from
the fine-tip passive capacitive stylus that is shipped with the tablet. Touch inputs from bare
fingertips will also continue to operate.
Glove Mode
Under the Glove mode, the touchscreen is set to have the ability to pick up touch inputs while
the user is operating the touchscreen with gloves on. Touch inputs from bare fingertips will
also continue to operate.
4.3 Changing the Touchscreen modes
The tablet’s advanced capacitive touchscreen has 3 built-in operating modes, for users to choose under different
usage scenarios:
There are 2 ways to switch between the different touchscreen operating modes:
1. Via the built-in HotTab utility
2. Via the programmable function buttons
Switch touchscreen modes via the built-in HotTab utility:
To switch between the different touchscreen modes via the HotTab utility, perform the following procedure:
1. Open HotTab utility by pressing (Menu) Button located on the front panel, OR launching HotTab Utility
application.
2. Choose “Device ON/OFF”and then click on “Touch Set” icon
Page 32

M133W User Guide
4-4
3. The Touch Mode Select utility will be shown as below:
4. Under the “Touch Mode”, select the desired touch modes by tapping on the radio button
.
5. Now the touchscreen mode would behave as configured.
Page 33

M133W User Guide
4-5
Item
Description
Mouse Mode
Single touch point supported, with mouse cursor shown.
Multi-touch Mode
The default setting of the touch screen supports multi-touch mode (up to 10 points).
here’s also additional Touch related setting to switch the touchscreen input between mouse mode with cursor, or with
multi-touch mode:
Page 34

M133W User Guide
4-6
Switch touchscreen modes via the programmable function buttons:
To switch between the different touchscreen modes via the programmable function buttons, make sure the
touchscreen mode switching is set to the programmable function buttons first.
1. Open HotTab utility by (Menu) Button located on the front panel, OR launching HotTab Utility
application.
2. Tap on the Setting button.
3. Tap on F1 icon.
4. Tap on the Long Press icon.
5. Change the Long Press function to “Touch Mode” as shown below:
Once the touchscreen mode switching is set to the programmable function button, Long Press on “F1” function
button to cycle through the different touchscreen modes. When touchscreen mode is switched, an icon will
temporarily overlay on the lower center of the screen to indicate current touchscreen mode:
Page 35

M133W User Guide
4-7
Item
Status Color
Description
Orange
Wi-Fi is enabled.
White
Wi-Fi is disabled.
Item
Status Color
Description
Orange
WWAN (3G/4G) is enabled.
White
WWAN (3G/4G) is disabled.
Note
• For the Windows 7 operating system, you also can check the Access Connections gauge, the Access
Connections status icon, or the Access Connections wireless status icon in the Windows notification
area.
4.4 Using the Wireless LAN (Wi-Fi) feature
To use the wireless LAN(Wi-Fi) feature to connect to the network, perform the following procedure:
1. Open the HotTab utility by press the (Menu) Button located on the front panel, OR launching the HotTab
Utility application.
2. Tap on the Device button.
3. Check the status color of the Wi-Fi icon:
4. If the Wi-Fi feature is disabled (white), tap on the Wi-Fi icon to enable it (orange).
5. Click the wireless network connection status icon in the Windows notification area. A list of available wireless
networks is displayed.
6. Double-click a network to connect to it. Provide required authentication information if needed.
7. To check the connection status, observe wireless network connection status icon in the Windows notification
area. The more bars the icon shows, the better the wireless LAN connection strength is.
8. Now wireless LAN connection is setup, try connection to the network with a internet browser such as Internet
Explorer.
4.5 Using the Wireless WAN feature
For tablets equipped with wireless WAN (3G or 4G/LTE) card, to use the wireless WAN feature to connect to the
network, perform the following procedure:
1. Open the HotTab utility by press the (Menu) Button located on the front panel, OR launching the HotTab
Utility application.
2. Tap on the Device button.
3. Check the status color of the WWAN icon:
4. If the WWAN feature is disabled (white), tap on the WWAN icon to enable it (orange).
5. You can check the wireless WAN connection status through the wireless network connection status icon in the
Windows notification area. The more bars encompassed, the better the signal is.
Page 36

M133W User Guide
4-8
Item
Status Color
Description
Orange
GPS is enabled.
White
GPS is disabled.
Item
Status Color
Description
Orange
Bluetooth is enabled.
White
Bluetooth is disabled.
4.6 Using the GPS feature
To enable the wireless GPS feature, perform the following procedure:
1. Open the HotTab utility by press the (Menu) Button located on the front panel, OR launching the HotTab
Utility application.
2. 2. Tap on the Device button.
3. 3. Check the status color of the GPS icon:
4. 4. If the GPS feature is disabled (white), tap on the GPS icon to enable it (orange).
5. 5. Now the GPS feature is ready to be used with an application utilizing the GPS.
4.7 Using the Bluetooth feature
To enable the wireless Bluetooth feature, perform the following procedure:
1. Open the HotTab utility by press the (Menu) Button located on the front panel, OR launching the HotTab
Utility application.
2. Tap on the Device button.
3. Check the status color of the Bluetooth icon:
5. If the Bluetooth feature is disabled (white), tap on the Bluetooth icon to enable it (orange).
6. Click the Bluetooth icon in the Windows notification area. A contextual menu for Bluetooth is displayed.
7. To add a device, tap on Add a Bluetooth Device. Windows will search any Bluetooth device automatically
8. Choose the Bluetooth device that user wants to connect and follow onscreen prompt to continue the pair
procedure and use the Bluetooth device.
Page 37

M133W User Guide
4-9
Item
Status Color
Description
Orange
LED indicator is enabled.
White
LED indicator is disabled.
4.8 Turn on/off the LED Indicators
The LED Indicators for Power Status, Battery Status, and RF Communication can be turned on/off from Hottab
menu. Toenable/disable the LED indicators, perform the following procedure:
1. Open the Hottab utility by press (Menu) Button located on the front panel, OR launching the Hottab
Utility application.
2. Tap on the Device ON/OFF button.
3. Check the status color of the Indicator icon:
4. If the indicator is disabled (white), tap on the Indicator icon to enable it (orange).
Page 38

M133W User Guide
4-13
Item
Status Color
Description
Orange
Camera is enabled.
White
Camera is disabled.
4.9 Using the Front and Rear Camera feature
This HotTab menu option allows users take a picture or record a video. Before use, make sure the Camera is turned
on under Devices menu option following the following procedure:
1. Open the HotTab utility by press the (Menu) Button located on the front panel, OR launching the HotTab
Utility application.
2. Tap on the Device button.
3. Check the status color of the Camera icon:
4. If the Camera feature is disabled (white), tap on the Camera icon to enable it (orange).
5. Go back to the HotTab main menu by pressing the (Menu) Button located on the front panel OR click on the
back arrow on top.
6. Tap on the Cameraicon to go into the Camera menu. The Camera user interface will take up the entire screen as
shown below:
Page 39

M133W User Guide
4-10
No
Item
Description
1
Camera Switch
Switch between front camera or rear camera.
2
Settings
Brings up Camera settings page.
Available Settings:
Picture Save: modify/inspect saved location for pictures.
Video Save Folder: modify/inspect saved location for video ecordings.
Picture Quality: Picture compression quality.
3
Flash Control
Disables LED Flash when taking picture.
LED flash fires regardless of condition when taking pictures.
LED Flash fires automatically in low light condition
when taking pictures.
4
Resolution
Pictures will be saved at resolution of 640 x 480.
Pictures will be saved at resolution of 1024 x 768.
Pictures will be saved at resolution of 1600 x 1200.
Pictures will be saved at resolution of 2592 x 1944.
5
Exit
Exits the Camera and hide HotTab Utility.
6
Picture/Video Mode
Switch
Switches between picture taking or video recording.
7
Shutter/Record
(automatically switch
base on mode)
Camera Shutter Button. Tap to take picture.
Video Record Button. Tap to Start, and press again to stop recording.
8
Open Saved
Location
Opens the location where pictures and videos are saved in a window.
4.9.1 Description of Camera User Interface Buttons:
Page 40

M133W User Guide
4-12
Item
Status Color
Description
Orange
Barcode Reader is enabled. Reading will need to be
triggered manually thru Fn button.
White
Barcode Reader is disabled.
4.10 Using the Barcode Reader Feature
To enable the Barcode Reader feature, perform the following procedure:
1. Open HotTab utility by pressing (Menu) Button located on the front panel, OR launching HotTab Utility
application.
2. Choose “Device ON/OFF” and click on “Barcode”, and the setting utility will show up as below:
3. Tap on the ON button.
4. Check the status color of the ON button is green, and the status color of the Barcode icon on the HotTab menu
is orange at the same time.
5. Open the application where barcode reader will be displaying the scanned barcode.
6. Trigger the barcode reader by pressing Fn2 function key. (User Programmable)
Page 41

M133W User Guide
4-13
Item
Description
Trigger mode options
User can define the barcode scanner trigger mode from Trigger mode options drop-down
menu shown as below.
Level
Under Level mode, the barcode scanner follows trigger button behavior. The scanning light
will be on when the Fn2 button is triggered, and off when the barcode is successfully read
or the Fn2 button is released.
To set up the scanning time, tap on the Read time options drop-down menu and choose a
preferred time frame (options from 1 second to 9 seconds).
4.10.1 Trigger Setting
Page 42

M133W User Guide
4-14
Item
Description
Sound
The Sound check box defines whether a beep sound will come with the data scanning.
Identifier Code
The Identifier Code check box defines whether to filter Application Identifiers from the scanned
data. Some barcode types, such as EAN-128, use Application Identifiers to include additional
data. User can disable Identifier Code check box to ignore specific characters.
Output to
This setting defines the output type of the scanned data. Here are the options available:
Keyboard Wedge
Under this setting, the data scanned is sent like keyboard data. The scanned data can be
output directly to the demo area below this window, or user can also open other utility, such as
Office Word or Notepad files, for data input.
Demo Area
Warning:
Please notice that the input method should support the scanned character.
4.10.2 Settings
Page 43

M133W User Guide
4-15
Item
Description
Prefix
User can type in this field to define the characters BEFORE the data
scanned.
Suffix
User can type in this field to define the characters AFTER the data
scanned.
Append Enter
The check box user can defines to append an “Enter” which is followed by
the characters.
Append TAB
The check box user can defines to append an “TAB” which is followed by
the characters.
Regex Filter
Press on “Presets…” button, user can define how many characters to
show after the data scanned.
Replace
User can define specific characters to be replaced with preferred
characters automatically. When the characters defined in Regex
Substitution is scanned, the data will be replaced with the one filled in
Replace with.
Reset to default
User can remove all the set up and back to default mode.
User can also tap on the Settings button for further details settings.
SDK
For users following SDK for software porting, the scanned data can also be output with the
format needed.
Virtual COM
User can also choose Virtual COM to transfer scanned data to the defined COM port.
Page 44

M133W User Guide
4-16
Disconnect
User can tap on the Disconnect button to stop the connection with Barcode. To recover the
connection, please turn off the module from setting UI and then turn on the module again.
Before user uses other software, should press Disconnect button, or there will be connection
issue.
Page 45

M133W User Guide
4-17
Item
Status Color
Description
Orange
HF RFID Reader is enabled.
White
HF RFID Reader is disabled.
Caution
The HF RFID Reader is optional for Tablet PC and is not re-workable by the end
user. To use this feature, please make sure the tablet PC is built-in HF RFID reader
before use, or contact our sales contact window for more details.
4.11 Using the HF RFID Reader feature
To enable the HF RFID Reader feature, perform the following procedure:
1. Open the Hottab utility by press the (Menu) Button located on the front panel, OR launching the Hottab
Utility application.
2. Tap on the Device ON/OFF button.
3. Tap on RFID, and the setting utility will show up as below:
4. Tap on the ON button.
5. Check the status color of the ON icon is green, and the status color of the RFID icon on the Hottab menu is
orange at the same time.
Page 46

M133W User Guide
4-18
Item
Description
Auto Scan
The default setting for RFID trigger is Auto Scan. Under this setting, the RFID Reader will
always be ready to scan tags.
1. When the RFID tag is detected from RFID antenna, the data will be read automatically.
2. User can define the RFID scanning frequency from the drop-down menu shown as below.
The frequency can be from 1 second to 9 seconds.
Single Scan
User can also define the RFID Reader scanning as Single Scan. Under this setting, the RFID
Reader will be triggered only when user click on “Send”.
4.11.1 Trigger Setting
Page 47

M133W User Guide
4-19
Item
Description
Sound
The Sound check box defines whether a beep sound will come with the data scanning.
Output to
This setting defines the output type of the scanned data. Two options are available:
Keyboard Wedge
Under this setting, the data scanned is sent like keyboard data. The scanned data can be
output directly to the demo area below this window, or user can also open other utility, such as
Office Word or Notepad files, for data input.
Demo Area
Warning:
Please notice that the input method should support the scanned character.
4.11.2 Settings
Page 48

M133W User Guide
4-21
User can also tap on the Settings button for further details settings.
SDK
For users following SDK for software porting, the scanned data can also be output with the
format needed.
Item
Description
Prefix
User can type in this field to define the characters BEFORE the data
scanned.
Suffix
User can type in this field to define the characters AFTER the data
scanned.
Append Enter
The check box user can defines to append an “Enter” which is followed by
the characters.
Append TAB
The check box user can defines to append an“TAB” which is followed by
the characters.
Regex Filter
Press on “Presets…” button, user can define how many characters to show
after the data scanned.
Replace
User can define specific characters to be replaced with preferred
characters automatically. When the characters defined in Regex
Substitutionis scanned, the data will be replaced with the one filled in
Replace with.
Reset to default
User can remove all the set up and back to default mode.
Page 49

M133W User Guide
4-20
Item
Description
Select RFID
Output Type
The default setting for built-in HF RFID Reader is to Read UID. For some applications, user
might need to read or write further block data; the drop-down menu under this section can do
this change.
Disconnect
User can tap on the Disconnect button to stop the connection with built-in HF RFID reader. To
recover the connection, please turn off the module from setting UI and then turn on the module
again.
4.11.3 RFID Output Setting
Page 50

M133W User Guide
4-22
Item
Status Color
Description
Orange
GPS Ext. Antenna is enabled, and using external antennaif
available
White
GPS Ext. Antenna is disabled, and using built-in antenna
Caution
The vehicle dock of Tablet PC supports external GPS antenna through standard
SMA connector. To work with external GPS antenna, pleasemake sure the tablet PC
is well installed tovehicle dock, and the vehicle dock has connected with external
GPS antenna.
4.12 Turn on/off the GPS Ext. Antenna
When working with vehicle dock connecting to external antenna, user can switch GPS antenna from the internal one
to the external one from Hottab menu. To enable/disable the GPS Ext. Antenna, perform the following procedure:
1. Open the Hottab utility by press the (Menu) Button located on the front panel, OR launching the Hottab Utility
application.
2. Tap on the Device ON/OFF button.
3. Check the status color of the GPS Ext. Antenna icon:
4. If the GPS Ext. Antenna is disabled (white), tap on the GPS Ext. Antenna icon to enable it (orange).
Page 51

M133W User Guide
4-23
Item
Status Color
Description
Orange
Light Sensor is enabled.
White
Light Sensor is disabled.
4.13 Turn on/off Light Sensor
The Light Sensor can be turned on/off from Hottab menu. To enable/disable the Light Sensor, perform the following
procedure:
1. Open the Hottab utility by press the (Menu) Button located on the front panel, OR launching the Hottab Utility
application.
2. Tap on the Device ON/OFF button.
3. Check the status color of the Light Sensor icon:
Page 52

M133W User Guide
4-24
Parameter
Parameter
Number
Default
UPC/EAN
UPC-A
01h
Enable
UPC-E
02h
Enable
UPC-E1
0Ch
Disable
EAN-8/JAN 8
04h
Enable
EAN-13/JAN 13
03h
Enable
Bookland EAN
53h
Enable
Bookland ISBN Format
F1h 40h
ISBN-10
Decode UPC/EAN/JAN Supplementals (2 and 5 digits)
10h
Ignore
User-Programmable Supplementals Supplemental 1:
Supplemental 2:
F1h 43h F1h 44h
N/A
UPC/EAN/JAN Supplemental Redundancy
50h
10
Decode UPC/EAN/JAN Supplemental AIM ID
F1h A0h
Combined
Transmit UPC-A Check Digit
28h
Enable
Transmit UPC-E Check Digit
29h
Enable
Transmit UPC-E1 Check Digit
2Ah
Enable
UPC-A Preamble
22h
System Character
UPC-E Preamble
23h
System Character
UPC-E1 Preamble
24h
System Character
Convert UPC-E to A
25h
Disable
Convert UPC-E1 to A
26h
Disable
EAN-8/JAN-8 Extend
27h
Disable
UCC Coupon Extended Code
55h
Disable
Coupon Report
F1h DAh
New Coupon
Symbols
ISSN EAN
F1h 69h
Disable
Code 128
Code 128
08h
Enable
Set Length(s) for Code 128
D1h, D2h
Any Length
GS1-128 (formerly UCC/EAN-128)
0Eh
Enable
ISBT 128
54h
Enable
ISBT Concatenation
F1h 41h
Disable
Check ISBT Table
F1h 42h
Enable
ISBT Concatenation Redundancy
DFh
10
Code 39
Code 39
00h
Enable
4.14 Setting the 2D Barcode Scanner Symbologies
The barcode scanner is shipped with default settings shown below. If the default setting suits the usage requirement,
setting symbologies is not necessary.
4.14.1 Symbologies Default Settings:
Page 53

M133W User Guide
4-25
Trioptic Code 39
0Dh
Disable
Convert Code 39 to Code 32 (Italian Pharmacy Code)
56h
Disable
Code 32 Prefix
E7h
Disable
Set Length(s) for Code 39
12h, 13h
Length Within
Range: 2 to 55
Code 39 Check Digit Verification
30h
Disable
Transmit Code 39 Check Digit
2Bh
Disable
Code 39 Full ASCII Conversion
11h
Disable
Buffer Code 39
71h
Disable
Code 93
Code 93
09h
Disable
Set Length(s) for Code 93
1Ah, 1Bh
Length Within
Range: 4 to 55
Code 11
Code 11
0Ah
Disable
Set Lengths for Code 11
1Ch, 1Dh
Length Within
Range: 4 to 55
Code 11 Check Digit Verification
34h
Disable
Transmit Code 11 Check Digit(s)
2Fh
Disable
Interleaved 2 of 5 (ITF)
Interleaved 2 of 5 (ITF)
06h
Disable
Set Lengths for I 2 of 5
16h, 17h
1 Length;
Length = 14
I 2 of 5 Check Digit Verification
31h
Disable
Transmit I 2 of 5 Check Digit
2Ch
Disable
Convert I 2 of 5 to EAN 13
52h
Disable
Discrete 2 of 5 (DTF)
Discrete 2 of 5
05h
Disable
Set Length(s) for D 2 of 5
14h, 15h
1 Length;
Length = 12
Codabar (NW - 7)
Codabar
07h
Disable
Set Lengths for Codabar
18h, 19h
Length Within
Range: 5 to 55
CLSI Editing
36h
Disable
NOTIS Editing
37h
Disable
Codabar Upper or Lower Case Start/Stop Characters Detection
F2h 57h
Upper Case
MSI
MSI
0Bh
Disable
Set Length(s) for MSI
1Eh, 1Fh
Length Within
Range: 4 to 55
MSI Check Digits
32h
One
Transmit MSI Check Digit
2Eh
Disable
MSI Check Digit Algorithm
33h
Mod 10/Mod 10
Page 54

M133W User Guide
4-26
Chinese 2 of 5
Chinese 2 of 5
F0h 98h
Disable
Matrix 2 of 5
Matrix 2 of 5
F1h 6Ah
Disable
Matrix 2 of 5 Lengths
F1h 6Bh F1h 6Ch
Length; Length = 14
Matrix 2 of 5 Check Digit
F1h 6Eh
Disable
Transmit Matrix 2 of 5 Check Digit
F1h 6Fh
Disable
Korean 3 of 5
Korean 3 of 5
F1h 45h
Disable
Inverse 1D
F1h 4Ah
Regular
Postal Codes
US Postnet
59h
Disable
US Planet
5Ah
Disable
Transmit US Postal Check Digit
5Fh
Enable
UK Postal
5Bh
Disable
Transmit UK Postal Check Digit
60h
Enable
Japan Postal
F0h 22h
Disable
Australia Post
F0h 23h
Disable
Australia Post Format
F1h CEh
Autodiscriminate
Netherlands KIX Code
F0h 46h
Disable
USPS 4CB/One Code/Intelligent Mail
F1h 50h
Disable
UPU FICS Postal
F1h 63h
Disable
GS1 DataBar
GS1 DataBar (GS1 DataBar Omnidirectional, GS1 DataBar
Truncated, GS1 DataBar Stacked, GS1 DataBar Stacked
Omnidirectional)
F0h 52h
Enable
GS1 DataBar Limited
F0h 53h
Disable
GS1 DataBar Limited Security Level
F1h D8h
3
GS1 DataBar Expanded (GS1 DataBar Expanded, GS1 DataBar
Expanded Stacked)
F0h 54h
Enable
Convert GS1 DataBar to UPC/EAN
F0h 8Dh
Disable
Composite
Composite CC-C
F0h 55h
Disable
Composite CC-A/B
F0h 56h
Disable
Composite TLC-39
F0h 73h
Disable
UPC Composite Mode
F0h 58h
UPC Always Linked
Composite Beep Mode
F0h 8Eh
Beep As Each Code
Type is Decoded
GS1-128 Emulation Mode for UCC/EAN Composite Codes
F0h ABh
Disable
2D Symbologies
PDF417
0Fh
Enable
MicroPDF417
E3h
Disable
Code 128 Emulation
7Bh
Disable
Data Matrix
F0h 24h
Enable
Page 55

M133W User Guide
4-27
Data Matrix Inverse
F1h 4Ch
Regular
Decode Mirror Images (Data Matrix Only)
F1h 19h
Auto
Maxicode
F0h 26h
Disable
QR Code
F0h 25h
Enable
QR Inverse
F1h 4Bh
Regular
MicroQR
F1h 3Dh
Enable
Aztec
F1h 3Eh
Enable
Aztec Inverse
F1h 4Dh
Inverse Autodetect
Symbology-Specific Security Levels
Redundancy Level
4Eh
1
Security Level (UPC/EAN and Code 93)
4Dh
1
Intercharacter Gap Size
F0h 7Dh
Normal
Macro PDF
Macro PDF Transmit/Decode Mode Symbols
BCh
Passthrough Mode
Transmit Macro PDF Control Header
B8h
Disable
Escape Characters
E9h
None
Flush Macro PDF Buffer
Abort Macro PDF Entry
Page 56

M133W User Guide
4-28
Caution
To utilize the MotoSetting application, the user has to first turn on the Barcode
Scanner, and then disconnect the Barcode Scanner from the HotTab utility. This then
allows the MotoSetting application to gain control for user to set the Symobologies
as required. Once the desired settings are set, the user has to power cycle the
Barcode Utility in HotTab, before continuing to use the Barcode Scanner.
4.15 Using the MotoSetting Application to set the Symbologies
To set the Symbologies settings, the user can utilize the MotoSetting application that is installed on the tablet. Please
follow the instructions below:
1. Open HotTab utility by pressing (Menu) Button located on the front panel, OR launching HotTab Utility
application.
2. Choose “Device ON/OFF” and then click on “Barcode”
3. Barcode utility will show up as below:
4. Tap on the ON button to turn on the Barcode Scanner.
5. Once the Barcode Scanner is ON, as shown below, tap on the “Disconnect” button.
Page 57

M133W User Guide
4-29
6. Once the HotTab utility disconnects from the Barcode Scanner successfully, it will be as shown below:
7. Start the MotoSetting application
Page 58

M133W User Guide
4-31
Button Name
Function
PULL
Turns on the Barcode Scanner, and stays on
RELEASE
Turns off the Barcode Scanner
Clear
Clears the right console panel of all status
R
Resets the Barcode Scanner if there are any malfunctions
8. MotoSetting application will be shown as below. The left panel shows the symbologies settings, with check
marks indicating the symbologies that are enabled. On the right side, is the console information indicating any
status for the application.
Table below shows the function of each button:
9. Using the left panel, the user is free to check/uncheck the symbologies setting as required.
Page 59

M133W User Guide
4-30
10. The right panel shows any status change in the symbologies settings, as shown below:
11. On the left panel, scroll to the top, scroll to the top, the user can also change the symbologies settings to default
setting:
12. Once the user is done setting the symbologies, close the MotoSetting by clicking on the X on the top right, and
then go back to the HotTab utility.
13. Open HotTab utility again by pressing (Menu) Button located on the front panel, OR launching HotTab Utility
application.
14. Choose “Device ON/OFF” and then click on “Barcode”
Page 60

M133W User Guide
4-32
15. Barcode utility will show up as below:
16. Turn off the Barcode Scanner by tapping on the OFF button
17. And then tap on the ON button again
18. The user can now continue to use the Barcode Scanner with the new Symbologies settings.
Page 61

M133W User Guide
4-33
• M133W is shipped with display scaling set at Larger - 150%. We recommend the users set the scaling
to this setting for optimal text and image viewing.
Note
• Before proceeding to change the scaling option, make sure any opened document is saved and close,
and all running applications are closed before proceeding to change the display scaling, because this
procedure requires users to log out of their account to apply display scaling change.
4.16 Configuring High Resolution Screen Scaling and Setting
The M133W’s 1920 x 1080 high resolution display is perfect for viewing image, video, or other applications, however,
Windows user interface (icons, buttons, and other user interface elements) may be too small to read and operate at
the default Windows settings. By changing the display scaling or the display resolution setting of the device, you can
adjust the size of the text and other items on the desktop for optimal viewing. Display scaling is the recommended
method because it has the effect of adjusting user interface element without having to move away from the optimal
resolution setting at 1920 x 1080. This section will explain how you can adjust the built-in windows display scaling
setting and resolution setting.
Page 62

M133W User Guide
4-34
4.17 Changing display scaling setting (Recommended)
Perform the following to change display scaling setting:
1. Tap and hold anywhere on the desktop for 3 seconds and release to bring up the context menu, and select
“Screen resolution” option as shown below:
2. A “Screen Resolution” Window will show up. Select the “Make text and other items larger or smaller”option in the
window, as shown below:
Page 63

M133W User Guide
4-35
3. A“Display” window will show up. Under “Change the size of all items” section, change the scaling option to
“Larger – 150%” or any other desired display scaling and hit “Apply” to save changes, as shown below
4. A prompt may show up to ask if you want to sign out to apply the scaling change. Hit “Sign out Now” to apply
changes, as shown below:
5. The user may now login again to Windows to see the changed display scaling already being applied.
Page 64

M133W User Guide
4-36
4.18 Changing screen resolution setting
Alternatively, instead of changing the display scaling setting, user may choose to change the overall resolution
setting to make screen elements bigger.
1. Tap and hold anywhere on the desktop for 3 seconds and release to bring up the context menu, and select
“Screen resolution” option as shown below:
2. Click on the dropdown option next to “Resolution” and select the desire resolution by tapping on the scale:
3. Hit “Apply”. A prompt “Display Settings” prompt will show up to ask the user if the applied resolution is usable.
4. If the new resolution is the desired display setting hit “Keep changes” and continue to next step. If the new
resolution is not desirable, hit “Revert” and select a different resolution to change to, and start again from step 2.
5. The user may now use the device with the new resolution setting.
Page 65

M133W User Guide
4-37
4.19 Using the HotTab Shortcuts (On-screen Software Shortcut)
The HotTab shortcuts are user configurableon-screensoftware short cuts via HotTabto allow users to have to quickly
access programs with a few tabs. The Shortcuts menu offers 8 empty slots to store user’s desired quick access.
Shortcuts can be mapped to any of the executable files (.exe) installed on the tablet.
Short Cut Menu: To store a new shortcut:
1. Open the HotTab utility by press the (Menu) Button located on the front panel,
OR launching the HotTab Utility application.
2. Tab on the Shortcuts button.
3. Tab on button of any empty slot.
4. An on screen file browser will appear.
5. Browse to find the desired application to have shortcut.
6. Click “Open” to save the shortcut.
To remove an saved shortcut:
1. Open the HotTab utility by press the (Menu) Button located on the front panel,
OR launching the HotTab Utility application.
2. Tab on the Shortcuts button.
3. Tab on the button of any saved slot to remove
4. Shortcut will be removed, and once again show “Empty” to indicate slot is empty.
5. Tab on the button will hide the HotTab Utility Menu.
Using the HotTab shortcuts:
1. Open the HotTab utility by press the (Menu) Button located on the front panel,
OR launching the HotTab Utility application.
2. Tab on the Shortcuts button.
3. Tab on the saved shortcut items to access the saved programs.
Page 66

M133W User Guide
4-38
Status
Description
High
Backup battery is fully charged, and can be used for hot
swapping
Medium
Backup battery level is intermediate, but can be used for
hot swapping
Low
Backup battery level is low, and hot swapping is not
recommended.
4.20 Accessing the Device Information (HotTab Setting)
This HotTab menu option provides users information such as PC Information, Battery status,and also device settings
such as power management setting, and function key mappings. Perform the following procedure to access the
HotTab Setting menu:
1. Open the HotTab utility by press the (Menu) Button located on the front panel, OR launching the HotTab
Utility application.
2. Tap on the Settings button.
3. Below shows the items listed in Settings Menu.
PC Information:
Battery Information:
This section provides user device information in regards to BIOS Version,
EC Versions, HotTab Versions, OS Versions, as well as Unit Serial Number,
shown in the picture sample.
This section provides user battery Information.
Main Battery:
The main battery Icon displays the battery level in percentages (0 to 100%).
Backup Battery: (Optional)
The backup battery used for battery hot swapping displays its state in text
with the following meanings.
Battery Charge Time:
The Battery Information also displays estimated time needed to fully charge
the main battery when AC adapter is plugged in. Meanwhile, the backup
battery is charged by the main battery.
Page 67

M133W User Guide
4-39
4.21 Using Recovery Wizard to Restore Computer
The tablet computer has a dedicate recovery partition stored on the hard drive of the tablet to enable quick onekey recovery process. This partition occupies about 11GB of the storage space, and comes built-in to each tablet
computer.
Warning:Before starting the recovery process, be sure to backup all user data, as all data will be lost after the
recovery process.
Follow the procedure below to enable quick one-key recovery procedure:
1. Plug-in the AC adapter to tablet computer. Make sure the tablet computer stays plugged in to power source
during the recovery process.
2. Turn on the tablet computer, and when the boot screen shows up, press the Fn1 button (Recovery Key) on the
front bezel OR press F6when using an external USB keyboard to initiate the Recovery Wizard.
3. The following screen shows the Recovery Wizard. Click on “Recovery” button to continue.
4. A warning message about data loss will show up. Make sure data is backed up before recovery, and click on
“Yes” to continue.
5. Wait till the recovery process to complete. During the recovery process, a command prompt will show up
to indicate the percent of recovery process.After recovery is completed, and the tablet computer will restart
automatically.
.
Page 68

Page 69

5-1
Problem
Solution
The removable battery is not charging.
Make sure the AC adapter is properly connected, and
that the removable battery is properly inserted.
Nothing appears on the screen.
The tablet computer may be in sleep mode. Press the
power button to wake up the display.
The brightness level may be too low. Increase
brightness.
The screen suddenly turns blank and the power
indicator goes off.
Make sure that LED indicator is not turned off in HotTab.
Make sure the AC adapter is properly connected.
If running on battery power, the battery may be depleted,
charge the battery.
Wireless LAN signal quality is poor.
The tablet computer may be out of range. Move the
tablet computer closer to the access point or another
wireless LAN device associated with it.
Check if your surroundings have interferences, such
as microwave ovens, cordless phones. Move the tablet
computer away from objects causing interference.
I cannot connect to another wireless LAN device.
Make sure that wireless LAN feature is turned on.
Make sure that the SSID setting is the same for every
wireless LAN device in the network.
Restart the tablet computer
Make sure the IP address or subnet mask setting is
correct.
I cannot connect to another device with Bluetooth.
Make sure that both devices have Bluetooth turned
on (For the Tablet Computer, check HotTab to see if
Bluetooth is turned on).
Make sure that the distance between the two devices
is within 10 meters and there are no walls or large
obstructions between the devices.
Make sure the both devices are turned on and
configured to be discoverable.
Make sure that both devices are compatible.
The GPS application cannot find my location.
Make sure that GPS is turned on in HotTab.
Make sure that GPS receiver and the location sensor
are enabled in Control Panel.
The tablet computer may be out of coverage area. Move
your tablet computer outdoors or closer to a window.
Check if your surroundings have interferences, such
as microwave ovens, cordless phones. Move the tablet
computer away from objects causing interference.
5
Troubleshooting
5.1 Troubleshooting (Basic)
Page 70

5-2
No sound is produced.
Adjust volume of the tablet computer by pressing on the
volume rocker.
If using an external audio device, make sure that the
cable is properly connected.
I cannot project the tablet computer display to another
monitor.
Make sure the graphic driver is installed.
Make sure the output setting selected is correct.
Barcode scanner does not emit laser beam and does
not seem to work.
Make sure the Barcode scanner device is enabled in
HotTab utility.
Make sure under Windows, the Barcode Reader is set
to COM 15 port, so that HotTab can trigger the Barcode
Reader hardware.
Barcode Scanner emits laser beam but does not read
barcode presented to it.
Adjust the distance between barcode scanner of the
device and the barcode being scanned.
Make sure the barcode code type is enabled in the
tablet.
I am having GPS accuracy issue
When utilizing the GPS function, we recommend
disabling the Barcode Reader in Hottab to reduce
interference.
RFID scanner does not seem to work.
Make sure under Windows, the RFID hardware is set to
COM 3 port.
M133W User Guide
Page 71

Winmate Inc.
9F, No.111-6, Shing-De Rd., San-Chung District,
New Taipei City 24158, Taiwan, R.O.C
www.winmate.com
Copyright © Winmate Inc. All rights reserved.
 Loading...