

Page 1

Please read these instructions carefully before using this product, and save this manual for future use.
Rugged Tablet PC
M133 Series
Windows 10 IoT Enterprise
Windows Embedded 8.1 Industry Pro
Windows 7 Professional for Embedded System
OS Deployment Guide
Version 1.1
Release date: 17-Apr-2017
Page 2

- 1 -
Document Revision History
Version
Date
Note
1.0
09-Mar-2017
Initial document release
1.1
17-Apr-2017
Add Graphics Settings
Page 3

- 2 -
CONTENTS
CHAPTER 1: INTRODUCTION 3
CHAPTER 2: BIOS 4
2.1 BIOS and OS Support Overview 4
2.2 Changing BIOS Mode for OS Installation 4
2.3 BIOS Navigation Keys 5
2.4 Changing BIOS Settings to Install OS 7
2.5 BIOS and EC Firmware Update Guide 11
CHAPTER 3: SETTING UP OS FIRST TIME 24
3.1 Windows 10 IoT Enterprise 24
3.2 Windows Embedded 8.1 Industry Pro 30
3.3 Windows 7 Ultimate / Professional for Embedded System 35
CHAPTER 4: DRIVER INSTALLATION 40
4.1 Windows 10 IoT Enterprise 40
4.2 Windows Embedded 8.1 Industry Pro 41
4.3 Windows 7 Professional for Embedded System 42
4.4 WMMIO Driver Installation (For Windows 7/8/10) 52
CHAPTER 5: UTILITY INSTALLATION 54
5.1 List of Winmate AP and Utilities 54
5.2 Installation Procedure 55
CHAPTER 6: SERIAL COM PORT SETTINGS 56
6.1 COM Port Settings 56
6.2 Adjusting COM Port Number 57
6.3 Setting Up Bluetooth COM Port 59
6.4 How to Check COM Port Proprieties 61
CHAPTER 7: OS SETTING ADJUSTMENTS 63
7.1 Microphone Setting Adjustment 63
7.2 Display Size Adjustment 66
7.3 On-screen Keyboard Adjustment (For Windows 10 Only) 69
7.4 Graphics Setting 74
CHAPTER 8: WINMATE SDK SUPPORT 78
8.1 Winmate Download Center 78
8.2 Download SDK from Winmate File Share 78
Page 4

- 3 -
CHAPTER 1: INTRODUCTION
This document contains references and instructions on operation system and utility
installation. This guide describes the procedure how to update BIOS or change
BIOS settings to install the OS different from Winmate shipment.
For standard installation Windows OS installation, you can use Winmate’s
Recovery CD/ DVD or use Recovery Wizard following procedures described in
the M133 Series User Manual.
For alternative way, if customer installs Windows from Microsoft CD/ DVD; this
document explains some key important information (especially for consumer
versions of Windows, Non-Embedded OS).
Page 5

- 4 -
CHAPTER 2: BIOS
2.1 BIOS and OS Support Overview
Newer operating systems such as Windows 8 and Windows 10 are supported when
the BIOS is in UEFI mode, while Windows 7 is only supported when the BIOS is in
Legacy Mode. Please make sure the BIOS is in the corresponding mode before
proceeding to OS installation:
BIOS Mode
Supported Operating System
UEFI
Windows 8, Windows 10
Legacy
Windows 7
2.2 Changing BIOS Mode for OS Installation
There are two ways to change the BIOS mode on the tablet for new OS installation
1. Through change of BIOS settings (UEFI / LEGACY mode) using the BIOS
menu
2. Update the BIOS to the corresponding preset versions dedicated to different
Windows versions.
IMPORTANT:
Choose only one BIOS Setup method for OS Installation: either
change BIOS settings (UEFI/LEGACY mode) or update the BIOS to
the corresponding preset versions dedicated to different Windows
versions.
The choice depends on your preferences.
Page 6

- 5 -
2.3 BIOS Navigation Keys
This section describes the procedure to enter BIOS settings and introduces BIOS
navigation keys. To enter the BIOS setup, you need to connect an external USB
keyboard, press Del key when the prompt appears on the screen during start up.
The prompt screen shows only few seconds so need press Del key quickly.
BIOS Navigation Keys
The following keys are enabled during POST:
Key
Function
Del
Enters the BIOS setup menu.
F7
Display the boot menu. Lists all bootable devices that are connected
to the system. With cursor ↑and cursor ↓and by pressing <ENTER>,
select the device used for the boot.
Pause
Pressing the [Pause] key stops the POST. Press any other key to
resume the POST.
Page 7

- 6 -
The following Keys can be used after entering the BIOS Setup.
Key
Function
F1
General Help
F2
Previous Values
F3
Optimized Defaults
F4
Save & Exit
Esc
Exit
+/-
Change options
Enter
Select or execute command
Cursor ↑
Moves to the previous item
Cursor ↓
Goes to the next item
Cursor ←
Moves to the previous item
Cursor →
Goes to the next item
Page 8
- 7 -
2.4 Changing BIOS Settings to Install OS
This section describes how to change operating system mode in BIOS settings to
install OS that is different from the version that is shipped.
2.4.1 Default Windows 8/8.1 change to Windows 7
The instruction below describes how to change Windows 8/8.1 to Windows 7.
1. Enter BIOS Setup utility.
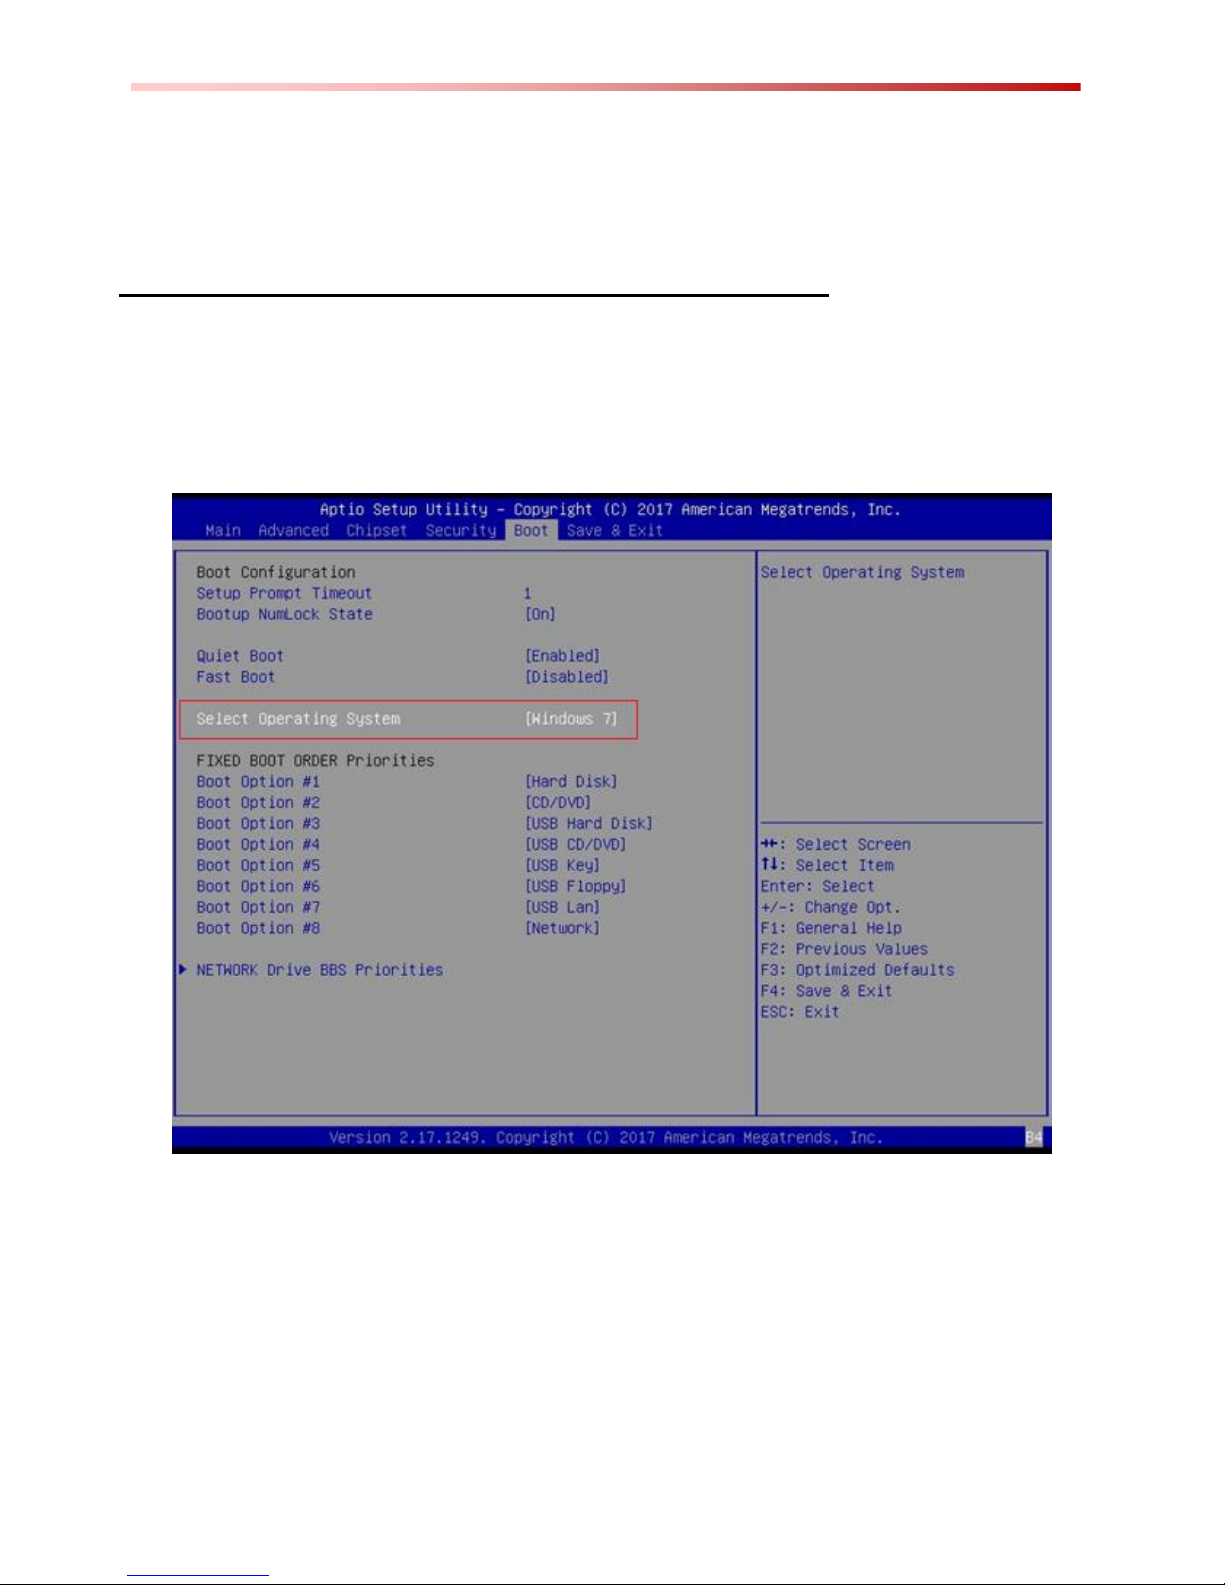
2. Go to “Boot” at BIOS setup menu. Click on Select Operating System.
Page 9

- 8 -
3. Change OS setting to Windows 7.
Page 10
- 9 -
2.4.2 Default Windows 7 change to Windows 8.1
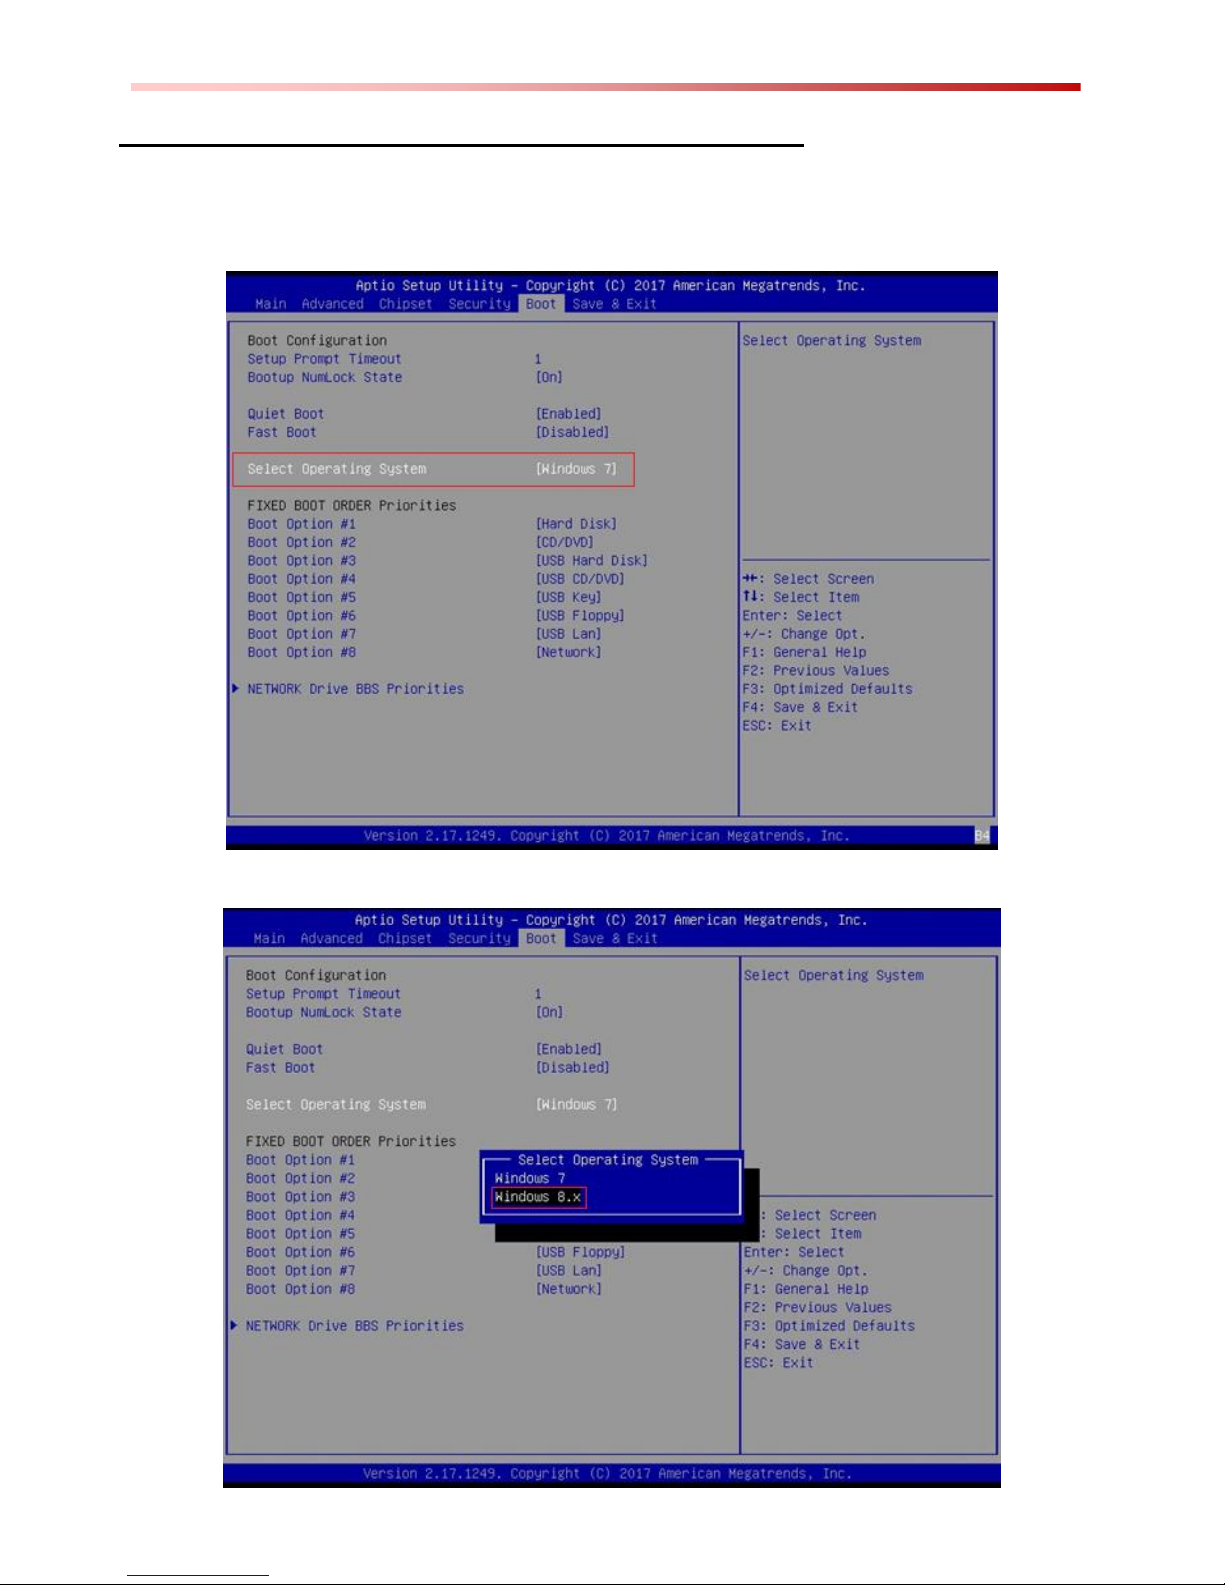
1. Enter BIOS Setup menu.
2. Go into item “Boot” at BIOS setup menu.
3. Change OS setting to Windows 8.X.
Page 11

- 10 -
4. Now you can put your device to Boot Option #1 then you will start installation
process.
IMPORTANT:
Pay attention to the mode you created on the Recovery DVD.
PE3.0 only support legacy mode for Windows 7, PE5.0 can
support Win7/8/8.1 at legacy or UEFI mode. Creation and installing
process of the chosen mode must match.
Page 12

- 11 -
2.5 BIOS and EC Firmware Update Guide
This section contains the procedures required to perform updates to BIOS and EC
firmware. The update procedures require user to prepare USB drive containing
BIOS/EC update files first, and then boot the computer to BIOS UEFI Shell Mode,
and perform BIOS and EC firmware update using the update script file prepared on
the USB drive.
2.5.1 Tools needed
1. Tablet PC to be updated
2. One empty USB drive
3. Winmate BIOS Update files
4. USB hub powered with an external AC adapter (Note: if the USB Hub is not
externally AC powered, the BIOS and EC firmware update run the risk of being
corrupted)
5. USB keyboard
6. Another Windows PC to prepare update USB drive
2.5.2 Where to Download BIOS Update Files
Download the latest BIOS version from Winmate Download Center or File Share.
If you cannot find the latest BIOS version, please contact Winmate sales department
at sales@winmate.com.tw.
Page 13
- 12 -
2.5.3 Preparing USB Drive with BIOS/EC FW Update Files
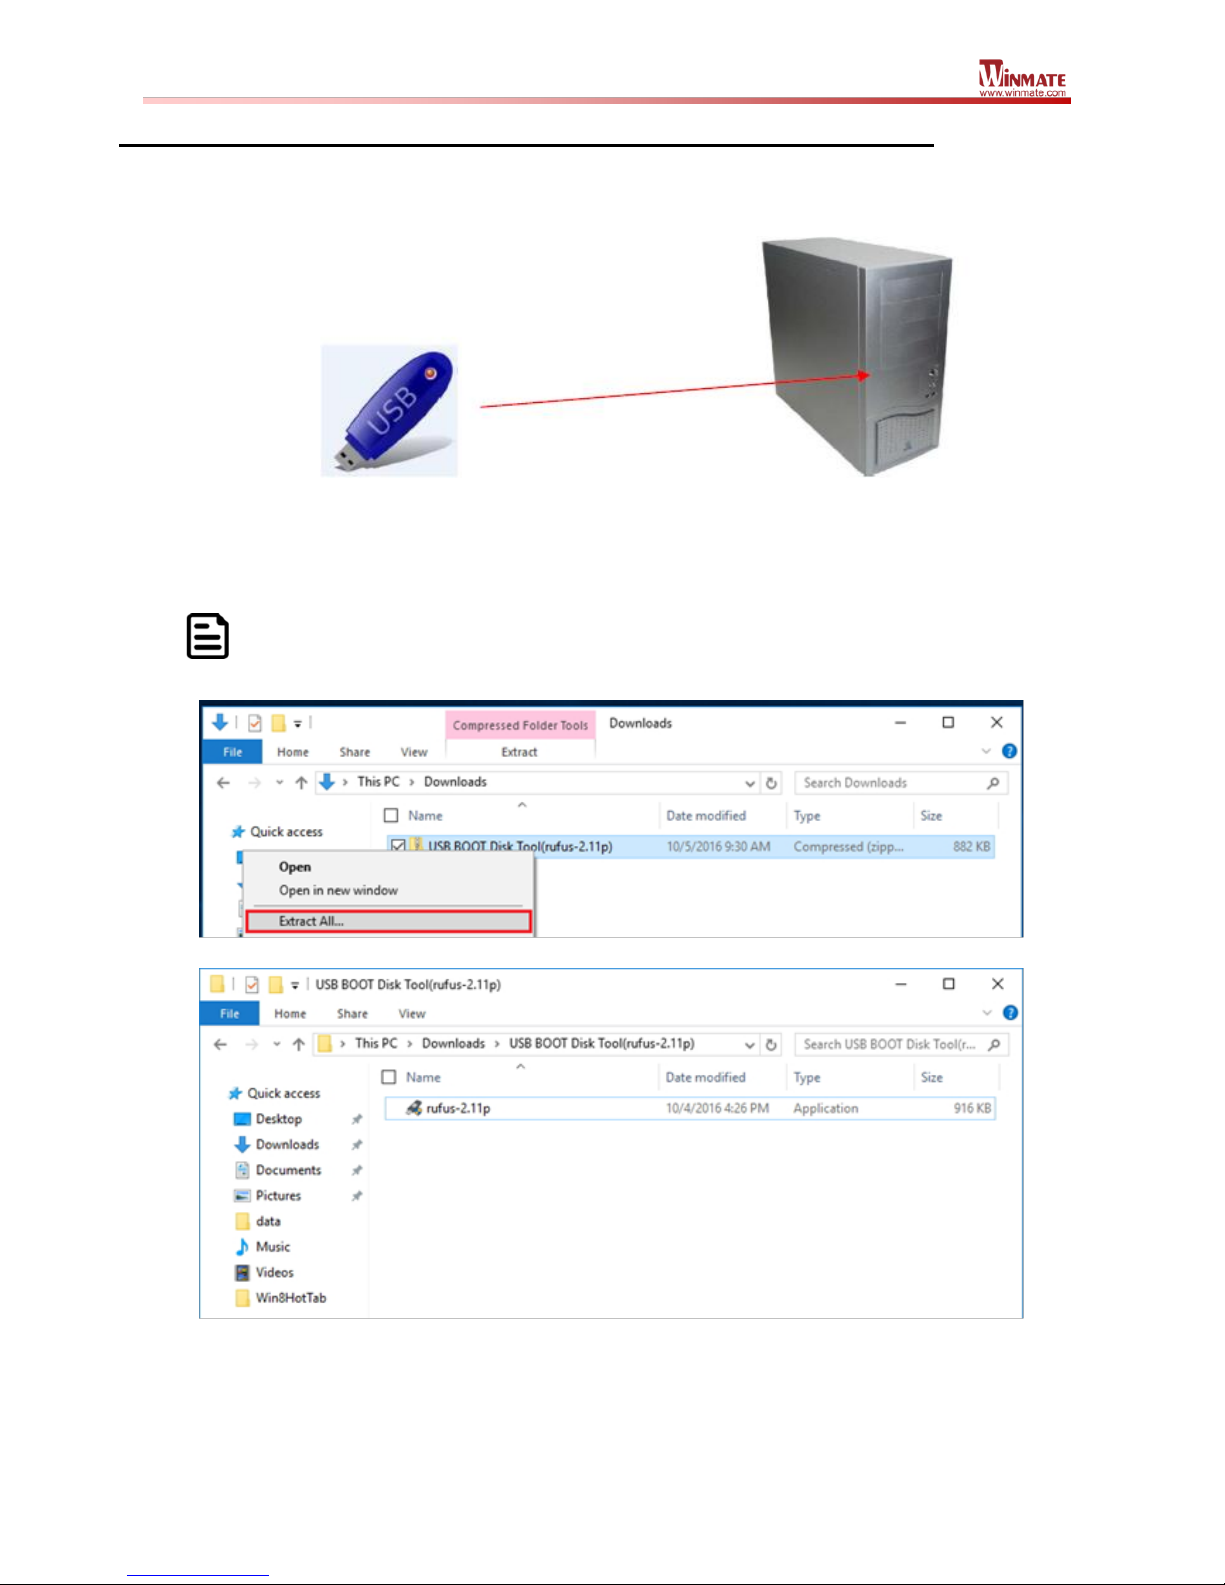
1. Plug in an empty USB drive to a PC.
2. Unzip files from USB BOOT Disk Tool(rufus-2.11p).zip into any location on
your computer first as a folder. This folder will be used in the next few steps.
NOTE:
The actual files listed in the screenshot below may be different.
Page 14

- 13 -
3. Right-click on the Hrufus-2.11p.EXE, and select Run as administrator.
4. The disk format tool will appear as shown below.
Make sure the Device is targeted at the removable USB drive (from Step 1)
Partition scheme and target system type is MBR Partition scheme for
BIOS or UEFI
File system is FAT32
New volume label is USB
Page 15

- 14 -
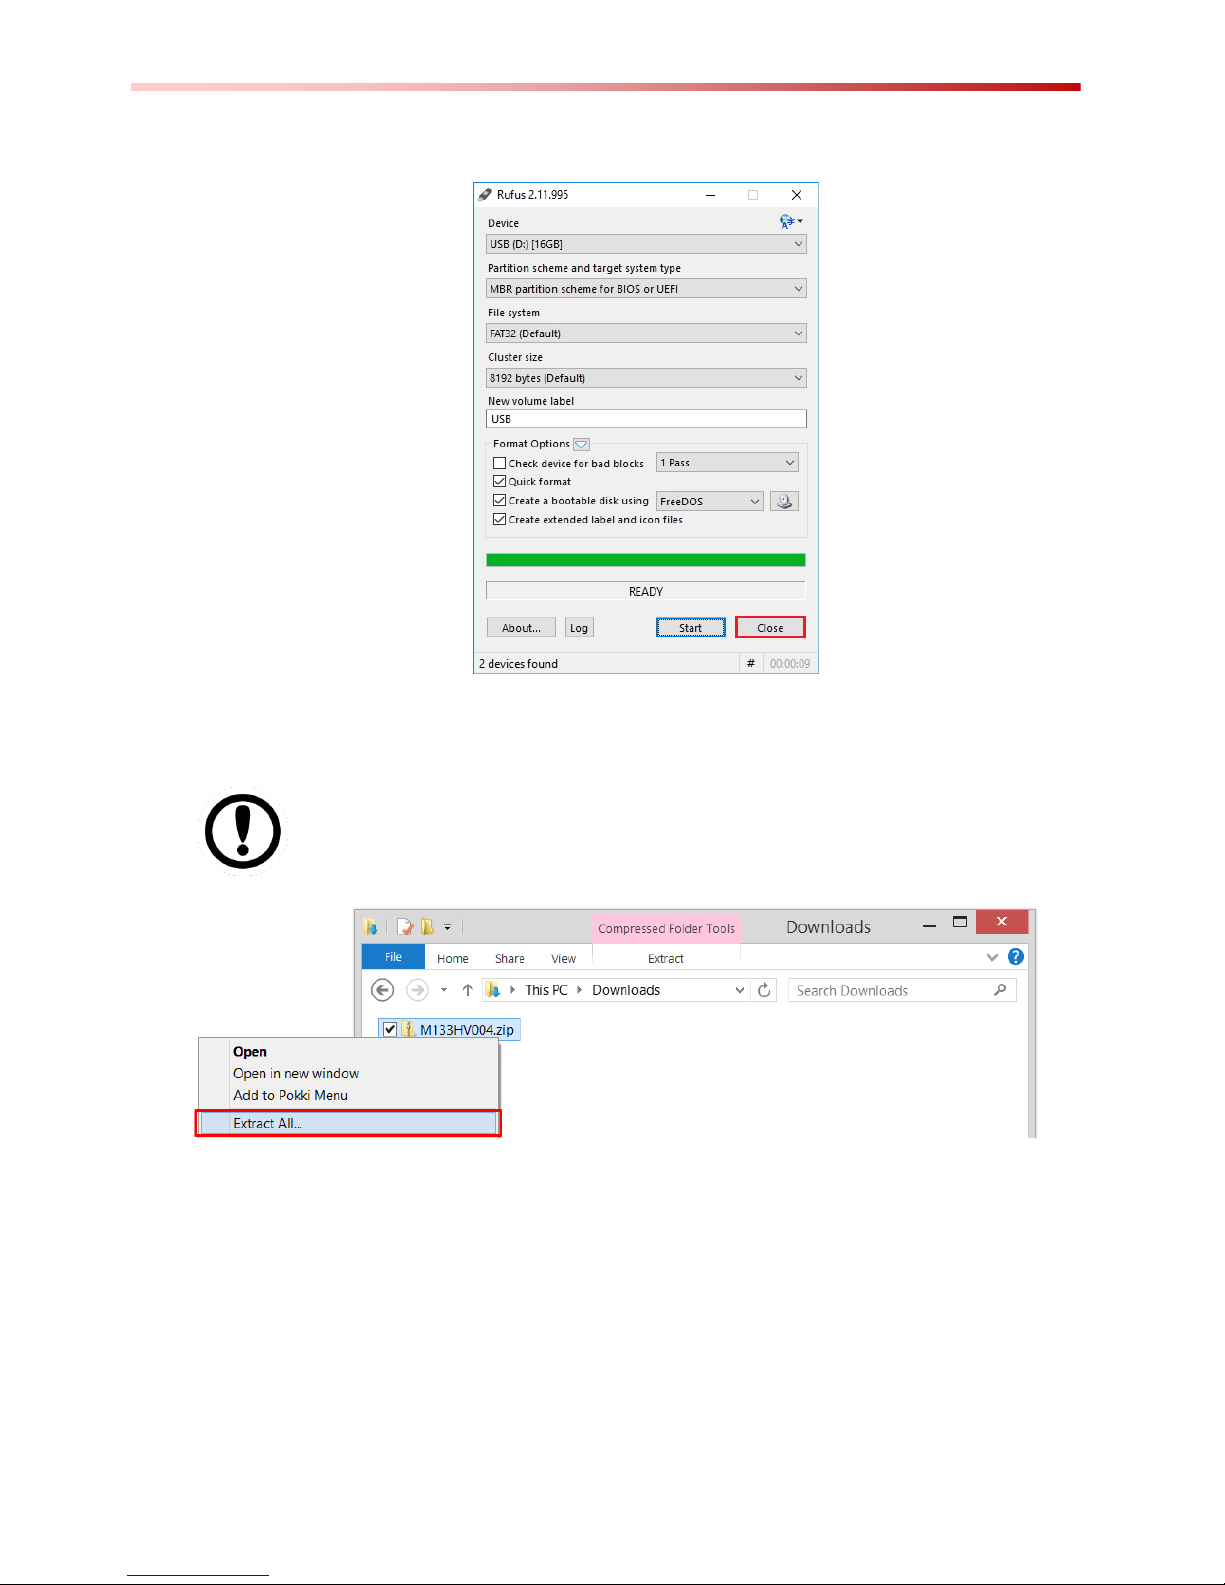
5. Select Quick Format and create a bootable disk using FreeDOS.
6. Next, click on the Start button, and a Warning message will be shown. Click
Yes to proceed.
Page 16
- 15 -
7. The USB drive will then be formatted to a FreeDOS startup disk. Click OK to
finish and Close the tool.
8. Download the latest BIOS update files, and extract the files into an UPDATE
folder.
IMPORTANT:
It is important that the folder name is shorter than 8 characters,
otherwise update procedure cannot start.
Page 17
- 16 -
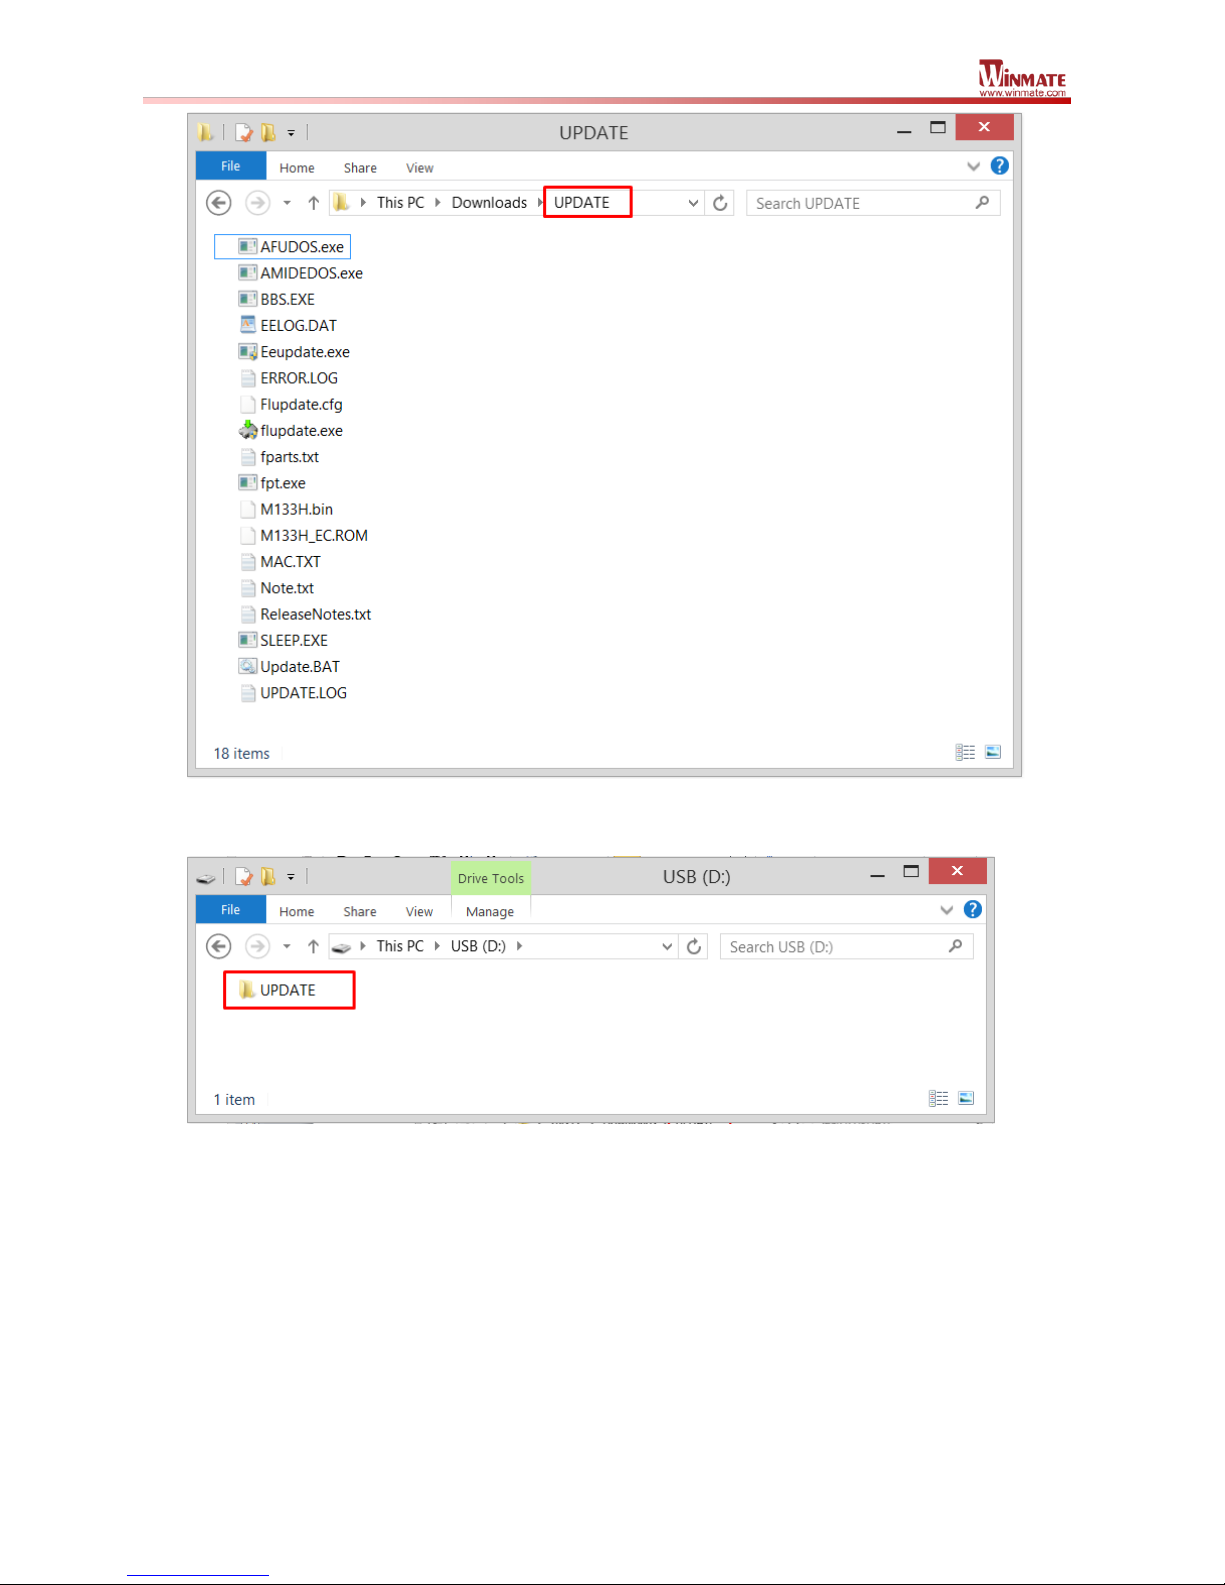
9. Copy the UPDATE folder into the formatted USB.
The USB drive is now ready to be used to perform for BIOS and EC firmware
update procedure detailed in the next section.
Page 18

- 17 -
2.5.4 Update/Flash BIOS and EC under DOS Mode
1. Prepare the Tablet PC to be updated by plugging in the AC Adapter, USB
hub, the USB drive (prepared in the previous section), and the USB
keyboard.
2. Power on the Tablet PC while pressing DEL key on the keyboard to enter the
BIOS Setup Menu.
3. Use the direction keys on the keyboard to navigate to the submenu “Boot”,
and then choose “CSM Parameters” by pressing Enter.
(If you do not have this option, jump to step 5)
Page 19

- 18 -
4. Once in the menu, select “Launch CSM” and hit Enter. Select Enabled and
hit Enter again.(Jump to step 6)
5. Use the direction keys on the keyboard to navigate to the submenu “Boot”,
and then choose “Select Operating System” by pressing Enter. Select
Windows 7 and hit Enter again.
Page 20

- 19 -
6. Hit F4, and select Yes to save the setting and exit BIOS.
7. Press F7 on the keyboard to go into the Boot Select Menu while the
computer restarts automatically. Select the removable USB drive to boot into
the USB.
8. The computer now will boot into the DOS environment loaded into the USB
drive.
Page 21

- 20 -
9. Enter the command “dir” to show the folder inside the USB. There should be a
“UPDATE” folder that was prepared in the previous section. Browse into the
folder by entering the command “cd UPDATE”
10. Once in the UPDATE folder, enter the command “update” to initiate the
11. The update script will scan through the BIOS on the computer and
replace it with new BIOS. The user will see block of data being programmed
with percentages.
CAUTION
Please do not unplug the AC Adapter, the update USB, or
shutdown the computer during this update, as it may cause
permanent damage to the computer that may require
substantial hardware repair.
Page 22

- 21 -
12. Once the BIOS update is done, a FPT Operation Passed message will
be shown, and the update script will automatically run through all the
necessary update processes as shown below. No user input will be required,
and the computer will automatically restart.
Page 23

- 22 -
13. To ensure the BIOS and EC firmware updates are applied successfully,
please restart the computer and press the DEL on the keyboard while the
computer is starting up, to boot into BIOS Setup Menu.
Page 24

- 23 -
14. Once the BIOS Setup Menu starts, check under the “Main” menu to
find the Project Version and the EC Version are shown to be update that
was successfully applied.
Page 25

- 24 -
CHAPTER 3: SETTING UP OS FIRST TIME
This section explains how to install OS for the first time. You will find guideline for
Windows 10 IoT Enterprise as an example. For other OS, follow on-screen
instructions from Microsoft.
3.1 Windows 10 IoT Enterprise
Follow the steps below to complete the setup process.
1. Press the power button to turn on the computer.
2. First, select your country/region, your preferred app language, your preferred
keyboard layout, and your time zone, and then click Next.
3. In the opened window, click Install now.
Page 26

- 25 -
4. Enter the product key to activate Windows, click Next.
5. Microsoft license will appear. Carefully read the terms of license, select “I
accept the license terms”, then click Next.
Page 27

- 26 -
6. Select the type of installation you want. We recommend you to choose custom.
Click Custom to continue.
7. Choose the place where to install Windows, then click Next.
Page 28

- 27 -
8. Windows setup window will pop-up. Windows might create additional partitions
for you system files. Click Ok.
9. Windows have created partition 2. Click Next to continue.
Page 29

- 28 -
10. Windows setup warning message pops-up, read it carefully, and then click
Cancel. Click Next to continue.
11. Installing Windows. Please wait.
Page 30

- 29 -
12. Now you are ready to Setup your system. Click Use Express settings.
13. Read any introductory screens describing features of your computer, and click
Next upon completing each. You are now done with the initial setup process.
Page 31

- 30 -
3.2 Windows Embedded 8.1 Industry Pro
Follow the steps below to complete the setup process.
1. Press the power button to power on the computer.
2. Check I accept the license terms for using Windows to accept the terms,
and then click or tap "I Accept."
3. On the Personalize screen, choose a color you like – you can always change
this later from the Start screen.
Page 32

- 31 -
4. In the PC name field, type a name for your computer, and then click or tap
Next.
5. On the Settings page screen, choose Use express settings for the fastest
setup.
Page 33

- 32 -
6. Windows will then try to connect to network. Ignore attempt to connect to
internet as you do not need internet connection to finish setup your pc.
7. On Your account screen, type your username and password to create a local
account, and then click or tap Finish.
Page 34

- 33 -
8. Windows may take some time to finalize your settings.
9. On the Windows Sign-in screen, enter the user name and password that you
set up earlier, and then press Enter.
Page 35

- 34 -
10. Once Windows finishes login, you are now ready to use the PC
Page 36

- 35 -
3.3 Windows 7 Ultimate / Professional for Embedded System
Follow the steps below to complete the setup process.
1. Press the power button to power on the computer.
2. First select your region and language information, and then tap Next
3. Type in a user name for your account to be used on this PC and tap Next
Page 37

- 36 -
4. Type in a password for your account and tap Next
5. Now enter the product key that came with the computer and tap Next. For this
version of the Windows, a product key entry is required when setting up the
computer for the first time.
Page 38

- 37 -
6. On the license terms screen, click on the I accept the license terms and tap
Next
7. For the update option, choose Use recommended settings for Windows to
install updates. If you do not wish Windows to do so, choose the other options
accordingly.
Page 39

- 38 -
8. Next, review the date and time settings on the computer
9. Select the computer current location for network privacy setting. Choose the
location below to your actual usage accordingly.
Page 40

- 39 -
10. Allow time for windows to setup your desktop for the first time.
11. Now the computer is ready to be used.
Page 41

- 40 -
CHAPTER 4: DRIVER INSTALLATION
This section contains the path to download drivers for Windows 10 IoT Enterprise,
Windows Embedded 8.1 Industry Pro and Windows 7 Professional for Embedded
System. Install the drivers in the sequence listed below.
4.1 Windows 10 IoT Enterprise
Download drivers from Winmate Download Center:
Go to www.winmate.com > Support > Download Center > Rugged Tablet PCs >
M133W > Drivers
Driver Installation Sequence:
1. Chipset
2. Graphics
3. Management Engine
4. Serial I/O
5. Audio
6. LAN
7. GPS
8. Bluetooth
9. Wi-Fi
10. WWAN
11. WMMIO Driver (Please see Section 4.4 WMMIO Driver Installation for
detailed information)
After completing the OS driver installation, you can install Utilities
Page 42

- 41 -
4.2 Windows Embedded 8.1 Industry Pro
Download drivers from Winmate Download Center:
Go to http://www.winmate.com/ > Support > Download Center > Rugged Tablet
PCs > M133W > Drivers
Driver Installation Sequence:
1. Chipset
2. Graphics
3. Management Engine
4. Serial I/O
5. Audio
6. LAN
7. GPS
8. Bluetooth
9. Wi-Fi
10. WWAN
11. WMMIO Driver (Please see Section 4.4 WMMIO Driver Installation for
detailed information)
After completing the OS driver installation, you can install Utilities
Page 43

- 42 -
4.3 Windows 7 Professional for Embedded System
Download drivers from Winmate Download Center:
Go to www.winmate.com > Support > Download Center Rugged Tablet PCs >
M133W > Drivers
Driver Installation Sequence:
1. Chipset
2. Graphics
3. Kernel-Mode Driver Framework version 1.11 Update
4. Management Engine
5. Audio
6. LAN
7. USB 3.0
8. .Net 4.5.2
9. Sensor Hub
10. LAVFilters
11. GPS
12. Bluetooth
13. Wi-Fi
14. WWAN
15. WMMIO Driver (Please see Section 4.4 WMMIO Driver Installation for
detailed information)
After completing the OS driver installation, you can install drivers for Utilities
Page 44

- 43 -
4.3.1 Sensor Hub Driver Installation (For Window 7 Only)
1. Open Device Manager located in Computer Management menu, and then go
to Human Interface Devices, right-click on HID-compliant device, in the
drop-down menu choose Properties.
2. Open the menu.
Page 45

- 44 -
3. In Details menu select Hardware Ids, the content shows
HID\VID_0483&PID_91D1&REV_0034&Col01 (refer to the picture below).
4. If the device confirmed to be the same as contents, go to the HID-compliant
device proprieties menu, go to Driver tab, and select Update Driver (If the
content is different, please select another device with the same name to view).
Page 46

- 45 -
5. In the opened menu, select “Browse my computer for driver software”.
6. Select “Let me pick from a list of device drivers on my computer”.
Page 47

- 46 -
7. Click on “Have Disk”.
8. Choose the location for the driver to be installed.
Page 48

- 47 -
9. In the specified Sensor Hub folder, STSensorHub.inf, find STSensorHub.inf,
click on Open.
10. Complete original Model name change to STMicroelectronics Sensor
Hub, and then select Next.
Page 49

- 48 -
11. Windows security window pops u, select “Install this driver software
anyway”.
12. Wait while the system is installing driver software.
Page 50

- 49 -
13. Installation complete, close the window.
14. The name of the device will be updated under the Sensors category.
Page 51

- 50 -
15. After the driver is installed, please open Control Panel.
16. Go to Hardware and Sound.
Page 52

- 51 -
17. Select Location and Others Sensors.
18. In STMicroelectronics Sensor Hub settings choose Enabled and click
Apply, now the device can work properly.
Page 53

- 52 -
4.4 WMMIO Driver Installation (For Windows 7/8/10)
This section details the WMMIO Driver installation required for HotTab utility
*WMMIO Driver is required for the following OS: Windows 7, Windows 8.1 and
Windows 10 IoT.
WMMIO Driver Installation steps:
i. Type “cmd” in the run box.
ii. The cmd.exe will appear in Programs
iii. Right click on the cmd.exe and click on “Run as administrator” to start
command prompt.
Page 54

- 53 -
iv. Change directory to driver’s location, and type install to install the driver
v. When Windows Security dialog appear, select install to continue the installation.
vi. When the driver is successfully installed, you can see “Drivers Updated
successfully” message in the dos prompt.
vii. “WMMIO” device should also have been added to the Device Manger under
“System devices”.
Page 55

- 54 -
CHAPTER 5: UTILITY INSTALLATION
This section contains Winmate AP/Utility download path, the list of items provided
for M133 Series Rugged Tablet PC by Winmate and HotTab driver installation.
5.1 List of Winmate AP and Utilities
You can download Winmate AP/ Utility from Winmate Download Center.
Go to www.winmate.com > Support > Download Center > Rugged Tablet PCs >
M133W > Utility
List of Winmate AP/ Utilities for M133 Series Rugged Tablet PC
Item
Type
Description
1
Utility
M133 Hot Tab Utility
*Refer to utility User Manual for detailed AP/Utility installation instructions.
M133 Series Rugged Tablet PC Hot Tab Version:
Filename
M133W Model Description
M133_A40.1.72
For M133W with HotSwap Battery
with or without Barcode Scanner
with or without HF RFID Reader
M133_A40.1.72_SmartCard
For M133W with HotSwap Battery
with Smart Card Reader
with or without HF RFID Reader
M133_A40.1.72_NoBackup
For M133W without HotSwap Battery
with or without Barcode Scanner
with or without HF RFID Reader
Page 56

- 55 -
5.2 Installation Procedure
1. With Windows booted up, go to “Control Panel” -> “Programs and Features”
2. Check if there exists item “Win8HotTab”. If it exists, please uninstall
3. Install the new HotTab installation executable - “setup.exe” in the folder
4. After installation is finished, restart the tablet before again
5. Check the new version of HotTab is correctly installed by opening HotTab, go
to “Setting” icon, and check if the “HotTab Ver” information listed matches the
updated version.
Page 57

- 56 -
CHAPTER 6: SERIAL COM PORT SETTINGS
This section explains how to adjust serial COM port settings for all the hardware
devices to work on the M133W Tablet. In order for Winmate’s Hot-Tab software to
communicate with & control the certain devices (for example, RFID, UHF, Barcode
Reader), it is required to assign fixed COM port number for each of the devices.
NOTE:
After installing Winmate AP / Utility you may require to adjust serial
COM port settings to match with Winmate AP settings.
6.1 COM Port Settings
Please make adjustments to the serial COM Port settings, so they match with the
following table:
Serial
Port No
Device Instance Path
Device Description
COM 1
ACPI\PNP0501\10
DB9 Connector for Serial Port
COM 3
ACPI\PNP0501\11
HF RFID (optional)
COM 4
Bluetooth Auto Pairing
COM 9
u-Blox GPS
COM 15
ACPI\PNP0501\12
Barcode Reader (optional)
Refer to the section “Adjusting Com Port Number” of this deployment guide to set up
COM port number.
Page 58

- 57 -
6.2 Adjusting COM Port Number
1. Go to the Device Manager > Expand the Ports (COM& LPT). Right-click
on the device and click on ‘Properties’.
2. In the Ports Settings tab, click Advanced.
Page 59

- 58 -
3. Specify the COM Port Number. Change COM port number from COM4 to
COM15. Click OK.
4. Check the device management that has been changed COM15, and then
restart your device.
Page 60

- 59 -
6.3 Setting Up Bluetooth COM Port
Instruction:
1. Open the Bluetooth Devices Control Panel.
2. In the Options tab, select Turn discovery on and allow Bluetooth devices to
connect to this computer.
3. In the COM Ports tab, click Add.
Page 61

- 60 -
4. Select Incoming (device initiates the connection) and click OK.
NOTE:
The COM port number you just added would be auto paired when
the Bluetooth Barcode scanner scans the barcode sticks on the
tablet PC.
5. Click OK to close the Bluetooth Devices Control Panel.
Page 62

- 61 -
6.4 How to Check COM Port Proprieties
To check the actual location of the device:
1. Right-click on Communications Port from Device Manager and select
Properties.
2. Enter Properties, then go to Details tab, in Device Instance Path check the
actual location of the device.
Page 63

- 62 -
Page 64

- 63 -
CHAPTER 7: OS SETTING ADJUSTMENTS
This section explains how to perform the necessary adjustments in the OS to make
sure the for all the hardware devices to work on the M133W Tablet.
7.1 Microphone Setting Adjustment
1. Use the right mouse button to click the sound icon in the lower right corner.
2. Choose Recording devices
Page 65

- 64 -
3. In Sound menu enter Recording, right click on the Default Microphone and
select Disable.
4. Right-click on the Microphone of Realtek High Definition Audio, and select
Properties.
Page 66

- 65 -
5. Enter the proprieties and select the Levels category
6. Enter Levels, adjust Microphone to 100, and Microphone Boost to +10 dB.
Page 67

- 66 -
7.2 Display Size Adjustment
1. Open Control Panel, and go to Appearance and Personalization.
2. Choose Display.
Page 68

- 67 -
3. Default setting is 100%.
4. Modify default setting to 125%, and click Apply.
Page 69

- 68 -
5. Warning window will pop up. Click on Log off now to log off your computer
and apply new settings.
Page 70

- 69 -
7.3 On-screen Keyboard Adjustment (For Windows 10 Only)
1. First, ppen Windows->Settings.
2. Open “Devies”.
Page 71

- 70 -
3. Selet “Typing”.
4. Set “Automatically show the touch keyboard in windowed apps when there’s no
keyboard attached to your device” off->on.
Page 72

- 71 -
5. Automatically show the touch keyboard.
6. Search “regedit”.
Page 73

- 72 -
7. In the Registry Editor, use the navigation pane to locate:
HKEY_LOCAL_MACHINE->SOFTWARE->Microsoft->Windows>CurrentVersion->Explorer->Scaling.
8. Right-click the newly created value and click Modify.
Page 74

- 73 -
9. Enter the screen size of your device in diagonal inches. eg:13.3
10. Restart your machine. Windows will automatically scale your apps and UI
based on the specified screen size.
Page 75

- 74 -
7.4 Graphics Setting
1. On the desktop open the shortcut Intel® HD Graphics Control Panel.
2. Select Power.
3. Enter the Power setting.
Page 76

- 75 -
4. In the upper left corner click Power and select On Battery.
Page 77

- 76 -
5. Enter power settings.
6. Change Display Refresh Rate Switching from Enable to Disable, and then
click Apply.
Page 78

- 77 -
7. A warning window will pop up asking if you want to save the newly modified
settings, click Yes.
8. You have completed changing graphics settings.
Page 79

- 78 -
CHAPTER 8: WINMATE SDK SUPPORT
Winmate provides Software Development Kit (SDK) for M133 Series Rugged Tablet
PC. If you cannot find SDK for your model, please contact Winmate at
sales@winmate.com.tw .
8.1 Winmate Download Center
Go to www.winmate.com > Support > Download Center > Rugged Tablet PCs >
M133 > Development Kit
8.2 Download SDK from Winmate File Share
https://app.box.com/files/0/f/7233497641/SDK
Page 80

Winmate Inc.
9F, No.111-6,Shing-De Rd., San-Chung Dist.,
New Taipei City 24158, Taiwan, R.O.C
Tel: 886-2-8511-0288
Fax: 886-2-8511-0211
Email: sales@winmate.com.tw
Official website: www.winmate.com
 Loading...