

Page 1
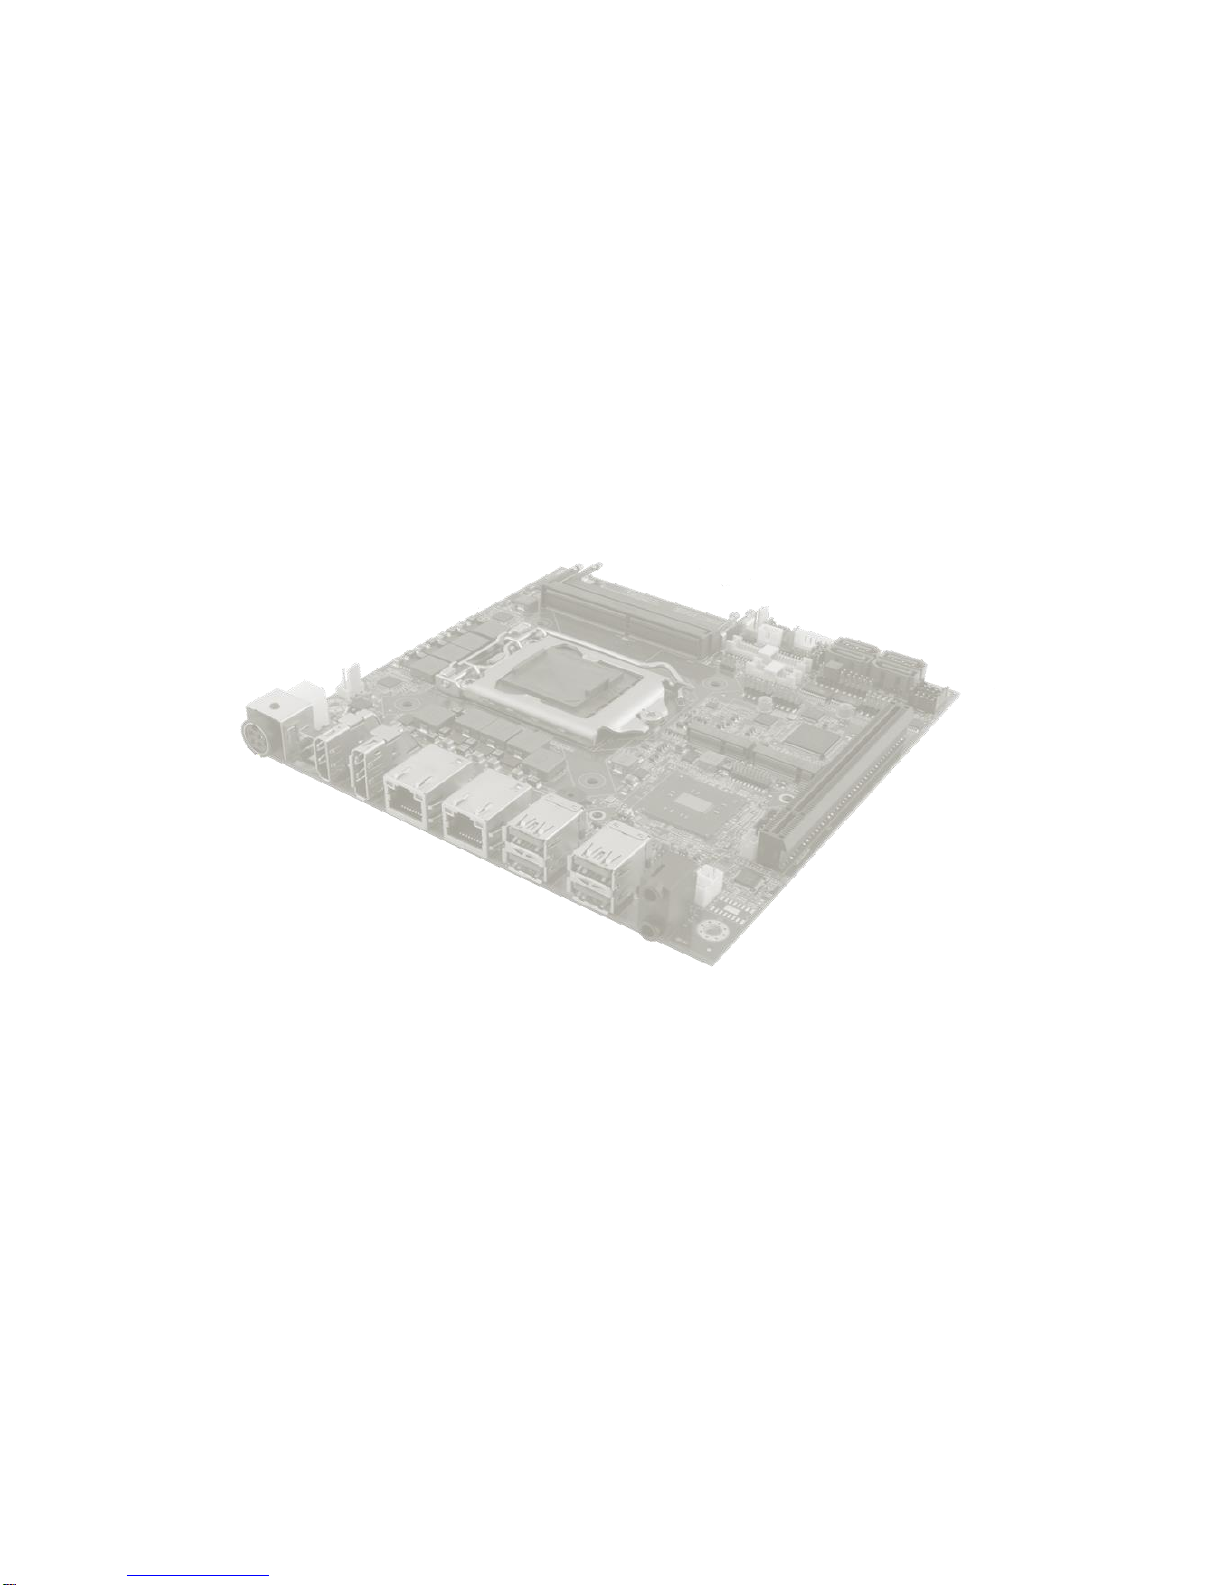
IK70 Motherboard
Mini-ITX SBC with Intel® 7th Generation Core i3/i5/i7 processor, HDMI, Display Port,
LVDS, Dual Giga Ethernet, USB 3.0 and NGFF Interface
V120
User Manual
Version 1.3
9171111I103R
Page 2

2
2
IK70 Motherboard User Manual
Contents
PREFACE ..................................................................................................................................................................................... 4
ABOUT THIS USER MANUAL ....................................................................................................................................................... 8
CHAPTER 1: GENERAL INFORMATION ......................................................................................................................................... 9
1.1 INTRODUCTION ........................................................................................................................................................................... 10
1.2 FEATURES................................................................................................................................................................................... 10
1.3 MOTHERBOARD SPECIFICATIONS..................................................................................................................................................... 11
1.4 FUNCTIONAL DESCRIPTION ............................................................................................................................................................ 13
1.5 PHYSICAL DESCRIPTION ................................................................................................................................................................. 14
CHAPTER 2: HARDWARE INSTALLATION .................................................................................................................................... 15
2.1 MOTHERBOARD COMPONENTS ...................................................................................................................................................... 16
2.1.1 Component Side .............................................................................................................................................................. 16
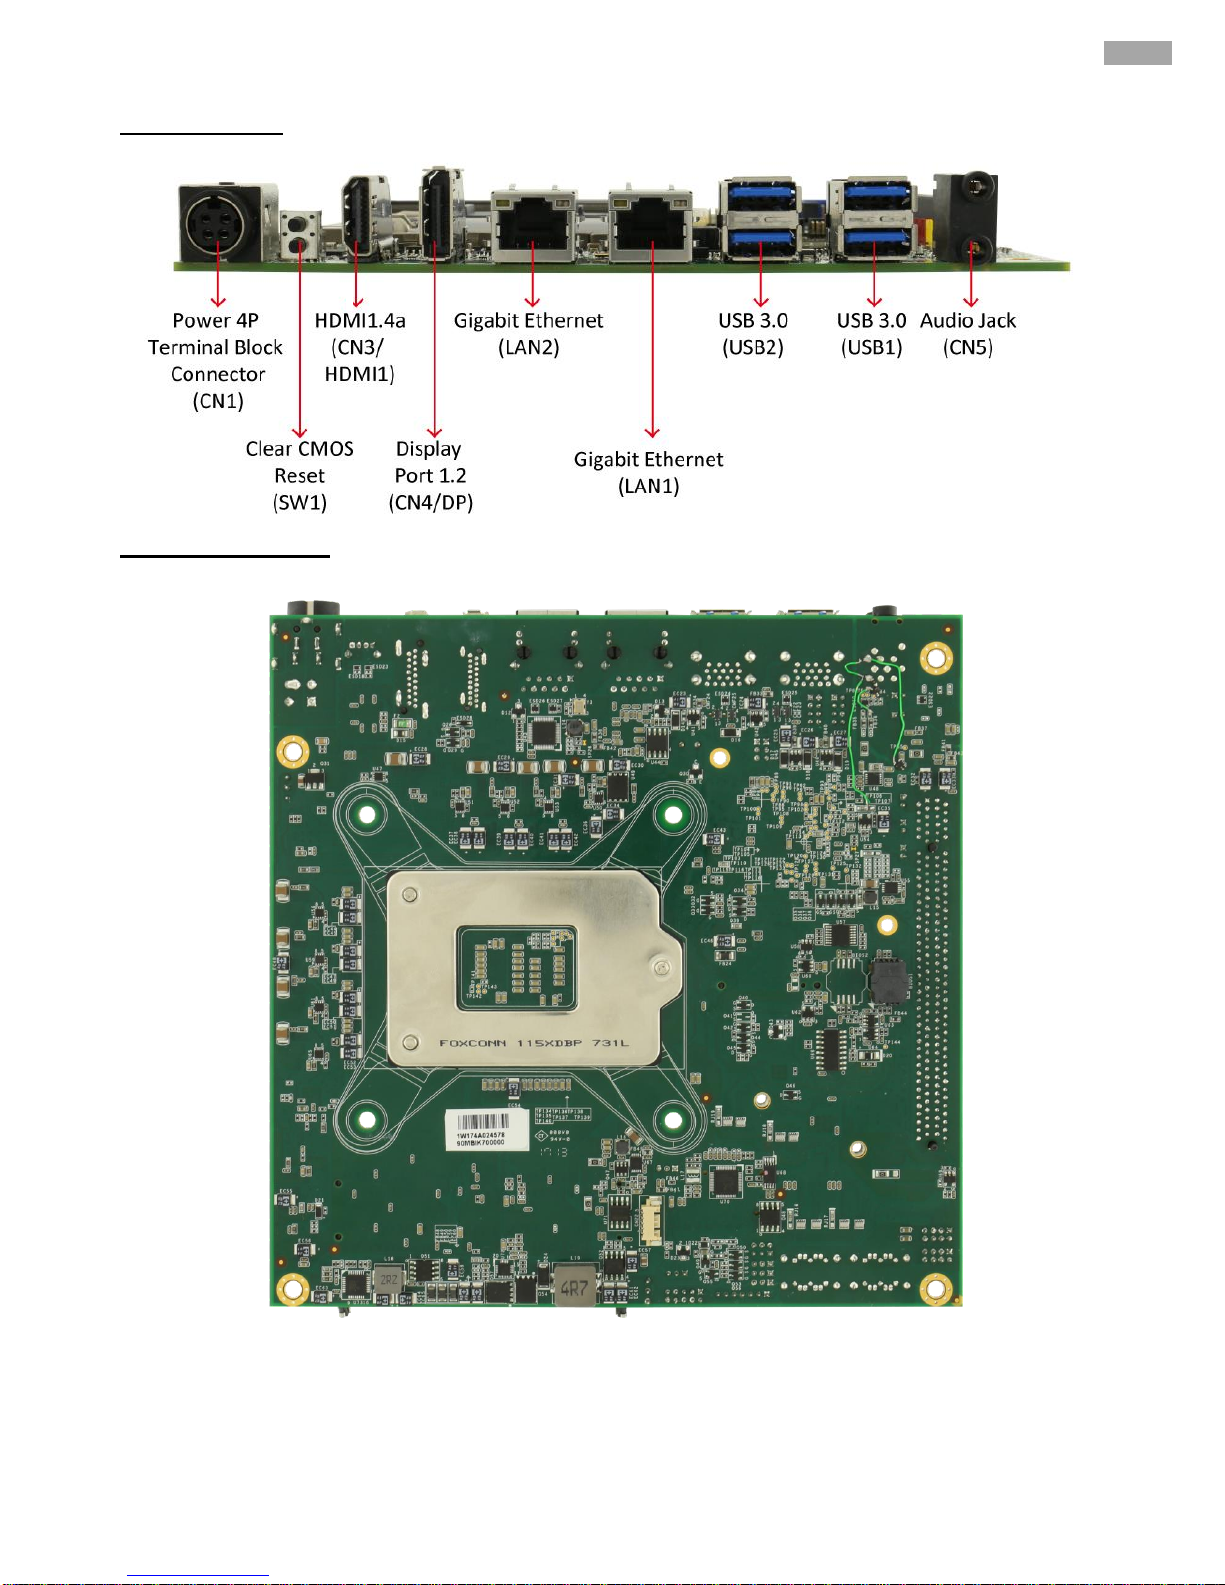
2.1.2 I/O Side ........................................................................................................................................................................... 17
2.1.3 Solder Side ...................................................................................................................................................................... 17
2.2 MEMORY MODULE (SO-DIMM) INSTALLATION................................................................................................................................ 18
2.3 I/O EQUIPMENT INSTALLATION ...................................................................................................................................................... 19
2.3.1 12V DC in ........................................................................................................................................................................ 19
2.3.2 Serial COM Port .............................................................................................................................................................. 19
2.3.3 HDMI .............................................................................................................................................................................. 19
2.3.4 Display Port..................................................................................................................................................................... 19
2.3.5 Ethernet Interface ........................................................................................................................................................... 19
2.3.6 USB Port .......................................................................................................................................................................... 19
2.3.7 Audio .............................................................................................................................................................................. 19
2.4 JUMPER SETTINGS ....................................................................................................................................................................... 20
2.4.1 JP1: Panel Power Select .................................................................................................................................................. 21
2.4.2 JP2: Backlight Power Select ............................................................................................................................................ 21
2.4.3 JP3: Backlight Dimming Select ........................................................................................................................................ 21
2.4.4 JP4: Backlight Dimming Control Select ........................................................................................................................... 21
2.4.5 CLR_CMOS: Clear CMOS Jumper .................................................................................................................................... 21
2.4.6 CLR_RTC: Clear RTC Jumper ............................................................................................................................................ 22
2.5 MAINBOARD CONNECTORS ........................................................................................................................................................... 23
2.5.1 Internal Front Side Connectors ....................................................................................................................................... 23
2.5.2 External I/O Side Connectors .......................................................................................................................................... 32
CHAPTER 3: DRIVER INSTALLATION ........................................................................................................................................... 36
3.1 CHIPSET DRIVER .......................................................................................................................................................................... 37
3.2 GRAPHIC DRIVER ......................................................................................................................................................................... 40
3.3 MANAGEMENT ENGINE (ME) ........................................................................................................................................................ 44
3.4 AUDIO DRIVER ............................................................................................................................................................................ 47
Page 3

3
3
Preface
3.5 ETHERNET DRIVER ....................................................................................................................................................................... 49
3.6 WATCHDOG DRIVER INSTALLATION .................................................................................................................................................. 52
3.7 DIGITAL IO DRIVER INSTALLATION ................................................................................................................................................... 56
CHAPTER 4: INSYDE H20 BIOS SETUP ........................................................................................................................................ 59
4.1 HOW AND WHEN TO USE BIOS SETUP ............................................................................................................................................ 60
4.2 BIOS FUNCTIONS ........................................................................................................................................................................ 62
4.2.1 Main Menu ..................................................................................................................................................................... 62
4.2.2 Advanced ........................................................................................................................................................................ 63
4.2.3 Security ........................................................................................................................................................................... 91
4.2.4 Power .............................................................................................................................................................................. 92
4.3 USING RECOVERY WIZARD TO RESTORE COMPUTER ........................................................................................................................... 95
4.4 HOW TO ENABLE WATCHDOG ........................................................................................................................................................ 96
CHAPTER 5: TECHNICAL SUPPORT ............................................................................................................................................ 98
5.1 DRIVERS .................................................................................................................................................................................... 99
5.2 SOFTWARE DEVELOPMENT KIT (SDK).............................................................................................................................................. 99
Page 4

4
4
IK70 Motherboard User Manual
Preface
Copyright Notice
No part of this document may be reproduced, copied, translated, or transmitted in any form or by any means,
electronic or mechanical, for any purpose, without the prior written permission of the original manufacturer.
Trademark Acknowledgement
Brand and product names are trademarks or registered trademarks of their respective owners.
Disclaimer
We reserve the right to make changes, without notice, to any product, including circuits and/or software
described or contained in this manual in order to improve design and/or performance. We assume no
responsibility or liability for the use of the described product(s), conveys no license or title under any patent,
copyright, or masks work rights to these products, and makes no representations or warranties that these
products are free from patent, copyright, or mask work right infringement, unless otherwise specified.
Applications that are described in this manual are for illustration purposes only. We make no representation
or warranty that such application will be suitable for the specified use without further testing or modification.
Warranty
We warrant that each of its products will be free from material and workmanship defects for a period of one
year from the invoice date. (Standard is one year, extended warranty will need to discuss with our sales
representatives. If the customer discovers a defect, we will, at its option, repair or replace the defective
product at no charge to the customer, provided it is returned during the warranty period of one year, with
transportation charges prepaid. The returned product must be properly packaged in its original packaging to
obtain warranty service.
If the serial number and the product shipping data differ by over 30 days, the in-warranty service will be
made according to the shipping date. In the serial numbers the third and fourth two digits give the year of
manufacture, and the fifth digit means the month (e. g., with A for October, B for November and C for
December).
For example, the serial number 1W16Axxxxxxxx means October of year 2016.
Page 5

5
5
Preface
Packing List
Before using this Motherboard, please make sure that all the items listed below are present in your package:
IK0 Motherboard
User Manual & Driver CD
If any of these items are missing or damaged, contact your distributor or sales representative immediately.
Customer Service
We provide a service guide as below for any problem by the following steps: First, contact your distributor,
sales representative, or our customer service center for technical support if you need additional assistance.
You need to prepare the following information before you call:
Product serial number
Peripheral attachments
Software (OS, version, application software, etc.)
Detailed problem description
The exact wording of any error messages
In addition, free technical support is available from our engineers every business day. We are always ready
to give advice on application requirements or specific information on the installation and operation of any of
our products. Please do not hesitate to call or e-mail us.
Page 6

6
6
IK70 Motherboard User Manual
Advisory Conventions
Four types of advisories are used throughout the user manual to provide helpful information or to alert you to
the potential for hardware damage or personal injury. These are Notes, Important, Cautions, and Warnings.
The following is an example of each type of advisory.
Note:
A note is used to emphasize helpful information
Important:
An important note indicates information that is important for you to know.
Caution
A Caution alert indicates potential damage to hardware and explains
how to avoid the potential problem.
Warning!
An Electrical Shock Warning indicates the potential harm from electrical
hazards and how to avoid the potential problem.
Page 7

7
7
Preface
Safety Precautions
CAUTION
Always ground yourself to remove any static charge before touching the CPU
card. Modern electronic devices are very sensitive to static electric charges.
As a safety precaution, use a grounding wrist strap at all times. Place all
electronic components in a static-dissipative surface or static-shielded bag
when they are not in the chassis.
Safety and Warranty
1. Please read these safety instructions carefully.
2. Please keep this user manual for later reference.
3. Please disconnect this equipment from any AC outlet before cleaning. Do not use liquid or spray detergents for
cleaning. Use a damp cloth.
4. For pluggable equipment, the power outlet must be installed near the equipment and must be easily accessible.
5. Keep this equipment away from humidity.
6. Put this equipment on a reliable surface during installation. Dropping it or letting it fall could cause damage.
7. Make sure the voltage of the power source is correct before connecting the equipment to the power outlet.
8. Position the power cord so that people cannot step on it. Do not place anything over the power cord.
9. All cautions and warnings on the equipment should be noted.
10. If the equipment is not used for a long time, disconnect it from the power source to avoid damage by transient
over-voltage.
11. If any of the following situations arises, get the equipment checked by service personnel:
A. The power cord or plug is damaged.
B. Liquid has penetrated into the equipment.
C. The equipment has been exposed to moisture.
D. The equipment does not work well, or you cannot get it to work according to the user’s manual.
E. The equipment has been dropped and damaged.
F. The equipment has obvious signs of breakage.
Page 8
8
8
IK70 Motherboard User Manual
About This User Manual
This User Manual provides information about using the IK70 Motherboard. The documentation set for the
IK70 Motherboard provides information for specific user needs, and includes:
IK70 Motherboard User Manual – contains detailed description on how to use the motherboard, its
components and features.
Note:
Some pictures in this guide are samples and can differ from actual
product.
Document Revision History
Version
Date
Note
1.0
3-Jul-2017
Initial release
1.1
15-Aug-2017
Update IK70 SBC to version 110
1.2
19-Dec-2017
Update BIOS to InsydeH20
1.3
5-Jul-2017
Update IK70 SBC to version 120
Page 9

9
9
Chapter 1: General Information
Chapter 1: General Information
This chapter includes the IK70 Motherboard background information.
1.1 Introduction
1.2 Features
1.3 Motherboard Specifications
1.4 Functional Description
1.5 Physical Description
Page 10

10
10
IK70 Motherboard User Manual
1.1 Introduction
Thank you for choosing the IK70 Motherboard. The IK70 Motherboard is powered by Intel® C236 chipset,
17x17 mm, and Socket G3 Intel® 7th Generation Core i7/i5/i3 Processor. The Intel®7th Generation Core™
processor based on 64-bit, multi-core processors built on 22-nanometer process technology. The
processors are designed for a two-chip platform consisting of a processor and Platform Controller Hub (PCH)
to be used with the mobile chipset. High performance platform delivers the performance and high scalability
cutting-edge embedded computing application.
In peripheral connectivity, IK70 Motherboard features two NGFF Sockets ,four Serial ATA III
(6Gb/s)connectors, four serial ports (four pin headers), 4 super-speed USB 3.0 connectors and four
hi-speed USB 2.0 connectors(four pin headers). Additionally, IK70 SBC features build-in a 12V DC in power
adapter.
Abundant I/O connectors and expandability makes IK70 Motherboard to be the right fit in the majority of
industrial computer applications such as machine vision and control, gaming, POS, KIOSK systems,
industrial automation, and others. Powerful processor in Mini ITX form-factor meets the demanding
performance requirements of modern industrial applications.
1.2 Features
IK70 Motherboard features:
Mini ITX Form Factor (170 x 170 mm)
Intel® 7th Generation Core™ i7/i5/i3 (Kaby Lake)
Intel® C236 Chipset
Integrated HD Graphics 630 supports DirectX 12 and OpenGL 4.4
2 x DDR4 SO-DIMM, max. 32GB
Integrated Dual Gigabit Ethernet
1 x PCI-E(x16)
4 x SATAIII, 4 x USB3.0, 4 x USB 2.0
Page 11
11
11
1.3 Motherboard Specifications
Model Name
IK70
System
Specifications
CPU
Socket LGA 1151 Intel® i7/ i5 / i3 processor
Chipset
Intel® C236
System
Memory
2 x SO-DIMM socket ® DDR4-1866/2133 ECC
Max. 32GB ( 2 x 16GB DIMMs)
Storage
SATA3 x4
M.2 SATA x 1 (KEY B)
BIOS
Insyde System BIOS
Graphic
Intel® HD Graphics 630
Super IO
Chipset
Fintek F81867
Audio
Realtek HD Audio Codec
LAN
2 x Giga LAN (Intel® I211-AIT Gigabit-LAN Controller + I219-LM
Gigabit-LAN PHY)
USB
4 ports USB 3.0
4 ports USB 2.0 (pin-header)
Display
Specifications
Display
Interface
Supports DirectX 12 and OpenGL 4.0
Analog monitor resolution up to 2048 x 1536 @75Hz HDMI supports
HDMI 1.4, max. resolution
4096 x 2304@24Hz
Display Port: supports DP 1.2, max. resolution
4096 x 2160@60Hz
eDP
I/O Ports
Specification
External I/O
4 x USB 3.0
2 x RJ-45 for Giga LAN with LED
1 x DP 1.2
1 x HDMI 1.4
1 x Audio Jack (Mic-in, Line-out)
1 x (+12V) Power Input 4P terminal block connector
1 x Clear CMOS Button
1 x Reset Button
Internal I/O
2 x RS232 Serial Console to 2x5 Pin Header (COM1/COM2)
2 x LVTTL Serial COM Console to 2x5 Pin Header (COM3/COM4)
SPK R / SPK L
Page 12

12
IK70 Motherboard User Manual
2 x USB 2.0 Pin Wafer
1 x CPU FAN Connector
1 x SYS FAN Connector (Optional in Backplane BD)
1 x LPC DB
4 x SATA III Connectors (SATA0/SATA1/SATA2/SATA3)
12V/5V power connector for SATA (Optional)
2 x SATA Power Connector (on Backplane BD)
1 x Inverter Wafer Connector
1 x LVDS Wafer Connector
1 x eDP Wafer Connector
1 x VR Control Wafer Connector
1 x Panel Button Wafer connector
Expansions
Slot
1 x M.2 NGFF KEY E for WWAN/WALN PCIe Card
1 x M.2 NGFF KEY B for SATA SSD
1 x PCIe (x16) slot
Indicators
LAN (2 x
RJ45)
10/100 Mbps (Green LED)
1000 Mbps (Orange LED)
Traffic LED (Yellow LED)
Security
TPM
TPM 2.0
Mechanical
Specifications
Dimensions
170 (W)x 170(L) mm
Environment
Considerations
Operating
Temp.
-20°C ~ 60°C
Storage
Temp.
-40°C ~ 70°C
Operating
Humidity
10% ~ 95%, non-condensing
Power
Management
Power Input
+12V Power Input
Power
Consumption
Maximum 50W
Packing List
Standard
IK70-120 Single Board Computer
IK70 Manual & Driver CD
Page 13

13
13
1.4 Functional Description
Function block (V120)
Page 14

14
IK70 Motherboard User Manual
1.5 Physical Description
Board Dimensions (V120)
Page 15

15
15
Chapter 2: Hardware Installation
Chapter 2: Hardware Installation
This chapter provides information on how to use jumpers and connectors on the
IK70 motherboard.
2.1 Motherboard Components
2.2 Memory Module Installation
2.3 I/O Equipment Installation
2.4 Jumper Settings
2.5 Motherboard Connectors
Page 16
16
IK70 Motherboard User Manual
2.1 Motherboard Components
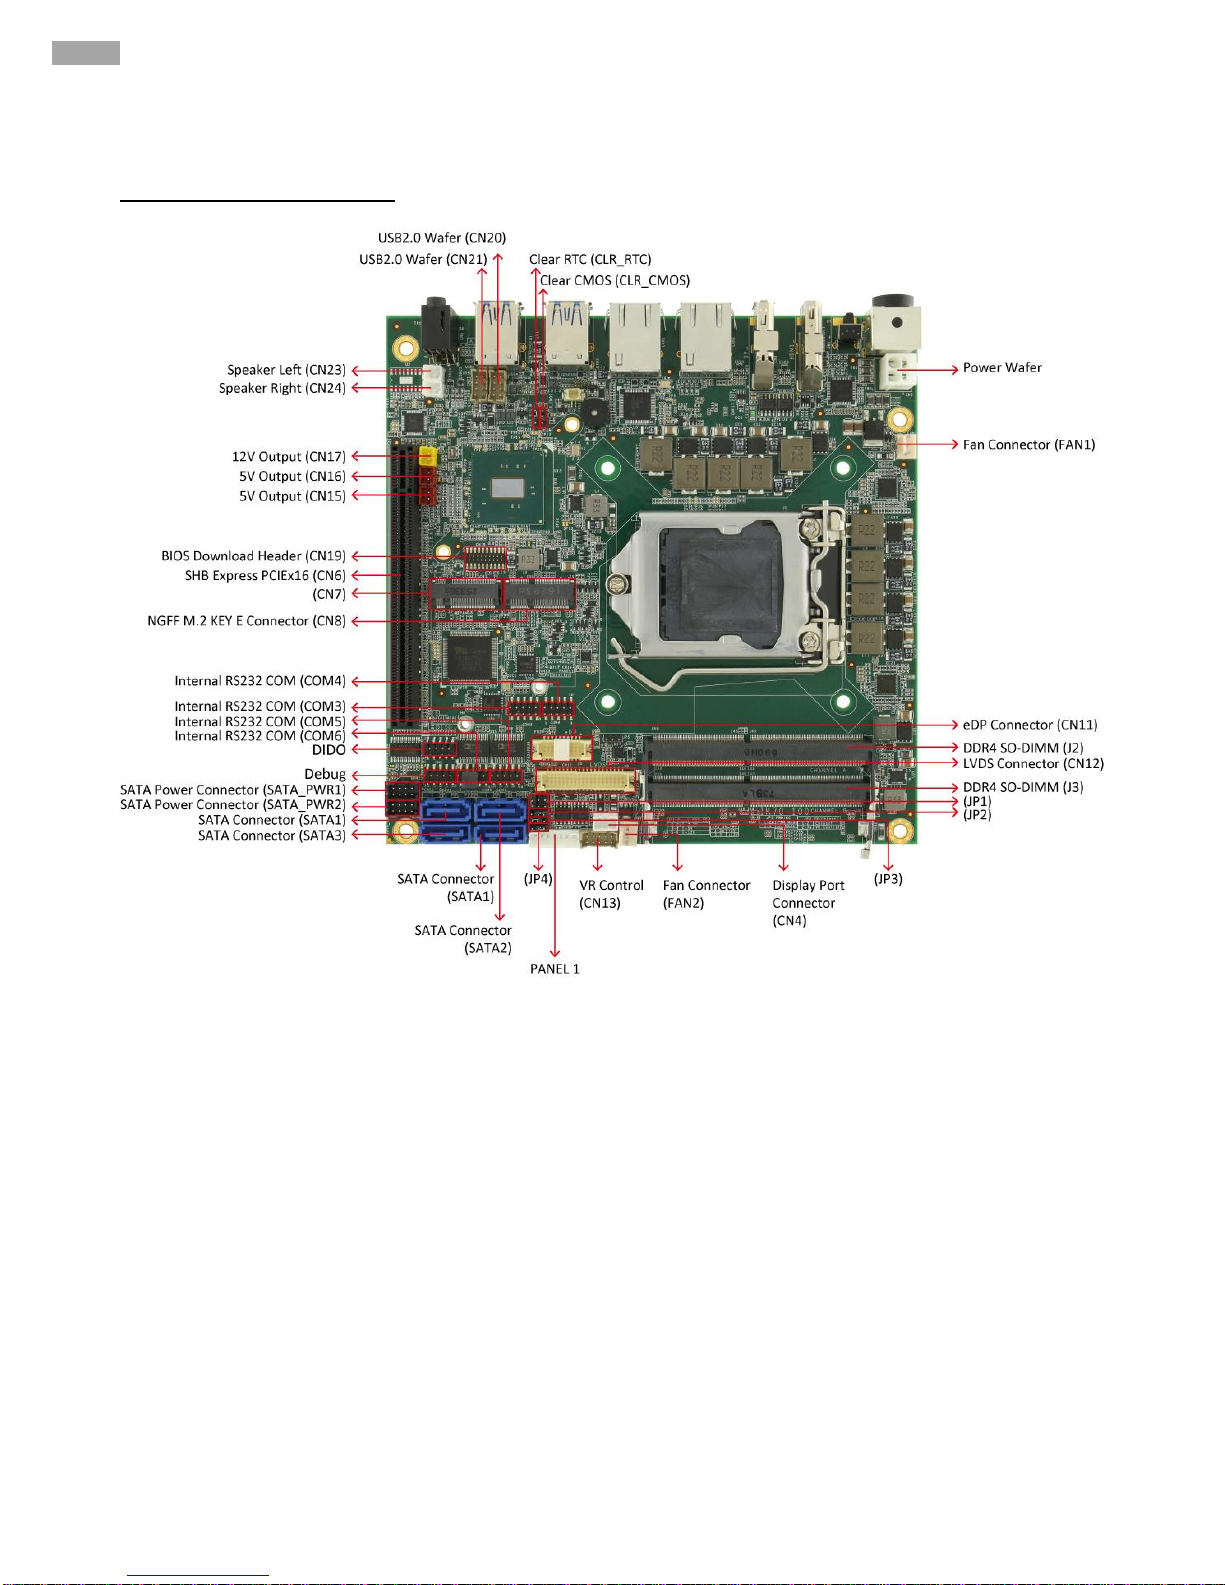
2.1.1 Component Side
Page 17
17
17
Chapter 2: Hardware Installation
2.1.2 I/O Side
2.1.3 Solder Side
Page 18
18
IK70 Motherboard User Manual
2.2 Memory Module (SO-DIMM) Installation
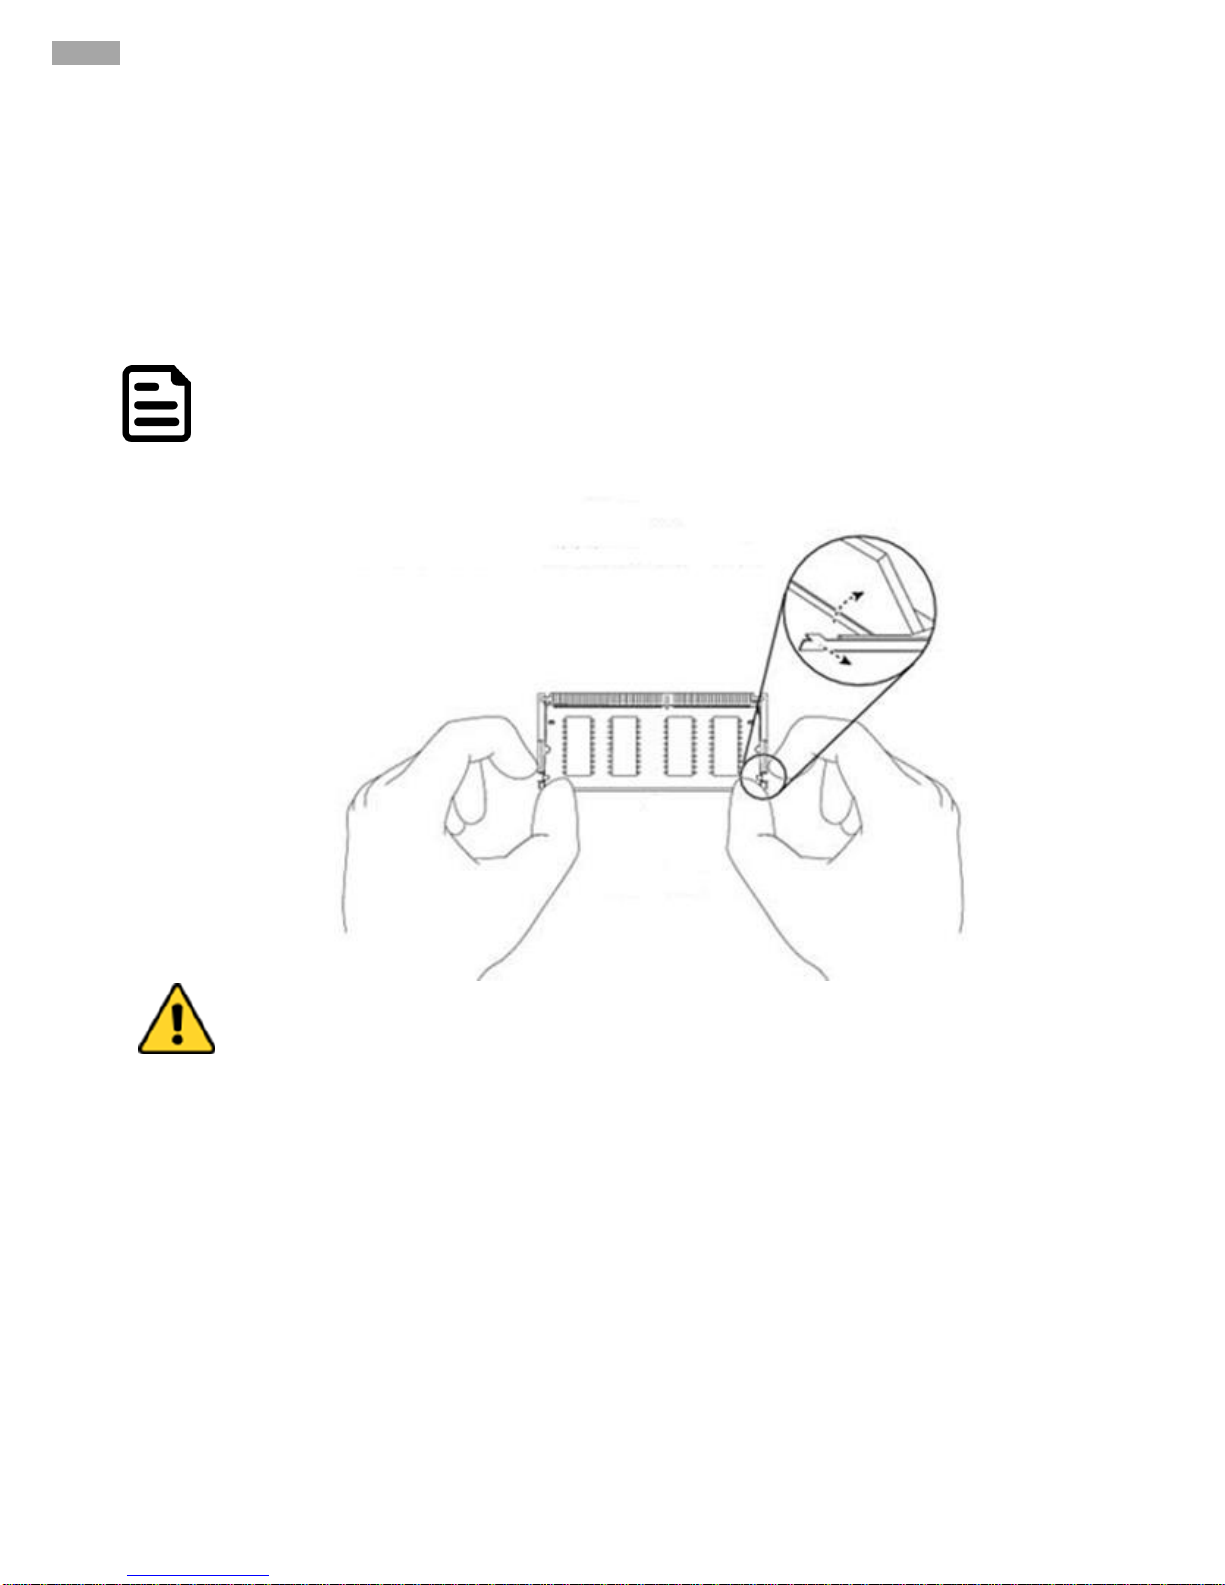
The IK70 SBC Motherboard has two 260-pin SODIMM slot. The socket supports DDR4.
When installing the memory unit, please follow the steps below:
1. Firmly insert the SO-DIMM at an angle of about 30-degree into the slot. Align the SO-DIMM with the
slot until it is fully inserted. The notch on the SO-DIMM should match the break on the slot.
2. Press downwards on SO-DIMM until the retaining clips at both ends fully snap closed and the
SO-DIMM is properly seated.
Note:
Pull tabs away with your thumbs, bracing your forefingers against the
rails. The memory module will be released. Then raise the memory
module to a vertical position.
Caution
The SO-DIMM only fits in one correct orientation. It will cause permanent
damage to the development board and the SO-DIMM if the SO-DIMM is
forced into the slot at the incorrect orientation.
Page 19

19
19
Chapter 2: Hardware Installation
2.3 I/O Equipment Installation
2.3.1 12V DC in
The IK70 Motherboard allows plugging 12V DC-IN jack on the board without another power module converter under
power consumption by Intel® 7th Generation Core i7/i5/i3 Processor and C236 chipset.
2.3.2 Serial COM Port
Four COM Port Pin Headers build in the motherboard. Optional COM ports support RS-422/485.
*When an optional touch-screen is ordered with PPC, serial com port can connect to a serial or an optional
touch-screen.
2.3.3 HDMI
The Motherboard has one HDMI port that can be connected to an external LCD monitor. Use HDMI cable to connect
to an external LCD monitor, and connect the power cable to the outlet. The HDMI connector is a standard 19-pin
HDMI connector.
2.3.4 Display Port
The Motherboard has one Display Port that can be connected to an external LCD monitor. Use Display Port
cable to connect to an external LCD monitor, and connect the power cable to the power outlet. The Display
Port connector is a standard 20-pin DP connector.
2.3.5 Ethernet Interface
The Motherboard is equipped with Intel® I211-AT Gigabit-LAN Controller + I219-LM Gigabit-LAN PHY which
is fully compliant with the PCI 10/100/1000 Mbps Ethernet protocol compatible. It is supported by major
network operating systems. The Ethernet ports provide two standard RJ-45 jacks.
2.3.6 USB Port
Eight USB devices (four with pin headers) may be connected to the system though an adapter cable.
Various adapters may come with USB ports. USB usually connect the external system to the system. The
USB ports support hot plug-in connection. Whatever, you should install the device driver before you use the
device.
2.3.7 Audio
The Audio 7.1 channel capabilities are provided by a Realtek chipset supporting digital audio outputs. The audio
interface includes two jacks: line-out and mic-in.
Page 20
20
IK70 Motherboard User Manual
2.4 Jumper Settings
This section explains how to set jumpers for correct configuration of the motherboard.
Note:
A pair of needle nose pliers may be helpful when working with jumpers. If
you have any doubts about the best hardware configuration for your
application, contact your local distributor or sales representative before
you make any changes. Generally, you simply need a standard cable to
make most connections.
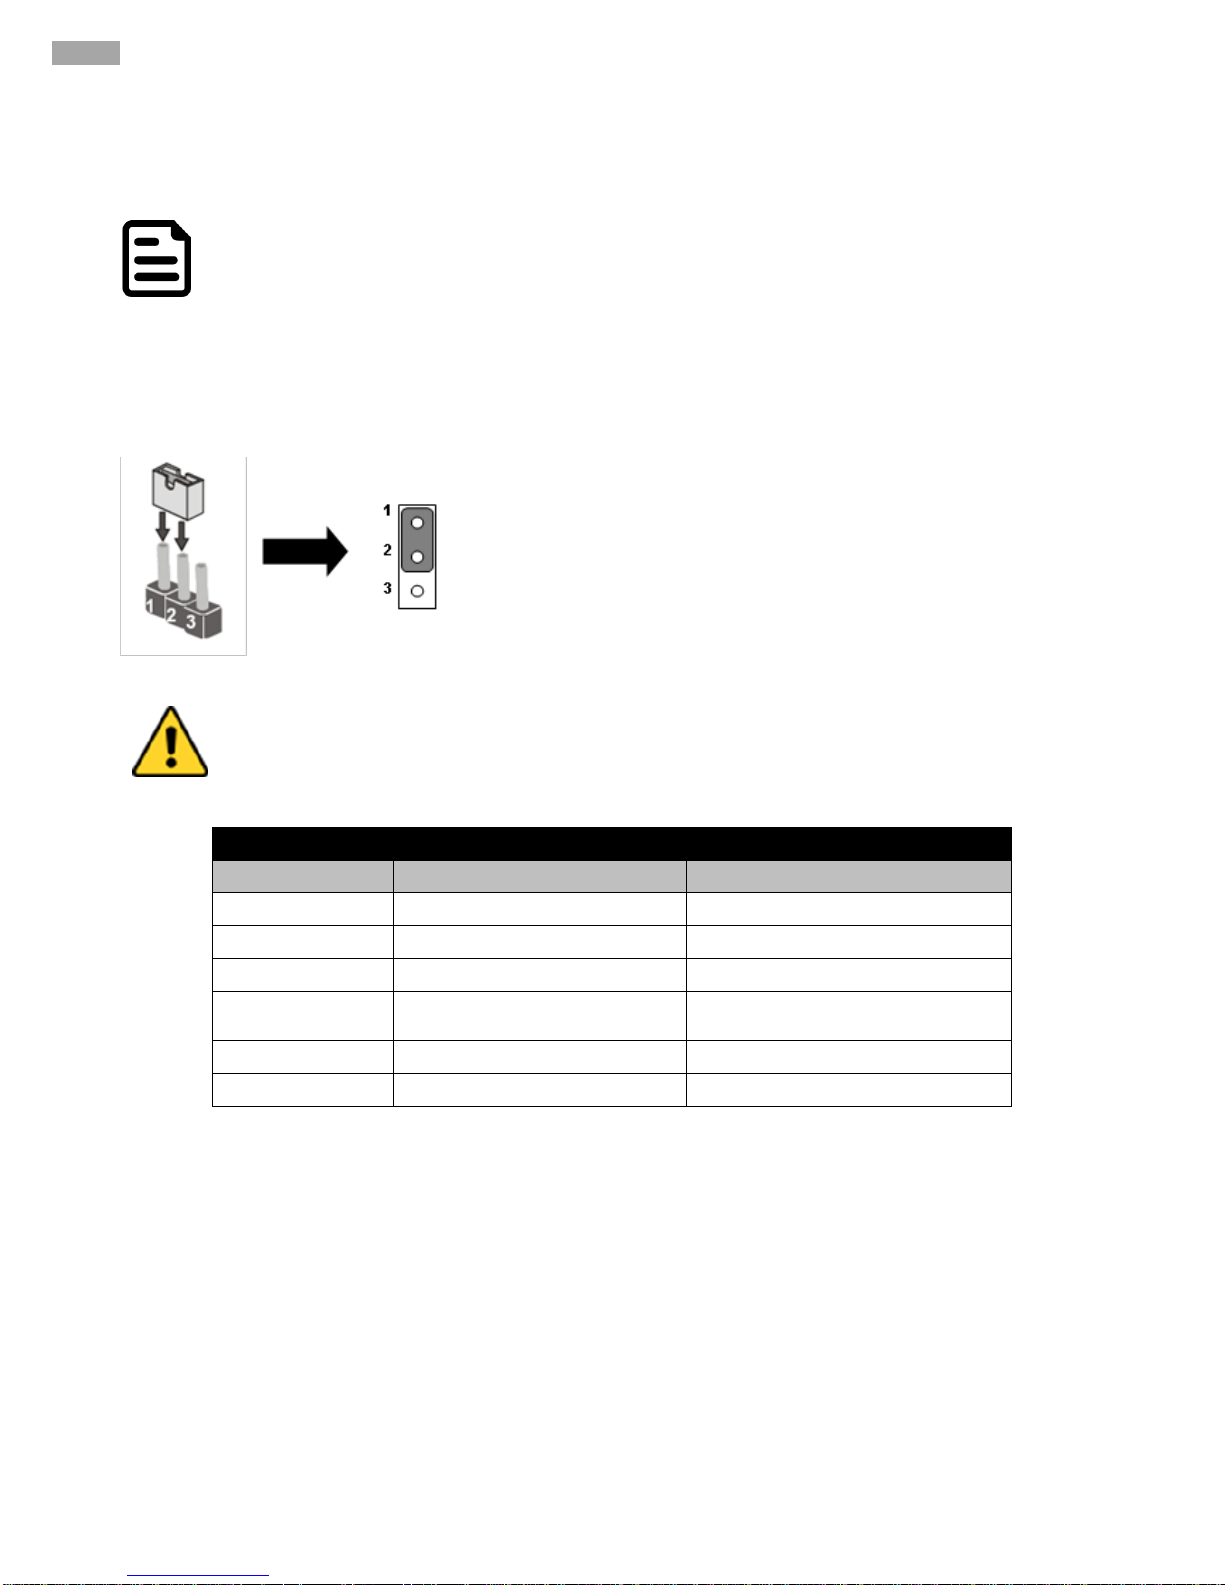
The jumper setting diagram is shown below. When the jumper cap is placed on both pins, the jumper is
SHORT. The illustration below shows a 3-pin jumper; pins 1 and 2 are short. If you remove the jumper cap,
the jumper is OPEN.
PIN 1-2 SHORT
PIN 3 OPEN
Caution
To avoid damaging the module, always turn off the power supply
before setting jumpers or clearing CMOS.
Jumpers
Label
Function
Note
JP1
Panel Power Select
2x3 header, pitch 2.0mm
JP2
Backlight Power Select
1x3 header, pitch 2.0mm
JP3
Backlight Dimming Select
1x3 header, pitch 2.0mm
JP4
Backlight Dimming Control
Select
1x3 header, pitch 2.0mm
CLR_CMOS
Clear CMOS
1*3p P:2.0mm DIP 180o
CLR_RTC
Clear RTC
1*3p P:2.0mm DIP 180o
Page 21
21
21
Chapter 2: Hardware Installation
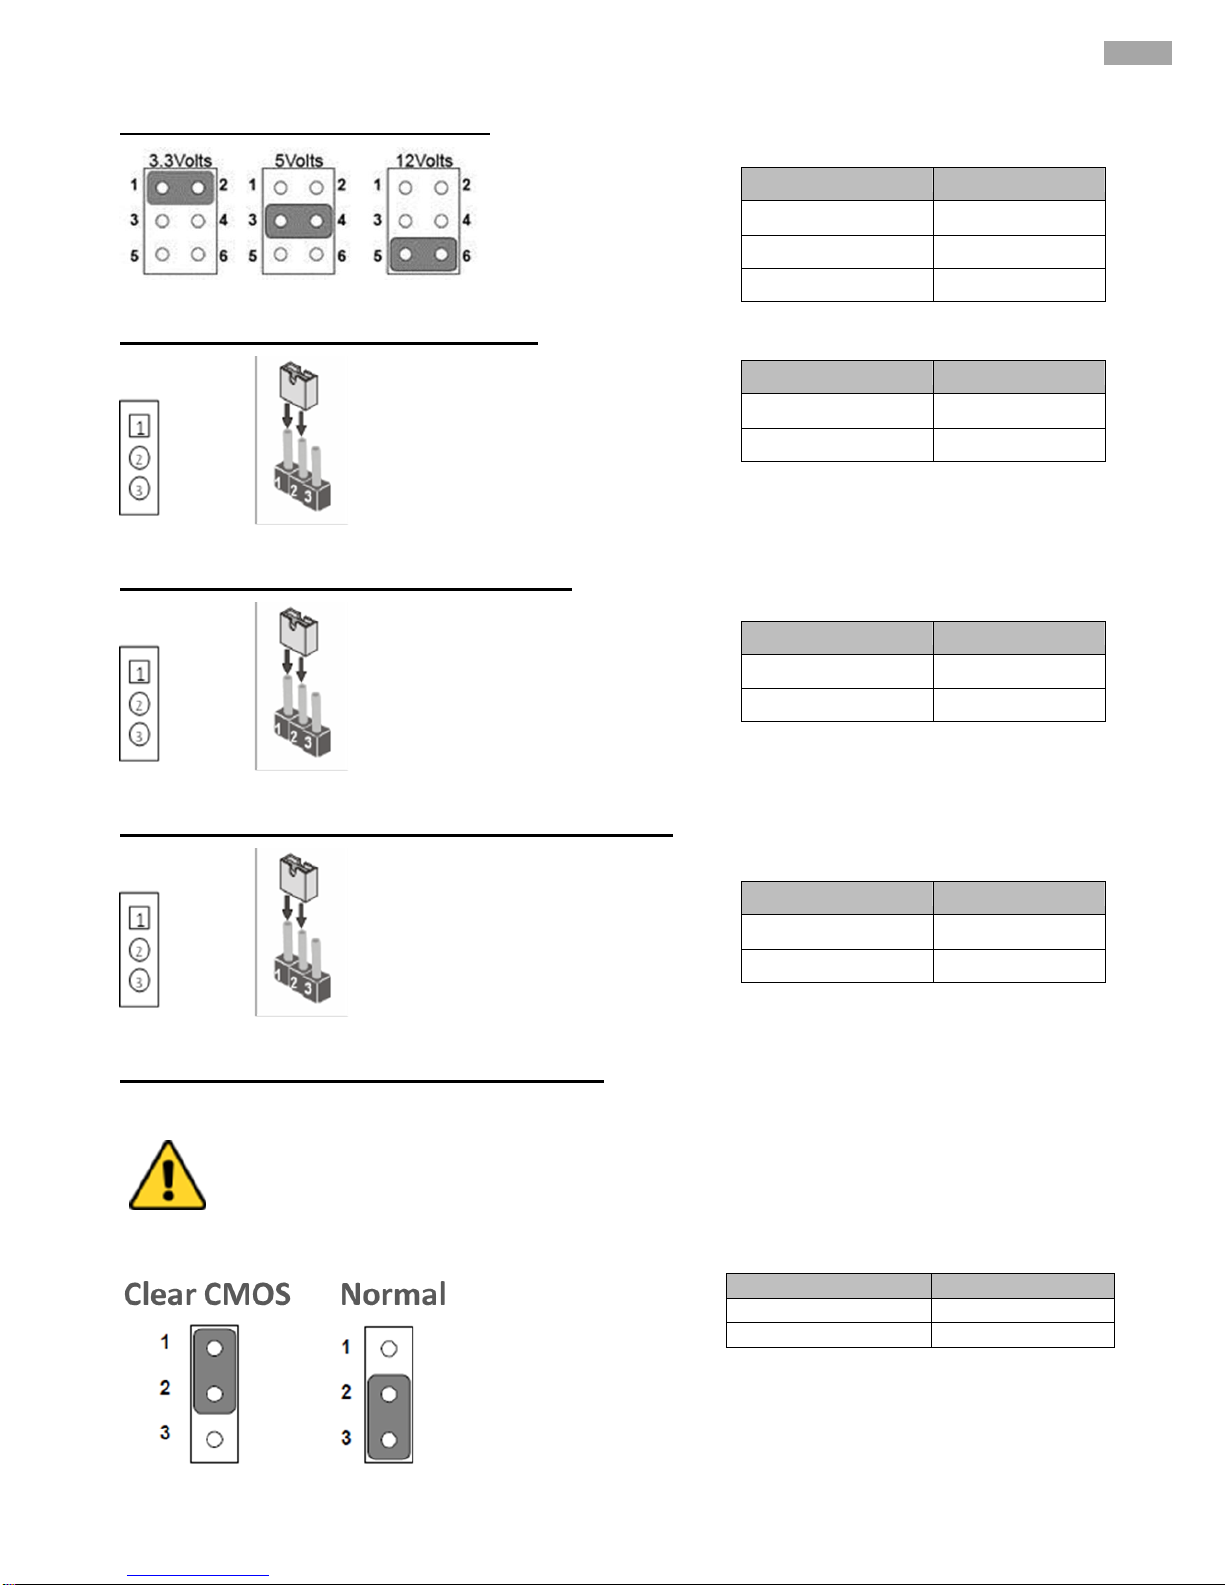
2.4.1 JP1: Panel Power Select
2.4.2 JP2: Backlight Power Select
2.4.3 JP3: Backlight Dimming Select
2.4.4 JP4: Backlight Dimming Control Select
2.4.5 CLR_CMOS: Clear CMOS Jumper
Remember to set jumper back to Normal before turning on the power supply.
Caution
TURN OFF the power supply before setting Clear CMOS.
Pin №
Name
1-2 (Default)
+3.3V
3-4
+5V
5-6
+12V
Pin №
Name
1-2 (Default)
+5V
2-3
+12V
Pin №
Name
1-2 (Default)
PWM Mode
2-3
DC Mode
Pin №
Name
1-2
Chipset
2-3(Default)
VR Control
Pin №
Function
1-2
Clear CMOS
2-3 (Default)
Normal
Page 22
22
IK70 Motherboard User Manual
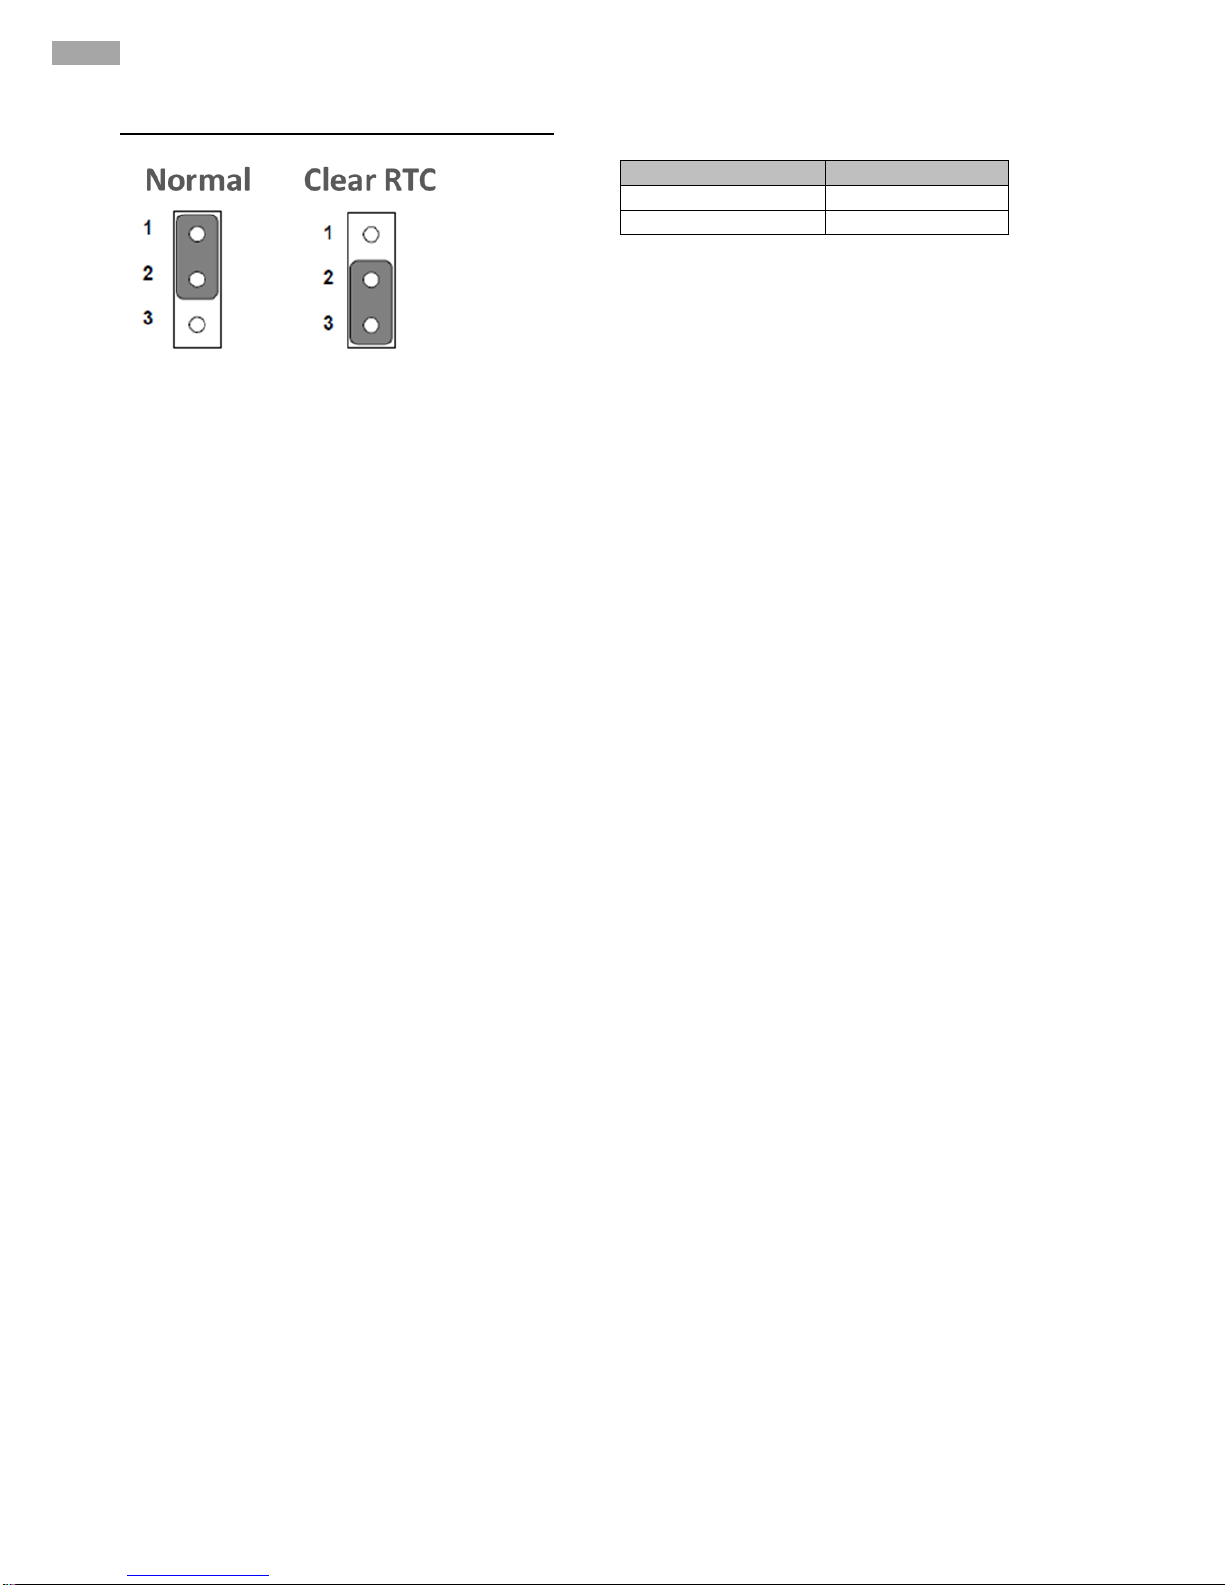
2.4.6 CLR_RTC: Clear RTC Jumper
Pin №
Function
1-2 (Default)
Normal
2-3
Clear RTC
Page 23

23
23
Chapter 2: Hardware Installation
2.5 Mainboard Connectors
2.5.1 Internal Front Side Connectors
Connectors
Label
Function
Note
CN2
Power 4P Wafer
Wafer 4p dip
CN3
HDMI Port Connector
QJ3119C-WFB1-4F vertical H:15mm
CN4
Display Port Connector
3VD21203-H7U0-4H
CN6
SHB Express PCIEx16
16x164p180°2EG08217-D2D
CN7
NGFF M.2 KEY B Connector
NGFF M.2 KEY B Connector
CN8
NGFF M.2 KEY E Connector
NXSE0-S6705-TP50
CN9
Digital Input / Digital Output
Header/2*5p P: 2.0mm SMD 180°, black color
CN10
Port 80 Debug Pin Header
2*5p P:2.0mm SMD 180°
CN11
eDP Connector
DF13 2*10p P:1.25mm SMD 180°
CN12
LVDS Connector
2*20p P:1.25mm SMD 180° White color
CN13
Backlight Connector
7p P:2.0mm DIP 180°
CN14
Backlight Brightness Control
3p P:2.0mm DIP 180°
CN15, CN16,CN17
Power Output Wafer
CN15 / CN16: 2p P:2.0mm DIP 180°, red color
CN17 - 2p P:2.0mm DIP 180°, yellow color
CN18
RTC Wafer
Hirose:DF13-2P-1
CN20, CN21
USB2.0 Wafer
2*4p P:2.0mm DIP 180°
CN23
Speaker Left
Wafer/2p P:2.0mm SIP 180°
CN24
Speaker Right
Wafer/2p P:2.0mm SIP 180°
COM1,COM2, COM3, COM4
Internal COM Port
2*5p P:2.0mm SMD 180°
PANEL 1
Front Panel Pin Header
2*5p P:2.0mm SMD 180°
SATA1, SATA2, SATA3,SATA4
SATA Connector
WATM-07ABN4A2B8UW
SATA_PWR1,
SATA_PWR2
SATA Power Connector
2*5p P:2.0mm DIP 180°
FAN1, FAN2
Fan Connector
3P 2.54mm DIP 180°
J2
DDR4 SO-DIMM
ASAA82X-EASB0-7H 9.2mm 1.2V SMT
J3
AS0AB26-H2SB-7H 5.2mm
1.2V SMT
AS0AB26-H2SB-7H 5.2mm 1.2V SMT
J6
USB2.0 Wafer
2*4p P:2.0mm DIP 180o
Page 24
24
IK70 Motherboard User Manual
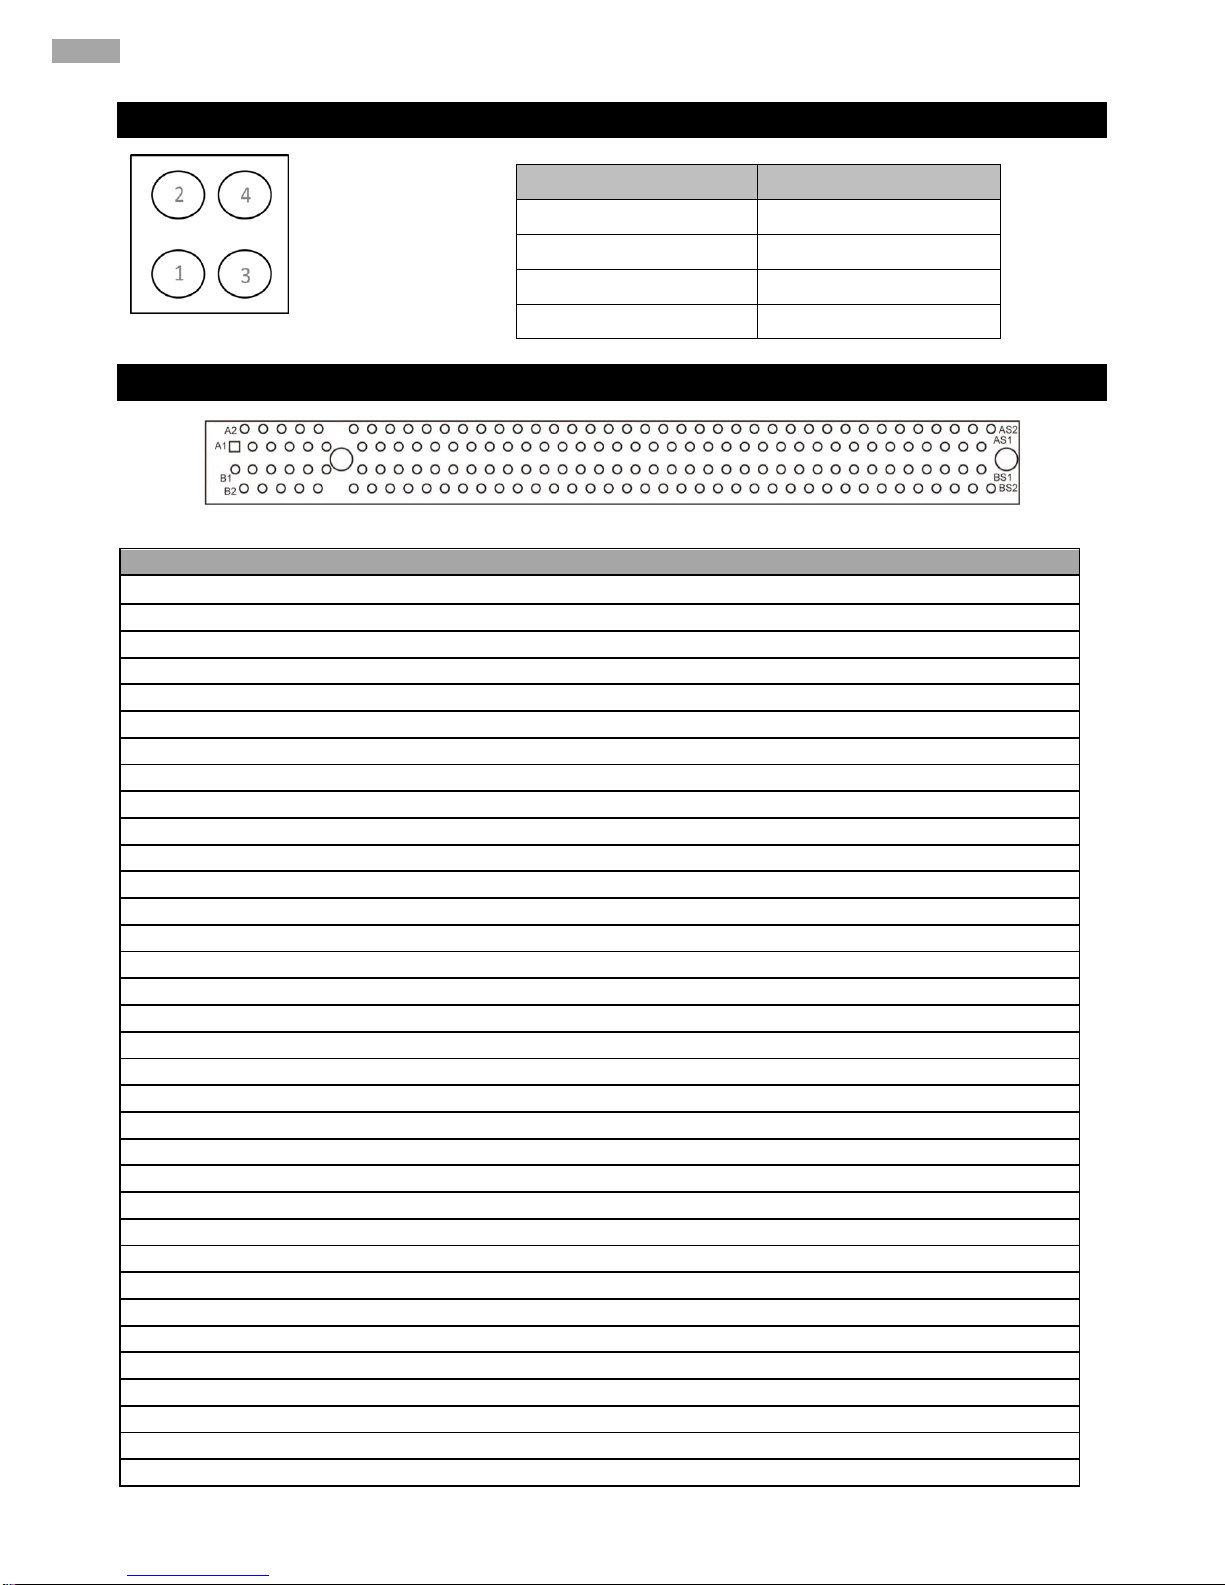
2.5.1.1 CN2: Power 4P Wafer
CN2
2.5.1.2 CN6: SHB Express PCIEx16
CN6
Side B
Net
Description
Side A
Net
Description
1
Side B
SMB_SHB_CLK
PCIE 12V power
Side A
SMB_SHB_DATA
External pull down
2
Side B
GND
PCIE 12V power
Side A
GND
PCIE 12V power
3
Side B
SHB_TDI
PCIE 12V power
Side A
SHB_TCK
PCIE 12V power
4
Side B
SHB_TDO
GND
Side A
SHB_TMS
GND
5
Side B
SHB_TRST#
SMBUD CLK
Side A
SHB_WAKE_N
6
Side B
SYSFANIN
SMBUS DATA
Side A
SHB_PCI_WAKE_N_R
7
Side B
NC
GND
Side A
SHB_PSON_N
8
Side B
NC
PCIE 3.3V power
Side A
SHB_PERST_N
9
Side B
SHB_CFG0_R
NC
Side A
SHB_CFG1_R
PCIE 3.3V power
10
Side B
SHB_CFG2_R
PCIE 3.3V aux
Side A
SHB_CFG3_R
PCIE 3.3V power
11
Side B
SHB_RSVD1
Wake signal
Side A
GND
Platform Reset
Mechanical Key
Side A
Mechanical Key
12
Side B
GND
NC
Side A
SHB_RSVD3
GND
13
Side B
PCIE9_SHB_TX_DP
GND
Side A
GND
PCIE CLK+
14
Side B
PCIE9_SHB_TX_DN
PCIE Group A TX0+
Side A
GND
PCIE CLK-
15
Side B
GND
PCIE Group A TX0-
Side A
PCIE9_SHB_RX_DP
GND
16
Side B
GND
GND
Side A
PCIE9_SHB_RX_DN
PCIE Group A RX0+
17
Side B
PCIE10_SHB_TX_DP
PCIEX16 PRSNT
Side A
GND
PCIE Group A RX0-
18
Side B
PCIE10_SHB_TX_DN
GND
Side A
GND
GND
19
Side B
GND
PCIE Group A TX1+
Side A
PCIE10_SHB_RX_DP
NC
20
Side B
GND
PCIE Group A TX1-
Side A
PCIE10_SHB_RX_DN
GND
21
Side B
PCIE11_SHB_TX_DP
GND
Side A
GND
PCIE Group A RX1+
22
Side B
PCIE11_SHB_TX_DN
GND
Side A
GND
PCIE Group A RX1-
23
Side B
GND
PCIE Group A TX2+
Side A
PCIE11_SHB_RX_DP
GND
24
Side B
GND
PCIE Group A TX2-
Side A
PCIE11_SHB_RX_DN
GND
25
Side B
PCIE12_SHB_TX_DP
GND
Side A
GND
PCIE Group A RX2+
26
Side B
PCIE12_SHB_TX_DN
GND
Side A
GND
PCIE Group A RX2-
27
Side B
GND
PCIE Group A TX3+
Side A
PCIE12_SHB_RX_DP
GND
28
Side B
GND
PCIE Group A TX3-
Side A
PCIE12_SHB_RX_DN
GND
29
Side B
CLK_PCIE_SHB_B0_P
GND
Side A
GND
PCIE Group A RX3+
30
Side B
CLK_PCIE_SHB_B0_N
NC
Side A
GND
PCIE Group A RX3-
31
Side B
GND
PCIEX16 PRSNT
Side A
CLK_PCIE_SHB_B1_P
GND
32
Side B
NC
GND
Side A
CLK_PCIE_SHB_B1_N
NC
33
Side B
CLK_PCIE_SHB_B2_P
PCIE Group A TX4+
Side A
GND
NC
Pin №
Signal Name
1
DC_GND
2
DC_GND
3
+12V
4
+12V
Page 25

25
25
Chapter 2: Hardware Installation
34
Side B
CLK_PCIE_SHB_B2_N
PCIE Group A TX4-
Side A
GND
GND
35
Side B
GND
GND
Side A
CLK_PCIE_SHB_B3_P
PCIE Group A RX4+
36
Side B
NC
GND
Side A
CLK_PCIE_SHB_B3_N
PCIE Group A RX4-
37
Side B
CLK_PCIE_SHB_A0_P
PCIE Group A TX5+
Side A
GND
GND
38
Side B
CLK_PCIE_SHB_A0_N
PCIE Group A TX5-
Side A
GND
GND
39
Side B
GND
GND
Side A
CLK_PCIE_SHB_A1_P
PCIE Group A RX5+
40
Side B
NC
GND
Side A
CLK_PCIE_SHB_A1_N
PCIE Group A RX5-
41
HSOP_6
SHB_PCIE_A6_TXP
PCIE Group A TX6+
Side A
GND
GND
41
Side B
CLK_PCIE_SHB_A2_P
PCIE Group A TX6-
Side A
GND
GND
42
Side B
CLK_PCIE_SHB_A2_N
GND
Side A
GND
PCIE Group A RX6+
43
Side B
GND
GND
Side A
CLK_PCIE_SHB_A3_P
PCIE Group A RX6-
44
Side B
GND
PCIE Group A TX7+
Side A
CLK_PCIE_SHB_A3_N
GND
45
Side B
EXP_A_TX_15_DP
PCIE Group A TX7-
Side A
GND
GND
46
Side B
EXP_A_TX_15_DN
GND
Side A
GND
PCIE Group A RX7+
47
Side B
GND
PCIEX16 PRSNT
Side A
EXP_A_RX_15_DP
PCIE Group A RX7-
48
Side B
GND
GND
Side A
EXP_A_RX_15_DN
GND
49
Side B
EXP_A_TX_14_DP
PCIE Group A TX8+
Side A
GND
NC
50
Side B
EXP_A_TX_14_DN
PCIE Group A TX8-
Side A
GND
GND
51
Side B
GND
GND
Side A
EXP_A_RX_14_DP
PCIE Group A RX8+
52
Side B
GND
GND
Side A
EXP_A_RX_14_DN
PCIE Group A RX8-
53
Side B
EXP_A_TX_13_DP
PCIE Group A TX9+
Side A
GND
GND
54
Side B
EXP_A_TX_13_DN
PCIE Group A TX9-
Side A
GND
GND
55
Side B
GND
GND
Side A
EXP_A_RX_13_DP
PCIE Group A RX9+
56
Side B
GND
GND
Side A
EXP_A_RX_13_DN
PCIE Group A RX9-
57
Side B
EXP_A_TX_12_DP
PCIE Group A
Side A
GND
GND
58
Side B
EXP_A_TX_12_DN
PCIE Group A TX10-
Side A
GND
GND
59
Side B
GND
GND
Side A
EXP_A_RX_12_DP
PCIE Group A RX10+
60
Side B
GND
GND
Side A
EXP_A_RX_12_DN
PCIE Group A RX10-
61
Side B
EXP_A_TX_11_DP
PCIE Group A
Side A
GND
GND
62
Side B
EXP_A_TX_11_DN
PCIE Group A TX11-
Side A
GND
GND
63
Side B
GND
GND
Side A
EXP_A_RX_11_DP
PCIE Group A RX11+
64
Side B
GND
GND
Side A
EXP_A_RX_11_DN
PCIE Group A RX11-
65
Side B
EXP_A_TX_10_DP
PCIE Group A
Side A
GND
GND
66
Side B
EXP_A_TX_10_DN
PCIE Group A TX12-
Side A
GND
GND
67
Side B
GND
GND
Side A
EXP_A_RX_10_DP
PCIE Group A RX12+
68
Side B
GND
GND
Side A
EXP_A_RX_10_DN
PCIE Group A RX12-
69
Side B
EXP_A_TX_9_DP
PCIE Group A
Side A
GND
GND
70
Side B
EXP_A_TX_9_DN
PCIE Group A TX13-
Side A
GND
GND
71
Side B
GND
GND
Side A
EXP_A_RX_9_DP
PCIE Group A RX13+
72
Side B
GND
GND
Side A
EXP_A_RX_9_DN
PCIE Group A RX13-
73
Side B
EXP_A_TX_8_DP
PCIE Group A
Side A
GND
GND
74
Side B
EXP_A_TX_8_DN
PCIE Group A TX14-
Side A
GND
GND
75
Side B
GND
GND
Side A
EXP_A_RX_8_DP
PCIE Group A RX14+
76
Side B
GND
GND
Side A
EXP_A_RX_8_DN
PCIE Group A RX14-
77
Side B
NC
PCIE Group A
Side A
GND
GND
78
Side B
+V3.3S_SHB
PCIE Group A TX15-
Side A
+V3.3S_SHB
GND
79
Side B
+V3.3S_SHB
GND
Side A
+V3.3S_SHB
PCIE Group A RX15+
80
Side B
+V3.3S_SHB
PCIEX16 PRSNT
Side A
+V3.3S_SHB
PCIE Group A RX15-
81
Side B
+V3.3S_SHB
NC
Side A
+V3.3S_SHB
GND
82
SB
+V3.3A_SHB
SA
+V3.3A_SHB
Page 26
26
IK70 Motherboard User Manual
2.5.1.3 CN8: NGFF M.2 KEY E Connector
IK70 Mini-PCIe connector supports 2 Mini-PCIe card application:
PCIe I/F + USB
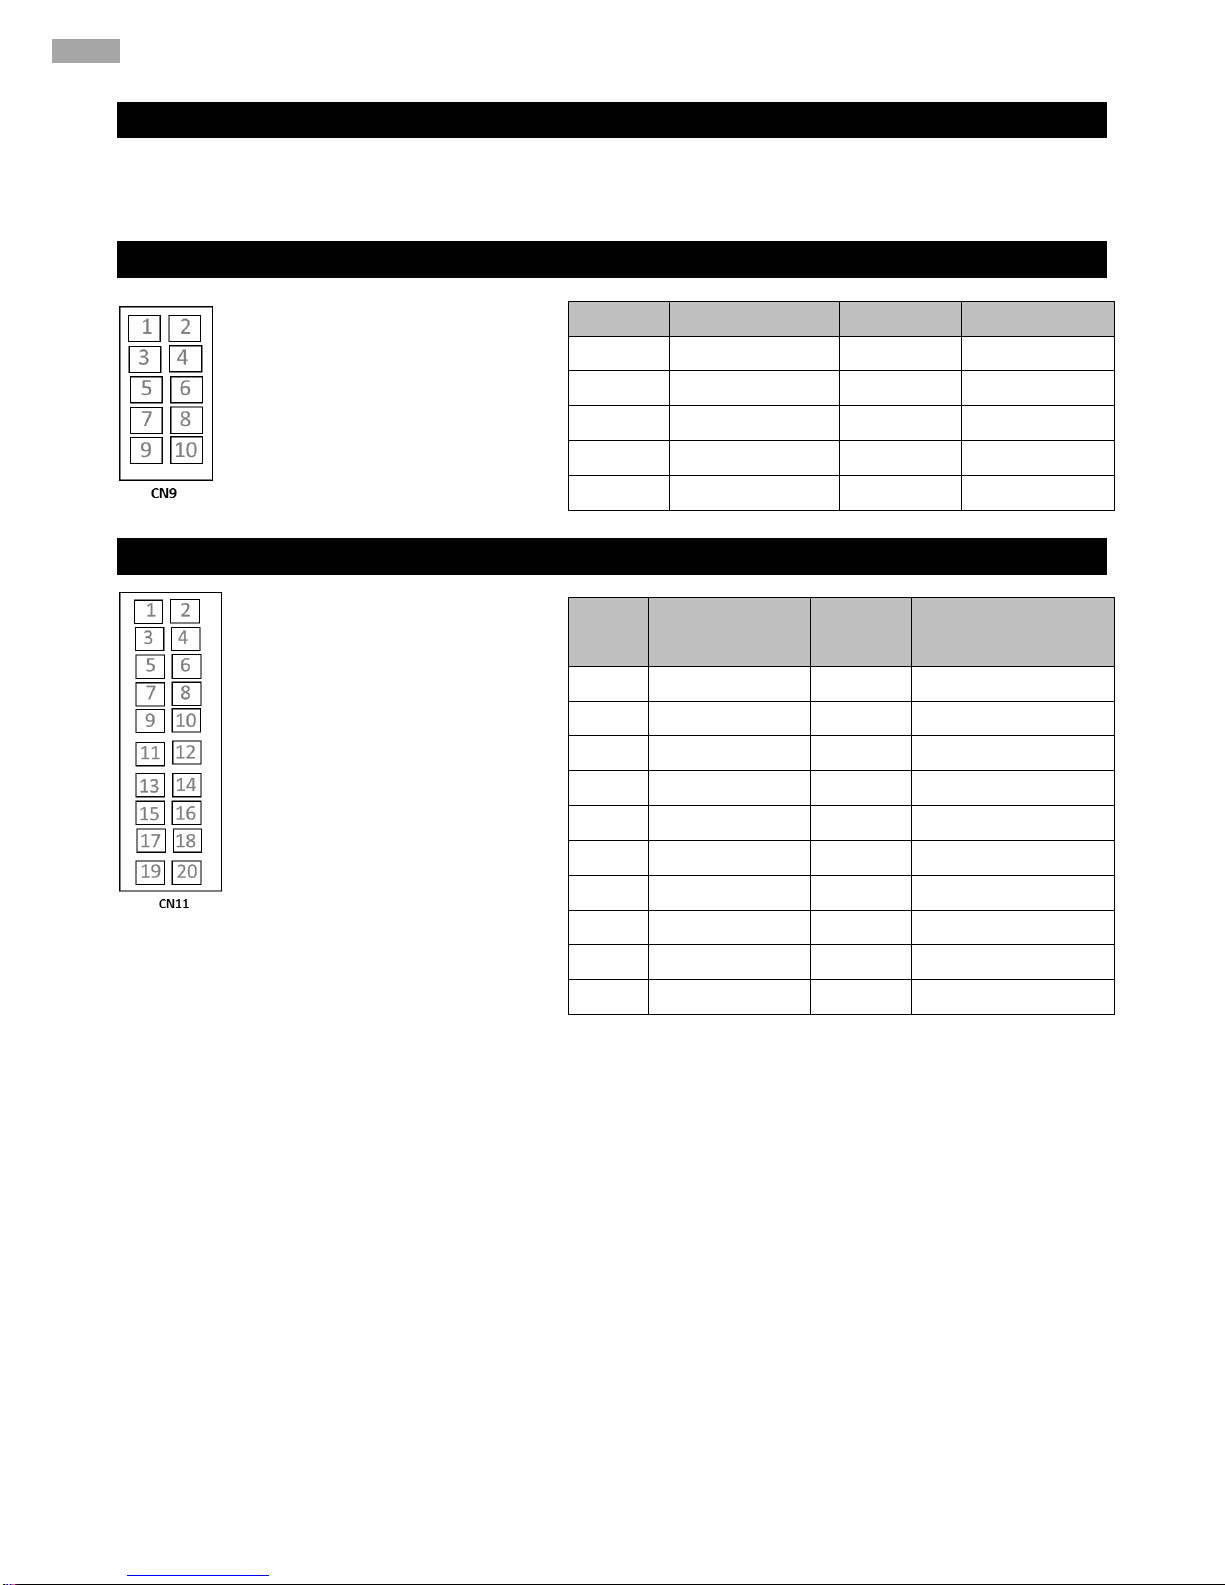
2.5.1.4 CN9: Digital Input / Digital Output
2.5.1.5 CN11: eDP Connector
Pin №
Signal Name
Pin №
Signal Name
1
GND
2
DIO_5V
3
DOUT3
4
DOUT1
5
DOUT2
6
DOUT0
7
DINT3
8
DINT1
9
DINT2
10
DINT0
Pin
№
Signal Name
Pin №
Signal Name
1
DP_TXP0_C
2
LCDVDD
3
DP_TXN0_C
4
LCDVDD
5
GND
6
+VCC_EDP_BKLT
7
DP_TXP1_C
8
+VCC_EDP_BKLT
9
DP_TXN1_C
10
+VCC_EDP_BKLT
11
GND
12
EDP_HPD
13
EMB_AUXP
14
GND
15
EMB_AUXN
16
GND
17
L_BKLT_EN
18
GND
19
L_BKLT_CTRL
20
GND
Page 27
27
27
Chapter 2: Hardware Installation
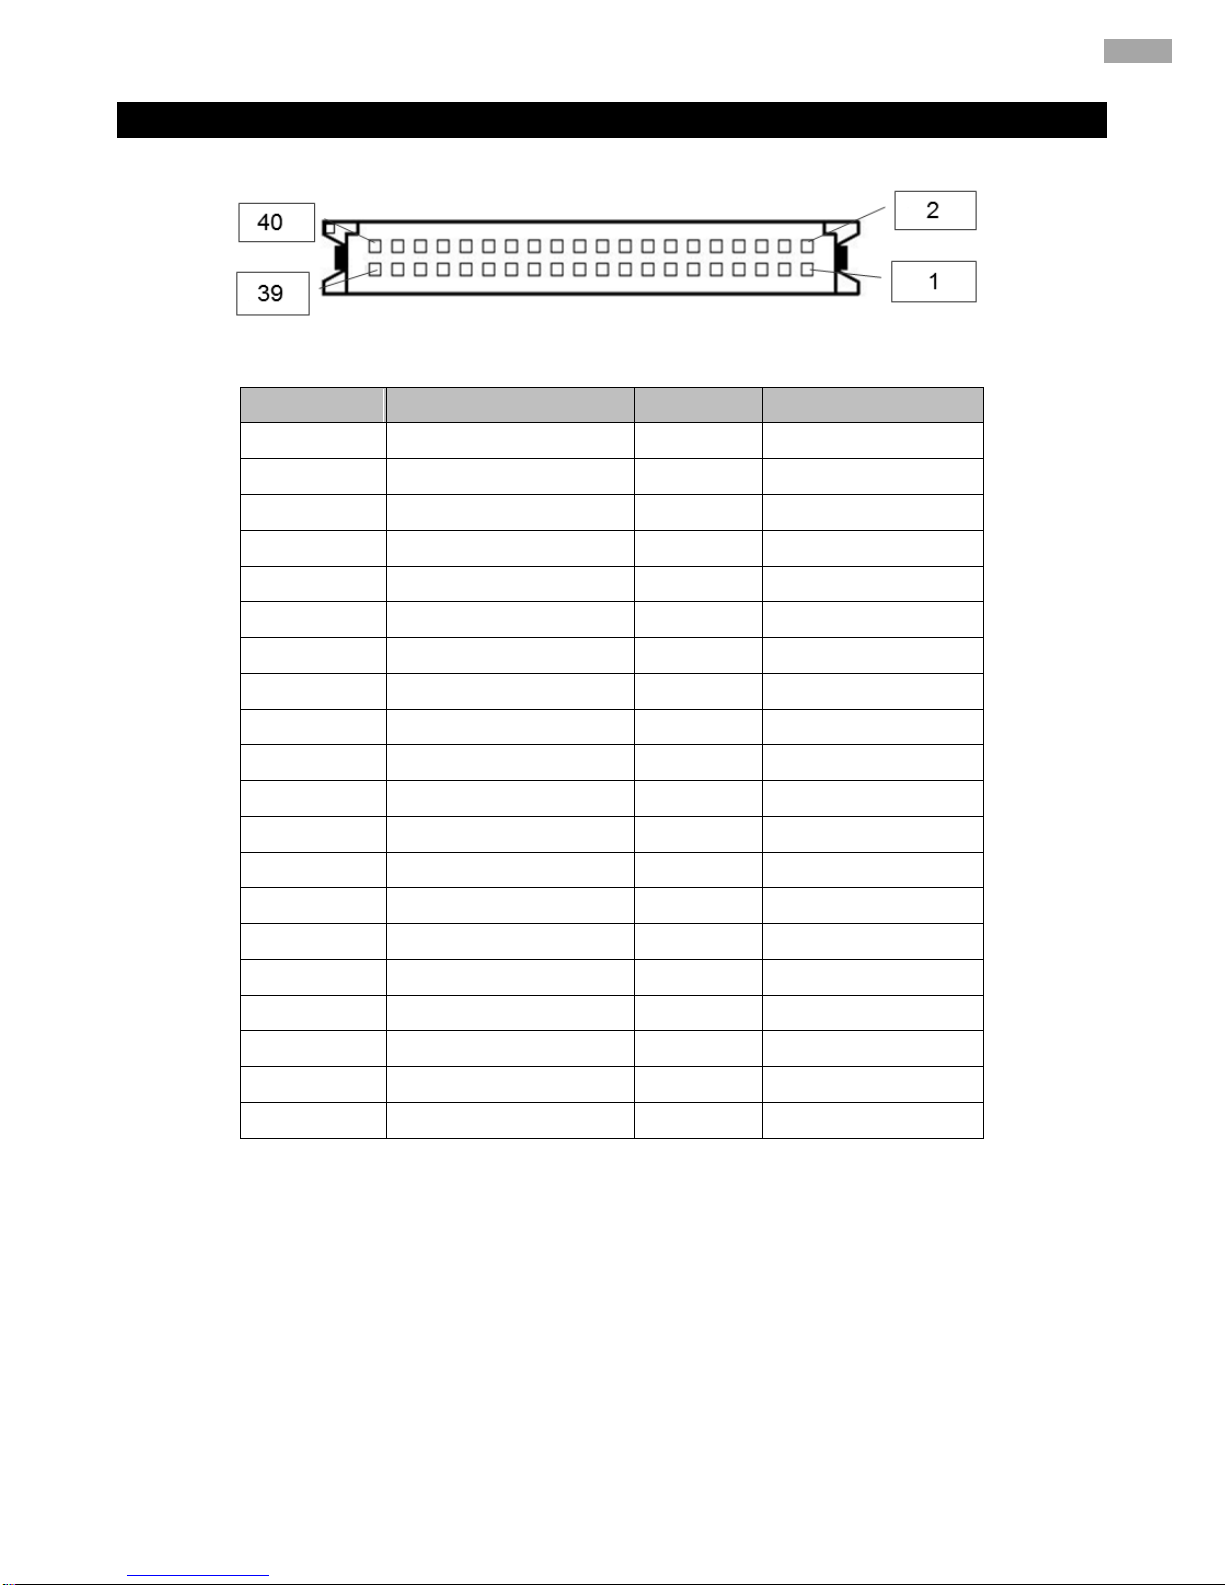
2.5.1.6 CN12: LVDS Connector
CN12
Pin №
Signal Name
Pin №
Signal Name
1
LCDVDD
2
LVDS0_TX0_N
3
LCDVDD
4
LVDS0_TX0_P
5
LCDVDD
6
LVDS0_TX1_N
7
GND
8
LVDS0_TX1_P
9
GND
10
LVDS0_TX2_N
11
GND
12
LVDS0_TX2_P
13
GND
14
LVDS0_CLK_N
15
GND
16
LVDS0_CLK_P
17
GND
18
LVDS0_TX3_N
19
GND
20
LVDS0_TX3_P
21
GND
22
LVDS1_TX0_N
23
GND
24
LVDS1_TX0_P
25
GND
26
LVDS1_TX1_N
27
GND
28
LVDS1_TX1_P
29
GND
30
LVDS1_TX2_N
31
GND
32
LVDS1_TX2_P
33
GND
34
LVDS1_CLK_N
35
GND
36
LVDS1_CLK_P
37
GND
38
LVDS1_TX3_N
39
GND
40
LVDS1_TX3_P
Page 28
28
IK70 Motherboard User Manual
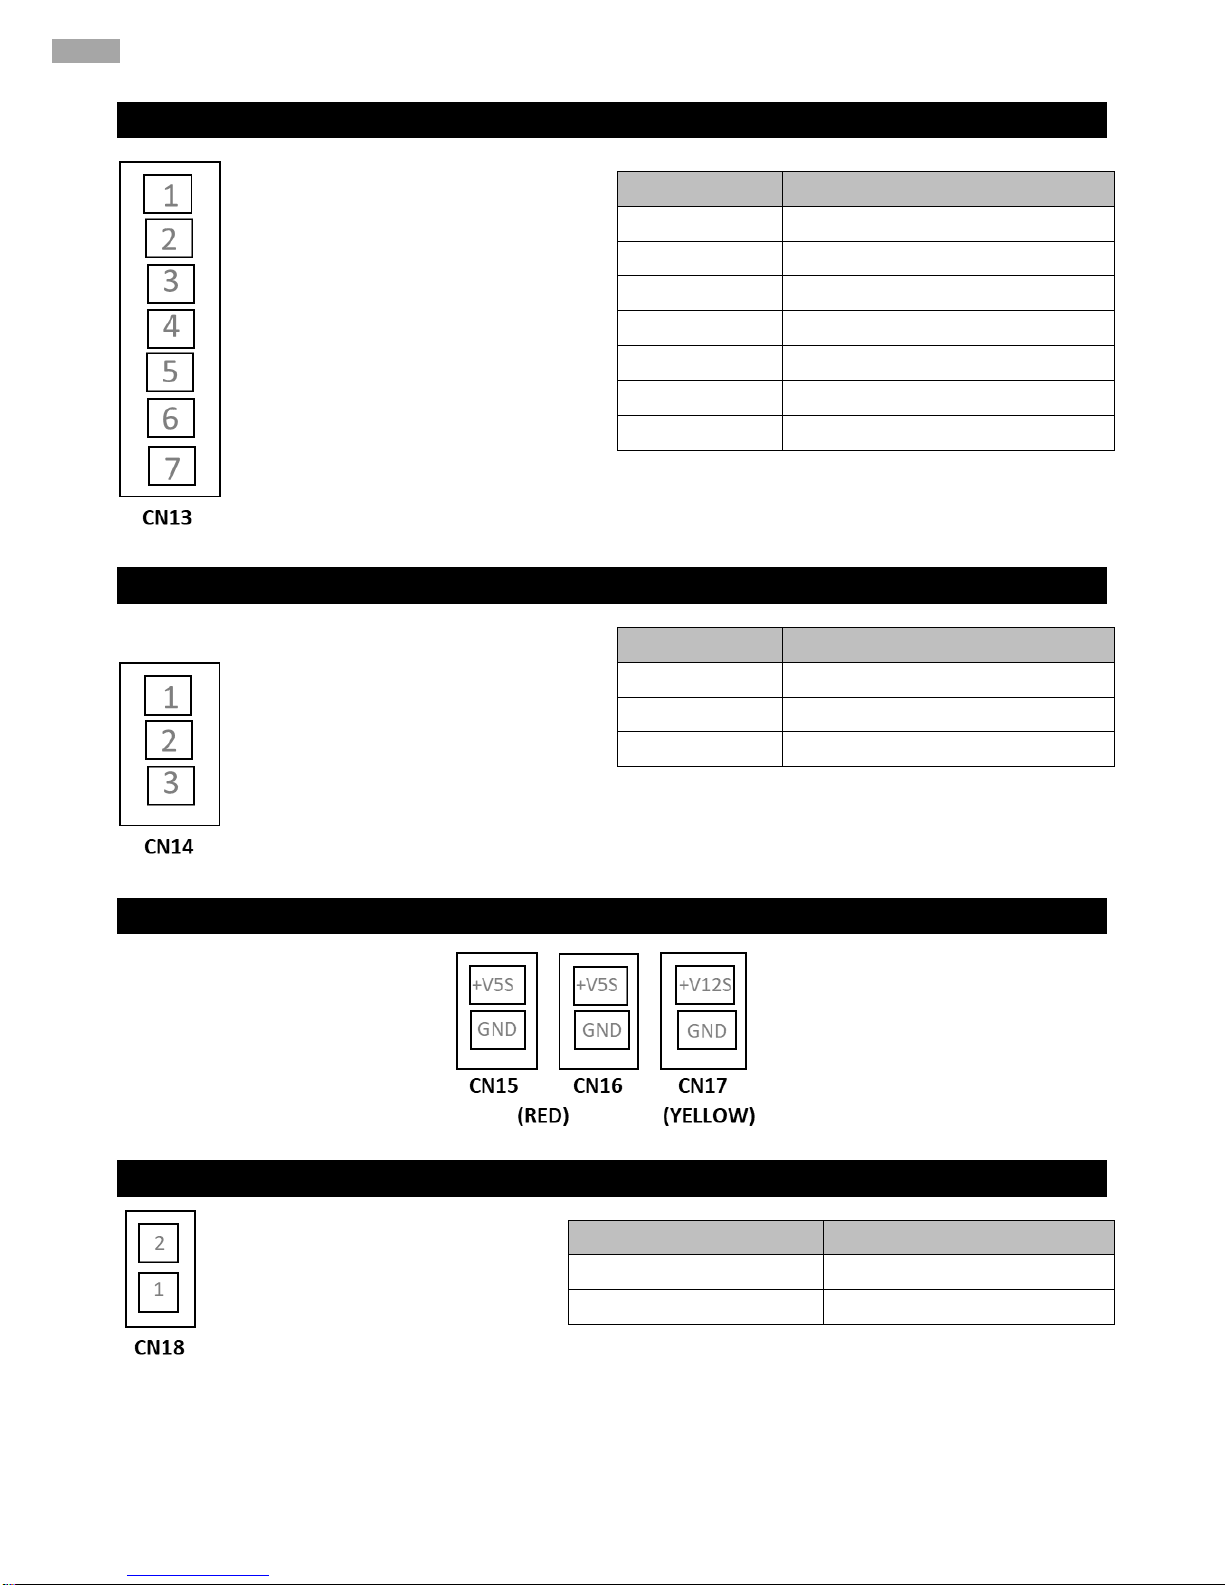
2.5.1.7 CN13: Backlight Connector
2.5.1.8 CN14: Backlight Brightness Control
VR Knob
2.5.1.9 CN15, CN16, CN17: Power Output Wafer
2.5.1.10 CN18: RTC Wafer
Pin №
Signal Name
1
+BKLPWR_R
2
+BKLPWR_R
3
+BKLPWR_R
4
GND
5
BRIGHT
6
GND
7
BLON_5V
Pin №
Signal Name
1
+V5S
2
VRD_ADC
3
GND
Pin №
Signal Name
1
GND
2
BACKUP_VBAT
Page 29
29
29
Chapter 2: Hardware Installation
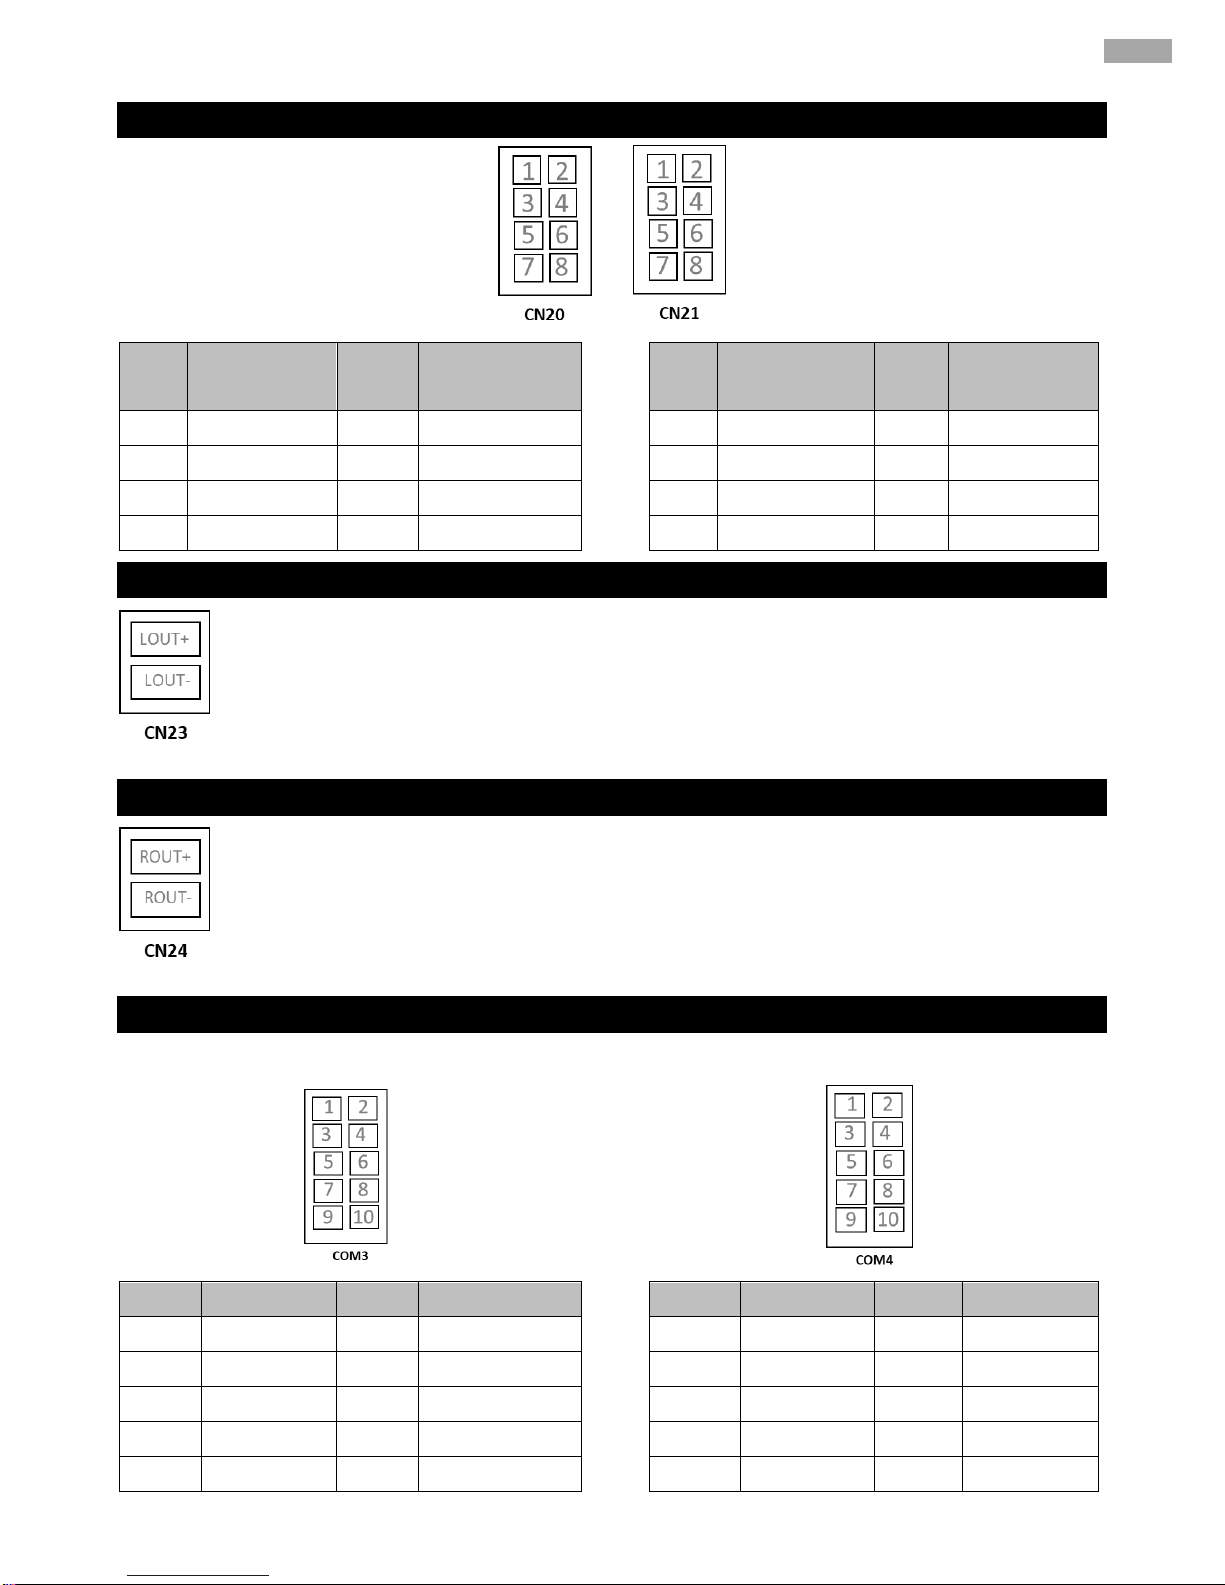
2.5.1.11 CN20, CN21: USB2.0 Wafer
Pin № Signal Name
Pin №
Signal
Name
Pin № Signal Name
Pin № Signal Name
1
USB_VCC
2
USB_VCC9
1
USB_VCC8
2
USB_VCC
3
USB_DN
4
USB_DN
3
USB_DN
4
USB_DN
5
USB_DP
6
USB_DP
5
USB_DP
6
USB_DP
7
GND
8
GND
7
GND
8
GND
2.5.1.12 CN23: Speaker Left
2.5.1.13 CN24: Speaker Right
2.5.1.14 COM1, COM2, COM3, COM4: Internal RS232 COM
The serial port which is Winbond I/O support is RS232 only.
Pin №
Signal Name
Pin №
Signal Name
Pin №
Signal Name
Pin №
Signal Name
1
DCDE#
2
DSRE#
1 DCDF#
2
DSRF#
3
RXDE
4
RTSE#
3 RXDF
4
RTSF#
5
TXDE
6
CTSE#
5 TXDF
6
CTSF#
7
DTRE#
8
RIE#
7 DTRF#
8
RIF#
9
GND
10
+V5S
9 GND
10
+V5S
Page 30

30
IK70 Motherboard User Manual
Pin № Signal Name
Pin №
Signal
Name
Pin № Signal
Name
Pin № Signal Name
1
FK_NDCD5
2
FK_NDSR5
1 FK_NDCD6
2
FK_NDSR6
3
FK_NSIN5
4
FK_NRTS5
3 FK_NSIN6
4
FK_NRTS6
5
FK_NSOUT5
6
FK_NCTS5
5 FK_NSOUT6
6
FK_NCTS6
7
FK_NDTR5
8
FK_NRI5
7 FK_NDTR6
8
FK_NRI6
9
GND
10
+V5S
9 GND
10
+V5S
2.5.1.15 PANEL 1: Front Panel Pin Header
2.5.1.16 SATA1, SATA2, SATA3, SATA4: SATA Connector
Pin №
Signal Name
Pin №
Signal Name
1
PW_LED+
2
HD_LED+
3
GND
4
HD_LED-
5
PW_BT
6
GND
7
BRI+
8
RST-BT
9
BRI-
10
5VSB
Pin №
Signal Name
Pin №
Signal Name
1
GND
2
SATA_TXP
3
SATA_TXN
4
GND
5
SATA_RXN
6
SATA_RXP
7
GND
Page 31
31
31
Chapter 2: Hardware Installation
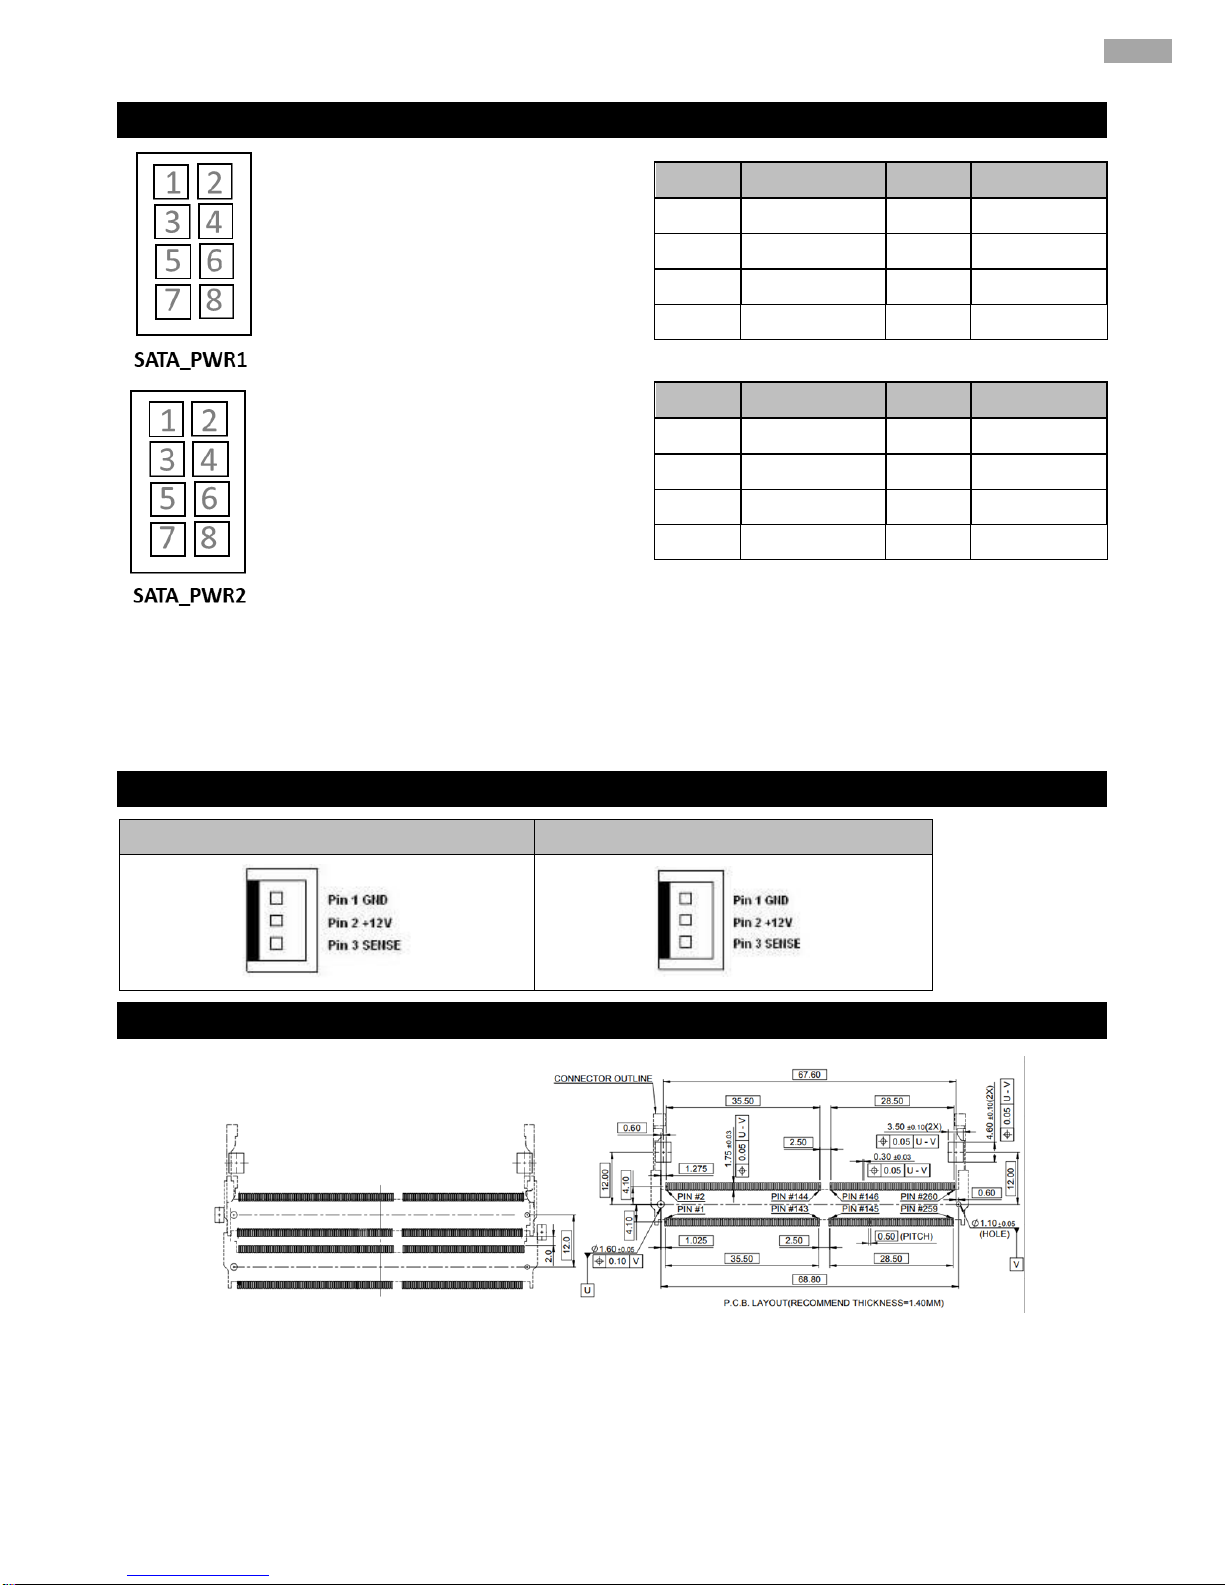
2.5.1.17 SATA_PWR1, SATA_PWR2: SATA Power Connector
2.5.1.18 FAN1, FAN2: Fan Connector
FAN1
FAN2
2.5.1.19 J2: DDR4 SO-DIMM
Pin №
Signal Name
Pin №
Signal Name
1
+V12S
2
+V12S
3
GND
4
GND
5
GND
6
GND
7
+V5S
8
+V5S
Pin №
Signal Name
Pin №
Signal Name
1
+V12S
2
+V12S
3
GND
4
GND
5
GND
6
GND
7
+V5S
8
+V5S
Page 32
32
IK70 Motherboard User Manual
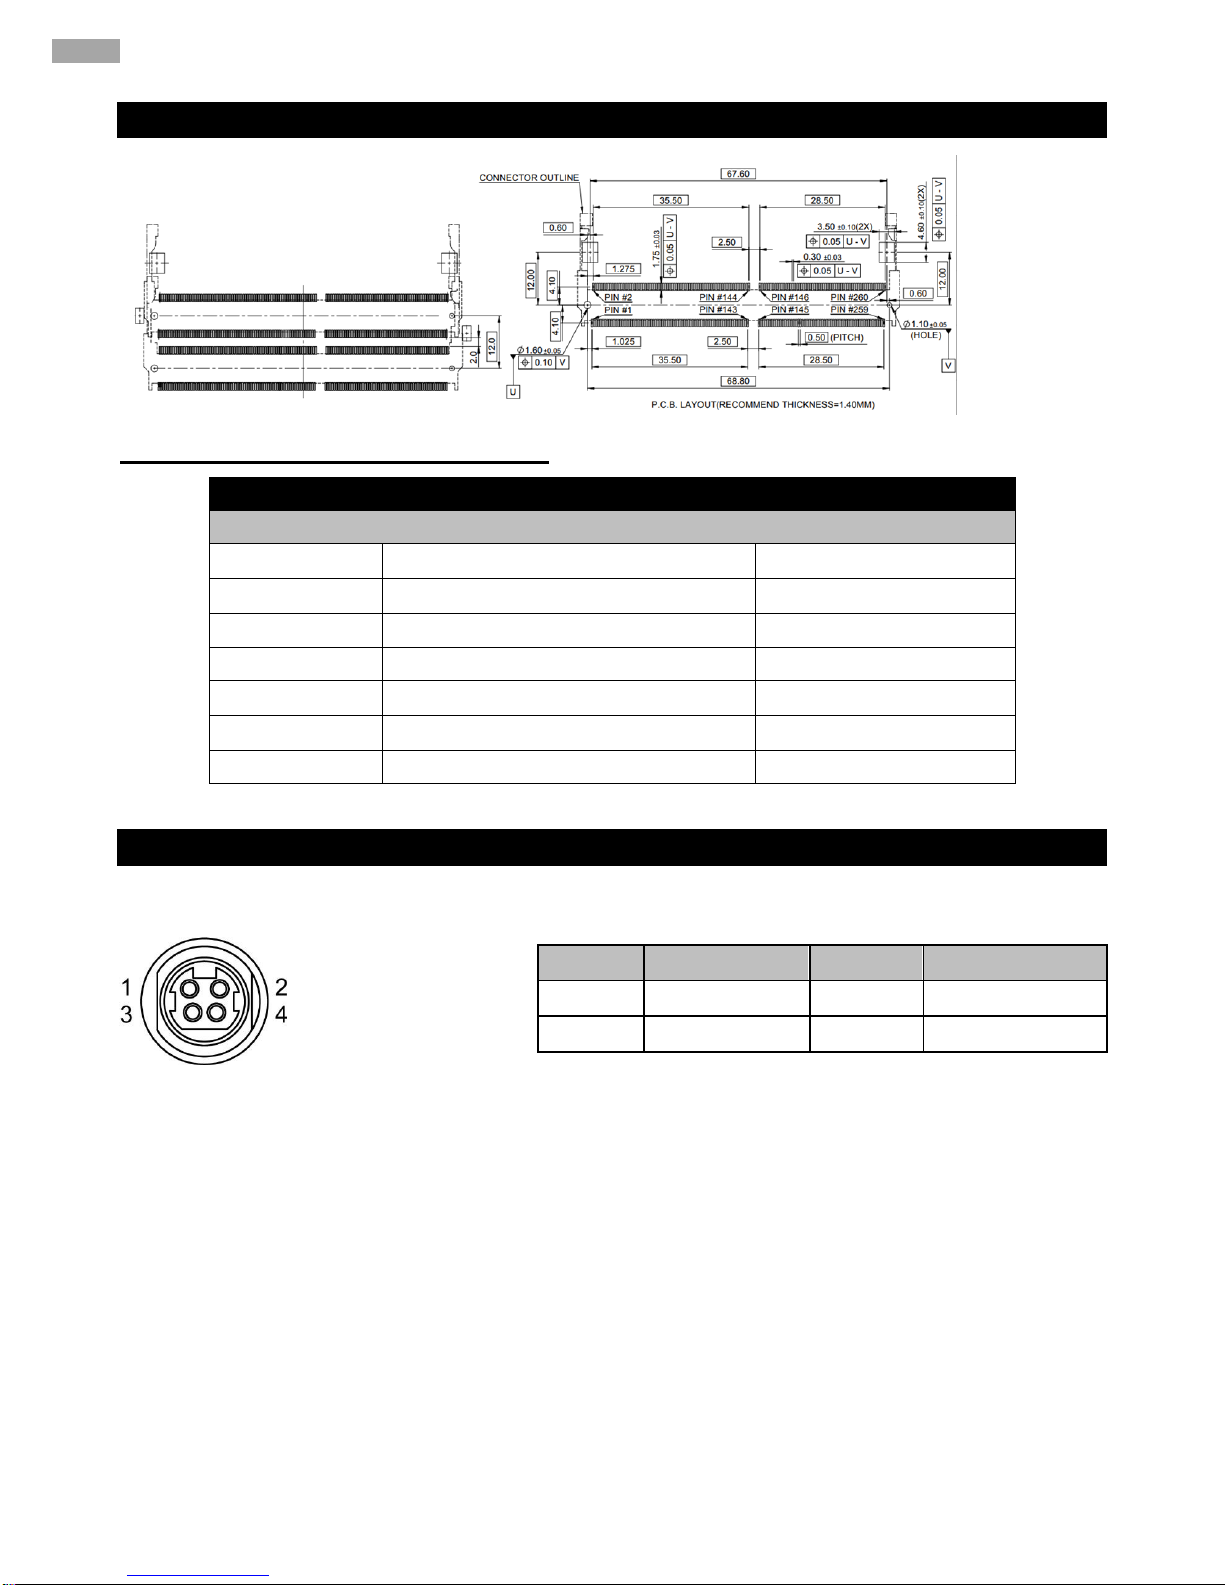
2.5.1.20 J3: DDR4 SO-DIMM
2.5.2 External I/O Side Connectors
Label
Function
Note
Connector
CN1
Power 4P Terminal Block Connector
Din 4p dip Quick Lock
CN3/ HDMI1
HDMI1.4a
HDMI1.4a
CN4/ DP
Display Port 1.2
Display Port 1.2
CN5
Audio Jack
PJD-035-17A
LAN1, LAN2
Gigabit Ethernet
RJ45+LED
SW1
Clear COM, Reset
Button
USB1, USB2
USB 3.0
USB Type A
2.5.2.1 CN1 (Power 4P Terminal Block Connector
The DC power input for the IK70 Motherboard allows a voltage input of 12V DC.
Pin №
Signal Name
Pin №
Signal Name
1
12VDC
2
GND
3
12VDC
4
GND
Page 33
33
33
Chapter 2: Hardware Installation
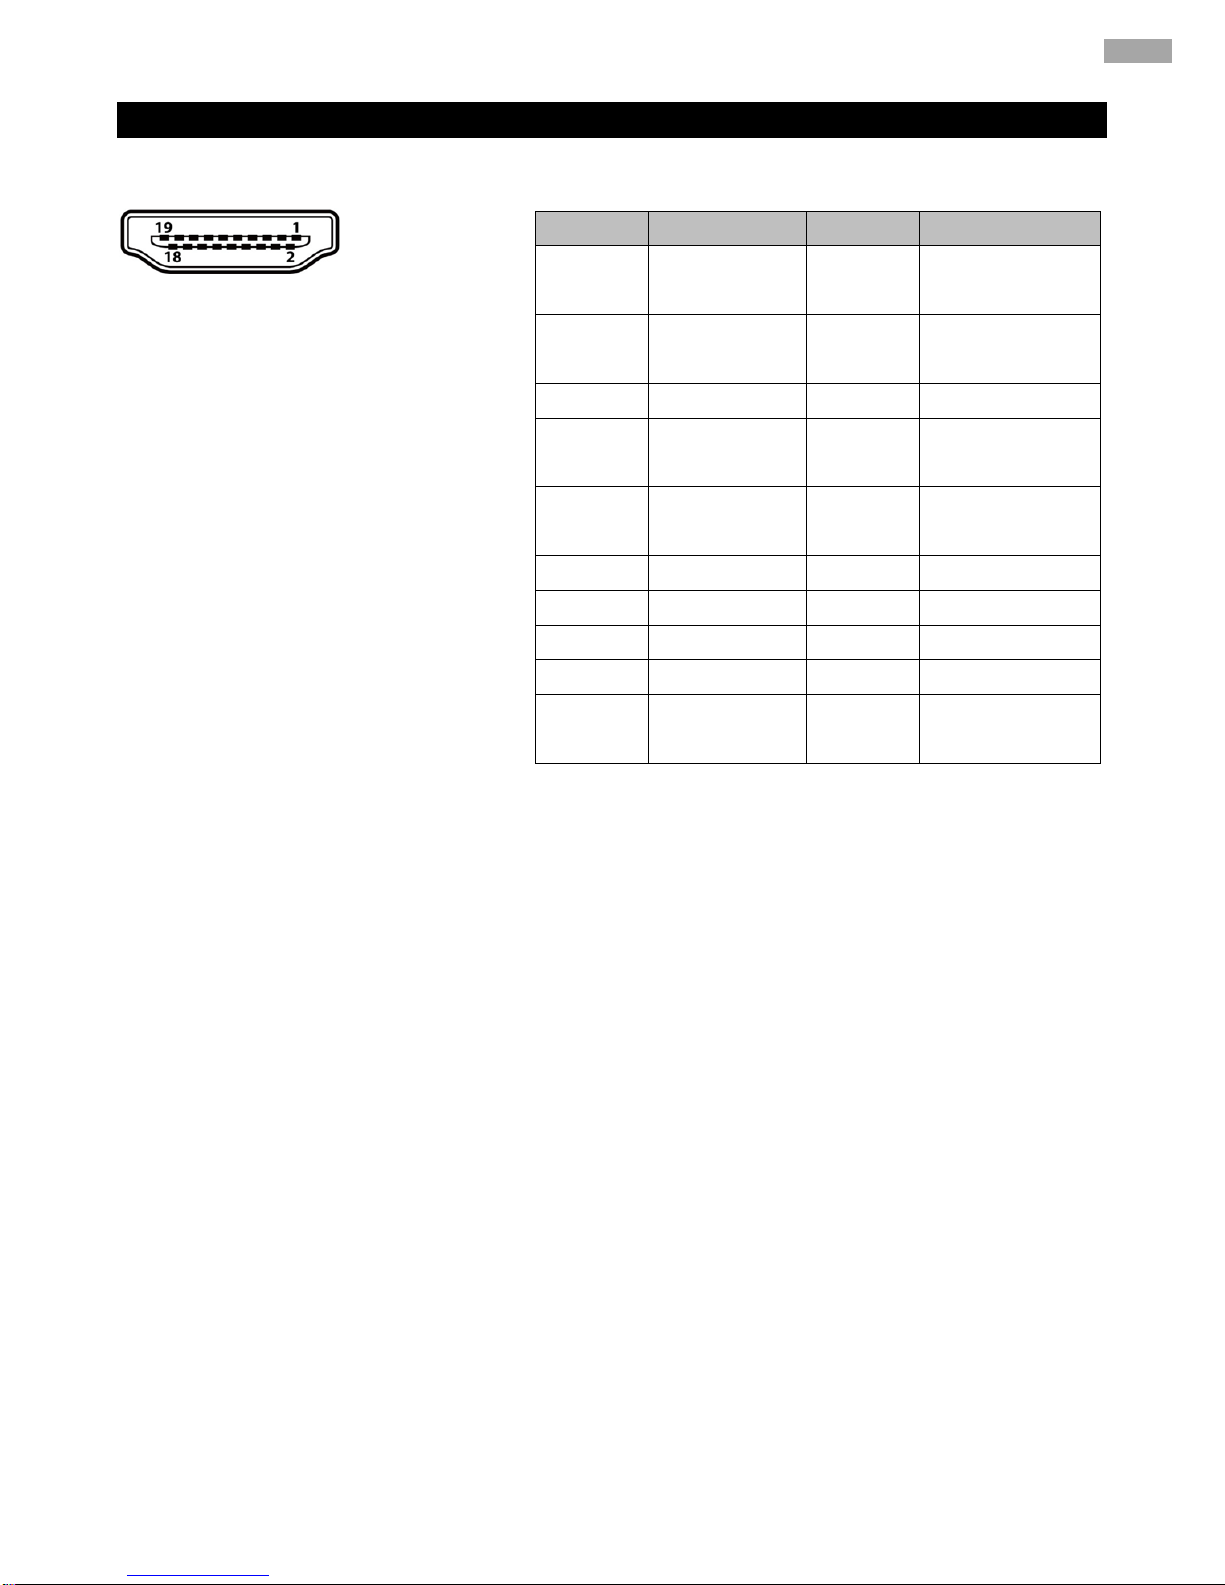
2.5.2.2 CN3/ HDMI1 (HDMI 1.4a)
Use HDMI 1.4a connector to connect the IK70 to an external monitor.
Pin №
Signal Name
Pin №
Signal Name
1
TMDS_DATA2
+
2
GND
3
TMDS_DATA2
-
4
TMDS_DATA1+
5
GND
6
TMDS_DATA1-
7
TMDS_DATA0
+
8
GND
9
TMDS_DATA0
-
10
TMDS_CLOCK+
11
GND
12
TMDS_CLOCK-
13
CEC
14
NC
15
DDC_CLOCK
16
DDC_DATA
17
GND
18
5V
19
Hot Plug
Detect
Page 34
34
IK70 Motherboard User Manual
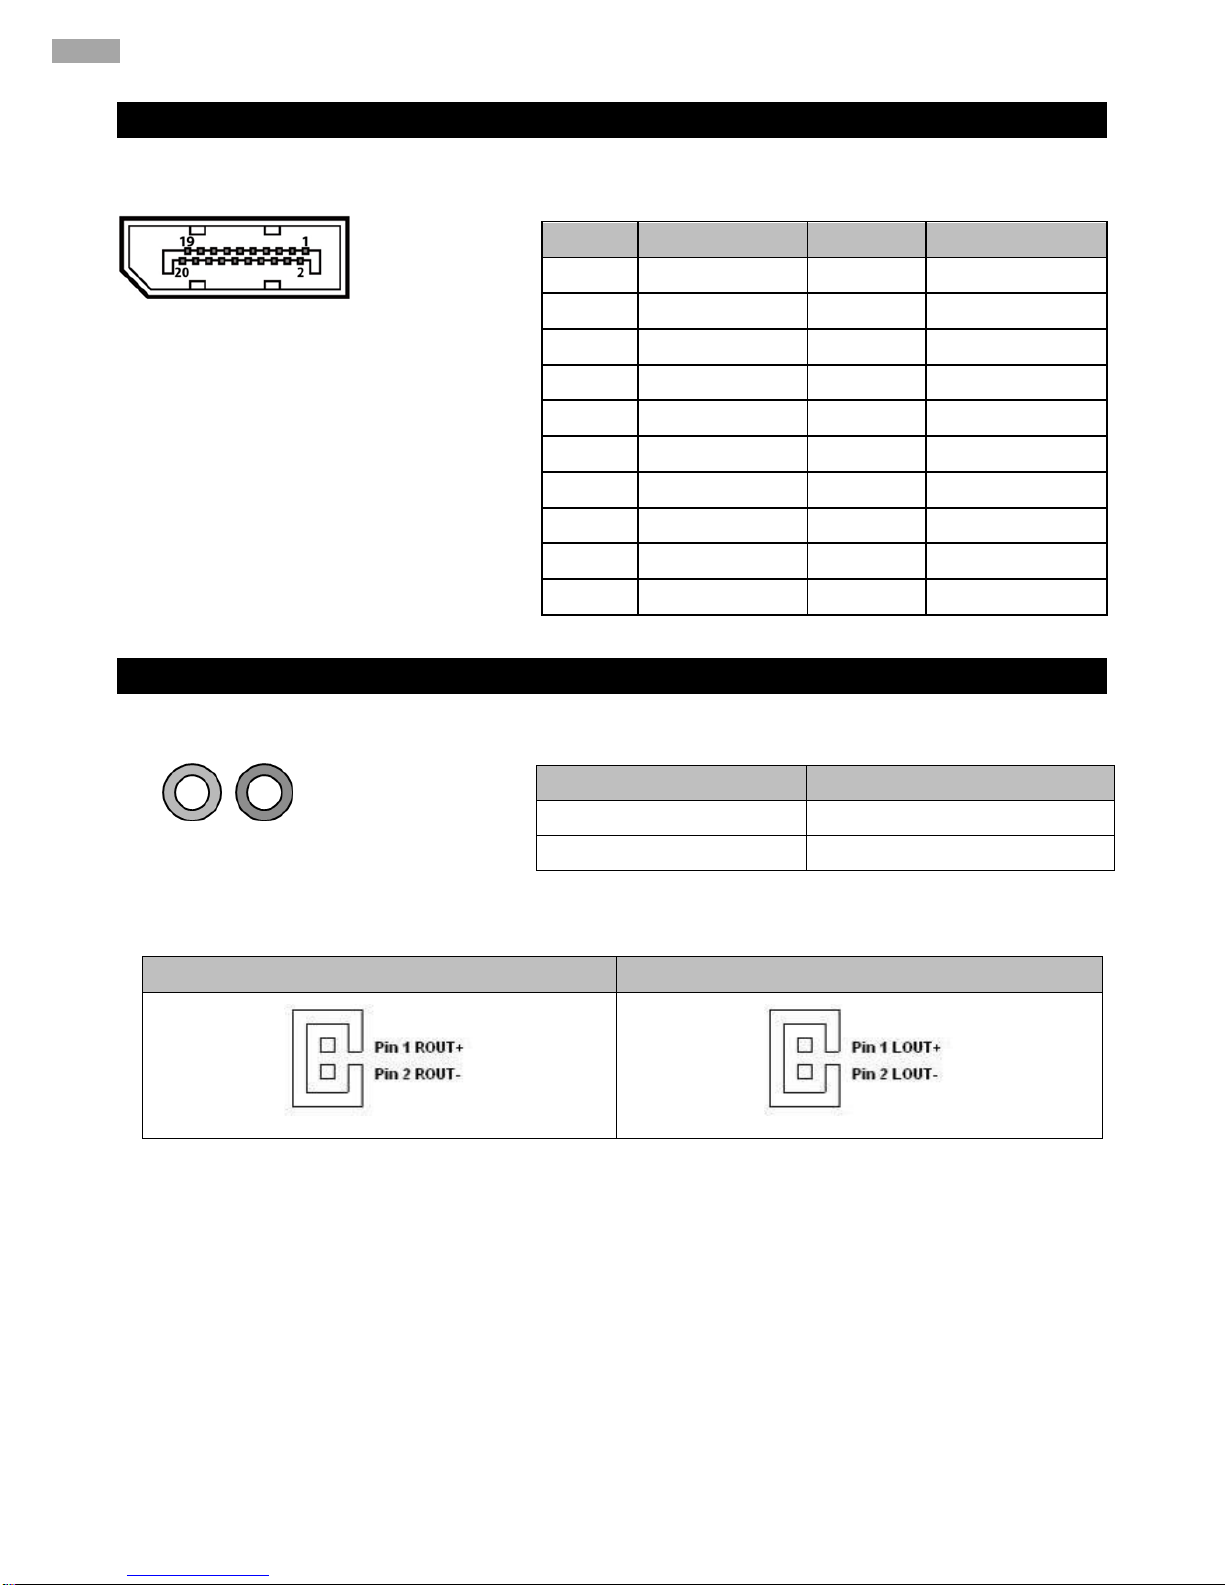
2.5.2.3 CN5/ DP (Display Port 1.2)
IK70 provides one Display Port 1.2 connector.
2.5.2.4 CN4 (Audio Jack)
IK70 has two stereo audio ports with phone jack connectors, one is Line-out, and the other one is Mic-in.
CN24
CN23
Pin №
Signal Name
Pin №
Signal Name
1
Lane 0+
2
GND
3
Lane 0-
4
Lane 1+
5
GND
6
Lane 1-
7
Lane 2+
8
GND
9
Lane 2-
10
Lane 3+
11
GND
12
Lane 3-
13
AUX_EN_N
14
GND
15
AUX+
16
GND
17
AUX-
18
Hot Plug
19
GND
20
+3.3V
Color
Signal Name
1
Line-out
2
Mic-in
Page 35
35
35
Chapter 2: Hardware Installation
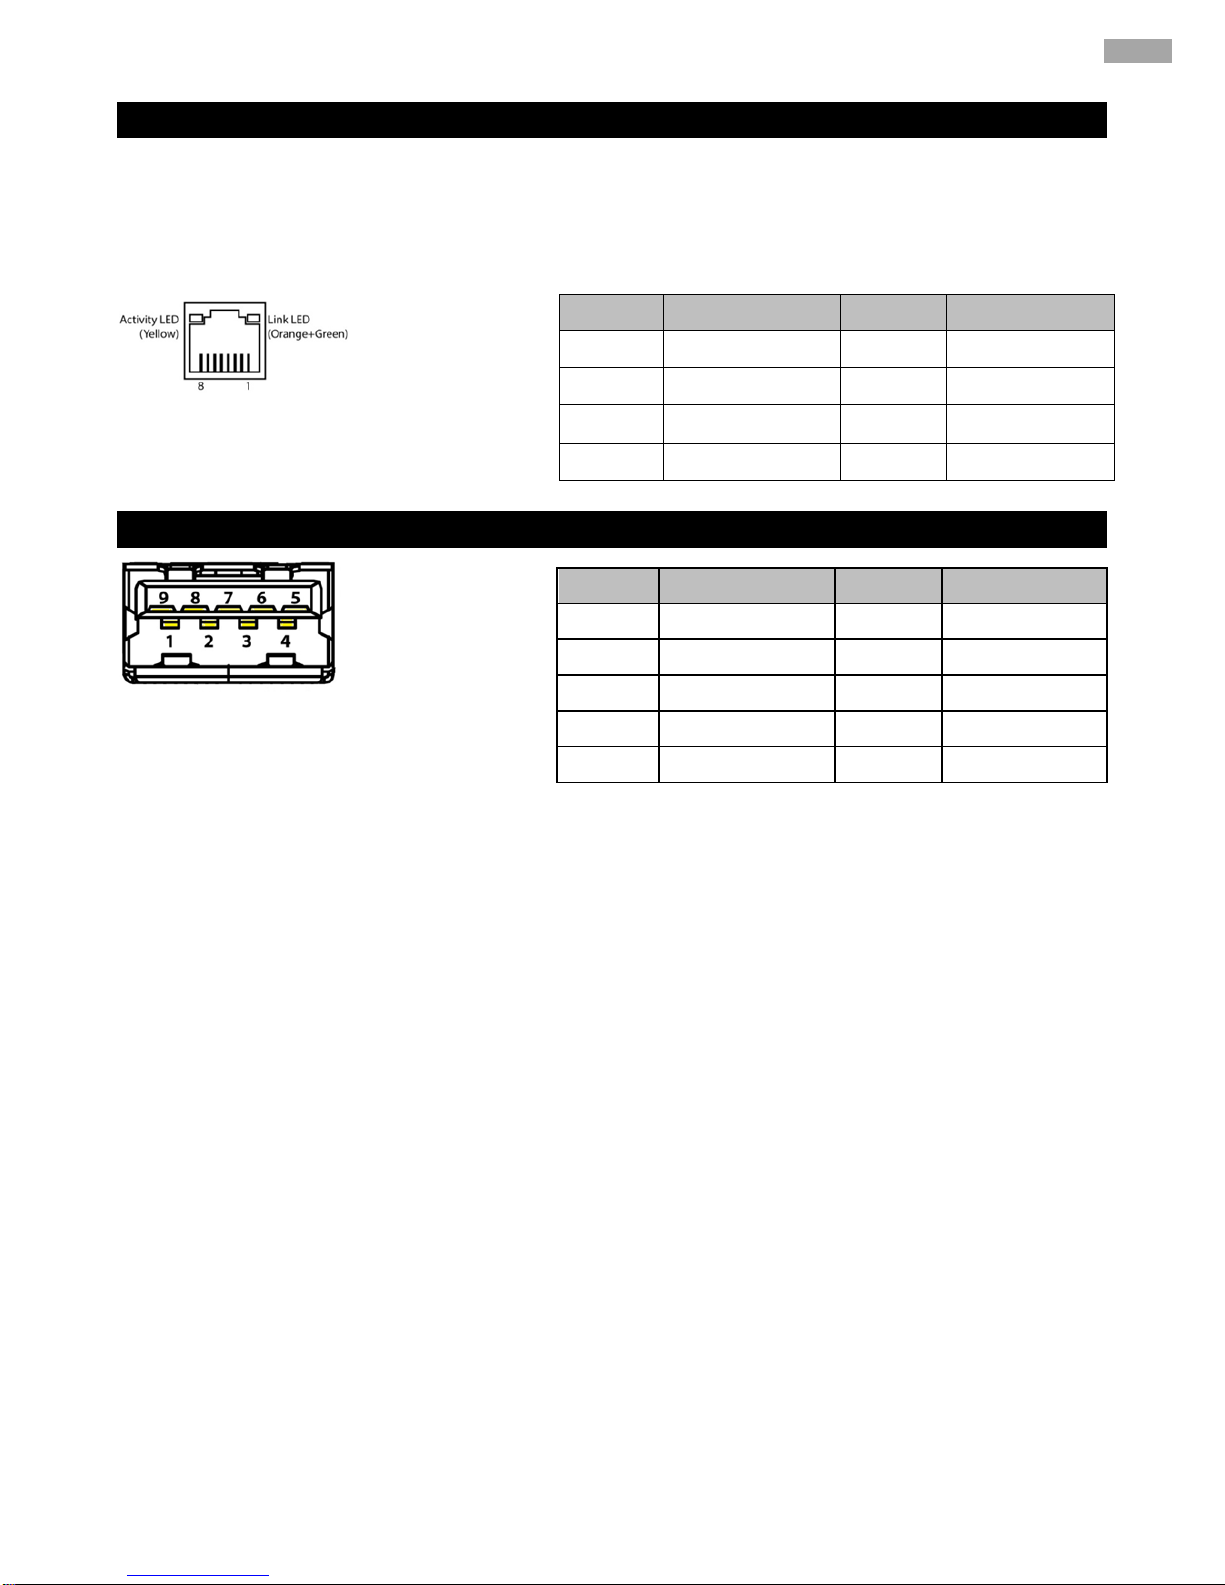
2.5.2.5 LAN1, LAN2 (Gigabit Ethernet)
IK70 has two Ethernet connectors located on the front. Ethernet ports provide a standard RJ45 10/100/1000
Mbps jack connector with LED indicators on the front side to show its Active/ Link status and Speed status.
10/100 Mbps- Green
1G Mbps – Orange
2.5.6 USB1, USB2 (USB 3.0)
Pin №
Signal Name
Pin №
Signal Name
1
TX1+
2
TX1-
3
TX2+
4
TX2-
5
TX3+
6
TX3-
7
TX4+
8
TX4-
Pin №
Signal Name
Pin №
Signal Name
1
+5V
2
USB_D-
3
USB_D+
4
GND
5
STDA_SSRX-
6
STDA_SSRX+
7
GND_DRAIN
8
STDA_SSTX-
9
STDA_SSTX+
Page 36

36
IK70 Motherboard User Manual
Chapter 3: Driver Installation
This chapter contains driver installation instructions for IK70 motherboard.
3.1 Chipset Driver Installation
3.2 Graphic Driver Installation
3.3 Management Engine (ME) and .NET Framework
3.4 Audio Driver Installation
3.5 Ethernet Driver Installation
3.6 RST Driver Installation
3.7 Microsoft .NET Framework Driver Installation
3.8 Watchdog Driver Installation
Page 37
37
Chapter 3: Driver Installation
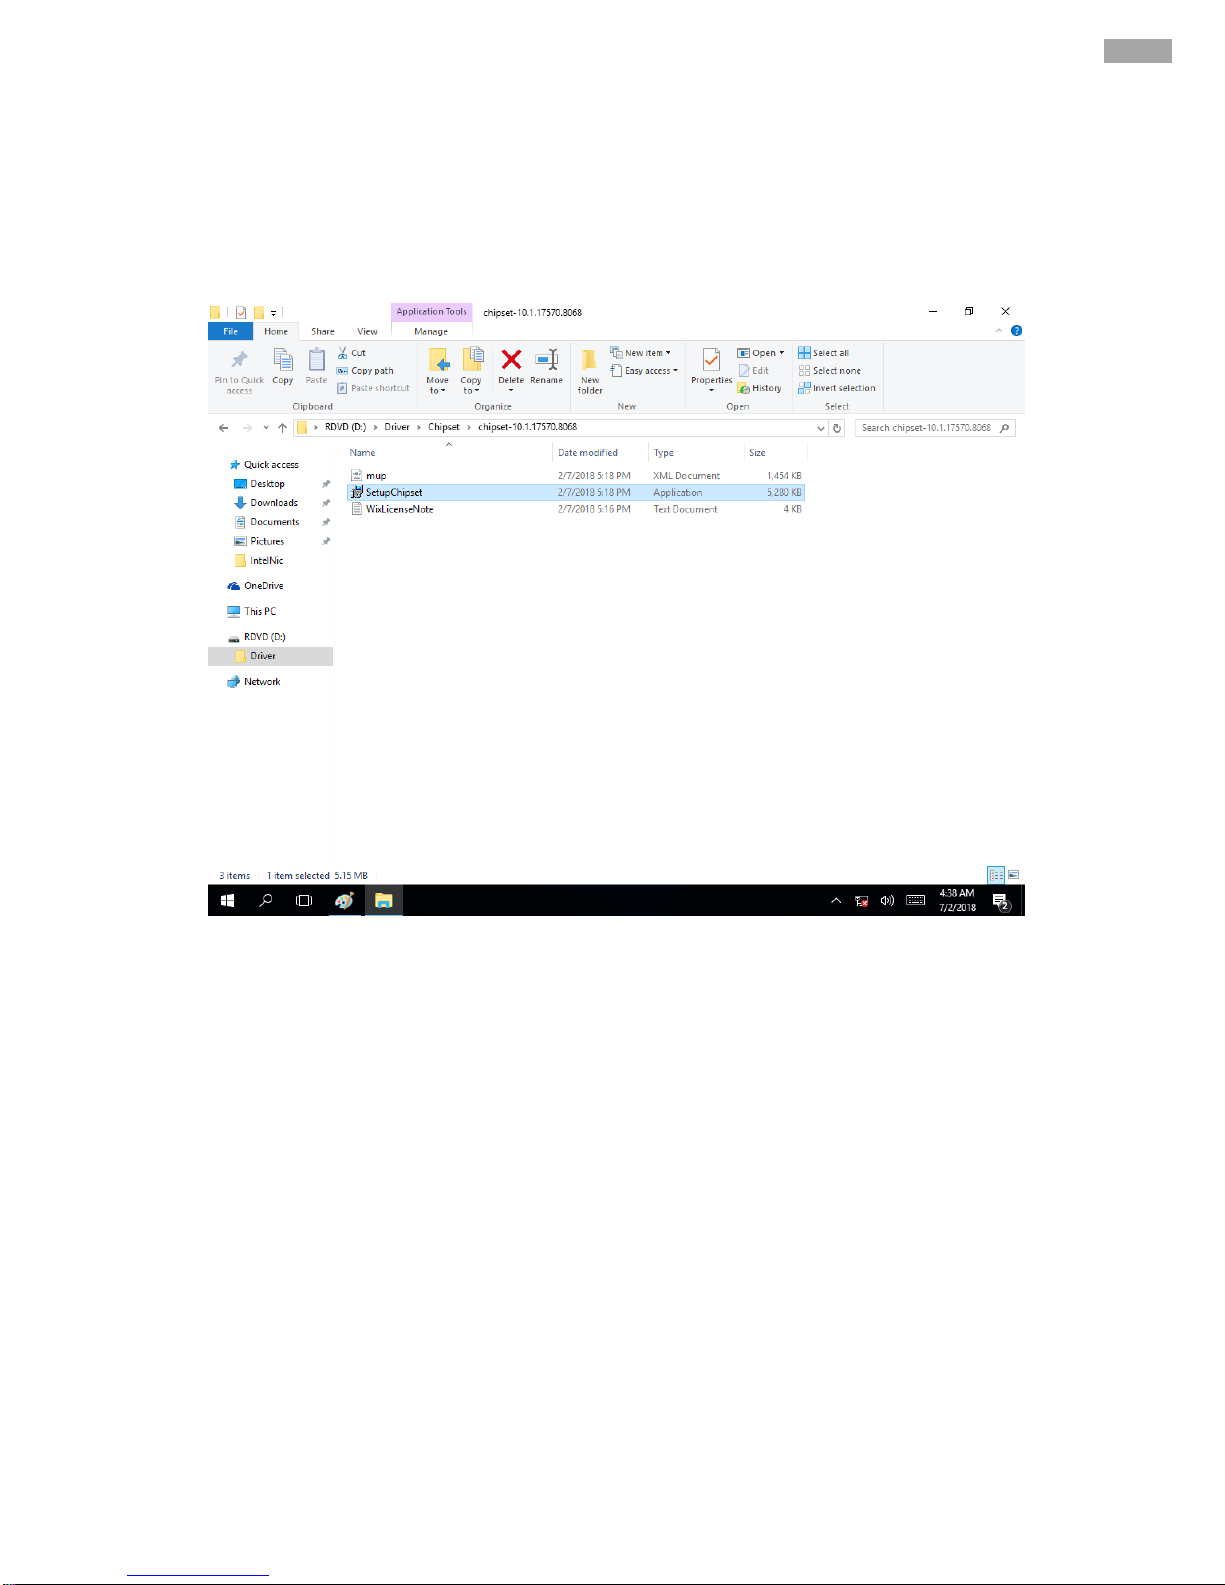
3.1 Chipset Driver
Follow instructions below to install Chipset driver.
1. Open the Driver CD (included in the package) and select Chipset driver.
Page 38

38
IK70 Motherboard User Manual
2. Installation window will pop up, select Next.
3. Select Accept to agree with the terms of license agreement.
Page 39
39
Chapter 3: Driver Installation
4. Check the ReadMe file information, select Install to continue.
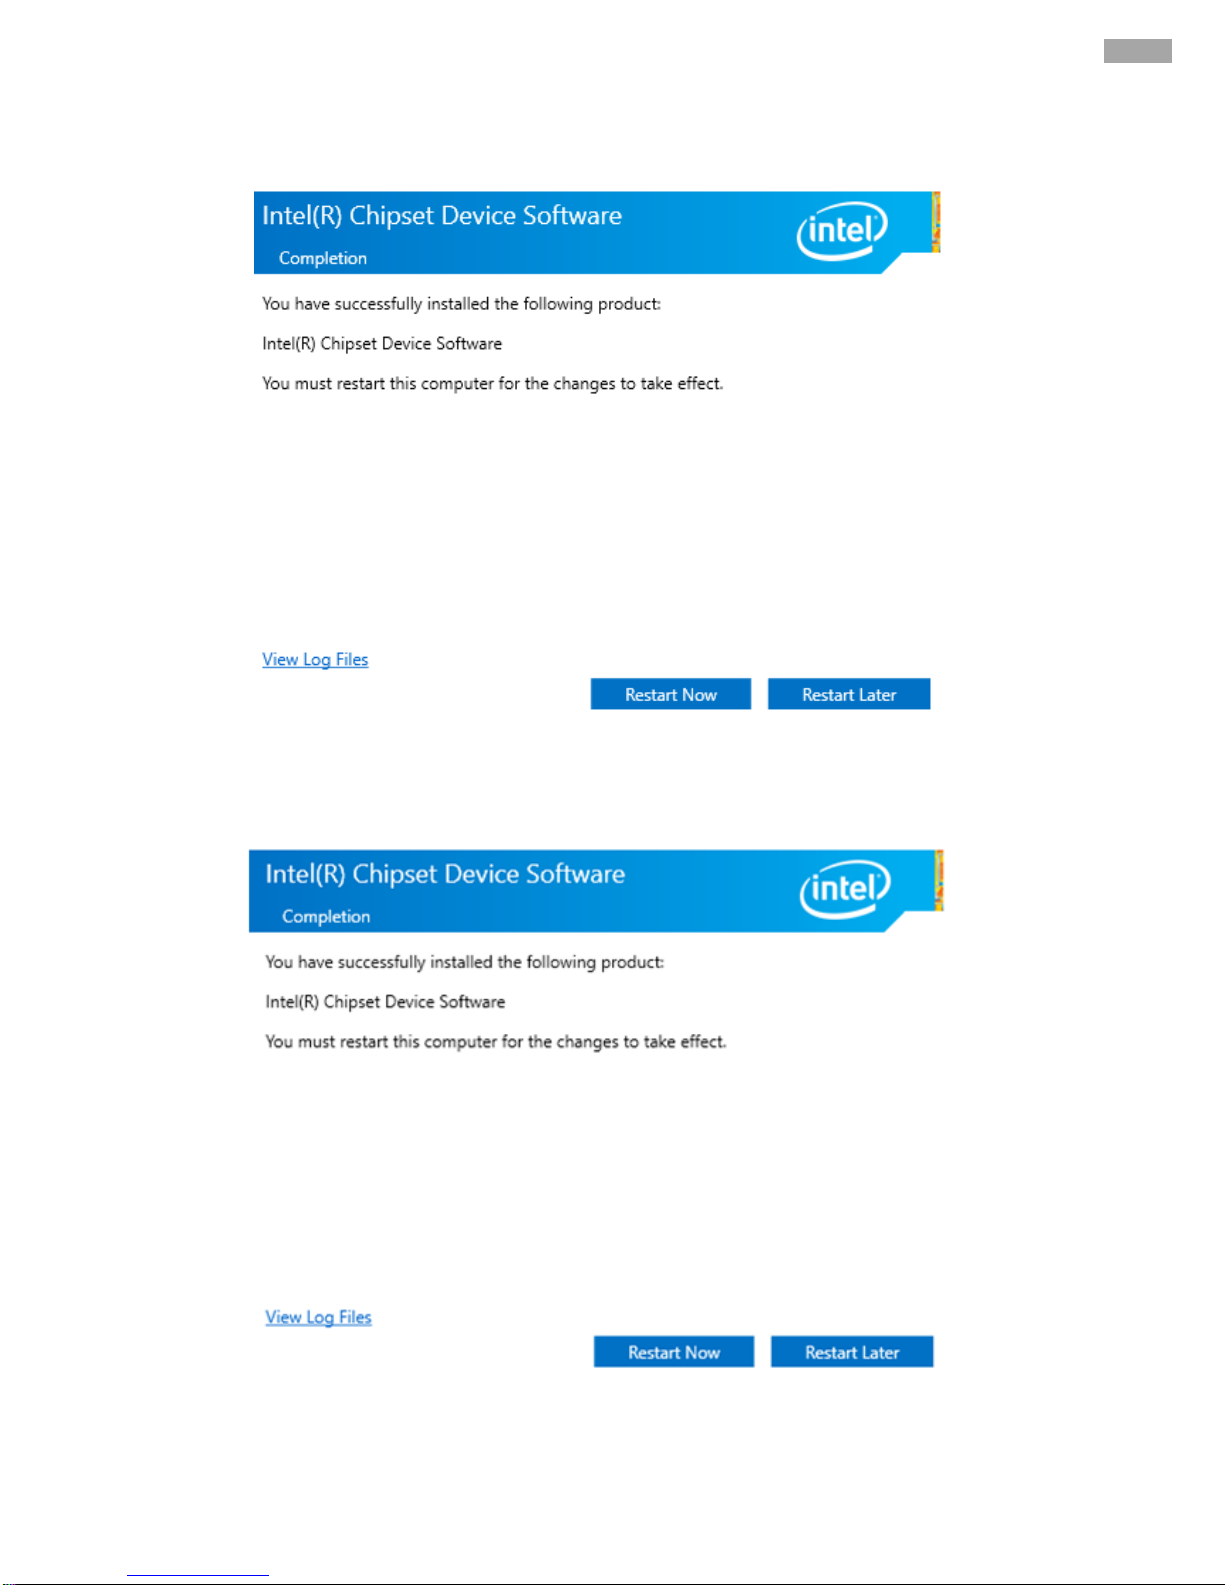
5. Wait for the driver to be installed. When installation completed, select Restart Now to restart your
computer.
Page 40
40
IK70 Motherboard User Manual
3.2 Graphic Driver
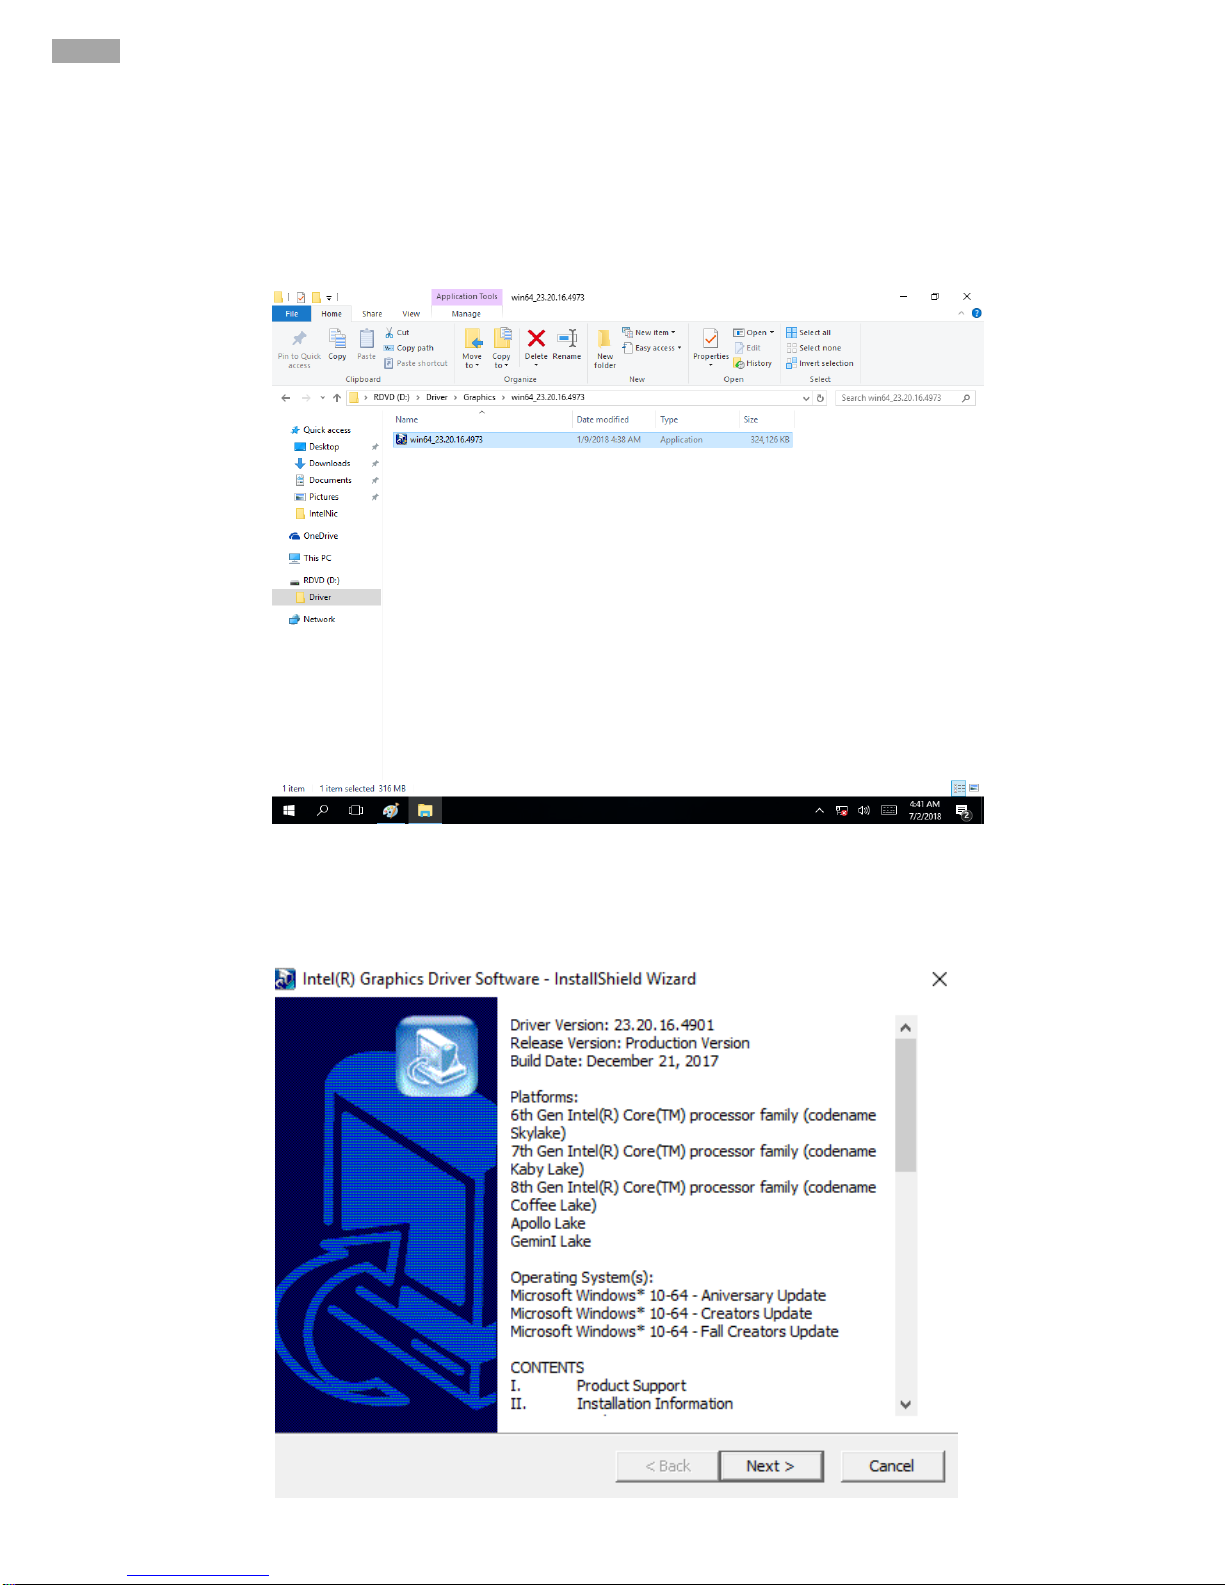
Follow instructions below to install Graphic driver.
1. Open the Driver CD (included in the package) and select Graphic driver.
2. Installation window will pop up, select Next.
Page 41
41
Chapter 3: Driver Installation
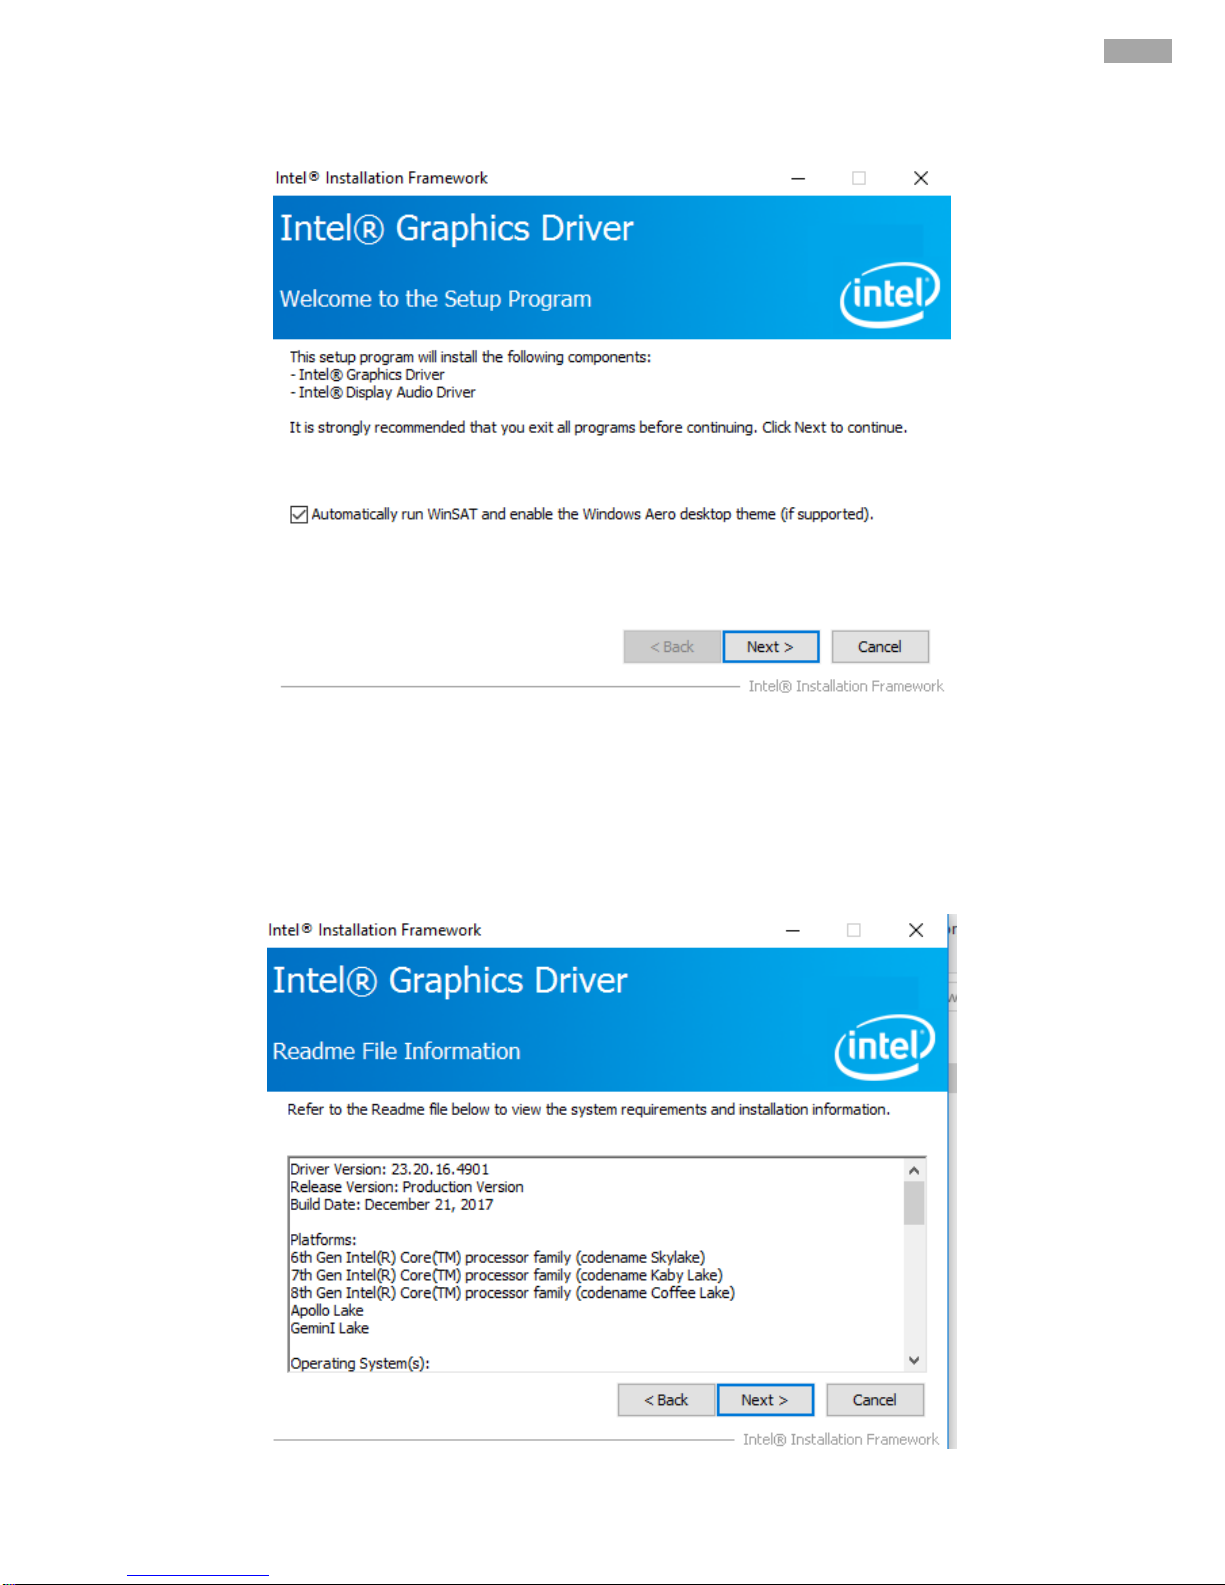
3. Select Accept to agree with the terms of license agreement.
4. Check the ReadMe file information, select Next to continue.
Page 42
42
IK70 Motherboard User Manual
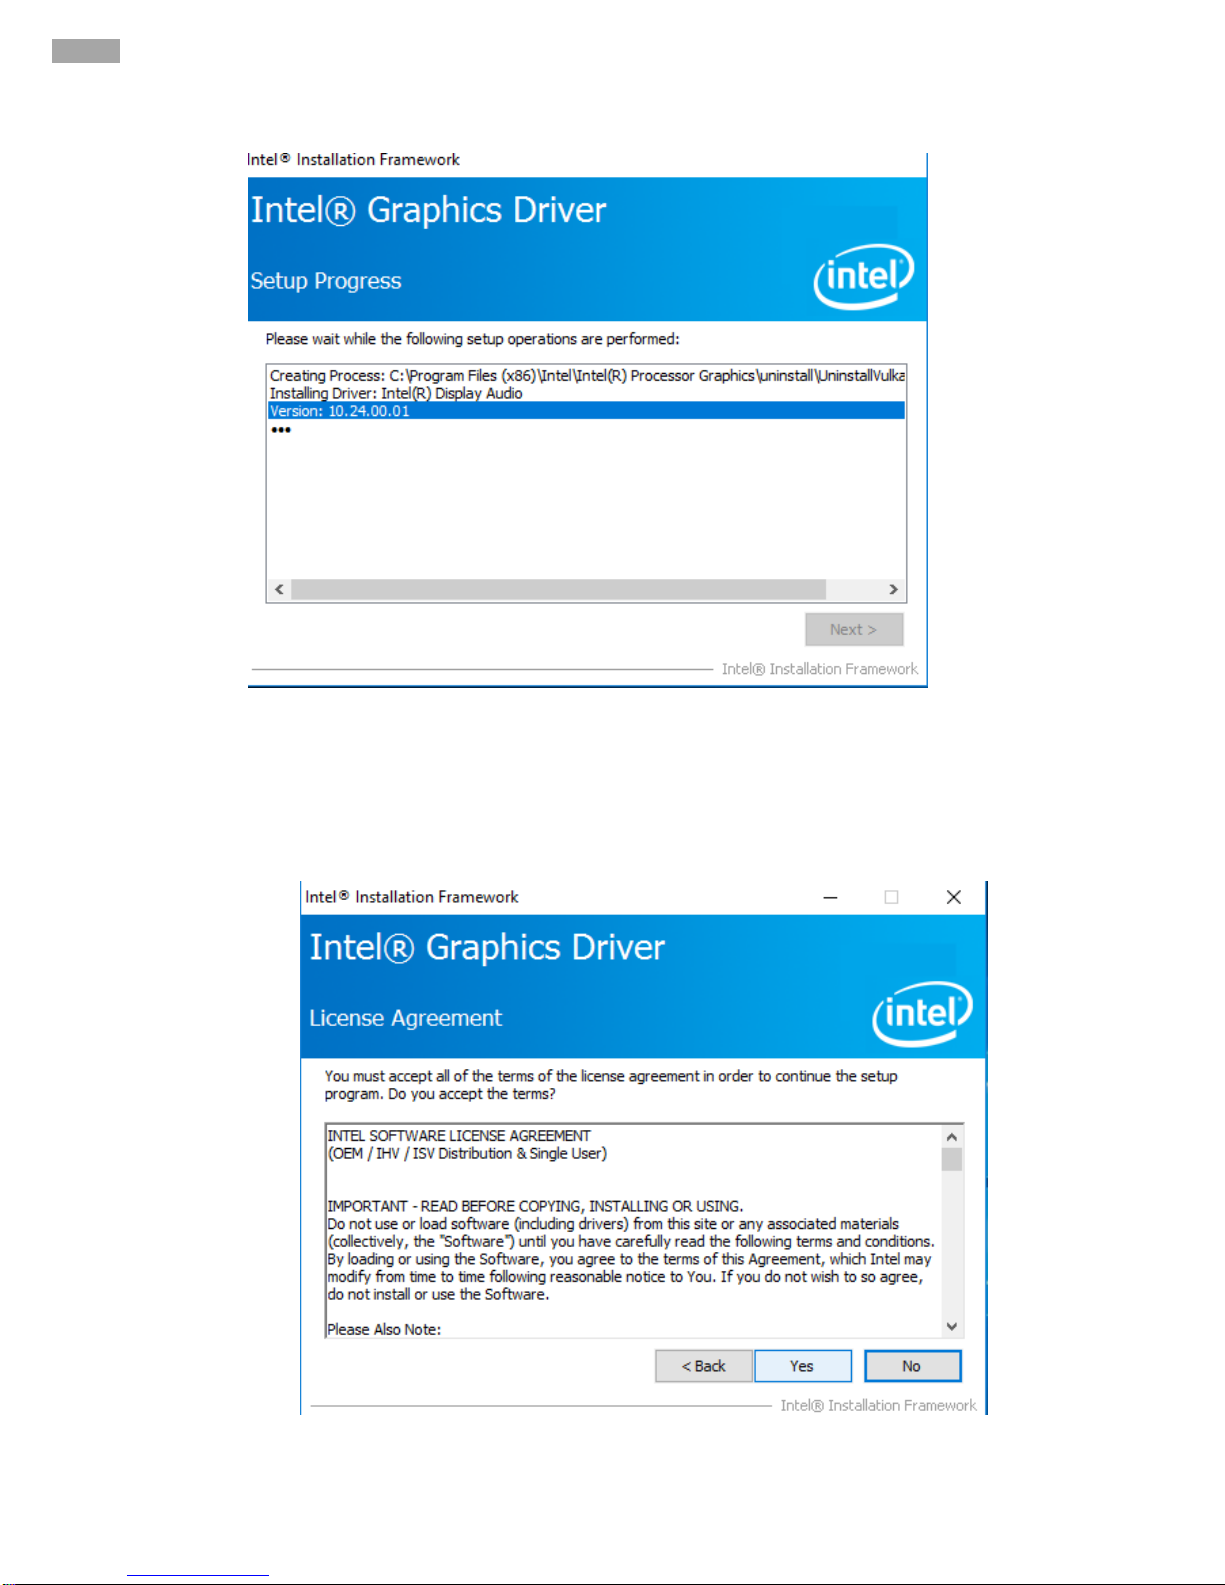
5. Wait for the driver to be installed.
6. Select Next to continue.
Page 43
43
Chapter 3: Driver Installation
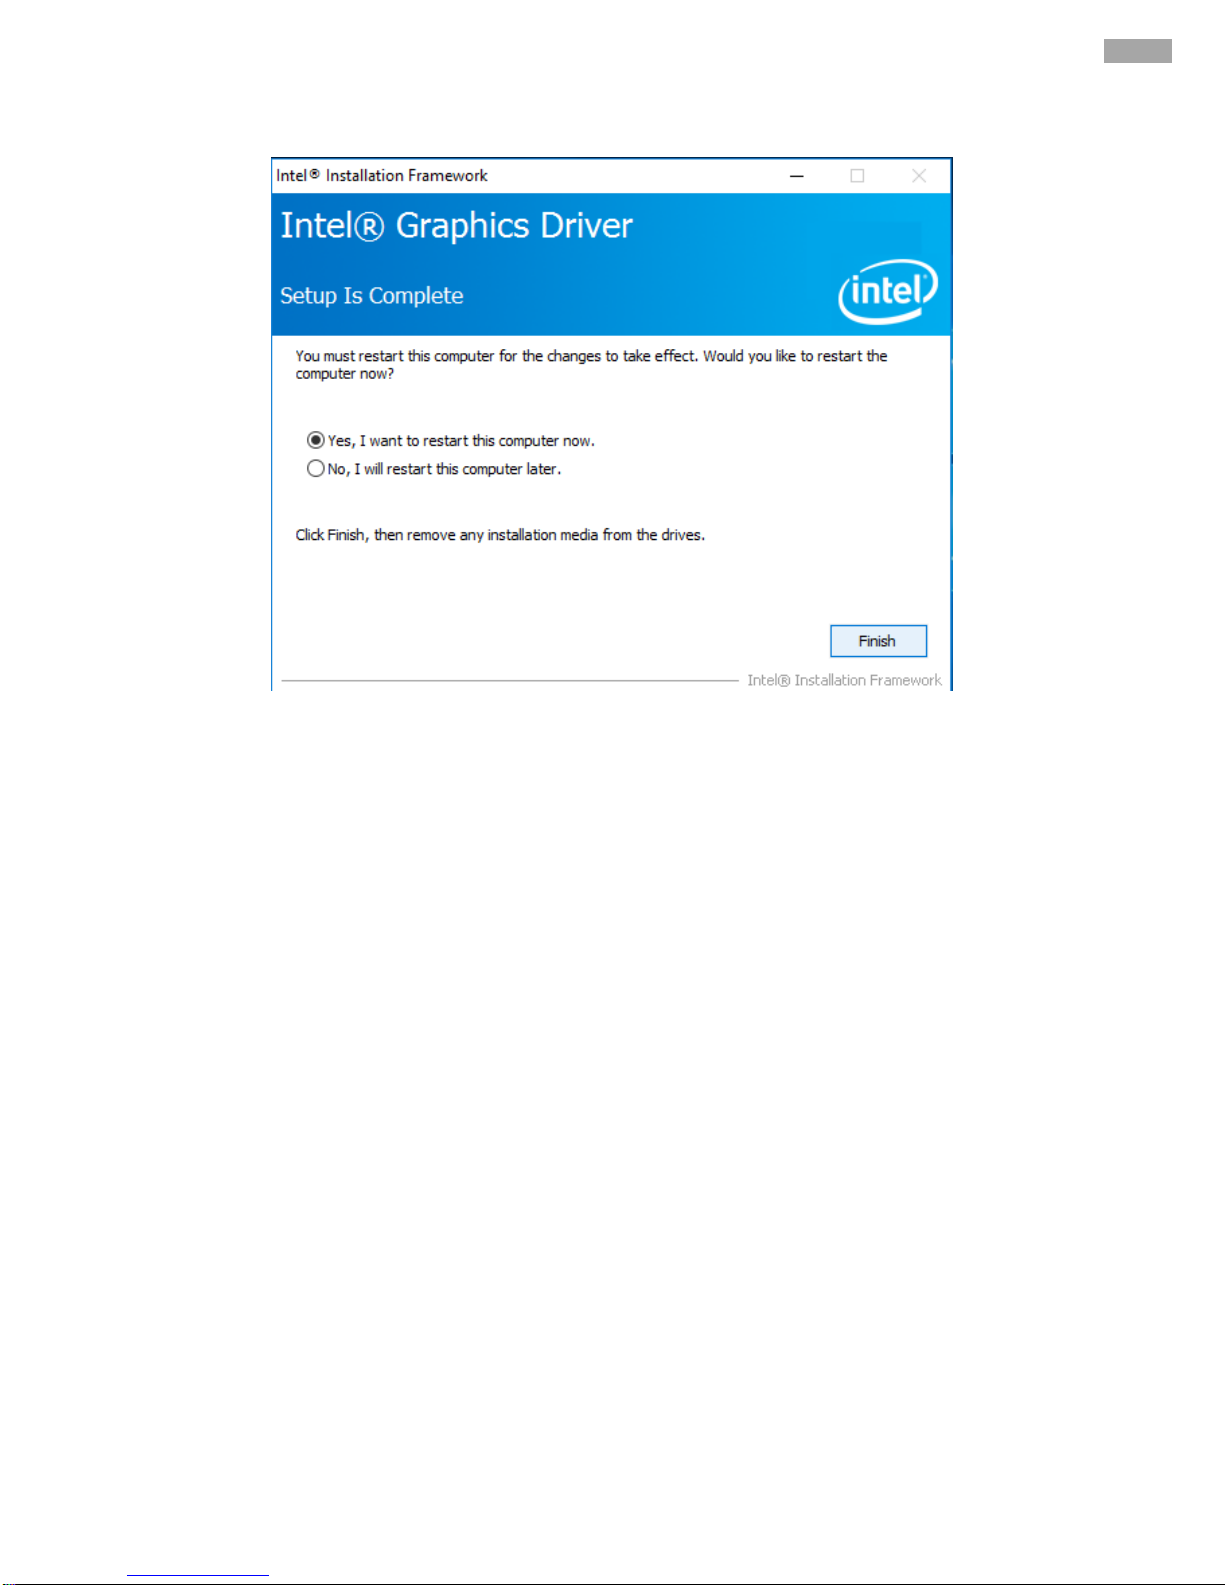
7. After installation is completed, select “Yes, I want to restart this computer now”, and click Finish.
Page 44
44
IK70 Motherboard User Manual
3.3 Management Engine (ME)
Follow instructions below to install Management Engine (ME) .
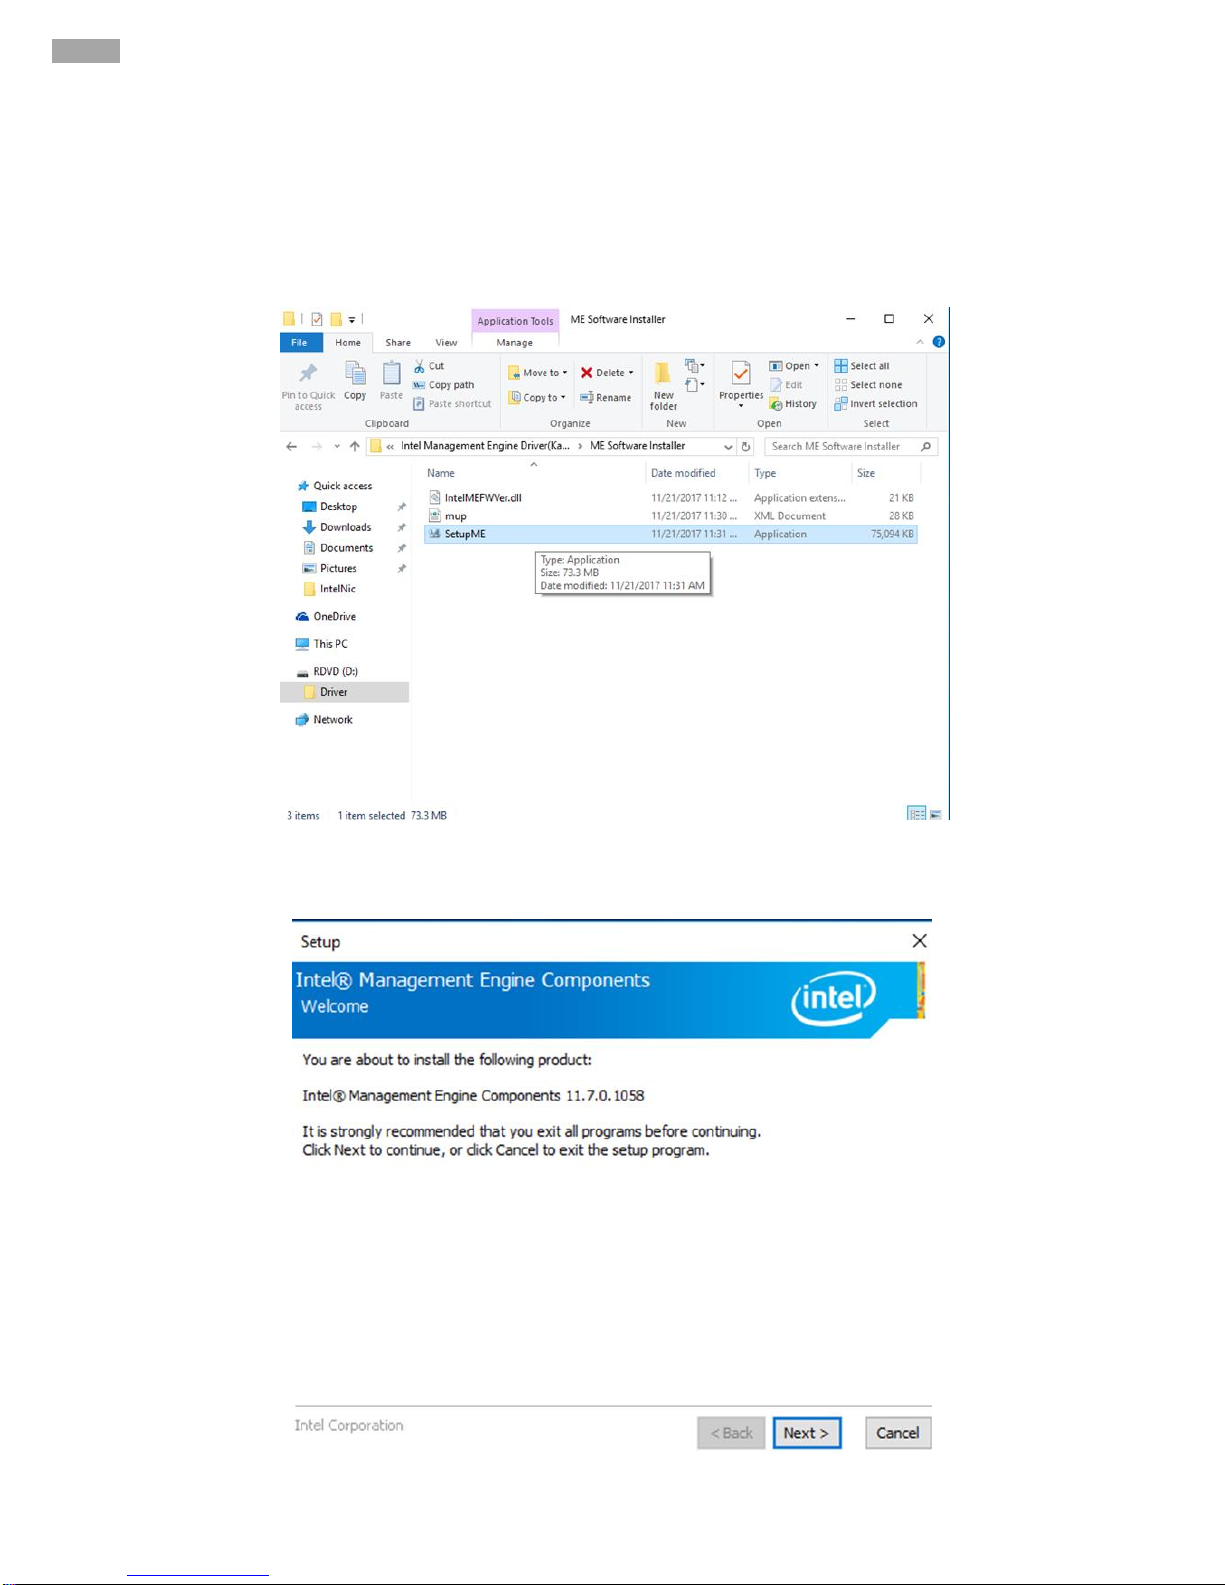
1. Open the Driver CD (included in the package) and select ME driver.
.
2. Select Next to start the installation.
Page 45

45
Chapter 3: Driver Installation
3. Select Next to agree with the terms of license agreement.
4. Wait for the driver to be installed.
Page 46
46
IK70 Motherboard User Manual
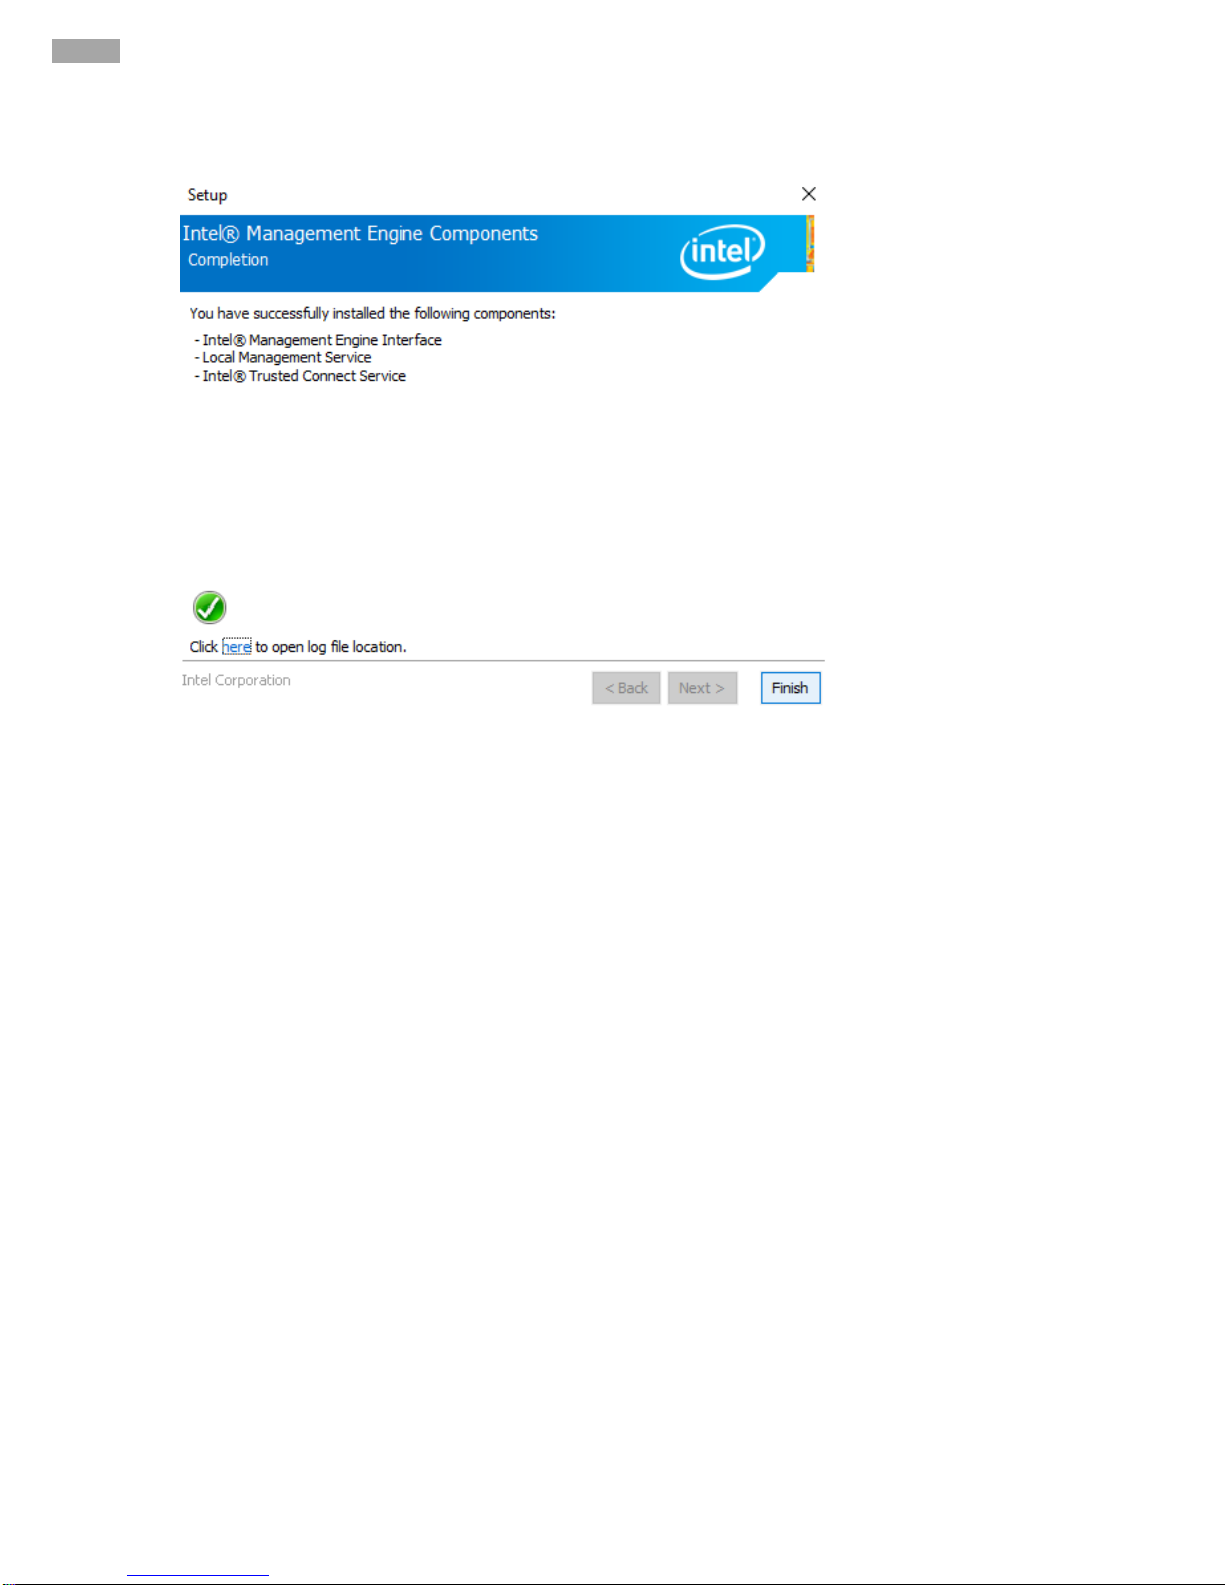
5. When installation completed, select Finish complete installation.
Page 47
47
Chapter 3: Driver Installation
3.4 Audio Driver
Follow instructions below to install Audio driver.
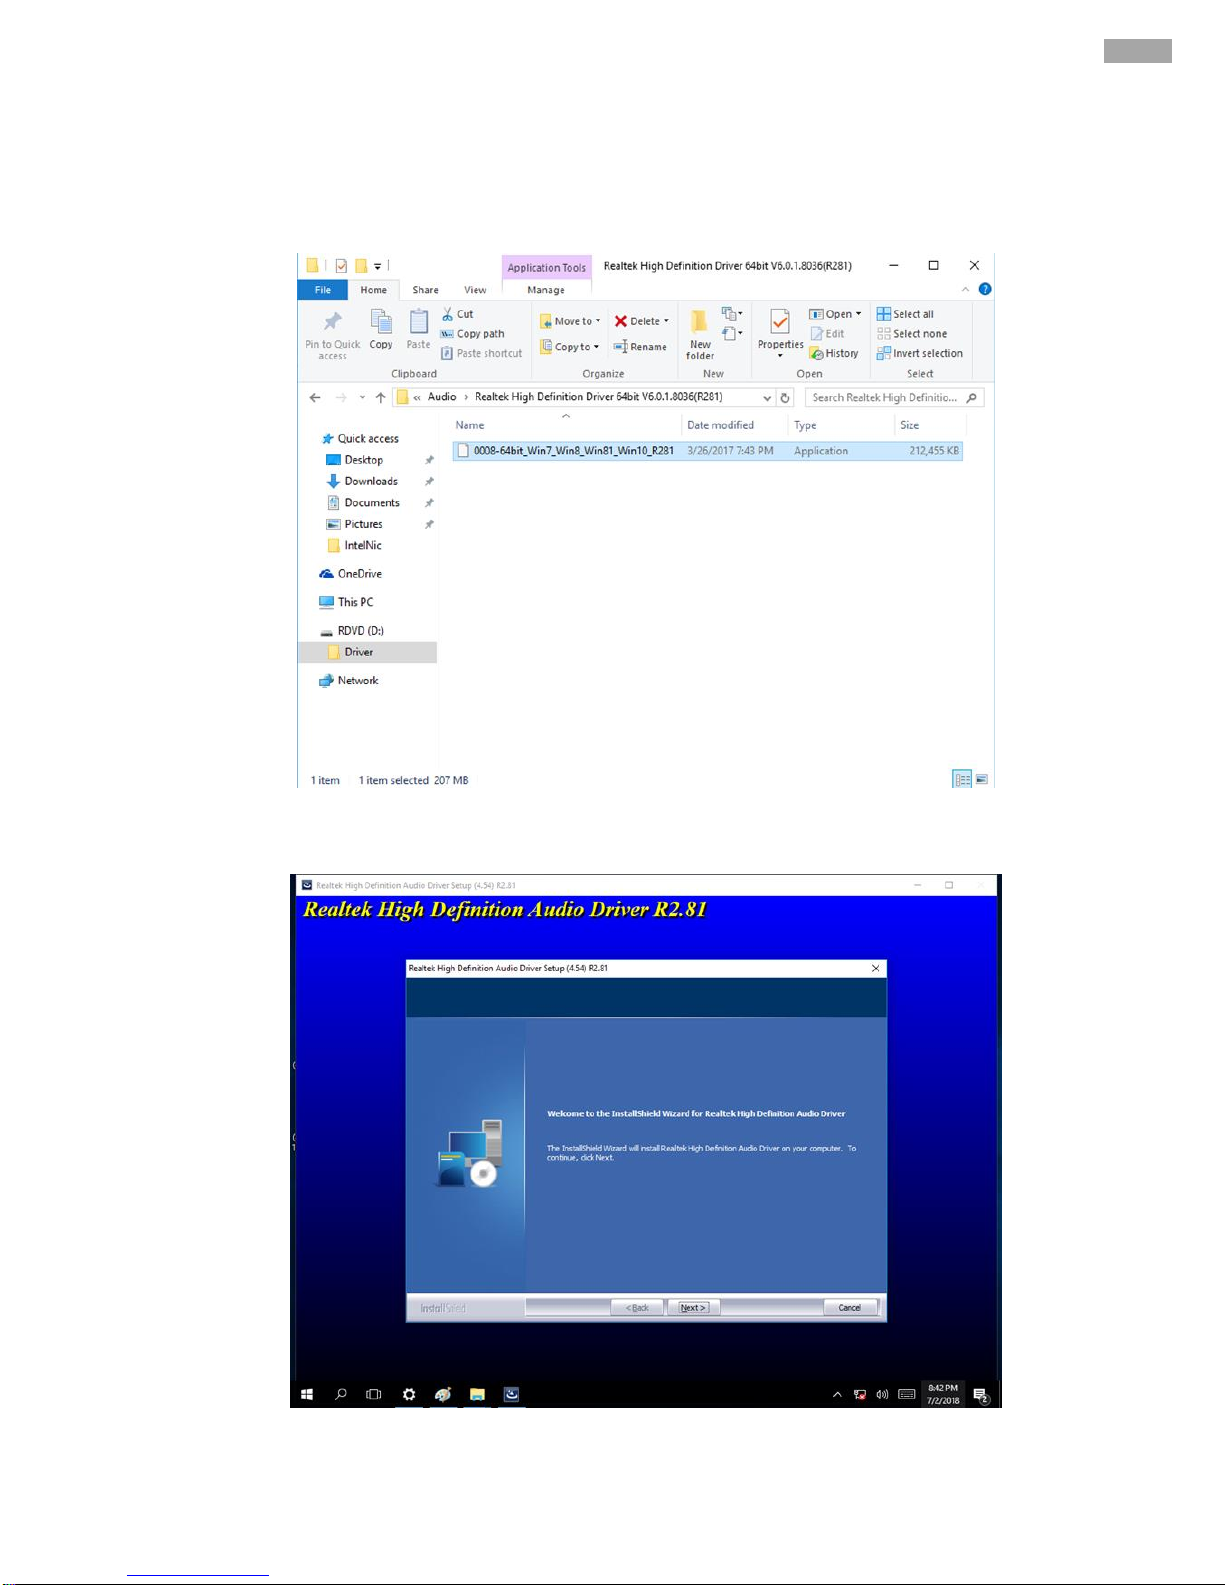
1. Open the Driver CD (included in the package) and select Audio driver.
2. Select Next to continue.
Page 48
48
IK70 Motherboard User Manual
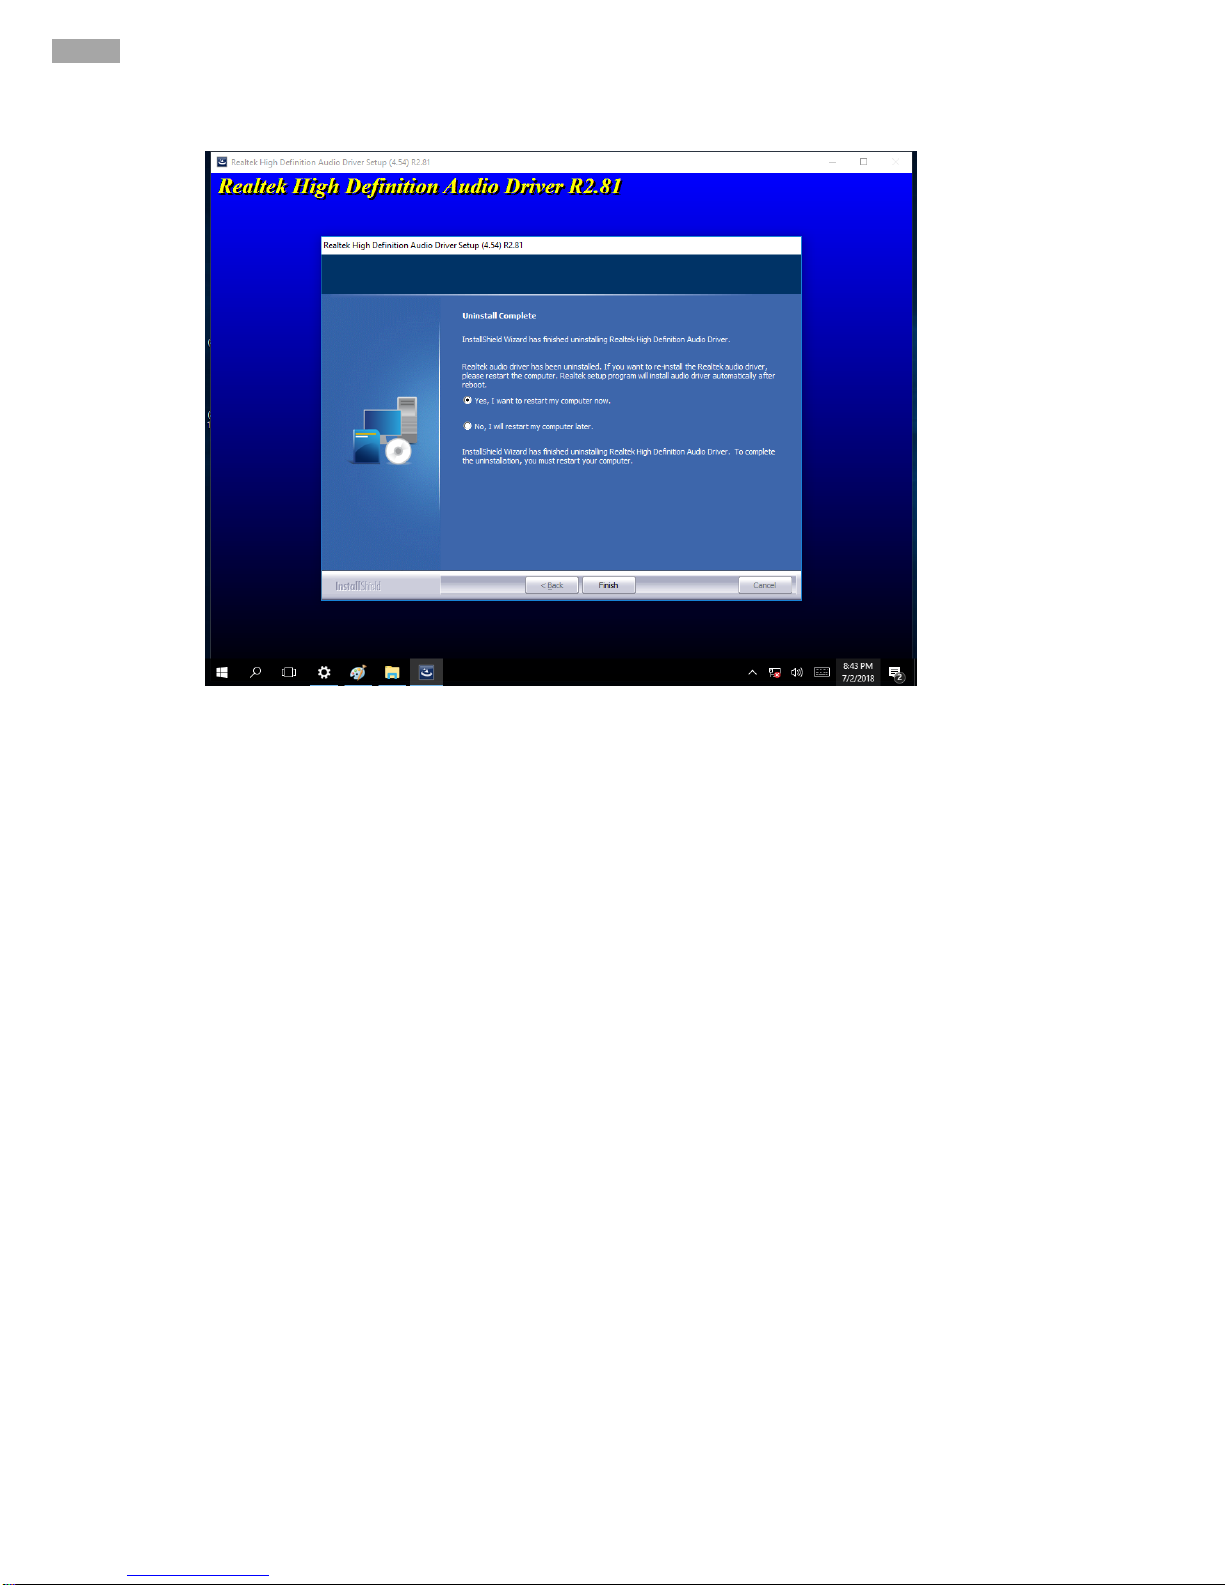
3. When installation completed, select Finish complete installation.
Page 49
49
Chapter 3: Driver Installation
3.5 Ethernet Driver
Follow instructions below to install LAN driver.
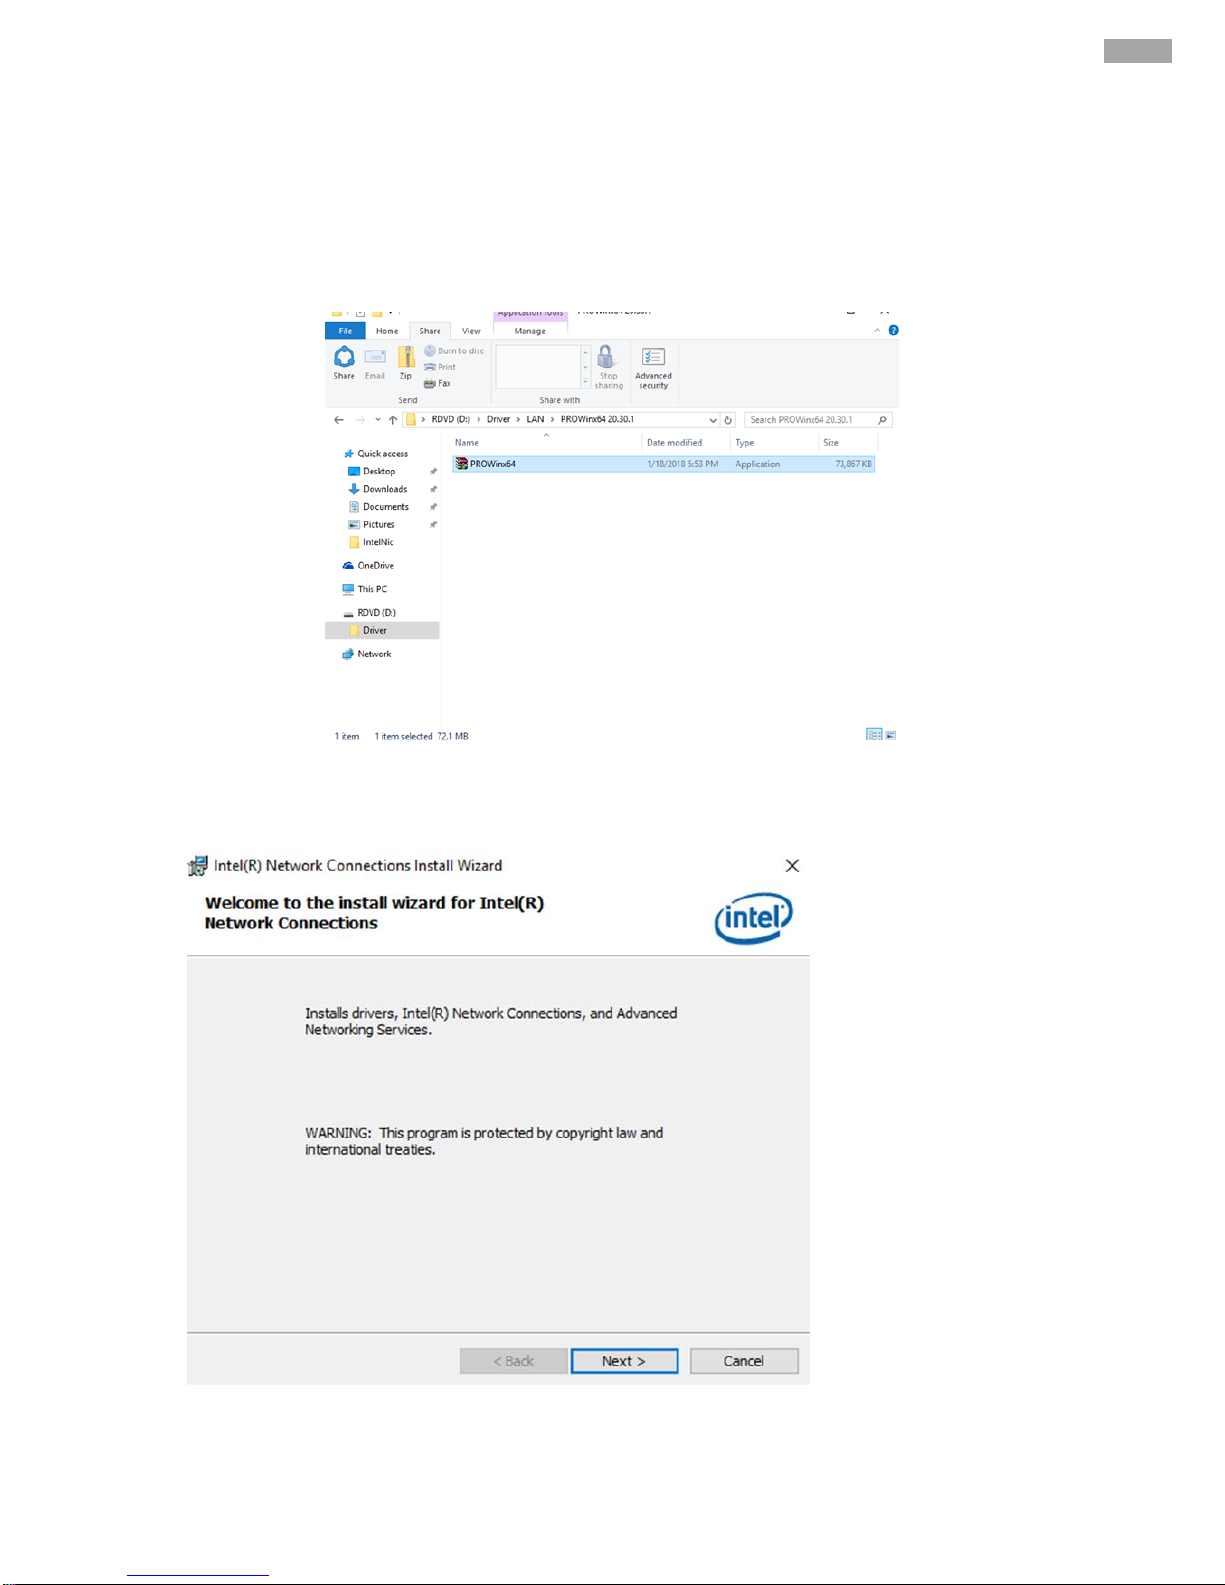
1. Open the Driver CD (included in the package) and select LAN driver.
2. When compression is complete, select Next.
Page 50
50
IK70 Motherboard User Manual
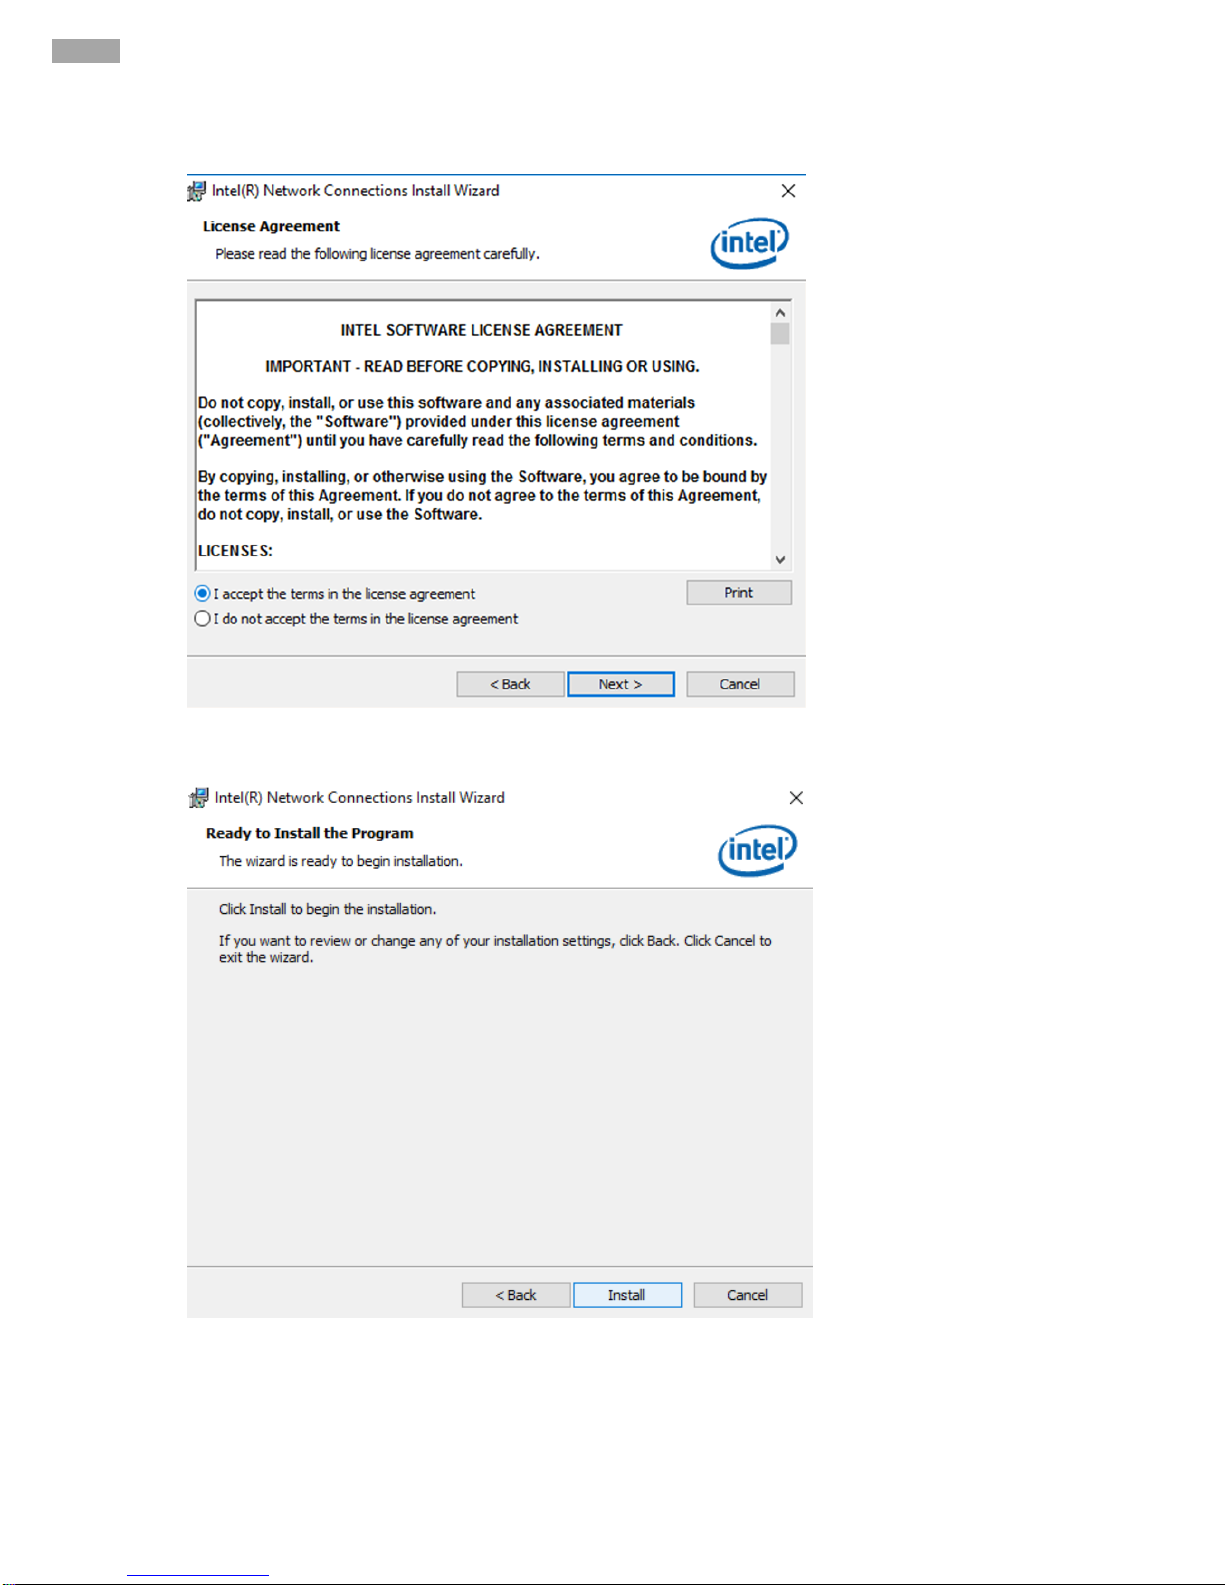
3. Read the license agreement, and then select Next.
4. System displays the installed packages, select Next.
Page 51
51
Chapter 3: Driver Installation
5. Confirm the installation, select Install to start the installation.
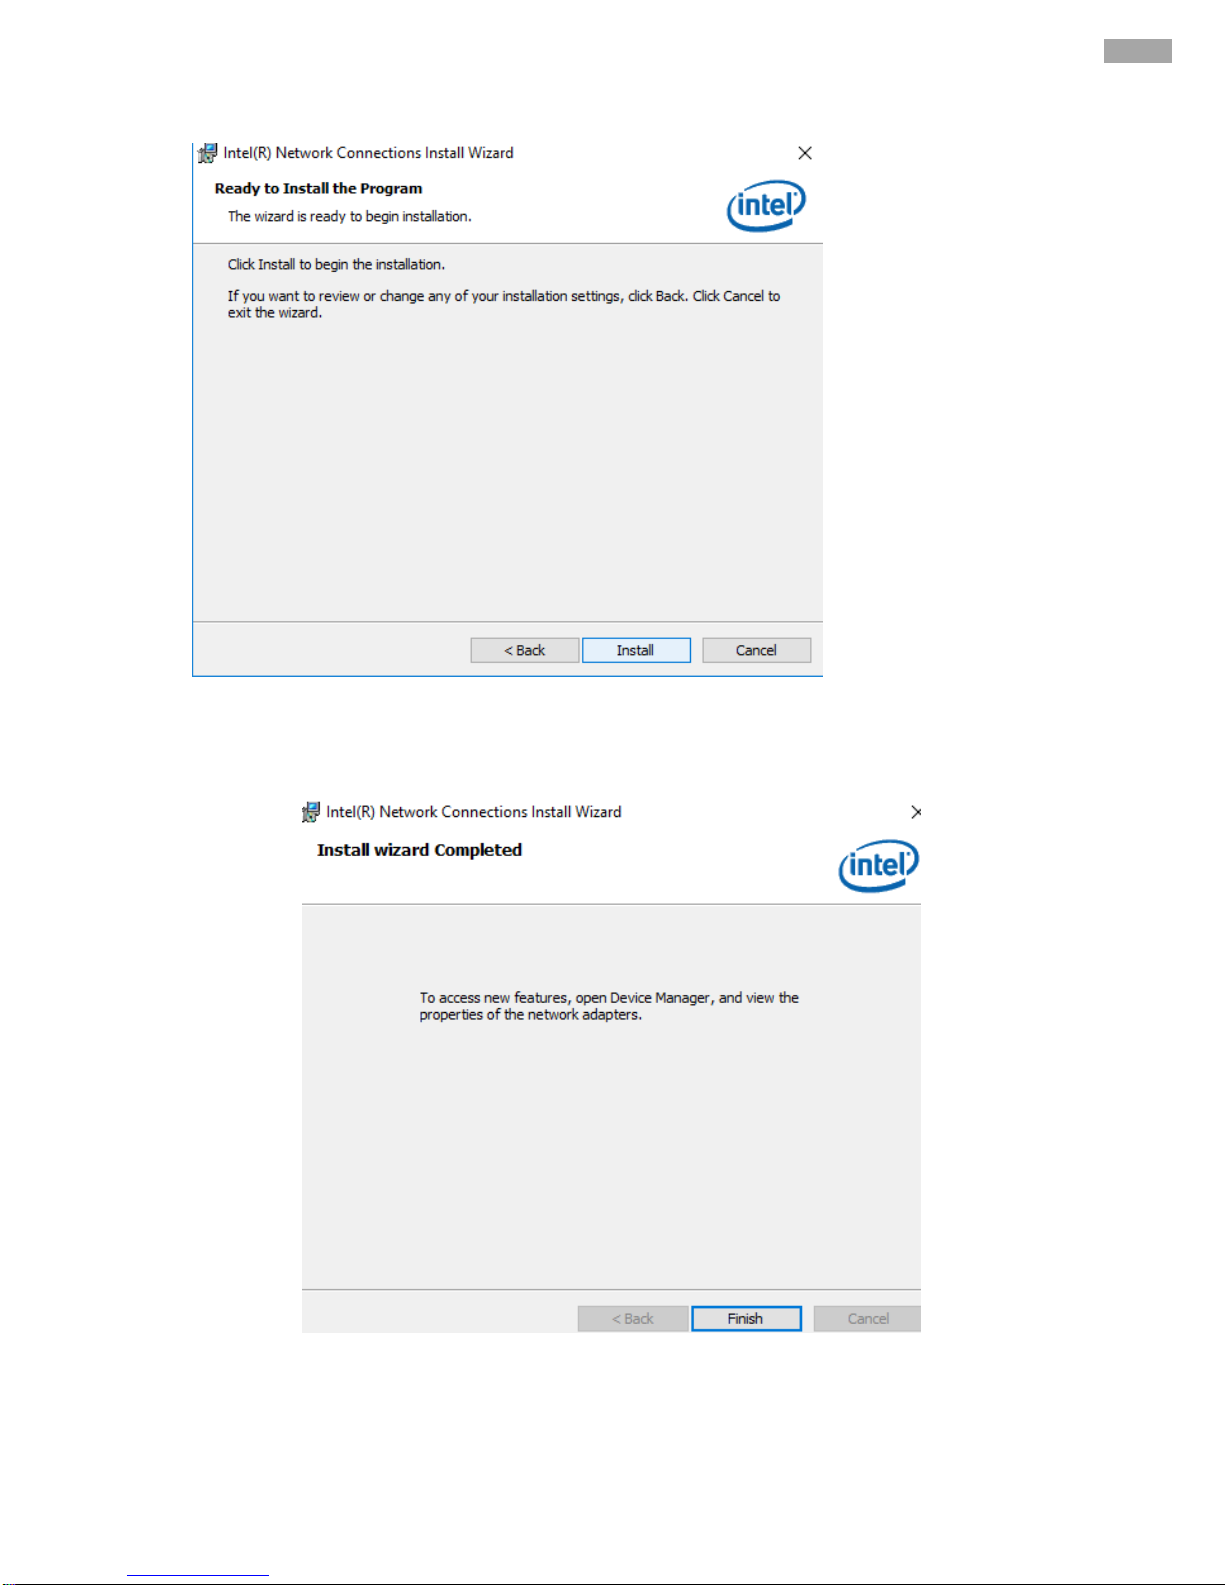
6. When installation is completed, select Finish to close the window.
Page 52

52
IK70 Motherboard User Manual
3.6 Watchdog Driver Installation
For more details about Winmate Watchdog, please download Watchdog Guide from Winmate Downloads
Center here.
Follow instructions below to install Watchdog driver.
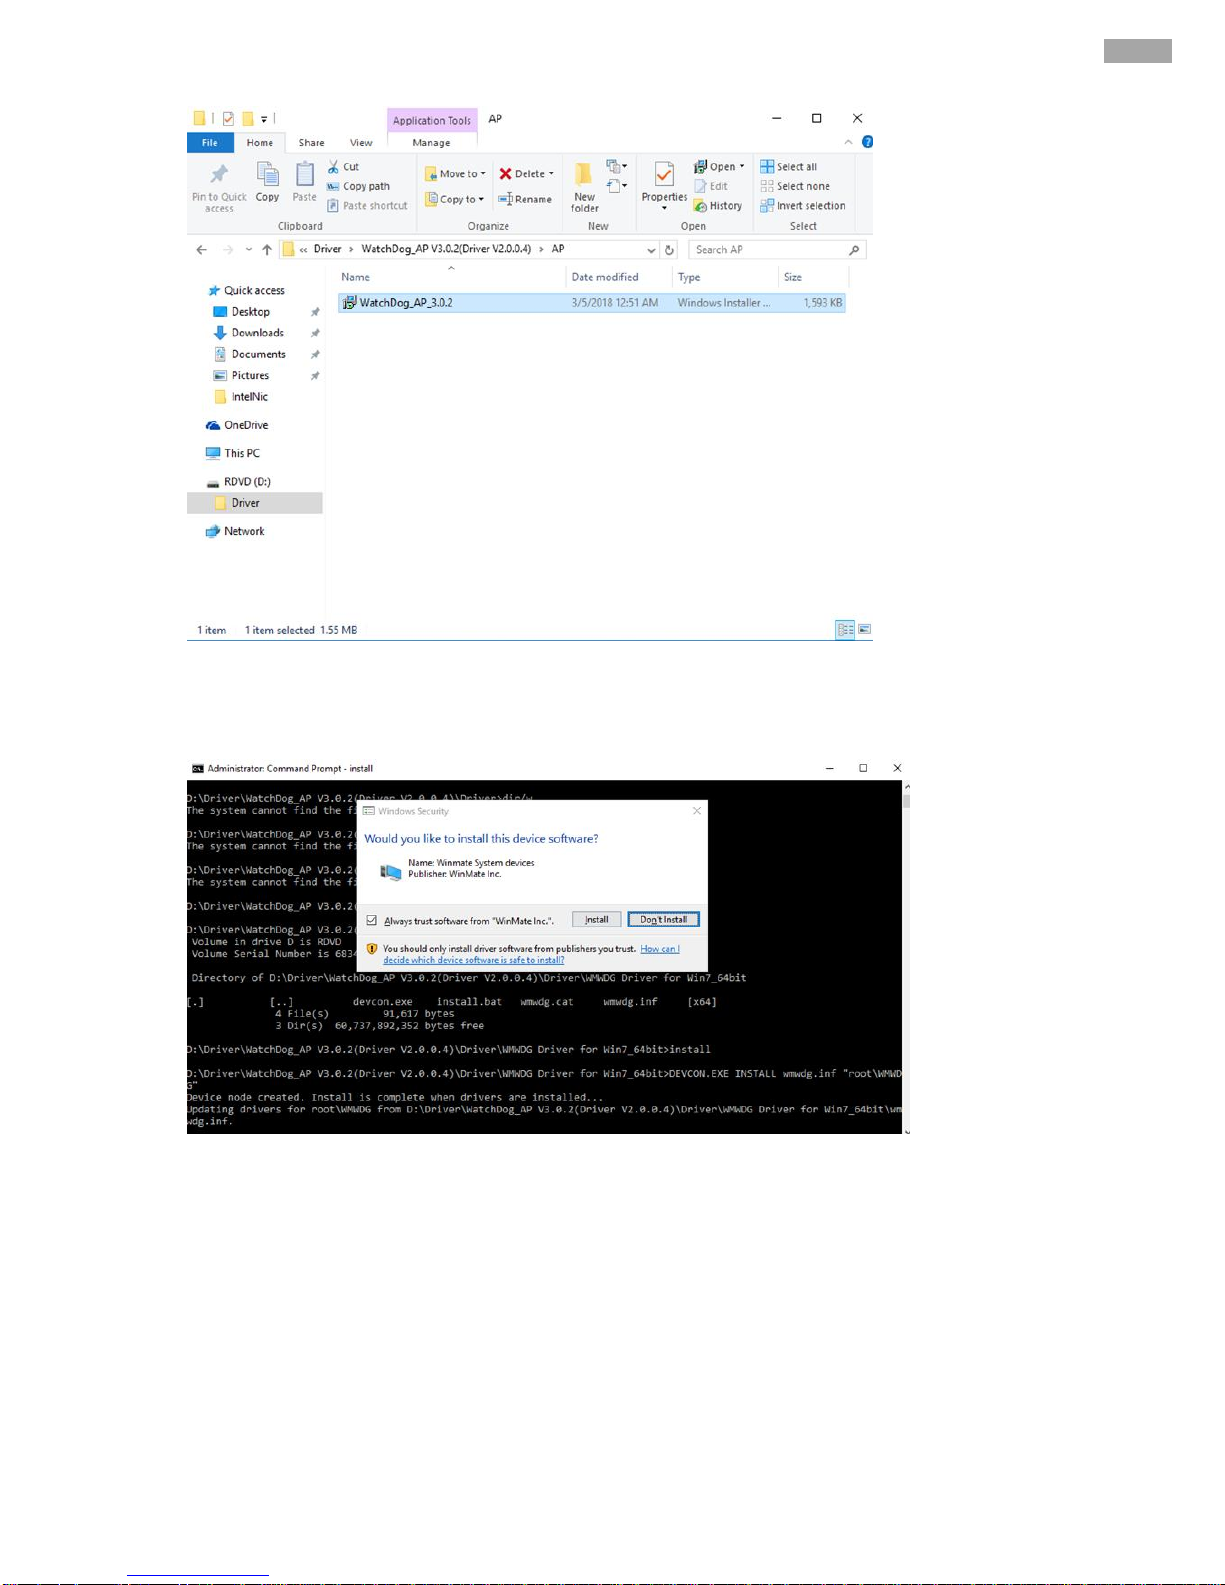
1. Type “cmd” in the run box then the cmd.exe will appear in programs.
2. Right click on the cmd.exe and click on “Run as administrator” to start
3. Open the Driver CD (included in the package) and select Watchdog driver.
Page 53
53
Chapter 3: Driver Installation
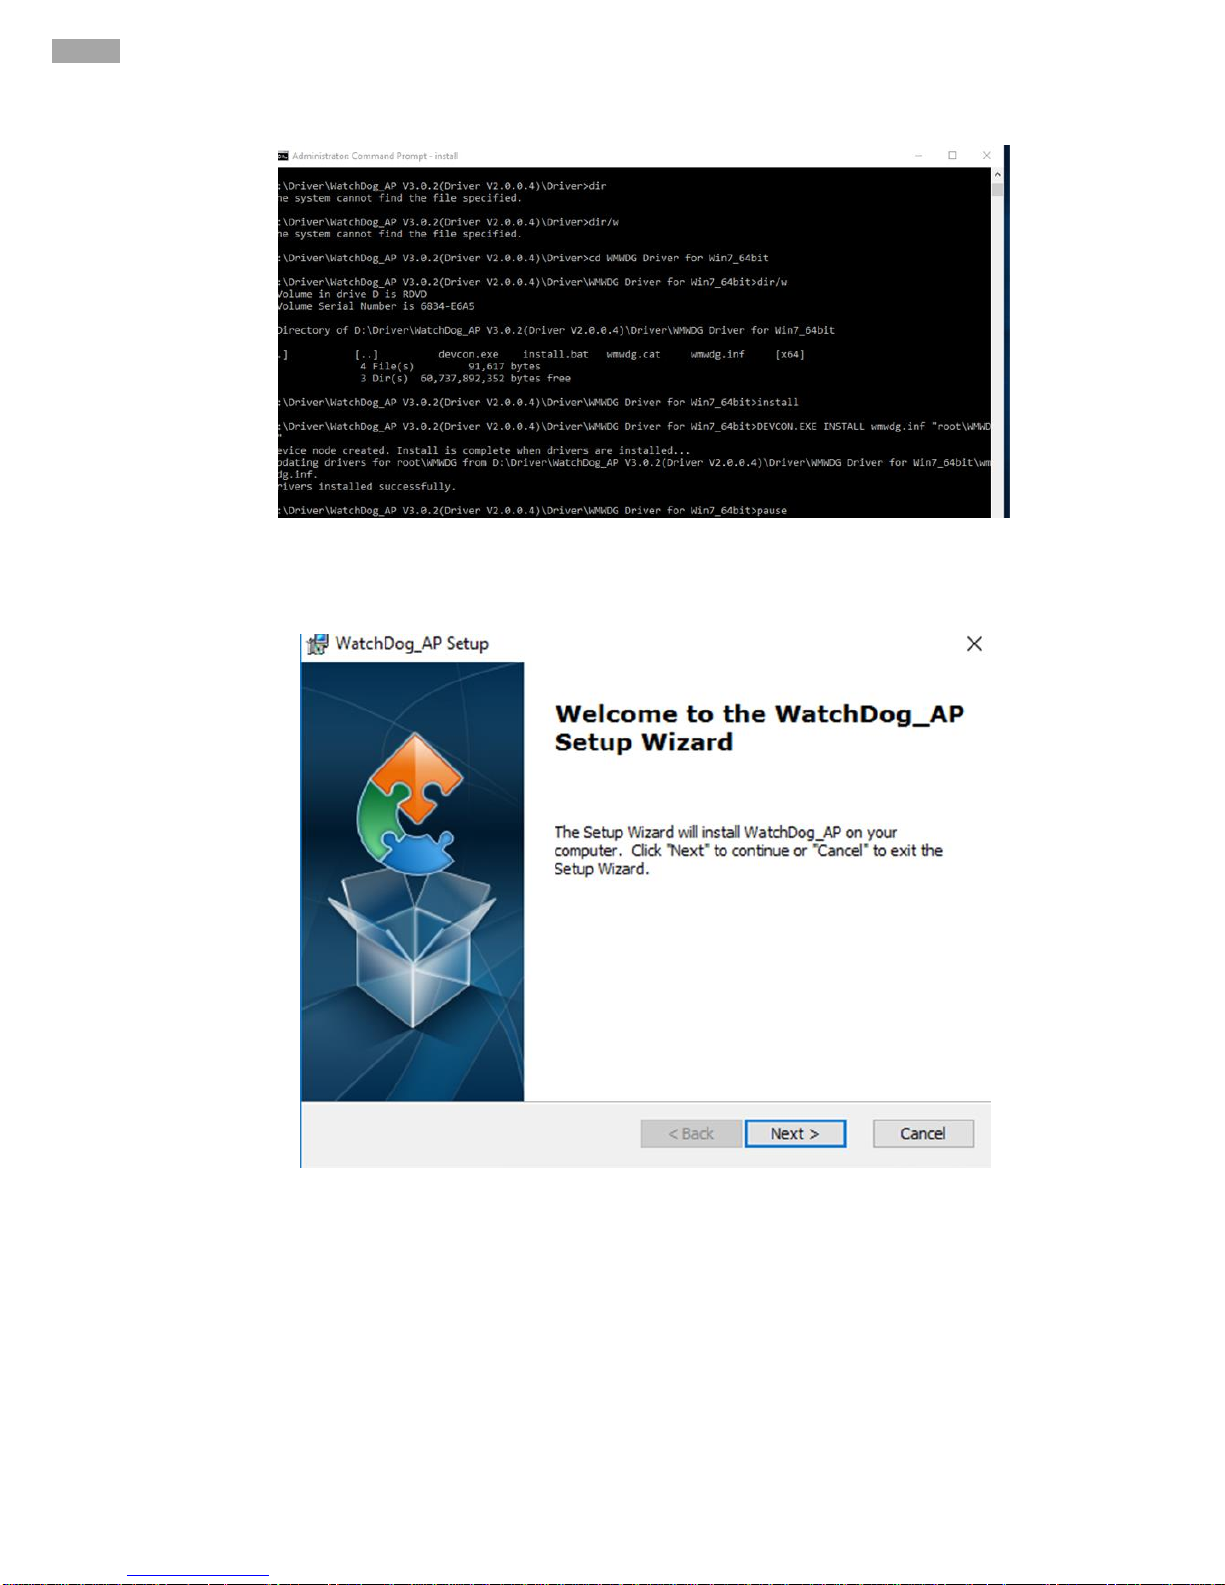
4. When Windows Security dialog appear, select install to continue the
Installation.
Page 54
54
IK70 Motherboard User Manual
5. Wait for installation to complete. When installation is complete, press any key to close.
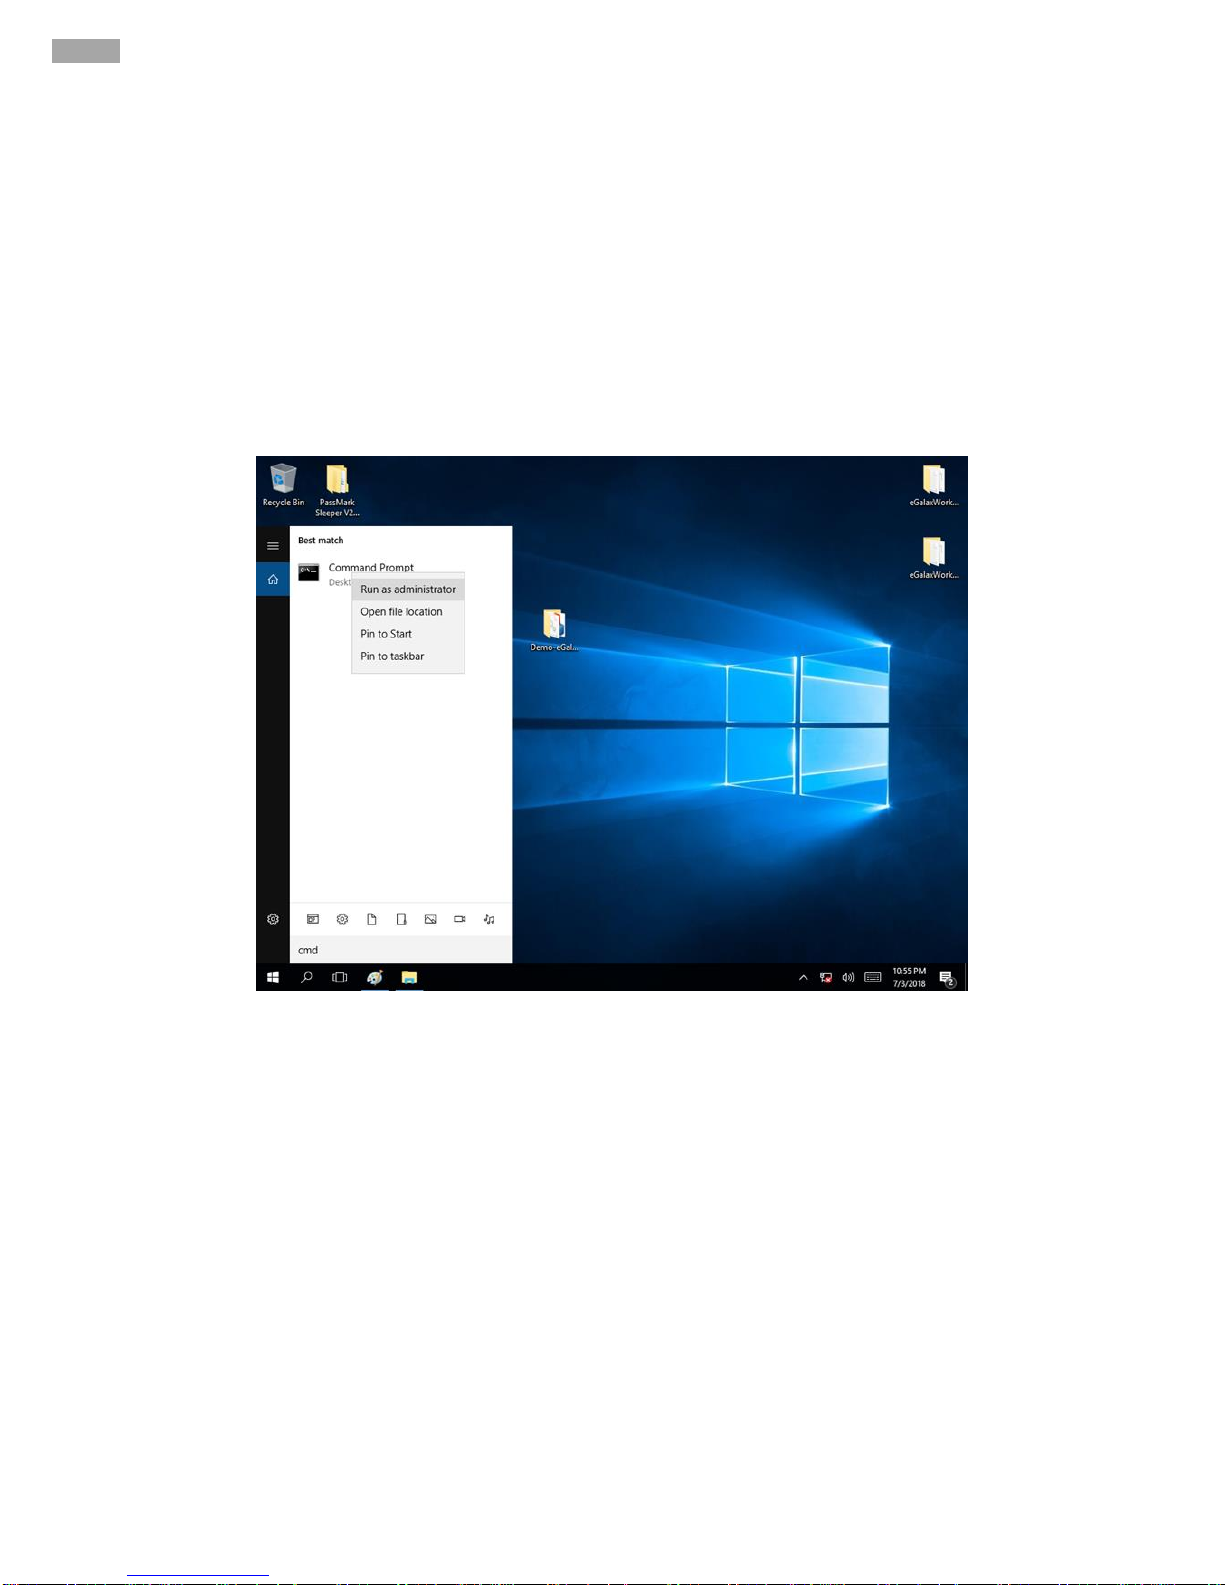
6. Open the Driver CD (included in the package) and select Watchdog AP.
7. Select Next.
Page 55

55
Chapter 3: Driver Installation
8. The installed storage location is displayed, select Next to continue.
9. Select Next to start the installation.
10. When installation is completed, select Finish to close the window.
.
Page 56
56
56
IK70 Motherboard User Manual
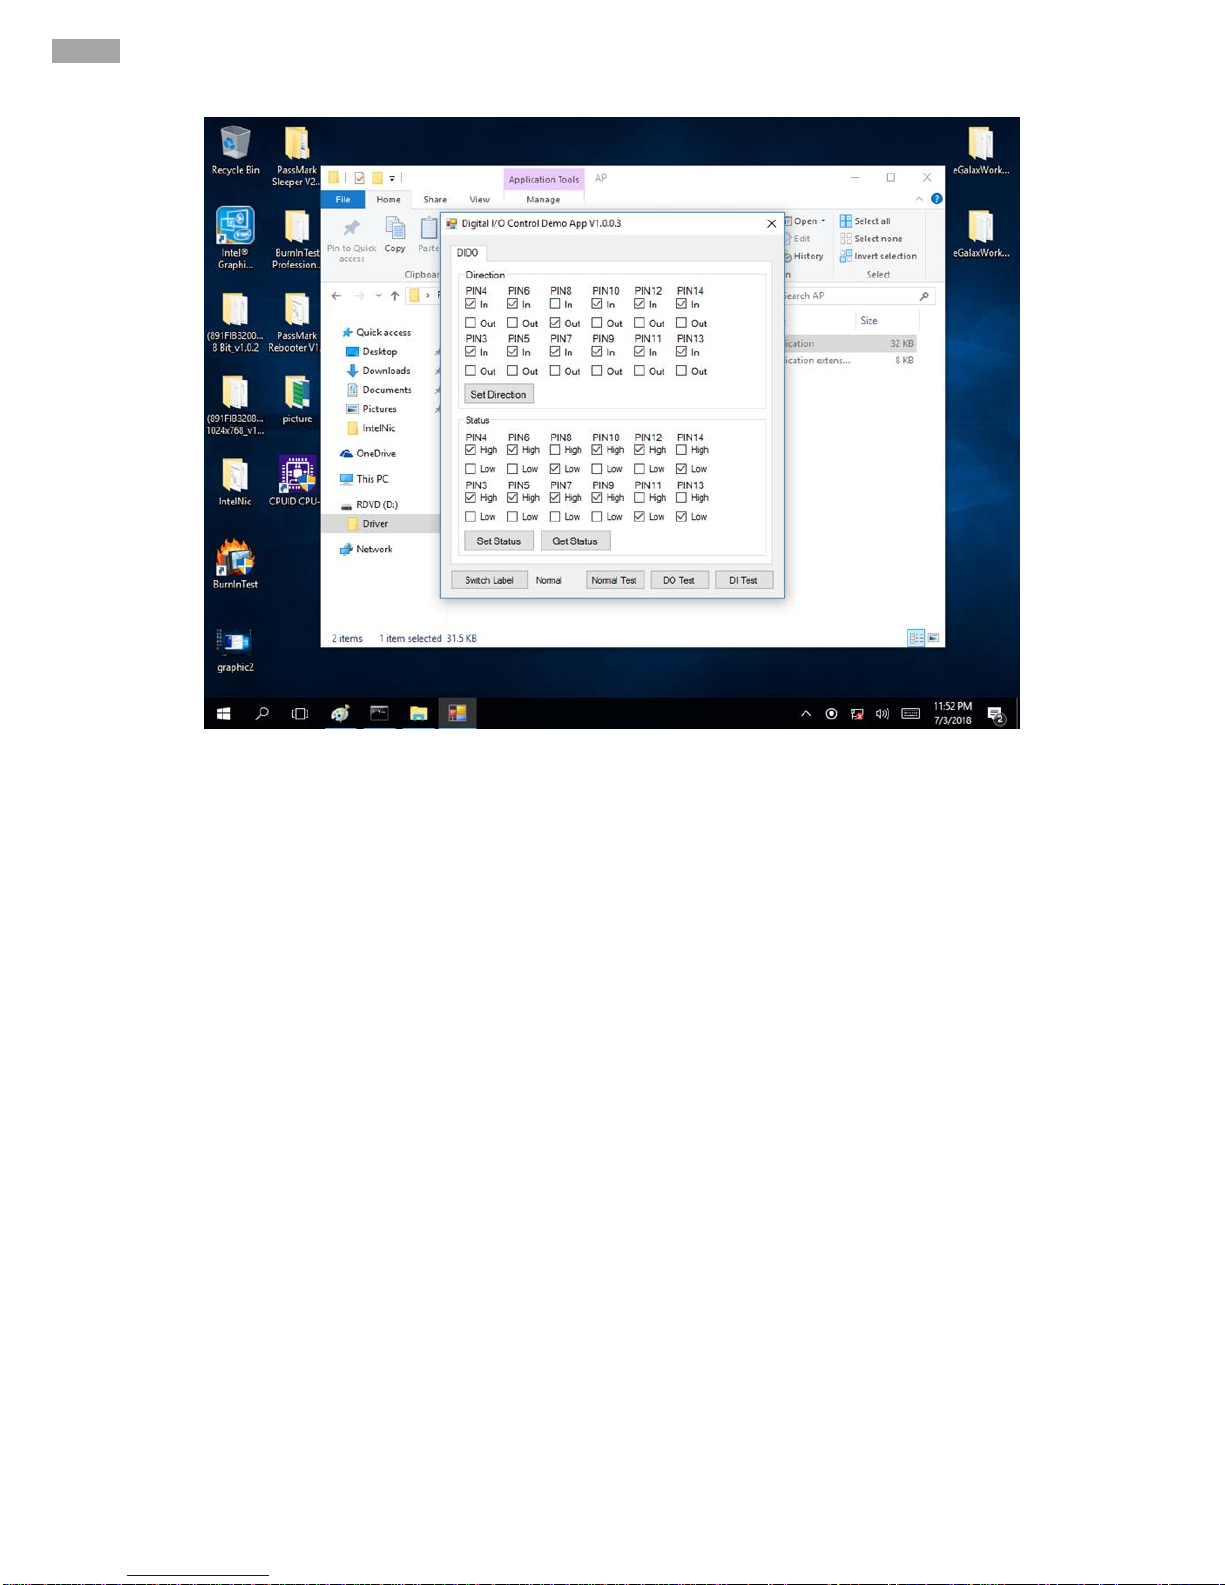
3.7 Digital IO Driver Installation
For more details about Winmate Watchdog, please download Digital IO Guide from Winmate Downloads
Center:
Follow instructions below to install Digital IO river.
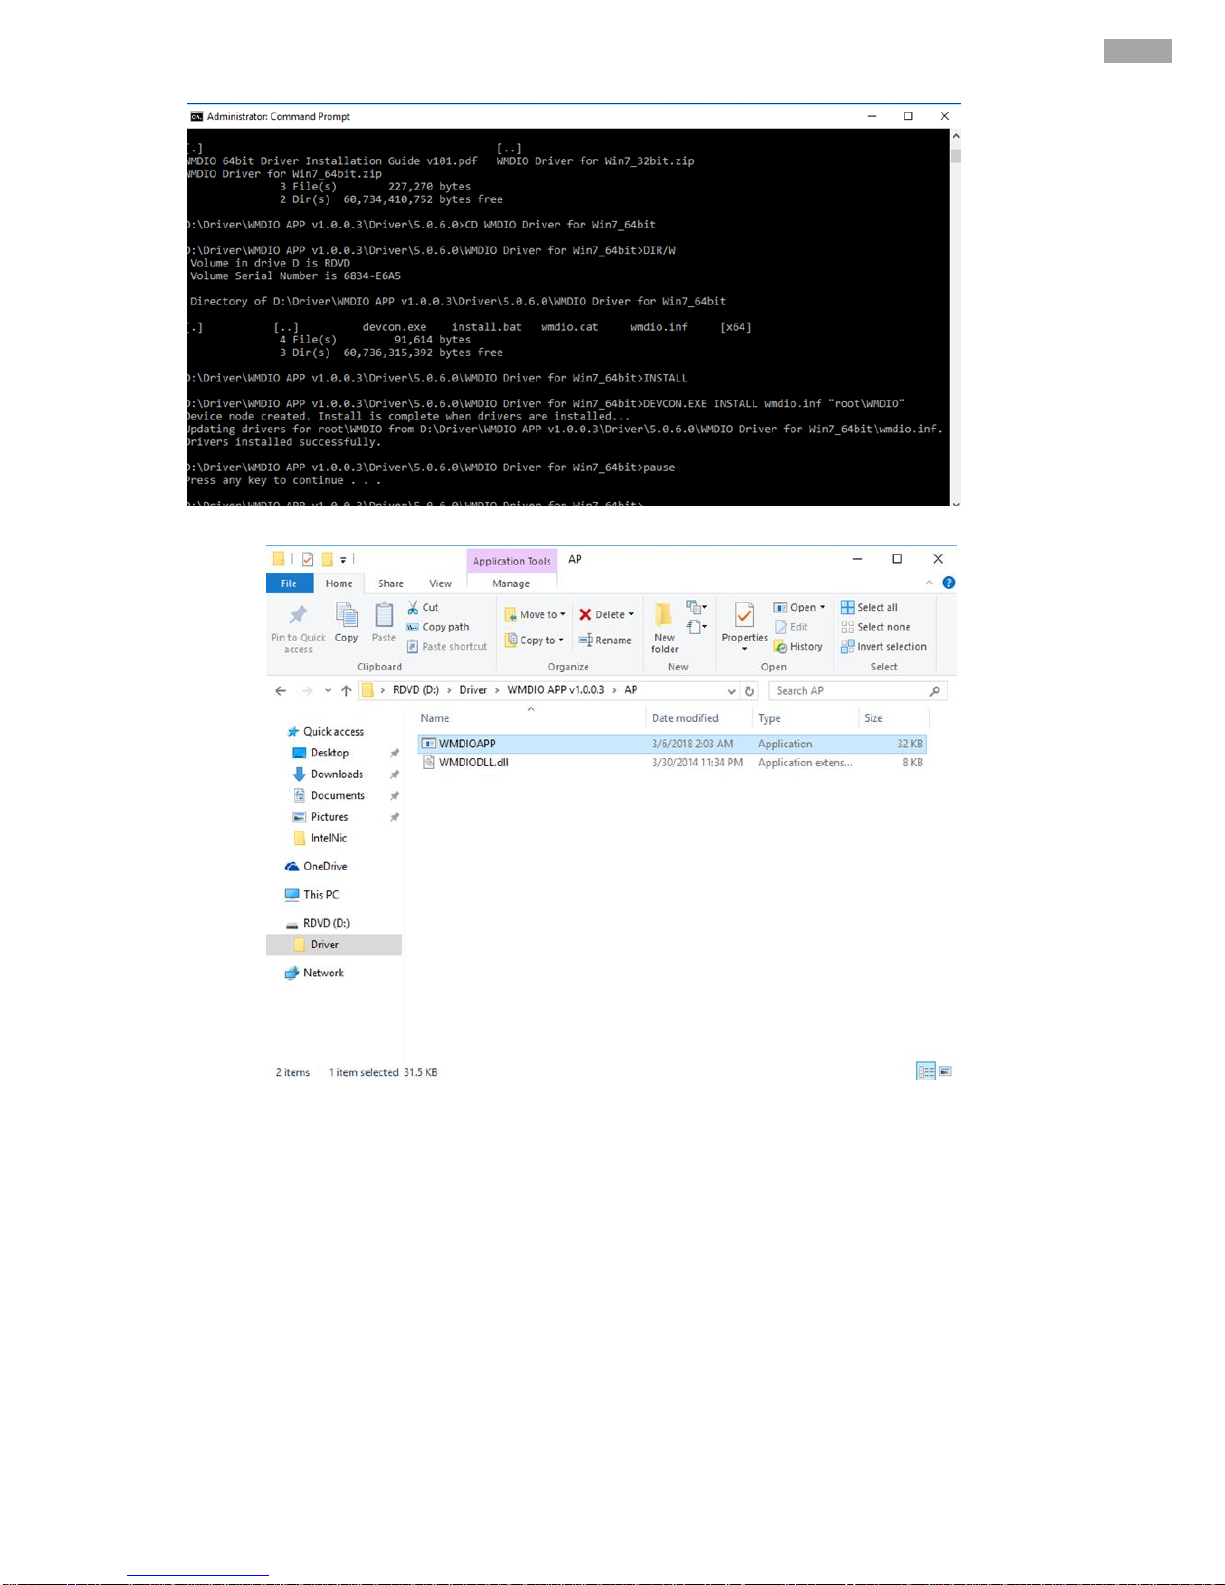
1. Type “cmd” in the run box then the cmd.exe will appear in programs.
2. Right click on the cmd.exe and click on “Run as administrator” to start
3. Open the Driver CD (included in the package) and select Digital IO driver.
4. When Windows Security dialog appear, select install to continue the
Installation.
5. Wait for installation to complete. When installation is complete, press any key to close.
Page 57
57
Chapter 3: Driver Installation
6. Open the Driver CD (included in the package) and select Digital IO AP.
Page 58
58
IK70 Motherboard User Manual
Page 59

59
Chapter 4: Insyde H20 BIOS Setup
Chapter 4: Insyde H20 BIOS Setup
This chapter describes the different settings available in the INSYDE BIOS that
comes with the board. This chapter offers information on the Award BIOS installation
utility.
4.1 How and When to Use BIOS Setup
4.2 BIOS Functions
4.3 Using Recovery Wizard to Restore Computer
4.4 How to Enable Watchdog
Page 60

60
IK70 Motherboard User Manual
4.1 How and When to Use BIOS Setup
To enter the BIOS setup, you need to connect an external USB keyboard, external monitor and press Del
key when the prompt appears on the screen during start up. The prompt screen shows only few seconds so
need press Del key quickly.
Important:
Updated BIOS version may be published after the manual released.
Check the latest version of BIOS on the website.
You may need to run BIOS setup utility for reasons listed below:
1. Error message on screen indicates to check BIOS setup
2. Restoring the factory default settings.
3. Modifying the specific hardware specifications
4. Necessity to optimize specifications
BIOS Navigation Keys
The following keys are enabled during POST:
Key
Function
Del
Enters the BIOS setup menu.
F7
Display the boot menu. Lists all bootable devices that are connected to the system. With
cursor ↑and cursor ↓and by pressing <ENTER>, select the device used for the boot.
Pause
Pressing the [Pause] key stops the POST. Press any other key to resume the POST.
Page 61
61
Chapter 4: Insyde H20 BIOS Setup
The following Keys can be used after entering the BIOS Setup.
Key
Function
F1
Help
F5/ F6
Change Values
F9
Setup Defaults
F10
Save & Exit
Esc
Exit
Enter
Select SubMenu
↑/ ↓
Select Item
← / →
Select Item
For items marked ► press <Enter> for more options.
Note:
You can press the F1, F2, F3, F4, –/+, and Esc keys by connecting a USB keyboard to
your computer.
Page 62
62
IK70 Motherboard User Manual
4.2 BIOS Functions
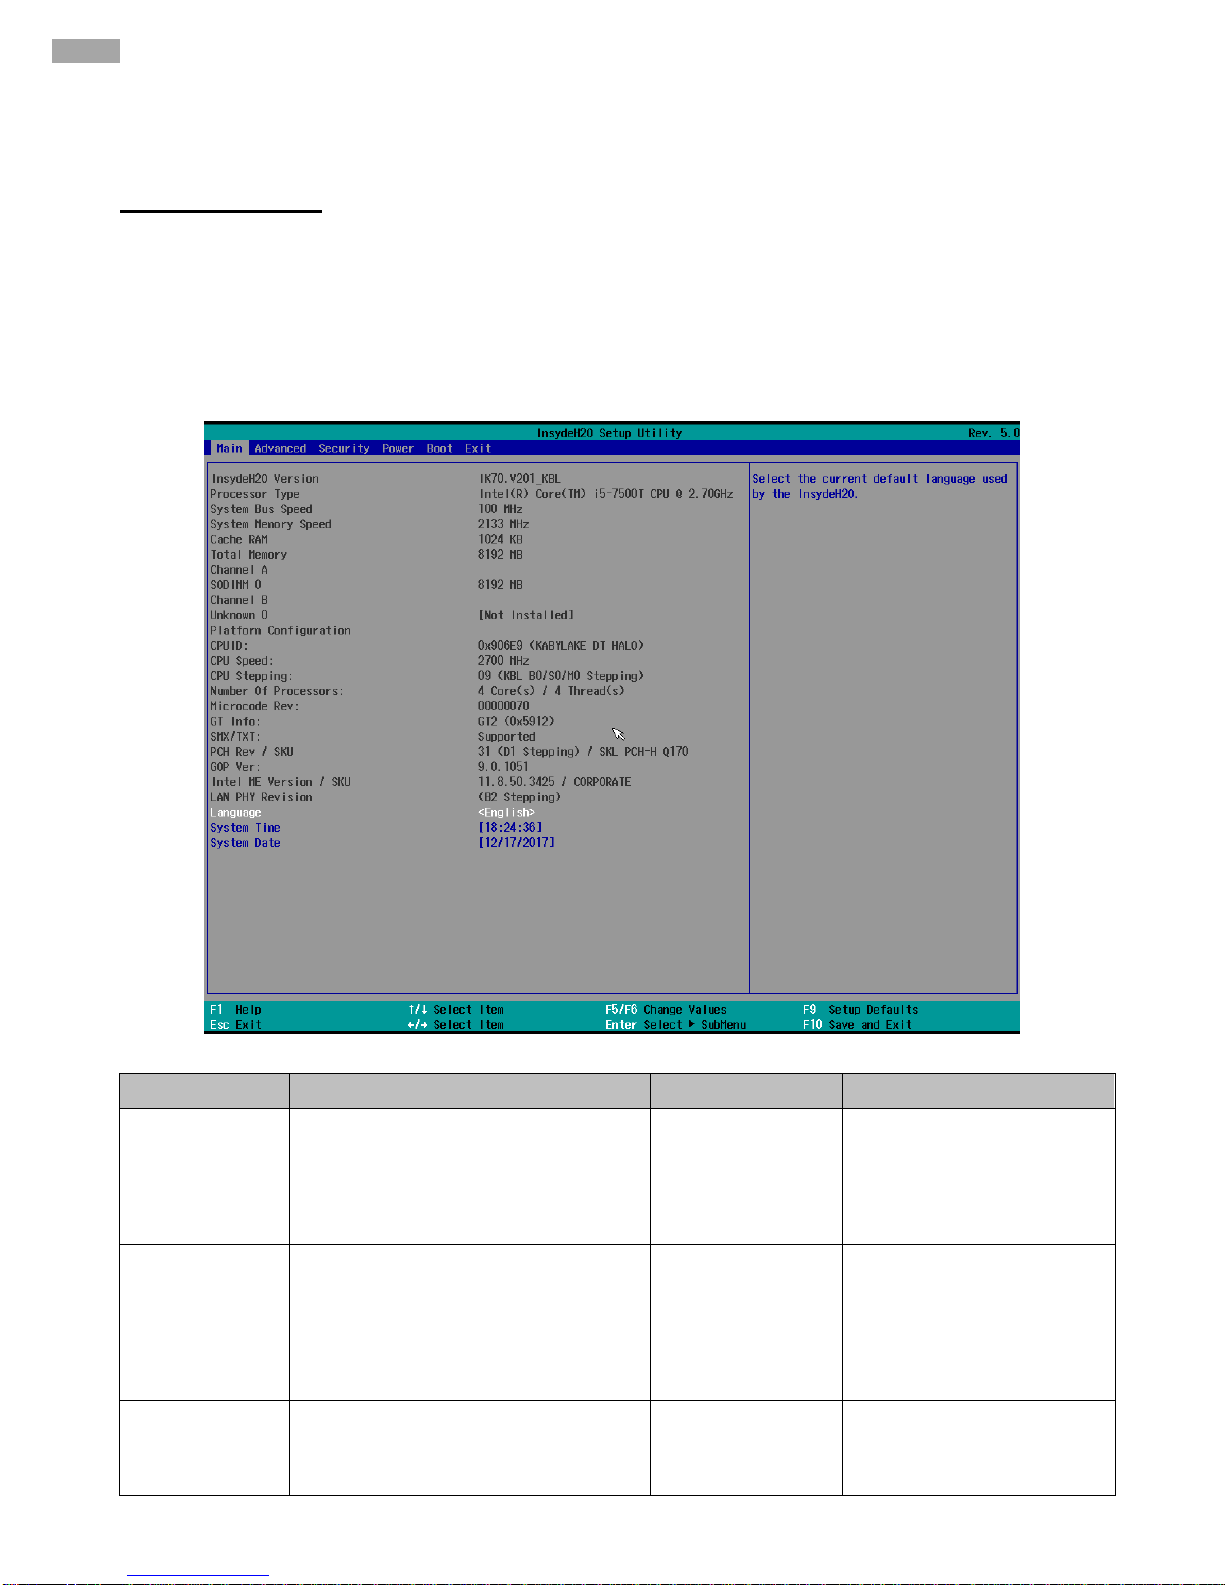
4.2.1 Main Menu
The Main menu displays the basic information about yoursystem including BIOS version, processor RC
version, system language, time, and date.
When you enter BIOS setup, the first menu that appears on the screen is the main menu.It contains the
system information including BIOS version, processor RC version, system language, time, and date.
BIOS Setting
Description
Setting Option
Effect
Language
Displays the system language.
[English] is set up by default.
Adjustment of the
language
Set the language in
other language. The
language in this
device is English.
System Time
This is current time setting. The time
is maintained by the battery when the
device is turned off.
Date and time
changes.
Set the time in the format:
[hh/mm/ss]
System Date
This is current date setting.
Date and time
changes.
Set the date in the format
[mm/dd/yyyy];
Page 63

63
Chapter 4: Insyde H20 BIOS Setup
4.2.2 Advanced
Select the Advanced Tab from the setup menu to enter the advanced BIOS setup screen. You can select any
of the items on the left frame of the screen to go to the sub menu for the item, such as CPU Configuration.
You can use the <Arrow> keys enter all advanced BIOS setup options. The advanced BIOS setup menu is
shown below. The submenus described on the following pages.
Caution
Handle advanced BIOS settings page with caution. Any changes can
affect the operation of your computer.
BIOS Setting
Description
Setting Option
Effect
CPU
Configuration
Configures Trusted Computing
parameters
Enter
Opens submenu
Power &
Performance
Configures Power & Performance
parameters
Enter
Opens submenu
System Agent
Configuration
Configures System Agent
Configuration parameters
Enter
Opens submenu
PCH-OI
Configuration
Configures PCH-OI parameters
Enter
Opens submenu
PCH-FM
Configuration
Configures PCH-FM parameters
Enter
Opens submenu
SIO F81866A
Configures SIO F81866A
parameters
Enter
Opens submenu
Console
Redirection
Configures Console Redirection
parameters
Enter
Opens submenu
Page 64

64
IK70 Motherboard User Manual
4.2.2.1 CPU Configuration
BIOS Setting
Description
Setting Option
Effect
Intel (VMM) Virtualization
Technology
Enable or disable Intel
Virtualization
Technology.
Enable/Disable
When enabled, a VMM
can utilized the
additional hardware
capabilities provided by
Vanderpool
Technology.
Active Processor Cores
Number of core to enable
in each processor
package
AII / 1 / 2/ 3
Select number of core
to enable in each
processor package
AES
Enable or disable AES
(Advanced Encyption
Standard)
Enable/Disable
Enable or disable AES
Page 65
65
Chapter 4: Insyde H20 BIOS Setup
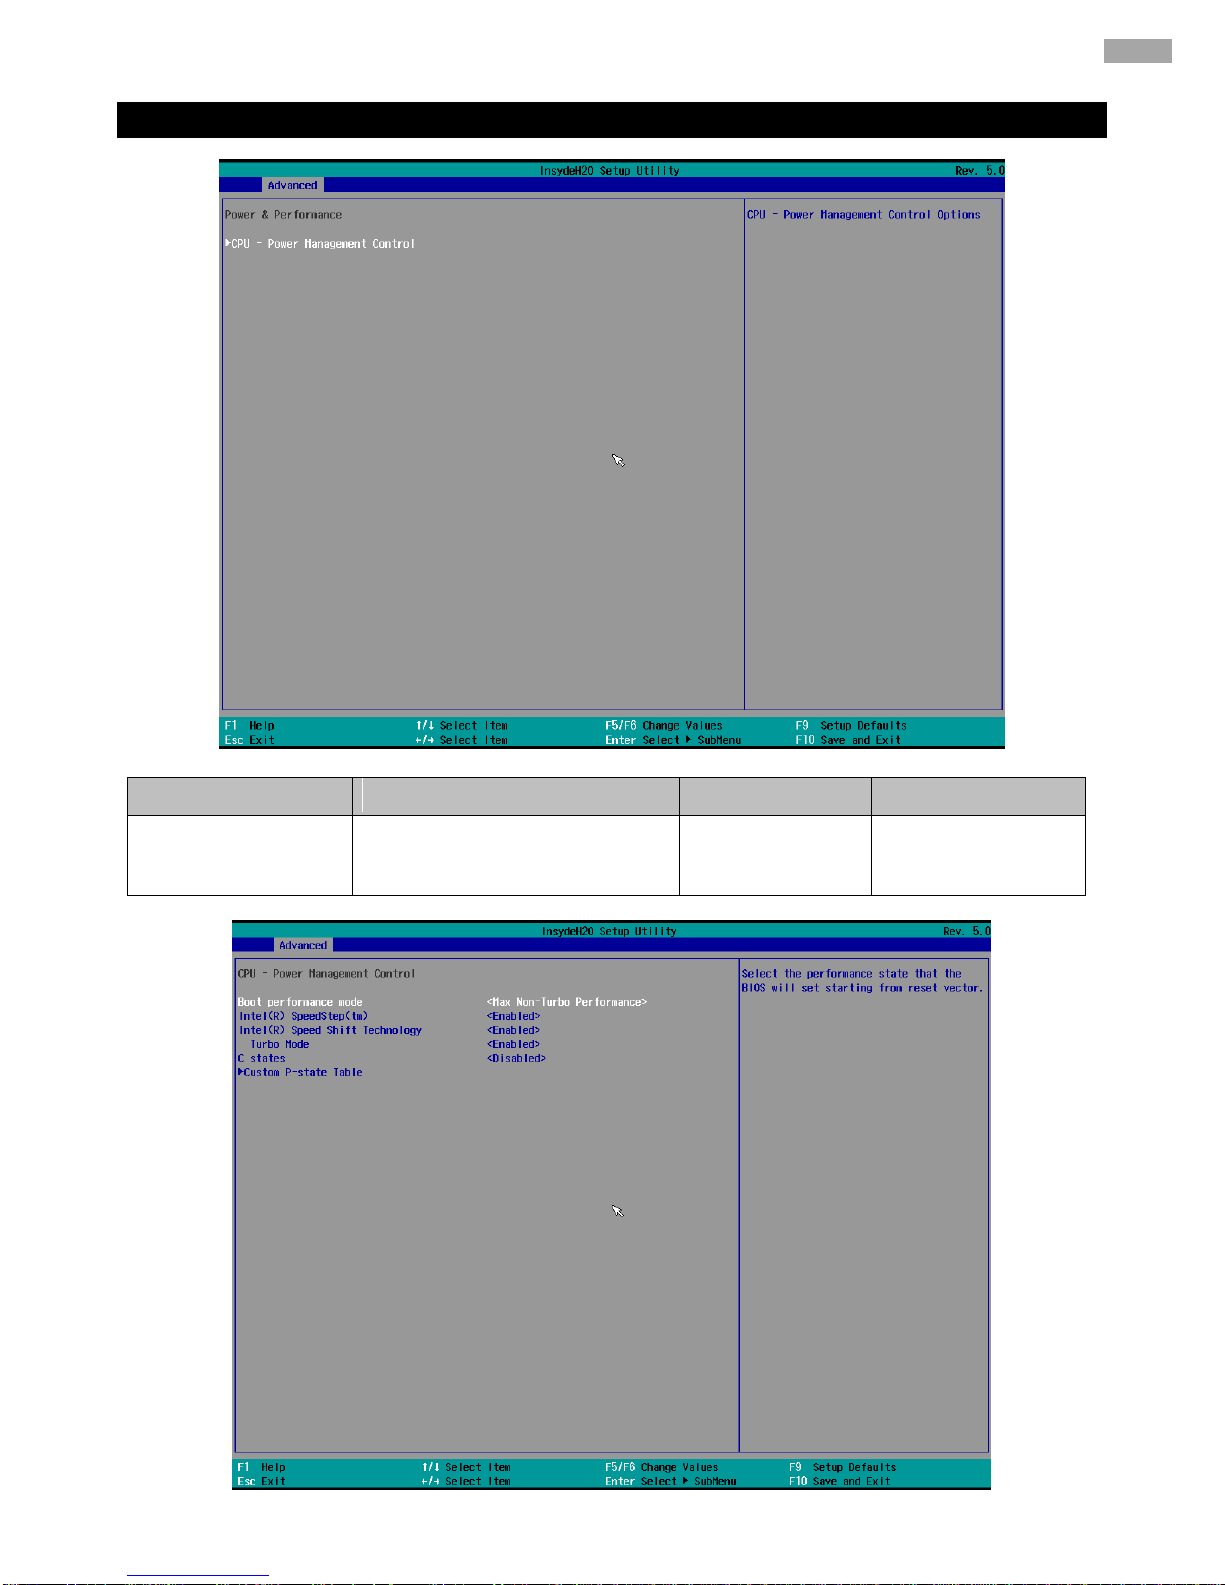
4.2.2.2 Power & Performance
BIOS Setting
Description
Setting Option
Effect
CPU – Power
Management Control
Configure CPU – Power
Management Control parameters
Enter
Enters sub-menu
Page 66

66
IK70 Motherboard User Manual
BIOS Setting
Description
Setting Option
Effect
Boot
Performance
Mode
Configure Boot
Performance
Mode
parameters
-Max non-turbo
performance
-Max battery
-Turbo
Performance
Select the performance state that the
BIOS will set starting from reset vector
Intel SpeedStep
(ta)
Configure Intel
SpeedStep (ta)
parameters
Enabled/ Disabled
Allows more than two frequency ranges
to be supported
Intel Speed Shift
Technology
Configure Intel
Speed Shift
Technology
parameters
Enabled/ Disabled
Enable/ Disable Intel Speed Shift
Technology support. Enabling will
expose the CPP v2 interface to allow for
hardware controlled P-states
-Turbo Mode
Enable or disable
Turbo Mode
Enabled/ Disabled
Enable/ Disable processor Turbo Mode
(requires EMTTM enabled too). Auto
means enabled, unless max turbo ratio is
bigger than 16 – SKL AO W/A
C states
Enable or disable
C states
Enabled/ Disabled
Enable/ Disable CPU Power
Management. Allows COU to go to C
states when it is not 100% utilized
Custom P-state
Table
Configure
Custom P-state
Table parameters
Enter
Enters sub-menu
-Number of
P-states
Select the
number of
custom P-states.
[Number]
Set the number of custom P-states. At
least 2 states must be present
Page 67

67
Chapter 4: Insyde H20 BIOS Setup
4.2.2.3 System Agent (SA) Configuration
BIOS Setting
Description
Setting Option
Effect
Graphics Configuration
Configure Graphics
Configuration
parameters
Enter
Opens sub-menu
PEG Port
Configuration
Configure PEG Port
Configuration
parameters
Enter
Opens sub-menu
Vt-d
Intel® Virtualization
Technology for
Directed I/O
Enabled
Disabled
Vt-d capability
Page 68
68
IK70 Motherboard User Manual
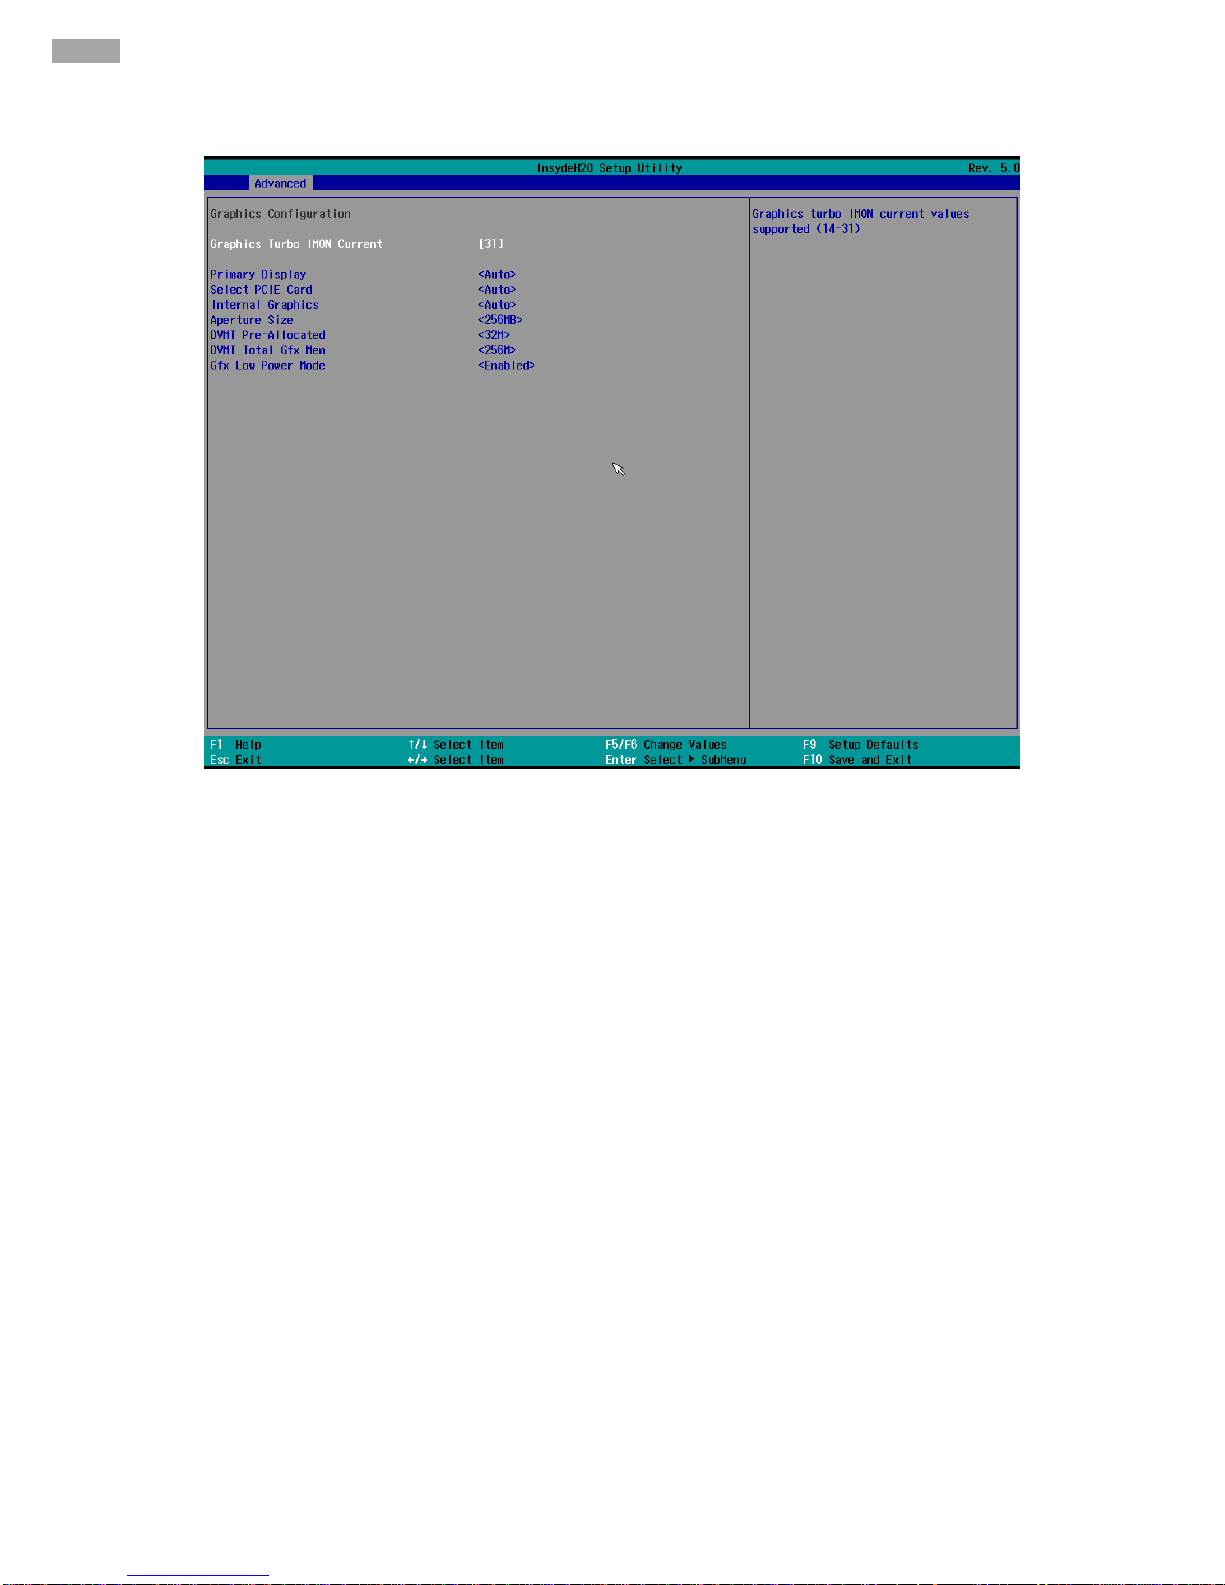
4.2.2.3.1 Graphics Configuration
Page 69

69
Chapter 4: Insyde H20 BIOS Setup
BIOS Setting
Description
Setting Option
Effect
Graphics Turbo
IMON Current
Graphics Turbo
IMON Current
values supported
14-31
Select Graphics Turbo IMON Current
values supported
Primary Display
Select Primary
Display
Auto
IGFX
PEG
PCI
Select which of IGFX/PEG/ PCI
Graphics device should be primary
display or select SG for Switchable Gfx
Select PCIE Card
Select the card
used on a platform
Auto
Skip GPIO based Power Enable to
dGPU
Elk Greek 4
DGPU Power Enable=ActiveLow
PEG Eval
DGPU Power Enable=ActiveHigh
Internal Graphics
Internal Graphics
settings
Auto
Enabled
Disabled
Keep IGFX enabled based on the setup
options
Aperture Size
Select the aperture
size
128MB
256MB
512MB
1024MB
2048 MB
Select the aperture size
Note: Above 4MB MMIO BIOS
assignment is automatically enabled
when selecting 2048MB aperture. To
use this feature please disable CSM
port
DVMT
Pre-Allocated
Select DVMT
Pre-Allocated
0M~60M
Select DVMT 5.0 Pre-Allocated (Fixed)
Graphic Memory size used by Internal
Graphic Device
DVMT Total Gfx
Mem
Select DVMT Total
Gfx Mem
256M
128M
MAX
Select DVMT 5.0 Total Graphic Memory
size used by the Internal Graphic
Device
Gfx Low Power
Mode
Select Gfx Low
Power Mode
Enabled/
Disabled
This option is applicable for SFF only
Page 70
70
IK70 Motherboard User Manual
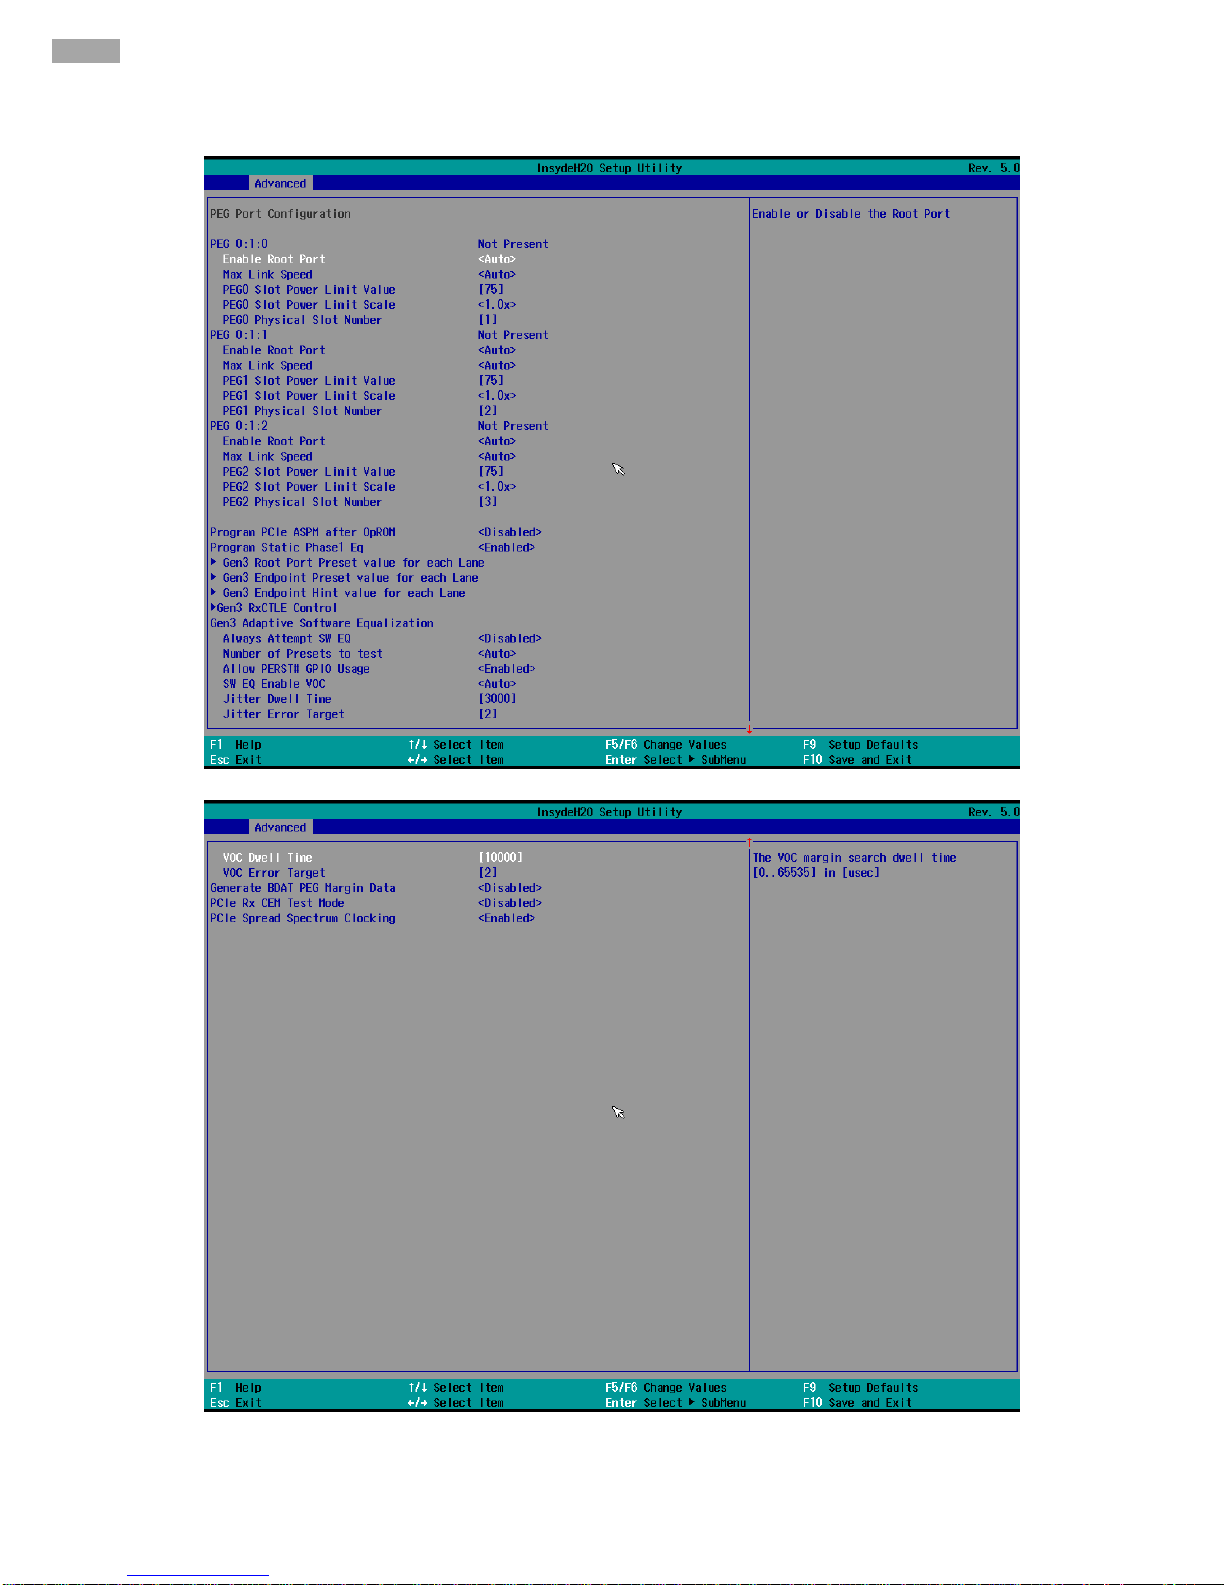
4.2.2.3.2 PEG Port Configuration
Page 71

71
Chapter 4: Insyde H20 BIOS Setup
BIOS Setting
Description
Setting Option
Effect
Enable Root Port
Configure Root
Port
parameters
Enabled
Disabled Auto
Enable or disable Root Port
Max Link Speed
Select Max Link
Speed
Auto
Gen1
Gen2
Gen3
Configure PEG 0:1:0 Max Speed
PEG0 Slot Power
Limit Value
PEG0 Slot
Power Limit
Value
75
PEG0 Slot Power Limit Value
PEG0 Slot Power
Limit Scale
Select PEG0
Slot Power
Limit Scale
1.0x
0.1x
0.01x
0.001x
Select the scale used for Slot Power
Limit Value
Program PCIe
ASPM after
OpROM
Program PCIe
ASPM after
OpROM
Disabled
PCIe ASPM will be programmed before
OpROM
Enabled
PCIe ASPM will be programmed after
OpROM
Program Static
Phase1 Eq
Program Static
Phase1 Eq
Disabled
Enabled
Program Phase1 Presents/ CTLEp
Always Attemp
SW EQ
Always Attemp
SW EQ
Disabled
Enabled
Always Attemp SW EQ, even it has
been done once
Number of
Presents to test
Select number
of Presents to
test
7,3,5,8
0-9
Auto
Choose between 7,3,5,8 and 0-9. Auto
= current default (7,3,5,8 for SKL). Do
not change the default unless
debugging.
Allow PERST #
GPIO Usage
Allow PERST #
GPIO Usage
Disabled
Enabled
Enable/ Disable GPIO-based resets to
PEG endpoint(s) during margin search,
if needed
SW EQ Enable
VOC
Select Jitter,
VOC test mode
-Jitter Only Test
Mode
-Jitter & VOC Test
Mode
-Auto
Select Jitter & VOC test mode (default)
or Jitter only test mode. Auto will current
default (Enabled)
Generate BDAT
PEG Margin Data
Generate BDAT
PEG Margin
Data
-Disabled
-Generate Port Gitter
Data
Enable to generate BDAT PCIe margin
tables
PCIe Rx CEM
PCIe Rx CEM
Disabled
Enable/ Disable PEG Rx CEM
Page 72

72
IK70 Motherboard User Manual
Test Mode
Test Mode
settings
Enabled
Loopback Mode
PCIe Spread
Spectrum
Clocking
PCIe Spread
Spectrum
Clocking
Enabled Disabled
Allow disabling Spread Spectrum
Clocking for compliance testing
Gen3 Root Port
Present value for
each Lane
Gen3 Root Port
Present value
for each Lane
Lane 0-Lane 15
Value for Lane 0- Lane 15
Gen3 Root Port
Endpoint value for
each Lane
Gen3 Root Port
Endpoint value
for each Lane
Lane 0-Lane 15
Value for Lane 0- Lane 15
Gen3 Endpoint
Hint value for
each Lane
Gen3 Endpoint
Hint value for
each Lane
Lane 0-Lane 15
Value for Lane 0- Lane 15
Gen3 RxCTLE
Control
Gen3 RxCTLE
Control
Bundle0-Bundle7
Gen3 RxCTLE settings for Bundle0
(Lane0, Lane1)
RxCTLE Overrride
When enabled, it overrides PEG’s
RxCTLE adaptive behavior
Page 73

73
Chapter 4: Insyde H20 BIOS Setup
4.2.2.3.3 VT-d
BIOS Setting
Description
Setting Option
Effect
Vt-d
Intel® Virtualization
Technology for
Directed I/O
Enabled
Disabled
Vt-d capability
Page 74
74
IK70 Motherboard User Manual
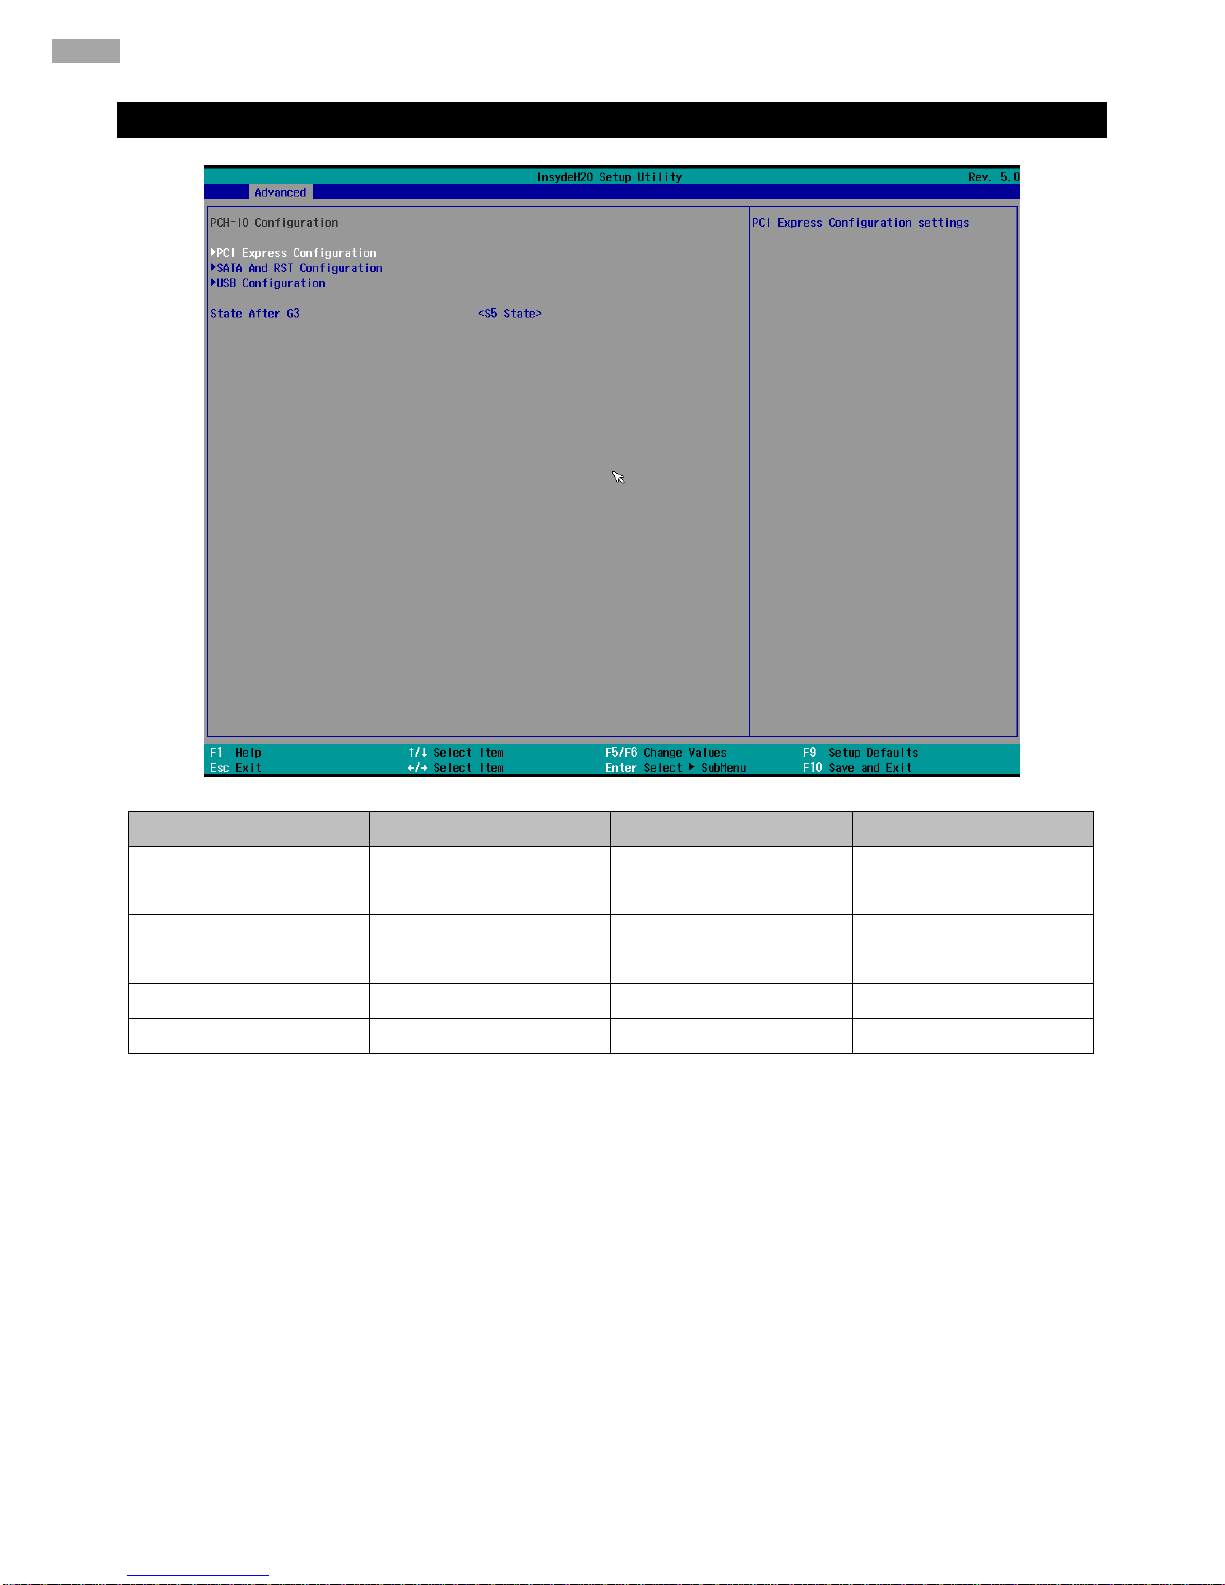
4.2.2.4 PCH-IO Configuration
BIOS Setting
Description
Setting Option
Effect
PCI Express
Configuration
Configure PCI Express
settings
Enter
Opens sub-menu
SATA And RST
Configuratuion
Configure SATA And
RST settings
Enter
Opens sub-menu
USB Configuration
Configure USB settings
Enter
Opens sub-menu
State After G3
Page 75
75
Chapter 4: Insyde H20 BIOS Setup
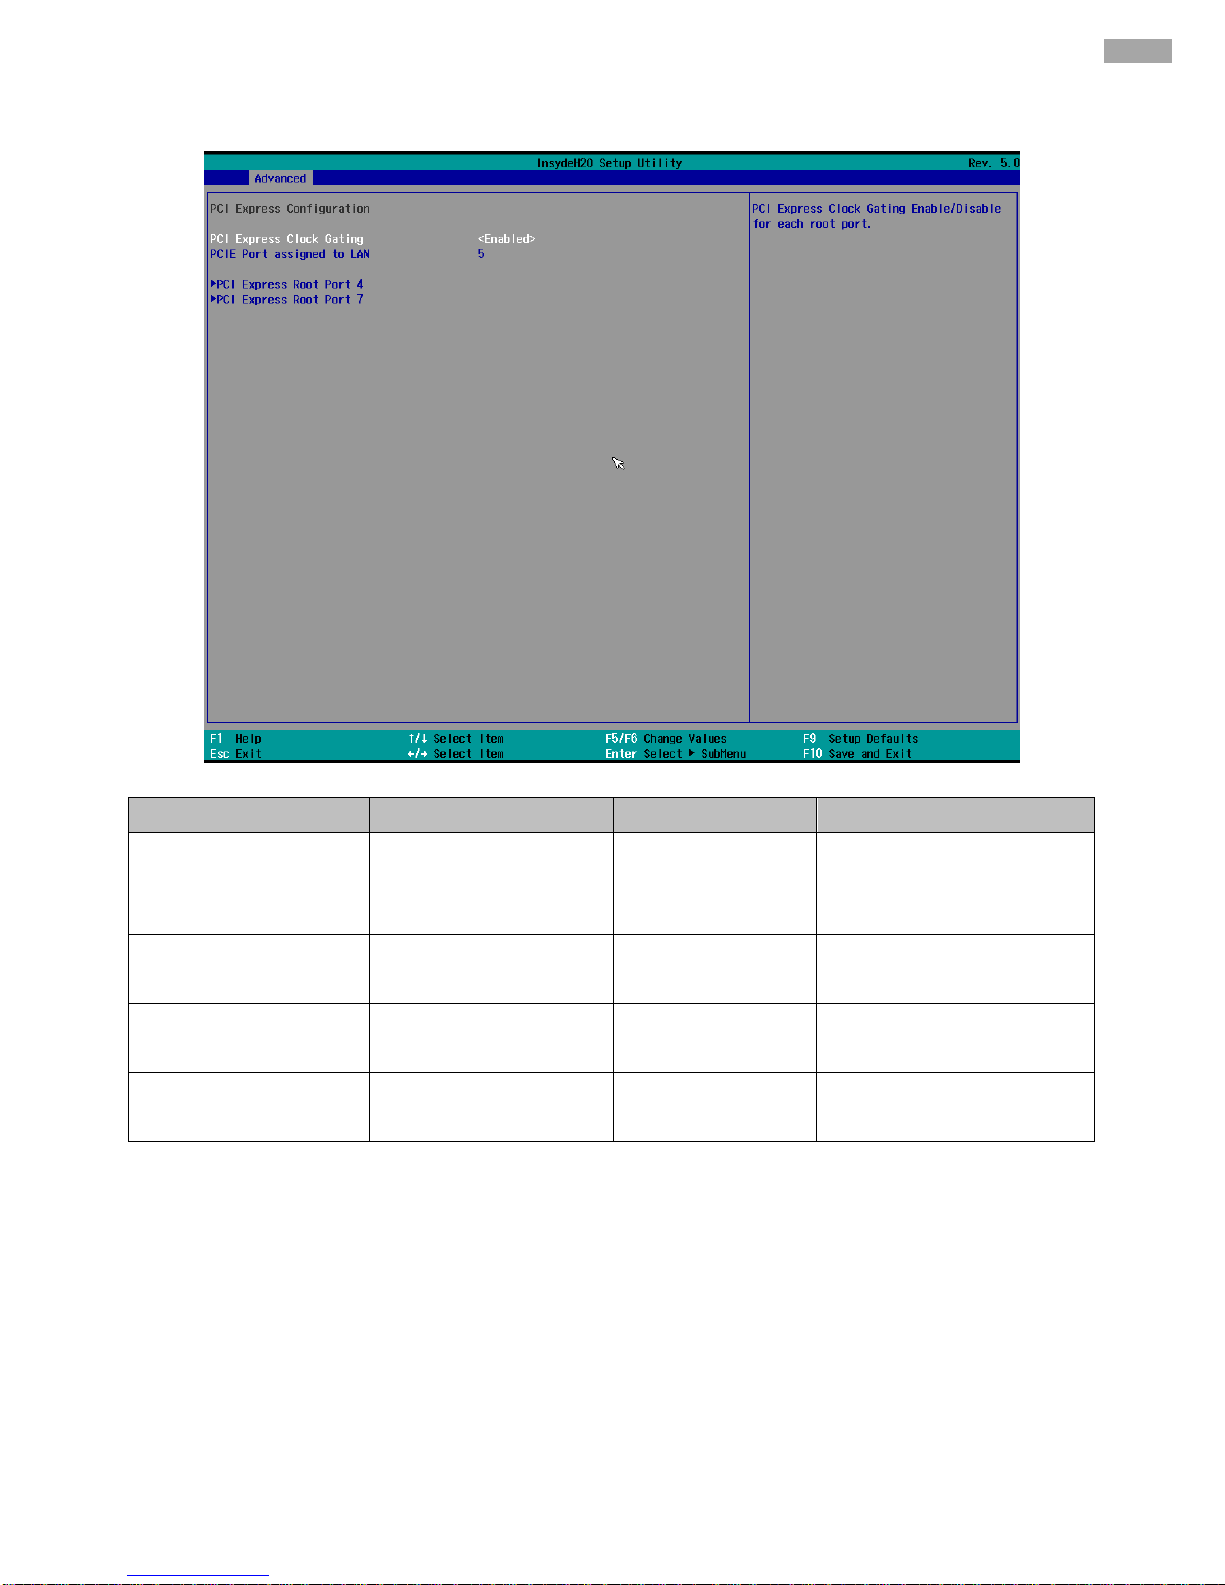
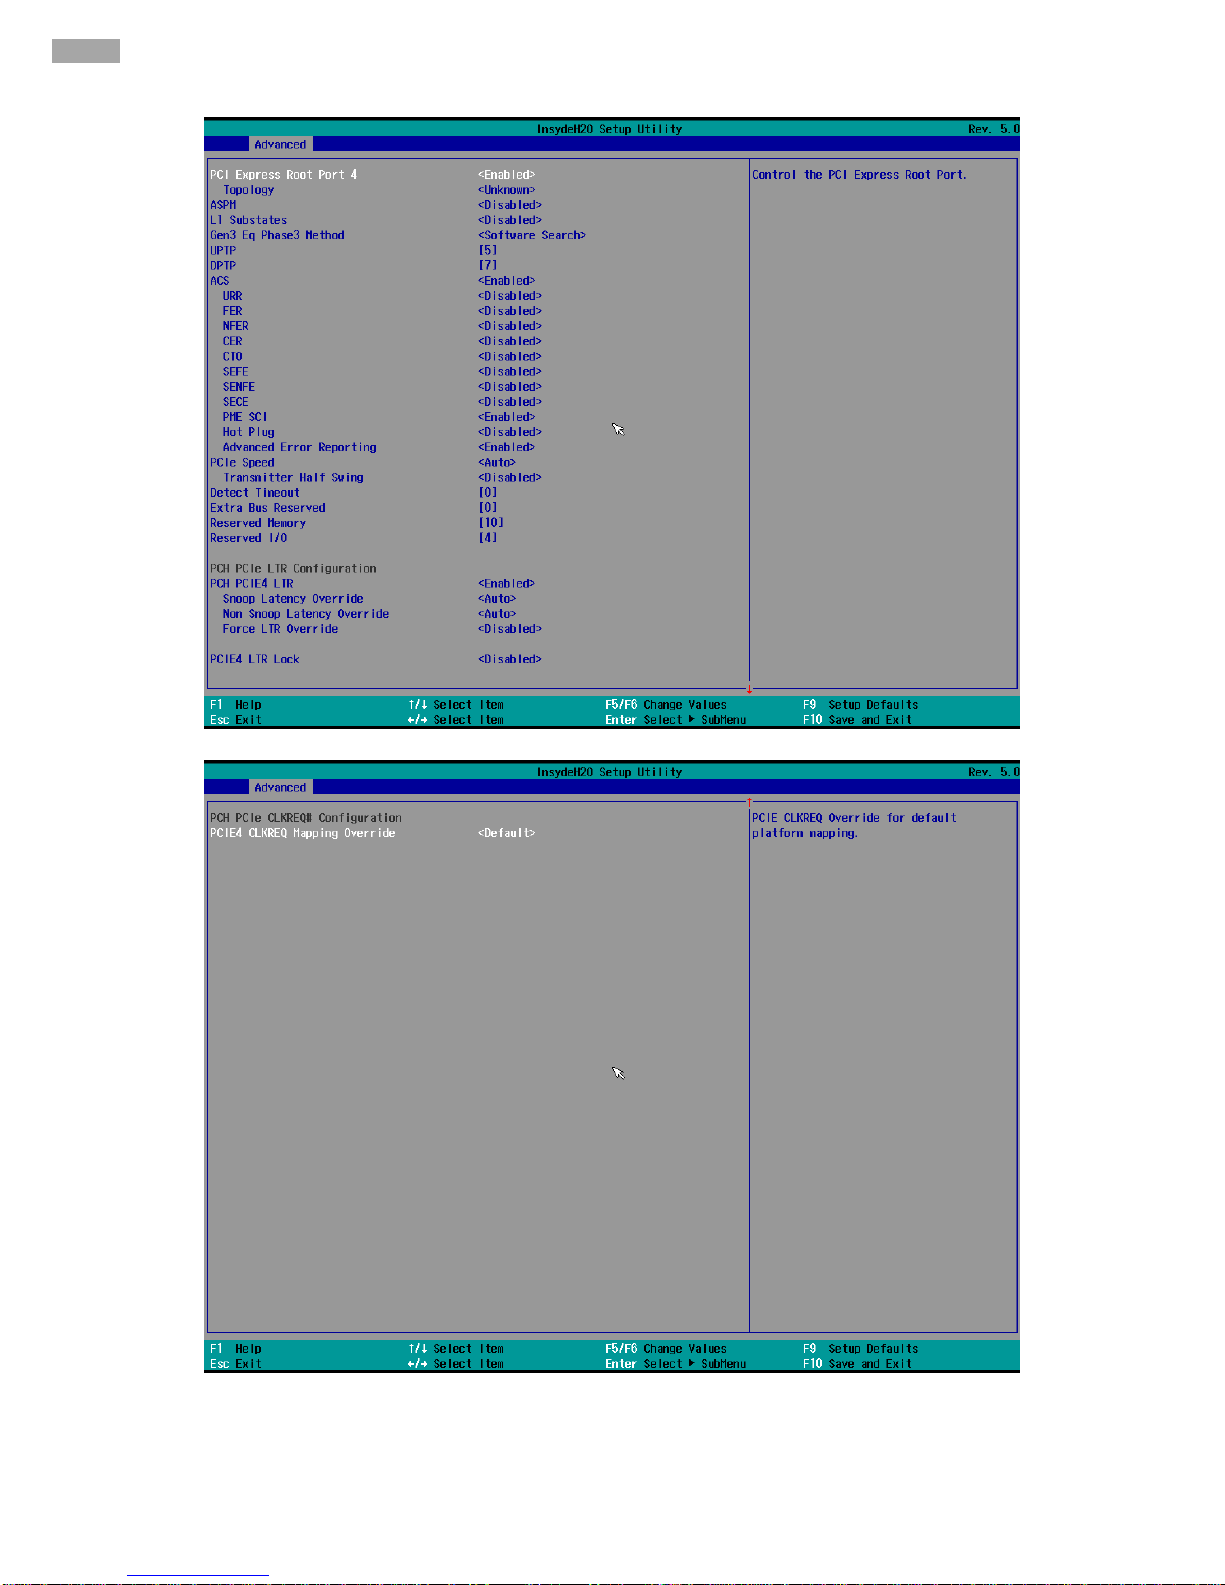
4.2.2.4.1 PCI Express Configuration
BIOS Setting
Description
Setting Option
Effect
PCI Express Clock
Gating
PCI Express Clock
Gating settings
Enabled
Disabled
PCI Express Clock Gating
Enable/ Disable for each
root port
PCI Port assigned to
LAN
PCI Port assigned to
LAN settings
Value
Choose value
PCI Express Root Port
4
Control the PCI Express
Root Port 4
Enter
Opens sub-menu
PCI Express Root Port
7
Control the PCI Express
Root Port 7
Enter
Opens sub-menu
Page 76
76
IK70 Motherboard User Manual
Page 77

77
Chapter 4: Insyde H20 BIOS Setup
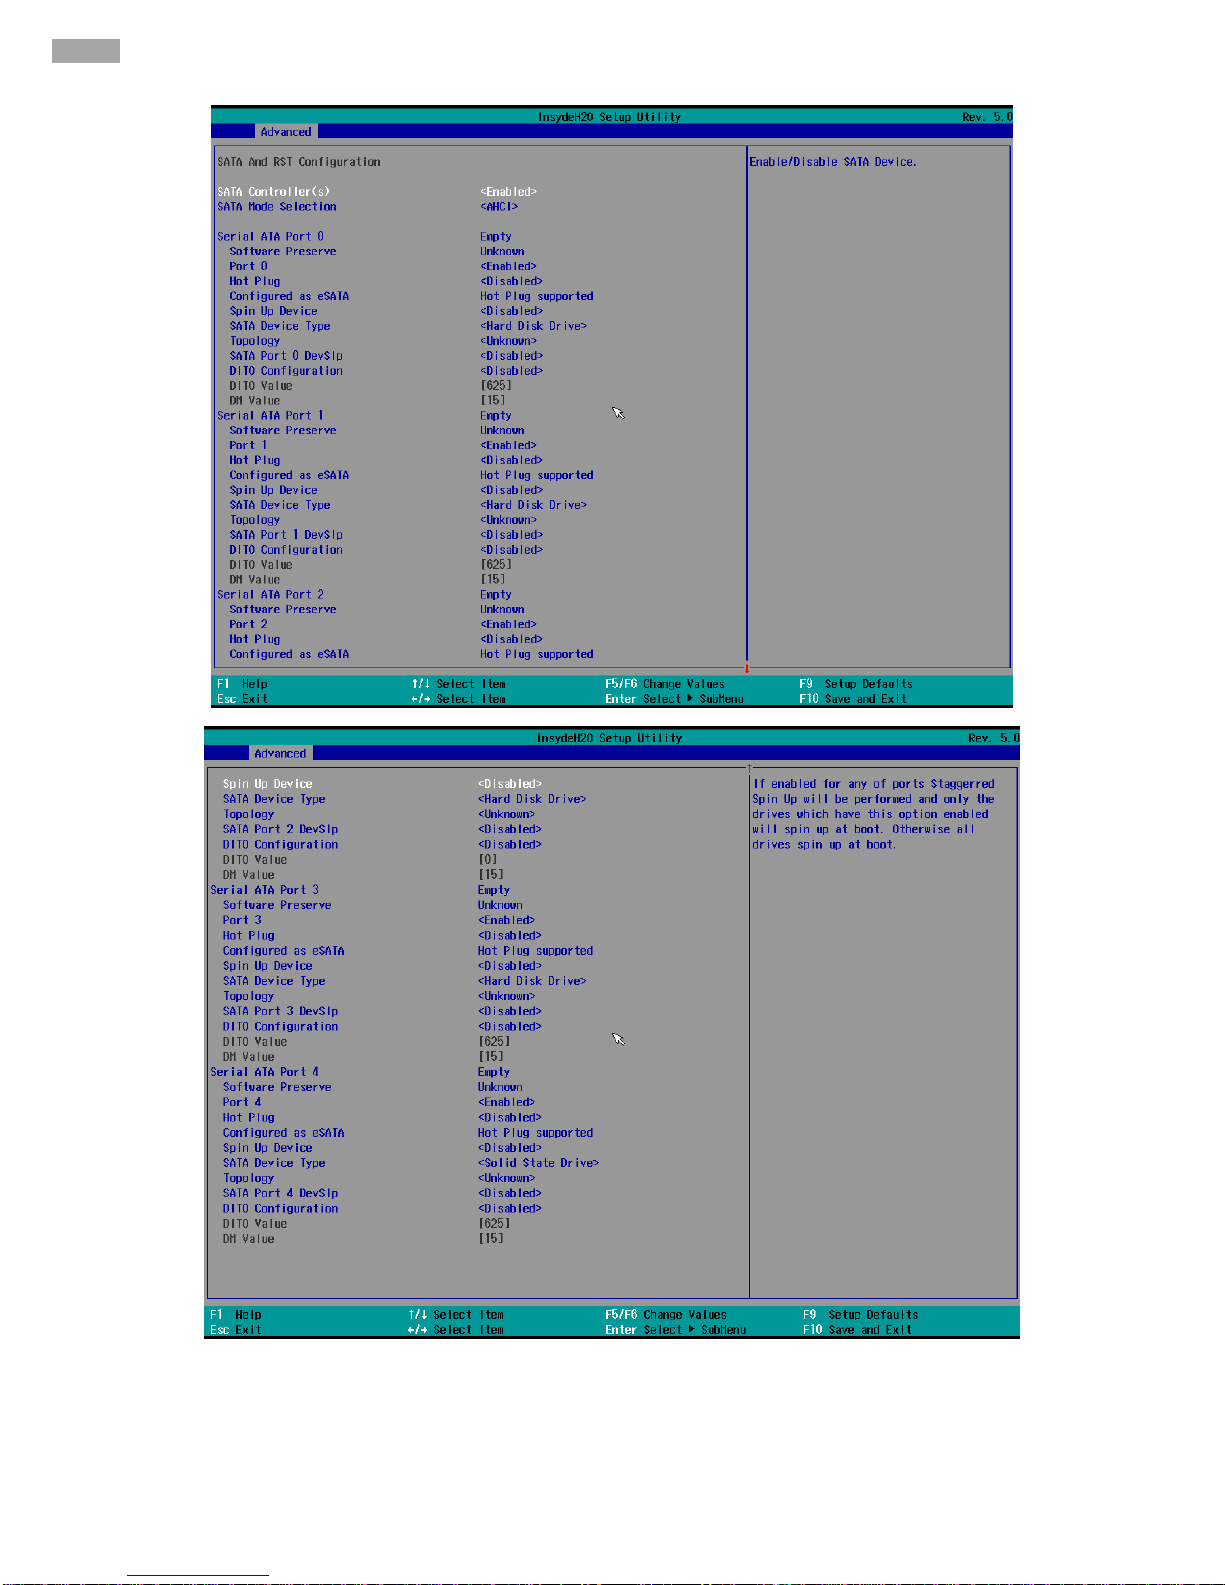
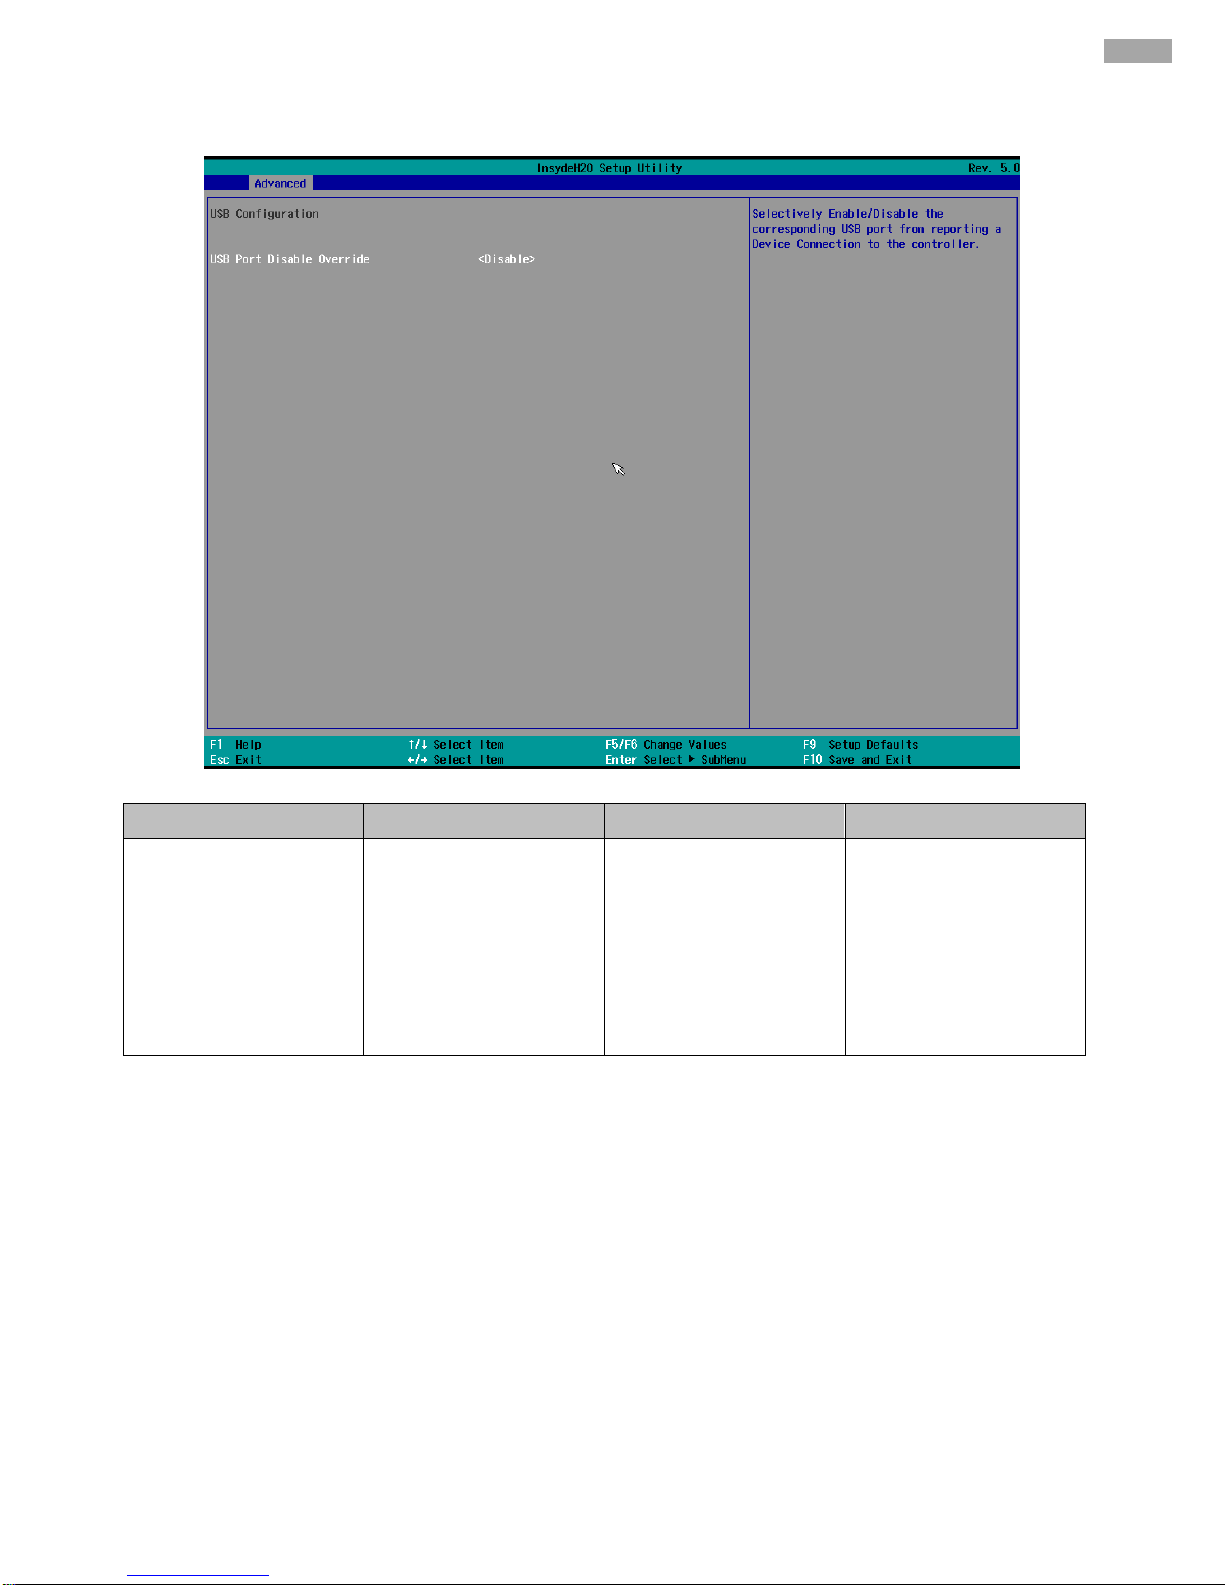
4.2.2.4.1 SATA and RST Configuration
BIOS Setting
Description
Setting Option
Effect
PCI Express Root
Port 4
Control the PCI Express Root
Port 4
Enter
Opens sub-menu
Topology
Topology settings
Unknown
x1
x4
SATA Express
M2
Identify the SATA Topology if it
is Default or ISATA or Flex or
DirectConnect or M2
ASPM
ASPM settings
Auto
L0sL1
L1
L0s
Disabled
Automatically enable ASPM
based on reported capabilities
and known issues
L1 Substates
PCIE Expresas L1 Substates
settings
Disabled
L1.1
L1.2
L1.1 & L1.2
PCIE Expresas L1 Substates
settings
Gen3 Eq Phase3
Method
Gen3 Eq Phase3 Method
settings
Hardware
Static Coefic
Software Search
PCIe Gen3 Equalization
Phase 3 Method
ACS
Access Control Services
Extended Capability settings
Disabled
Enabled
Enable/ Disable Access
Control Services Extended
Capability
PCIe Speed
Configure PCIe Speed
Auto
Gen1
Gen2
Gen3
Configure PCIe Speed
PCH PCIE4 LTR
PCH PCI Latency Reporting
Enable/ Disable
Disabled
Enabled
PCH PCI Latency Reporting
Enable/ Disable
PCIE4 LTR Lock
PCIE4 LTR Lock settings
Disabled
Enabled
PCIE4 LTR Configuration Lock
PCIE4 CLKREQ
Mapping Override
PCIE4 CLKREQ Mapping
Override
Default
No CLKREQ
Custom Number
PCIE4 CLKREQ Mapping
Override for default platforma
mapping
Page 78
78
IK70 Motherboard User Manual
Page 79
79
Chapter 4: Insyde H20 BIOS Setup
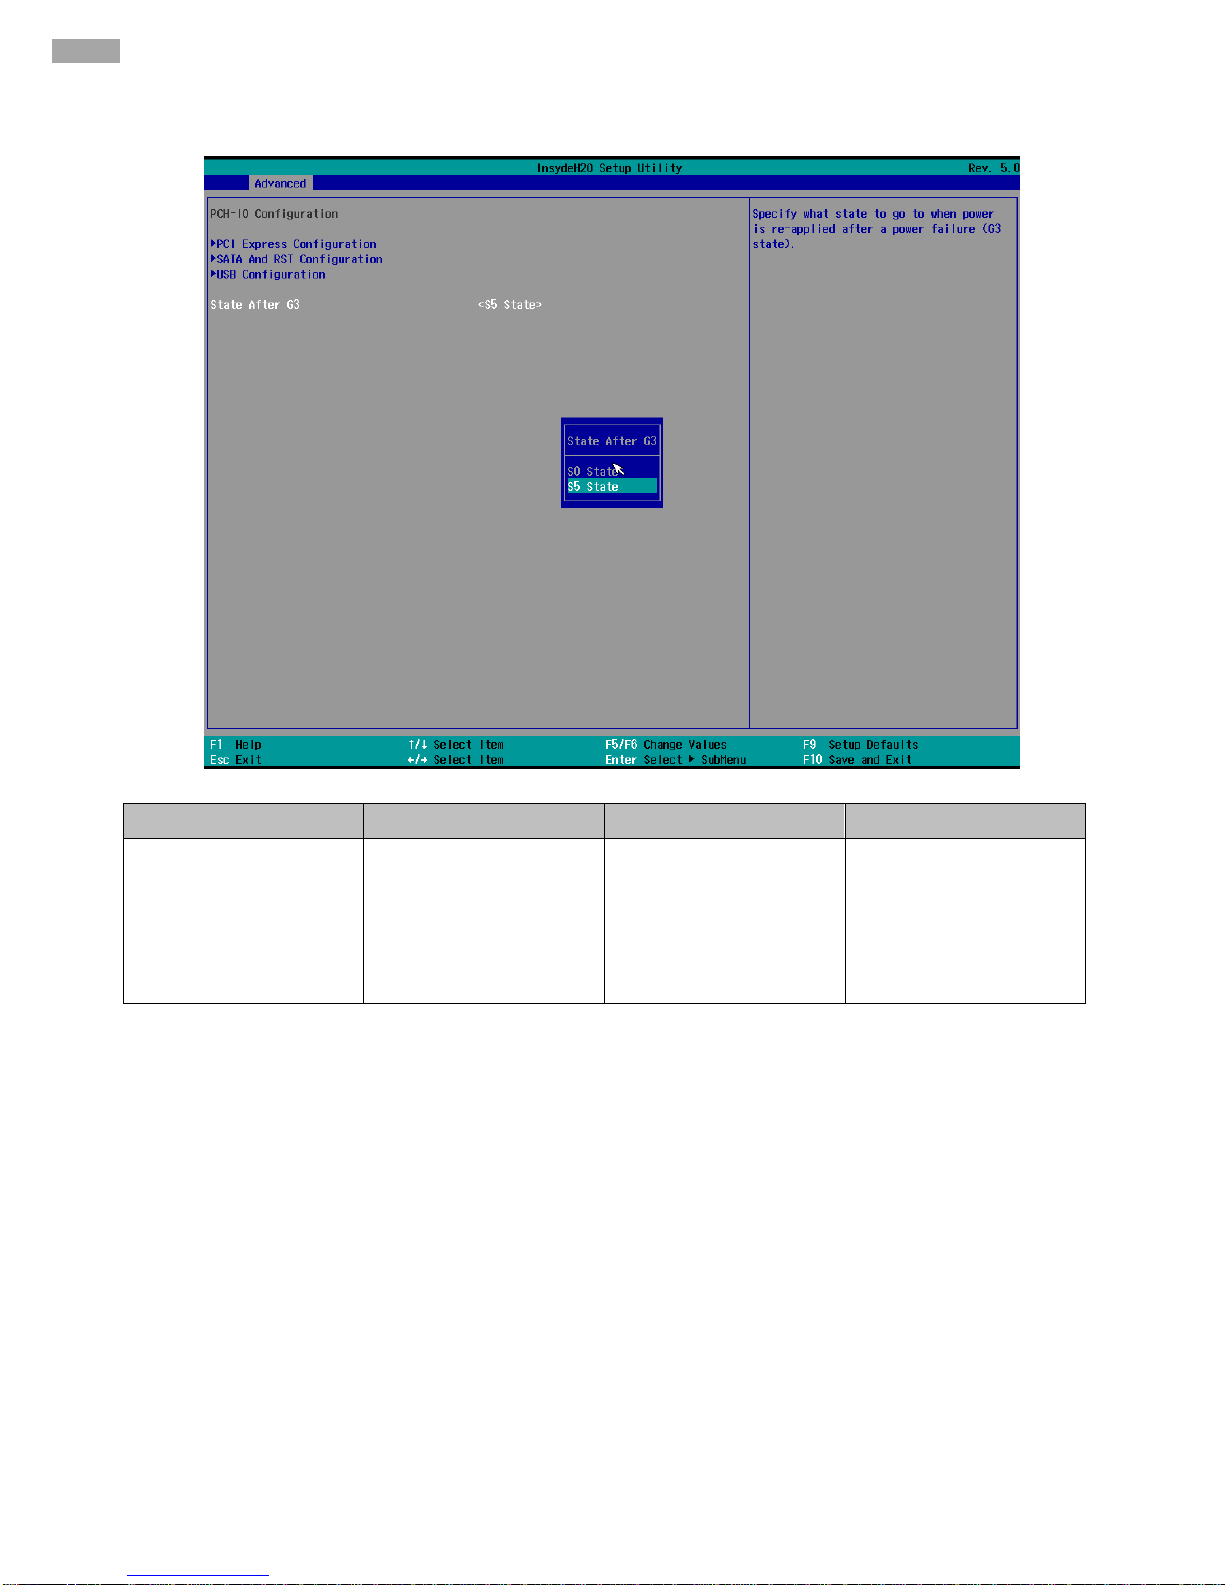
4.2.2.4.2 USB Configuration
BIOS Setting
Description
Setting Option
Effect
USB Port Disable
Override
USB Port Disable
Override configuration
Disable
Select Per-Pin
Selectively Enable/
Disable the
corresponding USB port
from reporting a Device
Connection to the
controller
Page 80
80
IK70 Motherboard User Manual
4.2.2.4.3 State After G3
BIOS Setting
Description
Setting Option
Effect
State After G3
State After G3
configuration
S0 State
S5 State
Specify what state to go
to when power is
re-applied after a power
failure (G3 state)
Page 81
81
Chapter 4: Insyde H20 BIOS Setup
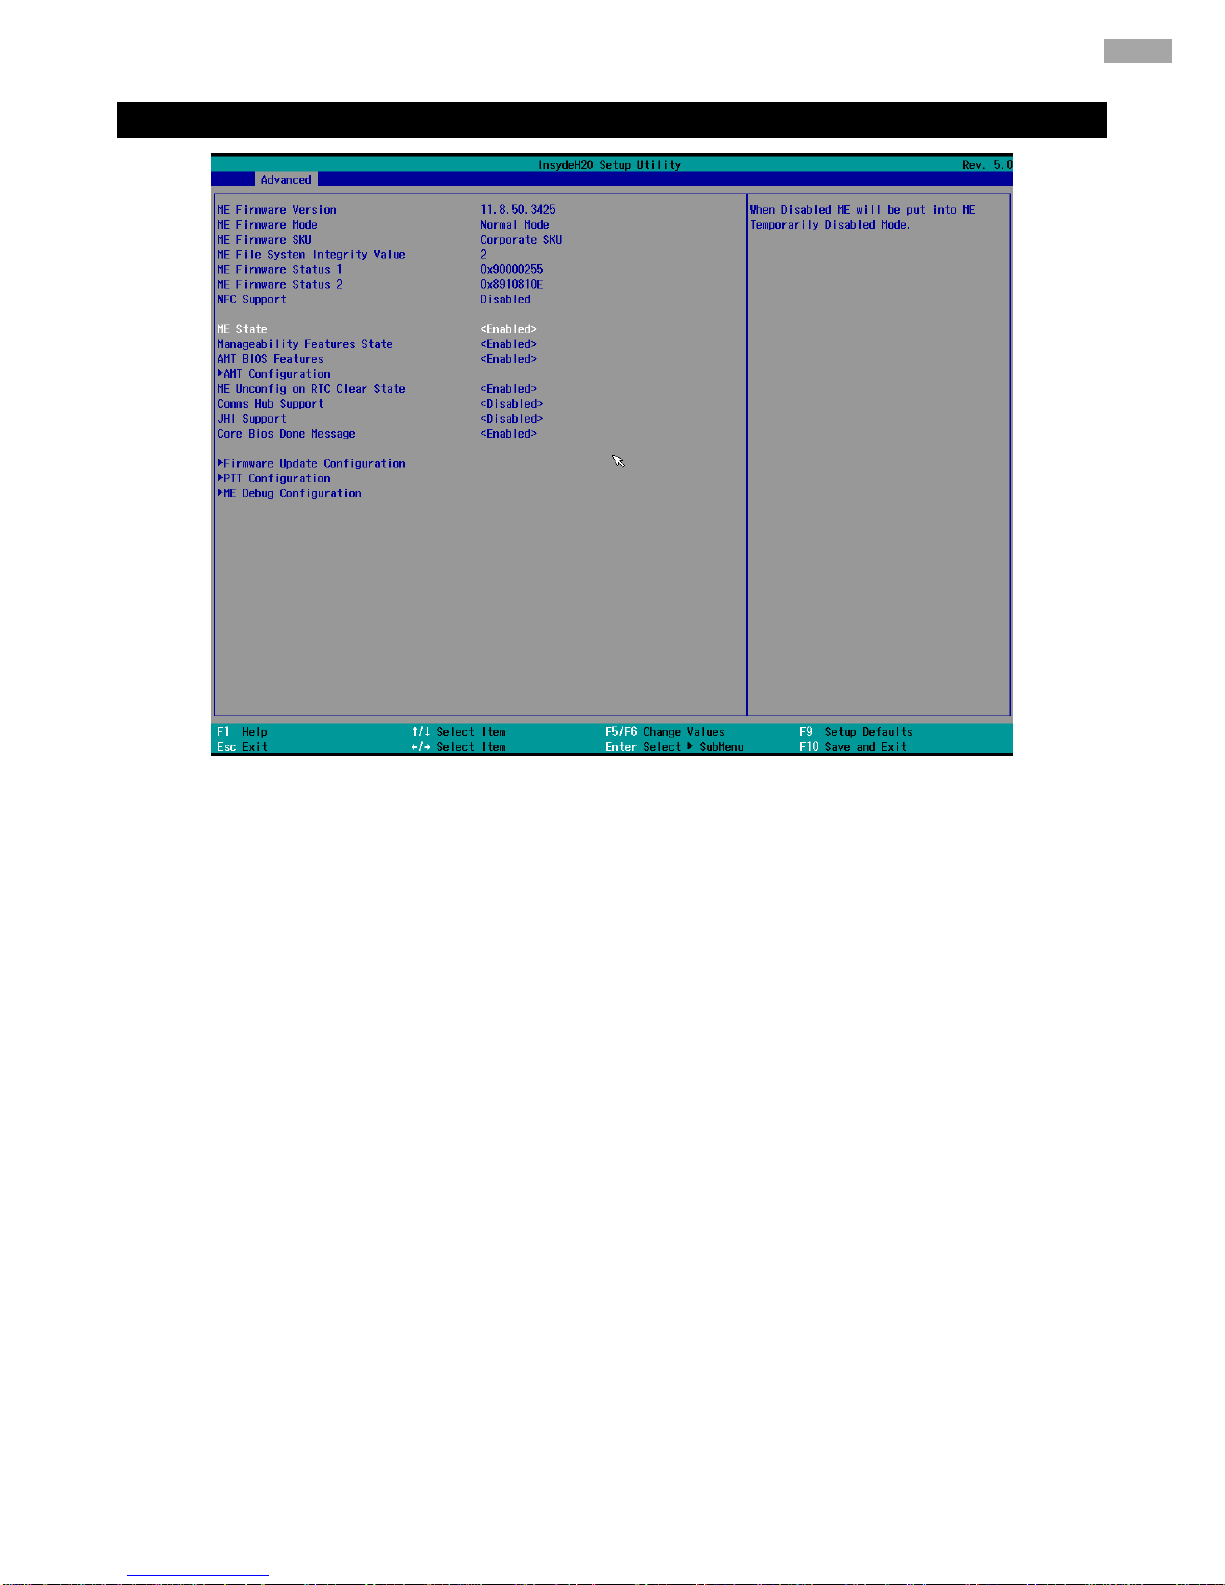
4.2.2.5 PCH-FW Configuration
Page 82
82
IK70 Motherboard User Manual
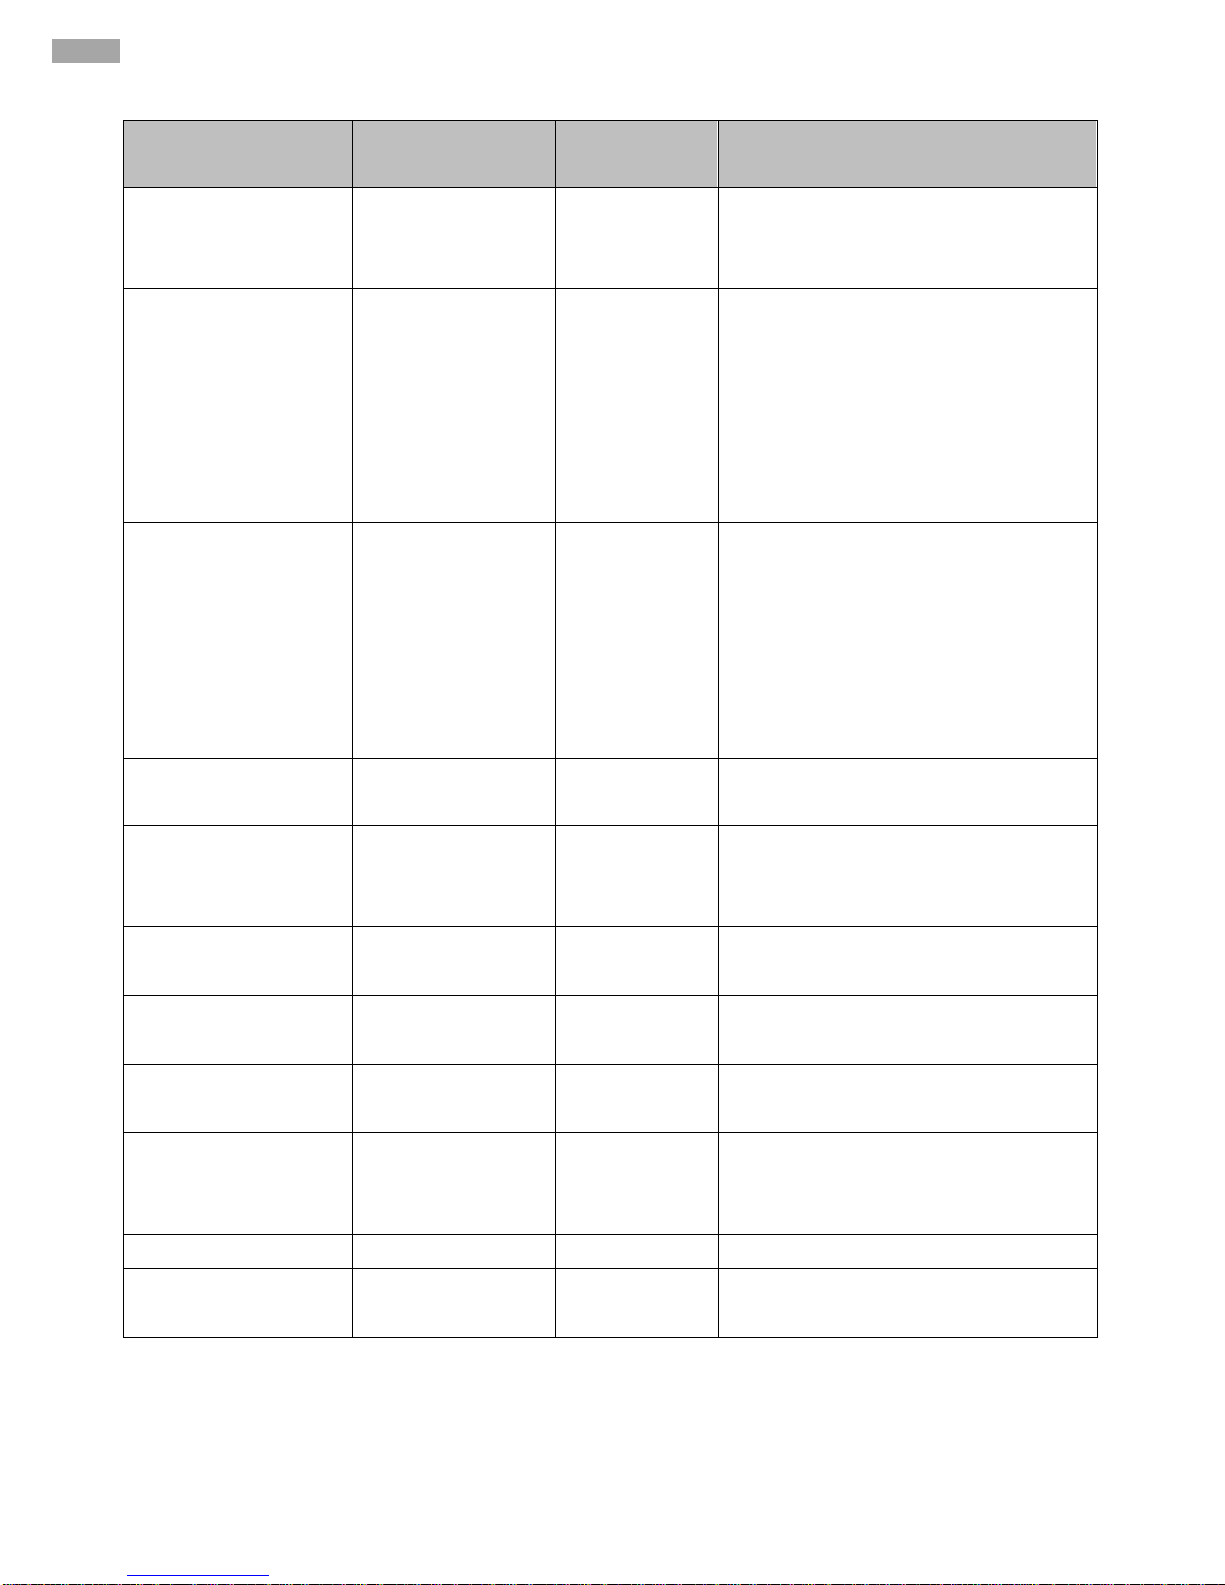
BIOS Setting
Description
Setting Option
Effect
ME State
ME State
configuration
Disabled
Enabled
When Disabled ME will be put into ME
Temporarily Disabled Mode
Manageability
Features State
Manageability
Features State
configuration
Disabled
Enabled
Enable/ Disable Intel Manageability
Features
Note: this option disabled/ enables
Manageability Features support in FW.
To disable support platform must be in
an unprovisioned state first.
AMT BIOS Features
AMT BIOS
Features
Disabled
Enabled
Enable/ Disable Intel Active
Management Technology BIOS
Extension.
Note: iAMT H/W Is always enabled.
This option just controls the BIOS
Extension execution.
AMT Configuration
AMT Configuration
Enter
Opens sub-menu
ME Unconfig on RTC
Clear State
ME Unconfig on
RTC Clear State
Disabled
Enabled
Disabling this option will cause ME not
to unconfigure on RST clear
Comms Hub Support
Comms Hub
Support
Disabled
Enabled
Enable/Disable support for Comms
Hub
JHI Support
JHI Support
Disabled
Enabled
Enable/Disable Intel DAL Host
Interface Service (JHI)
Core BIOS Done
Message
Core BIOS Done
Message
Disabled
Enabled
Enable /Disable Core BIOS Done
message sent to ME
Firmware Update
Configuration
Firmware Update
Configuration
Enter
Opens sub-menu
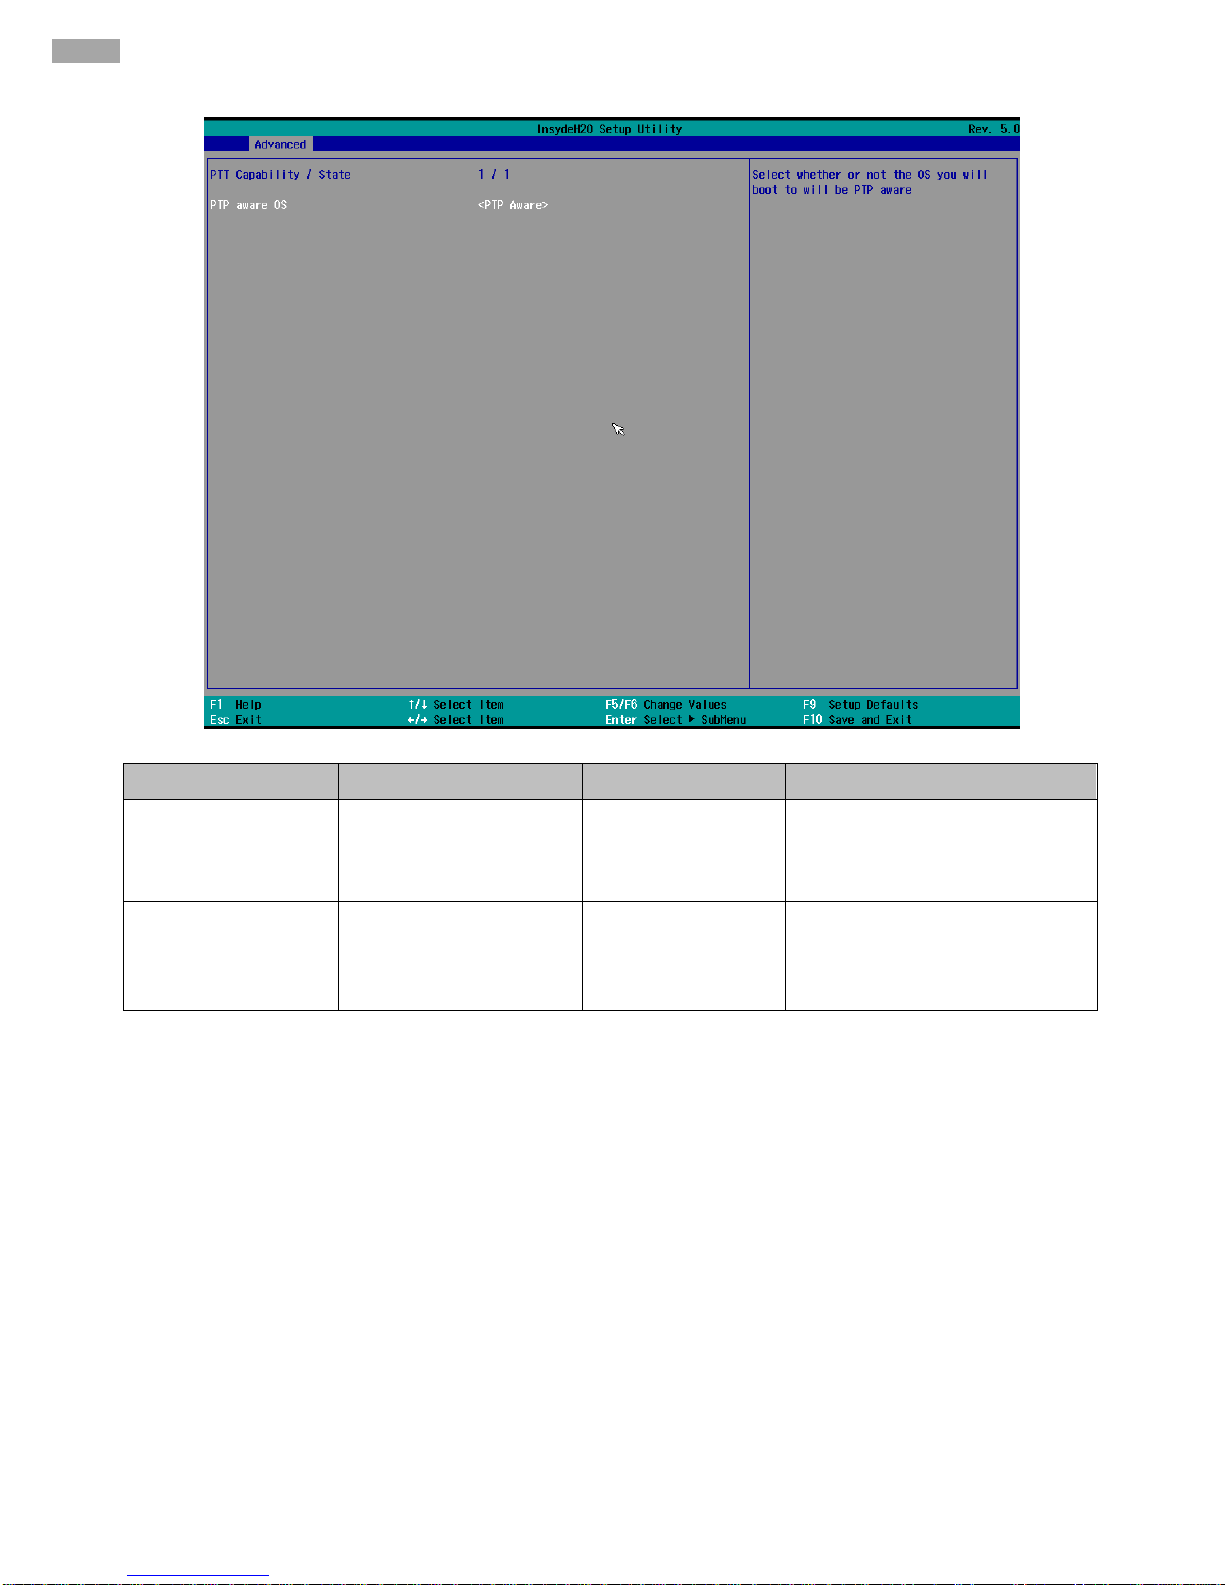
PTT Configuration
Enter
Opens sub-menu
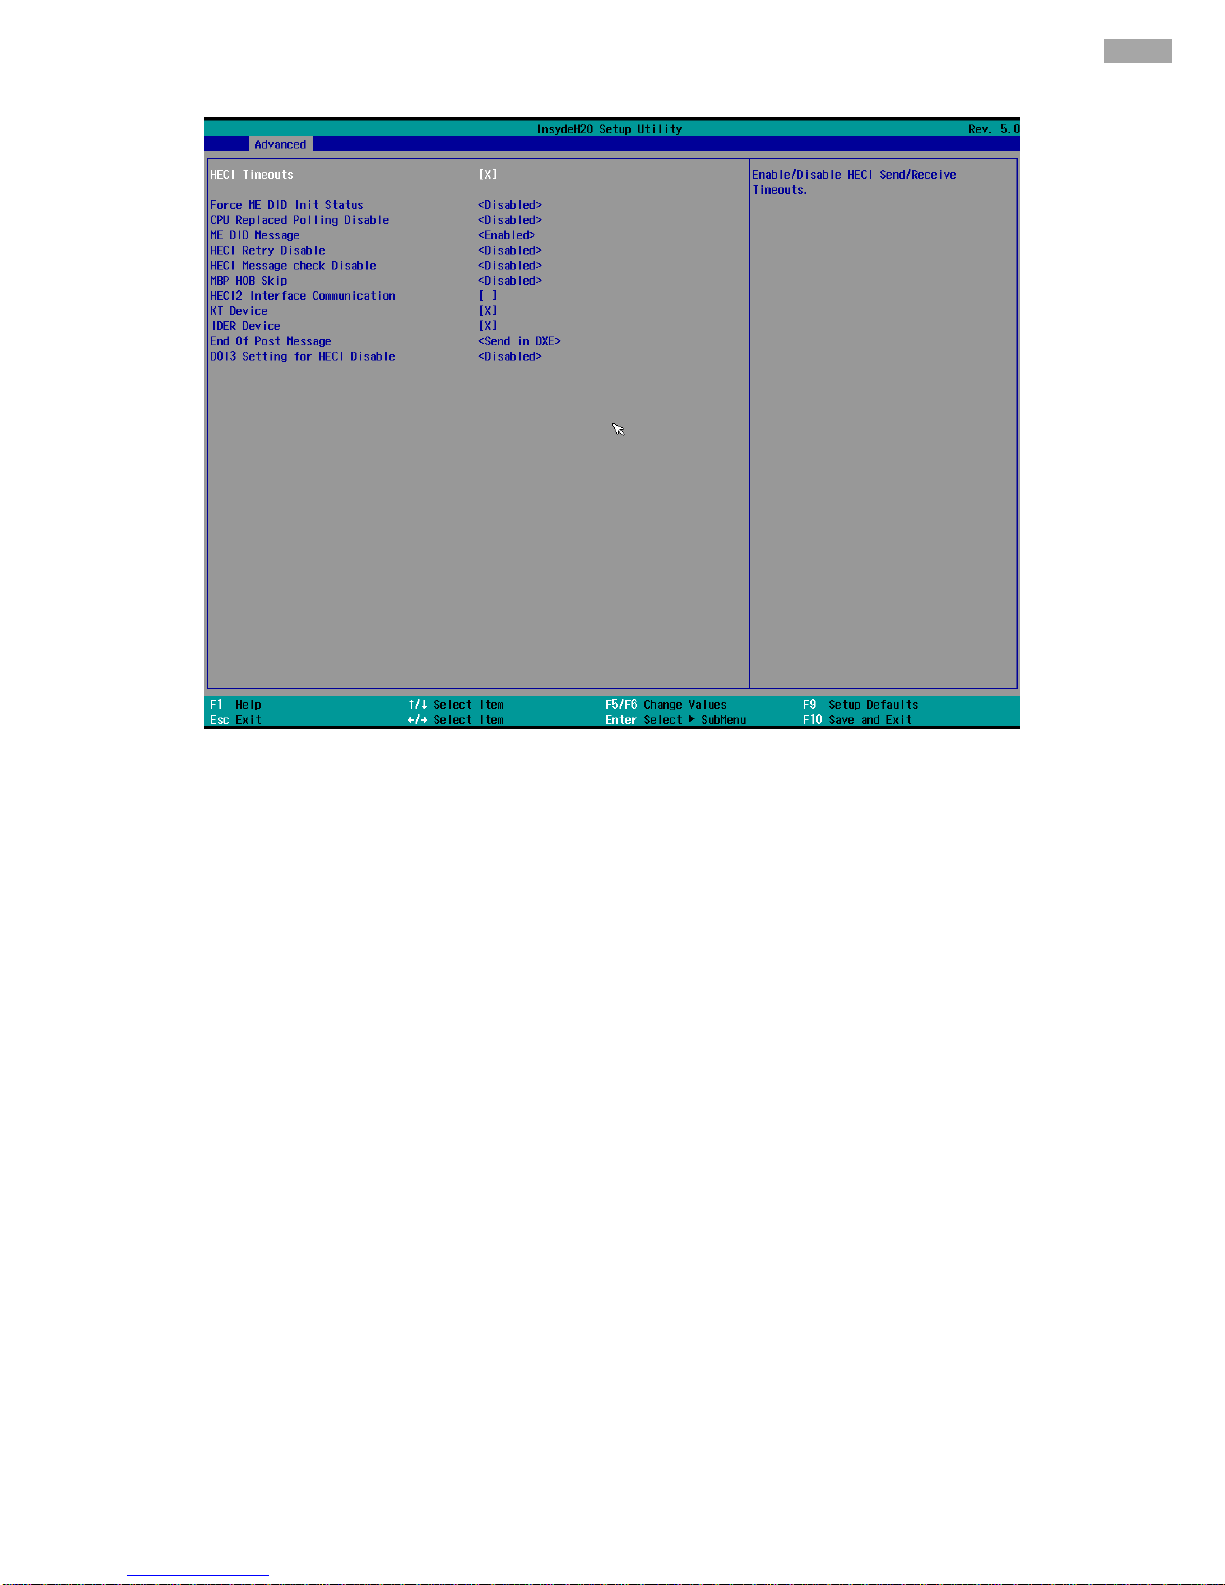
ME Debug
Configuration
Page 83

83
Chapter 4: Insyde H20 BIOS Setup
BIOS Setting
Description
Setting Option
Effect
USB Provisioning of
AMT
USB Provisioning of
AMT
Disabled
Enabled
Enable/ Disable of AMT USB
provisioning
Activate Remote
Assistance Process
Trigger CIRA Boot
Value
Note: Network Access must be
activated first from MEBx
Setup
PET Progress
PET Progress
configuration
Disabled
Enabled
Enable/ Disable PET Events
Progress to receive PET
Events.
Watchdog
Watchdog Timer
configuration
Disabled
Enabled
Enable/ Disable Watchdog
Timer
Secure Erase Mode
Change Secure Erase
Mode behavior
Simulated
Performs SE flow without
erasing SSD
Real
Erase SSD
Force Secure Erase
Force Secure Erase
Disabled
Enabled
Force Secure Erase on next
boot
Page 84
84
IK70 Motherboard User Manual
BIOS Setting
Description
Setting Option
Effect
PTT Capability/ State
PTT Capability/ State
configuration
1/1
Select whether or not the OS
you will boot to will be PTP
aware
PTP aware OS
PTP aware OS
PTP Aware
Not PTP Aware
Select whether or not the OS
you will boot to will be PTP
aware
Page 85
85
Chapter 4: Insyde H20 BIOS Setup
Page 86

86
IK70 Motherboard User Manual
4.2.2.6 SIO F81866A
BIOS Setting
Description
Setting Option
Effect
Serial Port A ~ Serial
Port D
Configure Serial port
settings
Disable
No configuration
Enable
User configuration
Auto
EFI/OS chooses configuration
WDT
Watchdog Timer
configuration
Disable
Enable
Enable or disable Watchdog
Timer
Hardware Monitor
Hardware Monitor
Enter
Opens sub-section
GPIO Group 0
Configuration
GPIO Group 0
Configuration
Enter
Opens sub-section
GPIO Group 1
Configuration
GPIO Group 1
Configuration
Enter
Opens sub-section
Page 87
87
Chapter 4: Insyde H20 BIOS Setup
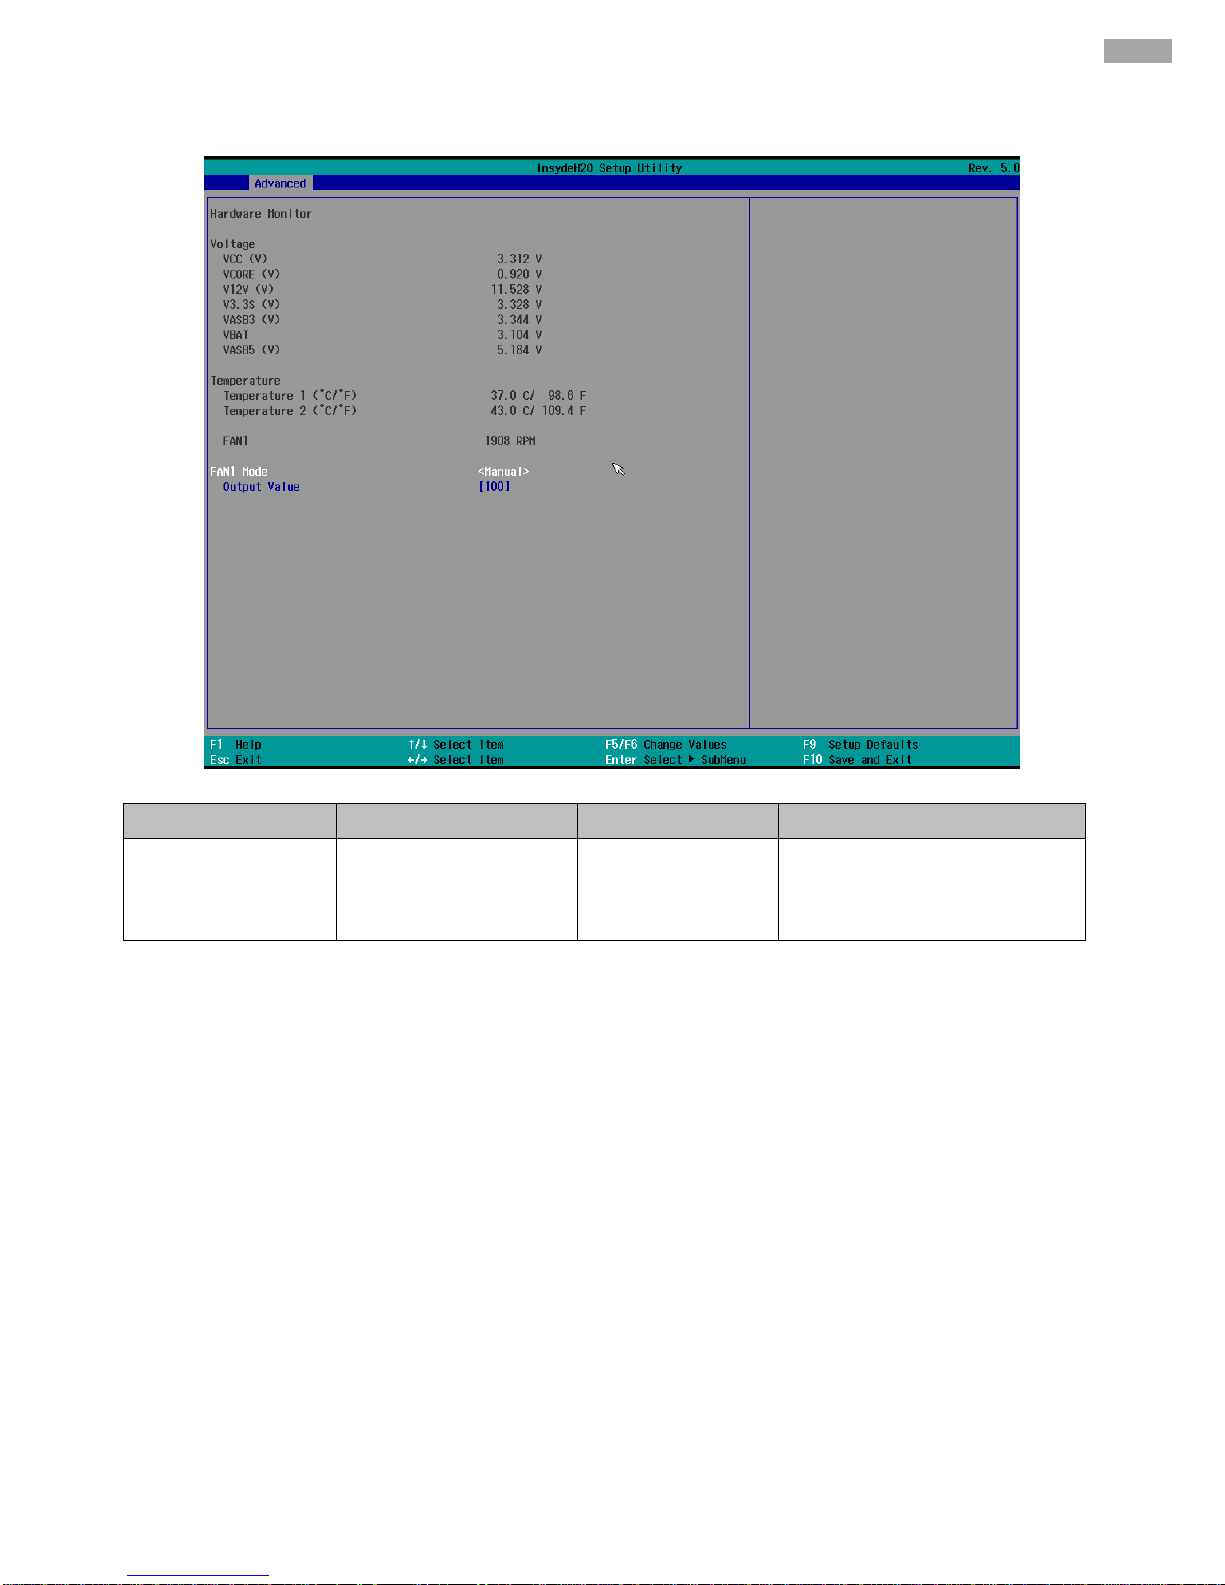
4.2.2.6.1 Hardware Monitor
BIOS Setting
Description
Setting Option
Effect
FAN1 Mode
FAN1 Mode
configuration
Manual
Linear
Stage
Select FAN1 Mode
configuration
Page 88
88
IK70 Motherboard User Manual
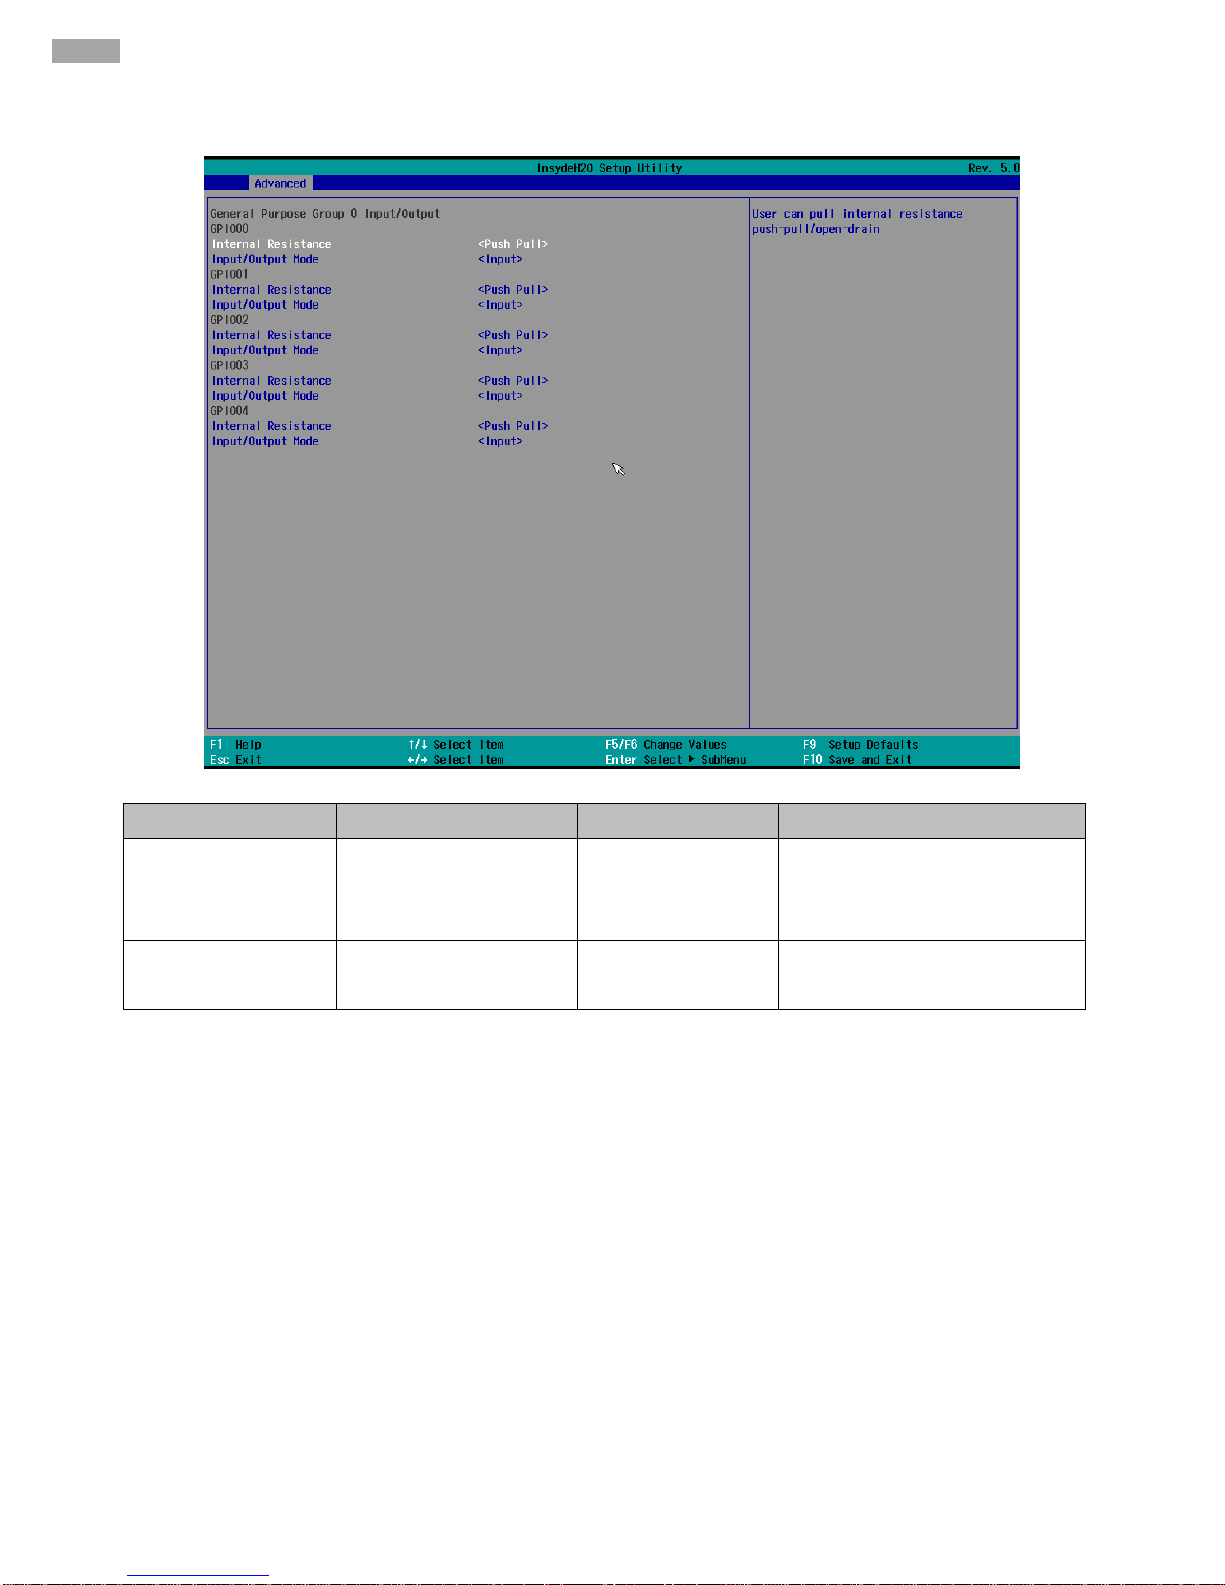
4.2.2.6.2 GPIO Configuration
BIOS Setting
Description
Setting Option
Effect
Internal Resistance
Internal Resistance
configuration
Push Pull
Open Drain
User can pull internal
resistance push-pull /
open-drain
Input/ Output Mode
GPIO pin configuration
Input
Output
Set GPIO pin is input or output
Page 89
89
Chapter 4: Insyde H20 BIOS Setup
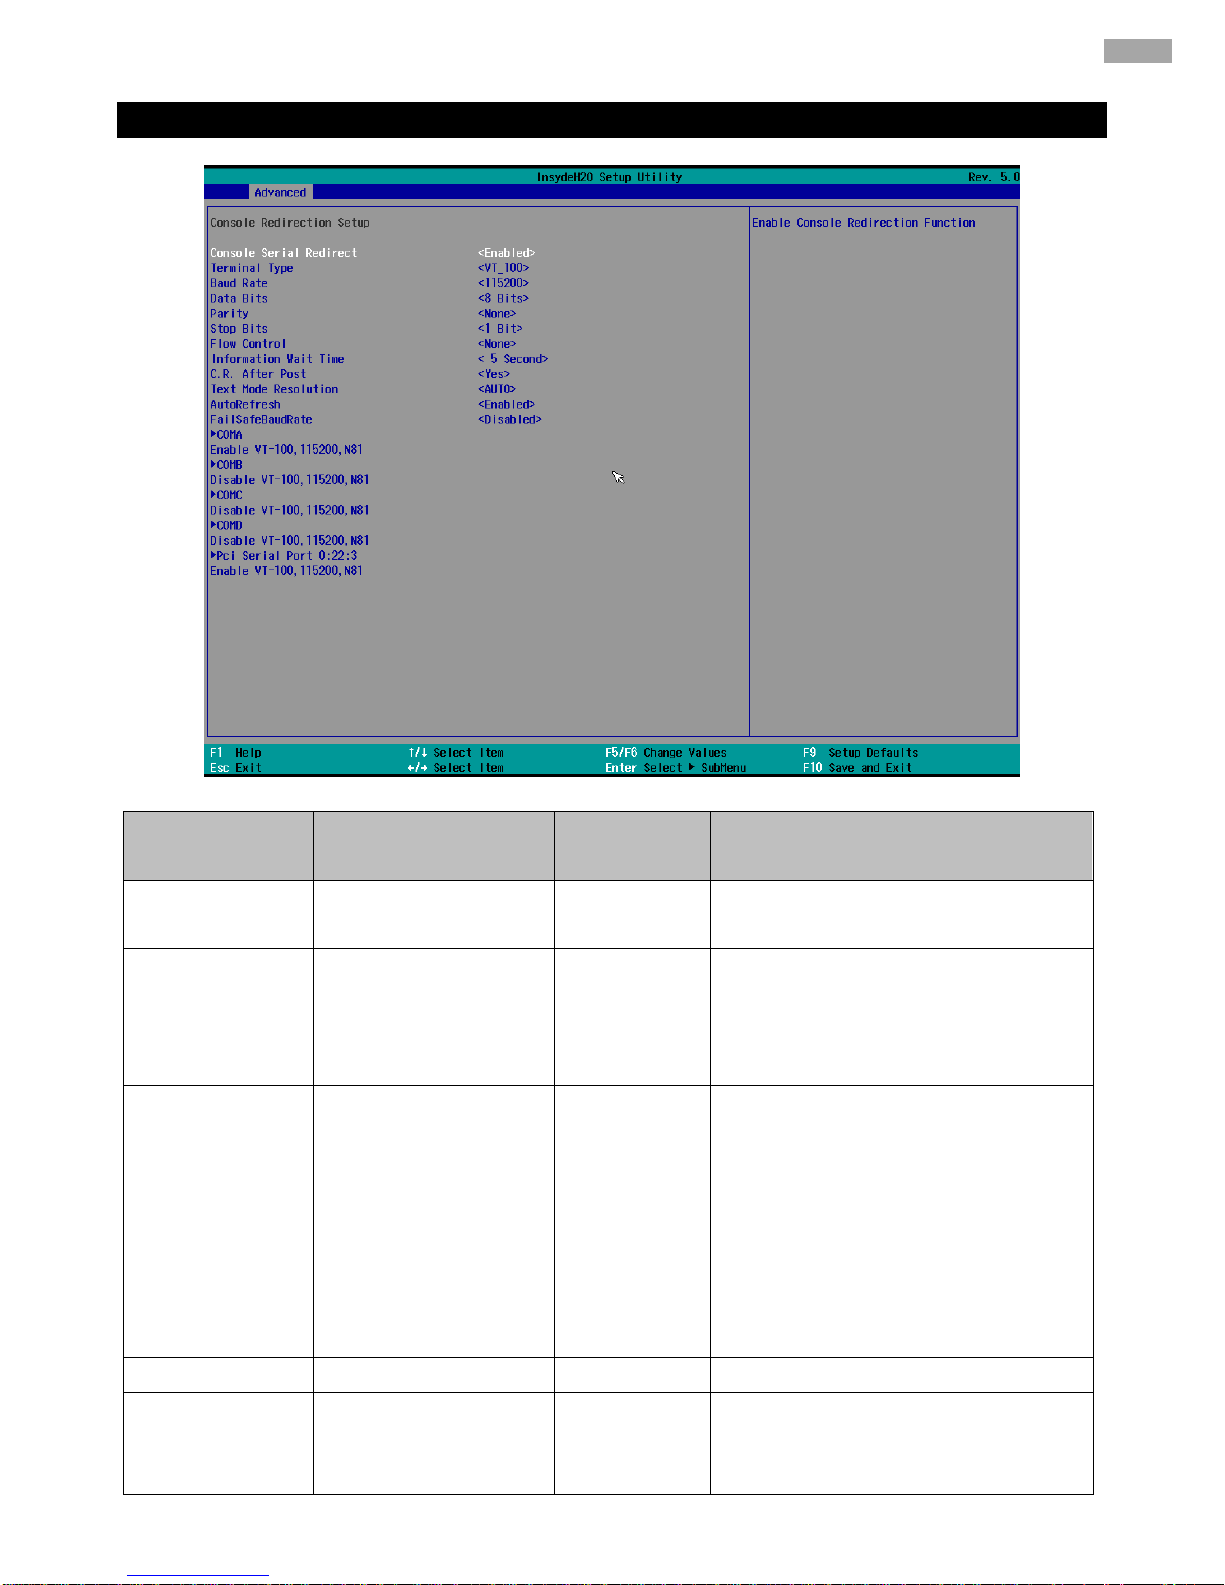
4.2.2.7 Console Redirection
BIOS Setting
Description
Setting
Option
Effect
Console Serial
Redirect
Console Redirection
Function settings
Enabled
Disabled
Enable Console Redirection Function
Terminal Type
Console Redirection
Terminal Type settings
VT_100
VT_100+
VT_UTF8
PC_ANSI
Set Console Redirection Terminal Type
Baud Rate
Console Redirection
Baud Rate settings
115200
57600
38400
19200
9600
4800
2400
1200
Set Console Redirection Baud Rate
Data Bits
Data Bits settings
7bits/ 8bits
Set Data Bits
Parity
Console Redirection
Parity bit settings
None
Even
Odd
Set Console Redirection Parity bit
Page 90

90
IK70 Motherboard User Manual
Stop Bits
Console Redirection
Stop Bits settings
1 Bit
2 Bits
Set Console Redirection Stop Bits
Flow Control
Console Redirection
Stop Flow Control Type
settings
None
RTS/ CTS
XON/ XOFF
Set Console Redirection Stop Flow
Control Type
Information Wait
Time
Console Redirection
port information display
time settings
0 sec~30 sec
Set Console Redirection port
information display time
C.R. After Post
Console Redirection
continue work after
POST time
Yes
No
Console Redirection continue work
after POST time
Text Mode
Resolution
Console Redirection
Text Mode Resolution
Auto
Follows VGA text mode
Force 80x25
Don’t care VGA, force text mode be
80x25
Force 80x24
(DEL FIRST
RAW)
Don’t care VGA, force text mode be
80x24 (DEL FIRST RAW)
Force
80x24(DEL
LAST RAW)
Don’t care VGA, force text mode be
80x24 (DEL LAST RAW)
Auto Refresh
Auto Refresh settings
Disabled
Enabled
When feature enabled, screen will be
auto refresh once after detect remote
terminal was connected
Fail Safe Baud
Rate
Fail Safe Baud Rate
settings
Disabled
Enabled
This feature will auto detect remote
terminal baud rate and connect C.R.
serial device with detected baud rate
Page 91

91
Chapter 4: Insyde H20 BIOS Setup
4.2.3 Security
BIOS Setting
Description
Setting Option
Effect
TrEE Protocol Version
Choose TrEE Protocol
Version
1.0
1.1
TrEE Protovol Version:
1.0 or 1.1
TPM Availability
TPM Availability
configuration
Available
Hidden
When hidden don’t
exposes TPM to 0
TPM Operation
TPM Operation
configuration
[ ]
Select one of the
supported operation to
change TPM2state
Clear TPM
Clear TPM configuration
[ ]
Select to Clear TPM
Set Supervisor
Password
Set Supervisor
Password
Enter New password
Install or Change the
password and the length
of password must be
greater than one
character
Page 92
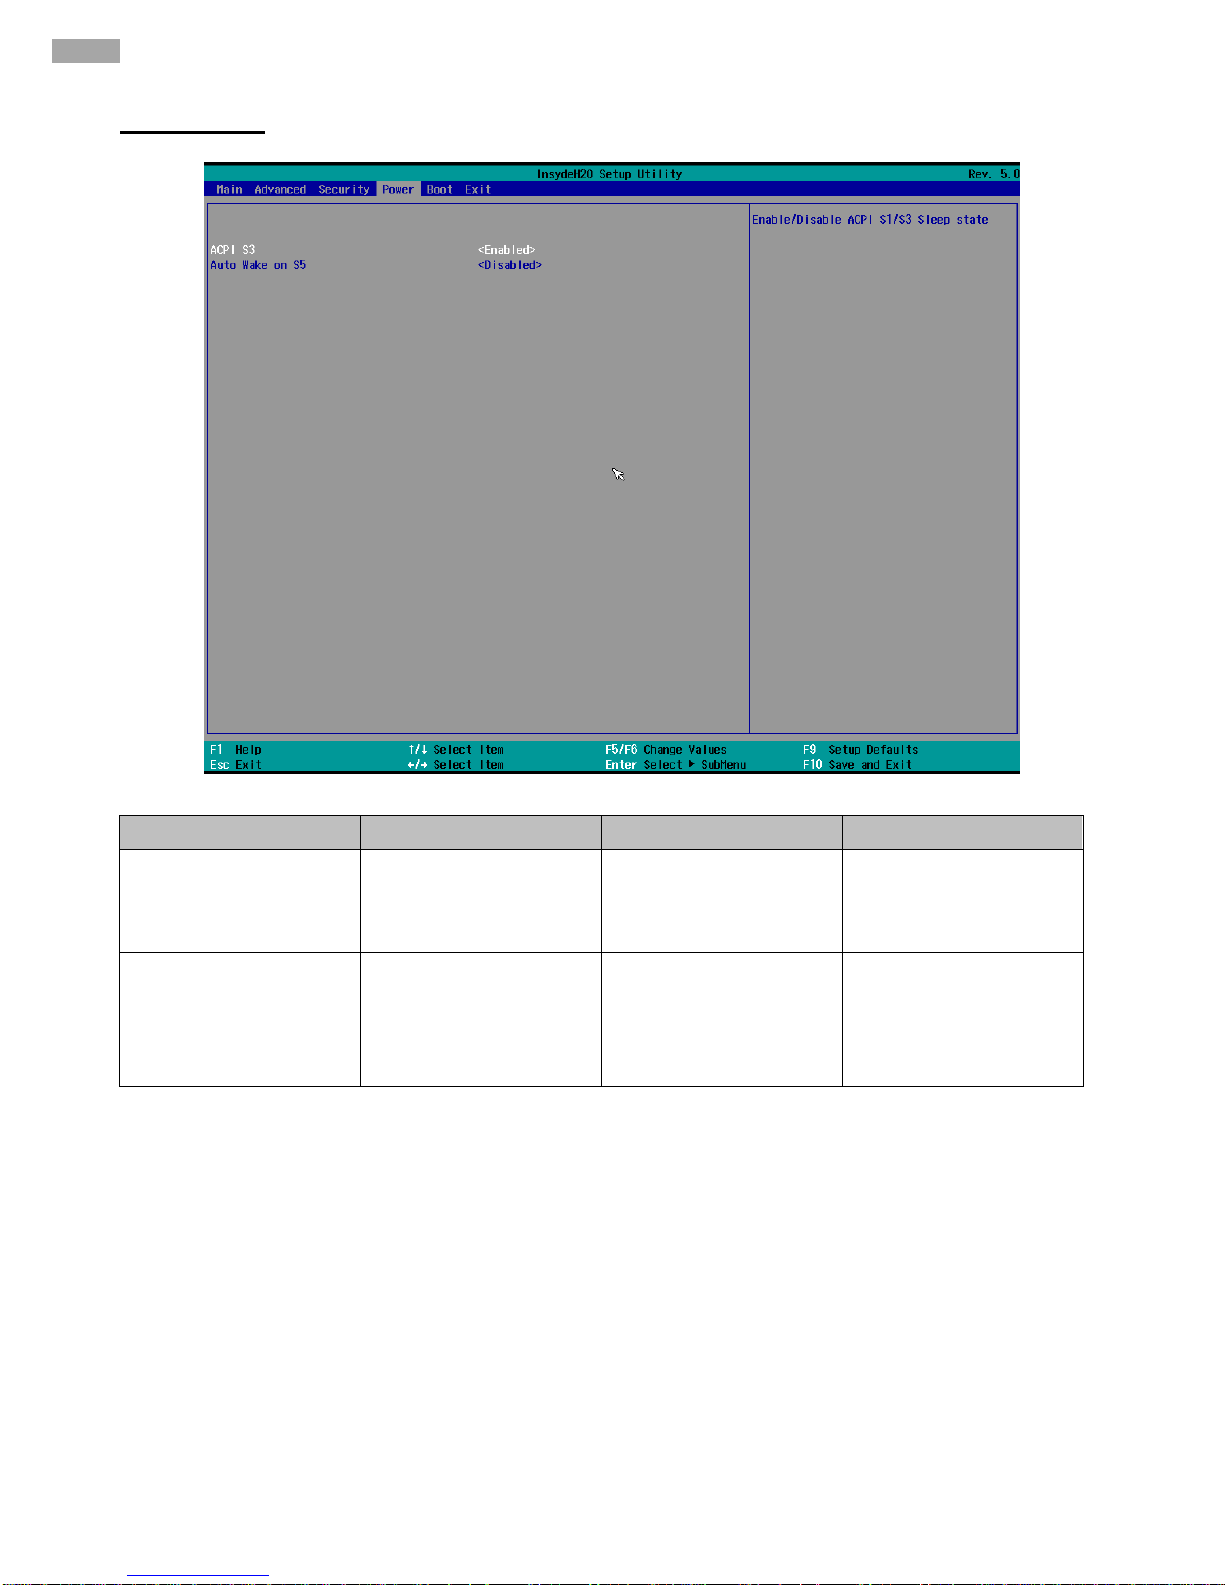
92
IK70 Motherboard User Manual
4.2.4 Power
BIOS Setting
Description
Setting Option
Effect
ACPI S3
ACPI S3 configuration
Disabled
Enabled
Enable/ Disable ACPI
S1/S3 Sleep state
Auto Wake on S5
Auto Wake on S5
configuration
Disabled
By Every Day
By Every Month
Auto Wake on S5, by
Day or Month or fixed
time of every day
Page 93
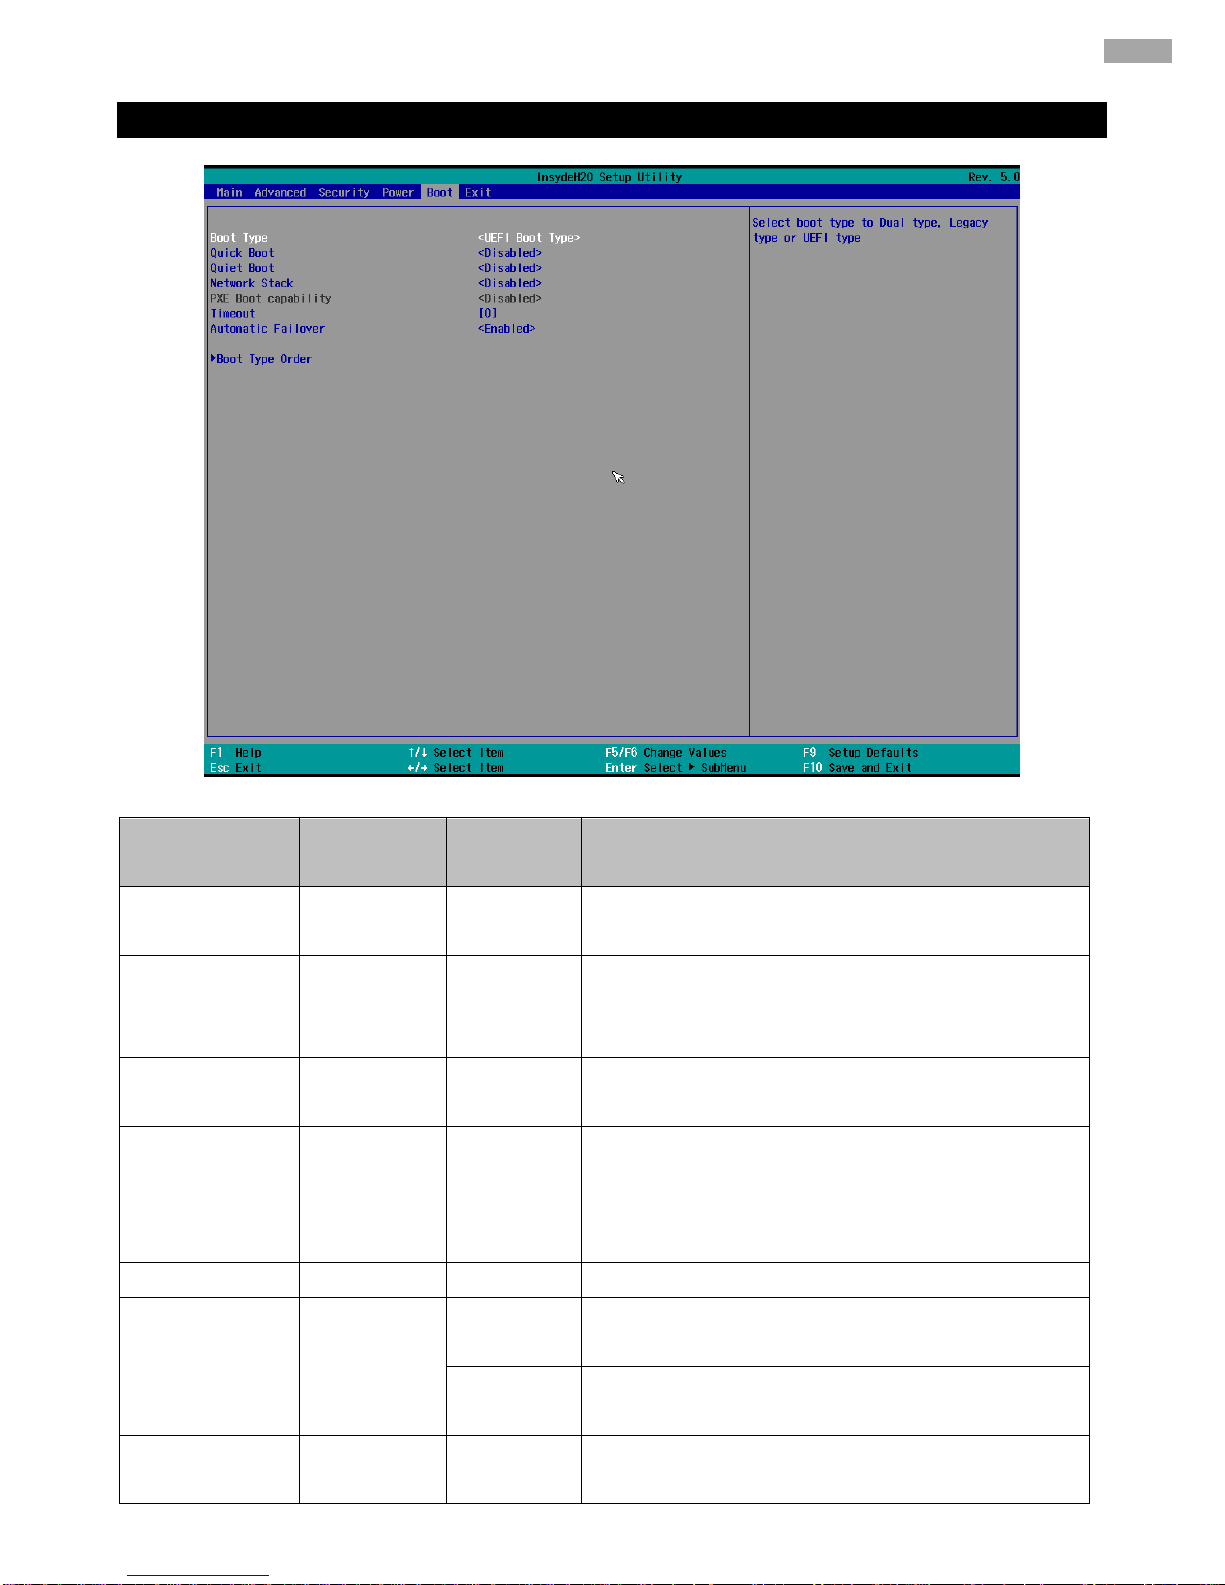
93
Chapter 4: Insyde H20 BIOS Setup
4.2.2.10 Boot
BIOS Setting
Description
Setting
Option
Effect
Boot Type
Boot Type
configuration
UEFI Boot
Type
Select boot type to Dual type, Legacy type or UEFI
type
Quick Boot
Quick Boot
configuration
Enabled
Disabled
Allows InsydeH20 to skip certain tests while booting.
This will decrease the time needed to boot the
system
Quiet Boot
Quiet Boot
configuration
Enabled
Disabled
Disable or enable booting in text Mode.
Network Stack
Network
Stack
configuration
Disabled
Enabled
Network Stack Support:
Windows 8 Bitlocker Unlock
UEFI IPv4/ IPv6 PXE
Legacy PXE OPROM
Timeout
Timeout
[Value]
Timeout settings
Automatic
Failover
Enable
If boot to default device fail, it will directly try to boot
next device
Disable
If boot to default device fail, it will pop warning
message then go to firmware UI
Boot Type Order
Boot Type
Order
Enter
Opens sub-menu
Page 94
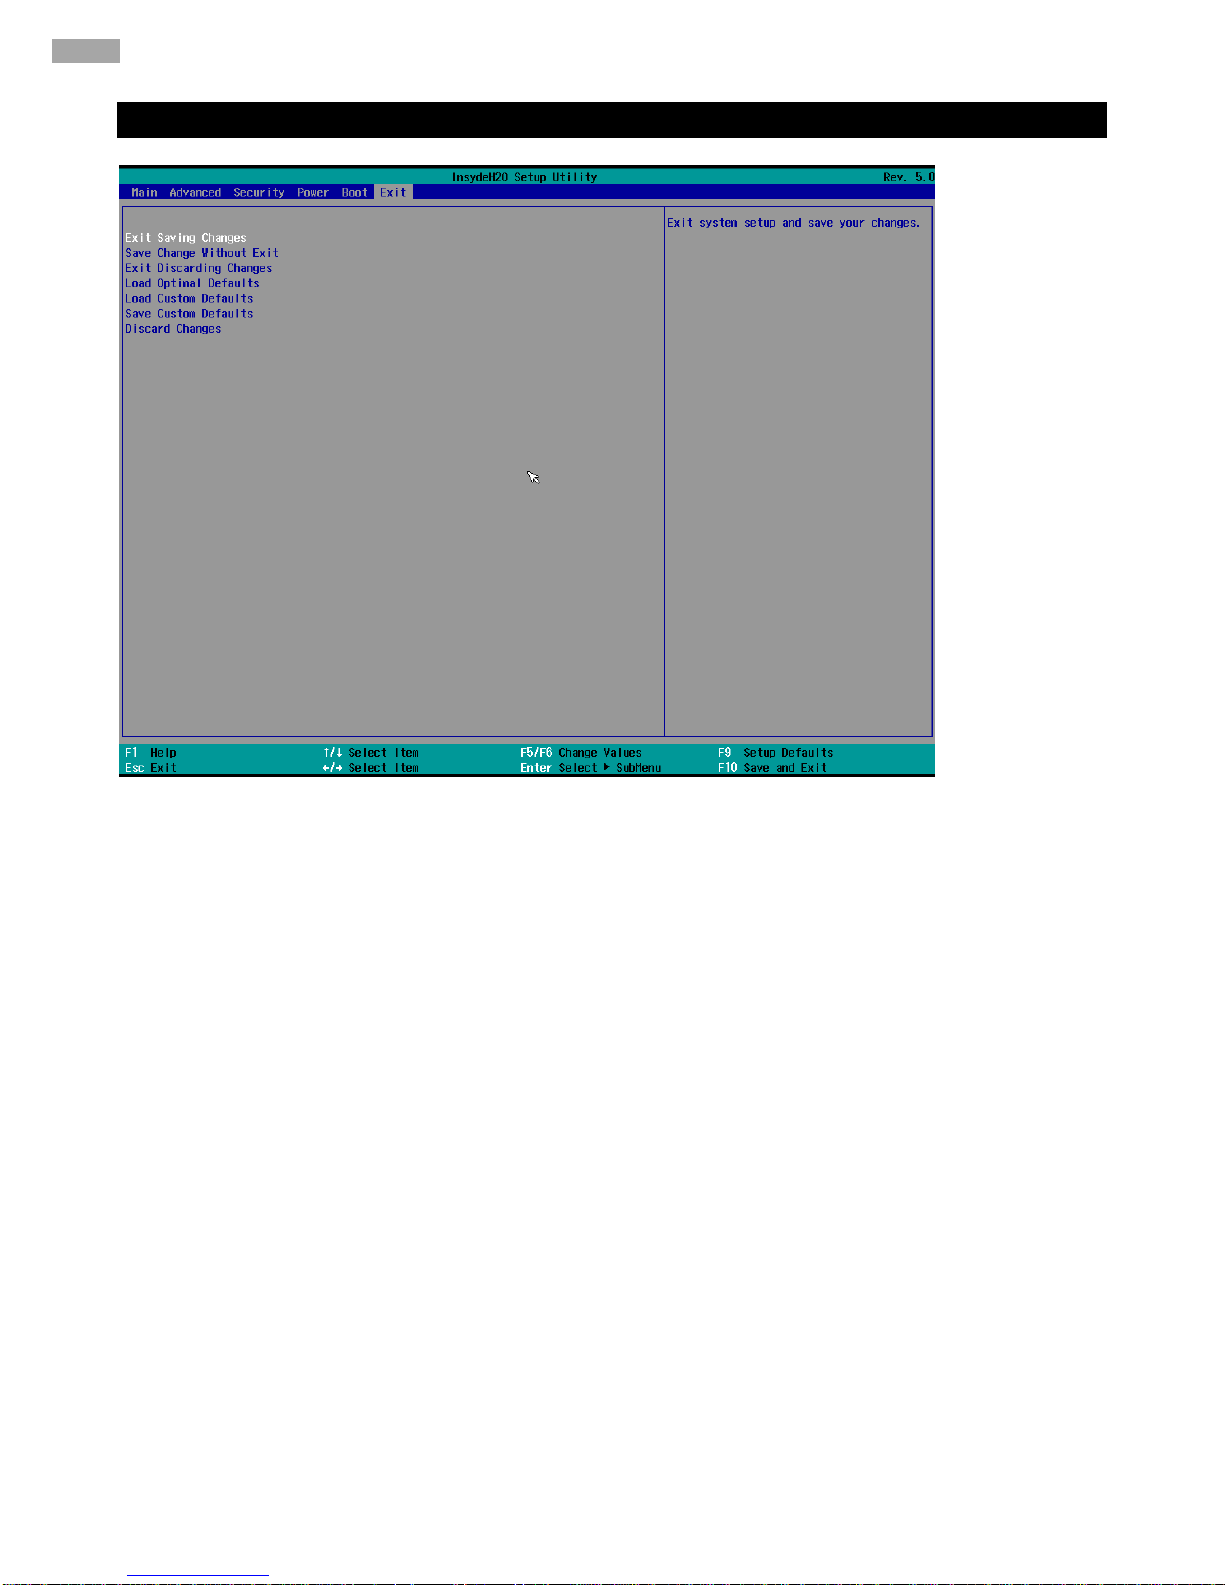
94
IK70 Motherboard User Manual
4.2.5 Exit
Page 95
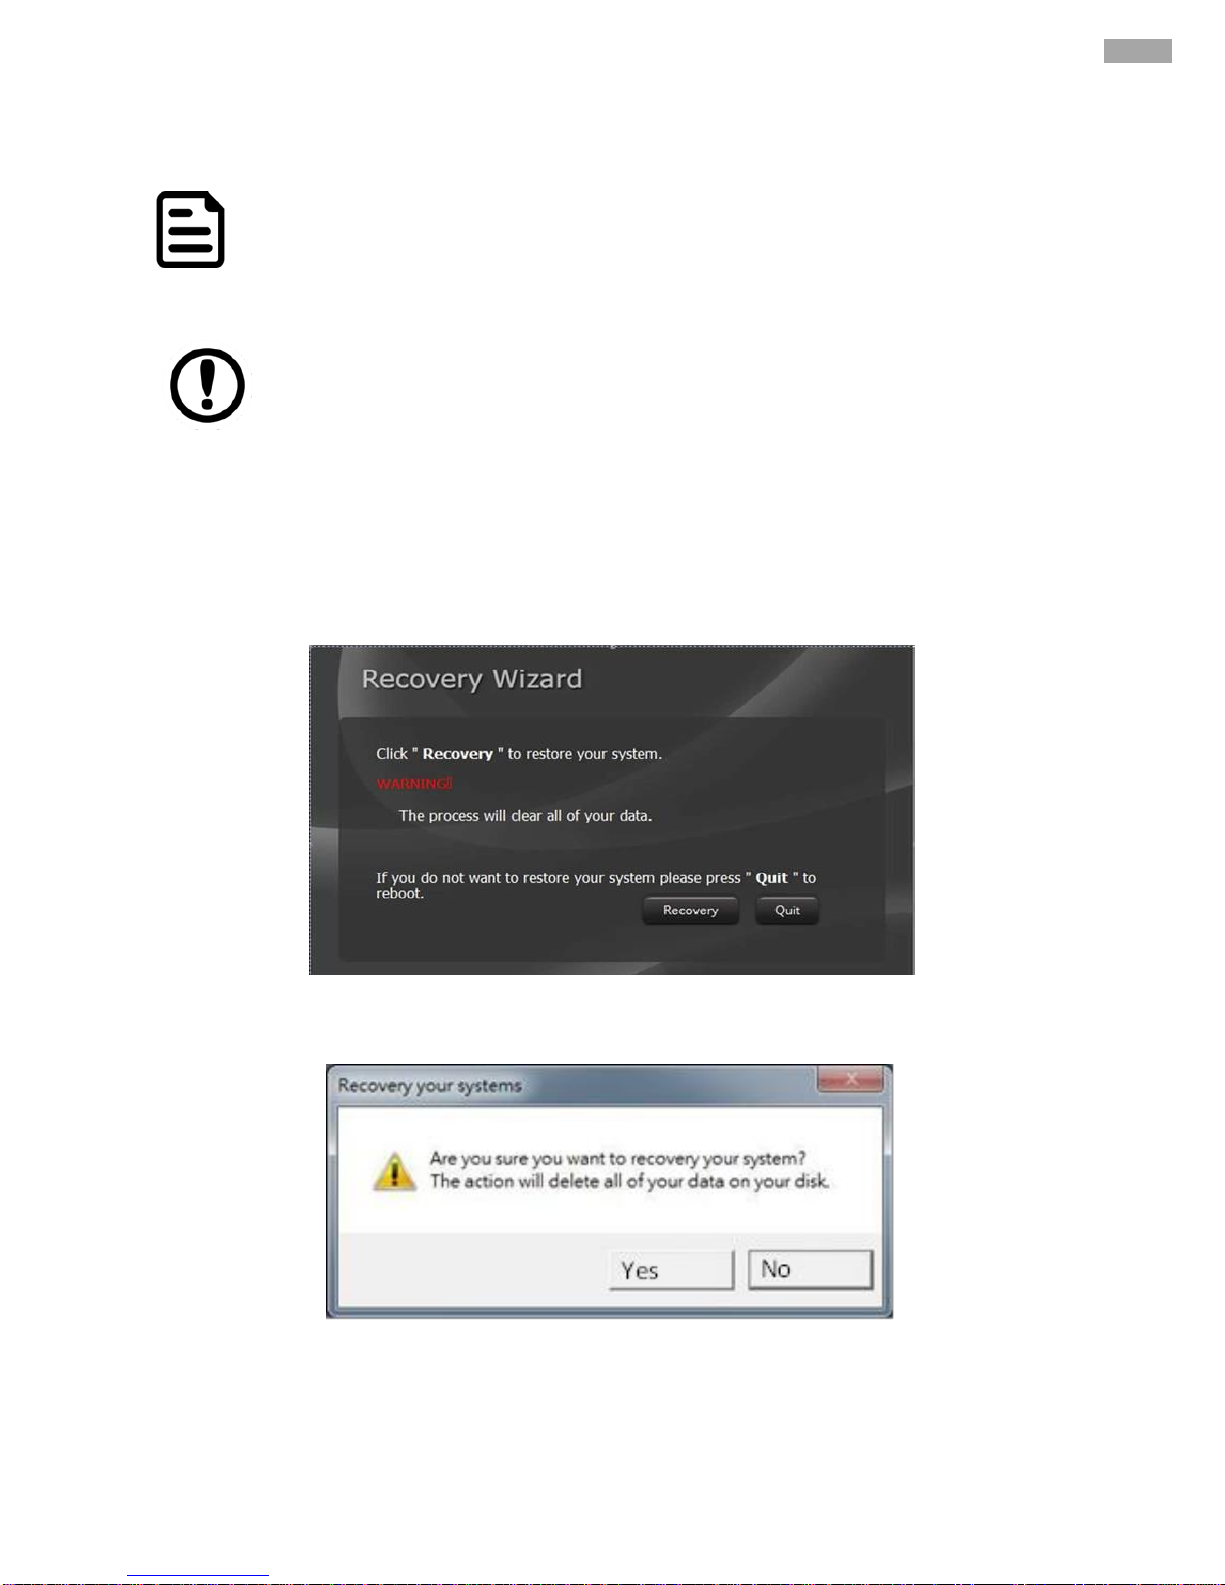
95
Chapter 4: Insyde H20 BIOS Setup
4.3 Using Recovery Wizard to Restore Computer
Note:
Before starting the recovery process, make sure to backup all user data.
The data will be lost after the recovery process.
To enable
quick one-key
recovery
procedure:
1. Connect the computer to the power source. Make sure the computer stays plugged in to power source
during the recovery process.
2. Turn on the computer, and when the boot screen shows up, press F6 to initiate the Recovery Wizard.
3. The following screen shows the Recovery Wizard. Click Recovery button to continue.
4. A warning message about data loss will show up. Make sure the data is backed up before recovery,
and click Yes to continue.
5. Wait the recovery process to complete. During the recovery process, a command prompt will show up
to indicate the percent of recovery process complete. The system will restart automatically after
recovery completed.
Important:
Before starting the recovery process, remove any expansion card.
Page 96
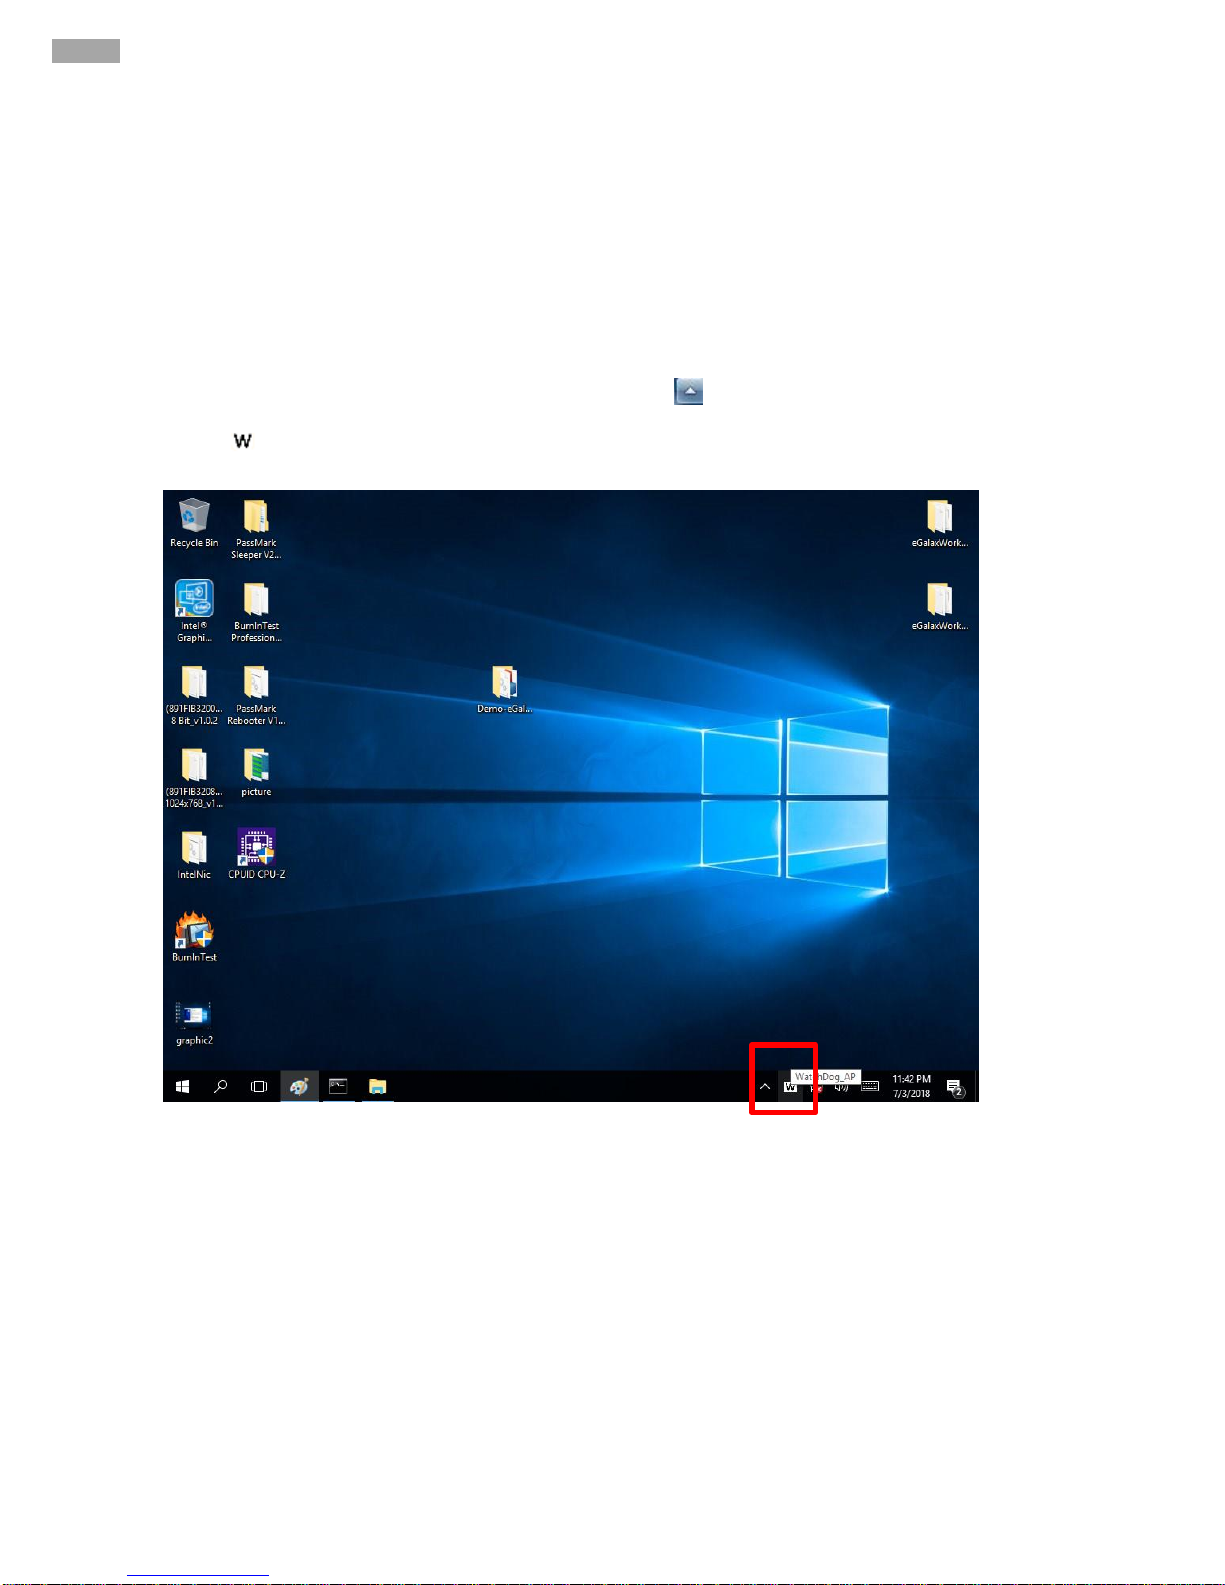
96
IK70 Motherboard User Manual
4.4 How to Enable Watchdog
To enable Watchdog, you need to download Winmate Watchdog utility. Find more information on Watchdog
in “Watchdog Guide” that you can download from Winmate Download Center or File Share. Refer to the
User Manual for more details.
To enable watchdog in Watchdog AP follow the instructions below:
1. On the right bottom side of the desktop screen, click triangle button to show hidden icons.
2. lick icon to open Watchdog utility.
Page 97

97
Chapter 4: Insyde H20 BIOS Setup
3. In Watchdog utility window set countdown time and periodically feed time, or disable watchdog.
Example:
Every 10 min watchdog will
monitor the system, in case any
error occurs the system will
restart automatically when the
countdown time reaches 0.
Every 9 min watchdog timer will
be reset to 10 min.
Setting
Description
Watchdog Countdown Time
The system automaticity restarts when this
countdown time reaches zero.
Default: 10 min
Periodically Feed Time
To set a cycle time to automatically reset watchdog
timer.
Default: 9 min
Enable / Disable
Enable or disable watchdog.
Default: Enable
Page 98

98
IK70 Motherboard User Manual
Chapter 5: Technical Support
This chapter contains directory to technical support.
5.1 Drivers
5.2 Software Development Kit (SDK)
Page 99

99
Chapter 5: Technical Support
Free technical support is available from our engineers every business day. We are always ready to give
advice on application requirements or specific information on the installation and operation of any of our
products. If any problem occurs immediately contact us.
5.1 Drivers
The list of drivers available for IK70 Motherboard:
Item
Driver
1
Chipset Driver
2
Graphic Driver
3
ME Driver
4
Audio Driver
5
Ethernet Driver
6
Watchdog Driver/AP
7
Digital IO Driver/AP
To find the Drivers, please refer to the Driver CD that comes in the package or contact us.
5.2 Software Development Kit (SDK)
The list of SDK available for IK70 Motherboard
Item
File Type
Description
1
SDK
Watchdog SDK
2
SDK
Digital IO SDK
To find the SDK, please refer to the Driver CD that comes in the package or contact us
Page 100

 Loading...