

Page 1

Rugged Computing
Users Manual Rugged Tablet PCs
ID83 Rugged Tablet PC
(Intel
®®®®
Atom™ Dual Core N2600 Based
Tablet PC)
USERS MANUAL
Version: 1.1
R10ID8M-RTXX 10.4 inch Rugged Tablet PC
R12ID8M-RTXX 12.1 inch Rugged Tablet PC
R10ID8M-RTXXGP 10.4 inch Mobile Rugged Tablet PC
R12ID8M-RTXXGP 12.1 inch Mobile Rugged Tablet PC
Page 2

Rugged Computing
Users Manual Rugged Table PCs
2
IMPORTANT SAFETY INSTRUCTIONS
Please read these instructions carefully before using the product and
save for later reference.
Follow all warnings and instructions marked on the product.
Unplug this product from the wall outlet before cleaning. Clean the
product with a damp soft cloth. Do not use liquid or aerosol cleaners
as it may cause permanent damage to the screen.
Do not use this product near water.
Do not place this product on an unstable cart, stand, or table. The
product may fall, causing serious damage to the product.
This product should be operated from the type of power indicated on
the marking label. If you are not sure of the type of power available,
consult your dealer or local power company.
This product is equipped with a 3-wire grounding type plug, a plug
having a third (grounding) pin. This plug will only fit into a
grounding-type power outlet. This is a safety feature. If you are
unable to insert the plug into the outlet, contact your electrician to
replace your obsolete outlet. (For AC version only)
Do not defeat the purpose of the grounding-type plug.
Do not allow anything to rest on the power cord. Do not locate this
product where persons will walk on the cord.
Never push objects of any kind into this product through cabinet slots
as they may touch dangerous voltage points or short out parts that
could result in a risk of fire or electric shock. Never spill liquid of any
kind on the product.
Do not attempt to service this product by yourself, as opening or
removing covers may expose you to dangerous voltage points or
other risks and will void the warranty. Refer all servicing to qualified
service personnel.
Unplug this product from the wall outlet and refer servicing to
qualified service personnel under the following conditions:
When the power cord or plug is damaged or frayed.
If liquid has been spilled into the product.
If rainy or water has been exposed to the product.
If the product does not operate normally that the operating
instructions are followed. Adjust only those controls that are covered
by the operating instructions since improper adjustment of other
controls may result in damage and will often require extensive work
by a qualified technician to restore the product to normal operation.
If the product has been dropped or the cabinet has been damaged.
If the product exhibited a distinct change in the performance, that
indicates a need for service.
Page 3

Rugged Computing
Users Manual Rugged Table PCs
3
Copyright Notice
Copyright © 2008 Winmate Communication Inc., ALL RIGHTS RESERVED. No
part of this document may be reproduced, copied, translated, or transmitted in any
form or by any means, electronic or mechanical, for any purpose, without the prior
written permission of the original manufacturer.
Trademark Acknowledgement
Brand and product names are trademarks or registered trademarks of their
respective owners.
Disclaimer
Winmate Communication Inc. reserves the right to make any product changes
without notice, including circuits and/or software described or contained in this
manual in order to improve design and/or performance. Winmate Communication
assumes no responsibility or liability for the use of the described product(s),
conveys no license or title under any patent, copyright, or masks work rights to
these products, and makes no representations or warranties that these products
are free from patent, copyright, or mask work right infringement, unless otherwise
specified. Applications that are described in this manual are for illustration
purposes only. Winmate Communication Inc. makes no representation or warranty
that such application will be suitable for the specified use without further testing or
modification.
Warranty
Winmate warrants that each of its products will be free from material and
workmanship defects for a period of one year from the invoice date. If the customer
discovers a defect, Winmate will, at its option, repair or replace the defective
product at no charge to the customer, provided it is returned during the warranty
period of one year, with transportation charges prepaid. The returned product must
be properly packaged in it’s original packaging to obtain warranty service.
If the serial number and the product shipping data differ by over 30 days, the
in-warranty service will be made according to the shipping date. In the serial
numbers the third and fourth two digits give the year of manufacture, and the fifth
digit means the month (e. g., with A for October, B for November and C for
December).
For example, the serial number 1W08Axxxxxxxx means October of year 2008.
Page 4

Rugged Computing
Users Manual Rugged Table PCs
4
Customer Service
We provide service guide for any problem as follow steps:First, visit the website
at http://www.winmate.com.tw to find the update information about the product.
Second, contact with your distributor, sales representative, or our customer service
center for technical support if you need additional assistance. You may have the
following information ready before you call:
Product serial number
Peripheral attachments
Software (OS, version, application software, etc.)
Description of complete problem
The exact wording of any error messages
In addition, free technical support is available from our engineers every
business day. We are always ready to give advice on application requirements or
specific information on the installation and operation of any of our products. Please
do not hesitate to call or e-mail us.
Notice
1. Do not touch the LCD panel surface with sharp or hard objects.
2. Do not use abrasive cleaners, waxes or solvents for cleaning, use only a dry or
damp, soft cloth.
3. Use only with a high quality, safety-approved, AC/DC power adapter.
Page 5
Rugged Computing
Users Manual Rugged Table PCs
5
Safety Precautions
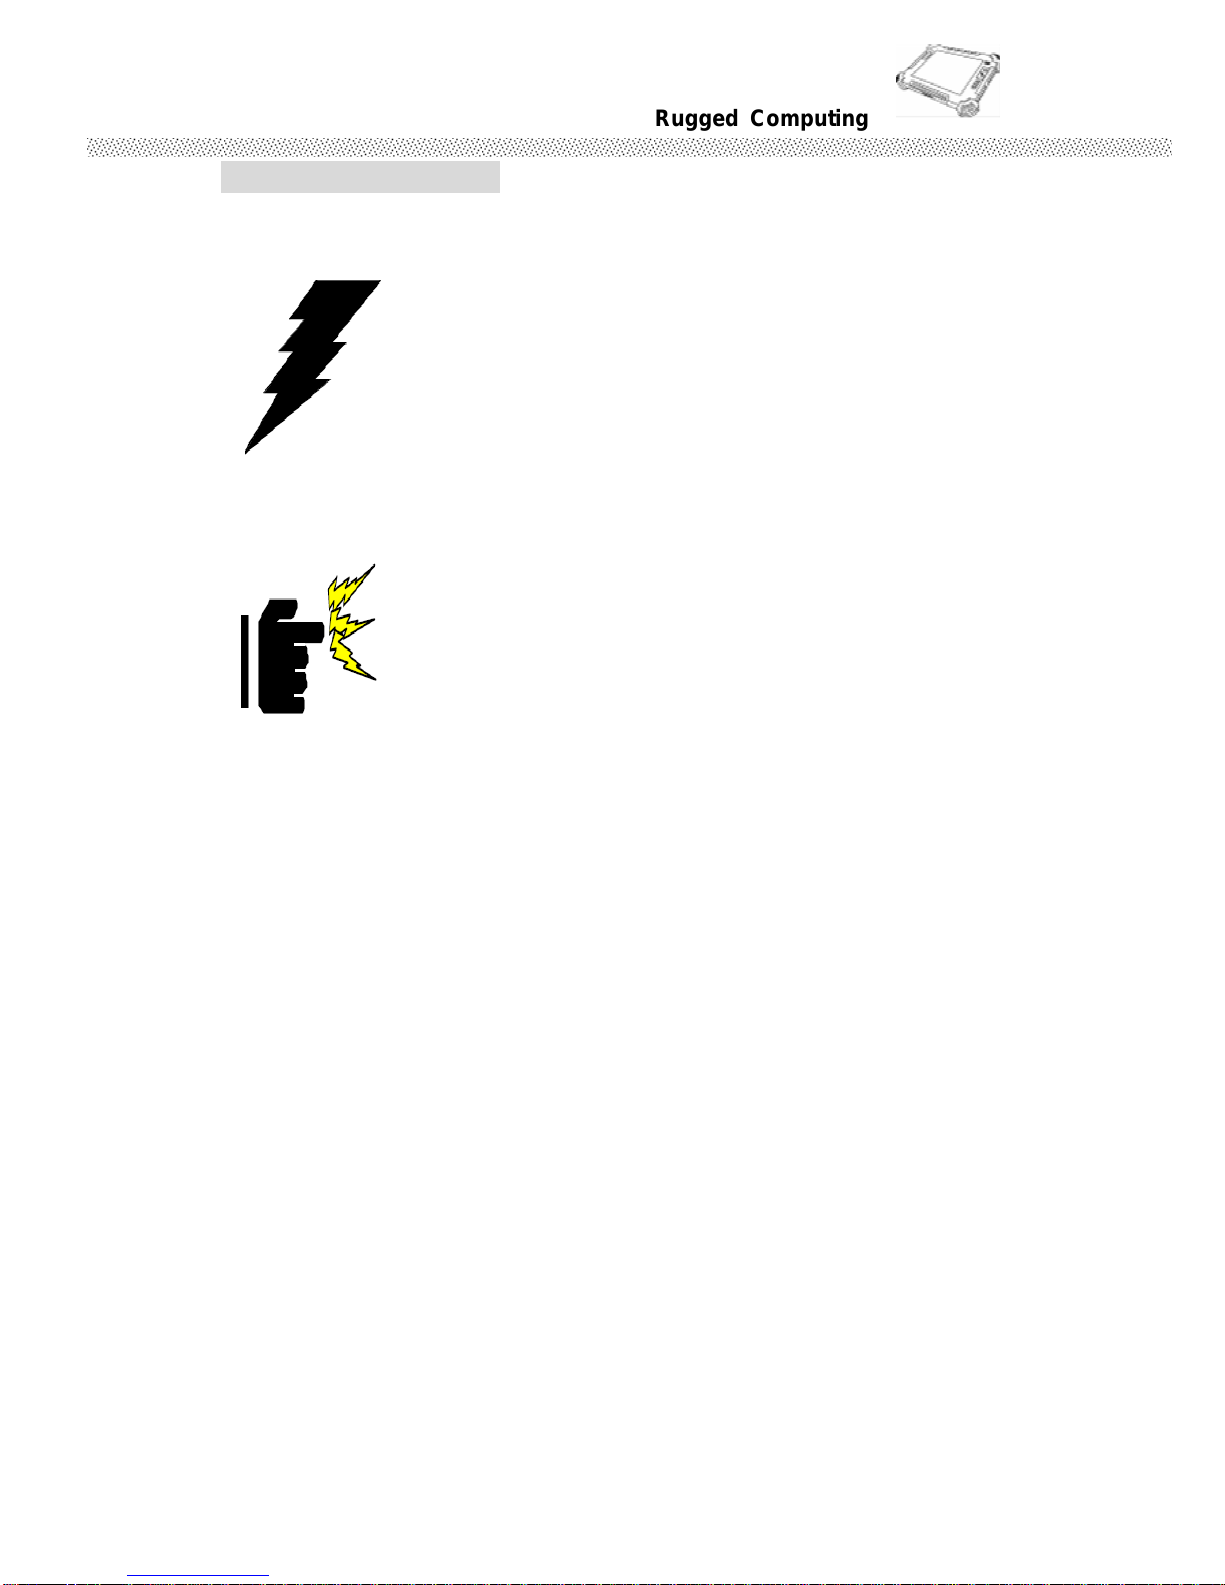
Warning!
Always completely disconnect the power cord from your
chassis whenever you work with the hardware. Do not make
connections while the power is on. Sensitive electronic
components can be damaged by sudden power surges. Only
experienced electronics personnel should open the PC chassis.
Caution!
Always ground yourself to remove any static charge before
touching the CPU card. Modern electronic devices are very
sensitive to static electric charges. As a safety precaution, use a
grounding wrist strap at all times. Place all electronic
components in a static-dissipative surface or static-shielded bag
when they are not in the chassis.
Page 6
Rugged Computing
Users Manual Rugged Table PCs
6
Packaging List
This product is shipped with the items list below. Please make sure that all are in
your package.
Item Description Note
Default Packing Accessories
1 1 piece of 6 Cell Li-Ion Battery Pack
2
1 piece of Rugged Tablet PC Quick Start
Guide
3 1 piece of CD for System Driver Utility.
4
1 piece of 19V Adapter w/ Standard Power
Cord.
(Euro / U.S. Std type, 1.8m)
5 1 piece of Stylus
6 1 piece of Slim Handheld Bag
Optional Accessories
1
1 piece of CD for Recovery CD for Operation
System (Windows 7 Embedded).
Optional with Windows 7
Embedded pre-installed.
2 1 piece of Win 7 Recovery Users Guide.
Optional with Windows 7
Embedded pre-installed.
3
1 piece of Handstrip with 4 pieces M3x5
screws
4
1 piece of Handle Belt can lock on the side of
the Tablet PC to carry on.
5
1 piece of Carry Bag, the Carry Bag is
convenient and easy for user to carry with
the Tablet PC.
6
1 piece of Carry Belt, can use with Carry Bag
or use stand-alone to click with the four
corners of Tablet PC to carry on.
7
1 pieces of Desktop Docking Stand with a
battery charger station
8 1 pieces of Car power charger adapter
Page 7

Rugged Computing
Users Manual Rugged Table PCs
7
9 Other battery if necessary in order
Page 8

Rugged Computing
Users Manual Rugged Table PCs
8
Contents
IMPORTANT SAFETY INSTRUCTIONS.............................................................2
PACKAGING LIST ...................................................................................................6
CHAPTER 1 GETTING STARTED ......................................................................11
1.1 C
ONNECTING THE AC POWER
............................................................................................................... 11
1.2 T
URNING ON AND OFF THE TABLET
PC ............................................................................................. 12
1.2.1
T
URNING ON THE TABLET
PC ................................................................................................... 12
1.2.2
T
URNING OFF THE TABLET
PC.................................................................................................. 12
1.3
T
HE OPTIMIZED USE FOR SUNLIGHT READABLE TOUCHSCREEN
................................................. 13
1.4 T
AKING A LOOK AT
I/O F
UNCTIONS (FOR
10.4
INCH RUGGED TABLET
PC)......................... 14
1.5 T
AKING A LOOK AT
I/O F
UNCTIONS (FOR
12.1
INCH RUGGED TABLET
PC)......................... 19
1.6 P
RODUCT FEATURES AND SPECIFICATION
........................................................................................ 25
1.6.1
Product Features .......................................................................................................................25
1.6.2
Product Specification ............................................................................................................... 26
CHAPTER 2 OPERATING TABLET PC AND HOTTAB HOTKEY UTILITY
....................................................................................................................................29
2.2 S
TARTING AND STOPPING THE TABLET
PC....................................................................................... 29
2.2 Q
UICK TO KNOW MENU AND HOTTAB HOTKEY FUNCTION
........................................................... 30
2.2.1
How to use Menu Function .................................................................................................... 30
2.2.2
How to use HotTab Hotkey Function ................................................................................. 34
2.2.3
Connecting to a Wireless Network and Bluetooth ........................................................ 42
2.2.4 Using the Bluetooth Wireless Feature ................................................................................ 43
2.2.5 Using the 3G Feature ................................................................................................................ 46
2.2.6
Using the GPS Feature ............................................................................................................ 49
2.2.7 Using the Camera Feature (Optional
)
.......................................................................... 52
CHAPTER 3 TABLET PC POWER MANAGEMENT.........................................56
3.1 A
BOUT AC ADAPTER
............................................................................................................................... 56
3.2 C
HARGING AND CHECKING CHARGING STATUS
............................................................................... 57
3.2.1
Charging the Battery Pack..................................................................................................... 57
3.2.2
Charging Approaches............................................................................................................... 58
3.2.3
Checking the Battery Level ................................................................................................... 60
3.2.4
Battery Low Signals and Actions ......................................................................................... 61
3.3 R
EPLACING THE BATTERY PACK
........................................................................................................... 62
3.4 P
OWER-SAVING TIPS
............................................................................................................................. 64
CHAPTER 4 EXPANDING YOUR TABLET PC ................................................66
4.1 H
OW AND WHEN TO USE
BIOS S
ETUP
.............................................................................................66
4.2 BIOS F
UNCTIONS
................................................................................................................................... 67
4.2.1 Main Menu........................................................................................................................................ 67
4.2.2 Advanced Menu.............................................................................................................................. 67
4.2.3 Boot Menu........................................................................................................................................ 68
4.2.4 Exit Menu ......................................................................................................................................... 69
Page 9

Rugged Computing
Users Manual Rugged Table PCs
9
CHAPTER 5 DRIVER INSTALLATION ..........................................................71
5.1 I
NSTALLATION OF CHIPSET DRIVER INSTALLATION
......................................................................71
5.2 G
RAPHIC DRIVER INSTALLATION
........................................................................................................ 75
5.3 A
UDIO DRIVER INSTALLATION
............................................................................................................ 78
5.4 LAN D
RIVER INSTALLATION
................................................................................................................ 81
5.5 HOTT
AB UTILITY DRIVER INSTALLATIONS
...................................................................................... 83
5.6 W
IRELESS
LAN D
RIVER INSTALLATION
...........................................................................................85
5.7 B
LUETOOTH DRIVER INSTALLATIONS
................................................................................................87
5.8 3G M
ODULE DRIVER INSTALLATIONS
................................................................................................91
5.9 GPS M
ODULE DRIVER INSTALLATIONS
.............................................................................................92
5.10
T
OUCH DRIVER INSTALLATION
................................................................................................95
CHAPTER 6 CARING YOUR TABLET PC ....................................................101
6.1 G
ENERAL PROTECTION TIPS FOR TABLET
PC ................................................................................101
6.2 C
LEANING THE TABLET
PC..................................................................................................................101
6.3 B
ATTERY PROTECTION TIPS
............................................................................................................... 103
6.4 T
OUCH SCREEN PROTECTION TIPS
................................................................................................... 104
6.5 T
ROUBLE SHOOTING FROM A TO
L ....................................................................................................105
A. Battery Problem ................................................................................................................................. 105
B. Bluetooth Transmission Problem................................................................................................. 105
C. Display Problem ................................................................................................................................. 105
D. Date/Time Problems ........................................................................................................................ 105
E. Hardware Driver Problem ...............................................................................................................106
F. Hard Drive Problem........................................................................................................................... 106
G. LAN Problem ....................................................................................................................................... 107
H. Power Management Problems ...................................................................................................... 107
I. Startup Problems................................................................................................................................107
J. Sound Problems .................................................................................................................................. 108
K. Wireless LAN Problem...................................................................................................................... 109
Page 10
Rugged Computing
Users Manual Rugged Table PCs
10
CHAPTER 1
Getting Started
Page 11
Rugged Computing
Users Manual Rugged Table PCs
11
CHAPTER 1 GETTING STARTED
This chapter guides you to get the Rugged Tablet PC ready for operating.
1.1 Connecting the AC Power
Our tablet PC can operate either on the external AC power adapter or internal
battery power. It is suggested that you use AC power when you start up the
tablet PC first time.
**Caution
Use only the AC adapter included with your tablet PC. Using other AC adapters
may damage the tablet PC.
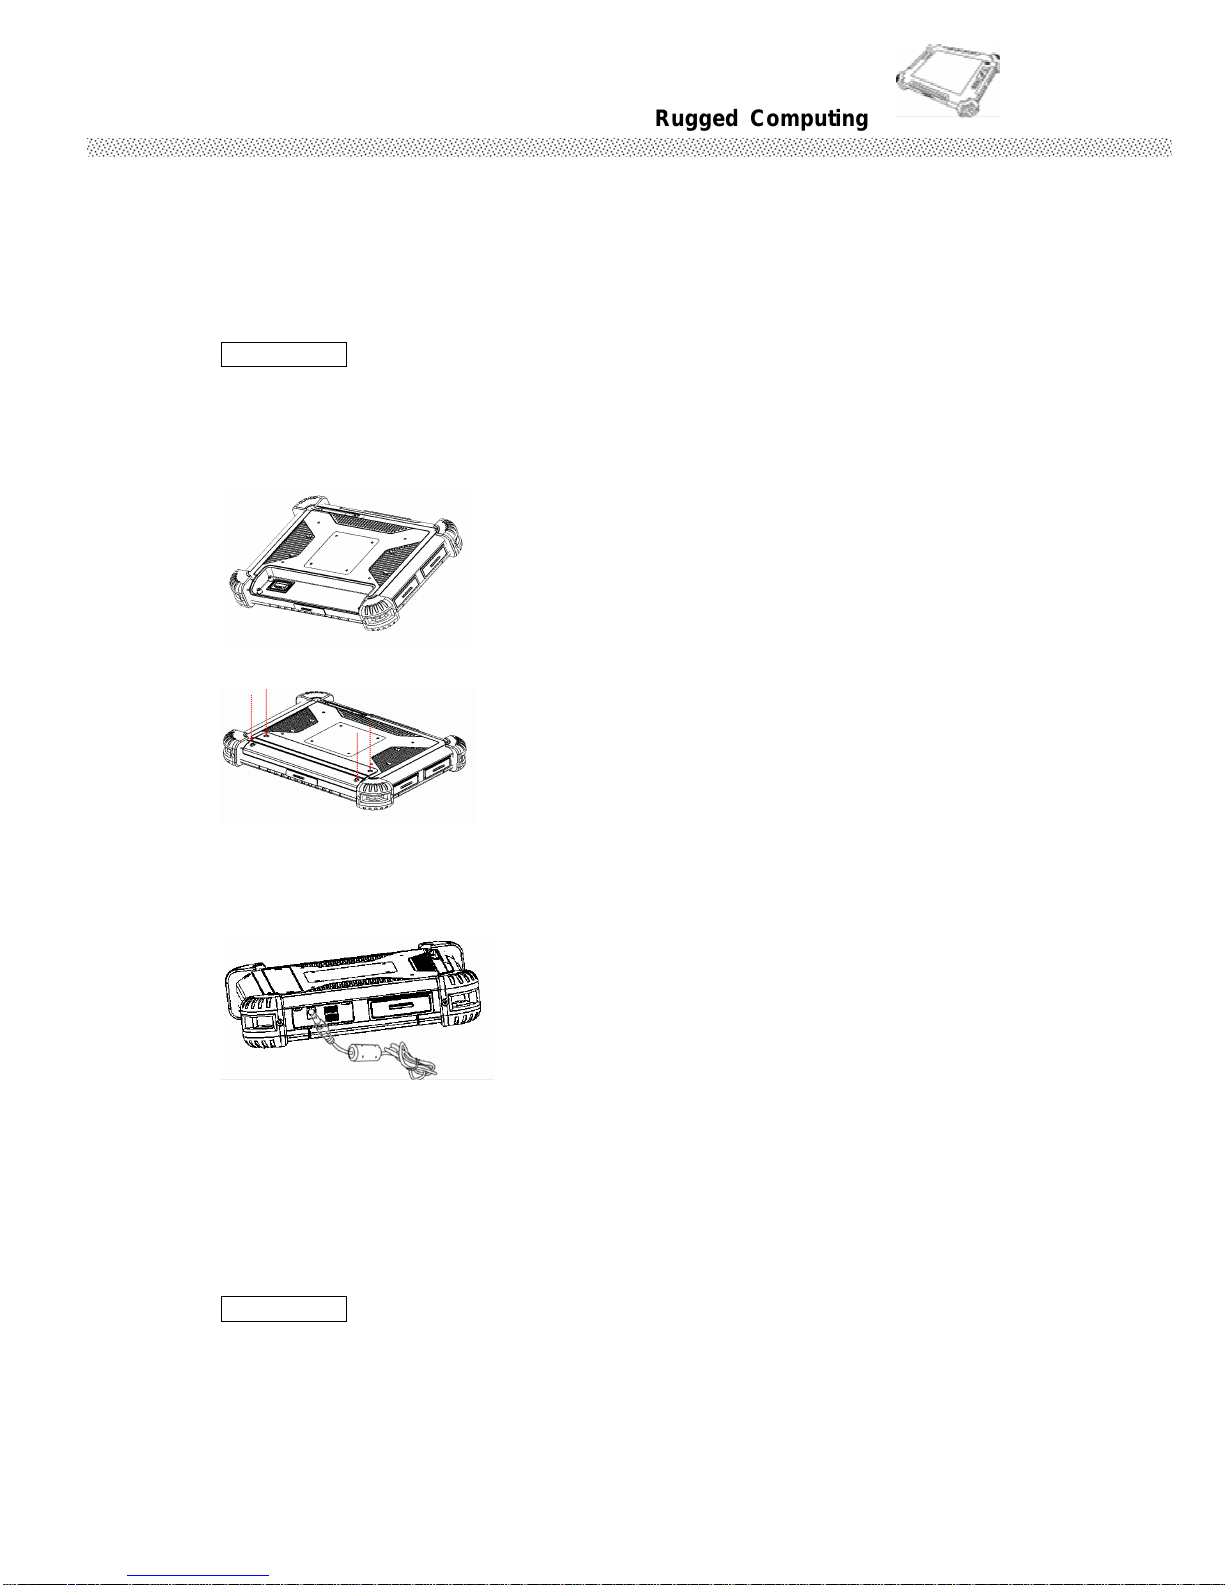
1. Make sure that the tablet PC is turned off.
2. Place the tablet PC upside down.
3. Put Battery Pack into the battery slot and screw tightly with four screws.
4. Plug the DC cord of the AC adapter to the power connector of the tablet PC.
5. Plug the female end of the AC power cord to the AC adapter and the male end to
the power electrical outlet.
6. Turn on the Tablet PC few seconds later after power is being supplied from the
electrical outlet to the AC adapter.
7. When the AC adapter is connected, the Battery Pack is also under charging. You
can check the Battery Status LED indicator to see the currently progress. The
indicator turns to green when is fully charged.
(For information on using battery power, see “Chapter 3 The Power Management”)
**Caution
When you disconnect the AC adapter, disconnect from the electrical outlet first
and then from the tablet PC. A reverse procedure may damage the AC adapter
or the tablet PC.
When unplugging the connector, always hold the plug head. Never pull on the
cord.
Page 12
Rugged Computing
Users Manual Rugged Table PCs
12
1.2
Turning On and Off the Tablet PC
1.2.1 Turning on the Tablet PC
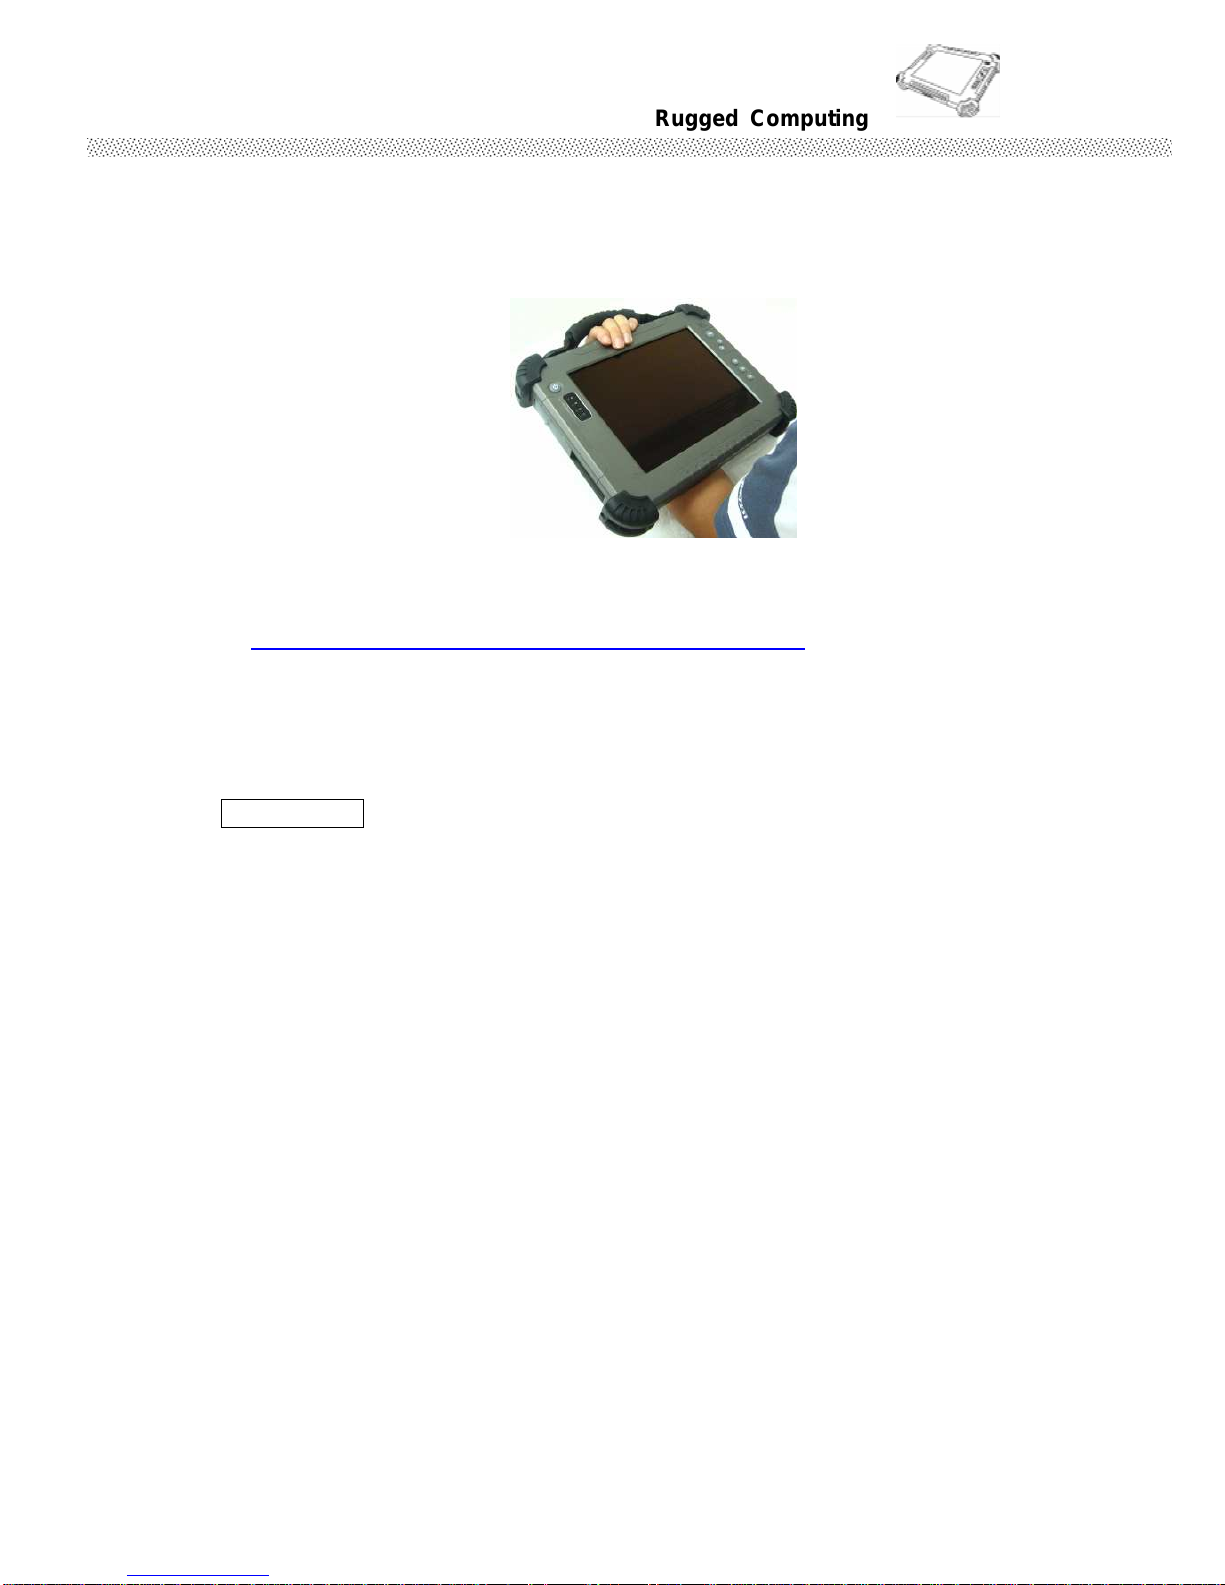
1. Place your tablet PC on a flat and stable surface or holding the tablet PC on your
hand.
2. Make sure that the tablet PC is either connected to AC power or the battery pack
with power.
3. Press the power button by 4 seconds to start it.
1.2.2 Turning off the Tablet PC
To turn off the tablet PC power, use the “Shut Down” command of your
operating system.
**Caution
If you have to turn the tablet PC on again immediately after turning it
off, wait for at least five seconds. Turning the tablet PC off and on
rapidly can damage it.
Page 13
Rugged Computing
Users Manual Rugged Table PCs
13
1.3 The Optimized Use for Sunlight Readable Touchscreen.
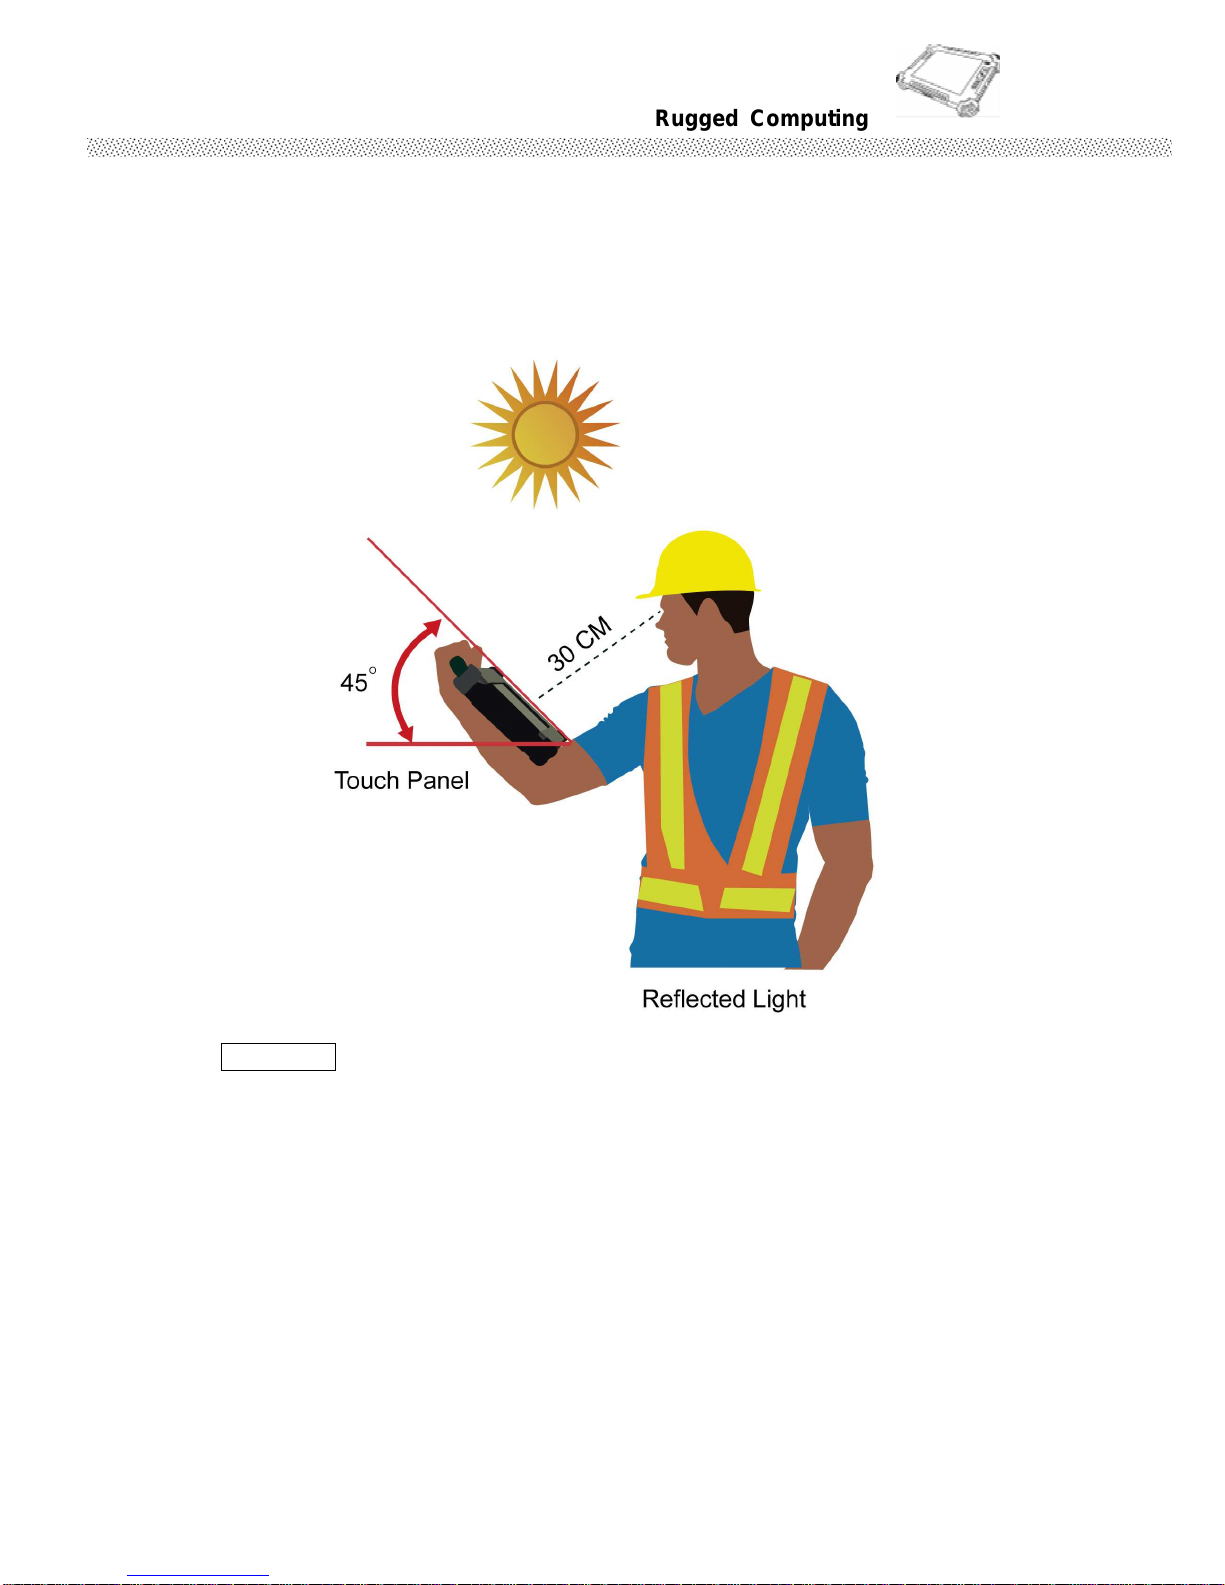
With the imposed reflective function, the modified LCD can reflect the ambient light
passing the LCD cell and utilize the reflected light beams as its illumination. The
stronger the ambient light is, the brighter the LCD will appear. As a result, the modified
LCD is viewable under lighting conditions. The optimized angle of view is fourty-five
degree. And the optimized distance of view is 30cm.
**Caution
Although transflective LCD is mainly used in outdoor environment and it may
increase the reflective lights under sunlight, it is suggested that you should keep
the LCD in appropriate temperature for operation and storage, and avoid direct
sunlight if possible. To ensure the transflective LCD work stably, 0~50°C
(32-121°F) operation and storage temperature is suitable.
Light Source
Page 14
Rugged Computing
Users Manual Rugged Table PCs
14
1.4 Taking a Look at I/O Functions (for 10.4 inch Rugged Tablet PC)
This section we will show the Tablet PC external connection parts and their
functions.
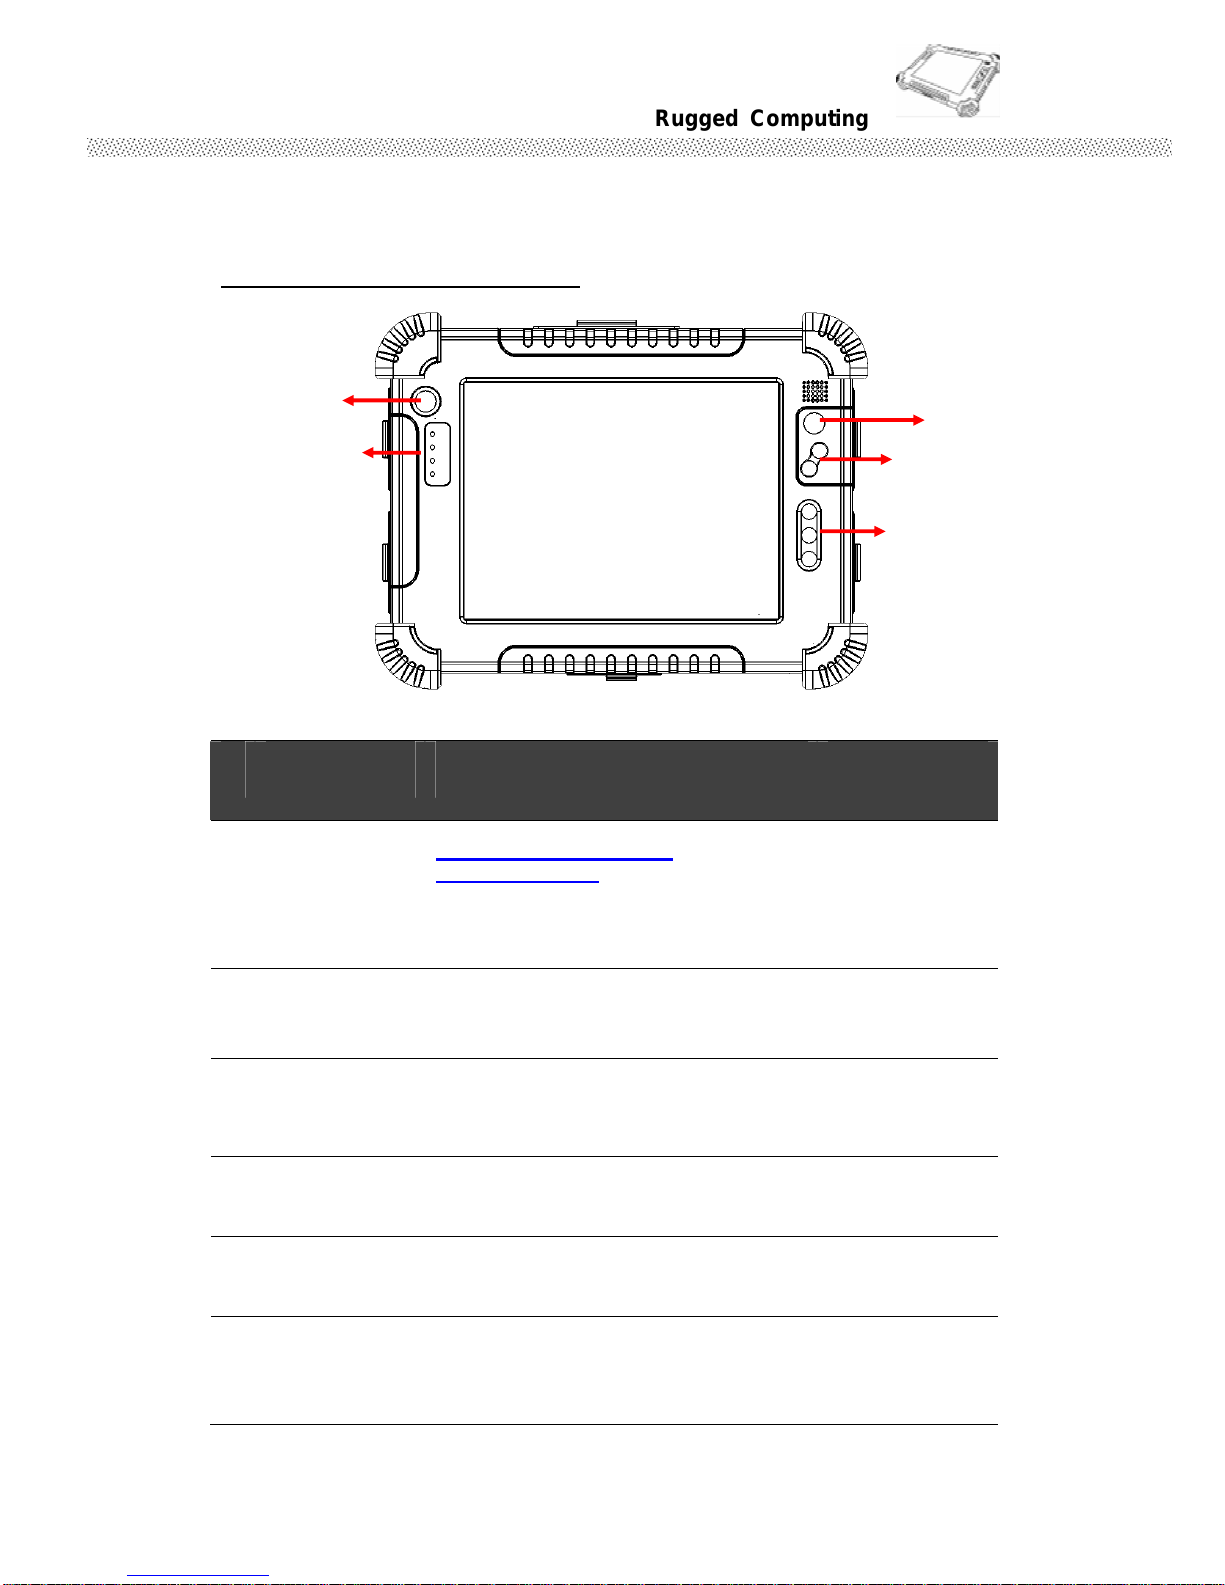
Front side Control Functions
# Components Function Description See Other
Intro.
1 Power On
Button
Push 4 seconds
continuous
to turn-on the PC.
Need 8 seconds continuous push to
force the Tablet PC turn-off
immediately.
2 LED Indicator From left to right shows the status
about Power mode, Battery mode,
Storage and Wi-Fi status mode.
3 Menu Push Menu function to show Brightness,
Volume,Battery status and WiFi/
Bluetooth on/off.
Chapter 2.2.1
4 Up Push Up key to increse Brightness or
Volume under Menu function.
Chapter 2.2.1
5 Down Push Down key to decrese Brightness or
Volume under Menu function.
Chapter 2.2.1
6 Hotkey 6 programmable Hot-key for user to
define by application, default first short
push key (F1 short) will turn-on Hot TAB
AP Utility.
Chapter 2.2.2
Menu
Up & Down
F1,
F2,
F3
Power On
Button
LED Indicator for
Power, Battery,
HDD and Wi-Fi
Status
Page 15
Rugged Computing
Users Manual Rugged Table PCs
15
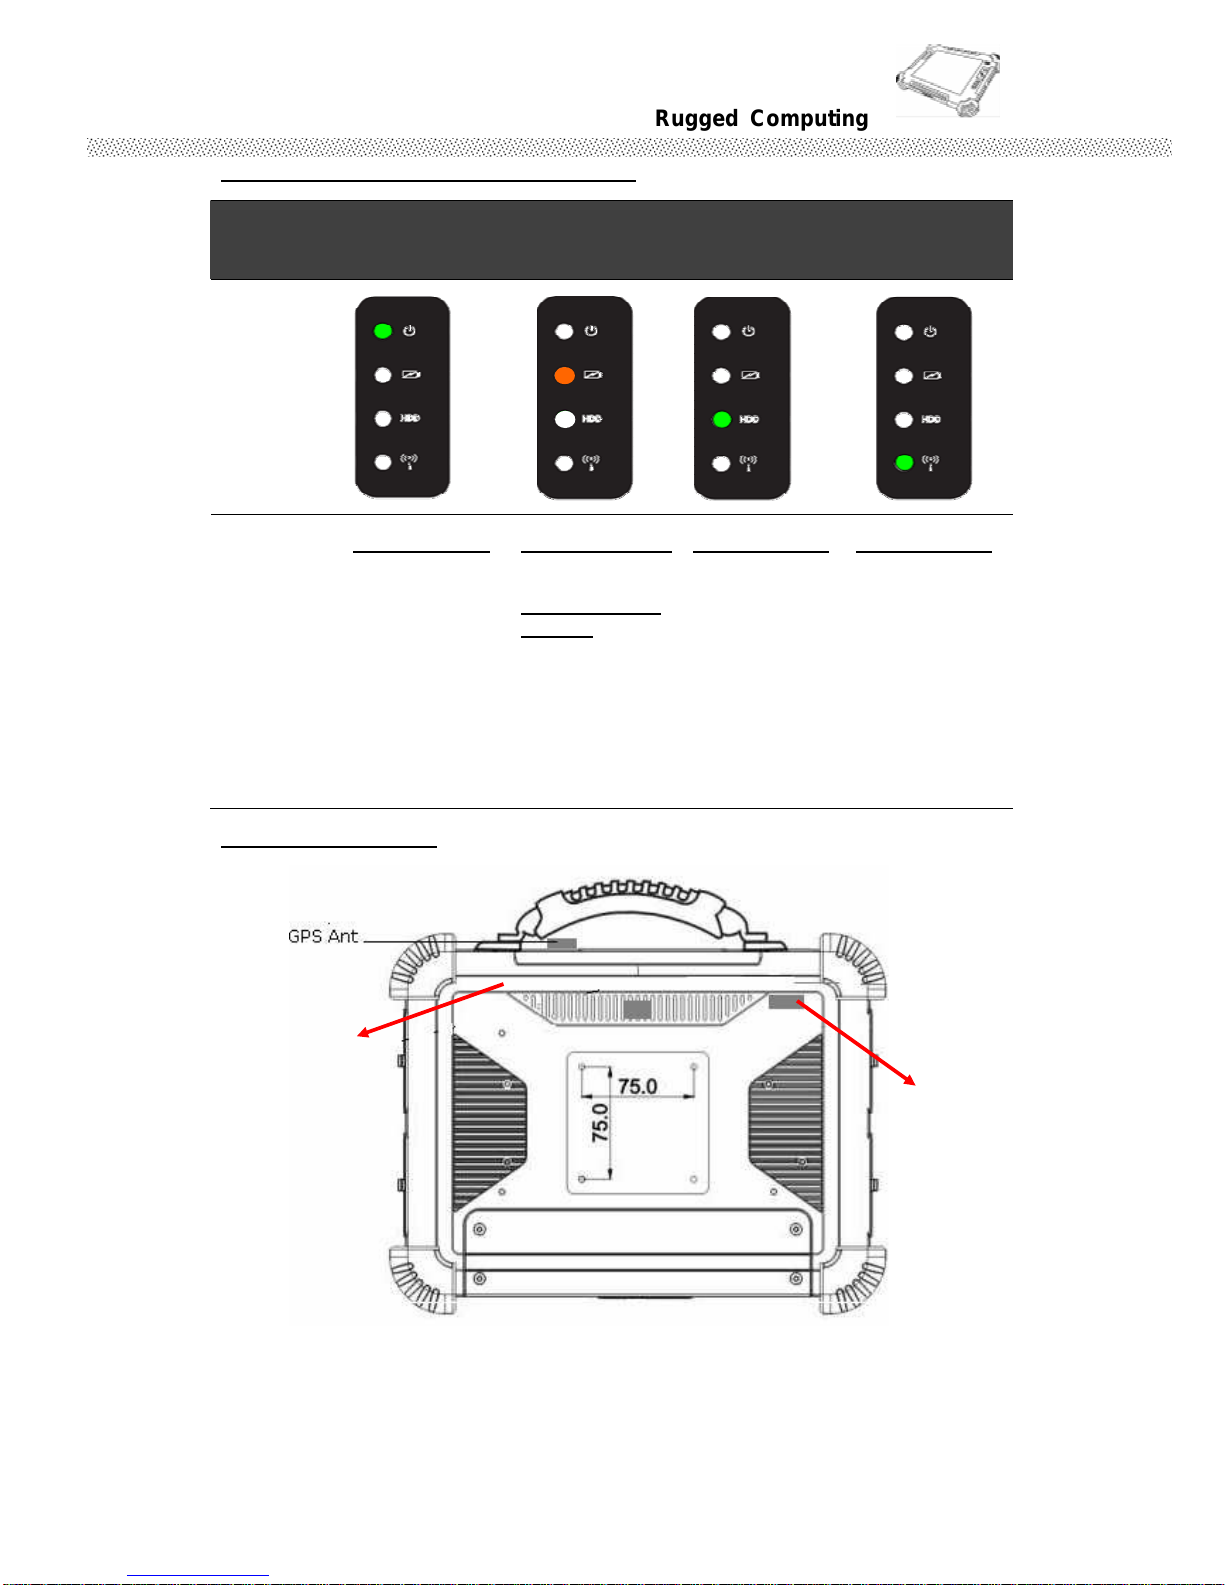
LED Indicator Status Description
LED Term Power mode Battery Status
Storage
Status
Wi-Fi Status
LED
Indicator
Indicator
Status
Description
Green light::::
when Power
On.
No light when
Power Off.
Orange Light::::
Under charging
Red Blinking
Light::::Low
Battery
Check Chapter
3.2.3/ 2.4 for
low battery and
replacing
battery
Green light::::
when storage
under
operation.
No light when
storage stop
operation.
Green light::::
when Wi-Fi
under
operation.
No light when
Wi-Fi stop
operation.
Rear side Stylus
Stylus Carry
Hole
WiFi Ant.
Page 16
Rugged Computing
Users Manual Rugged Table PCs
16
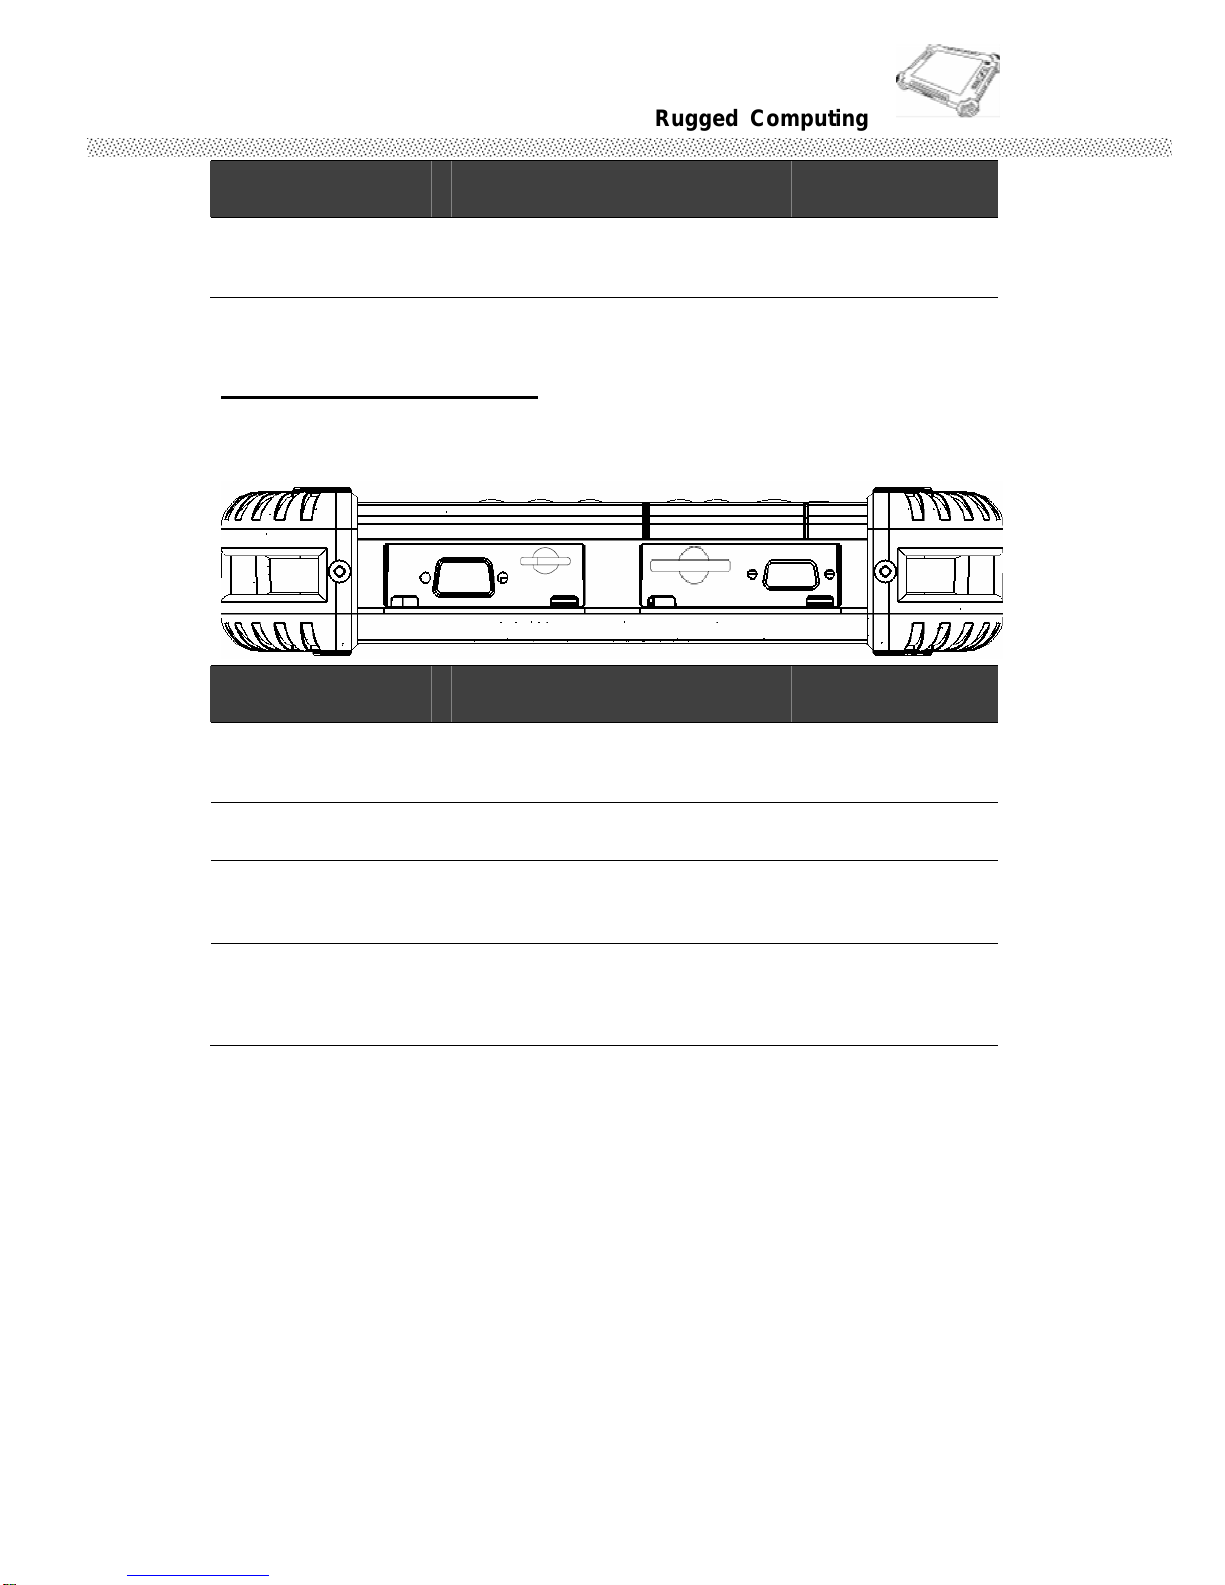
Front Side
# Components Function Description See Other Intro.
1 Stylus Slot Easy to take out and plug in the
stylus pen.
The Tablet PC has one stylus pen in accessory. Our default stylus is only recommended for
use in our Tablet PC.
Right side Input/ Output
# Components Function Description See Other Intro.
1 RS232 Port Connect RS232 cable D-SUB 9pin to
the RS232 port.
2 Sim Card Slot
3 SD Card Slot
4 VGA Port Connect VGA cable to the VGA
output port, and the other side
connect to monitor VGA input.
Page 17
Rugged Computing
Users Manual Rugged Table PCs
17
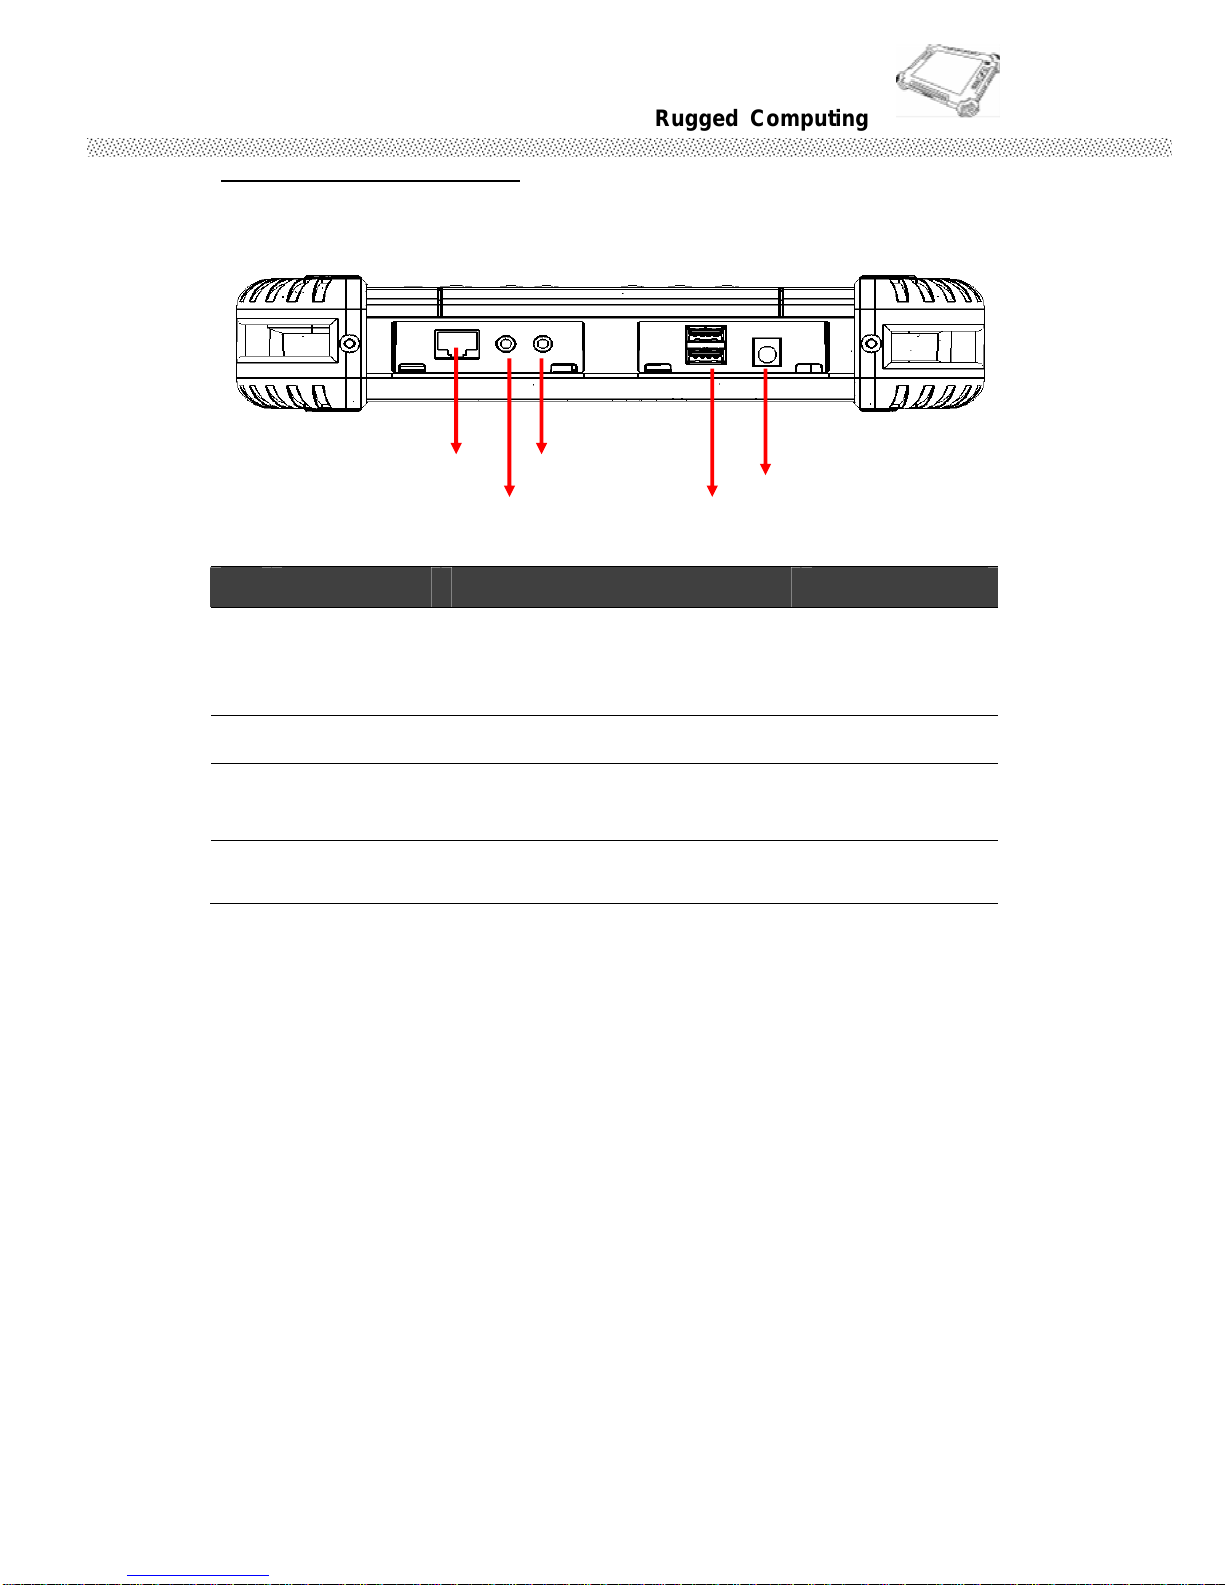
LAN
Audio Out USB x2
Power Input
Front Side
Micro In
Left side Input/ Output
# Components Function Description See Other Intro.
1 LAN Port The product can support
10/100/1000 Mbit Giga LAN
ethernet, connect RJ-45 LAN cable
to LAN port.
2 Audio Port Audio ouput, Microphone input
3 USB Two USB2.0 compliance ports for
user to connect any USB device.
4 Power Jack Connect 19V Adapter to the Power
jack.
Page 18
Rugged Computing
Users Manual Rugged Table PCs
18
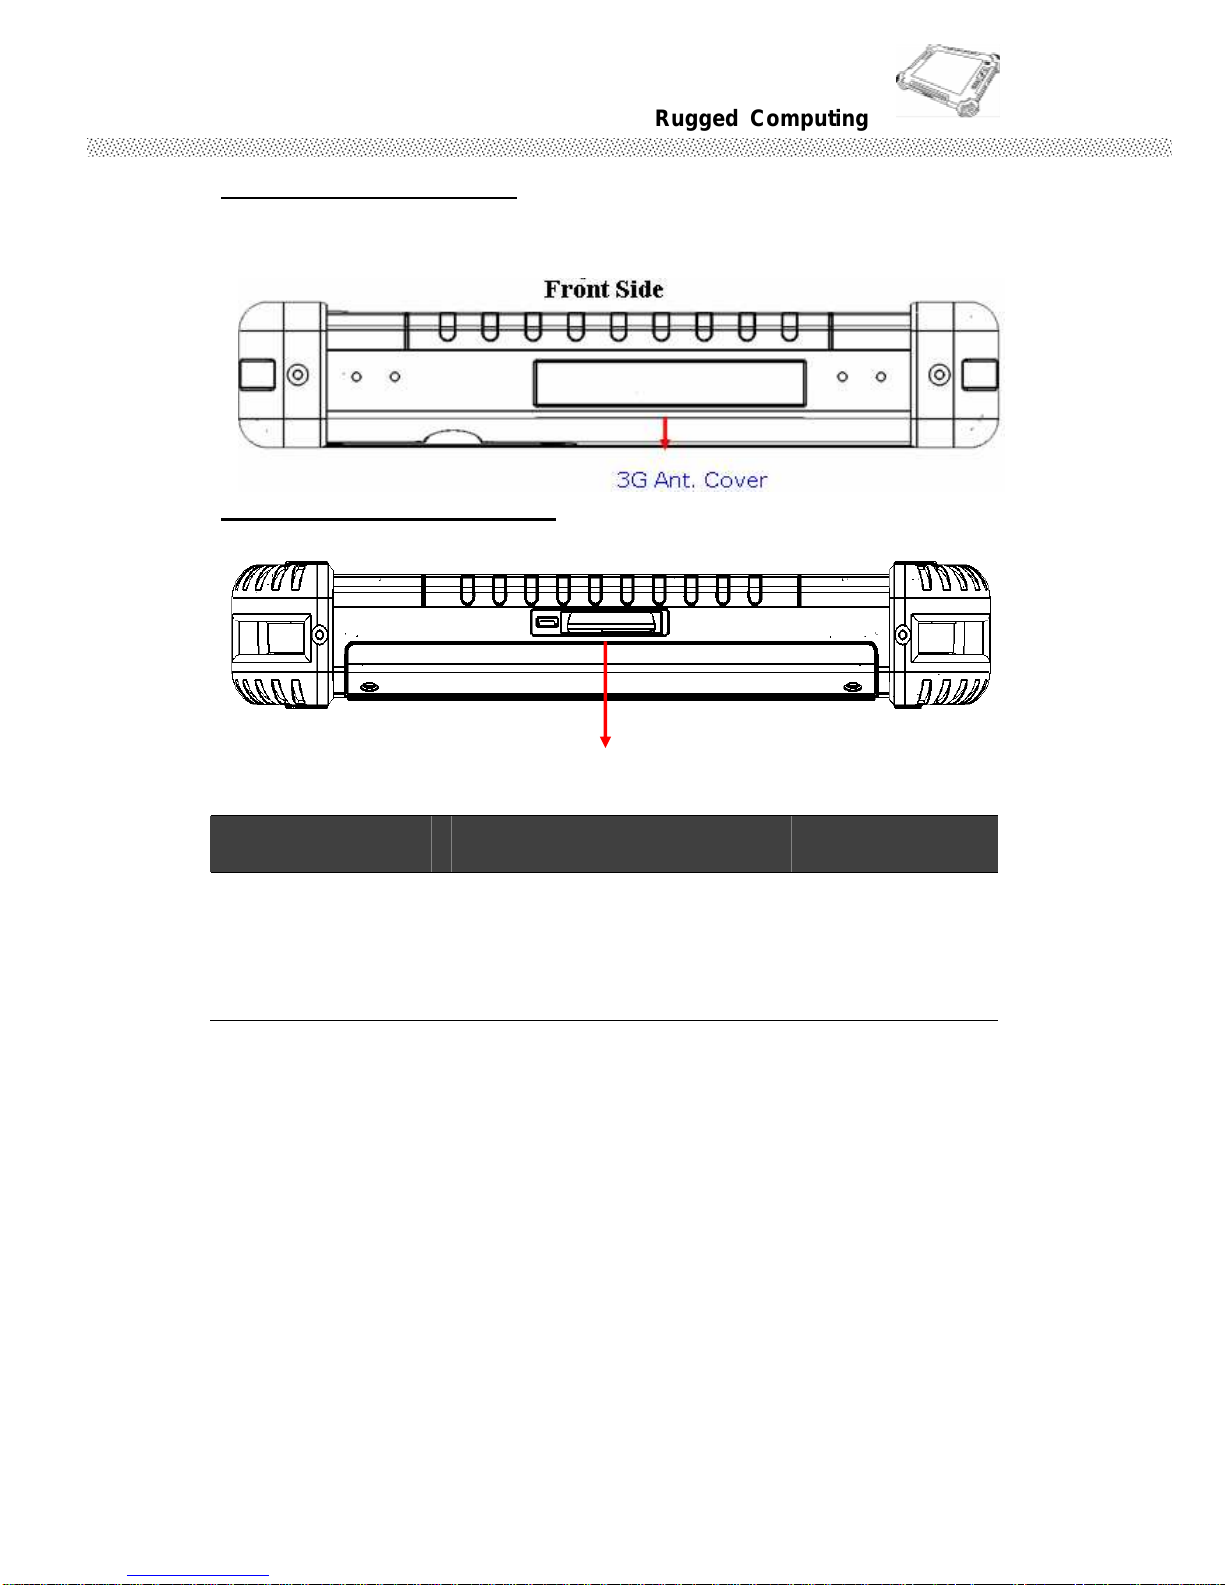
Top side Input/ Output
Button side Input/ Output
# Components Function Description See Other Intro.
1 Docking Slot The Docking slot can connect to
docking device as docking cradle,
the maximum funciotn of the
docking connector can support 1x
power input, 4 USB2.0 ports.
Front Side
Docking Slot
Page 19
Rugged Computing
Users Manual Rugged Table PCs
19
1.5 Taking a Look at I/O Functions (for 12.1 inch Rugged Tablet PC)
This section we will show the Tablet PC external connection parts and their
functions.
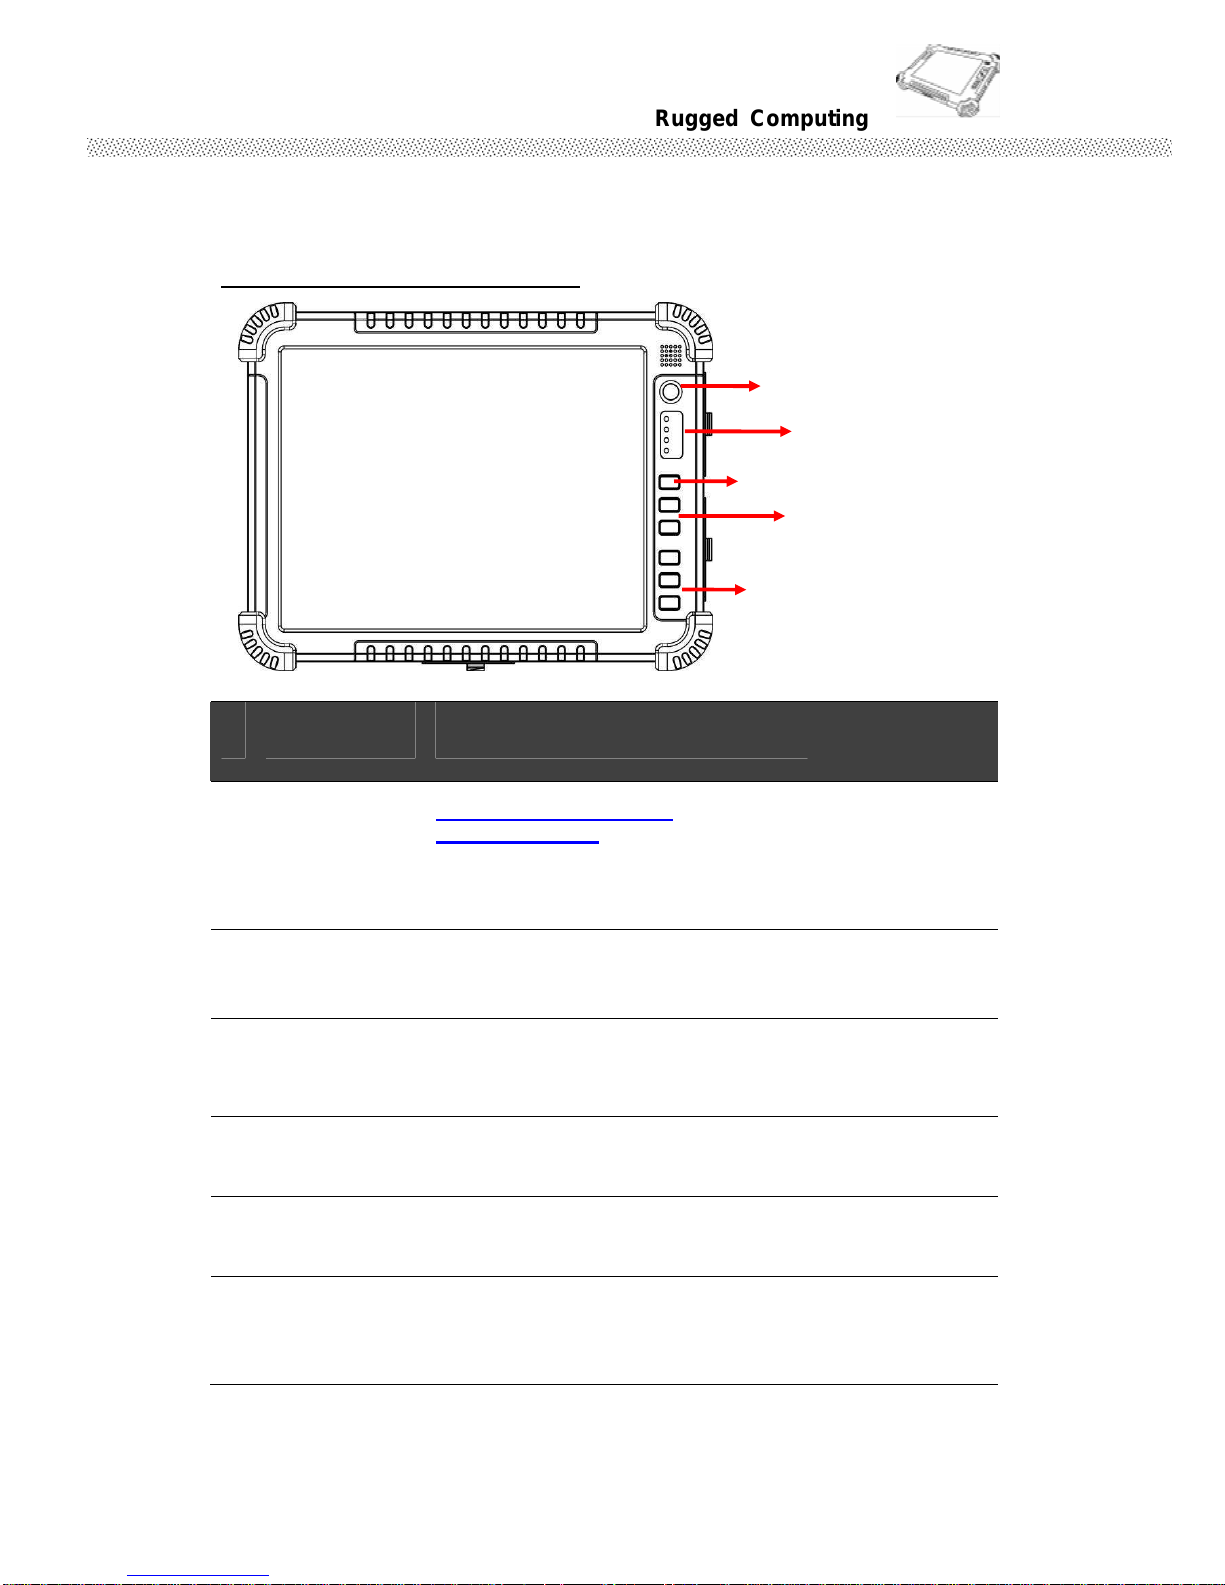
Front side Control Functions
# Components Function Description See Other
Intro.
1 Power On
Button
Push 4 seconds
continuous
to turn-on the PC.
Need 8 seconds continuous push to
force the Tablet PC turn-off
immediately.
2 LED Indicator From left to right shows the status
about Power mode, Battery mode,
Storage and Wi-Fi status mode.
3 Menu Push Menu function to show Brightness,
Volume,Battery status and WiFi/
Bluetooth on/off.
Chapter 2.2.1
4 Up Push Up key to increse Brightness or
Volume under Menu function.
Chapter 2.2.1
5 Down Push Down key to decrese Brightness or
Volume under Menu function.
Chapter 2.2.1
6 Hotkey 6 programmable Hot-key for user to
define by application, default first short
push key (F1 short) will turn-on Hot TAB
AP Utility.
Chapter 2.2.2
Menu
Up & Down
F1,
F2,
F3
Power on Button
LED Indicator for Power, Battery,
HDD and Wi-Fi Status
Page 20
Rugged Computing
Users Manual Rugged Table PCs
20
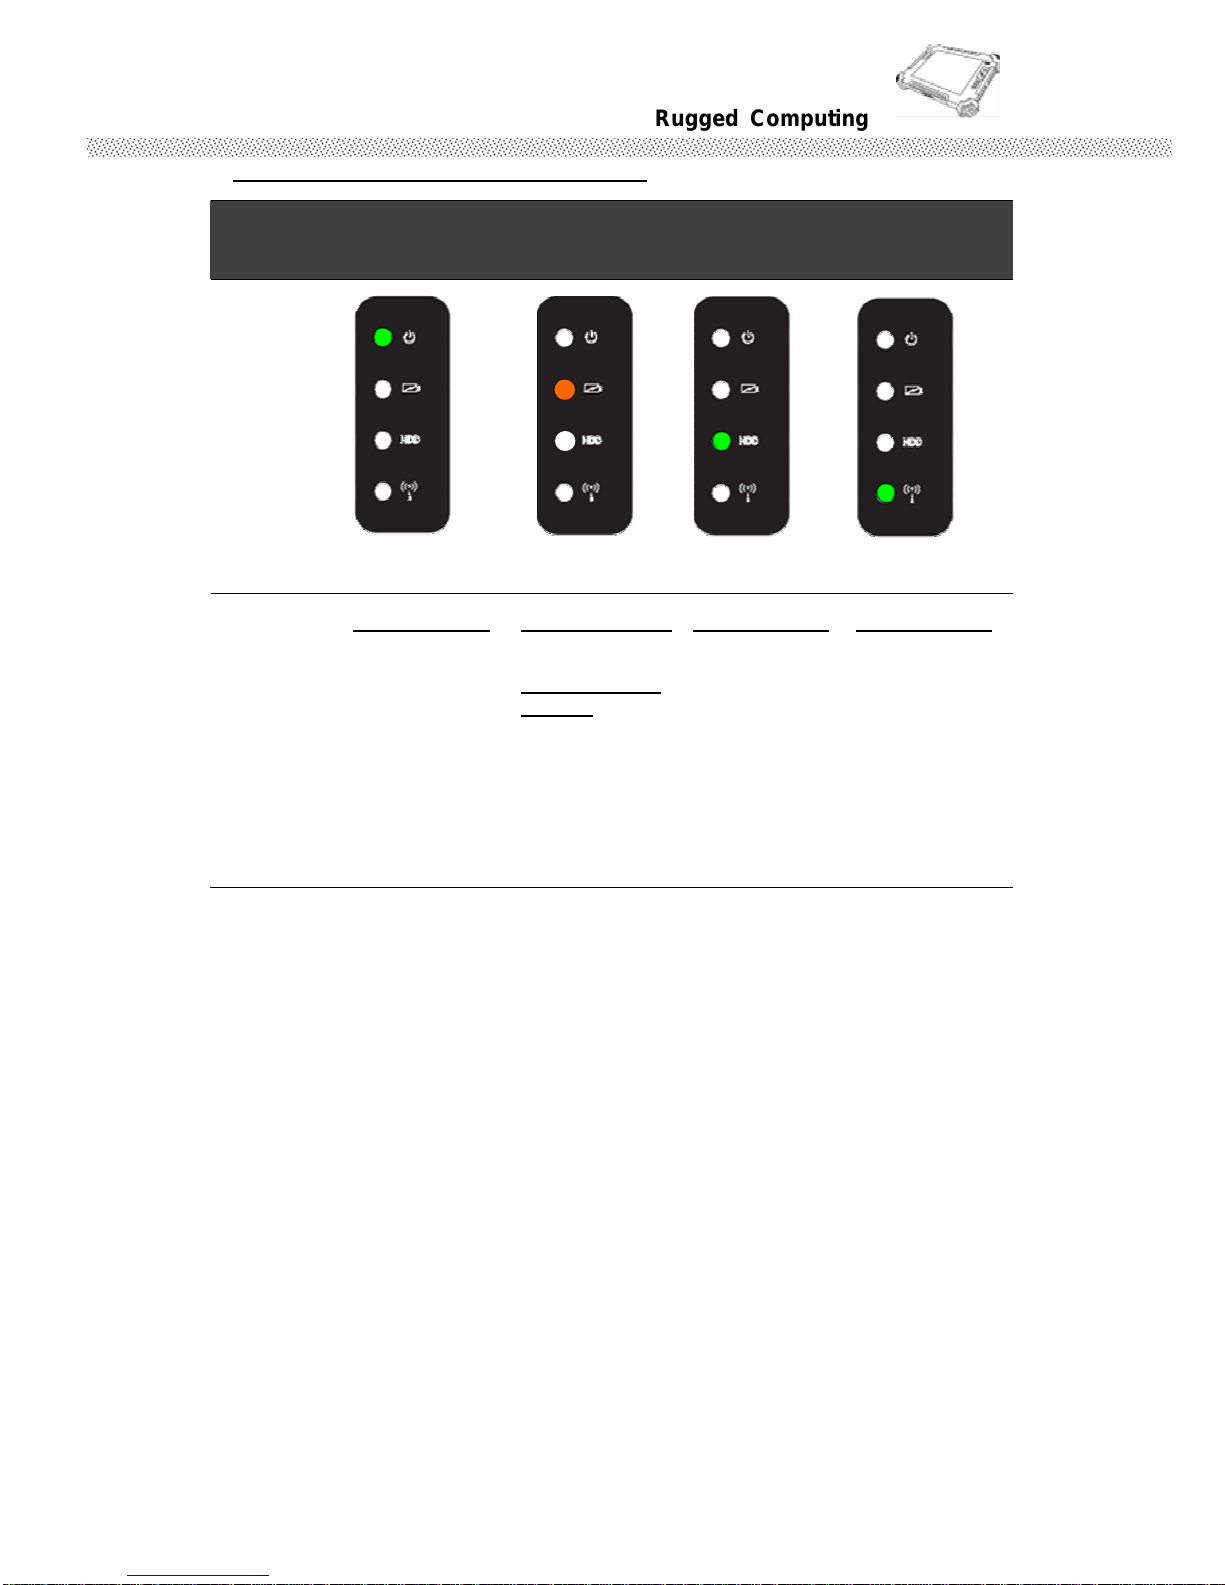
LED Indicator Status Description
LED Term Power mode Battery Status
Storage
Status
Wi-Fi Status
LED
Indicator
Indicator
Status
Description
Green light::::
when Power
On.
No light when
Power Off.
Orange Light::::
Under charging
Red Blinking
Light::::Low
Battery
Check Chapter
3.2.3/ 2.4 for
low battery and
replacing
battery
Green light::::
when storage
under
operation.
No light when
storage stop
operation.
Green light::::
when Wi-Fi
under
operation.
No light when
Wi-Fi stop
operation.
Page 21
Rugged Computing
Users Manual Rugged Table PCs
21
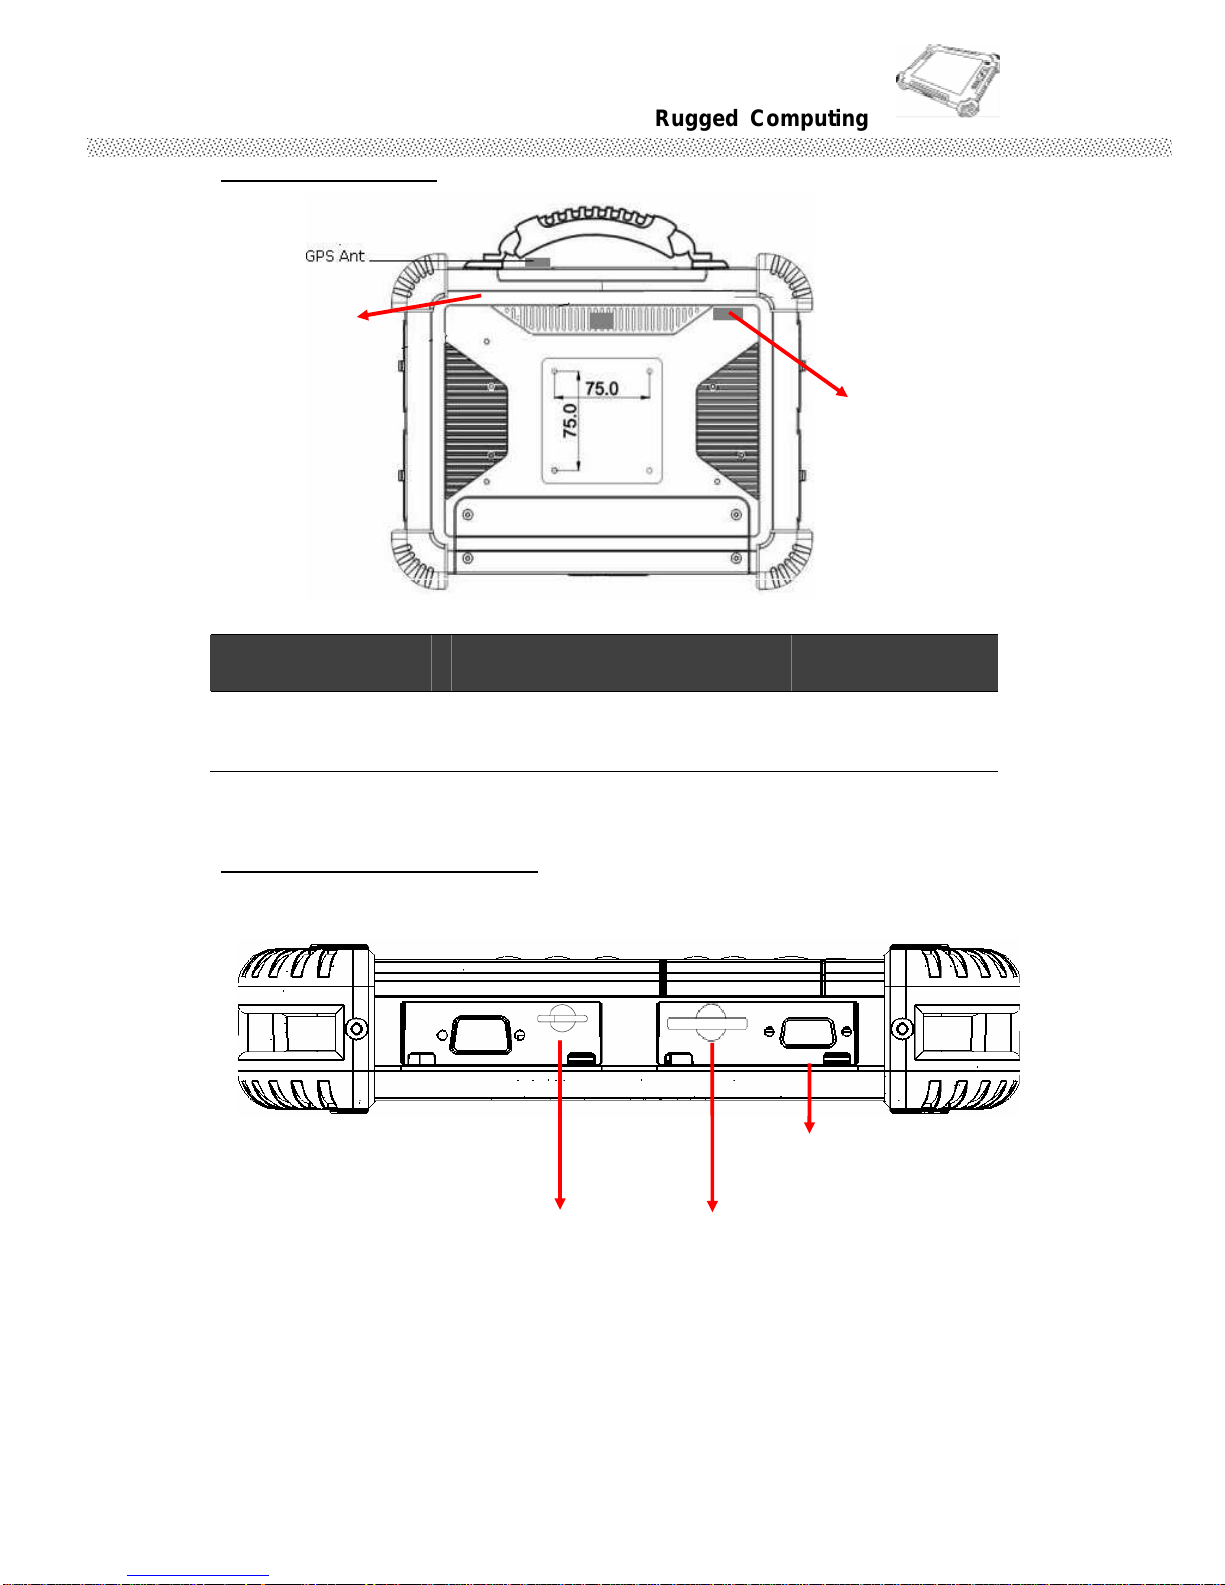
RS-232
SIM Card
VGA
SD Card
Rear side Stylus
# Components Function Description See Other Intro.
1 Stylus Slot Easy to take out and plug in the
stylus pen.
The Tablet PC has one stylus pen in accessory. Our default stylus is only recommended for
use in our Tablet PC.
Right side Input/ Output
Stylus Carry
Hole
WiFi Ant.
Front Side
Page 22

Rugged Computing
Users Manual Rugged Table PCs
22
# Components Function Description See Other Intro.
1 RS232 Port Connect RS232 cable D-SUB 9pin to
the RS232 port.
2 Sim Card Slot
3 SD Card Slot
4 VGA Port Connect VGA cable to the VGA
output port, and the other side
connect to monitor VGA input.
Page 23
Rugged Computing
Users Manual Rugged Table PCs
23
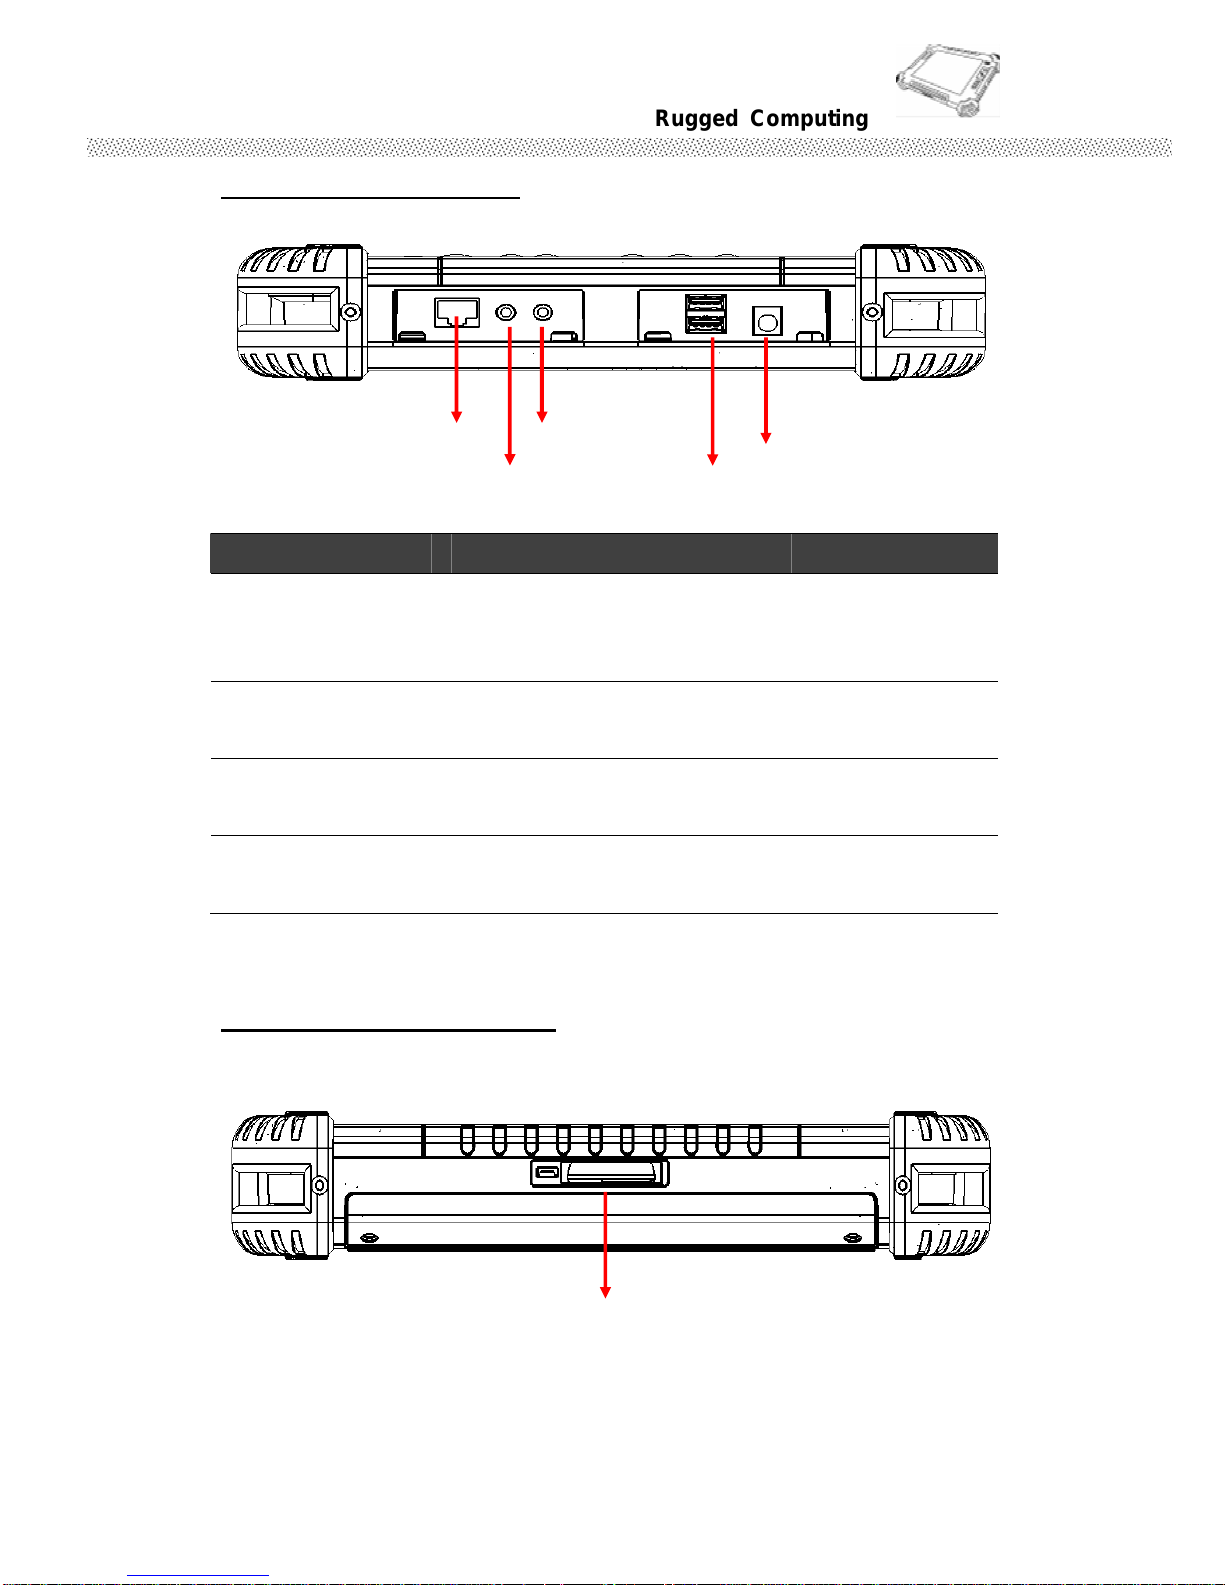
Left side Input/ Output
# Components Function Description See Other Intro.
1 LAN Port The product can support
10/100/1000 Mbit Giga LAN
ethernet, connect RJ-45 LAN cable
to LAN port.
2 Audio Port Audio ouput, Microphone input
3 USB Two USB2.0 compliance ports for
user to connect any USB device.
4 Power Jack Connect 19V Adapter to the Power
jack.
Button side Input/ Output
Front Side
Docking Slot
LAN
Audio Out USB x2
Power Input
Front Side
Micro In
Page 24
Rugged Computing
Users Manual Rugged Table PCs
24
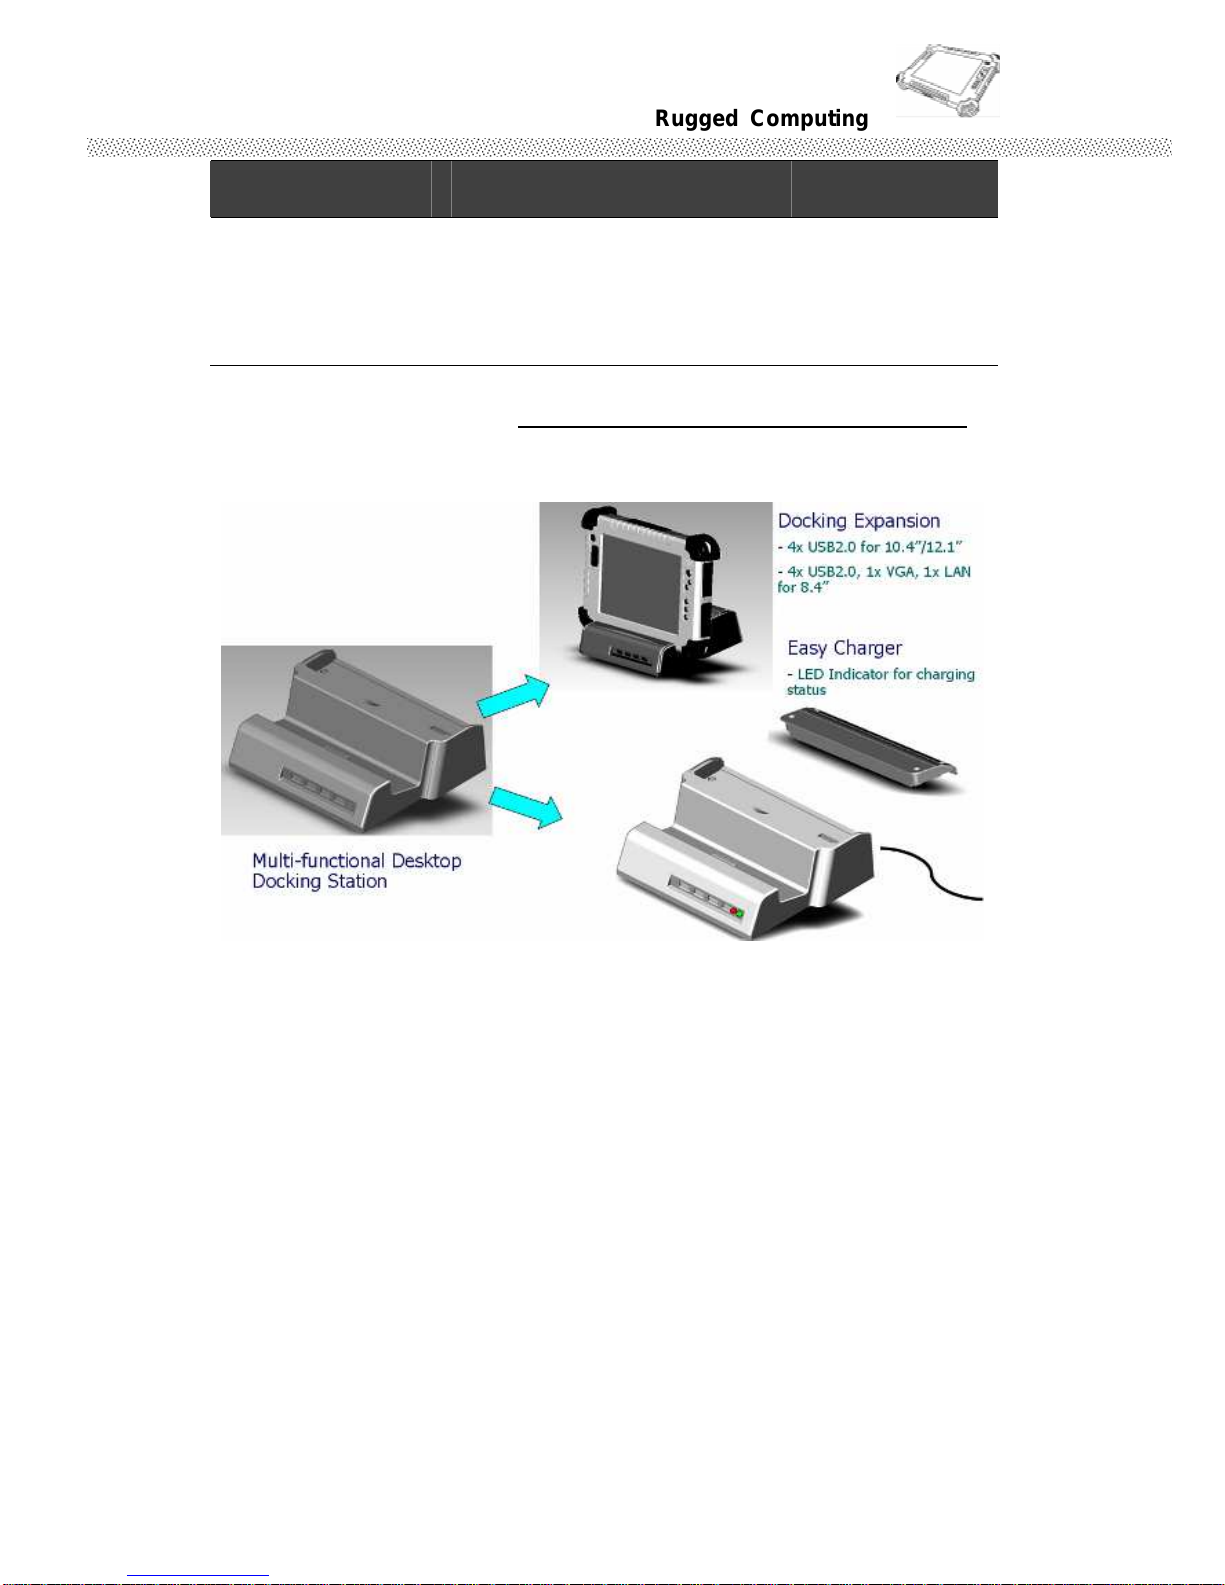
# Components Function Description See Other Intro.
1 Docking Slot The Docking slot can connect to
docking device as docking cradle,
the maximum funciotn of the
docking connector can support 1x
power input, 4 USB2.0 ports.
Our Tablet PC can support one Multi-functional Desktop Docking Station for optional
accessory. The Desktop Docking Station have one charger for other battery packs and
expansion slots as one RS232 and four USB ports.
Through the first Chapter 1.1 to 1.4, you can understand the basic information when you own
the machine, in next Chapter you will understand more detail about how to operate the tablet
PC. Between this, you can check our product function and specification.
Page 25
Rugged Computing
Users Manual Rugged Table PCs
25
1.6 Product Features and Specification
1.6.1 Product Features
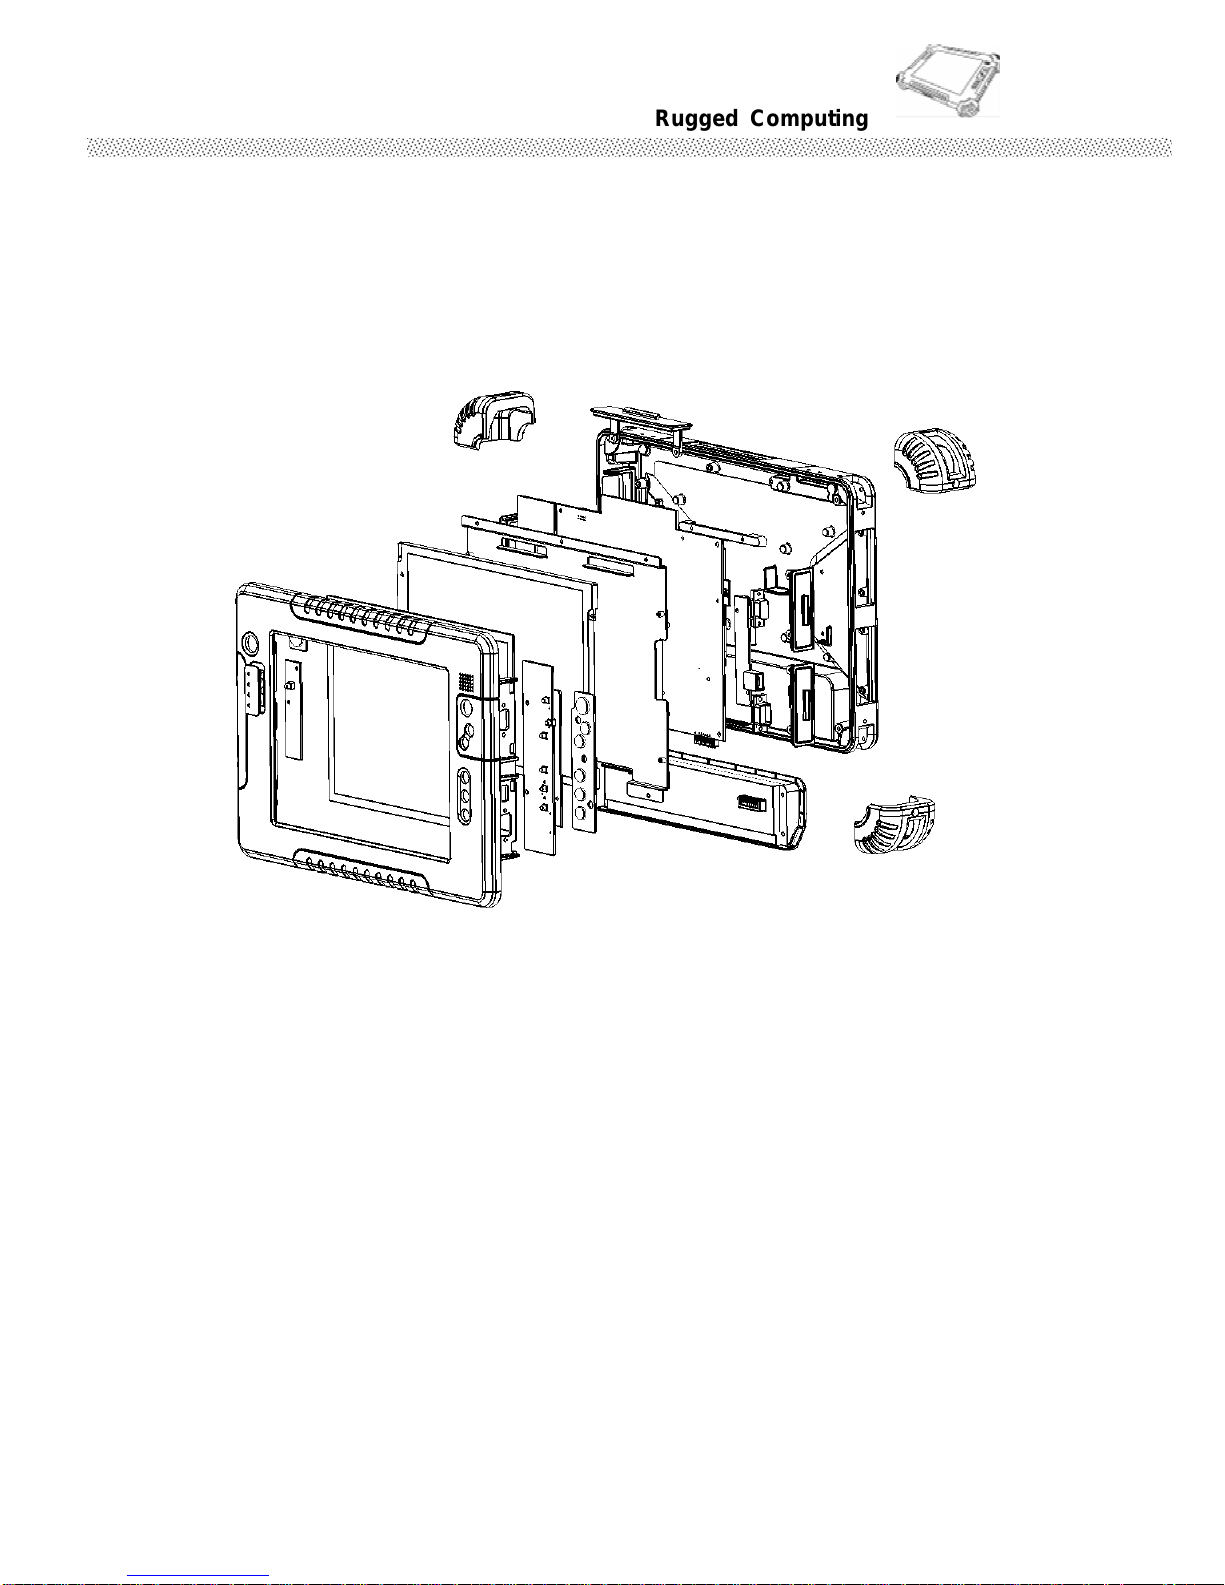
Our Rugged Tablet PCs are designed with state of the art industrial use,
versatile functionality and solid products. With great mobility support and
battery management, our products can fulfill most of outdoor tablet
applications. Great thermal conduction and solid mechanical design make our
products great reliability in harsh, highly-shock and vibration environment.
10.4" and 12.1” High Quality SVGA /XGA Resolution LED Panel
High Performance, Low Power Intel Atom N2600 1.6GHz + NM10 Chipset
1 x SO-DIMM Max. 4GB DDR3 RAM
Supports Mini PCI-e SATA SSD up to 128GB
4 Wire Resistive with High Visible Transmittance touch for the best optical performance.
Optical Bonding enhances better contrast visibility (for Optional)
Rugged Alu-Mg Alloy Housing Design with Protection Rubber for MIL-810F Shock,
Vibration and Drop Std.
Built-in 802.11b/g/n Wireless and 1T1R Class2 Bluetooth combo card
Built- in GPS Module
Built- in 3G Modem(for Optional)
Integrate 2M Pixels Camera. (for Optional)
5200mAh Lithium-Ion Battery Pack
Page 26
Rugged Computing
Users Manual Rugged Table PCs
26
1.6.2 Product Specification
The product specification as the following table description:
System Specification
System
Processor Intel® Atom™ Dual Core N2600 1.6GHz (CedarView-D)
BIOS AMI System BIOS
System Chipset Intel® NM10 express chipset
System Memory 1 x SODIMM, Max 4GB DDR3 RAM
LAN Controller Broadcom 10/100/1000 Mbps
Storage mSATA SSD (Default 16GB), max. up to 128GB
Audio Audio out for headset, Micro-in for microphone jack,
1.5W Speaker (Internal)
I/O Connectors
Left I/O Port 1x RJ-45 10/100/1000 Mps LAN ,2x USB 2.0, 1x Audio out,
Micro-in Jack, 1x Power Input Jack
Right I/O Port
1x COM, 1x VGA,1xSim Card Slot,1x SD Card Slot
Downside Docking
Conn
4x USB, and Docking Stand Power input
In Front Control
Control Button 1x Power button, Menu Key, Up Key, Down Key
Down Key to change Brightness, Volume and Battery Status
Volume
3x Programmable Hotkey / Function Keys
LED indicator Power On/ Off / Battery / HDD Access / Wi-Fi On -Off
Display Specification
Size 10.4 inch / 12.1 inch
Resolution
10.4 inch:800x600 / 1024x768 pixels
12.1 inch:1024x768 pixels
Touch 4 Wire Resistive with High Visible Transmittance touch for the
best optical performance.
Page 27
Rugged Computing
Users Manual Rugged Table PCs
27
System Specification (continues)
Mechanical and Environment
Weight 2.2 Kg (w/o accessories)
Operating
Temperature
Charging:0 ~℃ 40℃
Discharging:-15 ~50℃ ℃
Operating Humidity
10% to 90% (non condensing)
IP Proof IP54
Mounting VESA mount, Vehicle mount
Shock MIL-STD-810F M516.5
Vibration MIL-STD-810F M514.5
Drop 4 ft, Free to concrete
Certifications CE, FCC Class B
MIL810F for Vibration /Shock / Drop / Temp.
Power Management
Power Input 19V DC
Battery Li-Ion battery 5200mAh, 11.1V
Charging time 2.5 Hours
Adapter 100-240V, 50-60Hz, 19VDC
Wireless Communication
WLAN+ Bluetooth
WWAN PCI Express® full size (Type F1) mini-card form factor 3G
Modem
Supported frequency range:
WCDMA Release 99、HSDPA Release 5、HSUPA Release 6、
GPRS、EGPRS、CDMA2000 1X、CDMA2000 1xEV-DO
GPS GPS Solution (Apply for R10ID8M-RTXXGP/R12ID8M-RTXXGP
Model only)
Page 28
Rugged Computing
Users Manual Rugged Table PCs
28
CHAPTER 2
Operating Tablet PC and
HotTab Hotkey Utility
Page 29

Rugged Computing
Users Manual Rugged Table PCs
29
CHAPTER 2 OPERATING TABLET PC AND HOTTAB HOTKEY UTILITY
This Chapter will guide you how to operate the Tablet PC, including start /
stop the PC, and how to use menu function including basic hardware function
adjustment and the HotTab hotkey utility software that is very easy & helpful
for operating the computer.
2.2 Starting and Stopping the Tablet PC
Starting the Tablet PC
You always start the tablet PC using the power button ( ), push the
Power Button continuously by 4 second to turn on the Tablet PC.
Our Tablet PC will starts up with an operating system (OS) existing on the
storage device like the hard disk or compact flash card. The computer will
automatically load the OS after you turn it on. This is normal booting process.
NOTE: The operating system is the platform for all software application
programs to run on. The Tablet computer is recommended to use the
Microsoft Windows 7 embedded operating system for default solution.
Stopping the Tablet PC
When you finish your work, you can stop the tablet PC by turning off the
power or leaving the tablet PC in Standby mode:
# Stop mode How to do Start or
Resume
again
1 Power Off Following the shutdown process during
operating system. The standard
process can prevent unsave data loss or
damage your software programs.
2 Sleep (S3) Under normal operating system, Push
the Power Button Continously 4
seconds to show the inquiry action
window and choose Sleep option to
standby the use.
If you choose to stop in Standby mode, you can return to where you left off
the next time you start up the tablet PC. (See “Power Management” in
Chapter 3 for more information.)
Page 30
Rugged Computing
Users Manual Rugged Table PCs
30
2.2 Quick to Know Menu and HotTab Hotkey Function
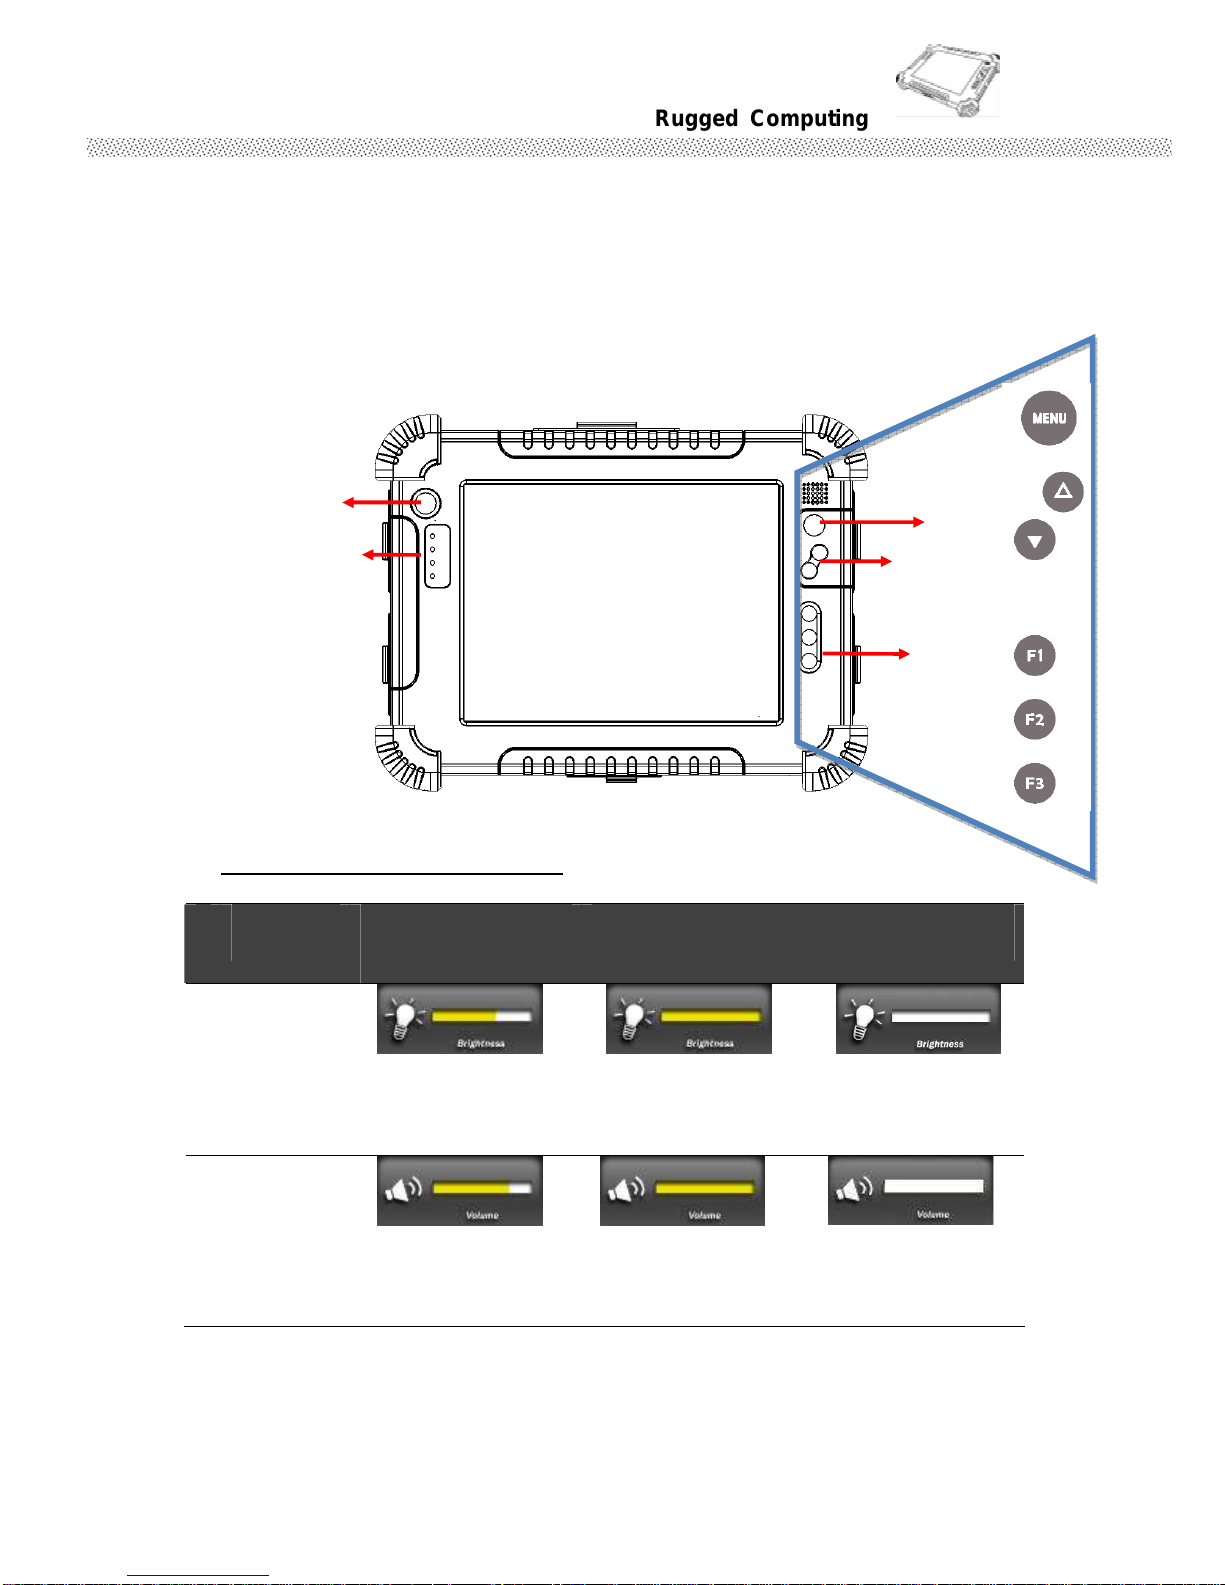
This section will introduce you about our easy-of-use front panel functionality.
Our Tablet PC front panel buttons support very easy way and useful function
to adjust Brightness, Volume and watch Battery current status. For six
programmable Hotkey function can also be defined by user to control by their
common use application.
2.2.1 How to use Menu Function
Menu Function Adjustment
#
Action Function
Description
Funtion Adjustment
1
Push
“Menu”
button
1st Time
Show Current Brightness
Click “Up” button to increase
brightness (Or Drag by
Touch)
Click ”Down” to
decrease brightness(Or
Drag by Touch)
2
Push
“Menu”
button
2nd Time
Show current Volume Click “Up” button to increase
volume(Or Drag by Touch)
Click ”Down” to
decrease volume(Or
Drag by Touch)
Menu
Up & Down
F1, F2, F3
Power
LED Indicator for
Power, Battery,
HDD and Wi-Fi
Status
Page 31

Rugged Computing
Users Manual Rugged Table PCs
31
3
Push
“Menu”
button
3rd Time
Show current Battery status
Page 32
Rugged Computing
Users Manual Rugged Table PCs
32
Menu Function Adjustment
#
Action Function Description Funtion Adjustment
4
Push
“Menu”
button
4th Time
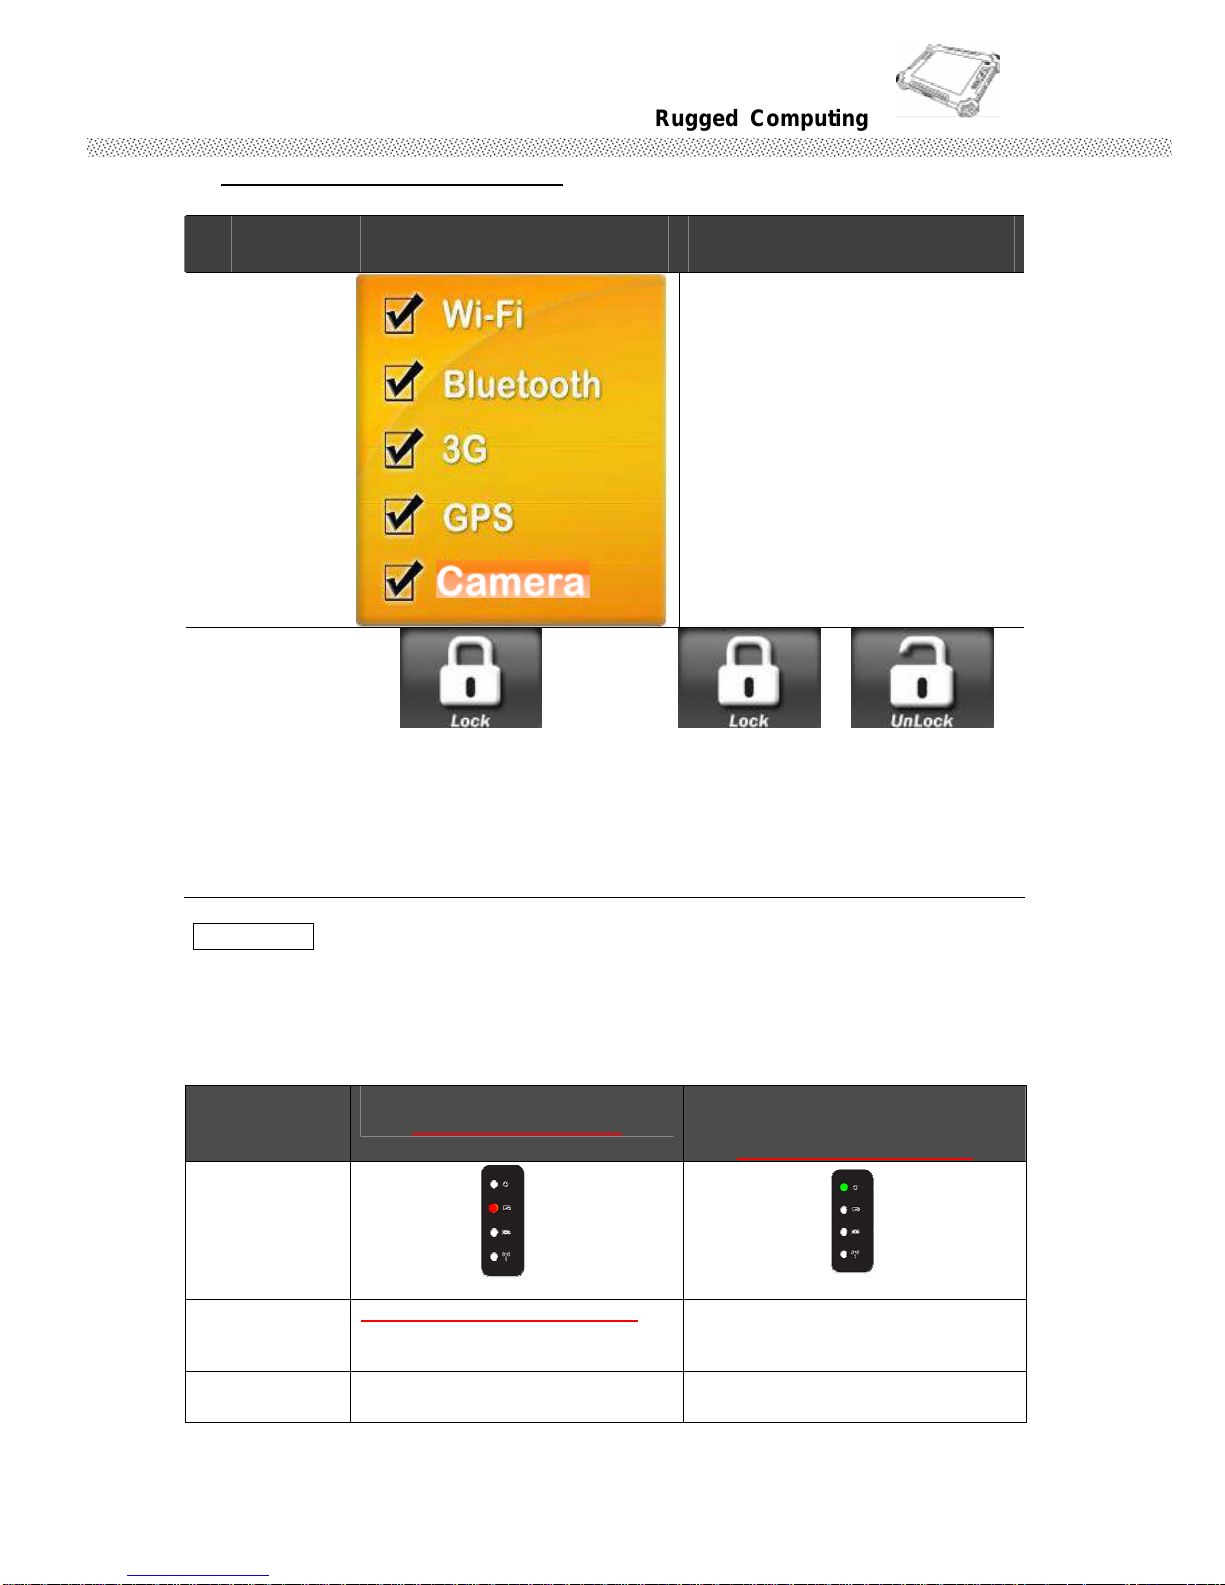
Show current on/off of
Wireless\ Bluetooth \3G \
GPS\ and Camera mode.
1. WiFi on/off
2. Bluetooth on/off
3. 3G on/off
4. GPS on/off
5. Camera On/Off
5
Push
“Menu”
button
continuous
ly 4
seconds
Lock/Unlock all button function
Push 4
seconds to
Lock all
button**(no
t including
Touch)
Push 4 seconds to
Unlock back to normal
operation
**NOTICE
If you shutdown the Tablet PC during operating system(By Touch) under Lock
condition, you CAN NOT turn on the Tablet PC by Power Button; you should
push “Menu“ button 4 seconds to Unlock the system and back to normal
operation then you can turn on by power button.
Action
Push Power button
Under Lock status
Push “Menu” button
4 seconds to
Under Unluck status
LED Indicator
Indicator
Status
Description
Quick Blinking Red Light::::
Button on Lock Status, you can
not control the Power button.
Normal power on indication.
Action
Push “Menu” button 4
seconds to Unluck back
N/A
Page 33

Rugged Computing
Users Manual Rugged Table PCs
33
We strongly recommend you to check Lock/ Unlock condition before turn off
PC.
Page 34
Rugged Computing
Users Manual Rugged Table PCs
34
2.2.2 How to use HotTab Hotkey Function
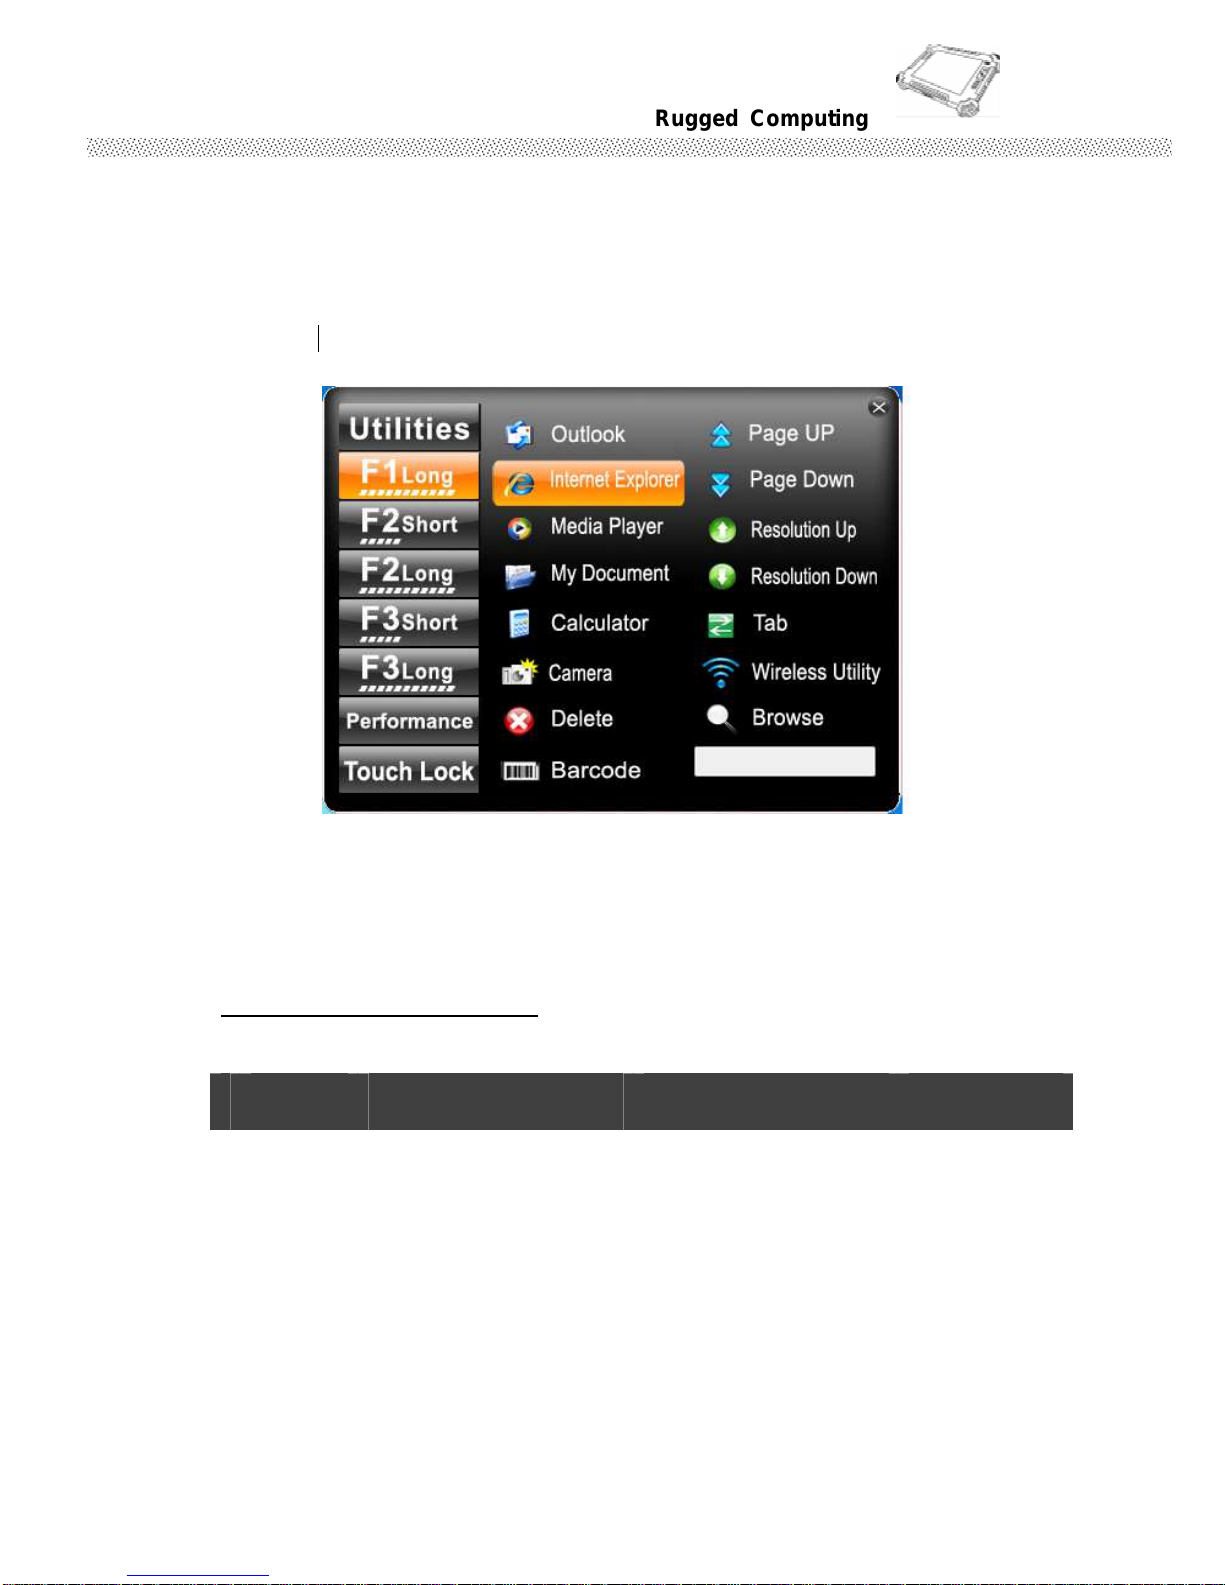
From the operation system installation, we will provide you Hot-tab Hotkey
software utility. After installation, you can see the shortcut on desktop of
computer.
Click the shortcut and you can see the software application at center of
desktop.
The HotTab Hotkey software program is the six key programmable application
software; we choose some usual applied function for default setup. For
example, User can choose his own application program very easy by setting
up the function from the setup window.
Hot-Tab Hotkey Function
Use the HotTab software utility to make it easy to program and define hot
keys by customer’s usual application.
# Action Function Description Funtion Adjustment See Other Intro.
1 Press “F1” Default:Hot TAB functions
2 Hold “F1” Default:Outlook Express
Long Push:
4sec.
3 Press “F2” Default:Internet Explorer
4 Hold “F2” Default:Media Player
Use “Browse” and choose
the execution program file
Long Push:
4sec.
Page 35

Rugged Computing
Users Manual Rugged Table PCs
35
5 Press “F3” Default:My Document
6
Hold
“F3”**
Default :
Calculator(Standard)
Use “Browse” and choose
the execution program file
Long Push:
4sec.
Page 36
Rugged Computing
Users Manual Rugged Table PCs
36
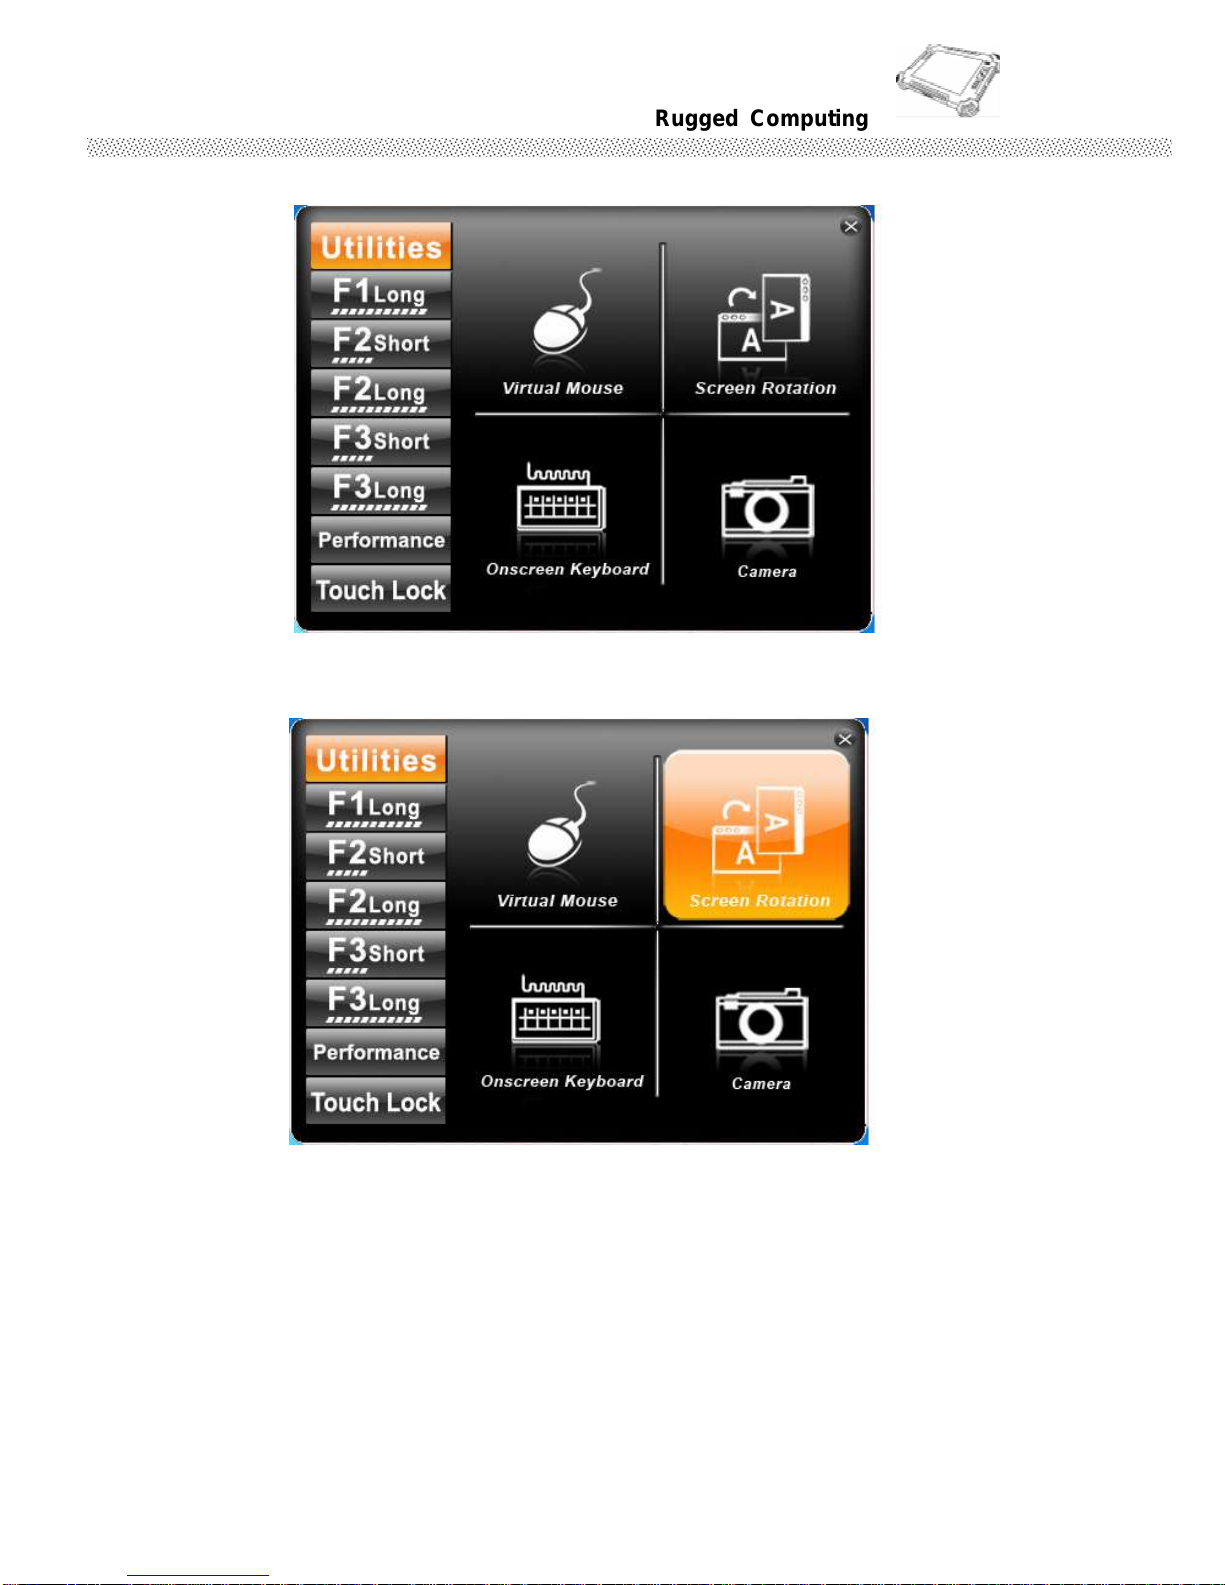
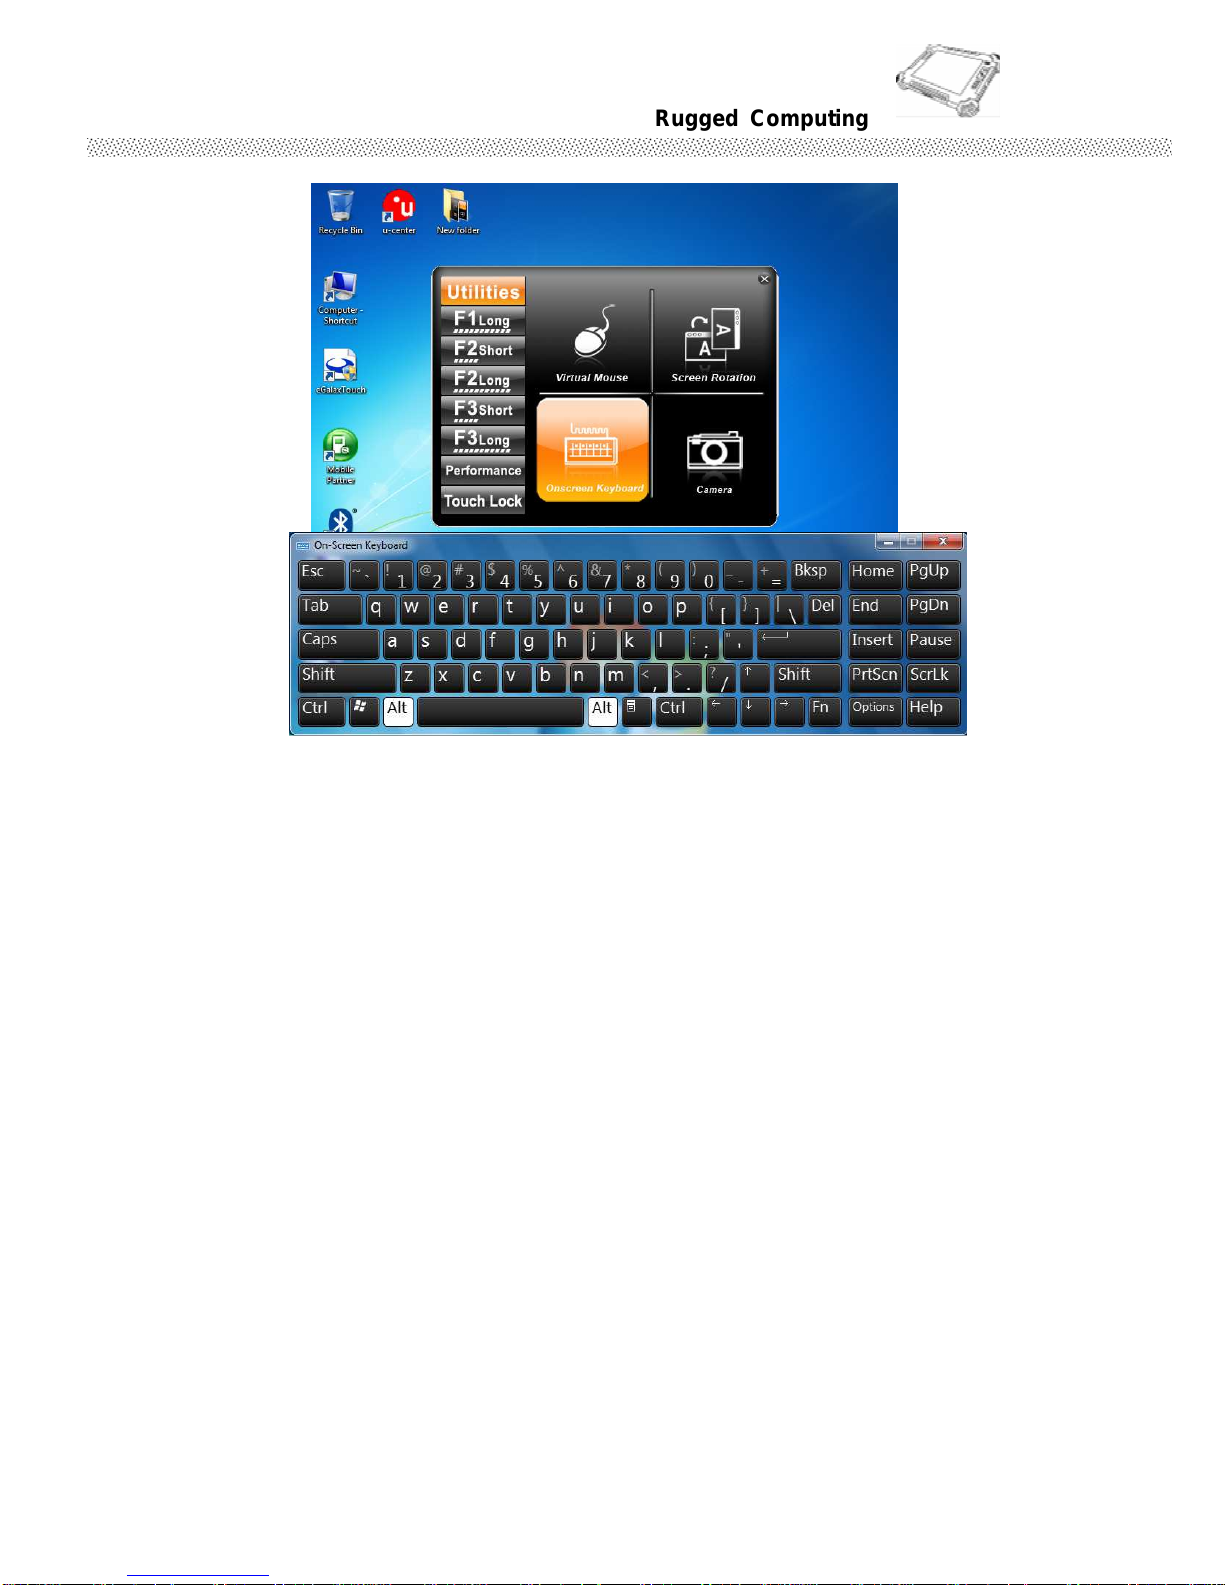
1. F1 Hot TAB functions will show four functions
A. The first is virtual mouse
B. Screen rotation
Page 37
Rugged Computing
Users Manual Rugged Table PCs
37
C. Onscreen Keyboard
Page 38
Rugged Computing
Users Manual Rugged Table PCs
38
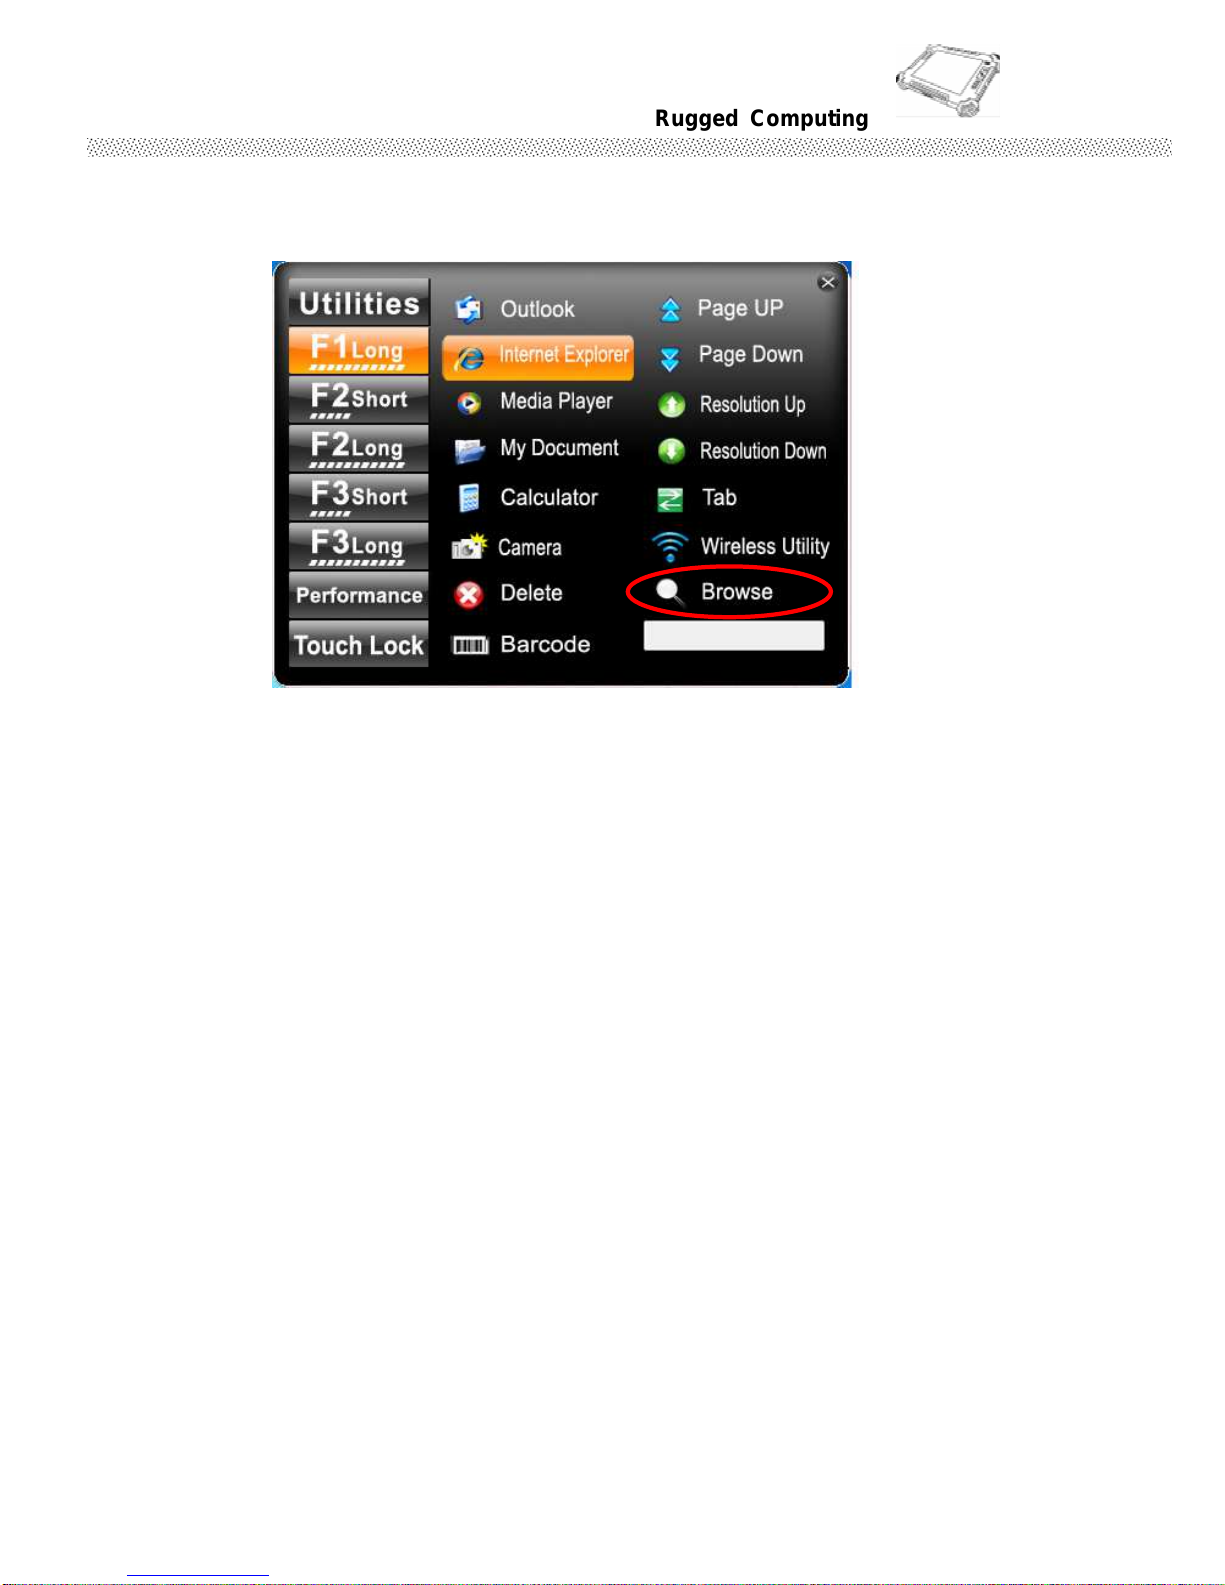
2. F2 to F3 function key
You can use “Browse” and choose the execution program file.
Page 39
Rugged Computing
Users Manual Rugged Table PCs
39
※※※※
Hot-swap function operation manual
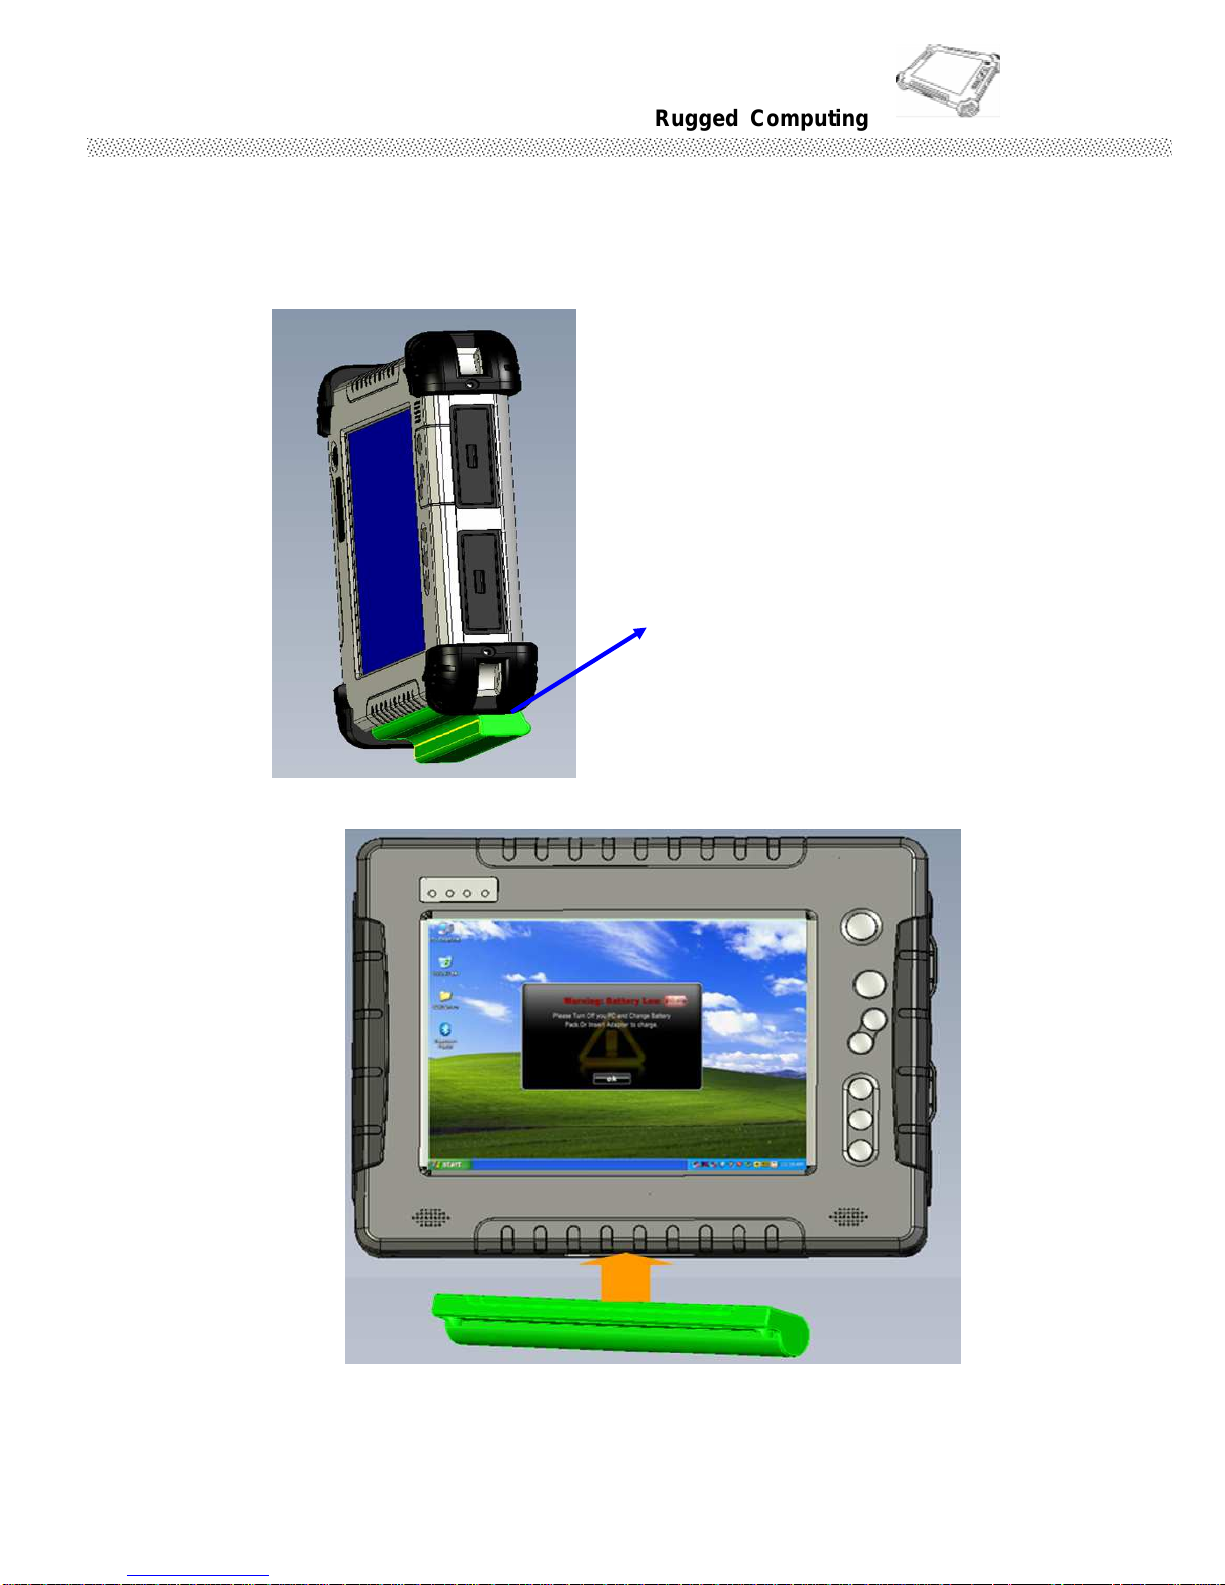
Hot-Swap Second Battery Operation (Optional)
A. Second Battery Specification
The second Li-Ion 2600mAh back-up battery support half operating time of main
battery.
B. Installed Hot-Swap Battery
i. Plug the second battery while the Main battery in low power status.
Second Battery Specification:
-Li-Ion 2600mAh Battery Cell, 11.1V
Page 40
Rugged Computing
Users Manual Rugged Table PCs
40
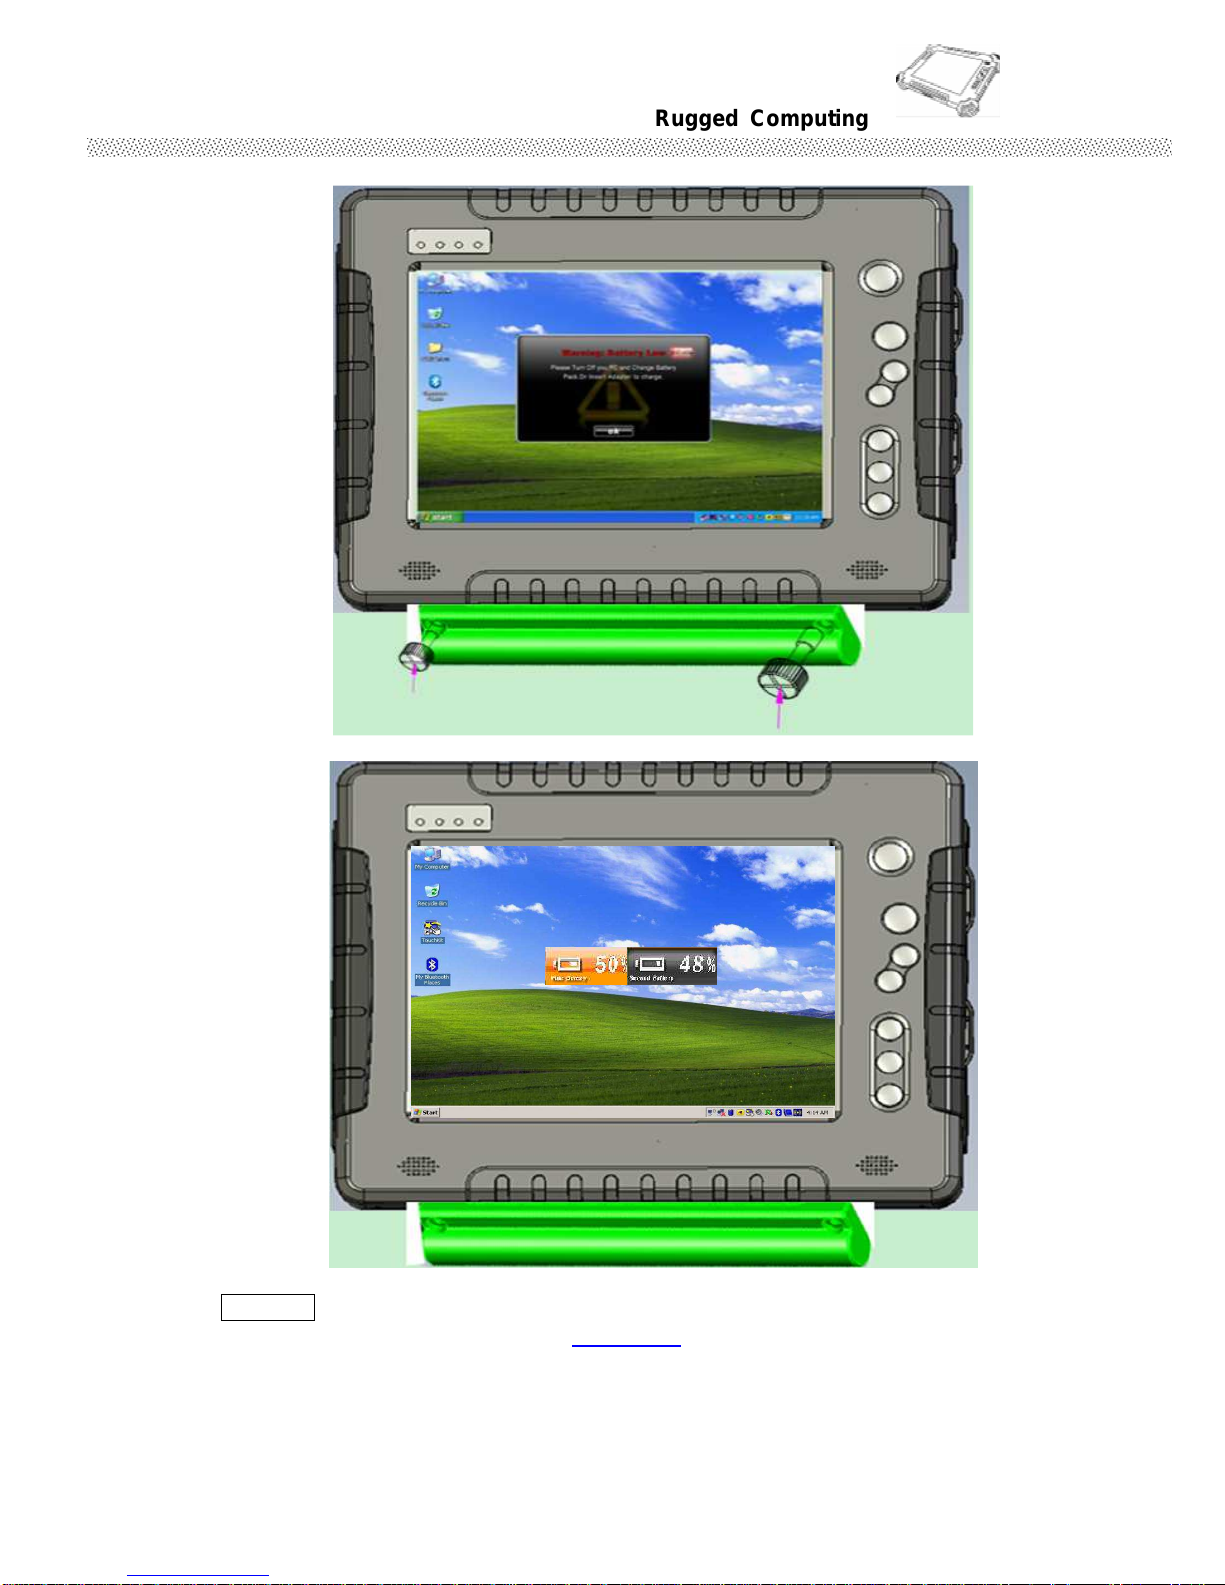
ii. Use the two Thumb screws to tighten the second battery.
iii. Push Menu button that will show the Main/ Second Battery Status.
**NOTE
When the Hot-Swap battery low, PUSH F3L to change battery back to Main
battery power, and swap other Hot-swap battery.
Step1. When the main
battery pack status in lower than 20% you will see the warning red light blinking in
LED.(See detail at Chapter 1.3). You can hold “F3” button for 4sec to turn the
Windows System into S3 (sleep) mode.
Page 41
Rugged Computing
Users Manual Rugged Table PCs
41
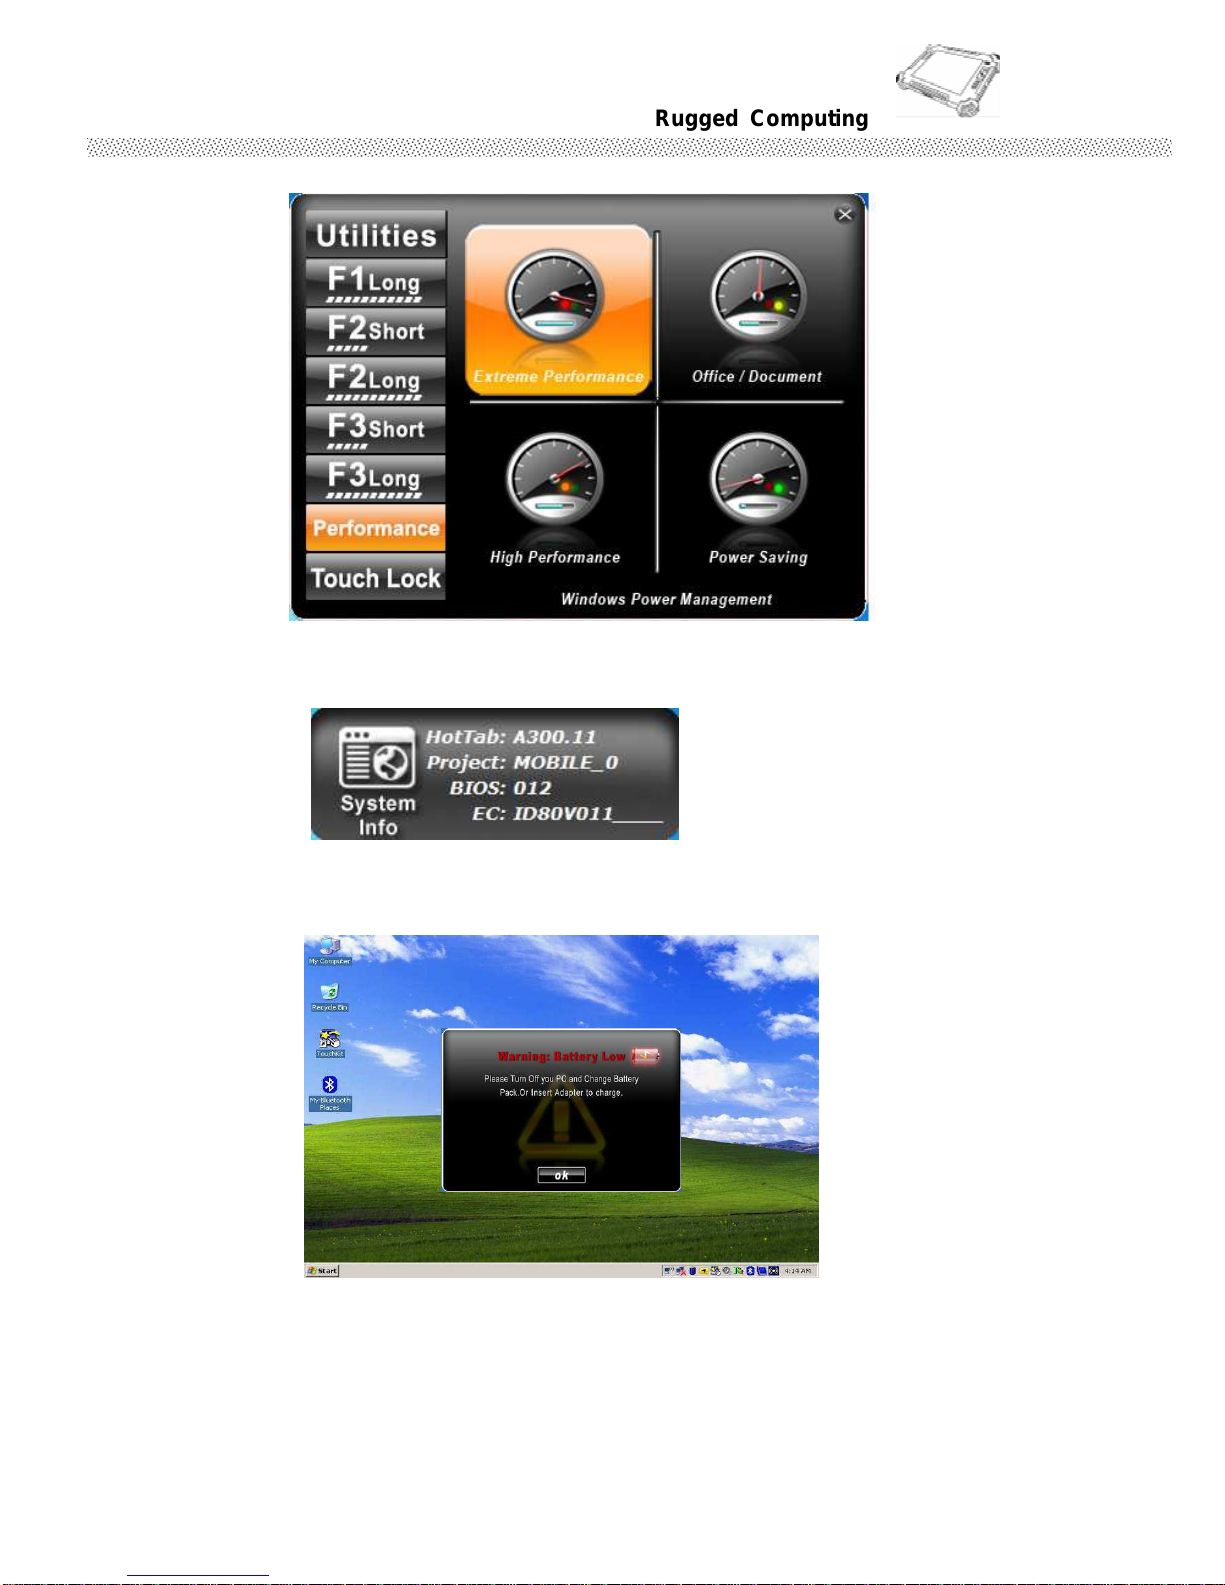
3. Power Manage function
4. System Information
When you press menu 5th time, you can see the system information.
5. Low battery warning:
When the battery under 10%, system will show the battery low to remind you to change
the new battery or insert adapter to charge.
Page 42
Rugged Computing
Users Manual Rugged Table PCs
42
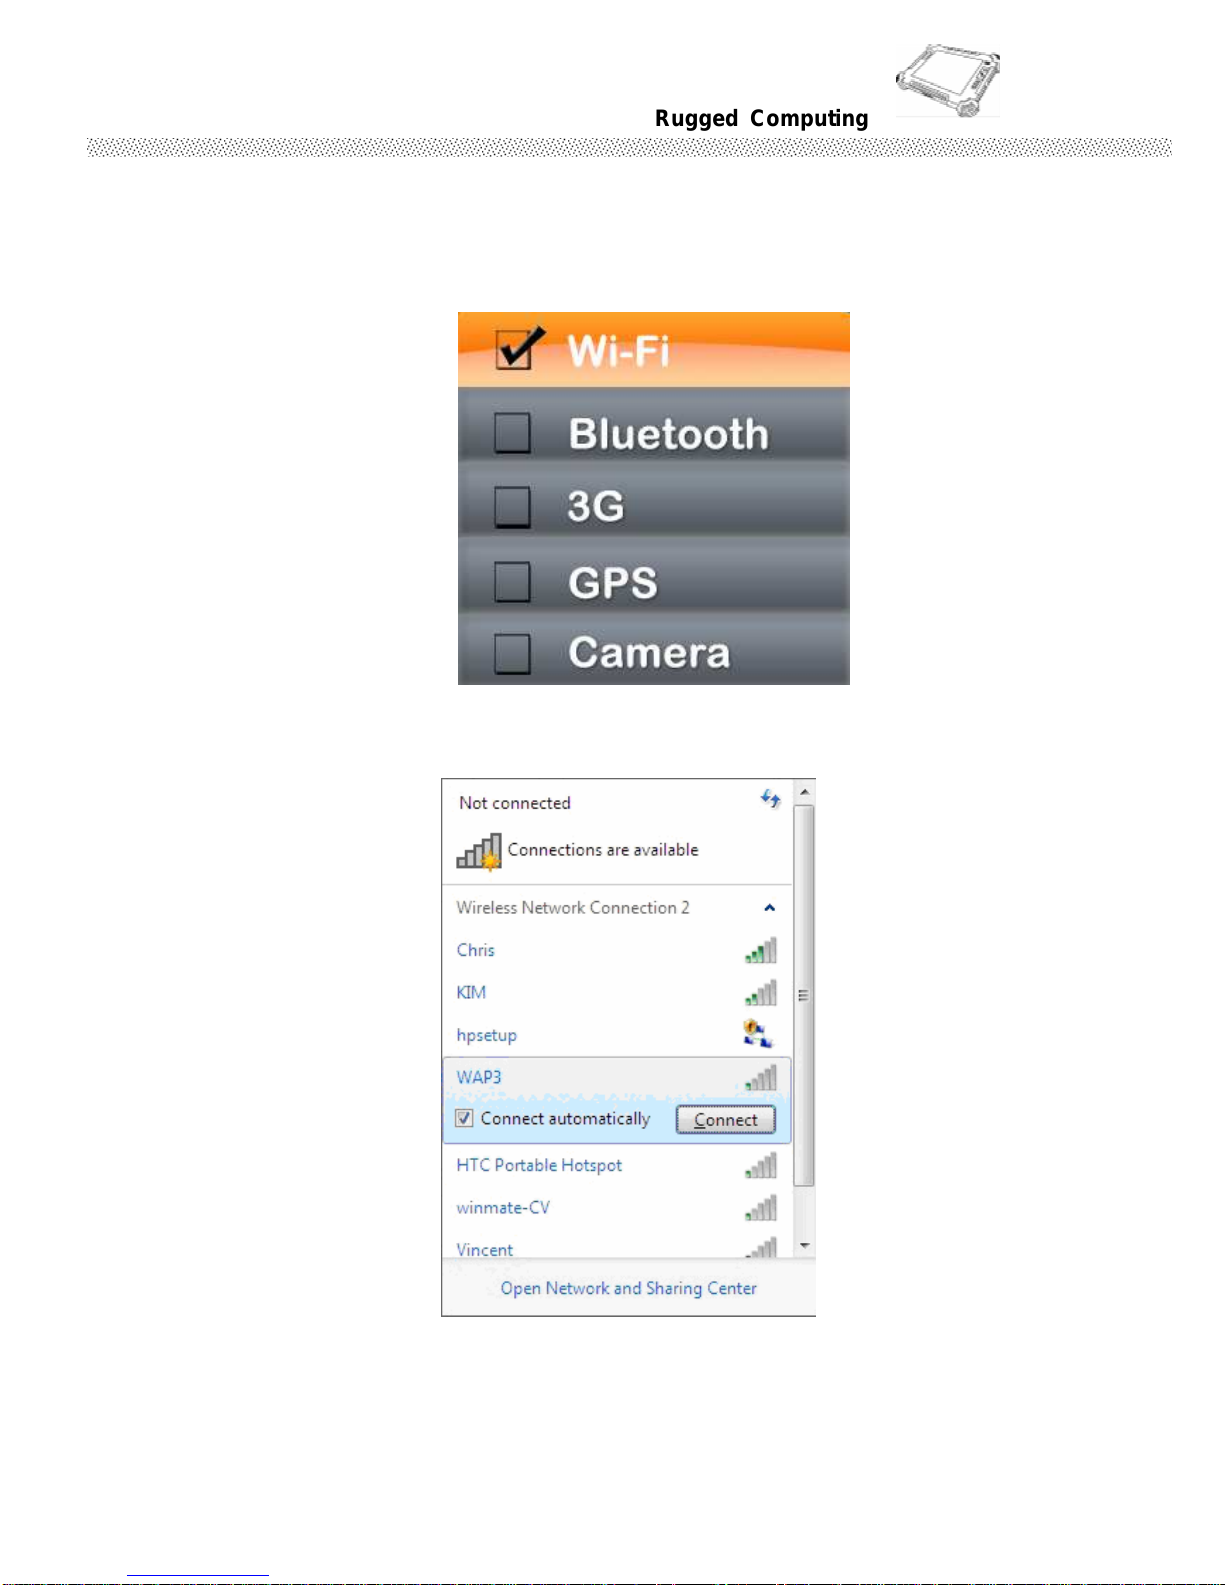
2.2.3 Connecting to a Wireless Network and Bluetooth
We apply IEEE 802.11 b/g/n WiFi + Bluetooth 3.0 HS Standard(ClassII)Half
mini card for default function of the Tablet PC series.
1. Push Menu function and making sure the Wireless function is “On”.
2.
By using the defult build-in module, the Windows Wireless Network Connection will
be enabled.
Page 43
Rugged Computing
Users Manual Rugged Table PCs
43
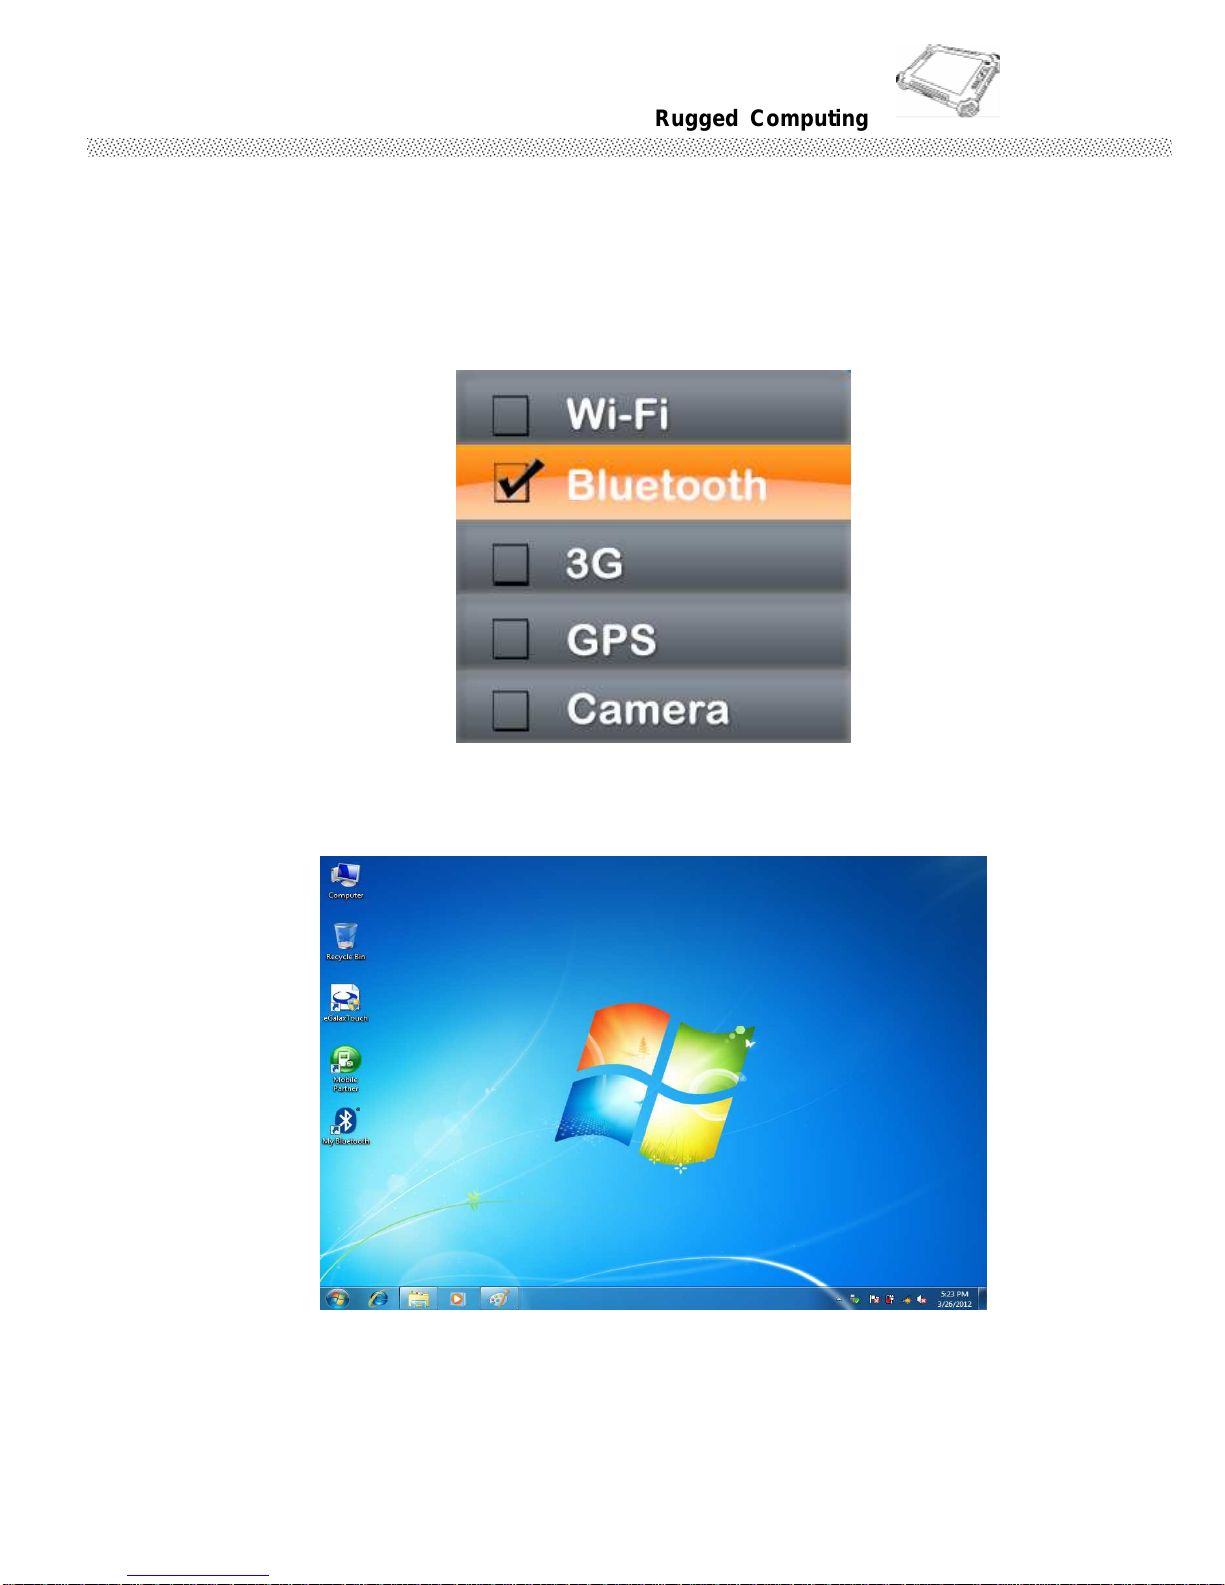
2.2.4 Using the Bluetooth Wireless Feature
Depending on your application, the Bluetooth module can give you capability
for short-range wireless communicaitons between devices without requiring
a cable connection. The transmission can go through walls, pockets and
briefcases as long as two devices are within range around 10 meters.
Following the easy step to connect to the Bluetooth communication.
1. Choose HotTab AP Menu function and making sure the Bluetooth function is “On”.
2. After installing the driver utility, the Bluetooth shortcut will shown on screen, double click
the shortcut and it will search any bluetooth device automatically. Or double click
“Search Devices” to search again.
Page 44
Rugged Computing
Users Manual Rugged Table PCs
44
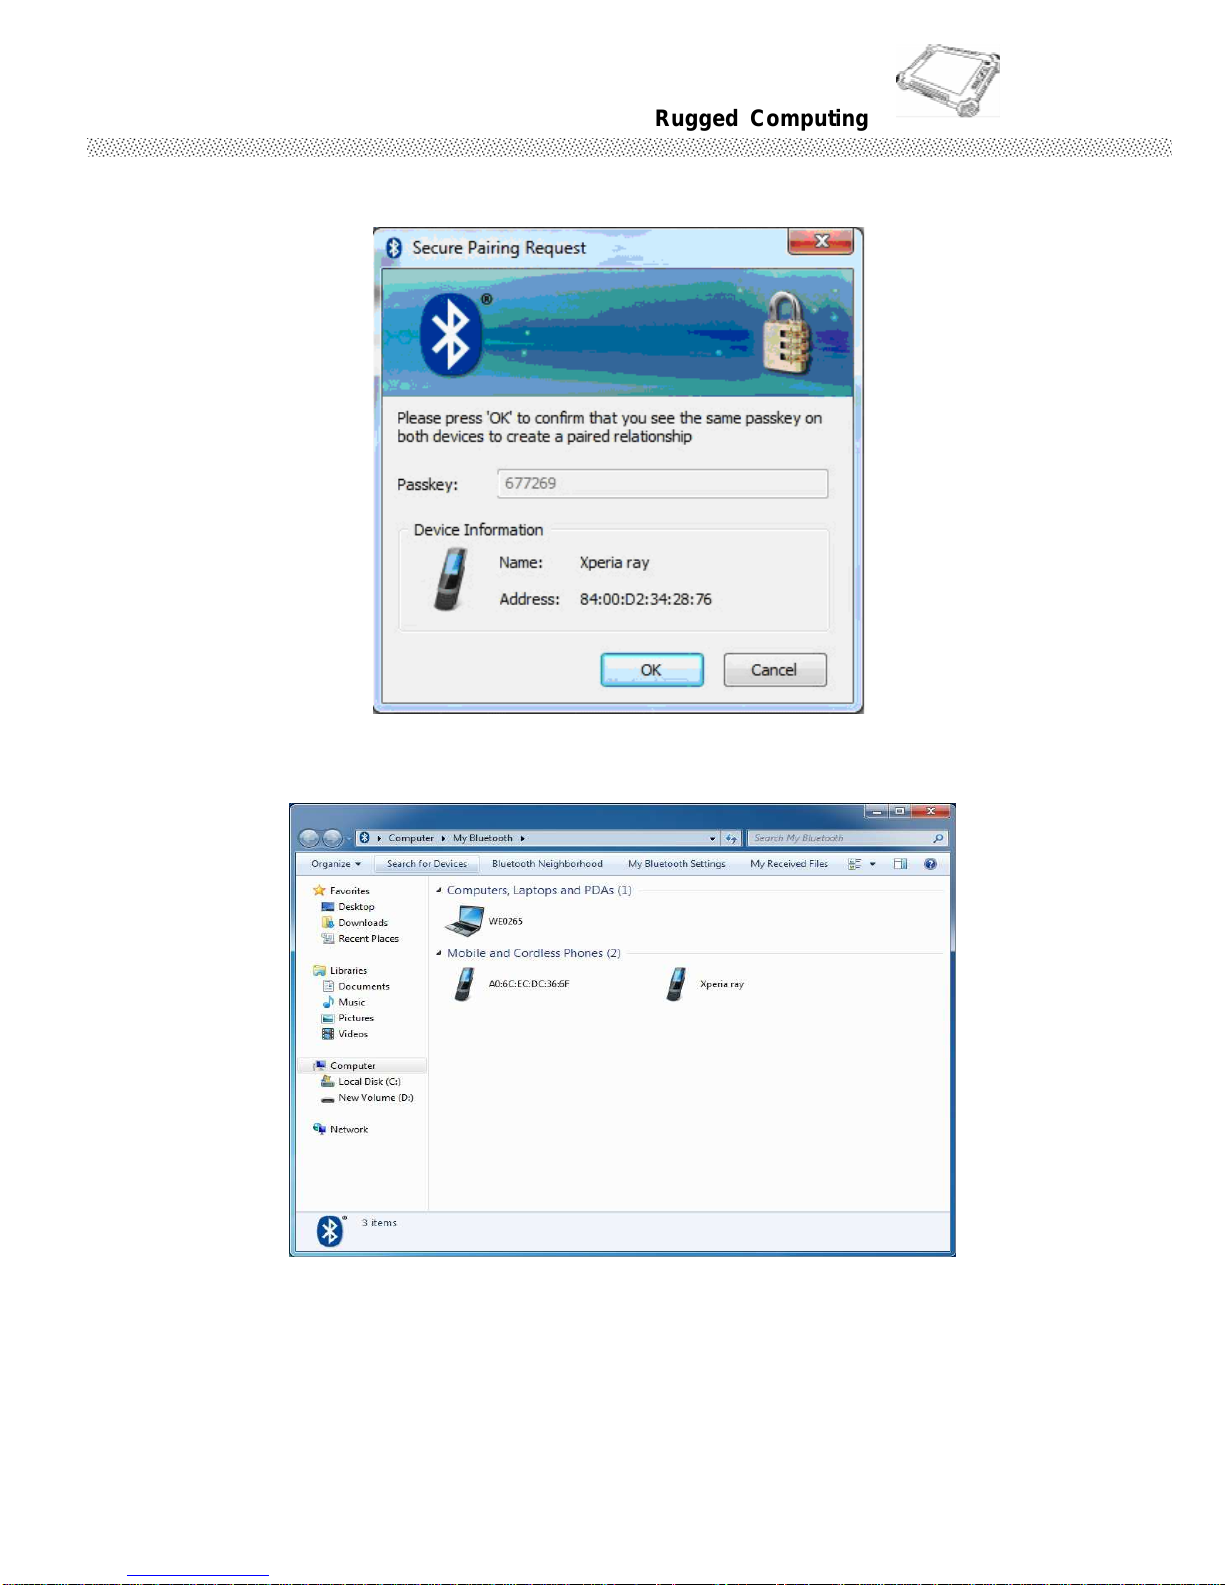
3. Choose the bluetooth device you want to connect, and left click to choose “Connect”.
Then the device will be connected to the module.
Page 45
Rugged Computing
Users Manual Rugged Table PCs
45
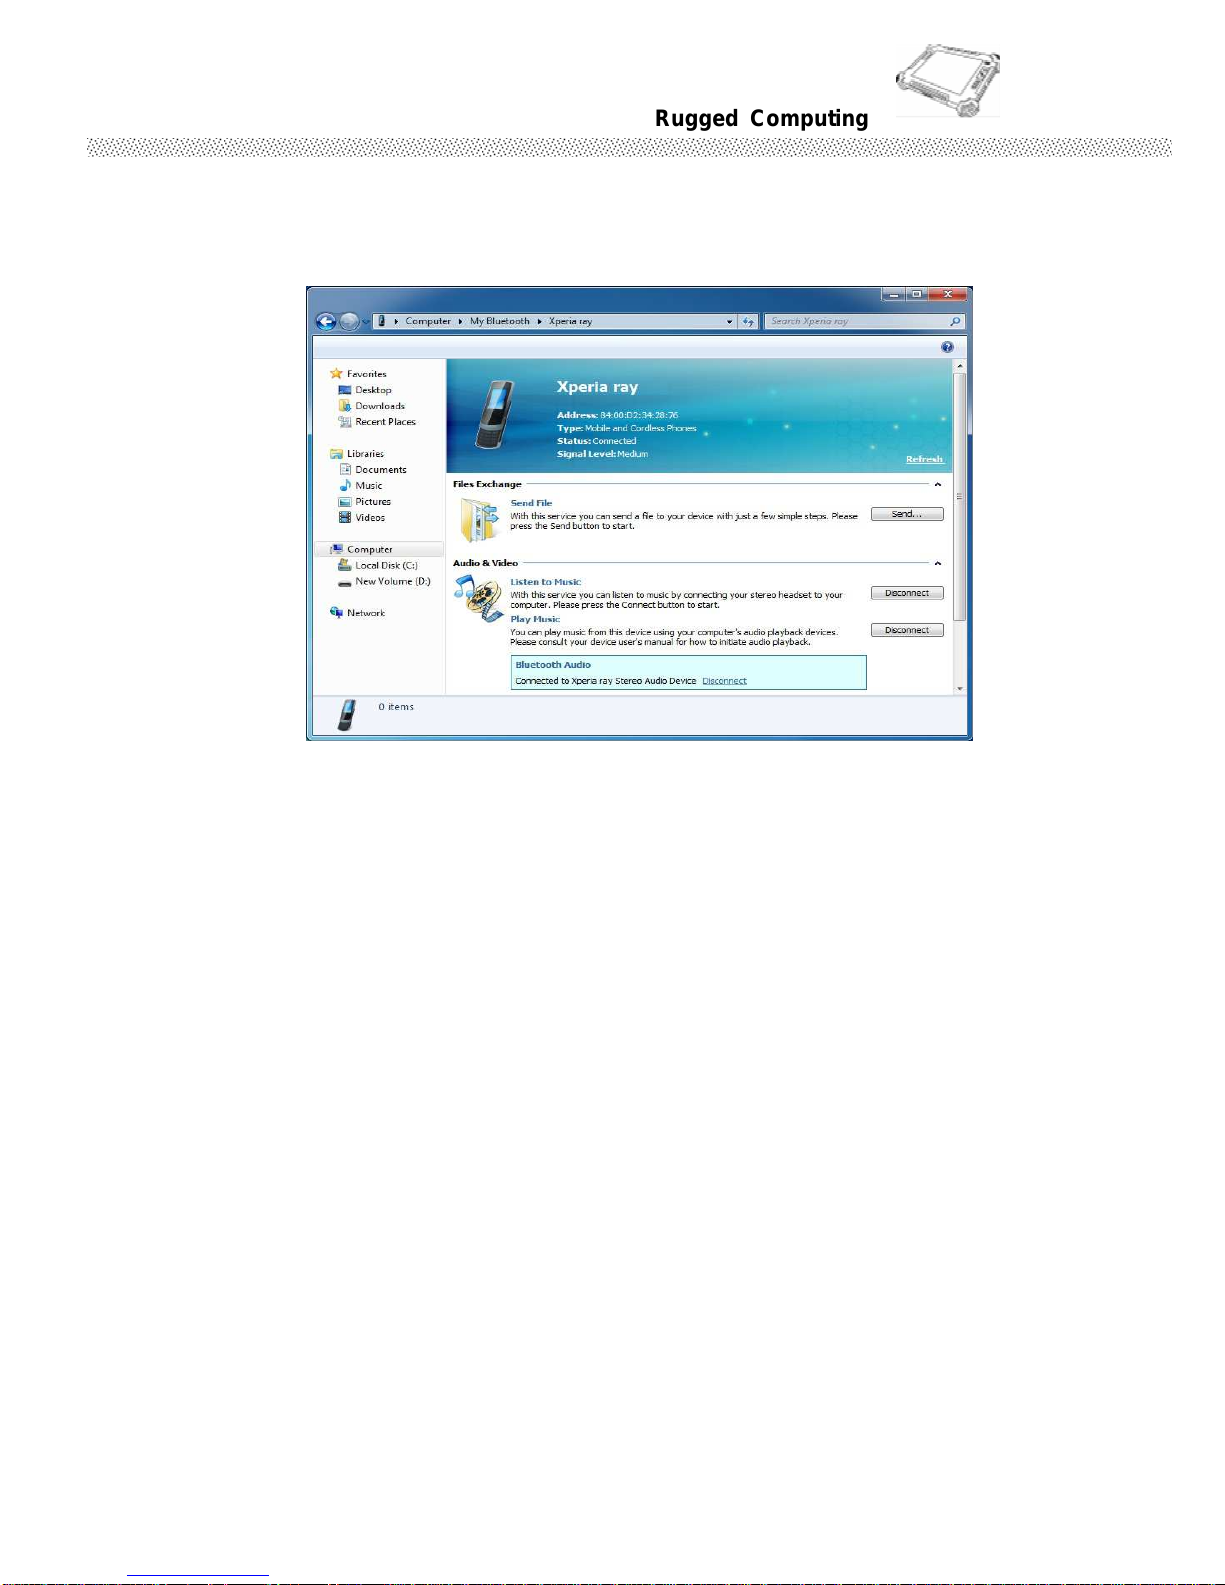
4. When under connecting, you can choose “Send” to send a data to the pair device.
connection.
Page 46
Rugged Computing
Users Manual Rugged Table PCs
46
2.2.5 Using the 3G Feature
※※※※Please insert SIM card before power on.
We apply a built-in Mini PCIe 3G module for Tablet PC to perform the 3G
function. Depending on your application, the 3G module can datacard and
host PC software combination deliver multiband HSPA/UMTS , EDGE/GPRS ,
WCDMA/GSM connectivity in a single hardware configuration.
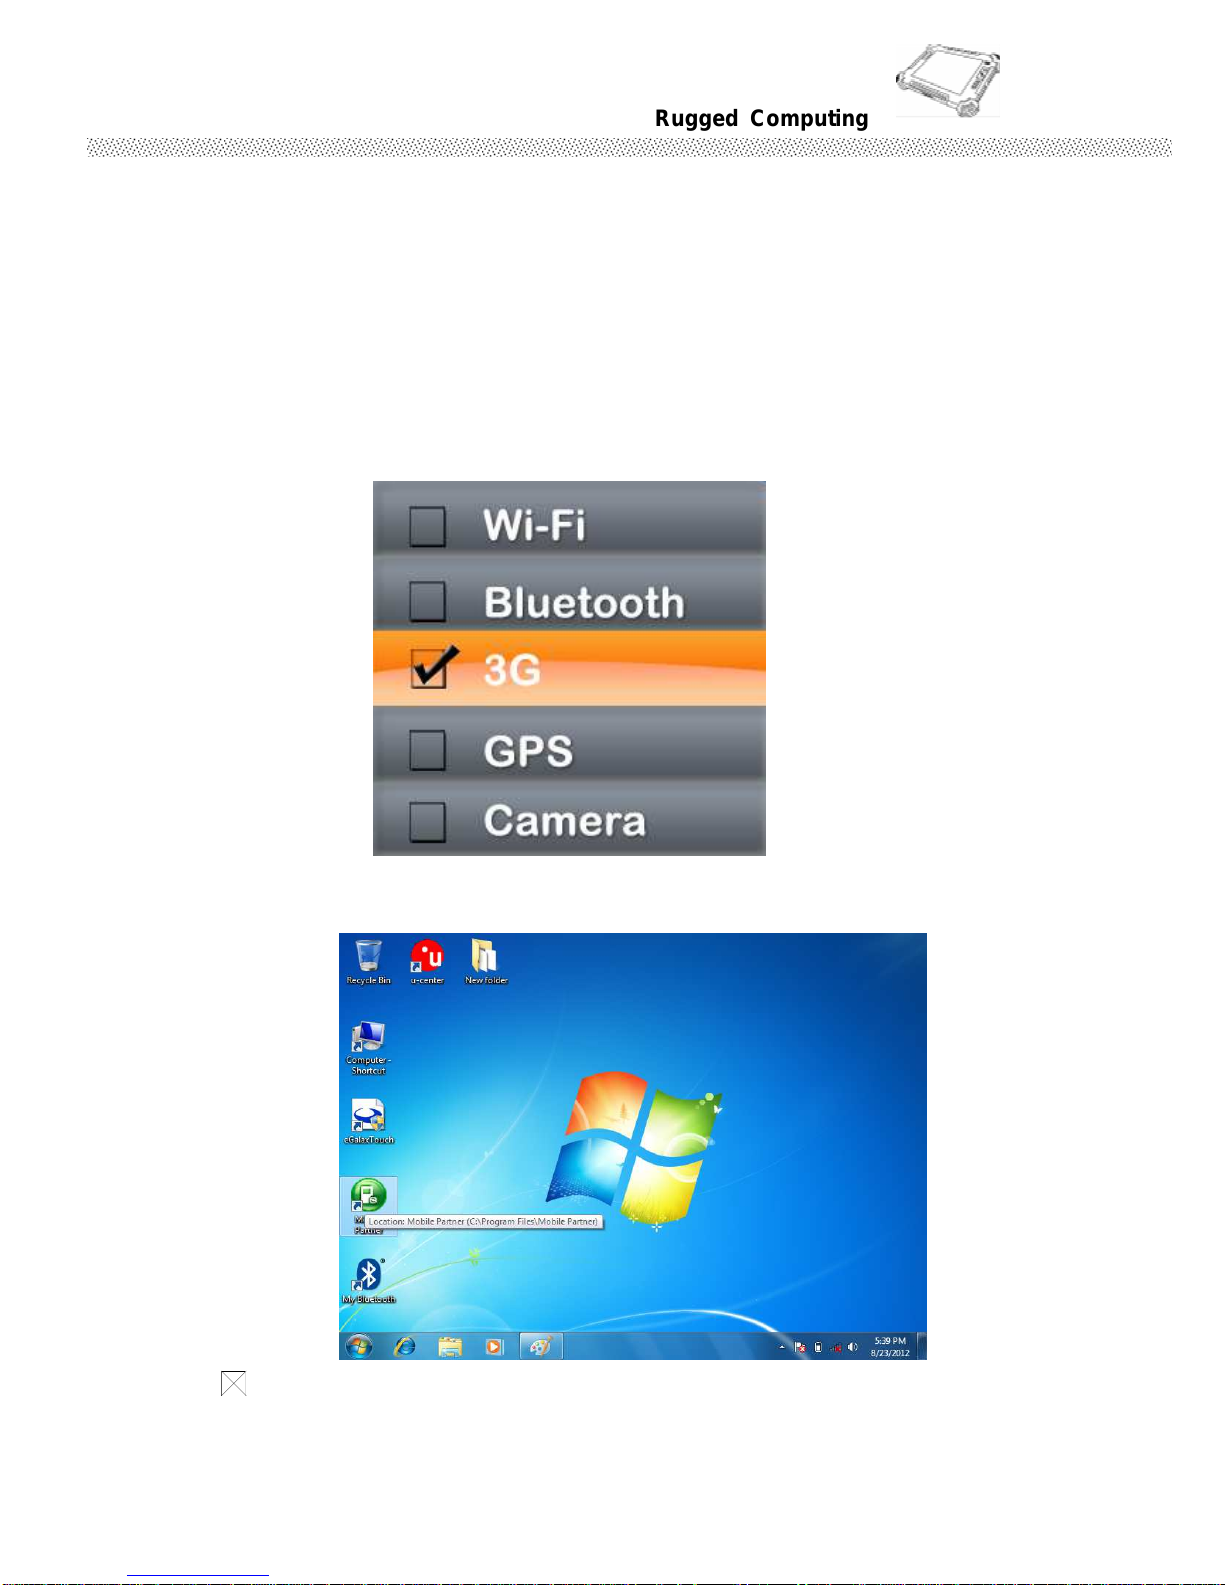
1. Choose HotTab AP Menu function and making sure the 3G Module is “On”.
2. After installing the driver utility, the shortcut of 3G application program will shown on
screen, then to executive Mobile Partner Internet connection management application.
Page 47
Rugged Computing
Users Manual Rugged Table PCs
47
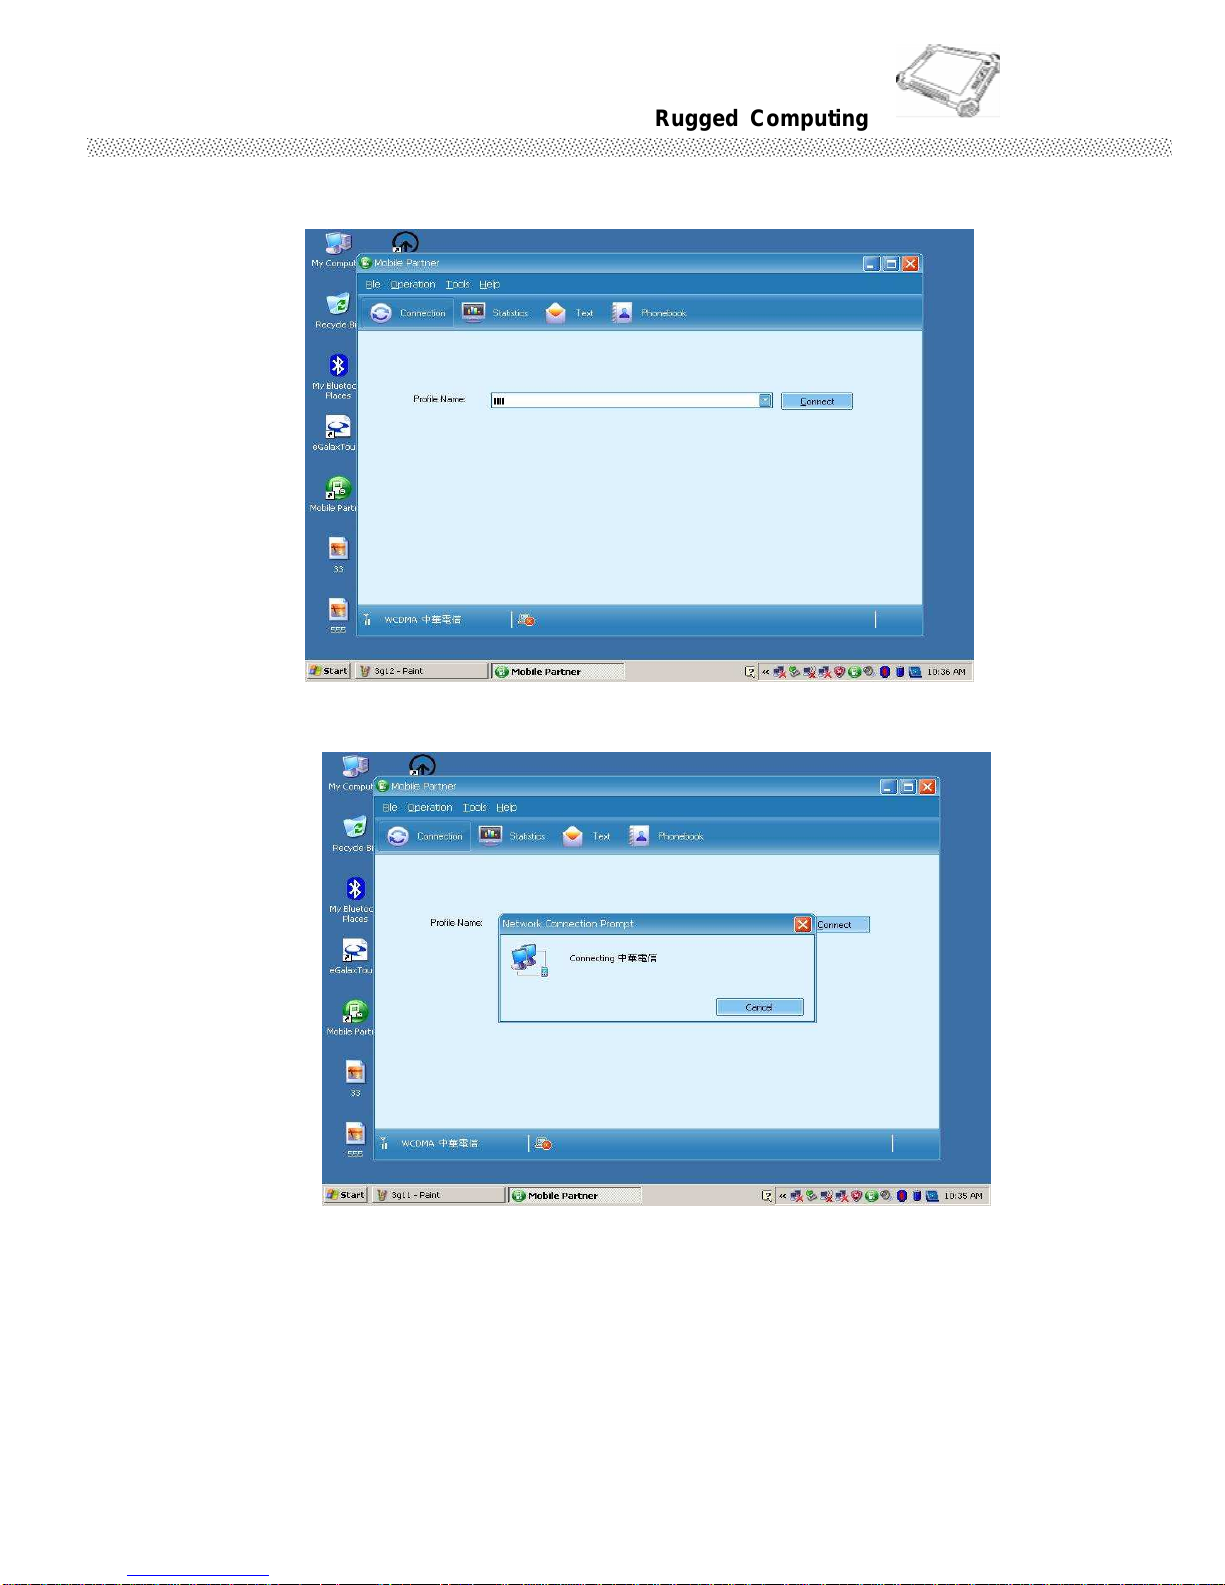
3. Confirm whether to detect the telecommunications system operators, then press the
“Connect” connect to 3G networks.
Page 48
Rugged Computing
Users Manual Rugged Table PCs
48
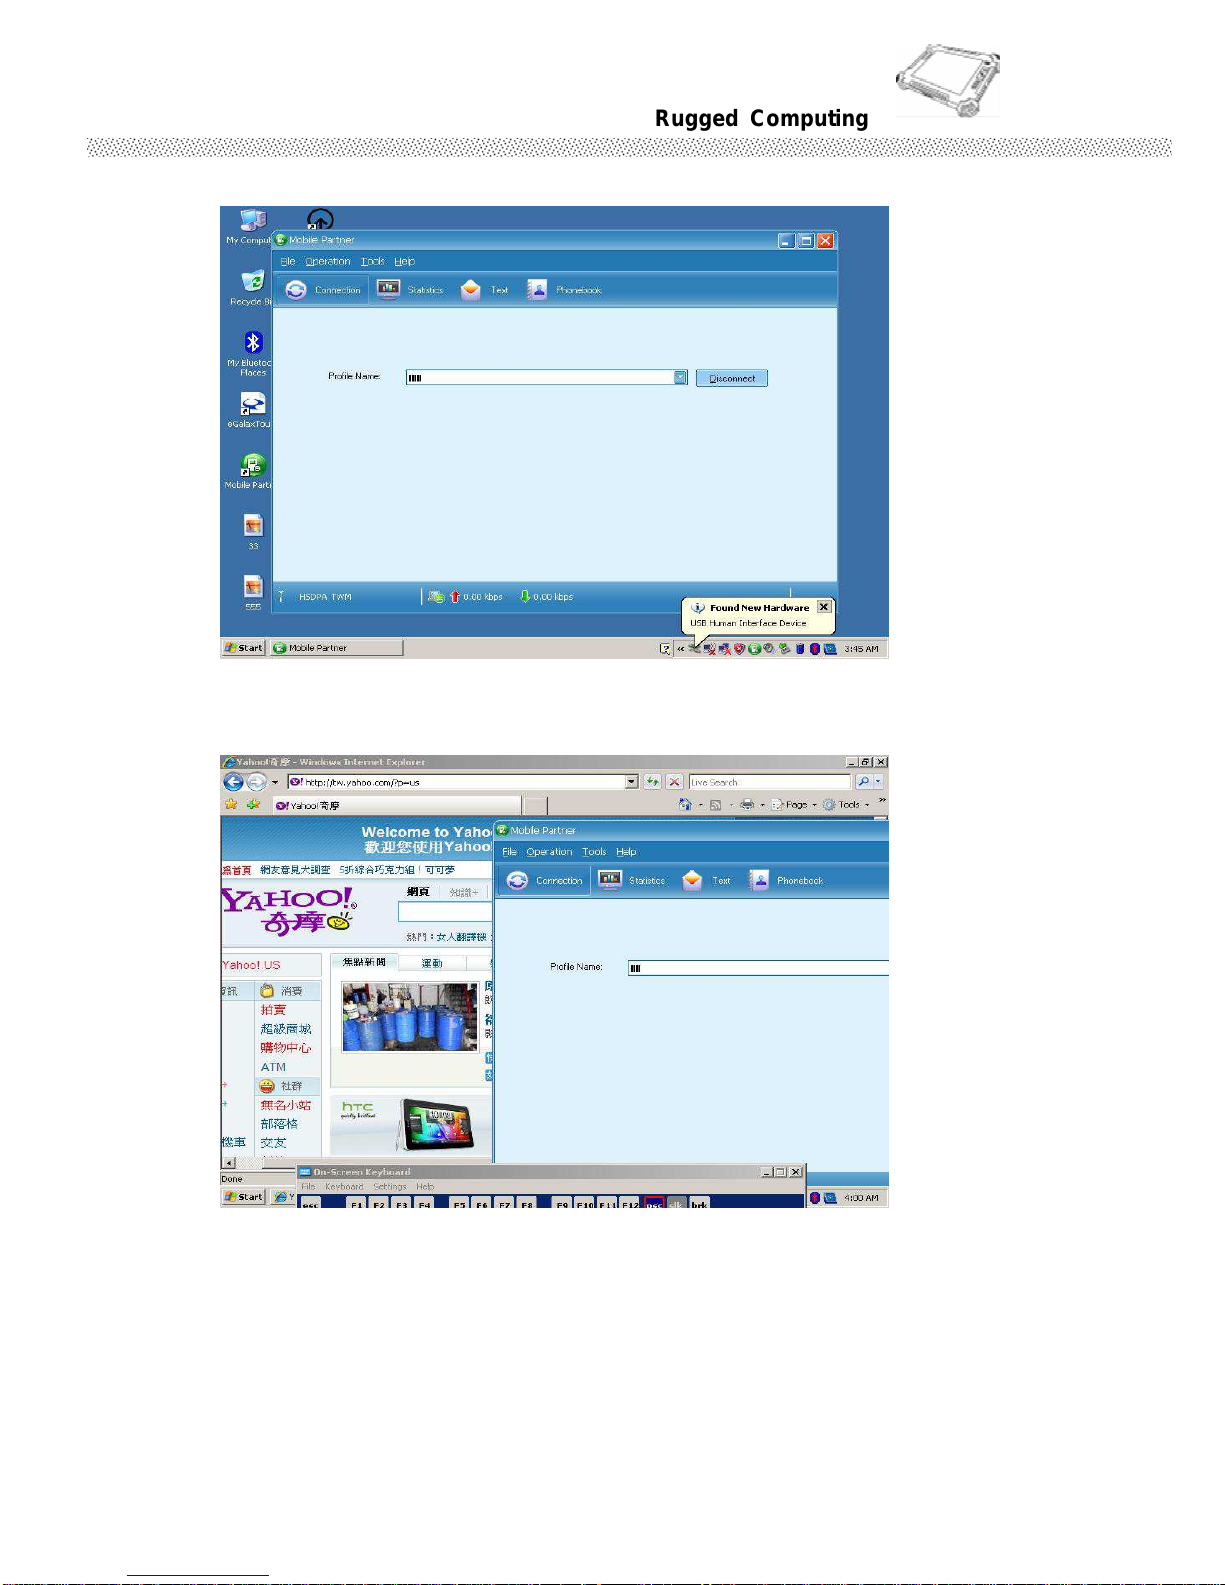
4. After initialization is completed, it will automatically connect to 3G networks.
Note: No additional driver installation is required for 3G module.
Page 49
Rugged Computing
Users Manual Rugged Table PCs
49
2.2.6 Using the GPS Feature
We apply a on board GPS module for default function of the Tablet PC series.
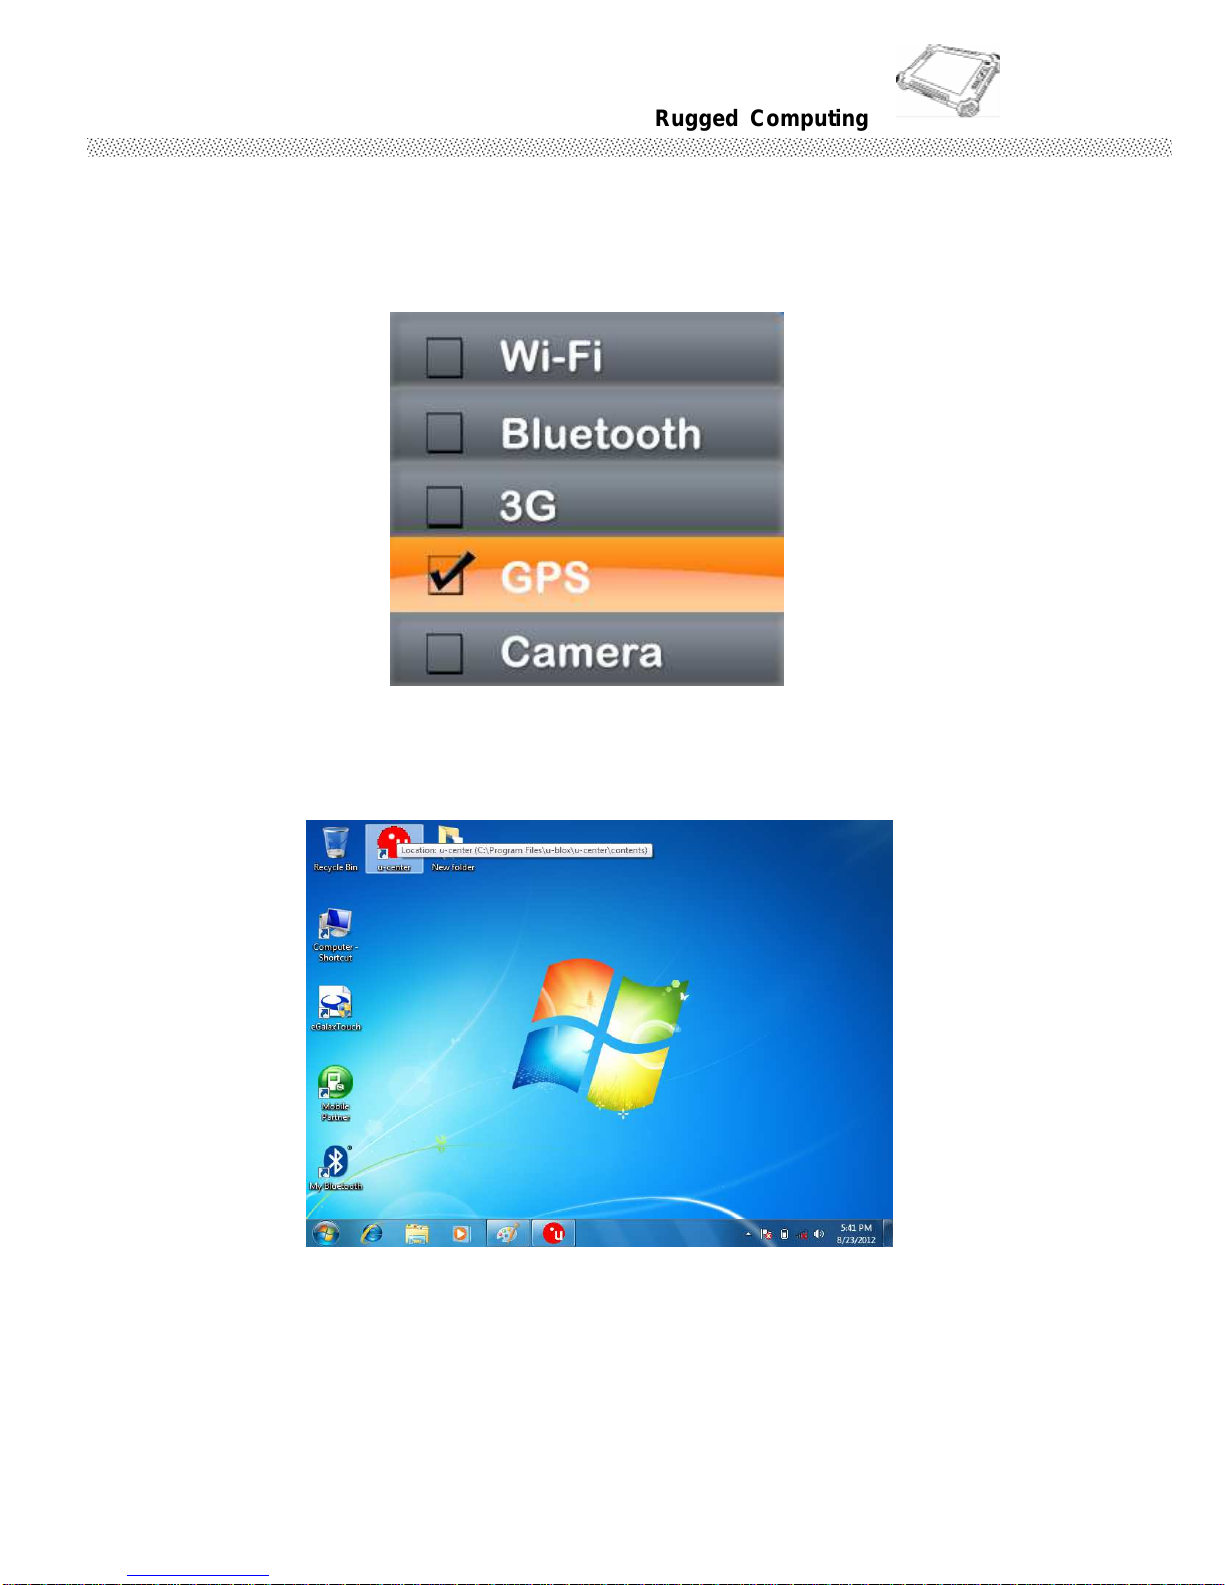
1. Choose HotTab AP Menu function and making sure the GPS Module is “On”.
2. Click the u-center icon to start the GPS function settings.
Page 50
Rugged Computing
Users Manual Rugged Table PCs
50
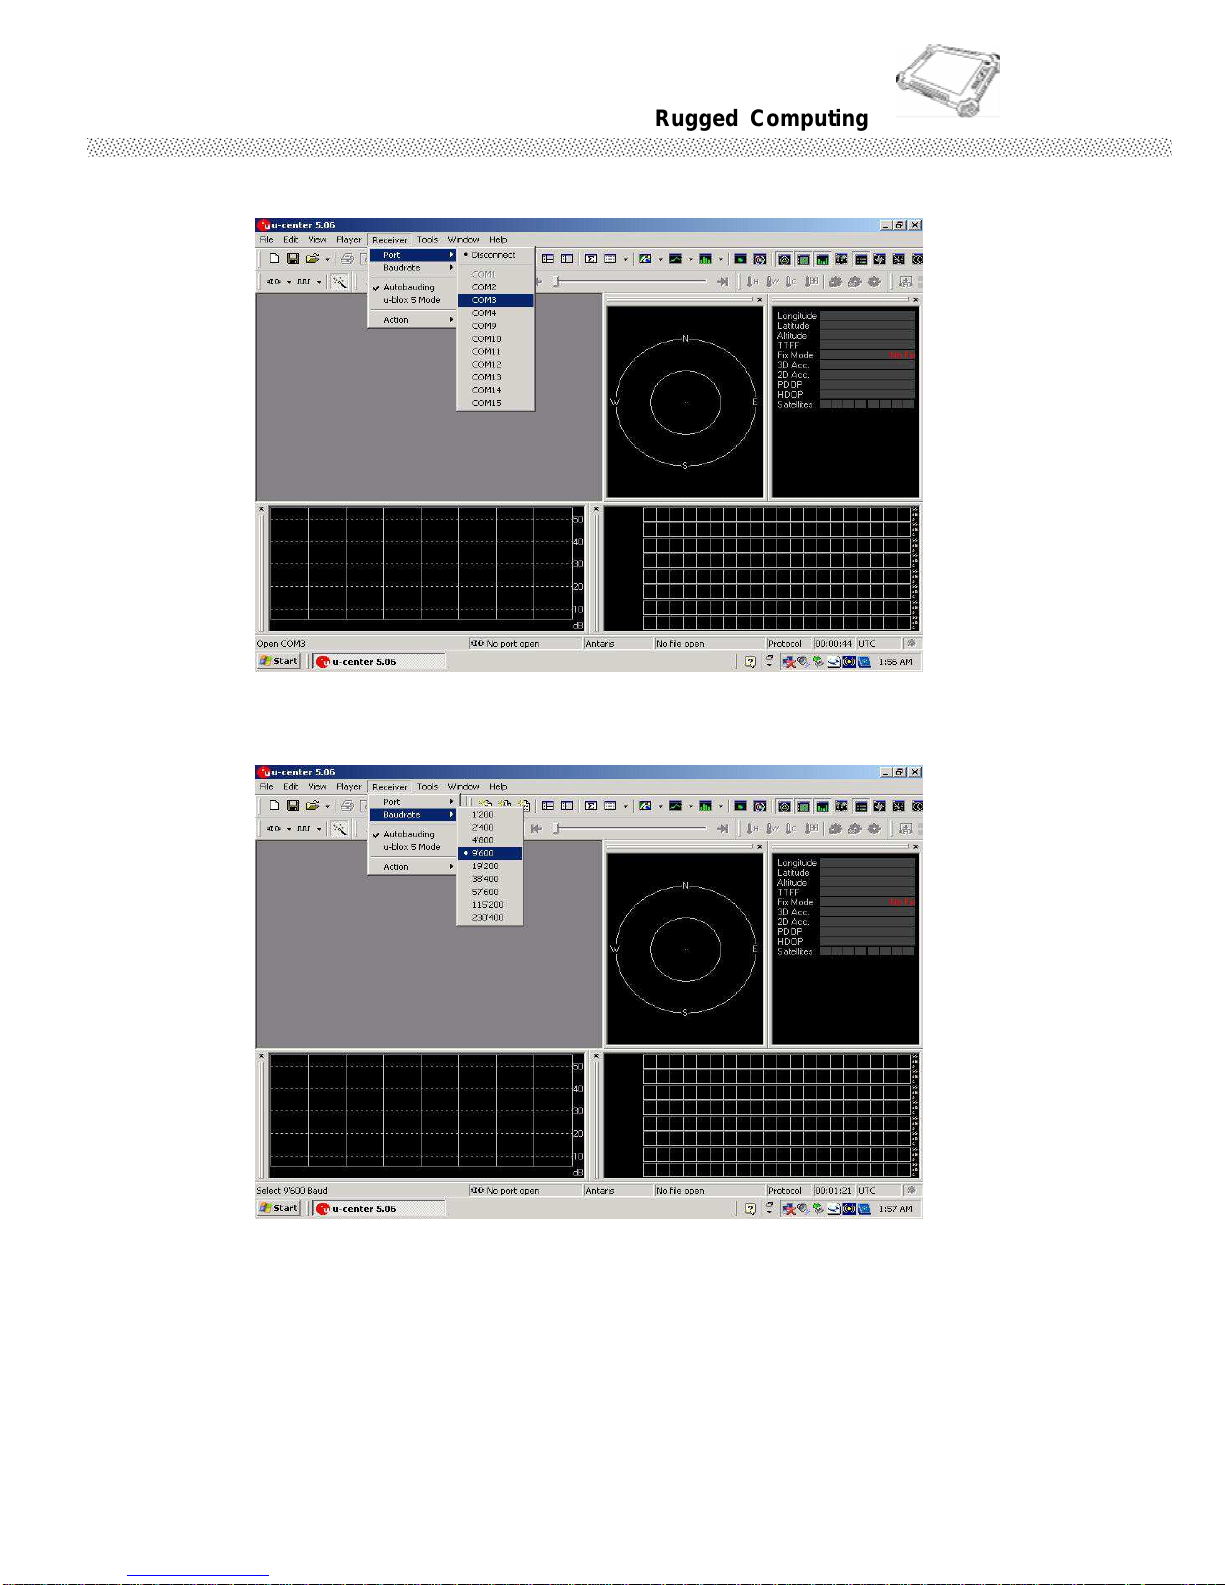
3. Setting the Receiver Port to COM9
4. Setting the Receiver Baudrate to 9600
Page 51
Rugged Computing
Users Manual Rugged Table PCs
51
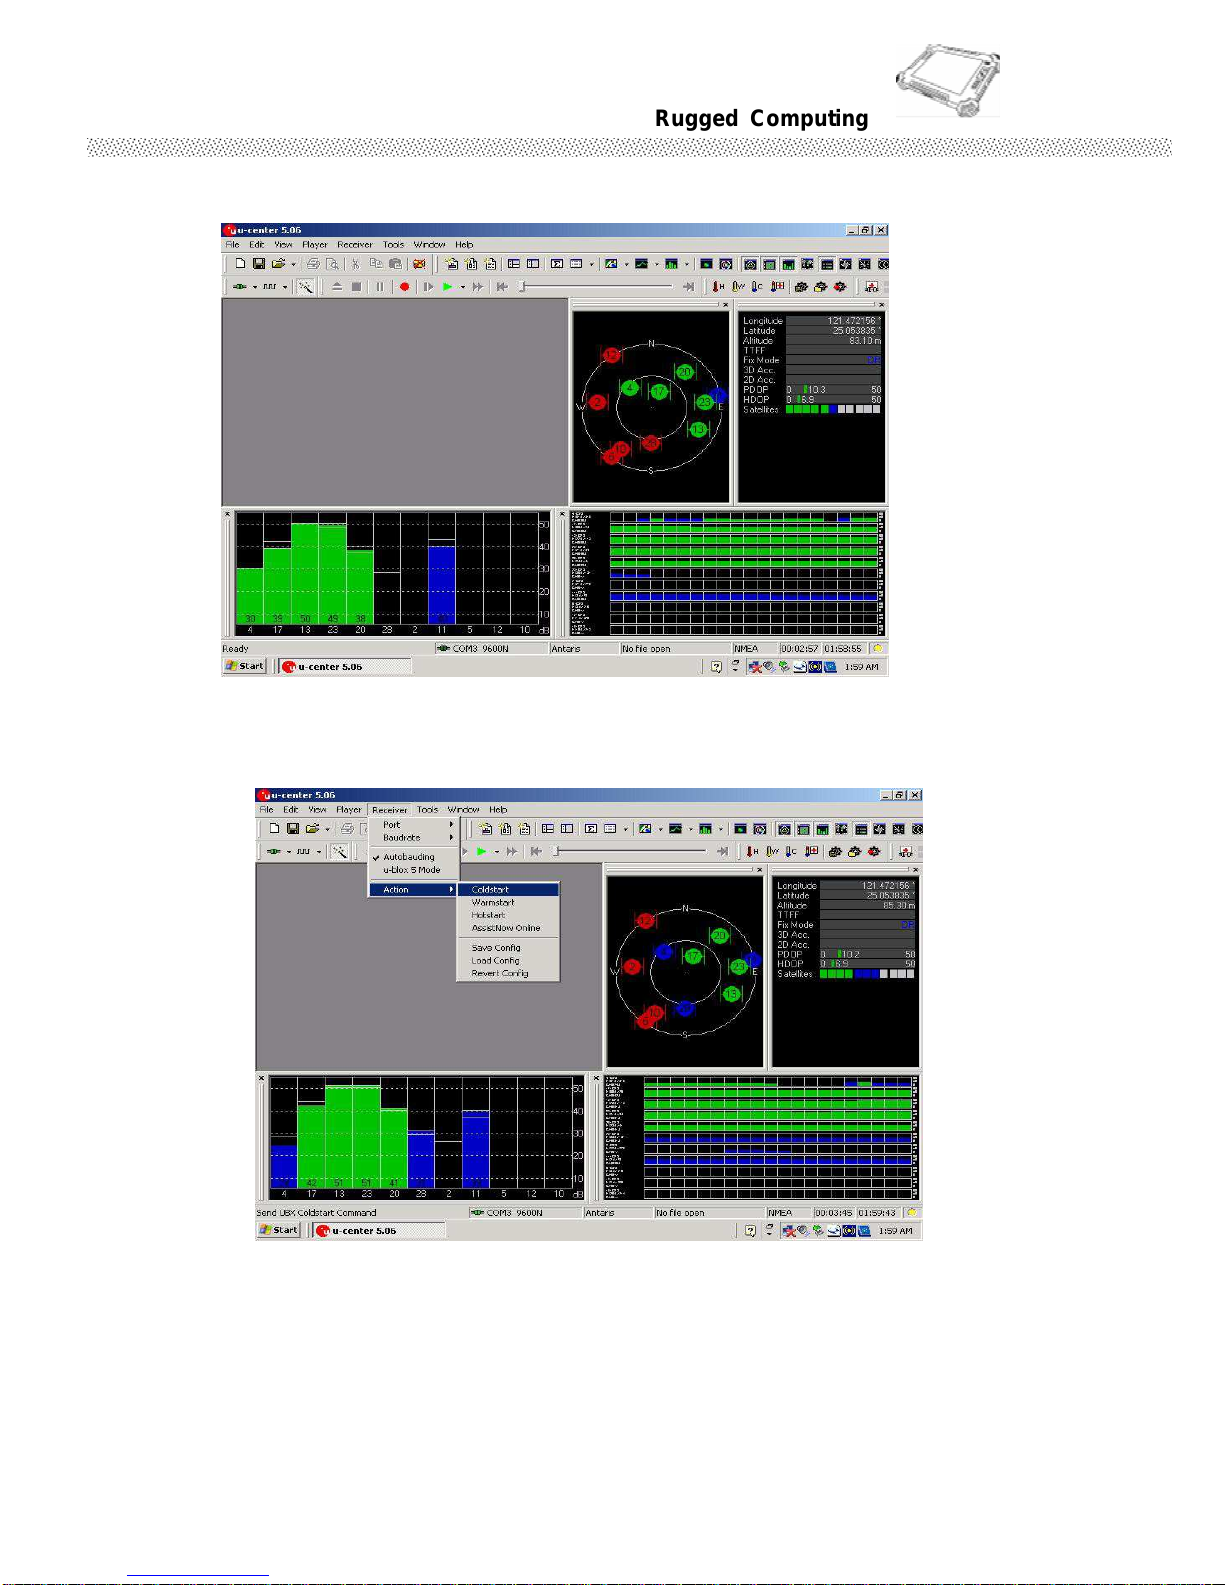
5. GPS Module will start Cold Start. When the positioning is complete, the Fix Mode will
appear as DR
6. You can choose coldstart, warmstart or Hotstart from Receiver Action
Page 52
Rugged Computing
Users Manual Rugged Table PCs
52
2.2.7 Using the Camera Feature (Optional)
We apply a internal 2M Pixels Camera module for default function of the
Tablet PC series.
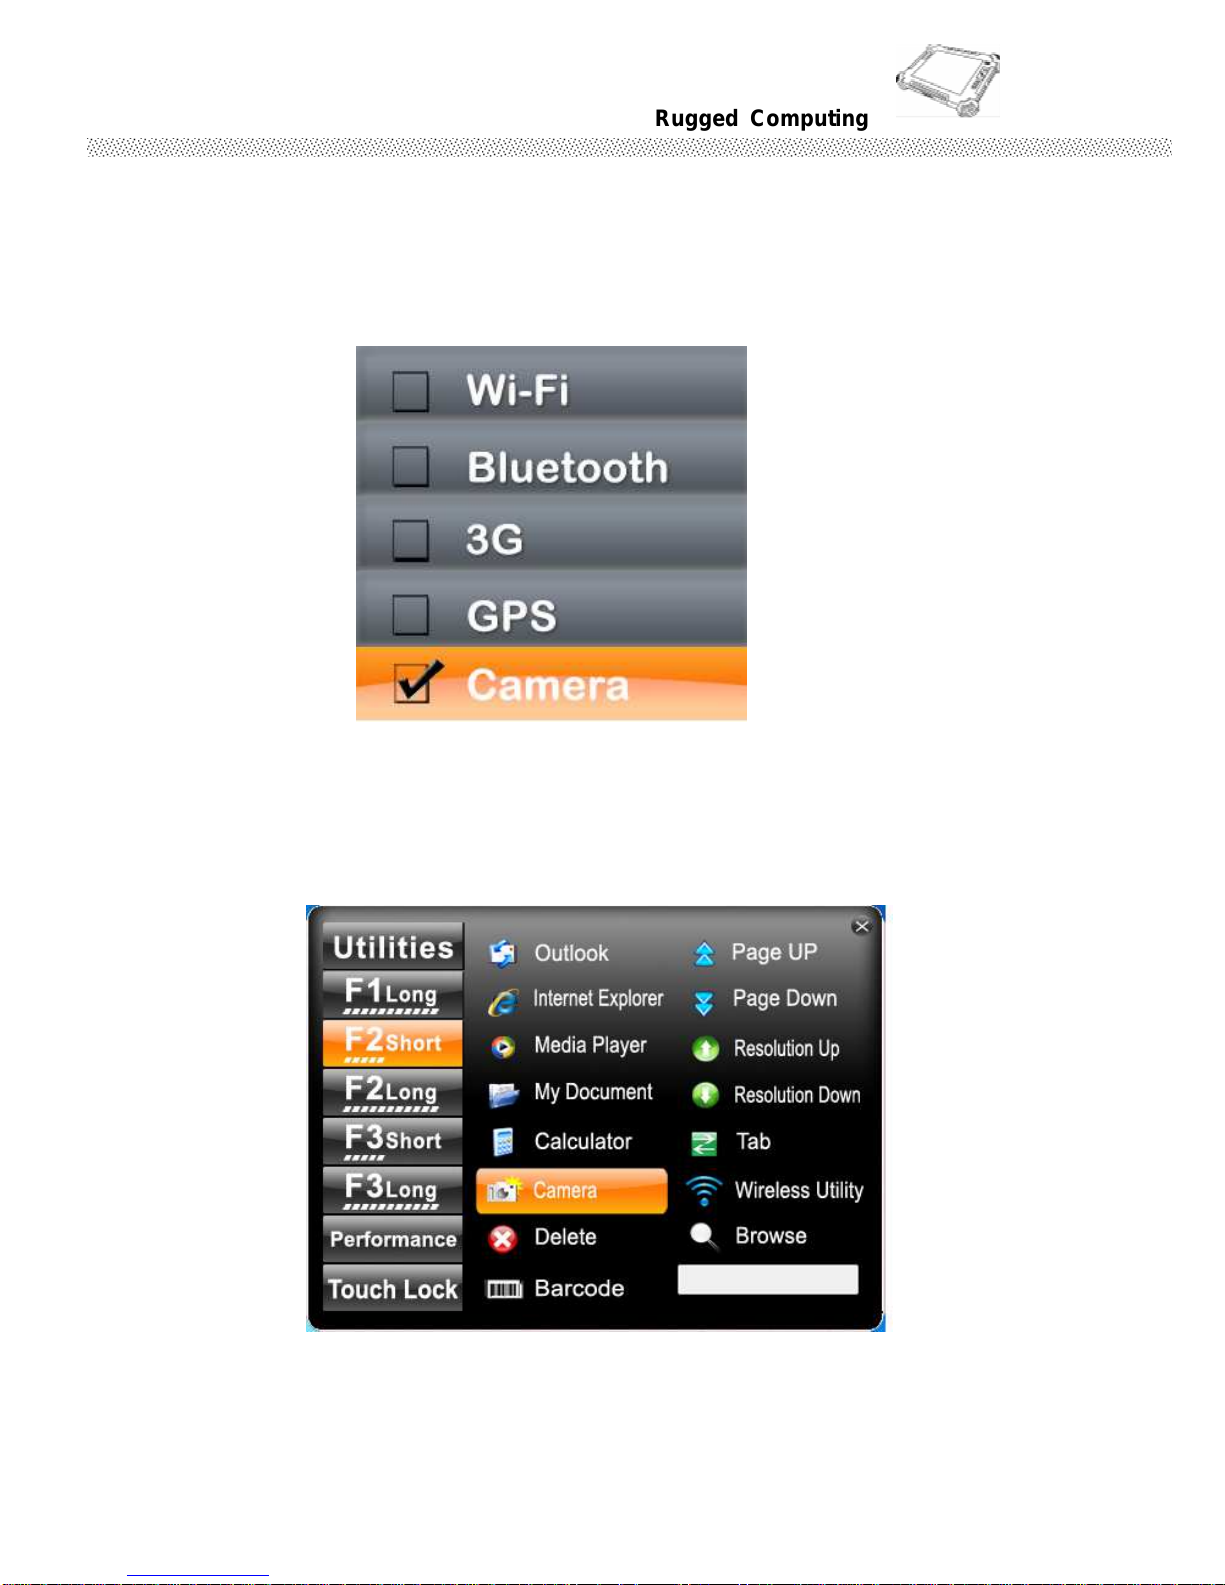
1. Choose HotTab AP Menu function and making sure the Camera Module is “On”.
2. Press F1 button to into the functional hot key setting. You can choose any functional key
as a shortcut to open the camera function. For example,you can set “F2 Short” as the
camera function.
Page 53
Rugged Computing
Users Manual Rugged Table PCs
53
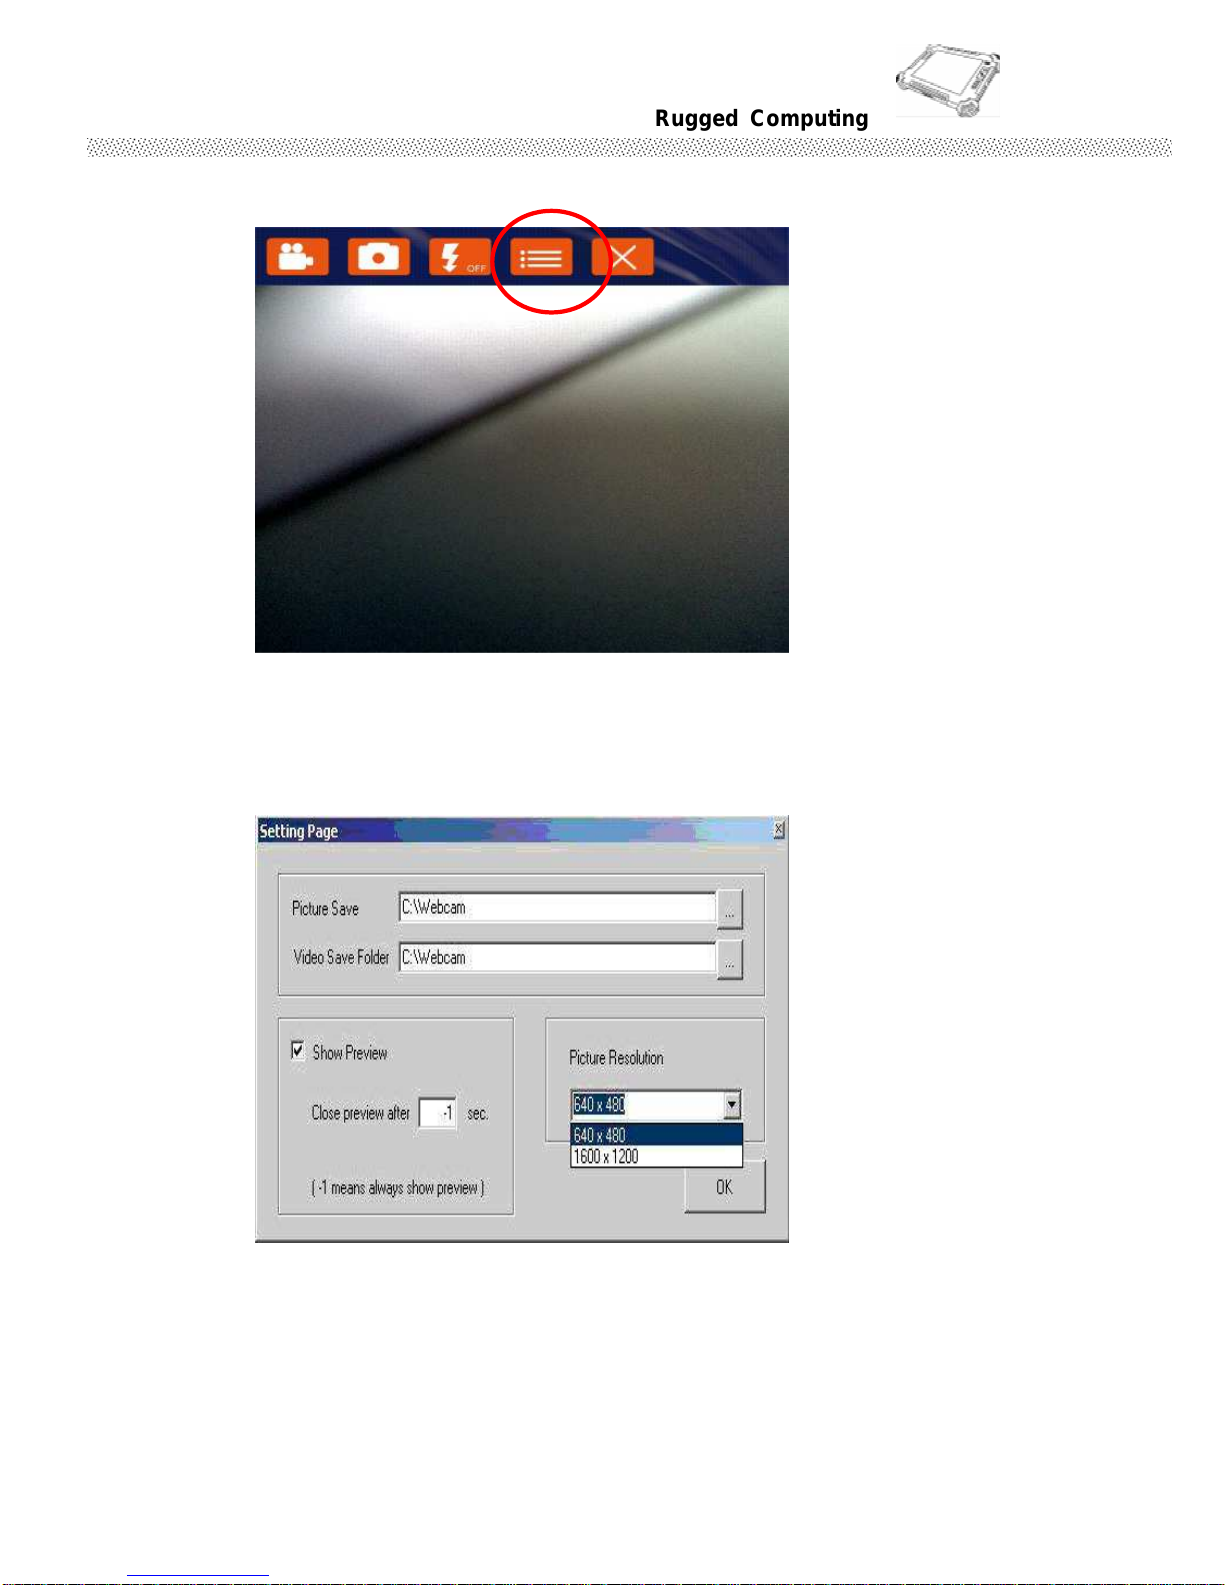
3. Setting the image pre-view resolution .
4. When you set the pre-view resolution to 640*480,the final picture resolution is also
640*480..
Page 54
Rugged Computing
Users Manual Rugged Table PCs
54
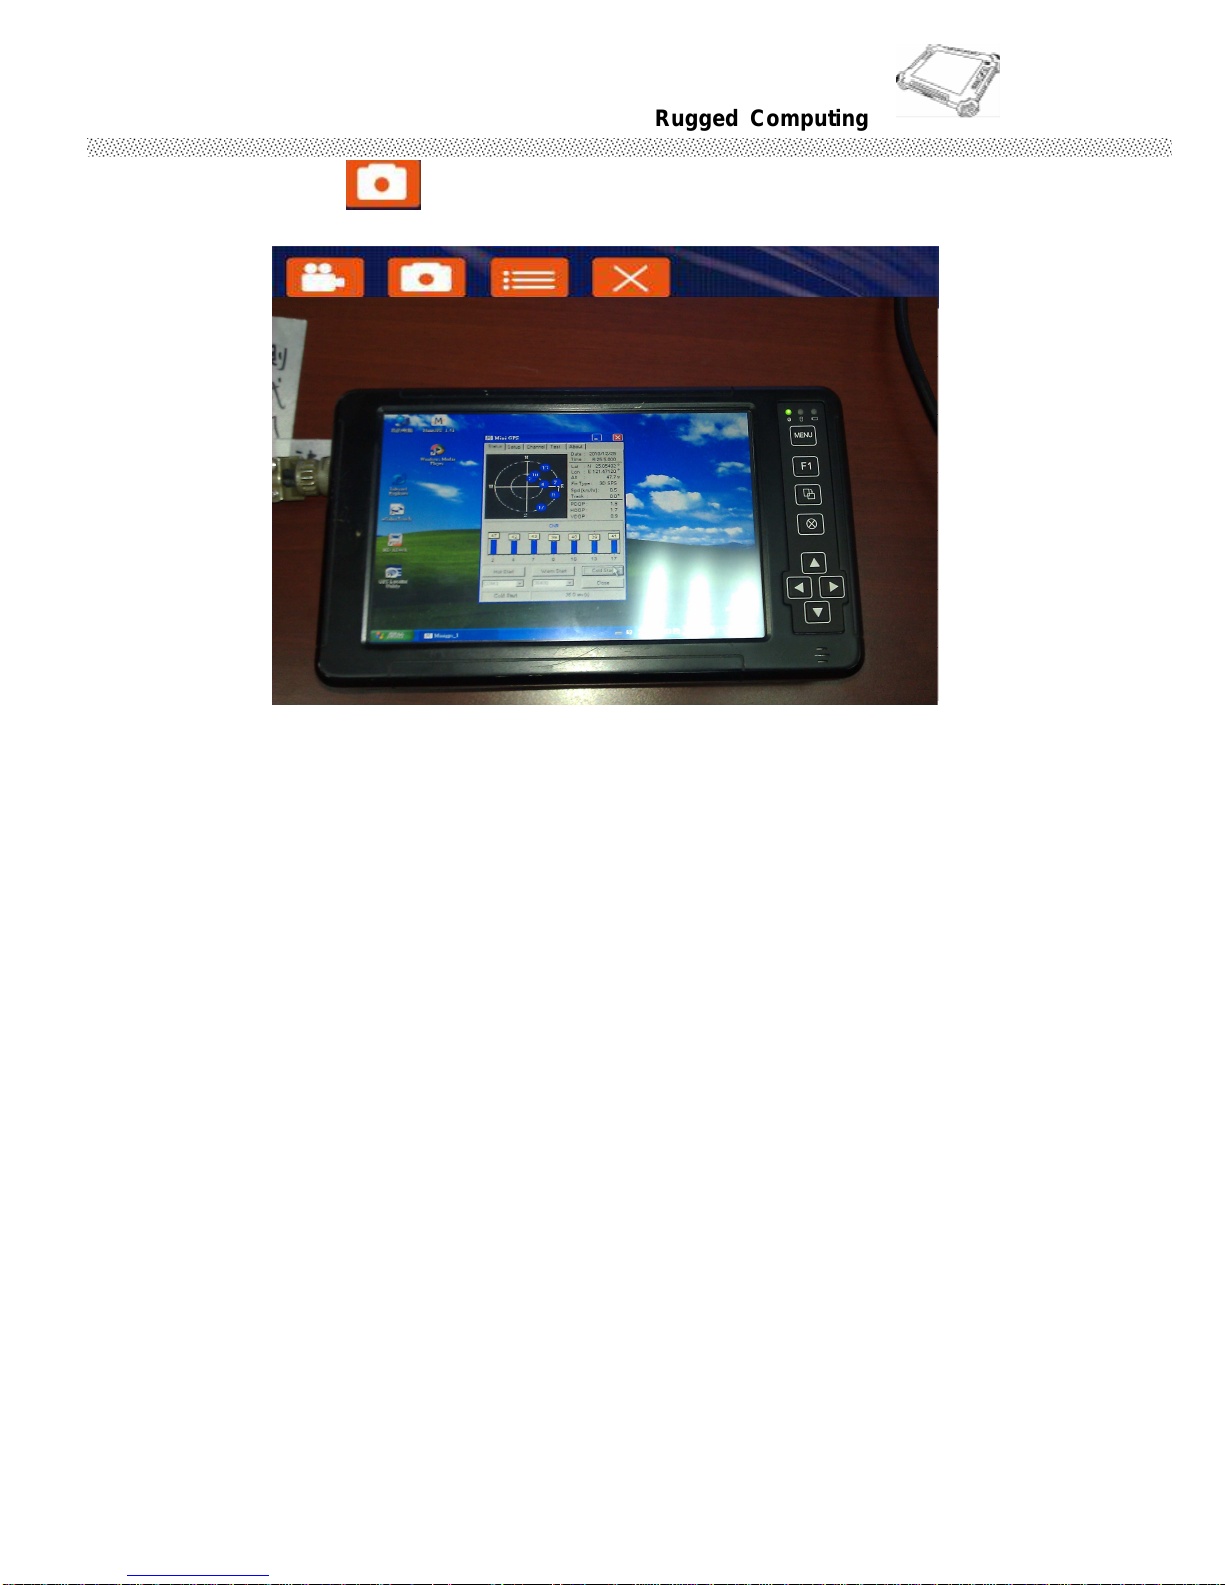
5. Click the icon to take a picture.
Page 55
Rugged Computing
Users Manual Rugged Table PCs
55
CHAPTER 3
Tablet PC Power
Management
Page 56
Rugged Computing
Users Manual Rugged Table PCs
56
CHAPTER 3 TABLET PC POWER MANAGEMENT
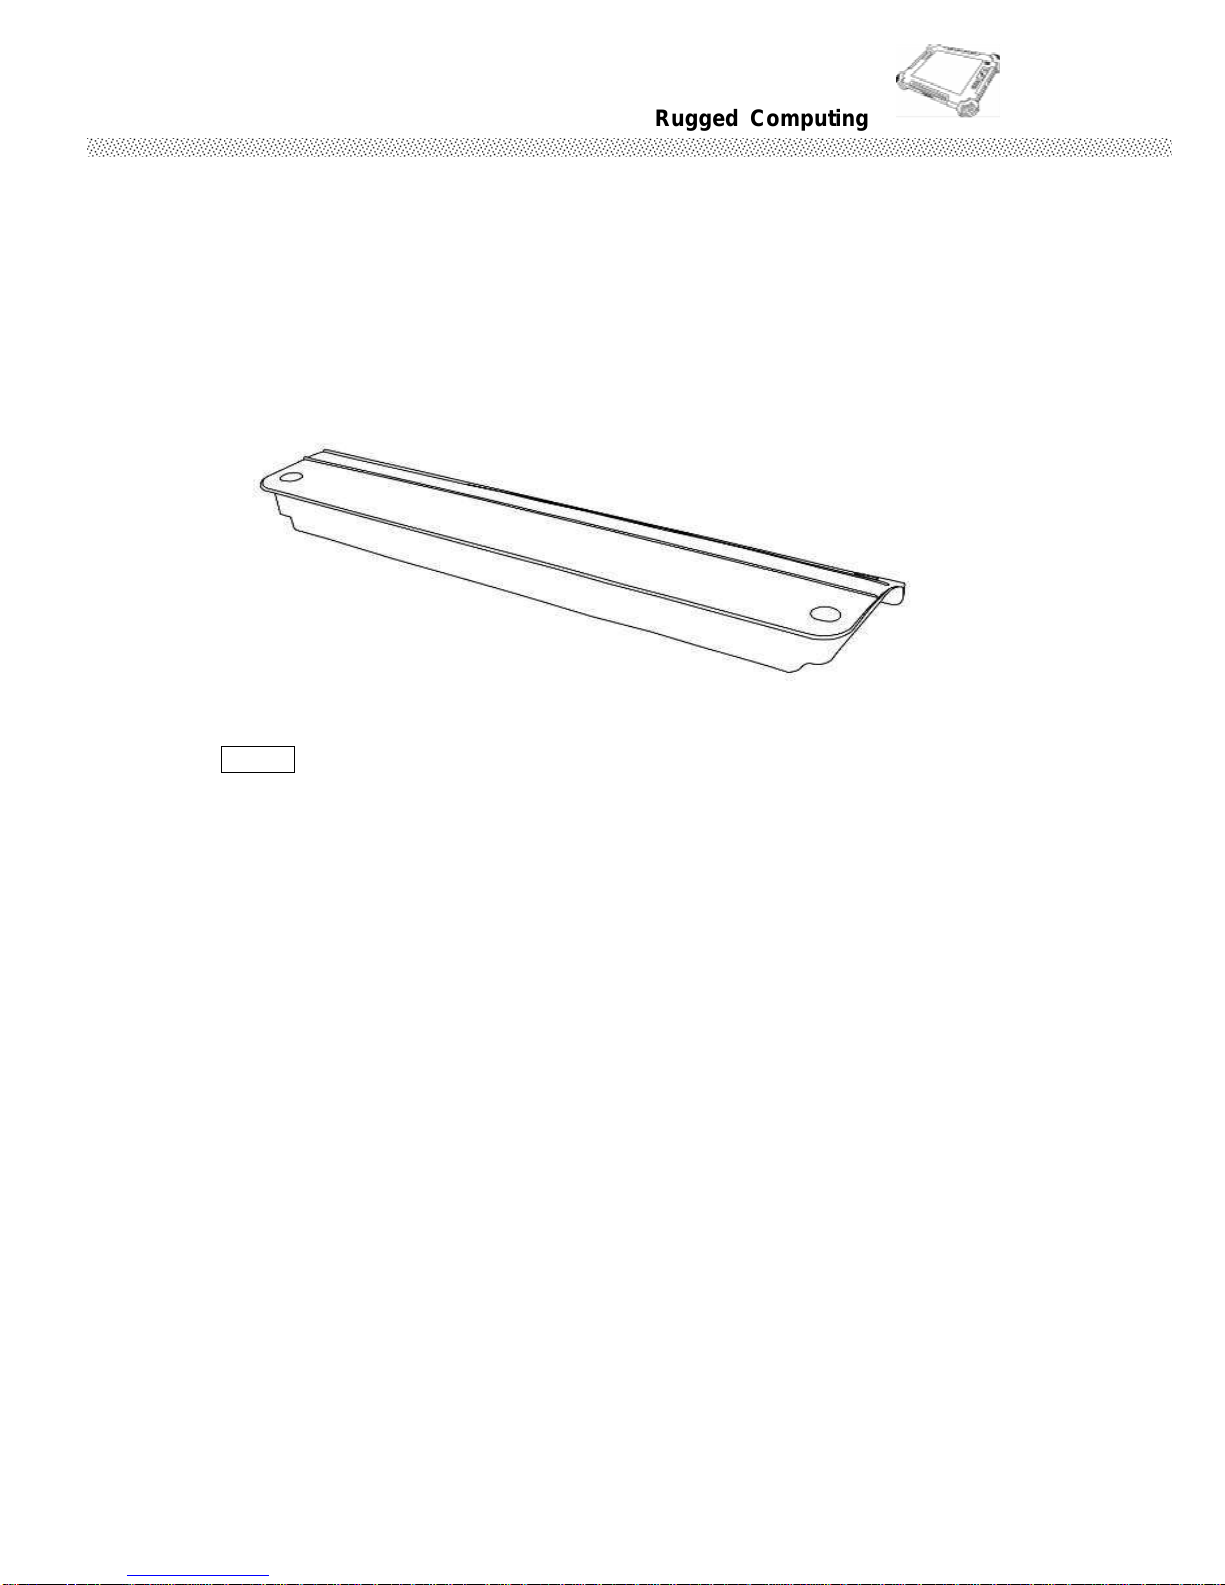
3.1 About AC Adapter
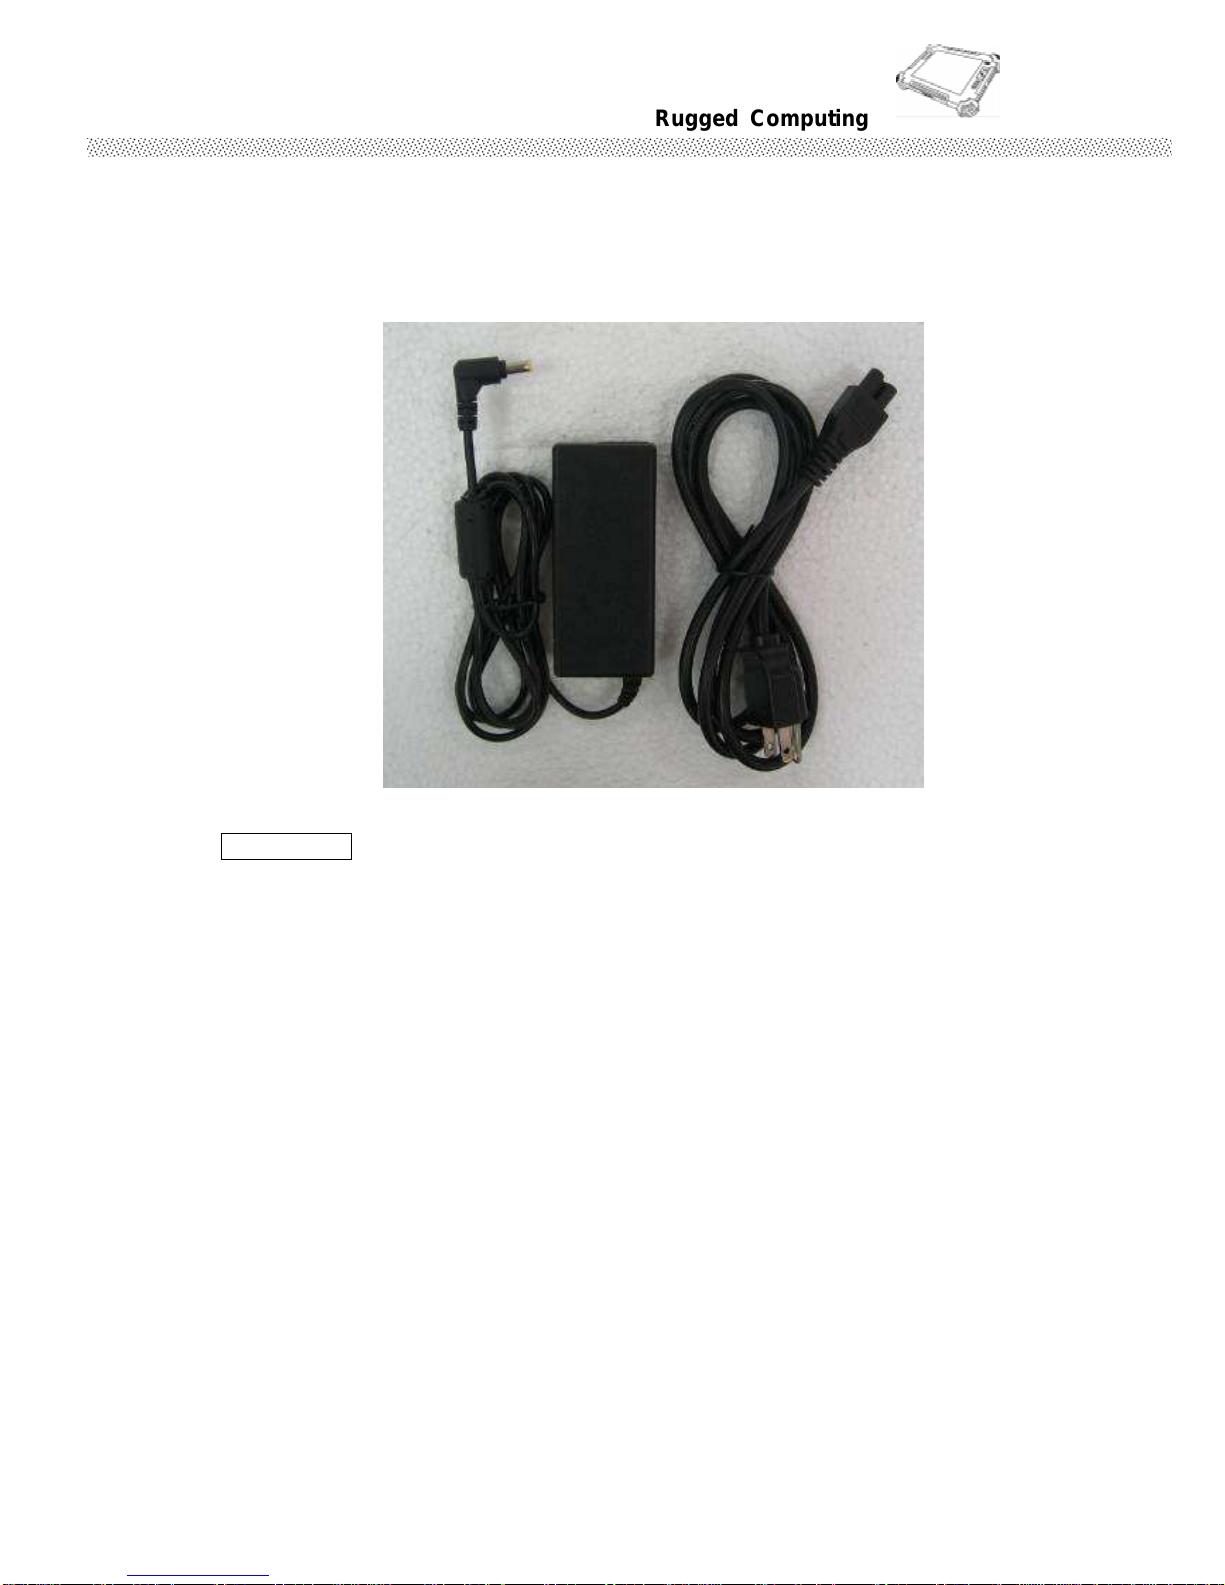
Our Tablet PC support one set of AC adapter and power code by country area.
Please confirm with your dealer for appropriate power code if necessary.
**Caution
1. When you disconnect the AC adapter, disconnect from the electrical
outlet first and then from the tablet PC. A reverse procedure may
damage the AC adapter or tablet PC.
2. Always hold the plug head when you unplug the connector, Never pull on
the cord.
3. The AC adapter is designed for use with your tablet PC only. Connecting
the AC adapter to another device can damage the adapter.
The adapter operates on any voltage in the range of 100~240 V AC. The AC
adapter serves as a converter from AC (Alternating Current) to DC (Direct
Current) power because the tablet PC runs on DC power input, but an
electrical outlet usually provides AC power. It also charges the battery pack
when connected to AC power.
Page 57
Rugged Computing
Users Manual Rugged Table PCs
57
3.2 Charging and Checking Charging Status
3.2.1 Charging the Battery Pack
The battery pack is the internal power source for the tablet PC. It is
rechargeable using the AC adapter. The operating time of a fully charged
battery pack depends on how you are using the tablet PC. When your
applications often access peripherals, you will experience a shorter operating
time.
NOTE:
1. Charging will not start if the battery’s temperature is below 0 °°°°C (32 °°°°F).
It is also recommended not to charge the battery when temperature is
above 45 °°°°C (113 °°°°F)
2. To prevent damage, the charging process may stop and the Battery
Charge Indicator flashes red when the environmental temperature gets
above 55 °°°°C (131°°°°F)
3. The battery level may automatically lessen due to the self-discharge
process (0.21 % per day), even when the battery pack is fully charged
(100 %). This happens no matter if the battery pack is installed in the
tablet PC.
Page 58
Rugged Computing
Users Manual Rugged Table PCs
58
3.2.2 Charging Approaches
There are two ways recommended to charge the battery pack.
1. By connecting the AC adapter to the tablet PC and an electrical outlet. The
Battery Charge Indicator on the tablet PC glowed orange to indicate that
charging is in progress. You are advised to keep the tablet PC power off
while the battery is being charged. When the battery is fully charged, the
Battery Charge Indicator glows green.
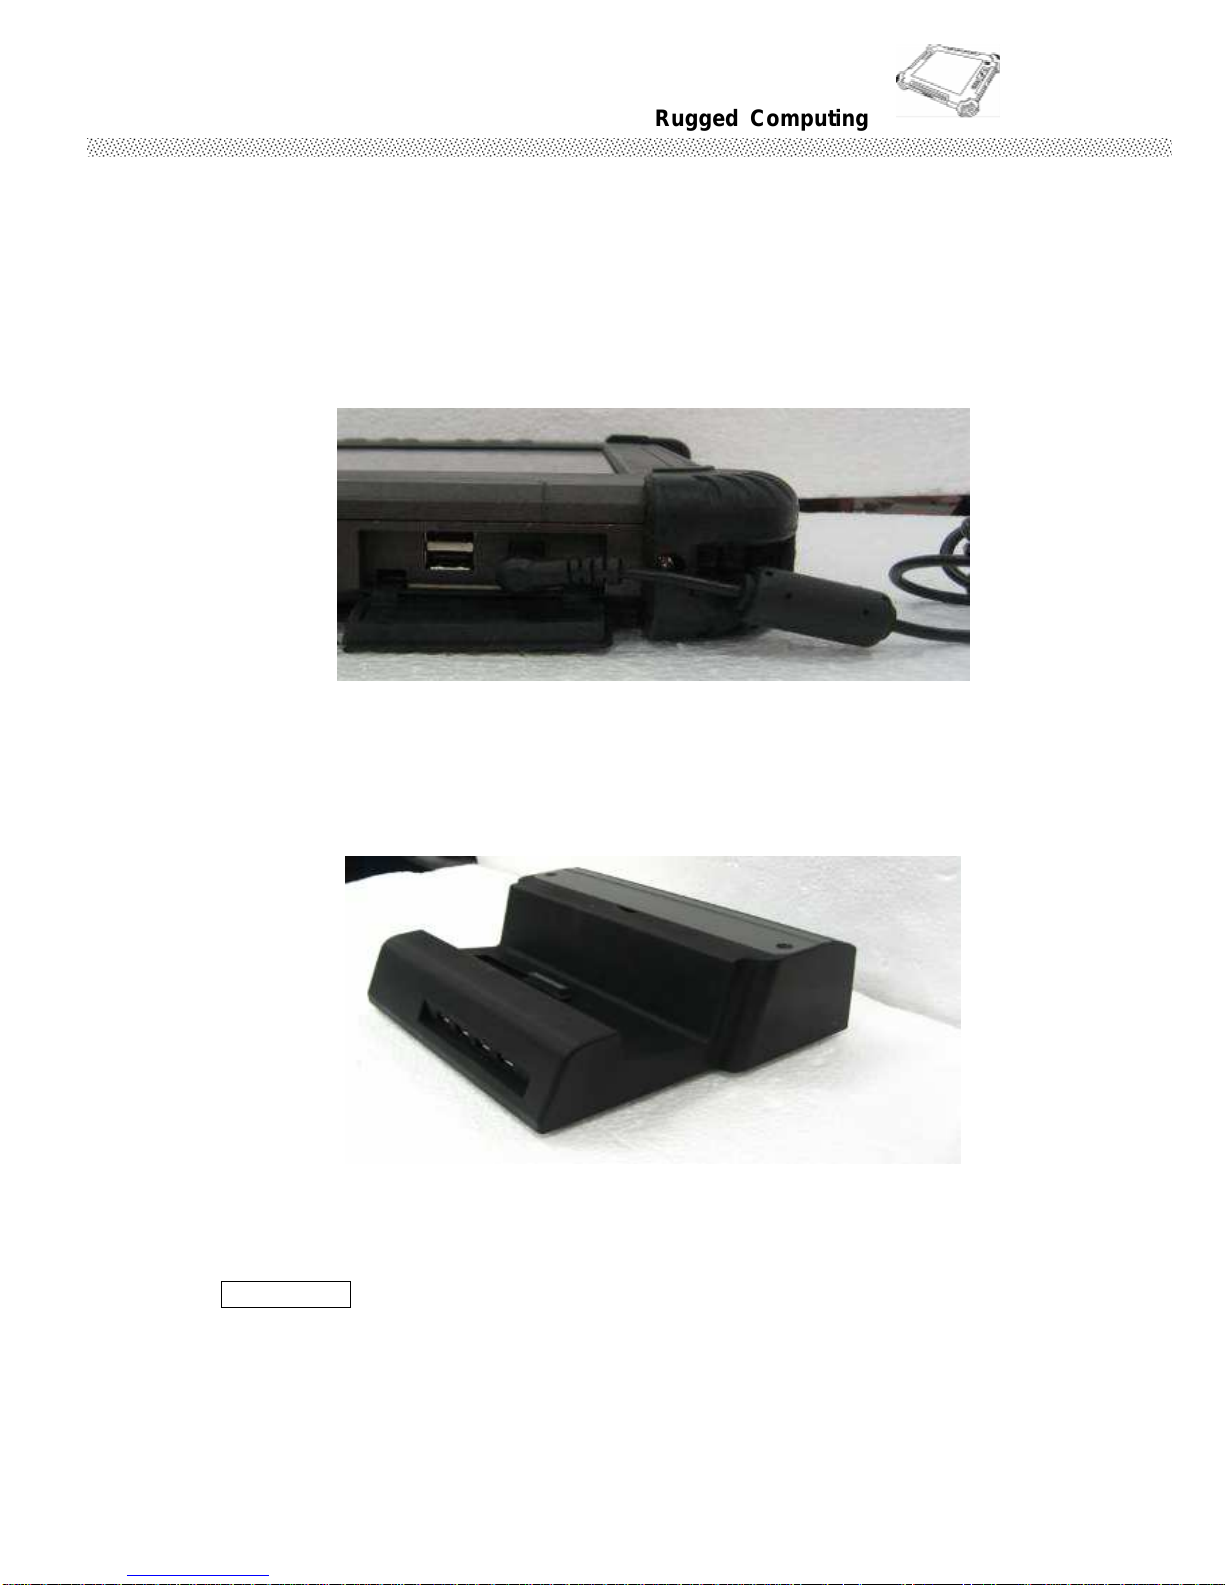
2. By using Multi-functional Docking Station charger, connect power code to
the electrical outlet and power connector to the Docking Station. Put
battery pack on rear side of charger slot. When the battery is fully charged,
the Battery Charge Indicator glows green.
It takes approximately 3 hours to fully charge the Li-Ion battery pack at a
room temperature of 25 °°°°C (may need a longer charging time at lower
temperatures).
CAUTION:
1. After the tablet PC has been fully recharged, do not immediately
disconnect and reconnect the AC adapter to charge it again. The
above-mentioned may damage the battery.
2. During charging, do not disconnect the AC adapter before the battery
Page 59

Rugged Computing
Users Manual Rugged Table PCs
59
has been fully charged; otherwise you will get a prematurely charged
battery.
Page 60
Rugged Computing
Users Manual Rugged Table PCs
60
3.2.3
Checking the Battery Level
Any battery level indication is an estimated result. The actual operating time
can be different from the estimated time, depending on how you are using
the tablet PC.
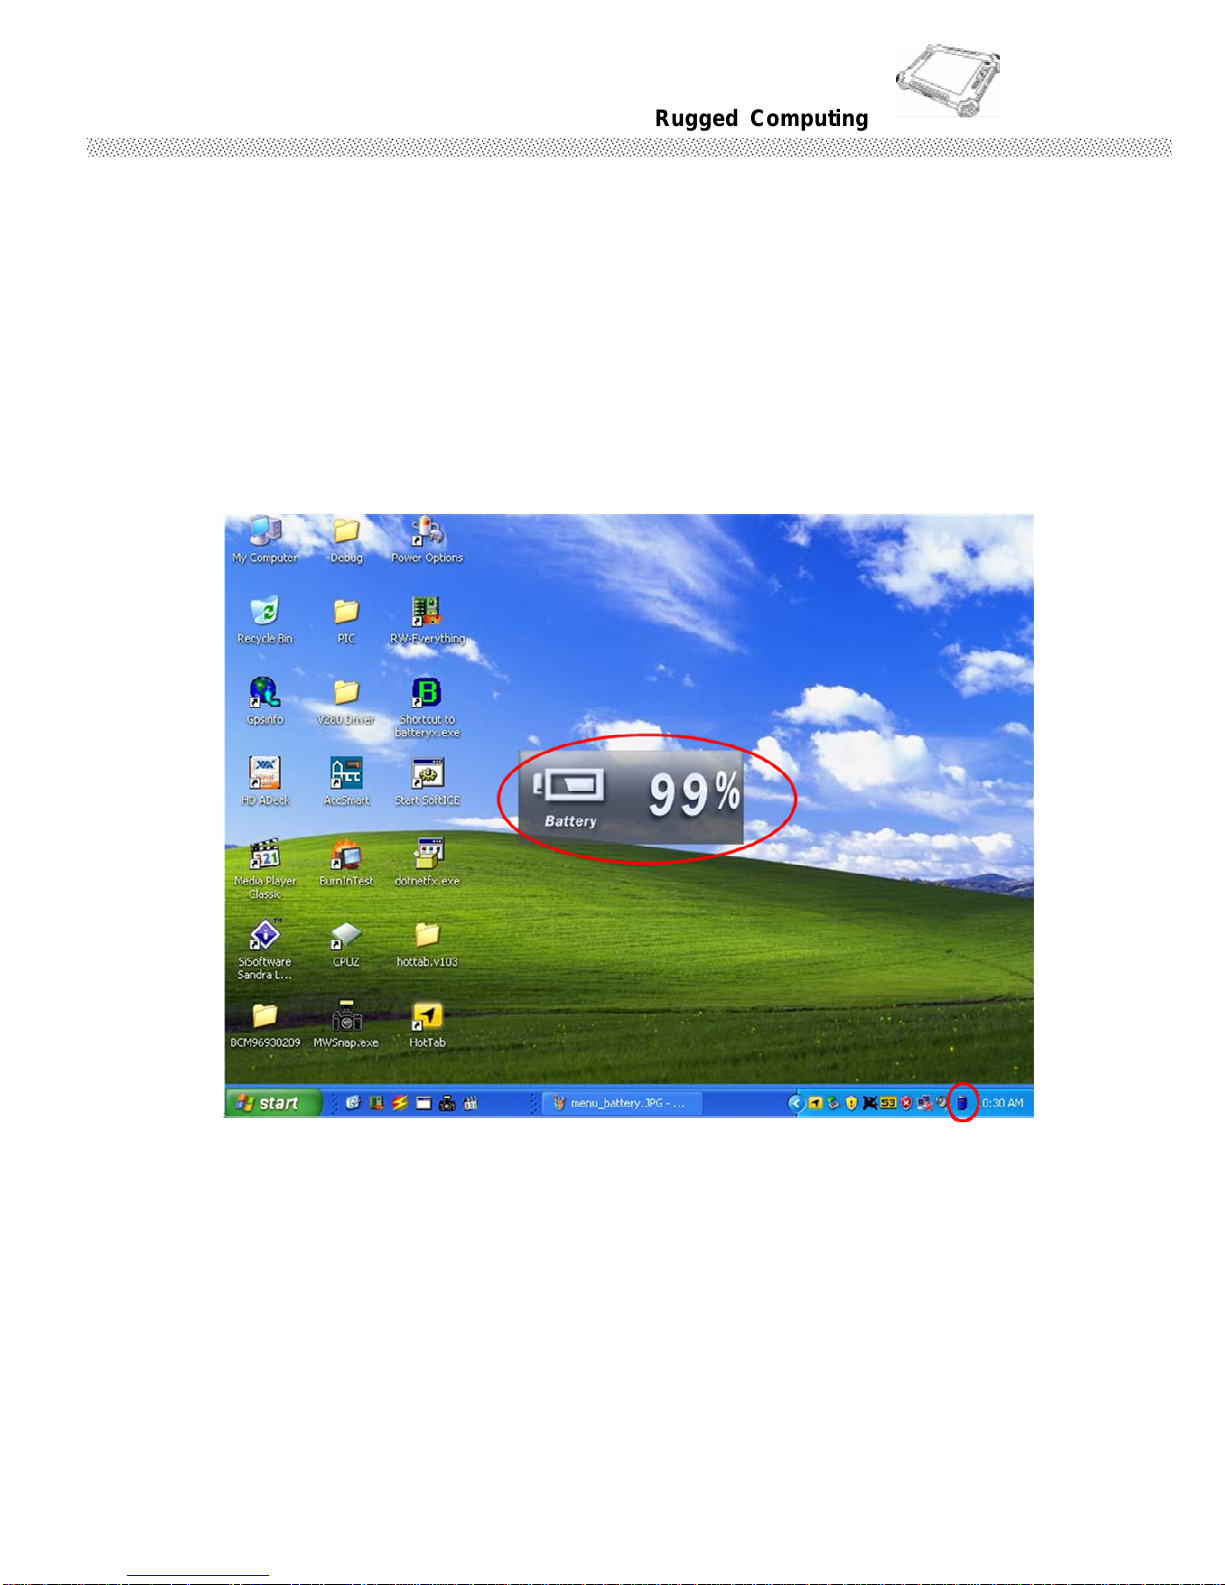
In Windows operating system, you can check the approximate battery level
using the battery meter function. To read the battery level in Windows, click
the icon on the taskbar. (Click the icon if the tablet PC is using AC power.)
Or just push the HotTab Menu Utility Function three times to show the
battery status. (Check Chapter 2.2.1)
Page 61

Rugged Computing
Users Manual Rugged Table PCs
61
3.2.4 Battery Low Signals and Actions
Battery Low occurs when the battery has approximately 10 % (Windows
default setting) of its charge remaining. The tablet PC’s Battery Charge
Indicator ( ) blinks red to alert you take actions.
NOTICE:
1. You can set up the Battey Low threshold and signals under Windows.
Immediately save your data upon Battery Low. The remaining operating
time depends on how you are using the tablet PC. If you are using the
audio subsystem, PC card, hard or USB flash disk, the battery might run
out of charge very quickly.
2. Always respond to Battery Low by placing your tablet PC on the Standby
or Hibernation mode, turning off the tablet PC, or connecting the AC
adapter.
CAUTION:
1. If you do not take any action, the tablet PC will automatically hibernate
and turn off.
2. If you are using a PC card, do not access the card during battery low
periods. The access may takes longer time than battery to run out of
charge, thus making your access to the card fail.
3. If you fail to save your data when the battery completely runs out of
charge, then you will lose your data.
Page 62
Rugged Computing
Users Manual Rugged Table PCs
62
3.3
Replacing the Battery Pack
CAUTION:
1. There is danger of explosion if the battery is incorrectly replaced. The
Battery only can replace with the tablet PC manufacturer’s optional
battery packs. Discard used batteries according to the dealer’s
instructions.
2. Do not attempt to disassemble the battery pack.
If you often rely on battery power for a long period of time while traveling,
you may consider to purchase of an additional battery pack from your dealer
and keep it with you in a fully charged state as a backup.
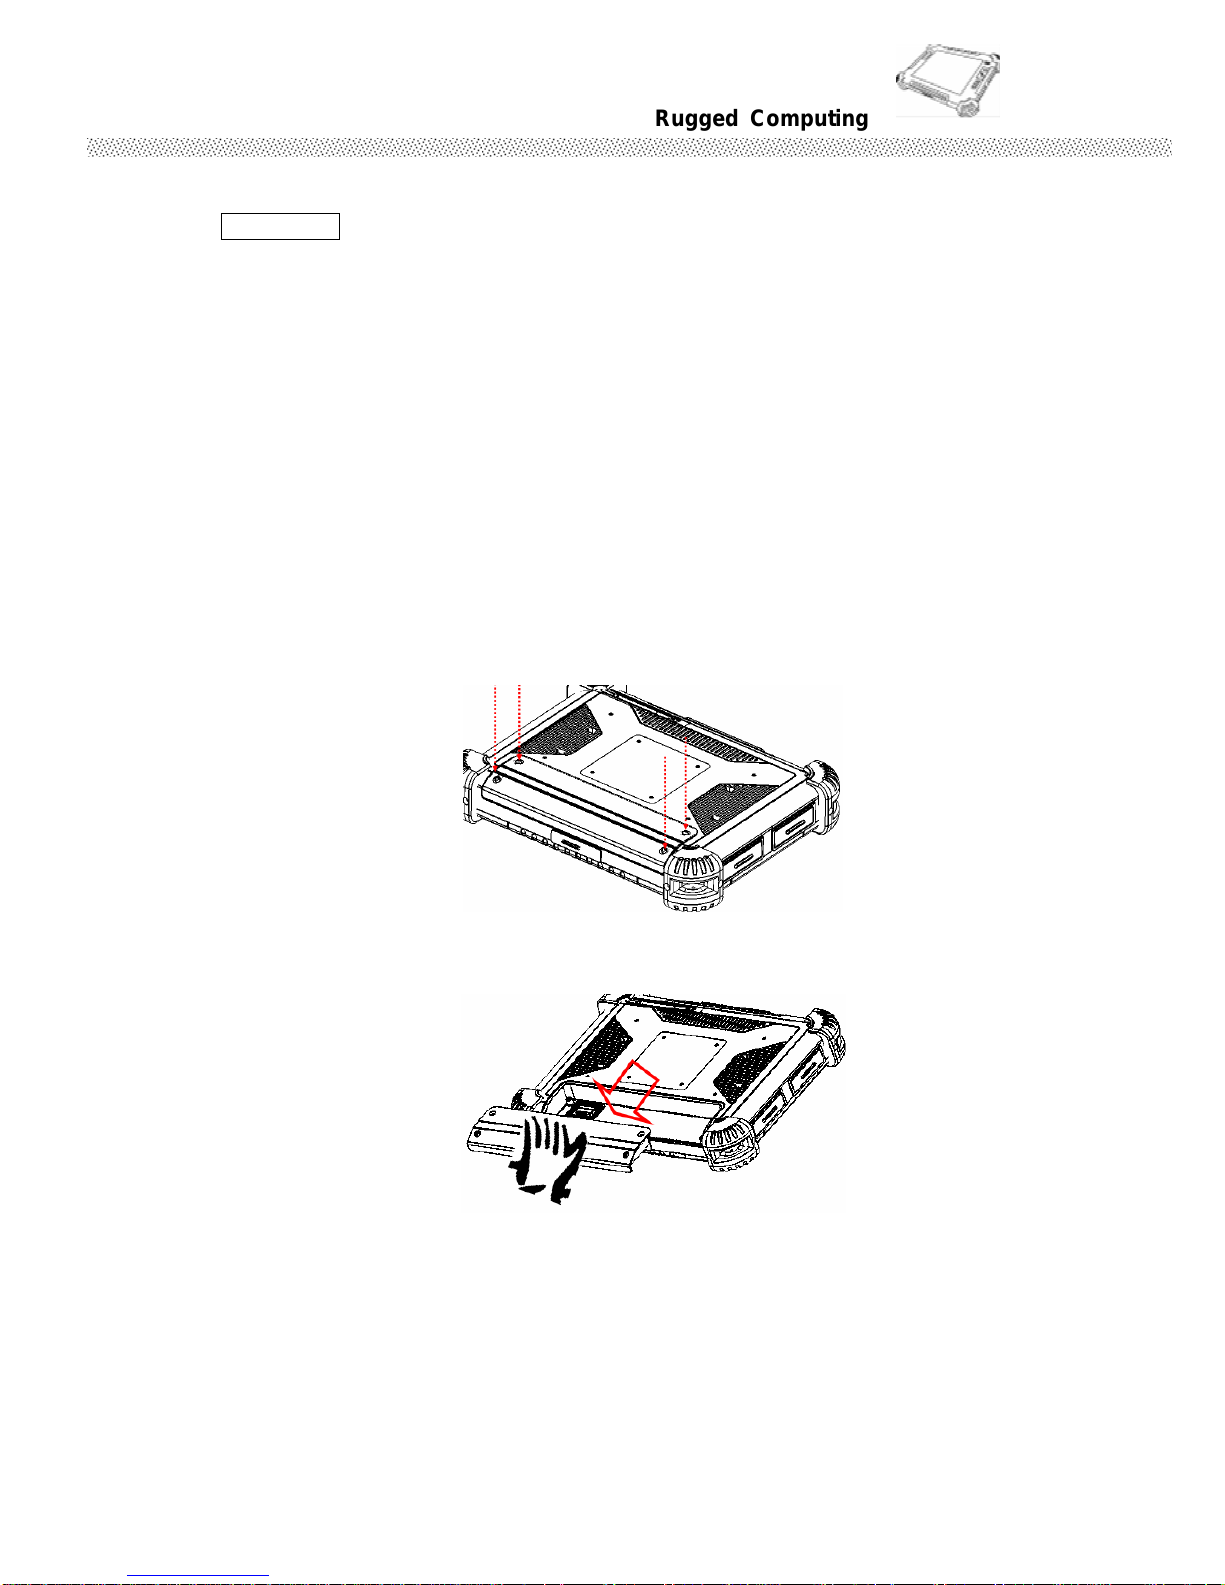
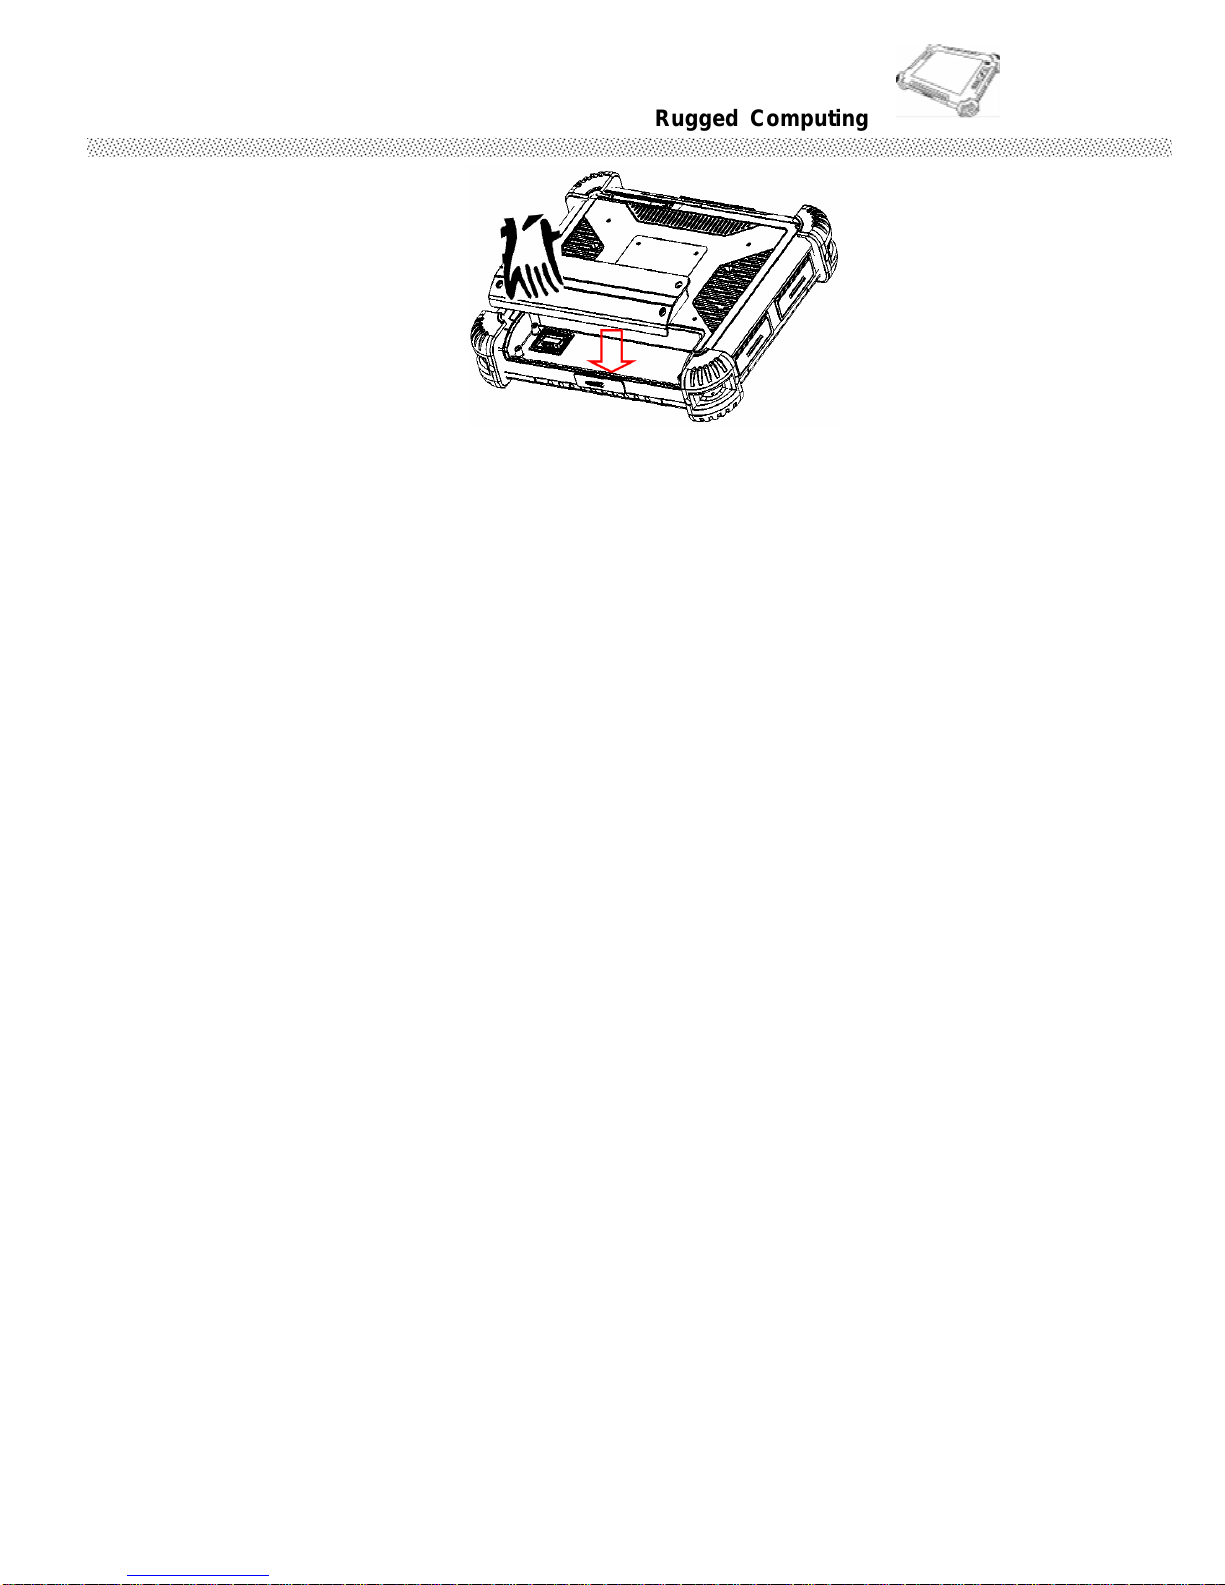
To replace the battery pack, follow these steps:
1. Make sure that the tablet PC is not turned on or connected to AC power.
Place the tablet PC upside down.
2. Remove the four screws securing the battery compartment cover and
remove it.
3. Pull back from the rear cover horizontally to lift the battery pack off the
tablet PC.
4. Fit another battery pack into place and secure with four screws.
Page 63
Rugged Computing
Users Manual Rugged Table PCs
63
Page 64

Rugged Computing
Users Manual Rugged Table PCs
64
3.4
Power-Saving Tips
The following are some Power-Saving Tips suggestions to maximize the
battery’s operating time.
Do not disable Power Management.
Decrease the LCD brightness to the lowest comfortable level.
Shorten the length of time before Windows turn off the display.
USB devices use power just by being connected. If you use a USB mouse,
you can save power by disconnecting the mouse and using the optional
touchscreen pen.
If you use a USB flash drive, unplug it when you are not using it.
Deactivate the Wireless LAN function if you are not using it (see Chapter
2).
Deactivate the Bluetooth wireless feature if you are not using it (see
Chapter 2)
Turn off the tablet PC when you are not using it.
Page 65
Users Manual Rugged Tablet PCs
CHAPTER 4
Expanding Your Tablet PC
Page 66
Rugged Computing
Users Manual Rugged Table PCs
66
CHAPTER 4 EXPANDING YOUR TABLET PC
4.1 How and When to Use BIOS Setup
For enter to the Tablet PC BIOS setup, you need connect to external
usb keyboarb, press “Del” key when the prompt appears on the
screen during start up. The prompt screen shows only few seconds so
need press Del key quickly.
**NOTICE
Updated BIOS version may be published after the manual is
released. Check with the latest version of BIOS on website.
You may need to run BIOS setup utility when the below status.
1. Error message on sreen indicate to check BIOS setup.
2. Restoring the factory default settings.
3. Modifing the specific hardware specification
4. Want to opttimize the specification.
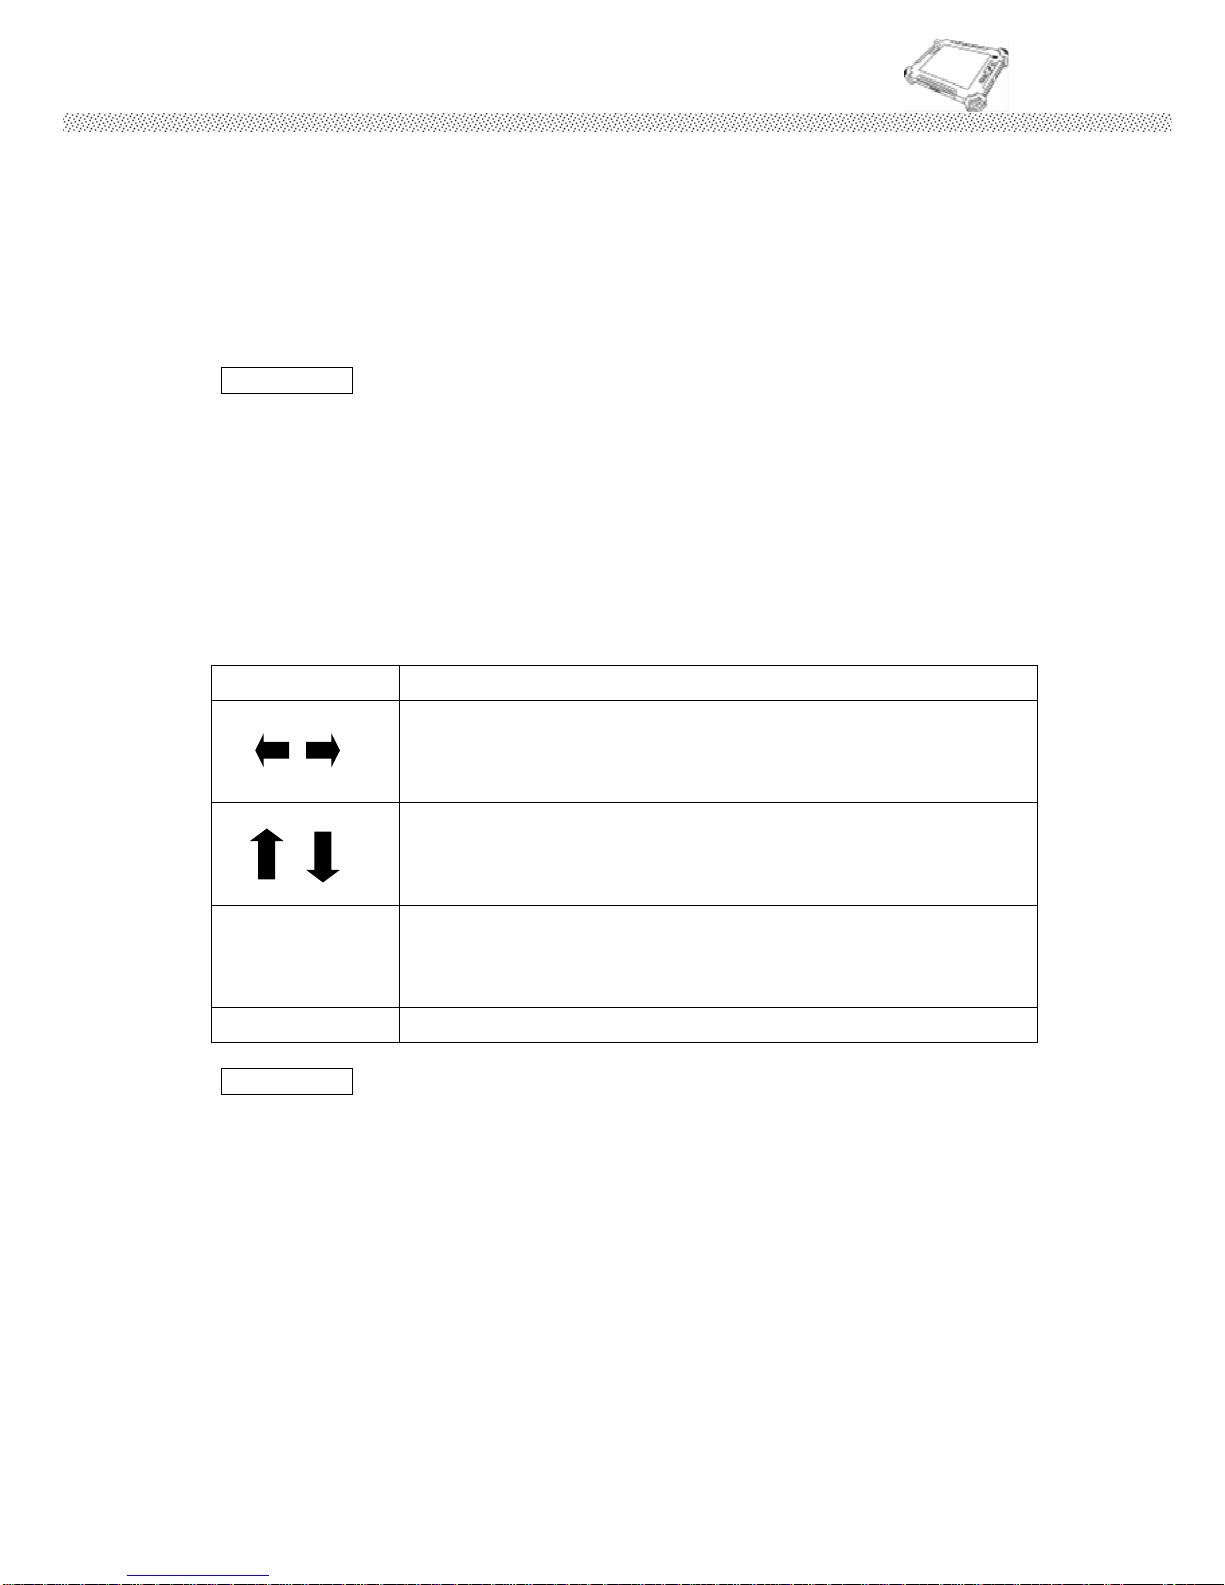
To control the keyboard to select BIOS utility setup, you need
Keyboard Icon Function Description
Selects a menu title
Selects an item or option
Enter Go to the sub-menu when available
Opens or closes the option window when an item is
selected
Esc To leave sub-menu and return to main menu.
**NOTICE
You can press the F1, F9, F10, –/+, and Esc keys by connecting a USB
keyboard to your tablet PC. Make sure that the item “Legacy USB Support”
under the Main menu is set at Enabled (default).
Page 67
Rugged Computing
Users Manual Rugged Table PCs
67
4.2 BIOS Functions
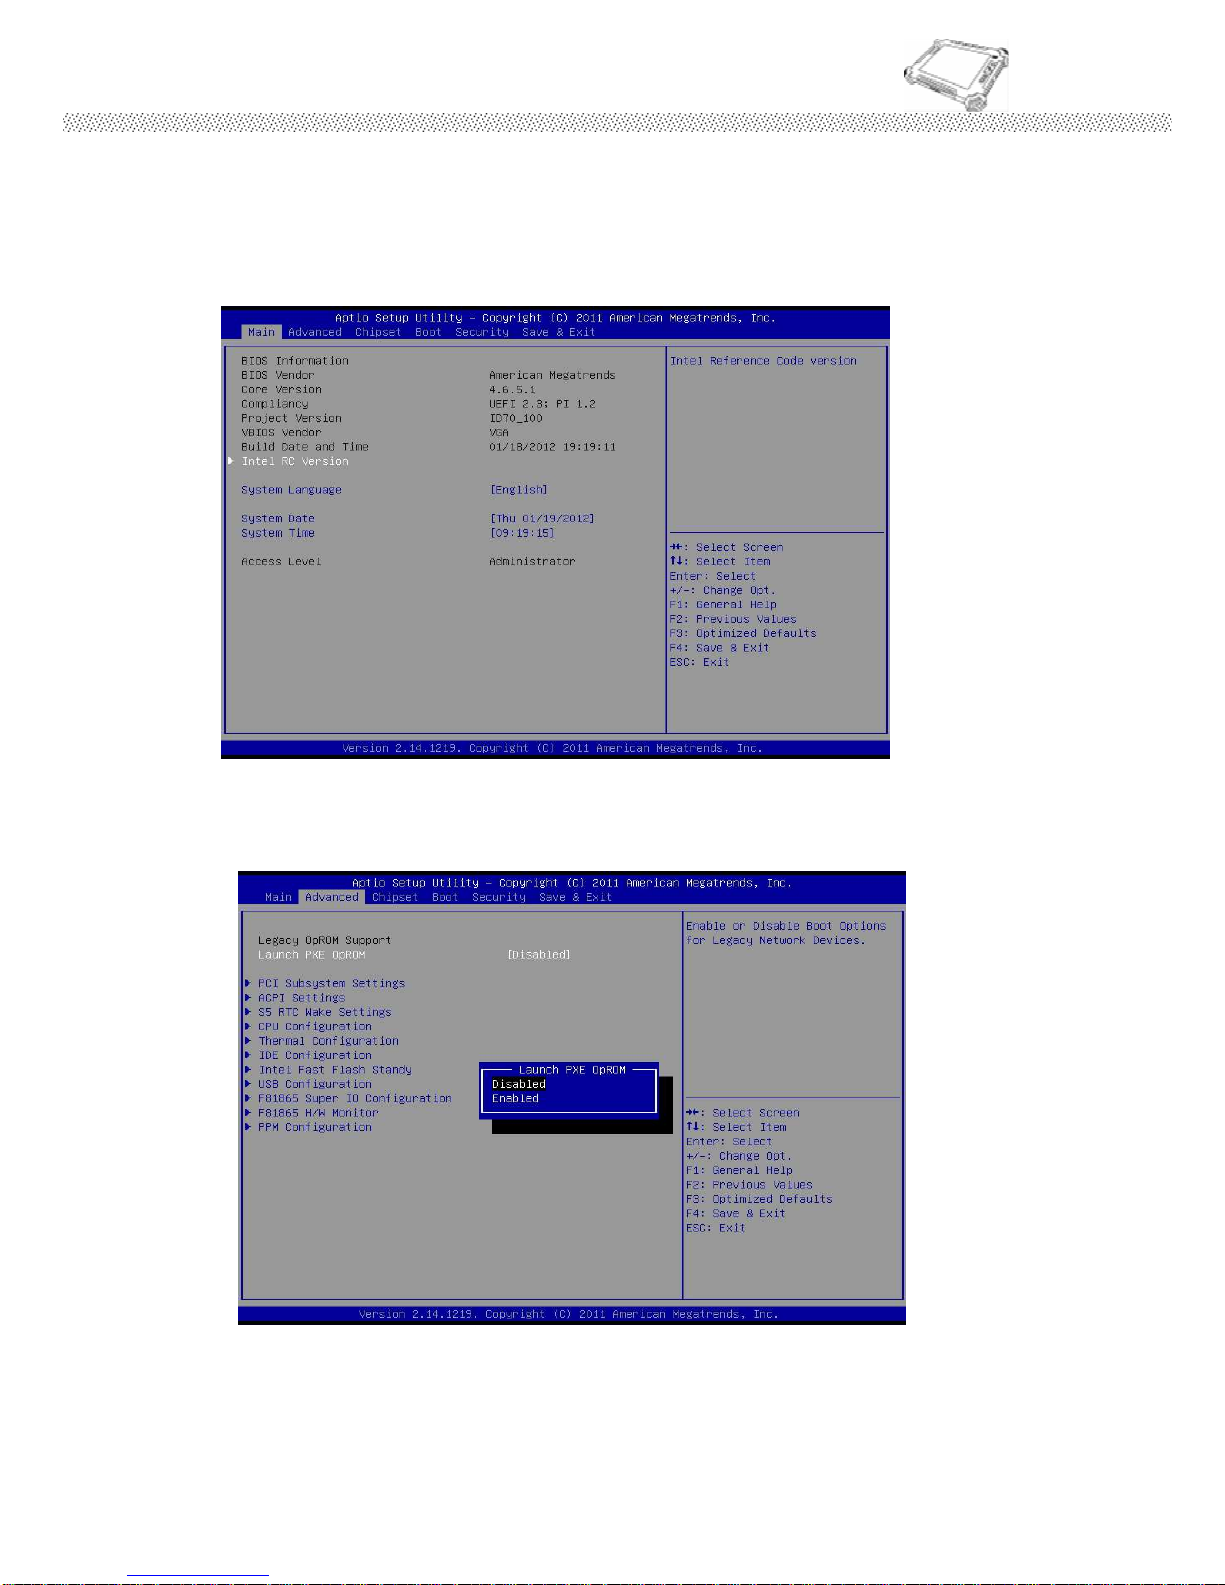
4.2.1 Main Menu
The main menu contains the information of the Tablet system
including BIOS version, processor, system memory, time, and date.
4.2.2 Advanced Menu
The advanced menu contains the configuration information of CPU.
Page 68
Rugged Computing
Users Manual Rugged Table PCs
68
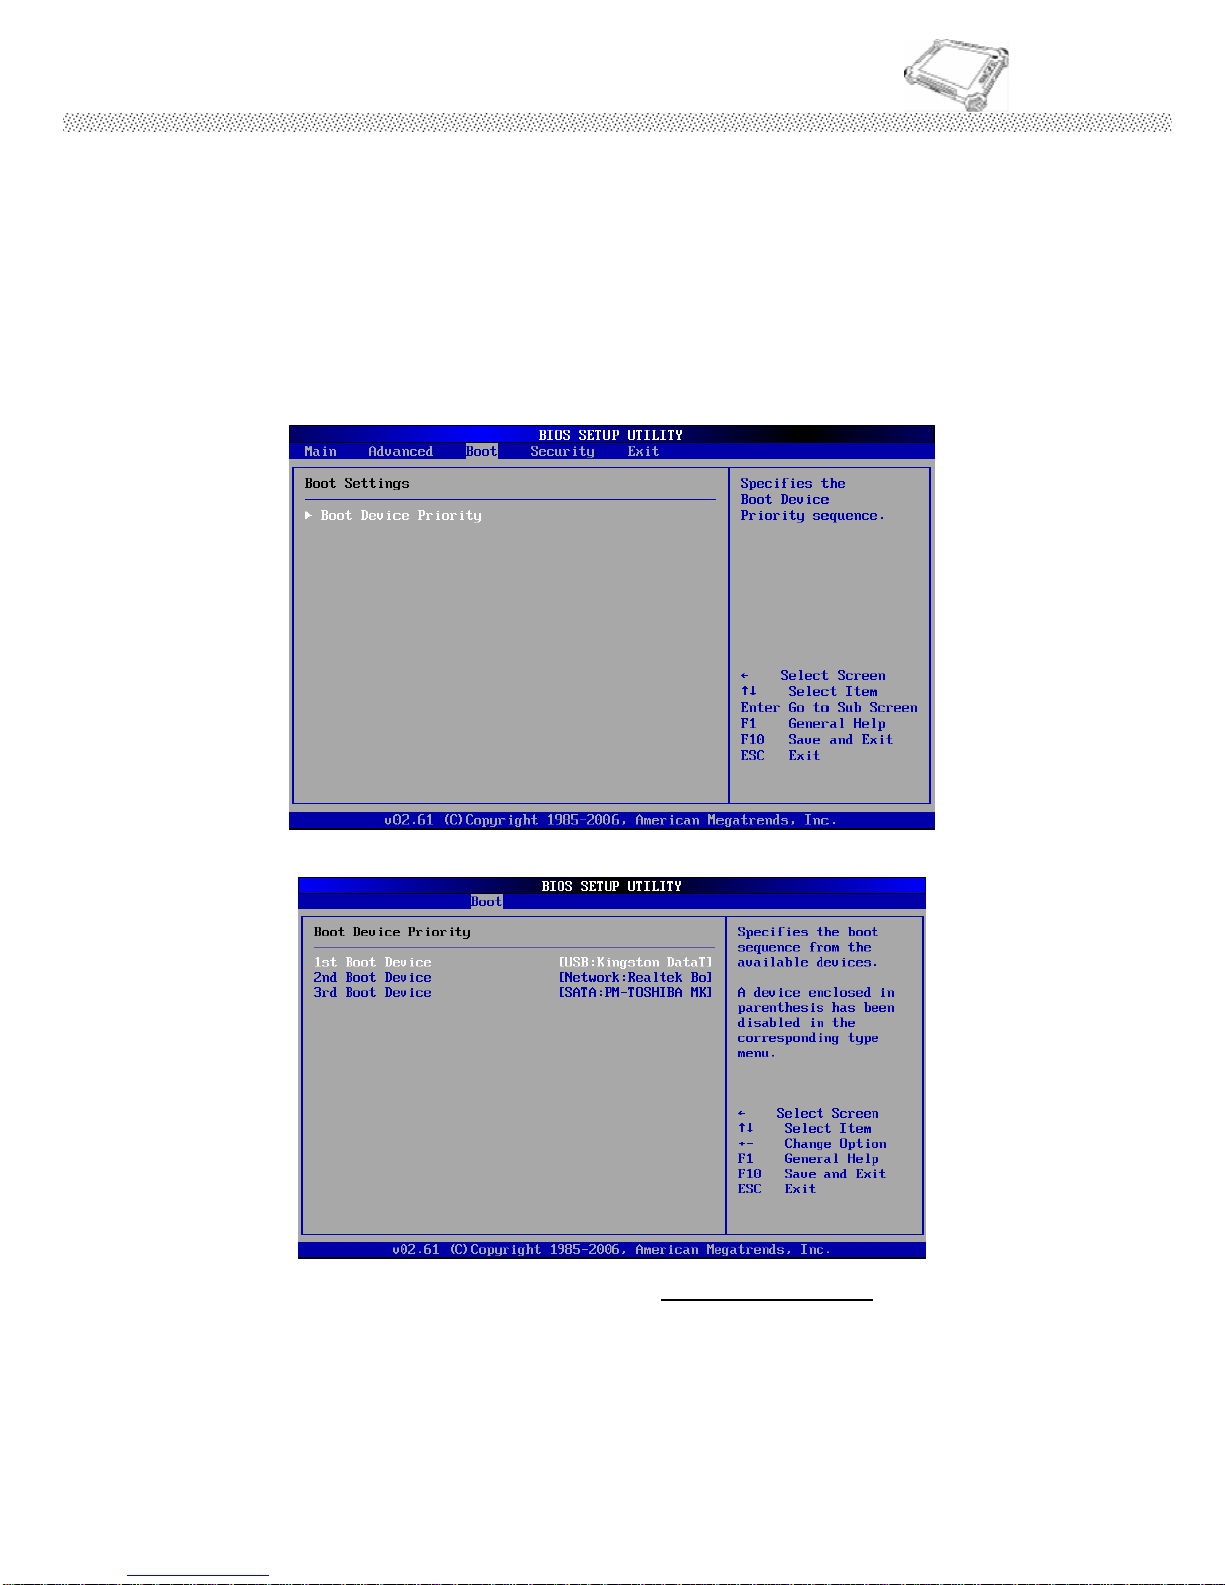
4.2.3 Boot Menu
The Boot menu sets the sequence of the devices to be searched for
the operating system.
The bootable devices will be automatically detected during POST and
shown here, allowing you to set the sequence that the BIOS uses to
look for a boot device from which to load the operating system. A brief
description of button usage is listed next:
Chck the Hard Disk Device in Hard Disk Drives.
Page 69
Rugged Computing
Users Manual Rugged Table PCs
69
4.2.4 Exit Menu
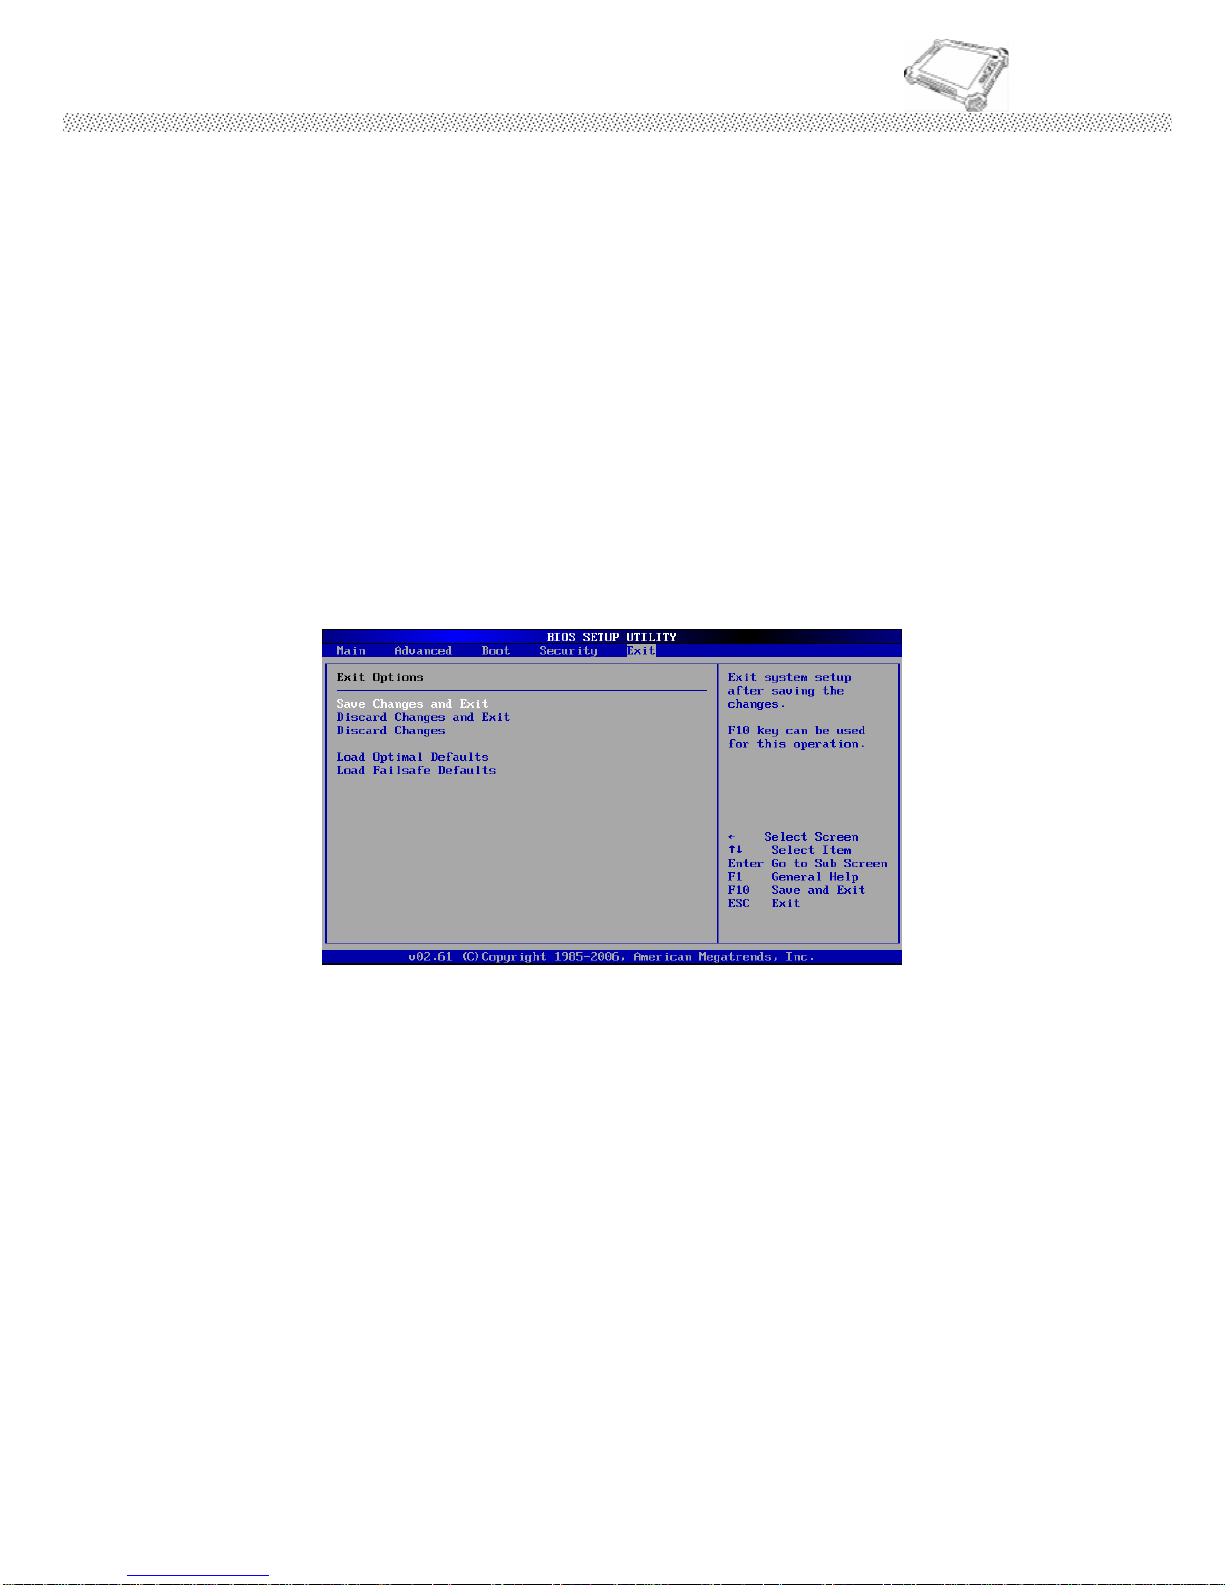
The Exit menu displays ways of exiting BIOS Setup utility. After
finishing with your settings, you must save and exit so that the
changes can take effect.
Save Canges and Exit saves the changes you have made and exits
BIOS Setup utility.
Discarding Changes and Exit exits BIOS Setup utility without
saving the changes you have made.
Discard Changes restores the previous values for all the items.
Load Optimal Default loads the factory default values for all the
items.
Page 70
Rugged Computing
Users Manual Rugged Table PCs
70
CHAPTER 5
Driver Installation
Page 71
Rugged Computing
Users Manual Rugged Table PCs
71
CHAPTER 5 DRIVER INSTALLATION
Through Chapter 5 to go further for Rugged Tablet PC driver
installation guide, you can easily install all related drivers if with out
operation system by yourself. The default system will include
operation system and you do need to install any of drivers at
first time use.
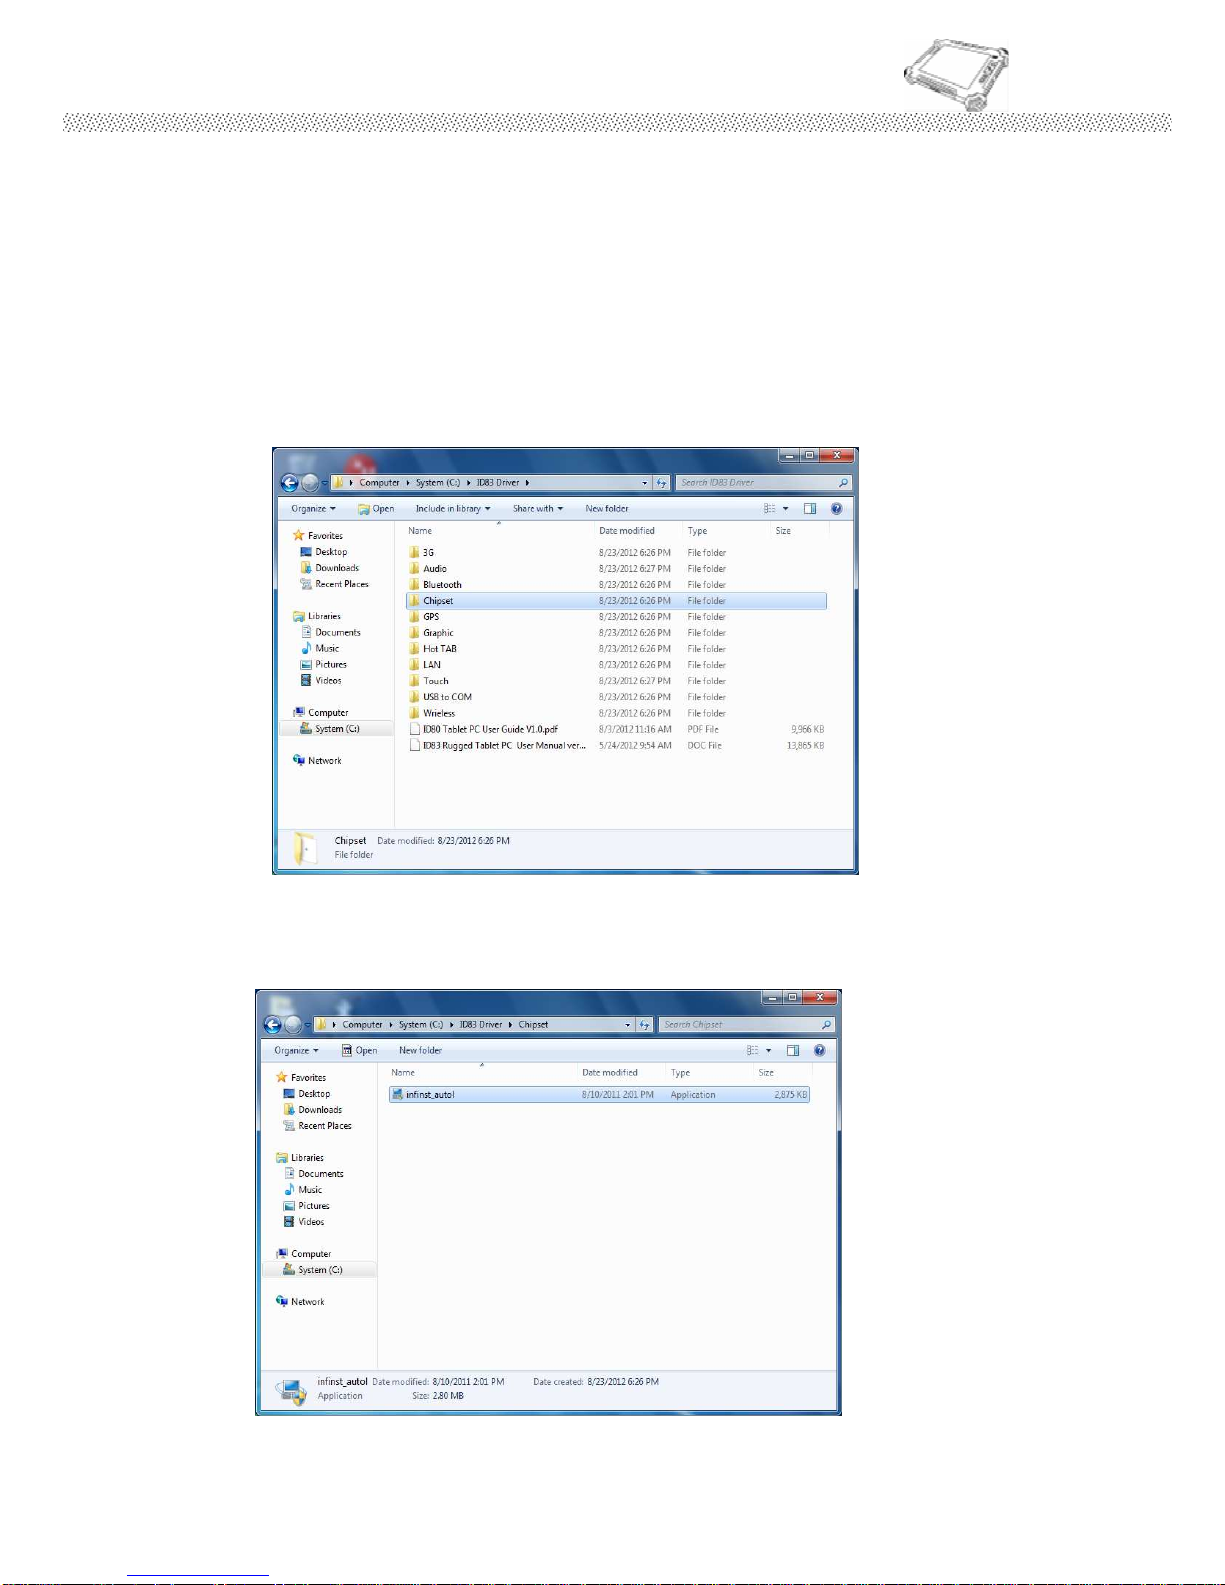
5.1 Installation of Chipset Driver Installation
Step.1 Insert the Driver Utility CD. Open the file document “Chipset”.
Click on “infinst_ auto” to install driver.
Page 72
Rugged Computing
Users Manual Rugged Table PCs
72
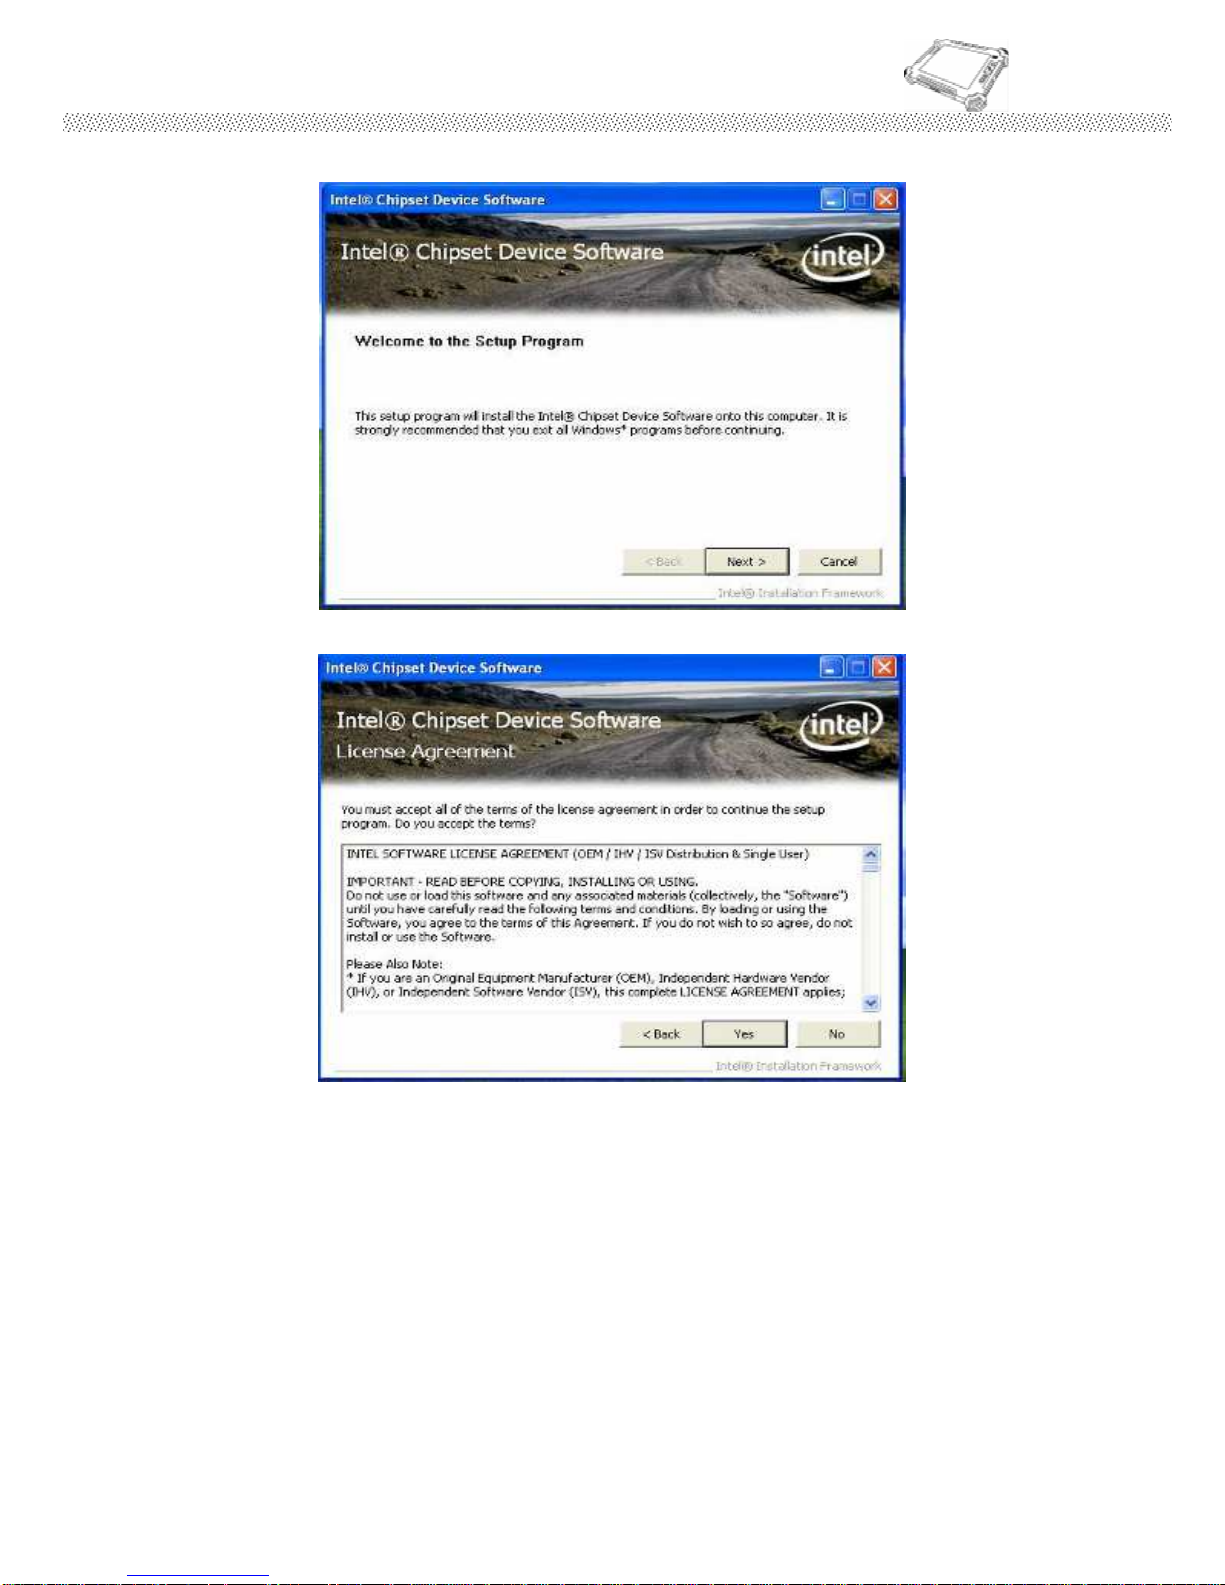
Step.2 Click on “Next“ to install driver.
Step.3 Click on “Yes “ to agree License
Page 73
Rugged Computing
Users Manual Rugged Table PCs
73
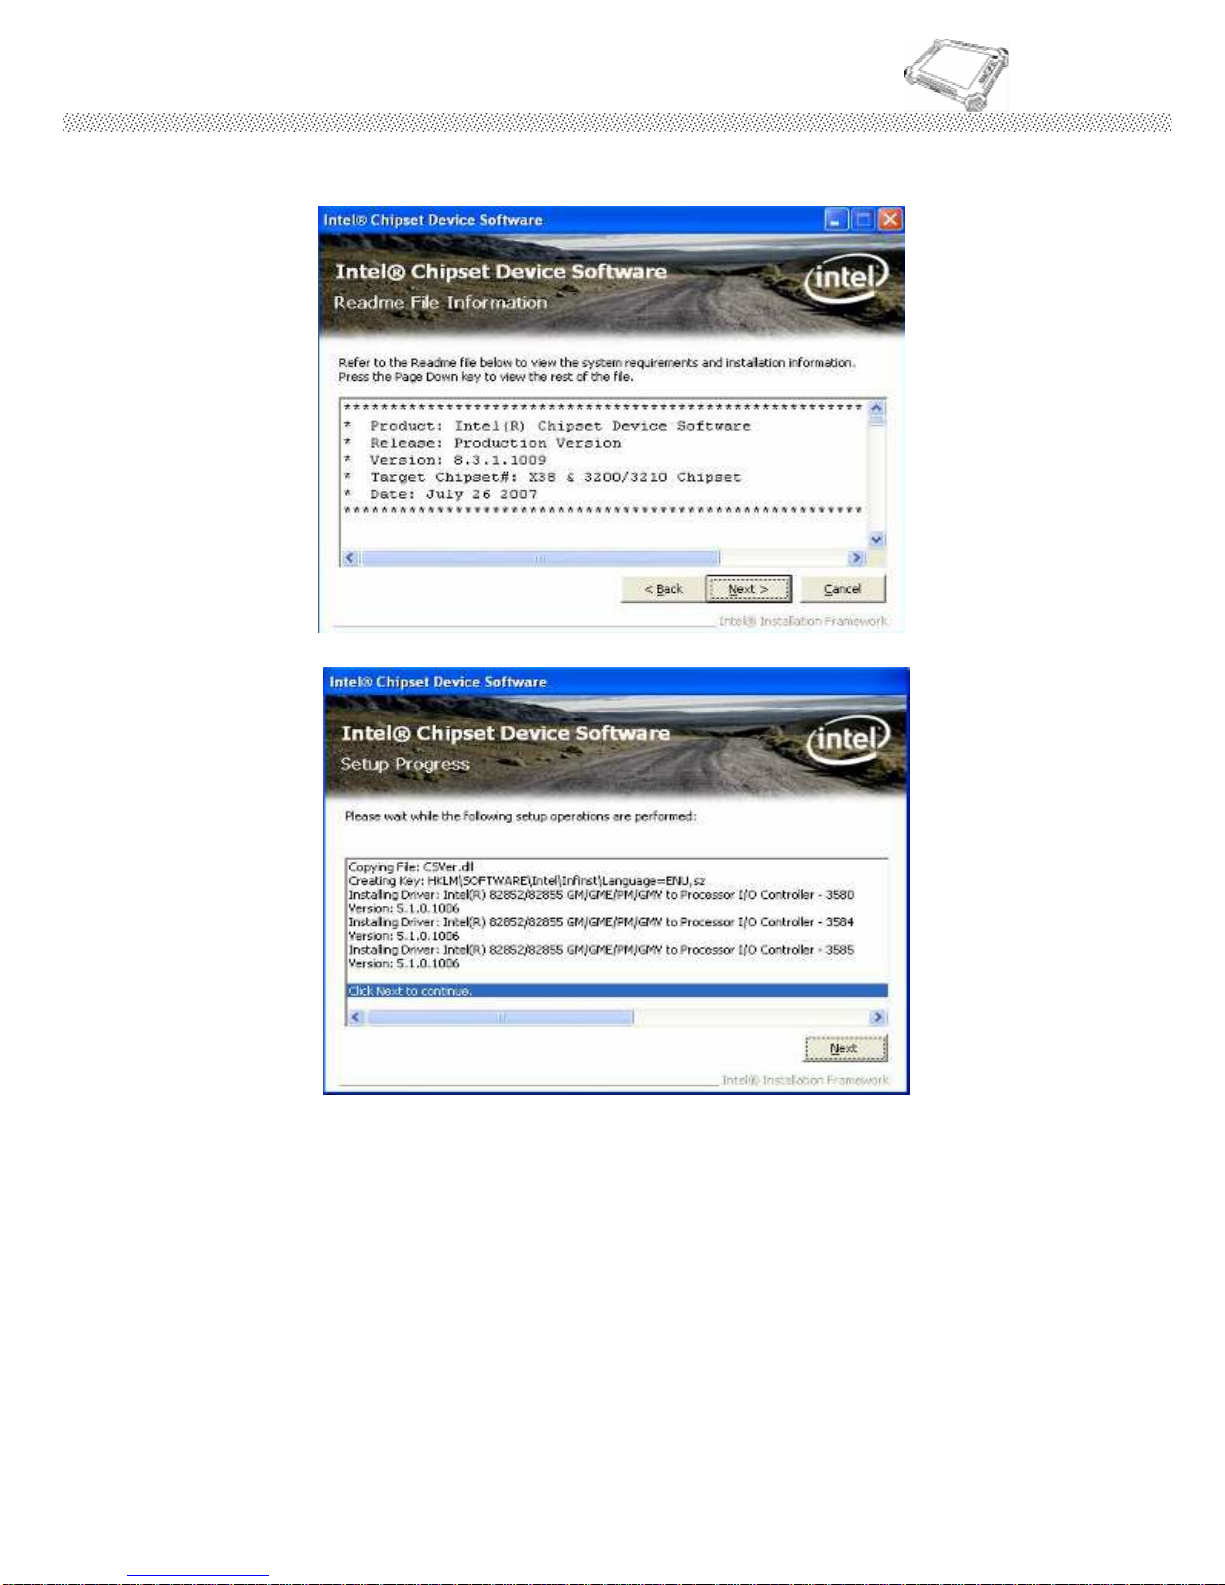
Step.4 Click on “Next“ to install driver.
Page 74
Rugged Computing
Users Manual Rugged Table PCs
74
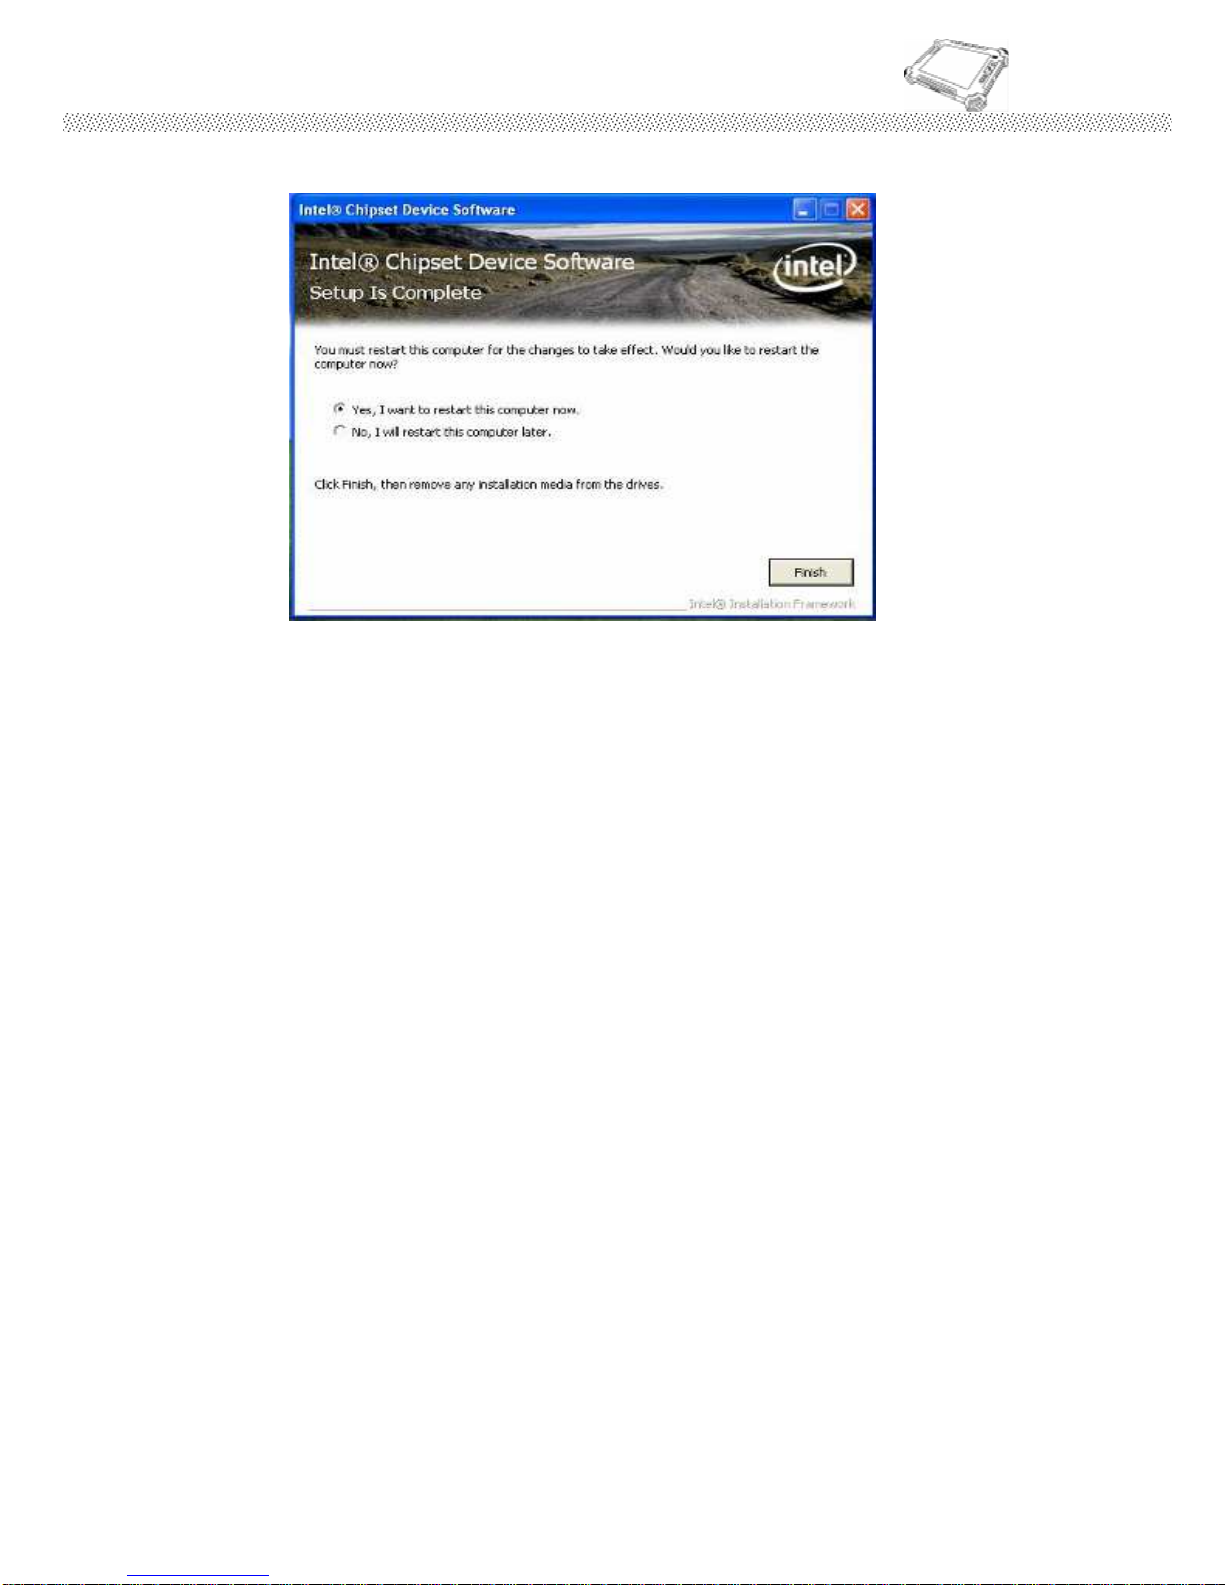
Step.5 Click on “Yes, I want to restart this computer now“ to go on.
Page 75
Rugged Computing
Users Manual Rugged Table PCs
75
5.2 Graphic Driver Installation
The system is equipped with Intel NM10 Chipset. The Intel Graphic
Drivers should be installed first, and it will enable “Video Controller
(VGA compatible). Follow the instructions below to complete the
installation. You will quickly complete the installation.
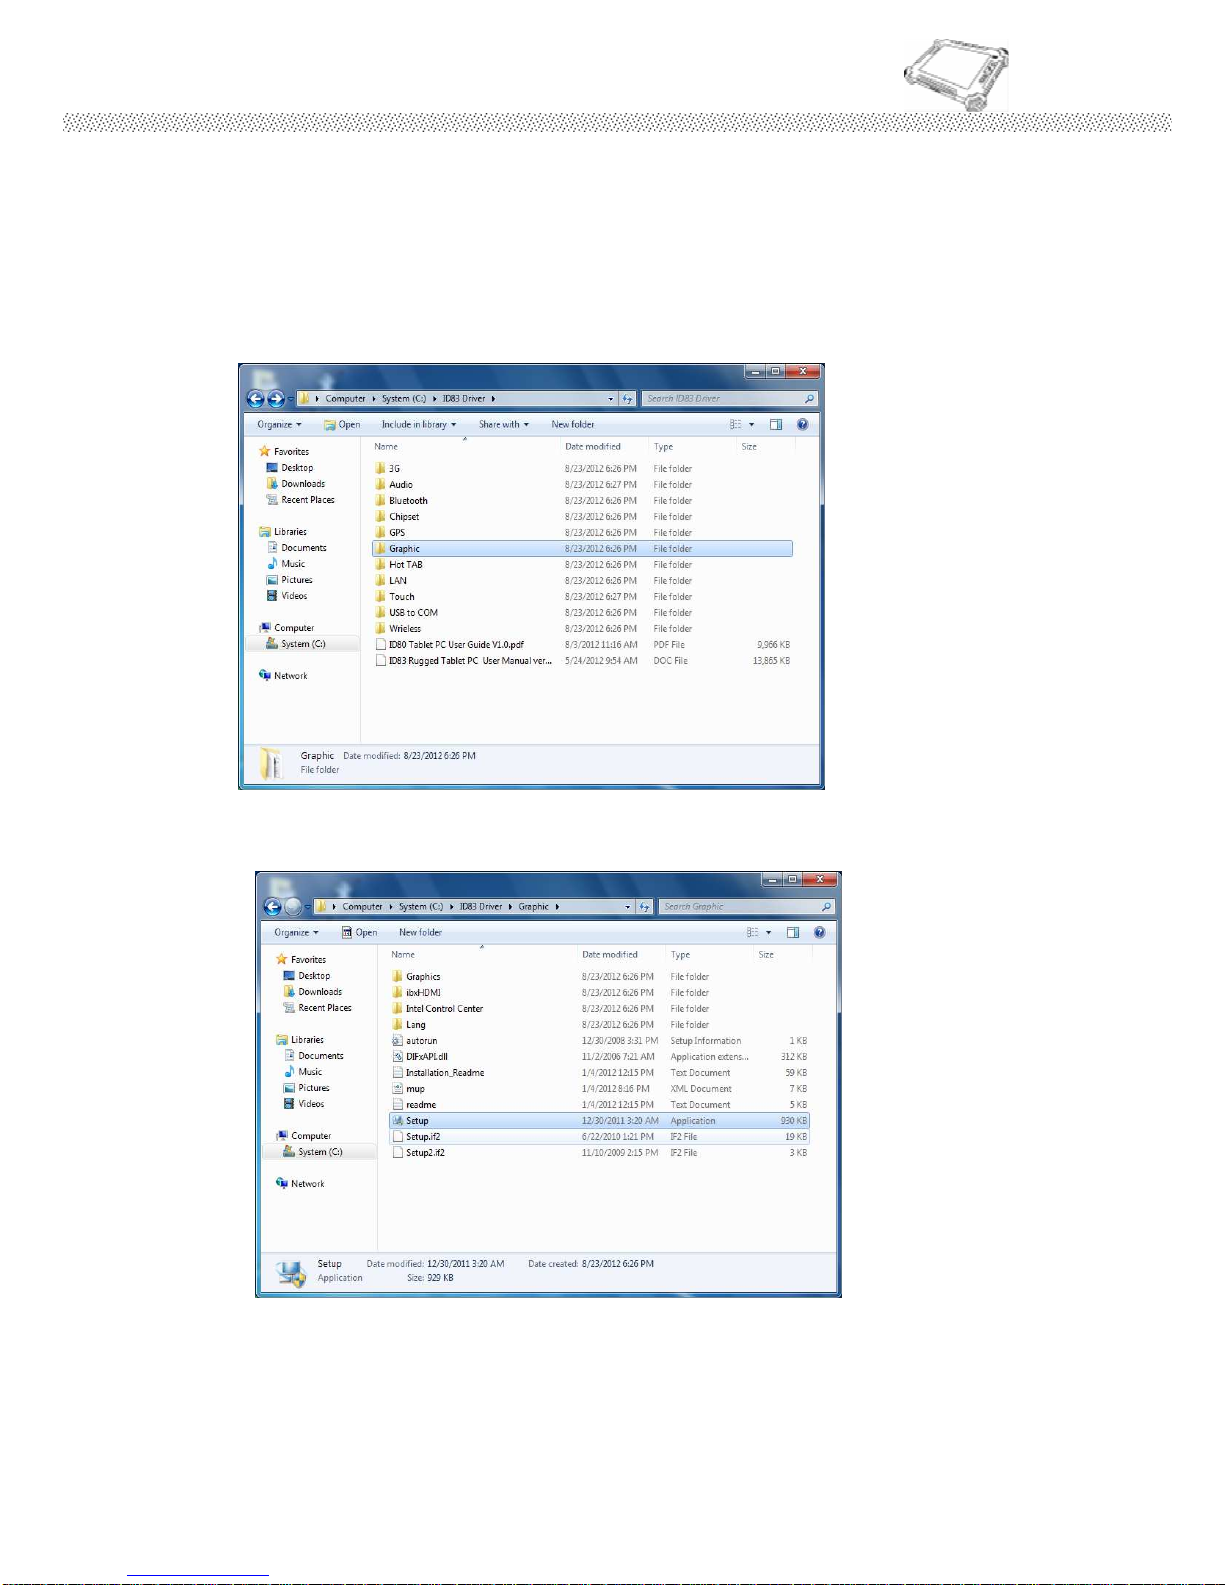
Step.1 Insert the Driver Utility CD. Open the file document “Graphic “.
Step.2 Click on “Setup.exe” to execute the setup.
Page 76
Rugged Computing
Users Manual Rugged Table PCs
76
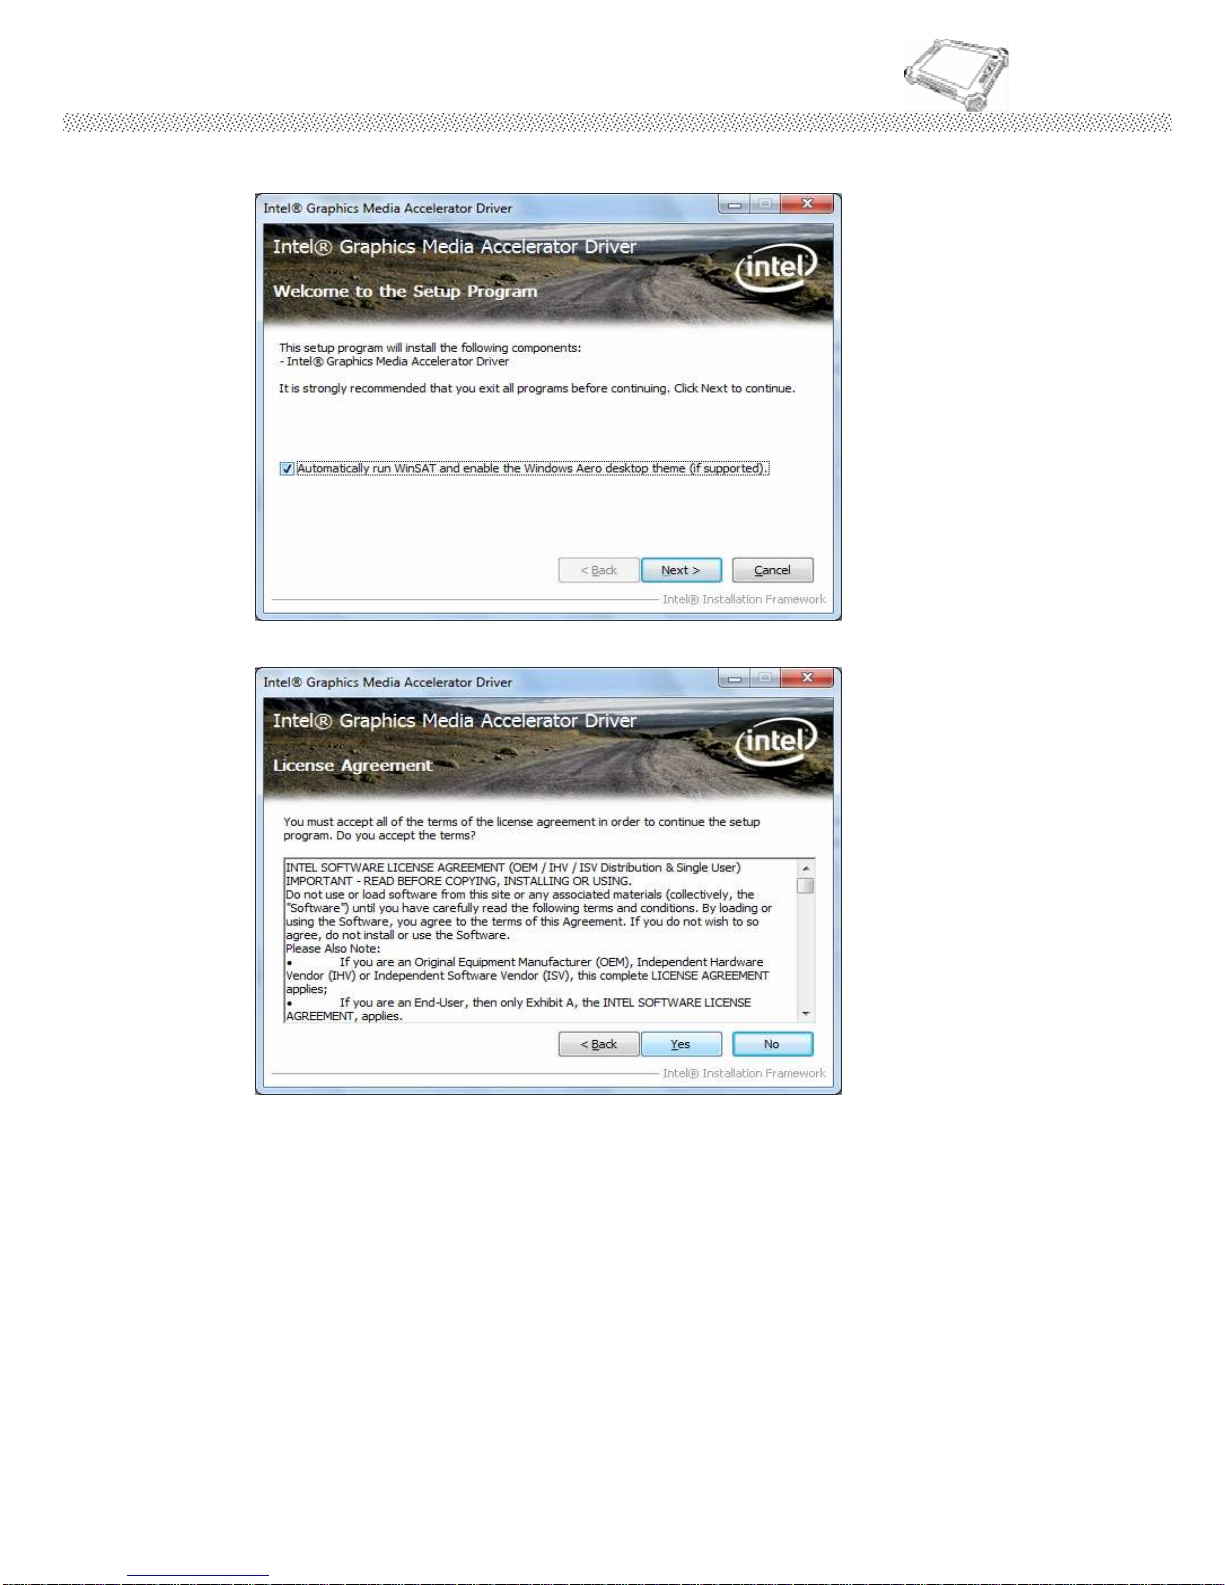
Step.3 Click on “Next “to install Driver.
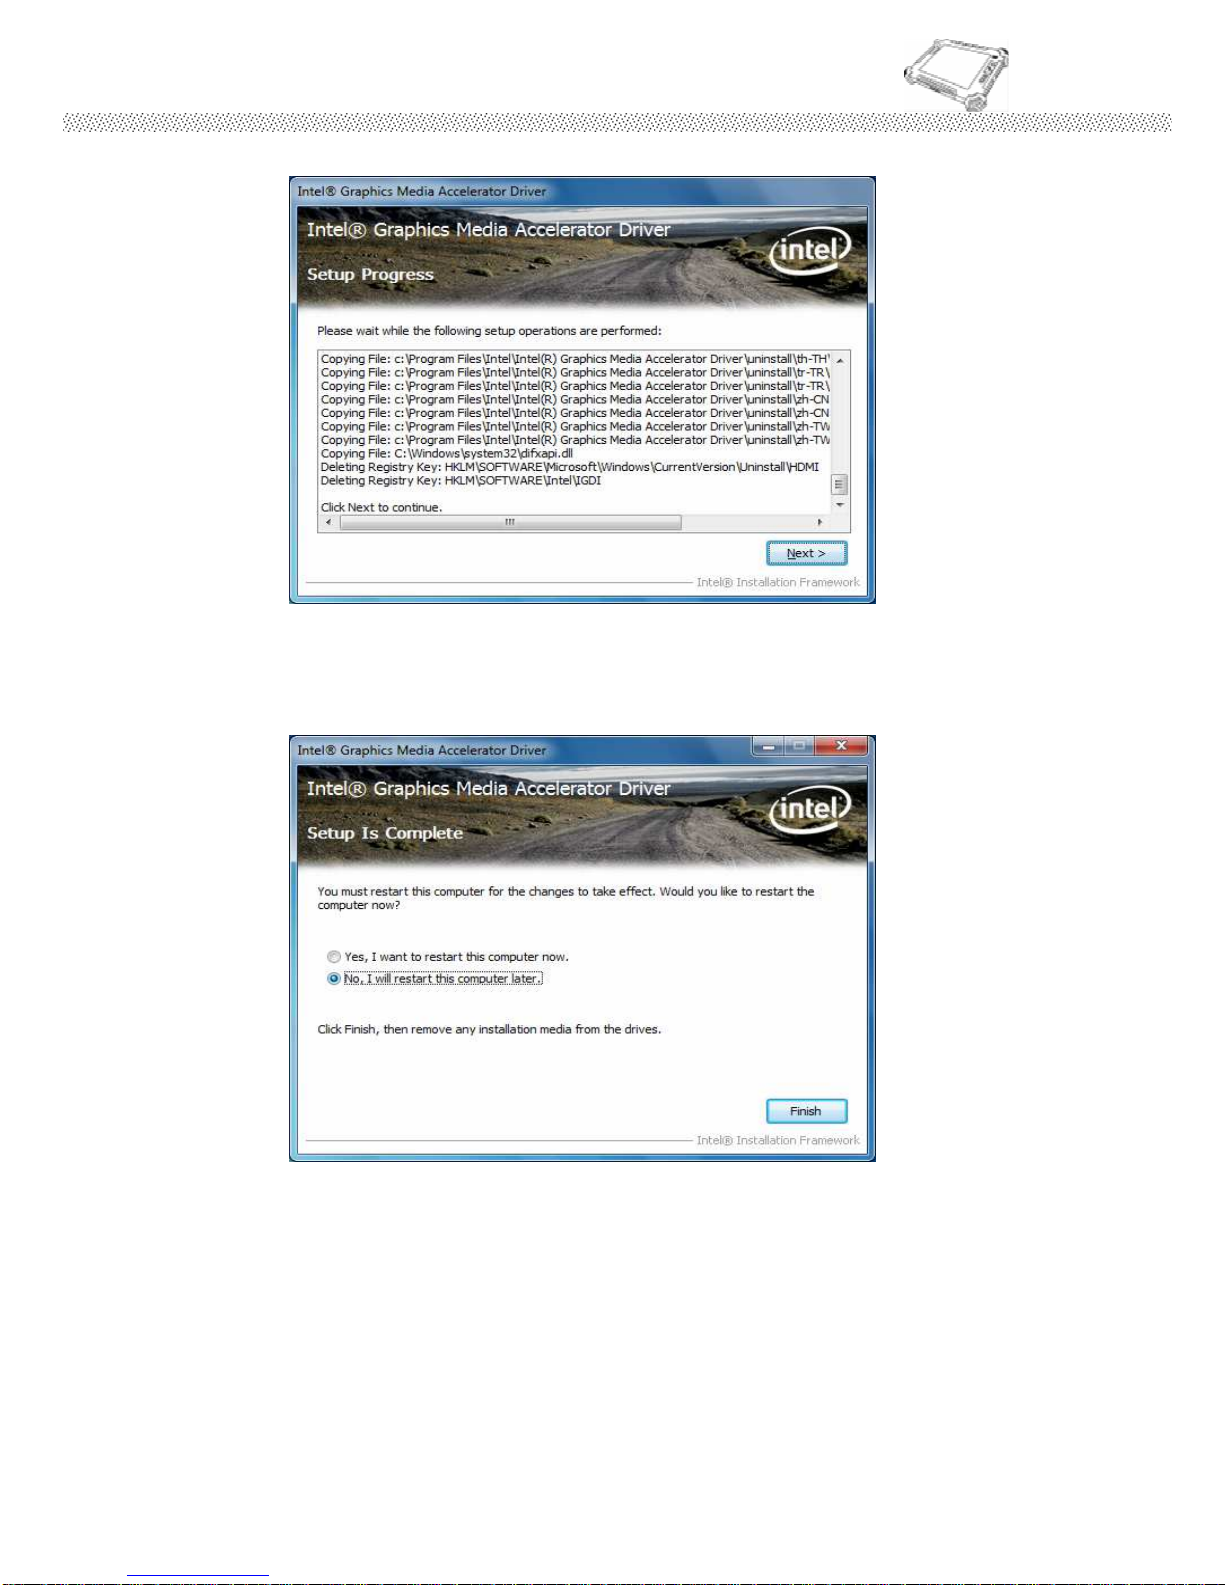
Step.4
Page 77
Rugged Computing
Users Manual Rugged Table PCs
77
Step.5 Click on “Yes, I want to restart this computer now“ to go on.
Page 78
Rugged Computing
Users Manual Rugged Table PCs
78
5.3 Audio Driver Installation
The system is equipped with the Realtek ALC886 HD Audio Codec
designed for PC multimedia systems, including host/soft audio and
AMR/CNR-based designs.
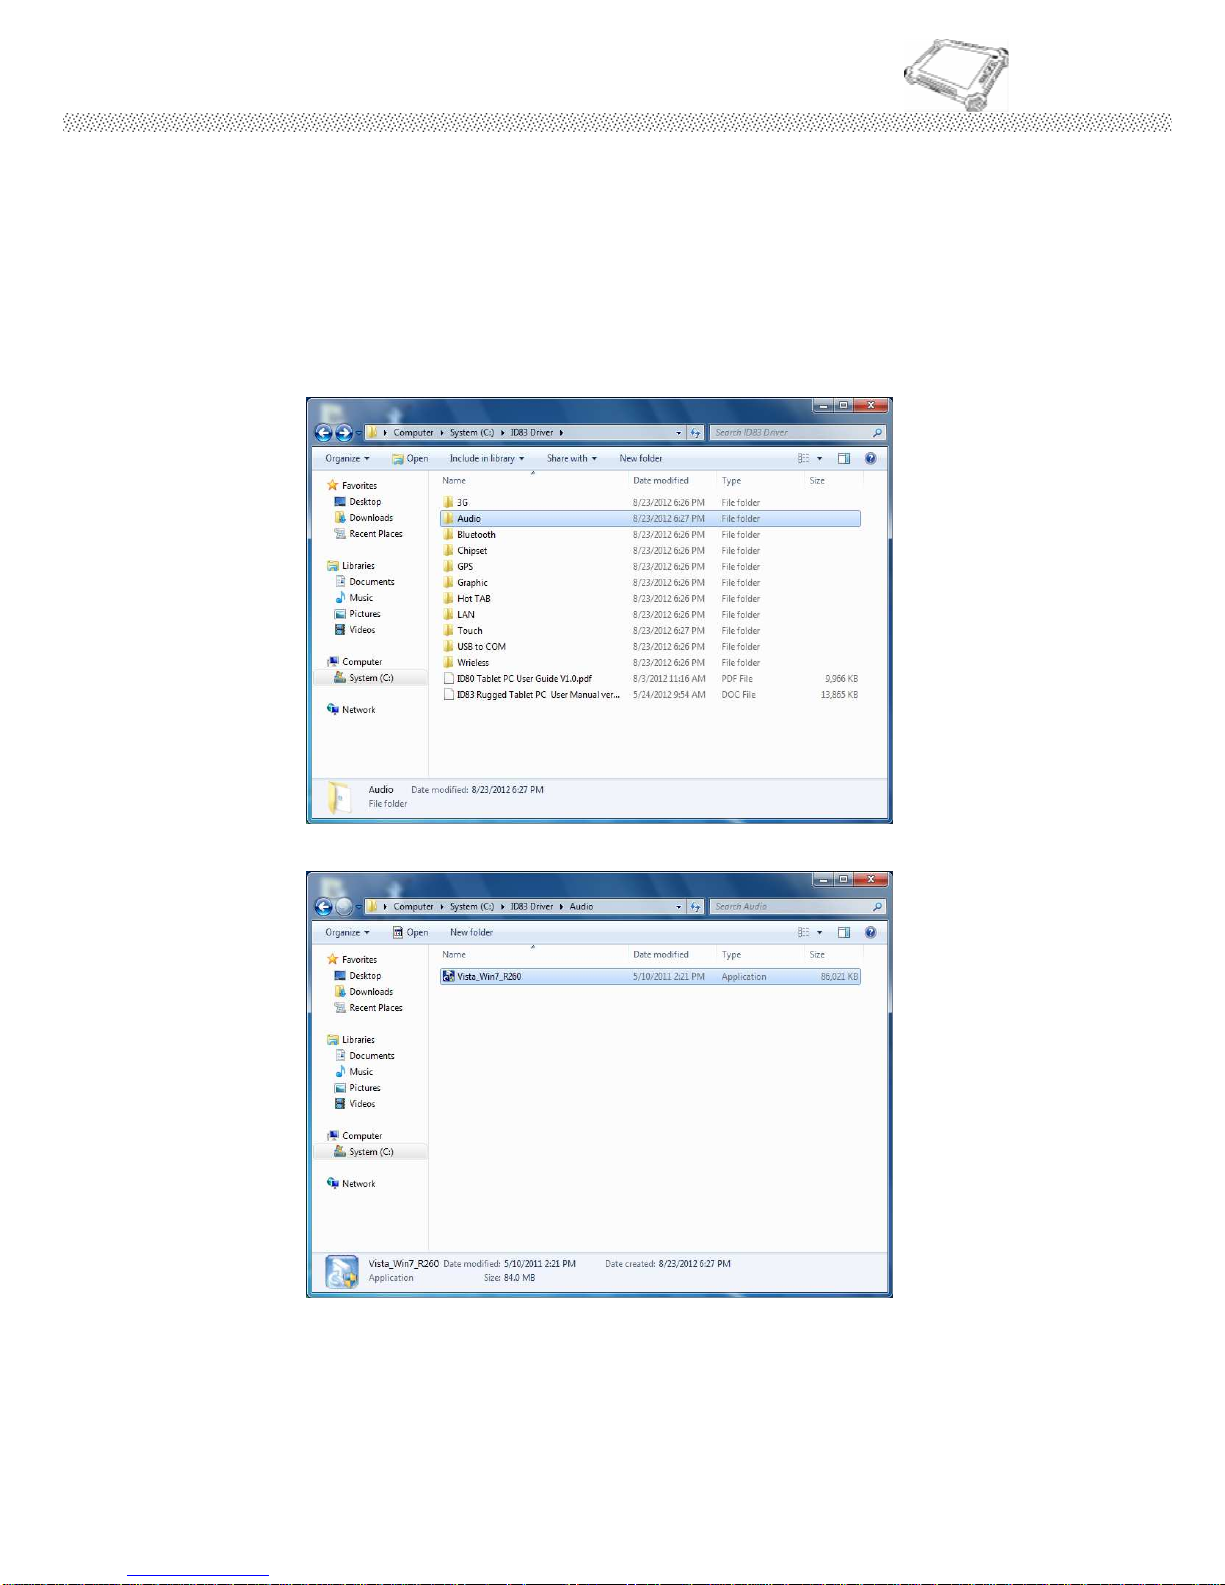
Step.1 Insert the Driver Utility CD . Open the file document “Audio” and click on
“Vista_Win7_R260.exe” to execute the setup.
Page 79
Rugged Computing
Users Manual Rugged Table PCs
79
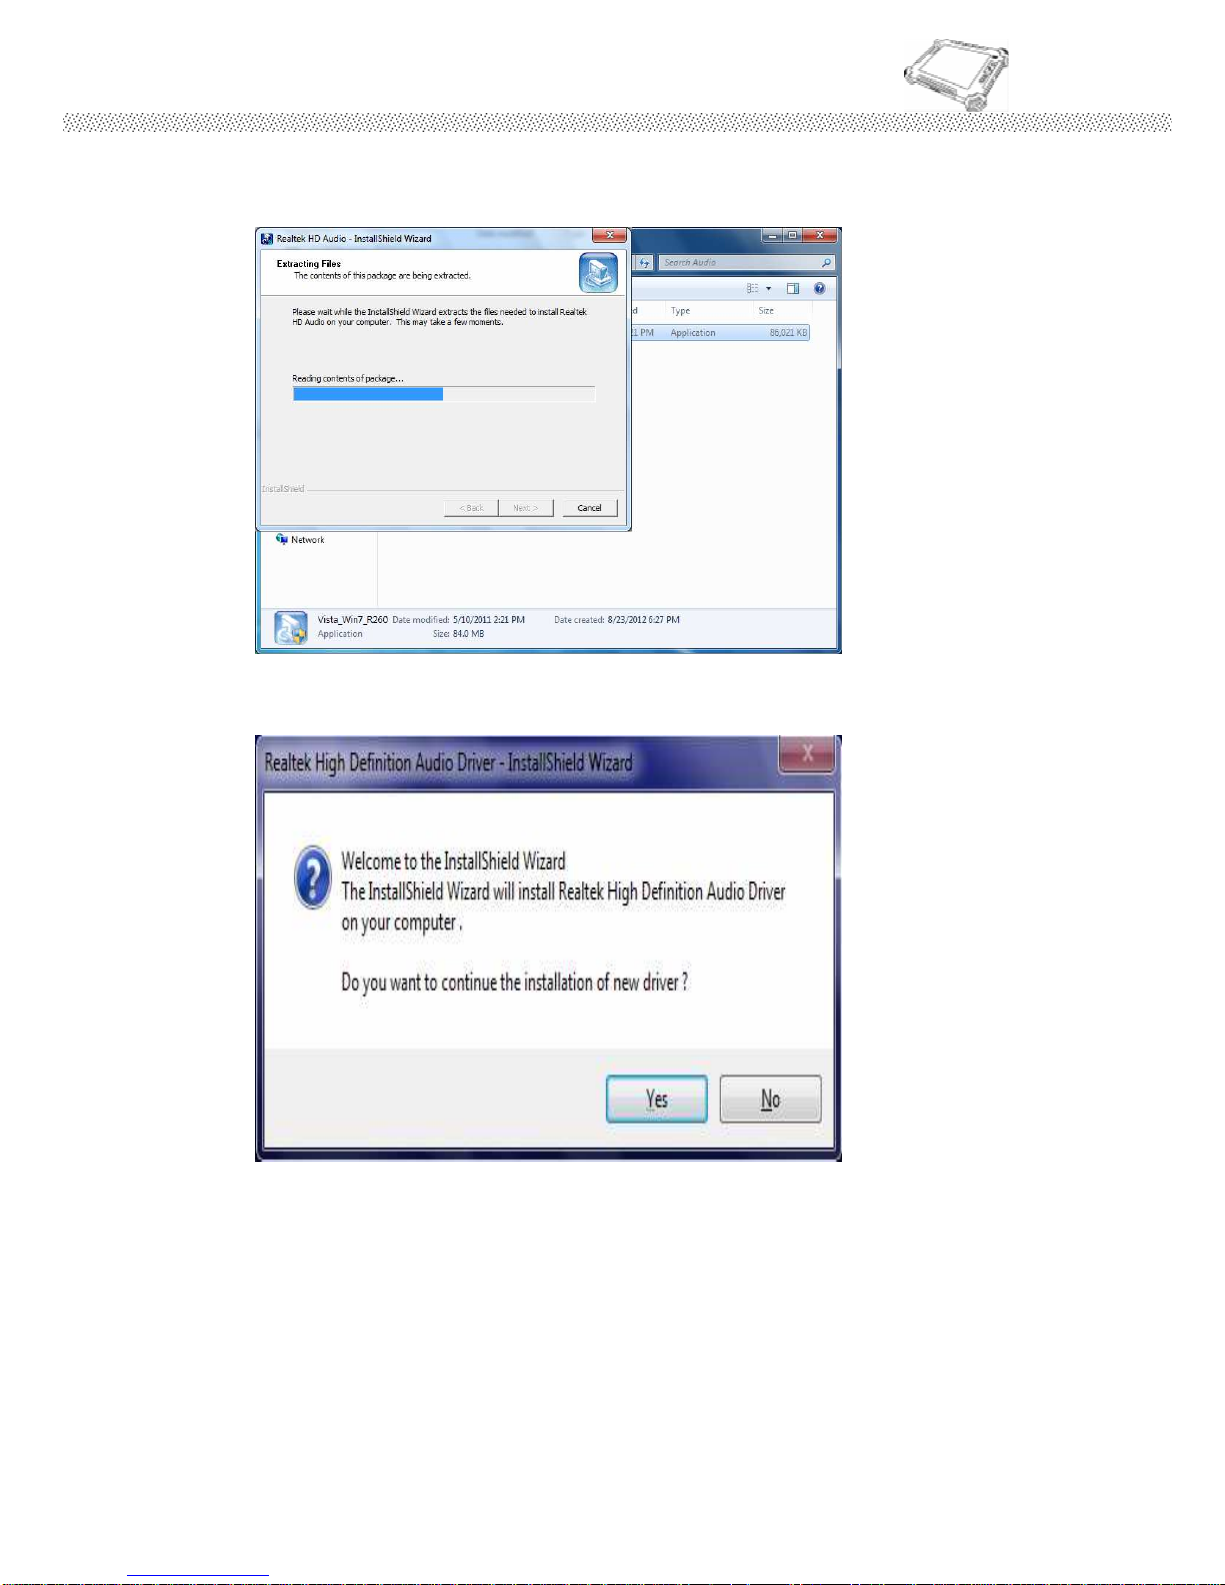
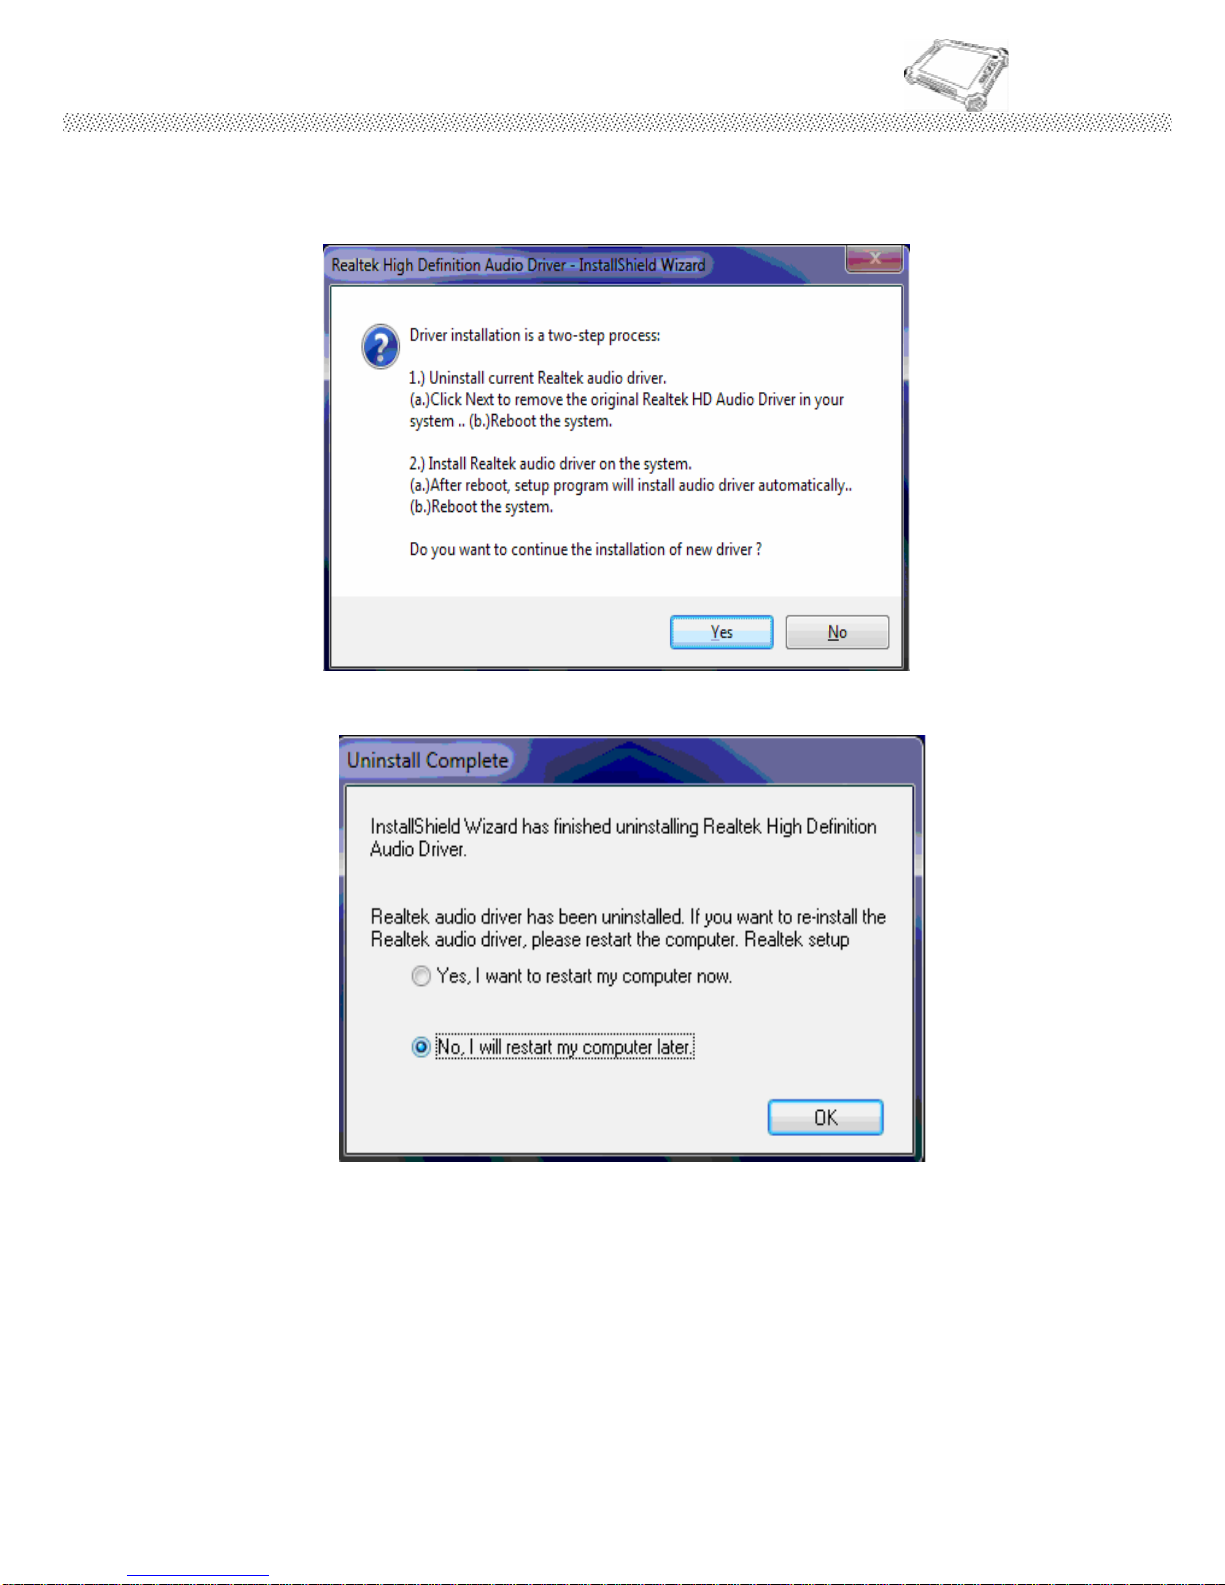
Step.2 Click on “Next“ to install driver.
Page 80
Rugged Computing
Users Manual Rugged Table PCs
80
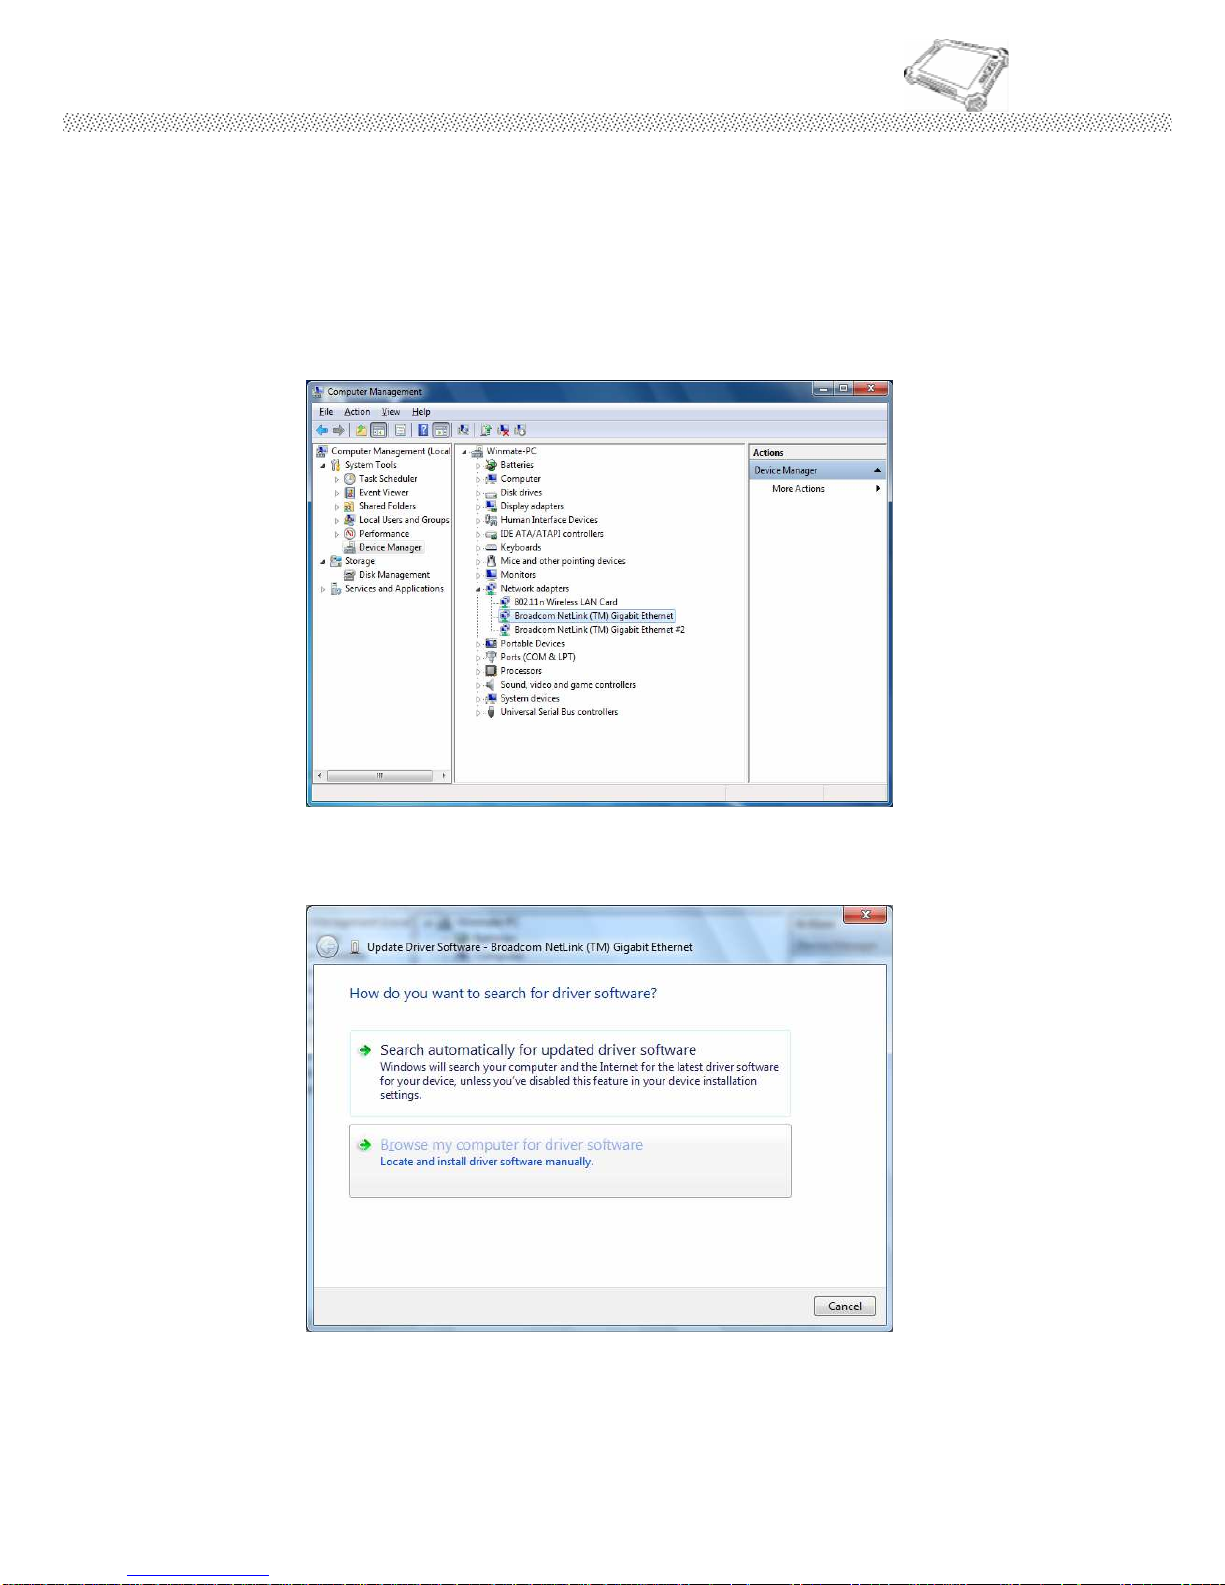
Step.3 Click on “Yes, to continue the installation and then click on” Yes, I want to
restart my computer now” to finish installation.
Page 81
Rugged Computing
Users Manual Rugged Table PCs
81
5.4 LAN Driver Installation
Follow the steps below to complete the installation of the LAN drivers.
You will quickly complete the installation.
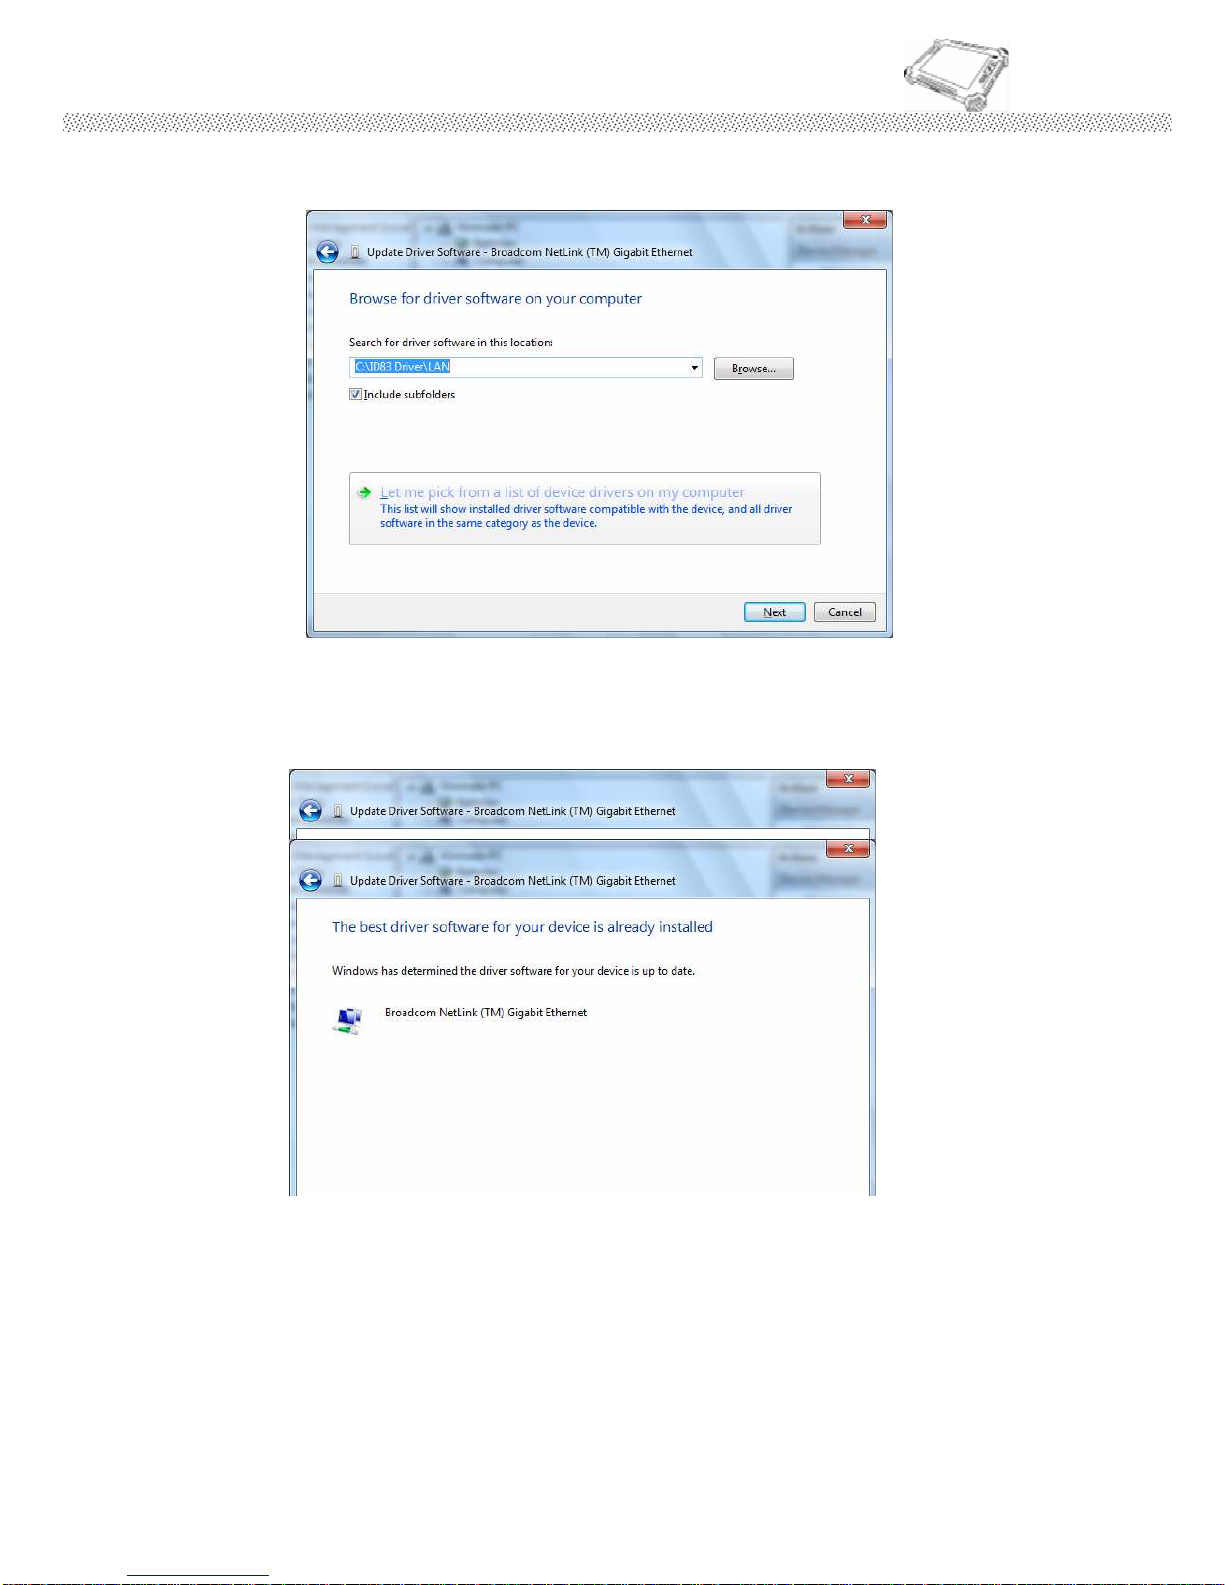
Step.1 In the Device Manager menu, select LAN device, and right click select
update driver
Page 82
Rugged Computing
Users Manual Rugged Table PCs
82
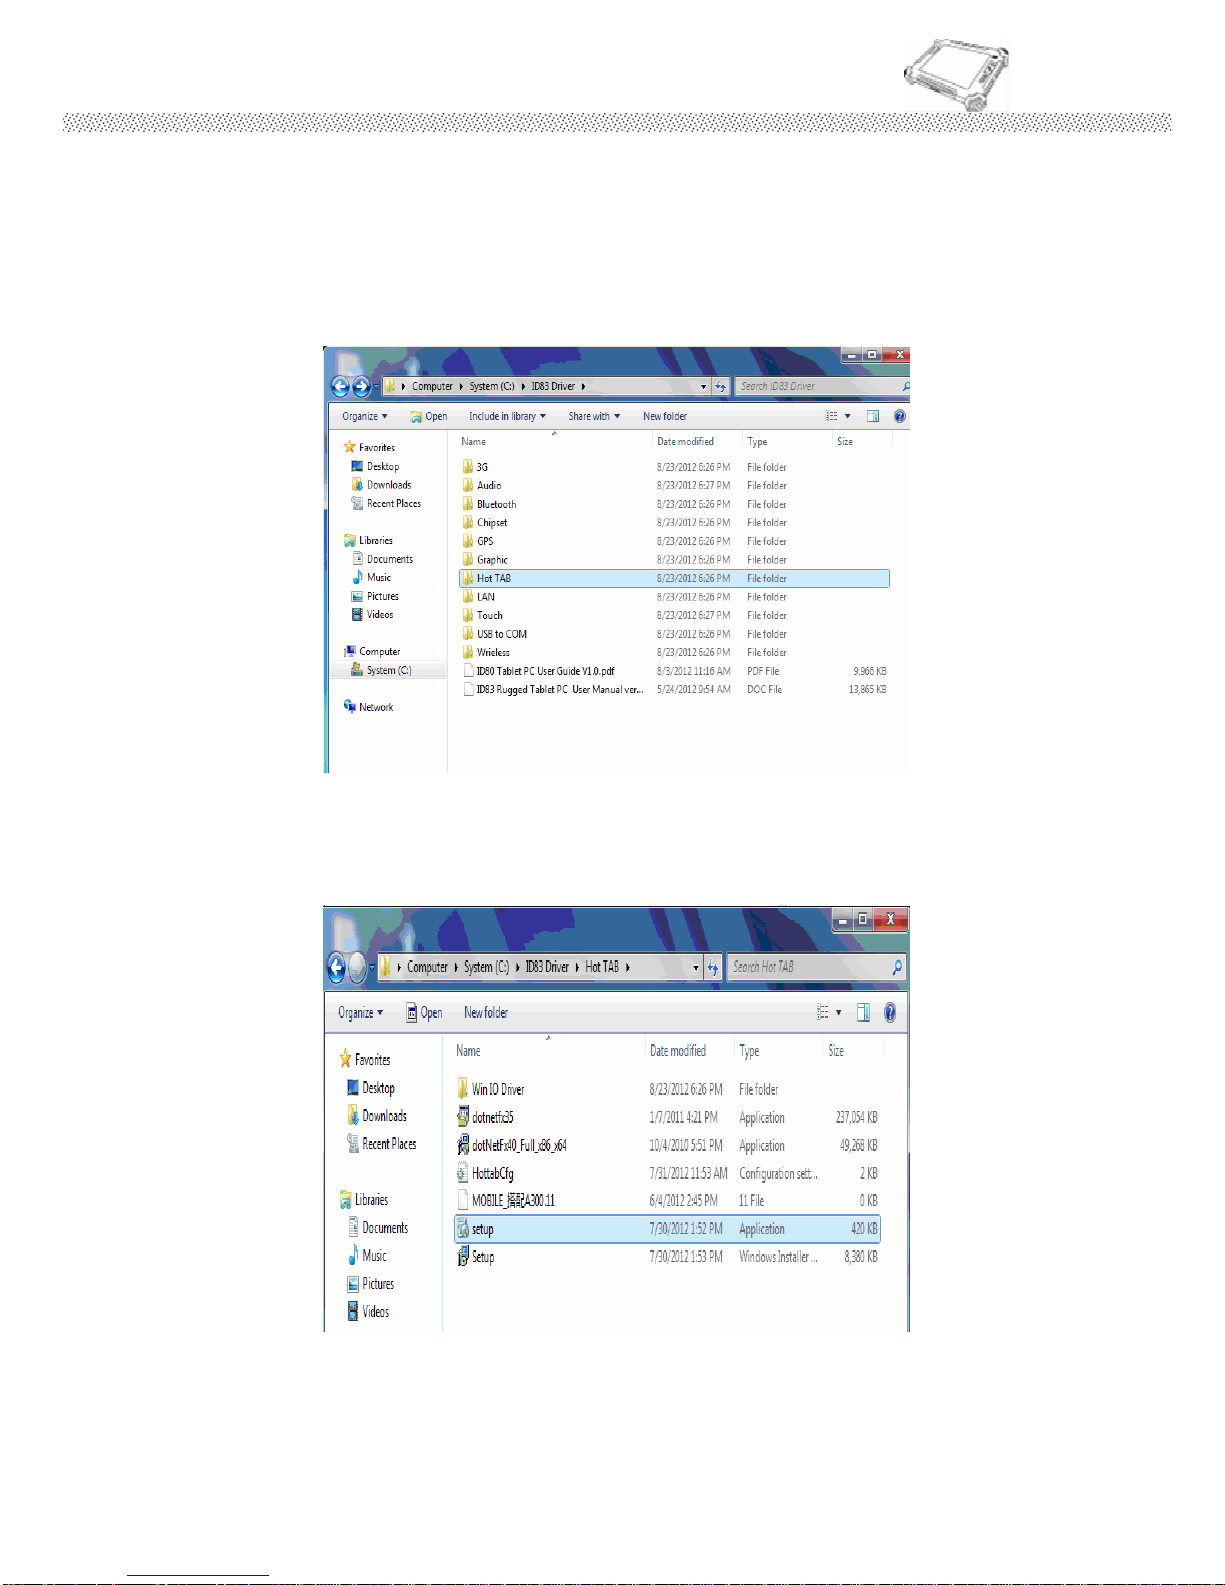
Step.2 Insert the Driver Utility CD. Open the file document “LAN”.
Step.3 Select the correct file in the document and click on open to execute the
setup.
Page 83
Rugged Computing
Users Manual Rugged Table PCs
83
5.5 HotTab Utility Driver Installations
With our HotTab software application utility, user can very easy to
control and program their usual hotkey for help their job.
Step.1 Insert the Driver Utility CD. Open the file document “Hot TAB”. Press the
Setup.exe to execute the installation program.
Step.2 Click on “Setup.exe” to start to the installation.
Page 84
Rugged Computing
Users Manual Rugged Table PCs
84
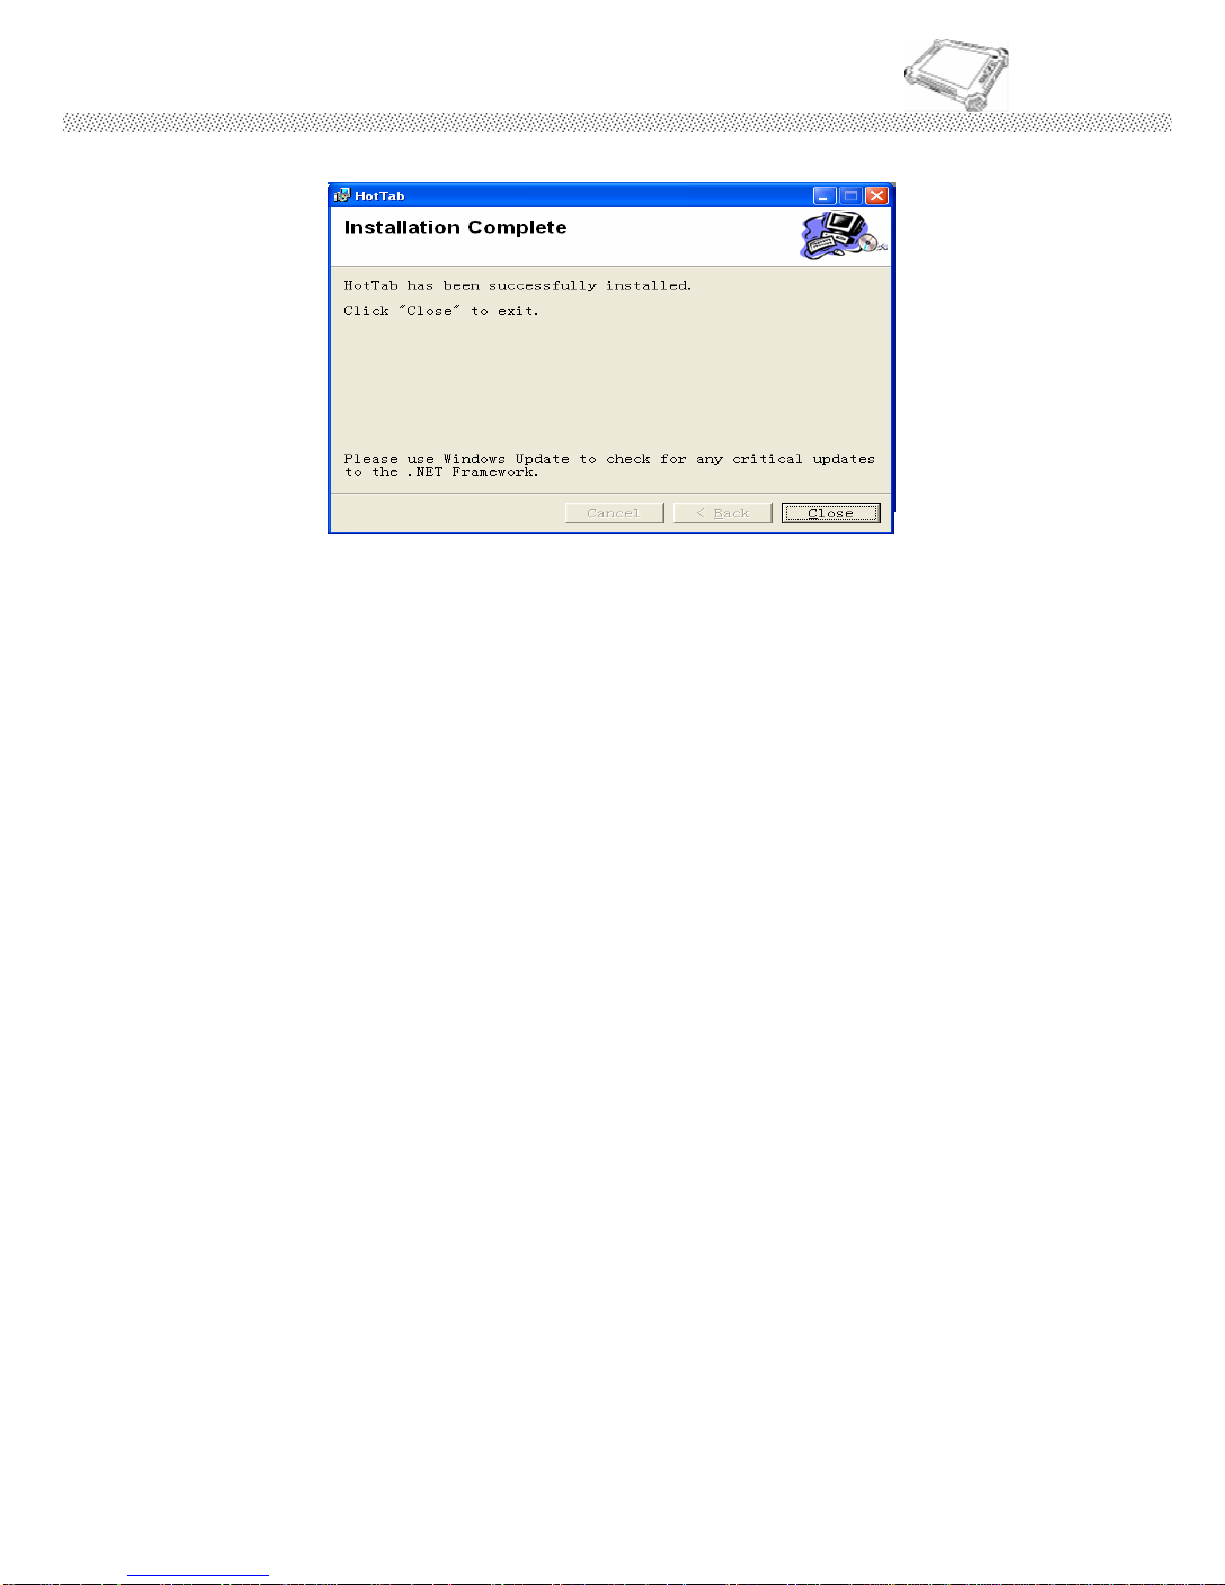
Step.3 Click “Close” to finish the installation.
Note: Microsoft .NET Framework 3.5 、、、、 4.0 and WMIO Driver are
necessary before HotTAB utility installation. You can install it from
the Hottab folder.
Page 85
Rugged Computing
Users Manual Rugged Table PCs
85
5.6 Wireless LAN Driver Installation
Following the step by step to finish the driver installation
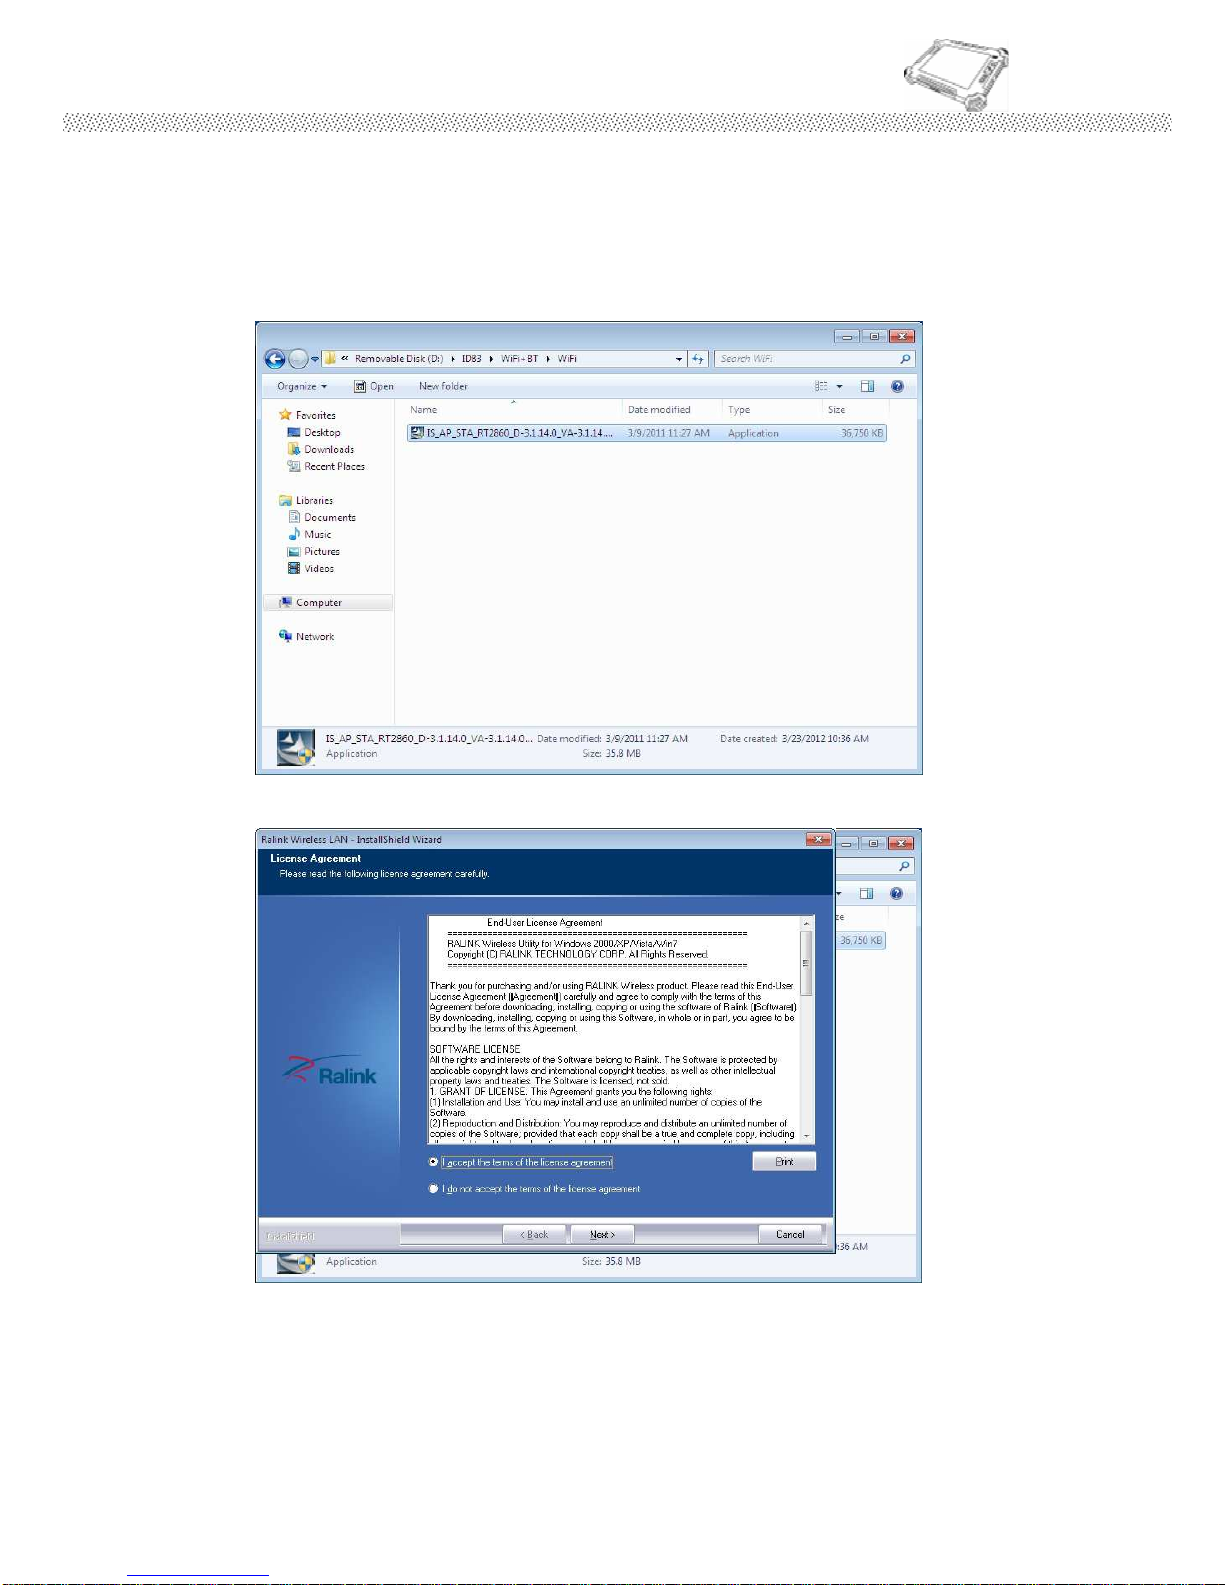
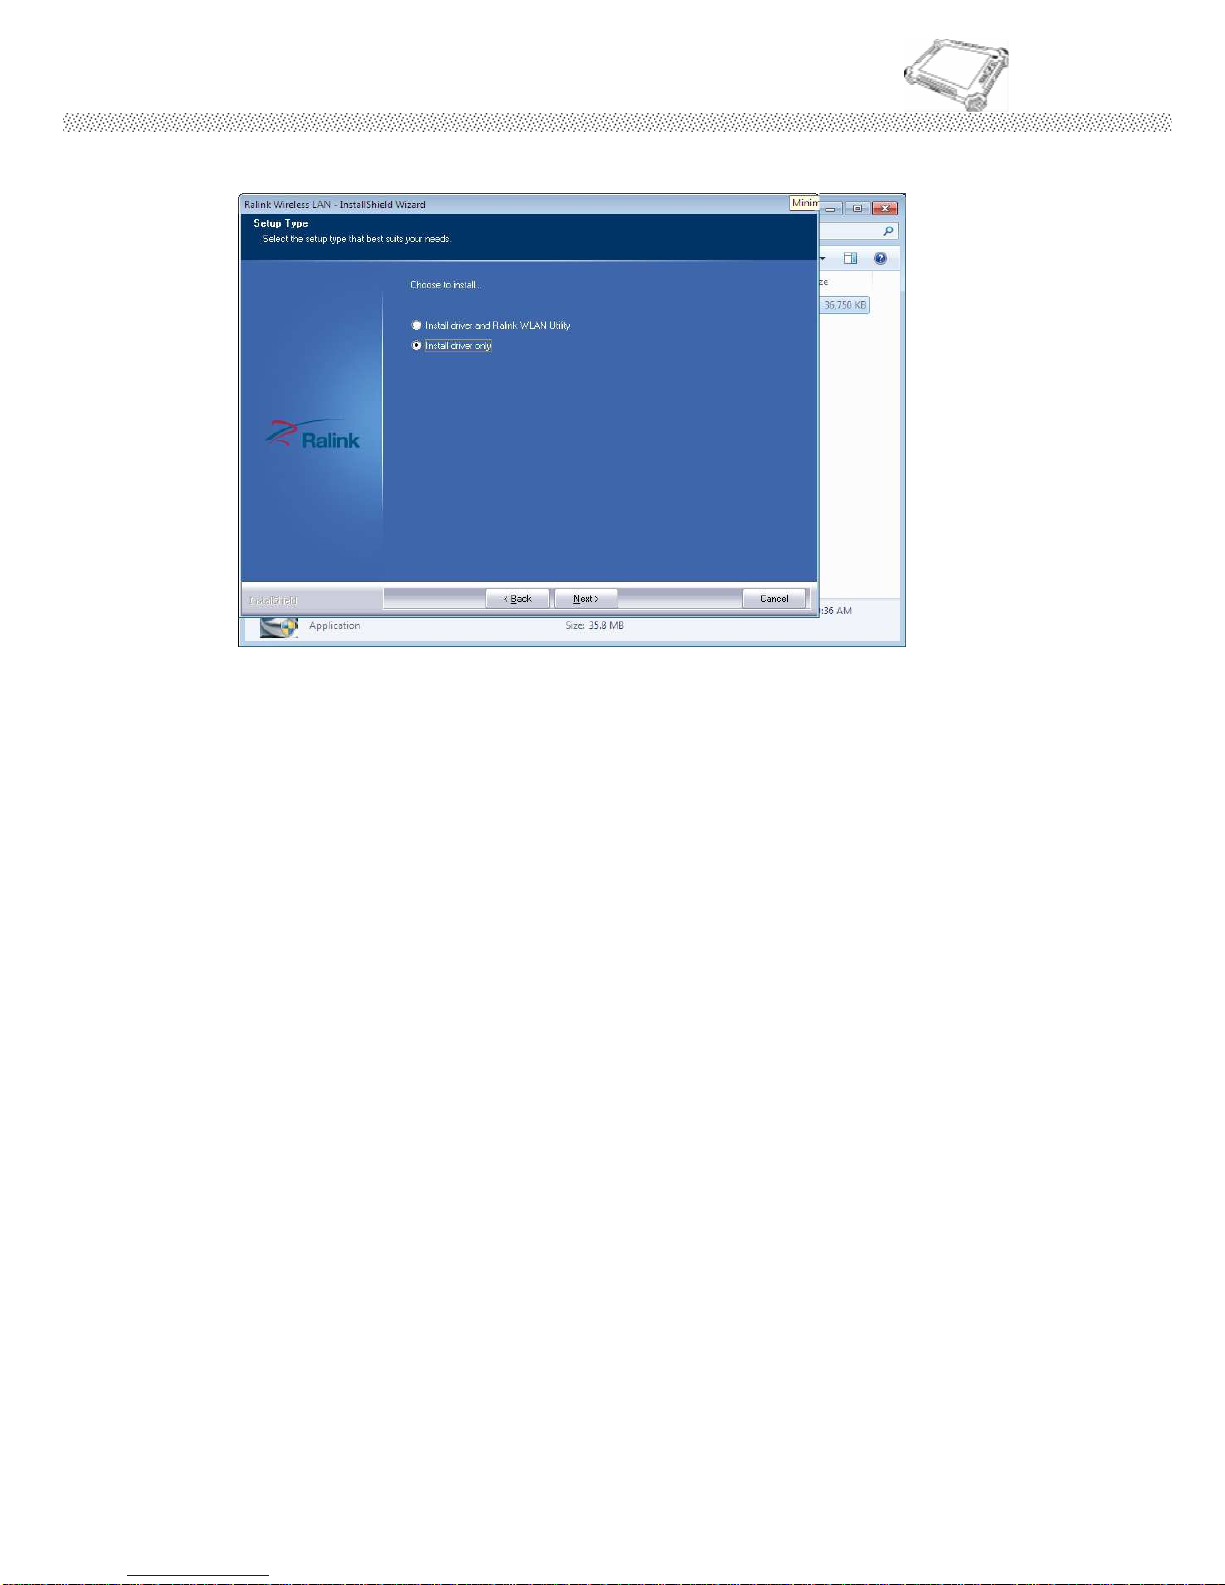
Step.1 Insert the Driver Utility CD. Open the file document “Wireless”. Execute
the installation program.
Step.2 Follow the step by step and click “Next” to finish the driver installation.
Page 86
Rugged Computing
Users Manual Rugged Table PCs
86
Page 87
Rugged Computing
Users Manual Rugged Table PCs
87
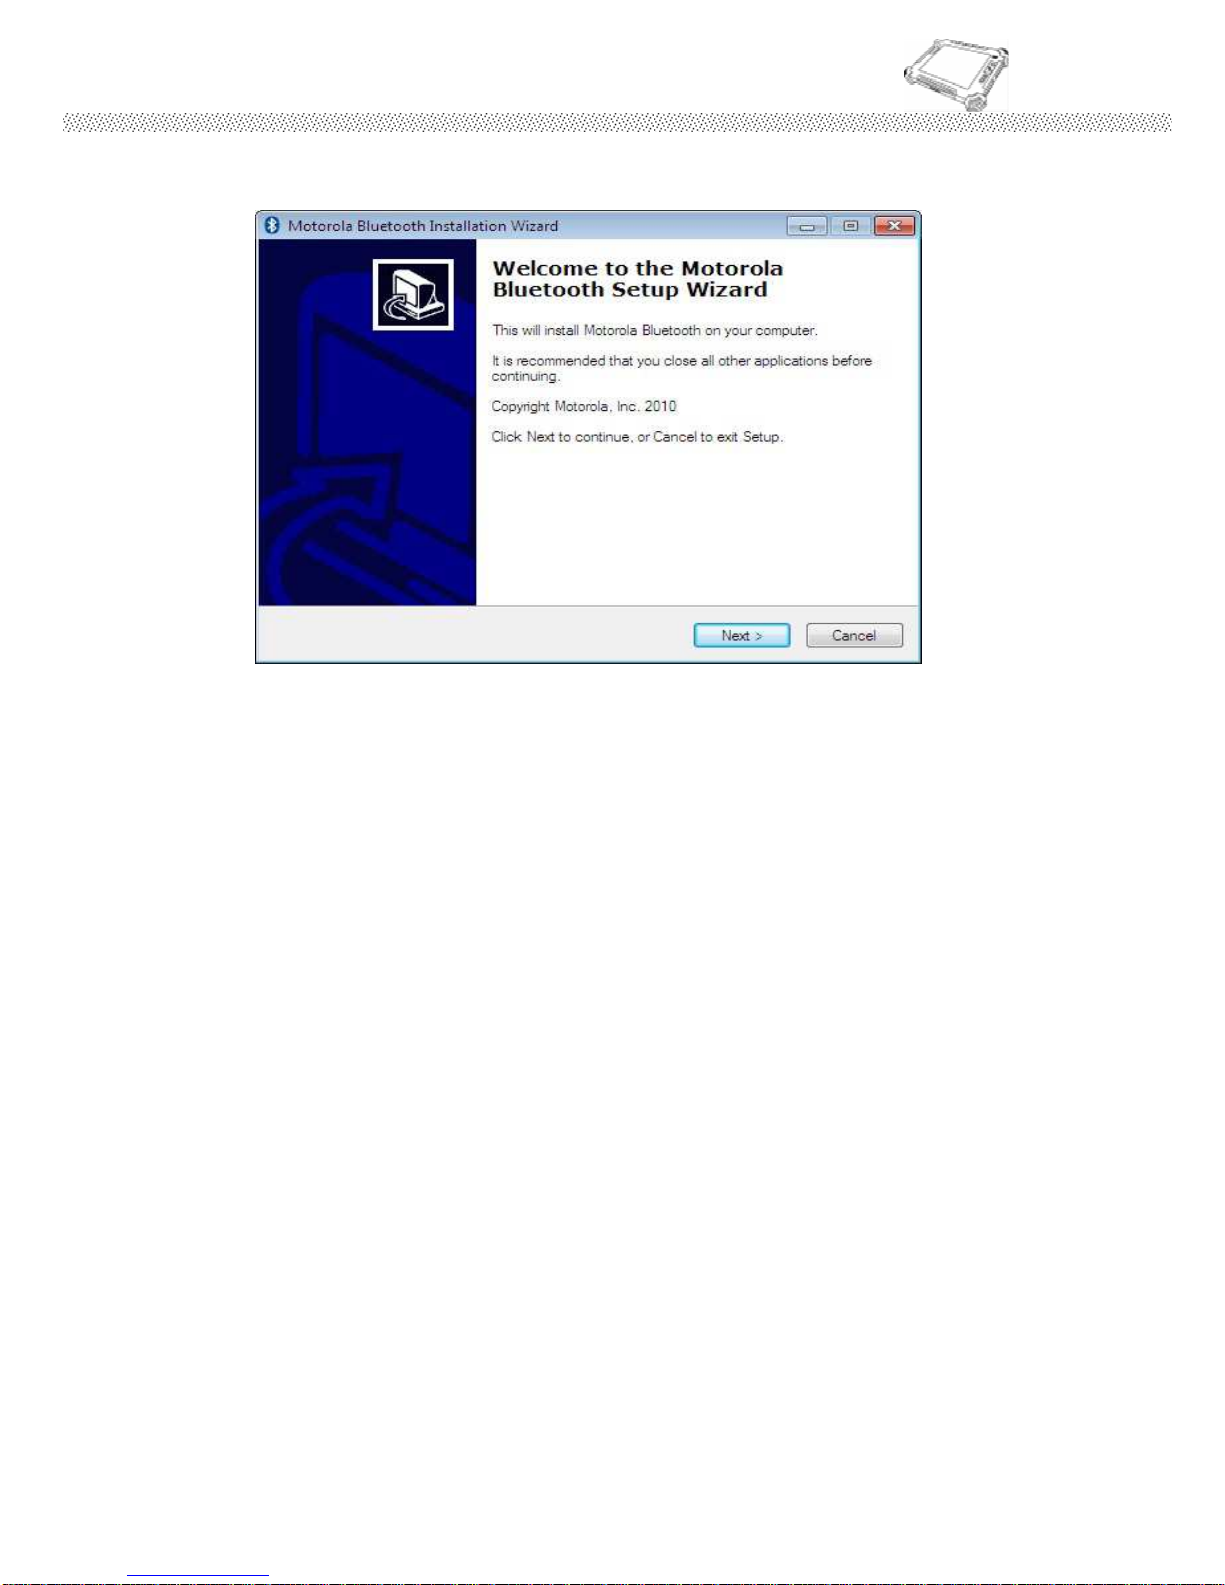
5.7 Bluetooth Driver Installations
Following the step by step to finish the driver installation
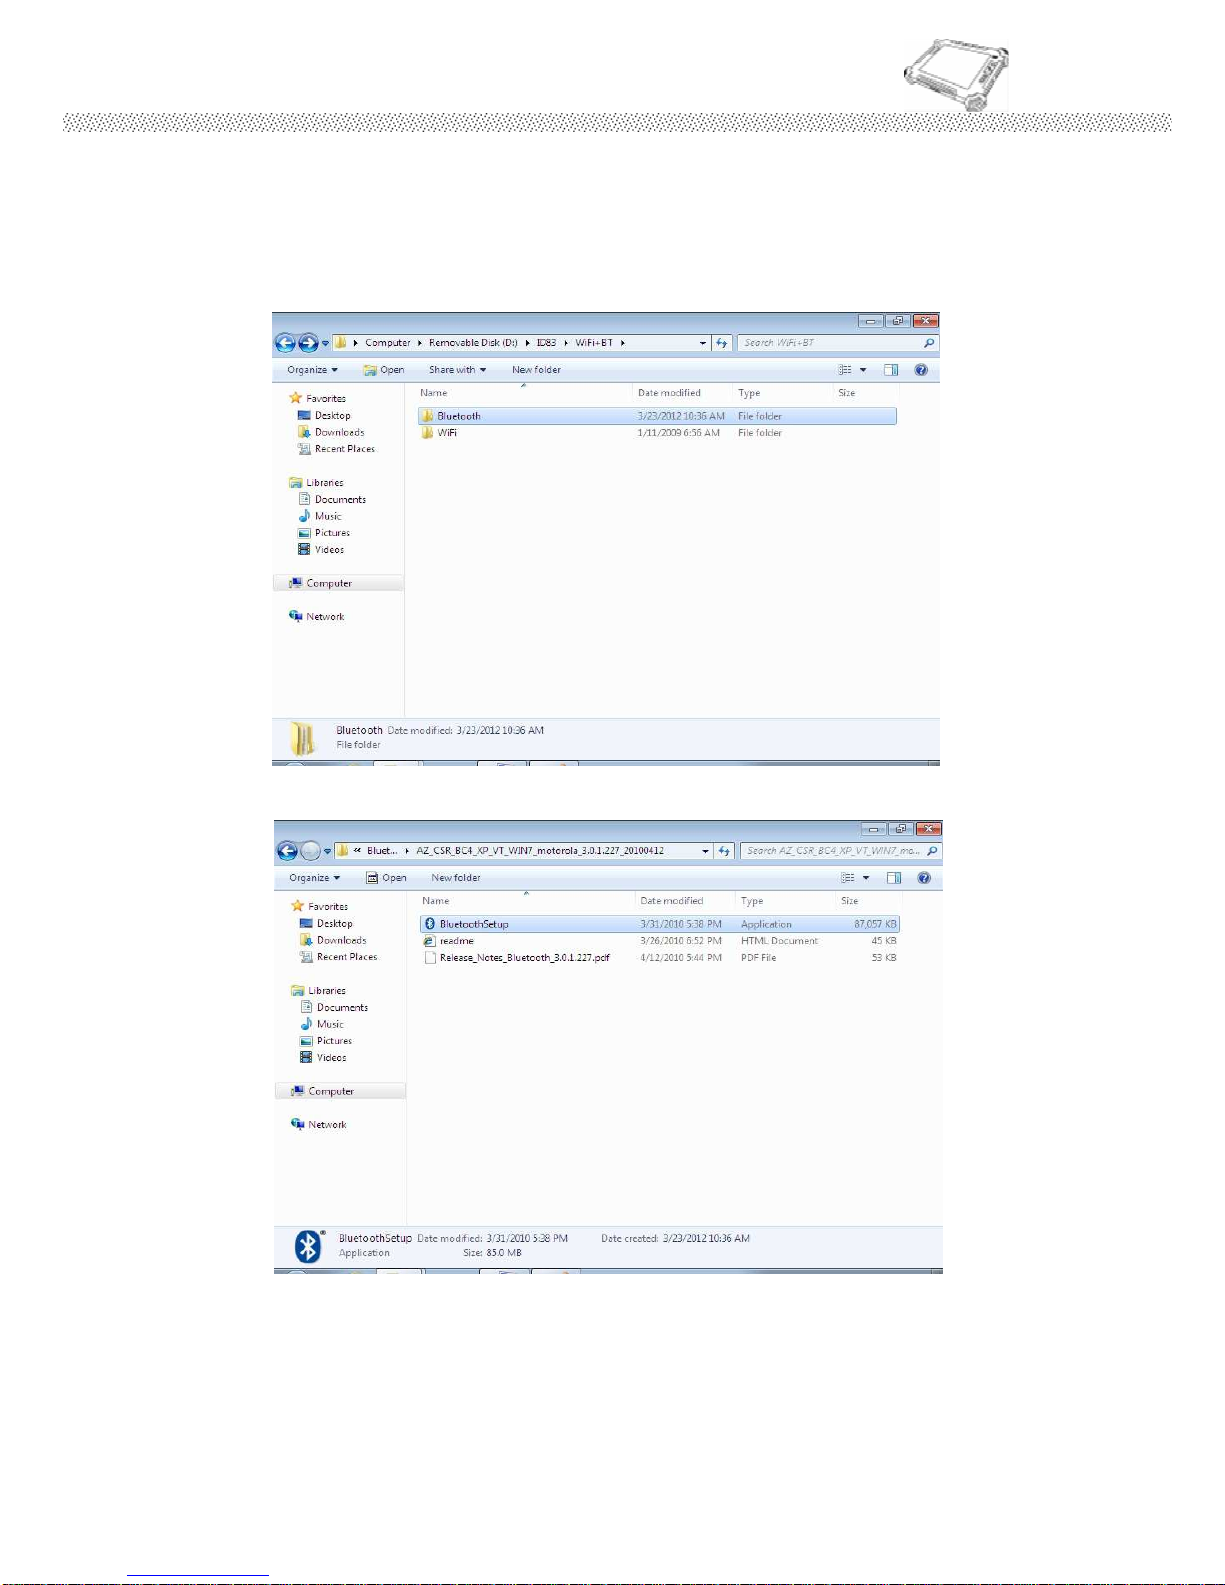
Step.1 Insert the Driver Utility CD. Open the file document “Bluetooth”. Press
“Install” to execute the installation program.
Page 88
Rugged Computing
Users Manual Rugged Table PCs
88
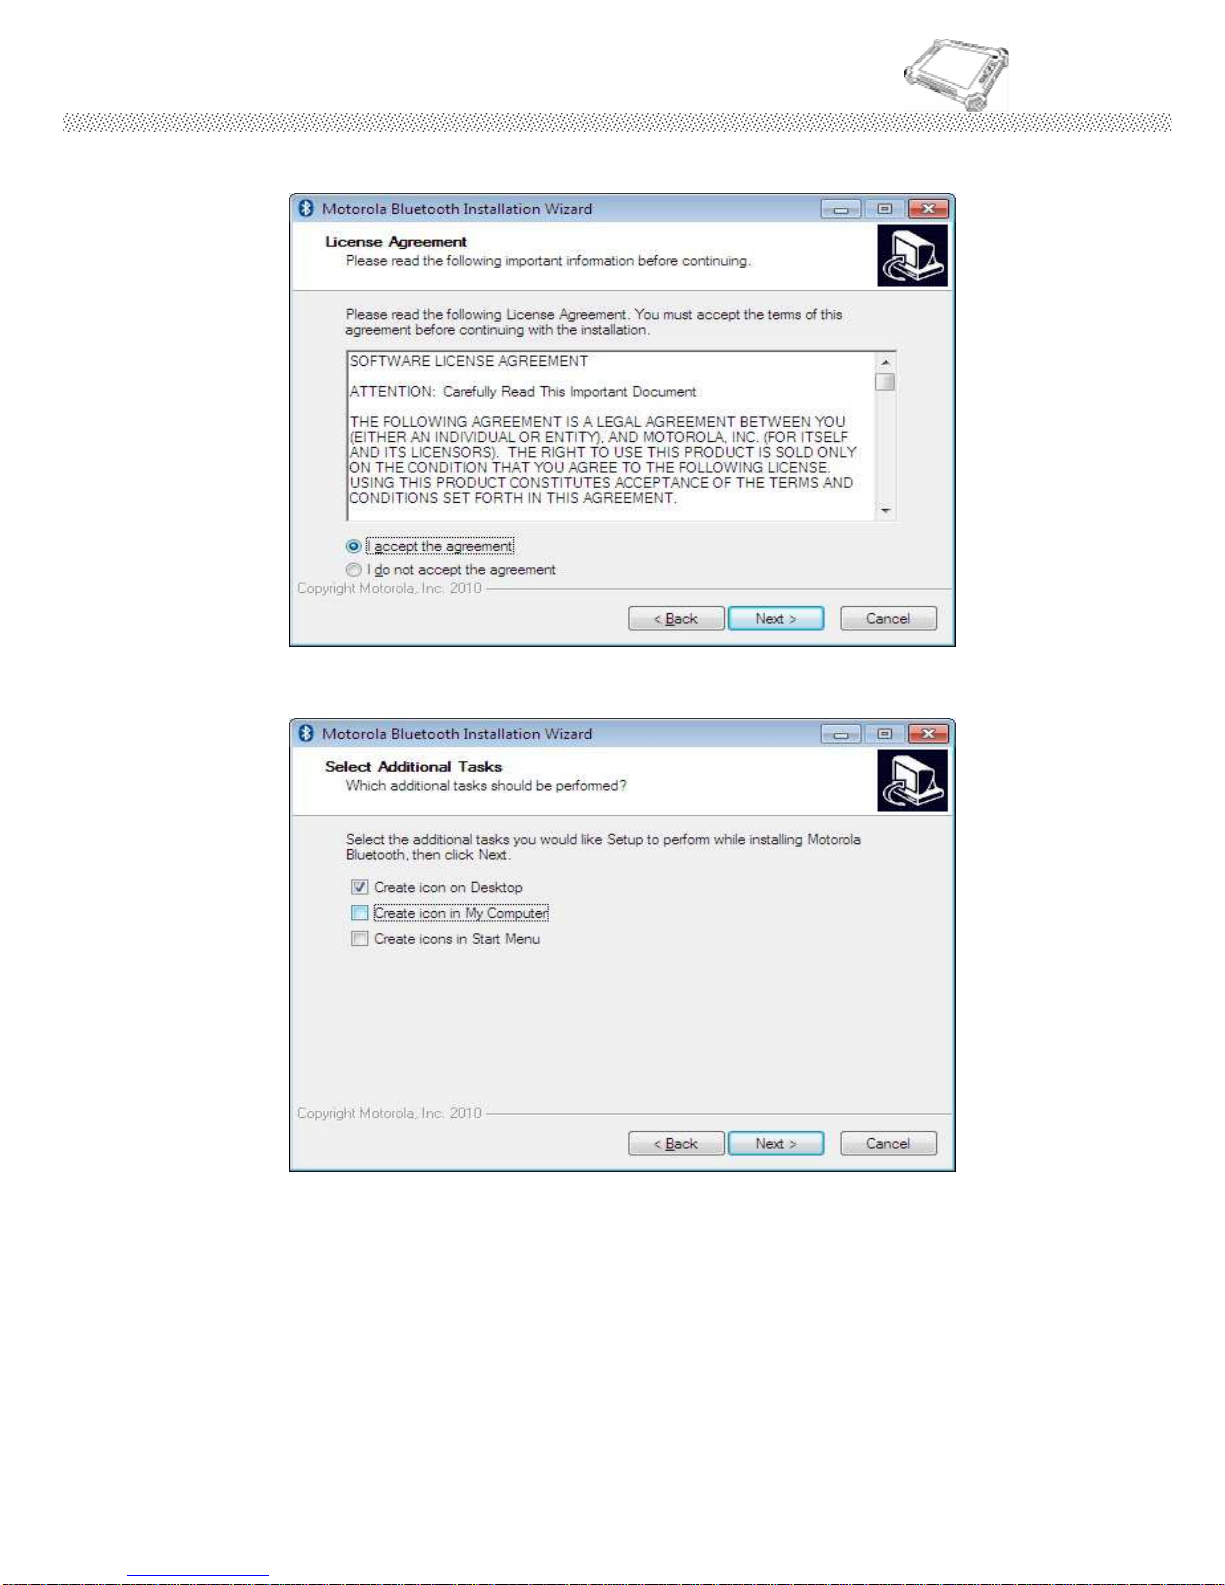
Step.2 Choose “Accept” icon and click “Next” to go to installation
Page 89
Rugged Computing
Users Manual Rugged Table PCs
89
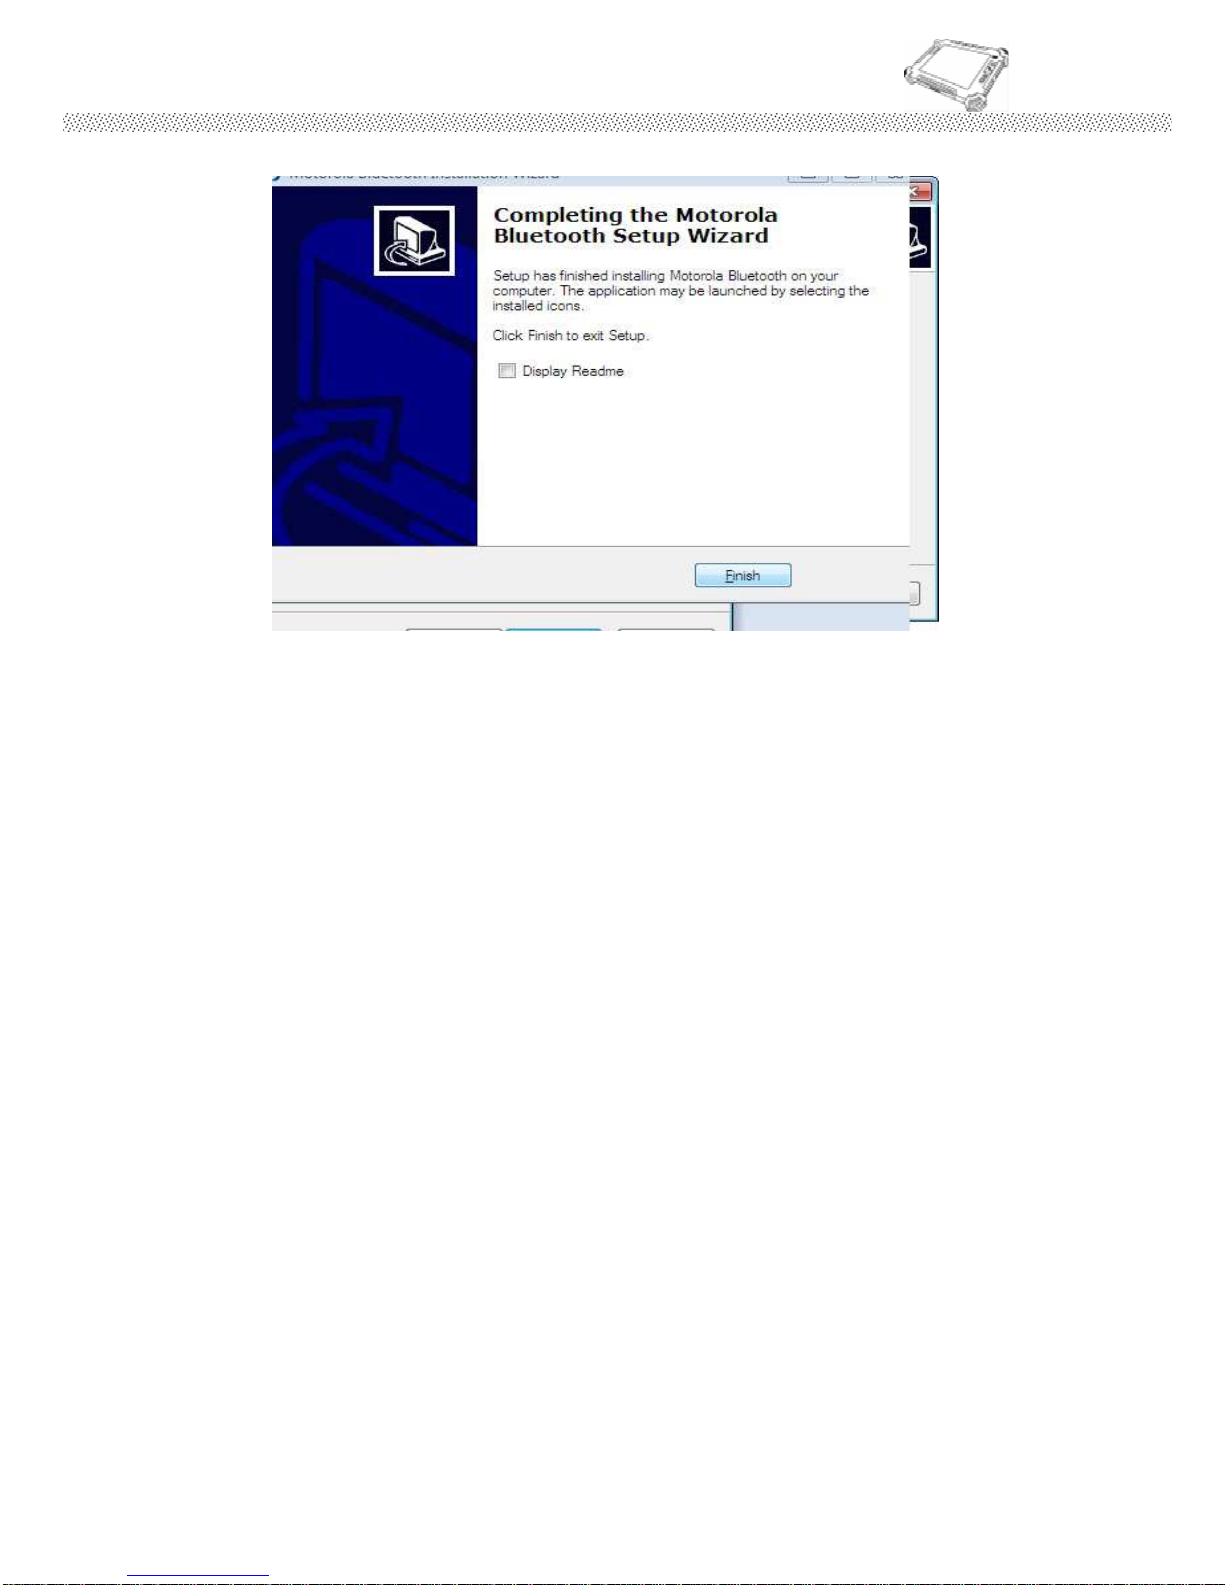
Step.3 Follow the step by step and click “Next” to finish the driver installation.
Page 90
Rugged Computing
Users Manual Rugged Table PCs
90
Page 91
Rugged Computing
Users Manual Rugged Table PCs
91
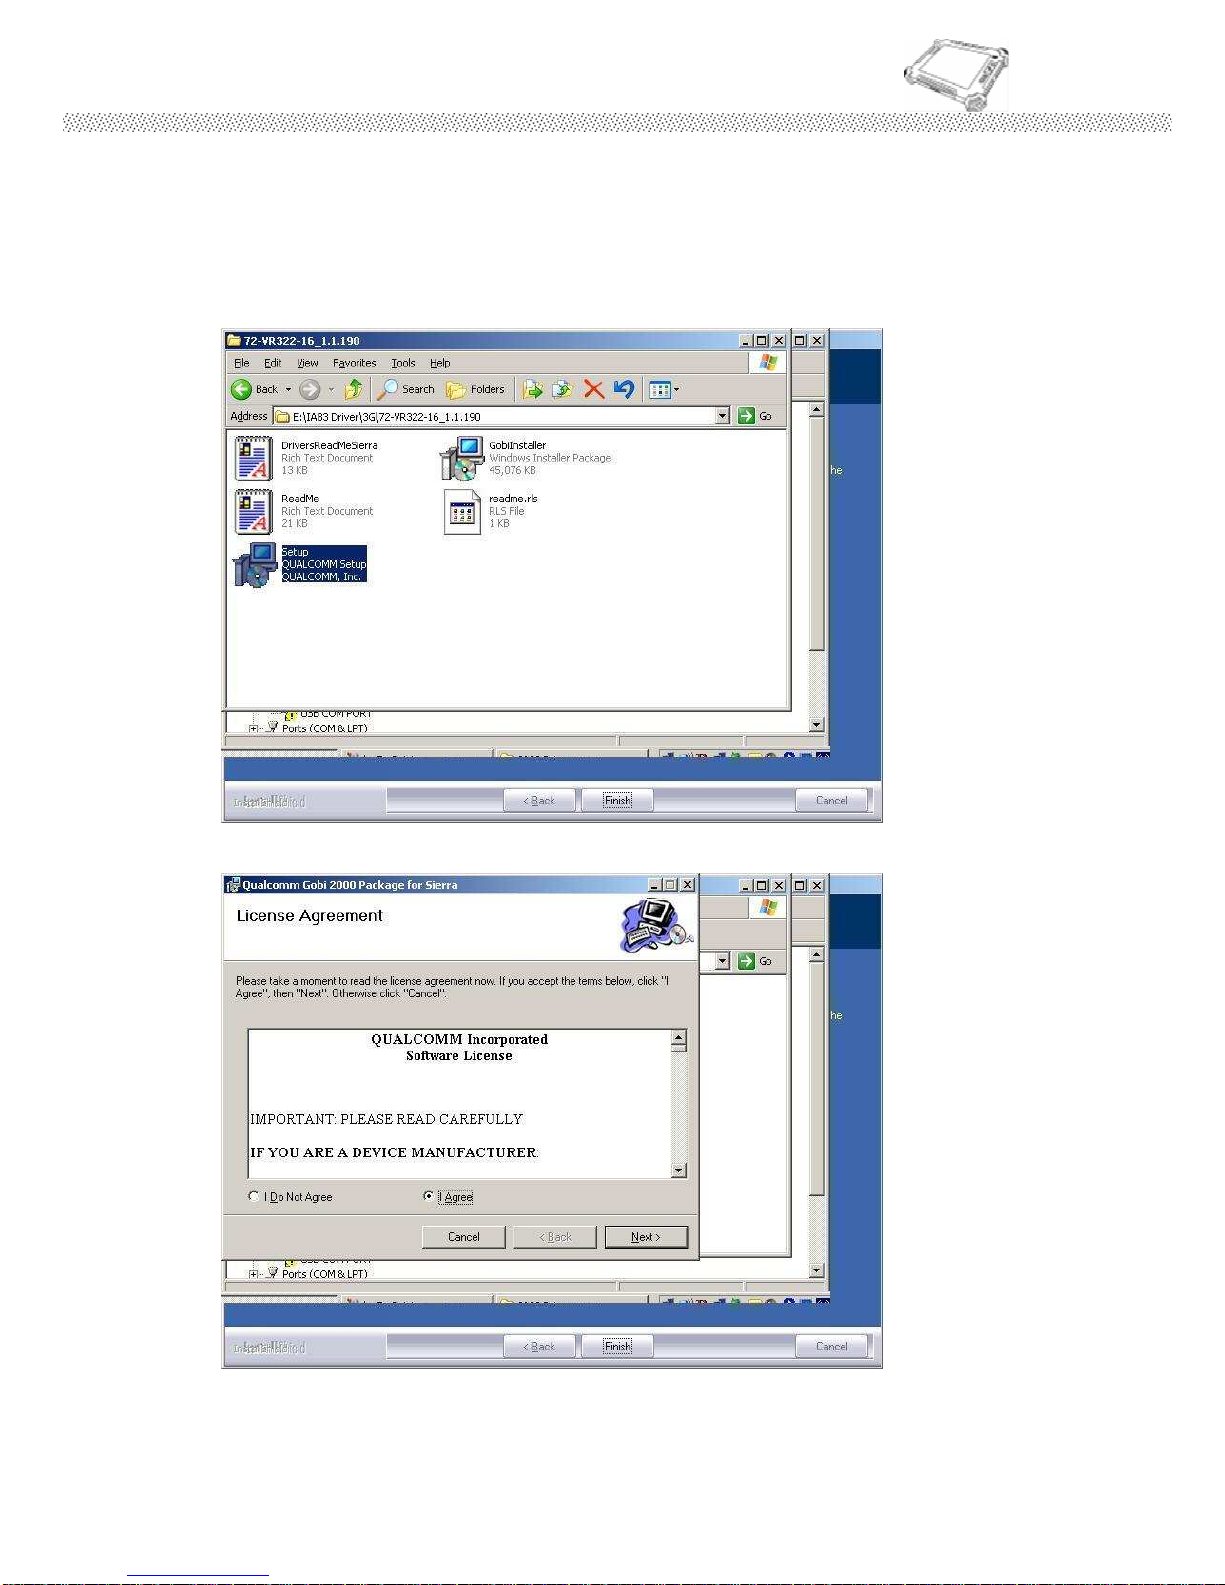
5.8 3G Module Driver Installations
Following the step by step to finish the driver installation
Step.1 Insert the Driver Utility CD. Open the file document “3G”. Press “Install” to
execute the installation program.
Page 92
Rugged Computing
Users Manual Rugged Table PCs
92
5.9 GPS Module Driver Installations
Following the step by step to finish the driver installation
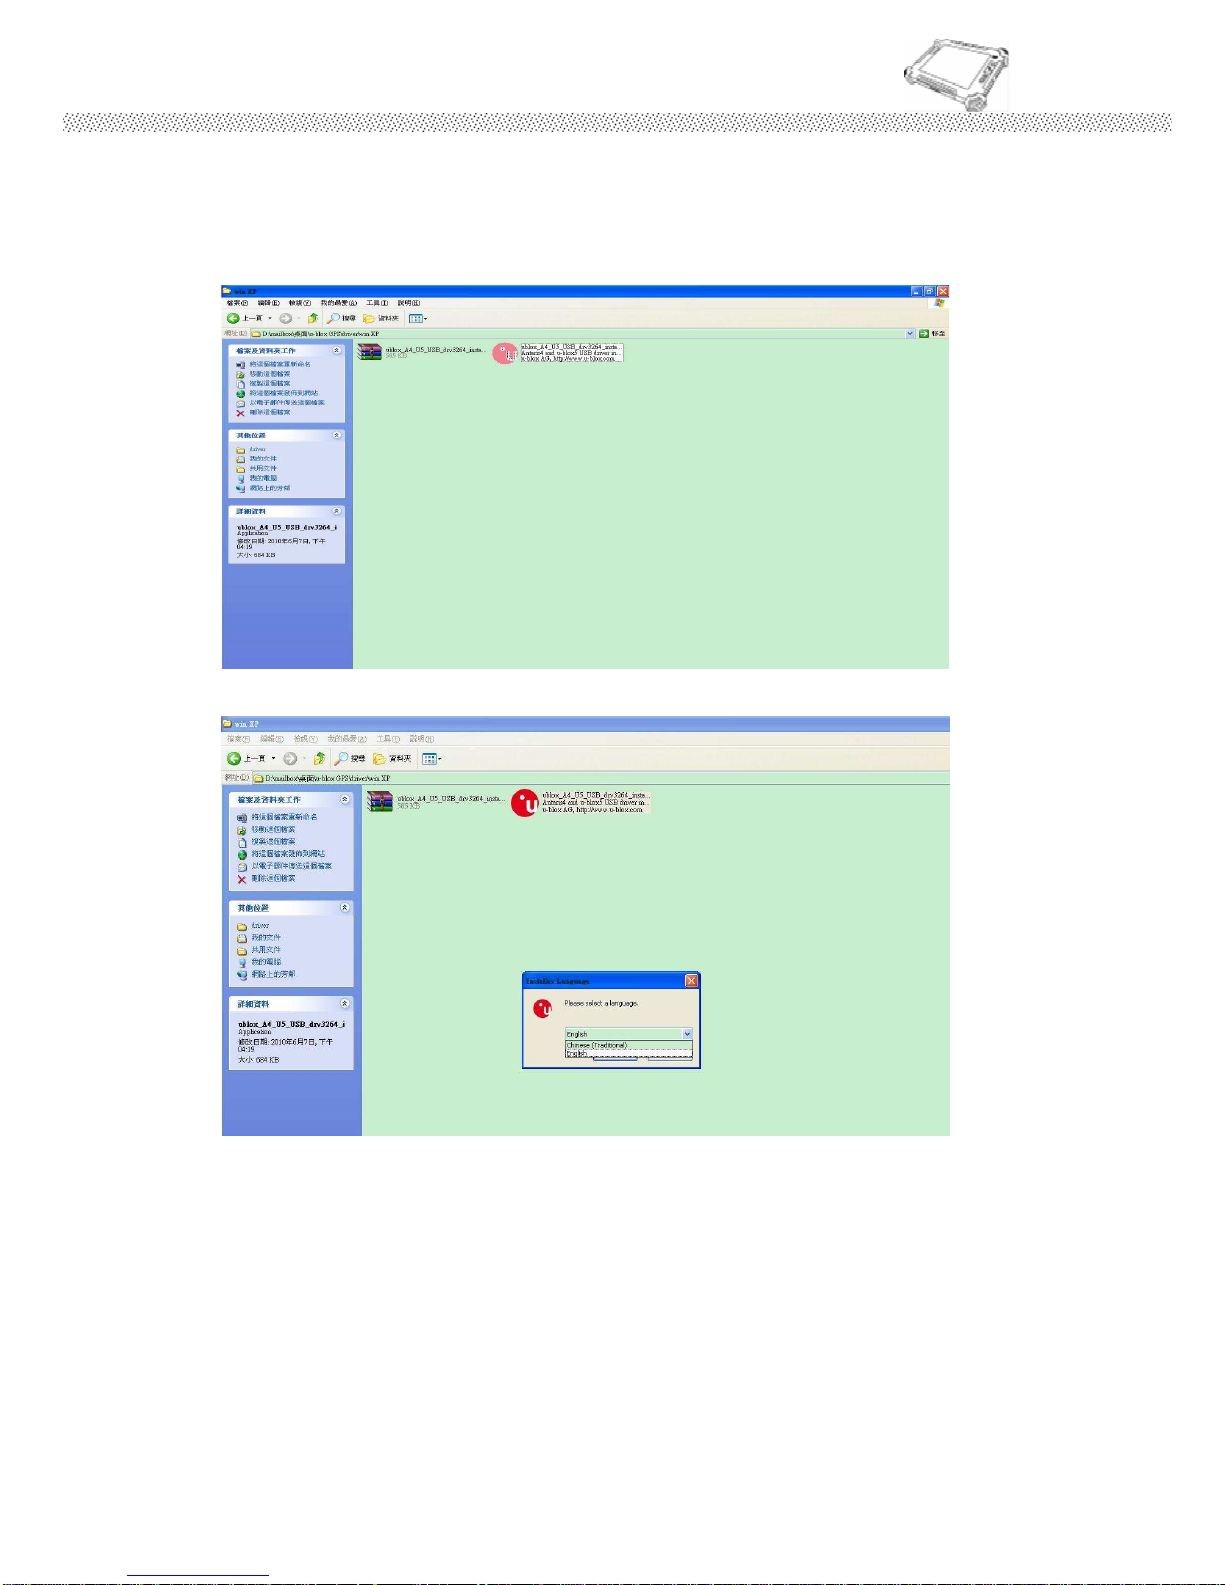
Step.1 Insert the Driver Utility CD. Open the file document “GPS”. Press
“ublox_A4_U5_USB_drv3264_install_UI” to execute the installation program.
Step.2 Select the “English” and click the “ok” to next step
Page 93
Rugged Computing
Users Manual Rugged Table PCs
93
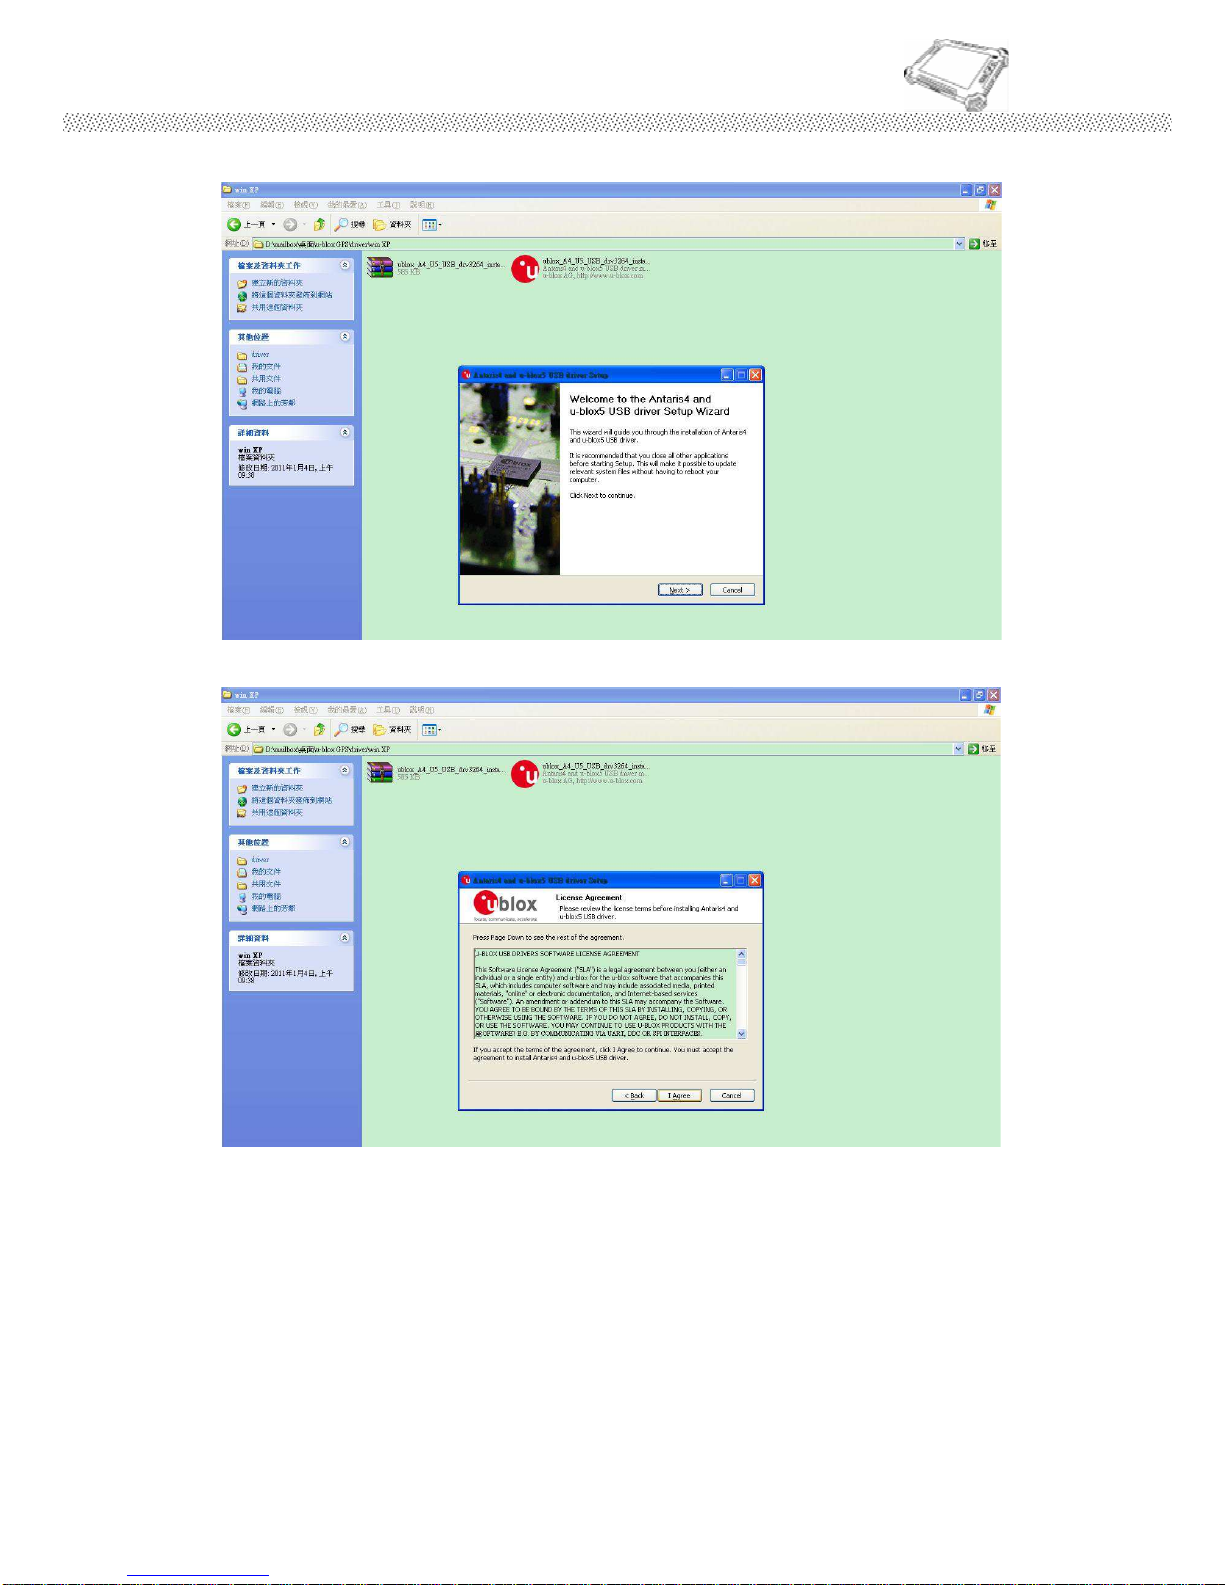
Step.3 Press “Next’ to install the driver.
Step.4 Press “I Agree” to install the driver.
Page 94
Rugged Computing
Users Manual Rugged Table PCs
94
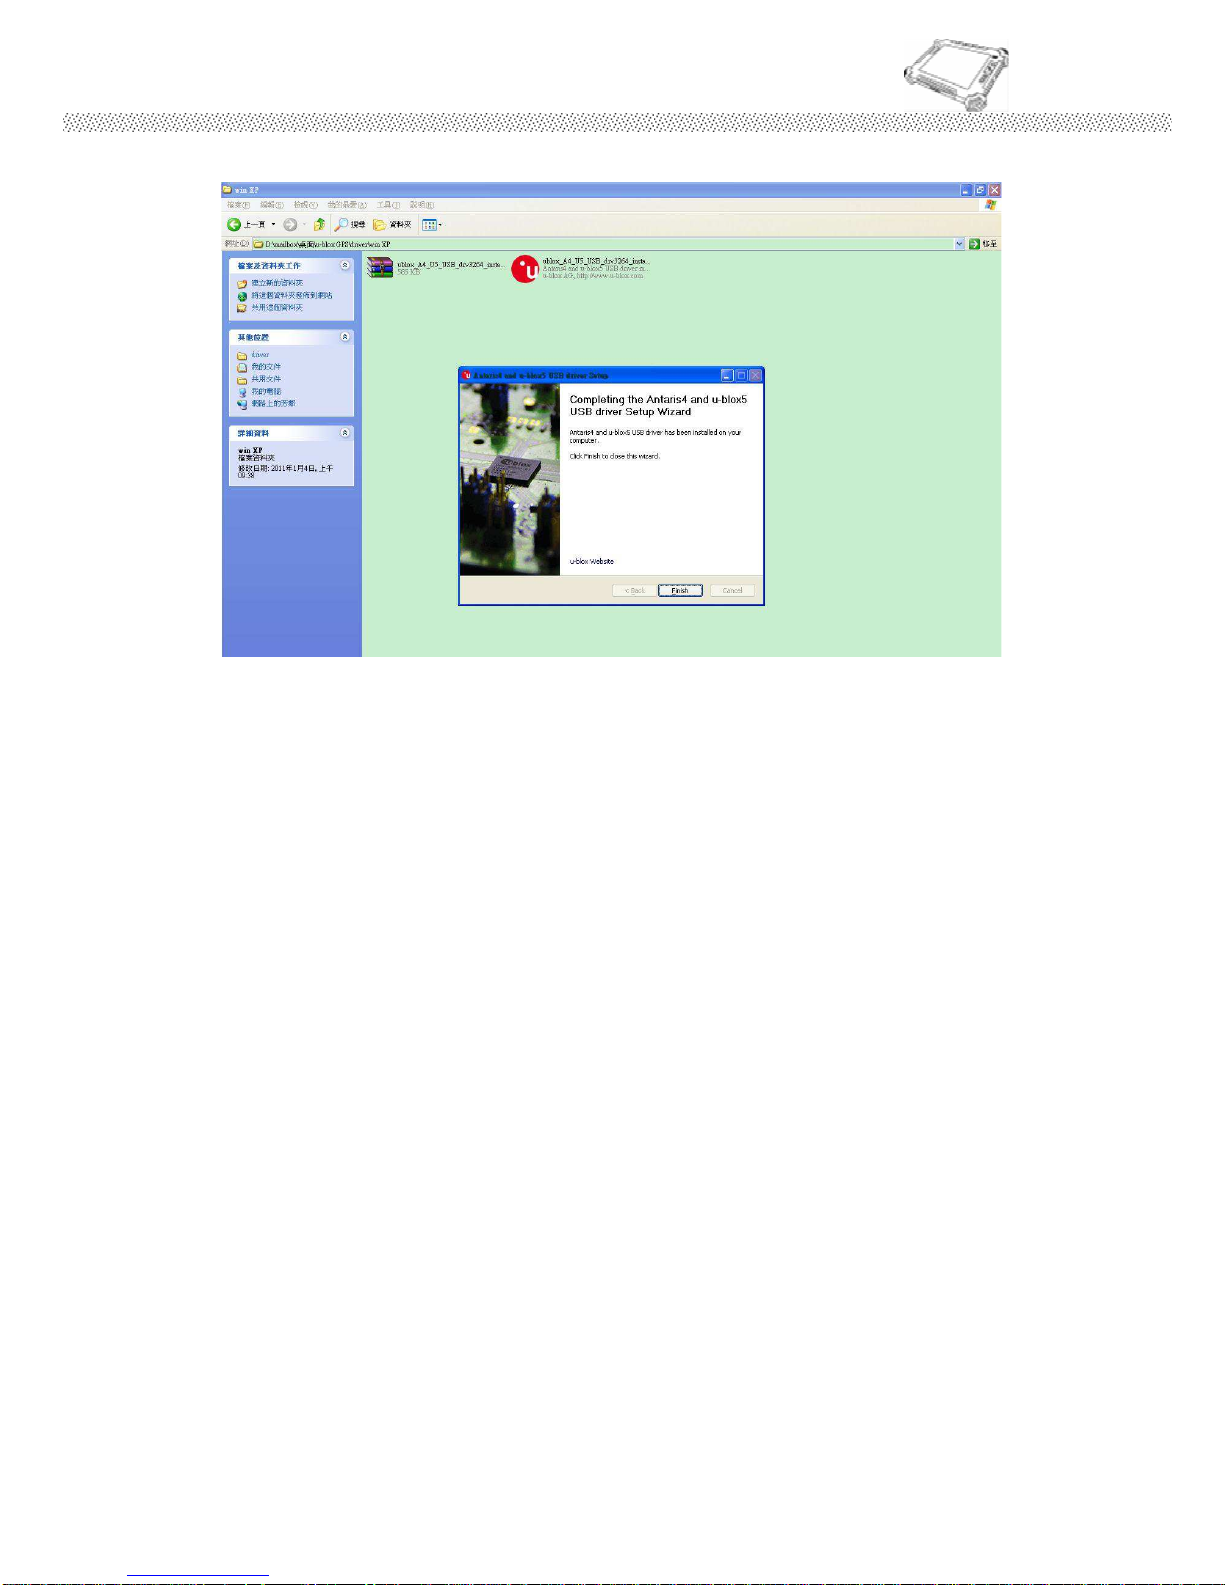
Step.5 Click “Finish” to complete the installation.
Page 95
Rugged Computing
Users Manual Rugged Table PCs
95
5.10 Touch Driver Installation
TouchKit is the Touch software, which contains drivers of the touch
panel controllers for the specified communication connectors, RS232,
PS/2 and USB, and the other two utilities.
The two utilities are as follows:
Touch Tray support
This is utility for emulating the right and left button of mouse
through controlling touch panel. Users can toggle between
right or left mouse buttons by this utility.
Configuration support
The calibration and draw test of touch panel are done by this
utility. Besides, users can add or remove for new RS-232 or
PS/2 touch panel devices.
Follow these steps to install TouchKit.
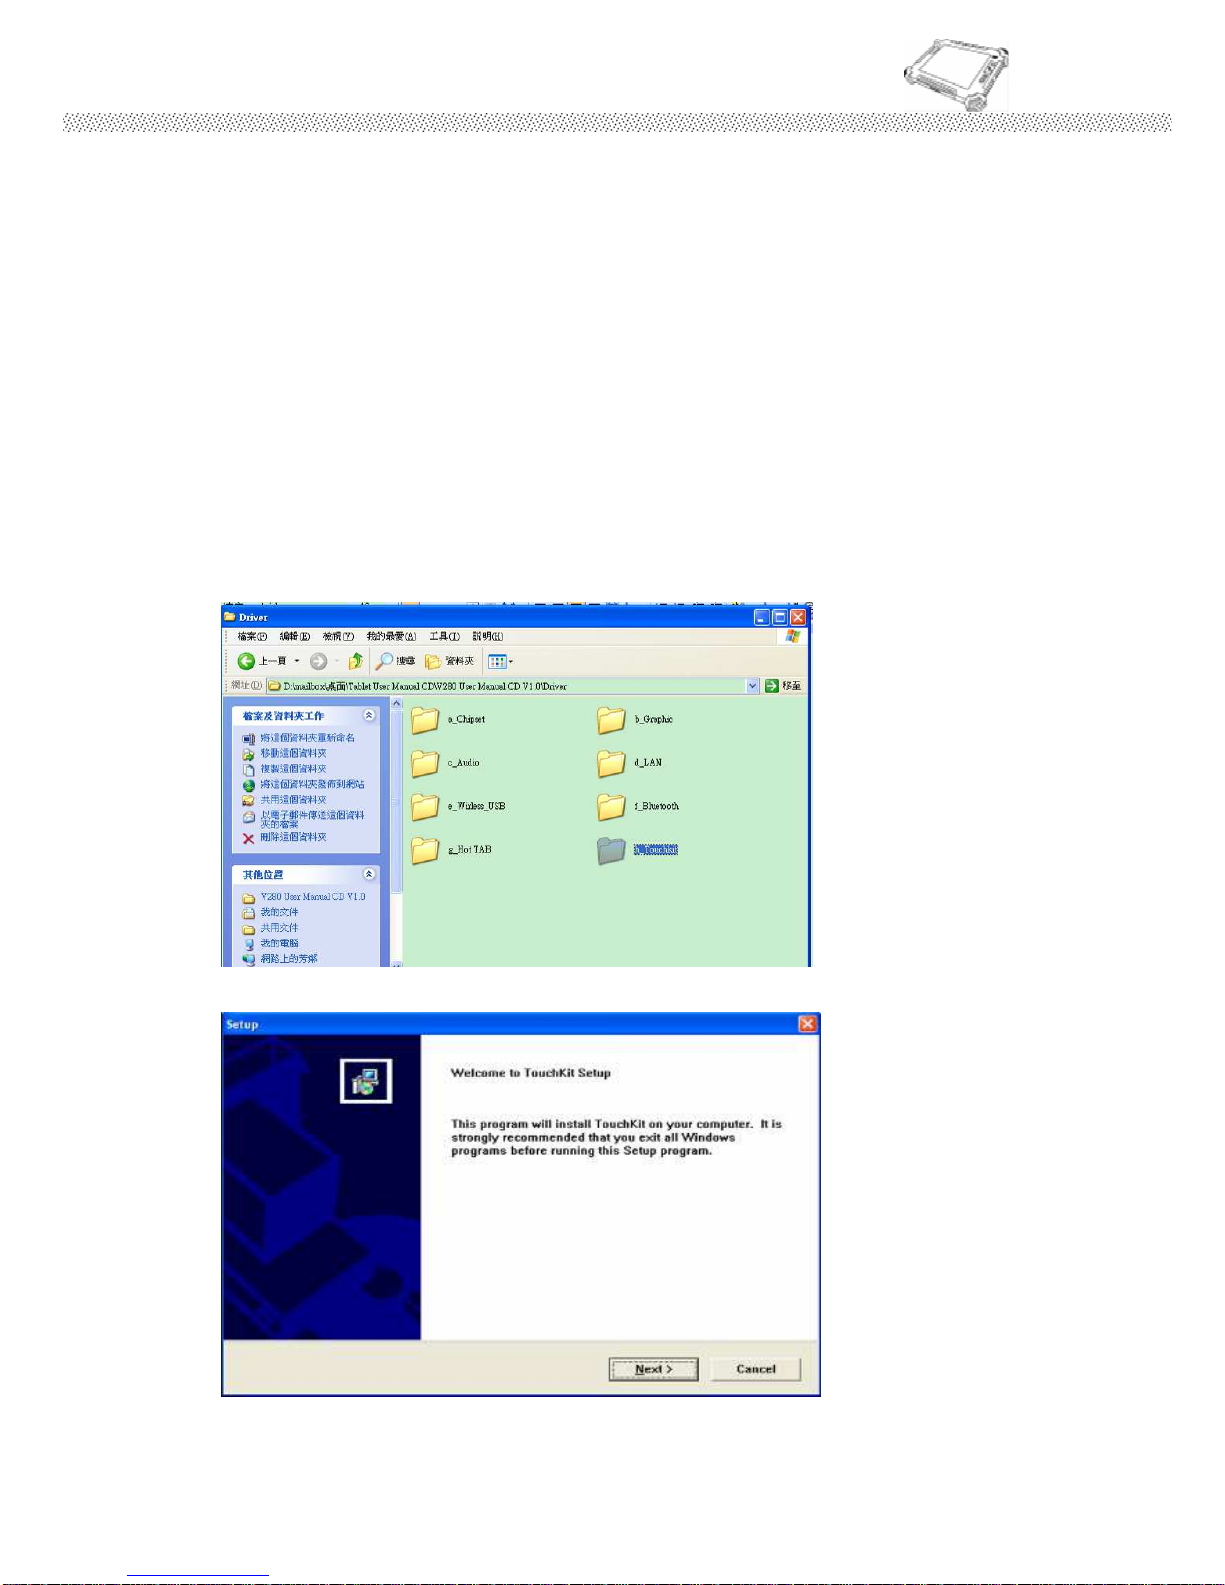
Step.1 Insert the Driver Utility CD. Open the file document “TouchKit” to execute
the setup.
Step.2 Click on “Setup.exe” to execute the setup.
Page 96
Rugged Computing
Users Manual Rugged Table PCs
96
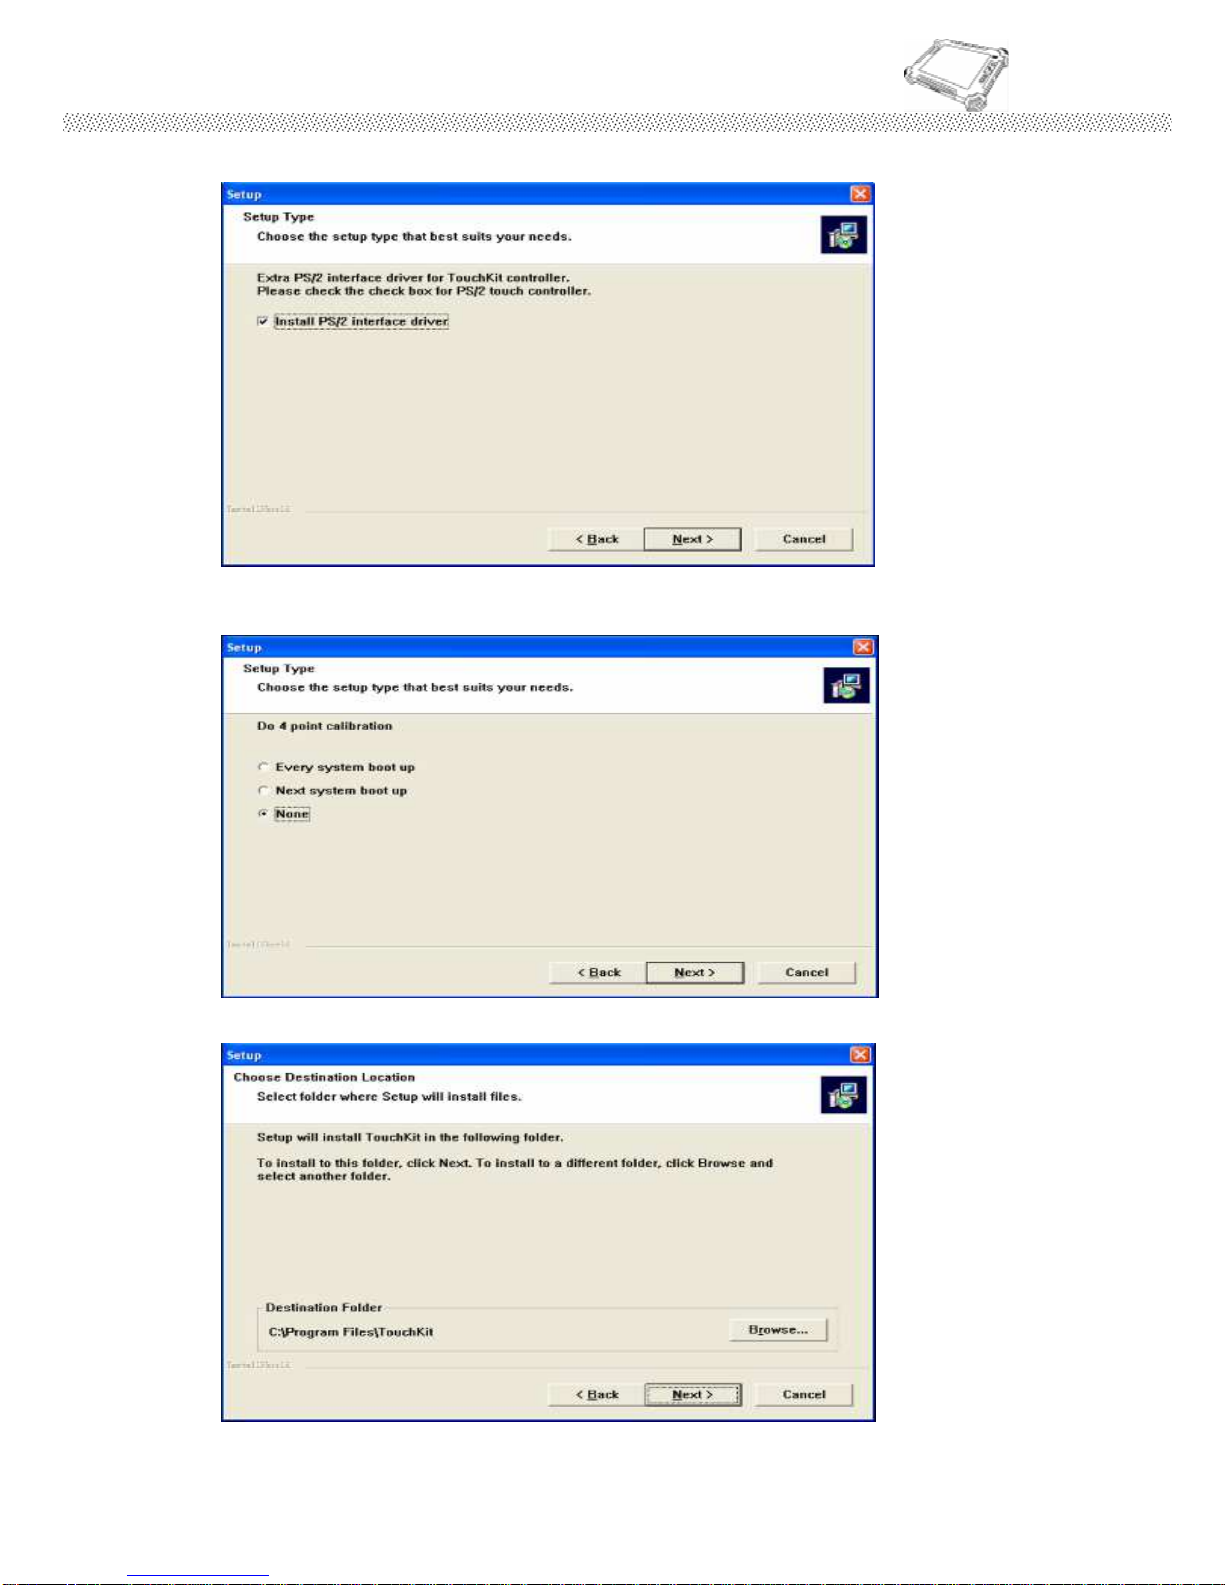
Step.3 Choose Install PS/2 interface driver and select “Next” to go on.
Step.4 Choose “No” for 4 point calibration and click “Next” to continue
installation.
Step.5 Choose “Next” to go on the installation.
Page 97
Rugged Computing
Users Manual Rugged Table PCs
97
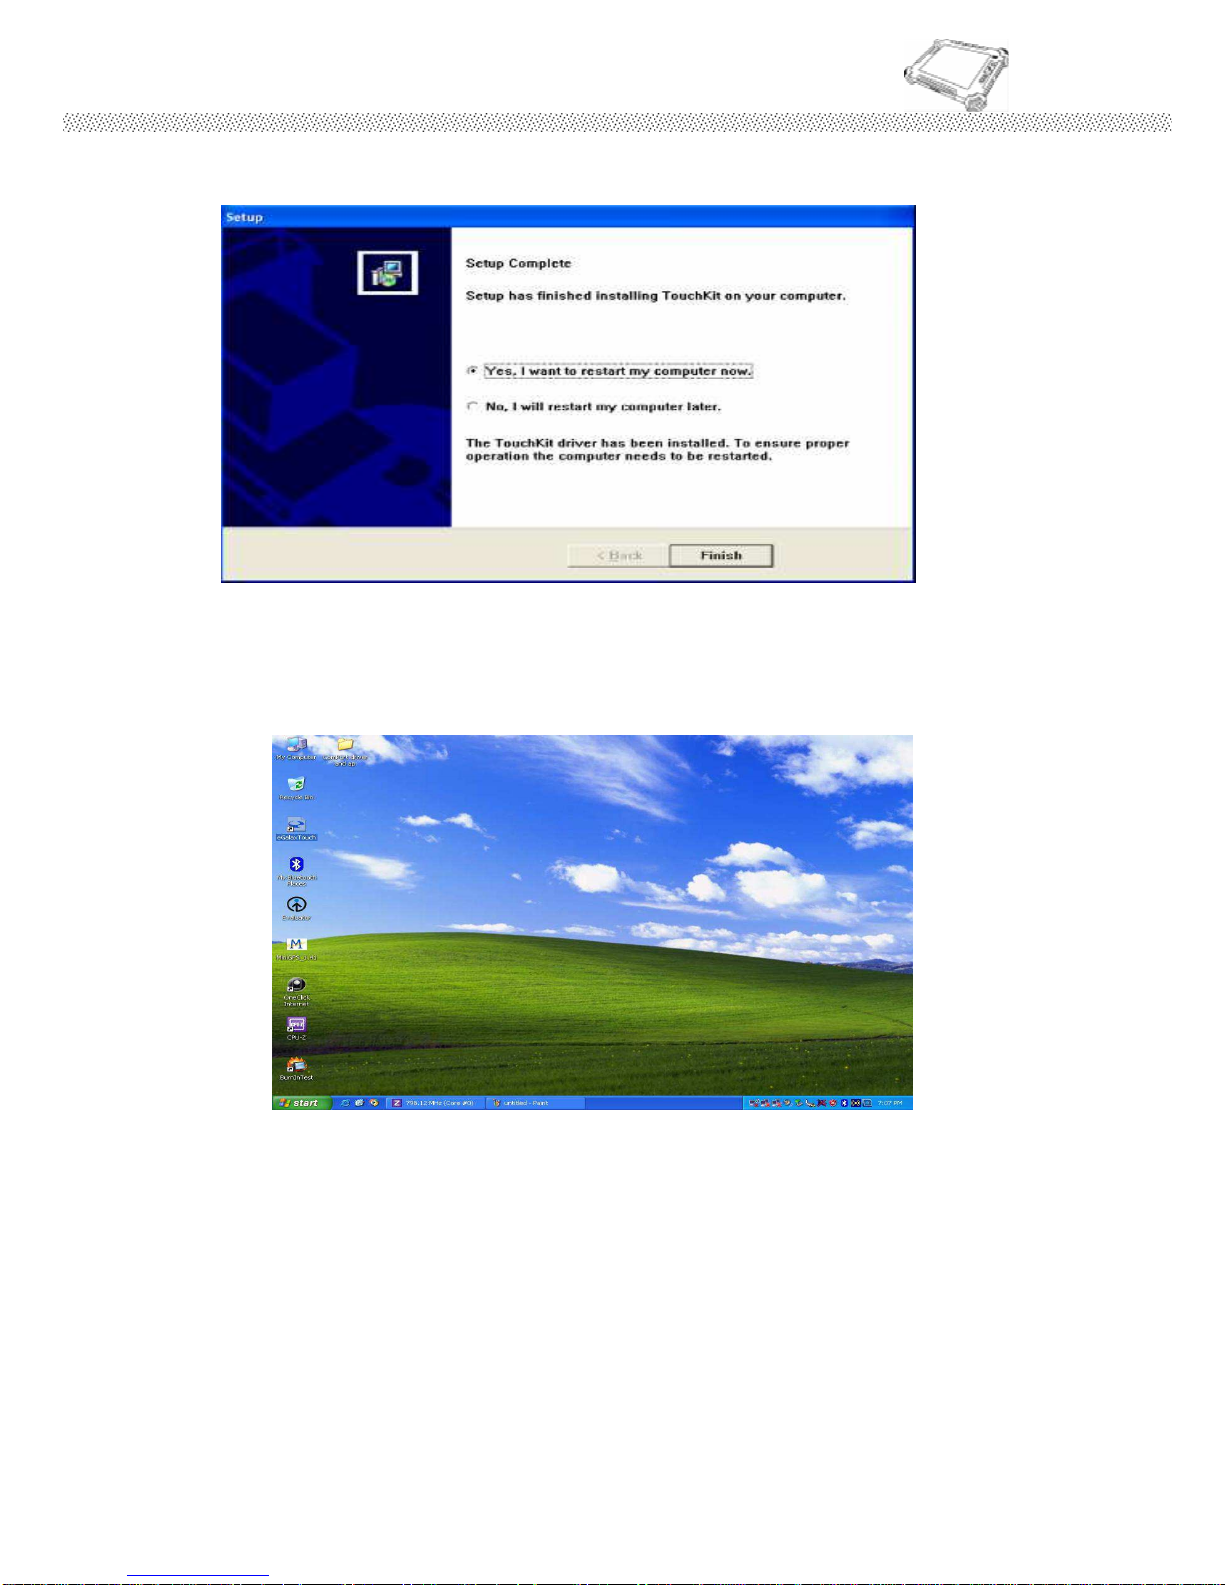
Step.6 After few seconds of installation, click on “Finish” and choose restart
computer to final the installation.
Note: Configuration Utility
After finishing the installation, please follow the steps to test the
configuration utility.
Step.1 Click the “TouchKit” shortcut function in the desktop.
Page 98
Rugged Computing
Users Manual Rugged Table PCs
98
Step.2
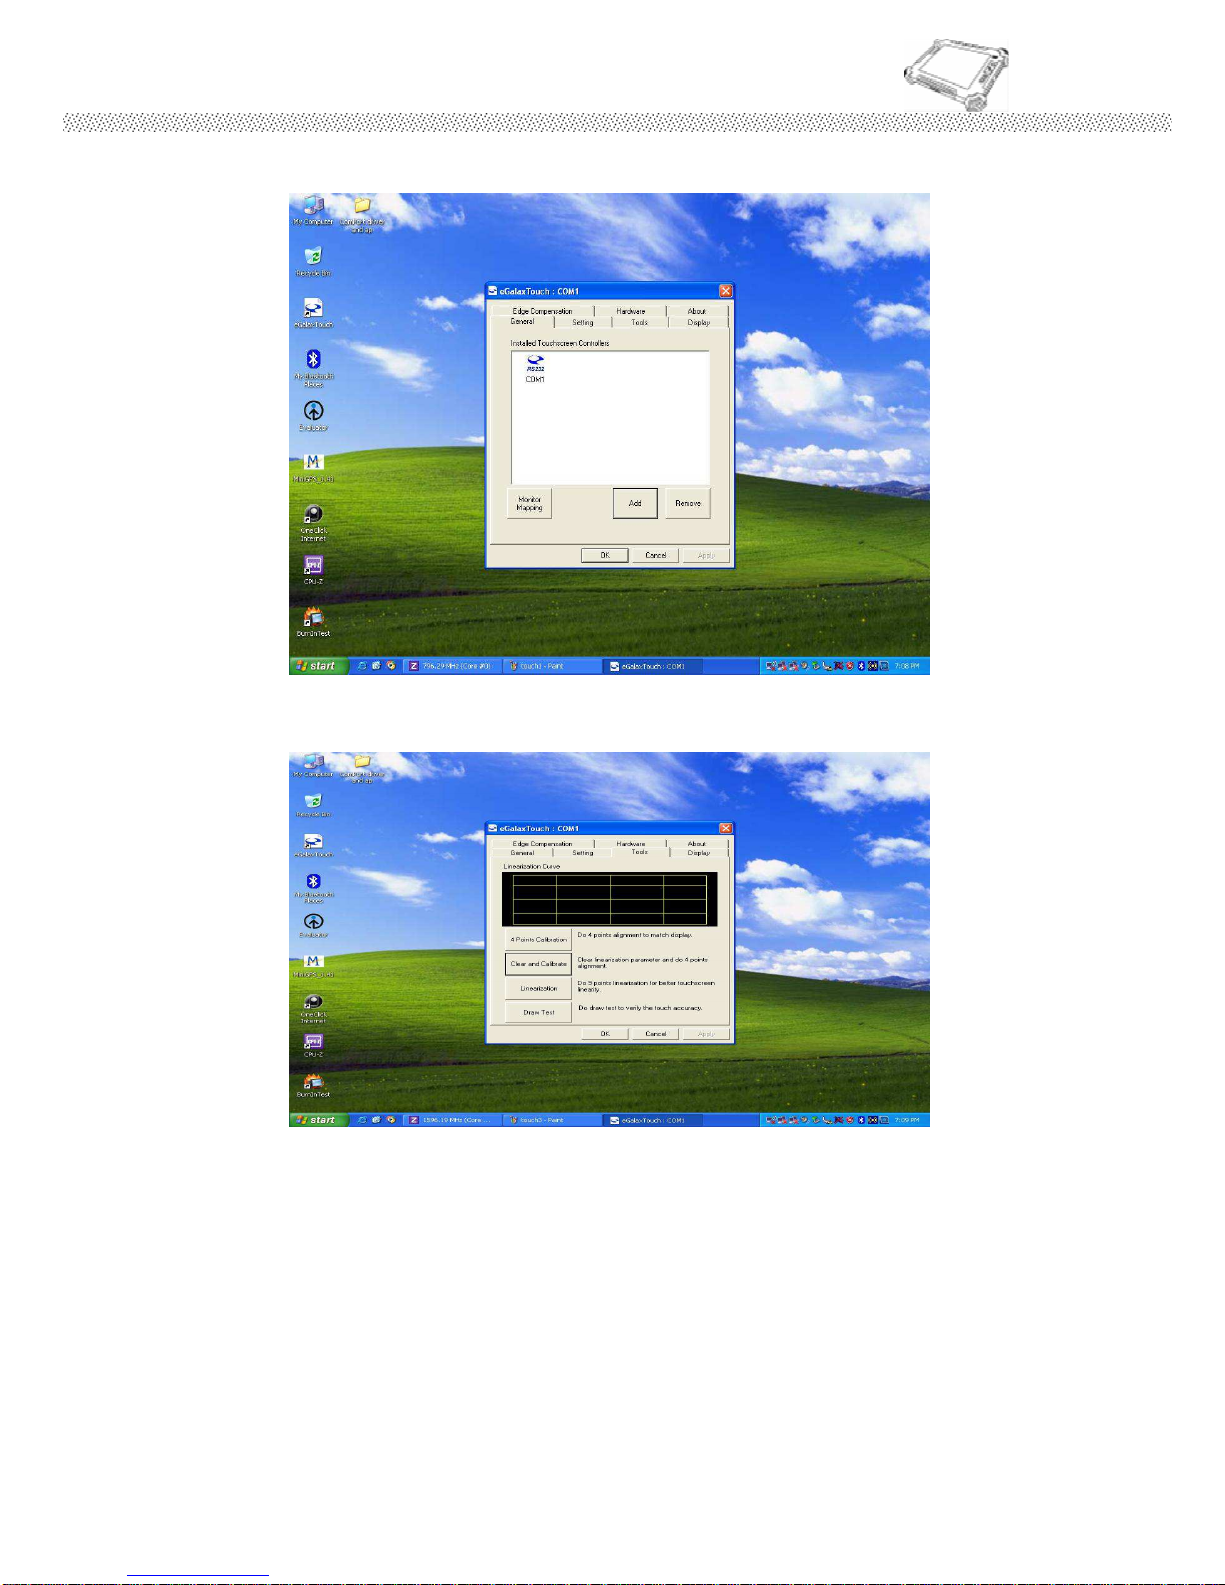
To make sure the touch controller is in the com1.
Step.3 Correct 4 point locations on screen with the Panel. Screen display as
follows
Page 99
Rugged Computing
Users Manual Rugged Table PCs
99
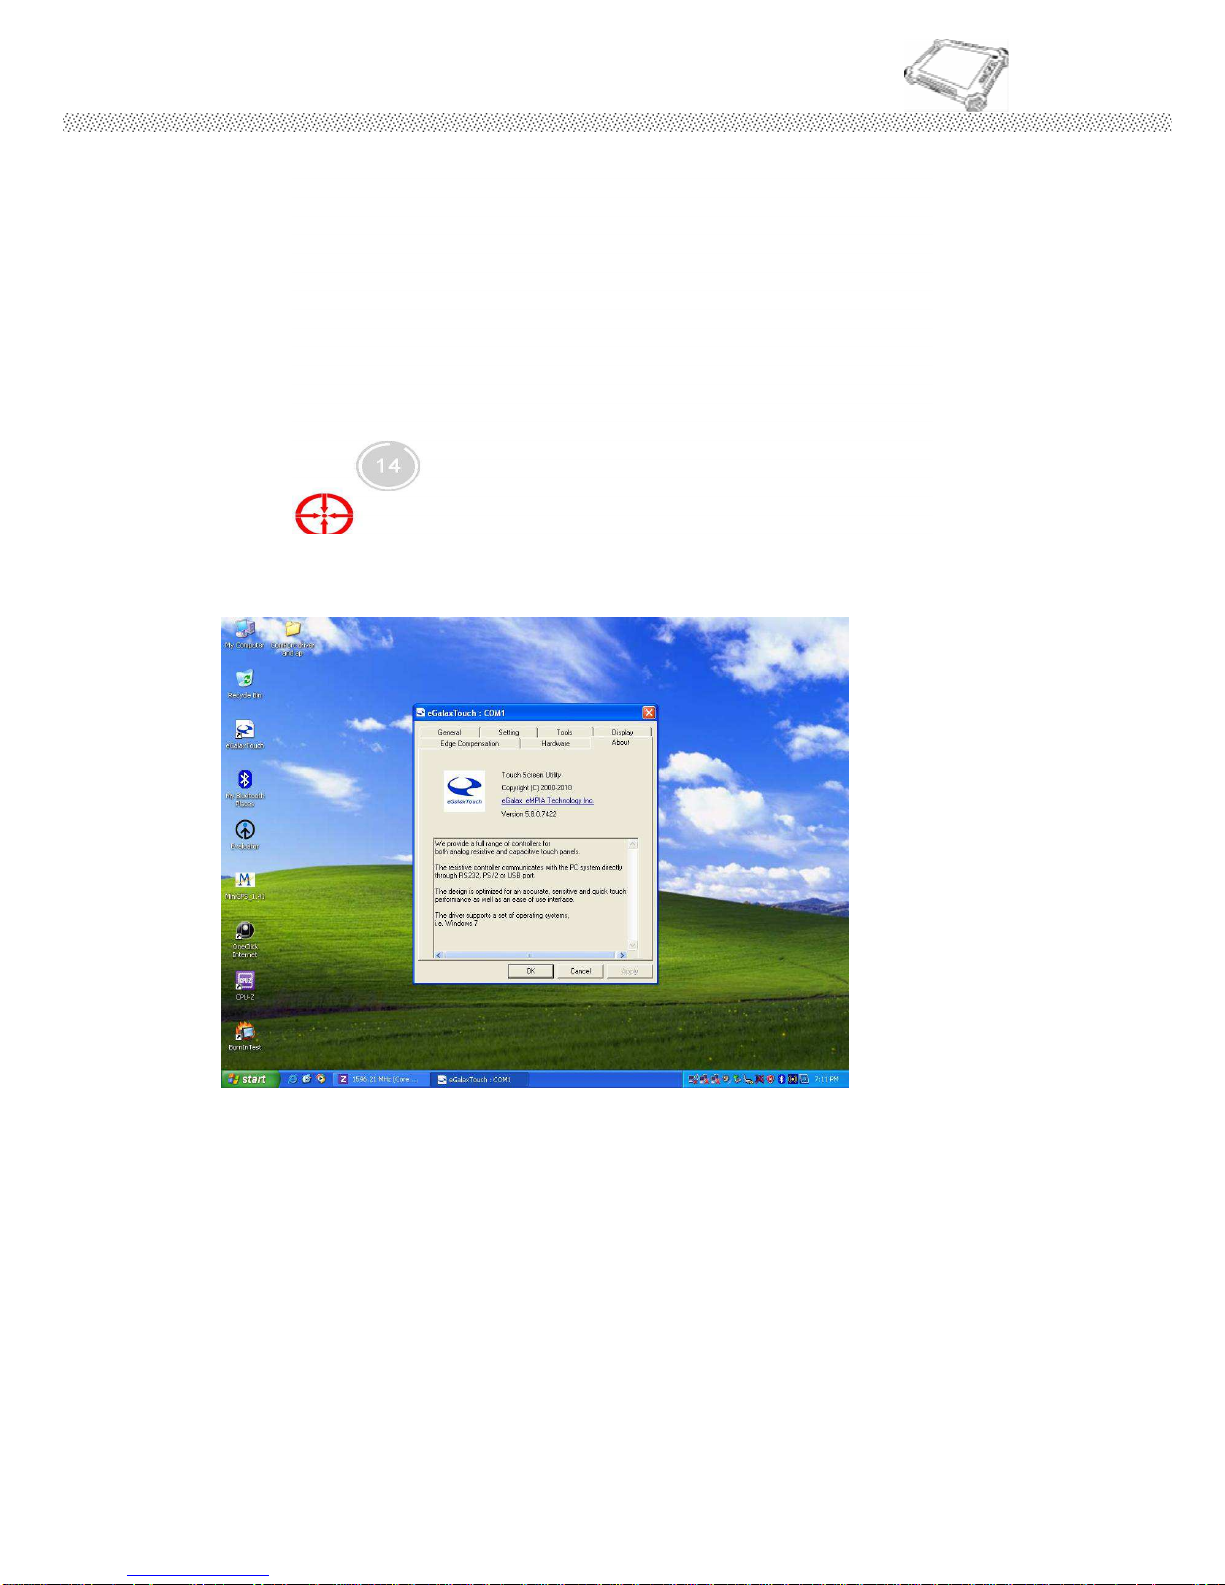
Step.4 If 4 point’s calibration tests are fine, push “yes” to finish the test.
Page 100
Rugged Computing
Users Manual Rugged Table PCs
100
CHAPTER 6
Caring Your Tablet PC
 Loading...