

Page 1

E430x Series PDA
User Manual
(V1.0)
Notes:
All screens in this guide are simulated. Actual displays may be different.
Depend on the different software version on your E430x, You may get different
screens with same tasks.
Unless specified otherwise, all instructions to perform tasks in this guide
assume that you are starting from the home screen.
Page 2

I
Before starting to use E430x
1) Charge the Battery
The battery in your new E430x series device is not charged yet. Please charge with
the bundled USB cable before your first use.
Caution! Please don’t remove the battery pack or try to take this PDA apart
while the E430x is charging. These actions will result in some damages and may
invalidate your warranty.
2) Select the RF functions that you want
E430x Series can support diverse Internet bandwidth quickly. Using data services
while roaming will be costly. Before using E430x series products supporting 3G
function, we strongly recommend that you double check your current data plan or
call your mobile operator for your data rates.
3) Some important legal information to E430x user
To the maximum extent permitted by applicable law, in no event shall Winmate or
its affiliates be liable to you, any user, or third party for any indirect, special,
consequential, incidental or punitive damages of any kind, arising in contract, tort,
or otherwise, including, but not limited to, injury, loss of revenue, loss of goodwill,
loss of business opportunity, loss of data, and/or loss of profits, regardless of the
foresee ability thereof or whether Winmate or its affiliates have been advised of
the possibility of such damages. And in no event shall the total liability of Winmate
or its affiliates exceed the amount received from you, regardless of the legal theory
under which the cause of action is brought. The foregoing does not affect any
statutory rights which may not be disclaimed.
Note: Certain apps and features may not be available in all countries.
Page 3
II
E430x Outlook
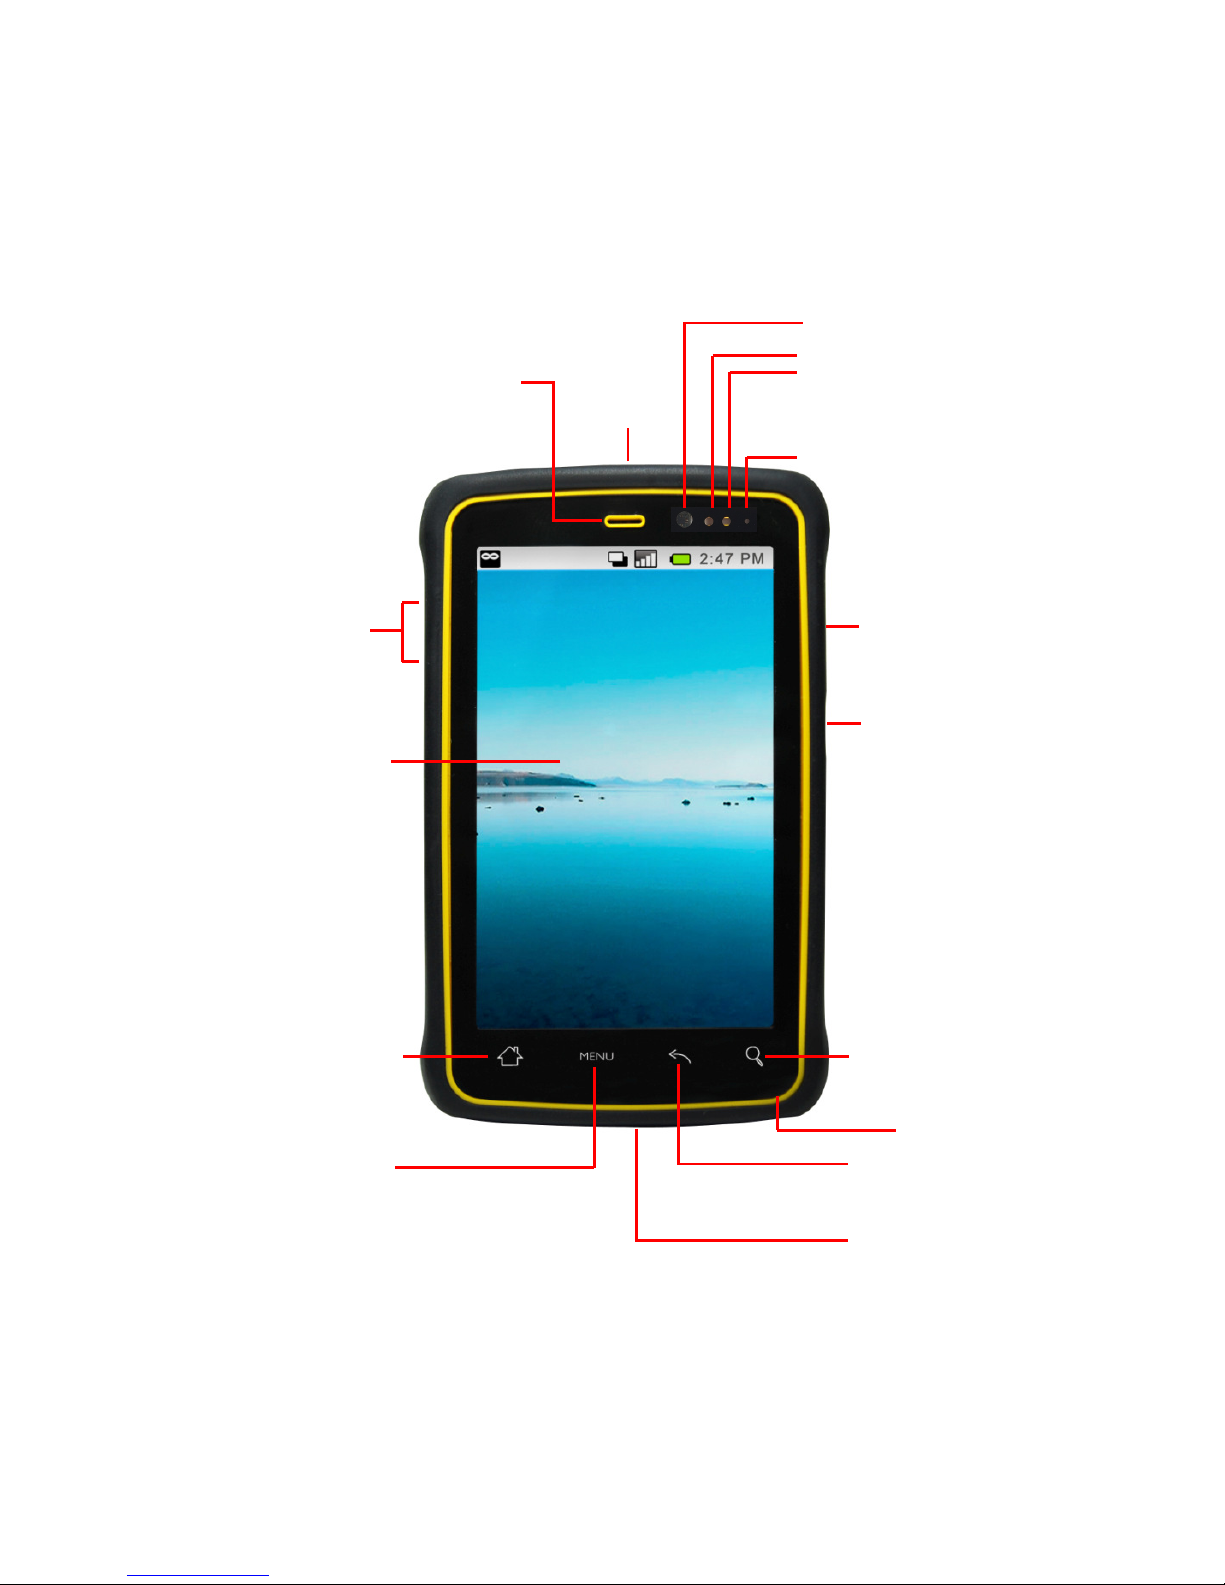
Front View
Volume
VolumeVolume
Volume
Adjustment
AdjustmentAdjustment
Adjustment
Power
PowerPower
Power
::::
Press = sleep
hold = power On/Off
Mute
MuteMute
Mute
3.5 mm
3.5 mm3.5 mm
3.5 mm
HHHHeadset
eadseteadset
eadset
2M Pixels
2M Pixels 2M Pixels
2M Pixels
We
WeWe
We
bcam
bcambcam
bcam
Proximity
Proximity Proximity
Proximity &
& &
& Light Sensor
Light SensorLight Sensor
Light Sensor
LED indicator
LED indicator LED indicator
LED indicator
Earpiece
EarpieceEarpiece
Earpiece
4.3” Touch Screen
4.3” Touch Screen4.3” Touch Screen
4.3” Touch Screen
Home
HomeHome
Home
Menu
MenuMenu
Menu
Back
BackBack
Back
Search
SearchSearch
Search
Micro USB
Micro USBMicro USB
Micro USB
Microphone
MicrophoneMicrophone
Microphone
Page 4

III
Back View
LED
LEDLED
LED Flash
Flash Flash
Flash
5M Pixels Cam
5M Pixels Cam5M Pixels Cam
5M Pixels Camera
eraera
era
Page 5

C
ONTENTS INDEX
Set up & Go ............................................................................... 1
Power On/Off ............................................................................ 5
Touch Screen and keys............................................................... 6
Home Screen & Status............................................................. 11
Set up Language ...................................................................... 15
Set up Date & Time ................................................................. 15
Internet Connection ................................................................ 16
Bluetooth................................................................................. 20
App Menu................................................................................ 22
Software Update...................................................................... 24
Text entry................................................................................. 25
Messaging................................................................................ 26
Camera .................................................................................... 27
Photo & Video ......................................................................... 30
Page 6

1
S
ET UP & GO
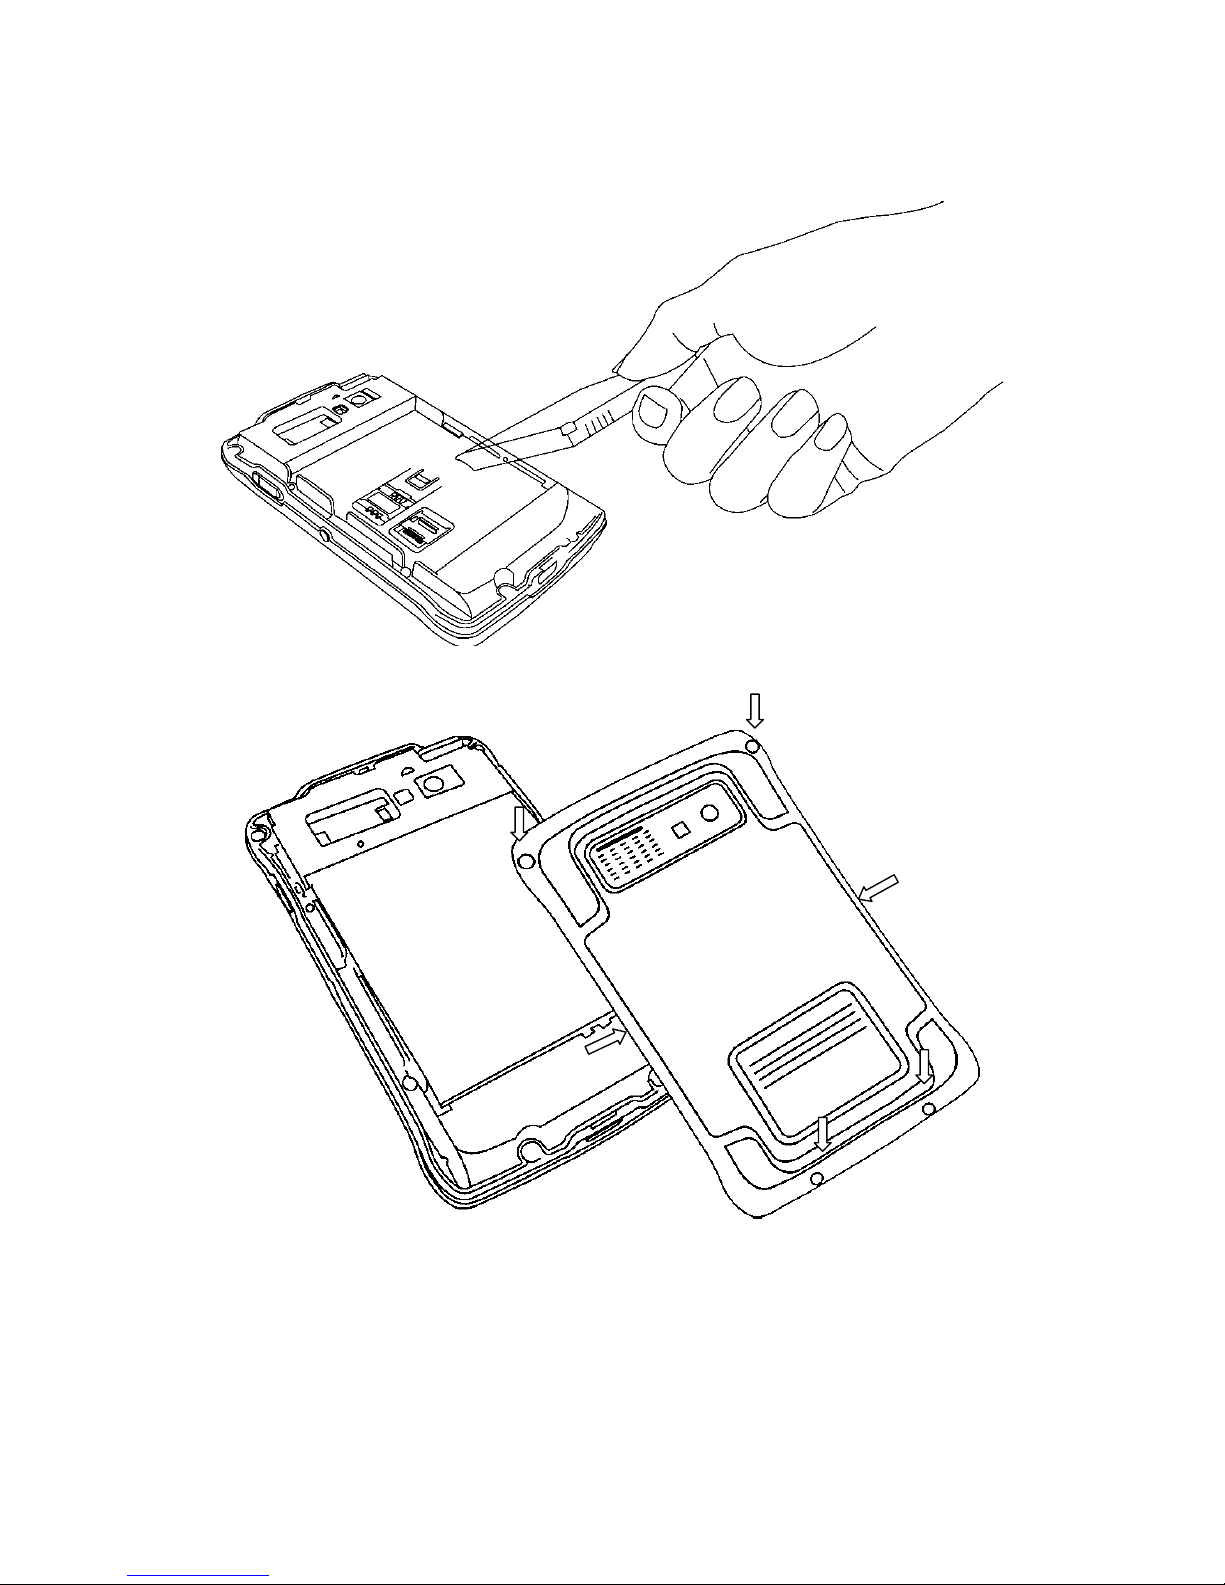
Before you remove the back cover, make sure the E430x is power
off.
1. Make the E430x facing down, and then unscrew the screws of E430x.
2. Gently pull E430x out of its back cover.
3. Pull the plastic strap, and then remove the battery.
Page 7

2
4. Insert the SIM card (with its gold contacts facing down and cut-off corner facing
out) all the way into the SIM card slot.
Caution! Please make sure you have removed both the battery and USB cable
while inserting SIM card.
5. Push the metal cover backward and lift the metal cover. Then put the SD card into
the socket, close the metal cover and push forward till click sound.
Page 8
3
6. Reinsert the battery.
7. Fix the back cover with screws.
Page 9

4
8. Use the bundled power adapter and USB cable to charge E430x for 4hrs.
Note: This product uses a non-removable battery. The battery should only be
removed when you want to changed SD card or SIM card.
Page 10

5
P
OWER ON
/O
FF
To turn on your E430x:
Press and hold Power button about 1 second. You can feel a slight vibration
when your E430x series PDA is turned on.
Drag the from left to right to un-lock the screen.
To turn off your E430x:
Press and hold Power button till the following window show up.
Tap Power off, and then touch OK.
You can also force the system to shutdown anytime by holding the Power
button about 8 seconds.
Page 11

6
T
OUCH SCREEN AND KEYS
Display & Touch Screen On/Off
To save battery power, press the Power button to have the display & touch
screen off and to force your E430x enter sleep mode.
You can also have your E430x goes to sleep automatically by touching:
> Settings > Display > Screen timeout.
To wake up your E430x, just press Power button again and drag from left to
right to unlock the screen.
Note:
When you hold E430x close to ear during voice transmit, the touch sensor
enters sleep mode automatically to prevent accidental touches.
Your touch screen might stay dark if the Proximity & Light sensor is covered.
Don't use covers or screen protectors (even clear ones) that cover this sensor.
Proximity & Light Sensor
Page 12

7
Adjust Screen Brightness
Find it: > Settings > Display Settings > Brightness
Here you can see a brightness adjustment bar.
Drag the slider to left to decrease or to right to increase the screen brightness.
Press OK to finish your settings.
You can also have your E430x adjust its display brightness automatically by
tapping on Automatic Brightness above the brightness adjustment bar.
Rotate the screen
Your E430x can rotate its display automatically to stay right-side up while changing
the screen orientation.
Find it: > Settings > Display > Auto-rotate screen
Page 13

8
Touch Tips
One Touch: Choose an icon or option
Press and Hold: Show options
Drag: Scroll or move slowly
Flick: Scroll or move quickly
Zoom: Pinch the screen with two fingers apart or together to zoom in or out
on Google Maps™, web pages or photos.
Slide two fingers apart
or together to zoom in
or out.
Drag or flick to scroll.
Touch & hold to show options.
Page 14

9
Capacitive Touch Keys
Home Menu Back Search
Touch to close any menu or app and return to home screen.
Or touch and hold on home screen to find the latest apps used.
Touch to open menu options.
Touch to return to the previous page.
Touch for text search, or touch and hold for voice search.
Touch here to enter text
Page 15

10
Power Key Menu
Press and hold Power Button for 3 seconds to open
the power key menu, where you can:
Mute the PDA from “Silent mode”
Turn off all wireless functions, including the
call function, data services, Bluetooth, and
Wi-Fi from “Airplane mode”
Turn off your E430x from “Power off”
Adjust Volume
Press the volume keys to adjust:
Ringer volume
- on the home screen
Earpiece volume
- during a call
Media volume
- when playing music or video files,
Mute
Press Mute key to turn off your E430x audio function.
To cancel the mute function, just need to press Mute
key again.
Page 16

11
H
OME SCREEN & STATUS
Home Screen
Home screen gives you all your latest information in one place. It is the screen you
can see when you turn on E430x or touch from a menu.
Home screen also provides a space where you can personalize your E430x by setting
different wallpaper or having shortcuts of the apps frequently used.
Status Bar
Shortcuts
Touch to open
Widget
Touch to use
Touch to open the app menu
Notification:
Drag this bar down to see details.
Flick left or right to see more panels or
widgets
Page 17

12
Add to Home Screen
You can personalize your Home screen by changing wallpaper or adding some
frequently-used shortcuts and widgets.
To change your wall paper:
Touch and hold home screen to open the Add to Home Screen list.
Tap Wallpapers and select a wallpaper source.
Select the wallpaper you like, and touch Set Wallpaper to finish your settings.
To add a shortcut / widget / folder to your home screen:
Touch and hold home screen to open the Add to Home Screen list.
Touch the type you like on Add to Home Screen list to open the details list.
Tap the one you are going to add to home screen.
The item you have chosen will show up at the home screen. The setting is done.
Page 18

13
You can also add a shortcut from the App Menu.
Touch to open the App list.
Find the App you are going to set, then touch and hold the App icon.
The display will return to home screen with the new shortcut you just set.
To remove a shortcut from Home screen:
Touch and hold the shortcut icon on your home screen.
You can find a trash can icon show up on the bottom of your home screen.
Drag the shortcut to the trash can icon, and the shortcut will be deleted.
Page 19

14
Status & Notifications
Icons at the top of the screen notify you about messages and E430x status. To view
your notifications, touch the status bar and drag it down. Touch a notification to see
details.
The table shows different icon’s meanings.
Page 20

15
S
ET UP LANGUAGE
Your E430x series PDA support diverse languages. You can find a language list from:
Find it: > Settings > Language & Keyboard > Select Language
Select the language you like.
The screen will return to Language & Keyboard Settings menu. The language
setting is done.
S
ET UP DATE & TIME
You can set the time manually or have it set up automatically.
Find it: > Settings > Date & Time
To set up the date and time manually:
Tap on Set Date, choose the right values of Month / Date / Year, and touch Set
to finish your setting.
Tap on Set Time to adjust time and touch Set to finish your setting.
You can also set up time with network-provided values by tapping on Automatic.
Adjust Time Manually Adjust Time Automatically
Page 21

16
I
NTERNET CONNECTION
Your E430x can access the Internet with WiFi connection or Data Connection.
WiFi Connection:
To turn on WiFi function and scan available networks:
Find it: > Settings > Wireless & Networks > WiFi.
When your E430x is connected to the network, the Wi-Fi connected indicator
appears in the status bar.
To set up your WiFi connection:
Find it: > Settings > Wireless & Networks > WiFi settings.
Touch WiFi to turn on WiFi function and to start scanning available networks.
If WiFi is already on, you should be able to see a list of networks within range.
Choose the network you are going to connect. If necessary, enter Network SSID,
Security and Wireless password.
Touch Connect to finish your WiFi connection settings.
Available networks
Page 22

17
Note: To extend battery life, turn off Wi-Fi power when not in use.
Note: Wi-Fi is mostly used in indoor environment. If you often need to access the
Internet outdoor, we strongly recommend that you choose the E430x series
model with 3G function.
Data Connection:
To turn on 3G function:
Find it: > Settings > Wireless & Network Settings > Mobile Networks
To check the Data connection you are using:
Find it: > Settings > Wireless & Network Settings > Mobile Networks
Settings > Access Point Names
Caution! As 3G module is an advanced option for E430x series PDA, before
accessing data connection, please make sure your E430x is built-in with 3G module.
Note: If your E430x supports 3G services, we strongly recommended that you
purchase a 3G service that meets your needs in local area. Contact your local 3G
service provider for details.
Data Roaming
When your E430x is out of your mobile operator’s service area, you can still connect
to the operator’s partner’s network with Data Roaming function.
Find it: > Settings > Wireless & Network Settings > Mobile Networks
Settings > Data Roaming
Caution! Using data services while roaming will be costly. Check with your mobile
operator for data roaming rates before you use data roaming.
Page 23

18
Share your internet access to other Devices
You can share your E430x PDA’s mobile data connection via USB or as a portable
Wi-Fi hotspot to provide convenient Internet access to other Wi-Fi enabled devices.
Caution! This application significantly impacts battery life. You may want to run
this application with the charger connected.
Note: You need to subscribe to Wi-Fi hotspot service to use this feature. Contact
your service provider for details.
To share your mobile internet connection by using a USB cable, tether your E430x
PDA to computer or WiFi enabled device with a USB cable and follow the procedure:
Find it: > Settings > Wireless & networks > Tethering & Portable Hotspot
> USB Tethering
Note: Tethering works with Windows Vista, Windows 7, and Linux. For other OSs,
please refer to Android website
To make your PDA a Portable WiFi Hotspot:
Find it: > Settings > Wireless & networks > Tethering & Portable Hotspot
> Portable WiFi Hotspot Settings
Touch Portable WiFi Hotspot to activate the hotspot.
Touch Configure mobile hotspot to change hotspot security and configuration
settings:
• Network SSID—Enter a unique name for your hotspot
• Security—Select the type of security you want. If necessary, enter a unique
password and touch Save to finish your settings.
Note: To protect your phone and hotspot from unauthorized access, it is strongly
recommended that you set up hotspot Security (WPA2 is the most secure). Other
users can access your Wi-Fi hotspot only if they enter the correct password.
Page 24

19
When your Wi-Fi hotspot is active, other Wi-Fi enabled devices can go through
your E430x PDA to access the internet by entering the hotspot's SSID, selecting
a Security type, and entering the correct password.
Note: When your PDA is serving as a WiFi hotspot, you can’t use your PDA’s
applications to access the internet via its WiFi connection
Page 25

20
B
LUETOOTH
To turn on Bluetooth function and scan available devices:
Find it: > Settings > Wireless & Networks > Bluetooth
To set up your Bluetooth connection:
Find it: > Settings > Wireless & Networks
> Bluetooth settings.
Make sure your Bluetooth function is turned on.
If not, turn on it by tapping Bluetooth.
To change the device name, touch Device Name,
enter new name you like, and touch Save to finish
your setting.
Connect new devices
Note: This feature requires an optional accessory. To connect with a new device, you
need to pair with it. You only need to do this once for each device—to connect again,
just turn on the device.
Make sure the device you are pairing with is in
discoverable mode.
Note: Refer to the guide that came with the
device for details.
Touch > Settings > Wireless & networks
> Bluetooth settings.
Touch Bluetooth to turn on and scan.
If Bluetooth power is already on, touch
Scan for devices.
You can see a Bluetooth device list. Touch a
device to connect.
Page 26

21
If necessary, touch OK, or enter the device passkey (like 0000) to connect to the
device.
When the device is connected, the Bluetooth connected indicator appears in the
status bar.
Note: Using a mobile device or accessory while driving may cause distraction and
may be illegal. Always obey the laws and drive safely.
Reconnect devices
To automatically reconnect your E430x with a paired device, simply turn the device
on.
To manually reconnect your E430x with a paired device, touch the device name
under the Bluetooth devices list.
Disconnect devices
To automatically disconnect your E430x from a paired device, simply turn the device
off.
To manually disconnect your E430x from a paired device, touch the device name in
the devices list, and then touch OK.
Note: To extend battery life, turn off Bluetooth power when not in use.
Page 27

22
A
PP MENU
Tap on to enter App Menu and see all available apps. When the App list is
longer than one page, just swipe up/down to see more items.
Recent Apps
Your E430x remembers the Apps that you used
most recently.
From the home screen, touch and hold
to show the most recent apps used.
Page 28

23
Manage & Restore Apps
From the home screen, touch > Manage apps.
To uninstall the Apps you have downloaded:
Switch to Downloaded tab
Touch the app you are going to uninstall
Touch Uninstall to finish your settings.
Page 29

24
S
OFTWARE UPDATE
You can update the latest E430x software using your computer:
On your computer, go to www.winmate.com.tw, find your E430x product webpage,
and check the "Download Center" links. If an update is available, follow the
installation instructions listed as below.
Download the update file and copy the file into Micro SD card in E430x
Reboot your E430x.
This might take a few minutes. Please wait till system boot successfully.
Erase the update file from the SD card in your E430x series PDA.
Note: Before updating your E430x series PDA, please backup your personal data. The
data may be damaged or erased during update process.
Page 30

25
T
EXT ENTRY
Touchscreen keypad
You can open a keypad on your screen by touching a text box.
To close the keypad, touch .
Text input settings
Find it: > Settings > Language & keyboard
To edit your dictionary, touch User dictionary.
To change the language and the style for your touchscreen keypad, touch Select
Language.
To change set up your onscreen keyboard settings, touch Android Keyboard.
To select an input method, you have two ways to do this setting:
1. From Language & keyboard list, simply touch Select Input Method and
select a method from the list.
2. From text entry area:
Touch and hold a text entry area on the screen to open the Input
method menu.
Touch Input method, and select the method you want.
Shift
Delete
Enter
Open a keypad for
numbers & symbols.
Space
Page 31

26
M
ESSAGING
To create a new message:
Find it: > SMS/MMS> Compose new message
Tap to add people from your contact list,
or touch To and type keyword to search a known
contact.
Touch Type to Compose and enter the message
content.
Tap Send to send out the message.
To read & reply a messages
Find it: > SMS/MMS > Message box
To open a message and the message history with the same contact, simply
touch the name of your SMS/MMS list.
To reply the message, touch the text box at the
bottom of the screen, enter your response, and
tap Send to finish the message delivery.
To see more options for message edit, touch
and hold a message in the conversation history
to open Message options list.
Note: Message box shows all of your messages together—text, email and social
networking messages. To show only one type of message, touch a message type
instead of Message box.
Touch here to search a contact
Touch here to enter texts
Page 32

27
C
AMERA
E430x Series PDA supports dual built-in cameras which can be used for taking
pictures or recording video clips.
Face Camera at the front side:
Main Camera at the rear side:
Note: Your E430x PDA built-in camera supports rotation function. When you turn
your E430x PDA to 90 degree (left or right), the preview screen display will rotate
accordingly. This function is not eliminated by your display settings.
2 Mega-Pixel Webcam
5 Mega-Pixel Camera
LED Flash
Page 33

28
Take Photos
To take photos, open the Camera App:
Find it: > Camera
Caution! Before opening the Camera App, please make sure:
The Micro SD card has been inserted.
Your E430x series PDA is not connecting with a USB cable.
Well using the onscreen control helps take good photos.
You can tap to switch from photo mode to video mode. To switch back to
photo mode, tap under video mode.
Tap to switch between the rear main camera and front webcam.
Tap to switch between different flash mode:
Flash Off
Flash On
Auto Flash
Previous saved pictures
Preview Screen
Focus
- Touch the preview screen to
decide the focus you like.
Switch Front / Rear Cameras
Switch Photo / Video Modes
Camera shutter
Switch Flash Mode
Special Effect Options
Evaluated available
capacity for photos
Page 34

29
Tap to change different photo effects. You can tell the difference from
your preview screen.
You can also change the photo’s focus by touch the preview screen. The green
square will move with your touch and mark the focus of this picture.
There are some advanced settings available under photo mode:
When you are ready to take pictures, touch to have a shut.
Record Videos
To record video clips, open the Camera App:
Find it: > Camera >
Caution! Before opening the Camera App, please make sure:
The Micro SD card has been inserted.
Your E430x series PDA is not connecting with a USB cable.
Zoom Flash White Store Capture EV
Setting Modes Balance Location Mode Values
Switch Photo / Video Modes
Switch Front / Rear Cameras
Previous saved videos
LED Light On/Off
Preview Screen
Evaluated available
capacity for videos
Special Effect Options
Recording Button
Page 35

30
Well use the onscreen controls helps record great video clips.
You can tap to switch from video mode to photo mode. To switch back to
video mode, tap under photo mode.
Tap to switch between the rear main camera and front webcam.
Tap to turn on / off the LED light while recording videos:
LED off
LED On
Tap to change different special effects. You can tell the difference from
your preview screen.
There are some advanced settings available under video mode:
When you are ready to take videos, touch to start recording.
To stop recording, simply need to touch again.
P
HOTO & VIDEO
The taken photos and recorded video clips will be restored in the Micro SD card. To
review these files, please check:
Find it: > Gallery
Touch a folder to see the photos/videos under this folder.
Tap to open the file you are going to review.
Swipe right or left on the display to check the previous/next photo or video file.
Zoom White Capture EV
Setting Balance Mode Values
 Loading...