

Wireless Contact FM.A
Operating instructions
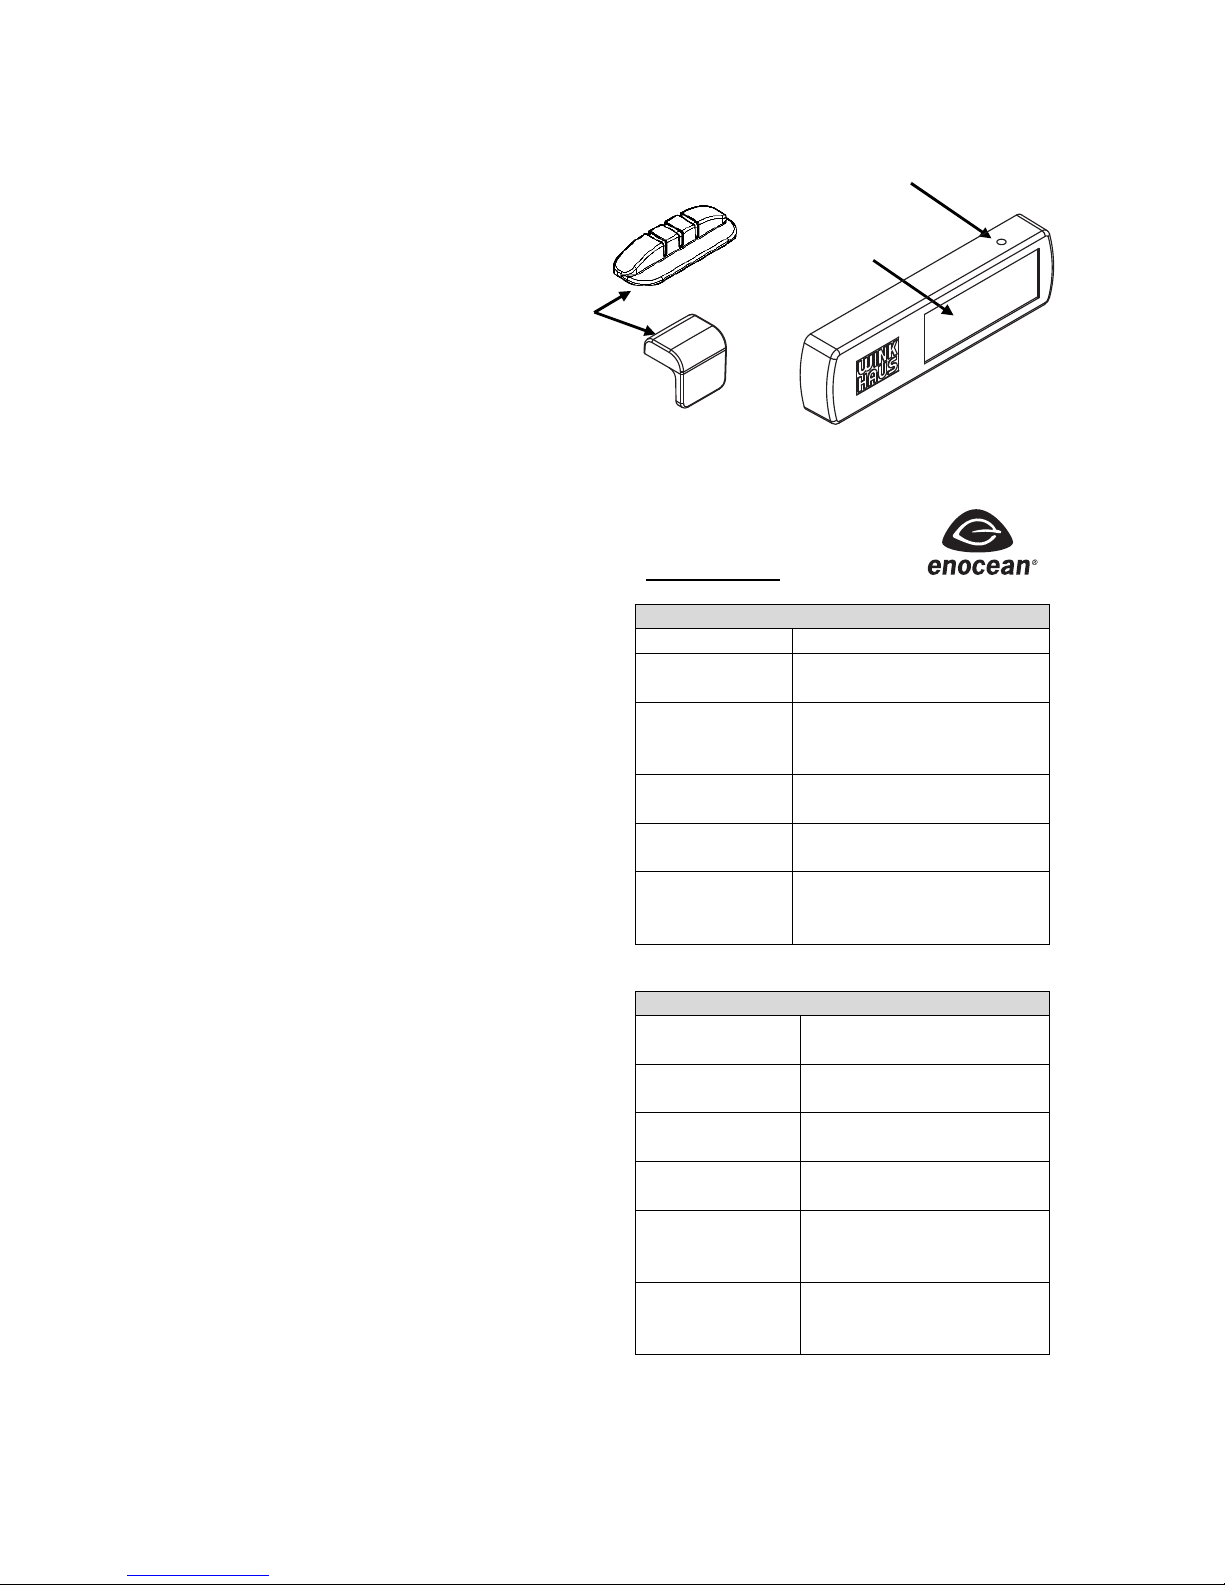
1. Product description
The FM.A wireless contact is a visible,
energy self-sufficient radio contact, which
is fixed to the window. It is visibly installed
on the window frame, enabling detection
of opening and closing procedures of a
window in combination with a magnet
attached to the sash. After the teaching
process the signal is wirelessly transmitted
to a subsequent EnOcean-compatible
component or a subsequent EnOceancompatible smart home system, using an
EnOcean radio protocol.
A possible application of the sensor is
heating control. In combination with
suitable heater actuators it is possible to
turn the heating down and hence to save
energy when the window is open. Further
solutions include the connection of a relay,
e. g. to activate or deactivate air conditioners or ventilation systems. It is also
possible to control the window by means
of appropriate alarm sensors and control
centres.
2. Scope of delivery
1 x Wireless contact FM.A
2 x Contactor FM.A
2 x Adhesive pad for radio contact FM.A
2 x Adhsesive pad for contactor FM.A
1 x Operating instructions
3. Product information
Technical data
General data
Designation Wireless contact FM.A
Operating
temperature
0 °C up to +60 °C
Suitable for Windows and doors
made of PVC-U, timber
or aluminium
Air moisture 0 % – 93 % relative
humidity, non-condensing
Protection
type
IP 30
Storage and
transport
conditions
+10 °C up to +30 °C,
< 60 % relative humidity,
non-condensing
Mechanical data
Dimensions
sensor W/H/D
70 x 9 x 20 mm
Universal
magnet W/H/D
14 x 5.0 x 15 mm
32 x 5.2 x 11 mm
Material
(housing)
Polyamide
Fixing type Adhesive bonding to
plane surface
Max. distance
of magnet to
radio contact
approx. 5 mm
Fixing place Window or door frame in
well-lit places
Magnets
Teaching
button
Solar module

Electrical data
Power supply Solar-powered energy
storage
Service life in
darkness
Usually approx. 90h at
25°C in complete
darkness, up to 6 days
(144 h) if fully charged
Communication
Radio EnOcean, unidirectional
Radio protocol EnOcean Equipment
Profile (EEP), D5-00-01
Frequency
Output (typ.)
868.3 MHz
5,7 dBm @ 50 Ohm
Typical ranges
Standard
values in
buildings
under
optimum
conditions
Plasterboard/timber
30m through max. 5 walls
Masonry
20m through max. 3 walls
Ferroconcrete
10m through max. 1 wall
4. Dimensions
5. Start-up
Before the start-up
These mounting instructions include the
installation and the teaching procedure of
Winkhaus wireless contacts on a window
or patio door. Every person in charge of
installation must have read and understood these mounting instructions.
During installation and use it is important
to protect the wireless contact from heavy
shocks, as it may be damaged.
The wireless contact FM.A is not suitable
for outdoor use and in humid environment.
Preparation
The wireless contact FM.A is delivered
ready for use, but the energy storage
might be empty if it was stored for a long
period. The energy storage is refilled
automatically with the aid of the solar cell
in daylight. If the wireless contact FM.A
does not react to the teaching procedure,
it should be charged in a bright place for a
few hours. (The contact must not be
exposed to direct solar radiation).
Teaching procedure
In order to make rational use of the
wireless contact it is necessary to teach it
in with a compatible smart home system or
another compatible component (e. g. EnOcean-compatible relays, actuators etc).
Step 1: Activate the teaching mode
For starting the teaching procedure you
first need to switch the smart home system
or the subsequent component into the
teaching mode. (How this is done you can
learn from the operating instructions of the
smart home system or the subsequent
component.)

Step 2: Teaching
Now put the wireless contact FM.A into the
teaching mode. To this effect press the
teaching button by means of a
straightened paper clip.
Now the wireless contact FM.A has been
taught in.
The wireless contact FM.A supports the
following Equipment Profile (EEP):
D5-00-01 (1BS telegram)
This radio telegram transmits the states:
open/ closed.
Installation
The wireless contact is suited for
installation into windows and doors made
of PVC-U, timber or aluminium. The
following section describes the installation
of a radio contact into a turn-tilt window.
Installation into a door is performed in the
same way.
Step 1: Choose mounting place
The perfect place for attaching the radio
contact is at the upper area of the
window’s drive side. In this position the tilt
as well as the turn position of the sash is
indicated as “open” (see positioning area 1
in the illustration below).
If the tilt position of the window is not
indicated as “open” but “closed”, the radio
contact should be installed in a horizontal
position at the bottom (see positioning
area 2).
Please note:
Please observe that the indicated areas
are not suitable for installation of the radio
contact FM.A because either the opening
of the window may cause damage of the
radio contact FM.A or the detection of the
window’s opening may be very unprecise.
Step 2: Mounting the wireless contact and
magnet
The installation position of the magnet and
the radio contact FM.A may vary according
to the window model. The following
illustration shows basic installation
positions with the help of the example of
the upper window corner at the handle
side.
Teaching
button
2

If the sash overlap height is bigger than 19
mm (which is frequently the case with
PVC-U and timber windows), the magnet
and the wireless contact should be
mounted in a way that the magnet is
positioned in front of the wireless contact
(first illustration).
If the sash overlap is smaller than 19 mm
(which is frequently the case with
aluminium windows), the magnet and the
radio contact should be positioned one
below the other (third illustration).
During installation please make sure to
locate the magnet in front of or below the
contact surface (line mark below the
sensor, see illustration) of the radio
contact.
For fixing the magnet please use the
attached adhesive pads. Attach one pad
beneath the smooth surface of the
magnet. Then fix the magnet to the
mounting position on the window.
For fixing the FM.A radio contact use the
two large adhesive pads. Stick them
beneath the ground of the radio contact
FM.A. After that fix the wireless contact
FM.A to the mounting position on the
window.
Step 6: Functional test
After the installation we recommend you to
perform a functions test. Open the window
and verify whether the smart home system
or the subsequent component responds to
the opening of the window. If there is no
response, use the section 7 (possible
sources of error) of these instructions to
solve the problem.
19-25
22
10-19
26
Contact
surface

6. Maintenance and cleaning
Check window adjustment
In the life of a window influences like wear,
heat and cold may induce a misalignment
of the window fitting. For this reason
window fittings should be controlled and
maintained on an annual basis. On this
occasion, additionally check whether the
distance between the magnet and the
wireless contact is large enough (min.
1 mm, max. 5 mm). If the distance is too
small or the two components collide, the
window fitting must be adjusted in order to
avoid damage to the wireless contact or
the magnet (see illustration Step 2:
Mounting wireless contact and magnets).
Cleaning
Normally cleaning of the radio contact is
not necessary. However, if you wish to
clean its surface, you can use a dry and
soft cloth. Heavy soiling can be removed
by means of a cloth dampened with
lukewarm water.
Please do not use any aggressive or
solvent-containing detergents damaging
the plastic surface of the housing.
7. Possible sources of error
The following section enumerates the
most frequent sources of error of nonfunctioning of the radio contact.
Empty energy storage
It is possible that the energy storage of the
FM.A radio contact is empty due to a long
period of storage in darkness. The energy
storage refills automatically in daylight. If
the wireless contact FM.A does not react
to the teaching procedure, it should be left
in a bright place for a few hours.
(Attention: do not expose to direct solar
radiation.)
Check the radio protocol
If several attempts to teach the sensor fail,
please verify whether the subsequent
device or the smart home system is
compatible with the EnOcean radio
protocol.
Repeat the teaching procedure
Repeat the teaching procedure, referring
to Step 2 of the Maintenance section.
Check the radio range
If there is no connection between the radio
contact and the subsequent component or
smart home system, you should check
whether the distance is too big, whether
there are too many obstacles between the
radio contact and the receiver or whether
there are any interference fields. The best
way to do so is to unmount the wireless
contact and check its function in close
proximity to the receiver. If it works in
proximity to the receiver, but not in the
place where it is installed, it is
recommended to use a repeater in order
to increase the radio range.
Installation
In case the sensor permanently detects an
open window (which however is closed)
although the teaching procedure was
performed correctly, this may have the
following reasons:
• There is no magnet.
• The magnet is not correctly
positioned on the sensor surface.

If there is no magnet, it must be attached
in order to restore the function.
If there is a magnet, please verify whether
the magnet is in its correct position on the
sensor surface and whether the distance
between the radio contact and the magnet
is o.k. (must not exceed 5 mm). Should the
distance be too big, you can improve the
position of the magnet by means of the
adjustment screws of the fitting system. If
this is not successful, restart positioning
the sensor and the magnet (When
adjusting the window fitting, please
observe the maintenance and adjustment
instructions of the window fittings
manufacturer in question.)
8. Declaration of conformity
This product complies
with the basic
requirements and
instructions of the R&TTE
guideline 1999/5/EG.
You can download the declaration of
conformity in the download section on the
internet at www.winkhaus.de.
9. Disposal information
FM wireless contacts include
elements treated as electronic
waste and thus must not be
disposed of with the normal
household waste. The housing
is made of recyclable plastic material.
When disposing of waste, please observe
the locally-valid rules and laws.
10. All rights reserved
The following information and illustrations
reflect the current state of our
development and manufacturing of this
product. In order to achieve customer
satisfaction and reliability of the wireless
contacts we reserve the right to change
the product. Any information given in this
document has been compiled and verified
with the greatest care. Due to the constant
technical progress, changes in legislation
and other inevitable changes, we cannot
accept any responsibility for the accuracy
and completeness of the contents. We are
always thankful for suggestions and
comments.
11. Copyright
© Aug. Winkhaus GmbH & Co. KG, all
rights and modifications reserved
Current version: FT - 09/2017
www.winkhaus.de
 Loading...