

Page 1

PlasmaWave
™
True HEPA Air Cleaner
CUSTOMER SERVICE
Mail requests or comments to:
Winix Inc.
2500 W. Higgins Rd. Suite 610
Hoffman Estates, IL 60195
Please be sure to specify a model number.
Tel: 1.847.781.9991
Fax: 1.847.781.9992
Toll Free: 1-877-MY-WINIX (699-4649)
Email: info@winixinc.com
Website: www.winixinc.com
Please visit our website or contact us to purchase
a Winix Replacement Filter Cassette.
NOTE: IF YOU EXPERIENCE A PROBLEM, PLEASE
CONTACT CUSTOMER SERVICE. REFER TO YOUR
WARRANTY. DEFECTIVE UNITS SHOULD BE
RETURNED TO THE PLACE WHERE ORIGINALLY
PURCHASED. DO NOT ATTEMPT TO REPAIR THE
APPLIANCE YOURSELF. DO NOT OPEN THE MOTOR HOUSING; DOING SO WILL VOID YOUR WARRANTY AND MAY RESULT IN GREATER DAMAGE
TO THE AIR CLEANER OR PERSONAL INJURY.
© WINIX INC.
32
Page 2
™
PlasmaWave
True HEPA Air Cleaner
Operator’s Manual
WAC-9000
CAUTION:
Read and follow all
safety rules and instructions
before operating this equipment.
Español: p. 16
WAC-9000S
Page 3

TABLE OF CONTENTS
Warranty......................................................2
Package Contents......................................2
Safety Instructions......................................3
Product Specications................................4
Air Cleaner Features...............................4-5
Air Cleaner Set-Up.....................................6
Display Panel..............................................7
Operation................................................8-9
Remote Control....................................10-11
Care and Maintenance........................12-14
Troubleshooting........................................15
WARRANTY
ONE YEAR LIMITED WARRANTY ON WINIX PLASMAWAVE™ AIR CLEANER
If this air cleaner fails due to defects in material or workmanship within one year from the
date of purchase, return it to place of purchase and you will receive a new one free of
charge.
• This warranty does not include the air cleaner’s replaceable lter cassette; that is an
expendable part that can wear out from normal use before one year expires.
• This warranty is void if this product is used for commercial or rental purposes.
• This warranty gives you specic legal rights, and you may also have other rights, which
vary from state to state.
PACKAGE CONTENTS
• Winix PlasmaWave™ Air Cleaner
• Remote Control (1 unit)
• Batteries (2 AA batteries)
• Operator's Manual
2 3
Page 4

SAFETY INSTRUCTIONS
Thank you for purchasing a Winix air
cleaner. Please read this manual carefully
before using. This product is for household
use only.
IMPORTANT CAUTIONS FOR USING
YOUR AIR CLEANER
WARNING: Follow the instructions in this
manual to reduce the risk of electric shock,
short circuit, and/or re:
• Do not repair or modify the unit unless
specically recommended in this manual.
All other repairs should be completed by
a qualied technician.
• The plug for this unit is polarized with
one blade wider than the other. Do not
force the plug into an electrical outlet.
• Do not alter the plug in any way. If the
plug does not t into the outlet, reverse
the plug. If it still does not t, contact
a qualied technician to install a
proper outlet.
• Do not use if the power cord or plug is
damaged or the connection to the wall
outlet is loose.
• Use AC 120V only.
• Do not damage, break, forcefully bend,
pull, twist, bundle, coat, pinch, or place
heavy objects on the power cord.
• Periodically remove dust from the
power plug. This will reduce the chance
that humidity will accumulate, which
increases the risk of electric shock.
• If the power plug is damaged, it must
be replaced by the manufacturer or a
qualied technician.
• Remove the power plug from the outlet
before cleaning the unit. When removing
the power plug, grasp by holding the plug
itself, never hold by the cord.
• Remove the power plug from the outlet
when the unit is not in use.
• Do not handle the power plug with
wet hands.
• Do not operate the unit when using
indoor smoke-generating insecticides.
• Do not clean unit with benzene or paint
thinner. Do not spray insecticides on
the unit.
• Do not use the unit where it is humid
or where the unit may get wet, such as
in a bathroom.
• Do not insert ngers or foreign objects
into the air intake or outlet.
• Do not use the unit near ammable
gases. Do not use near cigarettes,
incense, or other spark-creating items.
• Unit will not remove carbon monoxide
emitted from heating appliances or
other sources.
IMPORTANT INSTRUCTIONS FOR
USING YOUR AIR CLEANER
• Do not block the intake or outlet vents.
• Do not use near hot objects, such as a
stove. Do not use where the unit may
come into contact with steam.
• Do not use the unit on its side.
• Keep away from products that generate
oily residue, such as a deep fryer.
• Do not use detergent to clean the unit.
• Do not operate without a lter.
• Do not wash and reuse the True
HEPA Filter.
Page 5

PRODUCT SPECIFICATIONS
WAC-9000
Room Area Served 280 sq. ft. 210 sq. ft.
Power Supply AC 120V/60(Hz) AC 120V/60(Hz)
Power Rate Low 6W, Turbo 50W Low 6W, Turbo 50W
Fan Speed 4 Speeds 4 Speeds
Display LED Digital LED Digital
Control Type Auto/Manual Auto/Manual
Dust Sensor Yes Yes
Odor Sensor Yes Yes
Light Sensor Yes Yes
Timer 1, 4 and 8 hour(s) 1, 4 and 8 hour(s)
Sleep Mode Yes Yes
Filters 1 Replaceable Cassette 1 Replaceable Cassette
Washable Anti-Bacterial Pre-Filter
True HEPA Filter
Cleaning System
CADR
HEPA Filter True HEPA 99.99% True HEPA 99.99%
Technology PlasmaWave™ PlasmaWave™
Color Metallic Blue/Silver Pink Metallic Blue/Silver Pink
Remote Control Yes Yes
Dimensions 16.5”(W) X 9.9”(D) X 21.9”(H) 13.8”(W) X 9.1”(D) X 18.5”(H)
Weight 18.8 lbs 13.7 lbs
Washable Nano-Silver
Mesh/Carbon Filter
PlasmaWave™
182/183/194
(Smoke/Dust/Pollen)
WAC-9000S
Washable Anti-Bacterial Pre-Filter
True HEPA Filter
Washable Nano-Silver
Mesh/Carbon Filter
PlasmaWave™
142/138/145
(Smoke/Dust/Pollen)
AIR CLEANER FEATURES
NOTE: The features of your air cleaner may vary according to model.
• Ultra-Quiet Operation
This Winix air cleaner has a four speed fan with ultra-quiet operation that
is ideal for nighttime operation.
• Easy Maintenance
Winix air cleaners are simple and
economical to maintain. For optimum
performance, replace complete lter
cassette when CHANGE FILTER
indicator light is on.
• Smart Dust and Odor Sensors
The 9000 air cleaner is equipped with
digital sensors that automatically monitor
air quality. As dust or odor levels change,
fan speeds will adjust automatically.
• Simple Operation
Winix air cleaners have a remote
control and user-friendly display for your
convenience.
4 5
Page 6
• Light Sensor
Automatically activates Sleep mode
when the room is darkened, to ensure
continuously quiet and energy-efcient
operation.
• Change Filter Alert
Lets you know when it's time to replace
the complete lter cassete.
• Timer Setting
Allows you to adjust operation to your
preferences.
• Programmable Remote Control
Allows power on/off and fan speed
adjustments from anywhere in the room.
FIVE- STAGE CLEANING
Air undergoes ve separate processes
before returning, freshened and cleaned, to
the room.
• Washable Anti-Bacterial Pre- Filter
This reusable lter collects large
particles, pollen, pet hair, lint, etc.
• True HEPA Filter
Captures 99.99% of particles and
impurities as small as .3 microns.
• Nano-Silver Mesh
A shield of silver particles one billionth
of a meter in size neutralizes bacteria on
contact.
• Four-Speed Setting
From LOW for quiet, energy-efcient
operation to TURBO for the most
effective cleaning.
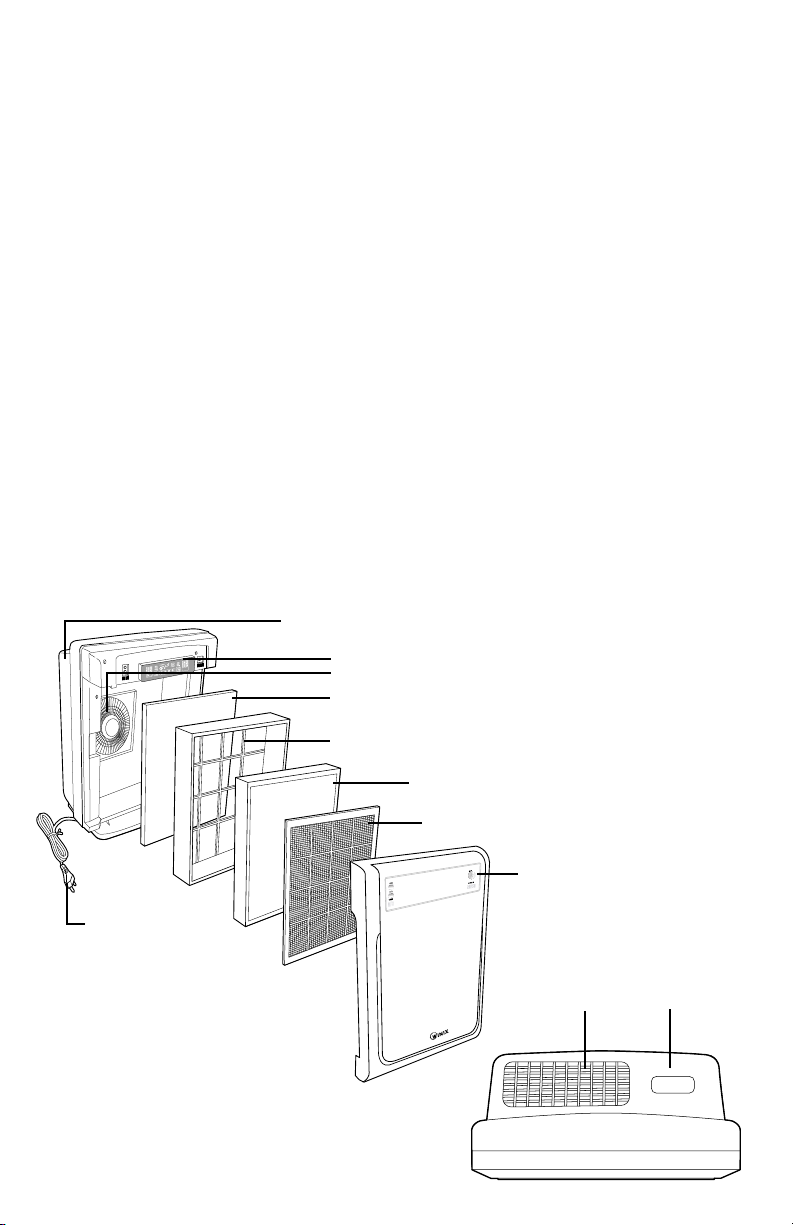
FRONT SIDE
PlasmaWave
Power Plug
• Washable Carbon Filter
This reausable activated granular carbon
effectively collects chemical vapors
and odors caused by cigarette smoke,
organic decay, and cooking.
• PlasmaWave™
In the nal stage of cleaning, Winix
PlasmaWave
both positive and negative ions to create
plasma clusters which instantly neutralize
viruses, bacteria, chemical vapors and
TM
odors in the air.
Display Panel
DC Motor
Washable Nano-Silver
Mesh/Carbon Filter
Cassette Frame
True HEPA Filter
Pre-Filter
TM
technology generates
Front Panel
Remote
Control
Air Outlet
Cradle
TOP SIDE
Page 7
AIR CLEANER SET-UP
NOTE: Follow these instructions for
best results.
• Place unit at least 7 feet from equipment
that emits electric waves such as
televisions or radios.
• Place unit at least 2 feet from the wall.
• Keep sensors away from drafty areas.
• Keep curtains away from sensors, as
they may interfere with air intake/outlet.
• Place unit on a stable surface with plenty
of air circulation.
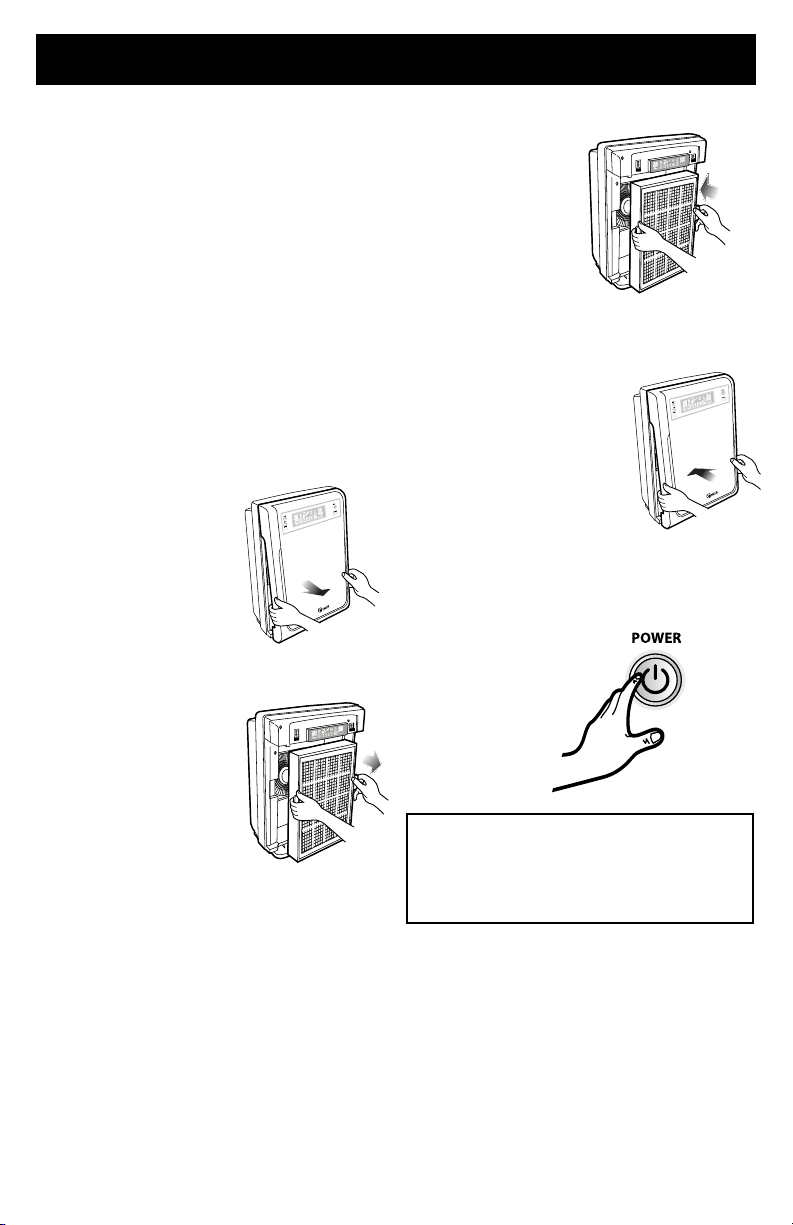
1. Remove protective lm from the
control panel.
2. Remove the front panel by grasping the
bottom outside edges and gently pulling
toward you.
3. Pull out the lter cassette by grasping
the tabs located on each side of the
lter cassette.
5. Return the lter cassette into the
main unit.
6. Replace the front panel by hooking the
front panel on the top of the unit. Swing
panel in by pushing gently until the panel
snaps into place.
7. Plug in the power cord to a wall outlet.
8. Press POWER button until short “beep”
is heard.
4. Remove the plastic wrap from the
lter cassette.
For the rst 4 minutes after turning the
unit on, the dust and odor indicators will
ash while the unit measures air quality.
6 7
Page 8

DISPLAY PANEL
1
2
3 3
4
5
1. TIMER - Press the TIMER button once
for 1 hour of operation; press the button
a second time for 4 hours; press a third
time for 8 hours. Pressing the TIMER
button a fourth time returns to the Off
Timer mode.
2. FUNCTION - Press the FUNCTION
button once to set the unit to Auto.
Continue to press the button for Sleep
> Low > Medium > High > Return
to Auto.
3. DUST & ODOR SENSORS -
Automatically monitor air quality and
adjust fan speed.
4. CHANGE FILTER INDICATOR - The
indicator will signal when to replace the
lter cassette.
5. AUTO MODE - The unit is set to
default to Automatic operation when
it is rst turned on. Smart sensors will
automatically sense the amount of
impurities in the air, and adjust the fan
speed accordingly.
6. PLASMAWAVETM INDICATOR - Turn
on the Plasma generator by pressing
the PLASMA ON/OFF button on the
remote. PlasmaWaveTM generates both
positive and negative ions to produce
hydroxyl radicals that inactivate airborn
contaminants.
6
7 10
8
9
11
12
7. LIGHT SENSOR - Automatically
activates Sleep mode when room
is darkened.
8. FAN SPEED INDICATOR - Shows
current fan speed setting.
9. SLEEP - The unit will work on Ultra-
Quiet mode and dim the control
panel lights.
10. AUTO SLEEP MODE - Use the TIMER
button on the display or remote to
manually turn the light sensor on or
off. With the light sensor on, the unit
will automatically operate in Sleep
mode when the room is dark. When the
room is light, the unit will revert to its
previous settings. Sleep mode provides
the lowest, quietest fan setting and a
dimmed display panel.
11. TIMER - Indicates timer setting or
continuous mode.
12. POWER BUTTON - Turn unit on
and off by pressing the POWER
button. Holding the button down
for 2-3 seconds turns the Plasma
generator on or off.
Page 9
OPERATION
AUTOMATIC OPERATION
The unit is set to default to Automatic
operation when it is rst turned on. The
air cleaner will automatically sense the
amount of impurities in the air, and adjust
the fan speed accordingly.
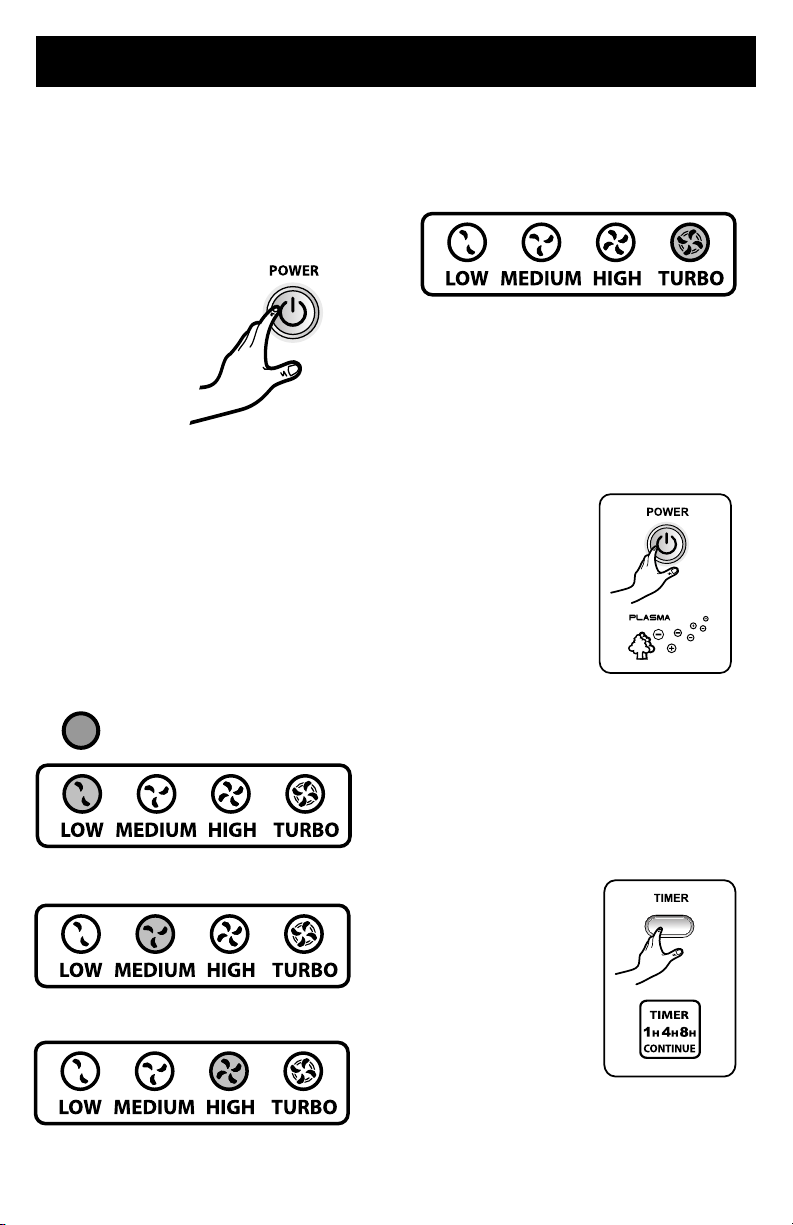
MANUAL OPERATION
After you turn on the unit, you can switch
to manual operation by using the remote
control or the FUNCTION button on
the unit.
• LOW, MEDIUM, AND HIGH
These levels are recommended for
standard daytime use. HIGH will activate
automatically when sensors detect high
levels of dust or odors.
PART IS BLINKING
LOW
• TURBO
The TURBO level, the highest fan speed,
can be activated manually for maximum
air circulation.
TURBO
• PLASMA ON/OFF
Activate PlasmaWaveTM by depressing
for 2-3 seconds the PLASMA ON/OFF
button on the remote, or the POWER
button on the unit. PlasmaWaveTM
generates positive and negative ions.
• TIMER
Set the timer for 1, 4, or 8 hours by
pressing the TIMER button on the
remote or the unit. The unit will stop
operating when the set time is up.
Cancel the timer by pressing the TIMER
button until the 1-, 4-, and 8-hour
indicator light on the unit disappears.
MEDIUM
HIGH
8 9
Page 10
• AUTO SLEEP
Use the TIMER button on the display or
remote to manually turn the light sensor
on or off. With the light sensor on, the
unit will automatically operate in Sleep
mode when the room is dark. When the
room is light, the unit will revert to its
previous settings. Sleep mode provides
the lowest, quietest fan setting and a
dimmed display panel.
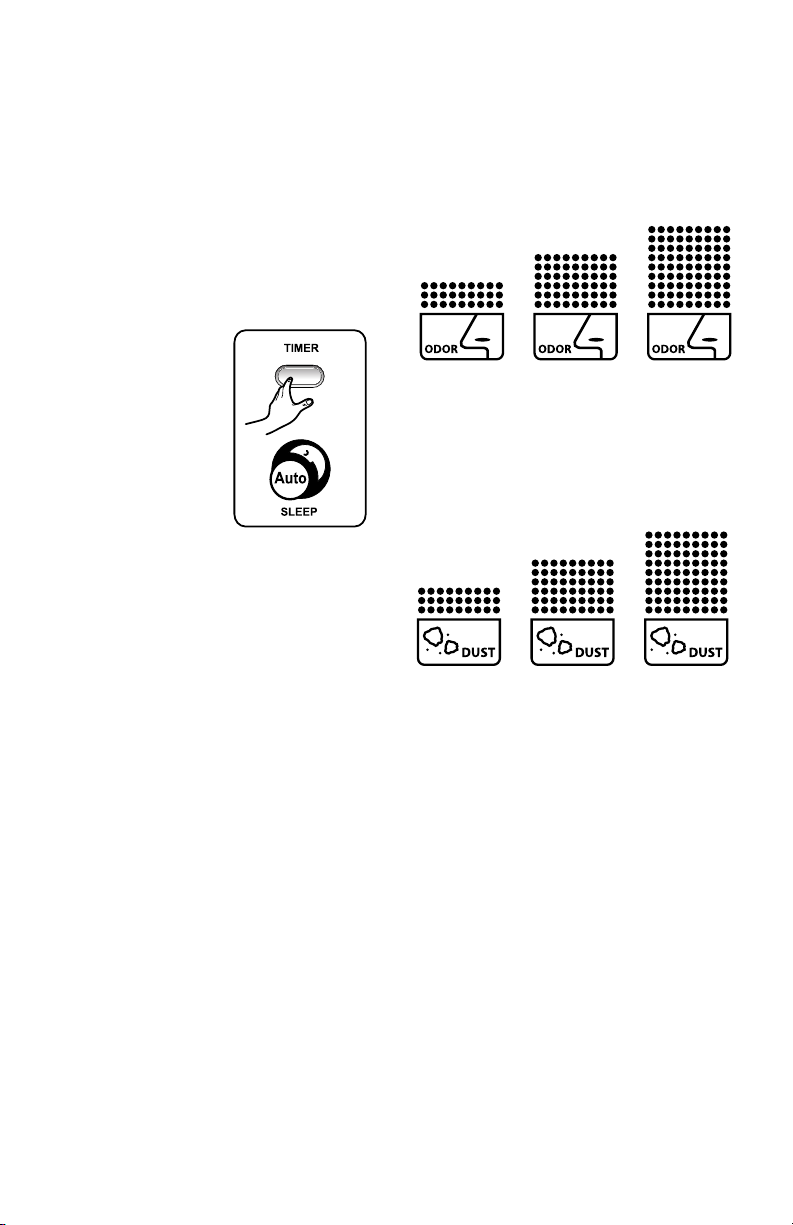
• Odor Sensor
The odor sensor responds to cigarette
smoke and pet odors, as well as other
air contaminants such as insecticides,
cosmetics, alcohol, or aerosol sprays.
DUST AND ODOR SENSORS
The dust and odor sensors show elevated
levels of air quality—green, orange, and
red. The green light indicates acceptable
dust and odor levels, the orange light
indicates high levels, and the red light
indicates very high levels. If the unit is set
on Automatic operation, it will adjust fan
speeds to compensate for increased or
decreased levels of air pollution.
LOW HIGH
MEDIUM
Indoor Odor Volume
• Dust Sensor
The dust sensor detects particles in the air
such as cigarette smoke, dust, and pollen.
LOW HIGH
MEDIUM
Indoor Dust Volume
Page 11

REMOTE CONTROL OPERATION
PREPARATION
• Press and slide the back cover of the
remote to remove.
• Insert batteries as shown.
• Close the back cover.
BATTERY USE
• The batteries for the remote control are
for initial use only. Change the batteries
when necessary.
• When replacing the batteries, replace
both at once with 2 new AA batteries.
• Incorrect battery usage may cause
battery uid leakage and/or damage.
• When not using the remote control for an
extended period of time, remove
the batteries.
• Avoid dropping or damaging the remote
control. Keep remote control away from
direct sunlight or heaters.
USING THE REMOTE CONTROL
Proper conditions
• Operate the remote control facing the
air cleaner.
• Operate within 20 feet of the air cleaner.
Poor conditions that may impair
operation
• Any location where there is inverter
lighting equipment or electronic
spontaneous lighting equipment.
• When objects or furniture are located
between remote and air cleaner.
• When air cleaner unit is located in
direct sunlight.
• In areas where uorescent lighting is
ickering due to worn out bulbs.
• POWER
Use the POWER button to turn the power
on and off. A short "beep" will sound
when you turn the unit on or off. Once
the unit is on, it will automatically switch
into Automatic operation. Turn the unit
to manual control by pressing one of the
FAN CONTROL buttons.
• TIMER
This button is used to set the timer. Press
the button repeatedly to set the unit to
run for 1, 4, or 8 hours, or to cancel. Each
time you press the button, it will advance
to the next pre-set amount of time. The
indicator light on the unit will show the
remaining amount of time. The unit will
stop operating when the set amount of
time runs out.
• FAN CONTROL
• UP
Use this button to switch from
Automatic operation and increase the
fan speed level.
• DOWN
Use this button to decrease the fan
speed level.
• TURBO
Use this button to switch from
Automatic operation and begin the
maximum amount of room cleaning
and air movement.
• AUTO SLEEP
Use the TIMER button to manually turn
the light sensor on or off. With the light
sensor on, the unit will automatically
operate in Sleep mode when the room
is dark. When the room is light, the unit
will revert to its previous settings. Sleep
mode provides the lowest, quietest fan
setting and a dimmed display panel.
• PLASMA ON/OFF
Use this button to turn the
PlasmaWaveTM generator on or off.
10 11
Page 12

PLASMA ON/OFF
button
POWER button
AUTO SLEEP
button
SLEEP button
AUTO button
TIMER button
TURBO button
FAN CONTROL buttons
NOTE: This equipment has been tested and found to comply with the limits for a Class
B digital device, pursuant to 15 of the FCC Rules. These limits are designed to provide
reasonable protection against harmful interference in a residential installation. This
equipment generates, uses, and can radiate radio frequency energy and, if not installed
and used in accordance with the instructions, may cause harmful interference to radio
communications. However, there is no guarantee that interference will not occur in a
particular installation. If this equipment does cause harmful interference to radio or
television reception, which can be determined by turning the equipment off and on, the
user is encouraged to try to correct the interference through one or more of the following
measures:
• Reorient or relocate the receiving antenna.
• Increase the distance between the equipment and receiver.
• Connect the equipment to an outlet on a circuit different from that
to which the receiver is connected.
• Consult an experienced radio/TV technician for help.
Page 13

CARE AND MAINTENANCE
CLEANING
• Clean unit as necessary by wiping with a
dry, soft cloth; for stubborn stains, use a
warm, damp cloth.
• Do not use volatile uids such as
benzene, paint thinner, or scouring
powder, as they may damage the
unit surface.
• Keep the unit dry.
• Clean the wall behind the air outlet
periodically, as it may become dirty.
Filter Cassette Replacement
The CHANGE FILTER indicator will signal
when to replace the lter cassette. The
replacement period will vary depending on
the hours of use, air quality, and location
of the unit. However, most lters in normal
use need to be replaced annually.
For your convenience, all three lters
(Washable Anti-Bacterial Pre-Filter,
True HEPA Filter, and Washable NanoSilver Mesh/Carbon Filter) come in one
pre-packaged replacement cassette.
For optimum unit efciency, wash the
Washable Anti-Bacterial Pre-Filter and
Washable Nano-Silver Mesh/Carbon Filter
as described in Filter Cleaning every three
months.
Do not wash and reuse the True HEPA
Filter—it will not work effectively.
Replacement Procedure
1. Remove the front panel by grasping the
bottom outside edges and gently pulling
toward you.
2. Pull out the lter cassette by grasping
the tabs located on each side.
3. Remove the plastic wrap from the new
lter cassette.
WARNING: Before replacing or
cleaning any lters, make sure to
remove the power plug from the
wall outlet.
12 13
Page 14

4. Place the new lter cassette in the
main unit.
5. Replace the front panel after pressing
CHANGE FILTER reset button.
2. Remove the Pre-Filter by gently pulling
one side of the cassette frame outward
while lifting the Pre-Filter tab at the same
time. When one edge is
clear of the frame, the
Pre- Filter will slide
out for cleaning.
3. Lightly vacuum the Pre-Filter and wash
with water and a mild household detergent. Rinse, and shake off excess water.
6. Plug in the power cord to a wall outlet
and turn on the unit.
Filter Cleaning
We recommend cleaning the Washable
Anti-Bacterial Pre-Filter and the Washable
Nano-Silver Mesh/Carbon Filter every
three months with normal use. The interval
between cleanings will vary based on room
conditions.
1. Remove the front panel and lter
cassette as described in Replacement
Procedure.
4. To remove the Washable Nano-Silver
Mesh/Carbon Filter, turn the cassette
over and place face-down on an even
surface. Slightly ex the cassette frame
outward while pulling up on the long
tab. When the rst corner is released,
pull out on the other long frame tab while
continuing to pull out on the lter tab.
When one long
edge of the lter
is free, slide out
for cleaning.
Page 15

5. Wash the lter in warm water with a mild
household detergent. Rinse, and shake
off excess water.
6. Do not dry the two lters—running the
unit will be sufcient to dry them.
7. Replace each lter in the cassette frame
by inserting one long edge rst, then
snapping into place by pushing sideways
and down at the same time. Make sure
both lters are completely inside the
cassette frame and secured by the short
tabs. If a lter is on top of one or more
tabs, pull outward, slightly exing the
cassette frame, while gently pushing
down on the edge of the lter.
FILTER CASSETTE
8. Replace the lter cassette and front
panel as described in Replacement
Procedure.
9. Plug in the power cord to a wall outlet
and turn on the unit.
Dust Sensor Cleaning
Lightly vacuum the dust sensor every two
months after removing the front panel.
CASSETTE
SHORT TABS
NOTE: Never attempt to
remove the True HEPA Filter
from the cassette frame. Never
attempt to clean the True HEPA
Filter. Replace the entire cassette
when CHANGE FILTER alert
activates.
FILTER TAB
CASSETTE
LONG TABS
14 15
Page 16

TROUBLESHOOTING
Before you call
Solutions to Common Problems
Review this list before you call for service. This list covers problems that are not the result
of defective materials or workmanship.
PROBLEM
The remote control
does not work.
The unit leaves smoke
and odors in the air.
The unit seems to
produce odors.
The dust or odor light
is green, but there is
still dust/odor in the air.
The dust or odor light
is orange or red, but
the air seems clean.
Unit makes a ticking
sound.
POSSIBLE SOLUTION
• Make sure the remote control batteries are inserted correctly.
• Replace worn-out batteries.
• Make sure the sensor is not blocked or clogged.
• Move the unit closer to the offending odors.
• Replace or wash the lter as needed.
• Replace or wash the lter as needed.
• Clear the sensor with a vacuum cleaner, as it may be blocked
or clogged.
• Clear the sensor with a vacuum cleaner, as it may be blocked
or clogged.
• This indicates that the PlasmaWaveTM function is working.
If the sound is distracting, turn off this function while you are
in the room.
Unit interferes with
radio or television
reception.
The REPLACE FILTER
indicator
after replacing the lter
cassette.
remains lit
• Because this unit radiates radio frequency energy, we suggest
you try one or more of the following:
- For better reception, adjust the television/radio antenna.
- Move the unit away from the affected television/radio.
- Plug the unit power cord into an outlet different from the
television/radio power cord.
• Press the FUNCTION and OFF TIMER buttons at the same
time for ve seconds. The REPLACE FILTER indicator
will ash ve times and turn off.
Page 17

™
PlasmaWave
Puricador de aire
True HEPA
Manual del operario
WAC-9000 WAC-9000S
ADVERTENCIA:
Lea y siga todas las reglas e instrucciones
de seguridad antes de operar este equipo.
Page 18

ÍNDICE
GARANTÍA
UN AÑO DE GARANTÍA LIMITADA SOBRE EL PURIFICADOR DE AIRE WINIX
PLASMAWAVE
Si este puricador de aire fallara debido a defectos del material o mano de obra dentro
de un año de la fecha de comprarlo, devuélvalo al lugar donde lo compró y recibirá uno
nuevo, sin costo.
• Esta garantía no incluye el marco con ltro de recambio para el puricador de aire, que
es una pieza de consumo que se puede desgastar antes de un año de uso normal.
• Esta garantía no es válida si el producto es utilizado comercialmente o para alquiler.
• Esta garantía proporciona derechos legales especícos y usted podría tener otros derechos, los que varían en diferentes estados.
TM
CONTENIDO DEL PAQUETE
• Puricador de aire Winix PlasmaWave
• Aparato de control remoto (1 unidad)
TM
• Pilas (2 de tamaño AA)
• Manual del operario
17
Page 19

INSTRUCCIONES DE SEGURIDAD
Agradecemos su compra de un puricador
de aire Winix. Antes de usarlo, por favor
lea este manual detenidamente. Este
producto es solamente para uso en el
hogar.
INFORMACIÓN IMPORTANTE
SOBRE EL USO DE SU
PURIFICADOR DE AIRE
ADVERTENCIA: Siga las instrucciones
de este manual para reducir el riesgo de
choque eléctrico, corto circuito o incendio:
• No reparar o modicar el equipo
a menos que sea recomendado
especícamente en este manual.
Cualquier otra reparación debe hacerla
un técnico especializado.
• El enchufe de este equipo es polarizado,
con una clavija más ancha que la otra.
No forzar el enchufe para introducirlo
en el tomacorriente hembra. No hacer
ningún cambio a la forma del enchufe. Si
el enchufe no entra en el tomacorriente,
invertir la posición. Si todavía no entra,
contáctese con un técnico especializado
para que instale un tomacorriente
hembra correcto.
• No usar el equipo si el cordón o el
enchufe está dañado o si la conexión del
tomacorriente de la pared está suelta.
• Usar solamente corriente alterna de
120 voltios.
• No dañar, romper, doblar con fuerza,
tirar, torcer, atar, recubrir, apretar con
fuerza o colocar objetos pesados sobre
el cordón eléctrico.
• Quitarle el polvo al enchufe eléctrico
periódicamente. Eso reducirá la
posibilidad de que se acumule la
humedad, lo cual aumenta el riesgo de
recibir un choque eléctrico.
• Si se daña el enchufe eléctrico, debe
reemplazarlo el fabricante o un técnico
especializado.
• Sacar el enchufe del tomacorriente antes
de dar limpieza al equipo. Para sacar
el enchufe eléctrico, tirarlo del mismo
enchufe; nunca tirar del cordón.
• Sacar el enchufe del tomacorriente
cuando no se está usando el equipo.
• No manipular el enchufe con las
manos mojadas.
• No operar el equipo mientras se usan
bombas de insecticidas en el hogar.
• No limpiarlo con bencina o disolvente de
pintura. No rociar insecticidas al equipo.
• No usar el equipo en lugares húmedos o
donde se pudiera mojar, así como en un
cuarto de baño.
• No introducir los dedos u objetos
extraños en la toma o la salida de aire.
• No usar el equipo en la cercanía de
gases inamables. No usarlo cerca de
cigarrillos, incienso o productos que
crean chispas.
• El equipo no extrae el monóxido
de carbono que emiten equipos de
calefacción u otros aparatos.
ADVERTENCIAS IMPORTANTES
SOBRE EL USO DE SU
PURIFICADOR DE AIRE
• No bloquear los conductos de entrada o
salida de aire.
• No utilizar el equipo cerca de objetos
calientes, tal como una estufa. No
usarlo donde pudiera ponerse en
contacto con vapor.
• No usar el equipo recostado sobre
su costado.
• Manténgalo lejos de productos que
producen residuos aceitosos, tales
como una freidora.
• No limpiar el equipo con detergente.
• No hacerlo funcionar sin el ltro.
• No se debe lavar y volver a usar el
ltro True HEPA.
18 19
Page 20

ESPECIFICACIONES DEL PRODUCTO
WAC-9000 WAC-9000S
Área De Puricación 280 sq. ft. (26 m2) 210 sq. ft. (19.5 m2)
Corriente Eléctrica CA 120V, 60 Hz CA 120V, 60 Hz
Potencia En Vatios Baja 6W, Turbo 50W Baja 6W, Turbo 50W
Velocidad Del
Soplador
Panel De Control LED Digital LED Digital
Control Automático/Manual Automático/Manual
Detector De Polvo Sí Sí
Detector De Olores Sí Sí
Detector De Luz Sí Sí
Temporizador De 1, 4 y 8 horas De 1, 4 y 8 horas
Modo De Reposo
(Sleep Mode)
Filtros 1 Marco de ltro reemplazable 1 Marco de ltro reemplazable
Sistema De
Puricación
CADR 182/183/194
Filtro Hepa True HEPA, 99.99% True HEPA, 99.99%
Tecnología PlasmaWave
Color Azul metálico/Rosado
Control Remoto Sí Sí
Dimensiones Ancho 16.5" (41.9 cm) x
Peso 18.8 lb (8.5 kg) 13.7 lb (6.2 kg)
4 velocidades 4 velocidades
Sí Sí
Preltro antibacteriano lavable
Filtro True HEPA
Filtro de malla Nano-Plata
(Nano-Silver) lavable/Filtro
de carbón
PlasmaWave
TM
Preltro antibacteriano lavable
Filtro True HEPA
Filtro de malla Nano-Plata
(Nano-Silver) lavable/Filtro
de carbón
PlasmaWave
142/138/145
(Humo/Polvo/Polen)
TM
(Humo/Polvo/Polen)
PlasmaWave
Azul metálico/Rosado
platinado
platinado
Ancho 13.8" (35.1 cm) x
profundidad 9.9" (25.2 cm) x
altura 21.9" (55.6 cm)
profundidad 9.1" (23.1 cm) x
altura 18.5" (47 cm)
TM
TM
CARACTERÍSTICAS DEL PURIFICADOR DE AIRE
NOTA: Las características del puricador de aire varían dependiendo del modelo.
• Funcionamiento ultra silencioso
Este puricador de aire Winix tiene un
soplador de aire ultra silencioso de cuatro
velocidades que lo hace ideal para usar
durante la noche.
• Fácil mantenimiento
El mantenimiento de los puricadores de
aire Winix es sencillo y económico. Para un
funcionamiento óptimo, reemplazar el marco
completo del ltro cuando se prende el letrero
CHANGE FILTER.
• Detectores inteligentes de polvo y
de olores
El puricador de aire 9000 incluye detectores
digitales que verican la calidad del aire
automáticamente. Al cambiar los niveles de
olores y de polvo, la velocidad del soplador se
ajusta automáticamente.
Page 21

• Operación sencilla
Para su conveniencia, los puricadores
de aire Winix tienen control remoto y un
panel de control fácil de usar.
PURIFICACIÓN EN CINCO ETAPAS
El aire pasa por cinco procesos
independientes antes de regresar fresco y
limpio a la habitación.
• Detector de luz
Pone en marcha al Modo de reposo
automáticamente cuando se oscurece la
habitación, para asegurar continuamente
un funcionamiento silencioso y ahorro de
energía.
• Aviso para cambiar el ltro
Avisa cuando se debe cambiar todo el
marco del ltro.
• Fijación del temporizador
Le permite ajustar la operación en la
forma que usted preere.
• Control remoto programable
Para prender, apagar o regular la
velocidad del soplador desde cualquier
lugar de la habitación.
• Soplador de cuatro velocidades
Desde LOW (baja) con funcionamiento
silencioso y ahorro de energía, hasta
TURBO para la puricación más ecaz.
FRENTE
PlasmaWave
Panel de control
Motor de corriente alterna
TM
Filtro de malla Nano-Plata
lavable/Filtro de carbón
Armazón del marco
• Preltro antibacteriano lavable
Este ltro re-utilizable atrapa partículas
grandes como polen, pelo de mascotas,
pelusa, etc.
• Filtro True HEPA
Atrapa 99.99% de partículas e
impurezas tan pequeñas como 0.3
micrones.
• Malla Nano- Plata
Una barrera de partículas de plata de
una milmillonésima parte de un metro,
neutraliza las bacterias al contacto.
• Filtro de carbón lavable
Este carbón granular activado
reutilizable atrapa los vapores químicos
y olores producidos por humo de
cigarrillos, productos orgánicos
descompuestos y de la cocina.
• PlasmaWave™
Durante la etapa nal de la puricación,
el PlasmaWaveTM de Winix, su proceso
técnico genera iones positivos y
negativos para crear un sistema de
plasma que neutriliza virus, bacterias,
vapores químicos y olores del aire
instantáneamente.
Enchufe eléctrico
Filtro True HEPA
Preltro
CUBIERTA SUPERIOR
20 21
Panel frontal
Escape
de aire
Base para el
control remoto
Page 22

MONTAJE DEL PURIFICADOR DE AIRE
NOTA: Para obtener resultados óptimos,
seguir estas instrucciones.
• Colocar el puricador a por lo menos
7 pies (2.1 m) de equipos que emiten
ondas eléctricas, tales como televisores
o radios.
• Ubicar el equipo a por lo menos 2 pies
(61 cm) de la pared.
• Mantener los detectores alejados de
zonas donde hay corrientes de aire.
• Mantener las cortinas alejadas de los
detectores, pues pueden obstaculizar la
entrada y salida del aire.
• Situar el equipo en un lugar con
adecuada circulación de aire y sobre una
supercie estable.
1. Quitar la película protectora del panel
de control.
2. Extraer el panel de control cogiéndolo
de los bordes inferiores y tirándolo
cuidadosamente hacia usted.
5. Reponer el marco del ltro en la
unidad principal.
6. Reponer el panel frontal enganchándolo
en la parte superior del equipo. Girar
el panel suavemente hacia abajo hasta
abrocharlo en su sitio.
7. Colocar el enchufe en
un tomacorriente en la pared.
8. Presionar el botón POWER hasta
oír un “tono”.
3. Sacar el marco del ltro sujetándolo de
las lengüetas de cada lado del marco del
ltro.
4. Quitar la envoltura de plástico del marco
del ltro.
Durante los primeros 4 minutos de
prender la unidad, los indicadores
de polvo y olores destellarán
intermitentemente mientras evalúan la
calidad del aire.
Page 23

PANEL DE CONTROL
1
2
3 3
4
5
1. TEMPORIZADOR - Para 1 hora de
operación presionar el botón TIMER.
Presionarlo por segunda vez para 4
horas, y una tercera vez para 8 horas.
Al presionar el botón TIMER por cuarta
vez, se apaga el temporizador.
2. FUNCIÓN - Presionar el botón
FUNCTION una vez para poner al
equipo en modo automático. Al continuar presionándolo, pasa a Reposo >
Bajo > Mediano > Alto > Vuelve a
modo automático.
3. DETECTORES DE POLVO Y
OLORES - Verican automáticamente
la calidad del aire y regulan la velocidad del soplador.
4. INDICADOR DE CAMBIO DE
FILTRO - El letrero avisa cuando
hay que cambiar el marco del ltro.
5. MODO AUTOMÁTICO - La unidad
está prejada para funcionamiento
automático cuando se le prende por
primera vez. Los detectores inteligentes detectan automáticamente el nivel
de impurezas del aire y regulan apropiadamente la velocidad del soplador.
6. INDICADOR PLASMAWAVETM -
Se prende el generador de plasma presionando el botón PLASMA ON/OFF
en el control remoto. El PlasmaWaveTM
genera iones positivos y negativos que
producen radicales hidroxilos que desactivan los contaminantes en suspensión en el aire.
6
7 10
8
9
11
7. DETECTOR DE LUZ - Inicia el modo
de reposo automáticamente cuando se
oscurece la habitación.
8. INDICADOR DE VELOCIDAD DEL
SOPLADOR - Muestra la velocidad
actual del soplador.
9. REPOSO - El equipo funcionará en
modo ultra silencioso y reduce la luminosidad del panel de control.
10. MODO AUTOMÁTICO DE REPOSO
Usar el botón TIMER del panel de
control o del control remoto para
prender o apagar manualmente el
detector de luz. Con el detector de luz
activado, la unidad funcionará en modo
de reposo automáticamente cuando se
oscurece la habitación. Cuando hay luz
en la habitación, regresará a la función
anterior. El modo de reposo proporciona el nivel más silencioso del soplador, y baja la luz del panel de control.
11. TEMPORIZADOR - Indica la función
seleccionada o el modo continuo.
12. INTERRUPTOR - Se prende o apaga
al equipo presionando el botón
POWER. Presionando el botón por 2
ó 3 segundos se prende o apaga el
generador de plasma.
12
22 23
Page 24

OPERACIÓN
OPERACIÓN AUTOMÁTICA
La unidad está prejada para
funcionamiento automático cuando se
le prende por primera vez. El puricador
de aire detecta automáticamente el
nivel de impurezas del aire y regulan
apropiadamente la velocidad del soplador.
OPERACIÓN MANUAL
Después de prender el equipo se podrá
cambiar el funcionamiento a manual,
utilizando el control remoto o el botón
FUNCTION del equipo.
• BAJO, MEDIANO Y ALTO
Se recomiendan estos niveles para
uso normal durante el día. El nivel
HIGH (Alto) se activa automáticamente
cuando los detectores perciben altos
niveles de polvo u olores.
EL BOTÓN DESTELLA
BAJO
• TURBO
El nivel TURBO, la más alta velocidad
del soplador, se puede activar
manualmente para obtener máxima
circulación de aire.
TURBO
• PRENDER O APAGAR EL PLASMA
Se prende el PlasmaWaveTM
presionando por 2 ó 3 segundos el
botón PLASMA ON/OFF del control
remoto o el botón POWER del equipo.
El PlasmaWave genera iones positivos y
negativos.
• TEMPORIZADOR
Fijar el temporizador para 1, 4 ó 8
horas presionando el botón TIMER del
control remoto o del equipo. La unidad
dejará de funcionar cuando termine
el tiempo seleccionado. Se cancela
el temporizador presionando el botón
TIMER hasta que se apague la luz
indicadora de 1, 4 ó 8 horas.
MEDIANO
ALTO
Page 25

• REPOSO AUTOMÁTICO
Usar el botón TIMER del panel de
control o del control remoto para prender
o apagar manualmente el detector de
luz. Con el detector de luz activado, el
equipo funcionará automáticamente en
modo de reposo cuando se oscurece
la habitación. Cuando hay luz en la
habitación, regresará a la función
anterior. El modo de Reposo proporciona
el nivel más silencioso del soplador, y
baja la luz del panel de control.
• Detector de olores
El detector de olores responde
al humo de cigarrillos y olores de
animales domésticos así como otros
contaminantes del aire tales como
cosméticos, alcohol o rociado de
aerosoles.
DETECTORES DE POLVO
Y OLORES
Los detectores de polvo y olores muestran
el nivel de calidad del aire con luces de
color verde, naranja y rojo. La luz verde
indica niveles aceptables de polvo y
olores, la luz naranja altos niveles, y la
roja niveles muy altos. Si el equipo está en
modo automático, regulará la velocidad del
soplador para compensar los niveles altos
o bajos de polución del aire.
BAJO ALTO
MEDIANO
Volumen de olores en la habitación
• Detector de polvo
El detector de polvo detecta partículas en
el aire, tales como humo de cigarrillos,
polvo y polen.
BAJO ALTO
MEDIANO
Volumen de polvo en la habitación
24 25
Page 26

OPERACIÓN DEL CONTROL REMOTO
PREPARACIÓN
• Presionar y deslizar la tapa trasera para
sacarla del control remoto.
• Insertar las pilas tal como se indica.
• Cerrar la tapa trasera.
USO DE LAS PILAS
• Las pilas para el control remoto son
solamente para uso inicial. Deben
cambiarse cuando sea necesario.
• Al reemplazar las pilas, cambiar las dos
al mismo tiempo con 2 pilas AA nuevas.
• Uso incorrecto de las pilas puede causar
derrame del uido o daños.
• Si no se va a utilizar el control remoto
por un largo período de tiempo, quitarle
las pilas.
• Evite dejar caer o dañar el control
remoto. Mantener el control remoto
fuera del sol o cerca de equipos de
calefacción.
USO DEL CONTROL REMOTO
Modo correcto de empleo
• Operar el control remoto apuntándolo
hacia el puricador de aire.
• Debe encontrarse dentro de 20 pies del
puricador de aire.
Condiciones inapropiadas que
reducirán su ecacia
• Cualquier lugar donde hay equipos
de luz a inversor o de iluminación
electrónica espontánea.
• Donde hay objetos o muebles entre el
control remoto y el puricador de aire.
• Donde el puricador de aire se encuentra
directamente bajo el sol.
• En lugares donde la luz uorescente
parpadea debido a tubos desgastados.
• INTERRUPTOR
Usar el botón POWER para prender o
apagar el equipo. Se escuchará un corto
“tono” cuando se prende o apaga la
unidad. Cuando se prende el equipo, se
pondrá automáticamente en el modo de
función automática. Se pone el equipo
en control manual presionando uno de
los botones FAN CONTROL.
• TEMPORIZADOR
Se usa este botón para seleccionar el
tiempo. Presionar varias veces el botón
para poner la unidad en 1, 4 ó 8 horas, o
para cancelar el temporizador. Cada vez
que se presiona el botón, avanzará al
siguiente período de tiempo prejado. La
luz indicadora de la unidad mostrará la
cantidad de tiempo por correr. La unidad
dejará de funcionar cuando termine el
tiempo seleccionado.
• CONTROL DEL SOPLADOR
• UP
Se usa este botón para salir del modo
automático y aumentar la velocidad
del soplador.
• DOWN
Usar este botón para disminuir la
velocidad del soplador.
• TURBO
Usar este botón para salir del modo
automático y comenzar la cantidad
máxima de puricación y movimiento
de aire en la habitación.
• REPOSO AUTOMÁTICO
Se usa el botón TIMER para prender
o apagar manualmente el detector de
luz. Con el detector de luz activado, el
equipo funcionará automáticamente en
modo de reposo cuando se oscurece
la habitación. Cuando hay luz en la
habitación, regresará a la función
anterior. El modo de Reposo proporciona
el nivel más silencioso del soplador, y
baja la luz del panel de control.
• PRENDER O APAGAR EL PLASMA
Usar este botón para prender o apagar el
generador de PlasmaWaveTM.
Page 27

Botón PLASMA ON/OFF
Botón POWER
Botón AUTO SLEEP
Botón SLEEP
Botón AUTO
Botón TIMER
Botón TURBO
Botones FAN CONTROL
NOTA: Este equipo ha sido examinado y encontrado en cumplimiento con los límites
permitidos para dispositivos digitales de la Clase B, de acuerdo con 15 de los reglamentos de la FCC. Estos límites son diseñados para proporcionar protección razonable
contra interferencia dañina en instalaciones residenciales. Este equipo genera, utiliza,
y puede irradiar radiofrecuencias y, si no es instalado y utilizado de acuerdo con sus
instrucciones, puede causar interferencia dañina a las radiocomunicaciones. Sin embargo, no se garantiza que no ocasionará interferencias en alguna instalación especíca. Si este equipo causara interferencia dañina a la recepción de radio o televisión, lo
cual se puede determinar prendiendo y apagando el equipo, se recomienda al usuario
intentar corregir la interferencia tomando una o más de las siguientes medidas:
• Reorientar o reubicar la antena receptora.
• Aumentar la distancia entre el equipo y el receptor.
• Conectar el equipo a un tomacorriente en un circuito
distinto al que está conectado el receptor.
• Pedir ayuda a un técnico en radio o televisión.
26 27
Page 28

CUIDADO Y MANTENIMIENTO
LIMPIEZA
• Limpiar la unidad cuando sea
necesario con un paño seco y suave.
Para manchas reacias, usar un trapo
humedecido con agua tibia.
• No usar uidos volátiles tales como
bencina, disolvente de pintura o
detergente en polvo, ya que éstos
pueden dañar la supercie de la unidad.
• Mantener seco al equipo.
• Limpiar periódicamente la pared detrás
del escape de aire del equipo, ya que se
puede ensuciar.
Reemplazo del
marco del ltro
El letrero indicador
CHANGE FILTER
avisa cuando hay
que cambiar el
marco del ltro. El
lapso de tiempo
entre cambios varía
dependiendo del número de horas de uso,
calidad del aire y ubicación de la unidad.
No obstante, bajo uso normal la mayoría
de los ltros deben cambiarse cada año.
Para su conveniencia, los tres ltros
(preltro antibacteriano lavable, ltro True
HEPA y el ltro de malla Nano-Plata/
ltro de carbón) vienen en un marco de
recambio pre-empacado.
Para máxima ecacia del equipo, lavar el
preltro antibacteriano lavable y el ltro de
malla Nano-Plata/Filtro de carbón como
se describe más adelante en “Limpieza del
ltro”, cada tres meses.
No se debe lavar y volver a usar el
ltro True HEPA, ya que no funcionará
ecazmente.
Procedimiento del recambio
1. Extraer el panel frontal cogiéndolo de los
bordes exteriores inferiores y tirándolo
cuidadosamente hacia usted.
2. Sacar el marco del ltro tomándolo
de las lengüetas ubicadas a cada lado.
3. Quitar la envoltura de plástico del
marco del ltro nuevo.
ADVERTENCIA: Antes de
reemplazar o limpiar los ltros
asegurarse de desconectar el
enchufe del tomacorriente.
Page 29

4. Colocar el nuevo marco del ltro en la
unidad principal.
5. Reponer el panel frontal después de
presionar el botón CHANGE FILTER.
2. Quitar el preltro tirando suavemente de
un lado del marco hacia fuera mientras
que al mismo tiempo se levanta la
lengüeta del preltro.
Cuando un borde
sobresale del
marco, el preltro
se deslizará
hacia fuera para
limpiarlo.
3. Aspirar ligeramente el preltro y lavarlo
con agua y un detergente doméstico
suave. Enjuagar y sacudirlo para quitarle
el exceso de agua.
6. Enchufar el equipo al tomacorriente de la
pared y prenderlo.
Limpieza del ltro
Recomendamos que se limpie el preltro
antibacteriano lavable y el ltro de malla
Nano-Plata/ltro de carbón cada tres
meses después de uso normal. El intervalo
entre limpiezas varía dependiendo de la
condición de la habitación.
1. Sacar el panel frontal y el marco del ltro
como se describió en el “Procedimiento
del recambio”.
4. Para sacar el ltro de malla NanoPlata/ltro de carbón, dar vuelta al
marco y colocarlo cara-abajo sobre una
supercie plana. Doblar ligeramente
hacia fuera el marco del ltro mientras
se tira de la lengüeta larga hacia arriba.
Cuando sale la primera esquina, tirar
de la otra lengüeta
larga del marco
hacia fuera
mientras
se continúa
tirando de la
lengüeta del
ltro. Cuando
se libera un
borde largo del
ltro, deslizarlo
hacia fuera para su limpieza.
28 29
Page 30

5. Lavar el ltro con agua tibia y un
detergente doméstico suave. Enjuagar
y sacudirlo para quitarle el exceso de
agua.
6. No se deben secar los dos ltros;
utilizarlos en el equipo será suciente
para que se sequen.
7. Reponer cada ltro en el marco
insertando un borde largo primero, luego
empujando lateralmente y hacia abajo
al mismo tiempo hasta abrocharlo en su
sitio. Asegurarse de que ambos ltros
queden completamente dentro de su
marco y asegurados por las lengüetas
cortas. Si un ltro está sobre una o más
lengüetas, tirar hacia fuera doblando
ligeramente el marco mientras se empuja
hacia abajo el borde del ltro.
8. Reponer el ltro y el panel frontal como
se describió en el “Procedimiento del
recambio”.
9. Enchufar el equipo al tomacorriente de la
pared y prenderlo.
Limpieza del detector de polvo
Aspirar ligeramente el detector de polvo
cada dos meses después de sacar el
panel frontal.
MARCO DEL FILTRO
LENGÜETA DEL FILTRO
NOTA: Nunca intente
sacar el ltro True HEPA del marco
del ltro. Nunca intente limpiar
el ltro True HEPA. Se debe
reemplazar el marco completo con
ltro cuando se prende el letrero
CHANGE FILTER.
LENGÜETAS CORTAS
DEL MARCO DEL FILTRO
LENGÜETAS LARGAS DEL
MARCO DEL FILTRO
Page 31

RESOLUCIÓN DE PROBLEMAS
Antes de llamar:
Solución de problemas comunes
Revisar esta lista antes de llamar a pedir ayuda. Esta lista cubre los problemas que no
son causados por material o mano de obra defectuosos.
PROBLEMA POSIBLE SOLUCIÓN
El aparato de control
remoto no funciona.
El equipo deja humo
y olores en el aire.
El equipo parece
producir olores.
La luz del polvo o la
de olores es verde,
pero continúa el
polvo u olor en el
ambiente.
La luz de polvo o la
de olores es color
naranja pero el aire
parece estar limpio.
El equipo hace un
sonido como tic-tac.
El equipo interere
con la recepción de
radio o televisión.
El letrero REPLACE
FILTER permanece
prendido después de
haberse cambiado el
marco del ltro.
• Asegurarse que las pilas del control remoto han sido
instaladas correctamente.
• Reemplazar las pilas desgastadas.
• Asegurarse que el detector no esté bloqueado o obstruido.
• Ubicar al puricador más cerca a los olores ofensivos.
• Reemplazar o lavar el ltro si es necesario.
• Reemplazar o lavar el ltro si es necesario.
• Limpiar el detector con una aspiradora, pues podría estar
bloqueado o obstruido.
• Limpiar el detector con una aspiradora, pues podría estar
bloqueado o obstruido.
• Eso indica que la función de PlasmaWaveTM está
funcionando. Si el sonido es molesto, apagar esa función
cuando se está en la habitación.
• Debido a que la unidad irradia radiofrecuencias, sugerimos
que intente una o más de las medidas siguientes:
- Para mejorar la recepción, reorientar la antena de la
radio o el televisor.
- Alejar al equipo de la radio o televisor afectado.
- Colocar el enchufe en un tomacorriente distinto al de la
radio o televisor.
• Presionar al mismo tiempo los botones FUNCTION y OFF
TIMER por cinco segundos. El letrero REPLACE FILTER
destellará cinco veces y se apagará.
30 31
Page 32

SERVICIO AL CLIENTE
Envíe sus consultas o comentarios a:
Winix Inc.
2500 West Higgins Rd, Suite 610
Hoffman Estates IL 60195
Asegúrese de mencionar el número del modelo
Tel.: 1.847.781.9991
Telefax: 1.847.781.9992
Teléfono sin cargo: 1-877-MY-WINIX (699- 4649)
Correo electrónico: info@winixinc.com
Sitio web: www.winixinc.com
Visite nuestro sitio web o contáctese con nosotros
para comprar su ltro Winix de recambio.
NOTA: SI TIENE ALGÚN PROBLEMA, POR FAVOR
LLAME AL SERVICIO AL CLIENTE. REFIÉRASE A
SU GARANTÍA. LOS EQUIPOS DEFECTUOSOS SE
DEBEN DEVOLVER AL LUGAR DONDE SE COMPRARON ORIGINALMENTE. NO INTENTE REPARAR
EL EQUIPO USTED MISMO. NO ABRA LA CAJA DEL
MOTOR, ESO INVALIDARÁ SU GARANTÍA Y PUEDE
CAUSAR DE DAÑOS MAYORES AL PURIFICADOR
DE AIRE O CAUSARLE LESIONES PERSONALES.
© WINIX INC.
 Loading...