

Page 1

Introduction Installation Operation Maintenance
POU W ATER COOLER
MODEL :`W-5C, W-5TC, W-5D, W-5TD
User’’s Manual
■Please read this user manual before using
the machine.
■Keep this manual in a safe place for future
reference.
Winix Europe 8 rue Faidherbe, 33110 Le Bouscat, France
Website www.winixeu.com Mail info@winixeu.com Tel +33.679.243.508
Page 2

10
10
11
PRODUCT INSTALLATION
●Space selection
●Product Set-up
FEATURES
1
Introduction Installation Operation Maintenance
2
Automatic water
level sensor
Dual floater measures water level
and let you know when to refill or
reset system.
Easy to use Cup
Dispenser
Integrated cup dispenser
allows easy access to cups
and easy refill
Drip tray Overflow
prevention
Red indicator light indicated when
drip tray is full.
Energy Saving
Turn Water Heating system
On/Off at your convenience
based upon your needs.
Hot Water Safety Switch
Safety Switch avoids unexpected
use of hot water and protects
against accidental burns.
TABLE OF CONTENT
INTRODUCTION
●Safety Instructions
●Other recommendations
●Product and Parts views
3
3~6
7
8~9
12
PRODUCT OPERATIONS
PRODUCT MAINTENANCE
●Filters Replacement
●Cleaning and Draining
●FAQ & Troubleshooting
●Tubing diagram
●Product Specifications
13
13
14
15
16
17
Page 3

3
Introduction
4
Safety Instructions
WARNING
PROHIBITED
DO NOT DISASSEMBLE
MUST BE ADHERED TO
It is a sign of earth protecting
from electrical shock.
DIRECTIONWARNING / NOTICE
Follow these instructions to
avoid any risks of injury or
burn injury, equipment or
property damage, electric
shocks or fire hazard.
Without following
directions, user's injury or
property damage can be
occurred.
After unplugging your product, wait for
5 minutes before plugging it in again.
Do not touch plug with wet hands.
Do not set-up your product underneath
a power outlet.
Always unplug your product and let it cool
down for 5 minutes before cleaning it up.
Do not plug product into a loose power outlet or socket
Always plug your product into a
dedicated 230V Power Outlet including
an earth connector and connected to an
electrical leakage breaker rated 30 mA or
lower.
Do not plug several appliances in the
same power outlet.
POWER CORD and PLUG
|
Do not unplug your product by pulling on
its power cord.
Do not bend or place any heavy objects
on the power cord of your product.
Page 4

Introduction
6
5
Safety Instructions
NO TICE
Before moving your product, always
unplug it from the power outlet and drain
water completely from the system.
Always unplug product and contact your
service dealer in case of water leakage.
Do not directly spray water onto your
product.
Do not place any container containing
water on top of your product.
If your product has not been used for an
extended time, unplug it from the power
outlet and drain water completely from
the tubes.
Do not directly touch the hot water
coming out of your product.
WATER
|
Do not spray insecticide or inflammables
close to or toward your product.
Do not place inflammables such as
spray, gasoline or gas near your product.
In case of irregular noise, smell or smoke,
immediately unplug your product and
contact your Service Dealer.
Do not attempt to repair, disassemble or
modify your product. Please contact your
Service Dealer when service is needed.
INFLAMMABLES
|
SERVICE & REPAIR
|
Page 5

7
8
PRODUCT AND PAR TS VIEWS
Hot water switch
(select ‘off’for cold water only.
select
‘on’for cold and hot water.)
Hot water
drain cap
Water Supply Inlet
Sink faucet water
outlet hole(option)
Handle
Cold water button
Display panel
Water outlet
Hot water
safety button
Cup dispenser
Drip tray
Front side Rear side
Models : W-5C, W-5D
Power plug
Safety Instructions
NO TICE
Do not use product if water supply is not
connected, open and ready.
Empty drip tray frequently to avoid
potential bad odors.
Do not place heavy objects on top of the
units to avoid potential housing damages.
Do not set-up your product on an uneven
surface or in a narrow space to avoid
dysfunctions.
Never incline your product by more than
45 degrees or wait for 1 hour after doing
so, before plugging it in.
Do not connect your product water
supply / inlet to a hot water source to
avoid risk of damaging filters.
Ensure that all tubing is
straight, free from any
obstacle and free from
bending or pinching.
Do not install your
product in areas with high
variations of temperature
Do not knock or rock
your products.
OTHER RECOMMENDATIONS
|
Introduction
Page 6

PRODUCT INSTALLATION
SPA CE SELECTION
9
10
Do not install product
under direct exposure
to sunlight.
Select a space with low humidity
and good ventilation.
Do not install outside.
To ensure better temperature control
and avoid risks of electric shocks
Product must be
installed about 10cm
away from the wall
Product must be installed
on hard and flat floor .
To avoid unexpected
vibrations and noise
For better perf ormances and a longer life of y our product,
select an adequate space to install it.
PRODUCT AND PAR TS VIEWS
Display panel
Models : W-5TC, W-5TD
Hot Water Indicator (red)
Power Indicator (orange)
Cold Water Indicator (green)
Display panel
Cold water
Button
Hot water
Safety button
Water outlet
Drip tray
Front side Rear side
Hot water switch
(select ‘off’for cold water only.
select
‘on’for cold and hot water.)
Sink faucet water
outlet hole(option)
Water Supply Inlet
Hot water
drain cap
Handle
Power plug
1. After installing your product in the right space, connect Water Supply.
2. Make sure that Hot Switch is Off
3. Plug product in.
PRODUCT INSTALLATION : SET-UP
Installation
Page 7

11
Operation
12
PRODUCT SET-UP PRODUCT OPERATIONS
Energy Saving Mode
Turn Hot Water Switch
Off at the back of the
unit for Cold Water only.
Turn Hot Water Switch On
at the back of the unit for a
choice between Hot and
Cold water.
After installing your product
in the right space, connect
tube from W ater Supply to
Water Supply inlet on y our
product.
Plug product in.
Wait for about 15
minutes for hot water
and about 30 minutes
for cold water.
Load paper cups into
cups dispenser
(W-5C and W-5D only)
Water
supply valve.
Models : W-5C, W-5D
Push “Cold” or “Hot Water Safety Switch” to dispense
water. Both Hot and Cold water will be released from
the same outlet. Hot Water Safety Switch requires to
be pushed up and forward to release Hot Water.
Grab one cup at a time,
as shown on the picture
below.
Place cup on drip tray
underneath water outlet.
Hot water
While pushing hot safety
water button, push it up.
Cold water
Push cold water button.
Turn Water Heating system On/Off at your convenience based upon your needs.
Models : W-5C, W-5D
Page 8

Maintenance
14
13
Turn and close the water supply valve.
MAINTENANCE
FILTERS REPLACEMENT
MAINTENANCE
Install the new filter and connect it.
Put front cover back by pushing it back into position.
CLEANING (CLEAN FREQUENTLY FOR A BETTER EFFICIENCY
AND A LONGER LIFE OF YOUR PRODUCT).
Drip tray cleaning
Product Housing Cleaning
1. When Red Overflow Indicator is visible, Drip Tray
must be emptied and cleaned-up
2. Lift drip tray off the product and dispose water.
3. Clean drip tray with a neutral detergent.
4. Clean the drip tray location, on your product,
with a neutral detergent.
5. Place drip tray back into its original location on
the product
Inside Product Cleaning (every 12-13 weeks)
2. Remove top lid
cover from
water tank
3. Remove baffle plate
4. Clean dirty areas
with soft wet cloth
1. Remove screws on
the back of the top
housing to remove
top panel
·Plastic areas : Clean with a piece of soft cloth and
a neutral detergent. Do not use water.
·Metal pipes`/`Back of the unit : Use vacuum cleaner
to get rid of dust accumulation.
·
Make sure water supply valve is closed.
·
Place a container underneath
regular water outlet.
·Press cold water button
to drain water
Cold water drain
·
Deactivate water heating system by turning Hot Water Switch to Off.
·
It is recommended to let heating system cool down for about
30 minutes and to wear protective gear to avoid risks of burn injury.
·
After heating system has cooled down, make sure water Water Supply
valve is closed.
·
Place a container below hot water drain cap at the back
of the unit
·Remove hot water drain cap and drain water.
·
Once water stop flowing, place hot water drain cap
back, open water supply valve and turn water heating
system back On.
Hot water draining
DRAINING METHOD
Water supply
valve handle
Pull front cover out to take it off.
Page 9

15
16
TROUBLE
SHOO TING
Sink faucet water
outlet hole(option)
Wire
condenser
Double float
Heater
Compressor
Drain
Hot tank
Drip tray
TUBING DIA GRAM
Maintenance
Hot
water
safety
button
Cold water button
Water outlet
Baffle plate
Cold tank
Sediment Filter
Pre-carbon Filter
U.F. Filter
Post-carbon Filter
Faucet
water
Evaporator
FAQ & Troubleshooting
For any questions or concerns, please contact your Service Dealer.
ISSUE
POTENTIAL SOLUTION
·Make sure product is correctly plugged-in
·Make sure Water Supply valve is open
·Make sure Water Supply is straight
·make sure Hot Water switch is On
·make sure you do not dispense hot water
continuously and wait for 5-6 minutes before
retrying
·Make sure you use a Carbon Filter and replace
it regularly.
·Make sure you drain water once a month if
you do not use your Water Cooler regularly
Contact your service dealer
·Make sure floor is flat and even
·Make sure than no foreign object has been left
on or inside the product
Water cannot be
dispensed
No hot water
available
Strange taste
or smell
Strange noise
occurs
·Close Water Supply and call your service dealer
Water Leakage
※The filters shown on the diagram are optional. They clean and dramatically improve the quality
of the water dispensed by your Water Cooler from the regular tap water you are getting without
filters.To order and install your optional filters, please call your service dealer.
Page 10
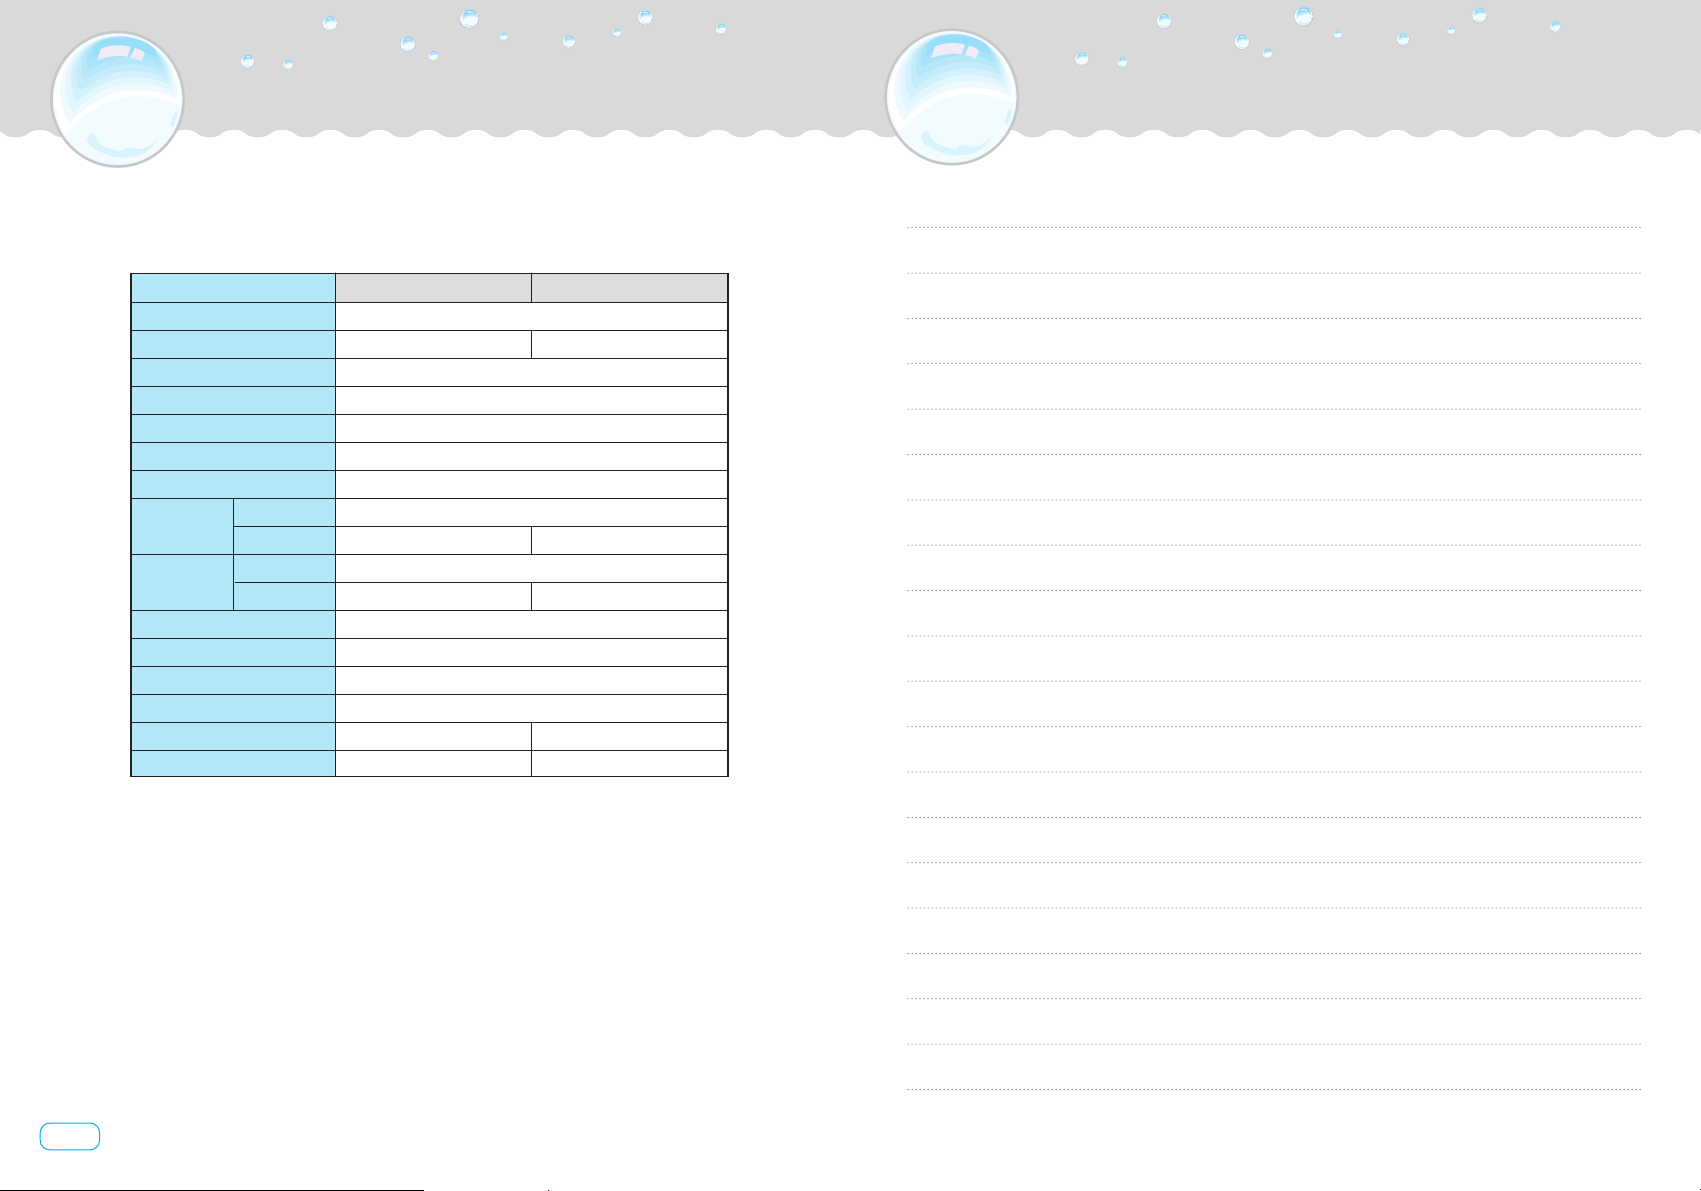
17
Memo
Water Supply Pressure Range
Water Supply Temperature Range
Purified water amount
Refrigerant
Weight(Filter excluded)
Dimensions
W-5C, W-5D
W-5TC , W-5TD
220~240V/50Hz
Cold water:100W, Hot water:450W Cold water:100W, Hot water:250W
Automatic Temperature Controller
Automatic Temperature Controller
Over heating protection sensor
4℃±4℃
85℃±10℃
3.9ℓ
1.9ℓ 1.0ℓ
15Cups(Under10℃, 100cc/20sec)
15Cups(Above70℃, 100cc/20sec)
8Cups(Above70℃, 100cc/20sec)
0.5kgf/㎠ - 6kgf/㎠
5 - 35℃
2.0L/min(3kgf/㎠)
R134a
18kg 14kg
334(W)×353(D)×1,030(H) 334(W)×353(D)×562(H)
Capacity
Extraction
Cold water
Hot water
Cold water
Hot water
Model
Power
Power consumption
Cold thermostat
Hot thermostat
Safety Thermostat
Cold Water Temperature
Hot Water Temperature
`
PRODUCT
SPECIFICATIONS
 Loading...