

Page 1

WINIX AIR CLEANE
R
HR950, HR951
User Manual
xPlease read and follow all safety rules and instructions in
this manual before operating.
xThe product warranty is printed on the back of this guide,
so please keep it in a safe place for future use.
xThis product is manufactured for use only in USA/CA
Model
Use & Care
Guide
Page 2

2
English
HR 950, HR 951
CONTENTS
Set Up
Where to use 5
Installing the filters 6
Safety Instructions
Safety and Cautions 8
Operation
Initial Operation 9
Modes of Operation 10
Features and Settings 11
Care and Maintenance
Filter Care 13
Smart Sensor Care 17
Cleaning Care 18
Troubleshooting
Frequently Asked Questions 19
Unit Specifications 21
Product Warranty 23
This product is suitable for 120V only.
5-Stage Air Purification 3
Controls 4
French 24
Spanish 4
Page 3

3
English
HR 950, HR 951
PACKAGE CONTENTS
WINIX AIR CLEANER
Model
Use & Care
Guide
HR950, HR951
Please read and follow all safety rules and instructions in
this manual before operating.
The product warranty is printed on the back of this guide,
so please keep it in a safe place for future use.
This product is manufactured for use only in USA.
Product
Pre-filter/CD Carbon Filter/
Anti-microbial True HEPA filter
(Included with the product.)
User Manual
PlasmaWave®
4 Anti-microbial coated
3 True HEPA filter
2 (CD) Coated Deodorization
Carbon filter
1 Pre-filter
5-STAGE AIR PURIFICATION
non-removable
replaceable
washable
replaceable
5
Page 4

4
English
HR 950, HR 951
Air
Outlet
Vent
Light Sensor
Detects the amount of ambient
light within the environment, to
adjust the brightness of the LED
indicators.
Timer Indicator
If timer has been set, the LED
light Indicates the set time of
operation.
PlasmaWave® Indicator
Indicates whether
PlasmaWave® is
enabled or disabled.
Smart Sensor
Automatically detects
indoor air quality.
Child Lock Indicator
LED light indicates
whether Child Lock mode
is enabled or disabled.
Child Lock Button
Press and hold for 3 seconds to enable
or disable the Child Lock mode.
Mode / Fan Speed Button
Every time the Mode button is
pressed, the Mode LED light will
cycle through the settings. (Auto,
Sleep, Low, Medium, High, Turbo)
Power Button
Turns the unit on or
off.
Timer / Air Quality
Button
Press to cycle through and set
desired length of operation (1hr,
4hr, 8hr, [NO TIMER]).
Press and hold for 3 seconds to
enable or disable the Air Quality
light.
PlasmaWave® Button
Enables or disables PlasmaWave®.
Check Filter Indicator
LED light indicates when it is
time to change the filter.
Reset Button
After replacing a filter, press
the RESET button for at least
5 seconds.
CONTROLS
Page 5

Installation | Set up
5
English
HR 950, HR 951
WARNING
Follow these instructions to reduce the risk of serious
injury or death and to reduce risk of damaging the unit.
WHERE TO USE
Do not use around mist or fumes from
industrial oil or around large quantities of
metallic dust
Do not install in any sort of motor or
transport vehicle (trucks, boats, ships, etc.)
Do not place near any flammable materials
(aerosols, fuel, gases etc.)
Do not place below any electrical outlet
Do not place around heating elements
Do not place in an area with excessive
amounts of noxious gases
Do not have unit facing into wind or draft
Do not place in excessively humid areas
where unit may become wet
Allow 12 ~ 18 in. of space between TVs, radios, and other electronic products
electromagnetic interference from certain electronics may cause product malfunction.
Place indoors away from direct sun light
direct exposure may cause product malfunction or failure.
Only place on hard, flat surfaces
flimsy or slanted surfaces may result in abnormal noise and vibrations.
This unit is not intended to be used to preserve documents or in art conservation.
Page 6

6
Set up | Installation
English
HR 950, HR 951
3 Anti-microbial
True HEPA filter
2
CD Carbon
filter
1 Pre-filter
INSTALLING THE FILTERS
This product comes with all of the required filters. The protective plastic wrap must be
removed from the filters before use.
Operating the unit without removing the plastic wrap may result in product failure.
Unplug and make sure the unit is turned off before installing filters.
The unit will automatically power off when front panel is opened.
①
Remove the front panel by grasping
its upper edge and gently pulling
towards yourself.
xTo remove the front panel, the latch
at the lower edge of the panel must
be released from its position.
Latch
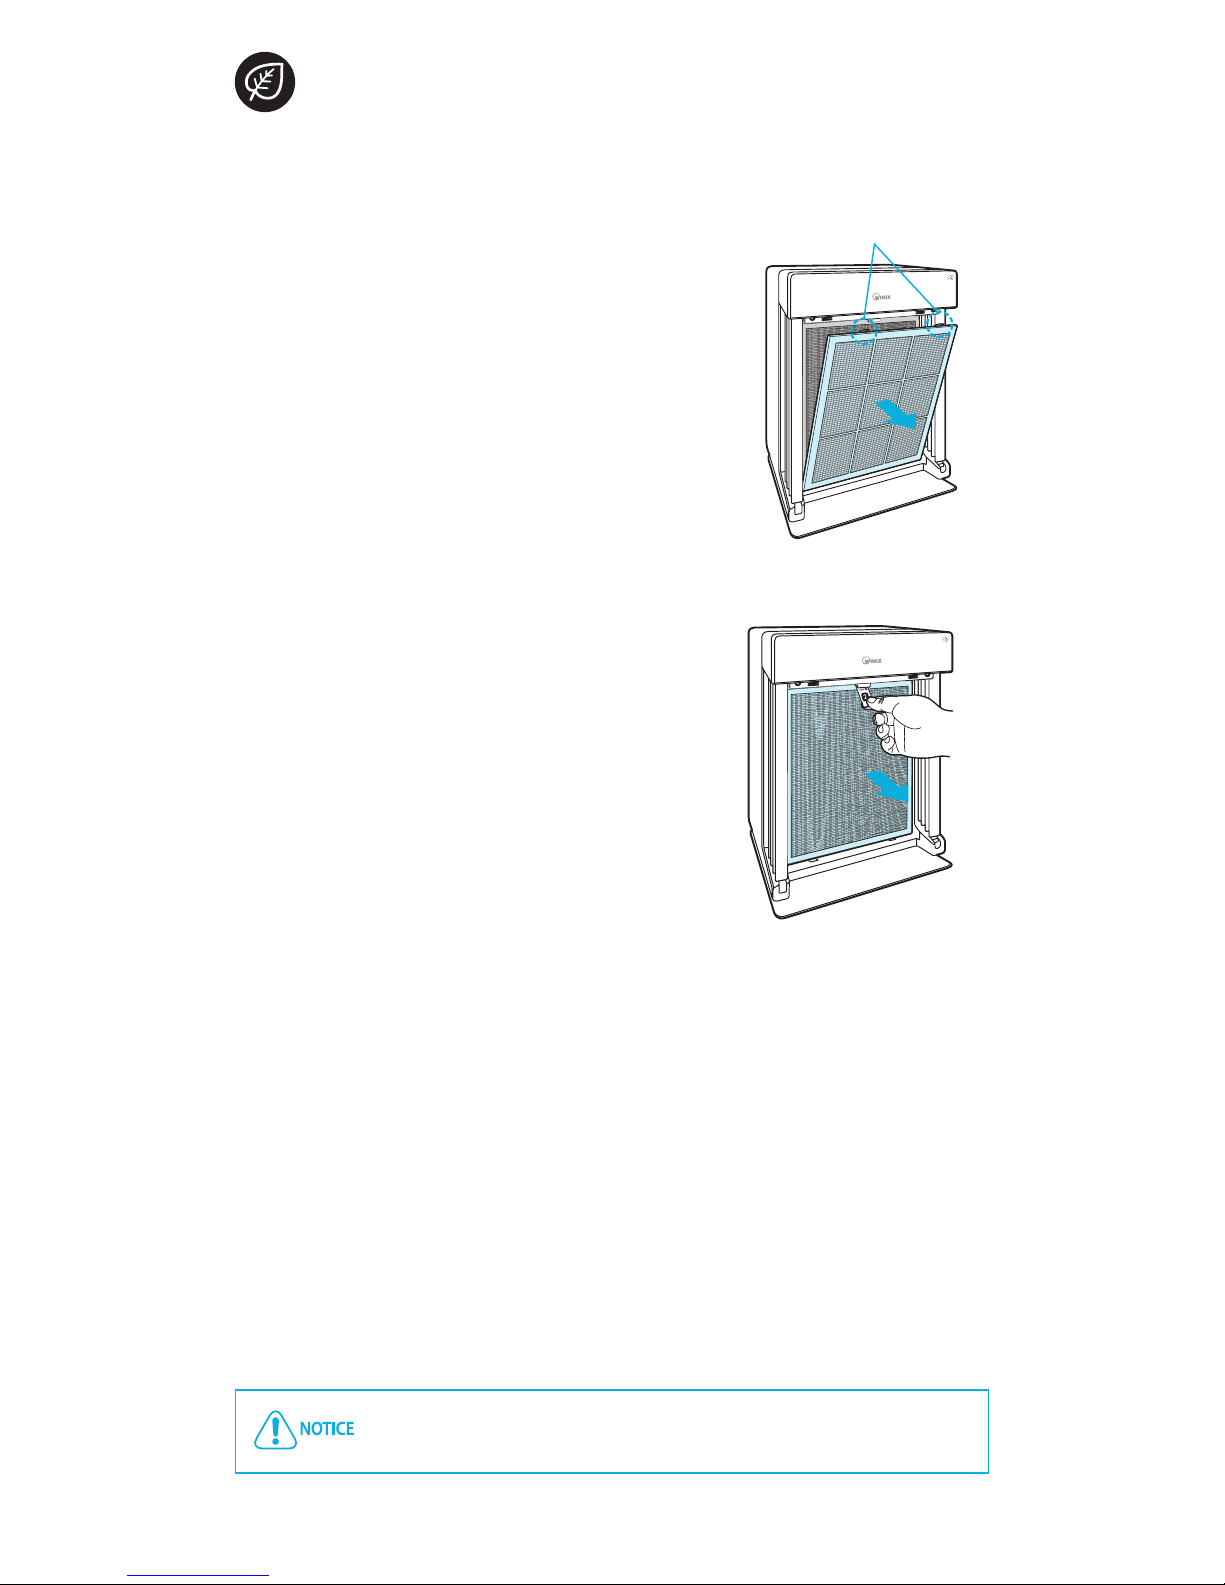
②
Remove the filters from the unit,
they are protected inside a plastic
wrap.
③
Remove filters from protective
plastic wrap.
xOperating the unit without removing
lters from plastic may cause abnormal
noise, deformation, or re as a result of
overheating.
④
Install the filters until they fit
securely in place.
Filters must be installed in this order:
3 Anti-microbial True HEPA filter
(rear)
2 CD Carbon filter (middle)
1 Pre-filter (front)
xTo install the pre-lter, insert
bottom tabs into the slots on either side
of the lower part of the unit, then rotate
upward to insert the upper tabs into the
slots at the top part of the unit until both
sides audibly click into place.
Page 7

Installation | Set up
7
English
HR 950, HR 951
⑤
Replace the front panel by first
inserting the latch at the bottom
edge into the base of the unit, then
rotate the panel upward toward the
top of the unit until it magnetically
snaps closed.
⑥
When to service and replace filters:
Filter Indicator Light
When to
service
When to
replace
1 Pre-filter
none
Clean once
every 14 days
Permanent
2 CD Carbon filter
Can NOT be
WASHED
Lasts up to
12 months
3 Anti-microbial True
HEPA filter
Intervals between filter replacement may vary depending on environment.
For optimal use, Pre-filter can be cleaned every 14 days which can extend the life of
other filters.
▶
Refer to pages 13-17 for detailed information on filter care and
how to replace them.
To purchase replacement Winix filters:
(877)-699-4649
www.winixamerica.com
INSTALLING THE FILTERS
this unit
is compatible
with this
filter
ITEM: 117130
FILTER
J
Page 8

Safety Instructions | Operation
8
English
HR 950, HR 951
SAFETY AND CAUTIONS
Before operating this equipment, carefully read and follow these safety cautions and
instructions to avoid damage and ensure safe use.
WARNING
Follow these instructions to reduce the risk of serious
injury or death and to reduce risk of damaging the unit.
Do not pull on the power cord when
unplugging the unit
Do not touch the plug with wet hands
Do not plug additional appliances into the
same outlet or power supply
Unplug unit when not in operation for
extended periods of time
Do not tie or knot power cord when unit
is in operation
Do not unplug or move the unit while in
operation
If the unit becomes submerged in water,
unplug it and contact customer service
Cord can become damaged by forcefully
bending, pulling, twisting, bundling,
pinching or placing heavy objects on it
Ensure filters are inserted before running unit
running unit without filters can shorten the units life and cause electric shock or injury.
Be sure foreign objects are NOT inserted into the vents on the unit
objects can include pins, rods, and coins.
Do not touch any part of the interior of the unit with wet hands
the high voltage may cause electric shock.
Ensure unit intake and outlet vents do not become blocked
blockage may lead to increased internal temperatures causing product failure and deformation.
Do not use the unit as a step stool or place heavy objects on it
personal injury may occur or product failure and deformation.
Page 9

Operating the air cleaner | Operation
9
English
HR 950, HR 951
①
Insert the unit plug into an electrical outlet.
xThe Control Panel lights will turn on and o.
②
Press the [Power] button.
▶
During the first 4 minutes of power up,
the Air Quality light will flash as the
Smart Sensors measure the air quality in
the environment, after which normal
operation will begin.
③
By default, when the unit first powers on, the mode will be set to Auto
with PlasmaWave® enabled.
x
When in Auto Mode the fan speed will be automatically adjusted according to the
environments air quality.
x
PlasmaWave® works to remove harmful airborne contaminants.
▶
In Auto mode, as the indoor air quality improves, the fan speed
will automatically be reduced to Low.
▶
When the unit is running, you may hear a chirping or buzzing
sound. The sound is from large particles passing through
PlasmaWave®, it is normal and does not signify product failure. To
disable PlasmaWave®, see page 11.
INITIAL OPERATION
Page 10

Operation | Operating the air cleaner
10
English
HR 950, HR 951
1.
Auto Mode
Enables Auto operation based on the unit's air quality Smart Sensors.
①
Press the Mode button to select Auto mode.
xThe mode LED light will indicate when ‘Auto’ mode has been selected, and
operation will begin.
xEach time the Mode button is pressed, the modes will be cycled.
(Auto, Sleep, Low, Medium, High, Turbo).
▶
▶
When in Auto Mode the fan speed is automatically adjusted
according to the indoor air quality. As the indoor air quality
improves, the fan speed will automatically be reduced. If the
indoor air quality decreases the fan speed will automatically be
increased.
▶
When unit is first started, Auto Mode is enabled and set to Low
fan speed.
2.
Sleep Mode
①
Press the Mode button to select Sleep
mode.
xThe mode LED light will indicate when ‘Sleep’
mode has been selected, and operation in
that mode will begin.
▶
When Sleep mode is selected, the fan
speed is automatically set to Low. Fan
speed can be changed by pressing the
Fan Speed (Mode) Button.
▶
When Sleep Mode is enabled, the Air
Quality light is disabled.
AUTO AND SLEEP
Every time the Mode button is pressed, the Mode LED light will cycle through the
settings. (Auto, Sleep, Low, Medium, High, Turbo)
Page 11

Operating the air cleaner | Operation
11
English
HR 950, HR 951
3.
Manual Mode (setting fan speed)
Users can opt to manually set the fan speed to Low, Medium, High, or Turbo.
①
Press the Mode button to select
the desired fan speed.
xThe mode LED light will indicate the selected
fan speed, and operation will begin.
▶
When Manual Mode is in use, Auto and Sleep modes are
automatically disabled.
4.
Timer
The timer can be set for when you want the unit to run for a specified period of time.
①
Select the desired period by pressing
the Timer button.
xThe Timer LED light will indicate the
selected length of operation.
xEvery time the Timer button is pressed
the Timer LED light will cycle through the
settings. (1hr, 4hr, 8hr, [NO TIMER]).
5.
PlasmaWave®
By default, PlasmaWave® is enabled whenever the unit is powered on.
①
Press the Plasma button when the
power is on to enable or disable this
feature.
▼
MANUAL MODE, TIMER AND PLASMAWAVE®
Every time the Mode button is pressed, the Mode LED light will cycle through the
settings. (Auto, Sleep, Low, Medium, High, Turbo)
Page 12

Operation | Operating the air cleaner
12
English
HR 950, HR 951
6.
Child Lock
This feature prevents children from tampering with the control panel.
①
Press and hold the Child Lock button
for 3 seconds to enable or disable the
feature.
xWhen the Child Lock indicator is lit, the
feature is enabled.
xWhen Child Lock is enabled, the control
panel is locked and the settings cannot
be changed.
xTo disable, press and hold the Child Lock
button again for 3 seconds.
3 seconds
7.
Air Quality LED Light
The Air Quality LED light may be turned on or off.
①
To turn the Air Quality LED light on or off,
press and hold the Timer button for 3 seconds.
xWhen on, the LED light will indicate the
current indoor air quality according to
three levels
BLUE (good), AMBER (fair), RED (poor)
▶
When Auto Mode is enabled the Air Quality LED light may or may not
be on, depending on the amount of ambient light in the room.
▶
When Sleep Mode is activated, the Air Quality Indicator light is
turned off.
CHILD LOCK, AIR QUALITY LED
3 seconds
▶
Air Quality Indicator
Page 13

Care and Maintenance
13
English
HR 950, HR 951
1.
Changing Filters
When the Check Filter indicator LED is on, it is time to replace both the Anti-microbial
True HEPA and CD Carbon filters.
Filter Indicator Light
When to
service
When to
replace
1 Pre-filter
-
Clean once
every 14 days
Permanent
2 CD Carbon filter
Can NOT be
WASHED
Lasts up to
12 months
3 Anti-microbial True
HEPA filter
Intervals between filter replacement may vary depending on environment.
For optimal use Pre-filter can be cleaned every 14 days which can extend the life of
other filters.
FILTER CARE
Removing Filters
Ensure the unit is turned off and unplugged before removing filters.
The unit will automatically power off when front panel is opened.
①
Remove the front panel by grasping its
upper edge and gently pulling towards
yourself.
xTo remove the front panel, the latch at the
lower edge of the panel must be released
from its position.
Latch
Page 14
Care and Maintenance
14
English
HR 950, HR 951
②
Press the tabs on the top edge to
remove the 1 Pre-filter.
Tabs
③
First remove the 2 CD Carbon filter and
then the 3 Anti-microbial True HEPA
filter by pulling on the numbered tags at
the top of each filter.
For optimal performance, only genuine Winix filters should be
used with this unit.
FILTER CARE
Page 15

Care and Maintenance
15
English
HR 950, HR 951
2.
Cleaning the Pre-filter
Intervals between filter cleanings may vary depending on the air quality.
Use a vacuum cleaner or soft brush to clean the Pre-filter. If it is
excessively dirty, wash with room temperature water.
xUse only water, do not use volatile substances such as alcohol or acetone.
If the pre-filter becomes damaged or in any way needs replacement:
Please contact Winix
(877)-699-4649
www.winixamerica.com
Do not use benzene, alcohol, or other volatile fluids, which may
cause damage or discoloration.
The Pre-filter is reusable after cleaning, ensuring it has
completely dried.
Do not use hot water over 104°F or volatile fluids such as paint
thinner.
After washing the pre-filter, allow it to dry completely in a wellventilated area. Otherwise, it may develop a bad odor.
FILTER CARE
Page 16

Care and Maintenance
16
English
HR 950, HR 951
3.
Filter Assembly and Replacement
Filters should be re-installed in the reverse order of their removal.
①
Insert the replacement
3 Anti-microbial True HEPA filter (rear)
2 CD Carbon filter (middle)
xRemove the protective plastic wrap from
new lters. Operating the unit without
removing the protective plastic wrap may
cause abnormal noise, deformation, or re as
a result of overheating.
3 Anti-microbial
True HEPA filter
2 CD Carbon
filter
②
Insert the 1 Pre-filter (front).
xTo install the pre-lter, insert bottom tabs
into the slots on either side of the lower part
of the unit, then rotate upward to insert the
upper tabs into the slots at the top part of
the unit until both sides audibly click into
place.
③
Replace the front panel by first inserting
the latch at the bottom edge into the
base of the unit, then rotate the panel
upward toward the top of the unit until
it magnetically snaps closed.
FILTER CARE
Page 17

Care and Maintenance
17
English
HR 950, HR 951
④
After replacing the filters, power on the
unit. Once the unit running, press and
hold the RESET button for 5 seconds.
4.
Cleaning the Dust Sensor
For optimal performance of the Dust Sensor, which detects airborne dust and
ultrafine particles, clean it every two months. Clean it more frequently when the unit
is running in a place with high dust levels.
①
Open the Dust Sensor cover.
②
Use a damp cotton swab to wipe the
lens and intake area of the Dust Sensor.
xTo clean the sensor area, use only water. Do
not use volatile substances such as alcohol
or acetone.
Lens
Cotton
swab
③
Wipe away any remaining moisture with
a dry cotton swab.
SMART SENSOR CARE
5 seconds
Page 18

Care and Maintenance
18
English
HR 950, HR 951
④
Close the Dust Sensor cover.
xThe Dust Sensor cover may be cleaned using
a vacuum cleaner.
Cleaning the exterior and interior
Cleaning the exterior
Wipe with a soft damp cloth using room
temperature water. Afterwards, wipe it
down with a clean dry cloth.
xFor optimal performance, clean the front
panel 1-2 times a month.
Cleaning the interior
Open the front panel and clean the
interior with a vacuum cleaner.
xFor optimal performance, clean the interior
1-2 times a month.
When cleaning the unit, always unplug the power cord first and
then wait until the unit has cooled off.
Never disassemble, repair or modify this unit yourself
Do not use flammable sprays or liquid detergents
Do not allow children to clean or maintain the unit
Before cleaning or maintaining, ensure unit is off and unplugged
CLEANING CARE
5.
Page 19

Troubleshooting | Other
19
English
HR 950, HR 951
Problem Check / Actions to take
It does not turn on
at all.
▶
Is there a power outage?
Check to see if other lights and electrical
equipment are working and try again.
It doesn’t work in Auto
mode.
▶
Has Auto mode been selected?
Press the Mode button until Auto mode is
selected.
▶
Is the sensor blocked or clogged?
Clear the sensor using a vacuum cleaner.
view page 17
It vibrates and makes a
lot of noise.
▶
Is it running on a slanted surface?
Move the unit to a hard, flat area of the floor.
FREQUENTLY ASKED QUESTIONS
Page 20

Other | Troubleshooting
20
English
HR 950, HR 951
Problem Check / Actions to take
The power plug and
outlet feel hot.
▶
Is the plug securely plugged in?
Make sure the plug is properly plugged into the
outlet.
There is a strange
smell.
▶
Is it being used in a place with a lot of smoke,
dust, or odors?
xClean the air intakes on the front sides of the unit
and clean the pre-lter.
xContact customer service to conrm the exact
cause.
xReplace the CD Carbon lter and Anti-microbial True
HEPA lter.
The product is not
purifying the air
enough.
▶
Is the Check Filter indicator light on?
Replace the filters as required.
FREQUENTLY ASKED QUESTIONS
Page 21

Troubleshooting | Other
21
English
HR 950, HR 951
P
Model Name HR950, HR951
Power Voltage
AC120V, 60Hz
Power Rate
90W
Room, Capacity in Sq. Ft.
400 sq. ft.
Weight
18.7 lbs
Dimensions
16.3in(W) x 9.6in(D) x 23.6in(H)
Replacement Filter
Filter J / Item: 117130
Pre-Filter
Part: 4521-0010-00
UNIT SPECIFICATIONS
The exterior, design, and product specifications may be changed to improve
product performance without prior notice.
Warning: Change or modifications to this unit not expressly approved by the party responsible for
compliance could void the user's authority to operate the equipment.
Note: This equipment has been tested and found to comply with the limits for a Class B digital device,
pursuant to Part 15 of the FCC Rules. These limits are designed to provide reasonable protection against
harmful interference in a residential installation. This equipment generates, uses and can radiate radio
frequency energy and, if not installed and used in accordance with the instructions, and may cause harmful
interference to radio communications. However, there is no guarantee that interference will not occur in a
particular installation. If this equipment does cause harmful interference to radio or television reception,
which can be determined by turning the equipment off and on, the user is encouraged to try to correct the
interference by one or more of the following measures.
x
x
Reorient or relocate the receiving antenna.
x
x
Increase the separation between the equipment and receiver.
x
x
Connect the equipment into an outlet on a circuit dierent from that to which the receiver is connected.
x
x
Consult the dealer or on experienced radio/TV technician for help.
This device complies with Industry Canada's license-exempt RSSs. Operation is subject to the following two
conditions:
x
x
This device may not cause interference; and
x
x
This device must accept any interference, including interference that may cause undesired operation of the
device.
Page 22

22
English
HR 950, HR 951
SAFETY INSTRUCTIONS
Thank you for purchasing a Winix air purifier. This product is for household use only.
IMPORTANT CAUTIONS FOR
USING YOUR AIR PURIFIER
WARNING: Follow the instructions in
this manual to reduce the risk of
electric shock, short circuit, and/or fire.
x
x
Do not repair or modify the unit unless
specically recommended in this manual.
All other repairs should be completed by
a qualied technician.
x
x
The plug for this unit is polarized with
one blade wider than the other. Do not
force the plug into an electrical outlet. Do
not alter the plug in any way. If the does
not t into the outlet, reverse the plug.
If it still does not t, contact a qualied
technician to install a proper outlet.
x
x
Do not use if the power cord or plug is
damaged or the connection to the wall
outlet is loose.
x
x
Use AC 120V only.
x
x
Do not damage, break, forcefully bend,
pull, twist, bundle, coat, pinch, or place
heavy objects on the power cord.
x
x
Periodically remove dust from the power
plug. This will reduce the risk of shock due
to humidity build up.
x
x
If the power plug is damaged, it must
be replaced by the manufacturer or a
qualied technician.
x
x
Remove the power plug from the outlet
before cleaning the unit. When removing
the power plug, grasp by holding the
plug itself, never hold by the cord.
x
x
Remove the power plug from the outlet
when not in use.
x
x
Do not handle the power plug with wet
hands.
x
x
Do not operate the unit when using
indoor smoke-generating insecticides.
x
x
Do not clean unit with benzene or paint
thinner. Do not spray insecticides on the
unit.
x
x
Do not use the unit where it is humid or
where the unit may become wet, such as
the bathroom.
x
x
Do not insert ngers or foreign objects
into air intake or outlet.
x
x
Do not use the unit near ammable
gases. Do not use near cigarettes, incense,
or other spark-creating items.
x
x
Unit will not remove carbon monoxide
emitted from heating appliances or other
sources.
x
x
Do not block the intake or outlet vents.
x
x
Do not use near hot objects, such as a
stove.
x
x
Do not use where the unit may come into
contact with steam.
x
x
Do not use the unit on its side.
x
x
Keep away from products that generate
oily residue, such as a deep fryer.
x
x
Do not use detergent to clean the unit.
x
x
Do not operate without a lter.
x
x
Do not wash and reuse the True HEPA
Filter or the CD Carbon Filter.
x
x
Hold the handle on the back of the unit
to transport.
x
x
Do not hold by the front panel.
IMPORTANT PRECAUTIONS FOR
USING YOUR AIR PURIFIER
WARNING
This product contains chemicals
known to the State of California to
cause cancer and birth defects or
other reproductive harm.
Page 23

23
English
HR 950, HR 951
The terms of the warranty are as follows.
1.
This product is manufactured under stringent quality control and
inspections.
2.
Warranty void if product failure is a result of negligence or misuse by the
consumer, shipping and service fees may be incurred even during the
warranty period.
3.
The warranty must be presented upon bringing the product for service.
4.
Store the warranty in a safe place, as it cannot be reissued.
5.
This warranty is valid only in the USA and Canada.
Product Name
Air Purifier
Model Name
HR950, HR951
Purchase Date
Warranty period
Two (2) years
Place of purchase
Place of purchase Tel.
Customer
Address
Name
Tel.
After purchase, be sure to complete all of the above information.
PRODUCT WARRANTY
Page 24

To expedite service, please specify the model name and number, the
nature of the problem, your contact information, and your address.
x Dedicated Call Center : (877) 699-4649
x Website : www.winixamerica.com
160201 Rev.A
Developed in partnership with
Drexel University
(Philadelphia, PA, USA)
Contact for product
related inquiries and
customer service
Page 25

HR950, HR951
Manuel d'utilisation
xVeuillez lire et suivre toutes les consignes de sécurité et les
instructions du manuel avant d'utiliser cet appareil.
xLa garantie du produit est imprimée au dos de ce guide.
Veuillez donc conserver celui-ci dans un endroit sûr an de
pouvoir vous y reporter ultérieurement.
xCe produit est fabriqué pour être utilisé uniquement aux
États-Unis/au Canada
Modèle
Manuel
d'entretien et
d'utilisation
PURIFICATEUR D'AIR
WINIX
Page 26

26
Français
HR 950, HR 951
SOMMAIRE
Ce produit est adapté au 120V uniquement.
Français 25
Espanol 49
Configuration
Où l'utiliser 29
Installation des filtres 30
Consignes de sécurité et mises en garde
Sécurité er mises en garde 32
Utilisation
Première utilisation 33
Modes de fonctionnement 34
Fonctions et réglages 35
Entretien et maintenance
Entretien des filtres 37
Entretien du capteur intelligent 41
Consignes d'entretien 42
Dépannage
Foire aux questions (FAQ) 43
Spécifications de l'appareil 45
Garantie du produit 47
Purification de l'air en 5 étapes 27
Commandes 28
Page 27

27
Français
HR 950, HR 951
CONTENU DE L'EMBALLAGE
WINIX AIR CLEANER
Model
Use & Care
Guide
HR950, HR951
Please read and follow all safety rules and instructions in
this manual before operating.
The product warranty is printed on the back of this guide,
so please keep it in a safe place for future use.
This product is manufactured for use only in USA.
Produit
Pré-filtre / Filtre à charbon CD/
Filtre True HEPA à revêtement antimicrobien
(inclus dans le produit.)
Manuel d'utilisation
PlasmaWave®
4 à revêtement antimicrobien
3 Filtre True HEPA
2 Filtre à charbon avec enduit
de désodorisation (CD)
1 Pré-filtre
PURIFICATION DE L'AIR EN 5 ÉTAPES
non amovible
remplaçable
lavable
remplaçable
5
Page 28

28
Français
HR 950, HR 951
Sortie
d'air
Capteur de lumière
Détecte la quantité de lumière
ambiante dans l'environnement,
en vue d'ajuster la luminosité des
voyants LED.
Indicateur de
minuterie
Si une minuterie a été réglée,
le voyant LED indique la
durée de fonctionnement
déterminée.
Indicateur PlasmaWave®
Indique si le PlasmaWave® est
activé ou désactivé
Capteur
intelligent
Détecte
automatiquement la
qualité de l'air ambiant.
Indicateur
Verrouillage enfant
Un voyant LED indique si
le mode Verrouillage
enfant est activé ou
désactivé.
Bouton Verrouillage enfant
Maintenir enfoncé pendant 3 secondes
pour activer ou désactiver le mode
Verrouillage enfant.
Bouton Mode / Vitesse de
ventilation
Le fait d'appuyer sur le bouton Mode
permet au voyant LED Mode de faire
déler les diérents réglages. (Auto,
Veille, Lent, Modéré, Élevé, Turbo)
Bouton
d'alimentation
Allume ou éteint
l'appareil.
Bouton Minuterie /
Qualité de l'air
Appuyer pour parcourir les
options et régler la durée de
fonctionnement désirée (1h, 4h,
8h, [SANS MINUTERIE]).
Maintenir enfoncé pendant 3
secondes pour activer ou
désactiver le voyant Qualité de
l'air.
Bouton PlasmaWave®
Active ou désactive le PlasmaWave®
Indicateur de
vérification du filtre
Un voyant LED indique
quand il est temps de
remplacer le filtre.
Bouton de réinitialisation
Après avoir remplacé un filtre,
appuyer sur le bouton RESET pendant
au moins 5 secondes.
COMMANDES
Page 29

Installation | Configuration
29
Français
HR 950, HR 951
AVERTISSEMENT
Suivez ces instructions pour réduire le risque
de blessure grave voire mortelle et limiter le
risque d'endommager l'appareil.
OÙ L'UTILISER
Ne pas utiliser en présence de vapeurs ou
fumées industrielles ou de grandes
quantités de poussière métallique.
Ne pas installer dans tout type de véhicule à
moteur ou de transport (camions, bateaux,
navires, etc.)
Ne pas placer à proximité de matières
inflammables (aérosols, carburant, gaz, etc.)
Ne pas placer en dessous d'une prise
électrique
Ne pas placer près d'éléments chauffants
Ne pas placer dans un endroit à forte
teneur en gaz nocifs
Ne pas positionner l'appareil face au vent
Ne pas placer dans des endroits
excessivement humides où l'appareil
pourrait prendre l'humidité
Laisser un espace de 12 in à 18 in entre les téléviseurs, radios et autres appareils
électroniques car les interférences
Placer à l'intérieur, à l'écart de la lumière directe du soleil
une exposition en plein soleil peut entraîner un dysfonctionnement ou une panne du produit.
Poser uniquement sur des surfaces dures et planes
car des surfaces fragiles ou inclinées peuvent provoquer des bruits anormaux et des vibrations.
Cet appareil n'est pas prévu pour la préservation de documents ou la conservation
d'œuvres d'art.
électromagnétiques de certains d'entre eux peuvent entraîner un dysfonctionnement du produit.
Page 30

30
Configuration | Installation
Français
HR 950, HR 951
①
Enlever le panneau frontal en
l'attrapant par le bord supérieur et en
le tirant doucement vers vous.
xPour enlever le panneau frontal, il faut
d'abord débloquer le crochet situé au
niveau du bord inférieur du panneau.
Crochet
②
Enlever les filtres de l'appareil. Ils sont
protégés par un emballage plastique.
③
Retirer les filtres de leur emballage
plastique de protection.
xFaire fonctionner l'appareil sans retirer les
ltres de leur emballage plastique peut
provoquer des bruits anormaux, une
déformation ou un feu en raison d'une
surchaue.
④
Installer les filtres de façon qu'ils
soient fermement en place.
Les filtres doivent être installés dans cet
ordre:
3 Filtre True HEPA antimicrobien
(arrière)
2 Filtre à charbon CD (milieu)
1 Pré-filtre (devant)
xPour installer le pré-ltre, insérer les
languettes du bas dans les fentes situées
de chaque côté de la partie inférieure de
l'appareil, puis retourner pour insérer les
languettes du haut dans les fentes situées
dans la partie supérieure de l'appareil. Le
clip de fermeture s'enclenche avec un
bruit nettement audible.
3 Filtre True
HEPA à revêtement
antimicrobien
2
Filtre à
charbon CD
1 Pré-filtre
INSTALLATION DES FILTRES
Ce produit est livré avec tous les filtres requis. L'emballage plastique de protection doit
être enlevé des filtres avant utilisation.
Faire fonctionner l'appareil sans avoir enlevé l'emballage plastique peut entraîner
une défaillance du produit.
Débrancher et vérifier que l'appareil est éteint avant d'installer les filtres.
L'appareil s'éteint automatiquement dès que le panneau frontal est ouvert.
Page 31

Installation | Configuration
31
Français
HR 950, HR 951
⑤
Remettre en place le panneau frontal
en commençant par insérer le crochet
du bord inférieur dans le socle de
l'appareil, puis en retournant le
panneau pour que la fermeture
magnétique s'effectue dans la partie
supérieure de l'appareil.
⑥
Quand entretenir et remplacer les
filtres:
Filtre
Témoin
lumineux
Quand
entretenir
Quand
remplacer
1 Pré-filtre
Aucun
Nettoyer une fois
tous les 14 jours
Permanent
2
Filtre à charbon CD
Ne peut PAS être
LAVÉ
Durée
maximale de
12 mois
3 Filtre True HEPA à
revêtement
antimicrobien
Les intervalles de remplacement de filtre peuvent varier en fonction de
l'environnement.
Pour une utilisation optimale, le fait de laver le pré-filtre une fois tous les 14 jours
peut prolonger la durée de vie des autres filtres.
▶
Consulter les pages 37 à 41 pour des informations détaillées sur
l'entretien des filtres et la façon de les remplacer.
Pour acheter des filtres de rechange Winix :
(877)-699-4649
www.winixamerica.com
INSTALLATION DES FILTRES
this unit
is compatible
with this
filter
ITEM: 117130
FILTER
J
Page 32

Consignes de sécurité | Fonctionnement
32
Français
HR 950, HR 951
SÉCURITÉ ET MISES EN GARDE
Avant d'utiliser cet appareil, lisez attentivement et suivez ces consignes de sécurité et
mises en garde afin d'éviter tout endommagement et garantir un fonctionnement sûr.
Vérifier que les filtres sont insérés avant de mettre l'appareil en marche
la mise en marche de l'appareil sans les filtres peut réduire sa durée de vie et provoquer un choc électrique ou une
blessure.
S'assurer que des objets étrangers ne sont PAS insérés dans les orifices de l'appareil
les objets peuvent inclure des épingles, tiges et pièces.
Ne toucher aucune partie à l'intérieur de l'appareil avec les mains mouillées
car la haute tension peut provoquer un choc électrique.
Do not use the unit as a step stool or place heavy objects on it
personal injury may occur or product failure and deformation.
S'assurer que les entrées et sorties de l'appareil ne se retrouvent pas obstruées
toute obstruction risque d'entraîner une augmentation de la température interne et provoquer une défaillance et une
déformation du produit.
Ne pas tirer sur le cordon d'alimentation
pour débrancher l'appareil
Ne pas toucher la fiche secteur avec les
mains mouillées
Ne pas brancher d'autres appareils sur la
même prise ou alimentation électrique
Débrancher l'appareil en cas d'inutilisation
pendant une période prolongée
Ne pas nouer le cordon d'alimentation
quand l'appareil est en marche
Ne pas débrancher ou déplacer l'appareil
uand il est en marche
En cas d'immersion de l'appareil dans l'eau,
le débrancher et contacter le service
après-vente
Le fait de courber, tirer, tordre, nouer,
incer avec force le cordon ou de poser
es objets lourds dessus peut
'endommager
AVERTISSEMENT
Suivez ces instructions pour réduire le risque
de blessure grave voire mortelle et limiter le
risque d'endommager l'appareil.
Page 33

Fonctionnement du purificateur d'air | Fonctionnement
33
Français
HR 950, HR 951
①
Brancher l'appareil à une prise électrique.
xLes voyants du panneau de commande s'allument puis s'éteignent.
②
Appuyer sur le bouton [Power]
▶
Pendant les 4 premières minutes de
l'allumage, le voyant Qualité de l'air
clignote car les capteurs intelligents
mesurent la qualité de l'air environnant,
puis le mode de fonctionnement
normal démarre.
③
Lors de la mise en route de l'appareil, le mode par défaut qui s'affiche
est Auto avec PlasmaWave® activé
x
En mode Auto, la vitesse de ventilation s'ajuste automatiquement en fonction de la
qualité de l'air environnant.
x
PlasmaWave® est activé pour éliminer les contaminants dangereux en suspension dans
l'air.
▶
En mode Auto, la vitesse de ventilation se réduit
automatiquement pour passer à Faible au fur et à mesure que la
qualité de l'air s'améliore.
▶
Quand l'appareil est en marche, il émet un son aigu ou
bourdonnement. Le son provient des grandes particules passant
dans le PlasmaWave®, il est normal et ne signifie pas que l'appareil
est défaillant. Pour désactiver le PlasmaWave®, voir page 35.
PREMIÉRE UTILISATION
Page 34

Fonctionnement | Fonctionnement du purificateur d'air
34
Français
HR 950, HR 951
5.
Mode Auto
Active le fonctionnement automatique basé sur les capteurs intelligents de qualité de
l'air intégrés à l'appareil.
①
Appuyer sur le bouton Mode pour sélectionner le mode Auto.
xLe voyant LED Mode indique quand le mode « Auto » a été sélectionné et
lance la mise en marche.
xLe fait d'appuyer sur le bouton Mode permet de faire déler les diérents
modes. (Auto, Veille, Lent, Modéré, Élevé, Turbo).
▶
▶
En mode Auto, la vitesse de ventilation s'ajuste automatiquement
en fonction de la qualité de l'air environnant. La vitesse de
ventilation se réduit automatiquement au fur et à mesure que la
qualité de l'air s'améliore. Si la qualité de l'air environnant diminue,
la vitesse de ventilation augmente automatiquement.
▶
Lors du démarrage de l'appareil, le Mode Auto est activé et la
vitesse de ventilation réglée sur Lent.
6.
Mode Veille
①
Appuyer sur le bouton Mode pour
sélectionner le mode Veille.
xLe voyant LED Mode indique quand le mode
« Veille » a été sélectionné et lance la mise en
marche.
▶
Quand le Mode Veille est sélectionné,
la vitesse de ventilation est
automatiquement réglée sur Lent. Il
est possible de changer la vitesse de
ventilation en appuyant sur le
bouton (Mode) Vitesse de ventilation.
▶
Quand le Mode Veille est activé, le
voyant Qualité de l'air est désactivé.
AUTO ET VEILLE
Le fait d'appuyer sur le bouton Mode permet au voyant LED Mode de faire déler
les diérents réglages. (Auto, Veille, Lent, Modéré, Élevé, Turbo).
Page 35

Fonctionnement du purificateur d'air | Fonctionnement
35
Français
HR 950, HR 951
7.
Mode Manuel (réglage de la vitesse de ventilation)
L'utilisateur peut opter pour un réglage manuel de la vitesse de ventilation : Lent,
Modéré, Élevé ou Turbo.
①
Appuyer sur le bouton Mode pour
sélectionner la vitesse de ventilation
désirée.
xLe voyant LED Mode indique la vitesse de
ventilation sélectionnée et lance la mise en marche.
▶
Quand le Mode Manuel est utilisé, les modes Auto et Veille sont
automatiquement désactivés.
8.
Minuterie
La minuterie peut être réglée quand vous voulez faire fonctionner l'appareil pendant
une période de temps déterminée.
①
Sélectionner la période désirée en appuyant
sur le bouton Minuterie.
xLe voyant LED Minuterie indique la durée de
fonctionnement sélectionnée.
xLe fait d'appuyer sur le bouton Minuterie permet
au voyant LED Minuterie de faire déler les diérents
réglages. (1h, 4h, 8h, [SANS MINUTERIE]).
9.
PlasmaWave®
Le PlasmaWave® est activé par défaut à chaque fois que
l'appareil est mis en marche.
①
Appuyer sur le bouton Plasma après
l'allumage pour activer ou désactiver
cette fonction.
▼
MODE MANUEL, MINUTERIE ET PLASMAWAVE®
Le fait d'appuyer sur le bouton Mode permet au voyant LED Mode de faire déler
les diérents réglages. (Auto, Veille, Lent, Modéré, Élevé, Turbo)
Page 36

Fonctionnement | Fonctionnement du purificateur d'air
36
Français
HR 950, HR 951
10.
Verrouillage enfant
Cette fonction empêche les enfants de modifier le panneau de commande.
①
Maintenir enfoncé le bouton
Verrouillage enfant pendant 3
secondes pour activer ou désactiver
cette fonction.
xQuand l'indicateur Verrouillage enfant est
allumé, la fonction est activée.
xQuand la fonction Verrouillage enfant est
activée, le panneau de commande est
verrouillé et les réglages ne peuvent pas
être modiés.
x
Pour la désactiver, maintenir enfoncé le
bouton Verrouillage enfant à nouveau
pendant 3 secondes.
11.
Voyant LED qualité de L'air
Le voyant LED Qualité de l'air peut être allumé ou éteint.
①
Pour allumer ou éteindre le voyant LED
Qualité de l'air, maintenir enfoncé le
bouton Minuterie pendant 3 secondes.
x
Quand il est allumé, le voyant LED indique la
qualité de l'air environnant actuelle selon trois
niveaux : BLEU (bon), ORANGE (moyen),
ROUGE (médiocre)
▶
Quand le Mode Auto est activé, le voyant LED Qualité de l'air peut
être allumé ou pas, ceci dépendant de la quantité de lumière
ambiante dans la pièce.
▶
Quand le Mode Veille est activé, le voyant Qualité de l'air est
éteint.
VERROUILLAGE ENFANT, VOYANT LED QUALITÉ
DE L'AIR
3 seconds
▶
Air Quality Indicator
3 secondes
Page 37

Entretien et maintenance
37
Français
HR 950, HR 951
1.
Changement des filtres
Lorsque l'indicateur LED vérification du filtre est activé, il est temps de remplacer à la
fois le filtre HEPA anti-microbienne et filtres CD carbone.
Filtre Témoin lumineux
Quand
entretenir
Quand
remplacer
1 Pré-filtre
Aucun
Nettoyer une
fois tous les 14
jours
Permanent
2
Filtre à charbon CD
Ne peut PAS
être LAVÉ
Durée
maximale de
12 mois
3 Filtre True HEPA à
revêtement
antimicrobien
Les intervalles de remplacement de filtre peuvent varier en fonction de
l'environnement.
Pour une utilisation optimale, le fait de laver le pré-filtre une fois tous les 14 jours
peut prolonger la durée de vie des autres filtres.
ENTRETIEN DES FILTRES
Enlèvement des filtres
S'assurer que l'appareil est éteint et débranché avant d'enlever les filtres.
L'appareil s'éteint automatiquement dès que le panneau frontal est ouvert.
①
Enlever le panneau frontal en l'attrapant
par le bord supérieur et en le tirant
doucement vers vous.
xPour enlever le panneau frontal, il faut
d'abord débloquer le crochet situé au
niveau du bord inférieur du panneau.
Crochet
Page 38

Entretien et maintenance
38
Français
HR 950, HR 951
②
Appuyer sur les languettes du bord
supérieur pour enlever le pré-filtre 1.
Tabs
③
Enlever d'abord le filtre à charbon CD 2
puis le filtre True HEPA antimicrobien 3
en tirant sur les languettes numérotées
en haut de chaque filtre.
Pour une performance optimale, utiliser uniquement des filtres
Winix d'origine avec cet appareil.
ENTRETIEN DES FILTRES
Page 39

Entretien et maintenance
39
Français
HR 950, HR 951
2.
Nettoyage du pré-filtre
Les intervalles de nettoyage du pré-filtre peuvent varier en fonction de la qualité de
l'air.
Utiliser un aspirateur ou une brosse souple pour nettoyer le pré-filtre.
Si celui-ci est très encrassé, le laver dans de l'eau à température
ambiante.
xUtiliser seulement de l'eau, ne pas utiliser de substances volatiles telles que
l'alcool ou l'acétone.
Si le pré-filtre se détériore ou a besoin d'être remplacé:
Veuillez contacter Winix
(877)-699-4649
www.winixamerica.com
Ne pas utiliser de benzène, alcool ou autres fluides volatiles
susceptibles d'entraîner un endommagement ou une
décoloration.
Le pré-filtre est réutilisable après le nettoyage, à condition d'être
complètement sec.
Ne pas utiliser d'eau chaude dépassant 104°F ni de fluides
volatiles tels que des diluants pour peinture.
Après avoir lavé le pré-filtre, le laisser sécher complètement
dans un endroit bien ventilé. Sinon, il risque de développer une
mauvaise odeur.
ENTRETIEN DES FILTRES
Page 40

Entretien et maintenance
40
Français
HR 950, HR 951
3.
Assemblage de filtre et remplacement
Les filtres doivent être réinstallés dans l'ordre inverse de leur enlèvement.
①
Insérer le 3 filtre True Hepa
antimicrobien de rechange (arrière),
le 2 filtre à charbon CD (milieu)
xEnlever les emballages plastiques de
protection des ltres neufs. Faire fonctionner
l'appareil sans retirer les emballages
plastique de protection peut provoquer des
bruits anormaux, une déformation ou un feu
en raison d'une surchaue.
3 Filtre True
HEPA à revêtement
antimicrobien
2
Filtre à charbon
CD
②
Insérer le 1 pré-filtre (devant).
xPour installer le pré-ltre, insérer les
languettes du bas dans les fentes situées
de chaque côté de la partie inférieure de
l'appareil, puis retourner pour insérer les
languettes du haut dans les fentes situées
dans la partie supérieure de l'appareil. Le
clip de fermeture s'enclenche avec un bruit
nettement audible.
③
Remettre en place le panneau frontal en
commençant par insérer le crochet du
bord inférieur dans le socle de l'appareil,
puis en retournant le panneau pour que
la fermeture magnétique s'effectue
dans la partie supérieure de l'appareil.
ENTRETIEN DES FILTRES
Page 41

Entretien et maintenance
41
Français
HR 950, HR 951
④
Après le remplacement des filtres, le pouvoir
sur la unité. Une fois l'appareil en marche,
appuyer et maintenez le bouton RESET
pendant 5 secondes.
4.
Nettoyage du capteur de poussière
Pour une performance optimale du capteur de poussière, qui détecte la poussière les
particules ultrafines en suspension dans l'air, le nettoyer une fois tous les deux mois.
Le nettoyer plus souvent si l'appareil fonctionne dans un endroit où le niveau de
poussière est élevé.
①
Ouvrir le couvercle du capteur de
poussière.
②
Utiliser un coton-tige humidifié pour
essuyer les éléments d'optique et la
zone d'admission du capteur de
poussière.
xPour nettoyer la partie capteur, utiliser
seulement de l'eau. Ne pas utiliser de
substances volatiles telles que l'alcool ou
l'acétone.
Lens
coton-tige
③
Essuyer tout résidu d'humidité à l'aide
d'un coton-tige sec.
ENTRETIEN DU CAPTEUR INTELLIGENT
5 seconds
Page 42

Entretien et maintenance
42
Français
HR 950, HR 951
④
Fermer le couvercle du capteur de
poussière.
xLe couvercle du capteur de poussière peut
être nettoyé en utilisant un aspirateur.
Nettoyage de l'extérieur et de l'intérieur
Nettoyage de l'extérieur
Essuyer à l'aide d'un chiffon doux mouillé
avec de l'eau à température ambiante.
Ensuite, essuyer avec un chiffon sec et
propre.
xPour une performance optimale, nettoyer le
panneau de commande 1 à 2 fois par mois.
Nettoyage de l'intérieur
Ouvrir le panneau de commande et
nettoyer l'intérieur avec un aspirateur.
xPour une performance optimale, nettoyer
l'intérieur 1 à 2 fois par mois.
Lors du nettoyage de l'appareil, toujours débrancher le cordon
d'alimentation en premier lieu et attendre que l'appareil ait
refroidi.
Ne jamais démonter, réparer ou modifier vous-même cet appareil
Ne pas utiliser de détergents liquides ou d'aérosols inflammables
Ne pas laisser des enfants nettoyer ou entretenir l'appareil
Avant le nettoyage ou l'entretien, s'assurer que l'appareil est
éteint et débranché
CONSIGNES D'ENTRETIEN
5.
Page 43

Dépannage | Autre
43
Français
HR 950, HR 951
Problème Vérification / Mesures à prendre
Il ne se met pas en
marche.
▶
Y a-t-il une panne de courant?
Vérifier que l'éclairage et les autres appareils
électriques fonctionnent, puis essayer à
nouveau.
Il ne fonctionne pas en
mode Auto.
▶
Le mode Auto est-il sélectionné?
Appuyer sur le bouton Mode jusqu'à ce que le
mode Auto soit sélectionné.
▶
Le capteur est-il bloqué ou obstrué?
Nettoyer le capteur en utilisant un aspirateur,
voir page 41.
Il vibre et fait
beaucoup de bruit.
▶
Fonctionne-t-il sur une surface inclinée?
Déplacer l'appareil vers une partie du sol plus
dure et plane.
FOIRE AUX QUESTIONS (FAQ)
Page 44

Autre | Dépannage
44
Français
HR 950, HR 951
Problème Vérification / Mesures à prendre
La prise électrique et
le connecteur sont
chauds.
▶
Le connecteur est-il bien branché?
Vérifier que le connecteur est bien branché à la
prise électrique.
Il y a une odeur
étrange.
▶
Est-il utilisé dans un endroit où il y a beaucoup
de fumée, de poussière ou des odeurs fortes?
xNettoyer les admissions d'air sur le devant de
l'appareil ainsi que le pré-ltre.
xContacter le service après-vente pour expliquer la
cause exacte.
xRemplacer le ltre à charbon CD et le ltre True
HEPA antimicrobien.
L'appareil ne purifie
pas assez l'air
▶
Est-ce que le voyant de contrôle du filtre est
allumé?
Remplacer les filtres si besoin.
FOIRE AUX QUESTIONS (FAQ)
Page 45

Dépannage | Autre
45
Français
HR 950, HR 951
P
Nom du modèle HR950, HR951
Tension d'alimentation
AC120V, 60Hz
Puissance
90W
Pièce, capacité en sq. ft.
400 sq. ft.
Poids
18.7 lbs
Dimensions
16.3in(W) x 9.6in(D) x 23.6in(H)
Filtre de rechange
Filter J / Article: 117130
Pré-filtre
Pièce: 4521-0010-00
SPÉCIFICATIONS DE L'APPAREIL
L'extérieur, la conception et les spécifications du produit peuvent être modifiés sans
préavis en vue d'améliorer la performance du produit
Attention : Les changements ou modifications apportés à cet appareil, qui ne sont pas expressément
approuvés par la partie responsable de la conformité, peuvent rendre nulle l'autorité de l'utilisateur à faire
fonctionner l'appareil.
Note : Cet appareil a été testé et reconnu conforme aux normes applicables aux appareils numériques de
Classe B, en vertu de la partie 15 des directives FCC. Ces limitations sont conçues pour fournir une protection
raisonnable contre les interférences nocives dans un environnement domestique. Cet appareil génère, utilise,
et peut émettre une énergie de fréquence radio et s'il n'est pas installé correctement, il peut provoquer des
perturbations nuisibles des communications radio. Cependant, il n'est pas garanti qu'aucune interférence ne
survienne dans une installation particulière. Si cet appareil cause effectivement une perturbation nuisible de
la réception radio ou de la télévision, ce qui peut être déterminé en éteignant et en allumant l'appareil, il est
recommandé que l'utilisateur essaie de corriger l'interférence à l'aide des mesures suivantes :
x
x
Réorienter ou déplacer l'antenne de réception.
x
x
Augmenter la séparation entre l'appareil et le récepteur.
x
x
Brancher l'appareil sur une prise d'un circuit diérent de celui sur lequel le récepteur est branché.
x
x
Consulter le distributeur ou un technicien radio / TV qualié.
Cet appareil est conforme à la norme canadienne des dispositifs de radiocommunication de faible puissance
exempts de licence. Son fonctionnement est soumis aux deux conditions suivantes:
x
x
Cet appareil peut provoquer des interférences ; et
x
x
Cet appareil peut accepter toute interférence, y compris les interférences susceptibles de provoquer un
fonctionnement préjudiciable de l'appareil.
Page 46

46
Français
HR 950, HR 951
CONSIGNES DE SÉCURITÉ
Merci d'avoir acheté un purificateur d'air Winix. Cet appareil est réservé à un usage
domestique uniquement.
MISES EN GARDE IMPORTANTES
POUR UTILISER VOTRE
PURIFICATEUR D'AIR
AVERTISSEMENT : Suivre les
instructions de ce manuel pour réduire
tout risque de choc électrique, de
court-circuit, et/ou de feu;
x
x
Ne pas réparer ou modier l'appareil sauf
recommandation expresse de ce manuel.
Toutes les autres réparations doivent être
eectuées par un technicien qualié.
x
x
Le connecteur de cet appareil est polarisé,
avec une lame plus large que l'autre.
Ne pas forcer pour brancher l'appareil à
une prise. Ne pas modier le connecteur
de l'appareil. Si l'insertion dans la prise
électrique, n'est pas possible, essayer
dans l'autre sens. Si cela n'est pas possible
également, contacter un technicien
qualié pour installer une prise adaptée.
x
x
Ne pas utiliser si le câble d'alimentation
ou le connecteur est abîmé ou si la prise
murale est mal xée.
x
x
Utiliser uniquement 120 V c.a.
x
x
Ne pas abîmer, casser, plier fortement,
tirer, tordre, empaqueter, couvrir, pincer,
ou placer des objets lourds sur le câble
d'alimentation.
x
x
Enlever régulièrement la poussière de la
prise d'alimentation. Cela réduira le risque
de choc en raison d'une accumulation
d'humidité.
x
x
Si la prise d'alimentation est
endommagée, elle doit être remplacée
par le fabricant ou par un technicien
qualié.
x
x
Débrancher la che secteur de la prise
avant de nettoyer l'appareil. Lors du
débranchement de la che secteur,
attraper la che, ne jamais tirer sur le
câble.
x
x
Débrancher la che secteur de la prise
lorsque l'appareil est éteint.
x
x
Ne pas manipuler la che secteur avec les
mains mouillées.
x
x
Ne pas faire fonctionner l'appareil lors
de l'utilisation de fumigènes insecticides
intérieurs.
x
x
Ne pas nettoyer l'appareil avec du
benzène ou un diluant à peinture. Ne pas
vaporiser d'insecticides sur l'appareil.
x
x
Ne pas utiliser l'appareil dans un
environnement humide, ou dans un
endroit où il pourrait être mouillé, comme
dans une salle de bain.
x
x
Ne pas bloquer les ouvertures d'entrée ou
de sortie.
x
x
Ne pas utiliser à proximité d'objets
chauds, comme un poêle.
x
x
Ne pas utiliser là où l'appareil peut entrer
en contact avec de la vapeur.
x
x
Ne pas utiliser l'appareil sur son côté.
x
x
Le conserver à distance de produits
générant des résidus huileux, comme une
friteuse.
x
x
Ne pas nettoyer l'appareil avec du
détergent.
x
x
Ne pas faire fonctionner sans un ltre.
x
x
Ne pas nettoyer et réutiliser le ltre True
HEPA ou le ltre à charbon CD.
x
x
Tenir la poignée à l'arrière de l'appareil
pour le transporter.
x
x
Ne pas le porter par le panneau avant.
PRÉCAUTIONS IMPORTANTES
POUR UTILISER VOTRE
PURIFICATEUR D'AIR
AVERTISSEMENT
Ce produit contient des substances
chimiques reconnues dans l'État de
Californie pour causer des cancers,
des malformations congénitales ou
autres troubles de la reproduction.
x
x
Ne pas insérer les doigts ou des objets
dans l'entrée ou la sortie d'air.
x
x
Ne pas utiliser l'appareil à proximité
de gaz inammables. Ne pas l'utiliser à
proximité de cigarettes, encens, ou autres
éléments créant des étincelles.
x
x
L'appareil ne supprime pas le monoxyde
de carbone émis par les appareils de
chauages et autres sources.
Page 47

47
Français
HR 950, HR 951
Les conditions de la garantie sont les suivantes.
1.
Ce produit est fabriqué selon des normes rigoureuses de contrôle de
qualité et d'inspection.
2.
La garantie est annulée si la défaillance du produit est due à une
négligence ou une mauvaise utilisation de la part du consommateur ;
des frais d'expédition et de service peuvent être facturés, même
pendant la période de garantie.
3.
La garantie doit être présentée lors de toute réparation du produit.
4.
Conserver la garantie en lieu sûr car elle ne peut pas être délivrée à
nouveau.
5.
Cette garantie est valable uniquement aux États-Unis et au Canada.
Nom du produit
Purificateur d'air
Nom du modèle
HR950, 951
Date de l'achat
Période de garantie
Deux (2) ans
Lieu de l'achat
Tél. du lieu de l'achat
Client
Adresse
Nom
Tél.
Après l'achat, assurez-vous de compléter toutes les informations
ci-dessus.
GARANTIE DU PRODUIT
Page 48

To expedite service, please specify the model name and number, the
nature of the problem, your contact information, and your address.
x Dedicated Call Center : (877) 699-4649
x Website : www.winixamerica.com
160201 Rev.A
Developed in partnership with
Drexel University
(Philadelphia, PA, USA)
Contact for product
related inquiries and
customer service
Page 49

HR950, HR951
Manual de uso
xAntes de utilizar el producto, le rogamos lea y siga todas las
normas e instrucciones mencionadas en este manual.
xDebido a que la garantía del producto se ha impreso en la
contraportada de este manual, le rogamos lo guarde en un
lugar seguro para su uso posterior.
xEste producto se ha fabricado para su uso exclusivo en
EE.UU./CA
Modelo
Guía de uso y
cuidado
PURIFICADOR DE AIRE
WINIX
Page 50

50
Español
HR 950, HR 951
ÍNDICE
Este producto solo es apto para su uso con 120V.
Francés 25
Español 49
Ajuste
Dónde usar el producto 53
Instalación de los filtros 54
Instrucciones de seguridad
Seguridad y precauciones 56
Operación
Operación inicial 57
Modos de operación 58
Características y ajustes 59
Cuidado y mantenimiento
Cuidado del filtro 61
Cuidado del sensor inteligente 65
Limpieza 66
Solución de averías
Preguntas frecuentes 67
Especificaciones de la unidad 69
Garantía del producto 71
Purificación del aire en 5 fases 51
Controles 52
Page 51

51
Español
HR 950, HR 951
PlasmaWave®
4 tratamiento antimicrobiano
3 Filtro True HEPA
2 Filtro de carbón activo con
tratamiento de
desodorización (CD)
1 Prefiltro
PURIFICACIÓN DEL AIRE EN 5 FASES
no extraíble
extraíble
lavable
extraíble
5
CONTENIDO DEL PAQUETE
WINIX AIR CLEANER
Model
Use & Care
Guide
HR950, HR951
Please read and follow all safety rules and instructions in
this manual before operating.
The product warranty is printed on the back of this guide,
so please keep it in a safe place for future use.
This product is manufactured for use only in USA.
Producto
Prefiltro / Filtro de carbón activo CD/ Filtro
antimicrobiano True HEPA (incluido en el
producto)
Manual de uso
Page 52

52
Español
HR 950, HR 951
Salida
de aire
Sensor de luz
Detecta la cantidad de luz
ambiente del entorno, para ajustar
la luminosidad de los LED
indicadores.
Indicador del
temporizador
Si se ha ajustado el
temporizador, la luz del LED
indica el tiempo de
operación ajustado.
Indicador PlasmaWave®
Indica si el PlasmaWave® está
activado o no.
Sensor
inteligente
Detecta
automáticamente la
calidad del aire interior.
Indicador Bloqueo
para niños
La luz del LED indica si el
Bloqueo para niños está
activado o no.
Botón Bloqueo para niños
Pulse durante 3 segundos para activar
o desactivar el modo Bloqueo para
niños.
Botón Modo / Velocidad
ventilador
Cada vez que se pulse el botón
Modo, la luz del LED Modo recorrerá
los ajustes. (Auto, Sleep, Baja, Media,
Alta, Turbo)
Botón
Encendido
Enciende o apaga la
unidad.
Botón Temporizador /
Calidad del aire
Presionar para recorrer las
opciones y ajustar el tiempo de
operación deseado (1h, 4h, 8h,
[SIN TEMPORIZADOR]).
Pulse durante 3 segundos para
activar o desactivar la luz de
Calidad del aire.
Botón PlasmaWave®
Activa o desactiva el PlasmaWave®.
Indicador Controlar
el filtro
La luz del LED indica
cuándo se debe cambiar
el filtro.
Botón de reset
Después de sustituir un filtro, pulse el
botón RESET durante 5 segundos
como mínimo.
CONTROLES
Page 53

Instalación | Ajuste
53
Español
HR 950, HR 951
ADVERTENCIA
Para disminuir el riesgo de lesiones graves o
fallecimiento y reducir el riesgo de dañar la unidad,
le recomendamos siga estas instrucciones.
DÓNDE USAR EL PRODUCTO
No utilizar cerca de brumas o humos de
aceites industriales o cerca de grandes
cantidades de polvo de metal
No instalar en ningún tipo de motor o
vehículo de transporte (camiones, barcos,
naves, etc.)
No situar cerca de materiales inflamables
(aerosoles, gasolina, gases etc.)
No colocar debajo de una toma de corriente
No colocar cerca de elementos
calefactores
No colocar en una zona con cantidades
excesivas de gases nocivos
La unidad no debe colocarse de cara al
viento o una corriente de aire
No colocar en zonas excesivamente
húmedas en las que la unidad podría
mojarse
Procure que la unidad esté situada a una distancia de 12 a 18 in de televisores, radios
y otros productos electrónicos
Colocar en un recinto interior al abrigo de la luz solar directa
la exposición directa puede provocar problemas o defectos en el producto.
Colocar solo sobre superficies lisas y duras
las superficies blandas o irregulares pueden provocar vibraciones y ruidos anormales.
Esta unidad no se debe utilizar en la conservación de documentos u obras de arte
la interferencia electromagnética de ciertos productos electrónicos puede causar problemas en la unidad.
Page 54

54
Ajuste | Instalación
Español
HR 950, HR 951
①
Retire el panel frontal, cogiéndolo por
la esquina superior y tirando con
cuidado.
xPara retirar el panel frontal, debe soltar el
cierre en la esquina inferior del panel.
Cierre
②
Extraiga los filtros de la unidad, se han
envuelto en plástico para protegerlos.
③
Retire el plástico de los filtros.
xEl funcionamiento de la unidad sin haber
retirado el plástico de los ltros puede
provocar un ruido anormal, deformación
o incendio por sobrecalentamiento.
④
Instale los filtros asegurándose de
que están sujetos en su sitio.
Los filtros se deben instalar en este
orden:
3 Filtro antimicrobiano True HEPA
(detrás)
2 Filtro de carbón activo CD (en
medio)
1 Prefiltro (delante)
xPara instalar el preltro, introduzca las
pestañas inferiores en las ranuras en
ambos lados de la parte inferior de
la unidad, e incline hacia arriba para
introducir las pestañas superiores en las
ranuras de la parte superior hasta oír un
clic, indicando que están en su sitio.
3 Filtro
antimicrobiano
True HEPA
2
Filtro de
carbón activo CD
1 Prefiltro
INSTALACIÓN DE LOS FILTROS
Este producto se suministra con todos los filtros necesarios. Antes de utilizar los filtros,
deberá retirar el plástico protector.
De lo contrario, podría averiar la unidad.
Antes de instalar los filtros, asegúrese de que ha apagado y desconectado la unidad.
La unidad se apaga automáticamente al abrir el panel frontal.
Page 55

Instalación | Ajuste
55
Español
HR 950, HR 951
⑤
Vuelva a colocar el panel frontal,
introduciendo la pestaña en la esquina
inferior en la base de la unidad y
rotando, a continuación, el panel hacia
arriba hacia la parte superior de la
unidad hasta que las pestañas se
cierran magnéticamente.
⑥
Cuándo realizar un mantenimiento y
sustituir los filtros:
Filtro
Luz
indicadora
Cuándo realizar un
mantenimiento
Cuándo
sustituir
1 Prefiltro
Ninguno
Limpiar una vez cada
dos semanas
Permanente
2
Filtro de carbón activo
CD
NO se puede
LIMPIAR
Dura hasta 12
meses
3 Filtro antimicrobiano
True HEPA
Los intervalos entre la sustitución del filtro depende del ambiente.
Para un uso óptimo, limpie el prefiltro cada dos semanas; esto también alarga la
vida útil de los otros filtros.
▶
Para una información más detallada sobre el cuidado del filtro y
sobre el modo de sustituirlo, consulte las páginas 61 - 65.
Para comprar filtros Winix nuevos:
(877)-699-4649
www.winixamerica.com
INSTALACIÓN DE LOS FILTROS
this unit
is compatible
with this
filter
ITEM: 117130
FILTER
J
Page 56

Instrucciones de seguridad | Operación
56
Español
HR 950, HR 951
SEGURIDAD Y CUIDADOS
Antes de operar este equipo, lea detenidamente estas precauciones e instrucciones
de seguridad y siga las mismas para evitar daños y garantizar un uso seguro.
No desconecta la unidad tirando del cable
eléctrico
No toque el enchufe con las manos
mojadas
No conecte otros aparatos en el mismo
enchufe o toma de corriente
Desconecte la unidad si no la va a utilizar
durante un tiempo.
No ate ni anude el cable eléctrico cuando
la unidad está en funcionamiento
No desconecte o desplace la unidad
mientras está en funcionamiento
Si la unidad se inunda, desconéctela y
póngase en contacto con el servicio de
atención al cliente
El cable se pueda dañar si se dobla o
tuerce con fuerza, se tira del mismo, se
agrupa o se colocan objetos pesados
encima.
Antes de poner en marcha la unidad, compruebe que están instalados los filtros
el funcionamiento sin filtros puede acortar la vida útil de la unidad o provocar un choque eléctrico o daños.
Asegúrese de que NO se introduzcan objetos extraños en las aperturas de la unidad
algunos ejemplos de objetos son alfileres, varillas o monedas.
No toque ninguna parte del interior de la unidad con las manos húmedas
el voltaje elevado puede provocar un choque eléctrico.
Asegúrese de que no se bloquean las aperturas de entrada y salida de la unidad
el bloqueo puede provocar un aumento de la temperatura interna y causar una avería o deformación del producto.
No utilice la unidad como escalera ni coloque objetos pesados encima del mismo
esto puede provocar daños personales o la avería o deformación del producto.
ADVERTENCIA
Para disminuir el riesgo de lesiones graves o
fallecimiento y reducir el riesgo de dañar la unidad,
le recomendamos siga estas instrucciones.
Page 57

Funcionamiento del purificador de aire | Operación
57
Español
HR 950, HR 951
①
Introduzca el enchufe de la unidad en la toma de electricidad.
xLas luces del panel de control se encenderán y apagarán.
②
Pulse el botón [Power].
▶
Durante los primeros 4 minutos tras el
encendido, la luz de Calidad del aire se
enciende, ya que los sensores
inteligentes miden la calidad del aire
ambiente. Después de este plazo, se
iniciará el funcionamiento normal.
③
Al encender por primera vez la unidad, el modo se ajusta, por defecto,
a Auto con PlasmaWave® activado.
x
Cuando está en el modo Auto, la velocidad del ventilador se ajusta automáticamente
en función de la calidad del aire ambiente.
x
PlasmaWave® actúa para eliminar los contaminantes del aire nocivos.
▶
En el modo Auto, la velocidad del ventilador se reducirá
automáticamente a la posición Baja, debido a que la calidad del
aire interior va mejorando.
▶
Cuando la unidad está en funcionamiento, puede que oiga un
zumbido o sonido miliar a un gorjeo. Esto sonido se debe a las
grandes partículas que pasan por el PlasmaWave®, es algo normal
y no significa que se haya producido una avería. Para desactivar
PlasmaWave®, véase la página 59.
OPERACIÓN INICIAL
Page 58

Operación | Funcionamiento del purificador de aire
58
Español
HR 950, HR 951
5.
Modo Auto
Activa la operación Auto basándose en los Sensores inteligentes de calidad del aire de
la unidad.
①
Pulse el botón Modo para seleccionar el modo Auto.
xLa luz del LED Modo indica cuando se ha seleccionado el modo Auto y se
pone en funcionamiento.
xCada vez que se pulsa el botón Modo, se recorrerán los modos. (Auto, Sleep ,
Baja, Media, Alta, Turbo).
▶
▶
Cuando está en el modo Auto, la velocidad del ventilador se
ajusta automáticamente en función de la calidad del aire interior.
A medida que vaya mejorando la calidad del aire interior, se
reducirá automáticamente la velocidad del ventilador. A medida
que vaya empeorando la calidad del aire interior, la velocidad del
ventilador irá aumentando automáticamente.
▶
Al poner en marcha la unidad, se activa el modo Auto y la
velocidad del ventilador se ajusta Baja.
6.
Modo Sleep
①
Pulse el botón Modo para seleccionar el
modo Sleep.
x
La luz del LED modo indica cuando se ha
seleccionado el modo Sleep y se pone en
funcionamiento en dicho modo.
AUTO Y SLEEP
Cada vez que se pulse el botón Modo, la luz del LED Modo recorrerá los ajustes.
(Auto, Sleep, Baja, Media, Alta, Turbo).
▶
Al seleccionar el modo Sleep, la
velocidad del ventilador se ajusta
automáticamente a Baja. La velocidad del
ventilador se ajusta pulsando el botón
(Modo) Velocidad del ventilador.
▶
Cuando el modo Sleep esté activado, la
luz de Calidad del aire estará apagada.
Page 59

Funcionamiento del purificador de aire | Operación
59
Español
HR 950, HR 951
7.
Modo Manual (ajuste de la velocidad del ventilador)
Los usuarios pueden ajustar manualmente la velocidad del ventilador a Baja, Media,
Alta o Turbo.
①
Pulse el botón Modo para seleccionar la
velocidad deseada.
xLa luz del LED Modo indica la velocidad del
ventilador seleccionada y la unidad se pone
en funcionamiento con dicha velocidad.
▶
Al usar el modo Manual, se desactivarán automáticamente los
modos Auto y Sleep.
8.
Temporizador
El temporizador se usa para que la unidad funcione durante un periodo de tiempo
determinado.
①
Seleccione el periodo deseado pulsando el
botón Temporizador.
xLa luz del LED Temporizador indica el plazo de
operación seleccionado.
xCada vez que se pulse el botón Temporizador, el
LED luminoso Temporizador recorrerá los ajustes.
(1h, 4h, 8h, [SIN TEMPORIZADOR]).
9.
PlasmaWave®
PlasmaWave® se activa, por defecto, al encender la unidad.
①
Para activar o desactivar esta función,
pulse el botón Plasma cuando la
unidad está encendida.
▼
MODO MANUAL, TEMPORIZADOR Y PLASMAWAVE®
Cada vez que se pulse el botón Modo, la luz del LED Modo recorrerá los ajustes.
(Auto, Sleep, Baja, Media, Alta, Turbo).
Page 60

Operación | Funcionamiento del purificador de aire
60
Español
HR 950, HR 951
10.
Bloqueo para niños
Esta opción evita que los menores manipulen el panel de control.
①
Pulse el botón Bloqueo para niños
durante 3 segundos para activar o
desactivar esta opción.
xCuando el indicador de Bloqueo para
niños esté encendido, la opción estará
activada.
xCuando esta opción esté activada, el
panel de control estará bloqueado y los
ajustes no se podrán modicar.
x
Para desactivar la opción, pulse el botón
Bloqueo para niños durante 3 segundos.
11.
Luz LED Calidad del aire
El LED Calidad del aire se puede encender o apagar.
①
Para encender o apagar la luz del LED Calidad
del aire, pulse el botón Temporizador
durante 3 segundos.
x
Cuando está encendido, la luz del LED indica
la calidad actual del aire interior según tres niveles
AZUL (buena), NARANJA (regular), ROJO (pobre)
▶
Cuando esté activado el modo Auto, la luz del LED Calidad del aire
puede estar encendido o no, en función de la cantidad de luz
ambiental en el recinto.
▶
Cuando el modo Sleep está activado, el indicador de Calidad del
aire estará apagado.
BLOQUEO PARA NIÑOS, LED CALIDAD DEL AIRE
3 seconds
▶
Air Quality Indicator
3 secondes
Page 61

Cuidado y mantenimiento
61
Español
HR 950, HR 951
1.
Cuándo realizar un mantenimiento y sustituir los filtros
Cuando el LED indicador de comprobación del filtro está activado, es el momento de sustituir
tanto el True HEPA anti-microbiana y filtros de carbono de CD.
Filtro
Luz
indicadora
Cuándo realizar un
mantenimiento
Cuándo
sustituir
1 Prefiltro
Ninguno
Limpiar una vez
cada dos semanas
Permanente
2
Filtro de carbón activo
CD
NO se puede
LIMPIAR
Dura hasta 12
meses
3 Filtro antimicrobiano
True HEPA
Los intervalos entre la sustitución del filtro depende del ambiente.
Para un uso óptimo, limpie el prefiltro cada dos semanas; esto también alarga la
vida útil de los otros filtros.
CAMBIO DE FILTROS
Retirada de los filtros
Antes de retirar los filtros, asegúrese de que la unidad está apagada y desconectada.
La unidad se apaga automáticamente al abrir el panel frontal.
①
Retire el panel frontal, cogiéndolo por la
esquina superior y tirando con cuidado.
xPara retirar el panel frontal, debe soltar el
cierre en la esquina inferior del panel.
Cierre
Page 62

Cuidado y mantenimiento
62
Español
HR 950, HR 951
②
Para retirar el (1) prefiltro, pulse las
pestañas en la esquina superior.
Tabs
③
Retire primero el filtro de carbón activo
CD (2) y luego el filtro antimicrobiano
True HEPA (3) tirando de las pestañas
numeradas en la parte superior de cada
filtro.
Para un rendimiento óptimo, esta unidad solo se debe equipar
con filtros Winix auténticos.
CIUDADO DEL FILTRO
Page 63

Cuidado y mantenimiento
63
Español
HR 950, HR 951
2.
Limpieza del prefiltro
Los intervalos de limpieza del filtro varían en función de la calidad del aire.
Limpie el prefiltro con una aspiradora o un cepillo suave. Si está muy
sucio, límpielo con agua templada.
xSolo debe utilizar agua, no use sustancias volátiles, como alcohol o acetona.
Si le pré-filtre se détériore ou a besoin d'être remplacé:
Le rogamos, contacte con Winix
(877)-699-4649
www.winixamerica.com
No utilice benceno, alcohol u otros fluidos volátiles, que puedan
dañar o desteñir.
El prefiltro se puede volver a utilizar tras su limpieza siempre y
cuando esté totalmente seco.
No utilice agua caliente a una temperatura de más de 104°F o
fluidos volátiles, tales como disolventes.
Tras limpiar el prefiltro, procure que se seque totalmente en una
zona bien ventilada, ya que, de lo contrario, puede provocar un
mal olor.
CIUDADO DEL FILTRO
Page 64

Cuidado y mantenimiento
64
Español
HR 950, HR 951
3.
Montaje del filtro y sustitución
Los filtros se deben volver a instalar en el sentido inverso a su extracción.
①
Introduzca el nuevo filtro
antimicrobiano True HEPA 3 (trasero)
y el nuevo filtro de carbón activo
CD 2 (en medio)
xRetire el plástico protector de los ltros
nuevos. El funcionamiento de la unidad sin
haber retirado el plástico de los ltros puede
provocar un ruido anormal, deformación o
incendio por sobrecalentamiento.
3 filtro
antimicrobiano True
HEPA
2
filtro de carbón
activo CD
②
Introduzca el prefiltro 1 (delante).
xPara instalar el preltro, introduzca las
pestañas inferiores en las ranuras en ambos
lados de la parte inferior de la unidad,
e incline hacia arriba para introducir las
pestañas superiores en las ranuras de la parte
superior, hasta oír un clic indicando que
están en su sitio.
③
Vuelva a colocar el panel frontal,
introduciendo la pestaña en la esquina
inferior en la base de la unidad y
rotando, a continuación, el panel hacia
arriba hacia la parte superior de la
unidad hasta que las pestañas se
cierran magnéticamente.
CIUDADO DEL FILTRO
Page 65

Cuidado y mantenimiento
65
Español
HR 950, HR 951
④
Después de reemplazar los filtros, encienda
el unidad. Una vez que la unidad en
funcionamiento, pulse y mantenga pulsado
el botón RESET durante 5 segundos.
4.
Limpieza del sensor de polvo
Para que el sensor de polvo, que detecta el polvo en suspensión y las partículas
ultrafinas, funcione óptimamente, límpielo cada dos meses. Límpielo con más
frecuencia si la unidad funciona en lugares con mucho polvo.
①
Abra la cubierta del sensor de polvo.
②
Limpie la lente y la zona de entrada del
sensor con un paño de algodón
húmedo.
xLa zona del sensor solo se debe limpiar con
agua. No use sustancias volátiles, como
alcohol o acetona.
Lens
algodón húmedo.
③
Seque cualquier humedad restante con
un bastoncillo de algodón.
CIUDADO DEL SENSOR INTELIGENTE
5 seconds
Page 66

Cuidado y mantenimiento
66
Español
HR 950, HR 951
④
Abra la cubierta del sensor de polvo.
xLa cubierta del sensor de polvo se puede
limpiar con una aspiradora.
Limpieza del exterior y del interior
Limpieza del exterior
Limpie con un paño suave y húmedo
utilizando agua templada. Seque luego
con un paño seco y limpio.
xPara un rendimiento óptimo, limpie el panel
frontal 1 a 2 veces al mes.
Limpieza del interior
Abra el panel frontal y limpie el interior
con una aspiradora.
xPara un rendimiento óptimo, limpie el
interior 1 a 2 veces al mes.
Antes de limpiar la unidad, deberá desconectar siempre el cable
eléctrico y esperar a que la unidad se haya enfriado
No desmonte, ni repare, ni modifique la unidad bajo ningún
concepto
No utilice sprays inflamables ni líquidos detergentes
Procure que los menores no limpien la unidad ni realicen tareas
de mantenimiento en la misma
Antes de realizar tareas de limpieza o mantenimiento, asegúrese
de que la unidad está apagada y desconectada
LIMPIEZA
5.
Page 67

Solución de averías | Otros
67
Español
HR 950, HR 951
Problema Control / Medidas a tomar
No se enciende de
ninguna manera.
▶
¿Se ha producido un corte de electricidad?
Compruebe si otras luces y equipos eléctricos
funcionan y vuélvalo a intentar.
No funciona en modo
Auto.
▶
¿Se ha seleccionado el modo Auto?
Pulse el botón Modo hasta que se haya
seleccionado el modo Auto.
▶
¿El sensor está bloqueado o sucio?
Limpie el sensor con una aspiradora, véase la
página 65.
La unidad vibra y hace
mucho ruido.
▶
¿Está situada sobre una superficie irregular?
Coloque la unidad sobre una zona dura y lisa del
suelo.
PREGUNTAS FRECUENTES
Page 68

Otros | Solución de averías
68
Español
HR 950, HR 951
Problema Control / Medidas a tomar
El enchufe y la toma
de corriente se
calientan demasiado.
▶
¿Está bien conectado el enchufe?
Asegúrese de que el enchufe está bien
conectado a la toma.
Huele raro.
▶
¿La unidad se utiliza en un lugar con mucho
humo, polvo u olores?
xLimpie las entradas de aire en la parte frontal de la
unidad y limpie el preltro.
xContacte con el servicio de atención al cliente para
conrmar la causa exacta.
xSustituya el ltro de carbón activo CD y el ltro
antimicrobiano True HEPA.
El producto no purifica
bien el aire.
▶
¿El indicador de control del filtro está encendido?
Sustituya los filtros tal y como se recomienda.
PREGUNTAS FRECUENTES
Page 69

Solución de averías | Otros
69
Español
HR 950, HR 951
P
Nombre del modelo HR950, HR951
Voltaje
AC120V, 60Hz
Potencia
90W
Recinto, capacidad en
metros cuadrados
400 sq. ft.
Peso
18.7 lbs
Dimensiones
16.3in(W) x 9.6in(D) x 23.6in(H)
Filtro de sustitución
Filtro J / Artículo: 117130
Prefiltro
Parte: 4521-0010-00
ESPECIFICACIONES DE LA UNIDAD
El exterior, el diseño y las especificaciones del producto se pueden cambiar, sin
previo aviso, para mejorar el rendimiento del producto
Advertencia: Los cambios o modificaciones realizados en esta unidad y no aprobados explícitamente por la
parte responsable del cumplimiento, puede anular la capacidad del usuario para operar el equipo.
Atención: El equipo se ha sometido a ensayos y se ha demostrado que cumple los límites de un dispositivo
digital clase B, conforme el apartado 15 de las normas FCC (comisión federal estadounidense de
comunicaciones). Estos límites se han establecido para ofrecer una protección razonable frente a la
interferencia negativa en una instalación doméstica. Este equipo genera, utiliza y puede irradiar una energía
de radiofrecuencia y, si no se instala y usa conforme las instrucciones, puede interferir negativamente en las
comunicaciones de radio. Sin embargo, no existen garantías de que no se produzca una interferencia en una
instalación en concreto. Si este equipo provoca una interferencia negativa en la recepción de radio o
televisión, algo que se determina apagando y encendido el mismo, se recomienda al usuario que corrija la
interferencia mediante una de las medidas siguientes.
x
x
Volver a orientar o colocar la antena de recepción.
x
x
Aumentar la distancia de separación entre el equipo y el receptor.
x
x
Conectar el equipo a una toma de un circuito distinto al cual está conectado el receptor.
x
x
Solicitar ayuda al distribuidor o a un técnico de radio/televisión con experiencia.
Cet appareil est conforme à la norme canadienne des dispositifs de radiocommunication de faible puissance
exempts de licence. Son fonctionnement est soumis aux deux conditions suivantes:
x
x
Cet appareil peut provoquer des interférences ; et
x
x
Cet appareil peut accepter toute interférence, y compris les interférences susceptibles de provoquer un
fonctionnement préjudiciable de l'appareil.
Page 70

70
Español
HR 950, HR 951
INSTRUCCIONES DE SEGURIDAD
Gracias por comprar un purificador de aire Winix. Este producto solo es para uso
doméstico.
PRECAUCIONES IMPORTANTES AL
UTILIZAR SU PURIFICADOR DE
AIRE
ADVERTENCIA: Para disminuir el riesgo
de choque eléctrico, cortocircuito o
incendio, siga las instrucciones de este
manual.
x
x
No repare o modique la unidad, salvo
lo explícitamente recomendado en este
manual. Todas las reparaciones deben ser
realizadas por un técnico debidamente
cualicado.
x
x
El enchufe de esta unidad está polarizado
con una clavija más ancha que la otra.
No ejerza fuerza al introducir el enchufe
en la toma de corriente. No modique
el enchufe bajo ningún concepto. Si el
enchufe no entra en la toma de corriente,
dele la vuelta. Si aún así no entra, póngase
en contacto con un técnico cualicado
para que instale un enchufe adecuado.
x
x
No utilice la unidad, si el cable eléctrico
o el enchufe está dañado o la toma de
pared está suelta.
x
x
Solo debe usar CA 120V.
x
x
No dañe, rompa, doble con fuerza, tire,
gire, agrupe, recubra ni pinche el cable
eléctrico, ni coloque objetos pesados
encima del mismo.
x
x
Retire periódicamente el polvo del
enchufe. De este modo, se reduce el
riesgo de choque por acumulación de
humedad.
x
x
Si el enchufe está dañado, deberá ser
sustituido por el fabricante o por un
técnico cualicado.
x
x
Antes de limpiar la unidad, saque el
enchufe de la toma de corriente. Al
extraer el enchufe, deberá sujetar el
propio enchufe y no el cable.
x
x
Saque el enchufe de la toma de corriente
cuando la unidad no esté siendo usada.
x
x
No manipule el enchufe con las manos
mojadas
x
x
No ponga en funcionamiento la unidad
cuando utilice insecticidas de interior que
generan humo.
x
x
No limpie la unidad con benceno o
disolvente. No aplique insecticidas sobre
la unidad.
x
x
La unidad no se debe utilizar en recintos
húmedos o donde puede mojarse, como
los cuartos de baño.
x
x
No se deben bloquear los oricios de
entrada o salida.
x
x
No utilizar la unidad cerca de objetos
calientes, como una estufa.
x
x
La unidad no se debe utilizar en lugares
en los que pueda entrar en contacto con
vapor.
x
x
La unidad no se debe utilizar de lado.
x
x
Mantenga la unidad alejada de productos
que generan residuos aceitosos, como
una freidora.
x
x
La unidad no se debe limpiar con
detergentes.
x
x
No operar la unidad sin ltro.
x
x
No limpie el ltro True HEPA o el de
carbón activo CD, ni los vuelva a utilizar.
x
x
Para transportar la unidad, sujétela por el
asa de la parte trasera.
x
x
No la sujete por el panel frontal.
PRECAUCIONES IMPORTANTES AL
UTILIZAR SU PURIFICADOR DE
AIRE
ADVERTENCIA
Este producto contiene sustancias
químicas que, según el Estado de
California, provocan cáncer y
defectos congénitos u otros daños
reproductivos.
x
x
No introduzca los dedos u objetos
extraños en las entradas o salidas de aire.
x
x
La unidad no se debe utilizar en la
proximidad de gases inamables. No
utilizar cerca de cigarrillos, incienso u
otros artículos que produzcan chispas.
x
x
La unidad no elimina el monóxido de
carbono emitido por los aparatos de
calefacción u otras fuentes.
Page 71

71
Español
HR 950, HR 951
Las condiciones de la garantía son las siguientes.
1.
Este producto se ha fabricado bajo un control de calidad e inspecciones
estrictos.
2.
La garantía queda anulada si el defecto del producto es el resultado de
negligencia o uso inadecuado por parte del consumidor. Durante el
periodo de garantía también se puede incurrir en gastos de envío y
servicio.
3.
Al entregar el producto para su servicio, se deberá presentar la garantía.
4.
Guarde la garantía en un lugar seguro, ya que no se puede volver a
emitir.
5.
Esta garantía solo es válida en EE.UU. y Canadá.
Nombre del
producto
Purificador de aire
Nombre del modelo
HR950, 951
Fecha de adquisición
Periodo de garantía
Dos (2) años
Lugar de adquisición
Tel. lugar de
adquisición
Cliente
Domicilio
Nombre
Tel.
Asegúrese de rellenar la información anterior después de la compra.
PÁGINA DE GARANTÍA DEL PRODUCTO
Page 72

To expedite service, please specify the model name and number, the
nature of the problem, your contact information, and your address.
x Dedicated Call Center : (877) 699-4649
x Website : www.winixamerica.com
160201 Rev.A
Developed in partnership with
Drexel University
(Philadelphia, PA, USA)
Contacto para
preguntas relacionadas
con el producto y
atención al cliente
 Loading...