

Page 1

HR1000
User Manual
xPlease read and follow all safety rules and instructions in
this manual before operating.
xThe product warranty is printed on the back of this guide,
so please keep it in a safe place for future use.
Model
Use & Care
Guide
Page 2

2
English
HR 1000
CONTENTS
Set Up
Where to use 5
Installing the filters 6
Safety Instructions
Safety and Cautions 8
Operation
Initial Operation 9
Modes of Operation 10
Features and Settings 11
WINIX SMART Set Up 13
Care and Maintenance
Filter Care 14
Smart Sensor Care 18
Cleaning Care 19
Troubleshooting
Frequently Asked Questions 20
Unit Specifications 22
Product Warranty 24
5-Stage Air Purification 3
Controls 4
This product is suitable for 220 ~ 240V only.
French 25
Spanish 49
German 73
Italian 97
Dutch 121
Page 3

3
English
HR 1000
PlasmaWave®
4 Anti-microbial coated
3 True HEPA filter
2 (CD) Coated Deodorization
Carbon filter
1 Pre-filter
5-STAGE AIR PURIFICATION
non-removable
replaceable
washable
replaceable
PACKAGE CONTENTS
Product
Pre-filter/CD Carbon Filter/
Anti-microbial True HEPA filter
(Included with the product.)
Power cord with
plug
User Manual
Page 4

4
English
HR 1000
Air
Outlet
Vent
Light Sensor
Detects the amount of
ambient light within
the environment, to
adjust the brightness
of the LED indicators.
Timer Indicator
If timer has been set, the LED
light Indicates the set time of
operation.
PlasmaWave® Indicator
Indicates whether
PlasmaWave® is
enabled or disabled.
Smart Sensor
Automatically
detects indoor air
quality.
Child Lock Indicator
LED light indicates
whether Child Lock mode
is enabled or disabled.
Wi-Fi Strength Indicator
Displays the strength of the Wi-Fi
connection.
Mode / Fan Speed Button
Every time the Mode button is
pressed, the Mode LED light will
cycle through the settings. (Auto,
Sleep, Low, Medium, High, Turbo)
Power Button
Turns the unit on or
off.
Timer / Air Quality Button
Press to cycle through and set
desired length of operation (1hr,
4hr, 8hr, [NO TIMER]).
Press and hold for 3 seconds to
enable or disable the Air Quality
light.
PlasmaWave® / Child Lock Button
Enables or disables PlasmaWave®. Press and hold for 3
seconds to enable or disable the Child Lock mode.
Check Filter
Indicator
LED light indicates
when it is time to
change the filter.
Reset Button
After replacing a filter, press
the RESET button for at least
5 seconds.
CONTROLS
Wi-Fi Button
Enables or disables
Wi-Fi function.
WINIX SMART
Indicator
LED light indicates
when WINIX SMART is
active with your unit.
Page 5

Installation | Set up
5
English
HR 1000
WARNING
Follow these instructions to reduce the risk of serious
injury or death and to reduce risk of damaging the unit.
WHERE TO USE
Do not use around mist or fumes from
industrial oil or around large quantities of
metallic dust
Do not install in any sort of motor or
transport vehicle (trucks, boats, ships, etc.)
Do not place near any flammable materials
(aerosols, fuel, gases etc.)
Do not place below any electrical outlet
Do not place around heating elements
Do not place in an area with excessive
amounts of noxious gases
Do not have unit facing into wind or draft
Do not place in excessively humid areas
where unit may become wet
Allow 30 ~ 46 cm. of space between TVs, radios, and other electronic products
electromagnetic interference from certain electronics may cause product malfunction.
Place indoors away from direct sun light
direct exposure may cause product malfunction or failure.
Only place on hard, flat surfaces
flimsy or slanted surfaces may result in abnormal noise and vibrations.
This unit is not intended to be used to preserve documents or in art conservation.
Page 6

6
Set up | Installation
English
HR 1000
3 Anti-microbial
True HEPA filter
2
CD Carbon
filter
1 Pre-filter
INSTALLING THE FILTERS
This product comes with all of the required filters. The protective plastic wrap must be
removed from the filters before use.
Operating the unit without removing the plastic wrap may result in product failure.
Unplug and make sure the unit is turned off before installing filters.
The unit will automatically power off when front panel is opened.
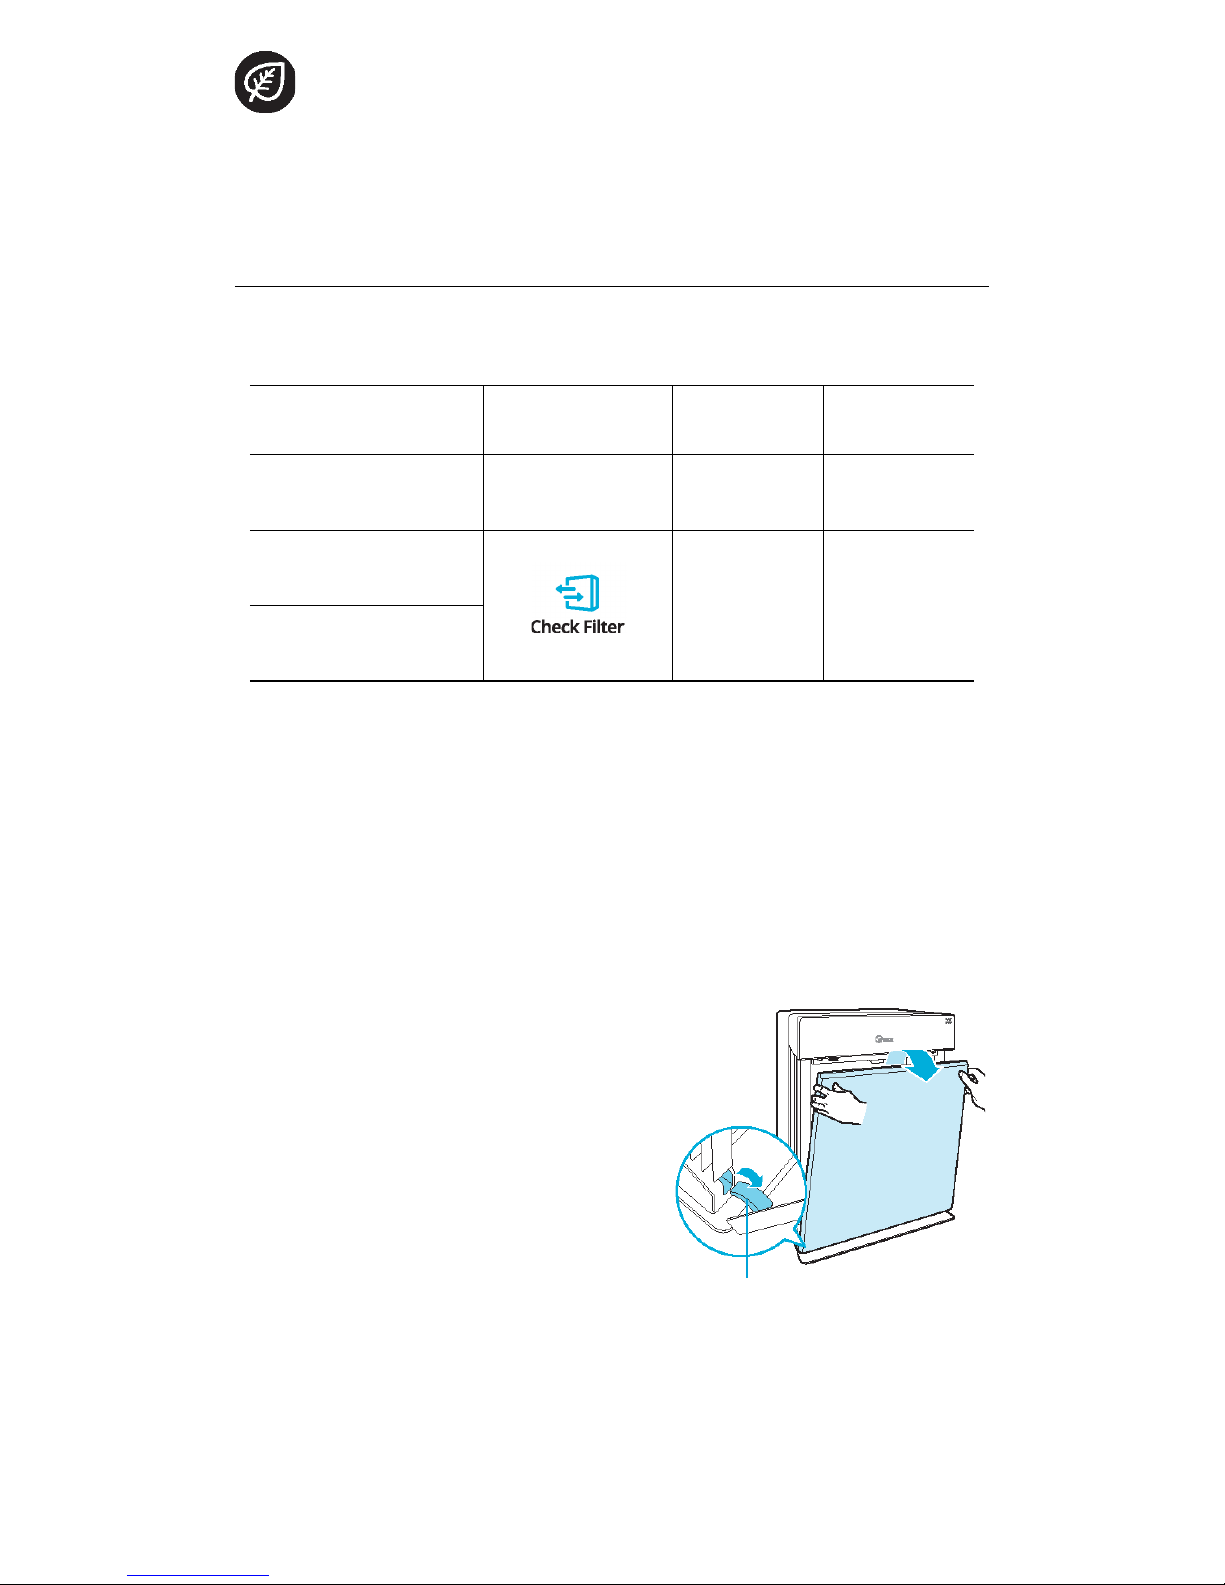
①
Remove the front panel by grasping
its upper edge and gently pulling
towards yourself.
xTo remove the front panel, the latch
at the lower edge of the panel must
be released from its position.
Latch
②
Remove the filters from the unit,
they are protected inside a plastic
wrap.
③
Remove filters from protective
plastic wrap.
xOperating the unit without removing
lters from plastic may cause abnormal
noise, deformation, or re as a result of
overheating.
④
Install the filters until they fit
securely in place.
Filters must be installed in this order:
3 Anti-microbial True HEPA filter
(rear)
2 CD Carbon filter (middle)
1 Pre-filter (front)
xTo install the pre-lter, insert
bottom tabs into the slots on either side
of the lower part of the unit, then rotate
upward to insert the upper tabs into the
slots at the top part of the unit until both
sides audibly click into place.
Page 7

Installation | Set up
7
English
HR 1000
⑤
Replace the front panel by first
inserting the latch at the bottom
edge into the base of the unit, then
rotate the panel upward toward the
top of the unit until it magnetically
snaps closed.
⑥
When to service and replace filters:
Filter Indicator Light
When to
service
When to
replace
1 Pre-filter
none
Clean once
every 14 days
Permanent
2 CD Carbon filter
Can NOT be
WASHED
Lasts up to
12 months
3 Anti-microbial True
HEPA filter
Intervals between filter replacement may vary depending on environment.
For optimal use, Pre-filter can be cleaned every 14 days which can extend the life of
other filters.
▶
Refer to pages 14-18 for detailed information on filter care and
how to replace them.
INSTALLING THE FILTERS
this unit
is compatible
with this
filter
ITEM: 117130
FILTER
J
Page 8

Safety Instructions | Operation
8
English
HR 1000
SAFETY AND CAUTIONS
Before operating this equipment, carefully read and follow these safety cautions and
instructions to avoid damage and ensure safe use.
WARNING
Follow these instructions to reduce the risk of serious
injury or death and to reduce risk of damaging the unit.
Ensure filters are inserted before running unit
running unit without filters can shorten the units life and cause electric shock or injury.
Be sure foreign objects are NOT inserted into the vents on the unit
objects can include pins, rods, and coins.
Do not touch any part of the interior of the unit with wet hands
the high voltage may cause electric shock.
Ensure unit intake and outlet vents do not become blocked
blockage may lead to increased internal temperatures causing product failure and deformation.
Do not use the unit as a step stool or place heavy objects on it
personal injury may occur or product failure and deformation.
Do not pull on the power cord when
unplugging the unit
Do not touch the plug with wet hands
Do not plug additional appliances into the
same outlet or power supply
Unplug unit when not in operation for
extended periods of time
Do not tie or knot power cord when unit
is in operation
Do not unplug or move the unit while in
operation
If the unit becomes submerged in water,
unplug it and contact customer service
Cord can become damaged by forcefully
bending, pulling, twisting, bundling,
pinching or placing heavy objects on it
If the supply cord is damaged, it must be replaced by a special cord or assembly
available from the manufacturer or its service agent.
This appliance is not intended for use by a person (including children) with reduced
physical sensory or mental capabilities, or lack of experience and knowledge, unless
they have been given supervision or instruction concerning use of the appliance by
a person responsible for their safety.
Children should be supervised to ensure that they do not play with the appliance.
Page 9

Operating the air cleaner | Operation
9
English
HR 1000
①
Insert the unit plug into an electrical outlet.
xThe Control Panel lights will turn on and o.
②
Press the [Power] button.
▶
During the first 4 minutes of power up,
the Air Quality light will flash as the
Smart Sensors measure the air quality in
the environment, after which normal
operation will begin.
③
By default, when the unit first powers on, the mode will be set to Auto
with PlasmaWave® enabled.
x
When in Auto Mode the fan speed will be automatically adjusted according to the
environments air quality.
x
PlasmaWave® works to remove harmful airborne contaminants.
▶
In Auto mode, as the indoor air quality improves, the fan speed
will automatically be reduced to Low.
▶
When the unit is running, you may hear a chirping or buzzing
sound. The sound is from large particles passing through
PlasmaWave®, it is normal and does not signify product failure. To
disable PlasmaWave®, see page 11.
INITIAL OPERATION
Page 10

Operation | Operating the air cleaner
10
English
HR 1000
1.
Auto Mode
Enables Auto operation based on the unit's air quality Smart Sensors.
①
Press the Mode button to select Auto mode.
xThe mode LED light will indicate when ‘Auto’ mode has been selected, and
operation will begin.
xEach time the Mode button is pressed, the modes will be cycled.
(
Auto, Sleep, Low, Medium, High, Turbo).
▶
▶
When in Auto Mode the fan speed is automatically adjusted
according to the indoor air quality. As the indoor air quality
improves, the fan speed will automatically be reduced. If the
indoor air quality decreases the fan speed will automatically be
increased.
▶
When unit is first started, Auto Mode is enabled and set to Low
fan speed.
2.
Sleep Mode
①
Press the Mode button to select Sleep
mode.
xThe mode LED light will indicate when ‘Sleep’
mode has been selected, and operation in
that mode will begin.
▶
When Sleep mode is selected, the fan
speed is automatically set to Low. Fan
speed can be changed by pressing the
Fan Speed (Mode) Button.
▶
When Sleep Mode is enabled, the Air
Quality light is disabled.
AUTO AND SLEEP
Every time the Mode button is pressed, the Mode LED light will cycle through the
settings.
(Auto, Sleep, Low, Medium, High, Turbo)
Page 11

Operating the air cleaner | Operation
11
English
HR 1000
3.
Manual Mode (setting fan speed)
Users can opt to manually set the fan speed to Low, Medium, High, or Turbo.
①
Press the Mode button to select
the desired fan speed.
xThe mode LED light will indicate the selected
fan speed, and operation will begin.
▶
When Manual Mode is in use, Auto and Sleep modes are
automatically disabled.
4.
Timer
The timer can be set for when you want the unit to run for a specified period of time.
①
Select the desired period by pressing
the Timer button.
xThe Timer LED light will indicate the
selected length of operation.
xEvery time the Timer button is pressed
the Timer LED light will cycle through the
settings. (
1hr, 4hr, 8hr, [NO TIMER]).
▶
The WINIX SMART app will display how much time is remaining
on the timer.
5.
PlasmaWave®
By default, PlasmaWave® is enabled whenever the unit
is powered on.
①
Press the Plasma button when the power is
on to enable or disable this feature.
MANUAL MODE, TIMER AND PLASMAWAVE®
Every time the Mode button is pressed, the Mode LED light will cycle through the
settings.
(Auto, Sleep, Low, Medium, High, Turbo)
Page 12

Operation | Operating the air cleaner
12
English
HR 1000
6.
Child Lock
This feature prevents children from tampering with the control panel.
①
Press and hold the Plasma/Child Lock
button for 3 seconds to enable or
disable the feature.
xWhen the Child Lock indicator is lit, the
feature is enabled.
xWhen Child Lock is enabled, the control
panel is locked and the settings cannot
be changed.
xTo disable, press and hold the Child Lock
button again for 3 seconds.
3 seconds
7.
Air Quality LED Light
The Air Quality LED light may be turned on or off.
①
To turn the Air Quality LED light on or off,
press and hold the Timer button for 3 seconds.
xWhen on, the LED light will indicate the
current indoor air quality according to
three levels
BLUE (good), AMBER (fair), RED (poor)
▶
When Auto Mode is enabled the Air Quality LED light may or may not
be on, depending on the amount of ambient light in the room.
▶
When Sleep Mode is activated, the Air Quality Indicator light is
turned off.
CHILD LOCK, AIR QUALITY LED
3 seconds
▶
Air Quality Indicator
Page 13

Operating the air cleaner | Operation
13
English
HR 1000
8.
Connecting to WINIX SMART
WINIX SMART allows you to conveniently control your air purifier from any location.
WINIX SMART is optimized for the following specifications. Depending
on your smart phone capabilities and service parameters, some
functions may not be supported.
Before connecting to Smart Home
• A Wi-Fi wireless router must be installed within range of the air purifier to use WINIX SMART.
• Ensure Wi-Fi router matches the following specifications; 802.11b/g/n 2.4GHZ or for a dual-band wireless
router (2.4GHz/5GHz), be sure to select 2.4GHz.
• Be sure to have the Wi-Fi password handy.
• During registration, please keep the air purifier, wireless router, and smart device within a 32 ft. radius.
• Obstacles between the air purifier, wireless router, and smart device may cause weak reception.
• Before connecting, users with a "Smart Network Switch" on their device should temporarily disable it.
• Once WINIX SMART has been connected, the "Smart Network Switch" on your device can be enabled.
Setup
①
Download the WINIX SMART app on your device.
xavailable via Google Play store or iTunes App store
②
Run the app and follow the setup
guide to connect your device to the unit.
xSelect "New Unit" and choose HR1000
to connect to this model.
xRead the notice and select "OK".
xEnter the password to your Wi-Fi network.
xPress and hold the Wi-Fi button on the unit's control
panel until it beeps. *The Wi-Fi strength indicator will begin to blink*
xConnect to the WINIX SMART network via your device's network menu.
xSelecting "Next" will connect your unit to your device.
xDene the unit settings (Name and Location).
xWhen set up is complete, the WINIX SMART Indicator will light up.
▶
The WINIX SMART Indicator will only light up when the app is in
direct use. If the app is closed it will turn off, but will light up
again when the app is re-opened.
▶
The indicator light will only light up when the mobile device and
Winix unit are on the same Wi-Fi network. It will not light up if
the device is on 3G or LTE modes.
▶
The light will turn off if the app controls another Winix unit.
WINIX SMART
ANDROID
iOS
(ICS 4.12 Jellybean or later recommended)
(6.0 or later recommended - iPhone 4S or later)
Page 14
Care and Maintenance
14
English
HR 1000
1.
Changing Filters
When the Check Filter indicator LED is on, it is time to replace both the Anti-microbial
True HEPA and CD Carbon filters.
Filter Indicator Light
When to
service
When to
replace
1 Pre-filter
-
Clean once
every 14 days
Permanent
2 CD Carbon filter
Can NOT be
WASHED
Lasts up to
12 months
3 Anti-microbial True
HEPA filter
Intervals between filter replacement may vary depending on environment.
For optimal use Pre-filter can be cleaned every 14 days which can extend the life of
other filters.
FILTER CARE
Removing Filters
Ensure the unit is turned off and unplugged before removing filters.
The unit will automatically power off when front panel is opened.
①
Remove the front panel by grasping its
upper edge and gently pulling towards
yourself.
xTo remove the front panel, the latch at the
lower edge of the panel must be released
from its position.
Latch
Page 15

Care and Maintenance
15
English
HR 1000
②
Press the tabs on the top edge to
remove the 1 Pre-filter.
Tabs
③
First remove the 2 CD Carbon filter and
then the 3 Anti-microbial True HEPA
filter by pulling on the numbered tags at
the top of each filter.
For optimal performance, only genuine Winix filters should be
used with this unit.
FILTER CARE
Page 16

Care and Maintenance
16
English
HR 1000
2.
Cleaning the Pre-filter
Intervals between filter cleanings may vary depending on the air quality.
Use a vacuum cleaner or soft brush to clean the Pre-filter. If it is
excessively dirty, wash with room temperature water.
xUse only water, do not use volatile substances such as alcohol or acetone.
If the pre-filter becomes damaged or in any way needs replacement:
Please contact your local dealer
Do not use benzene, alcohol, or other volatile fluids, which may
cause damage or discoloration.
The Pre-filter is reusable after cleaning.
Do not use hot water over 104°F or volatile fluids such as paint
thinner.
After washing the pre-filter, allow it to dry completely in a wellventilated area. Otherwise, it may develop a bad odor.
FILTER CARE
Page 17

Care and Maintenance
17
English
HR 1000
3.
Filter Assembly and Replacement
Filters should be re-installed in the reverse order of their removal.
①
Insert the replacement
3 Anti-microbial True HEPA filter (rear)
2 CD Carbon filter (middle)
xRemove the protective plastic wrap from
new lters. Operating the unit without
removing the protective plastic wrap may
cause abnormal noise, deformation, or re as
a result of overheating.
3 Anti-microbial
True HEPA filter
2 CD Carbon
filter
②
Insert the 1 Pre-filter (front).
xTo install the pre-lter, insert bottom tabs
into the slots on either side of the lower part
of the unit, then rotate upward to insert the
upper tabs into the slots at the top part of
the unit until both sides audibly click into
place.
③
Replace the front panel by first inserting
the latch at the bottom edge into the
base of the unit, then rotate the panel
upward toward the top of the unit until
it magnetically snaps closed.
FILTER CARE
Page 18

Care and Maintenance
18
English
HR 1000
④
After replacing the filters, power on the
unit. Once the unit running, press and
hold the RESET button for 5 seconds.
4.
Cleaning the Dust Sensor
For optimal performance of the Dust Sensor, which detects airborne dust and
ultrafine particles, clean it every two months. Clean it more frequently when the unit
is running in a place with high dust levels.
①
Open the Dust Sensor cover.
②
Use a damp cotton swab to wipe the
lens and intake area of the Dust Sensor.
xTo clean the sensor area, use only water. Do
not use volatile substances such as alcohol
or acetone.
Lens
Cotton
swab
③
Wipe away any remaining moisture with
a dry cotton swab.
SMART SENSOR CARE
5 seconds
Page 19

Care and Maintenance
19
English
HR 1000
④
Close the Dust Sensor cover.
xThe Dust Sensor cover may be cleaned using
a vacuum cleaner.
Cleaning the exterior and interior
Cleaning the exterior
Wipe with a soft damp cloth using room
temperature water. Afterwards, wipe it
down with a clean dry cloth.
xFor optimal performance, clean the front
panel 1-2 times a month.
Cleaning the interior
Open the front panel and clean the
interior with a vacuum cleaner.
xFor optimal performance, clean the interior
1-2 times a month.
When cleaning the unit, always unplug the power cord first and
then wait until the unit has cooled off.
Never disassemble, repair or modify this unit yourself
Do not use flammable sprays or liquid detergents
Do not allow children to clean or maintain the unit
Before cleaning or maintaining, ensure unit is off and unplugged
CLEANING CARE
5.
Page 20

Other | Troubleshooting
20
English
HR 1000
Problem Check / Actions to take
It does not turn on
at all.
▶
Is there a power outage?
Check to see if other lights and electrical
equipment are working and try again.
It doesn’t work in Auto
mode.
▶
Has Auto mode been selected?
Press the Mode button until Auto mode is
selected.
▶
Is the sensor blocked or clogged?
Clear the sensor using a vacuum cleaner.
view page 18
It vibrates and makes a
lot of noise.
▶
Is it running on a slanted surface?
Move the unit to a hard, flat area of the floor.
FREQUENTLY ASKED QUESTIONS
Page 21

Troubleshooting | Other
21
English
HR 1000
Problem Check / Actions to take
The power plug and
outlet feel hot.
▶
Is the plug securely plugged in?
Make sure the plug is properly plugged into the
outlet.
There is a strange
smell.
▶
Is it being used in a place with a lot of smoke,
dust, or odors?
xClean the air intakes on the front sides of the unit
and clean the pre-lter.
xContact customer service to conrm the exact
cause.
xReplace the CD Carbon lter and Anti-microbial True
HEPA lter.
The product is not
purifying the air
enough.
▶
Is the Check Filter indicator light on?
Replace the filters as required.
FREQUENTLY ASKED QUESTIONS
Page 22

Other | Troubleshooting
22
English
HR 1000
P
Model Name HR1000
Power Voltage
AC220 ~ 240V, 50/60Hz
Power Rate
90W
Room, Capacity in Sq. M.
40 sq. m.
Weight
8.5 kg
Dimensions
415mm(W) x 245mm(D) x 600mm(H)
Replacement Filter
Filter J / Item: 117130
Pre-Filter
Part: 4521-0010-01
UNIT SPECIFICATIONS
The exterior, design, and product specifications may be changed to improve
product performance without prior notice.
Page 23

23
English
HR 1000
The terms of the warranty are as follows.
1.
This product is manufactured under stringent quality control and
inspections.
2.
Warranty void if product failure is a result of negligence or misuse by the
consumer, shipping and service fees may be incurred even during the
warranty period.
3.
The warranty must be presented upon bringing the product for service.
4.
Store the warranty in a safe place, as it cannot be reissued.
5.
This warranty is valid only in the Europe.
Product Name
Air Purifier
Model Name
HR1000
Purchase Date
Warranty period
Two (2) years
Customer
Address
Name
Tel.
After purchase, be sure to complete all of the above information.
PRODUCT WARRANTY
Page 24

160504 Rev.B
Contact for product
related inquiries and
customer service
Developed in partnership with
Drexel University
(Philadelphia, PA, USA)
www.winixeurope.eu
Page 25

HR1000
Manuel d'utilisation
xVeuillez lire et suivre toutes les consignes de sécurité et les
instructions du manuel avant d'utiliser cet appareil.
xLa garantie du produit est imprimée au dos de ce guide.
Veuillez donc conserver celui-ci dans un endroit sûr an de
pouvoir vous y reporter ultérieurement.
Modèle
Manuel
d'entretien et
d'utilisation
PURIFICATEUR D'AIR
WINIX
Page 26

26
Français
HR 1000
SOMMAIRE
Configuration
Où l'utiliser 29
Installation des filtres 30
Consignes de sécurité et mises en garde
Sécurité er mises en garde 32
Utilisation
Première utilisation 33
Modes de fonctionnement 34
Fonctions et réglages 35
Connexion à WINIX SMART 37
Entretien et maintenance
Entretien des filtres 38
Entretien du capteur intelligent 42
Consignes d'entretien 43
Dépannage
Foire aux questions (FAQ) 44
Spécifications de l'appareil 46
Garantie du produit 47
Purification de l'air en 5 étapes 27
Commandes 28
Ce produit est adapté au 220-240V uniquement.
Français 25
Espanol 49
Allemand 73
Italien 97
Néerlandais 121
Page 27

27
Français
HR 1000
PlasmaWave®
4 à revêtement antimicrobien
3 Filtre True HEPA
2 Filtre à charbon avec enduit
de désodorisation (CD)
1 Pré-filtre
PURIFICATION DE L'AIR EN 5 ÉTAPES
non amovible
remplaçable
lavable
remplaçable
CONTENU DE L'EMBALLAGE
Produit
Pré-filtre / Filtre à charbon CD/
Filtre True HEPA à revêtement antimicrobien
(inclus dans le produit.)
Cordon
d'alimentation avec
connecteur
Manuel
d'utilisation
Page 28

28
Français
HR 1000
Sortie
d'air
Capteur de
lumière
Détecte la quantité de
lumière ambiante dans
l'environnement, en vue
d'ajuster la luminosité des
voyants LED.
Indicateur de
minuterie
Si une minuterie a été réglée,
le voyant LED indique la
durée de fonctionnement
déterminée.
Indicateur PlasmaWave®
Indique si le PlasmaWave® est activé
ou désactivé.
Capteur
intelligent
Détecte
automatiquement la
qualité de l'air
ambiant.
Indicateur
Verrouillage enfant
Un voyant LED indique si le
mode Verrouillage enfant est
activé ou désactivé.
Indicateur de puissance Wi-Fi
Affiche la force de signal de la connexion Wi-Fi.
Bouton Mode / Vitesse de
ventilation
Le fait d'appuyer sur le bouton Mode
permet au voyant LED Mode de faire
déler les diérents réglages. (Auto,
Veille, Lent, Modéré, Élevé, Turbo)
Bouton
d'alimentation
Allume ou éteint l'appareil.
Bouton Minuterie /
Qualité de l'air
Appuyer pour parcourir les options
et régler la durée de
fonctionnement désirée (1h, 4h, 8h,
[SANS MINUTERIE]).
Maintenir enfoncé pendant 3
secondes pour activer ou désactiver
le voyant Qualité de l'air.
Bouton PlasmaWave® / Verrouillage enfant
Active ou désactive le PlasmaWave®. Maintenir enfoncé pendant
3 secondes pour activer ou désactiver le mode Verrouillage
enfant.
Indicateur de
vérification
du filtre
Un voyant LED
indique quand il est
temps de
remplacer le filtre.
Bouton de
réinitialisation
Après avoir remplacé un
filtre, appuyer sur le bouton
RESET pendant au moins 5
secondes.
COMMANDES
Bouton Wi-Fi
Active ou désactive
la fonction Wi-Fi.
Indicateur de
WINIX SMART
Un voyant LED indique
si WINIX SMART est
activé sur votre
appareil.
Page 29

Installation | Configuration
29
Français
HR 1000
AVERTISSEMENT
Suivez ces instructions pour réduire le risque
de blessure grave voire mortelle et limiter le
risque d'endommager l'appareil.
OÙ L'UTILISER
Ne pas utiliser en présence de vapeurs ou
fumées industrielles ou de grandes
quantités de poussière métallique.
Ne pas installer dans tout type de véhicule à
moteur ou de transport (camions, bateaux,
navires, etc.)
Ne pas placer à proximité de matières
inflammables (aérosols, carburant, gaz, etc.)
Ne pas placer en dessous d'une prise
électrique
Ne pas placer près d'éléments chauffants
Ne pas placer dans un endroit à forte
teneur en gaz nocifs
Ne pas positionner l'appareil face au vent
Ne pas placer dans des endroits
excessivement humides où l'appareil
pourrait prendre l'humidité
Laisser un espace de 30 cm à 46 cm entre les téléviseurs, radios et autres appareils
électroniques car les interférences
Placer à l'intérieur, à l'écart de la lumière directe du soleil
une exposition en plein soleil peut entraîner un dysfonctionnement ou une panne du produit.
Poser uniquement sur des surfaces dures et planes
car des surfaces fragiles ou inclinées peuvent provoquer des bruits anormaux et des vibrations.
Cet appareil n'est pas prévu pour la préservation de documents ou la conservation
d'œuvres d'art.
électromagnétiques de certains d'entre eux peuvent entraîner un dysfonctionnement du produit.
Page 30

30
Configuration | Installation
Français
HR 1000
①
Enlever le panneau frontal en
l'attrapant par le bord supérieur et en
le tirant doucement vers vous.
xPour enlever le panneau frontal, il faut
d'abord débloquer le crochet situé au
niveau du bord inférieur du panneau.
Crochet
②
Enlever les filtres de l'appareil. Ils sont
protégés par un emballage plastique.
③
Retirer les filtres de leur emballage
plastique de protection.
xFaire fonctionner l'appareil sans retirer les
ltres de leur emballage plastique peut
provoquer des bruits anormaux, une
déformation ou un feu en raison d'une
surchaue.
④
Installer les filtres de façon qu'ils
soient fermement en place.
Les filtres doivent être installés dans cet
ordre:
3 Filtre True HEPA antimicrobien
(arrière)
2 Filtre à charbon CD (milieu)
1 Pré-filtre (devant)
xPour installer le pré-ltre, insérer les
languettes du bas dans les fentes situées
de chaque côté de la partie inférieure de
l'appareil, puis retourner pour insérer les
languettes du haut dans les fentes situées
dans la partie supérieure de l'appareil. Le
clip de fermeture s'enclenche avec un
bruit nettement audible.
INSTALLATION DES FILTRES
Ce produit est livré avec tous les filtres requis. L'emballage plastique de protection doit
être enlevé des filtres avant utilisation.
Faire fonctionner l'appareil sans avoir enlevé l'emballage plastique peut entraîner
une défaillance du produit.
Débrancher et vérifier que l'appareil est éteint avant d'installer les filtres.
L'appareil s'éteint automatiquement dès que le panneau frontal est ouvert.
3 Filtre True
HEPA à revêtement
antimicrobien
2
Filtre à
charbon CD
1 Pré-filtre
Page 31

Installation | Configuration
31
Français
HR 1000
⑤
Remettre en place le panneau
frontal en commençant par insérer
le crochet du bord inférieur dans le
socle de l'appareil, puis en
retournant le panneau pour que la
fermeture magnétique s'effectue
dans la partie supérieure de
l'appareil.
⑥
Quand entretenir et remplacer les
filtres :
Filtre
Témoin
lumineux
Quand
entretenir
Quand
remplacer
1 Pré-filtre
Aucun
Nettoyer une fois
tous les 14 jours
Permanent
2
Filtre à charbon CD
Ne peut PAS être
LAVÉ
Durée
maximale de
12 mois
3 Filtre True HEPA à
revêtement
antimicrobien
Les intervalles de remplacement de filtre peuvent varier en fonction de
l'environnement.
Pour une utilisation optimale, le fait de laver le pré-filtre une fois tous les 14 jours
peut prolonger la durée de vie des autres filtres.
▶
Consulter les pages 38 à 42 pour des informations détaillées sur
l'entretien des filtres et la façon de les remplacer.
INSTALLATION DES FILTRES
this unit
is compatible
with this
filter
ITEM: 117130
FILTER
J
Page 32

Consignes de sécurité | Fonctionnement
32
Français
HR 1000
SÉCURITÉ ET MISES EN GARDE
Avant d'utiliser cet appareil, lisez attentivement et suivez ces consignes de sécurité et
mises en garde afin d'éviter tout endommagement et garantir un fonctionnement sûr.
Ne pas tirer sur le cordon d'alimentation
pour débrancher l'appareil
Ne pas toucher la fiche secteur avec les
mains mouillées
Ne pas brancher d'autres appareils sur la
même prise ou alimentation électrique
Débrancher l'appareil en cas d'inutilisation
pendant une période prolongée
Ne pas nouer le cordon d'alimentation
quand l'appareil est en marche
Ne pas débrancher ou déplacer l'appareil
uand il est en marche
En cas d'immersion de l'appareil dans l'eau,
le débrancher et contacter le service
après-vente
Le fait de courber, tirer, tordre, nouer,
incer avec force le cordon ou de poser
es objets lourds dessus peut
'endommager
Vérifier que les filtres sont insérés avant de mettre l'appareil en marche
la mise en marche de l'appareil sans les filtres peut réduire sa durée de vie et provoquer un choc électrique ou une
blessure.
S'assurer que des objets étrangers ne sont PAS insérés dans les orifices de l'appareil
les objets peuvent inclure des épingles, tiges et pièces.
Ne toucher aucune partie à l'intérieur de l'appareil avec les mains mouillées
car la haute tension peut provoquer un choc électrique.
S'assurer que les entrées et sorties de l'appareil ne se retrouvent pas obstruées
toute obstruction risque d'entraîner une augmentation de la température interne et provoquer une défaillance et une
déformation du produit.
Ne pas se servir de l'appareil comme d'un escabeau ni y poser de objets lourds au
risque
de provoquer des blessures corporelles ou une défaillance et déformation du produit.
Si le cordon d'alimentation est endommagé, il doit être remplacé par un cordon
spécial ou un assemblage disponible auprès du fabricant ou de son distributeur.
Cet appareil n'est pas prévu pour être utilisé par des personnes (y compris des
enfants) dont les capacités physiques, sensorielles ou mentales sont réduites, ou
manquant d'expérience ou de connaissances, à moins qu'elles n'aient été informées
de la manière d'utiliser l'appareil par une personne chargée de leur sécurité.
Les enfants doivent être supervisés afin de s'assurer qu'ils ne jouent pas avec
l'appareil.
AVERTISSEMENT
Suivez ces instructions pour réduire le risque
de blessure grave voire mortelle et limiter le
risque d'endommager l'appareil.
Page 33

Fonctionnement du purificateur d'air | Fonctionnement
33
Français
HR 1000
①
Insérer le cordon d'alimentation dans la fiche ( ) située à l'arrière de
l'appareil et le brancher à une prise électrique ( ).
xLes voyants du panneau de commande s'allument puis s'éteignent.
②
Appuyer sur le bouton [Power]
▶
Pendant les 4 premières minutes de
l'allumage, le voyant Qualité de l'air
clignote car les capteurs intelligents
mesurent la qualité de l'air environnant,
puis le mode de fonctionnement
normal démarre.
③
Lors de la mise en route de l'appareil, le mode par défaut qui s'affiche
est Auto avec PlasmaWave® activé
x
En mode Auto, la vitesse de ventilation s'ajuste automatiquement en fonction de la
qualité de l'air environnant.
x
PlasmaWave® est activé pour éliminer les contaminants dangereux en suspension dans
l'air.
▶
En mode Auto, la vitesse de ventilation se réduit
automatiquement pour passer à Faible au fur et à mesure que la
qualité de l'air s'améliore.
▶
Quand l'appareil est en marche, il émet un son aigu ou
bourdonnement. Le son provient des grandes particules passant
dans le PlasmaWave®, il est normal et ne signifie pas que l'appareil
est défaillant. Pour désactiver le PlasmaWave®, voir page 35.
PREMIÉRE UTILISATION
Page 34

Fonctionnement | Fonctionnement du purificateur d'air
34
Français
HR 1000
5.
Mode Auto
Active le fonctionnement automatique basé sur les capteurs intelligents de qualité de
l'air intégrés à l'appareil.
①
Appuyer sur le bouton Mode pour sélectionner le mode Auto.
xLe voyant LED Mode indique quand le mode « Auto » a été sélectionné et
lance la mise en marche.
xLe fait d'appuyer sur le bouton Mode permet de faire déler les diérents
modes. (Auto, Veille, Lent, Modéré, Élevé, Turbo).
▶
▶
En mode Auto, la vitesse de ventilation s'ajuste automatiquement
en fonction de la qualité de l'air environnant. La vitesse de
ventilation se réduit automatiquement au fur et à mesure que la
qualité de l'air s'améliore. Si la qualité de l'air environnant diminue,
la vitesse de ventilation augmente automatiquement.
▶
Lors du démarrage de l'appareil, le Mode Auto est activé et la
vitesse de ventilation réglée sur Lent.
6.
Mode Veille
①
Appuyer sur le bouton Mode pour
sélectionner le mode Veille.
xLe voyant LED Mode indique quand le mode
« Veille » a été sélectionné et lance la mise en
marche.
▶
Quand le Mode Veille est sélectionné, la
vitesse de ventilation est
automatiquement réglée sur Lent. Il est
possible de changer la vitesse de
ventilation en appuyant sur le bouton
(Mode) Vitesse de ventilation.
▶
Quand le Mode Veille est activé, le voyant
Qualité de l'air est désactivé.
AUTO ET VEILLE
Le fait d'appuyer sur le bouton Mode permet au voyant LED Mode de faire déler
les diérents réglages. (Auto, Veille, Lent, Modéré, Élevé, Turbo)
.
Page 35

Fonctionnement du purificateur d'air | Fonctionnement
35
Français
HR 1000
7.
Mode Manuel (réglage de la vitesse de ventilation)
L'utilisateur peut opter pour un réglage manuel de la vitesse de ventilation : Lent,
Modéré, Élevé ou Turbo.
①
Appuyer sur le bouton Mode pour
sélectionner la vitesse de ventilation
désirée.
xLe voyant LED Mode indique la vitesse de
ventilation sélectionnée et lance la mise en marche.
▶
Quand le Mode Manuel est utilisé, les modes Auto et Veille sont
automatiquement désactivés.
8.
Minuterie
La minuterie peut être réglée quand vous voulez faire fonctionner l'appareil pendant
une période de temps déterminée.
①
Sélectionner la période désirée en appuyant
sur le bouton Minuterie.
xLe voyant LED Minuterie indique la durée de
fonctionnement sélectionnée.
xLe fait d'appuyer sur le bouton Minuterie permet
au voyant LED Minuterie de faire déler les diérents
réglages. (1h, 4h, 8h, [SANS MINUTERIE]).
▶
L'application WINIX SMART affiche combien de temps est restant
sur la minuterie.
9.
PlasmaWave®
Le PlasmaWave® est activé par défaut à chaque fois que
l'appareil est mis en marche.
①
Appuyer sur le bouton Plasma après l'allumage
pour activer ou désactiver cette fonction.
MODE MANUEL, MINUTERIE ET PLASMAWAVE®
Le fait d'appuyer sur le bouton Mode permet au voyant LED Mode de faire déler
les diérents réglages. (Auto, Veille, Lent, Modéré, Élevé, Turbo)
Page 36

Fonctionnement | Fonctionnement du purificateur d'air
36
Français
HR 1000
10.
Verrouillage enfant
Cette fonction empêche les enfants de modifier le panneau de commande.
①
Maintenir enfoncé le bouton Plasma/
Verrouillage enfant pendant 3
secondes pour activer ou désactiver
cette fonction.
xQuand l'indicateur Verrouillage enfant est
allumé, la fonction est activée.
xQuand la fonction Verrouillage enfant est
activée, le panneau de commande est
verrouillé et les réglages ne peuvent pas
être modiés.
x
Pour la désactiver, maintenir enfoncé le
bouton Verrouillage enfant à nouveau
pendant 3 secondes
3 secondes
11.
Voyant LED Qualité de l'air
Le voyant LED Qualité de l'air peut être allumé ou éteint.
①
Pour allumer ou éteindre le voyant LED
Qualité de l'air, maintenir enfoncé le
bouton Minuterie pendant 3 secondes.
x
Quand il est allumé, le voyant LED indique la
qualité de l'air environnant actuelle selon trois
niveaux : BLEU (bon), ORANGE (moyen),
ROUGE (médiocre)
▶
Quand le Mode Auto est activé, le voyant LED Qualité de l'air peut
être allumé ou pas, ceci dépendant de la quantité de lumière
ambiante dans la pièce.
▶
Quand le Mode Veille est activé, le voyant Qualité de l'air est
éteint.
VERROUILLAGE ENFANT, VOYANT LED QUALITÉ
DE L'AIR
3 seconds
▶
Air Quality Indicator
Page 37

Fonctionnement du purificateur d'air | Fonctionnement
37
Français
HR 1000
12.
Connexion à WINIX SMART
WINIX SMART vous permet de contrôler votre purificateur d'air de façon pratique depuis
n'importe où.
WINIX SMART est optimisé pour les spécifications suivantes. Selon les
capacités de votre smartphone et des paramètres de service, certaines
fonctions peuvent ne pas être prises en charge.
Avant la connexion à WINIX SMART
• Un routeur sans fil Wi-Fi doit être installé à portée du purificateur d'air pour utiliser WINIX SMART.
• Vérifier que le routeur Wi-Fi correspond aux spécifications suivantes : 802.11b/g/n 2,4GHZ ou pour un
routeur sans fil double bande (2,4GHz/5GHz), s'assurer de sélectionner 2,4GHz.
• S'assurer d'avoir le mot de passe Wi-Fi à portée de main.
• Durant l'enregistrement, veiller à ce que le purificateur d'air, le routeur sans fil et le dispositif intelligent
soient dans un rayon de 9,75 mètres.
• Tout obstacle entre le purificateur d'air, le routeur sans fil et le dispositif intelligent peut nuire à la
réception.
• Avant de connecter, les utilisateurs disposant d'un « Smart Network Switch » sur leur appareil doivent le
désactiver temporairement.
• Après avoir connecté WINIX SMART, la fonction « Smart Network Switch » de votre dispositif peut être à
nouveau activée.
Configuration
①
Téléchargez l'application WINIX SMART sur votre dispositif.
xdisponible sur Google Play store ou iTunes App store
②
Lancez l'application et suivez le guide de configuration
pour connecter votre dispositif à l'appareil.
xSélectionnez « Nouveau matériel » et choisissez HR1000
pour connecter à ce modèle.
xLisez la notice et sélectionnez « OK ».
xEntrez le mot de passe pour votre réseau Wi-Fi.
xMaintenez enfoncé le bouton Wi-Fi sur le panneau de commande
de l'appareil jusqu'au bip sonore. *L'indicateur de puissance
Wi-Fi commence à clignoter*
xConnectez au réseau WINIX SMART via le menu réseau de votre dispositif.
xLe fait de sélectionner « Suivant » permettra de connecter votre appareil à
votre dispositif.
xDénissez les paramètres de l'appareil (nom et localisation).
xQuand la conguration est terminée, l'indicateur WINIX SMART s'allume.
WINIX SMART
ANDROID
iOS
(ICS 4.12 Jellybean ou ultérieur recommandé)
(6.0 ou ultérieur recommandé - iPhone 4S ou ultérieur)
Page 38

Entretien et maintenance
38
Français
HR 1000
1.
Changement des filtres
Lorsque l'indicateur LED vérification du filtre est activé, il est temps de remplacer à la
fois le filtre HEPA anti-microbienne et filtres CD carbone.
Filtre Témoin lumineux
Quand
entretenir
Quand
remplacer
1 Pré-filtre
Aucun
Nettoyer une
fois tous les 14
jours
Permanent
2
Filtre à charbon CD
Ne peut PAS
être LAVÉ
Durée
maximale de
12 mois
3 Filtre True HEPA à
revêtement
antimicrobien
Les intervalles de remplacement de filtre peuvent varier en fonction de
l'environnement.
Pour une utilisation optimale, le fait de laver le pré-filtre une fois tous les 14 jours
peut prolonger la durée de vie des autres filtres.
Enlèvement des filtres
S'assurer que l'appareil est éteint et débranché avant d'enlever les filtres.
L'appareil s'éteint automatiquement dès que le panneau frontal est ouvert.
ENTRETIEN DES FILTRES
①
Enlever le panneau frontal en l'attrapant
par le bord supérieur et en le tirant
doucement vers vous.
xPour enlever le panneau frontal, il faut
d'abord débloquer le crochet situé au
niveau du bord inférieur du panneau.
Crochet
▶
L'indicateur WINIX SMART s'allume seulement quand l'application
est en cours d'utilisation. Si l'application est fermée, il s'éteindra
mais s'allumera à nouveau dès la réouverture de l'application.
▶
Le témoin n'allume lorsque l'appareil mobile et l'unité WINIX sont
sur le même réseau Wi-Fi. Il ne sera pas allumer si l'appareil est en
mode 3G ou LTE.
▶
Le voyant s'éteint si l'application contrôle une autre unité Winix.
Page 39

Entretien et maintenance
39
Français
HR 1000
②
Appuyer sur les languettes du bord
supérieur pour enlever le pré-filtre 1.
Tabs
③
Enlever d'abord le filtre à charbon CD 2
puis le filtre True HEPA antimicrobien 3
en tirant sur les languettes numérotées
en haut de chaque filtre.
Pour une performance optimale, utiliser uniquement des filtres
Winix d'origine avec cet appareil.
ENTRETIEN DES FILTRES
Page 40

Entretien et maintenance
40
Français
HR 1000
2.
Nettoyage du pré-filtre
Les intervalles de nettoyage du pré-filtre peuvent varier en fonction de la qualité de
l'air.
Utiliser un aspirateur ou une brosse souple pour nettoyer le pré-filtre.
Si celui-ci est très encrassé, le laver dans de l'eau à température
ambiante.
xUtiliser seulement de l'eau, ne pas utiliser de substances volatiles telles que
l'alcool ou l'acétone.
Si le pré-filtre se détériore ou a besoin d'être remplacé:
Veuillez contacter votre revendeur local
Ne pas utiliser de benzène, alcool ou autres fluides volatiles
susceptibles d'entraîner un endommagement ou une
décoloration.
Le pré-filtre est réutilisable après le nettoyage, à condition d'être
complètement sec.
Ne pas utiliser d'eau chaude dépassant 40°C ni de fluides
volatiles tels que des diluants pour peinture.
Après avoir lavé le pré-filtre, le laisser sécher complètement
dans un endroit bien ventilé. Sinon, il risque de développer une
mauvaise odeur.
ENTRETIEN DES FILTRES
Page 41

Entretien et maintenance
41
Français
HR 1000
3.
Assemblage de filtre et remplacement
Les filtres doivent être réinstallés dans l'ordre inverse de leur enlèvement.
①
Insérer le 3 filtre True Hepa
antimicrobien de rechange (arrière),
le 2 filtre à charbon CD (milieu)
xEnlever les emballages plastiques de
protection des ltres neufs. Faire fonctionner
l'appareil sans retirer les emballages
plastique de protection peut provoquer des
bruits anormaux, une déformation ou un feu
en raison d'une surchaue.
②
Insérer le 1 pré-filtre (devant).
xPour installer le pré-ltre, insérer les
languettes du bas dans les fentes situées
de chaque côté de la partie inférieure de
l'appareil, puis retourner pour insérer les
languettes du haut dans les fentes situées
dans la partie supérieure de l'appareil. Le
clip de fermeture s'enclenche avec un bruit
nettement audible.
③
Remettre en place le panneau frontal en
commençant par insérer le crochet du
bord inférieur dans le socle de l'appareil,
puis en retournant le panneau pour que
la fermeture magnétique s'effectue
dans la partie supérieure de l'appareil.
ENTRETIEN DES FILTRES
3 Filtre True
HEPA à revêtement
antimicrobien
2
Filtre à charbon
CD
Page 42

Entretien et maintenance
42
Français
HR 1000
④
Après le remplacement des filtres, le pouvoir
sur la unité. Une fois l'appareil en marche,
appuyer et maintenez le bouton RESET
pendant 5 secondes.
4.
Nettoyage du capteur de poussière
Pour une performance optimale du capteur de poussière, qui détecte la poussière les
particules ultrafines en suspension dans l'air, le nettoyer une fois tous les deux mois.
Le nettoyer plus souvent si l'appareil fonctionne dans un endroit où le niveau de
poussière est élevé.
①
Ouvrir le couvercle du capteur de
poussière.
②
Utiliser un coton-tige humidifié pour
essuyer les éléments d'optique et la
zone d'admission du capteur de
poussière.
xPour nettoyer la partie capteur, utiliser
seulement de l'eau. Ne pas utiliser de
substances volatiles telles que l'alcool ou
l'acétone.
Lens
coton-tige
③
Essuyer tout résidu d'humidité à l'aide
d'un coton-tige sec.
ENTRETIEN DU CAPTEUR INTELLIGENT
5 seconds
Page 43

Entretien et maintenance
43
Français
HR 1000
④
Fermer le couvercle du capteur de
poussière.
xLe couvercle du capteur de poussière peut
être nettoyé en utilisant un aspirateur.
Nettoyage de l'extérieur et de l'intérieur
Nettoyage de l'extérieur
Essuyer à l'aide d'un chiffon doux mouillé
avec de l'eau à température ambiante.
Ensuite, essuyer avec un chiffon sec et
propre.
xPour une performance optimale, nettoyer le
panneau de commande 1 à 2 fois par mois.
Nettoyage de l'intérieur
Ouvrir le panneau de commande et
nettoyer l'intérieur avec un aspirateur.
xPour une performance optimale, nettoyer
l'intérieur 1 à 2 fois par mois.
Lors du nettoyage de l'appareil, toujours débrancher le cordon
d'alimentation en premier lieu et attendre que l'appareil ait
refroidi.
Ne jamais démonter, réparer ou modifier vous-même cet appareil
Ne pas utiliser de détergents liquides ou d'aérosols inflammables
Ne pas laisser des enfants nettoyer ou entretenir l'appareil
Avant le nettoyage ou l'entretien, s'assurer que l'appareil est
éteint et débranché
CONSIGNES D'ENTRETIEN
5.
Page 44

Autre | Dépannage
44
Français
HR 1000
Problème Vérification / Mesures à prendre
Il ne se met pas en
marche.
▶
Y a-t-il une panne de courant?
Vérifier que l'éclairage et les autres appareils
électriques fonctionnent, puis essayer à
nouveau.
Il ne fonctionne pas en
mode Auto.
▶
Le mode Auto est-il sélectionné?
Appuyer sur le bouton Mode jusqu'à ce que le
mode Auto soit sélectionné.
▶
Le capteur est-il bloqué ou obstrué?
Nettoyer le capteur en utilisant un aspirateur,
voir page 42.
Il vibre et fait
beaucoup de bruit.
▶
Fonctionne-t-il sur une surface inclinée?
Déplacer l'appareil vers une partie du sol plus
dure et plane.
FOIRE AUX QUESTIONS (FAQ)
Page 45

Dépannage | Autre
45
Français
HR 1000
Problème Vérification / Mesures à prendre
La prise électrique et
le connecteur sont
chauds.
▶
Le connecteur est-il bien branché?
Vérifier que le connecteur est bien branché à la
prise électrique.
Il y a une odeur
étrange.
▶
Est-il utilisé dans un endroit où il y a beaucoup
de fumée, de poussière ou des odeurs fortes?
xNettoyer les admissions d'air sur le devant de
l'appareil ainsi que le pré-ltre.
xContacter le service après-vente pour expliquer la
cause exacte.
xRemplacer le ltre à charbon CD et le ltre True
HEPA antimicrobien.
L'appareil ne purifie
pas assez l'air
▶
Est-ce que le voyant de contrôle du filtre est
allumé?
Remplacer les filtres si besoin.
FOIRE AUX QUESTIONS (FAQ)
Page 46

Autre | Dépannage
46
Français
HR 1000
P
Nom du modèle HR1000
Tension d'alimentation
AC220 ~ 240V, 50/60Hz
Puissance
90W
Pièce, capacité en m
2
40 m
2
Poids
8.5 kg
Dimensions
415mm(W) x 245mm(D) x 600mm(H)
Filtre de rechange
Filter J / ITEM: 117130
Pré-filtre
Part: 4521-0010-01
SPÉCIFICATIONS DE L'APPAREIL
L'extérieur, la conception et les spécifications du produit peuvent être modifiés sans
préavis en vue d'améliorer la performance du produit
Page 47

47
Français
HR 1000
Les conditions de la garantie sont les suivantes.
1.
Ce produit est fabriqué selon des normes rigoureuses de contrôle de
qualité et d'inspection.
2.
La garantie est annulée si la défaillance du produit est due à une
négligence ou une mauvaise utilisation de la part du consommateur ;
des frais d'expédition et de service peuvent être facturés, même
pendant la période de garantie.
3.
La garantie doit être présentée lors de toute réparation du produit.
4.
Conserver la garantie en lieu sûr car elle ne peut pas être délivrée à
nouveau.
5.
Cette garantie est valable uniquement en Europe.
Nom du produit
Purificateur d'air
Nom du modèle
HR1000
Date de l'achat
Période de garantie
Deux (2) ans
Client
Adresse
Nom
Tél.
Après l'achat, assurez-vous de compléter toutes les informations
ci-dessus.
GARANTIE DU PRODUIT
Page 48

160504 Rev.B
Contact pour tous
renseignements
concernant le produit et
le service après-vente
Developed in partnership with
Drexel University
(Philadelphia, PA, USA)
www.winixeurope.eu
Page 49

HR1000
xAntes de utilizar el producto, le rogamos lea y siga todas las
normas e instrucciones mencionadas en este manual.
xDebido a que la garantía del producto se ha impreso en la
contraportada de este manual, le rogamos lo guarde en un
lugar seguro para su uso posterior.
Manual de uso
PURIFICADOR DE AIRE
WINIX
Modelo
Guía de uso y
cuidado
Page 50

50
Español
HR 1000
ÍNDICE
Este producto solo es apto para su uso con 220 a 240V.
Francés 25
Español 49
Alemán 73
Italiano 97
Holandés 121
Purificación del aire en 5 fases 51
Controles 52
Ajuste
Dónde usar el producto 53
Instalación de los filtros 54
Instrucciones de seguridad
Seguridad y precauciones 56
Operación
Operación inicial 57
Modos de operación 58
Características y ajustes 59
Conexión de WINIX SMART 61
Cuidado y mantenimiento
Cuidado del filtro 62
Cuidado del sensor inteligente 66
Limpieza 67
Solución de averías
Preguntas frecuentes 68
Especificaciones de la unidad 70
Garantía del producto 71
Page 51

51
Español
HR 1000
CONTENIDO DEL PAQUETE
Producto
Prefiltro / Filtro de carbón activo CD/ Filtro
antimicrobiano True HEPA (incluido en el
producto)
Cable eléctrico con
enchufe
Manual de uso
PlasmaWave®
4 tratamiento antimicrobiano
3 Filtro True HEPA
2 Filtro de carbón activo con
tratamiento de
desodorización (CD)
1 Prefiltro
PURIFICACIÓN DEL AIRE EN 5 FASES
no extraíble
extraíble
lavable
extraíble
Page 52

52
Español
HR 1000
Salida
de aire
Sensor de luz
Detecta la cantidad de luz
ambiente del entorno,
para ajustar la luminosidad
de los LED indicadores.
Indicador del
temporizador
Si se ha ajustado el
temporizador, la luz del LED
indica el tiempo de
operación ajustado.
Indicador PlasmaWave®
Indica si el PlasmaWave® está
activado o no.
Sensor
inteligente
Detecta
automáticamente la
calidad del aire
interior.
Indicador Bloqueo
para niños
La luz del LED indica si el
Bloqueo para niños está
activado o no.
Indicador de Intensidad del Wi-Fi.
Muestra la intensidad de la señal de Wi-Fi.
Botón Modo / Velocidad
ventilador
Cada vez que se pulse el botón
Modo, la luz del LED Modo recorrerá
los ajustes. (Auto, Sleep, Baja, Media,
Alta, Turbo)
Botón Encendido
Enciende o apaga la
unidad.
Botón Temporizador /
Calidad del aire
Presionar para recorrer las opciones
y ajustar el tiempo de operación
deseado (1h, 4h, 8h, [SIN
TEMPORIZADOR]).
Pulse durante 3 segundos para
activar o desactivar la luz de Calidad
del aire.
PlasmaWave® / Botón Bloqueo para niños
Activa o desactiva el PlasmaWave®. Pulse durante 3 segundos
para activar o desactivar el modo Bloqueo para niños.
Indicador
Controlar el
filtro
La luz del LED
indica cuándo se
debe cambiar el
filtro.
Botón de reset
Después de sustituir un filtro,
pulse el botón RESET durante
5 segundos como mínimo.
CONTROLES
Botón Wi-Fi
Activa o desactiva
la función Wi-Fi
WINIX SMART
La luz del indicador
LED indica cuando
está activo el WINIX
SMART en su unidad.
Page 53

Instalación | Ajuste
53
Español
HR 1000
ADVERTENCIA
Para disminuir el riesgo de lesiones graves o
fallecimiento y reducir el riesgo de dañar la unidad,
le recomendamos siga estas instrucciones.
DÓNDE USAR EL PRODUCTO
No utilizar cerca de brumas o humos de
aceites industriales o cerca de grandes
cantidades de polvo de metal
No instalar en ningún tipo de motor o
vehículo de transporte (camiones, barcos,
naves, etc.)
No situar cerca de materiales inflamables
(aerosoles, gasolina, gases etc.)
No colocar debajo de una toma de corriente
No colocar cerca de elementos
calefactores
No colocar en una zona con cantidades
excesivas de gases nocivos
La unidad no debe colocarse de cara al
viento o una corriente de aire
No colocar en zonas excesivamente
húmedas en las que la unidad podría
mojarse
Procure que la unidad esté situada a una distancia de 30 a 46 cm de televisores,
radios y otros productos electrónicos
Colocar en un recinto interior al abrigo de la luz solar directa
la exposición directa puede provocar problemas o defectos en el producto.
Colocar solo sobre superficies lisas y duras
las superficies blandas o irregulares pueden provocar vibraciones y ruidos anormales.
Esta unidad no se debe utilizar en la conservación de documentos u obras de arte
la interferencia electromagnética de ciertos productos electrónicos puede causar problemas en la unidad.
Page 54

54
Ajuste | Instalación
Español
HR 1000
①
Retire el panel frontal, cogiéndolo por
la esquina superior y tirando con
cuidado.
xPara retirar el panel frontal, debe soltar el
cierre en la esquina inferior del panel.
Cierre
②
Extraiga los filtros de la unidad, se
han envuelto en plástico para
protegerlos.
③
Retire el plástico de los filtros.
xEl funcionamiento de la unidad sin haber
retirado el plástico de los ltros puede
provocar un ruido anormal, deformación
o incendio por sobrecalentamiento.
④
Instale los filtros asegurándose de
que están sujetos en su sitio.
Los filtros se deben instalar en este
orden:
3 Filtro antimicrobiano True HEPA
(detrás)
2 Filtro de carbón activo CD (en
medio)
1 Prefiltro (delante)
xPara instalar el preltro, introduzca las
pestañas inferiores en las ranuras en
ambos lados de la parte inferior de
la unidad, e incline hacia arriba para
introducir las pestañas superiores en las
ranuras de la parte superior hasta oír un
clic, indicando que están en su sitio.
INSTALACIÓN DE LOS FILTROS
Este producto se suministra con todos los filtros necesarios. Antes de utilizar los filtros,
deberá retirar el plástico protector.
De lo contrario, podría averiar la unidad.
Antes de instalar los filtros, asegúrese de que ha apagado y desconectado la unidad.
La unidad se apaga automáticamente al abrir el panel frontal.
3 Filtro
antimicrobiano
True HEPA
2
Filtro de
carbón activo CD
1 Prefiltro
Page 55

Instalación | Ajuste
55
Español
HR 1000
⑤
Vuelva a colocar el panel frontal,
introduciendo la pestaña en la
esquina inferior en la base de la
unidad y rotando, a continuación, el
panel hacia arriba hacia la parte
superior de la unidad hasta que las
pestañas se cierran
magnéticamente.
⑥
Cuándo realizar un mantenimiento y
sustituir los filtros:
Filtro
Luz
indicadora
Cuándo realizar un
mantenimiento
Cuándo
sustituir
1 Prefiltro
Ninguno
Limpiar una vez cada
dos semanas
Permanente
2
Filtro de carbón activo
CD
NO se puede
LIMPIAR
Dura hasta 12
meses
3 Filtro antimicrobiano
True HEPA
Los intervalos entre la sustitución del filtro depende del ambiente.
Para un uso óptimo, limpie el prefiltro cada dos semanas; esto también alarga la
vida útil de los otros filtros.
▶
Para una información más detallada sobre el cuidado del filtro y
sobre el modo de sustituirlo, consulte las páginas 62 - 66.
INSTALACIÓN DE LOS FILTROS
this unit
is compatible
with this
filter
ITEM: 117130
FILTER
J
Page 56

Instrucciones de seguridad | Operación
56
Español
HR 1000
SEGURIDAD Y CUIDADOS
Antes de operar este equipo, lea detenidamente estas precauciones e instrucciones
de seguridad y siga las mismas para evitar daños y garantizar un uso seguro.
No desconecta la unidad tirando del cable
eléctrico
No toque el enchufe con las manos
mojadas
No conecte otros aparatos en el mismo
enchufe o toma de corriente
Desconecte la unidad si no la va a utilizar
durante un tiempo.
No ate ni anude el cable eléctrico cuando
la unidad está en funcionamiento
No desconecte o desplace la unidad
mientras está en funcionamiento
Si la unidad se inunda, desconéctela y
póngase en contacto con el servicio de
atención al cliente
El cable se pueda dañar si se dobla o
tuerce con fuerza, se tira del mismo, se
agrupa o se colocan objetos pesados
encima.
Antes de poner en marcha la unidad, compruebe que están instalados los filtros
el funcionamiento sin filtros puede acortar la vida útil de la unidad o provocar un choque eléctrico o daños.
Asegúrese de que NO se introduzcan objetos extraños en las aperturas de la unidad
algunos ejemplos de objetos son alfileres, varillas o monedas.
No toque ninguna parte del interior de la unidad con las manos húmedas
el voltaje elevado puede provocar un choque eléctrico.
Asegúrese de que no se bloquean las aperturas de entrada y salida de la unidad
el bloqueo puede provocar un aumento de la temperatura interna y causar una avería o deformación del producto.
No utilice la unidad como escalera ni coloque objetos pesados encima del mismo
esto puede provocar daños personales o la avería o deformación del producto.
Si el cable de suministro resulta dañado, se deberá sustituir por un cable especial o
conjunto, que se puede adquirir del fabricante o de su agente de servicio.
Este aparato no se ha diseñado para que lo usen personas (incluidos niños) con una
minusvalía física, sensorial o mental o con falta de experiencia y conocimientos, a
menos que sea bajo supervisión de una persona o siguiendo las instrucciones
relativas al uso del aparato recibidas de una persona responsable de su seguridad.
Se debe vigilar a los menores para garantizar que no jueguen con la unidad.
ADVERTENCIA
Para disminuir el riesgo de lesiones graves o
fallecimiento y reducir el riesgo de dañar la unidad,
le recomendamos siga estas instrucciones.
Page 57

Funcionamiento del purificador de aire | Operación
57
Español
HR 1000
①
Introduzca el cable eléctrico en el conector ( ) en la parte posterior
de la unidad y conecte el cable a una toma de electricidad ( ).
xLas luces del panel de control se encenderán y apagarán..
②
Pulse el botón [Power].
▶
Durante los primeros 4 minutos tras el
encendido, la luz de Calidad del aire se
enciende, ya que los sensores
inteligentes miden la calidad del aire
ambiente. Después de este plazo, se
iniciará el funcionamiento normal.
③
Al encender por primera vez la unidad, el modo se ajusta, por defecto,
a Auto con PlasmaWave® activado.
x
Cuando está en el modo Auto, la velocidad del ventilador se ajusta automáticamente
en función de la calidad del aire ambiente.
x
PlasmaWave® actúa para eliminar los contaminantes del aire nocivos.
▶
En el modo Auto, la velocidad del ventilador se reducirá
automáticamente a la posición Baja, debido a que la calidad del
aire interior va mejorando.
▶
Cuando la unidad está en funcionamiento, puede que oiga un
zumbido o sonido miliar a un gorjeo. Esto sonido se debe a las
grandes partículas que pasan por el PlasmaWave®, es algo normal
y no significa que se haya producido una avería. Para desactivar
PlasmaWave®, véase la página 59.
OPERACIÓN INICIAL
Page 58

Operación | Funcionamiento del purificador de aire
58
Español
HR 1000
5.
Modo Auto
Activa la operación Auto basándose en los Sensores inteligentes de calidad del aire de
la unidad.
①
Pulse el botón Modo para seleccionar el modo Auto.
xLa luz del LED Modo indica cuando se ha seleccionado el modo Auto y se
pone en funcionamiento.
xCada vez que se pulsa el botón Modo, se recorrerán los modos. (Auto, Sleep ,
Baja, Media, Alta, Turbo).
▶
▶
Cuando está en el modo Auto, la velocidad del ventilador se
ajusta automáticamente en función de la calidad del aire interior.
A medida que vaya mejorando la calidad del aire interior, se
reducirá automáticamente la velocidad del ventilador. A medida
que vaya empeorando la calidad del aire interior, la velocidad del
ventilador irá aumentando automáticamente.
▶
Al poner en marcha la unidad, se activa el modo Auto y la
velocidad del ventilador se ajusta Baja.
6.
Modo Sleep
①
Pulse el botón Modo para seleccionar el
modo Sleep.
x
La luz del LED modo indica cuando se ha
seleccionado el modo Sleep y se pone en
funcionamiento en dicho modo.
AUTO Y SLEEP
Cada vez que se pulse el botón Modo, la luz del LED Modo recorrerá los ajustes.
(Auto, Sleep, Baja, Media, Alta, Turbo).
▶
Al seleccionar el modo Sleep, la
velocidad del ventilador se ajusta
automáticamente a Baja. La velocidad del
ventilador se ajusta pulsando el botón
(Modo) Velocidad del ventilador.
▶
Cuando el modo Sleep esté activado, la
luz de Calidad del aire estará apagada.
Page 59

Funcionamiento del purificador de aire | Operación
59
Español
HR 1000
7.
Modo Manual (ajuste de la velocidad del ventilador)
Los usuarios pueden ajustar manualmente la velocidad del ventilador a Baja, Media,
Alta o Turbo.
①
Pulse el botón Modo para seleccionar la
velocidad deseada.
xLa luz del LED Modo indica la velocidad del
ventilador seleccionada y la unidad se pone
en funcionamiento con dicha velocidad.
▶
Al usar el modo Manual, se desactivarán automáticamente los
modos Auto y Sleep.
8.
Temporizador
El temporizador se usa para que la unidad funcione durante un periodo de tiempo
determinado.
①
Seleccione el periodo deseado pulsando el
botón Temporizador.
xLa luz del LED Temporizador indica el plazo de
operación seleccionado.
xCada vez que se pulse el botón Temporizador, el
LED luminoso Temporizador recorrerá los ajustes.
(1h, 4h, 8h, [SIN TEMPORIZADOR]).
▶
El WINIX INTELIGENTE aplicación mostrará cómo tiempo que le
queda en el temporizador.
9.
PlasmaWave®
PlasmaWave® se activa, por defecto, al encender la unidad.
①
Para activar o desactivar esta función,
pulse el botón Plasma cuando la
unidad está encendida.
MODO MANUAL, TEMPORIZADOR Y PLASMAWAVE®
Cada vez que se pulse el botón Modo, la luz del LED Modo recorrerá los ajustes.
(Auto, Sleep, Baja, Media, Alta, Turbo).
Page 60

Operación | Funcionamiento del purificador de aire
60
Español
HR 1000
10.
Bloqueo para niños
Esta opción evita que los menores manipulen el panel de control.
①
Pulse el botón Plasma/Bloqueo para
niños durante 3 segundos para activar
o desactivar esta opción.
xCuando el indicador de Bloqueo para
niños esté encendido, la opción estará
activada.
xCuando esta opción esté activada, el
panel de control estará bloqueado y los
ajustes no se podrán modicar.
x
Para desactivar la opción, pulse el botón
Bloqueo para niños durante 3 segundos.
3 secondes
11.
Luz LED Calidad del aire
El LED Calidad del aire se puede encender o apagar.
①
Para encender o apagar la luz del LED Calidad
del aire, pulse el botón Temporizador
durante 3 segundos.
x
Cuando está encendido, la luz del LED indica
la calidad actual del aire interior según tres niveles
AZUL (buena), NARANJA (regular), ROJO (pobre)
▶
Cuando esté activado el modo Auto, la luz del LED Calidad del aire
puede estar encendido o no, en función de la cantidad de luz
ambiental en el recinto.
▶
Cuando el modo Sleep está activado, el indicador de Calidad del
aire estará apagado.
BLOQUEO PARA NIÑOS, LED CALIDAD DEL AIRE
3 seconds
▶
Air Quality Indicator
Page 61

Funcionamiento del purificador de aire | Operación
61
Español
HR 1000
12.
Conexión al WINIX SMART
WINIX SMART le permite controlar cómodamente su purificador de aire desde cualquier
lugar.
WINIX SMART se ha optimizado para las siguientes especificaciones.
Dependiendo de las capacidades de su smartphone y de los
parámetros de servicio, puede que no se respalden ciertas funciones.
Antes de conectar a WINIX SMART
• Para utilizar WINIX SMART, se debe haber un router Wi-Fi dentro del alcance del purificador de aire.
• Asegúrese de que el router Wi-Fi tiene las siguientes especificaciones; 802.11b/g/n 2.4GHZ o para un
router inalámbrico de doble banda (2.4GHz/5GHz), asegúrese de seleccionar 2.4GHz.
• Procure tener a mano la contraseña del Wi-Fi.
• Durante el registro, el purificador de aire, el router inalámbrico y el smartphone deben estar situados
dentro de un radio de 9,75 m.
• Los obstáculos situados entre el purificador de aire, el router inalámbrico y el smartphone pueden
dificultar la recepción.
• Antes de establecer la conexión, los usuarios con un "Smart Network Switch" en su dispositivo, deben
desactivarlo temporalmente.
• Después de haber conectado WINIX SMART, el "Smart Network Switch" se puede volver a activar.
Ajuste
①
Bájese la aplicación WINIX SMART a su móvil.
xdisponible sur Google Play store ou iTunes App store
②
Instale la aplicación y siga las instrucciones de ajuste
para conectar su dispositivo móvil a la unidad.
xSeleccione "Unidad nueva" y elija HR1000 para conectar con
este modelo.
xLea el mensaje y seleccione "Aceptar".
xIntroduzca la contraseña de su red de Wi-.
xMantenga pulsado el botón Wi- del panel de control de
la unidad hasta que suene un pitido. *El indicador de intensidad
de la señal de Wi-Fi empezará a parpadear*
xConecte con la red WINIX SMART a través del menú red de su dispositivo.
xSeleccionando "Siguiente" conectará la unidad a su dispositivo.
xIntroduzca los ajustes de la unidad (nombre y ubicación).
xCuando el ajuste haya terminado, el indicador WINIX SMART se encenderá.
WINIX SMART
ANDROID
iOS
(ICS 4.12 Jellybean ou ultérieur recommandé)
(6.0 ou ultérieur recommandé - iPhone 4S ou ultérieur)
Page 62

Cuidado y mantenimiento
62
Español
HR 1000
1.
Cuándo realizar un mantenimiento y sustituir los filtros
Cuando el LED indicador de comprobación del filtro está activado, es el momento de sustituir
tanto el True HEPA anti-microbiana y filtros de carbono de CD.
Filtro
Luz
indicadora
Cuándo realizar
un
mantenimiento
Cuándo
sustituir
1 Prefiltro
Ninguno
Limpiar una vez
cada dos semanas
Permanente
2
Filtro de carbón activo
CD
NO se puede
LIMPIAR
Dura hasta 12
meses
3 Filtro antimicrobiano
True HEPA
Los intervalos entre la sustitución del filtro depende del ambiente.
Para un uso óptimo, limpie el prefiltro cada dos semanas; esto también alarga la
vida útil de los otros filtros.
Retirada de los filtros
Antes de retirar los filtros, asegúrese de que la unidad está apagada y desconectada.
La unidad se apaga automáticamente al abrir el panel frontal.
CAMBIO DE FILTROS
①
Retire el panel frontal, cogiéndolo por la
esquina superior y tirando con cuidado.
xPara retirar el panel frontal, debe soltar el
cierre en la esquina inferior del panel.
Cierre
▶
El indicador WINIX SMART solo se enciende cuando la aplicación
se está utilizando. Si la aplicación se cierra, la luz se apagará, pero
se volverá a encender cuando se vuelva a activar la misma.
▶
La luz indicador sólo se encenderá cuando el dispositivo móvil y
la unidad Winix están en la misma red Wi-Fi. No se encenderá si el
dispositivo está en modo 3G o LTE.
▶
La luz se apaga si la aplicación controla otra unidad Winix.
Page 63

Cuidado y mantenimiento
63
Español
HR 1000
②
Para retirar el (1) prefiltro, pulse las
pestañas en la esquina superior.
Tabs
③
Retire primero el filtro de carbón activo
CD (2) y luego el filtro antimicrobiano
True HEPA (3) tirando de las pestañas
numeradas en la parte superior de cada
filtro.
Para un rendimiento óptimo, esta unidad solo se debe equipar
con filtros Winix auténticos.
CIUDADO DEL FILTRO
Page 64

Cuidado y mantenimiento
64
Español
HR 1000
2.
Limpieza del prefiltro
Los intervalos de limpieza del filtro varían en función de la calidad del aire.
Limpie el prefiltro con una aspiradora o un cepillo suave. Si está muy
sucio, límpielo con agua templada.
xSolo debe utilizar agua, no use sustancias volátiles, como alcohol o acetona.
Si el prefiltro resulta dañado o se debe sustituir por otro motivo
Le rogamos contacte con su distribuidor local
No utilice benceno, alcohol u otros fluidos volátiles, que puedan
dañar o desteñir.
El prefiltro se puede volver a utilizar tras su limpieza siempre y
cuando esté totalmente seco.
No utilice agua caliente a una temperatura de más de 40°C o
fluidos volátiles, tales como disolventes.
Tras limpiar el prefiltro, procure que se seque totalmente en una
zona bien ventilada, ya que, de lo contrario, puede provocar un
mal olor.
CIUDADO DEL FILTRO
Page 65

Cuidado y mantenimiento
65
Español
HR 1000
3.
Montaje del filtro y sustitución
Los filtros se deben volver a instalar en el sentido inverso a su extracción.
①
Introduzca el nuevo filtro
antimicrobiano True HEPA 3 (trasero)
y el nuevo filtro de carbón activo
CD 2 (en medio)
xRetire el plástico protector de los ltros
nuevos. El funcionamiento de la unidad sin
haber retirado el plástico de los ltros puede
provocar un ruido anormal, deformación o
incendio por sobrecalentamiento.
②
Introduzca el prefiltro 1 (delante).
xPara instalar el preltro, introduzca las
pestañas inferiores en las ranuras en ambos
lados de la parte inferior de la unidad,
e incline hacia arriba para introducir las
pestañas superiores en las ranuras de la parte
superior, hasta oír un clic indicando que
están en su sitio.
③
Vuelva a colocar el panel frontal,
introduciendo la pestaña en la esquina
inferior en la base de la unidad y
rotando, a continuación, el panel hacia
arriba hacia la parte superior de la
unidad hasta que las pestañas se
cierran magnéticamente.
CIUDADO DEL FILTRO
3 filtro
antimicrobiano True
HEPA
2
filtro de carbón
activo CD
Page 66

Cuidado y mantenimiento
66
Español
HR 1000
④
Después de reemplazar los filtros, encienda
el unidad. Una vez que la unidad en
funcionamiento, pulse y mantenga pulsado
el botón RESET durante 5 segundos.
4.
Limpieza del sensor de polvo
Para que el sensor de polvo, que detecta el polvo en suspensión y las partículas
ultrafinas, funcione óptimamente, límpielo cada dos meses. Límpielo con más
frecuencia si la unidad funciona en lugares con mucho polvo.
①
Abra la cubierta del sensor de polvo.
②
Limpie la lente y la zona de entrada del
sensor con un paño de algodón
húmedo.
xLa zona del sensor solo se debe limpiar con
agua. No use sustancias volátiles, como
alcohol o acetona.
Lens
algodón húmedo.
③
Seque cualquier humedad restante con
un bastoncillo de algodón.
CIUDADO DEL SENSOR INTELIGENTE
5 seconds
Page 67

Cuidado y mantenimiento
67
Español
HR 1000
④
Abra la cubierta del sensor de polvo.
xLa cubierta del sensor de polvo se puede
limpiar con una aspiradora.
Limpieza del exterior y del interior
Limpieza del exterior
Limpie con un paño suave y húmedo
utilizando agua templada. Seque luego
con un paño seco y limpio.
xPara un rendimiento óptimo, limpie el panel
frontal 1 a 2 veces al mes.
Limpieza del interior
Abra el panel frontal y limpie el interior
con una aspiradora.
xPara un rendimiento óptimo, limpie el
interior 1 a 2 veces al mes.
Antes de limpiar la unidad, deberá desconectar siempre el cable
eléctrico y esperar a que la unidad se haya enfriado
No desmonte, ni repare, ni modifique la unidad bajo ningún
concepto
No utilice sprays inflamables ni líquidos detergentes
Procure que los menores no limpien la unidad ni realicen tareas
de mantenimiento en la misma
Antes de realizar tareas de limpieza o mantenimiento, asegúrese
de que la unidad está apagada y desconectada
LIMPIEZA
5.
Page 68

Otros | Solución de averías
68
Español
HR 1000
Problema Control / Medidas a tomar
No se enciende de
ninguna manera.
▶
¿Se ha producido un corte de electricidad?
Compruebe si otras luces y equipos eléctricos
funcionan y vuélvalo a intentar.
No funciona en modo
Auto.
▶
¿Se ha seleccionado el modo Auto?
Pulse el botón Modo hasta que se haya
seleccionado el modo Auto.
▶
¿El sensor está bloqueado o sucio?
Limpie el sensor con una aspiradora, véase la
página 66.
La unidad vibra y hace
mucho ruido.
▶
¿Está situada sobre una superficie irregular?
Coloque la unidad sobre una zona dura y lisa del
suelo.
PREGUNTAS FRECUENTES
Page 69

Solución de averías | Otros
69
Español
HR 1000
Problema Control / Medidas a tomar
El enchufe y la toma
de corriente se
calientan demasiado.
▶
¿Está bien conectado el enchufe?
Asegúrese de que el enchufe está bien
conectado a la toma.
Huele raro.
▶
¿La unidad se utiliza en un lugar con mucho
humo, polvo u olores?
xLimpie las entradas de aire en la parte frontal de la
unidad y limpie el preltro.
xContacte con el servicio de atención al cliente para
conrmar la causa exacta.
xSustituya el ltro de carbón activo CD y el ltro
antimicrobiano True HEPA.
El producto no purifica
bien el aire.
▶
¿El indicador de control del filtro está encendido?
Sustituya los filtros tal y como se recomienda.
PREGUNTAS FRECUENTES
Page 70

Otros | Solución de averías
70
Español
HR 1000
P
Nombre del modelo HR1000
Voltaje
AC220 ~ 240V, 50/60Hz
Potencia
90W
Recinto, capacidad en
metros cuadrados
40 m
2
Peso
8.5 kg
Dimensiones
415mm(W) x 245mm(D) x 600mm(H)
Filtro de sustitución
Filtro J / Artículo: 117130
Prefiltro
Parte: 4521-0010-01
ESPECIFICACIONES DE LA UNIDAD
El exterior, el diseño y las especificaciones del producto se pueden cambiar, sin
previo aviso, para mejorar el rendimiento del producto
Page 71

71
Español
HR 1000
Las condiciones de la garantía son las siguientes.
1.
Este producto se ha fabricado bajo un control de calidad e inspecciones
estrictos.
2.
La garantía queda anulada si el defecto del producto es el resultado de
negligencia o uso inadecuado por parte del consumidor. Durante el
periodo de garantía también se puede incurrir en gastos de envío y
servicio.
3.
Al entregar el producto para su servicio, se deberá presentar la garantía.
4.
Guarde la garantía en un lugar seguro, ya que no se puede volver a
emitir.
5.
Esta garantía solo es válida en Europa.
Nombre del
producto
Purificador de aire
Nombre del modelo
HR1000
Fecha de adquisición
Periodo de garantía
Dos (2) años
Cliente
Domicilio
Nombre
Tel.
Après l'achat, assurez-vous de compléter toutes les informations
ci-dessus.
PÁGINA DE GARANTÍA DEL PRODUCTO
Page 72

160504 Rev.B
Contacto para
preguntas relacionadas
con el producto y
atención al cliente
Developed in partnership with
Drexel University
(Philadelphia, PA, USA)
www.winixeurope.eu
Page 73

HR1000
xBitte lesen und befolgen Sie vor der Inbetriebnahme des
Geräts alle Sicherheitsvorschriften und Anleitungen in
diesem Handbuch.
xDie Produktgarantie ist auf der Rückseite dieses Handbuchs
abgedruckt. Bewahren Sie das Handbuch daher bitte für
die zukünftige Verwendung an einem sicheren Ort auf.
Bedienungsanleitung
WINIX LUFTREINIGER
Modell
Bedienungs- und
Wartungsanleitung
Page 74

74
Deutsch
HR 1000
INHALT
Dieses Produkt eignet
sich nur den Betrieb mit 220 - 240 V
Wechselspannung.
Französisch 25
Spanisch 49
Deutsche 73
Italienisch 97
Niederländer 121
Fünfstufige Luftreinigung 75
Bedienelemente 76
Setup
Aufstellungsort 77
Einsetzen der Filter 78
Sicherheitshinweise
Sicherheits- und Vorsichtsmaßnahmen 80
Bedienung
Erste Inbetriebnahme 81
Betriebsarten 82
Funktionen und Einstellungen 83
WINIX SMART Einrichten 85
Pflege und Wartung
Pflege der Filter 86
Smart-Sensor-Pflege 90
Reinigung Pflege 91
Fehlerbehebung
Häufig gestellte Fragen 92
Technische Daten des Geräts 94
Produktgarantie 95
Page 75

75
Deutsch
HR 1000
LIEFERUMFANG
Produkt
Vorfilter / CD-Aktivkohlefilter /
Antimikrobieller True HEPA-Filter (in dem
Produkt enthalten.)
Netzkabel mit
Netzstecker
Bedienungsanleitung
PlasmaWave®
4 Antimikrobiell beschichteter
3 True HEPA-Filter
2 Beschichteter
desodorierender
CD-Aktivkohlefilter
1 Vorfilter
FÜNFSTUFIGE LUFTREINIGUNG
Nicht entfernbar
auswechselbar
Waschbar
auswechselbar
Page 76

76
Deutsch
HR 1000
Lichtsensor
Erkennt die Lichtmenge in
der Umgebung, um die
Helligkeit der LEDAnzeigen entsprechend
anzupassen.
Timer-Anzeige
Wenn der Timer eingestellt
wurde, zeigt die LED-Lampe
die eingestellte Betriebszeit
an.
PlasmaWave®-Anzeige
Gibt an, ob PlasmaWave® aktiviert
oder deaktiviert ist
Smart Sensor
Erkennt automatisch
die Luftqualität in
Innenräumen.
Indicador Bloqueo
para niños
La luz del LED indica si el
Bloqueo para niños está
activado o no.
WLAN-Signalstärke-Anzeige
Gibt die Signalstärke für die WLAN-Verbindung an.
Mode/Fan Speed-Taste
Jedes Mal, wenn die Mode-Taste
gedrückt wird, durchläuft die ModusLED-Lampe die einstellbaren
Optionen (Auto, Sleep, Low,
Medium, High, Turbo).
Power-Taste
Schaltet das Gerät ein oder
aus.
Timer/Air Quality-Taste
Drücken Sie diese Taste, um die
einstellbaren Werte zu durchlaufen
und die gewünschte Betriebsdauer
einzustellen (1 h, 4 h, 8 h, [NO
TIMER]).
Halten Sie diese Taste 3 Sekunden
gedrückt, um die LuftqualitätAnzeigelampe zu aktivieren oder zu
deaktivieren.
PlasmaWave®/Child-Lock-Taste
Aktiviert oder deaktiviert PlasmaWave®. Halten Sie diese Taste 3
Sekunden gedrückt, um die Kindersicherung zu aktivieren oder
zu deaktivieren.
Check-FilterAnzeige
LED-Lampe, die
aufleuchtet, wenn
es Zeit ist, den Filter
zu wechseln.
Reset-Taste
Halten Sie die Reset-Taste
nach dem Filterwechsel
mindestens 5 Sekunden lang
gedrückt.
BEDIENELEMENTE
WLAN-Taste
Aktiviert oder
deaktiviert die
WLAN-Funktion.
WINIX SMART
LED-Anzeigelampe,
die aufleuchtet, wenn
WINIX SMART für Ihr
Gerät aktiv ist.
Luftauslassöffnung
Page 77

Setup | Installation
77
Deutsch
HR 1000
WARNHINWEIS
Befolgen Sie diese Anweisungen, um das Risiko von
schweren oder tödlichen Verletzungen und die
Gefahr einer Beschädigung des Geräts zu verringern.
AUFSTELLUNGSORT
Verwenden Sie das Gerät nicht in der Nähe
von Nebeln oder Dämpfen von
industriellem Öl oder größeren Mengen an
metallischen Staub.
Installieren Sie das Gerät nicht in
irgendeiner Art von Motor- oder
Transportfahrzeug (LKW, Boote, Schiffe
usw.)
Stellen Sie das Gerät nicht in der Nähe von
brennbaren Materialien (Aerosole,
Brennstoffe, Gase usw.) auf.
Stellen Sie das Gerät nicht unterhalb einer
elektrischen Steckdose auf.
Stellen Sie das Gerät nicht in der Nähe von
Heizelementen auf.
Stellen Sie das Gerät nicht in einem
Bereich mit übermäßigen Mengen an
giftigen Gasen auf.
Achten Sie darauf, dass das Gerät nicht in
den Wind oder in Zugluft gerichtet ist.
Stellen Sie das Gerät nicht in übermäßig
feuchten Bereichen auf, wo es nass werden
könnte.
Achten Sie darauf, dass der Luftreiniger 30 bis 46 cm Abstand zu Fernsehgeräten,
Rundfunkgeräten und anderen elektronischen Geräte hat
Stellen Sie das Gerät in Innenräumen geschützt vor direktem Sonnenlicht auf
Direkte Sonneneinstrahlung kann Fehlfunktion oder einen Ausfall des Produkts zur Folge haben.
Stellen Sie das Gerät auf einem harten und ebenen Untergrund auf
Instabile oder geneigte Flächen können zu ungewöhnlichen Geräuschen und Vibrationen führen.
Dieses Gerät ist nicht dafür vorgesehen, zur Erhaltung von Dokumenten oder zur
Konservierung von Kunstwerken verwendet zu werden.
Elektromagnetische Störungen von bestimmten Elektronikelementen können sonst Fehlfunktionen verursachen.
Page 78

78
Installation | Setup
Deutsch
HR 1000
①
Entfernen Sie die Frontplatte, indem
Sie sie am oberen Rand greifen und
vorsichtig auf sich zu ziehen.
xUm die Frontplatte zu entfernen,
muss der Riegel am unteren Rand der
Frontplatte aus seiner Position gelöst
werden.
Riegel
②
Nehmen Sie die Filter aus dem Gerät
heraus: Sie sind durch eine Plastikfolie
geschützt.
③
Entfernen Sie die Plastikfolie von den
Filtern.
xWenn der Luftreiniger in Betrieb
genommen wird, ohne zuvor die
Plastikfolie von den Filtern zu entfernen,
kann dies zu abnormalen Geräuschen,
Verformungen oder zur Entstehung eines
Brands infolge von Überhitzung führen.
④
Setzen Sie die Filter so ein, dass sie
gut sitzen.
Die Filter müssen in der folgenden
Reihenfolge eingesetzt werden:
3 Antimikrobieller True HEPA-Filter
(hinten)
2 CD-Aktivkohlefilter (Mitte)
1 Vorfilter (vorne)
xZum Einsetzen des Vorlters führen Sie
die unteren Laschen in die Schlitze auf
beiden Seiten des Unterteils des Geräts
ein und schwenken Sie den Vorlter
dann nach oben, um die oberen Laschen
in die Schlitze am Oberteil des Geräts
einzuführen, bis beide Seiten hörbar
einrasten.
EINSETZEN DER FILTER
Dieses Produkt wird mit allen erforderlichen Filtern geliefert. Die schützende Plastikfolie
muss vor dem Gebrauch von den Filtern entfernt werden.
Wenn das Gerät ohne Entfernen der Plastikfolie in Betrieb genommen wird, kann es
Schaden nehmen.
Ziehen Sie den Netzstecker heraus und vergewissern Sie sich, dass das Gerät
ausgeschaltet ist, bevor Sie die Filter einsetzen.
Das Gerät wird automatisch ausgeschaltet, wenn die Frontplatte geöffnet wird.
3 Antimikrobieller
True HEPA-Filter
2 CD-Aktivkohlefilter
1 Vorfilter
Page 79

Setup | Installation
79
Deutsch
HR 1000
⑤
Bringen Sie die Frontplatte wieder
an, indem Sie zuerst die Lasche am
unteren Rand in die Basis des Geräts
einführen, und schwenken Sie dann
die Platte nach oben auf den oberen
Teil des Geräts zu, bis sie sich durch
Magnetkraft schließt.
⑥
Wartung und Wechseln der Filter:
Filter Kontrollleuchte Wartung
Wechseln
1 Vorfilter
Keine
Einmal alle 14
Tage reinigen
Dauerhaft
2
CD-Aktivkohlefilter
Kann nicht
GEWASCHEN
werden
Hält bis zu 12
Monate
3 Antimikrobieller
True HEPA-Filter
Das Filterwechselintervall kann je nach Umgebung variieren.
Für die optimale Nutzung kann der Vorfilter alle 14 Tage gereinigt werden. Dadurch
kann auch die Lebensdauer der anderen Filter verlängert werden.
▶
Ausführliche Informationen zur Pflege und zum Wechseln der Filter
finden Sie auf den Seiten 62 - 66.
EINSETZEN DER FILTER
this unit
is compatible
with this
filter
ITEM: 117130
FILTER
J
Page 80

Installation | Setup
80
Deutsch
HR 1000
SICHERHEITS- UND VORSICHTSMASSNAHMEN
Lesen und befolgen Sie bitte vor der Inbetriebnahme des Geräts die folgenden
Sicherheitshinweise und Anweisungen, um Schäden zu vermeiden und eine sichere
Benutzung zu gewährleisten.
Ziehen Sie nicht am Netzkabel, wenn Sie
das Gerät von der Stromversorgung
trennen.
Berühren Sie den Stecker nicht mit nassen
Händen.
Verbinden sie keine zusätzlichen Geräte mit
der gleichen Steckdose oder
Stromversorgung.
Trennen Sie das Gerät von der
Stromversorgung, wenn es längere Zeit
nicht benutzt wird.
Verknoten Sie das Netzkabel nicht, wenn
das Gerät in Betrieb ist.
Trennen Sie das Gerät nicht von der
Stromversorgung und bewegen Sie es
nicht, während es in Betrieb ist.
Wenn das Gerät in Wasser getaucht wurde,
trennen Sie es von der Stromversorgung
und kontaktieren Sie den Kundendienst.
Das Kabel kann Schaden nehmen, wenn
es unter übermäßiger Kraftausübung
gebogen, gezogen, verdreht, gebündelt
oder gequetscht wird oder wenn
schwere Gegenstände darauf gestellt
werden.
Stellen Sie sicher, dass die Filter eingesetzt sind, bevor Sie das Gerät in Betrieb
einschalten
Wenn das Gerät ohne Filter betrieben wird, kann dies seine Lebensdauer verkürzen und es besteht Stromschlag- und
Verletzungsgefahr
Achten Sie darauf, dass keine Fremdkörper in die Lüftungsschlitze des Geräts
eingeführt werden
Zu den Fremdkörpern zählen beispielsweise Stifte, Stäbe und Münzen.
Berühren Sie keinen Teil der Innenausstattung des Geräts mit nassen Händen
Durch die Hochspannung kann es zu Stromschlägen kommen.
Stellen Sie sicher, dass die Einlass- und Auslassöffnungen nicht blockiert werden
Wenn die Öffnungen blockiert sind, kann die Temperatur im Gerät zu stark ansteigen, so dass das Gerät ausfallen oder sich
verformen kann.
Verwenden Sie das Gerät nicht als Hocker und stellen Sie keine schweren Gegenstände
darauf
Es besteht sonst Verletzungsgefahr und das Gerät kann ausfallen oder sich verformen.
Ein beschädigtes Netzkabel darf nur durch ein Spezialkabel ersetzt werden, das
entweder beim Händler oder bei seinem technischen Kundendienst erhältlich ist.
Das Gerät ist nicht für die Verwendung durch Personen (einschließlich Kinder) mit
eingeschränkten physischen, sensorischen oder psychischen Fähigkeiten bzw. ohne
jegliche Erfahrung oder Wissen vorgesehen, es sie denn sie sind unter Aufsicht oder
wurden in die Verwendung des Gerätes durch eine Person, die für ihre Sicherheit
verantwortlich ist, eingewiesen.
Kinder sollten unter Aufsicht stehen, damit gewährleistet ist, dass sie nicht mit
dem Gerät spielen.
WARNHINWEIS
Befolgen Sie die nachstehenden Anweisungen, um
das Risiko von schweren oder tödlichen
Verletzungen und die Gefahr einer Beschädigung
des Geräts zu verringern.
Page 81

Bedienung | Bedienen des Luftreinigers
81
Deutsch
HR 1000
①
Stecken Sie den Gerätestecker des Netzkabels in die Buchse ( ) auf
der Rückseite des Geräts und verbinden den Netzstecker des
Netzkabels mit einer Steckdose ( ).
xDie Lampen am Bedienfeld leuchten kurz auf.
②
Drücken Sie die [Power]-Taste.
▶
Während der ersten 4 Minuten des
Einschaltvorgangs blinkt die
Kontrollleuchte für die Luftqualität, weil
die Smart-Sensoren die Luftqualität in
der Umgebung messen. Danach
beginnt der normale Betrieb.
③
Wenn das Gerät zum ersten Mal eingeschaltet wird, ist es auf den
Modus Auto mit aktiviertem PlasmaWave® eingestellt.
x
Im Auto-Modus wird die Lüfterdrehzahl automatisch entsprechend der Luftqualität in
der Umgebung angepasst.
x
PlasmaWave® dient zum Entfernen von schädlichen, luftgetragenen Verunreinigungen.
▶
Wenn sich die Luftqualität im Innenraum verbessert, während
sich das Gerät im Auto-Modus befindet, wird die Lüfterdrehzahl
automatisch auf Low reduziert.
▶
Wenn das Gerät läuft, können Sie einen zwitschern oder
summenden Ton hören. Der Ton entsteht dadurch, dass große
Partikel durch PlasmaWave® hindurchtreten. Dies ist normal und
bedeutet keine Fehlfunktion. Zum Deaktivieren von PlasmaWave®,
siehe Seite 83.
ERSTE INBETRIEBNAHME
Page 82

Bedienen des Luftreinigers | Bedienung
82
Deutsch
HR 1000
5.
Auto-Modus
Ermöglicht den Automatikbetrieb basierend auf den Luftqualität-Messwerten der
Smart-Sensoren.
①
Drücken Sie die Mode-Taste, um den Auto-Modus zu wählen.
xDie Modus-LED-Lampe leuchtet auf, wenn der Auto-Modus ausgewählt
wurde, und der Betrieb beginnt.
xJedes Mal, wenn die Mode-Taste gedrückt wird, werden die Modi durchlaufen
(Auto, Sleep, Low, Medium, High, Turbo).
▶
▶
Im Auto-Modus wird die Lüfterdrehzahl automatisch
entsprechend der Luftqualität im Innenraum angepasst. Wenn
sich die Luftqualität im Innenraum verbessert, wird die
Lüfterdrehzahl automatisch reduziert. Wenn die Luftqualität im
Innenraum schlechter wird, wird die Lüfterdrehzahl automatisch
erhöht.
▶
Wenn das Gerät zum ersten Mal eingeschaltet wird, ist der AutoModus aktiviert und die Lüfterdrehzahl auf Low eingestellt.
6.
Sleep-Modus
①
Drücken Sie die Mode-Taste, um den
Sleep-Modus zu wählen.
x
Die Modus-LED-Lampe leuchtet auf, wenn der Sleep-
Modus ausgewählt wurde, und das Gerät beginnt, in
diesem Modus zu laufen.
AUTO UND SLEEP
Jedes Mal, wenn die Mode-Taste gedrückt wird, durchläuft die Modus-LED-Lampe
die möglichen Einstellungen (Auto, Sleep, Low, Medium, High, Turbo).
▶
Wenn der Sleep-Modus ausgewählt wird,
wird die Lüfterdrehzahl automatisch auf
Low eingestellt. Die Lüfterdrehzahl kann
geändert werden, indem die Fan Speed
(Mode)-Taste gedrückt wird.
▶
Wenn der Sleep-Modus aktiviert ist, ist
die Lampe für Luftqualität deaktiviert.
Page 83

Bedienung | Bedienen des Luftreinigers
83
Deutsch
HR 1000
7.
Manueller Modus (Einstellen der Lüfterdrehzahl)
Im manuellen Modus kann der Benutzer die Lüfterdrehzahl manuell auf Low,
Medium, High oder Turbo einstellen.
①
Drücken Sie die Mode-Taste, um die
gewünschte Lüfterdrehzahl auszuwählen.
xDie Modus-LED-Lampe gibt die ausgewählte
Lüfterdrehzahl an und der Betrieb beginnt.
▶
Wenn das Gerät im manuellen Modus läuft, werden die
Betriebsarten Auto und Sleep automatisch deaktiviert.
8.
Timer
Der Timer kann verwendet werden, wenn das Gerät eine bestimmte Zeit lang laufen
soll.
①
Wählen Sie die gewünschte Zeitdauer mit der
Timer-Taste.
xDie Timer-LED-Lampe gibt die gewählte
Betriebsdauer an.
xJedes Mal, wenn die Timer-Taste gedrückt wird,
durchläuft die Timer-LED-Lampe die möglichen
Einstellungen (1 h, 4 h, 8 h, [NO TIMER]).
▶
Die WINIX SMART App wird angezeigt, wie viel Zeit auf dem Timer
bleibt.
9.
PlasmaWave®
In der Standardeinstellung wird PlasmaWave® aktiviert,
sobald das Gerät eingeschaltet wird.
①
Drücken Sie die Plasma-Taste, wenn das
Gerät eingeschaltet ist, um diese Funktion
zu aktivieren oder zu deaktivieren.
MANUELLER MODUS, TIMER UND PLASMAWAVE®
Jedes Mal, wenn die Mode-Taste gedrückt wird, durchläuft die Modus-LED-Lampe
die möglichen Einstellungen (Auto, Sleep, Low, Medium, High, Turbo).
Page 84

Bedienen des Luftreinigers | Bedienung
84
Deutsch
HR 1000
10.
Child Lock
Diese Funktion verhindert, dass Kinder das Bedienfeld betätigen.
①
Halten Sie die Plasma/Child Lock-Taste
3 Sekunden gedrückt, um diese
Funktion zu aktivieren oder zu
deaktivieren.
xWenn die Child Lock-Anzeige leuchtet, ist
die Funktion aktiviert.
xWenn die Kindersicherung aktiviert
ist, ist das Bedienfeld gesperrt und die
Einstellungen können nicht geändert
werden.
x
Zum Deaktivieren der Funktion halten Sie
die Child Lock-Taste wieder 3 Sekunden
lang gedrückt.
3 secondes
11.
Air Quality-LED-Lampe
Die LED-Lampe für die Luftqualität kann ein- oder ausgeschaltet werden.
①
Zum Ein- oder Ausschalten der LED-Lampe für die Luftqualität halten
Sie die Timer-Taste 3 Sekunden lang gedrückt.
x
Wenn die LED-Lampe eingeschaltet ist, zeigt sie
die aktuelle Luftqualität im Innenraum in drei
Stufen an: Blau (gut), Amber (relativ gut),
Rot (schlecht).
▶
Wenn der Auto-Modus aktiviert ist, ist die LED-Lampe für die
Luftqualität je nach Raumhelligkeit eingeschaltet oder nicht.
▶
Wenn der Sleep-Modus aktiviert ist, ist die LED-Lampe für
Luftqualität ausgeschaltet.
CHILD LOCK, AIR QUALITY-LED
3 seconds
▶
Air Quality Indicator
Page 85

Bedienung | Bedienen des Luftreinigers
85
Deutsch
HR 1000
12.
Herstellen einer Verbindung mit WINIX SMART
Mit WINIX SMART können Sie den Luftreiniger bequem von jedem Standort aus steuern.
WINIX SMART ist für die folgenden Spezifikationen optimiert.
Abhängig von den Funktionen Ihres Smartphones und den ServiceParametern werden möglicherweise einige Funktionen nicht
unterstützt.
Vor dem Verbinden mit WINIX SMART
• Innerhalb der Reichweite des Luftreinigers muss ein WLAN-Router installiert sein, damit WINIX SMART
genutzt werden kann.
• Stellen Sie sicher, dass der WLAN-Router die Spezifikation 802.11b/g/n 2,4 GHZ erfüllt oder achten Sie bei
einem Dual-Band-Wireless-Router (2,4 GHz/5 GHz) darauf, dass Sie 2,4 GHz wählen.
• Achten Sie darauf, dass Sie das WLAN-Passwort zur Hand haben.
• Sorgen Sie dafür, dass sich Luftreiniger, WLAN-Router und Smart-Gerät bei der Registrierung in einem
Bereich mit einem Radius von max. 9,75 m befinden.
• Hindernisse zwischen Luftreiniger, WLAN-Router und Smart-Gerät können dazu führen, dass der
Signalempfang schwach ist.
• Vor dem Herstellen der Verbindung sollte bei Geräten mit einem "Smart Network Switch" diese Funktion
vorübergehend deaktiviert werden.
• Sobald die Verbindung mit WINIX SMART hergestellt ist, kann der "Smart Network Switch" am Gerät
wieder aktiviert werden.
Setup
①
Laden Sie die WINIX SMART App auf Ihr Smart-Gerät herunter.
x
Sie finden sie im Google Play Store oder im iTunes App Store.
②
Führen Sie die App aus und folgen Sie der
Setup-Anleitung, um Ihr Smart-Gerät mit dem
Luftreiniger zu verbinden.
xWählen Sie "New Unit" und HR1000, um eine Verbindung zu diesem
Modell herzustellen.
xLesen Sie den Hinweis und wählen Sie "OK".
xGeben Sie das Passwort für Ihr WLAN-Netzwerk ein.
xHalten Sie die WLAN-Taste auf dem Bedienfeld des Luftreinigers
gedrückt, bis Sie einen Piepton hören. *Die WLAN-Signalstärke-Anzeige
beginnt zu blinken*
xStellen Sie die Verbindung mit dem WINIX SMART-Netzwerk über das
Netzwerkmenü Ihres Smart-Geräts her.
xWenn Sie jetzt "Weiter" wählen, wird sich der Luftreiniger mit Ihrem Smart-
Gerät verbinden.
xDenieren Sie die Geräteeinstellungen für den Luftreiniger (Name und Ort).
xWenn das Setup abgeschlossen ist, leuchtet die WINIX SMART-Anzeige auf.
WINIX SMART
ANDROID
iOS
(ICS 4.12 Jellybean oder höher empfohlen)
(6.0 oder höher empfohlen - iPhone 4S oder höher)
Page 86

Pflege und Wartung
86
Deutsch
HR 1000
1.
Wartung und Wechseln der Filter:
Wenn die LED-Filter-Check-Anzeige leuchtet, ist es Zeit, sowohl die wahre antimikrobielle CD
HEPA und Aktivkohlefilter zu ersetzen.
Filter Kontrollleuchte Wartung
Wechseln
1 Vorfilter
Keine
Einmal alle 14 Tage
reinigen
Dauerhaft
2
CD-Aktivkohlefilter
Kann nicht
GEWASCHEN
werden
Hält bis zu 12
Monate
3 Antimikrobieller
True HEPA-Filter
Das Filterwechselintervall kann je nach Umgebung variieren.
Für die optimale Nutzung kann der Vorfilter alle 14 Tage gereinigt werden.
Dadurch kann auch die Lebensdauer der anderen Filter verlängert werden.
Ausbauen der Filter
Stellen Sie sicher, dass der Luftreiniger ausgeschaltet und von der Stromversorgung
getrennt ist, bevor Sie die Filter ausbauen.
Das Gerät wird automatisch ausgeschaltet, wenn die Frontplatte geöffnet wird.
WECHSELN DER FILTER
①
Entfernen Sie die Frontplatte, indem Sie
sie am oberen Rand greifen und
vorsichtig auf sich zu ziehen.
xUm die Frontplatte zu entfernen, muss der
Riegel am unteren Rand der Frontplatte aus
seiner Position gelöst werden.
Riegel
▶
Die WINIX SMART-Anzeige wird nur aufleuchten, wenn die App
direkt benutzt wird. Wenn die App geschlossen ist, wird die
Anzeige ausgeschaltet, leuchtet aber wieder auf, sobald die App
erneut geöffnet wird.
▶
Die Anzeigelampe leuchten nur, wenn das Mobilgerät und WINIX
Einheit auf dem gleichen Wi-Fi-Netzwerk sind. Es leuchtet nicht
auf, wenn das Gerät auf 3G oder LTE-Modus ist.
▶
Die Anzeige erlischt, wenn mit der App ein anderes WINIX-Gerät
gesteuert wird.
Page 87

Pflege und Wartung
87
Deutsch
HR 1000
②
Drücken Sie auf die Laschen am oberen
Rand, um den Vorfilter 1
herauszunehmen.
Tabs
Nehmen Sie zuerst den
CD-Aktivkohlefilter 2 und dann den
antimikrobiellen True HEPA-Filter 3
heraus, indem Sie an den nummerierten
Laschen oben an dem betreffenden
Filter ziehen.
Für eine optimale Leistung sollte dieser Luftreiniger nur mit
Original-WINIX-Filtern verwendet werden.
PFLEGE DER FILTER
Page 88

Pflege und Wartung
88
Deutsch
HR 1000
2.
REINIGEN DES VORFILTERS
Das Reinigungsintervall hängt von der vorhandenen Luftqualität ab.
Verwenden Sie einen Staubsauger oder eine weiche Bürste, um den
Vorfilter zu reinigen. Wenn er übermäßig verschmutzt ist, spülen Sie
ihn mit lauwarmem Wasser ab.
xVerwenden Sie nur Wasser, keine üchtigen Substanzen wie Alkohol oder
Aceton.
Wenn der Vorfilter beschädigt oder in irgendeiner Weise ausgetauscht werden
muss:
Wenden Sie sich bitte an Ihren Händler vor Ort.
Verwenden Sie kein Benzol, keinen Alkohol oder andere
flüchtige Flüssigkeiten. Sie können eine Beschädigung oder
Verfärbung verursachen.
Der Vorfilter kann nach der Reinigung wieder verwendet
werden, wenn er vollständig getrocknet ist.
Verwenden Sie kein heißes Wasser über 40°C oder flüchtige
Flüssigkeiten wie Farbverdünner.
Lassen Sie den Vorfilter nach dem Waschen an einem gut
belüfteten Ort vollständig trocknen, da sich anderenfalls
unangenehme Gerüche entwickeln können.
REINIGEN DES VORFILTERS
Page 89

Pflege und Wartung
89
Deutsch
HR 1000
3.
Einsetzen und Wechseln der Filter
Um die Filter wieder einzusetzen, sind die Schritte zum Herausnehmen der Filter in
umgekehrter Reihenfolge durchzuführen.
Einsetzen des neuen antimikrobiellen
True HEPA-Filters 3 (hinten) und
CD-Aktivkohlefilters 2 (Mitte).
xEntfernen Sie die Schutzplastikfolie von den
neuen Filtern. Wenn Sie den Luftreiniger in
Betrieb nehmen, ohne zuvor die Plastikfolie
zu entfernen, kann dies zu abnormalen
Geräuschen, Verformungen oder zur
Entstehung eines Brands infolge von
Überhitzung führen.
③
Einsetzen des Vorfilters 1 (vorne).
xZum Einsetzen des Vorlters führen Sie die
unteren Laschen in die Schlitze auf beiden
Seiten des Unterteils des Geräts ein und
schwenken Sie den Vorlter dann nach oben,
um die oberen Laschen in die Schlitze am
Oberteil des Geräts einzuführen, bis beide
Seiten hörbar einrasten.
④
Bringen Sie die Frontplatte wieder an,
indem Sie zuerst die Lasche am unteren
Rand in die Basis des Geräts einführen,
und schwenken Sie dann die Platte
nach oben auf den oberen Teil des
Geräts zu, bis sie sich durch
Magnetkraft schließt.
PFLEGE DER FILTER
3 Antimikrobieller
True HEPA-Filter
2 CD-Aktivkohlefilter
Page 90

Pflege und Wartung
90
Deutsch
HR 1000
⑤
Nach dem Austausch des Filters, wiederum
das Gerät. Sobald das Gerät Betrieb, drücken
und halten RESET-Taste für 5 Sekunden.
4.
Reinigen des Staubsensors
Für eine optimale Leistung des Staubsensors, der den Staub in der Luft und ultrafeine
Partikel erkennt, muss der Staubsensor alle zwei Monate gereinigt werden. Reinigen
Sie den Sensor öfter, wenn der Luftreiniger an einem Ort mit hoher Staubbelastung
steht.
①
Öffnen Sie die Staubsensor-Abdeckung.
②
Wischen Sie die Linse und den
Ansaugbereich des Staubsensors mit
einem feuchten Wattestäbchen ab.
xDie Sensoräche darf nur mit Wasser
gereinigt werden. Verwenden Sie keine
üchtigen Substanzen wie Alkohol oder
Aceton.
Lens
Wattestäbchen
③
Entfernen Sie verbleibende Feuchtigkeit
mit einem trockenen Wattestäbchen.
SMART-SENSOR-PFLEGE
5 seconds
Page 91

Pflege und Wartung
91
Deutsch
HR 1000
④
Schließen Sie die StaubsensorAbdeckung.
xDie Staubsensor-Abdeckung kann mit einem
Staubsauger gereinigt werden.
Reinigung der Außen- und Innenflächen
Reinigen der Außenflächen
Wischen Sie die Außenflächen mit einem
weichen, mit lauwarmem Wasser
befeuchteten Tuch ab. Wischen Sie die
Außenflächen anschließend einem
sauberen, trockenen Tuch ab.
xUm eine optimale Leistung
aufrechtzuerhalten, reinigen Sie die
Frontplatte 1-2-mal im Monat.
Reinigen des Innenraums
Öffnen Sie die Frontplatte und reinigen Sie
den Innenraum mit einem Staubsauger.
xUm eine optimale Leistung
aufrechtzuerhalten, reinigen Sie den
Innenraum 1-2-mal im Monat.
Ziehen Sie vor dem Reinigen des Geräts immer zuerst den
Netzstecker heraus und warten Sie, bis das Gerät abgekühlt ist
Demontieren, reparieren oder modifizieren Sie das Gerät niemals
selbst
Verwenden Sie keine entflammbaren Sprays oder
Flüssigwaschmittel
Lassen Sie die Reinigung oder Wartung des Geräts nicht von
Kindern durchführen
Achten Sie darauf, dass das Gerät vor dem Durchführen von
Reinigungs- oder Wartungsarbeiten ausgeschaltet und von der
Stromversorgung getrennt ist
REINIGUNG UND PFLEGE
5.
Page 92

Sonstiges | Fehlerbehebung
92
Deutsch
HR 1000
Problem
Mögliche Ursache /
Abhilfemaßnahme
Es läuft überhaupt
nicht.
▶
Liegt ein Stromausfall vor?
Überprüfen Sie, ob andere Lampen und elektrische
Geräte funktionieren und versuchen Sie es erneut.
Es funktioniert nicht
im Auto-Modus.
▶
Wurde der Auto-Modus ausgewählt?
Drücken Sie die Mode-Taste, bis der Auto-Modus
ausgewählt ist.
▶
Ist der Sensor blockiert oder verstopft?
Reinigen Sie den Sensor mit einem Staubsauger;
siehe Seite 90.
Es vibriert und
macht eine Menge
Lärm.
▶
Steht das Gerät auf einer geneigten Fläche?
Stellen Sie das Gerät auf einen festen, ebenen
Untergrund.
HÄUFIG GESTELLTE FRAGEN
Page 93

Fehlerbehebung | Sonstiges
93
Deutsch
HR 1000
Problem
Mögliche Ursache /
Abhilfemaßnahme
Der Netzstecker und
die Steckdose fühlen
sich heiß an.
▶
Ist der Stecker fest eingesteckt?
Stellen Sie sicher, dass der Stecker richtig in die
Steckdose eingesteckt ist.
Es ist ein seltsamer
Geruch
wahrzunehmen.
▶
Wird das Gerät an einem Ort mit starker
Rauchentwicklung, hoher Staubbelastung oder
Gerüchen verwendet?
xReinigen Sie die Lufteinlässe an der Frontseite des
Gerätes und reinigen Sie den Vorlter.
xKontaktieren Sie den Kundendienst, um die genaue
Ursache überprüfen zu lassen.
xErsetzen Sie den Aktivkohlelter und den
antimikrobiellen True HEPA-Filter.
Das Produkt reinigt die
Luft nicht ausreichend.
▶
Leuchtet die Anzeige „CHECK FILTER“?
Ersetzen Sie bei Bedarf die Filter.
HÄUFIG GESTELLTE FRAGEN
Page 94

Sonstiges | Fehlerbehebung
94
Deutsch
HR 1000
P
Modellname HR1000
Versorgungsspannung
AC220 ~ 240V, 50/60Hz
Nennleistung
90W
Raumkapazität in
QuadratmeternRecinto,
capacidad en metros
cuadrados
40 m
2
Gewicht
8.5 kg
Abmessungen
415mm(W) x 245mm(D) x 600mm(H)
Ersatzfilter
Filter J / Artikel: 117130
Vorfilter
Teilenr.: 4521-0010-01
TECHNISCHE DATEN DES GERÄTS
Das äußere Erscheinungsbild, das Design und die Produktspezifikationen können
ohne vorherige Ankündigung geändert werden, um die Produktleistung zu
verbessern.
Page 95

95
Deutsch
HR 1000
Die Garantiebedingungen lauten wie folgt.
1.
Dieses Produkt wird unter strengen Qualitätskontrollen und weiteren
Prüfungen hergestellt.
2.
Die Garantie erlischt, wenn die Betriebsstörungen auf Fahrlässigkeit oder
Missbrauch seitens des Konsumenten zurückzuführen sind.
Versandkosten und Bearbeitungsgebühren können auch während der
Garantiezeit anfallen.
3.
Wenn das Produkt zum Service gebracht wird, müssen die
Garantieunterlagen vorgelegt werden.
4.
Bewahren Sie die Garantieunterlagen an einem sicheren Ort auf, da sie
nicht erneut ausgestellt werden können.
5.
Diese Garantie gilt nur in Europa.
Produktbezeichnung
Luftreiniger
Modellname
HR1000
Kaufdatum
Garantiedauer
Zwei (2) Jahre
Kunde
Adresse
Name
Tel.
Achten Sie nach dem Kauf darauf, alle obigen Angaben vollständig
einzutragen.
PRODUKTGARANTIE
Page 96

160504 Rev.B
Kontaktdaten für
produktbezogene
Anfragen und
Kundendienst
Developed in partnership with
Drexel University
(Philadelphia, PA, USA)
www.winixeurope.eu
Page 97

HR1000
xLeggere attentamente e attenersi scrupolosamente a tutte
le regole e istruzioni di sicurezza nel presente manuale
prima dell'attivazione.
xLa garanzia relativa al prodotto è stampata sul retro della
presente guida, per cui si raccomanda di conservare la
stessa in luogo sicuro per futuri utilizzi.
Manuale utente
PURIFICATORE ARIA
WINIX
Modello
Guida
all'utilizzo e alla
cura
Page 98

98
Italiano
HR 1000
CONTENUTI
Il presente prodotto è adatto esclusivamente a 220 ~ 240V.
Francese 25
Spagnolo 49
Tedesco 73
Italiano 97
Olandese 121
Purificazione dell'aria in 5 fasi 99
Controlli 100
Setup
Dove utilizzare 101
Installazione dei filtri 102
Istruzioni di sicurezza
Sicurezza e precauzioni 104
Funzionamento
Funzionamento iniziale 105
Modalità di funzionamento 106
Caratteristiche e impostazioni 108
Impostazione WINIX SMART 109
Cura e manutenzione
Cura del filtro 110
Cura del sensore Smart 114
Pulizia 115
Risoluzione dei problemi
Domande frequenti 116
Specifiche dell'apparecchio 118
Garanzia del prodotto 119
Page 99

99
Italiano
HR 1000
CONTENUTI CONFEZIONE
Prodotto
Prefiltro / Filtro al carbone attivo CD/ Filtro
HEPA vero antimicrobico (acclusi al
prodotto)
Cavo di
alimentazione
con spina
Manuale utente
PlasmaWave®
4 antimicrobico con
3 Filtro HEPA vero
2 F il tr o d eo do r a nt e c o n
carbone attivo (CD)
1 Prefiltro
PURIFICAZIONE DELL'ARIA IN 5 FASI
Non rimovibile
Sostituibile
Lavabile
Sostituibile
Page 100

100
Italiano
HR 1000
Sensore luce
Rileva la quantità di luce
ambiente nel locale per
regolare la luminosità degli
indicatori LED.
Indicatore Timer
Se il timer è stato impostato,
la luce LED indicherà il
tempo stabilito di
funzionamento.
Indicatore PlasmaWave®
Indica se PlasmaWave® è attivato o
disattivato
Sensore Smart
Rileva
automaticamente la
qualità dell'aria
all'interno.
Indicatore Blocco di
sicurezza per bambini
La luce LED mostra se la
modalità Blocco bambini sia
stata attivata o disattivata.
Indicatore forza Wifi
Mostra la forza della connessione Wifi.
Modalità / Pulsante velocità ventola
Ogni volta che si preme il pulsante Modalità, la luce
LED della modalità scorrerà lungo le impostazioni
(Auto, Sleep, Bassa, Media, Alta, Turbo).
Pulsante
alimentazione
Accende o spegne
l'apparecchio.
Timer / Pulsante Qualità
aria
Premere per scorrere e impostare la
durata di funzionamento desiderata
(1hr, 4hr, 8hr, [NO TIMER]).
Tenere premuto per 3 secondi onde
attivare o disattivare la luce di
Qualità dell'aria.
PlasmaWave® / Pulsante blocco bambini
Attiva o disattiva PlasmaWave®. Tenere premuto per 3 secondi
onde attivare o disattivare la modalità Blocco bambini.
Indicatore
controllo filtro
La luce LED indica
quando è ora di
sostituire il filtro.
Pulsante di
reimpostazione
Dopo aver sostituito il filtro,
tenere premuto il pulsante
RESET per almeno 5 secondi.
CONTROLLI
Pulsante Wifi
Attiva o disattiva la
funzione Wifi.
WINIX SMART
La luce LED
dell'indicatore mostra
quando WINIX SMART
è attivo nel proprio
apparecchio.
Sfiato aria
 Loading...