

Page 1

1413
Add Connection
If you choose Microsoft RDP, “WTS (Windows Terminal Server) Connection
Wizard” appears as follows. “WTS Connection Wizard” begins as you click “Add
Connection” and you have to fill out two pieces of information.
N
ame : This is the name of connection assigned by the user. It is convenient
to use names such as “Operation Server” or “Production Server”
which are easy to remember.
Server : This is the address of the server such as “www.sales.com” or
“123.456.789.012.”
RDP connection wizard
Please ask the Server/Service manager.
If you click “Add” button, the following dialogue window appears so that you can
choose the type of connection. As for the types of connections supported by the
server, please ask the server/service manager.
Adding new connection
Page 2
1615
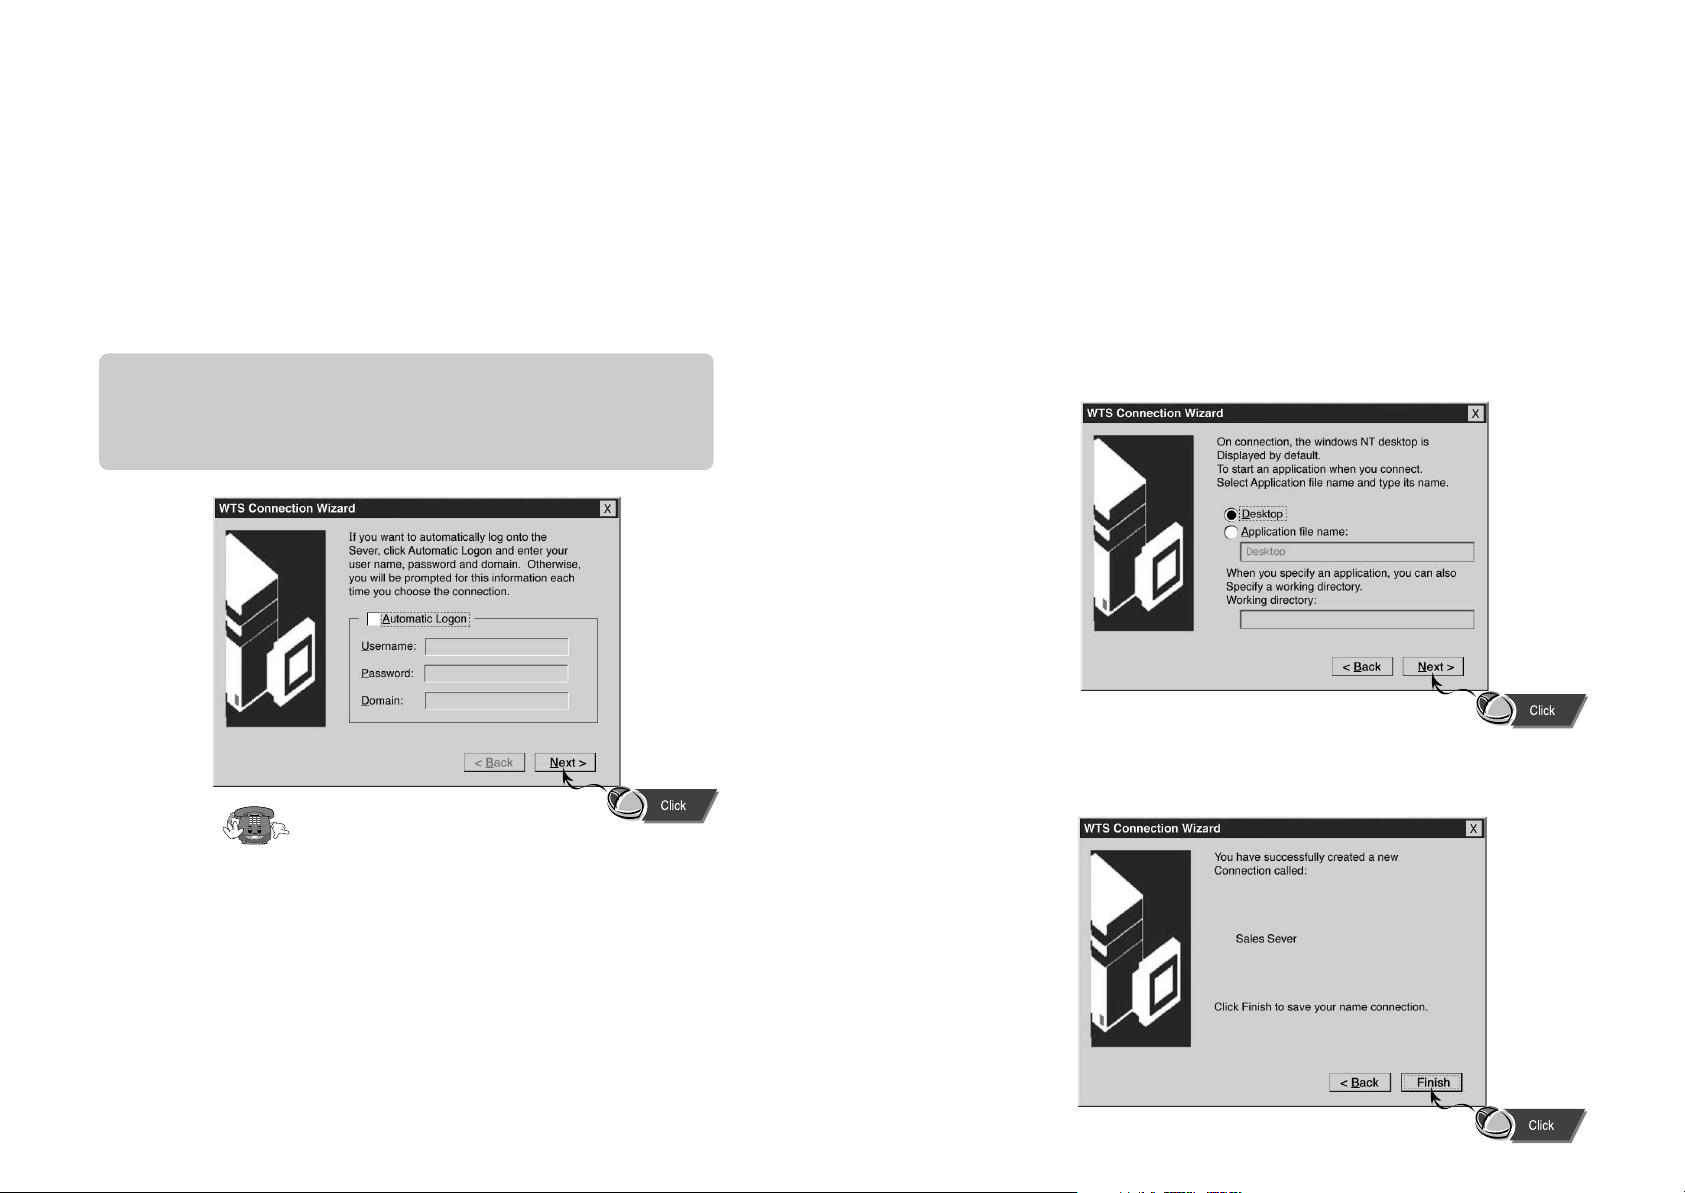
Automatic Execution of Application Programs
The user can choose the application program to be executed as soon as the terminal
is connected to server/service. If “Desktop” is chosen, the regular background screen
of Windows NT/Windows 2000 appears. If an application program is chosen, the
program is directly executed at the startup. In this case, the user must specify the path
of the application program.
Finishing RDP Connection Wizard
If you click the “Finish” button, the WTS Connection Wizard ends and the new
connection is added to the connection manager.
Automatic Connection to Server/Service
When automatic connection function is used, the user can be directly connected to
the server which is frequently used when the terminal is on. To use this function, the
following three data have to be typed.
Username : Username registered with the server/service.
Password : The password of the user.
Domain : The domain name of the server/service.
Please ask the Server/Service manager.
Page 3
1817
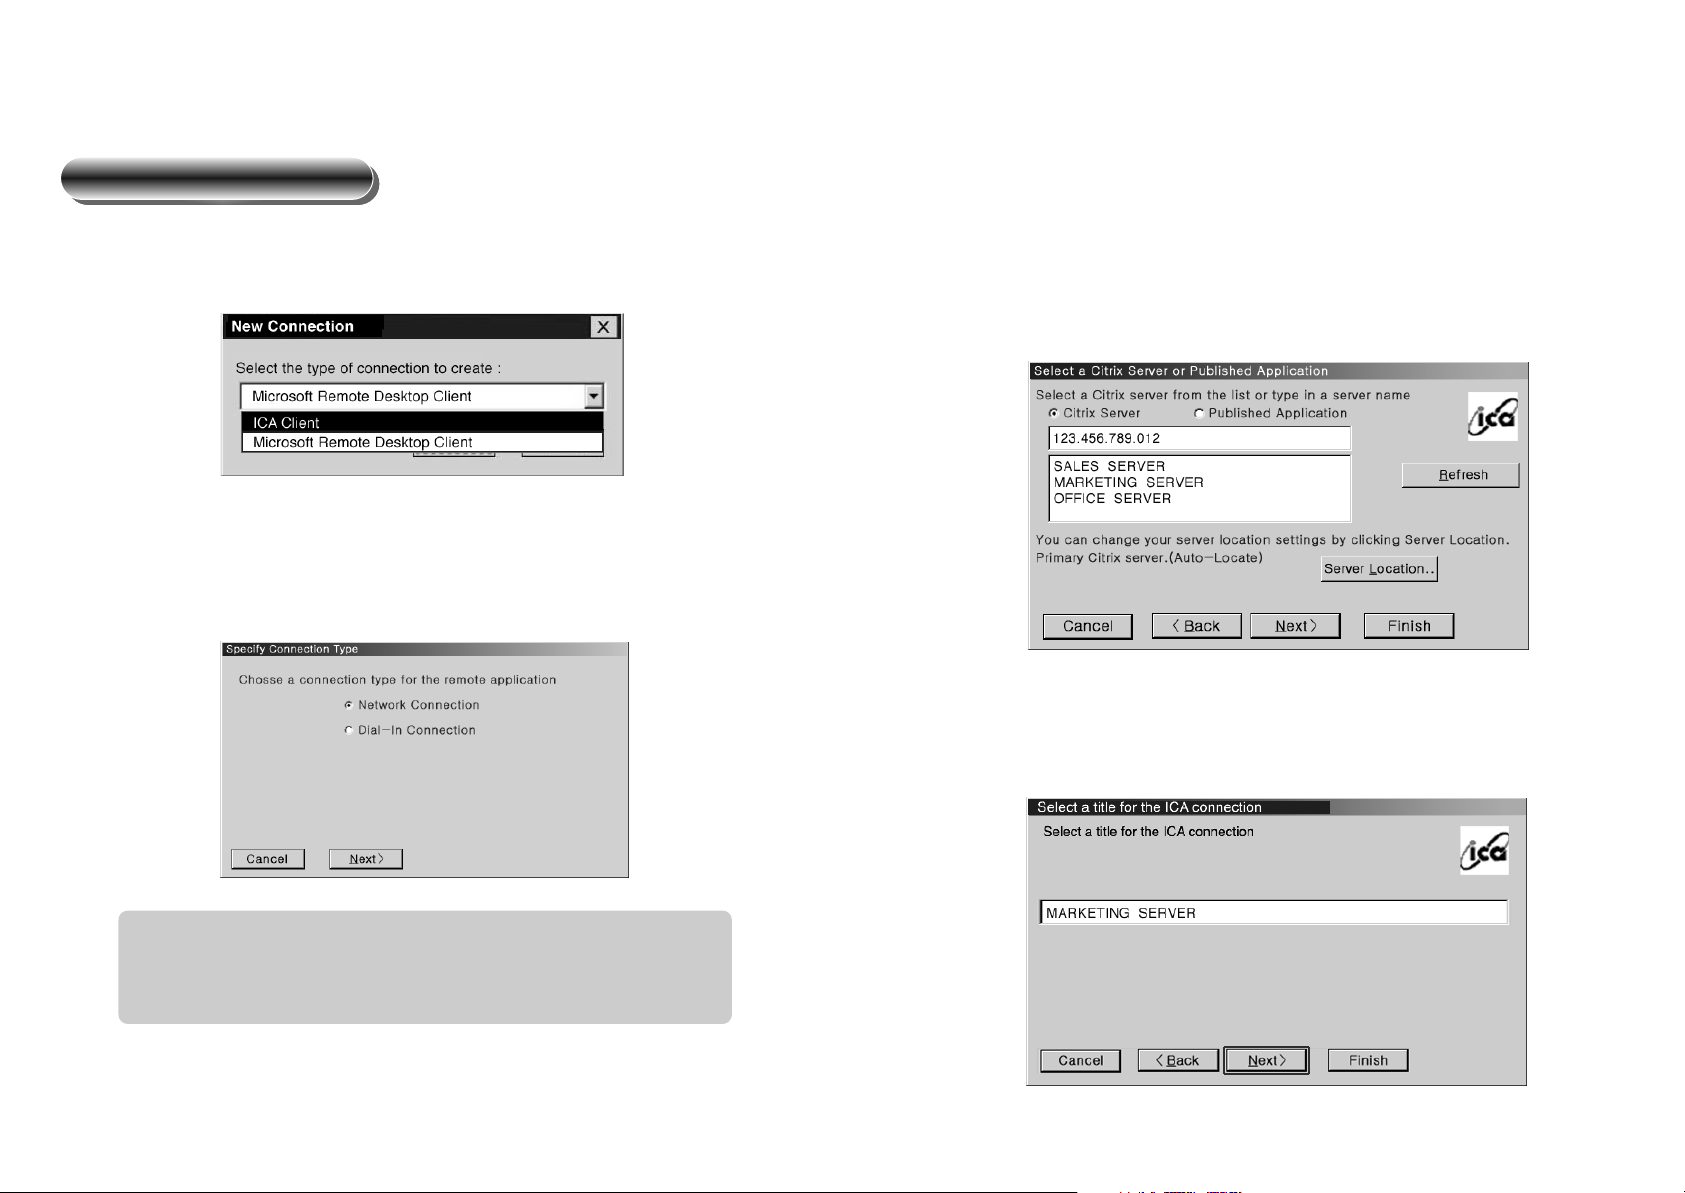
Choosing Connection Name
Connection name is given by the user. It is preferable to choose names such as
“Operation Server” or “Marketing Server” which are easily remembered.
Setting the Server
ICA Connection Wizard is equipped with a function to display all the servers that can
be currently used by the network.
Please choose the server to be used among the servers displayed or type the server
address yourself.
Choosing the Connection Method
In this section, the method for connection to the server/service is chosen. Our
terminal only supports “Network Connection.”
You can choose the ICA Client at the “Terminal Connection Manager”.
ICA connection wizard
Network Connection : uses the direct connection line like LAN
Connection.
Dial-in Connection : uses the modem.
Page 4
2019
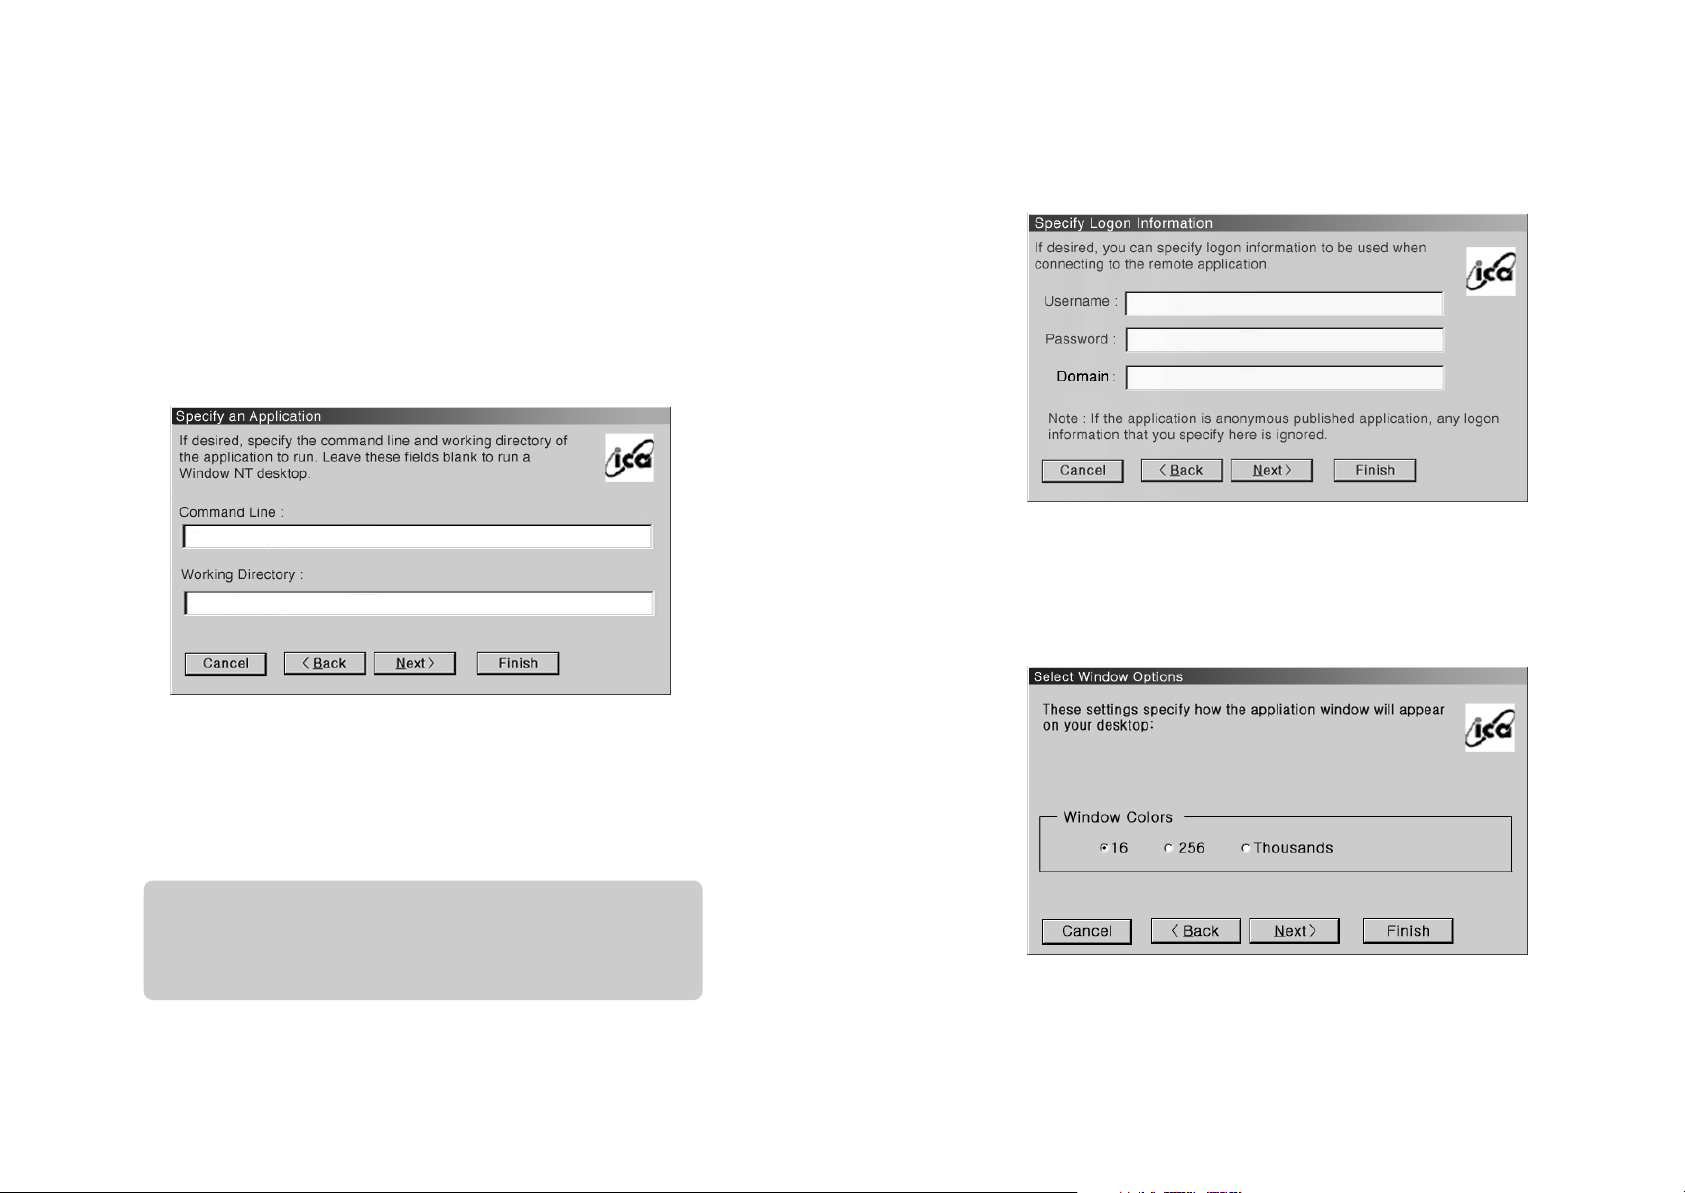
Choosing Colors
In this section, the user chooses the number of colors to be used by the ICA client.
Automatic Execution of Application Programs
The user can choose the application program to be executed when the terminal is
connected to the server/service. If the user does not specify the application program,
the background screen of Windows NT/Windows 2000 appears. If an application
program is chosen, the program is immediately executed. In this case, the location
of the application program must be given.
Automatic Connection to the Server/Service
If the automatic connection function is used, the terminal is directly connected to the
frequently used server at the startup. To use this function, the following three data
must be typed.
Username : Username registered with the server/service.
Password : The password of the user.
Domain : The domain name of the server/service.
Page 5
2221
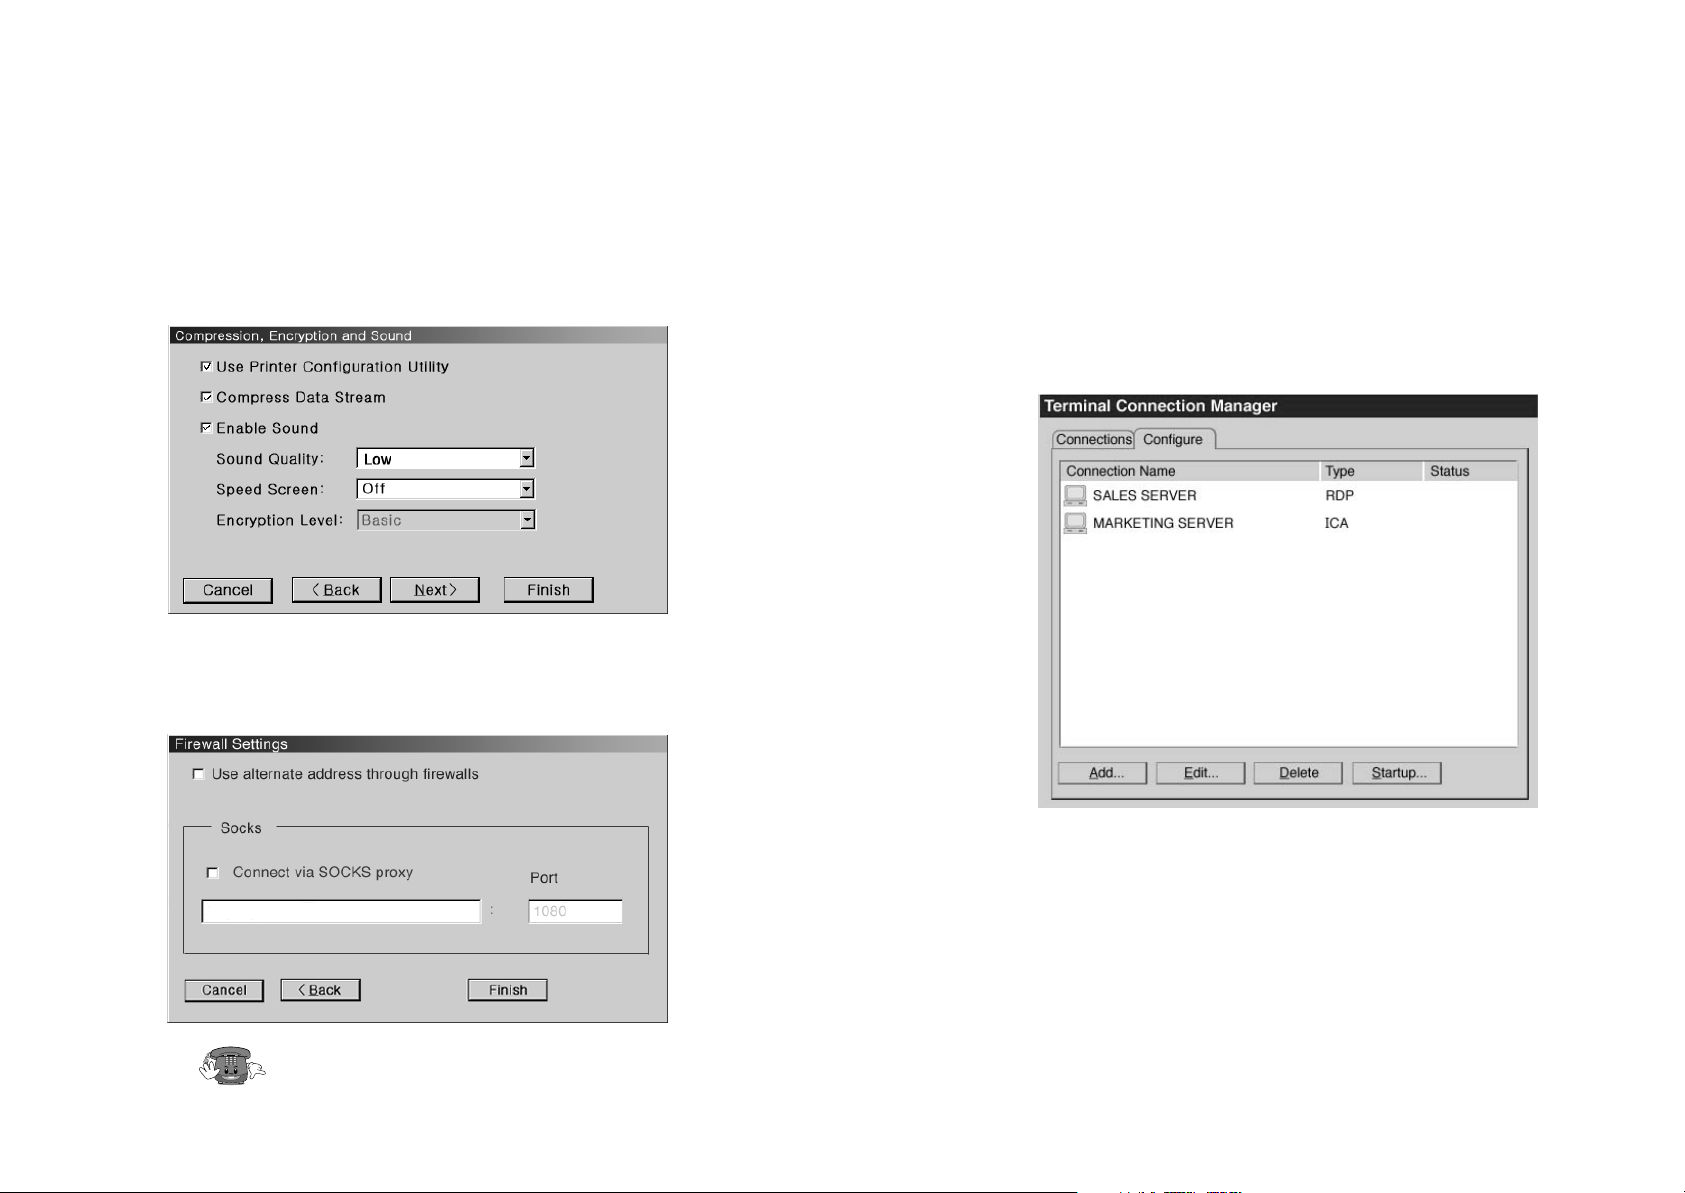
When you have finished adding new connection...
If you have finished adding new connections by “RDP Connection Wizard” or “ICA
Connection Wizard,” the following new connections are displayed. Therefore, from
now on, you can double-click the connection to be used and you are connected to the
server and implement desired operations.
Data Compression and Sound
The user chooses whether he/she will use the data compression function and the
sound function with the ICA client.
Firewall
If the firewall is installed at the Network, the user offers necessary information.
Ask the Network manager.
Page 6

24
From the “Configure” screen of the Terminal Connection Manager, please choose the
connection to be deleted and click the “Delete” button. Then, the following “Confirm
Connection Delete” screen appears.
Deleting connection
23
From the “Configure” screen of the Terminal Connection Manger, please choose the
connection to be changed and click the “Edit” button. The following is the screen that
appears.
You can change “ICA” on the following screen and change details, as you click each
tab.
Ask the Network manager.
Changing connection
Page 7

2625
In this section, you decide the waiting time keyboard input and the repeat speed.
In this section, you decide the display resolution, the volume size, etc.
Keyboard
Screen and volume
7. Terminal Setting
When “Terminal Connection Manager” is on the screen, press F2 key and the
following “Terminal Properties” screen appears and you can determine detailed
aspects of the terminal. To end “Terminal Properties” and move to “Terminal
Connection Manager” screen, press the “OK” button that is on the right side of the
screen. If the “X” button is pressed, all new settings are cancelled.
This section involves various types of information on the product.
If you choose “Reset the terminal to factory-default property settings” all settings of
the terminal are deleted and you return to the “Terminal Installation Wizard.”
Starting terminal setting
Product information
Page 8

2827
This section is for setting various options on the Network.
If you choose “Specify an IP address” the “Advanced Network Settings” button is
activated. Then, if you press the “Advanced Network Settings” button, the following
screen appears and you can offer necessary information.
Ask the Network manager.
Ask the Network manager.
Network
From the “Resolution & Frequency” list, you can choose the intended resolution and
frequency. If you press the “Test” button, the following dialogue window appears.
Press the “OK” button on the dialogue window and the terminal restarts at the
resolution and frequency chosen. And the following dialogue window appears to
check whether the monitor supports the resolution and frequency. If the following
dialogue window does not appear your monitor does not support the resolution and
frequency chosen. If you press the “PASS” button, the monitor is reset at the new
resolution. If you press “FAIL” the monitor returns to the previous resolution.
The following are the resolutions and frequencies supported by the terminal.
If you choose “Use Screensaver,” the monitor is protected as the screensaver function
is executed if the terminal has not in use for a predetermined period.
In addition, if you press the “Volume” button, it is possible to adjust the size of
volume out from the terminal.
640 X480 75Hz 800 X600 75Hz 1024 X768 75Hz
aaa
Page 9

3029
In this option, you input the Terminal name and colors to be used at the “ICA Client
Configuration” and choose colors among 3 types(16, 256 and thousands of colors).
It’s good to select a significant Client Name. The Client Name recognizes the
Terminal at the network.
In this option, you select the server that you want to connect. If you use LAN, you
select one from the server list that is displayed automatically. If you want to connect
the server that is not in the server list, press “ADD” button and input the Domain
Name or IP address.
In this section, you indicate various items related to the system and set the basic
configuration for the ICA client.
From the “ICA Client Configuration” press “Configure” button and than the
following dialogue window appears. Now you can choose options wanted.
This option is about Hot keys. They are defined on the Operating System or the
application program. Also, the user can set them to activate a specific order.
System
Page 10

3231
In this section, various items related to the web-browser are set.
Press the “Preferences” button and the following dialogue window appears. The
display method for hyperlinks and default font size can be decided.
Web setting
If the SOCKS Proxy server is installed at the network, IP address of the Proxy server
has to be typed. So you select the SOCKS Proxy server connection and input the port
number and IP address of the SOCKS Proxy server.
If the Nfuse server of Citrix Company is installed, various options related to the
Nfuse server have to be typed.
Page 11

3433
Press the “Change Password” button and the following dialogue window appears.
Then it is possible to change the password. For verification, the password must be
typed twice.
When the password for terminal security is in place, press F2 key for “Terminal
Setting.” Then the following dialogue window for password verification appears. The
user must type the correct password to use the “Terminal Setting” function.
Because the terminal cannot be reset if the
password is lost, it is necessary to handle
the password with care.
If the “Proxy Information” button is pressed, the following dialogue window appears
and various items related to the proxy server can be set.
Ask the Network manager.
This section is for the setting of terminal security that is necessary to protect the
contents of various terminal settings. Press the “Change Password” button to change
the password for the terminal setting. If a password is in place, the contents of
terminal setting cannot be changed without typing the correct password.
Terminal security
Page 12

3635
Key Process
Hot Key
BRIGHTNESS CONTRAST
MENU
Start
8. OPERATION & ADJUSTMENT
• Move cursor to the right window on the OSD window.
• Increase the value of any selected function.
• Move cursor to the left window on the OSD window.
• Decrease the value of any selected function.
• Launch OSD(On-Screen Display) MENU window.
• Move cursor to the high window on the OSD window.
• Increase the value of V.size or V.center.
• Move cursor to the low window on the OSD window.
• Decrease the value of V.size or V.center.
Page 13

3837
Monitor
9. SPECIFICATIONS
NS Geode GX-1 233 MHz
8/16M Flash Memory
16/32M RAM
Maximum Resolution 1024x768
Maximum 16 bit Color
CD-level sound - 16 bit 44.1 KHz Stereo
External speakers - 1/8 inch mini-jack
External microphone - 1/8 inch mini-jack
Built-in speakers - 8 OHM 1.75 W
PS/2 Type Keyboard
PS/2 Type Mouse
10/100 BaseT Ethernet
RJ-45 Connector
2 PS/2 Port
2 USB Port (Type A)
1 RS-232C Serial Port (DB-9)
1 Printer Port (DB-25)
Microsoft Windows CE 2.12 (Including Direct X)
Microsoft RDP Client
Citrix ICA Client
Win CE MS Internet Explorer 4.01
Win CE MS Windows Media Player 6.4
C P U
Memory
Video
Audio
Keyboard
Mouse
Network
I/O Interface
Software
Terminal
CDT Size 17-inch
Diagonal visible image area 16.2-inch
Dot Pitch 0.28mm
Synchronization Horizontal 30 - 70KHz
Vertical 50 - 160Hz
Plug and Play DDC1/2B/CI
Power Saving EPA, VESA DPMS, Nutek Compliant
Power Source 100-240 Vac, 50/60Hz (Free Voltage)
Power Consumption 85W
Dimension-W x H x D 420 x 440 x 440mm
(set with stand)
Weight-unpacked 37.0/16.8
(lbs/Kg)
Operating Temperature 10 ~ 40°C /50 ~ 104°F
User Control Contrast(Hot Key)
Brightness(Hot Key)
H/V Size, H/V Center, Pincushion, Trapezoid,
Temperature, Pin Balance, Parallelogram,
Pin Corner, RGB Gain, Status, Degauss,
H/V Moire, Recall, 5 languages (Eng. Deu.
Fra. Esp. Ita.)
Page 14

39
S/N : 9978630501
10. TROUBLESHOOTING
Check if power switch and computer power switch
are in the on position.
Check if power switch is in the on position.
Check if the power cord is correctly connected.
Adjust H&V Size or H&V Center to get the proper
image.
Keep the devices that may cause electrical interference away from the monitor.
See the FCC information at the front cover of the
manual.
Operate Degauss once.
Adjust Contrast and Brightness.
Operate Degauss once.
Adjust Geometry Control (Pincushion, Trapezoid..).
Symptom
No picture.
POWER LED is not
lit.
Image is not
centered, too small
or too large.
Picture bounces or a
wave pattern is
present in the
picture.
Color looks blotchy.
Picture is blurred.
Edges of available
area on the screen
are not straight.
Check
 Loading...