

Page 1
Page 2

1.1
1.2
2.1
2.2
3.1
3.2
3.3
4.1
4.2
5.1
5.2
6.1
6.2
6.3
6.4
Table of Contents
Introduction
Quick Start Guide
WingtraOne Package Content
WingtraOne Deliveries
Meet-WingtraPilot
Image Sensors
WingtraOne QX1
WingtraOne RX1
WingtraOne RedEdge
Safety
Safe Flying
Failsafe Scenarios
Charging of WingtraOne
Charging WingtraOne Flight Batteries
Charging Acessories
Flight Preparation
Handling of WingtraOne
Download-Maps-for-Offline-Use
Create-a-New-Flight-Plan
Preflight-Checklist
Flying
2
Page 3

7.1
7.2
8.1
9.1
10.1
10.2
10.3
10.4
10.5
10.6
10.7
10.8
11.1
Flight Modes and Flight Regimes
In Flight Interactions
Postprocessing
Geotagging
Update and Maintenance
Update WingtraPilot & WingtraOne to 1.5.0
FAQ / Troubleshooting
Geotagging Troubleshooting
Preflight Checklist Troubleshooting
Preflight Checklist Troubleshooting
Handling of WingtraOne Troubleshooting
Failsafe Scenarios Troubleshooting
Charging WingtraOne Flight Batteries Troubleshooting
WingtraOne 40MP RX1 Troubleshooting
WingtraOne 20MP QX1 Troubleshooting
Announcements and Release Notes
Wingtra Release
3
Page 4

WingtraOne User Manual — Release 1.5
Congratulations and a warm thank you! for being a Wingtra Customer. We hope you get the best out
of your new aerial data collection tool!
To get started, make yourself familiar with the support and feedback setup, and have a look at our
quick start guide.
Support and Feedback Setup
This knowledge base should always be your first point of contact where most queries have been
addressed already. We want you to enjoy the best experience possible and will be happy to support
you in the following ways as well.
Adhoc Support
If you are on the field and cannot take-off due to technical reasons, please check the Tips and Tricks
section below. If your issues are still not solved, you can call us under the following number, where a
Wingtra employee will respond immediately during working hours (8am - 6pm, CET).
+41 44 632 57 76 (Adhoc support only)
General Support and Feedback
For all questions that are not time-critical and cannot be answered by this knowledge base, please
write an email to our support team under [email protected]. We are also very happy to receive
emails regarding your feedback about our product.
Introduction
4
Page 5

Tips and Tricks
Tips and Tricks
Tip 1: Search this Knowledge Base for Help
Most of your questions are likely answered in one of the chapters in this knowledge base. Please try
different search terms if you cannot find your answer.
Tip 2: Go through the Quick Start Guide
Reassess the WingtraOne Quick Start Guide. It describes all steps that need to be performed before,
during, and after flight. It also links you to detailed explanations provided in different chapters.
Tip 3: Repower WingtraOne
Corner cases can lead to an unexpected situation that prevents WingtraOne from taking off. In case
you cannot solve your issue with tips 1 and 2, repower WingtraOne and try again.
Tip 4: Submit a Support Request
If you require further help or assistance for using our WingtraOne please submit a support request.
We will get back to you as soon as possible. During office hours (08:00-18:00 UTC+2) you may reach
us via phone +41 44 505 15 38.
Introduction
5
Page 6
WingtraOne Quick Start Guide
The following 10 easy steps guide you to collect high-end aerial imagery with your WingtraOne.
Check before you leave the Office
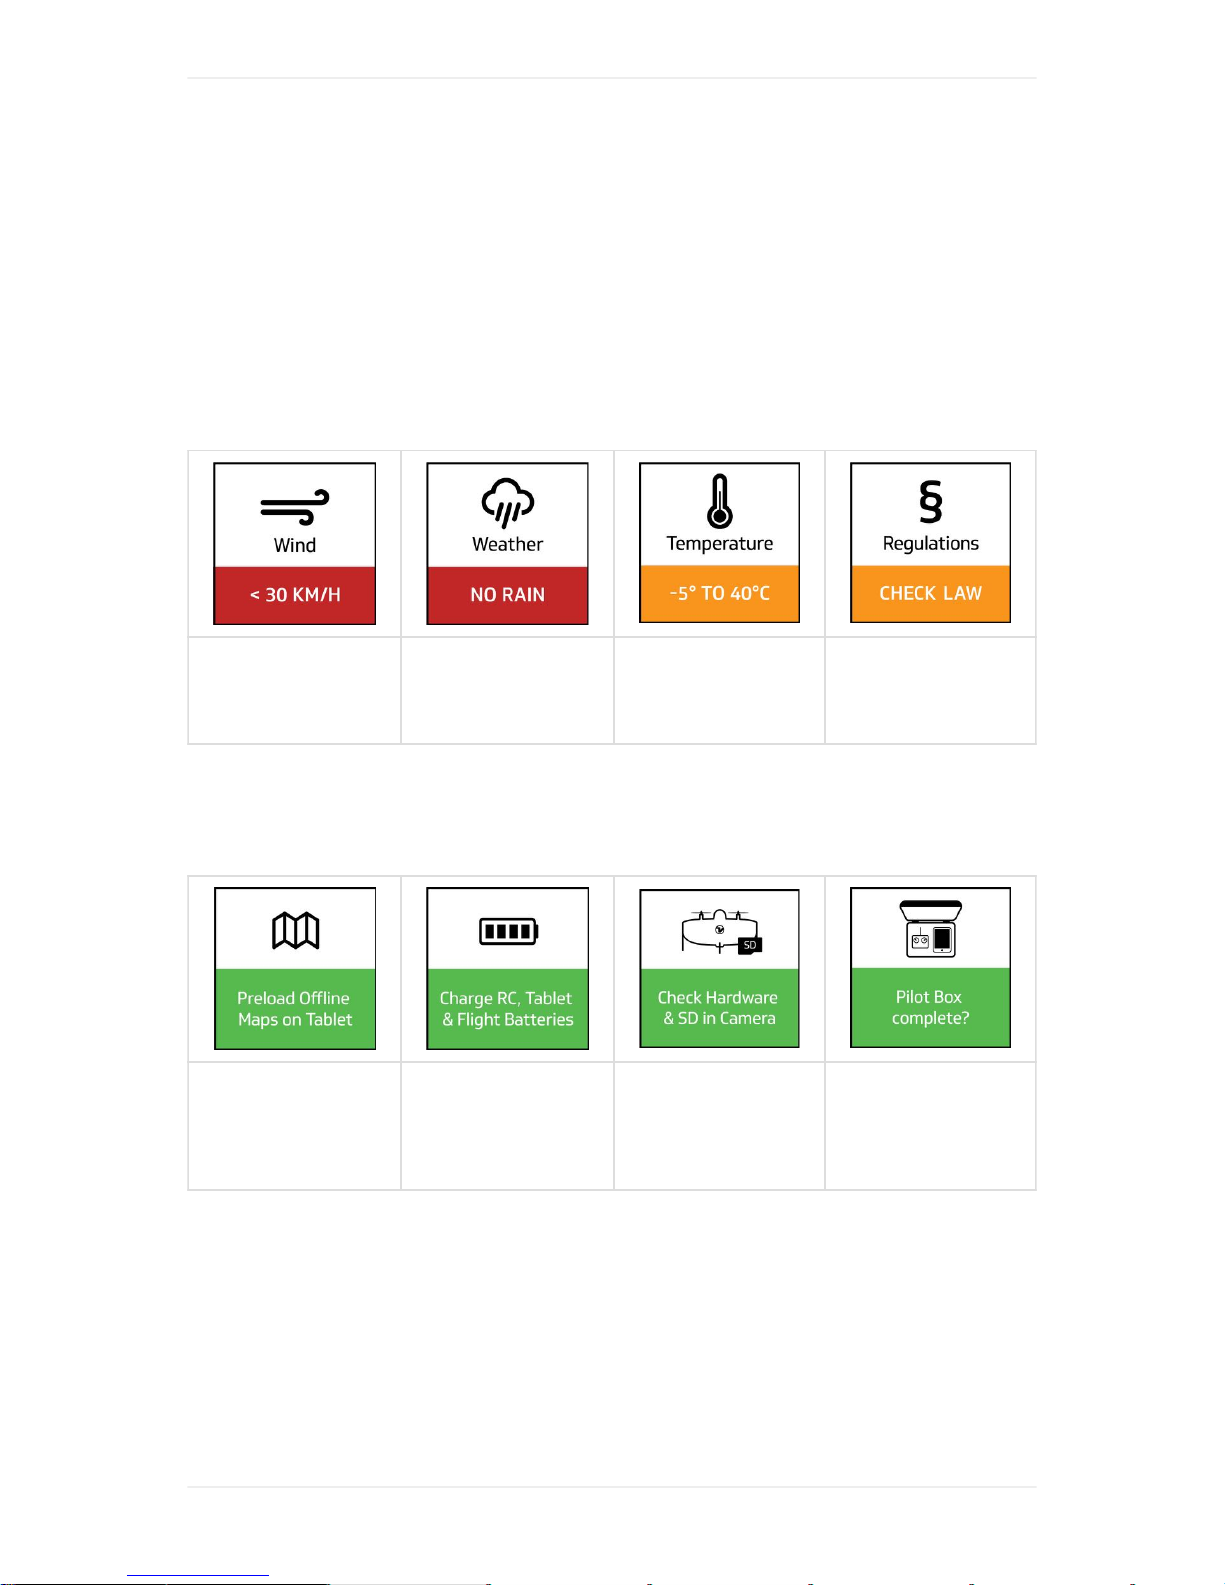
1. Check Flight Conditions
Do not fly if wind
gusts higher than
30 km/h (8 m/s, 16
kts)
Do not fly in rain,
snow or fog
Do not fly if
temperature is
below -5 or above
40 degree celsius
Check law of your
country
See also the general safety guidelines.
2. Office Checklist
Loading Offline
Maps
Charging Manual
for Flight Batteries,
RC and Tablet and
Charging Manual
Accessories
Check if hardware
is complete and
not damaged.
Check SD card
Content of Pilot
Box
Setup your Flight on the Field
3. Hardware Setup
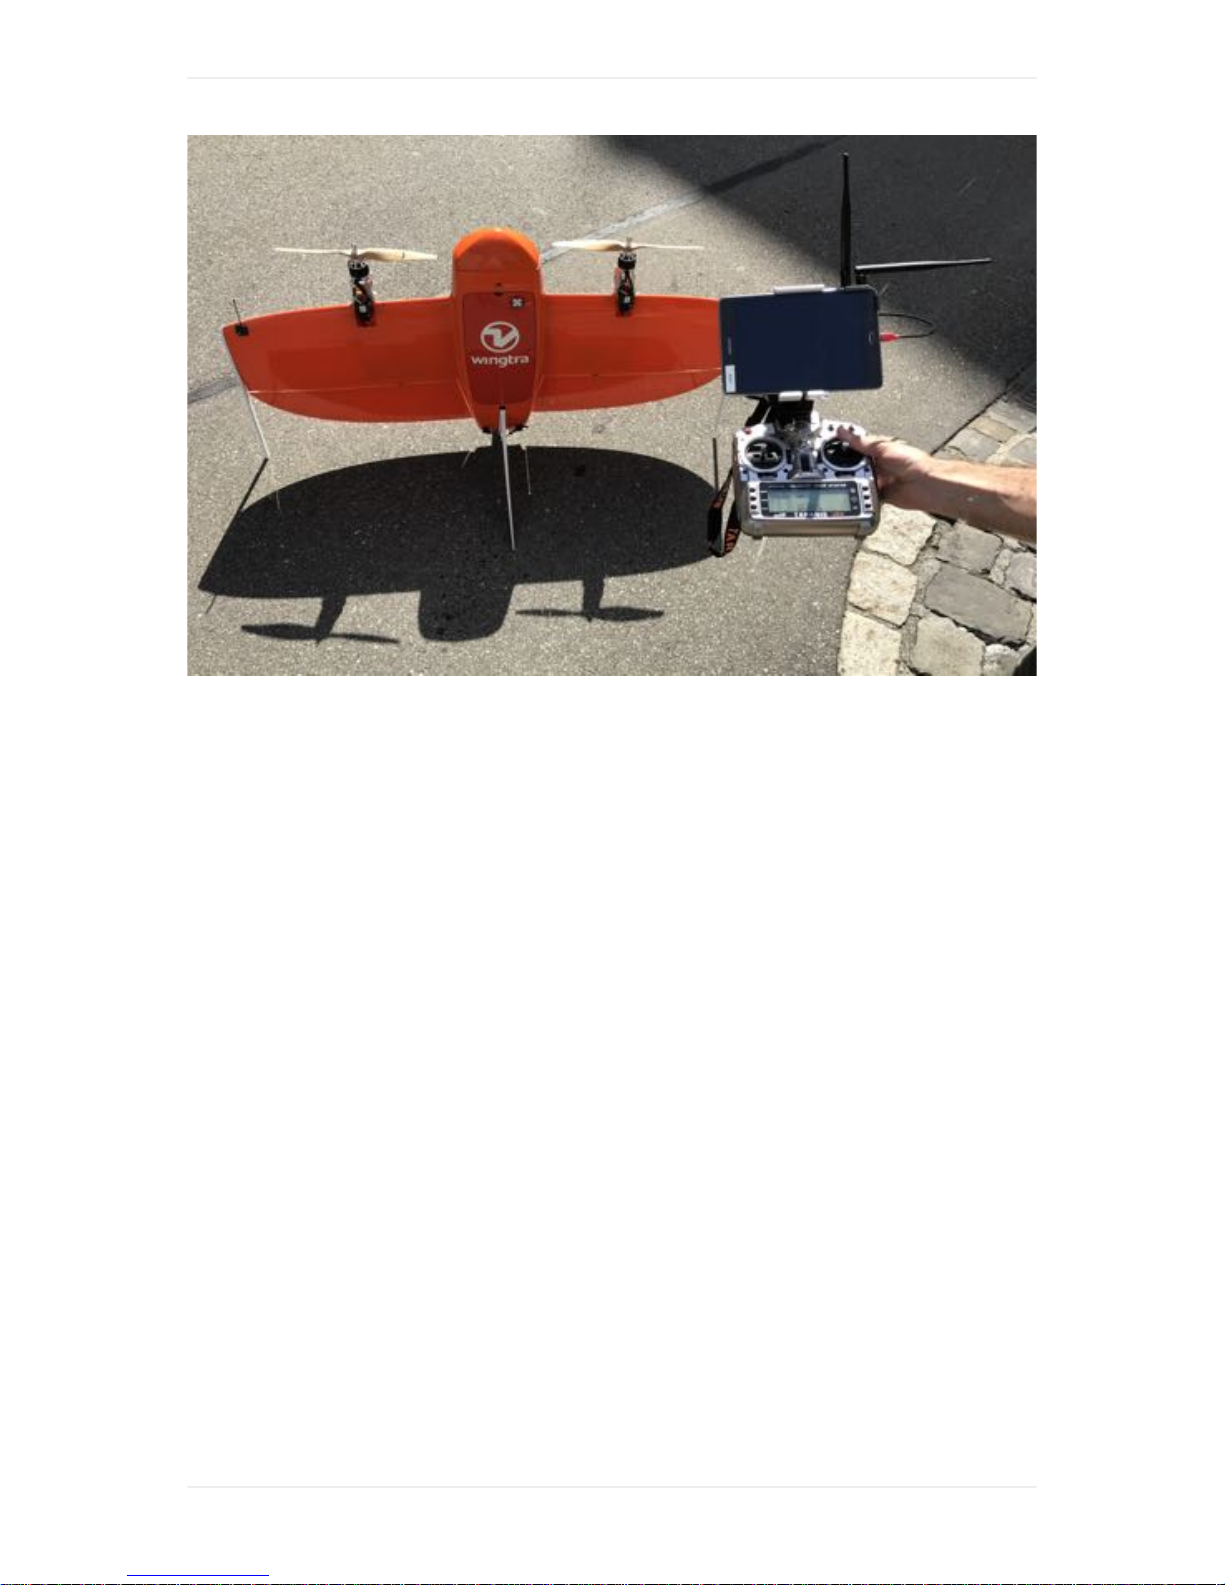
After arriving at the field, assemble WingtraOne by attaching the middle-stand and powering
WingtraOne. Start WingtraPilot on the tablet, connect telemetry to the tablet, and attach tablet to the
tablet holder. Switch on the remote control.
Quick Start Guide
6
Page 7
4. Plan your Flight
Plan a flight in 4 easy steps. For more details, see the flight planning chapter.
STEP 1 Create new Flight Plan:
WingtraPilot will open with the welcome menu. For flying and collecting data, select the first item
"Create a new Flight Plan" and follow the interface. Make sure you selected the correct camera
model. You can go back to the welcome menu at any time by pressing the orange Wingtra icon on the
top left of the screen.
Quick Start Guide
7
Page 8
STEP 2 Set Home:
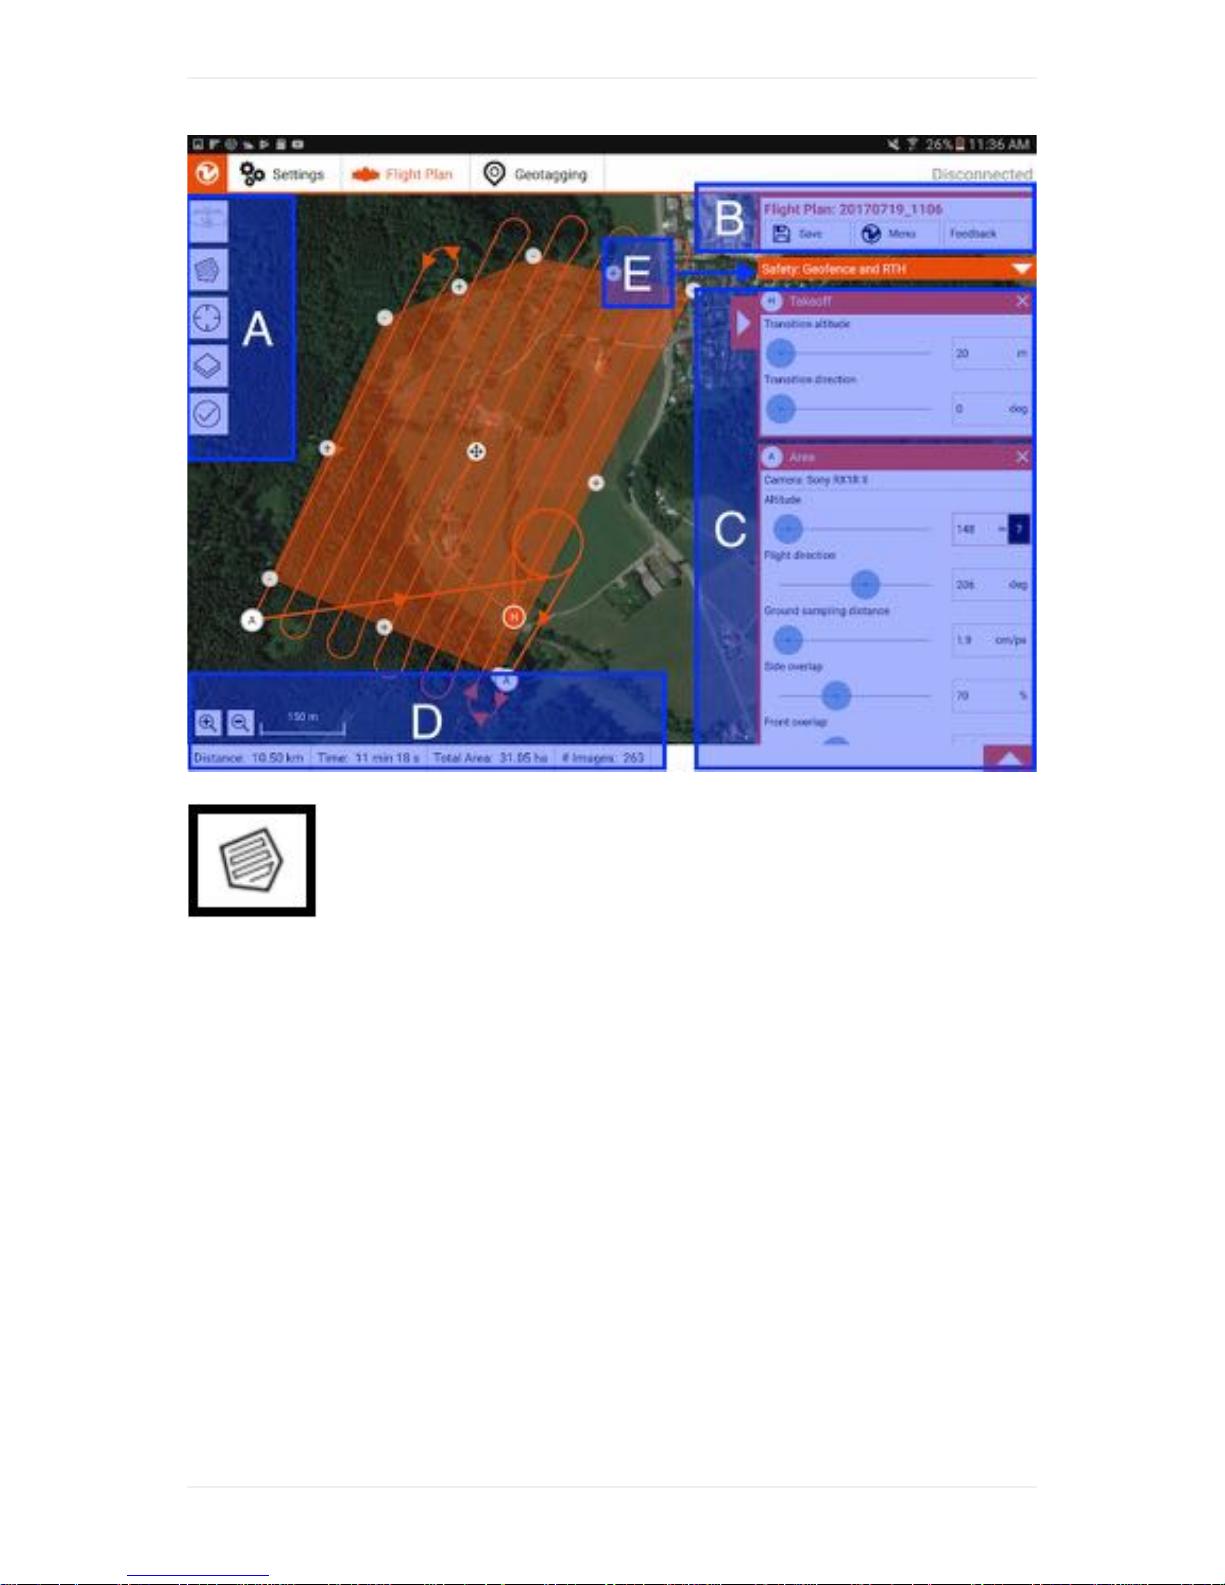
Place WingtraOne at your desired takeoff and landing point. Set Home on WingtraPilot by clicking on
the first item on left side (A). If you are connected to WingtraOne, Home is automatically placed to
WingtraOne's location. If you plan the flight beforehand in office, you can move it to the place where
you intend to takeoff — it will be adjusted to WingtraOne's location once you are on the field. Adjust
"transition altitude" and "transition direction" on the right side (C) such that WingtraOne will not collide
with any obstacle.
WingtraOne will take off, rise to your "transition altitude" above Home, transition into forward flight, fly
to the drawn loiter circle, loiter up to the area altitude and start data collection. After finishing data
collection, it will fly back to the loiter circle at the altitude of the last area, loiter down to "transition
altitude", fly back to the Home point, transition above Home, and land.
Quick Start Guide
8
Page 9
STEP 3 Add Area(s):
You can add one or more areas that you want to map by clicking on the area item on the left side (A).
Choose your desired ground sampling distance (or alternatively, your desired altitude) on the right
side (C), and adjust the flight direction and overlaps if needed. Move the corners (minus signs) and
add additional corners until you draw the area that you want to map.
STEP 4 Review the Flight Plan:
Review the terrain thoroughly: make sure WingtraOne will not collide with any obstacles. Also check
that your flight does not violate laws.
5. (Optional) Adjust Camera Settings
In most cases, the default camera settings should be fine. Use the following procedure to change
settings:
1. Power WingtraOne, if not done yet.
2. Manually turn on the QX1 by clicking the On/Off button on the camera. If you fly an RX1R2 it is
Quick Start Guide
9
Page 10
already turned on.
3. Adjust settings via Sony'a Play Memories app (QX1) or via the camera itself (RX1), see chapter
about your sensor for details.
4. To save the settings you have to manually turn off the camera by switching the on/off button. In
case of the RX1 make sure to turn on the camera afterwards again.
For RedEdge configuration, see RedEdge chapter.
6. Go through Preflight Checks
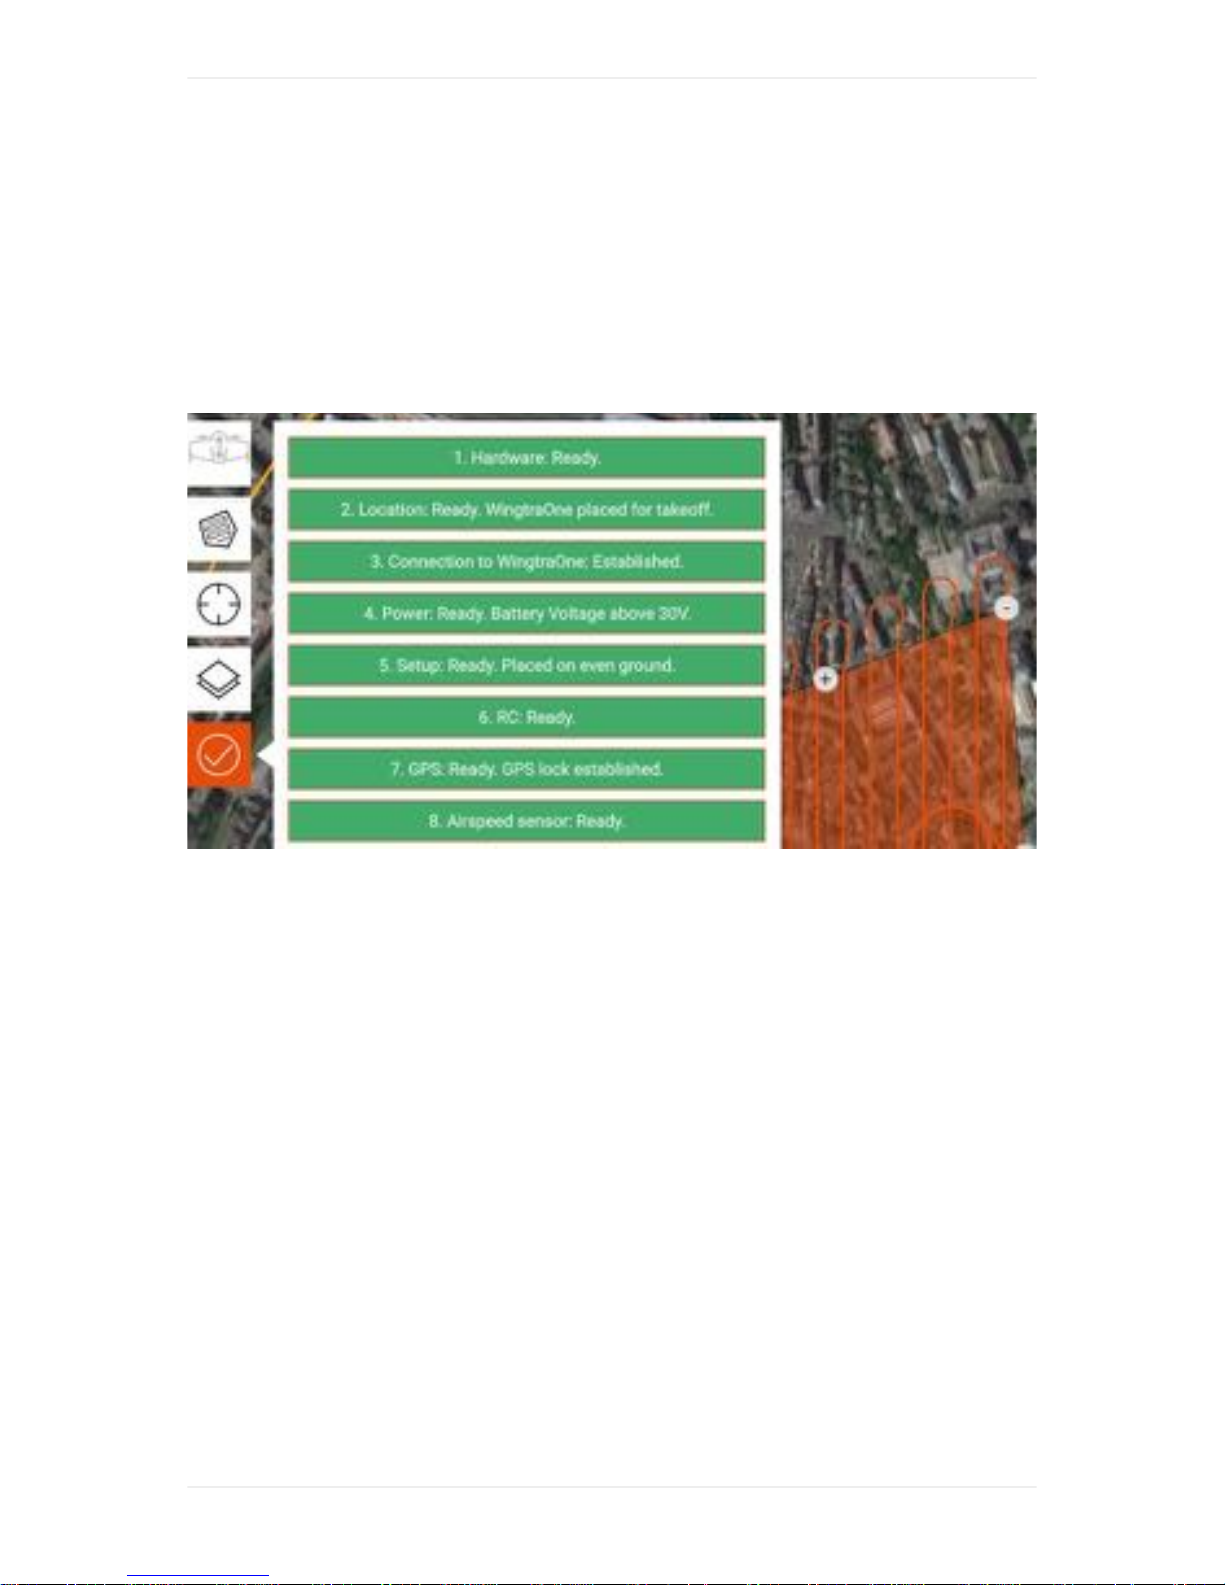
Go through the preflight checklist within WingtraPilot before you start the flight. If any of the preflight
checks fails (e.g. sensor failure), the respective preflight check turns red. Starting a flight is possible
only once all checks have been completed successfully. For a detailed description of all preflight
checks and troubleshooting advice, see the preflight checklist section.
WingtraOne takes a series of test pictures for the QX1 and RX1R2 cameras, during preflight
procedure to ensure the camera is working. For QX1, check if you can hear the camera's shutter, for
RX1R2 open the cover and watch on screen if pictures are taken. Wait for the audio-feedback "Test
pictures are taken" before taking off.
Fly & Collect Images
7. Start the Flight
Make sure that no people are closer than 5 meters to WingtraOne. Take off by clicking onto "Start
Flight" and moving the slider slowly from left to right.
Always repower WingtraOne between flights.
Quick Start Guide
10
Page 11
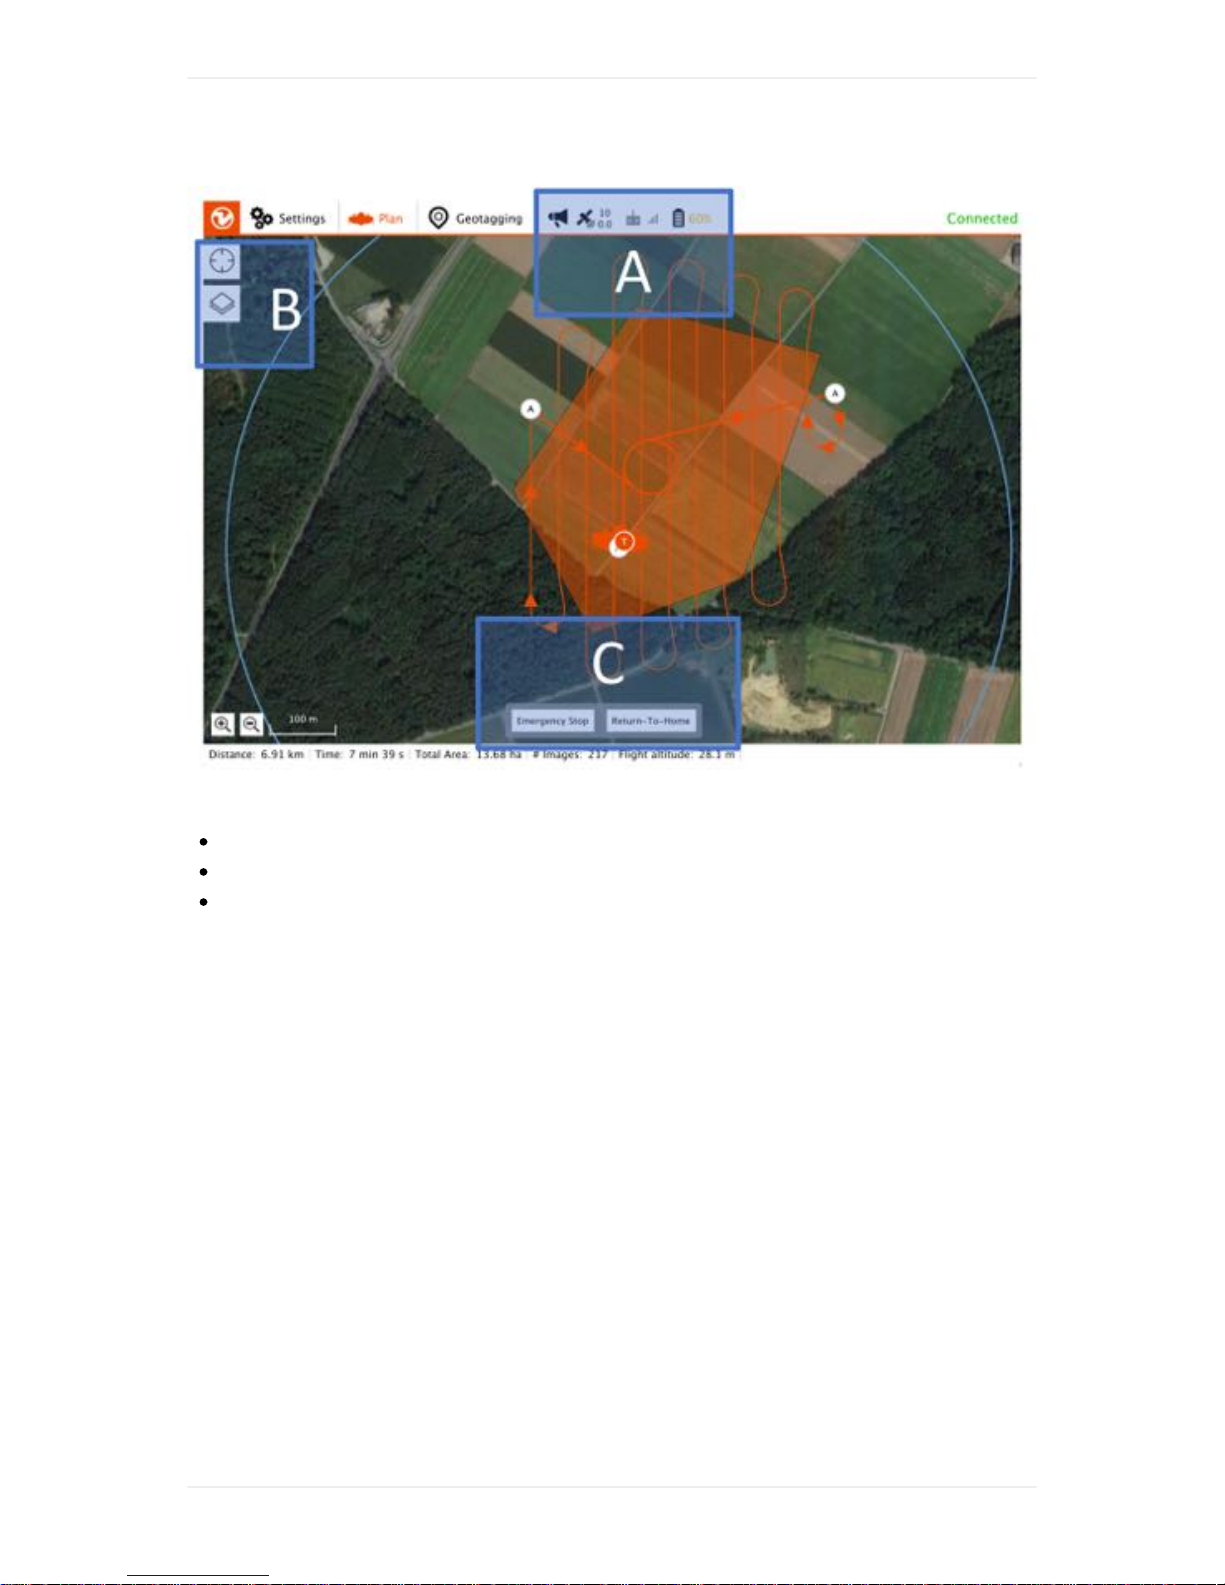
8. Flight Observation
Always observe WingtraOne during flight.
A: Information about remaining battery and GPS quality.
B: Change display options (center map, change map tiles)
C: Options to take over (after clicking a button, you have to confirm with a slider).
Engage "Return-to-Home" to bring back WingtraOne and let it land autonomously. WingtraOne will
automatically engage Return-to-Home in case of low battery, geofence violation, or if both telemetry
and RC connection are lost. For further details, see the chapters about your options to interact and
failsafe scenarios.
Only use emergency stop in real emergency cases. Emergency stop will kill the motors and make
WingtraOne spiral down without any control. There is no way to regain control on emergency stop.
Process your Images
9. Geotag the Images
The collected images are saved on the SD card in the camera without assigned GPS information
(geotags). To assign geotags to the images, you need to perform the following 3 steps. Tag your
images always right after flight.
STEP 1: Download the Geotags
Quick Start Guide
11
Page 12
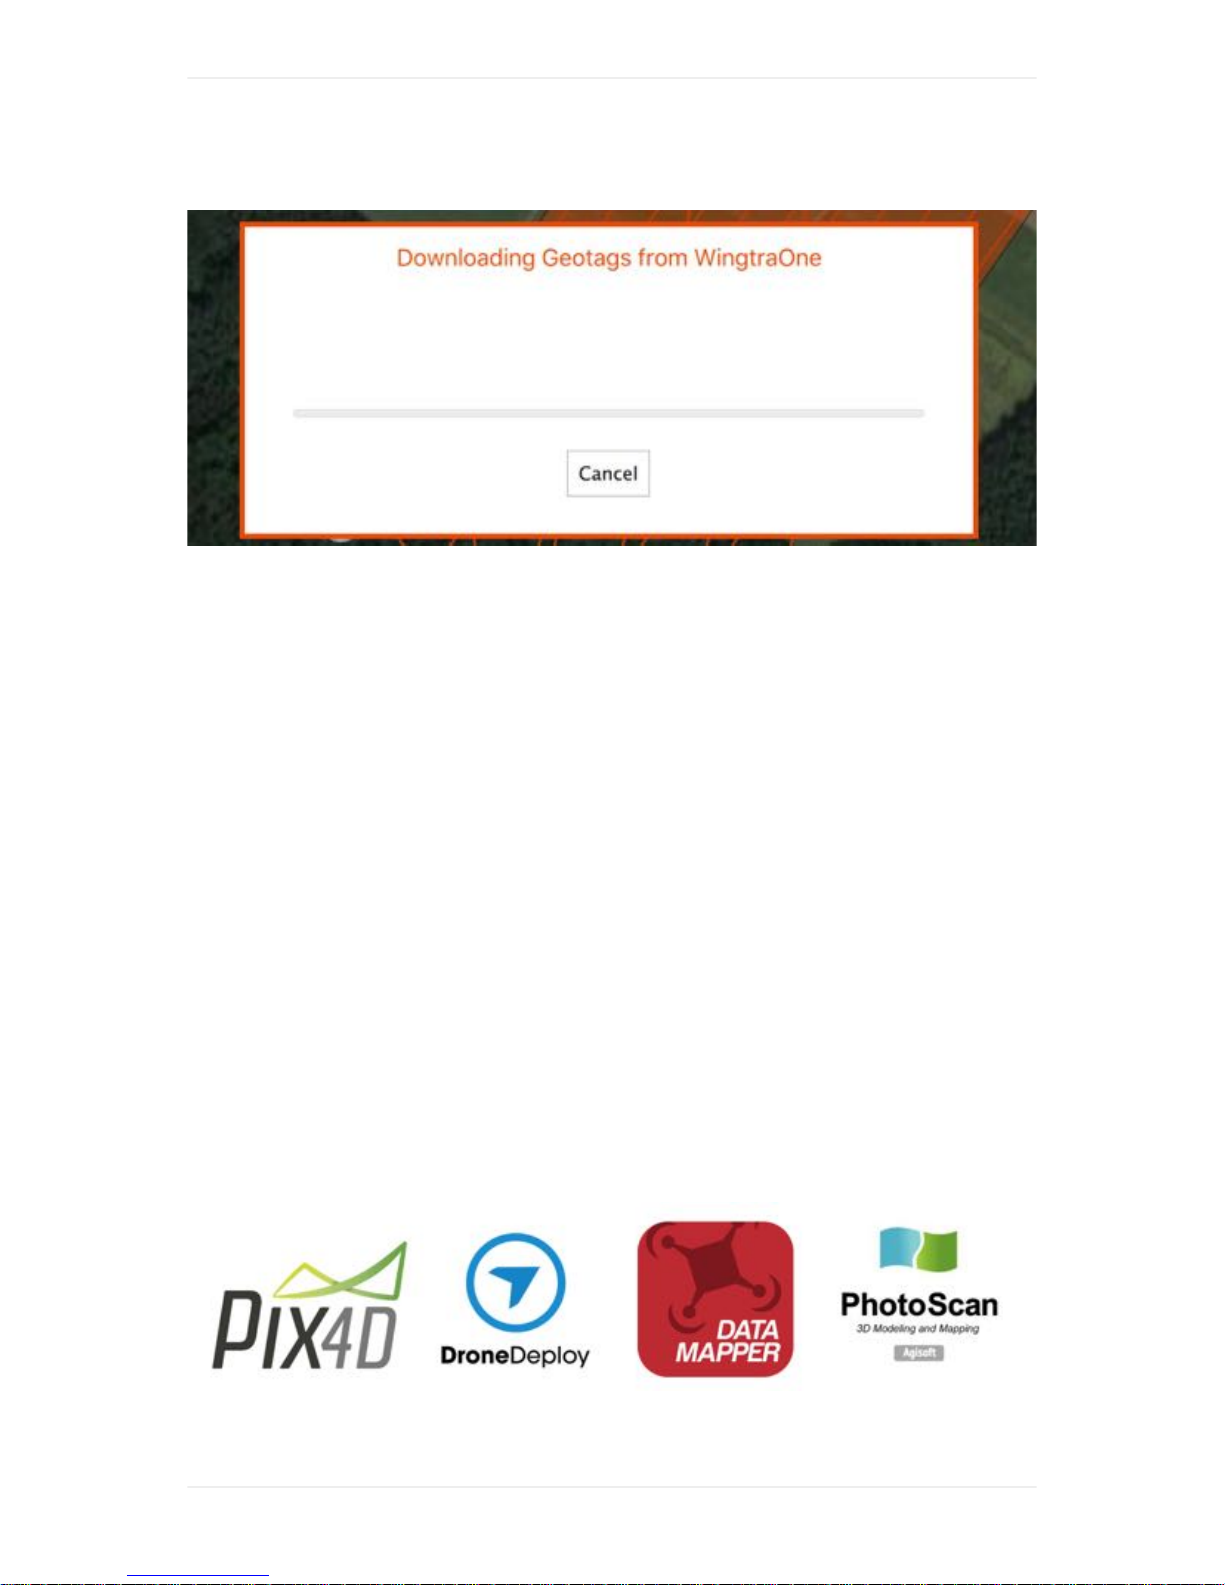
After landing, WingtraPilot will start downloading the geotags automatically. If the download fails, click
on "Retry" and walk towards WingtraOne to get better connection.
STEP 2: Geotag Images on the Tablet
After the download is successful, click on "Geotag Images". Then power off WingtraOne, get SD card
from the camera and insert the SD card to your tablet. Select the image directory on the SD card that
contains your images, and click "Start Tagging". Be patient! Geotagging images can take several
minutes. The geotags will be directly saved to the EXIF metadata of the images.
You can plan the next flight in parallel and continue collecting more data, while geotagging takes
place in the background.
STEP 3: Inspect / Save Images
To inspect your images, open the MyFiles App, navigate to SDcard/DCIM/ and into your project folder.
Open an image in the /Tagged subfolder and select "Gallery" as image viewer.
The SD card should provide enough space for several flights (up to 3000-4000 JPEG images), you
can continue flying directly or insert the SD card on a laptop and save the data after every flight.
10. Use the Geotagged Images in your Postprocessing Toolchain
Copy the geotagged images from the SD card to your computer and use them with your favorite
postprocessing toolchain. Always use the images from the /Tagged subfolder.
Quick Start Guide
12
Page 13

Quick Start Guide
13
Page 14

WingtraOne Deliveries
Your WingtraOne is shipped with the following accessories.
Pilot Box
1. Remote Controller (RC)
2. Tablet
3. Flight Batteries (2 flight sets)
4. Telemetry
5. Charger
6. Charging cables, Wind measuring tool
7. Pitot covering tool, SD card adapter, Hex-wrench tool
WingtraOne Bottom View
WingtraOne Deliveries
14
Page 15
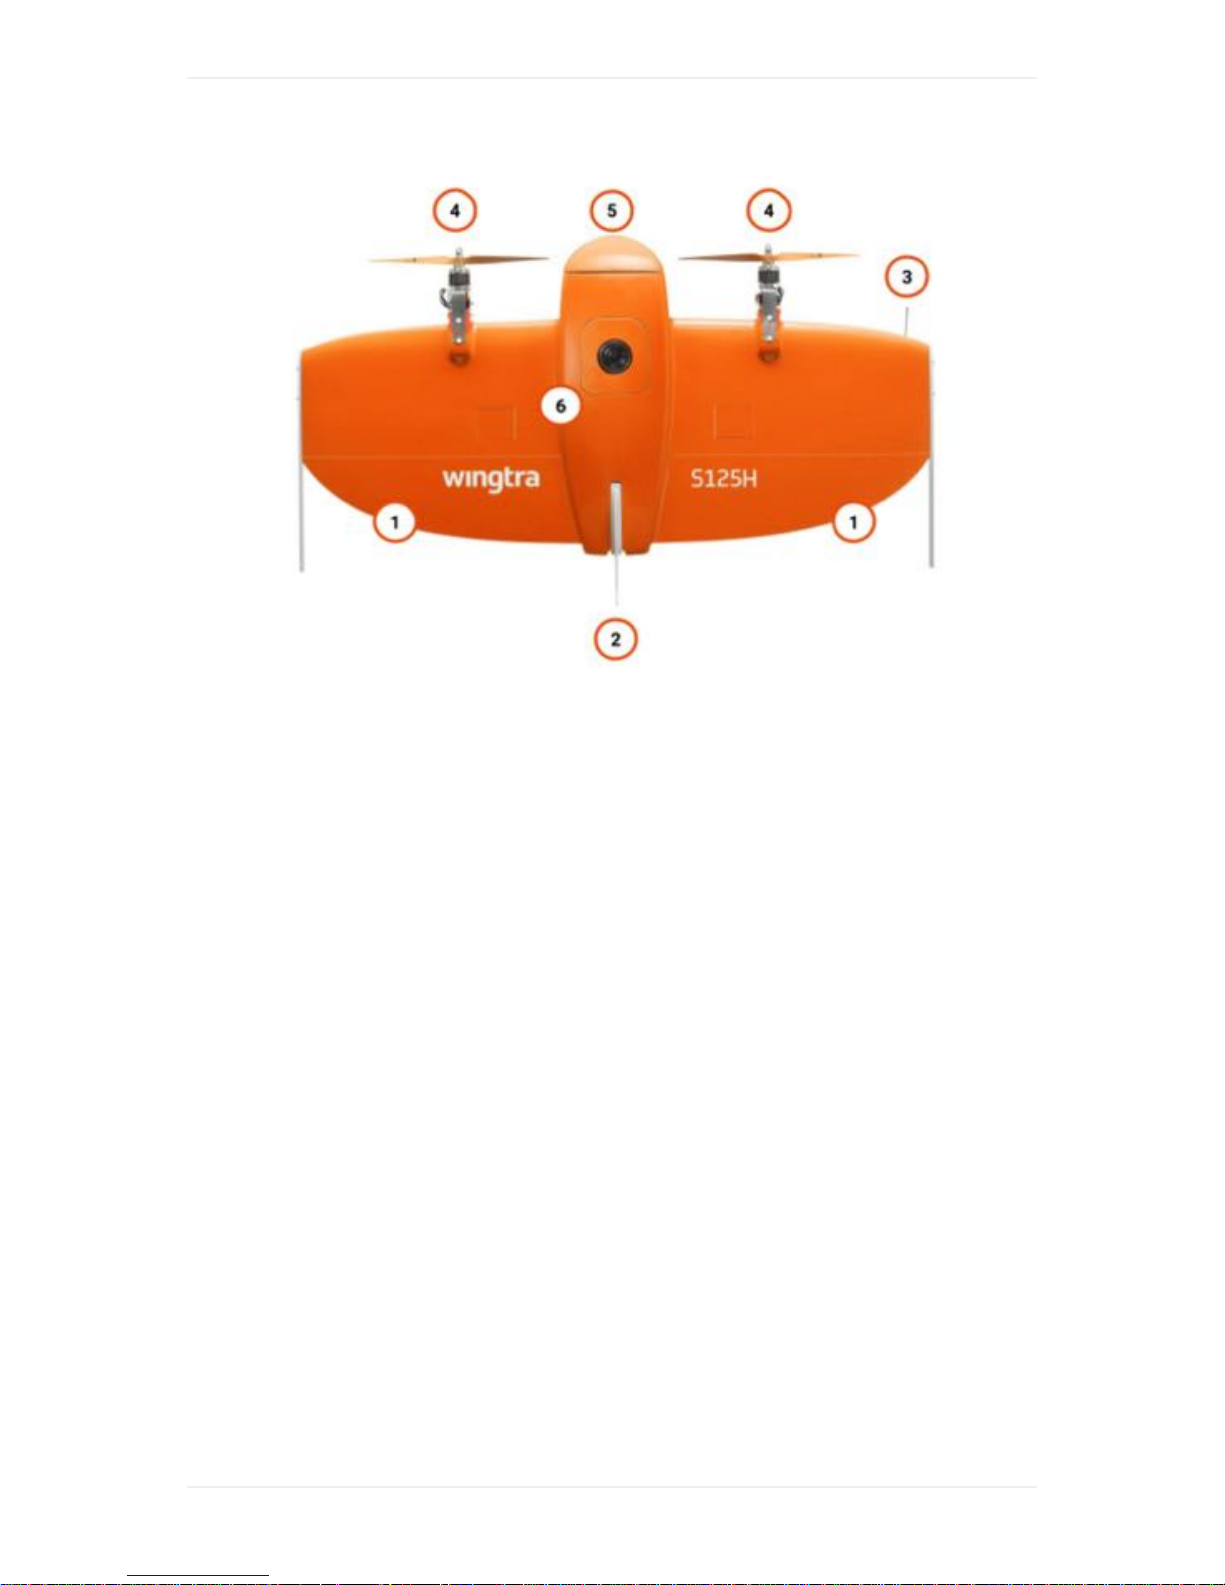
1. Flaps
2. Middle Stand
3. Airspeed Sensor (Pitot Tube)
4. Propellers
5. Battery Compartment
6. Sensor Compartment
WingtraOne Top View
WingtraOne Deliveries
15
Page 16
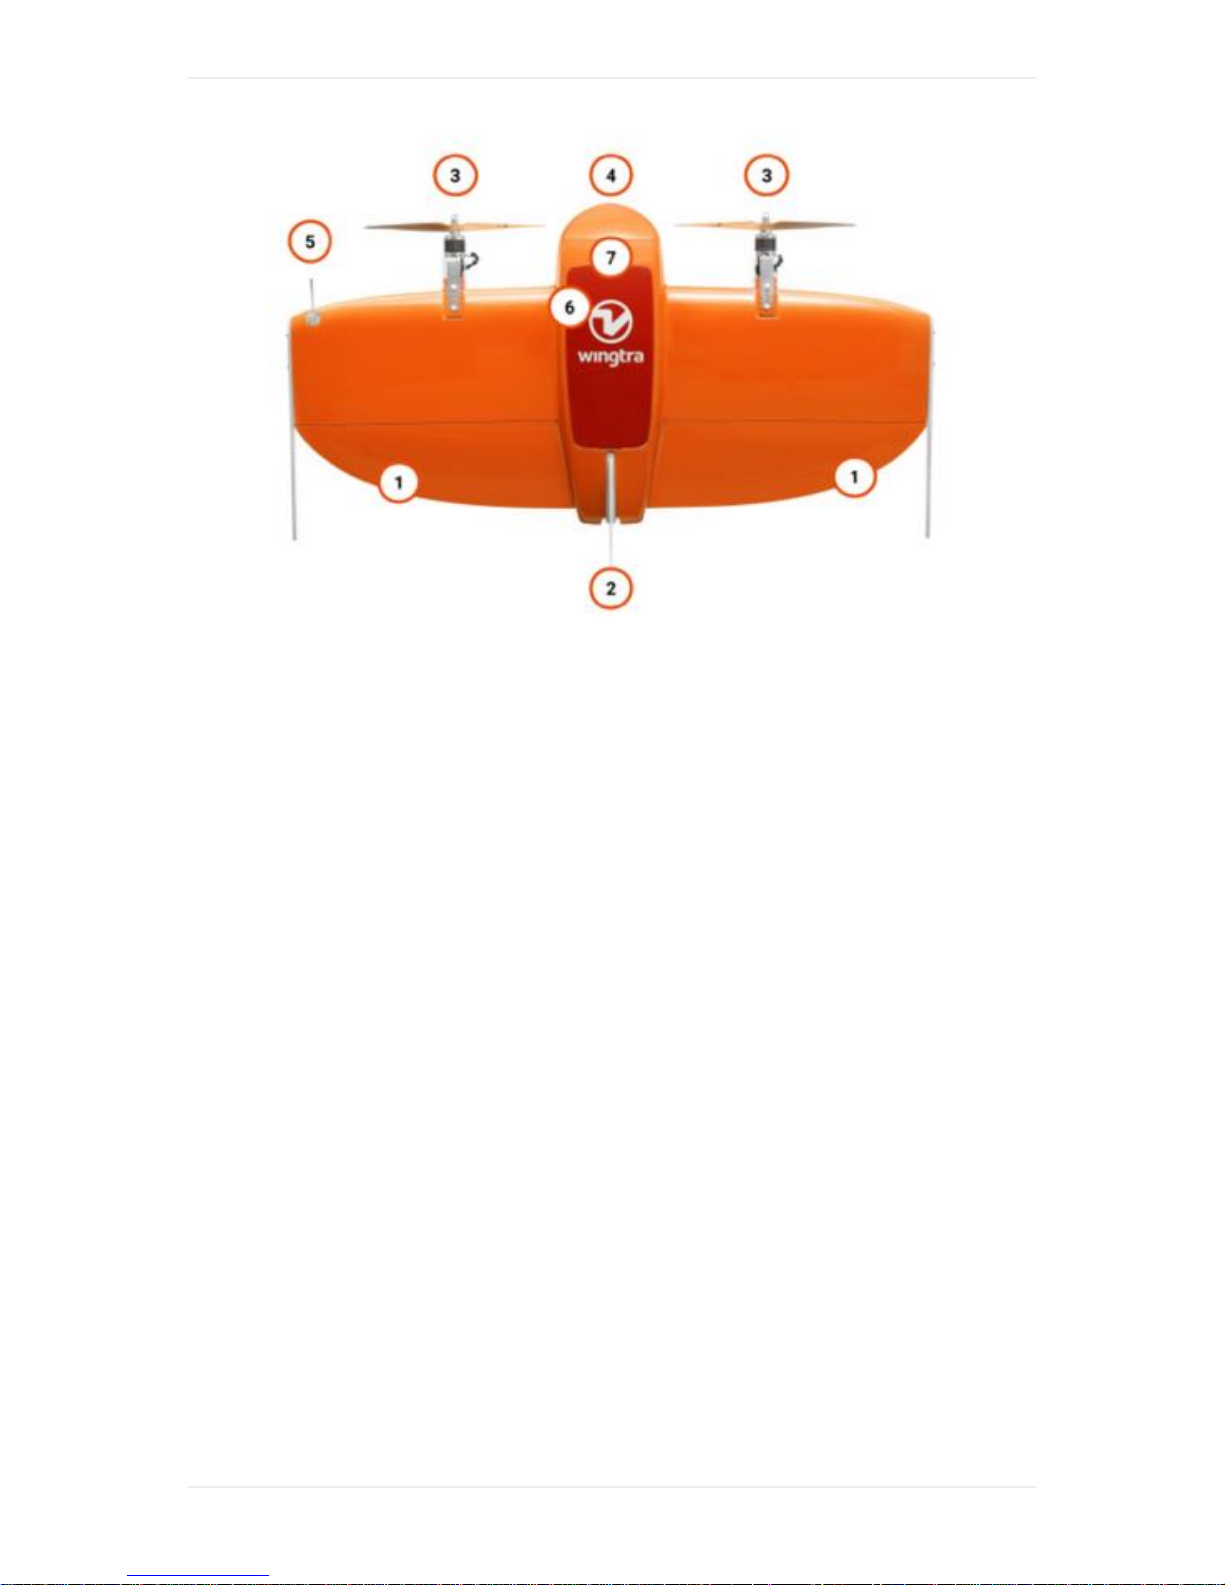
1. Flaps
2. Middle Stand
3. Propellers
4. Battery Compartment
5. Airspeed Sensor (Pitot Tube)
6. Cover - Access to Camera, Electronics
7. Ready-To-Fly Button
WingtraOne Deliveries
16
Page 17
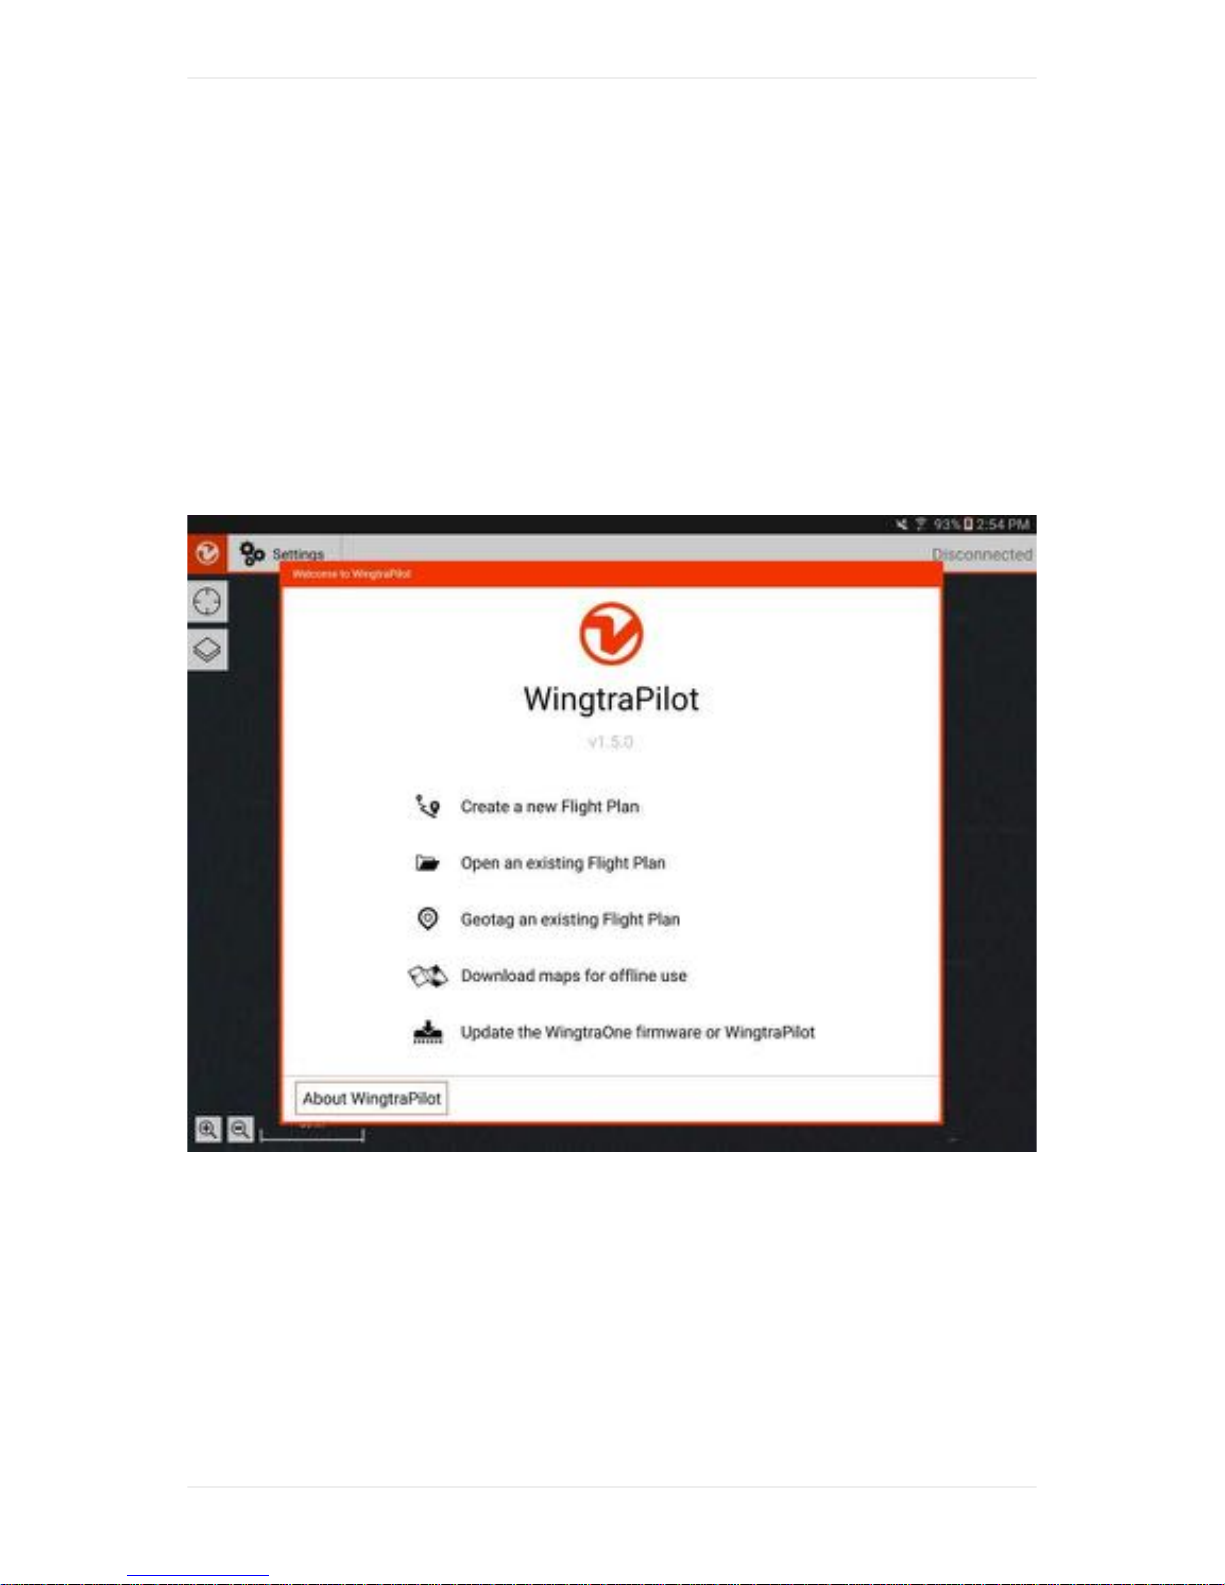
Meet WingtraPilot
WingtraPilot Tablet Application
WingtraPilot is your interface with the WingtraOne and enables you to collect high quality aerial
imagery. WingtraPilot's main functionalities include flight planning, flight execution, geotagging,
loading of offline maps and updating the WingtraOne firmware.
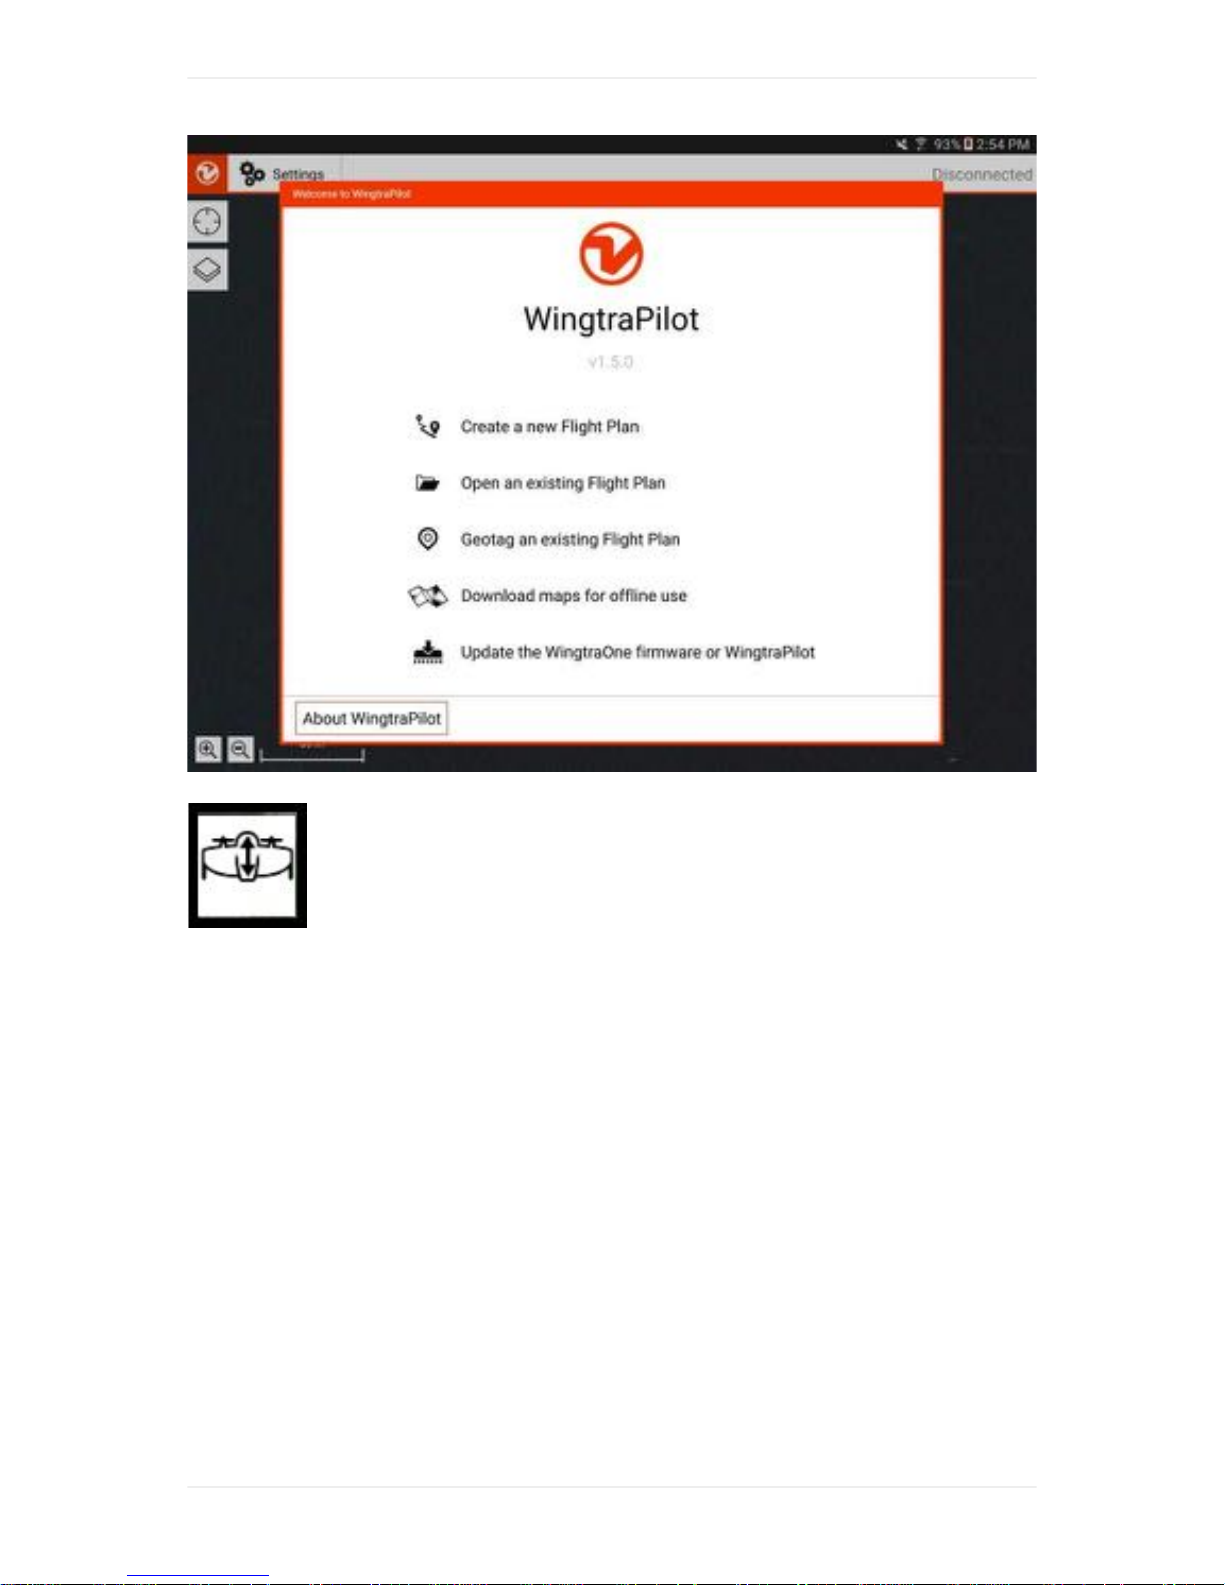
Starting WingtraPilot on your tablet, you will see the welcome menu. You can always go back to the
welcome menu by clicking on the orange Wingtra icon on top left of the screen.
What you can do with WingtraPilot
1. Create a new Flight Plan
You can either create a Flight Plan from scratch or create a new one based on an existing Flight Plan.
You have to create a new Flight Plan for every flight. Follow the instructions in the interface to enter
the flight planning itself. Below you can find a sample flight planning. See here for details on flight
planning.
Meet-WingtraPilot
17
Page 18
2. Open an existing Flight Plan
You cannot modify a Flight Plan that has been flown already. If you want to refly an already flown
Flight Plan, click onto the first option "Create a new Flight Plan" and choose "Based on existing Flight
Plan". Use "Open an existing Flight Plan" in the following two cases:
1. You planned a flight in office and want to fly or modify it now.
2. You want to inspect settings of an already flown Flight Plan.
3. Geotag an existing Flight Plan
Collected images are saved on the SD card in the camera without assigned GPS information
(geotags). Geotagging appends this information to the image metadata. Geotagging should always be
done right after flight, where you will be guided through the process of geotagging. You can use this
menu if you forgot to geotag after flight or if there was an issue with geotagging earlier.
4. Download maps for offline use
Use this option to download maps for offline use if you do not have internet connectivity on the field.
See below for more details.
5. Update WingtraOne firmware
You can use this option to update the WingtraOne firmware or the WingtraPilot App. See here for
details.
Adjust Settings / Customize WingtraPilot
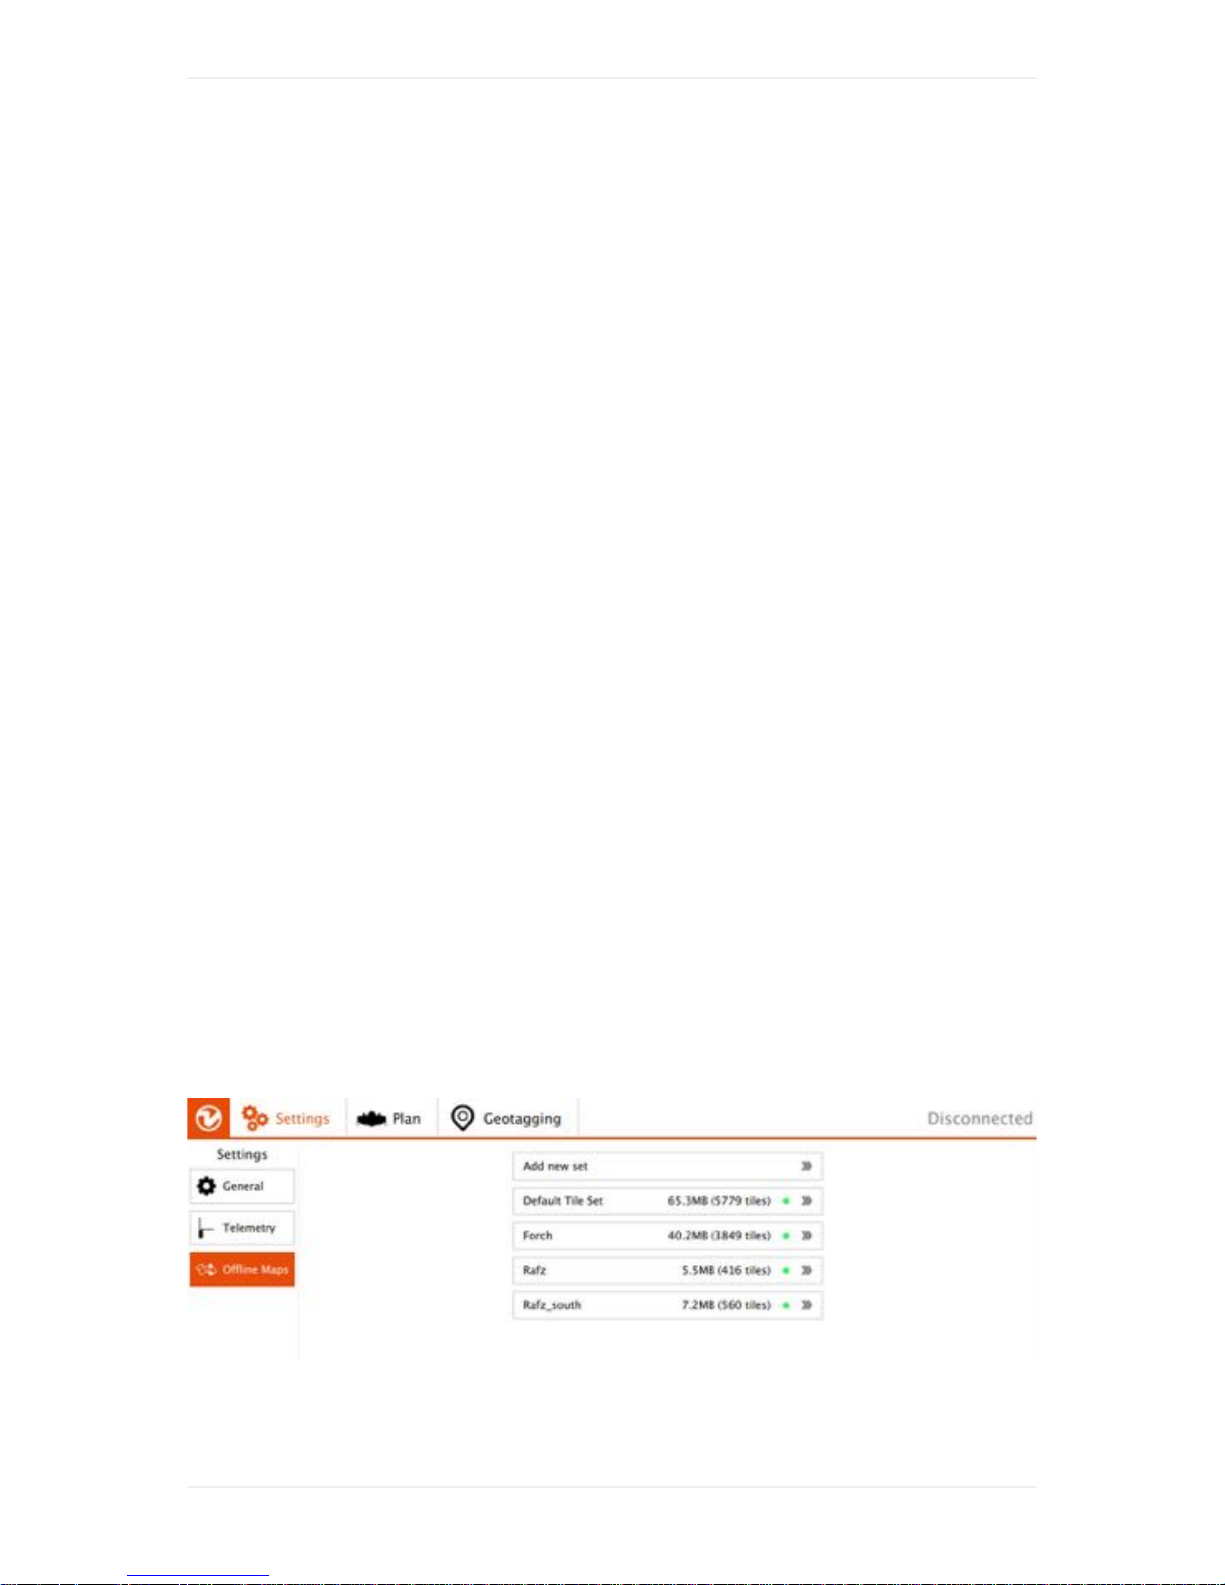
Download maps for offline use
On the settings tab, select “Offline Maps” and “Add new set”. Navigate to the desired location, choose
the right map type, zoom options (defaults of 14-20 should normally be fine), give the set a descriptive
name, and download.
Meet-WingtraPilot
18
Page 19

Be patient if the tiles are not loading immediately. If the download is stuck, restart WingtraPilot,
navigate to the settings tab, select "Offline Maps" again, and click onto your new set. On the right side
click onto "resume download" and be patient again.
Connect manually to WingtraOne
WingtraPilot automatically connects to WingtraOne as soon as the Telemetry is connected to tablet
and WingtraOne is powered. If automatic connection can not be established, you can manually
connect to your vehicle under the settings tab by clicking on the "Telemetry" button on the left side.
On the buttom, click on "Add". Select Type "Serial" and Baud Rate "57600" and click "ok". If you still
cannot connect, make sure that you have attached the Telemetry and powered WingtraOne.
Change User Mode
On the settings tab, you can change the user mode under the "General" button on the left side. Please
always use the Basic mode and only switch to Wingtra mode if you are told to by the Wingtra Support.
Basic
You get all functionality that is needed to plan and conduct a data collection flight in basic mode.
There is no need to go to Wingtra mode as long as everything works fine with WingtraOne.
Wingtra
In Wingtra mode, you have full access to the flight parameters, sensor calibrations, and advanced
settings. This mode will be removed with one of the upcoming updates and is only in place to make
first support as efficient as possible. You can easily make WingtraOne un-flyable if you do not know
what you are doing!
Never switch to Wingtra mode unless you are told by the Wingtra Support.
Change Language
On the settings tab, you can change the language under the "General" button on the left side. At the
moment, only a Chinese translation of the welcome menu and the preflight checklist is available.
Further Settings
You can adjust further settings under "Settings" --> "General": - change between metric and imperial
units - select map provider: Bing, Google, Here or Aero
Meet-WingtraPilot
19
Page 20
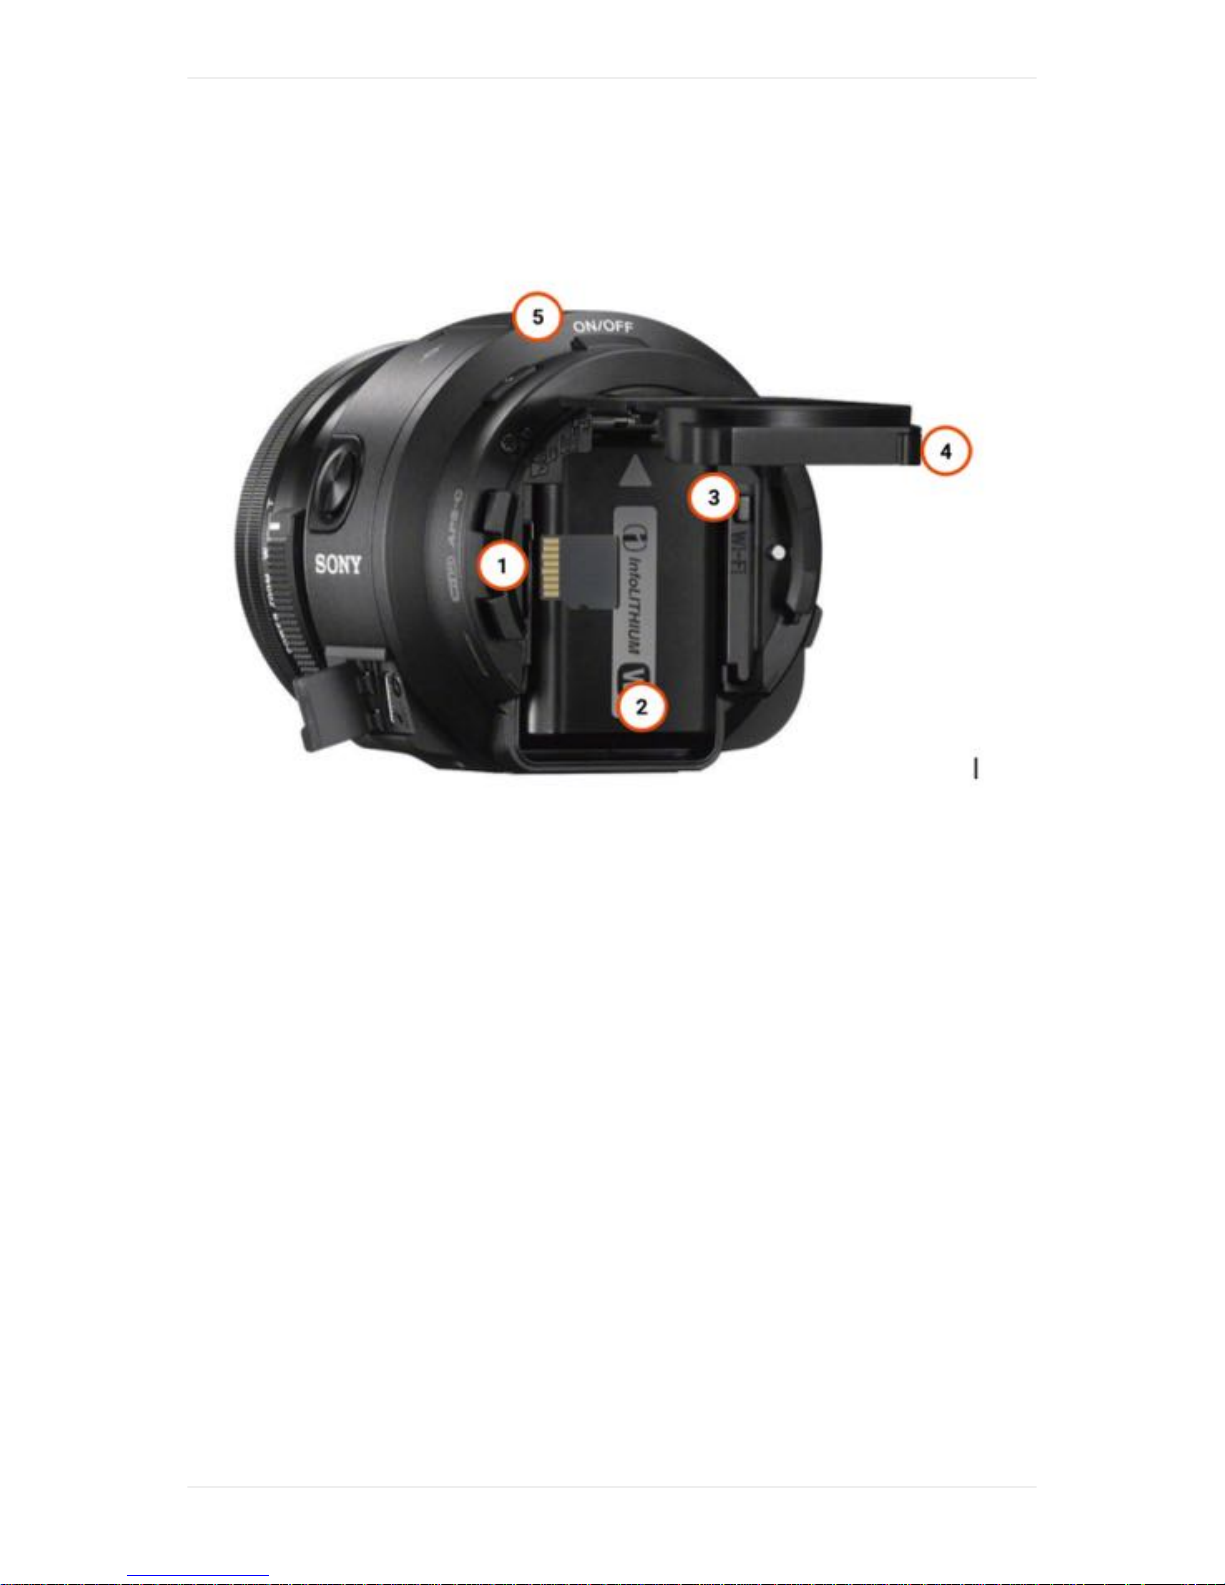
WingtraOne 20MP QX1
1. SD card slot
2. Battery compartment (the camera is powered externally from WingtraOne)
3. Wi-Fi button
4. Closure lid
5. Power on / off button
The SD card can be inserted in the wrong direction - always check if you insert it as displayed on the
figure.
Check and Adjust Camera Settings QX1
In most cases, the default camera settings should be fine. If you want to change the settings, you
have to power WingtraOne, manually switch on the camera (press On/Off button on camera housing),
open the PlayMemories app on your tablet, and connect to the camera (See the WingtraOne QX1
Troubleshooting Section if it does not connect). The recommended settings differ depending on the
used lens, see below.
For more information about the camera see the official Sony Documentation.
QX1 with 16mm or 20mm Pancake Lens
WingtraOne QX1
20
Page 21

Light
Conditions
Camera
Program
Mode
Shutter
Speed [s]
Aperture,
f-Number
ISO
Settings
Image
Quality
default
Shutter
Priority
1/2000 auto 1000 fine
The default settings give good results in large range of light conditions. In case of very dark conditions
you can increase shutter time (do not go beyond 1/1000s) and ISO (do not go beyond 3200). In case
of very bright conditions you can decrease the ISO value.
As a photogrammetry expert you can of course also try out different settings. If you want to adjust
camera settings before every flight, you can use the cameras "Program Mode" and set shuttertime,
aperture and ISO to the sweet spot (shuttertime ~ 1/2000s, aperture ~ 5, ISO depending on
conditions). Make sure you do not face the camera into the sun when adjusting the settings in
Program Mode.
Focus should be set to "manual focus" and infinity. Auto focus leads to inaccurate geotagging and
potentially holes in the map due to missed triggers. We recommend not touching the focus unless you
have problems with image sharpness. After exchanging lenses (from 15mm Voigtländer to the
16/20mm lens) we highly recommend to confirm a good focus setpoint of the lens prior to the first
flight.
To check the focus setpoint of the camera place the WingtraOne with the camera facing to the horizon
and power the WingtraOne. Then remove the top cover and press the on/off button of QX1 and
connect to camera using the PlayMemories App on your tablet. You should see a live view of the
camera image. Take a picture and pinch to zoom into the fetched image on the tablet. If the image is
sharp just disconnect the camera from the Playmemories App by pressing the back button on the
tablet twice. If the image is not sharp you should adjust the focus set point, as explained in the
WingtraOne QX1 Troubleshooting Section.
QX1 with 15mm Voigtländer Lens
Light
Conditions
Camera
Program
Mode
Shutter
Speed [s]
Aperture,
f-Number
ISO
Settings
Image
Quality
default
Shutter
Priority
1/2000
4.5 (adjust
on lens)
auto-ISO fine
With 15mm Voigtländer lens, you fix both aperture (on the lens) and shutter time (on the camera).
This means you fly manual exposure and should use auto-ISO.
The default settings give good results in large range of light conditions. In case of very dark conditions
you can increase shutter time (do not go beyond 1/1000s). In case of very bright conditions you can
decrease shutter time (e.g. to 1/4000s).
WingtraOne QX1
21
Page 22

The 15mm lens has a calibrated mechanical focus. Turn the focus ring to infinity and the images will
be perfectly sharp.
WingtraOne QX1 test pictures in preflight procedure.
WingtraOne takes a series of test pictures after you press the Ready-To-Fly button during the preflight
procedure to check if the camera is setup correctly, i.e. to make sure that the SD card is inserted
correctly and triggering from the autopilot is possible. Listen to the camera after you press the Ready-
To-Fly button. If you hear the shutter opening and closing (clicking sound) you can be sure that
everything works fine. If you run into trouble, check the WingtraOne QX1 Troubleshooting Section
before submitting a support request.
WingtraOne QX1
22
Page 23
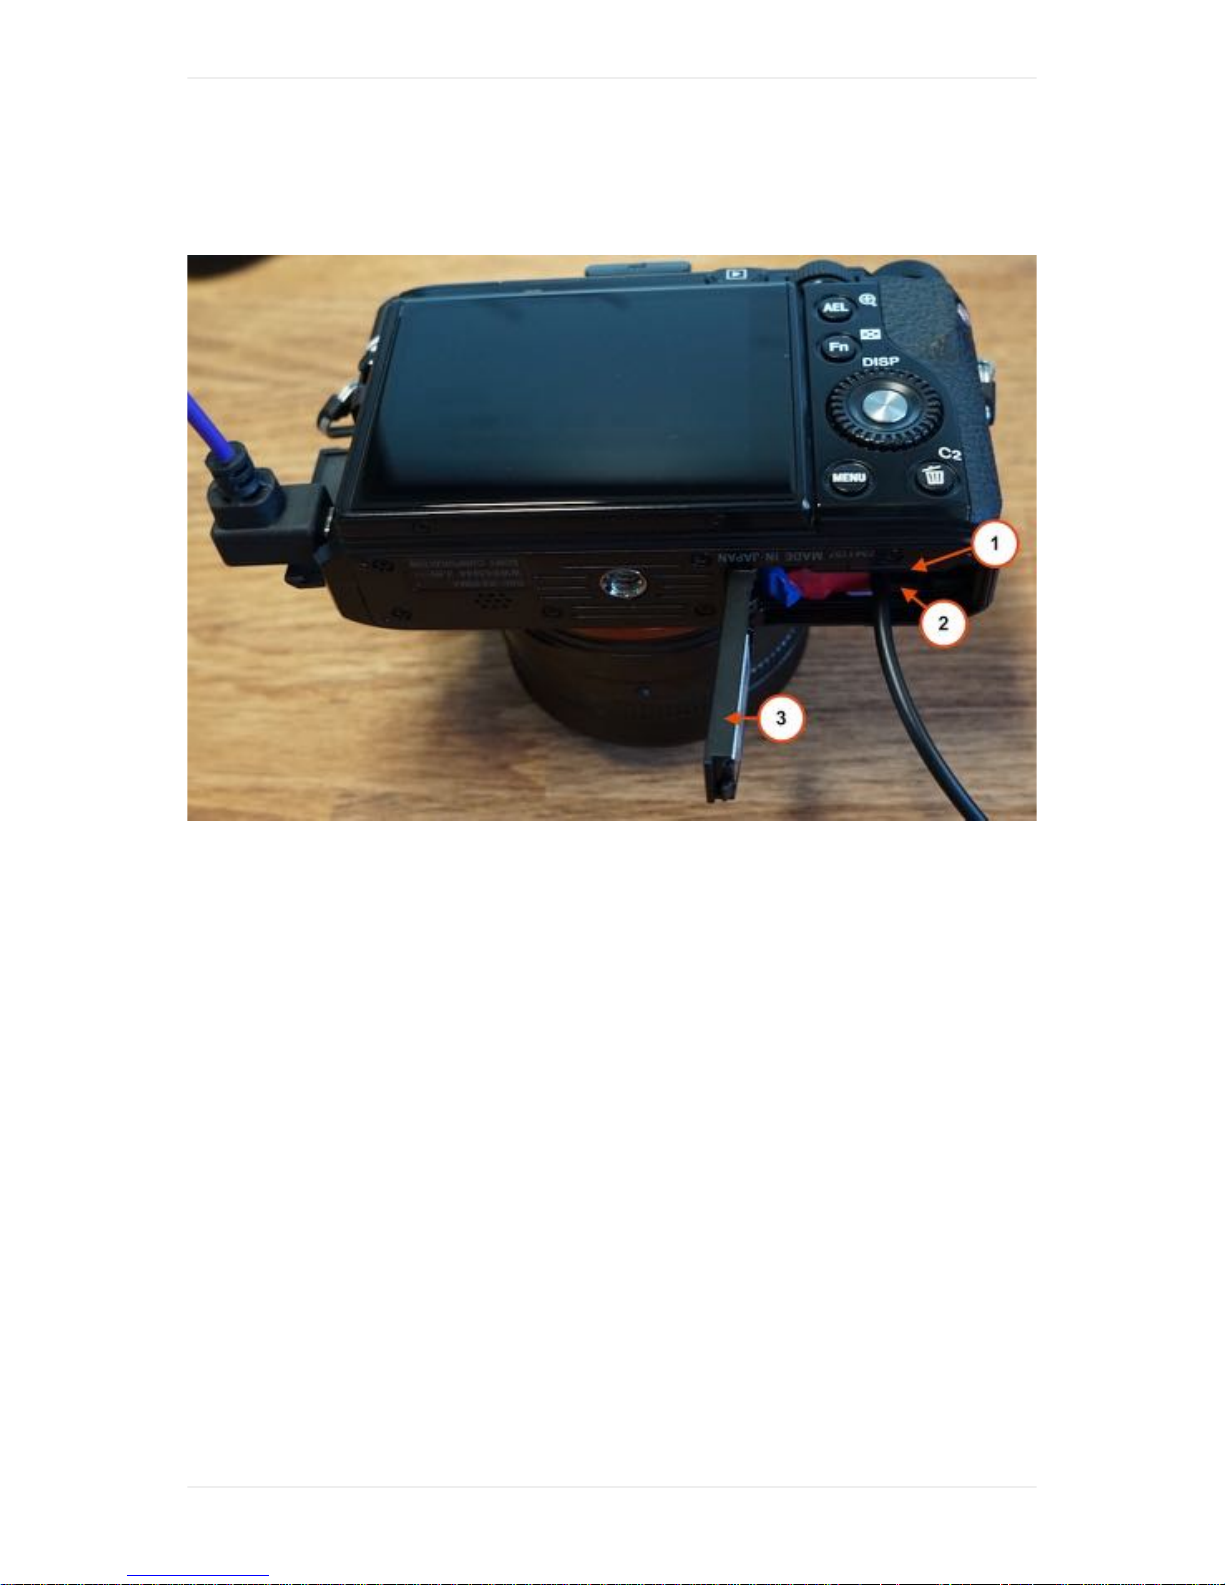
WingtraOne 40MP RX1
WingtraOne RX1
23
Page 24
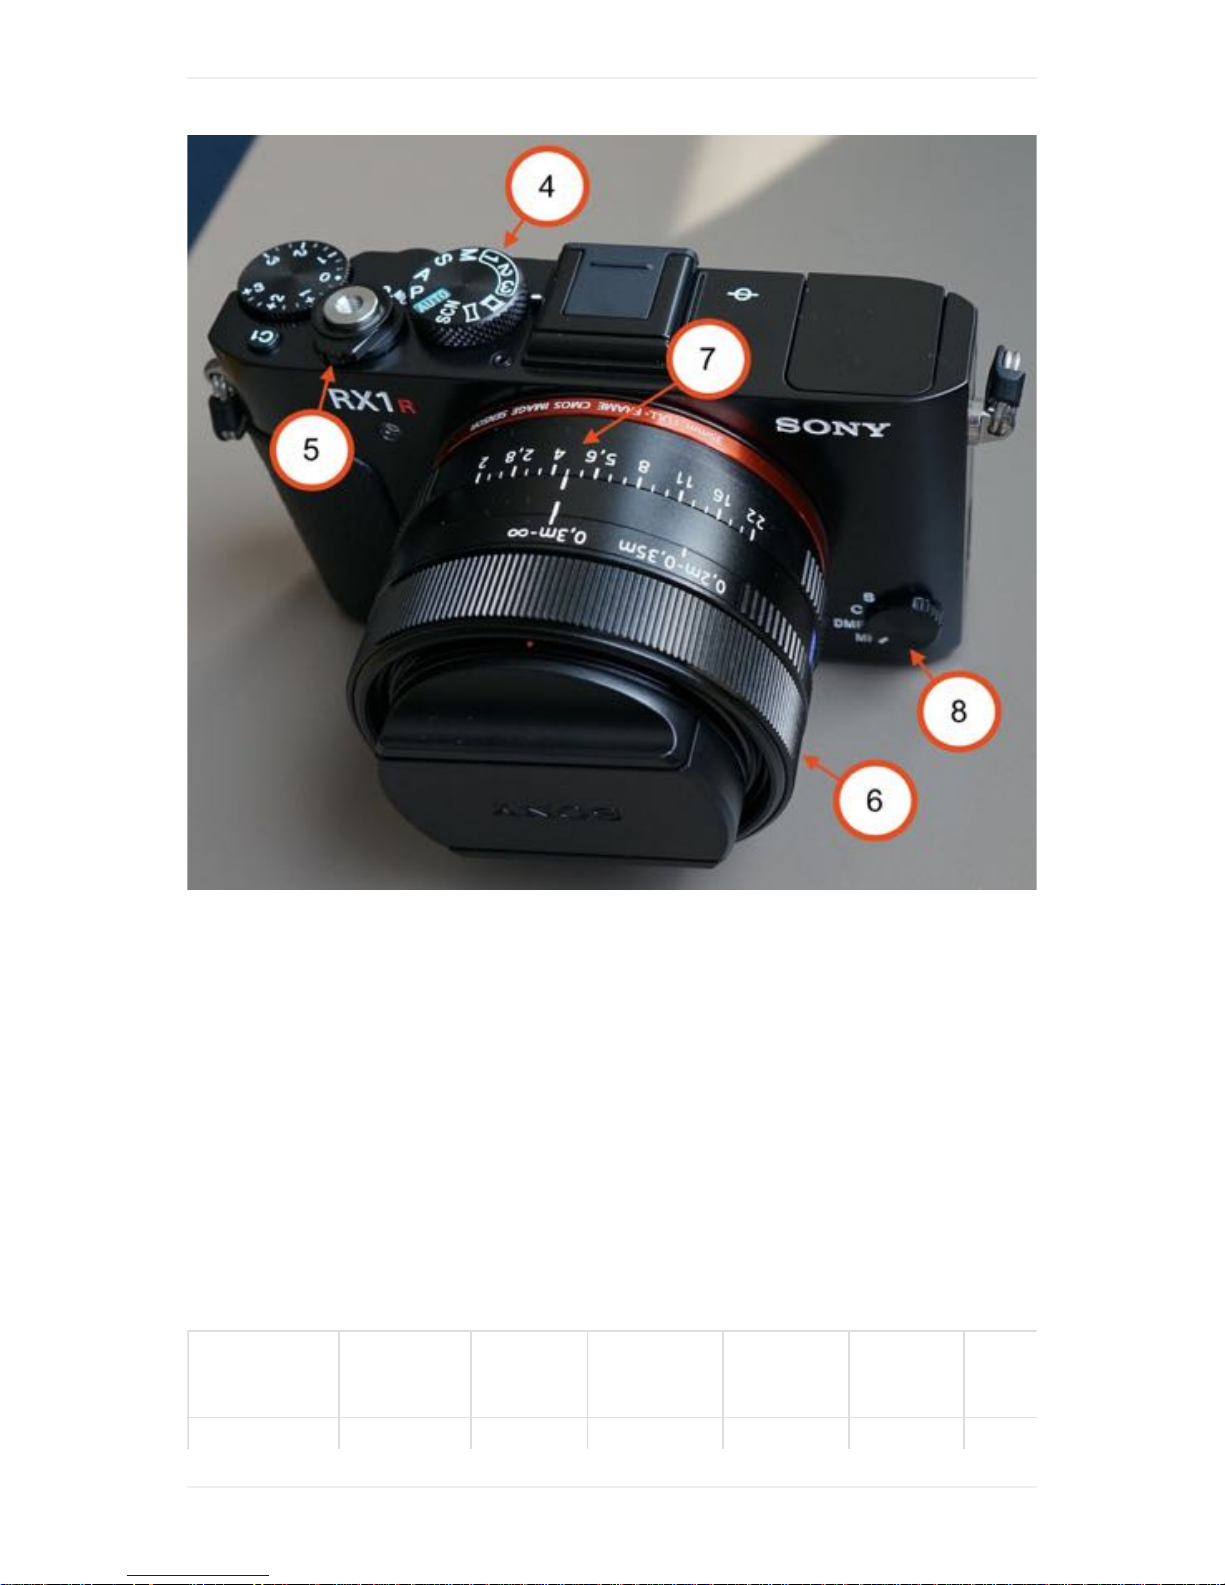
1. SD card slot (use at least 128GB SD card size)
2. Battery compartment (the camera is powered externally from WingtraOne)
3. Closure lid - has to stay open
4. Mode dial - default "3"
5. Power ON/OFF switch - default "ON"
6. Focus ring
7. Aperture selection ring
8. Focus Mode dial
Check and Adjust Camera Settings RX1R2
In most cases, the default camera settings (Mode Dial on 3) should be fine. If you want to change the
settings, you have to power WingtraOne and adjust the exposure settings. Recommended settings:
Light
Conditions
Camera
Program
Mode
Shutter
Speed
[s]
Aperture,
f-Number
ISO
Settings
Image
Quality
Mode
Dial
WingtraOne RX1
24
Page 25

default Manual
Exposure
1/2000 4.5 Auto
ISO
extra
fine
3
The default settings give good results in large range of light conditions. The maximum ISO the camera
will adjust is ISO 6400. In case of dark conditions you can decrease the shutter speed down to
1/1500s or open the aperture further (take the camera out and turn the aperture ring).
To save different exposure settings permanently they have to be stored as a memory recall function.
Adjust the desired settings on the camera like file size, compression, metering mode, WB, shutter
priority, shutter speed, ISO. Go to the settings menu and save the settings to memory recall "1" or "2".
Make sure not to overwrite the default settings by Wingtra on "3". Then turn off and on the camera via
the Power switch on the camera. To use the desired exposure settings set the Mode Dial to the
respective setting.
WingtraOne takes a series of test pictures after you press the Ready-To-Fly button during the preflight
procedure to check if the camera is setup correctly, i.e. to make sure that the SD card is inserted
correctly and triggering from the autopilot is possible. We recommend opening the WingtraOne cover
and inspect the routine on the camera screen. After pressing the "Ready-to-Fly" button the camera is
switched off and on again, than the test pictures are taken (you can see the counter of remaining
space on SD card on top left of the screen going down), and finally the camera is switched off again.
In case the screen is going black for >5s during the procedure, check if SD card is inserted. If you run
into trouble, check the WingtraOne RX1 Troubleshooting Section before submitting a support request.
The manual aperture ring can be set to any value only mechanically via the Aperture Selection Ring.
There is no storage setting for the correct aperture in manual mode.
For more information about the camera see the official Sony Documentation.
WingtraOne RX1
25
Page 26
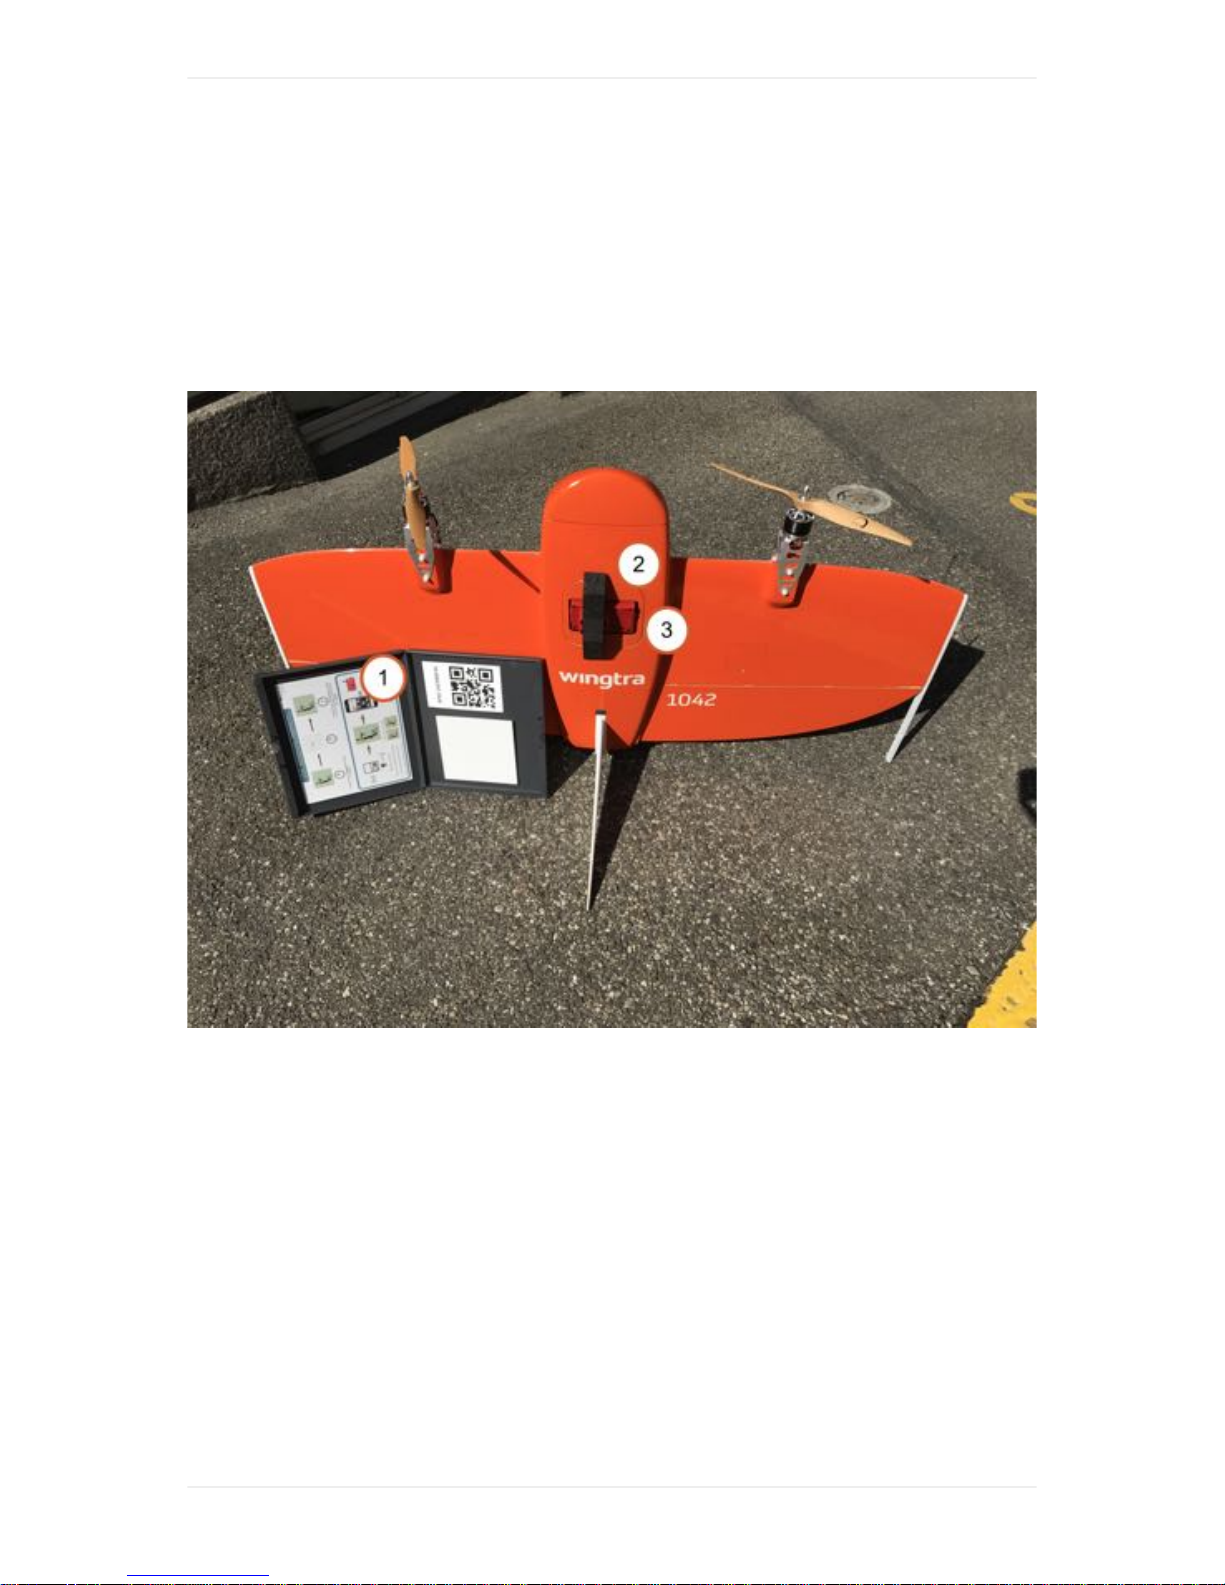
WingtraOne RedEdge
The WingtraOne RedEdge offers a multispectral image acquisition. The camera aquires 5 individual
images at the same time in spectral bands of blue, green, red, red edge and near IR. For camera
specifications, technical details and camera related support please refer to the Knowledge base of
Micasense
WingtraOne RedEdge
26
Page 27
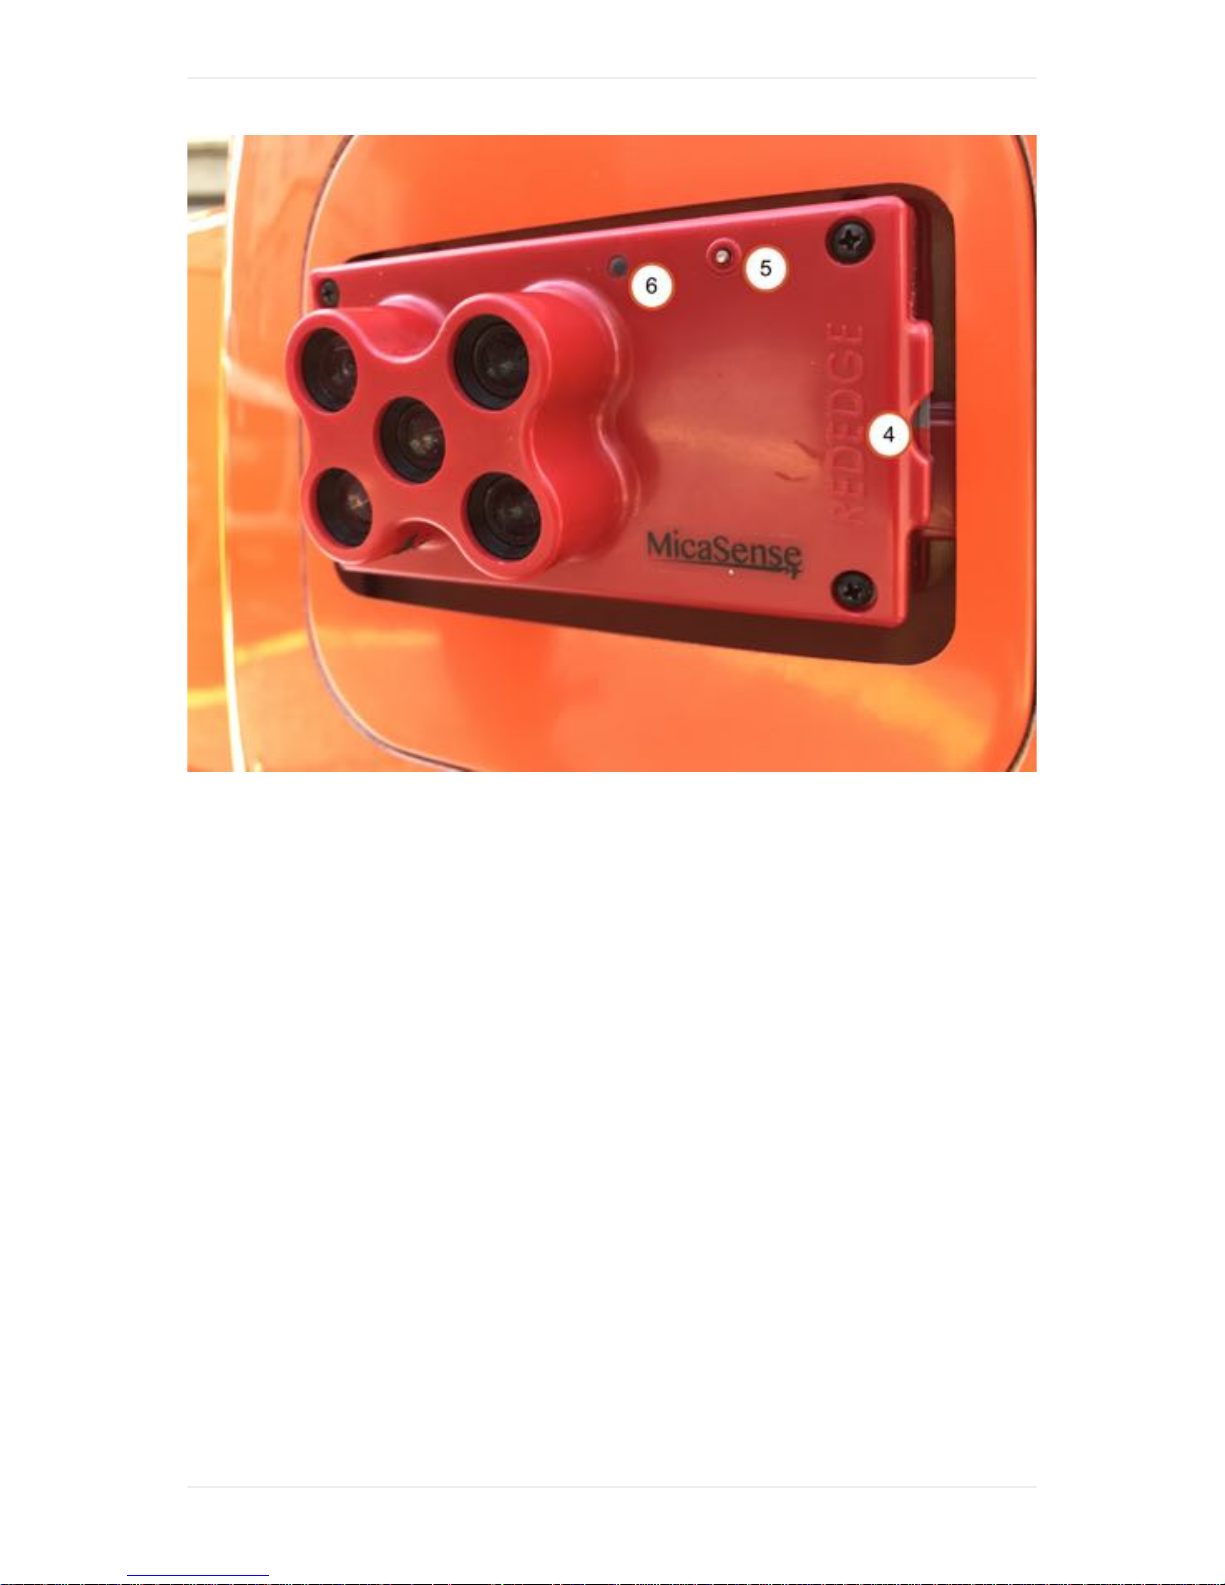
1. Reflectance tag
2. Transportation cover
3. RedEdge camera
4. SD card slot
5. On/Off (pressing >3s) and trigger (press <1s) button
6. Status LED
Make sure to use the provided 32GB SDHC SD card. SD cards wth high capacity (type SDXC) or
lower read/write speeds are not compatible with RedEdge.
General Information How to Use WingtraOne
RedEdge
The camera has to be configured and calibrated before each individual flight.
Configure RedEdge camera
Operation of WingtraOne RedEdge requires to configure the camera to the desired fligth plan
parameter in a separate camera user interface. This user interface can be accessed via Wifi and
webbrowser (Chrome).
To configure RedEdge camera:
WingtraOne RedEdge
27
Page 28
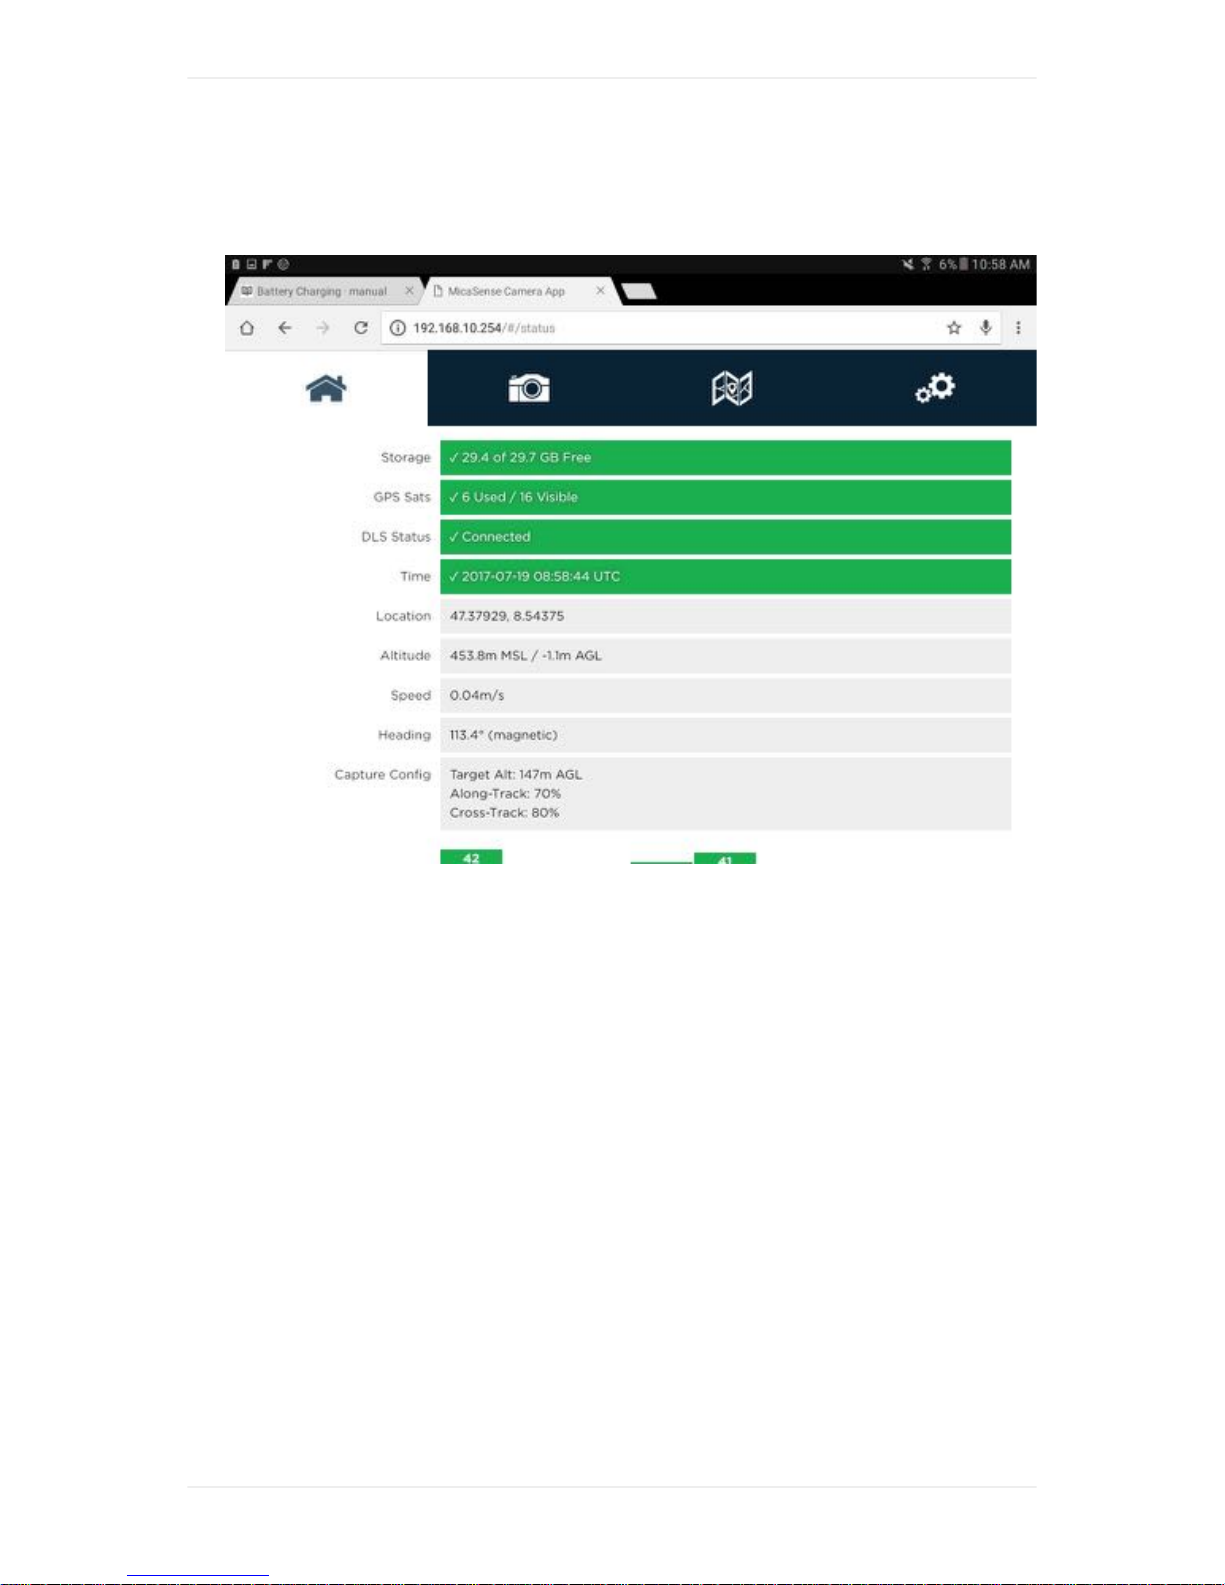
1. Power WingtraOne
2. Connect via Wifi to the RedEdge camera (SSID = rededge // passwort = micasense)
3. Open the browser app (Chrome) and access the page http://192.168.10.254
4. Go to status tab (house tab). Check free space on SD card, GPS signal reception and time
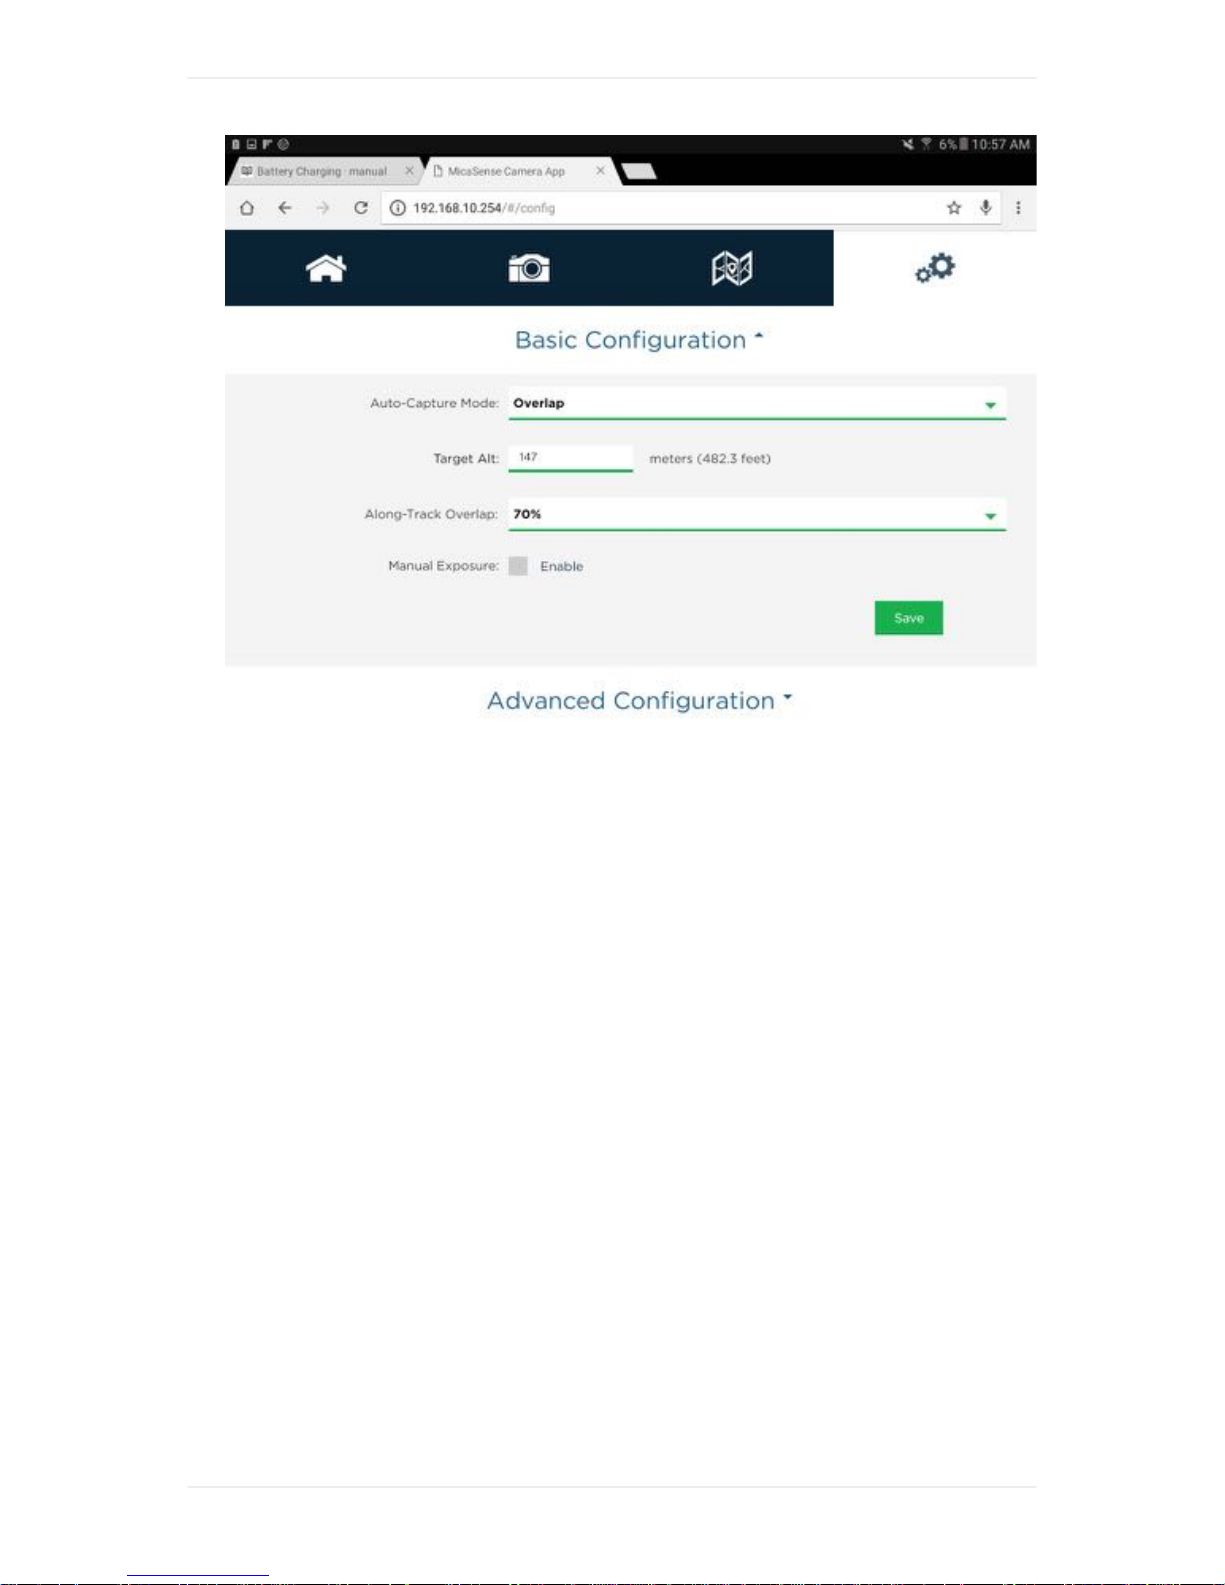
5. Go to configure tab (gear tab). Set Auto-Capture Mode to Overlap. Set target altitude to flight
altitude of your planned Flight Plan. Set Along-Track Overlap to frontal overlap of your planned
Flight Plan. Press save
WingtraOne RedEdge
28
Page 29
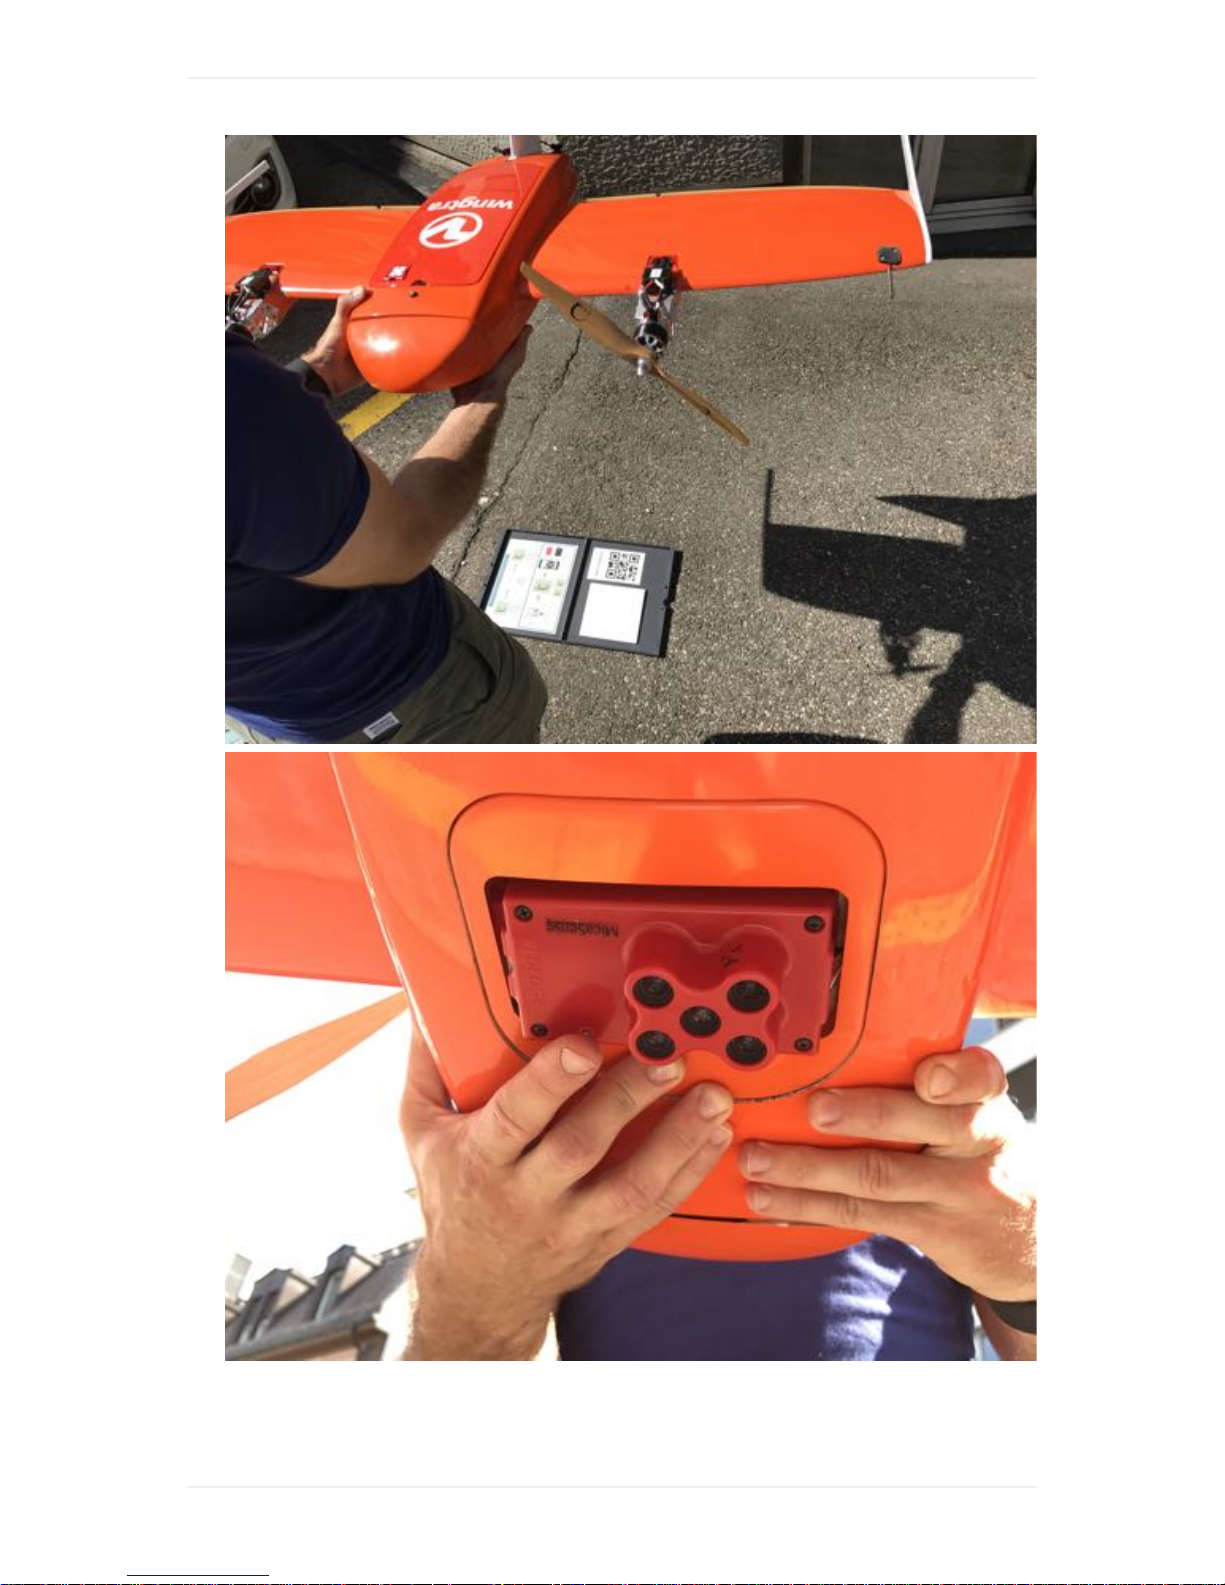
Calibrate RedEdge camera
Before and after each flight the RedEdge camera needs to be calibrated with the provided reflectance
tag. Only a timely calibration guarranties reliable spectral information of your covered flight area
To calibrate RedEdge camera:
1. Make sure a SD-card is inserted in the Rededge camera
2. Place the reflactance tag leveled onto the ground
3. Power WingtraOne, lift it up, and hold it with camera facing downwards ~1m over the reflactance
tab. Make sure to hold WingtraOne leveled and do not cover the reflectance tag with a shadow
from you or the WingtraOne.
WingtraOne RedEdge
29
Page 30
4. Trigger at least one image of the reflectance tag by pressing the button on the front of the
camera. Place WingtraOne back on ground
WingtraOne RedEdge
30
Page 31

Further Information
For further information about RedEdge camera please refer to Micasense RedEdge Manual
Executing a flight with WingtraOne RedEdge
Remove transportation Cover from Camera
On WingtraPilot Welcome Menu, create a new flight plan and select "Micasense RedEdge" as
camera.
Plan flight plan as described in Mission Planning
Follow the preflight checklist:
On preflight check nr. 7 (Configure Camera), save flight plan and configure RedEdge using
Chrome (see Configure RedEdge camera)
On preflight check nr. 11 (Calibrate RedEdge), take a calibration image (see Calibrate RedEdge
camera)
Camera status LED should be falshing green
Fly the mission
After landing perform the following two steps before depowering WingtraOne:
Take again a calibration image by holding WingtraOne over the reflectance tag and clicking the
small button on front side of Rededge.
Depower Rededge by holding the small button on front side of Rededge for 3 seconds.
Retrieve SD-card from RedEdge and access your flight images
WingtraOne RedEdge
31
Page 32
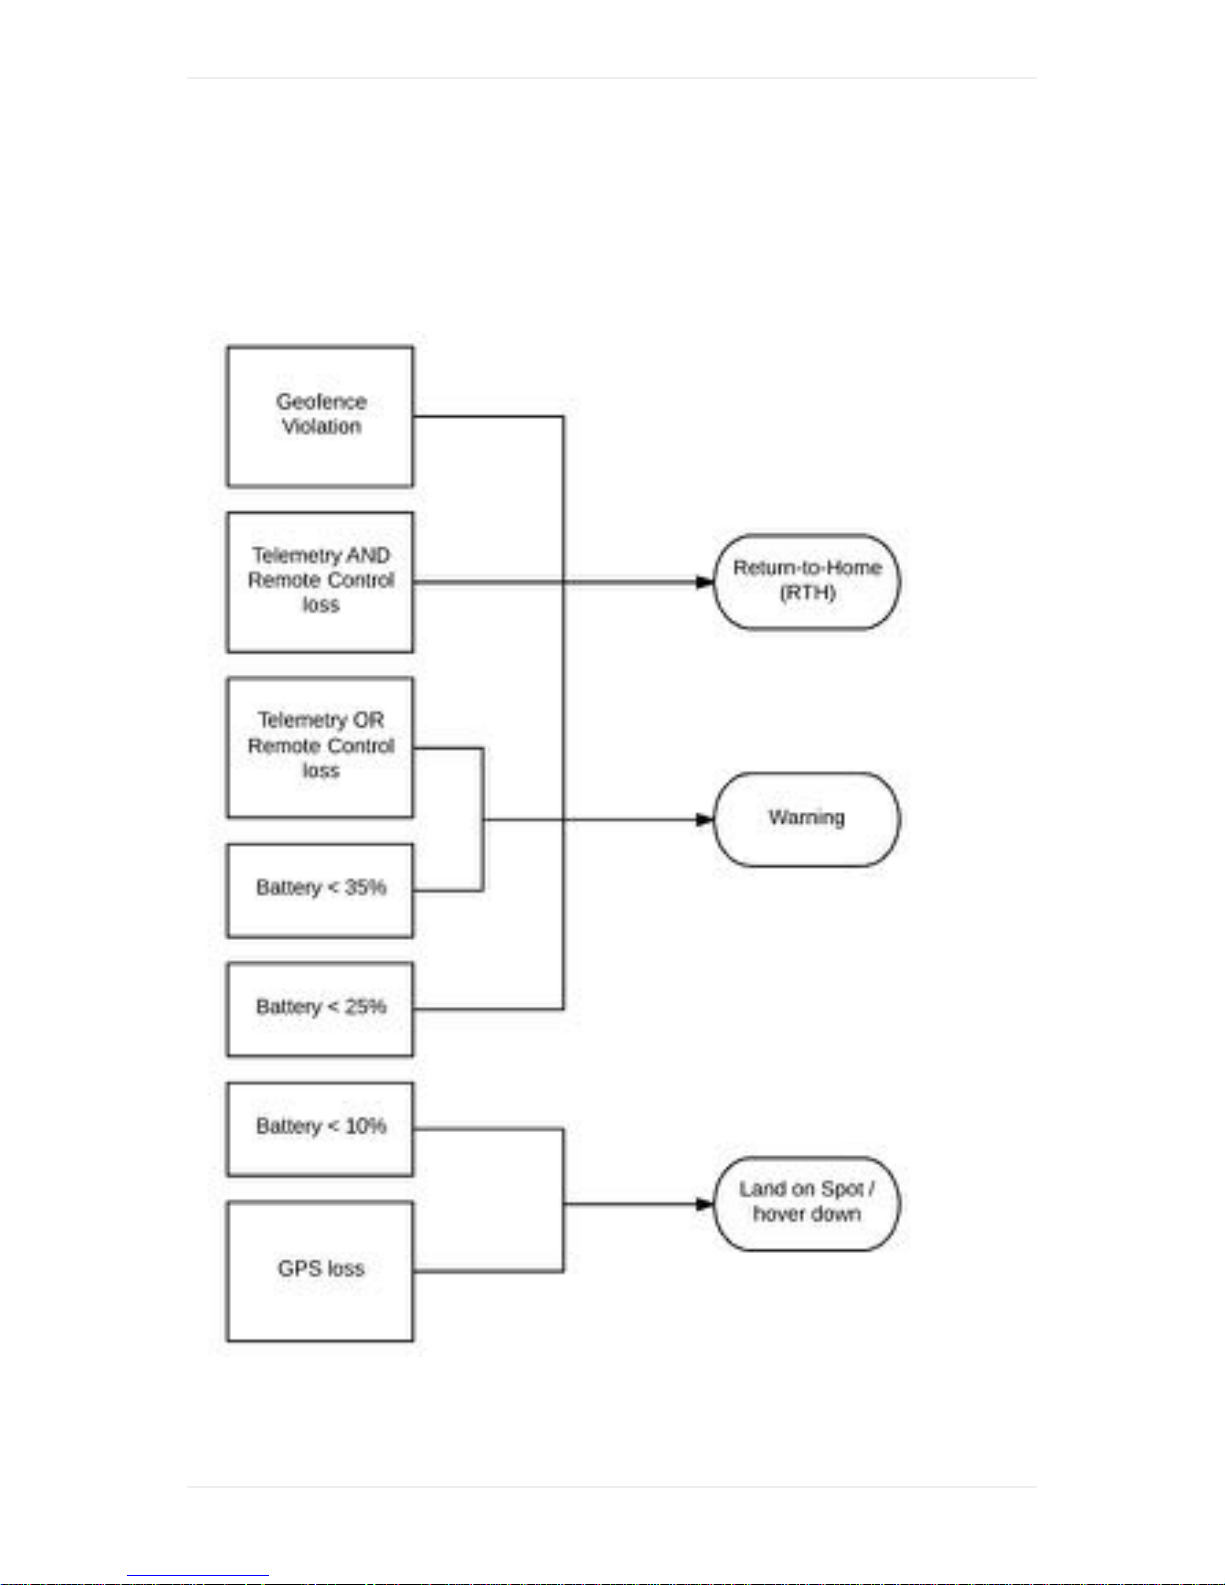
Failsafe Scenarios
There are several scenarios where WingtraOne will take action by itself and engage a certain failsafe
routine.
Return-to-Home
Failsafe Scenarios
32
Page 33
RTH is triggered when the geofence is violated, when both telemetry and RC connection are lost, or
when battery charge triggers this failsafe. It can also be triggered manually.
You can take over manually during Return-to-Home by switching to Assisted Mode.
Regime
Distance from
Home
Cruise Any
Cruise Any
Hover Larger than 80m
Hover Larger than 80m
Hover Less than 80m
Failsafe Scenarios
33
Page 34
Hover Less than 80m
Hover Less than 80m
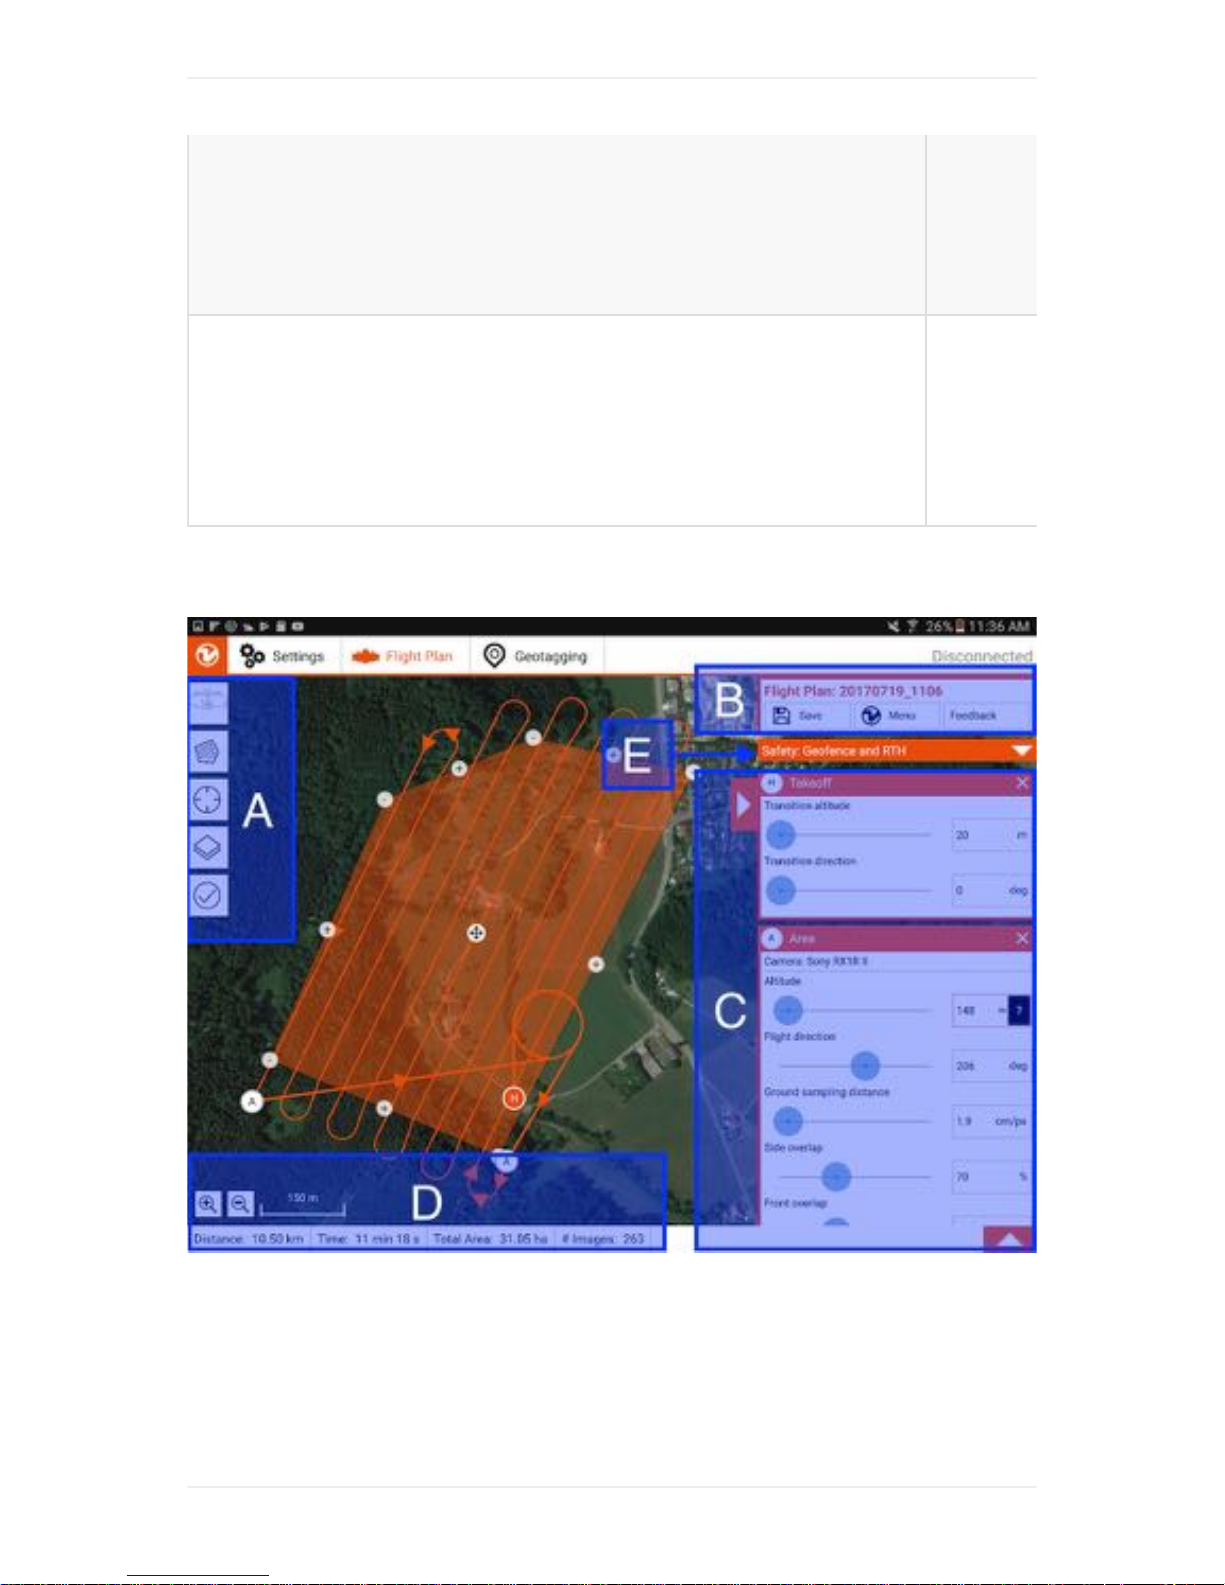
*This parameter (Minimum RTH Altitude) can be adjusted on the "Safety: Geofence and RTH" menu
on the right side of the flight planning tab (E).
Warning
Warnings are issued acoustically and visually on the tablet. The mission can still be continued, but
caution is advised depending on the foreseeable flight plan of the plane.
Failsafe Scenarios
34
Page 35
Land on Spot / hover down
This is the most extreme failsafe, as it forces WingtraOne to perform a backtransition and land on the
spot where it is at currently. It is triggered on GPS loss, or if battery voltage drops very low. If it is
triggered by the battery, you can take over manually by switching to Assisted Mode. If triggered by
GPS loss you cannot, as Assisted Mode does not work without GPS.
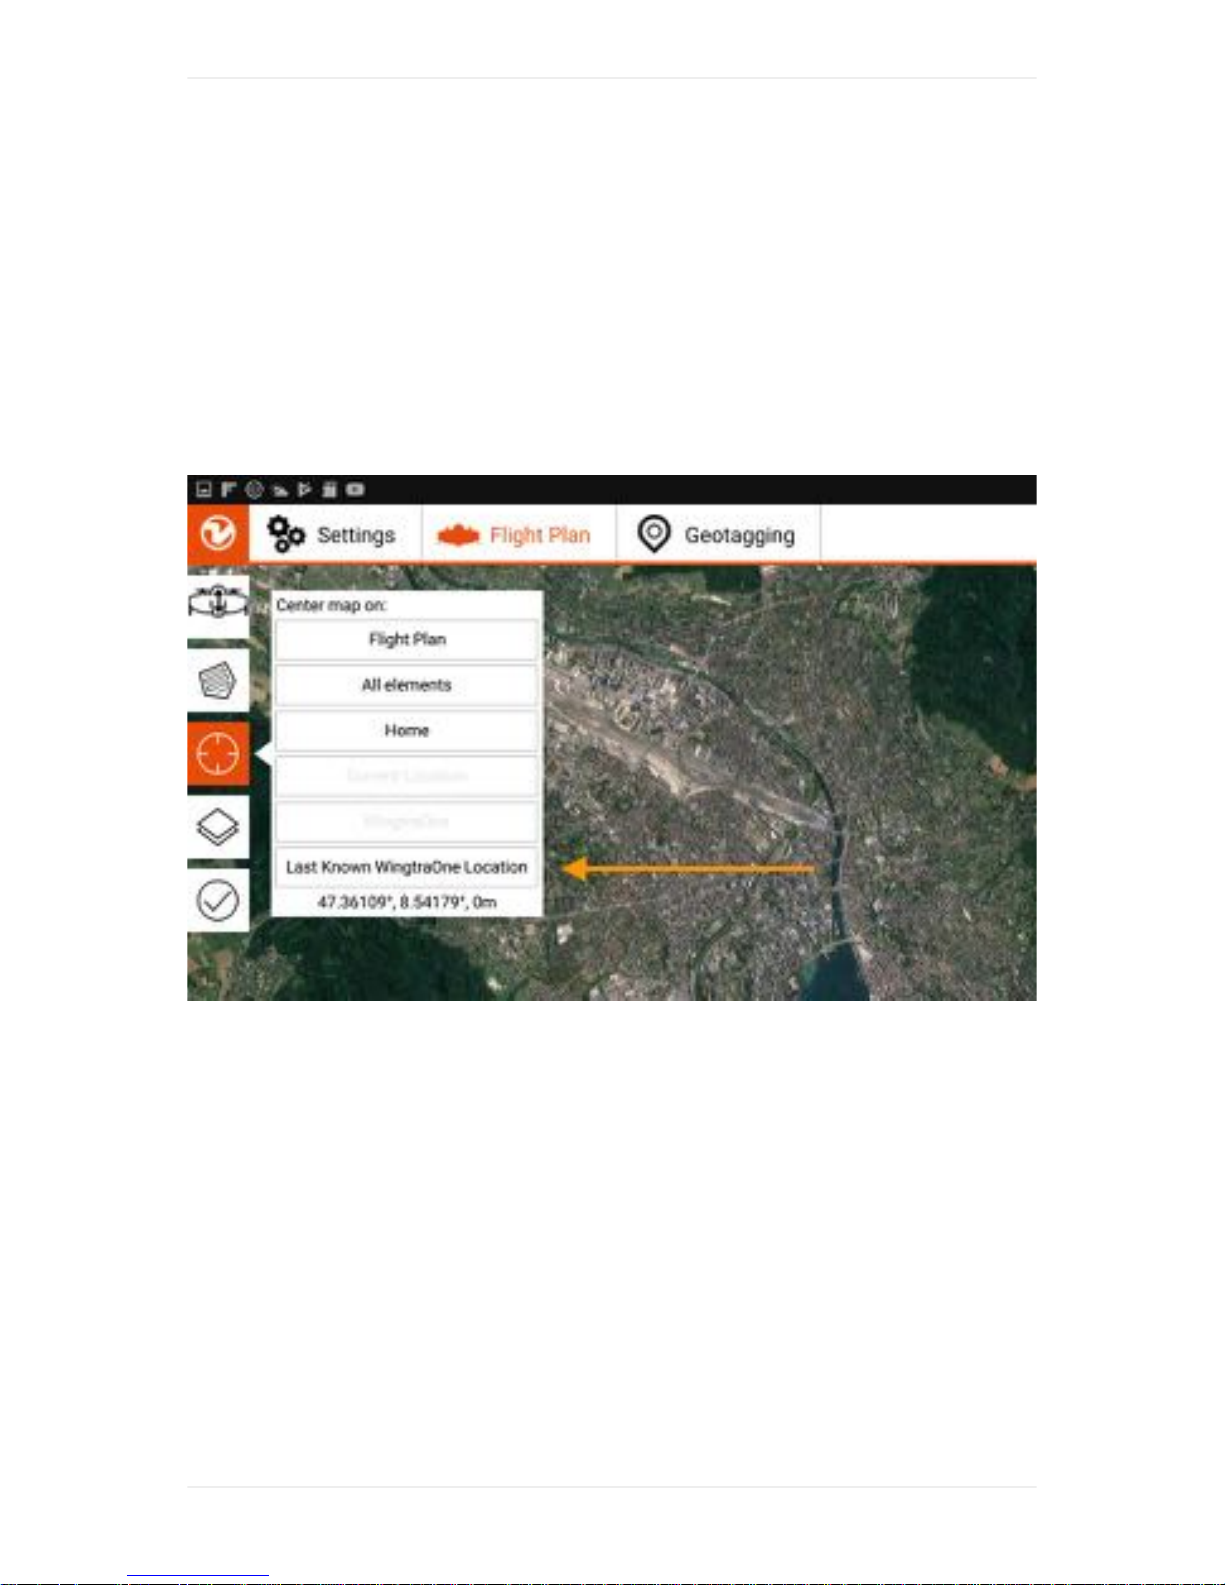
Last known WingtraOne location
Especially if there is a crash, you can click to check last known GPS location of WingtraOne.
Failsafe Scenarios
35
Page 36

Charging WingtraOne Flight Batteries
Before going to the field you have to charge the flight batteries, the remote control (RC) and the tablet.
The following sections describe how to charge the flight batteries.
Li-Ion Batteries
The WingtraOne is powered by a pair of 4S3P Lithium-Ion batteries. For a charging manual see
below.
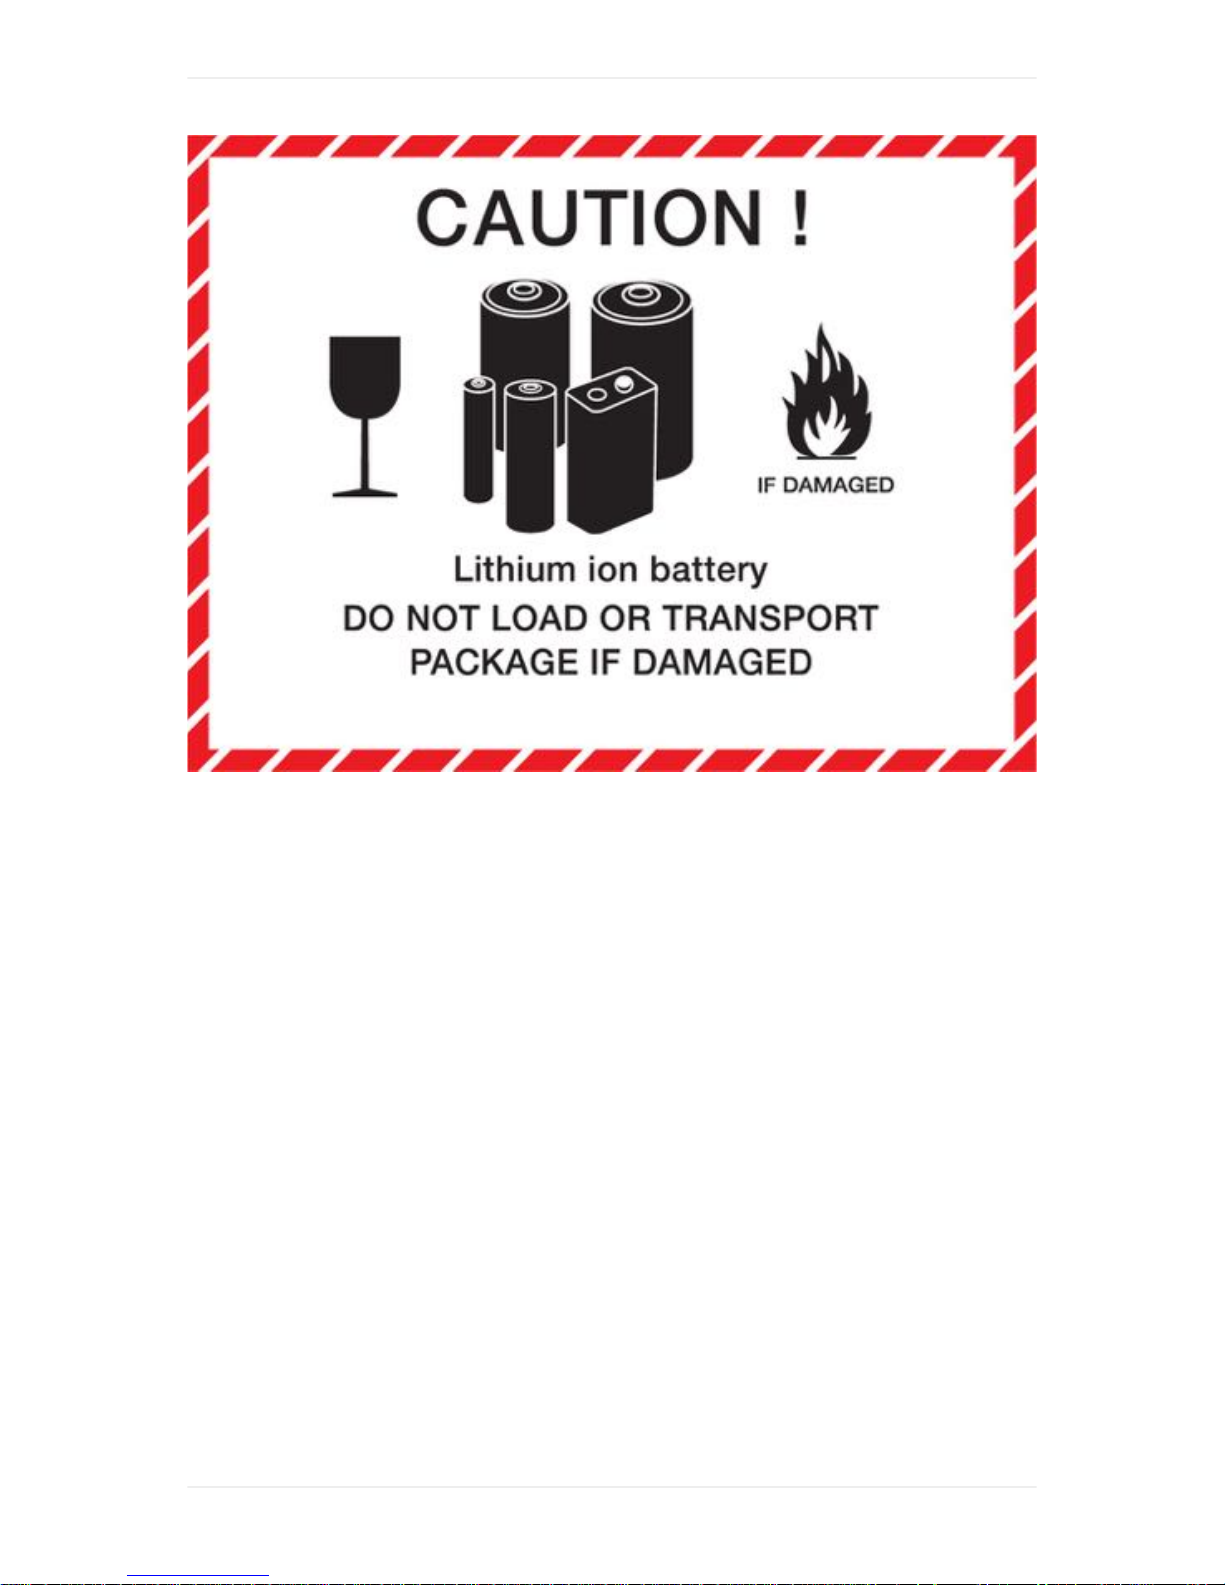
Lithium-Ion battery packs may get hot, explode or ignite, and cause serious injury if exposed to
abusive conditions. Be sure to follow the safety warnings listed below:
Do not connect the positive terminal and negative terminal of the battery to each other with any
metal object (such as wire).
Do not pierce the battery with nails, strike the battery with a hammer, step on the battery, or
otherwise subject it to strong impacts or shocks.
Do not expose battery to water or salt water, or allow the battery to get wet.
Do not attempt to charge an over-discharged or damaged battery, but dispose this battery safely.
Always use the correct charging mode (Li-Ion balancing).
Do not leave battery packs unattended during charging and make sure to place the batteries
away from easily flammable environments such as wood or carpet. It is recommended to charge
batteries in a fire proof container.
We expect all users of Li-Ion batteries to be professionals and to have the capability to handle
emergency cases.
Batteries of the first batches of WingtraOne are explicitly experimental batteries that require an extra
level of care, i.e. they do not hold for the UL Test Standard for Li-Ion and packs.
Charging WingtraOne Flight Batteries
36
Page 37
Charging Li-Ion 4s3p batteries
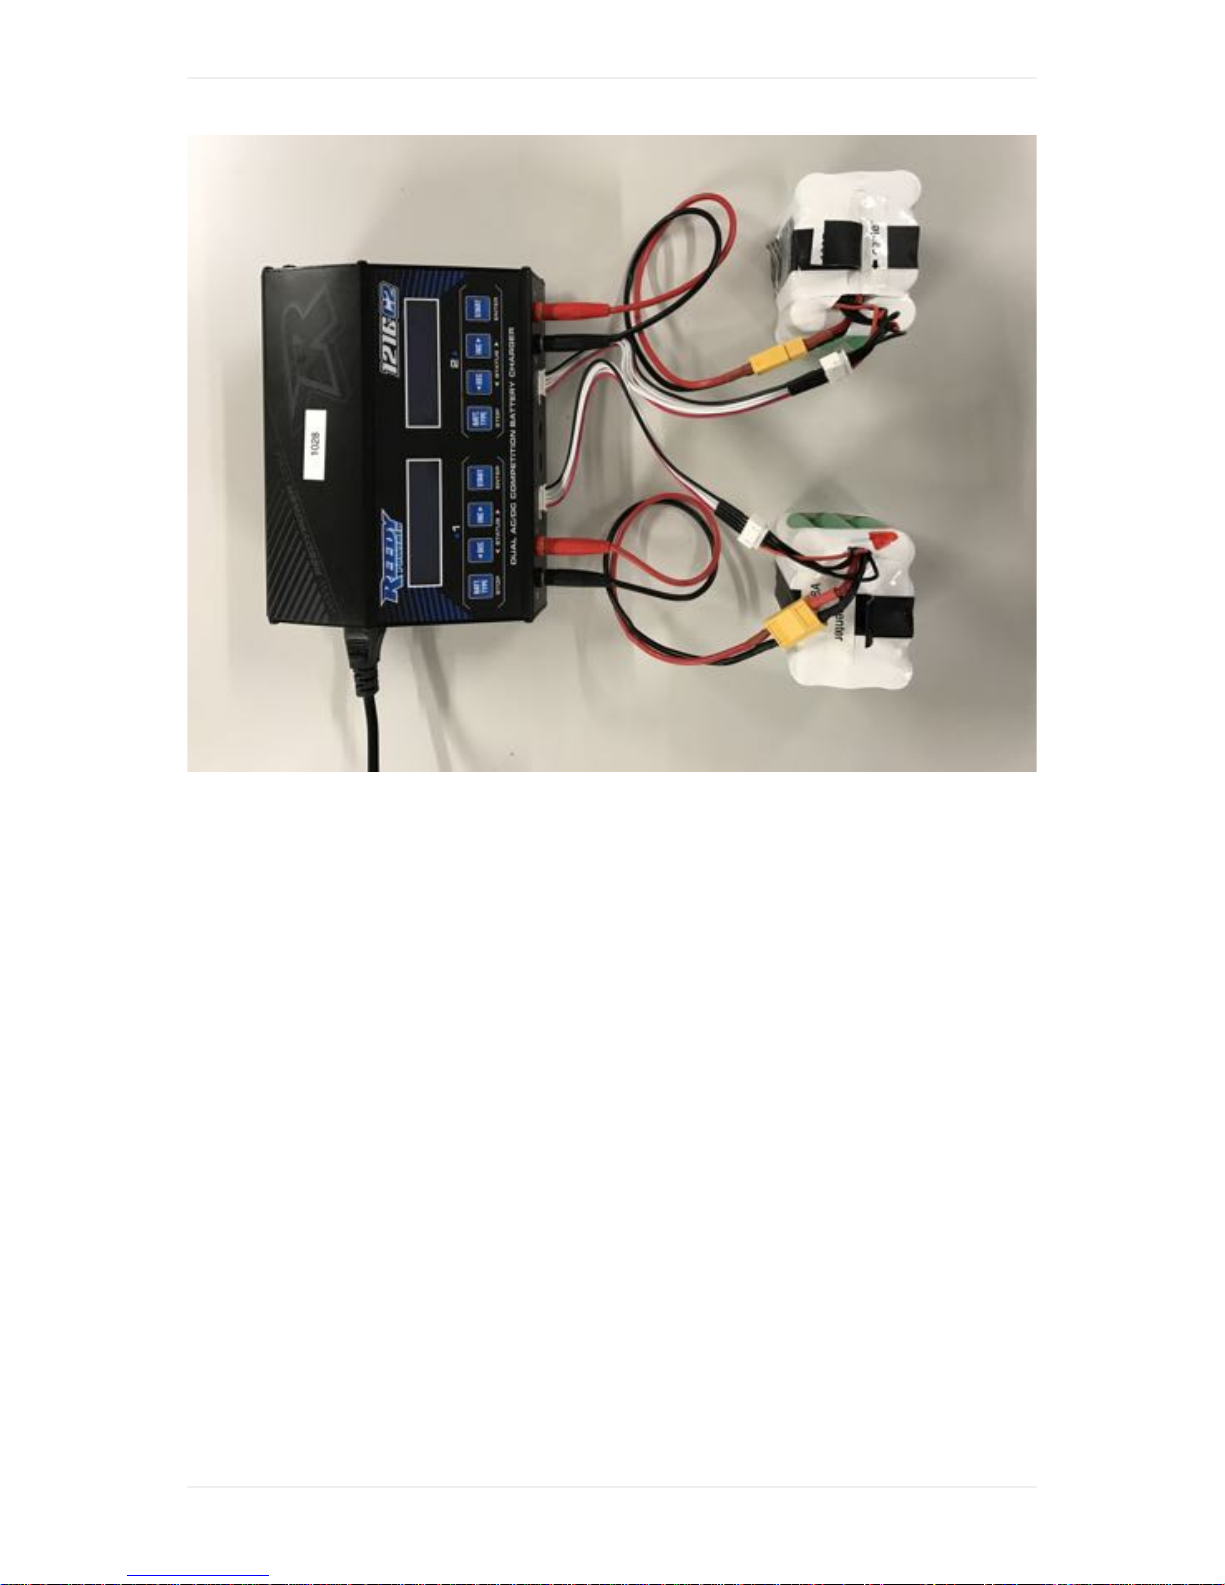
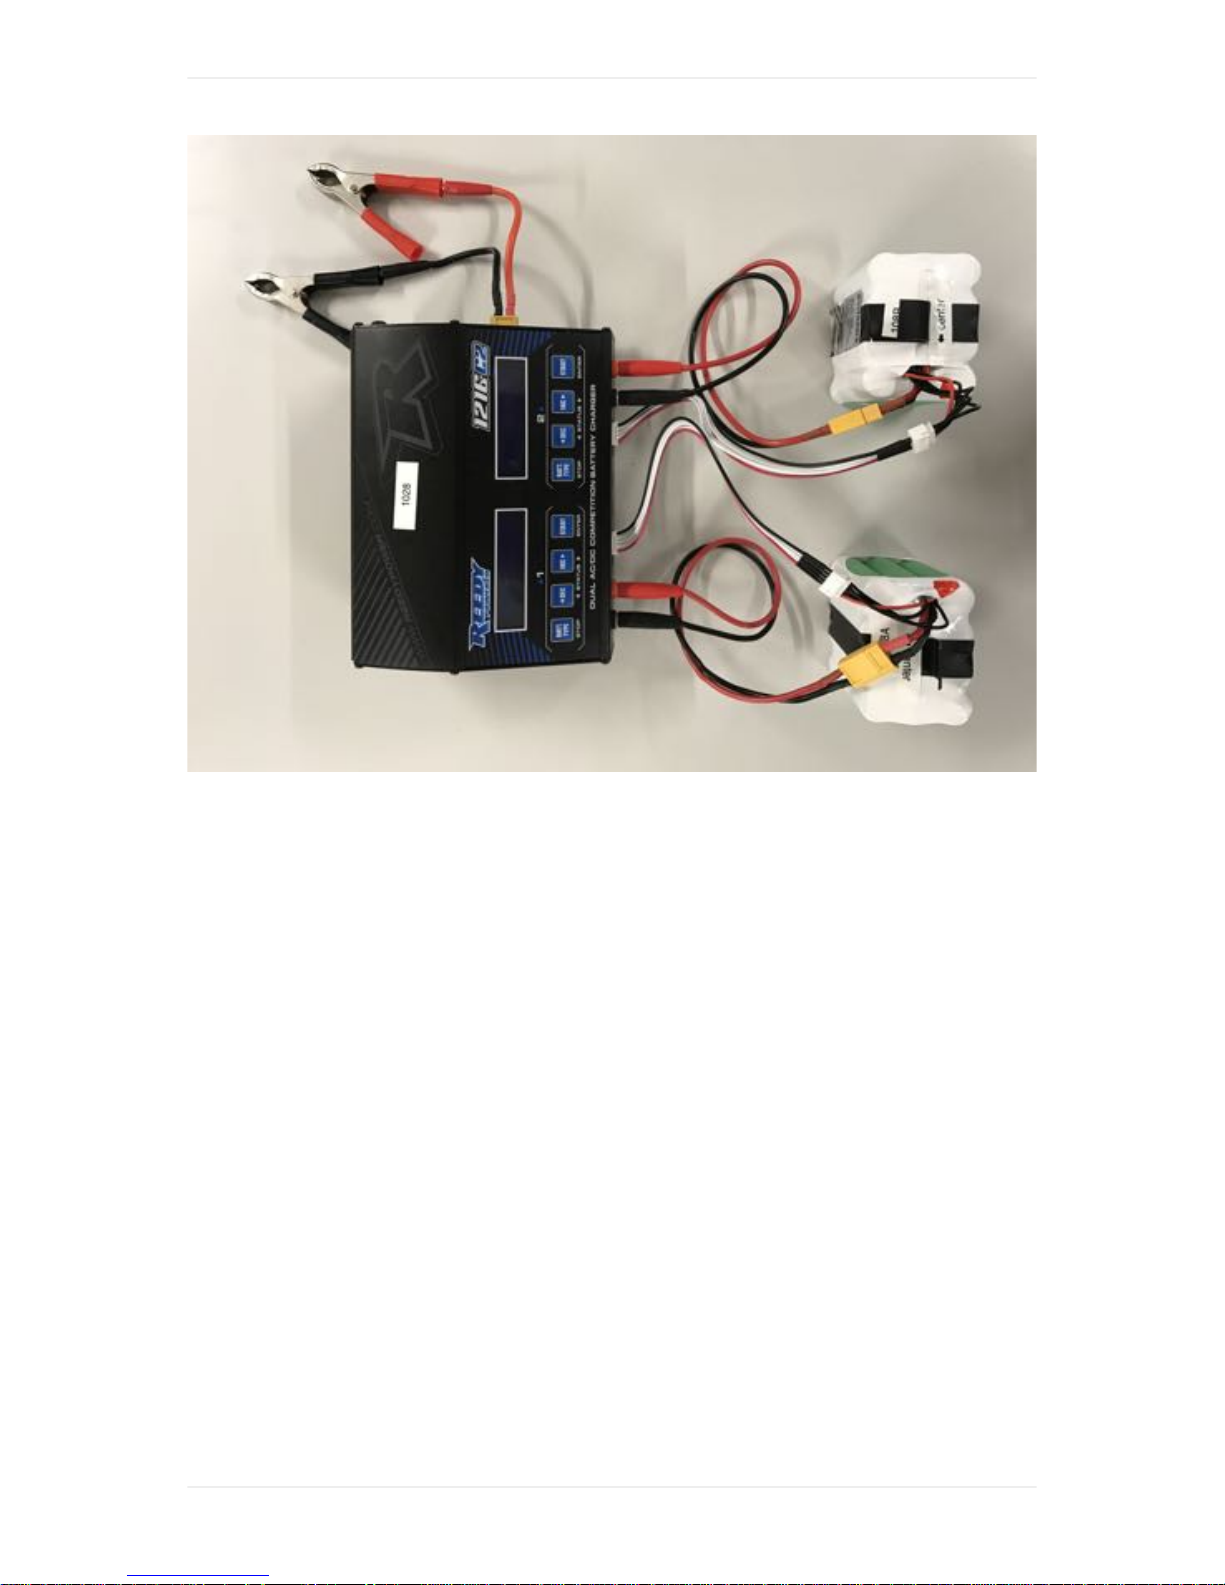
You can use the included charging system either on a power plug or on the field using car battery for
charging. Set up your charging system as shown below and follow the following instructions: * Select
the mode by clicking on “Batt Type”, navigate to Li-Ion mode with the “Dec” and “Inc” buttons, and
confirm with the “start/enter” button. * Set the number of cells to 4S, which corresponds to 14.4V, and
the charging current to 7.5A, which corresponds to 1C. Confirm with “enter”. * Confirm your settings
by pressing the “enter” button for 2 seconds. * Check the settings (Li-Ion balancing mode, 4S (14.4V),
7.5A), and confirm by pressing “enter”. * Charging of empty batteries takes approximately 1 hour.
Once the charging is finished you get an audio confirmation and you can see the message "finish" on
the display (16.4 Volt corresponds to fully charged batteries).
Use and charge the 4S batteries always in pairs as they are labeled (pairs have the same color), i.e.
do NOT fly with two batteries with different color labels.
Charger Setup (Office):
Charging WingtraOne Flight Batteries
37
Page 38
Charger Setup (Car Battery):
Charging WingtraOne Flight Batteries
38
Page 39
Charging WingtraOne Flight Batteries
39
Page 40
Charging Accessories
Operating WingtraOne safely requires fully charged accessories. In particular the tablet running
WingtraPilot and Remote Control need to be sufficiently charged to allow for monitoring WingtraOne
during flight and to trigger the appropriate failsafe actions if necessary.
Charging WingtraPilot Tablet
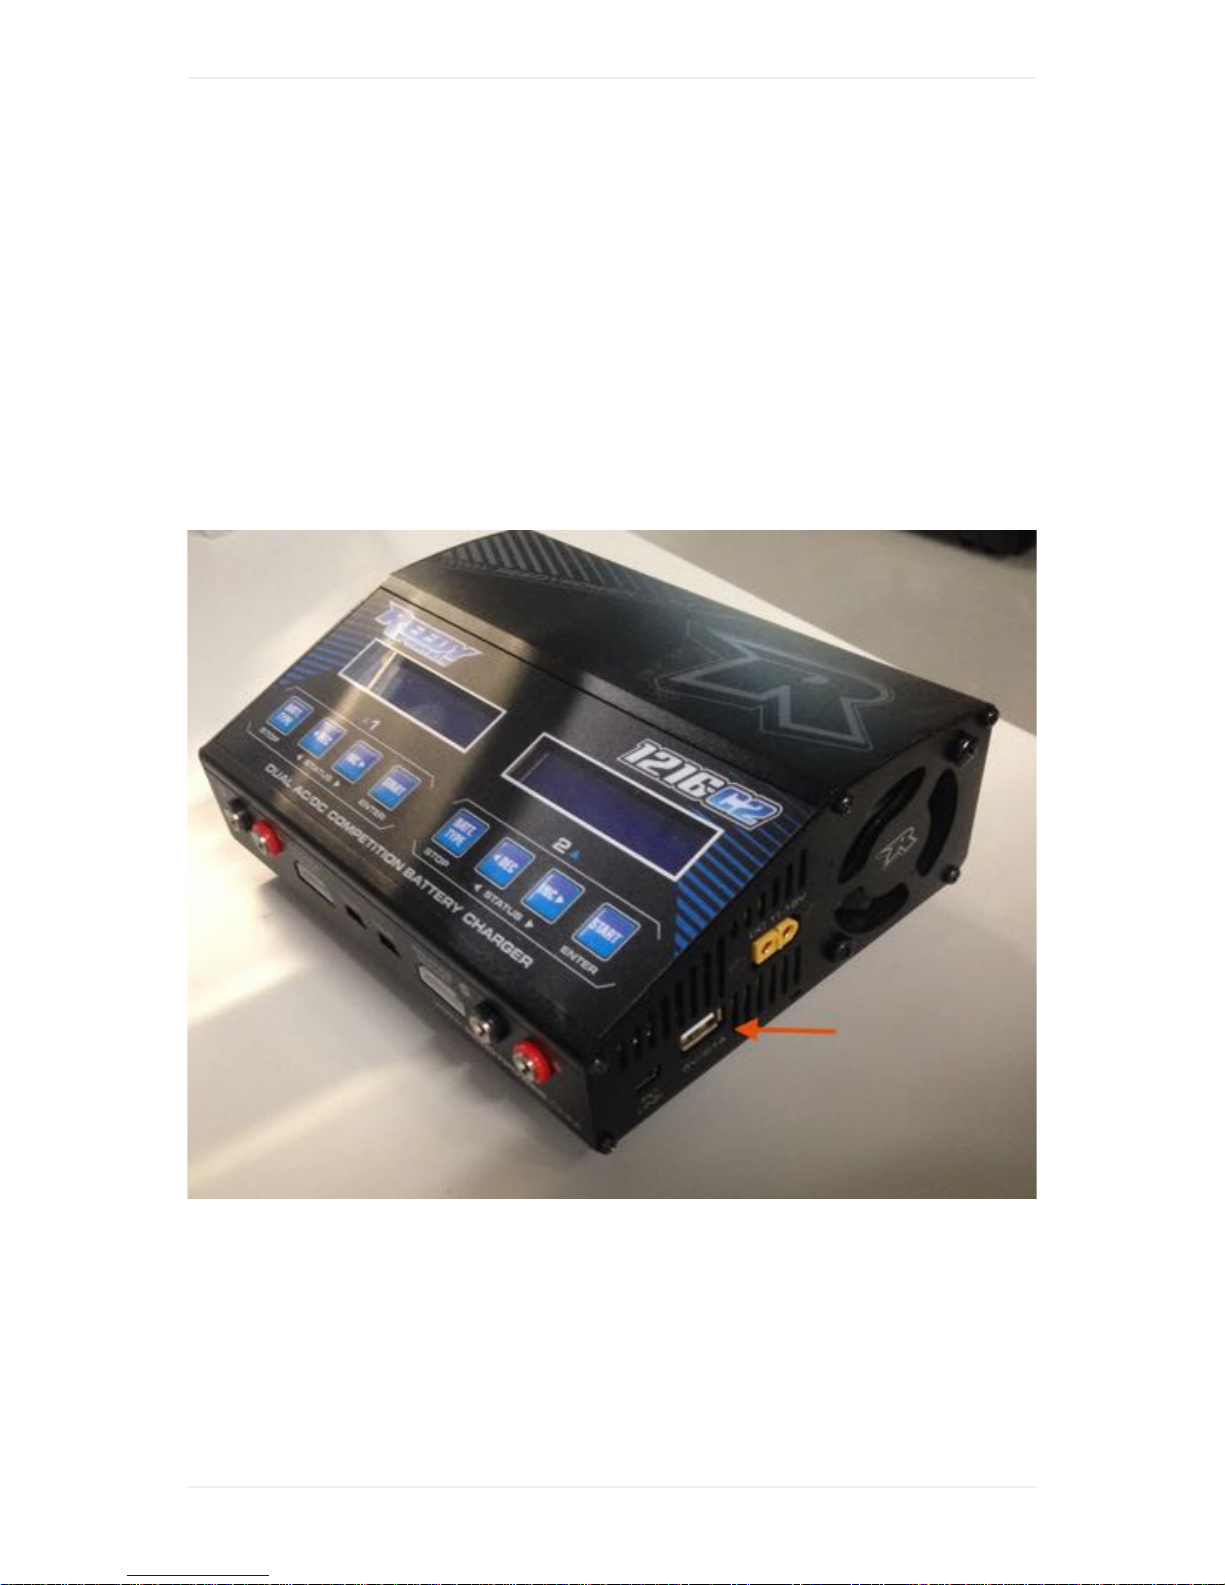
The tablet can be charged at any standard USB port via the supplied USB-A to micro USB cable. The
shipped flight battery charger has a USB-A port on its right side.
Plug in the USB cable into the tablet and connect it to the charger. Make sure that the charger is
connect to a power supply. Using the flight battery charger you can charge WingtraPilot tablet as well
on the go with a 12V power supply. For further information how to connect the flight battery charger
please check the Charging WingtraOne Flight Batteries. If you use any other USB charging equipment
make sure that the used charger can supply at least 2A to achieve satisfying charging speeds.
Fully charged the tablet running WingtraPilot app lasts up to 4 hours continuous WingtraOne
operation.
Charging Acessories
40
Page 41

Charging Remote Control (RC)
The remote control is charged with the included 12V power adapter. Plug in the power adapter and
connect it to the RC. Make sure the RC is turned off. A small green LED on the backside should be
on. If the LED turns off and the power adapter is still connected the battery of the RC is fully charged.
Fully charged the RC lasts up to 8 hours continuous WingtraOne operation.
Battery Replacement of Anemometer
The batteries of the anemometer last for at least half a year if operated at a normal rate. Please make
sure to check the battery charge indicator on the display of the anemometer regularly. If battery runs
low please replace the batteries with 3 new standard AAA batteries. To do that you need to open the
lid on the back side using a default cross tip screwdriver.
Charging Acessories
41
Page 42

Handling of WingtraOne
Carry WingtraOne
You can carry the WingtraOne easily if you hold it at the wing area between the propellers and the
battery compartment or at the motor mounts.
Attach and detach Middle Stand
The middle stand is not symmetric. Make sure that the shape of the midsection of the middle stand
matches the shape of the airframe. The middle stand can not be inserted properly in the wrong
direction.
To attach the middle stand, we recommend holding WingtraOne with one hand and turning it
vertically. Then simply attach the middle stand and secure it with the elastic band.
To detach the the middle stand, lift WingtraOne by holding the two motor mounts. Turn WingtraOne
vertically and place one hand between the upper motor mount and the battery compartment. With the
other hand, remove the security elastic band and detach the middle stand.
Power WingtraOne
Open battery compartment and insert batteries
Power WingtraOne by connecting the yellow ports, the cables need a firm push. The balancer
ports do not need to be connected.
Make WingtraOne Ready-To-Fly
WingtraOne is equipped with a single LED-button — the Ready-To-Fly button — which needs to be
pressed in the preflight procedure. Before pressing the button, no signals are sent to the motors and
flaps.
After powering, WingtraOne enters a neutral state (not ready-to-fly), which is indicated by a slowly
blinking Ready-To-Fly button (- - - - - -).
By pressing the button, you put WingtraOne into Ready-To-Fly state, indicated by a double blinking
LED (-- -- -- --).
When WingtraOne enters the Ready-To-Fly state, it runs a routine that checks the functionality of both
flaps. It then starts a process to check the functionality of the camera by capturing some test pictures.
For further details, see the preflight checklist chapter.
Handling of WingtraOne
42
Page 43

Once WingtraOne is in Ready-To-Fly state and all preflight checks have been fulfilled successfully, it's
only then that you can start the flight from tablet. During flight, the button is not blinking but solid on (--
---------). After landing, the LED changes back to blinking (-- -- -- --), which means that WingtraOne can
be approached without risk.
Handling of WingtraOne
43
Page 44
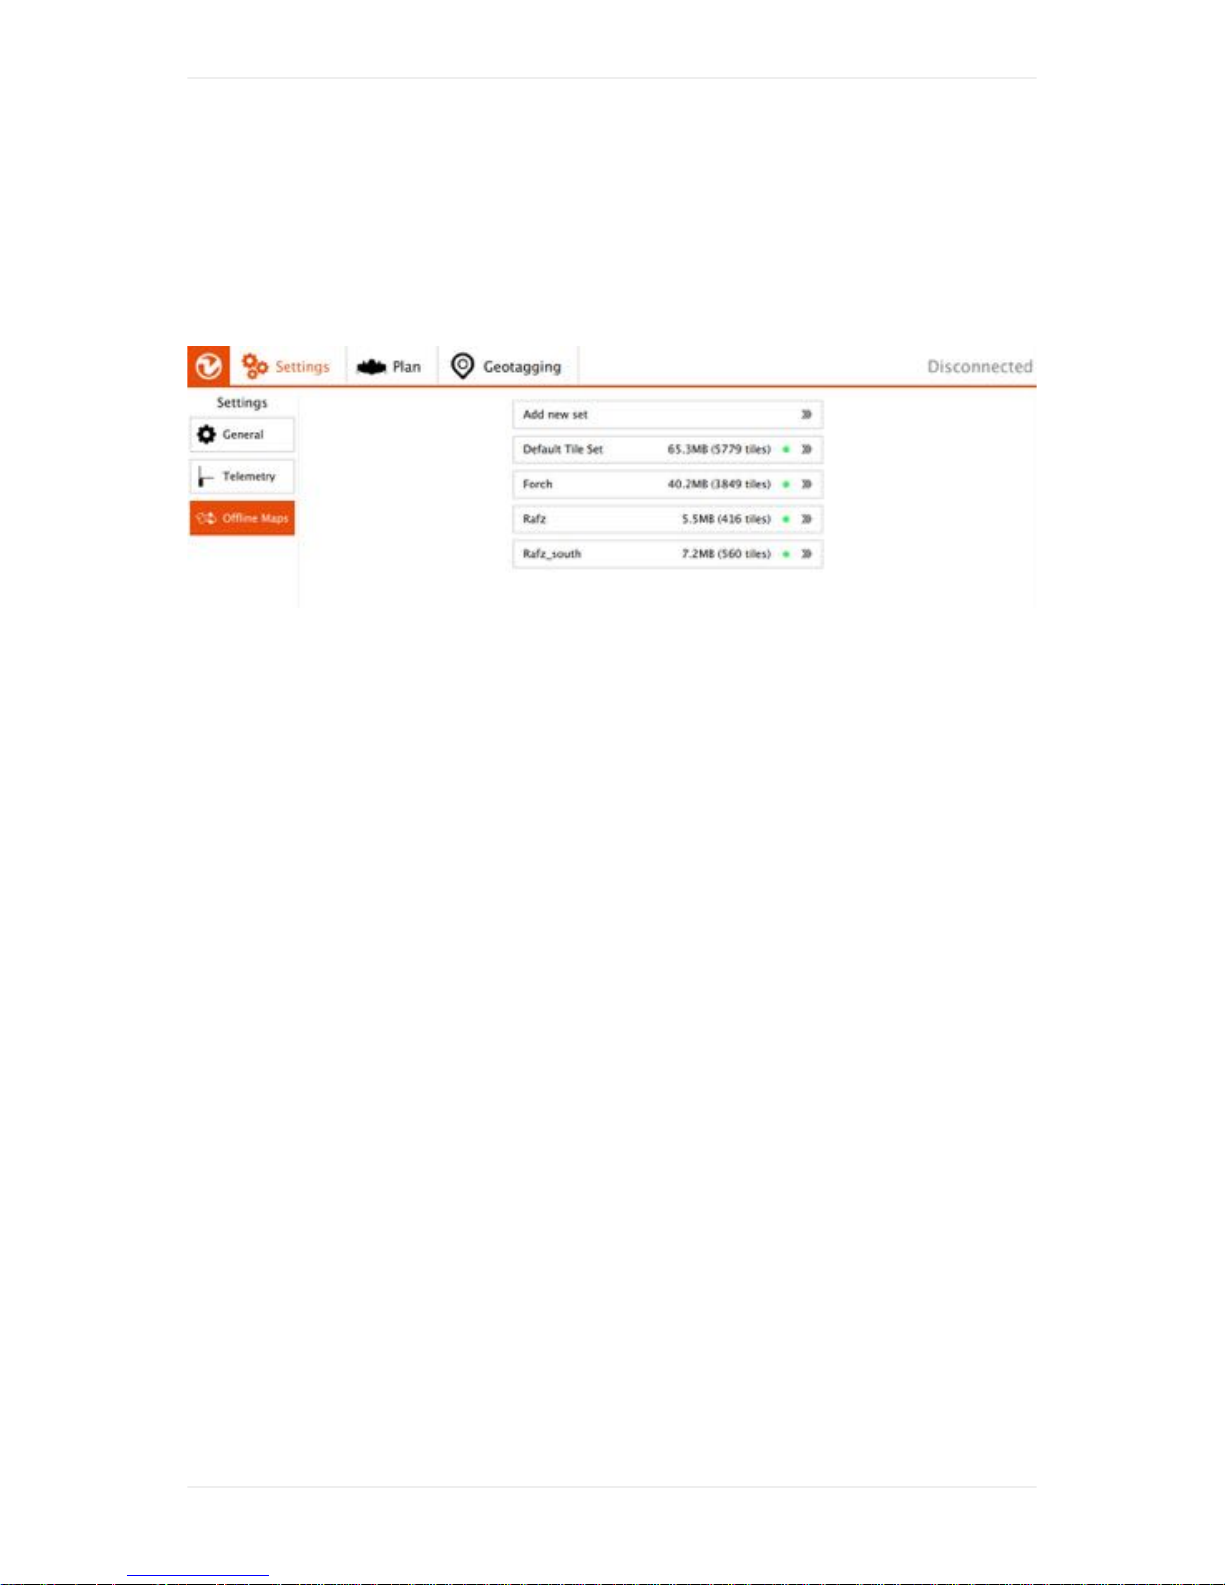
Download Maps for Offline Use
On the settings tab, select “Offline Maps” and “Add new set”. Navigate to the desired location, choose
the right map type, zoom options (defaults of 14-20 should normally be fine), give the set a descriptive
name, and download.
Be patient if the tiles are not loading immediately. If the download is stuck, restart WingtraPilot,
navigate to the settings tab, select "Offline Maps" again, and click onto your new set. On the right side
click onto "resume download" and be patient again.
Download-Maps-for-Offline-Use
44
Page 45
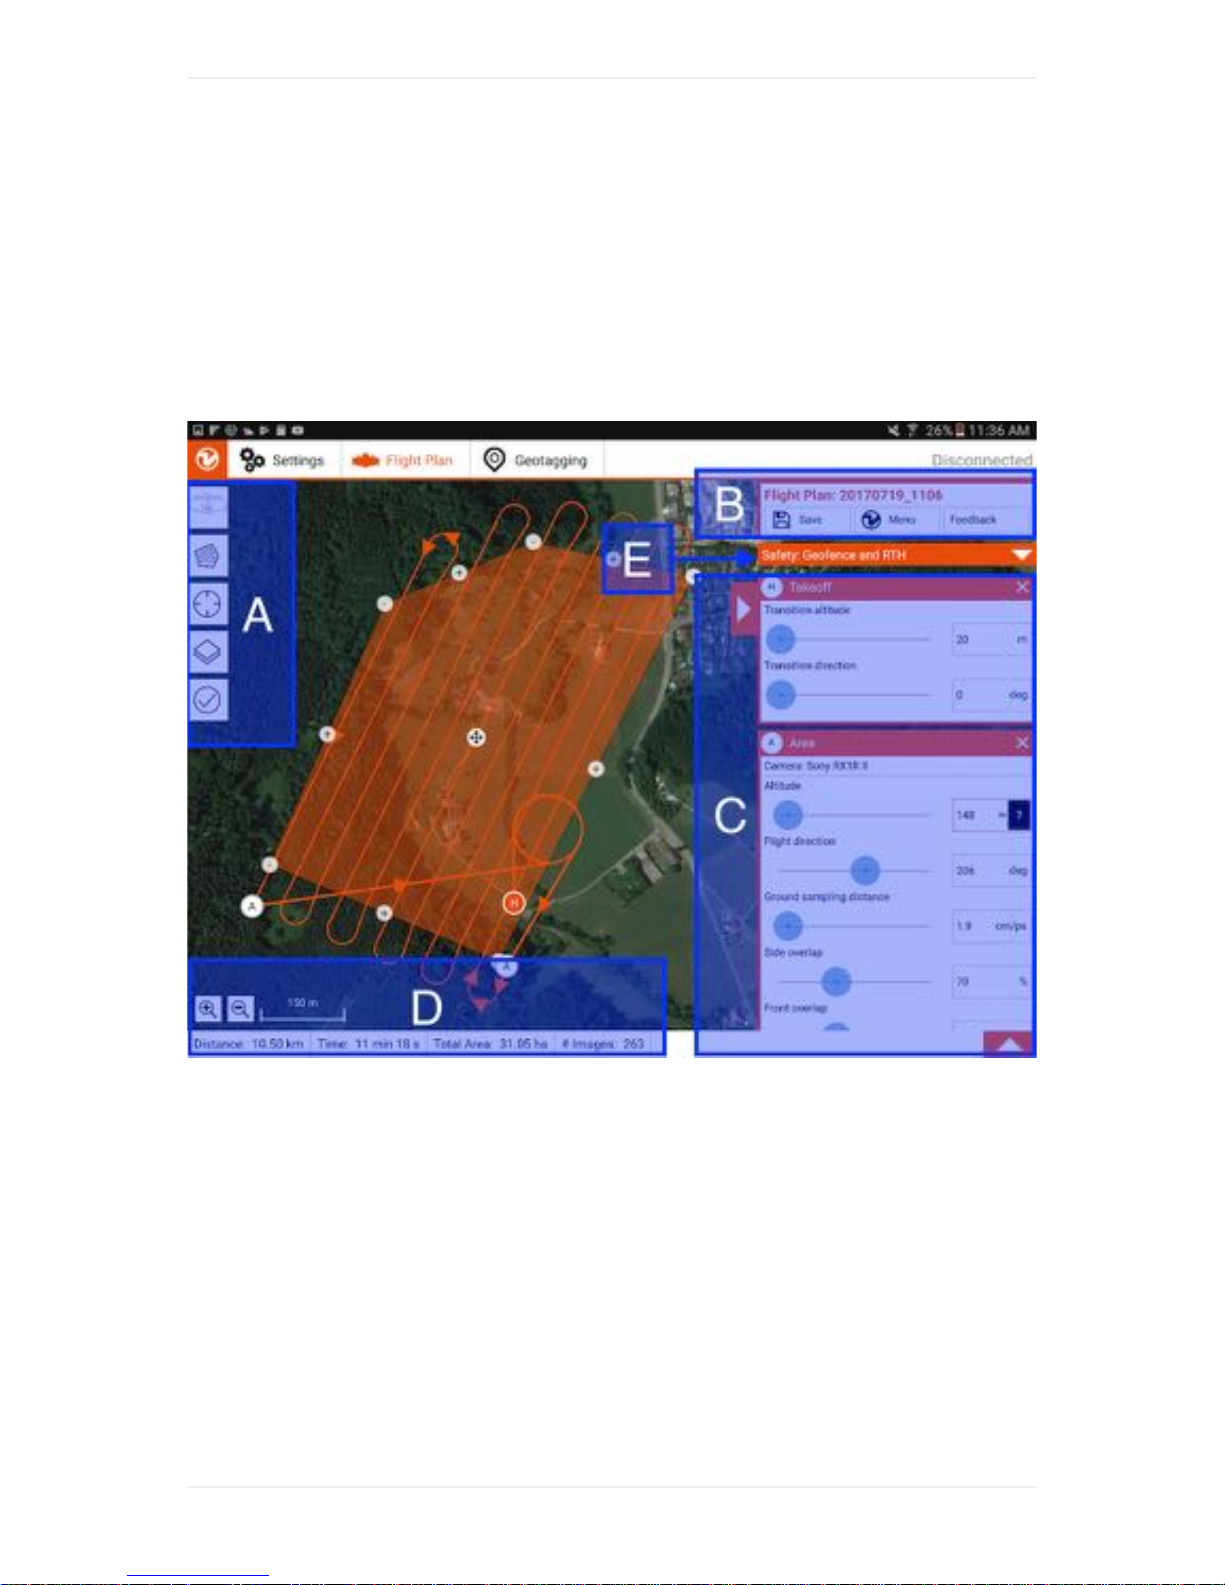
Create a New Flight Plan
To start planning a flight, you have to "Create a new Flight Plan" from the welcome menu of
WingtraPilot. You can open the welcome menu by clicking on the orange Wingtra icon on the top left.
Follow the interface to setup the high-level settings of the Flight Plan — Do you want to start from
scratch or based on an existing Flight Plan? What Camera do you use? Click on finish and you will
enter the flight planning display of WingtraPilot:
The flight planning procedure itself contains these steps:
1. Set Home
2. Add Area(s)
3. (Optional) Adjust Geofence
Step 1 Set Home for takeoff and landing
Create-a-New-Flight-Plan
45
Page 46
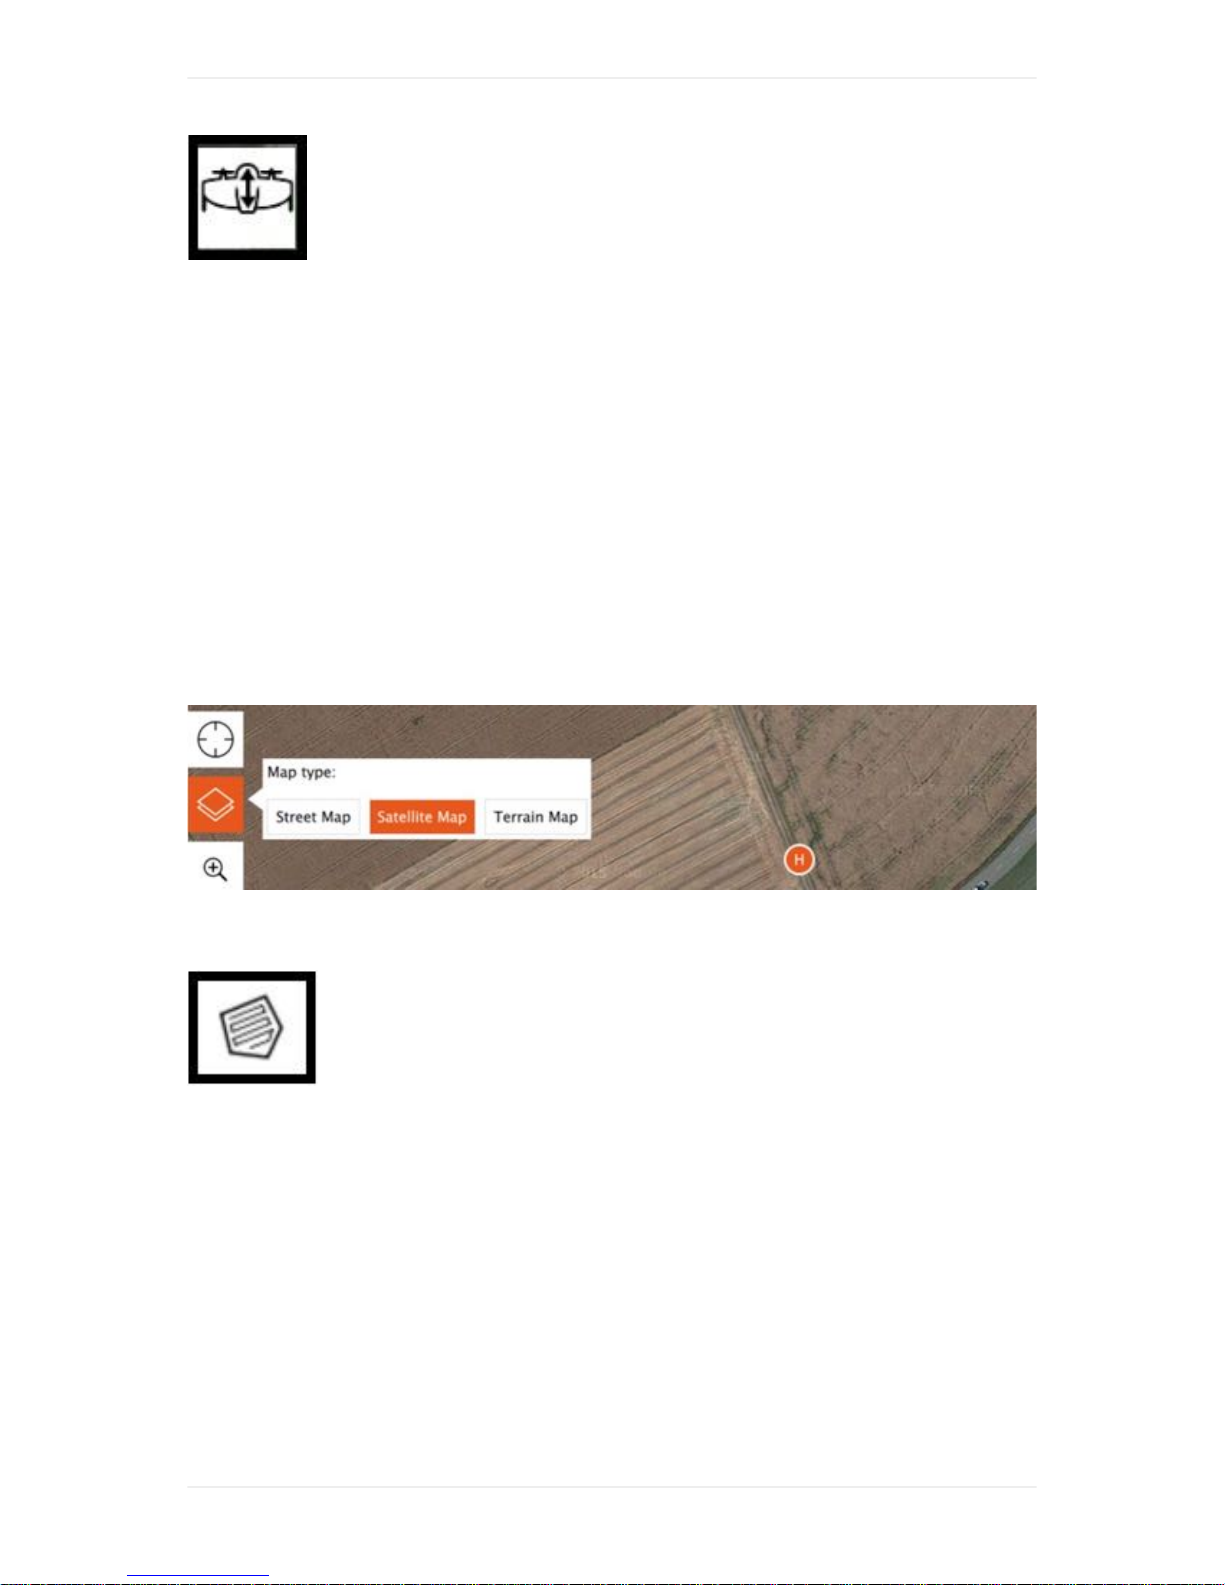
Add Home by clicking on the first button on the left (A). If you are on the field and the
WingtraOne is powered and connected to the tablet, Home is set to WingtraOne's current position
automatically. If you plan the flight beforehand in office, you can move it to the place where you intend
to takeoff — it will be adjusted to WingtraOne's location once you are on the field. Adjust "transition
altitude" and "transition direction" on the right side (C) such that WingtraOne will not collide with any
obstacle.
WingtraOne will take off, rise to your "transition altitude" above Home, transition into forward flight, fly
to the drawn loiter circle, loiter up to the area altitude and start data collection. After finishing data
collection, it will fly back to the loiter circle at the altitude of the last area, loiter down to "transition
altitude", fly back to the Home point, transition above Home, and land.
Note that if you are not connected to the WingtraOne or if there is no GPS lock, Home is added to the
center of the screen — where the location in WingtraPilot is set to the location of the last flight. To
change the location, select the “Street Map” tiles, navigate to your position, and switch back to
"Satellite Map".
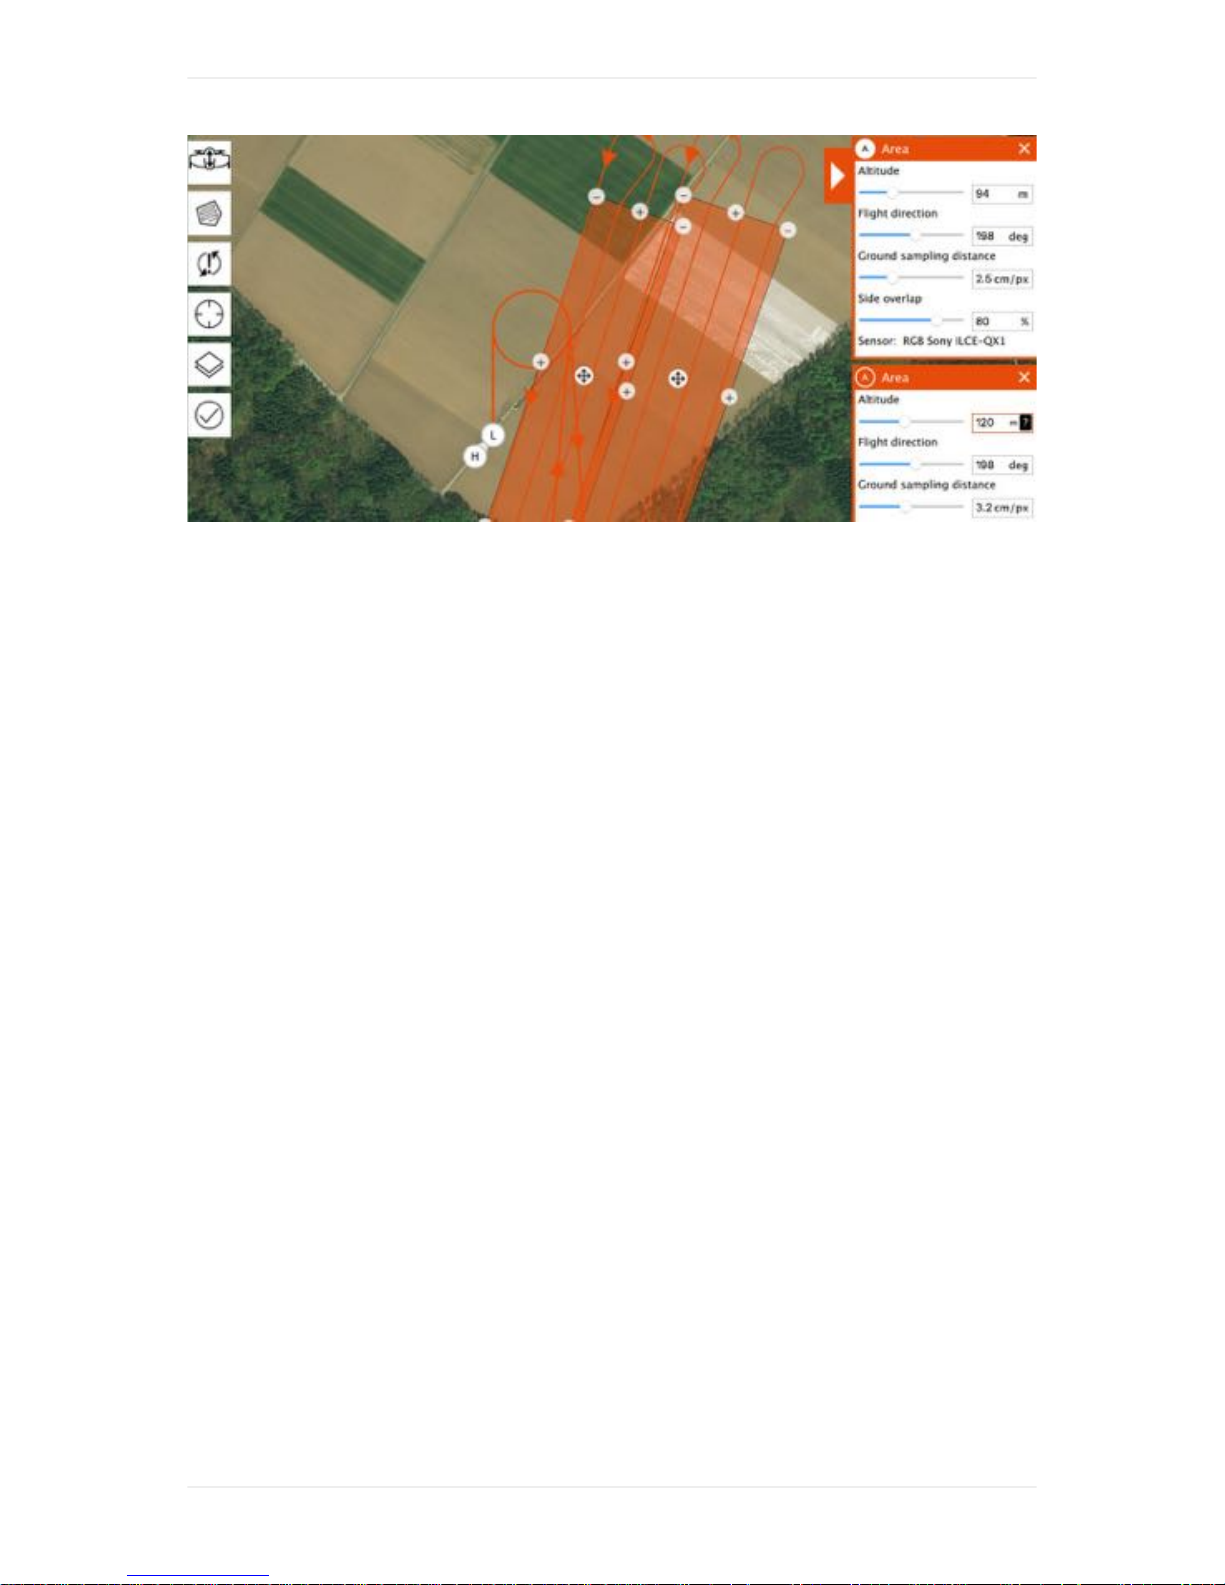
Step 2 Add Area(s)
You can add one or several area(s) for data collection to your Flight Plan by clicking
on the area item (A). Choose your desired ground sampling distance (or, alternatively, your desired
altitude) on the right side and adjust the flight direction if needed. Move the corners (minus signs) and
add additional corners until you draw the area(s) that you want to map. WingtraPilot will warn you if
you set up a mission that is too large.
You can also adjust the side overlap of the images. Decrease the overlap to maximize the
area/minimize the flight time. Increase the overlap to optimize the final map quality. Reliable
orthomosaics can be created with imagery down to 60% side overlap for flat areas. For more
sophisticated landscapes you have to increase the overlap, see the troubleshooting section below for
more details.
Create-a-New-Flight-Plan
46
Page 47
Step 3 (Optional) Adjust Geofence and Minimum RTH Altitude
You can adjust the geofence by clicking on the respective menu on the right side (E). Click on the
triangle to unfold the menu. By default, horizontal geofence is set to 1200m and vertical geofence is
set to 400m. This maximum alloweable distance can be increase to satisfy the needs for special
mission planning purpose.
Increasing the geofence size allows to operate the WingtraOne beyond visual line of sight (VLOS).
Make sure before changing the geofence limits that WingtraOne is operated within the local legal
boundaries for drone operation. If the flight exceeds 3km horizontal or 800m vertical distance to
Home, successful RTH on low battery can not be guaranteed.
You can also adjust the minimum RTH altitude to another value than 60 meter. In case RTH is
engaged in cruise and WingtraOne flies below the specified altitude, it will first climb to this altitude
before flying back to the loiter circle and performing the planned landing. In case WingtraOne is higher
than the value set here, it will return to loiter circle on current altitude before performing the planned
landing.
Example Flight Planning
Flight Planning on the Field
As flight planning with WingtraPilot is very easy, we recommend to plan your flight directly on the field.
If planning is performed on the field, it is recommended to set up equipment (power WingtraOne →
connect telemetry → start WingtraPilot) before planning the flight. Make sure you have internet access
on the field or download offline maps before going to the field.
Create-a-New-Flight-Plan
47
Page 48

Create-a-New-Flight-Plan
48
Page 49

Flight Modes and Flight Regimes
The flight mode defines if WingtraOne is flying autonomously (Auto), if you are flying in Assisted
Mode, or if Return-to-Home (RTH), is engaged.
The flight regime of WingtraOne is either Hover or Cruise. Hover is the vertical mode that is used
during takeoff and landing, Cruise is the horizontal, forward flight mode, where WingtraOne flies like a
fixed-wing aircraft.
Flight Modes
Auto Mode
This is the normal mode in which WingtraOne flies the planned flight autonomously from takeoff to
landing.
Return-to-Home (RTH)
Engage RTH if you realize something is wrong and you want WingtraOne to come back
autonomously. If RTH is engaged, WingtraOne flies back to the planned loiter circle on its current
flight altitude. It then loiters down to the planned transition altitude, flies back to the Home point,
transitions above the Home point and lands. For more details, see the failsafes chapter.
Assisted Mode
You can fly WingtraOne manually in Assisted Mode. Switch to Assisted Mode before landing (after
back-transition) to adjust the landing point if necessary.
Engage the Assisted Mode by pressing the respective button on the remote control (RC). The flight
regime will stay as it was before you switched to Assisted Mode, i.e., if you engage Assisted Mode
during cruise flight, you will take over in cruise, and if you engage Assisted Mode during hover flight,
you will take over in hover flight.
If you fly in Assisted Mode, you can transition between the two flight regimes with the transition button
on your remote control. See the section about manual flying for a detailed description of how to fly
with the remote control.
Flight Modes and Flight Regimes
49
Page 50
In-Flight Interactions
The following table summarizes your options to interact during flight.
Possible Interactions
Action Consequence
Emergency
Stop:
Kill all motors and spiral down.
RTH (Returnto-Home):
The plane flies back autonomously at the current altitude, performs the
planned landing procedure and lands.
Assisted
Mode:
Gives the pilot authority via the remote control (RC). Engage only if you
know how to fly the WingtraOne!
Transition
(Only works
in Assisted
Mode):
Lets WingtraOne transition between hover and cruise.
You can take all described actions from the RC by pressing the respective buttons. To trigger
Emergency Stop you have to click the red button 3 times within 2 seconds. You can engage Return-
to-Home (RTH) and trigger Emergency Stop also from tablet by clicking on the respective buttons and
moving the slider left to right.
THERE IS NO WAY TO REGAIN CONTROL ON EMERGENCY STOP!
Manual Flying in Assisted Mode
Use the remote control for manual flying in Assisted Mode. Read the following section carefully before
you switch to Assisted Mode. Use the "Assisted" button (5.) on your RC to switch from Auto Mode to
Assisted Mode. Be aware that there are no extended safety features (collision avoidance or similar)
available for WingtraOne.
Flight Instructions
The main reason to take over (switching to Assisted mode) should be to hold or adjust the position
before landing. Taking over in cruise is a safety feature that can be used e.g. in case of bird attacks.
When flying in Assisted Mode you won't be able to collect images.
WingtraOne can severely harm people if handled inappropriately. Only fly WingtraOne manually if you
know what you are doing.
In Flight Interactions
50
Page 51

Depending on GPS quality, WingtraOne can drift for several meters. Be prepared to react.
Hover
Flying WingtraOne in hover works similarly to flying a multicopter. WingtraOne will keep its position if
you do not touch the sticks. Likewise, it will move according to your control stick input.
Cruise
You can fly WingtraOne in cruise mainly with two control inputs: rising/sinking (pitching) and turning.
WingtraOne will fly at constant altitude, speed (16 m/s), and heading if you do not touch the sticks and
rise/sink/turn according to your control stick input.
Transition
Use the transition button (6.) to transition from hover to cruise or vice versa.
Forward-transition (hover->cruise): Make sure you are on a safe altitude before you transition into
forward flight (cruise). There is no option to rise or interact in any way during transition!
Back-transition (cruise->hover): The back-transition needs a lot of space. Engage it 40 meters before
you reach the point at which you want to hover. Always engage back-transition at a safe distance and
altitude away from obstacles and yourself. There is no option to interact in any way during transition!
Landing
If you are flying in cruise, transition back to hover by using the transition button (6.) at a safe distance
and altitude. Change heading after back transition such that the Wingtra logo is facing you. Direct
WingtraOne to its intended landing position. WingtraOne will use its distance sensor to detect landing
and switch-off the engines at 10cm distance above ground.
Remote Control
In Flight Interactions
51
Page 52
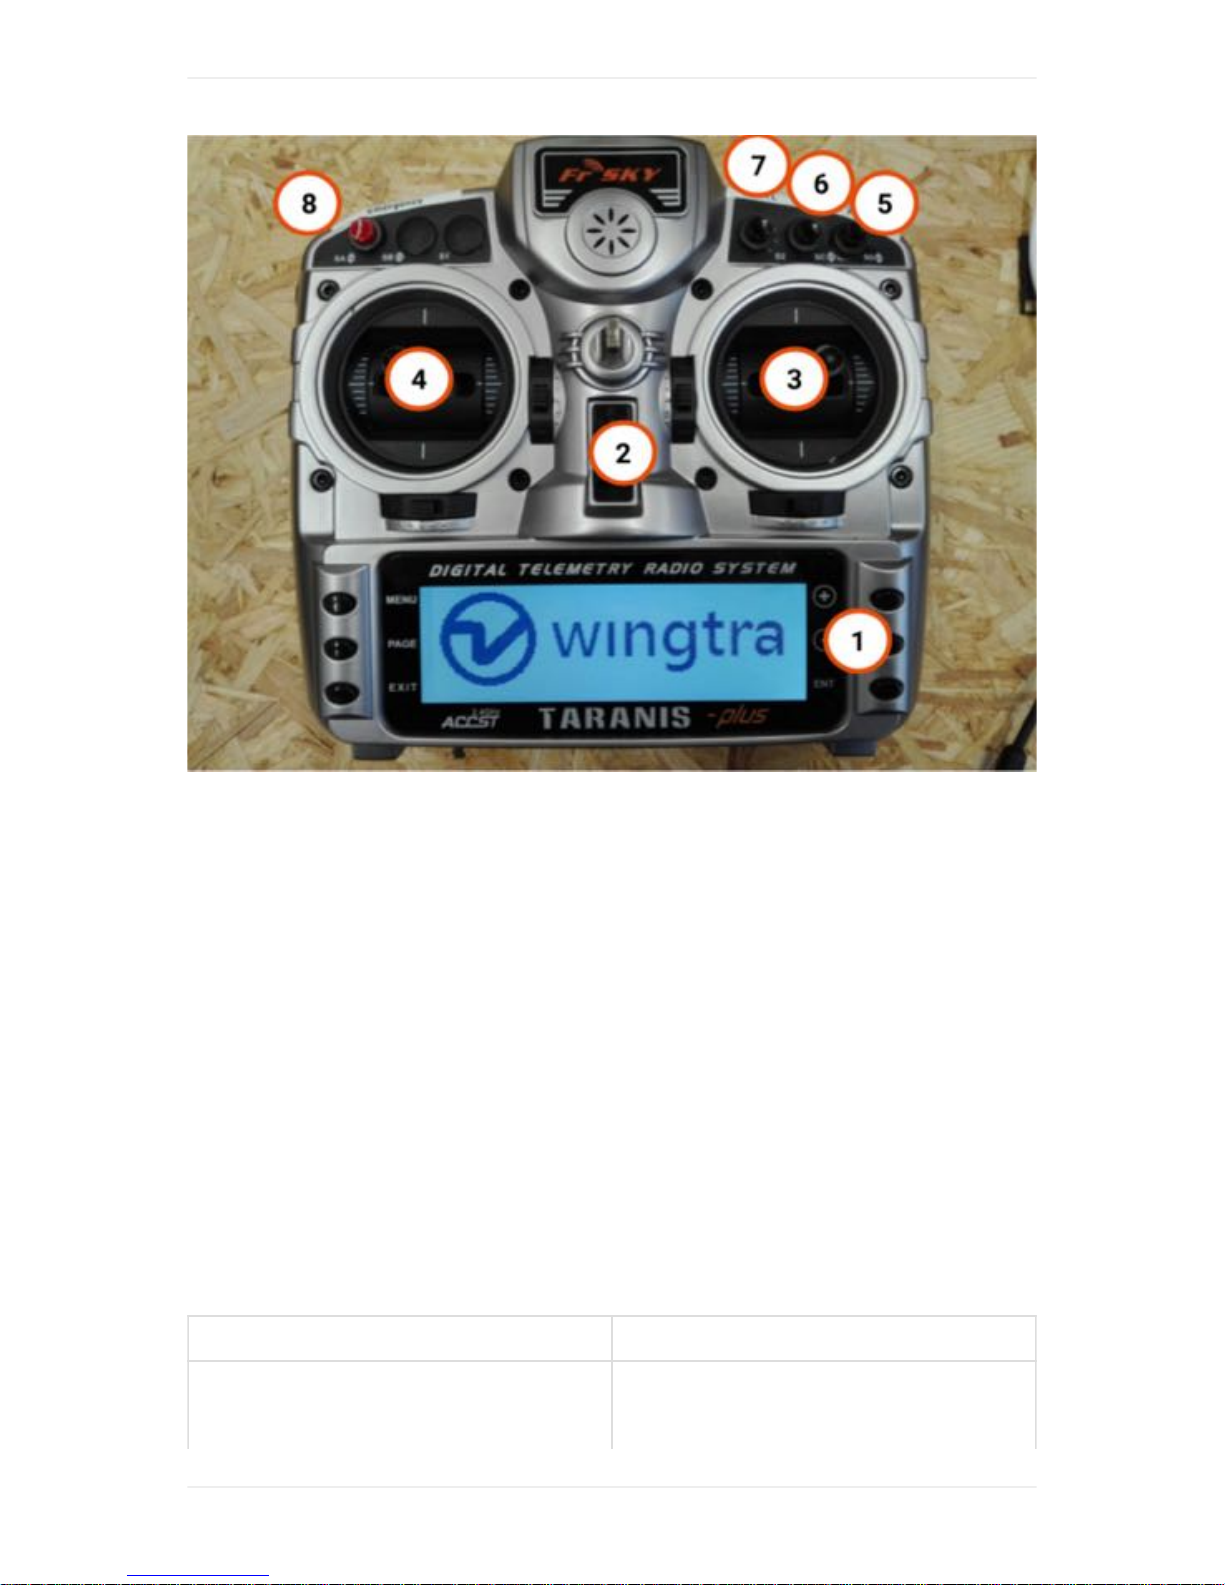
1. Menu navigation buttons, to navigate the RC's settings - don't change them.
2. On / off switch, turns RC on / off
3. Navigation stick right
4. Navigation stick left
5. Engage Assisted Mode: allows you to take manual control of WingtraOne
6. Transition: performs the "transition" maneuver — switching from cruise to hover regime and vice
versa (only works when flying in Assisted Mode)
7. Return-to-Home: initiates WingtraOne to autonomously fly home and land
8. Emergency button - when pushed three times within two seconds this will terminate the flight by
cutting the power to the engines
Control sticks
Use the control sticks to fly manually in Assisted Mode. These are carefully tuned and allow you to
maneuver easily and safe.
Assisted Mode - Hover
Input Result
In Flight Interactions
52
Page 53
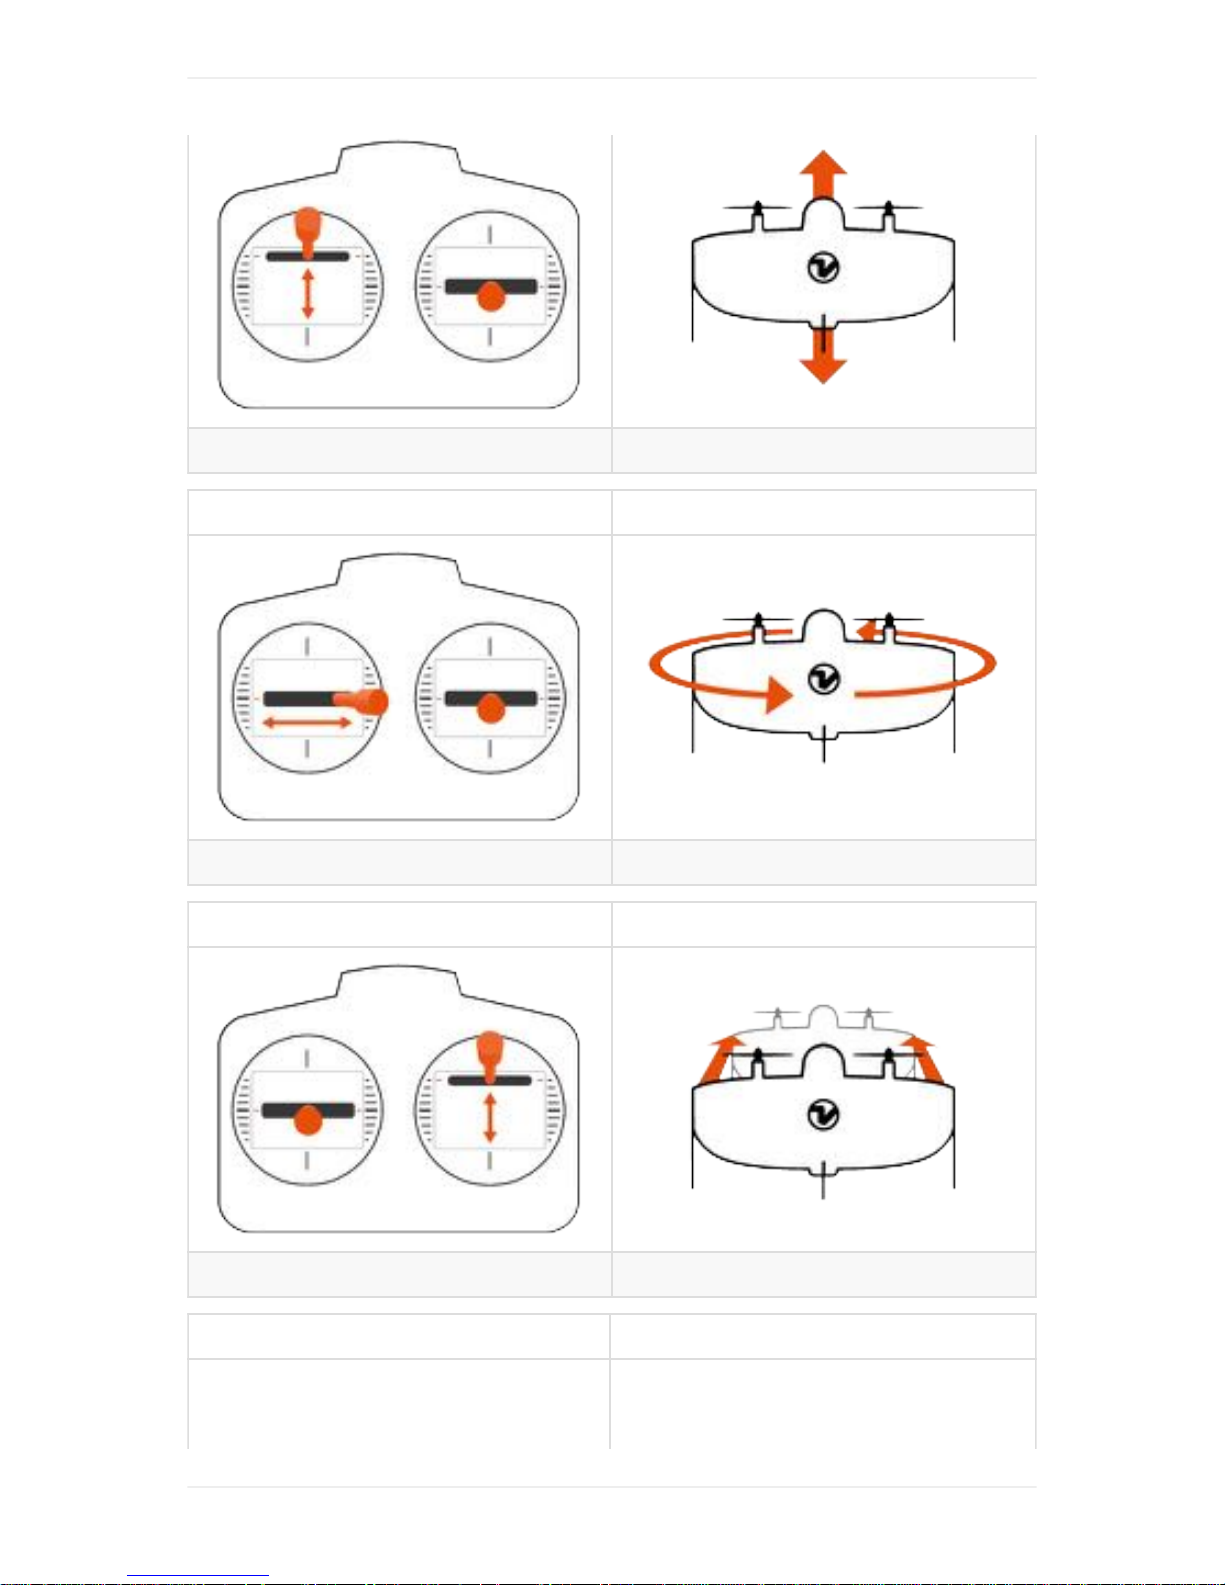
Left Stick: Up & Down gain and lose altitude
Input Result
Left Stick: Left & Right change heading (turn around central axis)
Input Result
Right Stick: Up & Down back and forth (pitching)
Input Result
In Flight Interactions
53
Page 54
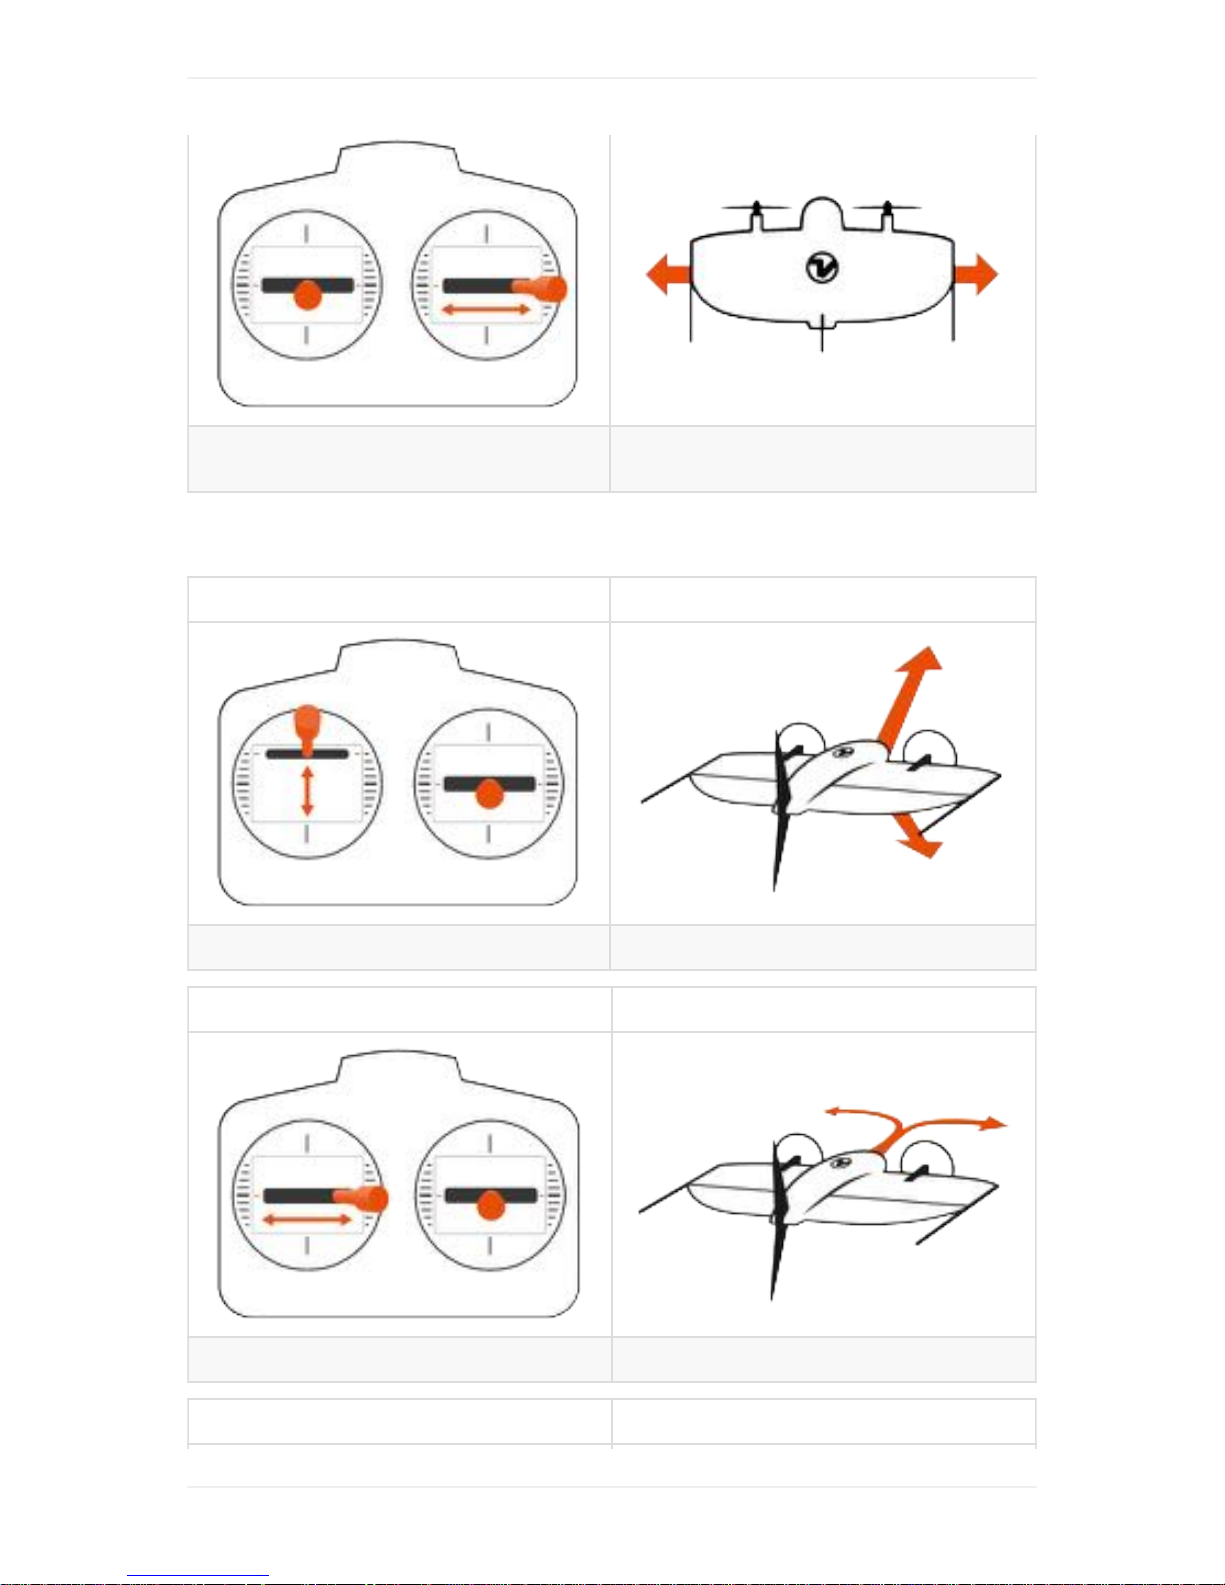
Right Stick: Left & Right
move left and right (move aircraft along the
wing)
Assisted Mode - Cruise
Input Result
Left Stick: Up & Down gain (stick up) or lose (stick down) altitude
Input Result
Left Stick: Left & Right perform turns in the respective direction
Input Result
In Flight Interactions
54
Page 55
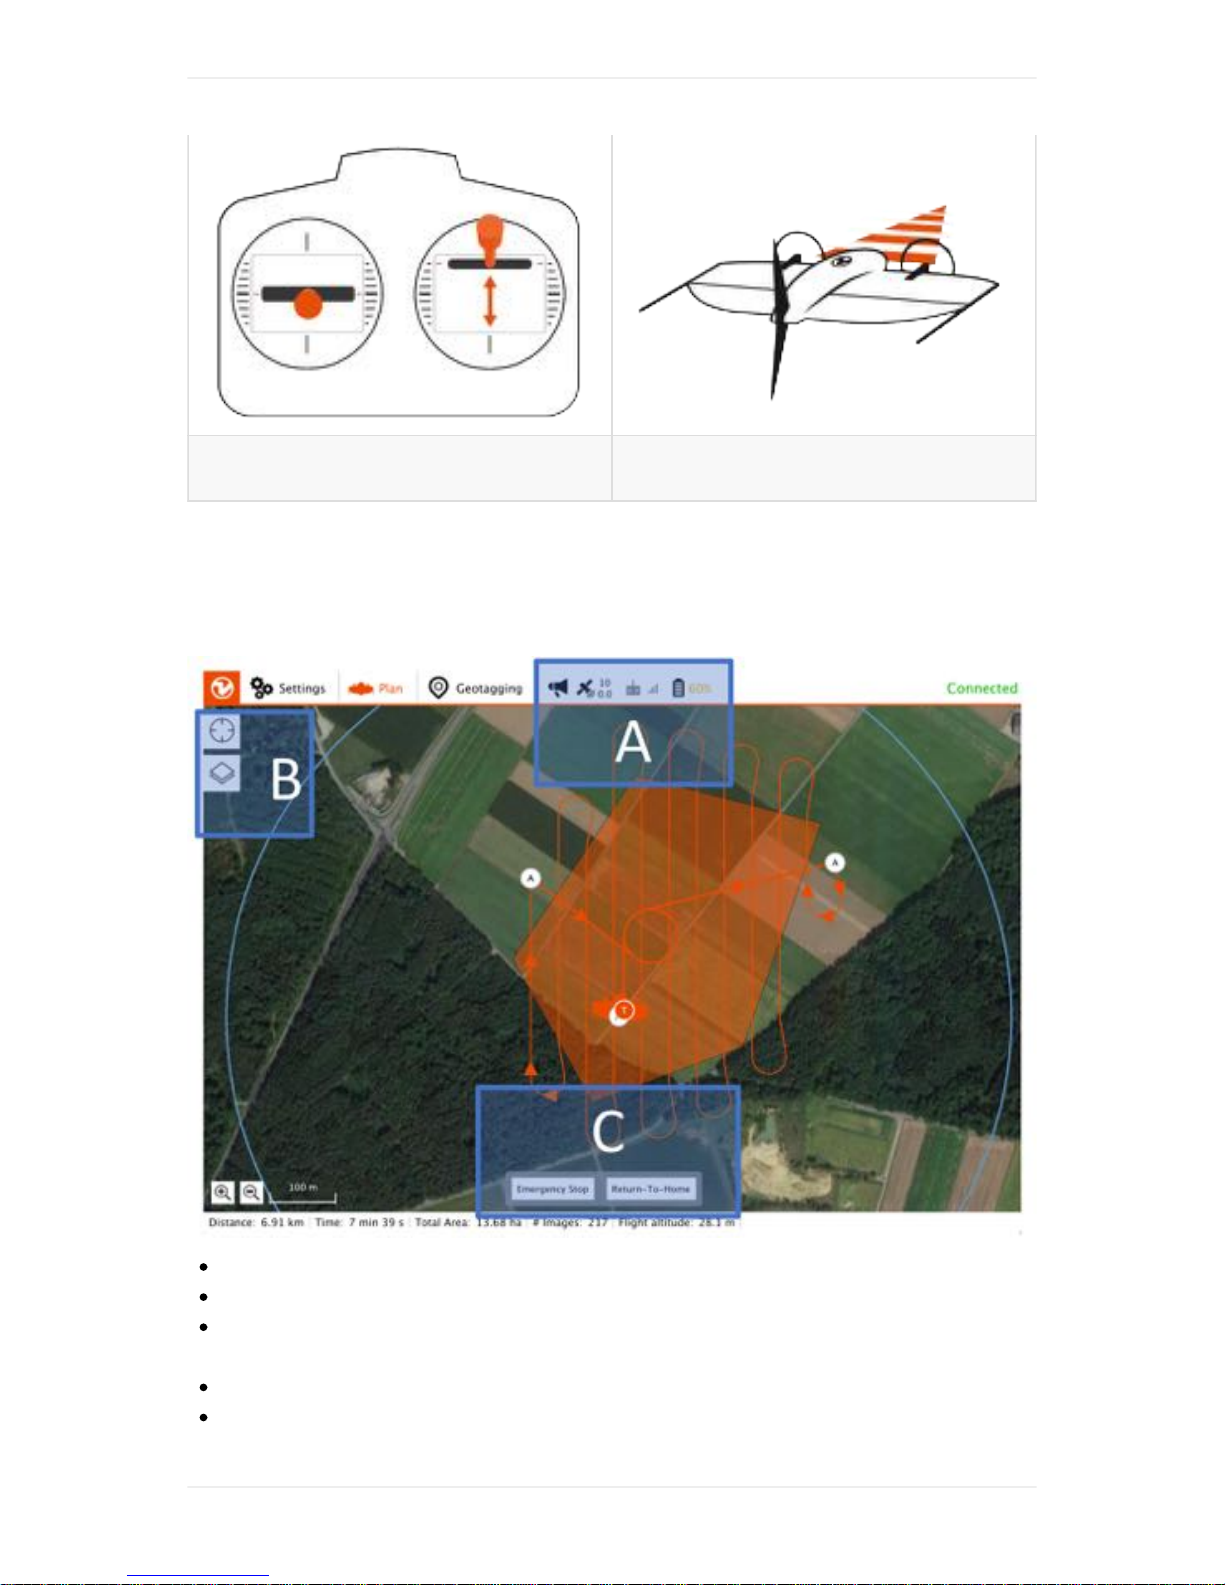
Right Stick: Up & Down
increase / decrease flight speed
(velocity will stay within safe boundaries)
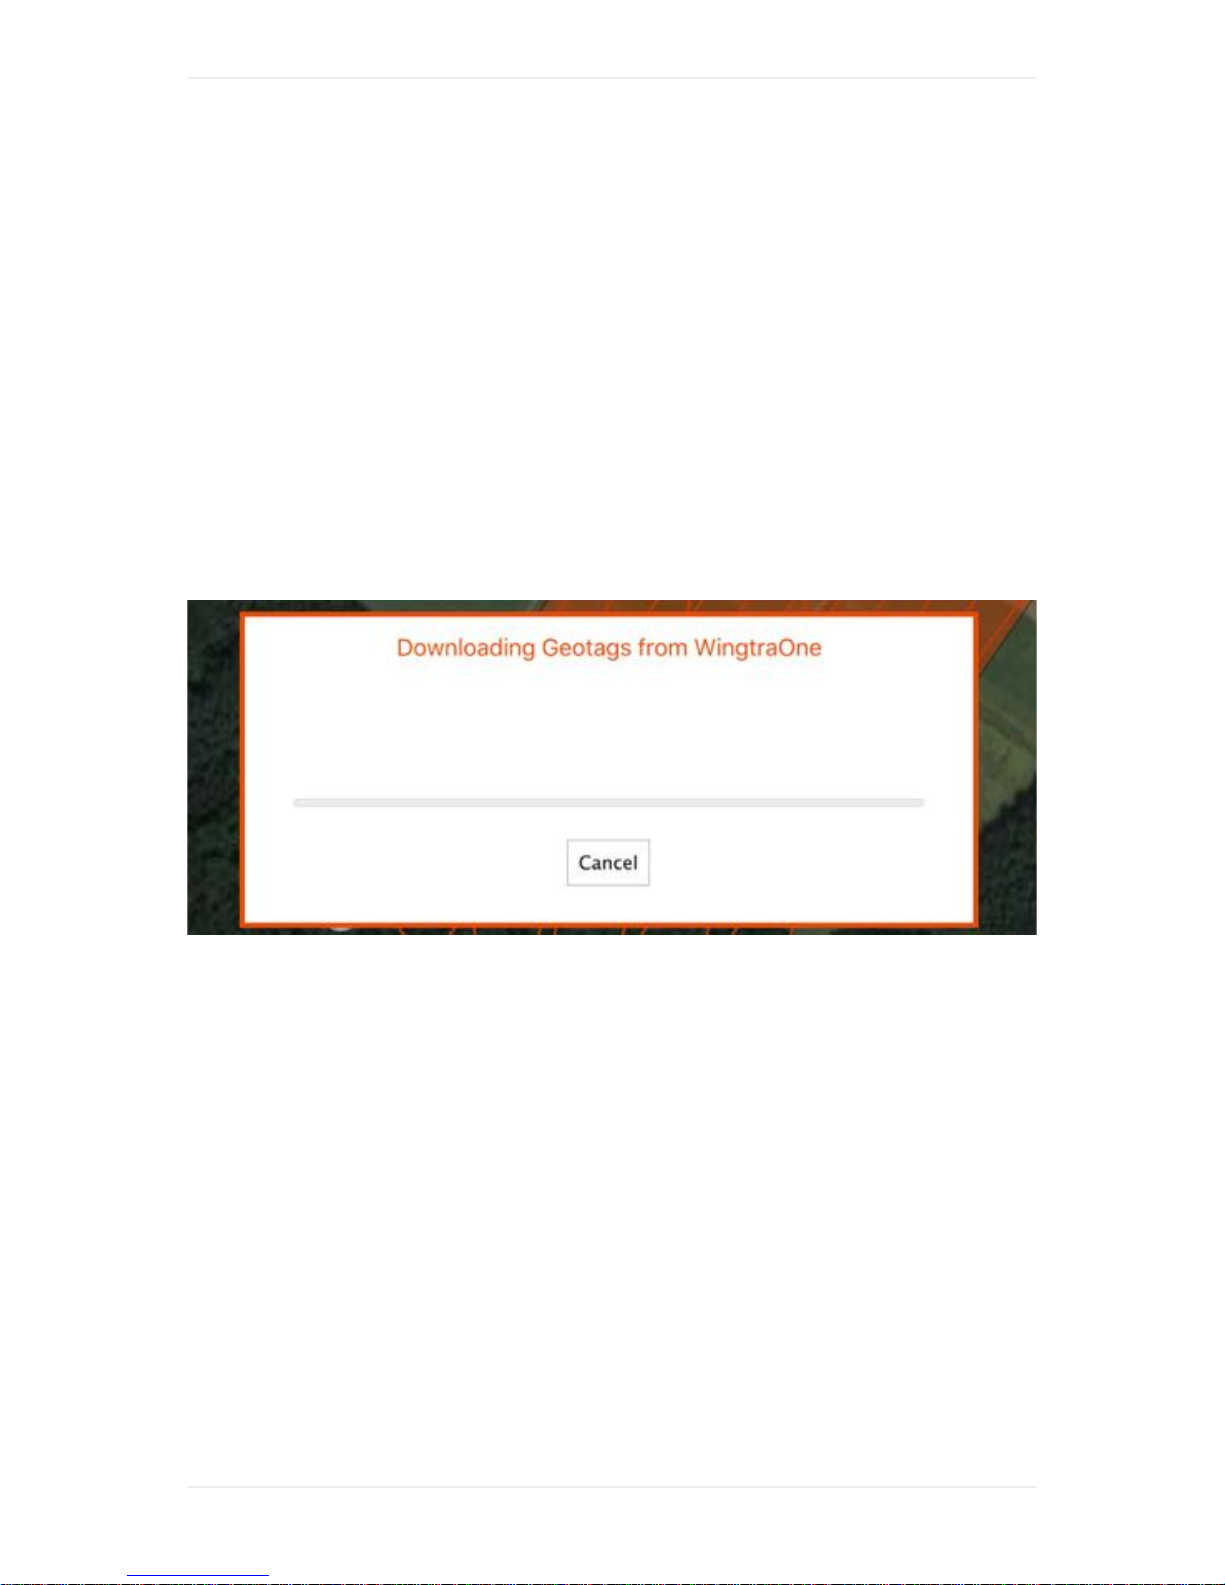
Flight Feedback
WingtraPilot shows you some information which you can use to inspect your flight.
A: Information about remaining battery and GPS quality.
B: Change display options (center map, change map tiles)
C: Options to take over. Engage RTH (Return-to-Home) to bring back WingtraOne and let it land
autonomously. For more details see above. Also check the failsafe scenarios.
You can see the flight altitude at the bottom of the page.
If you miss an important information, please give feedback.
In Flight Interactions
55
Page 56

In Flight Interactions
56
Page 57
Geotagging
The collected images are saved on the SD card in the camera without assigned GPS information
(geotags). The current workflow includes some user input to assign the geotags to the images.
Leave WingtraOne powered after landing until the geotags are downloaded to the tablet (**Step 1:
Download Geotags**).
Steps to Geotag your Images
Step 1: Download Geotags
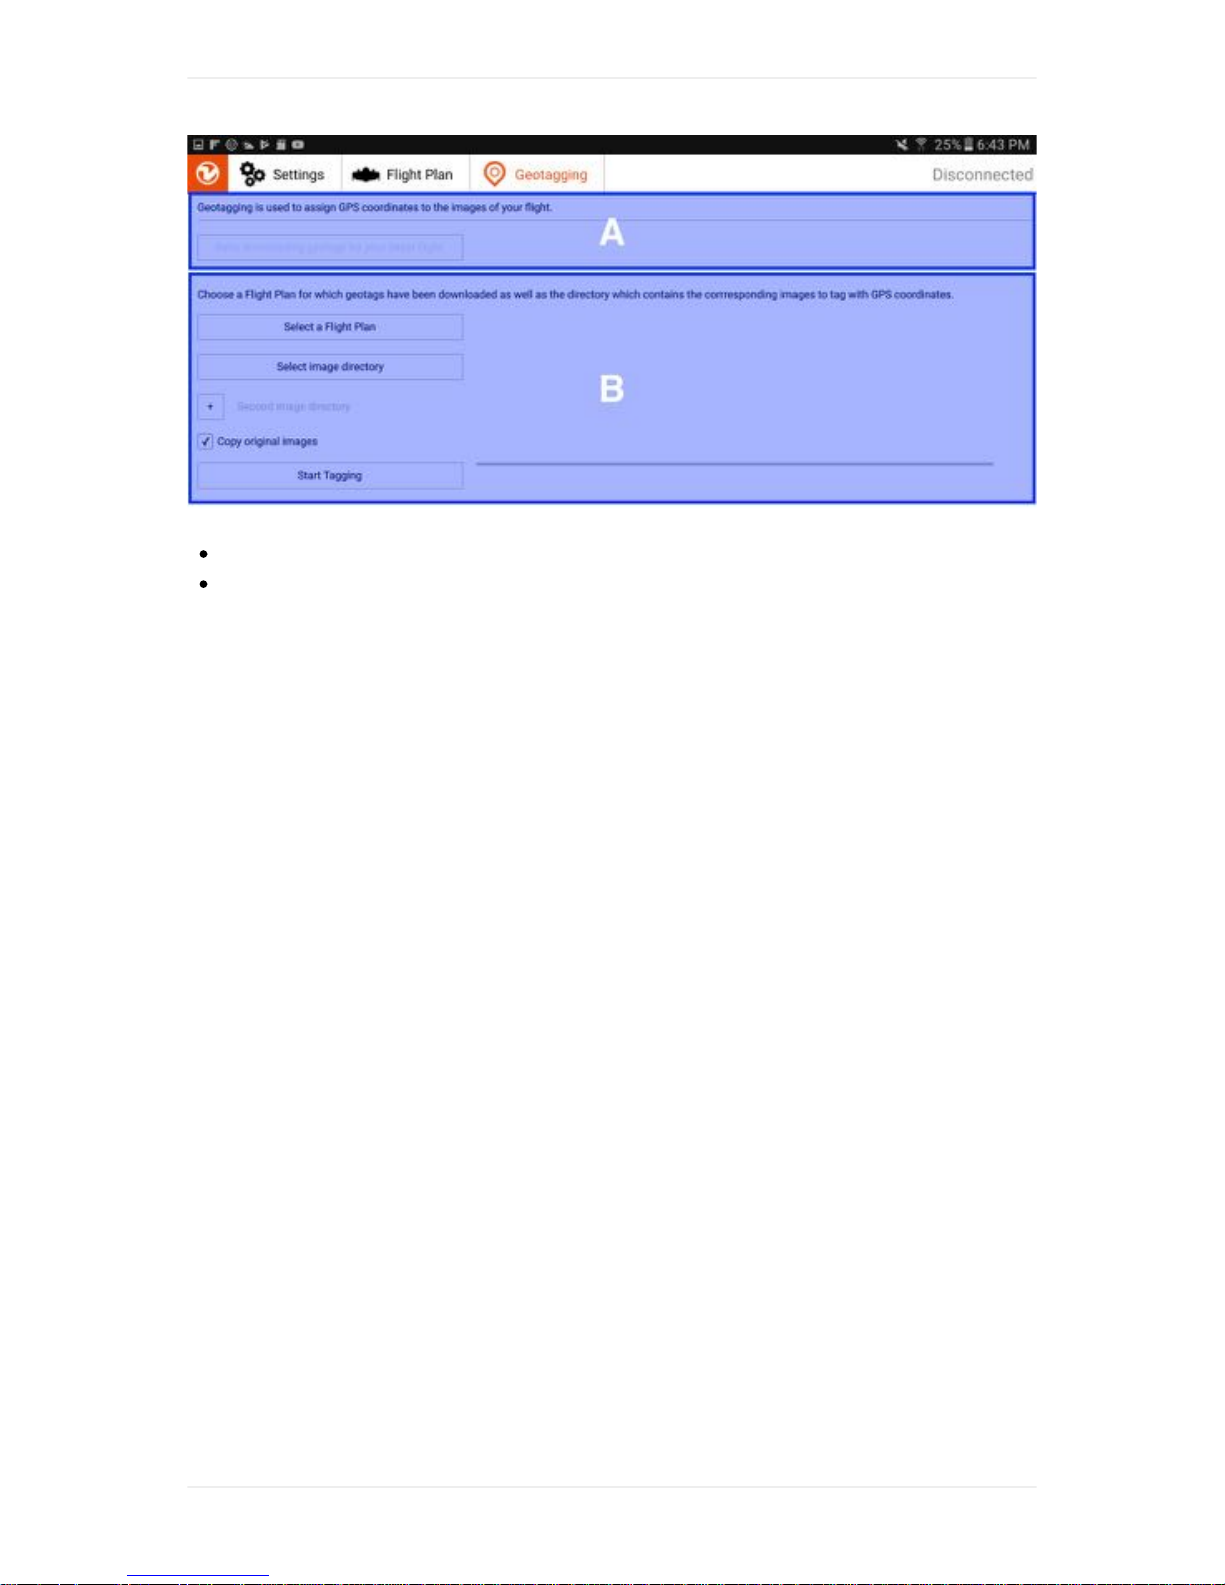
After landing, WingtraPilot starts downloading the geotags automatically and displays the progress:
Be patient and wait until the download succeeds. If the download fails, click on "Retry" and walk
towards WingtraOne to get better connection. We highly recommend to geotag always right after
flight. Click on "Geotag Images" to do so.
Step 2: Geotag your Images on the Tablet
Power off WingtraOne, get the SD card from the camera and insert the SD card to the tablet. Check if
the right Flight Plan is selected (change if not), select the directory on the SD card containing all
images as image directory, and click on "Start Tagging" (B).
You have the option to copy original images. At the moment we recommend to copy original images in
case geotagging would fail. Untick the box if you need the space on your SD card. Even if you do not
copy the images and geotagging fails, you still can run geotagging again on the already tagged
images to fix a failed geotagging. See troubleshooting section for additional imformation.
Geotagging
57
Page 58
A: Section for the Geotag Download (normally not needed).
B: Section for the Geotagging itself.
Wait for the feedback "Success! ...". Be patient! Geotagging the images can take several minutes (for
huge sets with thousands of images it can take up to 20 minutes). WingtraPilot creates a folder in the
image directory (on the SD card) containing the original images, the tagged images, the Flight Plan
file and a json text file with the geotags including attitude tags (see below).
You can plan the next flight in parallel and continue collecting more data, while the geotagging takes
place in the background. If you want to start the next flight already in parallel to the geotagging, you
need a second SD card.
Geotagging can fail if the camera's internal counter exceeds its maximum of 10'000 images. If that
happens, the camera creates a new folder for the new images. Click on the "+" button and select the
second image directory and start geotagging again.
Step 3: Inspect and Save the Images
To inspect the images on the tablet, open the "MyFiles" App, navigate to SDcard/DCIM/ and into your
project folder, open an image by clicking on it and select "Gallery" as image viewer. Do not inspect
your images during geotagging.
To continue working, remove the SD card from the tablet. You can either save the data from the SD
card to your computer after every flight and clear the SD card (recommended) or continue collecting
data and upload the data at the end of the day.
The SD card provides enough space for several flights (up to 3000-4000 JPEG images).
Step 4: Continue Working
To continue working with WingtraOne, re-insert the SD card to the camera.
Geotagging
58
Page 59
Results of Geotagging on the SD Card
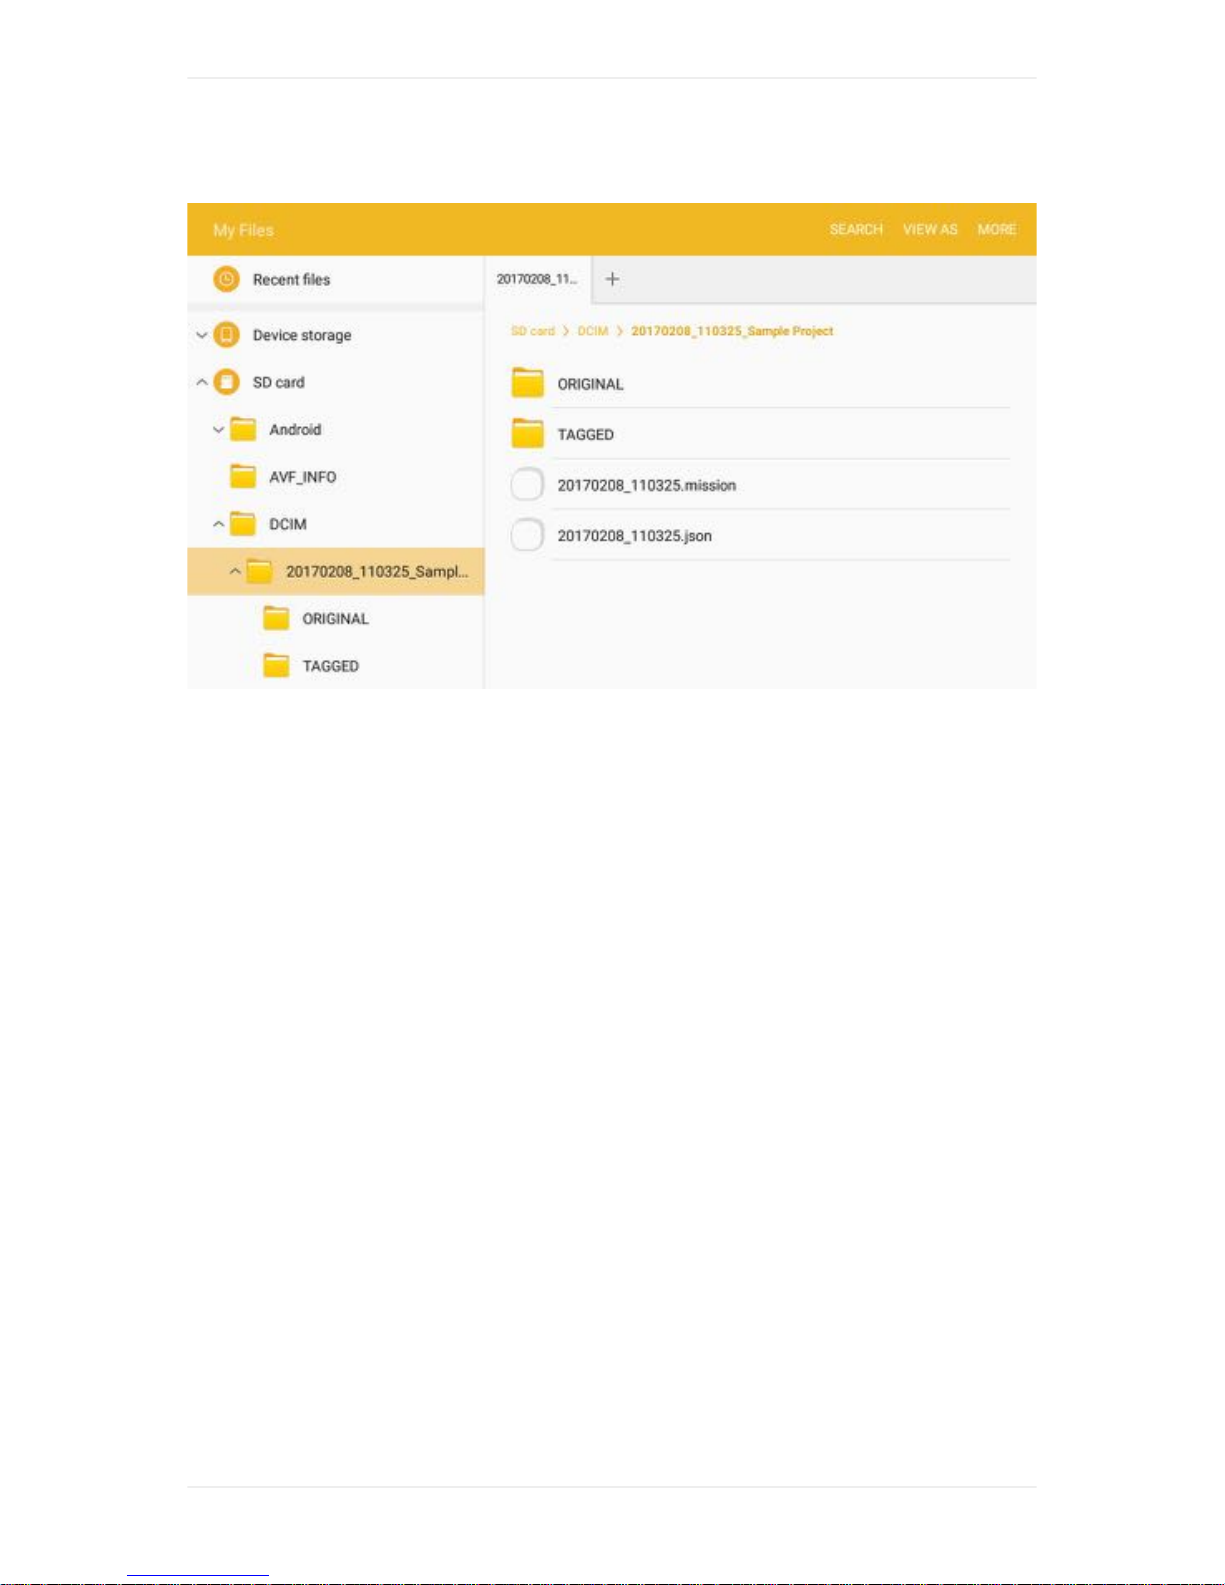
As a result you get a folder named after your Flight Plan in the image directory on your SD card. It
contains the following objects: * /ORIGINAL subfolder: Unmodified images * /TAGGED subfolder: All
images of the flight with geotags in metadata * /date_time.flightplan file: The Flight Plan that was
flown. This file can be loaded in WingtraPilot if you want to fly the same Flight Plan again. *
/date_time.json file: A text file containing time, GPS coordinates and attitudes for all images.
Geotag an existing Flight
You can always geotag an old flight at a later time again. Select "Geotag an existing Flight" on
WingtraPilot's welcome menu and select the respective Flight Plan.
Put the original images of the flight into a separate folder on an SD card and insert the SD card into
the tablet. Select the respective image directory within WingtraPilot and click on "Start Tagging".
Geotagging
59
Page 60

Update WingtraPilot & WingtraOne to 1.5.0
You will profit from all software improvements Wingtra achieves (for WingtraPilot and the Autopilot) by
getting the newest software updates. Please follow the instruction below to update your WingtraPilot
and WingtraOne.
Step 1: Get the new WingtraPilot Release
Make sure the tablet is charged (> 50%). On the tablet, login to your email account and open the
email informing you about a new update.
Attached to this email, you will find the WingtraPilot App installation file WingtraPilot_v1.5.0.apk
that you should download to your tablet.
After the download has completed, start with the WingtraPilot update.
Step 2: Update WingtraPilot
Open MyFiles, navigate to /Device storage/Download/ and click on WingtraPilot_v1.5.0.apk.
Follow the installer. You may grant the permission to install an application from an unknown
source.
If WingtraPilot installation fails, uninstall the old WingtraPilot first (go to Apps, hold WingtraPilot
Item and drag it to the "uninstall" sign on top of screen) and start installation again.
Step 3: Download Latest Release
Update WingtraPilot & WingtraOne to 1.5.0
60
Page 61
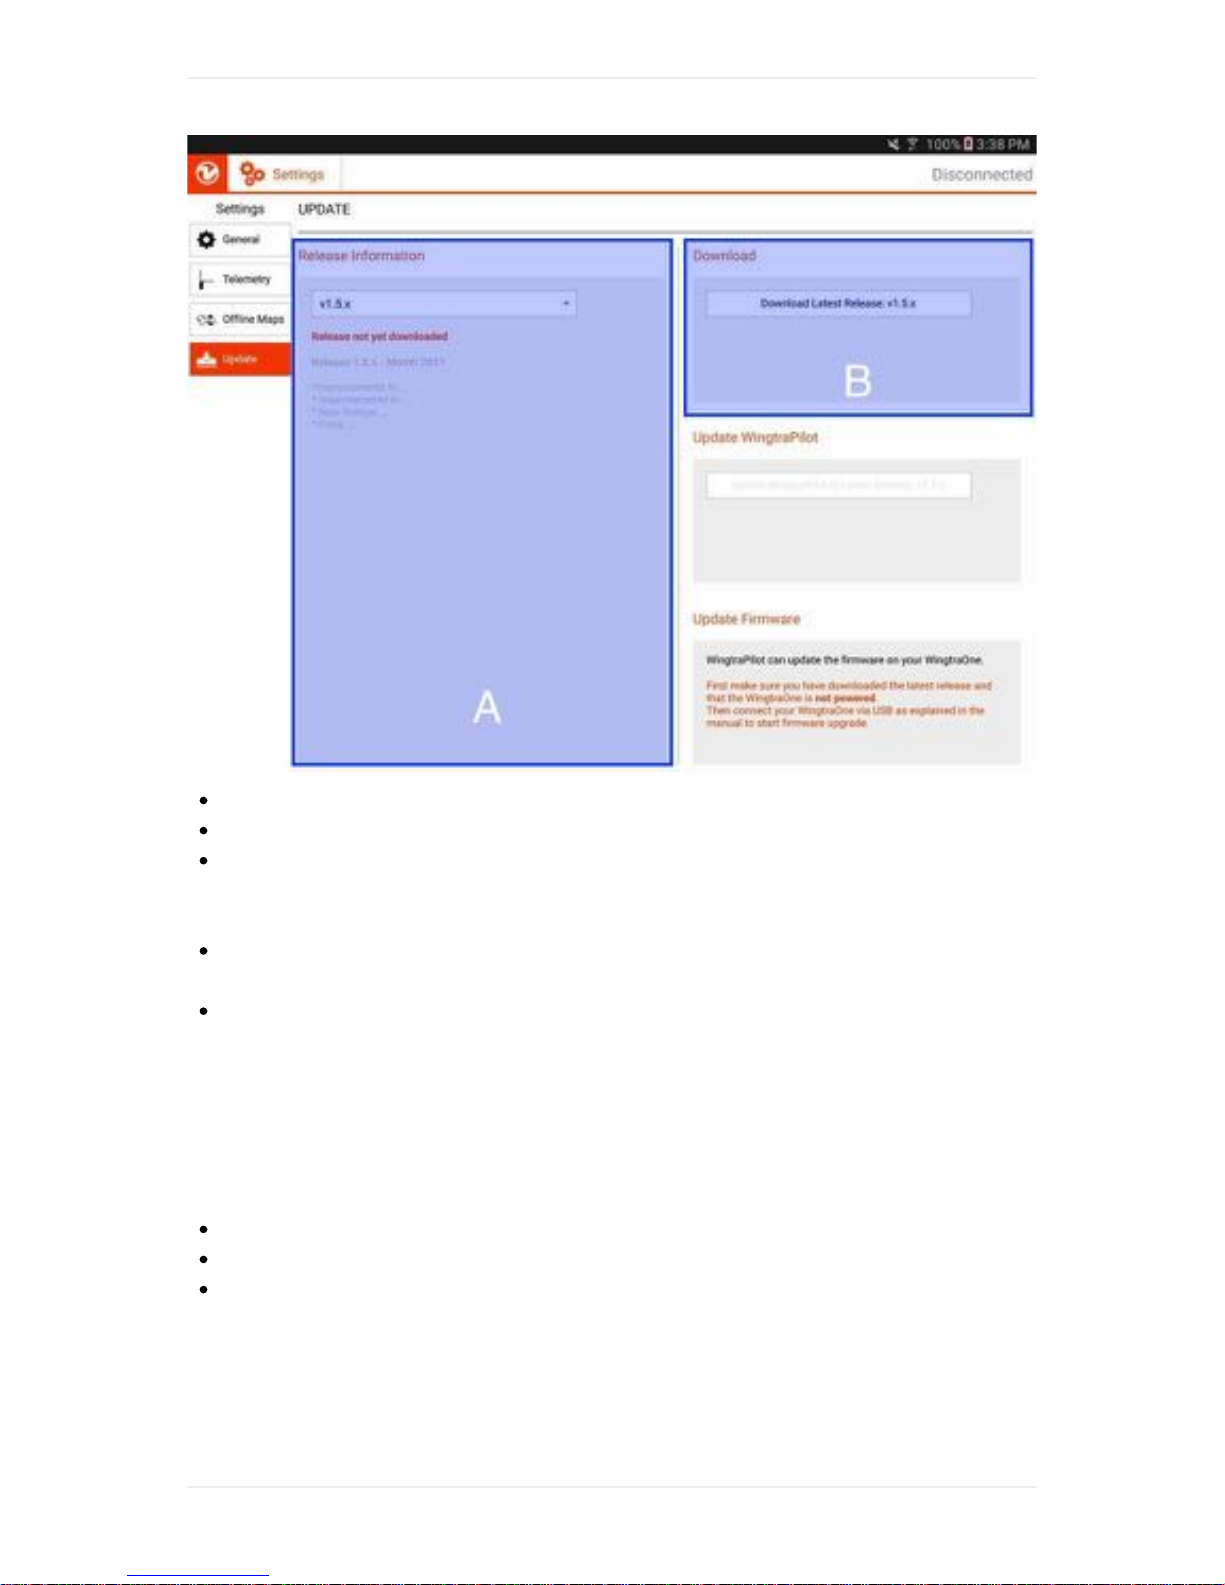
Ensure you have the newest WingtraPilot. Start WingtraPilot.
In the welcome menu, click on "Update the WingtraOne firmware or WingtraPilot"
On the left side (A) you will see the release information of the latest release and the information
that this release hasn't been downloaded yet. Using the drop down menu you can also take a
look at the release information of earlier releases.
On the right side (B), click on "Download Latest Release v1.5.0" to start the download of the
latest release.
Wait until the top progress bar is full and you see "Download complete" in (B). If the download
does not complete within 5 minutes, close WingtraPilot and try again.
Step 4: Update WingtraOne Firmware
Ignore orange box warnings on top of tablet screen during update process (remove them by clicking
on the X).
Ensure that your WingtraOne is powered off.
In WingtraPilot, make sure you are on "Settings --> Update" menu.
Take the small microusb-to-microusb cable provided in the WingtraOne package.
Update WingtraPilot & WingtraOne to 1.5.0
61
Page 62
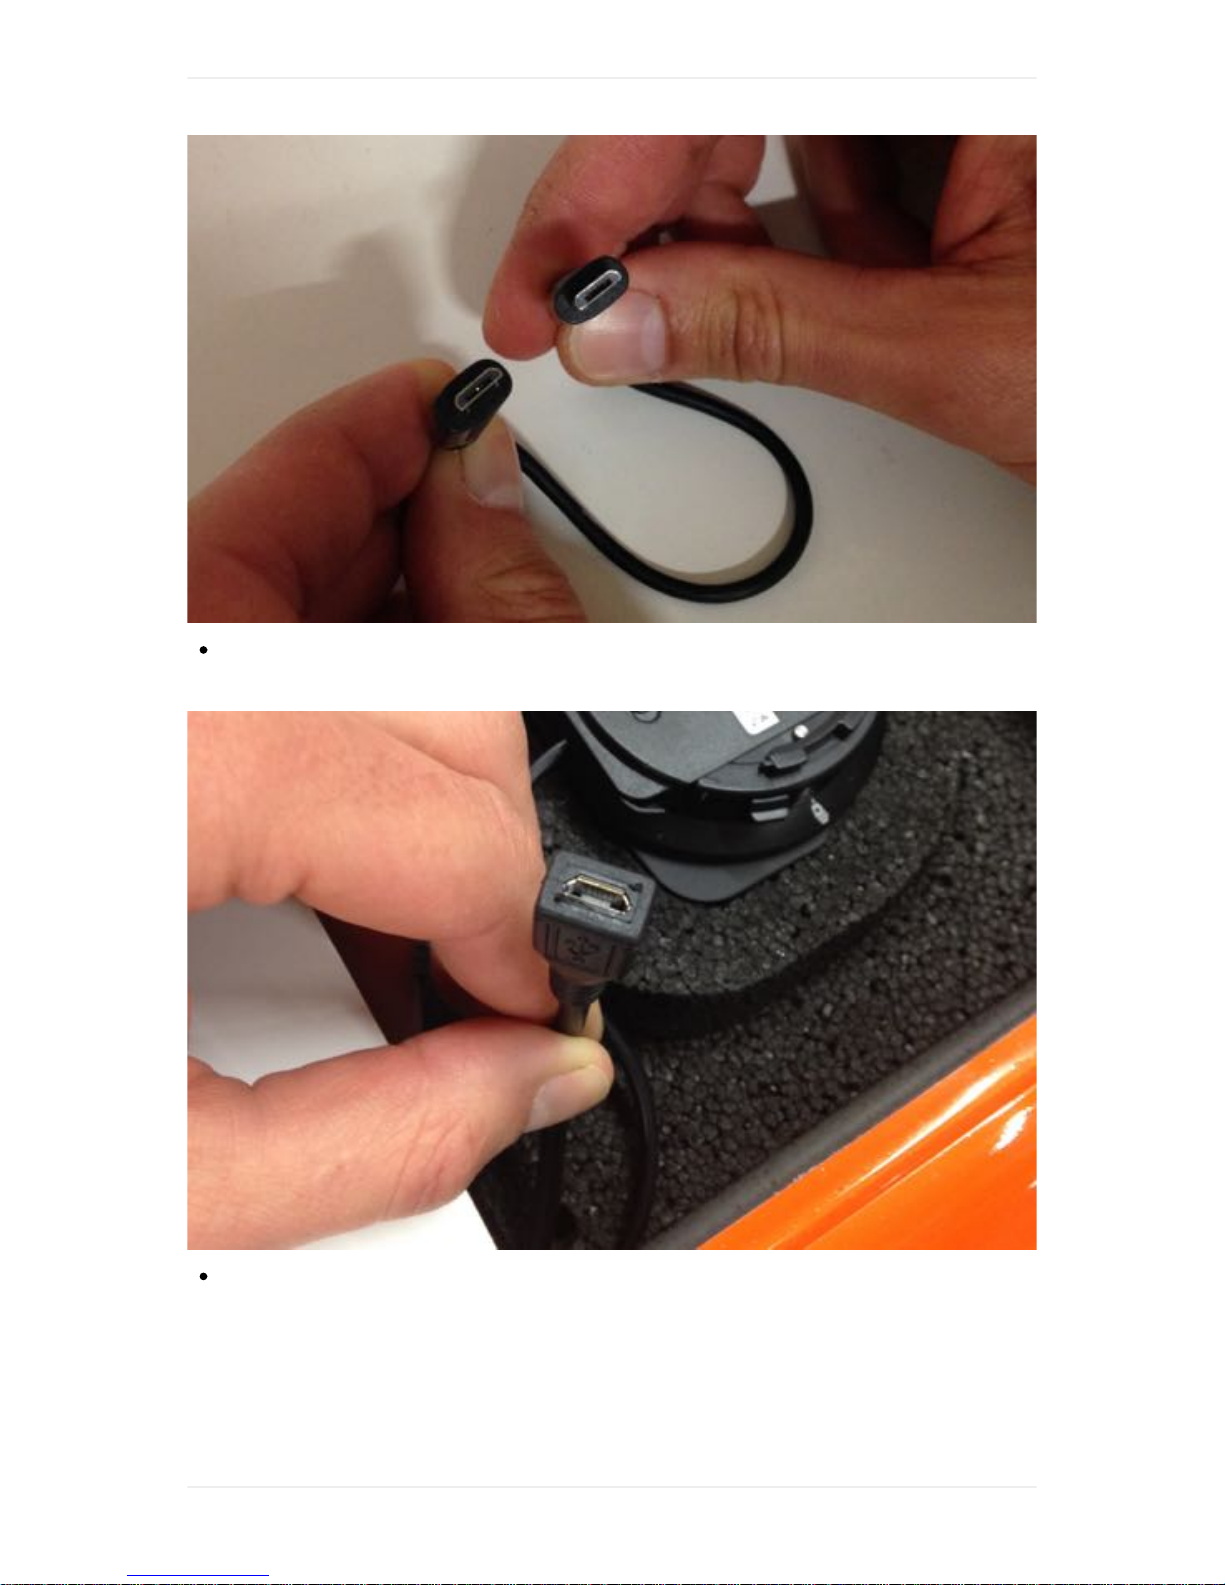
Connect the end of the connector which is marked with "OTG" to your tablet and the other end to
the microusb port on WingtraOne (shown in the picture below).
If there is a dialog asking for permission, click “Use by default for this USB device” and "OK".
Update WingtraPilot & WingtraOne to 1.5.0
62
Page 63
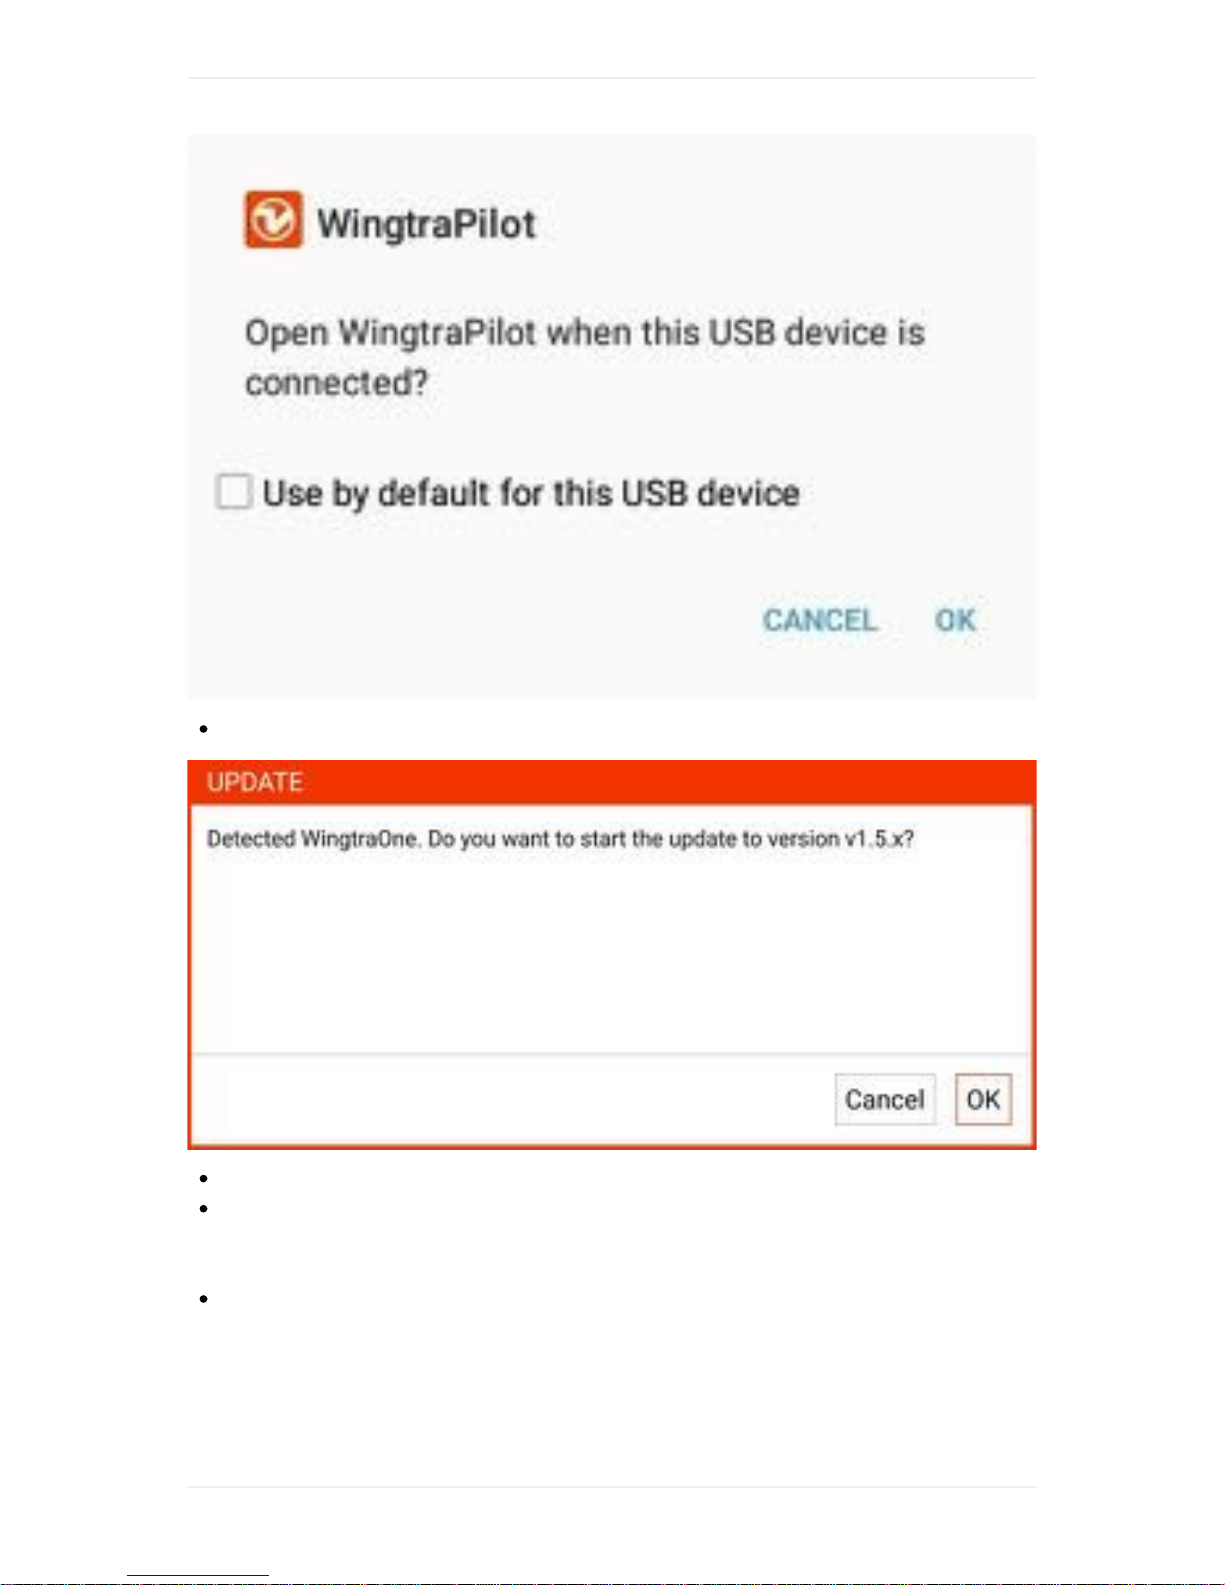
Wait for the Update dialog box and click "OK" to start the update.
Wait for up to 5 minutes as WingtraOne firmware is updated
You will receive a message “Update completed” and hear the buzzer of WingtraOne. The dialog
box asking for permission to the USB port may pop up again. Select again “Use by default for this
USB device” and click “Ok”.
Disconnect the microusb connection and close WingtraPilot
If update of WingtraOne fails, please disconnect the WingtraOne restart the WingtraPilot app and try
the update process again. In case it fails again, submit a support request.
Update WingtraPilot & WingtraOne to 1.5.0
63
Page 64

Step 5: Open the manual
Ensure you have downloaded the latest release in Step 3.
Go to My Files app and open the Manual_v1.5.0.pdf located in /device
storage/WingtraPilot/Releases/v1.5.0/ make sure you use Adobe Acrobat Reader App to open
the manual.
To add a direct link to the manual from the homescreen go to the My Files app and mark the
manual file (hold on the filename for 1s), click on MORE in the top right corner and select "Add
shortcut on Home screen"
Step 6: Verification
Open WingtraPilot freshly (click on tablets menu button left of home button and close the app,
restart the app).
On the Welcome menu: Check if version number is 1.5.0
Power WingtraOne, connect telemetry to tablet, click cancel on the WingtraPilot welcome menu,
click on Settings, then General and check if there is “WingtraOne Firmware Version: v1.5.0”.
Open Manual from home screen.
Troubleshooting
I get a warning about non-compatibility of WingtraPilot and
Firmware versions
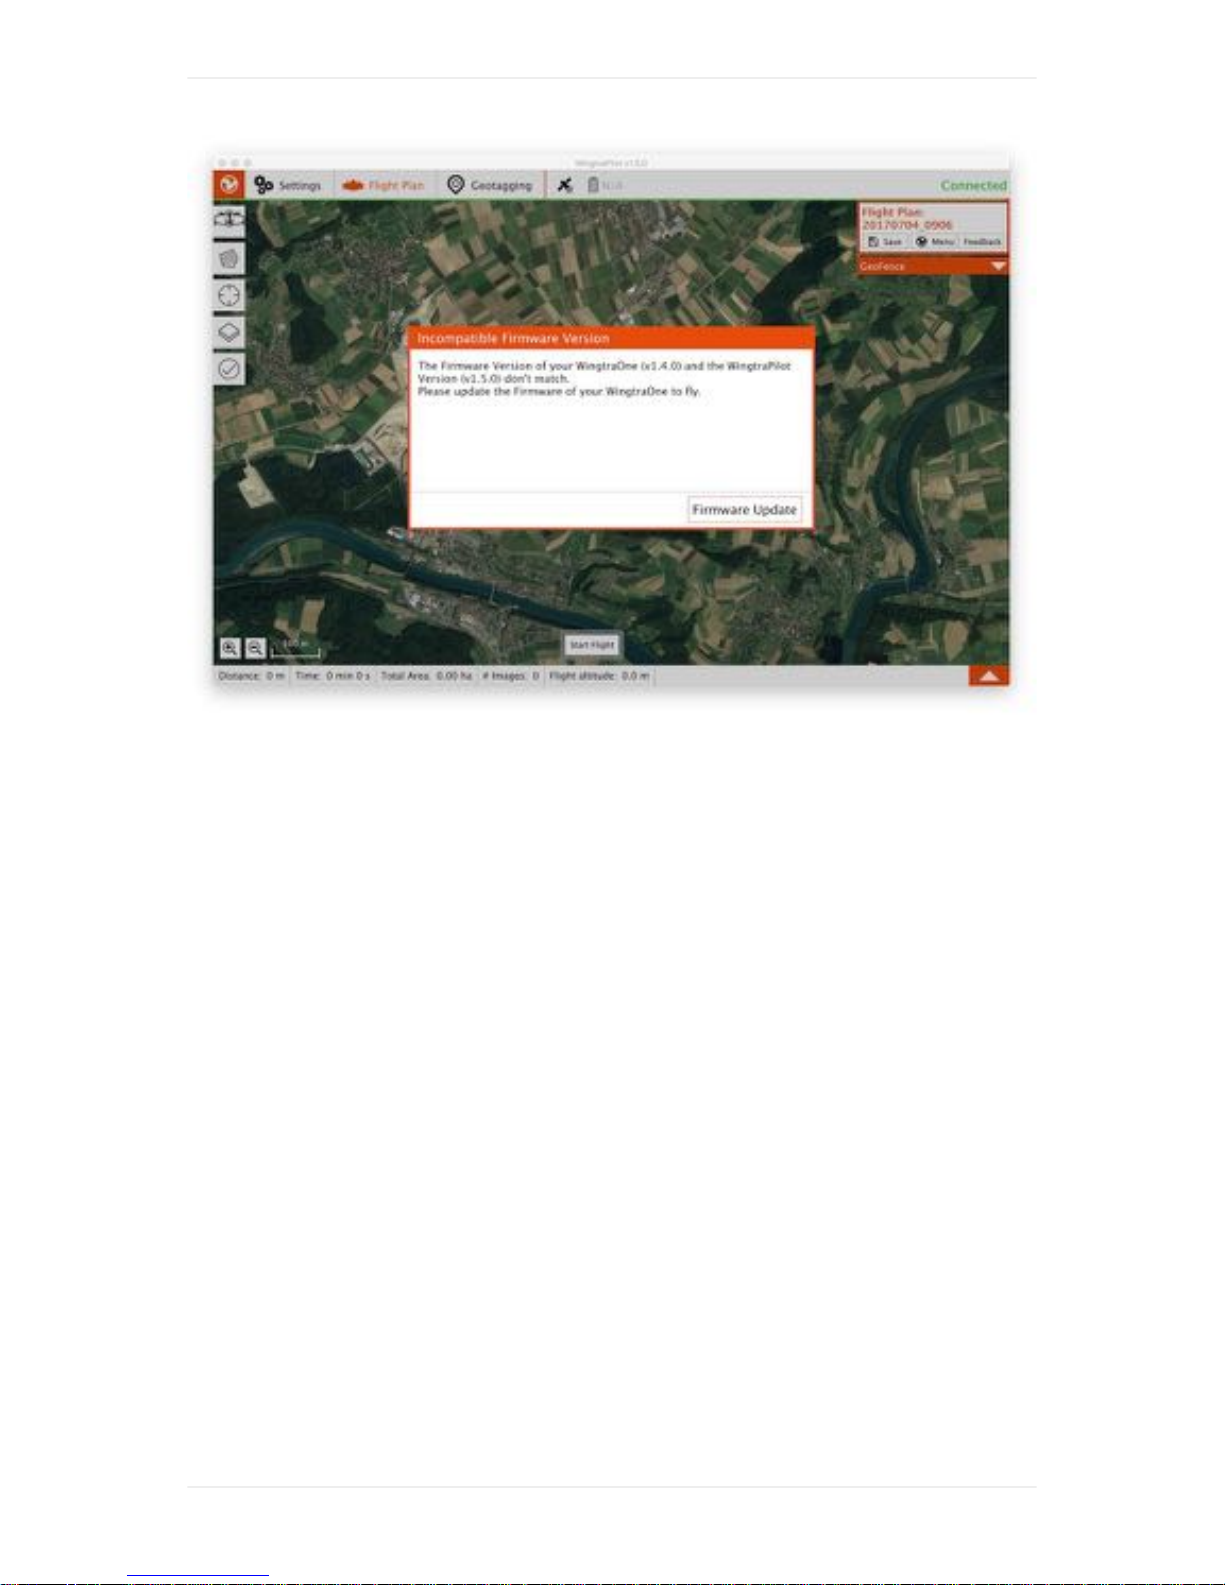
In order to ensure safety, we introduced a check if the version of WingtraPilot and WingtraOne are
compatible. In the case that the versions are not, you will be force to update the oldest version of the
two. The message that you will see, will look like the image below. Until you don’t disconnect
WingtraOne or you don't update one of the two, you will not be able to use WingtraPilot anymore.
Update WingtraPilot & WingtraOne to 1.5.0
64
Page 65
Update WingtraPilot & WingtraOne to 1.5.0
65
Page 66

Geotagging - Troubleshooting
Q: At the end of geotagging, I get "WARNING: generating a map
using this dataset might fail"
The message "WARNING: generating a map using this dataset might fail" is followed by one or
several of the following explanations. In many of the cases geotagging worked as expected but
anything was not as usual. Check the tagged images after getting this message.
"There are no images selected."
"The time stamps of your selected images and the trigger events recorded in your selected Flight Plan
do not match well."
Please check if you selected matching images and Flight Plan. If you selected them correctly and
there is no other explanation listed, your images are most probably tagged correctly.
"A high number of images were removed because they seemed to be taken some time prior to your
flight"
Most probably there were images on the SD card prior to your flight. If there is no other
explanation listed, your images are most probably tagged correctly.
"There are (#TRIGGERS) more trigger events recorded in your selected Flight Plan than selected
images."
It can happen that the camera fails to trigger on all trigger events. Especially on high front
overlaps or low GSDs this can happen due to fast trigger intervals. Check your data carefully, but
normally geotagging should still have worked sucessfully.
Q: On geotagging, I get "ERROR: Not enough free space with
current settings, aborting tagging."
This message is followed by an instruction to either make space on SD card or uncheck the option to
copy original images. If there is old data on the SD card we recommend making space on SD card.
Not copying original images is proven working in internal tests but still beta.
Q: Can I take and geotag RAW images?
At the moment, geotagging of RAW images is not supported.
Q: I forgot to geotag the images after flight and performed a second
flight.
Geotagging Troubleshooting
66
Page 67

Geotagging fails if images of several flights are on the SD Card. In case you forgot to geotag the
images from a first flight after flight, and you collected additional images in a second flight, you can
use the following workaround:
1. Save images from different flights into different folders on the SD card (order the images after
name and split them on the test pictures of the second flight).
2. Run the geotagging of the individual flights on the respective folders.
Q: I powered off the WingtraOne before the geotag download
succeded. What can I do?
If you powered off the WingtraOne before the geotag download succeded (Step 1), you can repower
the WingtraOne. You will be asked if you want to download the geotags now. If you are not asked by
WingtraPilot, go to the geotagging menu and click onto "retry downloading geotags for your latest
flight". Geotags of older flights, which were not downloaded, are lost permanently.
Q: I need to capture calibration images after flight? Will geotagging
still work?
No. Geotagging can not handle images captured after flight at the moment. You can use the following
workaround to geotag your images:
1. Open MyFiles app and move all postflight images out of the image folder to another folder on the
SD card.
2. Run the geotagging as normal on the folder without the postflight images.
I get a warning "Could not retrieve geotags from WingtraOne"
Downloading your geotags can fail if the telemetry link between WingtraPilot and WingtraOne is
unstable. You will get the following warning in this situation. Walk towards WingtraOne and click
"Retry" on the pop-up with the warning to download again.
"Could not retrieve geotag (SPECIFICGEOTAG) from your WingtraOne. Ensure you have a stable
telemetry link or move closer to your WingtraOne and retry."
Geotagging Troubleshooting
67
Page 68

Preflight Checklist - Troubleshooting
Known Issue: Initialization Failure of WingtraOne
In rare cases, WingtraOne fails to initialize the sensors correctly during boot up. In this situation you
either fail on the even ground preflight check, see WingtraOne heavily drifting or rotating in the map,
or get the following warning:
"PREFLIGHT FAIL: Gyro inconsistency. Reboot WingtraOne."
Reboot WingtraOne in this situation.
Known Issue: Upload of Flight Plan fails
h3>
The telemetry link between WingtraPilot and WingtraOne can be unstable on ground during upload of
your Flight Plan. In this situation you get one of the following warnings and the preflight check is not
going green. Click again on the preflight check to retry uploading.
p>
"Communication timed out. Please retry uploading your Flight Plan."
"WingtraOne did not respond. Please retry uploading your Flight Plan."
I get a warning: "WingtraOne is not fully set up"
The following warning should not appear in normal operation, it indicates that flight parameters are not
initialized or sensors are not calibrated correctly. If this warning appears, restart WingtraOne and
check if it appars again. If it still appears, please submit a support request.
"WingtraOne is not fully set up. Please repower WingtraOne. If the Problem persists please contact
support."
I get a warning about airspeed exceeding 4 m/s
In rare cases airspeed calibration is not very accurate (e.g. if there was airspeed or other induced
pressure spike during calibration. If you get the following warning when trying to start the flight, re-
calibrate airspeed sensor by clicking on the respective preflight check again.
"Airspeed measurement exceeds 4 m/s threshold. Please re-calibrate airspeed sensor."
I get a warning about negative pressure difference
Preflight Checklist Troubleshooting
68
Page 69

In rare cases airspeed calibration is not very accurate (e.g. if there was airspeed or other induced
pressure spike during calibration. If you get the following warning when trying to start the flight, re-
calibrate airspeed sensor by clicking on the respective preflight check again.
"Negative pressure difference detected! Please re-do the airspeed calibration. If issue persists, please
contact support."
I get a warning about not responding to store parameters
The following warning should not appear in normal operation. If this warning appears, restart
WingtraPilot and WingtraOne and check if it appars again. If it still appears, please submit a support
request.
"WingtraOne did not respond to command: Store parameters."
I get a warning "Ready to fly status command temporarily rejected"
The following message appears when trying to start the flight although WingtraOne is not set up
properly. Check if all preflight checks are green. If it comes together with another error message read
it carefully. If you are sure to be setup correctly, try again to start the flight or repower WingraOne and
go through the preflight procedure again. If it still appears, please submit a support request.
"Change ready to fly status command temporarily rejected."
I get a warning about WingtraOne not responding
If WingtraOne is not responding, you will get the following warning. If it appears, repower WingtraPilot
and Wingtraone as instructed. If it reappears again, please submit a support request.
"Your WingtraOne is not responding. If this continues shutdown WingtraPilot, restart your WingtraOne
letting it boot completely, then start WingtraPilot."
Preflight Checklist Troubleshooting
69
Page 70

Handling of WingtraOne - Troubleshooting
Q: What happens if I click Ready-to-Fly button again?
You should not do so. If you press Ready-to-Fly button a second time, WingtraOne will go back to
neutral state (- - - - - -). This action is not recommended and you will hear a beeping sound. Repower
WingtraOne in this situation.
Handling of WingtraOne Troubleshooting
70
Page 71

Failsafe Scenarios - Troubleshooting
Known Issue: WingtraPilot does not reconnect to WingtraOne after
the telemetry was unplugged
If the usb connection between tablet and telemetry is disconnected hardware-wise, WingtraPilot is not
able to regain connection automatically. If this happens, reconnect the telemetry to the tablet and
press the "disconnect" button on the top right of the screen. This first disconnects the connection and
immediately after lets WingtraPilot regain the connection to WingtraOne.
Failsafe Scenarios Troubleshooting
71
Page 72
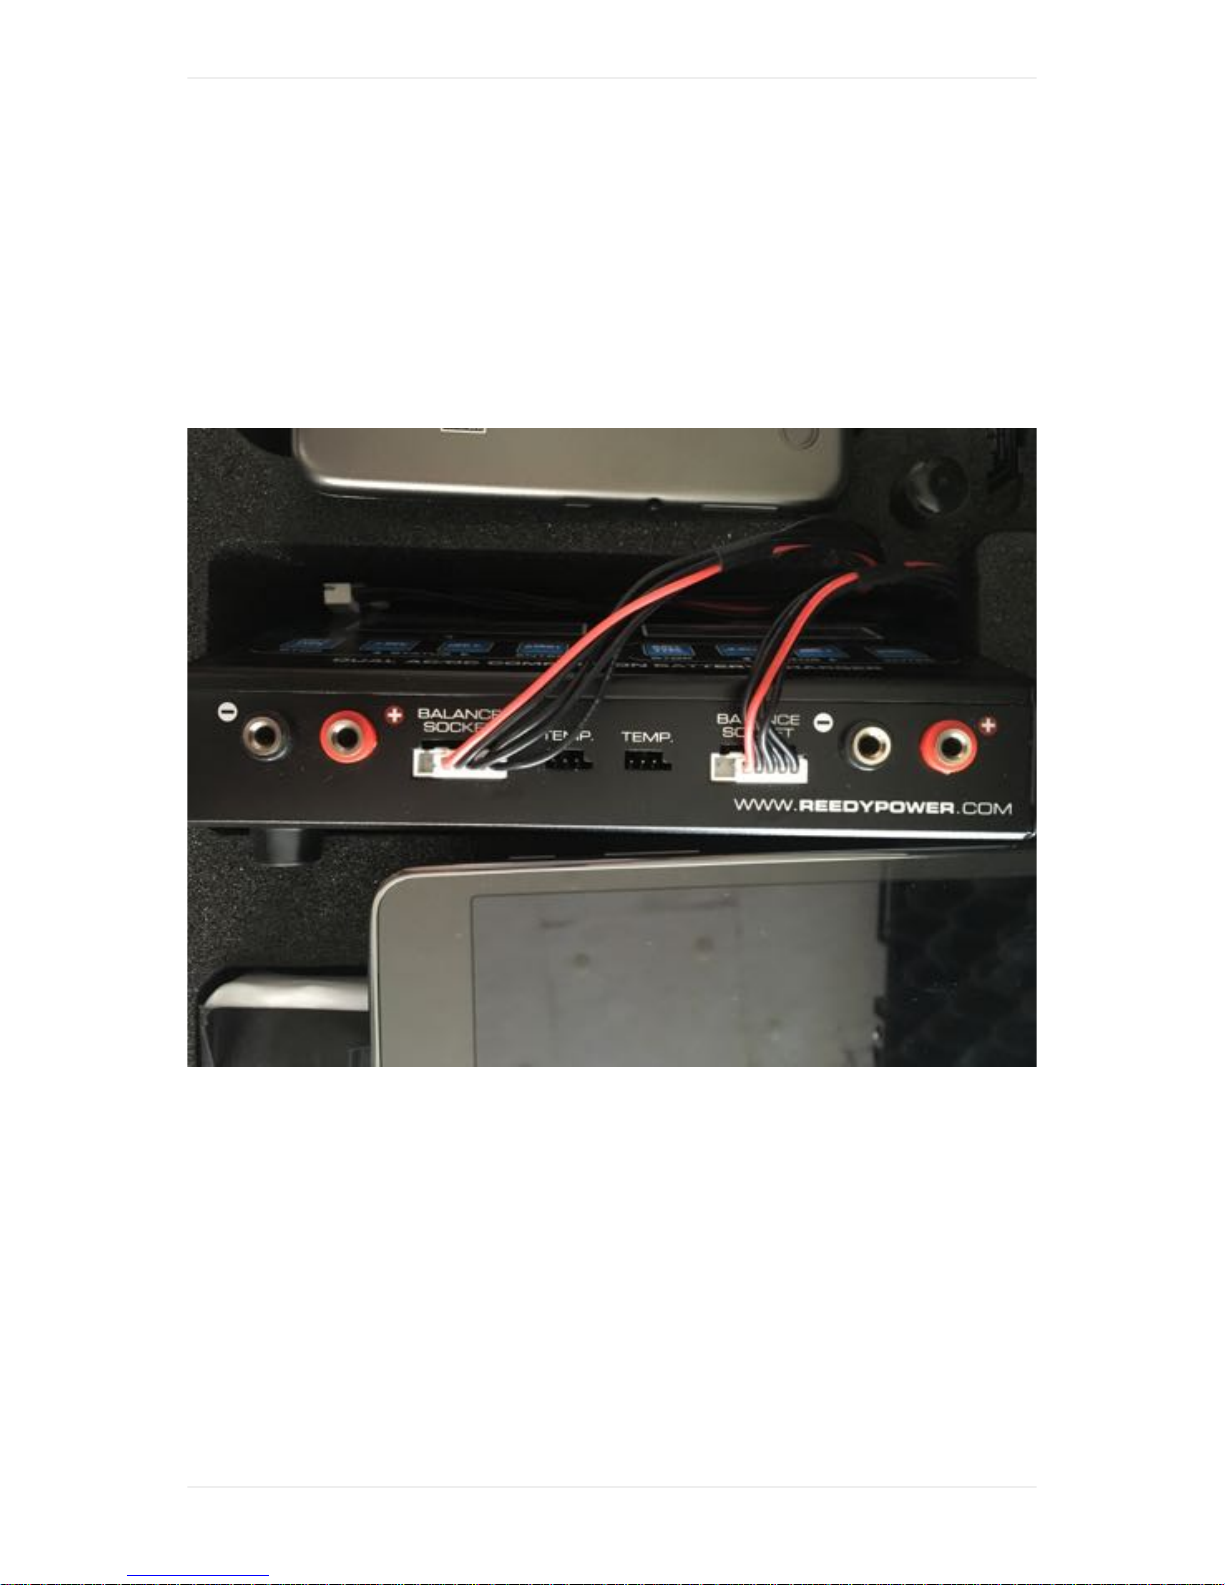
Charging WingtraOne Flight Batteries Troubleshooting
Q: I unplugged the balancer cables from charger. To which ports do
I have to re-attach?
Re-attach them as shown in the image below.
Charging WingtraOne Flight Batteries Troubleshooting
72
Page 73

WingtraOne 40MP RX1 - Troubleshooting
Q: The images are over or underexposed.
Check whether you use the memory recall function 3 with the correct default settings, see RX1
chapter
Check whether the EV correction dial is set to +-0 EV
Q: The images look blurry
The focus is not set to infinity. To set the focus distance correctly, power up the WingtraOne.
Make sure that the camera is in Manual Focus mode (see RX1 chapter) and turn the Focus Ring
on the lens such that the focus indicator on the display just reaches infinity at the right edge.
Continuously turning further will make the image blurry again.
Check whether camera is in none macro mode.
Q: The camera does not keep the adjusted settings after
repowering WingtraOne
To store camera capture settings permanently the camera has to be turned off and on again via
the On/Off switch. Unpowering the WingtraOne directly cuts the power of the camera and does
not keep time to save settings.
Q: The geotagging process lasts very long
The file size of individual images taken with the RX1R2 is up to 35MB. For large projects with
high overlaps that results in project sizes up to 50GB of image data. Handling of this amount of
data on the tablet can take up to 2h of processing time
Q: No images are taken
No SD card was inserted during flight
The SD card adapter is locked (small slider on adapter on "lock")
The On/Off switch is on Off
WingtraOne 40MP RX1 Troubleshooting
73
Page 74

WingtraOne 20MP QX1 - Troubleshooting
Q: Camera: My camera does not connect over WiFi
Make sure that your camera is powered (green LED on the camera housing)
Restart the PlayMemories App and see if you can connect now.
Take camera out of the foam (you have to diconnect the violet cable) and look at the tiny screen.
Check if you can read on the screen — if not, open the camera cover and click the small
WiFi button to change to single-channel WiFi mode. Close the cover and try to connect again.
Reconnect the violet cable after you re-inserted the camera to the mount. The Sony QX1 has 3
WiFi modes:
No WiFi
Single-channel WiFi (preferred)
Multi-channel WiFi (also functional)
Q: Camera: My images are blurry
Check if there is dust/water on the lens
QX1 + 15mm lens: The Sony QX1 is set to manual focus mode to ensure accurate triggering
(minimizing triggering time delays). The 15mm lens has a calibrated mechanical focus. To check
if it set to infinity, take camera out of mount and check if the focus ring is turned to the infinity
sign.
QX1 + 20mm lens: The Sony QX1 is set to manual focus mode to ensure accurate triggering
(minimizing triggering time delays). If you see that the images are out of focus, you have two
options to adjust manually:
Option 1: Power WingtraOne, manually switch on the camera (press On/Off button on camera
housing), connect the camera to the Playmemories App via Wifi and take the camera out of the
WingtraOne 20MP QX1 Troubleshooting
74
Page 75

foam (you have to disconnect the violet cable) and adjust the focus manually to infinity. To do that
point the camera towards a remote object and turn the focus ring clockwise (looking into the
camera) for a whole turn followed by slowly turing the ring back (counterclock wise) by 5 to 10°.
By carefully observing the image displayed on the tablet you can find the point of maximum
sharpness for remote objects. Expose a few images and check the image sharpness on the
tablet. Once you are satisfied disconnect the camera from the Playmemories App by pressing the
back button on the tablet twice and turn off the camera by pressing the on/off button. Reinsert the
camera in the the mount and reconnect the violet cable.
Option 2: Power WingtraOne, manually switch on the camera (press On/Off button on camera
housing), open the PlayMemories app on your tablet and connect to the camera. Change focus
mode to Auto, point the camera center to clouds or an object more than 50m away, wait until the
focus adjusts, and switch back to manual focus. Than disconnect the camera from the
PlayMemories App by pressing the back button on the tablet twice and turn off the camera by
pressing the on/off button.
Q: Camera: My images are too dark
Increase shutter time and/or ISO. See also the QX1 chapter.
Q: Camera: My images are too bright
Decrease ISO. See also the QX1 chapter.
Q: Camera: The LED on the camera is blinking red
If the SD card is not inserted correctly the LED is blinking red when the camera tries to capture an
image.
Q: Camera: What is the meaning of the messages “Test picture
process started" and "Test pictures are taken"?
The autopilot performs a routine after pressing the Ready-To-Fly button that triggers 4 test
pictures. If you hear the shutter on the camera, your camera is setup correctly (SD card is
inserted correctly and triggering of WingtraOne works). The process takes approximately one
minute, starts with the message "Test picture process started" and ends with "Test pictures are
taken".
Q: Camera: I did not capture images during flight
Check if you have removed the lens cover
Check if you have inserted the SD card correctly
Check if your SD card has free space
Remove and re-insert the SD card. Repower WingtraOne, press Ready-To-Fly, and listen to the
camera shutter sound from the test pictures (automated preflight routine).
WingtraOne 20MP QX1 Troubleshooting
75
Page 76

WingtraOne 20MP QX1 Troubleshooting
76
Page 77
Wingtra Releases
Release 1.5 - July 2017
Zendesk is introduced to support you even better.
Improved backward transition preventing overshoots if winds < 5 m/s.
Support for additional sensors (RX1RII and RegEdge).
Improved landing by better ground detection and consistent timing of switching off motors.
Improved landing accuracy by up to 2m in horizontal position.
Increased maximum distance to home and flight altitude.
New safety tab in flight planning for direct editing of geofence and minimum Return-to-Home
altitude.
New compatibility check for WingtraPilot and WingtraOne firmware versions.
New in-app update page for downloading and updating new Wingtra releases (includes
WingtraPilot, WingtraOne firmware and Manual releases).
Selection of camera model when creating a new Flight Plan to configure WingtraOne according to
the correct sensor.
Geotagging robustified against any preflight images. Re-tagging of previously tagged images is
now possible and copying the original images on geotagging can be disabled to save space on
SD card.
WingtraPilot is now partially translated to Chinese and contains new Chinese map providers.
Numerous safety and design improvements, including sensor failure handling, reliable ground
station communication, WingtraPilot bug fixes, flight control and reduced computational load.
link
Release 1.4 - May 2017
Unified Home, Takeoff, Landing
Welcome menu in WingtraPilot for user guidance
Different Sensors Support (several RGB, multispectral)
Landing accuracy improved
Wind alignment after backtransition: In case of wind the WingtraOne will rotate right after back
transition to optimally face the wind.
Improved flight behavior in hover and cruise
Simplified and robustified geotagging
Fixed orientation of geotagged images
Upgrade process
Geofence made adjustable
Improvements in Preflight Checklist
link
Release 1.3 - March 2017
Wingtra Release
77
Page 78
Improvements in flight behavior (e.g. descending in winds)
Improvements in WingtraPilot stability
New Return-to-Home logic
Removed in-flight replanning of landing based on wind
Changed RC stick assignment for cruise flight (Assisted Mode)
Changed Emergency swich logic (new: click 3 times within 2 seconds)
Terminology changes (Flight Plan, Assisted Mode, Ready-to-Fly)
Preflight checklist improvements
link
Release 1.2 - February 2017
Improvements in flight behavior
Improvements in WingtraPilot stability
Introduced WingtraPilot on tablet
Introduced new Return-to-Home logic with user defined RTH altitude
Introduced in-flight replanning of landing based on wind
link
Release 1.1 - January 2017
Initial version
link
Wingtra Release
78
 Loading...