

Page 1
SH-6580-4(108D) User Guide
SH-6580-4(108D) User Guide
2
------------------------ Introduction Automatic Mouse Conversion
Overview The KVM Switches enable you to connect computers with PS/2 or
serial mouse ports (using adapters supplied with each KVM Switches)
and control the computers from one PS/2 mouse(Touch pad). The
KVM Switches automatically identifies the mouse and switches to
proper mouse protocol.
The SH-6580 is only 1U Four in one control center (KVM switch,
KEYBOARD, LCD and MOUSE). It can control up to 8 PCs or 64
PCs by cascade. There is no interface card or software to configure.
Installation is as easy as connecting cables between SH-6580 and
your computers. Operation is as simple as pressing push button,
entering hot-key command and navigating through the user-friendly
on-screen menu. Depending on the model yo u have, it switches up
to 4 (KVM104D), 8 (KVM108D) IBM-compatible computers. The
KVM Switches is independent of the computer operating system.
High Video Quality
KVM Switches supports VGA resolution up to 1600x1200 @85Hz
without any degradation (But it is limited by Monitor, so only up to
Monitor resolution). Advanced VGA circuit design guarantees smooth
and flicker-free switching from one computer to the other with
distance up to 100ft (30M)* at both Console and PC sides.
Two-Console KVM Switches (Optional)
The advanced multi-access KVM Switches enable you to control
multiple computers from two different locations: one is contained in
SH-6580; the other one you can connect from outside, the distance is
up to 30M. KVM208D controls 8 computers.
NOTE: The following is the optional KVM Switch and Display models.
Optional KVM Switch Models
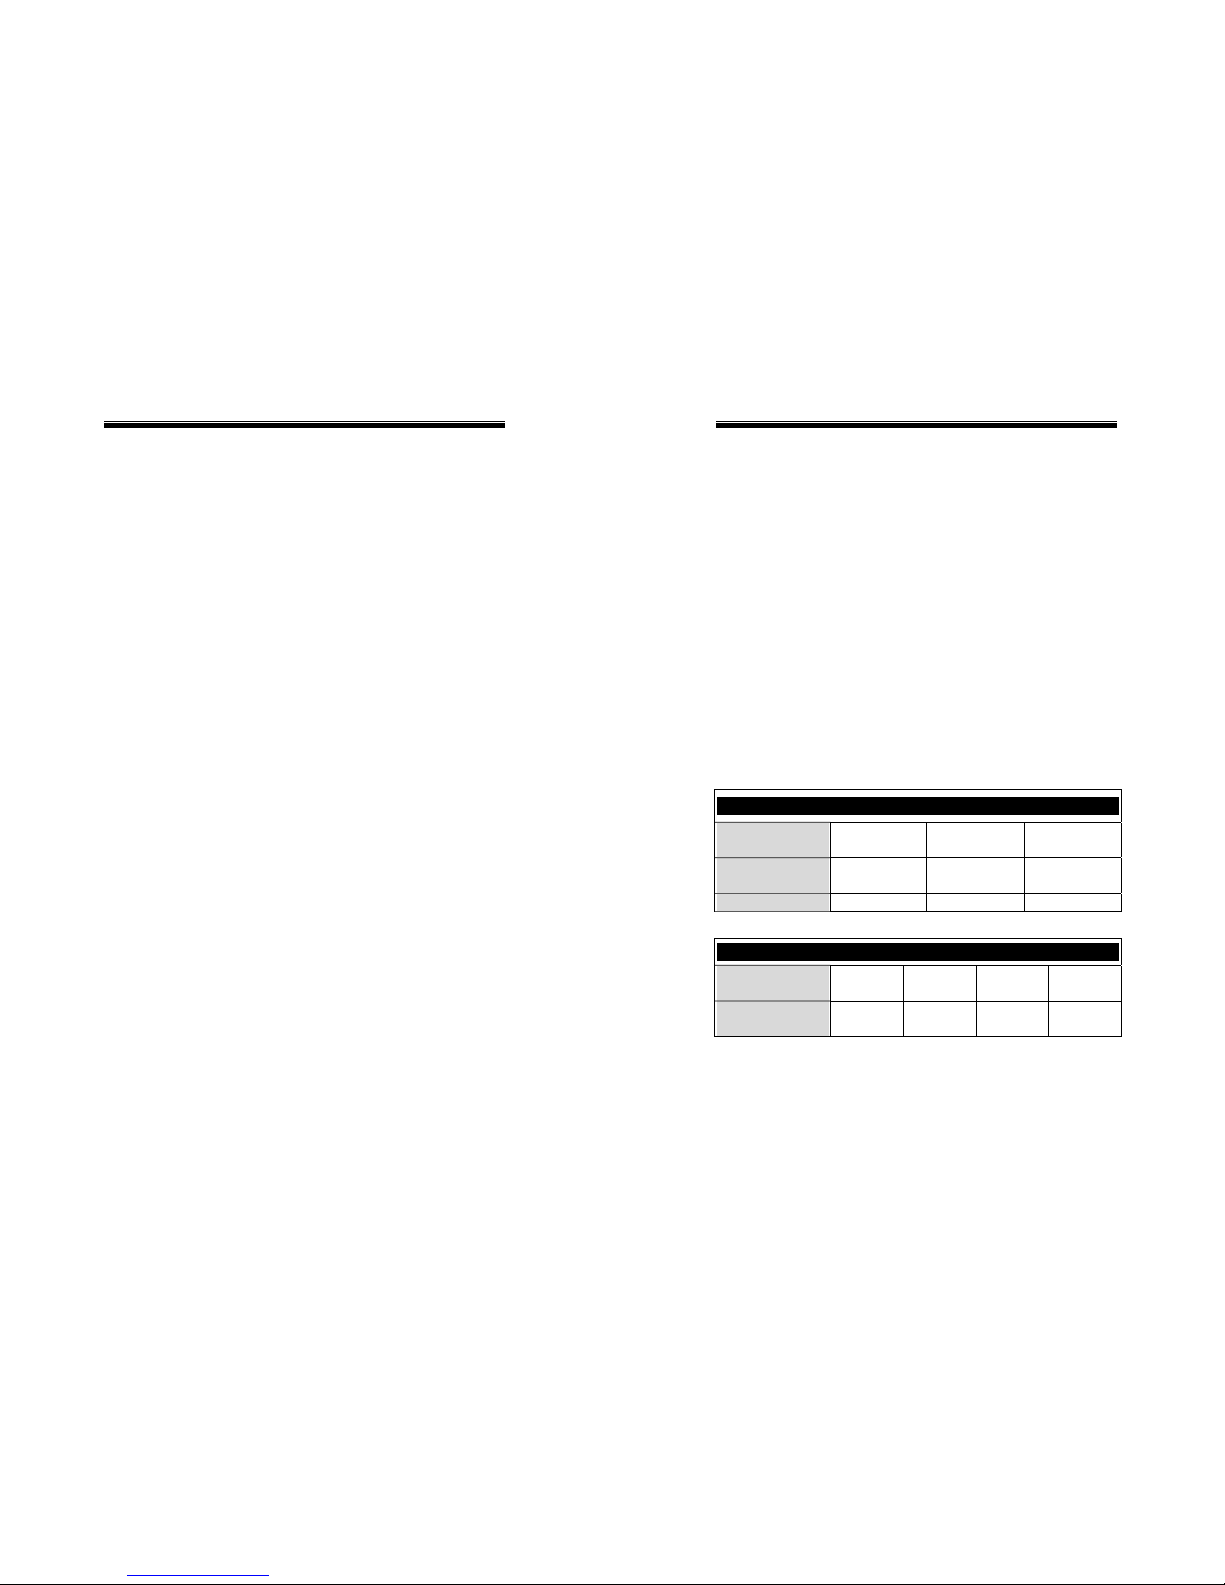
OSD
Optional switch
KVM104D KVM108D KVM208D
No. of console
supported
1 1 2
No. of PC supported 4 8 8
On-Screen Display (OSD) Menu
For KVM104D, KVM108D,
KVM208D models
For KVM Switches with built-in OSD control, you can name your
computers, switch to a computer from a list, configure settings with
easy-to-use menus, view the name of the selected computer
on-screen with programmable time interval. The OSD displays the
system status throughout operation.
Optional DISPLAY Models
Optional
DISPLAY
12.1 13.3 14.1 15.0
Display’s
Resolution
800x600 1024x768 1024x768 1024x768
For Monitor with built-in OSD control, you can be easy to set up your
monitor.
* Tested with high-quality UL2919-rated, low-loss and shielded cables.
1
Page 2
SH-6580-4(108D) User Guide
SH-6580-4(108D) User Guide
4
Features Configurations
Supports both PS/2 and serial mouse SH-6580 has several models each supporting a different number of
computers. For applications with a large number of computers,
KVM Switches can be cascaded in a master/slave configuration to
support even more computers.
Cascade configuration expands system capability up to 64 PCs
Auto-scan automatically selects computers sequentially
Supports Microsoft IntelliMouse (Pro)
Hot-key functions allow easy computer access
Keyboard states automatically saved and restored when switching
computers
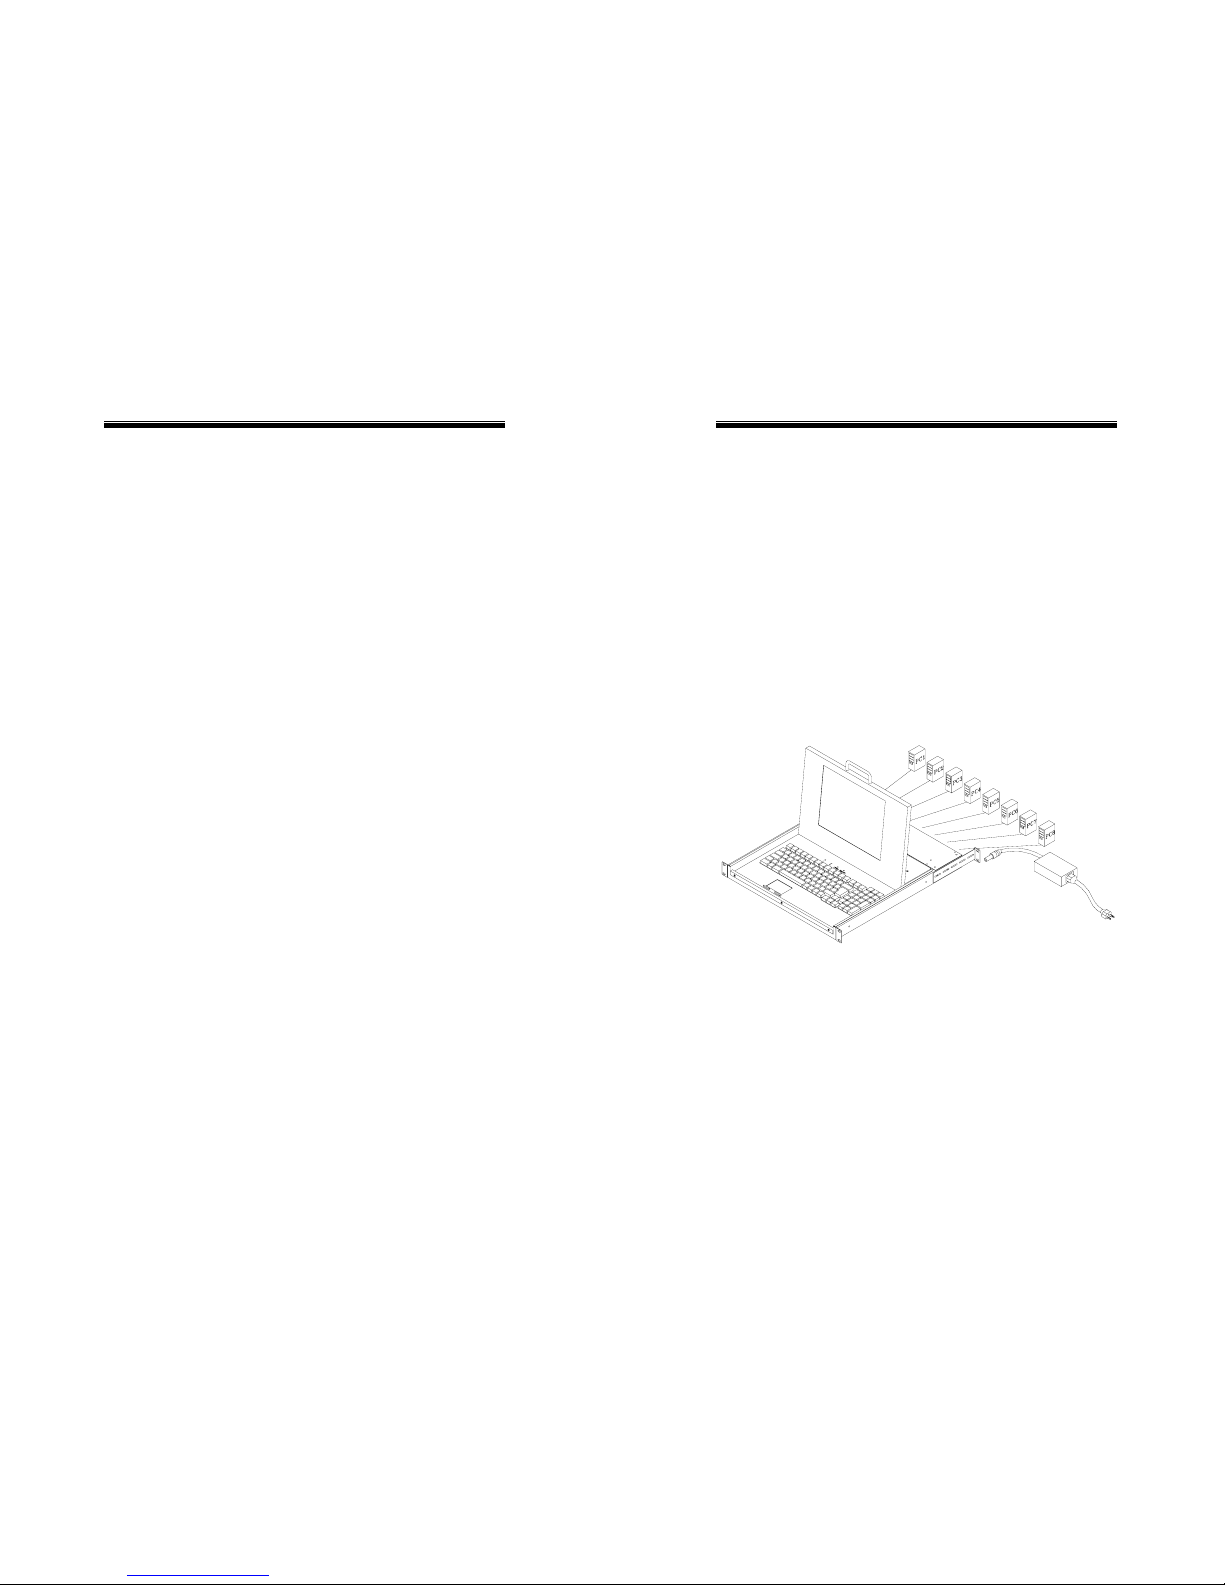
Single Configuration
Operating system independent, transparent to all applications
Plug and play system configuration
First let one side of adapter Plug-in power insert and connect the
other side of the adapter to the port of KVM switches. Then, connect
multiple sets of keyboard, mouse and monitor cables to the “PC x”
ports of the KVM Switches, as shown in figure 1.
Keyboard and mouse can be hot plugged at any time
High VGA resolution 1600x1200 for KVM switch, but limited by
LCD.
DDC2B compatible
Standard 1U 19 inch rack mounting
Supports optional multimedia module for microphones and stereo
speakers (MAV108).
Extra features for On-Screen Display model
Assign computers with unique and meaningful names
Identify and select computers by the names
Programmable scan filters unused computers
Store system settings and name entries to non-volatile memory
Password security locks computer from unauthorized access
Gain complete control with easy-to-use OSD interface
Figure 1: A single configuration
More features for multi-access
models(KVM208D)
Manage multiple computers from two locations
Support different type of mouse i.e. generic PS/2 mouse and
scroll mouse
Selectable User Timeout
3
Page 3
SH-6580-4(108D) User Guide
Cascade (Master/Slave) Configuration
You can connect a second level of one or more KVM Switches to “PC
1”~”PC 4” (KVM104) or "PC 1"~”PC 8” ports (KVM108) of a Master
unit. Cascade configuration expands system ability allowing you to
select computers connected to the Master or Slaves (There is only
one Master, which has a mouse, a keyboard and a monitor
connected to its CONSOLE port directly operated by a user). Once
connected, KVM Switches automatically configure themselves to
either Master or Slave. Slaves of different KVM Switches models
can be mixed in cascade configuration. [NOT E: Master must have
equal or more PC ports than that of Slaves, i.e., if KVM104 is a
master, KVM104 can be Slaves, but KVM108 can not.]
Figure 2: A cascade KVM Switches configuration
Throughout this manual, Master is the SH-6580. Slave is a KVM
Switches that has its CONSOLE port connected to a Master's “PC x”
port. Slave only exists in cascade configuration.
SH-6580-4(108D) User Guide
6
------------------------ Installation
Device Connection
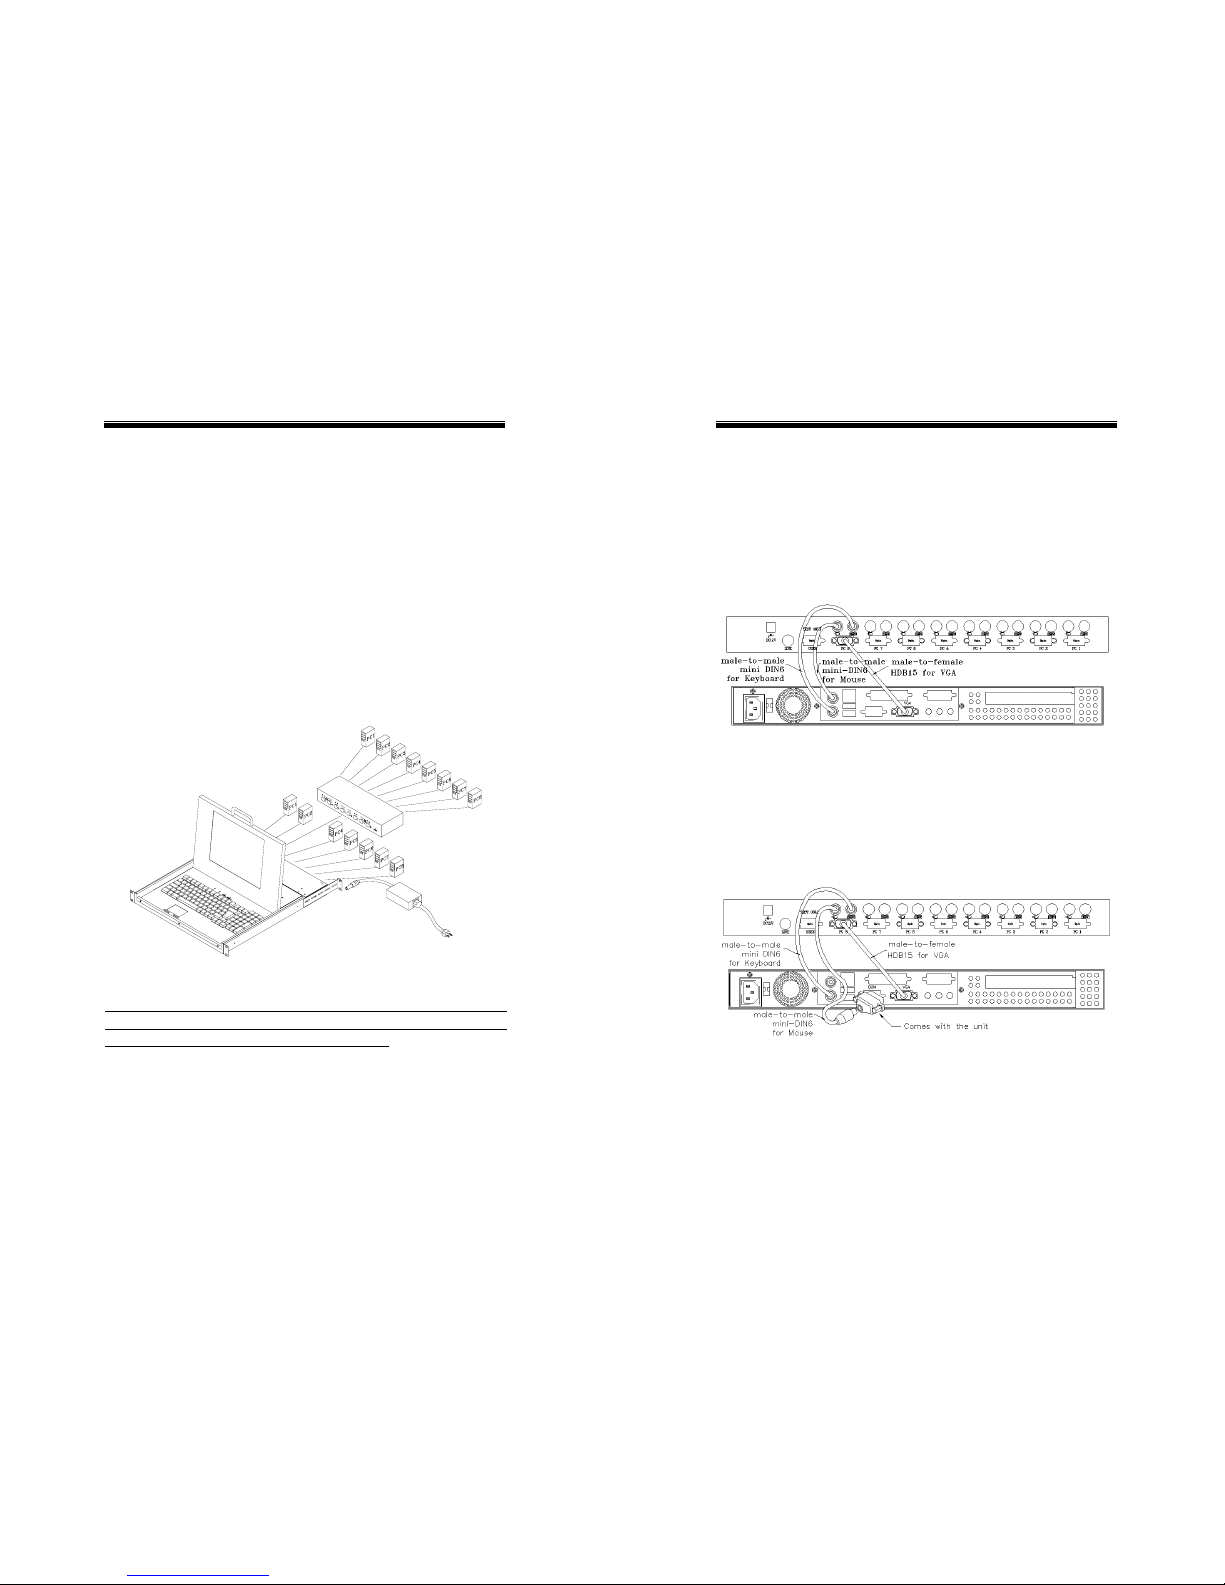
Determine the channel address of each computer. For computers
using PS/2 mouse, connect the computer's mouse and keyboard
cables to the KVM Switches’s connectors marked with a mouse and
keyboard respectively, as shown in figure 4.
Figure 4: Master computer connection
For computers using serial mouse, connect the DB-9 to mini-DIN-6
adapter (supplied with the KVM Switches) to the computer mouse
port, then use PS/2 cables to connect the mouse to KVM Switches,
see figure 5. Connect the computer's monitor cable to the
HD-DB-15 VGA connector. Repeat above steps for all remaining
computers to be connected to the KVM Switches.
Figure 5: Adapter and serial mouse connection
5
Page 4
SH-6580-4(108D) User Guide
SH-6580-4(108D) User Guide
8
Initial Power-Up Rack Mount Accessories
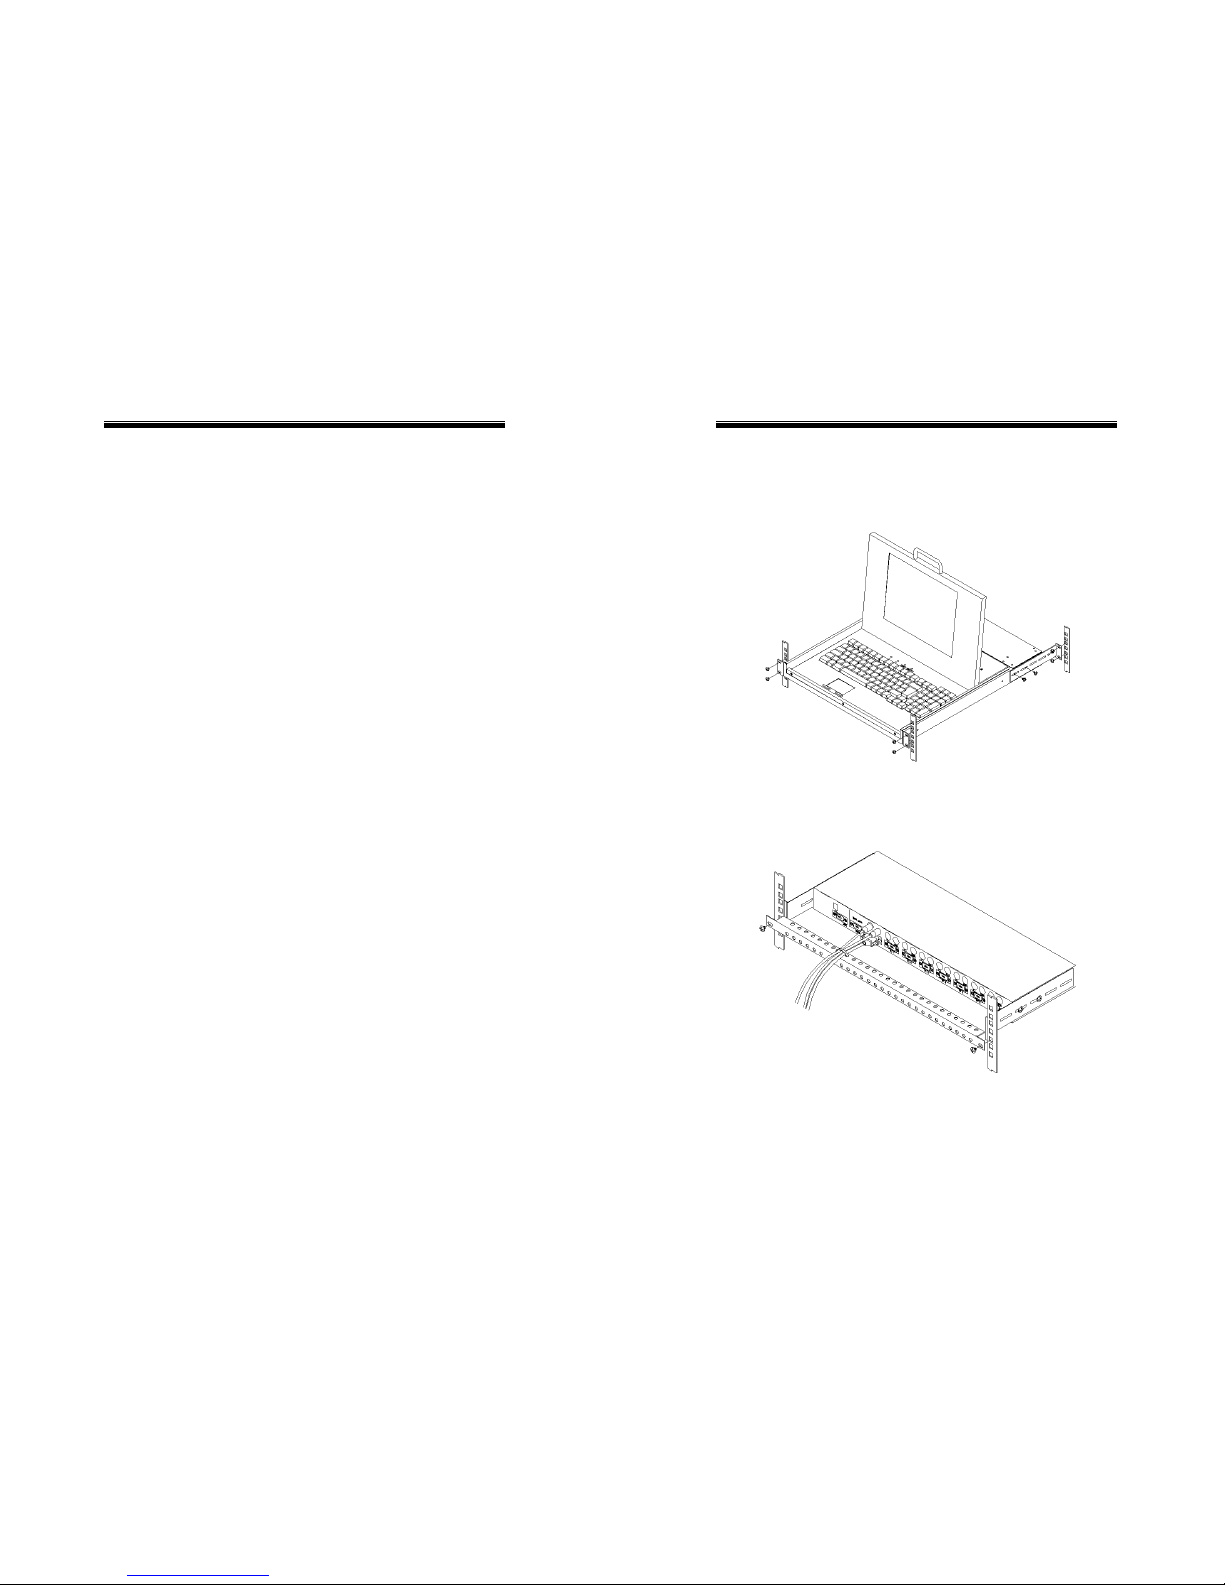
Figure 6 shows how to attach optional mounting brackets to the
SH-6580 unit for standard 19-inch rack cabinet.
Make sure all computers and KVM Switches are powered down
during installation. You must power up the Master KVM
Switches before turning on any other devices.
For single KVM Switches: 1) Apply a power adapter to the
Master. 2) Turn on computers.
For cascade: 1) Apply a power adapter to the Master.
2) Apply power adapters to all Slaves. 3) Turn on
computers.
Note: You may hot plug additional powered-down computer and
Slave without turning any existing KVM Switches or computer off
after initial power up.
Replace Master Console Devices
You can replace a faulty keyboard or mouse of the Master
CONSOLE port at any time without powering down the Master, as
long as your computers are booted with proper device driver for the
new device. Should you encounter any difficulty, just activate K/M
RESET by holding both front-panel ‘1’ and ‘2’ push buttons down for
2 seconds.
Figure 6: Attaching rack mount bracket
Figure 7 shows how to assemble rack cable support then screw it to
the back and inside the rack cabinet vertical post.
Figure 7: Assembling rack cable support
Then, keyboard/mouse/monitor cables can be routed over the cable
support. You can use plastic cable ties to bundle and label the
cables through the rack cable support holes for easy identification.
7
Page 5
SH-6580-4(108D) User Guide
SH-6580-4(108D) User Guide
10
------------------------ Operation
Multimedia Module
KVM Switch OSD (On-Screen-Display) Operation
KVM104D,KVM108D,KVM116D,KVM208D,KVM216D
An optional multimedia A/V module (MAV108) is used to select
microphone, speaker and monitor signals from one out of eight
computers. The A/V module is connected to the LINK port on the
rear panel via an mini-DIN-8 connector. When a computer is
selected, the microphone signal is directed to that computer, speaker
and monitor signal source from the same computer.
As an OSD option, the A/V module may select a computer different
from that of the KVM Switches system. There are t wo options in
Audio Stick function (<F4>:More\Audio Stick). When set to 'On', A/V
module selection follows computer selection. When set to 'Off', A/V
module selection stops following computer selection. It is useful if
you want to listen to one particular computer's audio signal while
selecting other computers during operation.
With extra VGA ports, the A/V module enables you to view multiple
monitors from one PC at the same time. No w you can extend your
Windows desktop for all your computers and switch accordingly.
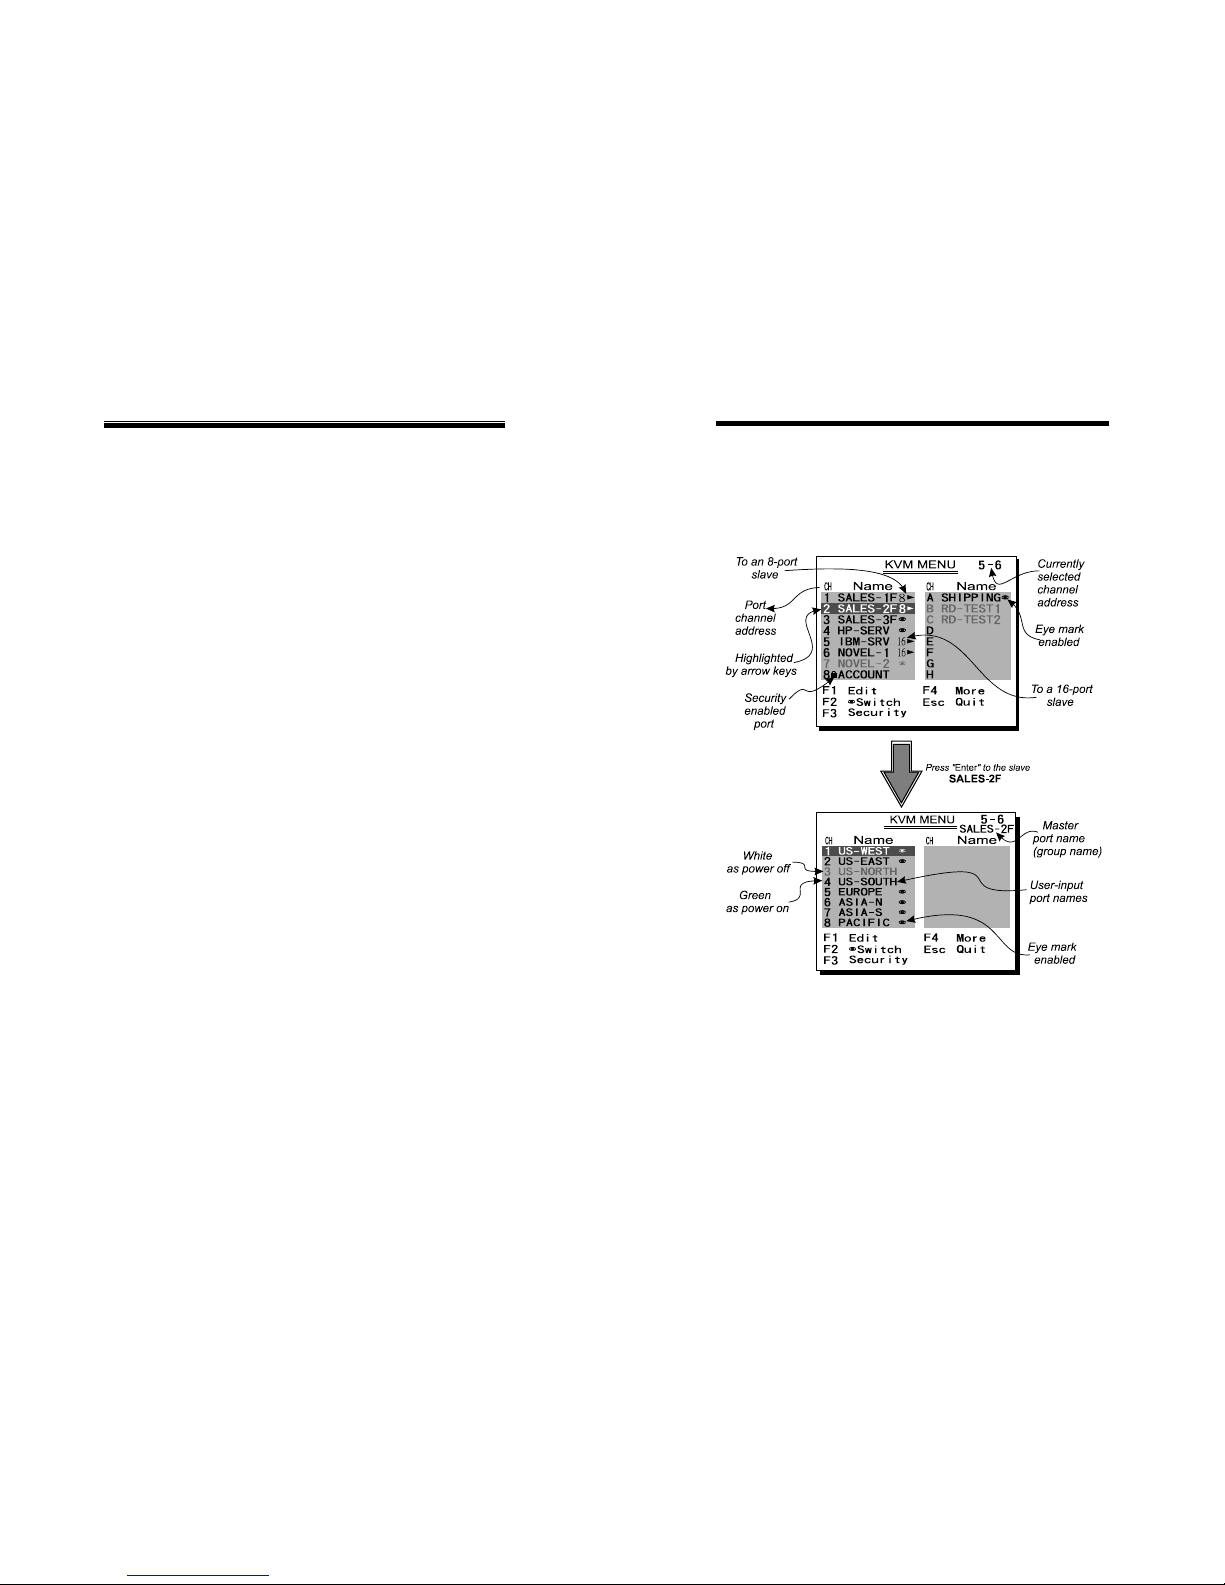
Figure 9: OSD screen illustration
By hitting the left <CTRL> key twice within two seconds, you may see
the 'Hotkey Menu' if it is enabled (an OSD option). Or, by hitting the
left <CTRL> key three times within two seconds, you will see a 'KVM
MENU' screen showing a list of the computers with corresponding
channel addresses, names and status, see figure 9.
9
Page 6

SH-6580-4(108D) User Guide
11
Function key <F2>: To switch the eye mark (1) of a
computer on or off. First, use the <UP> and <DOWN> arrow
keys to highlight it, then press <F2> to switch its eye mark on or
off. If Scan Type is 'Ready PC +1', only the power-on and
eye mark selected computers will be displayed sequentially in
Scan mode.
SH-6580-4(108D) User Guide
12
The channel address of the currently selected computer is displayed
in red, same as the front indicator, to the right of the OSD title 'KVM
MENU'. The color of a device name is green if it has power and is
ready for selection (its corresponding front panel indicator is green),
or the color is white as it has no power. OSD menu updates the
color when it is activated. U se the <UP> and <DOWN> arrow keys
to highlight a computer and the <ENTER> key to select it. Or, you
may press <ESCAPE> to exit OSD and remove the OSD menu from
the display; the status window returns to the display and indicates the
currently selected computer or operating status.
Function key <F3>: To lock a device (a computer or a Slave)
from unauthorized access, use Security. Security is effective
for only one device (a computer or a Slave). To lock a device,
use the <UP> and <DOWN> arrow keys to highlight it, then
press <F3>. Now, enter up to 4 characters (‘A’~’Z’, ‘0’~’9, ‘-‘)
followed by <ENTER> as new password. A Security-enabled
device is marked with a lock (±) following its channel number.
To permanently disable the security function from a locked
device, highlight it, press <F3> then enter the password.
A triangle mark () to the right of a name indicates the port is
cascaded to a Slave; the number at the left of the triangle mark
shows the number of ports the Slave has, i.e. 8for KVM108.
<ENTER> key brings you one level down and another screen pops
up listing the names of the computers on that Slave. The name of
the Slave will be shown at the upper right corner of the OSD menu.
It is useful to group computers and still be able to see the group
name.
If you want to access the locked device temporarily, simply
highlight it and press <ENTER>, the OSD will ask you for the
password. After entering correct password, you are allowed to
use the device. This device is automatically re-locked once you
switch to another one. During Scan mode, OSD skips the
security-enabled device. NOTE: Only one device (a computer
or a Slave) can be locked by this function at a time.
An eye mark (
1) to the right of a name indicating the computer is
selected to be monitored in Scan mode. In OSD, this mark can be
switched on or off by function key <F2>.
If you forget the password, the only way to permanently
disable the security function is to remove all possible
power sources from the master KVM Switches. You need
to turn off all computers and unplug all power adapters,
then restart everything.
Press <ESCAPE> key to exit OSD and to return to the selected
computer; the computer name is also shown on the screen.
Function key <F1>:To edit name entry of a computer or a
Slave. First, use the <UP> and <DOWN> arrow keys to
highlight a channel then press <F1> followed by name entry.
Valid characters are ‘A’~’Z’, ‘0’~’9’ and the dash character.
Lowercase letters are converted to uppercase ones. Press
<BACKSPACE> to delete a letter one at a time. Non-volatile
memory stores all name entries until you change, even if the unit
is powered down.
Function key <F4>: More functions are available by hitting
<F4>. A new screen pops up displaying more functions as
described below. Most of them are marked with a triangle ()
indicating there are options to choose from. Using the <UP>
and <DOWN> arrow keys, select the functions and press
<ENTER>. Available options will be shown in the middle of the
screen. Again, using the <UP> and <DOWN> arrow keys to
view options then press <ENTER> to select it. You can press
<ESCAPE> to exit at any time.
Page 7

SH-6580-4(108D) User Guide
13
Ready PC: In Scan mode, scan through power-on
computers.
SH-6580-4(108D) User Guide
Auto Scan The non-volatile memory stores the Scan Type setting.
In this mode, the KVM Switches automatically switches
from one power-on computer to the next sequentially in a
fixed interval. During Auto Scan mode, the OSD displays
the name of the selected computer. When Auto Scan
detects any keyboard or mouse activity, it suspends the
scanning till activity stops; it then resumes with the next
computer in sequence. To abort the Auto Scan mode,
press the left <CTRL> twice, or, press any front button.
Scan Type and Scan Rate set the scan pattern. Scan Type
(<F4>:More\Scan Type) determines if scanned computers
must also be eye mark selected. Scan Rate
(<F4>:More\Scan Rate) sets the display interval when a
computer is selected before selecting the next one.
Scan Rate
Sets the duration of a computer displayed in Auto Scan
mode. The options are 3 seconds, 8 seconds, 15
seconds and 30 seconds. The non-volatile memory
stores the Scan Rate setting.
Keyboard Speed
KVM Switches offers keyboard typematic setting that
overrides the similar settings in BIOS and in Windows.
Available speed options are Low, Middle, Fast and Faster
as 10, 15, 20 and 30 characters/sec respectively.
The non-volatile memory stores the Keyboard Speed setting.
Manual Scan Hotkey Menu
Scan through power-on computers one by one by keyboard
control. Scan Type (<F4>:More\Scan Type) determines if
scanned computers must also be eye mark selected.
Press the up arrow key (
↑) to select the previous computer
and the down arrow key (
↓) to select the next computer.
Press any other key to abort the Manual Scan mode.
When you hit the left <CTRL> key twice within two seconds,
the "Hotkey Menu" appears displaying a list of hot-key
commands if the option is On. The 'Hotkey Menu' can be
turned Off if you prefer not to see it when the left <CTRL>
key is hit twice.
The non-volatile memory stores the Hotkey Menu setting.
CH Display
Audio Stick
Auto Off: After you select a computer, the channel address
and name of the computer will appear on the screen for 3
seconds then disappear automatically.
An optional multimed ia module can be linked to the bac k of
each KVM Switches for selecting microphone and stereo
speaker signals. There are two options for Audio Stick: ON
and Off. When set to 'On', audio selection follows
computer selection. When set to 'Off', audio selection
stops following computer selection. It is useful if you want
to listen to a particular computer's audio signal while
operating other computers. The non-volatile memory
stores the Audio Stick setting.
Always On: The channel address and name of a selected
computer and/or OSD status displayed on the screen all the
time.
The non-volatile memory stores the CH Display setting.
Position
14
The position of the selected computer name and/or OSD
status displayed on screen during operation. The actual
display position shifts due to different VGA resolution, the
higher the resolution the higher the display position. The
non-volatile memory stores the Position setting.
Scan Type
Ready PC +
1: In Scan mode, scan through power-on and
eye mark selected computers.
Page 8

SH-6580-4(108D) User Guide
SH-6580 User Guide
Hot-key commands UL as Upper Left, UR as Upper Right,
LL as Lower Left, LR as Lower Right.
MI as MIddle,
Hot-key command is a short keyboard sequence to select a computer,
to activate computer scan, etc. KVM Switches interprets keystrokes
for hot-keys all the time. A hot-key sequence starts with two left
<CTRL> keystrokes followed by one or two more keystrokes. A
built-in buzzer generates a high-pitch beep for correct hot-key
command; otherwise, one low-pitch beep for error and the bad key
sequence will not be forwarded to the selected computer.
ESC: To exit the OSD, press the <ESCAPE> key.
DISPLAY OSD(On-Screen-Display) Operation
There are five push buttons “AUTO”, “MENU”, “+”, ”-“, “LCD-I/0” and
one “POWER” LED on the keyboard. When the control center is
power on, the LED is bright. When the display is power on, the LED
is green. When the display is power off, the LED is red. If you want to
adjust the display, first press “MENU” button. Use “+” or “-“ selecting
which function you want. Then press “MENU” to work out.
The short form hot-key menu can be turned on as an OSD function
(<F4>:more\Hotkey Menu) every time the left <CTRL> key is pressed
twice.
L-CTRL: is the <CTRL> key located at the left side of the
keyboard.
1~8: are the number keys '1' ~ '8' at the upper row of the
keyboard. Do not use the keypad at the right of the
keyboard.
When you put down the display, the display is off after 3~5 Second.
Oppositely the display is on after 3~5 Second. If the display is on, it
will be off when you press the “LCD-I/0” after 3~5 Second. Oppositely
the display will be on 3~5 Second.
J To select a computer by hot-key command, you must know its
channel address, which is determined by the KVM Switches
connection. For a computer connected to a Master, its address is
represented by the PC port label (1~8). For a computer
connected to a Slave, two characters represent its address. T he
first character is the channel address of the Master unit (1~8) and
the second one is the channel address of the Slave (1~8).
Please note that only Master's 'PC 1' ~'PC 8' ports can be
connected to a Slave.
Left Ctrl + left Ctrl + 7
Selects a computer connected to port 7 of the Master.
Left Ctrl + left Ctrl + 6 + 7
Selects a computer connected to port 7 of a Slave connected
to port 6 of the Master.
J To s t a rt Auto Scan, automatically scan power-on
computers one
by one at a fixed interval:
16
When Auto Scan detects any keyboard or mouse activity, it
suspends the scanning till activity stops; it then resumes with the
left Ctrl + left Ctrl + F 1
15
Page 9

SH-6580 User Guide
17
next computer in sequence. The length of the Auto Scan interval
(Scan Rate) is adjustable, see below. To abort the Auto Scan
mode, press the left Ctrl key twice.
Note: For OSD models, Scan Type determines whether eye mark is
necessary during Auto Scan.
J Manual Scan enables you to manually switch back and forth
between power-on
computers.
left Ctrl + left Ctrl + F2
Press ↑or ↓to select the previous or the next computer in
sequence. And, press any other key to abort the Manual Scan.
Note: For OSD models, Scan Type determines whether eye mark is
necessary during Manual Scan.
J To adjust Scan Rate which sets the duration before switching to
the next computer in Auto Scan:
left Ctrl + left Ctrl + F3
The KVM Switches sends one to four beeps indicating scan interval
of 3, 8, 15 and 30 seconds respectively.
J To adjust keyboard typematic rate (characters/sec), this setting
over-rides that of BIOS and any operating system:
left Ctrl + left Ctrl + F4
The KVM Switches generates 1 to 4 beeps corresponding to 10, 15,
20 and 30 characters/sec respectively.
J Audio Stick
An optional multimedia module can be LINKed to the back of each
KVM Switches for selecting microphone and stereo speaker signals.
There are two options for Audio Stick: ON and Off. When set to
'On', audio selection follows computer selection. When set to 'Off',
audio selection stops following computer selection. It is useful if
you want to listen to a particular computer's audio signal while
operating other computers.
left Ctrl + left Ctrl + F5
The KVM Switches generates 1 or 2 beeps corresponding to On
and Off respectively.
SH-6580 User Guide
18
Touch Pad
There are two function buttons on the Touch Pad (function similar
with mouse).
You can touch the Touch Pad twice continually instead of using
“enter” button.
If you want to pull something, you can touch the Touch Pad twice
continually. But your hand can’t leave the Touch Pad at the second
time. You have to touch the Touch Pad and move your finger until you
pull something to the place that you want.
Page 10
SH-6580 User Guide SH-6580 User Guide
20
19
--------------- Cascade Configuration
Connection
Before connecting a device (a computer or a Slave) to the Master
under power, you must turn off the device. The Master must have
equal or more 'PC x' ports than that of the Slave, i.e., if KVM104D is
the master, KVM104 can be Slaves, but KVM108 can not.
The ports labeled "PC 1"~”PC 8” can be connected to either a
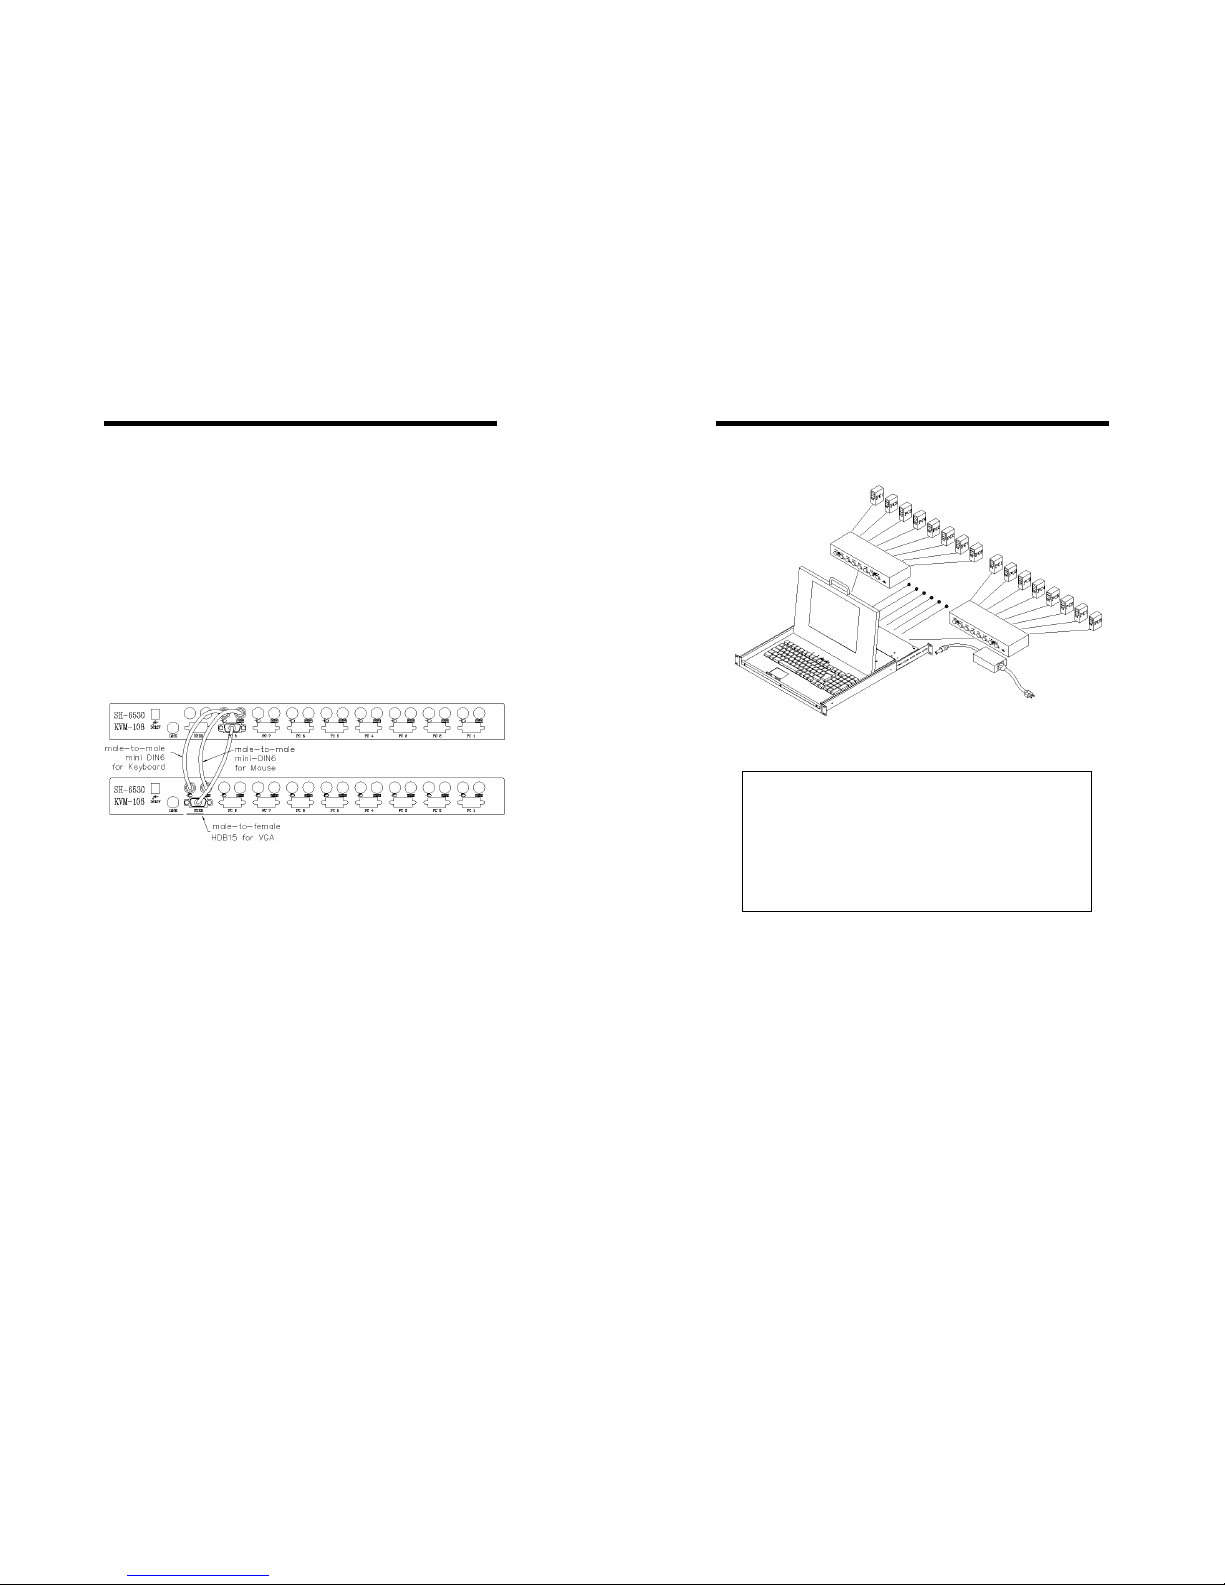
computer or a Slave's CONSOLE port, as shown in figure 10. A
power adapter with DC 12V output rating must be connected to the
Master.
Figure 11: Cascaded 8-port KVM Switches
For OSD model:
After connection completes, you should re-activate the
OSD menu to check if the Master recognizes the
Slaves. A triangle mark () is placed to the right of
the channel name indicating the port is connected to a
Slave not a computer. A number to the left of the
triangle mark indicates the Slave model, i.e. 8 for
KVM108 or KVM108D.
Figure 10: Slave console connection
The maximum number of computers controlled by a master/slave
configuration with all KVM104s is 16 with 4 Slaves and each Slave
connects to 4 computers, see figure. For an all KVM108s
configuration, the number is 64 with 8 Slaves and each Slave
connects to 8 computers, see figure 11.
Change Configuration while Running
Devices at any 'PC x' port can be changed at any time after initial
power-up. If you change any one of the “PC 1” to “PC 8” ports
connection from a computer to a Slave or vice versa, or replace the
devices of a port; the OSD will update this change the next time it is
activated. [NOTE: Any new device, a computer or a Slave, must be
turned off before it is connected to the Master.]
Page 11

SH-6580 User Guide
SH-6580 User Guide
22
-------------Multi-access KVM Switches
Operation KVM208D
Overview On power up, the KVM208D is in Idle mode broadcasting VGA signal
from the selected computer and detecting for keyboard and mouse
activity. User LEDs (marked with reverse black A and B) are both
green indicating the KVM Switches is not in use.
The advanced multi-access KVM208D has all the features of
KVM108D respectively. The mode l has two Console ports facilitate
you to access multiple computers from two different locations, local
and remote. Thanks to the high-drive circuit design, you may
connect high quality cables at Console and PC sides for up to 100ft
(30M), a definite plus for server room applications. No w you can
access all computers either in the server room when you have to
physically access the computers such as software upgrade, or away
from the server room for everyday use.
When keyboard or mouse activity is detected at one CONSOLE, the
KVM Switches immediately disables the other CONSOLE from
accessing the computer. Only one User LED, at the front panel,
remains lit indicating the KVM Switches is under user operation. In
the mean time, keyboard LEDs (Num/Caps/Scroll Lock) of the other
CONSOLE start to flash as its access is denied and the monitor is
blocked from VGA signal for security reason. After the user has
finished his operation for a period of time (i.e., User Timeout), the
multi-access KVM Switches Switch returns to Idle mode. User
Timeout has four options, 5 sec, 30 sec, 60 sec and HOLD. Select
HOLD when you plan to access the KVM Switches for a long time.
Pressing the <Scroll Lock> twice forces the KVM Switches return to
Idle mode immediately regardless of the User Timeout setting.
Connections
Connect one keyboards, mouse and monitors to the CONSOLE ports.
The built-in PS/2 mouse signal translation enables you to connect
PS/2 mice of different type to the CONSOLE ports, i.e., a generic
PS/2 mouse for one CONSOLE and a scroll mouse for another.
The User Timeout is available in the OSD menu by pressing the
Function key <F4>, under the sub-menu More. Note: Keyboard
Speed option is not available for multi-access models.
Configuration
To expand the number of computers under control, you may connect
CONSOLE port of another KVM Switches to "PC 1" ~ "PC 8" port.
Refer to the chapter Cascade Configuration for more detail. There
are rules to apply for Master/Slave configuration. When KVM208D
is a Master, its slave includes KVM104, KVM104D, KVM108 and
KVM108D. These multi-access KVM Switches already come with
OSD menu, their Slaves do not have to be OSD equipped.
21
Page 12
SH-6580 User Guide SH-6580 User Guide
24
------------------------ Appendices Troubleshooting:
Ensure that all cables are well seated. Check that keyboard/mouse
cables are not swapped. Label and bundle the cables for each
computer to avoid confusion when connected to the KVM Switches.
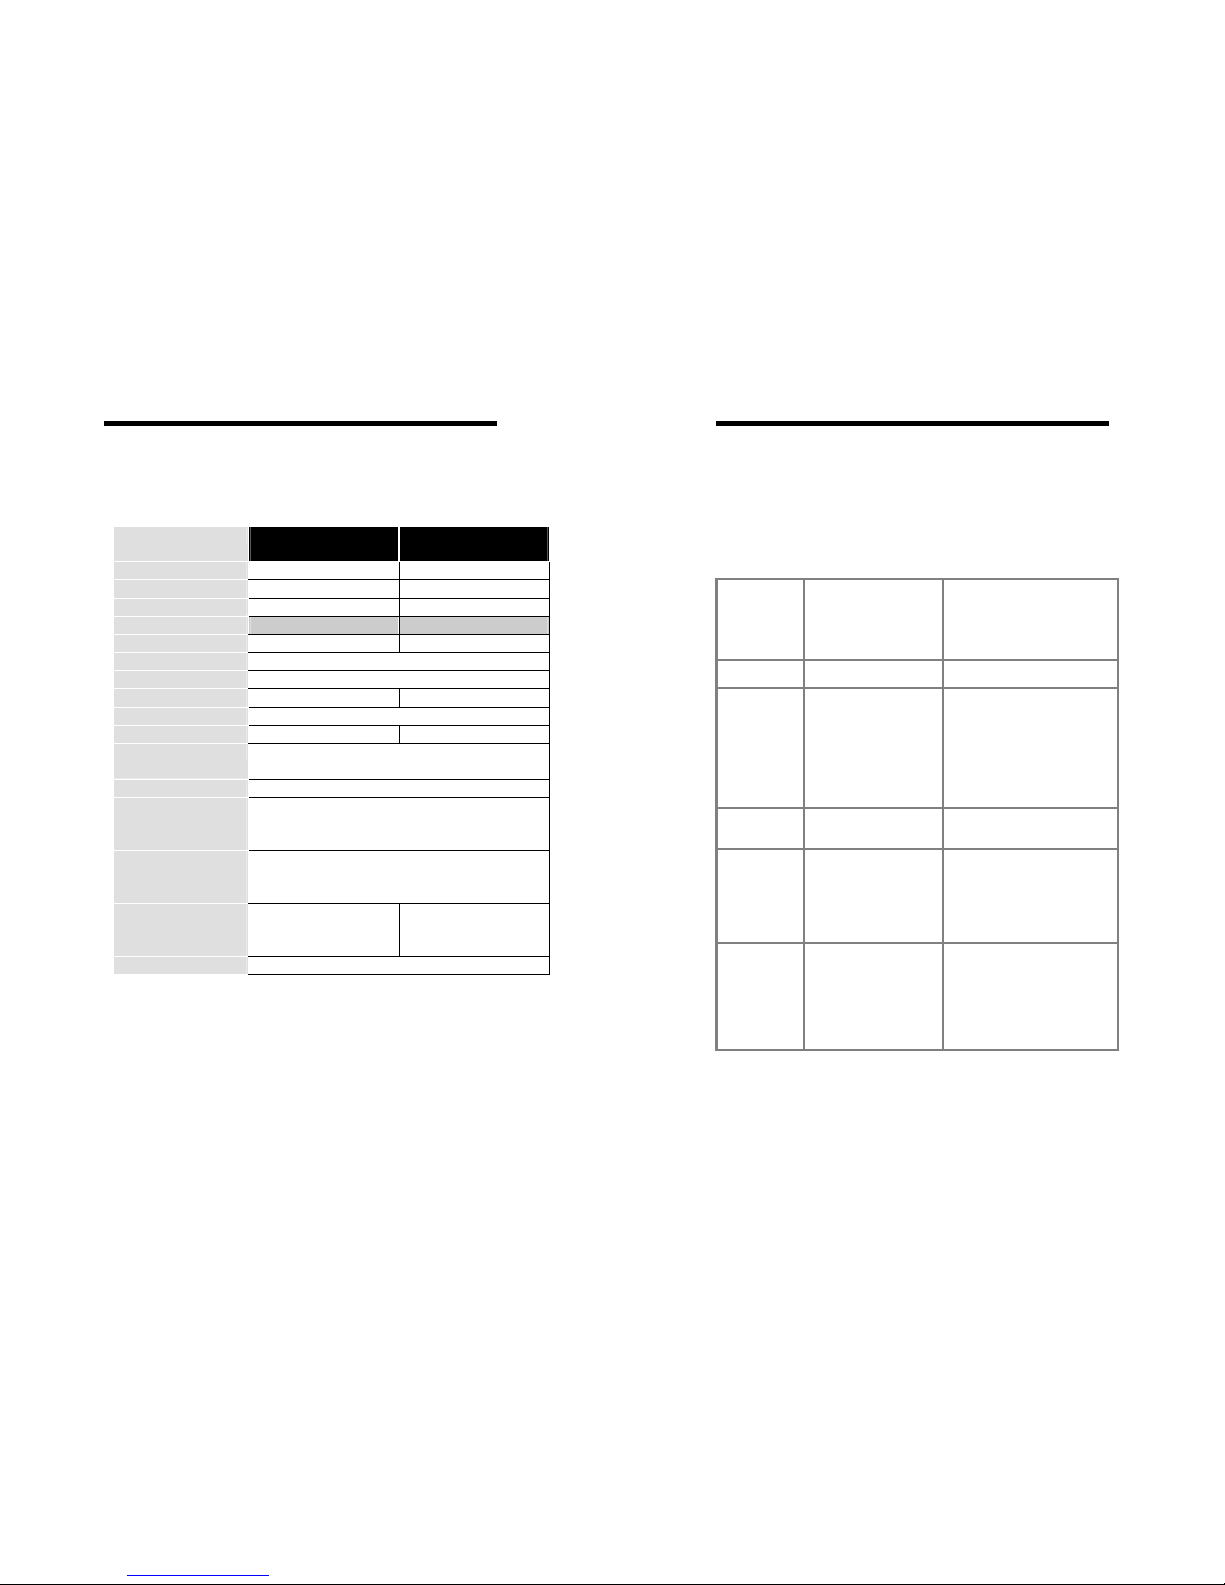
Specifications:
Specifications SH-6530-KVM104
SH-6530-KVM104D
SH-6530-KVM108
SH-6530-KVM108D
User port number 1 1
Computer port number 4 8
Cascade control PC number Up to 16* Up to 64*
On-screen display (OSD) KVM104D KVM108D
Front panel button control 4 8
Hot plug-and-play Yes
Hot-key control Yes
Rack-mount kit RMK04 RMK08
Automatic scan interval 3, 8, 15, 30 seconds
Programmable scan pattern KVM104D KVM108D
Cable length (Max) 30M (100ft) at CONSOLE
30M (100ft) at PC ports
VGA 1600 x 1200, DDC2B
keyboard
Computer mouse connector
monitor
PS/2
PS/2, serial (with adapter)
HD-DB-15 male
keyboard
Console mouse connector
monitor
PS/2
PS/2
HD-DB-15 female
H x W x D (mm)
(in.)
size
44x220x130
1.7x8.7x5.1
Compact
44x436x130
1.7x17.2x7.0
1U
Power supply (min) 9V DC, 500mA
Symptom Possible causes Recommended solutions
No OSD screen .No power to KVM
Switches
.Establish power by turning on
computers, wait, press left CTRL
keys several times.
.Monitor not multi-sync
.Press and hold the 7 and 8
push buttons to initiate Auto
scan.
Keyboard error
on boot
.Loose keyboard
connection
.Make sure keyboard cables are
Well seated
Master/slave
does not work
.Improper installation
procedures
.Make sure slave’s CONSOLE is
connected to Master’s PC 1~ PC
8 port
.Press and hold the 1 and 2
push buttons to initiate K/M reset
.Remove any possible power
supply to the slave (unplug all
cables), before connecting it to
the Master
Keyboard
strokes shifted
.The computer was in
shifted state when last
switched
.Press both SHIFT keys
The ↑ and ↓
keys do not
work in Manual
Scan
.All PCs are off or only
one PC is turned on.
Scan mode works for
power-on computers only
.Press any other key to abort
Manual Scan mode.
.Scan type is eye mark
selected but no PC is eye
mark selected in OSD.
.Set proper Scan type in OSD
and determine which PCs are
eye mark selected, do it in OSD.
.Turn computers on.
Auto Scan does
not switch PC
and KVM
Switches beeps
from time to
time and red
indicator
flashes
.All PCs are off or only
one PC is turned on.
Scan mode works for
power-on computers only
.Scan type is eye mark
selected but no power-up
PC is eye mark selected
in OSD.
.Set proper Scan Type in OSD
and determine which PCs are
eye mark selected, do it in OSD.
.Press left CTRL key twice to
abort Auto Scan mode.
.Turn on computers
.Press any front button to select
a PC, and Auto Scan stops.
*You can use the SH-6530 KVM Switches series independently.
* Cascaded with KVM Switches Switches supporting the same number of PC ports.
You can mix different models in cascade applications.
23
Page 13
SH-6580 User Guide SH-6580 User Guide
26
Limited Warranty
Double OSD
images at
cascade
configuration
.Improper slave
connection procedure.
.Press push buttons 1 and 2
down for 2 seconds to activate
K/M RESET.
. Remove any possible power
supply to the Slave (unplug all
cables), before connecting it to
the Master.
OSD menu is
not at the
proper position
.OSD menu has fixed
resolution and its size
varies due to computer
VGA resolution changes.
.Use <F4>:More\Position to
select UL or UR. OSD menu
may appear near the middle of
the screen when LL or LR is
selected.
Computer can
not use serial
mouse
.Loose mouse adapter
.Incorrect mouse adapter
.Secure the mouse adapter to
computer’s COM port
.Use only the mouse adapter
comes with the unit
Can not select a
computer
connected to a
slave
.Improper slave unit
connection
.Improper Master unit
connection
.Only Master ports PC1~PC8 can
be connected to slaves.
.Connect slave CONSOLE port to
PC1~PC8 ports of the Master
.Too many levels of
slaves
.Only one level of slave units is
allowed. Pop up OSD again to
check if Master recognizes the
slave connection. Look for
triangle mark and the number
before it.
The KVM
Switches fails to
function
occasionally.
.Computers do not supply
enough power.
.Make sure a power adapter with
minimum of 12V 2A output rating
is firmly connected to the power
jack for the SH-6580.
IN NO EVENT SHALL THE DIRECT VENDOR'S LIABILITY FOR DIRECT OR
INDIRECT, SPECIAL, INCIDENTI AL OR CONSEQUENTIAL DAMAGES, LOSS
OF PROFIT, LOSS OF BUSINESS, OR FINANCIAL LOSS WHICH MAY BE
CAUSED BY THE USE OF THE PRODUCT EXCEEDS THE PRICE PAID FOR THE
PDOCUDT.,
The direct vendor makes no warranty or representation, expressed or
implied with respect to the contents or use of this documentation, and
especially disclaims its quality, performance, merchantability, or fitness
for any particular purpose.
The direct vendor also reserves the right to revise or update the
product or documentation without obligation to notify any user of such
revisions or updates. For further information, please contact your
direct vendor.
All the brand names and registered trademarks are the p roperty of
their respective owners.
25
 Loading...