

Page 1

WINGTOP
E_MAIL:[email protected]
SH-3100-6.4
SH-3100-8.4
SH-3200-10.4
SH-3210-12.1
User’s manual
For TFT LCD RACK-MOUNT MONITOR
1
Version:1.0
Page 2
1.LCD Monitor Installation
1-1 Installation:
(1) The following process offers users the best way to set up your LCD
Monitor into a whole PC system with correct and safe installation.
(2) Turn off the power switch of the PC and disconnect from the mains
input supply.
(3) Connect one end of 15-pin Signal Cable to the signal input port on
the LCD Monitor (at backpanel) and the other end to the signal
output port of PC.( As shown in figure 1.)
(4) Connect the DC 12V power to the 12V DC input socket of the LCD
monitor. ( As shown in figure 2.)
(5) Now connect the PC power cord to the AC power outlet socket.
(6) Turn on the PC’s power switch Run the PC for image adjustment.
CAUTION:
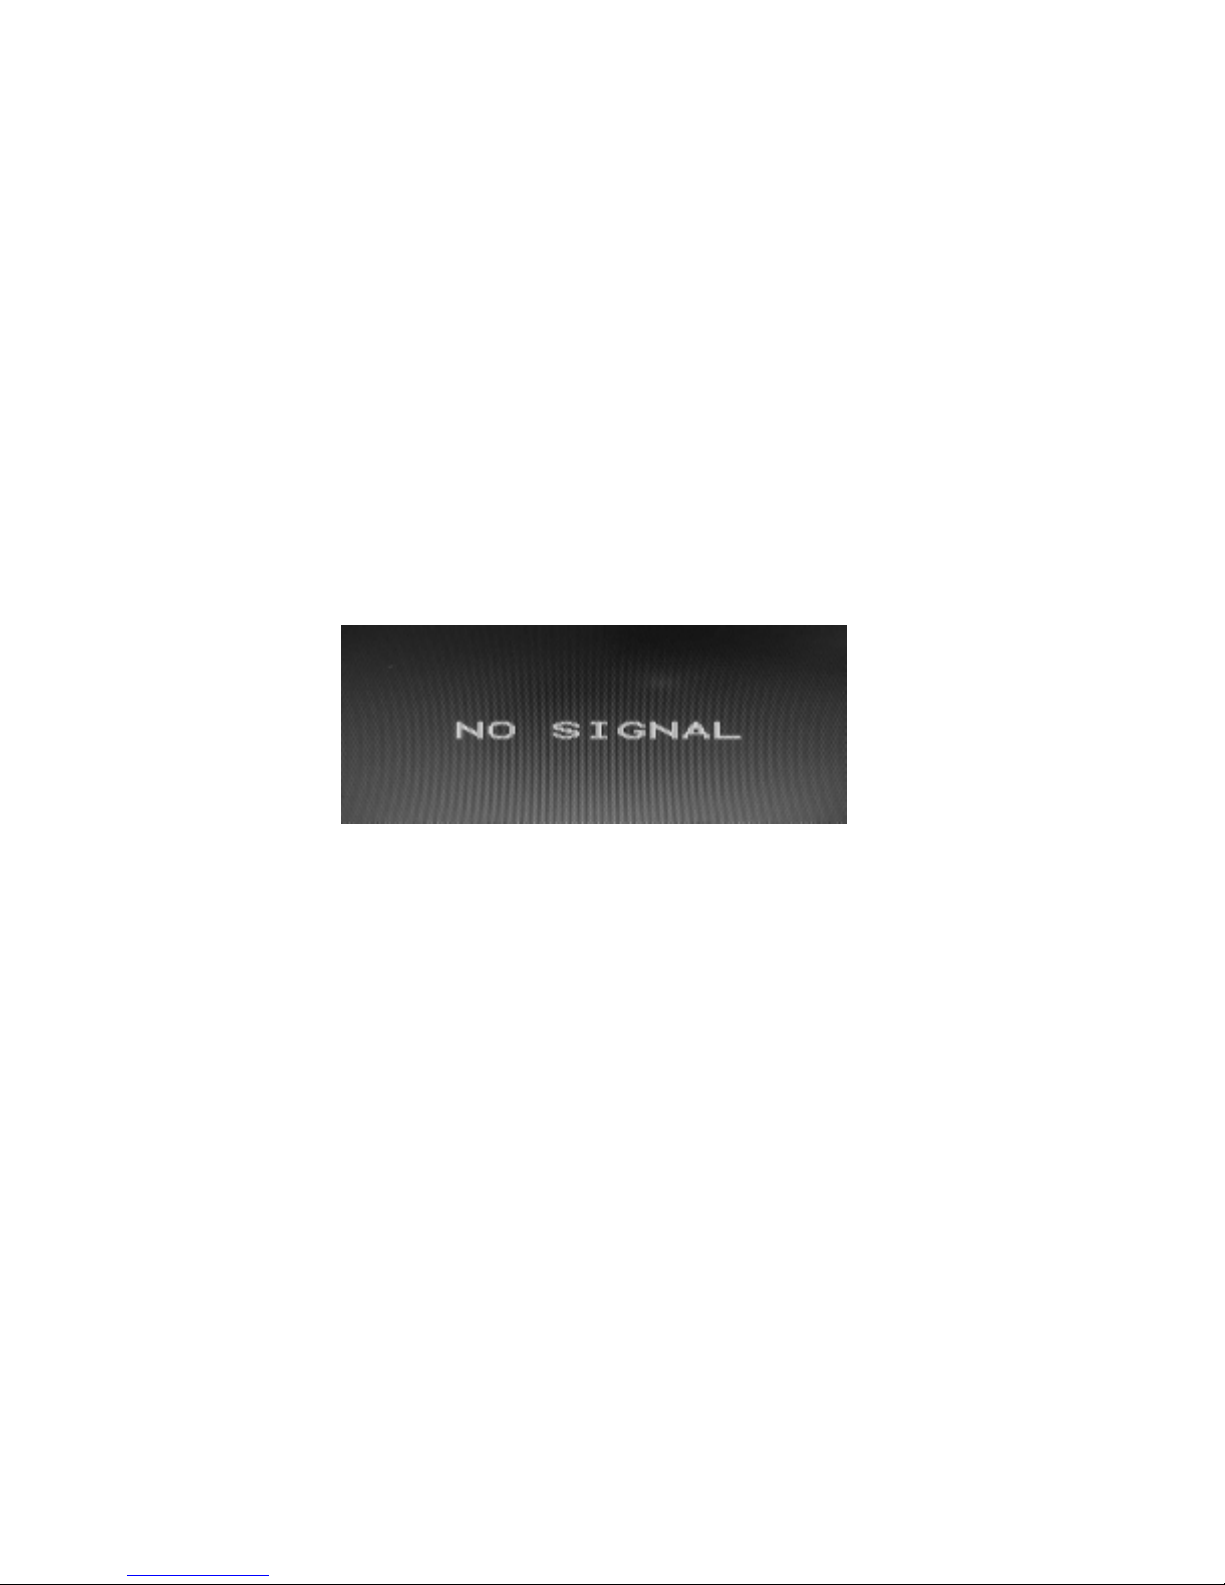
Figure 1. Display without Signal Input
2
Version:1.0
Page 3
2.Function Keys and operation:
2.1 Function Keys Definition and description:
(1) Menu Key: Use this key to select and execute the magnitude and
function process.
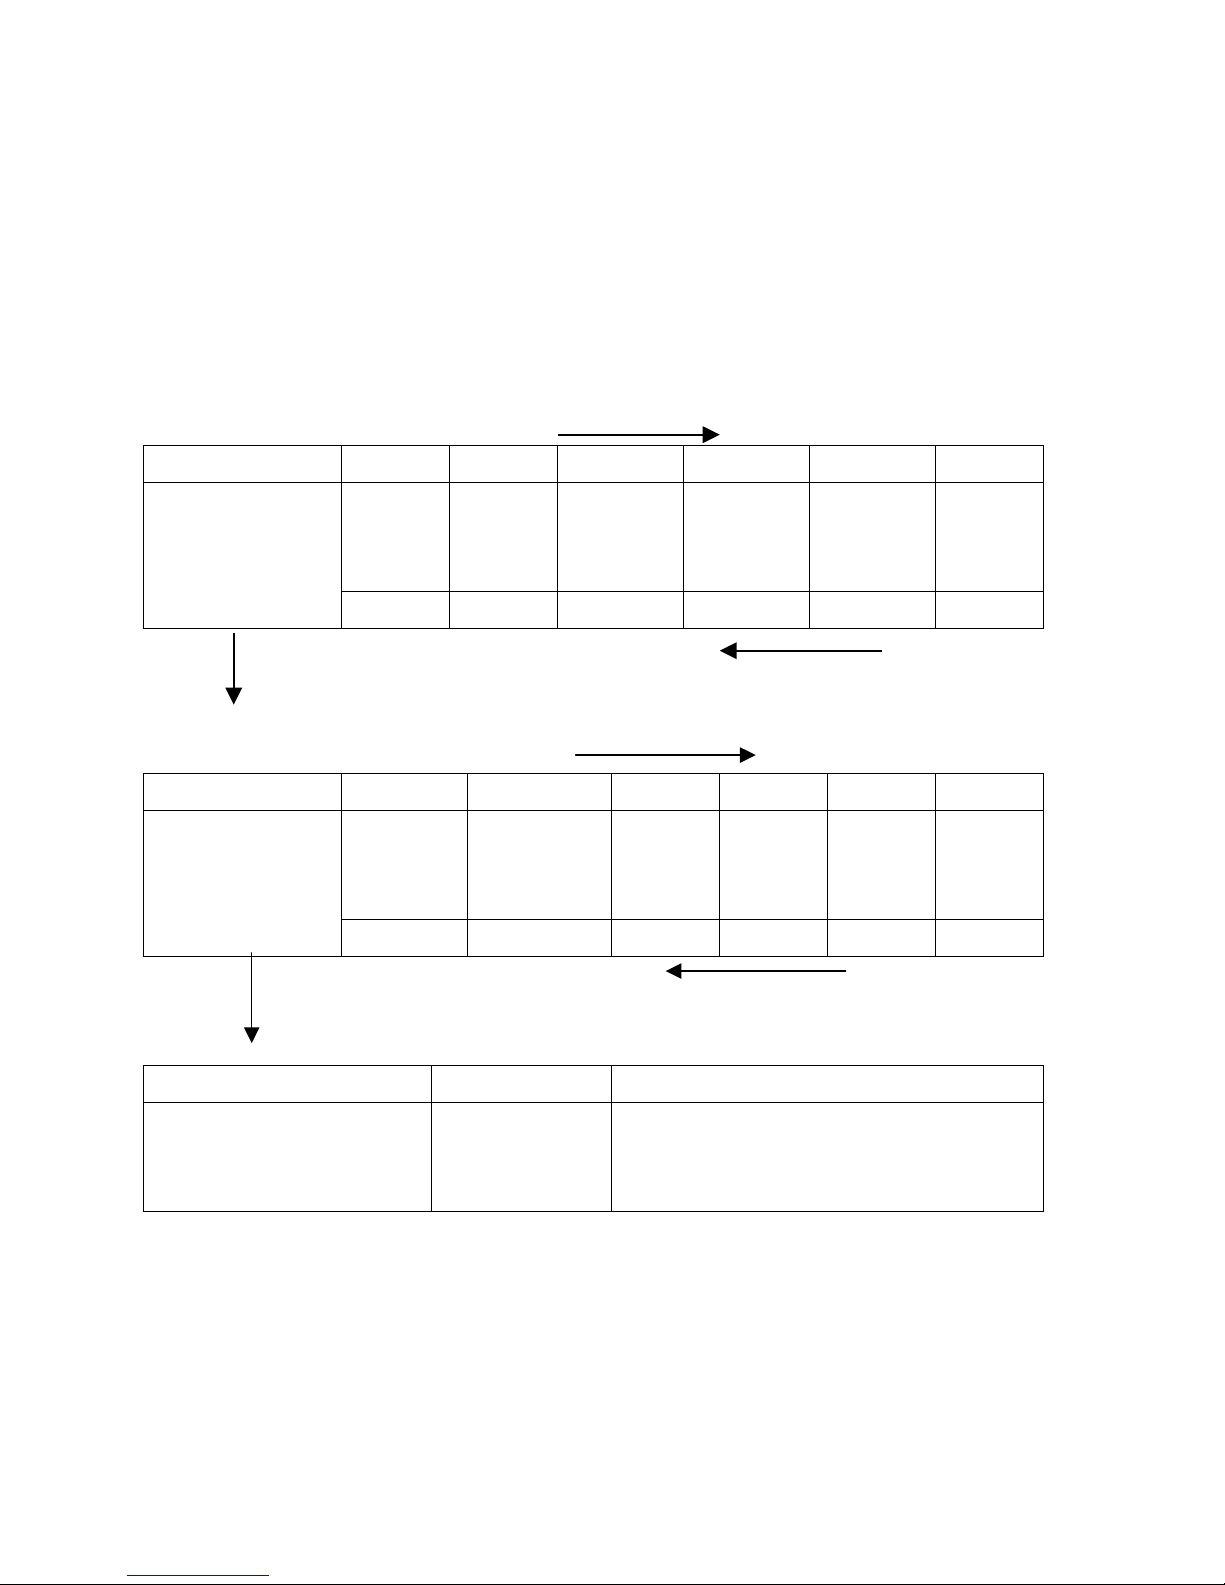
The Sequence flows of Manu Key pressing:
(a) Mode Selection:
(+ Key)
st
Press Manu key Display 1
press 2nd press 3rd press 4th press 5th press
*OSD shows up.
.
Colour
Picture Function
th
press 4th press 3rd press 2nd press 1st press
5
(b) Adjusting-and Executing for the desired Selection:
st
selection: Colour Adjustment)
(1
(+ Key)
Press Manu key 1
* “Colour icon”
flashed.
* “Contrast”
marked.
Contrast
th
press 4th press 3rd press 2nd press 1st press
5
- key
(c) Magnitude Adjustment:
OSD
Manu
Mics
(- key)
st
press 2nd press 3rd press 4th press 5th press
Brightness
Red
Green Blue
Exit
Exit
Press Manu key Adjusting item Magnitude varied by pressing:
Magnitude Scale shows
up
Mode Exit: Always selects Exit + Manu key pressing to go out from any one
of modes to another.
(d) When the system back to Mode Selection that it is ready for
another mode selection.
(e) As for actually uses of OSD’s Function adjustment and
execution, Please refers the item 2-2: “Quick OSD Adjustment
& Execution Operation”
Contrast
+ Key: Value increases to until 255.
-
Key: Value decreases to until 0.
3
Version:1.0
Page 4

(2) + Key:
(a) In the Mode-Selection Mode: Pressing this key to locate
forward the icon you want to adjust. Pressing it once, it moves
one step forward to the next icon. Pressing it twice, it moves
forward one more step to next 2nd icon. And so on.
(b) Keep pressing down on this key, it flows continually through
every icon and stops at the icon when the key is released.
(c) In the Adjusting-and-executing Mode: The + Key, becomes
the Adjusting-and-executing selection key. Pressing this key to
locate forward the icon you want to adjust or execute. Pressing
it once, it moves one step forward to the next icon. Pressing it
twice, it moves forward one more step to next 2nd icon. And
so on.
(d) Keep pressing down on this key, it flows continually through
every icon and stops at the icon when the key is released.
(e) In the magnitude adjustment mode, the + Key, once again,
becomes the magnitude Adjusting key. Press it once the
magnitude of the adjusting scale will increase one step.
(f) Keep pressing down on this key, and it will keep increasing
continually until the key is released.
(3) - Key:
(a) In the Mode-Selection Mode: Pressing this key to locate
backward the icon you want to adjust. Pressing it once, it
moves one step backward to the next icon. Pressing it twice, it
moves backward one more step to next 2nd icon. And so on.
(b) Keep pressing down on this key, it flows continually through
every icon and stops at the icon when the key is released.
(c) In the Adjusting-and-executing Mode: The
the Adjusting-and-executing selection key. Pressing this key to
locate backward the icon you want to adjust or execute.
Pressing it once, it moves one step backward to the next icon.
Pressing it twice, it moves backward one more step to next
2nd icon. And so on.
-
Key, becomes
(d) Keep pressing down on this key, it flows continually through
every icon and stops at the icon when the key is released.
(e) In the magnitude adjustment mode, the
becomes the magnitude Adjusting key. Press it once the
magnitude of the adjusting scale will increase one step.
-
Key, once again,
4
Version:1.0
Page 5

(f) Keep pressing down on this key, and it will keep increasing
continually until the key is released.
(4) Switch:Power on/off Switch.
(a) Press this Key once; the monitor would be turned on.
(b) Press this key again and the monitor will be turned off.
(c) Users are reminded that prior to press this Key to turn on the
monitor, remember to switch on your PC first
5
Version:1.0
Page 6

2-2. Quick OSD Adjustment & Execution Operation:
d
d
Key to be pressed Menu Display Remark
Step 1
Menu Key
OSD Menu
shows up.
1."Colour Icon” keeps flashing.
2.Mode is ready for Colour Adjustment.
3. Resolution displayed
Press/Display:
+ key: 1st press
OSD Display
Colour Adjusting Mode
Image Adjusting Mode
Section 1
Section 2
+ key: 2
+ key: 3
+ key: 4th press
+ key: 5th press
n
press
r
press
Function Executing Mode
OSD Manu Mode
Mics Selection Mode
Exit
Section 3
Section 4
Section 5
Section 6
Remark:
-
(1) Reverse selection is available to make by “
key”.
(2) Always get out from one mode to another by
selecting “exit” and pressing “Manu key” to execute.
6
Version:1.0
Page 7
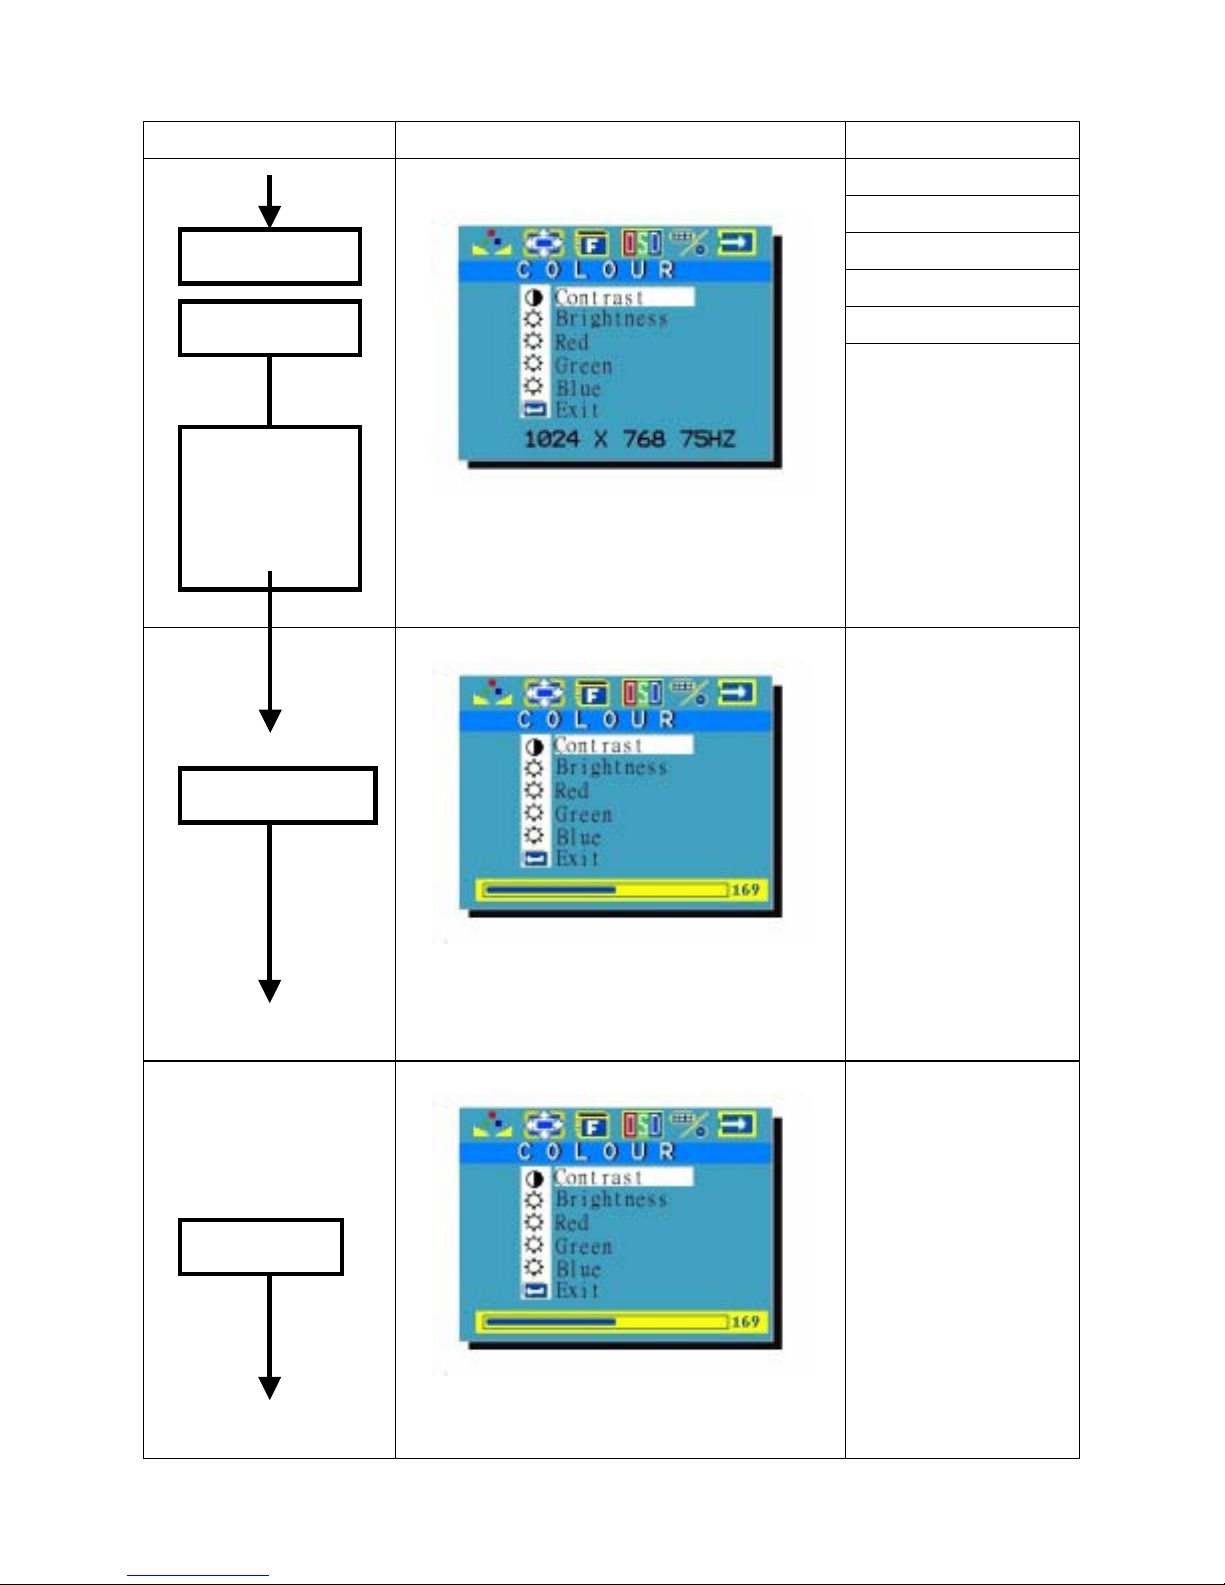
Section 1 : Colour Mode Adjustment
Key to be pressed Menu Display Magnitude Range
Step 1
Menu Key
Contrast
or
Brightness/
Red/Green/
Blue by
“+ key”
Step 2
Example: Contrast
1. “Colour icon” keeps flashing.
2. “Contrast” marked by indigo light.
Example: Contrast
Contrast: 0~255
Brightness: 0~216
Red Gain: 0~255
Green Gain: 0~255
Blue Gain: 0~255
Step 3
Menu Key
+/- key
1. “Colour icon” keeps flashing.
2. “Contrast” marked by indigo light.
3. Adjusting scale of 0~255 shows up.
Example: Contrast
* Keeps press
the “+ key”:
Value in the Scale is
increasing until 255
* Keeps press
-
the “
key”:
Value in the Scale is
decreasing until 0
Release the key, the
1. “Colour icon” keeps flashing.
2. “Contrast” marked by indigo light.
value will stop at
the satisfied point.
7
Version:1.0
Page 8
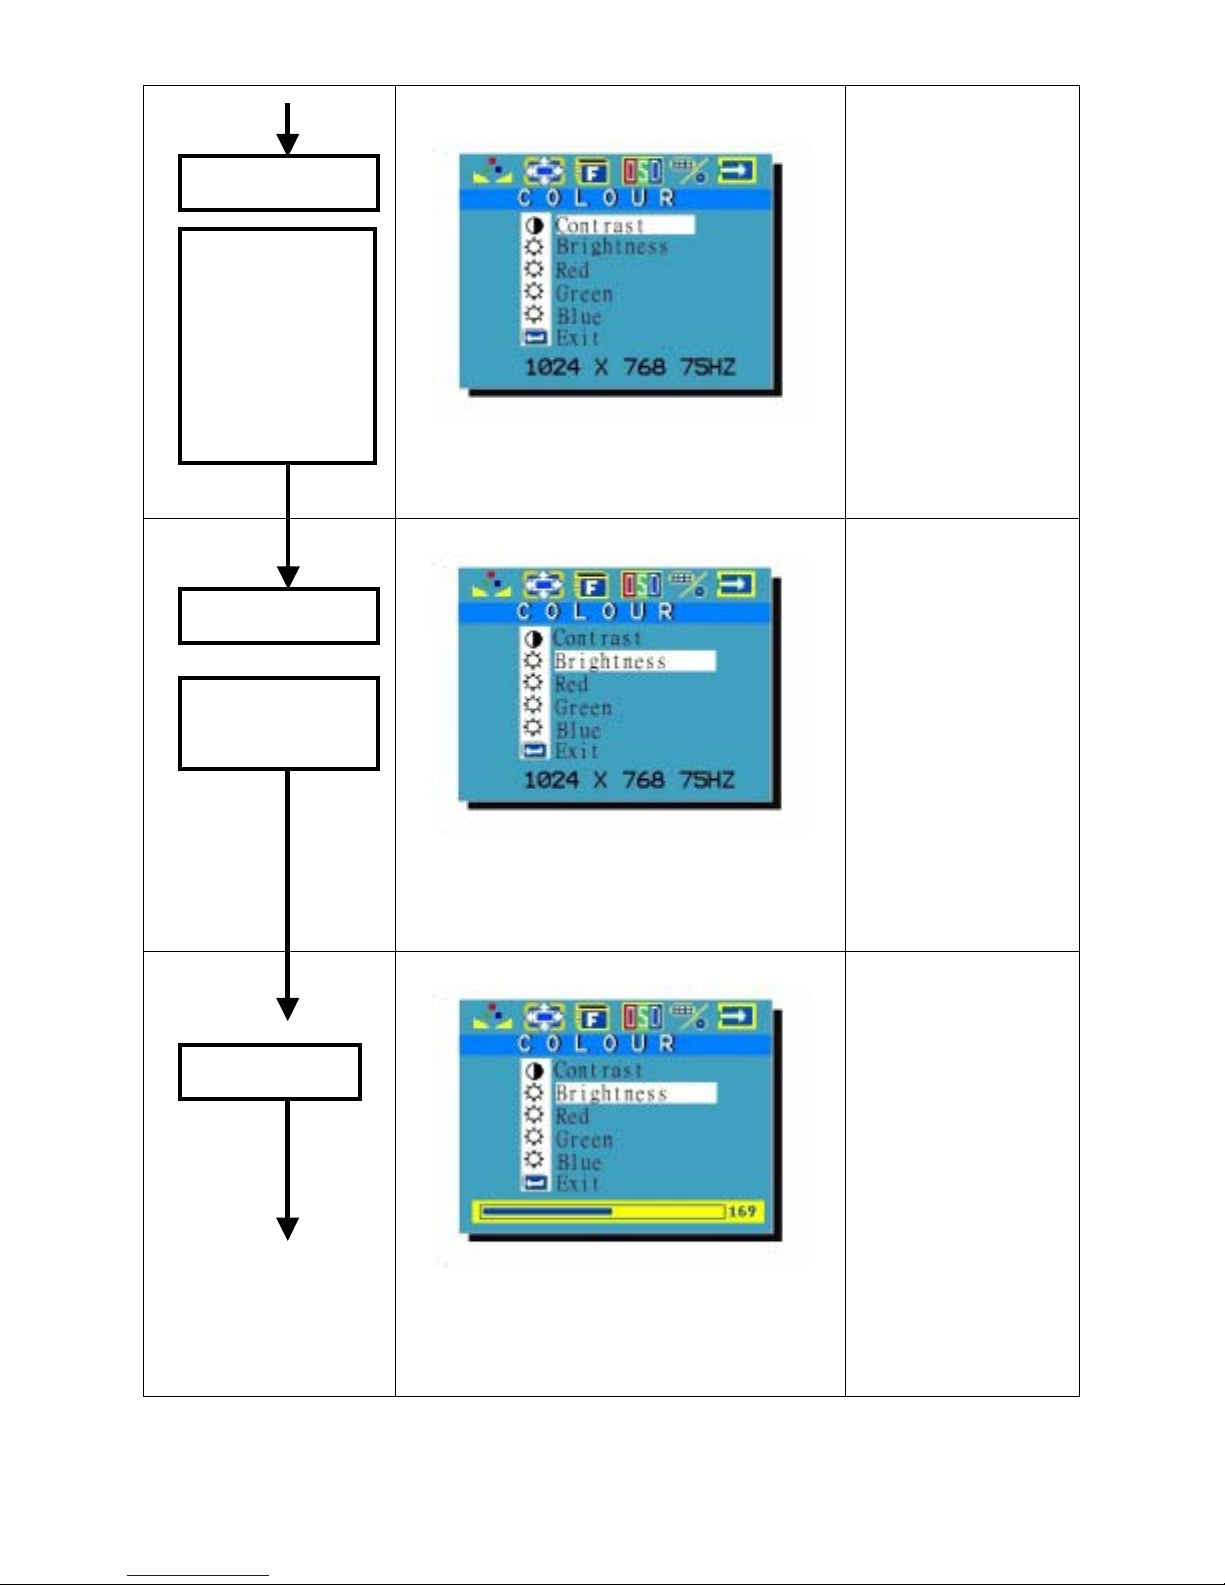
Step 4
Example: Contrast
Menu Key
The Contrast
adjustment is
completed.
The system is
ready for next
selection
Step 5
+/- key
To select
Brightness
1. “Colour icon” keeps flashing.
2. “Contrast” marked by indigo light.
Example: Brightness
If selects:
Red, Green, Blue.
Repeat step 3~ 5 to
complete the
adjustment.
Step 6
Manu Key
1. “Colour icon” keeps flashing.
2. “Brightness” on indigo light.
Example: Brightness
1. “Colour icon” keeps flashing.
2. “Brightness” on indigo light.
3. Adjusting scale of 0~216 shows up
8
Version:1.0
Page 9
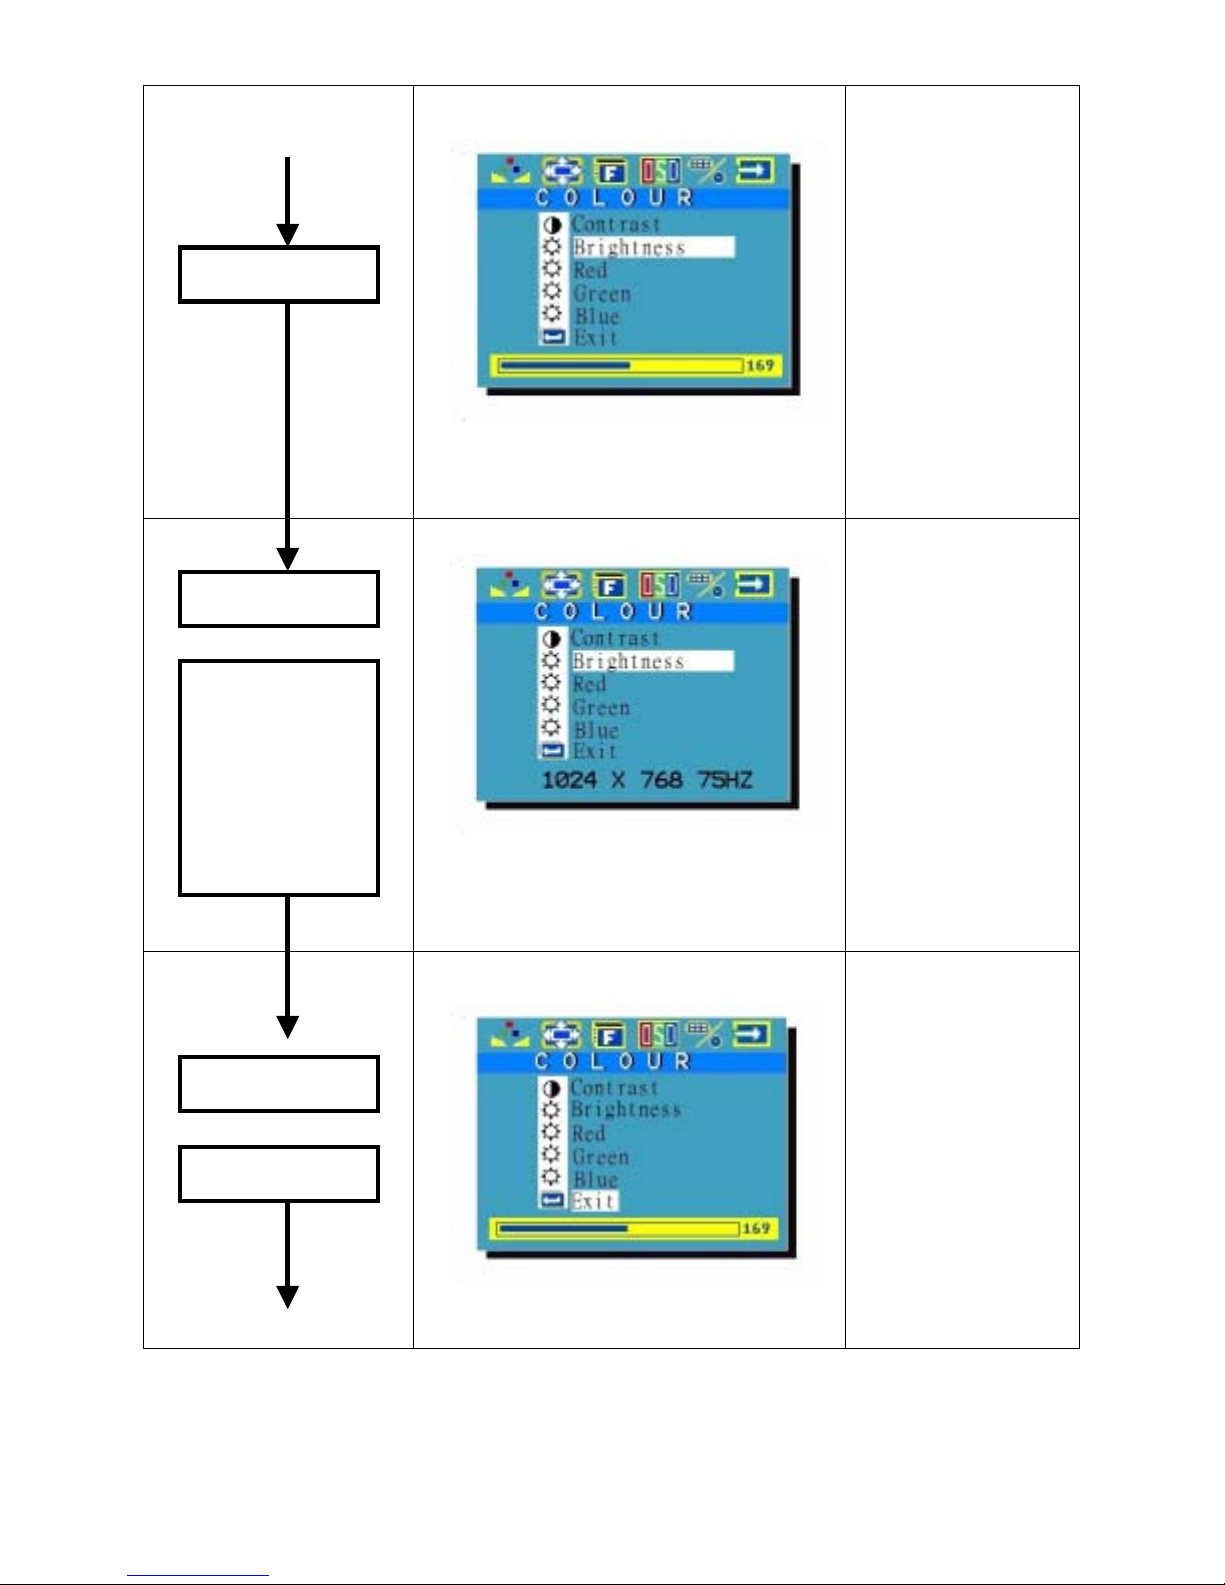
Step 7
Example: Brightness
* Keeps press
+/-key
Step 8
Manu key
Brightness
adjustment is
completed.
The system is
ready for next
selection
1. “Colour icon” keeps flashing.
2. “Brightness” on indigo light.
Example: Brightness
the “+ key”:
Value in the Scale is
increasing until 216
* Keeps press
-
the “
key”:
Value in the Scale is
decreasing until 0
Release the key, the
value will stop at
the satisfied point.
1. “Colour icon” keeps flashing.
Step 9
+/-key
To select Exit
2. “Brightness” on indigo light.
Example: Exit
1. “Colour icon” keeps flashing.
2. “Exit” on indigo light.
9
As for Red, Green,
or Blue Gain
adjustment: Repeat
step 5~ Step 8.
Version:1.0
Page 10
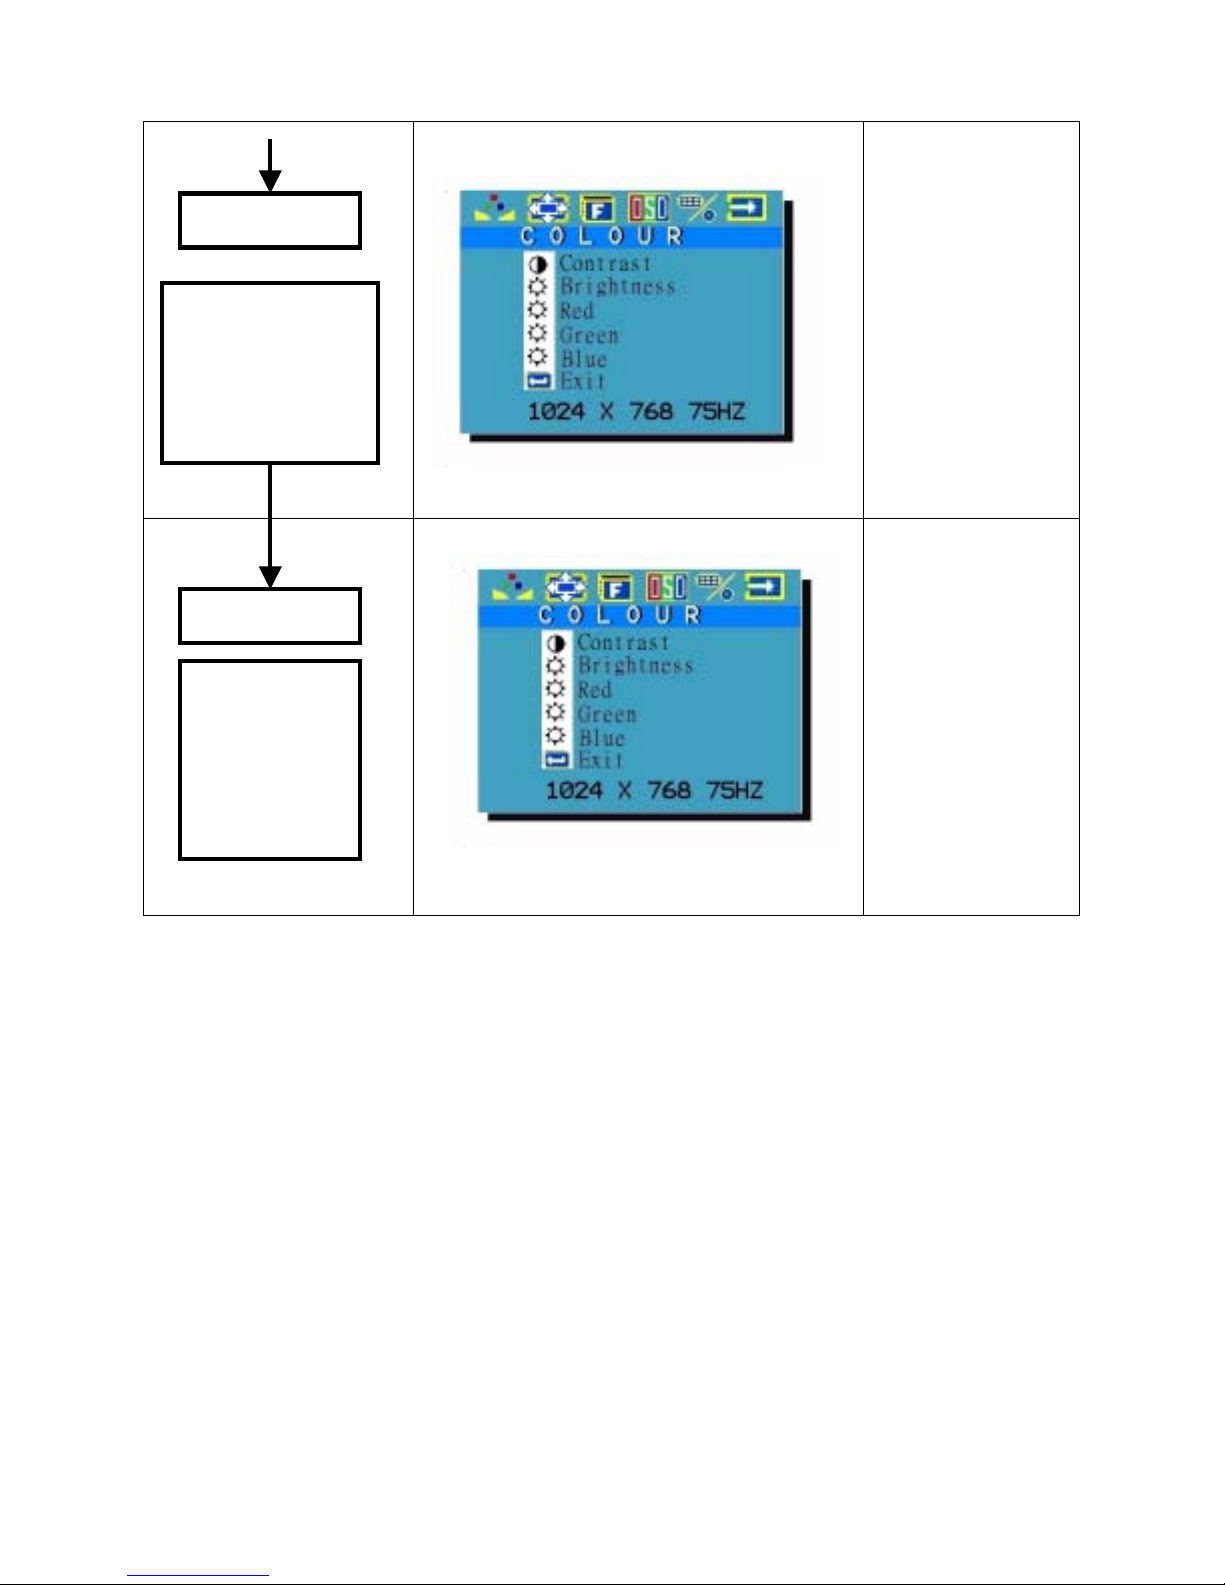
Step 10
Manu key
System backs to
Mode Selection
Status and is
ready to select:
Step 11
+/-key
Section 2 or
Section 3 or
Section 4 or
Section 5 or
Section 6
Example: Exit
1. “Colour icon” keeps flashing.
The selected icon become flashing.
10
Version:1.0
Page 11
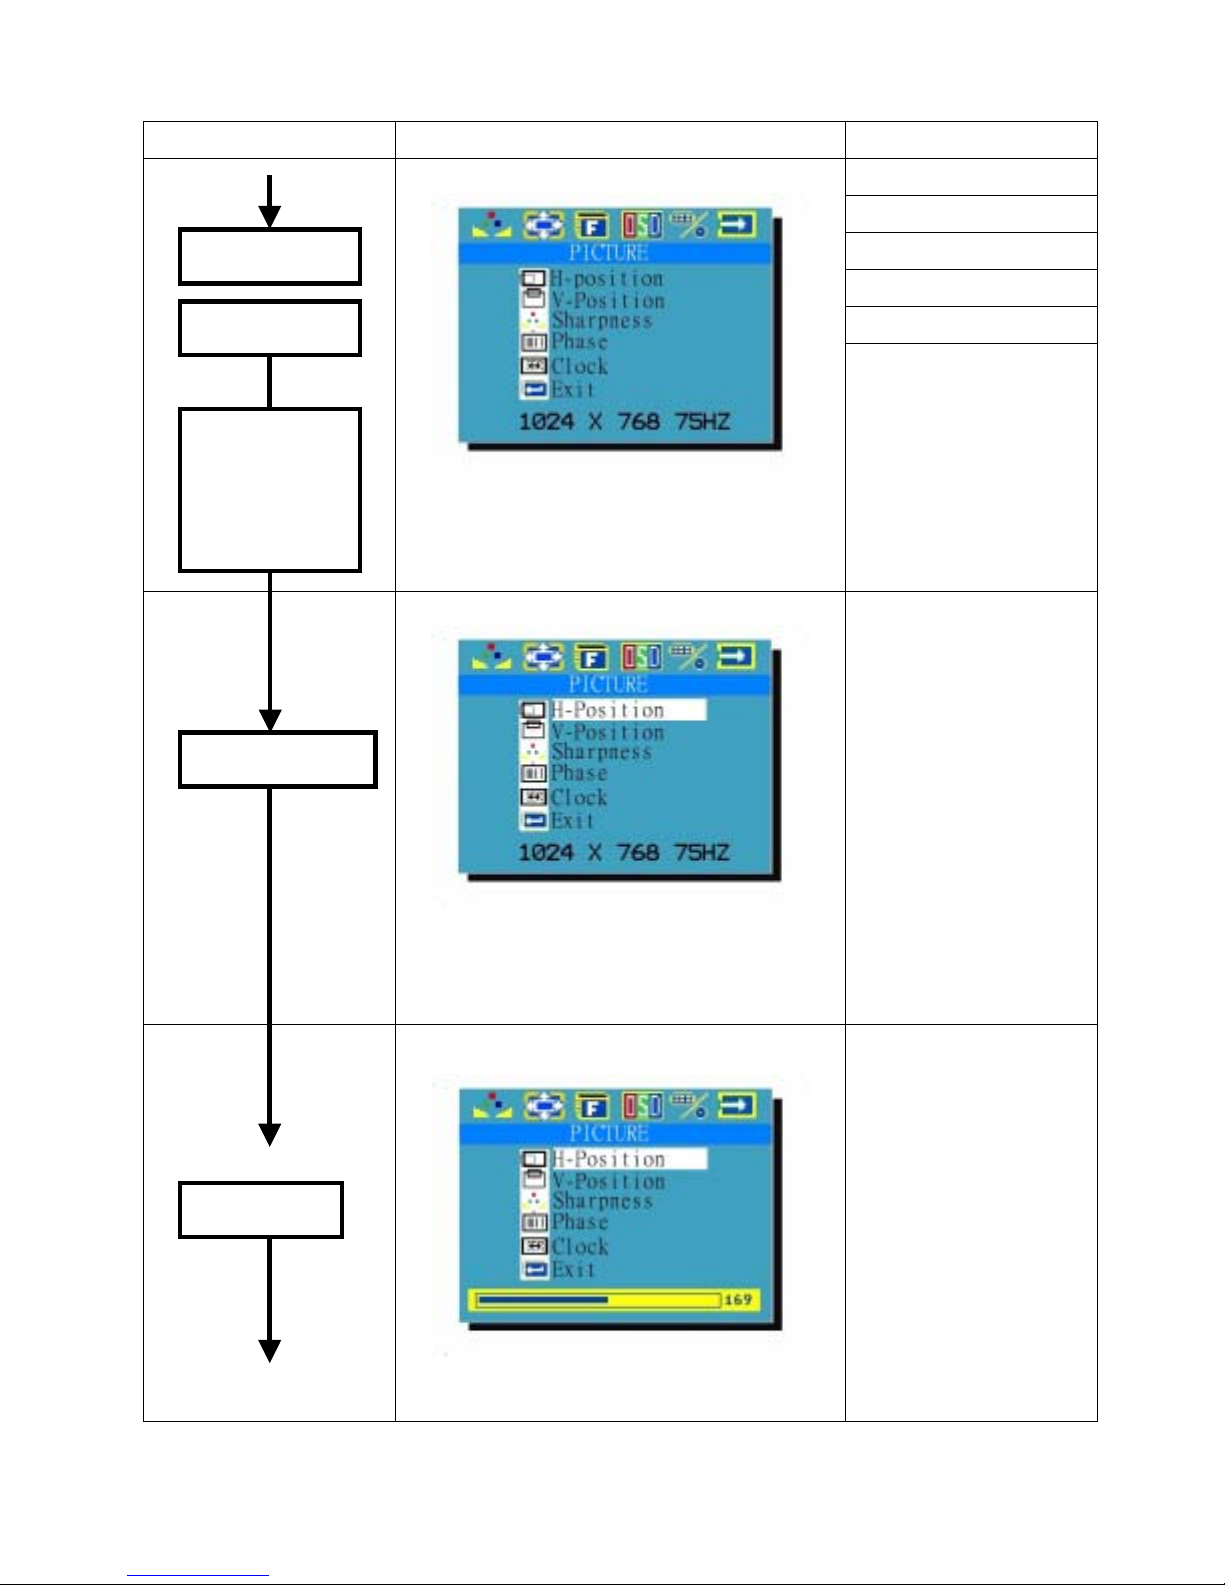
Section 2: Image Mode Adjustment
Key to be pressed Menu Display Magnitude Range
Step 1
Menu Key
H-Position
or
V-Position/
Sharpness/
Phase/Clock
by “+ key”
Step 2
Menu Key
Example: H-Position
3. “Image icon” keeps flashing.
4. “H-Posit.” marked by indigo light.
Example: H-Position
H-Position: 0~146
V-Position: 0~20
Sharpness: 1/2/3/4/5
Phase: 0~31
Clock: 0~127
Step 3
+/- key
4. “Image icon” keeps flashing.
5. “H-Posit.” marked by indigo light.
6. Adjusting scale of 0~146 shows up.
Example: H-Position
3. “Image icon” keeps flashing.
4. “H-Posit.” marked by indigo light.
* Keeps press
the “+ key”:
Value in the Scale is
increasing until 146
* Keeps press
-
the “
key”:
Value in the Scale is
decreasing until 0
Release the key, the
value will stop at the
satisfied point.
11
Version:1.0
Page 12
Step 4
Menu Key
H-Position
adjustment is
completed.
The system is
ready for next
selection
Step 5
+/- key
To select
V-Position
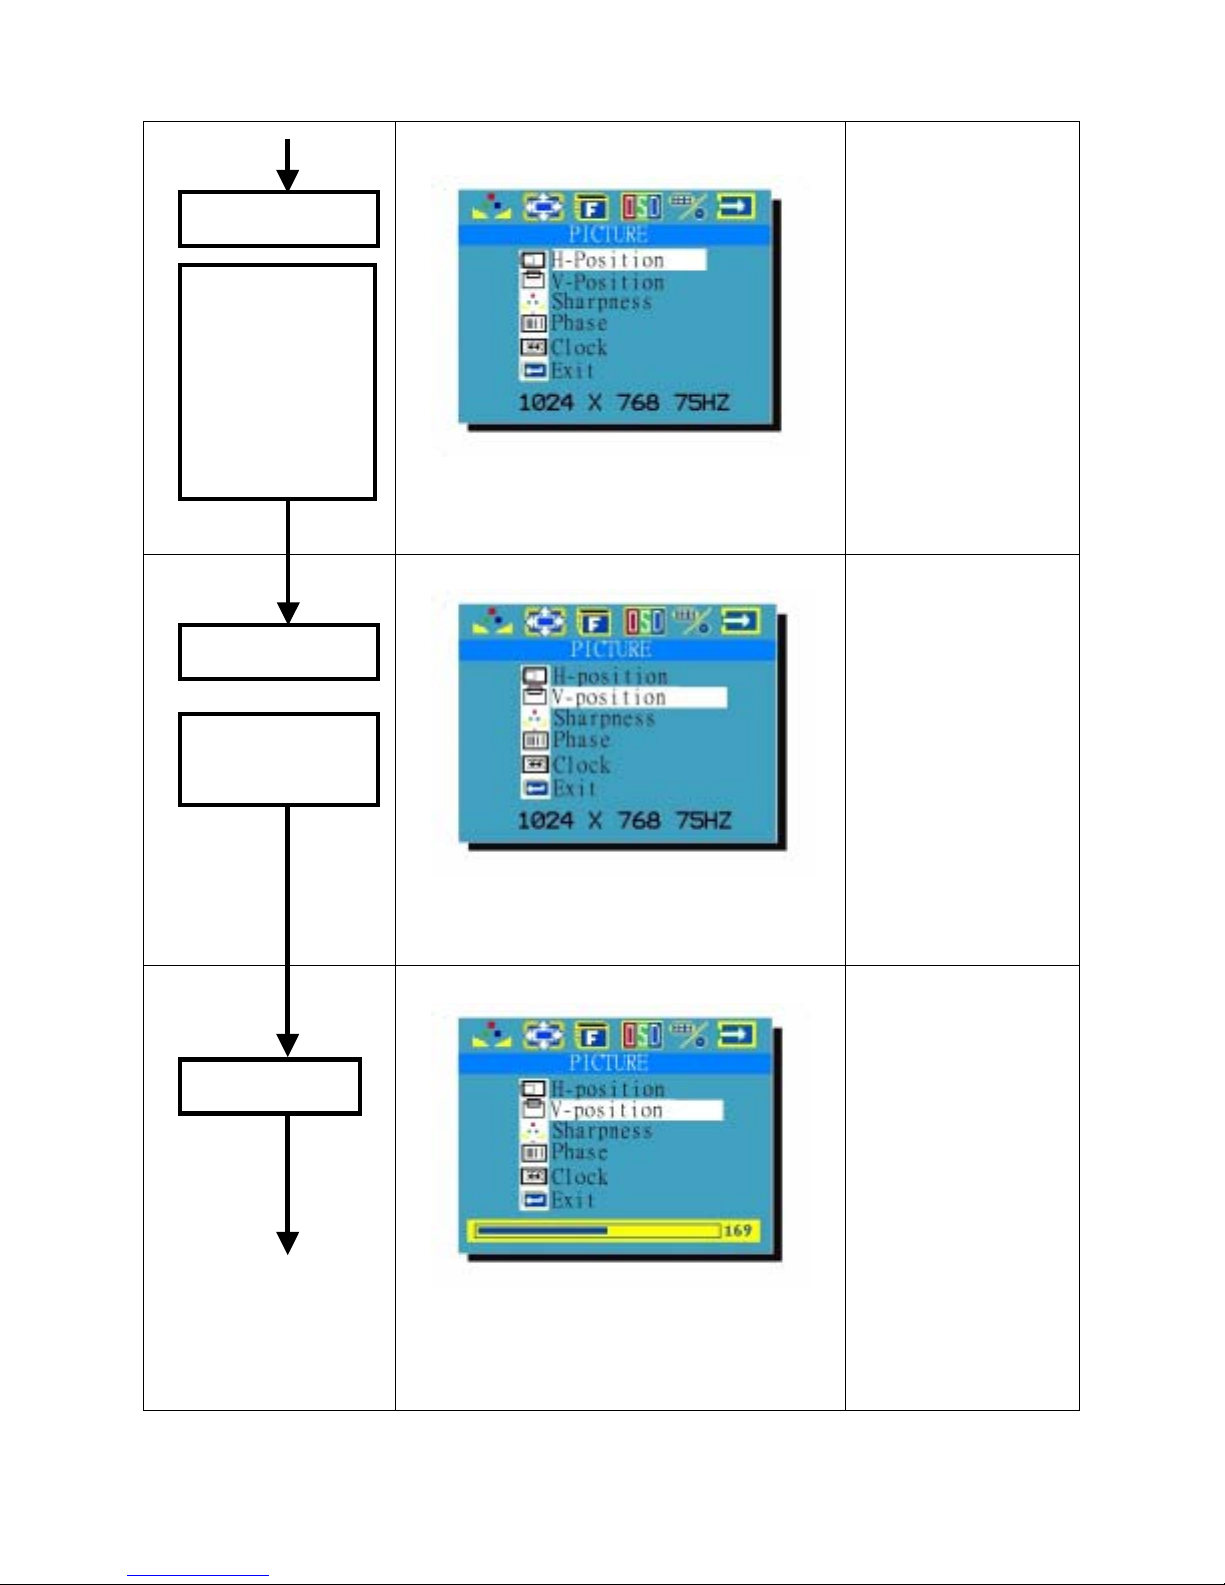
Example: H-Position
3. “Image icon” keeps flashing.
4. “H-Posit.” marked by indigo light.
Example: V-Position
If selects:
Sharpness, Phase,
or Clock:
Repeat step 3~ 5 to
complete the
adjustment.
Step 6
Manu Key
3. “Image icon” keeps flashing.
4. “V-Position” on indigo light.
Example: V-Position
4. “Image icon” keeps flashing.
5. “V-Position” on indigo light.
6. Adjusting scale of 0~20 shows up
12
Version:1.0
Page 13
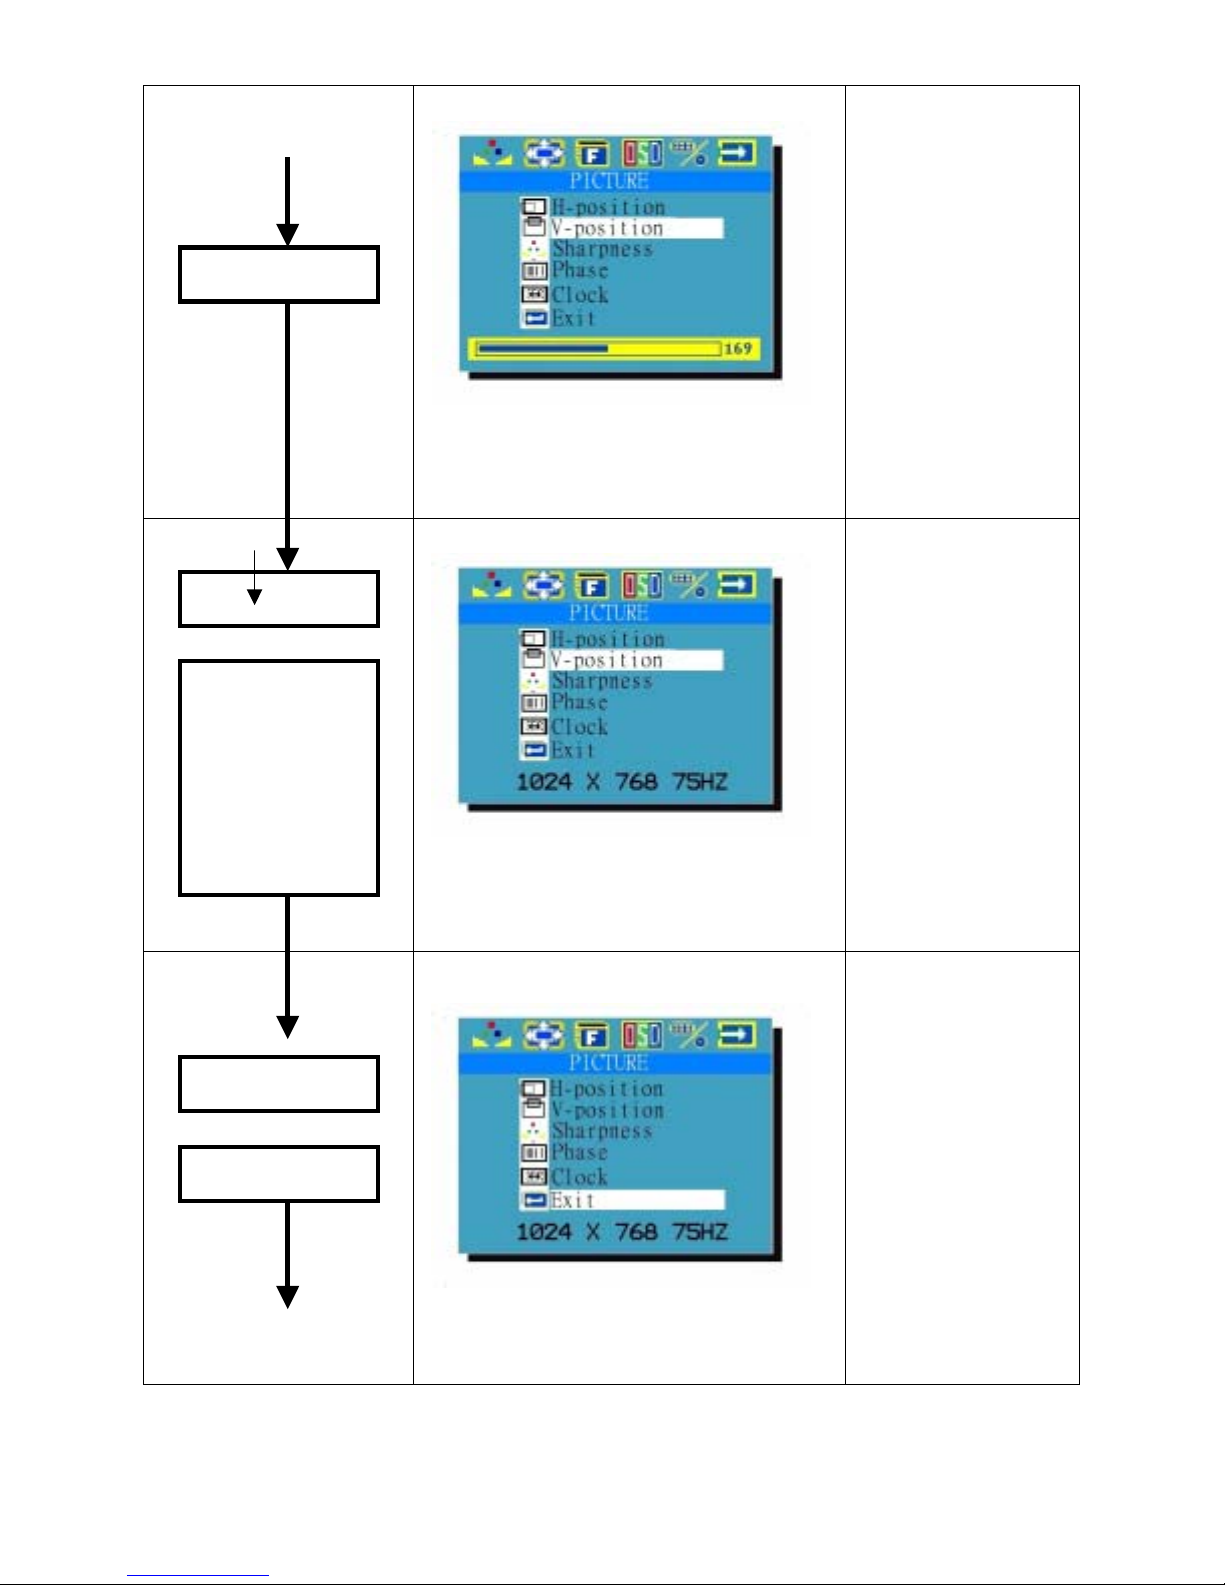
Step 7
Example: V-Position
* Keeps pressing
+/- key
Step 8
Manu key
V-position
adjustment is
completed.
The system is
ready for next
selection
3. “Image icon” keeps flashing.
4. “V-Position” on indigo light.
Example: V-Position
“+ key”:
Value in the Scale is
increasing until 20
* Keeps pressing
-
key”:
“
Value in the Scale is
decreasing until 0
Release the key, the
value will stop at
the satisfied point.
3. “Image icon” keeps flashing.
Step 9
+/-key
To select Exit
4. “V-Position” on indigo light.
Example: Exit
3. “Image icon” keeps flashing.
4. “Exit” on indigo light.
13
As for Sharpness,
Phase or Clock
adjustment: Repeat
step 5~ Step 8.
Version:1.0
Page 14
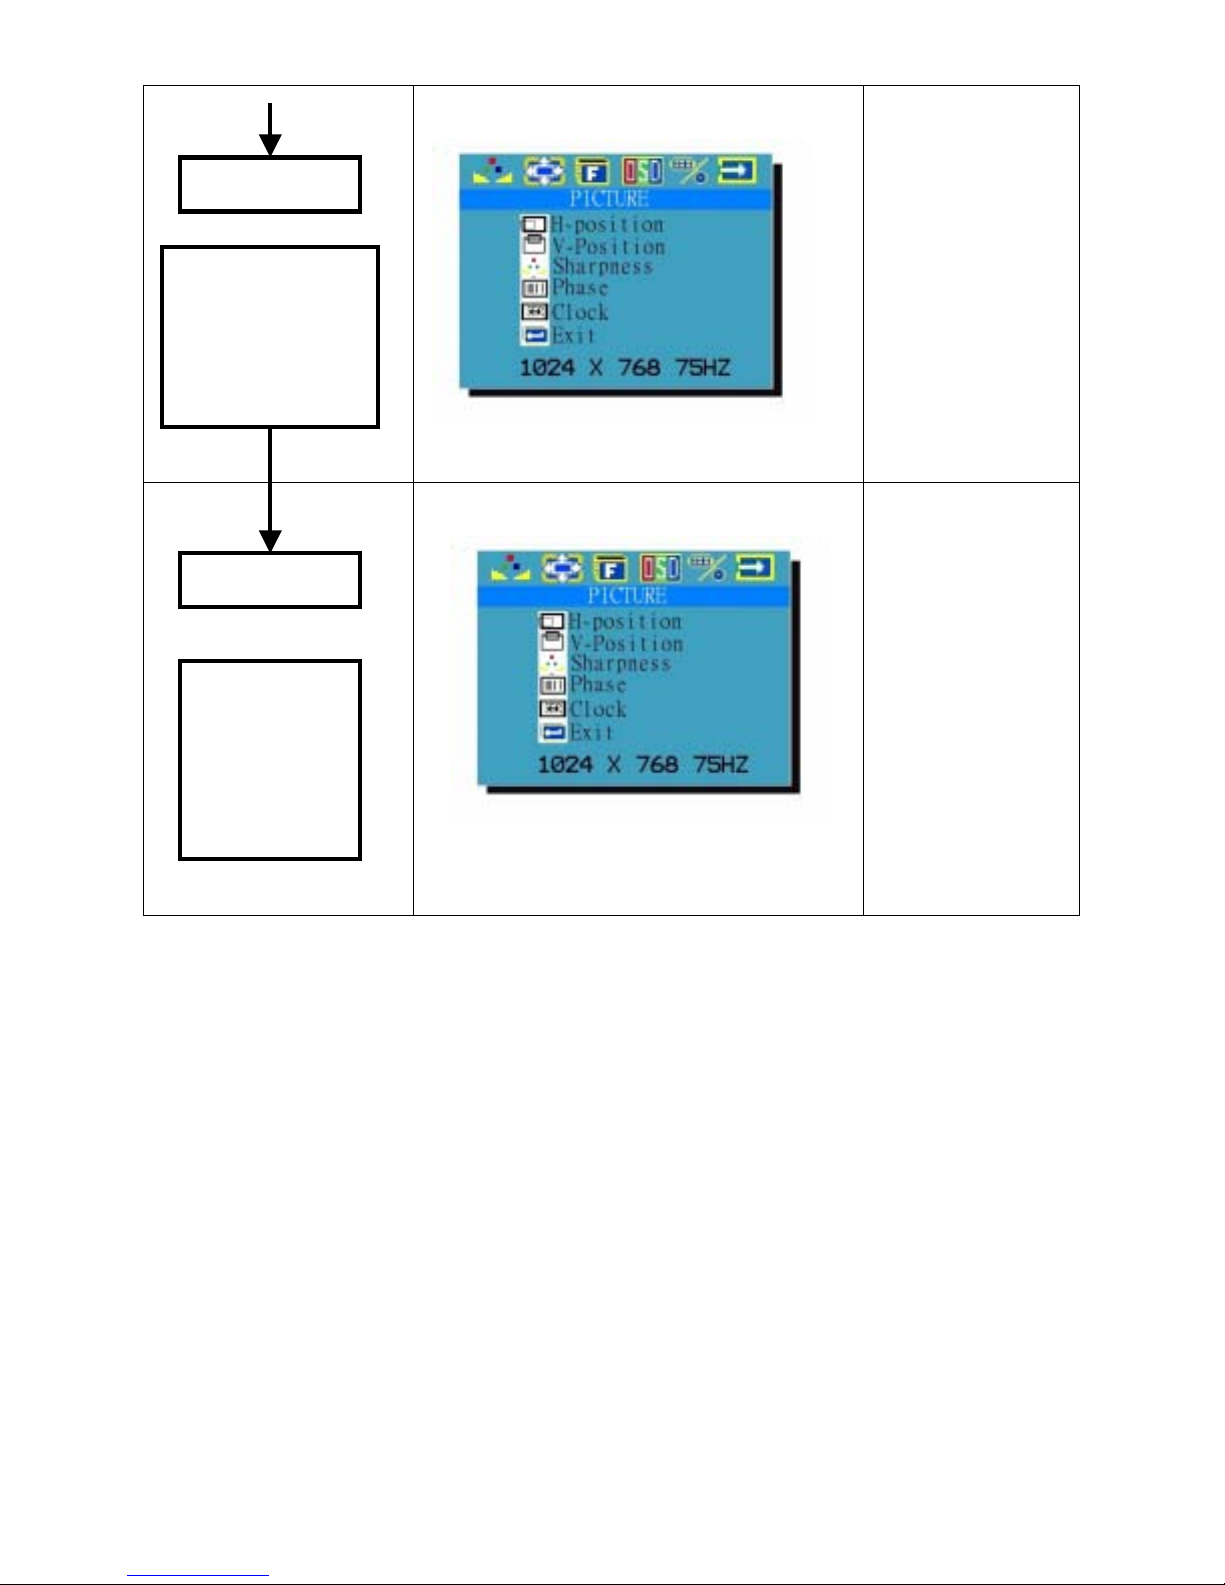
Step 10
Example: Exit
Manu key
System backs to
Mode Selection
Status and is
ready to select:
Step 11
+/-key
Section 1 or
Section 3 or
Section 4 or
Section 5 or
Section 6
1. “Image icon” keeps flashing.
The selected icon become flashing.
14
Version:1.0
Page 15
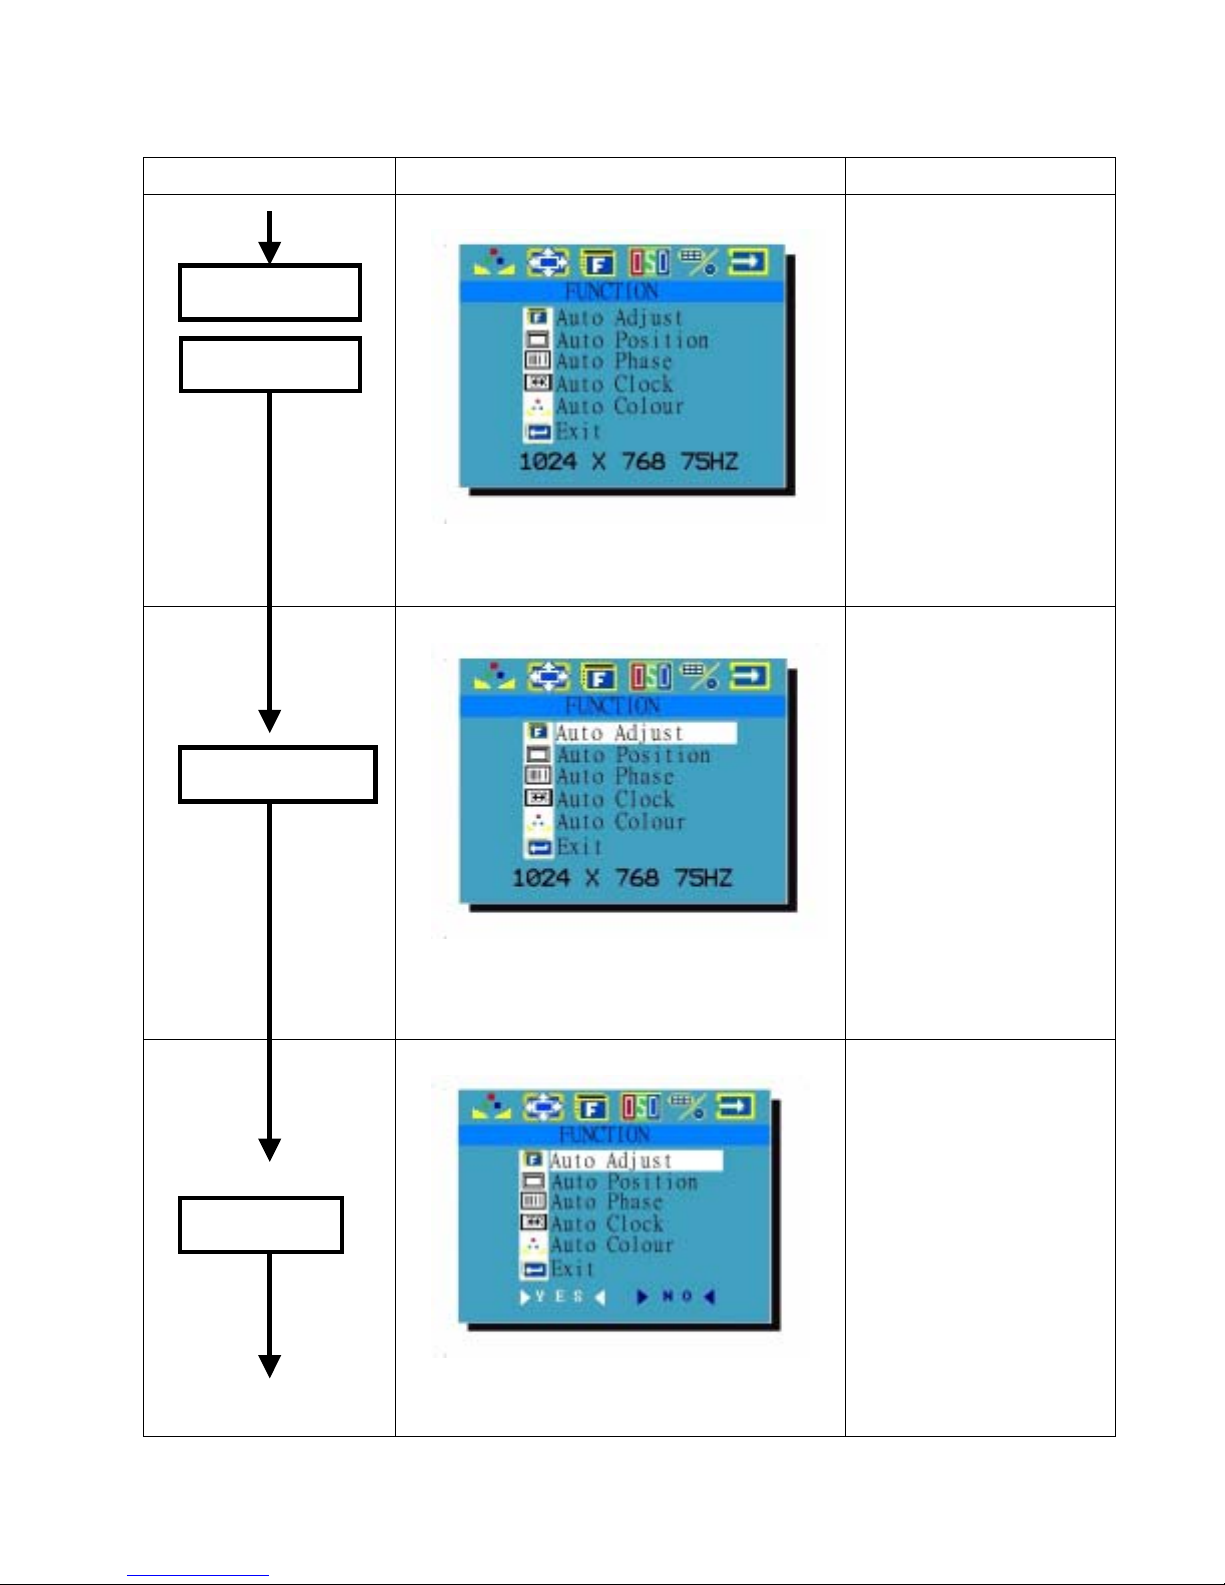
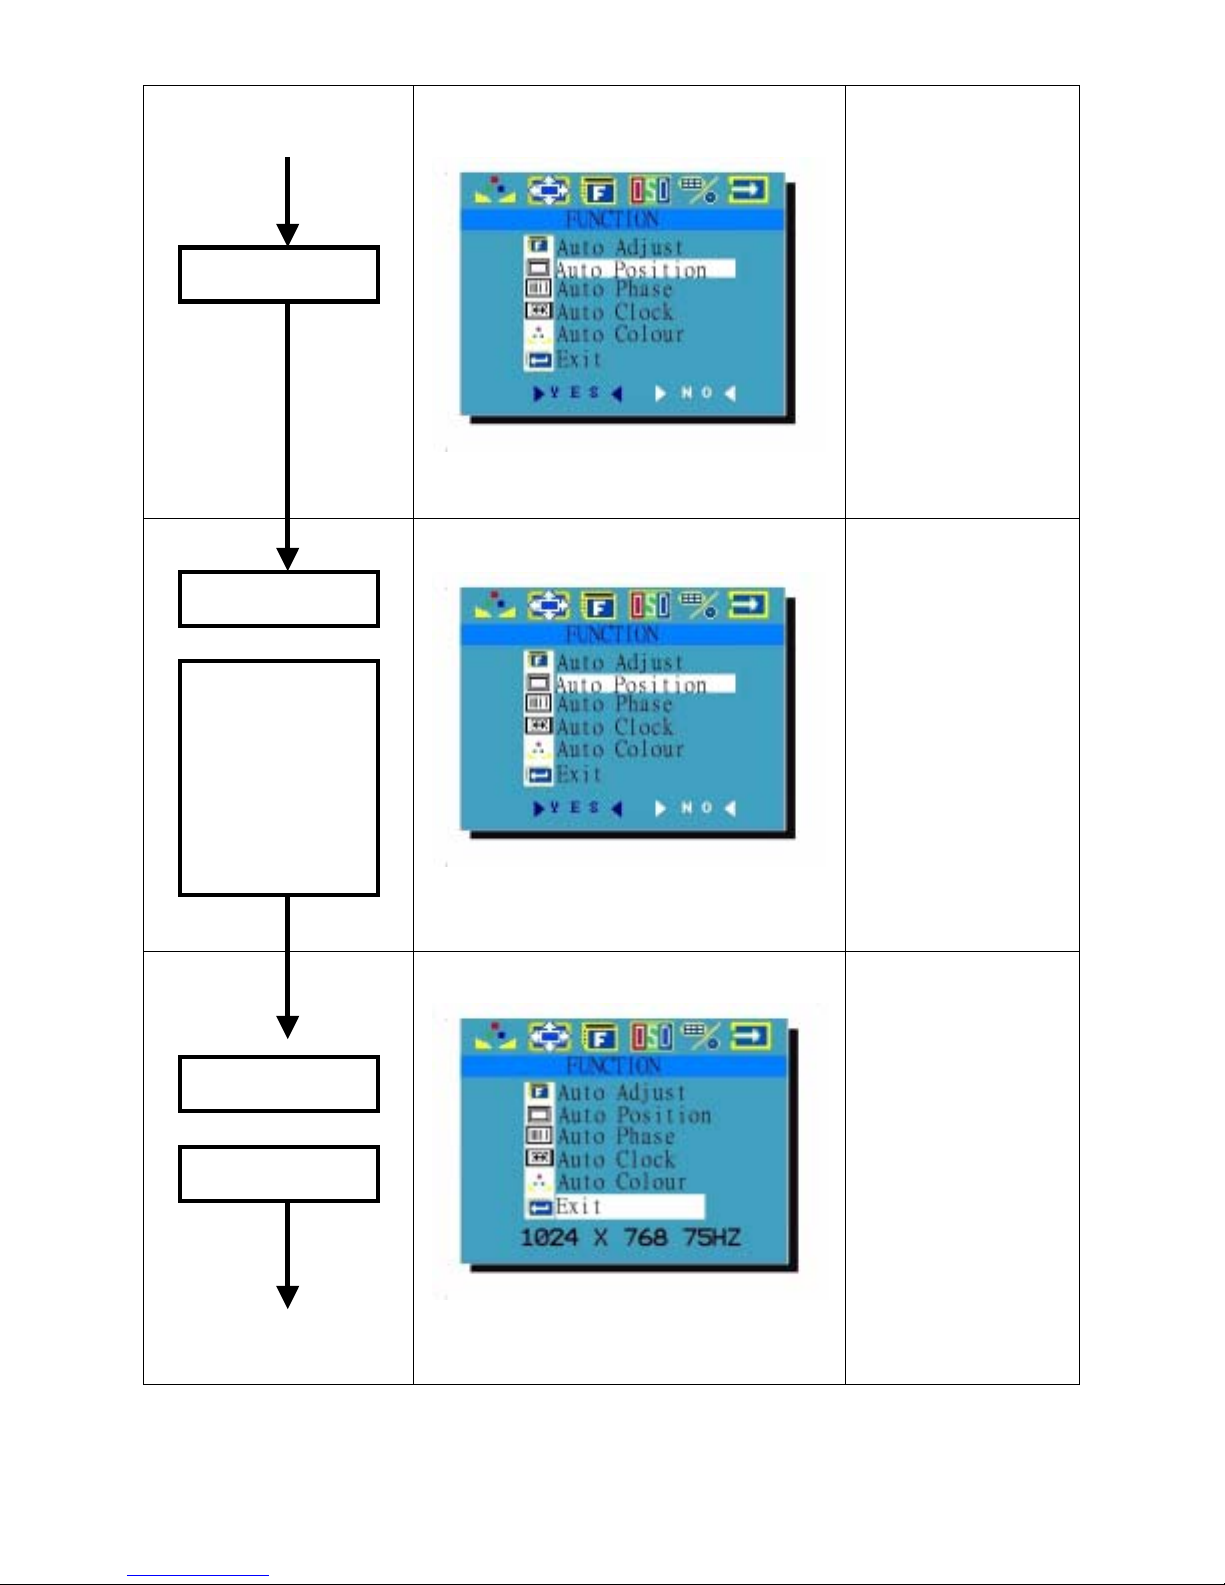
Section 3: Function Execution
Key to be pressed Menu Display Remark
Step 1
Menu Key
Auto config
Step 2
Menu Key
Example: Auto Configuration
5. “Function icon” keeps flashing.
6. “A. Config” marked by indigo light.
Example: Auto Configuration
Manu pressed and
Display: Auto Config.
-
Selected by +/
key:
Auto Position.
Auto Phase.
Auto Clock.
Auto Balance.
Exit
Step 3
+/- key
7.
“Function icon” keeps flashing..
8. Yes/No execution shows up.
Example: Auto Configuration
“Function icon” keeps flashing.
* Presses “+ key” to
select “Yes.”
-
* Presses “
key” to
select “No.”
15
Version:1.0
Page 16
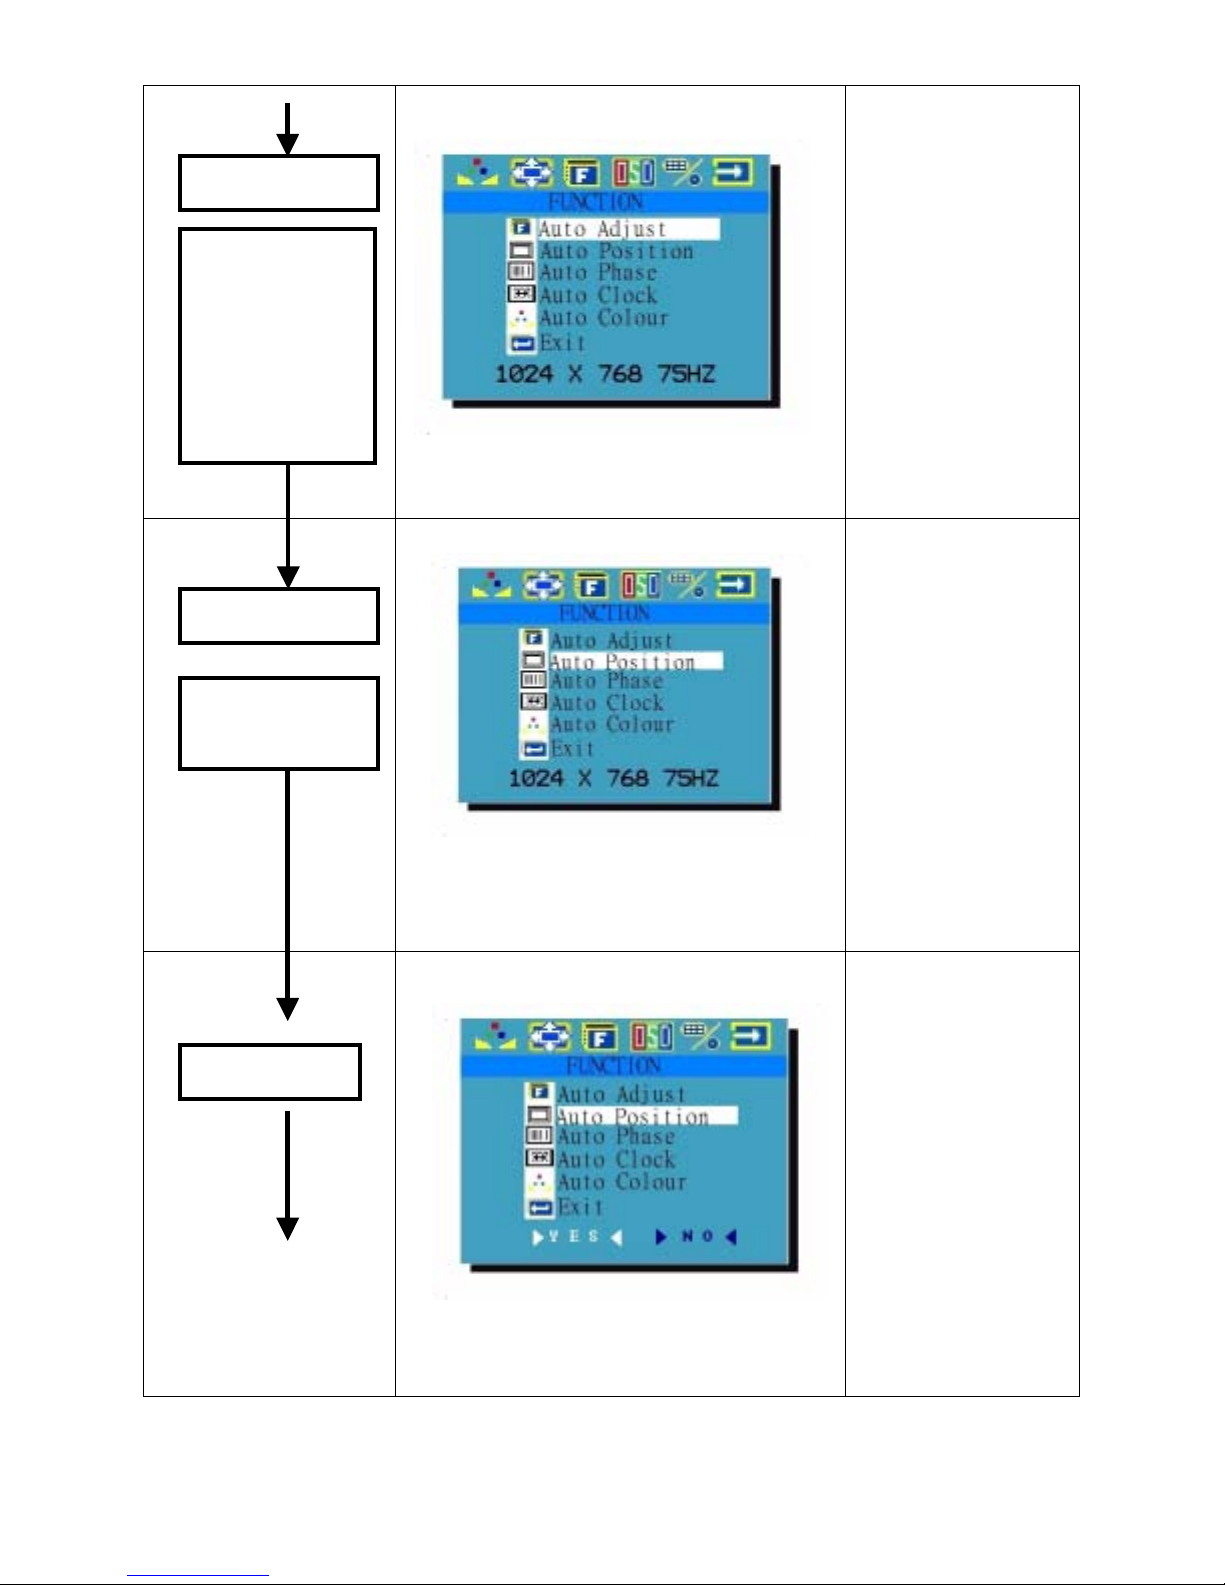
Step 4
Example: Auto Configuration
Menu Key
Auto Config.
is completed.
The system is
ready for next
selection
Step 5
+/- key
To select
Auto-Position
5.
“Function icon” keeps flashing.
Example: Auto-Position
If selects:
Auto Phase, Auto
Clock or Auto
Balance:
Repeat step 3~ 5 to
execute.
Step 6
Manu Key
1. “Function icon” keeps flashing.
2. “Auto position” Marked on Indigo
light.
Example: Auto-Position
7.
“Function icon” keeps flashing.
8. Yes/No execution shows up.
16
Version:1.0
Page 17
Step 7
Example: Auto-Position
* Presses “+ key”
+/- key
Step 8
Manu key
Auto-Position
execution is
completed.
The system is
ready for next
selection
to select “Yes.”
-
* Presses “
key”
to select “No.”
“Function icon” keeps flashing.
Example: Auto-Position
Step 9
+/-key
To select Exit
“Function icon” keeps flashing.
Example: Exit
5. “Fuction icon” keeps flashing.
6. “Exit” marked on indigo light.
17
As for Auto Phase,
Auto Clock or Auto
Balance:
Repeat step 5~
step 8.
Version:1.0
Page 18
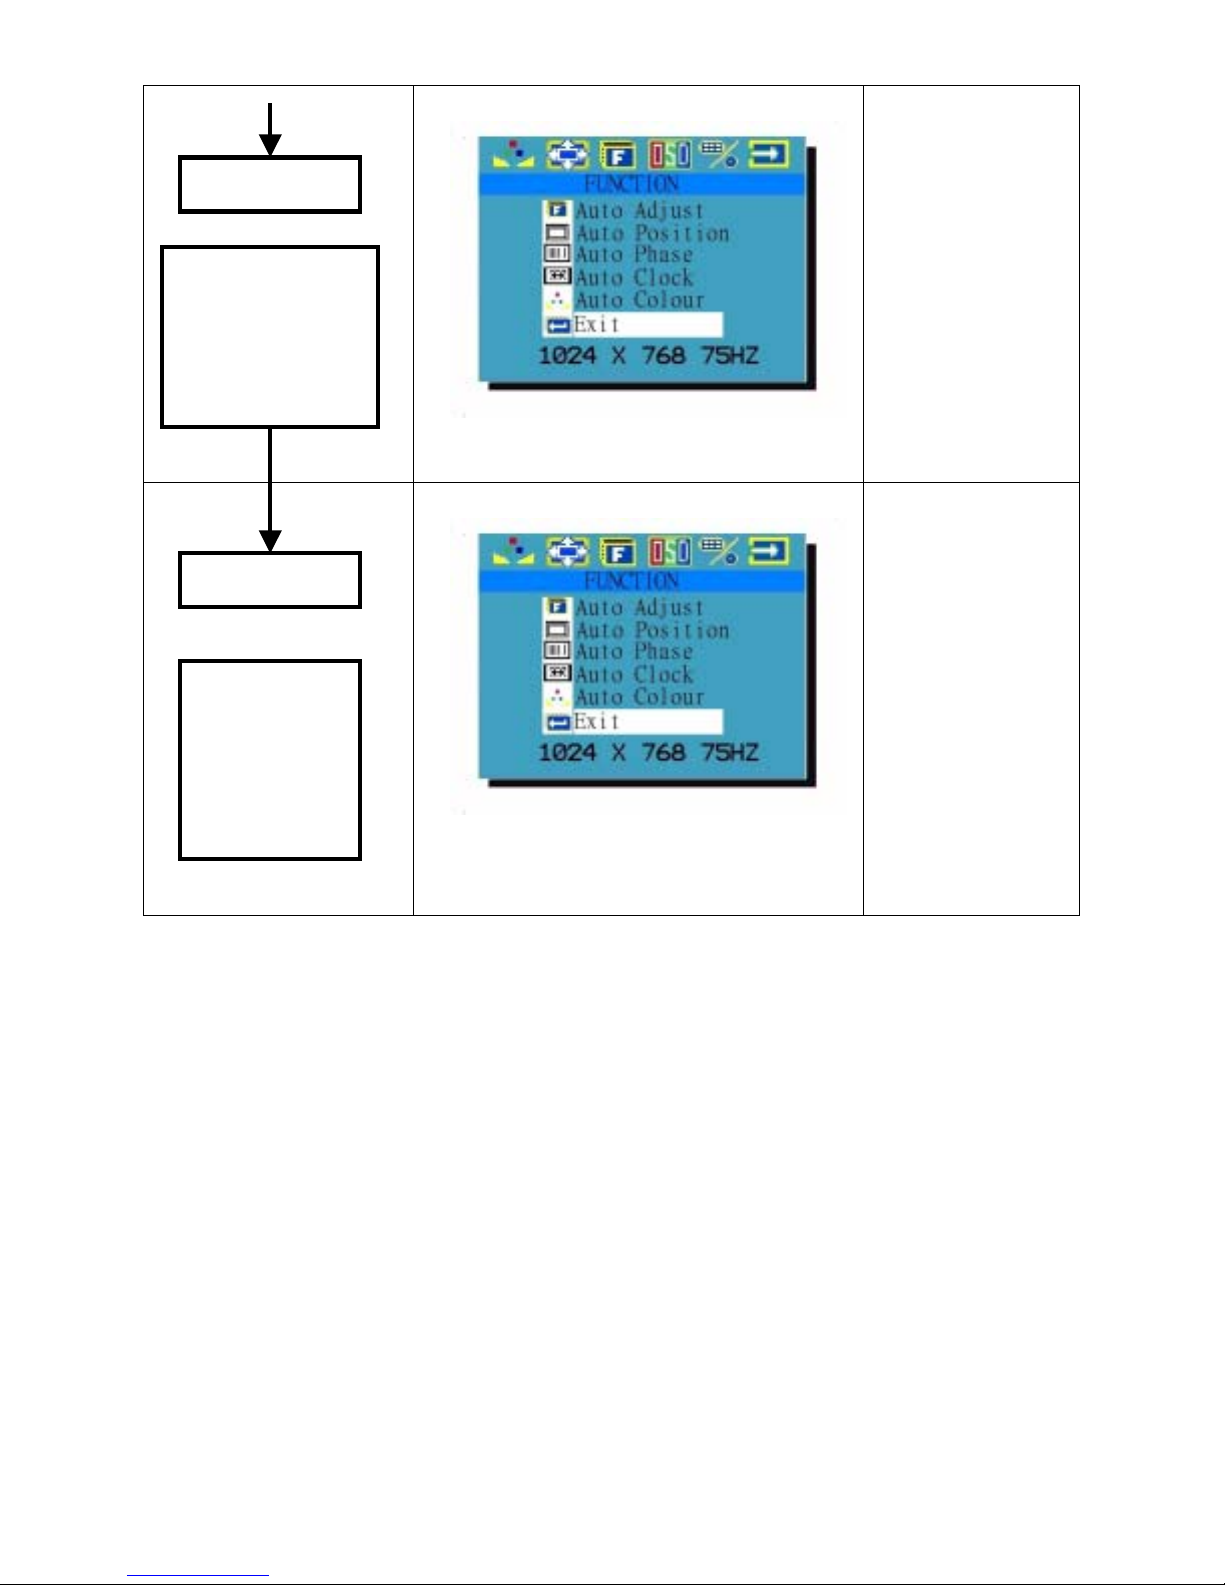
Step 10
Example: Exit
Manu key
System backs to
Mode Selection
Status and is
ready to select:
Step 11
+/-key
Section 1 or
Section 2 or
Section 4 or
Section 5 or
Section 6
“Function icon” keeps flashing.
The selected icon become flashing.
18
Version:1.0
Page 19
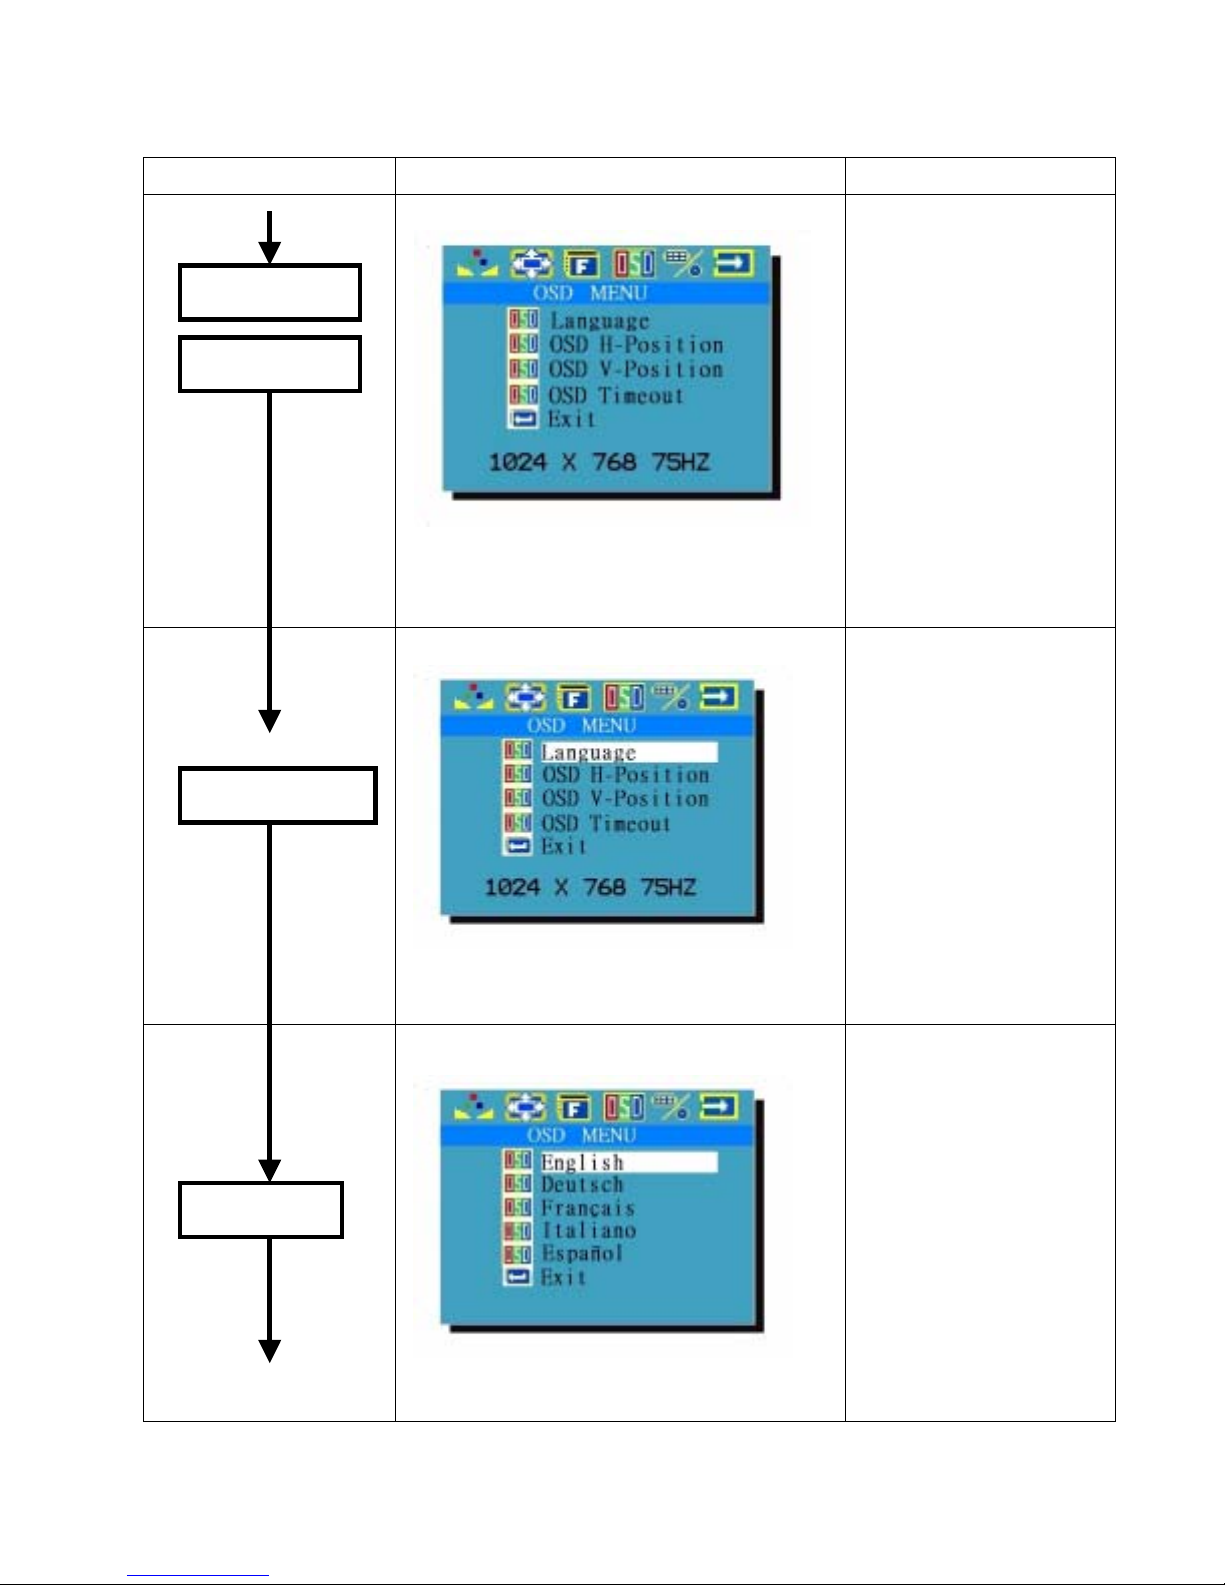
Section 4: OSD Manu Adjustment
Key to be pressed Menu Display Remark
Step 1
Menu Key
Language
Step 2
Menu Key
Example: Language
7. “OSD Manu icon” keeps flashing.
8. “Language” marked by indigo light
Example: Language
Manu pressed and
Display: Language
-
Selected by +/
key:
OSD H-Position.
OSD V-Position.
OSD Timer.
Exit
Language Table:
English.
Germany.
France.
Spanish
Italy
Step 3
+/- key
9.
“OSD Manu icon” keeps flashing..
10. Language table shows up.
Example: Language
* Presses “+ key” to
select the language
downward
* Presses “
select the language
upward.
“OSD Manu icon” keeps flashing.
key” to
19
Version:1.0
Page 20
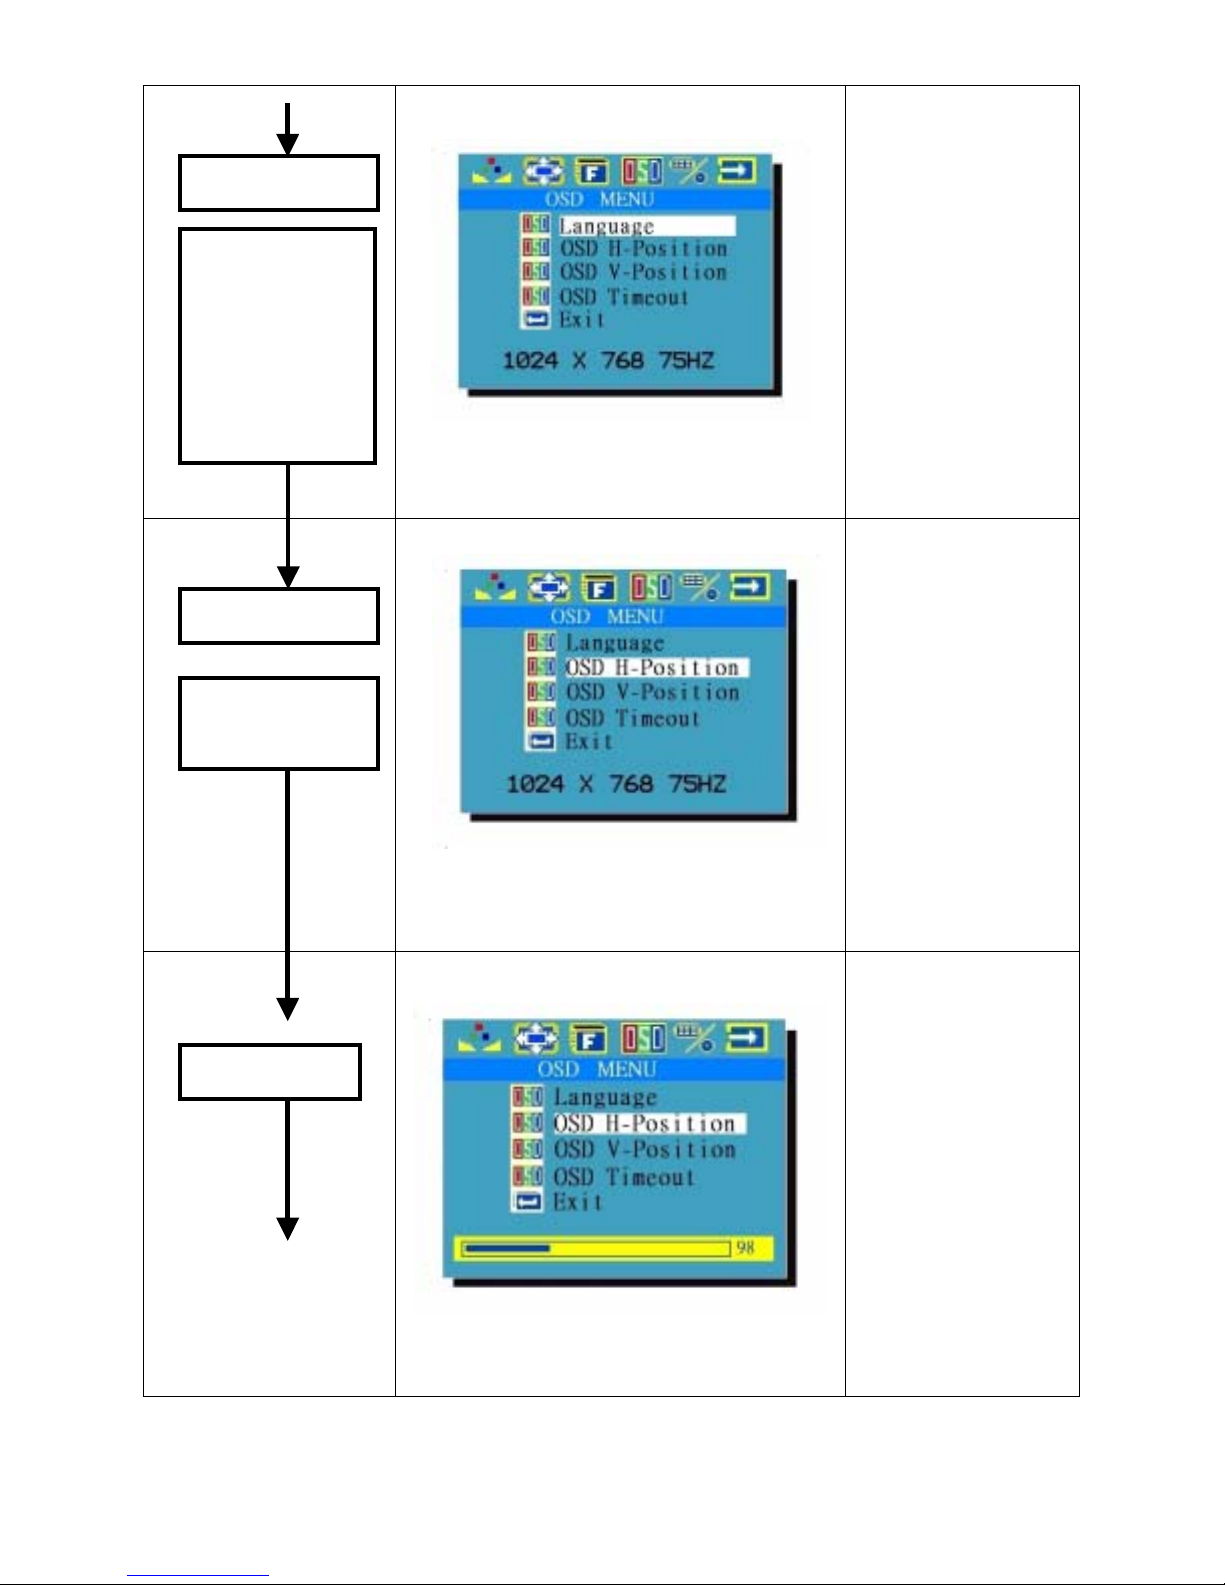
Step 4
Example: Language
Menu Key
Language
setting is
completed.
The system is
ready for next
selection
Step 5
+/- key
To select OSD
H-Position
6.
“OSD Manu icon” keeps flashing.
Example: OSD H-Position
Adjusting Range:
OSD Position:
H-Position: 0~120
V-position: 0~ 120
If selects:
OSD V-Position.
Step 6
Manu Key
3. “OSD Manu icon” keeps flashing.
4. “OSD H-position” Marked on
Indigo light.
Example: OSD H-Position
OSD Timer.
Repeat step 3~ 5 to
execute.
9.
“OSD Manu icon” keeps flashing.
10. Adjusting Scale of 0~120 shows up.
20
Version:1.0
Page 21
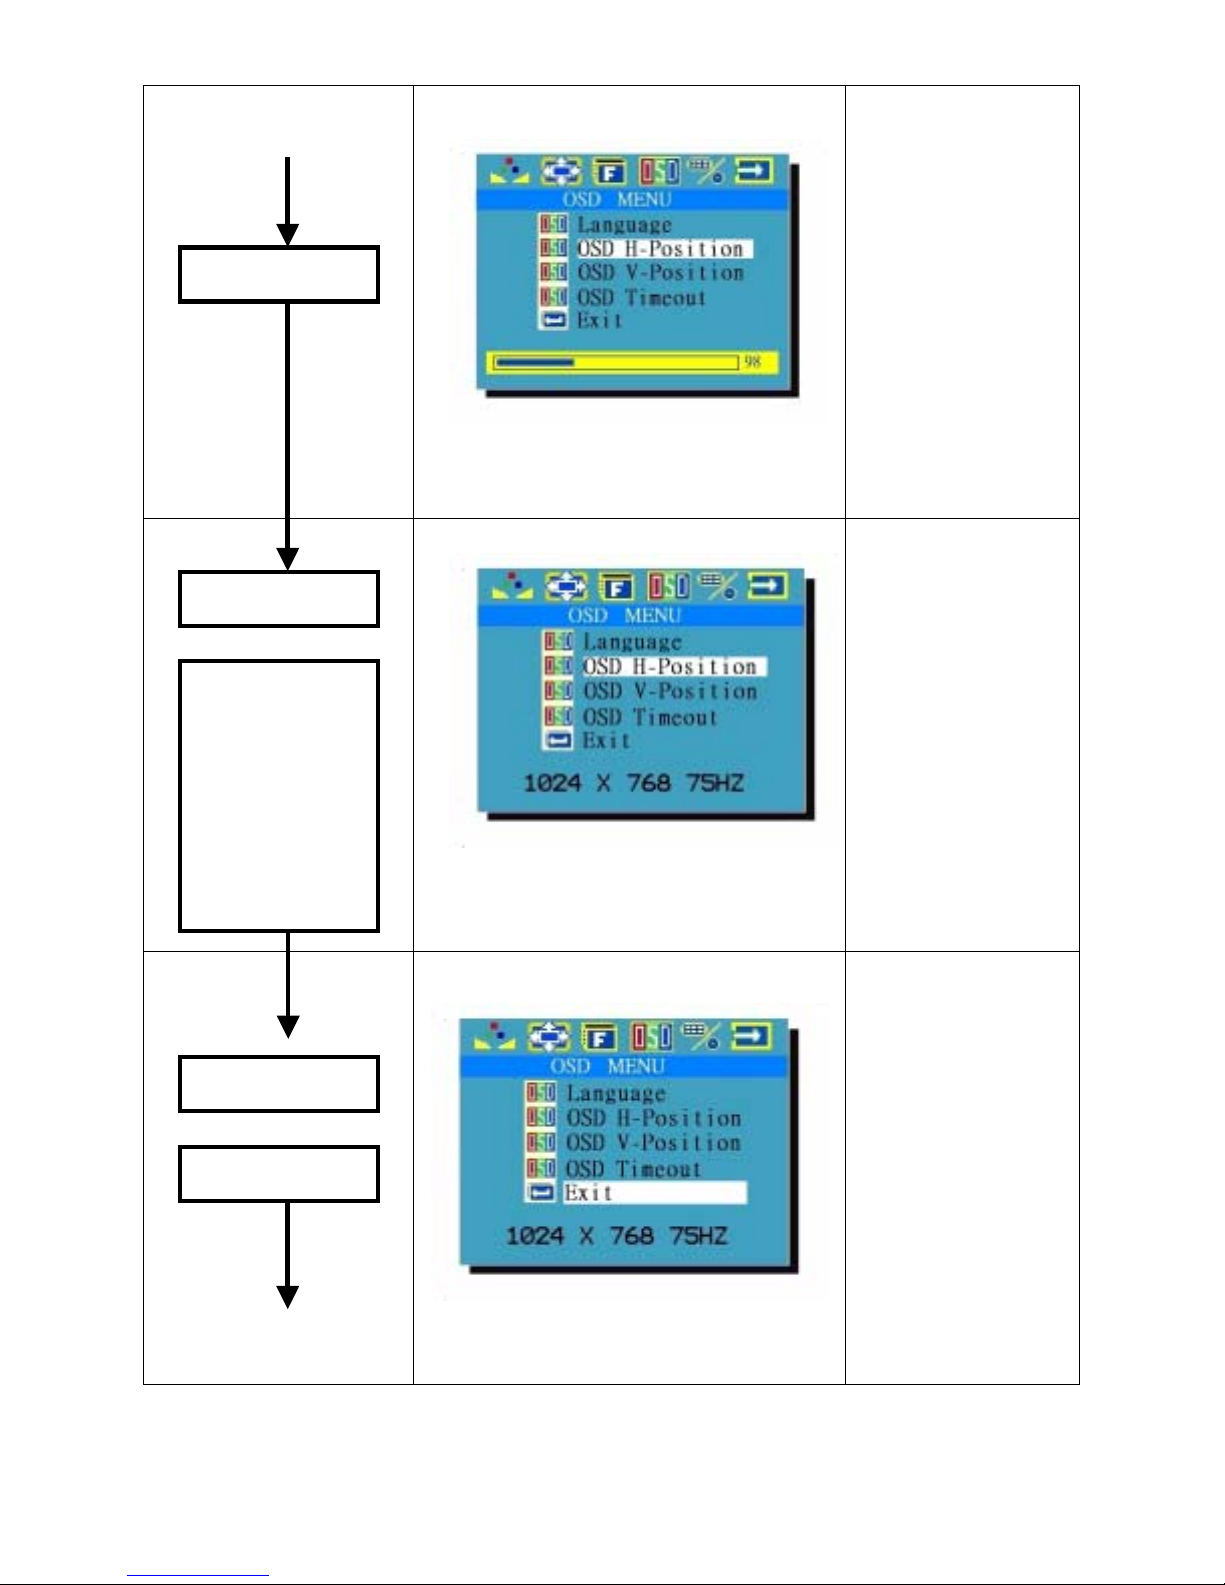
Step 7
Example: OSD H-Position
* Keeps presses
+/- key
Step 8
Manu key
OSD
H-Position
adjustment is
completed.
The system is
ready for next
selection.
“+ key”:
Value in the Scale is
increasing until 120
* Keeps presses
-
key”:
“
Value in the Scale is
decreasing until 0
Release the key, the
value will stop at
the satisfied point.
“OSD Manu icon” keeps flashing.
Example: OSD H-Position
“OSD Manu icon” keeps flashing.
Step 9
+/-key
To select Exit
Example: Exit
7. “OSD Manu icon” keeps flashing.
8. “Exit” marked on indigo light.
21
As for OSD Timer.
Repeat step 5~
step 8.
Version:1.0
Page 22
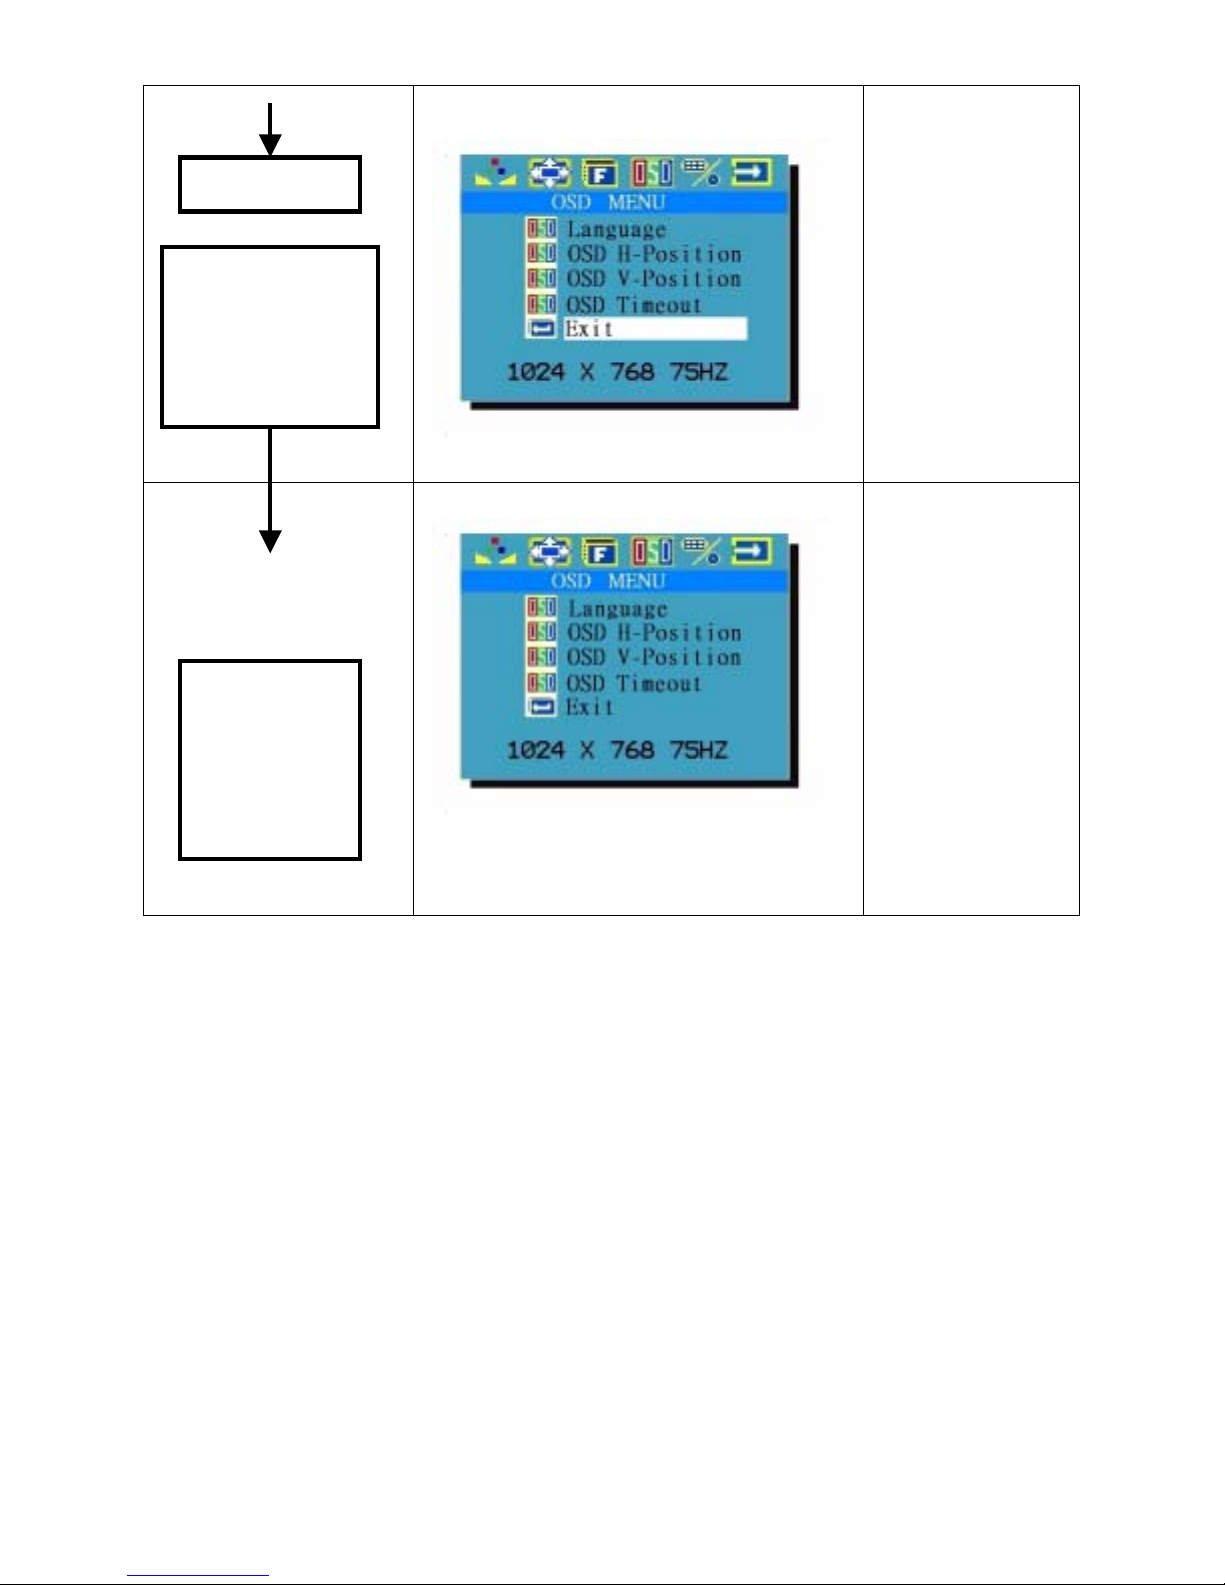
Step 10
Example: Exit
Manu key
System backs to
Mode Selection
Status and is
ready to select:
Step 11
Section 1 or
Section 2 or
Section 3 or
Section 5 or
Section 6
“OSD Manu icon” keeps flashing.
The selected icon become flashing.
22
Version:1.0
Page 23
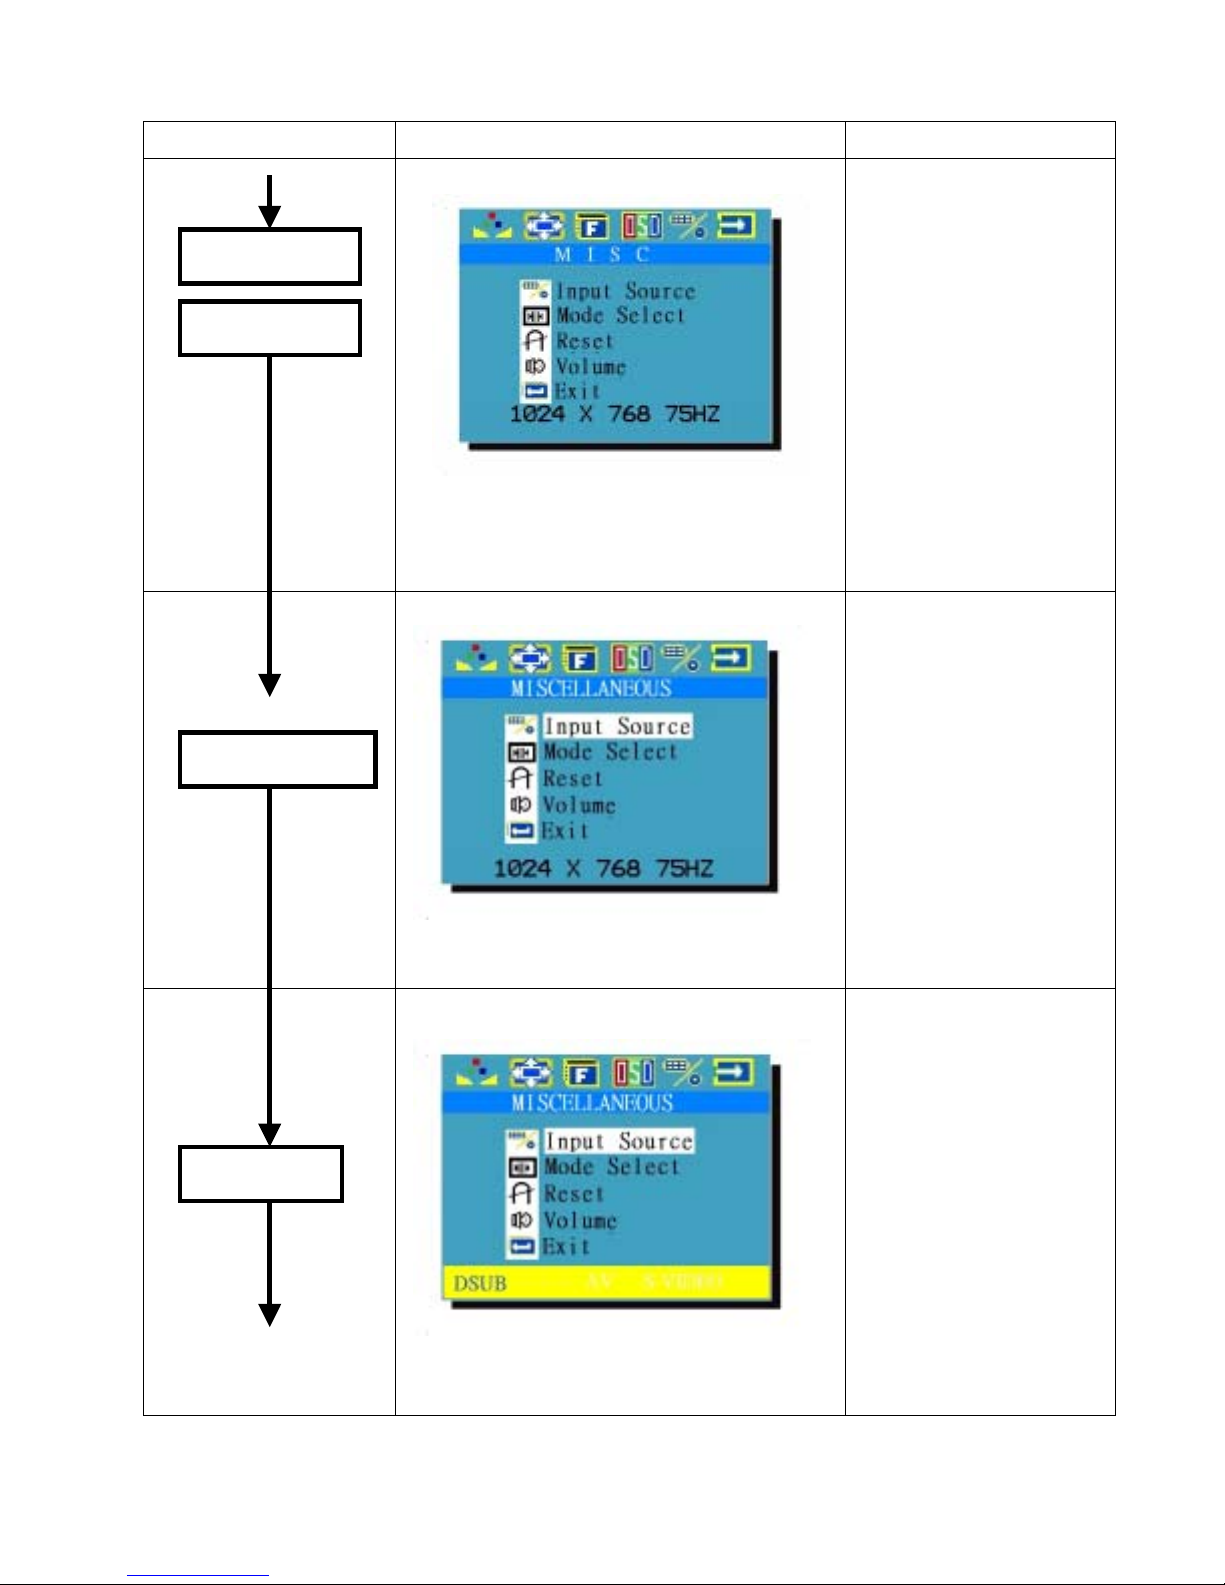
Section 5: Function Execution
Key to be pressed Menu Display Remark
Step 1
Menu Key
Input Source
Step 2
Menu Key
Example: Input Source
9. “Misc icon” keeps flashing.
10. “Input Source” marked by indigo
light.
Example: Input Source
Manu pressed and
Display: Input Source.
-
Selected by +/
key:
Mode Option.
Reset.
Exit
Step 3
+/- key
11.
“Misc icon” keeps flashing..
12. “DSUB/AV/S-VIDEO” shows up
Example: Input Source
“Misc icon” keeps flashing.
Presses “+ key” to
select one of the Input
Source among DSUB,
AV or S-VIDEO
rightward.
-
* Presses “
key” to
select one of the Input
Source among DSUB,
AV, S-VIDEO leftward
23
Version:1.0
Page 24
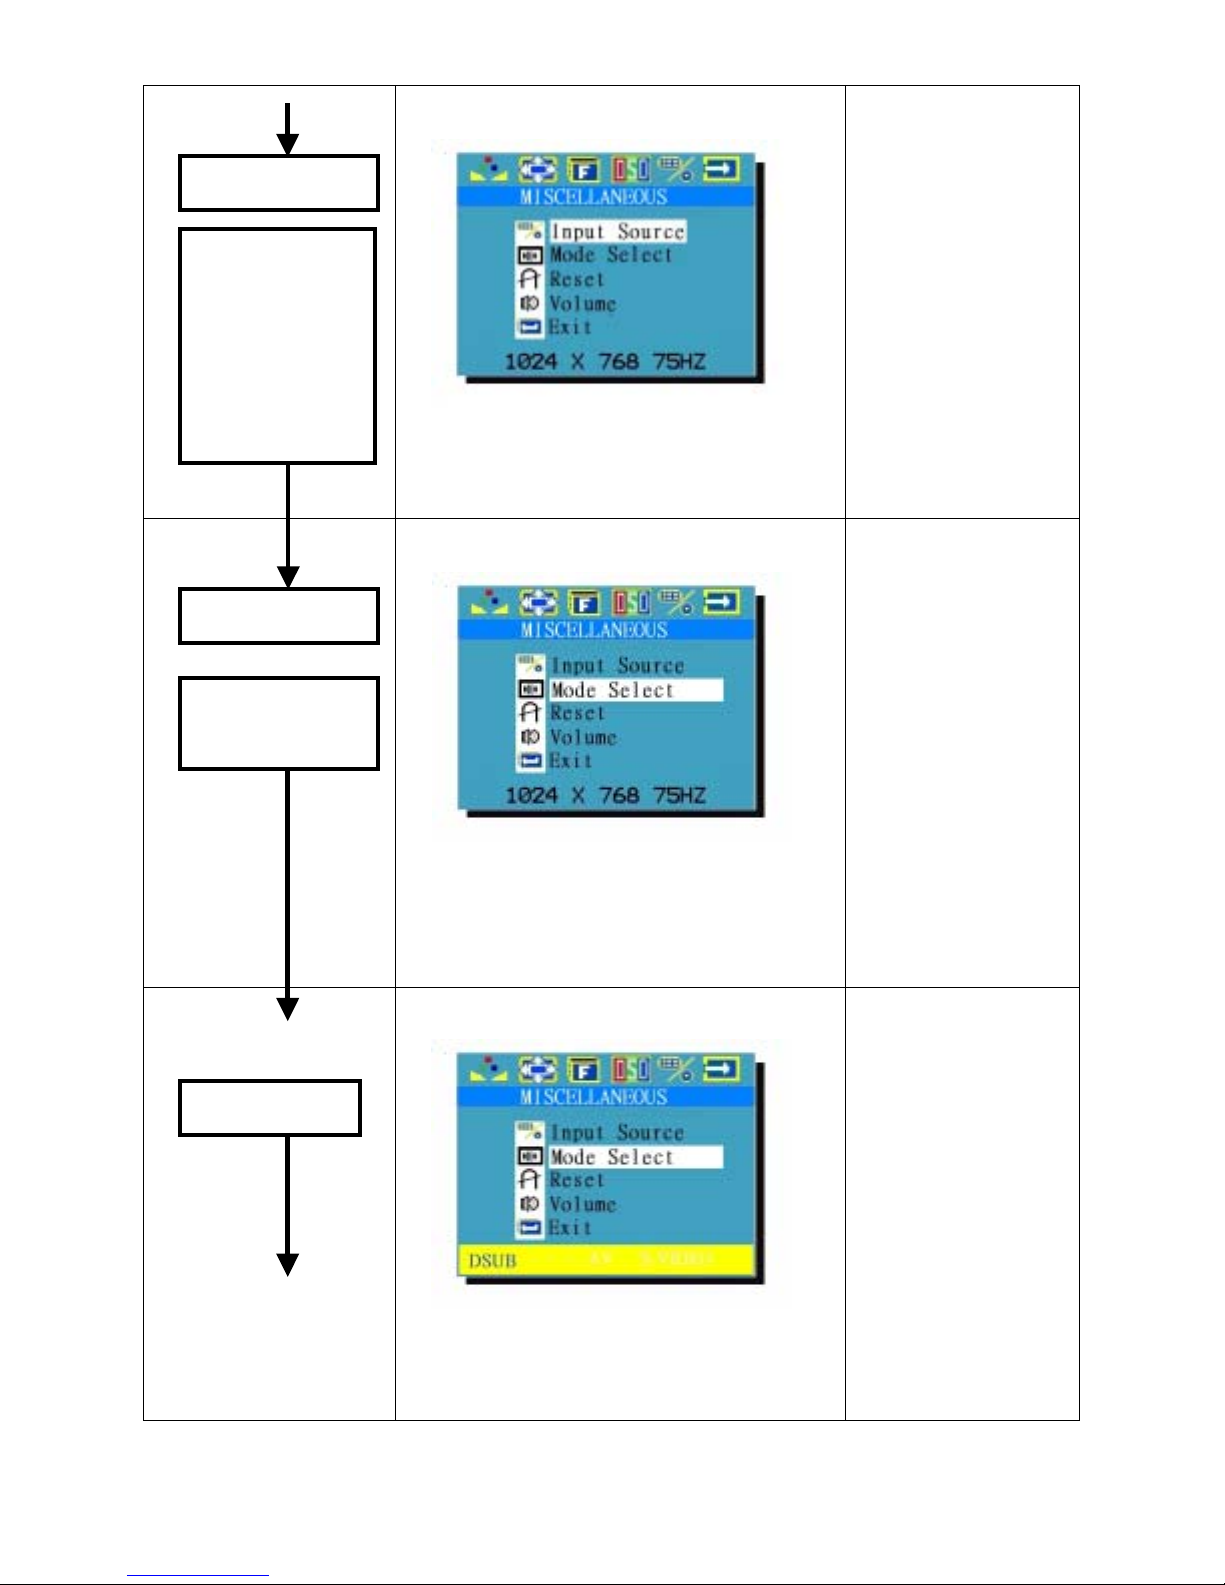
Step 4
Example: Input Source
Menu Key
Input Source
Selection is
completed.
The system is
ready for next
selection.
Step 5
+/- key
To select
Mode Option
“Misc icon” keeps flashing.
Example: Mode Option
If selects:
Reset.
Repeat step 3~ 5 to
execute.
Step 6
Manu Key
5. “Misc icon” keeps flashing.
6. “Mode Option” Marked on Indigo
light.
Example: Mode Option
11.
“Misc icon” keeps flashing.
12. MAC 768-75/VESA768-75 shows
up.
24
Version:1.0
Page 25
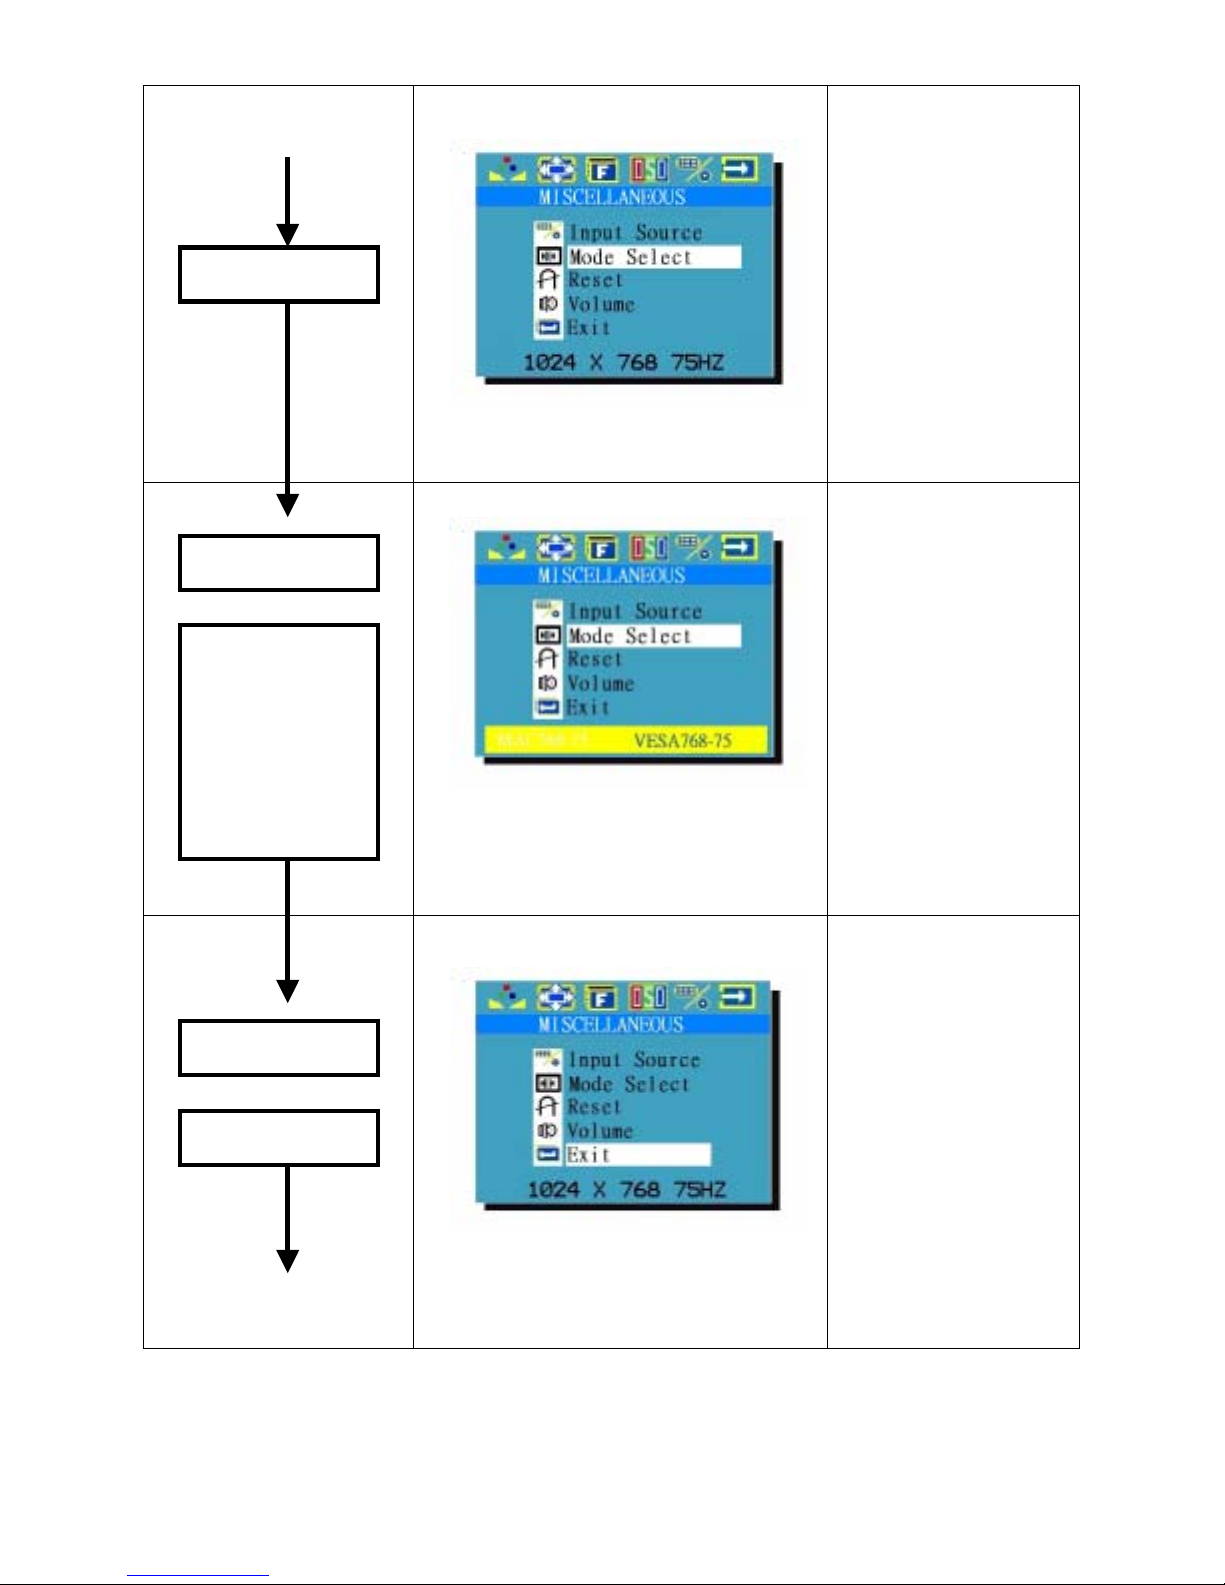
Step 7
Example: Mode Option
* Presses “+ key” to
+/- key
Step 8
Manu key
Mode Option
selection is
completed.
The system is
ready for next
selection
select “MAC768-75.”
-
* Presses “
key” to
select
“VESA768-75”
“Misc icon” keeps flashing.
Example: Mode Option
“Misc icon” keeps flashing.
Step 9
To select Exit
+/-key
Example: Exit
9. “Misc icon” keeps flashing.
10. “Exit” marked on indigo light.
As for Reset
Repeat step 5~step 8.
25
Version:1.0
Page 26
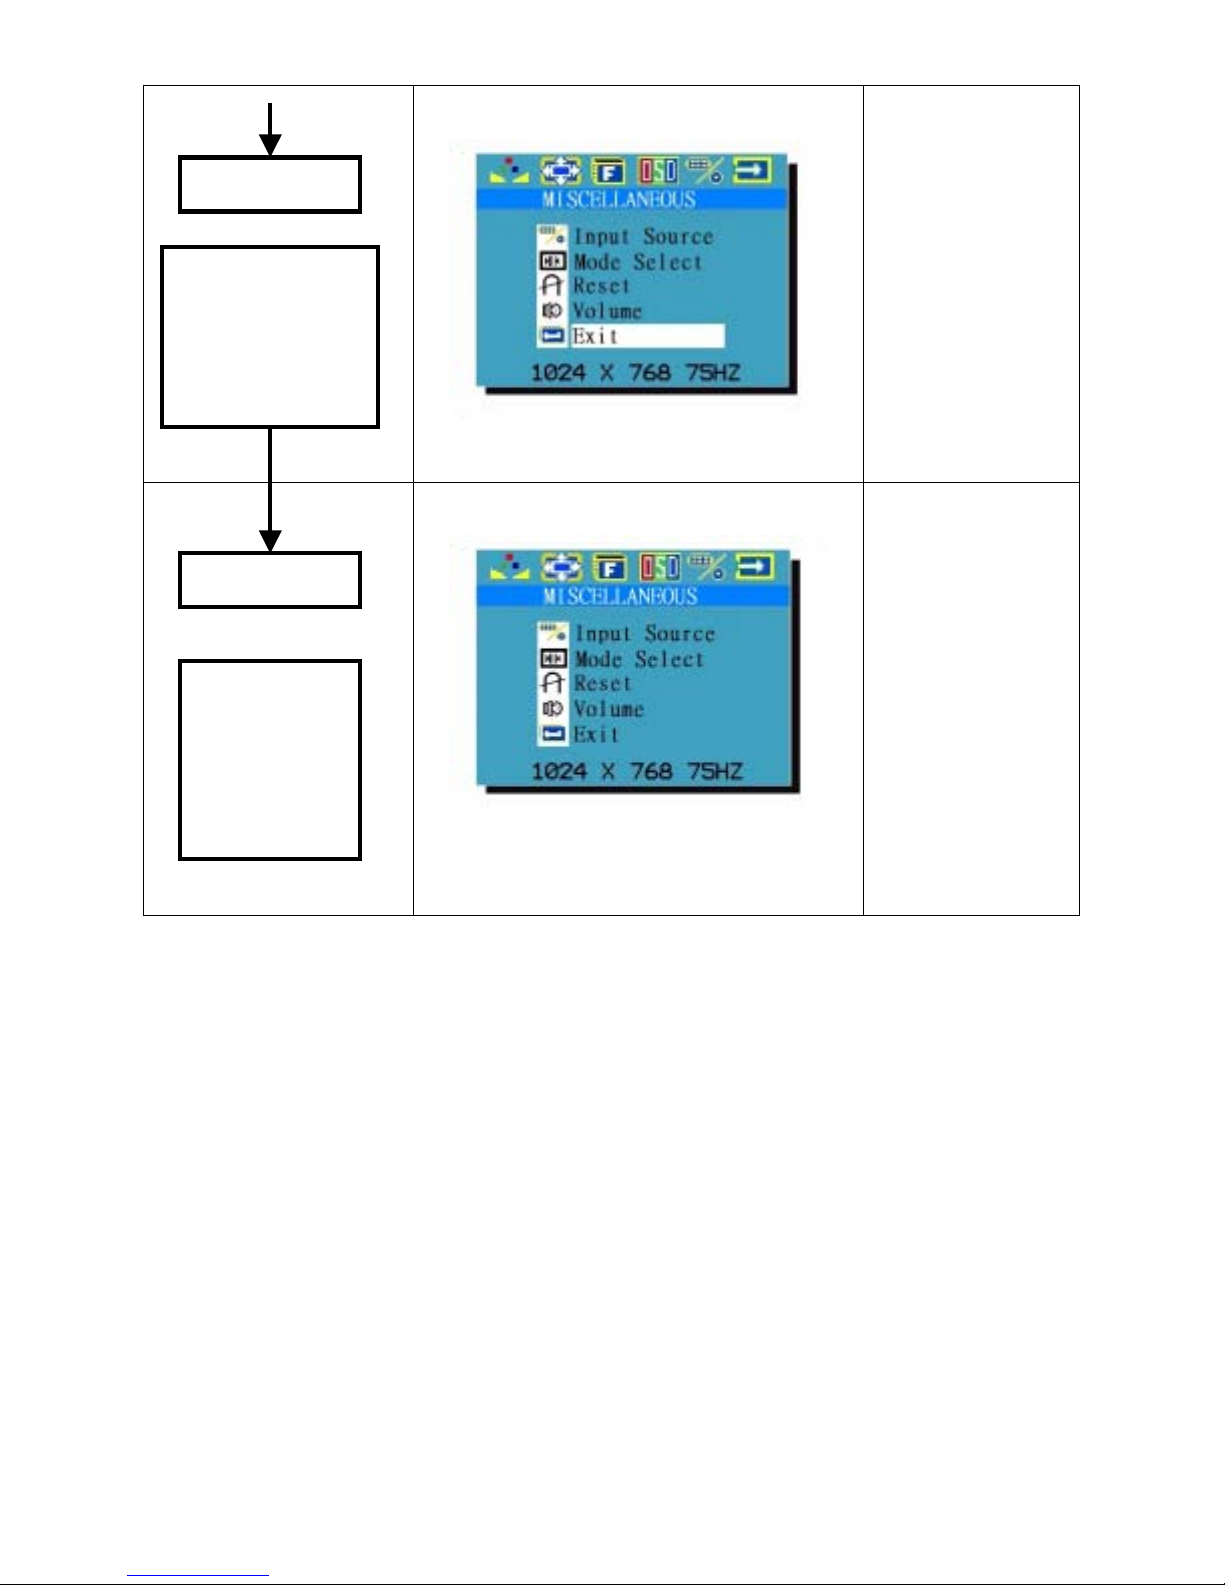
Step 10
Example: Exit
Manu key
System backs to
Mode Selection
Status and is
ready to select:
Step 11
+/-key
Section 1 or
Section 2 or
Section 3 or
Section 4 or
Section 6
“Misc icon” keeps flashing.
The selected icon become flashing.
26
Version:1.0
Page 27
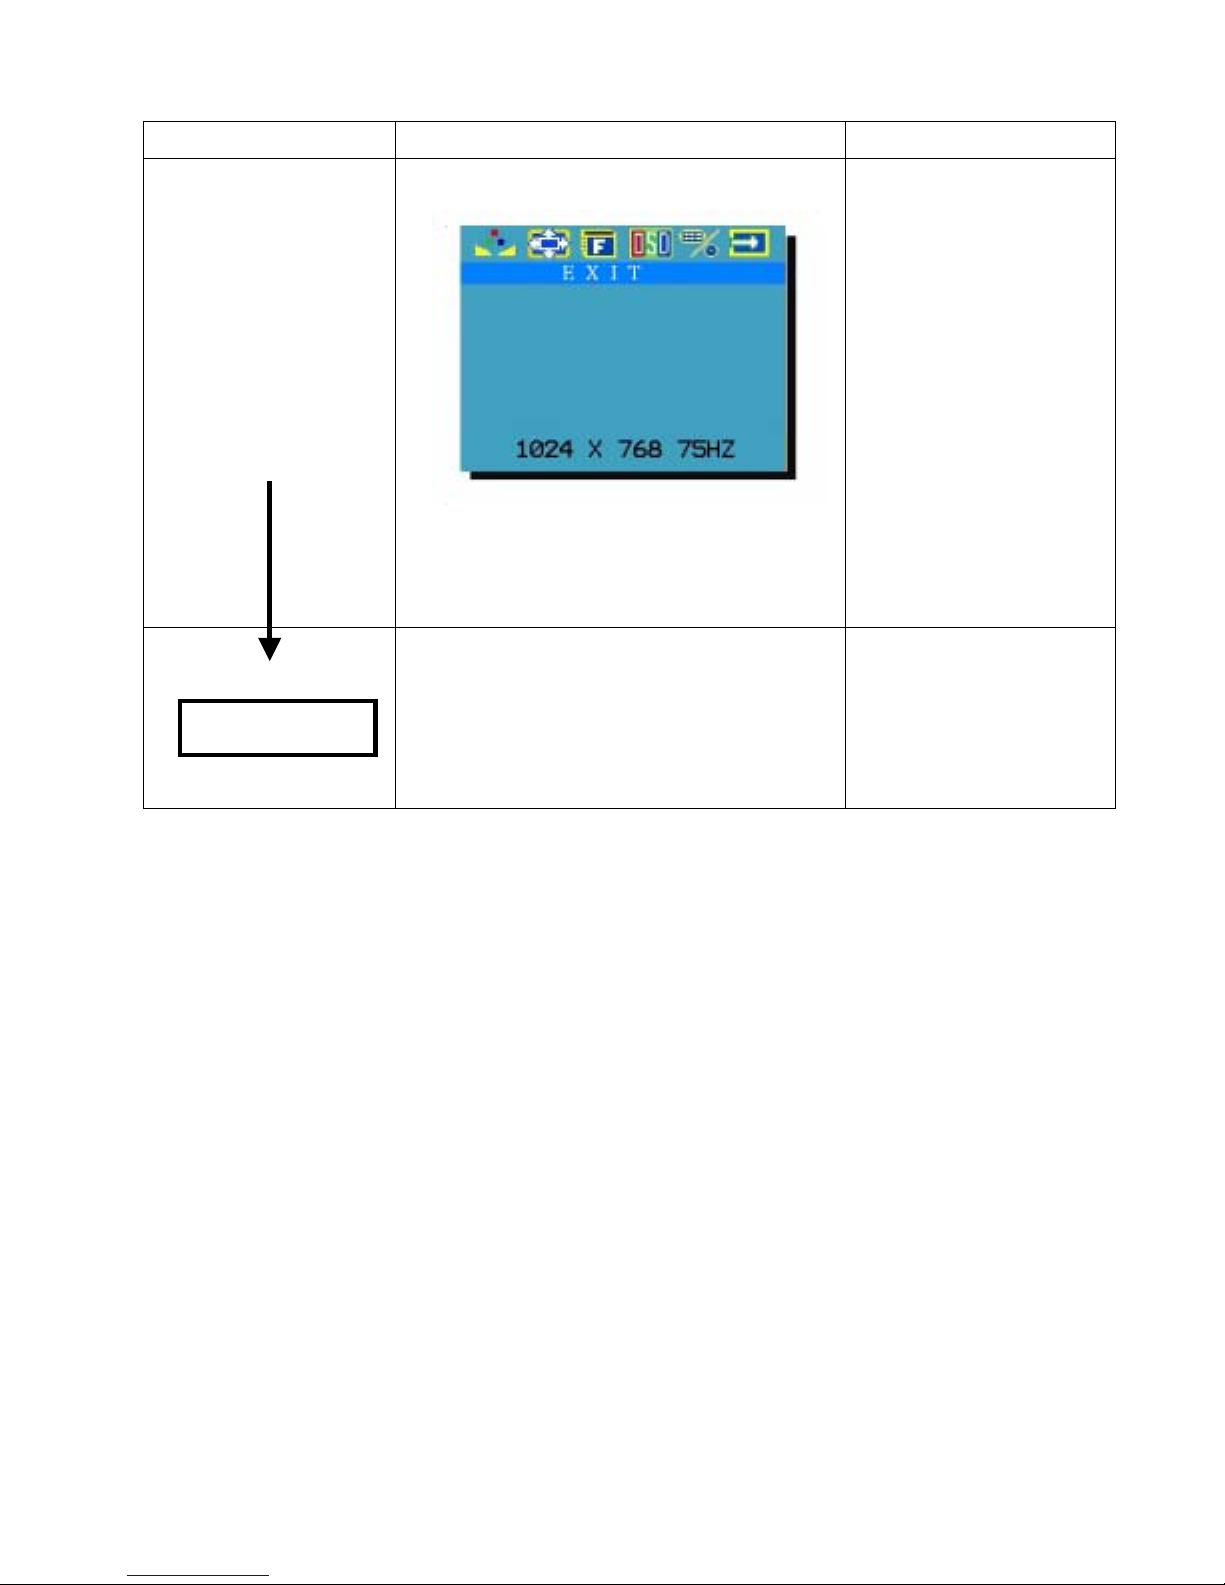
Section 6: OSD Exit
Key to be pressed Menu Display Remark
Mode Selection:
Exit
Step
Menu Key
Example: Exit
11. “Exit icon” keeps flashing.
12. Only “Exit” displayed on OSD.
OSD Disappeared
27
Version:1.0
Page 28
3.Specification and Appendix:
3-1
Technical Specification:
Model No. SH-3100-6.4 SH-3100-8.4SH-3200-10.4 SH-3210-12.1
LCD Panel: 12.1” TFT,
0.264mm, TTL
10.4”
8.4”
6.4”
V iewing Angle -80~80 degree
(H), -80~80
degree (V)
Resolution: 1280 x 1024
(SXGA)
1024 x 768
(XGA)
800 x 600
(SVGA)
640 x 480
(VGA)
8.4” TFT 10.4” TFT 12.1” TFT
800
600
(SVGA)
800
600
(SVGA)
800
600
(SVGA)
Display Colors: 16.7 M (8
bits/color)
Pixel Pitch
(mm):
Contrast
0.264 (H) x
0.264 (V)
450:1
Ration:
Brightness
350nit
(cd/m2):
Display Area
(mm):
337.92 (H) x
270.34 (V)
Power Supply: DC 12V Input DC 12V
Input
Power
management:
VESA-DPMS
30W Max.;
Power Down
Mode: less than
DC 12V
Input
DC 12V
Input
3W
28
Version:1.0
Page 29
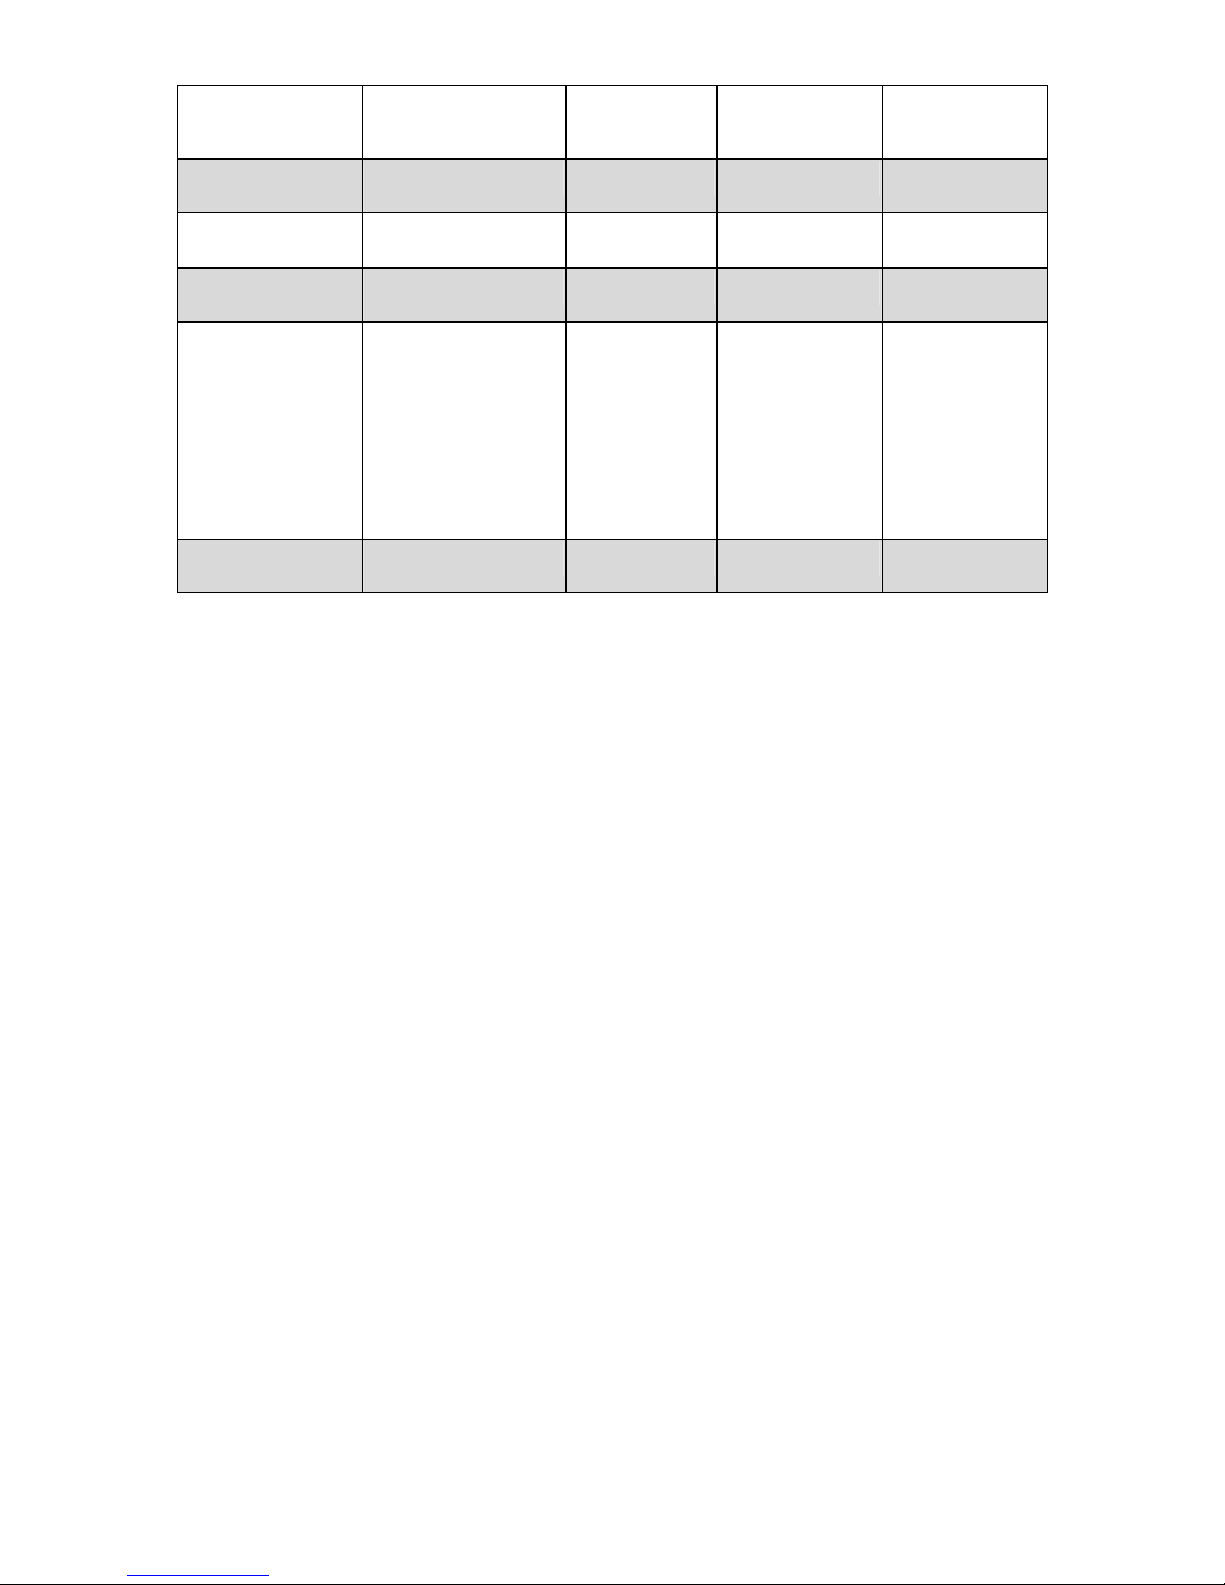
User’s Control: Power on/off,
OSD control
Environmental
Condition:
Operation Temp.:
0~50 degree C
Storage Temp.:
-20~60 degree C
Humidity:
10~90%
Accessories: Signal cable
29
Version:1.0
Page 30
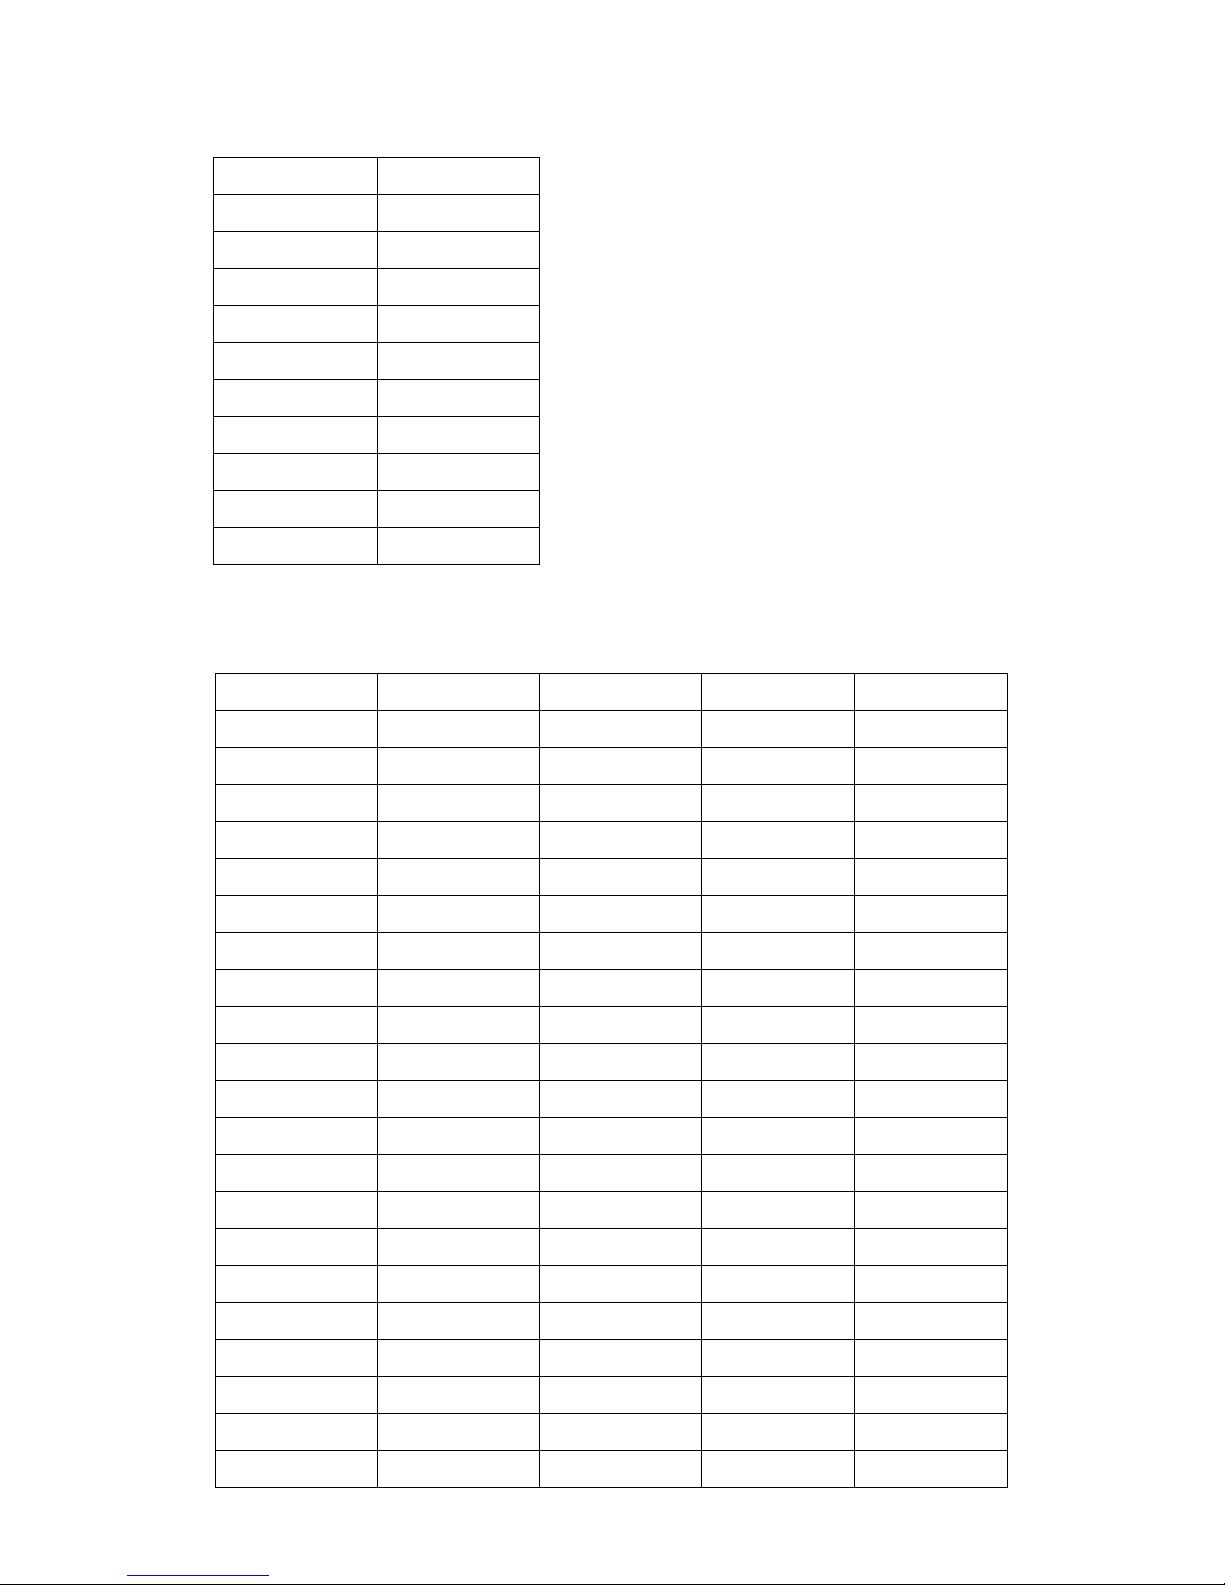
3-2. Appendix A: Systems Compatible:
Input Mode Resolution
SXGA 1280 x 1024
XGA 1024 x 768
SVGA 800 x 600
VGA 640 x 480
DOS (Text) 640 x 480
DOS (EGA) 640 x 350
TEXT 720 x 400
MAC 832 x 624
NTSC 720 x 240(I)
PAL 720 x 288 (I)
3-3: Appendix B: Modes supported
Resolution Horiz.F (KHz) Vert. F(Hz) Display Remark
1,280 x 1,024 50 75 OK
48 60 OK
45 56 OK
1,024 x 768 60 75 OK
60 75 OK MAC
58 72 OK
56 70 OK
48 50 OK
832 x 624 49 75 OK
800 x 600 46 75 OK
48 72 OK
37 60 OK
35 56 OK
720 x 400 31 70 OK
640 x 480 37 75 OK
37 72 OK
35 66 OK
31 60 OK
640 x 400 31 60 OK
24 56 OK
640 x 350 31 70 OK
30
Version:1.0
Page 31

31
Version:1.0
Page 32

3-4 Appendix C: Decorating plate Assemble and Dismantle
32
Version:1.0
Page 33

MENO
P/N:31320001
33
Version:1.0
 Loading...