

Page 1
GM048PO26141105
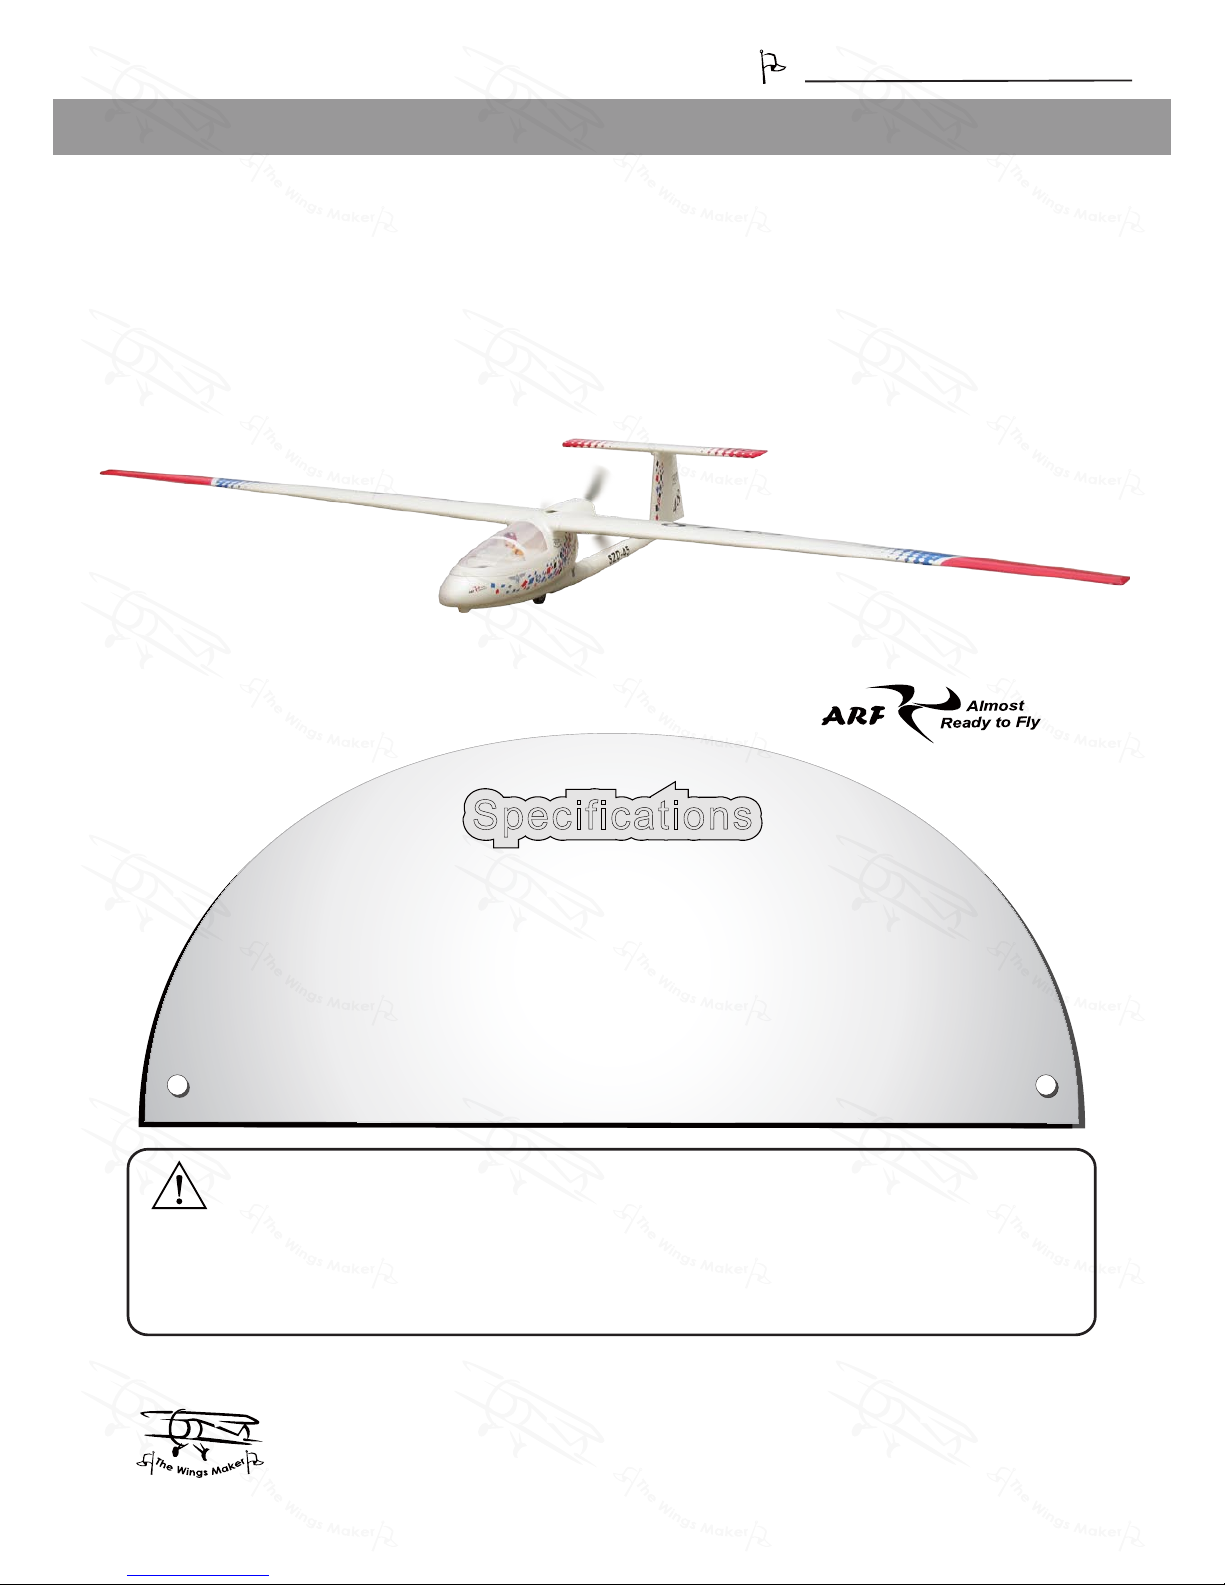
It is designed for maximum performance. Please seek advice if one is not familiar with this kind
of electric powered precision model. Operating this model without prior preparation may cause
injuries. Remember, safety is the most important thing. Always keep this instruction manual at
hand for quick reference.
Warning ! This model is not a toy.
THE WINGS MAKER
FACTORYPRE-FABRICATED
ALMOST-READY-TO-FLY(ARF) SERIES
MADE IN CHINA
* Specifications are subject to change without notice.*
www thewingsmaker com. .
SpecificationsSpecifications
Before commencing assembly please read these instructions thoroughly, .
INSTRUCTION MANUAL
Wing Span: 98.5 in / 2500 mm
Wing Area: 667 sq in / 43 sq dm
Flying Weight: 48 oz / 1360 g
Fuselage Length: 45 in / 1145 mm
Requires: 4-channel radio w/ 4 micro servos. Outrunner
Motor KM0283010 w/ Propeller Adaptor HW2340100
20A Brushless ESC, 3 cells 11.1V 15C 1800 mAh Li-Po
battery & charger.
szd-45 ogar
Page 2
GM048PO26141105
INDEX
BEFORE YOU BEGIN
BEFORE YOU BEGIN
PARTS LIST
ASSEMBLY
SAFETY PRECAUTIONS
P.1
P.2
P.3-P.9
P.9
Check all parts. If you find any defective or missing parts contact your local dealer. Please
DRY FIT and check for defects for all parts that will require CA or Epoxy for final assembly.
Any parts you find to be defective after the gluing process may be difficult to remove for
warranty replacement. The manufacturer will replace any defective parts, but will not extend
to the parts that are good before gluing to defective parts during assembly. Warranty will
not cover any parts modified by customer.
Symbols used throughout this instruction manual comprise of the following :-
Read through the manual before you begin, so you will have an overall idea of what to do.
1
2
3
P.1
Cut off shaded portion.
Ensure smooth non-binding
movement while assembling.
Apply instant glue
(C.A.glue, super glue.)
Assemble left and right
sides the same way.
Peel off shaded portion
covering film.
Pay close attention here!
Apply epoxy glue.
Must be purchased separately !
Drill holes with the specified
diameter (here: 3mm).
Pierce the shaded portion
covering film.
3mm
Do not overlook this symbol !
Warning!
Apply thread locker
szd-45 ogar
Page 3
GM048PO26141105
P.2
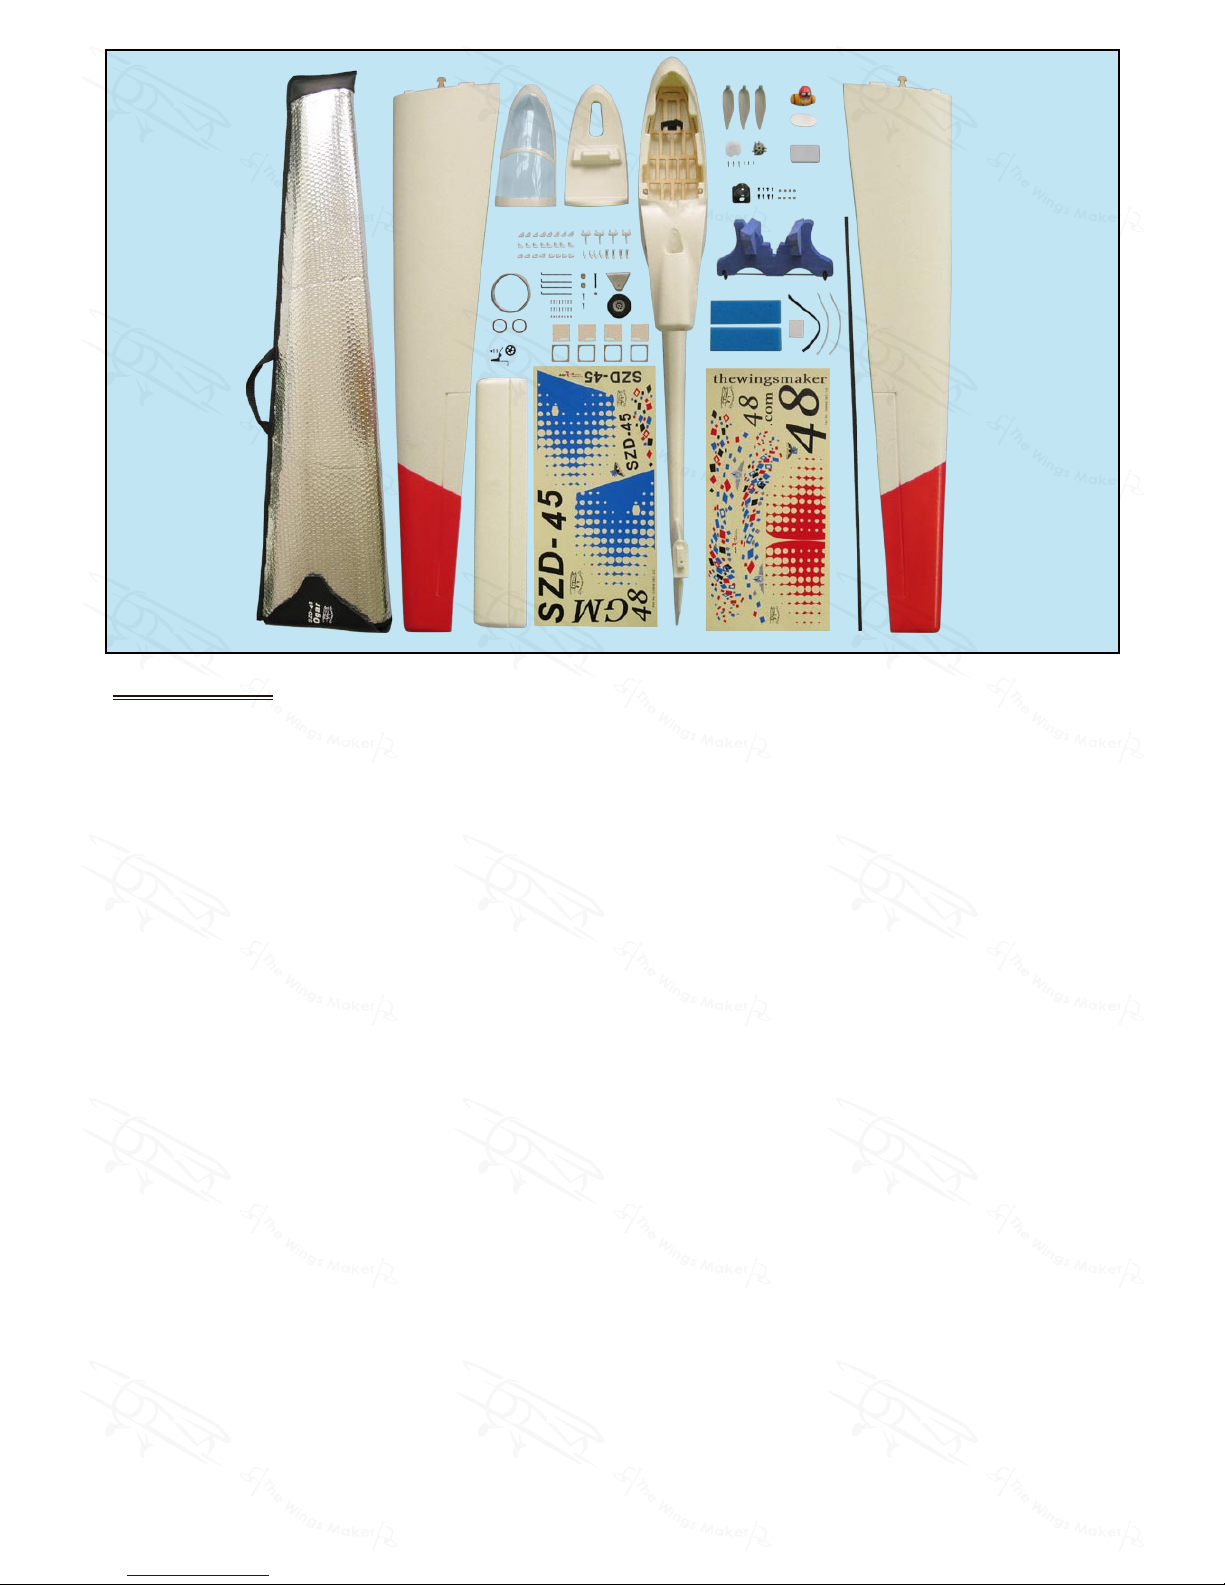
Parts List
1.MAIN WING -- 1 pair
MICRO AILERON SERVO MOUNT PL5310020 -- 1 pair
STRAPER PL4112106 -- 2 pcs
CLEVIS PL4112105 -- 2 pcs
FUEL TUBE d2xD4x4mm -- 4 pcs
HORN PL4113103 -- 2 pcs
PUSHROD Ø1.4x60mm w/ Threads (For Aileron) -- 2 pcs
SCREW PA1.7x8mm -- 8 pcs
FIBRE TAPE 17x435mm -- 2 pcs
PLYWOOD 36.5x36.5x2mm -- 2 pcs
2.FUSELAGE -- 1 set
STABILIZER & ELEVATOR -- 1 set
FIBRE TAPE 17x525mm -- 1 pc.
SCREW PA1.7x8mm -- 4 pcs
MICRO AILERON SERVO MOUNT PL5310020(R) -- 1 pc.
STRAPER PL4112106 -- 1 pc.
CLEVIS PL4112105 -- 1 pc.
FUEL TUBE d2xD4x4mm -- 2 pcs
HORN PL4113103 -- 1 pc.
PUSHROD Ø1.4x33mm w/ Threads (For Elevator) -- 1 pc.
PLYWOOD 36.5x36.5x2mm -- 1 pc.
3.FIBRE TAPE 17x185mm -- 1 pc.
SCREW PA1.7x8mm -- 4 pcs
MICRO AILERON SERVO MOUNT PL5310020(L) -- 1 pc.
STRAPER PL4112106 -- 1 pc.
CLEVIS PL4112105 -- 1 pc.
FUEL TUBE d2xD4x4mm -- 2 pcs
HORN PL4113103 -- 1 pc.
PUSHROD Ø1.4x42mm w/ Threads (For Rudder) -- 1 pc.
PLYWOOD 36.5x36.5x2mm -- 1 pc.
4.TAIL LANDING GEAR PL3410030 --1 set
SCREW PA2x8mm -- 2 pcs
5.MAIN LANDING GEAR -- 1 pc.
MAIN WHEEL Ø50mm PL3111500-- 1 pc.
PLASTIC COLLAR d4xD8x3mm -- 1 pc.
COLLAR Ø3.1mm w/ Set Screw -- 1 set
SCREW PA3x10mm -- 2 pcs
SOCKET HEAD SCREW M3x30mm -- 1 pc.
WASHER d3.2xD12mm -- 2 pcs
M3 NYLON INSERT LOCK NUT -- 1 pc.
6.MOTOR MOUNT PL5440000 -- 1 pc.
SOCKET HEAD SCREW M3x8mm -- 4 pcs
SOCKET HEAD SCREW M2.5x8mm -- 4 pcs
SCREW PM2x12mm -- 3 pcs
SCREW PA2x6mm -- 3 pcs
WASHER d3xD7mm -- 4 pcs
WASHER d2.5xD6mm -- 4 pcs
SPINNER Ø36mm SP28036WH0 -- 1 set
9x6 FOLDING PROPELLER(3 BLADE) PL6314051 -- 1 set
7.WING TUBE Ø8x900mm -- 1 pc.
RUBBER BAND 2.5x4mm -- 2 pcs
HOOK -- 1 pc.
8.
SPONGE 10x50x150mm (For Radio Equipment & Battery) -- 2 pcs
BATTERY TIE 200mm -- 1 pc.
RECEIVER TIE 160mm -- 1 pc.
CABLE TIE 150mm(For Brushless ESC) -- 1 pc.
9.COCKPIT -- 1 pc.
CANOPY -- 1 pc.
PILOT PC101050A -- 1 set
10.DECALS: GM048 DEC -- 1 set
11.FIELD STAND -- 1 set
Page 4
GM048PO26141105
P.3
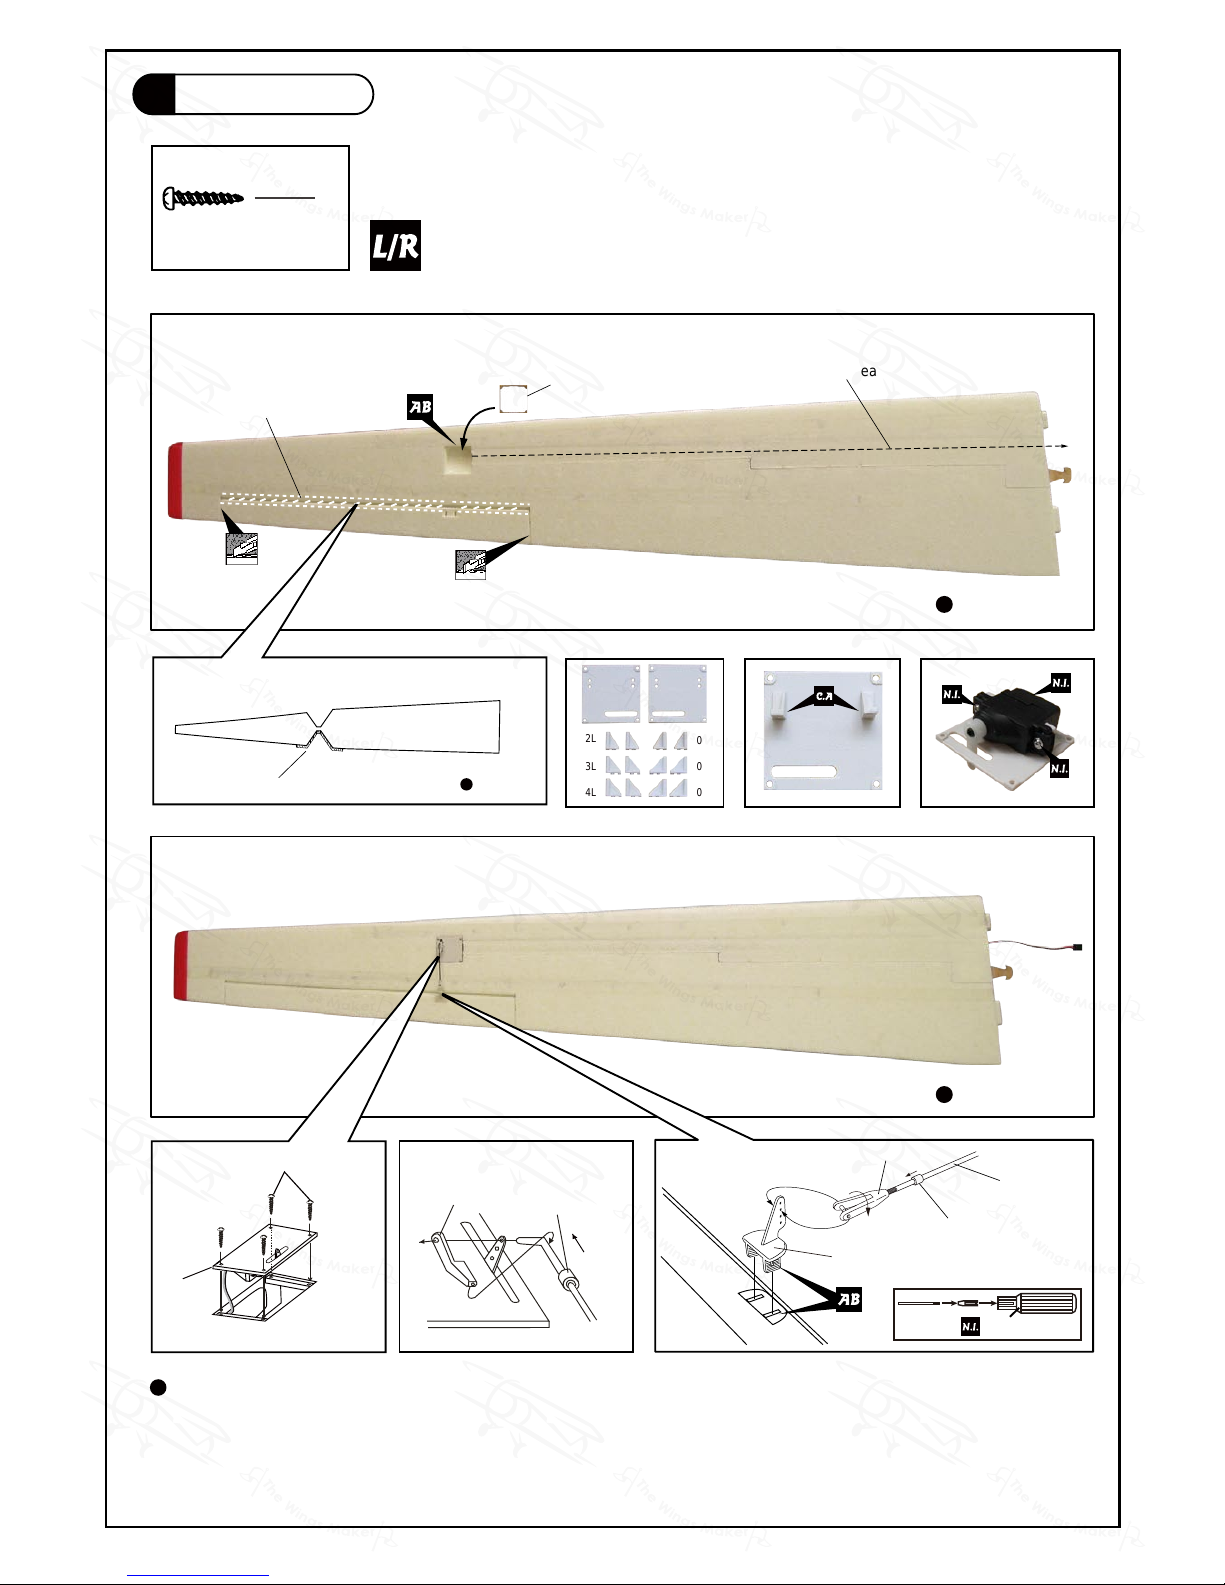
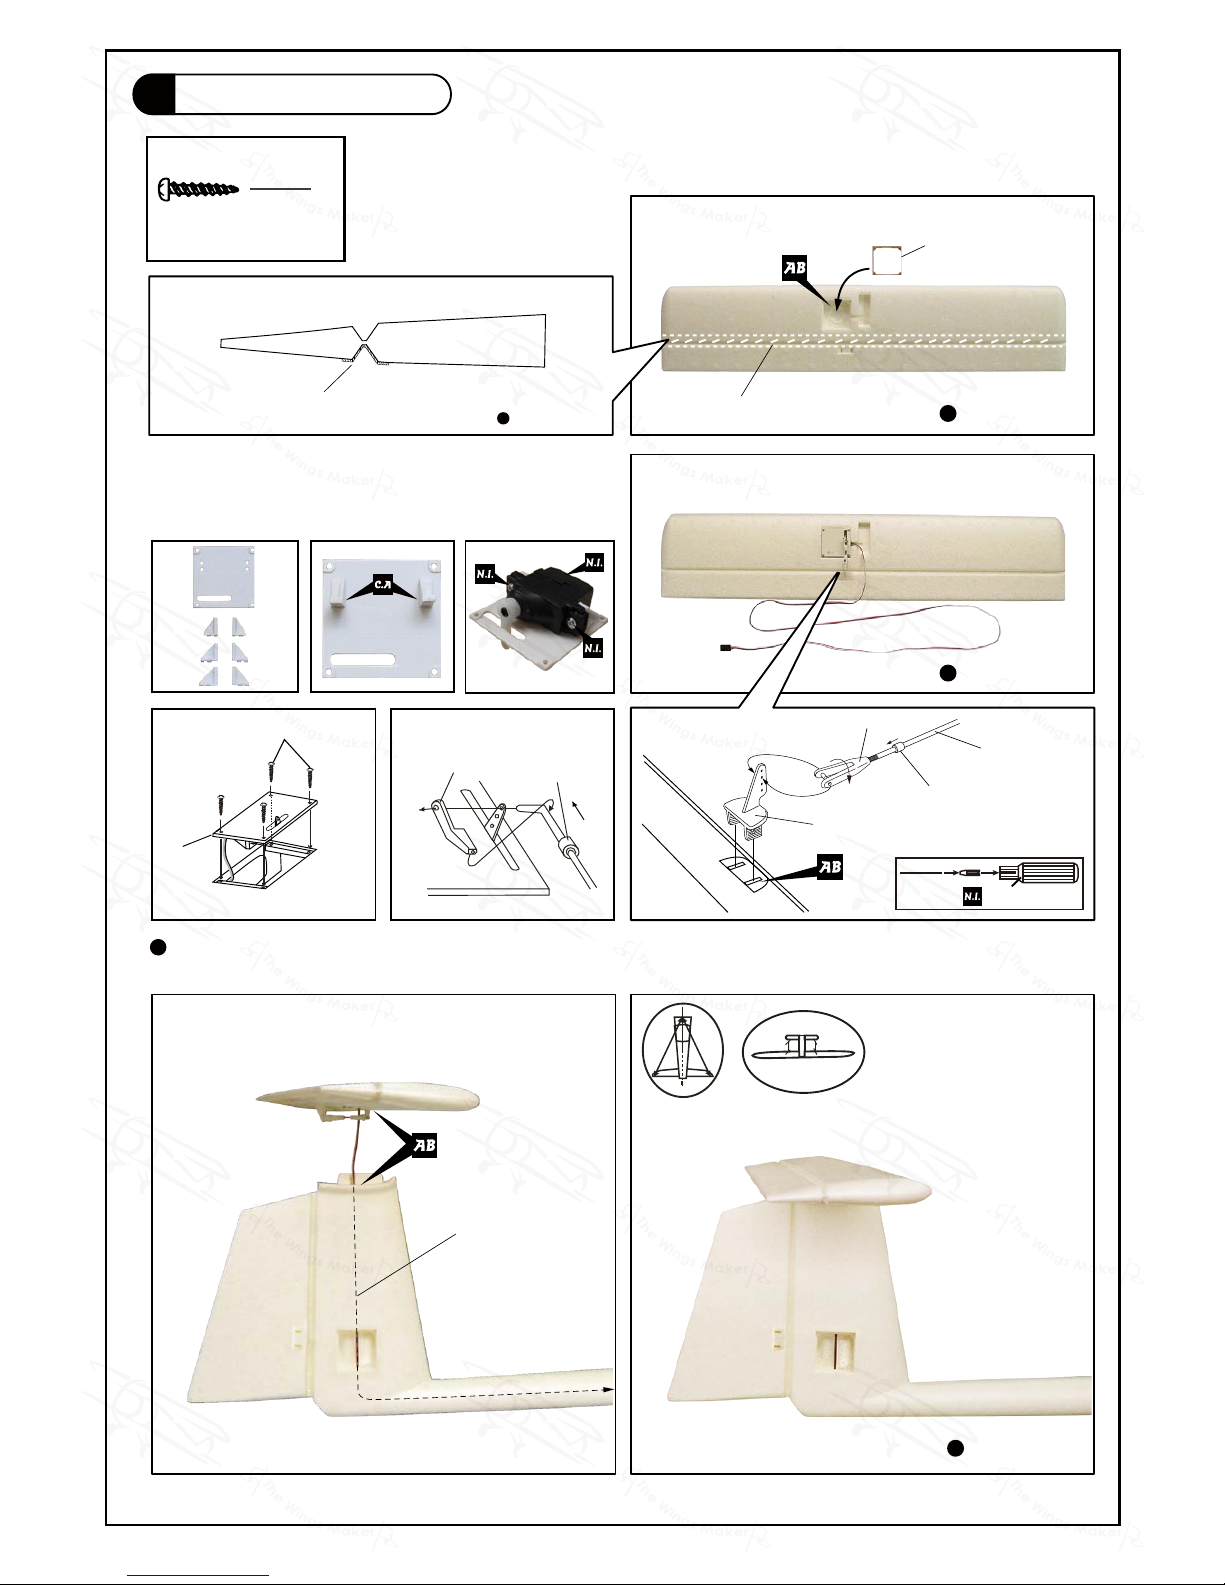
Please choose either (02L&02R) or (03L&03R) or (04L&04R) that suits your servo.
Aileron Servo
1
PA1.7x8mm Screw
8
Plywood
36.5x36.5x2 mm
Aileron Servo Lead
02L
03L
04L
02R
03R
04R
Bottom View
Bottom View
TWM PL8210010
CLEVIS WRENCH
Clevis
Pushrod
Ø1.4x60mm
Fuel Tube
d2xD4x4mm
Horn
Straper
Fuel Tube
d2xD4x4mm
PA1.7x8mm
Fibre Tape
Bottom
Fibre Tape
17x435 mm
Page 5
GM048PO26141105
P.4
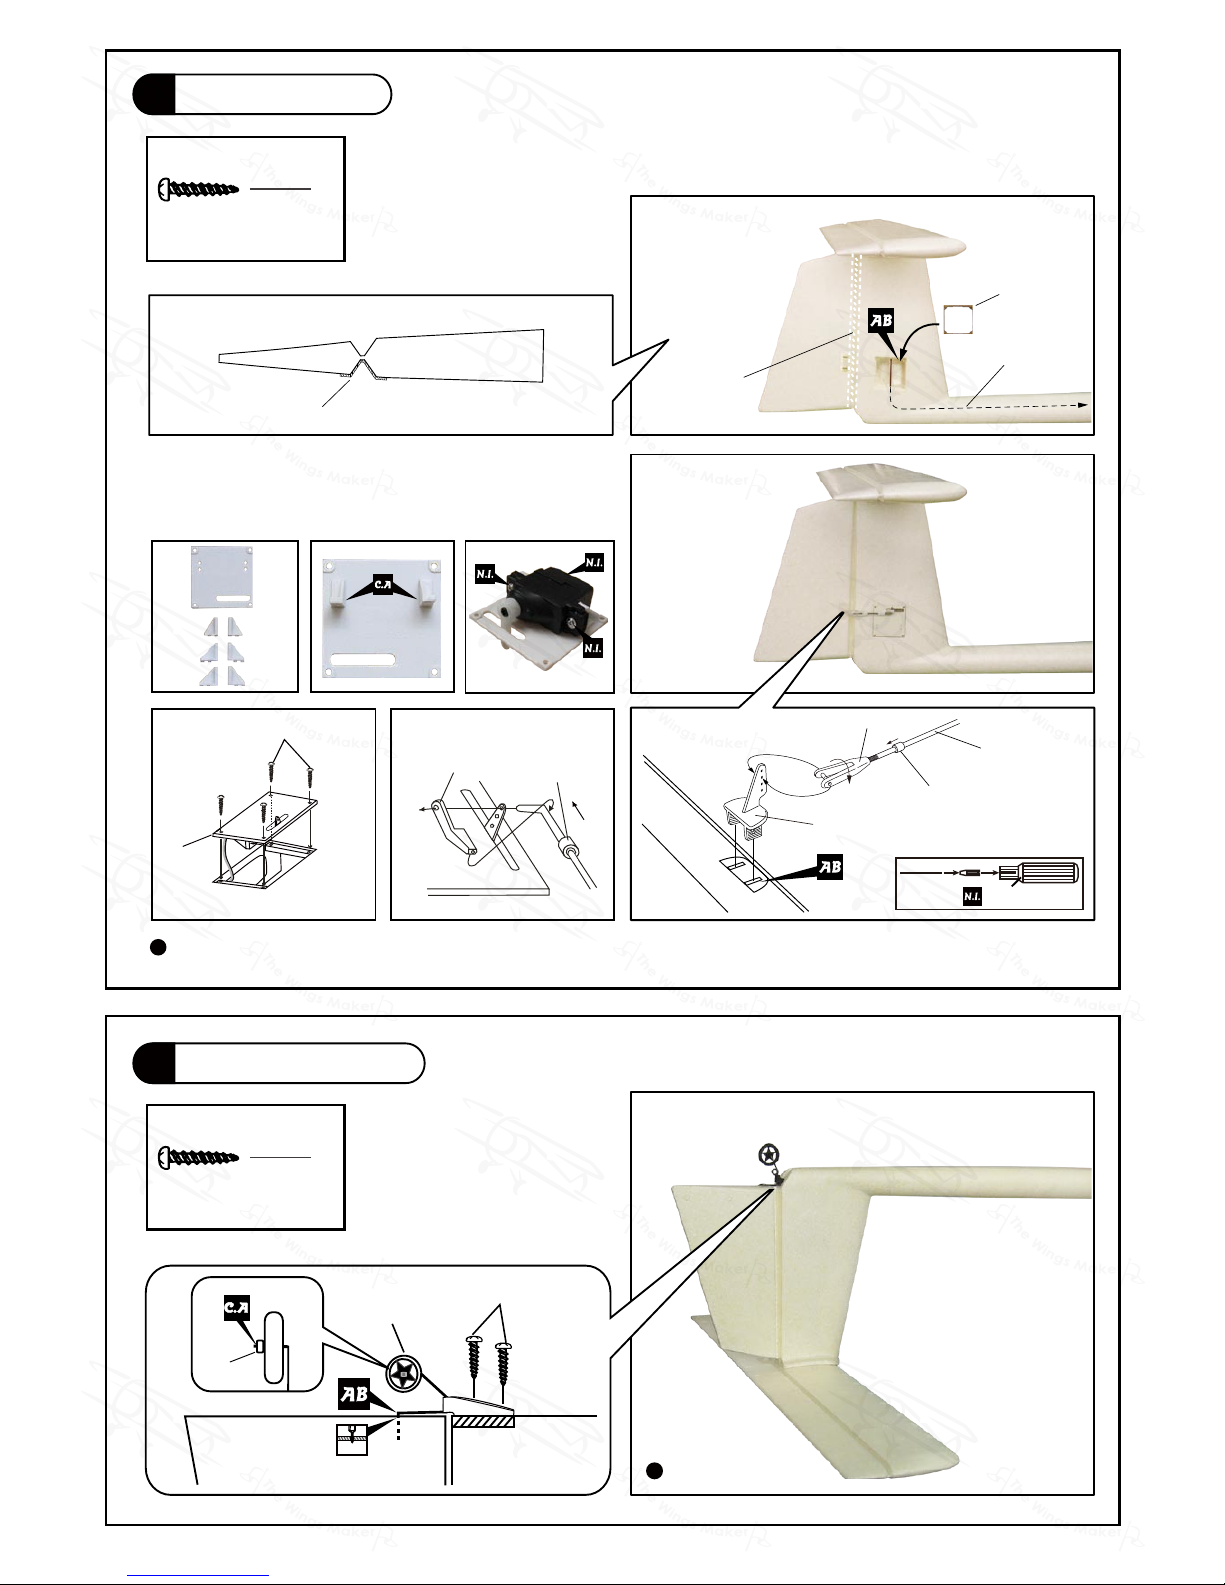
Please choose either (02L&02R) or (03L&03R) or (04L&04R) that suits your servo.
Stabilizer & Elevator
2
PA1.7x8mm Screw
4
Elevator Servo Lead
02L
03L
04L
02R
03R
04R
Completed
Bottom View
Bottom View
Straper
Fuel Tube
d2xD4x4mm
PA1.7x8mm
Plywood
36.5x36.5x2 mm
Fibre Tape
17x525 mm
Fibre Tape
Bottom
TWM PL8210010
CLEVIS WRENCH
Clevis
Pushrod
Ø1.4x33mm
Fuel Tube
d2xD4x4mm
Horn
A A'
A=A'
(Stabili zer)
(Main Wing)
B B'
B=B'
Temporaryinstall the mainwing,
adjust leveling of the stabilizer
to make it as parallel to the main
wing as possible
Page 6
GM048PO26141105
P.5
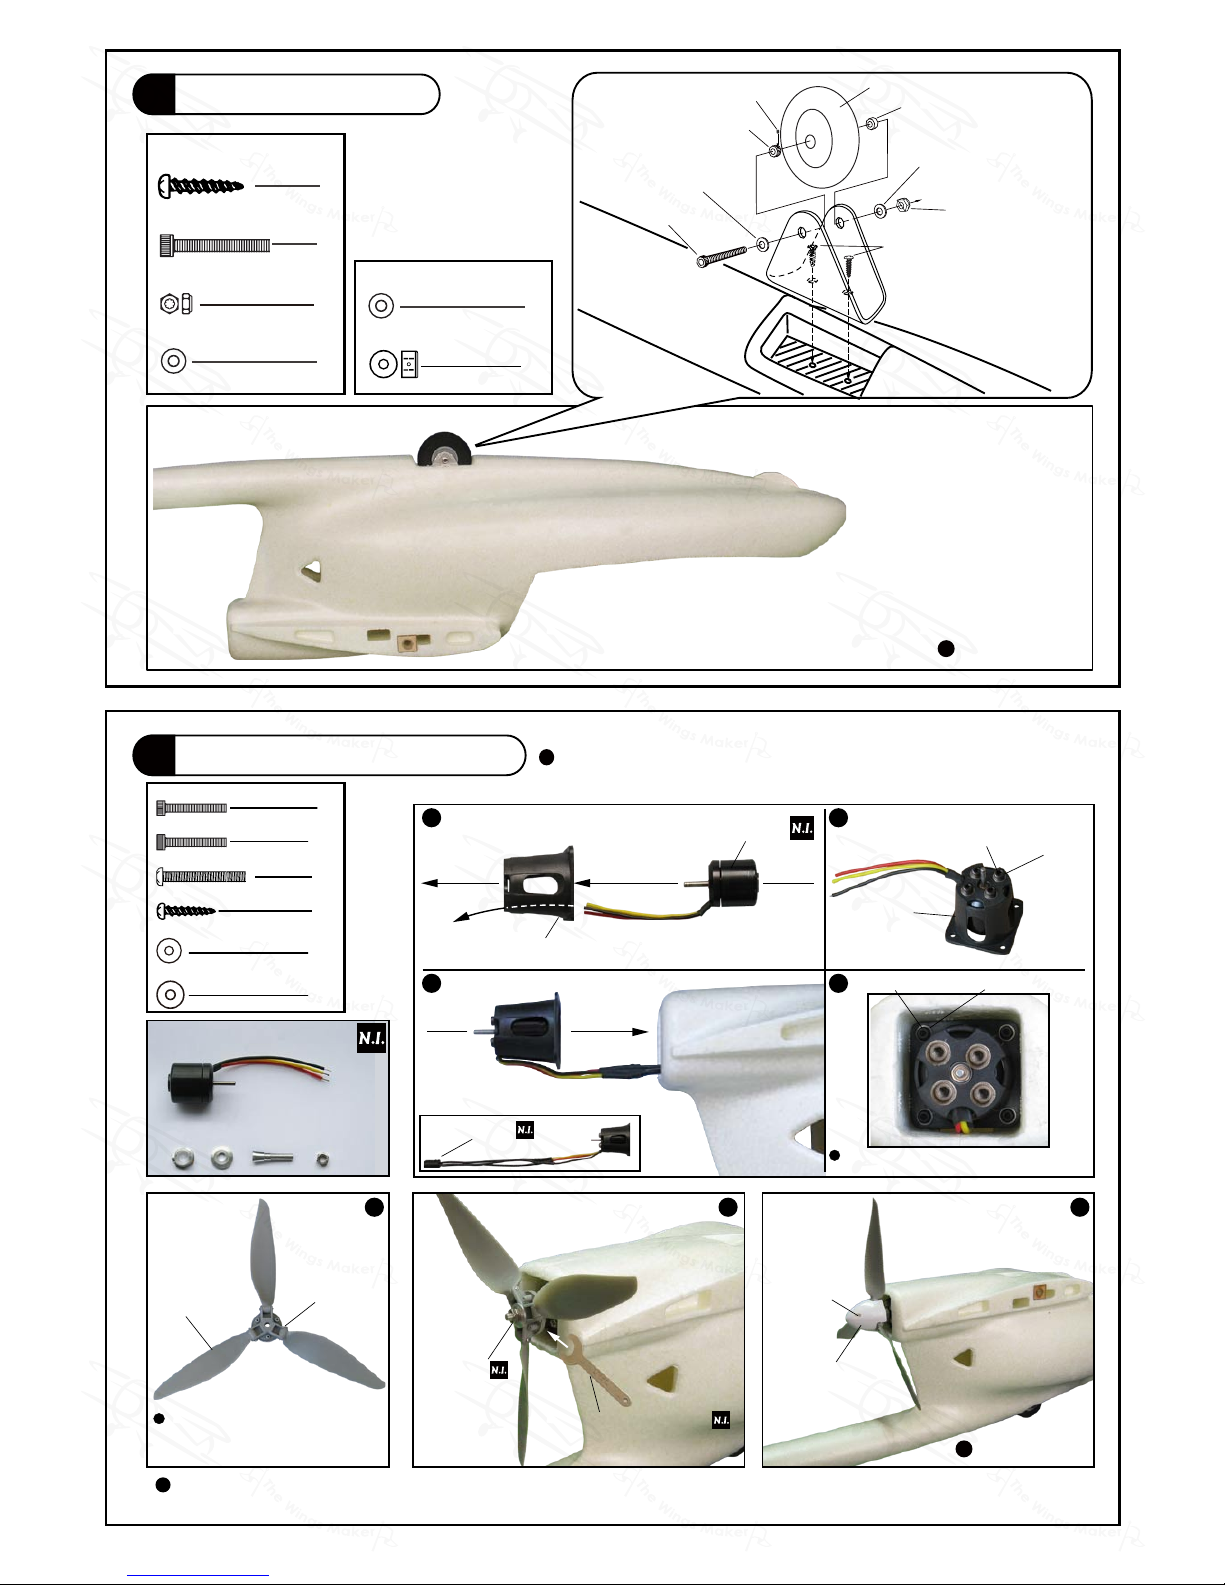
Please choose either (02L&02R) or (03L&03R) or (04L&04R) that suits your servo.
Rudder Servo
3
Tail Landing Gear
4
PA1.7x8mm Screw
4
Rudder Servo Lead
Straper
Fuel Tube
d2xD4x4mm
PA1.7x8mm
Fibre Tape
17x185 mm
Fibre Tape
TWM PL8210010
CLEVIS WRENCH
Clevis
Pushrod
Ø1.4x42mm
Fuel Tube
d2xD4x4mm
Horn
Plywood
36.5x36.5x2 mm
02L
03L
04L
02R
03R
04R
PA2x8 mm Screw
2
Plastic
Collar
Wheel Ø23mm
PA2x8mm
1.2mm
Bottom View
Page 7
GM048PO26141105
P.6
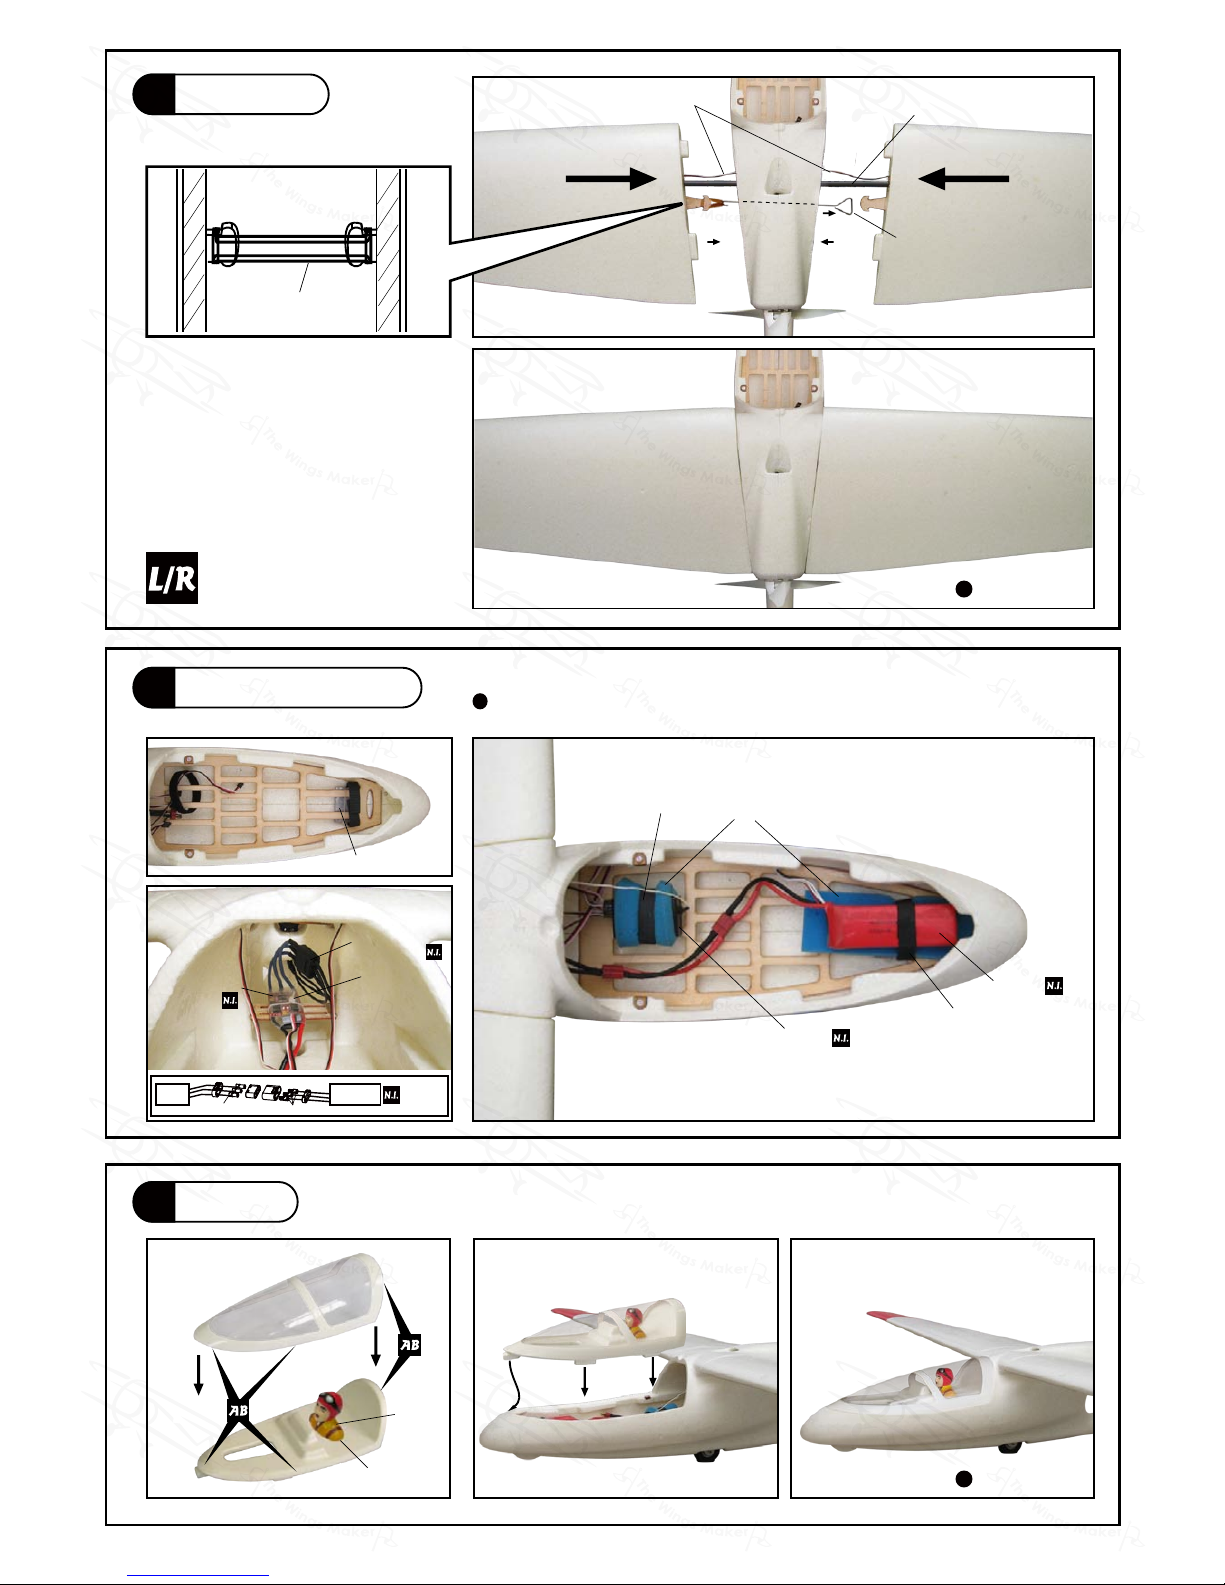
Main Landing Gear
5
Outrunner Motor / Spinner
6
PA3x10mm
d3.2xD12mm
Screw
2
Bottom View
Completed
M3x30mm
PA3x10mm
d3.2xD12mm
Washer
d4xD8x3mm
Plastic Collar
M3 Nylon Insert
Lock Nut
Motor Mount PL5440000
EZ Connector
Outrunner Motor
M3x8mm
Motor Mount
PL5440000
M2.5x8mm
PA2x6mm
d3xD7mm
Washer
d2.5xD6mm Washer
d3.2xD12mm
Washer
M3x3mm Set Screw
3.1mm Collar
Wheel Ø50mm
1
M3x30mm
Socket Head Screw
M3
Nylon Insert Lock Nut
Washer
2
d4xD8x3mm
Plastic Collar
1
1
1
M2.5x8mm
Socket Head Screw
4
M3x8mm
Socket Head Screw
4
3
PM2x12mm
Screw
3
PA2x6mm
Screw
d2.5xD6mm Washer
4
d3xD7mm Washer
4
Optional Parts
Outrunner Motor 28/ 30
KM0283010
Propeller Adaptor
(d3xD5) HW2340100
Optional Parts
1 2
3 4
5 6 7
9x6 Folding
Propeller (3 Blade)
PL
6314051
PM2x12mm
Spinner
Ø36mm
TWM HW3111400
PROPELLER ADAPTOR WRENCH
M5 Nut
Tighten the PM2 screws so the propeller
blades cannot swing freely, but don`t
over-tighten the screws,let the propeller
blades align themselves when spinning .
Don't over-tighten the M2.5 screws, too much
stress on the screws could split the firewall.
Make sure rotating motor casing is not in contact
with wirings or anything.
3.1mm
Collar w/ Set Screw
If you notice that the three propeller blades have not aligned themselves in one plane before flying, align them visually and
advance the throttle slowly to full throttle. The propeller blades will be self-aligned.
Page 8
GM048PO26141105
P.7
Main Wing
7
Radio Equipment
8
Completed
Completed
Rubber Band
Aileron Servo Lead
Receiver Tie
Battery Tie
Cable Tie
ESC Connector
Brushless ESC
Lead
Sponge
Receiver
Battery
Wing Tube
Ø8x900mm
Hook
Install and arrange the equipment as shown in the picture.
Double Sided Tape
Pilot
Canopy
9
Solder
Solder
TWM
KP0011310
ESC
Motor
Page 9
GM048PO26141105
P.8
Decals
10
Field Stand / Launching Pad
11
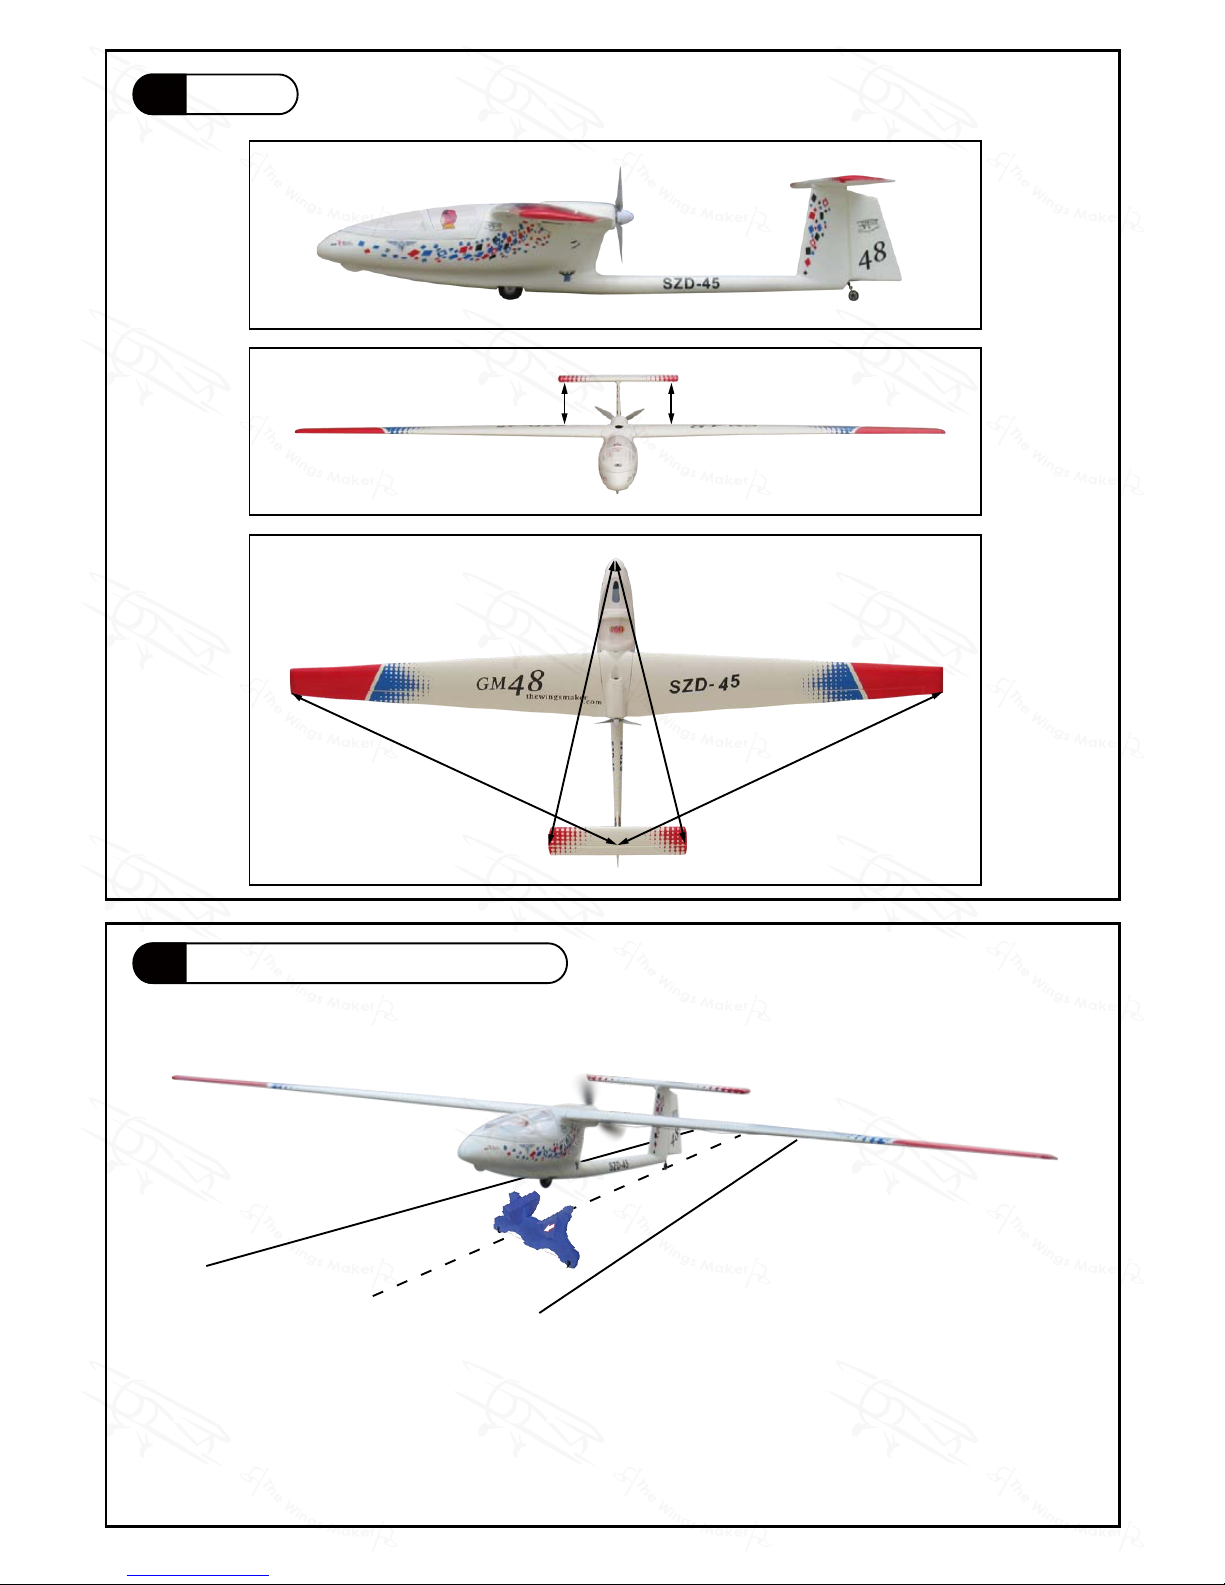
A=A’
C=C’
C C’
B=B’
B B’
A A’
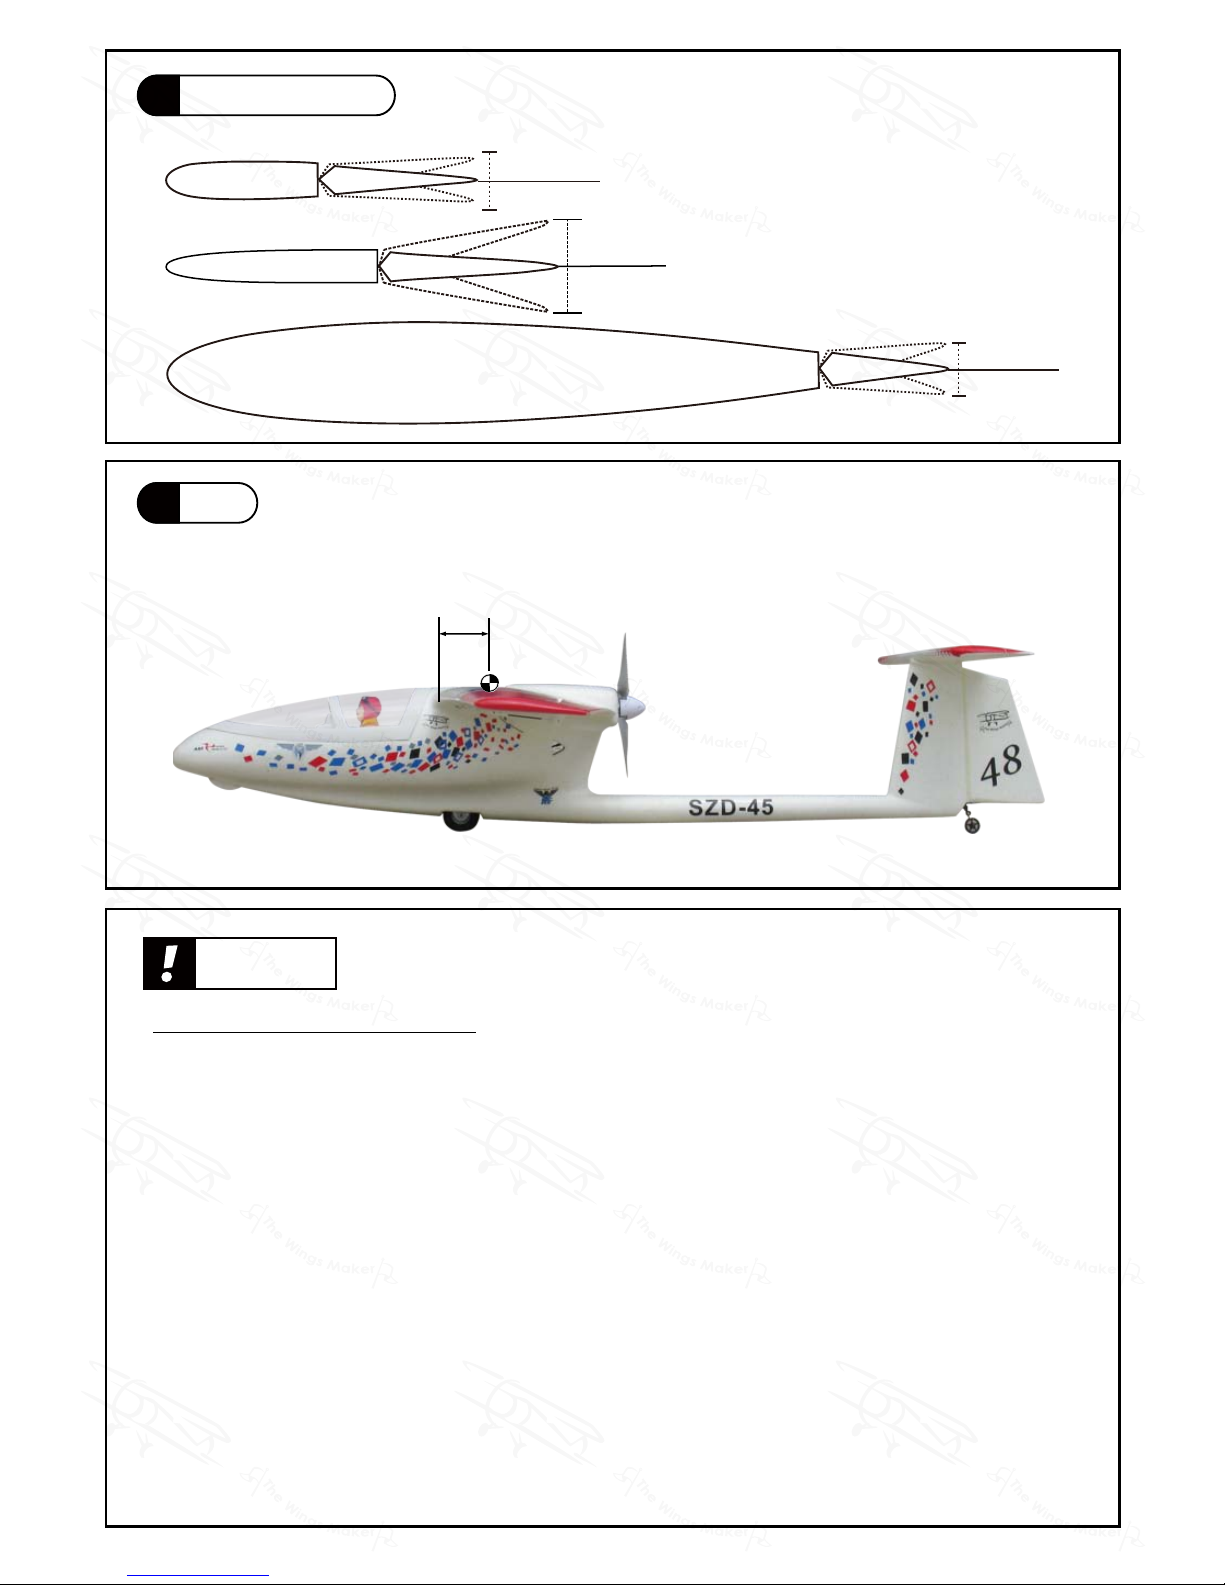
The field stand can be used as a launching-pad if you are flying on paved
runways. Place the on the stand, point it into the wind, check
your controls and advance the throttle. When the gets enough
air speed, pull the elevator gently and the will fly off the field
stand and get airborne gracefully.
szd-45 ogar
szd-45 ogar
szd-45 ogar
Page 10
GM048PO26141105
P.9
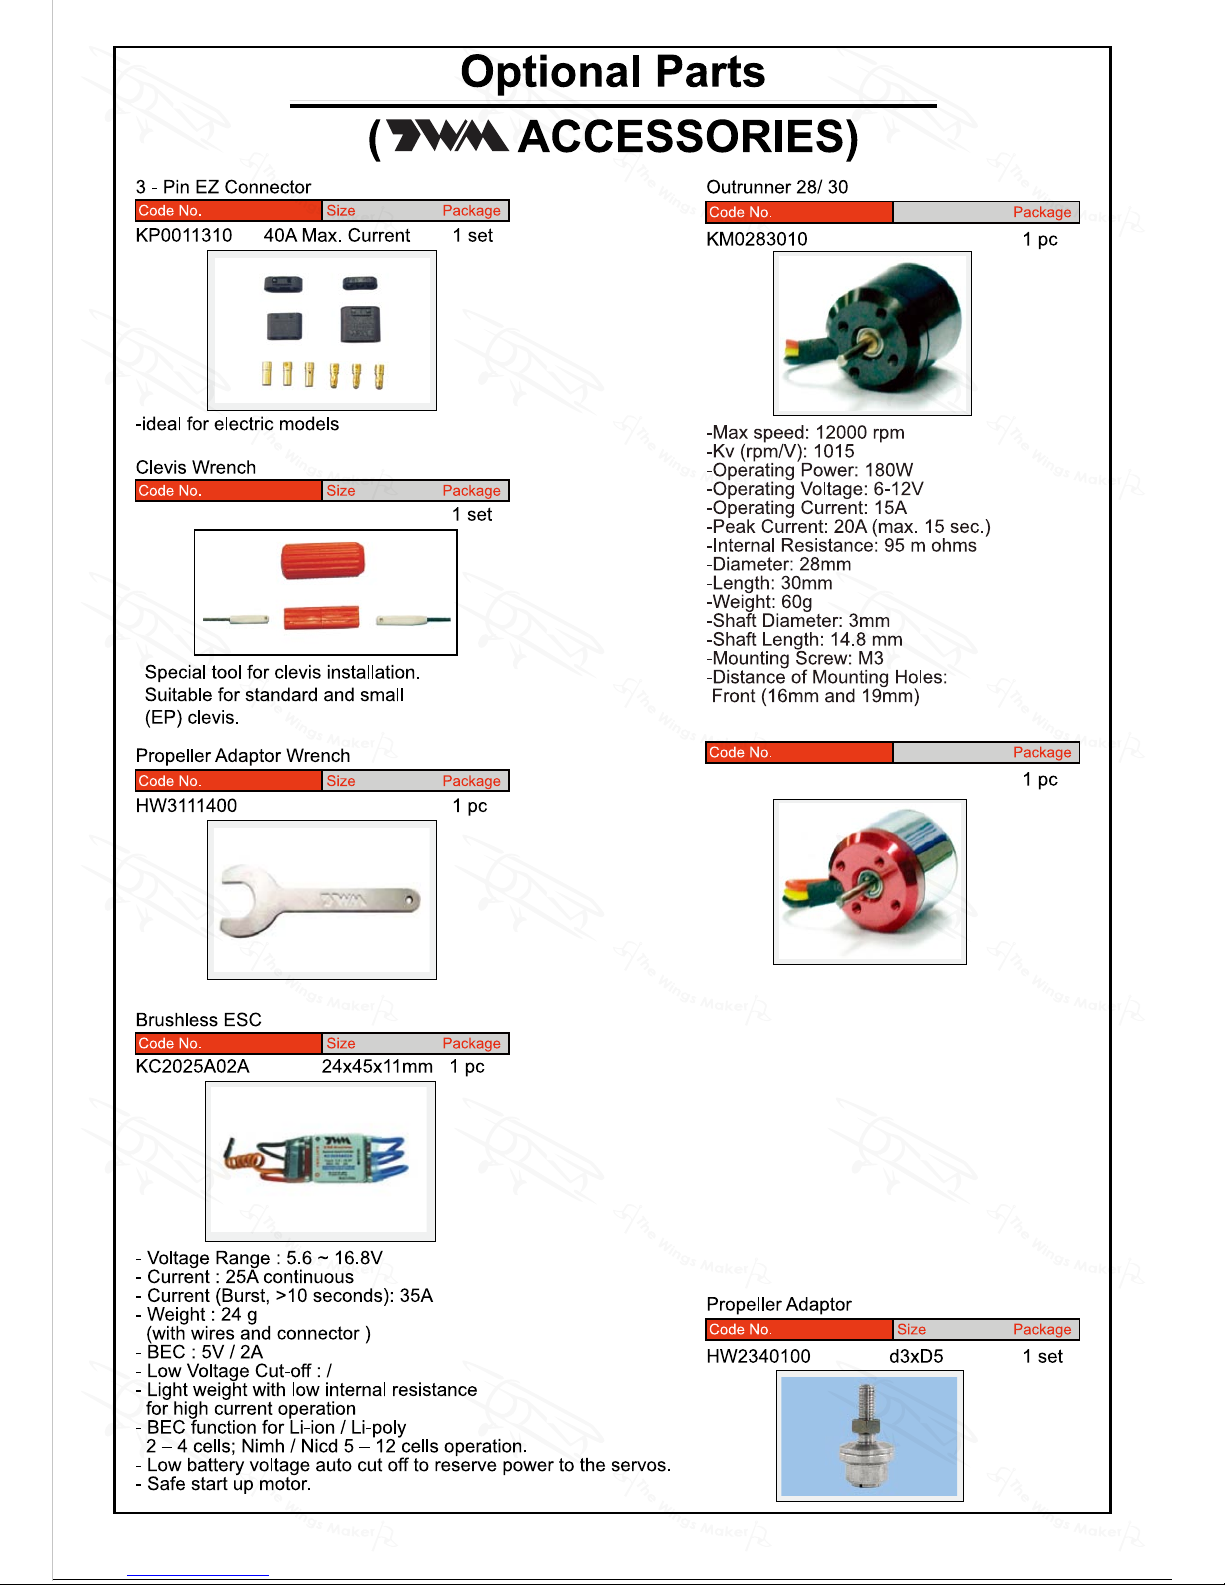
Control Throws
12
Adjust the control throws as shown in
the diagram. These throws are good for
general flying. You can adjust according
to your personal preference.
Ailerons
15mm
15mm
Elevator
12mm
12mm
Rudder
30mm
30mm
C.G.
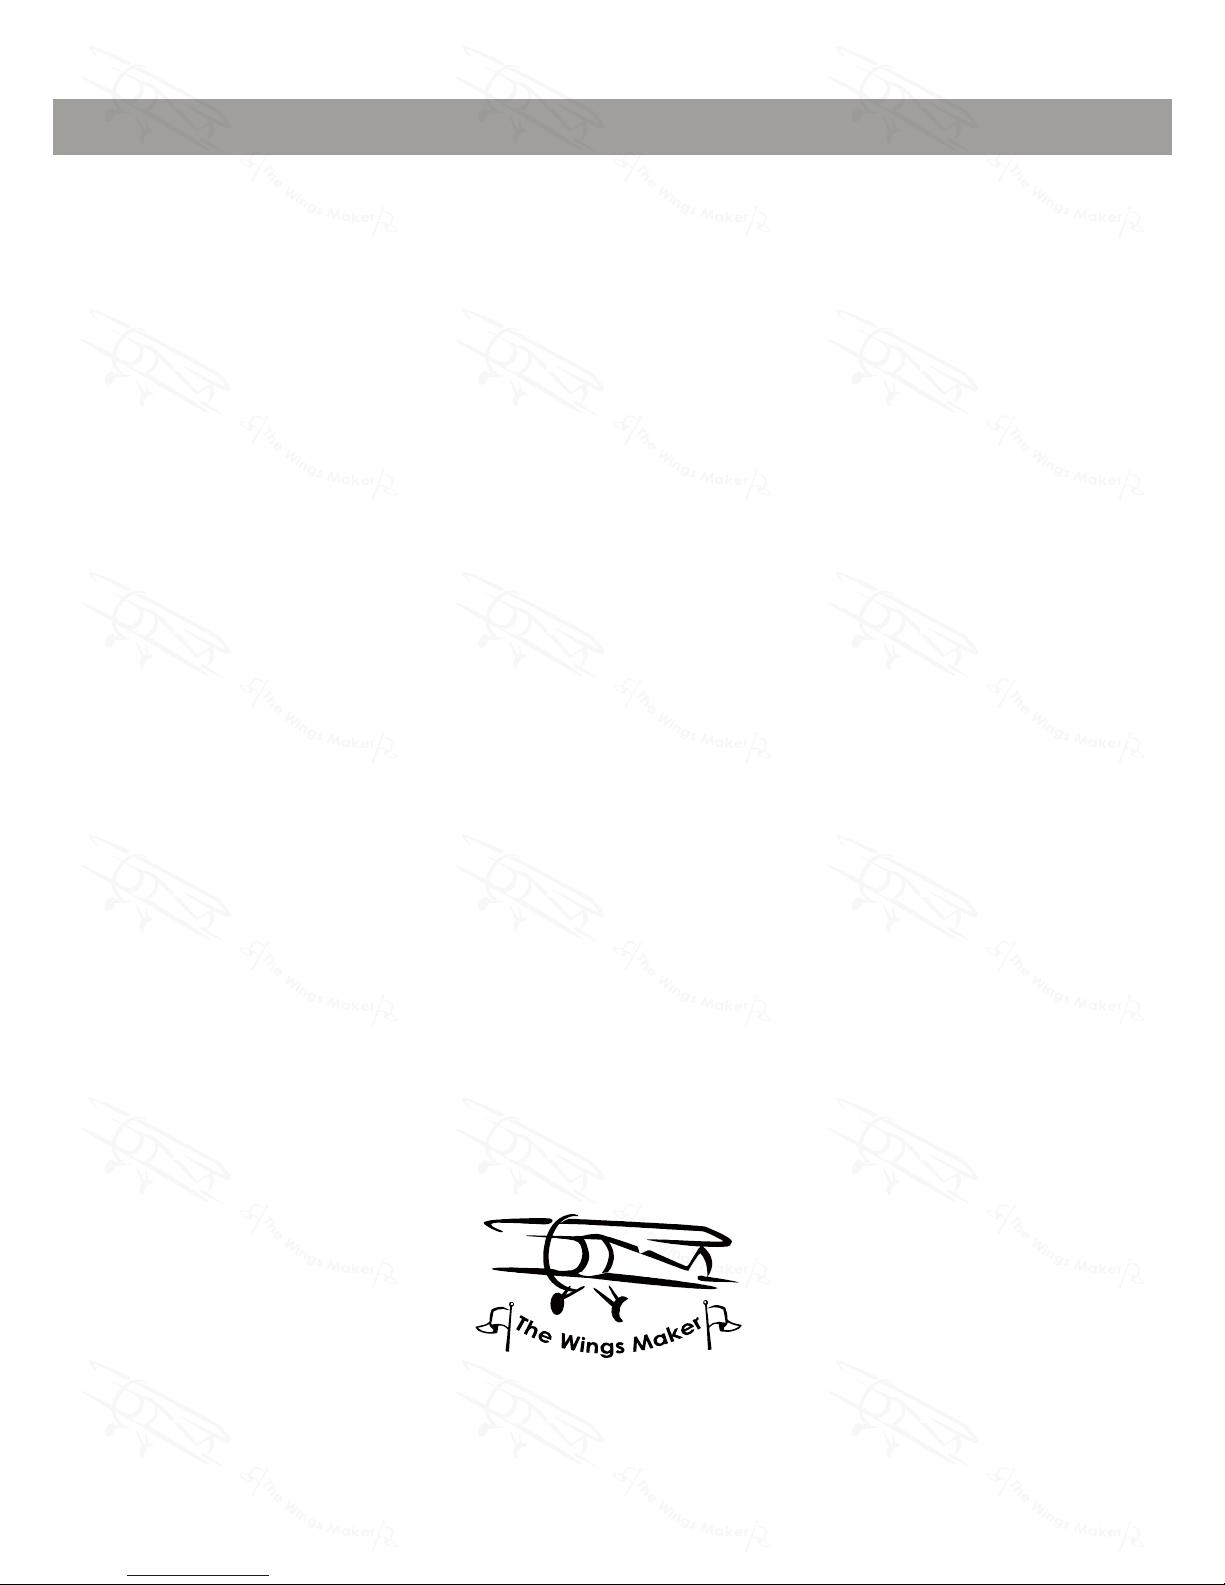
13
The ideal C.G. position is 65mm (2.56in.) behind the leading edge
measured at where the wing meets the fuselage. In order to obtain
the C.G. specified, add weight to the fuselage or move the battery
position. Check the C.G. before flying.
65mm
2.56in
C.G.
Important Safety Precautions
# First time flyer should never fly by himself / herself. Assistance from experienced flyer
is absolutely necessary.
# Pre-flight adjustment must be done before flying, it is very dangerous to fly a badly
pre-adjusted aircraft.
# is specially designed to be powered by KM0283010 Outrunner Motor.
# Make sure the air field is spacious, never fly the plane too close to people and never get
too close to a running propeller. Extreme caution should be exercised when working with
electric powered models. Make sure the propeller is cleared of all objects, especially your
hands before connecting the battery to the model. Make sure you understand the
operation of the ESC (Electronic Speed Control) by studying the ESC manual. Once you
plug in the battery for electric powered model, always treat the propeller as a rotating one,
as accidental movement of the throttle stick will spin the propeller and could cause injuries.
# Check and re-tighten up all factory assembled screws, use thread locker if necessary.
Warning!
szd-45 ogar
http://www.thewingsmaker.com/instructionManuals.php
Page 11
GM048PO26141105
Large Clevis•
Small Clevis•
Pl8210010
-Kv(rpm/V): 1010
-Operating Power: 225W
-Operating Voltage: 6-15V
-Operating Current: 15A
-Peak Current: 20A(max.15 sec.)
-Internal Resistance: 102 m ohms
-Diameter: 28mm
-Length: 32mm
-Weight: 60g
-Shaft Diameter: 3mm
-Shaft Length: 15mm
-Mounting Screw:
M3(Front) and M2(Back)
-Distance of Mounting Holes:
16mm and 19mm(Front),
12mm(Back)
KM02832R1
Outrunner 28/ 32 Deluxe (25% higher power)
Page 12
GM048PO26141105
THE WINGS MAKER
www.thewingsmaker.com
 Loading...