

Page 1
Quick Start Guide V2.0
Page 2
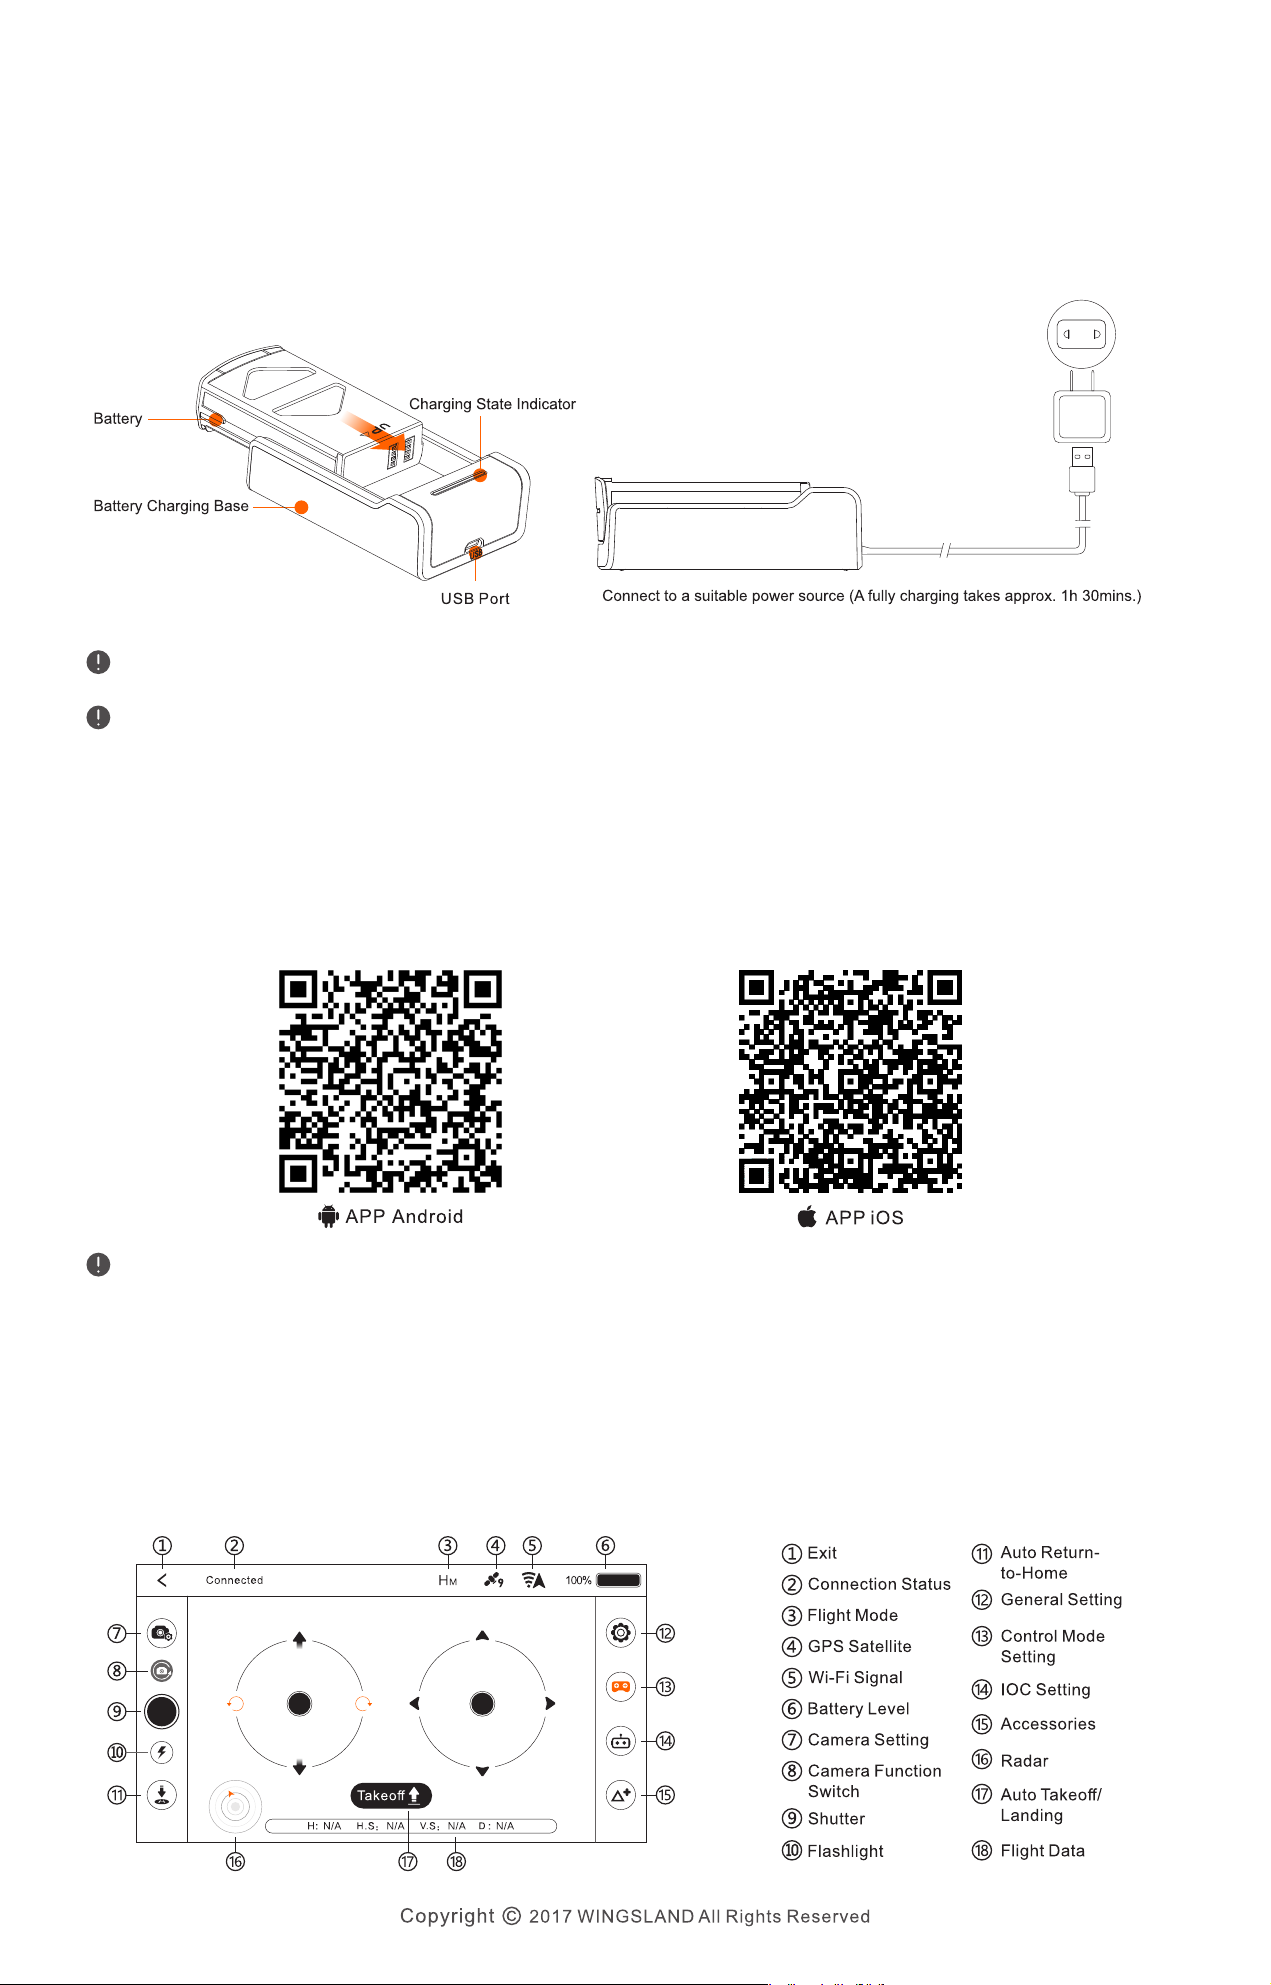
1. Flight Battery
The S6 flight LiPo battery has a capacity of 1400mAh, a voltage of 7.6V, and with charge
/ discharge functionality. Power the battery by using the S6 specialized charging base.
Please connect to a suitable power source or a portable power bank. A red solid LED
indicates the battery is charging. A green solid LED indicates the battery is fully charged.
Disconnect the power source when the battery is fully charged.
Disconnect the charger and the battery when an alternately green and red LED flash, which indicates a
battery error has occurred.
The performance of LiPo batteries will be affected by the relatively lower temperature which would
shorten the flight time. To warming up the battery to around 20℃ before takeoff will effectively increase
the flight time.
2. Download WINGSLAND FLY APP
Scan the QR code to download and install the latest version of WINGSLAND FLY. The APP
also can be found on WINGSLAND official website (www.wingsland.com) or App Store.
WINGSLAND FLY only supports iOS 9.0 (or later) or Android 5.0.1 (or later). Recommend devices: iPhone,
Huawei, Xiaomi, MEIZU, OPPO.
3. WINGSLAND FLY APP
WINGSLAND FLY is a mobile application designed specifically for the S6. WINGSLAND
offers an ideal and powerful mobile device remote solution for configuring the camera and
the aircraft, piloting through the virtual remote FPV monitor and flight critical information
display.
Page 3
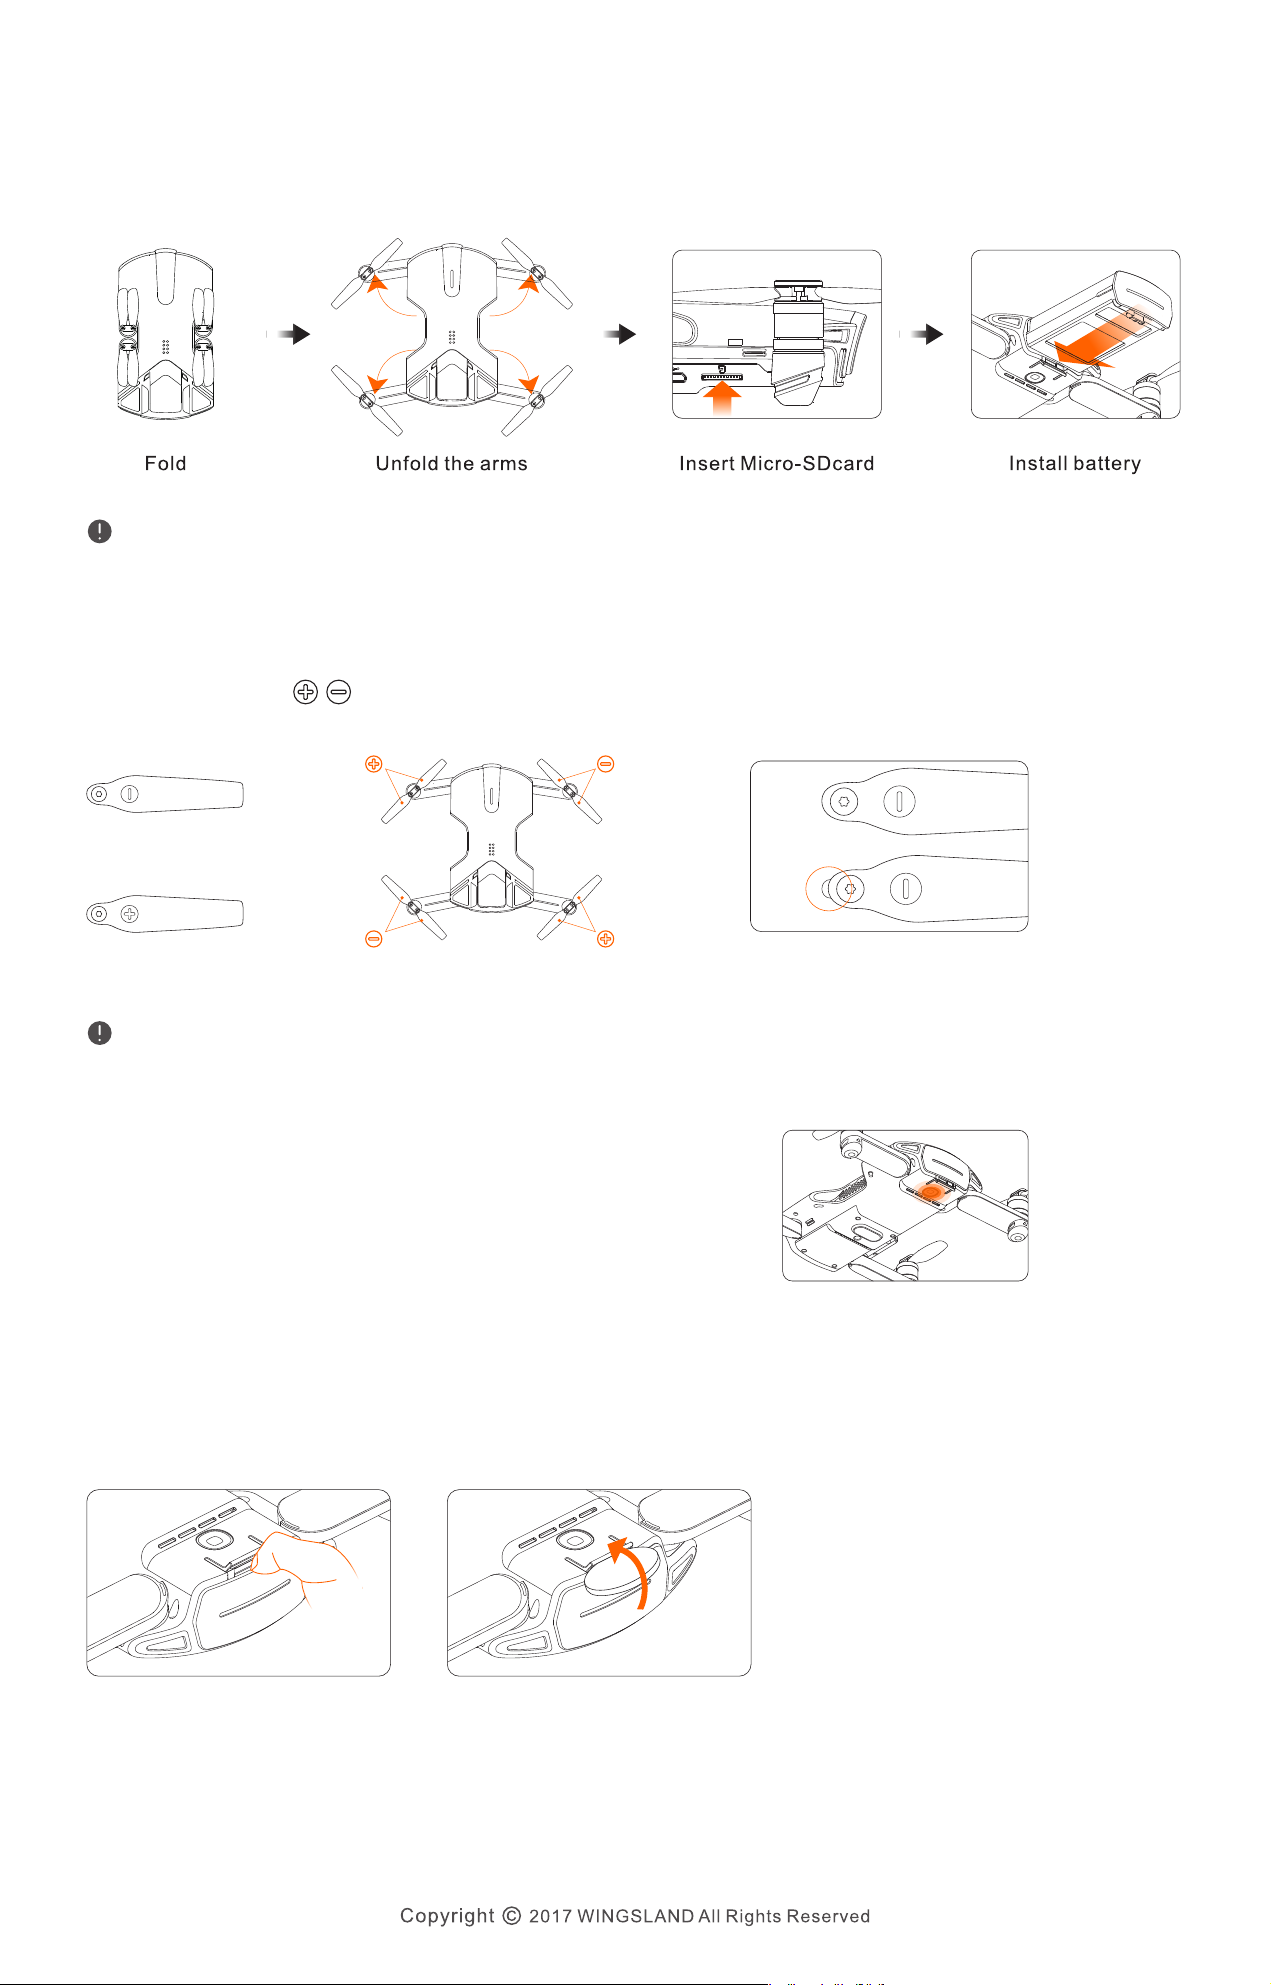
4.Preparing the Aircraft
Unfold 4 folding arms to maximum position. Insert Micro-SD card into SD card slot
(max. capacity supported: 32G) and slide the battery into the compartment.
The old version propellers need to be extended into ready-to-fly form when takeoff.
The new version can be spread off automatically by the centrifugal force when takeoff.
Change th propellers
Unscrew the covers on the motors, install new propellers with the same direction of rotation
according to the symbol. Then screw the covers back on the motors firmly.
New
Clockwise
Old
Anti-clockwise Installation diagram The difference between old and new edition
Recommend: Please twist screws of the motors tightly every after 5 hours flight time.
Battery
Press and hold the power button for 5 seconds to
power up the aircraft. After powering up, a continuously
short beep sound indicates the aircraft is self-checking,
a long beep sound indicates self - checking is complete
and the aircraft is ready to go.
Power Button
Remove the Battery
Flip over the aircraft, use your thumb or a coin to lever up the compartment lock and pull out
the battery.
Page 4
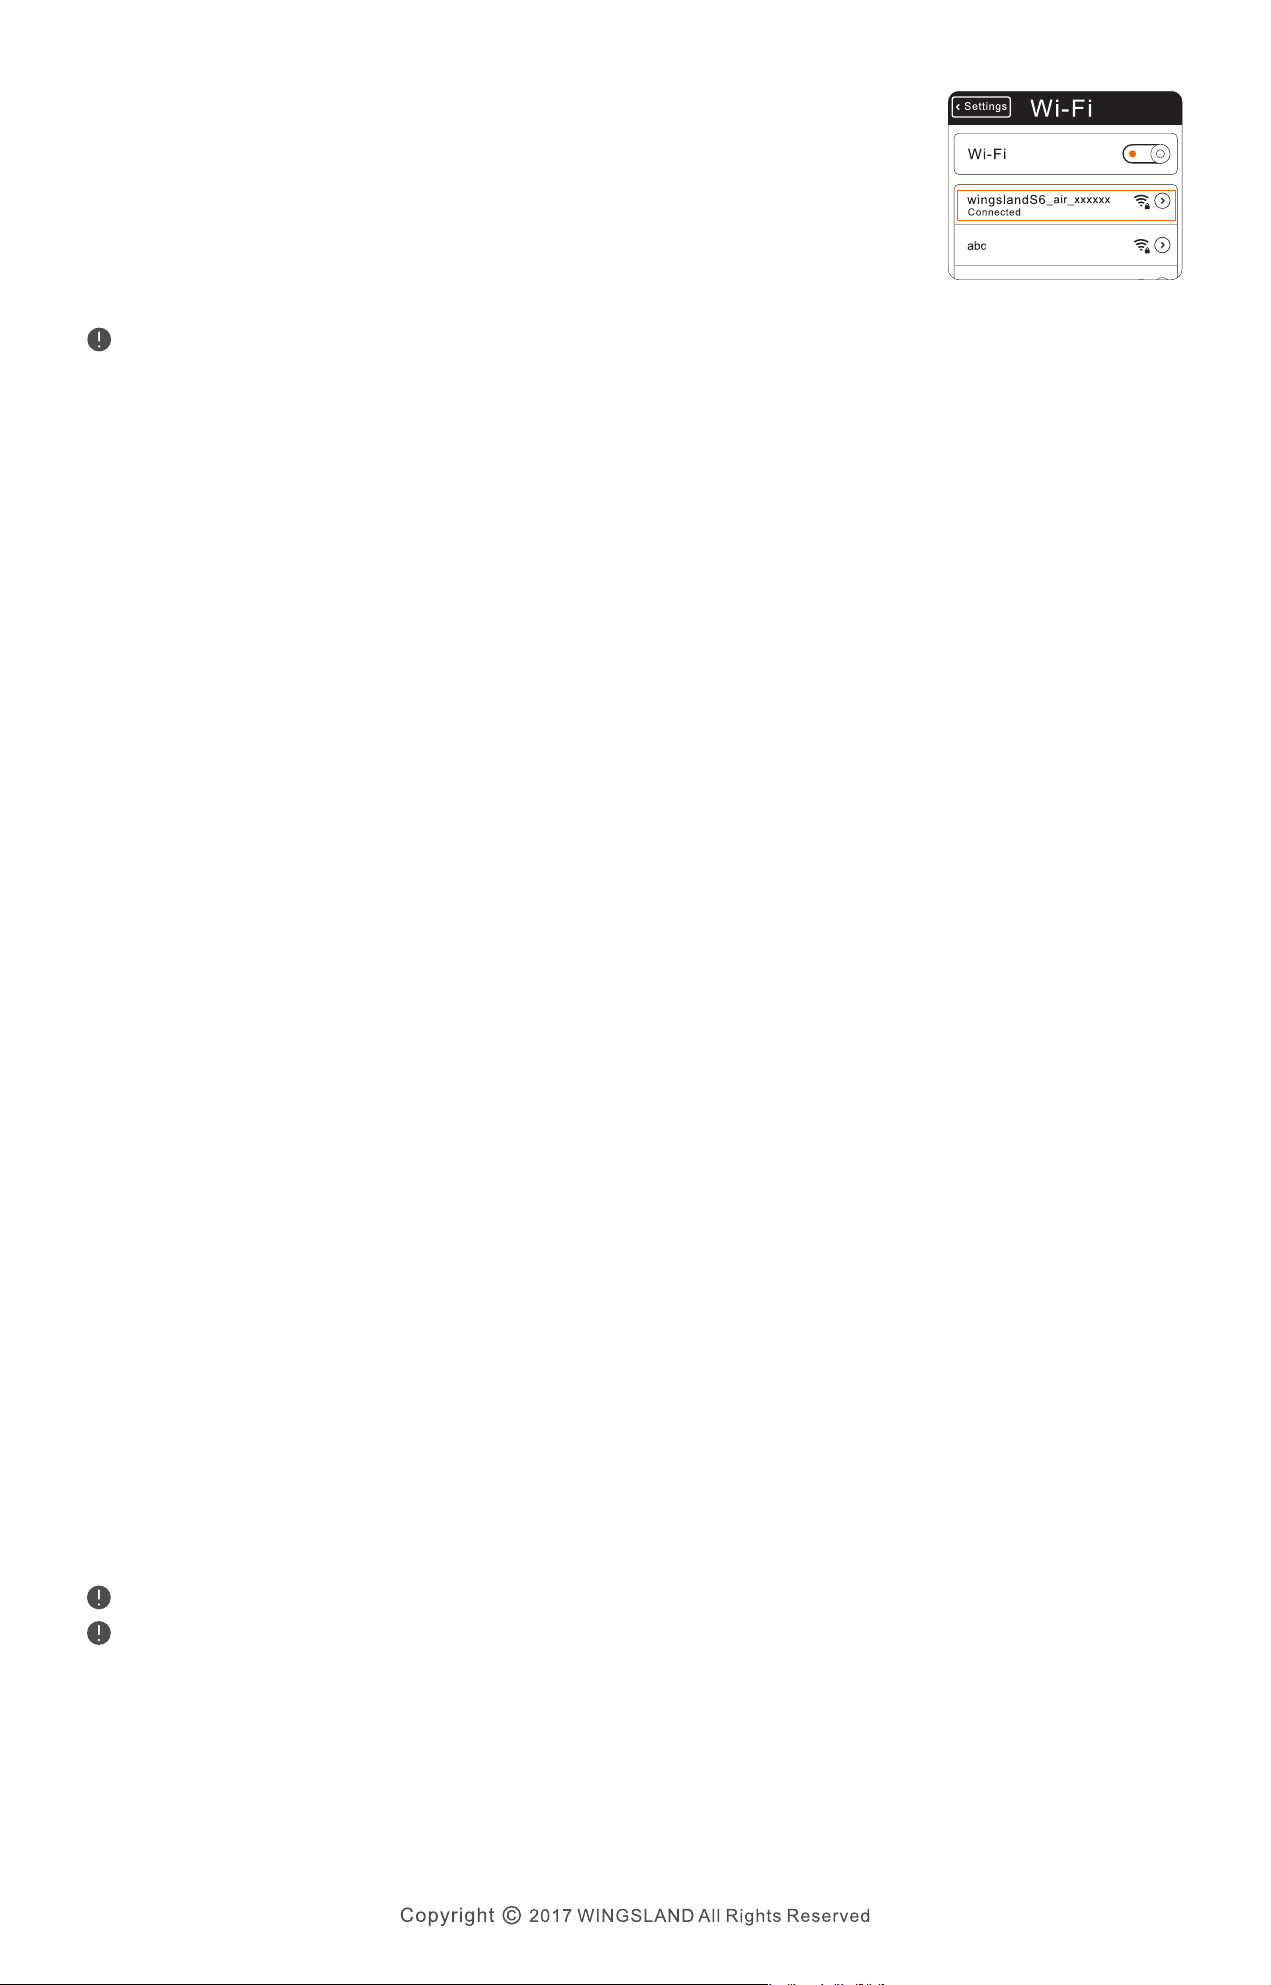
5. Connecting the Mobile Device
After powering on the aircraft, turn on the Wi-Fi connection
on your mobile device, select WINGSLANDs6_air_xxxxxx
from the Wi-Fi list. Enter the default password 12345678 or
wingsland. Launch the WINGSLAND FLY when the
connection is successful.
S6 uses Wi-Fi transmission, live-view quality and control distance will vary and may depend on different
mobile devices.
6. Start to Fly
Before the takeoff, please confirm the propeller guard prompt whether the aircraft is with
propellers guard or without propellers guard.
Outdoor Flying
The aircraft will only take off when sufficient GPS reception is available (GPS satellite
number ≥ 7). Flying environment will have a huge influence on the GPS reception, please
keep in mind the following notices.
1.Only fly in an open area and always fly your aircraft within line of sight and keep away
from the crowds and animals.
2.Always fly at locations that are clear of buildings, power lines and locations where may
have a strong magnetic interference.
3.Do not fly the aircraft within areas such as airports, no-fly zone. Observe local laws and
regulations. Keep the aircraft flight range and height within 100 meters.
4.Do not use the aircraft in severe weather conditions: snow, rain, smog, wind speeds
exceeding 5m/s, etc.
5.Be very careful when flying at 6000 meters or more above sea level. The aircraft functions
may be affected by the environmental conditions.
Indoor Flying
With the help of the Vision Positioning System, the aircraft can hover in place precisely when
flying indoor or in other environments where the GPS signal is unavailable. The system is only
valid when the aircraft is between 0.7m and 2.5m above the surface. The performance of the
Vision Positioning System is affected by the aircraft flying speed, brightness and texture of
the surface which the aircraft is flying over .and especially following situation
● Flying at a high speed while at a low altitude.
● Flying over a surface with unclear patterns or highly repeating patterns.
● Flying over a monochrome surface or a water surface.
● Flying in an extremely dark or bright environment.
● Flying over a inclined surface which is tilted over 30 degrees.
● Flying over a moving surface or other environment which may affect the system.
When flying indoor, the aircraft can only be landed by One-key Land operation.
When the Vision Positioning System is not in working situation, the aircraft will use barometer to only
maintain its altitude (the aircraft may be drifted by inertia effect). Control the aircraft return to home if a
drifting occurs.
Page 5
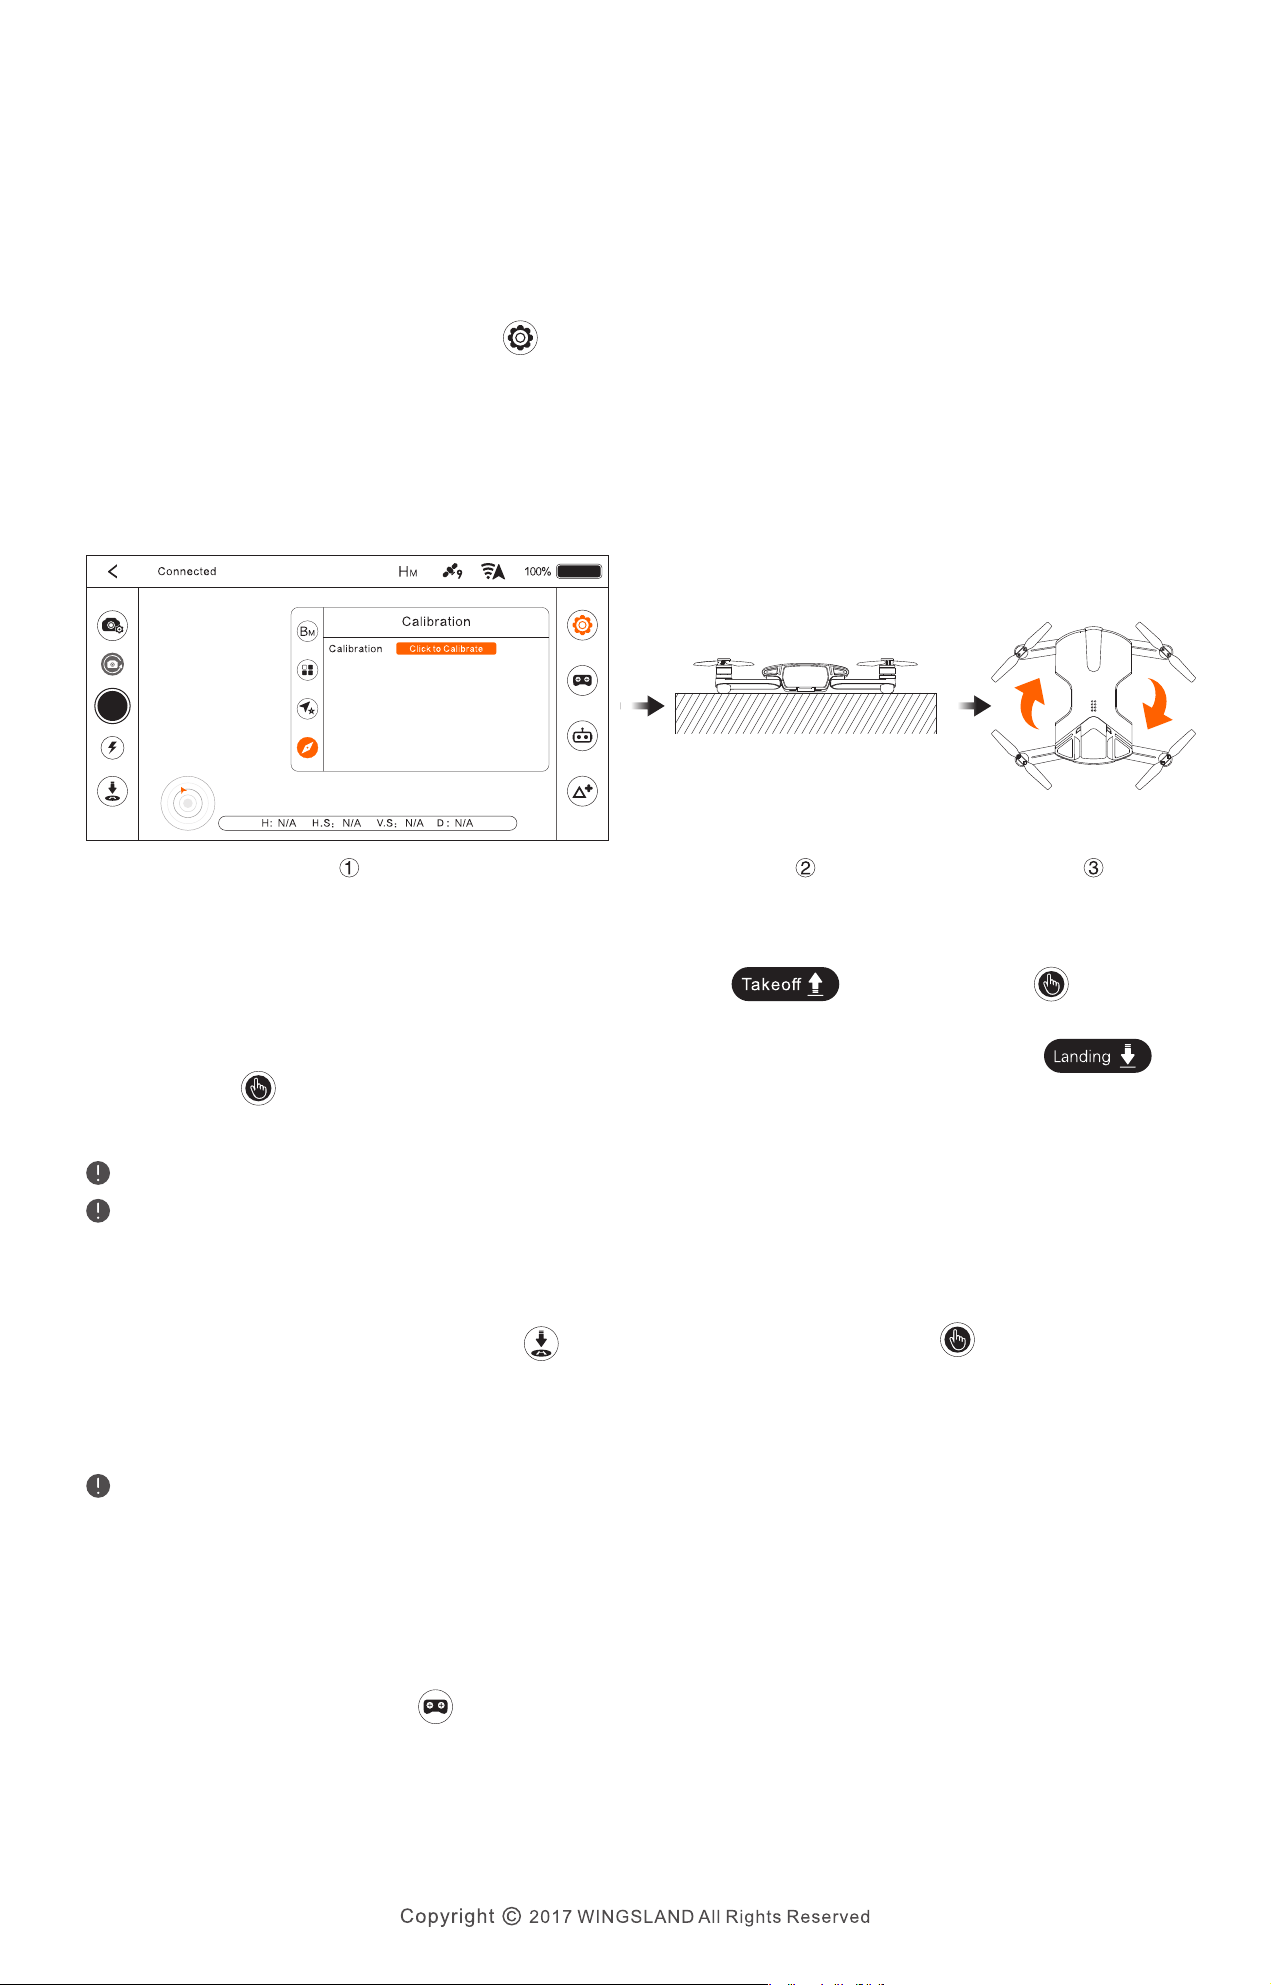
Calibrating the Compass
When to calibrate:
● First Flight.
● Flying in a new location or in a location that is different from the last flight.
● A drift occurs when the aircraft is hovering.
Tap into the general setting menu and select the compass calibration icon ①.Place the
aircraft on a flat ground ② and confirm to start the calibration and follow the APP prompt to
rotate the aircraft 360 degree clockwise in same altitude for at least 6 times ③. Place the
aircraft on a flat ground and waiting for the prompt shows Calibrating Data Updating.
After prompt shows Calibrating Successful, tap yes to finish the calibrating. If a Gyroscope
Error prompt shows up, please redo the above process.
Takeoff/Landing
In the flying interface, tap the One-key Takeoff icon , then conform to active
the feature. The aircraft will automatically hover up above ground and stabilize.
After takeoff, the One-key Takeoff icon will change to One-key Landing icon ,
Tap the icon the aircraft will automatically perform the landing. Check the landing area
condition and make sure no obstacle in landing way before the landing.
One-key Takeoff hover up attitude reference: Indoor 1.5m / Outdoor 2.5m
Please do not takeoff in a narrow and relatively small space. Follow the indoor and outdoor flying notices.
For more information please refer to the user manual.
Return-to-Home
Tap the Auto Return-to-Home icon in flying interface and Confirm to command the
aircraft return to the last recorded home point in a preset altitude. The auto Return-to-Home
function can be canceled during a Return-to-Home flight by tap the exit icon or move virtual
joysticks.
If the aircraft is flying under7 meters, the aircraft will automatically ascend to 7 meters from the current
height. If the current height is 7 meters or above 7 meters, the aircraft will return to home point with the
current height.
7. Control Mode
1. Virtual Joystick Mode
ln the flying interface, tap , two virtual joysticks will be displayed on the APP screen
to correspond the operation of the remote control sticks. The virtual joysticks are set
to Mode2 by default (Mode1 and Mode2 can be switched under general setting). The
left joystick controls the throttle and rotation of the aircraft,the right joystick controls
forward, backward, left, right movement of the aircraft.
Page 6
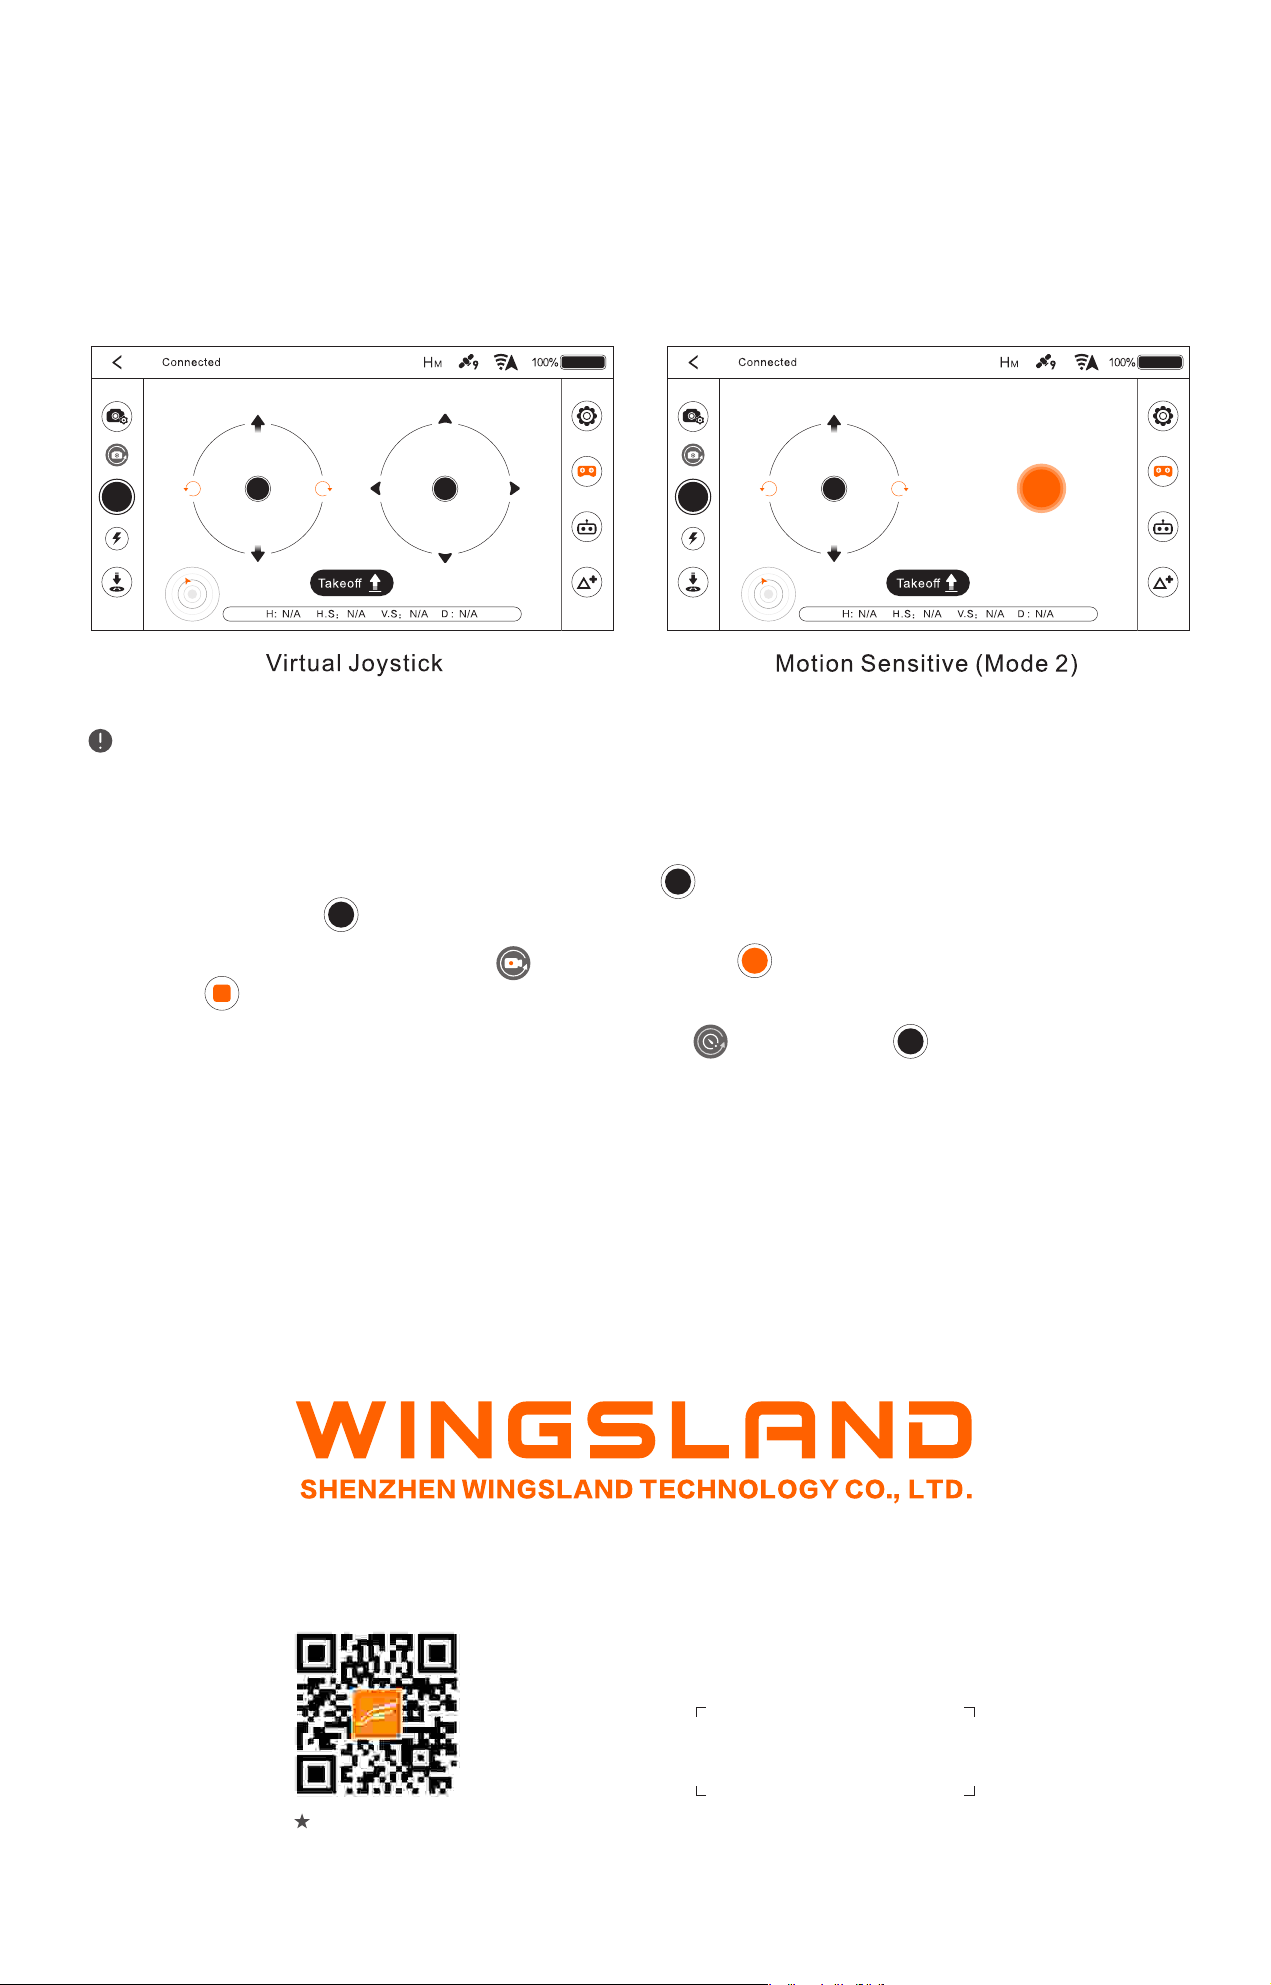
2. Motion Sensitive Mode
Change the Motion- Sensitive Mode by tapping the motion sensitive icon. A joystick will be
displayed on left of the APP screen, which controls the throttle and rotation of the aircraft. Tap
and hold the orange round on the right of the APP screen. The APP will record current inclined
position of mobile device as a referenced position. Then tilt the mobile device to control the
motion of aircraft when the round turns green. Tilt the mobile device up/down, the aircraft will
fly forward/backward. Tilt the mobile device left/right, the aircraft will fly toward left/right.
Motion Sensitive Mode only works under the Mode2. (Model 1 -The right joystick serves as the throttle.
Mode2 - The left joystick serves as the throttle. For more information,please refer to the S6 User Manual)
8. Photos/Videos
Photos: Under single shot mode: Tap shutter once to take one photo. Under burst
mode: Tap shutter once to take continuous 6 photos.
Videos: Choose video recording , tap record icon once to start recording video, then
tap again to stop recording. A recording timer will be displayed during the video shooting.
Timer Photo Mode: Choose Timer Photo Mode , tap shutter once, the camera will
take one photo in a preset delayed time (default time: 5s).
For more information, please refer to the “S6 User Manual”
www.wingsland.com
This content is subject to change without prior notice
 Loading...