

WingScapes Timelapse PlantCam User Manual
Timelapse PlantCam
User Guide

© 2009 Ebsco Industries, Inc. All Rights Reserved. Made in China
WARNING! This product may contain lead, a chemical known to the state of California to cause
cancer, birth defects andother reproductive harm.

1
Customer Support
Phone: 888.811.WING (9464)
Fax: 205.408.6157
Email: customerservice@wingscapes.com
Web: www.wingscapes.com/support
Address: Wingscapes
150 Industrial Road
Alabaster, AL 35007
Photogallery: wingscapes.com/photogallery
YouTube: youtube.com/wingscapes
Blog: wingscapes.typepad.com/wingscapes
Facebook: facebook.com/Wingscapes
Twitter: @wingscapes (or tweet with hashtags #birdcam
or #plantcam)
Find Us Online


Table of Contents
1. Welcome 4
2. Quick Start Guide 5
3. Definitions 6
4. Four Modes 8
5. Mounting Suggestions 12
6. Custom Settings & Converting Photos to Timelapse Video 14
7. Storage and Capacity 20
8. Image Viewing by TV Out Cable or USB Out Cable 21
9. Laser Aim 22
10. Specifications 23
11. Additional Information 24

4
1. WELCOME
This product allows you to accelerate time,....to easily see things that are
normally too slow to watch.
Wingscapes has designed this camera to be simple for beginning users,
but also to be flexible enough to work in a variety of conditions. This is a
new type of camera. Using it will require a little creativity, patience, and
artfulness on the part of the user.
The easiest way to get started is to...get started. Refer to the following “Quick Start Guide” and begin experimenting with a simple setup.
Custom settings allow you to optimize the camera for a variety of projects. Finding the correct combination of settings and camera placement
for a given situation may require some experimentation and practice. At
any time, you can reset the camera to its factory default settings in the
SETUP menu.
Please take a moment to familiarize yourself with this guide and the
basics of operating the camera. If at any time you need assistance or
have questions about the camera’s operation, please contact us via
e-mail or phone.

5
2. QUICK START GUIDE
The following steps outline the quickest way to begin using your camera. We recommend that you scan the remainder of this user’s guide
before using your new camera.
1. Remove camera from packaging.
2. Insert four new AA batteries.
3. Mount the camera so that it is level and aimed your target. Use
viewfinder and laser to insure accurate aim. (Refer to the chapter
on Mounting the PlantCam for suggestions.)
4. Using the included tape measure, adjust the focus ring to match
the distance between the camera and target.
5. Set the Rotary Dial to SETUP and press the Power/Status button
to turn the camera ON.
6. Important: set the date and time before initial use.
7. Turn Rotary Dial to AUTO, close the door and secure the latches.
What Happens Then?
The camera will be in the AUTO Mode. After 10 seconds, the camera
will take its first photo or video and then enter a standby mode and begin to count down a timelapse interval. At the end of each interval, the
camera will wake-up, take a photo or video, show status for 10 seconds,
and then begin to count down another interval. The camera will continue taking images until either the memory is depleted or the batteries
are drained.
6
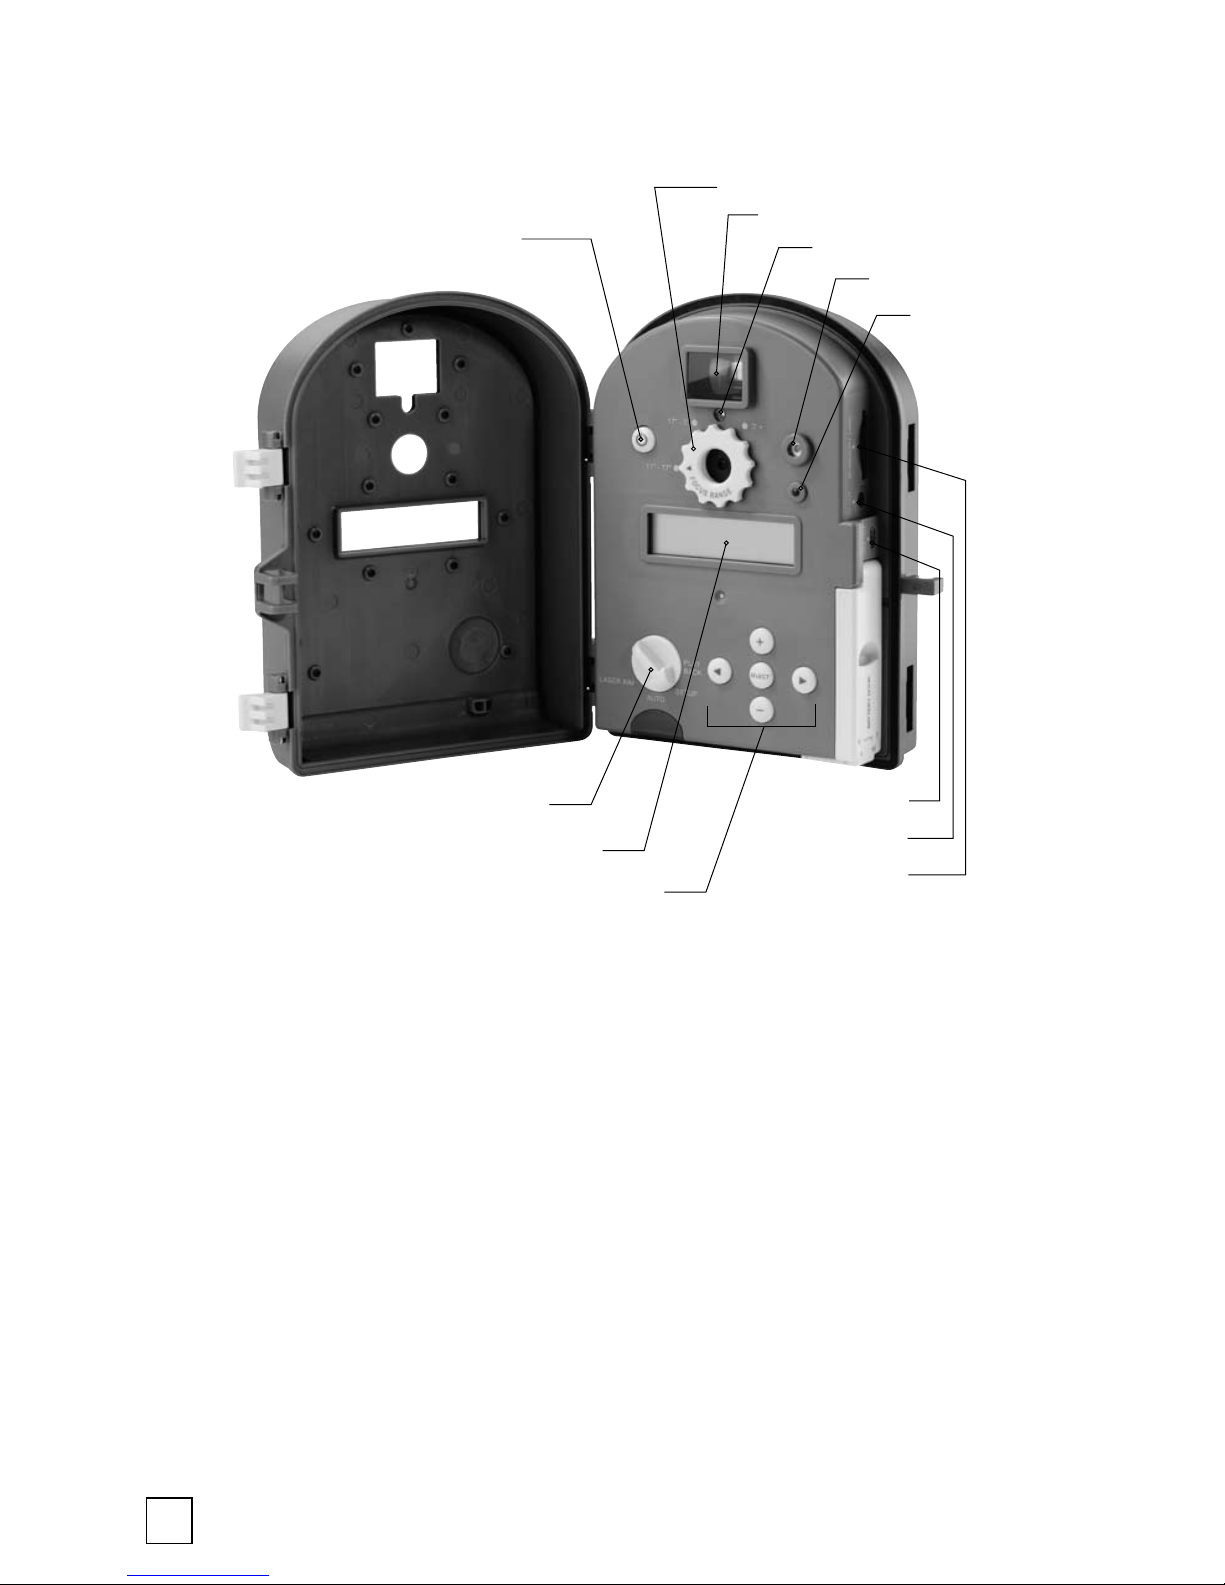
1. Power/Status button — Turns the unit ON or OFF.
• To turn ON you must press and hold the Power/Status button until
the LCD display activates.
• To turn OFF you must press and hold the Power/Status button
until the LCD display goes off.
• To see the status of the camera, click the power button quickly
(warning: if camera is within 15 seconds of taking its next photo or
video, pressing this button will reset the timelapse timer)
2. Rotary Dial — Depending on the position of the dial, there are 4 possible functions: LASER AIM, AUTO, SETUP and PLAYBACK.
3. LCD Display
3. DEFINITIONS
1
4
3
2
6
5
7
12
11
10
9
8

7
Definitions
4. Function buttons
SELECT button
Used to confirm selections during SETUP and PLAYBACK modes.
+ or – button
• Used to change the setting values within the SETUP mode.
• Used to move forward or backward while reviewing pictures in
PLAYBACK mode.
LEFT ( ) button
• Used to choose previous settings in SETUP mode.
• Used to delete pictures or video in PLAYBACK mode.
RIGHT ( ) button
• Used to choose next settings in SETUP mode.
• Used to play video clips in PLAYBACK mode.
5. USB OUT port — To plug USB cable to connect to a computer.
6. TV OUT port — To connect to TV to review pictures or video clips.
7. SD MEMORY CARD port — To insert SD card to increase memory
capacity. Note: The metal contact of your card should be facing down
when inserting.
8. Status/Standby Indicator — When the camera is in AUTO mode,
the flashes every 3 seconds to indicate that the camera is powered ON.
To see the status of the camera, click the power button quickly (note: if
camera is within 15 seconds of taking its next photo or video, pressing
this button will reset the timelapse timer).
9. LASER Aiming Device (read warnings)
10. Light Sensor — Measures available light and wakes up camera if
“DAILY WAKEUP” setting is set to “BY LIGHT”
11. Viewfinder
12. Focus Range Setting
 Loading...