

Page 1
IAF TC-2 Trainer Kfir
Assembly guide
WMK48011
1/48 Scale
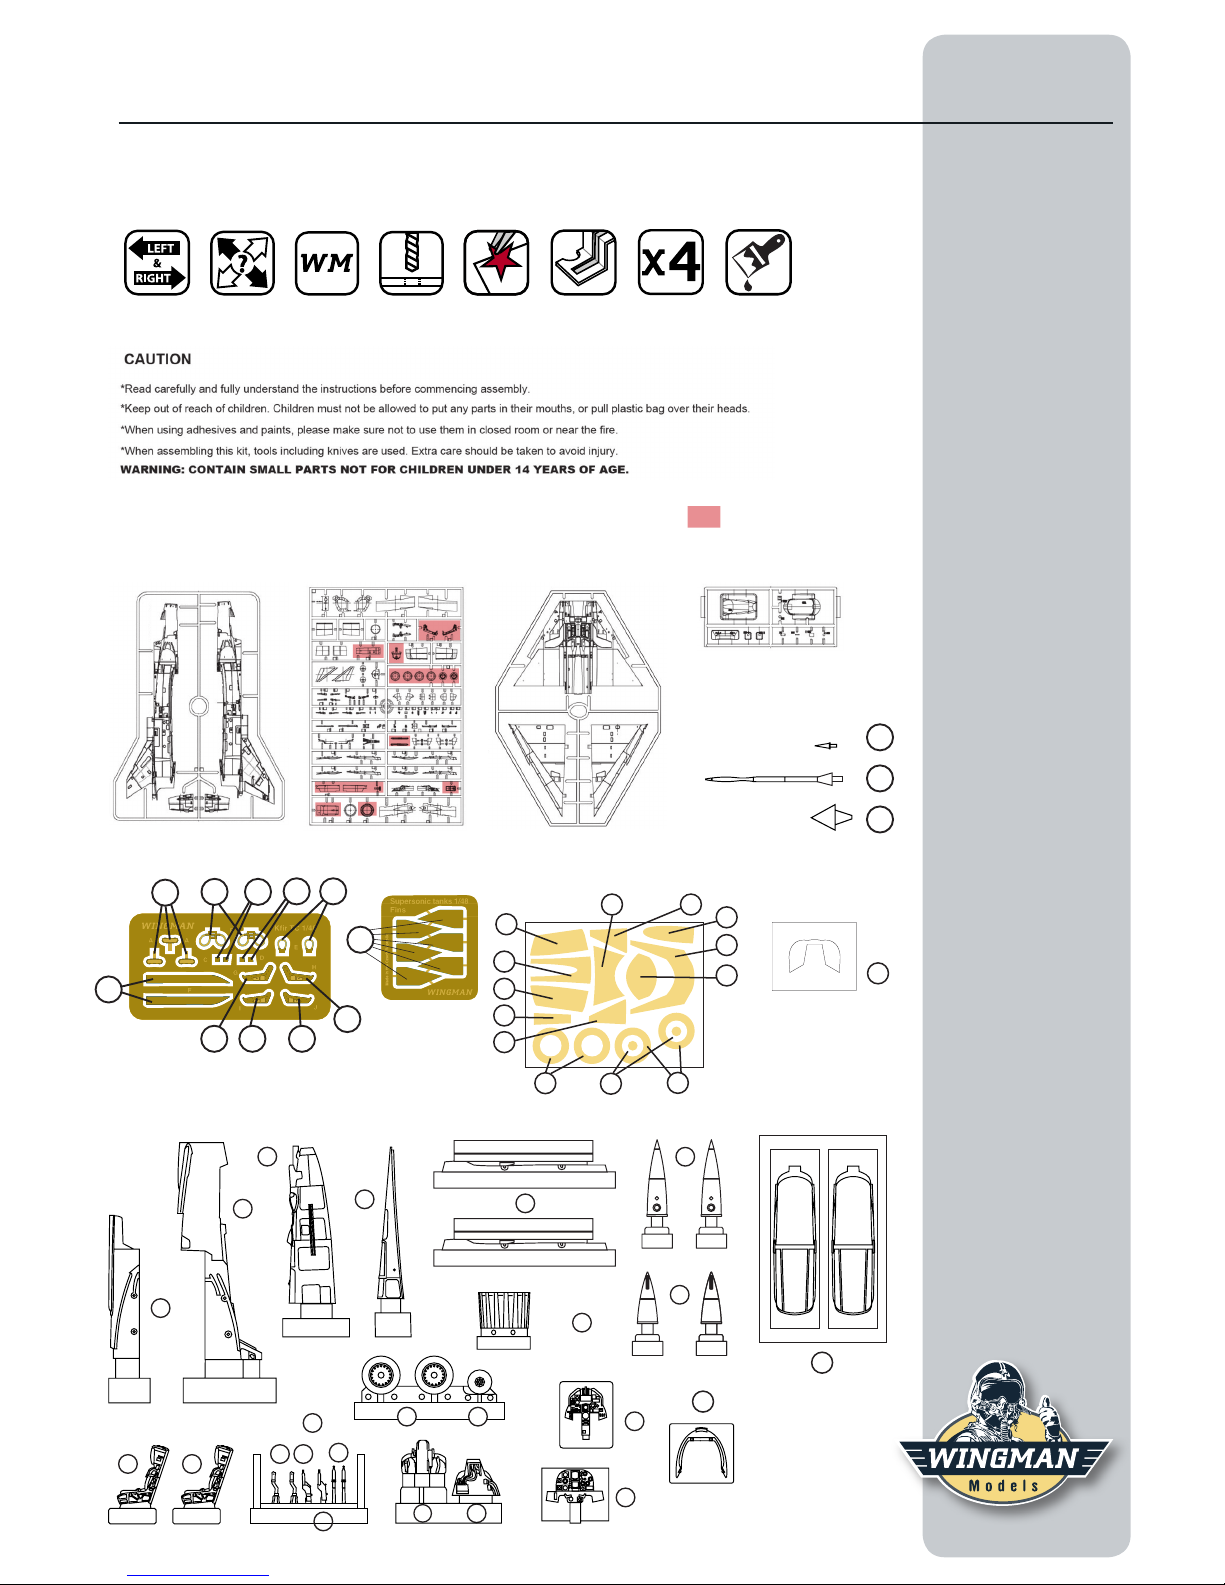
Plastic parts
Etched metal parts Paper masking
Transparent
part
Vac-u-formed
canopies
Resin parts
A BD
E
Parts not in use
1
2
3
4
5 5
6
A
D E
F
G H I
J
B C
23
33
34
38
21
22
24
25
26
27
33
29
30
31
32
28
35
Pitot
Nose tip
36
37
AOA probe
Brass parts
15
16
17
K
14
11
14
18
19
10
7
8
9
1312
Do the same for the
opposite side
Use Wingman parts
instead
Drill a hole Photo etch parts.
Glue with Super glue.
Apply decal
Options
Multiple time Painting
Instructions
Page 2
1 2
3
E
E9
E10
E11
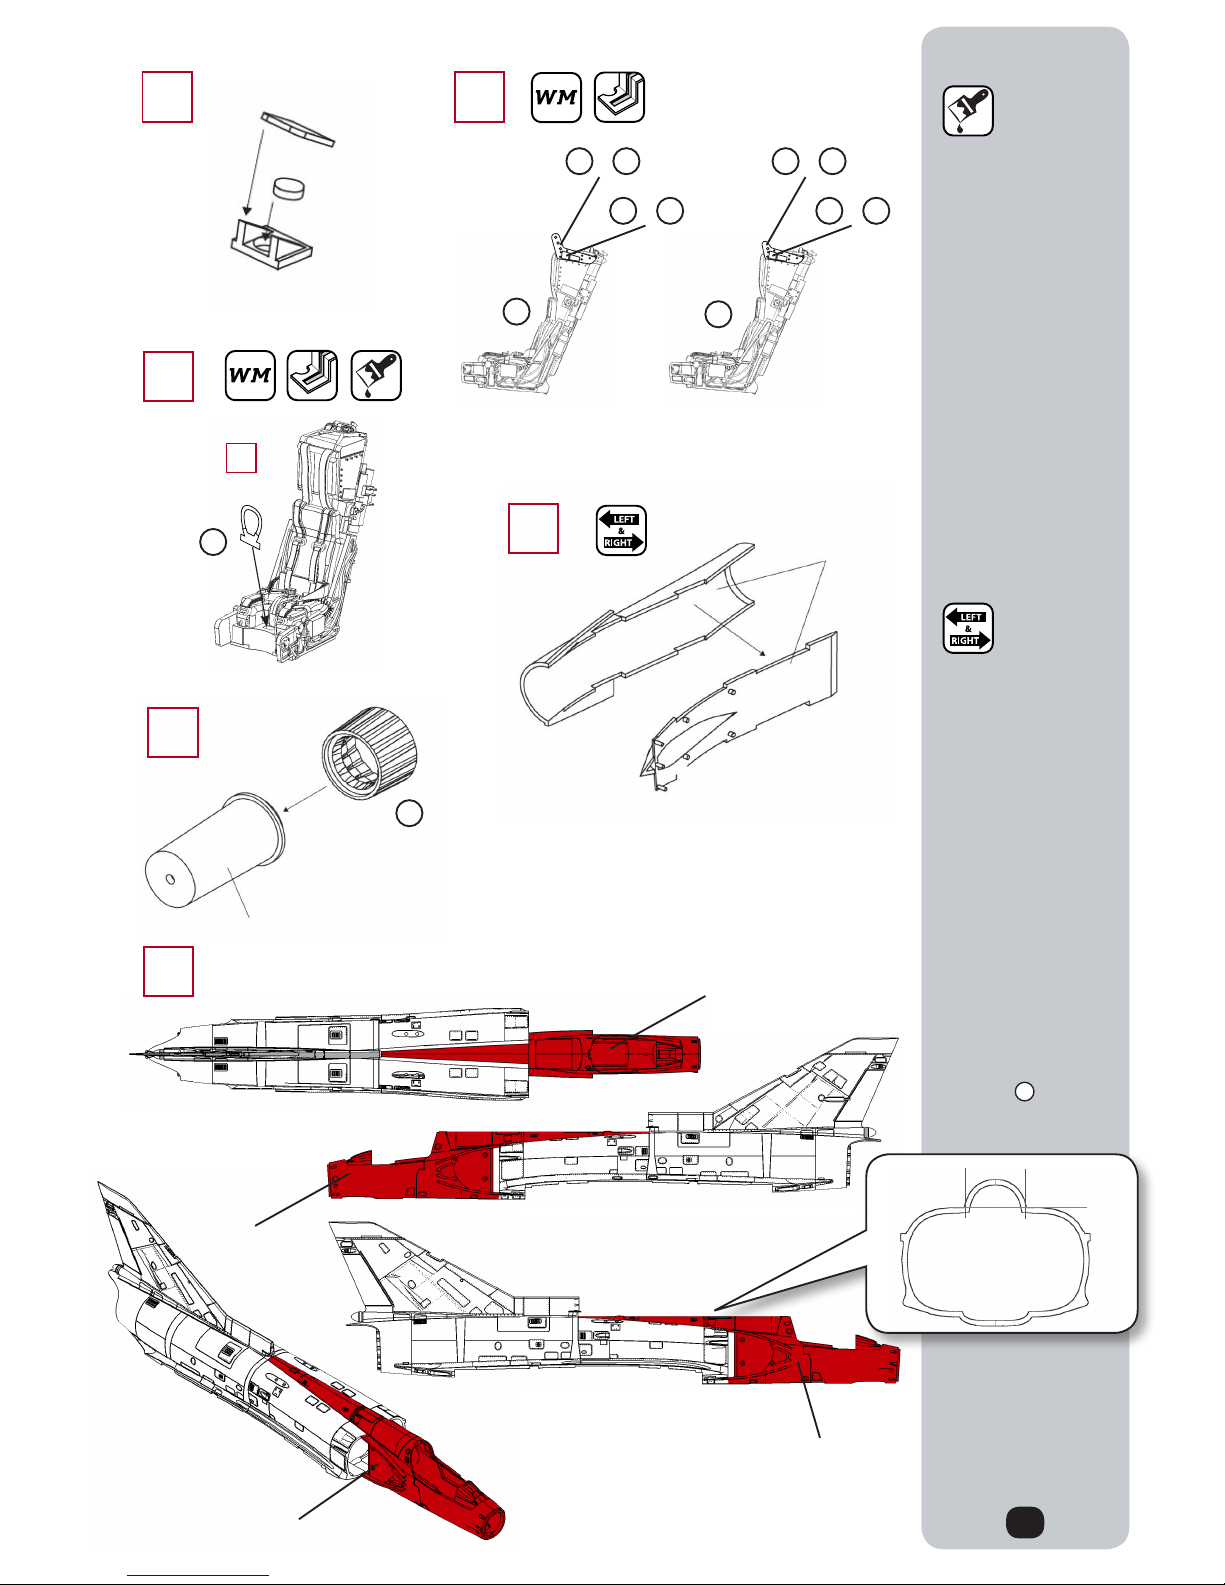
The numbers in
brackets refer to the
other side.
Cut and remove
Cut and remove
Cut and remove
Important:
Remove the kit spine
by cutting in the right
direction (horizontally
NOT vertically), leaving
a small mounting stage,
which is needed for our
resin part .
Cut and remove
2
4
White
D73 (D74)
D1 (D2)
6
D
ICH
( )
( )
Rear seat
5
2
5
8
D4
4
7 7
JCG
D
( )
( )
Front seat
5
4
Mk.10 Ejection Seats
Paint the metal frame of
the Mk.10 ejection seats
Medium Sea Grey Hu 165
with head rest and back
rest cushions in a mixture
of Hu 86 Light Olive and
Hu 155 Olive Drab. The
seat belts are Hu 26 Khaki
with pulls in Hu 155 Olive
Drab. The housing of the
rescue pack is painted
in Hu 99 Lemon. Other
colors in use are Red,
Yellow Hu 24, White, Black
Hu 33.
Page 3
7
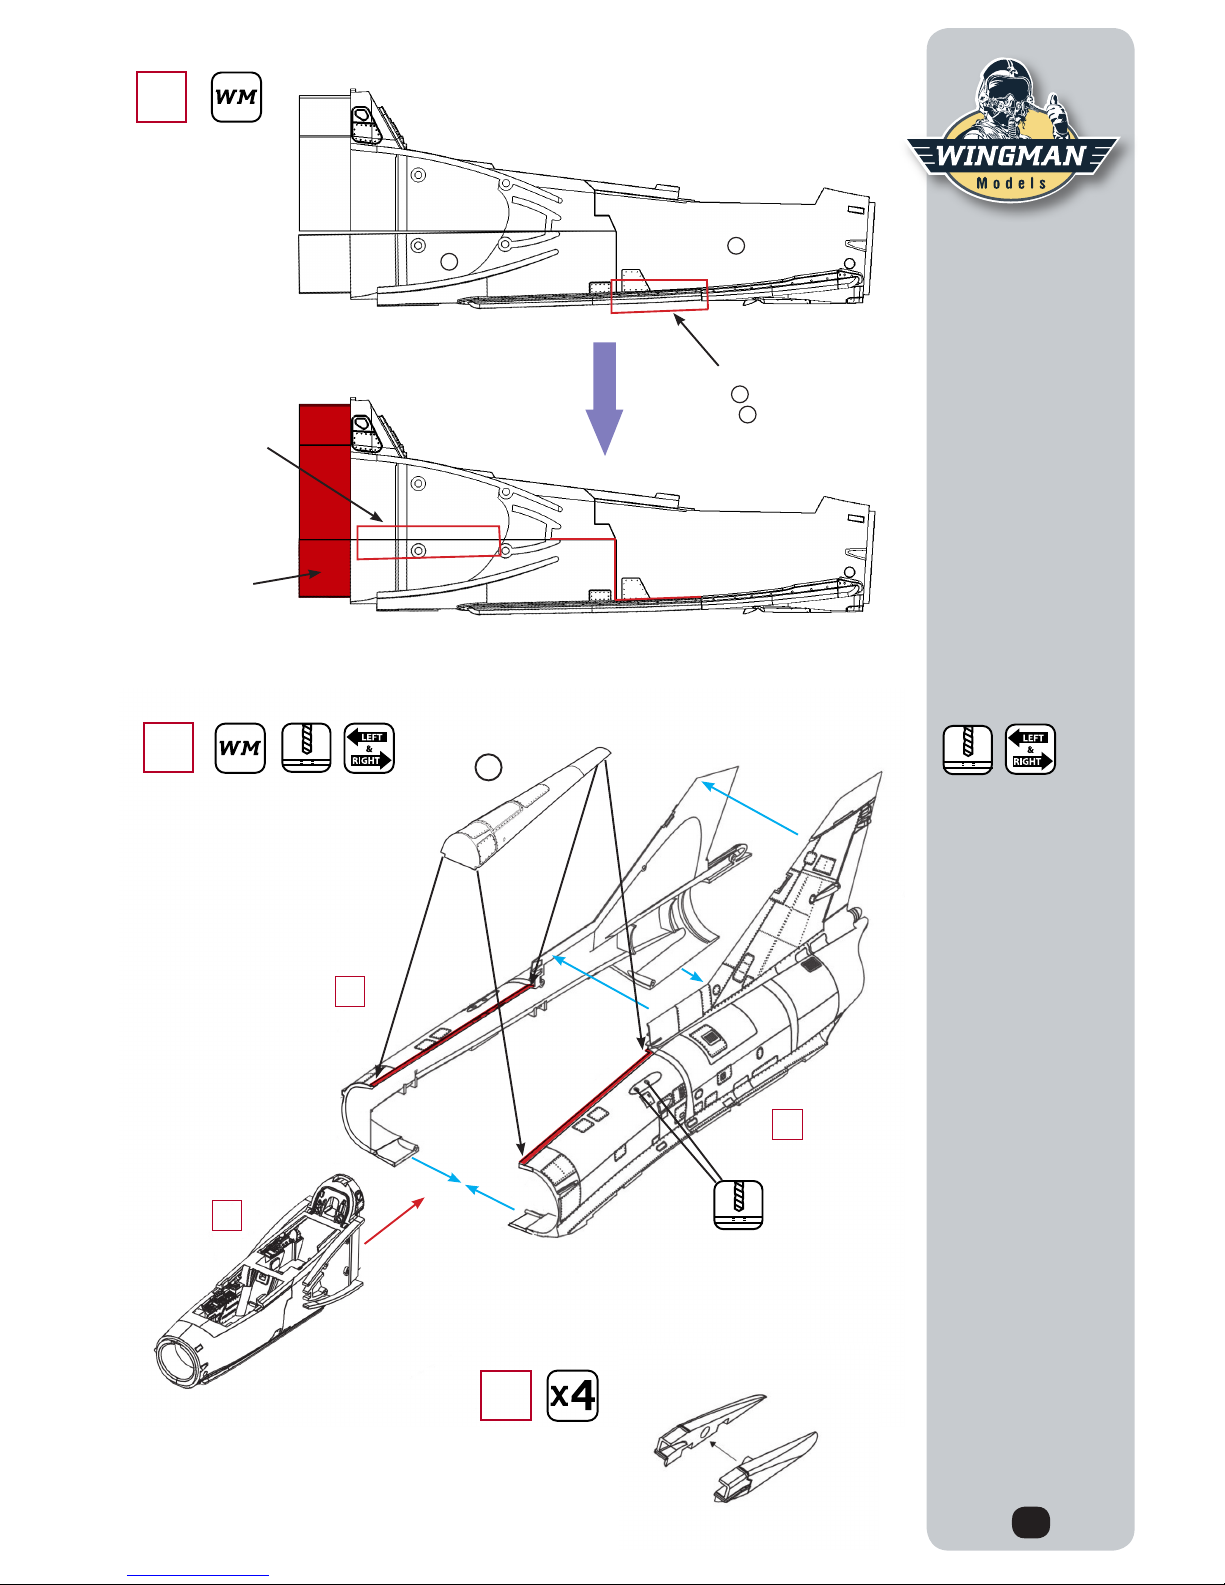
Drill the holes on
both intakes.
3
4
1. Glue the front area
of part to part
number and set
aside to let it dry.
4. Seal and carefully sand the
recess shown in Red.
2. Glue the rear area
and press the part
toward each other.
If in doubt, genly
heat the part for a
few seconds in the
microwave or over
hot water vapors to
t to shape.
1
2
1
2
8
9
D44
D45
7
6
6
3. Remove the area
marked in Red.
Page 4
D59
D20
D21
D70
D59
5
10
11
13
14
4
4
8
D7
A3
A4
D8
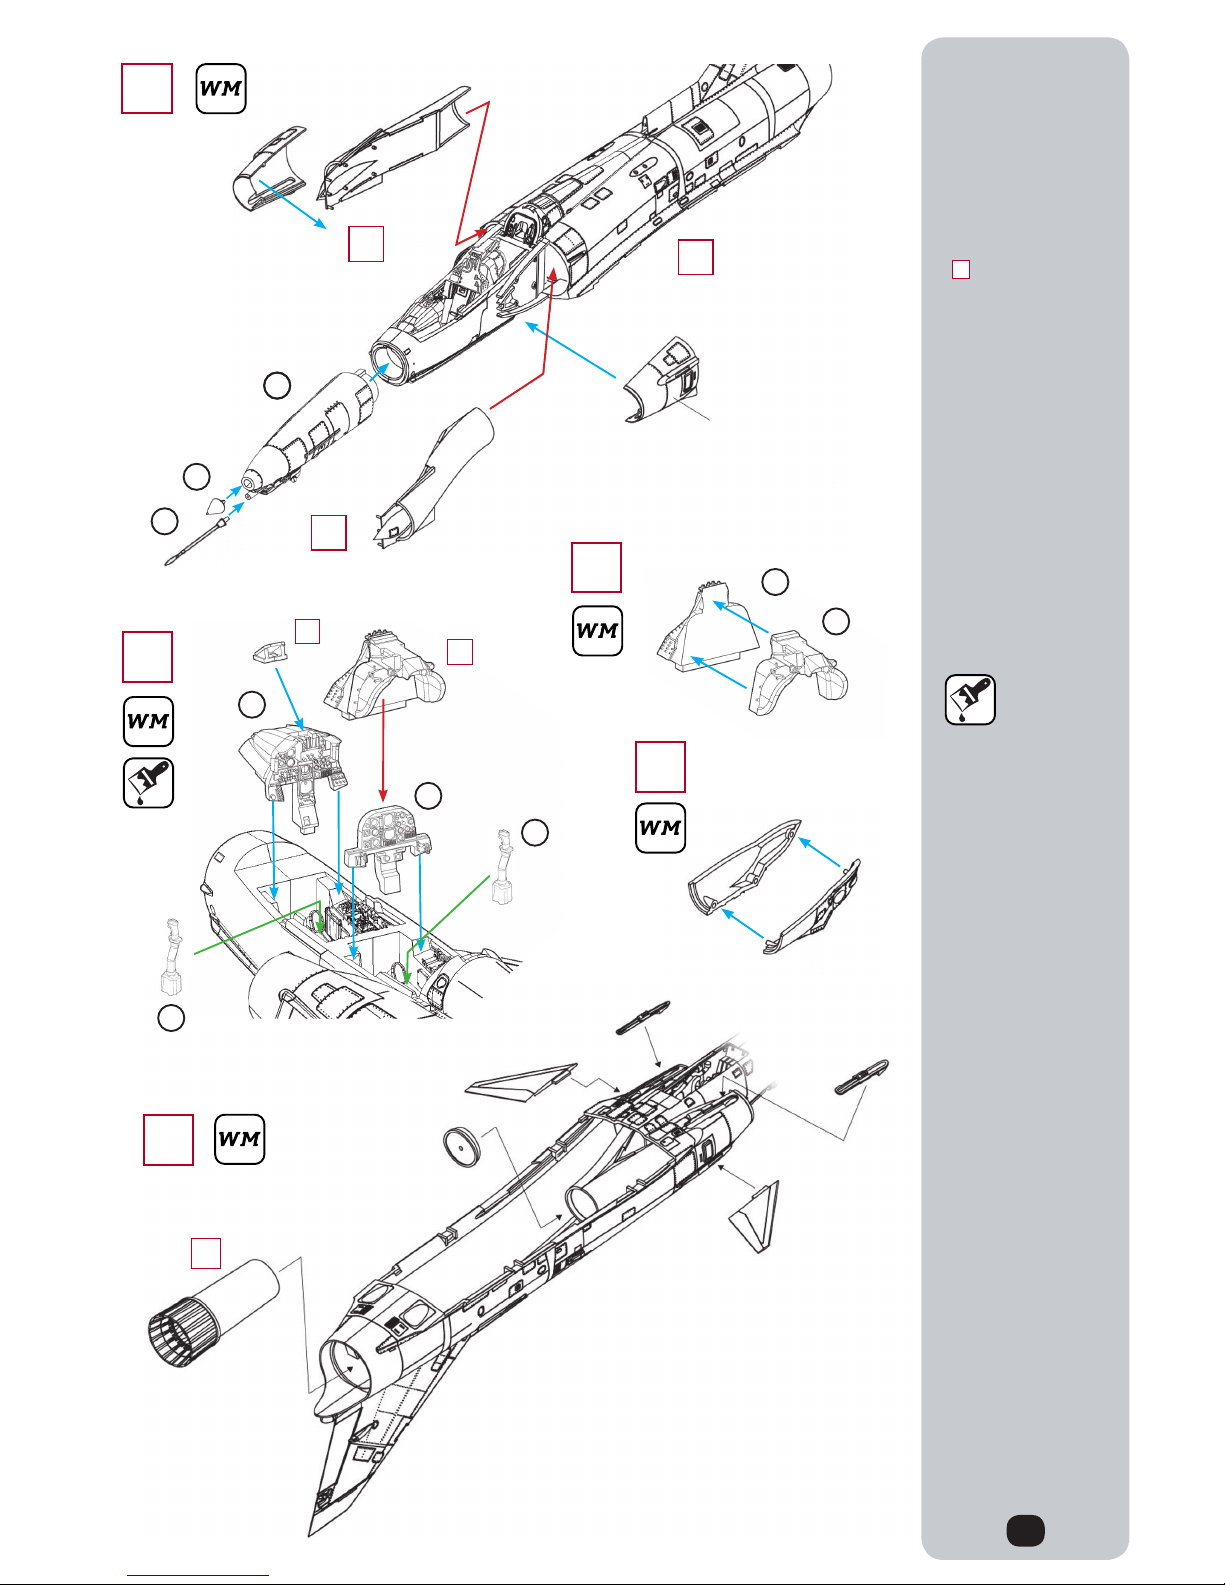
Attach parts A3 and
A4 after installing the
inner intakes parts
( ).
4
10
11
6
6
18
17
33
36
37
11
1
12
4
Paint cockpit tubs and
instrument panels in
Light Grey Humbrol 64,
while instruments were
kept in Black Hu 33. The
bulkhead behind the rear
seat’s headrest (part D57)
is painted Light Grey Hu
64 with black avionic
housings.
The instrument cover
of the rear instrument
panel in between the two
cockpits is painted in Hu
33 Black.
Page 5
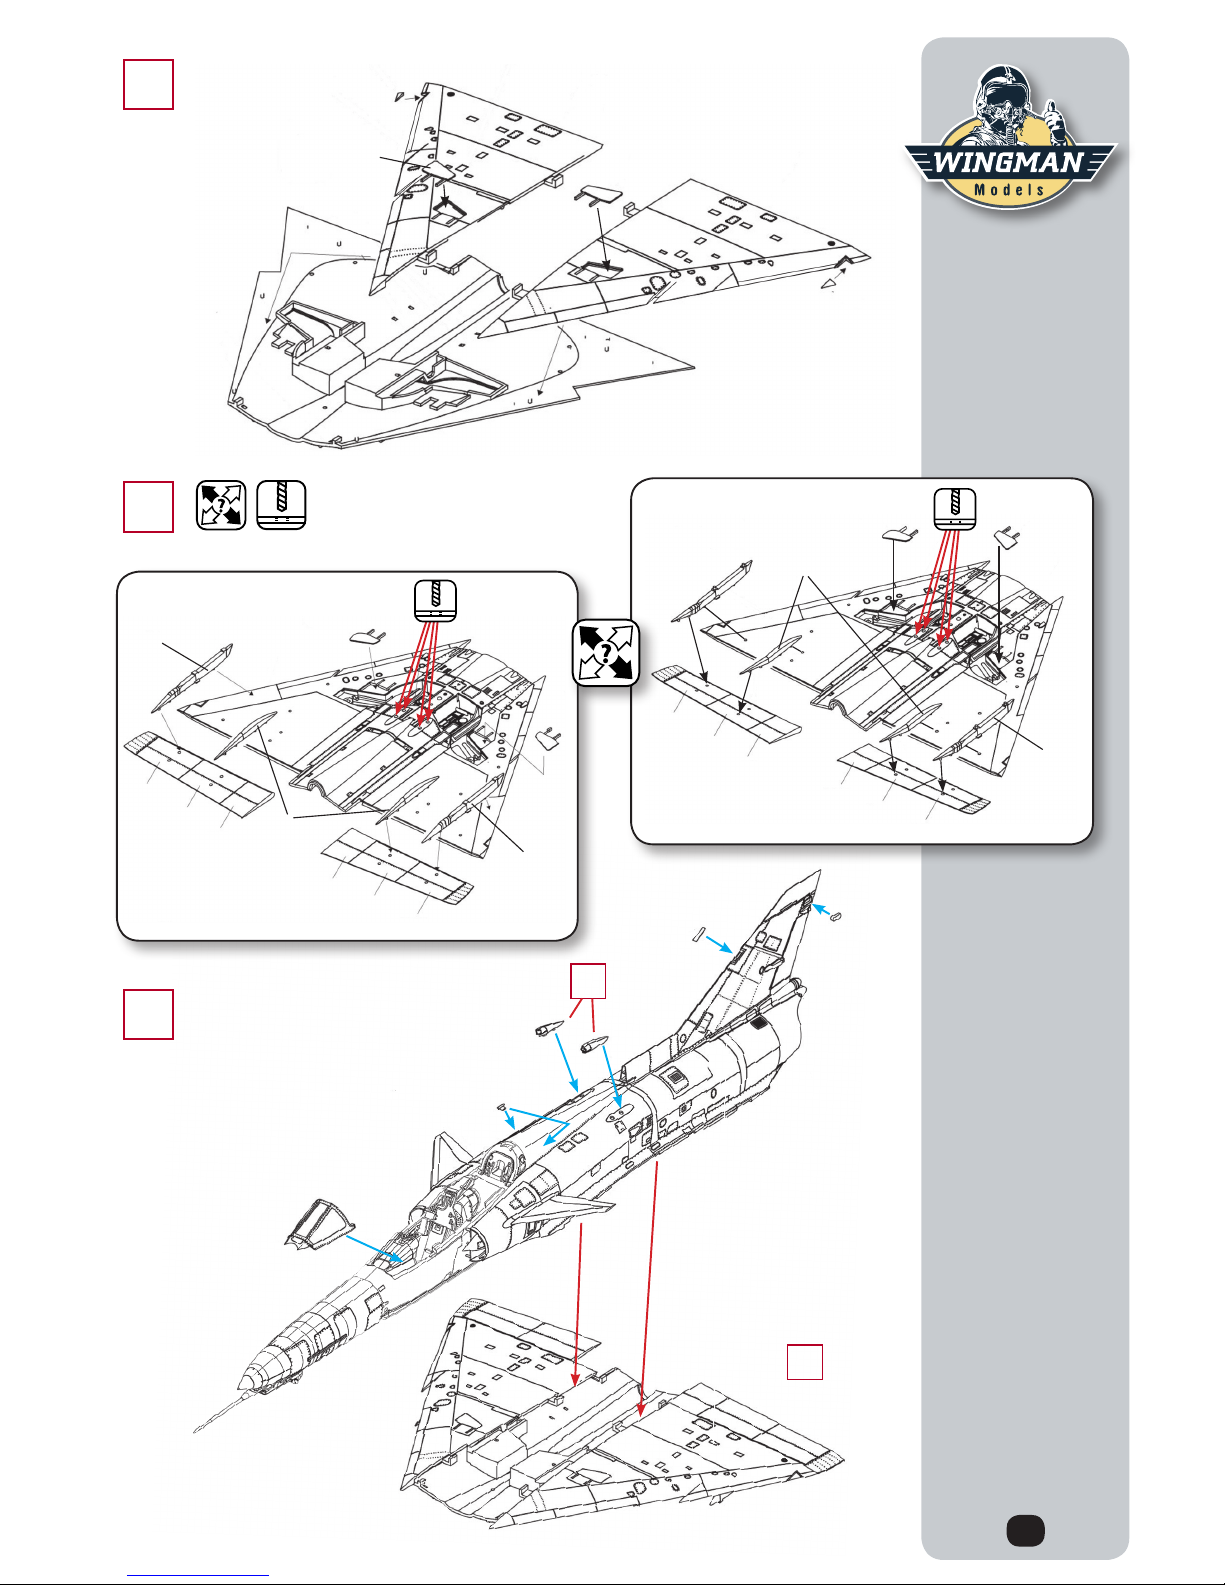
15
16
17
15
5
E3
E4
B3
B2
D19
B1
D18
Flaps Up
Flaps Down
D17
D17
D16
D16
D14
D13
D65
D65
D64
D64
D72
D72
D61
D61
D71
D71
D60
D60
D14
D12
D15
D12
E7
E8
D34
E1
9
Page 6
6
6
18
18
19
19
20
21
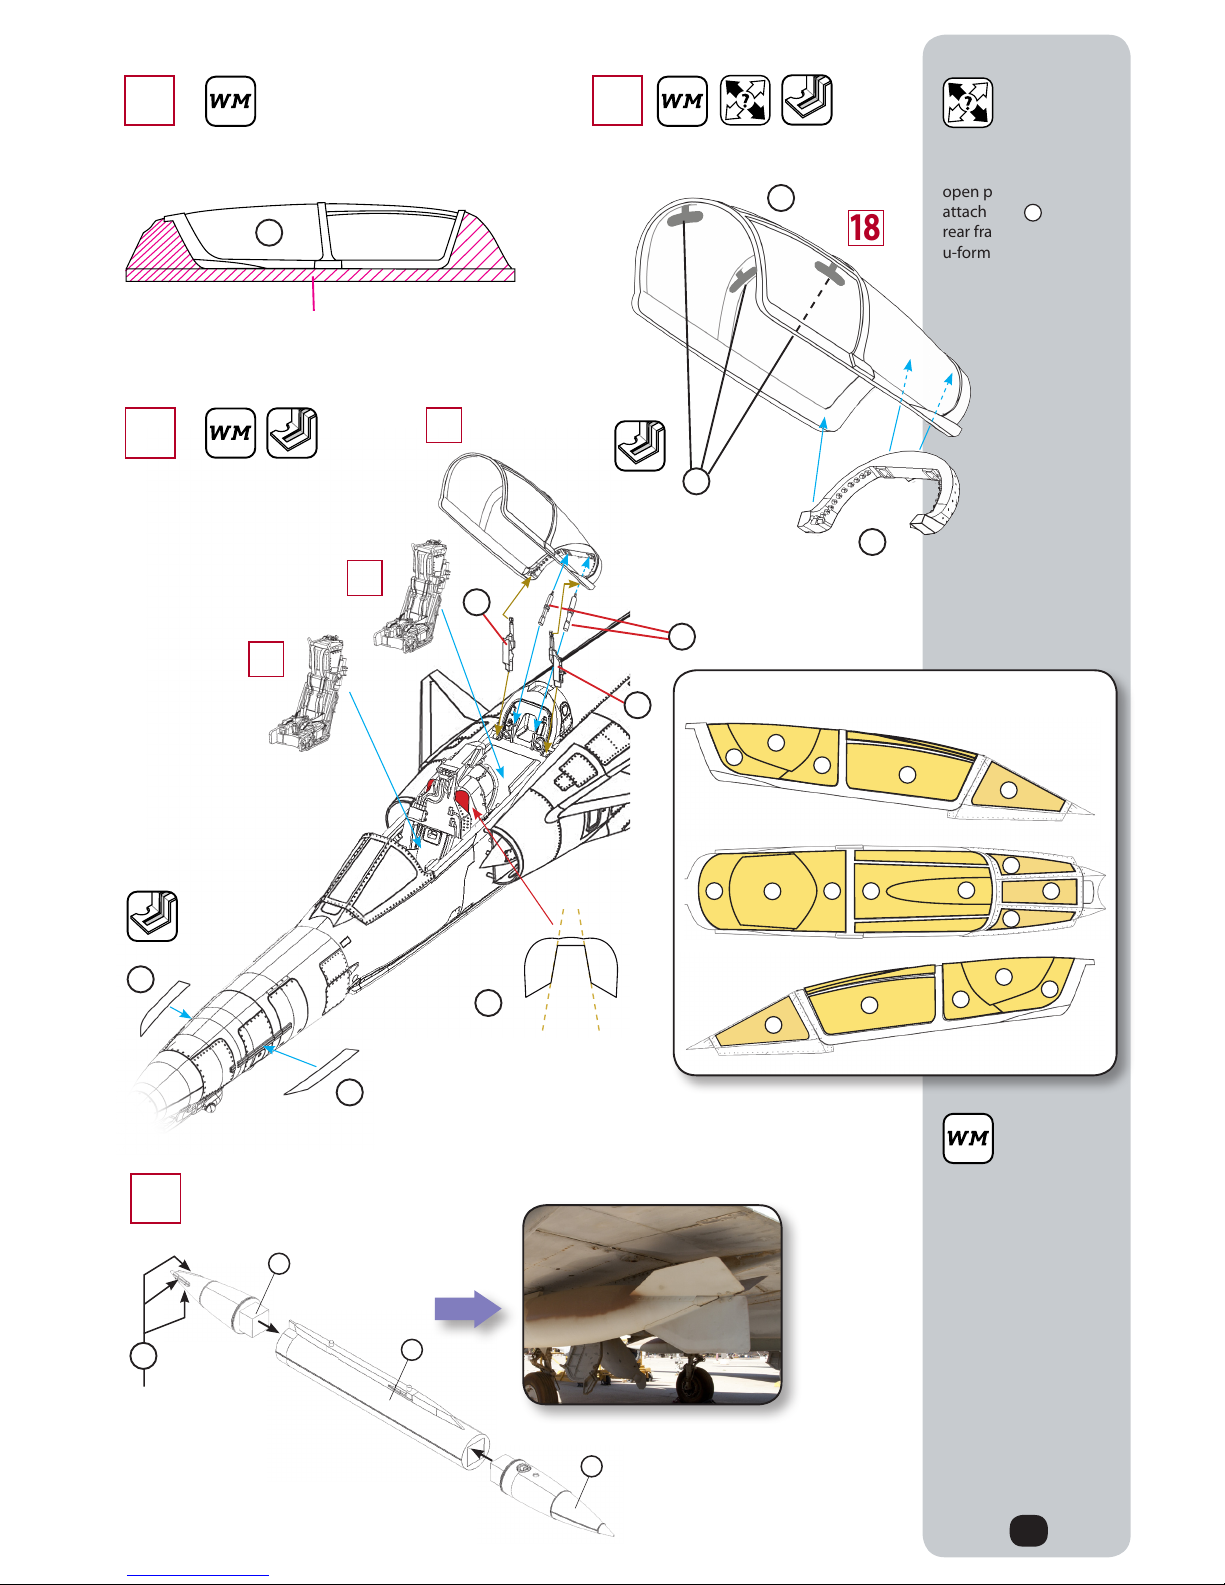
Cut the vac-u-formed canopy slowly and gently.
Sand the frame to received a smooth result.
If you want to place
the canopy in the
open position, then
attach part to the
rear frame of the vacu-formed canopy.
Remove
Canopy masks
29
23
29
27
26
16
14
Attach the photo-etch
ns as seen below.
Bend the transparent
sheet along the recessed
bending lines and attach
it to the red marked
areas in the cockpit.
The two fuel tanks, which suppied in the
kit should be located under the wings.
K
15
22
21
22
A
2
2
28
32
31
30
32
242831
27
25
29
32
31
21
Trainer-KFIRs mainly
used supersonic wing
tanks when on training missions. However, they were fully
combat capable and
could employ a large
variety of ordnenace
including the large
1.300 l containing
subsonic wing tanks!
For more KFIR ordnance check our
webiste www.wingmanmodels.com
F
F
38
7
9
8
Page 7
D42
D38
7
7
7
Wetterkreuz 13, 91058 Erlangen, Germany
www.wingmanmodels.com
We are right beside you!
D39
D43
D43
13
24
23
D47 (D46)
D53 (D54)
D51 (D50)
D23 (D24)
D49
D48
D32
D77
D25 (D26)
D75 (D76)
The numbers in
brackets refer to
the other side.
13
Light Grey Hu64
D31
E13
D29
D68 (D69)
D22
12 12
( )
The numbers in
brackets refer to the
other side.
23
25
22
24
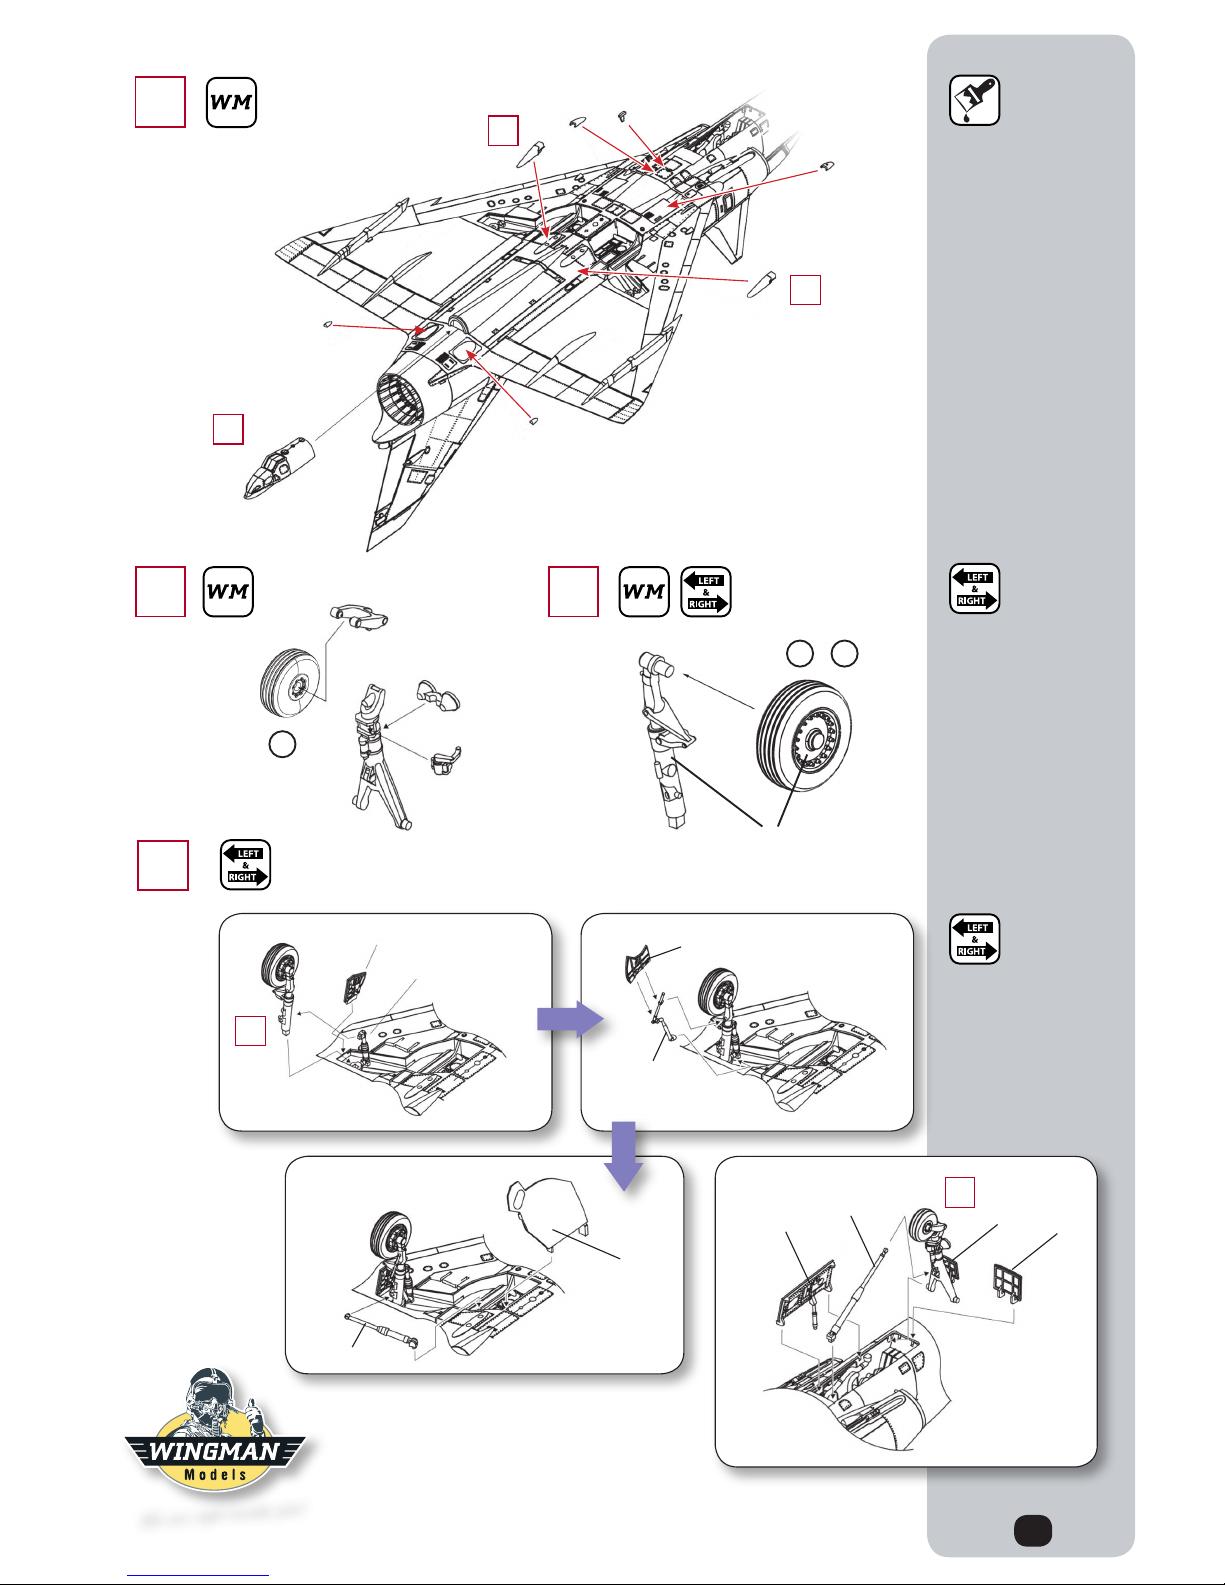
Paint front and main
landing gear bays
white with some of
the details in dierent
colours. The insides of
the landing gear doors
where kept in fuselage
colours – here light
grey FS36375 Hu 127.
 Loading...