

WingHome 350C User Manual
English
User Manual
Bedienungsanleitung
Mode: 350C
English
Deutsch
®

English
Content
1. Quick Start ................................................................................. 1
1.1 What in the Box? .............................................................. 1
1.2 How to Get the Camera Ready? ....................................... 1
1.3 How to Setup the Camera? .............................................. 2
1.4 Camera Default Settings in Red Letter ............................. 4
2. Whole View and Details of Camera .......................................... 5
2.1 Figure 1: Front View of Camera ........................................ 5
2.2 Figure 2: Bottom View of Camera.........................................5
2.3 Figure 3:Internal,Side and Back View of Camera.................6
3. Introduction................................................................................ 6
3.1 Fully Functionality Introduction ......................................... 7
3.2 Power Supply .................................................................... 7
3.3 SD Card Selection ............................................................ 9
3.4 USB Connection ............................................................... 9
3.5 Attention .......................................................................... 10
3.6 Key Features .................................................................. 11
4. Operation List .......................................................................... 11
4.1 Video/Photo Playback ..................................................... 11
4.2 Delete ............................................................................. 11
4.3 Format of SD Card .......................................................... 12
4.4 Auto Power Off ................................................................ 12
4.5 Operation Menu .............................................................. 12

English
5. Specification ............................................................................ 18
6. Trouble Shooting ..................................................................... 19
6.1 Photos Do Not Capture Subject of Interest ..................... 19
6.2 Camera Stops Taking Images or Won’t Take Images ..... 20
6.3 Night Vision Flash Range Doesn’t Meet Expectation ..... 21
6.4 Photos Do Not Capture Subject of Interest ..................... 21
7. Warranty ................................................................................... 22
8. Support ..................................................................................... 22
1
English
1. Quick Start
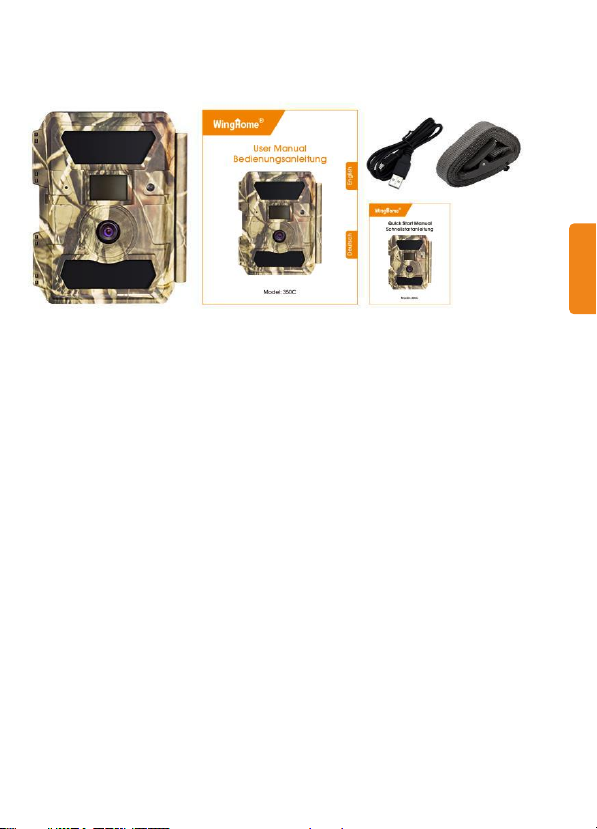
1.1 What in the Box?
Trail camera x 1
USB cable × 1
Mounting strap × 1
User manual x 1
Quick Start Manual × 1
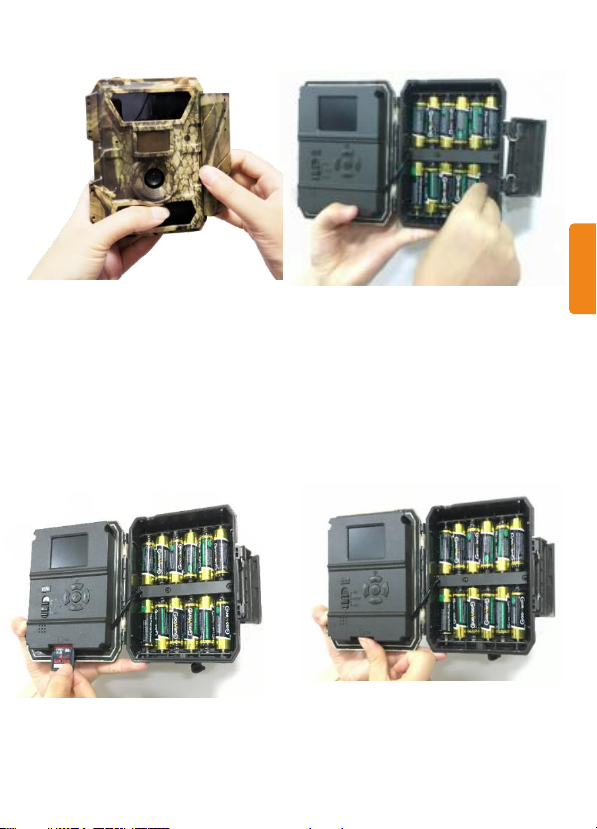
1.2 How to Get the Camera Ready?
1. Insert the batteries
Open camera house and insert the batteries as electrodes marked
in battery case.
Note: 12AA Alkaline or Ni-MH are recommended. For better
performance, pls choose the “Battery Type” of the batteries in using.
2
English
2. Insert the SD card
Note: 8-32GB SD card is recommended. Please insert it with correct
direction as marked.
1.3 How to Setup the Camera?
1. Power on the Camera
Switch to ON; camera is ready to work upon motion triggers (screen
will not light up upon “ON”). You can mount it out to work directly

3
English
after this if default settings are preferred. Pls refer to page4 below
for default settings in red letters.
2. Configure Camera Settings
Switch to SETUP, screen will light up. Press M key, you will enter
the menu to view & change settings. Please press arrow keys for
navigation and OK key to confirm settings.
Note: please switch to ON to enable the camera to work after you
get preferred settings.

4
English
1.4 Camera Default Settings in Red Letter
5
English
2. Whole View and Details of Camera
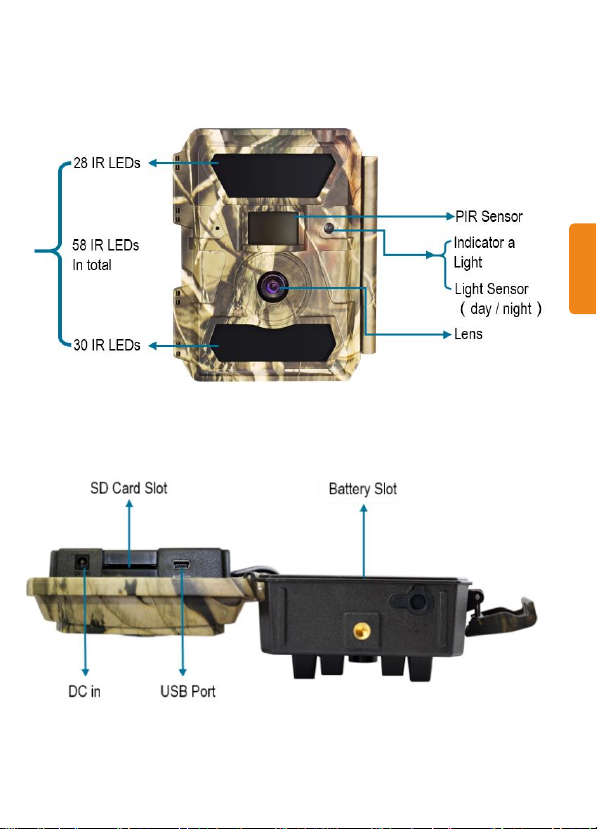
2.1 Figure 1: Front View of Camera
2.2 Figure 2: Bottom View of Camera

6
English
2.3 Figure 3: Internal, Side and Back View of Camera
3. Introduction
With contents in previous pages, believe you’ve already got a brief
idea about how this camera works. Before more details presented,
here we want to thank you for choosing one of our easy operation
highly qualified products. You now may enjoy the excellences
reflected on this series product. This 12MP HD digital camera was
totally R&D by our diligent and smart engineers based on feedbacks
and requirements from customers globally. May you also enjoy and
adore this product as we do. And our company is always openminded with willing to adopt creative ideas from you.
Menu Button
Power Switch

7
English
3.1 Fully Functionality Introduction
Besides all the functions you may experience from any other similar
cameras. This one is aimed to offer you stable quality product using
experience with many extraordinary features, 15 meters (50 ft)
invisible real night vision ability, 0.4 seconds trigger time, and 1
photo/sec (up to 5 photos per trigger) multi-shot to capture the whole
track of object (anti-theft evidence), user friendly operational menu,
etc.
3.2 Power Supply
A. Batteries
Camera runs on 6 or 12 AA size batteries (9-12V power supply to
ensure camera well performance of all functions); can work with
alkaline and high-quality NiMH rechargeable batteries. But we
suggest to run camera with NiMH batteries only as performance of
alkaline batteries is much poorer than NiMH batteries. Pls also
choose the battery type you’re using in the menu option “Battery
Type” to reach longer operation time.
Batteries should be inserted with correct electrode position as
marked on the housing. Upside down batteries electrodes may
cause device malfunction. Also, we strongly recommend changing
the batteries when power icon on camera screen or photo stamp is
empty.
Note: Don’t mix batteries types! Different batteries to be used in
camera may cause permanent damage which also violates warranty
policy!

8
English
Due to different settings, objects activities within camera detection
zone, different brands and quality of batteries, and using
environment, etc; we’re not able to list out exact number of photos
and videos that camera can achieve. So given table below only
shows approximate number of photos or videos camera can take
with 12AA alkaline batteries; better performance can be given by 12
AA rechargeable NiMH batteries.
Test Condition: LCD screen off. Mode: “Power On” _PIR intelligent automatically
monitoring;
12AA Alkaline Batteries
Photos shot per day
Working
time
Video clips shot per day
Working
time
IR LEDs On
Max.Range
100
pics
81 days
10secs video clips
10 clips
75 days
Balanced
100
pics
76 days
Min. Blur
100
pics
70 days
IR LEDs Off
Photo
100
pics
113 days
10secs video clips
10 clips
228 days
B. Solar Panel
To bring users better using experience, our engineers designed this
camera to be able to work with most standard 12V/2A lithium battery
build-in solar panels. However, as rechargeable AA NiMH batteries
need higher voltage for charging that solar panel can’t charge the
batteries in using in camera batteries cases.
C. Power Adaptor—Security Surveillance Purpose
This camera can also be powered by an external 12V/ 2A DC

9
English
adapter. Recommend to remove the AA size batteries when power
adapter is used. Electrical power is recommended for security
purposes.
3.3 SD Card Selection
Using a memory card is required to operate the camera. When the
camera is "ON" and no memory card is used, the screen displays
"No card". The SD slot of the camera has a 32 GB memory capacity.
Before inserting or removing the memory card, the camera must be
turned "OFF". Failing to do so may cause loss of or damage the
pictures/ videos already recorded from the memory card. When the
SD card is full, the viewing screen shows "Memory Full". The
following data shows an approximate quantity of photos which can
be recorded by the camera depending on the memory card capacity.
Chart below will show you the approximate capacity of different size
SD cards. Pls check to see which size card can fit your needs best.
SD
Size
Capacity
1GB
2 GB
4 GB
8 GB
16 GB
32 GB
Photo (pictures)
12 MP
410
819
1638
3277
6554
13107
16 MP
293
585
1170
2341
4681
9362
22 MP
213
427
853
1707
3413
6827
Video (hours)
640x480
00:05:27
00:10:13
00:22:28
00:46:57
01:35:56
03:13:52
HD
00:03:56
00:07:23
00:16:13
00:33:53
01:09:14
02:19:56
FHD
00:02:04
00:03:53
00:08:31
00:17:48
00:36:20
01:13:21
3.4 USB Connection
When camera is connected via USB cable; screen display “MSDC”,
press “Menu” once, “MSDC” turns to “PC Cam”, camera now can
be used as a PC camera; press “Menu” again, camera exits PC
camera mode.

10
English
3.5 Attention
1. Insert the SD memory card correctly, camera does not
support SD card hot swap (insertion).
2. Please use high-quality AA batteries in order to prevent battery
cells from corrosion of leaked acid.
3. Use right adaptor (12V/2A) of this camera to supply power, and
do not invert the electrode when put in batteries.
4. In Test mode, camera will automatically power off in 3 mins if there
is no keypad touching.
5. Don’t interrupt power supply during system upgrade, please
deliver it back to factory if the device doesn’t work after upgrading.
6. Do not frequently insert or pull out SD card and battery or plug in
and out the adaptor when the camera is on.
7. Do not have any floating objects, such as leaves, strings, or
ribbons in the 3M motion detection zone of cameras, to avoid
mistaking photograph or videos.
8. Do not keep camera next to hot irrelevant objects, air conditioner
exhaust vents, and light, etc. to avoid mistaking photos or videos.
9. Camera is with a 100° FOV lens which means more flash is
needed to get better night time images than the average 52° FOV
lens from market; that’s why 58pcs 60° IR LEDs are used on this
camera. But ensure these 58pcs IR LEDs can give enough flash
to back the wide angle lens up that high qualified AA batteries
must be applied accordingly to deliver enough amperage to
power the illuminator consistently in dark environments.
10. Programmed Date/Time can be saved in camera for 12 hours
as long as camera was powered 1 hour above.

11
English
3.6 Key Features
1. 0.4 seconds trigger speed;
2. Wide lens model: 100 degrees FOV lens;
3. 12MP/ 1080P@30FPS;
4. Programmable 5/8/12 Megapixel high-quality resolution;
5.58pcs invisible IR LEDs, offer 20 meters(65 feet) real night vision
distance;
6. crystal clear day & night photo/video quality;
7. 1 photo burst per second to get full moving track of object;
8. Support multiple functions: adjustable PIR sensitivity, Multi-shot
(1~5 photos per trigger), programmable delay between motions,
moon phase) on every single photo;
9. Available operation temperature: -25℃ to 60℃;
10. Built-in 2.0" TFT color screen;
4. Operation List
4.1 Video/Photo Playback
Turn “Power Switch” to SETUP position to enter test mode, press
arrow button “↑” to enter Playback; press “←” and “→” for selection,
“OK” to play photo/video.
a. Press button “↑” again to exit.
b. In Playback Mode, press “Menu” button to delete files, or format
SD card; press “Menu” again to exit.
4.2 Delete
a. Delete one: delete selected photo/video; Press “OK” to choose,
press“↑” and “↓”for selection, “Yes” to confirm, “No” to exit to
previous page.
b. Delete All.
12
English
4.3 Format of SD Card
a. No
b. Yes: to format SD card via camera. Press “←” and “→” for
selection, “Yes” to confirm, “No” to exit to previous page.
4.4 Auto Power Off
In Test mode, camera will automatically power off in 3 mins if there
is no keypad touching. Please manually turn ON it as if you want to
do some further configuration.
Note: camera stay in “Test” mode if camera is in Menu configuration
pages.
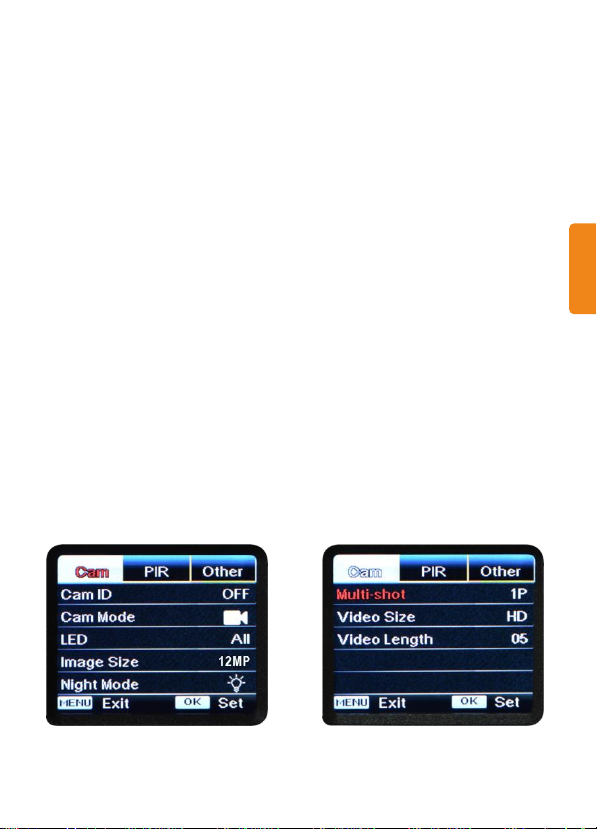
4.5 Operation Menu
Test mode, Press “Menu” once to enter camera setting menu; to
navigate setting interface by pressing “←”, “↑”, “→”, or “↓”, press
“OK” for selection, “Menu” to exit to previous page, and “Menu” to
switch alpha/ digits/ symbols.
Note: For some settings, user needs to press “Menu” to save & exit
the configuration after pressing “OK” to confirm; (Cam ID, Deley,
Time Lapse, Timer, Password)
 Loading...