

Page 1

WmFast
TV2000 XP Series
HARDWARE GUIDE
STATIC WARNINGS
STATIC CAN DAMAGE ELECTRONIC COMPONENTS. PLEASE FOLLOW THE INSTRUCTIONS
BELOW TO PROTECT YOUR EQUIPMENT FROM STATIC.
TOUCH A GROUNDED METAL OBJECT BEFORE TOUCHING THE VIDEO CARD OR WEAR
A GROUNDED WRIST STRAP WHILE HANDLING IT.
HANDLE THE CARD BY ITS EDGES AND AVOID TOUCHING ANY COMPONENTS.
FOR STORAGE, PUT THE CARD BACK IN THE ANTI-STATIC BAG.
MAKE SURE YOUR COMPUTER CASE PROVIDES EXCELLENT CONDUCTIVITY BETWEEN
ITS POWER SUPPLY, CASE, MOUNTING FASTENERS, AND SYSTEM BOARD.
If the FM related functions or the remote control is not included in the
product you purchased, disregard descriptions on those subjects.
System Requirements
* One available PCI 2.1or above
compliant slot
« Pentium II 300 MHz or higher
compatible PC
Pentium III 450 MHz for MPEG-1
recording
Pentium III 650 MHz for MPEG-2
recording
Pentium III IGHzforTimeShifting
* 64MB of system memory
* Microsoft® Windows
XP/2000/ME/98SE operating system
« 16-bit sound card
Contents
Package Contents
Specifications
System Requirements
Removing Old Driver & Application
Hardware Installation
Connecting Input & Output Device
Driver & Application Installation
Technical Support
CODE: LR6606/LR6611/
LR6613
P/N: W0500725
Page 2
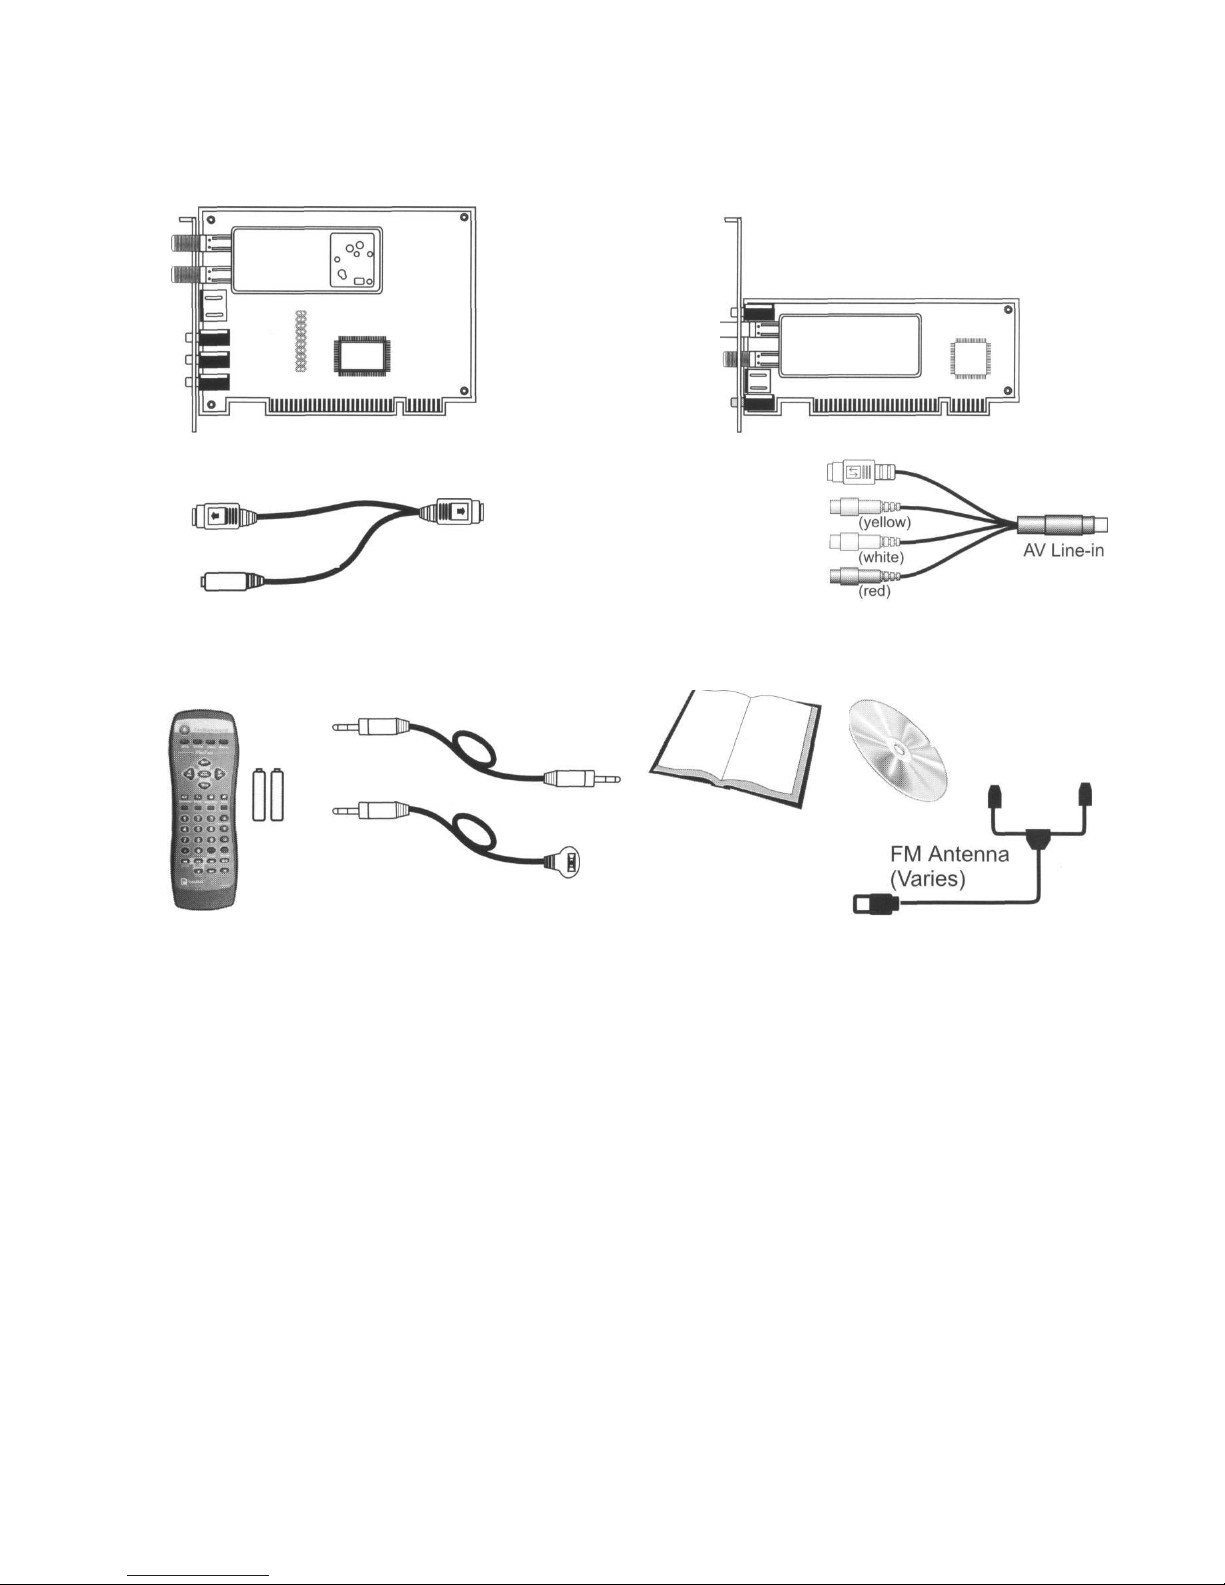
Package Contents
ATX version
Low profile version
WinFast TV2000 XP
S Video Connector
S V/CVBS In
WinFast TV2000 XP
S Video in
Composite Video in
Left Audio in
Right Audio in
AV Line-in Cable
Common package contents
WinFast
s
Multimedia
Software CD
Remote Control
with Batteries
(Varies)
Audio Cable
WinFast TV2000 XP
Hardware Guide/
WinFast PVR
IR
Sensor
Plug
Software
Manual
Specifications
Hardware Interface
32-bit PCI 2.2 bus mastering
Plug-n-Play compliant
Compatibility
Graphics drivers must include DirectX
8.1 or later software
Video Standards
NTSC, PAL or SECAM
TV Tuner
NTSC, PAL I, PAL BG, PAL DK, PAL M/N,
SECAM LL, SECAM BG for respective
model
Full 181 channels supported
FM Tuner (Optional)
Stereo FM 88MHz-108MHz (Worldwide
except Japan)
Stereo FM 76MHz-108MHz (Japan only)
Connectors
2 F-connectors for RF TV and FM signal
inputs
1 MiniDIN 6-pin cable for video input (for
ATX version)
1 MiniDIN 9-pin cable for video and
audio input (for Low Profile version)
1 Stereo phone jack for audio output
1 Stereo phone jack for audio input (for
ATX version)
1 phone jack for I/R sensor
RCA Connector
Y Cable
Page 3
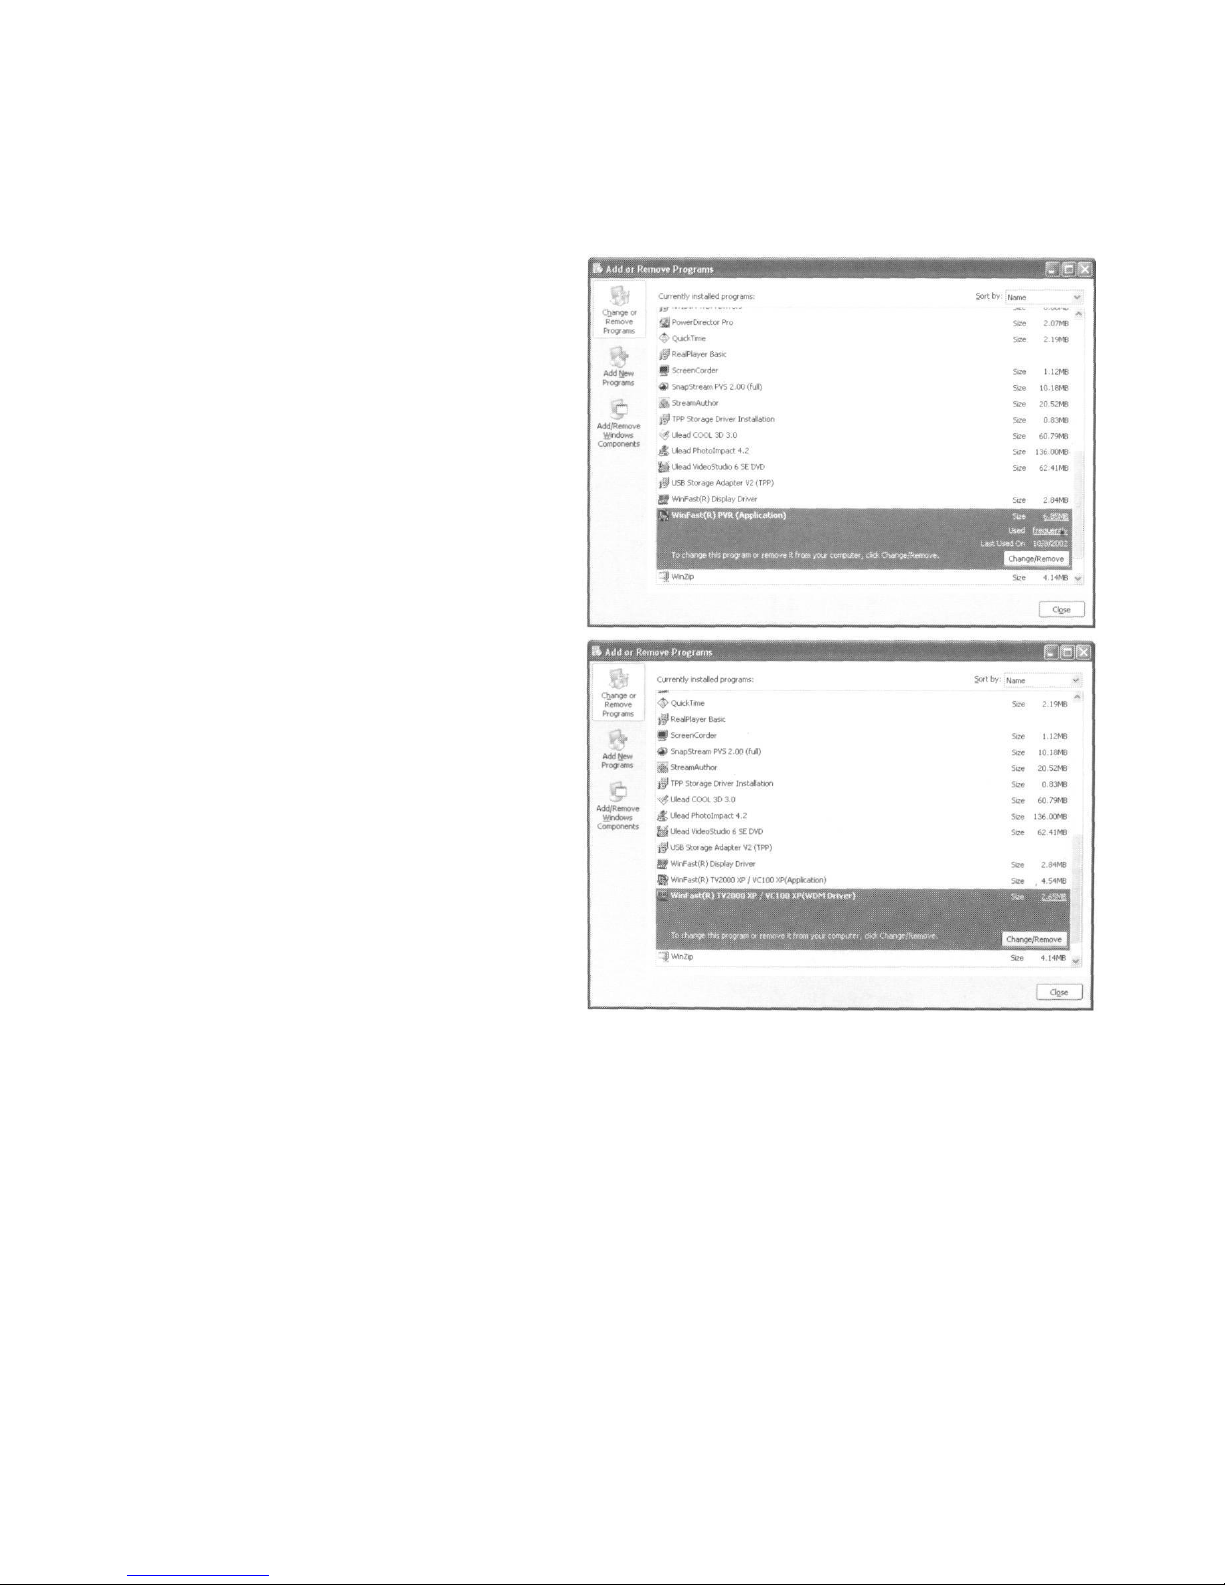
Removing Old Driver & Application
If your computer has been installed the old WinFast TV2000 XP driver and software, you
must remove them before installing the new WinFast TV2000 XP capture card.
Stepl:
Go to the Start menu and click Setup.
On the Setup submenu click Control
Panel to open an explorer on which
many programs are listed. Double click
the Add or Remove Programs to open
a setup panel with a list of software
installed on your system. Select
WinFast PVR (Application). And then
click the Change/ Remove button.
Step 2:
Once the application is uninstalled, go
back to the Add or Remove Programs
setup panel. Select WinFast TV2000
XP/VC100 XP (WDM Driver) and then
click the Change/Remove button.
Step 3:
When the old driver is removed, restart
the computer.
Hardware Installation
Stepl:
Power off your PC. Open the computer
case. Remove the coverplate of an
unused expansion slot.
Step 2:
Align the bus on the card with the PCI slot.
Step 3:
Gently press WinFast TV2000 XP down
into the slot until you feel the edge of the
bus reaches the bottom of the PCI slot.
Note that the capture card can be inserted
into PCI slot in one direction only.
Step 4:
Secure the bracket of the card to your
computer case with the screws. Then fit
the computer case cover back in place.
Step 5:
Connect the input sources and output
devices to your capture card following the
instructions given in Connecting Input
and Output Devices on the next page.
Now you are ready to connect the video
sources to your capture card.
Page 4
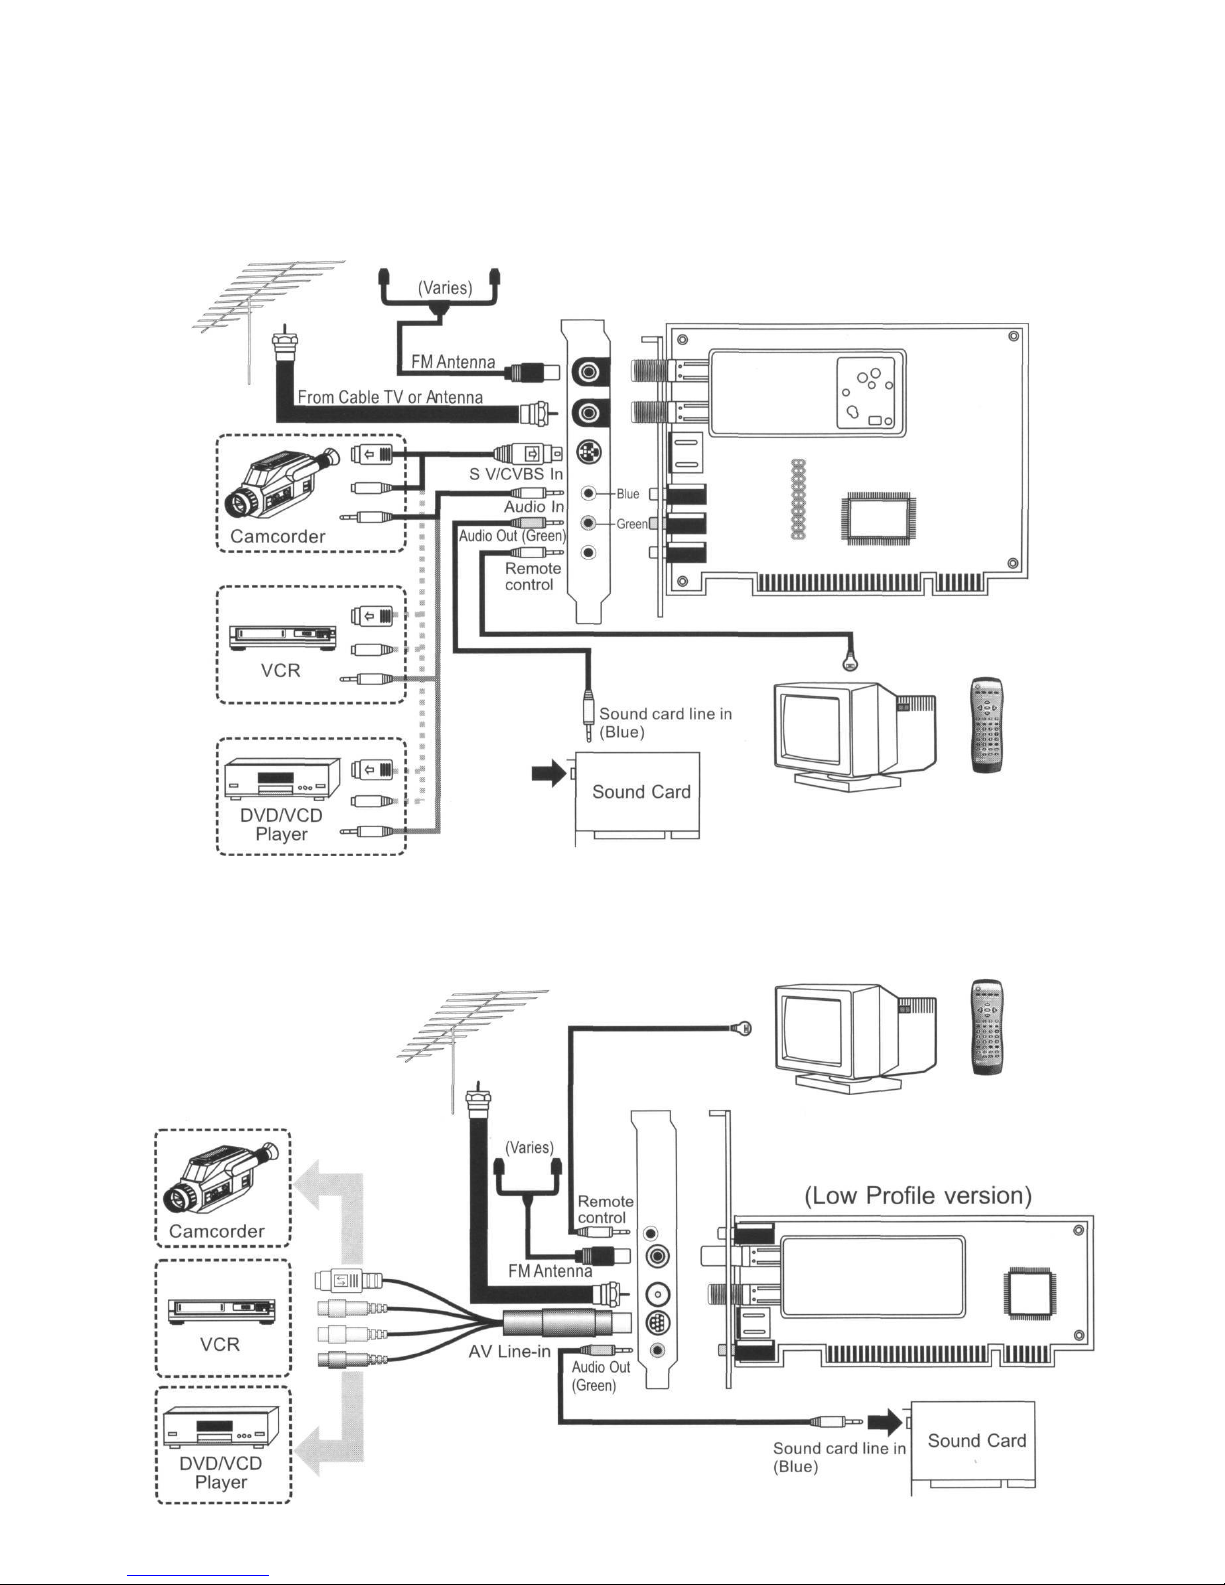
Connecting Input & Output Devices
ATX version
(ATX version)
Remote
PC Monitor Control
(Varies)
Low profile version
From Cable TV
or Antenna
Remote
PC Monitor Control
(Varies)
Page 5
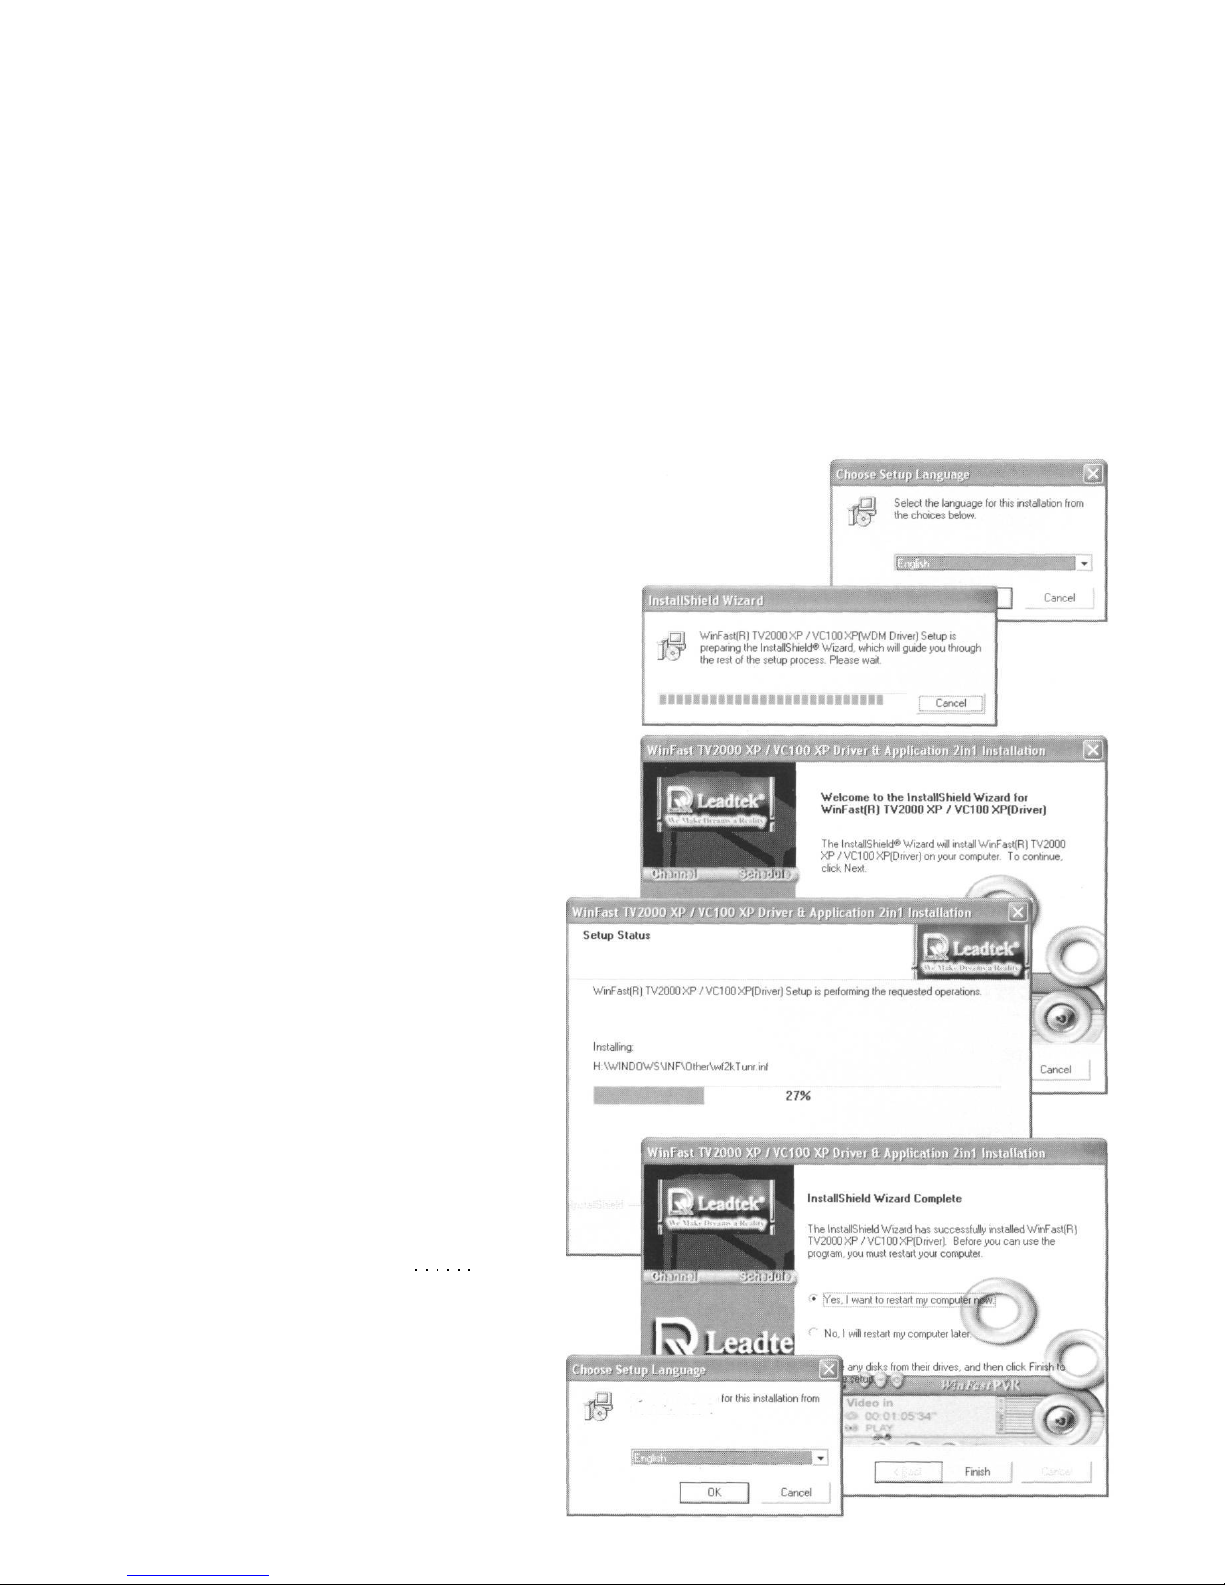
Driver & Application Installation
Stepl:
Power on your PC and start up Windows. If an earlier version of this product has been
installed on the computer, the Files Needed dialog box may appear. Click Cancel. If you
have never installed an earlier version of this product, you will see the New Hardware
Found information shown on the screen a few times, followed by a dialog box titled Add
New Hardware Wizard. Click Cancel to dismiss this dialog box.
Step 2:
Insert the software CD in your CD-ROM drive. The setup screen will then appear. Click
WinFast TV2000 XP (if not available, click WinFast Entertainment Center).
Step 3:
Select the language you use. And then click
OK.
Step 4:
The InstallShield Wizard starts to prepare for
the installation. The progress is shown in the
dialog box.
Step 5:
The WinFast TV2000 XPA/C100 XP Driver &
Application setup panel shows the welcome
information. Click Next to start the
installation of the driver.
Step 6:
Another dialog box shows the setup
status with a progress bar. Wait until
the bar is filled. Clicking Cancel will
exit the setup.
Step 7:
When the driver installation is
completed, the complete dialog box
appears asking if you want to restart
your computer. Click Yes, and
then Finish.
Step 8:
After rebooting the computer, the
Choose Setup Language dialog box
appears again. Select the language
you use and then click OK.
Select the language
the choices below.
Page 6
Driver & Application Installation
Step 9:
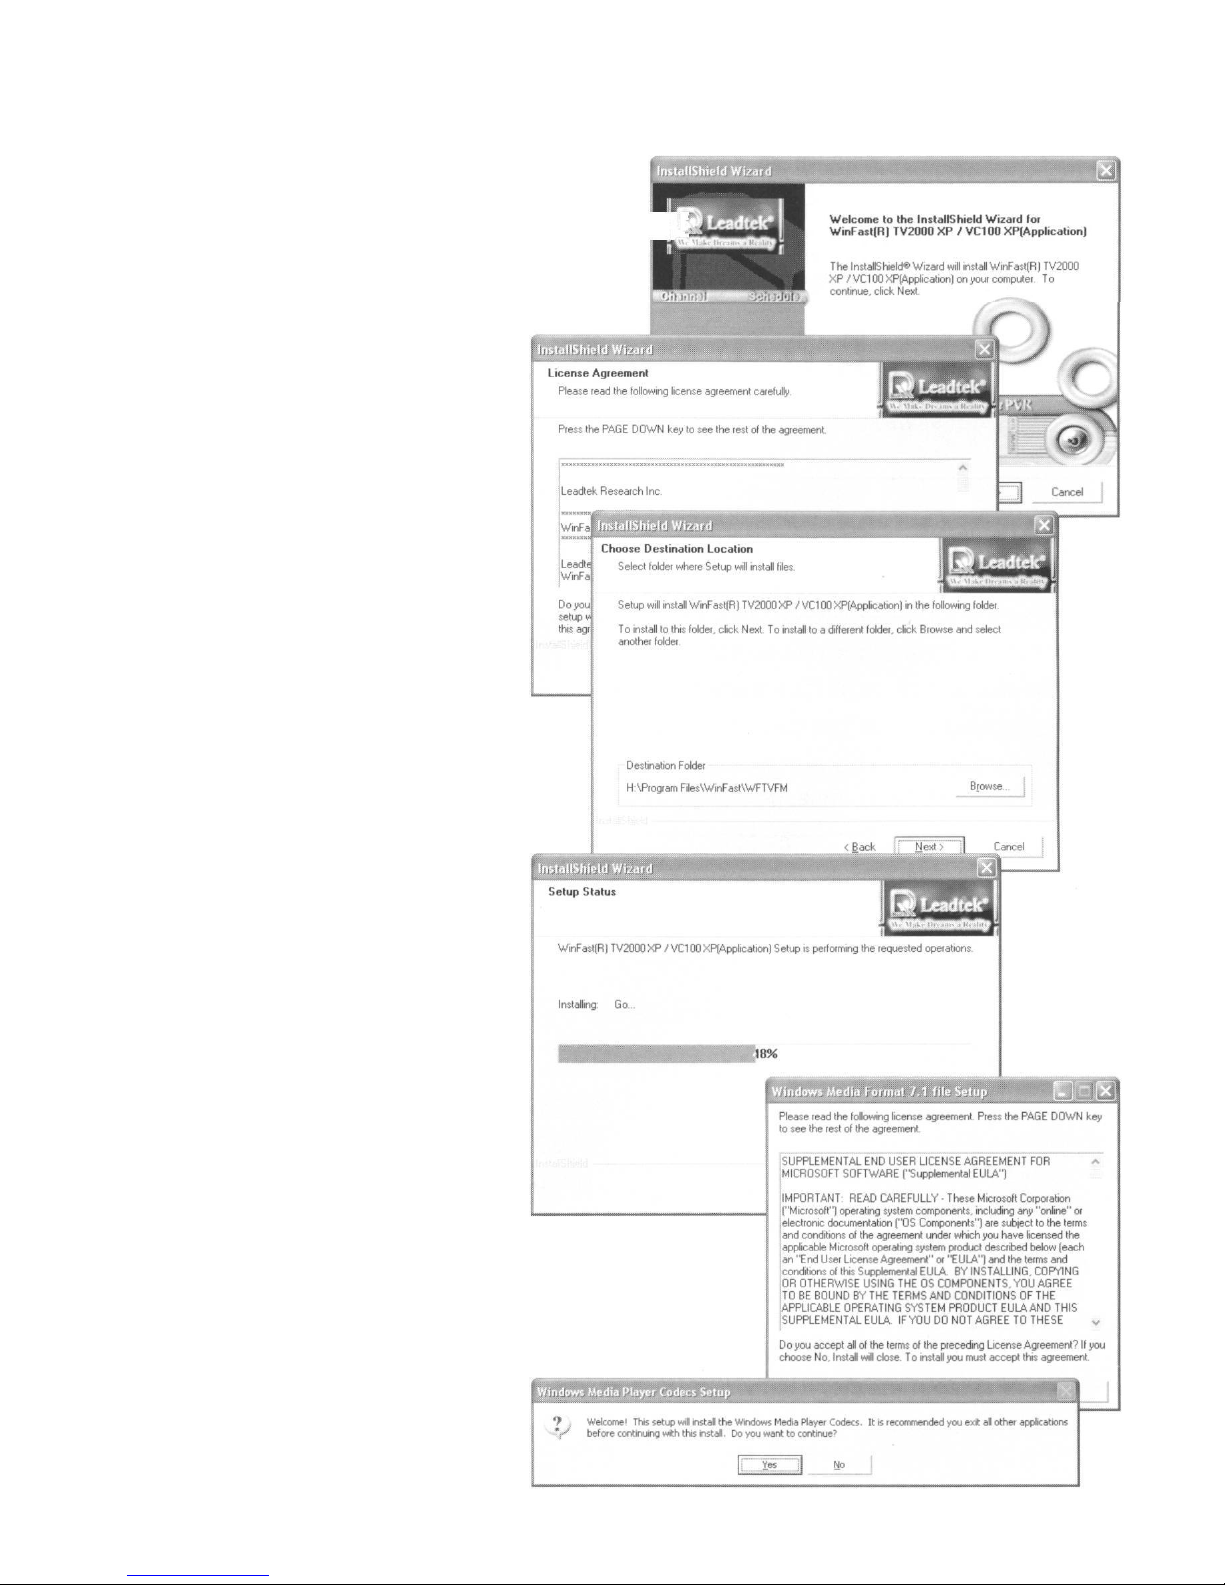
The InstallShield Wizard shows the welcome
message of the application installation. Click f
Next to start the installation of the application
Step 10:
A license agreement appears on
the screen. Click Yes to continue.
Step 11:
InstallShield Wizard will next
prompt you to choose the
destination location for the
application. To use the preset
location as shown in the lower
part of the panel, simply click
Next to go to the next step. If
another location is desired, click
Browse to choose a location.
Step 12:
The InstallShield Wizard starts to
install the driver. The progress is
shown in the Setup Status
dialog box as shown in the figure
to the right.
Step 13:
During the installation a Microsoft
Windows Media Format License
agreement appears stating the
terms of using Windows Media
Player codecs. Click Yes.
Step 14:
A dialog box prompts you to exit
all other applications before
installing the Windows Media
Player Codecs. Click Yes.
Page 7
Driver & Application Installation
Step 15:
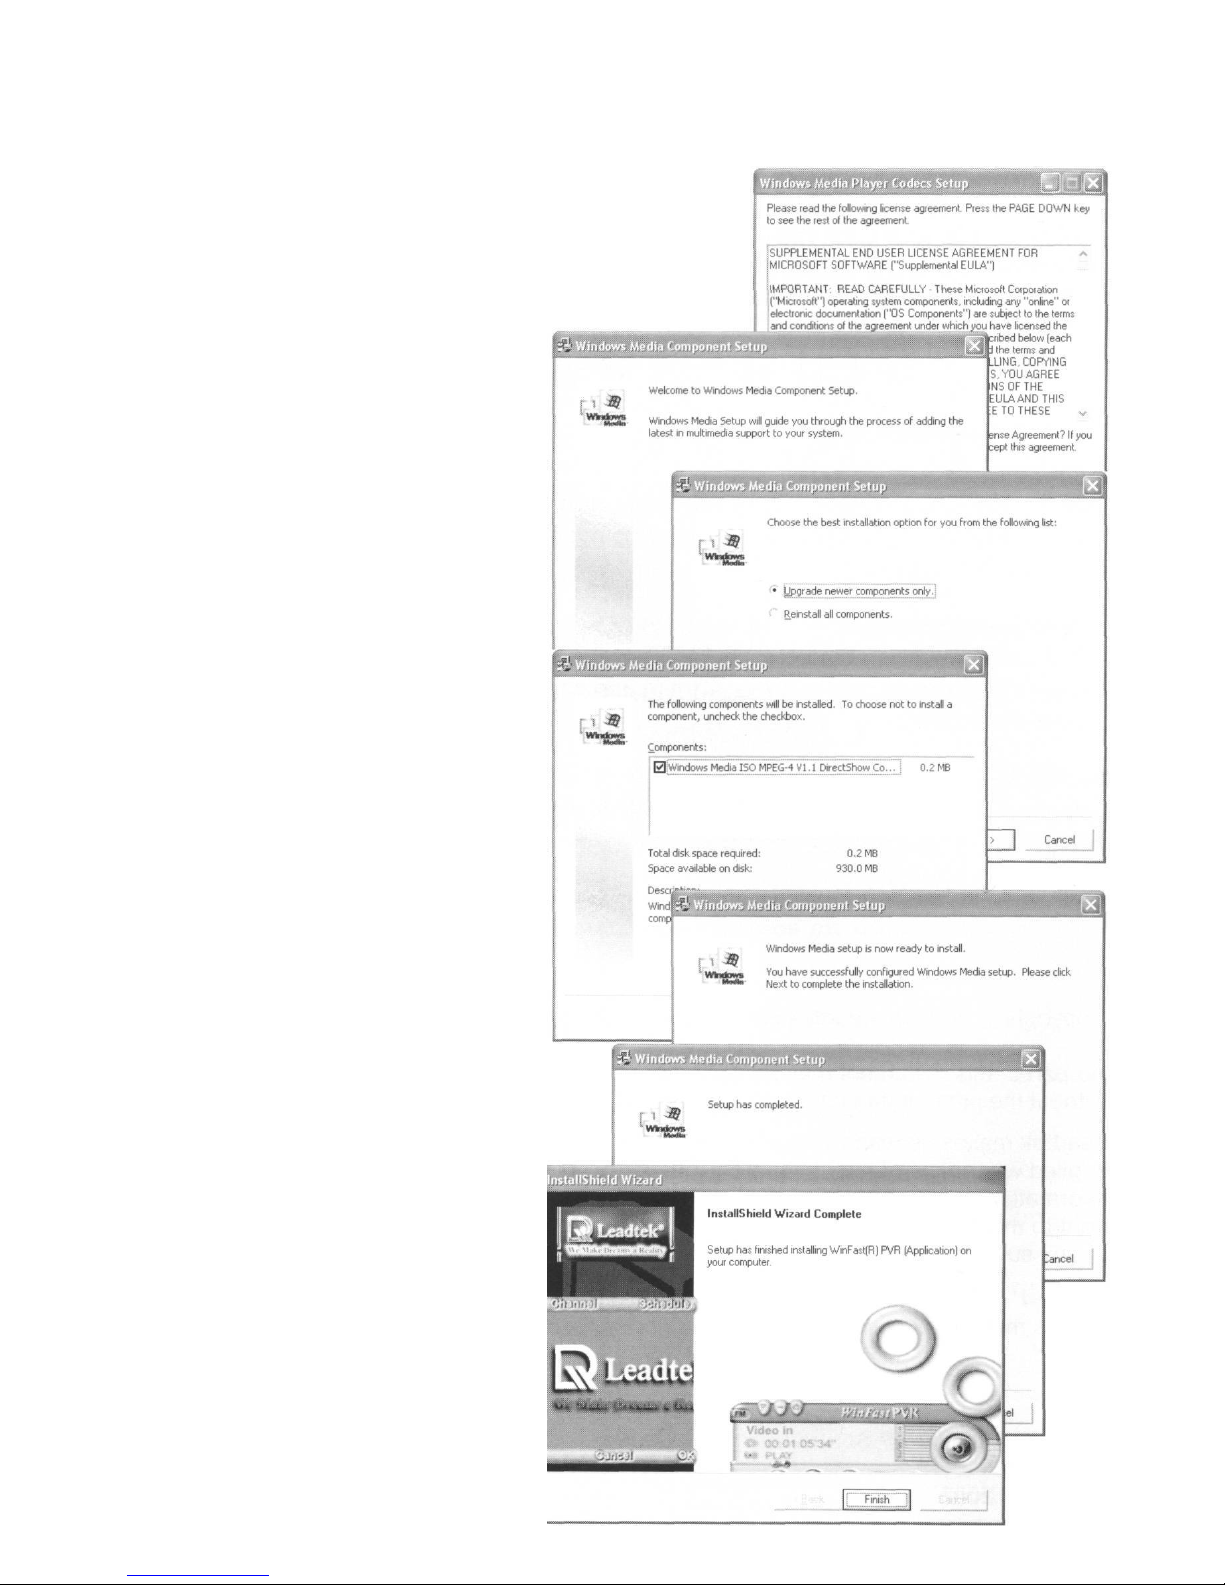
Another Microsoft license agreement
appears stating the terms of using Windows
Media Player codecs. Click Yes to continue.
Step 16:
The Windows Media Component
Setup welcome message appears.
Click Next.
Step 17:
The setup program will next ask you
if you want to update your
component or reinstall the
component entirely. Tick your
desired option and then click Next.
Step 18:
The setup program will then show a
list of components. Make sure the
component check boxes are
checked. And then click Next.
Step 19:
The setup program is now ready to
install the Windows Media
components. Click Next.
Step 20:
When the setup has completed, click
Finish.
Step 21:
The entire installation of the
application is completed, click
Finish.
Page 8

Technical Support
If the attempt of resolving the problem on your own was unsuccessful, please contact
your vendor or E-mail our technical support staff at: [email protected]. and
provide them in your message with: product name, software driver version,
motherboard manufacturer, BIOS version and chipset, Computer type and speed,
Monitor manufacturer and model, and a detailed description of your problem.
Leadtek Research Inc.
International Headquarters
18th Fl., 166, Chien-Yi Rd., Chung Ho, Taipei Hsien, Taiwan (235)
Phone: +886 (0)2 8226 5800 Fax: +886 (0)2 8226 5801
http://www.leadtek.com.tw E-mail: [email protected]
United States Office
46732 Lakeview Blvd., Fremont, CA94538, U.S.A.
Phone: +1 510 490 8076 Fax: +1 510 490 7759
http://www.leadtek.com
Europe Office
Antennestraat 16 1322 AB, Almere, The Netherlands
Phone: +31 (0)36 536 5578 Fax: +31 (0)36 536 2215
http://www.leadtek.nl
Copyright © 2003 by Leadtek Research Inc. All rights reserved.
No part of this document may be copied or reproduced in any form or by any means
without the prior written consent of Leadtek Research Inc.
Leadtek makes no warranties with respect to this documentation and disclaims any
implied warranties of merchantability, quality, or fitness for any particular purpose. The
information in this document is subject to change without notice. Leadtek reserves the
right to make revisions to this publication without obligation to notify any person or entity
of any such changes.
WinFasf is a registered trademark of Leadtek Research Inc. Trademarks or brand
names mentioned herein are trademarks or registered trademarks of their respective
owners.
WinFasf TV2000 XP Series Hardware Guide
Version C
February 2003
 Loading...